

Page 1
Bedienungsanleitung/Garantie
Instrucciones de servicio • Manual de instruções • Istruzioni
per l’uso • Instruction Manual
Autoradio bluetooth
Radio Para Coche Con Bluetooth • Auto-Rádio Bluetooth
Autoradio Con Bluetooth • Car Radio Bluetooth
AR 820
CD/MP3/BT
Page 2

DEUTSCH
ITALIANO
Inhalt
Bedienungsanleitung.........................Seite 4
Spezikation.......................................Seite 19
Garantiebedingungen........................Seite 21
ESPAÑOL
Contenidos
Manual del usuario..........................página 24
Especicaciones técnicas...............página 36
PORTUGUÊS
Índice
Manual do utilizador.........................página 39
Especicações técnicas..................página 51
Contenuto
Manuale dell’utente......................pagina 54
Speciche tecniche......................pagina 66
ENGLISH
Contents
User manual....................................page 69
Specications..................................page 81
Page 3

INHALTSVERZEICHNIS
Installation ...................................................4
Einbau-Hinweis.............................................4
Installation von der Vorderseite ....................4
Einbau des Gerätes ......................................5
Ausbau der Gerätes .....................................6
Installation von der Rückseite.......................6
Gebrauch des abnehmbaren
Bedienfeldes ...............................................7
Elektrische Anschlüsse .............................8
Platzierung der Bedientasten ....................9
Grundlegende Bedienung ........................10
Ein-/Ausschalten des Geräts ......................10
Lösen des Bedienfeldes .............................10
Einstellen des Sounds ................................10
Lautstärke ...................................................10
Anzeige.......................................................10
Equalizer.....................................................10
Reset-Funktion ...........................................10
Modusauswahl............................................11
Systemeinstellung ......................................11
Audio-Eingang. ...........................................11
Bedienung des Radios .............................11
Auswahl der Frequenz................................11
Auswahl der Sender ...................................11
Automatische Speicherung &
Programmsuche .........................................11
Suchfunktion ...............................................11
Speicherfunktion .........................................11
ANS Funktion .............................................11
CD/MP3/WMA Funktion ............................13
Umschalten in den CD Modus .................13
Titelauswahl .............................................13
Unterbrechen der Wiedergabe/Pause......13
Vorschau aller Titel ...................................13
Wiederholen eines Titels ..........................13
Abspielen in Zufallswiedergabe ...............14
Auswerfen einer CD .................................14
ESP Funktion ............................................14
Spezielle Funktionen für MP3/
WMA CD´s ................................................14
Support MP3/WMA Dekodiermodus .........15
Hinweise für CD’s, CD-R’s .......................15
Bedienung der Speicherkarten ...............16
Bluetooth Bedienung ...............................17
Vorbereitung .............................................16
Pairing ......................................................16
Verbinden .................................................17
T-Menü .....................................................17
Die Beantwortung MANU ANSl ................18
Tätigen eines Anrufs ................................18
Anruf umleiten zwischen Mobiltelefon
und Gerät .................................................18
Bluetooth Audio (A2DP Funktion) ............18
Spezikation .............................................19
Fehlerbehebung ........................................20
Garantie .....................................................21
3
Page 4

INSTALLATION
Entfemen Sie die schrauben vor der Installation
Hinweise:
• Wählen Sie eine Montageposition, in der
das Gerät nicht die normalen Bedienvorgänge des Fahrers beim Fahren beeinträchtigt
• Stellen Sie vor der endgültigen Installation
des Gerätes vorübergehend die elektrischen Anschlüsse her und prüfen Sie, ob
alle richtig verbunden sind sowie das Gerät und das System richtig funktionieren.
• Verwenden Sie, um die richtige Installation zu gewährleisten, nur die dem Gerät
beiliegenden Bauteile. Der Einsatz nicht
zugelassener Teile kann zu Funktionsstörungen führen.
• Wenden Sie sich an den nächstgelegenen
Vertriebshändler, wenn zur Installation das
Herstellen von Bohrungen oder andere
Veränderungen am Fahrzeug erforderlich
sind.
• Installieren Sie das Gerät in einer Position,
in der es den Fahrer nicht behindert und
der Beifahrer bei einer plötzlichen Bremsung, wie bei einer Notbremsung, nicht
verletzt wird.
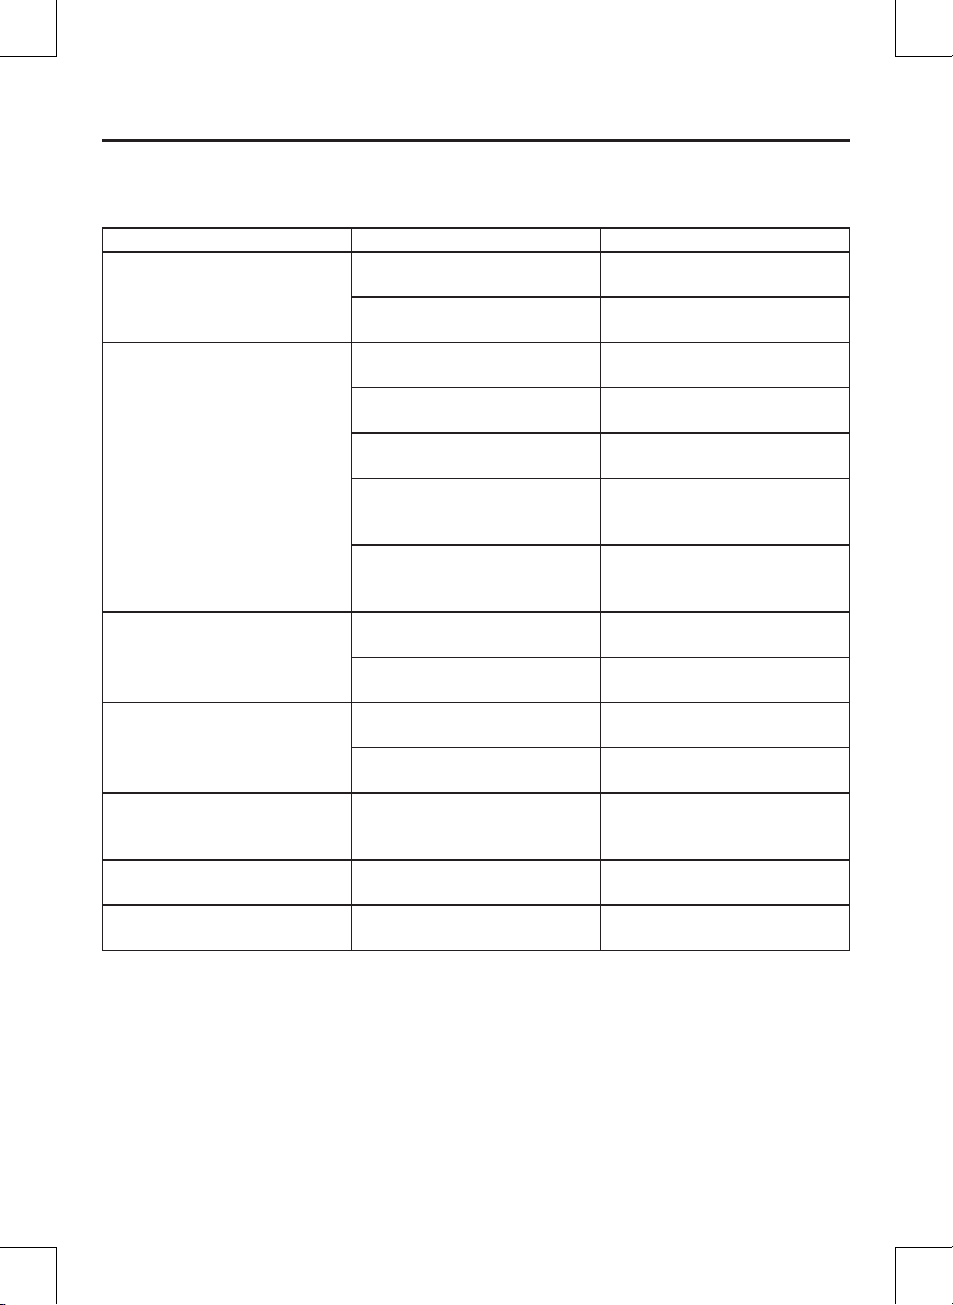
• Überschreitet die Installation einen Winkel
von 30° zur Waagerechten,erreicht das
Gerät unter Umständen nicht seine beste
Leistung.
30
INSTALLATION
Dieses Gerät kann sowohl von “vorn” (herkömmliche Montage von der Vorderseite)
oder “hinten” (DIN-Installation zur Montage
von der Rückseite unter Verwendung der
Bohrungen für Gewindeschrauben seitlich
des Gerätegehäuses) richtig installiert werden.
Weitere Details nden Sie in den nachfolgenden Installationshinweisen.
ENTFERNEN SIE DIE SCHRAUBEN VOR
DER INSTALLATION
Entfernen Sie vor der Installation des Gerätes bitte die Schrauben.
INSTALLATION VON DER VORDERSEITE
(Methode A) Installationsöffnung
Dieses Gerät kann in einem beliebigen
Armaturenbrett installiert werden, dass über
eine Öffnung mit den folgenden Abmessungen verfügt:
• Installieren Sie das Gerät nicht an Stellen, an denen es hohen Temperaturen,
wie durch direkte Sonneneinstrahlungoder Warmluft des Heizers, bzw. Staub,
Schmutz oder starken Erschütterungen
ausgesetzt ist.
53mm
182mm
4
Page 5
INSTALLIERUNG
Einbau des Gerätes
Prüfen Sie zuerst unbedingt alle Anschlüsse
und gehen Sie dann wie folgt zur Installation
des Gerätes vor.
1. Vergewissern Sie sich, dass der Motor
ausgeschaltet ist, und lösen Sie dann
das Kabel vom Minuspol (-) der Batterie.
2. Lösen Sie die Kabelstränge und die An-
tenne.
3. Betätigen Sie die Freigabetaste auf dem
Bedienteil und nehmen Sie das Bedienfeld ab (siehe “Gebrauch des abnehmbaren Bedienfeldes”).
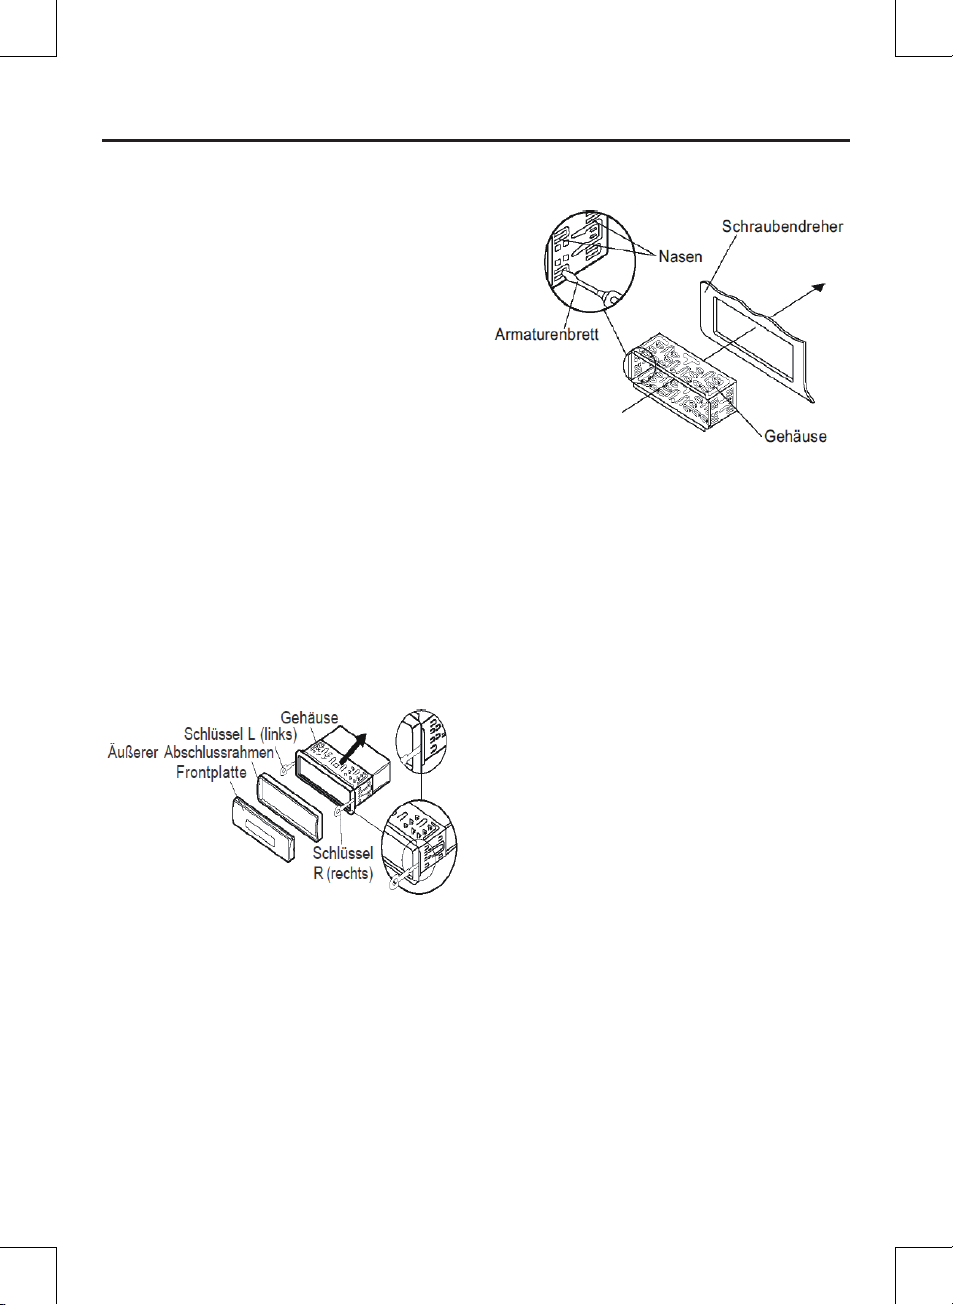
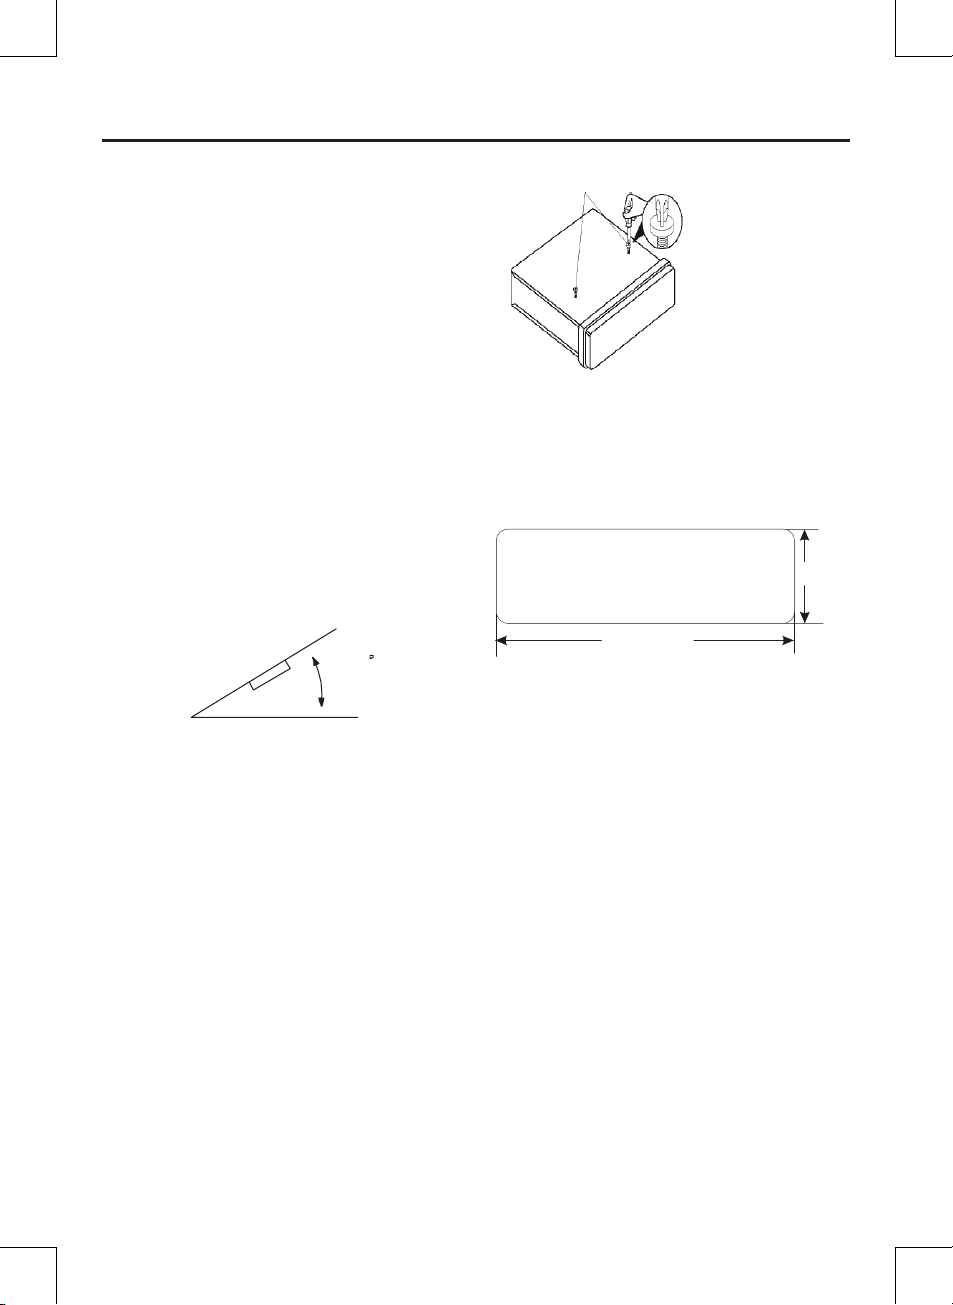
4. Heben Sie den oberen Teil des äußeren
Abschlussrahmens an und ziehen Sie
ihn nach außen, um ihn zu entfernen.
5. Mit den beiden beiliegenden Schlüsseln
können die Nasen im Gerätegehäuse
gelöst werden, so dass dieses entfernt
werden kann. Schieben Sie die Schlüssel
so weit wie möglich (sodass die Kerben
nach oben zeigen) in die Schlitze in der
Mitte der linken und rechten Geräteseite
hinein. Schieben Sie dann das Gehäuse
nach hinten vom Gerät.
6. Montieren Sie das Gehäuse durch
Einschieben in die Öffnung im Armaturenbrett und biegen Sie die rund um das
Gehäuse angeordneten Nasen mit einem
Schraubendreher auf. Nicht alle Nasen
werden greifen, prüfen Sie deshalb, welche davon am zweckdienlichsten sind.
Biegen Sie die geöffneten Nasen hinter
das
Armaturenbrett, um das Gehäuse zu befestigen.
7. Schließen Sie den Kabelstrang und die
Antenne wieder an und achten Sie darauf, keine Drähte oder Kabel zu quetschen.
8. Lassen Sie das Gerät in das Gehäuse
gleiten, so dass es einrastet.
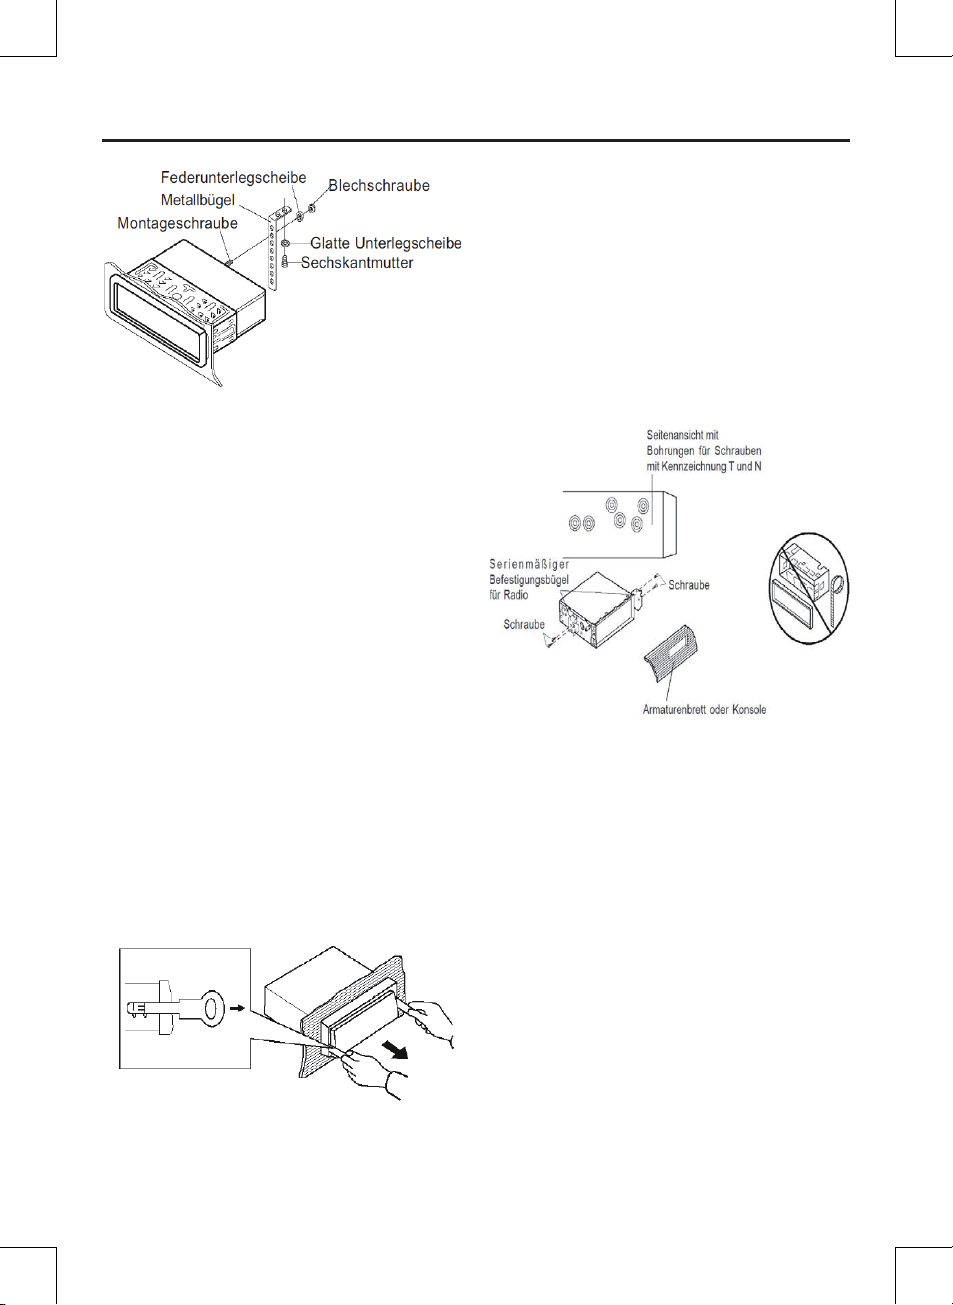
9. Verwenden Sie zu einer weiteren Be-
festigung des Gerätes den beiliegenden
Metallbügel, um das Gerät auf der Rückseite zu befestigen. Benutzen Sie die
beiliegenden Bauteile (Sechskantmutter
(M5mm) und Federunterlegscheibe) zum
Anbringen des einen Bügelendes an der
Montageschraube auf der Geräterückseite.
Biegen Sie den Metallbügel gegebenen-
falls, so dass er in den Montagebereich
in Ihrem Fahrzeug passt.
Benutzen Sie die beiliegenden Bauteile
(Blechschraube -5x25 mm und glatte
Unterlegscheibe) zum Anbringen des anderen Endes des Metallbügels an einem
festen Metallelement des Fahrzeugs
unter dem Armaturenbrett. Dieser Bügel
sorgt auch für die Gewährleistung einer
angemessenen Erdung des Gerätes.
Hinweis: Installieren Sie die
Montageschraube mit kurzem Gewinde auf
der Rückseite des Gerätes und die andere
mit langem Gewinde am Armaturenbrett.
5
Page 6
INSTALLIERUNG
10. Schließen Sie das Kabel wieder am
Minuspol (-) der Batterie an. Bringen Sie
dann den äußeren Abschlussrahmen
wieder an und setzen Sie das Bedienteil
des Gerätes ein (siehe “Gebrauch des
abnehmbaren Bedienfeldes”).
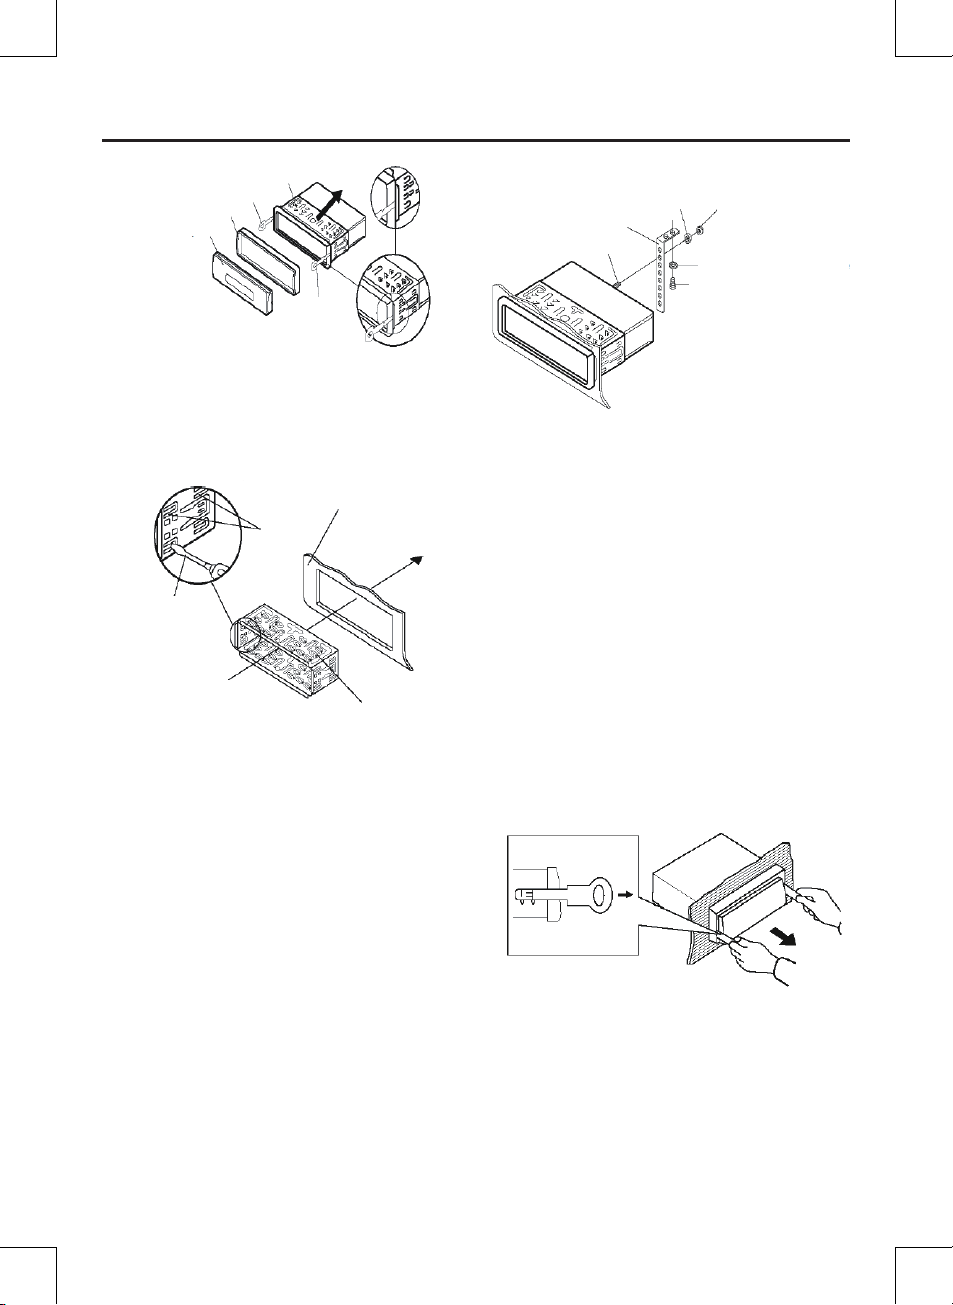
Ausbau des Geräts
1. Vergewissern Sie sich, dass der Motor
ausgeschaltet ist, und lösen Sie dann
das Kabel vom Minuspol (-) der Batterie
2. Entfernen Sie den auf der Rückseite des
Gerätes angebrachten Metallbügel (wenn
vorhanden).
3. Betätigen Sie die Freigabetaste, um das
Bedienteil abzunehmen.
4. Heben Sie den oberen Teil des äußeren
Abschlussrahmens an und ziehen Sie
ihn nach außen, um ihn zu entfernen.
5. Fügen Sie beide beiliegenden Schlüssel
in die Schlitze in der Mitte auf der linken
und rechten Seite des Gerätes ein und
ziehen Sie das Gerät dann aus dem
Armaturenbrett.
INSTALLATION VON DER RÜCKSEITE
(Methode B)
Sollte Sie ein Auto von Nissan oder Toyota
besitzen, beachten Sie bitte die folgenden
Montagehinweise.
Verwenden Sie die mit T (für Toyota) oder
N (für Nissan) markierten Bohrungen für die
Schrauben, die sich beidseitig des Gerätes
benden, um dieses an den serienmäßigen
Befestigungsbügeln Ihres Fahrzeugs anzubringen.
Befestigung des Gerätes an den serienmäßigen Befestigungsbügeln für das Radio. Bringen Sie die Bohrungen für die Schrauben am
Bügel mit denen am Gerät in Übereinstimmung und ziehen Sie dann die Schrauben
(5x5 mm) auf beiden Seiten fest.
Hinweis: Der äußere Abschlussrahmen,
das Gehäuse und der Metallbügel kommen
bei Installationen nach Methode B nicht zum
Einsatz.
6
Page 7

GEBRAUCH DES ABNEHMBAREN BEDIENFELDES
Abnehmen des Bedienfeldes
1. Betätigen Sie die Taste OPEN, wodurch
das Bedienfeld nach unten klappt.
2. Heben Sie das Bedienteil, um es abzu-
nehmen, leicht an und ziehen Sie zuerst
die rechte und dann die linke Seite nach
außen.
3. Bewahren Sie das Bedienteil zur Sicher-
heit sofort nach dem Abnehmen in der
beiliegenden Schutzhülle auf.
Anbringen des Bedienfeldes (Frontplatte)
1. Lassen Sie zum Anbringen des Bedienteils
zuerst die linke und dann die rechte Seite in
der entsprechenden Position einrasten.
2. Drücken Sie, wenn die beiden Seiten
eingerastet sind, das Bedienteil auf das
Hauptgerät.
3. Beachten Sie, dass, wenn das Bedien-
feld nicht richtig einrastet, die Betätigung
der Bedientasten unter Umständen wirkungslos ist und auf dem Display einige
Segmente nicht angezeigt werden. Betätigen Sie die Taste OPEN und bringen
Sie das Bedienteil erneut an.
Vorsichtsmaßnahmen beim Umgang mit
dem Bedienfeld
1. Lassen Sie das Bedienteil nicht fallen.
2. Üben Sie während des Abnehmens oder
Anbringens des Bedienteils keinen Druck
auf das Display oder auf die Bedientasten aus.
3. Berühren Sie nicht die Kontakte am
Bedienteil oder am Hauptgerät. Dadurch
kann es zu schlechten elektrischen Kontakten kommen.
4. Wenn Schmutz oder Fremdkörper an
den Kontakten haften, können diese mit
einem sauberen und trockenen Tuch entfernt werden.
5. Setzen Sie das Bedienfeld keinen hohen
Temperaturen oder direktem Sonnenlicht
aus.
6. Verhindern Sie ein Auftreffen üchtiger
Stoffe (z.B. Benzin, Verdünnungsmittel
oder Insektizide) auf der Oberäche des
Bedienteils.
7. Versuchen Sie nicht, das Bedienteil zu
zerlegen.
7
Page 8
ELEKTRISCHE ANSCHLÜSSE
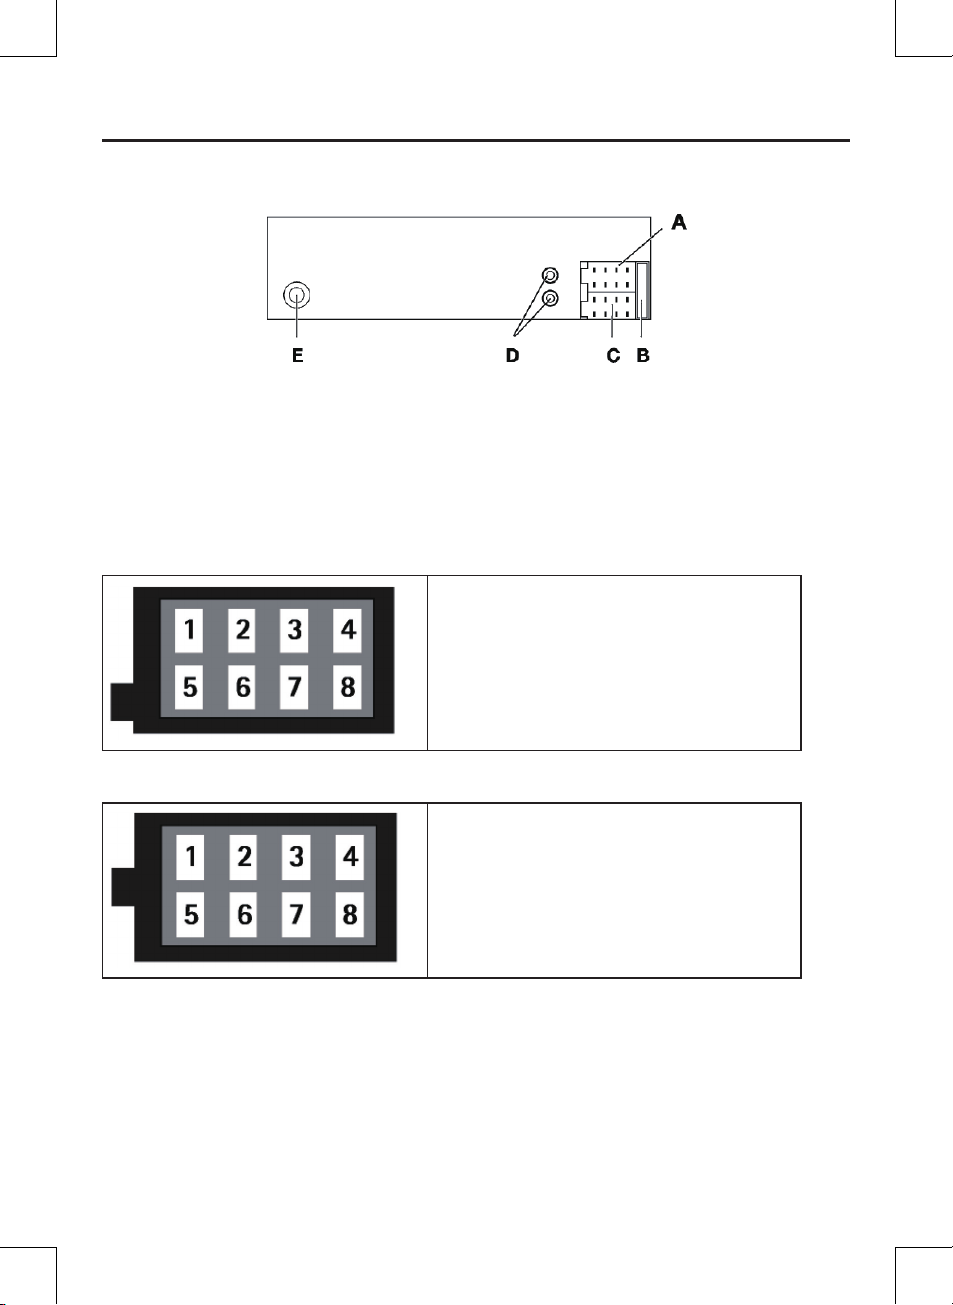
Anschlüsse an der Geräterückseite
A ISO-Anschluss B (Lautsprecher)
B Kfz-Flachsteckersicherung (5 A)
C ISO-Anschluss A (Spannungsversorgung)
D LINE OUT (Vorverstärkerausgang):
Audio-Cinch-Ausgang L/R für Verstärker
E Antennenanschluss
ISO-Anschluss A
1. nicht belegt
2. nicht belegt
3. Antennenspannung
4. 12 V (Zündungsplus)
5. nicht belegt
6. Dauerplus (Speicher)
7. nicht belegt
8. Minus (Masse -)
ISO-Anschluss B
1. Lautsprecher hinten rechts +
2. Lautsprecher vorne rechts +
3. Lautsprecher vorne links +
4. Lautsprecher hinten links +
5. Lautsprecher hinten rechts -
6. Lautsprecher vorne rechts -
7. Lautsprecher vorne links -
8. Lautsprecher hinten links -
8
Page 9
FUNKTIONSWEISE
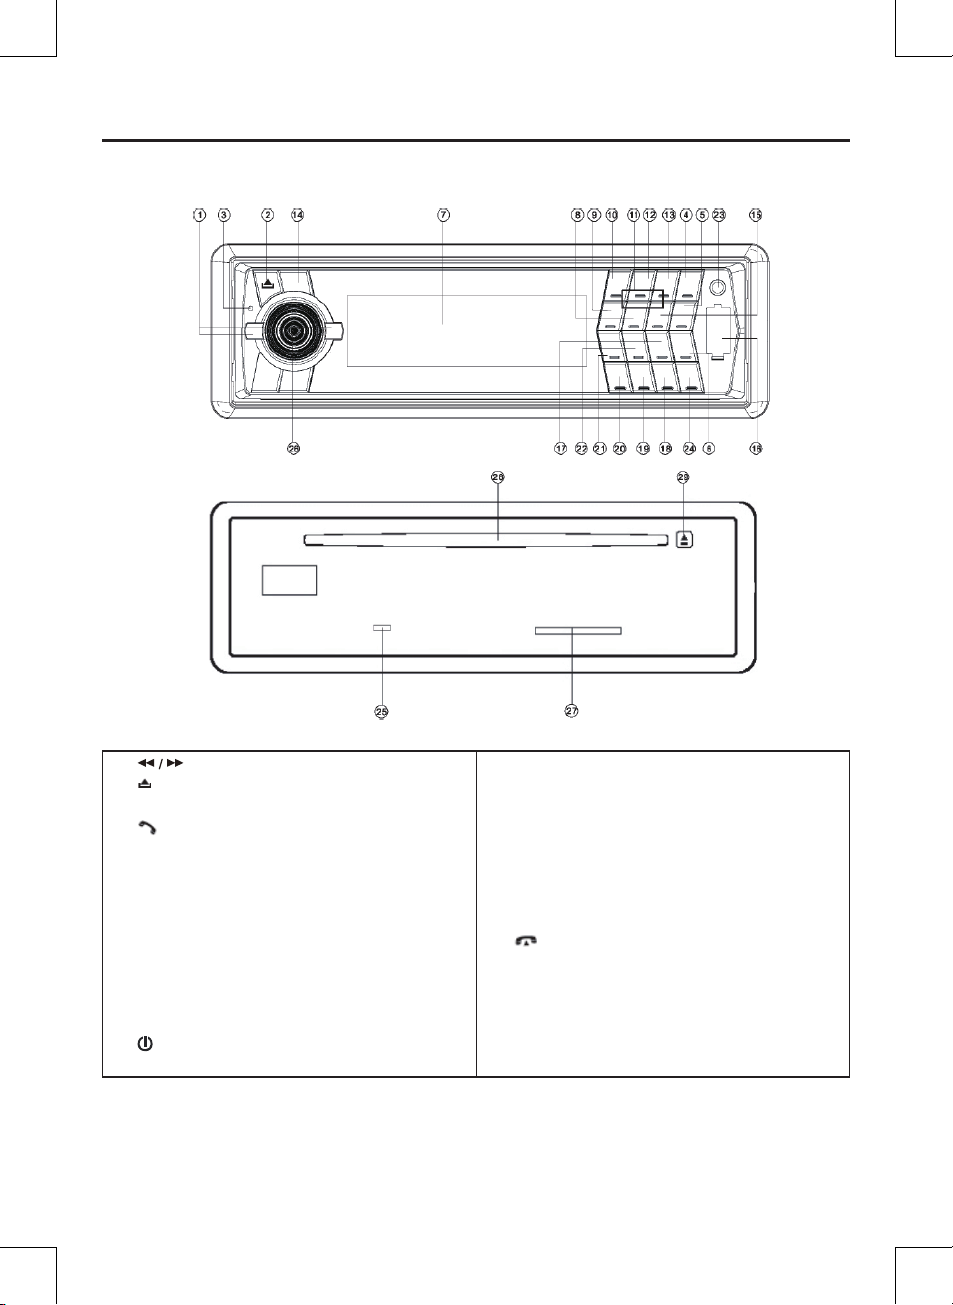
Platzierung der Bedientasten
1. tune/seek, Titel hoch/runter
2.
Freigabe
3. Mic (Mikrophon)
4.
Annehmen
5. PAIR / MOD
6. T-MENU
7. LCD
8. 5 / DIR-
9. 4 / SHF
10. 1 / PAU
11. 1-6 Vorwahl Tasten
12. 2 / SCN
13. 3 / RPT
MUTE
14.
15. 6 / DIR+
16. USB-Eingang
17. 9 / PTY
18. # / SCAN / CON
19. 0 / DISP
20. AS / PS / * / + / Navi-SCH
21. 7 / AF / MON
22. 8 / EQ / TA
23. AUX IN
24.
25. Reset-Taste
26. Lautstärke, SEL / MENU Taste
27. Speicherkarten-Schnittstelle
28. CD-Slot
29. Herausgabe-Taste (Eject)
9
Auegen / BND / LOUD / CLR
Page 10
FUNKTIONSWEISE
Grundlegende Bedienung
Ein-/Ausschalten des Gerätes
Drücken Sie die Taste
einzuschalten. Wenn das Gerät eingeschaltet ist, drücken und halten Sie Taste
um das Gerät auszuschalten.
Lösen des Bedienfeldes
Drücken Sie diese Taste
dienteil zu lösen.
Einstellen des Sounds
Drücken Sie die SEL-Taste (26) kurz um den
gewünschten Einstellmodus auszuwählen.
Der Einstellmodus wird sich in der folgenden
Reihenfolge ändern:
VOL BAS TRE BAL FAD
(Volume) (Bass) (Treble) (Balance) (Fader)
Durch das Drehen des Lautstärkeknopfs (26)
im Uhrzeigersinn oder gegen den Uhrzeigersinn ist es möglich, die gewünschte Tonqualität einzustellen.
SYSTEMEINSTELLUNG
Halten Sie die SEL-Taste (26) gedrückt, um
in den Systemeinstellmodus zu gelangen.
Dann drücken Sie die SEL-Taste (26), um
den zu ändernden Punkt auszuwählen und
drehen Sie den Lautstärkeknopf (26), um die
entsprechende Einstellung zu ändern.
1) BEEP: ON/OFF
Um den Beep Ton ein-/auszuschalten,
drücken Sie die Taste auf dem Bedienteil.
2) P-VOL Anzeige
Hier können Sie die Voreinstellung der
Lautstärke vornehmen. Beim Start wird
die Wiedergabe in dieser Lautstärke sein.
3) AREA EUR/USA
Benutzen Sie den Lautstärkeknopf (26),
um Europa oder USA auszuwählen.
4) Zeit Modus: 24 Stunden/12 Stunden
Hier können Sie zwischen dem 24 Stunden oder 12 Stunden Modus wählen.
(14) um das Gerät
(14),
(2) um das Be-
5) PCLK ON/OFF
Benutzen Sie den Lautstärkeregler (26),
um die Uhr im Stand-By-Modus ein-/auszuschalten.
Stumm
Halten Sie die MUTE-Taste (14) für einige
Sekunden gedrückt, um den Ton zu dämpfen, und das Zeichen „MUTE“ wird auf dem
Display erscheinen. Wenn Stumm eingeschaltet ist, drücken Sie die MUTE-Taste (14)
erneut, um den Ton wiederzuherstellen.
Lautstärke
Drücken Sie die LAUT Taste (24) für einige
Sekunden, um die Lautstärkefunktion einzuschalten; „LAUT“ wird auf dem LCD Erscheinen. Drücken Sie die Taste erneut für wenige
Sekunden, um diese Funktion zu beenden;
„LAUT“erlischt auf dem LCD.
Anzeige
Drücken Sie die DISP Taste (19), um in den
Display Modus zu wechseln.
Equalizer
Drücken Sie die EQ Taste (22), um die Funktion einzuschalten und den gewünschten
Audiomodus einzustellen. Es gibt 5 Modi, wie
unten angegeben:
Reset-Funktion
Die Reset Taste (25) muss mit einem Kugelschreiber oder dünnen Metallteil aktiviert
werden. Die Reset Taste soll aus folgenden
Gründen aktiviert werden:
- Erstinstallation des Geräts, nachdem alle
Kabel komplett vernetzt sind
- Wenn keine der Tasten mehr funktioniert
- Wenn das Error-Symbol auf dem Display
erscheint.
10
Page 11

FUNKTIONSWEISE
Hinweis: wenn Sie die Reset Taste (25)
drücken, kann das Gerät in dem Moment
nicht funktionieren. Benutzen Sie bitte etwas
in Isopropyl Alkohol getränkte Watte, um das
untereTeil des Bedienteils zu säubern.
Modusauswahl
Drücken Sie kurz die MOD Taste (5), um
den Modus entlang Radio, CD, ESB, CARD,
AUXund BT Audio zu wechseln.
Audio Eingang
An das Gerät kann über die AUX IN-Buchse
(23) auf dem Frontteil ein tragbarer AudioPlayer angeschlossen werden. Wenn Sie
beide Geräte miteinander verbunden haben,
drücken Sie die MOD Taste (5) auf dem Bedienteil, um in den AUX IN-Modus zu wechseln.
BEDIENUNG DES RADIOS
Auswahl der Frequenz/Band
Im Radiomodus drücken Sie Bnd (24) kurz,
um das gewünschte Band auszuwählen.
Die möglichen Bänder werden in folgender
Reihenfolge angezeigt:
FM1→FM2→FM3→AM (MW)→FM1…
Auswahl der Sender
Drücken Sie kurz (1) um die automatische Suchfunktion zu aktivieren. Halten
Sie die Taste mehrere Sekunden gedrückt
bis “Manuelles…”im Display erscheint;
somit haben Sie den manuellen Suchmodus
ausgewählt. Wenn Sie keine der Tasten für
wenige Sekunden drücken, gelangen Sie
wieder zur automatischen Suchfunktion und
automatisches Suchen “AUTO…”erscheint
im Display.
Automatische Speicherung & Programmsuche
- Automatische Speicherung.
Drücken die Taste AS/PS (20) für einige
Sekunden, “SEARCH” erscheint im LCD.
Das Radio sucht von der nächsten Frequenz und misst die Signalstärke, bis ein
Suchzyklus beendet ist. Anschließend sind
die 6 stärksten Programme unter der dazugehörigen Tastennummer gespeichert.
- Um ein Programm einzustellen, drücken
Sie die AS/PS Taste (20) kurz, um die
gewünschte Station auszuwählen. Die
dazugehörige Nummer P1~P6 leuchtet im
LCD auf.
Suchen (SCAN)
Drücken Sie Suchen (SCAN) (18), um in
den Suchmodus zu gelangen, es wird eine
Station mit stärkerer Frequenz gesucht. Die
Einheit verbleibt bei jeder Station für einige
Sekunden (die dazugehörende Frequenz
leuchtet fünfmal im LCD auf).
Programmspeicherung
Drücken Sie eine beliebige Taste von (1-6),
um ein Programm auszuwählen, welches
schon abgespeichert wurde. Drücken Sie die
Taste einige Sekunden (bis ein 2tes Signal
ertönt), dann ist das gewählte Programm
unter der gewählten Tastennummer gespeichert.
ANS (Announcement Name Station)
Bedienung
- Einstellen des ANS-Modus: Drücken
Sie die AF Taste (21) und lassen diese
umgehend los, um den ANS-Modus einoder auszuschalten. Wenn der ANSModus eingeschaltet ist, leuchtet „ANS“
auf dem LCD.
- Benutzen Sie die PTY Taste (17)
Drücken Sie kurz die PTY (17) Taste, um
in den PTY Auswahl Modus zu gelangen,
11
Page 12

FUNKTIONSWEISE
der Programmname wird im LCD angezeigt. Sie können Lautstärkeknopf (26)
drücken, um die Sender auzuwählen und
(1) drücken, um das gewünschte
Programm zu suchen.
1. drücken und halten Sie die Pty Taste
(8/9) und Sie gelangen ins ANS-Menu.
In diesem Menu nutzen Sie bitte den
Lautstärkeknopf (26), um die Sender
auszuwählen und (1), um den
gewünschten Sender einzustellen.
• TA-SEEK: SEEK/ALARM
a) TA SEEK Modus:
Wenn ein neu gewähltes Programm keine
TP-Information für mehr als 5 Sekunden
erhält, geht das Radio automatisch zum
nächsten Programm über, welches nicht
denselben Sender (Pl) hat, aber dieselbe
TP-Information. Wenn die TP-Information
für eine gewisse Zeit beim aktuellen Sender verloren geht, welcher gekennzeichnet
ist mit RETUNE SHORT (Kurz) und RETUNE LONG (Lang), so geht das Radio
zum nächsten selben Pl-Sender über.
Wenn der Pl-Sender in einem Suchzyklus
nicht erreicht wird, so wechselt das Radio
zum nächsten Sender mit TP-Information.
Hinweis: IM TA SEEK Modus kann der
aktuelle Sender in einen komplett anderen umgetauscht werden, weil das Radio
einen TP-Sender sucht, wenn das Feldsignal oder die Feldstärke sehr schwach ist
oder der aktuelle Sender kein TP-Signal
hat. (Die höhere Priorität liegt beim TP,
nicht beim Pl.)
b) TA ALARM Modus:
Wenn dieser Modus ausgewählt ist, ist
jegliche andere automatische Sendereinstellung inaktiviert. Man hört lediglich einen doppelten Beep-Ton (ALARM). Somit
wird der aktuelle Sender in diesem Modus
bewahrt. (Die höhere
Priorität liegt bei Pl, nicht beim TP). Wenn
ein neu gesuchter Sender keine TP-Information für 5 Sekunden hat, ertönen BeepTöne. Wenn die TP-Information beim
aktuellen Sender verloren geht, so setzt
der Beep-Ton aus. Wenn ein neu gesuchter Sender kein ANS-Signal hat, wird „PI
SEEK“ unterdrückt.
• MASK: DPI/ALL
MASK DPI Modus: Markiert nur die AF,
welche unterschiedliche Pl (DPI) haben.
Mask ALL (Alles) Modus: Markiert alle AF
mit unterschiedlicher Pl und keinem ANSSignal mit hoher Feldstärke.
• REGION: OFF/ON
Region AN Modus: Die AF Umschaltung
oder PI Seek-Funktion ist bei allen Sender
implementiert, die die gleichen PI Codes
haben wie der aktuelle Sender.
Region AUS Modus: der regionale Code in
Form vom Pl Code wird ignoriert, wenn AF
umgeschaltet oder PI SEEK implementiert
wird.
• TA-Lautstärke: Voreingestellte TA-Laut-
stärke 18, wahlweise 0-40
• RETUNE: LONG/SHORT
Wenn die Pl-Information beim aktuellen
Sender verloren geht für eine gewisse
Zeit, die festegelegt ist auf Retune Short
(30 Sekunden) und Retune Long (90
Sekunden), so beginnt das Radio nach
dem nächsten gemeinsamen Pl-Sender zu
suchen.
• Verkehrsnachrichten:
Die TA Taste (22) wird wie folgt benutzt:
Wenn Sie die Taste drücken und für ein
paar Sekunden so halten, schaltet sich der
TA Modus entweder ein oder aus.
12
Page 13

FUNKTIONSWEISE
Wenn der TA Modus eingeschaltet ist und
eine Verkehrsnachricht durchgegeben
wird:
War das Gerät im CD (MP3) Modus oder
AUX IN Modus oder IPOD Modus, so
schaltet es sich umgehend in den Radio
Modus um. Vorübergehend schaltet es zu
einem EON verlinkten Sender, wenn EON
eine Verkehrsnachricht bei dem anderen
Sender entdeckt. Ist die Lautstärke unter
dem des Nachrichtensenders, so wird diese angehoben. Ist die Lautstärke zu hoch,
so wird sie herabgesetzt.
Die TA Funktion kann unterbrochen wer-
den, indem Sie die Taste kurz gedrückt
halten. Die Funktion ist so jedoch nicht auf
Dauer ausgeschaltet.
PI: Programm Identizierungscode
PS: Programm Service-Name
AF: Alternative Frequenzen
TP: Verkehrsprogramm Identikation
TA: Verkehrsankündigung
EON: Enhanced other Network
PTY: Programmtyp Code
CD / MP3 / WMA BEDIENUNG
• Umschalten in den CD-Modus
Wenn keine CD in das Laufwerk eingelegt
ist :
Legen Sie vorsichtig die CD/MP3/WMA CD
mit der beschrifteten Seite nach oben in das
CD-Laufwerk ein, bis Sie einen geringen
Widerstand spüren. Die CD wird dann automatisch in das Laufwerk eingezogen. Die
CD/MP3/WMA Wiedergabe beginnt.
Wenn bereits eine CD/MP3/WMA in das
Laufwerk eingelegt ist:
Drücken Sie die kurz MOD Taste (5).
• Titelauswahl
Drücken Sie
vorherige Titel ausgewählt. Die Titelnummer
wird auf dem Display angezeigt.
Drücken und halten Sie (1), so wird der
Titel vor-/zurückgespult. Die CD wird abgespielt, wenn Sie Taste loslassen.
• Unterbrechen (PAUSE) des Abspielens
Drücken Sie die PAU (10) Taste um den
Abspielvorgang zu unterbrechen. „PAUSE“
erscheint auf dem LCD. Drücken Sie diese
Taste erneut um das Abspielen fortzusetzen.
• Vorschau aller Titel
Drücken Sie die Taste SCN (12), um vorerst
einige Sekunden von jedem Lied auf der
aktuellen CD zu hören,„SCAN“ erscheint auf
dem LCD. Drücken Sie diese Taste erneut,
werden die Titel in voller Länge abgespielt
und „SCAN“ erlischt auf dem LCD.
Wenn Sie MP3/WMA abspielen, so drücken
Sie die SCN Taste (12) und es werden einige
Sekunden von jedem Lied in der richtigen
Reihenfolge abgespielt. „D-SCAN“ leuchtet
auf. Wenn Sie die Taste erneut drücken,
verlassen Sie den Modus.
• Wiederholen eines Titel
Drücken Sie die RPT Taste (13), um kontinuierlich den gleichen Titel zu wiederholen,
so erscheint „REPEAT“. Drücken Sie diese
Taste erneut, um den Wiederholvorgang zu
beenden. „S-RPT“ erlischt im LCD.
(1), so wird der nächste/
13
Page 14

FUNKTIONSWEISE
Wenn Sie MP3/WMA abspielen, drücken und
halten Sie die RPT Taste (13), so wiederholen sich alle Titel in richtiger Reihenfolge.
„S-RPT“ erscheint im LCD. Drücken Sie
diese Taste erneut und Sie verlassen diesen
Modus.
• Zufallswiedergabe
Drücken Sie die SHF Taste (9), um alle
Titel auf der CD in zufälliger Reihenfolge
wiederzugeben. „S-SHF“ erscheint im LCD.
Drücken Sie diese Taste erneut, um diese
Funktion zu beenden. „S-SHF“ erlischt auf
dem LCD. Wenn Sie MP3/WMA abspielen,
drücken und halten Sie die SHF Taste (9)
und die Titel werden in zufälliger Reihenfolge
abgespielt. „S-SHF“ erscheint auf dem LCD.
Drücken Sie diese Taste erneut, so verlassen
Sie diesen Modus.
• Auswerfen einer CD
Drücken Sie (29) um die CD/MP3/WMA
Wiedergabe zu beenden und die CD auszuwerfen (28).
• ESP Funktion (optional)
CD und MP3 Medien kann das Gerät bis zu
70 Sekunden fehlerfrei bei kontinuierlicher
Erschütterung wiedergeben.
SPEZIELLE FUNKTIONEN FÜR MP3/WMA
CDs
1. Direkte HOCH/RUNTER Auswahl
Drücken Sie DIR- (8) oder DIR+ (15) um
hoch oder runter zu schalten. Wenn Ihre
MP3/WMACD kein Verzeichnis hat, so
haben diese Tasten keine Funktion.
2. Auswahl der Titel
• Suchen der Spur direkt
Drücken Sie AS / PS (D-AUD) Taste (20)
eine Zeit lang. Es erscheint im Display
"Suchen Spur direkt" bei Digital-Audio-CD.
Das Gerät sucht die Strecke durch folgende
direkte numerische Tasten:
M1-M6, MOD (5), DSP (0),
TUNE/SEEK/TRACK DOWN (8),
TUNE/SEEK/TRACK UP (9)
• Suchen Verzeichnis oder Dateiname
Drücken Sie zweimal AS / PS (D-AUD) Taste
(20). Es erscheint im Display "Searching
Directory oder Dateiname" bei Digital-AudioCD. Das Gerät sucht Dateien und Verzeichnisse.
Gehen Sie wie folgt vor:
- Verwenden Sie die entsprechenden
Tasten für die Buchstaben A bis Z, leer,
0 bis 9, _, -, +.
- Drücken Sie zur Eingabe jedes Zeichens
die SEL-Taste (26).
- Drücken Sie die BND/LOU/ENT-Taste
(24). So starten Sie die Titelsuche. Ist bei
dem ausgewählten Titel ein Verzeichnis
angegeben, wird im Display (“) angezeigt.
- Verwenden Sie die TUNE/SEEK/ TRACK
UP/DOWN-Tasten für alle Titel in diesem
Verzeichnis und wählen Sie den Titel.
- Drücken Sie die BND/LOU/ENT-Taste
um zu bestätigen und starten Sie das
Spiel.
- Wiederholen Sie die obigen Schritte,
falls die neu gewählten Titel wieder ein
Verzeichnis sind.
14
Page 15
FUNKTIONSWEISE
3. DISPLAY ID3 INFORMATION
Drücken Sie die ID3 Taste (20) um das ID3
TAG anzuzeigen (Falls verfügbar: LiedTitel, Name des Interpreten oder andere
Informationen/Inhalte…)
(NUR VERFÜGBAR IN DER MP3 ID3
VERSION)
SUPPORT MP3/WMA Dekodiermodus
Das wichtigste Gerät unterstützt MP3-und
WMA (Windows Media Audio)-Decodierung Modi wie unten.
Standard
MPEG1
Audio Layer
3 (44.1kHz)
Windows
Media Audio
(44.1kHz)
Bit Rate
(kbps)
32,48,64,96,
128,192,256,
320
64,96,128,
192
Unterstützt
Mode
Stereo
Stereo
HINWEISE FÜR CDs
A. Hinweise für CDs:
1. Versuche eine nicht standardisierte CD
zu verwenden, können das Gerät beschädigen.Vergewissern Sie sich daher
runde und keine verbogene CDs für
dieses Gerät zuverwenden.
2. Machen Sie kein Papier oder Tesalm,
etc. auf die beschriftete oder die bespielte Seite der CDs, dies kann zur Fehlfunktion führen.
3. Schmutz, Staub, Kratzer und verzerrte
CDs führen zur Fehlbedienung.
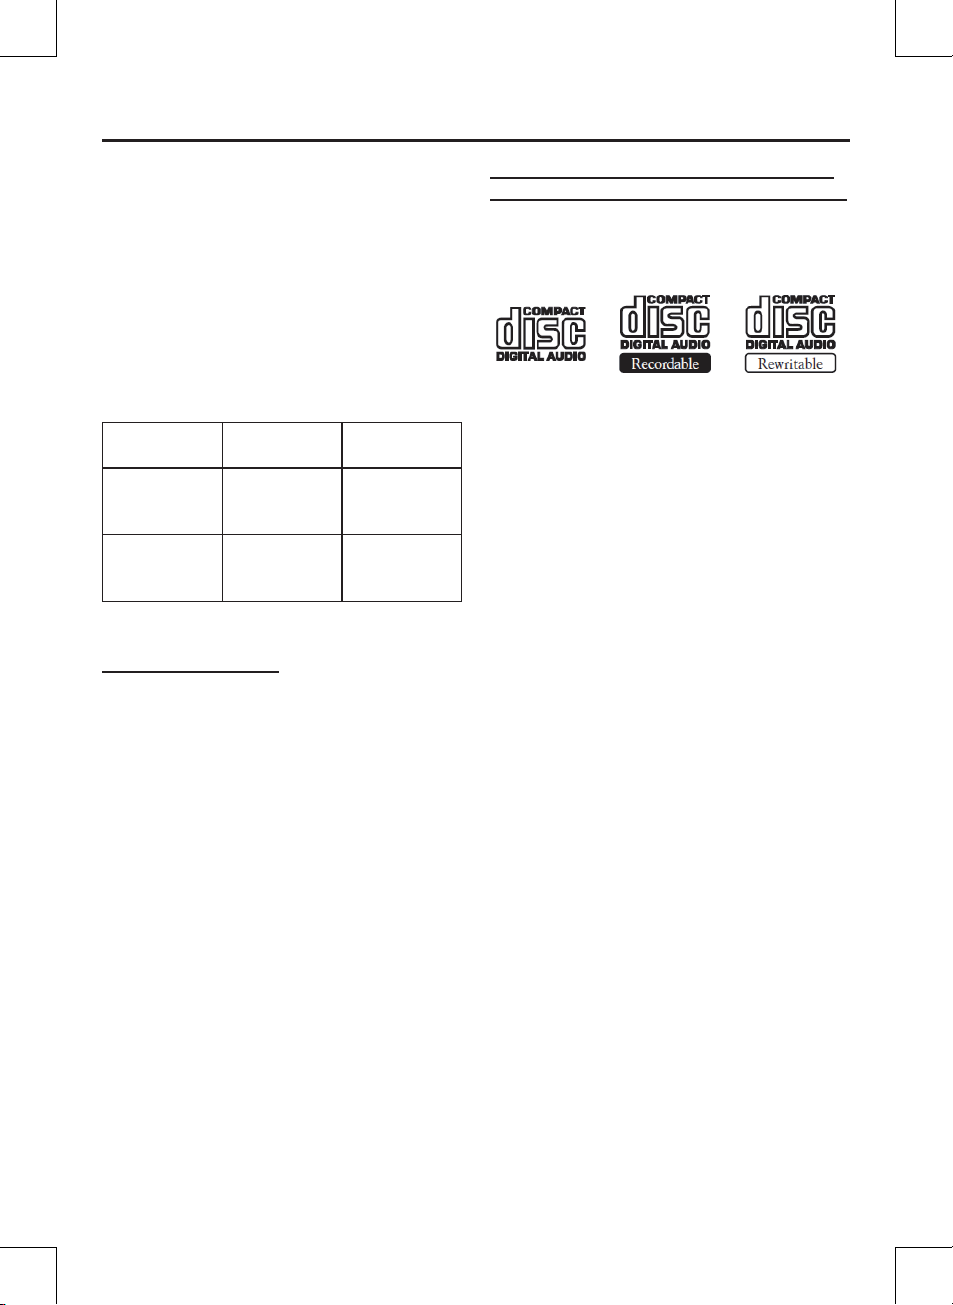
B. Hinweise für CD-Rs (aufnahmefähige
CDs)/CD-RWs (wiederbeschreibbare CDs)
1. Vergewissern Sie sich, dass Sie nur CDs
mit folgenden Hinweisen für dieses Gerät
zum Abspielen zu benutzen:
2. Das Gerät kann keine CD-R und CD-RW
abspielen, die nicht vollständig gebrannt
sind. (Bitte beziehen Sie sich auf das
Handbuch von Ihrem CD-R/CD-RW
Aufnahmegerät oder die CD-R/CD-RW
Software für mehr Information zum dem
Brennprozess.)
3. Abhängig vom Aufnahme-Status, dem
Zustand der CD und dem Zubehör, das
für die Aufnahme verwendet wurde, können manche CD-Rs/CD-RWs nicht mit
diesem Gerät abgespielt werden (beachten Sie *1).
*1: Um eine zuverlässigere Wiedergabe zu
erhalten, beachten Sie bitte folgende
Empfehlungen:
a: Verwenden Sie CD-RWs mit einer Ge-
schwindigkeit von 1x zu 4x und beschreiben Sie diese mit einer Geschwindigkeit
von 1x zu 2x.
b. Verwenden Sie CD-Rs mit einer Ge-
schwindigkeit von 1x zu 8x und beschreiben Sie diese mit einer Geschwindigkeit
von 1x zu 2x.
c. Spielen Sie keine CD-RW ab, die öfter
als 5x beschrieben wurde.
15
Page 16
FUNKTIONSWEISE
C. Hinweise zu MP3 Dateien (nur MP3
Version):
1. Wenn Sie eine MP3 Datei benennen,
vergewissern Sie sich, dass der Dateiname in der Endung „.MP3“ hat.
2. Eine nicht MP3 Datei, wenn auch die Endung „.MP3“ lautet, kann das Gerät nicht
erkennen.
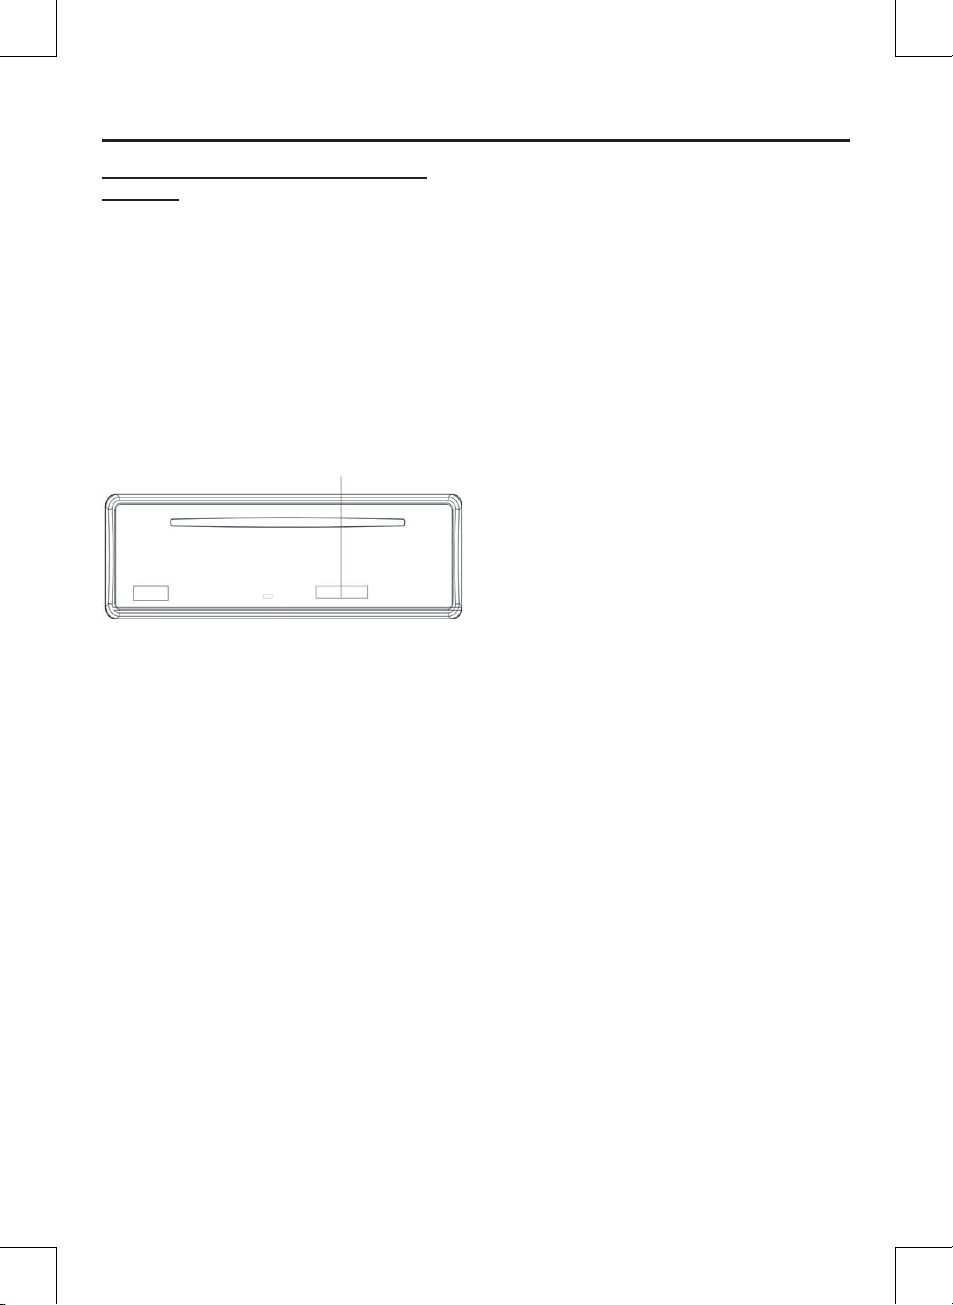
SPEICHERKARTEN-Bedienung
Als Sonderausstattung kann das Gerät eine
Speicherkarte Schnittstelle besitzen. Wie Sie
hier sehen, ist die Speicherkarten- Schnittstelle auf dem Innenteil des Geräts.
Wenn Sie eine Speicherkarte in die Speicherkarten-Schnittstelle einführen, wird
das Gerät nach MP3- oder WMA-Dateien
suchen und diese automatisch abspielen.
Die Bedienung ist dieselbe wie bei der MP3Bedienung (weiter oben beschrieben). Wenn
Sie in einem anderen Modus sind, können
Sie die MOD Taste (5) drücken, um den
Speicherkarten-Modus auszuwählen. Wenn
Sie wichtige Dateien auf der Speicherkarte
haben, verbinden Sie die Karte nicht mit dem
Hauptgerät, um diese abzuspielen.
CARD INTERFACE
BLUETOOTH-BENUTZUNG
• Vorbereitung für die Bluetooth Bedie-
nung
(i) Wenn Sie die Bluetooth-Funktion benut-
zen, vergewissern Sie sich bitte, dass Ihr
Mobiltelefon Bluetooth unterstützt.
(ii) Bedenken Sie bitte auch, dass unter-
schiedliche Mobiltelefonmodelle eine
unterschiedliche Bluetooth-Sendeleistung besitzen. Um eine optimale Übertragungsqualität zu gewährleisten, wird
empfohlen, die Entfernung zwischen
Mobiltelefon und Gerät innerhalb von 3m
zu halten. Achten Sie bitte darauf, keine
Metallgegenstände zwischen das Mobiltelefon und das Gerät zu legen.
• PAIRING
1) Halten Sie in einem beliebigen Betriebs-
modus die PAIR (MOD)-Taste (5) auf der
Bedientafel gedrückt 5 Sekunden und in
der Anzeige erscheint "Pairing…".
2) Gehen Sie in das Bluetooth-Einstellungsmenü Ihres Mobiltelefons. (Die genaue
Bedienung ist abhängig von Ihrem Mobiltelefonmodell.
Lesen Sie dazu entsprechend die Bedie-
nungsanleitung Ihres Mobiltelefons.)
3) In der angezeigten Liste Ihres Mobiltelefons sollte dann "CarBT" erscheinten.
Wählen Sie dieses Gerat und geben Sie
das Passwort "0000" ein.
4) Bei erfolgreichem Pairing erscheint
„CONN OK! “in der Anzeige.
16
Page 17

FUNKTIONSWEISE
5) Wenn die Verbindung fehlgeschlagen ist,
wird „END “ in der LCD-Anzeige angezeigt. Sie können auch drücken und halten
der PAIR-Taste (10) versuchen.
Hinweis: Während des Verbindungsaufbaus
funktionieren lediglich die Tasten RELEASE
(2), VOLUME (26) und MUTE (14). Alle weiterenTasten sind während des Verbindungsvorgangs außer Funktion. Während des
Verbindungsaufbaus können Sie PAIR (5)
drücken, um den Vorgang zu unterbrechen.
VERBINDEN
In dieses Gerät ist eine automatische erneute Verbindung eingebaut. Jedesmal, wenn
Sie kurz
automatisch mit dem Mobiltelefon erneut
verbinden (Hinweis: das Mobiltelefon muss
vorab mit dem Gerät gepaart worden sein!).
In den folgenden Bedingungen können Sie
auch manuell erneut verbinden, indem Sie
CON (18) für einige Sekunden drücken;
„Conn OK! erscheint in der LCD Anzeige, ist
die erneute Verbindung erfolgreich, erscheint
„Connected!OK!“ in der Anzeige und Sie können einen Piep-Ton hören.
1) Wenn das Mobiltelefon außer Reichweite
2) Wenn das Mobiltelefon außer Reichweite
(4) drücken, wird sich das Gerät
ist, geht die Verbindung verloren. Kommen Sie zurück zum Gerät, ist ein erneutes Verbinden notwendig.
des Geräts liegt und ein eingehender Anrufkommt, müssen Sie erneut verbinden,
um die Audiospur zum Gerät zu übertragen.
3) Wenn Sie die
cken, um das Frontteil zu lösen, so wird
dieVerbindung unterbrochen.
Wenn Sie das Frontteil wieder einsetzen,
so müssen Sie erneut verbinden.
4) Wenn Sie das Mobiltelefon ausschalten,
müssen Sie dieses nach Wiedereinschalten erneut verbinden.
T-MENÜ
Wenn Sie erfolgreich gepaart haben, drücken
Sie kurz T-MENU (6) auf dem Frontteil um
in das Telefonmenü zu gelangen, halten Sie
diese Taste gedrückt oder drücken Sie die /
Tasten (1) , um in den Funktionen im Menu
zu wechseln. Die Funktionen werden in folgender Reihenfolge angezeigt: PRE NUM/
RECELVED/DIALED/MLSSED/MANU ANS/
TALK .
Für Details lesen Sie bitte die folgenden
Anweisungen.
HINWEIS:
1) RRE NUM: Sie können 10 Nummern
speichern. Im PRE-NUM-Modus, drücken Sie die Taste VOLUME (26) zur
Eingabe der Nummer. Drücken Sie dann
dieSEL-Taste und geben Sie die Telefonnummer ein. Dann drücken Sie die SELTaste erneut, um die Telefonnummer im
Telefonbuch zu speichern, SEL (26) um
die Nummer anzurufen.
2) Anzeige der zuletzt gewählten Nummer.
3) Rufnummernanzeige, die Sie übersehen
haben.
Release-Taste (2) drü-
17
Page 18

FUNKTIONSWEISE
BEANTWORTUNG MANU ANSI
Im automatischen Antwortmodus ON
(AN) erscheint in der LCD-Anzeige
„ANSWER?+Telefonnummer“. Das Gerät empfängt den Anruf automatisch. Im
automatischen MANU Antwortmodus
OFF (AUS) erscheint in der LCD-Anzeige
„ANSWER?+Telefonnummer“. Doch Sie
können
nehmen oder aber
Anruf abzulehnen.
ANRUF TÄTIGEN
1) Um einen Anruf zu tätigen, haben
Anrufe über manuelle Eingabe der Telefonnummer tätigen.
Betätigen Sie die Taste
Bedientafel und in der Anzeige erscheint
"CALL__". Benutzen Sie die Tasten 0~9,*,
# zur Eingabe der Telefonnummer, die Sie
wählen wollen. (Hinweis: betätigen Sie die
Taste * zur Eingabe des Zeichens "*". Wenn
Sie die Taste ged rückthalten erscheint das
Zeichen "+".) Betätigen Sie dann die Taste
(4) erneut, um die Nummer zu wählen.
Hinweis: Bei Fehleingaben können Sie die
Eingabe mithilfe der Taste CLR (24) wieder
löschen. Wenn Sie die CLR-Taste(24) gedrückt halten, werden alle Ziffern auf einmal
gelöscht.
(4) drücken um den Anruf anzu-
(24) drücken, um den
Sie verschiedene Möglichkeiten. Sie
können dies über die Schnellwahltasten,
Eingangsliste, Wahlliste oder
Telefonbuch (Mobiltelefon oder SIMKarte) tun. Lesen Sie dazu bitte den
Abschnitt zum Telefonmenü.
(4) auf der
ANRUF UMLEITEN ZWISCHEN MOBILTELEFON UND GERÄT
Halten Sie während des Gesprächs die T-
MENU Taste (6) gedrückt, um den Anruf vom
Mobiltelefon auf das Gerät oder umgekehrt
umzuleiten. Hinweis:
1) Wenn Sie einen Anruf auf lhr Mobiltelefon umleiten, wird der Ton automatisch
angeschaltet, wenn er 0zuvor ausgeschaltet wurde.
2) Ausgehende Anrufe können nicht umgeleitet werden, wenn sie noch nicht vom
Empfänger angenommen wurden.
BLUETOOTH AUDIO (A2DP FUNKTION)
Dieses Gerät unterstützt die Bluetooth-AudioFunktion. Wenn Sie über lhr Mobiltelefon
Audiodateien in stereo wiedergeben und die
Verbindung zwischen Gerät und
Telefon steht, können Sie die
Audioausgabe auf das Gerät umleiten. Benutzen Sie die Tasten M1, M2, M3
auf der Bedientafel zur Wiedegabesteuerung
(Pause/Wiedergabe/Stopp). (Die Funktion
der Tasten ist abhängig von dem von Ihnen
benutzen Telefonmodell.)
Benutzen Sie die Tasten
der Bedientafel zur Auswahl eines Musiktitels. (Die Funktion der Tasten ist abhängig
von dem von lhnen benutzen Telefonmodell.)
Hinweis: Während der Musikwiedergabe
können Sie keine Anrufe tätigen.
(1) auf
18
Page 19

SPEZIFIKATION
ALLGEMEIN
Spannungsversorgung : DC 12 Volt, Negative Erdung
Chassis Abmessungen : 178 (W) x 160 (D) x 50 (H)
Tonregelung
Bäss (Bass) (bei 100 Hz) : ±10 dB
Höhen (Treble) (bei 10 kHz) : ±10 dB
Maximale Ausgangsleistung : 4x40 Watt
Stromaufnahme : 5 Ampere (max.)
CD PLAYER
Signal-Rauschabstand : Mehr als 55 dB
Kanaltrennung : Mehr als 50 dB
Frequenz Charakteristika : 40Hz – 18 kHz
RADIO
Für 2 Bands Europa
UKW
Frequenzbereich 87.5 bis 108 MHz
IF 10.7 MHz
Empndlichkeit
(S/N=30dB) 10 dBu
Stereo-Trennung >25dB
MW
Frequenzbereich 522 bis 1620 kHz
IF 450 kHz
Empndlichkeit (S/N=20dB) 36 dBu
Technische Änderungen vorbehalten!
Konformitätserklärung
Hiermit erklärt die Firma Clatronic International GmbH, dass sich das Gerät AR 820 CD/MP3/
BT in übereinstimmung mit den grundlegenden Anforderungen, der europäischen Richtlinie
für Funkentstörung von Kraftfahrzeugmotoren mit Fremdzündung (2004/104/EC) bendet.
Bitte führen Sie das ausgediente Gerät einer umweltgerechten Entsorgung zu.
19
Page 20
FEHLERBEHEBUNG
Bevor Sie die Prüiste durchgehen, prüfen Sie die Verbindungen der Kabel. Wenn irgendein
Problem nach Prüfen der Prüiste besteht, wenden Sie sich bitte an Ihren Verkäufer.
Symptoom Grund Lsöung
Kein Strom Die Zündung des Autos Ist
aus.
Die Sicherung ist durchge-
brannt
Die CD kann nicht geladen
oder herausgeworfen werden
KeinTon Die Lautstärke ist auf Mini-
Tonschwankungen Der Einbauwinkel liegt bei
Die Bedientasten
funktionieren nicht
Das Radio funktioniert nicht Das Antennenkabel ist nicht
Die automatische Senderwahl
funktioniert nicht.
Eine CD liegt bereits innen. Entfernen Sie diese und legen
Sie legen die CD mit der falschenSeite nach oben ein.
Die CD ist extrem verschmutzt
oder verkratzt.
Die Temperatur im Auto ist zu
hoch.
Kondensation Lassen Sie das Gerät für ca.
mum eingestellt.
Die Kabel sind nicht korrekt
verbunden.
über 30 Grad.
Die CD ist extrem schmutzig
oder verkratzt.
Der eingebaute Mikro-Compu-
ter funktioniert nicht einwandfrei.
verbunden.
Die Signale sind zu schwach. Wählen Sie manuell einen
Schalten Sie die Zündung ein.
Sicherung ersetzen
Sie eine neue CD ein.
Legen Sie diese richtig herum
ein.
Reinigen Sie die CD oder
legen Sie eine andere ein.
Kühlen Sie den Wagen, bis
die umgebende Temperatur
normal ist.
Eine Stunde ausgeschaltet,
dann versuchen Sie es erneut.
Stellen Sie die Lautstärke auf
die gewünschte Stärke ein.
Überprüfen Sie die Verbindungen der Kabel.
Der Winkel muss unter 30
Grad sein.
Reinigen Sie die CD oder
legen Sie eine andere ein.
Drücken Sie die RESET Taste.
Das Frontteil ist nicht einwandfrei an seinem Platz.
Fügen Sie das Antennenkabel
ein.
Sender aus.
20
Page 21

GARANTIE
Garantiebedingungen
1. Gegenüber Verbrauchern gewähren wir
bei privater Nutzung des Geräts eine Garantie von 24 Monaten ab Kaufdatum.
Ist das Gerät zur gewerblichen Nutzung
geeignet, gewähren wir beim Kauf durch
Unternehmer für das Gerät eine Garantie
von 12 Monaten.
Die Garantiezeit für Verbraucher red uziert
sich auf 12 Monate, sofern sie ein zur
gewerblichen Nutzung geeignetes Gerät –
auch teilweise – gewerblich nutzen.
2. Voraussetzung für unsere Garantieleistungen sind der Kauf des Geräts in Deutschland bei einem unserer Vertragshändler
sowie die Übersendung einer Kopie des
Kaufbelegs und dieses Garantiescheins
an uns.
Bendet sich das Gerät zum Zeitpunkt
des Garantiefalls im Ausland, muss es auf
Kosten des Käufers uns zur Erbringung
der Garantieleistungen zur Verfügung
gestellt werden.
3. Mängel müssen innerhalb von 14 Tagen nach Erkennbarkeit uns gegenüber
schriftlich angezeigt werden. Besteht der
Garantieanspruch zu Recht, entscheiden
wir, auf welche Art der Schaden/Mangel
behoben werden soll, ob durch Reparatur
oder durch Austausch eines gleichwertigen Geräts.
4. Garantieleistungen werden nicht für
Mängel erbracht, die auf der Nichtbeachtung der Gebrauchsanweisung, unsachgemäßer Behandlung oder normaler
Abnutzung des Geräts beruhen. Garantieansprüche sind ferner ausgeschlossen
für leicht zerbrechliche Teile, wie zum
Beispiel Glas oder Kunststoff. Schließlich
sind Garantieansprüche ausgeschlossen,
wenn nicht von uns autorisierte Stellen
Arbeiten an dem Gerät vornehmen.
5. Durch Garantieleistungen wird die Garantiezeit nicht verlängert. Es besteht auch
kein Anspruch auf neue Garantieleistun-
gen. Diese Garantieerklärung ist eine
freiwillige Leistung von uns als Hersteller
des Geräts. Die gesetzlichen Gewährleistungsrechte (Nacherfüllung, Rücktritt,
Schadensersatz und Minderung) werden
durch diese Garantie nicht berührt.
Stand 03 2008
Garantieabwicklung
Sollte Ihr Gerät innerhalb der Garantiezeit
einen Mangel aufweisen, bitten wir Sie, uns
Ihren Garantieanspruch mitzuteilen.
Die schnellste und komfortabelste Möglichkeit ist die Anmeldung über unser SLI (Service Logistik International) Internet-Service-
portal.
www.sli24.de
Sie können sich dort direkt anmelden und
erhalten alle Informationen zur weiteren Vorgehensweise Ihrer Reklamation. Über einen
persönlichen Zugangscode, der Ihnen direkt
nach Ihrer Anmeldung per E-Mail übermittelt
wird, können Sie den Bearbeitungsablauf
Ihrer Reklamation auf unserem Serviceportal
online verfolgen.
Alternativ können Sie uns den Servicefall per
E-Mail
hotline@clatronic.de
oder per Fax
0 21 52 – 20 06 15 97
mitteilen.
Bitte teilen Sie uns Ihren Namen, Vornamen,
Straße, Hausnummer, PLZ und Wohnort,
Telefon-Nummer, soweit vorhanden, Fax-
Nummer und E-Mail-Adresse mit.
Im Weiteren benötigen wir die Typenbe-
zeichnung des reklamierten Gerätes, eine
kurze Fehlerbeschreibung, das Kaufdatum
und den Händler, bei dem Sie das Neugerät
erworben haben.
21
Page 22

GARANTIE
Nach Prüfung Ihres Garantieanspruches
erhalten Sie von uns einen fertig ausgefüllten
Versandaufkleber. Sie brauchen diesen Aufkleber nur noch auf die Verpackung Ihres gut
verpackten Gerätes zu kleben und das Paket
bei der nächsten Annahmestelle der Deutschen Post / DHL abzugeben. Der Versand
erfolgt für Sie kostenlos an unser Servicecenter bzw. Servicepartner.
Bitte fügen Sie dem Paket eine Kopie Ihres
Kaufbeleges (Kassenbon, Rechnung, Lieferschein) sowie eine kurze Fehlerbeschreibung
bei.
Ohne den Garantienachweis (Kaufbeleg)
kann Ihre Reklamation nicht kostenfrei
bearbeitet werden.
Bitte nehmen Sie in keinem Fall eine unfreie
Einsendung Ihres Gerätes vor. Bei unfreien
Lieferungen entfällt Ihr Anspruch auf Garantieleistungen.
Haben Sie Fragen zur Bedienung, zur Inbetriebnahme oder zum Anschluss? Gern hilft
Ihnen unser Serviceteam weiter.
Sie erreichen uns Mo.- Do. 8:30 – 17:00
Uhr und Fr. 8:30 –14:00 Uhr unter folgender
Rufnummer:
0 21 52 – 20 06 666
Clatronic International GmbH
Industriering Ost 40
D-47906 Kempen/Germany
22
Page 23

CONTENIDO
Instalación .................................................24
Consejos de instalación..............................24
Instalación frontal .......................................24
Instalación de la unidad ..............................24
Extracción de la unidad ..............................25
Instalación trasera ......................................25
Extracción e instalación del panel
frontal ........................................................26
Conexiones electrónicas .........................27
Ubicación de los controles ......................28
Funcionamiento básico ...........................29
Encendido/Apagado ...................................29
Extracción del panel frontal ........................29
Ajuste del sonido ........................................29
Volumen......................................................29
Pantalla.......................................................29
Ecualizador .................................................29
Reinicio .......................................................29
Selección de modo .....................................30
Ajuste del sistema ......................................29
Entrada de audio. .......................................30
Funcionamiento de la radio .....................30
Selección de frecuencia/banda ..................30
Sintonización ..............................................30
Búsqueda y guardado automático ..............30
Búsqueda ...................................................30
Presintonías................................................30
Funcionamiento de ANS .............................30
Funcionamiento de CD / MP3 / WMA. .....31
Selección de modo de CD .......................31
Selección de pista ....................................32
Pausa .......................................................32
Intro de todas las pistas ...........................32
Repetición de pista...................................32
Aleatorio ...................................................32
Extracción de CD......................................32
Función ESP .............................................32
Funciones especiales para cds de
mp3/wma ..................................................32
Soporte de modo de decodicación de
MP3/WMA .................................................33
Consejos para discos CD, CD-R .............33
Funcionamiento de la tarjeta de
memoria.....................................................33
Bluetooth ...................................................34
Preparación para el funcionamiento de
Bluetooth ..................................................34
Sincronización ..........................................34
Conexión ..................................................34
T-Menu .....................................................34
Respuesta manual ...................................35
Efectuar una llamada telefónica ...............35
Transferencia de llamada entre el
teléfono móvil y esta unidad.....................35
Audio Bluetooth (Función A2DP) .............35
Especicaciones ......................................36
Resolución de problemas ........................37
23
Page 24
INSTALACIÓN
Extraiga los tornillos antes de instalar la unidad
Consejos de instalación:
• Seleccione una posición de montaje en
que la unidad no interera con la conducción.
• Conecte todos los cables eléctricos antes
de realizar la instalación nal y compruebe
que funcionan correctamente.
• Utilice únicamente los accesorios sumi-
nistrados para una correcta instalación.
El uso de piezas no autorizadas puede
provocar averías.
• Contacte con su distribuidor si necesita
taladrar oricios o realizar cualquier otra
modicación en el vehículo.
• Instale la unidad en una posición que no
moleste al conductor y no pueda lesionar
a los pasajeros en caso de frenada de
emergencia.
• No instale la unidad en un ángulo superior
a 30°, ya que el rendimiento podría verse
afectado.
• No instale la unidad expuesta a altas
temperaturas, como la luz solar directa o
conductos de calefacción, y evite lugares
sucios, con polvo o que puedan vibrar.
INSTALACIÓN
Esta unidad puede instalarse tanto en posición “frontal” (montaje frontal DIN convencional) o “trasero” (instalación trasera DIN,
utilizando oricios para tornillos de rosca en
los laterales del chasis de la unidad).
Para más información, consulte los siguientes métodos de instalación ilustrados.
EXTRAIGA LOS TORNILLOS ANTES DE
LA INSTALACIÓN
Extraiga los tornillos antes de instalar la unidad.
INSTALACIÓN FRONTAL (Método A) Apertura para la instalación
Instale esta unidad en cualquier salpicadero
con una apertura que tenga las siguientes
dimensiones:
53mm
182mm
30
Instalación de la unidad
En primer lugar, comprueba las conexiones,
y luego instale la unidad de la siguiente manera.
1. El motor debe estar apagado; desco-
necte el cable de la batería del terminal
negativo (-).
2. Desconecte todos los cables y el cable
de antena.
3. Pulse el botón de extracción del panel
frontal y sáquelo (véase “Extracción e
instalación del panel frontal”).
4. Levante la parte superior de la carcasa
exterior y tire hacia fuera para extraerla.
5. Aoje las pestañas de la funda con las
llaves suministradas. Introduzca las llaves todo lo posible (con la muesca hacia
arriba) en las ranuras izquierda y derecha de la funda. Empuje la funda hacia
atrás.
24
Page 25
INSTALACIÓN
Funda
Llave (izquierda)
Carcasa exterior
Panel frontal
Llave
R
(derecha)
6. Instale la funda en la ranura del sal-
picadero y doble las pestañas hacia
atrás con un destornillador. No todas
las pestañas hacen contacto. Doble las
pestañas por detrás del salpicadero para
jar la funda.
Destornillador
Pestañas
Salpicadero
Funda
7. Vuelva a conectar los cables y la antena,
y asegúrese de no doblar los cables.
8. Deslice la unidad dentro de la funda,
hasta que quede ubicada en su sitio.
9. Utilice la banda metálica para jar co-
rrectamente la unidad a la parte posterior. Utilice los componentes suministrados (tuerca hexagonal (M5) y arandela
elástica) para montar la banda metálica
en la parte posterior de la unidad.
Doble la banda metálica si es necesario.
Utilice los componentes suministrados
(tornillo de 5x25 mm y arandela) para
jar la otra parte de la banda metálica
bajo el salpicadero. La banda metálica
se pliega para hacer de conexión de
tierra para la unidad.
Nota: Fije el tornillo de rosca corto a la parte
posterior de la unidad y el tornillo de rosca
largo al salpicadero.
Arandela elástica
Banda metálica
Tornillo
Tornillo
Arandela
Tuerca hexagonal
10. Vuelva a conectar el cable de batería al
terminal negativo (-). Fije la carcasa exterior y el panel frontal (véase “Extracción
e instalación del panel frontal”).
Extracción de la unidad
1. El motor debe estar apagado; desco-
necte el cable de la batería del terminal
negativo (-).
2. Extraiga la banda metálica de la parte
posterior de la unidad (si está instalada).
3. Pulse el botón de extracción del panel
frontal y sáquelo.
4. Levante la parte superior de la carcasa
exterior y tire hacia fuera para extraerla.
5. Introduzca las dos llaves todo lo posible
en las ranuras izquierda y derecha de
la unidad y tire de ella hacia fuera del
salpicadero.
INSTALACIÓN TRASERA (Método B)
Lea atentamente las instrucciones de instalación siguientes si conduce un Nissan o un
Toyota.
Utilice los oricios con la marca T (para
Toyota) o N (para Nissan) para los tornillos
izquierdo y derecho de la unidad para jarla
25
Page 26

INSTALACIÓN
Vista lateral con orificios
a las abrazaderas de montaje estándar de
su vehículo.
para tornillos con las
marcas T y N
Fije la unidad a las abrazaderas de montaje
estándar para la radio. Alinee los oricios de
la abrazadera con los de la unidad y apriete
los tornillos (5x5 mm) en ambos laterales.
Nota: La carcasa exterior, la funda y la banda metálica no se utilizan en el método de
Abrazadera de
montaje estándar
para radio
Tornillo
Tornillo
Salpicadero o consola
instalación B.
EXTRACCIÓN E INSTALACIÓN DEL PANEL FRONTAL
Extracción del panel frontal
1. Pulse el botón de extracción OPEN para
bajar el panel frontal.
2. Eleve ligeramente el panel frontal y tire
primero del lado derecho y, a continuación, del lado izquierdo.
Panel frontal
Colocación del panel frontal
1. En primer lugar, introduzca el lado dere-
cho en la posición adecuada y fíjelo bien.
Lado izquierdo
Funda protectora
Lado izquierdo
Panel frontal
3. Guarde el panel frontal en su funda
Lado derecho
protectora.
Lado derecho
Panel frontal
2. Presione el panel frontal hacia la unidad
principal para jar ambos laterales.
26
Page 27

EXTRACCIÓN E INSTALACIÓN DEL PANEL FRONTAL
Precauciones con el panel frontal
1. No deje caer el panel frontal.
2. No presione los botones ni la pantalla
demasiado fuerte al colocar o extraer el
panel frontal.
3. No toque los contactos del panel frontal
o la unidad principal. Podrían producirse
3. Asegúrese de que el panel frontal quede
bien jado. Si no se instala correctamente,
es posible que los botones no funcionen
bien y que la pantalla no muestre todos los
segmentos. Pulse el botón de extracción
OPEN para instalar de nuevo el panel
frontal.
averías.
4. Quite la suciedad y los objetos extraños
de los contactos con un trapo limpio y
seco.
5. Proteja el panel frontal frente a altas
temperaturas y la luz solar directa.
6. Proteja el panel frontal de sustancias volá-
tiles (gasolina, disolventes o insecticidas).
7. No desmonte el panel frontal.
CONEXIONES ELECTRÓNICAS
Conexiones del panel trasero
A Conector ISO B (altavoces)
B Fusible plano del vehículo (5 A)
C Conector ISO A (fuente de alimentación)
D LINE OUT (salida de preamplicador):
Salida de audio RCA L/R para amplicador
E Toma de antena
Conector ISO A
1. no utilizado
2. no utilizado
3. Alimentación de antena
4. 12 V (ignition plus)
5. no utilizado
6. Continuo positive (memoria)
7. no utilizado
8. Negativo (GND -)
27
Page 28

FUNCIONES
Conector ISO B
Ubicación de los controles
1. Altavoz trasero derecho +
2. Altavoz delantero derecho +
3. Altavoz delantero izquierdo +
4. Altavoz trasero izquierdo +
5. Altavoz trasero derecho -
6. Altavoz delantero derecho -
7. Altavoz delantero izquierdo -
8. Altavoz trasero izquierdo -
1. Sintonizar/buscar, pista
siguiente/anterior
2.
Botón de extracción
3. Micrófono
Aceptar llamada
4.
5. PAIR / MOD
6. T-MENU
7. LCD
8. 5 / DIR-
9. 4 / SHF
10. 1 / PAU
11. Presintonías 1-6
12. 2 / SCN
13. 3 / RPT
14.
MUTE
15. 6 / DIR+
28
Page 29

FUNCIONES
VOL BAS TRE BAL FAD
16. Puerto USB
17. 9 / PTY
18. # / SCAN / CON
19. 0 / DISP
20. AS / PS / * / + / Navi-SCH
21. 7 / AF / MON
22. 8 / EQ / TA
FUNCIONES
Funcionamiento básico
Encendido/Apagado
Pulse
tenga pulsado
Extracción del panel frontal
Pulse
Ajuste del sonido
Pulse brevemente SEL (26) para seleccionar
el modo de ajuste deseado. Pulse varias
veces para pasar por los modos de ajuste:
(Volumen) (Bajos) (Agudos) (Balance) (Atenuador)
Gire la rueda del volumen (26) en el sentido
de las agujas del reloj o al revés para establecer la calidad de sonido deseada.
AJUSTE DEL SISTEMA
Mantenga pulsado SEL (26) para acceder al
modo de ajuste del sistema. Pulse SEL (26)
para seleccionar el elemento a modicar y
gire la rueda del volumen (26) para cambiar
el ajuste.
1) BEEP: ON/OFF
2) Pantalla P-VOL
3) AREA EUR/USA
4) Modo de hora: Formato de 24 horas/12
(14) para encender la unidad. Man-
(14) para apagar la unidad.
(2) para extraer el panel frontal.
Pulse este botón para activar /desactivar
el tono de los botones.
Preselecciona el ajuste de volumen para
la reproducción.
Seleccione la banda de Europa o EEUU
con la rueda del volumen (26).
horas
23. AUX IN
24.
25. Botón de reinicio
26. Volumen, SEL / MENU
27. Ranura de tarjeta
28. Unidad de CD
29. Expulsar
29
Finalizar llamada / BND / LOUD /
CLR
Seleccione entre el formato de 24 horas y
12 horas para la pantalla de hora.
5) PCLK ON/OFF
Active o desactive la pantalla de hora en
el modo de espera con la rueda del volumen (26).
Silencio
Mantenga pulsado MUTE (14) para silenciar el
sonido; aparecerá “MUTE” en la pantalla. Pulse MUTE (14) de nuevo para activar el sonido.
Volumen
Mantenga pulsado LOUD (24) para activar la
función de volumen alto; aparecerá “LOUD”
en la pantalla. Mantenga pulsado de nuevo
este botón para desactivar la función; “LOUD”
desaparecerá.
Pantalla
Pulse DISP (19) para acceder al modo de
pantalla.
Ecualizador
Pulse EQ (22) para seleccionar el modo de
sonido deseado. Hay 5 modos disponibles:
Reinicio
Utilice un bolígrafo o un objeto similar para
pulsar Reinicio (25). Pulse Reinicio en las
siguientes situaciones:
Page 30

FUNCIONES
- tras la instalación inicial de la unidad
- tras conectar todos los cables
- en caso de avería de los botones
- en caso de que aparezcan errores.
Nota: La unidad no funcionará durante unos
instantes tras pulsar el botón Reinicio (25).
Utilice alcohol isopropílico y algodón para
limpiar los contactos del panel frontal.
Selección de modo
Pulse brevemente MOD (5) para seleccionar
entre Radio, CD, ESB, CARD, AUX y BT Audio.
Entrada de audio
Puede conectar un reproductor de audio
portátil a través de AUX IN (23) en el panel
frontal. Pulse MOD (5) tras la conexión para
seleccionar el modo AUX IN.
FUNCIONAMIENTO DE LA RADIO
Selección de frecuencia/banda
Pulse brevemente BND (24) en el modo de
radio para seleccionar la banda y la frecuencia deseadas. Pulse varias veces para pasar
por las bandas:
FM1→FM2→FM3→AM →FM1…
Sintonización
Pulse brevemente (1) para activar la
búsqueda automática. Manténgalo pulsado
hasta que aparezca “Manual…”; ahora se
encuentra en el modo manual. La unidad
volverá al modo de búsqueda automática y
aparecerá “AUTO…” en la pantalla si no se
pulsa ningún botón durante unos segundos.
Búsqueda y guardado automático
- Función de guardado automático. Mantenga
pulsado AS/PS (20), aparecerá “SEARCH”.
La radio busca las frecuencias y mide la
intensidad de la señal durante un ciclo
de búsqueda. Las 6 emisoras con mayor
intensidad se guardarán en la memoria de
presintonías.
- Pulse AS/PS (20) para escuchar una emisora presintonizada. Aparecerá el número
de presintonía correspondiente P1~P6 en
la pantalla.
BÚSQUEDA
Pulse SCAN (18) para acceder al modo de
búsqueda y buscar una emisora con señal
potente. La unidad reproduce la emisora y
la frecuencia parpadea cinco veces en la
pantalla.
Presintonías
Pulse uno de los números (1-6) para seleccionar una emisora presintonizada. Mantenga pulsado el número (hasta que suene un
‘bip’) para guardar la emisora actual en el
número de presintonía seleccionado.
Funcionamiento de ANS (Anuncio
de nombre de emisora)
- Para establecer el modo ANS: Pulse AF
(21) para activar/desactivar el modo ANS.
Aparecerá “ANS” al activarlo.
- Pulse PTY (17) para acceder al modo
de selección PTY; aparecerá el nombre
de la emisora. Gire la rueda del volumen
(26) para seleccionar una emisora o pulse
(1) para buscar el canal deseado.
1. Mantenga pulsado PTY (8/9) para acceder
al menú de ANS. En este menú, utilice la
rueda del volumen (26) para seleccionar
la emisora y (1) para sintonizarla.
• TA-SEEK: BUSCAR/ALARMA
a) Modo TA SEEK:
Si una nueva emisora no muestra infor-
mación de TP durante más de 5 segundos, la radio sintoniza automáticamente
la siguiente emisora con una PI distinta,
pero con la misma información de TP. Si
la emisora actual pierde temporalmente
la información de TP y esta emisora se establece en RETUNE SHORT (corta) o RETUNE LONG (larga), la radio sintoniza la
siguiente emisora con la misma Pl. Si no
se encuentra ninguna emisora de Pl tras
30
Page 31

FUNCIONES
un ciclo de sintonización, la radio sintoniza
la siguiente emisora con información de
TP.
Nota: En el modo TA SEEK, la emisora
actual se puede sustituir por una emisora
diferente, ya que la radio busca una emisora de TP tan pronto como la señal de
campo o la potencia de señal se vuelva
débil o la emisora actual no tenga señal de
TP (la TP tiene más prioridad que la PI).
b) Modo TA ALARM:
Este modo desactiva la sintonización
automática. Suena un tono ‘bip’ dual largo
(ALARMA). Se guarda la emisora actual en
este modo (la PI tiene más prioridad que la
TP). Los tonos ‘bip’ suenan si una nueva
emisora no muestra información de TP en
más de 5 segundos. Se la emisora actual
pierde temporalmente la información de TP,
el tono ‘bip’ se detiene. “PI SEEK” queda
anulado si la nueva emisora no tiene señal
de ANS.
• MASK: DPI/ALL
Modo MASK DPI: Marca solo AF con Pl
distinto (DPI). Modo MASK ALL: Marca
todos los AF con Pl distinto y sin señal de
ANS con una potencia de campo alta.
• REGION: ON/OFF
Modo Región ON: La función de búsqueda
de AF o PI se implementa para todas las
emisoras con el mismo código de PI que
la emisora actual.
Modo Región OFF: El código regional del
código de Pl se ignora cuando se cambian
las AF o se implementa PI SEEK.
• Volumen de TA: El volumen predetermi-
nado de los TA es 18, y se puede variar de
0 a 40.
• RETUNE: LONG/SHORT
Si la emisora actual pierde la información
de Pl durante un tiempo determinado
(establecido para Resintonización corta
(30 segundos) o Resintonización larga
(90 segundos), la radio busca la siguiente
emisora con la misma PI.
• Anuncios de tráco:
Utilice el botón TA (22) de la siguiente
manera:
Manténgalo pulsado para activar o desactivar el modo TA.
Modo TA activado y emisión de anuncios
de tráco:
En los modos CD (MP3), AUX IN o IPOD,
la unidad se pone automáticamente en el
modo de radio. Sintoniza temporalmente
una emisora vinculada con EON si se detecta un anuncio de tráco de EON en una
emisora distinta. El volumen se aumenta si
está establecido por debajo del nivel de la
emisora de noticias. El volumen se disminuye si está establecido demasiado alto.
Pulse el botón para desactivar temporal-
mente la función de TA. La función no se
desactiva permanentemente.
PI: Identicación de programa
PS: Servicio de programa
AF: Frecuencias alternativas
TP: Programa de tráco
TA: Anuncio de tráco
EON: Otras redes mejoradas
PTY: Tipo de programa
FUNCIONAMIENTO DE CD / MP3 /
WMA
• Selección de modo de CD
Sin un CD cargado:
Introduzca con cuidado un CD/MP3/WMA
con la etiqueta mirando hacia arriba en la
unidad de CD hasta que note una ligera
resistencia. El CD se introduce automáticamente. Se inicia la reproducción de CD/MP3/
WMA.
Con un CD/MP3/WMA ya cargado en la unidad de CD:
Pulse brevemente MOD (5).
31
Page 32

FUNCIONES
• Selección de pista
Pulse (1) para seleccionar la pista
anterior/siguiente. Aparece el número de
pista en la pantalla.
Mantenga pulsado
avanzar rápidamente la pista. Suelte el botón
respectivo para que la unidad vuelva a la
reproducción normal.
• PAUSA
Pulse PAU (10) para poner la reproducción
en pausa. Aparece “PAUSE“ en la pantalla.
Vuelva a pulsar el botón para reanudar la
reproducción.
• Intro de todas las pistas
Pulse SCN (12) para escuchar los primeros
segundos de cada pista; aparece “SCAN” en
la pantalla. Vuelva a pulsar para reproducir
toda la pista; desaparecerá “SCAN” de la
pantalla.
Al escuchar CD MP3/WMA, pulse SCN (12)
para escuchar los primeros segundos de
cada pista. Aparece “D-SCAN” en la pantalla.
Vuelva a pulsar para salir de este modo.
• Repetición de pista
Pulse RPT (13) para repetir una y otra vez
la pista actual; aparecerá “REPEAT” en la
pantalla. Vuelva a pulsar para salir del modo
de repetición; “S-RPT” se apaga.
Al escuchar CDs de MP3/WMA, mantenga
pulsado RPT (13) para repetir todas las pistas; aparece “S-RPT” en la pantalla. Vuelva
a pulsar para salir de este modo.
• Aleatorio
Pulse SHF (9) para reproducir todas las
pistas en orden aleatorio. Aparece “S-SHF“
en la pantalla. Vuelva a pulsar para salir de
este modo; “S-SHF” se apaga. Al escuchar
CDs de MP3/WMA, mantenga pulsado SHF
(9) para reproducir todas las pistas en orden
aleatorio. Aparece “S-SHF“ en la pantalla.
Vuelva a pulsar para salir de este modo.
(1) para rebobinar/
• Extracción de CD
Pulse el botón (29) para detener la reproducción de CD/MP3/WMA y pulse (28) para
extraer el CD.
• Función ESP (opcional)
La unidad solo puede reproducir CD y MP3
durante un máximo de 70 segundos sin saltar.
FUNCIONES ESPECIALES PARA CDS DE
MP3/WMA
1. Selección directa ARRIBA/ABAJO
Pulse DIR- (8) o DIR+ (15) para navegar
hacia arriba o abajo. Estos botones no son
válidos si no hay ningún directorio guardado en su CD de MP3/WMA.
2. Selección de pista
• Selección directa de pista
Mantenga pulsado AS / PS (D-AUD) (20).
En los CDs de audio digitales, aparece
“Selección directa de pista” en la pantalla.
La unidad busca las pistas con los siguientes botones numéricos:
M1-M6, MOD (5), DSP (0),
TUNE/SEEK/TRACK DOWN (8),
TUNE/SEEK/TRACK UP (9)
• Búsqueda por nombre de carpeta o de
archivo
Pulse AS / PS (D-AUD) (20) dos veces.
Aparece “Buscando directorio o nombre de
archivo” para CDs de audio digitales. La
unidad busca archivos y carpetas.
Proceda de la siguiente manera:
- Utilice los botones
correspondientes para las letras A a
Z, espacio, 0 a 9, _, -, +.
- Tras cada entrada, pulse SEL (26).
- Pulse BND/LOU/ENT (24) para iniciar la
búsqueda de pistas. ( “ ) aparece en la
pantalla si la pista seleccionada está en
una carpeta.
- Pulse TUNE/SEEK/TRACK UP/DOWN
para todas las pistas de esta carpeta y
seleccione la pista.
32
Page 33

FUNCIONES
- Pulse BND/LOU/ENT para conrmar e
iniciar la reproducción.
- Repita los pasos anteriores si las pistas
nuevas seleccionadas están en una carpeta.
3. MOSTRAR INFORMACIÓN DE ID3
Pulse ID3 (20) para mostrar etiquetas ID3
(si están disponibles: título, artista y otros
datos)
(SOLO PARA LA VERSIÓN ID3 DE MP3)
SOPORTE de modo de decodicación
de MP3/WMA
La unidad admite la decodicación de
MP3 y WMA (Windows Media Audio),
como se describe a continuación.
Estándar
MPEG1
Audio Layer
3 (44,1kHz)
Windows
Media Audio
(44,1kHz)
Tasa de bits
(kbps)
32, 48, 64,
96,128, 192,
256,320
64, 96, 128,
192
Modo admi-
tido
Estéreo
Estéreo
CONSEJOS PARA CD
A. Consejos para CDs:
1. Utilice solo CDs estándar para evitar dañar
la unidad. Utilice únicamente CDs redondos que no estén dañados o combados.
2. No ponga pegatinas en los CDs, pues
pueden afectar al funcionamiento.
3. Los CDs sucios, con polvo, arañados o
combados pueden provocar un funcionamiento incorrecto.
2. La unidad no puede reproducir discos
CD-R o CD-RW que no tengan la sesión
nalizada (consulte el manual de usuario de su grabadora de CD-R/CD-RW o
el software de CD-R/CD-RW para más
información)
3. Dependiendo del modo de grabación,
la condición del CD y los accesorios de
grabación, algunos discos CD-R/CD-RW
no se pueden reproducir en esta unidad
(véase *1).
*1: Tenga en cuenta las siguientes recomen-
daciones para una reproducción able:
a: Utilice discos CD-RW con una velocidad
de 1x a 4x y grabe con una velocidad de
1x a 2x.
b. Utilice discos CD-R con una velocidad
de 1x a 8x y grabe con una velocidad de
1x a 2x.
c. No reproduzca discos CD-RW que hayan
sido regrabados 5 o más veces.
C. Consejos para archivos MP3 (solo versión de MP3):
1. Asegúrese de que el nombre de los
archivos MP3 acabe en “.MP3”.
2. La unidad no puede leer archivos que
no sean MP3, aunque su extensión sea
“.MP3”.
Funcionamiento de la tarjeta de memoria
Algunos modelos incluyen una interfaz para
tarjetas de memoria. La ranura para la tarjeta
se encuentra en el panel frontal.
INTERFAZ PARA SD/MMC
B. Consejos para discos CD-R (Grabables)
y CD-RW (Regrabables)
1. Utilice únicamente CDs con los siguientes logos de reproducción:
La unidad busca archivos MP3 y WMA y los
reproduce automáticamente tras insertar una
tarjeta de memoria. El funcionamiento es
similar al de los archivos MP3 (véase párrafo
33
Page 34

FUNCIONES
anterior). En un modo distinto, pulse MOD (5)
para seleccionar el modo de tarjeta. No introduzca su tarjeta de memoria para reproducir
archivos si guarda datos importantes en la
tarjeta.
BLUETOOTH
• Preparación para el funcionamiento de
Bluetooth
(i) Compruebe si su teléfono móvil es com-
patible con Bluetooth antes de acceder a
la función.
(ii) Cada teléfono móvil cuenta con carac-
terísticas de transmisión de Bluetooth
distintas. Para una calidad de transmisión optima, recomendamos una distancia no superior a 3 m entre la unidad y
su teléfono móvil. No coloque objetos de
metal entre la unidad y su teléfono móvil.
• SINCRONIZACIÓN
1) Desde cualquier modo, mantenga pulsa-
do PAIR (MOD) (5) durante 5 segundos;
aparecerá “Pairing…” en la pantalla.
2) Acceda al menú de características de
Bluetooth de su teléfono móvil (consulte el
funcionamiento en el manual de su teléfono móvil).
3) En la lista de su teléfono aparecerá “CarB”
Seleccione este dispositivo e introduzca la
contraseña “0000”.
4) Una vez realizada la sincronización, apa-
recerá “CONN OK!” en la pantalla.
5) Si la sincronización no es correcta, apare-
cerá “END”. Pruebe a mantener pulsado
PAIR (10).
Nota: Durante la sincronización, solo funcionarán los botones RELEASE (2), VOLUME
(26) y MUTE (14). El resto de botones no
funcionará. Durante la sincronización, pulse
PAIR (5) para cancelar la operación.
CONEXIÓN
La unidad se reconecta automáticamente.
Pulse brevemente
tomáticamente con su teléfono móvil (Nota:
(4) para reconectar au-
el teléfono móvil debe estar sincronizado).
En las siguientes condiciones, puede realizar también la sincronización manualmente;
mantenga pulsado CON (18); aparecerá
“Conn OK!” en la pantalla. Aparecerá “Connected! OK!“ y sonará un tono ‘bip’ si la
nueva conexión es correcta.
1) Cuando el teléfono móvil está fuera de
alcance, la conexión se pierde. Deberá
reconectarlo posteriormente.
2) Deberá reconectar el teléfono móvil si
éste se encuentra fuera de alcance y
tiene una llamada entrante.
3) La conexión se pierde al pulsar
(2) para extraer el panel frontal.
Deberá reconectar tras volver a colocar
el panel frontal.
4) Deberá reconectar cuando apague el
teléfono móvil.
T-MENU
Pulse brevemente T-MENU (6) tras una sincronización correcta para acceder al menú
del teléfono. Mantenga pulsado o pulse los
botones (1) para navegar por las funciones
del menú: PRE NUM/ RECELVED/ DIALED/
MLSSED/ MANU ANS/ TALK.
Puede encontrar más información en las
instrucciones siguientes.
NOTA:
1) RRE NUM: Puede guardar 10 números
en el modo PRE NUM. Pulse VOLUME
(26) para acceder al modo de números.
Ahora pulse SEL para introducir el número de teléfono. Pulse nuevamente SEL
para guardar el número en la agenda del
teléfono. Pulse SEL (26) para acceder al
número de teléfono.
2) Mostrar el último número marcado.
3) Mostrar las llamadas perdidas.
RESPUESTA MANUAL
Con el modo de respuesta automática activado, aparece en la pantalla “ANSWER? +
número de teléfono”. La unidad acepta au-
34
Page 35

FUNCIONES
tomáticamente la llamada. Con el modo de
respuesta automática desactivado, aparece
en la pantalla “ANSWER? + número de teléfono”, pero puede pulsar
la llamada o
EFECTUAR UNA LLAMADA TELEFÓNICA
1) Puede efectuar una llamada telefónica
de distintas maneras mediante las teclas
de método abreviado, la lista de llamadas recibidas, la lista de llamadas realizadas o la agenda del teléfono (teléfono
móvil o tarjeta SIM). Puede ver más
información en el capítulo T-MENU.
Introducción manual de números de teléfono
Pulse
botones 0~9, *, # para introducir el número
de teléfono que desee (Nota: pulse * para
introducir “*”. Manténgalo pulsado para introducir “+”.) Ahora, vuelva a pulsar (4) de
nuevo para marcar el número.
Nota: Pulse CLR (24) para borrar el último
número. Mantenga pulsado CLR (24) para
borrar todos los números introducidos.
(4) para ver “CALL__”. Pulse los
(24) para rechazarla.
(4) para aceptar
llamada desde el teléfono móvil hasta la
unidad, o viceversa. Nota:
1) Al redirigir una llamada entrante a su
teléfono móvil, el sonido se silencia
automáticamente si ha sido desactivado
previamente.
2) Las llamadas salientes no se pueden
redirigir si el interlocutor no las acepta.
AUDIO BLUETOOTH (FUNCIÓN A2DP)
Esta unidad es compatible con audio Bluetooth. Puede redirigir la reproducción de
audio a esta unidad al reproducir archivos de
audio en su teléfono móvil conectado. Pulse
M1, M2, M3 para controlar la reproducción
(Pausa/Reproducir/Detener) (las funciones
de los botones dependen del modelo de su
teléfono móvil).
Pulse
(las funciones de los botones dependen del
modelo de su teléfono móvil).
Nota: No se pueden realizar llamadas duran-
te la reproducción de música.
(1) para seleccionar la pista
TRANSFERENCIA DE LLAMADA ENTRE
EL TELÉFONO MÓVIL Y ESTA UNIDAD
Durante su conversación telefónica, mantenga pulsado T-MENU (6) para redirigir la
35
Page 36

ESPECIFICACIONES
GENERAL
Requisitos de alimentación : CC 12V, negativo a tierra
Dimensiones del chasis : 178 (An) x 160 (Pr) x 50 (Al) mm
Controles de tono
Bajos (@ 100Hz) : ±10 dB
Agudos (@ 10kHz) : ±10 dB
Salida de potencia máxima : 4 x 40 W
Consumo de corriente : 5 A(max)
REPRODUCTOR DE CD
Relación señal a ruido : > 55 dB
Separación de canales : > 50 dB
Respuesta de frecuencia : 40Hz – 18 kHz
RADIO
Para 2 bandas de Europa
FM
Rango de frecuencia 87,5 – 108 MHz
IF 10,7 MHz
Sensibilidad
(S/N=30dB) 10 dBu
Separación de estéreo >25dB
AM
Rango de frecuencia 522 a 1620 kHz
IF 450 kHz
Sensibilidad (S/N=20dB) 36 dBu
36
Page 37

RESOLUCIÓN DE PROBLEMAS
En primer lugar, compruebe que todos los cables estén bien conectados. Utilice esta tabla
para solucionar los problemas. Contacte con su distribuidor si el problema persiste.
Síntoma Incidencia Solución
Sin alimentación El arranque está apagado. Encienda el arranque.
El fusible está fundido. Sustituya el fusible.
El CD no se puede cargar o
es expulsado
Sin sonido El volumen está al mínimo. Ponga el volumen al nivel
Sonido distorsionado El ángulo de instalación es
Los botones no responden El microordenador integrado
La radio no funciona El cable de antena no está
La búsqueda automática no
funciona.
Ya hay CD un CD cargado. Extraiga el disco e introduzca
un nuevo CD.
El CD se ha insertado del
revés.
El CD está muy sucio o arañado. Limpie el CD o cargue un CD
La temperatura está demasiado alta.
Condensación. Deje la unidad apagada
El cable no está conectado
correctamente.
superior a 30 grados.
El CD está muy sucio o araña-
do.
no funciona bien.
conectado.
La señal es demasiado débil. Seleccione la emisora ma-
Introduzca el disco con la
etiqueta mirando hacia arriba.
distinto.
Deje que el coche se enfríe
hasta que la temperatura
ambiente alcance un grado
normal.
aproximadamente 1 hora y
vuelva a intentarlo después.
deseado.
Compruebe el cableado.
El ángulo debe ser inferior a
30 grados.
Limpie el CD o cargue un CD
distinto.
Pulse RESET. El panel frontal
no está colocado adecuadamente.
Conecte el cable de antena.
nualmente.
37
Page 38

ÍNDICE
Instalação ..................................................39
Dicas de Instalação ....................................39
Instalação Frontal .......................................39
Instalar Aparelho.........................................39
Remover o Aparelho ...................................40
Instalação Traseira .....................................40
Remover e Instalar o Painel Frontal .......41
Ligações Eléctricas ..................................42
Localização dos Controlos ......................43
Funcionamento Básico ............................44
Ligar/Desligar .............................................44
Soltar o Painel frontal .................................44
Denições de Som .....................................44
Volume........................................................44
Visor ...........................................................44
Equalizador.................................................44
Reiniciar......................................................44
Selecção de Modo ......................................45
Denições do Sistema ................................44
Entrada de Áudio. .......................................45
Funcionamento do rádio ..........................45
Seleccionar a Frequência/Banda ...............45
Sintonização ...............................................45
Pesquisar & Guardar Automático ...............45
Procura .......................................................45
Predenições ..............................................45
Funcionamento ANS...................................45
Funcionamento CD/MP3/WMA ................46
Seleccionar Modo CD ..............................46
Seleccionar Faixa.....................................46
Pausa .......................................................47
Intro Todas as Faixas ...............................47
Repetir Faixa ............................................47
Misturar ....................................................47
Ejectar CD ................................................47
Função ESP .............................................47
Funções Especiais para CDs
MP3/WMA .................................................47
Compatível com Modo Descodicação
MP3/WMA .................................................48
Dicas de Disco de CDs, CD-R..................48
Funcionamento do Cartão de Memória ....48
Bluetooth ...................................................49
Preparar Funcionamento Bluetooth .........49
Emparelhar...............................................49
Ligar .........................................................49
Menu T .....................................................49
Atender Manual ........................................49
Fazer Uma Chamada ...............................49
Alterar a Chamada Entre o Telemóvel e
Este Aparelho ...........................................50
Áudio Bluetooth (Função A2DP) ..............50
Especicações Técnicas .........................51
Resolução de problemas .........................52
38
Page 39

INSTALAÇÃO
Remova os parafusos antes de instalar o aparelho
Dicas:
• Seleccione uma posição de montagem em
que o aparelho não interra com a operação normal de condução
• Ligue todos os cabos eléctricos antes da
instalação nal e verique o correcto funcionamento.
• Utilize apenas os acessórios fornecidos
para a instalação correcta. A utilização de
peças não autorizadas pode causar maus
funcionamentos.
• Contacte o seu concessionário se for
necessário efectuar furações ou outras
modicações ao veículo.
• Instale o aparelho numa posição em que
não interra com o condutor e os passageiros e onde não provoque ferimentos
durante uma travagem de emergência.
• Não instale o aparelho num ângulo superior a 30°; pois pode provocar perda de
desempenho.
30
• Não instale o aparelho perto de temperaturas elevadas, como com sol directo
ou entradas do aquecimento, nem em
posições sujeitas a poeiras, sujidades ou
vibrações.
INSTALAÇÃO
Este aparelho pode ser instalado correctamente quer pela “frente” (montagem frontal
DIN convencional) ou por “trás” (montagem
traseira DIN, com furação na lateral da estrutura do aparelho).
Para detalhes, veja a ilustração dos seguintes métodos de instalação.
REMOVA OS PARAFUSOS ANTES DA
INSTALAÇÃO
Por favor, remova os parafusos antes de
instalar o aparelho.
INSTALAÇÃO FRONTAL (Método A)
Abertura da Instalação
Instale este aparelho em qualquer tablier
com uma ranhura de abertura com as seguintes dimensões:
53mm
182mm
Instalar Aparelho
Verique primeiro as ligações e depois instale o aparelho do seguinte modo.
1. O motor deve estar desligado; desligue o
cabo da bateria no terminal negativo (-).
2. Desligue todos os cabos e o cabo da
antena.
3. Prima o botão soltar no painel dianteiro
e remova o painel (consulte “Remover e
Instalar o Painel Frontal”).
4. Eleve a parte superior da estrutura exte-
rior e puxe para fora para remover.
5. Desaperte as abas na manga com as
chaves fornecidas. Insira as chaves o
mais afastado possível (para cima) nas
ranhuras esquerdas e direitas da manga.
Empurre a manga para trás.
39
Page 40

INSTALAÇÃO
Chave L (esquerda)
Manga
Armação exterior
Painel frontal
Chave
R (direita)
6. Instale a manga na ranhura do tablier e
dobre as abas para trás com uma chave
de fendas. Nem todas as abas têm contacto. Dobre as abas por trás do tablier
para xar a manga na posição.
Chave de fendas
Abas
Tablier
Manga
7. Volte a ligar os cabos e a antena e
certique-se que não pressione nenhuns
cabos.
8. Deslize o aparelho para a manga até
xar na posição.
9. Utilize a banda de metal para xar
melhor o aparelho na parte traseira.
Utilize os componentes fornecidos (porca
sextavada (M5) e grampo de mola) para
montar a banda de metal na parte traseira do aparelho.
Dobre a banda de metal, caso seja necessário. Utilize os componentes fornecidos (parafuso de 5x25 mm e anilha) para
xar o outro lado da banda de metal por
baixo do tablier. A banda de metal dobrase para cima, como ligação terra para o
aparelho.
Nota: Fixe o parafuso de montagem de
rosca curta na parte traseira do aparelho e o
parafuso de rosca longa no tablier.
Grampos de mola
Banda de metal
Parafuso de montagem
Parafuso
Anilha
Porca sextavada
10. Volte a ligar o cabo da bateria ao termi-
nal negative (-). Fixe a armação exterior
e volte a colocar o painel frontal (consulte
“Remover e Instalar o Painel Frontal”).
Remover o Aparelho
1. O motor deve estar desligado; desligue o
cabo da bateria no terminal negativo (-).
2. Remova a banda de metal da parte tra-
seira do aparelho (se estiver instalada).
3. Prima o botão soltar no painel frontal e
remova o painel.
4. Eleve a parte superior da estrutura exte-
rior e puxe para fora para remover.
5. Insira as duas chaves o mais afastado
possível nas ranhuras esquerdas e direitas
do aparelho e puxe para fora do tablier.
INSTALAÇÃO TRASEIRA
(Método B)
Observe as seguintes instruções de instalação no caso de conduzir um Nissan ou um
Toyota.
40
Page 41

INSTALAÇÃO
Vista lateral com orifícios
Tablier ou consola
Utilize os orifícios marcados T (para Toyota) ou N (para Nissan) para os parafusos
esquerdos e direito do aparelho, para xar
aos suportes de montagem de série do seu
Fixe o aparelho aos suportes de montagem
de série para o rádio. Alinhe os orifícios no
suporte com os orifícios no aparelho e aperte
os parafusos (5x5 mm) de ambos os lados.
veículo.
Nota: A estrutura exterior, a manga e a banda de metal não são utilizadas no método B
de instalação.
Suporte de
montagem de
série para rádio
Parafuso
para parafusos com
marcações T e N
Parafuso
REMOVER E INSTALAR O PAINEL FRONTAL
Remover o Painel Frontal
1. Prima o botão para soltar OPEN para
remover o painel frontal.
3. Guarde o painel frontal na caixa de pro-
tecção fornecida.
Caixa de protecção
2. Levante ligeiramente o painel frontal e
puxe primeiro o lado direito e depois o
lado esquerdo para fora.
Lado esquerdo
Painel frontal
Lado direito
Painel frontal
Inserir Painel Frontal
1. Insira primeiro o lado direito na posição
correcta e deixe xar na posição.
Lado esquerdo
Lado direito
Painel frontal
2. Pressione o painel frontal para o apare-
lho principal, para xar ambos os lados
na posição correcta.
41
Page 42

REMOVER E INSTALAR O PAINEL FRONTAL
Cuidados com o Painel Frontal
1. Não deixe cair o painel frontal.
2. Não pressione os botões com demasia-
da força, nem o visor quanto coloca ou
remove o painel frontal.
3. Não toque nos contactos do painel fron-
tal ou do aparelho principal. Isto pode
3. Certique-se que o painel frontal xa
correctamente na posição. Se o painel
frontal não estiver colocado correctamente, os botões podem funcionar
incorrectamente e o visor não apresenta
todos os segmentos. Prima o botão para
soltar OPEN para voltar a inserir o painel
frontal.
provocar anomalias.
4. Remova o lixo e objectos estranhos dos
contactos com um pano limpo e seco.
5. Proteja o painel frontal de temperaturas
elevadas e de sol directo.
6. Proteja o painel frontal de substâncias
voláteis (por ex. gasolina, solventes e
insecticidas).
7. Não desmonte o painel frontal.
LIGAÇÕES ELÉCTRICAS
Ligações do Painel traseiro
A Conector ISO B (colunas)
B Fusível plano do veículo (5 A)
C Conector ISO A (fonte de alimentação)
D LINE OUT (saída pré-amp):
Saída áudio RCA L/R para amplicador
E Entrada para antena
Conector ISO A
1. não utilizado
2. não utilizado
3. Energia da antena
4. 12V (ligação da ignição)
5. não utilizado
6. Contínuo mais (memória)
7. não utilizado
8. Menos (GND -)
42
Page 43

LIGAÇÕES ELÉCTRICAS
Conector ISO B
FUNÇÕES
Localização dos Controlos
1. Coluna traseira direita +
2. Coluna dianteira direita +
3. Coluna dianteira esquerda +
4. Coluna traseira esquerda +
5. Coluna traseira direita -
6. Coluna dianteira direita -
7. Coluna dianteira esquerda -
8. Coluna traseira esquerda -
1. Sintonizar/pesquisar, subir/descer
faixa
2.
Botão soltar
3. Microfone
Aceitar chamada
4.
5. PAIR / MOD
6. T-MENU
7. LCD
8. 5 / DIR-
9. 4 / SHF
10. 1 / PAU
11. 1-6 Predenições
12. 2 / SCN
13. 3 / RPT
14.
MUTE
15. 6 / DIR+
43
Page 44

FUNÇÕES
VOL BAS TRE BAL FAD
16. Porta USB
17. 9 / PTY
18. # / SCAN / CON
19. 0 / DISP
20. AS / PS / * / + / Navi-SCH
21. 7 / AF / MON
22. 8 / EQ / TA
Funcionamento Básico
Ligar/Desligar
Prima
nha premido
(14) para ligar o aparelho. Mante-
(14) para desligar o aparelho.
Soltar o Painel frontal
Prima
(2) para soltar o painel frontal.
Denições de Som
Prima por instantes SEL (26) para seleccionar modo de conguração pretendido. Prima
repetidamente para percorrer os modos de
conguração:
(Volume) (Baixo) (Agudo) (Balanço) (Desvanecer)
Rode o botão volume (26) para a direita ou
para a esquerda para denir a qualidade de
som pretendida.
DEFINIÇÕES DO SISTEMA
Mantenha premido SEL (26) para aceder ao
modo de conguração do sistema. Prima
SEL (26) para seleccionar o item a alterar
e rode o botão volume (26) para alterar a
conguração.
1) BEEP: ON/OFF
Prima o botão para activar/desactivar o
tom bip do botão.
2) Visor P-VOL
Pré-seleccione a conguração de volume
para reprodução.
3) AREA EUR/USA
Seleccione a banda Europa ou EUA com
o botão volume (26).
4) Modo de hora: Formato de 24 horas/
12 horas
23. AUX IN
24.
Terminar chamada / BND / LOUD /
CLR
25. Botão reiniciar
26. Volume, SEL / MENU
27. Entrada para cartão
28. Leitor de CD
29. Ejectar
Seleccione entre o formato de 24 horas
ou 12 horas para exibir a hora.
5) PCLK ON/OFF
Activar/desactivar a exibição da hora no
modo standby com o botão volume (26).
Mudo
Mantenha premido MUTE (14) para silenciar
o som; “MUTE” é apresentado. Prima novamente MUTE (14) para devolver o som.
Volume
Mantenha premido LOUD (24) para activar a
função de alto; “LOUD” é apresentado. Mantenha premido novamente para desactivar a
função; “LOUD” desliga-se.
Visor
Prima DISP (19) para aceder ao modo de
exibição.
Equalizador
Prima EQ (22) para seleccionar o cenário de
som pretendido. Estão disponíveis 5 modos:
Reiniciar
Utilize o bico de uma caneta ou um objecto
semelhante para premir Reset (25). Prima
Reset pelos seguintes motivos:
- após a instalação inicial do aparelho, depois de ligar todos os cabos.
- no caso de anomalia dos botões
- no caso de serem exibidas mensagens de
erro.
44
Page 45

FUNÇÕES
Nota: O aparelho não funciona durante
alguns instantes depois de premir o botão
Reset (25). Utilize apenas álcool isopropílico
e um cotonete para limpar os contactos do
painel frontal.
Selecção de Modo
Prima por instantes MOD (5) para seleccionar entre Radio, CD, ESB, CARD, AUX e BT
Audio.
Entrada de Áudio
Pode ligar um leitor áudio portátil através de
AUX IN (23) no painel frontal. Prima MOD (5)
depois da ligação, para seleccionar o modo
AUX IN.
FUNCIONAMENTO DO RÁDIO
Seleccionar a Frequência/Banda
No modo rádio, prima por instantes BND (24)
para seleccionar a banda de frequência pretendida. Prima repetidamente para percorrer
as bandas:
FM1→FM2→FM3→AM →FM1…
Sintonização
Prima por instantes (1) para activar
a busca automática. Mantenha premido até
“Manual…” ser apresentado; está agora no
modo manual. O aparelho volta ao modo de
busca automática e “AUTO…” é apresentado, se não premir nenhum botão durante
alguns segundos.
Pesquisar & Guardar Automático
- Função guardar automático.
Mantenha premido AS/PS (20), “SEARCH”
é apresentado. O rádio pesquisa as frequências e mede a força do sinal durante
o ciclo de busca. As 6 estações mais fortes
são guardadas na memória predenida.
- Prima por instantes AS/PS (20) para chamar
uma estação predenida. O número predenido correspondente P1~P6 é apresentado.
PROCURA
Prima SCAN (18) para aceder ao modo de
busca e pesquisar uma estação forte. O
aparelho reproduz a estação e a frequência
pisca cinco vezes no visor.
Predenições
Prima um dos botões numéricos (1-6) para
aceder à estação predenida. Mantenha premido (até ouvir um segundo bip) para guardar a estação actual no número predenido
seleccionado.
Operação ANS (Anúncio do Nome
da Estação)
- Denir o modo ANS: Prima por instantes
AF (21) para activar/desactivar o modo
ANS. “ANS” é apresentado, se estiver
activado.
- Prima PTY (17) para aceder a PTY seleccione o modo; o nome da estação é apresentado. Rode o botão volume (26) para
seleccionar uma estação ou prima
(1) para encontrar o canal pretendido.
1. Mantenha premido PTY (8/9) para aceder
ao menu ANS. Neste menu, utilize o botão
volume (26) para seleccionar a estação e
(1) para sintonizar a estação.
• BUSCA-TA: BUSCA/ALARME
a) Modo TA SEEK:
Se uma nova estação não transmitir infor-
mação TP durante mais de 5 segundos, o
rádio sintoniza automaticamente a estação seguinte com um PI diferente, mas
a mesma informação TP. Se a estação
actual perder temporariamente a informação TP e esta estação estiver denida
para RETUNE SHORT(curta) ou RETUNE
LONG (longa), então o rádio sintoniza a
estação seguintes com o mesmo PI. Se
não encontrar nenhuma estação PI depois
de um ciclo de sintonização, o rádio sintoniza a estação seguinte com informação
TP.
45
Page 46

FUNÇÕES
Nota: No modo TA SEEK, a estação ac-
tual pode ser substituída por uma estação
diferente, uma vez que o rádio pesquisa
uma estação TP assim que o sinal de
campo ou a força do sinal estão fracos ou
a estação actual não possua sinal TP (TP
tem prioridade superior a PI).
b) Modo TA ALARM:
Este modo desactiva a sintonização
automática. Soa um tom bip duplo longo
(ALARME). Isto mantém a estação actual
neste modo (PI tem prioridade superior
a TP). O tom bip soa se uma nova estação não transmitir informação TP durante
mais de 5 segundos. Se a estação actual
perder temporariamente a informação TP,
o tom bip pára. “PI SEEK” é premido se
uma nova estação não tiver sinal ANS.
• MASK: DPI/ALL
Modo MASK DPI: Marca apenas AF com
PI diferente (DPI). Modo MASK ALL:
Marca todos os AF com PI diferente e sem
sinal ANS com força de campo elevada.
• REGION: ON/OFF
Modo Regional ON: A função Busca AF ou
PI é implementada para todas as estações
com o mesmo código PI, como a estação
actual.
Modo Regional OFF: O código regional
no código PI é ignorado quando o AF é
alterado ou PI SEEK é implementado.
• Volume TA: Nível de volume TA predeni-
do 18, denido para nível 0-40
• RETUNE: LONG/SHORT
Se a estação actual perder a informação
TP durante um determinado período
(denido para Nova Sintonização SHORT
(30 segundos) ou Nova Sintonização
LONG (90 segundos), então o rádio pesquisa a estação seguinte com o mesmo
PI.
• Informação de Trânsito:
Utilize o botão TA (22) do seguinte modo:
Mantenha premido para activar/desactivar
o modo TA.
Modo TA activado e a informação de trân-
sito são transmitidos:
Nos modos CD (MP3), AUX IN ou IPOD,
o aparelho muda temporariamente para
o modo rádio. Sintoniza temporariamente
uma estação com ligação EON se detector uma informação de trânsito EON numa
estação diferente. O volume é aumentado
se estiver ajustador abaixo do nível da
estação de notícias. O volume é diminuído
se estiver demasiado alto.
Prima o botão para desactivar temporariamente a função TA. A função não é desactivada permanentemente.
PI: Identicação do Programa
PS: Serviço de Programa
AF: Frequências Alternativas
TP: Programa de Trânsito
TA: Informação de Trânsito
EON: Outra Rede Intensicada
PTY: Tipo de Programa
FUNCIONAMENTO CD/ MP3 / WMA
• Seleccionar Modo CD
Sem nenhum CD inserido:
Insira cuidadosamente um CD CD/MP3/
WMA com a etiqueta para cima no leitor de
CD até sentir uma ligeira resistência. O CD
é puxado automaticamente. A reprodução do
CD/MP3/WMA começa.
Com um CD/MP3/WMA já inserido no leitor
de CD:
Prima por instantes MOD (5).
• Seleccionar Faixa
Prima
rior/seguinte. É exibido o número da faixa.
Mantenha premido
der/avançar rapidamente pela faixa. Solte
o respectivo botão para o aparelho voltar à
reprodução normal.
(1) para seleccionar a faixa ante-
(1) para retroce-
46
Page 47

FUNÇÕES
• PAUSA
Prima PAU (10) para pausar a reprodução.
“PAUSE“ é apresentado. Prima novamente
para continuar a reprodução.
• Intro Todas as Faixas
Prima SCN (12) para ouvir os primeiros segundos de cada faixa, “SCAN” é apresentado. Prima novamente para reproduzir a faixa
na totalidade, “SCAN” desliga-se.
Quando ouve CDs MP3/WMA, prima SCN
(12) para ouvir os primeiros segundos de
cada faixa. “D-SCAN” é apresentado. Prima
novamente para sair deste modo.
• Repetir Faixa
Prima RPT (13) para repetir continuamente
a faixa actual, “REPEAT” é apresentado.
Prima novamente para sair do modo repetir,
“S-RPT” desliga-se.
Quando ouve CDs MP3/WMA, mantenha
premido RPT (13) para repetir todas as
caixas, “S-RPT” é apresentado. Prima novamente para sair deste modo.
• Misturar
Prima SHF (9) para reproduzir todas as faixas numa ordem aleatória. “S-SHF“ é apresentado. Prima novamente para sair deste
modo; “S-SHF” desliga-se. Quando ouve
CDs MP3/WMA, mantenha premido SHF (9)
para reproduzir todas as faixas numa ordem
aleatória. “S-SHF“ é apresentado. Prima
novamente para sair deste modo.
• Ejectar CD
Prima o botão (29) para parar a reprodução
CD/MP3/WMA e prima (28) para ejectar o
CD.
• Função ESP (opcional)
O aparelho pode reproduzir o formato CD e
MP3 durante 70 segundos sem saltar.
FUNÇÕES ESPECIAIS PARA CDs MP3/
WMA
1. Selecção CIMA/BAIXO Directa
Prima DIR- (8) ou DIR+ (15) para nave-
gar para cima ou baixo. Estes botões são
inválidos se não houver nenhum directório
guardado no seu CD MP3/WMA.
2. Seleccionar Faixa
• Selecção Directa de Faixa
Mantenha premido AS / PS (D-AUD) (20).
Para CDs de Áudio digital é apresentado
“Selecção directa de faixa”.
O aparelho procura as faixas com os seguintes botões numéricos:
M1-M6, MOD (5), DSP (0),
TUNE/SEEK/TRACK DOWN (8),
TUNE/SEEK/TRACK UP (9)
• Pesquisar Pasta ou Nome do Ficheiro
Prima AS / PS (D-AUD) (20) duas vezes. “A
Pesquisar Directório ou nome de cheiro” é
apresentado para CDs de Áudio digital. O
aparelho pesquisa cheiros e pastas.
Prossiga da seguinte maneira:
- Utilize os botões correspondentes para as
letras de A a Z, espaço, de 0 a 9, _, -, +.
- Após cada entrada, prima SEL (26).
- Prima BND/LOU/ENT (24) para iniciar a
pesquisa de faixa. ( “ ) é apresentado, se
a faixa seleccionada estiver numa pasta.
- Prima TUNE/SEEK/TRACK UP/DOWN
para todas as faixas nesta pasta e seleccione a faixa.
- Prima BND/LOU/ENT para conrmar e
iniciar a reprodução.
- Repita os passos acima, se as faixas
seleccionadas estiverem numa pasta.
3. APRESENTAR INFORMAÇÃO ID3
Prima ID3 (20) para apresentar as mar-
cas ID3 (caso estejam disponíveis: título,
artista e outra informação…)
(APENAS PARA A VERSÃO ID3 DE MP3)
47
Page 48

FUNÇÕES
COMPATÍVEL com Modo Descodica-
ção MP3/WMA
O aparelho é compatível como descodicação MP3 e WMA (Windows Media Audio),
como descrito abaixo.
Padrão Bitrato (kbps)
MPEG1
Audio Layer
3 (44.1kHz)
Windows
Media Audio
(44.1kHz)
32, 48, 64, 96,
128, 192, 256,
320
64, 96, 128,
192
Modo
Suportado
Estéreo
Estéreo
DICAS PARA CD
A. Dicas para CDs:
1. Utilize apenas CDs normais para evitar
danicar o aparelho. Utilize apenas CDs
redondos, que não estejam danicados
nem entortados.
2. Não cole autocolantes aos CDs; isto
pode causar anomalias.
3. Discos sujos, com pó, riscados ou torcidos vão causar anomalias.
podem ser reproduzidos neste aparelho
(consulte *1).
*1: Observe as seguintes recomendações
para uma reprodução correcta:
a: Utilize discos CD-RW com velocidade de
1x a 4x e velocidade de gravação de 1x
a 2x.
b. Utilize discos CD-R com velocidade de
1x a 8x e velocidade de gravação de 1x
a 2x.
c. Não reproduza discos CD-RW que te-
nham sido regravados 5 vezes ou mais.
C. Dicas Para Ficheiros MP3 (Apenas Versão MP3):
1. Certique-se que dá o nome aos cheiros MP3 com a extensão “.MP3”.
2. Os cheiros que não sejam MP3 não
podem ser lidos pelo aparelho, mesmo
se a extensão for “.MP3”.
Funcionamento do CARTÃO DE MEMÓRIA
Alguns modelos possuem interface de cartão
de memória. A entrada para o cartão ca por
trás do painel frontal.
INTERFACE DE CARTÃO
B. Dicas Para Discos CD-R (Graváveis) e
CD-RW (Regraváveis)
1. Utilize apenas CDs com os seguintes
logótipos para reproduzir:
2. O aparelho não pode reproduzir discos
CD-R ou CD-RW que não estejam fechados (consulte o manual de utilizador
do seu gravador de CD-R/CD-RW ou
o software do CD-R/CD-RW para obter
mais informação).
3. Dependendo do modo de gravação, da
condição do CD e dos acessórios para
gravar, alguns discos CD-R/CD-RW não
Depois de inserir um cartão de memória, o
aparelho procura cheiros MP3 e WMA e reproduz automaticamente. O funcionamento é
semelhante ao funcionamento MP3 (consulte
acima). Num modo diferente, prima MOD (5)
para seleccionar o modo de cartão. Não insira o seu cartão de memória para reproduzir,
se tiver dados importantes armazenados no
cartão.
48
Page 49

FUNÇÕES
BLUETOOTH
• Preparar Funcionamento Bluetooth
(i) Verique se o seu telemóvel suporta
Bluetooth antes de aceder à função.
(ii) Os telemóveis possuem diferentes capa-
cidades de transmissão Bluetooth. Para
uma qualidade de transmissão perfeita,
recomendamos uma distância de 3 m ou
inferior entre este aparelho e o seu telemóvel. Não coloque objectos de metal
entre este aparelho e o seu telemóvel.
• EMPARELHAR
1) Em qualquer modo, mantenha premido
PAIR (MOD) (5) durante 5 segundos,
“Pairing…” é apresentado.
2) Navegue para o menu de denições Blue-
tooth do seu telemóvel (consulte o manual
de utilizador do seu telemóvel).
3) A lista do seu telemóvel mostra “CarBT”.
Seleccione este aparelho e insira a senha
“0000”.
4) Depois de emparelhar correctamente, é
apresentado “CONN OK!”.
5) Se o emparelhamento não for bem suce-
dido, é apresentado “END”. Experimente
manter premido PAIR (10).
Nota: Durante o emparelhamento, apenas
os botões RELEASE (2), VOLUME (26) e
MUTE (14) funcionam. Os outros botões
não têm função durante o emparelhamento.
Durante o emparelhamento, prima PAIR (5)
para cancelar o emparelhamento.
LIGAR
O aparelho volta a ligar automaticamente.
Prima por instantes
automaticamente com o seu telemóvel (Nota:
o telemóvel tem de estar emparelhado). Sob
as condições seguintes, pode emparelhar
manualmente; mantenha premido CON (18),
“Conn OK!” é apresentado. “Connected! OK!“
é apresentado e soa um tom bip se a nova
ligação for bem sucedida.
1) Com o telemóvel fora do alcance, perde
a ligação. Tem de voltar a ligar.
2) Tem de voltar a ligar se o telemóvel
(4) para voltar a ligar
estiver fora do alcance e receber uma
chamada.
3) A ligação é perdida quando prime (2)
para soltar o painel frontal.
Tem de voltar a ligar depois de inserir o
painel frontal.
4) Tem de voltar a ligar depois do telemóvel
se desligar.
MENU T
Prima por instantes T-MENU (6) depois do
emparelhamento bem sucedido, para aceder
ao menu do telefone. Mantenha premido ou
prima os botões (1) para percorrer as funções do menu: PRE NUM/RECELVED/DIALED/MLSSED/MANU ANS/TALK.
Encontre mais informações nas seguintes
instruções.
NOTA:
1) RRE NUM: Pode guardar 10 números
no modo PRE NUM. Prima VOLUME
(26) para aceder ao modo número.
Agora prima SEL para inserir o número
de telefone. Prima novamente SEL para
guardar o número na lista de contactos.
Prima SEL (26) para aceder ao número
de telefone.
2) Apresenta o último número marcado.
3) Apresenta as chamadas perdidas.
ATENDER MANUAL
No modo atender manual ON, o visor mostra “ANSWER? + número de telemóvel”. O
aparelho recebe automaticamente a chamada. No modo atender manual OFF, o visor
mostra “ANSWER? + número de telefone”,
mas pode premir
(24) para rejeitar a chamada.
FAZER UMA CHAMADA
1) Pode fazer uma chamada de várias
formas, através das teclas de atalho, da
lista de chamadas recebidas, lista de
chamadas marcadas ou lista de contactos (telemóvel ou cartão SIM). Encontre
mais informação no capítulo MENU T.
49
(4) para atender ou
Page 50

FUNÇÕES
Introdução Manual do Número de Telemóvel
Prima
ma os botões 0~9, *, # para inserir o número
de telefone pretendido (Nota: prima * para
inserir “*”. Mantenha premido para inserir “+”.)
Agora prima novamente
o número.
Nota: Prima CLR (24) para cancelar a última
inserção. Mantenha premido CLR (24) para
cancelar todos os números inseridos.
ALTERAR A CHAMADA ENTRE O TELEMÓVEL E ESTE APARELHO
Durante a sua conversa telefónica, mantenha premido T-MENU (6) para redireccionar
a chamada do telemóvel para o aparelho –
ou vice-versa. Nota:
1) Quando redirecciona uma chamada
2) As chamadas feitas não podem ser redi-
(4) para apresentar “CALL__”. Pri-
(4) para marcar
recebida para o seu telemóvel, o som é
automaticamente silenciado, se tiver sido
desactivado previamente.
reccionadas depois do recipiente aceitar
as chamadas.
ÁUDIO BLUETOOTH (FUNÇÃO A2DP)
Este aparelho suporta áudio Bluetooth. Pode
redireccionar a reprodução de áudio para
este aparelho quando reproduz cheiros
áudio no telemóvel ligado. Prima M1, M2, M3
para controlar a reprodução (Pausa/Reprodução/Parar) (as funções do botão dependem do modelo do seu telemóvel).
Prima
funções do botão dependem do modelo do
seu telemóvel).
Nota: Não são possíveis chamadas durante
a reprodução de música.
(1) para seleccionar a faixa (as
50
Page 51

ESPECIFICAÇÕES TÉCNICAS
GERAL
Requisitos da fonte de alimentação : DC 12 V, massa negativa
Dimensões do chassis : 178(C) x 160 (A) x 50 (P) mm
Controlos de tom
Baixo (@ 100Hz) : ±10dB
Agudos (@ 10kHz) : ±10dB
Potência de saída máx. : 4 x 40W
Consumo de energia : 5A (máx.)
LEITOR DE CD
Frequência de sinal para ruído : > 55dB
Separação de canal : > 50dB
Frequência de resposta : 40Hz – 18kHz
RÁDIO
Para 2 bandas Europa
FM
Intervalo de frequência 87,5 - 108MHz
IF 10,7MHz
Sensibilidade (S/R =30dB) 10dBu
Separação estéreo >25dB
AM
Intervalo de frequência 522 a 1620 kHz
IF 450 kHz
Sensibilidade (S/R=20dB) 36 dBu
51
Page 52

RESOLUÇÃO DE PROBLEMAS
Primeiro verique a ligação correcta de todos os cabos. Utilize esta tabela para solucionar o
problema. Contacte o seu concessionário se o problema persistir.
Sintoma Razão Solução
Sem Alimentação. A ignição está desligada. Ligue a ignição.
Fusível queimado. Substitua o fusível
Não consegue inserir nem
ejectar o CD
Não há som O volume está no mínimo. Coloque o volume no nível
Som distorcido Ângulo de instalação superior
Os botões não respondem Anomalias do microcomputa-
O rádio não funciona O cabo da antena não está
A procura automática não
funciona
Já está inserido um CD. Ejecte o disco e insira um CD
novo.
O CD está inserido ao contrário.
O CD está muito sujo ou riscado.
Temperatura demasiado alta. Deixe o carro arrefecer até
Condensação. Deixe o aparelho desligado
O cabo não está ligado correctamente.
a 30 graus.
O CD está muito sujo ou ris-
cado.
dor integrado.
ligado.
Os sinais são demasiado
fracos.
Insira o disco com a etiqueta
para cima.
Limpe o CD ou insira um CD
diferente.
a temperatura ambiente ser
normal.
durante cerca de 1 hora e
tente novamente.
pretendido.
Verique a cablagem.
O ângulo de instalação deve
ser inferior a 30 graus.
Limpe o CD ou insira um CD
diferente.
Prima RESET. O painel frontal
não está colocado correctamente.
Ligue o cabo da antena.
Seleccione a estação manualmente.
52
Page 53

CONTENUTO
Installazione ..............................................54
Suggerimenti per l’installazione ..................54
Installazione anteriore ...............................54
Installare l’unità...........................................54
Rimuovere l’unità .......................................55
Installare la parte posteriore ......................56
Rimuovere e installare il frontalino.........56
Collegamento elettrico ............................57
Posizione dei comandi ............................58
Operazioni di base....................................59
Acceso/Spento ...........................................59
Rilascio del frontalino ................................59
Impostazioni del suono ...............................59
Volume........................................................59
Schermo .....................................................59
Equalizzatore ..............................................59
Resettare ....................................................59
Selezione modalità .....................................60
Impostazioni di sistema ..............................59
Audio in ingresso. .......................................60
Attivazione della radio .............................60
Scegliere la frequenza/banda .....................60
Sintonizzazione ..........................................60
Ricerca automatica & salvataggio ..............60
Scansione ...................................................60
Preimpostazioni ..........................................60
Funzionamento ANS ..................................60
Funzionamento di CD / MP3 / WMA ........61
Selezionare la modalità CD ......................61
Selezionare la traccia ...............................62
Pausa .......................................................62
Introduzione di tutte le tracce ...................62
Ripeti traccia .............................................62
Mescolare .................................................62
Espulsione CD ..........................................62
Funzione ESP ...........................................62
Funzioni speciali per CD MP3/WMA.........62
Modalità di decodica SUPPORTO MP3/
WMA .........................................................63
CD, suggerimenti per dischi CD-R ..........63
Funzionamento via SCHEDA DI
MEMORIA ..................................................63
Bluetooth ...................................................64
Preparare il funzionamento
via Bluetooth ...........................................64
Accoppiamento ........................................64
Collegamento ...........................................64
Menu’ T ....................................................64
Risposta manuale ....................................64
Fare una telefonata .................................65
Rimbalzare la chiamata da cellulare
a questa unita’ ..........................................65
Audio Bluetooth (Funzione A2DP) ...........65
Speciche..................................................66
Risoluzione problemi ...............................67
53
Page 54

INSTALLAZIONE
Rimuovere le viti prima di installare l’unità
Suggerimenti:
• Selezionare una posizione per il montaggio nella quale l’unità non interferisca con
le normali operazioni di guida.
• Collegare tutti i cavi elettrici prima dell’installazione nale e controllare che funzioni
adeguatamente.
• Usare solo gli accessory in dotazione per
una corretta installazione. L’uso di pezzi
non autorizzati può provocare malfunzionamenti.
• Contattare il proprio rivenditore se devono
essere praticati fori o se sono necessarie
altre modiche al veicolo.
• Installare l’unità in una posizione dove non
interferisca con la guida e i passeggeri non
possano essere feriti durante una frenata
di emergenza.
• Non installare l’unità con un’angolazione
maggiore di 30°; ciò può causare perdita
nelle prestazioni.
30
RIMUOVERE LE VITI PRIMA DELL’INSTALLAZIONE
Si prega di rimuovere le viti prima di installare l’unità.
INSTALLAZIONE ANTERIORE (metodo A)
Apertura di installazione
Installare questa unità in qualsiasi cruscotto con un vano aperto avente le seguenti
dimensioni:
53mm
• Non installare l’unità troppo vicina a
temperature elevate, quali la luce solare
diretta o i condotti del riscaldamento, in
posizioni polverose, sporche o soggette a
vibrazioni.
INSTALLAZIONE
Questa unità può essere installata adeguatamente sia “anteriormente” (montaggio anteriore convenzionale DIN) o “posteriormente”
(installazione tramite montaggio posteriore
DIN, che usa i fori per le viti praticati sui lati
del telaio dell’unità).
Per i dettagli,fare riferimento ai metodi illustrati di seguito.
182mm
Installare l’unità
Per prima cosa controllare i collegamenti,
e quindi installare l’unità come segue.
1. Il motore deve essere spento; scollegare
il cavo della batteria dal morsetto negativo (-).
2. Scollegare tutti i cavi e il cavo dell’anten-
na.
3. Premere il pulsante di rilascio sul fronta-
lino e rimuoverlo (vedere “Rimuovere e
installare il frontalino”).
4. Sollevare la parte superiore della cornice
esterna e spingere verso l’esterno per
rimuoverla.
54
Page 55

INSTALLAZIONE
Inserto
5. Allentare le alette nell’inserto con le
chiavi in dotazione. Inserire le chiavi
per quanto possibile (segno in su) nelle fessure sinistra e destra nell’inserto.
Spingere l’inserto sul retro.
Inserto
Chiave Sx (sinistra)
Cornice esterna
Pannello anteriore
Chiave Dx
(destra)
6. Installare l’inserto nel vano del cruscotto
e piegare le alette indietro con un cacciavite. Non tutte le alette fanno contatto.
Piegare le alette dietro il cruscotto per
ssare l’inserto al suo posto.
Cacciavite
Alette
Cruscotto
7. Ricollegare i cavi e l’antenna e assicurar-
si di non stringere alcun cavo.
8. Far scivolare l’unità nell’inserto nché
non si aggancia sul posto.
9. Usare la guida di metallo per ssare ulte-
riormente l’unità sul retro. Usare i componenti in dotazione (chiave a brugola
(M5) e rondella a scatto) per montare la
guida di metallo sul retro dell’unità.
Se necessario, piegare la guida di metallo. Usare i componenti in dotazione
(vite 5x25 mm e rondella) per attaccare
l’altro l’ato della guida di metallo sotto il
cruscotto. La guida di metallo si piega
in due durante il collegamento alla base
dell’unità.
Nota: Attaccare la vite di montaggio lettata
in basso sul retro dell’unità e la vite lettata
completamente al cruscotto.
Rondella a scatto
Guida di metallo
Vite di montaggio
Vite
Rondella
Dado esagonale
10. Ricollegare il cavo della batteria al mor-
setto negatvo (-). Attaccare la cornice
esterna e attaccare il frontalino (vedere
“Rimuovere e installare il frontalino”).
Rimuovere l’unità
1. Il motore deve essere spento; scollegare
il cavo della batteria dal morsetto negativo (-).
2. Rimuovere la guida di metallo sul retro
dell’unità (se installato).
3. Premere il pulsante di rilascio sul frontali-
no e rimuoverlo.
4. Sollevare la parte superiore della cornice
esterna e spingere verso l’esterno per
rimuoverla.
5. Inserire le due chiavi per quanto possibi-
le nelle fessure sinistra e destra nell’unità
e tirarla fuori dal cruscotto.
55
Page 56

INSTALLAZIONE
Vista laterale con
Cruscotto o consolle
INSTALLAZIONE POSTERIORE
(Metodo B)
Osservare le seguenti istruzioni di installazione se si guida una Nissan o una Toyota.
Attaccare l’unità alle staffe di montaggio di
serie per la radio. Allineare i fori sulle staffe
ai fori sull’unità e stringere le viti (5x5 mm) su
entrambi i lati.
Usare i fori con marchio T (per Toyota) o
N (per Nissan) per le viti sinistra e destra
dell’unità per attaccare le staffe di montaggio
di serie del vostro veicolo.
fori per le viti con
i marchi T e N
Staffa di
montaggio di
serie per radio
Vite
Vite
Nota: La cornice esterna frame, l’inserto e
la guida di metallo non vengono usati nell’in-
stallazione secondo il metodo B.
RIMUOVERE E INSTALLARE IL FRONTALINO
Rimuovere il frontalino
1. Premere il pulsante di rilascio OPEN per
ribaltare in basso il frontalino.
3. Conservare il frontalino nella custodia
protettiva in dotazione.
Custodia protettiva
2. Sollevare lentamente il frontalino e tirare
prima il lato destro, poi il lato sinistro
verso l’esterno.
Lato sinistro
Lato destro
Frontalino
Frontalino
Attaccare il frontalino
1. Inserire prima il lato destro nella posizio-
ne adeguata e lasciarlo agganciare al posto.
Lato sinistro
Lato destro
Frontalino
56
Page 57

RIMUOVERE E INSTALLARE IL FRONTALINO
2. Premere il frontalino sull’unità principale
nché entrambi i lati si agganciano al posto.
3. Assicurarsi che il frontalino si agganci
adeguatamente al posto. I pulsanti possono non funzionare bene e lo schermo
non mostra tutti i segmenti se il frontalino
non è installato adeguatamente. Premere
il pulsante di rilascio OPEN per installare
di nuovo il frontalino.
COLLEGAMENTO ELETTRICO
Collegamenti del pannello posteriore
Precauzioni inerenti il frontalino
1. Non far cadere il frontalino.
2. Non premere troppo forte i pulsanti o lo
schermo quando si attacca o si rimuove
il frontalino.
3. non toccare i contatti sul frontalino o
sull’unità principale. Ciò può causare
malfunzionamenti.
4. Rimuovere la sporcizia e gli oggetti
estranei con un panno pulito e asciutto
dai contatti.
5. Proteggere il frontalino dalle alte tempe-
rature e dalla luce solare diretta.
6. Proteggere il frontalino dalle sostanze
volatili (ad es. benzina, solventi e insetticidi).
7. Non smontare il frontalino.
A Connettore ISO B (casse)
B Fusibile piatto del veicolo (5A)
C Connettore ISO A (alimentazione)
D LINE OUT (uscita pre-amp):
RCA uscita audio L/R per amplicatore
E Jack antenna
Connettore ISO A
1. non usato
2. non usato
3. Alimentatore antenna
4. 12V (accensione più)
5. non usato
6. Continuo più (memoria)
7. non usato
8. Meno (GND -)
57
Page 58

COLLEGAMENTO ELETTRICO
Connettore ISO B
1. Cassa posteriore destra +
2. Cassa anteriore destra +
3. Cassa anteriore sinistra +
4. Cassa posteriore sinistra +
5. Cassa posteriore destra -
6. Cassa anteriore destra -
7. Cassa anteriore sinistra -
8. Cassa posteriore sinistra -
FUNZIONI
Posizione dei comandi
1. Sintonizza/cerca, traccia su/giù
2. Pulsante di rilascio
3. Micr
4.
Accetta chiamata
5. PAIR / MOD
6. T-MENU
7. LCD
8. 5 / DIR-
9. 4 / SHF
10. 1 / PAU
11. 1-6 Preimpostazioni
12. 2 / SCN
13. 3 / RPT
MUTE
14.
15. 6 / DIR+
58
Page 59

FADBALTREBASVOL
16. Porta USB
17. 9 / PTY
18. # / SCAN / CON
19. 0 / DISP
20. AS / PS / * / + / Nav.-SCH
21. 7 / AF / MON
22. 8 / EQ / TA
FUNZIONI
23. AUX IN
24. Termina chiamata/BND / LOUD / CLR
25. Pulsante resetta
26. Volume, SEL / MENU
27. Fessura per scheda
28. Vassoio CD
29. Espelli
Operazioni di base
Acceso/Spento
Premere
mere e tenere premuto
l’unità.
Rilascio del frontalino
Premere
Impostazioni del suono
Premere brevemente SEL (26) per scegliere
la modalità di impostazione desiderata. Premere ripetutamente per seguire il ciclo delle
modalità di impostazione:
(Volume) (Bassi) (Alti) (Bilanciamento) (Sfumatura)
Ruotare la manopola del volume (26) in senso orario o antiorario per impostare la qualità
del suono desiderata.
IMPOSTAZIONI DI SISTEMA
Premere e tenere premuto SEL (26) per accedere alla modalità impostazioni di sistema.
Premere SEL (26) per scegliere la voce da
cambiare e ruotare la manopola del volume
(26) per cambiare l’impostazione.
1) BEEP: ON/OFF
Premere il pulsante per attivare/disattivare
il segnale acustico dei pulsanti.
2) Schermo P-VOL
Preselezionare l’impostazione del volume
per la riproduzione.
3) AREA EUR/USA
Selezionare la banda Europa o USA con
la manopola del volume (26).
4) Modalità tempo: formato 24 ore/12 ore
Scegliere tra il formato 24 ore e 12 ore per
la visualizzazione sullo schermo.
(14) per accendere l’unità. Pre-
(14) per spegnere
(2) per rilasciare il frontalino.
5) PCLK ON/OFF
Attivare/disattivare la visualizzazione
dell’ora in modalità standby con la manopola del volume (26).
Muto
Premere e tenere premuto MUTE (14) per silenziare il sonoro; viene visualizzato “MUTE”.
Premere MUTE (14) di nuovo per riattivare il
sonoro.
Volume
Premere e tenere premuto LOUD (24) per
attivare la funzione “rumoroso”; viene visualizzato “LOUD”. Premere e tenere premuto di
nuovo per disattivare la funzione; “LOUD” si
spegne.
Schermo
Premere DISP (19) per accedere alla modali-
tà di visualizzazione.
Equalizzatore
Premere EQ (22) per scegliere lo scenario
audio desiderato. Sono disponibili 5 modalità:
Resettare
Usare una penna o un oggetto simile per
premere Resetta (25). Premere Resetta per
le seguenti ragioni:
- dopo l’installazione iniziale dell’unità dopo
che tutti i cavi sono collegati
- in caso di malfunzionamento dei pulsanti
- nel caso in cui vengano visualizzati errori.
59
Page 60

FUNZIONI
Nota: l’unità non funziona per un momento
dopo che è stato premuto il pulsante Resetta
(25). Usare un pò di alcol isopropilene e un
tampone di cotone per pulire i contatti del
frontalino.
Selezione modalità
Premere brevemente MOD (5) per scegliere
tra Radio, CD, ESB, CARD, AUX e BT Audio.
Audio in ingresso
È possible collegare un lettore audio portatile
tramite AUX IN (23) sul frontalino. Premere
MOD (5) dopo il collegamento per scegliere
la modalità AUX IN.
ATTIVAZIONE DELLA RADIO
Scegliere la frequenza/banda
Premere brevemente BND (24) in modalità
radio per scegliere la banda di frequenza
desiderata. Premere ripetutamente seguire il
ciclo delle bande:
FM1→FM2→FM3→AM→FM1…
Sintonizzazione
Premere brevemente (1) per attivare la
ricerca automatica. Premere e tenere premuto
nché non viene visualizzato “Manual…”;
ora si è in modalità manuale. L’unità torna in
modalità ricerca automatica e viene visualizzato “AUTO…” se non si preme alcun pulsante per qualche secondo.
Ricerca automatica & salvataggio
- Funzione di salvataggio automatico. Premere e tenere premuto AS/PS (20), viene
visualizzato “SEARCH”. La radio scansiona le frequenze e misura la potenza del
segnale durante un ciclo di ricerca. Le 6
stazioni più potenti vengono salvete nella
memoria preimpostata.
- Premere brevemente AS/PS (20) per
richiamare una stazione preimpostata.
Il numero preimpostato corrispondente
P1~viene visualizzato.
SCANSIONE
Premere SCAN (18) per accedere alla moda-
lità ricerca e per cercare una stazione più forte. L’unità riproduce la stazione e la frequenza lampeggia cinque volte sullo schermo).
Preimpostazioni
Premere uno dei pulsanti numerici (1-6) per
scegliere una stazione preimpostata. Premere e tenere premuto (nché non c’è un
secondo segnale sonoro) per memorizzare la
stazione attuale con il numero preimpostato
scelto.
Funzionamento ANS (Annuncio
Nome Stazione)
- Impostare la modalità ANS: premere brevemente AF (21) per attivare/disattivare
la modalità ANS. Se attivato, “ANS” viene
visualizzato.
- Premere PTY (17) per accedere alla modalità di selezione PTY; viene visualizzato
il nome della stazione. Ruotare la manopola del volume (26) per scegliere una
stazione o premere (1) per trovare il
canale desiderato.
1. Premere e tenere premuto PTY (8/9) per
accedere al menù ANS. In questo menù
usare la manopola del volume (26) per
scegliere la stazione e (1) sintonizzare la stazione.
• TA SEEK: SEEK/ALARM
a) Modalità TA SEEK:
se una nuova stazione non trasmette infor-
mazioni TP per più di 5 secondi la radio si
sintonizza automaticamente sulla stazione
successive con diversa informazione Pl
ma stessa TP. Se la stazione attuale perde
temporaneamente l’informazione TP e
questa stazione è impostata su RETUNE
SHORT (breve) o RETUNE LONG (lungo),
dunque la radio si sintonizza sulla stazione successive con lo stesso Pl. Se non
viene trovata alcuna stazione Pl dopo il
60
Page 61

FUNZIONI
ciclo di sintonizzazione, dunque la radio si
sintonizza sulla stazione successive con
l’informazione TP.
Nota: In modalità TA SEEK la stazione
attuale può essere sostituita con una
stazione diversa, poichè la radio effettua
la ricerca di una stazione TP non appena il
segnale di campo o la potenza del segnale si indebolisce o la stazione attualmente
in corso non ha un segnale TP (TP ha una
priorità maggiore rispetto al PI).
b) Modalità TA ALARM:
Questa modalità disattiva la sintonizza-
zione automatica. Suona un lungo beep
doppio (SVEGLIA). Ciò mantiene la stazione attuale in questa modalità (PI ha
una priorità maggiore rispetto al TP). I
beep suonano se una nuova stazione
non trasmette informazioni TP per più di 5
secondi. Se la stazione attuale perde temporaneamente l’informazione TP il beep si
ferma. “PI SEEK” viene represso se una
nuova stazione non ha segnali ANS.
• MASK: DPI/ALL
Modalità MASK DPI: segnala solo AF con
diversi Pl (DPI). Modalità maschera ALL:
segnala tutti AF con diversi Pl e nessun
segnale ANS con alta potenza di campo.
• REGION: ON/OFF
Modalità regione ON: la funzione di ricerca
AF o PI è implementata per tutte le stazioni con lo stesso codice PI della stazione in
corso.
Modalità regione OFF: il codice regionale
nel codice Pl viene ignorato quando si
cambia AF o PI SEEK è implementato.
• Volume TA: livello volume TA preimposta-
to 18, imposta su livello 0-40
• RETUNE: LONG/SHORT
Se la stazione perde l’informazione Pl per
un certo tempo (impostare su RETUNE
SHORT (30 seconde) o RETUNE LONG
(90 secondi)), quando la radio scansiona
la stazione successiva con lo stesso PI.
• Annunci sul trafco:
Usare il pulsante TA (22) come segue:
premere e tenere premuto per attivare/
disattivare la modalità TA.
Modalità TA attivata e trasmissione annun-
cio sul trafco in corso:
in modalità CD (MP3), AUX IN o IPOD
l’unità passa temporaneamente in modalità radio. Si sintonizza temporaneamente
su una stazione collegata alla stazione
EON se viene rilevato l’annuncio sul trafco su EON su un stazione diversa. Il volume viene aumentato se è impostato al di
sotto del livello della stazione delle notizie.
Il volume viene diminuito se è impostato
troppo basso. Premere il pulsante per
disattivare temporaneamente la funzione
TA. La funzione non è disattivata in modo
permanente.
PI: Identicazione Programma
PS: Servizio Programma
AF: Frequenze Alternative
TP: Programma sul Trafco
TA: Annunci sul Trafco
EON: Potenziata Altra Rete
PTY: Tipo di Programma
FUNZIONAMENTO DI CD / MP3 /
WMA
• Selezionare la modalità CD
Senza CD inserito:
Inserire attentamente un CD/MP3/WMA CD
con il lato stampato verso l’alto nel vassoio
del CD nché non si avverte una lieve resistenza. Il CD viene preso automaticamente.
La riproduzione di CD/MP3/WMA inizia.
Con il CD/MP3/WMA già inserito nel vassoio
per CD:
premere brevemente MOD (5).
61
Page 62

FUNZIONI
• Selezionare la traccia
Premere (1) per scegliere la taccia
precedente/successiva. Viene visualizzato il
numero della traccia.
Premere e tenere premuto (1) per
riavvolgere/mandare avanti nella traccia.
Rilasciare il rispettivo pulsante afnchè l’unità
tornialla riproduzione normale.
• PAUSA
Premere PAU (10) per mettere in pausa la
riproduzione. “PAUSE“ viene visualizzato.
Premere di nuovo per ripristinare la riproduzione.
• Introduzione di tutte le tracce
Premere SCN (12) per ascoltare i primi
secondi di ogni traccia, viene visualizzato
“SCAN”. Premere di nuovo per riprodurre la
traccia completa, “SCAN” scompare.
Quando si ascoltano CD di MP3/WMA premere SCN (12) per ascoltare i primi secondi
di ogni traccia. “D-SCAN” viene visualizzato.
Premere di nuovo per uscire da questa modalità.
• Ripeti traccia
Premere RPT (13) per ripetere continuamen-
te la traccia in corso, “REPEAT” viene visualizzato. Premere di nuovo per uscire dalla
modalità ripetizione, “S-RPT” scompare.
Quando si ascoltano CD MP3/WMA premere
e tenere premuto RPT (13) per ripetere tutte
le tracce, “S-RPT” viene visualizzato. Premere di nuovo per uscire da questa modalità.
• Mescolare
Premere SHF (9) per riprodurre tutte le trac-
ce in ordine casuale. “S-SHF“ viene visualizzato. Premere di nuovo per uscire da questa
modalità; “S-SHF” scompare. Quando si
ascoltano CD MP3/WMA premere e tenere
premuto SHF (9) per riprodurre tutte le tracce
in ordine casuale. “S-SHF“ viene visualizzato. Premere di nuovo per uscire da questa
modalità.
• Espulsione CD
Premere il pulsante (29) per arrestare la
riproduzione di CD/MP3/WMA e premere (28)
per espellere il CD.
• Funzione ESP (opzionale)
L’unità può riprodurre CD e MP3 noa 70
secondi senza saltare.
FUNZIONI SPECIALI PER CD MP3/WMA
1. Selezione diretta SU/GIU’
Premere DIR- (8) o DIR+ (15) per naviga-
re su o giù. Questi pulsanti non sono validi
se non è memorizzata alcuna cartella nel
vostro CD MP3/WMA.
2. Selezione traccia
• Selezione diretta traccia
Premere e tenere premuto AS / PS (D-
AUD) (20). Per CD audio digitali viene
visualizzata la “Selezione diretta traccia”.
L’unità ricerca le tracce con i seguenti
pulsanti numerici:
M1-M6, MOD (5), DSP (0),
TUNE/SEEK/TRACK DOWN (8),
TUNE/SEEK/TRACK UP (9)
• Cerca nome cartella o le
Premere due volte AS / PS (D-AUD) (20).
“Ricerca nome cartella o le” viene visualizzato per i CD audio digitali. L’unità cerca le
e cartelle.
Procedere come segue:
- Usare i rispettivi pulsanti per le lettere
dalla A alla Z, spazio, da 0 a 9, _, -, +.
- Dopo ogni immissione premere SEL (26).
- Premere BND/LOU/ENT (24) per iniziare
la ricerca della traccia. ( “ ) viene visualizzato se la traccia scelta è in una cartella.
- Premere TUNE/SEEK/TRACK UP/DOWN
per tutte le tracce in questa cartella e scegliere la traccia.
- Premere BND/LOU/ENT per confermare e
avviare la riproduzione.
- Ripetere i passaggi precedenti se le nuove
tracce scelte sono in una cartella.
62
Page 63

FUNZIONI
3. INFORMAZIONE DI VISUALIZZAZIONE ID3
Premere ID3 (20) per visualizzare le eti-
chette ID3 (se disponibili: titolo, artista e
ulteriori informazioni…)
(SOLO PER VERSIONE MP3 ID3)
Modalità di decodica SUPPORTO
MP3/WMA
L’unità supporta codiche MP3 e WMA
(Windows Media Audio) come descritto di
seguito.
Standard BitRate (kbps)
MPEG1
strato audio 3
(44.1kHz)
Windows
Media Audio
(44.1kHz)
32, 48, 64, 96,
128, 192, 256,
320
64, 96, 128,
192
Modalità
supportata
Stereo
Stereo
SUGGERIMENTI PER I CD
A. Suggerimenti per i CD:
1. Usare solo CD standard per evitare che
danneggino l’unità. Usare solo Cd rotondi, che non sono danneggiati o grafati.
2. Non attaccare adesivi sui CD; questi
possono causare malfunzionamenti.
3. CD sporchi, impolverati, puntati e grafati
provocano malfunzionamenti.
3. A seconda della modalità di masterizzazione, della condizione del CD e dei
supporto di registrazione, alcuni dischi
CD-R/CD-RW non possono essere riprodotti da questa unità (vedere *1).
*1: Osservare le seguenti raccomandazioni
per una riproduzione afdabile:
a: Usare dischi CD-RW con velocità da 1x
a 4x e masterizzati a 1x o 2x.
b. Usare dischi CD-R con velocità da 1x a
8x e masterizzati a 1x o 2x.
c. Non riprodurre CD-RW, che sono stati
rimasterizzati 5 o più volte.
C. Suggerimenti per le MP3 (solo versione MP3):
1. Assicurarsi di nominare i le MP3 con
l’estensione “.MP3”.
2. I le che non sono MP3 nonpossono
essere letti dall’unità, anche se la loro
estensione è “.MP3”.
Funzionamento via SCHEDA DI MEMORIA
Alcuni modelli arrivano con un’interfaccia per
scheda di memoria. Il vano per la scheda è
dietro il frontalino.
SCHEDA INTERFACCIA
B. Suggerimenti per CD-R (registrabile) e
dischi CD-RW (riscrivibili)
1. Per la riproduzione usare solo CD con i
seguenti loghi:
2. L’unità non può riprodurre CD-R o CDRW, che non siano stati nalizzati (vedere
il manuale utente de vostro masterizzatore CD-R/CD-RW o software CD-R/CDRW per ulteriori informazioni).
L’unità scansiona i le MP3 e WMA e li reproduce automaticamente dopo che è stata
inserita una scheda di memoria. Il funzionamento è simile a quello dell’MP3 (vedere sopra). In una diversa modalità premere MOD
(5) per scegliere la modalità scheda. Non
inserire la propria scheda di memoria per la
riproduzione se sono memorizzati nella scheda dati importanti.
63
Page 64

FUNZIONI
BLUETOOTH
• Preparare il funzionamento via Blueto-
oth
(i) Controllare che il proprio cellular supporti
il Bluetooth prima di attivare la funzione.
(ii) Diversi cellulari hanno diverse capacità di
trasmissione Bluetooth. Per una qualità
di trasmissione ottimale raccomandiamo
una distanza di 3 m o meno tra questa
unità e il telefono cellulare. Non posizionare oggetti di metallo tra questa unità e
il proprio cellulare.
• ACCOPPIAMENTO
1) In qualsiasi modalità premere e tenere pre-
muto PAIR (MOD) (5) per 5 secondi,viene
visualizzato “Pairing…” .
2) Navigare nel menù impostazioni Bluetooth
del proprio cellulare (vedere il funzionamento nel manuale del proprio cellulare).
3) Il proprio telefono cellulare mostra un elen-
co di telefoni “CarBT”. Scegliere questo
dispositivo e inserire la password “0000”.
4) Dopo che l’accoppiamento ha avuto suc-
cesso viene visualizzato “CONN OK!”.
5) Se l’accoppiamento non ha avuto succes-
so viene visualizzato “END”. Tentare di
premere e tenere premuto PAIR (10).
Nota: Durante l’accoppiamento sono opera-
tivi solo i pulsanti RELEASE (2), VOLUME
(26) e MUTE (14). Tutti gli altri pulsanti non
funzionano durante l’accoppiamento. Durante l’accoppiamento premere PAIR (5) per
cancellare l’operazione.
1) Con il cellulare fuori dalla portata la
connessione viene persa. È necessario
riconnettersi più tardi.
2) È necessario riconnettersi più tardi se il
cellulare è fuori dalla portata e c’è una
chiamata in entrata.
3) Il collegamento viene perso quando si
preme
È necessario riconnettersi più tardi dopo
aver risistemato il frontalino.
4) È necessario riconnettersi più tardi dopo
che il celllulare è stato spento.
MENU’ T
Premere brevemente T-MENU (6) dopo il
riuscito accoppiamento ed accesso al menù
telefono. Premere e tenere premuti i pulsanti
(1) per seguire il ciclo attraverso le funzioni
del menù: PRE NUM/ RECELVED/ DIALED/
MLSSED/ MANU ANS/ TALK.
I dettagli si trovano nelle istruzioni seguenti.
NOTA:
1) RRE NUM: è possibile memorizzare 10
numeri in modalità PRE NUM. Premere
VOLUME (26) per inserire la modalità
numero. Ora premere SEL per inserire
il numero di telefono. Premere SEL di
nuovo per salvare il numero nella rubrica. Premere SEL (26) per accedere al
numero di telefono.
2) Visualizza l’ultimo numero chiamato.
3) Visualizza le chiamate perse.
(2) per rilasciare il frontalino.
COLLEGAMENTO
L’unità si ricollega automaticamente. Premere brevemente
maticamente con il proprio cellulare (Nota: il
cellulare deve essere accoppiato). In queste
condizioni è possibile l’accoppiamento manuale; premere e tenere premuto CON (18),
viene visualizzato “Conn OK!”. “Connected!
OK!” viene visualizzato e si sente un segnale
sonoro se il nuovo collegamento ha successo.
(4) per ricollegarsi auto-
RISPOSTA MANUALE
In modalità risposta automatica ON lo schermo mostra “ANSWER? + numero di telefono”. L’unità riceve automaticamente la chiamata. In modalità risposta automatica OFF
lo schermo mostra “ANSWER? + numero di
telefono”, ma è possibile premere
ricevere o premere
chiamata.
64
(24) per riutare la
(4) per
Page 65

FUNZIONI
FARE UNA TELEFONATA
1) E’ possibile fare una telefonata in modi
diversi tramite i tasti di scorciatoia, la
lista delle chiamate ricevute, la lista delle
chiamate effettuate o la rubrica (cellulare
o SIM). Maggiori informazioni si trovano
nel capitolo T-MENU.
Inserire un numero da chiamare manualmente
Premere
Premere il pulsanti 0~9, *, # per inserire il numero di telefono desiderato (Nota: premere
* per inserire “*”. Premere e tenere premuto
“+”.) ora premere di nuovo
mare il numero.
Nota: Premere CLR (24) per cancellare l’ultima immissione. Premere e tenere premuto
CLR (24) per cancellare tutti i numeri immessi.
RIMBALZARE LA CHIAMATA DA CELLULARE A QUESTA UNITA’
Durante la vostra conversazione telefonica
premere e tenere premuto T-MENU (6) pre
reindirizzare la chiamata dal cellulare all’unità – o viceversa. Nota:
(4) per visualizzare “CALL__”.
(4) per chia-
1) Quando si reindirizza una chiamata in
entrata al proprio cellulare il suono viene
automaticamente annullato se prima era
stato disattivato.
2) Le chiamate in uscita non possono essere reindirizzate prima che il destinatario
le accetti.
AUDIO BLUETOOTH (FUNZIONE A2DP)
Questa unità supporta l’audio via Bluetooth.
È possibile reindirizzare la riproduzione audio a questa unità quando si riproducono le
audio sul proprio cellulare collegato. Premere
M1, M2, M3 per il controllo della riproduzione
(Pausa/Riproduzione/Arresto) (le funzioni dei
pulsanti dipendono dal modello del telefono).
Premere
funzioni dei pulsanti dipendono dal modello
del telefono).
Nota: Non tutte le chiamate sono possibili
durante la riproduzione di musica.
(1) per scegliere la traccia (le
65
Page 66

SPECIFICHE
GENERALE
Requisiti di alimentazione : DC 12 V, messa aterra negativa
Dimensioni telaio : 178 (B) x 160 (P) x 50 (H) mm
Comandi sonori
Bassi (@ 100Hz) : ±10 dB
Alti (@ 10kHz) : ±10 dB
Potenza massima in uscita : 4 x 40 W
Consumo di corrente : 5 A (max.)
LETTORE CD
Rapporto segnale-rumore : > 55 dB
Separazione canali : > 50 dB
Risposta di frequenza : 40 Hz – 18 kHz
RADIO
Per 2 bande in Europa
FM
Portata di frequenza 87.5 – 108 MHz
IF 10.7 MHz
Sensibilità (S/N=30dB) 10 dBu
Separazione stereo >25 dB
AM
Gamma di frequenza 522 to 1620 kHz
IF 450 kHz
Sensibilità (S/N=20dB) 36 dBu
66
Page 67

RISOLUZIONE PROBLEMI
Per prima cosa controllare che tutti i cavi siano adeguatamente collegati. Usare questa tavola
per risolvere il problema. Contattare il proprio rivenditore se il problema persiste.
Sintomo Ragione Rimedio
Nessuna potenza L’iniezione è spenta. Accendere l’auto.
Il fusibile è bruciato. Sostituire il fusibile.
Il CD non può essere caricato
o espulso
Nessun suono Volume impostato al minimo. Impostare il volume sul livello
Suono distorto Angolo di installazione mag-
I pulsanti non rispondono Il micro-computer integrato
La radio non funziona Il cavo dell’antenna non è
La scansione automatic non
funziona.
A CD è già caricato. Espellere il disco e inserire un
nuovo CD.
Il CD è inserito capovolto. Inserire il disco con l’etichetta
verso l’alto.
Il CD è davvero sporco o grafato.
Temperatura troppo alta. Lasciar raffreddare la mac-
Condensa. Lasciare l’unità spenta per
Il cavo non è collegato correttamente.
giore di 30 gradi.
CD molto sporco o grafato. Pulire il CD o caricare un CD
funziona male.
collegato.
I segnali sono troppo deboli. Selezionare le stazioni ma-
Pulire il CD o caricare un CD
diverso.
china nchè la temperature
ambientale sia normale.
circa 1 ora e provare di nuovo.
desiderato.
Controllare l’impianto.
L’angolo deve essere inferiore
di 30 gradi.
diverso.
Premere RESET. Frontalino
non attaccato adeguatamente.
Collegare il cavo dell’antenna.
nualmente.
67
Page 68

CONTENTS
Installation .................................................69
Installation Tips ...........................................69
Front Installation .........................................69
Install Unit ...................................................69
Remove Unit ...............................................70
Rear Installation..........................................70
Remove And Install Front Panel .............71
Electric Connections ................................73
Location Of Controls ................................74
Basic Operation ........................................75
On/Off .........................................................75
Release Front Panel ...................................75
Sound Settings ...........................................75
Volume........................................................75
Display ........................................................75
Equalizer.....................................................75
Reset ..........................................................75
Mode Selection ...........................................75
System Settings..........................................75
Audio In. .....................................................75
Radio Operation ........................................75
Select Frequency/Band ..............................75
Tuning .........................................................76
Auto Search & Save ...................................76
Scan ...........................................................76
Presets .......................................................76
ANS Operation ...........................................76
CD / MP3 / WMA Operation ......................77
Select CD Mode .......................................77
Select Track ..............................................77
Pause .......................................................77
Intro All Tracks ..........................................77
Repeat Track ............................................77
Shufe ......................................................78
Eject CD ...................................................78
ESP Function ............................................78
Special Functions for MP3/WMA CDs ......78
Support MP3/WMA Decoding Mode .........78
CDs, CD-R Disc Tips ................................78
Memory Card Operation...........................79
Bluetooth ...................................................79
Prepare Bluetooth Operation ...................79
Pairing ......................................................79
Connect ....................................................79
T-Menu .....................................................80
Manual Answer.........................................80
Making A Phone Call ................................80
Toggle Call Between Mobile Phone And
This Unit ...................................................80
Bluetooth Audio (A2DP Function) ............80
Specications ...........................................81
Troubleshooting .......................................82
68
Page 69

INSTALLATION
Remove the screws before installing the unit
Tips:
• Select a mounting position in which the
unit does not interfere with the normale
driving operation
• Connect all electric cables before the nal
installation and check for proper function.
• Use only supplied accessories for correct
installation. The use of unauthorized parts
can cause malfunctions.
• Contact your dealer if holes have to be
drilled or other modication to the vehicle
are necessary.
• Install the unit in a position, where it
does not interfere with the driver and
passengers cannot be injured during
emergency braking.
• Do not install the unit in an angle
greater than 30°; this can cause loss of
performance.
FRONT INSTALLATION (Method A)
Installation Opening
Install this unit in any dashboard with an
opening slot with the following dimensions:
53mm
• Do not install the unit in close proximity to
high temperatures, such as direct sunlight
or heater ducts, dusty, dirty or vibrating
positions.
INSTALLATION
This unit can be properly installed either from
“front” (conventional DIN front-mount) or
“rear” (DIN rear-mount installation, utilizing
threaded screw holes at the sides of the unit
chassis).
For details, refer to the following illustrated
installation methods.
REMOVE THE SCREWS BEFORE INSTALLATION
Please remove the screws before installing
the unit.
30
182mm
Install Unit
First check the connections, and then install
the unit as follows.
1. The engine must be switched off; discon-
nect the battery cable from minus terminal (-).
2. Disconnect all cables and the antenna
cable.
3. Press the release button on the front
panel and remove it (see “Remove and
install front panel”).
4. Lift the upper part of the outer frame and
pull outwards to remove.
5. Loosen the tabs in the sleeve with the
supplied keys. Insert the keys as far as
possible (notch up) into the slots left and
right in the sleeve. Push the sleeve to the
back.
69
Page 70

INSTALLATION
Sleeve
Sleeve
Key L (left)
Outer frame
Front panel
Key
R (right)
6. Install the sleeve in the dashboard slot
and bend the tabs back with a screwdriver. Not all tabs make contact. Bend
the tabs behind the dashboard to x the
sleeve in place.
Screwdriver
Tabs
Dashboard
7. Reconnect cables and antenna and en-
sure not to squeeze any cables.
8. Slide the unit into the sleeve until it locks
into place.
9. Use the metal stip for further fastening
the unit at the rear. Use the supplied
components (hexnut (M5) and spring
washer) to mount the metal stip at the
rear of the unit.
Bend the metal strip, if necessary.
Use the supplied components (screw
5x25mm and washer) to attach the other
side of the metal strip under the dashboard. The metal strip doubles up as
ground connection for the unit.
Note: Attach the short-threaded mounting
screw at the rear of the unit and the longthreaded screw at the dashboard.
Spring washer
Metal strip
Mounting screw
Screw
Washer
Hex nut
10. Reconnect the battery cable to minus
terminal (-). Attach the outer frame and
attach the front panel (see “Remove and
install front panel”).
Remove Unit
1. The engine must be switched off; discon-
nect the battery cable from minus terminal (-).
2. Remove the metal strip at the rear of the
unit (if installed).
3. Press the release button on the front
panel and remove it.
4. Lift the upper part of the outer frame and
pull outwards to remove.
5. Insert the two keys as far as possible into
the slots left and right in the unit and pull
it out of the dashboard.
REAR INSTALLATION (Method B)
Observe the following installation instructions
if you are driving a Nissan or Toyota.
Use the holes marked T (for Toyota) or N
(for Nissan) for the screws left and right of
the unit to attach to the standard mounting
brackets of your vehicle.
70
Page 71

INSTALLATION
Side view with
Dashboard or console
screw holes with
T and N markings
Attach the unit to the standard mounting
brackets for the radio. Align the holes on the
bracket with the holes on the unit and tighten
the screws (5x5mm) on both sides.
Standard
mounting bracket
for radio
Screw
Screw
Note: Outer frame, sleeve and metal strip
are not used in installation method B.
REMOVE AND INSTALL FRONT PANEL
Remove Front Panel
1. Press the release button OPEN to ap
the front panal down.
Left side
Right side
Front panel
2. Slightly lift the front panel and rst pull
the right side, then the left side outward.
3. Store the front panel in the supplied pro-
tective case.
Protective case
Front panel
71
Page 72

REMOVE AND INSTALL FRONT PANEL
Attach Front Panel
1. First insert the right side in the appropri-
ate position and let it lock in place.
Left side
Right side
Front panel
2. Press the front panel onto the main unit
to lock both sides in place.
3. Ensure that the front panel locks properly
in place. The buttons may malfunction
and the display does not show all segments if the front panel is not installed
properly. Press the release button OPEN
to install the front panel again.
Front Panel Precautions
1. Do not drop the front panel.
2. Do not press too hard on buttons or
display when attaching or removing the
front panel.
3. Do not touch the contacts on front panel
or main unit. This can cause malfunctions.
4. Remove dirt and foreign objects with a
clean and dry cloth from the contacts.
5. Protect the front panel from high tem-
peratures and direct sunlight.
6. Protect the front panel from volatile sub-
stances (e.g. petrol, solvents and insecticides).
7. Do not disassemble the front panel.
72
Page 73

ELECTRIC CONNECTIONS
Rear Panel Connections
A ISO connector B (speakers)
B Vehicle at fuse (5A)
C ISO connector A (power supply)
D LINE OUT (pre-amp out):
RCA audio out L/R for amplier
E Antenna jack
ISO Connector A
1. not used
2. not used
3. Antenna power
4. 12V (ignition plus)
5. not used
6. Continuous plus (memory)
7. not used
8. Minus (GND -)
ISO Connector B
1. Speaker rear right +
2. Speaker front right +
3. Speaker front left +
4. Speaker rear left +
5. Speaker rear right -
6. Speaker front right -
7. Speaker front left -
8. Speaker rear left -
73
Page 74

FUNCTIONS
Location Of Controls
1. Tune/seek, track up/down
2. Release button
3. Mic
4.
Accept call
5. PAIR / MOD
6. T-MENU
7. LCD
8. 5 / DIR-
9. 4 / SHF
10. 1 / PAU
11. 1-6 Presets
12. 2 / SCN
13. 3 / RPT
MUTE
14.
15. 6 / DIR+
16. USB port
17. 9 / PTY
18. # / SCAN / CON
19. 0 / DISP
20. AS / PS / * / + / Navi-SCH
21. 7 / AF / MON
22. 8 / EQ / TA
23. AUX IN
24. End call / BND / LOUD / CLR
25. Reset button
26. Volume, SEL / MENU
27. Card slot
28. CD drive
29. Eject
74
Page 75

FUNCTIONS
VOL BAS TRE BAL FAD
Basic Operation
On/Off
Press
hold
Release Front Panel
Press
Sound Settings
Briey press SEL (26) to select the desired
setting mode. Repeatedly press to cycle
through the setting modes:
(Volume) (Bass) (Treble) (Balance) (Fader)
Turn the volume knob (26) clockwise or
counter-clockwise to set the desired sound
quality.
SYSTEM SETTINGS
Press and hold SEL (26) to access the system setting mode. Press SEL (26) to selct
the item to be changed and turn the volume
knob (26) to change the setting.
1) BEEP: ON/OFF
2) P-VOL display
3) AREA EUR/USA
4) Time mode: 24-hour/12-hour format
5) PCLK ON/OFF
Activate/deactivate the time display in
Mute
Press and hold MUTE (14) to mute the
sound; “MUTE” is displayed. Press MUTE
(14) again to unmute the sound.
(14) to turn the unit on. Press and
(14) to turn the unit off.
(2) to release the front panel.
Press button to activate/deactivate the
button beep tone.
Pre-select the volume setting for playback.
Select Europe or USA band with the volume knob (26).
Select between 24-hour and 12-hour format for the time display.
standby mode with the volume knob (26).
Volume
Press and hold LOUD (24) to activate the
loud function; “LOUD” is displayed. Press
and hold again to deactivate the function;
“LOUD” turns off.
Display
Press DISP (19) to access display mode.
Equalizer
Press EQ (22) to select the desired sound
scenario. 5 modes are available:
Reset
Use a pen or similar object to press Reset
(25). Press Reset for following reasons:
- after the initial installation of the unit after
all cables are connected
- in case buttons malfunction
- in case errors are displayed.
Note: The unit does not work for a moment
after pressing the Reset (25) button. Use
some isopropyl alcohol and a cotton swab to
clean the front panel contacts.
Mode Selection
Briey press MOD (5) to select between
Radio, CD, ESB, CARD, AUX and BT Audio.
Audio In
You can connect a portable audio player via
AUX IN (23) on the front panel. Press MOD
(5) after connection to select AUX IN mode.
RADIO OPERATION
Select Frequency/Band
Briey press BND (24) in radio mode to select the desired frequency band. Repeatedly
press to cycle through the bands:
FM1→FM2→FM3→AM→FM1…
75
Page 76

FUNCTIONS
Tuning
Briey press (1) to activate auto
search. Press and hold until “Manual…” is
displayed; you are now in manual mode.
The unit returns to auto search mode and
“AUTO…” is displayed if no button is pressed
for a few seconds.
Auto Search & Save
- Auto save function. Press and hold AS/PS
(20), “SEARCH” is displayed. The radio
scans the frequencies and measures the
signal strength during one seach cycle.
The 6 strongest stations are saved in the
preset memory.
- Briey press AS/PS (20) to recall a preset
station. The corresponding preset number
P1~P6 is displayed.
SCAN
Press SCAN (18) to access search mode
and to scan for a strong station. The unit
plays the station and the frequency ashes
ve times on the display).
Presets
Press one of the number buttons (1-6) to
select a preset station. Press and hold (until
a second beep sounds) to store the current
station under the selected preset number.
ANS (Announcement Name Station)
Operation
- Set ANS mode: Briey press AF (21) to
activate/deactivate ANS mode. “ANS” is
displayed, if activated.
- Press PTY (17) to access PTY select
mode; the station name is displayed. Turn
the volume knob (26) to select a station or
press (1) to nd the desired channel.
1. Pess and hold PTY (8/9) to access the
ANS menu. In this menu use the volume
knob (26) to select the station and
tune into the station.
• TA-SEEK: SEEK/ALARM
a) TA SEEK mode:
If a new station does not broadcast TP
information for more than 5 seconds the
radio automatically tunes into the next station with different Pl but same TP information. If the current station temporarily looses TP information and this stations is set
to RETUNE SHORT or RETUNE LONG,
then the radio tunes into the next station
with same Pl. If no Pl station is found after
one tuning cycle, then the radio tunes into
the next station with TP information.
Note: In TA SEEK mode the current sta-
tion can be replaced with a different station, since the radio scans for a TP station
as soon as eld signal or signal strength
are weak or the current station has no TP
signal (TP has higher priority than PI).
b) TA ALARM mode:
This mode deactivates automatic tuning.
A long dual beep tone sounds (ALARM).
This keeps the current station in this mode
(PI has higher priority than TP). The beep
tones sound if a new station does not
broadcast TP information for more than 5
seconds. If the current station temporarily
looses TP information the beep tone stops.
“PI SEEK” is repressed if a new station
has no ANS signal.
• MASK: DPI/ALL
MASK DPI mode: Marks only AF with dif-
ferent Pl (DPI). Mask ALL mode: Marks all
AF with different Pl and no ANS signal with
high eld strength.
(1)
76
Page 77

FUNCTIONS
• REGION: OFF/ON
Region ON mode: AF or PI Seek function
is implemented for all stations with same
PI code as the current station.
Region OFF mode: The regional code in
the Pl code is ignored when AF is changed
or PI SEEK is implemented.
• TA volume: Preset TA volume level 18,
set to level 0-40
• RETUNE: LONG/SHORT
If the current station looses the Pl informa-
tion for a certain time (set to Retune Short
(30 seconds) or Retune Long (90 seconds)), then the radio scans for the next
station with same PI.
• Trafc Announcements:
Use the TA (22) button as follows:
Press and hold to activate/deactivate TA
mode.
TA mode activated and trafc announce-
ment is broadcast:
In CD (MP3), AUX IN or IPOD modes the
unit temporarily turns into radio mode. It
temporarily tunes into an EON-linked station if detecting an EON trafc announcemant at a different station. The volume is
increased if it is set below the news station
level. The volume is decreased if it is set
too high.
Press the button to deactivate the TA func-
tion temporarily. The function is not permanently deactivated.
PI: Program Identication
PS: Program Service
AF: Alternative Frequencies
TP: Trafc Program
TA: Trafc Announcement
EON: Enhanced Other Network
PTY: Program Type
CD / MP3 / WMA OPERATION
• Select CD Mode
With no CD loaded:
Carefully insert a CD/MP3/WMA CD with the
label up into the CD drive until feeling a slight
resistance. The CD is automatically drawn in.
CD/MP3/WMA playback starts.
With CD/MP3/WMA already loaded in CD
drive:
Briey press MOD (5).
• Select Track
Press
track. The track number is displayed.
Press and hold (1) to rewind/fast forward through the track. Release the respective button for the unit to return to normal
playback.
• PAUSE
Press PAU (10) to pause playback. “PAUSE“
is displayed. Press again to resume playback.
• Intro All Tracks
Press SCN (12) to listen to the rst few
seconds of each track, “SCAN” is displayed.
Press again to play the track in full length,
“SCAN” turns off.
When listening to MP3/WMA CDs press SCN
(12) to listen to the rst few seconds of each
track. “D-SCAN” is displayed. Press again to
exit this mode.
• Repeat Track
Press RPT (13) to continuously repeat the
current track, “REPEAT” is displayed. Press
again to exit repeat mode, “S-RPT” turns off.
When listening to MP3/WMA CDs press and
hold RPT (13) to repeat all tracks, “S-RPT” is
displayed. Press again to exit this mode.
(1) to select the previous/next
77
Page 78

FUNCTIONS
• Shufe
Press SHF (9) to playback all tracks in
random order. “S-SHF“ is displayed. Press
again to exit this mode; “S-SHF” turns off.
When listening to MP3/WMA CDs press and
hold SHF (9) to playback all tracks in random
order. “S-SHF“ is displayed. Press again to
exit this mode.
• Eject CD
Press button (29) to stop CD/MP3/WMA
playback and press (28) to eject the CD.
• ESP Function (optional)
The unit can play CD and MP3 media for up
to 70 seconds without skipping.
SPECIAL FUNCTIONS FOR MP3/WMA
CDs
1. Direct UP/DOWN Selection
Press DIR- (8) or DIR+ (15) to navigate up
or down. These buttons are invalid if no
directory is stored on your MP3/WMA CD.
2. Select Track
• Direct Track Select
Press and hold AS / PS (D-AUD) (20). For
digital Audio CDs “Direct track select” is
displayed.
The unit searches the tracks with the following numeric buttons:
M1-M6, MOD (5), DSP (0),
TUNE/SEEK/TRACK DOWN (8),
TUNE/SEEK/TRACK UP (9)
• Search Folder or File Name
Press AS / PS (D-AUD) (20) twice. “Searching
Directory or le name” is displayed for digital
Audio CDs. The unit searches for les and
folders.
Proceed as follows:
- Use the corresponding buttons for letters
A to Z, space, 0 to 9, _, -, +.
- After each entry press SEL (26).
- Press BND/LOU/ENT (24) to start track
search. ( “ ) is displayed if the selected
track is in a folder.
- Press TUNE/SEEK/TRACK UP/DOWN
for all tracks in this folder and select the
track.
- Press BND/LOU/ENT to conrm and start
playback.
- Repeat above steps if the new selected
tracks are in a folder.
3. DISPLAY ID3 INFORMATION
Press ID3 (20) to display ID3 tags (if avail-
able: title, artist and further information…)
(ONLY FOR MP3 ID3 VERSION)
SUPPORT MP3/WMA Decoding Mode
The unit supports MP3 and WMA (Windows Media Audio) decoding as described
below.
Standard
MPEG1
Audio Layer
3 (44.1kHz)
Windows
Media Audio
(44.1kHz)
Bit Rate
(kbps)
32, 48, 64, 96,
128, 192, 256,
320
64, 96, 128,
192
Supported
Mode
Stereo
Stereo
CD TIPS
A. Tips For CDs:
1. Only use standard CDs to avoid damaging the unit. Only use round CDs, which
are not damaged or warped.
2. Do not attach stickers to CDs; this can
cause malfunctions.
3. Dirt, dust, scratches and warped CDs
cause malfunctions.
B. Tips For CD-R (Recordable) And CD-
RW Discs (Rewritable)
1. Only use CDs with the following logos for
playback:
78
Page 79

FUNCTIONS
2. The unit cannot play CD-R or CD-RW
discs, which are not nalized (see user
manual of your CD-R/CD-RW recorder or
CD-R/CD-RW software for further information).
3. Depending on recording mode, condition of CD and accessories for recording
some CD-R/CD-RW discs cannot be
played on this unit (see *1).
*1: Observe the following recommendations
for reliable playback:
a: Use CD-RW discs with a speed of 1x to
4x and burn with 1x to 2x speed.
b. Use CD-R discs with a speed of 1x to 8x
and burn with 1x to 2x speed.
c. Do not play CD-RW discs, which have
been rewritten 5 times or more.
C. Tips For MP3 Files (MP3 Version Only):
1. Ensure to name MP3 les with “.MP3”
ending.
2. Non-MP3 les cannot be read by the
unit, even if the ending is“.MP3”.
MEMORY CARD Operation
Some models come with a memory card
interface. The card slot is behind the front
panel.
CARD INTERFACE
BLUETOOTH
• Prepare Bluetooth Operation
(i) Check if your mobile phone supports .
Bluetooth before accessing the function.
(ii) Different mobile phones have different
Bluetooth transmission capabilities. For
optimum transmission quality we recommend a distance of 3m or less between
this unit and your mobile phone. Do not
place metal objects between this unit and
your mobile phone.
• PAIRING
1) In any mode press and hold PAIR (MOD)
(5) for 5 seconds, “Pairing…” is displayed.
2) Navigate to the Bluetooth settings menu of
your mobile phone (see operation in your
mobile phone’s user manual).
3) Your mobile phone’s list shows “CarBT”.
Select this device and enter password
“0000”.
4) After successful pairing “CONN OK!” is
displayed.
5) If pairing is not successful “END” is displayed. Try to press and hold PAIR (10).
Note: During pairing only buttons RELEASE
(2), VOLUME (26) and MUTE (14) work. All
other buttons have no function during pairing. During pairing press PAIR (5) to cancel
pairing.
The unit scans for MP3 and WMA les and
plays them automatically after a memory
card is inserted. Operation is similar to MP3
operation (see above). In a different mode
press MOD (5) to select card mode. Do not
insert your memory card for playback if important data are stored on the card.
CONNECT
The unit automatically reconnects. Briey
press
your mobile phone (Note: the mobile phone
must be paired). Under following conditions
you can also pair manually; press and hold
CON (18), “Conn OK!” is displayed. „Connected! OK!“ is displayed and a beep tone
sounds if the new connection is successful.
1) With the mobile phone out of range the
2) You must later reconnect if the mobile
79
(4) to automatically reconnect with
connection is lost. You must later reconnect.
phone is out of range and you have an
incoming call.
Page 80

FUNCTIONS
3) The connection is lost when pressing
(2) to release the front panel.
You must later reconnect after replacing
the front panel.
4) You must later reconnect after the mobile
phone was switched off.
T-MENU
Briey press T-MENU (6) after successful
pairing to access the phone menu. Press and
hold or press buttons (1) to cycle through
the menu functions: PRE NUM/ RECELVED/
DIALED/ MLSSED/ MANU ANS/ TALK.
Find details in the following instructions.
NOTE:
1) RRE NUM: You can store 10 numbers in
PRE NUM mode. Press VOLUME (26)
to enter number mode. Now press SEL
to enter the phone number. Press SEL
again to save the number to the phone
book. Press SEL (26) to access the
phone number.
2) Display last dialled number.
3) Display missed calls.
MANUAL ANSWER
In auto answer ON mode the display shows
“ANSWER? + phone number”. The unit automatically receives the call. In auto answer
OFF mode the display shows “ANSWER? +
phone number”, but you can press
receive or press
MAKING A PHONE CALL
1) You can make a phone call in different
ways via the shortcut keys, received calls
list, dialed calls list or phone book (mobile
phone or SIM card). Find more information in chapter T-MENU.
Manual Phone Number Input
Press
buttons 0~9, *, # to enter the desired phone
number (Note: press * to enter “*”. Press and
hold to enter “+”.) Now press again (4) to
dial the number.
(4) to display “CALL__”. Press
(24) to reject the call.
(4) to
Note: Press CLR (24) to cancel your last
input. Press and hold CLR (24) to cancel all
entered numbers.
TOGGLE CALL BETWEEN MOBILE
PHONE AND THIS UNIT
During your phone conversation press and
hold T-MENU (6) to re-route the call from
the mobile phone to the unit – or vice versa.
Note:
1) When re-routing an incoming call to your
mobile phone the sound is automatically
muted if it was deactivated previously.
2) Outgoing calls cannot be re-routed before the recipient accepts them.
BLUETOOTH AUDIO (A2DP FUNCTION)
This unit supports Bluetooth audio. You can
re-route audio playback to this unit when
playing audio les on your connected mobile
phone. Press M1, M2, M3 for playback control (Pause/Play/Stop) (the button functions
depend on your mobile phone model).
Press
ton functions depend on your mobile phone
model).
Note: No calls are possible during music
playback.
(1) to select the track (the but-
80
Page 81

SPECIFICATIONS
GENERAL
Power supply requirements : DC 12V, negative ground
Chassis dimensions : 178 (W) x 160 (D) x 50 (H) mm
Tone controls
Bass (@ 100Hz) : ±10dB
Treble (@ 10kHz) : ±10dB
Max. power output : 4 x 40W
Current consumption : 5A (max.)
CD PLAYER
Signal-to-Noise Ratio : > 55dB
Channel separation : > 50dB
Frequency response : 40Hz – 18kHz
RADIO
For 2 bands Europe
FM
Frequency range 87.5 - 108MHz
IF 10.7MHz
Sensitivity (S/N=30dB) 10dBu
Stereo separation >25dB
AM
Frequency range 522 to 1620 kHz
IF 450 kHz
Sensitivity (S/N=20dB) 36 dBu
81
Page 82

TROUBLESHOOTING
First check all cables for proper connection. Use this table to remedy the problem. Contact
your dealer if the problem persists.
Symptom Reason Remedy
No Power Ignition is switched off. Turn the ignition on.
Fuse is blown. Replace the fuse.
CD cannot be loaded or
ejected
No sound Volume set to minimum. Set the volume to the desired
Distorted sound Installation angle greater than
Buttons do not respond Integrated microcomputer
The radio does not work Antenna cable not connected. Connect antenna cable.
Auto scan does not work Signals are too weak. Select station manually.
A CD is already loaded. Eject the disc and insert a new
CD.
CD inserted upside down. Insert the disc with the label
up.
CD very dirty or scratched. Clean the CD or load a differ-
ent CD.
Temperature too high. Let the car cool down until the
ambient temperature is normal.
Condensation. Leave the unit turned off for
approx. 1 hour and try again.
level.
Cable not correct connected. Check wiring.
The angle must be less than
30 degrees.
CD very dirty or scratched. Clean the CD or load a differ-
mafunctions.
30 degrees.
ent CD.
Press RESET. Front panel not
properly attached.
82
Page 83

GARANTIE-KARTE
Garantiebewijs • Carte de garantie
Certifi cato di garanzia • Tarjeta de garantia
Cartão de garantia • Guarantee card
Гарантійний талон • Karta gwarancyjna
Záruční list • Garancia lap • Гарантийная карточка
AR 820 CD/MP3/BT
24 Monate Garantie gemas Garantie-Erklarung • 24 maanden garantie overeenkomstig schriftelijke garantie • 24 mois de garantie conformement a la declaration de garantie • 24 meses de garantie segun la declaration de garantia
• 24 meses de garantia, conforme a declaracao de garantia • 24 mesi di garanzia a seconda della spiegazione della garanzia • 24 months guarantee
according to guarantee declaration • Гарантія терміном на два роки згідно
гарантійної декларації • 24 miesiące gwarancji na podstawie karty gwarancyjnej • Zaruka 24 mesiců podle prohlašeni o zaruce • A garanciat lasd a
hasznalati utasitasban • Гарантийные обязательства – смотри руководство
пользователя
Kaufdatum, Handlerstempel, Unterschrift • Koopdatum, Stempel van de leverancier, Handtekening • Date d‘achat, cachet du revendeur, signature • Fecha de compra, Sello del vendedor, Firma
• Data de compra, Carimbo do vendedor, Assinatura • Data dell‘aquisto, timbro del commerciante,
fi rma • Purchase date, Dealer stamp, Signature • Дата придбання, печатка продавця, підпис
• Data kupna, Pieczątka sklepu, Podpis • Datum koupě, Razitko prodejce, Podpis • A vasarlasi
datum, a vasarlasi hely belyegzője, alairas • Дата покупки, печать торговца, подпись
Stand 02/10
 Loading...