

Page 1
AR 737 USB/TFT
Bedienungsanleitung/Garantie
Instruction Manual/Guarantee
Autoradio mit USB & TFT-Monitor
Stereo Car Radio with USB & TFT Monitor
AR 737 USB/TFT
AR 737 USB/TFT
05-AR 737 DVD_D 1 21.08.2006, 11:50:58 Uhr
Page 2

DEUTSCH
DEUTSCH
DEUTSCH
ENGLISH
ENGLISH
Inhalt
Übersicht der Bedienelemente ................................... Seite 3
Bedienungsanleitung .................................................. Seite 4
Technische Daten ....................................................... Seite 15
Garantie....................................................................... Seite 17
Stichwortverzeichnis – Index ...................................... Seite 18
Menü-Übersicht........................................................... Seite 19
DEUTSCH
ENGLISH
ENGLISH
Contents
Overview of the Components ..................................... Page 3
Instruction Manual....................................................... Page 20
Technical Data ............................................................ Page 31
Guarantee ...................................................................Page 33
Index............................................................................ Page 34
Menu overview............................................................ Page 35
2
05-AR 737 DVD_D 2 21.08.2006, 11:50:59 Uhr
Page 3
Übersicht der Bedienelemente
Overview of the Components
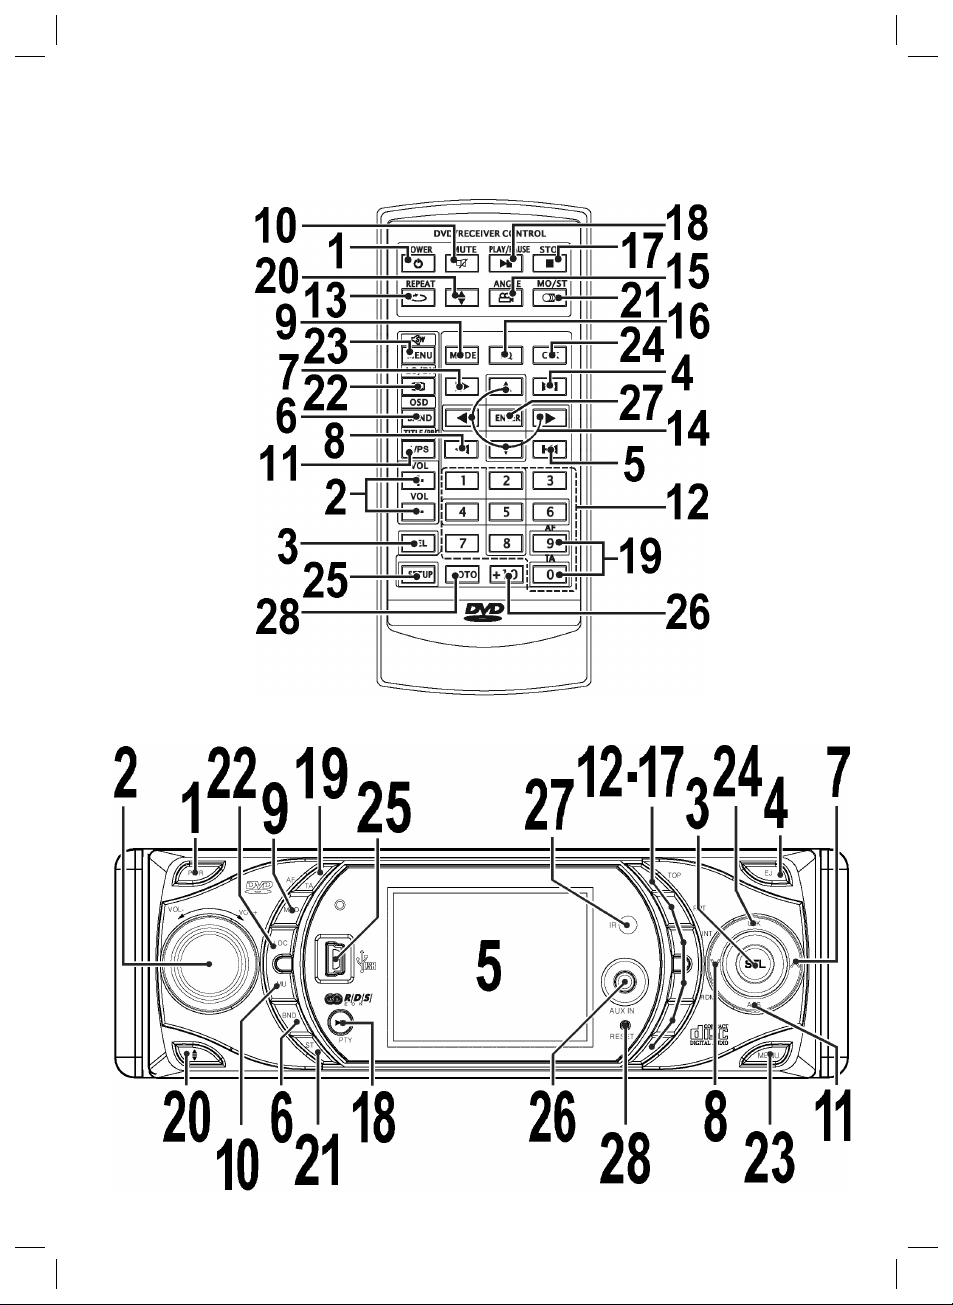
Abbildung 1: Fernbedienung; Illustration 1: Remote Control
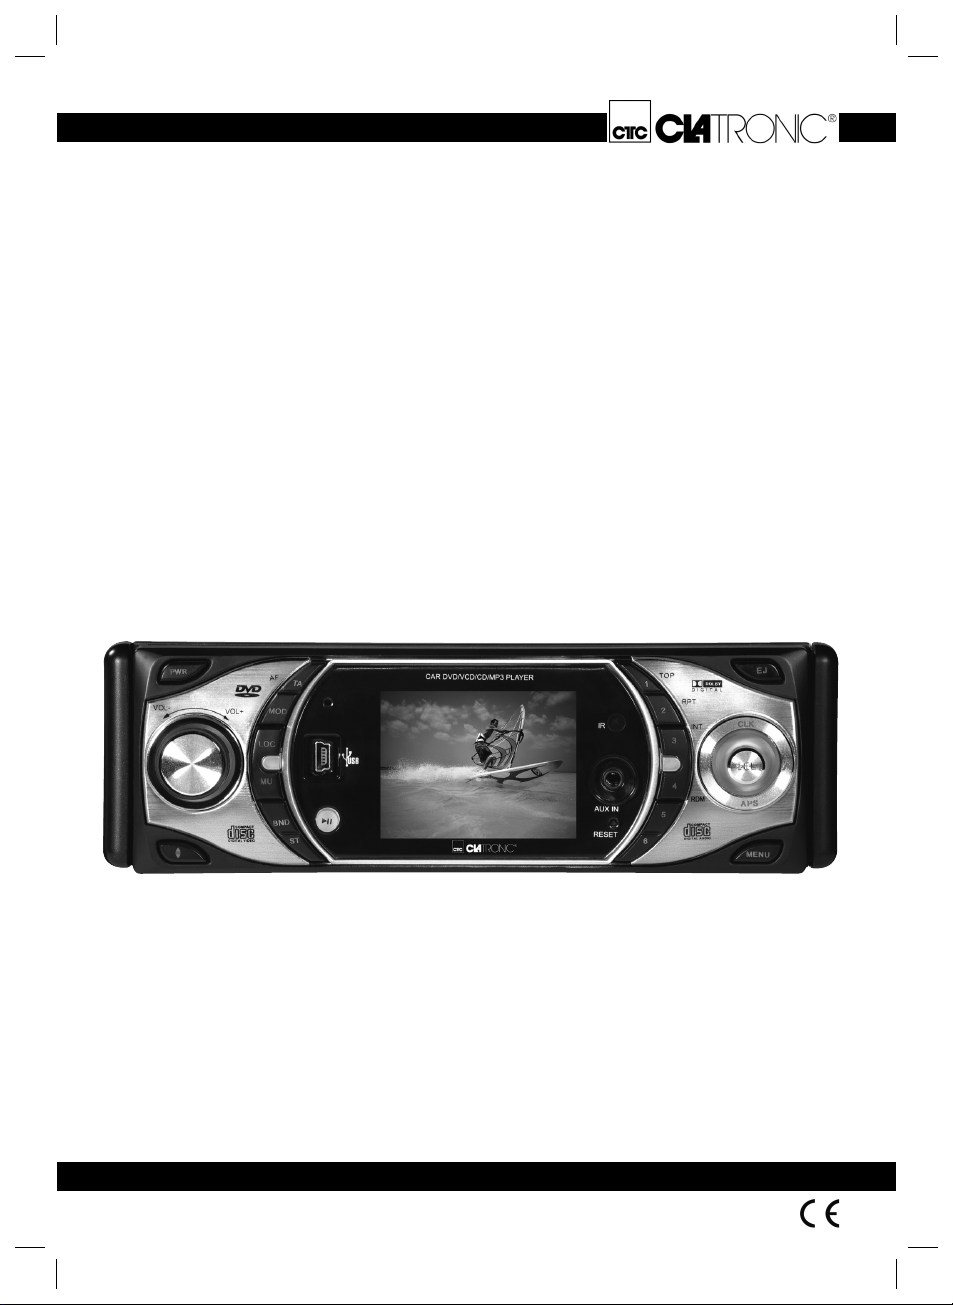
Abbildung 2: Bedienfeld; Illustration 2: Control Panel
3
05-AR 737 DVD_D 3 21.08.2006, 11:51:00 Uhr
Page 4

DEUTSCH
Abbildung 1: Fernbedienung
1 POWER: Standby-Modus aktivieren.
2 VOL +/-: Lautstärke erhöhen/vermindern.
3 SEL:
DEUTSCH
Radio Modus:
- Kurz drücken:
Auswahl des Klang-/ Bildmodus.
- Lang drücken:
REG-, PI-, AF-Funktion Anwahl.
4
왘왘
I: Sprung zum nächsten Kapitel oder Lied.
5 I왗왗: Sprung zum vorherigen Kapitel oder Lied.
6 BAND/OSD:
a) Radio Modus:
Umschalten der 3 FM- und 2 MW-Ebenen.
b) CD/MP3/DVD Modus:
Wechsel der Zeitanzeigen.
7 왘왘: Schnellvorlauf.
8 왗왗: Schnellrücklauf.
9 MODE: Auswahl des Betriebsmodus
(CD/DVD, AUX IN, Radio usw.).
10 MUTE: Stummschalten.
11 A/PS:
Radio Modus:
- Kurz drücken:
Anspielfunktion der gespeicherten Radiosender.
- Lang drücken:
Automatische Senderspeicherung.
TITLE/PBC:
a) Titelmenü der DVD anzeigen (abhängig von der DVD).
b) Playback-Control bei VCD anzeigen.
12 Zifferntasten:
Direkte Anwahl der Kapitel oder Lied-Nummer.
13 REPEAT : Titel, Kapitel, etc. wiederholen.
14 Richtungstasten:
a) Radio Modus:
- Kurz drücken:
Manueller Sendersuchlauf.
- Lang drücken:
Automatischer Sendersuchlauf.
b) MP3/DVD Modus: Navigation im Bildschirmmenü.
15 ANGLE/ : Bildwinkel auswählen.
16 EQ:
Radio Modus:
- Kurz drücken:
Equalizereinstellungen wählen.
- Lang drücken:
Ein- und Ausschalten der LOUDNESS-Funktion.
17 STOP: Wiedergabe stoppen.
18 PLAY/PAUSE:
a) Radio Modus:
PTY Wahl des Programmtyps.
b) CD/MP3/DVD Modus:
Die Wiedergabe starten, Bild/Track anhalten.
19 9/AF:
Lang drücken:
Alternativ Frequenz ein- bzw. ausschalten
0/TA:
Lang drücken:
Vorschaltung für Verkehrsfunk ein- bzw. ausschalten.
20 : Betrachtungswinkel vom Bedienteil ändern.
21 MO/ST/ :
a) Radio Modus:
Stereo/Mono Umschaltung.
b) CD/DVD Modus:
Audio-Einstellungen verändern (abhängig von der DVD).
22 LO/DX/ :
a) Radio Modus:
LOCAL/DX Funktion.
b) DVD Modus:
Untertitel anzeigen/ausblenden
(abhängig von der DVD).
23 MENU/ :
- Kurz drücken:
Hauptmenü der DVD/VCD anzeigen.
- Lang drücken:
Subwoofer ein- bzw. ausschalten.
24 CLK:
- Kurz drücken:
Uhrzeit ein- bzw. ausblenden.
- Lang drücken:
Uhrzeit einstellen.
25 SETUP: Setup-Menü starten.
26 10+: Zur Anwahl der Kapitel/Tracks über 9.
Erneuter Druck erhöht um jeweils 10.
27 ENTER: Die Eingabe bestätigen.
28 GOTO: Passage der CD/DVD direkt ansteuern.
Abbildung 2: Bedienfeld siehe Abschnitt Bedienung.
4
05-AR 737 DVD_D 4 21.08.2006, 11:51:01 Uhr
Page 5
DEUTSCH
Sicherheitshinweise
Lesen Sie vor Inbetriebnahme dieses Gerätes die Bedienungsanleitung sehr sorgfältig durch und bewahren Sie diese inkl.
Garantieschein, Kassenbon und nach Möglichkeit den Karton
mit Innenverpackung gut auf.
• Verwenden Sie das Gerät nur für den vorgesehenen Zweck.
• Das Gerät so einbauen, dass vorhandene Lüftungsöffnungen nicht verdeckt werden.
• Niemals das Gehäuse des Gerätes öffnen. Durch unsachgemäße Reparaturen können erhebliche Gefahren für den
Benutzer entstehen. Bei Beschädigung des Gerätes, das
Gerät nicht mehr in Betrieb nehmen, sondern von einem
Fachmann reparieren lassen.
Diese Symbole können sich ggfs. auf dem Gerät befi nden und
sollen Sie auf folgendes hinweisen:
Das Symbol mit Ausrufezeichen soll den Benutzer
auf wichtige Bedienungs- oder Wartungs-Hinweise
in den Begleitpapieren hinweisen.
Geräte mit diesem Symbol arbeiten mit einem
„Klasse 1-Laser“ zur Abtastung der CD/DVD. Die
eingebauten Sicherheitsschalter sollen verhindern,
dass der Benutzer gefährlichem, für das menschliche Auge nicht sichtbarem Laserlicht ausgesetzt
wird, wenn das CD-Fach geöffnet ist.
Diese Sicherheitsschalter sollten auf keinen Fall überbrückt oder
manipuliert werden, sonst besteht die Gefahr, dass Sie sich dem
Laser-Licht aussetzen.
Kinder
• Zur Sicherheit Ihrer Kinder lassen Sie keine Verpackungsteile (Plastikbeutel, Karton, Styropor, etc.) erreichbar liegen.
Achtung! Lassen Sie kleine Kinder nicht mit Folie spielen.
Es besteht Erstickungsgefahr!
Symbole in dieser Bedienungsanleitung
Wichtige Hinweise für Ihre Sicherheit sind besonders gekennzeichnet. Beachten Sie diese Hinweise unbedingt, um Unfälle
und Schäden am Gerät zu vermeiden:
WARNUNG:
Warnt vor Gefahren für Ihre Gesundheit und zeigt mögliche
Verletzungsrisiken auf.
ACHTUNG:
Weist auf mögliche Gefährdungen für das Gerät oder andere
Gegenstände hin.
HINWEIS: Hebt Tipps und Informationen für Sie hervor.
Verkehrssicherheit
• Die Verkehrssicherheit ist oberstes Gebot. Benutzen Sie
daher Ihre Autoradioanlage immer so, dass Sie stets der
aktuellen Verkehrssituation gewachsen sind.
• Bedenken Sie, dass Sie bei einer Geschwindigkeit von
50 km/h in der Sekunde 14 m fahren.
• In kritischen Situationen raten wir von einer Bedienung ab.
• Die Warnhinweise z.B. von Polizei und Feuerwehr müssen
im Fahrzeug rechtzeitig und sicher wahrgenommen werden
können.
• Hören Sie deshalb während der Fahrt Ihr Programm nur in
angemessenerer Lautstärke.
• Eine, mit der Handbremse des Fahrzeugs, gekoppelte
Sperre verhindert aus Sicherheitsgründen bestimmte Funktionen des Gerätes, während der Fahrt. Um die Funktionen
nutzen zu können, halten Sie an einem sicheren Ort an und
betätigen Sie die Handbremse.
• Bitte beachten Sie, dass der Betrieb des DVD-Players
während der Fahrt und bei laufendem Motor nicht zulässig ist!
• Um Verkehrsunfälle zu vermeiden, installieren Sie das Gerät
so, dass es Sie bei der Bedienung des Lenkrads, Ganghebels usw. nicht behindert.
• Ebenfalls dürfen Sicherheitseinrichtungen, wie z.B. Airbag
und die freie Sicht nicht behindert werden.
• Ein eventuell zusätzlich angeschlossener Monitor darf auf
keinen Fall so montiert werden, das er während der Fahrt
vom Fahrer eingesehen werden kann!
DEUTSCH
Für die Dauer der Montage
und des Anschlusses beachten Sie bitte
folgende Sicherheitshinweise.
• Zuerst den Minuspol, dann den Pluspol der Batterie abklemmen. (Anklemmen in umgekehrter Reihenfolge.)
Bitte beachten: Ist die Batterie vom Netz, verlieren alle
fl üchtigen Speicher ihre Informationen. Beachten Sie die
Sicherheitshinweise des KFZ- Herstellers.
• Die Hauptsicherung muss möglichst nahe (maximal nach
30 cm) am Pluspol der Batterie installiert werden, damit das
Auto vor einem eventuellen Kabelbrand z.B. durch Unfall
geschützt ist. Sollte die Installation dieser Vorgabe nicht
entsprechen, erlischt der Versicherungsschutz.
• Der Querschnitt des Plus- und Minuskabels darf 1,5 mm²
nicht unterschreiten.
• Beim Bohren von Löchern darauf achten, dass keine
Fahrzeugteile beschädigt werden.
Installationstipps:
• Kabelschutztüllen schützen Kabel vor Durchscheuern an
scharfen Karosserieteilen.
• Die Isolierung der Kabel darf bei der Installation nicht
beschädigt werden.
• Das richtige Werkzeug ist bei einer Car-HiFi-Installation
selbstverständlich.
Je nach Bauart kann Ihr Fahrzeug von dieser Beschreibung
abweichen. Für Schäden durch Einbau- oder Anschlussfehler
und für Folgeschäden übernehmen wir keine Haftung.
5
05-AR 737 DVD_D 5 21.08.2006, 11:51:04 Uhr
Page 6
DEUTSCH
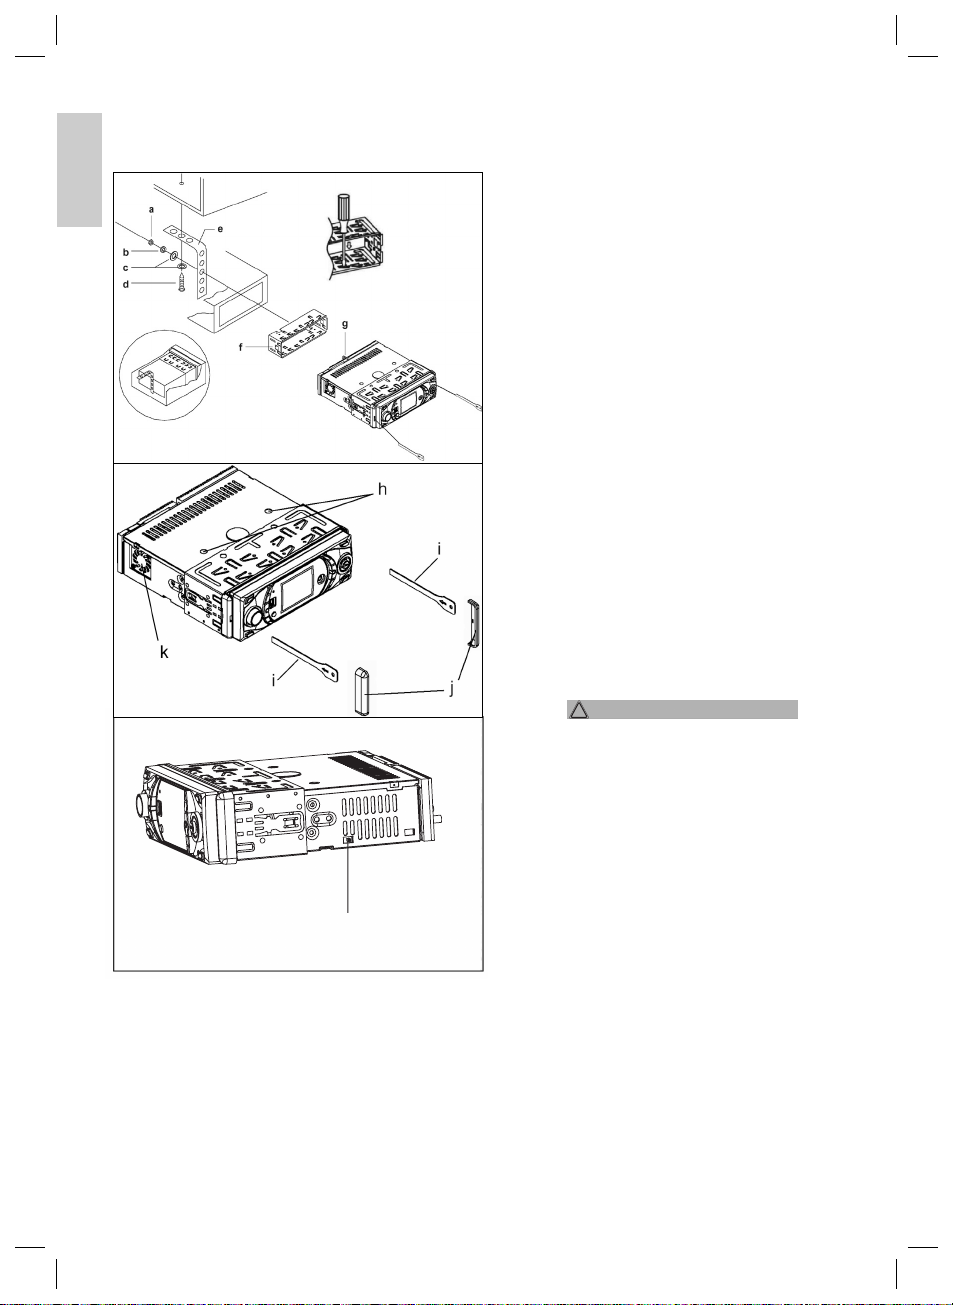
Installation
Montieren Sie das Radiogerät gemäß folgender Darstellungen.
DEUTSCH
a Mutter
b Federscheibe
c Unterlegscheibe
d Schraube
e Montagewinkel
f Einschubgehäuse
g Gewindebolzen
Achtung!
h Schrauben der Transportsicherung
(Bitte vor der Montage entnehmen)
i Ausziehwerkzeug (Schlüssel für die Demontage)
j Blendabdeckung
k Lüfter ACHTUNG: Lüfter nicht verdecken!
l USA/EURO Schalter (Radiofrequenz-Umschalter,
dient zur Auswahl zwischen dem USA und EUROPA
Frequenzband)
l
6
05-AR 737 DVD_D 6 21.08.2006, 11:51:08 Uhr
Page 7
DEUTSCH
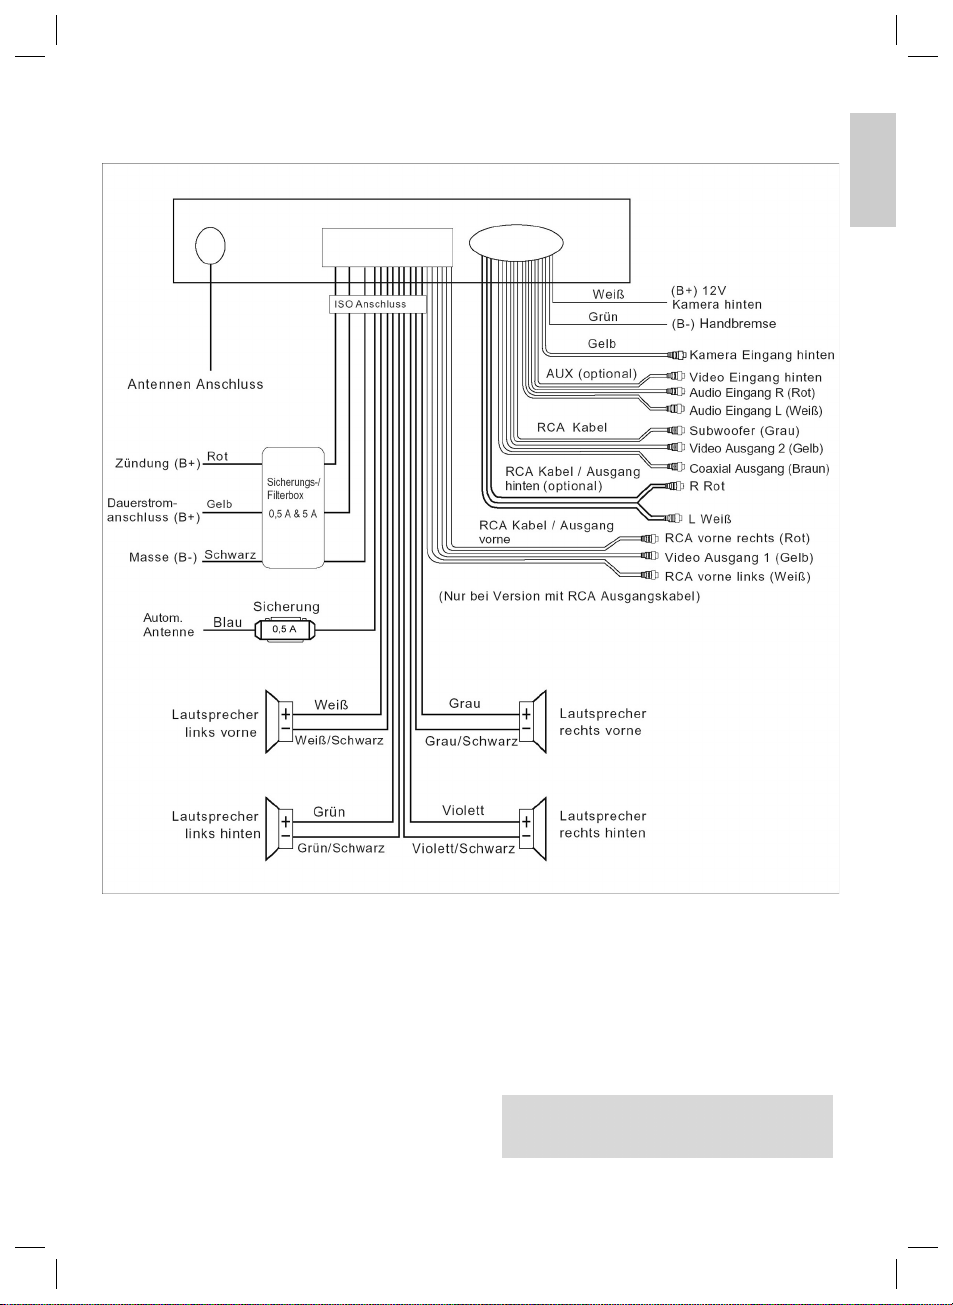
Stellen Sie die Anschlüsse gemäß des Schaubildes her.
Anschluss
DEUTSCH
Achtung:
• Schalten Sie das Gerät erst nach dem Anschluss sämtlicher
Kabel ein.
• Verwenden Sie Lautsprecher mit einer Impedanz von 4
Ohm.
• Die Lautsprecherverkabelung muss Massefrei sein.
• Beim Anschluss eines Subwoofers ist ein Verstärker erforderlich.
• Das Masseanschlusskabel (Handbremse B-) muss angeschlossen werden, damit bei der Wiedergabe von DVDs das
Bild auf dem Monitor wiedergeben wird. Wurde das Kabel
nicht korrekt verbunden, blinkt auf dem Monitor die Meldung
„PARKING BRAKE“.
05-AR 737 DVD_D 7 21.08.2006, 11:51:08 Uhr
• Sie haben die Möglichkeit den eingebauten TFT Bildschirm
als Monitor für eine optionale Rückfahrkamera (nicht im
Lieferumfang enthalten) zu verwenden. Schließen Sie den
„(B+) 12V Kamera hinten“ Anschluss an die Rückfahrleuchte
Ihres Fahrzeuges an und verbinden die Kamera mit dem
Anschluss „Kamera Eingang hinten (Gelb)“. Nach Einlegen
des Rückwärtsgangs erscheint das Kamerabild auf dem
Monitor. Für detaillierte Informationen richten Sie sich bitte
nach der Bedienungsanleitung Ihrer Rückfahrkamera.
HINWEIS:
Kamera hinten" Anschluss, wird das Bild der Kamera nicht
auf dem Monitor wiedergegeben.
Bei fehlender 12V Spannung am "(B+) 12V
7
Page 8

DEUTSCH
Wichtige Zusatzinformation
zum Einbau Ihres Autoradios!
1. Die Schrauben (h) der Transportsicherung bitte vor der
Montage entfernen, da sonst die CD nicht eingezogen
DEUTSCH
werden kann.
2. Das Gerät ist für den Minuspol der Batterie ausgelegt, der
an die Fahrzeugkarosserie angeschlossen sein muss. Dies
bitte vor Installation überprüfen.
3. Bitte beachten Sie beim Einbau/Anschluss Ihres Gerätes,
dass nicht jedes Fahrzeug mit einem “ISO Anschluss“ versehen ist. In diesem Fall empfehlen wir Ihnen den Einsatz
eines KFZ spezifi schen ISO Adapter.
Adapter erhalten Sie im Autozubehörhandel und/oder bei
Ihrer KFZ Werkstatt.
4. Bei der Belegung des “Dauer +“ (Dauerstromanschluss)
kann es je nach Fahrzeugtyp zu Abweichungen kommen.
(Dies ist jedoch für die Speicherung der Senderstationen
notwendig.)
Um alle Funktionen zu gewährleisten ist der Einbau entspre-
chend dieser Anleitung zwingend erforderlich. Im Zweifel
wenden Sie sich an eine autorisierte KFZ Werkstatt.
5. Der maximale Neigungswinkel beim Einbau Ihres
Autoradios darf 20° nicht überschreiten, da bei größeren
Einbauwinkeln die Funktion Ihres Autoradios (CD/DVD-Player) nicht mehr gewährleistet ist.
6. Je nach Fahrzeugtyp können in Ausnahmefällen Störgeräusche im Radio/CD/DVD Betrieb auftreten. Diese lassen
sich mit einem zusätzlichen Entstörfi lter entsprechend
beseitigen. Ihr Gerät ist bereits serienmäßig mit einem
Entstörfi lter ausgerüstet. Trotzdem kann es fahrzeugbedingt
zu Beeinträchtigungen kommen.
Entstörfi lter erhalten Sie im Autozubehörhandel und/oder bei
Ihrer KFZ Werkstatt.
7. Bitte beachten Sie beim Einbau Ihres Radios darauf, dass
die Rückseite und der Lüfter des Radios genügend Freiraum
hat, damit eine ausreichende Kühlung gewährleistet ist.
8. Beim Antennenanschluss gibt es zwei verschiedene
Normen. Erstens den alten (50 Ohm) mit langem,
herausstehendem Rundkontakt fahrzeugseitig und einer
Rundbuchse auf der Radioseite. Zweitens ISO-genormte
Antennenstecker (150 Ohm). Adapter für beide Formate
bieten Zubehörhersteller und/oder Ihrer KFZ Werkstatt an.
Bei VW/Audi unbedingt beachten: die aktive Antenne
benötigt Spannung auf der Abschirmung des AntennenKoaxialkabels, ohne die der Empfang unzureichend ist.
Ein Antennen-Adapter mit Phantomspeisung löst dieses
Problem.
Bedienhinweise
1. Etwaige Fehlfunktionen (ERROR) während des Betriebs
können durch Drücken der RESET Taste behoben werden.
Drücken Sie mit Hilfe eines Drahtes o.ä. die Taste RESET
(28), um die Elektronik wieder zurückzustellen (RESETEN).
8
2. Wenn das Fahrzeuginnere extrem heiß ist, z.B. nach einer
längeren Parkdauer in praller Sonne, den Player nicht
einschalten, bis das Fahrzeug nach einer kurzen Fahrzeit im
Inneren etwas abgekühlt ist.
3. Die Wiedergabe anwenderseitig erstellter CD/DVD kann
durch die Vielzahl der verfügbaren Software und CD/DVDMedien nicht garantiert werden.
4. Einige Tasten fi nden Sie sowohl am Gerät als auch auf der
Fernbedienung. Gleichlautende Tasten bewirken die gleiche
Funktion.
Bedienung (Abbildung 2: Bedienfeld)
1. PWR Ein-/ Ausschaltknopf
Zum Einschalten des Gerätes diese Taste drücken. WELCOME erscheint im Display. Zum Ausschalten des Gerätes
diese Taste gedrückt halten. SEE YOU erscheint im Display.
2. VOL-Multifunktionsknopf (Lautstärke)
Im normalen Spielbetrieb dient der Multifunktionsknopf zur
Einstellung der Lautstärke. In Verbindung mit der zuvor
gedrückten SEL-Taste können Änderungen in Menüs z.B.
dem Klangmodus vorgenommen werden.
3. SEL-Taste (Auswahl)
a) Drücken Sie die SEL-Taste kurz, um in das Auswahl-
menü des Klang-/ Bildmodus zu gelangen. Im Display
erscheint „BASS“ zur Einstellung der Bässe. Durch
wiederholtes Drücken der SEL- Taste können Sie nun
die einzelnen Menüpunkte wie BASS (Bässe), TREBLE
(Höhen), BALANCE (Balance) und FADE (Überblendregelung), BG COLOR (Hintergrundfarbe), COLOR*
(Farbe), BRIGHT* (Helligkeit), CONTRAST* (Kontrast),
TINT* (Farbton), VOLUME (Lautstärke), anwählen. Sie
ändern die Einstellungen der einzelnen Menüpunkte
durch Drehen des Multifunktionsknopfes VOL (2).
(* nur im DVD Modus.)
b) Drücken Sie die SEL-Taste lang, um in die folgenden
Auswahlmenüs zu gelangen:
• REG ON / REG OFF
• PI MUTE / PI SOUND
• AF OFF / AF ON
Durch wiederholtes Drücken der SEL-Taste können Sie
nun die einzelnen Menüpunkte anwählen. Sie ändern
die Einstellungen der einzelnen Menüpunkte durch
Drehen des Multifunktionsknopfes VOL.
• REG-Funktion
Einige Sender teilen zu bestimmten Zeiten ihr Programm in
Regionalprogramme mit unterschiedlichem Inhalt auf.
REG ON: Im Display erscheint wenige Sekunden lang die
Meldung „REG ON“.
HINWEIS:
• Die Anzeigekapazität des Displays ist begrenzt. Es ist
möglich, dass im doppelten Anzeigemodus einzelne
Segmente des Displays gelöscht sind.
• Mit der Funktion REG ON wird verhindert, dass das
Radio zu Alternativfrequenzen wechselt, die einen
anderen regionalen Programminhalt haben.
05-AR 737 DVD_D 8 21.08.2006, 11:51:09 Uhr
Page 9

DEUTSCH
REG OFF: Die Programmkennung (PI) des Regionalsen-
deprogramms wird bei der Suche nach einer Alternativfrequenz (AF) oder einer Programmkennung (PI) ignoriert.
• PI MUTE/PI SOUND (nur für Radiobetrieb)
Sollten Sie sich in einem Gebiet bewegen indem sich zwei
Programm Identifi kationen (PI) überschneiden, können Sie
für die Wiedergabe die Option PI SOUND und PI MUTE
wählen. Ein wechselseitiges Umschalten der Programm
Identifi kation soll vermieden werden.
PI SOUND: Sollte dennoch eine Umschaltung stattfi nden,
wird der Klang eines anderen Senders nur für weniger als
eine Sekunde eingeblendet.
PI MUTE: Der Klang eines anderen Senders wird unter-
drückt.
• AF (Alternativ Frequenzen)
AF ist eine Funktion die mit Hilfe des RDS (Radio Data
System) arbeitet und nur bei FM Sendern genutzt werden
kann. Das Gerät sucht im Hintergrund die am besten zu
empfangene Frequenz des eingestellten Senders.
AF ON: Wenn die AF-Funktion angewählt wird, prüft
das Radio laufend die Signalstärke der AF-Frequenz.
Das Prüfi ntervall für jede AF-Frequenz hängt von der
Signalstärke des aktuellen Senders ab und variiert von ein
paar Minuten im Fall eines starken Senders bis zu ein paar
Sekunden bei schwachen Sendern. Jedes Mal, wenn die
neue AF-Frequenz stärker ist, als die aktuell eingestellte
Station, schaltet das Gerät für kurze Zeit auf diese Frequenz
um und es wird ein bis zwei Sekunden lang die Meldung
„NEW FREQUENCY“ angezeigt. Da die Stummzeit beim
Frequenzwechsel bzw. der Prüfzeit sehr kurz ist, ist dies
während des normalen Programms fast nicht hörbar.
HINWEIS:
Die AF Funktion kann ebenfalls durch gedrückt halten der
TA Taste (19) aktiviert werden.
Der Status der AF Funktion wird durch ein AF-Zeichen im
Display angezeigt.
• Erscheint das AF Zeichen im Display ist die AF-Funktion
eingeschaltet und es werden RDS-Sendedaten empfangen.
• Blinkt das AF Zeichen im Display, ist die AF-Funktion
zwar angewählt, es kann jedoch gerade kein RDSSendesignal empfangen werden.
AF OFF: Die Funktion ist ausgeschaltet. Das AF Zeichen im
Display erlischt.
4. EJ-Taste
Zum Einlegen und Auswerfen der CD/DVD diese Taste
drücken. Das Bedienteil schwenkt nach unten. Schieben
Sie die CD/DVD mit der beschrifteten Seite nach oben
leicht in den CD-Schlitz, bis das Gerät die CD/DVD von
selbst einzieht. Das Bedienteil schwenkt automatisch in die
Normalposition zurück.
HINWEIS:
• Nicht mit den Fingern hinter das Bedienteil fassen.
Es besteht Verletzungsgefahr, wenn was Bedienteil
wieder in die Normalposition fährt.
• Wenn Sie keine CD/DVD einlegen, fährt das Bedienteil erst nach einiger Zeit in die Normalposition zurück
oder drücken Sie die EJ-Taste erneut.
5. TFT-Display (Flüssigkristallanzeige)
6. BND-Taste
Drücken Sie kurz die BND-Taste, um zwischen den 3 FM(UKW) Ebenen und den 2 MW (Mittelwelle) umzuschalten.
Die Bezeichnung der entsprechenden Ebene FM1, FM2,
FM3, MW1, MW2 wird in der TFT-Anzeige angezeigt.
7./8.
-/ -Tasten TUNE, SEEK, TRACK, SKIP UP/DOWN
a) Im Radiomodus: Bewegen Sie die SEL Taste in
Richtung oder , um manuell einen gewünschten
Radiosender einzustellen. Halten Sie die SEL Taste in
Richtung oder gedrückt, um die Suche nach einem
Radiosender zu starten.
b) Im CD/DVD-, USB - Modus: Zum Vor- bzw. Rück-
wärtsspringen die SEL Taste kurz in Richtung bzw.
drücken. Zum Spulen von Titeln die SEL Taste in
Richtung bzw. ca. 2 Sekunden gedrückt halten. FF
X2 erscheint im Display. Erneutes Bewegen der SEL
Taste in Richtung bzw. für ca. 2 Sekunden erhöht
die Spulgeschwindigkeit. Zur Auswahl stehen FF X2, FF
X4, FF X8, FF X16. Drücken Sie die 왘II Taste (18) um
zur Normalen Wiedergabe zurückzukehren.
9. MOD-Taste
Drücken Sie diese Taste zur Auswahl des CD/DVD-Player-,
AUX IN-, Radio-Modus usw.
10. MU-Taste (Stummschalten)
Drücken Sie die MU-Taste, um die Lautsprecher für
kurze Zeit stumm zu schalten. MUTE blinkt im Display.
Drücken Sie diese Taste erneut, um diese Funktion wieder
aufzuheben. Diese Funktion kann durch Betätigen des VOL
Multifunktionsknopfes ebenfalls aufgehoben werden.
11. APS-Taste (Automatische Senderspeicherung)
Im Radio-Modus:
a) Speicherfunktion:
Bewegen Sie die SEL Taste in Richtung APS für ca.
2 Sekunden, um die automatische Senderspeicherung
zu aktivieren.
Das Gerät sucht innerhalb des aktuellen Frequenz-
bandes z.B. FM 1 nach den größten Signalstärkepegel
bis der Suchzyklus abgeschlossen wird. Die sechs
stärksten Sender werden den entsprechenden Speicherplätzen zugeordnet. Anschließend wird der Sender
des ersten Speicherplatzes eingestellt.
Möchten Sie noch weitere Sender im FM-Band suchen
drücken Sie die BND-Taste um auf das FM2 bzw. FM3
Band zu wechseln. Bewegen Sie die SEL Taste erneut
in Richtung APS für ca. 2 Sekunden, um die weitere
Suche zu starten.
DEUTSCH
9
05-AR 737 DVD_D 9 21.08.2006, 11:51:13 Uhr
Page 10

DEUTSCH
b) Anspielfunktion:
Bewegen Sie die SEL Taste kurz in Richtung APS,
spielt das Radio alle voreingestellten Sender des
Frequenzbandes an.
DEUTSCH
HINWEIS:
Die Anspielfunktion endet automatisch beim ersten
Speicherplatz vom Frequenzband FM1.
Im DVD Modus:
Bewegen Sie die SEL Taste kurz in Richtung APS, um den
TFT Monitor am Gerät aus- bzw. wieder einzuschalten.
12-17.
als Stationstasten (1–6) vorgewählter Sender und als
1TOP-, 2RPT-, 3 INT-, 4 RDM-Tasten im CD Betrieb
a) Radio-Betrieb
Durch kurzes Drücken wird über diese Tasten ein
voreingestellter Radiosender direkt angewählt. Werden
diese Tasten länger als eine Sekunden gedrückt, wird
der aktuell eingestellte Sender unter der gewählten
Stationstaste gespeichert.
b) CD-Betrieb
Durch kurzes Drücken wird der entsprechende CD/MP3
Titel direkt angewählt. Halten Sie die entsprechende
Taste (1TOP, 2RPT, 3INT, 4RDM) für ca. 3 Sekunden
gedrückt, um folgende Funktionen ein- bzw. auszuschalten:
• Drücken Sie die 1TOP-Taste, um zum ersten Titel
der CD/MP3 zu springen.
HINWEIS: Bei DVD Betrieb ohne Funktion.
• Drücken Sie die 2RPT-Taste. Der aktuelle gespielte
Titel wird wiederholt. Drücken Sie diese Taste
erneut um diese Funktion wieder aufzuheben. Bei
DVD können Sie das Kapitel, den Titel oder die
gesamte DVD wiederholen.
• Drücken Sie die 3INT-Taste. Jeder Titel der CD wird
jeweils 6 Sekunden lang angespielt. Drücken Sie
diese Taste erneut, um die Suche abzubrechen. Der
aktuell angewählte Titel wird abgespielt.
Bei DVD Betrieb blendet sich ein Menü ein. Hier
können Sie mit den
Fernbedienung zwischen 4 Optionen wählen.
Bestätigen Sie Ihre Auswahl mit der ENTER Taste
(27).
왗, 왘, 왖, 왔
Tasten (14) der
HINWEIS: Bei MP3 Betrieb ohne Funktion.
• Drücken Sie die 4RDM-Taste. Die DVD, MP3-/CD
Titel werden in zufälliger Reihenfolge abgespielt.
Drücken Sie diese Taste erneut um diese Funktion
wieder aufzuheben.
18. 왘II-/PTY-Taste
Radio-Betrieb:
PTY Wahl des Programmtyps
Neben dem Sendername übermitteln einige FM-Sender
auch Informationen über den Programmtyp ihres Pro-
gramms. Diese Informationen können von Ihrem Autoradio
angezeigt werden.
Solche Programmtypen können z.B. sein:
SPORT NEWS POP CLASSICS
Mit der PTY-Funktion können Sie gezielt Sender eines be-
stimmten Programmtyps auswählen. Drücken Sie wiederholt
왘
II-/PTY-Taste um in die PTY Auswahl zu treffen. Im
auf die
Display erscheint anschließend kurz die Einblendung „PTY
SEEK“.
Wenn PTY angewählt wird, startet das Radiogerät die
Suche nach entsprechenden PTY-Informationen und stoppt,
wenn die gesuchte PTY-Information gefunden wurde. Wird
der gesuchte Programmtyp nicht gefunden erscheint im Display „NO PTY“. Wenn die gesuchte PTY-Information nicht
mehr besteht, schaltet sich die PTY-Funktion automatisch
auf normalen Modus um.
CD/DVD/USB Betrieb:
Drücken Sie die 왘II-/PTY-Taste, um das Abspielen der CD
zu unterbrechen (Pausenfunktion). Drücken Sie diese Taste
erneut, um diese Funktion wieder aufzuheben.
19. TA-/AF-Taste
a) TA Traffi c Annonuncement
(Vorrangschaltung für Verkehrsfunk)
Die TA-Funktion wird durch kurzes Drücken der TATaste aktiviert und durch ein TA-Zeichen im Display
angezeigt. Beim Radiobetrieb in einem FM Frequenzband beginnt automatisch die Suche nach einem
Verkehrsfunksender (TA SEEK).
Wenn ein FM-Sender empfangen wird, der periodisch
die neuesten Verkehrsfunkinformationen ausstrahlt,
leuchtet die TP-Anzeige im Display auf.
Bei eingeschalteter TA-Funktion unterbrechen die UKW/
FM Verkehrsfunkinformationen automatisch den CD
Betrieb (im Display erscheint TRAFFIC). Der Lautstärkepegel wird auf den Mindestwert für die Übertragung
von Verkehrsnachrichten angehoben.
Nach Beendigung der Verkehrsfunkinformationen setzt
das vorher eingestellte Programm wieder ein.
Unterbrechung der TA-Funktion:
Möchten Sie die aktuelle Verkehrsnachricht unterbrechen, Drücken Sie kurz die TA-Taste. Der TA-Modus
wird hierdurch ausgeschaltet.
b) AF (Alternativ Frequenz)
Siehe Punkt 3.
20. -Taste (Bedienteilwinkel)
Sie haben die Möglichkeit den Betrachtungswinkel vom
Bedienteil zu verändern. Drücken Sie bis zu 4x auf die
-Taste, um die gewünschte Position auszuwählen.
HINWEIS:
Nicht mit den Fingern hinter das Bedienteil fassen. Es
besteht Verletzungsgefahr, wenn was Bedienteil wieder in
die Normalposition fährt.
10
05-AR 737 DVD_D 10 21.08.2006, 11:51:17 Uhr
Page 11

DEUTSCH
21. ST-Taste
Radio-Betrieb:
STEREO/MONO Umschaltung
DVD-Betrieb:
Zum Auswählen der Audiosprachen, sofern auf der DVD
verschiedene Audiosprachen vorhanden sind.
CD -Betrieb:
Zur Auswahl zwischen Stereo, Mono links, Mono rechts und
MIX-Mono.
22. LOC-Taste
LOCAL/DX (EON) (Nur im Radiobetrieb wählbar)
Ihr Radio kann RDS EON Daten empfangen. Unter EON
versteht man die Übermittlung von zusätzlichen Senderinformationen innerhalb einer Senderkette z.B. des WDR. Im
Falle einer Verkehrsdurchsage (TA) wird innerhalb einer
Senderkette von einem Nicht-Verkehrsfunksender auf den
entsprechenden Verkehrsfunksender der Senderkette
umgeschaltet.
Der Empfang dieser Sendedaten wird durch das EON
Zeichen im Display angezeigt. Sie können zwischen dem
LOC(AL) bzw. DX (DISTANCE)-Modus für den lokalen oder
den Fernverkehrsfunkempfang wählen.
LOC(AL):
Durch diese Funktion wird ein Umschalten zu einer EONVerbindung mit zu schwachem Signalpegel vermieden. Das
Radio schaltet nicht auf diesen Sender um und der Hörer
nimmt kaum Störungen wahr.
DX (DISTANCE)-Modus:
In diesem Modus versucht die EON TA Schaltung die EON
TA Informationen von einem erreichbaren Sender zu erhalten und so die Empfangsqualität zu verbessern.
23. MENU-Taste
Im DVD Modus zum Anwählen des DVD-Hauptmenüs.
24. CLK-Taste (Uhrzeit)
a) Bewegen Sie die SEL-Taste (3) in Richtung CLK, um die
Uhrzeit ein- bzw. auszublenden.
b) Zum Einstellen der Uhrzeit halten Sie die SEL-Taste für
ca. 3 Sekunden in Richtung CLK gedrückt. Die Stunden
blinken im Display. Mit Hilfe des VOL Multifunktionsknopf (2) nehmen Sie die Einstellung vor. Bewegen Sie
anschließend die SEL-Taste (3) in Richtung CLK. Die
Minuten blinken. Mit Hilfe des VOL Multifunktionsknopf
(2) nehmen Sie die Einstellung vor. Zum Abspeichern
bewegen Sie erneut die SEL-Taste (3) in Richtung CLK.
HINWEIS:
Werden RDS Daten empfangen, wird die Uhrzeit
automatisch eingestellt.
25. USB-Anschluss
Dieses Gerät ist nach den letzten Stand der technischen
Entwicklungen im USB Bereich entwickelt worden. Die
große Anzahl von verschiedenen USB Speichermedien
jeglicher Art die heute angeboten werden, erlauben es leider
nicht, eine volle Kompatibilität mit allen USB Speichermedien zu gewährleisten. Aus diesem Grund kann es in
seltenen Fällen zu Problemen bei der Wiedergabe von USB
Speichermedien kommen. Dies ist keine Fehlfunktion des
Gerätes.
Wollen Sie Daten von einem USB-Stick abspielen, stecken
Sie diesen in die dafür vorgesehene Öffnung. Verwenden
Sie hierfür das beilegende Adapterkabel. Zum Abspielen
des Sticks wählen Sie mit Hilfe der MOD-Taste den USBStick an. Die Daten werden automatisch abgespielt.
HINWEIS:
Sollte es zu Problemen beim Betrieb über den USB
Anschluss kommen, verwenden Sie ein entsprechendes
Adapterkabel und verfahren wie unter Punkt AUX IN
beschrieben.
26. AUX IN Buchse
Zum Anschluss von analogen Wiedergabegeräte. Über
diese Buchse können Sie auch den Ton anderer Wiedergabegeräte wie DVD-Player, Computer usw. über die
Lautsprecherboxen hören.
1. Schließen Sie bitte das externe Gerät, mit einem 3,5
mm Stereo-Klinkenstecker, an die AUX IN Buchse an.
2. Drücken Sie die MOD Taste (9) um den AUX IN
Anschluss anzuwählen.
3. Über die Lautsprecher hören Sie die Tonwiedergabe
aus dem externen Gerät.
4. Mit dem VOL Multifunktionsknopf (2) können Sie die
Lautstärke verändern.
5. Die weitere Vorgehensweise entnehmen Sie bitte der
Bedienungsanleitung der externen Tonquelle.
27. IR (Infrarot)
Sensor für die Fernbedienung
28. RESET-Knopf
Durch Spannungsschwankungen im Bordnetz Ihres Fahrzeugs kann es vorkommen das sich der Steuerprozessor
Ihres Radios „aufgehangen“ hat. Hierbei handelt es sich
nicht um einen Gerätefehler! Durch betätigen dieser Taste, mit einem spitzen Gegenstand, wird dieser neu gestartet
(zurückgesetzt).
Über den DVD Player
Sie können mit dem DVD-Player eine Vielzahl von Datei-Formaten abspielen ➯ „Technische Daten“.
Beachten sollten Sie jedoch, dass DVDs in vielen Fällen mit
einem sogenannten „Regionalcode“ versehen sind. Dieser gibt
an, für welche Weltregion die DVD bestimmt ist. So kennzeichnet der Regionalcode „1“ beispielsweise DVDs, die für die USA
und Kanada bestimmt sind. Der Regionalcode „2“ hingegen
kennzeichnet DVD, die für Europa bestimmt sind.
DEUTSCH
11
05-AR 737 DVD_D 11 21.08.2006, 11:51:20 Uhr
Page 12

DEUTSCH
HINWEIS:
Sie können mit dem DVD-Player nur solche DVDs abspielen,
die mit dem Regionalcode 2 gekennzeichnet sind. Es gibt
sowohl eine Vielzahl von Brenn- und Komprimierungsverfah-
DEUTSCH
ren als auch große Qualitätsunterschiede bei (gebrannten)
CDs/DVDs. Darüber hinaus hält die Musikindustrie keine
festen Standards beim Kopierschutz ein. Aus diesen Gründen
kann es in seltenen Fällen zu Problemen bei der Wiedergabe
von CDs, DVDs und MP3 CDs kommen. Dies ist keine
Fehlfunktion des Gerätes.
Darüber hinaus kann es in Einzelfällen problematisch sein,
CDs oder DVDs abzuspielen, die auf einem Computer erzeugt
wurden (z.B. Urlaubsbilder). Überprüfen Sie im Falle von
Problemen die Einstellungen des DVD-Brennprogrammes auf
Ihrem Computer. Stellen Sie insbesondere sicher, dass die DVD
fi nalisiert wurde. Weitere Informationen hierzu fi nden Sie in der
Bedienungsanleitung Ihres Aufnahmegerätes.
Eingabe nicht möglich
Ist eine von Ihnen gewählte Funktion oder Eingabe nicht möglich, erscheint auf dem Bildschirm
das nebenstehend abgebildete Zeichen.
Voreinstellungen ändern
Zahlreiche Voreinstellungen können Sie komfortabel über das
Bildschirm-Menü verändern.
Sie starten das Menü zum Ändern der Voreinstellungen, indem
Sie auf die Taste SETUP (Abb. 1/25) der Fernbedienung
drücken (nur im DVD-Modus).
HINWEIS:
• Viele der Voreinstellungen können Sie sowohl über die
Fernbedienung als auch über das Menü ändern. Der
Unterschied ist: Ändern Sie die Vorsteinstellungen über
die Fernbedienung, so haben die Änderungen nur bis zum
Ausschalten des DVD-Players oder bis zum Entfernen der
DVD Bestand.
• Änderungen, die im Menü vorgenommen werden, sind
hingegen dauerhaft.
Menü verwenden
Navigation und Auswahl
• Im Hauptmenü bewegen Sie sich mit den Richtungstasten
(Abb. 1/14) der Fernbedienung (왗, 왘).
• Im Untermenü hingegen bewegen Sie sich mit den Rich-
tungstasten (왖, 왔).
• Einen Menüpunkt wählen Sie mit der Taste ENTER (Abb.
1/27) aus.
• Eine Option (z.B. „PAL“ in der Abbildung oben) wählen Sie
ebenfalls mit der Taste ENTER aus. Die ausgewählte Option
(im Beispiel „NTSC“ ist nun hervorgehoben).
Schieberegler
In einigen Menüs fi nden Sie Schieberegler. Sie verwenden den
Regler folgendermaßen:
1. Wählen Sie ihn mit der Taste ENTER aus.
2. Bewegen Sie den Regler mit den Richtungstasten (왖, 왔).
3. Bestätigen Sie Ihre Eingabe mit der Taste ENTER.
Überblick über das Hauptmenü
• Allgemeine-Einstellungen (1)
• Lautsprecher-Einstellungen (2)
• Digital-Einstellungen (3)
• Bevorzugte-Einstellungen (4)
Menü-Aufbau verstehen
Im Setup-Menü fi nden Sie zwei Menü-Ebenen:
• Hauptmenü: Die Hauptebene wird durch graphische
Symbole dargestellt.
• Untermenü: Unter jedem Hauptmenü-Eintrag fi nden Sie die
zugehörigen Untermenüeinträge.
12
05-AR 737 DVD_D 12 21.08.2006, 11:51:23 Uhr
HINWEIS:
Einige der Menüeinstellungen sind nur im Stopp-Modus
anwählbar (DVD abhängig).
TV Monitor
Hier können Sie die Ausgabe des DVD-Players an das Seitenverhältnis Ihres Wiedergabegerätes anpassen.
Page 13

DEUTSCH
Zum Hintergrund: Sofern Sie keinen Wide-Screen-Fernseher
haben, weist Ihr Fernsehbild ein Seitenverhältnis von 4:3 auf.
Die meisten Spielfi lme weisen jedoch ein Seitenverhältnis von
16:9 auf, deren Bild ist also zu breit für einen Fernseher.
Hier können Sie angeben, wie die Wiedergabe des Films an Ihr
Wiedergabegerät angepasst wird:
• Norm/PS: Sie sehen nur den mittleren Bereich des Films.
Die Ränder werden abgeschnitten („Pan-Scan“).
• Norm/LB: Sie sehen den gesamten Bereich des Films.
Hierzu wird dieser verkleinert, wodurch über und unter dem
Film schwarze Balken erscheinen („Letter-Box“).
• Breit: Wählen Sie diese Option, wenn Sie ein Wide-ScreenFernseher zur Wiedergabe verwenden. Beachten Sie dabei,
dass Filme, die mit einem Seitenverhältnis von 4:3 aufgezeichnet wurden, nach wie vor im Verhältnis 4:3 angezeigt
werden. Es wird also nicht die gesamte Fläche des WideScreen-Fernsehers zur Wiedergabe verwendet.
• SPDIF OFF: Es wird ein analoges und kein digitales Audio-
• SPDIF/RAW: Es wird ein digitales Audiosignal ausgegeben.
• SPDIF/PCM: Es wird ein digitales Audiosignal ausgegeben,
Erfolgt keine Audioausgabe, obwohl Sie den DVD-Player an
einen Verstärker angeschlossen haben, so haben Sie vermutlich für den Audio-Ausgang eine falsche Einstellung gewählt.
Kommentare
Allgemeine Einstellungen
Winkelzeichen (Kamerawinkel)
Auf manchen DVDs befi nden sich fi lmbegleitende Kommentare,
wie z.B. Untertitel für Hörgeschädigte.
• Ein: Die Kommentare werden angezeigt.
• Aus: Es werden keine Kommentare angezeigt.
Falls die DVD Sequenzen enthält, die von unterschiedlichen
Kamerawinkeln aus aufgenommen wurden, können Sie mittels
der Taste ANGLE (Abb. 1/15) die verschiedenen Kamerawinkel
auswählen. Diese Funktion steht nur zur Verfügung, wenn die
DVD Szenen mit verschiedenen Kamerawinkeln enthält.
Bevor Sie die Funktion nutzen können, müssen Sie diese zuerst
aktivieren.
• Ein: Das Winkelzeichen wird im Bildschirm angezeigt.
• Aus: Es wird kein Winkelzeichen im Bildschirm angezeigt.
OSD Sprache
Bildschirmschoner
Das Gerät kann ein Standbild beliebig lange auf dem Bildschirm
anzeigen. Hierbei können Schäden am Bildschirm entstehen. Es
ist daher sinnvoll, den Bildschirmschoner zu aktivieren.
Folgende Optionen stehen zur Auswahl:
• Ein: Der Bildschirmschoner ist aktiviert (Standardeinstellung).
• Aus: Der Bildschirmschoner ist deaktiviert.
Signal ausgegeben.
Verwenden Sie diese Einstellung, sofern es sich beim Verstärker nicht um einen Stereo-Zweikanal-Verstärker handelt.
das in ein 2-Kanal-Signal umgewandelt wird. Verwenden Sie
diese Einstellung, sofern es sich beim Verstärker um einen
Stereo-Zweikanal-Verstärker handelt.
HINWEIS:
DEUTSCH
Letzter Speicher
Wählen Sie hier die Sprache der Bildschirm-Anzeigen aus.
Audio-Ausgang
Bestimmen Sie, wie sich der DVD-Player verhalten soll, wenn
der Benutzer während der Wiedergabe auf die Taste STOP
(Abb. 1/17) drückt.
• Ein: Wird das Abspielen einer DVD, CD oder VCD angehalHier werden die Einstellungen für den digitalen Audio-Ausgang
festgelegt.
05-AR 737 DVD_D 13 21.08.2006, 11:51:27 Uhr
ten und danach wieder gestartet, beginnt das Abspielen an
der letzten Position.
13
Page 14

DEUTSCH
• Aus: Wird das Abspielen einer DVD, CD oder VCD angehalten und danach wieder gestartet, beginnt das Abspielen
wieder am Anfang des Medium.
DEUTSCH
Abwärtsmischung (Downmix)
Lautsprecher Setup
• PAL : In Europa verbreitetes System.
• AUTO: Wählen Sie diese Einstellung, wenn es sich bei
Ihrem Wiedergabegerät um ein Multisystemgerät handelt.
• NTSC: Primär in Nordamerika verbreitetes System.
Audio Sprache
Verändern Sie die Charakteristik der Lautsprecherausgabe:
• LT/RT: Wählen Sie diese Einstellung, wenn Sie die DVD im
Pro Logic Dolby Stereoeffekt abspielen wollen. Hierdurch
entsteht ein realitätsnaher 2-Kanal-Wiedergabeeffekt.
• Stereo: Wählen Sie diese Einstellung, wenn eine DVD, die
im 5.1-Audio-Format aufgenommen wurde, als 2-Kanal-Stereoton ausgegeben werden soll.
Digital Setup
Dynamisch (Dynamic Range)
Mit dem Begriff „Dynamic Range“ (Dynamikumfang) wird das
Verhältnis vom leisesten zum lautesten Ton beschrieben. Ist der
Dynamikumfang sehr groß, so gibt es sowohl sehr leise als auch
sehr laute Töne.
Unter Umständen stellt dies ein Wiedergabeproblem dar. Angenommen, Sie sehen eine DVD in relativ lauter Umgebung. Sie
können die Lautstärke nun erhöhen, um auch die leisen Passagen hören zu können, was allerdings den Nachteil hat, dass
die lauten Passagen unangemessen laut werden. Sinnvoll ist es
hier, den Dynamikumfang zu komprimieren (also zu reduzieren)
und zugleich die Ausgabelautstärke zu erhöhen.
• FULL -2/8: Der Dynamikumfang wird etwas (2/8) bis
maximal komprimiert (FULL).
• OFF: Der Dynamikumfang wird nicht komprimiert (Voreinstellung).
TV-Modell
Passen Sie die Ausgabe des DVD-Players an das Farbübertragungssystem Ihres Wiedergabegerät an. Folgende Optionen
stehen zur Auswahl:
14
Wählen Sie hier die bevorzugte Sprache der Audio-Ausgabe
aus.
Untertitel Sprache
Wählen Sie hier die bevorzugte Sprache der fi lmbegleitenden
Untertitel aus.
Menü Sprache
Wählen Sie hier die bevorzugte Sprache der DVD Menüs aus.
Sperrfunktion (Kinderschutz)
Manche DVDs weisen Informationen zur Zielgruppe auf. Das
Vorgehen gleicht hierbei der Freigabe für Kinofi lme („Freigegeben ab 12 Jahren“ z.B.).
Haben Sie die Kinderschutz-Option aktiviert, so wird, sofern vorhanden, die entsprechende Information von der DVD ausgelesen
und mit dem von Ihnen voreingestellten Wert verglichen. Ist eine
DVD für eine ältere Altersgruppe vorgesehen als es von Ihnen
voreingestellt wurde, so kann die DVD nicht abgespielt werden.
Folgendende Kinderschutz-Optionen können ausgewählt
werden:
• G: Für alle Altersgruppen geeignet.
• PG: Elterliche Begleitung wird empfohlen. Manche Passagen können für kleine Kinder unangemessen sein.
05-AR 737 DVD_D 14 21.08.2006, 11:51:30 Uhr
Page 15

DEUTSCH
• PG 13: Eine elterliche Begleitung wird dringend empfohlen.
Manche Passagen können für Kinder unter 13 Jahren
unangemessen sein.
• PGR: Eine elterliche Begleitung ist notwendig.
• R: Jugendliche unter 17 Jahren dürfen den Film nur in
Begleitung eines Erwachsenen sehen.
• NC17: Kinder und Jugendliche unter 17 Jahren dürfen den
Film nicht sehen.
• Erwachsener: Der Film darf nur von Erwachsenen gesehen
werden.
• Aus: Der Kinderschutz ist deaktiviert.
Kennwort
Möchten Sie den DVD-Player mit einer Kindersicherung
versehen, so müssen Sie zuvor ein Passwort vergeben. Mit dem
Passwortschutz werden die Einstellungen zur Kindersicherung
geschützt, so dass diese nur von Ihnen verändert werden
können.
Um das Passwort zu ändern, müssen Sie das aktuelle Passwort
eingeben. Das Master-Passwort ist „1379“.
HINWEIS:
Haben Sie Ihr Passwort vergessen, so können Sie mit diesem
Masterpasswort die Kindersicherung deaktivieren.
Gehen Sie folgendermaßen vor, um das Passwort zu ändern:
1. Geben Sie das aktuelle Passwort, in der Zeile „Altes Kennwort“, mit den Zifferntasten (Abb. 1/12) der Fernbedienung
ein. Damit das Passwort nicht von Unbefugten gelesen
werden kann, werden auf dem Bildschirm lediglich die
Zeichen „XXXX“ angezeigt.
2. Geben Sie das neue Passwort, in der Zeile „Neues Kennwort“, mit den Zifferntasten der Fernbedienung ein.
3. Geben Sie zur Bestätigung das neue Passwort, in der Zeile
„Bestätigen“, erneut ein. Bestätigen Sie Ihre Eingabe mit der
Ta st e ENTER (Abb. 1/27).
Grundeinstellung
Technische Daten
Allgemeines
Netzspannung ............................................................DC 13,8 V
Stromverbrauch..........................................................10 A Max.
Leistung........................................................................4 x 10 W
Monitor.......................................................................... 2,5“ TFT
Pixelanzahl ................................................................. 480 x 234
FM-Bereich
Frequenzbereich.................................. 87,5 MHz bis 108,0 MHz
Nutzbare Empfi ndlichkeit................................................15 dBµ.
I.F. Frequenz................................................................10,7 MHz
AM-Bereich
Frequenzbereich...................................... 522 kHz bis 1620 kHz
Nutzbare Empfi ndlichkeit.................................................. 40 dB
I.F. Frequenz..................................................................450 kHz
(Line-Out)
Ausgang ................................................................2 CH & 4 CH
Signalformat ..............................................................PAL/NTSC
Video-Ausgang............................................1,0 V (P-P) 75 Ohm
CD-Player
System....................................................... MP3 Audio - System
Verwendbare CDs ...... CD/CD-R/CD-RW/MP3/DVD/VCD Disks
Abspielbare Bit-Raten..........................................32 - 320 kBit/s
Anzahl der Quantizierungsbits............................................ 1 bit.
Frequenzcharakteristika ....................................20 Hz – 20 kHz
Signal-Rausch-Verhältnis .........................................90 dB (JIS)
Anzahl der Kanäle ............................................ 2 Stereo-Kanäle
Gehäuseabmessungen .............................178 B x 50 H x 165 T
Regionalcode........................2 (= Europa, Grönland, Südafrika,
Ägypten und Naher Osten, Japan)
Technische Änderungen vorbehalten!
DEUTSCH
Konformitätserklärung
Wählen Sie den Befehl „Grundeinstellung/Reset“, wenn Sie das
Gerät wieder auf die werkseitigen Voreinstellungen zurücksetzen möchten.
Alle Einstellungen, die von Ihnen vorgenommen wurden, gehen
dabei verloren.
05-AR 737 DVD_D 15 21.08.2006, 11:51:33 Uhr
Hiermit erklärt die Firma Clatronic International GmbH, dass
sich das Gerät AR 737 USB/TFT in Übereinstimmung mit den
grundlegenden Anforderungen, der europäischen Richtlinie für
elektromagnetische Verträglichkeit (89/336/EWG) befi ndet.
Bitte führen Sie das ausgediente Gerät einer umweltgerechten
Entsorgung zu.
15
Page 16

DEUTSCH
Störungsbehebung
Bevor Sie die Checkliste durchgehen, bitte zunächst den
Anschluss fertig stellen. Wenn nach erfolgtem Durchprüfen der
Checkliste immer noch Fragen offen sind, wenden Sie sich bitte
DEUTSCH
an Ihre nächstgelegene Kundendienststelle.
Fehlersymptom Grund Lösung
CDs werden nur bis
zur Hälfte in den CD
Schacht eingezogen.
„Keine Diskette vorhanden“ wird im Display
angezeigt.
CD lässt sich über die
MOD(E) Taste nicht
anwählen.
Nach Einlegen in das
Gerät läuft die CD
nicht.
CD setzt aus. Die Straßenoberfl äche
Keine Funktion. Die Zündung ist ausge-
Die Schrauben der
Transportsicherung
sind nicht entfernt
worden.
Die CD ist falsch
herum eingelegt.
Es ist keine CD
eingelegt.
Ein USB Speichermedium ist an den
USB Anschluss
angeschlossen.
Der Lautstärkeregler ist
zu leise eingestellt.
Die Anschlüsse
sind nicht korrekt
ausgeführt.
ist rau.
Das Gerät ist nicht fest
eingebaut.
Die CD ist defekt. Eine andere CD aus-
Die CD ist
verschmutzt.
Ggf. ist das Gerät
zu steil im Fahrzeug
eingebaut.
schaltet.
Eine oder mehrere
Sicherungen sind
durchgebrannt.
Entfernen Sie die
Schrauben der
Transportsicherung.
Legen Sie die CD
richtig herum ein.
Legen Sie eine CD ein.
Entfernen Sie das USB
Speichermedium.
Den Lautstärkeregler
höher einstellen.
Den +12V- sowie
den Masseanschluss
überprüfen.
Zum Abspielen der CD
warten, bis die Straße
glatter wird.
Das Gerät fest
einbauen.
Sicherstellen, dass die
hintere Befestigung
verwendet wird, wenn
das Fahrzeug keine
geeignete Aufnahme
für den hinteren
Geräteteil bietet.
probieren. Wenn diese
korrekt läuft, ist die
erste CD wahrscheinlich beschädigt.
Die CD reinigen.
Beachten Sie das ein
max. Neigungswinkel
von 20° Grad nicht
überschritten werden
sollte!
Den Zündschlüssel
auf „ON“ oder „ACC“
drehen.
Die Sicherung durch
eine andere 5 A /
0,5 A/0,5 A-Sicherung
ersetzen.
Fehlersymptom Grund Lösung
Gerät lässt sich nicht
über die Zündung „Ein“
bzw. „Aus“ Schalten.
Das Gerät funktioniert
nicht richtig (EJECT,
LOAD, PLAY).
Das Gerät lässt sich
nicht bedienen „hängt
fest“.
Kein Radioempfang. Das Antennenkabel ist
Schlechter Radioempfang.
Im automatischen
Suchmodus stoppt
das Radio bei keiner
Sendestation.
Fehlanschluss
(jeder KFZ Hersteller
belegt den ISO
Anschluss im Fahrzeug
anders).
Der Mikrocomputer
wurde durch elektromagnetische Felder
gestört.
Der Steuerprozessor
des Gerätes könnte
durch „Über- oder
Unterspannung“ des
Bordnetzes blockiert
sein.
nicht angeschlossen.
Ggf. hat Ihr Fahrzeug
eine spezielle Antenne
(Phantom gespeiste
Antenne.)
Die Sendesignale sind
zu schwach.
Bitte setzen Sie sich
mit Ihrer KFZ Werkstatt
oder einem Autospezialisten in Verbindung,
wegen KFZ spezifi sche
Anschlussadapter.
Die CD herausnehmen
und wieder einlegen.
Das Gerät aus- und
dann wieder
einschalten.
Betätigen Sie die
RESET-Taste.
Das Antennenkabel
fest in die Antennenbuchse des Gerätes
stecken.
Bitte setzten Sie sich
mit Ihrer KFZ Werkstatt
oder einem Autospezialisten in Verbindung.
(Für „Fremdfabrikate“
gibt es spezifi sche
Einspeisweichen bzw.
Spannungsadapter.)
Manuell eine Sendestation einstellen.
Handhabung einer CD
Reinigen der CD
Vor dem Abspielen, die CD mit
einem sauberen, staubfreien
Reinigungstuch abwischen. Die
CD in Pfeilrichtung abziehen.
Hinweis: Keine Lösungsmittel wie Benzin oder Verdünner
verwenden. Die allgemein erhältlichen Reinigungsmittel oder
Anti-Statiksprays beschädigen das Gerät.
Einlegen der CD
Wenn die CD mit dem Aufdruck
nach unten eingelegt wird, kann
das Gerät beschädigt werden.
CD immer mit dem Label nach
oben einlegen.
Hinweis: Wenn sich bereits eine CD im CD-Schlitz befi ndet,
nicht versuchen, eine weitere CD einzulegen. Dies kann zu
Schäden am Gerät führen.
16
05-AR 737 DVD_D 16 21.08.2006, 11:51:36 Uhr
Page 17

DEUTSCH
Anfassen der CD
Haben Sie Fragen zu Ihrem neuen Gerät? Unser Serviceteam
steht gerne für Sie bereit. Kleinere Probleme lassen sich oft
schon telefonisch lösen.
Die CD stets am Rand
anfassen. Um die CD sauber zu
halten, nicht an der Oberfl äche
anfassen.
• Keine Aufkleber oder Klebeband auf die CD kleben.
• Die CD nicht direkter Sonneneinstrahlung oder Wärmequellen wie Heizungsrohren aussetzen und sie auch nicht im
Auto lassen, wenn dieses in praller Sonne geparkt wird, da
dies zu einem beträchtlichen Temperaturanstieg führt.
• Überprüfen Sie alle CDs auf Risse, Kratzer und Verwellungen, bevor Sie sie abspielen. CDs mit derartigen Beschädigungen können unter Umständen nicht richtig abgespielt
werden. Sie sollten diese CDs nicht verwenden.
• Verwenden Sie nur handelsübliche kreisrunde CDs mit 12
cm Durchmesser! CDs mit 8 cm Durchmesser oder CDs,
die Konturen, z.B. eines Schmetterlings oder Herzens
haben, sind zur Wiedergabe nicht geeignet. Es besteht
Zerstörungsgefahr der CD und des Laufwerks. Für Beschädigungen durch ungeeignete CDs können wir keine Haftung
übernehmen.
Garantie
Wir übernehmen für das von uns vertriebene Gerät eine Garantie von 24 Monaten ab Kaufdatum (Kassenbon).
Innerhalb der Garantiezeit beseitigen wir unentgeltlich die Mängel des Gerätes oder des Zubehörs, die auf Material- oder Herstellungsfehler beruhen, durch Reparatur oder, nach unserem
Ermessen, durch Umtausch. Garantieleistungen bewirken weder
eine Verlängerung der Garantiefrist, noch beginnt dadurch ein
Anspruch auf eine neue Garantie!
Als Garantienachweis gilt der Kaufbeleg. Ohne diesen Nachweis
kann ein kostenloser Austausch oder eine kostenlose Reparatur
nicht erfolgen.
Im Garantiefall geben Sie bitte das komplette Gerät in der
Originalverpackung zusammen mit dem Kassenbon an Ihren
Händler.
Sowohl Defekte an Verbrauchszubehör bzw. Verschleißteilen, als auch Reinigung, Wartung oder der Austausch von
Verschleißteilen, fallen nicht unter die Garantie und sind deshalb
kostenpfl ichtig!
Die Garantie erlischt bei Fremdeingriff.
Rufen Sie deshalb bitte zunächst die untenstehende Hotline an.
Mo. – Do. 8.30 – 17.00 Uhr
Fr. 8.30 – 14.00 Uhr
oder per E-Mail:
Schonen Sie unsere Umwelt, Elektrogeräte gehören nicht in den
Hausmüll.
Nutzen Sie die für die Entsorgung von Elektrogeräten vorgesehenen Sammelstellen und geben dort Ihre Elektrogeräte ab, die
Sie nicht mehr benutzen werden.
Sie helfen damit die potenziellen Auswirkungen, durch falsche
Entsorgung, auf die Umwelt und die menschliche Gesundheit
zu vermeiden.
Sie leisten damit Ihren Beitrag zur Wiederverwertung, zum
Recycling und zu anderen Formen der Verwertung von Elektround Elektronik-Altgeräten.
Informationen, wo die Geräte zu entsorgen sind, erhalten Sie
über Ihre Kommunen oder die Gemeindeverwaltungen.
Kostenlose Hotline
DEUTSCH
Hotline 0 21 52/20 06-666
hotline@clatronic.de
Service Anschrift
Clatronic International GmbH
Industriering Ost 40
D-47906 Kempen/Germany
Bedeutung des Symbols „Mülltonne“
Nach der Garantie
Nach Ablauf der Garantiezeit können Reparaturen kostenpfl ichtig vom entsprechenden Fachhandel oder Reparaturservice
ausgeführt werden.
17
05-AR 737 DVD_D 17 21.08.2006, 11:51:39 Uhr
Page 18

DEUTSCH
Stichwortverzeichnis – Index
AF...............................................................................................10
Anschluss.....................................................................................7
DEUTSCH
APS Taste ....................................................................................9
Ausschalten..................................................................................8
Auswurftaste ................................................................................9
AUX IN .......................................................................................11
Bedienhinweise............................................................................8
Bedienung....................................................................................8
BND Taste....................................................................................9
CD auswerfen ..............................................................................9
CD Handhabung ........................................................................16
CLK Taste...................................................................................11
DVD-Player.................................................................................11
Einschalten...................................................................................8
EJ Taste........................................................................................9
A
B
C
D
E
PI (Programm Information) ..........................................................9
Play / Pause (
PTY Taste...................................................................................10
PWR Taste ...................................................................................8
RANDOM (4RTM) (Zufallswiedergabe).....................................10
REG (Regional)............................................................................8
REPEAT (2RPT) (Wiederholen) ................................................10
RESET Knopf............................................................................. 11
SEL Taste.....................................................................................8
Service .......................................................................................17
Sicherheitshinweise .....................................................................5
Stereo Umschaltung...................................................................11
Störungsbehebung.....................................................................16
Stummschalten (siehe MU Taste)................................................9
TA (Verkehrsfunk) ......................................................................10
Tasten der Fernbedienung...........................................................4
Technische Daten ......................................................................15
왘
II)......................................................................10
P
R
S
T
Garantie......................................................................................17
G
H
Handhabung einer CD ...............................................................16
I
Installation ....................................................................................6
Installationstipps...........................................................................5
INTRO (3INT).............................................................................10
L
LOC Taste .................................................................................. 11
M
MENU Taste...............................................................................11
MOD Taste ...................................................................................9
Mono Umschaltung.................................................................... 11
Montage (Sicherheitshinweise)....................................................5
MU Taste (Stummschalten) .........................................................9
Uhrzeit (siehe CLK).................................................................... 11
U
USB Anschluss ..........................................................................11
V
Verkehrsfunk (siehe TA).............................................................10
Verkehrssicherheit........................................................................5
VOL Drehknopf ............................................................................8
W
Wichtige Zusatzinformationen zum Einbau .................................8
Wiederholen (2 RPT) .................................................................10
Z
Zufallswiedergabe (4RPM) ........................................................10
18
05-AR 737 DVD_D 18 21.08.2006, 11:51:42 Uhr
Page 19

DEUTSCH
Menü-Übersicht
Seite Allgemeine Einstellung Seite Bevorzugte Einst.
TV-Monitor Norm/PS TV Modell PAL
Norm/LB Auto
Breit NTSC
Winkelzeichen Ein Audio Sprachen Englisch
Aus Französisch
OSD-Sprache Englisch Spanisch
Französisch Deutsch
Deutsch Italienisch
Spanisch Portugiesisch
Italien. Untertitel Sprachen Englisch
Portug. Spanisch
SPDIF-Ausgabe SPDIF Off Deutsch
SPDIF/RAW Itanienisch
SPDIF/PCM Portugiesisch
Kommentare Ein Aus
Aus Menü Sprachen Englisch
Scr Saver Ein Französisch
Aus Spanisch
Letzter Speicher Ein Deutsch
Aus Italienisch
Portugiesisch
Lautsprechereinstellseite
Abwärtsmischung LT/RT 3 PG
Stereo 4 PG13
Dolby Digital Einstellung
Dynamisch
Sperrfunktion 2 G
5 PGR
6 R
7 NC-17
Erwachsener
Aus
Kennwort Ändern
Grundeinst. Reset
DEUTSCH
19
05-AR 737 DVD_D 19 21.08.2006, 11:51:44 Uhr
Page 20

ENGLISH
Illustration 1: Remote Control
1 POWER: To activate standby mode.
2 VOL +/-: To increase/reduce the volume.
3 SEL:
Radio Mode:
- Press briefl y:
Select sound/picture mode.
- Press longer:
REG, PI, AF function selection.
왘왘
I: To jump to the next chapter or song.
4
ENGLISH
5 I왗왗: To return to the previous chapter or song.
6 BAND/OSD:
a) Radio Mode:
Switching the 3 FM and 2 MW levels.
b) CD/MP3/DVD mode:
Alternating the time displays.
7 왘왘: Fast forward.
8 왗왗: Fast reverse.
9 MODE: Operating mode selection
(CD/DVD, AUX IN, Radio etc.).
10 MUTE: To switch of the sound.
11 A/PS:
Radio Mode:
- Press briefl y:
Scan function of the stored radio stations.
- Press longer:
Automatic station storage.
TITLE/PBC:
a) To show the title menu of the DVD
(abhängig von der DVD).
b) To show the Playback-Control for VCD.
12 Numerical buttons:
For direct selection of chapter or song number.
13 REPEAT
14 Cursor buttons:
a) Radio Mode:
- Press briefl y:
Manual station search.
- Press longer:
Automatic station search.
b) MP3/DVD mode: Navigation in screen menu.
15 ANGLE/ : To select the viewing angle.
: To repeat title, chapters, etc.
16 EQ:
Radio Mode:
- Press briefl y:
Selecting equaliser settings.
- Press longer:
Switching the LOUDNESS function on and off.
17 STOP: Stop play.
18 PLAY/PAUSE:
a) Radio Mode:
PTY selection of the program type.
b) CD/MP3/DVD mode:
Starting playback, stopping picture/track.
19 9/AF:
Press longer:
Switching on and off an alternative frequency
0/TA:
Press longer:
Turning pre-switching for traffi c announcements on and off.
20 : Changing the viewing angle of the operating unit.
21 MO/ST/ :
a) Radio Mode:
Stereo/Mono switching.
b) CD/DVD Mode:
To change the Audio settings (depending on the DVD).
22 LO/DX/ :
a) Radio Mode:
LOCAL/DX function.
b) DVD Mode:
To show/hide subtitles (depending on the DVD).
23 MENU/ :
- Press briefl y:
To display the main menu of the DVD/VCD.
- Press longer:
Switching the subwoofer on and off.
24 CLK:
- Press briefl y:
Showing/hiding the time.
- Press longer:
Setting the time.
25 SETUP: To start the setup menu.
26 10+: for selecting the chapters/tracks above 9.
Pressing again increases by a further 10.
27 ENTER: Confi rming the input.
28 GOTO: For direct accessing of a section on the CD/DVD.
Illustration 2: Control Panel - see Operation.
20
05-AR 737 DVD_GB 20 21.08.2006, 14:01:08 Uhr
Page 21

ENGLISH
Safety Information
Read the operating instructions carefully before putting the
appliance into operation and keep the instructions including the
warranty, the receipt and, if possible, the box with the internal
packing.
• Use the device only for the intended purpose.
• The device should be installed in such a way that existing
ventilation holes are not covered.
• Never open the housing of the device. Incorrect repairs can
constitute a considerable risk for the user. If the device is
damaged it should not be used, but repaired by a specialist.
These symbols may be found on the machine and are intended
to indicate the following:
The symbol with an exclamation mark should advise the user of important operation or maintenance
instructions in the accompanying documentation.
Devices bearing this symbol work with a „class 1
laser“ for tracing the CD/DVD. The built-in safety
switches should prevent the user being exposed
to dangerous laser light, which is invisible to the
human eye, when the CD compartment is opened.
Under no circumstances should these safety switches be
bypassed or manipulated, as this could result in a danger of
exposure to the laser light.
Children
• In order to ensure your children‘s safety, please keep all
packaging (plastic bags, boxes, polystyrene etc.) out of their
reach.
Caution! Do not allow small children to play with the foil as
there is a danger of suffocation!
Symbols in these Instructions for Use
Important information for your safety is specially marked. It is
essential to comply with these instructions in order to avoid
accidents and prevent damage to the machine:
WARNING:
This warns you of dangers to your health and indicates
possible injury risks.
CAUTION:
This refers to possible hazards to the machine or other
objects.
NOTE: This highlights tips and information.
Road Safety
• Road safety is of paramount importance. You should
therefore use your car radio at all times in such a way that
you are able to cope with the current traffi c situation.
• Please remember that at a speed of 30 mph (50 kph) you
travel 15 yards (14 metres) in one second.
• We advise you not to operate the radio in critical situations.
• It must be possible to hear the sirens of police and fi re
brigade vehicles etc. from inside the vehicle in good time.
• When driving you should therefore not turn the radio volume
up excessively.
• For safety reasons a lock connected to the handbrake of
the vehicle prevents certain functions of the device from
operating when the vehicle is moving. In order to be able to
use these functions please stop in a safe place and put on
the handbrake.
• Please note that it is not permitted to operate the DVD player
when the vehicle is moving or if the engine is running!
• In order to prevent road accidents you should install the
device in such a way that it does not cause an obstruction
when you turn the steering wheel or move the gear lever etc.
• Similarly, safety equipment such as airbags and the driver’s
view of the road must not be obstructed.
• Under no circumstances should any additional monitor
that is connected be installed in such a way that it can be
seen by the driver when the vehicle is moving!
When installing and connecting
the radio please note the following
safety information.
• First disconnect the minus pole and then the plus pole of the
battery. (connection in the reverse order.)
Please note: Once the battery has been disconnected the
information is lost from all volatile memory. Please note the
safety information provided by the vehicle manufacturer.
• The main fuse must be installed as closely as possible
(not more than 30 cm away) to the plus pole of the battery
so that the car is protected from any cable fi re caused, for
example, by an accident. If the above is not complied with
the insurance protection no longer applies.
• The cross-section of the plus and minus cable must not
exceed 1.5 mm².
• When drilling holes please ensure that none of the vehicle
components are damaged.
Installation Tips:
• Cable protection sleeves protect cables against fraying on
sharp body parts.
• The insulation of the cables must not be damaged during
installation.
• It is essential to use the correct tools when installing car hi-fi .
Depending on the model, your vehicle may deviate from the
above description. We do not accept any liability for damage
caused by installation or connection errors or for consequential
damage.
ENGLISH
21
05-AR 737 DVD_GB 21 21.08.2006, 11:49:54 Uhr
Page 22

ENGLISH
Please install the car radio as shown below.
Installation
ENGLISH
a Nut
b Spring washer
c Plain washer
d Screw
e Mounting bracket
f Slide-in housing
g Threaded bolt
Note:
h Retaining screws during transport
(please remove before installation)
i Extraction tool (spanner for dismantling)
j Screen cover
k
Fan CAUTION: Do not cover the fan.
l USA/EURO Switch (Radio frequency change-over
switch, to select between the USA or EUROPA
radio frequency)
l
22
05-AR 737 DVD_GB 22 21.08.2006, 11:49:56 Uhr
Page 23

ENGLISH
Connect the device as shown in the diagram.
Connection
Antenna connection
Ignition (B+)
Constant current
connection (B+)
Earth (B-)
Automatic
antenna
Loudspeaker,
Loudspeaker,
Red
Yellow
Black
Blue
front left
rear left
Fuse/
fi lter box
Fuse
ISO connection
White
White/black
Green
Green/black
White
Green
Ye l l o w
AUX (optional)
RCA cable
RCA cable / output
rear (optional)
RCA cable / output
front
(Only about version at RCA output cable)
Grey
Grey/black
Violet
Violet/black
Loudspeaker,
front right
Loudspeaker,
rear right
(B+) 12 V
Camera rear
(B-) Hand brake
Camera input rear
Video input rear
Audio input R (red)
Audio input L (white)
Subwoofer (grey)
Video output 2 (yellow)
Coaxial output (brown)
R red
L white
RCA front right (red)
Video output 1 (yellow)
RCA front left (white)
ENGLISH
Note:
• The device should only be switched on after all cables have
been connected.
• Please use loudspeakers with an impedance of 4 ohm.
• The loudspeaker cables must be unearthed.
• If a subwoofer is connected, an amplifi er is required.
• The earth connection cable (handbrake B-) must be
connected in order for DVD pictures to be played back to the
monitor. If the cable has not been correctly connected, the
message „PARKING BRAKE“ appears on the monitor.
05-AR 737 DVD_GB 23 21.08.2006, 11:49:57 Uhr
• It is possible to use the integrated TFT screen as a monitor
for an optional reversing camera (not supplied). Connect the
„(B+) 12V camera rear“ connection to the reversing light
of your vehicle and connect the camera to „camera input on
rear (yellow)“. After the vehicle is put into reverse gear the
camera image appears on the monitor. For more detailed
information please see the operating instructions for your
reversing camera.
NOTE:
If the 12V is missing at the "(B+) 12V camera
rear" connection the camera picture is not shown on the
monitor.
23
Page 24

ENGLISH
Important Information
for installing your carradio!
1. The screws (h) of the transport locking device should
be removed before installation, as otherwise the CD
cannot be inserted.
2. The device is designed for the minus pole of the battery,
which must be connected to the body of the vehicle. Please
check this before installation.
3. When installing/connecting your device please note that not
every vehicle is equipped with an “ISO connection“. In this
case we recommend the use of an ISO adapter specifi cally
ENGLISH
designed for your vehicle.
Adapters are available from car accessory shops and/or
from your vehicle workshop.
4. Depending on the specifi c car type, different wiring connection of the „Duration +” wire (Constant current connection)
are available. (However, this is necessary for storing the
radio stations).
In order to guarantee all functions, installation in line with
these instructions is essential. In cases of doubt please
contact an authorised car workshop.
5. The angle of inclination when a car radio is installed must
not exceed 20°, as in the case of greater angles of inclination the function of the car radio (CD/DVD Player) can no
longer be guaranteed.
6. Depending on the specifi c car type, interferences can
be possibly arise during radio/CD/DVD operation. These
interferences can avoided easily with an additional Inter-
ferences fi lter. Your car radio is originally prepared with an
Interference Filter already.
In these case, please contact your authorized car dealer.
7. When installing your radio please ensure that there is
enough space at the rear and at the fan of the radio to ensure
sufficient cooling.
8. For the antenna connection there are two different norms.
The fi rst of these is the old (50 ohm) version with a long protruding round contact on the vehicle and a round socket on
the radio end. The second is the ISO-standardised antenna
plug (150 ohm). Adapters for both formats are available from
accessory manufacturers and/or your car workshop.
Important information for VW/Audi vehicles: The active
antenna requires voltage on the shielding of the antenna
coaxial cable, without which reception is unsatisfactory. An
antenna adapter with phantom power supply will solve this
problem.
Operating Instructions
1. Any errors (ERROR) occurring during operation can be
corrected by pressing the RESET button. Use a piece of
wire or similar item to press the RESET button (28) in order
to return the electronics to its original state.
2. If the interior of the vehicle becomes very hot, for example
after standing in direct sunlight for a prolonged period, do
not switch on the player until the inside of the vehicle has
cooled down a little after you have been driving for a few
minutes.
3. Playback of CDs/DVDs produced by the user cannot be
guaranteed due to the large variety of software and CD/DVD
media available.
4. Some keys are to be found both on the device itself and on
the remote control. Keys with the same designation have the
same function.
Operation (Illustration 2: Control Panel)
1. PWR On/Off Button
Press this button to switch the device on. WELCOME
appears in the display. Keep this button pressed to switch
the device off. SEE YOU appears in the display.
2. VOL Multifunction Button (Volume)
In the standard playback mode the multifunction button is
used for adjusting the volume. If the SEL button is pressed
beforehand, changes can be made in the menus, e.g. sound
mode.
3. SEL Button (Select)
a) Press the SEL button briefl y to access the sound/picture
mode selection menu. The word „BASS“ appears in the
display for adjusting the bass levels. By repeatedly pressing the SEL button you can now select the individual
menu items such as BASS, TREBLE, BALANCE and
FADE, BG COLOR, COLOR*, BRIGHT *, CONTRAST *,
TINT *, VOLUME. The settings of the individual menu
items are changed by turning the multifunction button
VOL (2). (* only in DVD mode.)
b) Press the SEL button for a longer time to access the
selection menu:
• REG ON / REG OFF
• PI MUTE / PI SOUND
• AF OFF / AF ON
Repeatedly pressing of the SEL button now brings up
the individual menu items. The settings of the individual
menu items are changed by turning the multifunction
button VOL.
• REG Function
At certain times some stations divide up their programmes
into regional programmes with varying content.
REG ON: The message „REG ON“ appears in the display
for a few seconds.
NOTE:
• The display capacity is limited. It is possible that in the
double display mode some segments of the display
are deleted.
• The function REG ON prevents the radio from switching to alternative frequencies which have a different
regional programme content.
24
05-AR 737 DVD_GB 24 21.08.2006, 11:49:58 Uhr
Page 25

ENGLISH
REG OFF: The programme identifi cation (PI) of the regional
programme is ignored during the search for an alternative
frequency (AF) or a programme identifi cation (PI).
• PI MUTE/PI SOUND (only for radio operation)
If you are in an area where two programme identifi cations
(PI) overlap, you can select the option PI SOUND and PI
MUTE for playback of the sound. Alternate switching of the
programme identifi cation should be avoided.
PI SOUND: If switching nevertheless occurs the sound of
another station is heard for less than one second.
PI MUTE: The sound of another station is suppressed.
• AF (Alternative Frequencies)
AF is a function that works with the help of RDS (Radio Data
System) and can only be used with FM stations. The radio
searches in the background for the best frequency reception
of the station that has been tuned into.
AF ON: If the AF function has been switched on, the radio
continuously tests the signal strength of the AF frequency.
The test interval for each AF frequency depends on the
signal strength of the current station and varies from a few
minutes in the case of a strong signal to a few seconds in
the case of weak signals. Whenever the new AF frequency
is stronger than the station that is currently tuned in, the
radio switches to this frequency for a short time and the
message „NEW FREQUENCY“ is displayed for one to two
seconds. As the mute time during the frequency change and
the test time is very short, this is almost inaudible during the
normal programme.
NOTE:
The AF function can also be activated by keeping the TA
button (19) pressed down.
The status of the AF function is shown by an AF symbol in
the display.
• If the AF symbol appears in the display, the AF function
is switched on and RDS transmission data is being
received.
• If the AF symbol fl ashes in the display, the AF function
is selected but no RDS signal can be received at the
moment.
AF OFF: The function is switched off. The AF symbol in the
display goes off.
4. EJ Button
Press this button to insert and eject the CD/DVD. The operating unit swings downwards. Insert the CD/DVD with the
labelled side facing upwards gently into the CD slot until the
device draws in the CD/DVD automatically. The operating
unit automatically swings back to the normal position.
NOTE:
• Do not place your fi ngers behind the operating unit.
There is a danger of injury when the operating unit
returns to the normal position.
• If you do not insert a CD/DVD the operating unit only
returns to the normal position after a certain time, or
you can press the EJ button again.
5. TFT Display (liquid crystal display)
6. BND button
Press the BND button briefl y to switch between the 3 FM
bands and the 2 MW (medium wave) bands. The designation of the corresponding level - FM1, FM2, FM3, MW1, MW2
- is shown in the TFT.
7./8
. / Buttons TUNE, SEEK, TRACK, SKIP UP/DOWN
a) In radio mode: Move the SEL button in the direction of
„ “ or „ “ in order to set a radio station manually. Keep
the SEL Taste pressed down in the „ “ or „ “ direction
in order to start the search for a radio station.
b) In CD/DVD, USB mode: If you wish to jump forwards or
backwards press the SEL button briefl y in the „ “ or „ “
direction. To wind through the tracks keep the SEL button pressed in the „ “ or „ “ direction for approximately
2 seconds. FF X2 appears in the display. Operating the
SEL button again in the „ “ or „ “ direction for approximately 2 seconds increases the winding speed. Speeds
of FF X2, FF X4, FF X8 and FF X16 are available. Press
the 왘II button (18) to return to normal playback.
9. MOD Button
Press this button to select the CD/DVD player, AUX IN, radio
mode etc.
10. MU Button (Mute)
Press the MU button to switch off the loudspeakers for a short
period. The word MUTE fl ashes in the display. Press this
button again to cancel the mute function. This function can
also be cancelled by pressing the VOL multifunction button.
11. APS Button (Autostore - Automatic Station Storage)
In radio mode:
a) Memory function:
Move the SEL button in the direction of APS for approximately 2 seconds to activate automatic station storage.
The radio searches within the current frequency band,
e.g. FM 1, for the strongest signal level until the search
cycle has fi nished. The six strongest stations are then
allocated to the corresponding storage locations. Then
the station of the fi rst storage location is set.
If you would like to search for more stations in the FM
band, press the BND button in order to change to the
FM 2 or FM 3 band. Move the SEL button again in
the direction of APS for approximately 2 seconds to
continue the search.
b) Scan Function:
If the SEL button is moved briefl y in the direction of
APS, the radio briefl y plays all the preset stations of the
frequency band.
ENGLISH
25
05-AR 737 DVD_GB 25 21.08.2006, 11:50:00 Uhr
Page 26

ENGLISH
NOTE:
The scan function ends automatically at the fi rst
storage location of frequency band FM1.
In DVD mode:
If the SEL button is moved briefly in the direction of APS, the
TFT monitor at the device is switched off or on.
12-17.
Station buttons (1–6) of preselected stations and as
1TOP, 2RPT, 3INT, 4 RDM buttons during CD operation
a) Radio Operation
Pressing these buttons briefl y directly selects a preset
ENGLISH
radio station. If these buttons are pressed for more than
one second, the station currently being listened to is
stored under the selected station button.
b) CD Operation
Pressing briefl y directly selects the corresponding
CD/MP3 track. Keep the corresponding button (1TOP,
2RPT, 3INT, 4RDM) pressed for approximately
3 seconds in order to switch the following functions on
and off:
• Press the 1TOP button to jump to the fi rst track of
the CD/MP3.
NOTE: No function during DVD operation.
• Press the 2RPT button. The track currently being
played is repeated. Press this button again to cancel
this function. In the case of DVDs you can repeat
the chapter, title or the entire DVD.
• Press the 3INT button. Each track on the CD is
played for 6 seconds. Press this button again to stop
searching. The currently selected track is played.
During DVD operation a menu appears. Here you
can use the
control to choose between 4 options. Confi rm your
selection with the ENTER button (27).
왗, 왘, 왖, 왔
buttons (14) of the remote
NOTE: No function during MP3 operation.
• Press the 4RDM button. The DVD, MP3/CD tracks
are played at random. Press this button again to
cancel this function.
18.
왘
II-/PTY button
Radio Operation:
PTY Selection of the Programme Type
Besides the station name, some FM stations also transmit
information on the type of programme. This information can
be displayed by your car radio.
Examples of such types of programme are:
SPORT NEWS POP CLASSICS
With the PTY function you can specifi cally select stations
transmitting a particular type of programme. Press the
왘
II-/PTY button repeatedly to call up the PTY selection
menu. The message „PTY SEEK“ then appears briefl y in
the display.
26
When PTY has been selected the radio starts searching for
corresponding PTY information and stops when the PTY
information has been found. If the programme type being
searched for is not found, „NO PTY“ appears in the display.
If the PTY information being searched for no longer exists,
the PTY function automatically switches to normal mode.
CD/DVD/USB Operation:
Press the 왘II-/PTY button to interrupt playback of the CD
(pause function). Press this button again to cancel this
function.
19. TA / AF button
a) TA Traffi c Annonuncement
(Priority for Traffi c Information)
The TA function is activated by pressing the TA button
briefl y. The TA symbol appears in the display. During
radio operation in one FM frequency band the search for
a traffi c announcement station is started automatically
(TA SEEK).
If an FM station is being received which transmits the
latest traffi c announcements from time to time, the TP
display lights up.
When the TA function is switched on, the FM traffi c
announcements automatically interrupt CD operation
(The word TRAFFIC appears in the display). The
volume level is increased to the minimum value for the
transmission of traffi c announcements.
After the traffi c announcement has fi nished, the
programme that was previously running is resumed.
Interruption of the TA Function:
If you would like to interrupt the current traffi c announcement, press the TA button briefl y. This does switch
off the TA mode.
b) AF (Alternative Frequencies)
See point 3.
20. button (Operating unit angle)
You can change the viewing angle of the operating unit.
Press the button up to four times in order to select the
desired position.
NOTE:
Do not place your fi ngers behind the operating unit. There
is a danger of injury if the operating unit returns to the
normal position.
21. ST button
Radio Operation:
STEREO/MONO switching
DVD Operation:
For selecting the audio languages, provided that various
languages are present on the DVD.
CD Operation:
For selecting between stereo, mono left, mono right and
MIX mono.
05-AR 737 DVD_GB 26 21.08.2006, 11:50:03 Uhr
Page 27

ENGLISH
22. LOC button
LOCAL/DX (EON) (only available during radio operation)
Your radio can receive RDS EON data. The term „EON“
signifi es the transmission of additional station information
within a station chain, e.g. WDR. If a traffi c announcement
(TA) is made within a station chain, the radio switches from
a station which does not transmit traffi c announcements to
one that does within the same station chain.
Reception of this station data is shown in the display by the
EON symbol. You can choose between the LOC(AL) and DX
(DISTANCE) mode for local or long-distance traffi c news.
LOC(AL):
This function prevents switching to an EON station whose
signal is too weak. The radio does not switch to this station
and the listener does not hear any interference.
DX (DISTANCE) Mode:
In this mode the EONTA circuitry tries to receive the EONTA
information from any available transmitter and thus improve
reception quality.
23. MENU button
For selecting the DVD main menu in DVD mode.
24. CLK Button (Time)
a) Move the SEL button (3) in the direction of CLK in order
to bring up or hide the clock.
b) In order to set the time, keep the SEL button pressed in
the direction of CLK for approximately 3 seconds. The
hours fl ash in the display. Carry out the settings with the
help of the VOL multifunction button (2). Then move the
SEL button (3) in the direction of CLK. The minutes now
fl ash. Carry out the settings with the help of the VOL
multifunction button (2). Before storing the time move
the SEL button (3) in the direction of CLK again.
NOTE:
If RDS data is received the time is set automatically.
25. USB Connexion
This device has been developed in accordance with the
latest technical developments in the USB fi eld. Unfortunately
the large number of different types of USB storage media on
offer today makes it impossible to guarantee full compatibility with all USB storage media. For this reason there may be
problems in rare cases with playing back from USB storage
media. This is not a malfunction of the device.
If you would like to play back data contained on a USB stick,
please insert the stick into the opening provided. You can
use the supplied adapter cable for this. To play back the
data on the stick, select the USB stick with the help of the
MOD button. The data is played back automatically.
NOTE:
If you have problems with operation using the USB
connexion, please use an appropriate adapter cable and
proceed as described under AUX IN.
26. AUX IN socket
To connect analogue replay devices. Use this jack to replay
sound of other replay equipment such as DVD players,
computers, etc. via the loudspeakers.
1. Please connect the external device with a 3.5 mm
stereo jack plug to the AUX IN socket.
2. Press the MOD button (9) to select the AUX IN connec-
tion.
3. You now hear the sound from the external device played
back through the loudspeakers.
4. With the VOL multifunction button (2) you can change
the volume.
5. For the remaining procedure please see the operating
instructions of the external sound source.
27. IR (Infrared)
Sensor for the remote control
28. RESET Button
Due to voltage fl uctuations in your vehicle electrical system
it is possible that the control processor of your radio has
„hung up“. This is not a fault in the device! Press this
button with a pointed object to restart it (reset).
About the DVD-Player
With this DVD-Player you can play a vast variety of DVD-formats
➯
„Technical data“.
However, you must be aware that in many cases DVDs are
encrypted with a so-called “Regional Code”. This specifi es for
which region in the world the DVD is intended. As an example,
the DVDs marked with regional code “1” are intended for the USA
and Canada. DVDs with regional code “2” are for use in Europe.
NOTE:
With your DVD-Player you can only play DVDs with regional
code “2”. There are both lots of burning and compressing
methods as well as high quality differences in (burned) CDs/
DVDs. Moreover, the music industry has not yet agreed on a
fi xed standard for copy protection. This may, in very isolated
cases, result in problems when relaying CDs, DVDs and MP3
CDs. This is no malfunction of the player.
Furthermore, there may be isolated problems when playing CDs
or DVDs which were created on a PC (e.g. holiday photographs). In case of problems check the settings of the DVD
writing program on your computer. You should in particular make
sure that the DVD has been fi nalized. For further information on
this matter please refer to the operating manual of your recorder.
Input Not Possible
If a function or input selected by you is not
possible, the adjacent symbol is shown on the
screen.
ENGLISH
27
05-AR 737 DVD_GB 27 21.08.2006, 11:50:05 Uhr
Page 28

ENGLISH
Changing the default settings
A large number of default settings can be comfortably changed
via the screen menu.
Press the SETUP-button (Fig. 1/25) on the remote control to
start the menu for changing the default settings (only in DVD
mode).
NOTE:
• Many of these default settings can be changed via both
the remote control and the menu. The difference is: If you
change the default settings via the remote control, these
ENGLISH
changes will only be valid until the DVD-Player is switched
off or the DVD is changed.
• However, any changes made in the menu are permanent.
Understanding the menu structure
The Setup menu has two menu levels:
• Main menu: The main level is represented by graphical
symbols.
• Sub-menu: The corresponding sub-menu options can be
found under each of the main menu options.
Using the menu
Navigation and selection
• Use the Cursor Buttons (Fig. 1/14) (왗, 왘) on the remote
control to browse through the main menu.
• In contrast to this, you must use the Cursor Buttons (왖,
왔
) to move in the sub-menu.
• Select a menu option with the ENTER-button (Fig. 1/27).
• Use the ENTER-button also to select an option (e.g. “PAL”
in the illustration on the top). The selected option (in the
example „NTSC”) is now highlighted.
Slide control
Overview of the main menu
• General Settings (1)
• Speaker Settings (2)
• Digital Settings (3)
• Preferred Settings (4)
NOTE:
Some of the menu settings can only be selected in stop mode
(depending on the DVD).
TV Display
Here you can adapt the output of the DVD-Player to the TV-aspect.
Concerning the background: If you do not have a wide screen
TV the TV-aspect will be 4:3. However, most feature fi lms
have an aspect of 16:9, the image is therefore too wide for the
TV-screen.
Here you can specify how the replay of the fi lm is to be adapted
to the replay device:
• Norm/PS: You will only see the middle section of the fi lm.
The borders will be cut off („Pan-Scan“).
• Norm/LB: You will see the complete width of the fi lm. The
fi lm is thus reduced in size, whereby black bars appear
below and above the fi lm („Letter-Box“).
• Wide: Select this option if you use a wide screen TV for
replay. Please note that fi lms, that have been recorded with
TV-aspect 4:3 can still be replayed using aspect 4:3. This
means, that replaying this fi lm will not require the complete
wide screen area of the television.
General Settings
Angle Mark (Camera Angle)
In some menus you will fi nd slide controls. The slide control is
used as follows:
1. Select with the ENTER-button.
2. Move the control with the Cursor Buttons (왖, 왔).
3. Confi rm the entry with the ENTER-button.
28
05-AR 737 DVD_GB 28 21.08.2006, 11:50:07 Uhr
If the DVD contains sequences recorded from different camera
angles you can use the ANGLE button (illustration 1/15) to
select the various camera angles. This function is only available
if the DVD contains scenes with various camera angles.
Before you can use this function it has to be activated.
• On: The angle symbol is shown on the screen.
• Off: No angle symbol is shown on the screen.
Page 29

ENGLISH
OSD language
Here you can select the language of the on-screen displays.
Audio output
The following options are available:
• On: The screen saver is activated (default setting).
• Off: The screen saver is deactivated.
Last Memory
Here you specify the settings for the digital Audio output.
• SPDIF OFF: Output of an analogue Audio signal, but no
digital signal.
• SPDIF/RAW: Output of a digital Audio signal. Use this
setting if your amplifi er is notwo-channel stereo amplifi er.
• SPDIF/PCM: Output of a digital Audio signal that is converted to a 2-channel signal. Use this setting if your amplifi er is
a two-channel stereo amplifi er.
NOTE:
If there is no Audio output, even though you connected the
DVD-Player to an amplifi er, you will most likely have chosen
an incorrect setting for the Audio output.
Captions
Some DVDs contain commentaries that accompany the fi lm,
e.g. subtitles for the hard of hearing.
• On: The commentary is displayed.
• Off: No commentaries are displayed.
Here you can defi ne how the DVD player should behave if the
user presses the STOP button (illustration 1/17) during playback.
• On: If the playback of a DVD, CD or VCD is stopped and
then restarted, playback begins from the previous position.
• Off: If the playback of a DVD, CD or VCD is stopped and
then restarted, playback begins from the beginning of the
medium.
Speaker setup
Downmix
Change the characteristics of the speaker output:
• LT/ RT: Choose this setting if you want to play the DVD with
the Pro Logic Dolby stereo effect. This produces a almost
real 2-channel replay effect.
• Stereo: Choose this setting if you want to play a DVD, that
has been produced in the 5.1-Audio format, as 2-channel
stereo sound.
Digital setup
Dynamic Range
ENGLISH
Screen saver
The term „Dynamic Range“ describes the ratio of quietest
and loudest sound. If the dynamic range is very large, you will
experience very quiet and very loud sounds.
This may cause replay problems. Let us assume that you are
watching a DVD in a relatively loud environment. You can now
increase the volume to be able to hear also the very quiet
The player is able to display a still image for any time on the
screen. This can cause damage to the screen. It is therefore
recommended to activate the screen saver.
05-AR 737 DVD_GB 29 21.08.2006, 11:50:09 Uhr
passages, however with the disadvantage that loud passages
will be unacceptably loud. In this case it would make sense to
compress the dynamic range (i.e. reduce) and increase the
output volume at the same time.
29
Page 30

ENGLISH
• FULL -2/8: The dynamic range is compressed slightly (2/8)
to full (FULL).
• OFF: The dynamic range is not compressed at all (default).
TV Type
ENGLISH
Match the output of the DVD-Player to the colour transfer system
of your replay device. The following options are available:
• PAL: A system commonly used in Europe.
• AUTO: Select this setting if your replay device is a multisystem unit.
• NTSC: A system primarily used in North America.
Audio language
Here you can select the preferred language for the audio output.
Subtitle language
Some DVD contain information concerning the target group.
This method is comparable with the rating of cinema fi lms
(„Suitable only for persons of 12 years and over“ e.g.).
If you have the child protection option activated a probably
existing corresponding information is read from the DVD and
compared with the value pre-set by you. If a DVD is intended for
an older age group than the one pre-set by you, the DVD cannot
be played.
The following child protection options are available:
• G: Suitable for all age groups.
• PG: The presence of parents is recommended. Some
scenes may be unsuitable for children.
• PG 13: The presence of parents is strictly recommended.
Some scenes may be unsuitable for children under the age
of 13.
• PGR: The presence of parents is strictly necessary.
• R: Young persons under the age of 17 may only view this
fi lm in the presence of an adult.
• NC17: Children and juveniles under the age of 17 are not
allowed to watch this fi lm.
• ADULT: The fi lm must only be watched by adults.
• Off: The child lock is deactivated.
Password
If you want to operate the DVD-Player with a child protection
system, you must fi rst enter a password. This password safeguards the settings for the child protection system, so that it can
only be changed by yourself.
Here you can select the preferred language for the subtitles
accompanying the fi lm.
Menu language
Here you can select the preferred language for the DVD menus.
Parental (Child protection)
30
05-AR 737 DVD_GB 30 21.08.2006, 11:50:11 Uhr
In order to change the password, you must fi rst enter the current
password. The master password is „1379“.
NOTE:
If you forgot your password, you can deactivate the child
protection system with this password.
Proceed as follows to change the password:
1. Enter the present password in the „Old Password“ line with
the numeral keys (illustration 1/12) of the remote control.
To prevent the password from being read by unauthorized
persons only the characters “XXXX” will appear on the
screen.
2. Enter the new password in the „New Password“ line with the
numeral keys of the remote control.
3. Confi rm the new password by entering it again in the
„Confi rm“ line. Confi rm your entry with the ENTER button
(illustration 1/27).
Page 31

ENGLISH
Default
Select the command „Default/Reset“ if you want to reset the
player to the factory implemented default settings.
Any settings you have made will be lost.
Technical data
General
Supply voltage............................................................DC 13,8 V
Power consumption....................................................10 A max.
Power ...........................................................................4 x 10 W
Monitor.......................................................................... 2,5“ TFT
Number of pixels......................................................... 480 x 234
FM band
Frequency range ...................................87,5 MHz to 108,0 MHz
Effective sensitivity .........................................................15 dBµ.
I.F. frequency...............................................................10,7 MHz
AM band
Frequency range .......................................522 kHz to 1620 kHz
Effective sensitivity ........................................................... 40 dB
I.F. frequency.................................................................450 kHz
(Line-Out)
Output.................................................................... 2 CH & 4 CH
Signal format .............................................................PAL/NTSC
Video output ................................................1,0 V (P-P) 75 Ohm
CD player
System......................................................... MP3 Audio System
Suitable CDs................CD/CD-R/CD-RW/MP3/DVD/VCD disks
Playable bit rates.................................................32 - 320 kBit/s
Number of quantising bits................................................... 1 bit.
Frequency characteristics.................................. 20 Hz – 20 kHz
Signal-to-noise ratio..................................................90 dB (JIS)
Number of channels .......................................2 stereo channels
ENGLISH
Housing dimensions ................................ 178 W x 50 H x 165 D
Regional code.................2 (= Europe, Greenland, South Africa,
This device has been tested according to all relevant current
CE guidelines, such as electromagnetic compatibility and low
voltage directives, and has been constructed in accordance with
the latest safety regulations.
Subject to technical changes without prior notice!
05-AR 737 DVD_GB 31 21.08.2006, 11:50:13 Uhr
Egypt and Middle East, Japan)
31
Page 32

ENGLISH
Troubleshooting
Before going through the checklist please make all the
connections fi rst. If you still have questions after going through
the checklist, please consult your local customer service
representative.
Fault Symptoms Cause Solution
CDs are drawn only
half way into the CD
tray.
„NO DISC“ is shown in
the display.
CD cannot be selected
ENGLISH
using the MOD(E)
button.
The CD does not play
back after being inserted into the device.
CD works intermittently
(dropouts).
No function. The ignition is switched
Device cannot be
switched on or off via
the ignition.
The device does not
work correctly (EJECT,
LOAD, PLAY).
The transport screws
have not been
removed.
The CD is inserted the
wrong way round.
There is no CD
inserted.
A USB storage
medium is connected
to the USB port.
The volume control is
set too low.
The device has
not been correctly
connected.
The surface of the road
is uneven.
The device is not fi rmly
installed.
The CD is damaged. Try another CD. If this
The CD is dirty. Clean the CD.
The device may have
been installed in the
vehicle at the wrong
angle.
off.
One or more fuses
have blown.
Incorrect connection
(each car manufacturer
wires the ISO connection in the vehicle
differently).
The microcomputer
has been interfered
with by electromagnetic fi elds.
Remove the transport
screws.
Insert the CD right way
round.
Insert a CD.
Remove the USB
storage medium.
Turn up the volume.
Check the +12V and
earth connection.
Wait until the road
becomes smoother
before playing the CD.
Install the device fi rmly.
Ensure that the rear attachment is used if the
vehicle does not have
any suitable retainer
for the rear section of
the device.
works correctly, the
fi rst CD is probably
damaged.
Please note that a
maximum inclination
of 20° degrees should
not be exceeded!
Turn the ignition key to
„ON“ or „ACC“.
Replace the fuse by
another 5 A /0,5 A/
0,5 A fuse.
Please contact your
car workshop or a
vehicle specialist for
connection adapters
may specifi cally for
your model.
Remove the CD and
reinsert it.
Switch the device off
and on again.
Fault Symptoms Cause Solution
The device cannot be
operated, but „hangs
up“.
No radio reception. The antenna cable is
Poor radio reception. It is possible that your
In automatic search
mode the radio does
not stop at a transmitting station.
The control processor
of the device may
have been blocked by
overvoltage or undervoltage in the vehicle
electrical system.
not connected.
vehicle has a special
antenna (phantompowered antenna.)
The transmission
signals are too weak.
Press the RESET
button.
Insert the antenna
cable fi rmly into the
antenna socket of the
device.
Please contact your
car workshop or a
vehicle specialist. (For
other manufacturers
there are specifi c
phantom power supply
adapters and voltage
adapters available.)
Tune in to a radio
station manually.
Handling a CD
Cleaning the CD
Before playing a CD, wipe it off
with a clean, dust-free cleaning
cloth. Pull out the CD in the
direction of the arrow.
Note: Do not use any solvents such as petrol or thinning agents.
Commercially available cleaning substances or antistatic sprays
will damage the device.
Inserting the CD
If the CD is inserted with the
printed side facing downwards,
the device may be damaged.
Always insert the CD with the
label facing upwards.
Note: If there is already a CD in the CD slit, do not try to insert a
second CD. This may damage the device.
Touching the CD
Always hold CDs by the edge.
In order to keep the CD clean
do not touch the surface.
32
05-AR 737 DVD_GB 32 21.08.2006, 11:50:14 Uhr
Page 33

ENGLISH
• Do not attach any stickers or adhesive tape to the CD.
• Do not expose the CD to direct sunlight or sources of heat
such as heating pipes. Do not leave CDs in the car if it is
parked in direct sunlight as this will lead to a considerable
rise in the temperature inside the car.
• Check all CDs for cracks, scratches and warping before you
play them. It is possible that CDs that are damaged in this
way cannot be played back correctly. Such CDs should not
be used.
• Use only standard commercially available circular CDs
with a 12 cm diameter! CDs with an 8 cm diameter or CDs
with contours, e.g. of a butterfl y or heart, are not suitable.
It is possible that such CDs may not only be destroyed
themselves, but may also destroy the drive of the CD player.
We cannot accept liability for damage caused by the use of
unsuitable CDs.
Guarantee
The device supplied by our Company is covered by a 24 month
guarantee starting on the date of purchase (receipt).
During the life of the guarantee any fault of the device or its
accessories ascribable to material or manufacturing defects will
be eliminated free of charge by repairing or, at our discretion, by
replacing it. The guarantee services do not entail an extension
of the life of the guarantee nor do they give rise to any right to a
new guarantee!
Proof of the guarantee is provided by the proof of purchase.
Without proof of purchase no free replacement or repair will be
carried out.
If you wish to make a claim under the guarantee please return
the entire machine in the original packaging to your dealer
together with the receipt.
Defects to consumables or parts subject to wearing as well as
cleaning, maintenance or the replacement of said parts are not
covered by the guarantee and hence are to be paid!
The guarantee lapses in case of unauthorized tampering.
Meaning of the “Dustbin” Symbol
Protect our environment: do not dispose of electrical equipment
in the domestic waste.
Please return any electrical equipment that you will no longer
use to the collection points provided for their disposal.
This helps avoid the potential effects of incorrect disposal on the
environment and human health.
This will contribute to the recycling and other forms of reutilisation of electrical and electronic equipment.
Information concerning where the equipment can be disposed of
can be obtained from your local authority.
ENGLISH
After the expiry of the guarantee
After the expiry of the guarantee repairs can be carried by the
competent dealer or repair service against the payment of the
ensuing costs.
33
05-AR 737 DVD_GB 33 21.08.2006, 11:50:16 Uhr
Page 34

ENGLISH
AF...............................................................................................25
APS button.................................................................................25
AUX IN .......................................................................................27
BND button.................................................................................25
Buttons on the Remote Control..................................................20
CLK button .................................................................................27
ENGLISH
Connection.................................................................................23
DVD Player.................................................................................27
EJ button....................................................................................25
Eject button ................................................................................25
Ejecting the CD ..........................................................................25
Guarantee ..................................................................................33
Handling a CD............................................................................32
Important Additional Installation Information .............................24
Installation ..................................................................................22
Installation (Safety Information) .................................................21
Installation Tips ..........................................................................21
INTRO (3INT).............................................................................26
LOC button.................................................................................27
MENU button..............................................................................27
MOD button................................................................................25
MU button (Mute).......................................................................25
A
B
C
D
E
G
H
I
L
M
Index
Operating instructions................................................................24
Operation ...................................................................................24
PI (Programme Information) ......................................................25
Play / Pause (
PTY button .................................................................................26
PWR button................................................................................24
RANDOM (4RTM)......................................................................26
REG (Regional)..........................................................................24
REPEAT (2RPT) ........................................................................26
RESET button ............................................................................27
Road Safety ...............................................................................21
SEL button .................................................................................24
Safety Information .....................................................................21
Switching off...............................................................................24
Switching on...............................................................................24
Switching to Mono......................................................................26
Switching to Stereo....................................................................26
Mute (see MU button) ................................................................25
TA (Traffi c Announcements) ......................................................26
Technical Data ..........................................................................31
Time (see CLK)..........................................................................27
Traffi c Announcements (see TA)................................................26
Troubleshooting..........................................................................32
USB Connection .......................................................................27
VOL Multifunction Button ..........................................................24
왘
II)......................................................................26
O
P
R
S
T
U
V
34
05-AR 737 DVD_GB 34 21.08.2006, 11:50:18 Uhr
Page 35

ENGLISH
Menu overview
General Setup Page Preference Page
TV Display Norm/PS TV Type PAL
Norm/LB Auto
Wide NTSC
Angle Mark On Audio English
Off French
OSD Lang English Spanish
French German
German Italian
Spanish Portuguese
Italian Subtitle English
Portuguese Spanish
SPDIF-Output SPDIF Off German
SPDIF/RAW Italian
SPDIF/PCM Portuguese
Captions On Off
Off Disc Menu English
Screen Saver On French
Off Spanish
Last Memory On German
Off Italian
Portuguese
Speaker Setup Page
Downmix LT/RT 3 PG
Stereo 4 PG13
Dolby Digital Setup
Dynamic
Parental 2 G
5 PGR
6 R
7 NC-17
8 ADULT
Off
Password Change
Default Reset
ENGLISH
35
05-AR 737 DVD_GB 35 21.08.2006, 11:50:19 Uhr
Page 36

D-47906 Kempen/Germany · Industriering Ost 40
Internet: http://www.clatronic.de · email: info@clatronic.de
05-AR 737 DVD_D 36 21.08.2006, 11:51:45 Uhr
Stünings Medien, Krefeld • 08/06
 Loading...