

Page 1
Bedienungsanleitung/Garantie
Gebruiksaanwijzing/Garantie • Mode d’emploi/Garantie
Instrucciones de servicio/Garantía • Manual de instruções/Garantia
Istruzioni per l’uso/Garanzia • Instruction Manual/Guarantee
Instrukcja obsługi/Gwarancja • A használati utasítás/Garancia
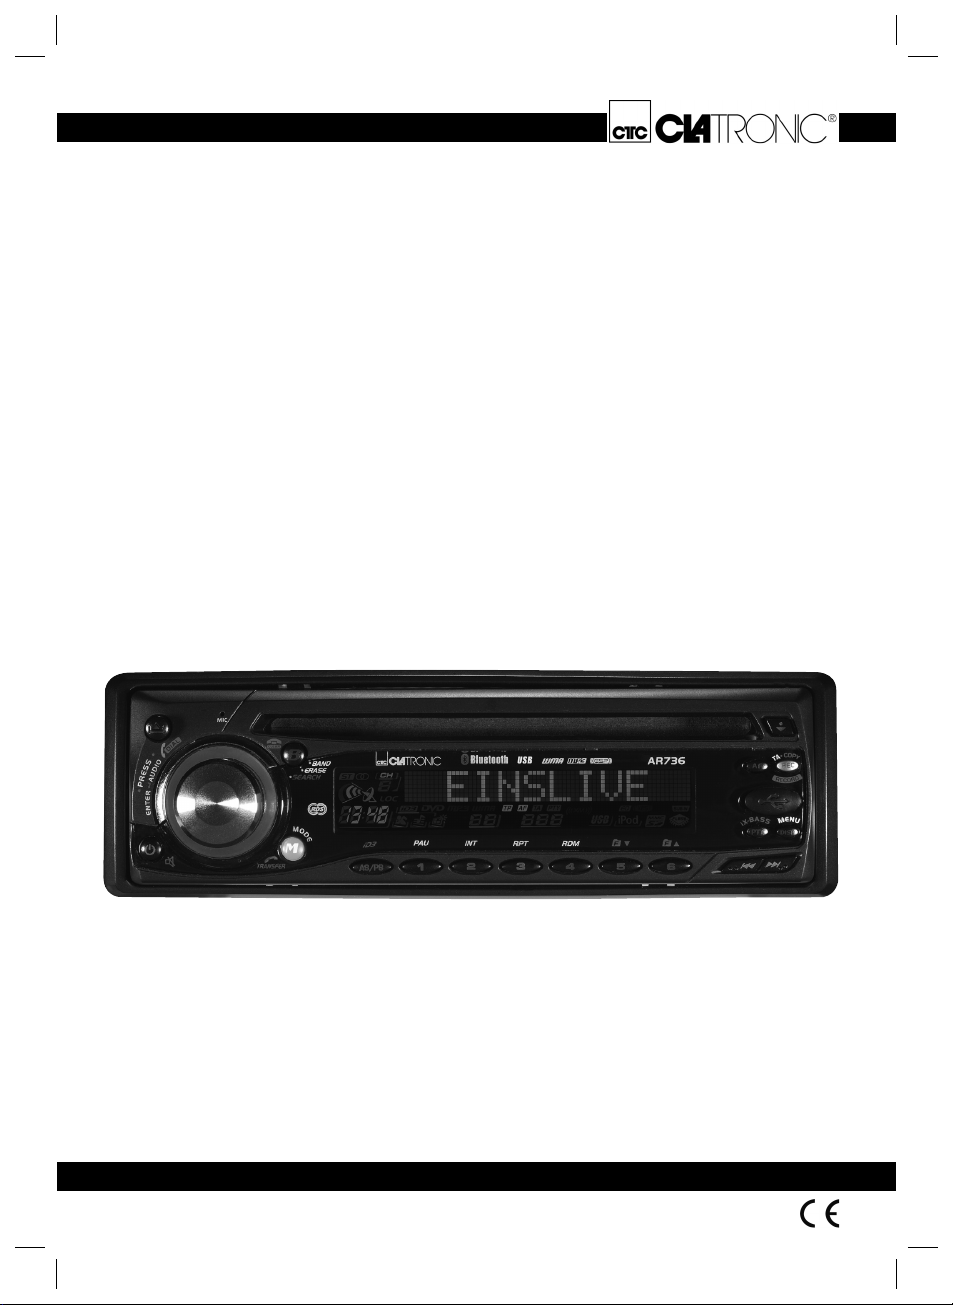
Autoradio mit CD-Player
Autoradio met CD-speler • Autoradio avec lecteur de CD
Auto-radio con CD-Player • Rádio para automóveis com leitor de CDs
Autoradio con lettore CD • Car radio with CD player
Radio samochodowe z odtwarzaczem CD • Autórádió CD-lejátszóval
AR 736 CD/MP3 - Bluetooth
05-AR 736 CD_MP3_NEU 1 18.09.2006, 11:00:06 Uhr
Page 2

DEUTSCH
NEDERLANDS
FRANÇAIS
ESPAÑOL
PORTUGUÊS
ITALIANO
ENGLISH
JĘZYK POLSKI
MAGYARUL
DEUTSCH
DEUTSCH
NEDERLANDS
FRANÇAIS
ESPAÑOL
PORTUGUÊS
ITALIANO
ENGLISH
JĘZYK POLSKI
MAGYARUL
ITALIANO
Inhalt
Übersicht der Bedienelemente ................................... Seite 3
Bedienungsanleitung .................................................. Seite 4
Technische Daten ....................................................... Seite 11
Garantie....................................................................... Seite 13
Stichwortverzeichnis – Index ...................................... Seite 14
NEDERLANDS
Inhoud
Overzicht van de bedieningselementen................... Pagina 3
Gebruiksaanwijzing.................................................. Pagina 15
Technische gegevens .............................................. Pagina 22
Garantie.................................................................... Pagina 24
Trefwoordenregister - index...................................... Pagina 25
FRANÇAIS
Sommaire
Liste des différents éléments de commande.............. Page 3
Mode d’emploi............................................................. Page 26
Données techniques ................................................... Page 33
Garantie....................................................................... Page 35
Index alphabétique...................................................... Page 36
Indice
Elementi di comando ............................................... Pagina 3
Istruzioni per l’uso .................................................... Pagina 59
Dati tecnici................................................................ Pagina 66
Garanzia................................................................... Pagina 68
Elenco tematico - Indice........................................... Pagina 69
ENGLISH
Contents
Overview of the Components ..................................... Page 3
Instruction Manual....................................................... Page 70
Technical Data ............................................................ Page 77
Guarantee ...................................................................Page 78
Index............................................................................ Page 79
JĘZYK POLSKI
Spis tres´ci
Przegląd elementów obłsugi.....................................Strona 3
Instrukcja obsługi ......................................................Strona 80
Dane techniczne .......................................................Strona 87
Gwarancja................................................................. Strona 89
Indeks rzeczowy........................................................Strona 90
DEUTSCH
NEDERLANDS
FRANÇAIS
ESPAÑOL
PORTUGUÊS
ESPAÑOL
Indice
Indicación de los elementos de manejo .................. Página 3
Instrucciones de servicio ......................................... Página 37
Datos técnicos.......................................................... Página 44
Garantia.................................................................... Página 46
Índice........................................................................ Página 47
Tartalom
A kezelő elemek áttekintéseé..................................... Oldal 3
A hasznalati utasítás................................................... Oldal 91
Műszaki adatok ........................................................... Oldal 98
Garancia...................................................................... Oldal 99
Címszójegyzék – Index............................................... Oldal 100
MAGYARUL
PORTUGUÊS
Índice
Descrição dos elementos......................................... Página 3
Manual de instruções............................................... Página 48
Características técnicas........................................... Página 55
Garantía ................................................................... Página 57
Índice........................................................................ Página 58
2
05-AR 736 CD_MP3_NEU 2 18.09.2006, 11:00:10 Uhr
ITALIANO
ENGLISH
JĘZYK POLSKI
MAGYARUL
Page 3
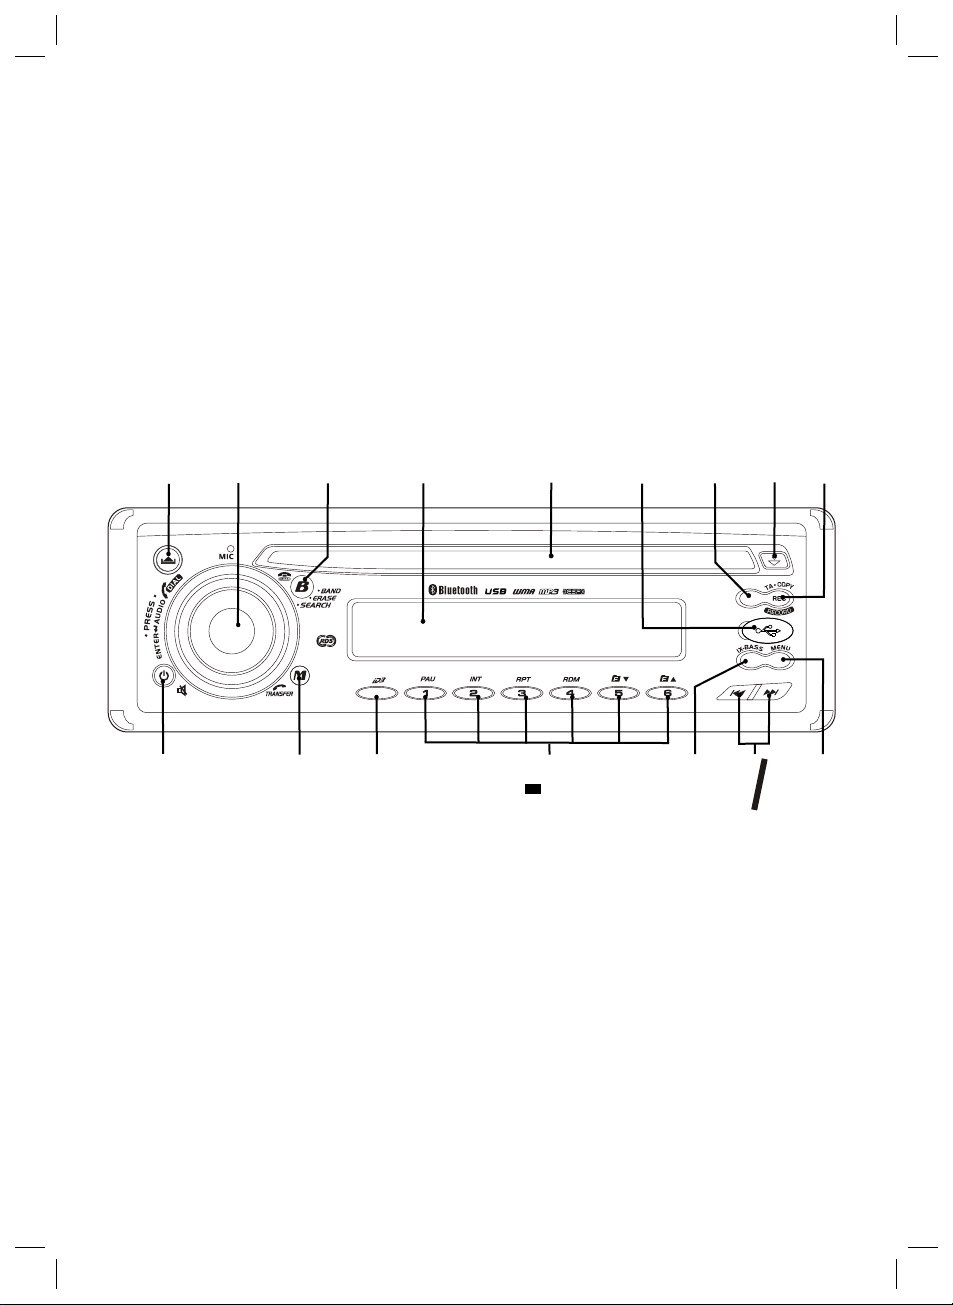
Übersicht der Bedienelemente
Overzicht van de bedieningselementen • Liste des différents éléments de commande
Indicación de los elementos de manejo • Descrição dos elementos • Elementi di comando
Overview of the Components • Przegląd elementów obsługi • A kezelő elemek áttekintése
1
4
2
6 22
M
M
O
O
D
D
E
E
AS/PS
5
1
1
1
2
10
7
1
21
1
20
7
9
AF
PTY
9
DISP
8
1
8
3
3
05-AR 736 CD_MP3_NEU 3 18.09.2006, 11:00:11 Uhr
Page 4
DEUTSCH
Sicherheitshinweise
Lesen Sie vor Inbetriebnahme dieses Gerätes die Bedienungs-
DEUTSCH
anleitung sehr sorgfältig durch und bewahren Sie diese inkl.
Garantieschein, Kassenbon und nach Möglichkeit den Karton
mit Innenverpackung gut auf.
• Verwenden Sie das Gerät nur für den vorgesehenen Zweck.
• Das Gerät so einbauen, dass vorhandene Lüftungsöffnungen nicht verdeckt werden.
• Niemals das Gehäuse des Gerätes öffnen. Durch unsachgemäße Reparaturen können erhebliche Gefahren für den
Benutzer entstehen. Bei Beschädigung des Gerätes, das
Gerät nicht mehr in Betrieb nehmen, sondern von einem
Fachmann reparieren lassen.
Diese Symbole können sich ggfs. auf dem Gerät befi nden und
sollen Sie auf folgendes hinweisen:
Das Symbol mit Ausrufezeichen soll den Benutzer
auf wichtige Bedienungs- oder Wartungs-Hinweise
in den Begleitpapieren hinweisen.
Geräte mit diesem Symbol arbeiten mit einem
„Klasse 1-Laser“ zur Abtastung der CD. Die eingebauten Sicherheitsschalter sollen verhindern, dass
der Benutzer gefährlichem, für das menschliche
Auge nicht sichtbarem Laserlicht ausgesetzt wird,
wenn das CD-Fach geöffnet ist.
Diese Sicherheitsschalter sollten auf keinen Fall überbrückt oder
manipuliert werden, sonst besteht die Gefahr, dass Sie sich dem
Laser-Licht aussetzen.
Kinder
• Zur Sicherheit Ihrer Kinder lassen Sie keine Verpackungsteile (Plastikbeutel, Karton, Styropor, etc.) erreichbar liegen.
Achtung! Lassen Sie kleine Kinder nicht mit Folie spielen.
Es besteht Erstickungsgefahr!
Verkehrssicherheit
• Die Verkehrssicherheit ist oberstes Gebot. Benutzen Sie
daher Ihre Autoradioanlage immer so, dass Sie stets der
aktuellen Verkehrssituation gewachsen sind.
• Bedenken Sie, dass Sie bei einer Geschwindigkeit von
50 km/h in der Sekunde 14 m fahren.
• In kritischen Situationen raten wir von einer Bedienung ab.
• Die Warnhinweise z.B. von Polizei und Feuerwehr müssen
im Fahrzeug rechtzeitig und sicher wahrgenommen werden
können.
• Hören Sie deshalb während der Fahrt Ihr Programm nur in
angemessenerer Lautstärke.
Für die Dauer der Montage und
des Anschlusses beachten Sie bitte
folgende Sicherheitshinweise.
• Zuerst den Minuspol, dann den Pluspol der Batterie abklemmen. (Anklemmen in umgekehrter Reihenfolge.)
Bitte beachten: Ist die Batterie vom Netz, verlieren alle
fl üchtigen Speicher ihre Informationen. Beachten Sie die
Sicherheitshinweise des KFZ- Herstellers.
• Die Hauptsicherung muss möglichst nahe (maximal nach
30 cm) am Pluspol der Batterie installiert werden, damit das
Auto vor einem eventuellen Kabelbrand z.B. durch Unfall
geschützt ist. Sollte die Installation dieser Vorgabe nicht
entsprechen, erlischt der Versicherungsschutz.
• Der Querschnitt des Plus- und Minuskabels darf 1,5 mm²
nicht unterschreiten.
• Beim Bohren von Löchern darauf achten, dass keine
Fahrzeugteile beschädigt werden.
Installationstipps:
• Kabelschutztüllen schützen Kabel vor Durchscheuern an
scharfen Karosserieteilen.
• Die Isolierung der Kabel darf bei der Installation nicht
beschädigt werden.
• Das richtige Werkzeug ist bei einer Car-HiFi-Installation
selbstverständlich.
Je nach Bauart kann Ihr Fahrzeug von dieser Beschreibung
abweichen. Für Schäden durch Einbau- oder Anschlussfehler
und für Folgeschäden übernehmen wir keine Haftung.
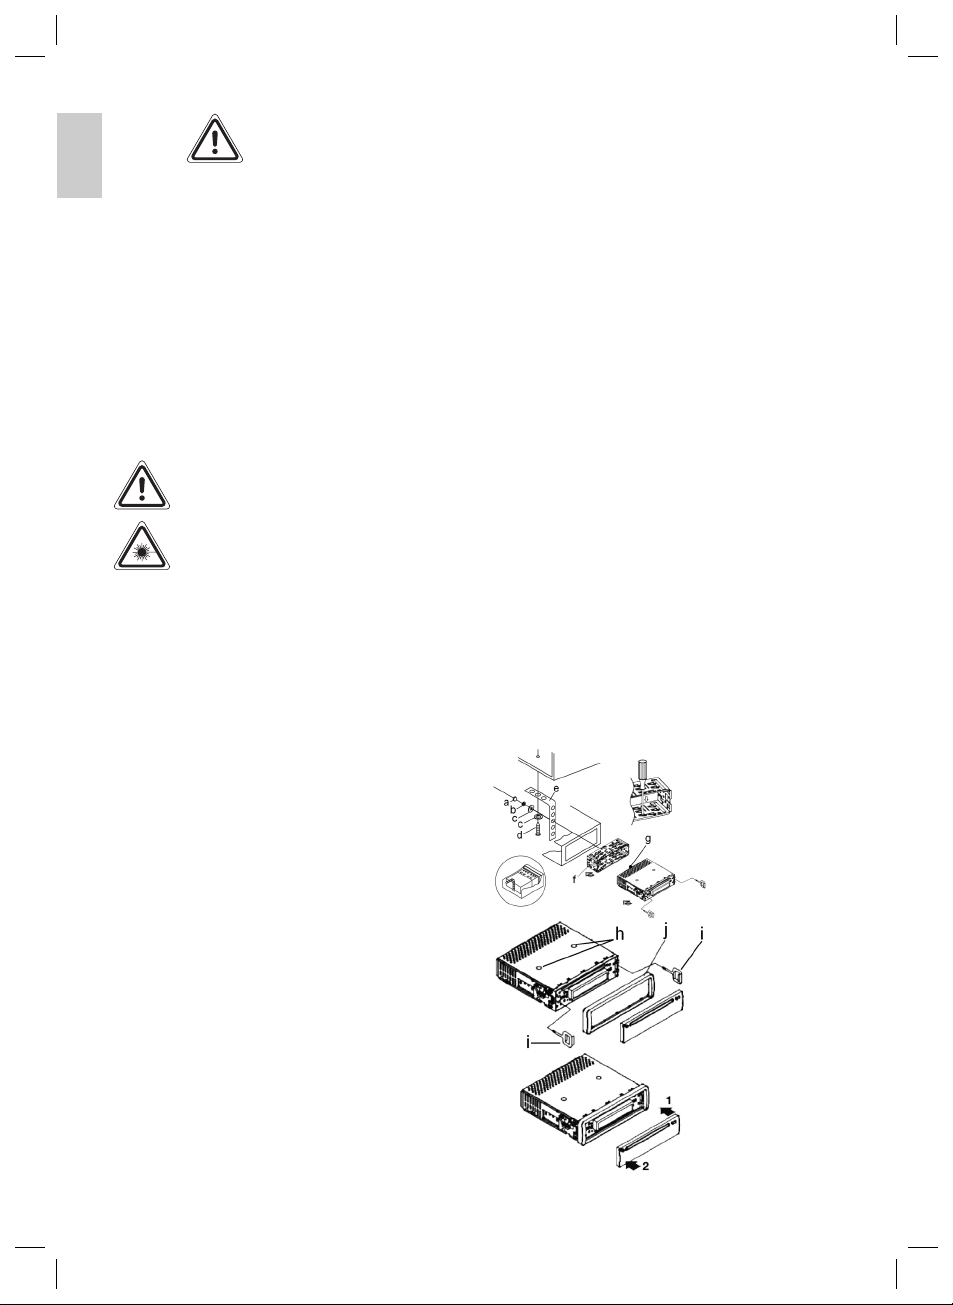
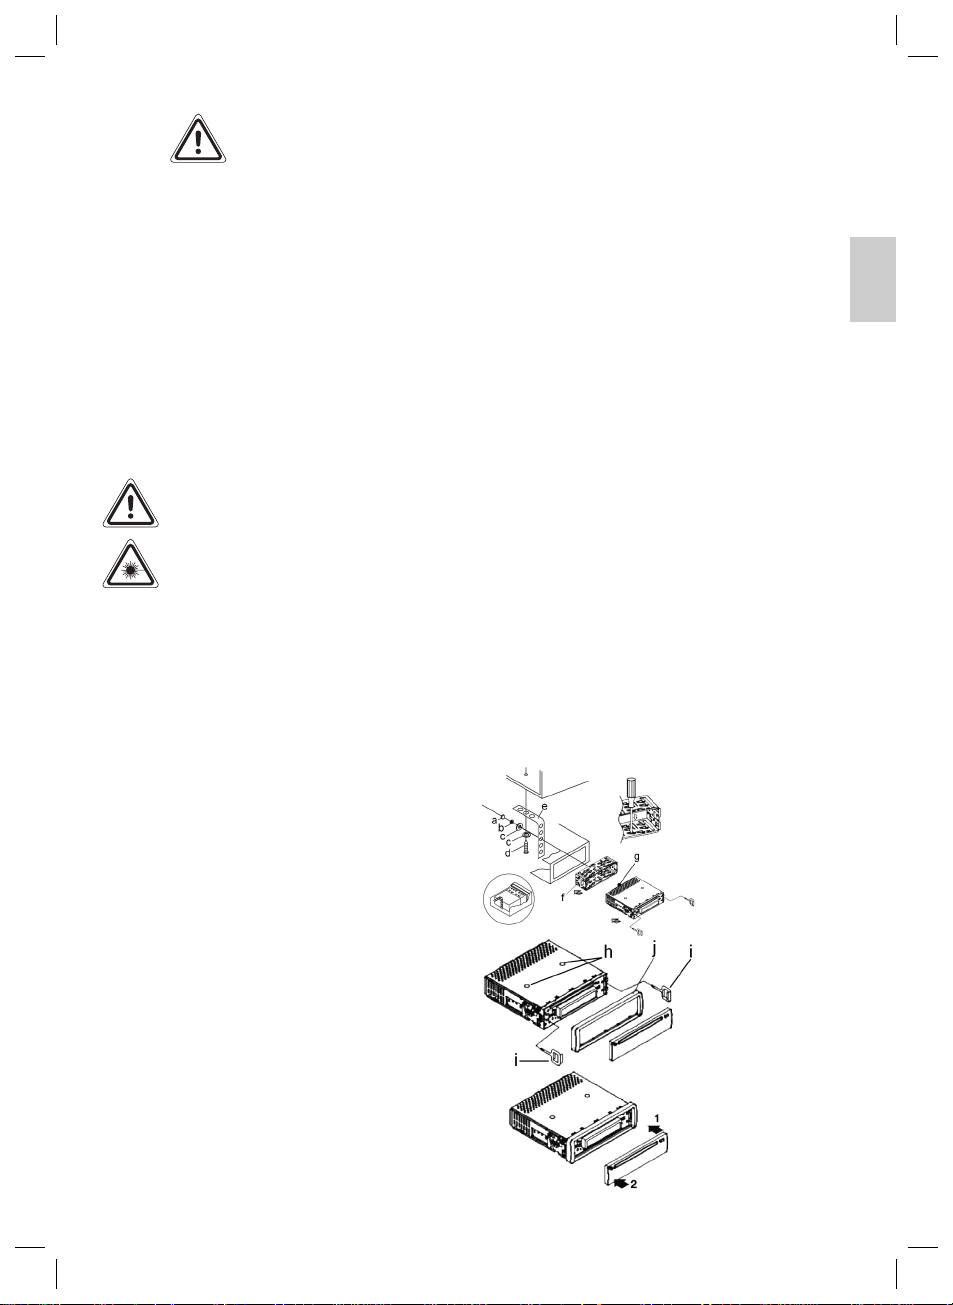
Installation
Montieren Sie das Radiogerät gemäß folgender Darstellungen.
a Mutter
b Federscheibe
c Unterlegscheibe
d Schraube
e Montagewinkel
f Einschubgehäuse
g Gewindebolzen
Achtung!
h Schrauben der Trans-
portsicherung (Bitte vor
der Montage entnehmen)
i Ausziehwerkzeug (Schlüs-
sel für die Demontage)
j Blendrahmen
Setzen Sie die Bedienblende
erst an der rechten Seite an und
rasten Sie diese dann auf der
linken Seite ein.
4
05-AR 736 CD_MP3_NEU 4 18.09.2006, 11:00:12 Uhr
Page 5
DEUTSCH
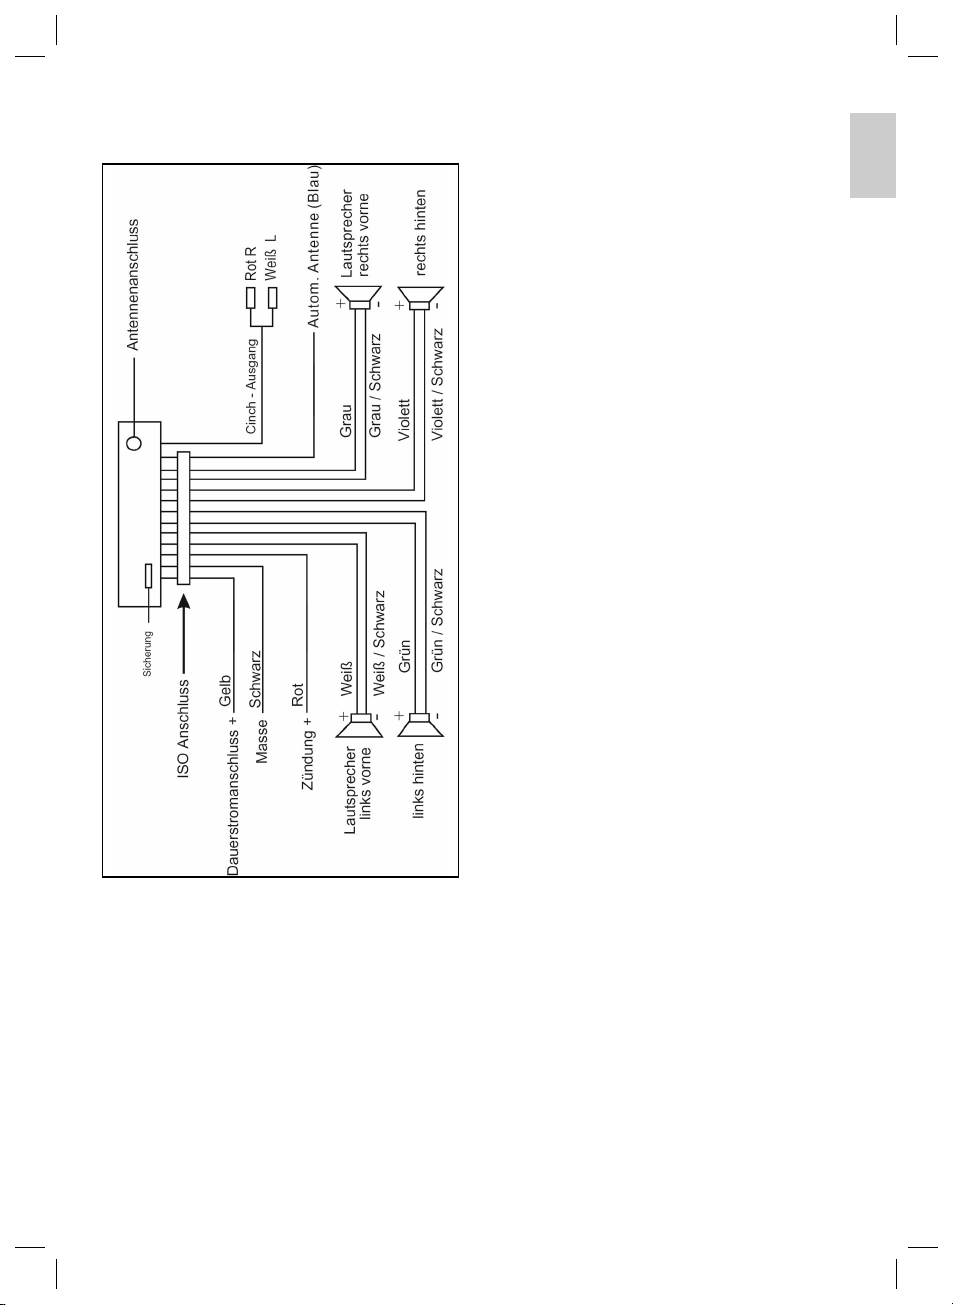
Anschluss
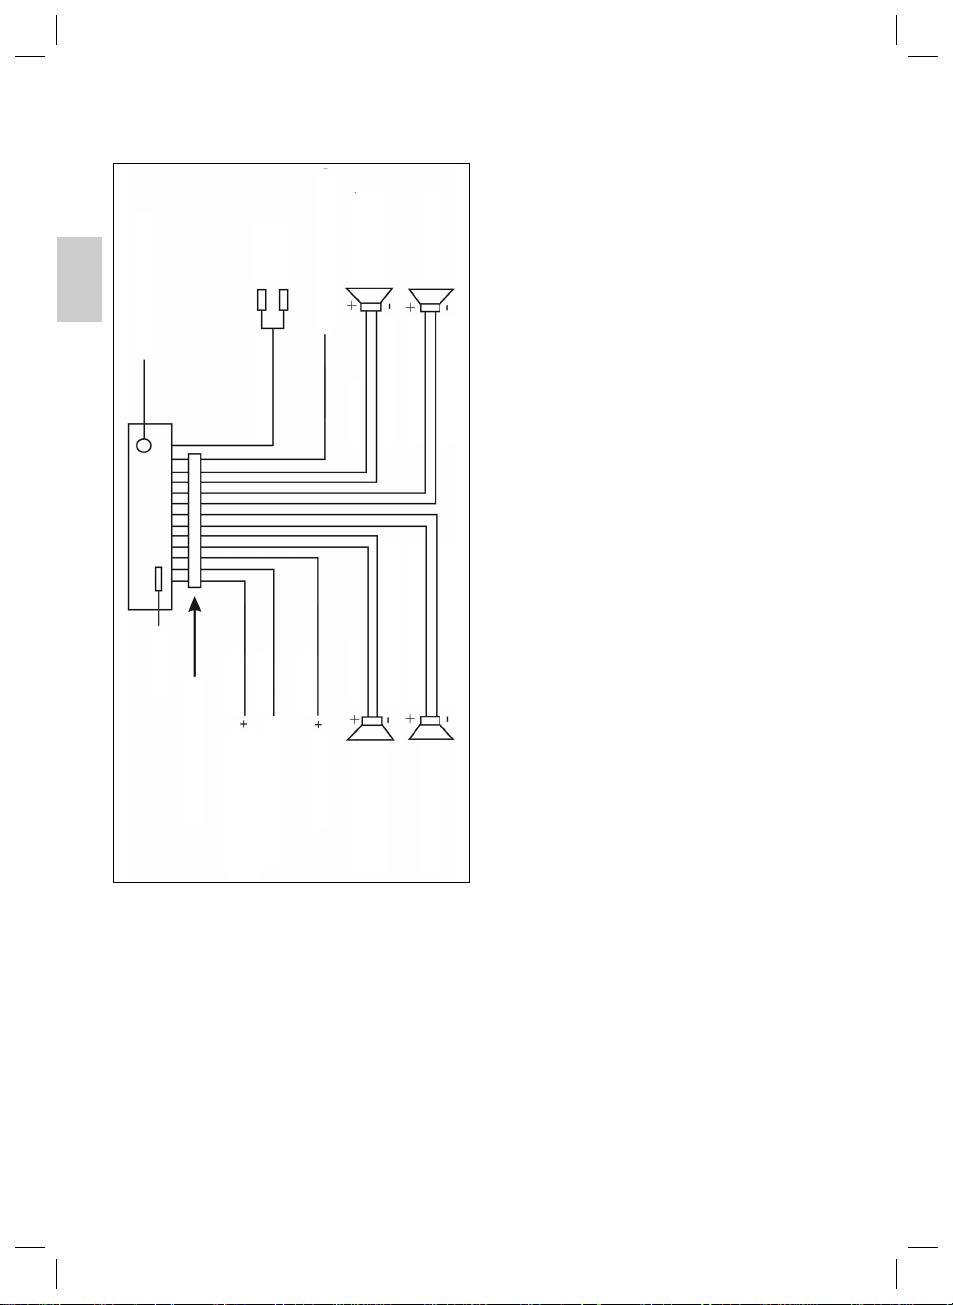
Stellen Sie die Anschlüsse gemäß des Schaubildes her.
Achtung:
• Setzen Sie das abnehmbare Bedienfeld erst nach dem
Anschluss der Kabel auf.
• Verwenden Sie Lautsprecher mit einer Impedanz von
4 Ohm.
• Die Lautsprecherverkabelung muss Massefrei sein.
• Das über die Cinch-Ausgänge angeschlossene Signal, wird
nur über die Rear-Lautsprecher wiedergegeben.
2. Das Gerät ist für den Minuspol der Batterie ausgelegt, der
3. Bitte beachten Sie beim Einbau/Anschluss Ihres Gerätes,
Adapter erhalten Sie im Autozubehörhandel und/oder bei
4. Bei der Belegung des “Dauer +“ (Dauerstromanschluss)
Um alle Funktionen zu gewährleisten ist der Einbau entspre-
5. Der maximale Neigungswinkel beim Einbau Ihres
6. Je nach Fahrzeugtyp können in Ausnahmefällen Störgeräu-
Entstörfi lter erhalten Sie im Autozubehörhandel und/oder bei
7. Bitte achten Sie beim Einbau Ihres Radios darauf, dass die
8. Beim Antennenanschluss gibt es zwei verschiedene
Bei VW/Audi unbedingt beachten: die aktive Antenne
1. Wenn die vordere Bedientafel während des Radio- oder
2. Wenn das Fahrzeuginnere extrem heiß ist, z.B. nach einer
Wichtige Zusatzinformation
zum Einbau Ihres Autoradios!
1. Die Schrauben (h) der Transportsicherung bitte vor der
Montage entfernen, da sonst die CD nicht eingezogen
werden kann.
3. Um das abnehmbare Bedienteil sicher aufzubewahren, stets
4. Die Wiedergabe anwenderseitig erstellter CD kann durch
an die Fahrzeugkarosserie angeschlossen sein muss. Dies
bitte vor Installation überprüfen.
dass nicht jedes Fahrzeug mit einem “ISO Anschluss“ versehen ist. In diesem Fall empfehlen wir Ihnen den Einsatz
eines KFZ spezifi schen ISO Adapter.
DEUTSCH
Ihrer KFZ Werkstatt.
kann es je nach Fahrzeugtyp zu Abweichungen kommen.
(Dies ist jedoch für die Speicherung der Senderstationen
notwendig.)
chend dieser Anleitung zwingend erforderlich. Im Zweifel
wenden Sie sich an eine autorisierte KFZ Werkstatt.
Autoradios darf 20° nicht überschreiten, da bei größeren
Einbauwinkeln die Funktion Ihres Autoradios (CD-Player)
nicht mehr gewährleistet ist.
sche im Radio/CD Betrieb auftreten. Diese lassen sich mit
einem zusätzlichen Entstörfi lter entsprechend beseitigen.
Ihr Gerät ist bereits serienmäßig mit einem Entstörfi lter
ausgerüstet. Trotzdem kann es fahrzeugbedingt zu Beeinträchtigungen kommen.
Ihrer KFZ Werkstatt.
Rückseite des Radios genügend Freiraum hat, damit eine
ausreichende Kühlung gewährleistet ist.
Normen. Erstens den alten (50 Ohm) mit langem,
herausstehendem Rundkontakt fahrzeugseitig und einer
Rundbuchse auf der Radioseite. Zweitens ISO-genormte
Antennenstecker (150 Ohm). Adapter für beide Formate
bieten Zubehörhersteller und/oder Ihrer KFZ Werkstatt an.
benötigt Spannung auf der Abschirmung des AntennenKoaxialkabels, ohne die der Empfang unzureichend ist.
Ein Antennen-Adapter mit Phantomspeisung löst dieses
Problem.
Bedienhinweise
CD-Betriebs abgenommen wird, wird das Gerät automatisch
ausgeschaltet.
längeren Parkdauer in praller Sonne, den Player nicht
einschalten, bis das Fahrzeug nach einer kurzen Fahrzeit im
Inneren etwas abgekühlt ist.
die dafür vorgesehene Schutzhülle verwenden.
die Vielzahl der verfügbaren Software und CD-Medien nicht
garantiert werden.
5
05-AR 736 CD_MP3_NEU 5 18.09.2006, 11:00:13 Uhr
Page 6

DEUTSCH
5. RESET-Knopf (ohne Abbildung): Etwaige Fehlfunktionen
(ERROR) während des Betriebs können durch Drücken
der RESET Taste behoben werden. Diese Taste fi nden
Sie bei abgenommenem Bedienfeld in der rechten unteren
DEUTSCH
Ecke. Durch Spannungsschwankungen im Bordnetz Ihres
Fahrzeugs kann es vorkommen das sich der Steuerprozessor Ihres Radios „aufgehangen“ hat. Hierbei handelt es
sich nicht um einen Gerätefehler! Durch betätigen dieser
Taste, mit einem spitzen Gegenstand, wird dieser neu
gestartet (zurückgesetzt).
Bedienung
1. -Taste
Drücken Sie die -Taste zum Herausnehmen des vorderen
Bedienfeldes.
2. PRESS • ENTER AUDIO DIAL-
Multifunktionsknopf (Lautstärke)
a) Drehen: Im normalen Spielbetrieb dient der Multifunkti-
onsknopf zur Einstellung der Lautstärke.
b) Kurz drücken: Um in den Eingabemodus der Telefon-
nummer zu gelangen. Für die weitere Bedienung richten
Sie sich bitte nach dem Abschnitt „Telefonieren via
Bluetooth“.
c) Lang drücken: Um in das Auswahlmenü des Klangmo-
dus zu gelangen. Im Display erscheint „VOLUME“ zur
Einstellung der Lautstärke. Durch kurzes Drücken des
Multifunktionsknopfes können Sie nun die einzelnen
Menüpunkte wie VOLUME (Lautstärke), BASS (Bässe),
TREBLE (Höhen), BALANCE (Balance) und FADER
(Überblendregelung) anwählen. Sie ändern die Einstellungen der einzelnen Menüpunkte durch Drehen des
Multifunktionsknopfes.
3. DISP/MENU-Taste (Display/Auswahl)
a) Radio Betrieb:
• Wenn RDS Daten empfangen werden drücken Sie
mehrmals kurz diese Taste um folgendes angezeigt
zu bekommen:
PS Name ➞ Uhrzeit ➞ Frequenz ➞ PTY
• Werden keine RDS Daten empfangen wird folgendes angezeigt:
Uhrzeit ➞ PTY➞ Frequenz
Hinweis: Die Anzeige bleibt für ca. 5 Sekunden sicht-
bar, anschließend geht das Gerät zur ursprünglichen
Anzeige zurück.
b) Drücken Sie die DISP/MENU-Taste lang, um in die
folgenden Auswahlmenüs zu gelangen:
• PAIRING
• RE-CONN / DIS-CONN
• A ANSWER ON / A ANSWER OFF
• PHONE VOL
• CONTRAST
• FORMAT 24H / FORMAT 12H
• SET
6
• DISTANT / LOCAL
• REGION ON / REGION OFF
• VOL PGM
• BEEP TONE ON / BEEP TONE OFF
Durch wiederholtes Drücken der DISP/MENU-Taste
können Sie nun die einzelnen Menüpunkte anwählen.
Sie ändern die Einstellungen der einzelnen Menüpunkte
durch Drehen des Multifunktionsknopfes (2).
• PAIRING:1 (Anmelden)
Bevor Sie Ihr Bluetooth-fähiges Mobiltelefon verwenden
können, müssen Sie dieses erst im Gerät anmelden
(siehe „Geräte anmelden“).
• RE-CONN:1/DIS-CONN:1
Über dieses Funktion besteht die Möglichkeit die
Bluetoothverbindung manuell ein- bzw. auszuschalten.
RE-CONN:1 = einschalten ; DIS-CONN:1 = ausschalten
Um die Bluetoothverbindung manuell ein- bzw.
auszuschalten, wählen Sie die gewünschte Option
und bestätigen Sie Ihre Auswahl durch Drücken des
Multifunktionsknopfes (2). „RE-CONN:1 >>>>“ bzw.
„DIS-CONN:1 >>>>“ erscheint im Display.
• A ANSWER ON/A ANSWER OFF
(Automatische Rufannahme)
A ANSWER ON: Das Gerät nimmt automatisch
alle eingehenden Gespräche
entgegen, ohne das Sie die
TRANSFER (Annahme) Taste
betätigen müssen. Die automatische Annahme erfolgt nach ca.
3 Klingeltönen.
A ANSWER OFF: Die automatische Rufannahme
ist ausgeschaltet.
• PHONE VOL
Wählen Sie hier die Klingeltonlautstärke, bei Eingang
eines Gesprächs.
• CONTRAST (Kontrast)
Stellen Sie hier den Kontrast des Displays ein.
• FORMAT 24 H/FORMAT 12 H
Wählen Sie hier das Anzeigeformat der Uhrzeit aus.
• SET
Um die Uhrzeit manuell einzustellen, gegen Sie bitte wie
folgt vor:
Minuten einstellen: Drehen Sie den Multifunktions-
knopf (2) im Uhrzeigersinn.
Stunde einstellen: Drehen Sie den Multifunktions-
knopf (2) gegen den Uhrzeigersinn.
Hinweis: Wird ein Radiosender empfangen, der RDS
Daten sendet, stellt sich die Uhrzeit automatisch ein.
• DISTANT/LOCAL (Nur im Radiobetrieb wählbar)
Ihr Radio kann RDS EON Daten empfangen. Unter
EON versteht man die Übermittlung von zusätzlichen
05-AR 736 CD_MP3_NEU 6 18.09.2006, 11:00:15 Uhr
Page 7
DEUTSCH
Senderinformationen innerhalb einer Senderkette z.B.
des WDR. Im Falle einer Verkehrsdurchsage (TA) wird
innerhalb einer Senderkette von einem Nicht-Verkehrsfunksender auf den entsprechenden Verkehrsfunksender der Senderkette umgeschaltet.
Sie können zwischen dem LOCAL bzw. DISTANT-Mo-
dus für den lokalen oder den Fernverkehrsfunkempfang
wählen.
LOCAL: Durch diese Funktion wird ein
DISTANT-Modus: In diesem Modus versucht die
• REGION ON/REGION OFF
(Nur bei eingeschalteter AF Funktion wirksam)
Einige Sender teilen zu bestimmten Zeiten ihr Pro-
gramm in Regionalprogramme mit unterschiedlichem
Inhalt auf.
REGION ON: Der regionale Modus wird einge-
Hinweis: Die Anzeigekapazität des Displays ist be-
grenzt. Es ist möglich, dass im doppelten Anzeigemodus einzelne Segmente des Displays gelöscht sind.
Mit der Funktion REGION ON wird verhindert, dass
das Radio zu Alternativfrequenzen wechselt, die einen
anderen regionalen Programminhalt haben.
REGION OFF: Der regionale Modus wird ausge-
• VOL PGM
Mit dem Multifunktionsknopf (2) können Sie die
gewünschte Einschaltlautstärke auswählen.
• BEEP TONE ON/BEEP TONE OFF (Bestätigungston)
Den Bestätigungston beim Tastendruck können Sie in
2 Arten wählen.
BEEP TONE ON: Der Bestätigungston erfolgt bei
BEEP TONE OFF: Der Bestätigungston ist abge-
Umschalten zu einer EONVerbindung mit zu schwachem
Signalpegel vermieden. Das
Radio schaltet nicht auf diesen
Sender um und der Hörer nimmt
kaum Störungen wahr. Im Display
erscheint die Anzeige „LOC“.
EON TA Schaltung die EON
TA Informationen von einem
erreichbaren Sender zu erhalten
und so die Empfangsqualität zu
verbessern. Die Anzeige „LOC“
im Display erlischt.
schaltet.
schaltet. Die Programmkennung
(PI) des Regionalsendeprogramms wird bei der Suche nach
einer Alternativfrequenz (AF)
oder einer Programmkennung
(PI) ignoriert.
jedem Tastendruck.
schaltet.
4.
/ Ein-/ Ausschaltknopf / Stummschalten
a) Zum Einschalten des Gerätes diese Taste drücken.
WELCOME erscheint im Display. Zum Ausschalten des
Gerätes diese Taste gedrückt halten.
b) Drücken Sie die / -Taste, um die Lautsprecher für
kurze Zeit stumm zu schalten. MUTE blinkt im Display.
Drücken Sie diese Taste erneut, um diese Funktion
wieder aufzuheben. Diese Funktion kann durch Betätigen
des Multifunktionsknopfes ebenfalls aufgehoben werden.
5. M / TRANSFER-Taste (MODE/Rufannahme)
a) Drücken Sie diese Taste zur Auswahl des CD-Player-,
Radio-Modus usw.
b) Drücken Sie diese Taste um bei Eingang eines Telefo-
nats das Gespräch entgegenzunehmen.
c) Halten Sie diese Taste während eines Gespräch
gedrückt, um dieses wieder auf Ihr Mobiltelefon zu
übertragen. Durch ein erneutes gedrückt halten wird
das Gespräch wieder zum Autoradio übertragen. In
beiden Fällen erscheint „TRANSFER “ im Display.
6. B / CLEAR-Taste (• BAND/• ERASE/• SEARCH)
a) Radio-Betrieb
Drücken Sie kurz die B-Taste, um zwischen den FM-
(UKW) Ebenen umzuschalten. Die Bezeichnung der
entsprechenden Ebene FM wird in der LCD-Anzeige
angezeigt.
b) B-Taste als Suchfunktionen im MP3 Betrieb:
Sind beim Erstellen einer CD im MP3 entsprechende
Daten angelegt worden, können diese über folgenden
Funktionen gesucht werden:
a) Direkteingabe der Titelnummer bei CD´s im MP3-
Format:
1. Drücken Sie 1x die B-Taste. Im Display
erscheint „NUMBER “.
2. Mit Hilfe des Multifunktionsknopfes (2)
können Sie nun die gewünschte Titelnummer
auswählen. Im Display erscheint „No.“ und die
entsprechende Tracknummer.
3. Drücken Sie anschließend zum Abspielen des
ausgewählten Tracks kurz den Multifunktionsknopf (2). Unmittelbar danach wird der gewählte
Titel abgespielt.
b) Ordnerwahl bei CD´s im MP3-Format:
1. Drücken Sie 2x die B-Taste. Im Display
erscheint „NAVIGATE “.
2. Mit Hilfe des Multifunktionsknopfes (2) haben
Sie nun die Möglichkeit die verschiedenen
Ordner auf der CD anzuwählen.
3. Bestätigen Sie den ausgewählten Ordner indem
Sie den Multifunktionsknopf (2) kurz drücken.
Der erste Titel des gewählten Ordners wird
angezeigt.
4. Durch drehen des Multifunktionsknopfes (2)
können Sie nun innerhalb eines Orderns einen
Titel auswählen.
DEUTSCH
7
05-AR 736 CD_MP3_NEU 7 18.09.2006, 11:00:17 Uhr
Page 8

DEUTSCH
5. Drücken Sie anschließend zum Abspielen des
ausgewählten Tracks kurz den Multifunktionsknopf (2).
DEUTSCH
7./8. 왘왘
Im CD-Modus:
Im Radio Modus:
9. Auswurftaste
Zum Auswerfen der CD diese Taste drücken.
10. CD-Schlitz
Schieben Sie die CD mit der beschrifteten Seite nach oben,
Hinweis: Die Wiedergabe anwenderseitig erstellter CD
8
Hinweis:
• Sind auf der MP3 CD keine Ordner vorhanden,
erscheint „ROOT“ im Display.
• Die Wiedergabe anwenderseitig erstellter CD
kann durch die Vielzahl der verfügbaren Software und CD-Medien nicht garantiert werden.
• Beim normalen Spielbetrieb vom CD´s im MP3Format kann mit den
(17/16) um jeweils einen Ordner rauf oder runter
gesprungen werden.
• Hinweis: Bei gespeicherter ID-3 Tag Information erscheint diese im Display als Laufband.
c) Im Telefonmodus:
Zum Löschen der eingegeben Telefonnummer.
d) Im USB Modus:
Zum Löschen des aktuellen Tracks.
1. Halten Sie die B-Taste gedrückt. Im Display
erscheint die Anzeige „ERASE“ und der aktuelle
Track (z.B. 002).
2. Drücken Sie den Multifunktionsknopf zum
Bestätigen (ERASE erscheint im Display).
Drücken Sie erneut auf den Multifunktionsknopf
(2), um den Track zu löschen (ERASE
erscheint im Display).
Hinweis: Wollen Sie den Track nicht löschen,
drehen Sie den Multifunktionsknopf (2) nach dem
ersten Drücken (ERASE X erscheint im Display).
Drücken Sie zum Bestätigen den Multifunktionsknopf (2).
I / I왗왗-Tasten TRACK UP/DOWN /
AUTO/MANUAL SEEK
Zum Vor- bzw. Rückwärtsspringen die Taste 왘왘I bzw.
I왗왗 kurz drücken. Zum Spulen von Titeln die Pfeiltaste
왘왘
I bzw. I왗왗 gedrückt halten.
Drücken Sie kurz die 왘왘I / I왗왗-Tasten und das Radio
wird bei der nächsten erreichbaren Sendestation stoppen
(AUTO SEEK erscheint im Display). Solange Sie die
왘왘
I / I왗왗-Tasten gedrückt halten wird der Suchlauf im
Frequenzband weiter geführt (MANUAL SEEK erscheint im
Display).
leicht in den CD-Schlitz, bis das Gerät die CD von selbst
einzieht. „READING“ erscheint im Display.
kann durch die Vielzahl der verfügbaren Software und CDMedien nicht garantiert werden.
왖 bzw. 왔 Tasten
Wiedergabe von Musik im MP3 Format
Sie haben die Möglichkeit mit diesem Gerät Musikstücke im
MP3 Format wiederzugeben. Das Gerät unterstützt außerdem die gängigen CD Typen: CD, CD-RW, CD-R.
Sie können mit Ihrem Gerät MP3 CDs abspielen. Auf diesen
CDs können bis zu 200 Titel verdichtet abgespeichert
werden. Ihr Gerät erkennt eine MP3 CD automatisch (im
Display erscheint MP3).
Hinweis: Bei gespeicherter ID-3 Tag Information erscheint
diese im Display als Laufband.
Bitte beachten Sie:
Es gibt eine Vielzahl von Brenn- und Komprimierungsverfahren,
sowie Qualitätsunterschiede bei CDs und gebrannten CDs.
Des Weiteren hält die Musikindustrie keine festen Standards
ein (Kopierschutz).
Aus diesen Gründen kann es in seltenen Fällen zu Proble-
men bei der Wiedergabe von CDs und MP3 CDs kommen.
Dies ist keine Fehlfunktion des Gerätes.
11. AS/PS / ID3-Taste (Automatische Senderspeicherung)
Im Radio-Modus:
a) Speicherfunktion:
Drücken Sie die AS/PS / ID3-Taste länger als eine
Sekunde, um die automatische Senderspeicherung zu
aktivieren. „AUTO STORE“ erscheint im Display.
Das Gerät sucht innerhalb des aktuellen Frequenzban-
des z.B. FM 1 nach den größten Signalstärkepegel bis
der Suchzyklus abgeschlossen wird. Die sechs stärksten Sender werden den entsprechenden Speicherplätzen zugeordnet.
Die nun gespeicherten Sender werden jeweils ca. 5 sek.
lang angespielt und danach wird der Sender des ersten
Speicherplatzes eingestellt.
Möchten Sie noch weitere Sender im FM-Band suchen
drücken Sie die B-Taste um auf das FM2 bzw. FM3
Band zu wechseln. Drücken Sie die AS/PS / ID3-Taste
erneut länger als eine Sekunde, um die weitere Suche
zu starten.
b) Anspielfunktion:
Nach kurzem Drücken der AS/PS / ID3-Taste spielt das
Radio alle voreingestellten Sender des Frequenzbandes an.
Hinweis: Die Anspielfunktion endet automatisch beim
Sender des ersten Speicherplatzes.
Im MP3-Modus:
Bei jedem Drücken der AS/PS / ID3-Taste erscheint der
Ordner-, Lied-, Interpret- und Albumtitel im Display (sofern
ID3 Tag Informationen auf die CD gebrannt wurden).
12.-17.
als Stationstasten (1–6) vorgewählter Sender und als
1PAU-, 2INT-, 3RPT-, 4RDM-Tasten im CD Betrieb
a) Radio-Betrieb
Durch kurzes Drücken wird über diese Tasten ein
voreingestellter Radiosender direkt angewählt. Werden
05-AR 736 CD_MP3_NEU 8 18.09.2006, 11:00:19 Uhr
Page 9

DEUTSCH
diese Tasten länger als eine Sekunden gedrückt, wird
der aktuell eingestellte Sender unter der gewählten
Stationstaste gespeichert.
b) CD-Betrieb
• Drücken Sie die 1PAU-Taste, um das Abspielen
der CD zu unterbrechen (Pausenfunktion). Drücken
Sie diese Taste erneut, um diese Funktion wieder
aufzuheben.
• Drücken Sie die 2INT-Taste. Jeder Titel der CD wird
jeweils 10 Sekunden lang angespielt. Drücken Sie
diese Taste erneut, um die Suche abzubrechen. Der
aktuell angewählte Titel wird abgespielt.
• Drücken Sie die 3RPT-Taste. Der aktuelle gespielte
Titel wird wiederholt. Drücken Sie diese Taste
erneut um diese Funktion wieder aufzuheben.
• Drücken Sie die 4RDM-Taste. Die CD Titel werden
in zufälliger Reihenfolge abgespielt. Drücken Sie
diese Taste erneut um diese Funktion wieder
aufzuheben.
18. REC/ TA • COPY-Taste
a) TA Traffi c Annonuncement
(Vorrangschaltung für Verkehrsfunk)
Die TA-Funktion wird durch kurzes Drücken der REC/TA
• COPY-Taste aktiviert und durch ein TA-Zeichen im
Display angezeigt.
Wenn ein FM-Sender empfangen wird, der periodisch
die neuesten Verkehrsfunkinformationen ausstrahlt,
leuchtet die TP-Anzeige im Display auf.
Bei eingeschalteter TA-Funktion unterbrechen die
UKW/FM Verkehrsfunk- informationen automatisch den
CD Betrieb (im Display erscheint TRAFFIC INFO).
Nach Beendigung der Verkehrsfunkinformationen setzt
das vorher eingestellte Programm wieder ein.
Unterbrechung der TA-Funktion:
Möchten Sie die aktuelle Verkehrsnachricht unterbrechen, halten Sie kurz die REC/TA • COPY-Taste
gedrückt. Der TA-Modus wird hierdurch nicht ausgeschaltet.
Hinweis: Wird keine Verkehrsfunkinformation empfangen,
erscheint im Display kurz die Anzeige „LOST TP TA“.
b) Aufnahmefunktion (nur im CD Betrieb verfügbar)
Sie haben die Möglichkeit von CD/MP3 CD auf USB
aufzunehmen.
1. Schließen Sie hierfür ein USB Speichermedium
mittels Adapterkabel an den entsprechenden
Anschluss (21) an.
2. Wählen Sie den gewünschten Track mit den
I왗왗-Tasten (7/8) aus, den Sie aufnehmen möchten.
3. Halten Sie die REC/TA • COPY-Taste gedrückt (im
Display erscheint REC USB).
4. Drücken Sie zum Bestätigen den Multifunktionsknopf (2). Die Aufnahme, des aktuellen Tracks auf
das USB Speichermedium, beginnt (im Display
erscheint REC >>>>).
왘왘
Hinweis: Bei MP3 CDs wird der Kopierstatus durch
eine Prozentanzeige angezeigt. Bei Audio CDs hingegen, wird die Aufnahme in Echtzeit durchgeführt.
5. Ist die Aufnahme beendet, erscheint bei MP3 CDs
Hinweis: Sie können immer nur den aktuellen Track
aufnehmen (keine komplette CD). Um einen weiteren
Track auf das USB Speichermedium aufzunehmen,
gehen Sie wie beschrieben vor.
19. PTY/IX-BASS-Taste
a) Ein- und Ausschalten der IX-BASS-Funktion. Halten Sie
die PTY/IX-BASS-Taste für ca. 3 Sek. gedrückt.
Im niedrigen Lautstärkebereich wird mit der Funktion
IX-BASS das Klangbild erweitert. Höhen und Bässe
werden angehoben.
b) Radio-Betrieb:
PTY Wahl des Programmtyps
Neben dem Sendername übermitteln einige FM-Sender
auch Informationen über den Programmtyp ihres
Programms. Diese Informationen können von Ihrem
Autoradio angezeigt werden.
Solche Programmtypen können z.B. sein:
SPORT NEWS POP CLASSICS
Mit der PTY-Funktion können Sie gezielt Sender eines
bestimmten Programmtyps auswählen.
Drücken Sie wiederholt auf die PTY/IX-BASS-Taste
um in die PTY Auswahl zu treffen. Bestätigen Sie Ihre
Auswahl mit dem Multifunktionsknopf (2). Im Display
erscheint anschließend kurz die Einblendung „PTY
SEEK“.
Wenn PTY angewählt wird, startet das Radiogerät die
Suche nach entsprechenden PTY-Informationen und
stoppt, wenn die gesuchte PTY-Information gefunden
wurde.
Wird der gesuchte Programmtyp nicht gefunden
erscheint im Display „NO MATCH PTY“.
Wenn die gesuchte PTY-Information nicht mehr besteht,
schaltet sich die PTY-Funktion automatisch auf norma-
len Modus um.
20. AF-Taste
I /
AF (Alternativ Frequenzen) REG-Funktion
AF ist eine Funktion die mit Hilfe des RDS (Radio Data
System) arbeitet und nur bei FM Sendern genutzt werden
kann. Das Gerät sucht im Hintergrund die am besten zu
empfangene Frequenz des eingestellten Senders.
Wenn die AF-Funktion angewählt wird, prüft das Radio lau-
fend die Signalstärke der AF-Frequenz. Das Prüfi ntervall für
jede AF-Frequenz hängt von der Signalstärke des aktuellen
“ und bei Audio CDs „REC “ im Display.
„100%
Anschließend schaltet das Gerät zur normalen
Wiedergabe um.
DEUTSCH
9
05-AR 736 CD_MP3_NEU 9 18.09.2006, 11:00:22 Uhr
Page 10

DEUTSCH
Senders ab und variiert von ein paar Minuten im Fall eines
starken Senders bis zu ein paar Sekunden bei schwachen
Sendern. Jedes Mal, wenn die neue AF-Frequenz stärker
ist, als die aktuell eingestellte Station, schaltet das Gerät
DEUTSCH
für kurze Zeit auf diese Frequenz um und es wird ein bis
zwei Sekunden lang die Meldung „NEW FREQUENCY“
angezeigt. Da die Stummzeit beim Frequenzwechsel bzw.
der Prüfzeit sehr kurz ist, ist dies während des normalen
Programms fast nicht hörbar.
Die AF Funktion wird durch kurzes Drücken der A.F-Taste
aktiviert und der Status der AF Funktion wird durch ein AFZeichen im Display angezeigt.
• Erscheint das AF Zeichen im Display ist die AF-Funktion
eingeschaltet und es werden RDS-Sendedaten empfangen.
• Blinkt das AF Zeichen im Display, ist die AF-Funktion
zwar angewählt, es kann jedoch gerade kein RDSSendesignal empfangen werden.
• Betätigen Sie die A.F-Taste erneut, um diese Funktion
wieder auszuschalten. Das AF Zeichen im Display
erlischt.
21. USB Anschluss
Dieses Gerät ist nach den letzten Stand der technischen
Entwicklungen im USB Bereich entwickelt worden. Die
große Anzahl von verschiedenen USB Speichermedien
jeglicher Art die heute angeboten werden, erlauben es leider
nicht, eine volle Kompatibilität mit allen USB Speichermedien zu gewährleisten. Aus diesem Grund kann es in
seltenen Fällen zu Problemen bei der Wiedergabe von USB
Speichermedien kommen. Dies ist keine Fehlfunktion des
Gerätes.
1. Schließen ein USB Speichermedium, mittels Adapterka-
bel an den entsprechenden Anschluss, an (USB HOST
erscheint im Display). Die Daten werden automatisch
abgespielt.
2. Um bestimmte Tracks zu suchen/auszuwählen, verfah-
ren Sie wie unter Punkt 6 b) (
im MP3 Modus) und Punkt 12-17 b) beschrieben.
22. LCD-Display (Flüssigkristallanzeige)
23. RESET-Knopf (ohne Abbildung)
Diese Taste fi nden Sie bei abgenommenem Bedienfeld in
der rechten unteren Ecke.
Durch Spannungsschwankungen im Bordnetz Ihres Fahr-
zeugs kann es vorkommen das sich der Steuerprozessor
Ihres Radios „aufgehangen“ hat. Hierbei handelt es sich
nicht um einen Gerätefehler! Durch betätigen dieser Taste, mit einem spitzen Gegenstand, wird dieser neu gestartet
(zurückgesetzt).
B
-Taste als Suchfunktion
Telefonieren via Bluetooth
Bei Bluetooth handelt es sich um eine Technologie zur drahtlosen Funkverbindung von Geräten über eine kurze Distanz.
Derzeit wird die Bluetooth Technologie hauptsächlich für den
Freisprechbetrieb von Mobiltelefonen verwendet. Während der
10
Fahrt wird dem Fahrer so ermöglicht ein Gespräch über sein
Mobiltelefon zu führen, ohne dieses ans Ohr halten zu müssen.
Dieses Gerät bietet Ihnen die Möglichkeit ein Bluetooth-fähiges
Mobiltelefon zu verwenden. Der Funktionsradius beschränkt
sich dabei auf ca. 3 Meter.
Für eine optimale Tonqualität während eines Telefongesprächs
Stellen Sie die Lautstärke nicht zu hoch ein. Eine Rückkopplung
(Pfeifton) aus den Lautsprechern könnte die Folge sein.
Hinweis: Die Einstellung der Lautstärke ist abhängig von den
Einbaupositionen der Lautsprecher zum Mikrofon und kann
daher nicht benannt werden.
Geräte anmelden
Bevor Sie über das Autoradio telefonieren können, müssen Sie
die Geräte untereinander anmelden.
1. Halten Sie die DISP/MENU Taste (3) gedrückt (PAIRING:1
erscheint im Display).
2. Drücken Sie zur Bestätigung den Multifunktionsknopf (2)
(PAIRING:1 >>>> erscheint im Display).
3. Melden Sie, wie in der Bedienungsanleitung Ihres Mobil-
telefons beschrieben, das Autoradio in Ihrem Mobiltelefon
an. Als Auswahl erscheint das Gerät „BT60“ in Ihrem
Mobiltelefon.
4. Geben Sie nun das Passwort „1234“ in Ihrem Mobiltelefon
ein. Das Autoradio ist nun in Ihrem Mobiltelefon angemeldet.
5. Wurde die Anmeldung erfolgreich durchgeführt, erscheint im
Display des Autoradios „PAIRING:1 “ und der Name des
Mobiltelefons.
Hinweise:
• Wurde die Anmeldung nicht erfolgreich durchgeführt,
erscheint im Display des Autoradios „PARING:1 X“.
• Je nach Mobiltelefonhersteller müssen Sie die Anmeldung
(PAIRING) erneut durchführen, um Ihr Mobiltelefon im
Autoradio anzumelden.
• Die Bluetooth-Kompatibilität kann nicht für zukünftig erschei-
nende Mobiltelefone gewährleistet werden.
• Um eine optimale Verbindung zu gewährleisten, achten Sie
darauf das der Akku Ihres Mobiltelefons vollständig geladen ist.
• Einige Mobiltelefonmarken verfügen über einen Energie-
sparmodus. Deaktivieren Sie bitte den Energiesparmodus,
da es ansonsten zu Problemen beim Telefonieren über
Bluetooth geben kann.
• Um ein ankommendes bzw. abgehendes Gespräch führen
zu können, muss Bluetooth in Ihrem Mobiltelefon aktiviert
bleiben. Bitte beachten Sie die Bedienungsanleitung Ihres
Mobiltelefons.
• Bitte beachten Sie das Sie in Richtung des eingebauten Mi-
krofons sprechen. Der Anschluss eines externen Mikrofons
ist nicht möglich.
Abgehende Gespräche
1. Drücken Sie kurz den Multifunktionsknopf (2) („ “ erscheint
im Display).
2. Zur Eingabe der gewünschten Telefonnummer, drehen Sie
den Multifunktionsknopf bis die gewünschte erste Ziffer
05-AR 736 CD_MP3_NEU 10 18.09.2006, 11:00:24 Uhr
Page 11

DEUTSCH
erscheint. Drücken Sie erneut kurz auf den Multifunktionsknopf (2) um die Ziffer zu bestätigen. Für die weiteren
Ziffern, wiederholen Sie diese Schritte, bis Sie die Telefonnummer komplett eingegeben haben (diese wird im Display
des Autoradios angezeigt).
Hinweis: Sollten Sie eine oder mehrer Ziffern falsch einge-
geben haben, können Sie die Ziffern mit der
Taste (6) löschen.
3. Um die gewünschte Nummer anzurufen, halten Sie
anschließend den Multifunktionsknopf (2) gedrückt, bis im
Display die Meldung „CALLING >>>>“ erscheint.
4. Zum Aufl egen drücken Sie bitte die
Hinweis: Um die eingegeben Telefonnummern anzurufen,
können Sie auch die M / TRANSFER-Taste (5) betätigen.
Wahlwiederholung
Das Gerät speichert die 9 zuletzt gewählten Rufnummern. Um
diese aufzurufen, gehen Sie bitte wie folgt vor:
1. Drücken Sie kurz den Multifunktionsknopf (2) („ “ erscheint
im Display).
2. Halten Sie anschließend den Multifunktionsknopf (2)
gedrückt. Die zuletzt gewählte Rufnummer wird im Display
angezeigt.
3. Durch Drehen des Multifunktionsknopfes (2) können Sie nun
untern den letzten Rufnummern wählen.
4. Um die gewünschte Nummer anzurufen, halten Sie
anschließend den Multifunktionsknopf (2) gedrückt, bis im
Display die Meldung „CALLING >>>>“ erscheint.
5. Zum Aufl egen drücken Sie bitte die B / CLEAR Taste (6).
Ankommende Gespräche
Bei ankommenden Anrufen, ertönt aus den Lautsprechern ein
Klingelton und sofern der Anrufer über ein CLIP „Calling Line
Identifi cation Presentation (Rufnummernübermittlung)“-fähiges
Telefon verfügt, erscheint im Display des Autoradios die Nummer des Anrufers. Ansonsten erscheint im Display die Anzeige
„PHONE IN“.
1. Um ein ankommendes Gespräch entgegen zu nehmen,
betätigen Sie bitte die M / TRANSFER Taste (5). Sie
hören den Anrufer über die Lautsprecher in Ihrem Auto.
2. Zum Aufl egen drücken Sie bitteB / CLEAR Taste (6).
Hinweis:
• Sie haben die Möglichkeit das Gespräch wieder auf Ihr
Mobiltelefon zu übertragen. Halten Sie hierfür die M /
TRANSFER-Taste (5) gedrückt („TRANSFER “
erscheint im Display). Das Autoradio aktiviert den MUTE
Betrieb. Halten Sie diese Taste erneut gedrückt, wird das
Gespräch wieder an das Autoradio übertragen.
• Um ein ankommendes Gespräch abzulehnen, betätigen Sie
die B / CLEAR Taste (6).
B
/ CLEAR
B
/ CLEAR Taste (6).
Allgemeines
Netzspannung ...............................................................DC 12 V
Stromverbrauch............................................................7 A max.
Leistung............................................................ 4 x 60 W PMPO
FM-Bereich
Frequenzbereich.................................. 87,5 MHz bis 108,0 MHz
Nutzbare Empfi ndlichkeit...................................................15 dB
I.F. Frequenz................................................................10,7 MHz
CD-Player
System......................................................... CD Audio - System
Verwendbare CDs ....................... CD/CD-R/CD-RW/MP3 Disks
Abspielbare Bit-Raten..........................................32 - 320 kBit/s
Anzahl der Quantizierungsbits............................................ 1 bit.
Signalformat .......................................Musterfrequenz 44,1 kHz
Signal-Rausch-Verhältnis .....................................50 dB (1 kHz)
Anzahl der Kanäle ............................................ 2 Stereo-Kanäle
Gehäuseabmessungen .............................178 B x 50 H x 157 T
Technische Änderungen vorbehalten!
Hiermit erklärt die Firma Clatronic International GmbH, dass
sich das Gerät AR 736 CD/MP3 in Übereinstimmung mit den
grundlegenden Anforderungen, der europäischen Richtlinie für
elektromagnetische Verträglichkeit (89/336/EWG) befi ndet.
Bitte führen Sie das ausgediente Gerät einer umweltgerechten
Entsorgung zu.
Technische Daten
DEUTSCH
Konformitätserklärung
11
05-AR 736 CD_MP3_NEU 11 18.09.2006, 11:00:26 Uhr
Page 12
DEUTSCH
Störungsbehebung
Bevor Sie die Checkliste durchgehen, bitte zunächst den
Anschluss fertig stellen. Wenn nach erfolgtem Durchprüfen der
Checkliste immer noch Fragen offen sind, wenden Sie sich bitte
DEUTSCH
an Ihre nächstgelegene Kundendienststelle.
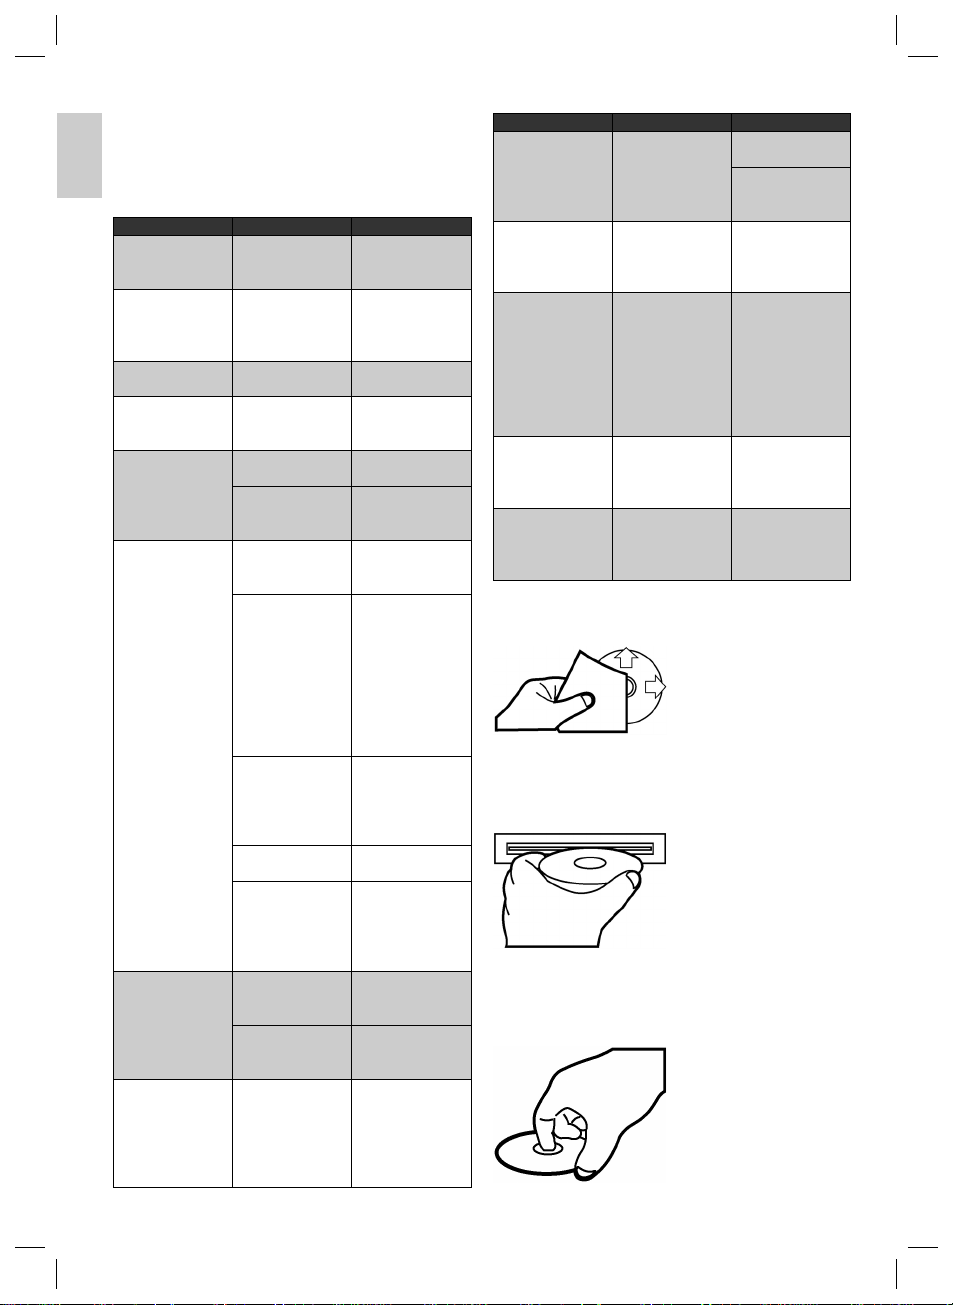
Fehlersymptom Grund Lösung
Pfeifton aus den
Lautsprechern.
CDs werden nur bis
zur Hälfte in den CD
Schacht eingezogen.
„READ ERR“ wird im
Display angezeigt.
CD lässt sich über
die MODE-Taste
nicht anwählen.
Nach Einlegen in das
Gerät läuft die CD
nicht.
CD setzt aus. Die Straßenoberfl äche
Keine Funktion. Die Zündung ist ausge-
Gerät lässt sich nicht
über die Zündung „Ein“
bzw. „Aus“ Schalten.
12
Rückkopplung Stellen Sie die
Die Schrauben der
Transportsicherung
sind nicht entfernt
worden.
Die CD ist falsch
herum eingelegt.
Es ist keine CD
eingelegt.
Der Lautstärkeregler ist
zu leise eingestellt.
Die Anschlüsse
sind nicht korrekt
ausgeführt.
ist rau.
Das Gerät ist nicht fest
eingebaut.
Die CD ist defekt. Eine andere CD aus-
Die CD ist
verschmutzt.
Ggf. ist das Gerät
zu steil im Fahrzeug
eingebaut.
schaltet.
Eine oder mehrere
Sicherungen sind
durchgebrannt.
Fehlanschluss
(jeder KFZ Hersteller
belegt den ISO
Anschluss im Fahrzeug
anders).
Lautstärke nicht zu
hoch ein.
Entfernen Sie die
Schrauben der
Transportsicherung.
Legen Sie die CD
richtig herum ein.
Legen Sie eine CD ein.
Den Lautstärkeregler
höher einstellen.
Den +12V- sowie
den Masseanschluss
überprüfen.
Zum Abspielen der CD
warten, bis die Straße
glatter wird.
Das Gerät fest
einbauen.
Sicherstellen, dass die
hintere Befestigung
verwendet wird, wenn
das Fahrzeug keine
geeignete Aufnahme
für den hinteren
Geräteteil bietet.
probieren. Wenn diese
korrekt läuft, ist die
erste CD wahrscheinlich beschädigt.
Die CD reinigen.
Beachten Sie das ein
max. Neigungswinkel
von 20° Grad nicht
überschritten werden
sollte!
Den Zündschlüssel
auf „ON“ oder „ACC“
drehen.
Die Sicherung durch
eine andere 15 ASicherung ersetzen.
Bitte setzen Sie sich
mit Ihrer KFZ Werkstatt
oder einem Autospezialisten in Verbindung,
wegen KFZ spezifi sche
Anschlussadapter.
Fehlersymptom Grund Lösung
Das Gerät funktioniert
nicht richtig (EJECT,
LOAD, PLAY).
Kein Radioempfang. Das Antennenkabel ist
Schlechter Radioempfang.
„NO FILE“ wird im
Display angezeigt.
„MEMORY FULL“ wird
im Display angezeigt.
Der Mikrocomputer
wurde durch elektromagnetische Felder
gestört.
nicht angeschlossen.
Ggf. hat Ihr Fahrzeug
eine spezielle Antenne
(Phantom gespeiste
Antenne.)
Das Dateiformat auf
der CD bzw. USB
Speichermedium wird
nicht unterstützt.
Das USB Speichermedium ist voll.
Die CD herausnehmen
und wieder einlegen.
Das Gerät aus- und
dann wieder
einschalten.
Das Antennenkabel
fest in die Antennenbuchse des Gerätes
stecken.
Bitte setzten Sie sich
mit Ihrer KFZ Werkstatt
oder einem Autospezialisten in Verbindung.
(Für „Fremdfabrikate“
gibt es spezifi sche
Einspeisweichen bzw.
Spannungsadapter.)
Stecken Sie ein anderes USB Speichermedium an, oder löschen
Sie einige Dateien.
Handhabung einer CD
Reinigen der CD
Vor dem Abspielen, die CD mit
einem sauberen, staubfreien
Reinigungstuch abwischen. Die
CD in Pfeilrichtung abziehen.
Hinweis: Keine Lösungsmittel wie Benzin oder Verdünner
verwenden. Die allgemein erhältlichen Reinigungsmittel oder
Anti-Statiksprays beschädigen das Gerät.
Einlegen der CD
Wenn die CD mit dem Aufdruck
nach unten eingelegt wird, kann
das Gerät beschädigt werden.
CD immer mit dem Label nach
oben einlegen.
Hinweis: Wenn sich bereits eine CD im CD-Schlitz befi ndet,
nicht versuchen, eine weitere CD einzulegen. Dies kann zu
Schäden am Gerät führen.
Anfassen der CD
Die CD stets am Rand
anfassen. Um die CD sauber zu
halten, nicht an der Oberfl äche
anfassen.
05-AR 736 CD_MP3_NEU 12 18.09.2006, 11:00:28 Uhr
Page 13
DEUTSCH
• Keine Aufkleber oder Klebeband auf die CD kleben.
• Die CD nicht direkter Sonneneinstrahlung oder Wärmequellen wie Heizungsrohren aussetzen und sie auch nicht im
Auto lassen, wenn dieses in praller Sonne geparkt wird, da
dies zu einem beträchtlichen Temperaturanstieg führt.
• Überprüfen Sie alle CDs auf Risse, Kratzer und Verwellungen, bevor Sie sie abspielen. CDs mit derartigen Beschädigungen können unter Umständen nicht richtig abgespielt
werden. Sie sollten diese CDs nicht verwenden.
• Verwenden Sie nur handelsübliche kreisrunde CDs mit 12
cm Durchmesser! CDs mit 8 cm Durchmesser oder CDs,
die Konturen, z.B. eines Schmetterlings oder Herzens
haben, sind zur Wiedergabe nicht geeignet. Es besteht
Zerstörungsgefahr der CD und des Laufwerks. Für Beschädigungen durch ungeeignete CDs können wir keine Haftung
übernehmen.
Haben Sie Fragen zu Ihrem neuen Gerät? Unser Serviceteam
steht gerne für Sie bereit. Kleinere Probleme lassen sich oft
schon telefonisch lösen.
Rufen Sie deshalb bitte zunächst die untenstehende Hotline an.
oder per E-Mail:
Garantie
Wir übernehmen für das von uns vertriebene Gerät eine Garantie von 24 Monaten ab Kaufdatum (Kassenbon).
Innerhalb der Garantiezeit beseitigen wir unentgeltlich die Mängel des Gerätes oder des Zubehörs, die auf Material- oder Herstellungsfehler beruhen, durch Reparatur oder, nach unserem
Ermessen, durch Umtausch. Garantieleistungen bewirken weder
eine Verlängerung der Garantiefrist, noch beginnt dadurch ein
Anspruch auf eine neue Garantie!
Als Garantienachweis gilt der Kaufbeleg. Ohne diesen Nachweis
kann ein kostenloser Austausch oder eine kostenlose Reparatur
nicht erfolgen.
Im Garantiefall geben Sie bitte das komplette Gerät in der
Originalverpackung zusammen mit dem Kassenbon an Ihren
Händler.
Sowohl Defekte an Verbrauchszubehör bzw. Verschleißteilen, als auch Reinigung, Wartung oder der Austausch von
Verschleißteilen, fallen nicht unter die Garantie und sind deshalb
kostenpfl ichtig!
Die Garantie erlischt bei Fremdeingriff.
Schonen Sie unsere Umwelt, Elektrogeräte gehören nicht in den
Hausmüll.
Nutzen Sie die für die Entsorgung von Elektrogeräten vorgesehenen Sammelstellen und geben dort Ihre Elektrogeräte ab, die
Sie nicht mehr benutzen werden.
Sie helfen damit die potenziellen Auswirkungen, durch falsche
Entsorgung, auf die Umwelt und die menschliche Gesundheit
zu vermeiden.
Sie leisten damit Ihren Beitrag zur Wiederverwertung, zum
Recycling und zu anderen Formen der Verwertung von Elektround Elektronik-Altgeräten.
Informationen, wo die Geräte zu entsorgen sind, erhalten Sie
über Ihre Kommunen oder die Gemeindeverwaltungen.
Kostenlose Hotline
Hotline 0 21 52/20 06-666
hotline@clatronic.de
Service Anschrift
Clatronic International GmbH
Industriering Ost 40
D-47906 Kempen/Germany
Bedeutung des Symbols „Mülltonne“
DEUTSCH
Nach der Garantie
Nach Ablauf der Garantiezeit können Reparaturen kostenpfl ichtig vom entsprechenden Fachhandel oder Reparaturservice
ausgeführt werden.
13
05-AR 736 CD_MP3_NEU 13 18.09.2006, 11:00:29 Uhr
Page 14

DEUTSCH
Stichwortverzeichnis – Index
AF Taste (Alternativ Frequenz)....................................................9
Anschluss.....................................................................................5
DEUTSCH
Anspielfunktion (siehe PS Taste).................................................8
AS Taste.......................................................................................8
Ausschalten..................................................................................7
Auswurftaste ................................................................................8
B (BAND) Taste............................................................................7
Bedienhinweise............................................................................5
Bedienteil abnehmen ...................................................................6
Bedienung....................................................................................6
BEEP (Bestätigungston) ..............................................................7
Bluetooth....................................................................................10
CD auswerfen ..............................................................................8
CD Handhabung ........................................................................12
DISP Taste ...................................................................................6
DSP (Equalizereinstellung)..........................................................6
Einschalten...................................................................................7
Einschaltlautstärke.......................................................................7
Garantie......................................................................................13
Handhabung einer CD ...............................................................12
Installation ....................................................................................4
Installationstipps...........................................................................4
INTRO (2 INT)..............................................................................8
ID3 Taste......................................................................................8
A
B
C
D
E
G
H
I
Lautstärke beim Einschalten........................................................7
L
Lautstärke einstellen....................................................................6
LOC (LOCAL) ...............................................................................6
M
Montage (Sicherheitshinweise)....................................................4
Multifunktionsknopf ......................................................................6
P
PAU (Play/Pause) Taste...............................................................8
PS Taste.......................................................................................8
PTY Taste.....................................................................................9
R
RANDOM (4 RDM) (Zufallswiedergabe) .....................................8
REC (Aufnahme) Taste ................................................................9
REGION (Regional) .....................................................................7
REPEAT (3 RPT) (Wiederholen) .................................................8
RESET Knopf...............................................................................6
S
Sicherheitshinweise .....................................................................4
Störungsbehebung.....................................................................12
Stummschalten ............................................................................7
T
TA (Verkehrsfunk) ........................................................................9
Technische Daten ......................................................................11
Telefonieren................................................................................10
TRANSFER Taste........................................................................7
U
Uhrzeit..........................................................................................6
USB Anschluss ..........................................................................10
V
Verkehrsfunk (siehe TA)...............................................................9
Verkehrssicherheit........................................................................5
Kostenlose Hotline.....................................................................13
14
05-AR 736 CD_MP3_NEU 14 18.09.2006, 11:00:31 Uhr
K
Wichtige Zusatzinformationen zum Einbau .................................5
Wiederholen (3 RPT) ...................................................................8
Zufallswiedergabe (4 RDM).........................................................8
W
Z
Page 15
NEDERLANDS
Veiligheidsinstructies
Lees vóór de ingebruikname van dit apparaat de handleiding
uiterst zorgvuldig door en bewaar deze goed, samen met het
garantiebewijs, de kassabon en zo mogelijk de doos met de
binnenverpakking.
• Gebruik het apparaat uitsluitend voor het daarvoor bestemde doel.
• Monteer het apparaat zodanig dat voorhanden ventilatieopeningen niet worden afgedekt.
• Open nooit de behuizing van het apparaat. Door ondeskundige reparaties kunnen aanzienlijke gevaren voor
de gebruiker ontstaan. Neem het apparaat in geval van
beschadigen niet meer in gebruik, maar laat het door een
vakman repareren.
Volgende symbolen kunnen op uw apparaat zijn aangebracht.
Zij hebben de volgende betekenis:
Het symbool met het uitroepteken verwijst naar
belangrijke bedienings- en onderhoudsinstructies in
de begeleidende documentatie.
Apparaten met dit symbool werken met een „klasse
1-laser„ voor de aftasting van de CD. De ingeboude
veiligheidsschakelaars moeten voorkomen dat de
gebruiker wordt blootgesteld aan gevaarlijke, voor
het menselijk oog onzichtbaar laserlicht wanneer
het CD-vak geopend is.
Deze veiligheidsschakelaars mogen in geen geval overbrugd of
gemanipuleerd worden omdat u anders gevaar loopt, aan het
laserlicht te worden blootgesteld.
Kindere
• Laat om veiligheidsredenen geen verpakkingsdelen (plasticzak, doos, piepschuim, enz.) binnen het bereik van uw
kinderen liggen.
Let op! Laat kleine kinderen niet met de folie spelen.
Er bestaat gevaar voor verstikking!
Verkeersveiligheid
• De verkeersveiligheid heeft absolute prioriteit. Gebruik
daarom uw autoradio-installatie zodanig dat u de actuele
verkeerssituatie altijd onder controle hebt.
• Denk erom dat u bij een snelheid van 50 km/h maar liefst 14
m per seconde rijdt.
• Wij raden u aan, het apparaat in kritieke situaties niet te
bedienen.
• De waarschuwingsaanwijzingen van bijv. politie en brandweer moet u in de auto op tijd kunnen horen en/of zien.
• Beluister uw programma daarom tijdens het rijden alléén
met gepaste geluidssterkte.
Voor de montage en de aansluiting
dient u de volgende veiligheidsinstructies
in acht te nemen.
• Klem eerst de minpool en dan de pluspool van de accu af.
(Het aanklemmen geschiedt in omgekeerde volgorde.)
Let op: wanneer de accu afgeklemd is, worden alle tijdelijke
geheugens gewist. Let op de veiligheidsinstructies van de
autofabrikant.
• De hoofdzekering moet zo dicht mogelijk (maximaal na
30 cm) aan de pluspool van de accu worden geïnstalleerd,
zodat de auto tegen een eventuele kabelbrand bijv. door
een ongeluk beschermd is. Wanneer u dit voorschrift niet in
acht neemt, komt de verzekeringsdekking te vervallen.
• De doorsnede van de plus- en de minkabel mag niet minder
dan 1,5 mm² bedragen.
• Let bij het boren van gaten op dat geen auto-onderdelen
worden beschadigd.
Installatietips:
• Met beschermtules kunt u voorkomen dat kabels aan
scherpe carrosseriedelen doorschuren.
• De isolatie van de kabel mag tijdens de installatie niet
worden beschadigd.
• Het gebruik van het juiste gereedschap is bij de installatie
van een autoradio vanzelfsprekend.
Al naargelang de bouwwijze kan uw auto van deze beschrijving
afwijken. Voor schade op grond van montage- of aansluitfouten
en voor volgschade zijn wij niet aansprakelijk.
Installatie
Monteer het radioapparaat volgens de onderstaande afbeeldingen.
a Moer
b Veerring
c Onderlegplaatje
d Schroef
e Montagehoek
f Inschuifbehuizing
g Schroefdraadbout
Let op!
h Schroeven van de trans-
portbeveiliging (a.u.b. vóór
de montage verwijderen)
i Uittrekgereedschap (sleutel
voor de demontage)
j Raamwerk
Zet het bedieningselement
eerst aan tegen de rechterzijde
en klik het vervolgens aan de
linkerzijde in.
NEDERLANDS
15
05-AR 736 CD_MP3_NEU 15 18.09.2006, 11:00:32 Uhr
Page 16
NEDERLANDS
Aansluiting
Breng de aansluiting tot stand volgens de afbeelding.
2. Het apparaat is geconcipieerd voor de minpool van de
accu die aan de carrosserie van het voertuig dient te zijn
aangesloten. U dient dit vóór de installatie te controleren.
3. Let bij de montage/aansluiting van uw apparaat op dat niet
iedere auto over een originele „ISO-aansluiting“ beschikt. In
dat geval adviseren wij het gebruik van een auto specifi eke
ISO-adapter.
Adapters zijn verkrijgbaar in een zaak voor autotoebehoren
luidspreker rechts
voor
rechts achter
NEDERLANDS
antenneaansluiting
rood R
wit L
autom. antenne (blauw)
en/of bij uw garage.
4. Bij de toewijzing van de Tijdsduur +“ (Permanente stroomaansluiting) kunnen echter al naargelang het voertuigtype
afwijkingen optreden. (Dit is echter noodzakelijk voor de
opslag van de zenderstations).
Om alle functies te kunnen waarborgen dient de montage
absoluut volgens deze handleiding te geschieden. Neem in
geval van twijfel contact op met een geautoriseerde garage.
Chinch-uitgang
grijs
grijs / zwart
violet
violet / zwart
5. De maximale hellingshoek bij de montage van uw autoradio
mag niet meer dan 20° bedragen omdat bij een grotere
montagehoek de functie van uw autoradio (CD-speler) niet
meer gewaarborgd is.
6. Al naargelang het voertuigtype kunnen in uitzonderingsgevallen stoorgeluiden in de radio/CD-modus optreden. Deze
kunnen worden verholpen met een extra ontstoorfi lter. Uw
apparaat is standaard reeds uitgerust met een ontstoorfi lter.
Desondanks kunnen er afhankelijk van het voertuigtype
storingen optreden.
Ontstoorfi lters zijn verkrijgbaar kunt in een zaak voor autoto-
ebehoren en/of bij uw garage.
zekering
geel
rood
zwart
wit
wit / zwart
groen
7. Let bij de montage van uw autoradio op dat de achterzijde
groen / zwart
van de radio over genoeg vrije ruimte beschikt, zodat
voldoende ventilatie gewaarborgd is.
ISO-aansluiting
massa
permanente
stroomaansluiting
ontsteking
links voor
luidspreker
links achter
8. Voor de antenne bestaan twee verschillende normaansluitingen. De oude (50 Ohm) met lang, uitstekend rond
contact aan de auto en een ronde bus aan de radio en de
ISO-genormeerde antennesteker (150 Ohm). Adapters voor
beide formaten zijn verkrijgbaar en/of bij uw garage.
Bij VW/Audi dient absoluut in acht te worden genomen:
de actieve antenne vereist spanning op de afscherming
van de coaxiale antennekabel, zonder deze spanning is de
ontvangst onvoldoende. Een antenneadapter met fantoom-
Opgelet:
voeding lost dit probleem op.
• Plaats het verwijderbare bedieningselement pas na de
aansluiting van de kabels.
• Gebruik luidsprekers met een impedantie van 4 Ohm.
• De luidsprekerkabel moet vrij van massa zijn.
• Het via de cinch-uitgangen aangesloten signaal wordt alleen
weergegeven via de Rear-luidsprekers.
Belangrijke aanvullende informatie
voor de montage van uw autoradio!
1. Verwijder vóór de montage a.u.b. de schroeven (h) van
de transportbeveiliging omdat in het andere geval de
CD niet kan worden geladen.
1. Wanneer het voorste bedieningselement tijdens de radio- en
CD-modus wordt verwijderd, wordt het apparaat automatisch uitgeschakeld.
2. Wanneer het extreem heet in het voertuig is, bijv. nadat de
auto gedurende een langere tijd in de zon geparkeerd stond,
dient u de CD-speler pas in te schakelen nadat het na een
korte rijduur een beetje is afgekoeld.
3. Gebruik steeds de voorhanden beschermhoes om het
afneembare bedieningselement veilig te bewaren.
4. De weergave van een door de gebruiker gemaakte CD kan
op grond van de vele beschikbare programma’s en CD-
Bedieningsinstructies
media niet worden gegarandeerd.
16
05-AR 736 CD_MP3_NEU 16 18.09.2006, 11:00:34 Uhr
Page 17

NEDERLANDS
5. RESET-toets (zonder afbeelding): Eventuele functiestoringen (ERROR) tijdens het bedrijf kunnen worden verholpen
door het indrukken van de RESET-toets. Deze toets kunt
u bij verwijderd bedieningsveld beneden in de rechterhoek
vinden. Op grond van spanningsschommelingen in het
boordnet van uw auto kan het gebeuren dat de stuurprocessor van uw radio zich heeft “opgehangen”. Dit is géén
apparaatstoring! Druk met een spits voorwerp op deze
toets en de processor wordt opnieuw gestart (teruggezet).
Bediening
1. -toets
Druk op de -toets om het voorste bedieningselement te
verwijderen.
2. Multifunctionele knop
PRESS • ENTER AUDIO DIAL (geluidssterkte)
a) Draaien: In normaal afspeelbedrijf kan met de multifunc-
tionele knop de geluidssterkte worden ingesteld.
b) Kort indrukken: naar de invoermodus voor de telefoon-
nummers schakelen. Voor de overige bediening verwijzen wij naar het hoofdstuk “Telefoneren via Bluetooth”.
c) Lang indrukken: naar het selectiemenu voor de klank-
modus schakelen. Op het display verschijnt „VOLUME“
voor de instelling van de geluidssterkte. Door het kort
indrukken van de multifunctionele knop kunt u nu de
afzonderlijke menupunten zoals VOLUME (geluidssterkte), BASS (bass), TREBLE (treble), BALANCE (balance) en FADER (faderregeling) selecteren. U verandert
de instellingen van de verschillende menupunten door
aan de multifunctionele knop te draaien.
3. DISP/MENU-toets (Display/selectie)
a) Radiomodus:
• Wanneer de radio RDS-gegevens ontvangt, drukt u
meerdere malen kort op deze toets om het volgende
weer te geven:
PS naam ➞ tijd ➞ frequentie ➞ PTY
• Wanneer de radio geen RDS-gegevens ontvangt
wordt het volgende weergegeven:
tijd ➞ PTY ➞ frequentie
Opmerking: De weergave blijft gedurende ca. 5 secon-
den zichtbaar, vervolgens schakelt het apparaat terug
naar de volgende weergave.
b) Druk lang op de DISP/MENU-toets om naar het selec-
tiemenu te schakelen:
• PAIRING
• RE-CONN / DIS-CONN
• A ANSWER ON / A ANSWER OFF
• PHONE VOL
• CONTRAST
• FORMAT 24H / FORMAT 12H
• SET
• DISTANT / LOCAL
• REGION ON / REGION OFF
• VOL PGM
• BEEP TONE ON / BEEP TONE OFF
Door herhaaldelijk op de DISP/MENU-toets te drukken
kunt u nu de afzonderlijke menupunten selecteren. U
verandert de instellingen van de verschillende menupunten door aan de multifunctionele knop (2) te draaien.
• PAIRING:1 (aanmelden)
Voordat u uw Bluetooth-compatibele mobieltelefoon
kunt gebruiken, moet u deze eerst in het toestel aanmelden (zie “Toestel aanmelden”).
• RE-CONN:1/DIS-CONN:1
Via deze functie kunt u de Bluetooth-verbinding hand-
matig in- en uitschakelen.
RE-CONN:1 = inschakelen, DIS-CONN:1 = uitschakelen
Om de Bluetooth-verbinding handmatig uit te schakelen
kiest u de gewenste optie en bevestigt uw keuze door het
indrukken van de multifunctionele knop (2). „RE-CONN:1
>>>>“ resp. „DIS-CONN:1 >>>>“ verschijnt op het display.
• A ANSWER ON/A ANSWER OFF
(automatische gespreksaanname)
A ANSWER ON: het toestel neemt automatisch
alle binnenkomende gesprekken
aan zonder dat u de TRANSFER
(aanname)-toets moet indrukken.
De automatische aanname volgt
na ca. 3x belsignaal.
A ANSWER OFF: de automatische aanname is
uitgeschakeld.
• PHONE VOL
Kies hier de sterkte van het belsignaal bij een binnenko-
mend gesprek.
• CONTRAST
Stel hier het contrast van het display in.
• FORMAT 24 H/FORMAT 12 H
Kies hier het weergaveformaat van de kloktijd.
• SET
Ga als volgt te werk om kloktijd handmatig in te stellen:
Minuten instellen: draai de multifunctionele knop (2)
met de klok mee.
Uur instellen: draai de multifunctionele knop (2)
tegen de klok in.
Opmerking: wanneer u een radiozender ontvangt die
RDS-gegevens uitzendt, wordt de kloktijd automatisch
ingesteld.
• DISTANT/LOCAL (alleen in radiomodus selecteerbaar)
Uw radio kan RDS EON-gegevens ontvangen. Met EON
wordt de overdracht van extra zenderinformatie binnen
een zenderketen, bijv. de WDR, bedoeld. In geval van
een verkeersbericht (TA) wordt binnen een zenderketen
van een niet-verkeerszender overgeschakeld naar de
desbetreffende verkeerszender van de zenderketen.
17
NEDERLANDS
05-AR 736 CD_MP3_NEU 17 18.09.2006, 11:00:35 Uhr
Page 18
NEDERLANDS
U kunt kiezen uit de LOCAL- resp. DISTANT-modus voor
de lokale of de langeafstandsverkeersberichten.
LOCAL: door middel van deze functie
NEDERLANDS
DISTANT-modus: in deze modus probeert de
• REGION ON/REGION OFF
(alleen actief bij ingeschakelde AF-functie)
Sommige zenders spreiden hun programma’s op
bepaalde tijdstippen in regionale programma’s met
verschillende inhoud.
REGION ON: De regionale modus wordt
Opmerking: de weergavecapaciteit van het display
is beperkt. Het is daarom mogelijk dat in de dubbele
weergavemodus enkele segmenten van het display
gewist zijn.
Met de functie REGION ON wordt vermeden dat de
radio overschakelt naar alternatieve frequenties die een
andere regionale programma-inhoud hebben.
REGION OFF: De regionale modus wordt
• VOL PGM
Met de multifunctionele knop (2) kunt u de gewenste
inschakelgeluidssterkte selecteren.
• BEEP TONE ON/BEEP TONE OFF
(bevestigingsgeluid)
Voor het bevestigingsgeluid bij het indrukken van
toetsen hebt u 2 keuzemogelijkheden.
BEEP TONE ON: het bevestigingsgeluid klinkt na
BEEP TONE OFF: het bevestigingsgeluid is uitge-
4. / Aan-/uitschakelknop / stomschakeling
a) Druk op deze toets om het apparaat in te schakelen.
WELCOME verschijnt op display. Druk op deze toets om
het apparaat uit te schakelen.
18
wordt een omschakelen naar een
EON-verbinding met een te zwak
signaal vermeden. De radio schakelt niet over naar deze zender
en de luisteraar neemt de storing
nauwelijks waar. Op het display
verschijnt de melding ‘LOC’.
EON TA-schakeling de EON
TA-informatie van een bereikbare
zender te ontvangen en de ontvangstkwaliteit op deze wijze te
verbeteren. De melding ‘LOC’-op
het display dooft.
ingeschakeld.
uitgeschakeld. De programmaidentifi catie (PI) van het regionale
zendprogramma wordt tijdens
het zoeken naar een alternatieve
frequentie (AF) of een programma-identifi catie (PI) genegeerd.
iedere druk op de toets.
schakeld.
b) Druk op de
uit te schakelen. MUTE knippert op het display. Druk
de toets opnieuw in om de functie weer te deactiveren.
Deze functie kunt u eveneens uitschakelen door het
bedienen van de multifunctionele knop.
5. M / TRANSFER-toets (MODE/gespreksaanname)
a) Druk op deze toets om de CD-speler-, de radiomodus
enz. te selecteren.
b) Druk deze toets in om een binnenkomend gesprek aan
te nemen.
c) Houd deze toets tijdens een gesprek ingedrukt om het
weer over te schakelen naar uw mobieltelefoon. Door
het opnieuw ingedrukt houden wordt het gesprek weer
naar de autoradio overgedragen. In beide gevallen
verschijnt „TRANSFER “ op het display.
6.
B
/ CLEAR-toets (• BAND/• ERASE/• SEARCH)
a) Radio-modus
Druk kort op de B-toets om tussen de FM- (UKW)-
niveaus heen en weer te schakelen. De benaming van
het desbetreffende niveau FM wordt op het LCD-display
weergegeven.
b) B-toets voor zoekfunctie in de MP3-modus:
Wanneer bij het produceren van een CD in MP3formaat dienovereenkomstige gegevens werden
aangelegd, kunnen deze met behulp van de volgende
functies worden gezocht.
a) Directe invoer van het titelnummer bij CD´s in MP3-
b) Mapselectie bij CD‘s in MP3-formaat:
/ -toets om de luidsprekers kortstondig
formaat:
1. Druk 1x op de B-toets. Op het display verschijnt
„NUMBER “.
2. Met behulp van de multifunctionele knop (2)
kunt u nu het gewenste titelnummer selecteren.
Op het display knippert „No“ en het betreffende
titelnummer.
3. Druk vervolgens kort op de multifunctionele
knop (2) om de geselecteerde titel af te spelen.
Onmiddellijk daarna wordt de geselecteerde titel
afgespeeld.
1. Druk 2x op de B-toets. Op het display verschijnt
„NAVIGATE “.
2. Met behulp van de multifunctionele knop (2)
hebt u nu de mogelijkheid om de verschillende
mappen op de CD te selecteren.
3. Bevestig een geselecteerde map door het kort
indrukken van de multifunctionele knop. De
eerste titel van de geselecteerde map wordt
weergegeven.
4. Met behulp van de multifunctionele knop (2)
kunt u nu binnen de map een titel selecteren.
5. Druk vervolgens kort op de multifunctionele
knop (2) om de geselecteerde titel af te spelen.
05-AR 736 CD_MP3_NEU 18 18.09.2006, 11:00:37 Uhr
Page 19
NEDERLANDS
Opmerking:
• Wanneer op de MP3-CD geen ordners voorhanden zijn, verschijnt „ROOT“ op het display.
• De weergave van een door de gebruiker
gemaakte CD kan op grond van de vele
beschikbare programma’s en CD-media niet
worden gegarandeerd.
• In de normale afspeelmodus van CD´s in MP3formaat kunt u met de
(17/16) telkens één titel in de map omhoog of
omlaag springen.
• Opmerking: Bij opgeslagen ID-3-Tag-informatie
verschijnt deze als looptekst op het display.
c) In de telefoonmodus:
Voor het wissen van het ingevoerde telefoonnummer.
d) In de USB-modus:
voor het wissen van de huidige titel:
1. Houd de B-toets kort ingedrukt. Op het display
verschijnt de weergave “ERASE” en het huidige
nummer (bijv. 002).
2. Druk ter bevestiging op de multifunctionele
knop (op het display verschijnt ERASE ).
Druk opnieuw op de multifunctionele knop om
het nummer/de titel te wissen (op het display
verschijnt ERASE ).
Opmerking: Draai na het eerste indrukken (ERASE
X verschijnt op het display), de multifunctionele
knop (2) wanneer u het nummer niet wilt wissen.
Druk ter bevestiging op de multifunctionele knop (2).
7./8. 왘왘
I / I왗왗-toetsen TRACK UP/DOWN /
AUTO/MANUAL SEEK
In CD-modus:
druk kortstondig op de toetsen 왘왘I of I왗왗 om voorruit
of achteruit te springen. Om titels voorruit of achteruit te
spoelen houdt u de pijltoetsen 왘왘I of I왗왗 ingedrukt.
In de radiomodus:
Druk de 왘왘I / I왗왗-toetsen in en de radio stopt bij het volgende ontvangbare zenderstation (op het display verschijnt
AUTO SEEK). Houd de 왘왘I / I왗왗-toetsen ingedrukt
totdat de zoekfunctie in de frequentieband wordt voortgezet
(Op het display verschijnt MANUAL SEEK).
9. Uitwerptoets
Druk op deze toets om de CD uit te werpen.
10. CD-sleuf
Schuif de CD met de bedrukte zijde naar boven in de CDlade totdat het toestel de CD vanzelf naar binnen trekt. Op
het display verschijnt „READING“.
Opmerking: de weergave van een door de gebruiker
gemaakte CD kan op grond van de vele beschikbare
programma’s en CD-media niet worden gegarandeerd.
왖 of 왔 -toets
Weergave van muziek in MP3-formaat
U kunt met dit apparaat ook muziek in MP3-formaat
afspelen. Bovendien ondersteunt het apparaat de gangbare
CD-types: CD, CD-RW, CD-R.
U kunt met uw apparaat MP3-CD’s afspelen. Op deze CD’s
kunnen tot 200 titels gecomprimeerd opgeslagen worden.
Uw apparaat herkent een MP3 automatisch (Op het display
verschijnt MP3).
Opmerking: Bij opgeslagen ID-3-Tag-informatie verschijnt
deze als looptekst op het display.
Let op!
Er zijn een aantal brand- en comprimeringsprocedures en
kwaliteitsverschillen bij CD’s en gebrande CD’s.
Bovendien houdt de muziekindustrie geen vaste standaards
aan (kopieerbeveiliging).
Om deze reden kan het in sommige gevallen tot problemen
bij de weergave van CD’s en MP3 CD’s komen. Dit is geen
storing van het apparaat.
11. AS/PS / ID3-toets (automatische zenderopslag)
In de radiomodus:
a) Opslagfunctie:
druk langer dan 1 seconde op de AS/PS / ID3-toets
om de automatische zenderopslag te activeren. Op het
display verschijnt „AUTO STORE“.
Het apparaat zoekt binnen de actuele frequentieband
bijv. FM 1 naar de grootste signaalsterktepegel totdat
de zoekcyclus wordt gestopt. De zes sterkste zenders
worden toegewezen aan de dienovereenkomstige
geheugenplaatsen.
De nu opgeslagen zenders worden telkens ca.
5 seconden lang aangespeeld en daarna wordt de
zender van de eerste geheugenplaats ingesteld.
Indien u nog meer zenders op de FM-band wilt zoeken,
drukt u op de B-toets om naar de FM2-of FM3-band
over schakelen. Druk opnieuw langer dan 1 seconde op
de AS/PS / ID3-toets om verder te zoeken.
b) Aanspeelfunctie:
nadat u de AS/PS / ID3-toets kort hebt ingedrukt,
speelt de radio alle vooringestelde zenders van de
frequentieband aan.
Opmerking: De aanspeelfunctie eindigt automatisch bij de
zender van de eerste geheugenplaats.
In de MP3-modus:
Bij elk indrukken van de AS/PS / ID3-toets verschijnt de
map-, lied-, artiest- en albumtitel op het display (wanneer
ID3-tag-informatie op de CD gebrand is).
12. -17.
als stationstoetsen (1–6) van voorgeselecteerde zenders en
als 1PAU-, 2INT-, 3RPT-, 4RDM-toetsen in de CD-modus
a) Radio-modus
Door kortstondig indrukken kunt u via deze toetsen
een voorgeselecteerde radiozender direct selecteren.
19
NEDERLANDS
05-AR 736 CD_MP3_NEU 19 18.09.2006, 11:00:39 Uhr
Page 20

NEDERLANDS
Wanneer u deze toetsen langer dan één seconde
indrukt, wordt de actueel ingestelde zender onder de
geselecteerde stationstoets opgeslagen.
b) CD-modus
• Druk op de 1PAU-toets om het afspelen van de
CD te onderbreken (pauzefunctie). Druk de toets
opnieuw in om de functie weer te deactiveren.
• Druk op de 2INT-toets. Iedere titel van de CD wordt
gedurende 10 seconden afgespeeld. Druk opnieuw
op deze toets om de zoekfunctie af te breken. De
NEDERLANDS
18. REC/ TA • COPY-toets
20
actueel geselecteerde titel wordt afgespeeld.
• Druk op de 3RPT-toets. De actuele titel wordt
herhaald. Druk de toets opnieuw in om de functie
weer te deactiveren.
• Druk op de 4RDM-toets. De CD-titels worden in
willekeurige volgorde afgespeeld. Druk de toets
opnieuw in om de functie weer te deactiveren.
a) TA traffi c annonuncement
(voorrangschakeling voor verkeersberichten)
De TA-fucntie wordt door het kort indrukken van de
REC/TA • COPY-toets geactiveerd en door het TA-symbool op het display weergegeven.
Wanneer een FM-zender wordt ontvangen die periodiek
de nieuwste verkeersinformatie uitzendt, brandt de TPweergave op het display.
Wanneer de TA-functie is ingeschakeld, onderbreken de
UKW/FM verkeersberichten automatisch de CD-modus
(op het display verschijnt TRAFFIC INFO).
Na afl oop van de verkeersinformatie wordt het tevoren
ingestelde programma voortgezet.
Onderbreking van de TA-functie:
wanneer u de weergave van de actuele verkeersberichten wilt onderbreken, drukt u kort op de REC/TA • COPYtoets. De TA-modus wordt hierdoor niet uitgeschakeld.
Opmerking: wanneer geen verkeersinformatie wordt
ontvangen verschijnt op het display de melding „LOST
TP TA”.
b) Opnamefunctie (alleen in de CD-modus beschikbaar)
U kunt opnemen van CD/MP3 CD naar USB.
1. Sluit hiervoor een USB-geheugenmedium d.m.v.
een adapterkabel aan op de betreffende aansluiting
(21).
2. Selecteer met de
uit die u wilt opnemen.
3. Houd de REC/TA • COPY-toets ingedrukt. (Op het
display verschijnt REC USB).
4. Druk ter bevestiging op de multifunctionele knop
(2). Het huidige nummer wordt op het USB-medium
opgenomen (Op het display verschijnt REC >>>>).
Opmerking: Bij MP3-CD’s wordt de voortgang
weergegeven d.m.v. een procentweergave. Bij
audio-CD’s daarentegen wordt de opname in ware
tijd weergegegven.
왘왘
I / I왗왗-toetsen (7/8) de titel
5. Zodra de opname voltooid is, verschijnt bij MP3CD’s „100%
display. Vervolgens schakelt het toestel over naar
de normale weergave.
Opmerking: U kunt steeds alleen de huidige titel opne-
men (geen complete CD). Voor het opnemen van een
volgend nummer op het USB-medium gaat u als volgt te
werk.
19. PTY/IX-BASS-toets
a) Aan- en uitschakelen van de IX-BASS-functie. Houd de
PTY/IX-BASS-toets ca. 3 sec. lang ingedrukt.
In het lagere volumebereik wordt door middel van de
functie IX-BASS het geluidsbeeld uitgebreid. Hoogten
en bassen worden versterkt.
b) Radio-modus:
PTY selectie van het programmatype
Naast de naam van de zender geven sommige FM-
zenders ook informatie over het programmatype van
hun programma. Deze informatie kan door uw autoradio
worden weergegeven.
Deze programmatypes kunnen bijv. zijn:
SPORT NEWS POP CLASSICS
Met de PTY-functie kunt u doelgericht zenders uitkiezen
van een bepaald programmatype.
Druk meerdere malen op de PTY/IX-BASS-toets om
naar de PTY-selectie te schakelen. Druk ter bevestiging
van uw selectie op de multifunctionele knop (2). Op het
display verschijnt kort het teken „PTY SEEK“.
Wanneer u PTY hebt gekozen, start de radio de
zoekfunctie naar dienovereenkomstige PTY-informatie
en stopt, zodra de gezochte PTY-informatie werd
gevonden.
Wanneer het gezochte programmatype niet werd gevon-
den, verschijnt op het display „NO MATCH PTY”.
Wanneer de gezochte PTY-informatie niet meer bestaat,
schakelt de PTY-functie automatisch over naar de
normale modus.
20. AF-toets
AF (alternatieve frequenties) REG-functie
AF is een functie die met behulp van het RDS (Radio
Data System) werkt en alleen bij FM-zenders kan worden
gebruikt. Het apparaat zoekt op de achtergrond de beste te
ontvangen frequenties van de ingestelde zenders.
Wanneer de AF-functie wordt geselecteerd, controleert de
radio voortdurend de signaalsterkte van de AF-frequentie.
Het controle-interval voor iedere AF-frequentie is afhankelijk
van de signaalsterkte van de actuele zender en varieert van
een paar minuten in geval van een sterke zender tot een
paar seconden bij zwakke zenders. Iedere keer wanneer de
nieuwe AF-frequentie sterker is dan het actueel ingestelde
station, schakelt het apparaat voor een korte tijd naar deze
“ en bij audio-CD’s „REC “ op het
05-AR 736 CD_MP3_NEU 20 18.09.2006, 11:00:41 Uhr
Page 21

NEDERLANDS
frequentie over en er wordt gedurende een tot twee seconden de melding weergegeven “NEW FREQUENCY”. Omdat
de geluidloze overschakelingstijd tijdens de frequentiewissel
resp. de controletijd zeer kort is, is dit tijdens het normale
programma nauwelijks hoorbaar.
De AF-functie wordt door kort indrukken van de A.F-toets
geactiveerd en de status van de AF-functie wordt door een
kort AF-teken op het display weergegeven.
• Wanneer het AF-teken op het display verschijnt, is de
AF-functie ingeschakeld en worden RDS-zendgegevens
ontvangen.
• Wanneer het AF-teken op het display knippert, is de
AF-functie weliswaar ingeschakeld, maar kan geen
RDS-zendsignaal worden ontvangen.
• Druk opnieuw op de A.F-toets om de functie weer uit te
schakelen. Het AF-teken op het display dooft.
21. USB-aansluiting
Dit apparaat is ontwikkeld volgens de laatste stand van de
technische ontwikkelingen op het gebied van USB. Het grote
aantal verschillende USB-geheugenmedia dat tegenwoordig
wordt aangeboden, kan helaas geen volledige onderlinge
compatibiliteit van alle USB-geheugenmedia waarborgen.
Om deze reden kan het in sommige gevallen tot problemen
bij de weergave van USB-opslagmedia komen. Dit is geen
storing van het apparaat.
1. Sluit hiervoor een USB-geheugenmedium d.m.v. een
adapterkabel aan op de betreffende aansluiting (Op het
display verschijnt USB HOST). De gegevens worden
automatisch afgespeeld.
2. Om bepaalde tracks te zoeken/te selecteren, gaat u te
werk zoals onder punt 6 b) (
MP3-modus) en de punten 12-17b) beschreven.
22. LCD-display (vloeibaar-kristaldisplay)
23. RESET-toets (zonder afbeelding)
Deze toets kunt u bij verwijderd bedieningsveld beneden in
de rechterhoek vinden.
Op grond van spanningsschommelingen in het boordnet van
uw auto kan het gebeuren dat de stuurprocessor van uw radio zich heeft “opgehangen”. Dit is géén apparaatstoring!
Druk met een spits voorwerp op deze toets en de processor
wordt opnieuw gestart (teruggezet).
B
-toets als zoekfunctie in
Telefoneren via Bluetooth
Bluetooth is een technologie voor de draadloze radioverbinding
van toestellen over een korte afstand. Momenteel wordt de
Bluetooth-technologie hoofdzakelijk gebruikt voor het handsfree
telefoneren met de mobieltelefoon. Zo kan de bestuurders
tijdens het rijden een gesprek via zijn mobieltelefoon aannemen
zonder deze aan zijn oor te moeten houden.
Het apparaat biedt u de mogelijkheid, een Bluetooth-compatibele mobieltelefoon te gebruiken. De functieradius is daarbij
beperkt tot ca. 3 meter.
Voor een optimale geluidskwaliteit tijdens een telefoongesprek
Stel de geluidssterkte niet te hoog in. Een terugkoppeling (piepgeluid) via de luidsprekers kan hiervan het gevolg zijn.
Opmerking: de instelling van de geluidssterkte is afhankelijk
van de inbouwpositie van de luidsprekers naar de microfoon en
kan daarom niet worden aangegeven.
Toestellen aanmelden
Voordat u via de autoradio kunt telefoneren, moet u de toestellen bij elkaar aanmelden.
1. Houd de DISP/MENU-toets (3) ingedrukt (op het display
verschijnt PAIRING:1 ).
2. Druk ter bevestiging op de multifunctionele knop (2) (Op het
display verschijnt PAIRING:1 >>>>).
3. Meld uw autoradio in uw mobieltelefoon aan volgens de
aanwijzingen in de handleiding. Als selectie verschijnt het
toestel “BT60” in uw mobieltelefoon.
4. Voer nu het wachtwoord “1234” in uw mobieltelefoon in. De
autoradio is nu in uw mobieltelefoon aangemeld.
5. Na de succesvolle aanmelding verschijnt op het display van
de autoradio „PAIRING:1 “ en de naam van de mobieltelefoon.
Opmerkingen!
• Na de succesvolle aanmelding verschijnt op het display van
de autoradio “PARING:1 X”.
• Al naargelang de mobieltelefoonfabrikant moet u de aanmelding (PARING) opnieuw uitvoeren om uw mobieltelefoon
in de autoradio aan te melden.
• De Bluetooth-compatibiliteit kan niet worden gegarandeerd
voor nog nieuw uitkomende mobieltelefoons.
• Ter waarborging van een optimale verbinding moet u erop
letten dat de accu van uw mobieltelefoon vol is.
• Sommige mobieltelefoonmerken beschikken over een
energiebesparingsmodus. Schakel de energiebesparingsmodus uit omdat anders problemen kunnen ontstaan bij het
telefoneren via Bluetooth.
• Om een inkomend of uitgaand gesprek te kunnen voeren
moet u Bluetooth in uw mobieltelefoon ingeschakeld
houden. Let daarvoor op de gebruiksaanwijzing van uw
mobieltelefoon.
• Denk eraan in de richting van de ingebouwde microfoon
te spreken. De aansluiting van een externe telefoon is niet
mogelijk.
Uitgaande gesprekken
1. Druk kort op de multifunctionele knop (2) (Op het display
verschijnt „ “).
2. Voor de invoer van het gewenste telefoonnummer draait
u aan de multifunctionele knop totdat het gewenste eerste
cijfer verschijnt. Druk ter bevestiging van het cijfer opnieuw
op de multifunctionele knop (2). Voor de volgende cijfers
herhaalt u deze stappen totdat u het telefoonnummer compleet hebt ingevoerd (het wordt weergegeven op het display
van de autoradio).
Opmerking: wanneer u een of meer cijfers fout hebt ingevo-
erd, kunt u deze wissen met de B / CLEAR toets (6).
NEDERLANDS
21
05-AR 736 CD_MP3_NEU 21 18.09.2006, 11:00:43 Uhr
Page 22

NEDERLANDS
3. Om het gewenste nummer op te bellen houdt u vervolgens
de multifunctionele knop (2) ingedrukt totdat op het display
de melding „CALLING >>>>“ verschijnt.
4. Voor het beëindigen drukt u op de
(6).
Opmerking: om de ingevoerde telefoonnummers te bellen kunt
u ook de M / TRANSFER-toets (5) indrukken.
Belherhaling
Het toestel slaat de 9 als laatste gebelde telefoonnummers op.
NEDERLANDS
Ga als volgt te werk om deze te bellen:
1. Druk kort op de multifunctionele knop (2) (Op het display
verschijnt „
2. Houd vervolgens de multifunctionele knop (2) ingedrukt.
Het als laatste gedraaide nummer wordt op het display
weergegeven.
3. Door het draaien aan de multifunctionele knop (2) kunt u nu
een van de laatste telefoonnummers kiezen.
4. Om het gewenste nummer op te bellen houdt u vervolgens
de multifunctionele knop (2) ingedrukt totdat op het display
de melding „CALLING >>>>“ verschijnt.
5. Voor het beëindigen drukt u op de B / CLEAR-toets (6).
Inkomende gesprekken
Bij inkomende gesprekken hoort u uit de luidsprekers een
beltoon en wanneer de gesprekspartner over een CLIP „Calling
Line Identifi cation Presentation” (overdracht van telefoonnum-
mers) –compatibele telefoon beschikt, verschijnt op het display
van de autoradio het nummer van de persoon die opbelt. In het
andere geval verschijnt op het display de melding “PHONE IN”.
1. Om een inkomend gesprek aan te nemen drukt u de M /
via de luidsprekers in uw auto.
2. Voor het beëindigen drukt u op de B / CLEAR-toets (6).
Opmerking:
• U kunt het apparaat ook weer overzetten op uw mobieltelefoon. Houd hiervoor de M / TRANSFER-toets (5)
ingedrukt (op het display verschijnt „TRANSFER “). Nu
activeert de autoradio de MUTE-modus. Door het opnieuw
ingedrukt houden wordt het gesprek weer naar de autoradio
overgedragen.
• Om een inkomend gesprek te weigeren drukt u op de B /
CLEAR-toets (6).
“).
TRANSFER toets (5) in. U hoort de gesprekspartner
B
/ CLEAR-toets
Algemeen
Netspanning ..................................................................DC 12 V
Stroomverbruik .............................................................7 A max.
Vermogensuitgang............................................4 x 60 W PMPO
FM-bereik
Frequentiebereik...................................87,5 MHz tot 108,0 MHz
Effectieve gevoeligheid......................................................15 dB
I.F. frequentie ..............................................................10,7 MHz
CD-speler
Systeem......................................................... CD-audiosysteem
Afspeelbare CD‘s..........................CD/CD-R/CD-RW/MP3 disks
Afspeelbare bitsnelheden....................................32 - 320 kBit/s
Aantal kwantifi ceringsbits ..................................................1 bit.
Signaalformaat ...............................Monsterfrequentie 44,1 kHz
Signaal-ruis-verhouding........................................50 dB (1 kHz)
Aantal kanalen................................................. 2 stereo kanalen
Apparaatbehuizing.................................... 178 B x 50 H x 157 D
Dit apparaat is gekeurd conform de op dit moment van toepassing zijnde CE-richtlijnen zoals bijvoorbeeld elektromagnetische
compatibiliteit en laagspanningsvoorschriften en is geconstrueerd volgens de nieuwste veiligheidstechnische voorschriften.
Technische wijzigingen voorbehouden!
Technische gegevens
22
05-AR 736 CD_MP3_NEU 22 18.09.2006, 11:00:45 Uhr
Page 23
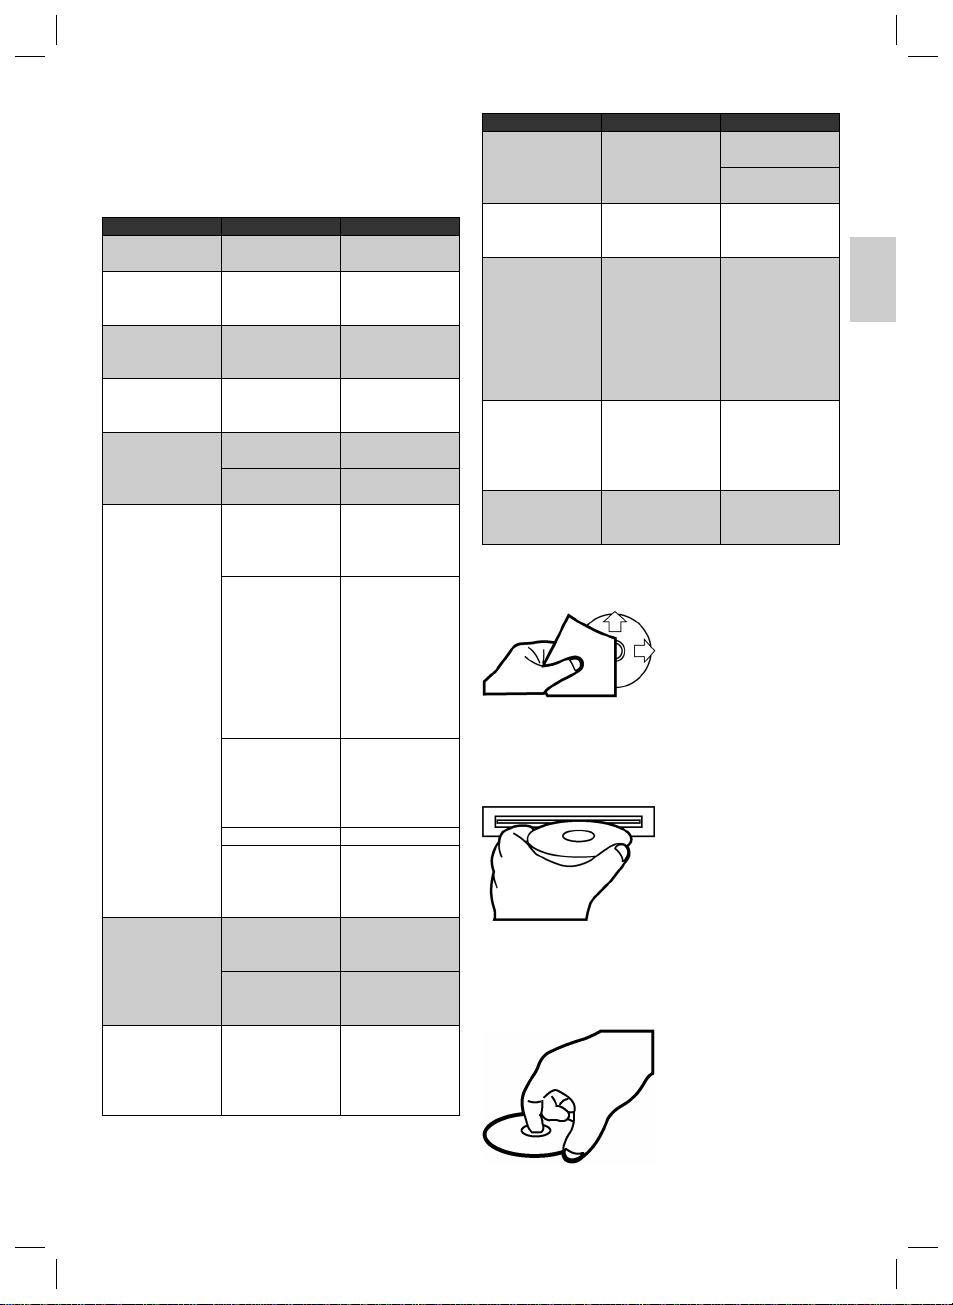
NEDERLANDS
Verhelpen van storingen
Voer eerst alle aansluitingen uit voordat u de checklist doorloopt.
Wanneer u na controle aan de hand van de checklist nog steeds
vragen hebt, neem dan a.u.b. contact op met de dichtstbijzijnde
klantenservice.
Storingssymptoom Reden Oplossing
Piepgeluid uit de
luidsprekers.
CD‘s worden maar tot
de helft in de CD-sleuf
getrokken.
„READ ERR“ wordt
op het display
weergegeven.
De CD kan niet via de
MODE-toets worden
geselecteerd.
Na het plaatsen in
het toestel loopt de
CD niet.
De CD stokt. Het wegdek is ruw. Wacht met het
Geen functie. De ontsteking is
Het apparaat kan niet
via de ontsteking “In”
of “Uit” geschakeld
worden.
Terugkoppeling Stel de geluidssterkte
De schroeven van de
transportbeveiliging
werden niet verwijderd.
De CD is verkeerd om
geplaatst.
Er is géén CD
geplaatst.
De volumeregelaar is
te zacht ingesteld.
De aansluitingen zijn
niet correct uitgevoerd.
Het apparaat is niet
vast gemonteerd.
De CD is defect. Probeer een andere
De CD is verontreinigd. Reinig de CD.
Eventueel is het
apparaat te schuin in
de auto gemonteerd.
uitgeschakeld.
Een of meerdere
zekeringen zijn
doorgebrand.
Verkeerde aansluiting
(iedere autofabrikant
voert de ISO-aansluiting in de auto anders
uit).
niet te hoog in.
Verwijder de schroeven
van de transportbeveiliging.
Plaats de CD correct.
Plaats een CD.
Stel de volumeregelaar
hoger in.
Controleer de +12V- en
de massa-aansluiting.
afspelen van de CD
totdat het wegdek
vlakker wordt.
Bouw het apparaat
vast in. Waarborg
dat de achterste
bevestiging wordt
gebruikt wanneer het
voertuig niet over een
geschikte opname voor
het achterste apparaatgedeelte beschikt.
CD. Wanneer deze
correct functioneert is
de eerste CD waarschijnlijk beschadigd.
Let op dat de max.
inbouwhoek van 20°
niet mag worden
overschreden!
Draai ontstekingssleutel naar de stand „ON“
of „ACC“.
Vervang de zekering
door een andere
15 A-zekering.
Neem contact op
met uw garage of
een autospecialist
i.v.m. autospecifi eke
aansluitadapters.
Storingssymptoom Reden Oplossing
Het apparaat functioneert niet correct
(EJECT, LOAD, PLAY).
Geen radio-ontvangst. De antennekabel is
Slechte radio-ontvangst.
„NO FILE“ wordt op het
display weergegeven.
„MEMORY FULL“
wordt op het display
weergegeven.
Reinigen van de CD
Opmerking: gebruik géén oplosmiddelen zoals benzine of
verdunner. De algemeen verkrijgbare reinigingsmiddelen of
antistatische sprays beschadigen het apparaat.
Plaatsen van de CD
Opmerking: tracht niet, een Cd te plaatsen wanneer zich reeds
een CD in de CD-sleuf bevindt. Hierdoor kan het apparaat
worden beschadigd.
Vastpakken van de CD
De microcomputer
werd door elektromagnetische velden
gestoord.
niet aangesloten.
Eventueel beschikt uw
auto over een speciale
antenne (antenne met
fantoomvoeding.)
Het bestandsformaat
van de CD resp.
het USB-geheugenmedium wordt niet
ondersteund.
Het USB-geheugenmedium is vol.
Verwijder de CD en
plaats deze weer.
Schakel het apparaat
uit- en weer in.
Steek de antennekabel
vast in de antennebus
van het apparaat.
Neem contact op
met uw garage of
een autospecialist.
(Voor “fabrikaten van
derden” zijn specifi eke
scheidingsfi lters resp.
spanningsadapters
verkrijgbaar.)
Het USB-geheugenmedium is vol.
Handling van een CD
Reinig de CD vóór het afspelen
met een schone, stofvrije
reinigingsdoek. Verwijder het
stof van de CD in pijlrichting.
Wanneer de CD met de opdruk
naar beneden wordt geplaatst,
kan het apparaat beschadigd
worden.
Plaats de CD altijd met het label
naar boven.
Grijp de CD altijd aan de rand
vast. Om de Cd schoon te
houden, mag u deze niet aan
het oppervlak vastpakken.
NEDERLANDS
23
05-AR 736 CD_MP3_NEU 23 18.09.2006, 11:00:47 Uhr
Page 24

NEDERLANDS
• Plak geen papier of plakband op de CD.
• Stel de CD niet bloot aan directe zoninstraling of warmtebronnen zoals verwarmingsbuizen en laat de CD ook niet
in de auto liggen wanneer deze in de zon geparkeerd staat
omdat dit een aanzienlijke temperatuurstijging tot gevolg
heeft.
• Controleer alle CD’s op scheuren, krassen en oneffenheden
voordat u deze afspeelt. CD’s met een dergelijke beschadiging kunnen eventueel niet correct worden afgespeeld.
Gebruik deze CD’s niet.
• Gebruik alléén in de handel verkrijgbare cirkelvormige CD’s
NEDERLANDS
met een diameter van 12 cm. CD’s met een diameter van
8 cm of CD’s die over contouren beschikken, bijv. in de
vorm van een vlinder of een hart, zijn niet geschikt voor
de weergave. Het gevaar bestaat dat de CD en het station
onherstelbaar worden beschadigd. Voor schade door een
ongeschikte CD zijn wij niet aansprakelijk.
Garantie
Voor het door ons geleverde apparaat verlenen wij een garantie
van 24 maanden vanaf koopdatum (kassabon).
Eventuele gebreken aan het apparaat of aan het toebehoren
die zijn ontstaan door productie- of materiaalfouten verhelpen
wij binnen deze periode kosteloos door middel van reparatie of,
naar ons oordeel, door vervanging. Eventuele garantiegevallen
verlengen noch de geldigheidsduur van de garantie, noch begint
daardoor een nieuwe garantieperiode!
Het koopbewijs geldt als garantiebewijs. Zonder dit bewijs kan
geen kosteloze reparatie of vervanging plaatsvinden.
Geef in garantiegevallen het complete apparaat in de originele
verpakking samen met de kassabon af bij uw handelaar.
Niet defecten aan de hulpstukken of aan de slijtende onderdelen, maar ook reiniging, onderhoud of de vervanging van
slijtende delen vallen niet onder de garantie en geschieden altijd
tegen berekening!
Bij ingrepen door derden komt de garantieverlening te vervallen.
Betekenis van het symbool “Vuilnisemmer”
Bescherm ons milieu, elektrische apparaten horen niet in het
huisafval.
Maak voor het afvoeren van elektrische apparaten gebruik van
de voorgeschreven verzamelpunten en geef daar de elektrische
apparaten af die u niet meer gebruikt.
Daardoor helpt u de potentiële effecten te voorkomen die een
verkeerde afvoer op het milieu en de menselijke gezondheid
kunnen inwerken.
Op deze wijze levert u uw bijdrage aan het hergebruik, de
recycling en andere verwerkingsvormen voor oude elektronische
en elektrische apparaten.
Voor informatie over verzamelpunten voor uw apparaten kunt u
contact opnemen met uw gemeente of gemeenteadministratie.
Na de garantieperiode
Na afl oop van de garantieperiode kunnen reparaties tegen berekening worden uitgevoerd door de betreffende vakhandelaar of
de technische dienst.
24
05-AR 736 CD_MP3_NEU 24 18.09.2006, 11:00:48 Uhr
Page 25

NEDERLANDS
Trefwoordenregister - index
A
Aansluiting..................................................................................16
Aanspeelfunctie (zie PS toets)...................................................19
AF toets......................................................................................20
AS toets......................................................................................19
B
B (BAND) toets...........................................................................18
Bediening ...................................................................................17
Bedieningsinstructies.................................................................16
Bedieningselement verwijderen................................................. 17
BEEP (bevestigingsgeluid) ........................................................18
Belangrijke extra informatie voor de montage...........................16
Bluetooth....................................................................................21
C
CD -handling ..............................................................................23
CD uitwerpen .............................................................................19
LOC (LOCAL) .............................................................................18
Montage (veiligheidsinstructies).................................................15
Multifunctionele knop ................................................................17
PAU (Play / Pauze) toets............................................................19
PS-toets......................................................................................19
PTY-toets....................................................................................20
RANDOM (4RDM) (toevallige weergave)..................................19
REC (opname)-toets..................................................................20
REGION (regionaal) ..................................................................18
REPEAT (3RPT) (herhalen).......................................................19
RESET-knop .............................................................................. 17
L
M
P
R
NEDERLANDS
DISP toets..................................................................................17
D
DSP (equalizerinstelling)............................................................23
G
Garantie......................................................................................24
Geluidssterkte bij het inschakelen .............................................18
Geluidssterkte instellen..............................................................17
H
Handling van een CD.................................................................23
Herhalen (3 RPT).......................................................................19
I
ID3 toets.....................................................................................19
Inschakelen................................................................................18
Inschakelgeluidssterkte..............................................................18
Installatie ....................................................................................15
Installatietips...............................................................................15
INTRO (2INT).............................................................................19
Stomschakeling..........................................................................18
S
T
TA (verkeersinformatie)..............................................................20
Technische gegevens ................................................................22
Telefoneren ................................................................................21
Tijd..............................................................................................17
Toevallige weergave (4RDM).....................................................19
TRANSFER-toets.......................................................................18
U
Uitschakelen...............................................................................18
Uitwerptoets ...............................................................................19
USB-aansluiting .........................................................................21
V
Veiligheidsinstructies..................................................................15
Verhelpen van storingen ............................................................23
Verkeersinformatie (zie TA)........................................................20
Verkeersveiligheid......................................................................15
25
05-AR 736 CD_MP3_NEU 25 18.09.2006, 11:00:49 Uhr
Page 26
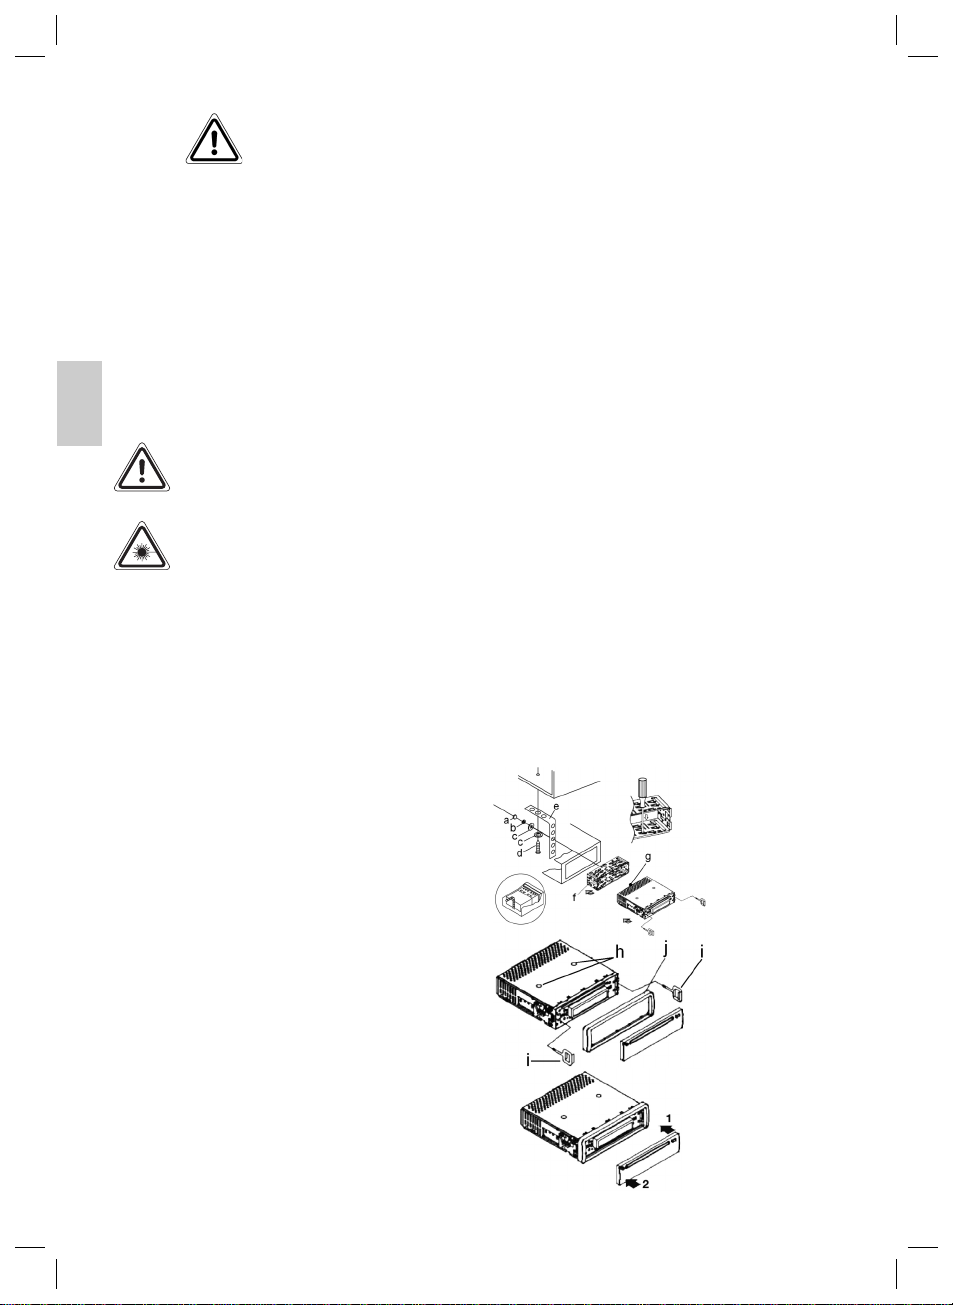
FRANÇAIS
Conseils de sécurité
Lisez attentivement ce mode d’emploi avant de mettre l’appareil
en marche pour la première fois. Conservez le mode d’emploi
ainsi que le bon de garantie, votre ticket de caisse et si possible,
le carton avec l’emballage se trouvant à l’intérieur.
• N’utilisez l’appareil qu’aux fi ns auxquelles il est destiné.
• Montez l’appareil sans masquer les grilles d’aération
existantes.
• N’ouvrez jamais le bloc moteur de l’appareil. Des réparations mal appropriées peuvent entraîner des risques
importants pour l’utilisateur. Si l’appareil est endommagé, ne
l’utilisez plus et faites-le réparer par un spécialiste.
Vous pouvez éventuellement trouver ces symboles sur
l’appareil, qui ont la signifi cation suivante:
FRANÇAIS
Il est absolument interdit de court-circuiter ou manipuler ces
boutons de sécurité, ce qui risquerait sinon de mettre l’utilisateur
en contact avec la lumière laser.
Le point d’exclamation attire l’attention de
l’utilisateur sur les remarques importantes
d’utilisation et d’entretien données dans les documents de l’appareil.
Les appareils dotés de ce symbole fonctionnent
avec un „laser de la classe 1“ pour la lecture des
disques CD. Les boutons de sécurité intégrés sont
chargés d’éviter qu’à l’ouverture du compartiment
à CD l’utilisateur entre en contact avec la lumière
laser qui est dangereuse et invisible à l’oeil humain.
de sécurité suivantes pendant le montage
et le branchement
• Débranchez d’abord le pôle négatif de la batterie, puis son
pôle positif. (Le branchement se faisant dans l’ordre inverse.)
Attention: quand la batterie est débranchée, tous les
mémoires volatiles se vident de leurs informations. Veuillez respecter les consignes de sécurité du constructeur automobile.
• Le fusible principal doit être installé le plus près possible (à max. 30 cm) du pôle positif de la batterie afi n
d’empêcher les câbles de brûler, par ex. lors d’un accident.
Si l’installation ne respecte pas cette condition, vous n’êtes
plus couvert par l’assurance.
• La section du câble plus/moins ne doit pas être inférieure à
1,5 mm².
• Veillez à n’endommager aucune pièce de voiture en perçant
des trous.
Conseils d’installation:
• Des gaines pour câbles protégeront les câbles de l’usure
par frottement contre des pièces de carrosseries coupantes.
• Veillez à ne pas endommager l’isolation des câbles pendant
l’installation.
• Utiliser un outillage approprié à l’installation d’un équipement HiFi automobile va de soi.
En fonction du modèle, votre véhicule peut différer de cette
description. Nous déclinons toute responsabilité en cas de dommages causés par des erreurs de montage ou de connexion et
dans le cas de dommages indirects.
Veuillez respecter les consignes
Enfants
• Par mesure de sécurité vis-à-vis des enfants, ne laissez pas
les emballages (sac en plastique, carton, polystyrène) à leur
portée.
Attention! Ne pas laisser les jeunes enfants jouer avec le
fi lm. Il y a risque d’étouffement!
Montez la radio conformément aux illustrations suivantes.
Sécurité routière
• La sécurité routière passe avant tout. Utilisez toujours votre
autoradio de manière à rester maître de la situation routière.
• N’oubliez pas qu’à une vitesse de 50 km/h, vous progressez
de 14 m par sec.
• Nous vous déconseillons d’utiliser cet appareil dans des
situations critiques.
• De votre véhicule, vous devez toujours être en mesure de
percevoir à temps les signaux d’avertissement de la police
ou des sapeurs-pompiers.
• De ce fait, réglez le volume de vos programmes modérément pendant vos déplacements.
26
05-AR 736 CD_MP3_NEU 26 18.09.2006, 11:00:51 Uhr
Installation
a Écrou
b Rondelle élastique
c Rondelle plate
d Vis
e Équerre de montage
f Boîtier encastrable
g Boulon fi leté
Attention!
h Vis de sécurité pour le
transport (à retirer avant
le montage)
i Outil d’extraction
(clé pour le démontage)
j Cadre
Mettez en place la façade amovible contenant le panneau de
commande en partant du côté
droit puis appuyez sur le côté
gauche jusqu’à enclenchement.
Page 27
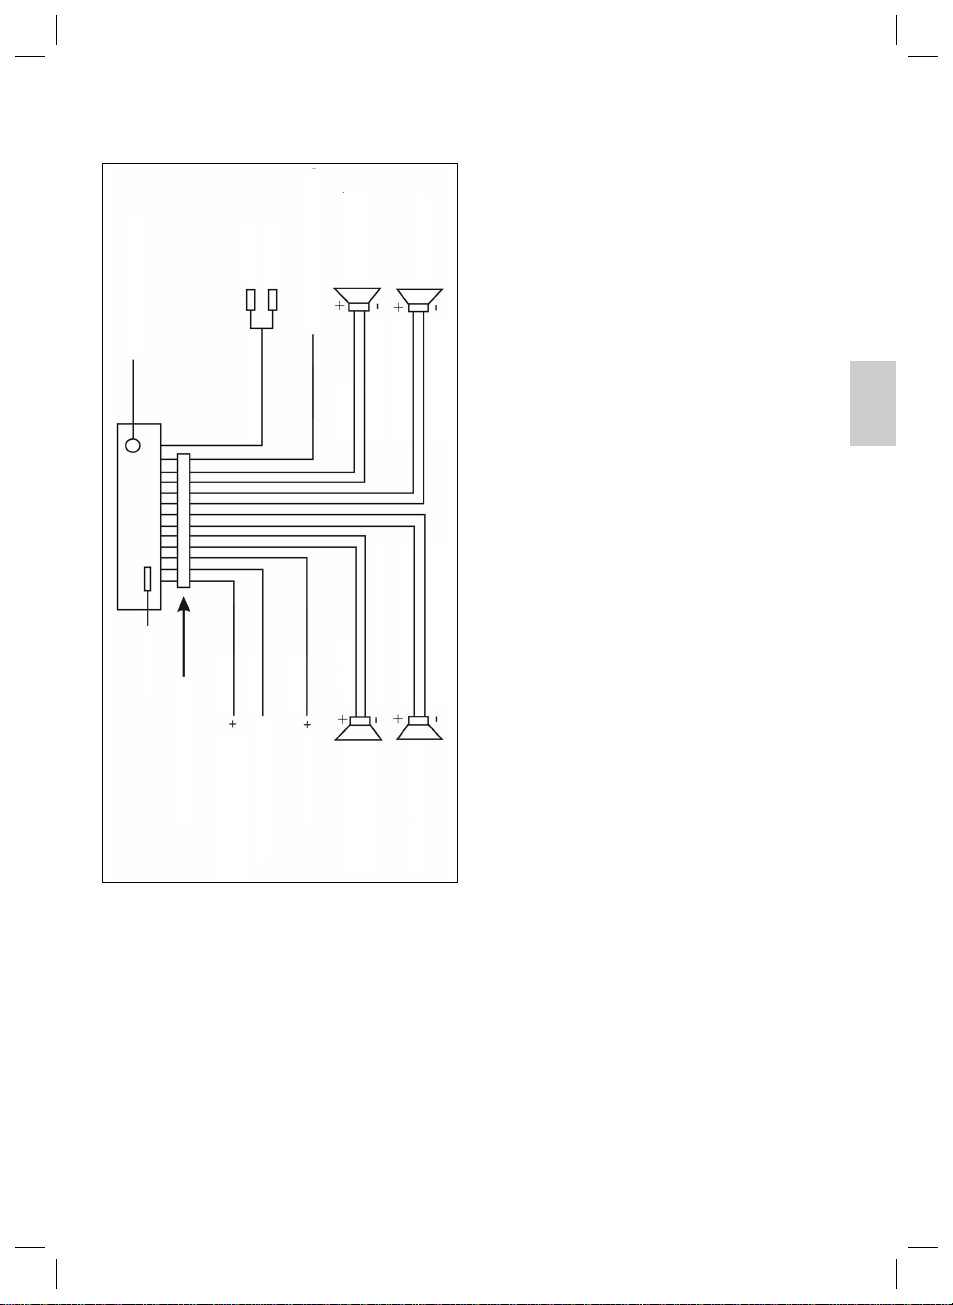
FRANÇAIS
Raccordement
Effectuez les raccordements conformément au diagramme.
Haut-parleur
avant droit
Gris / Noir
Violet
Blanc / Noir
Ver t
avant gauche
arrière droit
arrière gauche
Raccordement antenne
fusible
Rouge R
Blanc L
Sortie Chinch
Noir
Jaune
Masse
Raccordement ISO
Raccordement
courant continu
Antenne auto. (Bleu)
Rouge
Allumage
Gris
Blanc
Haut-parleur
3. Lors du montage/branchement de votre appareil, pensez au
fait que certains véhicules ne sont pas équipés de “connections ISO“. Dans ce cas, nous vous conseillons d’utiliser un
adaptateur ISO automobile spécifi que.
Vous trouverez de tels adaptateurs chez les revendeurs
d’accessoires automobiles et/ou chez votre garagiste.
4. L’occupation de “Durée +“ (raccordement au courant permanent) peut varier d’un véhicule à l’autre. (Elle est néanmoins
nécessaire à la mémorisation des stations radio.)
Ces instructions sont à suivre impérativement pour garantir
le bon fonctionnement de toutes les fonctionnalités. En cas
de doute, adressez-vous à un garage agréé.
5. Lors du montage de votre autoradio, veillez à ce que l’angle
d’inclinaison de dépasse pas 20° car nous ne pouvons
garantir le bon fonctionnement de votre autoradio (lecteur
Violet / Noir
CD) si l’angle de montage est plus important.
6. Dans des cas exceptionnels et en fonction du type de
véhicule, des interférences peuvent se produire pendant le
fonctionnement de la radio/du lecteur CD. Il est possible de
les éliminer grâce à un fi ltre antiparasite supplémentaire.
En effet, un fi ltre antiparasite fait déjà partie de l’équipement
de série de votre appareil. Des perturbations peuvent
néanmoins se produire selon le véhicule.
Les fi ltres antiparasite sont disponibles chez les revendeurs
d’accessoires automobiles et/ou chez votre garagiste.
7. Lors de l’installation de votre radio, veillez à laisser l’espace
nécessaire à l’arrière pour garantir un refroidissement
suffi sant.
8. Il existe deux normes de prise d’antenne différentes. D’une
Vert / Noir
part l’ancienne (50 ohms) au long contact annulaire qui
ressort côté véhicule et à la prise femelle circulaire côté
radio. De l’autre, la prise d’antenne ISO standardisée (150
ohms). Les fabricants d’accessoires et/ou votre garagistes
proposent des adaptateurs pour les deux types.
À respecter impérativement pour VW/Audi: l’antenne
active doit disposer de tension sur le blindage du câble
d’antenne coaxial pour une réception suffi sante. Un adaptateur d’antenne avec alimentation Phantom permet de
résoudre ce problème.
FRANÇAIS
Attention:
• Mettez en place la façade amovible seulement après avoir
raccordé les câbles.
1. Si vous retirez la façade amovible alors que la radio ou le
• Utilisez des haut-parleurs d’une impédance de 4 ohms.
• Le câblage des haut-parleurs doit être sans masse.
• Le signal raccordé par les sorties Cinch n’est restitué que
2. S’il fait extrêmement chaud à l’intérieur du véhicule, par ex.
sur les haut-parleurs arrières.
Informations complémentaires importantes
pour le montage de votre autoradio!
1. Enlevez les vis (h) de sécurité pour le transport avant le
montage sous peine de ne pouvoir insérer les CD.
2. L’appareil est prévu pour le pôle négatif de la batterie; ce
dernier doit être raccordé à la carrosserie du véhicule.
3. Pour conserver la façade amovible en toute sécurité, utilisez
4. Étant donné la quantité de logiciels et de supports CD dis-
lecteur CD sont en marche, l’appareil s’éteindra automatiquement.
après un stationnement prolongé en plein soleil, attendez
que la température intérieure de la voiture ait baissé un peu
en roulant un petit moment avant de mettre le lecteur en
marche.
toujours l’étui protecteur prévu à cet effet.
ponibles sur le marché, nous ne pouvons garantir la lecture
de CD créés par l’utilisateur.
Conseils d’utilisation
Veuillez vérifi er cela avant l’installation.
27
05-AR 736 CD_MP3_NEU 27 18.09.2006, 11:00:53 Uhr
Page 28
FRANÇAIS
5. Bouton RESET (non illustré): D’éventuelles erreurs de
fonctionnement (ERROR) en cours d’utilisation peuvent être
éliminées en enfonçant la touche RESET. Ce bouton se
trouve dans le coin inférieur droit de l’autoradio après retrait
de la façade amovible contenant le panneau de commande.
En raison de variati-ons de tension au sein du système
électrique de votre véhicule, il peut arriver que le processeur
de commande de votre radio continue de fonctionner même
après retrait de la façade amovible. Il ne s’agit pas d’un
dysfonctionnement de votre appareil! Vous pouvez
réinitialiser (remettre à zéro) le processeur en actionnant ce
bouton à l’aide d’un objet pointu.
Utilisation
1. Touche
Appuyez sur la touche pour retirer la façade amovible.
2. Bouton multifonctions
FRANÇAIS
PRESS • ENTER AUDIO DIAL (Volume)
a) Tournez: En mode de lecture standard, le bouton
multifonctions sert à régler le volume.
b) Enfoncez brièvement: pour accéder au mode d’entrée
de données des numéros de téléphone. Pour plus
d’informations d’utilisation, consultez la section „Téléphonez via Bluetooh“.
c) Enfoncez longtemps: pour accéder au menu de sélec-
tion du mode tonalité. L’indicateur de réglage du volume
„VOLUME“ apparaît à l’écran. Enfoncez brièvement le
bouton multifonctions pour sélectionner les différents
points du menu comme VOLUME (volume), BASS
(graves), TREBLE (aigus), BALANCE (balance) und
FADER (équilibrage des enceintes). Pour modifi er
le réglage des différentes options, tournez le bouton
multifonctions.
3. Touche DISP/MENU (Ecran/Sélection)
a) En mode radio:
• Pendant la réception de données RDS, pressez
cette touche plusieurs fois brièvement pour que
s’affi chent les informations suivantes:
PS Nom ➞ Heure ➞ Fréquence ➞ PTY
• En l’absence de réception de données RDS, ce
sont les informations suivantes qui s’affi chent:
Heure ➞ PTY ➞ Fréquence
Remarque: L’information reste visible env. 5 secondes,
après quoi l’appareil réaf-fi che l’écran précédent.
b) Pressez longuement la touche DISP/MENU pour
parvenir aux menus de sélection suivants:
• PAIRING
• RE-CONN / DIS-CONN
• A ANSWER ON / A ANSWER OFF
• PHONE VOL
• CONTRAST
• FORMAT 24H / FORMAT 12H
• SET
28
• DISTANT / LOCAL
• REGION ON / REGION OFF
• VOL PGM
• BEEP TONE ON / BEEP TONE OFF
En appuyant à nouveau sur la touche DISP/MENU,
vous pouvez accéder aux différentes options du menu.
Pour modifi er le réglage des différentes options,
tournez le bouton multifonctions (2).
• PAIRING:1 (identifi cation)
Avant de pouvoir utiliser votre téléphone portable Blue-
tooth, vous devez d’abord l’identifi er dans votre appareil
(voir „Identifi cation des appareils“).
• RE-CONN:1/DIS-CONN:1
Cette fonction permet d’activer et désactiver la connexi-
on Bluetooth manuellement.
RE-CONN:1 = activer ; DIS-CONN:1 = désactiver
Pour activer ou désactiver la connexion Bluetooth ma-
nuellement, choisissez l’option désirée puis confi rmez
votre choix en enfonçant le bouton multifonctions (2).
„RE-CONN:1 >>>>“ ou. „DIS-CONN:1 >>>>“ apparaît à
l’écran.
• A ANSWER ON/A ANSWER OFF
(acceptation automatique des appels)
A ANSWER ON: L’appareil accepte automatique-
ment tous les appels reçus, sans
que vous deviez enfoncer la
touche TRANSFER (acceptation). L’acceptation automatique
des appels se fait après env. 3
sonneries.
A ANSWER OFF: L’acceptation automatique des
appels est désactivée.
• PHONE VOL
Sélectionnez ici l’intensité de la sonnerie lors de l’arrivée
d’un appel.
• CONTRAST (contraste)
Réglez ici le contraste de l’écran.
• FORMAT 24 H/FORMAT 12 H
Choisissez ici le format d’affi chage des heures.
• SET
Pour régler l’heure manuellement, procédez de la façon
suivante:
Réglage des minutes: Tournez le bouton multifonctions
(2) dans le sens des aiguilles
d’une montre.
Réglage des heures: Tournez le bouton multifonctions
(2) dans le sens inverse des
aiguilles d’une montre.
Remarque: Si l’appareil reçoit une station de radio
émettant des données RDS, l’heure est automatiquement réglée.
05-AR 736 CD_MP3_NEU 28 18.09.2006, 11:00:54 Uhr
Page 29
FRANÇAIS
• DISTANT/LOCAL (uniquement en mode radio)
Votre radio peut capter des données RDS EON. La
fonction EON permet aux stations radio d’envoyer des
informations supplémentaires les concernant. Dans le
cas d’informations routières (TA), l’appareil passera de
la station sans informations routières à une station du
même groupe d’émetteurs diffusant des informations
routières.
Vous avez le choix entre les modes LOCAL et DISTANT
c’est-à-dire entre la réception d’informations routières
locales ou longues distances.
LOCAL: cette fonction permet d’éviter une
Mode DISTANT: dans ce mode, la fonction EON
• REGION ON/REGION OFF
(Ne fonctionne que lorsque la fonction AF est activée)
À certaines heures de la journée, certaines stations
répartissent leur pro-gramme en programmes régionaux
aux contenus différents.
REGION ON: Le mode régional est activé.
Remarque: la capacité d’affi chage de l’écran est
limitée. Il est possible qu’en mode d’affi chage double
des segments d’écran soient effacés.
La fonction REGION ON permet d’éviter que l’autoradio
passe à des fréquences alternatives diffusant un
programme régional au contenu différent.
REGION OFF: Le mode régional est désactivé.
• VOL PGM
Le bouton multifonctions (2) vous permet de déterminer
le volume souhaité pour la mise en marche de la radio.
• BEEP TONE ON/BEEP TONE OFF
(Bip de confi rmation)
Vous pouvez régler le bip de confi rmation de 2 maniè-
res différentes.
BEEP TONE ON: le bip de confi rmation retentit à
commutation sur une connexion
EON aux signaux trop faibles. La
radio ne passe pas sur la station
en question et l’auditeur perçoit
à peine le brouillage. L’écran
affi che le message « LOC ».
TA essaie de recevoir les informations EON TA d’une station
captable pour améliorer la qualité de la réception. L’affi chage
« LOC » sur l’écran s’éteint.
L’identifi ant de programme (PI)
de la station émettant un programme régional est ignoré lors
des recherches de fréquences
alternatives (AF) ou d’identifi ant
de programme (PI).
chaque fois que vous appuyez
sur une touche.
BEEP TONE OFF: le bip de confi rmation est désac-
/ Bouton marche/arrêt / Coupure du son
4.
a) Appuyez sur cette touche pour allumer l’appareil.
WELCOME apparaît à l’écran. Pour éteindre l’appareil,
pressez longuement cette touche.
b) Appuyez sur la touche / pour couper le son provi-
soirement. MUTE clignote à l’écran. Pressez à nouveau
la même touche pour désactiver cette fonction. Cette
fonction peut également être désactivée en appuyant
sur le bouton multifonctions.
5. Touche
6. Touche B / CLEAR (• BAND/• ERASE/• SEARCH)
M
a) Enfoncez cette touche pour sélectionner les modes
b) Enfoncez cette touche pour accepter un appel.
c) Maintenez cette touche enfoncée pendant un appel
a) Mode radio
Enfoncez brièvement la touche B pour choisir entre
b) Touche B pour la recherche en mode MP3
/ TRANSFER (MODE/acceptation d’appels)
lecteur de CD, radio, etc.
pour faire passer cet appel sur votre téléphone portable.
Si vous maintenez à nouveau la touche enfoncée,
l’appel passe à nouveau sur votre autoradio. Dans les
deux cas l’indication „TRANSFER “ apparaît à
l’écran.
les fréquences FM. La désignation des différentes
fréquences FM est affi chée sur l’écran LCD.
Si les données correspondantes ont été programmées
lors de la création du CD en format MP3, elles peuvent
être recherchées grâce aux fonctions suivantes:
a) Entrer directement le numéro d’un titre d’un CD en
format MP3:
1. Appuyez 1X sur la touche B. La mention „NUMBER “ apparaît à l’écran.
2. Le bouton multifonctions (2) vous permet de
sélectionner le numéro de titre désiré. L’écran
indique „No.“ et le numéro de plage correspondant.
3. Enfoncez ensuite brièvement le bouton multifonctions (2) pour lire le titre choisi.
b) Sélection de fi chier sur un CD en format MP3:
1. Poussez 2X sur la touche B. La mention
„NAVIGATE “ apparaît à l’écran.
2. Le bouton multifonctions (2) vous permet de
sélectionner les différents fi chiers du disque.
3. Pour confi rmer le fi chier sélectionné, enfoncez
brièvement le bouton multifonctions (2). Le
premier titre du fi chier sélectionné est affi ché.
4. Tournez le bouton multifonctions (2) pour
sélectionner un titre dans un fi chier.
5. Enfoncez ensuite brièvement le bouton multifonctions (2) pour lire le titre choisi.
tivé.
FRANÇAIS
29
05-AR 736 CD_MP3_NEU 29 18.09.2006, 11:00:56 Uhr
Page 30
FRANÇAIS
Remarque:
• Si le disque MP3 ne comporte aucun fi chier,
l’affi chage „ROOT“ apparaît sur l’écran.
• Étant donné la quantité de logiciels et de
supports CD disponibles sur le marché, nous
ne pouvons garantir la lecture de CD créés par
l’utilisateur.
• En fonctionnement normal de lecture de
disques en format MP3, vous pouvez avancer
ou reculer d’un fi chier grâce aux touches
ou 왔 (17/16).
• Remarque: Les informations ID-3 Tag apparaissent à l’écran les unes après les autres.
c) En mode téléphone:
Pour effacer le numéro de téléphone tapé.
d) En mode USB:
FRANÇAIS
Pour effacer le titre en cours de lecture.
1. Maintenez la touche B enfoncée. L’écran
indique „ERASE“ et le titre en cours (z.B. 002).
2. Enfoncez le bouton multifonctions (2) pour
confi rmer (ERASE apparaît à l’écran).
Enfoncez à nouveau le bouton multifonctions
(2) pour effacer le titre (ERASE apparaît à
l’écran).
Remarque: Si vous ne souhaitez pas effacer le tit-
re, tournez le bouton multifonctions (2) après l’avoir
enfoncé une première fois (ERASE X apparaît à
l’écran). Enfoncez le bouton multifonctions (2) pour
confi rmer.
7./8.
Touches 왘왘I / I왗왗 TRACK UP/DOWN /
AUTO/MANUAL SEEK
En mode CD:
pour avancer ou revenir en arrière, appuyez brièvement sur
la touche 왘왘I ou I왗왗. Pour vous déplacer dans les titres,
gardez le doigt appuyé sur la touche fl échée 왘왘I ou I왗왗.
En mode radio:
Enfoncez brièvement les touches 왘왘I / I왗왗 et la radio
s’arrête sur la première station captée (AUTO SEEK apparaît à l’écran). La recherche sur la bande de fréquence se
poursuit tant que vous pressez les touches 왘왘I / I왗왗 (La
mention „MANUAL SEEK“ apparaît à l’écran).
9. Touche d’éjection
Appuyez sur cette touche pour éjecter le CD.
10. Fente d’insertion des CD
Introduisez le disque dans la fente de l’appareil en orientant
le côté imprimé vers le haut. Poussez légèrement le disque
jusqu’à ce que l’appareil fi nisse de le faire rentrer dans la
fente. La mention „READING“ apparaît à l’écran.
Remarque: la lecture de disques gravés par l’utilisateur ne
peut être garantie, en raison de la multitude de logiciels et
médias de CD existants.
Lecture de musique en format MP3
Vous pouvez, avec cet appareil, lire de la musique en format
MP3. L’appareil est également compatible avec les types
usuels de disques: CD, CD-RW, CD-R.
Vous pouvez avec votre appareil lire des CD MP3. Vous
pouvez enregistrer sur ces CD jusqu’à 200 titres en les
comprimant. Votre appareil reconnaît automatiquement un
CD MP3 (l’affi chage MP3 apparaît sur l’écran).
왖
Remarque: Les informations ID-3 Tag apparaissent à
l’écran les unes après les autres.
Attention:
Il y a différents modes de gravage et de compression ainsi
que différentes qualités de disques compacts et disques
gravés.
De plus l’industrie de la musique n’utilise pas de standards
défi nis (protection contre la copie).
Des problèmes peuvent donc exister, dans certains cas
limités, lors de la lecture de disques compacts et MP3. Cela
n’est pas dû à un dysfonctionnement de l’appareil.
11.
Touche
AS/PS / ID3 (Mémorisation automatique des stations)
En mode radio:
a) Fonction de mémorisation:
Pressez la touche AS/PS / ID3 pendant plus d’une
seconde pour activer la mémo-risation automatique des
stations. La mention „AUTO STORE“ apparaît à l’écran.
L’appareil recherche les signaux les plus forts sur
l’ensemble de la bande de fréquence sélectionnée par
ex. FM 1. Il mémorise les six stations aux signaux les
plus forts sur les touches de présélection correspondantes.
Il passe chacune des stations mémorisées pendant
env. 5 sec. puis se règle sur la station mémorisée sur la
première touche.
Si vous souhaitez rechercher d’autres stations de la
bande FM, appuyez sur la touche B pour passer en
FM2 ou FM3. Poussez à nouveau pendant plus d’une
seconde sur la touche AS/PS / ID3 pour démarrer la
nouvelle recherche.
b) Fonction de lecture d’intro:
Si vous appuyez brièvement sur la touche AS/PS / ID3 ,
la radio passe toutes les stations présélectionnées de la
bande de fréquence.
Remarque: La fonction lecture s’arrête automatiquement
sur la station de la première plage mémoire.
En mode MP3:
A chaque fois que vous enfoncez la touche AS/PS / ID3,
l’écran indique le titre, la chanson, l’interprète et le titre de
l’album (si des informations ID3 Tag ont été gravées sur le
disque).
30
05-AR 736 CD_MP3_NEU 30 18.09.2006, 11:00:59 Uhr
Page 31

FRANÇAIS
12. -17.
Touches de stations présélectionnées (1-6) et touches
1PAU-, 2INT-, 3RPT-, 4RDM en mode CD
a) Mode radio
Pressez brièvement l’une de ces touches pour choisir
une des stations radio présélectionnées. Si vous
appuyez plus d’une seconde sur l’une de ces touches,
la station sur laquelle la radio est réglée à ce moment-là
sera mémorisée sur la touche de station pressée.
b) Mode CD
• Appuyez sur la touche 1PAU pour interrompre la
lecture du CD (fonction Pause). Poussez à nouveau
sur cette touche pour reprendre la lecture.
• Appuyez sur la touche 2INT. L’appareil lit chaque
titre du CD pendant 10 secondes. Appuyez à
nouveau sur cette touche pour interrompre la recherche. L’appareil lit le titre sélectionné au moment
de l’interruption.
• Appuyez sur la touche 3RPT. Le morceau en cours
de lecture passe à nouveau. Appuyez une seconde
fois sur cette touche pour interrompre la répétition
du morceau.
• Appuyez sur la touche 4RDM. Les titres du CD passent dans un ordre aléatoire. Appuyez à nouveau
sur cette touche pour interrompre cette fonction.
18. Touche REC/ TA • COPY
a) TA Traffi c Annonuncement
(Informations routières prioritaires)
Appuyez brièvement sur la touche REC/TA • COPY pour
activer la fonction TA et le sigle TA s’affi chera à l’écran.
Quand l’appareil capte une station FM donnant périodi-
quement les dernières informations routières, la mention
TP apparaît à l’écran.
Lorsque la fonction TA est activée, les informations rou-
tières UKW/FM interrompent automatiquement le mode
CD (La mention TRAFFIC INFO apparaît à l’écran).
Une fois les informations routières terminées, le pro-
gramme sélectionné précédemment reprend son cours.
Interruption de la fonction TA:
Si vous souhaitez interrompre les informations routières
en cours, appuyez brièvement sur la touche REC/TA •
COPY. Le mode TA n’en est pas pour autant désactivé.
Remarque: Si aucune information trafi c n’est reçue,
l’écran indique pour un court instant „LOST TP TA“.
b) Fonction enregistrement
(seulement en fonctionnement disque)
Vous pouvez enregistrer des disques CD/MP3 sur un
support USB.
1. Connectez pour cela un support d’enregistrement
USB à l’aide du câble adaptateur à la prise correspondante (21).
2. Sélectionnez la plage que vous souhaitez enregistrer grâce aux touches 왘왘I / I왗왗 (7/8).
3. Maintenez la touche REC/TA • COPY (La mention
REC USB apparaît à l’écran).
4. Enfoncez le bouton multifonctions (2) pour
confi rmer. L’enregistrement du titre en cours sur
le support d’enregistrement USB commence (La
mention REC >>>> apparaît à l’écran).
Remarque: Pour les disques MP3, le niveau
d’avancement d’enregistrement est indiqué en
pourcentage. Pour les disques audio par contre
l’enregistrement se déroule en temps réel.
5. Lorsque l’enregistrement est terminé, l’écran
affi che pour les disques MP3 „100% “ et pour les
disques audio „REC “. L’appareil passe ensuite
en lecture normale.
Remarque: Il n’est possible d’enregistrer que le titre
en cours de lecture (pas de disques entiers). Pour
enregistrer un autre titre sur le support USB, procédez
comme décrit précédemment.
19. Touche PTY/IX-BASS
a) Activer et désactiver la fonction IX-BASS. Maintenez la
touche PTY/IX-BASS enfoncée pendant env. 3 sec.
La fonction IX-BASS permet d’améliorer la sonorité à
faible volume. Les aigus et les graves sont accentués.
b) Mode radio:
PTY sélection du type de programme
En plus de leur nom, certaines stations FM transmettent
aussi des informati-ons relatives au type de programme
de leur programmation. Votre autoradio peut affi cher
ces informations.
Les types de programme seront par ex.:
SPORT NEWS POP CLASSICS
La fonction PTY vous permet de sélectionner des
stations diffusant un type de programme particulier.
Enfoncez à plusieurs reprises la touche PTY/IX-BASS
pour effectuer la sélection PTY. Confi rmez votre choix
à l’aide du bouton multifonctions (2). L’écran indique
ensuite brièvement „PTY SEEK“.
Une fois PTY sélectionné, l’appareil radio commence
à rechercher les infor-mations PTY correspondantes et
s’arrête lorsqu’il a trouvé l’information PTY voulue.
Si l’appareil ne parvient pas à trouver le type de program-
me recherché „NO MATCH PTY” apparaît à l’écran.
Si l’information PTY recherchée disparaît, la fonction
PTY se désactive et l’appareil repasse automatique-
ment en mode standard.
20. Touche AF
Fonctions AF (Fréquences alternatives), REG
La fonction AF est une sous-fonction du système RDS
(Radio Data System) qui ne peut être utilisée que pour les
stations de radio émettant en FM. L’appareil cherche en
tâche de fond la fréquence offrant la meilleure réception
pour la station sélectionnée.
FRANÇAIS
31
05-AR 736 CD_MP3_NEU 31 18.09.2006, 11:01:01 Uhr
Page 32

FRANÇAIS
Lorsque la fonction AF est activée, l’autoradio vérifi e en
permanence la puissance du signal émis sur la fréquence
AF en question. L’intervalle entre deux vérifi cations dépend
pour chaque fréquence AF de la puissance du signal de la
station émettrice et peut aller de quelques minutes dans le
cas d’un émetteur puissant à quelques secondes dans le
cas d’émetteurs faibles. Chaque fois que le signal de la nouvelle fréquence AF détectée est plus puissant que celui de
la station émettrice en cours, l’appareil commute brièvement
sur cette fréquence et le message „NEW FREQUENCY“
s’affi che à l’écran pendant une à deux secondes. Le silence
durant le changement de fréquence ou la vérifi cation étant
de très courte durée, on le remarque à peine.
Pour activer la fonction AF, pressez brièvement la touche
A.F et l’activation de la fonction AF sera confi rmée par
l’apparition du sigle AF à l’écran.
• Si le sigle AF est affi ché à l’écran, cela veut dire que la
FRANÇAIS
fonction AF est active et que des données RDS sont en
cours de réception.
• Si le sigle AF clignote, cela signifi e que la fonction AF
est sélectionnée mais que l’appareil ne reçoit aucune
donnée RDS.
• Si vous actionnez la touche A.F une nouvelle fois, cette
fonction sera désactivée. Le sigle AF disparaîtra alors
de l’écran.
21. Raccordement USB
Cet appareil est équipé des derniers développements
techniques relatives à l’USB. Le grand nombre de médias
de sauvegarde USB différents proposés à l’heure actuelle
ne permet pas de garantir une compatibilité complète avec
tous les médias de sauvegarde USB. Il est donc possible
dans certains cas rares que des problèmes de lecture de
support d’enregistrement USB surviennent. Cela n’est pas
dû à un dysfonctionnement de l’appareil.
1. Connectez un support d’enregistrement USB à l’aide du
câble adaptateur à la prise correspondante (La mention
USB HOST apparaît à l’écran). Les données seront lues
automatiquement.
2. Pour rechercher/sélectionner certains morceaux ou pis-
tes, procé-dez comme indiqué aux points 6 b) (touche
B
employée comme fonction de recherche en mode
MP3) et 12-17 b).
22. Écran LCD (affi chage à cristaux liquides)
23. Bouton RESET (non illustré)
Ce bouton se trouve dans le coin inférieur droit de
l’autoradio après retrait de la façade amovible contenant le
panneau de commande.
En raison de variati-ons de tension au sein du système
électrique de votre véhicule, il peut arriver que le processeur
de commande de votre radio continue de fonctionner même
après retrait de la façade amovible. Il ne s’agit pas d’un dysfonctionnement de votre appareil! Vous pouvez réinitialiser
(remettre à zéro) le processeur en actionnant ce bouton à
l’aide d’un objet pointu.
Bluetooth est une technologie permettant la connexion sans fi l
d’appareil sur une petite distance. La technologie Bluetooth est
actuellement essentiellement utilisée pour le fonctionnement
mains libres des téléphones portables. Le conducteur a ainsi la
possibilité d’effectuer une communication sur son téléphone portable tout en conduisant sans devoir tenir son appareil à l’oreille.
Cet appareil vous permet d’utiliser un téléphone portable Bluetooth. Le champ d’action est alors limité à env. 3 mètres.
Pour une qualité optimale du son pendant un entretien
téléphonique
Évitez de trop augmenter le volume. Ceci risquerait sinon de
provoquer une réaction acoustique (siffl ement) en provenance
des haut-parleurs.
Remarque: Le réglage du volume dépend de la position
d’installation des haut-parleurs par rapport au microphone et ne
saurait donc être indiqué.
Identifi cation des appareils
Avant de pouvoir téléphoner sur votre autoradio, vous devez
identifi er les appareils entre eux.
1. Maintenez la touche DISP/MENU (3) enfoncée (PAIRING:1
2. Enfoncez le bouton multifonctions (2) pour confi rmer (La
mention PAIRING:1 >>>> apparaît à l’écran).
3. Enregistrez votre autoradio sur votre téléphone portable,
comme décrit dans le mode d’emploi de votre téléphone portable. Vote téléphone vous propose alors l’appareil „BT60“.
4. Tapez maintenant le mot de passe „1234“ sur votre téléphone portable. Votre autoradio est maintenant identifi é sur
votre téléphone portable.
5. Si l’identifi cation est correctement réalisée, l’écran de
votre autoradio affi che „PAIRING:1 “ et le nom de votre
téléphone portable.
Remarques:
• Si l’identifi cation n’est pas correctement réalisée, l’écran de
votre autoradio affi che „PARING:1 X“.
• Selon la marque de votre appareil, vous devez à nouveau
effectuer l’identifi cation (PAIRING) afi n d’identifi er votre
téléphone portable sur votre autoradio.
• La compatibilité Bluetooth ne peut pas être garantie pour les
téléphones portables des prochaines générations.
• Pour vous assurer de la meilleure connexion, veillez à ce
que l’accu de votre téléphone soit complètement chargé.
• Certaines marques de téléphone sont équipées d’un mode
veille. Il est recommandé de le désactiver car il risque
sinon de causer des problèmes lors de communications via
Bluetooth.
• Bluetooth doit être activé sur votre téléphone, pour pouvoir
recevoir ou donner un appel. Consultez le mode d’emploi de
votre téléphone.
• Veillez à parler dans la direction du micro intégré. Le raccordement d’un micro externe n’est pas possible.
Téléphoner via Bluetooth
apparaît à l’écran).
32
05-AR 736 CD_MP3_NEU 32 18.09.2006, 11:01:03 Uhr
Page 33

FRANÇAIS
Donner un appel
1. Enfoncez brièvement le bouton multifonctions (2) (La
mention „ “ apparaît à l’écran).
2. Pour taper le numéro de téléphone désiré, tournez le bouton
multifonctions jusqu’à ce que le premier chiffre désiré
apparaisse. Enfoncez à nouveau brièvement le bouton
multifonctions (2) pour confi rmer le chiffre. Renouvelez la
même opération pour les chiffres suivants jusqu’à ce que le
numéro de téléphone soit complet (celui-ci sera affi ché sur
l’écran de votre autoradios).
Remarque: Si vous avez tapé un ou plusieurs mauvais
chiffres, vous pouvez les effacer à l’aide de la touche
CLEAR (6).
3. Pour appeler le numéro choisi, maintenant ensuite le bouton
multifonctions (2) enfoncé jusqu’à ce que l’écran affi che
„CALLING >>>>“.
4. Pour raccrocher, enfoncez la touche B / CLEAR (6).
Remarque: Pour appeler le numéro tapé, vous pouvez également enfoncer la touche M / TRANSFER (5).
Rappel automatique
Vote appareil sauvegarde les 9 derniers numéros appelés. Pour
les appeler procédez de la façon suivante:
1. Enfoncez brièvement le bouton multifonctions (2) (La
mention „ “ apparaît à l’écran).
2. Maintenez ensuite le bouton multifonctions (2) enfoncé. Le
dernier numéro appelé s’affi che à l’écran.
3. Tournez le bouton multifonctions (2) pour pouvoir sélectionner un des derniers appels.
4. Pour appeler le numéro chois, maintenez le bouton
multifonctions (2) enfoncé jusqu’à ce que l’écran indique
„CALLING >>>>“.
5. Pour raccrocher, enfoncez la touche B / CLEAR (6).
B
/
Données techniques
Généralités
Tension d’alimentation...................................................DC 12 V
Consommation .............................................................7 A max.
Puissance......................................................... 4 x 60 W PMPO
Bande FM
Plage de fréquences................................87,5 MHz - 108,0 MHz
Sensibilité utile...................................................................15 dB
Fréquence I.F...............................................................10,7 MHz
Lecteur CD
Système........................................................Système CD Audio
Disques utilisables................... CD/CD-R/CD-RW/MP3 Disques
Débits binaires pris en charge.............................32 - 320 kBit/s
Nombre de bits pour la quantifi cation................................. 1 bit.
Format du signal.................................. fréquence-type 44,1 kHz
Rapport Signal / Bruit ...........................................50 dB (1 kHz)
Nombre de canaux ........................................... 2 canaux stéréo
Dimensions boîtier..................................... 178 L x 50 H x 157 P
Cet appareil a été contrôlé d’après toutes les directives européennes actuelles applicables, comme par exemple concernant
la compatibilité électromagnétique et la basse tension. Cet appareil a été fabriqué en respect des réglementations techniques
de sécurité les plus récentes.
Sous réserve de modifi cations techniques.
FRANÇAIS
Appels reçus
Lorsque vous recevez un appel, vous entendez une sonnerie
par les haut-parleurs et si votre correspondant dispose d’un
téléphone équipé de CLIP „Calling Line Identifi cation Presentation (identifi cation du numéro de téléphone)“, l’écran de votre
autoradio affi chera le numéro de votre correspondant. Sinon
l’écran indiquera „PHONE IN“.
1. Pour répondre à un appel enfoncez la touche M /
TRANSFER (5). Vous entendez vote correspondant sur les
haut-parleurs de votre voiture.
2. Pour raccrocher, enfoncez la touche B / CLEAR (6).
Remarque:
• Vous pouvez faire passer votre appel à nouveau sur votre
téléphone. Il vous suffi t de maintenir la touche M /
TRANSFER (5) enfoncée („TRANSFER “ apparaît à
l’écran). L’autoradio active la fonction MUTE. Maintenez à
nouveau cette touche enfoncée pour que l’appel passe à
nouveau sur l’autoradio.
• Pour refuser un appel, enfoncez la touche B / CLEAR (6).
33
05-AR 736 CD_MP3_NEU 33 18.09.2006, 11:01:05 Uhr
Page 34

FRANÇAIS
Dépannage
Veuillez vous assurer que tous les raccordements ont été effectués avant de parcourir cette liste de vérifi cation. Si, après sa
lecture, des questions demeuraient malgré tout sans réponse,
veuillez vous adresser au point de service après-vente le plus
proche.
Symptôme Cause Remède
Siffl ement en
provenance des hautparleurs.
Les CD n’entrent qu’à
moitié dans la fente
d’insertion des CD.
L’écran affi che „READ
ERR“.
Impossible de sélecti-
FRANÇAIS
onner l’option CD via la
touche MODE.
Le disque a été
introduit dans l’appareil
mais n’est pas lu.
La lecture du CD
saute.
L’appareil ne fonctionne pas du tout.
Impossible d’allumer
ou d’éteindre l’appareil
avec la clé de contact.
Réaction acoustique. Évitez de trop augmen-
Les vis de sécurité
pour le transport n’ont
pas été enlevées.
Le CD a été inséré à
l’envers.
Il n’y a pas de CD dans
le lecteur.
Le volume est réglé sur
un niveau trop faible.
Les raccords et
branchements n’ont
pas été effectués
correctement.
Vous circulez sur une
route accidentée.
L’appareil n’est pas fi xé
solidement.
Le CD est défectueux. Essayez avec un autre
Le CD est encrassé. Nettoyez le CD.
L’appareil a été monté
trop en oblique dans le
véhicule.
Le contact est coupé. Tournez la clé de
Un ou plusieurs
fusibles ont sauté.
Raccordement
incorrect
(Les connexions ISO
de chaque véhicule
dépendent des choix
du constructeur).
ter le volume.
Enlevez les vis de
sécurité pour le
transport.
Éjectez le CD et
insérez-le dans le bon
sens.
Insérez un CD.
Augmentez le volume.
Vérifi ez le raccord
+12V- ainsi que le
raccord à la masse.
Attendez que la route
soit moins accidentée
pour lire des CD.
Fixez l’appareil
solidement.
Assurez-vous que la
pièce de fi xation arrière
est bien utilisée dans
les cas où le véhicule
n’offre pas de prise
appropriée pour la face
arrière de l’appareil.
CD. Si celui-ci fonctionne correctement, le CD
incriminé est probablement endommagé.
Veillez à ne pas dépasser 20° d’inclinaison
en montant l’appareil!
contact en position
„ON“ ou „ACC“.
Remplacez le fusible
par un autre fusible
de 15 A.
Adressez-vous à votre
garagiste ou concessionnaire auto pour
obtenir l’adaptateur de
raccordement spécifi que au véhicule.
Symptôme Cause Remède
L’appareil ne fonctionne pas correctement
(EJECT, LOAD, PLAY).
Pas de réception radio. Le câble d’antenne
Mauvaise réception
radio.
L’écran affi che „NO
FILE“.
L’écran affi che
„MEMORY FULL“.
Le micro-ordinateur a
été perturbé par des
champs électromagnétiques.
n’est pas raccordé
correctement.
Votre véhicule possède
une antenne spéciale
(à alimentation Phantom).
Le format du disque
ou du support USB ne
sont pas compatibles.
Le support
d’enregistrement USB
est plein.
Retirez le disque et introduisez-le à nouveau
dans l’appareil.
Éteignez puis rallumez
l’appareil.
Connectez fermement
le câble d’antenne
dans la prise d’antenne
extérieure de l’appareil.
Adressez-vous à votre
garagiste ou concessionnaire auto. (Il
existe des adaptateurs
de tension ou des
coupleurs spécifi ques
pour les produits „nonstandard“.)
Raccordez un
autre support
d’enregistrement USB
ou effacez certains des
fi chiers.
Manipulation des CD
Nettoyage des CD
Avant de charger le disque,
essuyez-le avec un chiffon
doux et propre. Suivez le sens
indiqué par la fl èche.
Remarque: N’utilisez pas de solvants tels que de l’essence
ou du diluant. Les produits de nettoyage disponibles dans le
commerce et les vaporisateurs antistatiques endommagent
l’appareil.
Chargement des CD
Insérer un CD face imprimée
vers le bas peut endommager
l’appareil.
Insérez toujours les CD face
imprimée vers le haut.
Remarque: N’essayez pas de charger un CD lorsqu’un autre
CD se trouve déjà dans la fente. Vous pourriez endommager
l’appareil.
34
05-AR 736 CD_MP3_NEU 34 18.09.2006, 11:01:07 Uhr
Page 35

FRANÇAIS
Manipulation des CD
Tenez toujours les CD par les
bords. Évitez de toucher les
surfaces pour ne pas les salir.
• N’apposez ni étiquettes ni bandes adhésives sur les CD.
• N’exposez pas les CD à la lumière directe du soleil ou à
des sources de chaleur telles que des radiateurs et ne les
laissez pas dans votre voiture lorsque celle-ci est garée en
plein soleil car cela entraîne une importante hausse de la
température.
• Avant toute lecture, vérifi ez que les CD ne sont ni rayés, ni
fêlés, ni gondolés. Il se peut que l’appareil ne puisse pas lire
des CD présentant ce genre de défauts. Évitez d’utiliser des
CD dans cet état.
• Utilisez uniquement les CD circulaires usuels de 12 cm
de diamètre disponibles dans le commerce! Les mini-CD
de 8 cm de diamètre et les CD fantaisie, par exemple en
forme de cœur ou de papillon, ne conviennent pas à la
lecture sur cet appareil. Tant les CD que le lecteur risquent
d’être endommagés défi nitivement. Nous déclinons toute
responsabilité pour des détériorations dues à l’emploi de CD
inadéquats.
Garantie
Nous accordons une garantie de 24 mois à dater de la date
d’achat (ticket de caisse) pour l’appareil que nous vendons.
Pendant la durée de la garantie, nous éliminons gratuitement les
défauts de l’appa reil ou des accessoires découlant d’un vice de
matériau ou de fabrication au moyen d’une réparation ou, selon
notre estimation, au moyen d’un remplacement. Les prestations
dans le cadre de la garantie n’entraînent aucune prorogation
de la durée de garantie et ne donnent pas droit à une nouvelle
garantie!
Le justifi catif de garantie est le reçu. Sans ce justifi catif, aucun
remplacement gratuit ni aucune réparation gratuite ne peuvent
être effectués.
En cas de recours à la garantie, ramenez votre appareil
complet, dans son emballage d‘origine, accompagné de votre
preuve d‘achat, à votre revendeur.
Les défauts sur les accessoires ou les pièces d’usure ainsi que
le nettoyage, l’entretien ou le remplacement de pièces d’usure
ne sont pas garantis et sont donc payants!
En cas d’intervention étrangère, la garantie devient caduque.
Signifi cation du symbole „Elimination“
Protégez votre environnement, ne jetez pas vos appareils
électriques avec les ordures ménagères.
Utilisez, pour l’élimination de vos appareils électriques, les
bornes de collecte prévues à cet effet où vous pouvez vous
débarrasser des appareils que vous n’utilisez plus.
Vous contribuez ainsi à éviter les impacts potentiels dans
l’environnement et sur la santé de chacun, causés par une
mauvaise élimination de ces déchets.
Vous contribuez aussi au recyclage sous toutes ses formes des
appareils électriques et électroniques usagés.
Vous trouverez toutes les informations sur les bornes
d’élimination des appareils auprès de votre commune ou de
l’administration de votre communauté.
FRANÇAIS
Après la garantie
Après écoulement de la durée de garantie, les réparations
peuvent être effectuées, contre paiement, par le commerce
spécialisé ou le service de réparation.
35
05-AR 736 CD_MP3_NEU 35 18.09.2006, 11:01:09 Uhr
Page 36

FRANÇAIS
Index alphabétique
A
AF touche...................................................................................31
Allumer .......................................................................................29
AS touche...................................................................................30
Lecture aléatoire (4RDM)...........................................................31
L
Lecture des intros (voir touche PS)............................................30
LOC (LOCAL) .............................................................................29
B (BAND) touche........................................................................29
BEEP (Bip de confi rmation) .......................................................29
Bluetooth....................................................................................32
CD (éjecter)................................................................................30
CD (manipulation)......................................................................34
Conseils d’installation.................................................................26
Conseils d’utilisation...................................................................27
Conseils de sécurité...................................................................26
FRANÇAIS
Dépannage.................................................................................34
DISP touche...............................................................................28
Données techniques ..................................................................33
DSP (Réglage de l’égaliseur).....................................................28
Éjection.......................................................................................30
Éteindre......................................................................................29
Garantie......................................................................................35
Heure..........................................................................................28
ID3 touche..................................................................................30
Informations routières (voir TA)..................................................31
Infos complémentaires importantes montage ...........................27
Installation ..................................................................................26
INTRO (2INT).............................................................................31
B
C
D
E
G
H
I
Manipulation des CD..................................................................34
Montage (Conseils de sécurité).................................................26
Multifonctions bouton.................................................................28
PAU (Play / Pause ) touche........................................................31
PS touche...................................................................................30
PTY touche ................................................................................31
Raccordement............................................................................27
RANDOM (4RDM) (Lecture aléatoire).......................................31
REC (enregistrement) touche....................................................31
Régler le volume ........................................................................28
REGION (Régional) ..................................................................29
REPEAT (3RPT) (Répétition).....................................................31
RESET bouton...........................................................................28
Retirer la façade.........................................................................28
Sécurité routière.........................................................................26
Son, coupure..............................................................................29
TA (Informations routières).........................................................31
Téléphoner .................................................................................32
TRANSFER touche....................................................................29
USB port.....................................................................................32
Utilisation....................................................................................28
Volume à l’allumage...................................................................29
M
P
R
S
T
U
V
36
05-AR 736 CD_MP3_NEU 36 18.09.2006, 11:01:10 Uhr
Page 37

ESPAÑOL
Avisos de Seguridad
Antes de la puesta en servicio de este aparato lea detenidamente el manual de instrucciones y guarde este bien incluido la
garantía, el recibo de pago y si es posible también el cartón de
embalaje con el embalaje interior.
• Utilice el aparato únicamente para la fi nalidad para la que
ha sido construido.
• Monte el equipo de tal manera que no se tapen las aberturas de ventilación disponibles.
• Jamás se abrirá la carcasa del cuerpo del aparato. Las
reparaciones mal hechas pueden generar considerables
peligros para el usuario. En el caso de daños en el equipo
no siga utilizándolo, sino déjelo reparar por un experta.
Estos símbolos pueden encontrarse en caso dado en el aparato, y son para indicar lo siguiente:
El símbolo con el signo de exclamación advierte
al usuario que hay instrucciones de manejo y de
mantenimiento importantes en la documentación
que va adjunta.
Aparatos que llevan puesto este símbolo operan
con un ”Lector Clase 1” para explorar el CD. Los
interruptores de seguridad incorporados sirven para
impedir que el usuario esté expuesto a luz láser
invisible peligrosa para la vista del usuario cuando
está abierto el compartimiento del CD.
Bajo ningún concepto se ha de hacer un puenteado sobre estos
interruptores de seguridad ni deben ser manipulados. De hacerlo, existe el peligro de que Vd. esté expuesto a la luz láser.
Niño
• Para la seguridad de sus niños no deje material de embalaje
(Bolsas de plástico, cartón, poliestireno etc.) a su alcance.
¡Atención! No deje jugar a los niños con la lámina.
¡Existe peligro de asfi xia!
observe los siguientes avisos de seguridad
• Primero desconecte el polo negativo y luego el polo positivo
de la batería. (Conectar por orden contrario.)
Por favor observe: Si la batería no está conectada toda
la información grabada provisionalmente se perderá. Por
favor observe los avisos de seguridad del fabricante de
automóviles.
• El fusible principal tiene que ser instalado muy cerca (con
una distancia máxima 30 cm) en el polo positivo de la batería,
para que el vehículo esté protegido contra un eventual
incendio de los cables, por ejemplo por un accidente. Si la
instalación no concuerda con este prerequisito, se perderá la
cobertura del seguro.
• La sección transversal del cable positivo y negativo respectivamente no debe ser inferior a 1,5 mm².
• Al hacer agujeros, le rogamos que observe que no se
dañen ningunas partes del vehículo.
Consejos para la instalación:
• Capas protectoras para cables impiden que ellos desollen
en las partes agudas de la carrocería.
• El material aislante del cable no debe ser dañado en la
instalación.
• Para la instalación de equipos Car-HiFi siempre hay que
utilizar las herramientas adecuadas.
Según el sistema de construcción, el vehículo puede divergir
de esta descripción. No asumimos ninguna responsabilidad por
daños causados por errores de instalación o conexión y daños
resultantes.
Monte el receptor de radio según las siguientes presentaciones.
Seguridad en el Transporte
• La seguridad en el transporte es el aspecto más importante.
Le rogamos que siempre utilice el radio de automóvil de tal
manera, que Ud. esté capaz en cada momento de adaptarse a la situación de tráfi co actual.
• Por favor observe que a una velocidad de 50 km/h el
automóvil conduce 14 m por segundo.
• Le recomendamos que no utilice el equipo en situaciones
críticas.
• Es necesario que pueda percibir las advertencias, por ejemplo de la policía y los bomberos, en el vehículo a tiempo.
• Por esta razón, por favor solamente escuche los programas
a un volumen apropiado.
Durante el montaje y la conexión por favor
ESPAÑOL
Instalación
a Tuerca
b Arandela elástica
c Arandela
d Tornillo
e Angulo de montaje
f Carcasa de unidad
enchufable
g Perno roscado
Atención!
h Tornillos para el transporte
seguro (Se ruega retirarlos
antes de iniciar el montaje)
i Herramienta extractora
(Llave para el desmontaje)
j Marco
Primero asiente el panel de
control en el lado derecho para
poder encajarlo en la parte
izquierda.
37
05-AR 736 CD_MP3_NEU 37 18.09.2006, 11:01:12 Uhr
Page 38

ESPAÑOL
Conexión
Realice las conexiones según la presentación.
3. En la instalación/conexión del equipo le rogamos que
observe que no todos los vehículos disponen de una
„conexión ISO“. En este caso le recomendamos que utilice
un adaptador ISO específi co para automóviles.
Puede adquirir adaptadores en el comercio de accesorios
automovilísticos y/o en su taller automovilístico.
4. En la puesta en estado de ocupación de “Duración +“
Rojo R
Blanco L
Altavoces
derecha parte
delantera
derecha parte
posterior
(Conexión de corriente convencional) se podrían originar,
dependiendo del tipo de vehículo, irregularidades. (Pero esto
es necesario para la memorización de las estaciones de las
Antena automática (Azul)
Conexión de antena
emisoras).
Para garantizar todas las funciones es absolutamente
necesario que la instalación se efectúe según este manual de
usuario. En el caso de que tenga dudas le rogamos que se
dirija a un taller automovilístico autorizado.
Salida-Chinch
Gris
Gris/ Negro
Violeta
5. El máximo ángulo de inclinación al instalar su autorradio no
Violeta/ Negro
debe sobrepasar los 20°, ya que en caso de ángulos de
inclinación superiores no estaría garantizada la función de su
autorradio (Reproductor de CD).
6. Dependiendo del tipo de vehículo podrían producirse en
casos excepcionales interferencias en el funcionamiento
Radio/CD. Estas se eliminan con un correspondiente fi ltro
ESPAÑOL
adicional eliminador de interferencias. Su aparato ya está
equipado de serie con un fi ltro eliminador de interferencias.
De todas formas se pueden originar perturbaciones a causa
del tipo de vehículo.
Los fi ltros eliminadotes de interferencias se obtienen en
fusible
Negro
Amarillo
Rojo
Blanco
Blanco/ Negro
Verde
Verde / Negro
negocios de piezas de recambio para el coche y/o en su
taller de coches.
7. Al incorporar su radio se ruega prestar atención de que la
parte posterior de la radio tenga sufi ciente espacio libre, para
Conexión-ISO
convencional
Conexión de corriente
Medidas
Encendido
Altavoces izquierda parte
delantera
izquierda parte posterior
Atención:
• No coloque el panel de control desmontable hasta haber
conectado los cables.
• Haga uso de altavoces con una impedancia de 4 ohmios.
• La conexión de altavoces debe ser sin conexión a masa.
• La señal conectada a través de las salidas cinch sólo se
reproduce por los altavoces traseros (Rear).
que se pueda garantizar una refrigeración sufi ciente.
8. Referente a la conexión de la antena hay dos normas
diferentes. Primero, existe la conexión antigua (50 Ohm) con
un largo contacto redondo que sale de la parte del vehículo y
un enchufe redondo en la parte de la radio. Segundo, hay el
enchufe de la antena según la norma ISO (150 Ohm). Fabricantes de accesorios y/o su taller automóvilístico disponen de
adaptadores para ambos formatos.
En los casos de VW/Audi es absolutamente necesario
que observe lo siguiente: la antena activa necesita tensión
en la protección de la antena coaxial, sin la que la recepción
está inadecuada. Por medio de un adaptador antena con
tensión en modo fantasma soluciona este problema.
Avisos de Manejo
1. Al retirar el panel de control frontal durante el funciona-
¡Informaciones adicionales de importancia
para el montaje de su autorradio!
1. Se ruega retirar los tornillos (h) para el transporte seguro
antes de iniciar el montaje, ya que si no el disco compacto no se podrá colocar.
2. El aparato está expuesto al polo negativo de la pila que debe
estar conectado a la carrocería del coche. Se ruega controlar
esto antes de iniciar la instalación.
38
miento de radio o de disco compacto, se desconectará el
aparato de forma automática.
2. Cuando el interior del coche se caliente mucho, p.ej. al estar
aparcado durante un tiempo a pleno sol, se ruega no conectar el player, hasta que el coche se haya enfriado levemente
por haber conducido un poco.
3. Para guardar de forma segura el panel de control desmontable, se ruega utilizar siempre la funda protectora.
05-AR 736 CD_MP3_NEU 38 18.09.2006, 11:01:14 Uhr
Page 39

ESPAÑOL
4. No se puede garantizar la reproducción de discos compactos producidos por parte del usuario, ya que existe multitud
de software y medios de discos compactos disponibles.
5. Botón-RESET (sin presentación): Eventuales funciones
erronéas (ERROR) durante el funcionamiento se pueden
suprimir pulsando la tecla RESET. Con el panel quitado
este botón se encuentra en la esquina derecha inferior. Por
oscilaciones de la tensión en la red de distribución eléctrica
de su vehículo pueda pasar que el procesador de control de
su radio se “cuelgue”. En este caso no se trata de ningún
error del equipo! Por pulsar este botón con un objeto
agudo, este se reinicia (reset).
Manejo
1. Tecla-
Presione la tecla- para sacar el panel de control frontal.
2. Botón multifuncional
PRESS • ENTER AUDIO DIAL (Volumen)
a) Girar: En el uso normal el botón multifuncional sirve de
elegir el volumen.
b) Pulsación breve: Para llegar al modo de entrada del
número de teléfono. Para el manejo más extenso se
ruega atenerse al apartado „Telefonear vía Bluetooth“.
c) Pulsación larga: Para llegar al menú de selección del
modo de sonido. En el display aparece „VOLUME“ para
ajustar el volumen. Pulsando brevemente el botón multifuncional puede seleccionar ahora los puntos de menú
uno por uno, como VOLUME (Volumen), BASS (Bajos),
TREBLE (Altos), BALANCE (Balance) y FADER (Ajuste
de encadenado). Por girar el botón multifuncional puede
cambiar los ajustes de los diferentes puntos del menú.
3. Tecla DISP/MENU (Display/Selección)
a) Uso de la radio:
• Si se reciben datos RDS tendrá que pulsar brevemente este botón varias veces para que se indique
lo siguiente:
PS Nombre ➞ Hora ➞ Frecuencia ➞ PTY
• Si no se reciben datos RDS se indica lo siguiente:
Hora ➞ PTY ➞ Frecuencia
Nota: Esta visualización se queda por aproximadamen-
te 5 segundos, luego el equipo regresa a la visualización inicial.
b) Presione la tecla-DISP/MENU hasta entrar en el menú
de selección:
• PAIRING
• RE-CONN / DIS-CONN
• A ANSWER ON / A ANSWER OFF
• PHONE VOL
• CONTRAST
• FORMAT 24H / FORMAT 12H
• SET
• DISTANT / LOCAL
• REGION ON / REGION OFF
• VOL PGM
• BEEP TONE ON / BEEP TONE OFF
Presionando repetidamente la tecla-DISP/MENU podrá
seleccionar ahora los puntos de menú uno por uno.
Por girar el botón multifuncional (2) puede cambiar los
ajustes de los diferentes puntos del menú.
• PAIRING:1 (Anunciar)
Antes de poder utilizar su teléfono móvil apto para
Bluetooth, debe anunciarlo primero en el aparato (véase
„Anunciar aparatos“).
• RE-CONN:1/DIS-CONN:1
A través de esta función existe la posibilidad de conec-
tar o desconectar manualmente la conexión Bluetooth.
RE-CONN:1 = conexión ; DIS-CONN:1 = desconexión
Para conectar o desconectar manualmente la conexión
Bluetooth, seleccione la opción deseada y confi rme su
selección pulsando el botón multifuncional (2). „RECONN:1 >>>>“ o „DIS-CONN:1 >>>>“ aparece en el
display.
• A ANSWER ON/A ANSWER OFF
(Recepción automática de llamadas)
A ANSWER ON: El aparato recibe automáti-
A ANSWER OFF: La recepción automática de
• PHONE VOL
Seleccione aquí el volumen del tono de llamada, al
entrar una llamada.
• CONTRAST (Contraste)
Ajuste aquí el contraste del display.
• FORMAT 24 H/FORMAT 12 H
Seleccione aquí el formato indicador de la hora.
• SET
Para ajustar la hora manualmente, proceda por favor
como indicado a continuación:
Ajustar los minutos: Gire el botón multifuncional (2) en
Ajustar la hora: Gire el botón multifuncional(2) en
Nota: Al recibir un emisor de radio que transmite datos
RDS, la hora se ajustará automáticamente.
• DISTANT/LOCAL
(Solamente elegible en el funcionamiento de radio)
Su radio puede recibir datos RDS EON. Bajo EON se
entiende la transmisión de informaciones adicionales
del emisor dentro de una cadena de emisores p.ej.
camente todas las llamadas
entrantes, sin tener que accionar
la tecla TRANSFER (Recepción).
La recepción automática se
realiza después de aprox. 3 tonos
de llamada.
llamadas está desconectada.
el sentido de las agujas del reloj.
el sentido contrario de las agujas
del reloj.
39
ESPAÑOL
05-AR 736 CD_MP3_NEU 39 18.09.2006, 11:01:16 Uhr
Page 40

ESPAÑOL
4.
la cadena de radio alemana WDR. En el caso de un
aviso de tráfi co (TA) se cambia dentro de una cadena
de emisores de un emisor que no emite información de
tráfi co a un emisor de información sobre el estado de
las carreteras dentro de la cadena de emisores.
Puede elegir entre el modo LOCAL o. DISTANT para el
emisor local o para el emisor a distancia de información
sobre el estado de las carreteras.
LOCAL: Con esta función se evita el
Modo-DISTANT: En este modo la conmutación
ESPAÑOL
• REGION ON/REGION OFF
(Sólo operante con función AF conectada)
Algunos emisores dividen en determinados horarios
su programa en programas regionales con diferentes
contenidos.
REGION ON: Se conecta el modo regional.
Nota: La capacidad de anuncio del display es limitada.
Es posible que en el modo de visualización doble se
eliminen segmentos diferentes del display.
Con la función REGION ON se evita que la radio cam-
bie a frecuencias alternativas que tengan otro contenido
de programa regional.
REGION OFF: Se desconecta el modo regional.
• VOL PGM
Con el botón multifuncional (2) puede elegir el volumen
deseado al encender el equipo.
• BEEP TONE ON/BEEP TONE OFF
(Tono de confi rmación)
Al pulsar el botón afi rmativo puede elegir 2 tipos de
sonidos.
BEEP TONE ON: El tono de confi rmación se
BEEP TONE OFF: El tono de confi rmación está
40
cambio a una conexión-EON con
un nivel de la señal demasiado
débil. La radio no se conmuta a
este emisor y el oyente no percibirá apenas interferencias. En
el display aparece la indicación
„LOC“.
EON TA intenta recibir las informaciones EON TA de un emisor
alcanzable y de esta manera
mejorar la calidad de recepción.
La indicación „LOC“ en el display
se apagará.
La identifi cación de programa
(PI) del programa regional se
ignora durante la búsqueda de
una frecuencia alternativa (AF) o
una identifi cación de programa
(PI).
efectúa en cada presión de tecla.
desconectado.
/ Conector/Interruptor / Ensordecer
a) Para encender el equipo pulse este botón. WELCOME
fi gura en el display. Para apagar el equipo mantenga
pulsado este botón.
b) Pulse el tecla / , para ensordecer los altavoces
durante un tiempo corto. MUTE destella en el display.
Pulse este botón de nuevo, para terminar esta función.
Accionando el botón multifuncional, esta función
igualmente se puede suprimir.
M
5. Tecla
6. Tecla B / CLEAR (• BAND/• ERASE/• SEARCH)
/ TRANSFER (MODE/Recepción de llamadas)
a) Pulse esta tecla para seleccionar el modo CD-Player,
Radio etc..
b) Pulse esta tecla para recibir la llamada a la hora de
entrar una llamada telefónica.
c) Mantenga pulsada esta tecla durante una llamada, para
poder transferirla otra vez a su teléfono móvil. Si de
nuevo mantiene la tecla pulsada se transferirá la llamada otra vez a la autorradio. En ambos casos aparece
„TRANSFER “ en el display.
a) Funcionamiento de radio
Pulse brevemente la tecla B, para conmutar entre los
niveles FM. La denominación del correspondiente nivel
FM se indica en la indicación LCD.
b) Tecla-B como funciones de búsqueda
en el servicio MP3:
Si al crear un CD en MP3 se han archivado los
correspondientes datos, éstos podrán ser buscados
mediantes siguientes funciones:
a) Introducción directa del número de título en el caso
de discos compactos en formato-MP3:
1. Pulse 1x la tecla-B. En el display aparece
„NUMBER “.
2. Con ayuda del botón multifuncional (2) puede
seleccionar ahora el número de título deseado.
En el display aparece „No.“ y el correspondiente
número de track.
3. A continuación pulse brevemente el botón
multifuncional (2) para la reproducción del track
seleccionado. Inmediatamente después se
reproducirá el título seleccionado.
b) Selección de un archivador en discos compactos
con formato-MP3:
1. Pulse 2X la tecla-B. En el display aparece
„NAVIGATE “.
2. Con ayuda del botón multifuncional (2) tiene
ahora la posibilidad de seleccionar los diferentes archivadores en el CD.
3. Confi rme la selección del archivador, pulsando
brevemente el botón multifuncional (2). El
primer título del archivador seleccionado se
indicará.
4. Girando el botón multifuncional (2) podrá seleccionar ahora un título dentro de un archivador.
05-AR 736 CD_MP3_NEU 40 18.09.2006, 11:01:18 Uhr
Page 41

ESPAÑOL
5. Para la reproducción del track seleccionado,
a continuación pulse brevemente el botón
multifuncional (2).
Nota:
• Si en el CD MP3 no hay archivadores, aparecerá „ROOT“ en el display.
• No se puede garantizar la reproducción de un
CD creado por el usuario a causa de la multitud
de software y medios de discos compactos
disponibles.
• En el funcionamiento normal de reproducción
de CDs en formato MP3 se puede saltar con
las teclas
hacia arriba o hacia abajo.
• Nota: Las informaciones ID3 Tag memorizadas
aparecen como escritura luminosa móvil en el
display.
c) En el modo de teléfono:
Para borrar el número de teléfono introducido.
d) En el modo USB:
Para borrar el track actual.
1. Mantenga la tecla B pulsada. En el display
aparece la indicación „ERASE“ y el track actual
(p.ej. 002).
2. Pulse el botón multifuncional para confi rmar
(ERASE aparece en el display). Pulse
de nuevo sobre el botón multifuncional (2),
para borrar el track (ERASE aparece en el
display).
Nota: Si no desea borrar el track, gire el botón
multifuncional (2) después de la primera pulsación
(ERASE X aparece en el display). Para la confi rmación pulse el botón multifuncional (2).
7./8
. Teclas 왘왘I / I왗왗 TRACK UP/DOWN /
AUTO/MANUAL SEEK
En el modo CD:
Para saltar en avance o en retroceso presione brevemente
la tecla 왘왘I es decir I왗왗. Para bobinar títulos mantenga
presionada la tecla de fl echa 왘왘I es decir I왗왗.
En el modo radio:
Pulse brevemente las teclas 왘왘I / I왗왗- y la radio se
parará en la próxima estación emisora localizable (AUTO
SEEK aparece en el display). La búsqueda en la banda
de frecuencias continuará, durante el tiempo que usted
mantenga presionadas las teclas 왘왘I / I왗왗 (En el display
aparece MANUAL SEEK).
9. Tecla de expulsión
Para expulsar el disco compacto presione esta tecla.
10. Ranura-CD
Coloque el CD con la cara etiquetada hacia arriba, levemente en la ranura CD, hasta que el aparato introduzca el CD
por sí mismo. En el display aparece „READING“.
왖 o 왔 (17/16) un archivador
Nota: No se puede garantizar la reproducción de discos com-
pactos producidos por parte del usuario, ya que existe multitud
de software y medios de discos compactos disponibles.
Reproducción de música en formato MP3
Con este aparato tiene la posibilidad de reproducir piezas
de música en formato MP3. El aparato soporta además los
tipos de discos compactos corrientes: CD, CD-RW, CD-R.
Es posible reproducir discos compactos MP3 en su aparato.
En estos discos compactos pueden almacenarse hasta
200 títulos en forma comprimida. Su aparato reconocerá
automáticamente un disco compacto MP3 (en el display
aparece MP3).
Nota: Las informaciones ID3 Tag memorizadas aparecen
como escritura luminosa móvil en el display.
Por favor tenga en cuenta:
Existe una multitud de métodos de copia y de compresión,
así como diferencias de calidad en CDs y CDs copiados.
La industria de la música además no sigue ningunos
estándares fi jos (Protección contra copia).
Por estos motivos hay casos en los cuales puede haber pro-
blemas al reproducir CDs y CDs MP3. Esto no es ninguna
función de error del aparato.
11. Tecla AS/PS / ID3 (Memorización automática de emisores
En el modo radio:
a) Función de memoria:
Presione la tecla-AS/PS / ID3 más de un segundo, para
activar la memorización automática de emisores. En el
display aparece „AUTO STORE“.
El aparato busca dentro de la banda de frecuencia
actual p.ej. FM 1 el nivel de la señal más fuerte hasta
que el ciclo de búsqueda se haya fi nalizado. Los seis
emisores más fuertes se asignarán a los correspondientes espacios de memoria.
Los emisores memorizados ahora se reproducirán un
por uno durante aprox. 5 segundos y a continuación se
ajustará el emisor del primer espacio de memoria.
Si desea buscar más emisores en la banda-FM presi-
one la tecla-B para cambiar a la banda FM2 es decir
FM3. Presione la tecla-AS/PS / ID3 de nuevo más de
un segundo, de forma que se inicie otra búsqueda.
b) Función de reproducción corta:
Al presionar brevemente la tecla-AS/PS / ID3 la radio
reproducirá de forma corta todos los emisores preajustados de la banda de frecuencia.
Nota: La función de reproducción inicio fi naliza automática-
mente en el emisor del primer espacio de memoria.
En el modo MP3:
Cada vez que se pulse la tecla AS/PS / ID3 aparece en el
display el título de archivador, de canción, de intérprete y de
álbum (siempre y cuando se hayan copiado informaciones
ID3 Tag en el CD).
41
ESPAÑOL
05-AR 736 CD_MP3_NEU 41 18.09.2006, 11:01:21 Uhr
Page 42

ESPAÑOL
12. -17.
como teclas de estación (1–6) de emisores preselecci-
onados y como teclas 1PAU-, 2INT-, 3RPT-, 4RDM en el
funcionamiento de disco compacto
a) Funcionamiento de radio
Mediante la pulsación breve se selecciona de forma
directa con estas teclas un emisor de radio preseleccionado. Si estas teclas se pulsan más de un segundo,
se memorizará el emisor actualmente ajustado bajo la
tecla de estación seleccionada.
b) Funcionamiento-CD
• Presione la tecla-1PAU, para interrumpir la repro-
ducción del disco compacto (Función de pausa).
Presione esta tecla de nuevo, para anular esta
función.
• Presione la tecla-2INT. Cada título del disco compacto se reproducirá unos 10 segundos. Presione
esta tecla de nuevo, para interrumpir la búsqueda.
Se reproducirá el título seleccionado actualmente.
• Presione la tecla-3RPT. Se repetirá el título actualmente reproducido. Presione esta tecla de nuevo,
para anular esta función.
• Presione la tecla-4RDM. Los títulos del disco compacto se reproducirán en un orden casual. Presione
ESPAÑOL
18. Tecla REC/ TA • COPY
42
esta tecla de nuevo, para anular esta función.
a) TA Traffi c Annonuncement
(Cambio de prioridad para el aviso de tráfi co)
La función-TA se activa mediante la pulsación breve de
la tecla-REC/TA • COPY y se indicará por un símboloTA en el display.
Si se recibe un emisor-FM que emite periódicamente
las últimas informaciones sobre el tráfi co, se iluminará
la indicación-TP en el display.
Al tener la función-TA activada las informaciones sobre
el tráfi co UKW/FM interrumpirán de forma automática
el funcionamiento de CD (En el display fi gura TRAFFIC
INFO).
Al fi nalizar los avisos de tráfi co continuará el programa
ajustado con anterioridad.
Interrupción de la función-TA:
Si desea interrumpir los avisos actuales sobre el tráfi co,
presione brevemente la tecla-REC/TA • COPY. El modoTA no se desconectará por ello.
Nota: Si no se recibe información de tráfi co por radio,
aparece en el display brevemente la indicación „LOST
TP TA“.
b) Función de grabación
(sólo disponible en funcionamiento CD)
Tiene la posibilidad de grabar de CD CD/MP3 a USB.
1. Para ello, conecte un medio de almacenamiento
USB mediante un cable adaptador a la correspondiente conexión (21).
2. Seleccione el track deseado con las teclas
I
왗왗
(7/8), el que quiere grabar.
왘왘
I /
3. Mantenga la tecla REC/TA • COPY pulsada (En el
display aparece REC
4. Pulse el botón multifuncional (2) para confi rmar. Se
inicia la grabación del track actual en el medio de
almacenamiento USB (En el display aparece REC
>>>>).
Nota: En CDs MP3 se indica el estado de copiado
por una indicación en valores porcentuales. En
cambio, en CDs de audio se realiza la grabación en
tiempo real.
5. Si se ha fi nalizado la grabación aparece en CDs
MP3 „100%
el display. A continuación conmuta el aparato a la
reproducción normal.
Nota: Siempre sólo podrá grabar el track actual (ningún
CD completo). Para grabar otro track en el medio de
almacenamiento USB, proceda como indicado.
19. Tecla PTY/IX-BASS
a) Conexión y desconexión de la función-IX-BASS. Man-
tenga la tecla PTY/IX-BASS aprox. 3 segundos pulsada.
En el campo de volumen bajo se amplia el sonido con
la función IX-BASS. Los tonos altos y bajos se aumentan.
b) Funcionamiento de radio:
PTY Selección del tipo de programa
Además del nombre del emisor algunos emisores-
FM transmiten también información sobre el tipo de
programa de su programa. Esta información puede ser
indicada por su autorradio.
Tales tipos podrían ser p.ej.
SPORT NEWS POP CLASSICS
Con la función-PTY puede seleccionar con precisión
emisores de un tipo de programa determinado.
Pulse repetidamente sobre la tecla PTY/IX-BASS para
llegar a la selección PTY. Confi rme su selección con
el botón multifuncional (2). A continuación aparece
brevemente en el display la inserción „PTY SEEK“.
Si se selecciona PTY, el receptor de radio inicia la
búsqueda de correspondientes informaciones-PTY y se
para al encontrar las informaciones buscadas de PTY.
Si no se encuentra el tipo de programa buscado,
aparece en el display „NO MATCH PTY“.
Si ya no existe la información-PTY buscada, la función-
PTY cambia automáticamente al modo normalm.
20. Tecla AF
AF (Alternativas Frecuencias) Función-REG
AF es una función que trabaja con ayuda del sistema RDS
(Radio Data System) y sólo se puede utilizar en emisores
FM. El aparato busca en el fondo la frecuencia que mejor se
reciba del emisor ajustado.
“ y en CDs de audio „REC “ en
USB).
05-AR 736 CD_MP3_NEU 42 18.09.2006, 11:01:23 Uhr
Page 43

ESPAÑOL
Al seleccionar la función-AF, la radio examina continuamen-
te la intensidad de la señal de la frecuencia-AF. El intervalo
de control de cada frecuencia-AF depende de la intensidad
de la señal del emisor actual y varia un par de minutos en
caso de un emisor fuerte hasta un par de segundos en caso
de emisores débiles. Cada vez que la frecuencia-AF sea
más fuerte que la estación actualmente ajustada, el aparato
cambia brevemente a esta frecuencia y se indicará de uno
a dos segundos el aviso „NEW FREQUENCY“. Dado que el
tiempo de supresión de sonido es muy corte en el cambio
de frecuencia o en el tiempo de control, casi no es audible
durante el programa normal.
La función AF se activa presionando brevemente la
tecla-A.F y el estado AF se indica por un símbolo-AF en el
display.
• Si aparece la señal AF en el display está activada la
función-AF y se reciben los datos de transmisión RDS.
• Si parpadea la señal AF en el display, está la funciónAF seleccionada, pero en estos momentos no se puede
recibir ninguna señal de transmisión-RDS.
• Accione de nuevo la tecla-A.F, para desconectar esta
función. La señal AF en el display se apaga.
21. Conexión USB
Este aparato está desarrollado según los últimos avances
técnicos en el campo USB. La gran cantidad de diferentes
medios de almacenamiento USB de todo tipo ofrecidos hoy
en día, lamentablemente no permiten, garantizar una íntegra compatibilidad con todos los medios de almacenamiento USB. Por este motivo pueden originarse en raros casos
problemas en la reproducción de medios de almacenamiento USB. Esto no es ninguna función de error del aparato.
1. Conecte un medio de almacenamiento USB mediante
un cable adaptador a la correspondiente conexión (En
el display aparece USB HOST). Los datos se reproducen automáticamente.
2. Para buscar/seleccionar títulos determinados, proceda
como descrito debajo de punto 6 b) (Tecla
función de búsqueda en el modo MP3) y puntos 12-17
b).
22. Display-LCD (Visualizador de cristal líquido)
23. Botón-RESET (sin presentación)
Con el panel quitado este botón se encuentra en la esquina
derecha inferior.
Por oscilaciones de la tensión en la red de distribución
eléctrica de su vehículo pueda pasar que el procesador de
control de su radio se “cuelgue”. En este caso no se trata
de ningún error del equipo! Por pulsar este botón con un
objeto agudo, este se reinicia (reset).
B
como
Telefonear vía Bluetooth
Bluetooth es una tecnología que permite el radioenlace inalámbrico de aparatos en corta distancia. Actualmente, la tecnología
Bluetooth se utiliza principalmente para el servicio de manos
libres de teléfonos móviles. De esta forma el conductor podrá
realizar una conversación telefónica a través de su teléfono
móvil durante el viaje, sin tener que acercar el teléfono móvil
al oído.
Este aparato le ofrece la posibilidad de utilizar un teléfono móvil
apto para Bluetooth. El radio de acción se limita a aprox. 3
metros.
Para una óptima calidad de sonido durante una llamada
telefónica
No regule el volumen demasiado alto. Una retroacción (Silbido)
procediente de los altavoces podría ser la consecuencia.
Nota: El ajuste del volumen depende de las posiciones de
incorporación de los altavoces al micrófono y por ello, no se
puede señalar.
Anunciar aparatos
Antes de poder telefonear a través de la autorradio, tiene que
anunciar los aparatos entre sí.
1. Mantenga la tecla DISP/MENU (3) pulsada (PAIRING:1
aparece en el display).
2. Para la confi rmación, pulse el botón multifuncional (2) (En el
display aparece PAIRING:1 >>>>).
3. Como indicado en el manual de instrucciones de su teléfono
móvil, anuncie la autorradio en su teléfono móvil. Como
selección aparece el aparato „BT60“ en su teléfono móvil.
4. Introduzca ahora la contraseña „1234“ en su teléfono móvil.
La autorradio está ahora dada de alta en su teléfono móvil.
5. Si el alta se ha realizado con éxito, aparece en el display de
la autorradio „PAIRING:1 “ y el nombre del teléfono móvil.
Notas:
• Si el alta no se ha realizado con éxito, aparece en el display
de la autorradio „PARING:1 X“.
• Según el fabricante de teléfonos móviles tiene que realizar
el alta (PAIRING) de nuevo, para que su teléfono móvil esté
anunciado en la autorradio.
• La compatibilidad Bluetooth no se puede garantizar para
futuros teléfonos móviles.
• Para garantizar una óptima conexión, cuide de que el acumulador de su teléfono móvil esté completamente cargado.
• Algunas marcas de teléfonos móviles disponen de un
modo de ahorro de energía. Desactive por favor el modo
de ahorro de energía, ya que podría originar problemas al
telefonear mediante Bluetooth.
• Para poder atender una llamada entrante o saliente, Bluetooth tiene que quedar activado en su teléfono móvil. Preste
atención por favor al manual de instrucciones de su teléfono
móvil.
• Cuide de hablar por favor en la dirección del micrófono
incorporado. La conexión de un micrófono externo no es
posible.
ESPAÑOL
43
05-AR 736 CD_MP3_NEU 43 18.09.2006, 11:01:25 Uhr
Page 44

ESPAÑOL
Llamadas salientes
1. Pulse brevemente el botón multifuncional (2) (En el display
aparece „ “).
2. Para introducir el número de teléfono deseado, gire el botón
multifuncional hasta que aparezca la primera cifra deseada.
De nuevo pulse brevemente sobre el botón multifuncional (2)
para confi rmar la cifra. Para las posteriores cifras, repita estos
pasos, hasta que haya introducido completamente el número
de teléfono (éste se indicará en el display de la autorradio).
Nota: En caso de que haya introducido una o más cifras
incorrectamente, podrá borrar las cifras con la tecla
CLEAR (6).
3. Para llamar el número deseado, mantenga a continuación el
botón multifuncional (2) pulsado, hasta que aparezca en el
display el aviso „CALLING >>>>“ .
4. Para colgar pulse por favor la tecla B / CLEAR (6).
Nota: Para llamar los números de teléfono introducidos también
puede accionar la tecla M / TRANSFER (5).
Repetición de la llamada
El aparato almacena los últimos 9 números de teléfono marcados. Para llamar a estos, proceda por favor como indicado a
continuación:
ESPAÑOL
1. Pulse brevemente el botón multifuncional (2) (En el display
aparece „ “).
2. Mantenga a continuación el botón multifuncional (2) pulsado. El último número de teléfono marcado se muestra en el
display.
3. Girando el botón multifuncional (2) podrá ahora elegir entre
los últimos números de teléfono.
4. Para llamar el número deseado, mantenga a continuación el
botón multifuncional (2) pulsado, hasta que aparezca en el
display el aviso „CALLING >>>>“.
5. Para colgar pulse por favor la tecla B / CLEAR (6).
B
Generalidades
Tensión de alimentación................................................DC 12 V
Consumo de corriente ..................................................7 A max.
Potencia............................................................ 4 x 60 W PMPO
Gama-FM
Gama de frecuencias .............................87,5 MHz y 108,0 MHz
Sensibilidad utilizable ........................................................15 dB
/
Frecuencia I.F. .............................................................10,7 MHz
CD-Player
Sistema..........................................................Sistema CD Audio
Afspeelbare CD‘s....................... Discos CD/CD-R/CD-RW/MP3
Secuencia de bits reproducibles..........................32 - 320 kBit/s
Cantidad de bits de cuantifi cación...................................... 1 bit.
Formato de señal.................... Frecuencia de muestra 44,1 kHz
Relación señal/ruido.............................................50 dB (1 kHz)
Cantidad de los canales .................................2 canales estéreo
Medidas de la carcasa.............. 178 ancho x 50 alto x 157 largo
Este aparato se ha examinado según las normativas actuales
y vigentes de la Comunidad Europea, como p.ej. compatibilidad electromagnética y directiva de baja tensión y se ha
construido según las más nuevas especifi caciones en razón de
la seguridad.
No reservamos el derecho de efectuar modifi caciones técnicas.
Datos técnicos
Llamadas entrantes
En el caso de las llamadas entrantes suena a través de los
altavoces un tono de llamada y si el llamante dispone de un
teléfono con función CLIP „Calling Line Identifi cation Presenta-
tion (Transmisión del número de teléfono)“, aparece el número
del llamante en el display de la autorradio. En caso contrario
aparece en el display la indicación „PHONE IN“.
1. Para aceptar una llamada entrante, accione por favor la
tecla M / TRANSFER (5). Escuchará al llamante a
través de los altavoces en su coche.
2. Para colgar pulse por favor la tecla B / CLEAR (6).
Nota:
• Tiene la posibilidad de transferir nuevamente la llamada
a su teléfono móvil. Para ello, mantenga la tecla M /
TRANSFER (5) pulsada („TRANSFER “ aparece en
el display). La autorradio activa el funcionamiento MUTE.
Si de nuevo mantiene esta tecla pulsada se transferirá la
llamada otra vez a la autorradio.
• Para rechazar una llamada entrante, accione la tecla B /
CLEAR (6).
44
05-AR 736 CD_MP3_NEU 44 18.09.2006, 11:01:27 Uhr
Page 45

ESPAÑOL
Reparación de averías
Antes de revisar el recordatorio, se ruega concluir la conexión.
Si después de haber revisado el recordatorio, existen todavía
cuestiones pendientes, contacte por favor su próximo servicio
técnico.
Síntoma de error Causa Solución
Silbido procediente de
los altavoces.
Los discos compactos
sólo se introducen
hasta la mitad del
portadisco.
„READ ERR“ se indica
en el display.
No se puede elegir CD
por el botón MODE.
Después de haber
introducido el CD en
el aparato éste no se
reproduce.
El CD para. La superfi cie de
Ninguna función. El encendido está
El equipo no deja encenderse o apagarse
por el encendido.
Retroacción No regule el volumen
Los tornillos para el
transporte seguro no
se han retirado.
El lado incorrecto del
CD ha sido insertado.
No se ha insertado
ningún CD.
El regulador de
volumen está regulado
muy bajo.
Las conexiones no se
han llevado a cabo
correctamente.
rodadura es áspera.
El aparato no está
instalado de forma fi ja.
El CD está defecto. Pruebe otro CD. Si
El CD está sucio. Limpie el CD.
Es probable que el
equipo haya sido
montado de manera
demasiado empinada
en el vehículo.
desconectado.
Uno o varios fusibles
se han fundido.
Conexión fallada
(cada fabricante
automovilísto tiene la
conexión ISO en otro
sitio.)
demasiado alto.
Retire los tornillos para
el transporte seguro.
Inserte el lado correcto
del CD.
Inserte un CD.
Regule el regulador de
volumen más alto.
Revise la conexión
+12V así como el
circuito de tierra.
Para la reproducción
del CD espere hasta
que la calle esté más
lisa.
Instale el aparato de
forma fi ja. Asegúrese
que se utilice la fi jación
trasera, si el vehículo
no ofreciese ninguna
fi jación adecuada para
la parte posterior del
aparato.
está se reproduce
correctamente,
posiblemente esté el
primer CD dañado.
¡Por favor observe
que no sobrepase un
ángulo máximo de 20°
grados!
Gire la llave de contacto a „ON“ o „ACC“.
Sustituya el fusible por
otro fusible-15 A.
Por favor contacte a
su taller automovilístico o un experta
automovilístico por
adaptadores de
conexión específi cos
para vehículos
Síntoma de error Causa Solución
El aparato no funciona correctamente
(EJECT,LOAD, PLAY).
No hay recepción de
radio.
Recepción insufi ciente
de radio.
„NO FILE“ se indica en
el display.
„MEMORY FULL“ se
indica en el display.
Limpieza del CD
Nota: No utilice disolventes como bencina o diluyente. Los deter-
gentes en general o sprays antiestáticos estropean el aparato.
Introducción del CD
Nota: Si ya se encuentra un CD en el portadisco, no intente
introducir otro CD más. Esto podría ocasionar daños al aparato.
Coger un CD
La microcomputadora
se ha perturbado a
causa de campos
electromagnéticos.
El cable de antena no
está conectado.
Es posible que su
vehículo tenga una
antena especial
(antena con tensión en
modo fantasma).
No se soporta el
formato de archivo en
el CD o en el medio de
almacenamiento USB.
El medio de almacenamiento USB está lleno.
Sacar el CD y volver a
introducirlo.
Desconecte el aparato
y después conéctelo
de nuevo.
Introduzca bien el
cable de antena en
el jack de antena del
aparato.
Por favor contacte a
su taller automovilístico o un experta
automovilístico. (Para
vehículos “extranjeros”
hay vías específi cas
de alimentación o adaptadores especiales
de tensión.)
Conecte otro medio
de almacenamiento
USB, o borre algunos
archivos.
Manejo de un CD
Antes de reproducir el CD,
limpie el CD con un paño de
limpieza limpio y sin polvo.
Pase el paño al CD en dirección de la fl echa.
Si introduce el CD con la
sobreimpresión hacia abajo, se
podría estropear el aparato.
Siempre introduzca el CD con
el etiquetado hacia arriba.
Agarre el CD siempre por el
borde. Para mantener el CD
limpio, no toque la superfi cie.
ESPAÑOL
45
05-AR 736 CD_MP3_NEU 45 18.09.2006, 11:01:29 Uhr
Page 46

ESPAÑOL
• No pegue sobre el CD adhesivos o cinta adhesiva.
• No exponga el CD a la radiación solar directa o a fuentes
de calor, como podrían ser los tubos de la calefacción, ni
tampoco deje el CD en el coche, cuando esté aparcado a
pleno sol, ya que esto conlleva a un considerable aumento
de temperatura.
• Antes de la reproducción de cada CD compruebe que no
tenga grietas, arañazos y líneas onduladas. CDs con tales
daños eventualmente no puedan ser reproducidos correctamente. Le recomendamos que no utilice estos CDs.
• ¡Sólo utilice CDs normales redondos con un diámetro de
12 cm! CDs con un diámetro de 8 cm o con contornos, por
ejemplo una mariposa o un corazón, no están apropiados
para la reproducción. Existe el peligro de destrucción del
CD y del disco del reproductor. No podemos asumir ninguna
responsabilidad por daños causados por CDs inapropiados.
Garantía
Para el aparato comercializado por nosotros nos responsabilizamos con una garantía de 24 meses a partir de la fecha de
compra (factura de compra).
Durante el período de garantía nos encargamos gratuítamente
de los defectos del aparato y de los accesorios, que se hayan
originado por defectos del material o de la fabricación. Depen-
ESPAÑOL
diendo de nuestra estimación se realizará una reparación o un
cambio. ¡Los servicios de garantía no prolangan la garantía, ni
se incia por ello un período nuevo de garantía!
Como comprobante para la garantía es válido la factura de
compra. Sin este comprobante no se podrá realizar un cambio o
una reparación gratuíta.
En caso de garantía entregue el aparato completo en su emba-
laje original junto con la factura a su agente comerciante.
Defectos en los accesorios de uso o en las piezas de desgaste,
como también la limpieza, mantenimiento o el recambio de
piezas de desgaste no recaen en la garantía e irán al cargo del
cliente!
En caso de intervención ajena se expira la garantía.
Signifi cado del símbolo „Cubo de basura“
Proteja nuestro medio ambiente, aparatos eléctricos no forman
parte de la basura doméstica.
Haga uso de los centros de recogida previstos para la
eliminación de aparatos eléctricos y entregue allí sus aparatos
eléctricos que no vaya a utilizar más.
Ayudará en evitar las potenciales consecuencias, a causa de
una erronéa eliminación de desechos, para el medio ambiente
y la salud humana.
Con ello, contribuirá a la recuperación, al reciclado y a otras
formas de reutilización de los aparatos viejos eléctricos y
electrónicos.
La información cómo se debe eliminar los aparatos, se obtiene
en su ayuntamiento o su administración municipal.
Después de la garantía
Después de haber expirado la garantía se pueden realizar las
reparaciones por el concesionario o por el servicio de reparaciones. Los gastos irán al cargo del cliente.
46
05-AR 736 CD_MP3_NEU 46 18.09.2006, 11:01:30 Uhr
Page 47

ESPAÑOL
AF tecla ......................................................................................42
A
Ajustar volumen .........................................................................39
Apagar........................................................................................40
AS tecla......................................................................................41
Avisos de manejo.......................................................................38
Avisos de Seguridad..................................................................37
Índice
L
LOC (LOCAL) .............................................................................39
M
Manejo........................................................................................39
Manejo de un CD.......................................................................45
Montaje (avisos de seguridad)...................................................37
B (BAND) tecla...........................................................................40
B
BEEP (Sonido afi rmativo) ..........................................................40
Bluetooth....................................................................................43
C
CD (manejo del CD)...................................................................45
Conexión....................................................................................38
Consejos para la instalación......................................................37
D
Datos técnicos............................................................................44
DISP tecla ..................................................................................39
DSP (Ajustes del Ecualizador)...................................................39
E
Encender....................................................................................40
Ensordecer ................................................................................40
Expulsar CD...............................................................................41
F
Función de probar (vea tecla PS)..............................................41
G
Garantía .....................................................................................46
H
Hora............................................................................................39
I
ID3 tecla ..................................................................................... 41
Importantes informaciones adicionalespara la instalación........38
Instalación ..................................................................................37
INTRO (2INT).............................................................................42
PAU (Play / Pause ) tecla...........................................................42
PS tecla......................................................................................41
PTY tecla....................................................................................42
Radiodifusión de tráfi co (vea TA)...............................................42
RANDOM (4RDM) (Reproducción casual)................................43
REC (Grabación) tecla...............................................................42
REGION (Regional) ..................................................................40
Reparación de averías...............................................................45
REPEAT (3RPT) (Repetir) .........................................................43
Repetir (3 RPT)..........................................................................43
Reproducción casual (4RDM)....................................................43
RESET tecla...............................................................................39
Retirar elemento de mando .......................................................39
Seguridad en el transporte ........................................................37
TA (Información de tráfi co).........................................................42
Tecla de expulsión......................................................................40
Tecla multifuncional....................................................................39
Telefonear ..................................................................................43
TRANSFER tecla.......................................................................40
USB conexión ............................................................................43
Volumen al encender.................................................................40
P
R
S
T
U
V
ESPAÑOL
47
05-AR 736 CD_MP3_NEU 47 18.09.2006, 11:01:31 Uhr
Page 48

PORTUGUÊS
PORTUGUÊS
Indicações de segurança
Antes de pôr este aparelho a funcionar, leia muito atentamente
as instruções de emprego e guarde-as muito bem, juntamente
com o talão de garantia, o talão de compra e, tanto quanto
possível, a embalagem com os elementos interiores.
• Utilize o aparelho só para o fi m previsto.
• Montar o aparelho de forma a que as aberturas de ventilação não fi quem tapadas.
• Nunca se deve abrir a caixa do aparelho. Devido a consertos inadquados poderão resultar da’ grandes perigos para
o utilizador do aparelho. No caso de estragos no aparelho,
principalmente referentes ao cabo da rede, nunca se deverá
voltar a pôr o aparelho a funcionar, mas sim mandar consertá-lo por um especialista.
Poderão encontrar-se estes simbolos no aparelho. Eles servem
para chamar a atenção para o seguinte:
O simbolo com pontos de exclamação deverá
chamar a atenção ao utilizador para importantes
instruções de serviço e de assistência que se
encontram nas folhas anexas.
Aparelhos com este simbolo trabalham com um
“Laser de 1-classe” o qual examina o CD. O
interruptor de segurança que se encontra montado,
serve para evitar que o utilizador, ao abrir a gaveta
de CD fi que exposto à luz laser, a qual é muito
perigosa e não é visivel aos olhos humanos.
Com estes interruptores de segurança nunca se deverá fazer
ponte nem manipular senão existe o perigo de se fi car exposto
à radiação laser.
Criança
• Para a segurança dos seus fi lhos, não deixe partes da
embalagem (sacos plásticos, papelão, esferovite, etc.) ao
alcance dos mesmos.
Atenção! Não deixe crianças pequenas brincarem com
folhas de plástico. Perigo de asfi xia!
• Desapertar primeiro o pólo negativo da bateria e só depois
Observar por favor: Se a bateria foi retirada da rede, todas
• O fusível principal deve ser montado o mais próximo possível
• O diâmetro do cabo positivo e negativo não deve ser menor
• Ao fazer orifícios atender a que não sejam danifi cadas
Propostas para montagem:
• Tubos de protecção de cabos protegem os mesmos de
• O isolamento dos cabos não deve ser danifi cado durante a
• Parte-se do princípio de que são usadas as ferramen-
O seu automóvel pode, consoante o modelo, não corresponder
a esta descrição. Não assumimos a responsabilidade por erros
de montagem ou de ligação e pelos danos que possam surgir
em consequência disso.
A instalação do auto-rádio deve ser efectuada de acordo com
as fi guras seguintes:
Segurança no tráfego
• A segurança no tráfego é um preceito de importância
máxima. Utilize por isso o seu rádio de automóvel sempre
de maneira, a que tenha a situação actual do trânsito bem
controlada.
• Tenha em conta que com uma velocidade de 50 km/h
percorre 14 m num segundo.
• Em situações críticas desaconselhamos a utilização do
rádio.
• As indicações de aviso por ex. da polícia e dos bombeiros
têm de ser perceptíveis no automóvel a tempo e com
segurança.
• Oiça por isso o seu programa durante a condução com o
volume de som adequado.
Observe as seguintes indicações de segurança
para o tempo da montagem e da ligação
o pólo positivo. (Para apertar os pólos, em ordem contrária.)
as memórias temporárias perdem as suas informações. Observe as indicações de segurança do fabricante do veículo.
(no máximo 30 cm depois) do pólo positivo da bateria, para
o carro fi car protegido de um eventual incêndio dos cabos,
originado por ex. por um acidente. A cobertura do seguro
deixa de ter efeito se esta directiva não for observada.
do que 1,5 mm².
nenhumas peças do veículo.
desgastes contra partes da carrossaria com arestas vivas.
montagem.
tas adequadas na montagem da aparelhagem HIFI no
automóvel.
Installação
a porca de parafuso
b anilha de borracha
c anilha rasa
d parafuso
e acessório de suporte
f passagem da caixa
g cavilha do parafuso
Nota:
h Remova os parafusos antes
da instalação e guarde-os
durante o transporte.
i ferramenta (chave) de
extracção.
j quadro
Comece por colocar o painel do
lado direito e prenda depois do
lado esquerdo.
48
05-AR 736 CD_MP3_NEU 48 18.09.2006, 11:01:33 Uhr
Page 49

PORTUGUÊS
Ligação
3. Tenha ao montar/ligar o seu aparelho por favor atenção a
Ligue o aparelho de acordo com o seguinte diagrama.
Obtém adaptadores junto do seu comerciante de acessórios
4. Na ocupação do “Pólo permanente +“ (ligação de corrente
Coluna frontal
direita
Posterior direita
Para garantir todas as funções a montagem de acordo com
Ligação Antena
Vermelho R
Branco L
Antena automática (azul)
5. O ângulo máximo de inclinação na montagem do seu auto-
Saída Chinch
Cinzento
Cinz/Preto
Violeta
Violet/Preto
6. Conforme o modelo do veículo podem aparecer em casos
Obtém fi ltros de supressão de interferências no comércio de
7. Atenda a que, ao montar o seu rádio, haja na parte de
Fusível
amarelo
Ligação ISO
Ligação de corrente
preto
Terra
permanente
vermelho
Ignição
Branco
esquerda
Coluna frontal
Branco/Preto
Verde
Posterior esquerda
8. Há na ligação da antena duas normas diferentes. Primei-
Verde/Preto
Para VW/Audi ter imprescindivelmente em conta: a
Nota:
• Não colocar o painel de controle antes de ligar todos os
cabos.
• Utilize as colunas com uma impedância de 4 ohm.
• Os cabos dos altifalantes têm de estar isentos de massa.
1. Quando o painel dianteiro de comando é retirado durante o
• O sinal ligado por meio das saídas cinch, só é transmitido
pelos altofalantes de trás.
2. Quando o interior do veículo se encontra extremamente
Infomação importante para a
instalação do deu auto-rádio
1. Por favor retirar os parafusos (h) da protecção para o
transporte antes da montagem, uma vez que em caso
contrário o CD não pode ser recolhido.
2. O aparelho está concebido para o pólo negativo da bateria,
que tem de ser ligado à carrossaria do veículo. Verifi que isto
por favor antes da montagem.
3. Para guardar com segurança o painel de comando des-
4. A leitura de CDs gravados pelo usuário não pode ser
que, nem todo o veículo está equipado com uma “ligação
ISO”. Neste caso aconselhamos o uso de um adaptador
ISO específi co para veículos.
para automóveis e/ou na sua ofi cina de veículos.
de regime permanente) pode haver variações conforme
o modelo de veículo. (Tal é contudo necessário para a
memorização das estações de emissão.)
estas instruções é absolutamente necessária. Em caso de
dúvidas dirija-se a uma ofi cina autorizada.
rádio não deve exceder os 20°, uma vez que em ângulos
de montagem maiores a função do seu auto-rádio (leitor de
CDs) não é garantida.
excepcionais ruídos de perturbação no funcionamento do
rádio-CD. Estes podem ser eliminados com um fi ltro adi-
cional de supressão de interferências. O seu aparelho
já está equipado de fábrica com um fi ltro de supressão de
interferências. Apesar de tudo pode, conforme os veículos,
haver interferências.
acessórios de automóveis e/ou na sua ofi cina de veículos.
trás do mesmo espaço livre sufi ciente para garantir uma
refrigeração adequada.
ramente a ligação antiga com o contacto circular (50 Ohm)
comprido e preponderante e com uma tomada circular do
lado do rádio. Segundo a fi cha de antena de norma ISO
(150 Ohm). Adaptadores para os dois formatos são oferecidos por fabricantes de acessórios e/ou pela sua ofi cina.
antena activa necessita de tensão na blindagem do cabo
coaxial da antena, sem a qual a captação é insufi ciente. Um
adaptador de antena com alimentação fantasma resolve
este problema.
Indicações de comando
funcionamento do rádio ou do leitor de CDs, o aparelho é
desligado automaticamente.
quente, por ex. depois de exposição prolongada ao sol
durante o estacionamento, não ligar o leitor de CDs, até o
interior do veículo depois de algum tempo de condução ter
arrefecido um pouco.
montável use sempre o envólucro protector para tal previsto.
garantida devido à multitude de software e de medias de
CD disponíveis.
49
PORTUGUÊS
05-AR 736 CD_MP3_NEU 49 18.09.2006, 11:01:35 Uhr
Page 50

PORTUGUÊS
PORTUGUÊS
5. Botão RESET (sem imagem): Quaisquer funções erradas
(ERROR) podem ser corrigidas premindo a tecla RESET.
Encontra esta tecla, depois de retirar o painel de comando,
no canto inferior direito. Através das variações de tensão na
rede de bordo do seu veículo pode dar-se o caso do processador de comando do seu rádio fi car “pendurado”. Não se
trata aqui de um erro do aparelho! Accionando esta tecla
com um objecto aguçado o aparelho é posto de novo em
funcionamento (reiniciado).
Comando
1. Tecla
Prima a tecla para retirar o painel de comando dianteiro.
2. PRESS • ENTER AUDIO DIAL-
Botão multifunções (volume de som)
a) Rodar: na função normal a tocar o botão de multifun-
ções serve para regular o volume de som.
b) Premir rapidamente: Para aceder ao modo de intro-
dução do número de telefone. Para o restante comando
oriente-se por favor pelo parágrafo „Telefonar via
Bluetooh“.
c) Premir prolongadamente: Para aceder ao menu de
selecção do modo de som. No ecrã visualiza-se
„VOLUME“ para confi guração do volume de som.
Premindo rapidamente o botão multifunção pode agora
seleccionar os pontos de menu individualizados, tais
como VOLUME (volume de som), BASS (graves),
TREBLE (agudos), BALANCE (equilíbrio) e FADER
(regulação da passagem gradual de um trecho para
outro). Altera as confi gurações de cada ponto do menu
individualmente rodando o botão multifunção.
3. Tecla DISP/MENU (display/selecção)
a) Funcionamento do rádio:
• Quando são captados dados RDS prima rapida e
repetidamente esta tecla para visualizar o seguinte:
PS Nome ➞ Hora ➞ Frequência ➞ PTY
• Se não são captados dados RDS visualiza-se o
seguinte:
Hora ➞ PTY ➞ Frequência
Indicação: A indicação é visível por um espaço de
tempo de aprox. 5 segundos, depois o aparelho volta à
indicação anterior.
b) Prima a tecla DISP/MENU prolongadamente para
visualizar os seguintes menus de confi guração:
• PAIRING
• RE-CONN / DIS-CONN
• A ANSWER ON / A ANSWER OFF
• PHONE VOL
• CONTRAST
• FORMAT 24H / FORMAT 12H
• SET
• DISTANT / LOCAL
• REGION ON / REGION OFF
• VOL PGM
• BEEP TONE ON / BEEP TONE OFF
Premindo repetidamente a tecla DISP/MENU pode
seleccionar pontos de menu individuais. Altera as
confi gurações de cada ponto do menu individualmente
rodando o botão multifunção (2).
• PAIRING:1 (Iniciar sessão)
Antes de poder utilizar o seu telemóvel com Bluetooth,
tem primeiramente de iniciar a sessão no aparelho (ver
„Iniciar sessão dos aparelhos“).
• RE-CONN:1/DIS-CONN:1
É possível por meio desta função de ligar ou desligar
manulamente a ligação Bluetooth.
RE-CONN:1 = ligar ; DIS-CONN:1 = desligar
Para ligar ou desligar manualmente a ligação Bluetooth,
seleccione a opção desejada e confi me a selecção
premindo o botão multifunção (2). Visualiza-se no ecrã
“RE-CONN:1 >>>>” ou “DIS-CONN:1 >>>>”.
• A ANSWER ON/A ANSWER OFF
(Atendimento automático de chamadas)
A ANSWER ON: O aparelho atende automati-
camente todos os telefonemas
feitos para o seu número de
telefone, sem que tenha de
accionar a tecla TRANSFER
(atendimento). O atendimento
automático é feito após cerca de
3 sinais de chamada.
A ANSWER OFF: O atendimento automático de
chamadas encontra-se desligado.
• PHONE VOL
Seleccione o volume do som do sinal de chamada no
início de uma conversa.
• CONTRAST (contraste)
Confi gure aqui o contraste do ecrã.
• FORMAT 24 H/FORMAT 12 H
Seleccione aqui o formato da visualização da hora.
• SET
Para confi gurar as horas manualmente, porceda do
seguinte modo:
Confi gurar minutos: Rode o botão multifunção (2) no
sentido dos ponteiros do relógio.
Confi gurar horas: Rode o botão multifunção (2)
no sentido contrário ao dos
ponteiros do relógio.
Indicação: Se é captado uma emissora de rádio, que
emite dados RDS, a hora é confi gurada automaticamente.
50
05-AR 736 CD_MP3_NEU 50 18.09.2006, 11:01:36 Uhr
Page 51

PORTUGUÊS
• DISTANT/LOCAL
(Só seleccionável em funcionamento do rádio)
O rádio pode captar dados RDS EON. Compreende-se
por EON a transmissão de informações de emissão
adicionais dentro de uma cadeia emissora como por
ex. o WDR. No caso de um boletim de trânsito (TA)
é conectado dentro da mesma cadeia de emissão
de uma emissora sem boletim de trânsito para uma
emissora com o bolteim de trânsito correspondente.
Pode seleccionar entre o modo LOCAL ou então
DISTANT para a captação do boletim de trânsito local
ou de uma emissora longínqua.
LOCAL: Por meio desta função é evitada
Modo DISTANT: A ligação EON ao boletim de
• REGION ON/REGION OFF
(Só é efi caz com a função AF ligada)
Algumas emissoras dividem a horas especiais do dia
o seu programa em programas regionais de diferente
conteúdo.
REGION ON: O modo regional é ligado.
Indicação: A capacidade de visualização do ecrã é
limitada. É possível que no modo de indicação duplo,
alguns segmentos do ecrã se encontrem apagados.
Com a função REGION ON é impedido, que o rádio
mude para frequências alternativas, que tenham um
outro conteúdo de programa regional.
REGION OFF: O modo regional é desligado. O
• VOL PGM
Com o botão mutlifunção (2) pode seleccionar o volume
de som desejado.
• BEEP TONE ON/BEEP TONE OFF
(som de confi rmação)
Pode escolher com o premir das teclas o som de
confi rmação de 2 tipos.
BEEP TONE ON: O som de confi rmação segue-se
uma comutação para uma
ligação EON com um sinal a um
nível demasiadamente baixo. O
rádio comuta para esta emissora
e o ouvinte mal se apercecebe
das interferências. No ecrã
visualiza-se a indicação “LOC”.
trânsito tenta deste modo obter
as informações EON do boletim
de trânsito de uma emissora
alcançável e melhorar assim a
qualidade da captação. A indicação “LOC” no ecrã desaparece.
indicativo do programa (PI) do
programa da emissora regional
é ignorado durante a procura de
uma frequência alternativa (AF)
ou de um indicativo de programa.
a qualquer pressão de tecla.
BEEP TONE OFF: O som de confi rmação encontra-
4. / Botão para ligar e desligar / Ligação muda
a) Para ligar o aparelho premir esta tecla. Visualiza-se
WELCOME no ecrã. Mantenha esta tecla premida para
desligar o aparelho.
b) Prima a tecla
de tempo os altofalantes. No ecrã pisca MUTE. Prima
de novo esta tecla, para voltar a abolir esta função. Por
meio do accionamento deste botão multifunção esta
função pode também ser abolida.
5. Tecla M / TRANSFER
(MODE/Atendimento de chamadas)
a) Prima esta tecla para selecção do leitor de CDs, modo
Rádio, etc.
b) Prima esta tecla para atender um telefonema quando
lhe ligam.
c) Mantenha esta tecla premida durante um telefone-
ma, para o transmitir de novo para o seu telemóvel.
Mantendo de novo premida a tecla o telefonema é de
novo transmitido para o auto-rádio. Em ambos os casos
visualiza-se „TRANSFER “ no ecrã.
6. Tecla B / CLEAR (• BAND/• ERASE/• SEARCH)
a) Função rádio
Prima rapidamente a tecla B -para comutar entre os
níveis FM- (UKW). A designação do correspondente
nível FM é visualizada no ecrã LCD.
b) Tecla B como funções de procura para
o funcionamento MP3
Se ao gravar um CD foram criados dados correspondentes em MP3, estes podem ser procurados por meio
das seguintes funções:
a) Introdução directa do número do título em CDs com
o formato MP3:
1. Prima 1x a tecla B. No ecrã visualiza-se
„NUMBER “.
2. Com ajuda do botão multifunção (2) pode
seleccionar o número do título desejado. No
ecrã visualiza-se „No.“ e o número do título
correspondente.
3. Para ouvir o título seleccionado prima de seguida rapidamente o botão multifunção (2). O título
seleccionado é lido imediatamente a seguir.
b) Selecção de fi cheiros em CDs com formato MP3:
1. Prima 2x a tecla B. No ecrã visualiza-se
„NAVIGATE “.
2. Com ajuda do botão multifunção (2) tem a possibilidade de seleccionar as diferentes pastas
no CD.
3. Confi rme a pasta seleccionada premindo
rapidamente o botão multifunção (2). O primeiro
título da pasta seleccionada é visualizado.
se desligado.
/ , para silenciar por um curto espaço
51
PORTUGUÊS
05-AR 736 CD_MP3_NEU 51 18.09.2006, 11:01:38 Uhr
Page 52

PORTUGUÊS
PORTUGUÊS
4. Rodando o botão multifunção (2) pode seleccionar agora um título dentro de uma pasta.
5. Prima de seguida rapidamente, para ouvir o
título seleccionado, o botão multifunção (2).
Indicação:
• Se não houver fi cheiros na CD MP3, é visualizado “ROOT” no ecrã.
• A leitura de CDs gravados pelo usuário não
pode ser, devido à multitude da software e dos
media-CD disponíveis, garantida.
• No funcionamento normal da leitura de CDs
com formato MP3 pode-se saltar com as teclas
왖 ou antes 왔 (17/16) uma pasta para
cima ou para trás.
• Indicação: Para a informação do dia ID-3
memorizada esta aprece no ecrã como fi ta
contínua.
c) No modo telefone:
Para apagar o número de telefone introduzido.
d) No modo USB:
Para apagar o título actual.
1. Mantenha a tecla B premida. No ecrã visualizase a indicação “ERASE” e o título actual (por
ex. 002).
2. Prima o botão multifunção para confi rmar
(visualiza-se ERASE no ecrã). Prima de
novo o botão mutlifunção (2) para apagar o
track (visualiza-se ERASE no ecrã).
Indicação: Se não quiser apagar o track, rode
o botão multifunção (2) depois de premir pela
primeira vez (visualiza-se ERASE X no ecrã). Para
confi rmar prima o botão multifunção (2).
7./8.
Teclas 왘왘I / I왗왗 TRACK UP/DOWN /
AUTO/MANUAL SEEK
No Modo CD:
Para saltar para a frente ou para trás premir a tecla 왘왘I
ou I왗왗. Para bobinar os títulos manter a tecla 왘왘I ou
I왗왗 premida.
No modo Rádio:
Prima rapidamente as teclas 왘왘I / I왗왗 e o rádio pára na
estação de emissão ao alcance de seguida (visualiza-se
AUTO SEEK no ecrã). Enquanto mantiver premidas as
teclas 왘왘I / I왗왗 é dada continuação à procura na banda
de frequências (No ecrã visualiza-se MANUAL SEEK).
9. Tecla ejectora
Para fazer ejectar o CD premir esta tecla.
10. Ranhura para o CD
Empurre levemente o CD com a parte escrita para cima
para dentro da ranhura, até o aparelho puxar por si mesmo
o CD. No ecrã visualiza-se „READING“.
Indicação: A leitura de CDs gravados pelo usuário não
pode ser, devido à multitude da software e dos media-CD
disponíveis, garantida.
Leitura de música em formato MP3
Com este aparelho tem a possibilidade de proceder à leitura
de trechos de música com o formato MP3. O aparelho
funciona, para além disso, com os tipos de CD correntes:
CD, CD-RW, CD-R.
Com o seu aparelho MP3 pode ler CDs. Nestes CDs podem
ser gravados até 200 títulos comprimidos. O seu aparelho
reconhece um CD MP3 automaticamente (no ecrã visualizase MP3).
Indicação: A informação diária memorizada ID-3 aparece
como fi ta contínua no ecrã.
Preste por favor atenção:
Existe uma multitude de procedimentos para gravar e
comprimir, assim como diferenças de qualidade entre CDs
e CDs gravados.
Para além disso a indústria da música não observa critérios
fi xos (protecção contra a cópia).
Por estas razôes podem em casos raros ocorrer problemas
com a leitura de CDs e CDs MP3. Tal não signifi ca que haja
uma funções erradas no aparelho.
11. Tecla AS/PS / ID3
(memorização automática das emissoras)
No modo Rádio:
a) Função de memorização:
Prima a tecla AS/PS / ID3 por mais tempo do que um
segundo, para activar a memorização automática das
emissoras. No ecrã visualiza-se „AUTO STORE“.
O aparelho procura dentro da banda de frequência
actual, por ex. FM 1 pelo maior nível de força de sinal
até ser concluído o ciclo de procura. As seis emissoras
mais fortes são atribuídas aos espaços disponíveis na
memória correspondentes.
As emissoras agora memorizadas são sintonizadas
durante cerca de 5 segundos cada uma e depois é
sintonizada a emissora do primeiro espaço de memorização.
Se desejar procurar outras emissoras na banda FM
prima a tecla B para mudar para a banda FM2 ou antes
FM3. Prima a tecla AS/PS / ID3 de novo por mais de
um segundo, para iniciar nova procura.
b) Função de sintonização: Depois de premir rapidamente
a tecla AS/PS / ID3 o rádio toca em todas as emissoras
pré-confi guradas da banda de frequência.
Indicação: A função de sintonização fi ca automaticamente
concluída quando o rádio chega à emissora do primeiro
espaço de memória.
52
05-AR 736 CD_MP3_NEU 52 18.09.2006, 11:01:40 Uhr
Page 53

PORTUGUÊS
No modo MP3:
Cada vez que se prime a tecla AS/PS / ID3 são visualizados
a pasta, a canção, o intérprete e o título do album no ecrã
(se tiverem sido gravadas informações diárias ID3 no CD).
12. -17.
como teclas de estações de emissão (1–6) de emissoras
previamente seleccionadas e como as teclas 1PAU, 2INT,
3RPT, 4RDM em funcionamento com o CD
a) Funcionamento-Rádio
Premindo rapidamente estas teclas é seleccionado
directamente uma emissoar de rádio pré-confi gurada.
Se as teclas são premidas mais tempo do que um
segundo, a emissora actual confi gurada é memorizada
sob a tecla de estação seleccionada.
b) Funcionamento CD
• Prima a tecla 1PAU, para interromper a leitura de
um CD (função de pausa). Prima de novo esta tecla
para abolir esta função.
• Prima a tecla 2INT. Cada título do CD é tocado
durante 10 segundos. Volte a premir esta tecla, para
cancelar a procura. É tocado o título seleccionado
actualmente.
• Prima a tecla 3RPT. O título que está a ser tocado,
volta a ser repetido. Prima de novo esta tecla para
abolir de novo esta função.
• Prima a tecla 4RDM. Os títulos do CD são tocados
por ordem arbitrária. Volte a premir esta tecla para
abolir de novo a função.
18. Tecla REC/ TA • COPY
a) Anúncio sobre o tráfego TA (Ligação prioritária do
serviço de informações rodoviárias)
A função TA é activada premindo rapidamente a tecla
REC/TA • COPY e visualizada no ecrã por meio de um
sinal TA.
Quando é captado um emissor, que emite periodi-
camente as mais recentes informações do tráfego,
visualiza-se a indicação TP no ecrã.
Com a função TA ligada os serviços de informações
rodoviárias em UKW/FM interrompem o funcionamento
dos CDs (no ecrã visualiza-se TRAFFIC INFO).
Depois de concluídas as informações radiofónicas
sobre o tráfego, o programa confi gurado anteriormente
volta a ser ligado.
Interrupção da função TA:
Se desejar interromper as informações radiofónicas
sobre o tráfego actuais, prima rapidamente a tecla REC/
TA • COPY. O Modo TA não é por este meio desligado.
Indicação: Se não é captada nenhuma informação
sobre o tráfego rodoviário, visualiza-se por um curto
espaço de tempo no ecrã a indicação „LOST TP TA”.
b) Função de gravação
(apenas disponível no funcionamento com CD)
Tem a possibilidade de gravar de CD/MP3 CD para
USB.
1. Ligue para tal um dispositivo de gravação USB
por meio de um cabo com adaptador à conexão
correspondente (21).
2. Seleccione o track que deseja gravar com as teclas
왘왘
I / I왗왗 (7/8).
3. Mantenha a tecla REC/TA • COPY premida (No
ecrã visualiza-se REC USB).
4. Prima, para confi rmar, o botão multifunção (2). Começa a gravação do track actual para o dispositivo
de memorização USB (No ecrã visualiza-se REC
>>>>).
Indicação: Em CDs MP3 o estado de copiar é
anunciado por uma indicação de percentagem. Em
CDs Audio contudo a gravação é executada em
tempo real.
5. Se a gravação está concluída, visualiza-se com
CDs MP3 „100%
no ecrã. O aparelho comuta de seguida para a
leitura normal.
Indicação: Só pode sempre gravar o track actual (não
uma CD completa). Para gravar mais um track no
dispositivo de memorização USB, proceda como foi
descrito.
19. Tecla PTY/IX-BASS
a) Ligar e desligar a função IX-BASS. Mantenha a tecla
PTY/IX-BASS premida durante aprox. 3 seg.
Com a função IX-BASS a imagem do som nas zonas de
baixo volume de som é alargada. Agudos e graves são
elevados.
b) Funcionamento do Rádio:
Selecção PTY do tipo de programa
Algumas emissoras transmitem para além do nome
da emissora também informações sobre o tipo de
programa do seu programa. Estas informações podem
ser visualizadas no seu auto-rádio.
Tais tipos de programa podem por ex. ser:
SPORT NEWS POP CLASSICS
Com a função PTY pode seleccionar emissoras de um
tipo determinado de programa.
Prima repetidamente a tecla PTY/IX-BASS para obter
a selecção PTY. Confi rme a sua selecção com o botão
multifunção (2). Visualiza-se de seguida por pouco
tempo “PTY SEEK”.
Se PTY é seleccionado, o aparelho de rádio dá inicio
à procura das correspondentes informações PTY e
pára quando as informações PTY procuradas foram
encontradas.
Se o tipo de programa procurado não é encontrado
visualiza-se no ecrã “NO MATCH PTY”.
Quando a informação PTY procurada já não existe,
a função PTY comuta automaticamente para o modo
normal.
“ e com CDs Audio „REC “
PORTUGUÊS
53
05-AR 736 CD_MP3_NEU 53 18.09.2006, 11:01:42 Uhr
Page 54

PORTUGUÊS
PORTUGUÊS
20. Tecla AF
AF (frequências alternativas) função REG
AF é uma função que funciona com ajuda do RDS (Radio
Data System) e que só pode ser utilizada com emissoras
FM. O aparelho procura em segundo plano a frequência
que é melhor captada para ouvir a emissora seleccionada.
Quando a função AF é seleccionada, o rádio verifi ca
continuamente a intensidade do sinal da frequência AF. O
intervalo de verifi cação para cada frequência AF depende
da intensidade do sinal da emissora actual e varia entre alguns minutos para uma emissora forte até alguns segundos
para uma emissora fraca. Cada vez que a nova frequência
AF é mais forte do que a estação confi gurada actualmente,
o aparelho comuta por um curto espaço de tempo para esta
frequência e é visualizada durante um a dois segundos a
mensagem „NEW FREQUENCY“. Uma vez que o tempo
mudo é na mudança de frequência ou antes no tempo de
experiência muito curto, quase não é audível durante o
programa normal.
A função AF é activada premindo rapidamente a tecla A.F
e o status da função AF é visualizado por meio de um sinal
AF no ecrã.
• Se o sinal AF é visualizado no ecrã a função AF está
ligada e são recebidos dados de emissão RDS.
• Se o sinal AF pisca no ecrã, a função AF encontra-se
seleccionada, mas de momento não pode ser recebido
nenhum sinal de emissão RDS.
• Volte a premir a tecla AF, para voltar a desligar esta
função. O sinal AF no ecrã apaga-se.
21. Tomada USB
Este aparelho foi concebido de acordo com as mais recentes inovações técnicas do sector USB. O grande número de
meios de memorização UBS que se encontra hoje em dia
no mercado, não permite, porém, que seja possível garantirse uma compatibilidade absoluta com todos esses meios.
Por esta razão podem em casos raros ocorrer problemas
com a leitura de meios de memória USB. sto não representa nenhuma função defi ciente do aparelho.
1. Ligue um dispositivo de memória USB por meio de
um cabo com adaptador à conexão correspondente
(No ecrã visualiza-se USB HOST). Os dados são lidos
automaticamente.
2. Para procurar/seleccionar determinados tracks, proceda
como descrito em Ponto 6 b) (tecla
procura no modo MP3) e em Ponto 12-17 b).
22. Ecrã LCD (Indicação em cristais líquidos)
23. Botão RESET (sem imagem)
Encontra esta tecla com o painel de comando retirado no
canto em baixo à direita.
Através das variações de tensão na rede de bordo do seu
veículo pode dar-se o caso do processador de comando do
seu rádio se ter „pendurado“. Não se trata aqui de um erro
do aparelho! Accionando esta tecla com um objecto aguçado
o aparelho é posto de novo em funcionamento (reiniciado).
54
B
- como função de
Telefonar por meio do Bluetooth
No Bluetooth trata-se de uma tecnologia para a ligação de rádio
sem cabo de aparelhos a curta distância. A tecnologia Bluetooth
é de momento utilizada sobretudo para o funcionamento mãos
livres de telemóveis. Durante a condução é assim possibilitado
ao condutor de falar com o seu telemóvel sem ter de o levar ao
ouvido.
Este aparelho oferece-lhe a possibilidade de utilizar um
telemóvel compatível com Bluetooth. O raio de função reduz-se
neste caso a cerca de 3 metros.
Para uma qualidade de som óptima durante uma conversa
telefónica
Não ponha o volume de som alto demais. Poderia ter uma
reacção dos altifalantes (som de apito) como consequência.
Indicação: A confi guração do volume de som depende da
posição da instalação dos altifalantes em relação ao microfone
e não pode por isso ser designada.
Registar aparelhos
Antes de poder telefonar pelo áuto-rádio, os aparelhos têm de
estar registados entre eles.
1. Mantenha a tecla DISP/MENU (3) premida (no ecrã visualiza-se PAIRING:1
2. Prima para confi rmar o botão multifunção (2) (No ecrã
visualiza-se PAIRING:1 >>>>).
3. Registe, como descrito nas instruções de uso do seu
telemóvel, o auto-rádio no seu telemóvel. Como selecção
visualiza-se o aparelho „BT60“ no seu telemóvel.
4. Introduza agora agora o password „1234“ no seu telemóvel.
O auto-rádio está agora registado no seu telemóvel.
5. Se o registo foi executado com sucesso, visualiza-se „PAIRING:1 “ no ecrã do auto-rádio e o nome do telemóvel.
Indicações:
• Se o registo não foi executado com sucesso, visualiza-se
“PARING:1 X” no ecrã do auto-rádio.
• Conforme o fabricante de telemóvel tem de executar de
novo o registo (PAIRING), para registar o seu telemóvel no
auto-rádio.
• A compatibilidade Bluetooth não pode ser garantida para
telemóveis que apareçam no futuro.
• Para garantir uma ligação óptima, preste atenção a que
o acumulador do seu telemóvel esteja completamente
carregado.
• Algumas marcas de telemóveis dispõem de um modo de
poupança de energia. Desactive por favor o modo de poupança de energia, uma vez que de outra maneira poderão
surgir problemas ao telefonar.
• Para poder receber um telefonema ou antes para telefonar
a alguém, o Bluetooth tem de se encontrar activo no seu
telemóvel.
• Preste por favor atenção de falar na direcção do microfone
incorporado. Não é possível a montagem de um microfone
externo.
).
05-AR 736 CD_MP3_NEU 54 18.09.2006, 11:01:44 Uhr
Page 55

PORTUGUÊS
Telefonar a alguém
1. Prima rapidamente o botão multifunção (2) (No ecrã visualiza-se „
2. Para introdução do número desejado, rode o botão multi-
Indicação: Se tiver introduzido um ou mais números
3. Para telefonar ao número desejado, mantenha de seguida
4. Para desligar prima por favor a tecla B / CLEAR (6).
Indicação: Para telefonar aos números de telefone introduzidos, também pode accionar a tecla M / TRANSFER (5).
Repetição de chamadas
O aparelho memoriza os números de telefone das 9 últimas
chamadas. Para telefonar a estes números proceda por favor da
seguinte forma:
1. Prima o botão multifunção (2) (No ecrã visualiza-se „ “).
2. Mantenha de seguida o botão multifunção (2) premido. O
3. Rodando o botão multifunção (2) pode agora seleccionar
4. Para telefonar ao número desejado, mantenha o botão
5. Para desligar prima por favor a tecla B / CLEAR (6).
“).
função até se visualizar o primeiro número desejado. Prima
de novo rapidamente o botão multifunção (2) para confi rmar
o número. Para os restantes números, repita estes passos,
até ter introduzido por completo o número de telefone (este
é visualizado do ecrã do auto-rádio).
erradamente, pode apagar os números com a tecla
CLEAR (6).
o botão multifunção (2) premido, até se visualizar no ecrã a
mensagem „CALLING >>>>“.
número de telefone da última chamada é visualizado no
ecrã.
um dos números entre os números das últimas chamadas.
multifunção (2) premido, até se visualizar a mensagem
„CALLING >>>>“ no display.
B
Generalidades
Tensão da rede..............................................................DC 12 V
Consumo de energia ....................................................7 A max.
Capacidade ......................................................4 x 60 W PMPO
Área FM
Gama de frequências ..............................87,5 MHz - 108,0 MHz
Sensibilidade utilizávelt .....................................................15 dB
/
I.F. Frequência.............................................................10,7 MHz
Leitor de CDs
Sistema..........................................................Sistema CD Audio
CDs utilizáveis............................. CD/CD-R/CD-RW/MP3 Disks
Taxa de transferência de bits tocáveis.................32 - 320 kBit/s
Número dos bits de quantifi cação ......................................1 bit.
Formato do sinal........................... Frequência modelo 44,1 kHz
Relação sinal/ruído............................................... 50 dB (1 kHz)
Número de canais ............................................2 canais estéreo
Dimensões da caixa ....................... 178 larg. x 50 alt.x 157 prof.
Este aparelho foi controlado nos termos das actuais directivas
da CEE aplicáveis, tais como inocuidade electromagnética e
directiva sobre baixa tensão, e fabricado de acordo com as mais
novas prescrições da segurança técnica.
Reserva-se o direito de alterações!
Características técnicas
PORTUGUÊS
Receber chamadas
Quando se recebe chamadas, ouve-se pelos altofalantes um
som de chamada e se a pessoa que telefona dispuser de um
telefone com CLIP „Calling Line Identifi cation Presentation
(transmissor de números de telefone)“, visualiza-se no ecrã
o número de quem está a ligar. Senão visualiza-se no ecrã a
indicação “PHONE IN”.
1. Para atender uma chamada, accione por favor a tecla M /
TRANSFER (5). Ouve a pessoa que faz a chamada
pelos altofalantes no seu carro.
2. Para desligar prima por favor a tecla B / CLEAR (6).
Indicação:
• Tem a possibilidade de transmitir de novo a chamada
para o seu telemóvel. Para tal mantenha a tecla M /
TRANSFER (5) premida (visualiza-se „TRANSFER “
no ecrã). O auto-rádio activa o funcionamento de MUTE.
Mantenha a tecla de novo premida, para a chamada ser de
novo transmitida para o auto-rádio.
• Para rejeitar uma chamada que acaba de chegar, accione a
tecla B / CLEAR (6).
55
05-AR 736 CD_MP3_NEU 55 18.09.2006, 11:01:46 Uhr
Page 56

PORTUGUÊS
PORTUGUÊS
Eliminação de avarias
Antes de ler a lista de verifi cações, conclua por favor de seguida
a ligação. Se depois da verifi cação da lista ainda houver
perguntas em aberto, dirija-se por favor ao posto de assistência
técnica mais próximo.
Simptoma de erro Causa Solução
Som de apito dos
altifalantes.
Os CDs só são
recolhidos na ranhura
dos CD até metade dos
mesmos.
„READ ERR“ é
visualizado no ecrã.
O CD não pode ser
seleccionado por meio
da tecla MODE.
O CD não funciona
depois de inserido no
aparelho.
O CD falha. A superfície da estrada
Não há função. A ignição está
Reacção Não ponha o volume
Não foram retirados os
parafusos da segurança
de transporte.
O CD foi mal inserido. Insira o CD correcta-
Não foi inserido CD
nenhum.
O regulador de volume
de som está demasiadamente baixo.
As ligações não foram
efectuadas correctamennte.
é irregular.
O aparelho não foi montado com segurança.
O CD tem um defeito. Tentar um outro CD. Se
Die CD está sujo. Limpar o CD.
O aparelho está eventualmente montado com
demasiada inclinação
no veículo.
desligada.
Rebentaram um
ou mais do que um
fusíveis.
de som alto demais.
Retire os parafusos
da segurança de
transporte.
mente.
Insira um CD.
Pôr o regulador de
volume de som mais
alto.
Ver ifi car a ligação de
+12V assim como a
ligação da massa.
Esperar que a estrada
fi que lisa para a leitura
do CD.
Montar o aparelho com
segurança.
Assegurar-se de que a
fi xação da parte de trás
é utilizada, se o veículo
não dispuser de uma
aceitação adequada
para a parte de trás do
aparelho.
este puder ser lido correctamente, é porque
o primeiro CD se
encontra provavelmente
danifi cado.
Preste atenção a que
não deve ser ultrapassado um ângulo de 20°
graus de inclinação na
montagem!
Rodar a chave de
ignição para „ON“ ou
para „ACC“.
Substituir o fusível por
um outro com 15 A.
Simptoma de erro Causa Solução
O aparelho não se deixa „ligar“ ou „desligar“
por meio da ignição.
O aparelho não
funciona correctamente
(EJECT,LOAD, PLAY).
O rádio não dá sinal de
captação.
Má recepção de rádio. O seu veículo tem
„NO FILE“ é visualizado
no ecrã.
„MEMORY FULL“ é
visualizado no ecrã.
Ligação defeituosa
(cada fabricante de
veículos dispõe a
ligação ISO no veículo
de outra maneira).
O microcomputador
sofre a interferência de
campos electromagnéticos.
O cabo da antena não
está ligado.
eventualmente uma
antena especial
(antena alimentada com
fantasma.)
O formato do fi cheiro
no CD ou antes no dispositivo de memorizar
USB não é apoiado.
O dispositivo de
memorizar USB está
cheio.
Entre em contacto com
a sua ofi cina ou com
um especialista em
automóveis, por causa
do adaptador para a
ligação específi co do
veículo.
Retirar o CD e voltar a
inseri-lo.
Desligar o aparelho e
voltar a ligá-lo.
Enfi ar com fi rmeza
o cabo da antena na
tomada para a antena
do aparelho.
Entre por favor em contacto com a sua ofi cina
ou com um especialista
em automóveis. (Para
aparelhos de outras
marcas existem fi ltros
separadores específi cos na alimentação ou
adpatadores de tensão.)
Conecte um dispositivo
de memorizar USB
novo ou apague
alguns fi cheiros.
Manuseio de um CD
Limpeza do CD
Limpar antes da leitura o CD
com um pano de limpeza limpo
e isento de pó. Retirar o CD na
direcção da seta.
Indicação: Não usar produtos solventes como gasolina ou
diluente. Os produtos de limpeza correntes no comércio ou
sprays anti-estáticos danifi cam o aparelho.
Colocar o CD
Se o CD é colocado com a
inscrição para baixo, isso pode
danifi car o aparelho.
Colocar o CD sempre com o
label para cima.
Indicação: Quando já se encontra um CD na ranhura de CDs,
não tentar inserir mais CDs na ranhura. Tal pode danifi car o
aparelho.
56
05-AR 736 CD_MP3_NEU 56 18.09.2006, 11:01:49 Uhr
Page 57

PORTUGUÊS
Pegar no CD
Pegar o CD sempre pelas
bordas. Para manter um CD
limpo, não tocar na superfície
do mesmo.
• Não colar autocolantes ou fi ta desiva nos CDs.
• Não espôr o CD à radiação solar directa ou a fontes de
calor, tais como canos de aquecimento e também não a
deixar no carro, quando este se encontra ao sol, uma vez
que isso conduz a uma subida apreciável da temperatura.
• Antes da leitura, verifi que se os CDs tem fendas, riscos ou
deformações. CDs com tais danos podem eventualmente
não ser lidos correctamente. Não deve usar estes CDs.
• Use apenas CDs correntes no comércio, circulares e com
um diâmtero de 12 cm! CDs com 8 cm de diâmetro ou CDs
com os contornos, por ex. de uma borboleta ou de um
coração, não são adequados para a leitura. Existe o perigo
de destruição do CD e do aparelho. Não nos podemos
responsabilizar por danos causados por CDs inapropriados.
Signifi cado do símbolo „contentor do lixo“
Poupe o nosso meio ambiente, não deite aparelhos eléctricos
para o lixo doméstico.
Dirija-se ao locais destinados à recolha especial de aparelhos eléctricos e entregue aí os aparelhos que não pretende
continuar a utilizar.
Desta forma, contribuirá para ajudar a evitar os potenciais efeitos perniciosos que um falso depósito de objectos usados terão,
tanto no que diz respeito ao ambiente, como à saúde humana.
Dará igualmente a sua contribuição para o reaproveitamento de
materiais, para a reciclagem e outras formas de aproveitamento
de aparelhos eléctricos e electrónicos usados.
Receberá, nas autarquias e juntas de freguesia, informações
sobre os locais onde poderá entregar tais aparelhos.
Garantia
O aparelho vendido pela nossa empresa tem uma garantia de
24 meses a partir da data da compra (talão).
Durante o período de garantia, procederemos à remoção grátis
- por reparação, ou, segundo a nossa decisão, por substituição -
das defi ciências do aparelho ou dos acessórios que provenham
de erros de material ou de fabricação. A prestação de serviços
relacionados com a garantia não prolongarão a mesma, nem
iniciarão um novo prazo de garantia!
O talão de compra consistirá prova desta garantia. Sem o
mesmo, não será possível proceder-se a qualquer troca ou
reparação grátis.
Em caso de garantia, entregue o aparelho completo, juntamente com o talão de compra, na loja onde o mesmo foi comprado.
Não estão incluídos na garantia quaisquer defeitos de
acessórios ou de peças que se desgastem, nem a limpeza, a
manutenção ou a substituição de peças que se desgastem,
devendo tais despesas ser reembolsadas!
A garantia terminará sempre que tenha havido intervenção
alheia nos aparelhos.
Após a garantia
Após a expiração do prazo de garantia, poderão ser efectuados
arranjos por pessoal especializado, ou pelos nossos serviços de
reparações, contra reembolso.
PORTUGUÊS
57
05-AR 736 CD_MP3_NEU 57 18.09.2006, 11:01:51 Uhr
Page 58

PORTUGUÊS
AF (Frequência alternativa), tecla..............................................54
A
AS, tecla.....................................................................................52
B
B (BAND), tecla..........................................................................51
BEEP (Som de confi rmação).....................................................50
Bluetooth....................................................................................54
Boletim do trânsito (ver TA)........................................................53
Botão multifunção ......................................................................50
C
Comando....................................................................................50
Conexão.....................................................................................49
Conexão muda...........................................................................51
Conexão USB ...........................................................................54
Confi gurar volume de som ........................................................50
Conselhos para instalação.........................................................48
D
Dados técnicos...........................................................................55
Desligar ...................................................................................... 51
DISP, tecla .................................................................................50
DSP (Confi guração do equalizer)..............................................50
índice
L
Leitura por ordem arbitrária (4 RDM).........................................53
Ligar ...........................................................................................49
LOC (LOCAL) .............................................................................51
M
Manuseamento de um CD.........................................................56
Manuseamento do CD ..............................................................56
Montagem (Indicações de segurança) ......................................48
P
PAU (Play/Pause), tecla.............................................................53
PS, tecla.....................................................................................52
PTY, tecla...................................................................................53
R
RANDOM (4 RDM) (Leitura por ordem arbitrária).....................53
REC (Gravação), tecla ...............................................................53
REGION (Regional) ...................................................................51
Reparação de irregularidades ...................................................56
REPEAT (3 RPT) (Repetir) ........................................................53
Repetir (3 RPT)..........................................................................53
RESET, botão ............................................................................50
Retirar o painel de comando......................................................50
PORTUGUÊS
Ejectar CD .................................................................................52
E
F
Função de sintonização (ver tecla PS)......................................52
G
Garantia......................................................................................57
H
Hora............................................................................................50
I
ID3, tecla ....................................................................................52
Indicações de segurança...........................................................48
Indicações para o uso................................................................49
Informação adicional importante para a montagem..................49
Instalação...................................................................................48
INTRO (2 INT)............................................................................53
Segurança no trânsito................................................................48
S
T
TA (Boletim do trânsito)..............................................................53
Tecla de ejecção ........................................................................52
Telefonar ....................................................................................54
TRANSFER, tecla......................................................................51
V
Volume de som ao ligar ............................................................. 51
58
05-AR 736 CD_MP3_NEU 58 18.09.2006, 11:01:52 Uhr
Page 59

ITALIANO
Avvertenze di sicurezza
Prima di mettere in funzione questo apparecchio, leggere molto
attentamente le istruzioni per l’uso e conservarle con cura unitamente al certifi cato di garanzia, allo scontrino e, se possibile,
alla scatola di cartone con la confezione interna.
• Utilizzare l’apparecchio solo per l’uso previsto.
• Montare l’apparecchio in modo che le aperture per la
ventilazione presenti non vengano coperte.
• Non togliere mai la protezione dell’apparecchio. Riparazioni
non a regola d’arte possono causare notevoli pericoli per
l’utente. Nel caso di danneggiamento dell’apparecchio non
metterlo più in funzione ma farlo riparare da un esperto.
Questi simboli possono trovarsi eventualmente sull’apparecchio
e rimandano ai seguenti elementi:
Il simbolo con il punto esclamativo fa presente
all’utente la presenza di importanti avvertenze per
l’uso e la manutenzione nei fogli di accompagnamento dell’apparecchio.
Gli apparecchi dotati di questo simbolo lavorano con
un „Laser classe 1“ per riprodurre i CD. Gli interruttori di sicurezza integrati hanno lo scopo di impedire
che l’utente venga esposto alla luce non visibile del
laser, pericolosa per l’occhio umano, aprendo lo
scomparto per i CD.
Questi interruttori di sicurezza non devono mai essere
cavallottati né manipolati perché altrimenti sussiste il rischio di
esposizione alla luce del laser.
Bambini
• Per sicurezza tenere l’imballaggio (sacchetto di plastica,
scatola, polistirolo, ecc,) fuori dalla portata dei bambini.
Attenzione! Non lasciar giocare i bambini piccoli con la
pellicola. Pericolo di soffocamento!
• Scollegare prima il polo negativo poi quello positivo della
Attenzione: Se la batteria è staccata dalla rete, tutte le
• La sicura principale deve essere installata possibilmente
• La sezione trasversale del cavo positivo e negativo non
• Durante la foratura di buchi fare attenzione che non venga-
Consigli per l’installazione:
• I tubi di protezione per cavi proteggono i cavi dall’abrasione
• L’isolamento dei cavi non deve essere danneggiato durante
• Ovviamente nell’installazione di un HiFi per auto si devono
A seconda del tipo di costruzione il vostro veicolo può differire
da questa descrizione. Decliniamo ogni responsabilità per danni
insorti a causa di errori di montaggio o collegamento e per danni
successivi.
Montare la radio operando conformemente alle illustrazioni
seguenti
Sicurezza della circolazione
• La sicurezza della circolazione è sempre l’obiettivo principale. Quindi utilizzare sempre l’autoradio in modo da essere
sempre pronti a far fronte alla situazione stradale attuale.
• Tenere conto che ad una velocità di 50 km/h si percorrono
14 m al secondo.
• In situazioni critiche se ne sconsiglia il comando.
• Le avvertenze, p.e. della polizia e dei vigili del fuoco, devono
poter essere sempre percepite tempestivamente e con
sicurezza nel veicolo.
• Per questa ragione durante il viaggio ascoltate sempre il
vostro programma con un volume adeguato.
Per la durata del montaggio e del collegamento
osservare le seguenti avvertenze di sicurezza
batteria. (Collegare in ordine inverso.)
memorie volatili perdono le loro informazioni. Per cortesia osservare le avvertenze di sicurezza del produttore del veicolo.
vicina (max. dopo 30 cm) al polo positivo della batteria
affi nché, in caso di incidente, l’auto sia protetta da un
eventuale incendio dei cavi. Se l’installazione non dovesse
corrispondere a questa direttiva di produzione, la protezione
assicurativa cessa.
deve essere inferiore a 1,5 mm².
no danneggiate parti del veicolo.
su parti spigolose della carrozzeria.
l’installazione.
usare gli utensili corretti.
Installazione
a Dado
b Rosetta elastica
c Rondella
d Vite
e Squadra di montaggio
f Alloggiamento di
inserimento
g Tirante fi lettato
Attenzione!
h Viti del sistema di sicurezza
per il trasporto (da rimuovere prima del montaggio)
i Dispositivo di estrazione
(chiave per le operazioni di
smontaggio)
j Fissaggio
ITALIANO
Appoggiare prima il frontalino
con i comandi sul lato destro e
poi innestarlo in posizione sul
lato sinistro.
59
05-AR 736 CD_MP3_NEU 59 18.09.2006, 11:01:53 Uhr
Page 60

ITALIANO
Allacciamento
Realizzare l’allacciamento conformemente a quanto indicato
dal grafi co.
2. L’apparecchio è confi gurato per il polo negativo della
batteria, il quale deve essere collegato alla carrozzeria del
veicolo. Accertarsene prima di procedere all’installazione.
3. Durante il montaggio/collegamento del vostro apparecchio
tener conto che non ogni veicolo è dotato di un “collegamento ISO”. In questo caso consigliamo l’impiego di un
adattatore ISO specifi co per autoveicoli.
Gli adattatori sono disponibili nei negozi di accessori per
auto e/o presso la vostra offi cina di fi ducia.
Altoparlante
a destra davanti
Rosso R
Bianco L
a destra dietro
4. Nel caso di „Durata +“ (Collegamento di corrente permanente), a seconda del tipo di veicolo possono esserci differenze.
Antenna automatica (Blu)
Collegamento per antenna
(Questo è necessario per memorizzare le stazioni emittenti).
Per garantire tutte le funzioni è assolutamente necessario
eseguire il montaggio conformemente a queste istruzioni. In
caso di dubbio rivolgersi ad un’offi cina autorizzata.
5. L’angolo di inclinazione massimo nel montaggio
Uscita Chinch
Grigio
Grigio/nero
Viola
Viola/nero
dell’autoradio non deve superare i 20° perché nel caso di
angoli di montaggio maggiori il funzionamento dell’autoradio
(Lettore CD) non è più garantito.
6. A seconda del tipo di veicolo in casi eccezionali possono
presentarsi disturbi nel funzionamento Radio/CD. Questi si
possono eliminare con un fi ltro anti disturbo supplemen-
tare. Malgrado il vostro apparecchio CD sia già dotato in
serie di un fi ltro antidisturbo, possono esserci ugualmente
limiti dovuti alla vettura.
Potete avere questo fi ltro nei negozi di accessori auto e/o
presso la vostra offi cina di fi ducia.
7. Durante il montaggio della radio fare attenzione che il retro
fusibile
Giallo
Nero
Rosso
Bianco
Bianco/nero
Verde
Verde/nero
della radio abbia abbastanza spazio affi nché sia garantita
una ventilazione suffi ciente.
8. Nel collegamento dell’antenna ci sono due norme diverse.
Prima la spina vecchia (50 Ohm) con contatto radio lungo
sporgente verso l’esterno sul lato veicolo e una presa
rotonda sul lato radio. Poi la spina antenna ISO (150 Ohm).
Adattatori per entrambi i formati sono disponibili presso i
produttori di accessori e/o presso la vostra offi cina autorizzata.
Con VW/Audi osservare assolutamente: l’antenna attiva
ha bisogno di tensione sulla schermatura del cavo coassiale
Collegamento di
corrente permanente
Massa
Accensione
Altoparlante a sinistra
davanti
a sinistra dietro
Collegamento ISO
ITALIANO
antenna senza cui la ricezione è insuffi ciente. Un adattatore
antenna con alimentazione artifi ciale risolve questo proble-
Attenzione:
• Il pannello di comando rimovibile deve essere montato
soltanto dopo aver effettuato l’allacciamento del cavo.
• Si consiglia di utilizzare altoparlanti con un’impedenza pari a
4 ohm.
• Il cablaggio degli altoparlanti deve essere privo di massa.
• Il segnale collegato tramite le uscite cinch viene riprodotto
dagli altoparlanti posteriori.
ma.
Avvertenze per l’uso
1. Nel caso in cui il quadro comandi anteriore venga rimosso
durante il funzionamento della radio o del lettore CD,
l’apparecchio si disattiva automaticamente.
2. Nel caso in cui la temperatura all’interno dell’abitacolo del
veicolo sia particolarmente elevata, per esempio quando il
veicolo sia rimasto parcheggiato a lungo al sole, si consiglia
Informazioni importanti per il montaggio
della vostra autoradio!
1. Le viti della sicura di trasporto (h) devono essere
rimosse prima del montaggio altrimenti il CD non entra.
di non attivare il lettore fi nché la temperatura dell’abitacolo
non sia diminuita in seguito a un breve periodo di marcia.
3. Affi nché il pannello di comando rimovibile possa essere
conservato in condizioni di sicurezza, si consiglia di utilizzare a tale scopo l’involucro protettivo appositamente previsto
allo scopo.
60
05-AR 736 CD_MP3_NEU 60 18.09.2006, 11:01:55 Uhr
Page 61

ITALIANO
4. A causa della molteplicità di software disponibili e di media
CD, la riproduzione di CD creati dall’utente non può essere
garantita.
5. Pulsante RESET (senza immagine): Eventuali errori
(ERROR) durante il funzionamento possono essere rimossi
premendo il tasto RESET. Questo tasto si trova nell’angolo
inferiore destro dopo aver tolto il pannello di comando.
Oscillazioni di tensione nella corrente di bordo del vostro
veicolo possono far sì che il processore di comando della
vostra radio sia “andato in tilt”. Non si tratta di un guasto
dell’apparecchio! Azionando questo tasto con un oggetto
acuminato l’apparecchio si riavvia (reset).
Funzionamento
1. Ta sto
Premere il tasto per staccare il campo di comando
anteriore.
2. Manopola multifunzioni
PRESS • ENTER AUDIO DIAL (volume)
a) Girare: Durante la riproduzione normale la manopola
serve per regolare il volume.
b) Premere per un attimo: per arrivare alla modalità di inse-
rimento del numero di telefono. Per l’utilizzo successivo
seguire il capitolo „Telefonare via Bluetooth“.
c) Premere più a lungo: per arrivare al menu di selezione
della modalità di suono. Sul display viene visualizzato
„VOLUME“ ai fi ni dell’impostazione del volume. Premendo per un attimo il tasto multifunzione potete selezionare
le singole voci di menu come VOLUME (Volume), BASS
(Bassi), TREBLE (Alti), BALANCE (Balance) e FADER
(Regolazione dissolvenza). Si cambiano le impostazioni
delle singole voci di menu girando la manopola multifunzioni.
3. Tasto DISP/MENU (display/selezione)
a) Funzionamento radio:
• Se si ricevono dati RDS premere di nuovo più volte
brevemente questo tasto per avere la visualizzazione di quanto segue:
PS Nome ➞ Ora ➞ Frequenza ➞ PTY
• Se non si ricevono dati RDS viene visualizzato
quanto segue:
Ora ➞ PTY ➞ Frequenza
Nota: Il visore rimane visibile per 5 secondi ca., poi
l’apparecchio ritorna alla visualizzazione originaria.
b) Tenere premuto a lungo il tasto DISP/MENU per aprire il
menu di selezione:
• PAIRING
• RE-CONN / DIS-CONN
• A ANSWER ON / A ANSWER OFF
• PHONE VOL
• CONTRAST
• FORMAT 24H / FORMAT 12H
• SET
• DISTANT / LOCAL
• REGION ON / REGION OFF
• VOL PGM
• BEEP TONE ON / BEEP TONE OFF
Azionando ripetutamente il tasto DISP/MENU, è quindi
possibile selezionare le varie opzioni di menu. Si cambiano le impostazioni delle singole voci di menu girando la
manopola multifunzioni (2).
• PAIRING:1 (registrazione)
Prima di poter utilizzare il vostro telefono cellulare abili-
tato per Bluetooth, dovete registrarlo nell’apparecchio (v.
“registrare apparecchio”).
• RE-CONN:1/DIS-CONN:1
Tramite questa funzione è possibile accendere e
spegnere manualmente il collegamento Bluetooth.
RE-CONN:1 = accendere /DIS-CONN:1 = spegnere
Per accendere e spegnere manualmente il collega-
mento Bluetooth, selezionate l’opzione desiderata e
confermate la vostra scelta premendo il tasto multifunzione (2). Nel display appare “RE-CONN:1 >>>>“ oppure
“DIS-CONN:1 >>>>”.
• A ANSWER ON/A ANSWER OFF
(Accettazione automatica della chiamata)
A ANSWER ON: L’apparecchio accetta automati-
A ANSWER OFF: L’accettazione automatica della
• PHONE VOL
Selezionate qui il volume dello squillo all’arrivo di una
chiamata.
• CONTRAST (contrasto)
Impostate qui il contrasto del display.
• FORMAT 24 H/FORMAT 12 H
Selezionate qui il formato di visualizzazione dell’ora.
• SET
Per impostare l’ora manualmente, procedete come qui
di seguito descritto:
Impostare i minuti: girate il tasto multifunzione (2) in
Impostare l’ora: girate il tasto multifunzione (2) in
Avvertenza: se si riceve un’emittente radio che trasmet-
te dati RDS, l’ora si imposta automaticamente.
• DISTANT/LOCAL
(selezionabile solo nel funzionamento radio)
La radio può ricevere dati RDS EON. Con l’espressione
„EON” si intende la trasmissione di ulteriori informazioni
in merito all’emittente nell’ambito di una catena di stazi-
camente tutte le chiamate in
entrata senza che voi dobbiate
premere il tasto TRANSFER
(accettazione). L’accettazione
automatica avviene dopo 3 squilli
circa.
chiamata è inattiva.
senso orario.
senso antiorario.
61
ITALIANO
05-AR 736 CD_MP3_NEU 61 18.09.2006, 11:01:57 Uhr
Page 62

ITALIANO
oni radio, come nel caso di WDR. Nel caso specifi co di
un annuncio sul traffi co (TA) nell’ambito di una catena di
stazioni radio, si passa da una emittente che non trasmette notiziari radiofonici sul traffi co alla corrispondente
stazione radio con trasmissione di notiziari sul traffi co
della catena di stazioni radio stesse.
Per la ricezione delle informazioni sul traffi co urbano
o interurbano si può scegliere tra la modalità LOCAL
ovvero DISTANT.
LOCAL: attraverso questa funzione si
Modalità DISTANT: in questa modalità, la commu-
• REGION ON/REGION OFF
(Effi cace solo se la funzione AF è attiva)
In determinati momenti alcune emittenti ripartiscono il
programma in programmi regionali con diverso contenuto.
REGION ON: Ora la modalità regionale è attiva.
Nota: il display ha una capacità limitata. Può pertanto
accadere che nella modalità di visualizzazione doppia
singoli segmenti del display siano cancellati.
Attraverso la funzione REGION ON si impedisce la
ITALIANO
radio si sintonizzi su frequenze alternative che abbiano
un altro contenuto di programma regionale.
REGION OFF: Ora la modalità regionale viene
• VOL PGM
Con la manopola multifunzioni (2) si può selezionare il
volume di accensione desiderato.
• BEEP TONE ON/BEEP TONE OFF
(segnale acustico di conferma)
Si può selezionare il suono di conferma di quando si
premono i tasti in 2 generi.
BEEP TONE ON: il segnale acustico di conferma
62
evita la sintonizzazione su un
collegamento EON caratterizzato
da un livello di segnale troppo
debole. La radio non si sintonizza
su questa emittente e l’utente
non avverte alcun disturbo. Nel
display appare l‘ indicazione
„LOC“.
tazione di tipo EONTA tenta di
ricevere le informazioni EONTA
da un’emittente raggiungibile e
di ottimizzare, in questo modo, la
qualità della ricezione.
L‘ indicazione „LOC“ nel display
si spegne.
disattivata. Il codice identifi cativo
di programma (PI) del programma regionale viene ignorato durante la ricerca di una frequenza
alternativa (AF) o di un codice
identifi cativo di programma (PI).
viene generato ogniqualvolta si
azioni un tasto.
BEEP TONE OFF: il segnale acustico di conferma è
/ Tasto on/off / mute
4.
a) Per accendere l’apparecchio premere questo tasto. Nel
display appare WELCOME. Per spegnere l’apparecchio
tenere premuto questo tasto.
b) Premere il tasto
te il volume. Nel display lampeggia MUTE. Premere di
nuovo questo tasto per ripristinare il volume. Questa
funzione può essere annullata anche azionando il tasto
multifunzione.
5. Ta sto M / TRANSFER (MODE/accettazione chiamata)
a) Premete questo tasto per selezionare il lettore CD, la
modalità radio eccetera.
b) Premete questo tasto per accettare la chiamata all’arrivo
di una telefonata.
c) Tenete questo tasto premuto durante una chiamata
per trasferirla di nuovo sul vostro telefono cellulare.
Premendolo un’altra volta, la chiamata viene di nuovo
trasmessa all’autoradio. In entrambi i casi appare
“TRANSFER “ nel display.
6. Tasto B / CLEAR (• BAND/• ERASE/• SEARCH)
a) Modalità radio
Premete brevemente il tasto B. per commutare tra i
livelli FM (UKW). La denominazione del corrispettivo
livello FM viene visualizzata nel display LCD.
b) Tasto B per le funzioni di ricerca nella modalità MP3:
Se nella creazione di un CD in formato MP3 sono stati
inseriti i corrispettivi dati, questi si possono cercare
mediante le seguenti funzioni:
a) Inserimento diretto del numero del titolo per i CD
con formato MP3:
1. Premere 1x il tasto B. Nel display appare
„NUMBER ”.
2. Con l’aiuto della manopola multifunzioni (2) si
può selezionare il numero di titolo desiderato.
Nel display appare “No.” e il corrispettivo
numero di track.
3. Premete infi ne per un attimo il tasto multifunzione (2) per riprodurre il track selezionato. ne del
brano corrispondente al titolo selezionato.
b) Scelta cartella nei CD in formato MP3:
1. Premere 2x il tasto B. Nel display appare
„NAVIGATE “.
2. Con l’aiuto della manopola multifunzioni (2)
avete ora la possibilità di selezionare le varie
cartelle sul CD.
3. Confermate la cartella selezionata premendo
il tasto multifunzione (2). Viene visualizzato il
primo titolo della cartella selezionata.
4. Girando la manopola multifunzioni (2) potete
selezionare un titolo all’interno di una cartella.
disattivato.
/ per sopprimere temporaneamen-
05-AR 736 CD_MP3_NEU 62 18.09.2006, 11:01:59 Uhr
Page 63

ITALIANO
5. Premete infi ne per un attimo il tasto multifunzione (2) per riprodurre il track selezionato.
Nota
:
• Se sul CD MP3 non ci sono raccoglitori, nel
display appare „ROOT“.
• La riproduzione di CD creati dall’utente non può
essere garantita dalla molteplicità di software
disponibili e media CD.
• Durante la riproduzione normale di CD nel
formato MP3 con i tasti
(17/16) si può passare alla cartella successiva o
precedente.
• Nota: Se l’informazione Tag ID-3 è memorizzata, appare nel display come testo scorrevole.
c) Nel funzionamento telefono:
Per cancellare il numero di telefono immesso:
d) Nel modo USB:
Per cancellare il track attuale:
1. Tenete premuto il tasto B. Nel display compare
l’indicazione “ERASE” e il track attuale (p.es.
002).
2. Premete il tasto multifunzione per confermare
(nel display compare ERASE ). Premete di
nuovo il tasto multifunzione (2) per cancellare il
track (nel display compare ERASE ).
Nota: Se non volete cancellare il track, girate il tasto
multifunzione (2) dopo aver premuto la prima volta
(nel display compare ERASE X). Per confermare
premete il tasto multifunzione (2).
7./8.
Tasti 왘왘I / I왗왗 TRACK UP/DOWN /
AUTO/MANUAL SEEK
Nella modalità CD:
per avanzare o tornare indietro, premere brevemente il
tasto 왘왘I oppure I왗왗. Per poter scorrere i titoli, tenere
premuto il tasto direzionale 왘왘I oppure I왗왗.
Nella modalità radio:
Premete per un attimo i tasti 왘왘I / I왗왗 e la radio si
fermerà alla prossima stazione raggiungibile (nel display
appare AUTO SEEK). Finché si tengono premuti i tasti
왘왘
I / I왗왗, la ricerca nella banda di frequenza continua
(Nel display appare MANUAL SEEK).
9. Tasto di espulsione
Premere questo pulsante per estrarre il CD.
10. Apertura per CD
Con cautela inserite il CD con il lato della dicitura rivolto
verso l‘alto nella fessura CD fi nché l‘apparecchio lo ritrae da
sé. Nel display appare „READING“.
Nota: A causa della molteplicità di software disponibili e di
media CD, la riproduzione di CD creati dall’utente non può
essere garantita.
왖 ovvero 왔
Riproduzione di musica in formato MP3
Con questo apparecchio è possibile riprodurre brani musicali in formato MP3. L’apparecchio supporta inoltre i tipi di CD
correnti: CD, CD-RW, CD-R.
Con questo apparecchio si possono ascoltare CD MP3.
Su questi CD si possono compattare fi no a 200 brani.
L’apparecchio riconosce automaticamente un CD MP3 (nel
display compare MP3).
Nota: Se l’informazione Tag ID-3 è memorizzata, appare nel
display come testo scorrevole.
Osservare:
Esistono diversi metodi di copiatura e di compressione, così
come esistono differenze nella qualità di CD e copie di CD.
Inoltre l’ industria della musica non fa uso di standard ben
defi niti (protezione contro copie).
Per queste ragioni ci possono essere, in casi estremi,
problemi con la riproduzione di CD e MP3. Questo fatto non
è dovuto ad un funzionamento scorretto dell’ apparecchio.
11. Tasto AS/PS / ID3
(memorizzazione automatica dell’emittente)
Nella modalità radio:
a) Funzione di memoria:
Per attivare la funzione di memorizzazione automatica
dell’emittente, è necessario premere il tasto AS/PS /
ID3 per più di un secondo. Nel display appare „AUTO
STORE“.
L’apparecchio ricerca il livello di segnale con maggiore
intensità all’interno della banda di frequenza corrente,
per esempio FM 1, sino alla conclusione del ciclo di
ricerca stesso. Le sei emittenti caratterizzate da segnale
a intensità più elevata vengono abbinate alle corrispondenti posizioni di memoria.
Le emittenti ora memorizzate vengono avviate per ca.
5 secondi e poi viene impostata l’emittente della prima
posizione di memoria.
Se si desidera cercare ancora altre emittenti nella
banda FM, premere il tasto B per passare a FM 2 o
FM 3. Tenere di nuovo premuto per più di un secondo il
tasto AS/PS / ID3 per dare avvio alla successiva ricerca.
b) Funzione Intro-Scan:
Dopo aver premuto per un attimo il tasto AS/PS / ID3,
la radio dà avvio a tutte le emittenti pre-impostate della
banda di frequenza attuale.
Nota: La funzione Intro termina automaticamente
all’emittente della prima posizione di memoria.
Nella modalità MP3:
Premendo il tasto AS/PS / ID3, nel display appare il titolo di
cartella, canzone, interprete e album (purché sul CD siano
masterizzate informazioni ID3 Tag ).
ITALIANO
63
05-AR 736 CD_MP3_NEU 63 18.09.2006, 11:02:01 Uhr
Page 64

ITALIANO
12. -17.
Tasti di stazione (1–6). Emittente preselezionata e pulsanti
1PAU-, 2INT-, 3RPT-, 4RDM in modalità con lettore CD
a) Modalità radio
Azionando brevemente questi pulsanti è possibile
selezionare direttamente una stazione radio precedentemente impostata. Qualora questi pulsanti vengano
premuti per più di un secondo, l’emittente correntemente impostata viene memorizzata in corrispondenza del
tasto di stazione selezionato.
b) Modalità CD/MP3
• Premere il tasto 1PAU allo scopo di interrompere
la riproduzione del CD (funzione di pausa). Per avviare nuovamente la riproduzione del CD, azionare
nuovamente questo pulsante.
• Premere il tasto 2INT. Ognuno dei brani del CD
viene riprodotto per 10 secondi. Per interrompere la
ricerca, azionare nuovamente questo pulsante. Viene in questo modo riprodotto il brano corrispondente
al titolo correntemente selezionato.
• Premere il tasto 3RPT. Il brano corrispondente al
titolo corrente viene ripetuto. Per annullare questa
funzione, premere nuovamente questo pulsante.
• Premere il tasto 4RDM. I brani corrispondenti ai
titoli del CD vengono riprodotti in una sequenza
casuale. Per annullare questa funzione, premere
nuovamente questo pulsante.
18. Tasto REC/ TA • COPY
a) TA Traffi c Annonuncement (commutazione prioritaria
per le informazioni radiofoniche sul traffi co)
La funzione TA viene attivata premendo brevemente
il tasto REC/TA • COPY ed è segnalata sul display
attraverso il simbolo TA corrispondente.
Quando si riceve un’emittente FM che trasmette perio-
dicamente informazioni aggiornate sulle condizioni del
traffi co, il simbolo TP si illumina sul display.
ITALIANO
Nel caso in cui la funzione TA sia attivata, la trasmissi-
one delle informazioni sul traffi co UKW/FM interrompe
automaticamente la modalità CD (Nel display appare la
parola TRAFFIC INFO).
Una volta terminata la diffusione delle informazioni
sul traffi co, viene ripreso il programma impostato in
precedenza.
Interruzione della funzione TA:
Qualora si desideri interrompere l’ascolto delle
informazioni attuali sulle condizioni del traffi co, azionare
brevemente il tasto REC/TA • COPY. La modalità TA
resta tuttavia attiva.
Avvertenza: Se non si ricevono le informazioni sul
traffi co, nel display appare brevemente la sigla „LOST
TP TA”.
b) Funzione registrazione
(disponibile solo durante il modo CD)
Avete la possibilità di registrare CD/MP3 CD su USB.
1. A tal fi ne, per mezzo del cavo dell’adattatore,
collegate un supporto di memorizzazione USB al
corrispettivo collegamento (21).
왘왘
2. Con i tasti
desiderato che volete registrare.
3. Tenete premuto il tasto REC/TA • COPY (Nel display
appare REC USB).
4. Per confermare premete il tasto multifunzione (2).
La registrazione del track attuale sul supporto di
memorizzazione USB inizia (Nel display appare
REC >>>>).
Nota: Nei CD in formato MP3 il procedimento di
copiatura viene visualizzato in percentuale. Invece
nei CD audio la registrazione viene effettuata in
tempo reale.
5. Quando la registrazione è terminata, per i CD in
MP3 nel display appare „100%
„REC “. Infi ne l’apparecchio passa alla riproduzione normale.
Nota: Potete registrare sempre e solo il track attuale
(no CD completi). Per registrare un altro track su un
supporto di memorizzazione USB, procedete come qui
di seguito descritto.
19. Tasto PTY/IX-BASS
a) Accendere e spegnere della funzione IX-BASS. Tenere
premuto il tasto PTY/IX-BASS per 3 secondi ca.
Con la funzione IX-BASS si espandono le catratteristi-
che del suono quando il volume è basso; si aumentano
così gli alti e bassi.
b) Modalità radio:
PTY Selezione del tipo di programma
Oltre al nome dell’emittente alcune emittenti FM
trasmettono anche informazioni in merito al tipo di
programma in oggetto. Queste informazioni possono
essere visualizzate dalla propria autoradio.
Questi tipi di programma possono essere, per esempio,
i seguenti:
SPORT NEWS POP CLASSICS
Mediante la funzione PTY è possibile selezionare in
modo mirato delle emittenti relative a un determinato
tipo di programma.
Premete ripetutamente il tasto PTY/IX-BASS per selezi-
onare la scelta PTY. Confermate la selezione premendo
il tasto multifunzione (2). Nel display (7) compare infi ne
per un attimo l‘indicazione „PTY SEEK“.
Quando si seleziona PTY, la radio avvia la ricerca delle
corrispondenti informazioni PTY. Questa operazioni
continua fi nché suddette informazioni PTY non vengano
effettivamente trovate.
Nel caso in cui il tipo di programma ricercato non venga
trovato, il display visualizza il messaggio „NO MATCH
PTY“.
I / I왗왗 (7/8) selezionate il track
“ e per i CD audio
64
05-AR 736 CD_MP3_NEU 64 18.09.2006, 11:02:03 Uhr
Page 65

ITALIANO
Qualora l’informazione PTY ricercata non sia più
disponibile, la funzione PTY passa automaticamente
alla modalità normale.
20. Tasto AF
AF (frequenze alternative) – Funzione REG
AF è una funzione che opera con l’ausilio del sistema RDS
(Radio Data System) e può essere utilizzata esclusivamente
per le emittenti FM. L’apparecchio ricerca in background
la frequenza dell’emittente impostanza che può essere
ricevuta nel modo migliore.
Quando si sleziona la funzione AF, la radio controlla
costantemente l’intensità del segnale della frequenza
AF. L’intervallo di prova per ogni frequenza AF dipende
dall’intensità del segnale stesso dell’emittente corrente e
può variare tra i due minuti rilevabili nel caso di emittenti
con segnale intenso e i due secondi nel caso di emittenti dal
segnale debole. Ogniqualvolta la nuova frequenza AF abbia
un segnale più forte rispetto a quelo della stazione impostata, l’apparecchio si sintonizza per un breve intervallo di
tempo su questa frequenza, e sul display viene visualizzato
il messaggio „NEW FREQUENCY“ per uno o due secondi.
Poiché il tempo della commutazione silenziosa durante il
cambio di frequenza e il tempo di controllo sono molto brevi,
questa operazione non viene pressoché percepita durante il
normale programma.
La funzione AF viene attivata premendo brevemente il
pulsante A.F, mentre lo stato della funzione AF è visualizzato sul display attraverso un simbolo AF.
• Se il simbolo AF viene visualizzato sul display, la
funzione AF è attiva e vengono ricevuti dati RDS.
• Se il simbolo AF lampeggia sul display, la funzione AF è
selezionata, ma non è possibile ricevere alcun segnale
RDS.
• Per disattivare nuovamente questa funzione, azionare
ancora una volta il tasto A.F. Il simbolo AF presente sul
display si spegne.
21. Collegamento USB
Questo apparecchio è stato sviluppato secondo lo standard
attuale degli sviluppi tecnici nel settore USB. Gran parte dei
supporti di memorizzazione USB di ogni tipo che oggigiorno
vengono offerti non consentono purtroppo di garantire una
compatibilità completa con tutti i supporti di memorizzazione
USB. Per questa ragione in rari casi possono presentarsi
problemi nella riproduzione di supporti di memoria USB.
Questo fatto non è dovuto ad un funzionamento scorretto
dell’ apparecchio.
1. Collegate un supporto di memorizzazione USB per
mezzo del cavo dell’adattatore al corrispettivo collegamento (Nel display appare USB HOST). I dati vengono
riprodotti automaticamente.
2. Per cercare/selezionare determinati track procedere
come descritto al punto 6 b) (tasto
ricerca nel modo MP3) e punto 12-17 b).
B
come funzione di
22. Display LCD (display a cristalli liquidi)
23. Pulsante RESET (senza immagine)
Questo tasto si trova nell’angolo inferiore destro dopo aver
tolto il pannello di comando.
Oscillazioni di tensione nella corrente di bordo del vostro
veicolo possono far sì che il processore di comando della
vostra radio sia “andato in tilt”. Non si tratta di un guasto
dell’apparecchio! Azionando questo tasto con un oggetto
acuminato l’apparecchio si riavvia (reset).
Telefonare via Bluetooth
Bluetooth è una tecnologia per il collegamento wireless via radio
di apparecchi a breve distanza. Attualmente la tecnologia Bluetooth viene usata soprattutto per il vivavoce di telefoni cellulari.
Consente al guidatore di fare una chiamata durante il viaggio
attraverso il suo telefono cellulare senza doverlo tenere in mano.
Questo apparecchio vi consente di impiegare un telefono cellulare idoneo per Bluetooth. Il raggio di funzionamento è limitato
a 3 metri circa.
Per un‘ottima qualità del suono durante le telefonate
Non impostare il volume troppo in alto. La conseguenza potrebbe essere una reazione acustica (fi schio) dagli altoparlanti.
Nota: L’impostazione del volume dipende dalla posizione di
installazione degli altoparlanti rispetto al microfono e non può
essere già indicata.
Registrare apparecchi
Prima di poter telefonare tramite l’autoradio, dovete registrare gli
apparecchi tra loro.
1. Tenete premuto il tasto DISP/MENU (3) (nel display appare
PAIRING:1 ).
2. Per confermare premete il tasto multifunzione (2) (Nel
display appare PAIRING:1 >>>>).
3. Registrate l’autoradio nel vostro telefono cellulare come
descritto nelle istruzioni per l’uso del vostro telefono cellulare. Come selezione appare nel vostro telefono cellulare
l’apparecchio “BT60“.
4. Ora inserite nel vostro telefono cellulare la password “1234”.
Ora l’autoradio è registrata nel vostro telefono cellulare.
5. Se la registrazione è stata effettuata con successo, nel
display dell’autoradio appare „PAIRING:1 “ e il nome del
telefono cellulare.
Avvertenze:
• Se la registrazione non è stata effettuata con successo, nel
display dell’autoradio appare “PAIRING:1 X”.
• A seconda del produttore del telefono cellulare, dovete
ripetere la registrazione (PAIRING) per registrare il vostro
telefono cellulare nell’autoradio.
• Non si può garantire la compatibilità di Bluetooth per i
telefoni cellulari futuri.
• Per garantire un collegamento ottimale, fate attenzione che
la batteria del vostro telefono cellulare sia completamente
carica.
ITALIANO
65
05-AR 736 CD_MP3_NEU 65 18.09.2006, 11:02:04 Uhr
Page 66

ITALIANO
• Alcune marche di telefono cellulare dispongono di una
modalità di risparmio energetico. Disattivate la modalità
di risparmio energetico perché altrimenti possono esserci
problemi telefonando mediante Bluetooth.
• Per poter effettuare una chiamata in entrata o in uscita,
Bluetooth deve rimanere attivata nel vostro telefono cellulare. Osservate anche le istruzioni d’uso del vostro telefono
cellulare.
• Fate attenzione a parlare in direzione del microfono
incorporato. Il collegamento di un microfono esterno non è
possibile.
Chiamate in uscita
1. Premete brevemente il tasto multifunzione (2) (Nel display
appare „
2. Per immettere il numero di telefono che si desidera chiamare, girate il tasto multifunzione fi nché compare la prima cifra
desiderata. Premete di nuovo brevemente il tasto multifunzione (2) per confermare la cifra. Per le altre cifre ripetete
queste sequenze fi nché il numero di telefono è stato inserito
per intero (viene visualizzato nel display dell’autoradio).
Avvertenza: Se una o più cifre non sono state inserite
correttamente, potete cancellare le cifre con il tasto B /
CLEAR (6).
3. Per chiamare il numero desiderato, tenete infi ne premuto il
tasto multifunzione (2) fi nché nel display appare il messaggio „CALLING >>>>“.
4. Per chiudere la chiamata premete il tasto
Avvertenza: per chiamare i numeri di telefono inseriti, potete
azionare anche il tasto M / TRANSFER (5).
Ripetizione del numero selezionato
L’apparecchio memorizza gli ultimi 9 numeri chiamati. Per
chiamare questi numeri, procedete come qui di seguito descritto:
1. Premete brevemente il tasto multifunzione (2) (Nel display
appare „ “).
ITALIANO
2. Tenete infi ne premuto il tasto multifunzione (2). L’ultimo
numero selezionato viene visualizzato nel display.
3. Girando la manopola multifunzioni (2) potete selezionare
uno degli ultimi numeri chiamati.
4. Per chiamare il numero desiderato, tenete infi ne premuto il
tasto multifunzione (2) fi nché nel display appare il messaggio „CALLING >>>>“.
5. Per chiudere la chiamata premete il tasto B / CLEAR (6).
“).
B
/ CLEAR (6).
Avvertenza:
• Avete di nuovo la possibilità di trasmettere la chiamata sul
vostro telefono cellulare. A tal fi ne tenete premuto il tasto
M
/ TRANSFER (5) (nel display appare “TRANSFER
“). L’autoradio attiva il funzionamento MUTE. Tenendo
premuto questo tasto un’altra volta, la chiamata viene di
nuovo trasmessa all’autoradio.
• Per rifi utare una chiamata in arrivo, premete il tasto B /
CLEAR (6).
Dati tecnici
Generalità
Tensione di rete.............................................................DC 12 V
Consumo di corrente ....................................................7 A max.
Potenza ............................................................4 x 60 W PMPO
Ambito FM
Ambito di frequenza.................................87,5 MHz - 108,0 MHz
Sensibilità utile...................................................................15 dB
Frequenza I.F...............................................................10,7 MHz
Lettore CD
Sistema..........................................................Sistema audio CD
CD utilizzabili................................. CD/CD-R/CD-RW/MP3 Disk
Velocità di trasmissione riproducibili....................32 - 320 kBit/s
Numero di bit di quantifi cazione ........................................1 bit.
Formato del segnale..................... Frequenza modello 44,1 kHz
Rapporto segnale-disturbo ................................... 50 dB (1 kHz)
Numero di canali..................................................2 canali stereo
Dimensioni dell’alloggiamento................... 178 L x 50 H x 157 P
Questo apparecchio è stato controllato sulla base di tutte le
direttive CE attuali in vigore in questo settore, quali per esempio
la normativa in materia di compatibilità elettromagnetica e
la direttiva in materia di bassa tensione, ed è stato costruito
conformemente alle norme di sicurezza più moderne.
Con riserva di apportare modifi che tecniche.
Chiamate in entrata
Nelle chiamate in entrata, dagli altoparlanti risuona uno squillo
e se il chiamante dispone di un telefono con CLIP “Calling Line
Identifi cation Presentation (trasmissione del numero chiaman-
te)“, nel display dell’autoradio appare il numero del chiamante.
Altrimenti nel display compare l’indicazione “PHONE IN”.
1. Per accettare una chiamata in arrivo, azionate il tasto M /
TRANSFER (5). Sentirete il chiamante attraverso gli
altoparlanti nella vostra auto.
2. Per chiudere la chiamata premete il tasto B / CLEAR (6).
66
05-AR 736 CD_MP3_NEU 66 18.09.2006, 11:02:06 Uhr
Page 67

ITALIANO
Eliminazione delle anomalie
Prima di esaminare la lista di riscontro, completare in primo luogo l’allacciamento. Nel caso in cui vi siano ancora domande in
seguito alla verifi ca sulla base della lista di riscontro, si consiglia
di rivolgersi al centro di assistenza tecnica più vicino.
Anomalie Causa Soluzione
Fischio proveniente
dagli altoparlanti.
I CD´s vengono inseriti
solo fi no a metà nel
vano CD.
Il display visualizza
„READ ERR“.
Non è possibile selezionare il CD tramite il
tasto MODE.
Dopo l’inserimento
nell’apparecchio il CD
non si avvia.
Il CD salta. La superfi cie della
Nessuna funzione. Il sistemadi accensione
Reazione acustica. Non impostare il
Le viti e la sicura per
il trasporto non sono
stati rimossi.
Il CD non è inserito
correttamente.
Non c’è nessun CD
inserito.
Il regolatore del volume
è impostato su un
valore troppo basso.
Gli allacciamenti non
sono stati effettuati in
modo corretto.
strada aspra.
L’apparecchio non è
stato montato in modo
saldo.
Il CD è difettoso. Provare con un
Il CD è sporco. Pulire il CD.
Eventualmente
l’apparecchio è montato troppo inclinato nel
veicolo.
è disattivato.
Una o più sicure sono
fuse.
volume troppo in alto.
Rimuovere le viti e la
sicura per il trasporto.
Inserire il CD correttamente.
Inserire un CD.
Impostare un valore
più elevato per il regolatore del volume.
Controllare il
collegamento da +12V
e il collegamento di
massa.
Prima di mettere in funzione il CD attendere
che la strada diventi
piana.
Montare l’apparecchio
saldamente.Accertarsi
che venga utilizzato
il sistema di fi ssaggio
posteriore nel caso
in cui il veicolo
non disponga di
supporti appropriati
per la parte posteriore
dell’apparecchio.
altro CD. Qualora
quest’ultimo non
presenti anomalie,
il CD precedente
è probabilmente
danneggiato.
Non superare l’angolo
di inclinazione max. di
20° gradi!
Ruotare la chiave di
accensione su „ON“
oppure „ACC“.
Sostituire il dispositivo
di sicurezza con un
altro da 15 A.
Anomalie Causa Soluzione
Non è possibile accendere l’apparecchio
tramite l’accensione
on/off.
L’apparecchio non
funziona correttamente
(EJECT, LOAD, PLAY).
Non vi è alcuna
ricezione radio.
Pessima ricezione
radio.
Il display visualizza
„NO FILE“.
Il display visualizza
„MEMORY FULL“.
Pulizia dei CD
Avvertenza: non utilizzare solventi quali la benzina o
diluenti. I comuni detergenti o gli spray antistatici danneggiano
l’apparecchio.
Inserimento CD
Avvertenza: nel caso in cui nell’apposita apertura per CD sia
già presente un CD, si raccomanda di non tentare di inserire
un ulteriore CD. In caso contrario, si potrebbe danneggiare
l’apparecchio.
Collegamento errato
(ogni produttore di
automobili occupa il
collegamento ISO nel
veicolo diversamente).
Il microcomputer è stato disturbato da campi
elettromagnetici.
Il cavo dell’antenna
non è collegato.
Eventualmente il vostro
veicolo ha un’antenna
speciale (antenna
ad alimentazione
artifi ciale).
Il formato fi le sul CD
ovvero sul supporto
USB non viene
supportato.
Il supporto USB è
pieno.
Contattare la propria
offi cina o un esperto in
automobili per un adattatore di collegamento
specifi co per auto.
Estrarre il CD e
reinserirlo.
Disattivare
l’apparecchio e riattivarlo nuovamente.
Inserire correttamente
il cavo dell’antenna
nella presa corrispondente dell’apparecchio.
Contattare la propria
offi cina o un esperto
in automobili. (Per
“fabbricati di terzi” ci
sono scambi di alimentazione specifi ci ovvero
adattatori di tensione.)
Inserite un altro supporto USB o cancellate
alcuni fi le.
Utilizzo di un CD
Prima di attivare il lettore CD,
pulire il CD con un panno pulito
e privo di polvere. Tirare il CD
nel senso indicato dalla freccia.
Se si inserisce il CD con le
scritte rivolte verso il basso,
l’apparecchio può essere
danneggiato.
Inserire sempre i CD con
l’etichetta rivolta verso l’alto.
ITALIANO
67
05-AR 736 CD_MP3_NEU 67 18.09.2006, 11:02:08 Uhr
Page 68

ITALIANO
Toccare il CD
I CD devono essere afferrati
sempre sul bordo. Affi nché i CD
possano mantenersi puliti, non
afferrarli sulla superfi cie.
• Non incollare etichette o nastri adesivi sui CD.
• Non esporre i CD ai raggi solari o a fonti di calore quali,
per esempio, i tubi di riscaldamento. Non lasciarli inoltre in
auto, quando quest’ultima è parcheggiata al sole, poiché
si potrebbe verifi care un considerevole aumento della
temperatura.
• Controllare che tutti i CD non presentino crepe, graffi e
rigonfi amenti prima di riprodurli. I CD con tali danni eventualmente non possono essere riprodotti correttamente. Non
impiegare questi CD.
• Impiegare solo i CD rotondi comunemente in commercio
con un diametro di 12 cm! I CD con un diametro di 8 cm
o CD che hanno contorni, p.e. di farfalla o cuore, non si
prestano per la riproduzione. Pericolo di distruzione del CD
e dell’unità. Decliniamo ogni responsabilità per danni dovuti
a CD non idonei.
Signifi cato del simbolo „Eliminazione“
Salvaguardare l’ ambiente, gli elettrodomestici non vanno
eliminati come rifi uti domestici.
Per l’ eliminazione degli elettrodomestici, fare uso die posti di
raccolta previsti per questo tipo e porre quegli elettrodomestici
che non sono più in uso.
Si contribuisce così ad evitare un effetto potenziale sull’ ambiente e sulla salute, dovuto magari ad una eliminazione sbagliata.
Questo signifi ca un contributo personale alla riutilizzazione, al
riciclaggio e altre forme di utilizzazione di elettrodomestici ed
apparecchi elettronici usati.
Si possono trovare le corrispondenti informazioni sugli appositi
luoghi di raccolta, nelle amministrazioni die comuni.
Garanzia
Per l’apparecchio da noi messo in commercio ci assumiamo una
garanzia di 24 mesi dalla data di acquisto (scontrino).
Durante la garanzia noi ci impegniamo ad eliminare gratuitamente i guasti dell’apparecchio o degli accessori, dovuti a difetti
di materiale o di fabbricazione, riparandoli o, a nostra discrezione, sostituendoli. Le prestazioni in garanzia danno luogo a una
proroga della garanzia né danno diritto ad una nuova garanzia!
Per la garanzia è suffi ciente lo scontrino di acquisto. Senza
questo scontrino non sussiste il diritto né ad una sostituzione né
ad una riparazione gratuita.
ITALIANO
Nel caso si ricorra alla garanzia, restituire al rivenditore
l’apparecchio completo in ogni sua parte, nell’imballaggio
originale unitamente allo scontrino.
La riparazione di pezzi d’uso ovvero soggetti a logoramento
come anche operazioni di pulizia e manutenzione o la sostituzione di pezzi soggetti a logoramento non rientrano nella garanzia
e quindi sono a pagamento!
La garanzia si annulla nel caso di intervento da parte di terzi.
Dopo la garanzia
Al termine della garanzia le riparazioni possono essere eseguite
dietro pagamento dal corrispettivo negozio specializzato o
servizio riparazioni.
68
05-AR 736 CD_MP3_NEU 68 18.09.2006, 11:02:10 Uhr
Page 69

ITALIANO
Elenco tematico - Indice
A
Accensione.................................................................................62
AF tasto......................................................................................65
Allacciamento.............................................................................60
AS tasto......................................................................................63
Avvertenze di sicurezza.............................................................59
Avvertenze per l’uso...................................................................60
B
B (BAND) tasto...........................................................................62
BEEP (suono di conferma) ........................................................62
Bluetooth....................................................................................65
C
CD uso ......................................................................................67
Consigli per l’installazione..........................................................59
Impostare il volume....................................................................61
L
LOC (LOCAL) .............................................................................61
M
Manopola multifunzioni ..............................................................61
Montaggio (avvertenze di sicurezza).........................................59
Mute ..........................................................................................62
O
Ora ............................................................................................61
P
PAU (Play / Pause) tasto ...........................................................64
PS tasto .....................................................................................63
PTY tasto ..................................................................................64
Dati tecnici..................................................................................66
D
DISP tasto..................................................................................61
DSP (impostazione equalizer) ...................................................61
E
Eliminazione delle anomalie ......................................................67
Espulsione CD ...........................................................................63
Espulsione tasto.........................................................................63
F
Funzionamento .........................................................................61
Funzione Intro (v. tasto PS)........................................................63
G
Garanzia.....................................................................................68
I
ID3 tasto.....................................................................................63
Importanti informazioni aggiuntive per il montaggio..................60
Informazioni sul traffi co (v. TA)...................................................64
Installazione ...............................................................................59
INTRO (2INT).............................................................................64
RANDOM (4RDM) (riproduzione casuale) ................................64
REC (registrazione) tasto...........................................................64
REGION (Regionale) ................................................................62
REPEAT (3RPT) (ripetere).........................................................64
RESET pulsante ........................................................................61
Ripetere (3 RPT)........................................................................64
Riproduzione casuale (4RDM)...................................................64
Sicurezza della circolazione.......................................................59
Spegnere....................................................................................62
TA (informazioni sul traffi co).......................................................64
Telefonare ..................................................................................65
Togliere il pezzo comandi...........................................................61
TRANSFER tasto.......................................................................62
USB collegamento .....................................................................65
Utilizzo di un CD.........................................................................67
Volume all’accensione ...............................................................62
Volume di accensione................................................................62
R
S
T
U
V
ITALIANO
69
05-AR 736 CD_MP3_NEU 69 18.09.2006, 11:02:11 Uhr
Page 70

ENGLISH
Safety Information
Read the operating instructions carefully before putting the appliance into operation and keep the instructions including the warranty, the receipt and, if possible, the box with the internal packing.
• Use the device only for the intended purpose.
• The device should be installed in such a way that existing
ventilation holes are not covered.
• Never open the housing of the device. Incorrect repairs can
constitute a considerable risk for the user. If the device is
damaged it should not be used, but repaired by a specialist.
These symbols may be found on the machine and are intended
to indicate the following:
The symbol with an exclamation mark should advise
the user of important operation or maintenance
instructions in the accompanying documentation.
Devices bearing this symbol work with a „class 1
laser“ for tracing the CD. The built-in safety switches
should prevent the user being exposed to dangerous laser light, which is invisible to the human eye,
when the CD compartment is opened.
Under no circumstances should these safety switches be
bypassed or manipulated, as this could result in a danger of
exposure to the laser light.
Children
• In order to ensure your children‘s safety, please keep all
packaging (plastic bags, boxes, polystyrene etc.) out of their
reach.
Caution! Do not allow small children to play with the foil as
there is a danger of suffocation!
Road Safety
• Road safety is of paramount importance. You should
therefore use your car radio at all times in such a way that
you are able to cope with the current traffi c situation.
• Please remember that at a speed of 30 mph (50 kph) you
travel 15 yards (14 metres) in one second.
• We advise you not to operate the radio in critical situations.
• It must be possible to hear the sirens of police and fi re
ENGLISH
brigade vehicles etc. from inside the vehicle in good time.
• When driving you should therefore not turn the radio volume
up excessively.
When installing and connecting the radio
please note
the following safety information.
• First disconnect the minus pole and then the plus pole of the
battery. (connection in the reverse order.)
Please note: Once the battery has been disconnected the
information is lost from all volatile memory. Please note the
safety information provided by the vehicle manufacturer.
• The main fuse must be installed as closely as possible
(not more than 30 cm away) to the plus pole of the battery
so that the car is protected from any cable fi re caused, for
example, by an accident. If the above is not complied with
the insurance protection no longer applies.
• The cross-section of the plus and minus cable must not
exceed 1.5 mm².
• When drilling holes please ensure that none of the vehicle
components are damaged.
Installation Tips:
• Cable protection sleeves protect cables against fraying on
sharp body parts.
• The insulation of the cables must not be damaged during
installation.
• It is essential to use the correct tools when installing car hi-fi .
Depending on the model, your vehicle may deviate from the
above description. We do not accept any liability for damage
caused by installation or connection errors or for consequential
damage.
Installation
Please install the car radio as shown below
a Nut
b Spring washer
c Plain washer
d Screw
e Mounting bracket
f Slide-in housing
g Threaded bolt
Note:
h Retaining screws during
transport (please remove
before installation)
I Extraction tool (spanner for
dismantling)
j Frame
First place the operating panel
in position on the right-hand
side and then lock it into place
on the left.
70
05-AR 736 CD_MP3_NEU 70 18.09.2006, 11:02:13 Uhr
Page 71

ENGLISH
Connection
Connect the device as shown in the diagram.
Loudspeaker,
front right
Grey/black
White/black
front left
rear right
Violet
Green
rear left
Violet/black
Green/black
Antenna connection
fuse
ISO connection
Red R
Chinch output
Black
Yellow
Earth
connection
Constant current
White L
Red
Ignition
Automatic antenna (Blue)
Grey
White
Loudspeaker,
Note:
• Do not attach the removable control panel until after connection of the cables.
• Please use loudspeakers with an impedance of 4 ohm.
• The loudspeaker cables must be unearthed.
• The signal connected via the cinch outputs is only played
back through the rear loudspeakers.
Important Information
for installing your carradio!
1. The screws (h) of the transport locking device should
be removed before installation, as otherwise the CD
cannot be inserted.
2. The device is designed for the minus pole of the battery,
which must be connected to the body of the vehicle. Please
check this before installation.
3. When installing/connecting your device please note that not
every vehicle is equipped with an “ISO connection“. In this
case we recommend the use of an ISO adapter specifi cally
designed for your vehicle.
Adapters are available from car accessory shops and/or
from your vehicle workshop.
4. Depending on the specifi c car type, different wiring connection of the „Duration +” wire (Constant current connection)
are available. (However, this is necessary for storing the
radio stations).
In order to guarantee all functions, installation in line with
these instructions is essential. In cases of doubt please
contact an authorised car workshop.
5. The angle of inclination when a car radio is installed must
not exceed 20°, as in the case of greater angles of inclination the function of the car radio (CD Player) can no longer be
guaranteed.
6. Depending on the specifi c car type, interferences can be
possibly arise during radio/CD operation. These interferences can avoided easily with an additional Interferences
fi lter. Your car radio is originally prepared with an Interference Filter already.
In these case, please contact your authorized car dealer.
7. When installing your radio please ensure that there is
enough space at the rear of the radio to ensure suffi cient
cooling.
8. For the antenna connection there are two different norms.
The fi rst of these is the old (50 ohm) version with a long protruding round contact on the vehicle and a round socket on
the radio end. The second is the ISO-standardised antenna
plug (150 ohm). Adapters for both formats are available from
accessory manufacturers and/or your car workshop.
Important information for VW/Audi vehicles: The active
antenna requires voltage on the shielding of the antenna
coaxial cable, without which reception is unsatisfactory. An
antenna adapter with phantom power supply will solve this
problem.
Operating Instructions
1. If the front control panel is removed while the radio or CD is
on, the device is automatically switched off.
2. If the interior of the vehicle becomes very hot, for example
after standing in direct sunlight for a prolonged period, do
not switch on the player until the inside of the vehicle has
cooled down a little after you have been driving for a few
minutes.
3. In order to keep the removable control panel in a safe place
you should always use the protective case provided.
4. Playback of CDs produced by the user cannot be guaranteed due to the large variety of software and CD media
available.
ENGLISH
71
05-AR 736 CD_MP3_NEU 71 18.09.2006, 11:02:14 Uhr
Page 72

ENGLISH
5. RESET Button (not shown): Any malfunctions (ERROR)
during operation can be corrected by pressing the RESET
button. the bottom right-hand corner. Due to voltage fl uctuations in your vehicle electrical system it is possible that the
control processor of your radio has „hung up“. This is not a
fault in the device! Press this button with a pointed object
to restart it (reset).
Operation
1. Button
Press the button to remove the front operating panel.
2. PRESS • ENTER AUDIO DIAL
Multifunction Button (Volume)
a) Turn: In the standard playback mode the multifunction
button is used for adjusting the volume.
b) Press briefl y: In order to access the input mode for
the telephone number. For further operation, please
follow the instructions in the section „Telephoning via
Bluetooth“.
c) Press for longer: In order to access the selection menu
for the sound mode. The letters „VOLUME“ appear in
the display for setting the volume. By briefl y pressing the
multifunction button you can now select the individual
menu items such as VOLUME (Volume), BASS (Bass),
TREBLE (Treble), BALANCE (Balance) and FADER
(Fade). The settings of the individual menu items are
changed by turning the multifunction button.
3. DISP/MENU Button (Display/Select)
a) Radio mode:
• When RDS data is being received, press this
button several times briefl y in order to bring up the
following display:
PS Name ➞ Time ➞ Frequency ➞ PTY
• If no RDS data is being received, the following is
shown:
Time ➞ PTY ➞ Frequency
Note: The display remains visible for approx. 5 seconds
before the device returns to the original display.
b) Press the DISP/MENU button for a longer time to
ENGLISH
access the selection menu:
• PAIRING
• RE-CONN / DIS-CONN
• A ANSWER ON / A ANSWER OFF
• PHONE VOL
• CONTRAST
• FORMAT 24H / FORMAT 12H
• SET
• DISTANT / LOCAL
• REGION ON / REGION OFF
• VOL PGM
• BEEP TONE ON / BEEP TONE OFF
Repeatedly pressing of the DISP/MENU button now
brings up the individual menu items. The settings of
the individual menu items are changed by turning the
multifunction button (2).
• PAIRING:1 (Registering)
Before you can use a Bluetooth-capable mobile tele-
phone this fi rst has to be registered in the device (see
„Registering Devices“).
• RE-CONN:1/DIS-CONN:1
Using this function you can manually switch your
Bluetooth connection on and off.
RE-CONN:1 = switch on; DIS-CONN:1 = switch off
In order to manually switch the Bluetooth connection
on and off, select the desired option and confi rm your
selection by pressing the multifunction button (2). „RECONN:1 >>>>“ or „DIS-CONN:1 >>>>“ appears in the
display.
• A ANSWER ON/A ANSWER OFF
(Automatic call acceptance)
A ANSWER ON: The device automatically receives
all incoming calls without your
having to press the TRANSFER
button. The call is automatically
received after approximately
3 rings.
A ANSWER OFF: Automatic call acceptance is
switched off.
• PHONE VOL
Here you can choose the volume of the ringing tone
when a call is received.
• CONTRAST
Here you can adjust the contrast of the display.
• FORMAT 24 H/FORMAT 12 H
Here you can select the display format for the time.
• SET
In order to set the time manually, please proceed as
follows:
Adjusting
the minutes: Turn the multifunction button (2)
in a clockwise direction.
Adjusting
the hours: Turn the multifunction button (2)
in an anticlockwise direction.
Note: If a radio station is being received which transmits
RDS data, the time is set automatically.
• DISTANT/LOCAL (only available during radio operation)
Your radio can receive RDS EON data. The term
„EON“ signifi es the transmission of additional station
information within a station chain, e.g. WDR. If a traffi c
announcement (TA) is made within a station chain, the
radio switches from a station which does not transmit
traffi c announcements to one that does within the same
station chain.
72
05-AR 736 CD_MP3_NEU 72 18.09.2006, 11:02:16 Uhr
Page 73

ENGLISH
You can choose between the LOCAL and DISTANT
mode for local or long-distance traffi c news.
LOCAL: This function prevents switching
DISTANT Mode: In this mode the EONTA circuitry
• REGION ON/REGION OFF
(Only active if the AF function is switched on)
At certain times some stations divide up their program-
mes into regional programmes with varying content.
REGION ON: The regional mode is switched
Note: The display capacity is limited. It is possible
that in the double display mode some segments of the
display are deleted.
The function REGION ON prevents the radio from swit-
ching to alternative frequencies which have a different
regional programme content.
REGION OFF: The regional mode is switched
• VOL PGM
With the multifunction button (2) you can select the
desired switch-on volume.
• BEEP TONE ON/BEEP TONE OFF
(Confi rmation Beep)
You can select 2 different types of confi rmation beep
when a key is pressed.
BEEP TONE ON: The confi rmation beep is heard
BEEP TONE OFF: The confi rmation beep is swit-
4.
/ On/Off Button / Mute
a) Press this button to switch the device on. WELCOME
appears in the display. Keep this button pressed to
switch the device off.
b) Press the / button to switch off the loudspeakers for
a short period. The word MUTE fl ashes in the display.
Press this button again to cancel the mute function.
This function can also be cancelled by operating the
multifunction button.
to an EON station whose signal
is too weak. The radio does
not switch to this station and
the listener does not hear any
interference. The letters „LOC“
appeared in the display.
tries to receive the EONTA
information from any available
transmitter and thus improve
reception quality. The letters
„LOC“ disappear from the display.
on.
off. The programme identifi cation
(PI) of the regional programme is
ignored during the search for an
alternative frequency (AF) or a
programme identifi cation (PI).
whenever a button is pressed.
ched off.
5.
M
/ TRANSFER Button (MODE/Call Acceptance)
a) Press this button to select the CD player, radio mode
etc.
b) Press this button to accept a telephone call.
c) Keep this button pressed down during a call in order
to transfer it back to your mobile telephone. Keep this
button pressed down again to transfer the call back to
the car radio. In both cases „TRANSFER “ appears
in the display.
6. B / CLEAR Button (• BAND/• ERASE/• SEARCH)
a) Radio Operation
Press the B button briefl y to switch between the FM
levels. The designation of the corresponding FM level is
shown in the LCD display.
b) B button as a search function during MP3 playback:
If the corresponding data were created when a CD was
made in MP3 format, these can be searched for using
the following functions.
a) Direct input of the track number for CDs in MP3
format:
1. Press the B button once. The letters „NUMBER
“ appear in the display.
2. With the help of the multifunction button (2)
you can now select the desired track number.
„No.“ appears in the display together with the
corresponding track number.
3. Then press the multifunction button (2) briefl y in
order to play back the selected track. Immediately after this the selected track is played.
b) Folder selection for CDs in MP3 format:
1. Press the B button three times. The letters
„NAVIGATE “ appear in the display.
2. With the help of the multifunction button (2) it is
now possible to select the various folders on the
CD.
3. Confi rm the selected folder by briefl y pressing
the multifunction button (2). The fi rst track of the
selected folder is displayed.
4. By turning the multifunction button (2) you can
now select a track within a folder.
5. Then press the multifunction button (2) briefl y in
order to play back the selected track.
Note:
• If there are no folders on the MP3 CD, the word
„ROOT“ appears in the display.
• It is not possible to guarantee that CDs created
by the user can be played back due to the large
variety of software and CD media available.
• During normal playback from CDs in MP3
format the 왖 or 왔 buttons (17/16) can
be used to jump up or down one folder in each
case.
• Note: If ID-3 Tag information has been stored,
this runs across the display from left to right.
ENGLISH
73
05-AR 736 CD_MP3_NEU 73 18.09.2006, 11:02:18 Uhr
Page 74

ENGLISH
c) In Telephone Mode:
For deleting the telephone number entered.
d) In USB Mode:
For deleting the current track.
1. Keep the B button pressed down. The word
„ERASE“ appears in the display together with
the current track (e.g. 002).
2. Press the multifunction button to confi rm
(ERASE
multifunction button (2) again in order to delete
the track (ERASE appears in the display).
Note: If you do not want to delete the track, turn the
multifunction button (2) after pressing for the fi rst
time (ERASE X appears in the display). Press the
multifunction button (2) to confi rm.
7./8. 왘왘I / I왗왗 Buttons TRACK UP/DOWN /
AUTO/MANUAL SEEK
In CD mode:
Press the 왘왘I or I왗왗 button briefl y to jump forwards or
backwards. If you would like to scroll the titles of the tracks
keep the 왘왘I or I왗왗 arrow button pressed.
In radio mode:
Press the 왘왘I / I왗왗 buttons briefl y and the radio will stop
at the next radio station it fi nds (AUTO SEEK appears in the
display). As long as the 왘왘I / I왗왗 buttons are pressed
down the search function will continue in the frequency band
(The letters MANUAL SEEK appear in the display).
9. Eject Button
Press this button to eject the CD.
10. CD Slit
Insert the CD with the labelled side facing upwards gently
into the CD slot until the device draws in the CD automatically. The letters „READING“ appear in the display.
Note: Playback of CDs produced by the user cannot be
guaranteed due to the large variety of software and CD
media available.
Playing back Music in MP3 Format
With this device it is possible to play back pieces of music
ENGLISH
in MP3 format. The device also supports all standard CD
types: CD, CD-RW, CD-R.
This machine of is able to play MP3 CDs. Up to 200 tracks
can be compressed and stored on these CDs. Your machine
detects an MP3 CD automatically (MP3 appears in the
display).
Note: If ID-3 Tag has been stored, this runs across the
display from left to right.
Please note:
There are a number of different recording and compression
methods, as well as quality differences between CDs and
self-recorded CDs.
appears in the display). Press the
Furthermore, the music industry does not adhere to fi xed
standards (copy protection).
For these reasons it is possible that in rare cases there are
problems with the playback of CDs and MP3 CDs. This is
not a malfunction of the device.
11. AS/PS / ID3 Button (Autostore - Automatic Station Storage)
In radio mode:
a) Memory function :
Press the AS/PS / ID3 button for longer than one
second to activate automatic station storage. The letters
“AUTO STORE“ appear in the display.
The radio searches within the current frequency band,
e.g. FM 1, for the strongest signal level until the search
cycle has fi nished. The six strongest stations are then
allocated to the corresponding storage locations.
The stations that have now been stored are played for
approximately 5 seconds each and then the station of
the fi rst storage location is set.
If you would like to search for more stations in the FM
band, press the B button in order to change to the FM
2 or FM 3 band. Press the AS/PS / ID3 button again for
more than one second in order to start the continued
search.
b) Scan Function:
After the AS/PS / ID3 button has been pressed briefl y
the radio plays all the pre-set stations in the current
frequency band for a short time.
Note: The scan function ends automatically at the station
stored in the fi rst storage location.
In MP3 Mode:
Every time the AS/PS / ID3 button is pressed the folder,
track, artist and album title appear in the display (provided
that ID3 Tag information has been written on the CD).
12.-17.
Station buttons (1-6) of preselected stations and as
1PAU-, 2INT-, 3RPT-, 4RDM-buttons during CD operation
a) Radio Operation
Pressing these buttons briefl y directly selects a preset
radio station. If these buttons are pressed for more than
one second, the station currently being listened to is
stored under the selected station button.
b) CD Operation
• Press the 1PAU button to interrupt playback of the
CD (pause function). Press this button again to
continue listening to the CD/MP3.
• Press the 2INT button. Each track on the CD is
played for 10 seconds. Press this button again
to stop searching. The currently selected track is
played.
• Press the 3RPT button. The track currently being
played is repeated. Press this button again to cancel
this function.
74
05-AR 736 CD_MP3_NEU 74 18.09.2006, 11:02:22 Uhr
Page 75

ENGLISH
• Press the 4RDM button. The CD tracks are played
at random. Press this button again to cancel this
function.
18. REC/ TA • COPY Button
a) TA Traffi c Announcement
(Priority for Traffi c Information)
The TA function is activated by pressing the REC/TA
• COPY button briefl y. The TA symbol appears in the
display.
If an FM station is being received which transmits the
latest traffi c announcements from time to time, the TP
display lights up.
When the TA function is switched on, the FM traffi c
announcements automatically interrupt CD operation
(The word TRAFFIC INFO appears in the display).
After the traffi c announcement has fi nished, the
programme that was previously running is resumed.
Interruption of the TA Function:
If you would like to interrupt the current traffi c announcement, press the REC/TA • COPY button briefl y. This
does not switch off the TA mode.
Note: If no traffi c information is being received, „LOST
TP TA“ appears briefl y in the display.
b) Recording function
(only available during CD operation)
It is possible to record from CD/MP3 CD to USB.
1. To this purpose connect a USB storage medium
using an adapter cable to the corresponding
connection (21).
2. With the
3. Keep the REC/TA • COPY button pressed down
4. Press the multifunction button (2) to confi rm.
Note: In the case of MP3 CDs the copying status is
5. Once recording has fi nished, „100% “ appears
Note: It is always only possible to record the current
track (not an entire CD). In order to record a further
track on the USB storage medium, please proceed as
described above.
19. PTY/IX-BASS Button
a) Switching the IX-BASS function on and off. Keep the
PTY/IX-BASS button pressed down fur approximately 3
seconds.
왘왘
you would like to record.
(The letters REC USB appear in the display).
Recording of the current track on the USB storage
medium begins (The letters REC >>>> appear in
the display).
indicated by a percentage. In contrast, in the case of
audio CDs the recording is performed in real time.
in the display in the case of MP3 CDs, „REC “ in
the case of audio CDs. The device then returns to
normal playback.
I / I왗왗 buttons (7/8) select the track
When the volume is low the IX-BASS function expands
the sound characteristics by increasing the treble and
bass sounds.
b) Radio Operation:
PTY Selection of the Programme Type
Besides the station name, some FM stations also
transmit information on the type of programme. This
information can be displayed by your car radio.
Examples of such types of programme are:
SPORT NEWS POP CLASSICS
With the PTY function you can specifi cally select
stations transmitting a particular type of programme.
Press the PTY/IX-BASS button repeatedly to access the
PTY selection. Confi rm your selection with the multi-
function button (2). „PTY SEEK“ then appears briefl y in
the display.
When PTY has been selected the radio starts searching
for corresponding PTY information and stops when the
PTY information has been found.
If the programme type being searched for is not found,
„NO MATCH PTY“ appears in the display.
If the PTY information being searched for no longer
exists, the PTY function automatically switches to
normal mode.
20. AF Button
AF (Alternative Frequencies) REG Function
AF is a function that works with the help of RDS (Radio Data
System) and can only be used with FM stations. The radio
searches in the background for the best frequency reception
of the station that has been tuned into.
If the AF function has been switched on, the radio conti-
nuously tests the signal strength of the AF frequency. The
test interval for each AF frequency depends on the signal
strength of the current station and varies from a few minutes
in the case of a strong signal to a few seconds in the case of
weak signals. Whenever the new AF frequency is stronger
than the station that is currently tuned in, the radio switches to
this frequency for a short time and the message „NEW FREQUENCY“ is displayed for one to two seconds. As the mute
time during the frequency change and the test time is very
short, this is almost inaudible during the normal programme.
The AF function is activated by briefl y pressing the A.F but-
ton and the status of the AF function is shown in the display
by an AF symbol.
• If the AF symbol appears in the display, the AF function
is switched on and RDS transmission data is being
received.
• If the AF symbol fl ashes in the display, the AF function
is selected but no RDS signal can be received at the
moment.
• Press the A.F button again to switch off this function.
The AF symbol in the display goes off.
75
ENGLISH
05-AR 736 CD_MP3_NEU 75 18.09.2006, 11:02:24 Uhr
Page 76

ENGLISH
21. USB Connexion
This device has been developed in accordance with the
latest technical developments in the USB fi eld. Unfortunately
the large number of different types of USB storage media on
offer today makes it impossible to guarantee full compatibility with all USB storage media. For this reason there may be
problems in rare cases with playing back from USB storage
media. This is not a malfunction of the device.
1. Use the adapter cable to connect a USB storage medi-
um to the corresponding connection (The letters USB
HOST appear in the display). The data is played back
automatically.
2. In order to search for/select certain tracks proceed
as described under section 6 b) (
function in MP3 mode) and section 12-17 b).
22. LCD (liquid crystal display)
23. RESET Button (not shown)
With the control panel removed this button is to be found in
the bottom right-hand corner.
Due to voltage fl uctuations in your vehicle electrical system
it is possible that the control processor of your radio has
„hung up“. This is not a fault in the device! Press this
button with a pointed object to restart it (reset).
B
button as search
Telephoning via Bluetooth
Bluetooth technology is a wireless radio connection between
devices over a short distance. Currently Bluetooth technology is
mainly used for the hands-free operation of mobile telephones.
This enables the driver to conduct a conversation via his or
her mobile telephone while driving without having to hold the
telephone to his or her ear.
This device provides you with the opportunity to use a Bluetoothcapable mobile telephone. The working radius is restricted to
approximately 3 metres.
For Optimum Sound Quality during a Telephone Call
Do not set the volume too high. Otherwise there may be feedback (a whistling noise) from the loudspeakers.
Note: The setting of the volume depends on the installation
positions of the loudspeakers relative to the microphone and
ENGLISH
cannot therefore be specifi ed in detail.
Registering Devices
Before you can telephone via the car radio the devices have to
be registered with one another.
1. Keep the DISP/MENU button (3) held down (PAIRING:1
appears in the display).
2. Press the multifunction button (2) to confi rm (The letters
PAIRING:1 >>>> appear in the display).
3. Register the car radio in your mobile telephone as described
in the operating instructions for your mobile telephone. The
device designation „BT60“ appears as a choice in your
mobile telephone.
4. Now enter the password „1234“ in your mobile telephone.
The car radio is now registered in your mobile telephone.
5. Once the registration has been successfully performed,
„PAIRING:1
together with the name of the mobile telephone.
Note:
• If registration was not successful, „PAIRING:1 X“ appears in
the display of the car radio.
• Depending on the mobile telephone manufacturer, it is
necessary to carry out the registration (PAIRING) again in
order to register your mobile telephone in the car radio.
• Bluetooth compatibility cannot be guaranteed for mobile
telephones that come onto the market in the future.
• In order to guarantee an optimum connection, please ensure that the battery of your mobile telephone is fully charged.
• Some makes of mobile telephone have an energy-saving
mode. Please deactivate the energy-saving mode, as you may
otherwise have problems when telephoning via Bluetooth.
• In order to be able to conduct an incoming or outgoing telephone call Bluetooth has to remain activated in your mobile
telephone. Please consult the operating instructions for your
mobile telephone.
• Please ensure that you speak in the direction of the built-in
microphone. The connection of an external microphone is
not possible.
Outgoing Calls
1. Press the multifunction button (2) briefl y (The letters „
appear in the display).
2. In order to enter the desired telephone number, turn the
multifunction button until the appropriate fi rst digit appears.
Press the multifunction button (2) again briefl y in order to
confi rm the digit. Repeat the above steps for the following
digits until you have entered the entire telephone number
(which is shown in the display of the car radio).
Note: If you have entered one or more incorrect digits you
can delete the digits with the B / CLEAR button (6).
3. In order to call the telephone number, keep the multifunction
button (2) pressed down until the word „CALLING >>>>“
appears in the display.
4. To terminate the call, please press the B / CLEAR button (6).
Note: In order to call the telephone numbers you have entered
you can also press the M / TRANSFER button (5).
Redialling
The device stores the last nine numbers dialled. If you wish to
call any of these these, please proceed as follows:
1. Press the multifunction button (2) briefl y (The letters „ “
appear in the display).
2. Then keep the multifunction button (2) pressed down. The
last number dialled appears in the display.
3. By pressing the multifunction button (2) you can now select
from the last nine numbers dialled.
4. In order to call the selected number keep the multifunction
button (2) pressed down until the word „CALLING >>>>“
appears in the display.
“ appears in the display of the car radio
“
76
05-AR 736 CD_MP3_NEU 76 18.09.2006, 11:02:26 Uhr
Page 77

ENGLISH
5. To terminate the call please press the B / CLEAR button (6).
Incoming Calls
In the case of incoming calls a ringing tone is heard from the
loudspeakers, and if the caller has a CLIP „Calling Line Identifi cation Presentation“-capable telephone, the caller’s number
appears in the display of the car radio. Otherwise „PHONE IN“
appears in the display.
1. To accept an incoming call, press the
button (5) to confi rm. You will now hear the caller through
the loudspeakers of your car.
2. To terminate the call please press the B / CLEAR button (6).
Note:
• You can transfer the call back to your mobile telephone. In
order to do so, keep the M / TRANSFER button (5)
pressed („TRANSFER “ appears in the display). The
car radio activates the MUTE function. If this button is held
down again, the call is transferred back to the car radio.
• In order to reject an incoming call press the B / CLEAR
button (6).
M
/ TRANSFER
Technical data
General
Supply voltage...............................................................DC 12 V
Power consumption......................................................7 A max.
Power ...............................................................4 x 60 W PMPO
FM band
Frequency range ...................................87,5 MHz to 108,0 MHz
Effective sensitivity ............................................................15 dB
I.F. frequency...............................................................10,7 MHz
CD player
System............................................................CD Audio System
Suitable CDs.................................CD/CD-R/CD-RW/MP3 disks
Playable bit rates.................................................32 - 320 kBit/s
Number of quantising bits................................................... 1 bit.
Signal format ............................... Sampling frequency 44,1 kHz
Signal-to-noise ratio..............................................50 dB (1 kHz)
Number of channels .......................................2 stereo channels
Housing dimensions ........................ 178 x 50 x 157 (W x H x D)
This device has been tested according to all relevant current
CE guidelines, such as electromagnetic compatibility and low
voltage directives, and has been constructed in accordance with
the latest safety regulations.
Subject to technical changes without prior notice!
Troubleshooting
Before going through the checklist please make all the
connections fi rst. If you still have questions after going through
the checklist, please consult your local customer service
representative.
Fault Symptoms Cause Solution
Whistling sound from
the loudspeakers.
CDs are drawn only
half way into the CD
tray.
„READ ERR“ is shown
in the display.
CD cannot be selected
using the MODE
button.
The CD does not play
back after being inserted into the device.
CD works intermittently
(dropouts).
No function. The ignition is switched
Device cannot be
switched on or off via
the ignition.
The device does not
work correctly (EJECT,
LOAD, PLAY).
No radio reception. The antenna cable is
Feedback Do not set the volume
The transport screws
have not been
removed.
The CD is inserted the
wrong way round.
There is no CD
inserted.
The volume control is
set too low.
The device has
not been correctly
connected.
The surface of the road
is uneven.
The device is not fi rmly
installed.
The CD is damaged. Try another CD. If this
The CD is dirty. Clean the CD.
The device may have
been installed in the
vehicle at the wrong
angle.
off.
One or more fuses
have blown.
Incorrect connection
(each car manufacturer
wires the ISO connection in the vehicle
differently).
The microcomputer
has been interfered
with by electromagnetic fi elds.
not connected.
too high.
Remove the transport
screws.
Insert the CD right way
round.
Insert a CD.
Turn up the volume.
Check the +12V and
earth connection.
Wait until the road
becomes smoother
before playing the CD.
Install the device fi rmly.
Ensure that the rear attachment is used if the
vehicle does not have
any suitable retainer
for the rear section of
the device.
works correctly, the
fi rst CD is probably
damaged.
Please note that a
maximum inclination
of 20° degrees should
not be exceeded!
Turn the ignition key to
„ON“ or „ACC“.
Replace the fuse by
another 15 A fuse.
Please contact your
car workshop or a
vehicle specialist for
connection adapters
may specifi cally for
your model.
Remove the CD and
reinsert it.
Switch the device off
and on again.
Insert the antenna
cable fi rmly into the
antenna socket of the
device.
ENGLISH
77
05-AR 736 CD_MP3_NEU 77 18.09.2006, 11:02:28 Uhr
Page 78

ENGLISH
Fault Symptoms Cause Solution
Poor radio reception. It is possible that your
„NO FILE“ is shown in
the display.
„MEMORY FULL“ is
shown in the display.
vehicle has a special
antenna (phantompowered antenna.)
The fi le format on
the CD or USB
storage medium is not
supported.
The USB storage
medium is full.
Please contact your
car workshop or a
vehicle specialist. (For
other manufacturers
there are specifi c
phantom power supply
adapters and voltage
adapters available.)
Insert another USB
storage medium or
delete some fi les.
Handling a CD
Cleaning the CD
Before playing a CD, wipe it off
with a clean, dust-free cleaning
cloth. Pull out the CD in the
direction of the arrow.
Note: Do not use any solvents such as petrol or thinning agents.
Commercially available cleaning substances or antistatic sprays
will damage the device.
Inserting the CD
If the CD is inserted with the
printed side facing downwards,
the device may be damaged.
Always insert the CD with the
label facing upwards.
Note: If there is already a CD in the CD slit, do not try to insert a
second CD. This may damage the device.
Touching the CD
ENGLISH
Always hold CDs by the edge.
In order to keep the CD clean
do not touch the surface.
• Do not attach any stickers or adhesive tape to the CD.
• Do not expose the CD to direct sunlight or sources of heat
such as heating pipes. Do not leave CDs in the car if it is
parked in direct sunlight as this will lead to a considerable
rise in the temperature inside the car.
• Check all CDs for cracks, scratches and warping before you
play them. It is possible that CDs that are damaged in this way
cannot be played back correctly. Such CDs should not be used.
• Use only standard commercially available circular CDs
with a 12 cm diameter! CDs with an 8 cm diameter or CDs
with contours, e.g. of a butterfl y or heart, are not suitable.
It is possible that such CDs may not only be destroyed
themselves, but may also destroy the drive of the CD player.
We cannot accept liability for damage caused by the use of
unsuitable CDs.
Guarantee
The device supplied by our Company is covered by a 24 month
guarantee starting on the date of purchase (receipt).
During the life of the guarantee any fault of the device or its
accessories ascribable to material or manufacturing defects will
be eliminated free of charge by repairing or, at our discretion, by
replacing it. The guarantee services do not entail an extension
of the life of the guarantee nor do they give rise to any right to a
new guarantee!
Proof of the guarantee is provided by the proof of purchase.
Without proof of purchase no free replacement or repair will be
carried out.
If you wish to make a claim under the guarantee please return
the entire machine in the original packaging to your dealer
together with the receipt.
Defects to consumables or parts subject to wearing as well as
cleaning, maintenance or the replacement of said parts are not
covered by the guarantee and hence are to be paid!
The guarantee lapses in case of unauthorized tampering.
After the expiry of the guarantee
After the expiry of the guarantee repairs can be carried by the
competent dealer or repair service against the payment of the
ensuing costs.
Meaning of the “Dustbin” Symbol
Protect our environment: do not dispose of electrical equipment
in the domestic waste.
Please return any electrical equipment that you will no longer
use to the collection points provided for their disposal.
This helps avoid the potential effects of incorrect disposal on the
environment and human health.
This will contribute to the recycling and other forms of reutilisation of electrical and electronic equipment.
Information concerning where the equipment can be disposed of
can be obtained from your local authority.
78
05-AR 736 CD_MP3_NEU 78 18.09.2006, 11:02:30 Uhr
Page 79

ENGLISH
Adjusting the volume..................................................................72
A
AF Button ...................................................................................75
AS Button...................................................................................74
B
B (BAND) Button........................................................................73
BEEP (Confi rmation Beep)........................................................73
Bluetooth....................................................................................76
C
CD Handling...............................................................................78
Connection.................................................................................71
D
DISP Button ...............................................................................72
DSP (Equalizer Adjustment)......................................................72
E
Eject button ................................................................................74
Ejecting the CD .......................................................................... 74
G
Guarantee ..................................................................................78
H
Handling a CD............................................................................78
I
ID3 Button ..................................................................................74
Important Additional Installation Information .............................71
Installation ..................................................................................70
Installation (Safety Information) .................................................70
Installation Tips ..........................................................................70
INTRO (2INT)............................................................................. 74
L
LOC (LOCAL) .............................................................................72
M
Multifunction Button ...................................................................72
Mute ..........................................................................................73
Index
O
Operating instructions................................................................71
Operation ...................................................................................72
P
PAU (Play / Pause ) Button .......................................................74
PS Button ..................................................................................74
PTY Button ................................................................................75
R
RANDOM (4RDM) (Random Playback) ....................................74
Random Playback (4RDM)........................................................74
REC (record) button...................................................................75
REGION (Regional) ..................................................................73
Removing the control panel.......................................................72
REPEAT (3RPT) ........................................................................74
RESET Button ...........................................................................72
Road Safety ...............................................................................70
S
Safety Information .....................................................................70
Scan function (see PS button)...................................................74
Switching off...............................................................................73
Switching on...............................................................................73
Switch-on volume.......................................................................73
T
TA (Traffi c Announcements) ......................................................75
Technical Data ..........................................................................77
Telephoning................................................................................76
Time ...........................................................................................72
Traffi c Announcements (see TA)................................................75
TRANSFER Button ...................................................................73
Troubleshooting..........................................................................77
U
USB Connection .......................................................................76
V
Volume when switching on ........................................................73
79
05-AR 736 CD_MP3_NEU 79 18.09.2006, 11:02:31 Uhr
ENGLISH
Page 80

JĘZYK POLSKI
Przed uruchomieniem urządzenia proszę bardzo dokładnie
przeczytać instrukcję obsługi. Proszę zachować ją wraz z kartą
gwarancyjną, paragonem i w miarę możliwości również kartonem z opakowaniem wewnętrznym.
• Urządzenie należy używać tylko zgodnie z jego przeznacze-
• Urządzenie wbudować uważając, aby nie zasłonić otworów
• Nigdy nie wolno otwierać obudowy urządzenia. Niefachowo
Poniższe symbole mogą znajdować się na urządzeniu i mają
zwracać Państwa uwagę na:
Wyłącznika tego nie należy w żadnym wypadku
zmostkować lub też przy nim manipulować, ponieważ grozi
to niebezpieczeństwem, że użytkownik poddany zostanie
oddziaływaniu niebezpiecznego dla ludzkich oczu niewidocznego światła lasera.
Dziec
• Dla bezpieczeństwa dzieci proszę nie zostawiać swobodnie
Uwaga! Nie pozwalaj dzieciom bawić się folią.
• Bezpieczeństwo ruchu drogowego jest najważniejszym
• Należy pamiętać o tym, że przy prędkości jazdy 50 km/h w
JĘZYK POLSKI
• W krytycznych sytuacjach odradzamy obsługę radia.
• Wskazówki bezpieczeństwa np. policji lub straży pożarnej
• Słuchania wybranego programu należy podczas
Wskazówki bezpieczeństwa
niem.
wentylacyjnych.
przeprowadzone naprawy mogą być groźne w skutkach
dla użytkownika. Nie włączać uszkodzonego urządzenia,
jedynie przekazać go fachowcowi do naprawy.
Symbol z wykrzyknikiem ma zwrócić uwagę
użytkownika na znajdujące się w załączonych dokumentach ważne wskazówki związane z obsługą i
konserwacją urządzenia.
Urządzenia z tym symbolem używają do odczytywania dźwięku z płyty kompaktowej „Lasera
klasy A“. Wbudowany wyłącznik bezpieczeństwa
ma zapobiec temu, żeby użytkownik w czasie otwierania kieszeni odtwarzacza płyt kompaktowych
został poddany niebezpiecznemu dla ludzkich oczu
oddziaływaniu niewidocznego światła lasera.
dostępnych części opakowania (torby plastikowe, kartony,
styropian itp.).
Niebezpieczeństwo uduszenia!
Bezpieczeństwo ruchu drogowego
przykazaniem. Dlatego też z odbiornika samochodowego
należy korzystać tak, aby w pełni panować nad aktualnymi
sytuacjami drogowymi.
ciągu sekundy pojazd pokonuje 14 m.
muszą być w pojeździe odbierane niezwłocznie i świadomie.
jazdy dokonywać wyłącznie z odpowiednim nastawienia
głośności.
Kroki bezpieczeństwa podczas montażu
i instalacji połączeń
• Od baterii odłączać najpierw biegun ujemny, a następnie
dodatni. (Podłączać w odwrotnym kierunku.)
Uwaga: Przy odłączonej baterii następuje wygaszenie
wszystkich informacji niestałej pamięci. Należy postępować
wg wskazówek bezpieczeństwa producenta pojazdu.
• Bezpiecznik główny musi być zainstalowany możliwie blisko
(maks. 30 cm) bieguna dodatniego baterii w celu zabezpieczenia samochodu przed ewentualnym pożarem kabla
spowodowanym np. wypadkiem. Postępowanie niezgodne z
powyższym powoduje wygaszenie gwarancji.
• Średnica kabli Plus i Minus nie może być mniejsza od
1,5 mm².
• Przy wierceniu otworów należy uważać, aby nie uszkodzić
żadnych części pojazdu.
Porady instalacyjne:
• Tulejki ochrony kabla zabezpieczają kabel przed przecieraniem na ostrych częściach karoserii.
• Izolacja kabla nie może być uszkodzona podczas instalacji.
• Podczas instalacji Car-HiFi niezbędne są właściwe
narzędzia.
W zależności od rodzaju budowy pojazdu możliwe są
odchyłki od niniejszego opisu. Nie przejmujemy żadnej
odpowiedzialności za uszkodzenia spowodowane błędnym
wbudowaniem i podłączeniem oraz za uszkodzenia będące
rezultatem powyższego.
Instalacja
Radioodbiornik należy zamontować zgodnie z poniższą
ilustracją
a nakrętka
b podkładka sprężysta
c podkładka
d śruba
e kątownik montażowy
f wsuwana obudowa
g kołki gwintowane
Uwaga!
h śruby zabezpieczające na
czas transportu (przed
montażem usunąć)
i
narzędzie do wysuwania
sprzętu (klucz do
demontażu)
j Ramka przesłony
Zaślepkę panelu sterowania
proszę przyłożyć najpierw po
prawej stronie i wcisnąć ją, aż
zaskoczy po stronie lewej.
80
05-AR 736 CD_MP3_NEU 80 18.09.2006, 11:02:33 Uhr
Page 81

JĘZYK POLSKI
Podłączenie
Wykonać połączenia zgodnie ze schematem.
2. Urządzenie dostosowane jest do podłączenia do ujemnego
bieguna akumulatora, który musi być podłączony do karoserii pojazdu. Prosimy o sprawdzenie tego przez instalacją.
3. Podczas instalacji/podłączania odbiornika zwróci uwagę na
fakt, że nie każdy pojazd wyposażony jest „łącze ISO”. W
takim przypadku zalecamy zastosowanie specyfi cznego dla
pojazdu adaptera normy ISO.
Adapter jest do nabycia w ośrodkach handlowych części
czerwony R
biały L
Głośnik
prawy przedni
prawy tylny
samochodowych i/albo w warsztatach samochodowych.
4. Przy zajęciu „czas trwania +“ (Przyłącze prądu ciągłego),
Automatyczna antena (niebieski)
Przyłącze antenowe
w zależności od typu pojazdu, może dojść do odchyleń.
(Potrzebne jednak do zapisywania stacji nadawczych do
pamięci).
Dla zapewnienia wszystkich funkcji niezbędne jest
postępowanie zgodne z instrukcją. W niepewnych przypadkach należy skontaktować się z autoryzowanym warsztatem
Wyjście Chinch
szary
szary/czarny
fi oletowy
fi oletowy/czarny
samochodowym.
5. Maksymalny kąt nachylenia przy montażu radioodbiornika
samochodowego nie może przekraczać 20°, ponieważ przy
większym kącie nachylenia instalowanego radia (Odtwarzacz CD) jego funkcjonowanie nie jest zagwarantowane.
6. W zależności od typu pojazdu w wyjątkowych sytuacjach
mogą wystąpić szumy zakłócające w trybie Radia/CD.
Można je odpowiednio usunąć przez dodatkowy fi ltr
przeciwzakłóceniowy. Mimo tego, że Wasz aparat już
seryjnie wyposażony jest w fi ltr przeciwzakłóceniowy, to
w zależności od pojazdu może dojść do pogorszonego
odbioru.
bezpiecznik
Przyłącze ISO
żółty
czarny
Masa
Przyłącze
prądu ciągłego
czerwony
Zapłon
biały
Głośnik
lewy przedni
biały/czarny
zielony
lewy tylny
Otrzymają je Państwo w handlu z akcesoriami samocho-
zielony/czarny
dowymi i/lub w Waszym warsztacie samochdowym.
7. Podczas instalacji radioodbiornika proszę zwrócić uwagę na
to, by jego tył miał wystarczająco dużo wolnej przestrzeni,
aby zagwarantowane było dostateczne chłodzenie.
8. Przy podłączeniu anteny istnieją dwie różne normy. W pierwszym przypadku; stare (50 Ohm) z długim, wystającym,
okrągłym kontaktem po stronie pojazdu i okrągłym
gniazdem po stronie radia. W drugim przypadku wtyk
antenowy wg normy ISO (150 Ohm). Adaptery dla każdego
z tych przypadków są do nabycia u producentów części
samochodowych i/albo w warsztatach samochodowych.
Uwaga:
• Zdejmowany panel obsługi należy założyć dopiero po
podłączeniu kabli.
• Należy stosować głośniki o impedancji 4 ohm.
Do niezbędnej uwagi przy VW/Audi: aktywna antena wy-
maga napięcia dla ekranizacji kabla współosiowego anteny,
brak napięcia oznacza niepełny odbiór. Adapter antenowy z
zasilaniem pozornym stanowi rozwiązaniem tego problemu.
• Oprzewodowanie głośników nie może być połączone z
masą.
• Sygnał podłączony przez wyjścia cinch jest odtwarzany tylko
przez tylne głośniki.
Ważne informacje dodatkowe,
dotyczące instalacji Waszego radioodbiornika
samochodowego!
1. Śruby (h) zabezpieczające w transporcie proszę usunąć
przed montażem, gdyż inaczej CD nie będzie wciągana.
1. Jeżeli podczas pracy w trybie radia lub CD zostanie
zdjęty panel przedni, nastąpi automatyczne wyłączenie
urządzenia.
2. Jeżeli wnętrze pojazdu jest bardzo nagrzane, np. na skutek
dłuższego parkowania w mocno nasłonecznionym miejscu,
to nie należy wówczas włączać odtwarzacza CD, do
momentu ochłodzenia się wnętrza w trackie jazdy.
3. W celu bezpiecznego przechowywania panela przedniego,
należy stosować przeznaczone do tego celu etui.
Instrukcja obsługi
JĘZYK POLSKI
81
05-AR 736 CD_MP3_NEU 81 18.09.2006, 11:02:35 Uhr
Page 82

JĘZYK POLSKI
4. Ze względu na dużą ilość dostępnego oprogramowania
5. Przycisk RESET (bez ilustracji): Ewentualne błędy
1. Przycisk
2. Guzik multifunkcyjny
3. Przycisk DISP/MENU (Wyświetlacz/selectie)
JĘZYK POLSKI
82
i rodzajów nośników, nie gwarantujemy prawidłowego
odtwarzania płyty CD, nagranej przez użytkownika.
(ERROR) w czasie pracy można kasować, naciskając
przycisk RESET. Przycisk ten jest po zdjęciu pola obsługi w
prawym dolnym kącie. Wahanie napięcia w zasilaniu może
spowodować „zawieszenie” procesora sterowania radia.
Nie znaczy to, że odbiornik jest uszkodzony! Naciśnięcie
tego przycisku ostrym przedmiotem powoduje wznowienie
startu (ustawienie powrotne).
Obsługa
Proszę wcisnąć przycisk w celu wyjęcia przedniego
panelu sterowania.
PRESS • ENTER AUDIO DIAL (głośność)
a) Obrócić: W normalnym trybie odtwarzania guzik multi-
funkcyjny służy do nastawiania głośności.
b) Nacisnąć i krótko przytrzymać: aby wejść w tryb wpro-
wadzania numeru telefonicznego. Dalsze informacje na
temat obsługi patrz punkt „Telefonowanie za pomocą
złącza Bluetooth“.
c) Nacisnąć i długo przytrzymać: aby przejść do menu
wyboru trybu brzmienia. Kiedy na wyświetlaczu LCD
pojawi się „VOLUME” możemy ustawić głośność.
Naciskając krótko przytrzymując przycisk wielofunkcyjny
można wybierać poszczególne punkty menu, takie jak
VOLUME (głośność), BASS (tony niskie), TREBLE
(tony wysokie), BALANCE (balans) i FADER (regulacja
wyciszania). Zmiany nastawienia poszczególnych
punktów menu przeprowadza poprzez obrót guzika
multifunkcyjnego.
a) Tryb radia:
• Przy odtwarzaniu danych RDS naciskać kilkakrotnie, krótko ten przycisk w celu wyświetlenia jak
poniżej:
PS Nazwa ➞ Czas ➞ Częstotliwość ➞ PTY
• Przy braku odbioru danych RDS zostaje
wyświetlone jak poniżej:
Czas ➞ PTY ➞ Częstotliwość
Uwaga: Informacja wyświetlana jest przez ok. 5 sekund,
następnie odbiornik powraca do wyświetlenia poprzedniej informacji.
b) Poprzez naciśnięcie i przytrzymanie przycisku DISP/
MENU otwieramy menu wyboru:
• PAIRING
• RE-CONN / DIS-CONN
• A ANSWER ON / A ANSWER OFF
• PHONE VOL
• CONTRAST
• FORMAT 24H / FORMAT 12H
• SET
• DISTANT / LOCAL
• REGION ON / REGION OFF
• VOL PGM
• BEEP TONE ON / BEEP TONE OFF
Po ponownym naciśnięciu przycisku DISP/MENU
możemy wybierać poszczególne punkty menu. Zmiany
nastawienia poszczególnych punktów menu przeprowadza poprzez obrót guzika multifunkcyjnego (2).
• PAIRING:1 (Rejestracja)
Przed użyciem telefonu komórkowego wyposażonego
w złącze Bluetooth należy go najpierw zarejestrować w
urządzeniu (patrz „Rejestracja urządzeń“).
• RE-CONN:1/DIS-CONN:1
Ta funkcja umożliwia ręczne włączanie i wyłączanie
połączenia Bluetooth.
RE-CONN:1 = włączanie ; DIS-CONN:1 = wyłączanie
Aby ręcznie włączyć lub wyłączyć połączenie Bluetooth,
wybierz pożądaną opcję i potwierdź wybór, naciskając
przycisk wielofunkcyjny (2). Na wyświetlaczu ukaże się
komunikat „RE-CONN:1 >>>>“ lub „DIS-CONN:1 >>>>“.
• A ANSWER ON/A ANSWER OFF
(automatyczne odbieranie wywołania)
A ANSWER ON: urządzenie automatycznie
odbiera wszystkie przychodzące
rozmowy, bez konieczności
naciskania przycisku TRANSFER
(przyjmowanie). Wywołania są
odbierane automatycznie po ok.
3 dzwonkach.
A ANSWER OFF: automatyczne odbieranie
wywołań jest wyłączone.
• PHONE VOL
Do ustawiania głośności dzwonka sygnalizującego
wywołanie.
• CONTRAST (kontrast)
Do ustawiania kontrastu wyświetlacza.
• FORMAT 24 H/FORMAT 12 H
Do wybierania formatu zegara.
• SET
Ręczne ustawianie zegara obejmuje następujące
czynności.
Ustawienie minut: obracaj przyciskiem wielofunk-
cyjnym (2) w kierunku ruchu
wskazówek zegara.
Ustawianie godziny: obracaj przyciskiem wielofunkcyj-
nym (2) w kierunku przeciwnym
do ruchu wskazówek zegara.
Uwaga: jeżeli odbierana jest radiostacja nadająca
sygnał RDS, zegar ustawi się automatycznie sam.
05-AR 736 CD_MP3_NEU 82 18.09.2006, 11:02:36 Uhr
Page 83

JĘZYK POLSKI
• DISTANT/LOCAL (do wyboru tylko w trybie „radio”)
Wasze radio może odbierać dane RDS EON. Pod
pojęciem EON rozumiemy możliwość odbioru
dodatkowych informacji w ramach danej sieci stacji np.
WDR. W przypadku komunikatu o ruchu (TA) w ramach
danej sieci stacji radiowych nastąpi automatyczne
przełączenie ze stacji nie nadającej informacji o ruchu
na odpowiednią stację nadającą takie informacje w
danej sieci stacji.
Mogą Państwo wybierać między trybem LOCAL lub
DISTANT celem odbioru lokalnych komunikatów
drogowych lub meldunków radiowych dla ruchu
dalekobieżnego.
LOCAL: Dzięki tej funkcji unikamy
Tryb DISTANT: W tym trybie funkcja EON TA pró-
• REGION ON/REGION OFF
(Działa tylko, gdy włączona jest funkcja AF)
Niektóre stacje o określonych godzinach dzielą swój
program na programy regionalne o zróżnicowanej treści.
REGION ON: Włączany jest tryb regionalny.
Uwaga: możliwość wskazań na wyświetlaczu jest ogra-
niczona. Możliwe, że w podwójnym trybie wskazań poszczególne segmenty wyświetlacza zostaną wygaszone.
Funkcja REGION ON zapobiega przełączaniu się radi-
oodbiornika na częstotliwości alternatywne, na których
nadawane są programy regionalne o innej treści.
REGION OFF: Wyłączany jest tryb regional-
• VOL PGM
Przy użyciu guzika multifunkcyjnego (2) możliwy jest
wybór dowolnej głośności włączenia.
• BEEP TONE ON/BEEP TONE OFF
(dźwięk potwierdzenia)
Możliwy jest wybór 2 rodzajów dźwięku potwierdzenia
naciskania przycisków.
BEEP TONE ON: dźwięk potwierdzenia pojawia
przełączania na stację EON
o słabym sygnale. Radio nie
przełącza się na tę stację a
słuchacz nie zauważa jakichkolwiek zakłóceń. Na wskaźniku
wyświetlany jest napis „LOC“.
buje uzyskać informacje EON TA
z osiągalnej stacji i w ten sposób
poprawić jakość odbioru. Gaśnie
napis „LOC“ na wskaźniku.
ny. Podczas wyszukiwania
częstotliwości alternatywnych
(AF) lub identyfi kacji programów
(PI) ignorowana jest identyfi kacja
programów (PI) z programu
nadawanego przez stację
regionalną.
się przy każdym naciśnięciu
przycisku.
BEEP TONE OFF: dźwięk potwierdzenia jest
/ Guzik Wł./Wył. / wyciszenie głośnika
4.
a) Przycisk ten nacisnąć dla włączenia odbiornika. Na
wyświetlaczu pojawia się informacja WELCOME. Dla
wyłączenia odbiornika przycisk ten naciskać przez
dłuższy czas.
b) Nacisnąć przycisk
na krótki okres czasu. Informacja wyświetlacza MUTE
miga. Ponowne naciśnięcie tego przycisku powoduje
przerwanie tej funkcji. Ta funkcja może być wyłączona
także przez naciśnięcie przycisku wielofunkcyjnego.
5. Przycisk M / TRANSFER
(MODE/Przyjęcie przychodzącej rozmowy)
a) Naciśnij ten przycisk, aby wybrać odtwarzacz CD, tryb
radia itd.
b) Naciśnij ten przycisk, aby przyjąć przychodzącą
rozmowę.
c) Trzymaj ten przycisk wciśnięty w czasie rozmowy, aby
przenieść rozmowę z powrotem na telefon komórkowy.
Ponowne naciśnięcie i przytrzymanie spowoduje
przeniesienie rozmowy na radio samochodowe. W
obu przypadkach na wyświetlaczu ukaże się wskaźnik
„TRANSFER “.
6. Przycisk B / CLEAR (• BAND/• ERASE/• SEARCH)
a) Tryb radia
Naciśnij i przytrzymaj przez chwilę przycisk B, aby
przełączyć poziom zakresu FM (UKF). Oznaczenie odpowiedniego poziomu zakresu FM będzie wyświetlane
na wskaźniku LCD.
b) Przycisk B jako funkcja wyszukiwania w trybie MP3:
Jeśli przy zestawianiu płyty CD w formacie MP3 zostały
wpisane odpowiednie dane, to można je odszukać
drogą następujących funkcji:
a) Bezpośrednie wprowadzenie numeru utworu na
płytach CD w formacie MP3:
1. Proszę wcisnąć jeden raz przycisk B. W
wyświetlaczu pojawia się „NUMBER ”.
2. Za pomocą przycisku wielofunkcyjnego (2)
Możesz teraz wybrać pożądany numer utworu.
Na wyświetlaczu ukaże się „No.“ i odpowiedni
numer ścieżki.
3. W celu odtworzenia wybranej ścieżki naciśnij
następnie i krótko przytrzymaj przycisk wielofunkcyjny (2). Bezpośrednio po tym zostanie
odtworzony utwór o wybranym numerze.
b) Wybór katalogu w przypadku płyt CD w formacie
MP3:
1. Proszę wcisnąć 2x przycisk B. W wyświetlaczu
pojawia się „NAVIGATE “.
2. Za pomocą przycisku wielofunkcyjnego (2)
możesz teraz wybrać jeden z folderów na płycie
CD.
wyłączony.
/ w celu przyciszenia głośników
JĘZYK POLSKI
83
05-AR 736 CD_MP3_NEU 83 18.09.2006, 11:02:38 Uhr
Page 84

JĘZYK POLSKI
7./8.
W trybie CD:
W trybie „radio”:
JĘZYK POLSKI
9. Przycisk wysuwania
3. Potwierdź wybrany folder, naciskając i
puszczając przycisk wielofunkcyjny (2). Zostanie wyświetlony pierwszy utwór z tego foldera.
4. Obracając przycisk wielofunkcyjny (2) możesz
wybierać utwory z wybranego foldera.
5. Następnie naciśnij i puść przycisk wielofunkcyjny (2), aby odtworzyć wybraną ścieżkę.
Uwaga:
• Jeżeli na płycie CD MP3 nie ma folderów, na
wyświetlaczu ukaże się “ROOT”.
• Odtwarzania płyt CD, nagranych przy pomocy
dowolnego oprogramowania, nie można
zagwarantować ze względu na dużą liczbę
istniejących programów i mediów CD.
• Podczas normalnego odtwarzania z płyt CD w
formacie MP3 przyciskami
(17/16) można przeskakiwać odpowiednio o
jeden folder do góry lub do dołu.
• Uwaga: Jeżeli jest zapisana informacja
ID-3 Tag, ukazuje się na wyświetlaczu jako
przesuwający się pasek.
c) W trybie telefonu:
Do kasowania wprowadzonego numeru telefonu.
d) W trybie USB:
Do kasowania aktualnej ścieżki.
1. Przytrzymaj wciśnięty przycisk B. Na
wyświetlaczu ukaże się wskaźnik „ERASE“ i
numer aktualnej ścieżki (np. 002).
2. Potwierdź, naciskając przycisk wielofunkcyjny
(na wyświetlaczu ukaże się komunikat ERASE
. Naciśnij ponownie przycisk wielofunkcyjny (2), aby skasować aktualną ścieżkę (na
wyświetlaczu ukaże się komunikat ERASE ).
Uwaga: Jeżeli nie chcesz kasować ścieżki,
obróć przycisk wielofunkcyjny (2) po pierwszym
naciśnięciu (na wyświetlaczu ukaże się komunikat
ERASE X). Potwierdź wybór, naciskając przycisk
wielofunkcyjny (2).
Przyciski 왘왘I / I왗왗 TRACK UP/DOWN /
AUTO/MANUAL SEEK
w celu przeskoczenia do przodu lub do tyłu należy nacisnąć
przycisk 왘왘I lub I왗왗. W celu przewijania utworów należy
nacisnąć i przytrzymać przycisk ze strzałką: 왘왘I lub I왗왗.
Naciśnij i puść przycisk 왘왘I / I왗왗, aby zatrzymać radio
na najbliższej dostępnej radiostacji (na wyświetlaczu
ukaże się komunikat AUTO SEEK). Póki trzymają Państwo
wciśnięte przyciski 왘왘I / I왗왗, odbywa się dalsze szukanie stacji w danym paśmie częstotliwości (W wyświetlaczu
pojawia się MANUAL SEEK).
Aby wysunąć płytę CD należy nacisnąć ten przycisk.
왖 lub 왔
10. Otwór na płyty CD
Wsuń delikatnie płytę CD zadrukowaną stroną do góry w
szczelinę aż urządzenie samo ją wciągnie. W wyświetlaczu
pojawia się „READING“.
Uwaga: ze względu na dużą ilość dostępnego oprogramo-
wania i rodzajów nośników, nie gwarantujemy prawidłowego
odtwarzania płyty CD, nagranej przez użytkownika.
Odtwarzanie muzyki w formacie MP3
Mają Państwo możliwość odtwarzania na tym urządzeniu utworów muzycznych w formacie MP3. Poza tym urządzenie
to obsługuje będące w powszechnym użyciu płyty kompaktowe typu: CD, CD-RW, CD-R.
Urządzenie to jest przystosowane również do odtwarzania
MP3 CD. Na tego rodzaju CD może być zapisane do 200
utworów. Państwa urządzenie automatycznie rozpoznaje
MP3 CD (Na wyświetlaczu ukaże się wskaźnik MP3).
Uwaga: Jeżeli jest zapisana informacja ID-3 Tag, ukazuje
się na wyświetlaczu jako przesuwający się pasek.
Pamiętaj:
Istnieje wiele metod wypalania i kompresji oraz różnic w
jakości fabrycznych i wypalanych płyt CD.
Ponadto w przemyśle fonografi cznym nie ma ogólnie
obowiązujących standardów (zabezpieczenia przed kopiowaniem).
Z tego względu mogą bardzo rzadko wystąpić problemy
przy odtwarzaniu płyt CD i płyt CD z nagraniami MP3. Nie
oznacza to wadliwego działania urządzenia.
11. Przycisk AS/PS / ID3
(automatyczne zapamiętywanie stacji)
W trybie radia:
a) Funkcja pamięci:
aby aktywować automatyczny tryb zapamiętywania
stacji, należy nacisnąć i przytrzymać przycisk AS/PS
/ ID3 przez dłużej niż jedną sekundę. W wyświetlaczu
pojawia się „AUTO STORE“.
Odbiornik - w ramach aktualnego pasma częstotliwości
np. FM 1 - wyszuka stacje o najwyższym poziomie
sygnału. Sześć stacji o najsilniejszym sygnale zostanie
zapamiętanych w kolejności rosnących częstotliwości i
zostaną im przypisane kolejne numery.
Teraz każda zapisana do pamięci stacja włącza się
na ok. 5 sekund, a następnie wybrana zostaje stacja
utrwalona na pierwszej pozycji w pamięci.
Jeżeli chcą Państwo szukać dalszych stacji w zakresie
FM, to proszę wcisnąć przycisk B, by przejść do FM2
lub FM3. Proszę ponownie wcisnąć przycisk AS/PS /
ID3 na dłużej niż sekundę, by rozpocząć dalsze szukanie.
b) Funkcja krótkiego włączania stacji:
Po krótkim wciśnięciu przycisku AS/PS / ID3 radio
włącza na krótko wszystkie ustawione stacje aktualnego
pasma częstotliwości.
84
05-AR 736 CD_MP3_NEU 84 18.09.2006, 11:02:42 Uhr
Page 85

JĘZYK POLSKI
Uwaga: Funkcja wyszukiwania kończy się automatycznie na
stacji zapisanej na pierwszej pozycji pamięci.
W trybie MP3:
Każde naciśnięcie przycisku AS/PS / ID3 wyświetla tytuł
foldera, utworu, nazwę wykonawcy i tytułu albumu (jeżeli
informacja ID3 została zapisana na płycie CD).
12. -17.
Przyciski (1-6) zapisanych stacji oraz jako przyciski
1PAU-, 2INT-, 3RPT-, 4RDM w trybie CD
a) Tryb radia
Krótkie naciśnięcie tych przycisków spowoduje
bezpośredni wybór wcześniej zapisanej stacji radiowej.
Jeżeli dany przycisk zostanie przytrzymany dłużej niż
1 sekundę, to wówczas do danego przycisku zostanie
przypisana aktualnie ustawiona stacja.
b) Tryb CD/MP3
• W celu przerwania odtwarzania CD nacisnąć
przycisk 1PAU (pauza). Ponowne naciśnięcie tego
przycisku wznowi odtwarzanie płyty.
• Nacisnąć przycisk 2INT. Każdy tytuł będzie
odtwarzany przez 10 sekund. Ponowne naciśnięcie
przycisku oznacza przerwanie procesu wyszukiwania i odtworzony zostanie aktualnie wybrany utwór.
• Nacisnąć przycisk 3RPT. Aktualnie odtwarzany
utwór zostanie powtórzony. Ponowne naciśnięcie
tego przycisku spowoduje unieważnienie tej funkcji.
• Nacisnąć przycisk 4RDM. Utwory będą odtwarzane
w przypadkowej kolejności. Ponowne naciśnięcie
tego przycisku spowoduje unieważnienie tej funkcji.
18. Przycisk REC/ TA • COP
a) TA Traffi c Annonuncement (układ priorytetu dla
radiowych komunikatów drogowych)
Funkcję TA załączamy poprzez krótkie naciśnięcie przycisku REC/TA • COPY, a o jej uaktywnieniu informuje
znaczek TA na wyświetlaczu.
Jeżeli odbierana będzie stacja, która co pewien czas
nadaje najświeższe informacje o ruchu, to wówczas na
wyświetlaczu zapali się wskaźnik TP.
Przy załączonej funkcji TA informacje o ruchu nadawane
na UKW/FM spowodują automatyczne przerwanie
odtwarzania płyty CD (W wyświetlaczu pojawia się
TRAFFIC INFO).
Po zakończeniu informacji o ruchu nastąpi powrót do
wcześniej ustawionego programu.
Przerwanie funkcji TA:
Jeżeli chcemy przerwać aktualnie nadawanie informacji
o ruchu, należy na krótko nacisnąć przycisk REC/TA •
COPY. Nie spowoduje to wyłączenia trybu TA.
Uwaga: jeżeli nie jest odbierana żadna informacja
drogowa, na wyświetlaczu ukaże się na chwilę wskaźnik
„LOST TP TA.
b) Funkcja zapisu (dostępna tylko w trybie CD)
Można nagrywać z płyt CD/MP3 CD na modułu pamięci
USB.
1. W tym celu podłącz nośnik pamięci USB za pomocą
kabla adapterowego do odpowiedniego złącza (21).
2. Przyciskami
którą chcesz nagrać.
3. Przytrzymaj wciśnięty przycisk REC/TA • COPY (W
wyświetlaczu pojawia się REC USB).
4. Potwierdź, naciskając przycisk wielofunkcyjny (2).
Rozpocznie się nagrywanie aktualnej ścieżki na
nośnik pamięci USB (W wyświetlaczu pojawia się
REC >>>>).
Uwaga: W przypadku płyt CD MP3 stan kopiowania
jest wyświetlany w postaci wskaźnika procentowego. W przypadku płyt CD audio nagranie jest
wykonywane w czasie rzeczywistym.
5. Po zakończeniu nagrania w przypadku płyt CD MP3
na wyświetlaczu ukazuje się jest wskaźnik „100%
a w przypadku płyt CD audio wskaźnik „REC “.
Następnie urządzenie przełącza się na normalne
odtwarzanie.
Uwaga: Możliwe jest nagrywanie tylko aktualnej ścieżki
(ni można nagrać całej płyty CD). Aby nagrać na
nośniku USB następną ścieżkę, należy postępować wg
opisu.
19. Przycisk PTY/IX-BASS
a) Włączanie i wyłączanie funkcji IX-BASS.Przytrzymaj
przycisk PTY/IX-BASS wciśnięty przez ok. 3 sek.
W niskim przedziale głośności przy użyciu funkcji
IX-BASS poszerza się obraz dźwięku. Tony wysokie i
niskie zostają podwyższone.
b) Tryb radia:
PTY wybór rodzaju programu
Niektóre stacje FM oprócz nazwy przekazują również
informacje na temat typu emitowanych przez nie
programów. Wasz odbiornik samochodowy może
pokazywać te informacje na swoim wyświetlaczu.
Mogą to być następujące typy programów np.:
SPORT NEWS POP CLASSICS
Za pomocą funkcji PTY możemy wybrać stację
nadającą pożądany przez nas typ programu.
Jeszcze raz naciśnij przycisk PTY/IX-BASS, aby wybrać
PTY. Potwierdź wybór, naciskając przycisk wielofunkcyj-
ny (2). Na wyświetlaczu pojawi się na chwilę wskaźnik
„PTY SEEK“.
Jeżeli wybrany jest tryb PTY radioodbiornik rozpoczyna
wyszukiwanie odpowiednich informacji PTY i zatrzymuje
się, jeżeli znajdzie pożądane przez nas informacje PTY.
Jeżeli poszukiwany typ programu nie zostanie znalezi-
ony, to wówczas na wyświetlaczu pojawi się informacja
„NO MATCH PTY”.
Jeżeli poszukiwana informacja PTY już nie istnieje, to
funkcja PTY automatycznie przełączy się w zwykły tryb
odbioru.
왘왘
I / I왗왗 (7/8) wybierz ścieżkę,
“
JĘZYK POLSKI
85
05-AR 736 CD_MP3_NEU 85 18.09.2006, 11:02:44 Uhr
Page 86

JĘZYK POLSKI
20. Przycisk AF
AF jest funkcja wykorzystującą RDS (Radio Data System)
Jeżeli wybierzemy funkcję AF to radioodbiornik będzie na
Funkcja AF aktywowana jest poprzez krótkie naciśnięcie
21. Złącze USB
JĘZYK POLSKI
22. Wyświetlacz LCD (wyświetlacz ciekłokrystaliczny)
23. Przycisk RESET (bez ilustracji)
86
AF (częstotliwości alternatywne) funkcja REG
i wykorzystywana jest tylko przez stacje FM. Urządzenie
wyszukuje w tle najlepszą częstotliwość nastawionej stacji
(śledzenie sieci).
bieżąco kontrolować siłę sygnału danej częstotliwości AF.
Częstotliwość przeprowadzania tych kontroli zależy od
siły sygnału z aktualnej stacji i mieści się w zakresie od
kilki minut w przypadku silnego sygnału do kilku sekund
przy słabym nadajniku. Za każdym razem, gdy nowa
częstotliwość AF jest silniejsza, niż aktualnie nastawiona
stacja, to wówczas odbiornik na krótko przełącza się na tę
częstotliwość i przez 1 do 2 sekund na wyświetlaczu pojawia
się informacja „NEW FREQUENCY”. Ponieważ czas wyciszenia przy zmianie częstotliwości wzgl. czas kontroli jest
bardzo krótki, to w trakcie odbioru programu jest to prawie
niesłyszalne.
przycisku A.F, a o jej wyborze informuje znaczek AF na
wyświetlaczu radia.
• Jeżeli na wyświetlaczu znajduje się znaczek AF oznacza to, że załączona jest funkcja AF i odbierane są dane
emitowane w systemie RDS.
• Jeżeli na wyświetlaczu znaczek AF miga, to funkcja AF
jest wprawdzie wybrana, ale w danym momencie nie
mogą być odbierane sygnały nadawane w systemie
RDS.
• Ponowne naciśnięcie przycisku A.F spowoduje
wyłączenie funkcji. Na wyświetlaczu gaśnie znaczek AF.
Urządzenie to zostało zaprojektowane zgodnie z najnowszym stanem techniki w zakresie złączy USB. Duża
liczba wszelkiego rodzaju nośników informacji typu USB,
oferowanych obecnie w handlu, nie pozwala niestety na
zagwarantowanie pełnej kompatybilności z wszystkimi
nośnikami informacji USB. Z tego powodu w rzadkich
przypadkach może dojść do problemów przy odtwarzaniu z
modułów pamięci USB. Nie oznacza to wadliwego działania
urządzenia.
1. Za pomocą kabla adapterowego podłącz nośnik pamięci
USB do odpowiedniego złącza (W wyświetlaczu pojawia
się USB HOST). Następuje automatyczne odtwarzanie
danych.
2. W celu wyszukiwania/wyboru specjalnych ścieżek
należy postępować wg kroków opisanych w punkcie 6 b)
(Przycisk
B
punkcie 12-17 b.
Przycisk ten jest po zdjęciu pola obsługi w prawym dolnym
kącie.
jako funkcja szukania w trybie MP3) i
Wahanie napięcia w zasilaniu może spowodować „zawi-
Bluetooth to technologia bezprzewodowego połączenia
radiowego urządzeń na małe odległości. Aktualnie technologia
Bluetooth jest wykorzystywana głównie do pracy telefonów
komórkowych w trybie głośnomówiącym. Dzięki temu kierowca
może w czasie jazdy rozmawiać przez telefon komórkowy bez
konieczności trzymania go przy uchu.
Opisywane tu urządzenie umożliwia wykorzystanie telefonów
komórkowych z technologią Bluetooth. Promień zasięgu
działania ogranicza się do ok. 3 metrów.
Jak uzyskać optymalną jakość dźwięku w czasie rozmowy
telefonicznej
Nie ustawiaj za wysokiego poziomu głośności. Może to
spowodować sprzężenie (gwiżdżący odgłos) w głośnikach.
Uwaga: ustawienie głośności zależy od pozycji montażowej
głośników w stosunku do mikrofonu, dlatego nie może być tu
podane.
Rejestrowanie urządzeń
Zanim będzie możliwe telefonowanie przez radio samochodowe,
urządzenia muszą zostać wzajemnie zarejestrowane.
1. Przytrzymaj wciśnięty przycisk DISP/MENU (3) (na
2. Potwierdź, naciskając przycisk wielofunkcyjny (2) (W
3. Postępując zgodnie z opisem telefonu komórkowego, zare-
4. Wprowadź hasło „1234“ w telefonie komórkowym. Radio
5. Jeżeli procedura rejestrowania zakończyła się prawidłowo,
Wskazówki:
• Jeżeli rejestracja nie powiodła się, na wyświetlaczu radia
• Zależnie od tego, jakiej marki jest telefon komórkowy, może
• Zgodność standardu Bluetooth nie może być zagwaranto-
• Aby zapewnić optymalną jakość połączenia, dopilnuj,
• W telefonach komórkowych niektórych marek dostępny jest
eszenie” procesora sterowania radia. Nie znaczy to, że
odbiornik jest uszkodzony! Naciśnięcie tego przycisku
ostrym przedmiotem powoduje wznowienie startu (ustawienie powrotne).
Telefonowanie z wykorzystaniem
technologii Bluetooth
wyświetlaczu ukaże się komunikat PAIRING:1 ).
wyświetlaczu pojawia się PAIRING:1 >>>>).
jestruj w nim radio samochodowe. Jako wybrane urządzenie
w telefonie komórkowym zostanie wyświetlone „BT60“.
samochodowe zostało w ten sposób zarejestrowane w
telefonie komórkowym.
na wyświetlaczu radia samochodowego ukaże się komunikat „PAIRING:1 “ i nazwa telefonu komórkowego.
samochodowego ukaże się komunikat „PARING:1 X“.
być konieczne powtórzenie procedury rejestracji (PAIRING),
w celu zarejestrowania telefonu w radiu samochodowym.
wana dla telefonów, które ukażą się na rynku w przyszłości.
aby akumulator telefonu komórkowego był całkowicie
naładowany.
tryb oszczędzania energii. Wyłącz ten tryb, ponieważ może
utrudnić telefonowanie z wykorzystaniem złącza Bluetooth.
05-AR 736 CD_MP3_NEU 86 18.09.2006, 11:02:46 Uhr
Page 87

JĘZYK POLSKI
• Aby możliwe było prowadzenie przychodzącej lub
wychodzącej rozmowy, w telefonie komórkowym musi być
aktywna funkcja Bluetooth. W tym celu należy postępować
zgodnie z instrukcją telefonu komórkowego.
• Zwróć uwagę, aby mówić w kierunku wbudowanego mikrofonu. Podłączenie zewnętrznego mikrofonu nie jest możliwe.
Rozmowy wychodzące
1. Naciśnij i puść przycisk wielofunkcyjny (2) (W wyświetlaczu
pojawia się „
2. Aby wprowadzić pożądany numer telefonu, obracaj przyciskiem wielofunkcyjnym aż ukaże się pierwsza pożądana
cyfra. Ponownie naciśnij i puść przycisk wielofunkcyjny (2),
aby potwierdzić tę cyfrę. Powtarzaj tę samą procedurę aż do
wprowadzenia całego numeru telefonu (numer ten będzie
wyświetlony na wyświetlaczu radia samochodowego).
Uwaga: w razie błędnego wprowadzenia jednej lub kilku
cyfr, można te cyfry skasować przyciskiem
3. Aby wywołać pożądany numer, przytrzymaj następnie
wciśnięty przycisk wielofunkcyjny (2) aż na wyświetlaczu
ukaże się komunikat „CALLING >>>>“.
4. Aby zakończyć połączenie, naciśnij przycisk
Uwaga: aby wywołać wprowadzone numery telefonu, można
także użyć przycisku M / TRANSFER (5).
Powtarzanie wybierania
Urządzenie zapamiętuje 9 ostatnio wybranych numerów. Procedura ich wywoływania wygląda następująco.
1. Naciśnij i puść przycisk wielofunkcyjny (2) (W wyświetlaczu
pojawia się „ “).
2. Następnie przytrzymaj wciśnięty przycisk wielofunkcyjny (2).
Ostatni wybrany numer telefonu zostanie wyświetlony na
wyświetlaczu.
3. Obracając przycisk wielofunkcyjny (2) można teraz wybrać
jeden z ostatnio wybieranych numerów.
4. Aby wywołać pożądany numer, przytrzymaj następnie
wciśnięty przycisk wielofunkcyjny (2), aż na wyświetlaczu
ukaże się komunikat „CALLING >>>>“.
5. Aby zakończyć połączenie, naciśnij przycisk
Rozmowy przychodzące
Rozmowa przychodząca jest sygnalizowana dźwiękiem
dzwonka emitowanym z głośników i jeżeli wywołujący dysponuje
telefonem obsługującym funkcję CLIP „Calling Line Identi-
fi cation Presentation (prezentacja numeru wywołującego)“,
na wyświetlaczu radia samochodowego ukaże się numer
wywołującego. W przeciwnym razie na wyświetlaczu ukaże się
komunikat „PHONE IN“.
1. Aby odebrać przychodzącą rozmowę, naciśnij przycisk
M
/ TRANSFER (5). Usłyszysz wywołującego przez
głośniki radia samochodowego.
2. Aby zakończyć połączenie, naciśnij przycisk
“).
B
/ CLEAR (6).
B
/ CLEAR (6).
B
/ CLEAR (6).
B
/ CLEAR (6).
Uwaga!
• Możesz przenieść rozmowę z powrotem na telefon
komórkowy. W tym celu przytrzymaj wciśnięty przycisk
TRANSFER (5) (na wyświetlaczu ukaże się wskaźnik
„TRANSFER “). Radio samochodowe włączy tryb
MUTE. Jeżeli ponownie przytrzymasz wciśnięty ten przycisk, rozmowa zostanie z powrotem przeniesiona na radio
samochodowe.
• Aby odrzucić rozmowę przychodzącą, naciśnij przycisk
CLEAR (6).
M
/
B
/
Dane techniczne
Ogólne
Napięcie zasilania..........................................................DC 12 V
Pobór prądu................................................................ 7 A maks.
Moc................................................................... 4 x 60 W PMPO
Zakres FM
Zakres częstotliwości............................87,5 MHz do 108,0 MHz
Czułość używalna..............................................................15 dB
Częstotliwość pośrednia..............................................10,7 MHz
Odtwarzacz CD
System.............................................................. Układ Audio CD
Czytane formaty ............................płyty CD/CD-R/CD-RW/MP3
Bitowa prędkość odtwarzania .............................. 32 - 320 kBit/s
Ilość bitów kwantowania .................................................... 1 bit.
Format sygnału............................................................. 44,1 kHz
Stosunek sygnału do szumów..............................50 dB (1 kHz)
Ilość kanałów......................................................2 kanały stereo
Wymiaru obudowy.......................178 szer. x 50 wys. x 157 głęb
Niniejsze urządzenie odpowiada wymaganiom normy
bezpieczeństwa użytkowania oraz spełnia wymagania dyrektywy niskonapięciowej i kompatybilności elektromagnetycznej.
Zastrzega się prawo do zmian technicznych!
JĘZYK POLSKI
87
05-AR 736 CD_MP3_NEU 87 18.09.2006, 11:02:48 Uhr
Page 88

JĘZYK POLSKI
Przed skorzystaniem z listy kontrolnej należy najpierw
sprawdzić, czy urządzenie jest właściwie podłączone. Jeżeli
po sprawdzeniu całej listy kontrolnej usterka nie zostanie w
pełni usunięta, należy skonsultować się z najbliższym punktem
serwisowym.
Oznaki usterki Powód Sposób usunięcia usterki
Gwiżdżący odgłos
z głośników.
Płyty kompaktowe wciągane są
do otworu na CD
tylko do połowy.
„READ ERR“ na
wyświetlaczu.
CD nie można
wybierać klawiszem MODE.
Po włożeniu do
urządzenia płyta
CD nie obraca
się.
Przerwy w
odtwarzaniu CD.
Brak funkcjonowania.
Odbiornika nie
można zapłonem
„Wł.” lub „Wył.”.
JĘZYK POLSKI
Urządzenie
nie działa
prawidłowo
(EJECT, LOAD,
PLAY).
88
Usuwanie usterek
Sprzężenie Nie ustawiaj za wysokiego
Śruby zabezpieczające
w transporcie nie
zostały usunięte.
CD włożona została w
złym kierunku.
Nie włożono żadnej
CD.
Za mały poziom
głośności ustawionej
na regulatorze.
Nieprawidłowo wykonane przyłącza.
Powierzchnia drogi jest
nierówna.
Urządzenie nie jest
zamontowane na stałe.
Uszkodzona płyta CD. Sprawdzić inną płytę
Brudna płyta CD. Wyczyścić CD.
Ew. urządzenie
zostało wbudowane do
pojazdu pod za dużym
kątem.
Włączony zapłon. Obrócić kluczyk zapłonu w
Nastąpiło przepalenie
jednego lub kilku
bezpieczników.
Błędne podłączenie
(każdy producent
samochodów
rozmieszcza inaczej
podłączenie ISO w
pojeździe).
Nastąpiło zakłócenie
mikrokomputera przez
pola elektromagnetyczne.
poziomu głośności.
Proszę usunąć śruby
zabezpieczające w
transporcie.
Włóż CD poprawnie.
Włożyć CD.
Zwiększyć poziom głośności.
Sprawdzić przyłącze +12V
i masę.
W celu odtworzenia CD
zaczekać aż droga stanie się
bardziej równa.
Zabudować urządzenie
na stałe. Upewnić się, że
w przypadku, gdy pojazd
nie oferuje odpowiedniego
podparcia dla tylnej części
urządzenia, zastosowano
tylne mocowanie.
CD. Jeżeli będzie ona
działać prawidłowo, to być
może poprzednia CD jest
uszkodzona.
Uważać, aby maks. kąt
pochylenia nie przekraczał
20°!
pozycję „ON” lub „ACC”.
Wymienić bezpiecznik na
inny bezpiecznik 15 A.
Skontaktować się z
warsztatem lub specjalistą
własnego samochodowym
z zapytaniem o specyfi czny
dla pojazdu adapter
Wyjmij i włóż z powrotem
płytę CD.
Wyłączyć i ponownie
włączyć odbiornik.
Oznaki usterki Powód Sposób usunięcia usterki
Brak odbioru
radiowego.
Słaby odbiór
radiofoniczny.
„NO FILE“ na
wyświetlaczu.
„MEMORY FULL“
na wyświetlaczu.
Niepodłączony kabel
antenowy.
Ew. pojazd
wyposażony jest w
specjalną antenę
(Antenę pochodnie
zakodowaną.)
Nie obsługiwany format
plików na płycie CD lub
nośniku pamięci USB.
Nośnik pamięci USB
jest przepełniony.
Mocno wetknąć kabel
antenowy w złącze antenowe
na urządzeniu.
Skontaktować się z
warsztatem lub specjalistą
własnego samochodowym.
(W przypadku „obcych fabrykatów” istnieją specyfi czne
zwrotnice zasilania wzgl.
adaptery napięciowe.)
Podłącz inny nośnik USB lub
skasuj część plików.
Postępowanie z dyskami kompaktami (CD)
Czyszczenie CD
Przed odtworzeniem, płytę
CD należy przetrzeć czystą,
niezakurzoną chusteczką do
czyszczenia.
Uwaga: nie stosować żadnych rozpuszczalników jak benzyny
lub substancje rozcieńczające. Powszechnie dostępne środki
czyszczące lub spraye antystatyczne powodują uszkodzenie
urządzenia.
Wkładanie płyty CD
Włożenie płyty CD
zadrukowaną stroną do dołu
może spowodować uszkodzenie urządzenia.
CD należy zawsze wkładać
etykietą zwróconą do góry.
Uwaga: jeżeli w kieszeni CD znajduje się już płyta, nie należy
usiłować wkładać tam kolejnej płyty, ponieważ może to
spowodować uszkodzenie urządzenia.
Chwytanie płyty CD
Płyty CD należy zawsze
chwytać za krawędzie. Aby
zapewnić czystość płyty, nie
należy dotykać jej powierzchni.
• Nie naklejać na płytach CD żadnych naklejek, ani taśm
klejących.
• Nie wystawiać płyt CD na bezpośrednie działanie promieni
słonecznych lub źródeł ciepła jak rury grzewcze oraz nie
pozostawiać ich w samochodzie, jeżeli pojazd jest parkowany w miejscu nasłonecznionym, ponieważ powoduje to
znaczny wzrost temperatury.
05-AR 736 CD_MP3_NEU 88 18.09.2006, 11:02:50 Uhr
Page 89

JĘZYK POLSKI
• Przed rozpoczęciem odtwarzania należy wszystkie CD
skontrolować pod względem rysów, zadrapań i zagięć. Tak
uszkodzone CD nie mogą być poprawnie odtwarzane. Nie
należy używa takich CD.
• Stosować wyłącznie specyfi czne dla handlu, dokładnie
okrągłe CD o średnicy 12 cm! CD o średnicy 8 cm lub
wykazujące kontury, np. motylki lub sercance nie nadają
się do odtwarzania. Istnieje zagrożenia uszkodzenia CD
i napędu odtwarzacza. Za uszkodzenie spowodowane
stosowaniem niewłaściwych CD nie przejmujemy żadnej
odpowiedzialności.
WARUNKI GWARANCJI
Przyznajemy 24 miesiące gwarancji na produkt licząc od daty
zakupu.
W tym okresie będziemy bezpłatnie usuwać w terminie 14 dni
od daty dostarczenia wadliwego sprzętu z kartą gwarancyjną
do miejsca zakupu wszystkie uszkodzenia powstałe w tym
urządzeniu na skutek wady materiałów lub wadliwego wykonania, naprawiając oraz wymieniając wadliwe części lub (jeśli
uznamy za stosowne) wymieniając całe urządzenie na nowe.
Sprzęt do naprawy powinien być dostarczony w komplecie
wraz z dowodem zakupu oraz z ważną kartą gwarancyjną
do sprzedawcy w miarę możliwości w oryginalnym opakowaniu
lub innym odpowiednim dla zabezpieczenia przed uszkodzeniem. W razie braku kompletnego opakowania fabrycznego,
ryzyko uszkodzenia sprzętu podczas transportu do i z miejsca
zakupu ponosi reklamujący.
Naprawa gwarancyjna nie dotyczy czynności przewidzianych
w instrukcji obsługi, do wykonania których zobowiązany jest
użytkownik we własnym zakresie i na własny koszt.
Gwarancja nie obejmuje:
• mechanicznych, termicznych, chemicznych uszkodzeń
sprzętu i wywołanych nimi wad,
• uszkodzeń powstałych w wyniku działania sił zewnętrznych
takich jak wyładowania atmosferyczne, zmiana napięcia
zasilania i innych zdarzeń losowych,
• nieprawidłowego ustawienia wartości napięcia elektrycznego, zasilanie z nieodpowiedniego gniazda zasilania,
• sznurów połączeniowych, sieciowych, żarówek, baterii,
akumulatorów,
• uszkodzeń wyrobu powstałych w wyniku niewłaściwego lub
niezgodnego z instrukcją jego użytkowania, przechowywania, konserwacji, samowolnego zrywania plomb oraz
wszelkich przeróbek i zmian konstrukcyjnych dokonanych
przez użytkownika lub osoby niepowołane,
• roszczeń z tytułu parametrów technicznych wyrobu, o ile są
one zgodne z podanymi przez producenta,
• prawidłowego zużycia i uszkodzeń, które mają nieistotny
wpływ na wartość lub działanie tego urządzenia.
Karta gwarancyjna bez pieczątki sklepu, daty sprzedaży, nie
wypełniona, źle wypełniona, ze śladami poprawek, nieczytelna wskutek zniszczenia, bez możliwości ustalenia miejsca
sprzedaży oraz dołączonego dowodu zakupu jest nieważna.
Korzystanie z usług gwarancyjnych nie jest możliwe po upływie
daty ważności gwarancji. Gwarancja na części lub całe
urządzenie, które są wymieniane kończy się, wraz z końcem
gwarancji na to urządzenie.
Wszystkie inne roszczenia, wliczając w to odszkodowania są
wykluczone chyba, że prawo przewiduje inaczej. Roszczenia
wykraczające poza tą umowę nie są uwzględniane przez tą
gwarancję.
Gwarancja na sprzedany towar konsumpcyjny nie wyłącza, nie
ogranicza ani nie zawiesza uprawnień kupującego wynikających
z niezgodności towaru z umową.
Gwarancja oraz zawarte w niej warunki obowiązują na terenie
Rzeczpospolitej Polskiej.
Znaczenie symbolu „Pojemnik na śmieci“
Proszę oszczędzać nasze środowisko, sprzęt elektryczny nie
należy do śmieci domowych.
Proszę korzystać z punktów zbiorczych, przewidzianych do
zdawania sprzętu elektrycznego, i tam proszę oddawać sprzęt
elektryczny, którego już nie będą Państwo używać.
Tym sposobem pomagają Państwo unikać potencjalnych
następstw niewłaściwego usuwania odpadów, mających wpływ
na środowisko i zdrowie ludzi.
Tą drogą przyczyniają się Państwo do ponownego użycia,
do recyklingu i do innych form wykorzystania starego sprzętu
elektrycznego i elektronicznego.
Informacje, gdzie można zdać sprzęt, otrzymają Państwo w
swoich urzędach komunalnych lub w administracji gminy.
JĘZYK POLSKI
89
05-AR 736 CD_MP3_NEU 89 18.09.2006, 11:02:52 Uhr
Page 90

JĘZYK POLSKI
Indeks rzeczowy
A
AF, przycisk................................................................................86
AS, przycisk ...............................................................................84
Obsługa .......................................................................... 82
O
Odtwarzanie przypadkowe (4RDM).........................................85
B (BAND), przycisk ....................................................................83
B
BEEP (sygnał potwierdzenia) ....................................................83
Bezpieczeństwo ruchu drogowego............................................80
Bluetooth....................................................................................86
C
CD, postępowanie z ..................................................................88
Czas ...........................................................................................82
D
Dane techniczne ........................................................................87
DISP, przycisk ............................................................................82
DSP (nastawy equalizera) .........................................................82
F
Funkcja odtwarzania próbek (patrz przycisk PS) ......................84
G
Głośność przy włączeniu ................................................. 83
Guzik multifunkcyjny ........................................................ 82
Guzik RESET .................................................................... 82
Gwarancja..................................................................................89
I
ID3, przycisk .................................................................... 84
Instalacja ......................................................................... 80
Instrukcja obsługi ............................................................ 81
INTRO (2INT).............................................................................85
L
LOC (LOCAL) .............................................................................83
M
Montaż (wskazówki bezpieczeństwa)................................. 80
PAU (Play / Pause ), przycisk.....................................................85
P
Podłączenie..................................................................... 81
Porady instalacyjne .......................................................... 80
Postępowanie z CD .......................................................... 88
Powtórka (3 RPT) ............................................................. 85
PS, przycisk ..................................................................... 84
PTY, przycisk.............................................................................85
R
Radiostacja ruchu drogowego (patrz TA)........................... 85
RANDOM (4RDM) (odtwarzanie przypadkowe) .................. 85
REC (nagrywanie), przycisk.......................................................85
REGION (regionalnie) ...................................................... 83
REPEAT (3RPT) (powtórka)............................................... 85
T
TA (radiostacja ruchu drogowego) .................................... 85
Telefonowanie............................................................................86
TRANSFER, przycisk.................................................................83
U
USB, podłączenie ............................................................ 86
Ustawianie głośności .................................................................82
Usuwanie usterek......................................................................88
W
Włączenie........................................................................ 83
Ważne informacje dodatkowe dotyczące wbudowania ....... 81
Wskazówki bezpieczeństwa .............................................. 80
Wyłączenie...................................................................... 83
Wyciszenie głośnika ........................................................ 83
Wytrącania, przycisk......................................................... 84
Wytrącanie CD ................................................................. 84
Z
Zdejmowanie części obsługowej................................................82
JĘZYK POLSKI
90
05-AR 736 CD_MP3_NEU 90 18.09.2006, 11:02:54 Uhr
Page 91

MAGYARUL
Biztonsági tudnivalók
A készülék használatba vétele előtt gondosan olvassa végig a
használati utasítást, és őrizze meg a garancialevéllel, a pénztári
nyugtával és lehetőleg a csomagolókartonnal, ill. az abban lévő
bélésanyaggal együtt!
• Csak arra a célra használja a készüléket, mire készült!
• Úgy szerelje be a készüléket, hogy a meglévő
szellőzőnyílások ne legyenek takarva.
• Soha ne nyissa ki a készülék burkolatát! A szakszerűtlen
javítások jelentős veszély forrásai lehetnek a használók
számára. Ha a készülék elromlott, ne használjuk tovább,
hanem szakemberrel javíttassuk meg.
Adott esetben a készüléken az alábbi szimbólumokat láthatja,
amelyek a következőkre hívják fel az Ön fi gyelmét:
A felkiáltójellel ellátott szimbólum a
kísérőpapírokban található fontos kezelési vagy
karbantartási útmutatásokra hívja fel a használó
fi gyelmét.
Az ezzel a szimbólummal jelzett készülékek „1.
osztályú lézerrel“ működve tapogatják le a CD-t. A
beépített biztonsági kapcsolók megakadályozzák,
hogy a használó emberi szemmel nem látható,
veszélyes lézersugárzás hatásának legyen kitéve,
amikor a CD-rekesz fel van nyitva.
Ezeket a biztonsági kapcsolókat semmi esetre sem szabad
„megpatkolni“ vagy más módon manipulálni, különben Ön
lézersugárhatás veszélyének teheti ki magát.
Gyerekek
• Gyermekei biztonsága érdekében ne hagyja általuk elérhető
helyen a csomagolóelemeket (műanyag zacskó, karton,
sztiropor stb.)!
Vigyázat! Kisgyermekeket ne engedjen a fóliával játszani.
Fulladás veszélye állhat fenn!
Közlekedésbiztonság
• A közlekedésbiztonság a legfőbb szabály, ezért mindig csak
úgy használja az autórádiót, hogy Ön állandóan fi gyelni és
reagálni tudjon az adott közlekedési helyzetre.
• Gondoljon arra, hogy 50 km/h-s sebességnél másodpercenként 14 métert tesz meg a gépkocsival.
• Azt javasoljuk, hogy kritikus helyzetekben kapcsolja ki a
készüléket.
• Olyan fi gyelmeztető hangjelzések, mint pl. rendőr- vagy
tűzoltókocsi szirénájának időben és biztosan hallhatónak
kell lennie.
• Ezért menet közben csak megfelelő hangerőn hallgassa a
készüléket.
A szerelés és a bekötés időtartamára
vonatkozólag olvassa el a következő biztonsági
tudnivalókat.
• Először az akkumulátor negatív majd a pozitív pólusát kell
lekötni. (Csatlakoztatni fordított sorrendben kell.)
Kérjük vegye fi gyelembe: ha az akkumulátor le van kötve,
a rövidtávú memóriaegységek elvesztik adataikat. Vegye
fi gyelembe a gépkocsigyártó biztonsági előírásait.
• A főbiztosítékot lehetőleg közel szerelje be (max. 30 cm-re)
az akkumulátor pozitív pólusához, hogy az autót egy esetlegesen előforduló kábelleégéstől megvédje pl. balesetnél.
Ha a beszerelés nem eszerint a feltétel szerint történik, a
biztosítás érvényét veszti.
• A pozitív- és negatív kábel átmérője nem lehet kevesebb
1,5 mm²-nél.
• Ha lyukat fúr, ügyeljen arra, hogy a gépkocsi részei ne
sérüljenek meg.
Beszerelési tanácsok:
• A kábelvédő tüllök védik a kábelt az éles karosszériarészeknél a kidörzsölődéstől.
• A kábel szigetelését nem szabad megsérteni szerelés
közben.
• A rendes szerszám szinte magától értetődő autó-HIFi
beszerelésekor.
Típus szerint gépkocsija eltérhet ettől a leírástól. A beszerelés
és csatlakoztatás során bekövetkezett károkért felelősséget nem
vállalunk.
Beszerelés
A rádiókészüléket a következő ábrák alapján szerelje be.
a anya
b rugós alátét
c alátét
d csavar
e szerelési szög
f betoló rögzítő keret
g menetes csapszeg
Figyelem!
h csavarok a szállítás
biztonsága érdekében
(Kérjük vegye ki őket a
szerelés előtt)
i kihúzó szerszám (kulcs a
kiszereléshez)
j előlap kerete
Helyezze az előlapot először a
jobb oldalra és illessze be, majd
a bal oldalon pattintsa be.
91
05-AR 736 CD_MP3_NEU 91 18.09.2006, 11:02:55 Uhr
MAGYARUL
Page 92

MAGYARUL
Csatlakoztatás/Bekötés
A tájékoztató ábra szerint csatlakoztassa a készüléket.
3. Kérjük vegye fi gyelembe a készülék bekötésekor/
csatlakoztatásakor, hogy nem minden gépjárműnek van
“ISO csatlakozója“. Ebben az esetben gépkocsispecifi kus
ISO adapter beszerelését javasoljuk.
Ilyen adaptert gépjárműboltokban és/vagy
gépjárműszervizekben szerezhet be.
4. A “tápfeszülség +“ (állandó áram csatlakozás) bekötésekor
Jobb első
hangfal
Piros R
Fehér L
jobb hátsó
a gépkocsi típusától függően eltérések lehetnek. (Ez a
rádióadók beprogramozásához szükséges)
Valamennyi funkció működőképességéhez kötelezően
Autom. antenna (Kék)
Antennacsatlakozás
szükséges ennek a bekötési leírásnak a betartása. Kétes
esetben forduljon hivatalos gépjárműszervízhez.
5. Az autórádió beszerelésénél a legnagyobb hajlási szög nem
lehet nagyobb 20°-nál, ennél nagyobb beszerelési szögeknél
már nem biztosított az autórádió működése (CD-lejátszó).
Chinch-kimenet
Szürke
Szürke / Fekete
Ibolyakék
6. A gépjármű típusától függően kivételes esetekben a
Ibolyakék / Fekete
rádió/CD üzemeltetés közben recseghet. Ezt egy plusz
zavarszűrővel lehet kiküszöbölni. Az Ön készüléke már
gyárilag tartalmaz zavarszűrőt. Ennek ellenére a gépkocsitól
függően előfordulhat ilyen zavar.
Zavarszűrőt gépjárműboltokban és/vagy
gépjárműszervizekben szerezhet be.
7. Kérjük vegye fi gyelembe az autórádió beszerelésekor, hogy
a rádió hátlapja mögött elegendő szabad tér legyen, hogy
ne melegedjen fel túlságosan.
8. Az antennacsatlakozásnál két szabvány létezik. Az egyik
a régi (50 ohmos), hosszú, kiálló kerek csatlakozóval a
biztosítás
Sárga
Piros
Fekete
Fehér
Fehér / Fekete
Zöld
Zöld / Fekete
gépjármű oldalán és egy kapcsolóhüvely a rádió oldalán.
A másik az ISO-szabványú antennadugó (150 ohmos).
A gépjárműboltok és/vagy gépjárműszervizek mindkét
típushoz kínálnak adaptert.
VW/Audi gépkocsiknál mindenképpen vegye fi gyelembe:
az aktív antennának feszültségre van szüksége a koaxiális
antennakábel árnyékolásán, enélkül nem lesz elég tiszta a
vétel. A fantom tápos antennaadapter megoldja ezt a gondot.
ISO áramcsatlakozás
Tartós
áramcsatlakozás
Földelés
Gyújtás
hangfal
Bal első
Bal hátsó
Kezelési tudnivalók
1. Ha az előlapot leveszi a rádió vagy CD-lejátszó működése
közben, a készülék automatikusan kikapcsol.
2. Ha a gépjármű belseje nagyon felforrósodna, pl. ha sokáig
Vigyázat:
• A levehető kezelő előlapot csak a kábelek csatlakoztatása
után helyezze vissza.
• 4 Ohm impedanciájú hangfalakat használjon.
• A hangfalak vezetékeinek földeletlennek kell lennie.
• A cinch-kimeneten keresztül csatlakoztatott jelzés csak az
elülső hangfalakon keresztül kerül lejátszásra.
a tűző napon parkolunk, ne kapcsoljuk be addig a lejátszót,
amíg a gépjármű belseje rövid menet után le nem hűl.
3. A levehető kezelő előlapot mindig az erre a célra készült
védőtokba helyezzük, hogy biztonságosan megőrizhessük.
4. A létező szoftverek és CD-médiák nagy száma miatt
nem tudjuk garantálni, hogy a készülék a saját előállítású
(másolt) CD-ket is lejátssza.
5. RESET-gomb (ábra nélkül): Az üzemelés közben fellépő
Fontos további tudnivalók
az autórádió beépítéséhez!
1. Beszerlés előtt vegyük ki a szállítást biztosító csavaro-
kat (h), különben a készülék nem veszi be a CD-t.
2. A készüléket az akkumulátor negatív pólusára kell kötni,
amely a gépkocsi karosszériájára van bekötve. Ezt szereléskor ellenőrizni kell.
MAGYARUL
92
esetleges hibákat (ERROR) a RESET gomb megnyomásával lehet elhárítani. Ha le van véve az előlap, a
jobb alsó sarokban találja meg ezt a gombot. A gépjármű
hálózatában lévő feszültségingadozás miatt előfordulhat,
hogy a rádió irányítási processzora lefagy. Ez esetben nem
a készülék hibájáról van szó! Ennek a gombnak a megnyomásával –valamilyen hegyes tárggyal tudjuk megnyomni
- újra indíthatjuk a processzort (visszaállíthatjuk).
05-AR 736 CD_MP3_NEU 92 18.09.2006, 11:02:57 Uhr
Page 93

MAGYARUL
Kezelés
1. -gomb
Nyomja meg a -gombot, ha le akarja venni az előlapot.
2. PRESS • ENTER AUDIO DIAL
multifunkciós gomb (hangerő)
a) Elfordítani: Normál lejátszásnál a multifunkciós gomb
hangerőszabályzóként működik.
b) Röviden megnyomni: a telefonszám beadási módjához
jut. A további kezeléshez lapozzon a „Bluetooth-n
keresztüli telefonáláshoz“.
c) Hosszan megnyomni: a csengőmód kiválasztási
menüjébe jut. A kijelzőn a „VOLUME“ jelenik meg a
hangerő beállításához. A multifunkciós gomb rövid
megnyomásával az alábbi menüpontokat választhatja
ki: VOLUME (hangerő), BASS (basszus), TREBLE
(magasságok), BALANCE (balance) és FADER
(hangzásjavító). Az egyes menüpontok beállításait a
multifunkciós gomb eltekerésével változtathatja meg.
3. DISP/MENU-gomb (kijelző/kiválasztás)
a) Rádió üzemmód:
• Ha a készülék veszi az RDS adatokat, nyomja meg
többször röviden ezt a gombot, amíg ezt nem látja:
PS név ➞ idő ➞ frekvencia ➞ PTY
• Ha a készülék nem fogja az RDS adatokat, a
következő jelenik meg:
idő ➞ PTY ➞ frekvencia
Figyelem: A kijelzés kb. 5 mp-re jelenik meg, majd a
készülék visszaáll az eredeti kijelzésre.
b) A következő menüpontokhoz a DISP/MENU-gomb
hosszantartó lenyomásával juthat:
• PAIRING
• RE-CONN / DIS-CONN
• A ANSWER ON / A ANSWER OFF
• PHONE VOL
• CONTRAST
• FORMAT 24H / FORMAT 12H
• SET
• DISTANT / LOCAL
• REGION ON / REGION OFF
• VOL PGM
• BEEP TONE ON / BEEP TONE OFF
A DISP/MENU-gomb ismétlődő megnyomásával
tudja kiválasztani az egyes menüpontokat. Az egyes
menüpontok beállításait a multifunkciós gomb (2)
eltekerésével változtathatja meg.
• PAIRING:1 (bejelentkezés)
Mielőtt használhatná bluetooth-os mobiltelefonját,
először be kell jelenteni ezt a készülékben (lásd „A
készülék bejelentését“).
• RE-CONN:1/DIS-CONN:1
Ezen a funkción keresztül lehet a bluetooth kapcsolatot
kézzel ki- és bekapcsolni.
RE-CONN:1 = bekapcsolni ; DIS-CONN:1 = kikapcsolni
A bluetooth kapcsolat kézi ki- és bekapcsolásához
válassza ki a kívánt opciót és igazolja választását a
multifunkciós gomb (2) megnyomásával. „RE-CONN:1
>>>>“ ill. „DIS-CONN:1 >>>>“ jelenik meg a kijelzőn.
• A ANSWER ON/A ANSWER OFF
(automatikus hívásfogadás)
A ANSWER ON: A készülék automatikusan
elfogad minden bejövő hívást,
anélkül, hogy meg kellene
nyomnia a TRANSFER (fogadás)
gombot. Az automatikus fogadás
kb. 3 csengő hang után történik
meg.
A ANSWER OFF: Az automatikus hívásfogadás ki
van kapcsolva.
• PHONE VOL
Itt válassza ki a csengő hang hangerejét bemenő
híváskor.
• CONTRAST (kontraszt)
Itt állíthatja be a kijelző kontrasztját.
• FORMAT 24 H/FORMAT 12 H
Itt választhatja ki az óra kijelzési formátumát.
• SET
Az óra kézi beállításához az alábbiak szerint járjon el:
Percek beállítása: Fordítsa el a multifunkciós gom-
bot (2) az óramutató járásával
megegyező irányban.
Órák beállítása: Fordítsa el a multifunkciós gom-
bot (2) az óramutató járásával
ellentétes irányba.
Tudnivaló: Ha olyan rádiócsatornát fog, amely RDS
adatokat küld, az óra automatikusan áll be.
• DISTANT/LOCAL (csak rádióüzemmódban választható)
Az Ön készüléke képes RDS EON adatokat fogni. Az
EON azt jelenti, hogy egy adóláncon belül pl. a WDR-en
belül (Westdeutsches Rundfunk, német adó) plusz
információkat közvetítenek. Közlekedési hírek esetén
(TA) egy adóláncon belül a közlekedési híreket nem
sugárzó adóról átkapcsol az adólánc másik adójára,
amely sugároz közlekedési híreket.
Attól függően, hogy helyi vagy országos közlekedési
híreket szeretne hallgatni, választhat az LOCAL vagy az
DISTANT-módusz között.
LOCAL: Ezzel a funkcióval kerülhető el az,
hogy a rádió egy gyenge jelszintű
EON-összekötésre kapcsoljon
át. A rádió nem kapcsol át erre
az adóra és a hallgató alig vesz
észre zavart. A kijelzőn a „LOC“
jelenik meg.
93
05-AR 736 CD_MP3_NEU 93 18.09.2006, 11:02:59 Uhr
MAGYARUL
Page 94

MAGYARUL
DISTANT-módusz: Ebben a móduszban az EON
• REGION ON/REGION OFF
(Csak bekapcsolt AF funkciónál működik)
Néhány adó bizonyos időben a regionális programokat
más tartalommal sugározza.
REGION ON: Bekapcsol a regionális mód.
Figyelem: A kijelző kapacitása korlátolt. Előfordulhat,
hogy kettős kijelzéskor a kijelző néhány szegmense
törlődik.
A REGION ON funkcióval elkerülheti, hogy a rádió olyan
alternatív frekvenciákra váltson, amelyek más tartalmú
regionális programot sugároznak ki.
REGION OFF: Kikapcsol a regionális mód. A
• VOL PGM
A multifunkciós gombbal (2) beállíthatja a kívánt
bekapcsolási hangerőt.
• BEEP TONE ON/BEEP TONE OFF
(visszaigazoló hangjelzés)
A gombok megnyomását visszaigazoló hangjelzésnek
2 fajtáját tudja beállítani:
BEEP TONE ON: A hangjelzés mindig megszólal,
BEEP TONE OFF: A hangjelzés ki van kapcsolva.
4. / Ki-/ bekapcsoló gomb / némítás
a) A készülék bekapcsolásához nyomja meg ezt a gombot.
A „WELCOME” felirat jelenik meg a kijelzőn. A készülék
kikapcsolásához tartsa lenyomva ezt a gombot.
b) A / -gomb megnyomásával kis időre el tudja némíta-
ni a hangfalakat. A kijelzőn villogni kezd a „MUTE”
felirat. A gomb újbóli megnyomásával tudja kikapcsolni
ezt a funkciót. Ezt a funkciót a multifunkciós gomb
megnyomásával lehet kikapcsolni.
5. M / TRANSFER-gomb (MODE/Hívásfogadás)
a) Ezt a gombot nyomja meg a CD-lejátszó, rádió mód,
stb., kiválasztásához.
b) Ezt a gombot nyomja meg hívás érkezésekor a hívás
fogadásához.
c) Ezt a gombot tartsa hívás közben, hogy újra átvigye a
mobiltelefonjára a hívást. Az ismételt nyomvatartással
a beszélgetés átkerül az autórádióra. Mindkét esetben
„TRANSFER “ jelenik meg a kijelzőn.
TA kapcsolás az EON TA
információkat megpróbálha egy
másik elérhető adóról fogni,
ezzel javítva a vétel minőségét. A
„LOC“ felirat eltűnik a kijelzőről.
készülék az alternatív frekvencia
keresésekor vagy PI kód kereséskor nem veszi fi gyelembe a
regionális adó PI kódját.
ha megnyom egy gombot.
6.
B
/ CLEAR-gomb (• BAND/• ERASE/• SEARCH)
a) Rádió-üzemmód
Röviden nyomja meg a B-gombot, ha az FM- (URH)
szintek között szeretne átkapcsolni. A megfelelő FM
szint megnevezése megjelenik az LCD-kijelzőn.
b) B-gomb keresési funkcióként MP3 üzemmódban
Ha MP3 CD-re írásakor a megfelelő adatok is le lettek
mentve, ezeket a következő funkciókkal meg lehet
keresni:
a) MP3-as formátumú CD-knél a szám címének
közvetlen beadásával:
1. Nyomja meg egyszer az
„NUMBER “ jelenik meg.
2. A multifunkciós gomb segítségével (2)
kiválaszthatja a kívánt szám címét. A kijelzőn
„No.“ és a megfelelő szám sorszáma jelenik
meg.
3. Ezután nyomja meg a röviden a kiválasztott
szám lejátszásához a multifunkciós gombot (2).
Közvetlen ezután megszólal a kívánt szám.
b) MP3-as CD-knél könyvtár keresése:
1. Nyomja meg háromszor az B-gombot. A
kijelzőn „NAVIGATE “ jelenik meg.
2. A multifunkciós gomb (2) segítségével a CD
különböző könyvtárait választhatja ki.
3. A kiválasztott könyvtárat a multifunkciós gomb
(2) rövid megnyomásával lehet igazolni. A
kiválasztott könyvtár első száma jelenik meg.
4. A multifunkciós gomb (2) elfordításával egy
könyvtáron belül lehet kiválasztani egy számot.
5. Ezután röviden nyomja meg a kiválasztott szám
lejátszásához a multifunkciós gombot (2).
Figyelem:
• Ha az MP3 formátumú CD-n nincsenek könyvtárak, „ROOT“ jelenik meg a kijelzőn.
• A létező szoftverek és CD-médiák nagy száma
miatt nem tudjuk garantálni, hogy a készülék a
saját előállítású (másolt) CD-ket is lejátssza.
• MP3-formátumú CD-k esetében a 왖 ill.
왔
gombokkal (17/16) lehet egyenként fel vagy
le lapozni a könyvtárakat.
• Figyelem: Lementett ID-3 tag információk a
kijelzőn szalagban jelennek meg.
c) Telefonmódban:
A beadott telefonszám törléséhez.
d) USB módban:
Az aktuális szám törtéléséhez.
1. Tartsa lenyomva a B gombot. A kijelzőn „ERASE“ és az aktuális szám (pl. 002) jelenik meg.
2. Nyomja meg a multifunkciós gombot, ha
igazolni szeretné (ERASE jelenik meg a
kijelzőn). Ismét nyomja meg a multifunkciós
gombot (2), ha törölni szeretné a számot
(ERASE jelenik meg a kijelzőn).
B
-gombot. A kijelzőn
MAGYARUL
94
05-AR 736 CD_MP3_NEU 94 18.09.2006, 11:03:01 Uhr
Page 95

MAGYARUL
Figyelem: Ha nem akarja törölni a számot, fordítsa
el a multifunkciós gombot (2) az első megnyomás
után (ERASE X jelenik meg a kijelzőn). Igazolásképp nyomja meg a multifunkciós gombot (2).
7./8. 왘왘
I / I왗왗-gombok TRACK UP/DOWN /
AUTO/MANUAL SEEK
CD-móduszban
az 왘왘I vagy I왗왗 gombok rövid megnyomásával tud előre
és visszafele kapcsolni. A számokat az 왘왘I vagy I왗왗
nyílgombok nyomvatartásával tudja tekerni.
Rádió-móduszban:
Röviden nyomja meg a 왘왘I / I왗왗-gombokat és a rádió a
következő elérhető adónál megáll (AUTO SEEK jelenik meg
a kijelzőn). Amíg nyomva tartja az 왘왘I / I왗왗-gombokat,
a keresés tovább folytatódik a frekvenciasávban (A kijelzőn
MANUAL SEEK jelenik meg).
9. Kiadó gomb
Ha ki akarja venni a CD-t, nyomja meg ezt a gombot.
10. CD-nyílás
Tolja a CD-t a feliratozott oldalával felfele lazán a CDnyílásba, amíg a készülék magától be nem húzza a lemezt.
A kijelzőn „READING“ jelenik meg.
Figyelem: A felhasználó által készített CD-k lejátszása a
rendelkezésre álló szoftverek és CD- hordozók sokfélesége
miatt nem garantálható.
MP3-as formátumú zene lejátszása
Ezzel a készülékkel MP3-as formátumban is le lehet játszani
zenedarabokat. A készülék ezenkívül az alábbi forgalomban
lévő CD-típusokat támogatja: CD, CD-RW, CD-R.
A készülékkel MP3-as CD-k is lejátszhatók. Az ilyen CD-ken
tömörítve akár 200 szám is tárolható. A készülék automatikusan felismeri az MP3-as CD-t (a kijelzőn MP3 jelenik meg).
Figyelem: Lementett ID-3 tag információk esetén ezek
szalagként jelennek meg a kijelzőn.
Kérjük, vegye fi gyelembe:
Sokféle másolási és komprimálási eljárás, valamint
minőségi különbség fordulhat elő CD-knél és másolt CDknél.
Továbbá a zeneipar nem tart be semmilyen szabványt sem
(másolásvédelem).
Ezekből az okokból kifolyólag a CD-k és MP3-as CD-k le-
játszásakor esetenként gondok adódhatnak. Ez nem jelenti
azt, hogy a készülék hibásan működik.
11. AS/PS / ID3-gomb (automatikus rádióadó-beprogramozás)
Rádió-móduszban:
a) Beprogramozási funkció:
Nyomja meg 1 másodpercnél tovább az AS/PS / ID3-
gombot, ezzel tudja aktiválni a rádióadó beprogramozást. A kijelzőn „AUTO STORE“ jelenik meg.
:
A készülék az aktuális frekvenciasávon belül pl. FM 1 a
sugárzás erőssége szerint megkeresi az adókat, amíg
a keresés le nem zárul. A legerősebb hat adót lementi a
megfelelő memóriahelyekre.
Ezután 5 másodpercig lejátssza valamennyi lementett
csatornát, majd beállítja az első helyen beprogramozott
adót.
Ha FM-szélességen még szeretne más adókat is ke-
resni, a B-gomb megnyomásával válthat FM2-es vagy
FM3-as sávra. Az AS/PS / ID3-gomb egy másodpercnél
hosszabbi megnyomásával újabb keresés indíthat el.
b) Bejátszás:
Az AS/PS / ID3-gomb rövid megnyomásával a rádió
a frekvenciasáv valamennyi előre beállított adóját
lejátssza.
Figyelem: A lejátszási funkció automatikusan befejeződik
az első tárhely adójánál.
MP3-módban:
Az AS/PS / ID3-gomb valamennyi megnyomásánál megjelenik a könyvtár, dal, előadó és album száma a kijelzőn
(amennyiben ID3 tag információk lettek mentve a CD-re).
12. -17.
előre kiválasztott adók állomásgombjai (1–6) és
1PAU-, 2INT-, 3RPT-, 4RDM-gombok CD üzemmódban
a) Rádió-üzemmód
Ezeknek a gomboknak a rövid megnyomásával köz-
vetlenül kiválasztható a gombra előre beprogramozott
rádióadó. Ha 1 mp-nél hosszabb ideig nyomjuk meg
a gombot, az éppen hallgatott adót programozzuk az
adott gombra.
b) CD-üzemmód
• Nyomja meg a 1PAU-gombot, hogy leálljon a CD
(szünetfunkció). A gomb újbóli megnyomásával
kikapcsolhatja ezt a funkciót.
• Nyomja meg a 2INT-gombot. A CD-lejátszó a
lemezről valamennyi számból 10 másodpercet
lejátszik. A gomb újbóli megnyomásával megszakíthatja a keresést. A lejátszó az éppen hallgatott
dalt játssza tovább.
• Nyomja meg a 3RPT-gombot. Az éppen lejátszott
számot újra lejátssza. A gomb újbóli megnyomásával megszakíthatja ezt a funkciót.
• Nyomja meg a 4RDM-gombot. A készülék a
CD-n lévő számokat véletlenszerűen játssza le. A
gomb újbóli megnyomásával megszakíthatja ezt a
funkciót.
18. REC/ TA • COPY-gomb
a) TA Traffi c Annonuncement
(Közlekedési hírek elsőbbségének bekapcsolása)
A TA-funkicót a TA-gomb rövid megnyomásával aktiválhatja, a kijelzőn ekkor a TA-jel jelenik meg.
Ha talál a kereső egy olyan FM-adót, amelyik rendsze-
resen sugároz közlekedési híreket, a TP-kijelzés felvillan
a kijelzőn.
95
05-AR 736 CD_MP3_NEU 95 18.09.2006, 11:03:04 Uhr
MAGYARUL
Page 96

MAGYARUL
Aktivált TA-funkció esetén az URH /FM közlekedési
hírek automatikusan megszakítják a CD-üzemmódot. (A
kijelzőn TRAFFIC INFO jelenik meg).
A közlekedési hírek végén újra bekapcsol a beállított
program.
A TA-funkció megszakítása:
Ha meg szeretné szakítani az éppen sugárzott közlekedési híreket, nyomja meg röviden a TA-gombot. A
TA-móduszt ezzel nem kapcsolja ki.
Figyelem: Ha nincs beállítva közlekedési információ, a
kijelzőn röviden „LOST TP TA“ jelenik meg.
b) Felvevő funkció (csak CD üzemmódban aktív)
CD/MP3 CD -t USB-re vehet fel.
1. Csatlakoztasson ehhez egy USB médiumot az
adapterkábellel a megfelelő csatlakozáshoz (21).
2. Válassza ki a felvenni kívánt számokat az
I왗왗-gombokkal (7/8).
3. Tartsa lenyomva a REC/TA • COPY-gombokkal (A
kijelzőn REC USB jelenik meg).
4. Nyomja meg igazolásképp a a multifunkciós gombot
(2). Megkezdődik az aktuális szám USB médiumra
való felvétele (A kijelzőn REC >>>> jelenik meg).
Figyelem: MP3-as CD-knél a másolási státusz
százalékosan kerül kijelzésre. Ezzel ellentétben az
audió CD-knél a felvétel valódi időben zajlik.
5. Ha befejeződik a felvétel, MP3-as CD-ék esetén
„100% “ és audió CD-knél „REC “ jelenik meg
a kijelzőn. Végül a készülék normál lejátszásra
kapcsol át.
Figyelem: Mindig csak az aktuális számot lehet felvenni
(nem teljes CD-t). Ha további számot szeretne felvenni
az USB médiumra, az alábbiak szerint járjon el.
19. PTY/IX-BASS-gomb
a) A IX-BASS-funkció ki-/és bekapcsolása. Tartsa lenyom-
va a PTY/IX-BASS gombot kb. 3 mp-ig.
Alsó hangerőszinten a hangkép kibővül a IX-BASS funk-
cióval. Megemeli a magasabb és basszus frekvenciákat.
b) Rádió-üzemmód:
PTY Az adó jellegének kiválasztása
Néhány FM-adó az adó nevén kívül az adó jellegéről
is sugároznak információt. Az Ön készüléke ki tudja
jeleníteni ezeket az információkat.
Ilyen adótípusok lehetnek pl.:
SPORT NEWS POP CLASSICS
A PTY-funkcióval egy bizonyos adótípusú rádióadót tud
kiválasztani.
Ismételten nyomja meg a PTY/IX-BASS-gombot a PTY
kiválasztásához. Igazolja választását a multifunkciós
gombbal (2). A kijelzőn végül röviden a „PTY SEEK“
kijelzés villan be.
왘왘
I /
Ha aktiválva van a PTY funkció, a rádiókészülék
azonnal elkezd PTY-információkat keresni és megáll a
keresésben, ha megtalálta a keresett PTY-információkat.
Ha nem találta meg a keresett adótípust, a kijelzőn „NO
MATCH PTY“ jelenik meg.
Ha már nincs meg már a keresett PTY-információ, a
PTY-funkció automatikusan normál móduszba kapcsol
át.
20. AF-gomb
AF (Alternatív frekvenciák) REG-funkció
Az AF olyan funkció, amelyik az RDS (Radio Data System)
segítségével működik és csak FM-adóknál lehet használni.
A készülék a háttérben a beállított adó legerősebben
fogható változatát keresi meg.
Ha az AF-funkció aktiválva van, a rádió állandóan ellenőrzi
az AF-frekvencia sugárzási erősségét. Az AF-frekvenciák ellenőrzésének időköze az éppen hallgatott adó
sugárzásának erősségétől függ és egy erős adó esetében
pár perc és gyenge adók esetén pár másodperc között
ingadozik. Minden egyes alkalommal, ha az új AF-frekvencia erősebb, mint az éppen hallgatott állomás, a készülék
rövid időre átkapcsol az új frekvenciára és egy vagy két
másodpercre a „NEW FREQUENCY“ jelentést jelzi ki. Mivel
a frekvenciaváltásnál ill. ellenőrzésnél hallható néma szünet
nagyon rövid, ez a normál adó hallgatásakor szinte nem is
hallható.
Az AF-funkció az A.F-gomb rövid megnyomásával
aktiválható, ilyenkor a kijelzőn megjelenő AF-jel jelzi az AF
funkciót.
• Ha a kijelzőn az AF-jel látható, akkor be van kapcsolva
az AF-funkció, a készülék RDS-adóadatokat fogad.
• Ha a kijelzőn villog az AF-jel, akkor az AF-funkció akti-
válva van, de a készülék mégsem fog RDS-adójelzéseket.
• Az AF-gomb újbóli megnyomásával kapcsolhatja ki az
AF-funkciót, ekkor eltűnik a kijelzőről az AF-jel.
21. USB csatlakozó
Ezt a készüléket a műszaki fejlesztések legújabb szintjének
megfelelően alakítottuk ki az USB tartományban. A ma kapható különféle USB tárolóeszközök nagy száma azonban
sajnos nem teszi lehetővé, hogy garantálhassuk az összes
USB tárolóeszközzel való teljes kompatibilitást. Ebből az
okból kifolyólag ritka esetekben előfordulhat, hogy gond van
az USB médiák lejátszásával. Ez nem jelenti azt, hogy a
készülék hibásan működik.
1. Csatlakoztasson egy USB médiumot adapterkábel
segítségével a megfelelő csatlakozóra. (A kijelzőn USB
HOST jelenik meg). Az adatokat automatikus játssza le
a készülék.
2. Ha bizonyos számokat akarunk kikeresni/kiválasztani,
a 6 b) pont (B gomb keresőfunkciója MP3 móduszban)
és a 12-17. b) pont szerint járjunk el.
22. LCD-kijelző (folyékony kristály kijelző)
MAGYARUL
96
05-AR 736 CD_MP3_NEU 96 18.09.2006, 11:03:06 Uhr
Page 97

MAGYARUL
23. RESET-gomb (ábra nélkül)
Ha le van véve az előlap, a jobb alsó sarokban találja meg
ezt a gombot.
A gépjármű hálózatában lévő feszültségingadozás miatt
előfordulhat, hogy a rádió irányítási processzora lefagy.
Ez esetben nem a készülék hibájáról van szó! Ennek a
gombnak a megnyomásával –valamilyen hegyes tárggyal
tudjuk megnyomni - újra indíthatjuk a processzort (visszaállíthatjuk).
Telefonálás a bluetooth-on keresztül
A bluetooth olyan technológia, mellyel készülékekkel vezetékmentes rádiós kapcsolatot lehet létrehozni rövid távolság
esetén. Jelenleg a bluetooth technológia főként mobiltelefonok
kihangosítójánál kerülnek felhasználásra. Vezetés közben a
sofőr anélkül telefonálhat a mobiltelefonról, hogy azt a füléhez
kellene tartania.
Ez a készülék lehetőséget nyújt bluetooth-os mobiltelefon használatára. A működési sugár kb. 3 méterre korlátozódik.
A telefonbeszélgetés közbeni optimális hangminőség
érdekében
Ne állítsa be túl magasra a hangerőt. Ennek a hangfalból való
visszacsatolás (sípoló hang) lehet a következménye.
Tudnivaló: a hangerő beállítása függ a hangfal mikrofonhoz
képesti beépítési helyétől és ezért nem lehet megnevezni.
A készülékek bejelentése
Mielőtt az autórádión keresztül telefonálna, a készülékeket
egymás közt be kell jelenteni.
1. Tartsa lenyomva a DISP/MENU gombot (3) (PAIRING:1
jelenik meg a kijelzőn).
2. Nyomja meg igazolásképp a multifunkciós gombot (2) (A
kijelzőn PAIRING:1 >>>> jelenik meg).
3. Jelentse be a mobiltelefonjában az autórádiót, ahogy az a
mobiltelefon kezelési útmutatójában le van írva. Választásképp a „BT60“ készülék jelenik meg a mobiltelefonjában.
4. Adja be a mobiltelefonjába a „1234“ jelszót. Ezzel az autórádió be van jelentve a mobiltelefonjában.
5. Ha a bejelentés sikeres volt, az autórádió kijelzőjén „PAIRING:1 “ és a mobiltelefon neve jelenik meg.
Tudnivalók:
• Ha a bejelentés nem volt sikeres, az autórádió kijelzőjén
„PARING:1 X“ jelenik meg.
• Mobiltelefongyártótól függően meg kell ismételni a bejelentést (PAIRING), hogy a mobiltelefon be legyen jelentve az
autórádióban.
• A bluetooth-kompatibilitás nem garantált a jövőben
megjelenő mobiltelefonokhoz.
• Az optimális kapcsolat elérése érdekében ügyeljen arra,
hogy mobiltelefonja akkuja teljesen fel legyen töltve.
• Néhány mobiltelefonmárka energiatakarékos üzemmóddal
rendelkezik. Kapcsolja ki az energiatakarékos üzemmódot,
mert különben gondok léphetnek fel a bluetooth-on keresztüli telefonáláskor.
• Beérkező vagy kimenő híváshoz a bluetooth-nak aktívnak
kell maradnia mobiltelefonjában. Kérjük vegye fi gyelembe
mobiltelefonja kezelési utasítását.
• Kérjük vegye fi gyelembe, hogy a beépített mikrofon irányába
beszéljen. Külső mikrofon beszerelése nem lehetséges.
Kimenő hívások
1. Nyomja meg röviden a multifunkciós gombot (2) (A kijelzőn
„ “ jelenik meg).
2. A kívánt telefonszám beadásához fordítsa el a multifunkciós
gombot addig, amíg a kívánt első számjegy meg nem
jelenik. Ezután ismét nyomja meg röviden a multifunkciós
gombot (2) a számjegy igazolásához. További számjegyekhez ismételje meg ezeket a lépéseket addig, amíg az
egész telefonszámot be nem adta (ezt kijelzi az autórádió
kijelzője).
Tudnivalók: Ha egy vagy több számjegyet hibásan adott
be, ezeket a számjegyeket a B / CLEAR gombbal (6)
törölheti.
3. A kívánt szám felhívásához tartsa lenyomva a multifunkciós gombot addig (2), amíg a kijelzőn meg nem jelenik a
„CALLING >>>>“ jelzés.
4. Ha le akarja tenni, nyomja meg a B / CLEAR gombot (6).
Tudnivalók: ha a beadott számokat fel szeretné hívni, az M /
TRANSFER-gombot (5) is megnyomhatja.
Hívásismétlés
A készülék a 9 utolsó telefonszámot lementi. Ha ezeket fel
szeretné hívni, az alábbiakat kell tennie:
1. Nyomja meg röviden a multifunkciós gombot (2) (A kijelzőn
„ “ jelenik meg).
2. Ezután tartsa lenyomva a multifunkciós gombot (2). A
legutóbb hívott számok megjelennek a kijelzőn.
3. A multifunkciós gomb elfordításával (2) válogathat a legutóbbi telefonszámok között.
4. A kívánt számok tárcsázásához tartsa lenyomva a multifunkciós gombot (2), amíg a kijelzőn a „CALLING >>>>“ felirat
nem jelenik meg.
5. Ha le akarja tenni, nyomja meg a B / CLEAR gombot (6).
Bejövő hívások
Bejövő hívásoknál a hangfalon keresztül csengő hang hallatszik
és amennyiben a hívó telefonja CLIP „Calling Line Identifi ca-
tion Presentation (hívószám azonosítással)“ rendelkezik, az
autórádió kijelzőjén megjelenik a hívó száma. Egyébként pedig
a „PHONE IN“ felirat jelenik meg a kijelzőn.
1. Ha bejövő hívást akar felvenni, nyomja meg az M /
TRANSFER gombot (5). A hívót a jármű hangfalán keresztül
hallja.
2. Ha le szeretné tenni, nyomja meg a B / CLEAR gombot (6).
Tudnivaló:
• Megvan rá a lehetősége, hogy a beszélgetést átvigye a
mobiltelefonjára. Tartsa lenyomva az M / TRANSFERgombot (5) („TRANSFER “ jelenik meg a kijelzőn).
Az autórádió bekapcsolja a MUTE üzemmódot. Ha ismét
97
05-AR 736 CD_MP3_NEU 97 18.09.2006, 11:03:09 Uhr
MAGYARUL
Page 98

MAGYARUL
lenyomva tartja ezt a gombot, a beszélgetés újra átkerül az
autórádióra.
• Bejövő hívás elutasításához nyomja meg a
gombot (6).
B
/ CLEAR
Műszaki adatok
Általános
Hálózati feszültség ........................................................DC 12 V
Áramfogyasztás............................................................7 A max.
Teljesítmény......................................................4 x 60 W PMPO
FM-tartomány
Frekvenciatartomány...............................87,5 MHz - 108,0 MHz
Használható érzékenység .................................................15 dB
I.F. frekvencia ..............................................................10,7 MHz
CD-lejátszó
Rendszer ..................................................... CD Audio - System
Felhasználható CD-k...............CD/CD-R/CD-RW/MP3 lemezek
Lejátszható bit-ráták ............................................ 32 - 320 kBit/s
Kvantizáló bitek száma....................................................... 1 bit.
Jelzésformátum .................................. mintafrekvencia 44,1 kHz
Jelzés-zaj-viszony ................................................50 dB (1 kHz)
Csatornák száma.......................................... 2 sztereó csatorna
Ház méretei ............................................... 178 B x 50 H x 157 T
Ezt a készüléket az Európa Tanács minden vonatkozó aktuális
irányelve szerint (pl. elektromágnesesség-elviselő képesség
vagy kisfeszültség-elviselő képesség) ellenőriztük, és a legújabb
biztonságtechnikai előírások szerint készült.
Megjegyezzük az esetleges müszaki változásokat!
Mielőtt átnézné a csekklistát, fejezze be a bekötést. Ha a csekklista áttekintése után még mindig lennének megválaszolatlan
kérdései, kérjük, forduljon a legközelebbi vevőszolgálathoz.
Hiba leírása Ok Megoldás
Sípoló hang a
hangfalakból.
A CD-t csak félig megy
be a CD-nyílásba.
A kijelzőn „READ
ERR“ jelenik meg.
A CD-t nem lehet
kiválasztani a MODEgombbal.
A behelyezett CD nem
megy.
Ugrál a CD.
Nem működik semmi.
A készüléket nem lehet
a gyújtással ki- és
bekapcsolni.
A készülék nem
működik rendesen
(EJECT, LOAD, PLAY).
Zavarelhárítás
Visszacsatolás Ne állítsa be túl
Bennefelejtette a
szállítást biztosító
csavarokat.
Fordítva lett betéve
a CD.
Nincs betéve CD. Tegyen be egy CD-t.
A hangerőszabályzó
túl halkra van beállítva.
A csatlakozások nem
lettek jól beszerelve.
Egyenetlen az út
felülete.
A készülék lazán lett
beszerelve.
Rossz a CD.
A CD piszkos. Tisztítsa meg a CD-t.
Esetleg túl meredeken
lett beszerelve a
készülék a járműbe.
Ki van kapcsolva a
gyújtás.
Egy vagy több biztosíték kiégett.
Rosszul van bekötve
(minden
gépjárműgyártó
máshogy köti be a
gépjármű ISO-csatlakozását).
A mikroszámítógépet
elektromágneses mező
zavarta.
magasra a hangerőt.
Vegye ki a szállítást
biztosító csavarokat.
Helyezze be helyesen
a CD-t.
Állítsa hangosabbra a
hangerőszabályzót.
Ellenőrizze a +12V-os
valamint a földeléses
csatlakozást.
A CD lejátszásával
várjon, amíg egyenes
útra ér.
Szerelje be a készüléket rendesen.
Ügyeljen arra, hogy a
hátsó rögzítést használja, ha a járműnek
nincs felvétele a készülék hátsó részeihez.
Próáljon ki egy másik
CD-t. Ha ennek semmi
baja sincs, akkor
valószínűleg az első
CD volt hibás.
Ügyeljen arra, hogy
20°-os maximális
hajlászögnél ne legyen
nagyobb a szerelési
szög!
Kapcsolja be a gyújtást
(a kulcsot fordítsa el
az„ON“ vagy az „ACC“
irányába.
Cserélje ki a biztosítékot egy 15 A –es
másikra.
Vegye fel a
kapcsolatot speciális
csatlakozóadapter miatt
gépjárműszervízzel
vagy
gépjárműszakemberrel.
Vegye ki a CD-t és újra
tegye be.
Kapcsolja ki a készüléket, majd újra be.
MAGYARUL
98
05-AR 736 CD_MP3_NEU 98 18.09.2006, 11:03:11 Uhr
Page 99

MAGYARUL
Hiba leírása Ok Megoldás
Nincs rádióvétel.
Rossz a rádió vétele.
A kijelzőn „NO FILE“
jelenik meg.
A kijelzőn „MEMORY
FULL“ jelenik meg.
Az antennakábel nincs
csatlakoztatva.
Esetleg a gépjárműnek
speciális antennája
van (fantomtápos
antenna.)
Az USB médium vagy
a CD nem támogatja a
fájl formátumát.
Az USB médium
tele van.
Dugja be jól az antennakábelt a készülék
antennahüvelyébe.
Kérjük vegye fel
a kapcsolatot a
gépjárműszervízzel
vagy egy
gépjárműszakemberrel.
(más gyártmányúak
speciális betápláló váltó
ill. feszültségi adapter
kapható.)
Csatlakoztasson egy
másik USB médiumot
vagy töröljön ki pár
fájlt.
A CD kezelése
A CD tisztítása
Lejátszás előtt a CD-t töröljük
meg egy tiszta, pormentes
törlőronggyal. A CD-t a nyíl
irányába húzzuk le.
Figyelem: ne használjon oldószereket, pl. benzint vagy higítót.
Az általában kapható tisztítószerek vagy antistatikus-sprayk kárt
okoznak a készülékben.
• Vizsgáljon meg valamennyi CD-t, hogy nincsenek-e megrepedve, megkarcolva, meghajlítva, mielőtt lejátszaná őket.
Az ily módon megrongálódott CD-ket esetleg nem lehet
rendesen lejátszani. Ezeket a CD-ket inkább ne is használja.
• Csak a kereskedelmi forgalomban használatos 12 cm
átmérőjű CD-t használjon. A 8 cm átmérőjűek vagy valamilyen különleges alakzatúak pl. pillangó vagy szív alkakúak
nem alkalmasak a lejátszásra. Kár keletkezhet a CD-ben
vagy a lejátszóban. Alkalmatlan CD-k által okozott károkért
felelősséget vállalni nem tudunk.
Garancia
Garanciális igényeivel forduljon, kérem, a szerződéses
kereskedőjéhez!
A garancia igazolására a pénztári nyugta szolgál. E nélkül az
igazolás nélkül sem díjmentes csere, sem díjtalan javítás nem
végezhető.
Garanciális esetben eredeti csomagolásában adja át az alap-
készüléket a pénztári bizonylattal együtt annak a kereskedőnek,
akitől a készüléket vásárolta!
Sem az elhasználódó tartozékokban, ill. kopó alkatrészekben
bekövetkező hibák, sem a tisztítás, karbantartás vagy a kopó
alkatrészek cseréje nem esik a garancia hatálya alá, következésképp térítésköteles.
Illetéktelen beavatkozás a garancia megszűnését eredményezi.
A garanciális idő után
A garanciális idő eltelte után a megfelelő szakkereskedésben
vagy javítószolgálatnál végeztethet térítésköteles javításokat.
CD-t betenni
Kárt okozhat a készülékben, ha
a CD-t a feliratos oldallal lefele
teszi be.
A CD-t mindig a fellirattal felfele
kell behelyezni.
Vigyázat: Ha már van egy CD a CD-nyílásban, ne próbáljon
meg még egyet beletenni. Ez kárt okozhat a készülékben.
CD-t megfogni
A CD-t mindig a szélénél fogjuk
meg. Sose fogjuk meg a felületét, mert attól bepiszkolódhat.
• Ne ragasszunk a CD-re öntapadót vagy ragasztószalagot.
• A CD-t ne tegyük ki közvetlen napsütésnek vagy
hőforrásnak, mint pl. konvektornak és ne hagyjuk az autóban, mert ez jelentős hőmérsékletemelkedéshez vezethet.
Kímélje környezetünket, az elektromos készülékek nem a
háztartási szemétbe valók!
Használja az elektromos készülékek ártalmatlanítására kijelölt
gyűjtőhelyeket, ott adja le azokat az elektromos készülékeit,
amelyeket többé már nem kíván használni!
Ezzel segítséget nyújt ahhoz, hogy elkerülhetők legyenek azok a
hatások, amelyeket a helytelen „szemétre dobás“ gyakorolhat a
környezetre és az emberi egészségre.
Ezzel hozzájárul az újrahasznosításhoz, a recyclinghoz és a
kiöregedett elektromos és elektronikus készülékek értékesítésének egyéb formáihoz.
Az önkormányzatoknál vagy a polgármesteri hivatalokban
tájékoztatást kaphat arról, hogy hova viheti a kiselejtezett
készülékeket.
A „kuka“ piktogram jelentése
99
05-AR 736 CD_MP3_NEU 99 18.09.2006, 11:03:13 Uhr
MAGYARUL
Page 100

MAGYARUL
Címszójegyzék – Index
A
A hangerő beállítása..................................................................93
A kezelőrész levétele .................................................................93
AF gomb.....................................................................................96
AS gomb ....................................................................................95
B
B (BAND) gomb .........................................................................94
BEEP (visszaigazoló hangjelzés) ..............................................94
Bejátszási funkció (lásd PS gomb) ............................................95
Bekapcsolás...............................................................................94
Bekapcsolási hangerő................................................................94
Beszerelés..................................................................................91
Beszerelési tanácsok.................................................................93
Biztonsági tudnivalók .................................................................91
Bluetooth....................................................................................97
C
CD kezelése...............................................................................99
CD kiadása.................................................................................95
Csatlakozás................................................................................92
D
DISP gomb.................................................................................93
DSP (equalizer beállítások) .......................................................93
F
Fontos egyéb tudnivalók a beszerléshez...................................92
G
Garancia.....................................................................................99
H
Hangerő bekapcsoláskor...........................................................94
I
ID3 gomb....................................................................................94
Idő ..............................................................................................93
INTRO (2INT).............................................................................95
Ismétlés (3 RPT) ........................................................................95
Kezelés.......................................................................................92
K
Kezelése CD ..............................................................................99
Kezelési tudnivalók.....................................................................92
Kiadó gomb................................................................................95
Kikapcsolás................................................................................94
Közlekedési biztonság ...............................................................91
Közlekedési hírek (lásd TA)......................................................95
L
LOC (LOCAL) .............................................................................93
M
Mőszaki adatok ................................................................ 98
Multifunkciós gomb ......................................................... 93
N
Némítás .....................................................................................94
P
PAU (Play / Pause ) gomb .........................................................95
PS-gomb ......................................................................... 95
PTY-gomb..................................................................................96
R
RANDOM (4RDM) (véletlenszerő lejátszás)........................ 95
REC (felvétel) gomb...................................................................95
REGION (regionális) ........................................................ 94
REPEAT (3RPT) (ismétlés) ................................................ 95
RESET-gomb.............................................................................92
S
Szerelés (biztonsági tudnivalók) ..............................................91
T
TA (Közlekedési hírek)...................................................... 95
Telefonálás.................................................................................97
TRANSFER-gomb .....................................................................94
U
USB-csatlakozás.......................................................................96
Véletlenszerő lejátszás (4RDM) ...............................................95
Zavarelhárítás............................................................................98
V
Z
MAGYARUL
100
05-AR 736 CD_MP3_NEU 100 18.09.2006, 11:03:15 Uhr
 Loading...