

Page 1
Owner’s manual
HX-D1
AM/FM CD PLAYER
WITH CD/MD CHANGER CONTROL
Page 2

Thank you for purchasing the Clarion product.
∗Please read this owner’s manual in its entirety before operating this equipment.
∗After reading this manual, be sure to keep it in a handy place (e.g., glove compartment).
∗Check the contents of the enclosed warranty card and keep it carefully with this manual.
∗This manual includes the operating procedures of the CD changer and MD changer connected via
the CeNET cable. The CD changer and MD changer have their own manuals, but no e xplanations f or
operating them are described.
Contents
1. FEATURES ..................................................................................................................................... 2
2. PRECAUTIONS .............................................................................................................................. 3
Handling Compact Discs................................................................................................................. 4
Adout the registered marks etc. ...................................................................................................... 4
3. CONTROLS .................................................................................................................................... 5
4. NOMENCLATURE.......................................................................................................................... 4
Names of the buttons and their functions....................................................................................... 4
Display Items................................................................................................................................... 7
5. OPERATIONS................................................................................................................................. 8
Basic Operations............................................................................................................................. 8
Radio Operations .......................................................................................................................... 10
CD Operations............................................................................................................................... 12
6. OPERATIONS OF ACCESSORIES ............................................................................................. 13
CD/MD Changer Operations......................................................................................................... 13
Listening to a portable audio player, etc. (AUX mode) ................................................................. 15
7. TROUBLESHOOTING.................................................................................................................. 16
8. ERROR DISPLAYS....................................................................................................................... 17
9. SPECIFICATIONS ........................................................................................................................ 18
1. FEATURES
■ Dual 24-Bit Digital to Analog Converters
■ HDCD® (High Definition Compatible Digital) Decoder
■ Copper Plated Chassis Housing
■ Isolated High Quality DC to DC Converter Unit
■ Precise Analog Volume Device & Machined Aluminum Knob
■ Maximum 9V Line Level Output
■ High Visibility Mono Color VF Display & High Brightness White LED
■ 4-Channel Line Output & 2-Channel AUX Input with Gold-Plated RCA Jack
■ CeNET with Balanced Audio Line Transmission and Dynamic Noise Canceling
■ Controller for Optional CD/MD Changer
■ CD Text Capability with Compatible CD Changer
■ Optical Digital Input for CD/MD Changer
■ High-Grade Audio Capacitor and Operational Amplifiers
■ 18 FM / 6 AM Preset Memory
2 HX-D1
Page 3
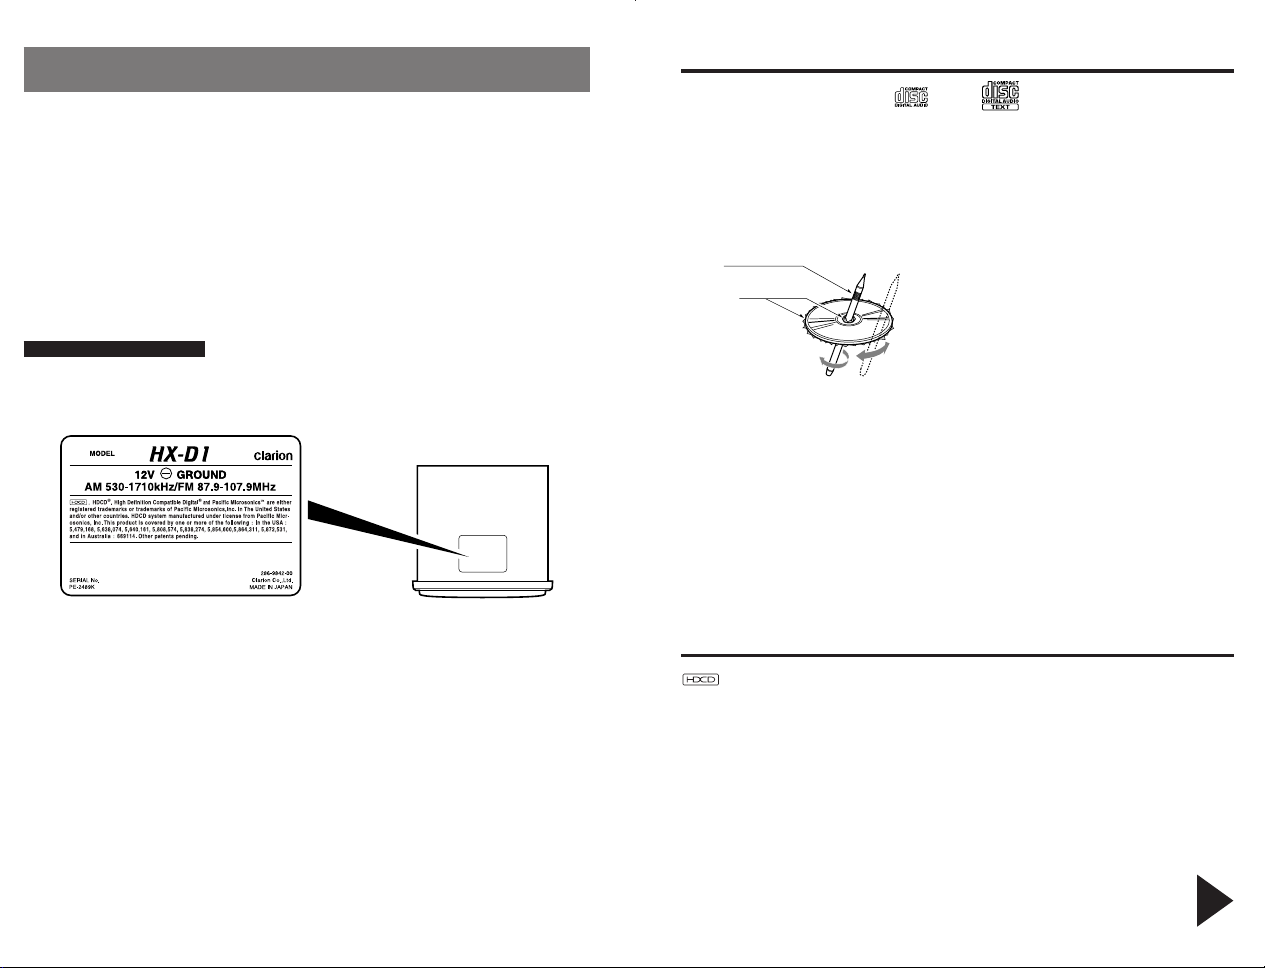
2. PRECA UTIONS
Bottom View of Source Unit
Ball-point pen
Roughness
1. When the inside of the car is very cold and
the player is used soon after switching on
the heater moisture may form on the disc or
the optical parts of the player and proper
playback may not be possible. If moisture
forms on the disc, wipe it off with a soft cloth.
If moisture forms on the optical parts of the
player, do not use the player for about one
hour. The condensation will disappear naturally allowing normal operation.
2. Driving on extremely bumpy roads which
cause severe vibration may cause the sound
to skip.
INFORMATION FOR USERS:
CHANGES OR MODIFICATIONS TO THIS
PRODUCT NOT APPROVED BY THE MANUFA CTURER WILL V OID THE W ARRANTY .
3. When the auto antenna cord is connected
to the car auto antenna cord, when the unit
is switched to the radio mode (or the TV
mode), the antenna is extended automatically. If the car is in a narrow space, the antenna may strike something, so be careful.
4. This unit uses a precision mechanism. Even
in the event that trouble arises, never open
the case, disassemble the unit, or lubricate
the rotating parts.
Handling Compact Discs
Use only compact discs bearing the
Do not play heart-shaped, octagonal, or other specially shaped compact discs.
Handling
• New discs may hav e some roughness around
the edges. If such discs are used, the pla y er
may not work or the sound may skip. Use a
ball-point pen or the like to remove any roughness from the edge of the disc.
• Never stick labels on the surf ace of the compact disc or mark the surface with a pencil or
pen.
• Never play a compact disc with any cellophane tape or other glue on it or with peeling
off marks. If you try to play such a compact
disc, you may not be able to get it back out of
the CD player or it may damage the CD
player.
• Do not use compact discs that have large
scratches, are misshapen, cracked, etc. Use
of such discs may cause misoperation or
damage.
mark or mark.
• To remove a compact disc from its storage
case, press down on the center of the case
and lift the disc out, holding it carefully by
the edges.
• Do not use commercially available CD protection sheets or discs equipped with stabilizers, etc. These may damage the disc or
cause breakdown of the internal mechanism.
Storage
• Do not expose compact discs to direct sunlight or any heat source.
• Do not expose compact discs to excess humidity or dust.
• Do not expose compact discs to direct heat
from heaters.
Cleaning
• To remove fingermarks and dust, use a soft
cloth and wipe in a straight line from the center of the compact disc to the circumference.
• Do not use any solvents, such as commercially available cleaners, anti-static spray or
thinner to clean compact discs.
• After using special compact disc cleaner, let
the compact disc dry off well before playing
it.
Adout the registered marks etc.
, HDCD®, High Definition Compatible
®
and Pacific Microsonics™ are either
Digital
registered trademarks or trademarks of pacific
Microsonics, Inc. in the united States and/or
other countries.
HDCD system manufactured under license
fron Pacific Microsonics, Inc. This product is
covered by one or more of the following: In the
USA: 5,479,168, 5,638,074, 5,640,161
5,808,574, 5,838,274, 5,854,600, 5,864,311,
5,872,531, and in Australia:669114. Other patents pending.
Be sure to unfold and read the next page.
HX-D1 4HX-D1 316 HX-D1
Page 4
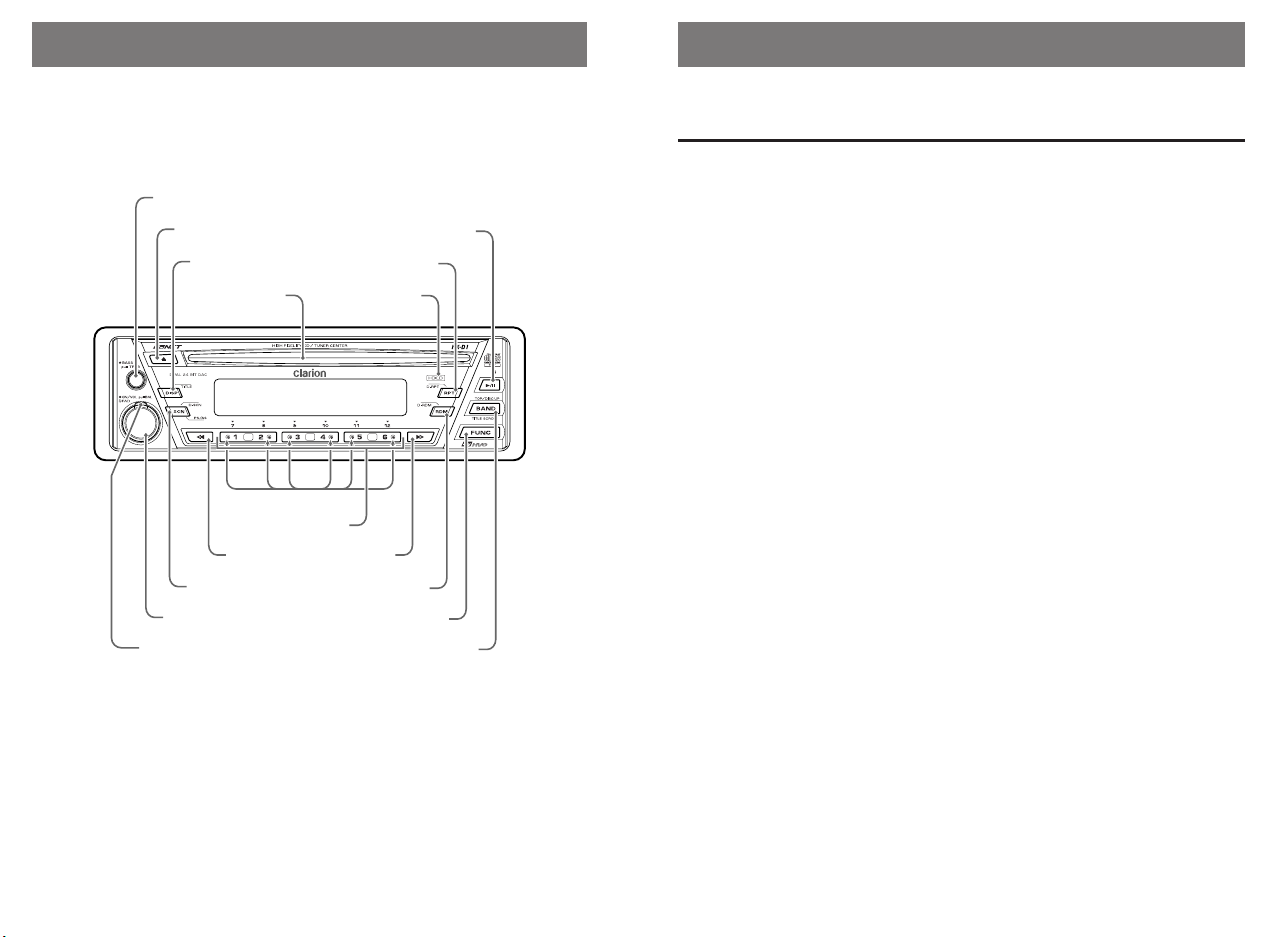
3. CONTROLS
Source unit
4. NOMENCLATURE
Note:
• Be sure to read this chapter referring to the front diagrams of chapter “3. CONTROLS” on page 5 (unfold).
Names of the buttons and their functions
[BASS] knob
• Adjusts the bass and treble.
[
BASS] knob
[Q]
button
[
DISP] button
CD insertion slot
[
RPT] button
[
HDCD] indicator
[s]
button
[Q] button
• Ejects a CD when it is loaded into the unit.
[DISP] button
• Switches the display indication.
[s] button
• Plays or pauses a CD or MD while in the CD
mode or CD/MD changer mode.
[RPT] button
• Plays repeatedly while in the CD mode or CD/
MD changer mode. When this button is pressed
and held while in the CD/MD changer mode,
disc repeat play is performed.
[HDCD] indicator
• Lights when an HDCD CD (CD encoded in the
HDCD format) is played.
Disc/preset indicator
• Lights to indicate the CD loading state in the
CD changer by lighting the number of the CD
disc loaded into the magazine while in the CD
changer mode.
• Lights to indicate the number of the preset channel being received while in the radio mode.
[DIRECT] button
• Stores a station into memory or recall it directly
while in the radio mode.
• Designates the disc to be played while in the
CD/MD changer mode.
[
VOL] knob
[
FAD] knob
[a]
[
SCN] button
Disc/preset indicator
[
DIRECT] button
button
[d]
button
[
RDM] button
[
FUNC] button
[
BAND] button
[a], [d] button
• Selects a station while in the radio mode or selects a track when listening to a CD . These buttons are used to make various settings.
[RDM] button
• Performs random play while in the CD mode or
CD/MD changer mode. Also perf orms disc random play when the button is pressed and held
while in the CD/MD changer mode.
[FUNC] button
Note: Be sure to unfold this page and refer to the front diagrams as you read each chapter.
• Switches the operation mode among the radio
mode, CD mode, CD changer mode, etc.
5 HX-D1 6 HX-D1 HX-D1 15
[BAND] button
• Switches the band, or seek tuning or manual
tuning while in the radio mode.
• Plays a first track while in the CD mode or CD/
MD changer mode.
• Press the button for 2 seconds or longer. Scrolls
a CD or MD title.
[SCN] button
• Performs preset scan while in the radio mode.
When the button is pressed and held, auto store
is performed.
• Performs scan play for 10 seconds for each tr ack
while in the CD mode and CD/MD changer
mode. Disc scan play is performed when the
button is pressed and held while in the CD/ MD
changer mode.
[VOL] knob
• Turns on and off the power , adjusts the v olume,
and the right and left balance by rotating the
knob clockwise or counterclockwise.
[FAD] knob
• Adjusts the front and rear balance of the volume.
[DIRECT] button 3
• Switches the dither (DITHER 1 to 3) during the
CD mode when the button is pressed while the
[DISP] button is kept pressed.
[DIRECT] button 4
• The display indication will disappear when the
button is pressed while the [DISP] button is kept
pressed. The indication will reappear when the
[DISP] button is pressed again.
[DIRECT] button 5
• Turns on and off the FM diversity reception during the reception of an FM broadcast when the
button is pressed while the [BAND] button is
kept pressed.
[DIRECT] button 6
• Switches the AUX input sensitivity (LOW to/from
HIGH) in the AUX mode when the button is
pressed while the [BAND] button is kept
pressed.
• Switches the reception area (inside/outside the
USA) in the radio mode when the button is
pressed while the [DISP] button is kept pressed.
Page 5
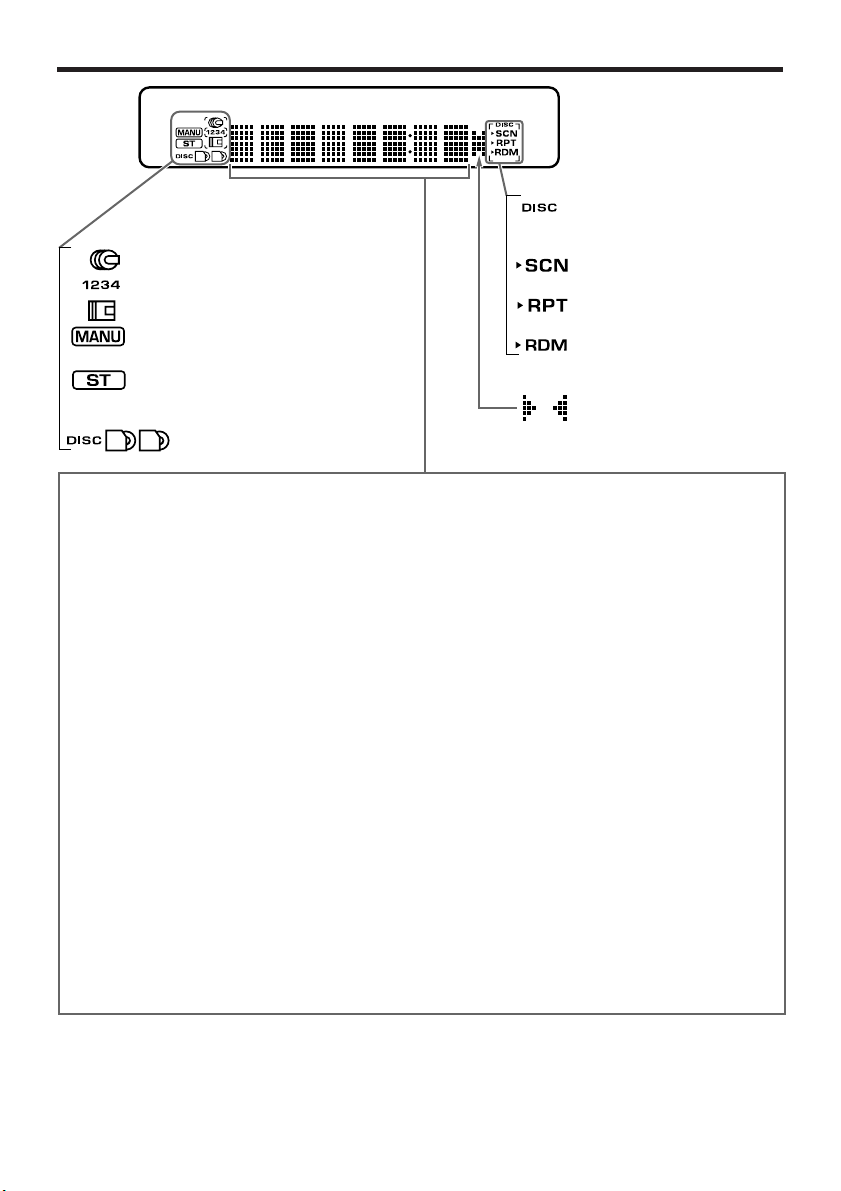
Display Items
:CD changer indicator
: CD changer number indicator
: MD changer indicator
: Manual indicator
Lights in the manual tuning mode.
: Stereo indicator
Lights when an FM stereo broadcast is
received.
: CD magazine indicator
<Indications shown in the title display>
• Indications in the radio mode
AM 1000 : Indications of the AM
F2 98.1 : Indications of the FM
A-STORE : Shown when the auto store
• Indications in the CD mode
EJECT : Shown when a CD is being
LOADING : Shown when a CD is being
NO DISC : Shown when no CD is
•
Indications in the CD mode, CD/MD changer mode
PAUSE : Shown when a CD or MD
T 01 00:15: Play track and play time
D01 T 01 : Play disc and play track
T-SCAN : Shown when track scan play
T-REPEAT : Shown when track repeat
T-RANDOM : Shown when track random
reception band and
frequency
reception band and
frequency
is selected.
ejected.
loaded.
loaded.
play is paused (temporarily
stopped).
is performed.
play is performed.
play is performed.
: Lights in the disc scan, disc
repeat and disc random
mode.
: Lights in the scan play
mode.
: Lights in the repeat play
mode.
: Lights in the random play
mode.
: Title scroll indicator
• Indications in the CD/MD changer mode
D-SCAN : Shown when disc scan play
D-REPEAT : Shown when disc repeat
D-RANDOM : Shown when disc random
NO MAG : Shown when no CD
Indications when the system is being checked
•
“SYSTEM” “CHECK”
“Func” “Push”
“CHECKING”
• Other indications
AM 1:05 : Time indication
is performed.
play is performed.
play is performed.
magazine is loaded into the
CD changer.
: The system is under check
(Press the function button
when “Func” or “Push” is
shown. For detailed
information, see next page.)
HX-D1 7
Page 6

5. OPERATIONS
Basic Operations
Note: Be sure to read this chapter referring to the front diagrams of
chapter “3. CONTROLS” on page 5 (unfold).
About the system check function
The CeNET system used in this unit adopts the
system check function. The system check indications are shown in the following cases. Only
when wiring connections have been made and
the power is turned on the first time, this function
checks the pieces of equipment connected.
• when the power is turned on soon after the unit
is installed.
• when a piece of external equipment is connected or removed.
• when the power source supply is interrupted
for a long period of time for the sake of battery
exchange.
• when the reset button is pressed.
1. Rotate the [VOL] knob clockwise until a click
is heard.
The system check is performed and the indi-
cation is shown in the display in a sequential
manner:
“SYTEM”➜“CHECK”➜“Push”➜“Func”
2. When the [FUNC] button is pressed, the indi-
cation “CHECKING” is shown and the displa y
shows any of the indications shown in the radio mode.
Note:
• When the connection cable between this unit and
external equipment is exchanged for a digital optical fiber cable or when the digital optical fiber
cable is removed from the unit to return to the analog input from the digital input, press the [FUNC]
button to execute the system check while the
[DIRECT] buttons 1 and 6 are kept pressed.
Selecting a mode
1. Press [FUNC] button to change the mode of
operation.
2. Each time you press [FUNC] button, the mode
of operation changes in the following order:
Radio mode ➜ CD mode ➜ CD changer mode
➜ MD changer mode ➜ AUX mode ➜ Radio
mode...
∗ External equipment not connected with CeNET
is not displayed.
The indication “NO DISC” is shown when no
disc is loaded in the CD mode. While no magazine is loaded in the CD changer mode, the
indication “NO MAG” is shown in the display.
Adjusting the volume
Turning the [VOL] knob clockwise increases the
volume; turning it counterclockwise decreases
the volume.
Adjusting the tone
Push the [BASS] knob to come out.
<View from above>
Push the knob
being stored.
Turning on/off the power
Note:
• Be careful about using this unit for a long time without running the engine. If you drain the car’s battery too far, you may not be able to start the engine and this can reduce the service life of the
battery.
1. Rotate the [VOL] knob clockwise until a click
is heard.
2. The illumination and display on the unit light
up. The unit automatically remembers its last
operation mode and will automatically switch
to display that mode.
3. To turn off the power, rotate the [VOL] knob
counterclockwise until a click is heard.
8 HX-D1
The knob comes out
<When adjusting
the bass>
● To adjust the bass
Rotating the [BASS] knob clockwise enhances
the bass; rotating it counterclockwise atten uates
the bass.
∗ When setting to the center position, the knob is
clicked in position.
Pull out the knob
with your fingers
<When adjusting
the treble>
Page 7

Basic Operations
• Clock display
• Main display
● To adjust the treble
1. After having let the knob come out in step 1,
pull it out further with your fingers.
2. Rotating the [BASS] knob clockwise en-
hances the treble; rotating it countercloc kwise
attenuates the treble.
∗ When setting to the center position, the knob
is clicked in position.
Notes:
• When pulling out the knob, you feel a little difficult
to do it.
• Pull out the knob gently. Pulling out the knob
strongly let it be removed from the unit.
• After adjustment, push the knob to store in position.
Adjusting the balance
1. Pull out the [VOL] knob.
2. Rotating the [VOL] knob clockwise empha-
sizes the sound coming from the right speaker;
rotating it counterclockwise emphasizes the
sound coming from the left speaker.
∗ After adjustment, push the knob to store in po-
sition.
∗ When setting to the center position, the knob
is clicked in position.
Adjusting the fader
Rotating the [FAD] knob clockwise emphasizes
the sound coming from the front speakers; rotating it counterclockwise emphasizes the sound
coming from the rear speakers.
∗ When setting to the center position, the knob is
clicked in position.
3. Press the [a] button or [d] button to select
the hour or the minute.
To set the hour, press the [a] button.
To set the minute, press the [d] button.
4. Press the [DISP] button to store the time into
memory.
∗ To let the time display being usually shown, do
it according to the procedure described in the
next section “Switching the display”.
Switching the display
1. Press the [DISP] button to select the desired
display.
Each time you press the [DISP] button, the
display switches in the following order :
(Radio mode)
(CD mode, CD/MD changer mode)
• Track number/play time display
While in the CD/MD changer mode,
press and hold the [DISP] button for
about 2 seconds or longer to show the
disc number/track number display.
Setting the clock
Note:
• The time is displayed in the 12-hour clock system.
The clock times in the morning are indicated by
attaching the word “AM”; the clock times in the
afternoon and evening are indicated by attaching
the word “PM”.
1. Press the [DISP] button.
The unit enters the clock display mode.
Note:
• You cannot set the clock when it is displayed with
only the ignition on. If you drain or remove car’s
battery or take out this unit, the clock is reset. While
setting the clock , if another button or operation is
selected, the clock set mode is canceled.
2. Press and hold the [DISP] button for 2 sec-
onds or longer to enter the clock set mode.
• Title display
• Clock display
∗ To turn off the display indication, press the [DISP]
button and the [DIRECT] button 4 at the same time.
Note:
• While the display indication is turned off, only the
QQ
[
] button and the power switch can be used. To
Q
QQ
return to the original state, press the [DISP] button again or turn off the power.
HX-D1 9
Page 8

Basic Operations
Radio Operations
Switching the title display
During CD play in the CD mode, normal CD or
CD Text play in the CD changer mode, and MD
play in the MD mode or MD changer mode, a
disc title or song (track) title, etc. previously registered in a disc can be shown in the display of
this unit.
While a title is being shown in the display, press
and hold the [DISP] button for 2 seconds or
longer.
Each time the [DISP] button is pressed, the display switches in the following order:
Disc title (during CD Text or MD play)
Artist name (during CD Text play)
Track title (during CD Text or MD play)
∗ If no title has not been set, the following indica-
tions are shown in the display.
• When a normal CD is played on a CD changer
compatible with CD Text
Disc title : “DNO-TEXT”
Artist name: “ANO-TEXT”
Track title : “TNO-TEXT”
• When an MD with no title set is played
Disc title : “DNO-TTL”
Track title : “TNO-TTL”
Changing the reception area
This unit is initially set to USA frequency intervals of 10 kHz for AM and 200 kHz f or FM. When
using it outside the USA, the frequency reception range can be switched to the intervals below.
● Setting the reception area
1. Press [BAND] button and select the desired
radio band (FM or AM).
2. While pressing [DISP] button, each time you
press and hold the number “6” of the [DIRECT]
buttons for 2 seconds or longer , the reception
area switches from inside the USA to outside
the USA or from outside the USA to inside
the USA.
∗ Any station preset memories are lost when the
reception area is changed.
Listening to the radio
1. Press [FUNC] button and select the radio
mode. The frequency is displayed.
2. Press [BAND] button and select the radio band.
Each time the button is pressed, the radio reception band changes in the following order:
FM1(F1) ➜ FM2(F2) ➜ FM3(F3) ➜ AM ➜
FM1...
3. Press the
the desired station.
[a]
button or
[d]
button to tune in
Scrolling a title
Press the [BAND] button f or 2 seconds or longer
while a title is shown in the display.
The title scrolls to the left.
∗ After the end of the title is sho wn, the first 8 char-
acters are shown again.
10 HX-D1
Tuning
There are 3 types of tuning mode available, seek
tuning, manual tuning and preset tuning.
Seek tuning
1. Press [BAND] button and select the desired
band. (FM or AM)
∗ If “MANU” is lit in the display, press and hold
BAND button for 1 second or longer. “MANU”
in the display goes off and seek tuning is now
available.
2. Press the
matically seek a station.
When the
is sought in the direction of higher frequencies; if the
is sought in the direction of lower frequencies.
[a]
button or
[d]
button is pressed, the station
[a]
button is pressed, the station
[d]
button to auto-
Manual tuning
There are 2 ways av ailable: Quick tuning and step
tuning.
Page 9

Radio Operations
When you are in the step tuning mode, the frequency changes one step at a time. In quic k tuning mode, you can quickly tune the desired frequency.
1. Press [BAND] button and select the desired
band (FM or AM).
∗ If “MANU” is not lit in the display, press and
hold [BAND] button for 1 second or longer.
“MANU” is lit in the display and manual tuning
is now available.
2. Tune into a station.
● Quick tuning:
Press and hold the
for 1 second or longer to tune in a station.
● Step tuning:
Press the
ally tune in a station.
[a]
[a]
button or
button or
[d]
[d]
button
button to manu-
Recalling a preset station
A total of 24 preset positions (6-FM1, 6-FM2, 6FM3, 6-AM) exists to store individual radio stations in memory. Pressing the corresponding [DI-
RECT] button recalls the stored radio frequency
automatically.
1. Press [BAND] button and select the desired
band (FM or AM).
2. Press the corresponding [DIRECT] button to
recall the stored station.
∗ Press and hold one of [DIRECT] buttons for 2
seconds or longer to store that station into preset memory.
Manual memory
1. Select the desired station with seek tuning,
manual tuning or preset tuning.
2. Press and hold one of [DIRECT] buttons for
2 seconds or longer to store the current station into preset memory.
∗ If auto store is perf ormed in the FM bands, the
stations are stored in FM3 even if FM1 or FM2
was chosen for storing stations.
Preset scan
Preset scan receives the stations stored in preset memory in order. This function is useful when
searching for a desired station in memory.
1. Press [SCN] button.
2. When a desired station is tuned in, press
[
SCN] button again to continue receiving that
station.
Note:
• Be careful not to press and hold [SCN] button for
2 seconds or longer, otherwise the auto store function is engaged and the unit starts storing stations.
Turning on and off the FM diversity
system
The FM diversity system automatically switches
to the antenna that receives an FM broadcast
with a stronger reception signal.
If two antennas are connected, set the FM diversity system to ON; if one antenna is connected,
set it to OFF.
∗ The factory default setting is “OFF”. Setting this
system to the incorrect position results in noise.
1. Press the [BAND] button to receive an FM
broadcast.
2. Press the [DIRECT] button 5 while holding
the [BAND] button.
After having shown the indication “ FM DIVER”
in the display, switch the FM diversity system
to show the indication “ON” or “OFF” in the
display.
Auto store
Auto store is a function for storing up to 6 stations that are automatically tuned in sequentially .
If 6 receivable stations cannot be received, a previously stored station remains unoverwritten at
the memory position.
1. Press [BAND] button and select the desired
band (FM or AM).
2. Press and hold [SCN] button for 2 seconds
or longer. The stations with good reception are
stored automatically to the preset channels.
HX-D1 11
Page 10

CD Operations
Loading a CD
Insert a CD into the centre of the insertion slot
with the label side facing up. The CD plays automatically after loading.
Notes:
• Never insert foreign objects into the CD insertion slot.
• If the CD is not inserted easily, there may be an-
other CD in the mechanism or the unit may require service.
• Discs not bearing the mark or and
CD-ROMs cannot be played by this unit.
•
Some CDs recorded in CD-R mode may not be usable.
Even when recorded in CD-RW mode, some CDs
not be usable.
Loading 8 cm compact discs
∗ No adapter is required to play an 8 cm CD.
∗ Insert the 8 cm CD into the centre of the insertion slot.
Listening to a CD already inserted
Press [FUNC] button to select the CD mode. Pla y
starts automatically. If no CD is loaded in the unit,
“NO DISC” appears in the display.
Pausing play
1. Press [s] button to pause play. “PAUSE”
appears in the display.
2. T o resume CD play, press [s] button again.
Ejecting a CD
Press the [Q] button. “EJECT” appears in the displa y.
Notes:
∗ If a CD (12 cm) is left in the ejected position for 15
seconds, the CD is automatically reloaded. (Auto
reload)
∗ 8 cm CDs are not auto reloaded. Be sure to re-
move it when ejected.
Note:
• If you force a CD into before auto reloading,
this can damage the CD.
Selecting a track
● Track-up
1. Press the [d] button to move ahead to the
beginning of the next track.
2.
Each time you press the [d] button, the track advances ahead to the beginning of the next trac k.
● Track-down
1. Press the [a] button to move back to the beginning of the current track.
2. Press the [a] button twice to move to the
beginning of the previous track.
Fast-forward/fast-backward
● Fast-forward
Press and hold the [d] button for 1 second or longer .
● Fast-backward
Press and hold the [a] button for 1 second or longer .
12 HX-D1
Top function
The top function resets the CD player to the first
track of the disc.
Press [BAND] button to play the first trac k (track
No. 1) on the disc.
Scan play
The scan play locates and plays the first 10 seconds of each track on a disc automatically. This
function continues on the disc until it is cancelled.
∗ The scan pla y is useful when y ou w ant to select a
desired track.
1. Press the [SCN] button to start scan play.
“SCN” lights in the display.
2. T o cancel the scan pla y, press the [SCN] button again. “SCN” goes off from the display
and the current track continues to play.
Repeat play
The repeat play continuously plays the current
track. This function continues automatically until
it is cancelled.
1. Press the [RPT] button. “RPT” lights in the
display and the current track is repeated.
2. T o cancel the repeat play, press the [RPT] button again. “RPT” goes off from the displa y and
normal play resumes.
Random play
The random play selects and pla ys individual tracks
on a disc in no particular order. This function continues automatically until it is cancelled.
1. Press the [RDM] button. “RDM” lights in the
display, an individual track is selected randomly and play begins.
2. To cancel the random play, press the [RDM
button again. “RDM” goes off and normal play
resumes.
Switching the amount of dither
“Dither” is one of the technologies developed to
reduce quantization distortion or quantization noise.
Even in the play system lik e a CD play er, the D/A
conversion difference is generated theoretically.
Therefore, quantization distortion or noise can
be reduced purposely by adding a random noise
component called “Dither” to digital data before
D/A conversion.
Press the [DIRECT] button 3 while holding the
[DISP] button.
Each time the [DIRECT] button 3 is pressed while
holding the [DISP] button, the indication shown
in the display changes as follows:
DITHER1….Dither off
↓
DITHER2….small amount of dither
↓
DITHER3….large amount of dither
↓
DITHER1….
]
Page 11

6. OPERATIONS OF ACCESSORIES
CD/MD Changer Operations
CD(MD) changer functions
When an optional CD(MD) changer is connected
through the CeNET cable, this unit controls all
CD(MD) changer functions. This unit can control
a total of 2 changers (MD and/or CD).
Press [FUNC] button and select the CD(MD)
changer mode to start play. If 2 CD(MD) changers are connected, press [FUNC] button to select the CD (MD) changer for play.
∗ If “NO MAGAZINE” appears in the display, insert
the magazine into the CD changer. “DISC CHECK”
appears in the display while the player loads
(checks) the magazine.
∗ If “NO DISC” appears in the displa y , eject the maga-
zine and insert discs into each slot. Then, reinsert
the magazine back into the CD changer.
∗ If “NO DISC” appears in the displa y, load MDs into
the MD changer.
CAUTION
CD-ROM discs and CD-R discs cannot be
played in the CD changer.
Pausing play
1. Press [s] button to pause play. “PAUSE”
appears in the display.
2. To resume play, press [s] button again.
Displaying CD titles
This unit can display title data for CD-text CDs
and user titles input with this unit.
1. Press [DISP] button to display the title.
2. Each time you press and hold [DISP] button
for 2 seconds or longer, the title display
changes in the following order:
CD-text title (disc) ➜ Artist name ➜ CD-text
title (track) ➜ CD-text title (disc) ...
Note:
• If the CD playing is not a CD-text CD has been
DD
input, “
Switching disc titles and track titles
This unit can display disc titles and track titles
already entered on MDs. Titles up to 128 characters long can be displayed by scrolling the titles.
∗ Titles cannot be entered for MDs with this unit.
NO-TEXT” appears in the display.
D
DD
1. Press [DISP] button to display the title. The
disc title or track title is displayed.
2. Each time you press and hold [DISP] button
for 2 seconds or longer, the display toggles
between the disc title and the track title.
Selecting a CD
Each [DIRECT] button corresponds to a disc
loaded into the magazine.
● Selecting a disc from 1 to 6
Press the corresponding [DIRECT] button(1 to
6) to select the desired disc.
● Selecting a disc from 7 to 12 (only when a
12 disc CD changer is used.)
Press and hold [DIRECT] button(7 to 12) for 1
second or longer to select the desired disc.
∗ If a CD is not loaded in a slot of magazine, press-
ing [DIRECT] button corresponding to its disc
number is invalid.
Selecting an MD
Each [DIRECT] button corresponds to an MD
loaded into the MD changer. Press the corresponding [DIRECT] button(1 to 6) to select the
desired disc.
∗ If an MD is not loaded in a slot of MD changer,
pressing [DIRECT] button corresponding to its
disc number is invalid.
Selecting a track
● Track-up
1. Press the [d] button to move ahead to the
beginning of the next track.
2. Each time you press the [d] button, the track
advances ahead to the beginning of the next
track.
● Track-down
1. Press the [a] button to move back to the
beginning of the current track.
2. Press the [a] button twice to move to the
beginning of the previous track.
Fast-forward/fast-backward
● Fast-forward
Press and hold the [d] button for 1 second or
longer.
HX-D1 13
Page 12

CD/MD Changer Operations
● Fast-backward
Press and hold the [ ] button for 1 second or
longer.
Top function
The top function plays from the first track (track
No. 1) of the disc.
● When playing a disc 1 to 6
Press [DIRECT] button(1 to 6) with the same
number as the CD(MD) playing.
● When playing a disc 7 to 12 (only when a
12 disc CD changer is used.)
Press and hold for 1 second or longer [DIRECT
button(7 to 12) with the same number as the CD
playing.
∗ If a CD(MD) is not loaded in a slot of magazine(MD
changer), pressing [DIRECT] button corresponding to its disc number is invalid.
Scan play
The scan play locates and plays the first 10 seconds of each track on a disc automatically. This
function continues on the disc until it is cancelled.
∗ The scan play is useful when you want to select a
desired track.
1. Press [SCN] button to start track scanning.
“SCN” lights in the display.
2. To cancel the scan play, press [SCN] button
again. “SCN” goes off from the display and
the current track continues to play.
Disc scan play
The disc scan play locates and plays the first 10
seconds of the first track on each disc in the currently selected CD(MD) changer. This function
continues automatically until it is cancelled.
∗ The disc scan pla y is useful when y ou w ant to se-
lect a desired CD(MD).
1. Press and hold [SCN] button for 1 second or
longer. “DISC” and “SCN” light in the display
and the disc scan play starts.
2. To cancel the disc scan pla y , press [SCN] button
again. “DISC” and “SCN” go off from the display
and the current track continues to play.
Repeat play
The repeat play continuously plays the current
track. This function contin ues automatically until it
is cancelled.
1. Press [RPT] button. “RPT” lights in the display and the current track is repeated.
2. T o cancel the repeat pla y, press [RPT] button
again. “RPT” goes off from the display and normal play resumes.
Disc repeat play
After all the tracks on the current disc have been
played, the disc repeat pla y automatically replays
]
the current disc over from the first track. This function continues automatically until it is cancelled.
1. Press and hold [RPT] button for 1 second or
longer. “DISC” and “RPT” light in the display
and the disc repeat play starts.
2. T o cancel the disc repeat pla y , press and hold
[
RPT] button again. “DISC” and “RPT” go off
from the display and normal play resumes on
the current track.
Random play
The random play selects and plays individual
tracks on the disc in no particular order. This function continues automatically until it is cancelled.
1. Press [RDM] button. “RDM” lights in the display and the random play begins.
2. To cancel the random play, press [RDM] button again. “RDM” goes off from the displa y and
normal play resumes.
Disc random play
The disc random play selects and plays individual
tracks or discs automatically in no particular order. This function continues automatically until it
is cancelled.
1. Press and hold [RDM] button for 1 second or
longer. “DISC” and “RDM” light in the display
and the disc random play starts.
2. T o cancel the disc random play, press and hold
[
RDM] button again. “DISC” and “RDM” go off
from the display and normal play resumes
from the current track.
14 HX-D1
Page 13

Listening to a portable audio player, etc. (AUX mode)
You can listen to the sound coming from external equipment by connecting a portable audio
player, etc. to the AUX terminal of this unit.
Selecting the AUX mode
Press the [FUNC] button to select the AUX mode.
When the AUX mode is selected, the indication
“AUX” is shown in the display.
Each time the [FUNC] button is pressed, the
mode is switched. (The indication “AUX ” is always shown regardless of whether or not external equipment is connected to the AUX terminal
of this unit.)
Operating external equipment
connected to the AUX terminal
To operate external equipment, use the operation buttons provided with external equipment.
For the operating instructions of external equipment, read the instructions manual provided with
external equipment to operate it properly.
Switching the input sensitivity
You can switch the RCA input sensitivity of external equipment to go high (HIGH) or low (LOW).
Press the [DIRECT] button 6 while holding the
[BAND] button.
Each time the [DIRECT] button 6 is pressed, the
indications are switched between “AUX SENS”-
➜ “HIGH” and “AUX SENS” ➜ “LOW” to show in
the display for about 2 seconds.
Page 14

Bottom View of Source Unit
Ball-point pen
Roughness
7. TROUBLESHOOTING
Problem
Power does not
turn on.
(No sound is
produced.)
Nothing happens
when buttons are
pressed.
Display is not
GeneralCD
accurate.
Compact disc
cannot be loaded.
Sound skips or is
noisy.
Sound is bad
directly after
power is turned
on.
Cause Measure
Fuse is blown.
Incorrect wiring.
The microprocessor has
malfunctioned due to noise,
etc.
Another compact disc is
already loaded.
Compact disc is dirty.
Compact disc is heavily
scratched or warped.
Water droplets may form on
the internal lens when the
car is parked in a humid
place.
Replace with a fuse of the same amperage. If the
fuse blows again, consult your store of purchase.
Consult your store of purchase.
Press the reset button for about 2 seconds with a thin
rod.
Eject the compact disc before loading the new one.
Clean the compact disc with a soft cloth.
Replace with a compact disc with no scratches.
Let dry for about 1 hour with the power on.
Reset button
Page 15

8. ERROR DISPLAYS
If an error occurs, one of the following displays is displayed.
Take the measures described below to eliminate the problem.
Error Display
ERROR 2
ERROR 3
CDCD changerMD changer
ERROR 6
ERROR 2
ERROR 3
ERROR 6
ERROR H
ERROR 2
ERROR 3
ERROR 6
Cause
A CD is caught inside the CD deck and is
not ejected.
A CD cannot be played due to scratches,
etc.
A CD is loaded upside-down inside the CD
deck and does not play.
A CD inside the CD changer is not loaded.
A CD inside the CD changer cannot be
played due to scratches, etc.
A CD inside the CD changer cannot be
played because it is loaded upside-down.
Displayed when the temperature in the MD
changer is too high and playback has
been stopped automatically.
An MD inside the MD changer is not
loaded.
An MD inside the MD changer cannot be
played due to scratches, etc.
An MD inside the MD changer cannot be
played because it is loaded upside-down.
Displayed when a non-recorded MD is
loaded in the MD changer.
Measure
This is a failure of CD deck’s mechanism
and consult your store of purchase.
Replace with a non-scratched,
non-warped-disc.
Eject the disc then reload it properly .
This is a failure of CD changer’s mechanism and consult your store of purchase.
Replace with a non-scratched, non-warped
disc.
Eject the disc then reload it properly .
Lower the surrounding temperature and
wait for a while to cool off MD changer.
This is a failure of MD changer’s mechanism and consult your store of purchase.
Replace with a non-scratched, non-warped
disc.
Eject the disc then reload it properly .
Load a pre-recorded MD in the MD
changer.
If an error display other than the ones described above appears, press the reset b utton. If the problem
persists, turn off the power and consult your store of purchase.
HX-D1 17
Page 16

9. SPECIFICATIONS
CD Player
System: Compact disc digital audio system
Usable Discs: Compact disc
Frequency Response (±0.5dB): 5 Hz to 20 kHz
Signal to Noise Ratio (1 kHz): 110 dB
Dynamic Range (1 kHz): 100 dB
Harmonic Distortion: 0.005%
FM T uner
Frequency Range: 87.9 MHz to 107.9 MHz
Usable Sensitivity: 9 dBf
50dB Quieting Sensitivity: 15 dBf
Alternate Channel Selectivity: 70 dB
Stereo Separation (1 kHz): 35 dB
Frequency Response (±3 dB): 30 Hz to 15 kHz
AM T uner
Frequency Range: 530 kHz to 1710 kHz
Usable Sensitivity: 28 µV
Audio
Bass Control Action (50 Hz): ±12 dB
Treble Control Action (10 kHz): ±12 dB
Line Output Level (CD 1 kHz): 4 V
AUX
Input sensitivity : AUX H 650 mV (at 4 V output)
: AUX L 1.3 V (at 4 V output)
General
Power Supply Voltage:
14.4 V DC (10.8 to 15.6 V allowable),
negative ground
Current Consumption: Less than 3 A
Fuse rating : Main power source A 3 A
Weight / Source: 1.6 kg
Weight / DC/DC converter unit: 0.3kg
Dimensions / Source unit:
178 (W) × 50 (H) × 182 (D) mm
Dimensions / DC/DC converter unit:
186 (W) × 28 (H) × 71 (D) mm
Main power source B 3 A
Clarion Co., Ltd.
2001/5 (D·K)
All Rights Reserved. Copyright © 2001: Clarion Co., Ltd.
Printed in Japan
Accessories
DC/DC converter unit ...................................... 1
Owner’s manual............................................... 1
Installation instructions.................................... 1
Warranty card .................................................. 1
Power cord....................................................... 1
Plate nut........................................................... 2
Tapping screw (5 × 16) .................................... 2
Sems hexagonal bolt (M5 × 8) ........................ 5
Cable clip ......................................................... 1
Universal mounting bracket............................. 1
Strap ................................................................ 1
Hook plate........................................................ 2
Note:
• Specifications and design are subject to change
without notice for further improvement.
PE-2489K
280-7694-00
 Loading...