

Page 1
Owner’s manual
Mode d’emploi
Manual de instrucciones
AM/FM CD PLAYER WITH DVD/CD/MD CHANGER
CONTROL
•
RADIO AM/FM-LECTEUR CD AVEC COMMANDE DE CHANGEUR
DVD/CD/MD
•
RADIO-REPRODUCTOR AM/FM DE DISCOS COMPACTOS CON
CONTROL DE CAMBIADOR DE DVD/DISCOS COMPACTOS/
MINIDISCOS
2002/12 (A·C)
Clarion Co., Ltd.
All Rights Reserved. Copyright © 2002: Clarion Co., Ltd.
Printed in China / Imprimé en Chine / Impreso en China
PE-2552B
280-7884-00
Page 2

Thank you for purchasing this Clarion product.
English
∗ Please read this owner’s manual in its entirety before operating this equipment.
∗ After reading this manual, be sure to keep it in a handy place (e.g., glove compartment).
∗ Check the contents of the enclosed warranty card and keep it carefully with this manual.
∗ This manual includes the operating procedures of the CD changer, MD changer, DVD changer and
TV tuner connected via the CeNET cable. The CD changer, MD changer, DVD changer and TV
tuner have their own manuals, but no explanations for operating them are described.
Contents
1. FEATURES...................................................................................................................................... 2
2. PRECAUTIONS .............................................................................................................................. 3
Flip Down Panel .............................................................................................................................. 3
Handling Compact Discs ................................................................................................................. 4
3. CONTROLS .................................................................................................................................... 5
4. NOMENCLATURE .......................................................................................................................... 6
Names of the Buttons and their Functions ...................................................................................... 6
Major button operations when external equipment is connected to this unit ................................... 6
Display Items ................................................................................................................................... 8
LCD Screen ..................................................................................................................................... 8
5. DCP ................................................................................................................................................. 9
6. REMOTE CONTROL ..................................................................................................................... 10
Inserting the Batteries .................................................................................................................... 10
Functions of Remote Control Unit Buttons ..................................................................................... 11
7. OPERATIONS ............................................................................................................................... 12
Basic Operations ........................................................................................................................... 12
Radio Operations ........................................................................................................................... 14
CD Operations ............................................................................................................................... 16
Operations Common to Each Mode .............................................................................................. 18
8. OPERATIONS OF ACCESSORIES .............................................................................................. 21
CD/MD Changer Operations ......................................................................................................... 21
TV Operations ............................................................................................................................... 23
9. IN CASE OF DIFFICULTY ............................................................................................................ 25
10. ERROR DISPLAYS ....................................................................................................................... 26
11. SPECIFICATIONS ......................................................................................................................... 28
1. FEATURES
11. ESPECIFICACIONES
Sintonizador de FM
Gama de frecuencias:
87,9 a 107,9 MHz
Sensibilidad útil:
9 dBf
Sensibilidad a 50 dB de silenciamiento:
15 dBf
Selectividad de canal alternativo:
70 dB
Separación entre canales (1 kHz):
35 dB
Respuesta en frecuencia (±3 dB):
30 Hz a 15 kHz
Sintonizador de AM
Gama de frecuencias:
530 a 1710 kHz
Sensibilidad útil:
25 µV
Reproductor de discos compactos
Sistema:
Sistema audiodigital de discos compactos
Discos utilizables:
Discos compactos
Respuesta en frecuencia (±1 dB):
10 Hz a 20 kHz
Relación señal-ruido (1 kHz):
100 dBA
Gama dinámica (1 kHz):
95 dB
Distorsión armónica:
0,01%
Audio
Salida máxima de potencia:
208 W (52 W ✕ 4 canales)
Salida media continua de potencia:
16 W ✕ 4, con 4 Ω, de 20 Hz a 20 kHz, 1% de
distorsión armónica total
Acción de control de graves (60 Hz):
±15 dB
Acción de control de agudos (10 kHz):
±12 dB
Nivel de salida de línea (CD a 1 kHz):
2 V
Generales
Tensión de alimentación:
14,4 V CC (permisible de 10,8 a 15,6 V),
negativo a masa
Consumo de corriente:
Menos de 15 A
Impedancia de los altavoces:
4 Ω (permisible de 4 a 8 Ω)
Peso / Unidad fuente:
2,86 lb. (1,3 kg)
Peso / Controlador remoto:
1 oz. (30 g) (incluyendo la pila)
Dimensiones / Unidad fuente:
7" (An) ✕ 2" (Al) ✕ 6-1/6" (Prf)
[178 (An) ✕ 50 (Al) ✕ 157 (Prf) mm]
Dimensiones / Controlador remoto:
1-3/4" (An) ✕ 4-5/16" (Al) ✕ 1-1/8" (Prf)
[44 (An) ✕ 110 (Al) ✕ 27 (Prf) mm]
• Flip Down Detachable Aluminum Face & High Visibility Multi-Color LC Display
• Controller for Optional SIRIUS Tuner Modules
• Z-Enhancer Plus for Sound Creation with 3 Adjustment Modes (2-Band P.EQ)
• CeNET with Balanced Audio Line Transmission and Dynamic Noise Cancelling
• 8-Times Oversampling Digital Filter and Dual 1-Bit D/A Converters
2 DXZ535
Nota:
• Las especificaciones y el diseño están sujetos a cambio sin previo aviso por motivo de mejoras.
DXZ535 85
Page 3
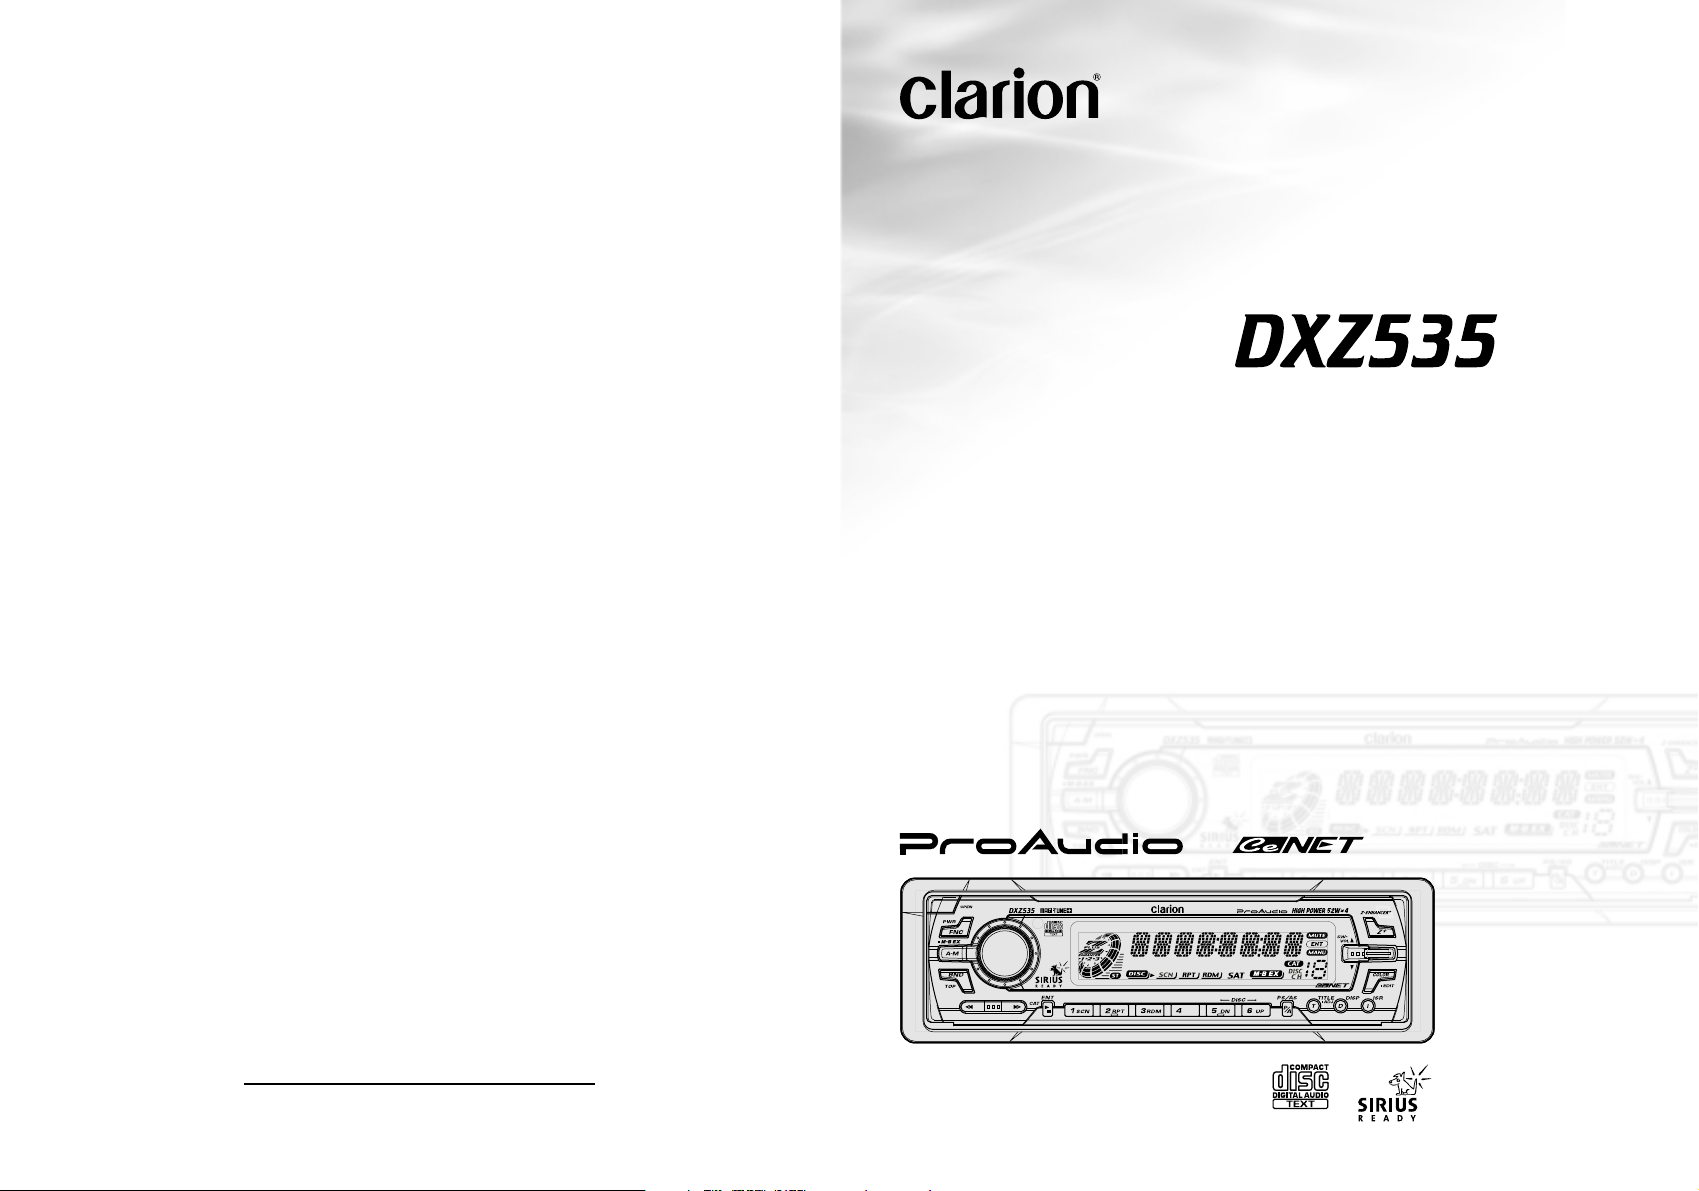
Display Items
English
Z-Enhancer Plus indication
Operation status indication
Titles, frequency, PS names, clock, etc.
are displays.
: Mute indication
: Enter indication
: Manual indication
Stereo indication
Preset channel indication (1 to 6)
Disc number indication (1 to 12)
: Disc indication
: Scan indication
: Repeat indication
: Random indication
: SIRIUS indication
: MAGNA BASS EXTEND indication
: Category indication
LCD Screen
In extreme cold, the screen movement may slow down and the screen may darken, but this is normal.
The screen will recover when it returns to normal temperature.
2. PRECAUTIONS
1. When the inside of the car is very cold and the
player is used soon after switching on the
heater moisture may form on the disc or the
optical parts of the player and proper playback
may not be possible. If moisture forms on the
disc, wipe it off with a soft cloth. If moisture
forms on the optical parts of the player, do not
use the player for about one hour. The condensation will disappear naturally allowing
normal operation.
This equipment has been tested and found to comply with the limits for a Class B digital device, pursuant to Part 15 of the FCC Rules.
These limits are designed to provide reasonable
protection against harmful interference in a residential installation.
This equipment generates, uses, and can radiate
radio frequency energy and, if not installed and
used in accordance with the instructions, may
cause harmful interference to radio communications. However, there is no guarantee that interference will not occur in a particular installation.
If this equipment does cause harmful interference
to radio or television reception, which can be determined by turning the equipment off and on, the
user is encouraged to consult the dealer or an experienced radio/TV technician for help.
MODEL
AM 530-1710kHz/ FM 87.9 -107.9MHz
THIS DEVICE COMPLIES WITH PART 15 OF THE FCC RULES.
OPERATION IS SUBJECT TO THE FOLLOWING TWO CONDITIONS:
(1) THIS DEVICE MAY NOT CAUSE HARMFUL INTERFERENCE, AND
(2) THIS DEVICE MUST ACCEPT ANY INTERFERENCE RECEIVED,
INCLUDING INTERFERENCE THAT M AY CAUSE UNDESIRED
OPERATION.
THIS PRODUCTION COMPLIES WITH DHHS RULES 21 CFR
SUBCHAPTER J APPLICABLE AT DATE OF MANUFACTURE.
CLARION CO.,LTD.
50 KAMITODA,TODA-SHI,SAITAMA-KEN,JAPAN
MANUFACTURED:
SERIAL No.
PE-
12V GROUND
Clarion Co.,Ltd.
MADE IN
2. Driving on extremely bumpy roads which cause
severe vibration may cause the sound to skip.
3. This unit uses a precision mechanism. Even in
the event that trouble arises, never open the
case, disassemble the unit, or lubricate the rotating parts.
CAUTION
USE OF CONTROLS, ADJUSTMENTS, OR PERFORMANCE OF PROCEDURES OTHER THAN
THOSE SPECIFIED HEREIN, MAY RESULT IN
HAZARDOUS RADIATION EXPOSURE.
THE COMPACT DISC PLAYER and MINI DISC
PLAYER SHOULD NOT BE ADJUSTED OR REPAIRED BY ANYONE EXCEPT PROPERLY
QUALIFIED SERVICE PERSONNEL.
CHANGES OR MODIFICATIONS NOT EXPRESSLY APPROVED BY THE MANUFACTURER FOR COMPLIANCE COULD VOID THE
USER’S AUTHORITY TO OPERATE THE EQUIPMENT.
INFORMATION FOR USERS:.
CHANGES OR MODIFICATIONS TO THIS
PRODUCT NOT APPROVED BY THE MANUFACTURER WILL VOID THE WARRANTY AND
WILL VIOLATE FCC APPROVAL.
Bottom View of Source Unit
Flip Down Panel
English
This unit uses a flip-down structure that makes possible large-size displays.
CAUTION
When opening and closing the FLIP DOWN
PANEL, be careful not to catch your fingers.
They could be injured.
1. Always use this unit with the FLIP DOWN
PANEL closed.
4. When closing the FLIP DOWN PANEL, do
not press the [OPEN] button.
5. Strong impacts to the operating or display
section can cause damage or deformation.
6. If the FLIP DOWN PANEL does not open
fully, gently open it with your hand.
2. Do not force operations or use this device
abnormally when opening or closing the FLIP
DOWN PANEL.
3. Do not use the FLIP DOWN PANEL as a tray
to place objects on when it is open.
Handling Compact Discs
•
Use only compact discs bearing the or
mark.
Do not play heart-shaped, octagonal, or other
specially shaped compact discs.
Some CDs recorded in CD-R/CD-RW mode
may not be usable.
Handling
•
Compared to ordinary music CDs, CD-R and
CD-RW discs are both easily affected by high
temperature and humidity and some of CD-R
and CD-RW discs may not be played. Therefore,
do not leave them for a long time in the car.
• New discs may have
some roughness
around the edges. If
such discs are used,
the player may not
work or the sound
may skip. Use a ballpoint pen or the like
to remove any
roughness from the edge of the disc.
•
Never stick labels on the surface of the compact
disc or mark the surface with a pencil or pen.
• Never play a compact disc with any cello-
phane tape or other glue on it or with peeling
off marks. If you try to play such a compact
disc, you may not be able to get it back out of
the CD player or it may damage the CD
player.
Ball-point pen
Roughness
Do not use compact discs that have large
scratches, are misshapen, cracked, etc. Use of
such discs may cause misoperation or damage.
•
To remove a compact disc from its storage case,
press down on the center of the case and lift the
disc out, holding it carefully by the edges.
• Do not use commercially available CD protection sheets or discs equipped with stabilizers,
etc. These may damage the disc or cause
breakdown of the internal mechanism.
Storage
• Do not expose compact discs to direct sunlight
or any heat source.
• Do not expose compact discs to excess humidity or dust.
• Do not expose compact discs to direct heat
from heaters.
Cleaning
• To remove fingermarks and dust, use a soft
cloth and wipe in a straight line from the center
of the compact disc to the circumference.
• Do not use any solvents, such as commercially
available cleaners, anti-static spray, or thinner
to clean compact discs.
• After using special compact disc cleaner, let
the compact disc dry off well before playing it.
English
Be sure to unfold and read the next page. / Veuillez déplier et vous référer à la page suivante.
DXZ535 38 DXZ535 DXZ535 4
Cerciórese de desplegar y de leer la página siguiente.
Page 4
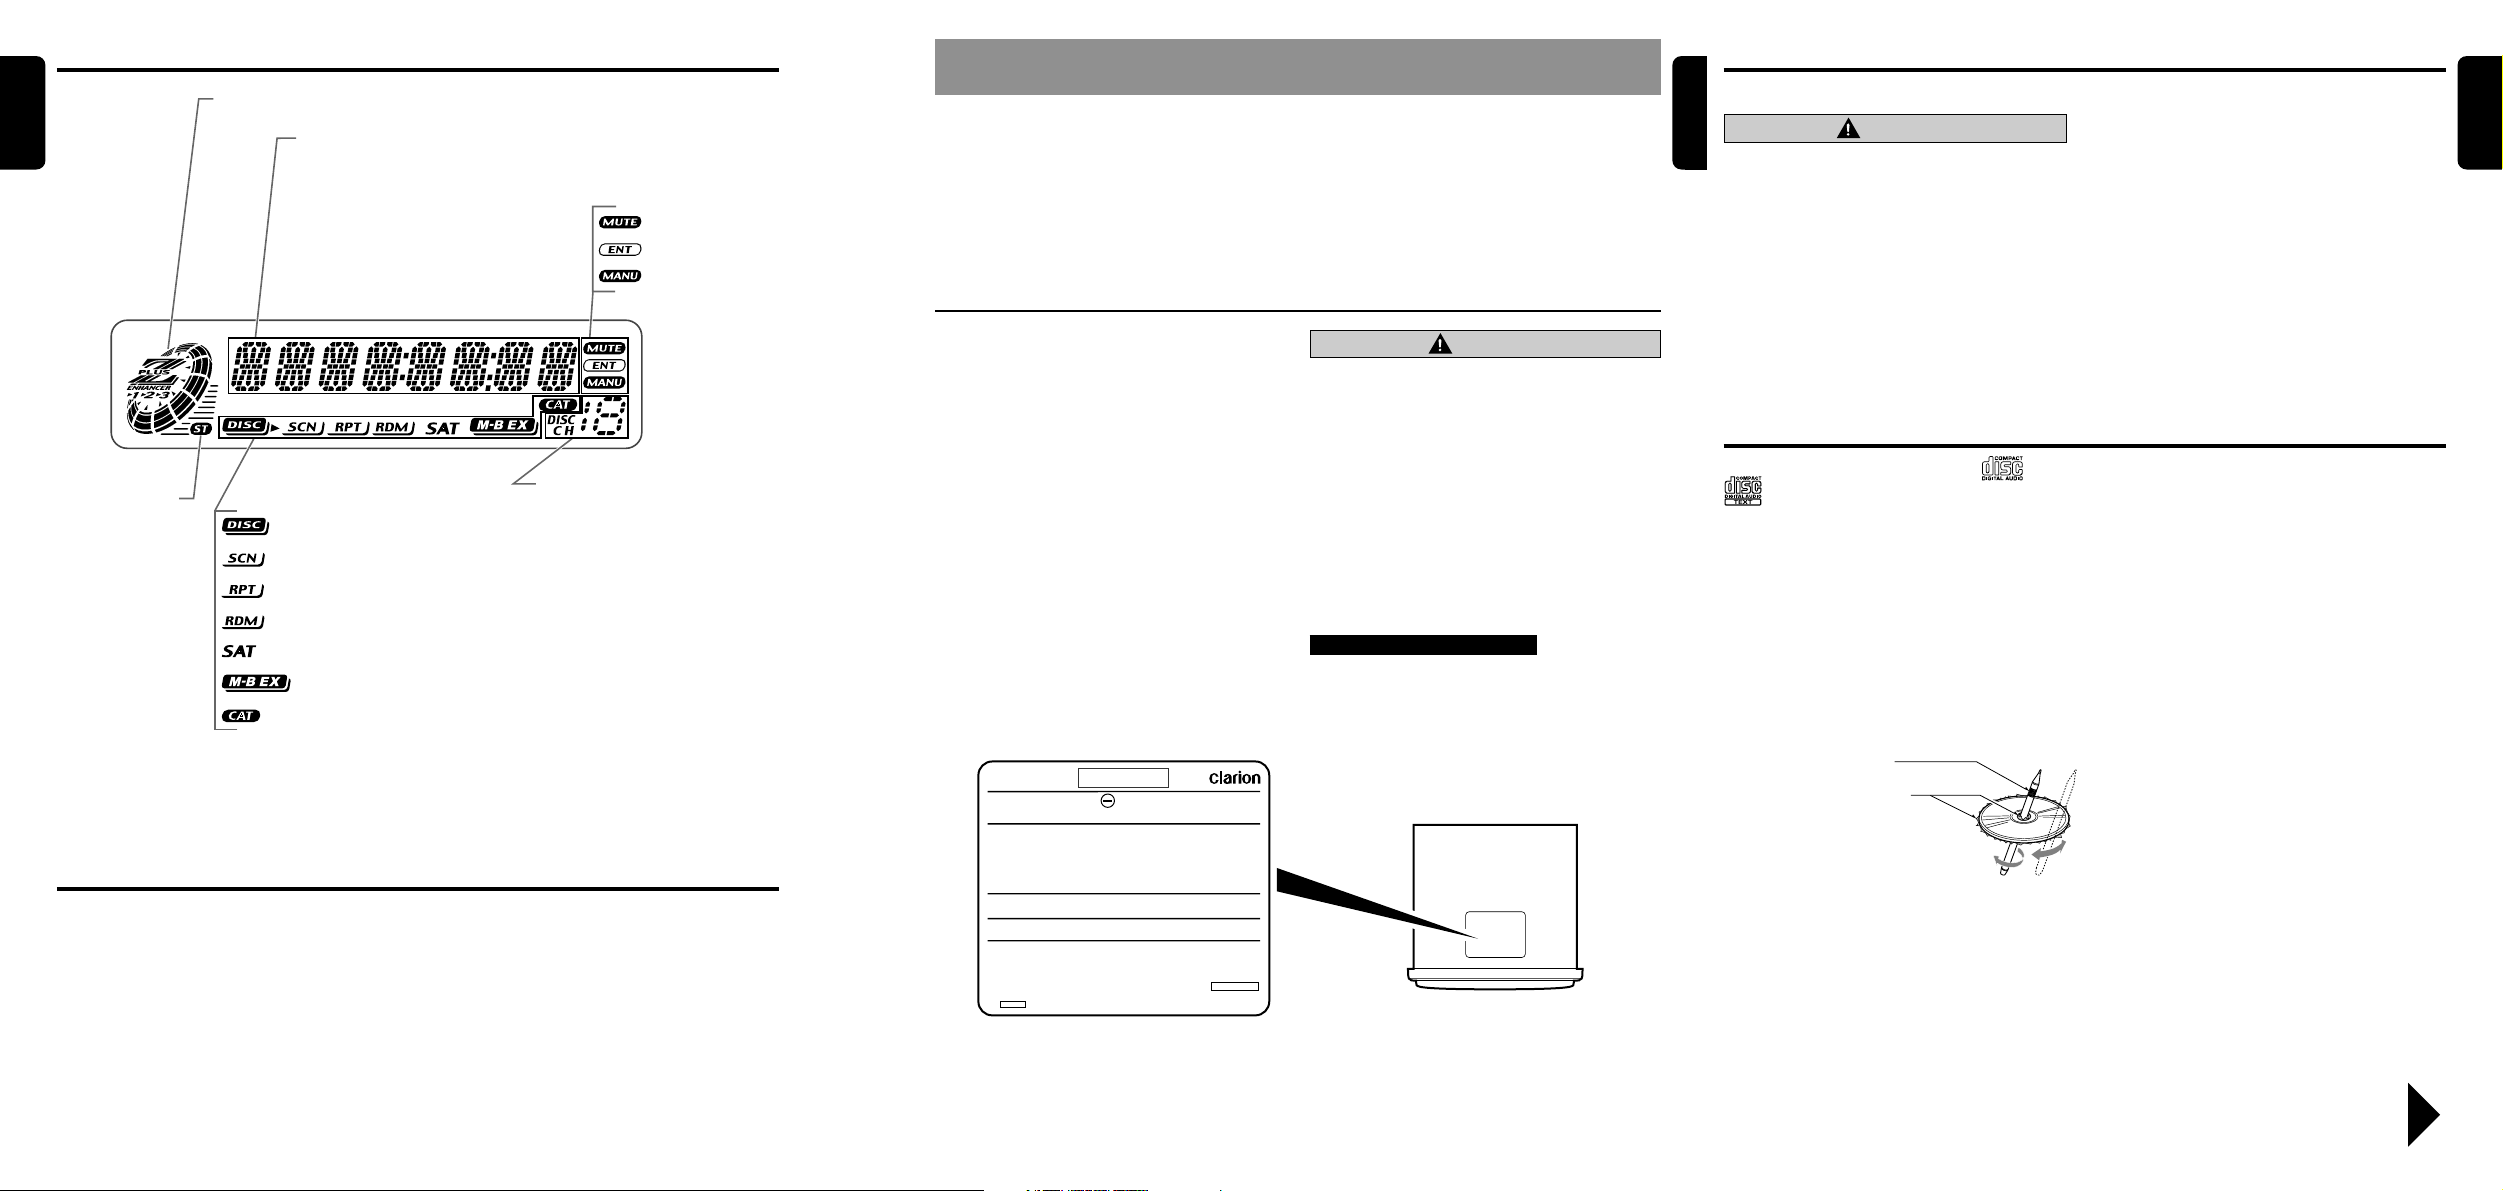
English
3.CONTROLS / LES COMMANDES / CONTROLES
Source unit / Appareil pilote / Unidad fuente
Français
[
ROTARY
[
OPEN
]
]
English
4. NOMENCLATURE
Note:
• Be sure to read this chapter referring to the front diagrams of chapter “3. CONTROLS” on page 5 (unfold).
Names of the Buttons and their Functions
[OPEN] button
• Deeply push in [OPEN] button to unlock the
flip down panel.
[ROTARY] knob
Español
[FNC]
[A-M]
[BND]
[a], [d]
[ ]
[
SCN
[
RPT
]
]
[
RDM
[
]
DIRECT
]
[DN], [UP]
With the FLIP DOWN PANEL opened / Ouvrez le PANNEAU RABATTABLE
Apertura del PANEL ABATIBLE
[
P/A
[T]
[Z+]
[
SW-VOL
[
[I]
[D]
]
COLOR
]
]
• Adjust the volume by turning the knob clockwise or counterclockwise.
• Use the knob to perform various settings.
[Z+] button
• Use the button to select one of the four types
of sound characteristics already stored in
memory.
[SW-VOL] button
• Adjust sub woofer volume.
The volume is adjusted in the range ±6.
[COLOR] button
• Button’s color change to multicolor.
[I] button
• Recall ISR radio station in memory.
• Press and hold for 2 seconds or longer: Store
current station into ISR memory (radio mode
only).
[D] button
• Switch the display indication (Main display,
Sub display, Clock display).
[T] button
[ ]
[
CD SLOT
]
• Use the button to input a title in the CD
mode.
• Press and hold the button for 1 second or
longer to enter the adjust mode.
[P/A] button
• Perform preset scan while in the radio mode.
When the button is pressed and held, auto
store is performed.
[UP], [DN] buttons
• Select the disc.
Major button operations when external equipment is
connected to this unit
Note: Be sure to unfold this page and refer to the front diagrams as you read each chapter.
Remarque: Veuillez déplier cette page et vous référer aux schémas quand vous lisez chaque chapitre.
Nota: Cuando lea los capítulos, despliegue esta página y consulte los diagramas.
● When the CD/MD/DVD changer
is connected
∗ For details, see the section “CD/MD
changer operations”. For the DVD
changer, refer to the Owner’s Manual provided with the DVD changer.
[DIRECT] buttons
• Store a station into memory or recall it directly while in the radio mode.
[RDM] button
• Perform random play while in the CD mode.
[RPT] button
• Repeat play while in the CD mode.
[SCN] button
• Perform scan play for 10 seconds of each
track while in the CD mode.
[ ] button
• Play or pause a CD while in the CD mode.
[a], [d] buttons
• Select a station while in the radio mode or
select a track when listening to a CD. These
buttons are used to make various settings.
• Press and hold the button for 1 second or
longer to switch the fast-forward/fastbackward.
[BND] button
• Switch the band, or seek tuning or manual
tuning while in the radio mode.
• Play a first track while in the CD mode.
[A-M] button
• Use the button to switch to the audio mode
(bass/treble, balance/fader Z-Enhancer Plus,
Magna Bass Extended adjustment)
[FNC] button
• Press the button to turn on the power.
Press and hold the button for 1second or
longer to turn off the power.
• Switches the operation mode among the radio mode, etc.
[Q] button
• Eject a CD when it is loaded into the unit.
[CD SLOT]
• CD insertion slot.
[D] button
• When the button is pressed and held,
switches the disc titles or track titles while in
the MD changer mode.
• When the button is pressed and held,
switches the user titles or track titles, etc.
while in the CD changer mode.
[T] button
• Use the button to input a title in the CD
changer mode.
• Use the button to scroll the title during CDtext play or MD changer play in the MD
changer mode.
[UP], [DN] buttons
• Select the disc.
[RDM] button
• Perform random play. Also perform disc random play when the button is pressed and
held.
[RPT] button
• Perform repeat play. When this button is
pressed and held, disc repeat play is performed.
[BND] button
• Move the next disc in increasing order.
[SCN] button
• Perform scan play for 10 seconds of each
track. Disc scan play is performed when the
button is pressed and held.
[ ] button
• Play or pause a CD, MD or DVD.
[a], [d] buttons
• Select a track when listening to a disc.
• Press and hold the button for 1 second or
longer to switch the fast-forward/fastbackward.
● When the TV is connected
∗ For details, see the section “TV
operations”.
[P/A] button
• Perform preset scan while in the TV mode.
When the button is pressed and held, auto
store is performed.
[ ] button
• Switch the TV picture mode or VTR (external)
picture mode.
[DIRECT] buttons
• Store a station into memory or recall it directly.
[a], [d] buttons
• Select a station.
[BND] button
• Switch the band.
• When the button is pressed and held, switch
seek tuning or manual mode.
● When the Sirius Satellite
Radio is connected
∗ For details, refer to the Owner’s Manual
provided with the Sirius Satellite Radio.
[FNC] button
• Press the button to switch the operation
mode among the SIRIUS mode, etc.
[ ] button
• Performs category scan while in the SIRIUS
mode. When the button is pressed and held,
preset scan is performed.
[DIRECT] buttons
• Stores a station into memory or recall it di-
rectly while in the SIRIUS mode.
[a], [d] button
• Press the button to selects a station.
What is Sirius Satellite Radio?
Sirius is radio the way it was meant to be: Up
to 100 new channels of digital quality programming delivered to listeners coast to coast via
satellite. That means 50 channels of completely
commercial-free music. Plus up to 50 more
channels of news, sports, and entertainment
from names like CNBC, Discovery, SCI-FI
Channel, A&E, House of Blues, E!, NPR,
Speedvision and ESPN.
Sirius is live, dynamic entertainment, completely focused on listeners. Every minute of
every day of every week will be different. All 50
commercial-free music channels are created inhouse and hosted by DJs who know and love
the music. Do you like Reggae? How about
Classic Rock or New Rock? Sirius has an array
of choices spanning a vast range of musical
tastes including the hits of the 50’s, 60’s, 70’s,
& 80’s as well as Jazz, Country, Blues, Pop,
Rap, R&B, Bluegrass, Alternative, Classical,
Heavy Metal, Dance and many others...
From its state-of-the-art, digital broadcasting facility in Rockefeller Center, New York City,
Sirius will deliver the broadest, deepest mix of
radio entertainment from coast to coast.
Sirius will bring you music and entertainment
programming that is simply not available on traditional radio in any market across the country.
It’s radio like you’ve never heard before.
So Get Sirius and Listen Up! For more information, visit siriusradio.com.
DXZ535 75 DXZ535 6 DXZ535
English
Page 5
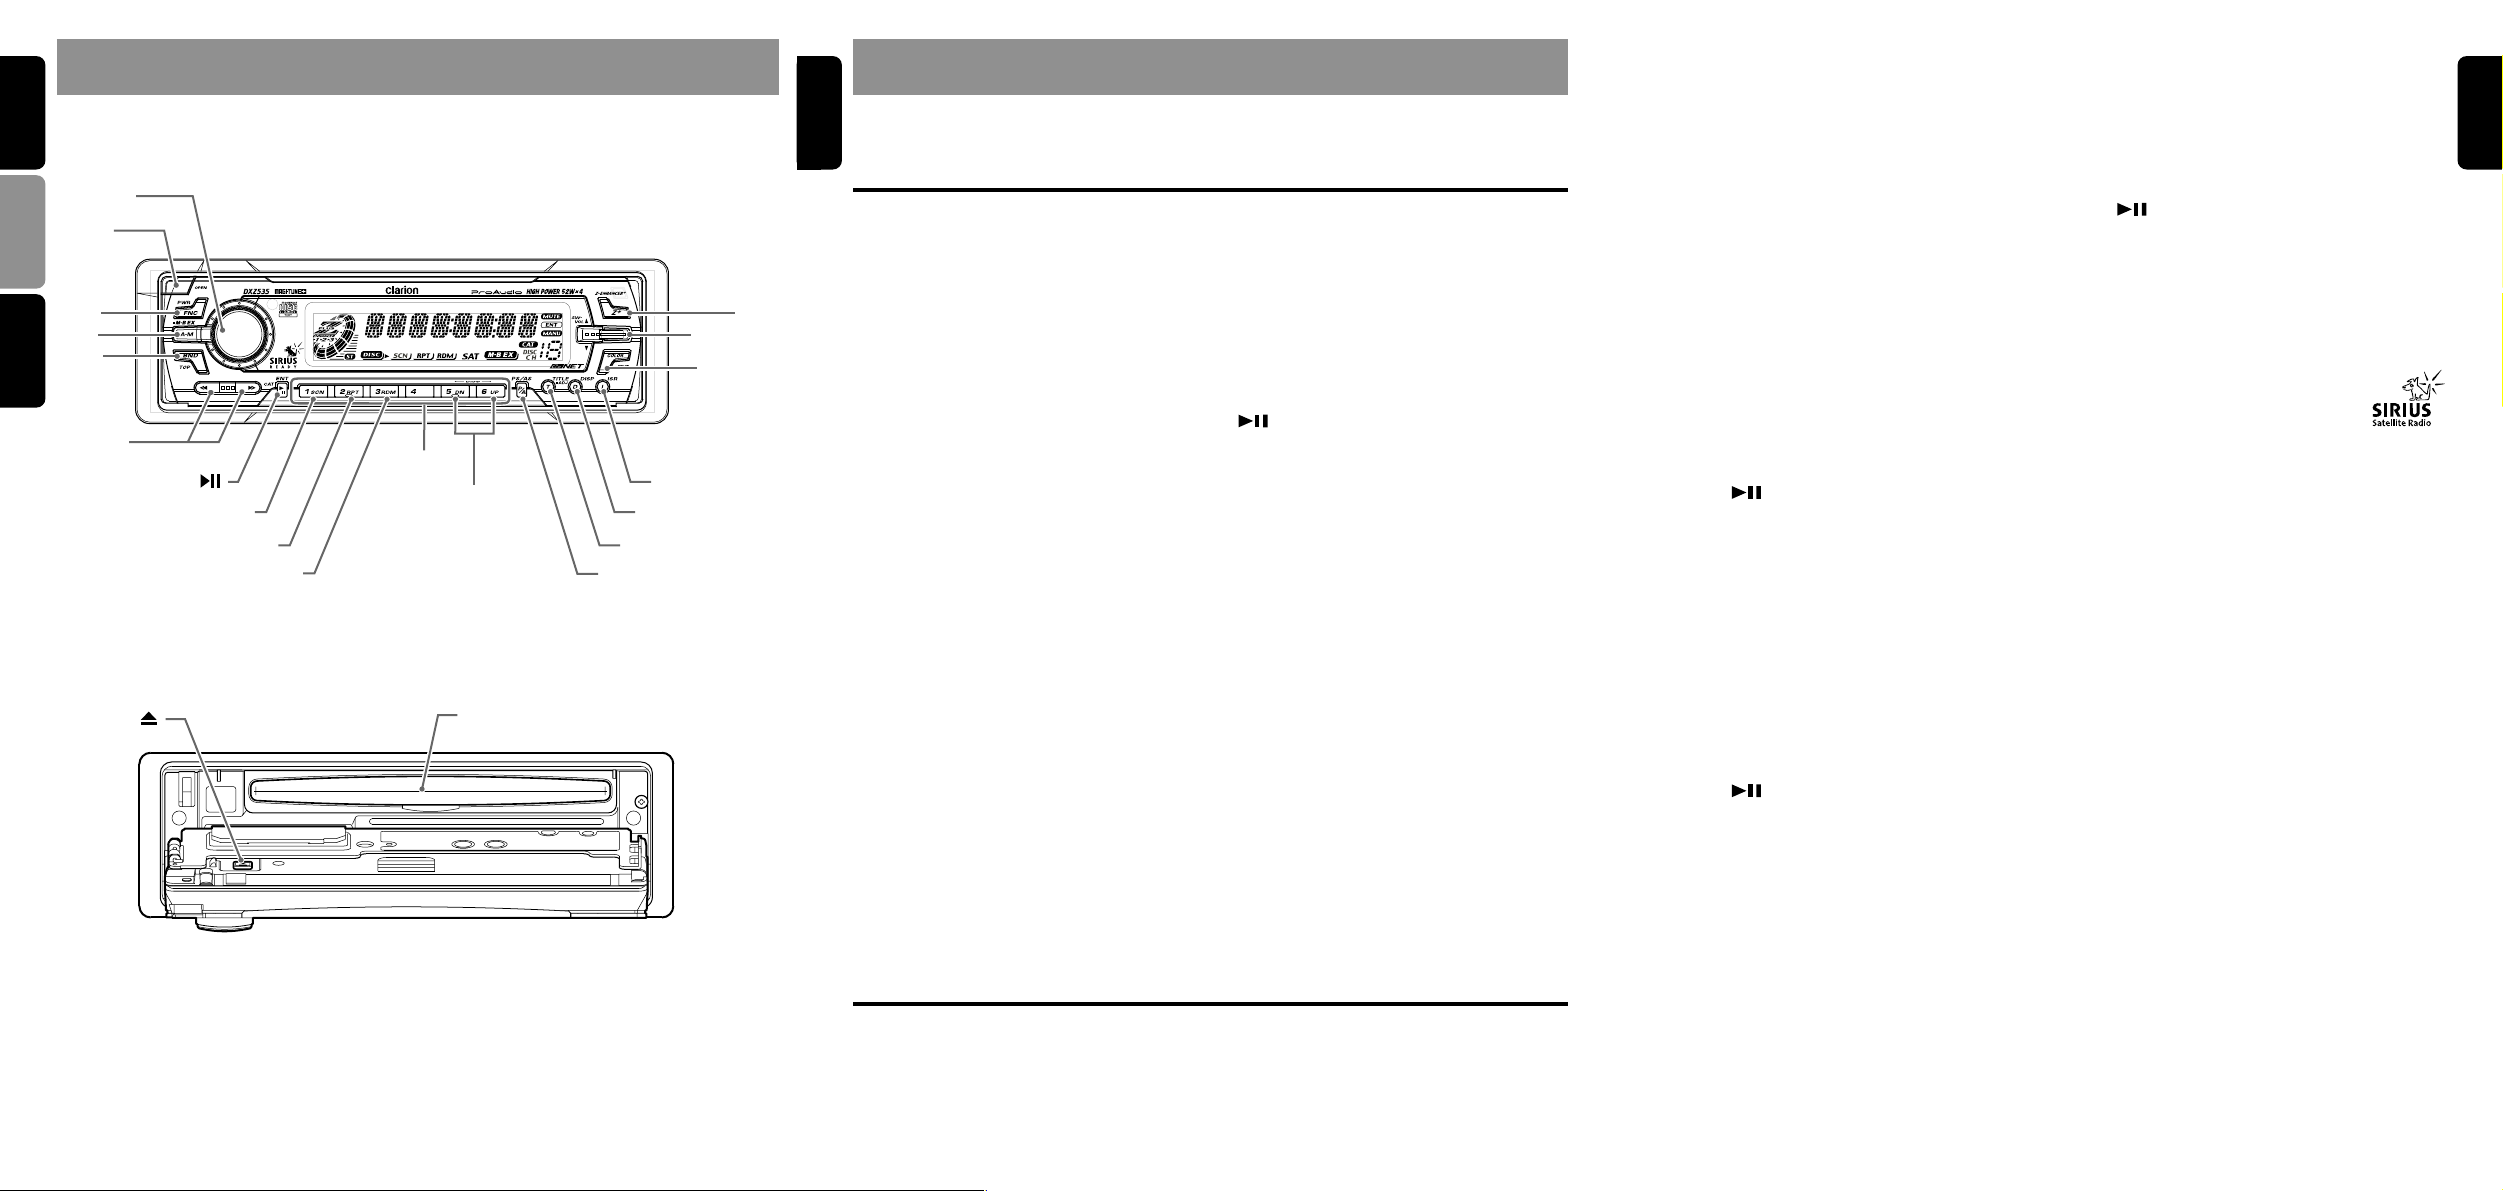
5. DCP
English
The control panel can be detached to prevent
theft. When detaching the control panel, store it
in the DCP (DETACHABLE CONTROL PANEL)
case to prevent scratches.
We recommend taking the DCP with you when
leaving the car.
Removing the DCP
1. Press the [FNC] button for 1 second or
longer to turn off the power.
2. Deeply push in [OPEN] button to unlock the
flip down panel.
∗ If the flip down panel does not open fully, gen-
tly open it with your hand.
[OPEN] button
DCP
3. Pull the DCP toward you and remove it.
DCP
4. Close the HOLD FLAP.
CAUTION
Be sure to close the HOLD FLAP for safety
when removing the DCP.
Attaching the DCP
1. Insert the right side of the DCP into the main
unit.
2. Insert the left side of the DCP into the main
unit.
2.
DCP
1.
CAUTION
• The DCP can easily be damaged by
shocks. After removing it, be careful not to
drop it or subject it to strong shocks.
• If the FLIP DOWN PANEL is kept open, the
DCP may drop due to vibration of the car.
This results in damage to the DCP. So
close the FLIP DOWN PANEL or remove
the DCP to store into the case.
• The connector connecting the source unit
and the DCP is an extremely important
part. Be careful not to damage it by pressing on it with fingernails, screwdrivers, etc.
Note:
• If the DCP is dirty, wipe off the dirt with a soft, dry
cloth only.
HOLD FLAP
DXZ535 9
Page 6
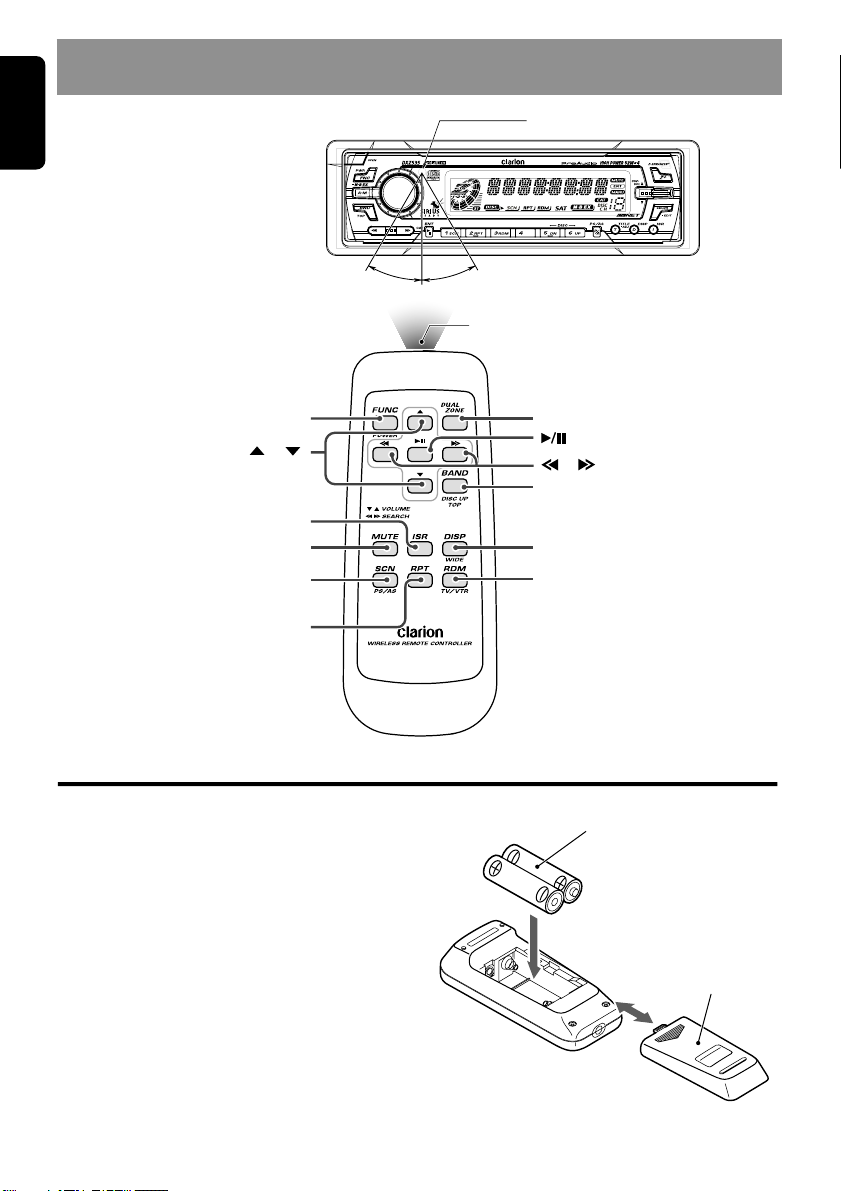
English
6. REMOTE CONTROL (Optional)
Receiver for remote control unit
Operating range: 30˚ in all directions
Signal transmitter
Remote control unit
[
] [
[
[
[
SCN
FUNC
],[ ]
[
ISR
MUTE
[
RPT
]
]
]
]
DUAL ZONE
[
]
[
],[ ]
[
BAND
[
]
DISP
[
]
RDM
]
]
Inserting the Batteries
1. Turn the remote control unit over, then slide the
rear cover in the direction of the arrow.
2. Insert the AA (SUM-3, IECR-6/1.5V) batteries
that came with the remote control unit facing in
the directions shown in the figure, then close
the rear cover.
Notes:
Using batteries improperly can cause them to
explode. Take note of the following points:
• When replacing batteries, replace both batteries
with new ones.
• Do not short-circuit, disassemble or heat batteries.
• Do not dispose of batteries into fire or flames.
• Dispose of spent batteries properly.
10 DXZ535
AA (SUM-3, IECR-6/1.5V)
Batteries
Rear cover
Rear side
Page 7
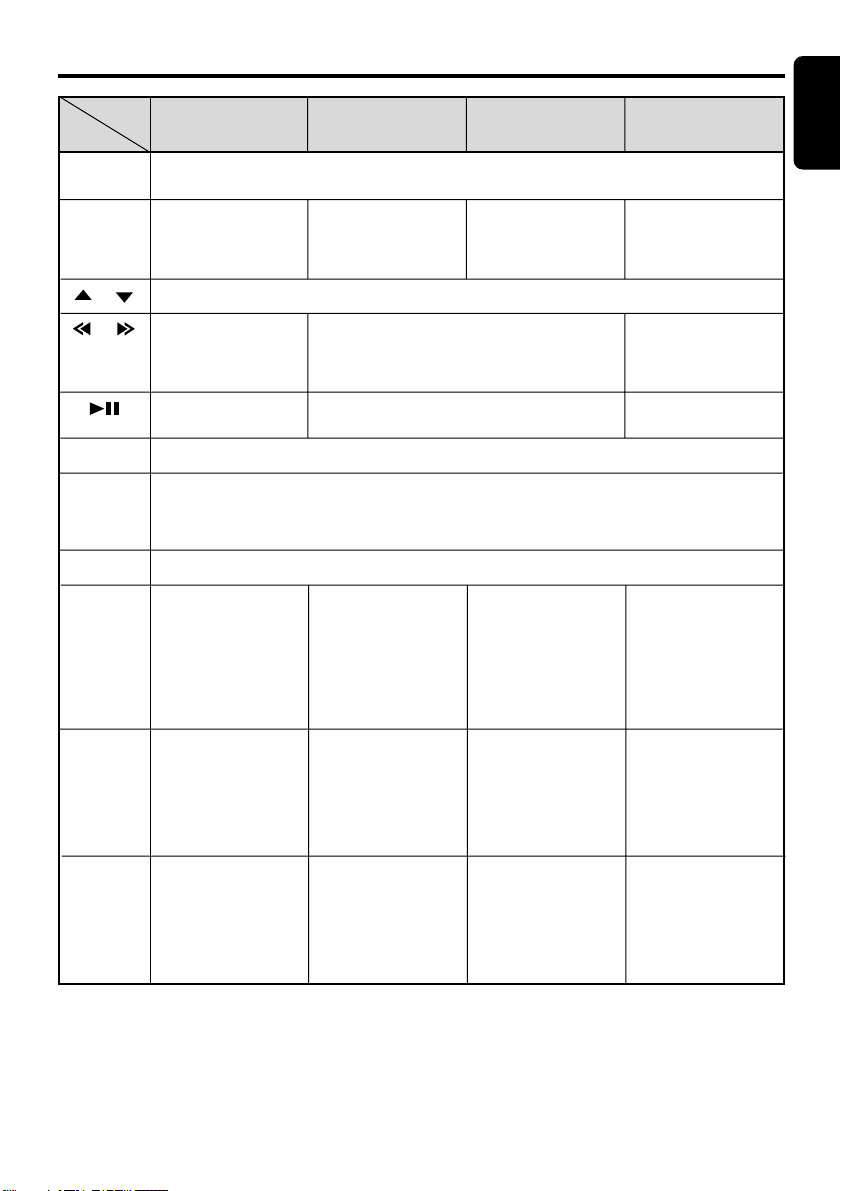
Functions of Remote Control Unit Buttons
English
Mode
Button
[FUNC]
[BAND]
[ ] , [ ]
[ ] , [ ]
[ ]
[MUTE]
[ISR]
[DISP]
[SCN]
Radio CD
Switches among radio, SIRIUS tuner, CD, CD/MD changer, DVD changer, TV and AUX.
Switches reception
band.
Increases and decreases volume (in all modes).
Moves preset
channels up and
down.
No function.
Turns mute on and off.
Recalls ISR radio station in memory.
Press and hold for 2 seconds or longer: Stores current station into ISR memory
(radio mode only).
Switches among main display, sub display, clock display.
Preset scan.
When pressed and
held for 2 seconds:
Auto store.
Plays the first track.
Top play.
Moves tracks up and down.
When pressed and held for 1 second:
Fast-forward/fast-backward.
Switches between playback and pause.
Scan play.
CD/MD changer
DVD changer
Moves the next disc
in increasing order.
Scan play.
When pressed and
held for 1 second:
Disc scan play.
TV
Switches reception
band.
Moves preset
channels up and
down.
No function.
Preset scan.
When pressed and
held for 2 seconds:
Auto store.
[RPT]
[RDM]
∗ Some of the corresponding buttons on the main unit and remote control unit have different functions.
∗ [DUAL ZONE] button is not available.
No function.
No function.
Repeat play.
Random play.
Repeat play.
When pressed and
held for 1 second:
Disc repeat play.
Random play.
When pressed and
held for 1 second:
Disc random play.
No function.
Switches between TV
and VTR.
DXZ535 11
Page 8
English
7. OPERATIONS
Basic Operations
Note:Be sure to read this chapter referring to the front diagrams of
chapter “3. CONTROLS” on page 5 (unfold).
CAUTION
Be sure to lower the volume before switching off the unit power or the ignition key. The
unit remembers its last volume setting. If
you switch the power off with the volume up,
when you switch the power back on, the
sudden loud volume may hurt your hearing
and damage the unit.
Turning on/off the power
Note:
• Be careful about using this unit for a long time
without running the engine. If you drain the car’s
battery too far, you may not be able to start the
engine and this can reduce the service life of the
battery.
1. Press the [FNC] button.
2. The illumination and display on the unit light
up. The unit automatically remembers its last
operation mode and will automatically switch
to display that mode.
3. Press and hold the [FNC] button for 1 sec-
ond or longer to turn off the power for the
unit.
Note:
• System check
The first time this unit is turned on after the wire
connections are completed, it must be checked
what equipment is connected. When the power is
turned on, “SYSTEM” and “PUSH PWR” appear
in the display alternately, so press the [FNC] button. The system check starts within the unit.
When the system check is complete, press the
[FNC] button again.
Selecting a mode
1. Press the [FNC] button to change the opera-
tion mode.
2. Each time you press the [FNC] button, the
operation mode changes in the following order:
Radio mode ➜ SIRIUS mode ➜ CD mode ➜
CD changer mode ➜ MD changer mode ➜
DVD changer mode ➜ TV mode ➜ AUX
mode ➜ Radio mode...
∗ External equipment not connected with
CeNET is not displayed.
Adjusting the volume
Turning the [ROTARY] knob clockwise in-
creases the volume; turning it counterclockwise
decreases the volume.
∗ The volume level is from 0 (minimum) to 33 (maxi-
mum).
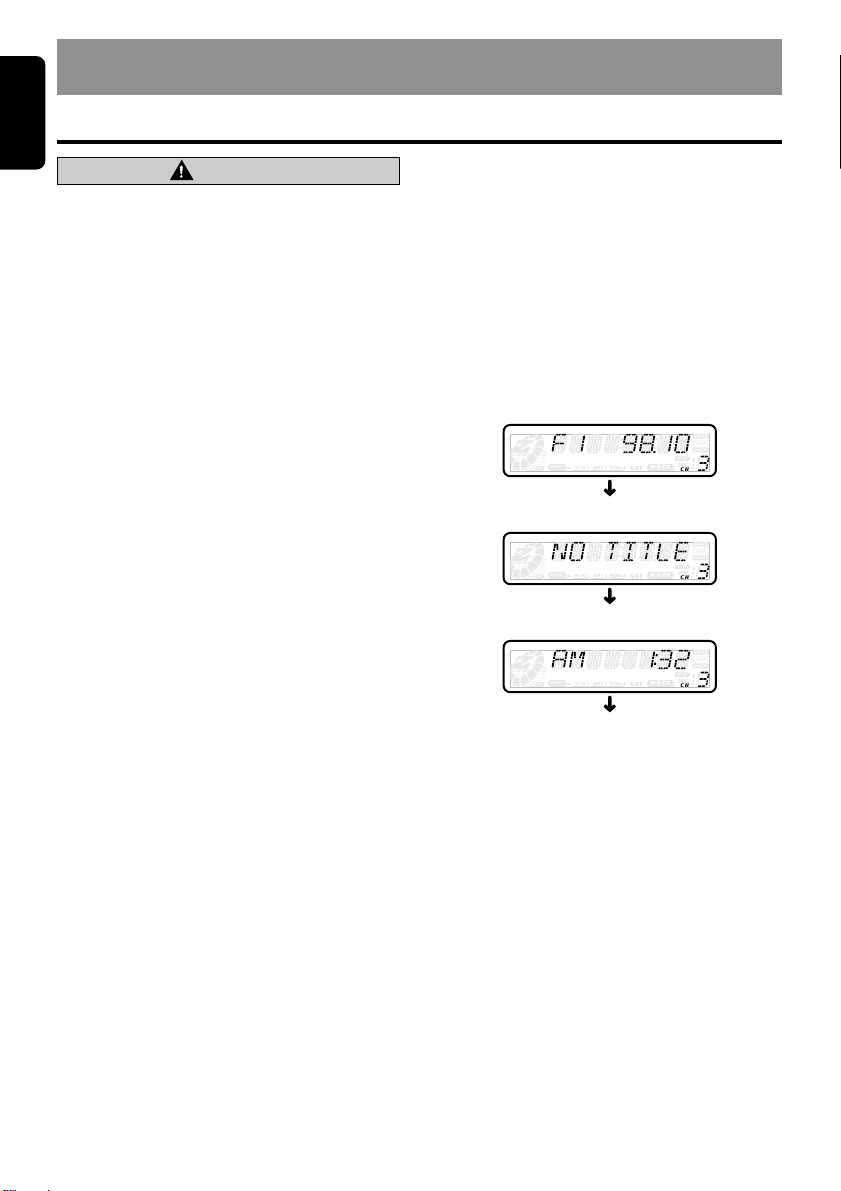
Switching the display
Press the [D] button to select the desired display.
Each time you press the [D] button, the display
switches in the following order:
Main display
Sub display
Clock display
Main display
∗ Once selected, the preferred display becomes
the display default. When a function adjustment such as volume is made, the screen will
momentarily switch to that function’s display,
then revert back to the preferred display several seconds after the adjustment.
∗ When you have entered a title in a CD, it ap-
pears in the sub display. If you have not entered a title, “NO TITLE” appears in the title
display instead. For information on how to enter a title, refer to the subsection “Entering
titles” in section “Operations Common to
Each Mode”.
Setting the Z-Enhancer Plus
This unit are provided with 4 types of sound tone effects stored in memory. Select the one you prefer.
∗ The factory default setting is “Z+ OFF”.
Each time you press the [Z+] button, the tone effect changes in the following order:
12 DXZ535
Page 9

Basic Operations
“Z+ OFF” ➜ “B-BOOST” ➜ “IMPACT” ➜
“EXCITE” ➜ “CUSTOM” ➜ “Z+ OFF” ...
• B-BOOST : bass emphasized
• IMPACT : bass and treble empha-
• EXCITE : bass and treble empha-
• CUSTOM : user custom
• Z+ OFF : no sound effect
sized
sized mid de-emphasized
Adjusting the tone
Press the [A-M] button and select the item to
adjust. Each time you press the [A-M] button,
the item changes as following order:
● When “B-BOOST” is set
“B-BOOST” ➜ “BAL 0” ➜ “FAD 0” ➜ Last
function mode.
● When “IMPACT” is set
“IMPACT” ➜ “BAL 0” ➜ “FAD 0” ➜ Last
function mode.
● When “EXCITE” is set
“EXCITE” ➜ “BAL 0” ➜ “FAD 0” ➜ Last
function mode.
● When “CUSTOM” is set
“BASS” ➜ “TREBLE” ➜ “BAL 0” ➜ “FAD
0” ➜ Last function mode.
● When “Z+ OFF” is set
“BAL 0” ➜ “FAD 0” ➜ Last function mode.
Adjusting the bass (Gain,
Frequency, Q-curve)
This adjustment can be performed when the ZEnhancer Plus is set to “CUSTOM”.
1.
Press the [A-M] button and select “BASS”.
2. Turning the [ROTARY] knob clockwise em-
phasizes the bass; turning it counterclockwise attenuates the bass.
∗ The factory default setting is “B<G 0>”. (Ad-
justment range: –6 to +6)
3. Press the [d] or [a] button to select “B<F
60>”.
Turninng the [ROTARY] knob clockwise or
counterclockwise to select the frequency.
∗ The factory default setting is “B<F 60>”.(Ad-
justment 60/100/200 Hz)
4.
Press the [d] or [a] button to select “B<Q 1>”.
Turninng the [ROTARY] knob clockwise or
counterclockwise to select the Q-curve.
∗ The factory default setting is “B<Q 1>”.(Ad-
justment 1/1.25/1.5/2)
5. When the adjustment is complete, press the
[A-M] button several times until the function
mode is reached.
Adjusting the treble (Gain,
Frequency)
This adjustment can be performed when the ZEnhancer Plus is set to “CUSTOM”.
1.
Press the [A-M] button and select “TREBLE”.
2. Turning the [ROTARY] knob clockwise em-
phasizes the treble; turning it counterclockwise attenuates the treble.
∗ The factory default setting is “T<G 0>”. (Ad-
justment range: –6 to +6)
3. Press the [d] or [a] button to select
“T<F 10>”.
Turninng the [ROTARY] knob clockwise or
counterclockwise to select the frequency.
∗ The factory default setting is “T<F 10>”.(Ad-
justment 10 kHz/15 kHz)
4. When the adjustment is complete, press the
[A-M] button several times until the function
mode is reached.
Adjusting the balance
1. Press the [A-M] button and select “BAL 0”.
2. Turning the [ROTARY] knob clockwise em-
phasizes the sound from the right speaker;
turning it counterclockwise emphasizes the
sound from the left speaker.
∗ The factory default setting is “BAL 0”. (Adjust-
ment range: L13 to R13)
3. When the adjustment is complete, press the
[A-M] button several times until the function
mode is reached.
Adjusting the fader
1. Press the [A-M] button and select “FAD 0”.
2. Turning the [ROTARY] knob clockwise em-
phasizes the sound from the front speakers;
turning it counterclockwise emphasizes the
sound from the rear speakers.
∗ The factory default setting is “FAD 0”. (Adjust-
ment range: F12 to R12)
3. When the adjustment is complete, press the
[A-M] button several times until the function
mode is reached.
English
DXZ535 13
Page 10

Basic Operations
English
Adjusting the Z-Enhancer Plus
1. Press the [Z+] button and select the Z-En-
hancer Plus mode to adjust.
2. Press the [A-M] button and turning the [RO-
TARY] knob clockwise adjusts in the + direction; tuning it counterclockwise adjusts in the
– direction.
● When “B-BST 0” selected, you can adjust
the bass in the range of –3 to 3.
● When “IMPACT 0” selected, you can
adjust the bass and treble in the range of
–3 to 3.
● When “EXCITE 0” selected, you can adjust
the bass and treble in the range of –3 to 3.
∗ When Z-Enhancer Plus is selected, press and
hold the [Z+] button for 2 seconds or longer to
change to the “CUSTOM” mode.
Bass/treble characteristics become flat and
the indication “Z+FLAT” is shown in the display.
Press the [Z+] button again to change to the
“Z+ OFF” mode.
Adjusting MAGNA BASS EXTEND
The MAGNA BASS EXTEND does not adjust
the low sound area like the normal sound
adjustment function, but emphasizes the deep
bass sound area to provide you with a dynamic
sound.
∗ The factory default setting is off.
1. Press and hold the [A-M] button for 1 second or longer to turn on the MAGNA BASS
EXTEND effect. “M-B EX” lights in the display.
2. Press and hold the [A-M] button for 1 second
or longer to turn off the MAGNA BASS EXTEND effect. “M-B EX” goes on in the display.
Adjusting the subwoofer
When you default select one of mode (LPF50,
LPF80, LPF120).
∗ The factory default setting is “S-VOL 0”. (Ad-
justment range: –6 to +6)
1. Press the [SW-VOL ] button to select the
subwoofer volume increases or decreases.
2. Press and hold the [SW-VOL ] button, the
subwoofer volume automatically increases or
decreases.
14 DXZ535
Radio Operations
FM reception
For enhanced FM performance the
tuner includes signal actuated stereo control,
Enhanced Multi AGC, Impulse noise reduction
curcuits and Multipath noise reduction circuits.
Changing the reception area
This unit is initially set to USA frequency intervals
of 10kHz for AM and 200kHz for FM. When using it
outside the USA, the frequency reception range
can be switched to the intervals below.
● Setting the reception area
1. Press the [BND] button and select the de-
sired radio band (FM or AM).
2. While pressing the [A-M] button and hold the
number “2” of the [DIRECT] buttons for 2
seconds or longer, the reception area
switches from inside the USA to outside the
USA.
3. While pressing the [A-M] button and hold the
number “1” of the [DIRECT] buttons for 2
seconds or longer, the reception area
switches from outside the USA to inside the
USA.
∗ Any station preset memories are lost when the
reception area is changed.
Listening to the radio
1. Press the [FNC] button and select the radio
mode. The frequency or PS appears in the
display.
∗ PS: Programme service name
2. Press the [BND] button and select the radio
band. Each time the button is pressed, the radio reception band changes in the following
order:
FM1 ➜ FM2 ➜ FM3 ➜ AM ➜ FM1...
3. Press the [a] or [d] button to tune in the
desired station.
Tuning
There are 3 types of tuning mode available, seek
tuning, manual tuning and preset tuning.
Seek tuning
1. Press the [BND] button and select the de-
sired band (FM or AM).
∗ If “MANU” is lit in the display, press and hold
the [BND] button for 1 second or longer.
“MANU” in the display goes off and seek tuning is now available.
®
Page 11

Radio Operations
2. Press the [a] or [d] button to
automatically seek a station.
When the [d] button is pressed, the station is
sought in the direction of higher frequencies; if
the [a] button is pressed, the station is sought
in the direction of lower frequencies.
Manual tuning
There are 2 ways available: Quick tuning and
step tuning.
When you are in the step tuning mode, the frequency changes one step at a time. In the quick
tuning mode, you can quickly tune the desired
frequency.
1. Press the [BND] button and select the de-
sired band (FM or AM).
∗ If “MANU” is not lit in the display, press and
hold the [BND] button for 1 second or longer.
“MANU” is lit in the display and manual tuning
is now available.
2. Tune into a station.
● Quick tuning:
Press and hold the [a] or [d] button for 1
second or longer to tune in a station.
● Step tuning:
Press the [a] or [d] button to manually
tune in a station.
Recalling a preset station
A total of 24 preset positions (6-FM1, 6-FM2, 6FM3, 6-AM) exists to store individual radio stations in memory. Pressing the corresponding
[DIRECT] button recalls the stored radio frequency automatically.
1. Press the [BND] button and select the de-
sired band (FM or AM).
2. Press the corresponding [DIRECT] button to
recall the stored station.
∗ Press and hold one of the [DIRECT] buttons
for 2 seconds or longer to store that station
into preset memory.
Manual memory
1. Select the desired station with seek tuning,
manual tuning or preset tuning.
2. Press and hold one of the [DIRECT] buttons
for 2 seconds or longer to store the current
station into preset memory.
English
Auto store
Auto store is a function for storing up to 6 stations that are automatically tuned in sequentially. If 6 receivable stations cannot be received,
a previously stored station remains
unoverwritten at the memory position.
1. Press the [BND] button and select the de-
sired band (FM or AM).
2. Press and hold the [P/A] button for 2 sec-
onds or longer. The stations with good reception are stored automatically to the preset
channels.
∗ If auto store is performed in the FM bands, the
stations are stored in FM3 even if FM1 or FM2
was chosen for storing stations.
Preset scan
Preset scan receives the stations stored in preset memory in order. This function is useful
when searching for a desired station in memory.
1. Press the [P/A] button.
2. When a desired station is tuned in, press the
[P/A] button again to continue receiving that
station.
Note:
• Be careful not to press and hold the [P/A] button
for 2 seconds or longer, otherwise the auto store
function is engaged and the unit starts storing
stations.
Instant station recall (ISR)
Instant station recall is a special radio preset
that instantly accesses a favorite radio station at
a touch of a button. The ISR function even operates with the unit in other modes.
● ISR memory
1. Select the station that you wish to store in ISR
memory.
2. Press and hold the [I] button for 2 seconds or
longer.
● Recalling a station with ISR
In any mode, press the [I] button to turn on the
radio function and tune the selected radio station. “ISR” appears in the display. Press the [I]
button again to return to the previous mode.
DXZ535 15
Page 12
CD Operations
English
Loading a CD
1. Press the [OPEN] button to access the CD
SLOT behind the FLIP DOWN PANEL.
2. Insert a CD into the centre of the CD SLOT
with the label side facing up. The CD plays
automatically after loading.
Notes:
• Never insert foreign objects into the CD SLOT.
• If the CD is not inserted easily, there may be an-
other CD in the mechanism or the unit may require service.
• Discs not bearing the or mark and
CD-ROMs cannot be played by this unit.
• Some CDs recorded in CD-R/CD-RW mode may
not be usable.
Loading 8 cm compact discs
∗ No adapter is required to play an 8 cm CD.
∗ Insert the 8 cm CD into the centre of the insertion
slot.
3. Close the FLIP DOWN PANEL.
Displaying CD titles
This unit can display title data for CD-text CDs
and user titles input with this unit.
1. Press the [D] button to display the title.
2. Each time you press and hold the [D] button
for 1 second or longer, the title display
changes in the following order:
User title (disc) ➜ CD-text title (disc) ➜ Artist
name ➜ CD-text title (track) ➜ User title
(disc)...
Note:
• If the CD playing is not a CD-text CD or no user
title has been input, “NO TITLE” appears in the
display.
Ejecting a CD
1. Press the [OPEN] button to open the FLIP
DOWN PANEL.
2. Press the [Q] to eject the CD. Take it out
from the ejected position.
3. Close the FLIP DOWN PANEL.
CAUTION
Be careful not to catch your hand or fingers
while closing the FLIP DOWN PANEL.
Notes:
• If the FLIP DOWN PANEL does not open fully,
gently open with your hand.
• After loading a CD, always close the FLIP DOWN
PANEL.
Listening to a CD already inserted
Press the [FNC] button to select the CD mode.
Play starts automatically. If no CD is loaded in
the unit, “NO DISC” appears in the display.
Pausing play
1. Press the [ ] button to pause play.
“PAUSE” appears in the display.
2. To resume CD play, press the [ ] button
again.
CAUTION
Be careful not to catch your hand or fingers
while closing the FLIP DOWN PANEL.
Notes:
• If the FLIP DOWN PANEL does not open fully,
gently open with your hand.
• After taking out the CD, be sure to close the FLIP
DOWN PANEL.
∗ If a CD (12 cm) is left in the ejected position for 15
seconds, the CD is automatically reloaded (Auto
reload).
∗ 8 cm CDs are not auto reloaded. Be sure to re-
move it when ejected.
Note:
• If you force a CD into before auto reloading, this
can damage the CD.
Selecting a track
● Track-up
1. Press the [d] button to move ahead to the
beginning of the next track.
2. Each time you press the [d] button, the
track advances ahead to the beginning of the
next track.
● Track-down
1. Press the [a] button to move back to the
beginning of the current track.
2. Press the [a] button twice to move to the
beginning of the previous track.
16 DXZ535
Page 13

CD Operations
Fast-forward/fast-backward
● Fast-forward
Press and hold the [d] button for 1 second or
longer.
● Fast-backward
Press and hold the [a] button for 1 second or
longer.
Top function
The top function resets the CD player to the first
track of the disc. Press the [BND] button to play
the first track (track No. 1) on the disc.
Scan play
The scan play locates and plays the first 10 seconds of each track on a disc automatically. This
function continues on the disc until it is cancelled.
∗ The scan play is useful when you want to select a
desired track.
1. Press the [SCN] button to start scan play.
“SCN” lights in the display.
2. To cancel the scan play, press the [SCN] but-
ton again. “SCN” goes off from the display
and the current track continues to play.
English
Repeat play
The repeat play continuously plays the current
track. This function continues automatically until
it is cancelled.
1. Press the [RPT] button. “RPT” lights in the
display and the current track is repeated.
2. To cancel the repeat play, press the [RPT]
button again. “RPT” goes off from the display
and normal play resumes.
Random play
The random play selects and plays individual
tracks on a disc in no particular order. This function continues automatically until it is cancelled.
1. Press the [RDM] button. “RDM” lights in the
display, an individual track is selected randomly and play begins.
2. To cancel the random play, press the [RDM]
button again. “RDM” goes off from the
display and normal play resumes.
DXZ535 17
Page 14

Operations Common to Each Mode
English
Setting LOW PASS FILTER
∗ The factory default setting is “LPF 120”.
1. Press and hold the [T] button for 1 second or
longer to switch to the adjustment selection
display.
2. Press the [a] or [d] button to select “SW
LPF”.
3. Turn the [ROTARY] knob clockwise or coun-
terclockwise to select the setting. Each time
you turn the [ROTARY] knob, the setting
changes in the following order:
REAR ➜ LPF 50 ➜ LPF 80 ➜ LPF 120
4. Press the [T] button to return to the previous
mode.
Dimmer control
You can setting the dimmer control on or off.
∗ The factory default setting is “ON”.
1. Press and hold the [T] button for 1 second or
longer to switch to the adjustment selection
display.
2. Press the [a] or [d] button to select “DIM-
MER”.
3. Turn the [ROTARY] knob clockwise to “ON”
or counterclockwise to “OFF”.
4. Press the [T] button to return to the previous
mode.
Adjusting the display contrast
You can adjust the display contrast to match the
angle of installation of the unit.
∗ The factory default setting is “5”. (Adjustment
level:1to 8)
1. Press and hold the [T] button for 1 second or
longer to switch to the adjustment selection
display.
2. Press the [a] or [d] button to select “CON-
TRAST”.
3. Turn the [ROTARY] knob clockwise or coun-
terclockwise to adjust the contrast.
4. Press the [T] button to return to the previous
mode.
Setting the method for title scroll
Set how to scroll in CD-TEXT or MD.
∗ The factory default setting is “ON”.
1. Press and hold the [T] button for 1 second or
2. Press the [a] or [d] button to select
3. Turn the [ROTARY] knob clockwise or coun-
4. Press the [T] button to return to the previous
AUX function
This system has an external input jack so you
can listen to sounds and music from external
devices connected to this unit.
Selecting AUX IN sensitivity
Make the following settings to select the sensitivity when sounds from external devices connected to this unit are difficult to hear even after
adjusting the volume.
∗ The factory default setting is “MID”.
1. Press and hold the [T] button for 1 second or
2. Press the [a] or [d] button to select “AUX
3. Turn the [ROTARY] knob clockwise or coun-
4. Press the [T] button to return to the previous
Setting the clock
1. Press and hold the [T] button for 1 second or
2. Press the [a] or [d] button to select
3. Press the [ ] button.
longer to switch to the adjustment selection
display.
“SCROLL”.
terclockwise and select “ON” or “OFF”.
● ON:
To scroll automatically.
● OFF:
To scroll just 1 time when the title was
changed or the title key was pressed.
mode.
longer to switch to the adjustment selection
display.
SENS”.
terclockwise as needed and select from
“HIGH”, “MID” or “LOW”.
mode.
longer to switch to the adjustment selection
display.
“CLOCK”.
18 DXZ535
Page 15
Operations Common to Each Mode
4. Press the [a] or [d] button to select the
hour or the minute.
5. Turn the [ROTARY] knob clockwise or coun-
terclockwise to set the correct time.
∗ The clock is displayed in 12-hour format.
6. Press the [ ] button to store the time into
memory.
7. Press the [T] button to return to the previous
mode.
Note:
• You cannot set the clock when it is displayed with
only the ignition on. If you drain or remove the
car’s battery or take out this unit, the clock is reset. While setting the clock, if another button or
operation is selected, the clock set mode is canceled.
Turning the screen saver function
on or off
This unit is provided with the screen saver function which allows you to show various kinds of
patterns and characters in the Operation Status
indication area of the display in a random order.
You can turn on and off this function.
If the button operation is performed with the
screen saver function on, the operation display
corresponding to the button operation is shown
for about 30 seconds and the display returns to
the screen saver display.
∗ The factory default setting is “SS”.
1. Press and hold the [T] button for 1 second or
longer to switch to the adjustment selection
display.
2. Press the [a] or [d] button to select
“SCRN SVR”.
3. Press the [ ] button.
4. Turn the [ROTARY] knob clockwise or counterclockwise to select the setting. Each time
you turn the [ROTARY] knob, the setting
changes in the following order:
OFF ➜ SS ➜ MESSAGE
5. Press the [ ] button to store the setting.
6. Press the [T] button to return to the previous
mode.
∗ The following illustration presents one of the
patterns which are shown when the screen
saver function is turned on.
English
Entering MESSAGE INFORMATION
Message up to 30 characters long can be stored
in memory and displayed for CD, CD changer
and TV stations.
* The factory default setting is “WELCOME TO
CLARION”.
1. Press and hold the [T] button for 1 second or
longer to switch to the adjustment selection
display.
2. Press the [a] or [d] button to select “IN-
PUT”.
3. Press the [ ] button.
4. Press the [a] or [d] button to move the
cursor.
5. Press the [D] button to select a character.
Each time you press the [D] button, the character changes in the following orders:
Numbers ➜ Symbols ➜ Capital letters ➜
Numbers…
6. Turn the [ROTARY] knob to select the de-
sired character.
7. Repeat step 4 to 6 to enter up to 30 characters for message.
8. Press and hold the [ ] button for 2 seconds or longer to store the message in
memory and cancel input message.
Setting the button illumination
Press the [COLOR] button to select a color
type. Each time you press the [COLOR] button,
the type changes in the following orders:
CLR SCAN ➜ RED ➜ MANDARIN ➜ ORANGE ➜ AMBER ➜ YELLOW ➜ Y-GREEN ➜
LIME ➜ GREEN ➜ D-GREEN ➜ USER ➜ CLR
SCAN…
● Setting CLR SCAN mode
As selecting “CLR SCAN”, the color automatically changes in the following orders:
CLR SCAN ➜ RED ➜ MANDARIN ➜ ORANGE ➜ AMBER ➜ YELLOW ➜ Y-GREEN ➜
LIME ➜ GREEN ➜ D-GREEN ➜ USER ➜ CLR
SCAN…
∗ The factory default setting is “CLR SCAN”.
∗ During change the color’s name not appear.
∗ After 3 second the color change to the other.
DXZ535 19
Page 16
Operations Common to Each Mode
English
● Setting USER mode
The factory default setting is “R>8 G>3”.
As selecting “USER”, press and hold the
[COLOR] button 1 second or longer “R>8 G>3”
appears in the display.
1. Press the [a] or [d] button to move the
cursor.
2. Turn the [ROTARY] knob clockwise or coun-
terclockwise to select from 0 to 8.
3. Press and hold the [ ] button for 2 seconds or longer to store the color in memory
and cancel setting mode.
Clearing titles
1. Select and play a CD in the CD changer or
tune in to a TV station for which you want to
clear the title.
2. Press the [D] button and display the sub.
3. Press the [T] button.
The display switches to the title input display.
4. Press the [BND] button.
5. Press and hold the [ ] button for 1 second or longer to clear the title and cancel title
input mode.
Entering titles
Titles up to 8 characters long can be stored in
memory and displayed for CD, CD changer and
TV stations. The number of titles that can be entered for each mode are as follows.
Mode Number of titles
CD mode 50 titles
TV mode 20 titles
CD changer mode Number of titles
CDC655z connected 60 titles
CDC655Tz connected 100 titles
CDC1255z connected 50 titles
1. Press the [FNC] button to select the mode
you want to enter a title (CD, CD changer or
TV).
2. Select and play a CD in the CD changer or
tune in to a TV station for which you want to
enter the title.
3. Press the [D] button and display the sub.
4. Press the [T] button.
5. Press the [a] or [d] button to move the
cursor.
6. Press the [D] button to select a character.
Each time you press the [D] button, the character changes in the following order:
Numbers ➜ Symbols ➜ Capital letters ➜
Numbers...
7. Turn the [ROTARY] knob to select the de-
sired character.
8. Repeat steps 5 to 7 to enter up to 8 characters for the title.
9. Press and hold the [ ] button for 2 seconds or longer to store the title into memory
and cancel title input mode.
Triggered audio mute for cellular
telepones
This unit requires special wiring to mute the audio signal automatically when a cellular telephone rings in the car.
∗ This function is not compatible with all cellular
telepones Contact your local authorized Clarion
dealer for information on proper installation and
compatibility.
20 DXZ535
Page 17
8. OPERATIONS OF ACCESSORIES
CD/MD Changer Operations
English
CD/MD changer functions
When an optional CD/MD changer is connected
through the CeNET cable, this unit controls all
CD/MD changer functions. This unit can control
a total of 2 changers.
Press the [FNC] button and select the CD(MD)
changer mode to start play. If 2 CD(MD) changers are connected, press the [FNC] button to select the CD(MD) changer for play.
∗ If “NO MAG” appears in the display, insert the maga-
zine into the CD changer. “DISC CHK” appears in
the display while the player loads (checks) the
magazine.
∗ If “NO DISC” appears in the display, eject the maga-
zine and insert discs into each slot. Then, reinsert
the magazine back into the CD changer.
∗ If “NO DISC” appears in the display, load MDs into
the MD changer.
Note:
• Some CDs recorded in CD-R/CD-RW mode may
not be usable.
CAUTION
CD-ROM discs cannot be played from every
CD changer, it’s depended on the model.
Pausing play
1. Press the [ ] button to pause play.
“PAUSE” appears in the display.
2. To resume play, press the [ ] button again.
Displaying CD titles
This unit can display title data for CD-text CDs
and user titles input with this unit.
∗ Title data for CD-text CDs can be displayed with
this unit only when it is connected to CDC655Tz.
● When connected to CDC655z or CDC1255z.
Press the [D] button to display the title.
● When connected to CDC655Tz
1. Press the [D] button to display the title.
2. Each time you press and hold the [D] button
for 1 second or longer, the title display
changes in the following order:
User title (disc) ➜ CD-tect title (disc) ➜ Artist
title ➜ CD-text title (track) ➜ User title
(disc)…
Notes:
• If the CD playing is not a CD-text CD or no user
title has been input, “NO TITLE” appears in the
display.
• If a CD-text CD is not input its disc title or a track
title, “NO TITLE” appears in the display.
Switching disc titles and track titles
(MD)
This unit can display disc titles and track titles
already entered on MDs.
∗ Titles cannot be entered for MDs with this unit.
1. Press [D] button to display the title. The disc
title or track title is displayed.
2. Each time you press and hold the [D] button
for 1 second or longer, the display toggles
between the disc title and the track title.
Note:
• If an MD is not input its disc title or a track title,
“NO TITLE” appears in the display.
Procedure to scroll a title
Set “SCROLL” to “ON” or “OFF”.
(The factory default setting is “ON”. Refer to the
subsection “Turning the screen saver function
on or off” in section “Operation common to
each mode”.)
● When set to “ON”
The title is automatically kept scrolling.
● When set to “OFF”
Press the [T] button to scroll the title.
Selecting a CD
[DN] or [UP] button correspond to a disc load in
the magazine.
Press the [DN] or [UP] button to select the
desired disc.
∗ If a CD is not loaded in a slot of magazine, “NO
DISC” appears in the display.
DXZ535 21
Page 18

CD/MD Changer Operations
English
Selecting a MD
[DN] or [UP] button correspond to a MD load in
the MD changer. Press the [DN] or [UP] button
to select the desired disc.
∗ If a MD is not loaded in a slot of MD changer, “NO
DISC” appears in the display.
Selecting a track
● Track-up
1. Press the [d] button to move ahead to the
beginning of the next track.
2. Each time you press the [d] button, the
track advances ahead to the beginning of the
next track.
● Track-down
1. Press the [a] button to move back to the
beginning of the current track.
2. Press the [a] button twice to move to the
beginning of the previous track.
Fast-forward/fast-backward
● Fast-forward
Press and hold the [d] button for 1 second or
longer.
● Fast-backward
Press and hold the [a] button for 1 second or
longer.
2. To cancel disc scan play, press the [SCN]
button again. “DISC” and “SCN” go off from
the display and the current track continues to
play.
Repeat play
Repeat play continuously plays the current
track. This function continues automatically until
it is cancelled.
1. Press the [RPT] button. “RPT” lights in the
display and the current track is repeated.
2. To cancel repeat play, press the [RPT] button
again. “RPT” goes off from the display and
normal play resumes.
Disc repeat play
After all the tracks on the current disc have
been played, disc repeat play automatically replays the current disc over from the first track.
This function continues automatically until it is
cancelled.
1. Press and hold the [RPT] button for 1 second
or longer. “DISC” and “RPT” light in the display and disc repeat play starts.
2. To cancel disc repeat play, press and hold
the [RPT] button again. “DISC” and “RPT” go
off from the display and normal play resumes
on the current track.
Scan play
Scan play locates and plays the first 10 seconds
of each track on a disc automatically. This function continues on the disc until it is cancelled.
∗ The scan play is useful when you want to select a
desired track.
1. Press the [SCN] button to start track scan-
ning. “SCN” lights in the display.
2. To cancel the scan play, press the [SCN] but-
ton again. “SCN” goes off from the display
and the current track continues to play.
Disc scan play
Disc scan play locates and plays the first 10 seconds of the first track on each disc in the currently selected CD (MD) changer. This function
continues automatically until it is cancelled.
∗ Disc scan play is useful when you want to select a
desired CD (MD).
1. Press and hold the [SCN] button for 1 sec-
ond or longer. “DISC” and “SCN” light in the
display and disc scan play starts.
22 DXZ535
Random play
Random play selects and plays individual tracks
on the disc in no particular order. This function
continues automatically until it is cancelled.
1. Press the [RDM] button. “RDM” lights in the
display and random play begins.
2. To cancel random play, press the [RDM] but-
ton again. “RDM” goes off from the display
and normal play resumes.
Disc random play
The disc random play selects and plays individual tracks or discs automatically in no particular order. This function continues automatically until it is cancelled.
1. Press and hold the [RDM] button for 1
second or longer. “DISC” and “RDM” light in
the display and disc random play starts.
2. To cancel disc random play, press and hold
the [RDM] button again. “DISC” and “RDM”
go off from the display and normal play resumes from the current track.
Page 19

TV Operations
TV tuner functions
When an optional TV tuner is connected through
the CeNET cable, this unit controls all TV tuner
functions. To watch TV requires a TV tuner and
monitor.
Watching a TV
1. Press the [FNC] button and select the TV
mode.
2. Press the [BND] button to select the desired
TV band (TV1 or TV2). Each time the button
is pressed, the input selection toggles between TV1 and TV2.
3. Press the [a] or [d] button to tune in the
desired TV station.
Watching a video
The TV tuner has a VTR input terminal to which
1 external device can be connected. Connect a
12 V video cassette player (VCP) or video cassette recorder (VCR) to the TV tuner input terminal.
1. Press the [ ] button to select VTR.
2. To return to the TV broadcast, press the
[ ] button.
Tuning
There are 3 types of tuning mode available,
Seek tuning, manual tuning and preset tuning.
Seek tuning
1. Press the [BND] button and select the de-
sired TV band (TV1 or TV2).
∗ If “MANU” is lit in the display, press and hold
the [BND] button for 1 second or longer.
“MANU” in the display goes off and seek tuning is now available.
2. Press the [a] or [d] button to automati-
cally seek a station. Press the [d] button to
automatically tune up the frequency band to
the next available TV station; press the [a]
button to automatically tune down.
English
Manual tuning
There are 2 ways available: Quick tuning and
step tuning.
When you are in the step tuning mode, the frequency changes one step at a time. In the quick
tuning mode, you can quickly tune the desired
frequency.
1. Press the [BND] button and select the de-
sired band (TV1 or TV2).
∗ If “MANU” is not lit in the display, press and
hold the [BND] button for 1 second or longer.
“MANU” lights in the display and manual tuning is now available.
2. Tune into a station.
● Quick tuning:
Press and hold the [a] or [d] button for 1
second or longer to tune in a station.
● Step tuning:
Press the [a] or [d] button to manually
tune in a station.
Recalling a preset station
A total of 12 TV stations can be stored (6-TV1
and 6-TV2). This allows you to select your favorite TV stations and store them in memory for
later recall.
1. Press the [BND] button and select the de-
sired TV band (TV1 or TV2).
2. To recall a stored TV station, press the desired [DIRECT] button to select that station.
∗ Press and hold one of the [DIRECT] buttons
for 2 seconds or longer to store the current
station into preset memory.
Manual memory
1. Select the desired station with seek tuning,
manual tuning or preset tuning.
2. Press and hold one of [DIRECT] buttons for
2 seconds or longer to store the current station into preset memory.
DXZ535 23
Page 20

TV Operations
English
Auto store
Auto store selects 6 TV stations automatically
and stores each one into preset memory.
If there are not 6 stations with good reception,
stations previously stored in memory remain
and only the strong stations are stored into
memory.
1. Press the [BND] button and select the de-
sired TV band (TV1 or TV2).
2. Press and hold the [P/A] button for 2 sec-
onds or longer. The stations with good reception are stored automatically to the preset
channels.
Preset scan
Preset scan allows the user to view each preset
position before it automatically advances to the
next preset. This function is useful for searching
for a desired TV station in memory.
1. Press the [P/A] button.
2. When the desired station is found, press the
[P/A] button again to remain tuned to that
station.
Note:
• Do not press and hold the [P/A] button for 2 sec-
onds or longer. Doing so will trigger the auto store
function and start storing stations into memory.
Setting the TV diver
You can change the reception setting for the TV
antenna connected to the TV tuner.
1. Press and hold the [T] button for 1 second
or longer to switch to the adjustment
selection display.
2. Press the [a] or [d] button to select “TV
DIVER”.
3. Turn the [ROTARY] knob clockwise to set to
“ON” or counterclockwise to set to “OFF”.
● ON:
Sets reception emphasizing the visual.
● OFF:
Sets the diver setting to OFF.
4. Press the [T] button to return to the previous
mode.
Setting the TV area
When you select the TV area (TV reception
area), the TV tuner area setting changes.
1. Press and hold the [T] button for 1 second or
longer to switch to the adjustment selection
display.
2. Press the [a] or [d] button to select “TV
AREA”.
3. Press the [ ] button.
4. Turn the [ROTARY] knob clockwise or coun-
terclockwise to select the reception area.
5. Press the [ ] button.
6. Press the [T] button to return to the previous
mode.
24 DXZ535
Page 21
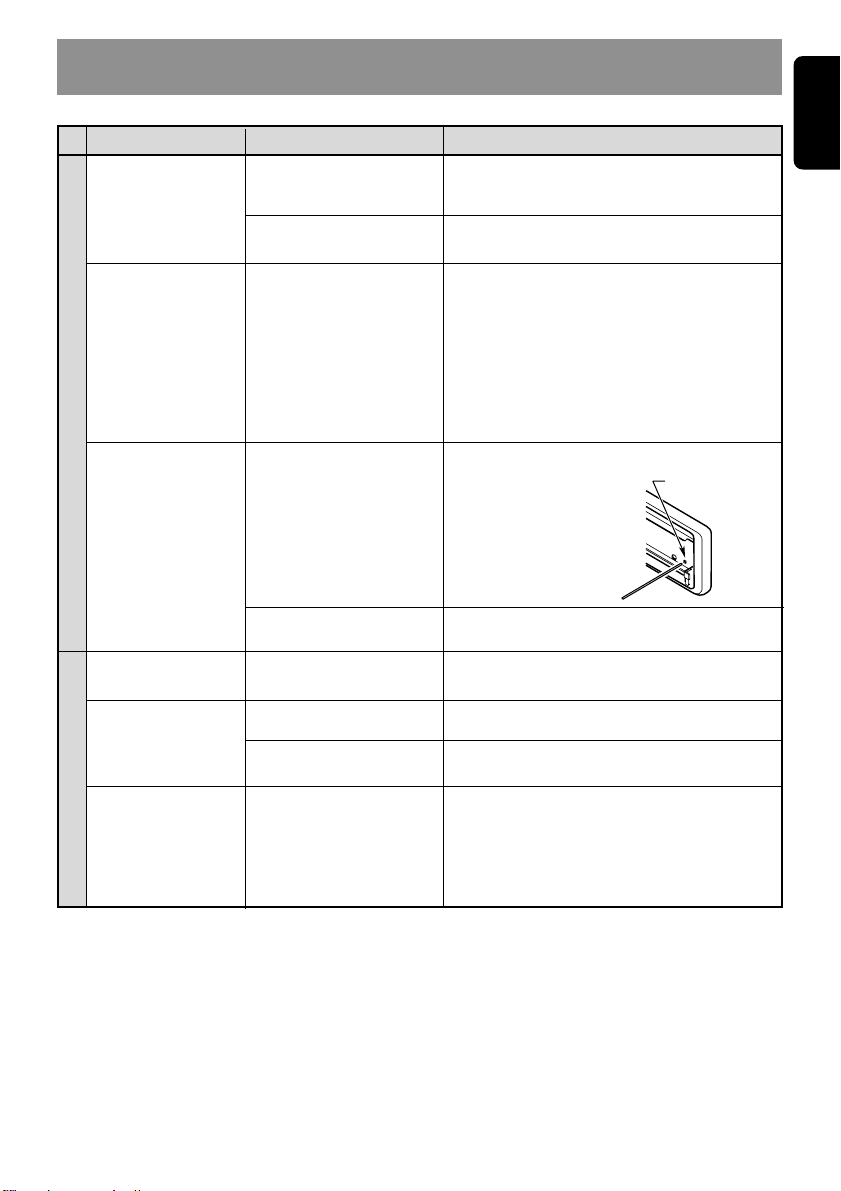
9. IN CASE OF DIFFICULTY
English
Problem
Power does not turn
on.
(No sound is produced.)
No sound output
when operating the
unit with amplifiers or
power antenna attached.
General
Nothing happens
when buttons are
pressed.
Display is not accurate.
Compact disc cannot
be loaded.
Sound skips or is noisy.
CD
Sound is bad directly
after power is turned
on.
Cause Measure
Fuse is blown.
Incorrect wiring.
Power antenna lead is shorted to ground or excessive
current is required for remote-on the amplifiers or
power antenna.
The microprocessor has
malfunctioned due to noise,
etc.
DCP or main unit connectors are dirty.
Another compact disc is already loaded.
Compact disc is dirty.
Compact disc is heavily
scratched or warped.
Water droplets may form on
the internal lens when the
car is parked in a humid
place.
Replace with a fuse of the same amperage. If
the fuse blows again, consult your store of
purchase.
Consult your store of purchase.
1. Turn the unit off.
2. Remove all wires attached to the power
antenna lead. Check each wire for a possible
short to ground using an ohm meter.
3. Turn the unit back on.
4. Reconnect each amplifier remote wire to the
power antenna lead one by one. If the
amplifiers turn off before all wires are
attached, use an external relay to provide
remote-on voltage (excessive current
required).
Turn off the power, then
press the [OPEN] button
and remove the DCP.
Press the reset button for
about 2 seconds with a
thin rod.
Wipe the dirt off with a soft cloth moistened with
cleaning alcohol.
Eject the compact disc before loading the new
one.
Clean the compact disc with a soft cloth.
Replace with a compact disc with no scratches.
Let dry for about 1 hour with the power on.
Reset button
DXZ535 25
Page 22

English
10. ERROR DISPLAYS
If an error occurs, one of the following displays is displayed.
Take the measures described below to eliminate the problem.
Error Display
ERROR 2
CD
ERROR 3
ERROR 6
ERROR 2
ERROR 3
CD changer
ERROR 6
ERROR H
ERROR 2
Cause
A CD is caught inside the CD deck and is
not ejected.
A CD cannot be played due to scratches,
etc.
A CD is loaded upside-down inside the
CD deck and does not play.
A CD inside the CD changer is not
loaded.
A CD inside the CD changer cannot be
played due to scratches, etc.
A CD inside the CD changer cannot be
played because it is loaded upside-down.
Displayed when the temperature in the
MD changer is too high and playback has
been stopped automatically.
An MD inside the MD changer is not
loaded.
Measure
This is a failure of CD deck’s mechanism
and consult your store of purchase.
Replace with a non-scratched,
non-warped-disc.
Eject the disc then reload it properly.
This is a failure of CD changer’s
mechanism and consult your store of
purchase.
Replace with a non-scratched, nonwarped disc.
Eject the disc then reload it properly.
Lower the surrounding temperature and
wait for a while to cool off MD changer.
This is a failure of MD changer’s
mechanism and consult your store of
purchase.
ERROR 3
MD changer
ERROR 6
26 DXZ535
An MD inside the MD changer cannot be
played due to scratches, etc.
An MD inside the MD changer cannot be
played because it is loaded upside-down.
Displayed when a non-recorded MD is
loaded in the MD changer.
Replace with a non-scratched, nonwarped disc.
Eject the disc then reload it properly.
Load a pre-recorded MD in the MD
changer.
Page 23

ERROR 2
ERROR 3
CauseError Display Measure
A DISC inside the DVD changer cannot be
played.
A DISC cannot be played due to scratches,
etc.
English
This is a failure of DVD mechanism and consult your store of purchase.
Retry or replace with a non-scratched, nonwarped-disc.
ERROR 6
DVD changer
ERROR P
ERROR R
A DISC inside the DVD changer cannot be
played because it is loaded upside-down.
Parental level error
Region code error
Eject the disc then reload it properly
Set the correct Parental level.
Eject the disc and replace correct region
code disc.
If an error display other than the ones described above appears, press the reset button. If the problem
persists, turn off the power and consult your store of purchase.
DXZ535 27
Page 24

English
11. SPECIFICATIONS
FM Tuner
Frequency Range:
87.9 MHz to 107.9 MHz
Usable Sensitivity:
9 dBf
50dB Quieting Sensitivity:
15 dBf
Alternate Channel Selectivity:
70 dB
Stereo Separation (1 kHz):
35 dB
Frequency Response (±3 dB):
30 Hz to 15 kHz
AM Tuner
Frequency Range:
530 kHz to 1710 kHz
Usable Sensitivity:
25 µV
CD Player
System:
Compact disc digital audio system
Usable Discs:
Compact disc
Frequency Response (±1 dB):
10 Hz to 20 kHz
Signal to Noise Ratio (1 kHz):
100 dBA
Dynamic Range (1 kHz):
95 dB
Harmonic Distortion:
0.01%
Audio
Maximum Power Output:
208 W (52 W ✕ 4 ch)
Continuous Average Power Output:
16 W ✕ 4, into 4 Ω, 20 Hz to 20 kHz, 1%THD
Bass Control Action (60 Hz):
±15 dB
Treble Control Action (10 kHz):
±12 dB
Line Output Level (CD 1 kHz):
2 V
General
Power Supply Voltage:
14.4 V DC (10.8 to 15.6 V allowable), negative
ground
Current Consumption:
Less than 15 A
Speaker Impedance:
4 Ω (4 Ω to 8 Ω allowable)
Weight / Source unit:
2.86 lb. (1.3 kg)
Weight / Remote control unit:
1 oz. (30 g) (including battery)
Dimensions / Source unit:
7" (Width) ✕ 2" (Height) ✕ 6-1/6" (Depth)
[178 (W) ✕ 50 (H) ✕ 157 (D) mm]
Dimensions / Remote control unit:
1-3/4" (Width) ✕ 4-5/16" (Height) ✕ 1-1/8"
(Depth)
[44 (W) ✕ 110 (H) ✕ 27 (D) mm]
Note:
• Specifications and design are subject to change without notice for further improvement.
28 DXZ535
Page 25

Nous vous remercions d’avoir acheté ce produit Clarion.
∗ Lisez tout le manuel de l’utilisateur avant de mettre l’appareil en service.
∗ Après avoir lu ce manuel, conservez-le dans un endroit pratique (par ex. dans la boîte à gants).
∗ Lisez le contenu de la carte de garantie jointe et conservez-la précieusement avec ce manuel.
∗ Ce mode d’emploi contient les procédures de fonctionnement du changeur de CD, du changeur de
MD, du changeur de DVD et du tuner de télévision, raccordé par le câble CeNET. Comme le
changeur de CD, le changeur de MD, le changeur de DVD et le tuner de télévision ont leur propre
mode d’emploi, aucune explication n’est donnée ici en ce qui concerne leur fonctionnement.
Table des matières
1. CARACTÉRISTIQUES .................................................................................................................. 29
2. PRÉCAUTIONS ............................................................................................................................ 30
Panneau rabattable ....................................................................................................................... 31
Manipulation des disques compacts .............................................................................................. 31
3. LES COMMANDES ......................................................................................................................... 5
4. NOMENCLATURE DES TOUCHES ............................................................................................. 32
Nom des touches et leurs fonctions ..............................................................................................32
Principales opérations des touches lorsqu'un appareil externe est raccordé à l'appareil.............. 32
Rubriques d’affichage .................................................................................................................... 34
Ecran LCD ..................................................................................................................................... 34
5. CLAVIER DE COMMANDE AMOVIBLE (DCP) ............................................................................ 35
6. TÉLÉCOMMANDE (EN OPTION) ................................................................................................. 36
Installation des piles ...................................................................................................................... 36
Fonctions des touches de la télécommande ................................................................................. 37
7. FONCTIONNEMENT ..................................................................................................................... 38
Fonctionnement de base ............................................................................................................... 38
Fonctionnement de la radio ........................................................................................................... 41
Fonctionnement des CD ................................................................................................................ 43
Opérations communes aux deux modes ....................................................................................... 45
8. FONCTIONNEMENT DES ACCESSOIRES ................................................................................. 48
Fonctionnement du changeur de CD/MD ...................................................................................... 49
Fonctionnement du téléviseur ....................................................................................................... 51
9. EN CAS DE DIFFICULTÉ ............................................................................................................. 53
10. AFFICHAGE DES ERREURS ....................................................................................................... 54
11. CARACTÉRISTIQUES TECHNIQUES ......................................................................................... 56
Français
1. CARACTÉRISTIQUES
• Tuner avec façade amovible rabattable en aluminium et afficheur LCD multi-couleur à haute visibilité
• Contrôleur de modules de tuner SIRIUS en option
• Renforceur-Z Plus pour création de sons avec 3 modes de réglage (P.EQ à 2 plages)
• CeNET avec transmission de ligne audio équilibrée et annulation dynamique du bruit
• Filtre numérique à suréchantillonnage octuple et doubles convertisseurs N/A 1 bit
DXZ535 29
Page 26

2. PRÉCAUTIONS
1. Lorsque l’habitacle de la voiture est très froid
et que le lecteur est utilisé juste après la
mise en route du chauffage, de l’humidité
Français
risque de se former sur le disque ou sur les
pièces optiques du lecteur et d’empêcher le
bon fonctionnement de la lecture. Si de
l’humidité s’est formée sur le disque,
essuyez le disque avec un chiffon doux. Si
de l’humidité s’est formée sur les pièces
optiques du lecteur, attendez environ une
heure avant d’utiliser le lecteur pour que
l’humidité puisse s’évaporer naturellement et
permettre un fonctionnement normal.
L’appareil a été testé et jugé conforme aux
limites des appareils numériques de classe B,
aux termes de la section 15 de la
Réglementation FCC.
Ces limites ont pour but d’assurer une
protection raisonnable contre les interférences
parasites dans une installation résidentielle.
Cet appareil engendre, utilise et peut émettre
une énergie radioélectrique et, s’il n’est pas
installé et utilisé en stricte conformité avec ces
instructions, il peut provoquer des interférences
parasites dans les liaisons radiophoniques. Ceci
ne garantit pas pour autant qu’une installation
particulière n’émettra aucune interférence.
Si l’appareil engendre des interférences
parasites avec la réception radio ou télévision,
ce qui pourra être déterminé en éteignant puis
en rallumant l’appareil, il est conseillé à
l’utilisateur de consulter son magasin ou un
technicien radio/télévision expérimenté.
MODEL
AM 530-1710kHz/FM 87.9 -107.9MHz
THIS DEVICE COMPLIES WITH PART 15 OF THE FCC RULES.
OPERATION IS SUBJECT TO THE FOLLOWING TWO CONDITIONS:
(1) THIS DEVICE MAY NOT CAUSE HARMFUL INTERFERENCE, AND
(2) THIS DEVICE MUST ACCEPT ANY INTERFERENCE RECEIVED,
INCLUDING INTERFERENCE THAT M AY CAUSE UNDESIRED
OPERATION.
THIS PRODUCTION COMPLIES WITH DHHS RULES 21 CFR
SUBCHAPTER J APPLICABLE AT DATE OF MANUFACTURE.
CLARION CO.,LTD.
50 KAMITODA,TODA-SHI,SAITAMA-KEN,JAPAN
MANUFACTURED:
12V GROUND
2. Une conduite sur routes mauvaises qui
provoque de fortes vibrations peut entraîner
des interruptions du son.
3. L’appareil utilise un mécanisme de précision.
Même en cas d’anomalie, n’ouvrez jamais le
coffret, ne démontez pas l’appareil et ne
lubrifiez pas les pièces rotatives.
PRÉCAUTION
L’UTILISATION DE COMMANDES ET
L’EXÉCUTION DE RÉGLAGES OU
D’OPÉRATIONS AUTRES QUE CEUX
SPÉCIFIÉS DANS CETTE BROCHURE
RISQUENT D’ENTRAÎNER UNE EXPOSITION
À UN RAYONNEMENT DANGEREUX.
LES RÉGLAGES ET RÉPARATIONS DU
LECTEUR DE DISQUES COMPACTS OU DU
LECTEUR DE MINI-DISQUES DOIVENT
ÊTRE CONFIÉS UNIQUEMENT À UN
TECHNICIEN QUALIFIÉ.
LES ALTÉRATIONS OU MODIFICATIONS
NON EXPRESSÉMENT APPROUVÉES PAR
LE FABRICANT RISQUENT DE RETIRER À
L’UTILISATEUR LE DROIT D’UTILISER
L’APPAREIL.
INFORMATIONS AUX UTILISATEURS:.
LES ALTÉRATIONS OU MODIFICATIONS
APPORTÉES À L’APPAREIL ET NON
EXPRESSÉMENT APPROUVÉES PAR LE
FABRICANT ANNULENT LA GARANTIE ET
PEUVENT CONSTITUER UNE INFRACTION À
LA RÉGLEMENTATION FCC.
SERIAL No.
PE-
30 DXZ535
Clarion Co.,Ltd.
MADE IN
Fond de l’appareil pilote
Page 27

Panneau rabattable
Cet appareil possède une structure rabattable qui rend possible l’utilisation de gros affichages.
PRÉCAUTION
Quand vous ouvrez ou que vous refermez le
PANNEAU RABATTABLE, faites attention de
ne pas vous coincer les doigts. Vous pourriez vous blesser.
1. Utilisez toujours cet appareil avec le PANNEAU RABATTABLE fermé.
2. Ne forcez pas sur l’appareil et n’utilisez pas
l’appareil anormalement quand vous ouvrez
ou que vous refermez le PANNEAU
RABATTABLE.
3. N’utilisez pas le PANNEAU RABATTABLE
comme tiroir pour y poser des objets lorsqu’il
est ouvert.
4. N’appuyez pas sur la touche [OPEN] pour
refermer le PANNEAU RABATTABLE.
5. Les heurts violents dans la section de commande ou d’affichage peuvent provoquer des
dommages ou une déformation.
6. Si le PANNEAU RABATTABLE ne s’ouvre
pas complètement, ouvrez-le délicatement
de la main.
Manipulation des disques compacts
Utilisez uniquement des disques compacts,
portant le label ou .
N’utilisez pas de disques en forme de coeur, octo-
gonale ou des disques compacts d’autres formes.
Certains modèles de CD enregistrés en mode
CD-R/CD-RW risquent de ne pas être utilisables.
Manipulation des disques
• Comparés aux CD de musique ordinaires, les
CD-R et CD-RW sont tous deux plus sensibles aux niveaux élevés de température et
d’humidité, et avec certains CD-R et CD-RW
la lecture risque de ne pas être possible.
• Les disques neufs présenteront certaines aspérités sur les bords. Avec ces disques, l’appareil peut ne pas fonctionner ou le son s’in-
terrompre. A l’aide d’un stylo-bille, etc. retirez
les aspérités sur le pourtour du disque.
Stylo-bille
• N’utilisez pas de disques compacts fortement
rayés, gondolés ou fendillés, etc. Cela provoquerait des anomalies de fonctionnement ou
des dommages.
• Pour sortir le disque compact de son étui de
rangement, appuyez sur le centre de l’étui et
soulevez le disque en le tenant délicatement
par les bords.
• N’utilisez pas de feuilles de protection de CD
en vente dans le commerce ni de disques dotés de stabilisateur, etc. Ils risquent d’endommager le disque ou de provoquer une panne
du mécanisme interne.
Rangement
• N’exposez pas les disques compacts en plein
soleil ni à une source de chaleur.
• N’exposez pas les disques compacts à une
humidité ou une poussière excessives.
• N’exposez pas les disques compacts directement à la chaleur d’un appareil de chauffage.
Français
Aspérités
• Ne collez jamais d’étiquettes sur la surface du
disque compact et n’y écrivez rien avec un
stylo ou un crayon.
• Ne lisez jamais un disque compact ayant du
ruban adhésif ou de la colle sur sa surface. Si
vous lisez ce genre de disques, vous risquez
de ne pas pouvoir le sortir du lecteur de CD
ou d’endommager le lecteur de CD.
Nettoyage
• Pour enlever les marques de doigts ou la saleté, essuyez le disque en ligne droite avec un
chiffon sec, en procédant du centre du disque
vers la périphérie.
• N’utilisez aucun type de solvant, par exemple
des produits de nettoyage, vaporisateurs antiélectricité statique ou diluant vendus dans le
commerce, pour nettoyer les disques compacts.
• Après avoir utilisé le nettoyeur de disque compact spécial, laissez le disque sécher complè-
tement avant de l’utiliser.
DXZ535 31
Page 28

4. NOMENCLATURE DES TOUCHES
Remarque:
• Lisez bien le chapitre relatif aux schémas de la façade, au chapitre “3. LES COMMANDES”, à la page 5
(dépliante).
Français
Nom des touches et leurs fonctions
Touche [OPEN]
• Appuyez à fond sur cette touche pour retirer le
panneau rabatta.
Bouton [ROTARY]
• Réglez le volume en tournant le bouton dans le
sens des aiguilles d'une montre ou dans le sens
inverse.
• Utilisez ce bouton pour effectuer différents réglages.
Touche [Z+]
• Elle permet de choisir un des quatre types de
caractéristiques sonores, déjà mémorisés.
Touche [SW-VOL]
• Elle ajuste le volume du caisson des graves. Ce
volume peut s’ajuster dans une plage de ±6.
Touche [COLOR]
• La couleur des touches passe en multicolore.
Touche [I]
• Pour rappeler une station radio ISR placée en
mémoire.
• Appuyez 2 secondes ou plus sur la touche :
Mémorisation de la station actuelle dans la
mémoire ISR (en mode radio seulement).
Touche [D]
•
Elle change l'indication d'affichage (Affichage
principal, Affichage auxiliaire, Affichage d'horloge).
Touche [T]
• Utilisez cette touche pour entrer un titre en mode
CD.
• Maintenez la touche enfoncée plus d'une
seconde pour passer au mode d'ajustage.
Touche [P/A]
•
Elle exécute l’exploration des stations préréglées
en mode radio. Si vous maintenez la touche
enfoncée, la sauvegarde automatique est effectuée.
Touches [UP], [DN]
• Pour sélectionner un disque.
Touches [DIRECT]
• Pour sauvegarder une station en mémoire ou la
rappeler directement en mode radio.
Touche [RDM]
• Elle exécute une lecture aléatoire en mode CD.
Touche [RPT]
• Elle commande la répétition de la lecture en
mode CD.
Touche [SCN]
• Elle commande une lecture à exploration de 10
secondes sur chaque plage en mode CD.
Touche [ ]
• Elle lance ou interrompt la lecture d'un CD en
mode CD.
Touches [a], [d]
• Elles sélectionnent une station en mode radio ou
une plage pendant la lecture d'un CD. Elles
servent aussi pour effectuer divers autres
réglages.
• Maintenez la touche enfoncée pendant plus
d'une seconde pour passer à l'avance rapide ou
au retour rapide.
Touche [BND]
• Pour sélectionner la gamme ou la syntonisation
à recherche ou la syntonisation manuelle en
mode radio.
• Lit la première plage en mode CD.
Touche [A-M]
• Utilisez cette touche pour passer au mode audio
(Réglage : grave/aigu, balance/fader, Z-Enhancer
Plus, Magna Bass Extended)
Touche [FNC]
• Sa poussée commande la mise sous tension.
Maintenez la touche enfoncée pendant plus
d'une seconde pour mettre l'appareil hors
tension.
• Elle change le mode de fonctionnement entre le
mode Radio, etc.
Touche [Q]
• Ejecte le CD chargé dans l'appareil.
Touche [CD SLOT]
• Fente d'insertion de CD
Principales opérations des touches lorsqu'un appareil
externe est raccordé à l'appareil
∗
● Si l'appareil raccordé est un
changeur de CD/MD/DVD
32 DXZ535
Pour les détails, voyez la section “Fonctionnement
du changeur de CD/MD”. Pour le changeur de
DVD, voyez le mode d'emploi du changeur de DVD.
Page 29

Touche [D]
• Si vous maintenez la touche enfoncée, commute
sur les titres de disque ou les titres de plage en
mode changeur de MD.
• Si vous maintenez la touche enfoncée, commute
sur les titres utilisateur ou les titres de plage, etc.
en mode changeur de CD.
Touche [T]
• Utilisez cette touche pour saisir un titre en mode
changeur CD.
• Utilisez cette touche pour faire défiler le titre
pendant la lecture de texte CD ou la lecture de
changeur MD en mode changeur MD.
Touches [UP], [DN]
• Pour sélectionner un disque.
Touche [RDM]
• Effectue une lecture aléatoire. Effectue égale-
ment une lecture aléatoire de tous les disques si
vous maintenez la touche enfoncée.
Touche [RPT]
• Effectue une lecture répétée. Effectue une lec-
ture répétée des disques si vous maintenez la
touche enfoncée.
Touche [BND]
• Permet de choisir le disque suivant dans l’ordre
croissant.
Touche [SCN]
• Lit les 10 premières secondes de chaque plage.
Effectue un balayage des disques si vous maintenez la touche enfoncée.
Touche [ ]
• Lit le CD, le MD ou le DVD ou effectue une
pause.
Touche [a], [d]
• Sélectionne une plage pendant la lecture d'un
disque.
• Maintenez pressée la touche pendant plus d’une
seconde pour sélectionner l’avance rapide ou le
retour rapide.
● Si l'appareil raccordé est un
téléviseur
∗ Pour les détails, voyez la section “Fonctionne-
ment du téléviseur”.
Touche [P/A]
•
Elle effectue l’exploration des stations préréglées
en mode TV.
Si vous maintenez la touche enfoncée, effectue
une mémorisation automatique.
Touche [ ]
• Commute sur le mode image du téléviseur ou sur
le mode image du magnétoscope (externe).
Touche [DIRECT]
• Enregistre une station dans la mémoire ou rap-
pelle la station directement.
Touche [a], [d]
• Sélectionne une station.
Touche [BND]
• Sélectionne la gamme.
• Si vous maintenez la touche enfoncée, elle
commute sur la syntonisation automatique ou la
syntonisation manuelle.
● Quand la radio satellite Sirius
est raccordée
∗ Pour les détails, voyez le mode d'emploi de la
radio satellite Sirius.
Touche [FUNC]
• Appuyez pour commuter le mode de
fonctionnement entre le mode SIRIUS, etc.
Touche [ ]
•
Effectue un balayage de catégorie en mode SIRIUS.
Lorsque vous maintenez la touche enfoncée, elle
effectue une exploration des stations préréglées.
Touche [DIRECT]
• Enregistre une station dans la mémoire ou rap-
pelle la station directement en mode SIRIUS.
Touche [a], [d]
• Appuyez sur la touche pour sélectionner une
station.
Français
Qu'est-ce que la radio satellite Sirius?
Sirius est la radio telle que vous l'avez toujours rêvée:
100 nouveaux canaux de programmes de qualité
numérique offerts à tous les auditeurs d'un bout à
l'autre du pays, par satellite. Cela représente 50
canaux de musique absolument sans aucune publicité.
Plus 50 canaux d'actualités, de sports et de
divertissement préparés par des noms comme CNBC,
Discovery, SCI-Fi Channel, A&E, House of Blues, E!,
NPR, Speedvision et ESPN.
Sirius est un divertissement vivant et dynamique,
entièrement axé sur les auditeurs. Chaque minute de
chaque jour de chaque semaine sera différente. Les 50
canaux de musique sans publicité sont créés sur les
lieux et animés par des DJ qui connaissent et qui aiment
la musique. Aimez-vous le Reggae ? Ou bien peut-être
le Rock classique ou de New rock ? Sirius possède un
vaste choix de programmes couvrant tous les goûts musicaux, y compris les grands succès des années 50, 60,
70 et 80, ainsi que du jazz, du Country, du Blues, du
pop, du rap, R&B, Bluegrass, Alternative, Classique,
Heavy Metal, Danse et bien d'autres encore...
De ses locaux de diffusion numérique à la pointe du
progrès, situés dans le Rockfeller Center (New York),
Sirius vous offre le divertissement par radio le plus
étendu et le plus profond qui soit, d'un bout à l'autre du
pays.
Sirius vous apportera des programmes de musique et
de divertissement qui n'existent tout simplement pas
sur la radio traditionnelle, sur quelque marché du pays
que ce soit. C'est une radio comme vous n'en avez
jamais entendue.
Alors, branchez-vous sur Sirius et écoutez! Pour tous
renseignements, consultez notre site "siriusradio.com".
DXZ535 33
Page 30

Rubriques d’affichage
Indication de Z-Enhancer Plus
Français
Indication stéréo
Indication de l'état de fonctionnement
Les titres, noms de station (PS), CT
(horloge), etc. sont affichés.
: Indication de disque
: Indication de balayage
: Indication de répétition
: Indication de lecture aléatoire
: Indication de radio SIRIUS
: Indication MAGNA BASS EXTEND
: Indication de catégorie
: Indication de mise en sourdine
: Indication de saisie
: Indication de fonctionnement
manuel
Indication de canal préréglé (1 à 6)
Indication de numéro de
disque (1 à 12)
Ecran LCD
Par temps très froid, les mouvements sur l’écran risquent de s’effectuer plus lentement et l’écran de
s’obscurcir. Ceci est normal. L’écran redeviendra normal lorsque la température elle aussi redeviendra
normale.
34 DXZ535
Page 31

5.
CLAVIER DE COMMANDE AMOVIBLE (DCP)
Le clavier de commande se retire, de façon à
éviter le vol. Quand vous l’enlevez, rangez-le
dans le boîtier DCP (CLAVIER DE COMMANDE
AMOVIBLE) pour le protéger des rayures.
Nous vous recommandons d’emporter le DCP
avec vous quand vous quittez votre voiture.
Retrait du CLAVIER DE
COMMANDE AMOVIBLE (DCP)
1. Maintenez pressée la touche [FNC] pendant
plus d’une seconde pour mettre l’appareil
hors tension.
2. Appuyez à fond sur la touche [OPEN] pour
déverrouiller le PANNEAU RABATTABLE.
∗ Si le PANNEAU RABATTABLE ne s’ouvre pas
complètement, ouvrez-le délicatement à la
main.
Touche [OPEN]
DCP
3. Tirez le DCP vers vous et retirez-le.
DCP
4. Refermez le VOLET DE SECURITE.
PRÉCAUTION
A des fins de sécurité, refermez bien le VOLET DE SECURITE quand vous enlevez le
CLAVIER DE COMMANDE AMOVIBLE (DCP).
Fixation du CLAVIER DE
COMMANDE AMOVIBLE (DCP)
1. Insérez le côté droit du DCP dans l’appareil
principal.
2. Insérez le côté gauche du DCP dans l’appa-
reil principal.
2.
DCP
1.
PRÉCAUTION
• Le DCP est très sensible aux chocs. Quand
vous l’enlevez, faites attention de ne pas le
faire tomber ni le heurter violemment.
• Si le PANNEAU RABATTABLE reste ouvert,
le DCP risque de tomber sous l’effet des
vibrations de la voiture, ce qui l’endomma-
gera. En conséquence, refermez le PANNEAU RABATTABLE ou retirez le DCP et
rangez-le dans son boîtier.
• Le connecteur qui raccorde l’appareil pi-
lote au DCP est une pièce extrêmement importante. Faites attention de ne pas l’abî-
mer en appuyant dessus avec les ongles,
un tournevis, etc.
Remarque:
• Si le DCP est sale, enlevez la saleté uniquement
avec un chiffon doux et sec.
Français
VOLET DE SECURITE
DXZ535 35
Page 32

5. TÉLÉCOMMANDE (EN OPTION)
Récepteur de télécommande
Français
Rayon d’action: 30° dans toutes les
directions
Emetteur de signal
Télécommande
[
] [
[
[
[
SCN
FUNC
],[ ]
[
ISR
MUTE
[
RPT
]
]
]
]
DUAL ZONE
[
]
[
],[ ]
[
]
BAND
[
]
DISP
[
]
RDM
]
Installation des piles
1. Retournez la télécommande à l’envers, puis
poussez le couvercle arrière dans le sens de la
flèche.
2. Insérez les piles AA (SUM-3, IECR-6/1,5 V)
fournies avec la télécommande dans le sens
indiqué sur la figure, puis refermez le couvercle
arrière.
Remarques:
Une utilisation incorrecte des piles risque de les
faire exploser. Notez les points suivants:
• Quand vous remplacez les piles, remplacez bien
les deux piles en même temps.
• Ne court-circuitez pas, ne démontez pas et ne
chauffez pas les piles.
• Ne jetez pas les piles au feu.
36 DXZ535
Piles AA
(SUM-3, IECR-6/1,5 V)
Couvercle arrière
Dos
Page 33

Fonctions des touches de la télécommande
Mode
Touche
[FUNC]
[BAND]
[ ] , [ ]
[ ] , [ ]
[ ]
[MUTE]
[ISR]
[DISP]
[SCN]
Radio
Pour sélectionner la radio, le tuner SIRIUS, le changeur CD, CD/MD, le changeur DVD, le
téléviseur ou la fonction auxiliaire (AUX).
Sélection de la
gamme de réception.
Augmentation et diminution du volume (tous les modes).
Balayage ascendant/descendant des
canaux préréglés.
Sans fonction.
Mise en/hors service du silencieux.
Rappel d’une station de radio ISR placée en mémoire.
Pression de plus de 2 secondes : Préréglage de la station actuelle dans la mémoire ISR.
Fait passer entre l'affichage principal, l'affichage auxiliaire et l'affichage d'horloge.
Balayage des
stations préréglées.
Pression de 2
secondes:
Préréglage
automatique des
stations.
Lecture de la
première plage.
Lecture TOP.
CD
Sélection ascendante/descendante des
plages.
Pression de plus de 1 seconde: Avance
rapide/retour rapide.
Commutation entre la lecture et la pause.
Lecture des
introductions.
Changeur de CD/MD
Changeur de DVD
Saut au disque
suivant dans l’ordre
croissant.
Lecture des
introductions.
Pression de plus de
1 seconde:
Balayage de tous les
disques.
Téléviseur
Sélection de la
gamme de réception.
Balayage ascendant/descendant des
canaux préréglés.
Sans fonction.
Balayage des
stations préréglées.
Pression de 2
secondes:
Préréglage
automatique des
stations.
Français
[RPT]
[RDM]
∗
Certaines des touches correspondantes de l’appareil principal et de la télécommande ont des fonctions
différentes.
∗ La touche [DUAL ZONE] n’est pas disponible.
Sans fonction.
Sans fonction.
Lecture répétée.
Lecture aléatoire.
Lecture répétée.
Pression de plus de
1 seconde:
Lecture répétée de
tous les disques.
Lecture aléatoire.
Pression de plus de
1 seconde:
Lecture aléatoire de
tous les disques.
Sans fonction.
Commute
alternativement entre
la télévision (TV) et le
magnétoscope
(VTR).
DXZ535 37
Page 34

7. FONCTIONNEMENT
Fonctionnement de base
Français
Réglez bien le volume au minimum avant de
mettre l’appareil hors tension. Un son puissant au moment de la mise sous tension risque d’abîmer les tympans et d’endommager
l’appareil. Si vous mettez l’appareil hors tension avec le volume réglé à un niveau élevé
et que vous remettez l’appareil sous tension,
l’augmentation brusque du volume risque de
vous abîmer les tympans et d’endommager
l’appareil.
Mise sous/hors tension
Remarque:
• Faites attention si l’appareil fonctionne pendant
longtemps sans que le moteur de la voiture ne
tourne. Si la batterie se décharge, vous ne pourrez plus démarrer le moteur et vous risquez de
raccourcir la durée de vie de la batterie.
1. Appuyez sur la touche [FNC].
2. L’éclairage et l’afficheur de l’appareil s’allu-
ment. L’appareil se souvient du dernier mode
de fonctionnement et il commute automatiquement sur ce mode.
3. Maintenez la touche [FNC] enfoncé pendant
1 seconde ou plus pour mettre l’appareil hors
tension.
Remarque:
• Vérification du système
La première fois que vous mettez l’appareil sous
tension après avoir effectué les raccordements,
vous devez vérifier s’il est bien raccordé. Quand
l’appareil est sous tension et que “SYSTEM” et
“PUSH PWR” s’allument alternativement sur l’afficheur, appuyez sur
du système démarre. Quand la vérification du
système est terminée, appuyez de nouveau sur la
touche [FNC].
Sélection du mode
1. Appuyez sur la touche [FNC] pour changer
de mode de fonctionnement.
2. Chaque fois que vous appuyez sur la touche
[FNC], le mode de fonctionnement change
dans l’ordre suivant:
Mode Radio ➜ Mode SIRIUS ➜ Mode CD ➜
Mode Changeur CD ➜ Mode Changeur MD
➜ Mode Changeur DVD ➜ Mode Téléviseur
➜ Mode AUX ➜ Mode Radio ...
PRÉCAUTION
la touche
[FNC]. La vérification
Remarque: Lisez bien ce chapitre en vous référant aux schémas de la façade,
au chapitre “3. LES COMMANDES”, à la page 5 (dépliante).
∗ Les appareils externes non raccordés via la
liaison CeNET ne sont pas affichés.
Réglage du volume
Tournez le bouton [ROTARY] dans le sens des
aiguilles d'une montre pour augmenter le volume; tournez-le dans le sens inverse pour diminuer le volume.
∗ Le niveau de volume se règle entre 0 (minimum) et
33 (maximum).
Sélection de l’affichage
Appuyez sur la touche [D] pour sélectionner l’affi-
chage.
Chaque fois que vous appuyez sur la touche [D],
l’affichage change dans l’ordre suivant:
Affichage principal
Affichage auxiliaire
Affichage de l'horloge
Affichage principal
∗ Une fois sélectionné, votre affichage favori de-
vient l’affichage par défaut. Quand vous réglez
une fonction, par exemple le volume, l’écran
passe momentanément à l’affichage de la
fonction en question, puis il revient à votre affichage favori quelques secondes après le
réglage.
∗ Si vous avez saisi un titre pour un CD, il
apparaît sur l’affichage auxiliaire. Si aucun
titre n’a été saisi, le message “NO TITLE”
(pas de titre), apparaît sur l’affichage de titre.
Pour les détails sur la façon d'entrer les titres,
voyez la sous-section “Entrée de titres” dans
la section “Opérations communes aux deux
modes”.
38 DXZ535
Page 35

Fonctionnement de base
Réglage de la fonction Z-Enhancer
Plus
L’appareil possède 4 types d’effets de tonalité
enregistrés en mémoire. Sélectionnez celui de
votre choix.
∗ Le réglage usine est “Z+ OFF” (personnalisé utili-
sateur).
Chaque fois que vous appuyez sur la touche
[Z+], l’effet de tonalité change dans l’ordre suivant:
“Z+ OFF” ➜ “B-BOOST” ➜ “IMPACT” ➜
“EXCITE” ➜ “CUSTOM” ➜ “Z+ OFF” ...
• B-BOOST : Graves accentués
• IMPACT : Graves et aigus accentués
• EXCITE : Graves et aigus accen-
• CUSTOM : Réglage personnalisé utili-
• Z+ OFF : Pas d’effet sonore
tués, à moitié
désaccentués
sateur
Réglage de la tonalité
Appuyez sur la touche [A-M] et sélectionnez la
rubrique à régler. Chaque fois que vous appuyez sur la touche [A-M], la rubrique change
dans l’ordre suivant:
●
Si vous réglez “B-BOOST”
“B-BOOST” ➜ “BAL 0” ➜ “FAD 0” ➜
Dernier mode de fonction
●
Si vous réglez “IMPACT”
“IMPACT” ➜ “BAL 0” ➜ “FAD 0” ➜ Dernier
mode de fonction
●
Si vous réglez “EXCITE”
“EXCITE” ➜ “BAL 0” ➜ “FAD 0” ➜ Dernier
mode de fonction
●
Si vous réglez “CUSTOM”
“BASS” ➜ “TREBLE” ➜ “BAL 0” ➜ “FAD
0” ➜ Dernier mode de fonction
●
Si vous réglez “Z+ OFF”
“BAL 0” ➜ “FAD 0” ➜ Dernier mode de
fonction
Ajustement des graves
(Gain, Fréquence, courbe Q)
Cet ajustement peut être réalisé quand la fonction Z-Enhancer Plus est réglé sur “CUSTOM”.
1. Appuyez sur la touche [A-M] et sélectionnez
“BASS”.
2. Tournez le bouton [ROTARY] dans le sens
des aiguilles d’une montre pour accentuer
les graves, ou dans le sens inverse pour atténuer les graves.
∗ Le réglage par défaut est “B<G 0>”. (Plage de
réglage: -6 à +6)
3. Appuyez sur la touche [d] ou [a] pour
choisir “B<F 60>”.
Tournez le bouton [ROTARY] dans le sens
des aiguilles d’une montre ou dans le sens
contraire pour sélectionner la fréquence.
∗ Le réglage par défaut de l’usine est “B<F
60>”. (Ajustement 60/100/200 Hz)
4. Appuyez sur la touche [d] ou [a] pour
choisir “B<Q 1>”.
Tournez le bouton [ROTARY] dans le sens
des aiguilles d’une montre ou dans le sens
contraire pour sélectionner la courbe Q.
∗ Le réglage par défaut de l’usine est “B<Q 1>”.
(Ajustement 1/1.25/1.5/2)
5. Quand le réglage est terminé, appuyez plu-
sieurs fois de suite sur la touche [A-M] jusqu’à ce que vous obteniez le mode de fonctionnement voulu.
Ajustement des aigus
(Gain, Fréquence)
Cet ajustement peut être réalisé quand la fonction Z-Enhancer Plus est réglé sur “CUSTOM”.
1. Appuyez sur la touche [A-M] et sélectionnez
“TREBLE”.
2. Tournez le bouton [ROTARY] dans le sens
des aiguilles d’une montre pour accentuer
les aigus, ou dans le sens inverse pour atté-
nuer les aigus.
∗ Le réglage par défaut est “T<G 0>”. (Plage de
réglage: –6 à +6)
3. Appuyez sur la touche [d] ou [a] pour
choisir “T<F 10>”.
Tournez le bouton [ROTARY] dans le sens
des aiguilles d’une montre ou dans le sens
contraire pour sélectionner la fréquence.
∗ Le réglage par défaut de l’usine est “T<F 10>”.
(Ajustement 10 kHz/15 kHz)
4. Quand le réglage est terminé, appuyez plu-
sieurs fois de suite sur la touche [A-M] jusqu’à ce que vous obteniez le mode de fonctionnement voulu.
Français
DXZ535 39
Page 36

Fonctionnement de base
Réglage de la balance gauchedroite
1. Appuyez sur la touche [A-M] et sélectionnez
“BAL 0”.
Français
2. Tournez le bouton [ROTARY] dans le sens
des aiguilles d’une montre pour augmenter le
son de l’enceinte droite; et tournez-le dans le
sens inverse pour accentuer le son de
l’enceinte gauche.
∗ Le réglage par défaut est “BAL 0”. (Plage de
réglage: L13 à R13)
3. Quand le réglage est terminé, appuyez plu-
sieurs fois de suite sur la touche [A-M] jusqu’à ce que vous obteniez le mode de fonctionnement voulu.
Réglage de la balance avant-arrière
1. Appuyez sur la touche [A-M] et sélectionnez
“FAD 0”.
2. Tournez le bouton [ROTARY] dans le sens
des aiguilles d’une montre pour accentuer le
son des enceintes avant, et tournez-le dans
le sens inverse pour accentuer le son des
enceintes arrière.
∗ Le réglage par défaut est “FAD 0”. (Plage de
réglage: F12 à R12)
3. Quand le réglage est terminé, appuyez plu-
sieurs fois de suite sur la touche [A-M] jusqu’à ce que vous obteniez le mode de fonctionnement voulu.
Ajustement de la fonction ZEnhancer Plus
1. Appuyez sur la touche [Z+] et choisissez le
mode Z-Enhancer Plus à ajuster.
2. Appuyez sur la touche [A-M] et tournez le
bouton [ROTARY] dans le sens des aiguilles
d’une montre pour ajuster dans la direction +
ou tournez dans le sens contraire des
aiguilles d’une montre pour ajuster dans la
direction –.
● Quand “B-BST 0” est sélectionné, vous
pouvez ajuster les graves dans une plage
de –3 à 3.
● Quand “IMPACT 0” est choisi, vous
pouvez ajuster les graves et les aigus dans
une plage de –3 à 3.
● Quand “EXCITE 0” est sélectionné, vous
pouvez ajuster les graves et les aigus dans
une plage de –3 à 3.
∗ Quand la fonction Z-Enhancer Plus est sélec-
tionnée, maintenez la touche [Z+] enfoncée
pendant 2 secondes ou plus pour sélectionner
le mode “CUSTOM”.
Les caractéristiques des graves/aigus deviennent plates et l’indication “Z+FLAT” apparaît
sur l’affichage.
Appuyez de nouveau sur la touche [Z+] pour
revenir sur le mode “Z+OFF”.
Réglage MAGNA BASS EXTEND
La commande MAGNA BASS EXTEND n'ajuste
pas la plage des sons graves comme la fonction
d'ajustement des sons normaux, mais elle
accentue la plage des sons graves profonds
pour fourni un son plus dynamique.
∗ Le réglage usine par défaut est la mise hors
service.
1. Appuyez sur la touche [A-M] pendant plus
d’une seconde pour activer l’effet MAGNA
BASS EXTEND. L’indication “M-B EX”
apparaît sur l’affichage.
2. Appuyez sur la touche [A-M] pendant plus
d’une seconde pour désactiver l’effet
MAGNA BASS EXTEND. L’indication “M-B
EX” disparaît de l’affichage.
Réglage du caisson des graves
Lorsque vous choisissez par défaut un des
modes (LPF50, LPF80, LPF120).
∗ Le réglage usine par défaut est “S-VOL 0”.
(Plage de réglage : de –6 à +6)
1. Appuyez sur la touche [SW-VOL ] pour
faire augmenter ou diminuer le volume du
caisson des graves.
2. Appuyez sur la touche [SW-VOL ] pendant
plus d’une seconde pour faire augmenter ou
diminuer automatiquement le volume du
caisson des graves.
40 DXZ535
Page 37

Fonctionnement de la radio
Réception FM
Pour accroître les performances FM, le tuner
déclenchée par signal, le Multi AGC renforcé, des
circuits de réduction de bruit d’impulsion et des circuits de réduction de bruit à trajets multiples.
®
incorpore une commande stéréo
Changement de la zone de
réception
Originellement, l’appareil est réglé aux intervalles
de fréquence américains de 10kHz pour la AM et
de 200kHz pour la FM. Si vous l’utilisez en dehors
des Etats-Unis, vous devrez régler la plage de ré-
ception de fréquence aux intervalles ci-dessous.
● Réglage de la région de réception
1. Appuyez sur la touche [BND] pour
sélectionner la bande de fréquence (FM ou
AM) souhaitée.
2. En appuyant sur la touche [A-M] et en
maintenant le numéro “2” de la touche
[DIRECT] enfoncé pendant plus de 2
secondes, la région de réception change de
l’intérieur à l’extérieur des États-Unis.
3. En appuyant sur la touche [A-M] et en
maintenant le numéro “1” de la touche
[DIRECT] enfoncé pendant plus de 2
secondes, la région de réception change de
l’extérieur à l’intérieur des États-Unis.
∗ Toutes les stations radio préréglées en
mémoire sont perdues lorsque la région de
réception est changée.
Ecoute de la radio
1. Appuyez sur la touche [FNC] et sélectionnez
le mode radio. La fréquence ou PS apparaît
sur l’afficheur.
∗ PS: Nom de service de programme
2. Appuyez sur la touche [BND] et sélectionnez
la gamme. Chaque fois que vous appuyez sur
la touche, la gamme de réception radio
change dans l’ordre suivant:
FM1 ➜ FM2 ➜ FM3 ➜ AM (PO/GO) ➜ FM1...
3. Appuyez sur la touche [a] ou [d] pour ac-
corder la station.
Syntonisation
Il existe 3 modes de syntonisation au choix: la
syntonisation automatique, la syntonisation
manuelle, et la syntonisation des stations
préréglées.
Syntonisation automatique
1. Appuyez sur la touche [BND] et sélectionnez
la gamme (FM ou AM).
∗ Si “MANU” est allumé sur l’afficheur, mainte-
nez la touche [BND] enfoncée pendant 1 seconde ou plus. “MANU” s’éteint sur l’afficheur
et la syntonisation automatique est possible.
2. Appuyez sur la touche [a] ou [d] pour
syntoniser automatiquement la station.
Si vous appuyez sur la touche [d], la station
est recherchée vers le haut de la plage de fré-
quence; si vous appuyez sur la touche [a],
elle est recherchée vers le bas de la plage de
fréquence.
Accord manuel
Il existe 2 méthodes au choix: l’accord rapide, et
l’accord par paliers.
En mode d’accord par palier, le canal est recherché palier par paliers; en mode d’accord rapide, le canal est recherché rapidement.
1. Appuyez sur la touche [BND] et sélectionnez
la gamme (FM ou AM).
∗ Si “MANU” n’est pas allumé sur l’afficheur,
maintenez la touche [BND] enfoncée pendant
1 seconde ou plus. “MANU” s’allume et la
syntonisation manuelle est possible.
2. Accordez la station.
● Accord rapide:
Maintenez la touche [a] ou [d] enfoncée
pendant 1 seconde ou plus pour accorder la
station.
● Accord par paliers:
Appuyez sur la touche [a] ou [d] pour accorder la station manuellement.
Français
DXZ535 41
Page 38

Fonctionnement de la radio
Rappel d’une station préréglée
Il est possible de mémoriser jusqu’à 24 stations
(6 FM1, 6 FM2, 6 FM3 et 6 AM) sur les 24
adresses mémoires. Appuyez sur la touche de
[DIRECT] correspondante pour rappeler auto-
Français
matiquement la station.
1. Appuyez sur la touche [BND] et sélectionnez
la gamme (FM ou AM).
2. Appuyez sur la touche de [DIRECT] correspondante pour rappeler la station mémorisée.
∗ Maintenez l’une des touches de [DIRECT] en-
foncée pendant 2 secondes ou plus pour mémoriser la station en cours de réception.
Mémorisation manuelle
1. Sélectionnez la station par accord automati-
que, accord manuel ou accord des stations
préréglées.
2. Maintenez l’une des touches de [DIRECT]
enfoncée pendant 2 secondes ou plus pour
mémoriser la station en cours de réception.
Mémorisation automatique
Le préréglage automatique des stations est une
fonction qui permet de mémoriser automatiquement un maximum de 6 stations les unes après
les autres. Les stations préalablement mémori-
sées ne sont pas recouvertes dans l’adresse
mémoire s’il n’est pas possible de capter 6 stations puissantes.
1. Appuyez sur la touche [BND] et sélectionnez
la gamme (FM ou AM).
2. Maintenez la touche [P/A] enfoncée pendant
2 secondes ou plus. Les stations offrant une
bonne sensibilité de réception sont automatiquement mémorisées sur les canaux de
préréglage.
∗ Quand vous effectuez un préréglage automati-
que dans les gammes FM, les stations sont
enregistrées dans FM3 même si vous avez
choisi FM1 ou FM2 pour la mémorisation.
Balayage des stations préréglées
Cette fonction permet de balayer les adresses
mémoires l’une après l’autre dans l’ordre. Ceci
est pratique pour rechercher une station donnée.
1. Appuyez sur la touche [P/A].
2. Lorsque la station voulue est accordée, ap-
puyez à nouveau sur la touche [P/A] pour
continuer à recevoir la station.
Remarque:
• Faites attention de ne pas maintenir la touche
[P/A] enfoncée pendant 2 secondes ou plus, car
la fonction de préréglage automatique des stations entrerait en service et l’appareil commencerait à mémoriser les stations.
Rappel instantané des stations (ISR)
Le rappel instantané des stations est un préré-
glage spécial de la radio qui donne accès
instantanémentà la station voulue sur simple
pression d’une touche. La fonction ISR est
opérationnelle même si l’appareil est dans un
autre mode.
● Mémoire ISR
1. Sélectionnez la station que vous voulez en-
registrer dans la mémoire ISR.
2. Maintenez la touche [I] enfoncée pendant 2
secondes ou plus.
● Rappel d’une station avec la fonction ISR
Appuyez sur la touche [I] dans n’importe quel
mode. “ISR” s’allume sur l’afficheur, le mode radio est activé et la station est sélectionnée. Appuyez à nouveau sur la touche [I] pour revenir
au mode précédent.
42 DXZ535
Page 39

Fonctionnement des CD
Chargement d’un CD
1. Appuyez sur la touche [OPEN] pour accéder
à la CD SLOT (Fente à CD) qui se trouve
derrière la PANNEAU RABATTABLE.
2. Insérez un CD au centre de la CD SLOT
(Fente à CD) avec la face imprimée dirigée
vers le haut. La lecture du CD démarre
automatiquement après le chargement.
Remarques:
• N’insérez jamais d’objets étrangers dans la CD
SLOT (Fente à CD).
• Si le disque ne rentre pas facilement, il se peut
qu’il y ait déjà un disque dans le mécanisme, ou
que l’appareil ait besoin d’être réparé.
• Les disques, ne portant pas le label ou
, et les CD-ROM ne peuvent pas être lus
sur cet appareil.
• Certains modèles de CD enregistrés en mode
CD-R/CD-RW risquent de ne pas être utilisables.
Chargement des disques de 8 cm
∗ Vous n’avez pas besoin d’adaptateur pour lire les
disques de 8 cm.
∗ Insérez les disques de 8 cm au centre de la fente
d’insertion.
3. Refermez le PANNEAU RABATTABLE.
PRÉCAUTION
Faites attention de ne pas vous coincer la
main ou les doigts pendant la fermeture du
PANNEAU RABATTABLE.
Remarques:
• Si le PANNEAU RABATTABLE ne s’ouvre pas
complètement, ouvrez-le délicatement à la main.
• Refermez toujours le PANNEAU RABATTABLE
après avoir chargé un disque.
Lecture d’un disque déjà chargé
Appuyez sur la touche [FNC] pour sélectionner
le mode CD. La lecture commence automatiquement. S’il n’y a pas de disque dans l’appareil,
“NO DISC” (pas de disque) apparaît sur l’afficheur.
Pause de la lecture
1. Appuyez sur la touche de [ ] pour interrompre momentanément la lecture. “PAUSE”
apparaît sur l’afficheur.
2. Pour reprendre la lecture, appuyez à nou-
veau sur la touche de [ ].
Affichage des titres de CD
L’appareil est capable d’afficher les données de
titre des CD-texte et les titres entrés par l’utilisa-
teur.
1. Appuyez sur la touche [D] pour afficher le ti-
tre.
2. Chaque fois que vous maintenez la touche
[D] enfoncée pendant 1 seconde ou plus,
l’affichage du titre change dans l’ordre suivant:
Titre utilisateur (disque) ➜ Titre de CD-texte
(disque) ➜ Nom de l’artiste ➜ Titre de CDtexte (plage) ➜ Titre utilisateur (disque)...
Remarque:
• Si le CD en cours de lecture n’est pas un CD-
texte ou si vous n’avez pas entré de titre pour le
CD, “NO TITLE” apparaît sur l’afficheur.
Ejection d’un CD
1. Appuyez sur la touche [OPEN] pour ouvrir le
PANNEAU RABATTABLE.
2. Appuyez sur la touche [Q] pour éjecter le
disque. Le disque s’éjecte. Sortez-le.
3. Refermez le PANNEAU RABATTABLE.
PRÉCAUTION
Faites attention de ne pas vous coincer la
main ou les doigts pendant la fermeture du
PANNEAU RABATTABLE.
Remarques:
• Si le PANNEAU RABATTABLE ne s’ouvre pas
complètement, ouvrez-le délicatement à la main.
• Pensez bien à refermer le PANNEAU
RABATTABLE après avoir sorti le disque.
∗ Si le disque (12 cm) reste en position éjectée pen-
dant 15 secondes, il se recharge automatiquement
(Rechargement automatique).
∗ Les disques de 8 cm ne sont pas automatiquement
rechargés. Retirez-les bien après l’éjection.
Remarque:
• Si vous insérez un disque de force avant le
rechargement automatique, vous risquez d’en-
dommager le disque.
Français
DXZ535 43
Page 40

Fonctionnement des CD
Sélection d’une plage
● Plage suivante
1. Appuyez sur la touche [d] pour aller au dé-
but de la plage suivante.
Français
2. Chaque fois que vous appuyez sur la touche
[d], la plage avance jusqu’au début de la
plage suivante.
● Plage précédente
1. Appuyez sur la touche [a] pour aller au dé-
but de la plage actuelle.
2. Appuyez deux fois sur la touche [a] pour
aller au début de la plage précédente.
Avance rapide/retour rapide
● Avance rapide:
Maintenez la touche [d] enfoncée pendant 1
seconde ou plus.
● Retour rapide:
Maintenez la touche [a] enfoncée pendant 1
seconde ou plus.
Fonction de lecture de la première
plage (TOP)
La fonction Top ramène le lecteur CD à la première plage du disque. Appuyez sur la touche
[BND] pour lire la première plage (plage No. 1)
du disque.
Lecture répétée
La lecture répétée permet de lire la plage sé-
lectionnée de façon répétée. Cette fonction se
poursuit automatiquement jusqu’à ce que vous
l’annuliez.
1. Appuyez sur la touche [RPT] pour démarrer
la lecture des introductions de plage. “RPT”
s’allume sur l’afficheur et la plage en cours
est répétée.
2. Pour annuler la lecture répétée, appuyez à
nouveau sur la touche [RPT]. “RPT” s’éteint
sur l’afficheur et la lecture normale reprend.
Lecture aléatoire
La lecture aléatoire permet de lire toutes les plages d’un disque en cours dans un ordre au hasard. Cette fonction se poursuit automatiquement
jusqu’à ce que vous l’annuliez.
1. Appuyez sur la touche [RDM]. “RDM” s’allume sur l’afficheur, une plage est sélectionnée au hasard et sa lecture démarre.
2. Pour annuler la lecture aléatoire, appuyez à
nouveau sur la touche [RDM]. “RDM”
s’éteint sur l’afficheur et la lecture normale
reprend.
Lecture des introductions
La lecture des introductions recherche et lit
automatiquement les 10 premières secondes de
chacune des plages du disque. Cette fonction
se poursuit sur tout le disque jusqu’à ce que
vous l’annuliez.
∗ La lecture des introductions est très utile pour
rechercher la plage de votre choix.
1. Appuyez sur la touche [SCN] pour démarrer
la lecture des introductions de plage. “SCN”
s’allume sur l’afficheur.
2. Pour annuler la lecture des introductions,
appuyez à nouveau sur la touche [SCN].
“SCN” s’éteint sur l’afficheur et la lecture de
la plage en cours continue.
44 DXZ535
Page 41

Opérations communes aux deux modes
Réglage du filtre passe-bas (LOW
PASS FILTER)
∗ Le réglage par défaut est “LPF 120”.
1. Maintenez la touche [T] enfoncée pendant
plus d’une minute pour passer à l’affichage
de sélection d’ajustement.
2. Appuyez sur la touche [a] ou [d] pour
sélectionner “SW LPF”.
3. Tournez le bouton [ROTARY] dans le sens
horaire ou antihoraire pour sélectionner le
réglage. A chaque rotation du bouton [RO-
TARY], le réglage change dans l’ordre
suivant :
REAR (arrière) ➜ LPF 50 ➜ LPF 80 ➜
LPF 120
4. Appuyez sur la touche [T] pour revenir au
mode précédent.
Commande d’atténuateur
Vous pouvez mettre la commande d’atténuateur
en ou hors service.
∗ Le réglage usine est “ON”.
1. Maintenez la touche [T] enfoncée pendant 1
seconde ou plus pour passer à l’affichage de
sélection de réglage.
2. Appuyez sur la touche [a] ou [d] pour sé-
lectionner “DIMMER”.
3. Tournez le bouton [ROTARY] dans le sens
des aiguilles d’une montre pour la mise en
service (“ON”) ou dans le sens inverse pour
la mise en service ( “OFF”).
4. Appuyez sur la touche [T] pour revenir au
mode précédent.
Réglage du contraste de l’affichage
Vous pouvez ajuster le contraste de l’affichage
pour convenir à l’angle de l’installation de
l’appareil.
∗ Le réglage usine par défaut est “5”. (Niveau de
réglage : de 1 à 8)
1. Appuyez sur la touche [T] pendant une
seconde ou plus pour passer à l’affichage de
sélection de réglage.
2. Appuyez sur la touche [a] ou [d] pour
sélectionner “CONTRAST”.
3. Tournez le bouton [ROTARY] dans le sens
des aiguilles ou dans le sens contraire pour
ajuster le contraste.
4. Appuyez sur la touche [T] pour revenir au
mode antérieur.
Réglage de la méthode de
défilement du titre
Réglez la méthode de défilement dans CDTEXT ou MD.
∗ Le réglage usine est “ON” (activé).
1. Maintenez la touche [T] enfoncée pendant 1
seconde ou plus pour passer à l’affichage de
sélection de réglage.
2. Appuyez sur la touche [a] ou [d] et sélec-
tionnez “SCROLL”.
3. Tournez le bouton [ROTARY] dans le sens
des aiguilles d’une montre ou dans le sens
inverse pour sélectionner “ON” ou “OFF”.
● ON:
Pour défiler automatiquement.
● OFF:
Pour défiler juste une fois lorsque le titre change
ou que vous appuyez sur la touche de titre.
4. Appuyez sur la touche [T] pour revenir au
mode précédent.
Fonction AUX
Cette chaîne possède une prise d’entrée externe, ce qui vous permet d’écouter les sons et
la musique d’un appareil externe raccordé à la
chaîne.
Sélection de la sensibilité d’entrée
auxiliaire (AUX IN)
Effectuez les réglages suivants pour sélection-
ner la sensibilité si les sons de l’appareil externe
raccordé à la chaîne sont difficiles à entendre
même en réglant le volume.
∗ Le réglage usine est “MID”.
1. Maintenez la touche [T] enfoncée pendant 1
seconde ou plus pour passer à l’affichage de
sélection de réglage.
2. Appuyez sur la touche [a] ou [d] pour
sélectionner “AUX SENS”.
3. Tournez le bouton [ROTARY] dans le sens
des aiguilles d’une montre ou dans le sens
inverse pour sélectionner “HIGH”, “MID” ou
“LOW”.
4. Appuyez sur la touche [T] pour revenir au
mode précédent.
Français
DXZ535 45
Page 42

Opérations communes aux deux modes
Réglage de l’horloge
1. Maintenez la touche [T] enfoncée pendant 1
seconde ou plus pour passer à l’affichage
de sélection de réglage.
Français
2. Appuyez sur la touche [a] ou [d] pour sé-
lectionner “CLOCK”.
3. Appuyez sur la touche [ ].
4. Appuyez sur la touche [a] ou [d] pour sé-
lectionner les heures et les minutes.
5. Tournez le bouton [ROTARY] dans le sens
des aiguilles d’une montre ou dans le sens
inverse pour régler l’heure.
∗ L’horloge affiche l’heure en un cycle de 12
heures.
6. Appuyez sur la touche [ ] pour enregistrer l’heure en mémoire.
7. Appuyez sur la touche [T] pour revenir au
mode précédent.
Remarque :
• Vous ne pouvez pas régler l’heure si l’horloge est
affichée mais que seul l’allumage est enclenché.
Si vous épuisez ou retirez la batterie ou que vous
sortez l’appareil, il faudra régler à nouveau
l’horloge. Si vous actionnez une touche ou
sélectionnez un autre mode pendant le réglage
de l’heure, le mode de réglage de l’horloge
s’annule.
Mise en/hors service de la fonction
d'économiseur d'écran
L'appareil est doté d'une fonction d'économiseur
d'écran qui vous permet d'afficher différents motifs et caractères dans la section d'affichage de
l'état de fonctionnement, et ce dans un ordre
aléatoire. Vous pouvez activer ou désactiver
cette fonction.
Si vous appuyez sur une touche lorsque la fonction d'économiseur d'écran est en service, l'affichage de l'opération correspondant à la touche
actionnée apparaît pendant environ 30 secondes, puis l'affichage revient à l'économiseur
d'écran.
∗ Le réglage usine est “SS”.
1. Maintenez la touche [T] enfoncée pendant 1
seconde ou plus pour passer à l’affichage de
sélection de réglage.
2. Appuyez sur la touche [a] ou [d] et sélec-
tionnez “SCRN SVR”.
3. Appuyez sur la touche [ ].
4. Tournez le bouton [ROTARY] dans le sens
horaire ou antihoraire pour sélectionner le
réglage. A chaque pression sur le bouton
[ROTARY], le réglage change dans l’ordre
suivant :
OFF (Désactivé) ➜ SS ➜ MESSAGE
5. Appuyez sur la touche [ ] pour
mémoriser le réglage.
6. Appuyez sur la touche [T] pour revenir au
mode précédent.
∗ Le schéma ci-dessous représente l'un des
motifs qui s'affichent lorsque la fonction d'éco-
nomiseur d'écran est en service.
Saisie de messages d’informations
Des messages comportant jusqu’à 30
caractères peuvent être mémorisés et affichés
pour les CD, le changeur CD et les stations de
télévision.
* Le réglage usine par défaut est “WELCOME TO
CLARION” (Bienvenue chez Clarion).
1. Maintenez la touche [T] enfoncée pendant 1
seconde ou plus pour passer à l’affichage
de sélection de réglage.
2. Appuyez sur la touche [a] ou [d] pour
sélectionner “INPUT”.
3. Appuyez sur la touche [ ].
4. Appuyez sur la touche [a] ou [d] pour
déplacer le curseur.
5. Appuyez sur la touche [D] pour sélectionner
un caractère. A chaque pression sur la touche [D], les caractères changent dans l’ordre
suivant :
Chiffres ➜ Symboles ➜ Lettres majuscules
➜ Chiffres…
6. Tournez le bouton [ROTARY] pour
sélectionner le caractère souhaité.
7. Répétez les étapes 4 à 6 pour saisir le mes-
sage qui peut comporter jusqu’à 30
caractères.
8. Maintenez la touche [ ] enfoncée pendant plus de 2 secondes pour mémoriser le
message et annuler la saisie de message.
46 DXZ535
Page 43

Opérations communes aux deux modes
Réglage de l’éclairage des touches
Appuyez sur la touche [COLOR] pour
sélectionner une des couleurs. A chaque
pression sur la touche [COLOR], le type change
dans l’ordre suivant :
Exploration des couleurs ➜ Rouge ➜
Mandarin ➜ Orange ➜ Ambré ➜ Jaune ➜
Vert-jaune ➜ Citron ➜ Vert ➜Vert-foncé ➜
Utilisateur ➜ Exploration des couleurs…
● Réglage de l’exploration des couleurs
(CLR SCAN)
Lorsque “CLR SCAN” est sélectionné, les
couleurs changent automatiquement dans
l’ordre suivant :
Exploration des couleurs ➜ Rouge ➜
Mandarin ➜ Orange ➜ Ambré ➜ Jaune
➜Vert-jaune ➜ Citron ➜ Vert ➜ Vert-foncé ➜
Utilisateur ➜ Exploration des couleurs…
∗ Le rélage par défaut est “CLR SCAN”.
∗ Le nom de la couleur n’apparaît pas pendant le
changement.
∗ Après 3 secondes, la couleur est remplacée par la
suivante.
● Réglage du mode Utilisateur (USER)
Le réglage par défaut est “R>8 G>3”.
Lorsque “USER” est sélectionné, maintenez la
touche [COLOR] enfoncée pendant plus d’une
seconde; “R>8 G>3” apparaît sur l’afficheur.
1. Appuyez sur la touche [a] ou [d] pour
déplacer le curseur.
2. Tournez le bouton [ROTARY] dans le sens
des aiguilles ou dans le sens contraire pour
sélectionner une valeur de 0 à 8.
3. Maintenez la touche [ ] pendant plus de
2 secondes pour mémoriser la couleur et annuler le mode de réglage.
Entrée de titres
Vous pouvez entrer des titres de 8 caractères
de long maximum dans la mémoire et les afficher pour le CD, le changeur de CD et les stations de TV. Le nombre de titres que vous pouvez entrer pour chaque mode est le suivant.
Mode Nombre de titres
Mode CD 50 titres
Mode TV 20 titres
Mode changeur de CD
CDC655z raccordé 60 titres
CDC655Tz raccordé 100 titres
CDC1255z raccordé 50 titres
Nombre de titres
1. Appuyez sur la touche [FNC] pour sélection-
ner le mode pour lequel vous voulez entrer
un titre (changeur de CD ou TV).
2. Sélectionnez et lisez un disque du changeur
de CD ou accordez la chaîne de télévision
pour lesquels vous voulez enregistrer un titre.
3. Appuyez sur la touche [D] et obtenez
l’affichage auxiliaire.
4. Appuyez sur la touche [T].
5. Appuyez sur la touche [a] ou [d] pour dé-
placer le curseur.
6. Appuyez sur la touche [D] pour sélectionner
un caractères. Chaque fois que vous appuyez sur la touche [D], le caractère change
dans l’ordre suivant:
Chiffres ➜ Symboles ➜ Lettres majuscules
➜ Chiffres...
7. Tournez le bouton [ROTARY] pour sélection-
ner le caractère.
8. Recommencez les opérations 5 à 7 pour entrer jusqu’à 8 caractères pour le titre.
9. Maintenez la touche [ ] enfoncée pendant 2 secondes ou plus pour enregistrer le
titre en mémoire et annuler le mode d’entrée
de titre.
Effacement de titres
1. Lisez le disque du changeur de CD ou accordez la chaîne de télévision dont vous voulez
effacer le titre.
2. Appuyez sur la touche [D] et obtenez
l’affichage auxiliaire.
3. Appuyez sur la touche [T].
L’afficheur passe à l’Indication d’entrée de
titre.
4. Appuyez sur la touche [BND].
5. Maintenez la touche [ ] enfoncée pendant 1 seconde ou plus pour effacer le titre
et annuler le mode d’entrée de titre.
Mode sourdine audio automatique
pour téléphones cellulaires
Ce système nécessite l’utilisation d’un câblage
spécial pour rendre automatiquement le système audio en sourdine si le téléphone cellulaire
sonne dans le véhicule.
∗ Cette fonction n’est pas compatible avec tous les
téléphones cellulaires. Adressez-vous à votre revendeur Clarion agréé le plus proche pour plus d’informations sur l’installation correcte et la compatibilité.
DXZ535 47
Français
Page 44

8.
FONCTIONNEMENT DES ACCESSOIRES
Fonctionnement du changeur de CD/MD
Fonctionnement du changeur de
Français
CD/MD
Si vous avez raccordé un changeur CD/MD en
option via le câble CeNET, l’appareil pourra piloter toutes les fonctions du changeur CD/MD.
L’appareil peut piloter au total 2 changeurs (MD
et/ou CD).
Appuyez sur la touche [FNC] pour sélectionner
le mode changeur CD(MD) et commencer la
lecture. Si vous avez raccordé 2 changeurs CD
(MD), appuyez sur la touche [FNC] pour
sélectionner le changeur CD (MD) de lecture.
∗ Si “NO MAG” (pas de chargeur) apparaît sur l’affi-
cheur, insérez un chargeur dans le changeur CD.
“DISC CHK” (chargement en cours) apparaît sur
l’afficheur pendant que le lecteur charge (vérifie) le
chargeur.
∗ Si “NO DISC” (pas de disque) apparaît sur l’affi-
cheur, éjectez le chargeur et insérez les disques
un à un dans les fentes. Réinsérez le chargeur dans
le changeur CD.
∗ Si “NO DISC” (pas de chargeur) apparaît sur l’affi-
cheur, insérez les minidiscs dans le changeur MD.
Remarque:
• Certains modèles de CD enregistrés en mode
CD-R/CD-RW risquent de ne pas être utilisables.
PRÉCAUTION
Les disques CD-ROM ne peuvent pas être reproduits sur tous les changeurs de CD. Cela
dépend du modèle.
Pause de la lecture
1. Appuyez sur la touche [ ] pour interrom-
pre momentanément la lecture. “PAUSE” ap-
paraît sur l’afficheur.
2. Pour reprendre la lecture, appuyez à nou-
veau sur la touche [ ].
Affichage des titres de CD
Cet appareil permet d’afficher des données de
titres pour CD-texte et des titres utilisateur,
saisis sur cet appareil.
∗ Les données de titres pour CD-texte peuvent être
affichées par cet appareil seulement s’il est raccordé
au CDC655Tz.
● Lors d’un branchement au CDC655z ou au
CDC1255z
Appuyez sur la touche [D] pour afficher le titre.
● Lors d'un branchement au CDC655z
1. Appuyez sur la touche [D] pour afficher le
titre.
2. Chaque fois que la touche [D] est enfoncée
pendant plus d'une seconde, l'affichage de
titre change dans l'ordre suivant :
Titre Utilisateur (disque) ➜ Titre CD-texte
(disque) ➜ Nom de l’artiste ➜ Titre CD-texte
(plage) ➜ Titre Utilisateur (disque)…
Remarque :
• Si le disque lu n’est pas un CD-texte ou si aucun
titre utilisateur n’a été saisi, le message “NO
TITLE” apparaît sur l’afficheur.
• Si un CD-texte ne comporte pas de titre de
disque ou de titre de plage, le message “NO
TITLE” apparaît sur l’afficheur.
Commutation des titres de disque
et des titres de plage (MD)
Cet appareil peut afficher des titres de disque et
des titres de plage, déjà saisis sur des MD.
∗ Des titres ne peuvent pas être saisis pour des MD
sur cet appareil.
1. Appuyez sur la touche [D] pour afficher le
titre. Le titre de disque ou le titre de plage est
affiché.
2. Chaque fois que la touche [D] est maintenue
enfoncée plus d’une seconde, l’affichage
permute entre le titre de disque et le titre de
plage.
Remarque :
• Si un MD ne comporte pas de titre de disque ou
de titre de plage, le message “NO TITLE”
apparaît sur l’afficheur.
48 DXZ535
Page 45

Fonctionnement du changeur de CD/MD
Pour faire défiler un titre
Régler “SCROLL” sur “ON” (activé) ou “OFF”
(désactivé).
(Le réglage par défaut est “ON” (activé).
Reportez-vous au paragraphe “Mise en/hors
service de la fonction d’économiseur
d’écran” dans la section “Opérations
communes aux deux modes”.)
● Lors d’un réglage sur “ON”
Le titre continue de défiler automatiquement.
● Lors d’un réglage sur “OFF”
Appuyez sur la touche [T] pour faire défiler le
titre.
Sélection d’un CD
La touche [UP] ou [DN] correspond à un disque,
installé dans le magasin.
Appuyez sur la touche [UP] ou [DN] pour choisir
le disque souhaité.
∗ Si un CD n’est pas installé dans une fente du
magasin, le message “NO DISC” apparaît sur
l’afficheur.
Sélection d’un MD
La touche [UP] ou [DN] correspond à un MD,
installé dans le changeur de MD. Appuyez sur la
touche [UP] ou [DN] pour choisir le disque
souhaité.
∗ Si un MD n’est pas installé dans le changeur de
MD, le message “NO DISC” apparaît sur l’afficheur.
Sélection d’une plage
● Plage suivante
1. Appuyez sur la touche [d] pour aller au dé-
but de la plage suivante.
2. Chaque fois que vous appuyez sur la touche
[d], la plage avance jusqu’au début de la
plage suivante.
● Plage précédente
1. Appuyez sur la touche [a] pour aller au dé-
but de la plage actuelle.
2. Appuyez deux fois sur la touche [a] pour
aller au début de la plage précédente.
Avance rapide/retour rapide
● Avance rapide
Maintenez la touche [d] enfoncée pendant 1
seconde ou plus.
● Retour rapide
Maintenez la touche [a] enfoncée pendant 1
seconde ou plus.
Lecture des introductions
La lecture des introductions recherche et lit
automatiquement les 10 premières secondes de
chacune des plages d’un disque. Cette fonction
se poursuit sur tout le disque jusqu’à ce que
vous l’annuliez.
∗ La lecture des introductions est très utile pour re-
chercher la plage de votre choix.
1. Appuyez sur la touche [SCN] pour commen-
cer la lecture des introductions de plage.
“SCN” s’allume sur l’afficheur.
2. Pour annuler la lecture des introductions, appuyez à nouveau sur la touche [SCN]. “SCN”
s’éteint sur l’afficheur et la lecture de la plage
en cours continue.
Balayage de tous les disques
Le balayage de tous les disques recherche et lit
automatiquement les 10 premières secondes de
chaque plage de tous les disques du changeur
de CD (MD) sélectionné. Cette fonction se poursuit automatiquement jusqu’à ce que vous l’an-
nuliez.
∗ Le balayage de tous les disques est pratique pour
rechercher un disque.
1. Maintenez la touche [SCN] enfoncée pen-
dant 1 seconde ou plus. “DISC” et “SCN”
s’allument sur l’afficheur.
2. Pour annuler le balayage de tous les disques, appuyez à nouveau sur la touche
[SCN]. “DISC” et “SCN” disparaissent de l’afficheur et la lecture normale du disque reprend à la plage en cours.
Français
DXZ535 49
Page 46

Fonctionnement du changeur de CD/MD
Lecture répétée
La lecture répétée vous permet de relire la
plage en cours indéfiniment. Cette fonction se
poursuit automatiquement jusqu’à ce que vous
l’annuliez.
Français
1.
Appuyez sur la touche [RPT]. “RPT” s’allume
sur l’afficheur et la plage en cours est répétée.
2. Pour annuler la lecture répétée, appuyez à
nouveau sur la touche [RPT]. “RPT” s’éteint
sur l’afficheur et la lecture normale reprend.
Lecture répétée d’un disque
Lorsque toutes les plages du disque en cours
ont été lues, la lecture répétée d’un disque relit
automatiquement le disque en cours depuis la
première plage. Cette fonction se poursuit automatiquement jusqu’à ce que vous l’annuliez.
1. Maintenez la touche [RPT] enfoncée
pendant 1 seconde ou plus. “DISC” et “RPT”
s’allument sur l’afficheur et la lecture répétée
du disque commence.
2. Pour annuler la lecture répétée d’un disque,
maintenez à nouveau la touche [RPT] enfoncée. “DISC” et “RPT” s’éteignent sur l’afficheur et la lecture normale reprend à partir
de la plage en cours.
Lecture aléatoire
La lecture aléatoire permet de sélectionner et de
lire des plages individuelles du disque dans un
ordre au hasard. Cette fonction se poursuit automatiquement jusqu’à ce que vous l’annuliez.
1. Appuyez sur la touche [RDM]. “RDM”
s’allume sur l’afficheur, une plage est
sélectionnée au hasard et la lecture
commence.
2. Pour annuler la lecture aléatoire, appuyez à
nouveau sur la touche [RDM]. “RDM” disparaît de l’afficheur et la lecture normale reprend.
Lecture aléatoire de tous les
disques
La lecture aléatoire de tous les disques permet
de sélectionner et de lire automatiquement des
plages ou des disques individuels dans un ordre
au hasard. Cette fonction se poursuit automatiquement jusqu’à ce que vous l’annuliez.
1. Maintenez la touche [RDM] enfoncée
pendant 1 seconde ou plus. “DISC” et “RDM”
s’allument sur l’afficheur et la lecture
aléatoire de tous les disques commence.
2. Pour annuler la lecture aléatoire de tous les
disques, maintenez à nouveau la touche
[RDM] enfoncée. “DISC” et “RDM”
s’éteignent sur l’afficheur et la lecture
normale reprend à la plage en cours.
50 DXZ535
Page 47

Fonctionnement du téléviseur
Fonctions du tuner TV
Si vous raccordez un tuner TV en option via le
câble CeNET, cet appareil pourra piloter toutes
les fonctions du tuner TV. Pour pouvoir regarder
la télévision, vous devez avoir un tuner TV et un
moniteur.
Réception d’une émission de
télévision
1. Appuyez sur la touche [FNC] et sélectionnez
le mode TV.
2. Appuyez sur la touche [BND] pour sélection-
ner la gamme TV voulue (TV1 ou TV2). Chaque fois que vous appuyez sur la touche,
l’entrée commute alternativement entre TV1
et TV2.
3. Appuyez sur la touche [a] ou [d] pour ac-
corder la chaîne de télévision.
Lecture d’une cassette vidéo
Le tuner TV possède une borne d’entrée de magnétoscope (VTR) qui permet de raccorder un
appareil externe. Raccordez un lecteur de cassette vidéo (VCP) ou un magnétoscope (VCR)
12 V à la borne d’entrée de tuner TV.
1. Appuyez sur la touche [ ] pour sélection-
ner VTR.
2. Pour revenir à l’émission de télévision, ap-
puyez sur la touche [ ].
Syntonisation
Il existe 3 modes de syntonisation au choix: la
syntonisation automatique, la syntonisation manuelle, et la syntonisation des stations préré-
glées.
Accord automatique
1. Appuyez sur la touche [BND] et sélectionnez
la gamme de télévision (TV1 ou TV2).
∗ Si “MANU” est allumé sur l’afficheur, mainte-
nez la touche [BND] enfoncée pendant 1 seconde ou plus. “MANU” s’éteint sur l’afficheur
et la syntonisation automatique est possible.
2. Appuyez sur la touche [a] ou [d] pour ac-
corder automatiquement la chaîne. Si vous
appuyez sur la touche [d], la prochaine
chaîne de télévision vers le haut de la plage
de fréquence est accordée; si vous appuyez
sur la touche [a], la chaîne est recherchée
vers le bas de la plage.
Accord manuel
Il existe 2 méthodes au choix: L’accord rapide,
et l’accord par paliers.
En mode d’accord par paliers, la chaîne est recherchée palier par palier; en mode d’accord rapide, la chaîne est recherchée rapidement.
1. Appuyez sur la touche [BND] et sélectionnez
la gamme (TV1 ou TV2).
∗ Si “MANU” n’est pas allumé sur l’afficheur,
maintenez la touche [BND] enfoncée pendant
1 seconde ou plus. “MANU” s’allume et la
syntonisation manuelle est possible.
2. Accordez la chaîne.
● Accord rapide:
Maintenez la touche [a] ou [d] enfoncée
pendant 1 seconde ou plus pour accorder la
chaîne.
● Accord par paliers:
Appuyez sur la touche [a] ou [d] pour accorder la chaîne manuellement.
Rappel d’une chaîne préréglée
Il est possible de mémoriser jusqu’à 12 chaînes
de télévision (6 TV1 et 6 TV2). Ceci vous
permet d’enregistrer vos chaînes de télévision
favorites pour les rappeler en toute facilité.
1. Appuyez sur la touche [BND] et sélectionnez
la gamme TV (TV1 ou TV2).
2. Pour rappeler une chaîne de télévision en
mémoire, appuyez sur la touche [DIRECT]
correspondante.
∗ Maintenez l’une des touches [DIRECT] enfon-
cée pendant 2 secondes ou plus pour mémoriser la chaîne en cours de réception.
Mémorisation manuelle
1. Sélectionnez la chaîne de télévision avec
l’accord automatique, manuel ou préréglé.
2. Maintenez l’une des touches [DIRECT] en-
foncée pendant 2 secondes ou plus pour enregistrer la chaîne dans la mémoire.
Français
DXZ535 51
Page 48

Fonctionnement du téléviseur
Mémorisation automatique
La mémorisation automatique sélectionne automatiquement 6 chaînes de télévision et elle enregistre chacune d’elle dans une adresse mé-
moire.
Français
S’il n’y a pas 6 chaînes dont la qualité de réception soit satisfaisante, les chaînes
préalablement préréglées dans la mémoire
seront conservées. Seules les chaînes
puissantes seront préréglées.
1. Appuyez sur la touche [BND] et sélectionnez
la gamme TV (TV1 ou TV2).
2. Maintenez la touche [P/A] enfoncée pendant
2 secondes ou plus. Les stations offrant une
bonne sensibilité de réception sont automatiquement mémorisées sur les canaux de
préréglage.
Balayage des chaînes préréglées
Le balayage des chaînes préréglées permet de
voir chaque chaîne avant de passer automatiquement à la suivante. Cette fonction est pratique pour rechercher la chaîne de téléviseur
mémoriséé de votre choix.
1. Appuyez sur la touche [P/A].
2. Quand le tuner a repéré la chaîne, appuyez
à nouveau sur la touche [P/A] pour activer la
réception de cette chaîne.
Remarque:
• Faites attention de ne pas maintenir la touche
[P/A] enfoncée pendant 2 secondes ou plus, car
la fonction de préréglage automatique des chaî-
nes entrerait en service et l’appareil commencerait à mémoriser les chaînes.
Réglage du diver TV
Vous pouvez changer le réglage de réception
de l’antenne TV raccordée au tuner TV.
1. Maintenez la touche [T] enfoncée pendant 1
seconde ou plus pour passer à l’affichage de
sélection de réglage.
2. Appuyez sur la touche [a] ou [d] pour sé-
lectionner “TV DIVER”.
3. Tournez le bouton [ROTARY] dans le sens
des qiguilles d’une montre pour “ON” (activer) ou dans le sens inverse pour “OFF” (dé-
sactiver) la fonction.
● ON:
Règle la réception de façon à accentuer les
images.
● OFF:
Désactive le diver TV.
4. Appuyez sur la touche [T] pour revenir au
mode précédent.
Réglage de la zone TV
Quand vous sélectionnez la zone TV (zone de
réception de la télévision), le réglage de zone
du tuner TV change.
1. Maintenez la touche [T] enfoncée pendant 1
seconde ou plus pour passer à l’affichage de
sélection de réglage.
2. Appuyez sur la touche [a] ou [d] pour sé-
lectionner “TV AREA”.
3. Appuyez sur la touche [ ].
4.
Tournez le bouton [ROTARY] dans le sens des
aiguilles d’une montre ou dans le sens inverse
pour sélectionner la zone de réception.
5. Appuyez sur la touche [ ].
6. Appuyez sur la touche [T] pour revenir au
mode précédent.
52 DXZ535
Page 49

9. EN CAS DE DIFFICULTÉ
Problème Cause Solution
Pas d’alimentation.
(Pas de son.)
Pas de son lorsque
les amplificateurs et
l’antenne
automatique sont
raccordés.
Généralité
Fusible sauté.
Raccordement incorrect.
Le fil de l’antenne
automatique est courtcircuité à la masse, ou un
courant excessif est requis
pour la télécommande des
amplificateurs et de
l’antenne automatique.
Remplacez le fusible par un autre de même
ampérage. Si le fusible saute à nouveau,
consultez votre magasin.
Consultez votre magasin.
1. Mettez l’appareil hors tension.
2. Retirez tous les fils raccordés au fil d’antenne
automatique. Vérifiez chaque fil pour voir s’il
n’est pas court-circuité à la masse à l’aide
d’un ohmmètre.
3. Remettez l’appareil sous tension.
4. Raccordez chaque fil de télécommande
d’amplificateur au fil d’antenne automatique
un par un. Si les amplificateurs s’éteignent
avant que tous les fils ne soient raccordés,
utilisez un relais externe pour obtenir la
tension de commande à distance nécessaire
(courant excessif requis).
Français
Rien ne se passe
quand on appuie sur
les touches.
L’affichage est
incorrect.
Impossible de
charger le disque.
Interruptions du son
ou parasites.
CD
Le son se détériore
tout de suite après la
mise sous tension.
Mauvais fonctionnement du
microprocesseur à cause
du bruit, etc.
Les connecteurs du
CLAVIER DE COMMANDE
AMOVIBLE (DCP) ou de
l’appareil principal sont
sales.
Il y a déjà un disque dans
le tiroir.
Le disque est sale.
Le disque est fortement
rayé ou gondolé.
Des gouttelettes d’eau
risquent de se former sur la
lentille interne si la voiture
a été garée dans un lieu
humide.
Eteignez l’appareil,
appuyez sur la touche
[OPEN] du CLAVIER
DE COMMANDE
AMOVIBLE (DCP) et
retirez le clavier.
Appuyez sur la touche
de réinitialisation
pendant environ 2
secondes avec une
petite tige.
Enlevez la saleté avec un chiffon doux humecté
d’alcool de nettoyage.
Ejectez le disque avant d’en mettre un autre.
Nettoyez le disque avec un chiffon doux.
Remplacez-le par un disque sans rayures.
Allumez l’appareil et laissez-le sécher pendant
environ 1 heure.
Touche de
réinitialisation
DXZ535 53
Page 50

10. AFFICHAGE DES ERREURS
S’il se produit une erreur, l’un des affichages suivants apparaît.
Prenez les mesures expliquées ci-dessous pour résoudre le problème.
Français
Affichage d’erreur
ERROR 2
CD
ERROR 3
ERROR 6
Le disque est coincé à l’intérieur du
lecteur de CD et qu’il ne s’éjecte pas.
La lecture du disque est impossible parce
qu’il est rayé, etc.
Le disque est chargé à l’envers dans le
lecteur CD et la lecture est impossible.
Cause
Ceci est une anomalie du mécanisme du
lecteur CD. Consultez votre magasin.
Remplacez-le par un disque non rayé et
non gondolé.
Ejectez le disque et rechargez-le
correctement.
Mesure
ERROR 2
ERROR 3
Changeur de CD
ERROR 6
ERROR H
ERROR 2
ERROR 3
Changeur de MD
ERROR 6
Le disque à l’intérieur du changeur de
CD n’est pas chargé.
La lecture du disque à l’intérieur du
changeur de CD est impossible parce
qu’il est rayé.
La lecture du disque à l’intérieur du
changeur de disque est impossible parce
qu’il est chargé à l’envers.
S’affiche lorsque la température à
l’intérieur du changeur de MD est trop
élevée et que la lecture s’est arrêtée
automatiquement.
Il n’y a pas de MD à l’intérieur du
changeur de MD.
La lecture du MD à l’intérieur du
changeur de MD est impossible parce
qu’il est rayé, etc.played due to
scratches, etc.
La lecture du MD à l’intérieur du
changeur de MD est impossible parce
qu’il est mis à l’envers.
S’affiche si vous avez chargé un MD non
enregistré dans le changeur de MD.
Ceci est une anomalie du mécanisme du
changeur de CD. Consultez votre
magasin.
Remplacez-le par un disque non rayé et
non gondolé.
Ejectez le disque et rechargez-le
correctement.
Réduisez la température ambiante ou
attendez quelques instants que le
changeur de MD ait refroidi.
Il s’agit d’une anomalie du mécanisme
du changeur de MD; consultez le
magasin où vous avez acheté l’appareil.
Remplacez le disque par un disque non
rayé.
Ejectez le disque, puis rechargez-le
correctement.
Chargez un MD enregistré dans le
changeur de MD.
54 DXZ535
Page 51

Affichage
d’erreur
ERROR 2
ERROR 3
ERROR 6
Changeur de DVD
ERROR P
Cause
La lecture du disque à l’intérieur du changeur de DVD n’est pas possible.
La lecture du disque n’est pas possible
parce qu’il est rayé, etc.
La lecture du disque à l’intérieur du changeur de DVD n’est pas possible parce qu’il
est mis à l’envers.
Erreur de niveau de censure parentale.
Mesure
Il s’agit d’une défaillance du mécanisme du
DVD. Consultez votre magasin d’achat.
Réessayez ou remplacez le disque par un
disque ni rayé, ni gondolé, etc.
Français
Ejectez le disque, puis rechargez-le
correctement.
Réglez le niveau de censure parentale voulu.
ERROR R
Erreur de code de région.
Ejectez le disque et remplacez-le par un disque ayant le bon code de région.
Si un affichage d’erreur autre que ceux décrits ci-dessus apparaît, appuyez sur la touche de
réinitialisation.
Si le problème persiste, mettez l’appareil hors tension et consultez votre magasin.
DXZ535 55
Page 52

11.
CARACTÉRISTIQUES TECHNIQUES
Tuner FM
Plage de fréquence :
87,9 à 107,9 MHz
Français
Sensibilité utilisable :
9 dBf
Seuil de sensibilité à 50dB :
15 dBf
Sélectivité de canal de substitution :
70 dB
Séparation stéréo (1 kHz) :
35 dB
Réponse en fréquence (±3 dB) :
30 Hz à 15 kHz
Tuner AM
Plage de fréquence :
530 kHz à 1710 kHz
Sensibilité utilisable :
25 µV
Lecteur CD
Système :
Système audionumérique de disque compact
Disques utilisables :
Disques compacts
Réponse en fréquence (±1 dB) :
10 Hz à 20 kHz
Rapport signal/bruit (1 kHz) :
100 dBA
Plage dynamique (1 kHz) :
95 dB
Distorsion harmonique :
0,01%
Audio
Puissance de sortie maximale :
208 W (52 W ✕ 4 canaux)
Puissance de sortie continue moyenne :
16 W ✕ 4, à 4 Ω, 20 Hz à 20 kHz, DHT 1%
Plage de variation des graves (60 Hz) :
±15 dB
Plage de variation des aigus (10 kHz) :
±12 dB
Sortie de ligne (CD 1 kHz) :
2 V
Données générales
Tension d’alimentation :
14,4 V CC (10,8 V à 15,6 V admissible),
masse négative
Consommation :
Inférieure à 15 A
Impédance de haut-parleurs :
4 Ω (4 Ω à 8 Ω admissible)
Poids / Appareil pilote :
2,86 lb. (1,3 kg)
Poids / Télécommande :
1 oz. (30 g) (avec la pile)
Dimensions / Appareil pilote :
7" (largeur) ✕ 2" (hauteur) ✕ 6-1/6" (profondeur)
[178 (L) ✕ 50 (H) ✕ 157 (P) mm]
Dimensions / Télécommande :
1-3/4" (largeur) ✕ 4-5/16" (hauteur) ✕ 1-1/8"
(profondeur)
[44 (L) × 110 (H) × 27 (P) mm]
Remarque :
• La conception et les spécifications sont sujettes à modification sans préavis pour des raisons d’amélioration.
56 DXZ535
Page 53

Muchas gracias por la adquisición de este producto Clarion.
∗ Antes de utilizar este equipo lea completamente el manual de instrucciones.
∗ Después de haber leído este manual, cerciórese de guardarlo a mano (p. ej., en la guantera).
∗ Compruebe el contenido de la tarjeta de garantía adjunta y guárdela cuidadosamente con este
manual.
∗
Este manual incluye los procedimientos de operación del cambiador de discos CD, cambiador de discos
MD, cambiador de discos DVD y sintonizador de TV conectados a través del cable CeNET. El cambiador
de discos CD, cambiador de discos MD, cambiador de discos DVD y sintonizador de TV tienen sus
propios manuales, pero no describen los procedimientos de su operación.
Índice
1. CARACTERÍSTICAS .................................................................................................................... 57
2. PRECAUCIONES .......................................................................................................................... 58
Panel abatible ................................................................................................................................ 59
Manejo de los discos compactos ................................................................................................... 59
3. CONTROLES .................................................................................................................................. 5
4. NOMENCLATURA ........................................................................................................................ 60
Nombres de los botones y sus funciones ...................................................................................... 60
Operaciones de los principales botones cuando se haya
conectado un equipo externo a esta unidad .................................................................................. 60
Ítemes de visualización ................................................................................................................. 62
Pantalla de cristal líquido ............................................................................................................... 62
5. PANEL DE CONTROL DESMONTABLE (DCP)........................................................................... 63
6. CONTROLADOR REMOTO (OPCIONAL) ................................................................................... 64
Inserción de las pilas ..................................................................................................................... 64
Funciones de los botones del controlador remoto ......................................................................... 65
7. OPERACIONES ............................................................................................................................ 66
Operaciones básicas ..................................................................................................................... 66
Operaciones de la radio ................................................................................................................ 69
Operaciones del reproductor de discos compactos ...................................................................... 71
Operaciones comunes a todos los modos .................................................................................... 73
8. OPERACIONES DE LOS ACCESORIOS..................................................................................... 77
Operaciones del cambiador de discos compactos/minidiscos ...................................................... 77
Operaciones del televisor .............................................................................................................. 80
9. EN CASO DE DIFICULTAD .......................................................................................................... 82
10. INDICACIONES DE ERROR ........................................................................................................ 83
11. ESPECIFICACIONES ................................................................................................................... 85
Español
1. CARACTERÍSTICAS
• Panel frontal de aluminio abatible y desmontable y visualizador de cristal líquido multicolor de gran
visibilidad
• Controlador para módulos de sintonizador SIRIUS opcionales
• Reforzador Z mejorado para creación de sonido con 3 modos de ajuste (P.EQ de 2 bandas)
• CeNET con transmisión por línea de audio equilibrada y cancelación de ruido dinámico
• Filtro digital de sobremuestreo óctuple y convertidores D/A de 1 bitio dobles
DXZ535 57
Page 54

2. PRECAUCIONES
1. Si el interior del automóvil esté muy frío y uti-
liza la unidad inmediatamente después de
haber encendido el calefactor, es posible
que se condense humedad en el disco o en
las piezas del reproductor, y que resulte imposible realizar la reproducción apropiada. Si
se condensa humedad en el disco, frótelo
con un paño seco. Si se condensa humedad
en las piezas ópticas del reproductor, no lo
utilice durante aproximadamente una hora, y
la humedad condensada desaparecerá de
forma natural para permitir la operación
normal.
Este equipo ha sido probado y se ha determinado que cumple con los límites para un dispositivo digital de clase B, de acuerdo con la parte 15
de las normas de la FCC.
Estos límites han sido establecidos para proporcionar una protección razonable contra
interferencias perjudiciales en una instalación
residencial.
Este equipo genera, utiliza, y puede radiar energía de radiofrecuencia y, si no se instala ni utiliza de acuerdo con las instrucciones, puede
causar interferencias perjudiciales en las
radiocomunicaciones. Sin embargo, no se puede garantizar el que no se produzcan
Español
interferencias en una instalación particular.
Si este equipo produce interferencias perjudicia-
les en la recepción de radio o de televisión, lo
que puede determinarse desconectando y volviendo a conectar la alimentación del equipo, el
usuario deberá consultar a su proveedor o solicitar la ayuda de un técnico de radio/televisión
cualificado.
2. La conducción por carreteras accidentadas
que causen vibraciones notables puede causar el salto del sonido.
3. Esta unidad utiliza un mecanismo de precisión. Incluso en el caso de problemas, no
abra nunca la caja, no desarme la unidad, ni
lubrique las piezas giratorias.
PRECAUCIÓN
LA UTILIZACIÓN DE CONTROLES, LA REALIZACIÓN DE AJUSTES, O EL USO DE PROCEDIMIENTOS QUE NO SE HAYAN ESPECIFICADO AQUÍ,
PUEDEN RESULTAR EN LA EXPOSICIÓN A
RADIACIÓN PELIGROSA.
EL REPRODUCTOR DE DISCOS COMPACTOS Y
EL REPRODUCTOR DE MINIDISCOS NO DEBEN
SER AJUSTADOS NI REPARADOS POR NADIE
QUE NO SEA PERSONAL DE SERVICIO
DEBIDAMENTE CUALIFICADO.
LOS CAMBIOS O MODIFICACIONES NO
APROBADOS EXPRESAMENTE POR EL
FABRICANTE PUEDEN ANULAR LA AUTORIDAD
DEL USUARIO PARA UTILIZAR ESTE EQUIPO.
INFORMACIÓN PARA LOS USUARIOS:.
LOS CAMBIOS O MODIFICACIONES
REALIZADOS EN ESTE PRODUCTO NO
APROBADOS POR EL FABRICANTE ANULARÁN
LA GARANTÍA Y VIOLARÁN LA APROBACIÓN
DE LA FCC.
MODEL
AM 530-1710kHz/FM 87.9 -107.9MHz
THIS DEVICE COMPLIES WITH PART 15 OF THE FCC RULES.
OPERATION IS SUBJECT TO THE FOLLOWING TWO CONDITIONS:
(1) THIS DEVICE MAY NOT CAUSE HARMFUL INTERFERENCE, AND
(2) THIS DEVICE MUST ACCEPT ANY INTERFERENCE RECEIVED,
INCLUDING INTERFERENCE THAT M AY CAUSE UNDESIRED
OPERATION.
THIS PRODUCTION COMPLIES WITH DHHS RULES 21 CFR
SUBCHAPTER J APPLICABLE AT DATE OF MANUFACTURE.
CLARION CO.,LTD.
50 KAMITODA,TODA-SHI,SAITAMA-KEN,JAPAN
MANUFACTURED:
SERIAL No.
PE-
12V GROUND
58 DXZ535
Clarion Co.,Ltd.
MADE IN
Vista inferior de la unidad fuente
Page 55

Panel abatible
Este aparato utiliza una estructura de panel abatible que permite utilizar visualizadores más grandes.
PRECAUCIÓN
Cuando abra y cierre el PANEL ABATIBLE,
tenga cuidado de no pillarse los dedos. Podría dañárselos.
1. Utilice siempre este aparato con el PANEL
ABATIBLE cerrado.
2. No fuerce las operaciones ni utilice esta unidad de forma anormal cuando abra o cierre
el PANEL ABATIBLE.
3. No utilice el PANEL ABATIBLE como bandeja para colocar objetos sobre ella cuando
esté abierto.
4. Cuando cierre el PANEL ABATIBLE, no presione el botón de [OPEN].
5. Los golpes fuertes en la sección de opera-
ción o de visualización pueden causar daños
o deformación.
6. Si el PANEL ABATIBLE nos e abre completamente, ábralo suavemente con la mano.
Manejo de los discos compactos
Emplee solamente discos compactos que
tengan la marca o .
No reproduzca discos compactos en forma de
corazón, octogonales, ni de ninguna otra forma
especial.
Es posible que algunos discos CD grabados en
el modo CD-R/CD-RW no puedan emplearse.
Manejo
• En comparación con los discos compactos de
música normales, los discos CD–R y CD–RW
se ven afectados fácilmente por la temperatura y la humedad elevadas, y es posible que
algunos de tales discos no puedan reproducirse. Por lo tanto, no los deje durante mucho
tiempo en un automóvil.
•
Los discos nuevos pueden tener rugosidades en
el borde. Si utilizase tales discos, el reproductor
podría no trabajar, o el sonido podría saltar.
Utilice un bolígrafo, u objeto similar, para
eliminar tales rugosidades del borde del disco.
Bolígrafo
Rugosidad
• No pegue nunca etiquetas sobre la superficie
de los discos compactos, ni marque dicha superficie con lápices ni bolígrafos.
• No reproduzca nunca un disco compacto pegado con cinta plástica ni otros pegamentos,
ni con las marcas despegadas. Si tratase de
reproducir uno de tales discos, quizás no pudiese sacarlo del reproductor de discos compactos o dañarlo.
• No utilice discos compactos que posean ralladura grandes, deformados, rajados, etc. La
utilización de tales discos podría causar el
mal funcionamiento o daños.
• Para extraer un disco compacto de su caja,
presione el centro de dicha caja y levante el
disco, sujetándolo cuidadosamente por los
bordes.
• No utilice hojas protectoras de discos compactos, vendidas en establecimientos del
ramo, ni discos provistos de estabilizadores,
etc. Estos elementos podrían dañar los discos
o el mecanismo interno.
Almacenamiento
• No exponga los discos compactos a la luz solar directa ni a fuentes térmicas.
• No exponga los discos compactos a humedad
ni polvo excesivo.
• No exponga los discos compactos al calor directo de aparatos de calefacción.
Limpieza
• Para eliminar las huellas dactilares y el polvo,
utilice un paño suave y frote el disco en línea
recta del centro a la periferia.
• No utilice disolventes, como limpiadores adquiridos en establecimientos del ramo,
rociadores antiestáticos, ni diluidor de pintura
para limpiar los discos compactos.
• Después de haber utilizado un limpiador de
discos compactos, deje que el disco compacto se seque bien antes de reproducirlo.
DXZ535 59
Español
Page 56

4. NOMENCLATURA
Nota:
• Cerciórese de leer este capítulo consultando los diagramas de la parte frontal del capítulo “3. CONTROLES” de la página 5 (desplegada).
Nombres de los botones y sus funciones
Botón [OPEN]
• Presiónelo a fondo para desmontar el panel
abatible.
Mando [ROTARY]
• Ajuste el volumen girando el mando hacia la
derecha o la izquierda.
• Utilice el mando para realizar varios ajustes.
Botón [Z+]
• Emplee el botón para seleccionar uno de los
cuatro tipos de características de sonido que
están almacenados en la memoria.
Botón [SW-VOL]
• Ajusta el volumen del altavoz de subgraves.
El volumen se ajusta dentro del margen de ±6.
Botón [COLOR]
• El color de los botones cambia a multicolor.
Botón [I]
• Sirve para llamar la memoria de emisoras de
radio ISR.
• Presiónelo y manténgalo presionado durante 2 o
más segundos: Se almacena la emisora actual
en la memoria ISR (sólo en el modo de la radio).
Botón [D]
Español
• Cambia la indicación del visualizador
(visualización principal, visualización
secundaria, visualización del reloj).
Botón [T]
• Emplee este botón para introducir un título en el
modo de discos CD.
• Presione y mantenga presionado este botón
durante 1 o más segundos para establecer el
modo de ajuste.
Botón [P/A]
• Sirve para efectuar la exploración de emisoras
preajustadas en el modo de la radio. Cuando se
presiona y mantiene presionado el botón, se
efectúa el almacenamiento automático.
Botones [UP] y [DN]
• Sirven para seleccionar los discos.
Botones [DIRECT]
• Sirven para almacenar emisoras en la memoria o
para sintonizarlas directamente en el modo de la
radio.
Botón [RDM]
• Sirve para efectuar la reproducción aleatoria en
el modo de discos CD.
Botón [RPT]
• Sirve para efectuar la repetición de la
reproducción en el modo de discos CD.
Botón [SCN]
•
Sirve para explorar la reproducción durante 10
segundos para cada canción en el modo de discos CD.
Botón [ ]
• Sirve para reproducir o pausar el disco CD en el
modo de discos CD.
Botones [a], [d]
• Sirven para seleccionar las emisoras en el modo
de la radio o para seleccionar canciones cuando se
escucha un disco CD. Estos botones se emplean
para realizar varios ajustes.
• Presione y mantenga presionado este botón
durante 1 o más segundos para activar el avance
rápido/inversión rápida.
Botón [BND]
• Sirve para cambiar la banda radiofónica o para
realizar la sintonización por búsqueda o manual
en el modo de la radio.
• Reproduce la primera canción en el modo de
discos CD.
Botón [A-M]
•
Emplee este botón para cambiar al modo de
audio (graves/agudos, balance derecho-izquierdo/
delantero-trasero, mejorador Z-Enhancer Plus y el
ajuste de Magna Bass Extended).
Botón [FNC]
• Presione este botón para conectar la alimentación.
Presione y mantenga presionado este botón durante
1 o más segundos para desconectar la alimentación.
• Sirve para cambiar el modo de operación entre el
modo de la radio y otros modos.
Botón [Q]
• Expulsará un disco CD cuando esté cargado en
la unidad.
[CD SLOT]
• Ranura de inserción del disco CD.
Operaciones de los principales botones cuando se haya conectado un equipo externo a esta unidad
● Cuando haya conectado un cambiador de discos CD/MD/DVD
60 DXZ535
∗ Con respecto a los detalles, consulte la sección
“Operaciones del cambiador de discos CD/MD”.
Para el cambiador de discos DVD, refiérase al
Manual de instrucciones suministrado con el mismo.
Page 57

Botón [D]
• Si lo mantiene presionado en el modo de carga-
dor de discos MD, cambiará los títulos de los
discos o de las canciones.
• Si lo mantiene presionado en el modo de cam-
biador de discos CD, cambiará los títulos de
usuario, los títulos de canciones, etc.
Botón [T]
• Emplee este botón para introducir un título en el
modo del cambiador de discos CD.
• Emplee este botón para desplazar el título
durante la reproducción de texto de CD o
reproducción del cambiador de discos MD en el
modo de cambiador de discos MD.
Botones [UP] y [DN]
• Sirven para seleccionar los discos.
Botón [RDM]
• Realiza la reproducción aleatoria. Si lo mantiene
presionado, realizará la reproducción aleatoria
de disco.
Botón [RPT]
• Realiza la reproducción repetida. Si lo mantiene
presionado, realizará la reproducción repetida de
disco.
Botón [BND]
• Permite pasar a otros discos en orden ascendente.
Botón [SCN]
• Realiza la reproducción con exploración durante
10 segundos de cada canción. Si lo mantiene
presionado, se realizará la reproducción con
exploración de discos.
Botón [ ]
• Pone en reproducción o el modo de pausa un
disco CD, MD, o DVD.
Botones [a], [d]
• Seleccionan canciones durante la escucha de un
disco.
• Mantenga presionado este botón durante 1 se-
gundo o más para cambiar entre avance y retroceso rápido.
● Cuando haya conectado un televisor
∗ Con respecto a los detalles, consulte la sec-
ción “Operaciones del televisor”.
Botón [P/A]
• Efectúa la exploración de emisoras preajustadas
mientras está en el modo de TV.
Si lo mantiene presionado, se realizará el alma-
cenamiento automático de emisoras.
Botón [ ]
• Cambia al modo de imágenes de televisión o de
videograbadora (externa).
Botón [DIRECT]
• Almacena una emisora en la memoria o la invoca
directamente.
Botones [a], [d]
• Seleccionan emisoras.
Botón [BND]
• Cambia la banda.
• Si mantiene presionado el botón, cambiará la
sintonía con búsqueda o el modo manual.
●
Cuando haya conectad una radio
de recepción vía satélite Sirius
∗ Con respecto a los detalles, consulte el ma-
nual de instrucciones suministrado con la
radio de recepción vía satélite Sirius.
Botón [FUNC]
• Presiónelo para cambiar el modo de operación
entre el modo SIRIUS, etc.
Botón [ ]
• Realiza la exploración de emisoras de categoria
en el modo SIRIUS. Si lo mantiene presionado,
se realizará la exploracion de emisoras
memorizadas.
Botones [DIRECT]
• Almacena una emisora en la memoria o la
sintoniza directamente en el modo SIRIUS.
Botón [a], [d]
• Presiónelo para seleccionar una emisora.
¿Qué es la radio de recepción
vía satélite Sirius?
Sirius es radio en la forma que tiene que ser: Hasta
100 nuevos canales de programación con calidad
digital ofrecidos a los oyentes de costa a costa vía
satélite.
Esto significa 50 canales de música completamente exenta de anuncios. Y 50 canales más de
noticias, deportes, y entretenimiento de nombres
tales como CNBC, Discovery, SCI-FI Channel,
A&E, House of Blues, E!, NPR, Speedvision, y
ESPN.
Sirius es entretenimiento dinámico en vivo, completamente enfocado en los oyentes. Cada minuto de
cada día y de cada semana será diferente. Los 50
canales de música exenta de anuncios se crean
dentro y se emiten dirigidos por "pinchadiscos" que
conocen y aman la música. ¿Le gusta Reggae?
¿Qué tal el Rock clásico o el Nuevo Rock? Sirius
tiene una gran variedad de opciones para una amplia
gama de gustos musicales, incluyendo los éxitos de
los años 50, 60, 70, y 80, así como Jazz, Country,
Blues, Pop, Rap, R&B, Bluegrass, Alternative,
Classical, Heavy Metal, Dance, y mucho más...
Desde su inmejorable instalación de radiodifusión
digital en Rockefeller Center, New York City, Sirius
radiodifunde la mezcla más profunda de entretenimiento radiofónico de costa a costa.
Sirius le ofrecerá música y programación de entretenimiento que no están disponibles en la radio
tradicional en ningún mercado del país. Es radio
como nunca la había escuchado antes.
Por lo tanto, ¡sintonice Sirius y escuche! Para más
información, visite siriusradio.com.
DXZ535 61
Español
Page 58

Ítemes de visualización
Indicación de reforzador Z mejorado
(Z-Enhancer Plus)
Indicación del estado de operación
Se visualizan títulos, nombres de PS,
CT (reloj), etc.
: Indicación de silenciamiento
: Indicación de introducción
: Indicación de manual
Indicación de canal memorizado (1 a 6)
Indicación de número de disco (1 a 12)
de estéreo
Español
Indicación
: Indicación de disco
: Indicación de exploración
: Indicación de reproducción repetida
: Indicación de reproducción aleatoria
: Indicación de SIRIUS
: Indicación de MAGNA BASS EXTEND
: Indicación de la categoría
Pantalla de cristal líquido
Con frío extremado, el movimiento de la pantalla puede reducirse, y es posible que la pantalla se
vuelva obscura, pero esto es normal. La pantalla se recuperará cuando vuelva a la temperatura normal.
62 DXZ535
Page 59

5.
PANEL DE CONTROL DESMONTABLE (DCP)
El panel de control podrá desmontarse como
medida antirrobo. Después de haber desmontado el panel de control, guárdelo en la caja para
el PANEL DE CONTROL DESMONTABLE
(DCP) para evitar que se raye.
Le recomendamos que lleve el DCP consigo
cuando salga del automóvil.
Extracción del panel de control
desmontable (DCP)
1. Para desconectar la alimentación, mantenga
presionado el botón [FNC] durante 1 segundo o más.
2. Presione a fondo el botón [OPEN] y abra el
PANEL ABATIBLE.
∗ Si el PANEL ABATIBLE no se abre completa-
mente, ábralo suavemente con la mano.
Botón [OPEN]
DCP
3. Tire del DCP hacia usted y extráigalo.
DCP
4. Cierre la SOLAPA DE SUJECIÓN.
PRECAUCIÓN
Cerciórese de cerrar la SOLAPA DE SUJECIÓN por motivos de seguridad cuando extraiga el panel de control desmontable
(DCP).
Instalación del panel de control
desmontable (DCP)
1. Inserte el DCP en la parte derecha de la unidad principal.
2. Inserte la parte izquierda del DCP en la unidad principal.
2.
DCP
1.
PRECAUCIÓN
• El DCP puede dañarse fácilmente con los
golpes. Después de haberlo extraído,
colóquelo en su caja, y tenga cuidado de
no dejarlo caer ni de someterlo a golpes
fuertes.
• Si mantiene el PANEL ABATIBLE abierto, el
DCP puede caerse debido a vibraciones
del automóvil. Esto podría dañar el DCP.
Por lo tanto, cierre el PANEL ABATIBLE o
extraiga y guarde el DCP en su caja.
• El conector de la unidad fuente al DCP es
una pieza extremadamente importante.
Tenga cuidado de no dañarlo
presionándolo con sus uñas, bolígrafos,
destornilladores, etc.
Nota:
• Si el DCP se ensucia, frótelo con un paño suave
y seco.
Español
SOLAPA DE SUJECIÓN
DXZ535 63
Page 60

6.
CONTROLADOR REMOTO (OPCIONAL)
Controlador remoto
Español
[
[
[
[
] [
FUNC
],[ ]
[
]
ISR
]
MUTE
]
SCN
[
]
RPT
Receptor para el controlador remoto
Margen de operación: 30° en
todas las direcciones
Transmisor de señal
DUAL ZONE
[
]
[
],[ ]
[
BAND
[
DISP
[
RDM
]
]
]
]
Inserción de las pilas
1. Dé la vuelta al controlador remoto, y después
deslice la cubierta posterior en el sentido de la
flecha.
2. Inserte las pilas AA (SUM-3, IECR-6/1,5 V)
suministradas con el controlador remoto en el
sentido mostrado en la figura, y después cierre
la cubierta posterior.
Notas:
La utilización inadecuada de las pilas puede provocar
su explosión. Tenga en cuenta los puntos siguientes:
• Cuando reemplace las pilas, cambie ambas por
otras nuevs.
• No cortocircuite, desarme, ni caliente las pilas.
• No tire las pilas al fuego.
• Tire las pilas agotadas en el lugar apropiado.
64 DXZ535
Pilas AA
(SUM-3, IECR-6/1,5 V)
Cubierta posterior
Parte posterior
Page 61

Funciones de los botones del controlador remoto
Modo
Botón
[FUNC]
[BAND]
[ ] , [ ]
[ ] , [ ]
[ ]
[MUTE]
[ISR]
[DISP]
[SCN]
Radio
Cambia entre los modos de la radio, sintonizador SIRIUS, CD, cambiador de CD/MD,
cambiador de DVD, TV y AUX.
Cambio de la banda
de recepción.
Aumento o reducción del volumen (en todos los modos).
Movimiento a canales
memorizados
superiores e inferiores.
Sin función.
Activación y desactivación del silenciamiento.
Llama la memoria de emisoras de radio ISR.
Presiónelo y manténgalo presionado durante 2 o más segundos: Se almacena la emisora
actual en la memoria ISR (sólo en el modo de la radio).
Cambia entre la visualización principal, visualización secundaria, y visualización del reloj.
Exploración de
emisoras
memorizadas.
Cuando lo mantenga
presionado durante 2
segundos:
Almacenamiento
automático.
Reproductor de
discos compactos
Reproducción de la
primera canción.
Reproducción desde
el tope.
Movimiento a canciones superiores e
inferiores. Cuando lo mantenga presionado
durante 1 segundo: Avance/retroceso rápido.
Cambio entre reproducción y pausa.
Reproducción con
exploración.
Cambiador de discos
compactos/minidiscos
Cambiador de DVD
Movimiento al disco
siguiente en orden
ascendente.
Reproducción con
exploración.
Cuando lo mantenga
presionado durante 1
segundo:
Reproducción con
exploración de
discos.
Televisor
Cambio de la banda
de recepción.
Movimiento a canales
memorizados
superiores e inferiores.
Sin función.
Exploración de
emisoras
memorizadas.
Cuando lo mantenga
presionado durante 2
segundos:
Almacenamiento
automático.
Español
[RPT]
[RDM]
∗ Algunos de los botones correspondientes de la unidad principal y del controlador remoto posen funciones
diferentes.
∗ El botón [DUAL ZONE] no està disponìble.
Sin función.
Sin función.
Reproducción
repetida.
Reproducción
aleatoria.
Reproducción
repetida.
Cuando lo mantenga
presionado durante 1
segundo:
Reproducción
repetida de discos.
Reproducción
aleatoria.
Cuando lo mantenga
presionado durante 1
segundo:
Reproducción
aleatoria de discos.
Sin función.
Cambio entre
televisor y
videograbadora.
DXZ535 65
Page 62

7. OPERACIONES
Nota: Cerciórese de leer este capítulo consultando los diagramas de la parte
Operaciones básicas
frontal del capítulo “3. CONTROLES” de la página 5 (desplegada).
PRECAUCIÓN
Cerciórese de reducir el nivel del volumen
antes de desconectar la alimentación de la
unidad o de poner la llave de encendido en
OFF. Si desconectase la alimentación con el
volumen a alto nivel, cuando volviese a conectarla, el volumen alto repentino podría
dañar sus oídos y la unidad.
Conexión/desconexión de la
alimentación
Nota:
•
Tenga cuidado cuando utilice la unidad durante mucho tiempo sin el motor en marcha. Si se agotase la
batería, no podría arrancar el motor, y posiblemente
se reduciría la duración útil de dicha batería.
1. Presione el botón [FNC].
2. Se encenderán la iluminación el visualizador
de la unidad. La unidad recuerda
automáticamente el último modo de operación, y cambiará de forma automática a la visualización de tal modo.
3. Para desconectar la alimentación de la unidad, mantenga presionado el botón [FNC]
Español
durante 1 segundo o más.
Nota:
• Comprobación del sistema
La primera vez que conecte la alimentación de
esta unidad, después de haber finalizado la conexión de los cables, ésta comprobará qué equipos están conectados. Cuando conecte la alimentación, en el visualizador aparecerán alternativamente “SYSTEM” y “PUSH PWR”. Presione el botón [FNC]. En la unidad se iniciará la la comprobación del sistema.
del sistema, vuelva a presionar el botón [FNC].
Cuando finalice la comprobación
Selección del modo
1. Presione el botón [FNC] para cambiar el
modo de operación.
2. Cada vez que presione el botón [FNC], el
modo de operación cambiará en el orden siguiente:
Modo de la radio ➜ modo de SIRIUS ➜
modo de CD ➜ modo del cambiador de CD
➜ modo del cambiador de MD ➜ modo del
cambiador de DVD ➜ modo de TV ➜ modo
de AUX ➜ modo de la radio...
∗ Los equipos externos no conectados a través
de CeNET no se visualizarán.
66 DXZ535
Ajuste del volumen
Al girar el mando [ROTARY] hacia la derecha,
el volumen aumentará, y al girarlo hacia la izquierda, se reducirá.
∗ El margen del volumen es de 0 (mínimo) a 33
(máximo).
Cambio de la visualización
Presione el botón [D] para seleccionar la visualización deseada. Cada vez que presione el botón
[D], la visualización cambiará en el orden siguiente:
Visualización principal
Visualización secundaria
Visualización del reloj
Visualización principal
∗ Después de haber seleccionado la visualiza-
ción deseada, ésta pasará a ser la predeterminada. Cuando realice un ajuste de función,
como el ajuste del volumen, la pantalla cambiará momentáneamente a la visualización de
tal función, y después volverá a la visualización preferida varios segundos después de
haber realizado el ajuste.
∗ Cuando haya introducido un título en un disco
CD, aparecerá en la visualización secundaria.
Si no ha introducido ningún título, aparecerá
“NO TITLE” en su lugar en la visualización
del título. Con respecto a la información sobre
cómo introducir un título, refiérase a la
subsección “Introducción de títulos” de la
sección “Operaciones comunes a todos los
modos”.
Page 63

Operaciones básicas
Ajuste del reforzador Z mejorado
Esta unidad dispone de 4 tipos de efectos de tono
de sonido almacenados en la memoria. Seleccione
el deseado.
∗ El ajuste de fábrica es “Z+ OFF”.
Cada vez que presione el botón [Z+], el efecto
del tono cambiará en el orden siguiente.
“Z+ OFF” ➜ “B-BOOST” ➜ “IMPACT” ➜ “EXCITE” ➜ “CUSTOM” ➜ “Z+ OFF” ...
• B-BOOST: graves reforzados
• IMPACT: graves y agudos reforzados
• EXCITE: graves y agudos reforza-
• CUSTOM: ajuste del usuario
• Z+ OFF: sin efecto de sonido
dos, medios atenuados
Ajuste del tono
Presione el botón [A-M] y seleccione el ítem
que desee ajustar. Cada vez que presione el
botón [A-M], el ítem cambiará en el orden siguiente:
●
Cuando “B-BOOST” esté ajustado
“B-BOOST” ➜ “BAL 0” ➜ “FAD 0” ➜ Modo
de última función.
●
Cuando “IMPACT” esté ajustado
“IMPACT” ➜ “BAL 0” ➜ “FAD 0” ➜ Modo
de última función.
●
Cuando “EXCITE” esté ajustado
“EXCITE” ➜ “BAL 0” ➜ “FAD 0” ➜ Modo
de última función.
●
Cuando “CUSTOM” esté ajustado
“BASS” ➜ “TREBLE” ➜ “BAL 0” ➜ “FAD
0” ➜ Modo de última función.
●
Cuando “Z+ OFF” esté ajustado
“BAL 0” ➜ “FAD 0” ➜ Modo de última
función.
Ajuste de los graves (Ganancia,
frecuencia, y curva Q)
Este ajuste podrá realizarse cuando el
reforzador Z Plus esté ajustado a “CUSTOM”.
1.
Presione el botón [A-M] y seleccione “BASS”.
2. Al girar el mando [ROTARY] hacia la dere-
cha se acentuarán los graves, y al girarlo hacia la izquierda, se atenuarán.
∗ El ajuste de fábrica es “B<G 0>”. (Margen de
ajuste: –6 a +6)
3. Presione el botón [d] o [a] para seleccio-
nar “B<F 60>”.
Gire el mando [ROTARY] hacia la derecha o
la izquierda para seleccionar la frecuencia.
∗ El ajuste predeterminado en fábrica es “B<F
60>”. (Ajuste 60/100/200 Hz)
4. Presione el botón [d] o [a] para seleccio-
nar “B<Q 1>”.
Gire el mando [ROTARY] hacia la derecha o
la izquierda para seleccionar la curva Q.
∗ El ajuste predeterminado en fábrica es “B<Q
1>”. (Ajuste 1/1.25/1.5/2)
5. Cuando finalice el ajuste, presione el botón
[A-M] varias veces hasta seleccionar el
modo de función.
Ajuste de los agudos (Ganancia y
frecuencia)
Este ajuste podrá realizarse cuando el
reforzador Z Plus esté ajustado a “CUSTOM”.
1.
Presione el botón [A-M] y seleccione
“TREBLE”.
2. Al girar el mando [ROTARY] hacia la dere-
cha se acentuarán los agudos, y al girarlo
hacia la izquierda, se atenuarán.
∗ El ajuste de fábrica es “T<G 0>”. (Margen de
ajuste: –6 a +6)
3. Presione el botón [d] o [a] para seleccio-
nar “T<F 10>”.
Gire el mando [ROTARY] hacia la derecha o
la izquierda para seleccionar la frecuencia.
∗ El ajuste predeterminado en fábrica es “T<F
10>”. (Ajuste 10 kHz/15 kHz)
4. Cuando finalice el ajuste, presione el botón
[A-M] varias veces hasta seleccionar el
modo de función.
Español
DXZ535 67
Page 64

Operaciones básicas
Ajuste del equilibrio entre los
altavoces izquierdos y derechos
1. Presione el botón [A-M] para seleccionar
“BAL 0”.
2. Al girar el mando [ROTARY] hacia la derecha
se acentuará el sonido de los altavoces derechos, y al girarlo hacia la izquierda se acentuará el de los altavoces izquierdos.
∗ El ajuste de fábrica es “BAL 0”. (Margen de
ajuste: L13 a R13)
3. Cuando haya finalizado el ajuste, presione
varias veces el botón [A-M] hasta seleccionar el modo de función deseado.
Ajuste del equilibrio entre los
altavoces delanteros y traseros
1.
Presione el botón [A-M] para seleccionar “FAD
0”.
2. Al girar el mando [ROTARY] hacia la derecha
se acentuará el sonido de los altavoces delanteros, y al girarlo hacia la izquierda se
acentuará el de los altavoces traseros.
∗ El ajuste de fábrica es “FAD 0”. (Margen de
ajuste: F12 a R12)
3. Cuando haya finalizado el ajuste, presione
varias veces el botón [A-M] hasta seleccionar el modo de función deseado.
Español
Ajuste del reforzador Z Plus
1. Presione el botón [Z+] y seleccione el modo
de reforzador Z Plus para ajustarlo.
2. Presione el botón [A-M] y gire el mando
[ROTARY] hacia la derecha para ajustar en
el sentido +, y hacia la izquierda para ajustar
en el sentido –.
●
Cuando seleccione “B-BST 0” podrá ajustar
los graves dentro del margen de –3 a 3.
● Cuando seleccione “IMPACT 0”, podrá
ajustar los graves y los agudos dentro de
la gama de –3 a 3.
● Cuando seleccione “EXCITE 0”, podrá
ajustar los graves y los agudos dentro del
margen de –3 a 3.
∗ Cuando seleccione el reforzador Z Plus, man-
tenga presionado el botón [Z+] durante 2 segundos o más para cambiar el modo
“CUSTOM”.
Las características de graves/agudos adquirirán una respuesta plana y en el visualizador
aparecerá la indicación “Z+FLAT”.
Vuelva a presionar el botón [Z+] para cambiar
el modo “Z+ OFF”.
Ajuste de MAGNA BASS EXTEND
La característica de MAGNA BASS EXTEND no
ajusta el sonido de los graves como lo hace la
función de ajuste del sonido normal, sino que
acentúa los graves bajos para proporcionarle un
sonido dinámico.
∗ El ajuste predeterminado de fábrica es el de
desactivado.
1. Presione el botón [A-M] y manténgalo
presionado durante 1 o más segundos para
activar el efecto MAGNA BASS EXTEND.
Se encenderá “M-B EX” en el visualizador.
2. Presione el botón [A-M] y manténgalo
presionado durante 1 o más segundos para
desactivar el efecto MAGNA BASS
EXTEND. Se apagará “M-B EX” en el
visualizador.
Ajuste del altavoz de subgraves
Cuando tenga el ajuste predeterminado de
fábrica, seleccione uno de los modos (LPF50,
LPF80, LPF120).
∗ El ajuste predeterminado de fábrica es “S-
VOL 0” (Margen de ajuste; –6 a +6)
1. Presione el botón [SW-VOL ] para
seleccionar el incremento la reducción del
volumen del altavoz de subgraves.
2. Presione y mantenga presionado el botón
[SW-VOL ] y el volumen del altavoz de
subgraves se incrementará o reducirá.
68 DXZ535
Page 65

Operaciones de la radio
Recepción de FM
Para mejorar el rendimiento de recepción de
FM, el sintonizador
cuitos de control de estéreo mediante señal, de
control automático de ganancia (AGC) múltiple
mejorado, de reducción de ruido de impulsos, y
de reducción de ruido de trayectoria múltiple.
®
incluye cir-
Cambio del área de recepción
Esta unidad ha sido ajustada inicialmente a los
intervalos de frecuencia de EE.UU. de 10kHz
para AM y 200kHz para FM. Cuando utilice el
reproductor fuera de EE.UU., podrá cambiar la
gama de recepción de frecuencias a los intervalos indicados a continuación.
● Ajuste del área de recepción
1. Presione el botón [BND] y seleccione la
banda de radio deseada (FM a AM).
2. Mientras presiona el botón [A-M] y mantiene
presionado el número “2” de los botones
[DIRECT] durante 2 o más segundos, el área
de recepción cambiará desde dentro de
EE.UU. a fuera de EE.UU.
3. Mientras presiona el botón [A-M] y mantiene
presionado el número “1” de los botones
[DIRECT] durante 2 o más segundos, el área
de recepción cambiará desde fuera de
EE.UU. a dentro de EE.UU.
∗ Cuando se cambia el área de recepción, se
pierden las memorias de las emisoras
preajustadas.
Escucha de la radio
1. Presione el botón [FNC] para seleccionar el
modo de radio. La frecuencia o PS aparecerá
en el visualizador.
∗ PS: Nombre de servicio de programa
2. Presione el botón [BND] para seleccionar la
banda de radiorrecepción. Cada vez que presione el botón, la banda de radiorrecepción
cambiará en el orden siguiente:
FM1 ➜ FM2 ➜ FM3 ➜ AM (MW/LW) ➜ FM1...
3. Presione la botón [a] o [d] hasta sintoni-
zar la emisora deseada.
Sintonía con búsqueda
1. Presione el botón [BND] para seleccionar la
banda deseada (FM o AM).
∗ Si en el visualizador está indicándose
“MANU”, mantenga presionado el botón
[BND] durante 1 segundo o más. “MANU”
desaparecerá del visualizador y la sintonía
con búsqueda estará disponible.
2. Presione la botón [a] o [d] para buscar
automáticamente una emisora.
Cuando presione el botón [d], se buscarán
emisoras en el sentido de frecuencias superiores; si presiona el botón [a], las
emisoras se buscarán en el sentido de
frecuencias inferiores.
Sintonía manual
Existen 2 modos disponibles: sintonía rápida y
sintonía por pasos.
Cuando utilice el modo de sintonía por pasos, la
frecuencia cambiará un paso cada vez. En el
modo de sintonía rápida, usted podrá sintonizar
rápidamente la frecuencia deseada.
1. Presione el botón [BND] para seleccionar la
banda deseada (FM o AM).
∗ Si “MANU” no está indicándose en el
visualizador, mantenga presionado el botón
[BND] durante 1 segundo o más. En el
visualizador aparecerá “MANU” y la sintonía
manual estará disponible.
2. Sintonice la emisora.
● Sintonía rápida:
Mantenga presionada el botón [a] o [d]
durante 1 segundo o más para sintonizar
una emisora.
● Sintonía por pasos:
Presione el botón [a] o [d] para sintonizar
manualmente una emisora.
Español
Sintonía
Existen 3 modos de sintonía: sintonía con bús-
queda, sintonía manual, y sintonía memorizada.
DXZ535 69
Page 66

Operaciones de la radio
Invocación de una emisora
memorizada
En la memoria existe un total de 24 posiciones
de memorización (6 de FM1, 6 de FM2, 6 de
FM3 y 6 de AM) para almacenar emisoras individuales.
Al presionar el botón [DIRECT] correspondiente
se invocará automáticamente la frecuencia de la
emisora almacenada.
1. Presione el botón [BND] para seleccionar la
banda deseada (FM o AM).
2. Presione el botón [DIRECT] correspondiente
para invocar la emisora almacenada.
∗ Para almacenar una emisora en la memoria,
mantenga presionado uno de los botones
[DIRECT] durante 2 segundos o más.
Memorización manual
1. Seleccione la emisora deseada con la
sintonía con búsqueda, la sintonía manual, o
la sintonía memorizada.
2. Para almacenar una emisora en la memoria,
mantenga presionado uno de los botones
[DIRECT] durante 2 segundos o más.
Almacenamiento automático
El almacenamiento automático es una función
para almacenar hasta 6 emisoras automática y
Español
secuencialmente sintonizadas. Si no pueden recibirse 6 emisoras, las previamente almacenadas permanecerán en sus posiciones de memoria.
1. Presione el botón [BND] para seleccionar la
banda deseada (FM o AM (MW/LW)).
2. Mantenga presionado el botón [P/A] durante
2 segundos o más. Las emisoras con buena
recepción se almacenarán automáticamente
en los canales de memorización.
∗ Si realiza la memorización automática en las
bandas de FM, las emisoras se almacenarán
en FM3, aunque haya elegido FM1 o FM2
para almacenarlas.
Exploración memorizada
La exploración memorizada recibirá por orden
las emisoras almacenadas en la memoria. Esta
función será muy útil para buscar la emisora
memorizada deseada.
1. Presione el botón [P/A].
2. Cuando sintonice la emisora deseada, vuelva a presionar el botón [P/A] para continuar
recibiendo tal emisora.
Nota:
• Tenga cuidado de no mantener presionado el bo-
tón [P/A] durante 2 segundos o más, ya que se
activaría la función de almacenamiento automático y la unidad comenzaría a memorizar emisoras.
Sintonización instantánea de
emisoras (ISR)
La sintonización instantánea de emisoras es un
método de preajuste especial de emisoras de
radio que accede instantáneamente a la
emisora preferida pulsado un botón. La función
de ISR funcionará incluso con la unidad en
otros modos.
● Memoria de ISR
1. Seleccione la emisora que desee almacenar
en la memoria de ISR.
2. Mantenga presionado el botón [I] durante 2 o
más segundos.
● Sintonización de una emisora con ISR
En cualquier modo que esté utilizando, presione
el botón [I] para activar la función de la radio y
sintonizar la emisora que desee. Aparecerá
“ISR” en el visualizador. Presione de nuevo el
botón [I] para volver al modo anterior.
70 DXZ535
Page 67

Operaciones del reproductor de discos compactos
Carga de un disco compacto
1. Presione el botón [OPEN] para lograr acceso
a la ranura para discos CD (CD SLOT) situada detrás del panel abatible (FLIP DOWN
PANEL).
2. Inserte un disco CD en el centro de la ranura
para discos CD (CD SLOT) con la cara de la
etiqueta hacia arriba. El disco CD se reproducirá automáticamente después de haberse
cargado.
Notas:
• No inserte nunca objetos extraños en la ranura
para discos CD.
• Si el disco compacto no puede insertarse fácil-
mente, es posible que ya haya otro insertado en el
mecanismo, o que la unidad necesite reparación.
• Los discos que no tienen la marca o
y los discos CD-ROM no pueden
reproducirse en esta unidad.
• Es posible que algunos discos CD grabados en el
modo CD-R/CD-RW no puedan emplearse.
Carga de discos compactos de 8 cm
∗ Para reproducir discos compactos de 8 cm no se
requerirá adaptador.
∗ Inserte el disco compacto de 8 cm en el centro de
la ranura de inserción.
3. Cierre el PANEL ABATIBLE.
PRECAUCIÓN
Tenga cuidado de no pillarse los dedos
cuando cierre el PANEL ABATIBLE.
Notas:
• Si el PANEL ABATIBLE no se abre completamen-
te, ábralo suavemente con la mano.
• Después de haber cargado un disco compacto,
cierre siempre el PANEL ABATIBLE.
Escucha de un disco compacto ya
insertado
Presione el botón [FNC] para seleccionar el
modo de reproductor de discos compactos. La
reproducción se iniciará automáticamente. Si no
hay disco compacto cargado en la unidad, en el
visualizador aparecerá “NO DISC”.
Detención de la reproducción
1.
Para detener la reproducción, presione el botón
[ ]. En el visualizador aparecerá “PAUSE”.
2. Para reanudar la reproducción del disco com-
pacto, vuelva a presionar el botón [ ].
Visualización de títulos de discos
compactos
Esta unidad puede visualizar los datos de títulos
de discos compactos CD-text, y los títulos introducidos con la misma por el usuario.
1. Presione el botón [D] para hacer que se
visualice el título.
2.
Cada vez que mantenga presionado el botón
[D] durante 1 segundo o más, la visualización
del título cambiará en el orden siguiente:
Título de usuario (disco) ➜ título de CD-text
(disco) ➜ nombre del artista ➜ título de CDtext (canción) ➜ título de usuario (disco)...
Nota:
• Si el disco compacto en reproducción no es CD-
text, o no ha introducido ningún título de usuario,
en el visualizador aparecerá “NO TITLE”.
Expulsión de un disco compacto
1. Presione el botón de [OPEN] para abrir el
PANEL ABATIBLE.
2. Presione el botón de [Q] para expulsar el
disco compacto. Extráigalo de la posición de
expulsión.
3. Cierre el PANEL ABATIBLE.
PRECAUCIÓN
Tenga cuidado de no pillarse los dedos
cuando cierre el PANEL ABATIBLE.
Notas:
• Si el PANEL ABATIBLE no se abre completamen-
te, ábralo suavemente con la mano.
• Después de haber extraído el disco compacto,
cerciórese de cerrar el PANEL ABATIBLE.
∗ Si deja un disco compacto (12 cm) en posición de
expulsado durante 15 segundos, volverá a cargarse automáticamente (Recarga automática).
∗ Los discos compactos de 8 cm no se recargarán
automáticamente. Cerciórese de extraer el disco
cuando salga expulsado.
Nota:
• Si forzase un disco compacto antes de la recarga
automática, podría dañarlo.
Español
DXZ535 71
Page 68

Operaciones del reproductor de discos compactos
Selección de una canción
● Canciones posteriores
1. Presione el botón [d] para avanzar hasta el
comienzo de la canción siguiente.
2. Cada vez que presione el botón [d], la can-
ción avanzará hasta el comienzo de la siguiente.
● Canciones anteriores
1. Presione el botón [a] para retroceder hasta
el comienzo de la canción actual.
2. Para retroceder al comienzo de la canción
anterior, presione dos veces el botón [a].
Avance/retroceso rápidos
● Avance rápido
Mantenga presionado el botón [d] durante 1
segundo o más.
● Retroceso rápido
Mantenga presionado el botón [a] durante 1
segundo o más.
Función de vuelta al comienzo del
disco
Esta función repondrá el reproductor de discos
compactos a la primera canción del disco.
Para reproducir la primera canción (canción
Español
núm. 1) del disco, presione el botón [BND].
Reproducción repetida
La reproducción repetida reproducirá
continuamente la canción actual. Esta función
continuará automáticamente hasta que la
cancele.
1.
Presione el botón [RPT]. En el visualizador
aparecerá “RPT” y la canción actual se
repetirá.
2. Para cancelar la reproducción repetida,
vuelva a presionar el botón [RPT]. “RPT”
desaparecerá del visualizador y continuará
la reproducción de la canción actual.
Reproducción aleatoria
La reproducción aleatoria seleccionará y
reproducirá canciones individuales de uno disco
sin orden particular. Esta función continuará
automáticamente hasta que la cancele.
1. Presione el botón [RDM]. En el visualizador
aparecerá “RDM”, se seleccionará
aleatoriamente una canción individual, y se
iniciará la reproducción.
2. Para cancelar la reproducción aleatoria,
vuelva a presionar el botón [RDM]. “RDM”
desaparecerá del visualizador y se
reanudará la reproducción normal.
Reproducción con exploración
La reproducción con exploración localizará y
reproducirá automáticamente los primeros 10
segundos de cada canción de un disco. Esta
función continuará en el disco hasta que la
cancele.
∗ La reproducción con exploración será muy útil
para seleccionar la canción deseada.
1. Para iniciar la reproducción con exploración,
presione el botón [SCN]. En el visualizador
aparecerá “SCN”.
2.
Para cancelar la reproducción con
exploración, vuelva a presionar el botón
[SCN]. “SCN” desaparecerá del visualizador
y continuará la reproducción de la canción
actual.
72 DXZ535
Page 69

Operaciones comunes a todos los modos
Ajuste del FILTRO DE PASO BAJO
∗ El ajuste predeterminado de fábrica es “LPF
120”.
1. Presione y mantenga presionado el botón [T]
durante 1 o más segundos para cambiar a la
visualización selección de ajuste.
2. Presione el botón [a] o [d] para
seleccionar “SW LPF”.
3. Gire el mando [ROTARY] hacia la derecha o
la izquierda para efectuar la selección del
ajuste. Cada vez que gire el mando
[ROTARY], el ajuste cambiará en el orden
siguiente:
REAR ➜ LPF 50 ➜ LPF 80 ➜ LPF 120
4. Presione el botón [T] para volver al modo
anterior.
Control de regulación de brillo
Usted podrá activar o desactivar el control de
regulación de brillo.
∗ El ajuste de fábrica es “ON”.
1. Mantenga presionado el botón [T] durante 1
segundo o más para cambiar a la visualización de selección de ajuste.
2. Presione el botón [a] o [d] para seleccio-
nar “DIMMER”.
3. Gire el mando [ROTARY] hacia la derecha
para ajustar “ON” o hacia la izquierda para
ajustar “OFF”.
4. Presione el botón [T] para volver al modo
anterior.
Ajuste del contraste del
visualizador
Podrá ajustar el contraste del visualizador para
adaptarlo al ángulo de instalación de la unidad.
∗ El ajuste predeterminado de fábrica es “5”. Nivel
de ajuste: 1 a 8)
1. Presione el botón [T] y manténgalo
presionado durante 1 o más segundos para
cambiar la visualización de selección de
ajuste.
2. Presione el botón [a] o [d] para
seleccionar “CONTRAST”.
3. Gire el mando [ROTARY] hacia la derecha o
hacia la izquierda para ajustar el contraste.
4. Presione el botón [T] para volver al modo
anterior.
Ajuste del método para
desplazamiento del título
Ajuste cómo desplazar el título en CD-TEXT o MD.
∗ El ajuste de fábrica es “ON”.
1. Mantenga presionado el botón [T] durante 1
segundo o más para cambiar a la visualización de selección de ajuste.
2. Presione el botón [a] o [d] y seleccione
“SCROLL”.
3. Gire el mando [ROTARY] hacia la derecha o
la izquierda, en la forma necesaria, y seleccione “ON” u “OFF”.
● ON:
Para que el desplazamiento se realice
automáticamente.
● OFF:
Para desplazar solamente 1 vez cuando
haya cambiado el título o haya presionado la
tecla de título.
4. Presione el botón [T] para volver al modo
anterior.
Función de entrada auxiliar (AUX)
Este sistema posee una toma de entrada externa para que pueda escuchar los sonidos y la
música de dispositivos externos conectados a la
misma
Español
Selección de la sensibilidad de
entrada auxiliar (AUX IN)
Realice los ajustes siguientes para seleccionar
la sensibilidad cuando los sonidos de los dispositivos externos conectados a esta unidad sean
difíciles de oír incluso después de haber ajustado el volumen.
∗ El ajuste predeterminado de fábrica es “MID”.
1. Presione el botón [T] y manténgalo
presionado durante 1 o más segundos para
cambiar a la visualización de selección de
ajuste.
2. Presione el botón [a] o [d] para
seleccionar “AUX SENS”.
3. Gire el mando [ROTARY] hacia la derecha o
hacia la izquierda como sea necesario y
seleccione “HIGH”, “MID”, o “LOW”.
4. Presione el botón [T] para volver al modo
anterior.
DXZ535 73
Page 70

Operaciones comunes a todos los modos
Ajuste del reloj
1. Presione el botón [T] y manténgalo
presionado durante 1 o más segundos para
cambiar a la visualización de selección de
ajuste.
2. Presione el botón [a] o [d] para
seleccionar “CLOCK”.
3. Presione el botón [ ].
4. Presione el botón [a] o [d] para seleccio-
nar la hora o los minutos.
5. Gire el mando [ROTARY] hacia la derecha o
la izquierda para introducir la hora correcta.
∗ La visualización del reloj es según el formato
de 12 horas.
6. Para almacenar la hora en la memoria, presione el botón [ ].
7. Presione el botón [T] para volver al modo
anterior.
Nota:
•
Usted no podrá ajustar el reloj cuando esté
visualizándose solamente con la llave de encendido en ON. Si la batería del automóvil se agota, si
la desconecta, o si desinstala esta unidad, el reloj
se repondrá. Durante el ajuste del reloj, si presiona otro botón o selecciona una operación diferente, el modo de ajuste del reloj se cancelará.
Activación y desactivación de la
función del protector de pantalla
Español
Esta unidad dispone de la función de protector
de pantalla, que le permitirá hacer que aparezcan por orden aleatorio varios tipos de patrones
y caracteres en la indicación del estado de operación del visualizador.
Usted podrá activar y desactivar esta función.
Si presiona un botón de operación con la fun-
ción del protector de pantalla activada, aparecerá la visualización de la operación correspondiente al botón durante unos 30 segundos, y
después la visualización volverá a la del protector de pantalla.
∗ El ajuste de fábrica es “SS”.
1. Mantenga presionado el botón [T] durante 1
segundo o más para cambiar a la visualización de selección de ajuste.
2. Presione el botón [a] o [d] y seleccione
“SCRN SVR”.
3. Presione el botón [ ].
4. Gire el mando [ROTARY] hacia la derecha o
la izquierda para seleccionar el ajuste. Cada
vez que gire el mando [ROTARY], el ajuste
cambará en el orden siguiente:
OFF ➜ SS ➜ MESSAGE.
5. Presione el botón [ ] para almacenar el
ajuste.
6. Presione el botón [T] para volver al modo an-
terior.
∗ La ilustración siguiente presenta uno de los
patrones que se visualizarán cuando se active
la función del protector de pantalla.
Introducción de INFORMACIÓN DE
MENSAJES
Los mensajes de hasta 30 caracteres de
longitud pueden almacenarse en la memoria y
visualizarse para discos CD, cambiador de
discos CD y emisoras de TV.
* El ajuste predeterminado de fábrica es
“WELCOME TO CLARION”.
1. Presione y mantenga presionado el botón [T]
durante 1 o más segundos para cambiar a la
visualización selección de ajuste.
2. Presione el botón [a] o [d] para
seleccionar “INPUT”.
3. Presione el botón [ ].
4. Presione el botón [a] o [d] para mover el
cursor.
5. Presione el botón [D] para seleccionar un
carácter.
Cada vez que presione el botón [D], los
caracteres cambiarán en el orden siguiente:
Números ➜ Símbolos ➜ Letras mayúsculas
➜ Números…
6. Gire el mando [ROTARY] para efectuar la
selección del carácter deseado.
7. Repita los pasos 4 al 6 para introducir hasta
los 30 caracteres del mensaje,
8. Presione y mantenga presionado el botón
[ ] durante 2 o más segundos para
almacenar el mensaje en la memoria y
cancelar el mensaje de entrada.
74 DXZ535
Page 71

Operaciones comunes a todos los modos
Ajuste de la iluminación de los botones
Presione el botón [COLOR] para seleccionar un
tipo de color. Cada vez que presione el botón
[COLOR], el tipo cambiará en el orden
siguiente:
CLR SCAN (exploración de colores) ➜
RED (rojo) ➜ MANDARIN (mandarina) ➜
ORANGE (naranja) ➜ AMBER (ámbar) ➜
YELLOW (amarillo) ➜ Y-GREEN (verde Y) ➜
LIME (lima) ➜ GREEN (verde) ➜
D-GREEN (verde D) ➜ USER (personalizado)
➜ CLR SCAN (exploración de colores)…
● Ajuste del modo CLR SCAN (exploración
de colores)
Al seleccionar “CLR SCAN”, el color cambia
automáticamente en el orden siguiente:
CLR SCAN (exploración de colores) ➜
RED (rojo) ➜ MANDARIN (mandarina) ➜
ORANGE (naranja) ➜ AMBER (ámbar) ➜
YELLOW (amarillo) ➜ Y-GREEN (verde Y) ➜
LIME (lima) ➜ GREEN (verde) ➜
D-GREEN (verde D) ➜ USER (personalizado)
➜ CLR SCAN (exploración de colores)…
∗ El ajuste predeterminado de fábrica es “CLR
SCAN”.
∗ Durante el cambio del color, no aparece el
nombre.
∗ Después de 3 segundos, el color cambia al
siguiente.
● Ajuste del modo USER (personalizado)
El ajuste predeterminado de fábrica es “R>8
G>3”.
Para seleccionar “USER”, presione y mantenga
presionado el botón [COLOR] durante 1 o más
segundos para que aparezca “R>8 G>3” en el
visualizador.
1. Presione el botón [a] o [d] para mover el
cursor.
2. Gire el mando [ROTARY] hacia la derecha o
hacia la izquierda para seleccionar desde 0
a 8.
3. Presione y mantenga presionado el botón
[ ] durante 2 o más segundos para
almacenar el color en la memoria y cancelar
el modo de ajuste.
Introducción de títulos
Usted podrá almacenar en la memoria títulos de
hasta 8 caracteres de longitud y hacer que se
visualicen para discos compactos, el cargador
de discos compactos, y emisoras de televisión.
El número de títulos que podrá introducir para
cada modo es el siguiente.
Modo Número de títulos
Modo de CD 50 títulos
Modo de televisor 20 títulos
Modo de cambiador de
discos compactos
CDC655z conectado 60 títulos
CDC655Tz conectado 100 títulos
CDC1255z conectado 50 títulos
1. Presione el botón [FNC] para seleccionar el
modo en el que desee introducir un título
(discos compactos, cambiador de discos
compactos o televisor).
2. Seleccione y reproduzca un disco compacto
del cargador de discos compactos, o sintonice una emisora de televisión para asignarle
un título.
3. Presione el botón [D] y visualice la
visualización secundaria.
4. Presione el botón [T].
5. Presione el botón [a] o [d] para mover el
cursor.
6. Presione el botón [D] para seleccionar uno
carácter.
Cada vez que presione el botón [D], el carácter cambiará ene l orden siguiente:
Números ➜ Símbolos ➜ Letras mayúsculas
➜ Números...
7. Gire el mando [ROTARY] para seleccionar el
carácter deseado.
8. Repita los pasos 5 a 7 para introducir hasta
8 caracteres para el título.
9. Mantenga presionado el botón [ ] duran-
te 2 segundos o más para almacenar el título
en la memoria y cancelar el modo de introducción de títulos.
Número de títulos
Español
DXZ535 75
Page 72

Operaciones comunes a todos los modos
Borrado de títulos
1. Seleccione y reproduzca un disco compacto
del cargador de discos compactos, o sintonice un emisora de televisión cuyo título desee
borrar.
2. Presione el botón [D] y visualice la
visualización secundaria.
3. Presione el botón [T].
La visualización cambiará a la visualización
de introducción del título.
4. Presione el botón [BND].
5. Presione el botón [ ] y manténgalo
presionado durante 1 o más segundos para
borrar el título y cancelar el modo de
introducción de títulos.
Silenciador de audio de accionamiento
automático para teléfonos celulares
Esta unidad una conexión especial para
silenciar automáticamente la señal de audio
cuando suene el teléfono celular en el vehículo.
∗ Esta función no es compatible con todos los telé-
fonos celulares. Póngase en contacto con su
concesionario local autorizado Clarion para informarse sobre la correcta instalación y
compatibilidad.
Español
76 DXZ535
Page 73

8.
OPERACIONES DE LOS ACCESORIOS
Operaciones del cambiador de discos compactos/minidiscos
Funciones del cambiador de discos
compactos/minidiscos
Cuando haya conectado un cambiador de discos compactos/minidiscos opcional a través del
cable CeNET, esta unidad podrá controlar todas
las operaciones del mismo. Esta unidad podrá
controlar un total de 2 cambiadores (minidiscos
y/o discos compactos).
Presione el botón [FNC] para seleccionar el modo
de cambiador de discos compactos(minidiscos), e
inicie la reproducción. Si ha conectado 2
cambiadores de discos compactos(minidiscos),
presione el botón [FNC] para seleccionar el que
desee para reproducción.
∗ Si en el visualizador aparece “NO MAG”, inserte
el cartucho en el cambiador de discos compactos. Mientras el cambiador esté cargando (comprobando) el cartucho, en el visualizador se indicará “DISC CHK”.
∗ Si en el visualizador aparece “NO DISC”, extraiga
el cartucho e inserte discos en cada ranura. Después vuelva a insertar el cartucho en el cambiador de discos compactos.
∗ Si en el visualizador aparece “NO DISC”, cargue
minidiscos en el cambiador de minidiscos.
Notas:
• Es posible que algunos discos CD grabados en el
modo CD-R/CD-RW no puedan emplearse.
PRECAUCIÓN
Los discos CD-ROM no podrán reproducirse
en todos los cargadores de discos CD, dependiendo del modelo.
Detención de la reproducción
1. Para detener la reproducción, presione el bo-
tón [ ]. En el visualizador aparecerá
“PAUSE”.
2. Para reanudar la reproducción, vuelva a pre-
sionar el botón [ ].
Visualización de los títulos de CD
Esta unidad puede visualizar los datos del título
de discos CD con texto y títulos personalizados
introducidos en esta unidad.
∗ Los datos de los títulos de discos CD con texto
pueden visualizarse en esta unidad sólo cuando
se haya conectado a la unidad CDC655Tz.
● Cuando se ha conectado a la unidad
CDC655z ó CDC1255z
Presione el botón [D] para visualizar el título.
● Cuando se ha conectado a la unidad
CDC655Tz
1. Presione el botón [D] para visualizar el título.
2. Cada vez que presione y mantenga
presionado el botón [D] durante 1 o más
segundos, la visualización del título
cambiará en el orden siguiente:
Título personalizado (disco) ➜ título de texto
de CD (disco) ➜ nombre del artista ➜ título
de texto de CD (canción) ➜ título
personalizado (disco)…
Notas:
• Si el disco CD que se está reproduciendo no es
un CD con texto o no se ha introducido ningún
título personalizado, aparecerá “NO TITLE” en el
visualizador.
• Si un disco CD con texto no tiene introducido su
título de disco o título de canción, aparecerá “NO
TITLE” en el visualizador.
Cambio de títulos de discos y de
títulos de canción (MD)
Esta unidad puede visualizar títulos de disco y
títulos de canción ya introducidos en los discos
MD.
∗ En esta unidad no pueden introducirse títulos de
discos MD.
1. Presione el botón [D] para visualizar el título.
Se visualizará el título del disco o el título de
la canción.
2. Cada vez que presione y mantenga
presionado el botón [D] durante 1 o más
segundos, la visualización cambiará entre la
del título del disco y la del título de la
canción.
Nota:
• Si un disco MD no tiene introducido su título de
disco o título de canción, aparecerá “NO TITLE”
en el visualizador.
Español
DXZ535 77
Page 74

Operaciones del cambiador de discos compactos/minidiscos
Procedimiento para desplazar el
título visualizado
Ajuste “SCROLL” en “ON” o en “OFF”.
(El ajuste predeterminado de fábrica es “ON”.
Consulte la subsección “Activación y
desactivación de la función del protector de
pantalla” en la sección “Operaciones
comunes a todos los modos”.)
● Cuando se ajusta en “ON”
El título se desplaza automáticamente.
● Cuando se ajusta en “OFF”
Presione el botón [T] para desplazar el título.
Selección de un disco CD
El botón [DN] o [UP] corresponden a los discos
cargados en el cartucho.
Presione el botón [DN] o [UP] para seleccionar el
disco deseado.
∗ Si no hay ningún disco cargado en una ranura del
cartucho, aparecerá “NO DISC” en el
visualizador.
Selección de un disco MD
El botón [DN] o [UP] corresponden a los discos
MD cargados en el cambiador de MD. Presione
el botón [DN] o [UP] para seleccionar el disco
deseado.
Español
∗ Si no hay ningún disco MD cargado en una
ranura del cambiador de MD, aparecerá “NO
DISC” en el visualizador.
Selección de una canción
● Canciones posteriores
1. Presione el botón [d] para avanzar hasta el
comienzo de la canción siguiente.
2. Cada vez que presione el botón [d], la can-
ción avanzará hasta el comienzo de la siguiente.
● Canciones anteriores
1. Presione el botón [a] para retroceder hasta
el comienzo de la canción actual.
2. Para retroceder al comienzo de la canción
anterior, presione dos veces el botón [a].
Avance/retroceso rápidos
● Avance rápido
Mantenga presionado el botón [d] durante 1
segundo o más.
● Retroceso rápido
Mantenga presionado el botón [a] durante 1
segundo o más.
Reproducción con exploración
La reproducción con exploración localizará y reproducirá automáticamente los orymeros 10 segundos de cada canción de un disco. Esta función continuará en el disco hasta que la cancele.
∗ La reproducción con exploración será muy útil
para seleccionar la canción deseada.
1. Presione el botón [SCN] para iniciar la explo-
ración de canciones. En el visualizador
aparecerá “SCN”.
2. Para cancelar la reproducción con explora-
ción, vuelva a presionar el botón [SCN].
“SCN” desaparecerá del visualizador, y continuará la reproducción de la canción actual.
Reproducción con exploración de discos
La reproducción con exploración de discos localizará y reproducirá los 10 primeros segundos
de la primera canción de cada disco del cambiador de discos compactos actualmente seleccionado. Esta función continuará
automáticamente hasta que la cancele.
∗ La reproducción con exploración de discos será
muy útil para seleccionar el disco compacto deseado.
1. Mantenga presionado el botón [SCN] duran-
te 1 segundo o más. En el visualizador
aparecerán “DISC” y “SCN”, y se iniciará la
reproducción de los discos.
2. Para cancelar al reproducción con explora-
ción de discos, vuelva a presionar el botón
[SCN]. “DISC” y “SCN” desaparecerán del
visualizador, y continuará la reproducción
normal de discos desde la canción actual.
78 DXZ535
Page 75

Operaciones del cambiador de discos compactos/minidiscos
Reproducción repetida
La reproducción repetida reproducirá continuamente la canción actual. Esta función continuará
automáticamente hasta que la cancele.
1. Presione el botón [RPT]. En el visualizador
aparecerá “RPT” y se repetirá la canción actual.
2. Para cancelar la función de repetición, vuel-
va a presionar el botón [RPT]. “RPT” desaparecerá del visualizador y se reanudará la
reproducción normal.
Reproducción repetida de disco
Después de que se hayan reproducido todas las
canciones del disco actual, la función de reproducción repetida de disco volverá a repetir el
disco actual desde la primera canción. Esta función continuará automáticamente hasta que la
cancele.
1. Mantenga presionado el botón [RPT] durante
1 segundo o más. En el visualizador
aparecerán “DISC” y “RPT”, y se iniciará la
reproducción repetida de disco.
2. Para cancelar la función de reproducción re-
petida de disco, vuelva a presionar el botón
[RPT]. “DISC” y “RPT” desaparecerán del
visualizador y se reanudará la reproducción
normal de la canción actual.
Reproducción aleatoria de discos
La reproducción aleatoria de disco seleccionará
y reproducirá automáticamente canciones o discos individuales sin orden en particular. Esta
función continuará automáticamente hasta que
la cancele.
1. Mantenga presionado el botón [RDM]
durante 1 segundo o más. En el visualizador
aparecerán “DISC” y “RDM” y se iniciará la
reproducción aleatoria de discos.
2. Para cancelar la reproducción aleatoria de
discos, vuelva a presionar el botón [RDM].
“DISC” y “RDM” desaparecerán del
visualizador y se reanudará la reproducción
normal desde la canción actual.
Español
Reproducción aleatoria
La reproducción aleatoria seleccionará y reproducirá canciones individuales del disco sin orden
particular. Esta función continuará
automáticamente hasta que la cancele.
1. Presione el botón [RDM]. En el visualizador
aparecerá “RDM”, y se iniciará la reproducción aleatoria.
2. Para cancelar la reproducción aleatoria,
vuelva a presionar el botón [RDM]. “RDM”
desaparecerá del visualizador y se reanudará la reproducción normal.
DXZ535 79
Page 76

Operaciones del televisor
Funciones del sintonizador de
televisión
Cuando haya conectado un sintonizador de televisión opcional a través del cable CeNET, esta
unidad podrá controlar todas las funciones del
sintonizador de televisión. Para contemplar programas de televisión, necesitará un sintonizador
de televisión y un monitor.
Contemplación de programas de
televisión
1. Presione el botón [FNC] para seleccionar el
modo de televisión.
2. Presione el botón [BND] para seleccionar la
bonda de televisión deseada (TV1 o TV2).
Cada vez que presione el botón, la selección
de entrada cambiará entre TV1 y TV2.
3. Presione el botón [a] o [d] para sintonizar
la emisora de televisión deseada.
Contemplación de vídeo
El sintonizador de televisión posee un terminal
de entrada VTR al que podrá conectar un dispositivo externo. Conecte un reproductor de videocasetes (VCP) o una videograbadora (VCR) de
12 V al terminal de entrada del sintonizador de
televisión.
1. Presione el botón [ ] para seleccionar
Español
VTR.
2. Para volver a emisiones de televisión, pre-
sione el botón [ ].
Sintonía
Existen 3 tipos de sintonía disponibles: sintonía
con búsqueda, sintonía manual y sintonía memorizada.
Sintonía con búsqueda
1. Presione el botón [BND] para seleccionar la
banda de televisión deseada (TV1 o TV2).
∗ Si en el visualizador está indicándose
“MANU”, mantenga presionado el botón
[BND] durante 1 segundo o más. “MANU”
desaparecerá del visualizador y podrá utilizar
la sintonía con búsqueda.
2. Presione el botón [a] o [d] para buscar
automáticamente una emisora. Presione el
botón [d] para sintonizar automáticamente
la siguiente emisora de televisión de frecuencia superior disponible, o el botón [a]
para sintonizar automáticamente emisoras
de frecuencia inferior.
80 DXZ535
Sintonía manual
Existen 2 modos disponibles: sintonía rápida y
sintonía por pasos.
Cuando utilice el modo de sintonía por pasos, la
frecuencia cambiará un paso cada vez. En el
modo de sintonía rápida, usted podrá sintonizar
rápidamente la frecuencia deseada.
1. Presione el botón [BND] para seleccionar la
banda deseada (TV1 o TV2).
∗ Si en el visualizador no está indicándose
“MANU”, mantenga presionado el botón
[BND] durante 1 segundo o más. “MANU”
aparecerá en el visualizador y podrá utilizar la
sintonía manual.
2. Sintonice la emisora.
● Sintonía rápida:
Mantenga presionado el botón [a] o [d]
durante 1 segundo o más para sintonizar
una emisora.
● Sintonía por pasos:
Presione el botón [a] o [d] para sintonizar
manualmente una emisora.
Invocación de una emisora
memorizada
En la memoria existe un total de 12 posiciones
de memorización (6 de TV1 y 6 de TV2) para almacenar emisoras de televisión. Esto le permitirá seleccionar sus emisoras favoritas de televisión y almacenarlas en la memoria para invocarlas posteriormente.
1. Presione el botón [BND] para seleccionar la
banda de televisión deseada (TV1 o TV2).
2. Presione el botón [DIRECT] correspondiente
para invocar la emisora de televisión almacenada.
∗ Para almacenar la emisora de televisión ac-
tualmente sintonizada en la memoria, mantenga presionado uno de los botones [DIRECT]
durante 2 segundos o más.
Memorización manual
1. Seleccione la emisora de televisión deseada
con la sintonía con búsqueda, la sintonía
manual, o la sintonía memorizada.
2. Para almacenar una emisora en la memoria,
mantenga presionado uno de los botones
[DIRECT] durante 2 segundos o más.
Page 77

Operaciones del televisor
Almacenamiento automático
El almacenamiento automático selecciona
automáticamente hasta 6 emisoras de televisión
y las almacena en la memoria.
Si no pueden recibirse 6 emisoras, las previamente almacenadas permanecerán en sus posiciones de memoria.
1. Presione el botón [BND] para seleccionar la
banda de televisión deseada (TV1 o TV2).
2. Mantenga presionado el botón [P/A] durante
2 segundos o más. Las emisoras con buena
recepción se almacenarán automáticamente
en los canales de memorización.
Exploración memorizada
La exploración memorizada permitirá que el
usuario pueda ver cada emisora memorizada
antes de pasar a la siguiente. Esta función será
muy útil para buscar la emisora de televisión
deseada almacenada en la memoria.
1. Presione el botón [P/A].
2. Cuando sintonice la emisora deseada, vuelva a presionar el botón [P/A] para continuar
recibiendo tal emisora.
Nota:
• Tenga cuidado de no mantener presionado el bo-
tón [P/A] durante 2 segundos o más, ya que se
activaría la función de almacenamiento automático y la unidad comenzaría a memorizar emisoras.
Ajuste de diversidad de televisión
Usted podrá cambiar el ajuste de recepción
para la antena de televisión conectada al
sintonizador de televisión.
1. Mantenga presionado el botón [T] durante 1
segundo o más para cambiar a la
visualización de selección de ajuste.
2. Presione el botón [a] o [d] para
seleccionar “TV DIVER”.
3. Gire el mando [ROTARY] hacia la derecha
para ajustar a “ON” o hacia la izquierda para
ajustar a “OFF”.
● ON:
Ajusta la recepción acentuando las imáge-
nes.
● OFF:
Desactiva la recepción en diversidad.
4. Presione el botón [T] para volver al modo an-
terior.
Español
Designación del área de televisión
Cuando seleccione el área de televisión (área
de recepción de televisión), el ajuste de área
del sintonizador de televisión cambiará.
1. Mantenga presionado el botón [T] durante 1
segundo o más para cambiar a la visualización de selección de ajuste.
2. Presione el botón [a] o [d] para seleccio-
nar “TV AREA”.
3. Presione el botón [ ].
4. Gire el mando [ROTARY] hacia la derecha o
hacia la izquierda para seleccionar el área
de recepción.
5. Presione el botón [ ].
6. Presione el botón [T] para volver al modo an-
terior.
DXZ535 81
Page 78

9. EN CASO DE DIFICULTAD
Problema
La alimentación no se
conecta. (No se
produce sonido.)
Al utilizar la unidad
con amplificadores o
con una antena
motorizada, no sale
sonido.
Generales
No sucede nada al
presionar los botones.
La visualización no es
precisa.
Español
El disco compacto no
se carga.
El sonido salta o se
oye ruido.
El sonido es malo
inmediatamente
después de haber
conectado la
alimentación.
Reproductor de discos compactos
Causa
El fusible está quemado.
Las conexiones son
incorrectas.
El conductor de la antena
motorizada está
cortocircuitado a tierra, o se
necesita excesiva corriente
para controlar remotamente
los amplificadores o la
antena motorizada.
El microprocesador ha
funcionado mal debido al
ruido, etc.
Los conectores del panel de
control desmontable (DCP) o
de la unidad principal están
sucios.
Ya hay otro disco compacto
cargado.
El disco compacto está
sucio.
El disco está muy rayado o
alabeado.
Es posible que se hayan
formado gotas de agua en el
objetivo interno suando haya
estacionado en un lugar
húmedo.
Solución
Reemplace el fusible por otro del mismo amperaje. Si
el fusible vuelve a quemarse, póngase en contacto
con el comercio en el que adquirió la unidad.
Póngase en contacto con el comercio en el que
adquirió la unidad.
1. Desconecte la alimentación de la unidad.
2. Desconecte todos los conductores conectados al
conductor de la antena motorizada. Compruebe
todos los conductores para ver si existe un
cortocircuito a masa utilizando un ohmímetro.
3. Vuelva a conectar la alimentación de la unidad.
4. Vuelva a conectar, uno tras otro, todos los
conductores de control remoto del (de los)
amplificador (es) al conductor de la antena
motorizada. Si la alimentación de los
amplificadores se desconecta antes de haber
conectado todos los conductores, utilice un relé
externo para suministrar tensión de alimentación
remota (se requiere corriente excesiva).
Desconecte la
alimentación, presione el
botón [
OPEN
el panel de control
desmontable (DCP).
Mantenga presionado el
botón de reposición
durante unos 2 segundos
con un objeto puntiagudo.
Limpie la suciedad con un paño suave ligeramente
humedecido en alcohol de limpieza.
Extraiga el disco compacto antes de cargar el
nuevo.
Limpie el disco compacto con un paño suave.
Reemplace el disco compacto por otro que esté en
buenas condiciones.
Deje que se seque durante 1 hora con la
alimentación conectada.
] y extraiga
Botón de reposición
82 DXZ535
Page 79

10. INDICACIONES DE ERROR
Cuando ocurra un error, se visualizará el tipo del mismo.
Tome las medidas descritas a continuación para solucionar el problema.
Indicación
de error
ERROR 2
CD
ERROR 3
ERROR 6
ERROR 2
Causa
El disco compacto se haya atascado en
el interior del reproductor de discos
compactos y no puede extraerse.
El disco compacto no puede
reproducirse debido a ralladuras, etc.
El disco compacto está cargado al
revés en el reproductor de discos
compactos y no puede reproducirse.
No hay discos cargados en el interior del
cambiador de discos compactos.
Éste es un problema del reproductor de
discos compactos. Póngase en
contacto con el comercio en el que
adquirió la unidad.
Reemplace el disco compacto por otro
que no esté rayado ni alabeado.
Extraiga el disco y cárguelo
adecuadamente.
Éste es un problema del cambiador de
discos compactos. Póngase en contacto
con el comercio en el que adquirió la
unidad.
Solución
ERROR 3
ERROR 6
Cambiador de discos compactos
ERROR H
ERROR 2
ERROR 3
Cambiador de minidiscos
ERROR 6
El disco compacto del cambiador de
discos compactos no puede reproducirse
debido a ralladuras, etc.
El disco compacto del cambiador de
discos compactos no puede reproducirse
debido a que está cargado al revés.
Se visualizará cuando la temperatura del
cambiador de minidiscos sea demasiado
alta y la reproducción se haya parado
automáticamente.
En el interior del cambiador de
minidiscos no hay minidisco cargado.
El minidisco del interior del cambiador de
minidiscos no puede reproducirse debido
a ralladuras, etc.
El minidisco del interior del cambiador de
minidiscos no puede reproducirse debido
a que está cargado al revés.
Se visualizará cuando haya cargado un
minidisco no grabado en el cambiador de
minidiscos.
Reemplace el disco compacto por otro
que no esté rayado ni alabeado.
Extraiga el disco y cárguelo
adecuadamente.
Reduzca la temperatura ambiental y
espere durante cierto tiempo hasta que
se enfríe el cambiador de minidiscos.
Ésta es una avería del mecanismo del
cambiador de minidiscos, motivo por el
que tendrá que consultar al
establecimiento de adquisición del
mismo.
Reemplácelo por un disco no alabeado.
Extraiga el disco y después vuelva a
cargarlo adecuadamente.
Cargue un minidisco grabado en el
cambiador de minidiscos.
Español
DXZ535 83
Page 80

Indicación
de error
ERROR 2
ERROR 3
Causa
No es posible reproducir un disco insertado
en el cambiador de discos DVD.
No es posible reproducir un disco debido a
ralladuras, etc.
Solución
Este es un fallo debido al mecanismo del
cambiador de discos DVD. Consulte al establecimiento en el que adquirió la unidad.
Vuelva a probarlo, o reemplace el disco por
otro que no esté rallado ni alabeado.
ERROR 6
ERROR P
Cambiador de videodiscos
ERROR R
No es posible reproducir un disco DVD del
cambiador debido a que está insertado al
revés.
Error de nivel de censura de los padres
Error de código de región
Extraiga el disco y después vuelva a
cargarlo adecuadamente.
Ajuste el nivel de censura de los padres correcto.
Extraiga el disco y corrija el error de región.
Si aparece una indicación de error no descrita arriba, presione el botón de reposición. Si el problema
continúa, desconecte la alimentación y póngase en contacto con el comercio en el que adquirió la unidad.
Español
84 DXZ535
 Loading...