

Page 1
6. DVD VIDEO SYSTEM
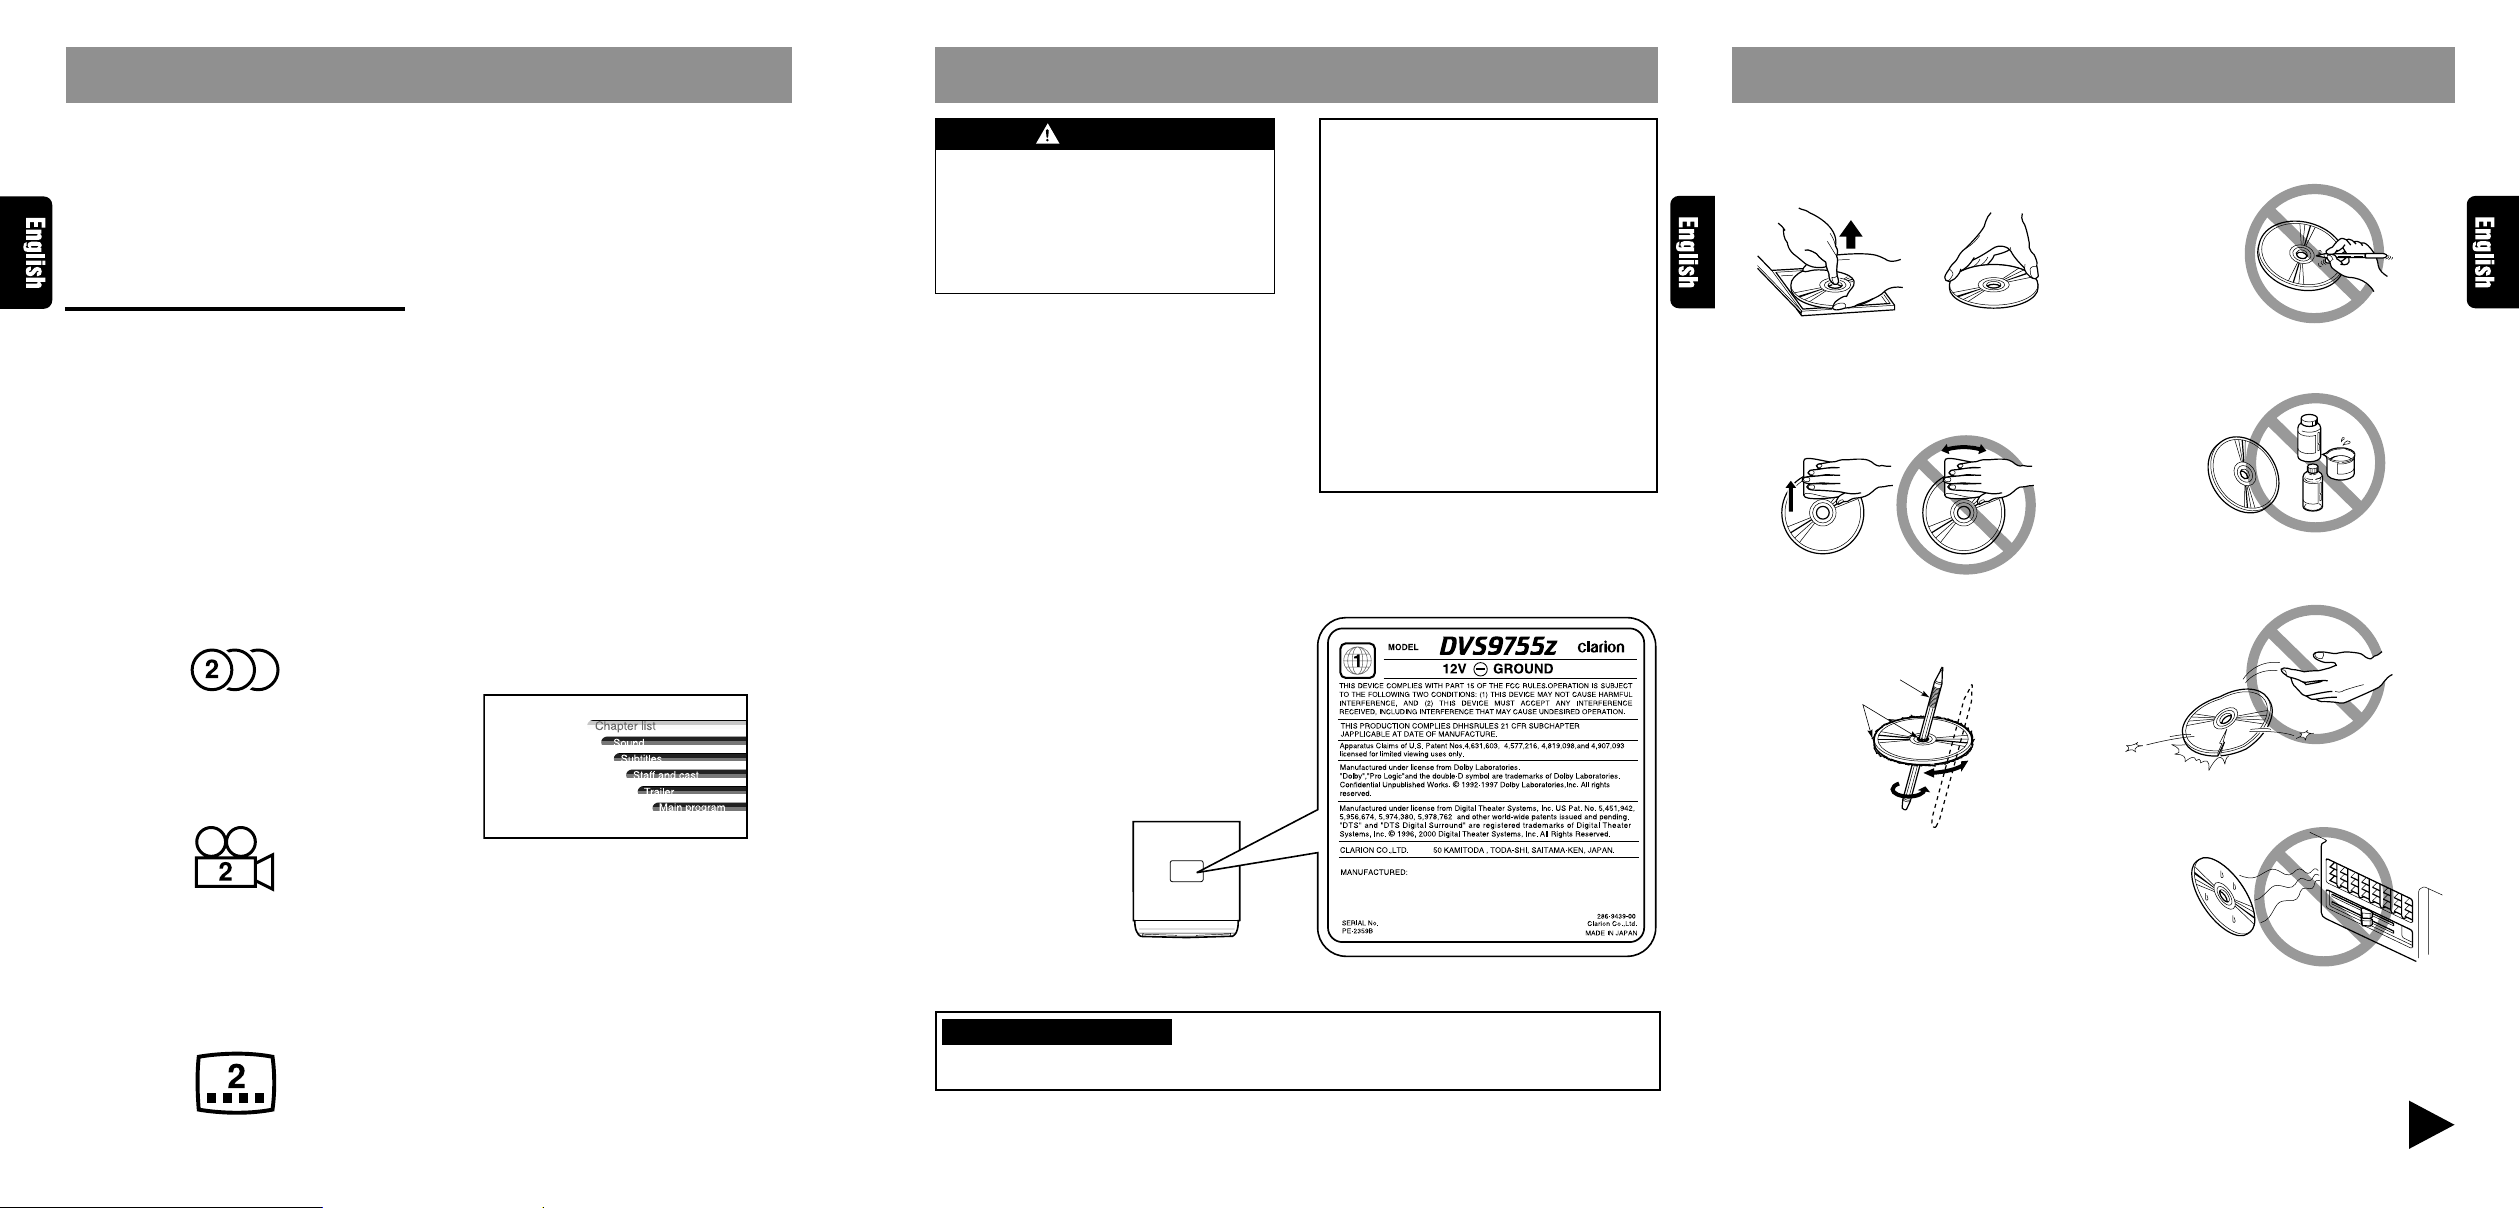
Proper way to hold
the disc
Removing the disc
No
No
2. PRECAUTIONS
3. HANDLING DISCS
DVD video is a high-quality digital video source
that provides crisp and clear images. One 12 cm
disc contains either one film or four hours of
music. The built-in 5.1 channel surround and the
Dolby digital 5.1 channel surround let you enjoy
a realistic sound that emulates the sound of a
movie theater.
DVD Video Features
This unit provides the following functions in addition to the high image quality and sound quality of DVD video.
Notes:
• The functions described in the section, “Features”,
for example, the recorded language, subtitles,
angles, etc. differ with the DVD video disc. Refer
to the instructions provided with the DVD video.
• Some disc functions may operate differently than
described in this manual.
Multi-sound function
DVD video can store up to 8 languages for one
film; select the language of your preference.
• The languages stored on the disc are indicated
by the icon shown below.
Multi-angle function
A DVD video that is filmed from multiple angles
allows you to select the angle of choice.
• The number of recorded angles are indicated by
the icon shown below.
Multi-story function
When a DVD video contains more than one story
for a film, you can select the story you wish to
enjoy. The operation procedures vary with the
disc; observe the instructions for selecting a story
provided during playback.
Dolby digital
Dolby digital enables up to 5.1 independent multichannel audio reproduction, the same type of
surround system that is also used in movie theaters.
DTS
DTS (Digital Theater System) is a sound system
that differs from the Dolby digital system. DTS
provides a larger amount of data than Dolby
digital enabling high-quality surround playback
and incorporates a DTS-CD software for music
like a DVD software allows 5.1 channel
independent multi-channel audio reproduction.
Menu screens
Menus can be called up during DVD video playback to perform menu setting.
Example showing menu display
Main Menu
WARNING
For your safety, the driver should not watch
the TV or operate the controls while driving. Please note that watching and operating the TV while driving are prohibited by
law in some countries. Also, while driving,
keep the volume to a level at which external
sounds can be heard.
1. When the inside of the car is very cold and
the player is used soon after switching on the
heater, moisture may form on the disc or the
optical parts of the player and proper playback may not be possible. If moisture forms
on the disc, wipe it off with a soft cloth. If moisture forms on the optical parts of the player,
do not use the player for about one hour. The
condensation will disappear naturally allowing normal operation.
2. Driving on extremely bumpy roads which
cause severe vibration may cause the sound
to skip.
3. This unit uses a precision mechanism. Even
in the event that trouble arises, never open
the case, disassemble the unit, or lubricate
the rotating parts.
!
This equipment has been tested and found
to comply with the limits for a Class B digital device, pursuant to Part 15 of the FCC
Rules. These limits are designed to provide
reasonable protection against harmful interference in a residential installation. This
equipment generates, uses, and can radiate radio frequency energy and, if not installed and used in accordance with the instructions, may cause harmful interference
to radio communications. However, there
is no guarantee that interference will not
occur in a particular installation. If this
equipment does cause harmful interference to radio or television reception, which
can be determined by turning the equipment off and on, the user is encouraged to
consult the dealer or an experienced radio/
TV technician for help.
To remove the disc from its storage case, press
down on the centre of the case and lift the disc
out, holding it carefully by the edges.
Always handle the disc by the edges. Never touch
the surface.
T o remove fingermarks and dust, use a soft cloth,
and wipe in a straight line from the centre of the
disc to the circumference.
New discs may have some roughness around the
edges. The unit may not work or the sound may
skip if such discs are used. Use a ball-point pen,
etc. to remove roughness from the edge of the disc.
Ball-point pen
Roughness
Note on Discs
Never stick labels on the surface of the disc or
mark the surface with a pencil or pen.
No
Do not use any solvents such as commercially
available cleaners, anti-static spray, or thinner
to clean discs.
No
Do not use discs that have large scratches, are
misshapen, or cracked, etc. Use of such discs will
cause misoperation or damage.
No
Do not expose discs to direct sunlight or any heat
source.
Subpicture (subtitles) function
A DVD video can record subtitles for up to 32
languages and you can select the language of
the subtitles you wish to see.
• The number of recorded subtitle languages are
indicated by the icon shown below.
8 DVS9755z
INFORMATION FOR USERS:
CHANGES OR MODIFICATIONS TO THIS PRODUCT NOT APPROVED BY THE MANUFACTURER WILL VOID THE WARRANTY AND WILL VIOLATE FCC APPROVAL.
Note:
•
Do not use commercially available disc protection sheets or discs equipped with stabilizers, etc. These
may get caught in the internal mechanism and damage the disc.
Be sure to unfold and read the next page. / Veuillez déplier et vous référer à la page suivante.
/ Cerciórese de desplegar y de leer la página siguiente.
DVS9755z 4DVS9755z 3
Page 2
CONTROLS / COMMANDES / CONTROLES
4.
CONTROLS / LES COMMANDES / CONTROLES
■ Control unit / Module des touches / Unidad de control
[
]
VOL
[
]
DISP
[
ENT
■ Remote control unit
■ Télécommande
■ Unidad de control remoto
]
[
JOG
[
MUTE
[
VOL
[
[
[
A.SRC
[
PWR OFF
]
]
]
]
[
]
]
]
[
MUTE
]
]
[
SOURCE
[
DISP
[
SENSOR
[
DSF
POWER
[
POWER
]
]
[
AUDIO
DSFADJUSTA-MODESOURCE
[
A-MODE
10KEYS
ON/OFF
ADJUST
]
]
]
]
]
]
[
(These buttons are available when the cover is open.)
(Pour pouvoir utiliser ces touches,ouvrez le couvercle.)
(Estos botones están disponibles cuando la tapa está abierta.)
]
]
[
SEARCH MODE
]
]
]
]
]
[
SUB-TITLE
[
[
[
DVD/AUDIO
[
RTN
[
MENU
[
TITLE
[
[
V.SRC
]
]
]
[
SELECT
[
ANGLE
(These buttons are available when
5. NOMENCLATURE
Names of Buttons
Control Unit
[VOL] button:
•Raises and lowers the volume.
•Changes the adjustment values in the AD-
JUST MODE and AUDIO MODE.
[MUTE] button:
•Turns off the sound.
[DISP] button:
•Changes the display.
•Changes set items in the ADJUST MODE.
[ENT] button:
•Determines the adjustment setting in the AD
JUST MODE.
[SOURCE] button:
•Switches the input source.
[A-MODE] button:
•Adjusts the volume balance in each speaker.
[ADJUST] button:
•Invokes the ADJUST MODE to set speakers
and other equipment.
[DSF] button:
•Changes the sound characteristics in the car.
[POWER] button:
•Turns the power on and off.
[SENSOR]: Remote control signal receiver
Remote Control Unit
[PWR OFF] button:
•Turns off the power.
[JOG] button:
•Press the top, bottom, right or left to select
menu displayed on the monitor.
•Press the center to enter the selection.
]
]
[MUTE] button:
•Turns mute on and off.
[VOL] knob:
•Turn the knob clockwise or counterclockwise
to adjust the sound volume.
[ ] button:
•Temporarily stops video and audio playback.
Press the button once again to resume playback.
[ ] button:
•Stops video and audio playback.
[ ] button:
•Locates the beginning of video or audio sections in reverse direction and performs fast
reverse playback.
[A.SRC] button:
•Switches audio inputs.
[DISP] button:
•Displays playback status of track no. or chapter no. Press the button once again to return
to the original display.
[DVD/AUDIO] switch:∗
•Set the switch to DVD for normal use.
•Set it to AUDIO when the center unit is to be
used.
∗When the DVD/AUDIO switch on the
remote control unit is set to AUDIO, some
of the functions of the remote control unit
change allowing you to control some of
the source unit functions.
• / of the [JOG] button:
performs search UP/DOWN.
• / of the [JOG] button:
increases/decreases the volume level.
•[ENT] of the [JOG] button:
functions as the play/pause button.
•[DISP] button:
selects the function mode.
•[MENU] button:
functions as the mute button.
•[RTN] button:
switches the band.
Note that when the DVD/AUDIO switch on the
remote control unit is set to AUDIO, functions
other than the above are not available.
Refer to the instructions provided with the
remote control unit of the source unit for
details.
[RTN] button:
•Press to return to the menu previously displayed on the monitor.
[MENU] button:
•Displays the menus recorded on a DVD video
disc.
[TITLE] button:
•Displays the title menus recorded on a DVD
video disc.
[ ] button:
•Locates the beginning of video or audio sections in the forward direction and performs fast
forward and slow playback.
[V.SRC] button:
•Switches video inputs.
∗When the power of this unit is turned off, the
unit returns to the video mode of the DVD video
player.
the cover is open.)
[SEARCH MODE] button:
•Locates beginning of a section using title and
chapter numbers.
[SUB-TITLE] button:
•Switches the language of the subtitles.
[10KEYS] button:
•Enters numbers.
Control Unit Display
DOLBY DIGITAL: Dolby digital indication
DOLBY PRO LOGIC: Dolby pro logic indication
LINEAR PCM: Linear PCM indication
: DTS indication
: D.S.F. indication
Title indication
Press the [SOURCE] button on
the control unit to display image
when the input source has been
changed.
INTERNAL:
When DVD, audio CD playback
is selected.
DIGITAL:
When a CD changer or other
digital playback source connected with an optical-fiber
cable is selected.
ANALOG1:
When an analog source con-
nected to an analog input with
RCA plugs is selected.
ANALOG2:
When an analog source con-
nected to an analog input with
a CeNET cable is selected.
[ON/OFF] button:
•Turns the subtitle display on and off.
[SELECT] button:
•Finalizes a numeric entry.
[ANGLE] button:
•Switches the view angle when ( ) is dis-
played.
[AUDIO] button:
•Switches languages.
Center speaker indication
Surround speaker
indication
Subwoofer indication
Mute indication
5 DVS9755z 6 DVS9755z DVS9755z 7
Page 3
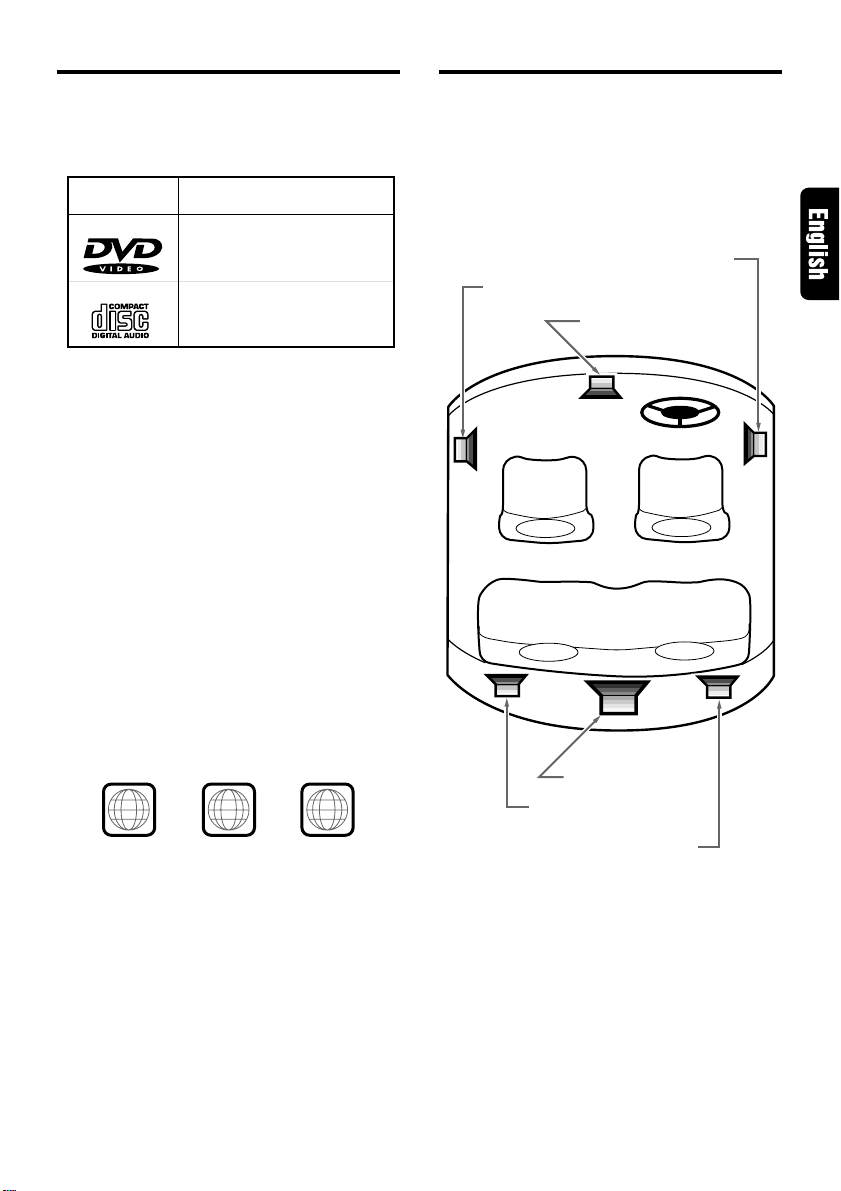
Discs
Speaker system
Playable discs
This DVD video player can play the following
discs.
Playable disc Disc size and playback time
DVD video discs
Audio CDs
Audio+video(MPEG-2 format)
12cm:133minutes to 484minutes
8cm:41minutes to 150minutes
Audio
12cm:74minutes
8cm:20minutes
Discs that cannot be played back
This DVD video player cannot play back DVD-R,
DVD-RAM, Photo CDs and Video CDs. It may
also not be possible to play back CDs recorded
on a CD-R unit. CD discs recorded on a CD-RW
unit cannot be played back.
See “ERROR DISPLAY” for information on any
error message that may be displayed during
operation.
Note on region numbers
The DVD video system assigns a region number
to DVD video players and DVD discs by sales
area. DVD video players sold in the United States
can play back DVD discs with the region number
“ALL”, “1” or any combination of numbers that
also incorporate a “1”.
The DVD video region number is marked on the
disc jacket as shown below.
1
ALL
NTSC
1
NTSC
4
NTSC
6
We recommend that you use the type of speaker
system described below to fully enjoy the surround function of a DVD video disc system. However, audio CDs do not output any signals to the
center speaker and the sub woofer, so you will
only hear sound from the front and rear speakers. Contact your dealer for further details.
Front speaker(right)
Front speaker(left)
Center speaker
Sub woofer
Surround speaker(left)
Surround speaker(right)
TV color system
This DVD player plays NTSC discs only and
cannot be used for playback of PAL or SECAM
discs.
To fully enjoy the audio capability of DVD video,
change the initial settings made at shipment as
described in the Section, “Changing Settings” (on
page20 to page21).
DVS9755z 9
Page 4
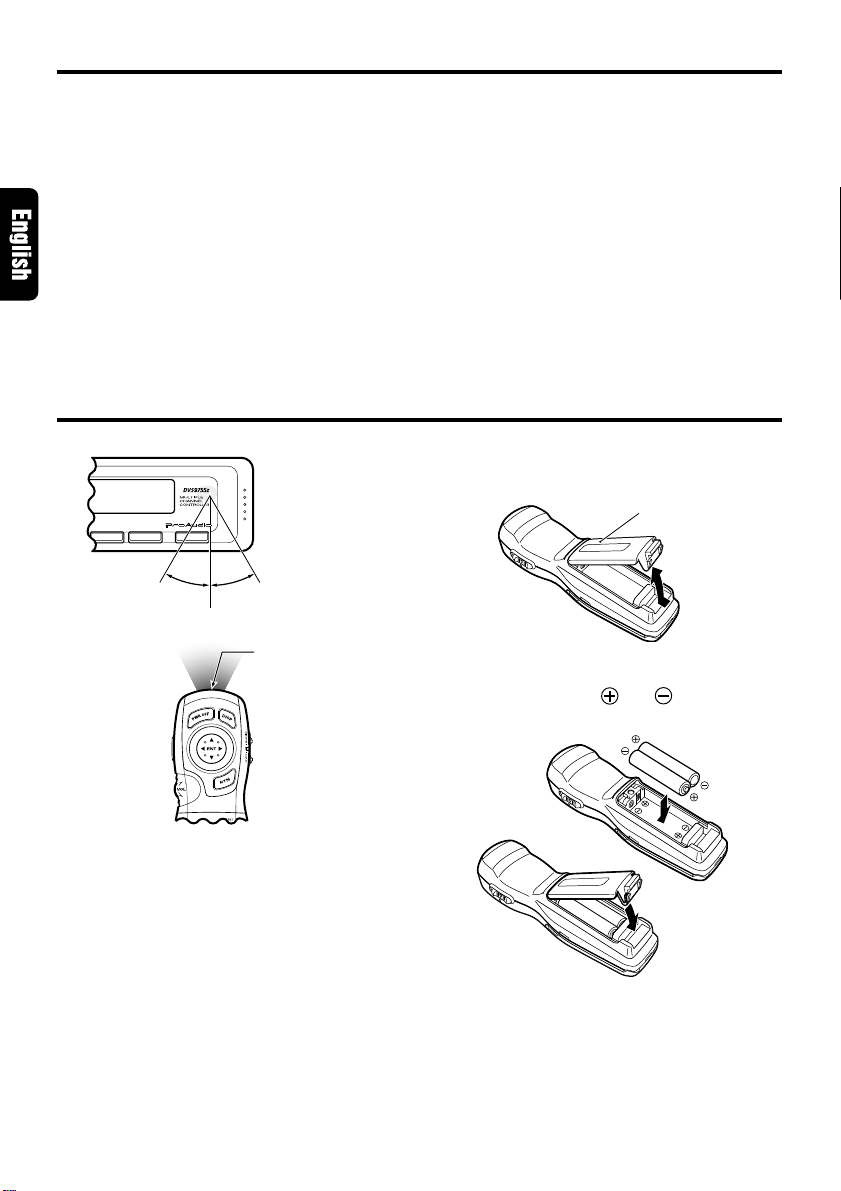
Rear cover
About the registered marks etc.
Signal transmitter
POWER
DSFADJUST
Operating range
: 30˚ in all directions
• This product incorporates copyright protection
technology that is protected by method claims of
certain U.S. patents and other intellectual property rights owned by Macrovision Corporation and
other rights owners. Use of this copyright protection tecnology must be authorized by
Macrovision Corporation, and is intended for
home and other limited viewing uses only unless
otherwise authorized by Macrovision Corporation. Reverse engineering or disassembly is prohibited.
• Manufactured under license from Dolby Laboratories.
Remote control
“Dolby”, “Pro Logic” and duble-D symbol are
trademarks of Dolby Laboratories. Confidential
Unpublished Works.©1992-1997 Dolby
Laboratories,Inc. All rights reserved.
• Manufactured under license from Digital Theater
Systems, Inc. US Pat. No. 5,451,942, 5,956,674,
5,974,380, 5,978,762 and other world-wide
patents issued and pending.
“DTS” and “DTS Digital Surround” are registered
trademarks of Digital Theater Systems, Inc. © 1996,
2000 Digital Theater Systems, Inc. All Rights
Reserved.
Replacing the batteries
1. Open the rear battery cover.
2. Insert the two supplied size AAA batteries orienting the plus and minus poles of the batter-
ies as shown by the and symbols inside
the battery compartment. Close the battery
cover.
10 DVS9755z
Notes:
Using batteries improperly can cause them to explode. Take note of the following points:
• When replacing batteries, replace both batteries
with new ones.
• Do not short-circuit, disassemble or heat batter-
ies.
• Do not dispose of batteries into fire or flames.
• Dispose of spent batteries properly.
Page 5

7. OPERATION
Basic Operations
Note: Be sure to read this chapter referring to the front diagrams of
chapter “4. CONTROLS” on page 5 (unfold).
CAUTION
Be sure to lower the volume before switching off the unit power or the ignition key. The
unit remembers its last volume setting. If you
switch the power off with the volume up, when
you switch the power back on, the sudden
loud volume may hurt your hearing and damage the unit.
Turning on/off the power
Note:
• Be careful about using this unit for a long time without running the engine. If you drain the car’s battery too far, you may not be able to start the engine and this can reduce the service life of the
battery.
1. Press the [POWER] button.
2. The settings are displayed on the control unit
display.
3. Press the [POWER] button to turn off the
power.
Switching input source
Change the settings to suit the input signal
source.
• The initial setting is [INTERNAL].
Press the [SOURCE] button.
Each time the [SOURCE] button is pressed, the
indications change as shown below.
[INTERNAL] → [DIGITAL] → [ANALOG1] →
[ANALOG2] → [INTERNAL]
• The original mode is resumed when the but-
ton is not pressed during a 7 second interval.
●
INTERNAL (Internal):
Use this setting for playing back DVD videos and
CDs.
●
DIGITAL (Digital):
Use this setting when playing back CD changer
media or other digital input sources connected
using an optical-fiber cable.
●
ANALOG1 (Analog1):
Use this setting when playing back an analog
input source connected using RCA plugs.
●
ANALOG2 (Analog 2):
Use this setting when playing back an analog
input source connected using a CeNET cable.
Adjusting the sound volume
CAUTION
The sound volume on a DVD video disc can
become very loud. For that reason, turn up
the sound volume gently when the video
image is displayed.
Press the [VOL] buttons on the control unit.
:increases the sound volume.
Y ou can also turn the [ VOL] knob on the remote
control unit clockwise or counterclockwise.
Changing display settings
Press the [ ] or [ ] [DISP] button.
Each time the [ ] or [ ] [DISP] button are
pressed, the indications change as shown below.
[PROGRAM] → [SS 1] → [SS 2] → [DISP OFF]
→ [PROGRAM] →
●
PROGRAM (Program):
Displays the sound system used for the DVD
video disc.
:decreases the sound volume
:increases the sound volume.
:decreases the sound volume
DVS9755z 11
Page 6
Basic Operations
Control unit button operations
• MONO: monaural sound
• STEREO: stereo sound
• 2/1: 2 front channels, surround monaural
• 2/2: 2 front channels, 2 channel surround
sound
• 3/0: sound via the 3 front channels
• 3/1: 3 front channels, surround monaural
sounds
• 3/2: 3 front channels, 2 channel surround
sound
• 3/2 LFE: 3 front channels, 2 surround chan-
nels and sub woofer sound.
●
SS1: displays a dolphin.
●
SS2: Displays “CLARION” being
scrolled across the display.
●
DISP OFF: the display is off.
DSF setting
DSF (Digital Sound Field) makes it possible
through sound simulation to enjoy the acoustic
experience you would have in a concert hall or a
live performance hall.
• The initial setting is [DSF OFF].
1. Press the [DSF] button.
Each time the [DSF] button is pressed, the indi-
cations change as shown below.
[DSF OFF] → [HALL] → [CHURCH] → [STA-
DIUM] → [LIVE] → [JAZZCLUB] → [THEATER]
→ [DSF OFF]
• The original mode is resumed when the
button is not pressed during a 7 second
interval.
• HALL(Hall):Large concert hall.
• CHURCH(Church):Church with a vaulted ceil-
ing.
• STADIUM(Stadium):Large stadium without
roof or walls.
• LIVE(Live):Live performance hall, larger than
a jazz club.
• JAZZCLUB(Jazzclub):Jazz club with a low
ceiling.
• THEATER(Theater):Movie or drama theatre.
2. When the [DSF] button is held down for 2 sec-
onds, the original mode is resumed.
Adjusting the sound volume balance of each speaker
(AUDIO MODE)
Y ou can adjust the sound image to suit the seating position and number of passengers.
Press the [A-MODE] button.
Each time the [A-MODE] button is pressed, the
indications change as shown below.
[SW] → [CTR] → [BAL] → [FAD] → original mode
• The original mode is resumed when the
button is not pressed during a 7 second
interval.
●
SW (Sub woofer):
Adjusts sub woofer volume.
The volume is adjusted in the range –6 to
+3.
●
CTR (Center speaker):
Adjusts center speaker volume.
The volume is adjusted in the range –6 to 0.
●
BAL (Balance):
Adjusts the sound volume in the left and right
speakers.
The sound volume is adjusted in the range
L13 to R13.
●
FAD (Fader):
Adjusts the sound volume in the front and
rear speakers.
The sound volume is adjusted in the range
R12 to F12.
Mute
Each time you press the [MUTE] button, mute is
turned on and off.
“MUTE” appears when mute is turned on.
12 DVS9755z
Page 7
DVD Operations
Remote control unit button operations
The operations described in this chapter are performed using the remote control buttons.
Replacing discs
1. Slide the door downwards until a clicking
sound is heard. The disc is now automatically
ejected.
• If the disc is left as is and not removed, it
will automatically be retracted into the unit
after 15 seconds.
2. Insert the DVD video disc in the slot with the
label side upwards. When the disc has been
inserted halfway, it is automatically pulled inside the unit.
• When an inserted DVD video disc is not to
be automatically played back, press the
[ ] button.
• When playing back a double-sided DVD
video disc, insert the disc with the top side
up, play it back entirely. Then take out the
disc and turn it over to play the other side.
(The top and back side of a DVD video disc
are marked differently on different discs.)
• Dirt or dust on the data surface may generate read errors. Wipe the disc with a soft
cloth before insertion. If errors still occur,
remove the disc.
3. Close the door.
Playing back discs
Press the [ ] button to start playback. Pressing the [ ] button again stops playback.
• When a menu is displayed, select the desired item in step 2 of the following section, “Selecting menus”.
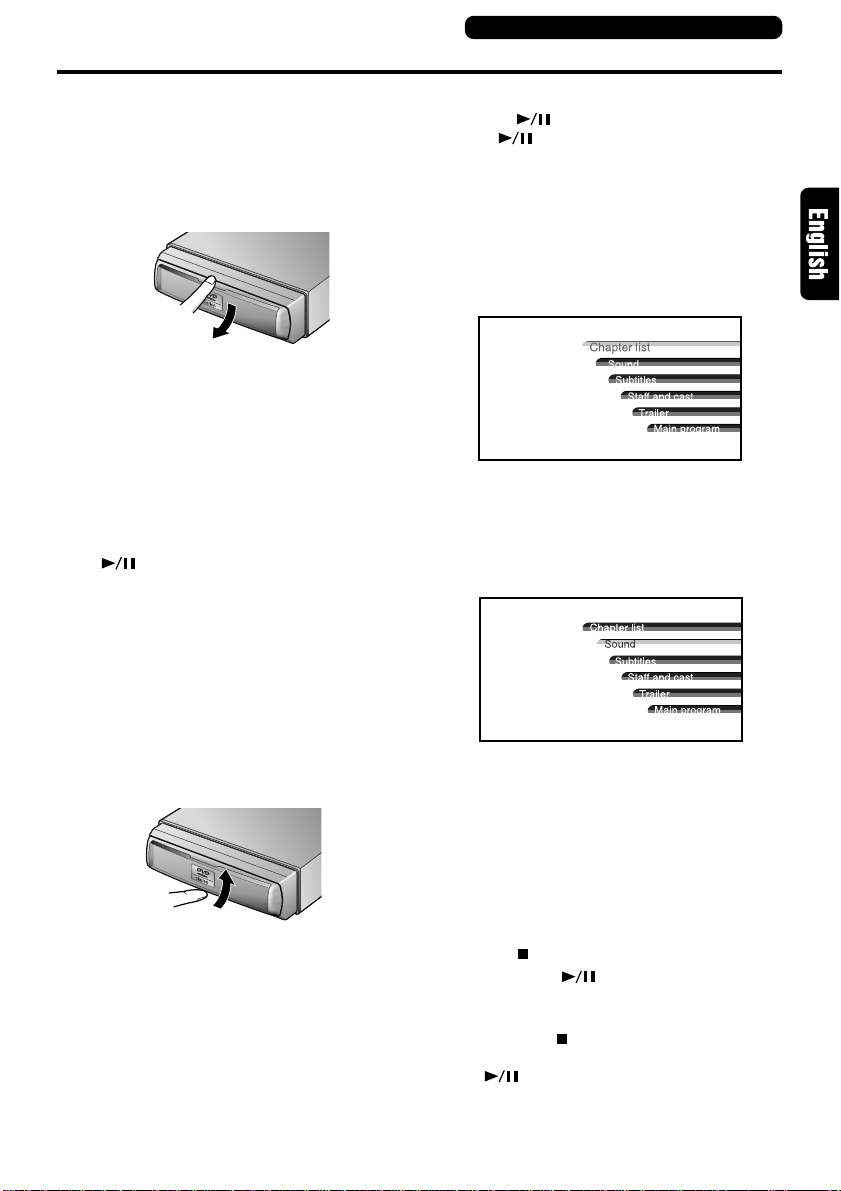
Selecting menus
1. When the [MENU] button is pressed during
playback, the DVD video menu is displayed.
Main Menu
2. Press the top or bottom of the [JOG] button to
select an item and then press the center of
the [JOG] button.
Or, use the [10KEYS] buttons to select the
item and press the [SELECT] button.
Main Menu
• Note that some DVD video discs do not allow you to select items using the [10KEYS]
buttons.
• [JOG] button operations differ with the type
of menus used on the disc.
• Also the type of menus that are displayed
varies with the DVD video disc.
• Keep the door closed at all times to prevent dust from entering the unit.
Note:
• Do not close the door before an ejected DVD video
disc has been removed. Should the door be closed
without first removing the DVD video disc, the disc
will not be ejected and may also be damaged.
Stopping playback
Press the [ ] button to stop playback.
• Press the [ ] button to start playback
from the location where playback was previously stopped.
• When the [ ] button is pressed once again
after the disc has been stopped and the
[ ] button is also pressed, the DVD
video disc is played back from the beginning.
DVS9755z 13
Page 8

DVD Operations
Remote control unit button operations
Pausing playback
Press the [ ] button to pause playback. Normal playback is resumed when the [ ] button
is pressed again.
• The disc is played back at 1/2 normal speed
when the [ ] button is pressed while disc
playback is paused.
Slow playback
The disc is played back at 1/2 normal speed while
the [ ] button is held down in pause mode.
• Slow playback cannot be performed in reverse direction. The sound is muted during
slow playback.
Skipping chapters/tracks (To locate
the beginning of a track or chapter)
Press the [ ] or [ ] button during playback.
Chapters or tracks corresponding to the number
of presses are skipped and playback is resumed.
Current
location
Chapter/track
Reverse Forward
• Press the [ ] button to start playback
from the beginning of the next chapter or
track.
• Press the [ ] button to start playback
from the beginning of the current chapter
or track.
When this button is pressed again within 1
sec, playback starts from the beginning of
the previous chapter or track.
• Chapter:
DVD video data is divided into smaller sec-
tions (chapters).
• The menu may be displayed again when
the [ ] or [ ] button is pressed.
Chapter/track Chapter/track
Fast forward/fast backward
Hold down the [ ] or [ ] button during playback.
When one of these two buttons are held down,
the speed increases after 1 sec. Normal playback
speed is resumed when the button is released.
• The sound is muted during fast forward and
fast reverse playback.
• The [ ] and [ ] buttons are also used
to locate the beginning of a section. When
one of these buttons is held down for 1 sec
or less, the beginning of a section is located
and playback starts from there.
• Some buttons are not available depending
on the DVD video story. The speed of fast
forward/backward depends on the disc.
• The menu may be displayed again when
the [ ] or [ ] button is pressed.
Locating the beginning of a section
using title and chapter numbers
This function is used to locate the beginning of a
section using the title numbers and chapter numbers recorded on a DVD video disc.
1. Press the [SEARCH MODE] button during
playback to display title number input ([T∗∗]).
Each press of the button toggles the display
between title number input ([T∗∗]) and chapter
number input ([C
• Title
DVD video data is divided into larger sections (titles).
• Chapter
DVD video data is divided into smaller sections (chapters).
2. Use the [10KEYS] buttons to enter the number of the title or chapter you wish to play back.
• The following error message is displayed
when a non-existing title number is entered
or when the beginning of a section cannot
be located using a title number.
3. Press the [SELECT] button to start playback
from the entered title number or chapter number.
∗∗∗
]).
14 DVS9755z
Page 9

Remote control unit button operations
DVD Operations
Using title menus
A DVD disc containing multiple titles can be
played back by selecting the desired title from
the title menu.
1. Press the [TITLE] button during playback to
display the title menu.
• Some DVD video discs do not allow you to
display titles using the [TITLE] button.
• Press the [TITLE] button again to resume
playback from scene where the [TITLE] button was pressed.
2. Select items by pressing the top, bottom, right
or left of the [JOG] button or enter a number
using the [10KEYS] buttons.
• The movement of selected items using the
[JOG] button depends on the disc. Selec-
tions using the [10KEYS] button also vary
with the DVD video disc.
• Note that some DVD video discs do not allow you to select items using the [10KEYS]
buttons.
3. Press the center of the [JOG] button to enter
the selection.
Selecting a language
A DVD video that contains multiple sound recordings and languages allows you to select a language during playback.
Press the [AUDIO] button during playback to
change the language.
• Some DVD video discs contain up to 8 languages. Check the disk symbol (8: indicates 8 languages).
• When the power is turned on or a DVD
video disc is replaced, the disc is played
back in the default language. When the
selected language is not on the DVD disc,
a language on the disc is selected.
• Some DVD video discs do not allow you to
change languages at all or not change languages for specific scenes.
• Changing from one language to another
may take some time.
Selecting an angle
A DVD disc where scenes have been recorded
from different camera angles allows you to select the desired angle during playback.
Press the [ANGLE] button during playback to
change the angle.
The angle changes at each press of the button.
• Some DVD video discs record up to 9
different angles. Check the disk symbol
( : indicates 2 angles).
• The change between different angles may
be smooth on some DVD video discs while
on others a still picture is first displayed.
• Some DVD video discs do not allow you to
change angles at all or not change angles
for specific scenes.
• It may take some time before playback
starts from the selected angle.
• Some DVD video discs may play back
scenes recorded from multiple angles.
Turning subtitle display ON/OFF
Press the [ON/OFF] button during playback to
turn on (subtitle display) or off (no subtitles) this
function.
• Some DVD video discs do not turn off the
subtitles even when the OFF (no subtitles)
setting is selected.
Changing subtitle language display
A DVD video that contains multiple subtitle languages allows you to select a subtitle language
during playback.
Press the [SUB-TITLE] button during playback
to change the subtitle language.
• Some DVD video discs contain subtitles in
up to 32 languages. Check the disk sym-
bol ( 8: indicates subtitles in 8 languages).
• Some DVD video discs do not allow you to
change subtitle languages at all or not
change the subtitle language for specific
scenes.
• Changing from one subtitles in language
to another may take some time.
DVS9755z 15
Page 10

DVD Operations
Displaying playback status
Press the [DISP] buttons during playback to
change display mode.
Each press of the buttons turns the playback status display on or off.
Remote control unit button operations
• Also when the playback status display is
off, pressing a button other than [ ] causes
the corresponding playback status symbol
to be displayed.
• The following symbol may be displayed depending on playback status or the DVD
video disc.
16 DVS9755z
Page 11
CD Operations
Remote control unit button operations
The operations described in this chapter are performed using the remote control buttons.
Replacing discs
1. Slide the door downwards until a clicking
sound is heard.
The disc is now automatically ejected.
• If the disc is left as is and not removed, it
will automatically be retracted into the unit
after 15 seconds.
2. Insert the disc in the slot with the label side
upwards.
When the disc has been inserted halfway, it is
automatically pulled inside the unit.
• When an inserted disc is not automatically
played back, press the [ ] button.
• Dirt or dust on the data surface may generate read errors. Wipe the disc with a soft
cloth before insertion. If errors still occur,
remove the disc.
3. Close the door.
• Keep the door closed at all times to prevent dust from entering the unit.
Playing back discs
Press the [ ] button to start playback. Pressing the [ ] button again stops playback.
Stopping playback
Press the [ ] button to stop playback.
• Press the [ ] button to start playback
from the location where playback was previously stopped.
• When the [ ] button is pressed again after
the disc has been stopped, the disc is
played back from the beginning.
Pausing playback
Press the [ ] button to pause playback. Normal playback is resumed when the [ ] button
is pressed again.
Skipping tracks (to locate the
beginning of a section)
Press the [ ] or [ ] button during playback.
The number of tracks corresponding to the num-
ber of presses are skipped and playback is resumed.
• Press the [ ] button to start playback
from the beginning of the next track.
• Press the [ ] button to start playback
from the beginning of the current track.
When this button is pressed again within 1
sec, playback starts from the beginning of
the previous track.
Fast forward/fast backward
Hold down the [ ] or [ ] button during playback.
When one of these buttons is held down, fast
forward or fast backward starts within 1 sec.
Normal playback speed is resumed when the
button is released.
• Intermittent sound can be heard during fast
forward or fast backward playback.
• The [ ] and [ ] buttons are also used
to locate the beginning of a section. When
one of these buttons is held down for 1 sec
or less, the beginning of a section is located
and playback starts from there.
DVS9755z 17
Page 12

Control unit button operations
Setting acoustic features (ADJUST MODE)
In this chapter, the control unit buttons are used.
Selecting adjust mode settings
Adjust the settings to suit your sound system.
1. Press the [ADJUST] button to enter the ADJUST MODE.
2. Press the [ ] or [ ] [DISP] button to select
item to set.
Each time the [ ] or [ ] [DISP] button is
pressed, the indications change as shown
below.
Adjust automatic sound format identification
(FORMAT)
Set speaker to on or off
(SP-SEL)
Set speaker filter frequency
(FILTER)
Adjust speaker output level
(SP-GAIN)
Set speaker delay time
(DELAY)
•A flow chart is shown on the next page.
*1. The display shows the settings made in the
Section, “Changing display settings” (11
page).
*2. When an is displayed at the end of a
setting, press the [ENT] button to enter the
adjust mode.
*3. When the illustration is shown, press
the indicated button (the [ENT] button in this
example).
*4. When [ ] is displayed to the left of the
adjusted value, press the [ ] or [ ] [DISP]
button to switch the setting.
*5. When the [VOL] buttons are not used within
1 sec, the adjustment value display is
switched.
*6. When [ ] is displayed to the left of the ad-
justed value, press the [ ] or [ ] [VOL] button to switch the adjustment value.
*7. The next item is displayed.
Set Dolby digital
(Dolby D)
Set parametric equalizer
(P.EQ)
Press the [ADJUST] button to return to the
original mode.
18 DVS9755z
Page 13

*1
Control unit button operations
Setting acoustic features (ADJUST MODE)
*7
*2
*3
*4
*7
*5
*6
DVS9755z 19
Page 14

Setting acoustic features (ADJUST MODE)
Control unit button operations
Adjusting automatic sound format
identification (FORMAT)
This function automatically identifies the sound
format of the inserted disc and plays back the
disc accordingly.
• The initial value is [AUTO].
1. Press the [ADJUST] button to enter the ADJUST MODE.
2. Press the [ ] or [ ] [DISP] button to show
the [FORMAT] display.
3. Press the [ENT] button to display the adjustment item.
4. Press the [ ] or [ ] [VOL] button to select
[AUTO] or [DTS CD].
• AUTO: Dolby and DTS format discs are au-
tomatically detected.
• DTS CD: select this mode when a DTS CD
cannot be played back in [AUTO] mode.
Note:
• When a DTS DVD or CD disc are played back in
[AUTO], some noise may be generated until the
DTS signal is detected. When this happens, you
can use the [DTS CD ] setting to avoid noise.
5. Press the [ADJUST] button to return to the
original mode.
Turning speakers on or off
(SP-SEL)
The center speaker, surround speakers and sub
woofer have to be set to on or off to achieve
maximum sound quality.
• The initial value is [ON].
1. Press the [ADJUST] button to enter the AD-
JUST MODE.
2. Press the [ ] or [ ] [DISP] button to change
to the [SP-SEL] display.
3. Press the [ENT] button to display the adjust-
ment item.
Press the [ ] or [ ] [DISP] button to select
[CTR-SP], [SRD-SP] or [SUB-WF].
• CTR-SP: center speaker
• SRD-SP: surround speaker
• SUB-WF: subwoofer
4. Press the [ ] or [ ] [VOL] button to select
[ON] or [OFF].
• ON: Speaker installed
• OFF: Speaker not installed
• When a sub woofer is used, set [ON+],
[ON-] or [OFF]. The normal setting is [ON+],
but use the [ON-] setting when this provides
a better effect for low frequency range.
5. Press the [ADJUST] button to return to the
original mode.
Adjusting speaker output level
(SP-GAIN)
Use the built-in test tone function of the unit to
adjust the speaker output level to the same level.
• The initial value is [0 dB].
• A speaker that was turned off in the Sec-
tion, “T urning speakers on or off” is not displayed.
1. Press the [ADJUST] button to enter the ADJUST MODE.
2. Press the [ ] or [ ] [DISP] button to change
to the [SP-GAIN] display.
3. Press the [ENT] button to display the adjustment item.
• In the adjustment mode, the test tone is
output from the selected speaker.
4. Press the [ ] or [ ] [DISP] button to select
the speaker to adjust.
• Each time the [DISP] button is pressed, the
indications change as shown below.
FRONT-L: front left speaker
CENTER: front center speaker
FRONT-R: front right speaker
R-SRD: right surround speaker
L-SRD: left surround speaker
SUB-WF: rear subwoofer
5. Press the [ ] or [ ] [VOL] button to adjust
the gain.
• The adjustment range is –10 dB to +6 dB.
• Holding down the [ ] or [ ] [VOL] button
to increase or decrease the value in a fast
forwarding way.
Note:
• The sound may become distorted if the level is
set too high. Should this happen, lower the level.
6. Press the [ADJUST] button to return to the
original mode.
Adjusting speaker delay time
(DELAY)
The timing when the sound of each speaker
reaches the listening position depends on
speaker installation and the size of the car. Adjust the delay time of each speaker so that the
20 DVS9755z
Page 15

Control unit button operations
Setting acoustic features (ADJUST MODE)
sound of all speakers reach the listening position at the same time as the sound from the front
speakers.
• The initial value is [0 ms].
• The delay time setting is a Dolby digital and
Dolby surround function.
• A speaker that was turned off in the Section, “T urning speakers on or off” is not displayed.
1. Press the [ADJUST] button to enter the ADJUST MODE.
2. Press the [ ] or [ ] [DISP] button to change
to the [DELAY] display.
3. Press the [ENT] button to display the [CTR-
SP].
4. Press the [ ] or [ ] [DISP] button to select
the speaker to adjust.
• CTR-SP: center speaker
• SRD-SP: surround speaker
5. Press the [ ] or [ ] [VOL] button to adjust
the delay time.
• The [CTR-SP] adjustment range is 0 to 5
ms.
• The [SRD-SP] adjustment range is 0 to 15
ms.
• Holding down the [ ] or [ ] [VOL] button
to increase or decrease the value in a fast
forwarding way.
6. Press the [ADJUST] button to return to the
original mode.
Setting speaker filter frequency
(FILTER)
This function is used to set a filter frequency that
suits the frequency characteristics of the used
speakers.
• The initial value is [THRGH] (no filter).
• A speaker that was turned off in the Sec-
tion, “T urning speakers on or off” is not displayed.
1. Press the [ADJUST] button to enter the ADJUST MODE.
2. Press the [ ] or [ ] [DISP] button to change
to the [FILTER] display.
3. Press the [ENT] button to display the [F HPF].
4. Press the [ ] or [ ] [DISP] button to select
the speaker to adjust.
• F HPF: high pass filter for front speakers
• CTR HPF: high pass filter for the center
speaker
• SRD HPF: high pass filter for the surround
speakers
• SW LPF: low pass filter for the subwoofer
5. Press the [ ] or [ ] [VOL] button to select
the frequency.
• In case of [F HPF], [CTR HPF] and [SRD
HPF], the frequency is 50 Hz, 80 Hz, 120
Hz and THRGH (no filter).
• In case of [SW HPF], the frequency is 50
Hz, 80 Hz or 120 Hz.
6. Press the [ADJUST] button to return to the
original mode.
Setting the Dolby digital functions
(Dolby D)
The Dolby digital functions consist of the Dolby
Pro Logic on/off function and dynamic range compression switching.
These functions are only available on Dolby digital DVD discs.
• The Dolby Pro Logic function (Dolby PL)
can process four channel sound (right, left,
front, center, monaural surround) recorded
in a 2-channel encoded source and decode
it in its original 4 channel format.
• Dynamic range compression function (D-
RANGE):
This function compresses the dynamic
range of Dolby digital to maintain low level
sounds such as actor conversation and
suppress loud sound volumes.
1. Press the [ADJUST] button to enter the ADJUST MODE.
2. Press the [ ] or [ ] [DISP] button to change
to the [Dolby D] display.
3. Press the [ENT] button to display the [D-
RANGE].
4. Press the [ ] or [ ] [DISP] button to select
[D-RANGE] or [Dolby PL].
5. Press the [ ] or [ ] [VOL] button to select
the adjustment value.
● In [D-RANGE], settings are switched be-
tween [MAX], [STD] and [MIN]. The initial
value is [MAX].
• MAX: maximum dynamic range mode of
the original source
• STD: recommended mode for standard
listening
• MIN: the most compressed dynamic
range mode that renders even low sounds
easy to hear.
DVS9755z 21
Page 16

Setting acoustic features (ADJUST MODE)
Control unit button operations
● This button is used to turn [Dolby PL] mode
[ON] and [OFF].
6. Press the [ADJUST] button to return to the
original mode.
Setting parametric equalizer (P.EQ)
The parametric equalizer function allows you to
adjust the frequency characteristics to suit the
car.
• The initial value provides the following settings for all speakers.
FREQ = 1kHz,Q =1, GAIN = 0dB
1. Press the [ADJUST] button to enter the ADJUST MODE.
2. Press the [ ] or [ ] [DISP] button to change
to the [P.EQ] display.
3. Press the [ENT] button to display [EFFECT].
4. Press the [ ] or [ ] [DISP] button to select
the adjustment value.
● EFFECT: turns P.EQ on or off.
● SIGNAL: selects the adjustment signal.
• P-NOIS: set when pink noise is to be used
• MUSIC: set to use music signals
● SP-SEL: selects the speakers whose P.EQ
value is to be adjusted.
• FRONT: front speaker
• CENTER: center speaker
• SRD: surround speaker
● BAND: selects the frequency band (Band
1 to 3) to adjust.
● FREQ: selects the frequency for bands 1
to 3.
• The range of adjustments is from 20 Hz
to 20 kHz.
• Holding down the [ ] or [ ] [VOL] but-
ton to increase or decrease the value continuously.
● Q: sets the Q curve.
• Larger numbers produce a sharper Q
characteristics curve while smaller numbers produce gentler characteristics.
Adjustments are made in the range Q1 to
Q20.
• Holding down the [ ] or [ ] [VOL] but-
ton to increase or decrease the value continuously.
● GAIN: adjusts the output level.
• Adjustments are made in the range -12
dB to +12 dB.
• Holding down the [ ] or [ ] [VOL] but-
ton to increase or decrease the value continuously.
5. Press the [ ] or [ ] [VOL] button to select
the adjustment value.
6. Press the [ADJUST] button to return to the
original mode.
22 DVS9755z
Page 17
Remote control unit button operations
Making menu language and other settings
This setting menu is displayed on the monitor.
The menu can be selected using the supplied
remote control unit.
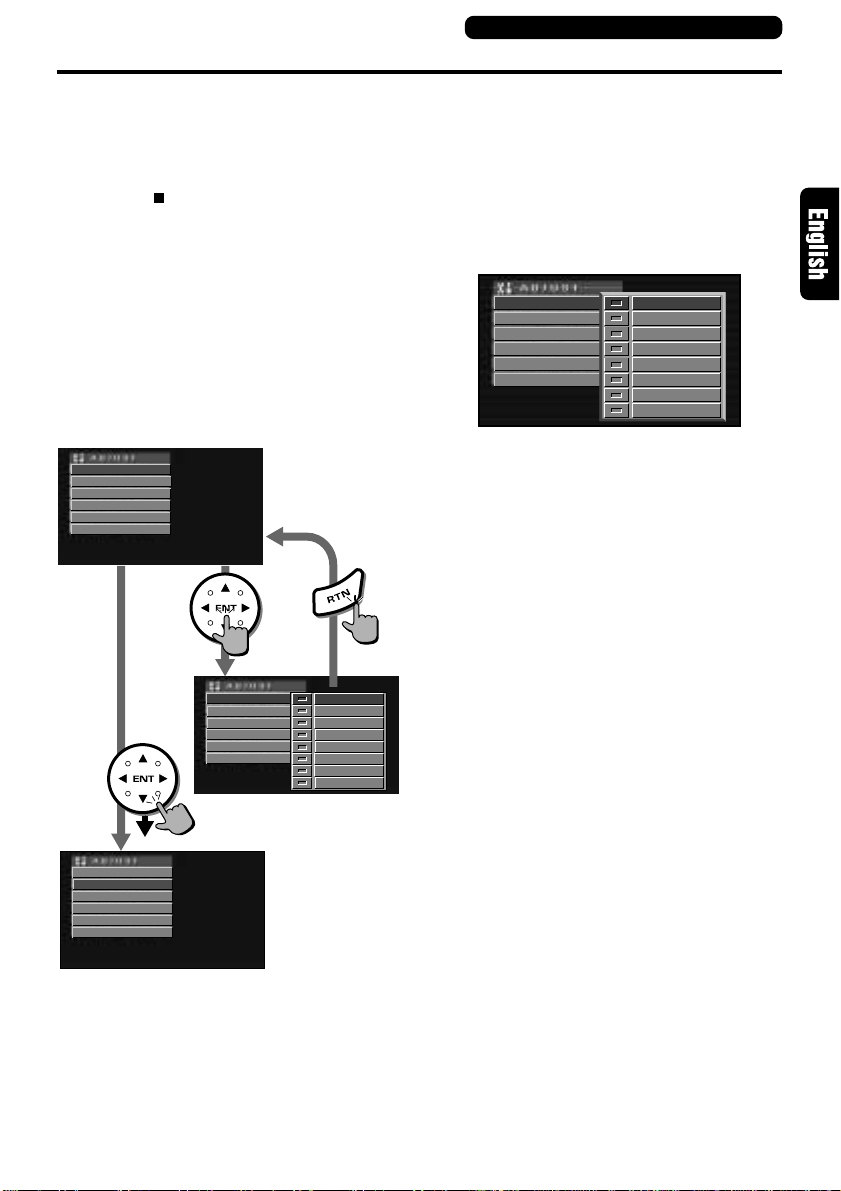
Selecting monitor menus
1. Press the [ ] button to pause playback.
2. Press the [MENU] button to display the main
menu.
3. Press the top or bottom of the [JOG] button
and select the menu.
4. Press the center of the [JOG] button to display the submenu.
• Use the top and bottom of the [JOG] but-
ton to select items in the submenu.
(Main menu)
MENU LANGUAGE
AUDIO LANGUAGE
CREDIT TTL LANGUAGE
PARENTAL LEVEL
TV SCREEN
COUNTRY CODE
ENGLISH
FRENCH
GERMAN
ITALIAN
DUTCH
SWEDISH
PORTUGISE
SPANISH
MENU LANGUAGE
AUDIO LANGUAGE
CREDIT TTL LANGUAGE
PARENTAL LEVEL
TV SCREEN
COUNTRY CODE
MENU LANGUAGE
AUDIO LANGUAGE
CREDIT TTL LANGUAGE
PARENTAL LEVEL
TV SCREEN
COUNTRY CODE
(Sub menu)
Setting the menu language
The DVD video menus can be displayed in the
language of your choice.
1. Display the [MENU LANGUAGE] submenu
according to steps 1 to 4 in the Section, “Selecting monitor menus”.
2. Press the top or bottom of the [JOG] button to
select a language.
MENU LANGUAGE
AUDIO LANGUAGE
CREDIT TTL LANGUAGE
PARENTAL LEVEL
TV SCREEN
COUNTRY CODE
ENGLISH
FRENCH
GERMAN
ITALIAN
DUTCH
SWEDISH
PORTUGISE
SPANISH
3. Press the center of the [JOG] button to enter
the selection.
4. Press the [RTN] button twice to return to the
original playback mode.
Selecting audio language
You can select the language you normally use
from the languages recorded on the DVD video
to play back the disc in that language.
1. Display the [AUDIO LANGUAGE] submenu
according to steps 1 to 4 in the Section, “Selecting monitor menus”.
2. Press the top or bottom of the [JOG] button to
select a language.
• This language is the same as the [MENU
LANGUAGE].
3. Press the center of the [JOG] button to enter
the selection.
4. Press the [RTN] button twice to return to the
original playback mode.
Setting Credit TTL language
The DVD video subtitles can be displayed in the
language you normally use.
1. Display the [CREDIT TTL LANGU] submenu
according to steps 1 to 4 in the Section, “Selecting monitor menus”.
2. Press the top or bottom of the [JOG] button to
select a language.
• This language is the same as the [MENU
LANGUAGE].
3. Press the center of the [JOG] button to enter
the selection.
DVS9755z 23
Page 18

Making menu language and other settings
Remote control unit button operations
4. Press the [RTN] button twice to return to the
original playback mode.
Setting parental level
The parental level is a function that allows you
to restrict the viewing of certain contents. Make
this setting in conjunction with the Country code
setting. When a DVD video with a parental lock
is played back, violent scenes, etc. that you do
not want your children to watch are skipped in
playback.
1. Display the [PARENTAL LEVEL] submenu
according to steps 1 to 4 in the Section, “Selecting monitor menus”.
2. Press the top or bottom of the [JOG] button to
select level 1 to 7.
• Larger numbers indicate a stricter parental
level setting.
The relationship between DVD video category
codes and parental level are shown in the table
below. Use this table when setting the parental
level.
LEVEL7
LEVEL6
LEVEL4
LEVEL3
LEVEL1
3. Press the center of the [JOG] button to enter
the selection.
4. Press the [RTN] button twice to return to the
original playback mode.
NC-17
(NO ONE 17 AND UNDER ADMITTED)
R
(RESTRICTED)
PG-13
(PARENTS STRONGLY CAUTIONED)
PG
(PARENTAL GUIDANCE SUGGESTED)
G
(GENERAL AUDIENCES)
• The contents that the parental level restricts
varies with the country code.
Setting screen size
Set the size of the connected TV monitor.
1. Display the [MONITOR SETTING] submenu
according to steps 1 to 4 in the Section, “Selecting monitor menus”.
2. Press the top or bottom of the [JOG] button to
select a screen size.
● Viewing on a monitor with the traditional
aspect ratio (4:3)
• PAN/SCAN: the left and right sides are
cropped
The PAN/SCAN function displays the
most important part of the image on the
monitor.
• LETTER: adds a black stripe at the top
and bottom of the screen.
● Viewing on a wide TV monitor (16:9)
WIDE:
3. Press the center of the [JOG] button to enter
the selection.
4. Press the [RTN] button twice to return to the
original playback mode.
24 DVS9755z
Page 19

Making menu language and other settings
Setting the country code
Enter the country code when the parental level
function is to be used.
Note:
• When the country code setting is changed, eject
the DVD video and insert it again.
1. Display the [COUNTRY CODE] submenu ac-
cording to steps 1 to 4 in the Section, "Selecting monitor menus".
MENU LANGUAGE
AUDIO LANGUAGE
CREDIT TTL LANGUAGE
PARENTAL LEVEL
TV SCREEN
COUNTRY CODE
2. Open the remote control unit cover.
8 5 8 3
SET AFTER ENTERING 10KEYS
Remote control unit button operations
3. Press the [10KEYS] buttons to enter the coun-
try code.
Country code list
Country
CANADA
UNITED STATES
AMERICAN SAMOA
BERMUDA
PUERTO RICO
ST. PIERRE AND MIQUELON
VIRGIN ISLANDS (U.S)
Input code
6765
8583
6583
6677
8082
8077
8673
4. Press the [SELECT] button to enter the selec-
tion.
5. Press the [RTN] button twice to return to the
original playback mode.
DVS9755z 25
Page 20

8. IN CASE OF DIFFICULTY
Problem
Power does not
turn on.
(No sound is
produced.)
Nothing happens
when buttons are
pressed.
Disc cannot be
loaded.
The disc is
ejected as soon
as it is inserted.
Sound skips or is
noisy.
Sound is bad
directly after
power is turned
on.
Cause Measure
Fuse is blown.
Incorrect wiring.
The microprocessor has
malfunctioned due to noise,
etc.
The microprocessor has
malfunctioned due to noise,
etc.
Another disc is already
loaded.
The disc has been inserted
upside down.
Disc is dirty.
Disc is heavily scratched or
warped.
Water droplets may form on
the internal lens when the
car is parked in a humid
place.
Replace with a fuse 3A of the same amperage. If the
fuse blows again, consult your store of purchase.
Consult your store of purchase.
Press the reset button with a thin rod.
Reset button
Press the reset button with a thin rod.
Eject the disc before loading the new one.
Insert the disc with the label side up.
Clean the disc with a soft cloth.
Replace with a disc with no scratches.
Let dry for about 1 hour with the power on.
9. ERROR DISPLAYS
If an error occurs, one of the following displays is displayed.
Take the measures described below to eliminate the problem.
Error Display Cause Measure
ERROR 2
ERROR 3
ERROR 6
A DVD/CD is caught inside the DVD
deck and is not ejected.
A DVD/CD cannot be played due to
scratches, etc.
A DVD/CD is loaded upside-down inside
the DVD deck and does not play.
If an error display other than the ones described above appears, press the reset button. If the problem
persists, turn off the power and consult your store of purchase.
26 DVS9755z
This is a failure of DVD deck’s mechanism
and consult your store of purchase.
Replace with a non-scratched,
non-warped-disc.
Eject the disc then reload it properly.
Page 21

10. SPECIFICATIONS
DVD player section
System: Digital Versatile Disc System with CDDA
Capable
Usable Discs: DVD Video Disc, Compact Disc
Frequency Response: 20 Hz to 20 kHz (± 1 dB)
Signal to Noise Ratio: 100 dB
Dynamic Range: 100 dB
Distortion: 0.01% THD
Channel Separation: 80 dB
Audio section
S/N: 100 dB (digital input)
100 dB (analog input)
Frequency characteristics: 20 Hz to 20 kHz
(±1 dB)
Separation: 90 dB (digital input)
80 dB (analog input)
High frequency distortion: 0.01% (digital input)
0.01% (analog input)
Analog output :4.0 Vrms (VOL Max)
Analog input :2.0 Vrms (Max)
Digital input :44.1 kHz sampling,
16-bit digital audio data
DSF : 6 modes
P.EQ : 3 bands x 2 (front/rear independent)
Fo; 20 Hz to 20 kHz
1/3 octave steps
Q; 1 to 20
G; ± 12 dB
Preset front; 6 types
Rear; 7 types
Subwoofer voltage gain; +12 dB
(M.VOL MAX)
LPF Fo; 50 Hz, 80 Hz, 120 Hz
LPF slope; 12, 18, 24 dB/oct
General
Source unit
Power Supply Voltage:
14.4 V DC (10.8 to 15.6 V allowable)
Ground:Negative
Current Consumption : Less than 3 A
Weight: 3.5lb. (1.6 kg)
Dimensions:
7” Width X 2” Hight X 6-5/8” Depth
(178 mmWidth X 50 mm Hight 165mm Depth)
Remote control unit
Weight: 1oz. (30 g) (including battery)
Dimensions:
1-7/8” Width X 5-9/16” Hight X 1-1/4” Depth
(47 mm Width X 142 mm Hight 32 mm Depth)
Note:
• Specifications and design are subject to change
without notice for further improvement.
List of accessories
1. DVD disc unit...............................................1
2. Control unit ..................................................1
3. Owner’s manual ..........................................1
4. Warranty ......................................................1
5. Control unit cord ..........................................1
6. Power supply harness .................................1
7. Parts bag (1)
• Set screws (M2.6 x 4)................................. 1
• Cord clamps (small)....................................1
• Double sided tape for securing brackets ...2
• Cord clamps (large) ................................... 3
• Cord holders .............................................. 2
• Velcro tape (large A) .................................. 2
• Velcro tape (small B) ..................................2
• Set screws (M5 wing nuts) .........................4
• Installation bolts (M5 x 6) ...........................4
• Double sided tape for securing the remote con-
trol holder....................................................1
• Installation bolts (M5 x 6 counter sunk) .... 4
8. Parts bag (2)
• Hook plate................................................... 2
• Spring..........................................................2
• Rubber cap .................................................1
• Special screw............................................. 1
• Screw (M5 x 6) .......................................... 1
9. Bracket with bolt ..........................................2
10. Main unbracket ..........................................2
11. Batteries (type AAA) for remote control ....2
12. Remote control ..........................................1
13. Remote control holder...............................1
14. Installation .................................................1
15. Universal mounting bracket ......................1
16. Strap ..........................................................1
17. Outer escutcheon ......................................1
DVS9755z 27
Page 22

28 DVS9755z
 Loading...