

Page 1

OWNER'S HANDBOOK
Page 2

You can nd your handbook on the CITROËN website, under
"MyCITROËN".
On-line owner's handbook
This personal and customisable space allows you to establish direct
and special contact with CITROËN.
If the "MyCITROËN" function is not available on the CITROËN public
website for your country, you can nd your handbook at the following
address:
http://service.citroen.com/ddb/
Referring to the owner's handbook on-line also gives you access to the
latest information available, easily identied by the bookmark, associated
with this symbol:
Select:
the language,
the vehicle, its body style,
the print edition of your handbook appropriate for the date of registration
of your vehicle.
You have access to your handbook on line, together with the latest
information, identied by the symbol:
Page 3

We draw your attention to the following...
336.4348.9
The "Familiarisation" section at the start of this
document is intended as a quick way of getting
to know your vehicle. Reading the detailed
sections is essential to make the most of your
vehicle, in complete safety.
Your vehicle is fitted with only some of the
equipment described in this document,
depending on the trim level, version and the
specifications for the country in which it is sold.
The fitting of electrical equipment or
292.7
accessories which are not recommended
by CITROËN may result in a failure of your
vehicle's electronic system. Please note this
specific warning and contact a CITROËN
dealer for information on the recommended
equipment and accessories.
Key
safety warning
348.9
additional information
contributes to the protection of the environment
refer to the page indicated
348.9
810.1810.1 810.1
CITROËN has a presence on every continent,
a complete product range,
bringing together technology and a permanent spirit of innovation,
for a modern and creative approach to mobility.
We thank you and congratulate you on your choice.
At the wheel of your new vehicle,
getting to know each system,
each control, each setting,
makes your trips, your journeys
more comfortable and more enjoyable.
Happy motoring!
Page 4
Contents
Familiarisation
Eco-driving
.
.
Monitoring
Instrument panel 20
Indicator and warning lamps 21
Indicators 33
7-inch touch screen tablet 37
Trip computer 43
Distance recorders 45
Setting the date and time 46
Access
Remote control key 47
Central locking 51
Doors 52
Boot 54
Front electric window controls 55
Rear door windows 56
Comfort
Front seats 57
Rear seats 60
Mirrors 62
Steering wheel adjustment 64
Ventilation 65
Heating 67
Manual air conditioning 69
Automatic air conditioning 71
Front Demist - Defrost 75
Rear screen demist - defrost 76
Fittings
Interior ttings 77
Boot ttings 83
Driving
Starting - Stopping the engine 86
Parking brake 87
5-speed manual gearbox 88
Gear shift indicator 89
Electronic gearbox 90
Hill start assist 94
Stop & Start 95
Speed limiter 98
Cruise control 101
Memorising speeds 104
Parking sensors 105
Reversing camera 107
Park Assist 108
Visibility
Lighting control 113
Automatic illumination of headlamps 117
Daytime running lamps /Sidelamps (LEDs) 118
Headlamp adjustment 120
Cornering lighting 121
Wiper control stalk 122
Automatic rain sensitive wipers 124
Panoramic sunroof 126
Courtesy lamp 127
Brightness of instruments and controls 128
Boot lamp 128
Page 5
Contents
Safety
Direction indicators 129
Hazard warning lamps 129
Horn 130
Emergency or assistance call 130
Tyre under-ination detection 131
ESC system 134
Seat belts 137
Airbags 140
Child safety
Child seats 146
Deactivating the passenger's
front airbag 149
ISOFIX child seats 155
i-Size child seats 158
Child lock 160
Practical info rmat ion Technical data
Fuel tank 161
Misfuel prevention (Diesel) 163
Running out of fuel (Diesel) 165
®
AdBlue
additive and SCR system
(Blue HDi Diesel) 166
Temporary puncture repair kit 174
Changing a wheel 181
Snow chains 187
Changing a bulb 188
Changing a fuse 196
12 V battery 203
Energy economy mode 207
Changing a wiper blade 208
Towing 209
Towing a trailer 211
Roof bars 213
Very cold climate screens 215
AIRBUMP
Accessories 217
®
protectors 216
Checks
Bonnet 220
Petrol engines 221
Diesel engines 222
Checking levels 223
Checks 226
Petrol engines 228
Petrol weights 229
Diesel engines 230
Diesel weights 231
Dimensions 232
Identication markings 233
Audio and telematics
Emergency or assistance 235
Touch screen tablet 237
Visual search
Alphabetical index
.
.
Page 6

Familiarisation
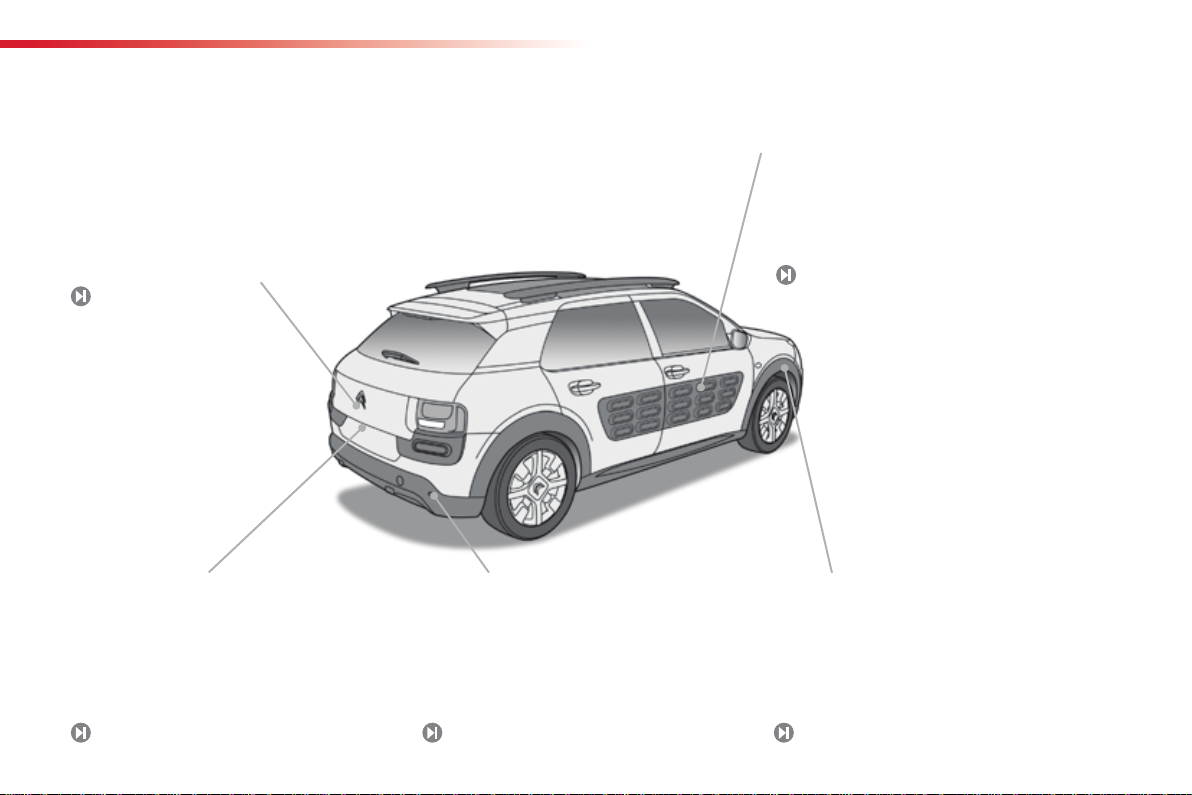
Exterior
Stop & Star t
This system puts the engine temporarily into
standby during stops in the traffic (traffic
lights, traffic jams, etc...). The engine restarts
automatically as soon as you want to move
off. The Stop & Start system reduces fuel
consumption and exhaust emissions, as well as
noise levels when stationary.
95
Under-inflation detect ion
This system monitors the pressures in the tyres
and alerts you in the event of an under-inflated
tyre.
131
4
Cornering lighting
At low speed, this additional lighting increases
the driver's field of vision in corners,
junctions, when parking... by switching on the
corresponding front foglamp.
121
Automatic illumination of
headlamps
The number plate lamps, sidelamps and dipped
beam headlamps come on automatically
without any action by the driver when a low
level of ambient light is detected.
117
Page 7
Exterior
Temporary puncture
repair kit
This kit is a complete system, consisting of a
compressor and a sealant cartridge, for the
temporary repair of a tyre.
174
Familiarisation
®
AIRBUMP
These protect the body by reducing the effect
of minor impacts experienced in everyday use
(parking knocks, opening a door, scrapes, ...).
216
protectors
.
This system is activated automatically on
engaging reverse and provides an image in the
the touch screen tablet.
Park ing se ns or s
This system detects and warns you of the
presence obstacles in front of and behind the
vehicle when manoeuvring the vehicle.
Park AssistReversing camera
This system provides active assistance when
parallel parking, both entering and exiting a
space. It detects a parking space, operates
the vehicle's steering and provides visual and
audible signals to the driver.
108107 105
5
Page 8
Familiarisation
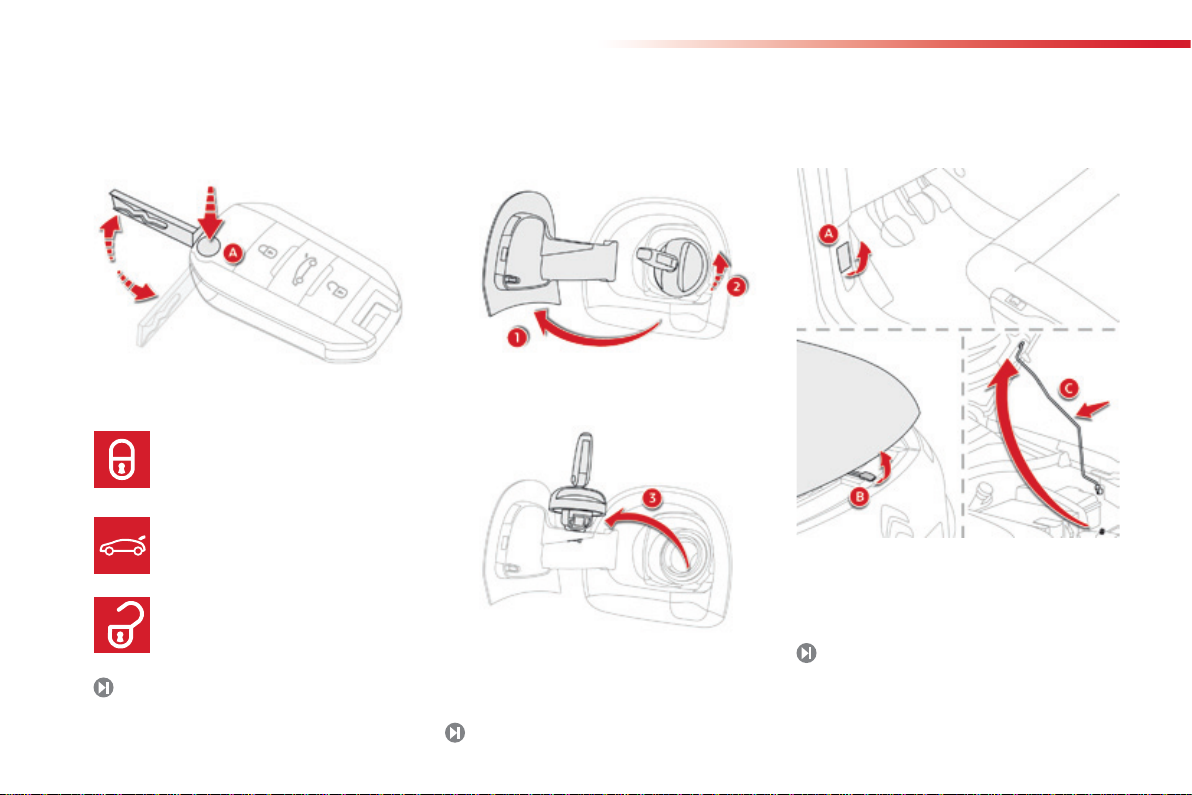
Access
Remote control key
A. Unfolding / Folding the key.
Locking the vehicle
(direction indicators
on fixed).
Unlocking the boot.
Unlocking the vehicle
(rapid flashing of the direction
indicators).
47
Fuel tank Bonnet
1. Opening the filler flap.
2. Removing the filler cap.
A. Interior release lever.
B. Exterior safety catch.
C. Bonnet stay.
3. Hooking the filler cap.
Petrol: approximately 50 litres, Diesel:
approximately 45 or 50 litres (depending version).
220
161
6
Page 9

Interior
Familiarisation
.
Speed limiter / Cruise
control
These two systems allow you to control the
speed of the vehicle to a value you have
programmed.
99, 101
Electronic gea rbox
It offers the ease of automatic management of
the gears, without intervention by the driver.
90
Multimedia controls
They allow access to the various sources
(radio, MP3, portable player, jukebox,
telephone) and volume adjustment.
241
7-inch touch screen tablet
It gives access to the air conditioning controls,
settings for vehicle systems, controls for
the audio navigation and telematic systems,
configuration of the display, ...
37
7
Page 10
Familiarisation
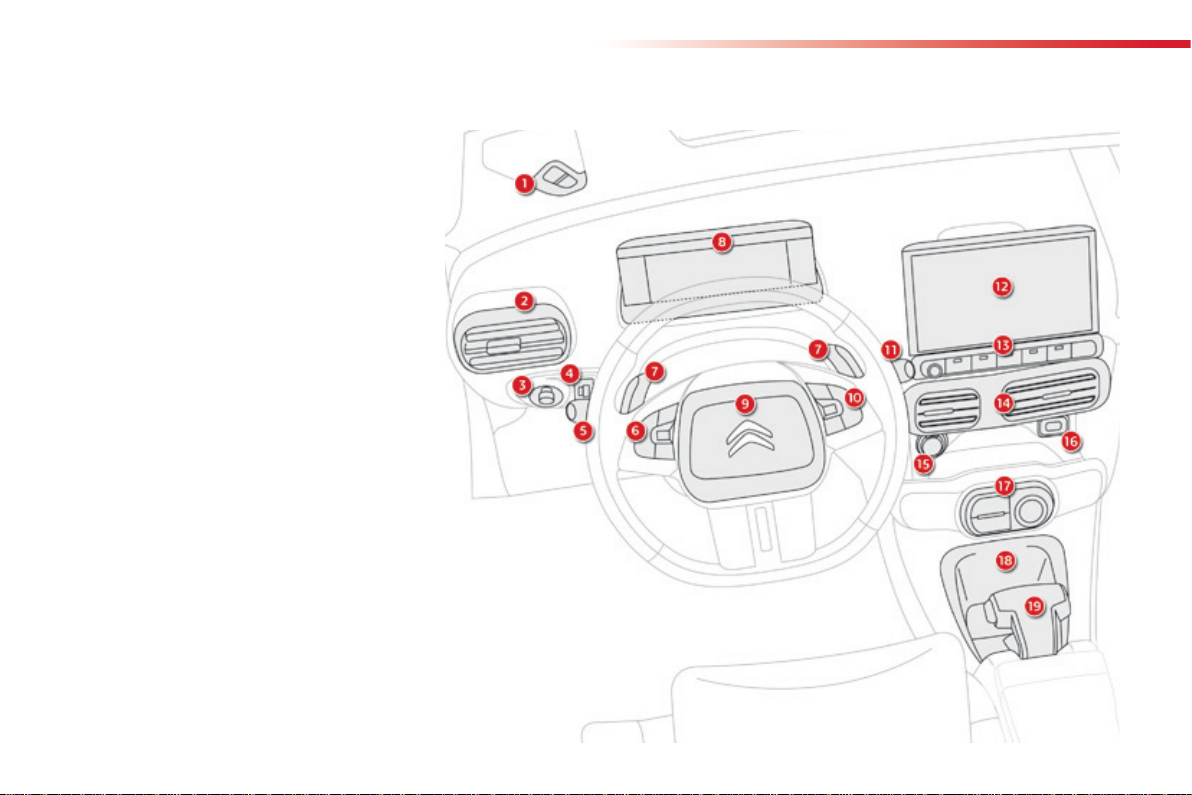
Instruments and controls
1. Vents for demisting or defrosting the front
side windows.
2. Side adjustable air vents.
3. Door mirror controls.
4. Headlamp height adjustment.
5. Lighting and direction indicator stalk.
6. Controls for the speed limiter / cruise
control.
7. Steering mounted controls (electronic
gearbox).
8. Instrument panel.
9. Driver's front airbag.
Horn.
10. Audio system and telephone steering
mounted controls.
11. Wiper / screenwash / trip computer stalk.
12. 7-inch touch screen tablet.
13. Controls for: front/rear demisting and
defrosting, central locking, deactivating
DSC, Park Assist, hazard warning lamps.
14. Central adjustable air vents.
15. 12V accessory socket.
16. USB port.
17. Control panel (electronic gearbox).
18. Central storage.
19. Parking brake.
8
Page 11

7-inch touch screen tablet
Operation
Use the buttons arranged either side of the
touch screen tablet for access to the menus,
then press on the virtual buttons in the screen.
Each menu is displayed over one or two pages
(primary page and secondary page).
For access to the secondary page
(from the primary page).
Menus
Familiarisation
.
To return to the primary page
(from the secondary page).
For access to additional information
and to the settings for certain
functions.
To confirm.
To quit.
37
"Air conditioning".
"Driving assistance".
"Media".
"Navigation".
"Configuration".
"Connected services".
"Telephone".
Use a clean soft cloth to clean the touch
screen tablet.
Do not use pointed objects on the touch
screen.
Do not touch the touch screen with wet
hands.
9
Page 12
Familiarisation
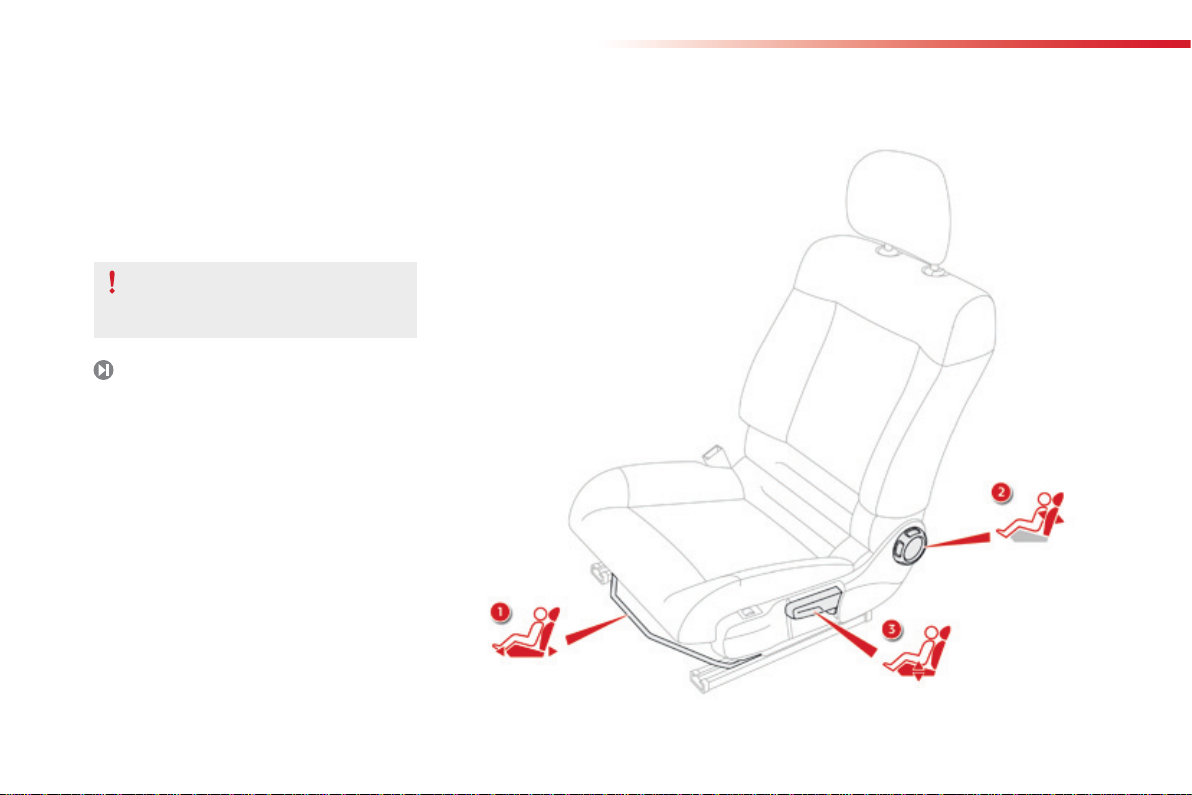
Sitting comfortably
Driver's seat
1. Forwards-backwards adjustment.
2. Adjustment of the backrest angle.
3. Adjustment of the cushion height.
As a safety precaution, adjustments
to the drivers seat most only be made
when stationary.
57
10
Page 13

Sitting comfortably
Head restraint adjustment
Steering wheel adjustment
Door mirrors
Familiarisation
.
To raise it, pull it upwards.
To lower it, press on the lug A and on the head
restraint at the same time.
58
1. Release.
2. Adjust for height.
3. Lock.
As a safety precaution, these
operations must only be carried out
when stationary.
64
Adjustment
A. Turn to select the mirror to adjust.
B. Adjust the mirror position in four
directions.
62
11
Page 14
Familiarisation
Sitting comfortably
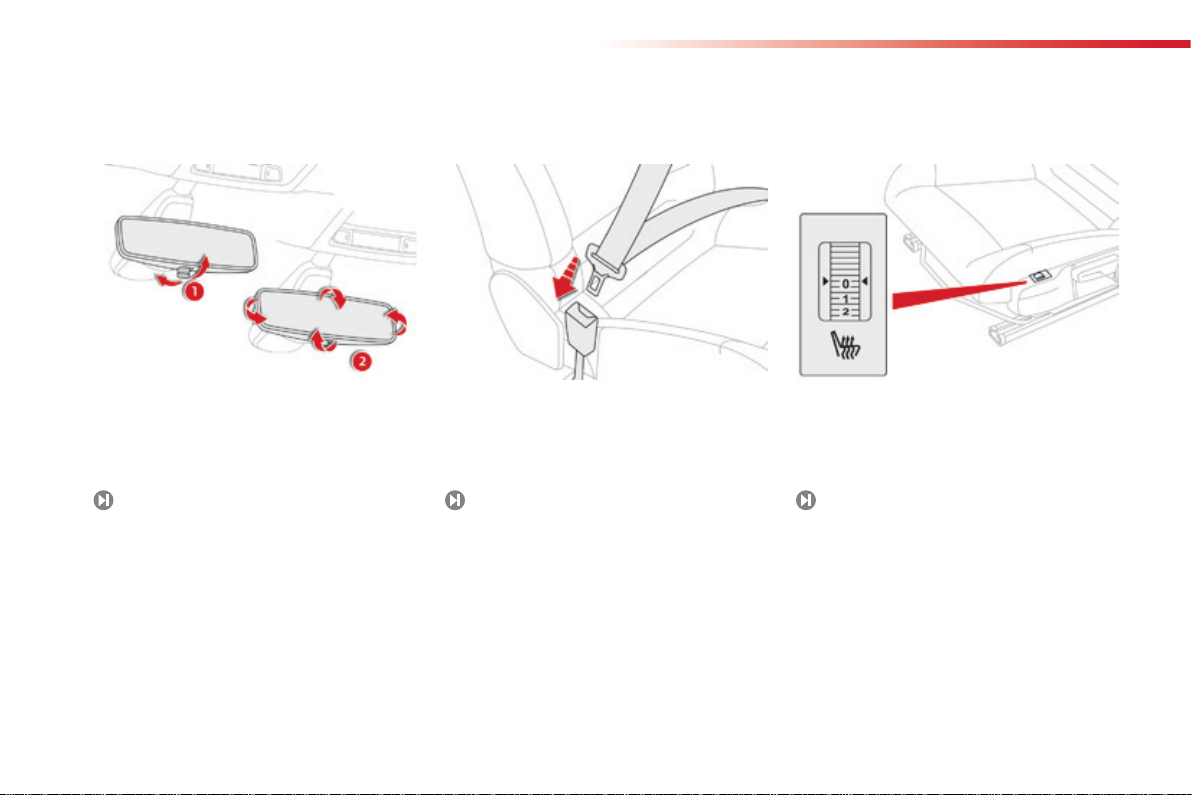
Rear view mir ror
Front seat belts Heated seats
12
1. Selection of the "day" position of the mirror.
2. Adjustment of the mirror.
63
Fastening the buckle. 0: Off.
1: Low.
2: Medium.
3: High
137 59
Page 15

Seeing clearly
Lighting
Wipers
Familiarisation
.
Ring A
Lighting off/daytime running lamps.
Automatic illumination of headlamps.
Sidelamps.
Dipped / main beam headlamps.
114
Ring B
Rear foglamp only.
Front foglamps and rear
foglamp.
115
Stalk A: windscreen wipers
2. Fast wipe.
1. Normal wipe.
Int. Intermittent wipe.
0. Off.
â Single wipe: pull the stalk briefly towards
you.
or
AUTO Automatic wiping.
122
Switching on "AUTO"
F Press the stalk downwards.
Switching off "AUTO"
F Press the stalk downwards again or place
the stalk in another position (Int, 1 or 2).
124
Ring B: rear wiper
Park.
Intermittent wipe.
Wipe with screen wash.
123
13
Page 16

Familiarisation
Passenger safety
Passenger's front airbag
1. Open the glove box.
2. Insert the key.
3. Select the position:
"OFF" (deactivated), with "rearward facing"
child seat,
"ON" (activated), with front passenger or
"forward facing" child seat.
4. Remove the key keeping the switch in the
new position.
141
Seat belt warning lamps
1. Not fastened / unfastened front seat belts,
in the instrument panel.
2. Left hand front.
3. Right hand front.
4. Right hand rear.
5. Centre rear.
6. Left hand rear.
138
Manual child lock
This manual device prevents the opening of a
rear door from the inside.
The control is located on the edge of each rear
door.
160
14
Page 17
Driving safely
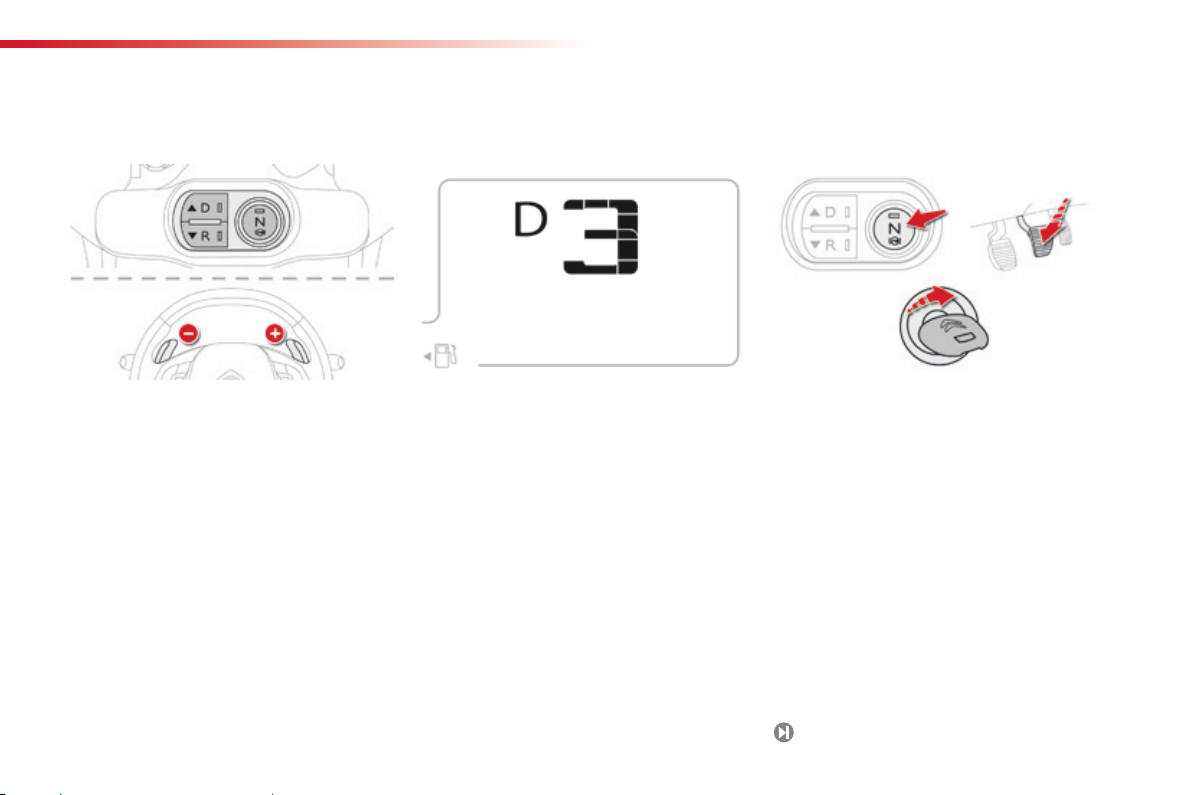
Electronic gea rbox
Familiarisation
.
This five or six speed electronically controlled
gearbox offers the ease of automatic
management of the gears, without intervention
by the driver. The steering mounted paddles
allows temporary manual control of the gears.
Display in the instrument panel
N Neutral.
D and 1 2 3 4 5 / 6 Drive (forward drive) and
the gear engaged.
R Reverse.
Moving off
F Switch the ignition on.
F Press the N (Neutral) control.
F Press firmly on the brake pedal.
F Start the engine.
F Press control D to select forward drive,
or
Press control R to select reverse gear.
F Release the parking brake.
F Progressively release the brake pedal: the
vehicle moves off.
90
15
Page 18

Familiarisation
Driving safely
Stop & Star t
Going into engine STOP mode
Going into engine START mode Deactivation / Reactivation
16
The "ECO" warning lamp comes on in
the instrument panel and the engine
automatically goes into standby:
- with a manual gearbox, vehicle
stationary, when you put the gearbox into
neutral and release the clutch pedal,
- with an electronic gearbox, vehicle
stationary or at speeds below 5 mph
(8 km/h) (depending on version), when you
put the gearbox into neutral (control on N)
or when you press the brake pedal.
In some circumstances, STOP mode may not
be available; the "ECO" warning lamp flashes
for few seconds, then goes off.
95
The "ECO" warning lamp goes off
and the engine restarts automatically:
- with a manual gearbox, when you fully
depress the clutch pedal,
- with an electronic gearbox:
● control on D, when you release the brake
pedal,
● control on N and brake pedal released,
when you press control D,
● when you engage reverse.
In certain special circumstances, START mode
may be invoked automatically; the "ECO"
warning lamp flashes for few seconds, then
goes off.
96
The Stop & Start system can be deactivated in
the the touch screen tablet.
F Select the "Driving assistance"
menu.
F Press on "Stop & Start".
Pressing this button again reactivates
Stop & Start.
The system is reactivated automatically
at every new start using the key.
Before refuelling or doing anything
under the bonnet, you must switch off
the ignition with the key.
97
Page 19

Driving safely
Speed limiter
"LIMIT"
Cruise control
"CRUISE"
Familiarisation
.
1. Select speed limiter mode.
2. Decrease the programmed speed
3. Increase the programmed speed.
4. Speed limiter On / Pause.
5. Display the list of memorised speeds.
Operation of the speed limiter requires
a programmed speed of at least 20 mph
(30 km/h).
98
1. Select cruise control mode.
2. Activation of cruise control at the current
speed of your vehicle, then decrease the
programmed speed.
3. Activation of cruise control at the current
speed of your vehicle, then increase the
programmed speed.
4. Cruise control Pause / Resume.
5. Display the list of memorised speeds.
Operation of the cruise control requires
a vehicle speed of at least 25 mph
(40 km/h).
101
Display in the instrument panel
When selected, the speed limiter or cruise
control mode is displayed in the instrument
panel, accompanied by the value of the
programmed speed.
Speed limiter
Cruise control
17
Page 20

Eco-driving
Familiarisation
Eco-driving
Eco-driving is a range of everyday practices that allow the motorist to optimise their fuel consumption and CO2 emissions.
18
Optimise the use of your gearbox
With a manual gearbox, move off gently and change up without waiting.
During acceleration change up early.
The gear shift indicator invites you engage the most suitable gear: as
soon as the indication is displayed in the instrument panel, follow it
straight away.
With an electronic gearbox, do not press the accelerator pedal heavily
or suddenly.
Drive smoothly
Maintain a safe distance between vehicles, use engine braking rather
than the brake pedal, and press the accelerator progressively. These
practices contribute towards a reduction in fuel consumption and CO
emissions and also help reduce the background traffic noise.
If your vehicle has cruise control, make use of the system at speeds
above 25 mph (40 km/h) when the traffic is flowing well.
2
Control the use of your electrical
equipment
Before moving off, if the passenger compartment is too warm, ventilate it
by opening the windows and air vents before using the air conditioning.
Above 30 mph (50 km/h), close the windows and leave the air vents
open.
Remember to make use of equipment that can help keep the
temperature in the passenger compartment down ( s unroof and window
blinds...).
To save energy, do not set the air conditioning at too low a temperature.
As soon as the desired temperature has been reached, limit the use of
the air conditioning, except if regulation is automatic.
Switch off the demisting and defrosting controls as soon as you consider
possible.
Switch off the heated seat as soon as possible.
Switch off the headlamps and foglamp when the level of light does not
require their use.
Avoid running the engine before moving off, particularly in winter; your
vehicle will warm up much faster while driving.
As a passenger, if you avoid connecting your multimedia devices
(film, music, video game...), you will contribute towards limiting the
consumption of electrical energy, and so of fuel.
Disconnect your portable devices before leaving the vehicle.
Page 21

.Familiarisation
Limit the causes of excess consumption
Spread loads throughout the vehicle; place the heaviest items in the
bottom of the boot, as close as possible to the rear seats.
Limit the loads carried in the vehicle and reduce wind resistance (roof
bars, roof rack, bicycle carrier, trailer...). Use a roof box in preference.
Remove roof bars and roof racks after use.
At the end of winter, remove snow tyres and refit your summer tyres.
Observe the recommendat ions
on maintenance
Check the tyre pressures regularly, when cold, referring to the label in
the door aperture, driver's side.
Carry out this check in particular:
- before a long journey,
- at each change of season,
- after a long period out of use.
Don't forget the spare wheel and the tyres on any trailer or caravan.
Have your vehicle serviced regularly (engine oil, oil filter, air filter,
passenger compartment filter...) and observe the schedule of
operations recommended in the maintenance and warranty guide.
When refuelling, do not continue after the third cut-off of the nozzle to
avoid any overflow.
At the wheel of your new vehicle, it is only after the first 1 800 miles
(3 000 kilometres) that you will see the fuel consumption settle down to
a consistent average.
19
Page 22
Monitoring
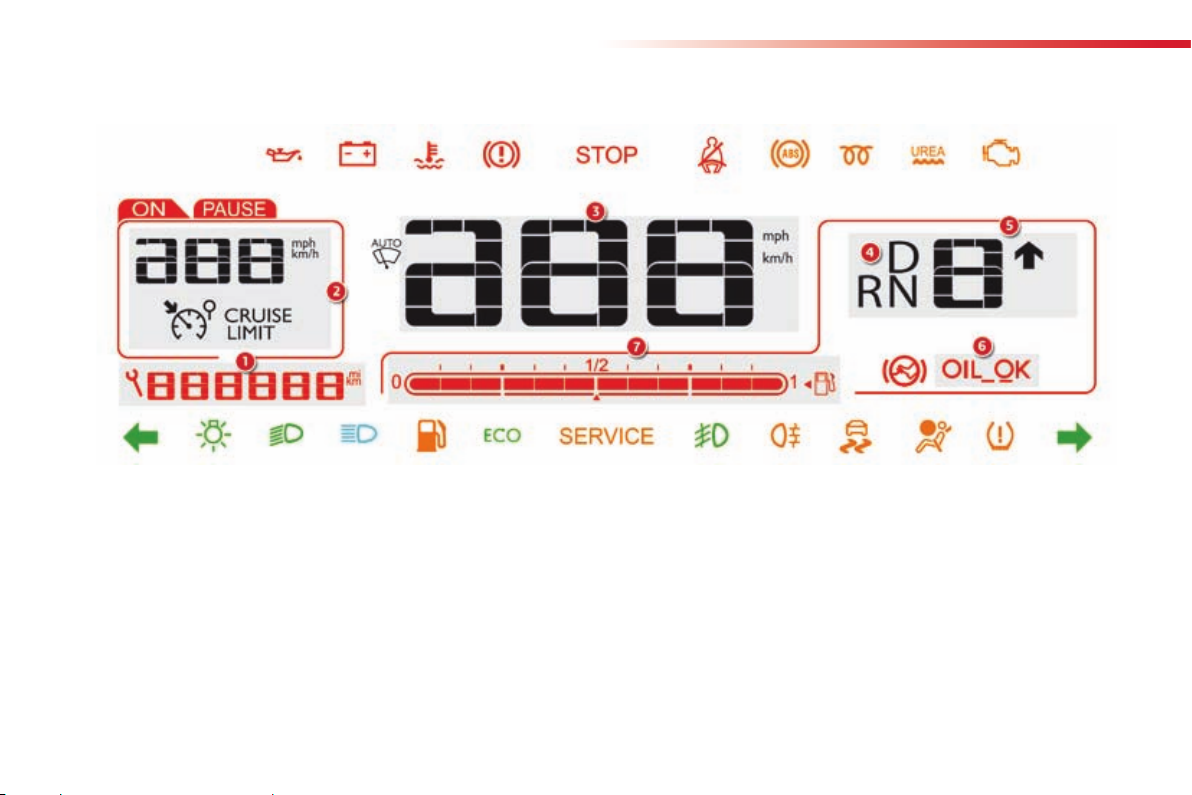
Instrument panel
Display screens
1. Service indicator, then total distance
recorder (miles or km).
These functions are displayed in turn when
the ignition is switched on.
2. Cruise control or speed limiter settings.
3. Digital speedometer (mph or km/h).
4. Information related to the electronic
gearbox.
5. Gear shift indicator.
6. Engine oil level indicator.
7. Fuel gauge.
20
Page 23

Monitoring
Indicator and warning lamps
Visual indicators informing the driver that a system is in operation, switched off or has a fault.
When the ignition is switched on
Certain warning lamps come on for a few
seconds in the instrument panel when the
vehicle's ignition is switched on.
When the engine is started, these same
warning lamps should go off.
If they remain on, before moving off, refer to the
section on the warning lamp concerned.
When switching on the ignition, the
displays in the instrument panel appear
dynamically and progressively. This is
normal operation.
Associated warnings
The switching on of certain warning lamps may
be accompanied by an audible signal and a
message.
The warning lamps may come on continuously
(fixed) or flash.
1
Certain warning lamps may come on in
one of two modes: fixed (continuous) or
flashing.
Only by relating the type of illumination
to the operation of the vehicle can it
be determined whether the situation is
normal or a fault has occurred. In the
event of a fault, the illumination of the
warning lamp may be accompanied by
a message.
Refer to the tables in the following
pages for more information.
21
Page 24

Monitoring
Operation indicator lamps
If one of the following indicator lamps comes on, this confirms that the corresponding system has come into operation.
It may be accompanied by an audible signal and a message in the screen.
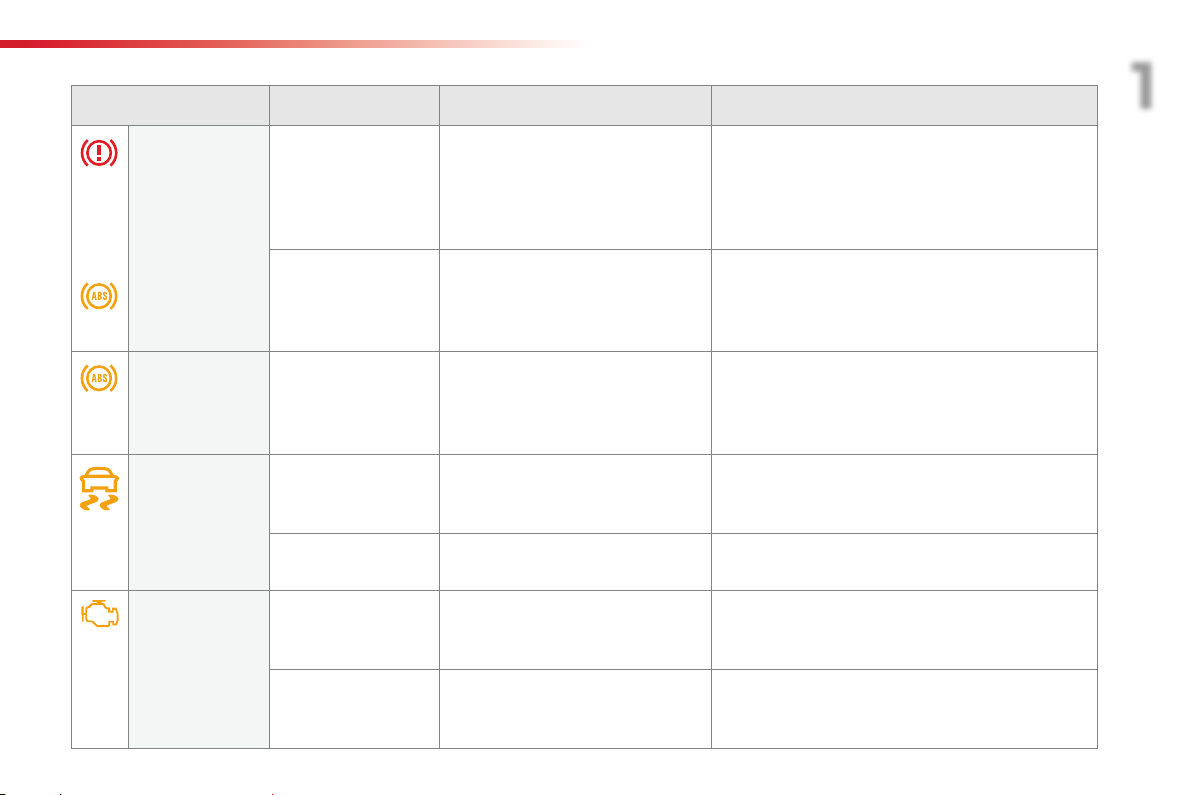
Warning / indicator lamp State Cause Action / Observations
22
Left-hand
direction indicator
Right-hand
direction indicator
Sidelamps fixed. The lighting stalk is in the
Dipped beam
headlamps
Main beam
headlamps
Front
foglamps
For more information on the lighting controls, refer to the corresponding section.
flashing with buzzer. The lighting stalk is pushed down.
flashing with buzzer. The lighting stalk is pushed up.
"Sidelamps" position.
fixed. The lighting stalk is in the "Dipped
beam headlamps" position.
fixed. The lighting stalk is pulled towards
you.
fixed. The front foglamps are switched on. Turn the ring on the stalk rearwards twice to switch off
Pull the stalk to return to dipped beam headlamps.
the front foglamps.
Page 25

Monitoring
Warning / indicator lamp State Cause Action / Observations
Rear foglamp fixed. The rear foglamp is switched on. Turn the ring on the stalk rearwards to switch off the
Diesel engine
pre-heating
Parking brake fixed. The parking brake is applied or not
fixed. The key is at position 2 (ignition on) in
the ignition switch.
properly released.
rear foglamp.
Wait until the warning lamp goes off before starting.
The period of illumination of the warning lamp is
determined by the climatic conditions (up to about
thirty seconds in extreme climatic conditions).
If the engine does not start, switch the ignition off and
then on, wait until the warning lamp goes off again,
then start the engine.
Release the parking brake to switch off the warning
lamp, keeping your foot on the brake pedal.
Observe the safety recommendations.
For further information on the parking brake, refer to
the "Parking brake" section.
1
23
Page 26

Monitoring
Warning / indicator lamp State Cause Action / Observations
Automatic
wiping
Passenger's
front airbag
Stop & Start fixed. When the vehicle stops (red lights,
fixed. The wiper control is pushed
fixed. The control switch, located in the
flashes for a few
seconds, then
goes off.
downwards.
glove box, is in the "ON" position.
The passenger's front airbag is activated.
In this case, do not install a rearward
facing child seat.
traffic jams, ...) the Stop & Start system
has put the engine into STOP mode.
STOP mode is temporarily
unavailable.
or
START mode is invoked
automatically.
Automatic front wiping is activated.
To deactivate automatic wiping, operate the control
stalk downwards or put the stalk into another position.
Turn the control switch to the "OFF" position to
deactivate the front passenger's airbag.
You can install a rearward facing child seat, unless
there is an airbag fault (Airbag warning lamp on).
The warning lamp goes off and the engine restarts
automatically in START mode, as soon as you want to
move off.
For more information on special cases with STOP
mode and START mode, refer to the "Stop & Start"
section.
24
Page 27

Monitoring
Deactivation indicator lamps
If one of the following indicator lamps comes on, this confirms that the corresponding system has been switched off intentionally.
This is may be accompanied by an audible signal and the display of a message.
Warning / indicator lamp State Cause Action / Observations
Passenger's
front airbag
Dynamic
stability control
(DSC/ASR)
fixed. The control switch, located in the
glove box, is set to the OFF position.
The passenger's front airbag is
deactivated.
You can install the child seat
"rearward facing", unless there is an
airbag fault (Airbag warning lamp on).
fixed. The button is pressed and the
indicator lamp comes on.
The DSC/ASR is deactivated.
DSC: dynamic stability control.
ASR: anti-slip regulation.
Set the control to the "ON" position to activate the
passenger's front airbag.
In this case, do not fit a child seat in the "rearward
facing" position.
Press the button to activate the DSC/ASR. Its
indicator lamp goes off.
The DSC/ASR system is activated automatically when
the vehicle is started.
If deactivated, the system is reactivated automatically
from around 30 mph (50 km/h).
For more information on DSC/ASR, refer to the
corresponding section.
1
25
Page 28

Monitoring
Warning lamps
When the engine is running or the vehicle is being driven, illumination of one of the following warning lamps indicates a fault which requires action on
the part of the driver.
Any fault resulting in the illumination of a warning lamp must be investigated further using the associated message.
If you encounter any problems, contact a CITROËN dealer or a qualified workshop.
Warning / indicator lamp State Cause Action / Observations
26
STOP fixed, associated with
another warning lamp,
accompanied by an
audible signal and a
message.
Service on temporarily. A minor fault has occurred for which
fixed. A major fault has occurred for which
Illumination of this warning lamp is
related to a serious fault detected
with the braking or power steering
systems, the electrical system, or
with engine lubrication or cooling or
a puncture.
there is no specific warning lamp.
there is no specific warning lamp.
Stop as soon as it is safe to do so as the engine may
cut out.
Park, switch off the ignition and call a CITROËN
dealer or a qualified workshop.
Identify the fault by means of the associated message,
such as:
- opening of a door, the boot or bonnet,
- low engine oil level,
- low screenwash fluid level,
- discharged remote control battery,
- low tyre pressures,
- saturation of the particle emission filter (PEF) on
Diesel vehicles.
For more information on the PEF, refer to the
"Checks - particle emissions filter" section.
For any other faults, contact a CITROËN dealer or a
qualified workshop.
Identify the fault by reading the message and contact
a CITROËN dealer or a qualified workshop.
Page 29
Monitoring
Warning / indicator lamp State Cause Action / Observations
Braking fixed. The brake fluid level has dropped
+ fixed, associated
Anti-lock
Braking System
(ABS)
Dynamic
stability control
(DSC/ASR)
Engine
autodiagnosis
system
with the ABS warning
lamp.
fixed. The anti-lock braking system has a
flashing. The DSC/ASR regulation is
fixed. The DSC/ASR system has a fault. Have it checked by a CITROËN dealer or a qualified
flashing. The engine management system has
significantly.
The electronic brake force distribution
(EBFD) system has a fault.
fault.
operating.
a fault.
You must stop as soon as it is safe to do so.
Top up with brake fluid listed by CITROËN.
If the problem persists, have the system checked by a
CITROËN dealer or a qualified workshop.
You must stop as soon as it is safe to do so.
Have it checked by a CITROËN dealer or a qualified
workshop.
The vehicle retains conventional braking.
Drive carefully at reduced speed and contact a
CITROËN dealer or a qualified workshop without
delay.
The system optimises traction and improves the
directional stability of the vehicle in the event of loss of
grip or trajectory.
workshop.
Risk of destruction of the catalytic converter.
Have it checked by a CITROËN dealer or a qualified
workshop.
1
fixed. The emission control system has a
fault.
The warning lamp should go off when the engine is started.
If it does not go off, contact a CITROËN dealer or qualified
workshop without delay.
27
Page 30

Monitoring
Warning / indicator lamp State Cause Action / Observations
®
AdBlue
additive
(Blue HDi Diesel)
fixed, on switching
on the ignition,
accompanied by an
audible signal and a
The remaining driving range is
between 350 miles (600 km) and
1500 miles (2400 km).
Have the AdBlue
possible: go to a dealer CITROËN or a qualified
workshop, or carry out this operation yourself by
referring to the corresponding section.
®
additive topped up as soon as
message indicating the
remaining driving range.
28
+ flashing associated with
the SERVICE warnin g
lamp, accompanied by
an audible signal and a
message indicating the
remaining driving range.
flashing, associated
with the SERVICE
warning lamp,
accompanied by an
audible signal and a
message indicating that
starting is prevented.
The remaining driving range is
between 0 and 375 miles (600 km).
The AdBlue
®
tank is empty: the
starting inhibition system required
by legislation prevents starting of the
engine.
You must top-up the AdBlue
®
additive tank to avoid
a breakdown: go to a dealer CITROËN or a qualified
workshop, or carry out this operation yourself by
referring to the corresponding section.
To be able to start the engine, you must top-up the
®
AdBlue
additive tank: go to a dealer CITROËN or a
qualified workshop, or carry out this operation yourself
by referring to the corresponding section.
It is essential to add at least 3.8 litres of AdBlue
®
to
the tank.
Page 31

Monitoring
Warning / indicator lamp State Cause Action / Observations
SCR emissions
control system
(Blue HDi Diesel)
+
+
fixed, on switching on
the ignition, associated
with the SERVICE
and engine diagnostic
warning lamps,
accompanied by an
audible signal and a
message indicating an
emissions control fault.
flashing, on switching
on the ignition,
associated with the
SERVICE and engine
diagnostic warning
lamps, accompanied by
an audible signal and a
message indicating the
remaining driving range.
flashing, on switching
on the ignition,
associated with the
SERVICE and engine
diagnostic warning
lamps, accompanied by
an audible signal and a
message indicating that
starting is prevented.
A fault with the SCR emissions
control system has been detected.
The remaining driving range is
between 0 and 650 miles (1 100 km).
You have exceeded the authorised
driving limit: the starting inhibition
system prevents starting of the
engine.
This alert disappears once the exhaust emissions
return to normal levels.
Contact a CITROËN dealer or a qualified workshop
without delay.
To be able to start the engine, you must call on a
CITROËN dealer or a qualified workshop.
1
29
Page 32

Monitoring
Warning / indicator lamp State Cause Action / Observations
Low fuel level fixed, accompanied by
Seat belt(s)
not fastened /
unfastened
Airbags on temporarily. This lamp comes on for a few
an audible signal and
a message.
fixed
or flashing
accompanied by an
audible signal.
fixed. One of the airbag or seat belt
When it first comes on there remains
approximately 5 litres of fuel in the
tank.
You are then using the fuel reserve.
A seat belt has not been fastened or
has been unfastened.
seconds when you turn on the
ignition, then goes off.
pretensioner systems has a fault.
You must refuel as soon as possible to avoid running
out of fuel.
Until sufficient fuel is added, this warning lamp will
come on every time the ignition is switched on,
accompanied by an audible signal and a message.
This audible signal and message are repeated with
increasing frequency as the drops towards "0".
Fuel tank capacity:
- Petrol: approximately 50 litres.
- Diesel: approximately 45 or 50 litres (depending
on version).
Never continue to drive until you run out of fuel as
this could damage the emission control and injection
systems.
Pull the strap then insert the tongue in the buckle.
This lamp should go off when the engine is started.
If it does not go off, contact a CITROËN dealer or a
qualified workshop.
Have it checked by a CITROËN dealer or a qualified
workshop.
30
Page 33

Monitoring
Warning / indicator lamp State Cause Action / Observations
Battery charge fixed. The battery charging circuit has a
Maximum
coolant
temperature
Engine oil
pressure
fixed. The temperature of the cooling
fixed. There is a fault with the engine
fault (dirty or loose terminals, slack or
cut alternator belt, ...).
system is too high.
lubrication system.
The warning lamp should go off when the engine is
started.
If it does not go off, contact a CITROËN dealer or a
qualified workshop.
Stop as soon as it is safe to do so.
Wait until the engine has cooled down before topping
up the level, if necessary.
If the problem persists, contact a CITROËN dealer or
qualified workshop.
You must stop as soon it is safe to do so.
Park, switch off the ignition and contact a CITROËN
dealer or a qualified workshop.
1
31
Page 34

Monitoring
Warning / indicator lamp State Cause Action / Observations
Under-inflation fixed, accompanied by
+ flashing then fixed,
Foot on the
brake pedal
an audible signal and
a message.
accompanied by the
Service warning lamp.
flashing, accompanied
by an audible signal
and a message, and
associated with the
"Foot on the brake"
warning flashing in the
control panel for the
electronic gearbox.
flashing. With an electronic gearbox, if you
The pressure in one or more wheels
is too low.
The system has fault: the tyre
pressures are no longer monitored.
The brake pedal is not pressed when
starting the engine, with an electronic
gearbox.
hold the vehicle on an incline using
the accelerator for too long, the
clutch overheats.
Check the pressure of the tyres as soon as possible.
This check should preferably be carried out when the
tyres are cold.
You must reinitialise the system after the adjustment
of one or more tyre pressures and after changing one
or more wheels.
For more information, refer to the "Under-inflation
detection" section.
Check the tyre pressures as soon as possible.
have the system checked by a CITROËN dealer or a
qualified workshop.
With an electronic gearbox, press the brake pedal to
start the engine.
If you wish to release the parking brake without
pressing the brake pedal, this warning lamp will
remain on.
Use the brake pedal and/or the parking brake.
32
Page 35

Monitoring
Indicators
Service indicator
System which informs the driver when the
next service is due, in accordance with the
manufacturer's servicing schedule.
The point at which the next service is due is
calculated from the last indicator zero reset,
depending on the distance travelled and the
time elapsed since the last service.
For Blue HDi Diesel versions, the
degree of deterioration of the engine oil
is also taken into account (depending
on the country of sale).
More than 1 800 miles (3 000 km)
remain before the next service is
due
When the ignition is switched on, no service
information appears in the screen.
1
Between 600 miles (1 000 km) and 1 800 miles
(3 000 km) remain before the next service is due
For 5 seconds after the ignition is switched on,
the spanner symbolising the service operations
comes on. The distance recorder display line
indicates the distance remaining before the
next service is due.
Example: 1 700 miles (2 800 km) remain
before the next service is due.
For 5 seconds after the ignition is switched on,
the screen indicates:
5 seconds after the ignition is switched on,
the spanner goes off; the distance recorder
resumes its normal operation. The screen then
indicates the total distance.
33
Page 36

Monitoring
Less than 600 miles (1 000 km)
remain before the next service is due
Example: 560 miles (900 km) remain before
the next service is due.
For 5 seconds after the ignition is switched on,
the screen indicates:
5 seconds after the ignition is switched on,
the distance recorder resumes its normal
operation. The spanner remains on to
indicate that a service must be carried out
soon.
Service overdue
For 5 seconds after the ignition is switched on, the
spanner flashes to indicate that the service must
be carried out as soon as possible.
Example: the service is overdue by 186 miles
(300 km).
For 5 seconds after the ignition is switched on, the
screen indicates:
5 seconds after the ignition is switched on,
the distance recorder resumes its normal
operation. The spanner remains on.
For Blue HDi Diesel versions, this alert
may also be accompanied by the fixed
illumination of the "SERVICE" warning
lamp when the ignition is on.
The distance remaining may be
weighted by the time factor, depending
on the driving conditions.
Therefore, the spanner may also come
on if you have exceeded the period
since the last service, indicated in the
maintenance and warranty guide.
For Blue HDi Diesel versions, the
spanner may also be brought on earlier
than expected, depending on the
degree of deterioration of the engine oil
(depending on the country of sale).
The rate of deterioration of the engine
oil depends on the driving conditions in
which the vehicle is used.
34
Page 37

Monitoring
1
Service indicator zero reset
After each service, the service indicator must
be reset to zero.
If you have carried out the service on your
vehicle yourself:
F switch off the ignition,
F press and hold the button on the end of the
lighting control stalk,
F switch on the ignition; the distance recorder
display begins a countdown,
F when the display indicates "=0", release
the button; the spanner disappears.
Following this operation, if you wish to
disconnect the battery, lock the vehicle
and wait at least five minutes for the
zero reset to be taken into account.
Retrieving the service
information
You can access the service information at any
time in the touch screen tablet.
F Select the "Driving assistance"
menu.
F In the secondary page, select
"Diagnostic".
The servicing information is displayed in the
screen.
35
Page 38

Monitoring
Engine oil level
indicator
(depending on version)
System which informs the driver whether the
engine oil level is correct or not.
This information is indicated for a few seconds
when the ignition is switched on, after the
service information.
The level read will only be correct if
the vehicle is on level ground and the
engine has been off for more than
30 minutes.
Oil level correct
This is indicated by a message in the
instrument panel.
Oil level incorrect
This is indicated by a message in the
instrument panel.
If the low oil level is confirmed by a check using
the dipstick, the level must be topped up to
avoid damage to the engine.
Oil level indicator fault
This is indicated by a message in the
instrument panel. Contact a CITROËN dealer
or a qualified workshop.
36
Refer to the "Checks" section.
Page 39

Monitoring
7-inch touch screen tablet
The touch screen tablet gives access to:
- the heating/air conditioning controls,
- the trip computer for settings for certain
vehicle functions,
- audio system and telephone controls,
- interactive help, sound settings and the
brightness of instruments and controls,
and, depending on equipment:
- the controls for the navigation system and
connected services.
For reasons of safety, the driver
should only carry out operations
that require close attention, with the
vehicle stationary.
Some functions are not accessible
when driving.
General operation
Recommendations
It is necessary to press firmly, particularly for
"flick" gestures (scrolling through lists, moving
the map...).
A light wipe is not enough.
The tablet does not recognise pressing with
more than one finger.
This technology allows use at all temperatures
and when wearing gloves.
Do not use pointed objects on the touch screen
tablet.
Do not touch the tablet screen with wet hands.
Uses a soft clean cloth to clean the tablet touch
screen.
State of indicator lamps
Some buttons contain an indicator lamp that
gives the state of the corresponding function.
Green indicator: you have switched on the
corresponding function.
Orange indicator: you have switched off the
corresponding function.
In very hot conditions, the system may
go into standby (display and sound off)
for a minimum period of 5 minutes.
1
Principles
Use the buttons on either side of the screen
for access to the menus, then press the virtual
buttons in the touch screen.
Each menu is displayed over one or two pages
(primary page and secondary page).
Use this button to go to the
secondary page.
Use this button to return to the
primary page.
After a few moments with no action on
the secondary page, the primary page
is displayed automatically.
Use this button for access to
additional information and to the
settings for certain functions.
Use this button to confirm and save
the changes.
Use this button to quit.
37
Page 40

Monitoring
Touch screen tablet menus
"Air conditioning"
allows control of the settings for
temperature and air flow.
"Driving assistance"
allows access to the trip computer
and certain vehicle functions to be
activated, deactivated and adjusted.
"Media"
allows selection of a radio station,
the various music sources and the
display of photographs.
"Navigation"*
allows settings for navigation and the
choice of a destination.
"Configuration"
allows sound settings and the
brightness of instruments and
controls to be adjusted and gives
access to the interactive help for the
main vehicle systems and warning
lamps.
"Connected services"*
allows connection to an applications
portal to facilitate, make safe and
personalise journeys by means
of a connection key available on
subscription from a CITROËN dealer.
"Telephone"
allows the connection of a mobile
telephone via Bluetooth.
38
For the Air conditioning menu, refer to
the "Comfort" section.
For the Media, Navigation, Connected
Services and Telephone menus, refer
to the "Audio and telematics" section.
* Depending on equipment.
Page 41

"Driving assistance" menu
The functions with settings that can be adjusted are detailed in the following table.
Button Corresponding function Comments
Stop & Start Deactivation of the function.
Parking sensors Deactivation of the function.
Speed settings Memorisation of speeds for use with the speed limiter or cruise control.
Under-inflation initialisation Reinitialisation of the under-inflation detection system.
Park Assist Activation / Deactivation of the Park Assist function.
Monitoring
1
39
Page 42

Monitoring
Button Corresponding function Comments
Diagnostic List of current alerts, servicing information.
40
Vehicle settings Access to other functions with settings that can be adjusted. The functions are grouped
together under three tabs:
- "Driving assistance"
● "Automatic rear wiper in reverse": activation/deactivation of rear wiper linked to reverse
gear (see the "Visibility" section).
- "Lighting"
● "Guide-me-home lighting": activation/deactivation and duration of the automatic
guide-me-home lighting (see the "Visibility" section).
- "Vehicle access"
● "Unlock boot only": activation/deactivation of selective boot unlocking (see the
"Access" section).
Page 43

"Conguration" menu
The functions available through this menu are detailed in the table below.
Button Corresponding function Comments
Audio settings Adjustment of volume, balance...
Monitoring
1
Turn off screen Turns off the screen display in the touch screen tablet (black screen). Pressing the black
screen restores the display.
Interactive help Access to the interactive handbook.
Brightness Adjustment of the brightness of the instruments and controls.
41
Page 44

Monitoring
Button Corresponding function Comments
Configuration Choice of units:
Time/Date Setting the date and time.
- temperature (°Celsius or °Fahrenheit)
- distance and fuel consumption (l/100 km, mpg or km/l).
42
Languages Choice of language used by the touch screen tablet: French, English, Italian, Spanish,
German, Dutch, Portuguese, Polish, Turkish, Russian, Croatian, Hungarian, Czech, Brazilian.
Screen settings Adjustment of the display settings (scrolling of text, animations...)
Calculator Display the calculator.
Calendar Display the calendar.
Page 45

Monitoring
Trip computer
System that gives you information on the journey in progress (range, fuel consumption…).
The information is accessible in the the touch screen tablet.
Information display in the touch screen tablet
- The current fuel consumption tab
with:
● the range,
● the current fuel consumption,
● the Stop & Start time counter.
- The trip "1" tab with:
● the average fuel consumption,
● the distance travelled.
F Select the "Driving assistance"
menu.
The trip computer information is displayed in
the primary page of the menu.
F Press one of the buttons to display the
desired tab.
For a temporary display in a new
window, press the end of the wiper stalk
for access to the information and cycle
through the different tabs.
● the average speed,
for the first trip.
- The trip "2" tab with:
● the average fuel consumption,
● the distance travelled.
● the average speed,
for the second trip.
1
Trip reset
F When the desired trip is displayed, press
the Reset button or on the end of the wiper
control stalk until zeros appear.
Trips "1" and "2" are independent.
For example, trip "1" can be used for daily
figures, and trip "2" for monthly figures.
43
Page 46

Monitoring
Trip computer, a few definitions
Range
(miles or km)
The distance which can still be
travelled with the fuel remaining in
the tank (related to the average fuel
consumption over the last few miles
(kilometres) travelled).
This value may vary following a change
in the style of driving or the relief,
resulting in a significant change in the
current fuel consumption.
When the range falls below 20 miles (30 km),
dashes are displayed. After filling with at least
5 litres of fuel, the range is recalculated and is
displayed when it exceeds 60 miles (100 km).
If dashes are displayed continuously
while driving in place of the digits,
contact a CITROËN dealer or a
qualified workshop.
Current fuel consumption
(mpg or l/100 km or km/l)
Calculated over the last few seconds.
This function is only displayed from
20 mph (30 km/h).
Stop & Start time counter
(minutes / seconds or hours /
minutes)
If your vehicle is fitted with Stop & Start, a time
counter calculates the time spent in STOP
mode during a journey.
It resets to zero every time the ignition is
switched on.
Average fuel consumption
(mpg or l/100 km or km/l)
Calculated since the last trip
computer reset.
Distance travelled
(miles or km)
Calculated since the last trip
computer reset.
Average speed
(mph or km/h)
Calculated since the last trip
computer reset.
44
Page 47

Monitoring
Distance recorders
Total distance recorder
System which measures the total distance
travelled by the vehicle during its life.
The total distance recorder is displayed
continuously in the instrument panel, as soon
as the driver's door is opened, as well as when
the vehicle is locked or unlocked.
To conform to legislation in the
country you are crossing, change the
units of distance (miles or km) in the
"Configuration" menu of the touch
screen tablet.
This operation must be carried out with
the vehicle stationary.
1
Trip distance recorder
System which measures a distance travelled
(daily, for example) since it was reset to zero by
the driver.
This function is accessible from the trip
computer in the touch screen tablet.
F Select the "Driving assistance"
menu.
F Select the tab for trip "1"
or trip "2".
F To reset the trip recorder to zero, press
the "Reset" button or the end of the wiper
control stalk until zeros appear.
45
Page 48

Monitoring
Setting the date and time
46
This function is accessible in the touch screen
tablet.
F Select the "Configuration"
menu.
F In the secondary page, press on
"Time/Date".
F Select "Adjust time" or "Adjust date"
and modify the settings using the number
keypad, then confirm.
F Press "Confirm" to quit.
Page 49

Remote control key
System which permits central unlocking or locking of the vehicle using the door lock or from a distance.
It is also used to locate and start the vehicle, as well as providing protection against theft.
Unfolding / folding the key Unlocking the vehicle
Access
2
F Press this button to unfold or fold the key.
Unlocking using the remote
control
F Press the open padlock to unlock
the vehicle.
Unlocking is confirmed by rapid
flashing of the direction indicators for
approximately two seconds.
Unlocking using the key
F Turn the key in the driver's door lock
towards the front of the vehicle to unlock.
Selective unlocking of the boot
F Press the central button on the
remote control to unlock the
boot. The doors remain locked.
If selective unlocking of the boot is
deactivated, pressing this button also
unlocks the doors.
Don't forget to lock the boot again by
pressing the closed padlock button.
The activation or deactivation of selective boot
unlocking is set in the touch screen tablet.
F Select the "Driving assistance"
menu.
F In the secondary page, press on
"Vehicle settings".
Selective unlocking of the boot is
activated by default.
47
Page 50

Access
Locking the vehicle
Locking using the remote control
F Press the closed padlock to lock
the vehicle.
Locking is confirmed by the fixed illumination
of the direction indicators for approximately
two seconds.
If one of the doors or the boot is still
open, the central locking does not
take place; the vehicle locks then
immediately unlocks, identifiable by the
sound of the locks rebounding.
When the vehicle is locked, if it is
unlocked inadvertently, it will lock
again automatically after thirty seconds
unless a door or the boot is open.
Locking using the key
F Turn the key in the driver's door lock,
towards the rear of the vehicle to lock it.
Check that the doors and boot are fully
closed.
Locating your vehicle Anti-thef t p rotection
This function allows you to identify your vehicle
from a distance, especially when the light is
poor. Your vehicle must be locked.
F Press the closed padlock on the
remote control.
This will bring on the courtesy lamps and
flashing of the direction indicators for a
few seconds.
Electronic engine immobiliser
The key contains an electronic chip which has
a special code. When the ignition is switched
on, this code must be recognised in order for
starting to be possible.
This electronic engine immobiliser locks the
engine management system a few minutes
after the ignition is switched off and prevents
starting of the engine by anyone who does not
have the key.
In the event of a fault, you are
informed by illumination of this
warning lamp, an audible signal
and a message in the screen.
In this case, your vehicle will not start; contact
a CITROËN dealer as soon as possible.
Keep safely, away from your vehicle, the label
attached to the keys given to you on acquisition
of the vehicle.
48
Page 51

Fault with the remote
control
In the event of a fault with the remote control,
you can no longer unlock, lock or locate your
vehicle.
F First of all, use the key in the lock to unlock
or lock your vehicle.
F Then, reinitialise the remote control.
Access
2
Reinitialisation
F Switch off the ignition and remove the
ignition key.
F Press the closed padlock immediately for a
few seconds.
F Turn the key to position 2 (Ignition on).
F Switch off the ignition and remove the key
from the ignition switch.
The remote control is fully operational again.
Changing the battery
Battery ref.: CR2032 / 3 volts.
If the battery is flat, you are
informed by illumination of this
warning lamp, an audible signal
and a message in the screen.
F Unclip the cover using a small screwdriver
at the cutout.
F Lift off the cover.
F Remove the flat battery from its location.
F Fit the new battery into its location
observing the original direction of fitment.
F Clip the cover onto the casing.
If the problem persists, contact a
CITROËN dealer as soon as possible.
49
Page 52

Access
Lost keys
Go to a CITROËN dealer with the vehicle's registration document, your personal
identification documents and if possible the key code label.
The CITROËN dealer will be able to look up the key code and the transponder code
required to order a new key.
Remote control
The high frequency remote control is a sensitive system; do not operate it while it is in your
pocket as there is a possibility that it may unlock the vehicle, without you being aware of it.
Do not repeatedly press the buttons of your remote control out of range and out of sight of
your vehicle. You run the risk of stopping it from working and the remote control would have
to be reinitialised.
No remote control can operate when the key is in the ignition switch, even when the ignition
is switched off, except for reinitialisation.
Locking the vehicle
Driving with the doors locked may make access to the passenger compartment by the
emergency services more difficult in an emergency.
As a safety precaution, never leave children alone in the vehicle, except for a very short period.
In all cases, it is essential to remove the key from the ignition switch when leaving the vehicle.
Anti-thef t p rotection
Do not make any modifications to the electronic engine immobiliser system; this could
cause malfunctions.
When purchasing a second-hand vehicle
Have the pairing of all of the keys in your possession checked by a CITROËN dealer, to
ensure that only your keys can be used to open and start the vehicle.
Do not throw the remote control
batteries away, they contain metals
which are harmful to the environment.
Take them to an approved collection
point.
50
Page 53

Central locking
Manual central locking
F
Press this button to operate the central locking
of the vehicle (doors and boot) from inside the
vehicle, the indicator lamp in the button comes on.
F
Pressing the button again unlocks the vehicle
completely, the indicator lamp in the button
goes off.
If one of the doors is open, central
locking from the inside does not take
place.
Automatic central
locking
(anti-intrusion securit y)
The doors and boot can lock automatically
while driving (speed above 6 mph (10 km/h)).
To activate or deactivate this function
(activated by default):
F Press this button until an audible signal
is heard and a message appears in the
screen.
Driving with the doors locked may make
access to the passenger compartment
by the emergency services more
difficult in an emergency.
Access
2
Transporting long or voluminous
objects
If you want to drive with the boot open,
press the central locking control button
to lock the doors.
51
Page 54

Access
Doors
Opening
Closing
When a door is not fully closed:
- engine running, a message appears in
the screen,
- vehicle moving, a message appears in
the screen, accompanied by an audible
signal.
52
From outside
F After unlocking the vehicle using the
remote control or the key, pull the door
handle.
From inside
F Pull the interior control lever of a front door;
this unlocks the vehicle completely.
The interior opening control on a rear
door does not work if the child lock is on.
Refer to the "Child lock" section.
Page 55

Secondar y control
Procedure for mechanically locking and
unlocking the doors in the event of a fault with
the central locking system or a battery failure.
In the event of a fault with the central
locking system, it is essential to
disconnect the battery to lock the boot
and so ensure complete locking of the
vehicle.
Access
2
Driver's door
(locking/unlocking)
Insert the key in the lock to lock or unlock the
door.
Front and rear passenger doors
Locking
On the rear doors, check that the child
lock is not on.
F Remove the black cap located on the edge
of the door, using the key.
F Insert the key into the aperture without
forcing, then without turning, move the
latch sideways towards the inside of
the door.
F Remove the key and refit the cap.
Unlocking
F Pull the interior door opening control lever.
53
Page 56

Access
Boot
Opening
Closing Boot release
System for mechanical unlocking of the boot
in the event of a battery or central locking
malfunction.
54
F After unlocking the boot (see the "Remote
control key" section), press the opening
control and raise the tailgate.
F Lower the tailgate using the interior grab
handle.
If the tailgate is not fully closed:
- engine running, a message appears in
the screen,
- vehicle moving, a message appears in
the screen, accompanied by an audible
signal.
Unlocking
F Fold the rear seat backrest to gain access
to the lock from inside the boot.
F Insert a small screwdriver into hole A of the
lock to unlock the tailgate.
Page 57

Front electric window controls
The electric window switches
remain operational for approximately
45 seconds after the ignition is
switched off or until a front door
is opened. If, during this period of
45 seconds, you open a door while
operating a window, the window stops.
The window switch will then only be
operative after the ignition is switched
on again.
1. Front left electric window switch.
2. Front right electric window switch.
F Press the switch to open the window.
F Pull the switch to close the window.
The window stops when you release the switch.
Access
Always remove the key from the ignition
when leaving the vehicle, even for a
short time.
In the event of contact during operation
of the windows, reverse the movement
of the window. To do this, press the
corresponding switch.
When the driver operates the
passenger electric window switch, they
should ensure that no one is preventing
correct closing of the window.
The driver should ensure that the
passenger uses the electric window
correctly.
Be particularly aware of children when
operating the windows.
2
55
Page 58

Access
Rear door windows
Each window can be hinged open to provide ventilation at the rear seats.
Opening Closing
F Pull the lever to release the window.
F Tilt the lever fully inwards to secure the
window in the closed position.
F Tilt the lever outwards.
F Push it fully to secure the window in the
open position.
56
Page 59

Front seats
As a safety measure, adjustments to the driver's seat must only be done when stationary.
Adjustments
Forwards-backwards HeightSeat backrest angle
Comfort
3
(driver only)
F Raise the control A and slide the seat
forwards or backwards.
F Turn the knob B to adjust the backrest.
F Pull the control C upwards to raise the seat
or push it downwards to lower it, as many
times as required, to obtain the desired
position.
57
Page 60

Comfort
Head restraint height
58
F To raise the head restraint, pull it upwards.
F To remove the head restraint, press the
lug A and pull the head restraint upwards.
F To put the head restraint back in place,
engage the head restraint stems in the
openings keeping them in line with the seat
back.
F To lower the head restraint, press the lug A
and the head restraint at the same time.
The head restraint has a frame with
notches which prevents it from lowering;
this is a safety device in case of impact.
The adjustment is correct when the
upper edge of the head restraint is
level with the top of the head.
Never drive with the head restraints
removed; they must be in place and
adjusted correctly.
Page 61

Heated seats
Comfort
F With the engine running, use the control
wheel to switch on and select the level of
heating required:
0: Off.
1: Low.
2: Medium.
3: High.
The front seats can be heated
individually.
Before leaving the vehicle, check that
the control wheel for the passenger's
seat is at position 0 so that the seat is
not heated unnecessarily if there is no
passenger on your next journey.
3
59
Page 62

Comfort
Rear seats
Bench seat with fixed one-piece cushion and folding one-piece backrest.
Folding the backrest
Repositioning the seat backrest
60
F Move the front seats forward if necessary.
F Position the seat belts on the backrest and
buckle them.
F Place the head restraints in the low
position.
F Press both controls 1 simultaneously to
release the seat backrest 2.
F Fold the seat backrest 2 on to the cushion.
When folding the seat, the centre seat
belt should not be buckled but laid out
flat on the seat.
F Straighten the seat backrest 2 and secure
it.
F Unfasten and return the seat belts to the
sides of the backrest.
When repositioning the backrest,
ensure that the seat belts are not
trapped and the red indicator, located
next to the controls 1, is no longer
visible.
Page 63

Rear head restraints
These have one position for use (up) and a
stowed position (down).
Comfort
3
They can be removed and are interchangeable
side to side.
To remove a head restraint:
F Pull the head restraint upwards to the stop.
F Then, press the lug A.
To refit a head restraint:
F Engage the head restraint rods in the
apertures, keeping the head restraint in line
with the seat backrest.
To lower a head restraint:
F Press down on the head restraint and on
lug A at the same time.
Never drive with the head restraints
removed; they must be in place and
adjusted to the normal position (up).
61
Page 64

Comfort
Mirrors
Door mirrors
Each fitted with an adjustable mirror glass
providing the lateral rearward vision necessary
for overtaking or parking. They can also be
folded for parking in confined spaces.
Electric adjustment
F Move control A to the right or to the left to
select the corresponding mirror.
F Move control in all four directions to adjust.
F Return control to the central position.
Manual folding
You can fold the mirrors manually (tight parking
space, narrow garage...).
F Turn the mirror towards the vehicle.
As a safety measure, the mirrors should
be adjusted to reduce the "blind spots".
The objects observed are, in reality,
closer than they appear.
Take this into account in order to
correctly judge the distance of vehicles
approaching from behind.
Demisting - Defrosting
Demisting-defrosting of the door
mirrors operates with the engine
running, by switching on the heated
rear screen.
For more information on demisting and
defrosting the rear screen, refer to the
corresponding section.
62
Page 65

Rear view mir ror
Adjustable mirror providing a central rearward
view.
Equipped with an anti-dazzle system, which
darkens the mirror glass and reduces the
nuisance to the driver caused by the sun,
headlamps from other vehicles...
Comfort
3
Adjustment
F Adjust the mirror so that the glass is
directed correctly in the "day" position.
Day / night position
F Pull the lever to change to the "night" anti-
dazzle position.
F Push the lever to change to the normal
"day" position.
63
Page 66

Comfort
Steering wheel adjustment
F When stationary, lower the control lever A
to release the steering wheel adjustment
mechanism.
F Adjust the height of the steering wheel to
suit your driving position.
F Raise the control lever A to lock the
steering wheel adjustment mechanism.
As a safety precaution, these
operations should only be carried out
while the vehicle is stationary.
Correct driving position
Before taking to the road and to make the most
of the ergonomics of your driving position, carry
out these adjustments in the following order:
- height of the head restraint,
- backrest angle,
- cushion height,
- longitudinal position of the seat,
- height of the steering wheel,
- the interior and door mirrors.
64
Once these adjustments have been made,
ensure that from your driving position you
can see the instrument panel clearly.
Page 67

Ventilation
Air intake
The air circulating in the passenger
compartment is filtered and originates either
from the outside via the grille located at the
base of the windscreen or from the inside in air
recirculation mode.
Air treatment
The incoming air follows various routes
depending on the controls selected by the
driver:
- direct arrival in the passenger
compartment (air intake),
- passage through a heating circuit (heating),
- passage through a cooling circuit (air
conditioning).
Comfort
3
Control panel
The controls of this system are
accessible in the "Air conditioning"
menu of the touch screen tablet A.
The demisting/defrosting controls for the
windscreen and rear screen are located below
the touch screen tablet.
Air distribution
1. Windscreen demisting-defrosting vents.
2. Front side window demisting/defrosting
vents.
3. Adjustable side air vent (driver only).
4. Central adjustable air vents.
5. Air outlets for the front footwells.
6. Air outlets for the rear footwells.
65
Page 68

Comfort
Recommendations for ventilation and air conditioning
In order for these systems to be fully effective, follow the operation and maintenance
guidelines below:
F To obtain an even air distribution, take care not to obstruct the exterior air intake grilles
located at the base of the windscreen, the nozzles, the vents and the air outlets, as well
as the air extractor located in the boot.
F Do not cover the sunshine sensor, located on the dashboard; this is used for regulation
of the air conditioning system.
F Operate the air conditioning system for at least 5 to 10 minutes, once or twice a month
to keep it in perfect working order.
F Ensure that the passenger compartment filter is in good condition and have the filter
elements replaced regularly.
We recommend the use of a combined passenger compartment filter. Thanks to its
special active additive, it contributes to the purification of the air breathed by the
occupants and the cleanliness of the passenger compartment (reduction of allergic
symptoms, bad odours and greasy deposits).
F To ensure correct operation of the air conditioning system, you are also advised to have
it checked regularly as recommended in the maintenance and warranty guide.
F If the system does not produce cold air, switch it off and contact a CITROËN dealer or a
qualified workshop.
When towing the maximum load on a steep gradient in high temperatures, switching off the
air conditioning increases the available engine power and so improves the towing ability.
If after an extended stop in sunshine,
the interior temperature is very high, first
ventilate the passenger compartment for
a few moments.
Put the air flow control at a setting high
enough to quickly change the air in the
passenger compartment.
The air conditioning system does not
contain chlorine and does not present
any danger to the ozone layer.
The condensation created by the air
conditioning results in a discharge
of water under the vehicle which is
perfectly normal.
Stop & Start
The heating and air conditioning
systems only work when the engine
is running. To maintain a comfortable
temperature in the passenger
compartment, you can temporarily
deactivate the Stop & Start system (see
the corresponding section).
66
Page 69

Heating
The heating system works only when the engine is running.
Comfort
F Select the "Air conditioning"
menu in the touch screen tablet
to display the controls page for
the system.
Temperature adjustment
F Press one of these buttons
or move the cursor from blue
(cold) to red (hot) to adjust the
temperature to your wishes.
Air flow adjustment
3
F Press one of these buttons to
increase or decrease the air flow
from the system.
The symbol for air flow (a fan) fills progressively
according to the air flow setting made.
By reducing the air flow to the minimum, you
are stopping ventilation of the passenger
compartment.
Avoid driving for too long without
ventilation (risk of misting and
deterioration of air quality).
67
Page 70

Comfort
Air distribution adjust ment
You can vary the air distribution in the passenger
compartment using these three buttons.
Windscreen.
Centre and side vents.
Footwells.
Each press of a button activates or deactivates
the function.
For an even distribution of air in the
passenger compartment, the three
buttons can be activated simultaneously.
Air intake / Air recirculation
The intake of exterior air prevents and
eliminates misting of the windscreen and side
windows.
The recirculation of interior air prevents exterior
odours and smoke entering the passenger
compartment.
This function can also be used
temporarily to speed up the heating of
the air in the passenger compartment.
F Press this button to recirculate
the interior air.
F Press this button again to allow the intake
of exterior air.
Avoid the prolonged use of recirculation
of the interior air (risk of misting and
deterioration of air quality).
68
Page 71

Manual air conditioning
The air conditioning system operates with the engine running.
Comfort
F Select the "Air conditioning"
menu in the touch screen tablet
to display the controls page for
the system.
Temperature adjustment
F Press one of these buttons or
move the cursor blue (cold)
to red (hot) to adjust the
temperature to your liking.
Air flow adjustment
3
F Press one of these buttons to
increase or decrease the air flow.
The symbol for air flow (a fan) fills progressively
according to the air flow setting made.
By reducing the air flow to minimum, you are
stopping ventilation.
Avoid driving too long without ventilation
(risk of misting and deterioration of air
quality).
69
Page 72

Comfort
Air distribution adjust ment
You can modulate the distribution of air in the
passenger compartment using these three
buttons.
Windscreen.
Central and side vents.
Footwells.
Each press on a button activates or deactivates
the function.
For a uniform distribution of air in the
passenger compartment, the three
buttons can be activated simultaneously.
Fresh air intake / Air
recirculation
The intake of fresh air avoids and eliminates
misting of the windscreen and side windows.
Recirculation of the interior air isolates the
passenger compartment from exterior odours
and fumes.
This function can also be used
temporarily to speed up the heating or
cooling of the passenger compartment.
F Press this button to recirculate
the interior air.
F Press this button again to allow the intake
of exterior air.
Avoid the prolonged use of interior
air recirculation (risk of misting and
deterioration of air quality).
Air conditioning On / Of f
The air conditioning is designed to operate
effectively in all seasons, with the windows closed.
It enables you to:
- lower the temperature, in summer,
- increase the effectiveness of the demisting
in winter, above 3°C.
Switching on
F Press this button to switch on the
air conditioning.
The air conditioning does not operate
when the air flow adjustment is set to
off.
Switching off
F Press this button again to switch
off the air conditioning.
70
Page 73

Automatic air conditioning
This air conditioning system operates with the engine running, but the ventilation and its controls are available with the ignition on.
Comfort
Operation of the air conditioning and regulation
of temperature, air flow and air distribution in
the passenger compartment are automatic.
F Select the "Air conditioning"
menu in the touch screen tablet
to display the controls page for
the system.
Temperature adjustment
F Press one of this button to
increase the value.
F Press one of this button to
decrease the value.
The value indicated corresponds to a
level of comfort and not to a precise
temperature.
Automatic comfort
programme
Activation / Deactivation
F Press the "AUTO" button
to activate or deactivate the
automatic mode of the air
conditioning system.
The air conditioning system operates
automatically: the system manages the
temperature, air flow and air distribution in
the passenger compartment in an optimum
way according to the comfort level you have
selected.
3
71
Page 74

Comfort
Automatic programme mode
setting
F Go to the secondary page
by pressing this button to
modulate the automatic comfort
programme, choosing one of the
modes offered.
To change the current setting press the button
for the desired mode:
"Soft": provides soft and quiet
operation by limiting air flow.
"Normal": offers the best
compromise between a comfortable
temperature and quiet operation
(default setting).
"Fast": provides strong and effective
air flow.
This setting is associated with AUTO mode
only. However, on deactivation of AUTO mode,
the last setting used remains on.
Changing the setting does not reactivate AUTO
mode if deactivated.
In cold weather with the engine cold,
the air flow is increased gradually until
the system has warmed up, in order
to limit the delivery of cold air into the
passenger compartment.
On entering the vehicle, if the interior
temperature is much colder or warmer
than the comfort value setting, there
is no need to alter the value displayed
in order to reach more quickly the
required level of comfort. The system
compensates automatically and
corrects the temperature difference as
quickly as possible.
72
Page 75

Resuming manual control
Comfort
You can manually adjust the air flow and
distribution.
As soon as you modify a setting, the automatic
comfort programme is deactivated.
F Press the "AUTO" button to
activate the automatic comfort
programme again.
Air ow adjustment
F Press one of these buttons to
increase or decrease the air flow.
The symbol for air flow (a fan) fills progressively
according to the air flow setting made.
By reducing the air flow to minimum, you are
stopping ventilation.
"OFF" is displayed alongside the fan.
Avoid driving for too long with the
ventilation off (risk of misting and
deterioration of air quality).
Air distribution adjustment
You can modulate the distribution of air in the
passenger compartment using these three buttons.
Windscreen.
Centre and side vents.
Footwells.
Each press on a button activates or deactivates
the function.
For a uniform distribution in the
passenger compartment, all three
buttons can be pressed simultaneously.
3
73
Page 76

Comfort
Air conditioning On/Of f
The air conditioning is designed to operate
efficiently in all seasons, with the windows
closed.
It allows you:
- in summer, to lower the temperature,
- in winter, above 3 °C, to improve demisting.
Switching on
F Press this button to switch on the
air conditioning.
The air conditioning cannot operate
when the air flow is set to off.
Switching off
F Press this button again to switch
off the air conditioning.
Air intake/Air recirculation
The intake of exterior air avoids and eliminated
misting of the windscreen and side windows.
The recirculation of interior air prevents exterior
odours and smoke from entering the passenger
compartment.
This function also allows faster heating
or cooling of the air in the passenger
compartment.
F Press this button to recirculate
the interior air.
F Press this button again to allow
the intake of exterior air.
Avoid the prolonged use of interior
air recirculation (risk of misting and
deterioration of air quality).
Ventilation with "ignition
on" function
With the ignition on, you can use the
ventilation system and have access to the "Air
conditioning" menu to adjust the air flow and
air distribution in the passenger compartment.
This function is available for a few minutes,
depending on the state of charge of the battery
of your vehicle.
This function does not activate the air
conditioning.
You can make use of the residual heat in the
engine to warm the passenger compartment
using the temperature setting buttons.
74
Page 77

Front Demist - Defrost
Comfort
Switching on
F Press this button to demist or
defrost the windscreen and side
windows as quickly as possible.
The indicator lamp in the button
comes on.
The system automatically manages the air
conditioning (depending on version), air
flow and air intake, and provides optimum
distribution towards the windscreen and side
windows.
Switching off
F To switch off demisting, press
this button again, the indicator
lamp goes off.
With Stop & Start, when demisting has
been activated, the STOP mode is not
available.
3
75
Page 78

Comfort
Rear screen demist - defrost
Switching on
F Press this button to demist/
defrost the rear screen and
(depending on version) the door
mirrors. The indicator lamp in the
button comes on.
Switching off
The demisting/defrosting switches off automatically
to prevent an excessive consumption of current.
F It is possible to stop the
demisting/defrosting operation
before it is switched off
automatically by pressing this
button again. The indicator lamp
in the button goes off.
Switch off the heating of the rear screen
and door mirrors as soon as you judge it
possible, as reducing the consumption
of electrical current reduces fuel
consumption.
The rear screen demist - defrost
can only operate when the engine is
running.
76
Page 79

Interior ttings
with manual gearbox
1. Sun visor.
2. Glove box.
It houses an auxiliary socket and a USB
port (depending on version).
3. 12 V (120 W) accessory socket.
4. USB port.
5. Open storage.
6. Cup holder.
7. Front armrest with storage.
(depending on version).
8. Front door pockets.
9. Mat.
Fittings
4
77
Page 80

Fittings
Interior ttings
with electronic gearbox
1. Sun visor.
2. Glove box.
It houses an auxiliary socket and a USB
port (depending on version).
3. 12 V (120 W) accessory socket.
4. USB port.
5. Open storage.
6. Cup holder.
7. Front armrest.
8. Front door pockets.
9. Mat.
78
Page 81

Fittings
Component to protect against sunlight from the
front or the side.
The driver's sun visor is fitted with a vanity
mirror, with concealing flap and a card (or
ticket) holder.
Glove boxSun visor
It can be used to hold a water bottle, the
vehicle's handbook pack...
F To open the glove box, raise the lid.
It houses an auxiliary socket, a USB
port (depending on equipment) and the
front passenger airbag deactivation
switch.
12 V accessory socket
4
F To connect a 12 V accessory (maximum
power: 120 Watts), lift the cover and
connect a suitable adaptor.
Do not exceed the maximum power
rating of the socket (risk of damage to
your device).
79
Page 82

Fittings
Auxiliary soc ketUS B po rt(s) *
When a USB port is used, the portable
device charges automatically.
For more information on using this
equipment, refer to the "Audio and
telematics" section.
80
It allows the connection of a portable device or
a USB memory stick.
It reads the audio files which are sent to your
audio system and played via the vehicle's
speakers.
You can manage these files using the steering
mounted controls or the audio system.
* Depending on version.
For best reception, it is recommended
that the "CITROËN MULTICITY
CONNECT" connection key be plugged
into the USB port located in the glove
box (depending on version).
It permits the connection of a portable device
to listen to your music files using the vehicle's
speakers.
The management of the files is done using your
portable device.
For more information on the use of
this equipment, refer to the "Audio and
telematics" section.
Page 83

Fittings
Front armrest
Manual gearbox
(depending on equipment)
F For access to the closed storage box, lift
the lever to open the lid.
F For access to the open storage box below
the armrest, lift the complete armrest
towards the rear.
These storage spaces can be used to
house portable devices (mobile phone,
MP3 player...) which can be connected
to the USB port / auxiliary socket or
charged from the 12 V socket in the
centre console.
Electronic gearbox
The armrest can be inclined forwards to
benefit from its comfort or folded completely
backwards.
Coat hooks
4
They are located above each rear door.
81
Page 84

Fittings
Mats
Removable carpet protection.
Fitting
When fitting the mat for the first time, on the
driver's side use only the fixings provided.
The other mats are simply placed on the
carpet.
Removal
To remove the mat on the driver's side:
F move the seat as far back as possible,
F unclip the fixings,
F remove the mat.
Retting
To refit the mat on the driver's side:
F position the mat correctly,
F refit the fixings by pressing,
F check that the mat is secured correctly.
To avoid any risk of jamming of the
pedals:
- only use mats which are suited to
the fixings already present in the
vehicle; these fixings must be used,
- never fit one mat on top of another.
The use of mats not approved by
CITROËN may interfere with access to
the pedals and hinder the operation of
the cruise control / speed limiter.
The mats approved by CITROËN have
two fixings located below the seat.
82
Page 85

Boot ttings
1. Rear parcel shelf.
2. Hook.
3. Storage box.
4. Storage net (accessory).
5. Storage net fixing rings.
The storage net fixing rings are not
intended to secure loads or restrain
baggage.
Fittings
4
83
Page 86

Fittings
Rear parcel shelf
To remove the shelf:
F unhook the two cords,
F raise the shelf slightly, then remove it.
There are several options for storing the shelf:
- either upright behind the front seats,
- or flat at the base of the boot.
Hook Storage box
It can be used to secure shopping bags.
F Remove the boot carpet for access to the
storage box.
Depending on the configuration, it is laid out for
storing:
- a towing eye,
- a temporary puncture repair kit,
- a warning triangle,
- ...
For versions with storage box: it must
be in place before loading the boot.
84
Page 87

Warning triangle (storage)
The triangle may be stowed under the boot carpet (in the storage well) or, depending on version, under the front passenger seat.
Fittings
Before leaving your vehicle to set up
and install the triangle, switch on the
hazard warning lamps and put on your
high visibility vest.
Refer to the manufacturer's instructions
on using the triangle.
Placing the triangle in the
road
F Place the triangle behind the vehicle, as
required by the legislation in force in your
country.
The triangle is available as an
accessory; contact a CITROËN dealer
or a qualified workshop.
4
85
Page 88

Driving
Starting - Stopping the engine
Starting
F Insert the key in the ignition switch.
The system recognises the starting code.
F Turn the key fully towards the dashboard to
position 3 (Starting).
F When the engine starts, release the key.
Switching off
F Immobilise the vehicle.
F Turn the key fully towards you to
position 1 (Stop).
F Remove the key from the ignition switch.
Avoid attaching heavy objects to the
key, which could pull down in it when in
the ignition switch and cause faults.
Key left in the "Ignition on"
position
On opening the driver's door, an alert
message is displayed, accompanied by an
audible signal, to remind you that the key is
still in the ignition switch at position 1 (Stop).
If the key has been left in the ignition
switch at position 2 (Ignition on),
the ignition will be switched off
automatically after one hour.
To switch the ignition back on, turn the
key to position 1 (Stop), then back to
position 2 (Ignition on).
86
Page 89

Parking brake
Driving
Application Release
F Pull the parking brake lever up to
immobilise your vehicle.
F Pull the parking brake lever up slightly,
press the release button, then lower the
lever fully.
When the vehicle is being driven,
if this warning lamp and the STOP
warning lamp come on, accompanied
by an audible signal and a message
in the screen, this indicates that the
parking brake is still on or has not
been fully released.
When parking on a slope, direct your
wheels against the kerb, apply the
parking brake, engage a gear and
switch off the ignition.
5
87
Page 90

Driving
5-speed manual gearbox
Engaging reverse gear
F Press the clutch pedal fully down.
F Push the gear lever fully to the right then
backwards.
Only engage reverse gear when the
vehicle is stationary with the engine at idle.
As a safety precaution and to facilitate
starting of the engine:
- always select neutral,
- press the clutch pedal.
88
Page 91

Gear shift indicator
System which reduces fuel consumption by advising the driver to change up, on vehicles fitted with a manual gearbox.
Operation
Depending on the driving situation and your
vehicle's equipment, the system may advise
you to skip one (or more) gear(s). You can
follow this instruction without engaging the
intermediate gears.
The gear engagement recommendations must
not be considered compulsory. In fact, the
configuration of the road, the amount of traffic
and safety remain determining factors when
choosing the best gear. Therefore, the driver
remains responsible for deciding whether or not
to follow the advice given by the system.
This system cannot be deactivated.
Example:
- You are in third gear.
- You press the accelerator pedal.
- The system may suggest that you engage
a higher gear.
The information appears in the instrument
panel in the form of an arrow, accompanied by
the recommended gear.
The system adapts its gear change
recommendation according to the
driving conditions (slope, load, ...) and
the demands of the driver (power,
acceleration, braking, ...).
The system never suggests:
- engaging first gear,
- engaging reverse gear,
- engaging a lower gear.
Driving
5
89
Page 92

Driving
Electronic gearbox
Five or six-speed electronically controlled gearbox which offers the comfort of automatic control of the gears, without any action by the driver.
You can temporarily take control of gear changes at any time, using the steering mounted control paddles.
90
Control panel
N Neutral: with your foot on the brake, press
this control to put the gearbox into neutral
and for starting the engine.
D Drive: press this control to engage forward
drive with automatic operation of the gears,
R Reverse: with your foot on the brake, press
this control to engage reverse
Steering mounted controls
F Press the back of the paddle to
the right of the steering wheel to
change up.
F Press the back of the paddle to
the left of the steering wheel to
change down.
The steering mounted paddles do not
allow neutral to be selected, or reverse
gear to be engaged or disengaged.
Display in the instrument panel
N Neutral
D and 1 2 3 4 5 / 6 Drive (forward drive) and
the gear engaged.
R Reverse
F Place your foot on the brake
when this warning lamp flashes.
Page 93

Moving off
F Switch on the ignition.
F Select neutral (control N).
The indicator lamp for the control comes on.
F Press the brake pedal fully.
F Start the engine.
You must keep your foot on the brake
pedal while starting the engine.
The "Foot on the brake" warning and
the associated control panel indicator
lamp flash if the brake pedal is not
pressed when starting the engine.
Press firmly on the brake pedal.
N appears in the instrument panel.
N flashes in the instrument panel,
accompanied by an audible signal and
a message if the control N has not been
pressed for starting.
Press control N to select neutral.
F Select forward drive (control D) or reverse
(control R)
The associated indicator lamp comes on in
the control panel.
Driving
Creep function
This function allows the vehicle to be
manoeuvred more easily at low speeds (when
parking, in traffic jams...).
After pressing control D or R, the vehicle
moves as soon as you take your foot off the
brake pedal, at low speed and with the engine
at idle.
Do not leave children unsupervised
inside the vehicle when the engine is
running.
5
D and 1 or R appear in the instrument
panel.
F Release the parking brake.
F Progressively take your foot off the brake
pedal.
The vehicle moves off.
The creep function may be temporarily
unavailable if the clutch temperature is
too high or the slope too steep.
91
Page 94

Driving
Forward drive
F Press control D.
The indicator lamp in the control comes on.
D and the gear engaged appear in
the instrument panel.
The gearbox then operates in auto-adaptive
mode, without any action on the part of the
driver. It continuously selects the most suitable
gear taking account of:
- optimisation of fuel consumption,
- driving style,
- road conditions,
- vehicle load.
For optimum acceleration, when
overtaking another vehicle for example,
press the accelerator pedal fully down,
beyond the point of resistance.
Never select neutral (position N) when
moving.
Do not press the brake and accelerator
pedals at the same time: this could
cause very rapid wear of the clutch.
Temporary control of gear
changing
You can temporarily take over control of gear
changes using the steering mounted "+" and "-"
control paddles: if the engine speed allows, the
gear change is carried out.
This function allows you to anticipate certain
situations such as overtaking another vehicle or
approaching a bend.
After a few moments without any action on the
paddles, the gearbox resumes control of gear
changing automatically.
Reverse
To engage reverse, the vehicle must be
immobilised with your foot on the brake.
F Press control R.
The indicator lamp in the control comes on.
There is an audible signal on
engagement of reverse.
If reverse gear is requested when moving,
the N warning lamp flashes and the gearbox
goes into neutral automatically.
To engage reverse, stop the vehicle and press
control N, then R, with your foot on the brake
pedal.
92
Page 95

Driving
Stopping the vehicle
Before switching off the engine:
- press control N to be in neutral,
or
- leave the vehicle in gear; in this case the
vehicle cannot be moved.
For all parking situations, you must
apply the parking brake to immobilise
the vehicle.
When immobilising the vehicle with
the engine running, you must select
neutral N.
Before doing anything under the bonnet,
ensure that control N has been pressed
and that the parking brake is applied.
Reinitialisation
(5-speed elec tronic
gearbox)
Following disconnection of the battery, it is
necessary to reinitialise the gearbox.
F Switch on the ignition.
- - - appears in the instrument panel.
F Press control N.
F Press the brake pedal.
F Wait for around 30 seconds until N or a
gear appears in the instrument panel.
F Press control D, then N.
F With your foot still on the brake pedal, start
the engine.
The gearbox is operational again.
In exceptional circumstances, the
gearbox may need an automatic
reinitialisation: starting and gear
changing are no longer possible.
- - - appears in the instrument
panel.
Follow the procedure described above.
Operating fault
With the ignition on, illumination of
this warning lamp, accompanied by
an audible signal and a message,
indicates a gearbox fault.
Have it checked by a CITROËN dealer or a
qualified workshop.
5
93
Page 96

Driving
Hill start assist
System which keeps your vehicle immobilised
temporarily (approximately 2 seconds) when
starting on a gradient, the time it takes to
move your foot from the brake pedal to the
accelerator pedal.
This system only operates when:
- the vehicle is completely stationary, with
your foot on the brake pedal,
- certain conditions of slope are met,
- with the driver’s door closed.
The hill start assist system cannot be
deactivated.
Operation
94
Do not leave the vehicle while it is being
held in the hill start assist phase.
If you need to exit the vehicle with
the engine running, apply the parking
brake.
On an ascending slope, with the vehicle
stationary, the vehicle is held momentarily
when you release the brake pedal, provided
that:
- you are in first gear or neutral with a
manual gearbox,
- you are in position D with an electronic
gearbox.
On a descending slope, with the vehicle
stationary and reverse gear engaged, the
vehicle is held momentarily when you
release the brake pedal.
Operating fault
If a fault in the system occurs, these warning
lamps come on, accompanied by an alert
message. Contact a CITROËN dealer or
a qualified workshop to have the system
checked.
Page 97

Stop & Start
The Stop & Start system puts the engine temporarily into standby - STOP mode - during stops in the traffic (red lights, traffic jams, or other...).
The engine restarts automatically - START mode - as soon as you want to move off. The restart takes place instantly, quickly and silently.
Perfect for urban use, the Stop & Start system reduces fuel consumption and exhaust emissions as well as the noise level when stationary.
Operation
Going into engine STOP mode
The "ECO" warning lamp comes on
in the instrument panel and the engine
goes into standby automatically:
- with a manual gearbox, when stationary,
in neutral, and you release the clutch
pedal.
- with an electronic gearbox, when
stationary or at speeds below 5 mph
(8 km/h) (depending on version), in neutral
(control on N) or when you press the brake
pedal.
Stop & Start time counter
A cumulative time counter for periods
in STOP mode during a journey.
It is displayed in the trip computer (accessible
via the "Driving assistance" menu of the
touch screen tablet).
It resets to zero every time the ignition is switched on.
For your comfort, during parking
manoeuvres, STOP mode is not
available for a few seconds after
coming out of reverse gear.
STOP mode does not affect the
functionalities of the vehicle, such as for
example, braking, power steering...
Never refuel with the engine in STOP
mode; you must switch off the ignition
with the button.
Special cases: STOP mode not
available
STOP mode is not invoked principally when:
- the driver's door is open,
- the driver's seat belt is not fastened,
- the vehicle has not exceeded 6 mph
(10 km/h) since the last engine start by the
driver,
- the engine is needed to maintain a
comfortable temperature in the passenger
compartment,
- demisting is active,
- some special conditions (battery charge,
engine temperature, braking assistance,
ambient temperature...) where the engine is
needed to assure control of a system.
In this case, the "ECO" warning lamp
flashes for a few seconds then goes
off.
This operation is perfectly normal.
Driving
5
95
Page 98

Driving
Going into engine START mode
The "ECO" warning lamp goes off
and the engine starts automatically:
- with a manual gearbox, when you fully
depress the clutch pedal.
- with an electronic gearbox:
● control on D, when you release the brake
pedal,
● control on N and brake pedal released,
when you press control D,
● when you engage reverse.
Special cases: START invoked
automatically
START mode is invoked automatically when:
- you open the the driver's door,
- you unfasten the driver's seat belt,
- the speed of the vehicle exceeds 7 mph
(11 km/h) with an electronic gearbox,
- some special conditions (battery charge,
engine temperature, braking assistance,
ambient temperature...) where the engine is
needed for control of a system.
In this case the "ECO" warning lamp
flashes for a few seconds, then goes
off.
This operation is perfectly normal.
Maintenance
Before doing anything under the
bonnet, deactivate the Stop & Start
system to avoid any risk of injury
resulting from automatic operation of
START mode.
This system requires a 12 V battery with a
special specification and technology (reference
numbers available from CITROËN dealers).
Fitting a battery not listed by
CITROËN introduces the risk of malfunction of
the system.
For charging, use a 12 V charger and do not
reverse the polarity.
The Stop & Start system makes use of
advanced technology. For any work on
the system go to a qualified workshop
with the skills and equipment required,
which a CITROËN dealer is able to
provide.
96
Page 99

Driving
Deactivation
The Stop & Start system can be deactivated in
the touch screen tablet.
F Select the "Driving assistance"
menu.
F Press on "Stop & Start".
The indicator lamp in this button comes on
continuously.
If the system has been deactivated in STOP
mode, the engine restarts immediately.
When driving on a flooded road, it is
recommended that the Stop & Start
function be deactivated and that you
drive very slowly.
Reactivation
The system can be reactivated in the touch
screen tablet.
Pressing this button again reactivates
the Stop & Start system. The
indicator lamp in the button goes off.
The system is reactivated automatically
every time the engine is started by
the driver.
Operating fault
A fault with the system is signalled
in the "Driving assistance" menu
(primary page) of the touch screen
tablet.
In the event of a fault with the
system, the indicator lamp in the
Stop & Start button flashes for a few
moments, the stays on continuously.
If you press this button to reactivate the
system, the indicator lamp flashes again for a
few moments and then stays on continuously.
Have it checked by a CITROËN dealer or a
qualified workshop.
In the event of a fault in STOP mode, the vehicle
may stall.
All of the instrument panel warning lamps come on.
Depending on version, an alert message may
also be displayed, asking you to change to
neutral (control on N) and put your foot on the
brake pedal.
You must switch off the ignition, then start the
engine again.
5
97
Page 100

Driving
Speed limiter
System which prevents the vehicle from exceeding the speed programmed by the driver.
The programmed speed remains in the system
memory when the ignition is switched off.
The speed limiter cannot, in any circumstances,
replace the need to observe speed limits,
nor can it replace the need for vigilance and
responsibility on the part of the driver.
Steering mounted controls
The controls are grouped together at the
steering wheel.
1. Speed limiter mode selection wheel.
2. Value decrease button.
3. Value increase button.
4. Speed limiter on / pause button.
5. List of memorised speeds display button.
Display in the instrument panel
The information is grouped together in the
instrument panel.
6. Speed limiter on / pause indication.
7. Speed value setting.
8. Speed limiter mode selection indication.
98
 Loading...