

Page 1
Index
Abbreviated Dialing 20
Adjusting the Phone 4
Answering a Call 12
Billing Codes 24
Call Block 23
Call Forwarding 14
Call Logs (Directories) 22
Conferencing 16
Connecting Your Phone 3
Direct Call Pickup 17
Do Not Disturb (DND) 18
Group Pickup 17
Group Speed Dials 21
Hold/Resume 13
Intercom 18
Long Distance Authorization Codes 24
Multi-Call Park (MC Park) 16
Mute 17
Permanent Caller ID Block Release 23
Phone Settings 19
Placing a Call 11
Priority Call 18
Razorline Contact Information 2
Speed Dials 20
Star Code Summary 27
Table of Contents 2
Transfer 14
Voice Mail 21
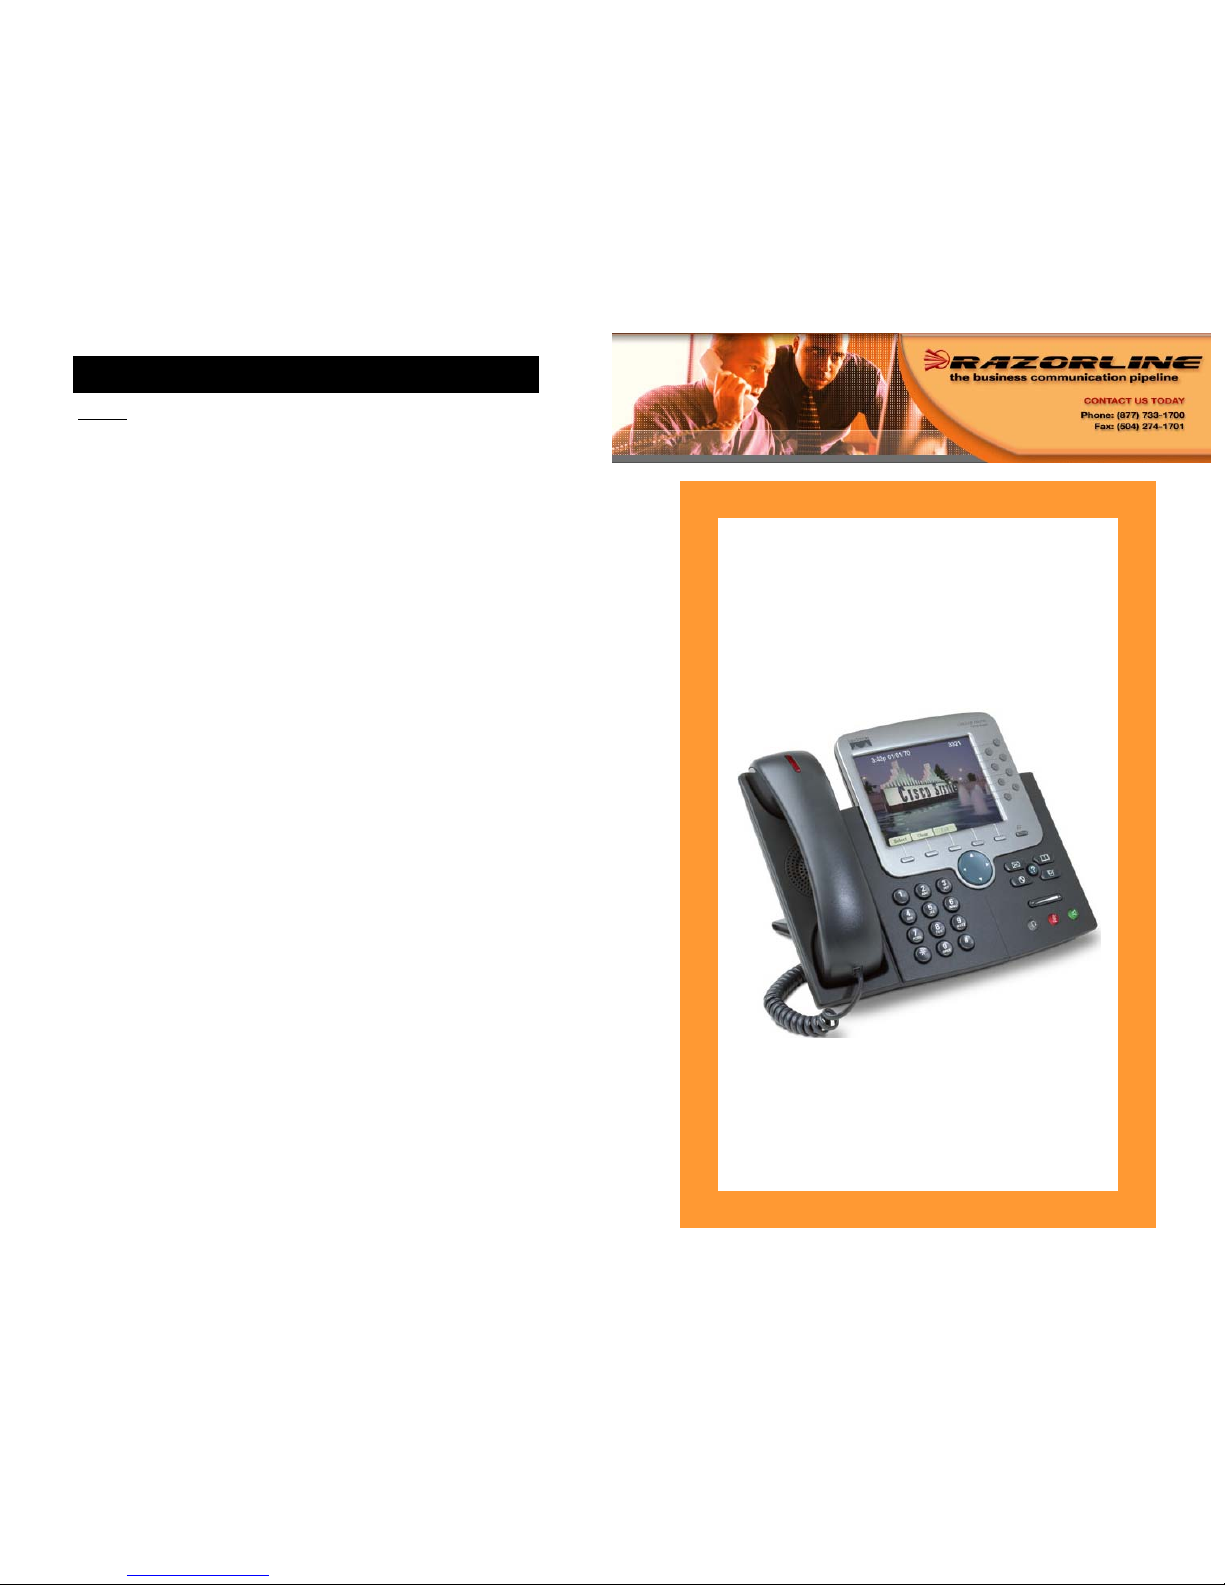
Razorline
7975 Cisco User
Manual
Page 2
Page 2
Table of Contents
Connecting Your Phone 3
Buttons and Hardware 4
Touchscreen Features 8
Helpful Tips 10
Basic Call Handling 11
Advanced Call Handling 16
Customizing Phone Settings 19
Voice Mail 21
Using the Directories 22
Call Blocking and Privacy Features 23
Billing and Long Distance Codes 24
Using Your Phone Off-Net 25
Voice Mail System Cheat Sheet 26
Star Code Summary 27
Index 28
Customer Service/Technical Support
Please call 877-733-1700 or e-mail us at support@razorline.com
Razorline customer/technical support is available 24/7.
Important Razorline Numbers and Web Addresses
New Orleans Main
Number: 504-274-1700
Razorline Website: http://www.razorline.com
Web Portal Address: http://webportal.razorline.com
Technical Support Email: support@razorline.com
Technical Support Line: 877-733-1700
Star Code Summary
Page 27
Feature Set Cancel
Abbreviated Dial 75* + Menu 75* + Menu
Anonymous Call Rejection *77 *87
Call Forward—All Calls 72* + no. + # 73*
Call Forward—Busy 76* no. + # 77*
Call Forward—No Answer 78* + no. + # 79*
Call Forward—Out of Svc. 70* + Menu 71*
Call Forward—Selective *63 + Menu *83 + Menu
Call Return *69 N/A
Call Trace *57 N/A
Call Waiting N/A *70 + no.
Caller ID Block *67 N/A
Directed Call Pickup *12 + extension N/A
Do Not Disturb *04 *04
Group Call Pickup *06 N/A
Perm. Caller ID Block
Release
N/A *82 + no.
Priority Call *61 + Menu *61 + Menu
Privacy Guard *88 + Menu *88 + Menu
Redial *07 N/A
Selective Call Block *60 + Menu *60 + Menu
Speed Dial 74* + Menu 74 + Menu
Voicemail *09 N/A
Page 3
Voice Mail System Cheat Sheet
Voice Mail Menu
1—Listen to Inbox messages
2—Listen to Saved messages
3—Change you password
4—Listen to your voice mail greetings
5—Record your voice mail greetings
6—Access your personal distribution groups
7—To compose a message
8—To hear or change your customized operator
While Listening To Your Messages
# - Skip Time/Date stamp prior to message
7—Rewind in 5 second increments
9—Forward in 5 second increments
99—Skip to the end of the message
77—Rewind to the beginning of the message
8—Pause the message
5—Save the message
4—Delete the message
Page 26
Page 3
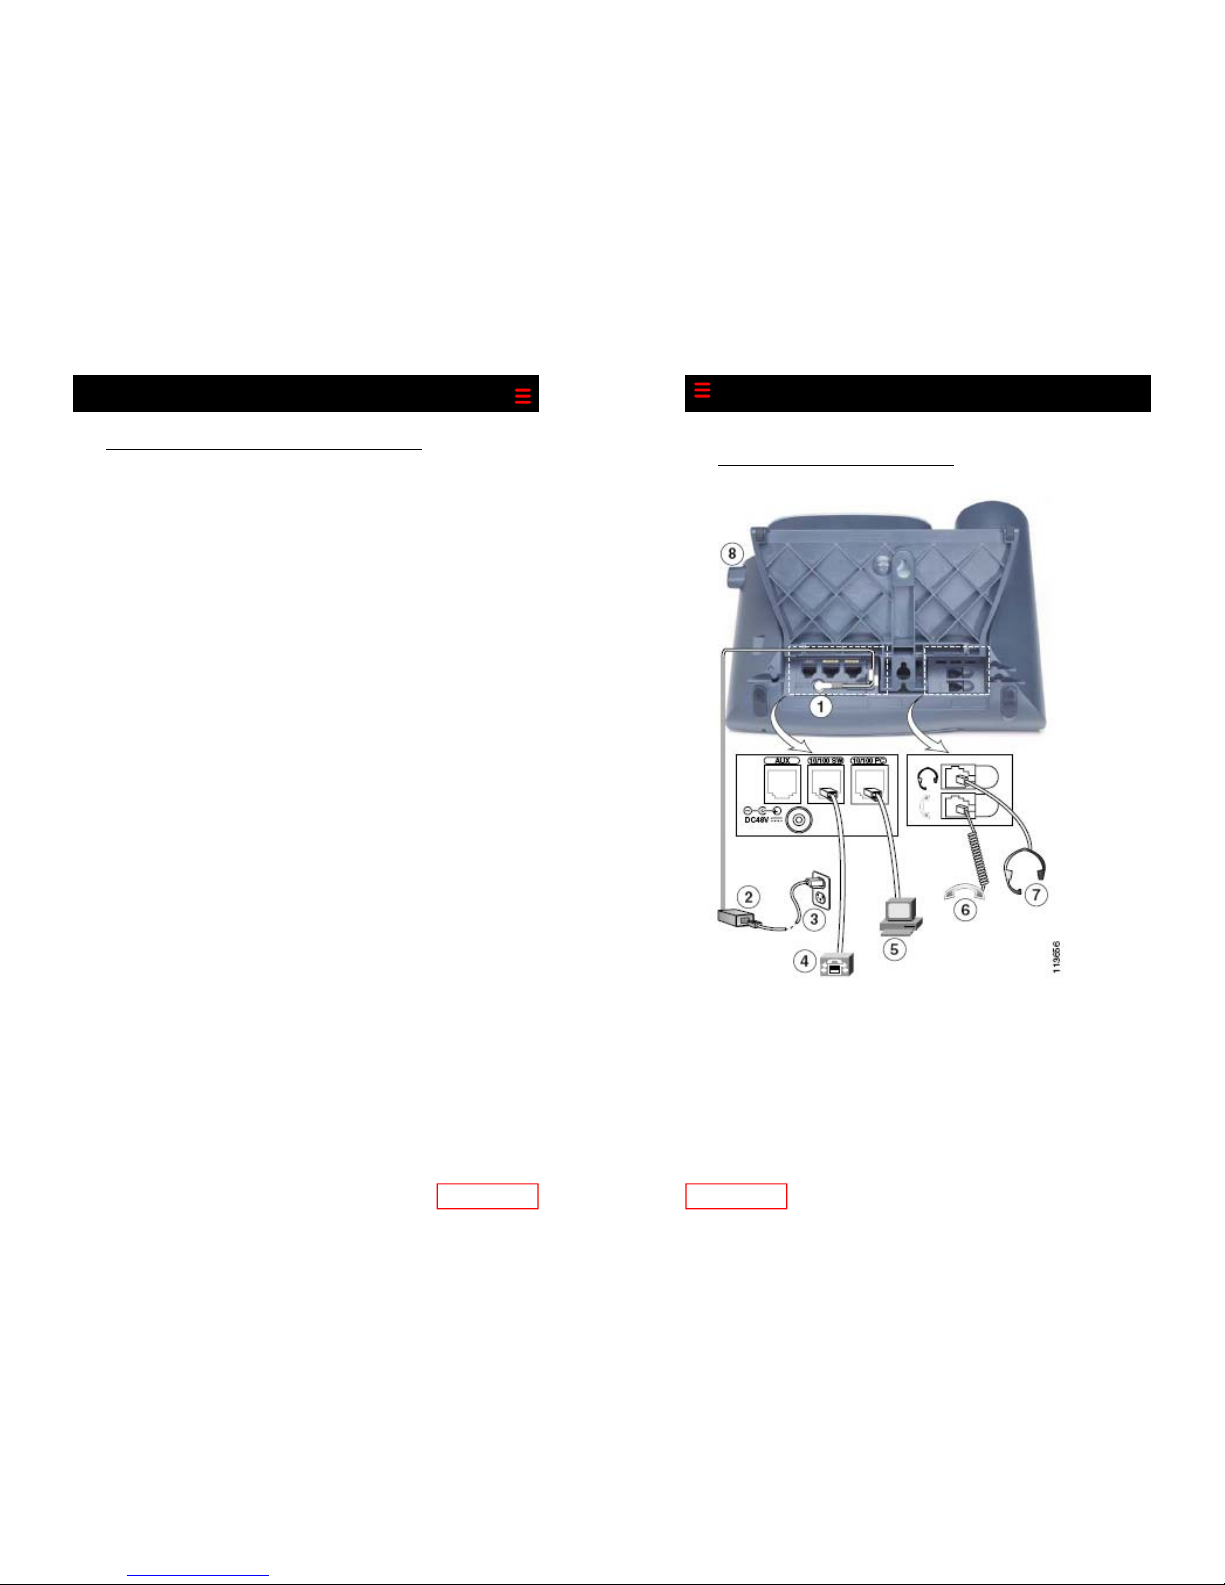
Connecting Your Phone
1. DC adaptor port (DC48V)
2. AC-to-DC power supply
3. AC power cord
4. Network port (10/100 (/1000) SW) for connecting to the network
5. Access port (10/100 (/1000) PC) for connecting your phone to
your computer
6. Handset port
7. Headset port
8. Foot stand button
Page 4
Page 4
Buttons and Hardware
Adjusting the Foot stand
To change the angle that your phone sits on your desktop, adjust
the foot stand while pressing the foot stand button.
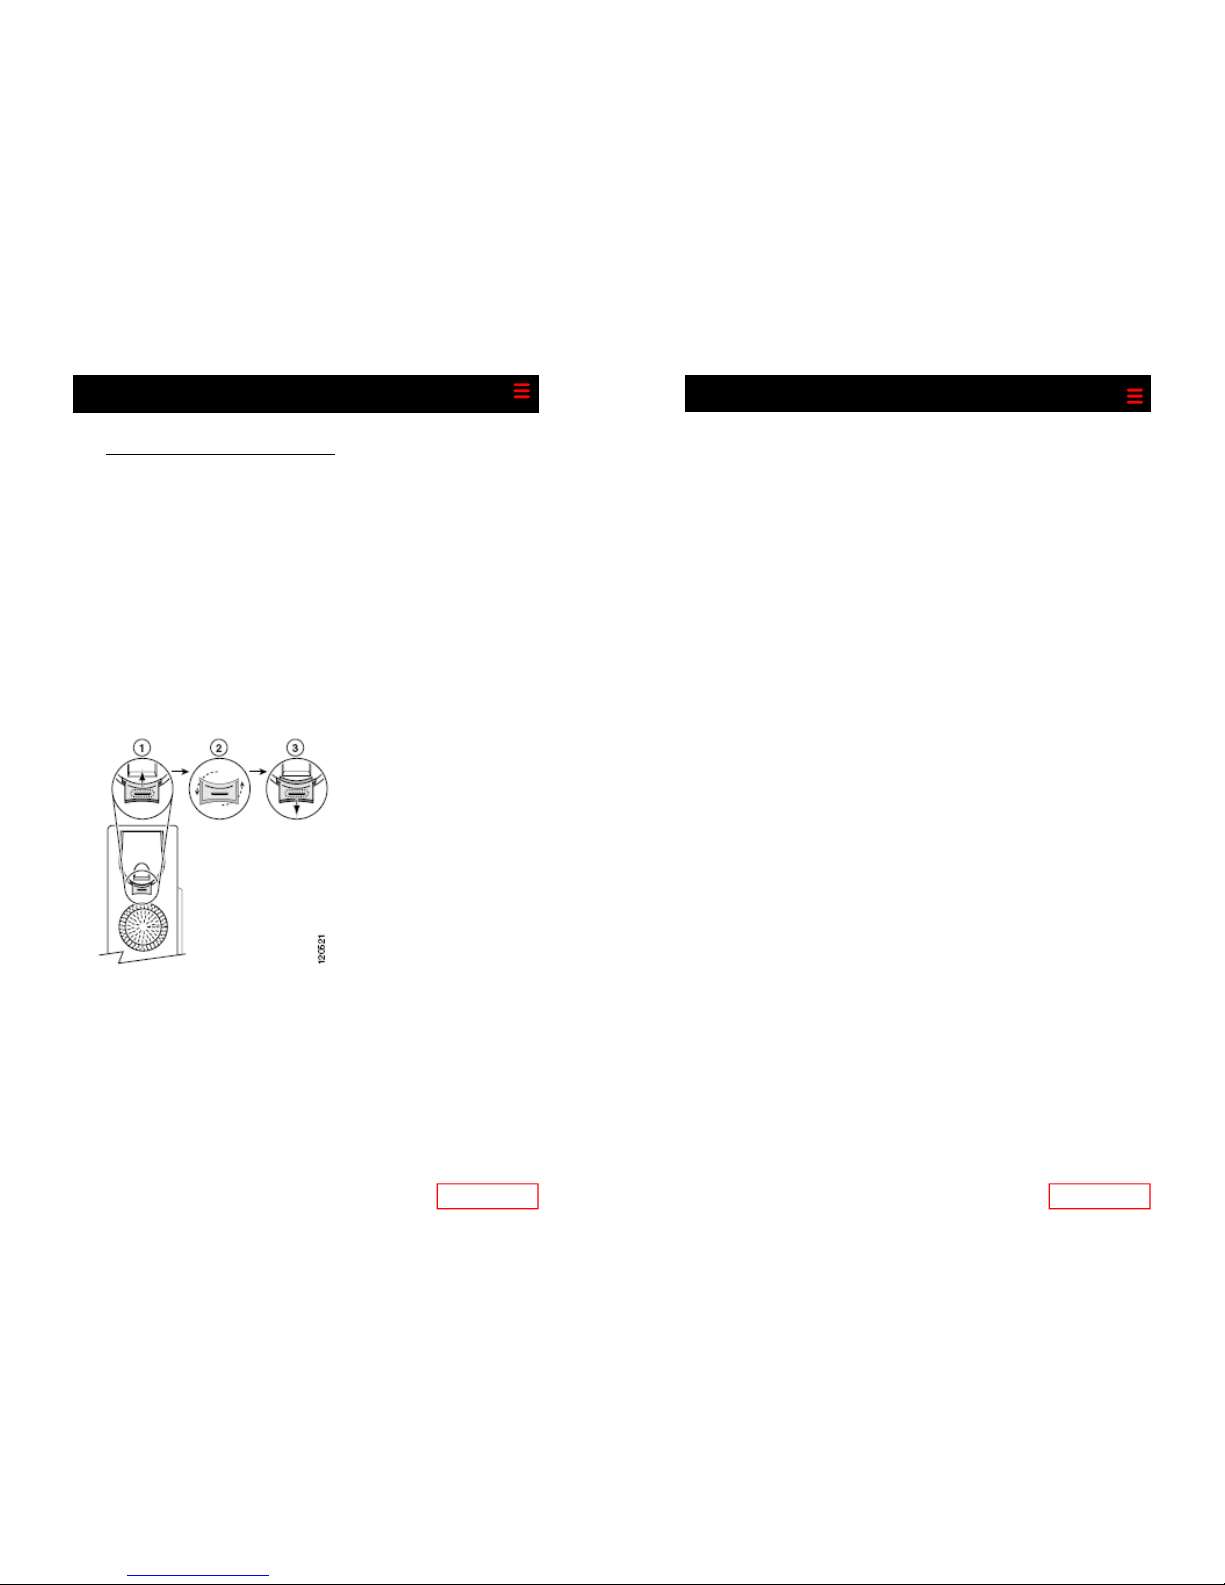
Adjusting the Handset Rest
When you connect your phone, you may want to adjust handset
rest to ensure that the receiver will not slip out of the cradle. See
the description below for instructions.
1. Set the handset aside and pull the square plastic tab from the
handset rest.
2. Rotate the tab 180 degrees.
3. Slide the tab back into the handset rest. An extension
protrudes from the top of the rotated tab. Return the handset
to the handset rest.
Configuring Cisco 7945 for Off-Network
Access
Important – To use your telephone away from the office,
you will need to supply power to the phone. Make sure you
have a power brick for the telephone.
Erasing Existing Configuration
1. Press the Settings Button
2. Select Network Configuration
3. Using the keypad, dial the following keys:
• * * #
• Make sure that the lock in the upper right hand corner of the
LCD screen is open.
4. Press the Erase soft key
5. Disconnect and reconnect power cord from phone.
Setting New Configuration
1. Press the Settings Button
2. Select Network Configuration
3. Using the keypad, dial the following keys:
• * * #
• Make sure that the lock in the upper right hand corner of
the LCD screen is open.
4. Use arrow keys to navigate to line 24 (Alternate TFTP)
• Press the Yes soft key
• DO NOT HIT SAVE AFTER THIS
5. Use arrow keys to navigate to line 8 (TFTP Server 1)
• Use the Edit soft key
• Using the keypad, dial the following keys:
204*11*8*140
• Press the Validate soft key
6. Press the Save soft key
Page 25
Page 5
Billing and Long Distance Authorization
Codes
Billing Codes
Billing codes enable you to track calls by associate a billing code
with each call.
To enter a billing code for a all using star codes:
During a call, press *02
Enter the billing code and then press #
To enter a billing code for a call using the menu:
Press the More soft key until you see the Billing soft key
Press the Billing soft key
Enter the billing code
Press the More soft key again until you see the Billing soft key
Press the Billing soft key
Note: The other party will not hear key tones as you make entries. If
you enter multiple billing codes during a call, only the last billing code
will be recorded.
Long Distance Authorization Codes
Authorization codes enable you to override any call restrictions on
the phone when you place a call.
To make a call with an authorization code:
Lift the handset
Dial you outside access digit
Press #
Enter your authorization code
When you enter the correct code, you will hear a dial tone
Dial the phone number
Page 24
Page 5
Page 6

Page 6
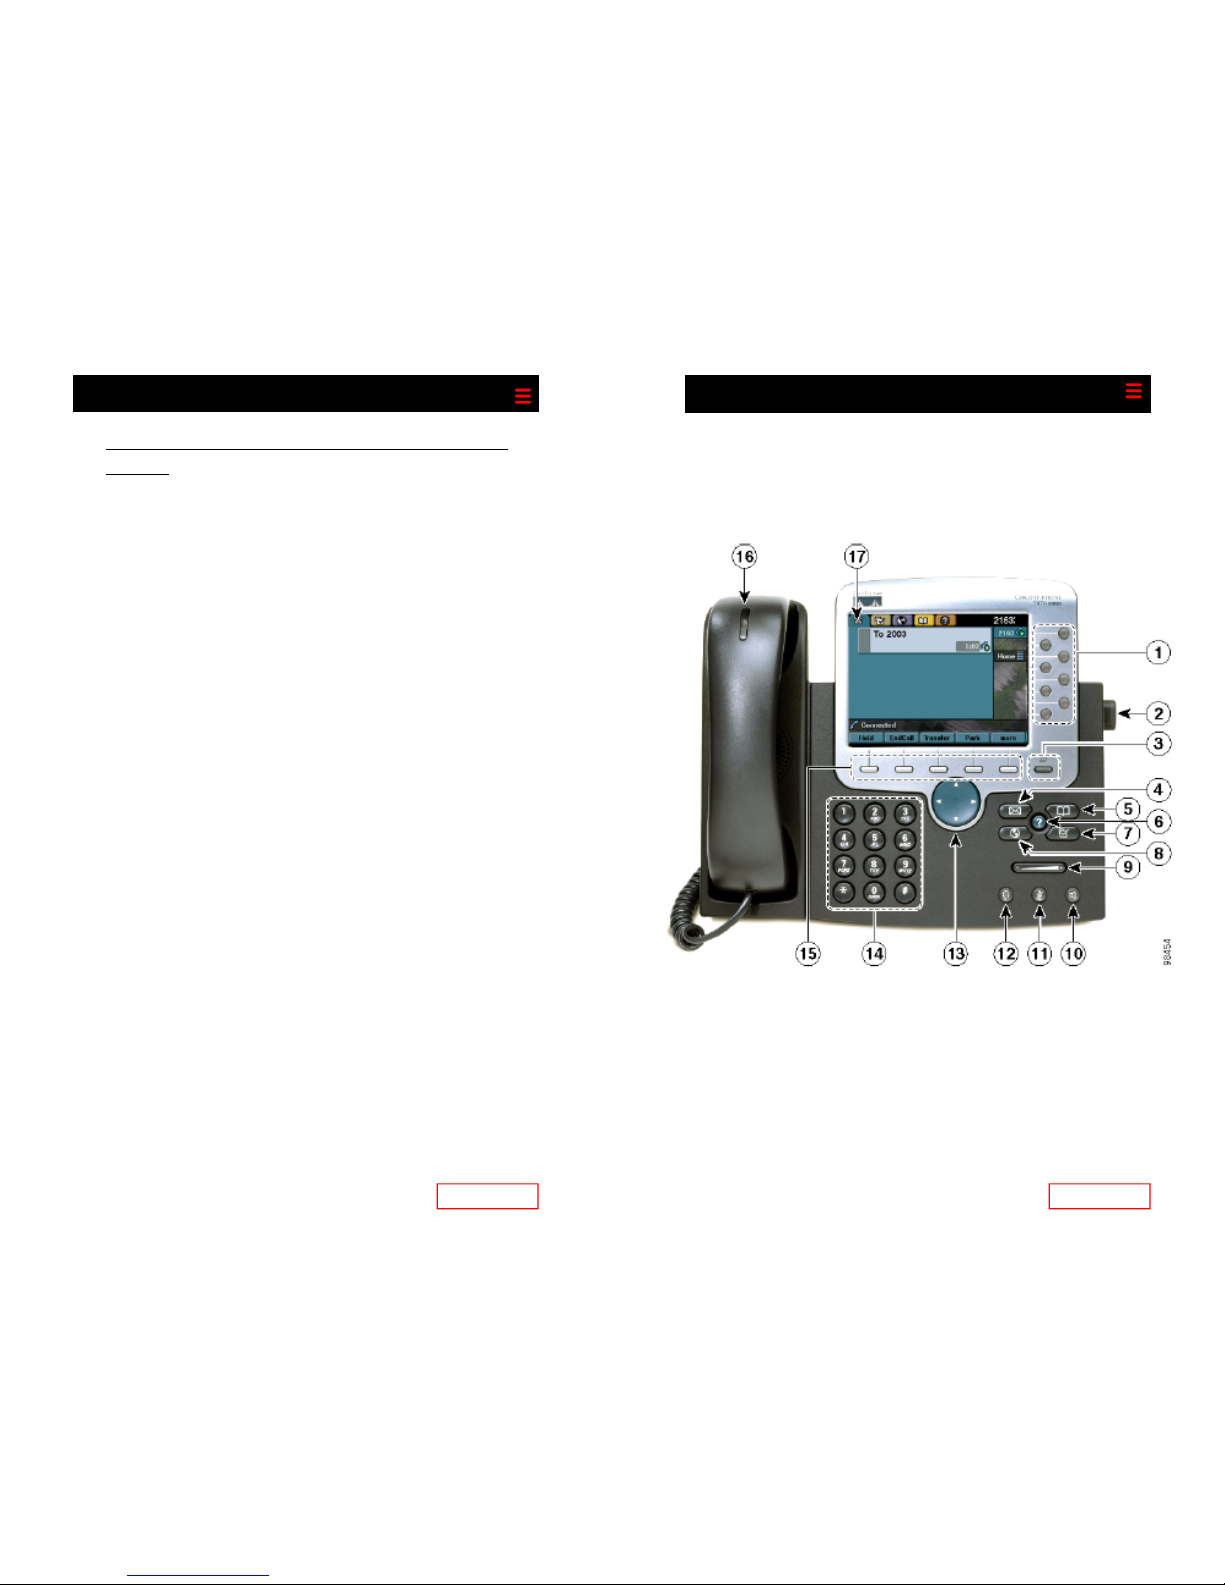
1
Programmable buttons
Depending on configuration, programmable buttons provide access
to:
Phone lines (line buttons)
Speed dial numbers (speed dial
buttons)
The phone buttons illuminate to
indicate status:
2
Foot stand button Allows you to adjust the angle of the
phone base.
3
Display button Awakens the touch screen from
power-save mode or disables it for
cleaning.
4
Messages button
Provides access to the voicemail
system.
5
Directories button
Provides access to call history
(missed, received and placed calls)
6
Help button
Displays help on your phone screen
for a phone button or function.
Green, steady—Active call on
this line (off-hook)
Green, blinking—Call on hold
on this line
Orange, blinking—Incoming call
ringing on this line
Red—Shared line currently in
use
No color—No call activity on
this line (on-hook)
No color—Touchscreen available/ready for input.
Green Flashing—Touchscreen
disabled
Green Steady—Touchscreen
and backlight disabled
Page 23
Call Blocking & Privacy Features
Call Block (Selective Call Rejection)
With Call Block you can program your phone to decline calls from
certain people. The Call Block menu provides step-by-step instructions on enabling/disabling the feature and managing the call block
list.
To access the Call Block menu, dial *60 and follow the voice
prompts.
Note: When entering an external number to the call block list, enter
the 10-digit number. Do not include the outside access digit.
Permanent Caller ID Block Release
If your phone is configured to block sending Caller ID, this feature
sends your caller ID for a single phone call.
To send your caller ID for a call, dial *82. At the second dial tone,
dial the desired phone number.
If you want to… Then…
Erase your call
logs
Press the Directories button, and then press Clear.
See call details
such as time and
date
Scroll to the number you want more information
on, and press the More soft key until the Details
soft key is displayed.
Press the Details soft key to display call information.
Page 7

Using the Directories
Your phone maintains logs of your missed, placed and received
calls. You can use the Directories button to access these records.
Page 22
If you want to… Then…
Access your voice
mailbox from
another internal
phone
Dial the access code provided to you by Razorline.
You will be prompted to enter your extension and
password.
Follow the prompts to use the voice mail system.
Access your voice
mailbox remotely
Dial your phone number.
When your voicemail greeting plays, press the *
key.
You will prompted to enter your password.
Follow the prompts to use the voice mail system.
Create a custom
operator (the
caller can press 0
when reaching
your voicemail
and be directed
to another number)
Press the Messages button or dial *09 and enter
your password (if required).
Follow the prompts to create a custom operator
number.
When recording your greeting, be sure to include
instructions to press 0 to reach the other destination.
If you want to… Then…
View your call
logs
Press the Directories button and select Missed,
Received or Placed calls.
Dial from a call
log
Scroll to the phone number you want to dial and
pick up the receiver or press the Dial soft key. If
you need to edit the number displayed (to add a 1
for example), press EditDial followed by << or >>
to add or erase digits.
Page 7
7
Settings button Provides access to contrast, ring
types, network configuration and
status information.
8
Services button Provides access to personal and
company directories.
9
Volume button
Controls the volume for the handset, headset, speakerphone, or
ringer.
10
Speaker button
Toggles the speakerphone on and
off. When the speakerphone is on,
the button is lit.
11
Mute button
Toggles the mute feature on and off.
When mute is on, the button is lit.
12
Headset button
Toggles the headset on and off.
When the headset is on, the button
is lit.
13
Navigation button
Allows you to scroll through the
menus and highlight items. Use in
conjunction with soft keys to activate highlighted items.
14
Keypad Allows you to dial phone numbers,
enter letters, and choose menu
items.
15
Soft key buttons
Each button activates a soft key option (displayed on your phone
screen).
16
Handset light strip Indicates an incoming call or a new
voice message.
17
Touchscreen Shows phone features. See
“touchscreen features” section, page
8.
Page 8

Page 8
Touchscreen Features
1
Primary line Displays your primary phone num-
ber or extension.
2
Line area and call overview Displays all configured lines or
phone numbers assigned to the
phone. Also shows an overview of
current calls on each line. The active call is highlighted.
3
Programmable button labels Displays configuration of each pro-
grammable button on your phone.
4
Softkey labels
Each displays a softkey function.
Activate a softkey by pressing either
the softkey label on the touchscreen
or the softkey button.
Phone lines, or extensions
(line buttons)
Speed dial buttons
Page 21
Group Speed Dial
Group Speed Dial provides up to 1000 extensions that are configured to dial other numbers. Razorline creates these extensions
which can be dialed from everyone’s phone in your network.
To dial a group speed dial number, simply pick up the handset and
dial the extension.
Voice Mail
When accessing your voice messaging system, you will be prompted
for a password. Your password will be the last 4 digits of your
phone number (your extension). You have the option to change
this password.
If you want to… Then…
Set up and personalize your
voice mailbox
Press the Messages button or dial *09 and enter
your password (if required).
Follow the voice instructions.
You can record 3 greetings:
1. Your phone rings and you don’t answer it (No
Answer greeting)
2. You have activated DND (Do not Disturb
greeting)
3. You are talking on the phone (Busy Greeting)
See if you have a
new voice message
Look at your phone for the following indicators:
A steady red light on your handset
A flashing envelope icon on your screen
Listen to your
voice messages
Press the Messages button or dial *09 and enter
your password (if required).
Follow the prompts to use the voice mail system.
Page 9

Press the Up or Down soft key
Press the Save soft key to exit the menu
Setting Up Speed Dial Features
Speed dial features allow you to press a button or enter a code to
place a call.
You can set up speed dialing for your phone in two ways:
Speed dialing with a button - You can assign a speed dial num-
ber to any available programmable button on your phone that
has not already been configured as a line or feature.
Speed dialing with a code - Using the Abbreviated Dialing fea-
ture, you can create up to 100 2-digit speed dial codes.
Page 20
If you want to… Then…
Add speed dial
numbers to phone
buttons
Lift the handset and dial 74*.
Follow the prompts.
Modify or delete a
speed dial button
Lift the handset and dial 74*
Follow the instructions to program a new speed
dial button. When prompted, press the button you
want to modify or delete. If modifying, enter the
new phone number. If deleting, press # to enter an
empty phone number.
Add speed dial
numbers to use
with Abbreviated
Dialing
Lift the handset and dial 75*.
Follow the voice prompts.
Modify an Abbreviated Dial code
Lift the handset and dial 75*.
Follow the prompts to program a new abbreviated
dial code and use the same digits.
Use and abbreviated dial code
Lift the handset and dial *3.
Enter the desired 2-digit speed dial code.
Page 9
5
Status line
Displays current audio mode icon,
status information and prompts.
6
Call activity
Displays your current calls per line,
caller ID, call duration, and call state.
7
Phone tab
Appears when there is call activity.
Press this tab to return to the call
activity area from another screen.
8
Feature tabs Each indicates an open feature menu.
Press a tab to switch between open
menus. (To open a menu, press a
feature button).
Page 10

Page 10
Helpful Tips
Understanding Lines vs. Calls
It is sometimes easy to confuse lines and calls on your phone. Use
these tips to avoid confusion:
Lines
The Cisco IP Phone 7975 supports up to 8 lines. Each line corresponds to a phone number (or extension) that others can use to
call you.
Calls
Each line can support 2 calls.
Choosing Touchscreen Items
To choose a touchscreen item...
Do this...
By scrolling Press the Navigation button to highlight an item
in a list. Press a relevant soft key such as Select
or Dial to finish the action, or tap the item with
your fingertip.
By item number Press the corresponding number on your key-
pad. For example, press 4 to choose the fourth
item in a menu.
By touch Press (or tap) an item on the touchscreen with
your fingertip. Pressing a phone number on the
touchscreen can cause the phone to dial the
number.
Page 19
Lift the handset and dial *61
Follow the voice prompts
Note: When entering an external number in the priority list, enter the
10-digit number. Do not include the outside access digit.
Customizing Phone Settings
Adjusting the Volume
Customizing Ring Tone
Press the Settings button
Select menu item “User Preferences”
Select menu item “Rings”
Select the line you want to customize
Scroll through the list of ring types, pressing the Play soft key
to hear the ring, and the Select soft key to accept the ring.
Press the Save soft key to exit the menu.
Customizing the Display
Press the Settings button
Scroll to menu item “Contrast”
If you want to… Then…
Adjust the volume
level for a call
Press the Volume button during a call or after invoking a dial tone. You can press Save to save this
volume setting for future calls. Note that the volume settings for the handset, speakerphone, and
headset must be adjusted separately.
Adjust the volume
level for the
ringer
Press the Volume button while the handset is in the
cradle and the headset and speakerphone buttons
are off. The new ringer volume is saved automatically.
Page 11

Do Not Disturb (DND)
Do Not Disturb instantly routes all of your incoming calls to your
voice mailbox. You can record a special voice mail greeting that
callers will hear when you have DND active.
Intercom
Intercom allows you to make an announcement through another
person’s speakerphone.
To initiate an intercom call
Press the More soft key until you see the Intercom soft key
Press the Intercom soft key
Dial the extension of the other party
Begin speaking after you hear two beeps
Note: If the other party is on the phone, your intercom will come
across as a new call to either answer or ignore.
Priority Call
Priority Call lets you define a list of callers identified as priority callers using a unique ring tone when they call you. The Priority call
menu provides step-by-step instructions on enabling/disabling the
feature and manage the priority list.
Page 18
If you want to… Then…
Enable DND Press the DND soft key or lift the handset and dial
*04 and hang up.
The display will show “Do Not Disturb is active”
Disable DND Press the DND soft key or lift the handset and dial
*04 and hang up.
The “Do Not Disturb is active” message will disappear.
Page 11
Basic Call Handling
This section covers basic call-handling tasks such as placing, answering, transferring, and conferencing calls.
Placing a Call
If you want to… Then…
Pre-dial (dial onhook, without
first getting a dial
tone)
Enter the outside access digit and the phone number. Next, press Dial. Or do one of these actions
to go off-hook and dial the number:
Lift the handset
Press the speakerphone or headset button
Press a line button
Dial using the
speakerphone
You can press the speakerphone before or after
dialing, re-dialing or speed dialing a number.
Redial the most
recently dialed
number
Press the Redial soft key or dial *07. By default,
Redial uses your primary line. However, you can
open a secondary line and then press Redial.
Place a call when
another call is
active (using another line)
Press a line button for the new line. The call on
the first line will be placed on hold automatically.
Place a call when
another call is
active (using the
same line)
Press New Call. The original call will be placed on
hold automatically. Then dial, redial, or speed dial
a number.
Dial from a call
log
Choose Missed, Received, or Placed calls from the
Directory. To dial, select the listing or scroll to it
and go off-hook.
Dial a long distance number
Dial the outside access digit + 1 + the phone number.
Dial an international number
Dial the outside access digit + 011 + country code
+ the phone number.
Page 12

Page 12
Tip: If you make a mistake while entering a phone number, press
<< to erase one or more digits. Press Cancel to exit the dialing
attempt.
Answering a Call
When you hear your phone ring and see the red light flashing on
your handset, you have a new call. The Cisco IP phone has distinctive rings for incoming calls:
Internal calls - one ring
External calls - two rings
If you want to… Then…
Answer with a
headset
Press the headset button if unlit. Or, if the headset
button is already lit, press answer or the flashing
line button.
Answer with the
speakerphone
Press the Speakerphone., Answer, or the flashing
line button.
Switch from a
connected call to
answer a ringing
call
Press Answer, or if the call is ringing on a different
line, press the flashing line button. Either action
answers the new call and automatically places the
first call on hold.
Retrieve a held
call on another
phone
Use Call Park
Use your phone
to answer a call
that is ringing on
another phone
Use Direct Call Pickup
Send an incoming
call directly to
voicemail
Press the DND (Do not Disturb) soft key. Your
phone will remain in DND mode until the DND
soft key is pressed again.
still be able to hear the caller, but they cannot hear you.
Page 17
Directed Call Pickup
Directed Call Pickup allows you answer another ringing phone from
your phone.
Pick up the handset
Press the More soft key until you see the DC Pick.. soft key
Press the DC Pick… soft key
Enter the ringing extension number and you will immediately
be connected to the call
Group Call Pickup
Group Call Pickup allows you to answer another ringing phone that
is in your call pickup group, from your phone.
Pick up the handset
Press the More soft key until you see the Group pickup soft
key
Press the Group pickup soft key
You may also dial *06
You will immediately be connected to the call
Note: If multiple inbound calls are ringing in your group, the call that
has been ringing the longest will be answered.
Using Mute
The Mute button disables the microphone of the handset, speakerphone or headset so you can have a private conversation. You will
If you want to… Then…
Toggle Mute on Press the Mute button. It will turn red.
Toggle Mute off Press the Mute button again. It will turn gray.
Page 13

Making Conference Calls
Your Cisco IP phone allows you to join up to 5 people into one
telephone conversation, creating a conference call.
While on an existing call, press the More soft key
Press the Conf soft key. The first call will automatically be
placed on hold
Enter the conference participant’s phone number
After the call connects, press the Conf soft key again to com-
plete the conference
To add more parties to the conference, repeat the steps above
Advanced Call Handling
Parking Calls and Retrieving Parked Calls
You can “park” a call when you want to store the call so that you
or someone else can retrieve it from another phone. When
parked, a call is assigned an ID number by the system.
Page 16
If you want to… Then…
Park a call During a call, press the More soft key until you
see the MC Park soft key (Multi-call park). Press
the MC Park soft key. This prompts your phone
to store the call. Note the park number displayed
on your phone screen and hang up.
Retrieve a parked
call
Enter the call park number from any Cisco IP
phone in your network to connect to the call.
You have a limited amount of time to retrieve the
parked call before it reverts to ringing at its original destination. Razorline can adjust this time if
necessary.
Page 13
Ending a Call
Using Hold and Resume
If you want
to…
Then…
Put a call on hold Make sure the call you want to put on hold is high-
lighted and press hold. Note: Starting one minute
after the party is on hold, and occurring each minute after that, three short rings sound from the
phone speaker. This is to remind you that you have
a call on hold.
Remove a call
from hold on the
current line
Make sure that the appropriate call is highlighted
and press Resume.
Remove a call
from hold on a
different line
Press the blinking link button. If there is a single call
holding on this line, the call will resume automatically. If there are multiple calls holding, make sure
that the appropriate call is highlighted and press
Resume.
If you want to… Then…
Hang up while
using the handset
Return the handset to its cradle, or press End Call.
Hang up while
using the headset
Press the Headset button. If you want to keep
headset mode activated (keep the button lit after
hanging up), press End Call.
Hang up while
using the speakerphone
Press the Speakerphone button, or press End Call.
Page 14

Transferring a Connected Call
Transfer redirects a connected call. The target is the number to
which you want to transfer the call.
Forwarding Your Calls to Another Number
Page 14
Transfer a call to a
voice mailbox
Press the More soft key, and then press the
Transfer soft key. Dial the access code provided
to you by Razorline, then dial the target number
and hang up.
Cancel a transfer Use the Navigation button to scroll to the holding
call and press Resume.
If you want to… Then…
Set up call forwarding for all
calls
Press the Forward soft key and enter the forwarding number as you would dial it from your phone.
Press the Forward soft key again.
The display shows “Forwarded to xxxx”
Disable call forwarding
Press the Forward soft key. Pick up and replace
the handset.
You can also dial 73*. After hearing verification,
hang up.
Talk to the transfer
recipient before
transferring a call
(announced transfer)
Press the More soft key, and then press the
Transfer soft key. Enter the target number and
wait for the transfer recipient to answer. If the
recipient accepts the transferred call, hang up. If
the recipient refuses the call, use the Navigation
button to scroll to the holding call and press Resume.
If you want to… Then…
Transfer a call
without talking to
the transfer recipient (blind transfer)
Press the More soft key, and then press the Transfer soft key. Enter the target number. When you
hear the call ringing, hang up or press End Call.
Page 15
Enable/modify call
forward (Busy) forwards calls to
another number
when you are on a
call
Lift the handset and dial 76*.
Enter the extension or forwarding number followed by #. For external numbers, use your outside access digit.
Press # to confirm followed by 2 to exit.
Hang up.
Disable call forward (Busy)
Lift the handset and dial 77*
Hang up.
Enable/modify call
forward (No Answer) - forwards
calls to another
number when you
don’t answer
Lift the handset and dial 78*.
Enter the extension or forwarding number followed by #. For external numbers, use your outside access digit.
Press # to confirm followed by 2 to exit.
Hang up.
Disable call forward (No Answer)
Lift the handset and dial 79*
Hang up.
Access the selective call forwarding
menu - forwards
calls from certain
callers
Lift the handset and dial *63
Follow the voice prompts to enable, disable,
change the forwarding number, hear the forwarding number, add or remove callers to forwarding
list, and to hear the forwarding list.
Enable/modify call
forwarding from a
remote location
Dial the number for Remote Access to Call Forwarding specified by Razorline. Enter your complete telephone number + #. If your phone is
configured as an extension only (non DID) line,
enter your company’s complete main telephone
number + * + your extension number + #.
Enter your telephone password + #.
Enter the new forwarding number + #. For external numbers use your outside access digit.
After hearing the verification, hang up.
Disable call forwarding from a
remote location
Dial the number for Remote Access to Call Forwarding specified by Razorline. Enter your complete telephone number + #.
Enter your telephone password + #.
Press #. After hearing the verification, hang up.
If you want to... Then...
 Loading...