

Page 1
WARNING: Important Safety Warnings and Instructions
WARNING: When using electric tools, basic safety precautions should always be followed to
reduce risk of fire, electric shock, and personal injury, including the following.
READ ALL INSTRUCTIONS
TO REDUCE RISK OF INJURY:
• Before any use, be sure everyone using this tool reads and understands all safety instructions
and other information contained in this manual.
• Save these instructions and review frequently prior to use and in instructing others.
General Safety Warnings and Instructions for All Tools
• KEEP WORK AREA CLEAN. Cluttered areas and benches invite injuries.
• CONSIDER WORK AREA ENVIRONMENT. Don’t expose power tools to rain. Don’t use power tools in
damp or wet locations. Keep work area well lit. Do not use in presence of flammable liquids or gases.
Motors in these tools normally spark, and the sparks may ignite the fumes.
• GUARD AGAINST ELECTRIC SHOCK. Prevent body contact with grounded surfaces. For example; pipes,
radiators, ranges, refrigerator enclosures. Use extreme caution when drilling, driving, or cutting into
walls, floors, ceilings or other areas or wherever live electrical wires may be contacted, do not touch
any metal parts of the tool. Hold the tools only by the plastic handle to prevent electric shock.
• KEEP CHILDREN AWA Y. Do not let children and visitors contact tool or extension cord. All children and
visitors should be kept away from work area.
• STORE IDLE TOOLS. When not in use, tools should be stored in dry, and high or locked-up place–out of
reach of children.
• DON’T FORCE TOOL. It will do the job better and safer at the rate for which it was intended.
• USE RIGHT TOOL. Don’t force small tool or attachment to do the job of a heavy-duty tool. Don’t use tool
for purposes not intended.
• DRESS PROPERLY. Do not wear loose clothing or jewelry . They can be caught in moving parts. Rubber
gloves and non-skid footwear are recommended when working outdoors. Wear protective hair covering
to contain long hair .
• USE SAFETY GLASSES AND OTHER SAFETY EQUIPMENT. Use safety goggles or safety glasses with side
shields, complying with applicable safety standards and, when needed, a face shield. Also use face or
dust mask if cutting operation is dusty. This applies to all persons in the work area. Also use a hard hat,
hearing protection, gloves, safety shoes and dust collection systems when specified or required.
• DON’T ABUSE CORD. Never carry tool by cord or yank it to disconnect from receptacle. Keep cord from
heat, oil, and sharp edges.
• SECURE WORK. Use clamps or a vise to hold work. It’s safer than using your hand and it frees both hands
to operate tool.
• DON’T OVERREACH. Keep proper footing and balance at all times.
• MAINTAIN TOOLS WITH CARE. Keep tools sharp and clean for better and safer performance. Follow
instructions for lubricating and changing accessories. Inspect tool cords periodically and if damaged, have
repaired by authorized service facility. Inspect extension cords periodically and replace if damaged. Keep
handles dry, clean, and free from oil and grease.
• REMOVE ADJUSTING KEYS AND WRENCHES. Form habit of checking to see that keys and adjusting
wrenches are removed from tool before turning it on.
• STA Y ALER T. W atch what you are doing. Use common sense. Do not operate tool when you are tired or
otherwise impaired.
• CHECK DAMAGED PARTS. Before further use of the tool, a guard or other part that is damaged should be
carefully checked to determine that it will operate properly and perform its intended function. Check for
alignment of moving parts, binding of moving parts, breakage of parts, mounting, and any other
conditions that may affect its operation. A guard or other part that is damaged should be properly
repaired or replaced by an authorized service center. Do not use tool if switch does not turn it on and off.
• REPAIRS AND SERVICE. Repairs, maintenance and any adjustments not specified in this manual should be
performed by Black & Decker authorized service centers or other qualified service organizations, always
using identical replacement parts.
• USE OF ACCESSORIES AND ATT ACHMENTS.The use of any accessory or attachment not recommended
for use with the tool could be hazardous. Note: Refer to the accessory section of this manual for further
details.
Safety Warnings and Instructions: Charging the Drill
1. This manual contains important safety and operating instructions.
2. Before using battery charger, read all instructions and cautionary markings on (1) battery charger, (2)
battery, and (3) product using battery.
3. CAUTION: To reduce the risk of injury , charge only Black& Decker Power Packs. Other types of
batteries may burst causing personal injury and damage.
4. Do not expose charger to rain or snow.
5. Use of an attachment not recommended or sold by Black & Decker may result in a risk of fire, electric
shock, or injury to persons.
6. T o reduce risk of damage to electric plug and cord, pull by plug rather than cord when disconnecting
charger.
7. Make sure cord is located so that it will not be stepped on, tripped over , or otherwise subjected to
damage or stress.
8. An extension cord should not be used unless absolutely necessary. Use of improper extension cord
could result in a risk of fire, electric shock or electrocution.
a. Two-wire cords can be used with 2-wire or 3-wire extension cords. Only round jacketed extension
cords should be used, and we recommend that they be listed by Underwriters Laboratories (U.L.). If the
extension is to be used outside, the cord must be suitable for outdoor use. Any cord marked for outdoor
use can also be used for indoor work. The letters “W” or “W A” on the cord jacket indicate that the cord
is suitable for outdoor use.
b. An extension cord must have adequate wire size (AWG or American Wire Gauge) for safety, and to
prevent loss of power and overheating. The smaller the gauge number of the wire, the greater the
capacity of the cable; that is, 16 gauge has more capacity than 18 gauge. When using more than one
extension to make up the total length, be sure each extension contains at least the minimum wire size.
CHART FOR MINIMUM WIRE SIZE (AWG)OF EXTENSION CORDS
NAMEPLATE RATING AMPS – 0 – 10.0
T otal Extension Cord Length (ft) 25 50 75 100 125 150
Wire Gauge 18 18 16 16 14 14
• Use only the supplied charger when charging your drill. The use of any other charger could damage the
drill or create a hazardous condition.
• Use only one charger when charging.
• Do not attempt to open the charger or the drill. There are no customer serviceable parts inside. Return to
any authorized Black & Decker service center.
• DO NOT incinerate the drill or battery packs even if they are severely damaged or completely worn out.
The batteries can explode in a fire.
• Do not incinerate the batteries. They can explode in a fire. A small leakage of liquid from the battery cells
may occur under extreme usage, charging or temperature conditions. This does not indicate a failure.
However , if the outer seal is broken and this leakage gets on your skin:
a.Wash quickly with soap and water .
b.Neutralize with a mild acid such as lemon juice or vinegar.
c. If the battery liquid gets in your eyes, flush them with clean water for a minimum of 10 minutes and seek
immediate medical attention. MEDICAL NOTE: The liquid is a 25-35% solution of potassium hydroxide.
SAVE THESE INSTRUCTIONS FOR FUTURE USE
Safety Warnings and instructions: Drills
•When drilling or driving into walls, floors or wherever live electrical wires may be encountered, DO
NOT TOUCH ANY METAL PARTS OF THE TOOL! Hold the tool only by the plastic handle to prevent
shock.
•Do not lock the tool ON when drilling by hand. Refer to Operating Instructions-Switch.
• Hold drill firmly to control the twisting action of the drill.
• When attaching accessories in the drill chuck, hand tighten the keyless chuck firmly.
WARNING: Drill may stall (if overloaded or improperly used) causing a twist. Always expect the stall.
Grip the drill firmly to control the twisting action and prevent loss of control which could
cause personal injury. If a stall does occur, release the trigger immediately and
determine the reason for the stall before re-starting.
SAVE THESE INSTRUCTIONS FOR FUTURE USE
Charging the Power Pack
THE BATTERIES IN YOUR POWER PACK ARE NOT FULLY CHARGED AT THE FACTOR Y. BEFORE
ATTEMPTING TO CHARGE THEM, THOROUGHLY READ ALL OF THE SAFETY INSTRUCTIONS.
The drills covered in this instruction manual use the same charger .
The 3 hour charger is designed to use standard household 120 volt 60 Hz power .
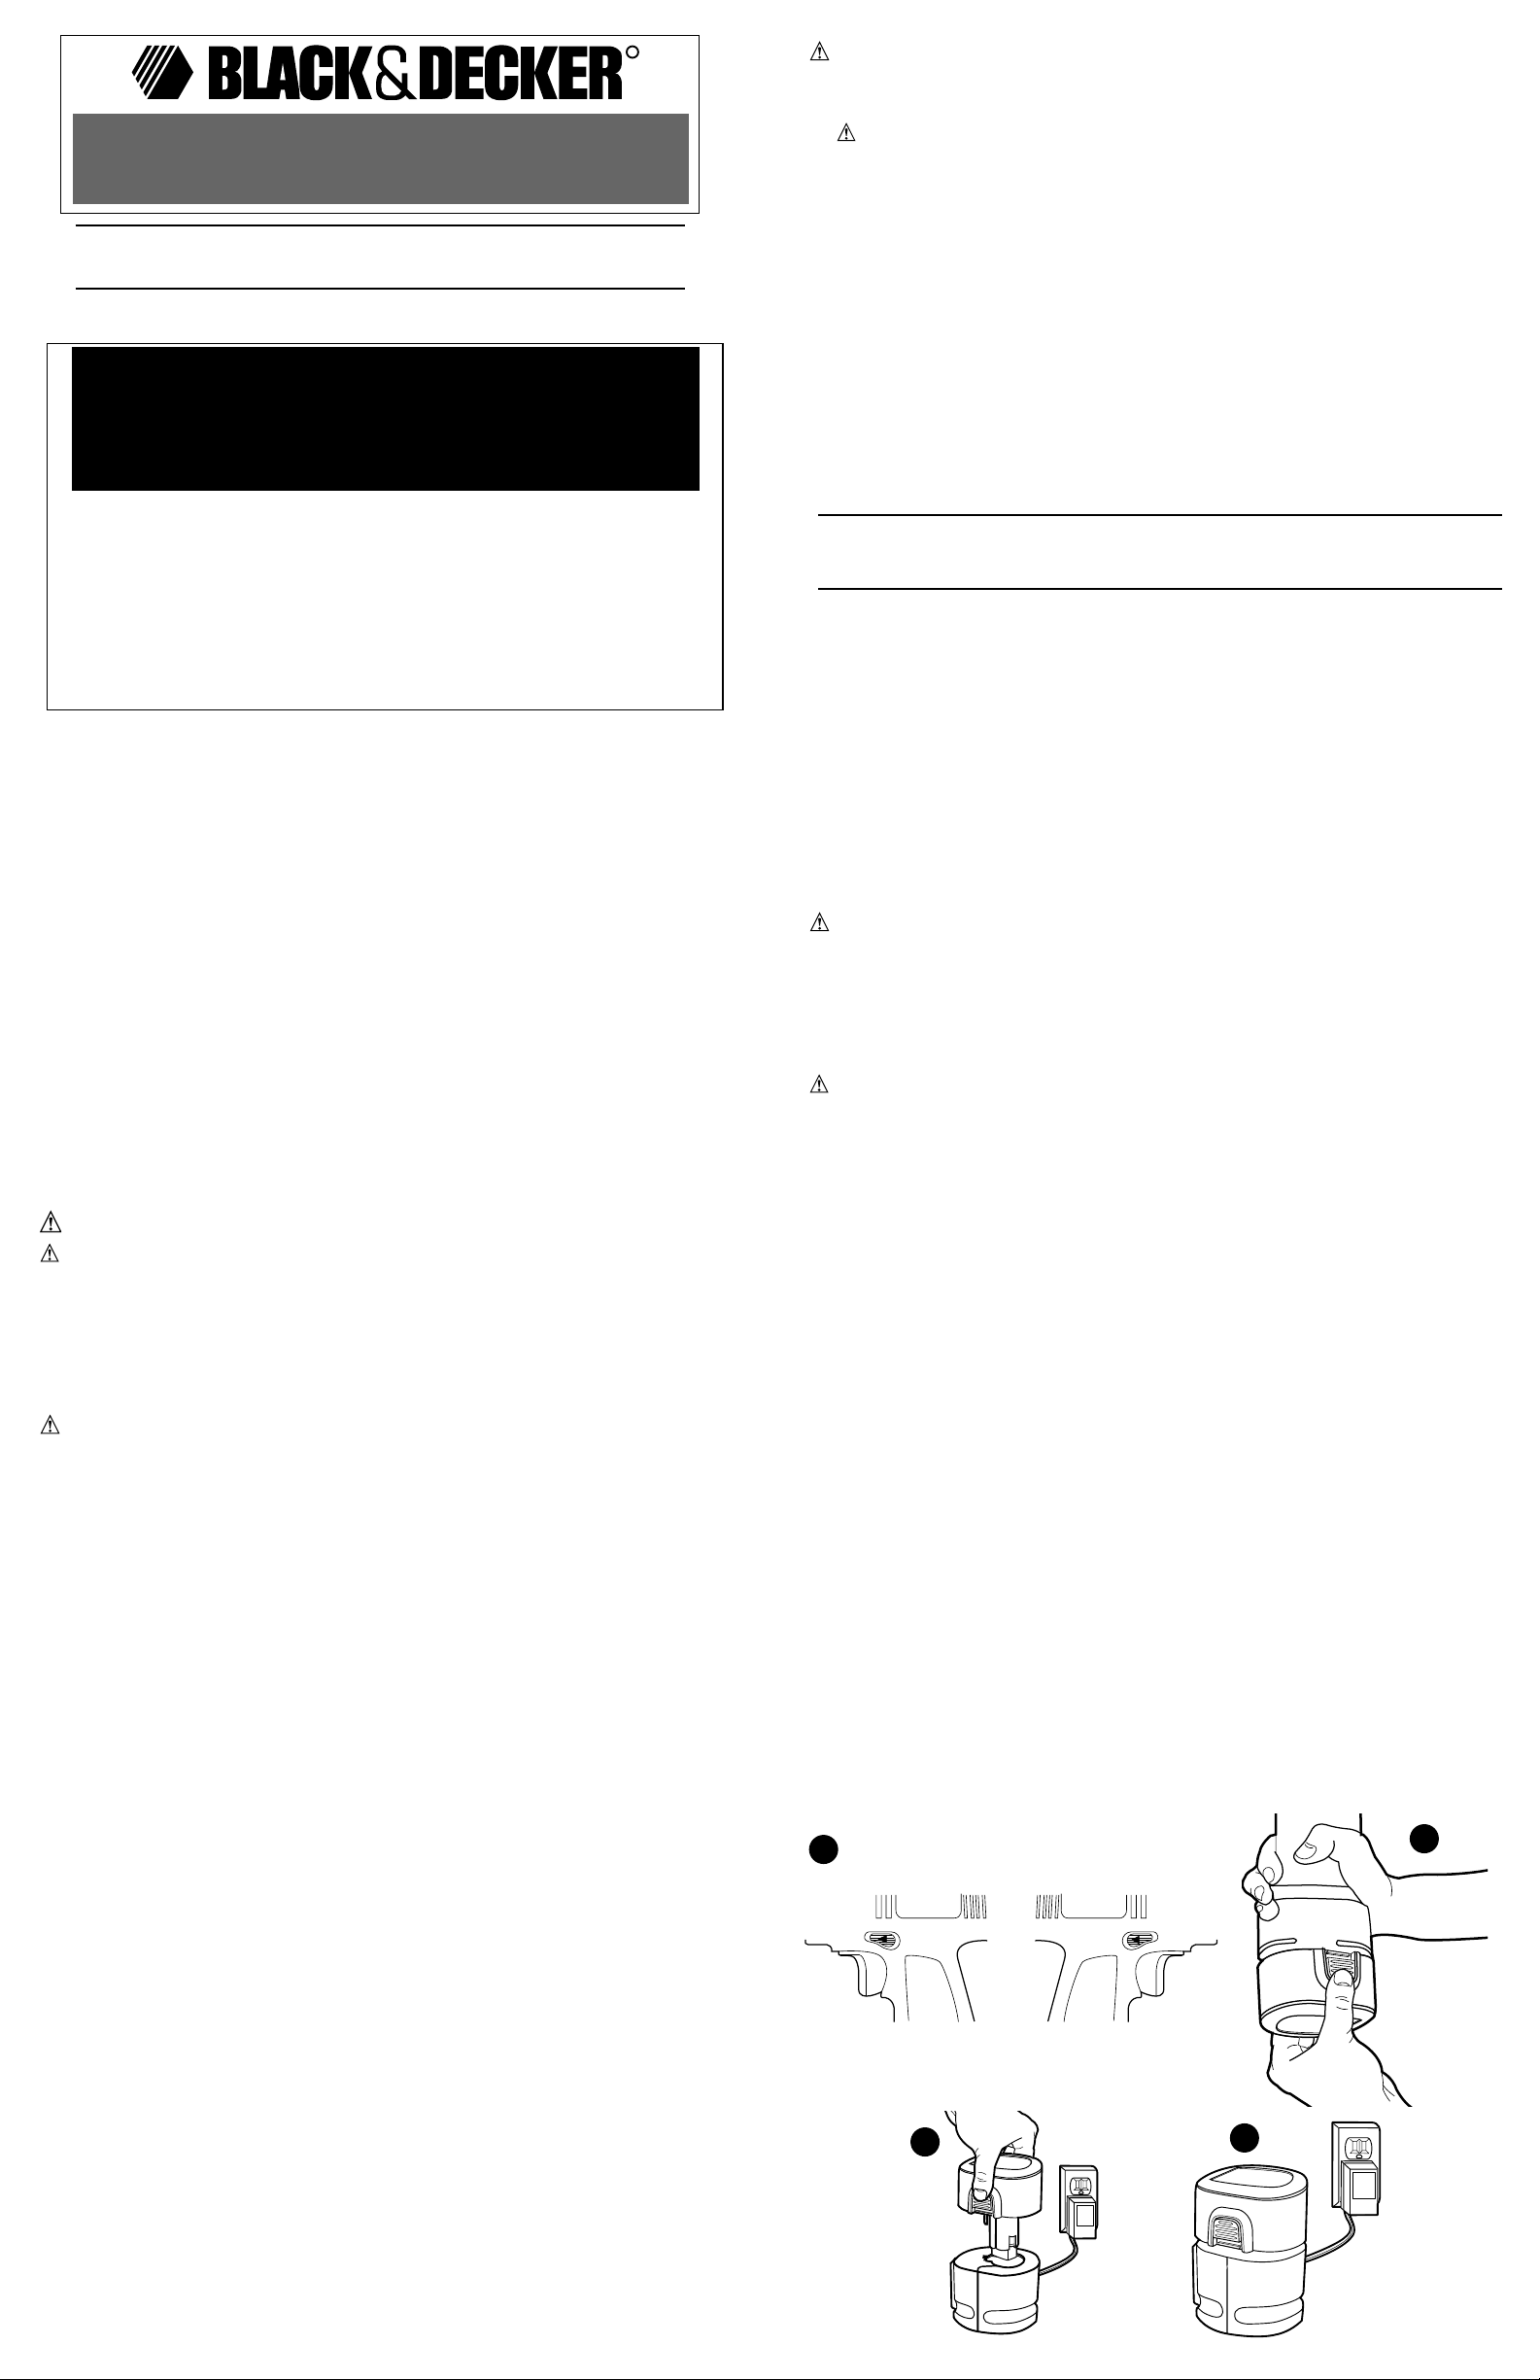
1. Put the switch control lever in the center OFF position (Fig. 1) and remove the power pack from the
tool (Fig. 2).
2. Plug the charger into any standard 120 Volts 60 Hz electrical outlet.
3. Insert the power pack into the charger (Fig. 3) and let it charge for 3 hours.
4. Remove pack from the charger and replace in tool.
Important Charging Notes
1. After normal usage, your power pack should be fully charged in
3 hours or less. If the power pack is run-down completely, it may take up to 8 hours to become fully
charged. Your power pack was sent from the factory in an uncharged condition. Before attempting to
use it, it must be charged for at least 3 hours.
2. DO NOT charge the power pack in an air temperature below 40°F or above 105°F. This is important
and will prevent serious damage to the power pack. Longest life and best performance can be
obtained if the power pack is charged when the air temperature is about 75°F.
3. While charging, the charger may hum and become warm to touch. This is a normal condition and
does not indicate a problem.
4. If the power pack does not charge properly—(1) Check current at receptacle by plugging in a lamp
or other appliance. (2) Check to see if receptacle is connected to a light switch which turns power off
when you turn out the lights. (3) Move charger and power pack to a surrounding air temperature of
40°F to 105°F. (4) If the receptacle and temperature are OK, and you do not get proper charging,
take or send the power pack and charger to your local Black & Decker ser vice center. See “Tools
Electric” in yellow pages.
5. The power pack should be recharged when it fails to produce sufficient power on jobs which were
easily done previously. DO NOT CONTINUE to use the drill with its power pack in a depleted condition.
6. T o prolong power pack life, avoid leaving the power pack on charge for more than 8 hours. Although
overcharging is not a safety concern, it can significantly reduce overall power pack life.
VEA EL ESPAÑOL EN LA CONTRAPORTADA.
SAVE THIS MANUAL FOR FUTURE REFERERENCE.
INSTRUCTIVO DE OPERACIÓN, CENTROS DE SERVICIO Y PÓLIZA DE
GARANTÍA. ADVERTENCIA: LÉASE ESTE INSTRUCTIVO ANTES DE USAR EL
PRODUCTO.
R
INSTRUCTION MANUAL
PS3200, PS3300, PS3500, PS3600, PS3700
3333////8888"""" 9999....6666VVVV,,,, 11112222VVVV,,,, 11114444....4444VVVV,,,, 11118888VV
VV
CCCCOOOORRRRDDDDLLLLEEEESSSSSSSS DDDDRRRRIIIILLLLLLLL DDDDRRRRIIIIVVVVEEEERRRRSS
SS
KEY INFORMA TION YOU SHOULD KNOW:
•Battery pack must be charged for three hours before initial use.
•Drill is shipped with switch locked off.
•Look down into keyless chuck when tightening to observe chuck jaw movement.
Cat No. PS3200 / PS3300 / PS3500 / PS3600 / PS3700 Form No. 154717 (JAN98-2)
Copyright © 1998 Black & Decker Printed inChina
2
1
Depress for forward
Enfoncer pour la marche avant
Oprima para reversa
Depress for reverse
Enfoncer pour la marche arrière
Oprima para marcha hacia adelante
3
4
BEFORE RETURNING THIS PRODUCT
FOR ANY REASON PLEASE CALL
1-800-54-HOW-TO
IF YOU SHOULD EXPERIENCE A PROBLEM
WITH YOUR BLACK & DECKER PURCHASE,
CALL 1-800-54-HOW-TO.
IN MOST CASES, A BLACK & DECKER REPRESENTATIVE
CAN RESOLVE YOUR PROBLEM OVER THE PHONE.
IF YOU HAVE A SUGGESTION OR COMMENT,
GIVE US A CALL. YOUR FEEDBACK IS VITAL
TO THE SUCCESS OF BLACK & DECKER'S QUALITY
IMPROVEMENT PROGRAM.
Page 2

7. A fully charged power pack, after being off charge for 1 month, will still have 75% of its energy in the
power pack; after 6 months, 50% will remain.
Operating Instructions
WARNING: To reduce the risk of serious personal injury, read, understand and follow all important
safety warnings and instructions prior to using tool.
Switch and Control Button
A forward/reverse control button determines the direction of the tool and also serves as a lock off button
(Fig. 1) T o select forward rotation, release the trigger switch and depress the forward/reverse control
button on the left side of the tool.T o select reverse, depress the forward/reverse control button on the right
side of the tool. The center position of the control button locks the tool in the off position. When changing
the position of the control button, be sure the trigger is released. NOTE: The first time the tool is run after
changing the direction of rotation, you may hear a click on start up. This is normal and does not indicate a
problem.
Torque Control
T o set the tool’s torque, rotate the adjustable torque collar clockwise as required. Six positions are marked
around the collar and the higher the number , the higher the tor que.
Each click in a clockwise direction means an increase in the torque produced. Position 6 is the drill mode.
In this position the clutch will not operate. This permits heavy duty drilling.
Keyless Chuck Operation
T o attach accessories, loosen the chuck by rotating the outer sleeve counterclockwise until the chuck is open
enough to accept the accessory. Insert the accessory as far as it will go and tighten the outer sleeve by
hand.
Drilling
•Use sharp drill bits only.
•Support and secure work properly , as instructed in the Safety Instructions.
•Use appropriate and required safety equipment, as instructed in the safety instructions.
•Secure and maintain work area, as instructed in the safety instructions.
•Run the drill very slowly, using light pressure, until the hole is started enough to keep the drill bit from
slipping out of it.
•Apply pressure in a straight line with the bit. Use enough pressure to keep the bit biting but not so much
as to stall the motor or deflect the bit.
•Hold the drill firmly to control its twisting action..
•DO NOT CLICK THE TRIGGER OF A STALLED DRILL OFF AND ON IN AN A TTEMPT TO START IT.
DAMAGE TO THE DRILL CAN RESULT.
•Minimize stalling on breakthrough by reducing pressure and slowly drilling through the last part of the
hole.
•Keep the motor running while pulling the bit out of a drilled hole This will help reduce jamming.
•Use a cutting lubricant when drilling metals. The exceptions are cast iron and brass which should be
drilled dry. The lubricants that work best are sulphurized cutting oil or lard oil. Bacon grease will also
serve.
•When using twist drill bits to drill holes in wood, it will be necessary to pull the bits out frequently to clear
chips from the flutes.
• Make sure switch turns drill on and off.
WARNING: It is important to support the work properly and to hold the drill firmly to prevent loss of
control which could cause personal injury If you have any questions on how to properly
operate tool, call: 1-800-54-HOW-TO
DRILLING IN WOOD
Holes in wood can be made with the same twist drill bits used for metal or with spade bits. These bits
should be sharp and should be pulled out frequently when drilling to clear chips from the flutes.
DRILLING IN MET AL
Use a cutting lubricant when drilling metals. The exceptions are cast iron and brass which should be drilled
dry. The cutting lubricants that work best are sulfurized cutting oil or lard oil; bacon grease will also serve
the purpose.
DRILLING IN MASONRY
Use carbide tipped masonry bits. Refer to Drilling section. Keep even force on the drill but not so much that
you crack the brittle material. A smooth, even flow of dust indicates the proper drilling rate.
Maintenance
Use only mild soap and damp cloth to clean the tool. Never let any liquid get inside the tool; never immerse
any part of the tool into a liquid.
IMPORTANT:To assure product SAFETY and RELIABILITY , repairs, maintenance and adjustment should be
performed by authorized service centers or other qualified service organizations, always using identical
replacement parts.
THE RBRC™ SEAL
The RBRC™ (Rechargeable Battery Recycling Corporation)
Seal on the nickel-cadmium battery (or battery pack) indicates that the costs to recycle
the battery (or battery pack) at the end of its useful life have already been paid by Black
& Decker . In some areas, it is illegal to place spent nickel-cadmium batteries in the trash
or municipal solid waste stream and the RBRC program provides an environmentally
conscious alternative.
RBRC in cooperation with Black & Decker and other battery users, has established programs in the United
States and Canada to facilitate the collection of spent nickel-cadmium batteries. Help protect our
environment and conserve natural resources by returning the spent nickel-cadmium battery to an authorized
Black & Decker service center or to your local retailer for recycling. You may also contact your local
recycling center for information on where to drop off the spent battery.You may also contact your local
recycling center for information on where to drop off the spent battery, or call 1-800-8-BA TTERY.
Accessories
Recommended accessories for use with your tool are available from your local dealer or authorized service
center . If you need assistance regarding accessories, please call: 1-800-54-HOW-TO.
The following accessories should be used only in the sizes specified below: BITS, METAL DRILLING – Up to
3/8" (9.5mm); BITS, MASONRY DRILLING – Up to 3/8" (9.5mm); WOOD DRILLING – Up to 1/2"
(12.7mm).
Y our drill includes one double-ended screwdriver bit that is stored in the clip on top of the tool. The
included bit is: No. 2 Phillips - No. 8-10 slotted.
WARNING: The use of any accessory not recommended for use with this tool could be hazardous.
Full T wo-Year Home Use Warranty
Black & Decker (U.S.) Inc. warrants this product for two years against any defects in material or workmanship.
The defective product will be replaced or repaired at no charge in either of two ways:
The first, which will result in exchanges only, is to return the product to the retailer from whom it was
purchased (provided that the store is a participating retailer). Returns should be made within the time period
of the retailer’ s policy for exchanges (usually 30 to 90 days after the sale). Proof of purchase may be required.
Please check with the retailer for their specific return policy regarding returns that are beyond the time set for
exchanges.
The second option is to take or send the product (prepaid) to a Black & Decker owned or authorized Service
Center for repair or replacement at our option. Proof of purchase may be required. Black & Decker owned
and authorized service centers are listed under “Tools-Electric” in the yellow pages of the phone directory .
This warranty does not apply to accessories. This warranty gives you specific legal rights and you may have
other rights which vary from state to state. Should you have any questions, contact the manager of your
nearest Black & Decker Service Center.
This product is not intended for commercial use.
Service Information
Black & Decker offers a full network of company-owned and authorized service locations throughout North
America. All Black & Decker Service Centers are staffed with trained personnel to provide customers with
efficient and reliable power tool service.
Whether you need technical advice, repair , or genuine factory replacement parts, contact the Black &
Decker location nearest you. T o find your local service location, refer to the yellow page directory under
“T ools—Electric” or call: 1-800-54-HOW-TO.
AVERTISSEMENT : IMPORTANTES MESURES DE SÉCURITÉ
AFIN DE RÉDUIRE LES RISQUES DE BLESSURES :
•Avant toute utilisation, s’assurer que tous ceux qui se servent de l’outil lisent et comprennent toutes les
mesures de sécurité et tout autre renseignement contenu dans le présent guide.
•Conserver ces mesures et les relire fréquemment avant d’utiliser l’outil et d’en expliquer le fonctionnement
à d’autres personnes.
AVERTISSEMENT : Afin de réduire les risques d’incendie, de secousses électriques ou de blessures
lorsqu’on utilise des outils électriques, il faut toujours respecter les mesures de
sécurité suivantes.
LIRE TOUTES LES DIRECTIVES.
MESURES DE SÉCURITÉ POUR TOUS LES OUTILS
• BIEN DÉGAGER LA SURFACE DE TRA VAIL. Des surfaces et des établis encombrés peuvent être la cause de
blessures.
• TENIR COMPTE DU MILIEU DE TRAVAIL. Protéger les outils électriques de la pluie. Ne pas s’en servir dans
des endroits humides ou mouillés. Bien éclairer la surface de travail. Ne pas se servir de l’outil en
présence de liquides ou de vapeurs inflammables. En effet, le moteur de tels outils génère habituellement
des étincelles et celles-ci peuvent enflammer les vapeurs.
• SE PROTÉGER CONTRE LES SECOUSSES ÉLECTRIQUES. Éviter tout contact avec des objets mis à la terre,
comme des tuyaux, radiateurs, cuisinières, réfrigérateurs et autres objets du genre. Prendre soin
lorsqu’on perce, visse ou coupe des murs, planchers, plafonds ou autres endroits qui pourraient cacher
des fils électriques sous tension. Ne pas toucher aux composants métalliques de l’outil. Saisir celui-ci
seulement par sa poignée en plastique afin d’éviter les secousses électriques.
• ÉLOIGNER LES ENFANTS. Tous les visiteurs doivent être tenus à l’écart de l’aire de travail et il faut les
empêcher de toucher à l’outil ou au cordon de rallonge.
• RANGER LES OUTILS INUTILISÉS. Il faut ranger les outils dans un endroit sec, situé en hauteur ou fermé à
clé, hors de la portée des enfants.
• NE JAMAIS FORCER L’OUTIL. Afin d’obtenir un rendement sûr et efficace, utiliser l’outil à son rendement
nominal.
• UTILISER L’OUTIL APPROPRIÉ. Ne jamais exiger d’un petit outil ou d’un accessoire le rendement d’un outil
de fabrication plus robuste. Se servir de l’outil selon l’usage prévu.
• PORTER DES VÊTEMENTS APPROPRIÉS. Éviter de porter des vêtements amples et des bijoux qui peuvent
être happés par les pièces en mouvement. Porter des gants de caoutchouc et des chaussures à semelle
antidérapante pour travailler à l’extérieur . Protéger la chevelure si elle longue.
• PORTER DES LUNETTES DE SÉCURITÉ ET AUTRE ÉQUIPEMENT DE SÉCURITÉ. Porter des lunettes de
protection ou de sécurité à écrans latéraux, conformément aux normes de sécurité appropriées, et, au
besoin, un écran facial. Porter également un masque respiratoire si le travail de coupe produit de la
poussière. La présente mesure vaut pour toute personne dans la zone de travail. Il faut également porter
un casque, des protège-tympans, des gants et des chaussures de sécurité ainsi qu’utiliser des systèmes de
dépoussiérage lorsque spécifié ou exigé.
• NE PAS MANIPULER LE CORDON DE FAÇON ABUSIVE. Ne pas transporter l’outil par le cordon ni tirer
sur ce dernier pour le débrancher de la prise. Éloigner le cordon des sources de chaleur , des flaques
d’huile et des arêtes tranchantes.
• ASSUJETTIR LA PIÈCE. Immobiliser la pièce à l’aide de brides ou d’un étau. On peut alors se servir des
deux mains pour faire fonctionner l’outil, ce qui est plus sûr .
• NE PAS DÉP ASSER SA PORTÉE. Toujours demeurer dans une position stable et garder son équilibre.
• PRENDRE SOIN DES OUTILS. Conserver les outils propres pour qu’ils donnent un rendement supérieur et
sûr . Suivre les directives concernant la lubrification et le remplacement des accessoires. Inspecter
régulièrement le cordon de l’outil et le faire réparer au besoin à un atelier d’entretien autorisé. Inspecter
régulièrement les cordons de rallonge et les remplacer lorsqu’ils sont endommagés. S’assurer que les
poignées sont toujours propres, sèches et libres de toute tache d’huile ou de graisse.
• ENLEVER LES CLÉS DE RÉGLAGE. Prendre l’habitude de vérifier si les clés de réglage ont été retirées avant
de faire démarrer l’outil.
• DEMEURER VIGILANT. T ravailler avec vigilance et faire preuve de bon sens. Ne pas se servir de l’outil
lorsqu’on est fatigué ou autrement affaibli.
• VÉRIFIER LES PIÈCES ENDOMMAGÉES. Avant de continuer à utiliser l’outil, il faut vérifier si le protecteur
ou toute autre pièce endommagée remplit bien la fonction pour laquelle il a été prévu. Vérifier
l’alignement et les attaches des pièces mobiles, le degré d’usure des pièces et leur montage, ainsi que tout
autre facteur susceptible de nuire au bon fonctionnement de l’outil. Faire réparer ou remplacer tout
protecteur ou toute autre pièce endommagée dans un centre de service autorisé. Ne jamais se servir d’un
outil dont l’interrupteur est défectueux.
• RÉPARA TIONS ET ENTRETIEN.Confier l’outil à un centre de service Black & Decker autorisés ou à tout
autre atelier d’entretien qualifié utilisant toujours des pièces de rechange identiques lorsqu’il doit subir des
réparations ainsi que des travaux d’entretien ou de réglage qui ne sont pas spécifiés dans le présent
guide.
• ACCESSOIRES. L ’utilisation d’accessoires non recommandé pour l’outil peut être dangereuse. Note:
Consulter la rubrique relative aux accessoires su présent guide pour obtenir de plus amples
renseignements à ce sujet.
MESURES DE SÉCURITÉ : CHARGEMENT DE L’OUTIL
1. Le présent guide renferme d’importantes directives relatives à la sécurité et au fonctionnement.
2. Avant d’utiliser le chargeur de piles, bien lire toutes les directives et les mises en garde qui se trou-
vent sur (1) le chargeur de piles, (2) l’ensemble de piles et (3) le produit utilisant l’ensemble de piles.
3. MISE EN GARDE : Afin de minimiser les risques de blessures, charger seulement des ensembles
de piles Black & Decker. D’autres types de piles pourraient exploser et causer des blessures et des
dommages.
4. Protéger le chargeur de la pluie et de la neige.
5. L’utilisation d’accessoires non recommandés ni vendus par Black & Decker présente des risques d’in-
cendie, de secousses électriques ou de blessures.
PPPPeeeerrrrcccceeeeuuuusssseeeessss----ttttoooouuuurrrrnnnneeeevvvviiiissss ssssaaaannnnssss ffffiiiillll ddddeeee
11110000mmmmmmmm ((((3333////8888ppppoooo)))) eeeetttt ddddeeee 9999,,,,6666VVVV,,,, ddddeeee 11112222 VVVV,,
,,
11114444,,,,4444 VVVV oooouuuu ddddeeee 11118888 VV
VV
AVANT DE RETOURNER LE PRODUIT, PEU IMPORTE LA
RAISON PRIÈRE DE COMPOSER
1 800 544-6986
GUIDE D’UTILISATION
FRANÇAIS
Modèles PS3200, PS3300, PS3500, PS3600 et PS3700
RENSEIGNEMENTS IMPORTANTS
•Il faut charger l’ensemble de piles pendant trois heures avant de s’en servir.
•À la sortie de l’usine, l’interrupteur de l’outil est verrouillé en position d’arrêt.
•Examiner l’intérieur du mandrin sans clé lorsqu’on le serre afin d’observer le
mouvement des mâchoires.
CONSERVER LE PRÉSENT GUIDE À TITRE DE RÉFÉRENCE.
See ‘Tools-Electric’
– Yellow Pages –
for Service & Sales
Imported by
Black & Decker (U.S.) Inc.,
701 E. Joppa Rd.
Towson, MD 21286 U.S.A.
RBRC
RBRC
Ni-Cd
YOU'VE GOT THE TOOL
http://www.blackanddecker.com
NOW GET THE KNOW-HOW
R
Page 3

6. Il vaut mieux tirer sur la fiche que sur le cordon pour débrancher le chargeur afin de minimiser les
risques de dommages à la fiche et au cordon.
7. S’assurer que le cordon est situé de sorte qu’on ne puisse marcher dessus, y trébucher, l’endommager ou le soumettre à toute autre contrainte.
8. Utiliser un cordon de rallonge seulement en cas d’absolue nécessité. L’utilisation d’un cordon de rallonge inapproprié présente des risques d’incendie ou de secousses électriques.
a. Les cordons bifilaires peuvent être utilisés avec un cordon de rallonge muni de 2 ou de 3 fils. Il faut
seulement utiliser des cordons de rallonge à gaine ronde homologués par l’organisme américain
Underwriters Laboratories (U.L.). Lorsque le cordon de rallonge est utilisé à l’extérieur, il doit être
prévu à cet effet. Tout cordon extérieur peut servir à l’intérieur. Les lettres «W» ou «WA» sur la gaine
du cordon indiquent que celui-ci convient pour une utilisation à l’extérieur.
b. Les cordons de rallonge doivent être faits de conducteurs de calibre approprié (AWG ou jauge
américaine des fils) par mesure de sécurité et afin de prévenir les pertes de puissance et les surchauffes. Le numéro de calibre du fil est inversement proportionnel à la capacité du cordon. Ainsi,
un cordon de calibre 16 a une capacité supérieure à un cordon de calibre 18. Lorsqu’il est nécessaire d’utiliser plus d’un cordon de rallonge, veiller à ce que chaque cordon ait au moins le calibre
minimal.
TABLEAU POUR LE CALIBRE MINIMAL (AWG) DES CORDONS DE RALLONGE
INTENSITÉ (A) - PLAQUE SIGNALÉTIQUE – 0 – 10,0
Longueur totale du cordon de rallonge (pi) 25 50 75 100 125 150
Calibre de fil 18 18 16 16 14 14
• Utiliser seulement le chargeur fourni pour charger la perceuse. L’utilisation de tout autre chargeur
peut endommager la perceuse et être dangereuse.
• Utiliser un seul chargeur à la fois.
• Ne pas tenter de démonter le chargeur ni la perceuse. L’utilisateur ne peut les réparer. En confier les
réparations à un centre de service autorisé Black & Docker.
• NE PAS incinérer la perceuse ni les ensembles de piles même si ceux-ci sont très endommagés ou
complètement usés. La chaleur des flammes risque de les faire exploser.
• Ne pas incinérer les piles. La chaleur des flammes risque de les faire exploser. Il peut se produire une
légère fuite du liquide excitateur des piles dans des conditions d’utilisation et de chargement difficiles
ou en cas de température extrême, fuite qui ne serait pas nécessairement un signe de panne.
Toutefois, si ce liquide s’échappe par une rupture du joint étanche du boîtier et atteint la peau, il
faut :
a. laver immédiatement à l’eau et au savon;
b. neutraliser à l’aide d’un acide doux (jus de citron ou vinaigre, p. ex.);
c. si le liquide excitateur atteint les yeux, il faut rincer à l’eau claire pendant au moins dix minutes et
consulter immédiatement un médecin. AVIS AU MÉDECIN : Le liquide excitateur est une solution d’hy-
drogène de potassium à 25-35 p. 100.
MESURES DE SÉCURITÉ : PERCEUSES
• Lorsqu’on perce ou visse des murs, planchers, plafonds ou autres endroits qui pourraient cacher
des fils électriques sous tension, Ne pas toucher aux composants métalliques de l’outil. Saisir celuici seulement par sa poignée en plastique afin d’éviter les secousses électriques.
• Ne pas verrouiller la perceuse en mode de fonctionnement continu lorsqu’on perce à la main.
Consulter la rubrique «Fonctionnement - Interrupteur».
• Bien saisir la perceuse afin d’en maîtriser l’effet de torsion.
AVERTISSEMENT : La perceuse peut caler (en raison d’une surcharge ou d’une mauvaise utilisation)
et provoquer un effet de torsion. Toujours en prévenir le blocage. La saisir
fermement pour en empêcher l’effet de torsion et pour prévenir la perte de
maîtrise de l’outil qui pourrait occasionner des blessures. Lorsque la perceuse
cale, relâcher immédiatement la détente et déterminer la cause du blocage avant
de se servir de nouveau de l’outil.
• Lorsqu’on installe un accessoire dans le mandrin de la perceuse, il faut bien le serrer le mandrin sans
clé, à la main.
CONSERVER CES MESURES À TITRE DE RÉFÉRENCE.
Chargement de l’ensemble de piles
L’ENSEMBLE DE PILES N’EST PAS COMPLÈTEMENT CHARGÉ À SA SORTIE DE L’USINE. AVANT DE LE
CHARGER, BIEN LIRE TOUTES LES MESURES DE SÉCURITÉ.
Les perceuses décrites dans le présent guide utilisent le même chargeur .
Faire ce qui suit pour charger l’ensemble de piles.
Le chargeur en 3 heures est conçu pour utiliser une alimentation standard de 120 volts, 60 Hz.
1. Placer le levier de commande de l’interrupteur à la position centrale (arrêt), comme le montre la figure 1, et retirer l’ensemble de piles de l’outil de la façon illustrée à la figure 2
2. Brancher le chargeur dans une prise standard de 120 volts.
3. Insérer l’ensemble de piles dans le chargeur, comme le montre la figure 3, et l’y laisser pendant
3 heures.
4. Retirer l’ensemble de piles du chargeur et le remettre dans l’outil.
Notes importantes relatives au chargement
1. Après une utilisation normale, le chargement complet de l’ensemble de piles prend au plus 3 heures.
Lorsque l’ensemble de piles est complètement à plat, cela peut prendre jusqu’à 8 heures. L’ensemble
de piles n’est pas chargé à sa sortie de l’usine. Avant de s’en servir, il faut donc le charger pendant
au moins 3 heures.
2. NE PAS charger les piles lorsque la température ambiante est inférieure à 5 °C (40 °F) ou supérieure
à 40 °C (105 °F). On optimise la durée et le rendement de l’ensemble de piles lorsqu’on le charge à
une température ambiante d’environ 24 °C (75 °F).
3. Le chargeur peut émettre des sons et devenir chaud au toucher pendant le chargement. Cette situation est normale et ne pose aucun problème.
4. Lorsque l’ensemble de piles n’est pas bien chargé, (1) vérifier l’alimentation de la prise en y branchant une lampe ou un autre appareil. (2) Vérifier si la prise est reliée à un interrupteur pour l’éclairage qui met la prise hors circuit lorsqu’on éteint les lumières. (3) Déplacer l’ensemble de piles et
le chargeur dans un endroit où la température ambiante se situe entre 5 °C (40 °F) et 40 °C
(105 °F). (4) Si le problème persiste, il faut confier l’ensemble de piles et le chargeur au centre de
service Black & Decker de la région. Consulter la rubrique «Outils électriques» des Pages Jaunes.
5. Il faut charger l’ensemble de piles lorsqu’il ne fournit plus la puissance nécessaire pour effectuer les
tâches avec autant de facilité qu’auparavant. Ne plus se servir de la perceuse lorsque l’ensemble de
piles est à plat.
6. Pour prolonger la durée de l’ensemble de piles, éviter de le laisser en chargement pendant plus de
8 heures. Même si le chargement continu ne pose aucun problème, cela peut grandement diminuer
la durée de l’ensemble de piles.
7. Un ensemble de piles bien chargé conserve 75 p. 100 de sa puissance au bout de un mois; il en
reste 50 p. 100 au bout de 6 mois.
FONCTIONNEMENT
AVERTISSEMENT : Afin de minimiser les risques de blessures graves, il faut lire, comprendre et
respecter toutes les mesures de sécurité avant d’utiliser l’outil.
Inverseur de marche
L’inverseur de marche permet de choisir le mode de fonctionnement de l’outil et de le verrouiller en position
d’arrêt (fig. 1). Pour actionner la marche avant, il faut relâcher l’interrupteur à détente, puis enfoncer
l’inverseur vers la droite de l’outil. Pour actionner la marche arrière, il faut relâcher l’interrupteur à détente,
puis enfoncer l’inverseur vers la gauche de l’outil. L’outil est verrouillé en position hors circuit lorsque
l’inverseur se trouve au centre. Il faut relâcher l’interrupteur à détente avant de modifier la position de
l’inverseur de marche. NOTE : Lorsqu’on démarre l’outil après en avoir changé le mode de
fonctionnement, un déclic peut se faire entendre. Il s’agit d’une situation normale qui ne pose aucun
problème.
Réglage du couple
Pour régler le couple de l’outil, faire tourner la bague de réglage du couple dans le sens horaire jusqu’à la
position voulue. Il y a six marques de position sur la bague. Plus le chiffre est élevé, plus le couple l’est.
Chaque déclic dans le sens horaire correspond à une augmentation du couple produit. La position 6
correspond au mode de perçage. Dans cette position, l’embrayage ne fonctionne pas. On peut de la sorte
effectuer de rudes tâches de perçage.
Fonctionnement du mandrin sans clé
Pour installer un accessoire, desserrer le mandrin en faisant tourner dans le sens antihoraire le manchon
extérieur jusqu’à ce que le mandrin s’ouvre suffisamment pour accepter l’accessoire. Insérer l’accessoire
à fond et resserrer le manchon extérieur à la main.
Perçage
• N’utiliser que des forets bien affûtés.
• Veiller à ce que la pièce à percer soit solidement retenue ou fixée en place, selon les mesures de
sécurité.
• Porter l’équipement de sécurité approprié et requis, selon les mesures de sécurité.
• Rendre la zone de travail sûre et en assurer l’entretien, selon les mesures de sécurité.
• Actionner la perceuse à basses vitesses en exerçant une pression minimale jusqu’à ce que le trou soit
suffisamment percé afin d’empêcher le glissement du foret hors du trou.
• Toujours exercer la pression en ligne directe avec le foret. N’user que de la force nécessaire pour
que le foret continue de percer; éviter de trop forcer, ce qui pourrait faire étouffer le moteur ou dévier
le foret.
• Bien saisir la perceuse afin de maîtrise son effet de torsion.
• NE PAS ACTIONNER À PLUSIEURS REPRISES LA DÉTENTE D’UNE PERCEUSE BLOQUÉE DANS LE
BUT DE LA DÉCOINCER AU RISQUE DE L’ENDOMMAGER.
• Réduire la pression exercée sur l’outil et le foret vers la fin de la course afin d’éviter que le moteur ne
cale en traversant le matériau.
• Laisser le moteur en marche lorsqu’on retire le foret du trou afin d’en prévenir le coincement.
• Utiliser de l’huile de coupe pour percer dans les métaux, sauf la fonte et le laiton qui se percent à
sec. Les huiles de coupe les plus efficaces sont l’huile sulfurisée ou l’huile de lard; la graisse de bacon
est parfois suffisante.
• Les forets hélicoïdaux à métal peuvent servir à percer le bois, mais il faut les retirer souvent du trou
pour chasser les copeaux et rognures des goujures.
• S’assurer que l’interrupteur met l’outil en marche et qu’il l’arrête.
AVERTISSEMENT : Il est essentiel de bien soutenir la pièce à ouvrer et de saisir fermement la
perceuse afin de prévenir la perte de maîtrise de l’outil qui pourrait occasionner
de graves blessures. Pour obtenir de plus amples renseignements relatifs au bon
fonctionnement de l’outil, composer le : 1 800 544-6986.
PERÇAGE DANS LE BOIS
Les forets hélicoïdaux à métal peuvent servir à percer le bois, mais il faut s’assurer qu’ils sont affûtés et il
faut les retirer souvent du trou pour chasser les copeaux et rognures des goujures.
PERÇAGE DANS LE MÉT AL
Utiliser de l’huile de coupe pour percer les métaux, sauf la fonte et le laiton qui se percent à sec. Les huiles
de coupe les plus efficaces sont l’huile sulfurisée ou l’huile de lard; la graisse de bacon est parfois
suffisante.
PERÇAGE DANS LA MAÇONNERIE
Utiliser des forets au carbure à basses vitesses. Consulter la rubrique «Perçage». Exercer une pression
constante, sans forcer afin d’éviter de casser les matériaux friables. Une production uniforme de poussière
à débit moyen indique un perçage convenable.
ENTRETIEN
Nettoyer l’outil seulement à l’aide d’un savon doux et d’un linge humide. Ne laisser aucun liquide s’infiltrer
dans l’outil et ne jamais immerger l’outil.
IMPORTANT : Pour assurer la SÉCURITÉ D’EMPLOI et la FIABILITÉ de l’outil, n’en confier la réparation,
l’entretien et les rajustements qu’à un centre de service ou à un atelier d’entretien autorisé n’utilisant que
des pièces de rechange identiques.
LE SCEAU RBRCmc*
Le sceau RBRCmc de la pile au nickel-cadmium indique que Black & Decker défraie le coût
du recyclage de la pile à la fin de sa durée utile. Le programme RBRCmc offre une solution
de rechange pratique à la mise au rebut des piles au nickel-cadmium usées, que ce soit à
la poubelle ou dans le système municipal car cette mise au rebut est illégale à certains
endroits.
L'organisme RBRC en collaboration avec Black & Decker et d'autres utilisateurs de piles a mis sur pied des
programmes aux États-Unis afin de faciliter la collecte des piles au nickel-cadmium usées. Pour aider à
préserver l'environnement et à conserver les ressources naturelles, il suffit de retourner les piles au nickelcadmium usées à un centre de service Black & Decker ou chez le détaillant de la région pour qu'elles soient
recyclées. On peut également communiquer avec le centre de recyclage de la région afin de savoir où
déposer les piles usées, ou composer le 1 (800) 822-8837.
*RBRCmc est une marque de commerce de l'organisme américain Rechargeable Battery Recycling
Corporation.
Accessoires
Les détaillants et le centre de service de la région vendent les accessoires recommandés pour l’outil. Pour
trouver un accessoire, composer le
1 800 544-6986.
Il faut utiliser les accessoires suivants seulement en fonction des dimensions spécifiées.
FORETS À MÉTAL – 9,5mm (3/8 po) max.; FORETS À MAÇONNERIE – 9,5 mm (3/8 po) max.; FORETS
À BOIS – 12,7 mm (1/2 po) max..
Il y a également une lame de tournevis réversible rangée dans une pince près du bas de la poignée de la
perceuse. Il s’agit d’une lame Phillips n° 2 et à tête fendue n° 8-10.
AVERTISSEMENT : L’utilisation de tout accessoire non recommandé pour l’outil peut être dangereuse.
Renseignements relatifs au service
Black & Decker exploite un réseau complet de centres de service et d'ateliers d'entretien autorisés par toute
l'Amérique du Nord. Le personnel de tous les centres de service Black & Decker a reçu la formation voulue
pour assurer l'entretien efficace et fiable des outils électriques.
Pour obtenir des renseignements d'ordre technique, des conseils relatifs aux réparations ou des pièces de
rechange d'origine, communiquer avec le centre de service Black & Decker de la région. On peut trouver
l'adresse du centre de service de la région dans l'annuaire des Pages Jaunes à la rubrique «Outils
électriques» ou en composant le numéro suivant : 1 (800) 544-6986.
Garantie complète de deux ans pour utilisation domestique
Black & Decker garantit le produit pour une période de deux ans contre les vices de matière ou de
fabrication. Le produit défectueux sera réparé ou remplacé sans frais conformément à l'une des conditions
suivantes.
Pour échanger l'outil, il suffit de le retourner au détaillant (si le détaillant participe au programme
d'échange rapide Black & Decker). Le retour doit être effectuer dans les délais impartis par la politique de
retour du détaillant (habituellement entre 30 et 90 jours suivant la date d'achat). Le détaillant peut exiger
une preuve d'achat. Prière de vérifier la politique de retour du détaillant au-delà des délais impartis.
On peut également retourner l'outil (port payé) à un centre de service Black & Decker ou à tout autre
atelier d'entretien accrédité pour y être remplacé ou réparé, à notre gré. On peut exiger une preuve
d'achat. Les adresses des centres de service Black & Decker se trouvent à la rubrique «Outils électriques»
des Pages Jaunes.
La présente garantie ne vaut pas pour les accessoires. Les modalités de la présente garantie donnent des
droits légaux spécifiques. L'utilisateur peut également se prévaloir d'autres droits selon l'état ou la
province qu'il habite. Pour obtenir de plus amples renseignements, communiquer avec le directeur du
centre de service Black & Decker de la région.
Le produit n'est pas conçu pour un usage commercial.
Imported by / Importé par
Black & Decker Canada Inc.
100 Central Ave.
Brockville (Ontario) K6V 5W6
Voir la rubrique “Outils électriques”
des Pages Jaunes
pour le service et les ventes.
R
BRC
RBRC
Ni-Cd
Page 4

ADVERTENCIA: ADVERTENCIAS E INSTRUCCIONES IMPORTANTES DE
SEGURIDAD
P ARA REDUCIR EL RIESGO DE LESIONES:
• Antes de cualquier uso, asegúrese que cualquier persona que vaya a utilizar esta herramienta lea y
comprenda todas las instrucciones de seguridad y la información contenida en este manual.
• Conserve estas instrucciones y repáselas con frecuencia antes de usar la herramienta e instruir a otras
personas.
ADVERTENCIA: Siempre que utilice herramientas eléctricas debe seguir ciertas precauciones
básicas de seguridad, a fin de reducir los riesgos de incendio, choque eléctrico y
lesiones personales, entre las que se encuentran las siguientes.
LEA TODAS LAS INSTRUCCIONES
ADVERTENCIAS E INSTRUCCIONES GENERALES DE SEGURIDAD PARA
TODAS LAS HERRAMIENTAS.
• CONSERVE LIMPIA LA ZONA DE TRABAJO. Las superficies y bancos con objetos acumulados propician
los accidentes.
• DELE PRIORIDAD AL AMBIENTE DE TRABAJO. No exponga las herramientas eléctricas a la lluvia. No
utilice herramientas eléctricas en lugares húmedos o inundados. Ilumine bien la zona de trabajo. No
utilice las herramientas eléctricas en presencia de líquidos o gases inflamables. Los motores de estas
herramientas producen chispas, que pueden encender los vapores.
• PROTEJASE CONTRA EL CHOQUE ELECTRICO. Evite el contacto corporal con superficies aterrizadas,
por ejemplo; tuberías, radiadores, hornos, gabinetes de refrigeración, etc. Tenga precaución extrema
cuando taladre, atornille o corte en muros, pisos, techos u otras áreas en donde pueda encontrar
cables eléctricos vivos, no toque ninguna parte metálica de la herramienta. Sujete las herramientas
solamente por las empuñaduras de plástico para evitar descargas eléctricas.
• CONSERVE APARTADOS A LOS NIÑOS. No permita que niños ni otros visitantes toquen la herramienta
ni los cables de extensión. Todos los niños y otros visitantes deben apartarse del área de trabajo.
• GUARDE LAS HERRAMIENTAS QUE NO EMPLEE. Siempre que no use las herramientas, debe guardarlas en un lugar seco y elevado o bajo chapa, fuera del alcance de los niños.
• NO FUERCE LA HERRAMIENTA. Esta hará el trabajo mejor y de manera más segura bajo las especificaciones para las que se diseñó.
• EMPLEE LA HERRAMIENTA ADECUADA. No fuerce a una herramienta pequeña o a sus dispositivos en
tareas destinadas a una herramienta de alto rendimiento. No utilice la herramienta para tareas para las
que no ha sido diseñada.
• VISTASE DE LA MANERA ADECUADA. No utilice ropas sueltas ni joyas, pueden quedar atrapadas en
las partes móviles. Se recomienda el uso de guantes y calzado antiderrapante cuando trabaje a la
intemperie. Cúbrase el cabello si lo tiene largo.
• UTILICE GAFAS Y OTRO EQUIPO DE SEGURIDAD. Utilice gafas de seguridad o anteojos de seguridad
con cubiertas laterales, que cumplan con las normas de seguridad aplicables, y, cuando se requiera
también utilice una mascarilla contra polvo si la operación lo produce. Esto se aplica a todas las personas en el área de trabajo. Use también casco, guantes, calzado de seguridad y sistemas de recolección de polvo cuando se especifique o se requiera.
• NO MALTRATE EL CABLE. Nunca cargue la herramienta por el cable ni tire de éste para desconectar la
herramienta de la toma de corriente. Aleje el cable de calor, aceite y bordes cortantes.
• ASEGURE LAS PIEZAS DE TRABAJO. Utilice prensas para sujetar su pieza de trabajo; es más seguro
que usar su mano y le deja ambas manos libres para operar la herramienta.
• NO SE SOBREEXTIENDA. Apoye bien los pies y conserve el equilibrio siempre.
• CUIDE SUS HERRAMIENTAS. Conser ve sus herramientas limpias y afiladas para un rendimiento mejor y
más seguro. Siga las instrucciones de lubricación y cambio de accesorios. Revise la herramienta periódicamente y si está dañada, hágala reparar por una estación de servicio autorizada. Revise también
los cables y, si están dañados, reemplácelos. Conserve las empuñaduras secas, limpias y libres de
aceite y grasa.
• QUITE LAS LLAVES DE AJUSTE Y LAS HERRAMIENTAS DE MANO. Acostúmbrese a verificar que se
hayan retirado todas las llaves antes de encender la unidad.
• ESTE ALERTA. Concéntrese en lo que hace. Utilice el sentido común. No opere la herramienta si está
cansado o discapacitado de alguna manera.
• REVISE LAS PARTES DAÑADAS. Antes de seguir usando la herramienta, debe revisar las guardas y
otras partes para determinar realizarán su función adecuadamente. Revise la alineación de las partes
móviles, la manera en que están sujetas, que no haya piezas o soportes rotos, y cualesquiera otras
condiciones que puedan afectar la operación. Una guarda u otra pieza que esté dañada debe ser
reparada o reemplazada en un centro de servicio autorizado. No use la herramienta si el interruptor no
enciende y apaga.
• SERVICIO Y REPARACIONES. Las reparaciones, el mantenimiento y cualquier ajuste no especificados en
este manual deben ser realizados por los centros de servicio autorizado Black & Decker u otras estaciones de servicio calificadas, que siempre utilicen refacciones idénticas.
• EMPLEO DE ACCESORIOS Y DISPOSITIVOS. El uso de cualquier accesorio o dispositivo no recomendado para emplearse con esta herramienta puede ser peligroso. Nota: Consulte la sección referente a los
accesorios de este manual para obtener más detalles.
ADVERTENCIAS E INSTRUCCIONES DE SEGURIDAD: CARGA DEL
TALADRO
1. Este manual contiene instrucciones de seguridad y de operación importantes.
2. Antes de utilizar el cargador de baterías, lea todas las instrucciones y las marcas precautorias en (1)
el cargador de baterías, (2) la batería y (3) el producto que emplea la batería.
3. PRECAUCION: A fin de reducir el riesgo de lesiones, solamente recargue baterías Black &
Decker. Otros tipos de baterías pueden estallar ocasionando lesiones personales y daños.
4. No exponga el cargador a lluvia o nieve.
5. El uso de dispositivos no recomendados o vendidos por Black & Decker puede originar riesgos de
incendios, descargas eléctricas o lesiones a personas.
6. Para reducir el riesgo de daños a la clavija o al cable, tire de la clavija en vez de tirar del cable
cuando desconecte el cargador.
7. Asegúrese que el cable se ubique de manera que no se pise, se enrolle, o se sujete a otro tipo de
tensiones o daños.
8. No deben emplearse cables de extensión a menos que sea absolutamente indispensable. El empleo
de una extensión incorrecta puede resultar en riesgos de incendio, choque eléctrico o electrocución.
a. Los cables de 2 hilos se pueden emplear con extensiones de 2 o de 3 hilos. Solamente deberán
emplearse extensiones con cubierta cilíndrica, y le recomendamos que estén aprobados por la
Norma Oficial Mexicana (NOM). Si se piensa utilizar la extensión a la intemperie, ésta deberá ser
adecuada para dicho uso. Cualquier extensión marcada para utilizarse a la intemperie se puede
emplear bajo techo. las siglas “W” o “WA” en la cubierta de la extensión indican que es adecuada
para utilizarse a la intemperie.
b. Una extensión debe tener el calibre de cable adecuado (AWG o American Wire Gauge) por seguri-
dad, y a fin de evitar pérdida de potencia y sobrecalentamiento. Mientras más pequeño sea el
número del calibre del alambre, mayor será su capacidad; esto significa que un cable de calibre 16
tiene mayor capacidad que otro de calibre 18. Cuando emplee más de una extensión para alcanzar
la longitud total, asegúrese que cada extensión tenga por lo menos el calibre mínimo requerido.
TABLA PARA EL CALIBRE MINIMO DEL ALAMBRE (AWG) EN CABLES DE EXTENSION
AMPERAJE EN LA PLACA DE IDENTIFICACION – 0 – 10,0
Longitud total del cable de extensión (m) 7,6 15,2 22,8 30,4 38,1 45,7
Calibre del alambre 18 18 16 16 14 14
• Solamente utilice el cargador suministrado para recargar su taladro. El empleo de cualquier otro car-
gador puede dañar el taladro o crear condiciones peligrosas.
• Solamente utilice un cargador cuando cargue.
• Nunca intente abrir el cargador ni el taladro. No contienen par tes susceptibles de ser reparadas por el
usuario en su interior. Envíelos a cualquier centro de servicio Black & Decker.
• NO incinere el taladro o la batería aún cuando estén muy dañados o la batería esté completamente
desgastada. Pueden explotar con el fuego. Puede ocurrir una pequeña fuga de líquido de las celdas de
la batería bajo condiciones extremas de uso, carga o temperatura. Esto no indica fallas, sin embargo,
si el sello externo está roto y el líquido hace contacto con su piel:
a.Lave inmediatamente con agua y jabón.
b.Neutralice con un ácido débil como jugo de limón o vinagre.
c. Si el líquido de la batería toca sus ojos, enjuáguelos con agua limpia por un mínimo de 10 minutos y
busque inmediatamente atención médica. NOTA MEDICA: el líquido es una solución de potasa cáustica
en concentración de 25 a 35%.
ADVERTENCIAS E INSTRUCCIONES DE SEGURIDAD: TALADROS
• Cuando taladre o atornille en paredes, pisos o cualquier otro sitio en el que puedan encontrarse
cables eléctricos vivos, ¡NO TOQUE NINGUNA PARTE METALICA DE LA HERRAMIENTA! Sosténgala
por el mango de plástico para evitar descargas.
• No asegure el taladro en posición de ENCENDIDO permanente cuando taladre a mano. Refiérase a
Instrucciones de operación-Interruptor.
• Sujete el taladro con firmeza para controlar la acción de torsión.
ADVERTENCIA: El taladro se puede atascar (si se sobrecarga o se utiliza de manera inadecua-
da) ocasionando un giro. Siempre espere el atascamiento. Sujete el taladro con
firmeza para controlar la acción de torsión y evitar la pérdida de control que
pudiera causar lesiones personales. Si el taladro se atasca, suelte inmediatamente el gatillo y determine la razón del atascamiento antes de reiniciar la
operación.
• Cuando instale accesorios en el por tabrocas, apriételo a mano con firmeza.
CONSERVE ESTAS INSTRUCCIONES
PARA REFERENCIAS FUTURAS
Carga de la batería
LAS BATERIAS NO VIENEN COMPLETAMENTE CARGADAS DE FABRICA. ANTES DE INTENTAR CARGARLAS, LEA COMPLETAMENTE TODAS LAS INSTRUCCIONES DE SEGURIDAD.
Los taladros cubiertos por este manual de instrucciones utilizan el mismo cargador.
El cargador de 3 horas está diseñado para emplear corriente doméstica estándar de 120 volts a 60 Hz.
1. Coloque la palanca de control del interruptor en la posición central de APAGADO (fig. 1) y retire la
batería de la herramienta (fig. 2).
2. Conecte el cargador a cualquier toma de corriente doméstica estándar de 120 volts a 60 Hz.
3. Inserte la batería en el cargador (fig. 3) y permita que cargue durante 3 horas.
4. Retire la batería del cargador y colóquela de nuevo en la herramienta.
Notas importantes sobre la carga
1. Después de uso normal, su batería deberá quedar completamente cargada en 3 horas o menos. Si
la batería se descarga por completo, puede llevarle hasta 8 horas recargarse completamente. Su
batería viene descargada de fábrica. Antes de intentar usarla, deberá cargarse durante 3 horas al
menos.
2. NO cargue la batería cuando la temperatura sea INFERIOR a 5°C (+40°F), o SUPERIOR a 40°C
(+105°F). Esto es importante y le evitará daños severos a la batería. Se puede lograr mayor
duración y mejor rendimiento si l batería s carga cuando la temperatura ambiental es de aproximadamente 24°C (75°F).
3. Durante la carga, el cargador puede zumbar y volverse tibio al tacto. Esto es una condición normal
y no indica problemas.
4. Si la batería no carga apropiadamente —(1) Verifique la corriente en la toma conectando una lám-
para u otro aparato. (2) Revise si la toma de corriente está conectada a un interruptor que corte la
corriente al apagar las luces. (3) Mueva el cargador y la batería a un sitio en que la temperatura
ambiental esté entre 5°C y 40°C. (4) Si la temperatura y la toma de corriente son correctas, y usted
no consigue cargar apropiadamente, lleve la batería y el cargador a un centro de servicio Black &
Decker. Consulte “herramientas eléctricas” en la sección amarilla.
5. La batería debe recargarse cuando deja de producir potencia suficiente en trabajos que se
realizaron anteriormente con facilidad. NO CONTINUE utilizando el taladro con la batería en
condiciones de carga baja.
6. Para prolongar la vida útil de la batería, evite dejarla en carga durante más de 8 horas. Aunque la
sobre carga no es un aspecto que ponga en riesgo la seguridad, puede disminuir significativamente
la durabilidad de la batería.
7. Una batería con carga completa, después de transcurrir un mes, aún tendrá el 75% de su energía;
después de 6 meses, restará el 50%.
INSTRUCCIONES DE OPERACION
ADVERTENCIA: Para reducir el riesgo de lesiones personales, lea, comprenda y siga todas las
instrucciones y advertencias de seguridad antes de utilizar la herramienta.
Interruptor y palanca de control
Un botón de control de marcha determina la dirección de la herramienta y funciona también como botón
de trabado (Figura 1) . Para seleccionar la rotación hacia adelante, suelte el gatillo interruptor y oprima el
botón de control del lado derecho de la herramienta.
Para seleccionar reversa, oprima el botón de control del lado izquierdo de la herramienta. La posición
central del botón de control asegura la herramienta en la posición de APAGADO. Cuando cambie la
posición del botón de control, asegúrese que el gatillo interruptor se encuentra liberado.
NOTA: La primera vez que encienda la herramienta después de cambiar la dirección de rotación, puede
escuchar un “clic” al arrancar . Esto es normal y no indica ningún problema.
CONTROL DE PAR (TORQUE)
Para ajustar el par de la herramienta, gire el collarín ajustable en el sentido de las manecillas del reloj
como se requiera.
El collarín cuenta con seis posiciones marcadas a su alrededor, mientras mayor sea el número, mayor
será el par.
Cada chasquido en el sentido de las manecillas del reloj significa un incremento en el par que se produce. La posición 6 es el modo de taladro. En esta posición el embrague no funciona. Esto permite taladrado pesado.
OPERACION DEL PORTABROCAS SIN LLAVE
Para instalar accesorios, afloje el portabrocas girando el cilindro exterior en sentido contrario a las
manecillas del reloj hasta que el portabrocas esté suficientemente abierto para aceptar el accesorio.
Inserte el accesorio tanto como pueda y apriete el cilindro exterior a mano.
TTTTaaaallllaaaaddddrrrroooossss////DDDDeeeessssttttoooommmmiiiillllllllaaaaddddoooorrrreeeessss
iiiinnnnaaaalllláááámmmmbbbbrrrriiiiccccoooossss ddddeeee 11110000mmmmmmmm ((((3333////8888"""")))) ddddee
ee
9999,,,,6666VVVV,,,, 11112222VVVV,,,, 11114444,,,,4444VVVV,,,, 11118888VV
VV
ESPAÑOL
PS3200, PS3300, PS3500, PS3600, PS3700
ANTES DE DEVOLVER ESTE PRODUCTO POR CUALQUIER
RAZON POR FAVOR LLAME
326-7100
CONSERVE ESTE MANUAL PARA REFERENCIAS FUTURAS
MANUAL DE INSTRUCCIONES
INFORMACION CLAVE QUE DEBE SABER
•Cargue las baterías durante tres horas antes de usar por vez primera.
•El taladro viene con el interruptor en posición de seguro de apagado.
•Mire hacia el portabrocas sin llave cuando lo apriete para observar el movimiento
de las mordazas.
R
Page 5

Taladrado
• Solamente utilice brocas afiladas.
• Apoye y asegure apropiadamente la pieza de trabajo, como se recomienda en las Instrucciones de
seguridad.
• Utilice el equipo de seguridad apropiado y requerido, como se señala en las instrucciones de seguridad.
• Cuide el área de trabajo, como se menciona en las instrucciones de seguridad.
• Haga funcionar el taladro muy lentamente, utilizando poca presión, hasta haber per forado lo suficiente
para evitar que la broca se deslice hacia afuera del barreno.
• Aplique presión en línea recto con la broca. Haga presión suficiente para conservar a la broca cortando, pero no tanta como para que el motor se atasque o la broca se desvíe.
• Sujete firmemente el taladro para controlar su acción de torsión.
• NO OPRIMA EL GATILLO DE UN TALADRO ATASCADO PARA INTENTAR ENCENDERLO Y APAGARLO. PUEDE DAÑARLO.
• Minimice el atascamiento al iniciar el barreno reduciendo la presión y per forando lentamente a través
de la última parte del barreno.
• Conserve el motor en funcionamiento mientras saca la broca de un barreno. Esto ayudará a evitar atascaduras.
• Emplee un lubricante para cor te cuando per fore metales. Las excepciones son el hierro colado y el
latón, que deben taladrarse en seco. Los lubricantes que tienen mejor funcionamiento son el aceite
sulfúrico para corte y la manteca de cerdo. La grasa de tocino funciona también.
• Cuando emplee brocas helicoidales para per forar en madera, será necesario sacarlas del barreno con
frecuencia para limpiar las virutas de los canales.
• Asegúrese que el interr uptor enciende y apaga el taladro.
ADVERTENCIA: Es importante apoyar la pieza de trabajo adecuadamente y sujetar al taladro
con firmeza para evitar la pérdida de control que pudiese ocasionar lesiones
personales. Si tiene preguntas sobre la operación correcta de la herramienta,
llame: 326-7100
TALADRADO EN MADERA
Se puede utilizar el mismo tipo de brocas helicoidales que se emplean para metal cuando haga barrenos en madera. Estas brocas deben estar afiladas y deben sacarse con frecuencia del barreno para
quitar las virutas acumuladas en las estrías.
TALADRADO EN METAL
Utilice un lubricante para corte cuando perfore metales, excepto en los casos de hierro fundido o latón
en los que se deberá taladrar en seco. Los lubricantes para corte que mejor funcionan son el aceite
sulfúrico y la manteca de cerdo; la grasa de tocino también funciona para este propósito.
TALADRADO EN MAMPOSTERIA
Utilice brocas para mampostería con punta de carburo. Consulte la sección Taladrado. Aplique fuerza
uniforme al taladro, pero no tanta como para estrellar el material. El flujo uniforme de polvo indica la
velocidad de perforación adecuada.
MANTENIMIENTO
Utilice únicamente jabón suave y un trapo húmedo para limpiar la herramienta. No permita nunca que
lleguen líquidos al interior de la herramienta, ni sumerja ninguna parte en ningún líquido.
IMPORTANTE: Para garantizar la SEGURIDAD y la CONFIABILIDAD del producto, las reparaciones, el
mantenimiento y los ajustes deben ser realizados por centros de servicio autorizados u otras organizaciones de servicio calificadas, que siempre utilicen partes de repuesto idénticas.
•EL SELLO RBRC™
El sello RBRC™ en las baterías de níquel-cadmio indica que Black & Decker participa voluntariamente en un programa industrial para recolectar y reciclar estas baterías al término de
su vida útil, cuando se retiran de servicio dentro de los Estados Unidos. El programa RBRC™
proporciona una conveniente alternativa para el depósito en los lotes de basura municipales
de las baterías de níquel-cadmio desgastadas, hecho que es ilegal en algunas regiones.
Los pagos de Black & Decker a RBRC™ hacen más sencillo para usted deshacerse de sus baterías desgastadas con los distribuidores de baterías de níquel-cadmio de su localidad, o en los centros de servicio autorizado Black & Decker. También puede comunicarse al centro de reciclaje de su localidad para
que le informen de los lugares a los que puede regresar las baterías desgastadas. La entrada de Black &
Decker a este programa es parte de su compromiso para proteger nuestro medio ambiente y conservar
los recursos naturales.
RBRC™ es una marca registrada de Rechargeable Battery Recycling Corporation.
Accesorios
Los accesorios recomendados para emplearse con su herramienta se encuentran a su disposición con su
distribuidor local o en los centros de servicio autorizado. Si necesita ayuda en relación con los accesorios, por favor llame: 326-7100
Los siguientes accesorios deben utilizarse únicamente en las medidas especificadas para mayor seguridad: BROCAS PARA METAL–Hasta 9,5 mm (3/8"); BROCAS PARA MAMPOSTERIA–Hasta 9,5 mm
(3/8"); BROCAS PARA MADERA–Hasta 12,7 mm (1/2").
Su taladro incluye una punta doble de destornillador que está guardada en el sujetador cercano a la
parte inferior del mango. La punta incluida es: Phillips No. 2 - Plana No. 8-10.
ADVERTENCIA: El uso de cualquier accesorio no recomendado para emplearse con esta her-
ramienta puede ser peligroso.
Información de ser vicio
Black & Decker ofrece una red completa de centros de servicio propiedad de la compañía y franquiciados
a través de toda Norteamérica. Todos los centros de servicio Black & Decker cuentan con personal
capacitado para proporcionar el servicio a herramientas más eficiente y confiable.
Siempre que necesite consejo técnico, reparaciones o partes de repuesto genuinas, comuníquese con el
centro Black & Decker más cercano a usted.
Para encontrar su centro de servicio local, consulte la sección amarilla bajo “Herramientas eléctricas”, o
llame al: 326-7100
PARA REPARACION Y SERVICIO DE SUS HERRAMIENTAS ELECTRICAS FAVOR DE
DIRIGIRSE AL CENTRO DE SERVICIO MAS CERCANO
CULIACAN
Av . Nicolas Bravo #1063 Sur (91 671) 242 10
GAUDALAJARA
Av . La Paz #1779 (91 3) 826 69 78.
MEXICO
Eje Lázaro Cárdenas No. 18 Local D, Col. Obrera 588-9377
MERIDA
Calle 63 #459-A (91 99) 23 54 90
MONTERREY
Av . Francisco I. Madero Pte. 1820-A (91 83) 72 11 25
PUEBLA
17 Norte #205 (91 22) 46 37 14
QUERETARO
Av . Madero 139 Pte. (91 42) 14 16 60
SAN LOUIS POTOSI
Pedro Moreno #100 Centro (91 48) 14 25 67
TORREON
Blvd. Independencia, 96 pte. (91 17) 16 52 65
VERACRUZ
Prolongación Diaz Miron #4280 (91 29) 21 70 16
VILLAHERMOSA
Constitucion 516-A (91 93) 12 53 17
PARAOTRAS LOCALIDADES LLAME AL: 326 7100
INFORMACIÓN DE SERVICIO
Black & Decker ofrece una red completa de centros de servicio propiedad de la compañía y franquiciados
a través de toda Norteamérica. Todos los centros de servicio Black & Decker cuentan con personal
capacitado para proporcionar el servicio a herramientas más eficiente y confiable.
Siempre que necesite consejo técnico, reparaciones o partes de repuesto genuinas, comuníquese con el
centro Black & Decker más cercano a usted.
Para encontrar su centro de servicio local, consulte la sección amarilla bajo “Herramientas eléctricas”, o
llame al: 326-7100.
POLIZA DE GARANTIA
IDENTIFICACION DEL PRODUCTO:
Sello firma del Distribuidor .
N
ombre del producto:_____________ Mod/Cat.: ____________________
Marca: _________________________ Núm. de serie: _________________
(Datos para ser llenados por el distribuidor)
Fecha de compra y/o entrega del producto: ____________________________
Nombre y domicilio del distribuidor donde se adquirió el producto:
_________________________________________________________________
Este producto esta garantizado por dos años a partir de la fecha de entrega, contra cualquier defecto en
su funcionamento, así como en materiales y mano de obra empleados para su fabricación. Nuestra
garantía incluye la reparación o reposición del producto y/o componentes sin cargo alguno para el
cliente, incluyendo mano de obra, así como los gastos de transportación razonablemente erogados
derivados del cumplimiento de este certificado.
Para hacer efectiva esta garantía deberá presentar su herramienta y esta póliza
sellada por el establecimiento comercial donde se adquirió el producto, de no contar con ésta, bastará la
factura de compra.
EXCEPCIONES.
Esta garantía no será válida en los siguientes casos:
• Cuando el producto se hubiese utilizado en condiciones distintas a las normales;
• Cuando el producto no hubiese sido operado de acuerdo con el instructivo de uso que se acompaña;
• Cuando el producto hubiese sido alterado o reparado por personas distintas a las enlistadas al final
de este certificado.
Anexo encontrará una relación de sucursales de servicio de fábrica, centros de servicio autorizados y
franquiciados en la República Mexicana, donde podrá hacer efectiva su garantía y adquirir partes,
refaciones y accesorios originales.
Este producto no ha sido diseñado para uso comercial.
T odas las herramientas Black & Decker son de la mejor calidad
IMPORTADO: BLACK & DECKER S.A. DE C.V.
BOSQUES DE CIDROS ACCESO RADIATAS NO. 42
COL. BOSQUES DE LAS LOMAS.
05120 MÉXICO, D.F
TEL. 3-26-71-00
SECCI N
AMARILLA
Si funciona…
y funciona muy bien.
Para servicio y ventas consulte
“HERRAMIENTAS ELECTRICAS”
en la sección amarilla.
Los tres taladros/destornilladores cubiertos por este manual son:
PS3200 9,6 Volts Taladro con dos velocidades reversibles 350 y 700 RPM
PS3300 9,6 Volts Taladro con velocidad variable reversible 0 – 700 RPM
PS3500 12,0 Volts Taladro con velocidad variable reversible 0 – 800 RPM
PS3600 14,4 Volts Taladro con velocidad variable reversible 0 – 800 RPM
PS3700 18.0 Volts Taladro con velocidad variable reversible 1 – 850 RPM
Cargador: PS150, 120V, 60 Hz, 9W
Salida: 10,15 VDC @ 210mA
11,6 VDC @ 165mA
Cargador: PS160, 120V, 60 Hz, 12W
Salida: 14,5 VDC @ 200 mA
Cargador: PS185, 120 V, 60Hz, 18W
Salida: 21,75VDC @ 210 mA
Cargador: PS180, 120V, 60
Hz, 15W
Salida: 17,4 VDC @ 210MA
Baterias: PS110, PS120, PS130,PS140, PS145
RBRC
RBRC
Ni-Cd
 Loading...