

Page 1

QUICK START GUIDE
Cisco ASA Services Module
1 Information About the ASA Services Module in the Switch Network
2 Verifying the Module Installation
3 Assigning VLANs to the ASA Services Module
4 Using the MSFC as a Directly-Connected Router
5 Logging Into the ASA Services Module
6 Configuring ASDM Connectivity
7 Launching ASDM
8 Running the Startup Wizard
9 (Optional) Allowing Access to Public Servers Behind the ASA Services Module
10 (Optional) Running Other Wizards in ASDM
11 Advanced Configuration
Related Documentation
To access all documents related to this product, go to:
http://www.cisco.com/en/US/docs/security/asa/roadmap/asaroadmap.html
Page 2
ASASM
ASASM
MSFC/Router Behind the ASASM MSFC/Router In Front of the ASASM
MSFC/Router
Router
VLAN 200
VLAN 201
VLAN 302
VLAN 303VLAN 301
DMZ
Inside HR
MSFC/Router
VLAN 200
VLAN 100
VLAN 201
VLAN 202
VLAN 203
DMZ
Inside HR
Internet
Internet
Updated: May 15, 2013, 78-19998-02
1 Information About the ASA Services Module in the
Switch Network
For switch and software compatibility with the ASA Services Module (ASASM), see the following:
http://www.cisco.com/en/US/docs/security/asa/compatibility/asamatrx.html. The switch runs Cisco
IOS software on both the switch supervisor engine and the integrated Multilayer Switch Feature Card
(MSFC). The ASASM runs its own operating system.
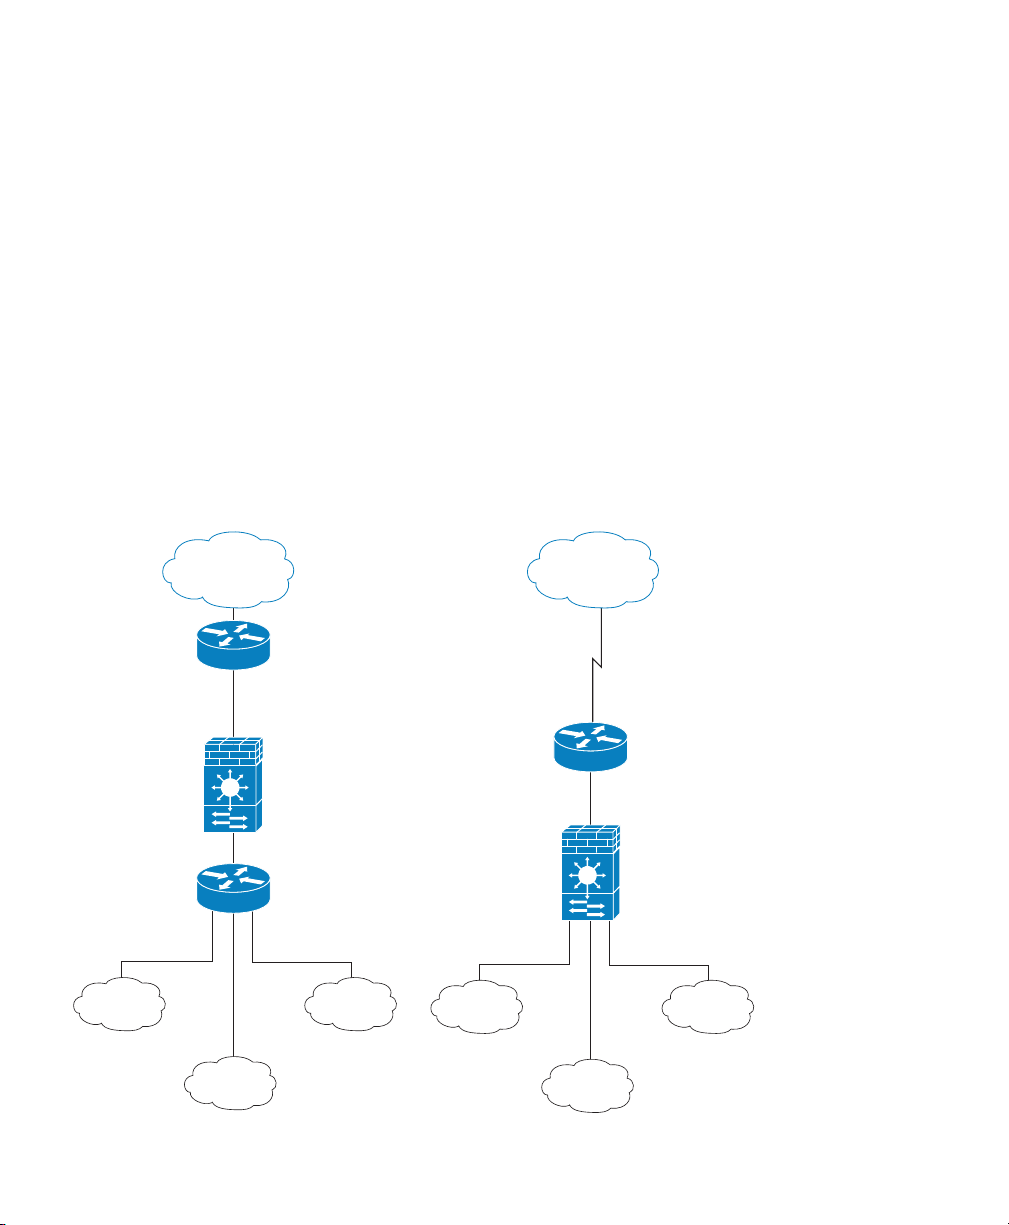
Although you need the MSFC as part of your system, you do not have to use it. If you choose to do
so, you can assign one or more VLAN interfaces to the MSFC (known as switched virtual interfaces
(SVIs)). You can alternatively use an external router instead of the MSFC.
In single context mode, you can place the MSFC or router in front of the ASASM or behind the
ASASM; location depends on the VLANs that you assign to the ASASM interfaces.
2
Page 3
Context A Context B Context C
VLAN 203VLAN 202VLAN 201
VLAN 100
Admin
Context
VLAN 200
VLAN 300 VLAN 303
VLAN 302VLAN 301
MSFC/Router
Internet
Inside
Customer A
Inside
Customer B
Inside
Customer C
Admin
Network
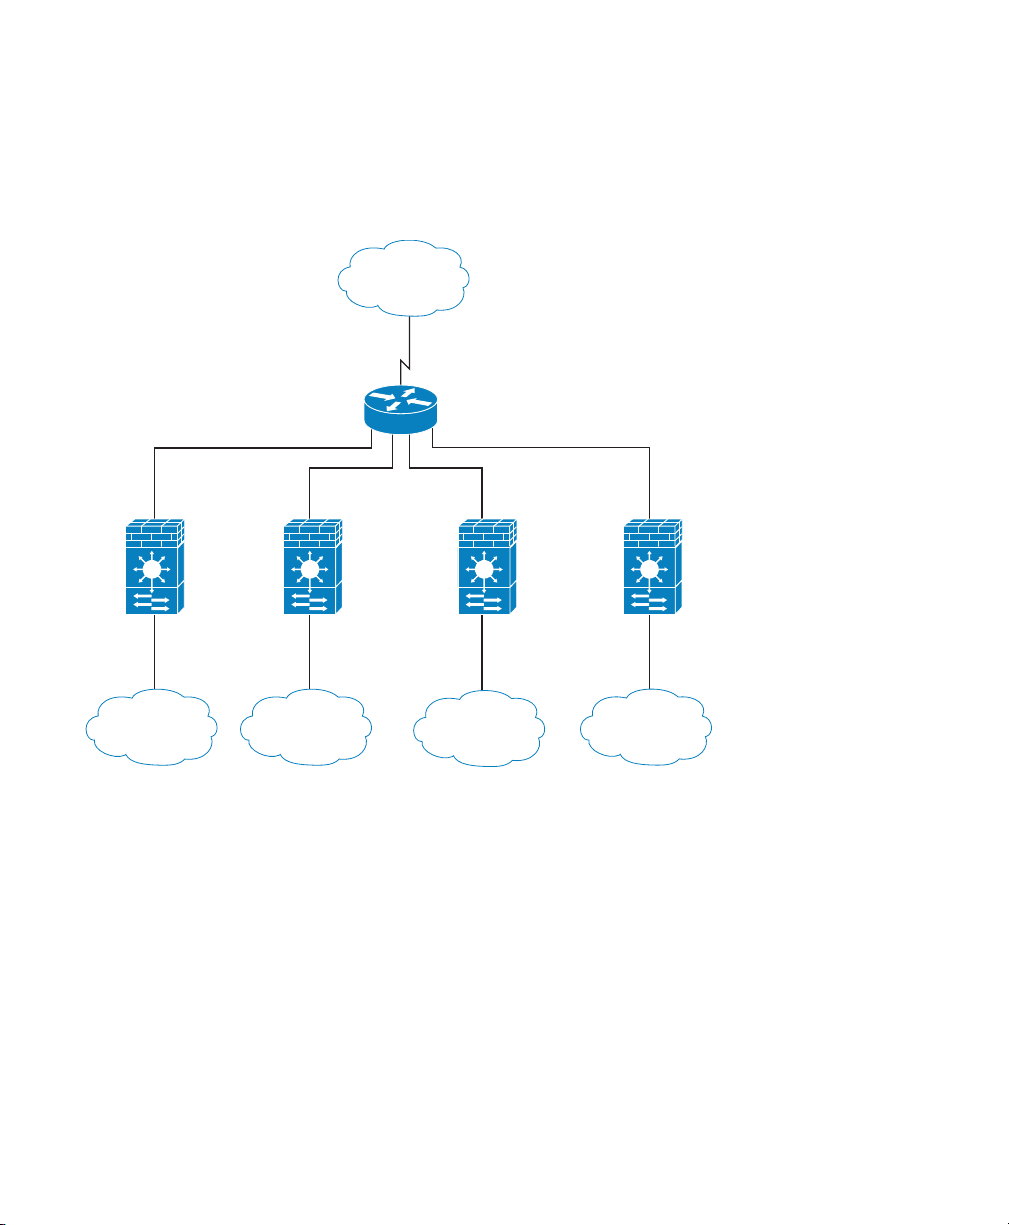
For multiple context mode, if you place the MSFC or router behind the ASASM, you should only
connect it to a single context. If you connect it to multiple contexts, the MSFC/router will route
between the contexts, which might not be your intention. The typical scenario for multiple contexts is
to use a router in front of all the contexts to route between the Internet and the switched networks.
3
Page 4

2 Verifying the Module Installation
Verify that the switch acknowledges the ASASM and has brought it online. (If you need to install your
ASASM, see the module installation guide on Cisco.com.) Enter the following command to ensure that
the Status column shows “Ok” for the ASASM:
show module [switch {1 |2}] [mod-num | all]
For a switch in a VSS, enter the switch argument.
For example:
Router# show module
Mod Ports Card Type Model Serial No.
--- ----- -------------------------------------- ------------------ ---------- 2 3 ASA Service Module WS-SVC-ASA-SM1 SAD143502E8
Mod MAC addresses Hw Fw Sw Status
--- ---------------------------------- ------ ------------ ------------ ------ 2 0022.bdd4.016f to 0022.bdd4.017e 0.201 12.2(2010080 12.2(2010121 Ok
...
3 Assigning VLANs to the ASA Services Module
The ASASM does not include any external physical interfaces. Instead, it uses VLAN interfaces passed
down from the supervisor. Perform the following steps at the switch CLI to pass down VLANs from
the supervisor:
Command Purpose
Step 1
Step 2
4
firewall vlan-group firewall_group_num vlan_range
Example:
Router(config)# firewall vlan-group 50 55-57
Router(config)# firewall vlan-group 51 58-63
Router(config)# firewall vlan-group 52 64,66-74
firewall [switch {1 |2}] module module_number
vlan-group firewall_group_num
Example:
Router(config)# firewall module 5 vlan-group 50,52
Router(config)# firewall module 8 vlan-group 51,52
Assigns VLANs to a firewall
group.
Assigns the firewall groups to the
ASASM
enter the switch argument.
. For a switch in a VSS,
Page 5

4 Using the MSFC as a Directly-Connected Router
If you want to use the MSFC as a directly-connected router (for example, as the default gateway
connected to the ASASM outside interface), then add an ASASM VLAN interface to the MSFC as a
switched virtual interface (SVI). By default, you can add only one SVI; to add multiple SVIs, and
understand the caveats for multiple SVIs, see the configuration guide on Cisco.com.
Perform the following steps at the switch CLI:
Command Purpose
Step 1
Step 2
Step 3
interface vlan vlan_number
Example:
Router(config)# interface vlan 100
ip address address mask
Example:
Router(config)# ip address 192.168.1.2
255.255.255.0
no shutdown
Adds a VLAN interface to the MSFC.
Sets the IP address for this interface on the
MSFC.
Enables the interface.
Example:
Router(config)# no shutdown
5
Page 6

5 Logging Into the ASA Services Module
From the switch CLI, you can connect to a virtual console session on the ASASM:
Command Purpose
Step 1
Step 2
Step 3
service-module session [switch {1 |2}]
slot number
Example:
Router# service-module session slot 4
hostname>
enable
Example:
hostname> enable
Password:
hostname#
configure terminal
Connects to the ASASM. For a switch in a
VSS, enter the switch argument.
You access user EXEC mode.
Accesses privileged EXEC mode, which is the
highest privilege level.
Enter the enable password at the prompt. By
default, the password is blank.
Accesses global configuration mode.
Example:
hostname# configure terminal
hostname(config)#
6
Page 7

Logging Out of the ASA Services Module
If you do not log out of the ASASM, the console connection persists; there is no timeout. To end the
ASASM console session and access the switch CLI, perform the following steps.
To kill another user’s active connection, which may have been unintentionally left open, see the
configuration guide.
Step 1 To return to the switch CLI, type:
Ctrl-Shift-6, x
You return to the switch prompt.
Note: Shift-6 on US and UK keyboards issues the caret (^) character. If you have a different
keyboard and cannot issue the caret (^) character as a standalone character, you can
temporarily change the escape character to a different character. In Cisco IOS, before you
session to the ASASM, use the terminal escape-character ascii_number command. For
example, to temporarily change the sequence to Ctrl-w, x, enter terminal escape-character 23.
6 Configuring ASDM Connectivity
Because the ASASM does not have physical interfaces, it does not come pre-configured for ASDM
access; you must configure ASDM access using the CLI on the ASASM.
Command Purpose
Step 1
(Optional)
firewall transparent
Example:
hostname(config)# firewall transparent
Enables transparent firewall mode. This
command clears your configuration. See the
configuration guide for more information.
7
Page 8

Step 2
Command Purpose
Do one of the following to configure a management interface, depending on your mode:
Routed mode:
interface vlan number
ip address ip_address [mask]
nameif name
security-level level
Configures an interface in routed mode. The
security_level is a number between 1 and
100, where 100 is the most secure.
Example:
hostname(config)# interface vlan 1
hostname(config-if)# ip address
192.168.1.1 255.255.255.0
hostname(config-if)# nameif inside
hostname(config-if)# security-level 100
Transparent mode:
interface bvi bvi_number
ip address ip_address [mask]
Configures a bridge virtual interface and
assigns a management VLAN to the bridge
group. The security_level is a number
between 1 and 100, where 100 is the most
interface vlan number
bridge-group bvi_number
nameif name
security-level level
secure.
Step 3
8
Example:
hostname(config)# interface bvi 1
hostname(config-if)# ip address
192.168.1.1 255.255.255.0
hostname(config)# interface vlan 1
hostname(config-if)# bridge-group 1
hostname(config-if)# nameif inside
hostname(config-if)# security-level 100
dhcpd address ip_address-ip_address
interface_name
dhcpd enable interface_name
Example:
hostname(config)# dhcpd address
192.168.1.2-192.168.1.254 inside
hostname(config)# dhcpd enable inside
Enables DHCP for the management host on
the management interface network. Make
sure you do not include the management
address in the range.
Page 9

Step 4
Step 5
Step 6
Step 7
Command Purpose
http server enable
Enables the HTTP server for ASDM.
Example:
hostname(config)# http server enable
http ip_address mask interface_name
Allows the management host to access
ASDM.
Example:
hostname(config)# http 192.168.1.0
255.255.255.0 inside
write memory
Example:
hostname(config)# write memory
(Optional)
mode multiple
Saves the configuration.
Sets the mode to multiple mode. When
prompted, confirm that you want to convert
the existing configuration to be the admin
context. You are then prompted to reload
Example:
hostname(config)# mode multiple
the ASASM. See the configuration guide for
more information.
9
Page 10

7 Launching ASDM
Using ASDM, you can use wizards to configure basic and advanced features. ASDM is a graphical user
interface that allows you to manage the ASASM from any location by using a web browser.
See the ASDM release notes on Cisco.com for the requirements to run ASDM.
Step 1 On the PC connected to the ASASM management VLAN, launch a web browser.
Step 2 In the Address field, enter the following URL:
https://management_ip_address/admin
The Cisco ASDM web page appears.
Step 3 Click Run Startup Wizard.
Step 4 Accept any certificates according to the dialog boxes that appear. The Cisco ASDM-IDM
Launcher appears.
Step 5 Leave the username and password fields empty, and click OK. The main ASDM window
appears and the Startup Wizard opens.
10
Page 11

8 Running the Startup Wizard
Run the Startup Wizard so that you can customize the security policy to suit your deployment. Using
the startup wizard, you can set the following:
• Hostname
• Domain name
• Administrative passwords
• Interfaces
• IP addresses
• Static routes
• DHCP server
• Network address translation rules
• and more...
Step 1 If the wizard is not already running, in the main ASDM window, choose Wizards > Startup
Wizard.
Step 2 Follow the instructions in the Startup Wizard to configure your ASASM. (For information
about any wizard field, click Help.)
11
Page 12
9 (Optional) Allowing Access to Public Servers Behind the
ASA Services Module
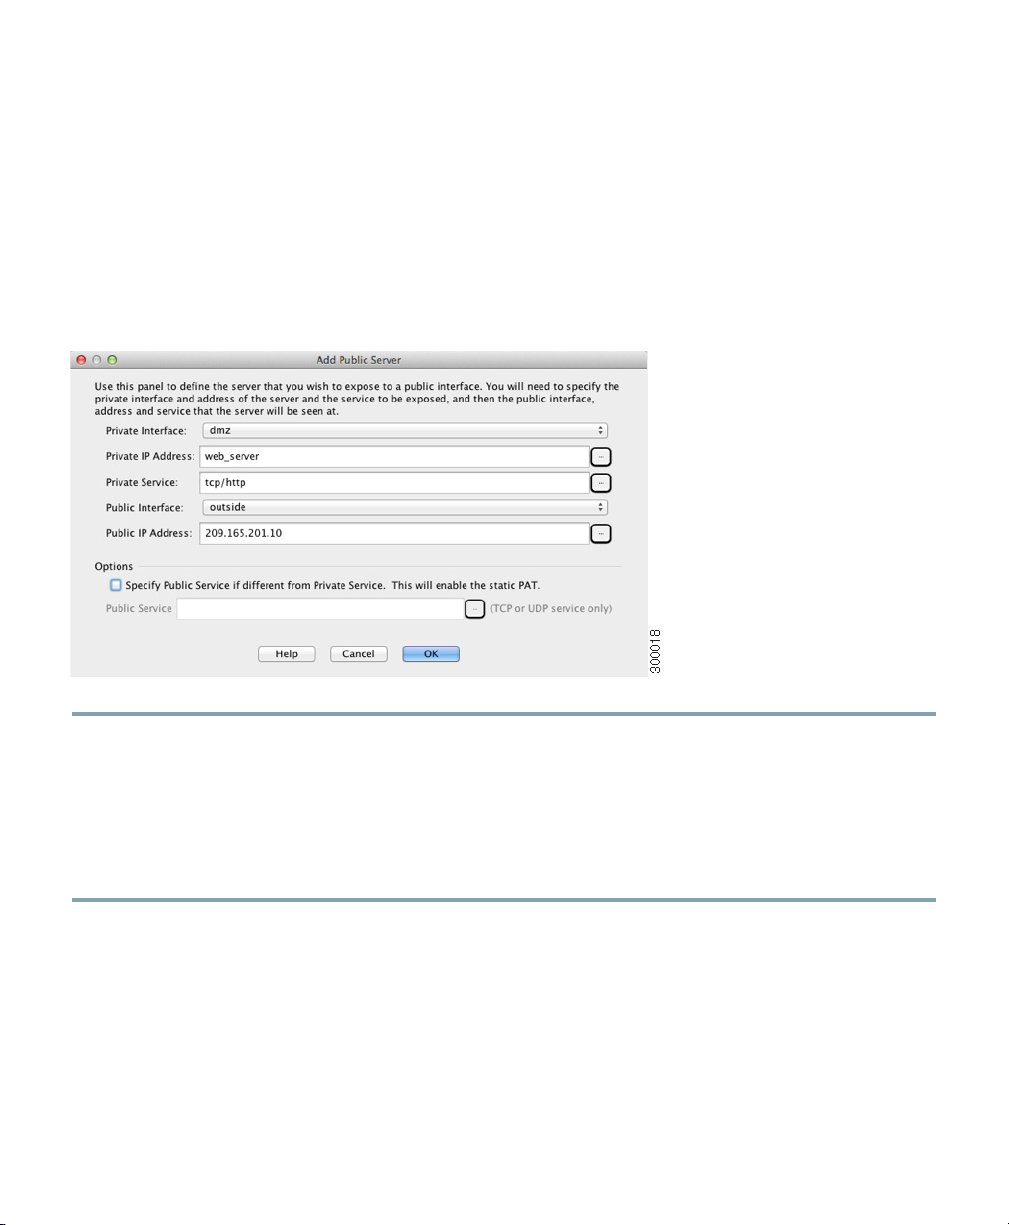
The Public Server pane automatically configures the security policy to make an inside server accessible
from the Internet. As a business owner, you might have internal network services, such as a web and
FTP server, that need to be available to an outside user. You can place these services on a separate
network behind the ASASM, called a demilitarized zone (DMZ). By placing the public servers on the
DMZ, any attacks launched against the public servers do not affect your inside networks.
Step 1 In the main ASDM window, choose Configuration > Firewall > Public Servers. The Public
Server pane appears.
Step 2 Click Add, then enter the public server settings in the Add Public Server dialog box. (For
information about any field, click Help.)
Step 3 Click OK. The server appears in the list.
Step 4 Click Apply to submit the configuration to the ASASM.
12
Page 13

10 (Optional) Running Other Wizards in ASDM
You can optionally run the following additional wizards in ASDM:
• High Availability and Scalability Wizard
Configure active/active or active/standby failover, or VPN cluster load balancing.
• Packet Capture Wizard
Configure and run packet capture. The wizard will run one packet capture on each of the ingress
and egress interfaces. After capturing packets, you can save the packet captures to your PC for
examination and replay in the packet analyzer.
11 Advanced Configuration
To continue configuring your ASASM, see the documents available for your software version at:
http://www.cisco.com/en/US/docs/security/asa/roadmap/asaroadmap.html
13
Page 14

Americas Headquarters
Cisco Systems, Inc.
San Jose, CA
Cisco has more than 200 offices worldwide. Addresses, phone numbers, and fax numbers are listed on the
Cisco and the Cisco logo are trademarks or registered trademarks of Cisco and/or its affiliates in the U.S. and other countries. To view a list of
Cisco trademarks, go to this URL: www.cisco.com/go/trademarks. Third-party trademarks mentioned are the property of their respective owners.
The use of the word partner does not imply a partnership relationship between Cisco and any other company. (1110R)
© 2012-2013 Cisco Systems, Inc. All rights reserved.
Printed in the USA on recycled paper containing 10% postconsumer waste.
78-19998-02
Asia Pacific Headquarters
Cisco Systems (USA) Pte. Ltd.
Singapore
Cisco Website at www.cisco.com/go/offices.
Europe Headquarters
Cisco Systems International BV Amsterdam,
The Netherlands
 Loading...