

Page 1
MULTI-FUNCTION JUMP STARTER
MODEL CA1000
www.chamberlain.com
The Chamberlain Group, Inc.
Elmhurst, Illinois 60126-1196
845 Larch Avenue
Page 2
INTRODUCTION
Thank you for purchasing the Chamberlain Multi-Function Jump Starter. Backed
by Chamberlain’s commitment to quality and innovation, you now have the security
of knowing you won’t be left stranded if your vehicle won’t start because of a dead
battery. In addition, the Chamberlain Multi-Function Jump Starter can be used every
day to charge or power your mobile electronics. Visit www.chamberlain.com to learn
more about Chamberlain and what we do to provide products that empower you and
give you peace of mind.
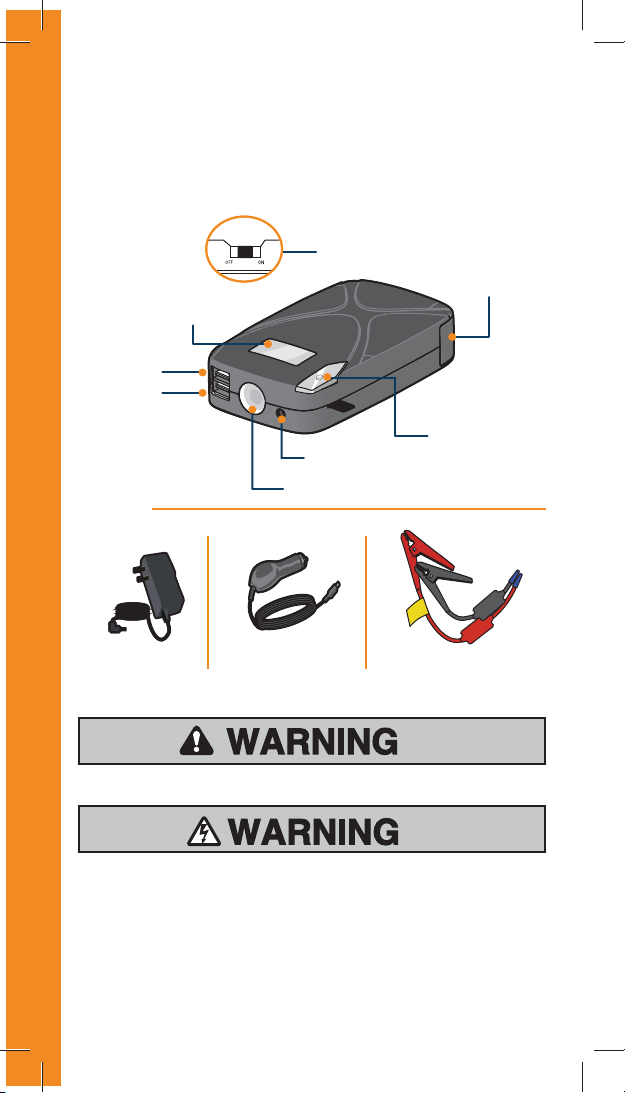
On/Off Switch
for LCD, LED light
and USB Ports
LCD Display
USB Port
(5V/2.1)
USB Port
(5V/1.0)
Charging
Input (12-15V/1A)
LED Light
INCLUDES
12V Output Socket
for Jumper Cables
Function
Button
Wall Charger
12V Car Charger
Jumper Cables
SAFETY INFORMATION
Mechanical
Electrical
When you see these Safety Symbols and Signal Words on the following pages, they
will alert you to the possibility of the risk of injury or property damage. When you
see this Signal Word on the following pages, it will alert you to the possibility of risk
of injury or damage to the Jump Starter. Read them Carefully.
2
Page 3

IMPORTANT OPERATION INSTRUCTIONS
WARNING
WARNING
WARNING WARNING
To reduce the risk of SEVERE INJURY
or PROPERTY DAMAGE:
1. READ AND FOLLOW ALL
INSTALLATION WARNINGS
AND INSTRUCTIONS.
2.
SAVE THESE
INSTRUCTIONS.
Battery Warnings
1. RISK OF EXPLOSIVE GASES:
• Car batteries can generate
explosive gases during
normal battery operation. It
is important that you follow
the instructions each time
you use the starter.
• To reduce risk of battery
explosion, follow ALL
instructions and warnings
on the Jump Starter and
the vehicle manufacturer
instructions when jump
starting a vehicle.
2. DO NOT touch eyes while
working near batteries.
3. NEVER smoke or allow a spark
or fl ame in the vicinity of
battery or engine.
4. DO NOT drop ANY metal tools
onto the battery. It might
spark or short-circuit battery
or other electrical part that
may cause explosion.
5. NEVER wear watches, rings,
bracelets, or necklaces when
working with car batteries.
Batteries can produce a
shortcircuit current high
enough to weld a ring or the
like to metal, causing a severe
burn.
6. Do NOT use or charge Jump
Starter if damaged, cracked, or
swollen.
Usage Warnings
1. DO NOT plug the jumper
cables into the Jump Starter
prior to attaching to the
vehicle battery terminals.
2. DO NOT touch the red and
black jumper clamps together
or connect both to the same
piece of metal to prevent
physical injury or damage
to the vehicle or the Jump
Starter.
3. DO NOT pull on the car
charger cable when removing
it.
4. Disconnect the jump starter
from the battery after starting
the vehicle.
5. DO NOT attempt to jump
start a vehicle more than 3
consecutive times.
6. DO NOT operate the Jump
Starter if ANY cord, plug, or
jumper cable is damaged.
Product Warnings
1. DO NOT store with the jumper
clamps attached to each other.
2. DO NOT disassemble this
product.
3. DO NOT insert screwdrivers or
other items into the product.
4. DO NOT expose to rain or
snow.
5. Remove from your vehicle
and store in your home if the
temperature falls outside of
-5F to 140F (-20C to +60C).
6. Except for USB cables DO
NOT use ANY other cords/
cables NOT provided with this
product.
7. This product is not intended to
be used by children.
3
Page 4

OPERATION AND FEATURES
J
CHARGING THE JUMP STARTER
1. Connect 12V car charger or the wall charger to the charging input for the Jump
Starter.
2. Slide the On/Off switch to the ‘On’ position. The LCD display will light up and
begin to fl ash, indicating normal charging has begun. The LCD display says “IN”
while charging.
3. The Jump Starter will be fully charged in 2 – 3 hours and the LCD display will
show 100%.
4. Slide the On/Off switch to the ‘Off’ position and disconnect the 12V car charger.
NOTE: Charge the Multi-Function Jump Starter every 30 days or whenever the
charge level drops below 85% to be sure your Multi-Function Jump Starter will be
ready when you need it.
OR
4
Page 5

JUMPSTARTING A VEHICLE
To reduce the risk SEVERE INJURY or PROPERTY DAMAGE:
• Attach jumper cables to a battery and vehicle chassis as indicated below. Jump
Starter is intended for a NEGATIVELY GROUNDED vehicle.
• DO NOT touch the red and black jumper clamps together.
• Keep jumper cables away from moving engine parts.
• Stay clear of fan blades, belts, pulleys, and other parts that can cause injury to
persons.
• Check polarity of battery posts. Positive is red, and negative is black.
• ONLY connect red (POSITIVE) clamp from jump starter to POSITIVE post of the
car battery (POS, P, +, RED) and the black (NEGATIVE) clamp from jump starter
to NEGATIVE post of the car battery (NEG, N, -, BLACK). DO NOT connect
jumper clamp to carburetor, fuel lines, or sheet-metal body parts.
• After the vehicle has started, disconnect the jumper cables from the Jump
Starter prior to removing the jumper clamps from the battery posts.
• DO NOT attempt to jump start your vehicle more than three consecutive times.
If the vehicle will not start after three attempts, consult a mechanic.
1. Slide the On/Off switch to the ‘On’ position. Check the charge level displayed on
the LCD display. The minimum charge required to jump start a vehicle is 40%. It
is not necessary to have the switch in the “On” position to jump start a vehicle.
2. Connect the red jumper clamp to the positive (+) terminal on the car battery.
3. Connect the black jumper cable clamp to the negative (-) terminal on the car
battery.
4. Connect the battery clamp assembly plug to the 12V Jump Starter.
5. Start the vehicle. If the vehicle does not start within few seconds, turn the key off
and wait a minute before attempting to start the vehicle again.
NOTE: DO NOT attempt to jump start your vehicle more than three consecutive
times. If the vehicle will not start after three attempts, consult a mechanic.
1. Once the vehicle is running, disconnect the jumper cables from the Jump Starter.
2. Remove the jumper clamps from the vehicle’s positive and negative terminals.
3. Slide the On/Off switch to the ‘Off’ position if it is ON.
4. Be sure to recharge the Jumper Starter prior to using it again.
12 3
5
Page 6

CHARGING A MOBILE DEVICE:
T
T
C
T
M
s
T
S
V
s
c
1. Connect a mobile device cable to the appropriate USB port on the Jump
Starter. Consult your mobile device’s manufacturer for proper charging power
specifi cations.
2. Slide the On/Off switch to the ‘On’ position. Press and release the Function
button to begin charging.
3. Time required to achieve a full charge varies based on the size of the battery in
the mobile device and the USB charging port used.
NOTE: Most devices will work with either USB port but may charge at a slower rate.
.
USING THE EMERGENCY LED LIGHTING:
Slide the On/Off switch ‘On’ position. Press and hold the Function button for 3
seconds until the LED light glows steadily. Once the LED light is turned on, press
and release the Function button to cycle through the following modes.
• LED fl ashes an SOS distress signal.
• LED fl ashes in strobe mode.
• LED light turns off.
• LED glows steadily.
6
Page 7

TROUBLESHOOTING
The Jump Starter will not turn on.
Charge the Jump Starter.
The Jump Starter will not charge.
Make sure to use the 12V car charger or wall charger provided. The LCD display
says “IN” when it is charging the Jump Starter.
The Jump Starter will turn on, but will not jump start my vehicle.
Slide the On/Off switch to the ‘On’ position. Press and release the Function button.
Verify the charge level of the Jump Starter is at least 40%. Do not attempt to jump
start your vehicle more than three consecutive times. If the vehicle still will not start,
consult a mechanic.
SPECIFICATIONS
Output voltage: 12V
Start Current: 200A
Peak Current: 400A
Cycle life: 1000 times
USB output: 5V 2.1 A/1.0 A
NOTICE: To comply with FCC rules, adjustment or modifications of this digital device
are prohibited. THERE ARE NO OTHER USER SERVICEABLE PARTS. Any changes or
modifications not expressly approved by the party responsible for compliance could
void the user’s authority to operate the equipment.
This device complies with Part 15 of the FCC rules. Operation is subject to the
following two conditions: (1) this device may not cause harmful interference, and
(2) this device must accept any interference received, including interference that may
cause undesired operation.
Charge input: 12-15V/1A
Operating temperature range: -5°F to
140°F (-20°C to +60°C)
Dimensions: 5.3” X 3.05” X 1.28”
(134.7mm X 77.5MM X 32.6mm)
WARRANTY
ONE YEAR LIMITED WARRANTY
PLEASE DO NOT RETURN TO THE STORE
If you have questions or need help call 1-800-528-9131.
WWW.CHAMBERLAIN.COM
7
Page 8

© The Chamberlain Group, Inc.
114A4794B All Rights Reserved
 Loading...