


Operator Manual
Water Boilers
ME10EN, ME15EN
Model ME15EN
Model ME10EN
Table of Contents
Safety Information |
..................2 |
Adjustments ............................ |
6 |
Rough-In Drawing................... |
3 |
Maintenance ........................... |
7 |
Installation............................... |
4 |
Parts Diagram.......................... |
9 |
Priming .................................... |
5 |
Wiring Diagram..................... |
10 |
Cleaning................................... |
5 |
|
|
Thank you for purchasing this quality boiler. For your safety and the safety of others, read all warnings and the operator manual before installing or using the product. Properly instruct all operators. Keep training records. For future reference, record serial number here: 
Grindmaster-Cecilware
4003 Collins Lane, Louisville, KY 40245 USA Phone: 502.425.4776 Toll Free: 800.695.4500 Fax: 502.425.4664
Web: gmcw.com Email: info@gmcw.com
Grindmaster-Cecilware provides the industry’s BEST warranty. Visit gmcw.com for warranty terms and conditions.
©2016 Grindmaster-Cecilware |
0516 Form #CW-328-01 |
Printed in USA |
Part # 390-00073 |
Safety Information
Important Safety Information
This is the safety alert symbol. It is used to alert you to potential personal injury hazards. Obey all safety messages that follow this symbol to avoid possible injury or death.
For your safety and the safety of others, read all warnings and the operator manual before installing or using the product.
DANGER: This term warns the user of imminent hazard that will result in serious injury or death.
WARNING: This term refers to a potential hazard or unsafe practice, which could result in serious injury or death. CAUTION: This term refers to a potential hazard or unsafe practice, which could result in minor or moderate injury.
NOTICE: This term refers to information that needs special attention or must be fully understood.
 WARNING
To reduce risk of electrical shock, do not remove or open cover. No user-serviceable parts inside. Repair should be done by authorized service personnel only.
The appliance is not intended for outdoor use.
Do not clean with a water jet or use in an area where a water jet may be used.
Cleaning and maintenance shall be made only by properly trained persons with supervision.
This appliance is not intended for use by persons with reduced physical, sensory, or mental capabilities, or lack of experience and knowledge, unless they have been given supervision or instruction concerning use of the appliance by a person responsible for their safety.
Children should be supervised to ensure that they do not play with the appliance.
Do not alter or deform the power cord or plug in any way! Altering or deforming the plug may cause electrical shock, damage unit and will void warranty.
To reduce risk of explosion or fire, do not use near combustibles.
 CAUTION
For safe and proper operation, the appliance must be placed in a stable, vertical position.
To reduce risk of serious burns or scalding do not place hand or other body parts under dispenser or container while product is brewing.
Always unplug unit from power supply before servicing.
Surfaces are hot and can cause burns.
NOTICE
Use only on a circuit that is properly protected and capable of the rated load.
Electronically ground the chassis.
Follow national and local electrical codes.
Do not use extension cord.
This equipment must be installed in compliance with applicable Federal, State and/or Local plumbing codes having jurisdiction. This product requires an approved backflow prevention water device, such as a double check valve, that must be installed between the machine and the water supply.
GB2 Series |
Cecilware |
Water Boilers2 |
|
®® |
|
|
|
|

Rough-In Drawing
GENERAL SPECIFICATIONS
MODEL NO |
WATER CAP. |
DIMENSION "A" |
SHIPPING |
|
(GAL) |
(INCHES) |
WT. (LB) |
||
|
||||
|
|
|
|
|
ME10E-N CME10E-N |
10.0 |
26.0 |
45 |
|
|
|
|
|
|
ME15E-N CME15E-N |
15.0 |
30.5 |
50 |
|
|
|
|
|
VENT OPENING
POWER
SUPPLY BOX
POWER ON |
LIGHT |
ME10E-N |
HEATER ON |
|
LIGHT |
|
POWER |
|
SWITCH |
|
TEMPERATURE |
"A" |
CONTROL |
|
OVERFLOW |
|
|
SIDE ACCESS DOOR |
|
|
(SLIDES UP) |
|
4.0 |
|
|
|
THERMOMETER |
|
|
WATER INLET |
14.0 |
4.0 |
3.4 |
16.0 |
ELECTRICAL SPECIFICATIONS
MODEL NO |
VOLTS |
WATTS |
AMPS |
PHASE |
FIELD WIRING |
|
SIZE |
||||||
|
|
|
|
|
||
|
|
|
|
|
|
|
|
120 |
1,800 |
15 |
1 |
14 AWG |
|
|
|
|
|
|
|
|
|
240 |
7,000 |
29.2 |
1 |
10 AWG |
|
ME10E-N |
|
|
|
|
|
|
CME10E-N |
208 |
5,300 |
25.5 |
1 |
10 AWG |
|
ME15E-N |
|
|
|
|
|
|
CME15E-N |
|
|
|
|
|
|
240 |
10,500 |
25 |
3 |
10 AWG |
||
|
||||||
|
|
|
|
|
|
|
|
208 |
7,900 |
22 |
3 |
10 AWG |
|
|
|
|
|
|
|
NOTE:
1.FIELD WIRING MUST BE SUITABLE FOR 75 DEGREES CELSIUS.
2.USE COPPER WIRE ONLY FOR POWER SUPPLY CONNECTION.
3.120 VOLT UNITS SUPPLIED WITH A GROUNDED 120V-15A LINE CORD AND PLUG.
Water Boilers |
Cecilware® |
3 |

Installation
Unpacking Instructions
Carefully unpack the machine and inspect immediately for shipping damage. The packaging may contain unattached parts. Your machine was shipped in a carton designed to give it maximum protection in normal handling. It was thoroughly inspected before leaving the factory. In case of damage, contact the shipper, not Grindmaster-Cecilware.
NOTICE: The person installing this appliance is responsible for ensuring that electric and water connections meet the requirements of the national electric code, national plumbing code, and any local ordinances.
See Rough-in Drawing for approximate dimensions and location of water input.
NOTE: When positioning the unit, leave a minimum 6 inch (15 cm) clearance on the right side of the water boiler for ease of service.
Water boilers are shipped with the thermostats in the OFF position. Do not turn the thermostat ON before filling the water boiler with water.
 CAUTION
These urns are heavy pieces of equipment. It is recommended that moving or lifting the unit be done by two people to avoid injury.
Mechanical Installation
NOTICE: Do not turn thermostat on until all installation instructions have been followed.
1.Inspect unit to see if any damage occurred in shipment.
2.Remove the boiler from the packing material. The four legs, faucets, and vent cap drain are packed separately with water boiler.
3.Install legs by tilting boiler on its side and screwing legs into leg supports until hand tight.
4.Carefully right unit and install in its permanent location, being sure to leave at least 6" (15 cm) on right side of boiler for access to controls. Position boiler so that the faucet drips into a drip trough or drain receptacle of some type.
5.Level the boiler by adjusting the bottom pad of the legs.
6.Place the vent cap into the recess in the top of the unit.
7.Mount the faucet assembly onto the shank.
Water Hook-up
NOTICE: This equipment must be installed in compliance with applicable Federal, State and/or Local plumbing codes having jurisdiction. This product requires an approved backflow prevention water device, such as a double check valve, to be installed between the machine and the water supply. Incoming pressure should be greater than 30 psi and not more than 70 psi.
NOTICE: Connecting the water boiler to a warm water supply will speed up heating and recovery times.
1.The boiler is equipped with a ¼" Flare water inlet fitting, which is located on the back of the unit.
2.Provide shut-off valve and union in supply line near boiler.
3.Minimum inlet pressure at boiler should be 30 PSI.
4.Maximum inlet pressure recommended at 70 PSI.
5.Copper flex tubing should be used for valve connections.
6.Turn on the water supply line and check for leaks.
NOTE: A filtering system is recommended to remove odors and inhibit lime and scale build up in the unit. NOTE: In areas with extremely hard water, a water softener must be installed in order to prevent mineral deposits that will cause malfunctioning of the equipment.
Electrical Hook-up
 WARNING: ELECTRIC SHOCK HAZARD!
Installation of this appliance should be performed by qualified service personnel only. Improper installation could result in electrocution.
NOTICE: This equipment must be installed in compliance with applicable Federal, State and/or Local electrical codes having jurisdiction. Do not use extension cords. Make sure that the outlet is properly grounded.
1.Check rating marking on boiler nameplate to be sure electric lines match voltage, phase, and amperage requirements of boiler. Select the proper cord and cord grip for electrical rating of the boiler.
2.120V water boilers are provided with 120V/15A grounding plug. Units must have a separate 120V/15A outlet.
3.208/240V water boilers are provided with a terminal block inside the control box. Field wiring must be performed by a qualified serviceman. 1 and 3 phase hook-up for units with terminal blocks. To access terminal block, remove the fastener on the cover and slide off cover. Install a suitable conduit and connect copper wires to terminal L1 and L2 (and L3 for 3 phase unit only) and a #14 AWG ground wire to the ground lug.
4 |
Cecilware® |
Water Boilers |
Priming
NOTE: THERMOSTAT MUST BE IN THE "OFF" POSITION.
1.Open water supply line valve to boiler.
2.Turn on or plug in the power supply to the boiler. The unit fills at the rate of 1 gallon (3.8 L) per minute. Do not power up the boiler when the water line is off.
3.When the water level becomes visible in the sight gage, turn the thermostat clockwise to maximum position. The unit will now automatically fill to capacity and heat the water.
4.In high altitude locations (over 5000 ft. or 1500 m above sea level), thermostat may have to be lowered to prevent boiling. See the Adjustments section if changes are needed.
5.Heat and discard at least one batch of water.
 CAUTION: BURN HAZARD
Water from boiler is very hot. Use caution when pouring or transporting hot water. Accidental spills may result in severe burns.
Cleaning
 CAUTION: BURN HAZARD
Boiler surfaces and water inside boiler are very hot. Use caution when cleaning unit to prevent burns.
NOTICE: All sanitizing agents in the food zone must comply with 21 CFR 178.1010. Sanitize all food dispensing units periodically. All parts to be sanitized must be cleaned first. Cleaning and sanitizing frequency must follow state and local health department regulations.
NOTICE: Do not use cleansers, bleach liquids, powders, or any other substance containing chlorine. These products promote corrosion and will pit the stainless steel. USE OF THESE PRODUCTS WILL VOID THE WARRANTY.
Daily
Wipe the outside of the unit with a damp cloth, using soap solution or a non-abrasive compound when required.
Sanitizing
 CAUTION: BURN HAZARD
Never remove faucet when the liner has water in it. Switch OFF the power to the unit at the circuit breaker. Turn off the water line running to the boiler.
1.With power to the unit disconnected, fill unit to capacity.
2.Prepare a sanitizing solution in accordance with
local health department regulations. You may also refer to the US Food and Drug Administration regulation 21 CFR 178.1010 “Sanitizing Solutions” and US Environmental Protection Agency 40 CFR 18.940 “Tolerance exemptions for active and inert ingredients for use in antimicrobial formulations (Food-contact surface sanitizing solutions)”.
3.Follow the instructions provided with the sanitizing agent.
4.Drain all water from the unit slowly.
5.Let all sanitized parts drain and air dry. DO NOT WIPE THEM DRY.
6.If the unit is not to be used again immediately after sanitizing - do not rinse with water. If the unit is to be used immediately after sanitizing - rinse with water before refilling the unit for further use.
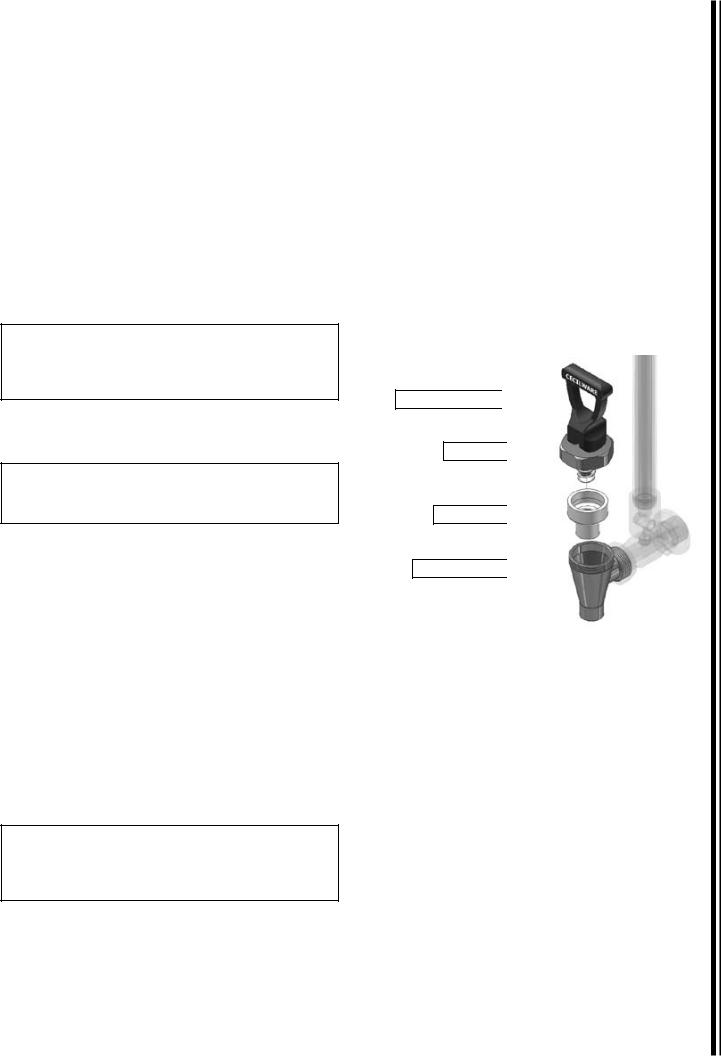
Faucet Handle 

Bonnet 

Seat Cup 

Faucet Body 

Water Boilers |
Cecilware® |
5 |
 Loading...