


®
Since 1911
ESP Espresso Machines
Instruction Manual
Models: ESP1, ESP2 and ESP3
Cecilware Corporation 43-05 20th. Avenue, LIC NY 11105 Tel: 800.935.2211 / 718.932.1414 • Fax: 718.932.7860
®
Since 1911
NR27A (05/08) |
www.cecilware.com |

Operation Manual |
|
|
Table of Contents |
|
|
1. |
General . . . . . . . . . . . . . . . . . . . . . . . . . . . . . . . . . . . . . . . . . |
pg. 3 |
2. |
Precautions . . . . . . . . . . . . . . . . . . . . . . . . . . . . . . . . . . . . . |
pg. 4 |
3. |
Machine Overview . . . . . . . . . . . . . . . . . . . . . . . . . . . . . . . . |
pg. 5 |
4. |
Operations . . . . . . . . . . . . . . . . . . . . . . . . . . . . . . . . . . . . . . |
pg 6 |
5. |
Cleaning and Maintenance . . . . . . . . . . . . . . . . . . . . . . . . . . |
pg. 9 |
6. |
Troubleshooting Common Problems . . . . . . . . . . . . . . . . . . |
pg. 11 |
7. |
Replacement Parts . . . . . . . . . . . . . . . . . . . . . . . . . . . . . . . . |
pg. 12 |
Standard Features
•Fully Automatic – Dispense single or double espresso, 1 or 2 cups at a time, or choose manual continuous flow.
•Dual Pressure Gauge – Readouts for the dispensing water pressure & boiler steam pressure.
•User Friendly Microprocessor Technology - features touch pad controls & LED display.
•Heavy Duty Design – Built-in 260W motor & 200-300 qt/hr pump.
•Sight Glass – For instant & easy monitoring of the water tank level.
•Auto Cleaning Function – Flushes the line to the brew head.
•Stainless Steel Dual Boiler.
•Hot Water Dispensing Valve.
•In low water pressure locations, an internal pump will draw water into the boiler.
Model |
# of Heads |
Boiler Size |
Cups / Hr.* |
Dimensions |
Electrical |
Ship |
|
W x D x H |
Weight |
||||||
|
|
|
|
|
|||
|
|
|
|
|
|
|
|
ESP1-110V |
1 Group |
6 qts. |
240 |
205/16" x 219/16" x 211/2" |
120V, 1.5KW, 18A |
106 lbs. |
|
|
|
|
|
|
|
|
|
ESP1-220V |
1 Group |
6 qts. |
240 |
205/16" x 219/16" x 211/2" |
240V, 2.5KW, 10A |
106 lbs. |
|
|
|
|
|
|
|
|
|
ESP2-220V |
2 Group |
13 qts. |
480 |
283/8" x 219/16" x 211/2" |
240V, 4.7KW, 20A |
147 lbs. |
|
|
|
|
|
|
|
|
|
ESP3-220V |
3 Group |
19 qts. |
720 |
377/8" x 219/16" x 211/2" |
240V, 6.5KW, 27A |
185 lbs. |
|
|
|
|
|
|
|
|
Plumbing: ½" water line required
Accessories: Two & one cup filter holder assemblies and hoses are included with all espresso machines. Note: in-line water filter must be installed for warranty to be in effect 
Specifications subject to change without notice.
2
1 General
1-1 This operations manual includes instructions for using and maintaining your espresso machine, please keep this manual readily available.
1-2 After unpacking, please check to ensure your machine has not been damaged during shipping and includes all parts/components. Please notify your service representative regarding any questions or concerns before installing. Please note that machine packaging material can be dangerous and should be kept out of reach of children.
1-3 Please confirm that your electricity supply conforms to the espresso machine power requirements. A qualified technician should install the machine in accordance with manufacturer instructions. The manufacturer assumes no responsibility for injury or damage resulting from improper installation.
1-4 Please use an independent and suitable power source for your machine.
1-5 Please use an independent, fuseless breaker appropriate to machine safety requirements. Do not plug your machine into an extension cord.
1-6 Be sure to use a grounded power source to prevent electric shock and ensure operating safety.
1-7 Use the automatic espresso machine for its intended purpose only. Any other usage is inappropriate and may be dangerous. The manufacturer assumes no responsibility for injury, loss or damage resulting from improper machine use.
1-8 Do Not:
a.touch machine with wet hands or feet.
b.touch machine with bare feet.
c.pull on the cord to disconnect machine from power outlet.
d.expose the espresso machine to rain or direct sunlight.
e.permit children or persons not normally qualified to operate basic machinery to use this machine.
1-9 Turn off the power source first before maintaining or servicing your espresso machine.
1-10 Take care when touching machine parts; subject to high temperature heating to avoid injury.
1-11 Clean machine according to instructions provided in this manual to ensure proper operations.
1-12 Turn power off if machine functions abnormally and notify qualified service personnel for repairs. Do not permit non-qualified service personnel to attempt repairs. Continuing to use a damaged or otherwise irregularly functioning machine will nullify the manufacturer warranty.
3

1-13 Use softened water to make coffee or tea. Well / municipal water should be softened to prevent scaling in the boiler, which will shorten the serviceable life of your machine. If a hard water source is used, the filter should be replaced every two weeks -- although long-life filters may remain serviceable up to eight weeks. Actual filter replacement scheduling will vary based on volume and quality of water used.
1-14 The machine refills water automatically (see Section 4-2 for initializing). An error code will appear if water flow into the machine exceeds two minutes (see Troubleshooting Section in this manual), and power will be cut off automatically to protect the system. To resume normal functions, restart the system after three or more seconds.
1-15 The heating element will not operate when water in the machine is less than the minimum required level. When starting the machine without any water in the tank, heating will be delayed for about 60 seconds.
1-16 Please ensure the water inside the piping will not be frozen while using the machine. The water temperature must maintain over the freezing point even during the power off period. The warranty does not cover any damages on piping and boiler cost by frozen water.
1-17 When turning off the machine for long-term, please be sure to evacuate the water inside the piping completely. For this may freeze the water and lead to damaging the machine. To ensure the safety of your machine, please notify your service representative regarding any needs on operations in frigid zone or prepare to shut down the machine for long-term for complete water evacuation.
2.Operating Precautions
!Do not use the machine and turn off the power when water intake has ceased.
!When operating the machine for the first time or replacing the filter, remove the water inlet tube and allow it to drain for about one minute in order to discharge impurities from the water.
!Please check and confirm normal water supply before turning on power.
!Please check and confirm water level registers within the green zone. Operating the machine outside the green zone may cause the electric heating element to overheat and burn out.
!After installing the machine, please check to make sure that, during water intake, the steam pressure gauge indicator is within the green zone (1~1.4bar) and the water pressure gauge indicator is also within the green zone (8~10bar). Please adjust the system to the water supply pressure conditions in your area.
!The water and steam taps are used to make coffee or tea. The nozzle at the hot water outlet and the steam outlet are very hot -- please do not touch.
4
!To avoid overheating, electric wires should be kept untangled and free of obstructions. Do not block air intake or outlet vents on the machine. Never cover or otherwise prevent the free flow of air across the cup warmer.
!Please clean machine components with a soft cloth only. Do not use plastic or wire brushes.
!Turn the power off and release all boiler pressure if the machine is to remain idle for an extended period of time.
!Place an appropriate quantity of ground coffee in the filter cup and tamper carefully. Clean all residual coffee from the rim and sides of the filter to ensure a good seal and full pressure for steaming and to maximize service life.
!The filter basket must be connected firmly to the filter support during steaming to avoid disengagement of the handle or overflow.
!Remove the cup from the steam tube after foaming milk. Failure to do so may draw liquid from the cup into the steam tube, risking machine component contamination.
!After machine power has been switched off, always let the machine set for at least 3 seconds before restarting.
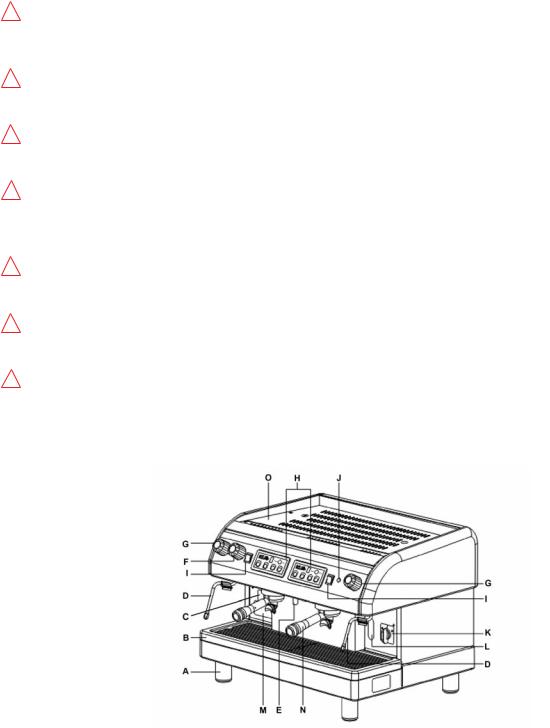
3. |
Machine Overview |
|
|
A. Foot |
I. Manual water outlet controller |
|
B. Water tray |
J. Power indicator |
|
C. Pressure gauge (water/steam pressure) |
K. Power switch |
|
D. Steam tube |
L. Water level viewing window |
|
E. Hot water outlet nozzle |
M. Manufacturer plate |
|
F. Hot water control knob |
N. Filter basket handle |
|
G. Steam control knob |
O. Cup warming tray holder |
|
H. Control Panel |
|
5
4.Operations
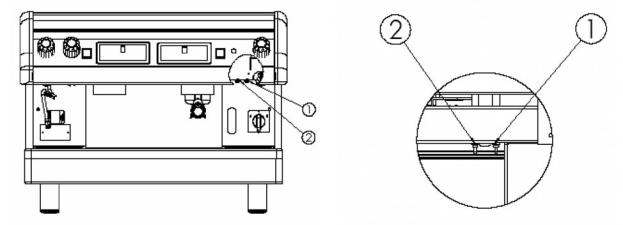
4-1 Activating / Deactivating the Water Inlet Motor
a.If filtered water source pressure exceeds 2 bar and the amount of hot water needed is small, turn the water inlet motor (2) to the OFF (up) position to permit water inflow without internal pump assistance.
b.In areas of low source water pressure, turn the water inlet motor (2) to the ON (down) position to activate the internal pump and draw water into the boiler mechanically.
Caution: When source water pressure is low & turn the water inlet motor (2) to the OFF (up) position may risks drawing hot water away from the boiler and damaging the pump and water intake solenoid.
4-2 Starting the Automatic Machine
a.Check and confirm that water source is in normal working order.
b.Turn the power switch to position 1 to initiate automatic system check. If boiler water level is not in the green zone, wait until the automatic water replenishment process is complete before proceeding to the next step.
c.Heating will stop when boiler pressure reaches approximately 1.2 bars (factory default setting). Do not operate machine until steam pressure gauge reading is in the green zone.
4-3 Using the Various Machine Functions
a.Steam Output
Turn steam knob counterclockwise to draw steam through the steam tube. Steam output will increase the further the steam knob is turned. Turn the knob clockwise to reduce/stop steam output. Pull out the steam knob when needing a good deal of steam for a short period of time.
b. Hot Water Output
Turn the hot water knob counterclockwise to obtain hot water through the hot water tube. Hot water output will increase the further the hot water knob is turned. Turn the knob clockwise to reduce/stop steam output. Pull out the hot water knob for hot water supply for a short period of time.
6
 Loading...