

Page 1

CATERPILLAR® T20
User Manual
Page 2

NOTES, CAUTIONS AND WARNINGS:
NOTE: A NOTE indicates important information that will enable you to make the most out of your T20 Tablet.
CAUTION: A CAUTION indicates potential damage to hardware or loss of data if you do not follow the instructions.
WARNING: A WARNING indicates potential damage to property, personal injury, or death.
LEGAL NOTICE
© 2017 Caterpillar. All Rights Reserved. CAT, CATERPILLAR, BUILT FOR IT, their respective logos,
“Caterpillar Yellow,” the “Power Edge” trade dress as well as corporate and product identity used
herein, are trademarks of Caterpillar and may not be used without permission.
Bullitt Mobile Ltd is a licensee of Caterpillar Inc.
Bullitt Mobile Ltd.’s and third-party trademarks are the property of their respective owners.
No part of this document may be reproduced or transmitted in any form or by any means without prior written
consent of Caterpillar Inc.
The product described in this manual may include copyrighted software and possible licensors. Customers shall
not in any manner reproduce, distribute, modify, decompile, disassemble, decrypt, extract, reverse engineer, lease,
assign, or sublicense the said software or hardware, unless such restrictions are prohibited by applicable laws or
such actions are approved by respective copyright holders under licenses.
The Bluetooth® word mark and logos are registered trademarks owned by the Bluetooth SIG, Inc. and any use of
such marks by Bullitt Group is under license. All other third-party trademarks and trade names are those of their
respective owners.
Wi-Fi® is a registered trademark of Wi-Fi Alliance®.
NOTICE
Some features of the product and its accessories described herein rely on the software installed, capacities and
settings of local network, and may not be activated or may be limited by local network operators or network service
providers. Therefore, the descriptions in this manual may not exactly match the purchased product or its accessories.
The manufacturer reserves the right to change or modify any information or speci cations contained in this manual
without prior notice or obligation.
The manufacturer is not responsible for the legitimacy and quality of any products that you upload or download
through this device including text, pictures, music, movies, and non-built-in software with copyright protection. Any
consequences arising from the installation or usage of the preceding products on this device is accountable to you.
NO WARRANTY
The contents of this manual are provided “as is”. Except as required by applicable laws, no warranties of any kind,
either express or implied, including but not limited to the implied warranties of merchantability and tness for a
particular purpose, are made in relation to the accuracy, reliability or contents of this manual.
To the maximum extent permitted by applicable law, in no case shall the manufacturer be liable for any special,
incidental, indirect, or consequential damages; or lost pro ts, business, revenue, data, goodwill or anticipated
savings.
IMPORT AND EXPORT REGULATIONS
Customers shall comply with all applicable export or import laws and regulations. Customers must obtain all
necessary governmental permits and licenses to export, re-export or import the product mentioned in this manual
including the software and technical data.
2 3
Page 3

CONTENTS
1.0 FEATURES
2.0 ACCESSORIES
3.0 SETTING UP YOUR T20 TABLET
3.1 CHARGE YOUR TABLET
3.2 TURN ON YOUR TABLET
3.3 SETTING UP A MICROSOFT ACCOUNT
3.4 TURN OFF YOUR TABLET
4.0 INSERTING SIM AND microSD CARDS
4.1 INSERTING A SIM CARD
4.2 INSERTING A microSD CARD
6
7.4 SWIPE LEFT
7.5 SWIPE RIGHT
7
7.6 SCREEN ROTATION
7.7 LOCKING THE SCREEN ROTATION
15
15
15
15
8
8
8.0 SYNCHRONISING YOUR TABLET
15
9
9
9.0 TECHNICAL SPECIFICATION
16
10
17
17
17
17
10
10
10
10.0 RF EXPOSURE INFORMATION (SAR)
10.1 EU COMPLIANCE STATEMENT
10.2 CAUTION
10.3 WASTE ELECTRICAL AND ELECTRONIC EQUIPMENT (WEEE)
4.3 REMOVING A microSIM CARD
4.4 REMOVING A microSD CARD
5.0 WIRELESS NETWORKS
5.1 CONNECTING TO WIFI
5.2 TURN OFF WIFI
6.0 LEARN TO USE YOUR SCREEN MULTI-TOUCH DISPLAY
7.0 MICROSOFT WINDOWS 10 FAMILIARISATION
7.1 CONNECTING TO WIFI
7.2 ACCESSING THE START SCREEN
11
11
11.0 RF SPECIFICATION
19
12
12
12
13
13
14
14
7.3 CUSTOMISING THE START SCREEN TILES
4 5
14
Page 4
USING YOUR T20 TABLET
13
5
2
English ................................................................................3
Cesky .................................................................................. 3
Deutsch ..............................................................................3
Español ...............................................................................3
Français .............................................................................. 3
Hrvatski ..............................................................................3
Italiano ...............................................................................3
Magyar ............................................................................... 3
Nederlands .........................................................................3
Polski .................................................................................. 3
Slovencina ..........................................................................3
2.0
ACCESSORIES
1.0
FEATURES
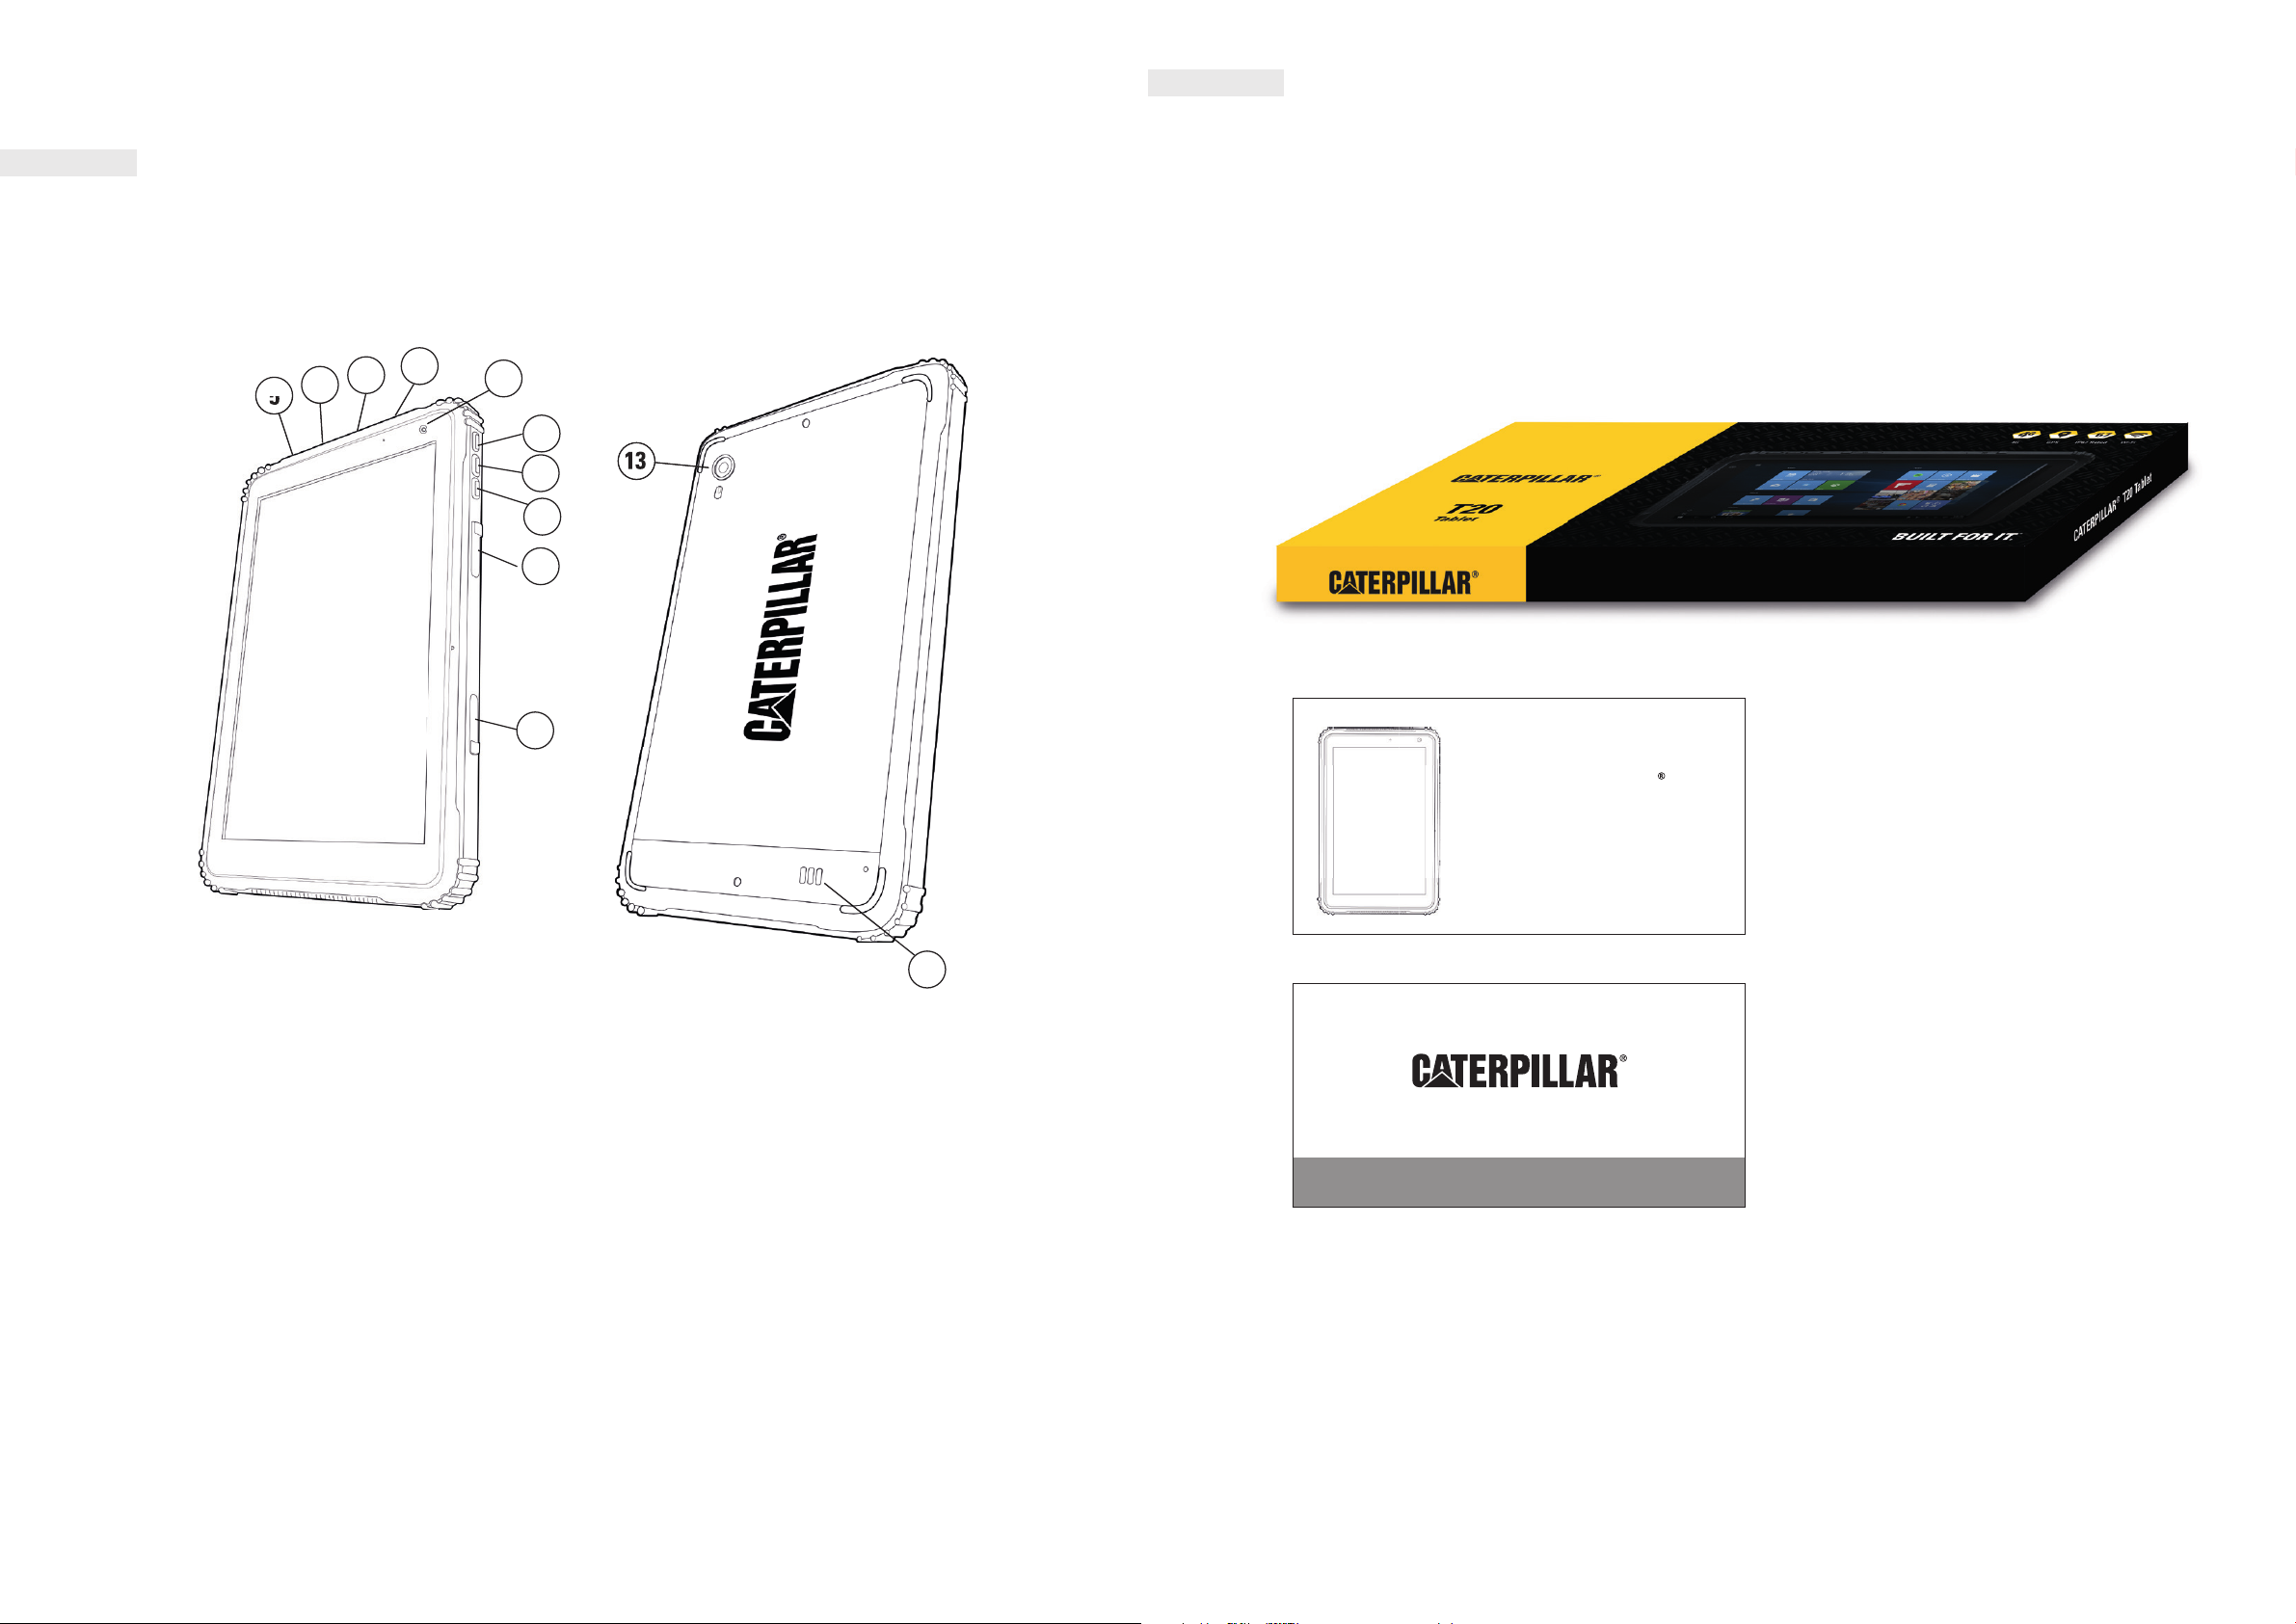
Front and back features
4
5
Your T20 Tablet includes the following accessories:
• 1 x Charger and cable
• 1 x Quick Start Guide
• 1 x Warranty Statement
2
3
6
8
9
13
10
11
12
1. SPEAKER
2. CHARGING PORT
3. MICRO USB PORT COVER
4. HDMI PORT COVER
5. AUDIO JACK PORT BEHIND THE HDMI COVER
6. CAMERA 2.0MP
7. CORNING GLASS
8. POWER ON/OFF BUTTON
9. VOLUME INCREASE BUTTON
10. VOLUME DECREASE BUTTON
11. SD CARD SLOT
12. SIM SLOT (MICRO SIM)
13. CAMERA 5.0MP
CATERPILLAR
T20 TABLET
QUICK START GUIDE
1
LIMITED WARRANTY STATEMENT
1
6 7
Page 5

3.0
x
3.2 TURN ON YOUR TABLET
SETTING UP YOUR T20 TABLET
WARNING: Before you begin any of the procedures outlined in this section, ensure that you have read
the safety information provided with your Tablet.
3.1 CHARGE YOUR TABLET
1. Open the charging port cover.
2. Connect the power cable to the charging port – see (5) on page 4.
3. Plug the charger into an AC mains socket.
Note: The battery will not be charged when you unpack your Tablet. We recommend that you fully charge
your T20 Tablet before rst using it in battery mode.
CAUTION: Charge the battery in an ambient temperature of 0 °C to 35 °C.
CAUTION: Use only Caterpillar® approved chargers and cables. Using unauthorised power adapters
or cables may severely damage your T20 Tablet and invalidate the warranty.
You can monitor the charging process by referring to the LED battery-charge located at the top right of your
T20 Tablet. When your Tablet is charging, it will either display a ashing Red LED or solid Red LED.
WARNING: Before you begin any of the procedures outlined in this section, ensure that you have read
the safety information provided with your Tablet.
3.3 SETTING UP A MICROSOFT ACCOUNT
With a Microsoft account, you have access to the Windows store, Cloud storage to back up les and data,
social networking sites, contact information, and much more.
1. When you initially turn on your T20 Tablet, the rst screen displayed will be the Windows 10 Start Up
Screen. To start using your Tablet, you must complete the Windows set-up.
NOTE:
It is recommended that you create a Microsoft account to ensure you are aware of all the distributed
updates from Microsoft. This will ensure that your Tablet’s OS remains current and that it has the latest
security patches.
2. Your Microsoft account will enable you to set up an email account and password, so you can sign
into your Windows user account securely. This is free to set up and the steps are easy to follow. It is
possible to set up an account with most email addresses, however if not, you can create a new email
address.
NOTE:
If more than one person is using the Tablet, we recommend each user creates their own account. This way,
each user can personalise their pro le and set their own parameters.
LED behaviour Description
Solid Red Battery is fully charged
Flashing Red Battery is charging
Additionally, by referring to the on-screen battery icon display, you can monitor the charging progress of
the battery:
Battery Icon Description
Full battery and plug
100%
Partially charged battery and plug
50%
Partially charged battery
Your Tablet is fully charged and connected to the AC mains power
Your Tablet is connected to the AC mains power and is partially
charged.
NOTE: If you click on the icon, it will indicate the charge level of the
battery, and the time left until your Tablet is fully charged
Your Tablet is in battery mode. The device is running on battery power
and is discharging the battery
3. Follow the on-screen instructions to install the operating system.
Battery low warning symbol
Your Tablet is in battery mode and is running on battery power. The
battery has low charge
Battery critically low
Your Tablet is running on battery power and the battery charge is
critically low. Please connect to AC mains
8 9
Page 6

3.4 TURN OFF YOUR TABLET
• Press and hold the power button for a couple of seconds
• Slide in the direction of the arrow to shut down the Tablet
OR
• Press the power Icon positioned in the lower left corner of the screen. It will offer Sleep,
Shutdown or Restart, select your preferred option
4.0
INSERTING SIM AND microSD CARDS
4.1 INSERTING A SIM CARD
NOTE:
Your T20 Tablet only accepts micro-SIM cards. You will need an adapter if you wish to use a smaller
SIM.
1. Open the SIM slot port cover - see (12) on page 6.
2. Place your tablet on a at surface with the screen facing downwards on top of a cloth to protect
the screen.
The below illustration shows the location of the ports and the microSD and SIM cards.
4.3 REMOVING A micro-SIM CARD
1. Open the port cover.
3. Push the micro-SIM until the SIM “clicks” into place.
4.2 INSERTING A micro-SD CARD
NOTE:
Your T20 Tablet only accepts microSD cards.
2. Push the edge of the micro-SIM card into the Tablet. The Tablet mechanism will release the micro-SIM.
3. You can now remove the micro-SIM.
4.4 REMOVING A microSD CARD
CAUTION: Removing a microSD card whilst the Tablet is in use may cause data loss or result in
application errors. Make sure you have completed all current actions with the microSD card before
attempting to remove it. Open the port cover.
1. Open the port cover.
2. At the bottom of the display towards the right of the tablet is a ^ symbol. Touch this and a USB icon will
pop up.
3. Tap the USB icon for the option to eject the microSD card.
4. Your Tablet will display a message indicating that it is now safe to remove the microSD card.
5. Open the microSD port and push the edge of the microSD card. The Tablet mechanism will now eject
the microSD.
1. Open the SD card port cover - see (11) on page 6.
2. Position the microSD card so that the pins are pointed towards the slot as per below illustration.
3. Push the microSD card into the slot and close the port cover.
10 11
6. You can now remove the microSD card.
Page 7

5.0
6.0
WIRELESS NETWORKS
5.1 CONNECTING TO WI-FI
1. Swipe-in from the right edge of the display to access the ACTION CENTER.
2. Select Network (bottom right). The next window will show Wi-Fi turned off.
3. Tap Network Settings at the bottom of this window.
4. This will display a new window showing “Wi-Fi Off”. Click on this to enable Wi-Fi. It will now show
“Wi-Fi On”.
5. Navigate through the options: Available Networks, Hardware Properties and Manage Known Networks.
Select the network you wish to connect to and follow the instructions.
6. Note: Secured networks will require a Passcode.
5.1 TURN OFF WI-FI
1. Swipe-in from the right edge of the display to access the ACTION CENTER.
2. In the ACTION CENTER, tap the Wi-Fi icon.
3. Then in the next screen, tap the Wi-Fi icon again to disable your Tablet’s Wi-Fi.
LEARN TO USE YOUR SCREEN MULTI-TOUCH DISPLAY
Your T20 Tablet has a multi-touch display. Use these nger gestures to operate your Tablet’s
screen:
Single tap This allows you to:
Tap on the display with your
nger
Single tap and hold
Tap and hold your nger on
the display
Drag
1. Tap and hold your nger
on an item
2. Keep your nger in
contact with the display,
then use your ngertip
to move the item to your
desired location
3. Remove your nger
across the display to
drop the item
Swipe or slide
• Use buttons on the screen
• Input text using the on-screen keyboard
• Select items on the screen: including options, entries, images, and icons
• Start apps
• Display detailed information about an item
• Open the menu of an item to perform further actions
• Move items such as images and icons on the display
Move your nger in a vertical
or horizontal direction on the
display
Zoom in
Touch the display with two
ngers, then move your
ngers apart
Zoom out
Touch the display with two
ngers, then move your
ngers together
• Scroll through the Start screen, web pages, lists, entries, photos, contacts,
and so on.
• Close an app. (Swipe the app to the bottom of the display.)
• Enlarge an image or web page
• Reduce the view of an image or web page.
7.0
MICROSOFT WINDOWS 10 FAMILIARISATION
When you initially power up your T20 Tablet, you must complete the Windows set up. The rst
screen displayed will be the Windows Start Up Screen. Follow the on-screen instructions to
correctly install the operating system.
NOTE:
We recommended that you create a Microsoft account to ensure that you are aware of the
distributed Microsoft updates.
12 13
Page 8

7.1 CONNECTING TO WIFI
7.4 SWIPE LEFT
• The Windows 10 Start screen displays a list of default and custom Live Tiles, which act as a shortcut to
Mail, Microsoft EDGE, Weather app, Calendar, Windows Store, Skype, and other installed apps.
• Live Tiles on your Start screen change and update in real time to show news and sports updates,
weather updates, social-networking feeds, and so on.
• The interface gives you direct access to your most recently used apps, emails, photos, music, videos,
contacts, updates from social-networking sites, and frequently viewed websites. You can pin your
favourite apps as tiles to customise the Start screen.
Swipe-in from the right edge of the display to show the ACTION CENTER. The ACTION CENTER provides
access to the system commands, such as Tablet Mode, Rotation Lock, Note, Airplane mode, Location, Quiet
hours, Battery charge available, Bluetooth, VPN, Battery saver, Project Wi-Fi and all Settings options.
7.5 SWIPE RIGHT
• Swipe-in quickly from the left edge of the display to show the apps currently running.
• Touch the thumbnail of a running app to open
7.6 SCREEN ROTATION
To ensure that you experience optimal viewing when using your T20 tablet, the screen rotation will
automatically adjust to portrait or landscape format, depending on how you are holding the device. You
can disable the automatic Screen Rotation in settings and choose to lock it in either landscape or portrait.
NOTE:
Some apps may not support automatic screen rotation as they are designed to work in only one screen
orientation
7.2 ACCESSING THE START SCREEN
When your Tablet boots into Windows, you can access the Start screen from any window or app by using
one of the following methods.
• Press the Windows Icon button.
OR
• Swipe-in from the right edge of the display to access the ACTION CENTER.
• Then select Tablet Mode.
7.3 CUSTOMISING THE START SCREEN TILES
• Pinning icons: Tap and hold the icon you want to move from your apps list to the Start screen.
7.7 LOCKING THE SCREEN ROTATION
1. Change the screen to the desired rotation.
2. Swipe in from the right edge of the tablet screen to access the ACTION CENTER.
3. One of the options is Rotation lock select. The icon will display “On” to indicate screen rotation is
locked.
8.0
SYNCHRONISING YOUR TABLET
USING A MICROSOFT ACCOUNT
1. Swipe in from the right edge of the Tablet screen to access the ACTION CENTER.
2. From the ACTION CENTER, select Sync Your Settings.
3. Then follow the on-screen directions.
4. Your T20 Tablet will now sync your settings with devices associated with your account name on
Windows 10.
• Moving icons: Drag the icon to your desired location on the Start screen, then drop it.
• More options for icons: Hold the icon.
NOTE:
You can also personalise the Start screen by setting your favourite picture as the wallpaper.
14 15
Page 9

9.0
10.0
TECHNICAL SPECIFICATION
Dimensions 220x143x14mm
Weight 650g
Display size 8”
Processor Type Intel Atom x5-Z8350
Processor Speed 1.44GHz
Display Resolution 800x1280
Rear Camera 5MP
Front Camera 2MP
Video Connector mini-HDMI
Memory RAM 2GB
Memory ROM 64GB
SD Card Micro SD - Max 64GB
USB Speed USB 3.0 (micro)
Battery Size 7500mAh
Windows Version Windows 10 (Home or Pro depending on model)
RF EXPOSURE INFORMATION (SAR)
This device has been tested and meets applicable limits for Radio Frequency (RF) exposure.
Speci c Absorption Rate (SAR) refers to the rate at which the body absorbs RF energy. SAR limits is 2.0 W/
kg (averaged over 10 grams of tissue) in countries that follow the Council of the European Union limit.
Tests for SAR are conducted using standard operating positions with the device transmitting at its highest
certi ed power level in all tested frequency bands.
This device has been tested and meets applicable limits for radio frequency exposure at 0mm separation
distance.
The highest reported SAR values under the CE regulatory for the tablet is 1.649 W/kg
10.1 EU COMPLIANCE STATEMENT
This device is restricted to indoor use only when operating in the 5150 to 5350 MHz frequency range.
Restrictions in:
Belgium (BE), Bulgaria (BG), Czech Republic (CZ), Denmark (DK), Germany (DE), Estonia (EE), Ireland
(IE), Greece (EL), Spain (ES), France (FR), Croatia (HR), Italy (IT), Cyprus (CY), Latvia (LV), Lithuania (LT),
Luxembourg (LU), Hungary (HU), Malta (MT), Netherlands (NL), Austria (AT), Poland (PL), Portugal (PT),
Romania (RO), Slovenia (SI), Slovakia (SK), Finland (FI), Sweden (SE), United Kingdom (UK), Switzerland
(CH), Norway (NO), Iceland (IS), Liechtenstein (LI) and Turkey (TR).
SIM Card Size Micro SIM
Charging Options USB2.0 or DC
Cellular Connectivity GPRS, EDGE, HSPA, 4G
4G Speed DL – 150 Mbps UL – 50 Mbps
2G Speed 850, 900, 1800, 1900
3G Speed 1, 2, 5, 8
4G Bands 1, 2, 3, 4, 5, 7, 8, 20
WiFi Connectivity 802.11 b/g, 2.4GHz
802.11.n , 2.4G/5G
802.11.ac, a 5G
Bluetooth BT4.1
GPS Support GPS, Glonass
Ingress Protection IP67 (Waterproof 1m for 30 mins)
Drop Test 1.2m
10.2 CAUTION
RISK OF EXPLOSION IF BATTERY IS REPLACED BY AN INCORRECT TYPE. DISPOSE OF USED BATTERIES
ACCORDING TO THE INSTRUCTIONS.
10.3 WASTE ELECTRICAL AND ELECTRONIC EQUIPMENT (WEEE)
This symbol means that according to local laws and regulations your product and/or its battery
shall be disposed of separately from household waste.
When this product reaches its end of life, take it to a collection point designated by local
authorities. Proper recycling of your product will protect human health and the environment.
To prevent possible hearing damage, do not listen at high volume levels for long periods.
16 17
Page 10

11.0
RF SPECIFICATION
Function Operation Frequency Max RF output power Limit
BLE 2402-2480MHz 5.08dBm 20dBm
BT(BR+EDR)
WIFI802.11B/G/N
(HT20,HT40
2402-2480MHz GFSK:3.08dBm;
Pi/4 DQPSK:2.59dBm;
8DPSK:2.41dBm
802.11b/g/n(20Mhz):
2412-2472MHz;
802.11n(40Mhz):
2422-2462Mhz
802.11b:16.25dBm;
802.11g:14.36dBm;
802.11n20:12.31dBm;
802.11n40:12.39dBm;
20dBm
20dBm
RUGGED TABLET
MODEL NUMBER: T20
OPERATING TEMPERATURE: -20° C TO 40° C
This device was tested for typical body-worn operations. To comply with RF exposure requirements, a minimum separation distance
of 0mm must be maintained between the user’s body and the handset, including the antenna. Third-party belt-clips, holsters, and
similar accessories used by this device should not contain any metallic components. Body-worn accessories that do not meet these
requirements may not comply with RF exposure requirements and should be avoided. Use only the supplied or an approved antenna.
This device in compliance with the essential requirements and other relevant provisions of Directive 2014/53/EC. All essential radio
test suites have been carried out.
1. Use carefully with earphones. Excessive sound pressure from earphones and headphones can cause possible hearing
loss
802.11a/n(20/40)/
ac(20/40/80)
GPRS/EDGE 900
GPRS/EDGE 1800
WCDMA B1
WCDMA B8
LTE FDD B1
LTE FDD B3
5180-5240MHz 802.11a:14.76dBm;
802.11n20:13.76dBm;
802.11n40:10.73dBm;
802.11ac20:10.74dBm;
802.11ac40:10.36dBm;
802.11ac80:7.62dBm
TX(Uplink):880-915Mhz;
RX(Downlink):925-960Mhz
TX(Uplink):1710 -1785Mhz;
RX(Downlink):18051880Mhz
TX(Uplink):1920-1980Mhz;
RX(Downlink):21102170Mhz
TX(Uplink):880-915Mhz;
RX(Downlink):925-960Mhz
TX(Uplink):1920-1980Mhz;
RX(Downlink):21102170Mhz
TX(Uplink):1710-1785Mhz;
RX(Downlink):18051880Mhz
GPRS 900:31.57dBm;
EDGE 900:26.57dBm
GPRS 1800:28.67dBm;
EDGE 1800:25.35dBm
21.69dBm 24(dBm)+1.7/-3.7(dBm)
22.75dBm 24(dBm)+1.7/-3.7(dBm)
23.11dBm 23(dBm)±2.7(dBm)
24.08dBm 23(dBm)±2.7(dBm)
23dBm
Class 4
(33±3dBm)
Class 1
(30±3dBm)
2. CAUTION : RISK OF EXPLOSION IF BATTERY IS REPLACED BY AN INCORRECT TYPE. DISPOSE OF USED BATTERIES
ACCORDING TO THE INSTRUCTIONS
3. The product shall only be connected to a USB interface of version USB 2.0
4. Adapter shall be installed near the equipment and shall be easily accessible
5. The supplied adapter is considered as separate to the T20 tablet
6. The device complies with RF speci cations when the device is used at 0mm from your body
7. USB 3.0 : load up to 0.5A
SI SK
TX(Uplink):2500-2570Mhz;
LTE FDD B7
LTE FDD B8
LTE FDD B20
GPS RX:1.57542Ghz N/A N/A
This product can be used across EU member states.
18 19
RX(Downlink):26202690Mhz
TX(Uplink):880-915Mhz;
RX(Downlink):925-960Mhz
TX(Uplink):832-862Mhz;
RX(Downlink):791-821Mhz
22.94dBm 23(dBm)±2.7(dBm)
24.25dBm 23(dBm)±2.7(dBm)
24.09dBm 23(dBm)±2.7(dBm)
Page 11

Declaration of Conformity
Manufacturer:
Name: Bullitt Mobile Limited
Address: One Valpy, Valpy Street, Reading, Berkshire, England RG1 1AR
EQUIPMENT TYPE : Rugged Tablet
MODEL CODE : T20
We, Bullitt Mobile Limited, declare under our sole responsibility that the product described above is in conformity with the relevant
Union harmonization legislations:
RE Directive (2014/53/EU)
APPLICATION OF COUNCIL DIRECTIVE:
Applied / Complied Harmonized Standards
RE Directive 2014/53/EU,
Article 3(1)(a)
Safety
RE Directive 2014/53/EU,
Article 3(1)(a)
Health
EN 60950-1:2006+A11:2009+A1:2010+A12:2011+A2:2013
RE Directive 2014/53/EU,
Article 3(1)(a)
Health
RE Directive 2014/53/EU,
Article 3(1)(b)
EMC
RE Directive 2014/53/EU,
Article 3(2)
Radio
CE Doc by: Shenzhen NTEK Testing Technology Co., Ltd. Certi cate Number: RE-17092006
SIGNATURE : Wayne Huang
POSITION : Director of ODM Management
DATE OF ISSUE : September 21, 2017
Draft EN 301 489-1 V 2.2.0, Draft EN 301 489-17 V3.2.0,
Draft EN 301 489-19 V2.1.0, Draft EN 301 489-52 V1.1.0
EN 55032:2015, EN 55024:2010+A1:2015
EN 301 511 V12.5.1, EN 301 908-1 V11.1.1
EN 301 908-2 V11.1.1, EN 301 908-13 V11.1.1
EN 300 328 V2.1.1, EN 303 413 V1.1.1
EN 301 893 V2.1.1
20
Page 12

© 2017 Caterpillar. All Rights Reserved. CAT, CATERPILLAR, BUILT FOR IT, their respective logos, “Caterpillar Yellow”, the
CATERPILLAR® T20
“Power Edge” trade dress as well as corporate and product identity used herein, are trademarks of Caterpillar and may not
be used without permission.
User Manual
Bullitt Mobile Ltd is a licensee of Caterpillar Inc.
21
 Loading...