

Page 1
OH0411C @ Pointed in Korea
AcAAA;n - ^ \'^ \Á \ ^ . ■
\\ \\ ■
\ \ \
\ \ \ \ \ A \ • \ \ \ \ \ * \ - • • ' ' ' ' . \
\ > \ \\ \ \ ‘ \ '• . ' \ ' '' \ \ • •'
\\\'^ \W O- \\ \ •••'
\'A\W \\ -. \' ••
\ É
CASIO
L
*
t
V. \
3>
nr.
I
^.- Í' f ^ f g
L
OPERATION
MANUAL
MANUAL OE
OPERACION
I 7Zj7JI/St>yjl'
Page 2

€T-636
ELECTROIMJC MUSICAL INSTRUMENT
Introduction
Your new ef=63B keyboard is a state-of-the-art musical in
strument which incorporates the latest electronics tech
nology to make its operation as easy as possible.
Exceptional sound quality backed up by a host of sophisti
cated features and functions makes this keyboard a joy to
t
4
play for everyone. _
In order to enjoy the features and functions of this unit
to their fullest, be sure to carefully read this manual and
follow the instructions contained herein.
Contents
1. General Guide
2. Power Supply
3. General Operation
4. Preset Tones... ... ... .. ... ... .. ... ... .. ... ... .. ... ... ... .. ... . 8
5. Tone Bank Sound Combinations
6. Auto-rhythms
7» Auto-accompaniment
8. Troubleshooting
9. Care of Your Keyboard
.. .. .. .. ... .. .. .. .. .. ... .. .. .. .. .. ... .. .. .. .. .. .
.. .. ... .. .. .. ... .. .. .. ... .. .. ... .. .. .. ... .. .. .. ..
.. .. .. .. .. .. .. .. .. .. ... .. .. .. .. .. .. .. .. .. .
.. .. .. .. ... .. .. .. .. .. ..
.. .. ... .. .. .. ... .. .. .. ... .. .. ... .. .. .. ... .. .. .. .
.. .. ... .. .. .. ... .. .. .. ... .. .. ... .. ..
.. .. .. .. .. .. .. .. .. .. .. .. .. .. . .. .. .. .. .. .. .. .
.. .. .. . .. .. .. .. .. .. .. .. . .. .. .. .. .. .
4
6
7
10
12
13
17
18
-2
10. Specifications.... .. ... ... .. ... ... .. ... ... .. ... ... .. ... ... .. .19
-3-
Page 3
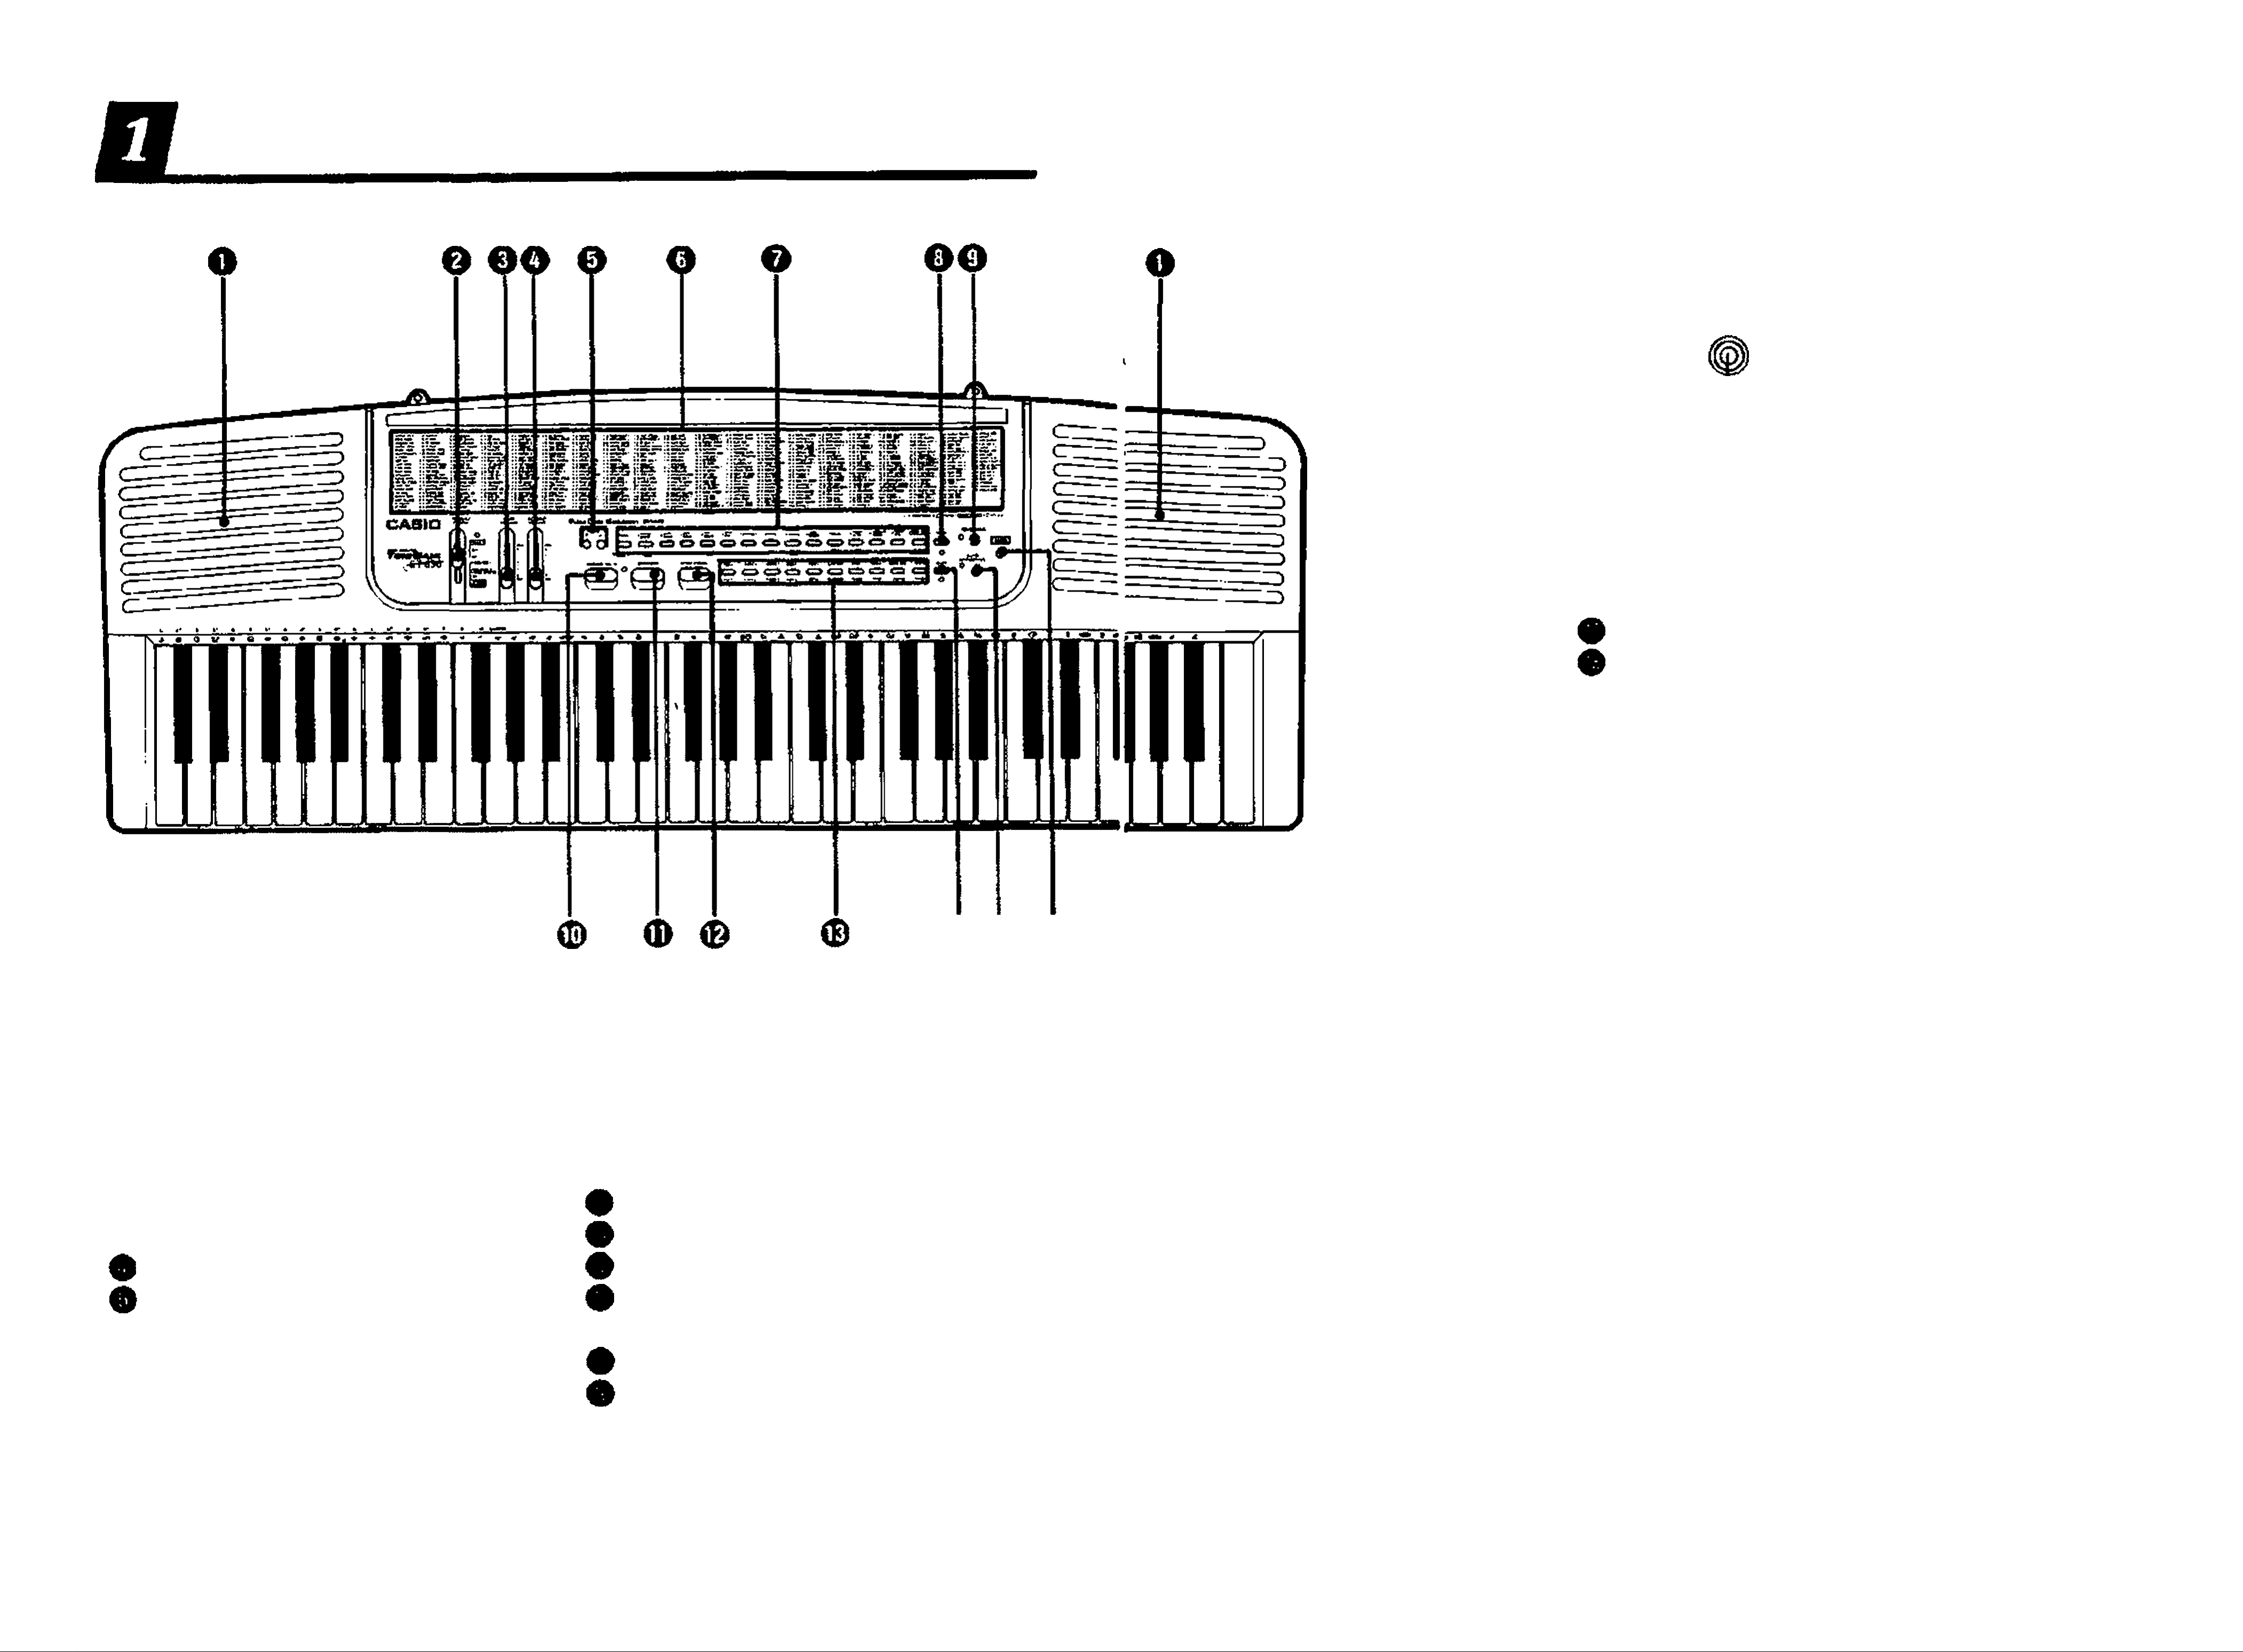
General Guide
i. General Guide
< Rear panel >
PHONES/
OUTPUT OC 9V
<i)
é é
Output lack
AC adaptor fack
o Built-in stereo speakers
0 POWER/CHORD switch
0MAIN VOLUME slider
0TONE BANK button
SYNCHRO/FILL-IN button
START/STOP button
(0 0 0
Demonstration Tune
This unit features a preset demonstration tune which has been
ACCOMP VOLUME slider
TEMPO control buttons
0210 SOUND TONE BANK list
0TONE selectors
O Tone SELECT button
0
INTRO/ENDINC button
RHYTHM selectors
Rhythm SELECT button
AUTO HARMONIZE button
DEMO button
carefully programmed to showcase alt the features and benefits
g DEMOS
of this unit. Simply press the DEMO button
0
, and listen to
o
the GT*636 play!
• The demonstration tune is piayed m an endless loop. Press the DEMO button again to
stop the tune,
• The keyboard is inoperable while playirtg the demonstration tune.
-5-
Page 4
Power 8мфр1у
DC Power )
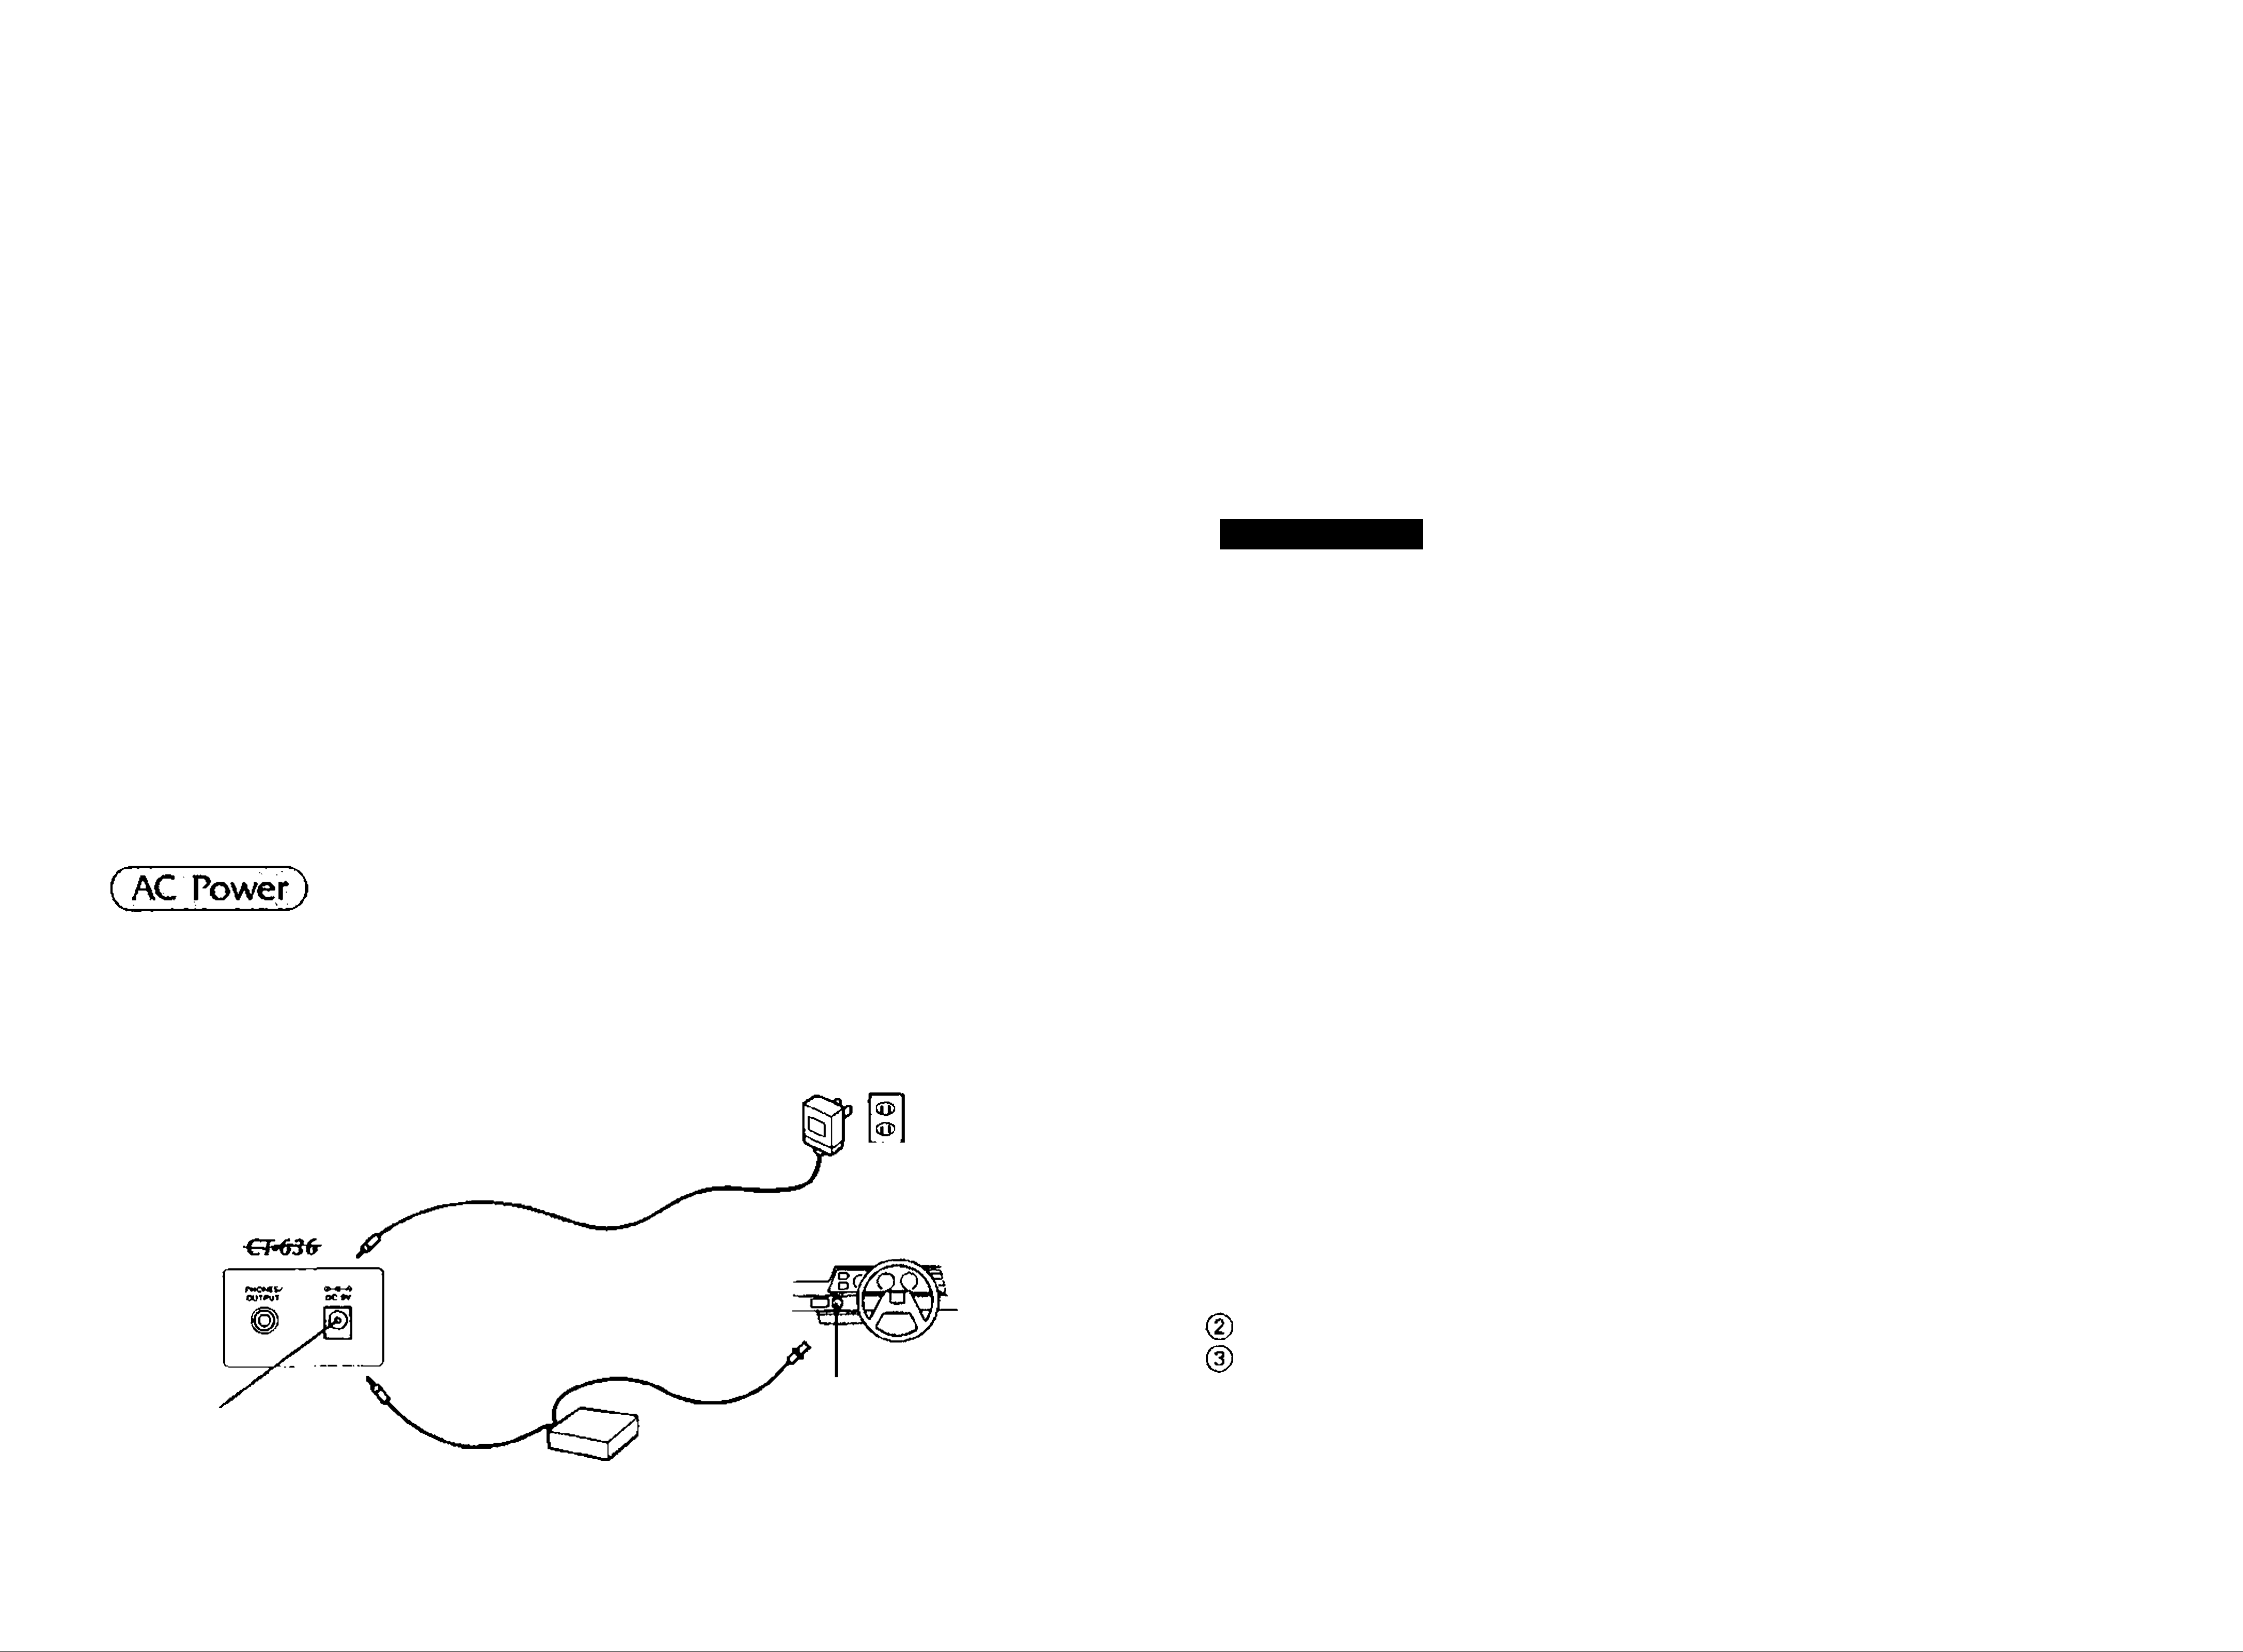
2. Power Supply
* Use only genuine CASIO adaptors to avoid risk of damage.
* The adaptor may become warm when left connected to an outlet. This is
• Dry batteries
This unit can be powered by six D size (SUM-1/R20P) manganese dry cell
batteries. Weakened batteries will result in lower volume or poor tonal quality.
The power indicator lamp will gradually lose its brightness when battery
power weakens. At this time, change batteries or shift to one of the alter
nate power sources mentioned below.
• Battery replacement
(1) Open the battery compartment cover on the bottom of the unit and take
out used batteries,
normal, but the adaptor should be disconnected when not in use.
★ Auto power
off
function
Power is automatically cut off approximately 6 minutes after the last opera
tion of the unit. Power supply can be restored by switching power OFF and
then ON again.
PRbCAUTIONS
Incorrectly using batteries can cause leakage or bursts, and may damage your
(2) Load new batteries taking care that polarity is correct,
* It is advisable to replace all six batteries at the same time for longer tiarfery life.
* Standard battery life is approximately 10 hours.
\
• Car battery
With the car battery adaptor (CA-5, optional), DC power is supplied from
a car battery through the cigarette lighter socket.
product. Note the following precautions:
* Be sure that ± polarity is correct.
* Do not mix battery types.
* Do not mix new batteries with old ones.
* Never leave dead batteries in battery compartment as they may cause mal
functions.
* Remove batteries when not using the product for extended period,
* Never try to recharge the batteries that are specified for the power supply
of this unit.
* Do not expose the battery to direct heat, let it become shorted or try to take
An AC adaptor (AD-5, optional) is required when using household current. Use
only a genuine CASIO adaptor with the same voltage rating (100,117,220, or 240)
as the power supply in your area to prevent component damage. Plug the AC
adaptor into the AC outlet and the cord into the unit. This will automatically
cut off the battery power supply.
AC adaptor AD-5
AC outlet
it apart,
(If a battery leaks, dean out the battery compartment of the product im
mediately, taking care to avoid letting the battery fluid come into direct
confacf with your skin.)
General Operation
* Refer io the general guide found on page 4-5 for exact locations of this keyboard controls and
connections.
AC adaptor jack
Car battery adaptor CA-5
-6-
Cigarette lighter socket
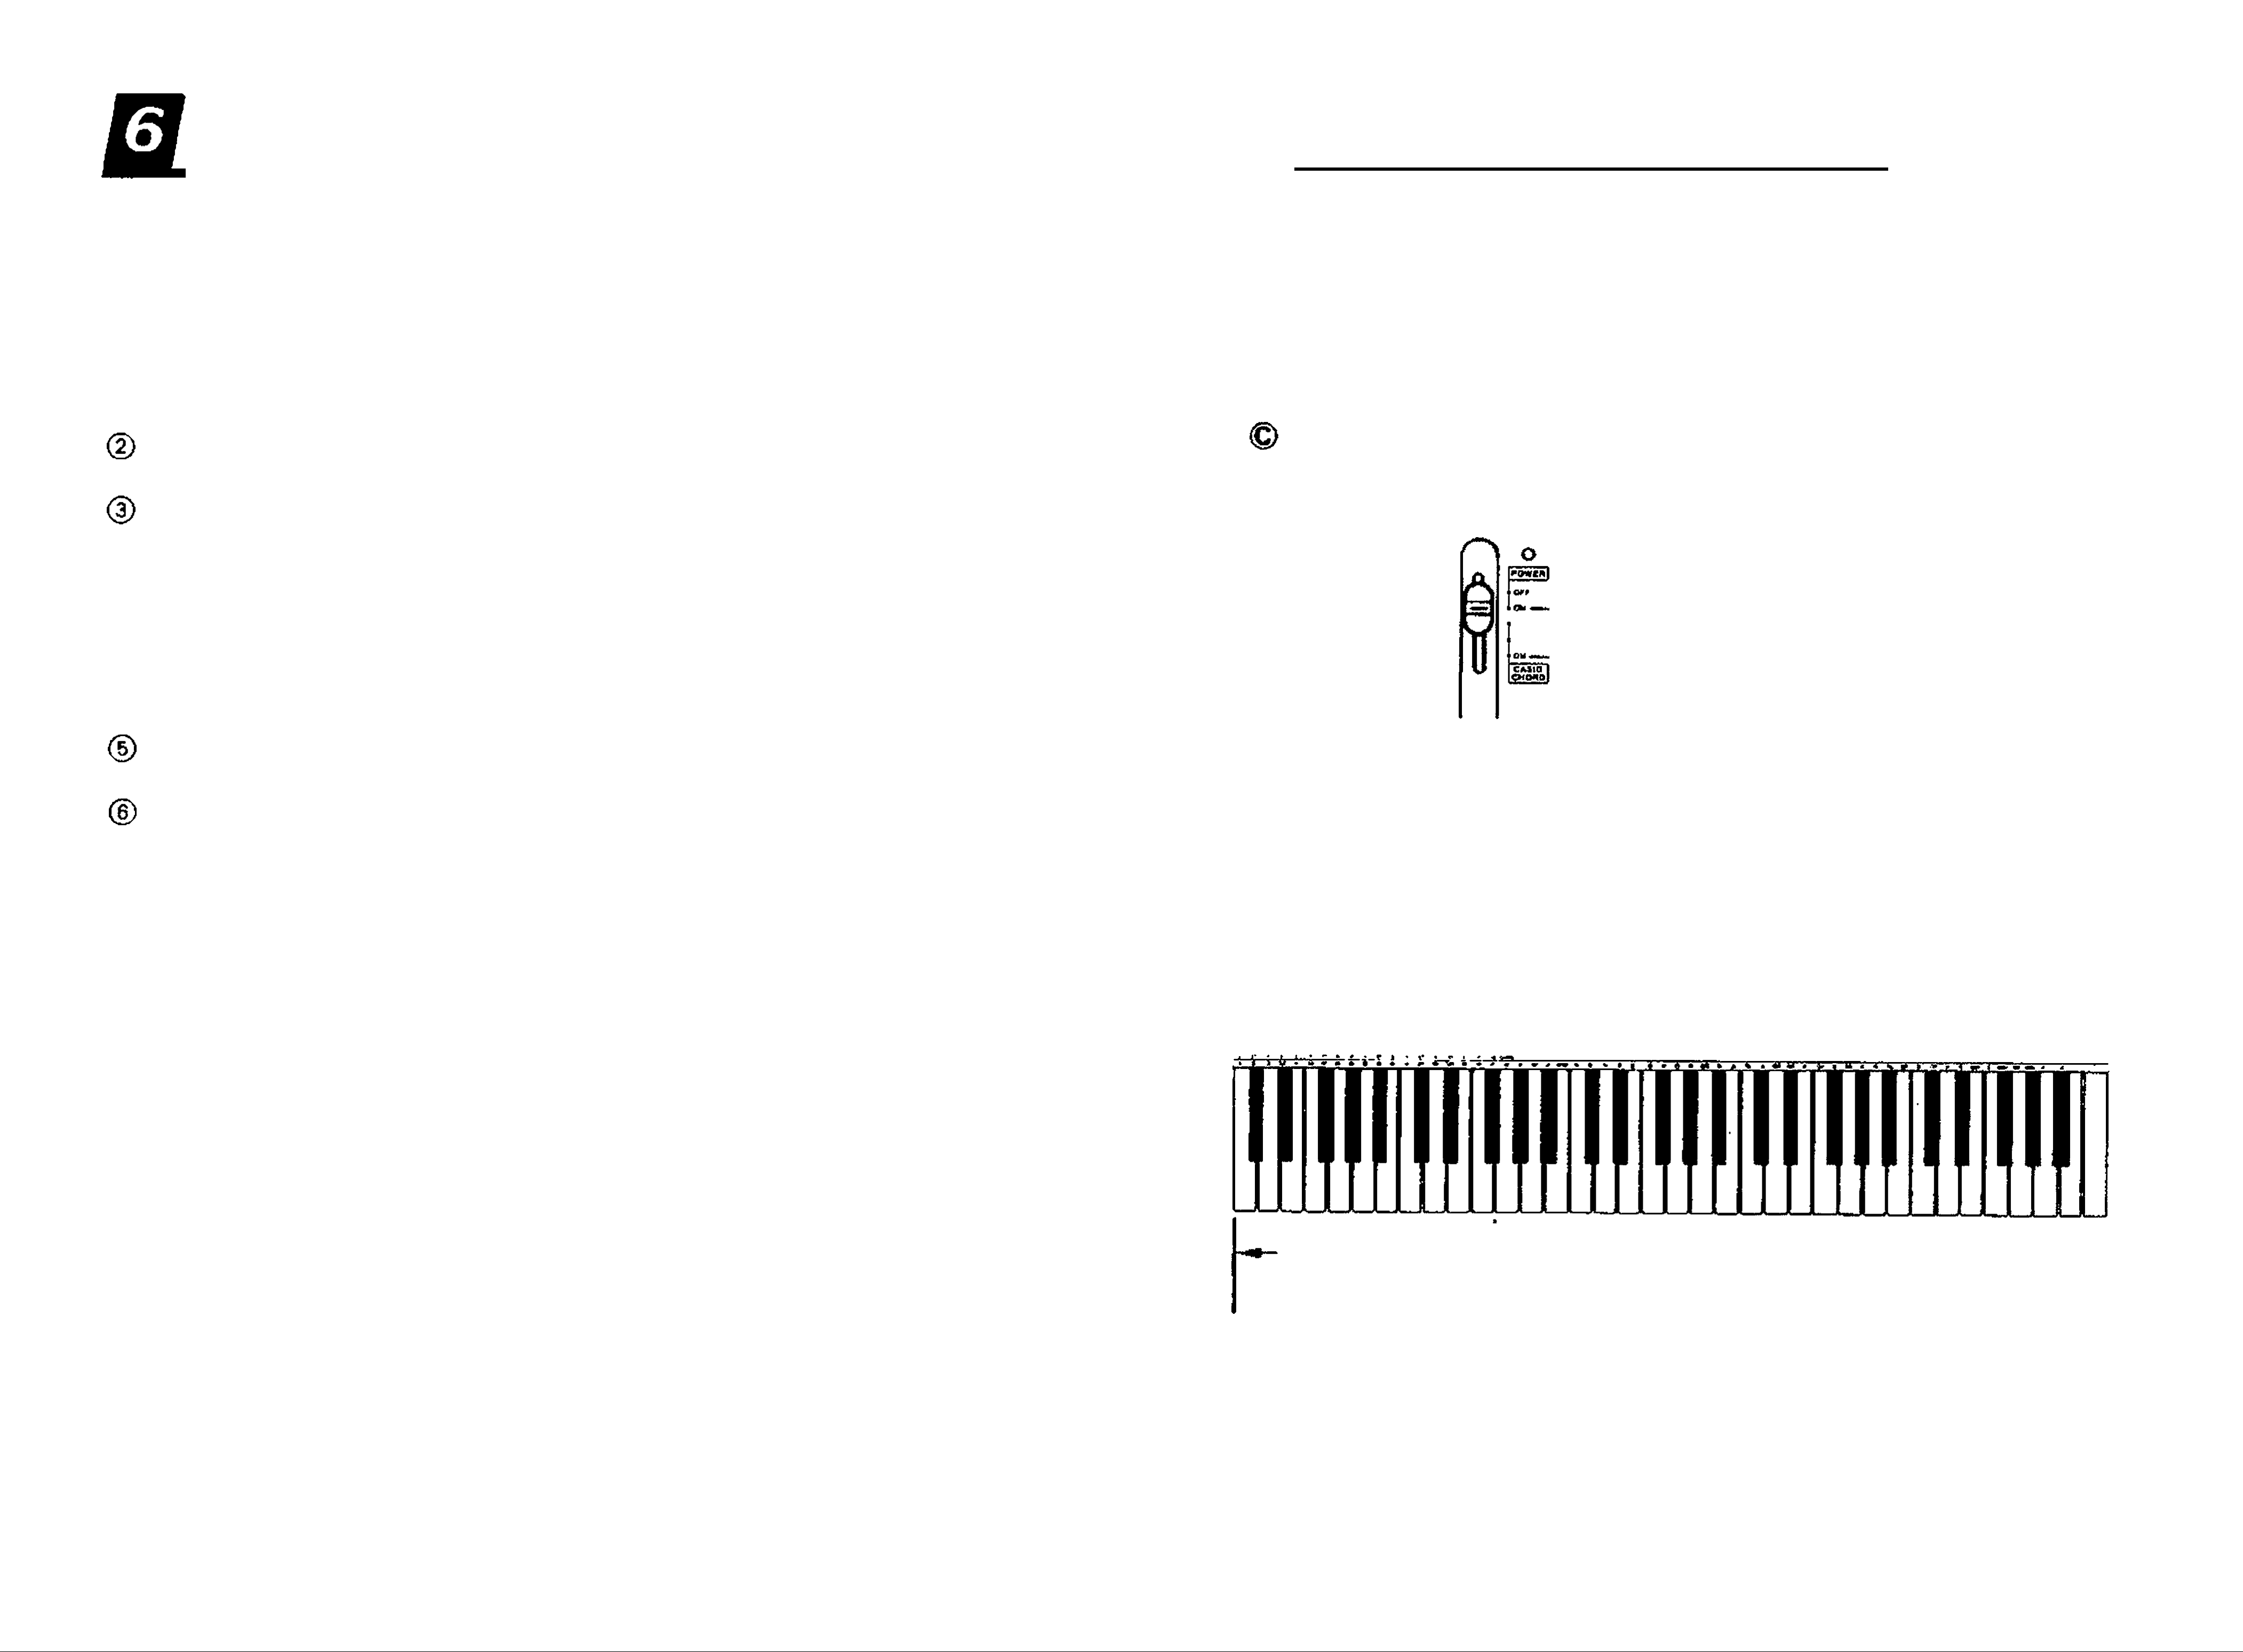
@ Set the POWER/CHORD switch to ON.
Adjust the volume level.
Select one of 30 preset tones (see "Preset Tones", page 8) or one of 465 Tone
Bank sounds (see "Tone Bank Sound Combinations", page 10).
@ Now, start playing.
Page 5

Preset Tones
* Refer to the general guide found on page 4-5 for exact locations of this keyboard controls and
connections.
4. Preset Tones
Dual bass sounds
* To select a preset tone
0 Press the tone SELECT button to switch between the two tones assigned to
each TONE selector. When the SELECT indicator is lit, you can select one
of the lower tones (16—30). When it is not lit, you can select one of the upper
tones (1—15).
Press a TONE selector to choose a preset tone.
* PIANO tone is automatically selected whenever you switch the power of the keyboard ON.
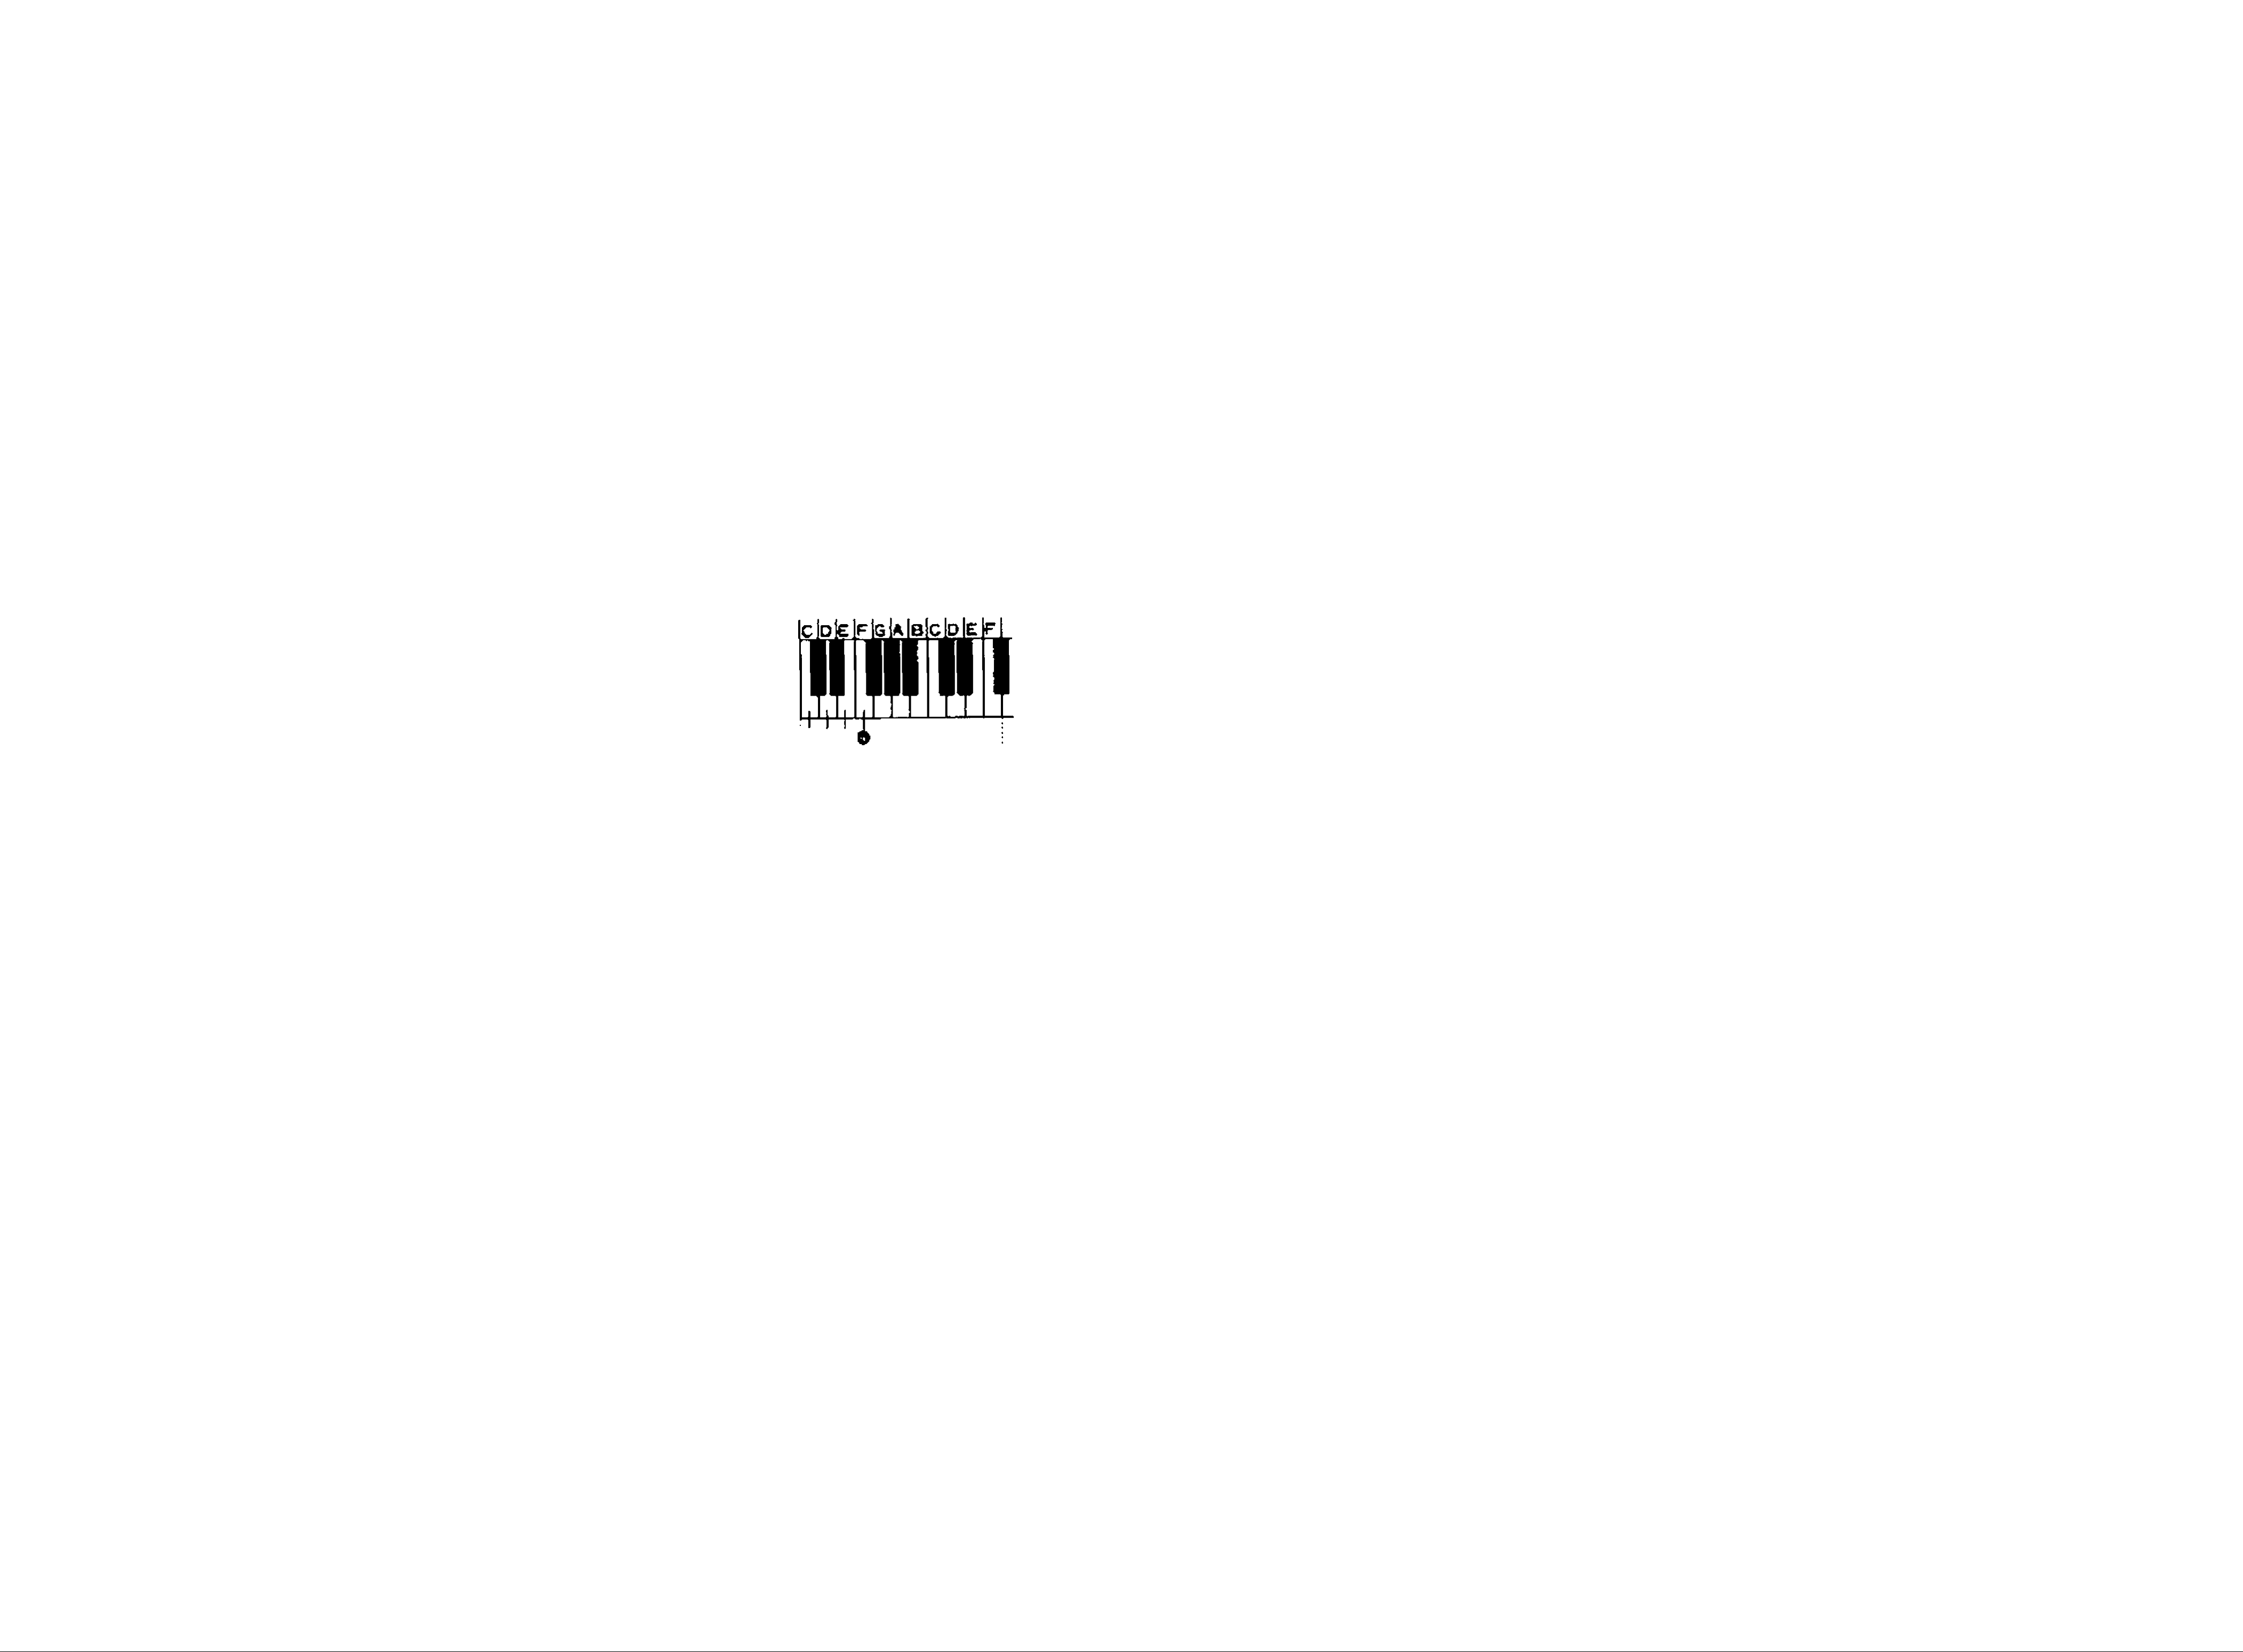
' To select percussion sounds
When PERCUSSION sound is selected by the tone selector, the keyboard
When BASS sound is selected by pressing the BASS button (one of the tone
selectors), two different bass tones can be played on the keyboard at the
san^e time.
The WOOD BASS tone sounds on the lower half of the keyboard (C2—B3),
while the SLAP BASS tone sounds on the upper half (C4—C7).
keys can be used to play a total of 61 different built-in percussion sounds.
These sounds afe assigned to respective keys as shown below;
oe O0 o
Wood bass (C2—B3)
Slap bass (C4—C7)
bass drum 1/2/3
gated snare drum
snare drum 1/2/3
# synth. snare drum
# rim shot 1/2
0 dosed hihat 1/2
sample percussion 1/2
open hihat 1/2
0 synth. cymbal 1/2/3
crash cymbal 1/2/3/mixed
ride cymbal 1/2
0
tom 1/2/3/4/mixed
0
synth. tom 1/2/3
cow bell 1/2
triangle open/mute
0
timbales; high mute/high/low/mixed
0
computer game sound 1/2/3
0
agogo; high/low
scratch; fast/slow
conga; high mute/high/middle/low/
mixed
0
brass hit 1/2/3
gong 1/2
-8-
0
clave high/low
-9-
Page 6

Tone Bank Sound Combinations
* Refer to the general guide found on page 4-5 for exact locations of this keyboard controls and
connections.
5. Tone Bank Sound Combinations
< Example of Tone Bank Operation >
i This keyboard features Casio's innovative "'Tone Bank'' feature, which lets
® you choose from an amazing total of 465 different sound combinations.
To create these layered sounds, the Tone Bank function actually integrates the
characteristics of the 30 preset tones. You can select these sound combinations
through the following procedure.
* To select Tone Bank Sound Combinations
® Select any of the 30 preset tones. When selecting Tone Bank sounds, the
tone initially selected is used as a base, or "Primary" sound.
* When the Primary sound is selected, the keyboard features 10-note polyphony.
Look at the 465-SOUND TONE BANK list on the keyboard. Here, let us produce
the TONE BANK sound "4 6 BRASSH ORGAN".
The two numbers to the left of the TONE BANK sound name are preset tone
numbers. The number 4 represents the "Primary" sound, while 6 is the
"Secondary" sound. Basically, the 465-SOUND TONE BANK list indicates that
if you mix preset tone "6 BRASS ENS" with preset tone "4 JAZZ ORGAN”, you
will get BRASSH ORGAN.
preset tone numbers
(2) Press the TONI^ BANK button.
This activates the Tone Bank function, allowing you to choose a Secondary
sound to integrate with the Primary sound you just selected.
* After the TONE BANK button is pressed, the keyboard changes to 5-note polyphony.
Select any other of the 30 preset tones. The characteristics of this
"Secondary" sound is automatically integrated with those of the "Primary
sound already selected.
To select a different secondary sound
ОЙСАН
»» онем
ff
tone selector
The secondary sound can be changed at any time, as long as the Tone Bank
function is selected. Simply select a different preset tone—the primary sound
remains the same.
To select a different primary sound
The primary sound tan be changed by first turning the Tone Bank function
OFF (press TONE BANK button so that indicator goes out), selecting any other
preset tone, and finally turning the Tone Bank function back ON. The secon
dary tone remains the same in this case.
• To select "4 6 BRASSH ORGAN"
0 First, select preset tone 4, JAZZ ORGAN. This first selection becomes the
"Primary" sound.
Press the TONE BANK button. At this time, the TONE BANK indicator above
the button should light.
Select preset tone 6, BRASS ENS. This selection becomes the "Secondary"
sound.
I
4
BRASSH ORGAN is now selected. The following is a summary of the above
operation.
-10-
4 6 BRASSH ORGAN =
Pkii
CNtAK
-11-
Ч-
TONS BANK
О
tlUMi
(Ж
Page 7
Auto-rhythms
Auto-accompaniment
_______
* Refer to the general guide found on page 4~5 for exact locations of this keyboard controls and
connections.
• To play an auto-rhythm
© Press the rhythm SELECT button to switch between the two rhythms assigned
to each RHYTHM selector. When the SELECT indicator is lit, you can select
one of the lower rhythms (ROCK 2, 8 BEAT 2, etc.). When it is not lit, you
can select one of the upper rhythms (ROCK 1, 8 BEAT 1, etc.).
Press a RHYTHM selector to choose an auto-rhythm.
' ROCK 1 rhythm is automaticafly selected whenever you switch the power of the keyboard ON.
♦ Refer to the general guide found on page 4-5 for exact locations of this keyboard controls and
connections.
• POWER/CHORD switch
Slide to switch the power ON and to select one of the Casio Chord functions.
.................
.................
.................
For normal play without auto-accompaniment.
For auto-accompaniment pressing chords as usual.
For auto-accompaniment using the Casio Chord system.
Press START/STOP button to start the rhythm.
® Adjust the tempo of the rhythm by using the TEMPO control buttons. Press
ing the <A> button will increase tempo, while pressing the <▼> button
will decrease tempo.
* Tempo of the auto-rhythm can be adjusted between 40 and 256 beats per minute. Pressing both
tempo keys at the same time resets the tempo to 132 beats per minute.
* After playing the demonstration tune, the tempo of the auto-rhythm is changed. Adjust the tempo
of the auto-rhythm if you need.
You can adjust the relative volume of the rhythm by using the ACCOMP
VOLUME slider.
Press START/STOP button once again to stop auto-rhythm play.
POWER/
Chord
>
• ACCOMP VOLUME slider
• Using SYNCHRO/FILL-IN button
Press to enter synchro start standby. Rhythm starts when an accompaniment
keyboard key (lower 15 octave, C through F) is pressed. (See page 14 to use
synchro start in the auto-accompaniment performance.) When pressed
during auto-rhythm and accompaniment performance, an appropriate fill-
in is inserted in the rhythm pattern. If the button is held down, the fill-in
pattern is repeated until the end of the measure during which the button
is released.
Adjust the volume of the auto-accompaniment.
NOTES;
• If the POWER/CHORD switch is set to (|) "FINGERED (1 or 2)" or ©"ON",
the lower 15 octave of the keyboard become accompaniment keyboard keys,
and the upper part of the keyboard becomes 4-note polyphonic.
« Using INTRO/ENDING button
If you press the INTRO/ENDING button instead of pressing the START/STOP
button to start an auto-rhythm, the selected auto-rhythm begins after a one-
Accomjpaniment
Melody keyboard (A-note polyphonic) m»
measure intro pattern. This can be an effective way to lead into auto-rhythm
keyboard
performance. If pressed during auto-rhythm and accompaniment perfor
mance, the rhythm stops after an appropriate ending pattern.
During auto-accompaniment performance, chord played on the accompani
■Ar Using synchro start with an intro pattern
: I
ment keyboard will continue to sound after releasing the keys.
Press the SYNCHRO/FILL-IN button to enter synchro start standby, and sub
Auto-accompaniment starts with rhythm, the moment the accompaniment
sequently press the INTRO/ENDING button. Rhythm starts when an accom
keyboard key is pressed if synchro start is in standby status.
paniment keyboard key is pressed, after a one-measure intro pattern.
-12-
-13-
Page 8
7. Auto-accompaniment
7, Auto-accony>animent
■Casio Chord system-----------------------------------------------------
The Casio Chord system has been developed so you can play the four main
types of chords more easily. Playing of the chords is simplified as shown
below;
• Pressing one of the accompaniment keyboard keys produces a major
chord corresponding to that note.
• Simultaneously pressing any key to the right (two keys at the same time)
results in a minor chord.
• Similarly, pressing one more key to the right (three keys in all) produces
<About ''FINGERED 1" and "FINGERED 2">
This keyboard features two different types of fingered accompaniment patterns.
You can select which type you want by selecting either the FINGERED 1 mode,
or the FINGERED 2 mode. Respective accompaniment patterns and characteris
tics are as listed below.
FINGERED 1 Accompaniment
Accompaniment consists of a single bass line and two different backing chord
patterns. The pattern does not change until you play a chord consisting of at
least 3 notes.
a seventh chord, and pressing the fourth key to the right (four keys
in all) creates a minor seventh chord.
< Examples >
C (C major chord)—Press O-
Cm (C minor chord)—Press Q, 0 together.
C? (C seventh chord)—Press O, O. 0 together.
Cmi7 (C minor seventh chord)—Press O, Or O. 0
together.
Not only Qi O/ dnd O/ but ^ny black or white keys can be used as long as they are to
aoo
........
Avto^ccompinirntfU
keyboard
FINGERED 2 Accompaniment
Accompaniment consists of a single bass line and a single backing chord pattern.
In addition, you can add notes manually in two-note polyphony on the
"accompaniment keyboard" without affecting the accompaniment pattern. The
pattern does rot change until you play a chord consisting of at least 3 notes.
Fingered 2 accompaniment also allows you to choose the way the chord will
play rhythmically. If you keep repeating your chord shape in any rhythmic pattern
you choose (quarter-notes, eight-note triplets or any syncopation) this keyboard
will play that chord pattern rhythm, allowing for more flexibility in your accom
paniment patterns.
the right of^.
ni Auto-accompaniment using the Casio Chord system (One-finger method)
O Set the POWER/CHORD switch to "ON" (©position).
(2) Select one of the auto-rhythms and press the SYNCHRO/FILL-IN button.
* Tempo indicator lights, meaning that the accompaniment keyboard keys are ready for play
(3) Play on the accompaniment keyboard keys according to the Casio Chord
system.
** Adjust the tempo and accompaniment voiume using the respective controls.
* Auto-accompaniment tones are preset in correspondence to each auto-rhythm type. A list of
auto-rhythms and corresponding accompaniment tones is provided on page 16.
»
1
[2] Auto-accompaniment play using standaixl chord fingering
(1) Set the POWER/CHORD switch to “FINGERED 1“ or “FINGERED 2“
(2) Select one of the auto-rhythms and press the SYNCHRO/FlLL-IN button.
* Tempo indicator lights, meaning that the accompaniment keyboard keys are ready for play.
(3) Play a chord on the accompaniment keyboard keys.
^ Adjust the tempo and accompaniment volume using the respective controls.
* This unit is capable of recognizing the following chords; <M, m, -5, +5 dim, sus4, 7, M7, m7,
mMZ mT^'S, 7sus4, 9, m9>
-14
-15-
Page 9

7. Auto-accompaniment
Tìxiubleshooting
< About the tones used in the auto-accompaniment >
Each auto-accompaniment pattern consists of one bass line and two types of
chord lines (chord 1 and chord 2), The tones of these elements are preset
corresponding to each auto-rhythms as shown below;
RHYTHMS
ROCK 1 FUNKY CLAVI
8 BEAT 1
16 BEAT 1
DISCO 1
POPS 1
CHORD 1 TONES
ELEC. PIANO
JAZZ ORGAN
JAZZ ORGAN
PIANO
CHORD 2 TONES BASS TONES
HARPSICHORD SLAP BASS
VIBRAPHONE
SYNTH CLAVI
ORGAN
VIBRAPHONE
WOOD BASS
SLAP BASS
SLAP BASS
WOOD BASS
* For any malfunction, always check battery condition first (see page 6)
1. Main volume turned
1. Turn up main
down.
• ±.k- f
2. Headphones con
2. Disconnect head
nected.
3. Auto power off has
3. Turn the power
activated.
volume.
phones.
switch off and then
on again.
SLOW ROCK
SWING
SAMBA 'JAZZ GUITAR
BOSSA NOVA
WALTZ JAZZ ORGAN
ROCK 2
8 BEAT 2
16 BEAT 2 BRASS ENS.
DISCO 2
POPS 2
BLUECRASS
REGGAE
TANGO
BEGUINE
PIANO
PIANO
JAZZ GUITAR ELEC. PIANO
HARPSICHORD
PIANO
HARPSICHORD
PIANO
HARPSICHORD
HARPSICHORD
ACCORDION HARPSICHORD
JAZZ GUITAR
HARPSICHORD
JAZZ GUITAR
HONKY TONK PIANO WOOD BASS
ORGAN
HARPSICHORD
HARPSICHORD SLAP BASS
HARPSICHORD SLAP BASS
HARPSICHORD
ELEC. PIANO
HARPSICHORD
JAZZ ORGAN
CHORUS
WOOD BASS
WOOD BASS
WOOD BASS
WOOD BASS
SLAP BASS
SLAP BASS
WOOD BASS
WOOD BASS
SLAP BASS
WOOD BASS
WOOD BASS
'11
w»i
iV/.*
Main and accompani
ment volume turned
down.
Refrigerators, washing
machines and similar
electric appliances.
1. Main volume turned
down.
2. Defective connection
Turn up main and
accompaniment volume.
Use outlet as far away
as possible from appli
ance thought to be the
cause.
1. Turn up main
volume.
2. Replace connection
MARCH BRASS ENS.
FLUTE
WOOD BASS
Using the auto harmonize function
When you're using the Casio Chord or fingered chord function, you can
add automatic harmony to your melodies by pressing the AUTO HARMONIZE
button. If you use this function when Tone Bank button is ON, automatic
harmony is added using the "Secondary" sound (see "Tone Bank Sound
Combinations", page 10), and "Primary" sound performance becomes
monophonic.
cord.
I
4
cord.
When you seiect this function, melody keyboard performance becomes monophonic even if
no accompaniment keyboard keys are pressed.
-16-
-17
Page 10
Саге of Your Keyboard
1. Avoid heat, humidity, and direct sunlight.
Do not overexpose the unit to direct sunlight, place it near a heater, or in
Model:
Specifications
~CT^636
any area subject to high temperature.
2. Avoid severe impacts and do not drop.
Severe impacts can result in malfunction. When carrying or transporting the
unit, protect the keyboard and keys by packing with soft cloth.
3. Keep the unit free of liquids, dust, particles, etc.
Do not allow foreign matter to enter between the keys. Be especially careful
of metallic objects such as hairpins, sewing needles or coins. Also, do not
allow the unit to get wet.
1
Ф
•i
•4
i
I
Number of keys:
Polyphonic:
Preset tones:
61 keys
10-note polyphonic
30;
Piano, Harpsichord, Vibraphone, Jazz organ, Pipe
organ, Brass-ens, Strings 1, Flute, Chorus, Jazz guitar.
Bells, Funky davi, Metallic sound, Synth-ens,
Percussion, Honky-tonk piano, Hlec piano, Marimba,
Organ, Accordion, Trumpet, Strings 2, Oboe, Synthreed, Harp, Sy nth-cel està, Synth-davi, Fantasy,
Miracle, Bass (Wood bass/Slap bass)
P
4. Never attempt to modify any part of the unit.
Your keyboard is a precision musical instrurrtent made up of sophisticated
electronic parts. Any modification of, or tampering with internal components
can cause trouble or malfunction.
5. Do not use lacquer thinner or similar chemicals for cleaning.
Clean the keyboard with a soft cloth dampened with a mild detergent solu
tion and squeeze it until almost dry.
il
Tone bank sounds:
465
Auto-rhythms: 20;
Rock 1-2,8 beat 1-2,16 beat 1-2, Disco 1-2, Pops 1-2,
Slow rock, Bluegrass, Swing, Samba, Bossa nova.
Waltz, Reggae, Tango, Beguine, March
Auto-accom pani men t
function:
Effect:
Casio Chord on/fingered 1/fingered 2
Auto harmonize
6. Remove batteries before extended storage.
Batteries left in the unit for long periods can leak and cause damage to elec
tronic circuitry.
7. In case of malfunction...
Check whether buttons and connections are set correctly as indicated in
the troubleshootiong chart, lithe unit still does not work properly, contact
the original retailer or a nearby dealer. Never attempt to repair the unit your
self, This can result in serious damage of the components.
Terminals:
Built-in speakers:
Auto power off function:
Power source:
Output jack [output impedance: 30 il, output
voltage: 2.1 V (RMS) MAX], AC adaptor jack (DC 9 V)
12 cm dia x 2 (output: 1.1W+1.1W)
Approximately 6 minutes after the last operation
3-way AC/DC power source;
• AC: 100, 117, 220, 240 V (±10V), 50/60 Hz, with
optional AD-5 AC adaptor
• DC: 6 D size (SUM-1/R20P) manganese dry
batteries
18
Battery life: Approximately 10 hours
• Car battery: Requires optional CA-5 car adaptor
Power consumption:
4.5 W
Dimensions; 935(W) X 341(D) X 93(H) mm
36 13/l6"(W)x13 7/16'^(D)x3 11/16"(H)
19-
 Loading...