

Page 1
MODE B
MODE A
FIVA
User’s Guide
(Product No.: MPC-205E/206E)
P1
P2
P3
B
E
E B
D
D
O
O
M
M
A
A
E
E
D
D
O
O
M
M
N
A
L
Thank you for purchasing the CASIO MPC-205E/206E.
This guide describes the basic operations of the
MPC-205E/206E.
Read this guide in its entirely before handling or
operating this products, and keep it close at hand so
it can easily referenced.
Page 2

International E
NERGY STAR
®
As a member of the International ENERGY STAR
Program, CASIO products have been judged to
meet International E
ENERGY STAR® is a U.S. registered mark.
The information regarding International ENERGY STA R® Program attached
to this product and found in its manual, advertising pamphlets, and so
on, is applicable under our Power Management software in Windows
Me. When booting from B mode, it is not applicable.
Power Plug and AC Adaptor
AC cord plug and wall outlet illustrated in this User’s Guide shows the
Note
• Microsoft, Windows are registered trademarks of Microsoft Corporation in the United
• Other company, product and service names used herein may also be trademarks or
two-pin plug type. It may not be the same shape of AC cord plug used
in your area.
FIVA’s AC adaptor has an automatic voltage switching circuit (input:
100 to 240VAC, 50/60Hz) and lets you use your FIVA under AC power
virtually anywhere in the world without having an extra power-transformer.
Note, however, that AC cord plug shape differ according to area you
are in. Make sure that the AC cord you will use can fit into wall outlet
and is compliance with the local electric safety standard.
States and/or other countries.
service marks of respective companies.
Program
NERGY STAR
®
standards.
®
Page 3
MODE B
MODE A
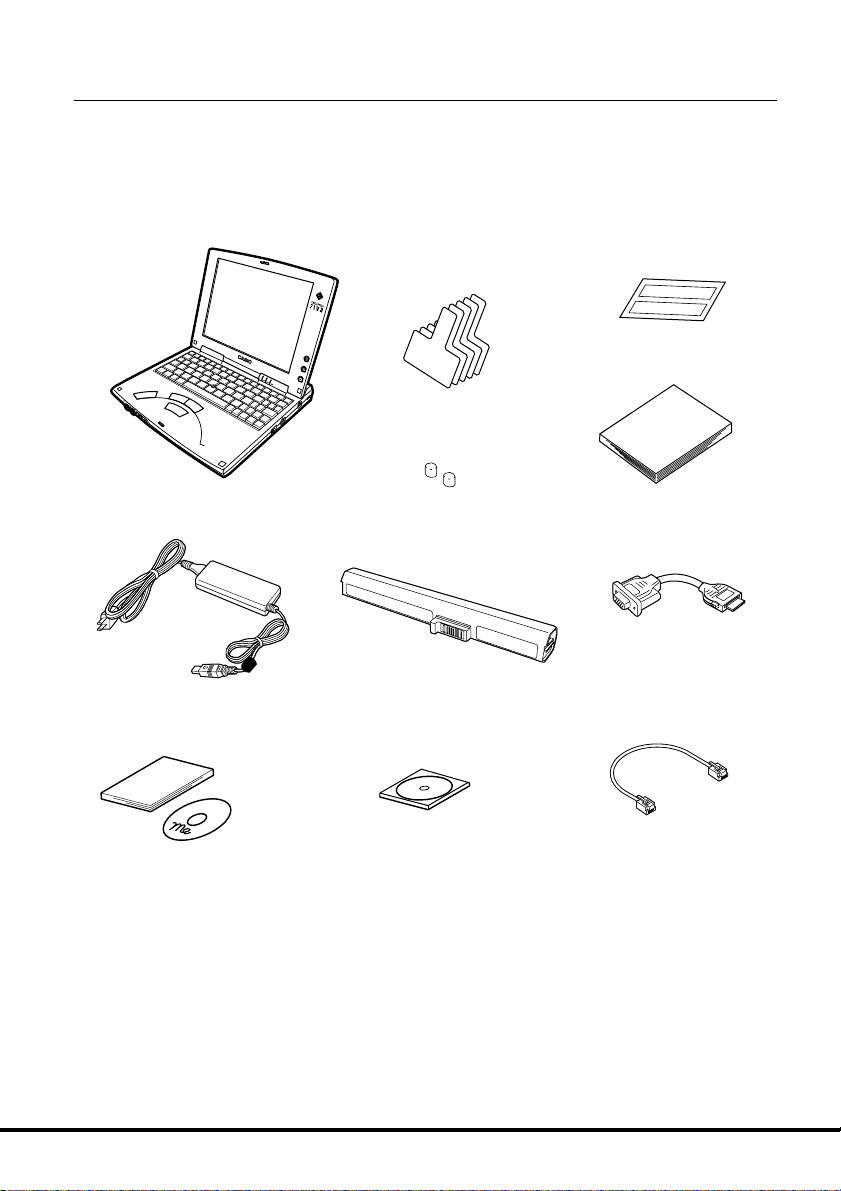
Packing List
Thank you for purchasing the CASSIOPEIA FIVA205E/206E series. A list of the items
included with this product is given below. Confirm that nothing is missing or damaged.
If anything is missing or damaged, contact the dealer from which you purchased this
product.
FIVA main unit
For CF card
Puller tapes (5)
P
1
P
2
P
3
B
B
E
E
D
D
O
O
M
M
A
A
E
E
D
D
O
O
M
M
LAN
Stick caps (2)
AC adaptor Battery pack
Windows Me
Quick Start Guide
W
in
d
o
w
s M
e
W
in
d
o
w
s
Product
Recovery CD-ROM
FiVA
CD
ID sticker
User’s Guide
RGB cable
Modular cable
• Do not dispose of the box and packing materials. Use the box and packing materials
for storage and transport.
1
Page 4
Safety Precautions
• To use this product safely and correctly, read this User’s Guide
thoroughly and operate as instructed.
After reading this guide, keep it close at hand for easy reference.
• Always observe the warnings and cautions indicated on the product.
• If this guide is misplaced or damaged so as to be unreadable, a new
one can be ordered. To obtain a new User’s Guide, contact the dealer
from which this product was purchased.
About the icons
In this guide various icons are used to highlight safe operation of this
product and to prevent injury to the operator and other personnel
and also to prevent damage to property and this product. The icons
and definitions are given below.
Warning!
Caution!
Icon examples
Indicates that there is a risk of severe injury or death if used incorrectly.
Indicates that injury or damage may result if used incorrectly.
To bring attention to risks and possible damage, the following types
of icons are used.
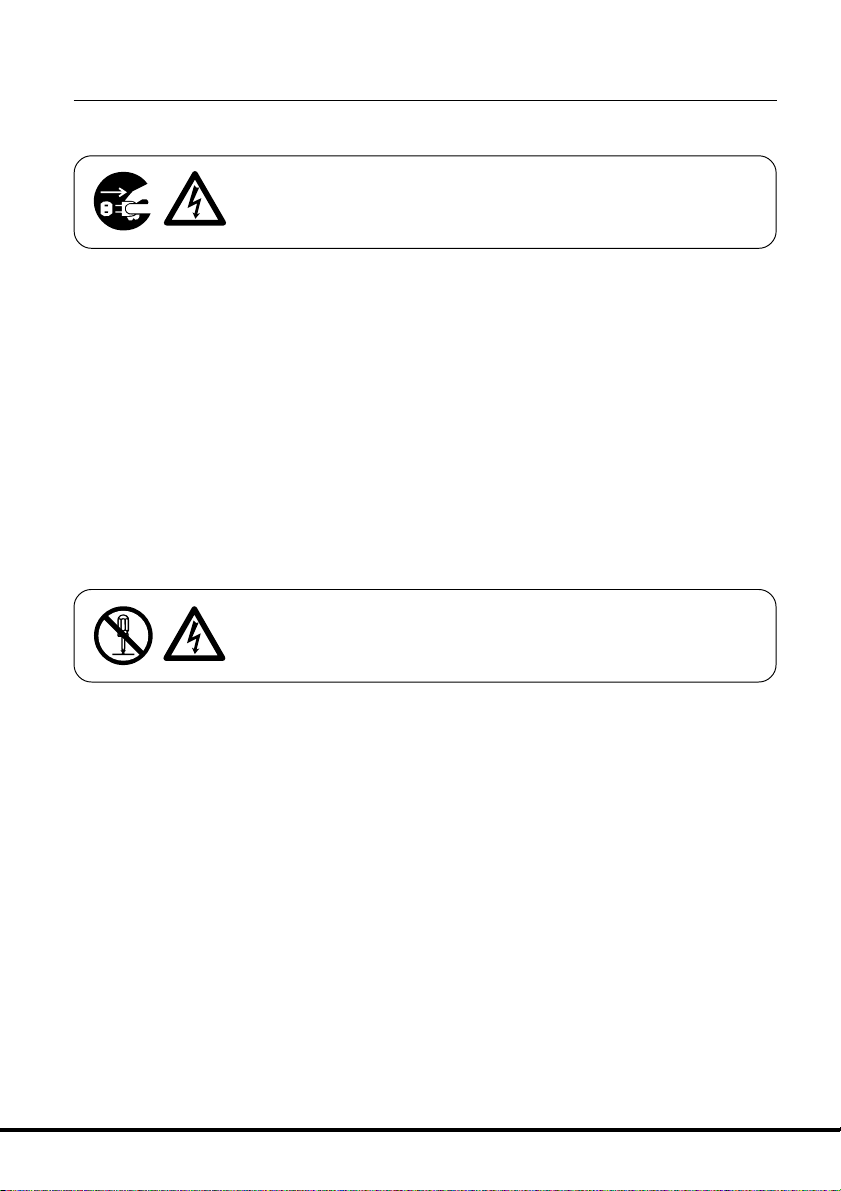
The
includes some symbol for attracting
attention (including warning). In this
triangle the actual type of precautions
to be taken (electric shock, in this
case) is indicated.
The
action. In this symbol the actual type
of prohibited actions (disassembly, in
this case) will be indicated.
The
restriction. In this symbol the type of
actual restriction (removal of the
power plug from an outlet, in this
case) is indicated.
symbol indicates that it
symbol indicates a prohibited
symbol indicates that a
2
Page 5
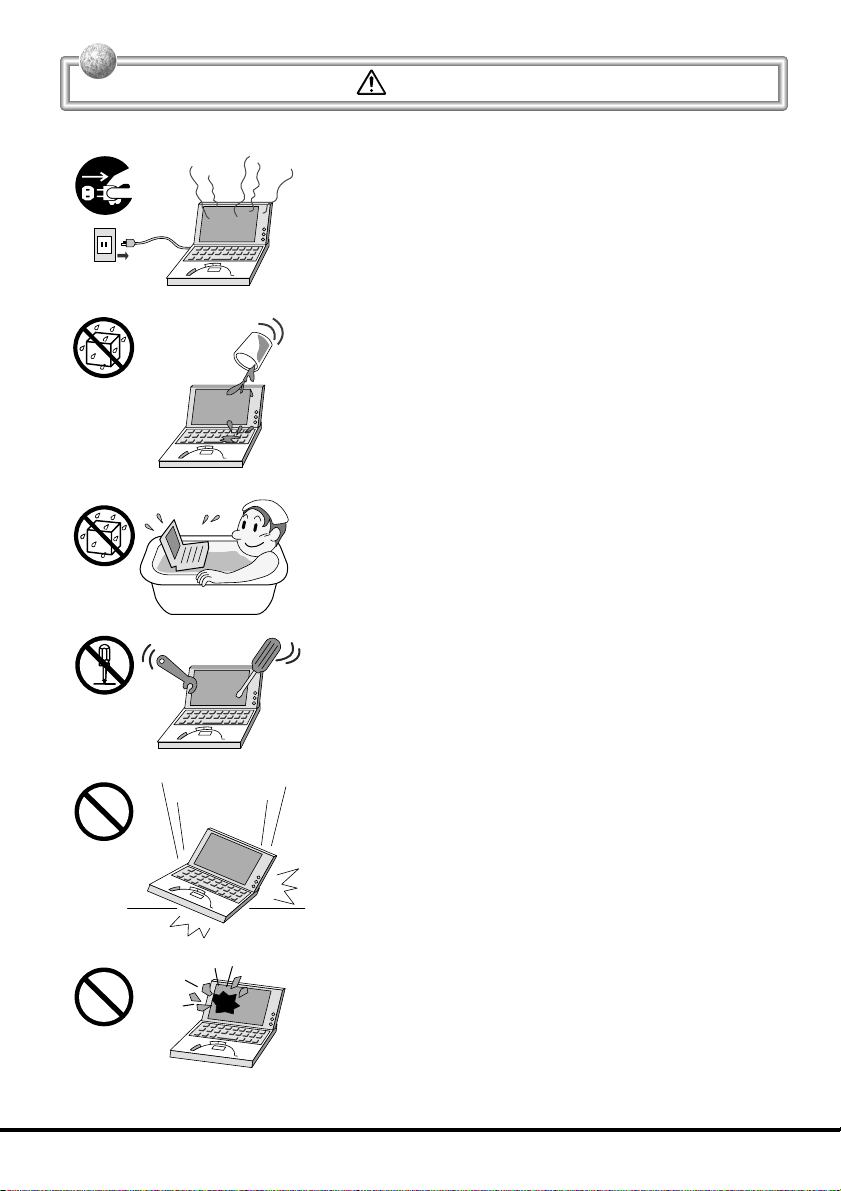
Handling FIVA
Warning!
Should FIVA malfunction, start to emit smoke or a
strange odor, or otherwise behave abnormally,
immediately shut down the power, remove batteries, and
unplug the AC adaptor from the power outlet. Continued
use creates the danger of fire and electric shock.
• Contact your original retailer or authorized distributor.
Do not place containers of liquids near FIVA and do not
allow any foreign matter to get into it. Should water or
other foreign matter get into FIVA, immediately shut
down the power and unplug the AC adaptor from the
power outlet. Continued use creates the danger of
shorting, fire and electric shock.
• Contact your original retailer or authorized distributor.
Never bring in FIVA a bathroom or any other location
where the possibility of splashing or high humidity
exists. Use of FIVA in such an area creates the danger
of electric shock. Be especially carefully when using
FIVA while rain or snow is falling, or in beach areas.
Never try to take FIVA apart or modify it in any way. Highvoltage components inside FIVA create the danger of
fire and electric shock.
• Contact your authorized distributor for all repair and
maintenance.
Should you drop FIVA and damage it, immediately shut
down the power and unplug the AC adaptor from the
power outlet. Continued use creates the danger of
shorting, fire and electric shock.
• Attempting to repair FIVA yourself is extremely dangerous.
Contact your authorized distributor for all repair and
maintenance.
The liquid inside the LCD is harmful to humans. Never
touch it or allow it to get in your mouth.
• Should liquid from the LCD panel accidentally get into
your mouth immediately wash out your mouth with clean
water. If it gets onto your skin, immediately rinse for at
least 15 minutes with clean tap water. In either case,
consult a physician.
3
Page 6
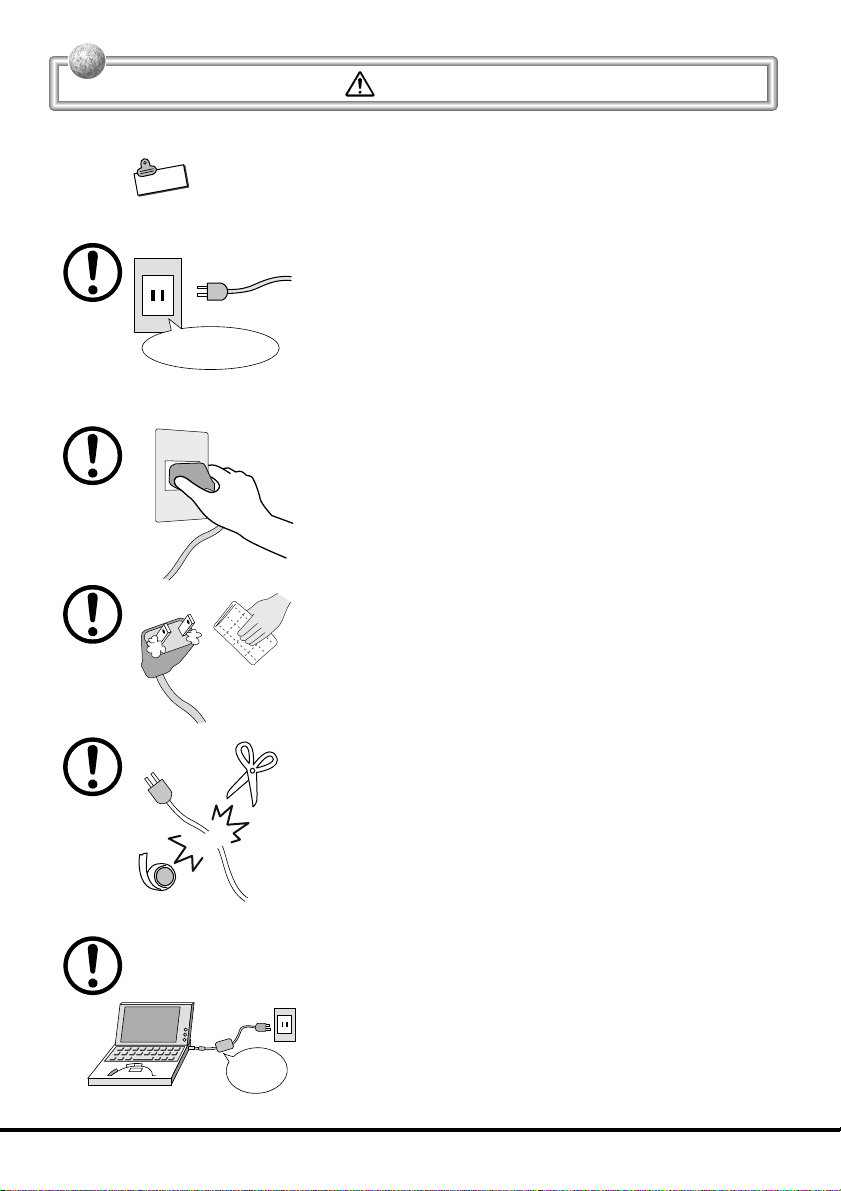
Power Plug and AC Adaptor
AC cord plug and wall outlet illustrated in this User’s Guide shows the
Note
two-pin plug type. It may not be the same shape of AC cord plug used
in your area.
Use only a proper AC electric outlet (100V~240V) when
powering FIVA with the AC adaptor. Use of an outlet with
a different voltage from the rating creates the danger of
AC100~240V
malfunction, fire, and electric shock. Overloading an
electric outlet creates the danger of overheating and
fire.
Make sure the power plug and AC adaptor plug are
inserted as far as they will go. Loose plugs create the
danger of electric shock, overheating, and fire.
• Do not use the adaptor if the plug is damaged. Never
Use a dry cloth to periodically wipe off any dust built up
on the prongs of the plug. Humidity can cause poor
insulation and create the danger of electric shock and
fire if dust stays on the prongs.
Warning!
connect to a power outlet that is loose.
Do not allow the power cord or plug to become damaged,
and never try to modify them in any way. Continued use
of a damaged power cord can cause deterioration of
the insulation, exposure of internal wiring, and shorting,
which creates the danger of electric shock and fire.
• Contact your authorized distributor whenever the power
cord or plug requires repair or maintenance.
Use only the AC adaptor that comes with FIVA or the
one specified by CASIO. Use of another type of AC
adaptor creates the danger of fire.
Supplied
AC adaptor
4
Page 7
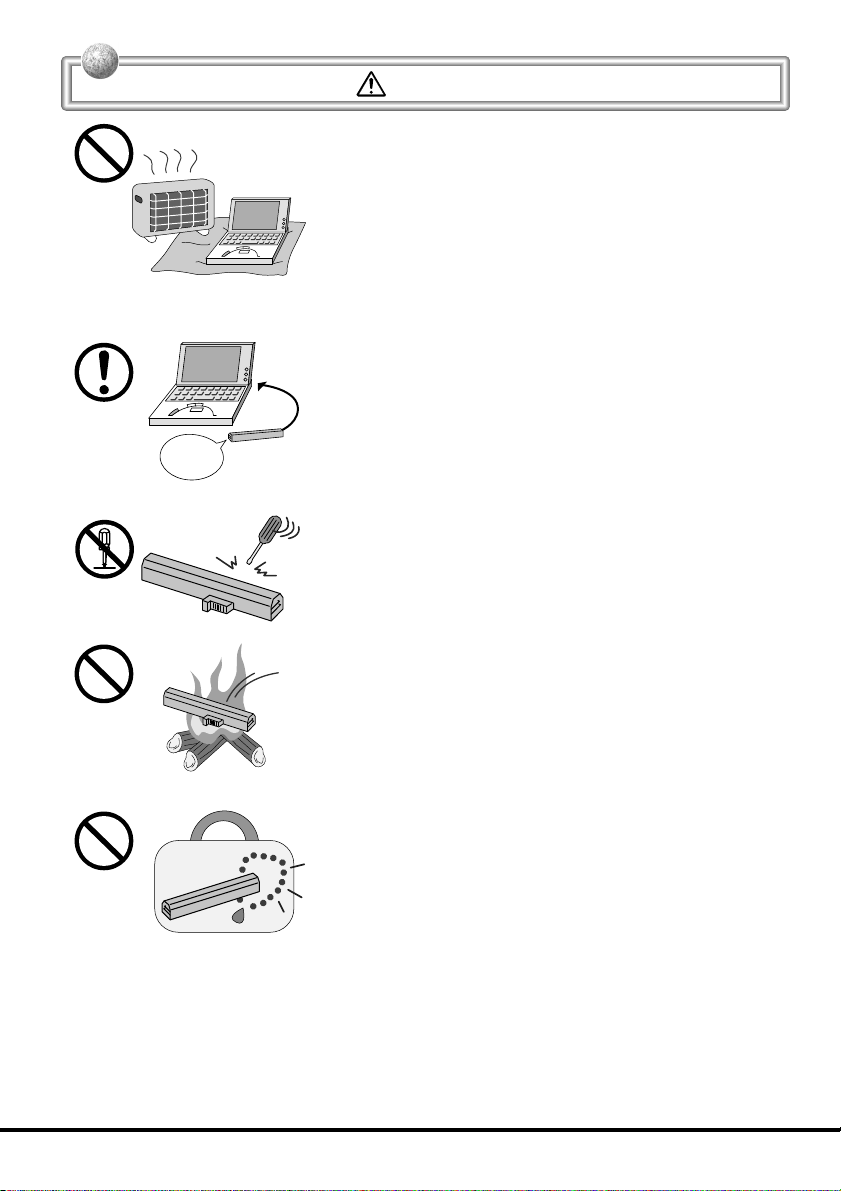
Battery Pack
Supplied
battery pack
Warning!
Do not cover the AC adaptor with a blanket, etc., or do
not place FIVA on the heating rug, near a heater, etc.
Doing so may cause malfunction or deformation of FIVA,
which creates the danger of fire.
Use only the battery pack that comes with FIVA. When
the battery pack reaches the end of its life, replace it
with a new battery pack as specified by CASIO. Other
types of batteries have different voltage rating and
polarity, which creates the danger of fire and bursting
of the batteries.
Never try to take the battery pack apart or modify it in
any way. Doing so creates the danger of overheating,
fire, and bursting of the battery pack.
Never throw the battery pack into fire or otherwise
expose it to direct flame. Doing so creates the danger
of fire and explosion.
Never allow the positive (+) and negative (–) poles of
the batteries to become connected by metal. Do not store
or transport the battery pack together with metal
necklaces, hairpins, or other metal items. Shorting of
the battery pack poles creates the danger of overheating,
fire, and explosion.
• When transporting or storing the battery pack, wrap it in
plastic to keep the poles away from metal items that might
cause a short.
5
Page 8
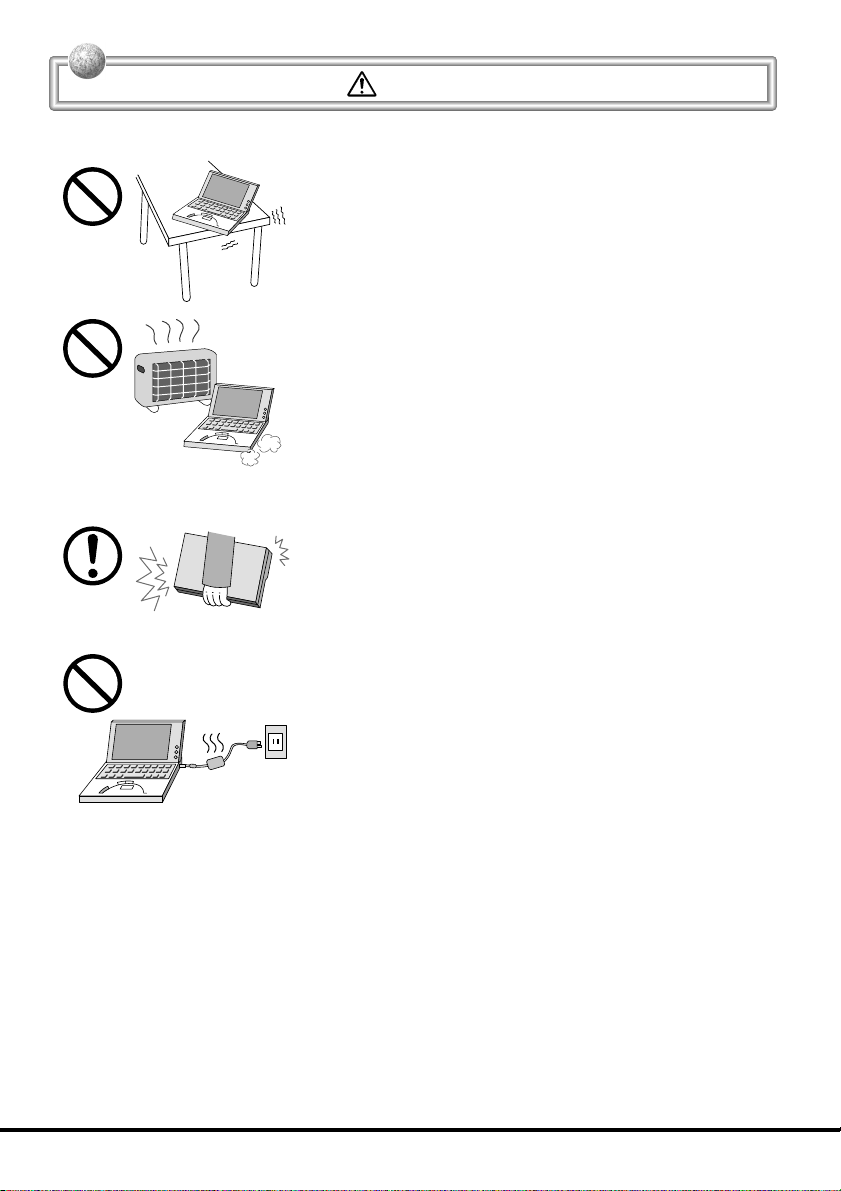
Handling FIVA
Caution!
Do not place FIVA on an unstable or uneven surface.
Doing so can cause FIVA to fall, creating the danger of
malfunction, fire, and electric shock.
Do not leave FIVA in the following areas.
• Areas where FIVA will be subject to large amounts of
humidity or dust, or directly exposed to hot or cold air.
• Areas exposed to direct sunlight, in a close motor vehicle,
or any other area subject to very high temperatures.
The above conditions can cause malfunction or
deformation of FIVA, which creates the danger of fire.
When transporting FIVA, take care to avoid subjecting
it to vibration and impact. This unit contains a hard disk
and other precision components that can be damaged
by rough handling.
The AC adaptor normally becomes warm during use.
Avoid allowing the AC adaptor to rest on your lap or
other part of your body when using it for long period.
Long term with the AC adaptor creates the danger of
burns.
6
Page 9
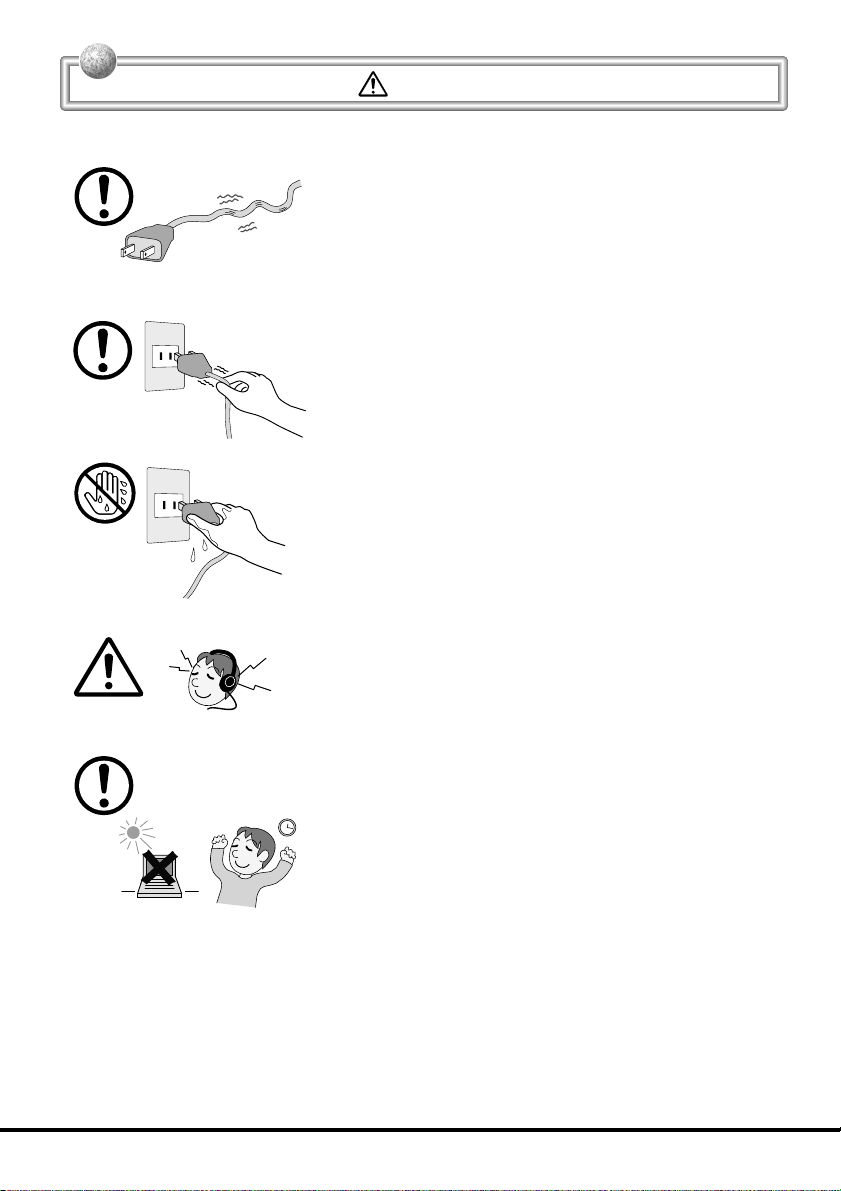
Power Cord and Peripherals
Do not overly bend the power cord, do not allow it to be
caught between desks or other furniture, and never
place heavy objects on top of the power cord. Doing so
can cause shorting or breaking of the power cord,
creating the danger of fire and electric shock.
Be sure to grasp the plug when unplugging the power
cord from the wall outlet. Pulling on the cord can damage
it, break the wiring, or cause short, creating the danger
of fire and electric shock.
Never touch the plug while your hands are wet. Doing
so creates the danger of electric shock. Pulling on the
cord can damage it, break the wiring, or cause short,
creating the danger of fire and electric shock.
When using headphones, make sure you do not turn up
the volume too high. Doing so can cause hearing
damage.
Caution!
Avoid use in areas where the brightness around the
display is very different from surrounding lighting, or
where the sunlight is shining directly on the display.
Such conditions can cause eye fatigue.
7
Page 10

Before Using FIVA
• This product has been designed and manufactured under stringent
quality control. Should you suspect FIVA is defective or malfunctioning,
contact your original dealer or authorized distributor. Repair and
maintenance are subject to the terms and conditions of the Warranty.
The mis-operation of electronic product may create a risk of injury
caused by a fire or electric shock, etc. To avoid the accident, be sure
to follow the instructions below.
•
Follow the cautions
The cautions for FIVA are described on pages from 2 to 7.
•
Do not use FIVA if it does not work correctly
Contact your original retailer or authorized distributor.
•
If FIVA works abnormally
If FIVA malfunctions, or emits smoke, strange odor or noise, etc.,
immediately shut down the power, remove the battery pack, and
unplug the power cord of the AC adaptor from the power outlet.
Contact your original retailer or authorized distributor.
• CASIO COMPUTER CO., LTD. shall not be held liable for any loss or
claims due to using this product except as instructed to do so in this
User’s Guide.
• CASIO COMPUTER CO., LTD. shall not be held liable for any loss or
claims (lost profits, interruption of business, corruption or loss of
memory data, etc.) by you or any third party due to the use of this
product or the inability to use this product for a specific purpose,
except as specifically stipulated by law.
• Unauthorized copying of this product or its software is prohibited.
• This product is guaranteed only when operating under the version of
Windows Me that comes bundled with it.
• This product is guaranteed only when operating under the version of
Windows Me that comes bundled with it.
Product Application
8
• This product is intended for use as a general office computing device.
• CASIO makes no warranties, that this product is fault-tolerant. It is not
designed, manufactured or intended for use in which the failure of
FIVA could lead directly to death, personal injury, or severe physical
or environmental damage.
Page 11
System Recovery
• This product comes with Windows Me and a collection of utility
software pre-installed on its hard disk. Should the problem occur to
the system or applications due to an unexpected malfunction, you
can use the “Product Recovery CD-ROM” that comes with FIVA to
restore the factory default system. This returns FIVA the same settings
and state it was in when you originally purchased it.
Computer Viruses
Avoiding Computer Viruses
A computer virus is a program. It gets installed on your system without
you being aware of it, and can do anything from displaying strange
messages to destroying your data and other programs. A virus can
enter your system via a floppy diskette or network. Taking the following
precautions are normally sufficient to protect against having a virus
invade your system.
• Write protect the master copies of your programs and data files.
• Never open data files or run programs of unknown origin.
• Use a commercially available virus checker to check new programs,
and periodically check your system for virus contamination.
Use the latest version of a commercially available virus checker
to check your system.
An immediate virus check is recommended in the following cases.
• Check your system each time you start up your computer.
• Check any data file or program you received on a floppy diskette or
other external media, over a network, from a BBS or the Internet, via
e-mail, etc. before opening the file or running the program.
FIVA
Caution
• Turn off this product before connecting or
disconnecting peripherals.
• Never apply impact or vibration.
• Never take this product apart.
• Use only the specified AC adaptor.
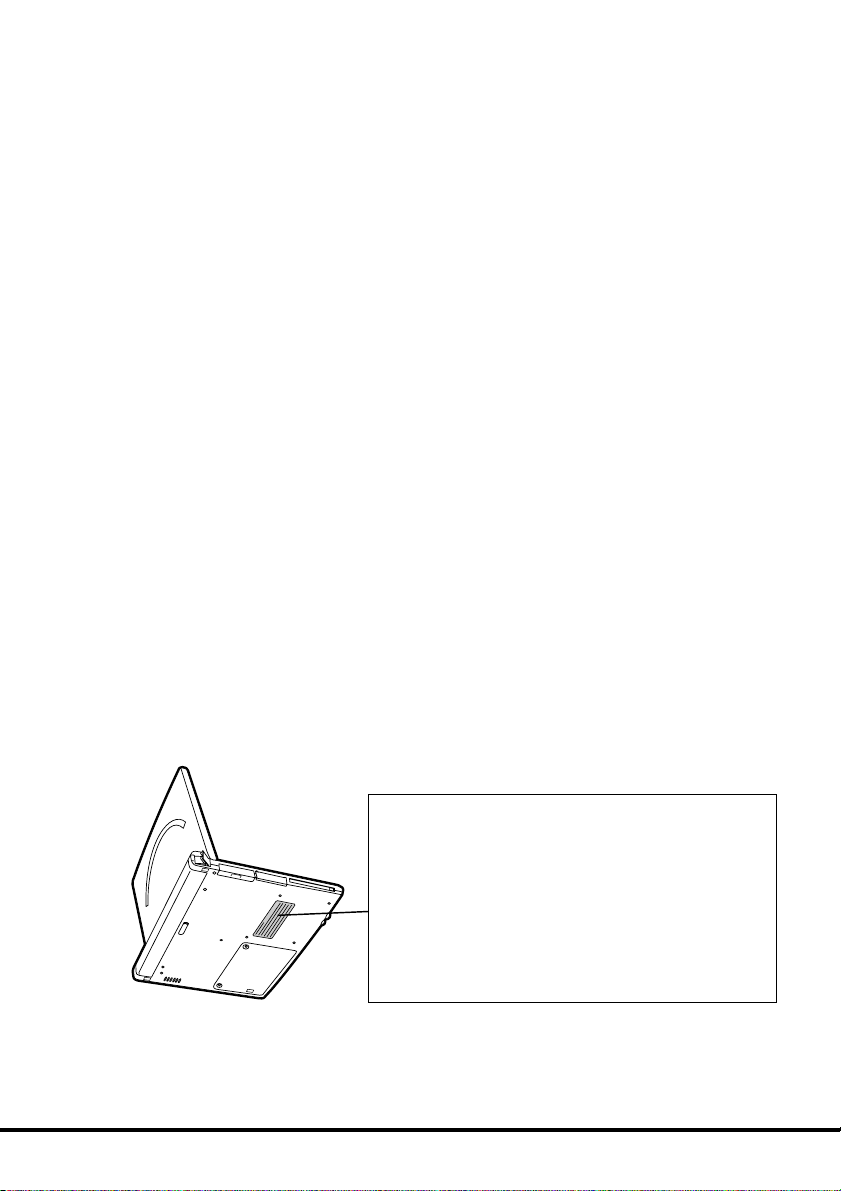
• The bottom of this product becomes warm
during use. Avoid using it on your lap for a
long period.
9
Page 12

Precaution Label
• The label shown above is affixed to the bottom of FIVA.
Be sure to carefully observe these precautions at all times. Never
remove this label.
Should this label ever start to come off or should its contents become
unreadable, contact your original dealer or authorized distributor.
Power Requirements
• Plug the AC adaptor into a power outlet rated for 100V to 240V AC,
50/60Hz only.
• Do not connect FIVA to the same outlet of another device that
generates electrical noise. Such a device can corrupt data in FIVA.
Turning Off Power
• Never shut down the power while the system startup routine is being
executed or while a program is running. Doing so can cause data to
be lost or corrupted, causing malfunction of FIVA.
• Do not turn power on and then suddenly off again. Doing so can
cause data to be lost or corrupted, causing malfunction of FIVA.
Cables
• Use only the cables that come with FIVA or the one specified by CASIO
to connect it to other optional equipment.
• Never pull on cable or place heavy object on it. Doing so can cause
the cable to break or short.
The bottom of FIVA or the AC adaptor becomes warm during use
• This is caused by the CPU operation or the current when FIVA’s battery
is charged. This is not malfunction. The heating value changes
according to the condition of use.
• When FIVA or the AC adaptor is warmer than usual, shut down the
power, unplug the power cord of the AC adaptor and remove the
battery pack.
Contact your original retailer or authorized distributor.
Avoid Strong Vibration and Impact
• Strong vibration or impact can cause malfunction. Be particularly
careful when FIVA is turned on. Vibration and impact can cause
corruption of data on built-in hard disk.
Avoid Water and Moisture
• FIVA is not water resistant. Never use or store FIVA where there is the
danger it might become exposed to water or moisture.
Transporting FIVA
• Be sure to shut down the power and disconnect all options (FD drive,
CD-ROM drive, etc.) before removing FIVA. Leaving cables connected
while removing FIVA can damage the cables and creates the danger
of accident.
10
Page 13

Options
• Be sure to carefully follow the procedures provided in the applicable
User’s Guides whenever connecting or disconnecting peripherals.
Failure to do so can damage FIVA or the peripheral.
AC adaptor: WARNING
• Use the AC adaptor MPC-277ADPE.
Main battery: WARNING
• Replace this main battery with the MPC-273BAT or MPC-274LBAT.
Use of other battery may present a risk of fire or explosion.
• This battery pack is suitable for use only with the MPC-205E or MPC206E.
• Dispose of used batteries according to the manufacturer’s instruction.
Non-CASIO options
• Check with the manufacturer for compatibility before using any nonCASIO options with this unit.
• CASIO assumes no responsibility for any loss (including but not limited
to personal injury, material loss, damage to FIVA) suffered by you or
other arising out of the use of a non-CASIO option.
Hard Disk Data
Disk Operations
• A lit hard disk drive access lamp indicates that a disk operation is
being performed.
• Never shut down while a hard disk drive is being performed. Doing
so can make data or applications on the disk unusable.
Backup Data
• You should occasionally back up data on the hard disk by copying it
to floppy diskette. This ensures that you always have backup data on
hand in case of accidental data deletion or corruption caused by
mis-operation, malfunction, maintenance, etc.
Note that CASIO is not liable for any losses suffered by you or
any third party due to the loss of data stored on FIVA’s hard
disk.
11
Page 14
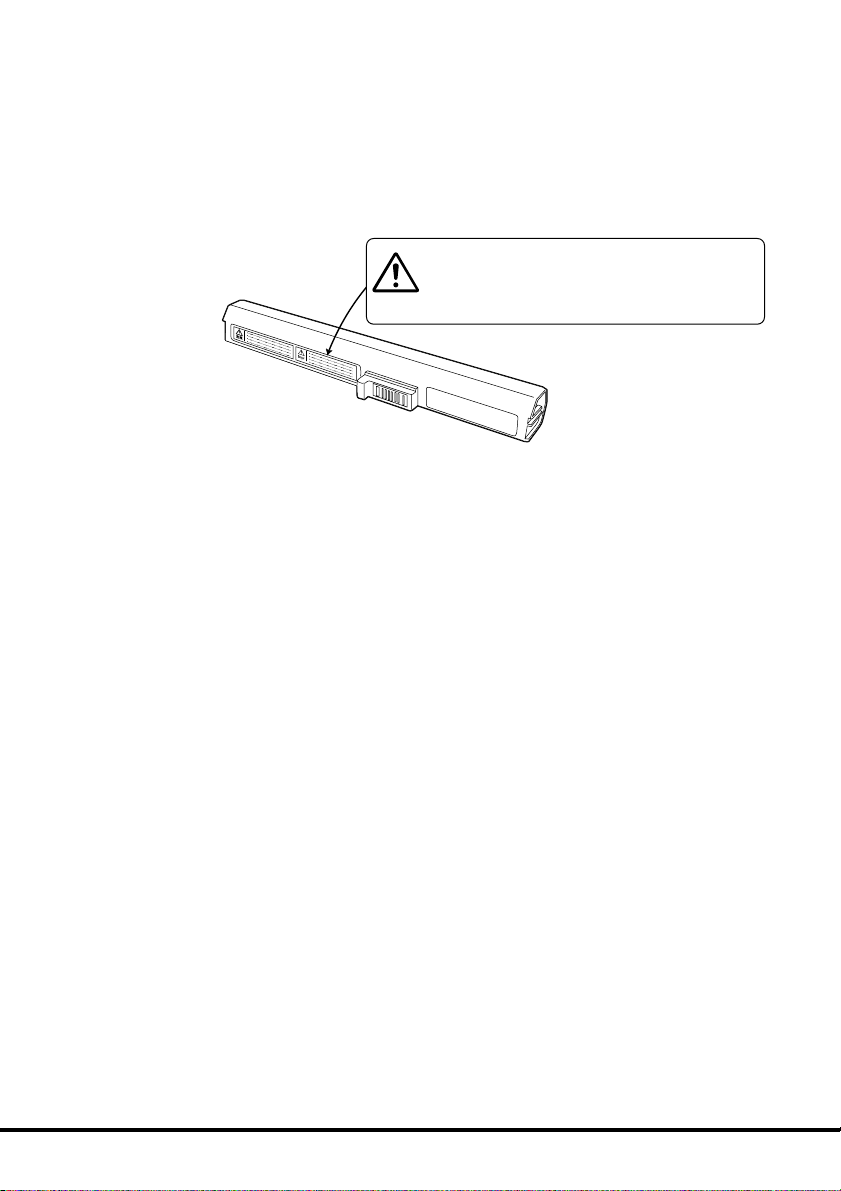
Danger
• Use this product for only specified CASIO product.
• Never take this product apart or modify it or apply an
impact on it.
• Never allow the positive and negative poles to become
shorted by metal.
Consumables
Standard Battery Pack
• Long use of the battery pack causes it to deteriorate and lose its
ability to recharge. If you feel your battery pack is not providing enough
operating time, it may be time to contact your dealer or authorized
distributor about purchasing a new one.
Disposal
When it comes time to dispose of your FIVA, do so in accordance with
local regulations in your area. Contact your local government authorities
for details about proper disposal methods.
12
Page 15
Maintenance and Care
Normal Care
Shut down the power and unplug the power cord from the
power outlet before cleaning FIVA. Cleaning FIVA with the
power on creates the danger of electric shock.
• Clean FIVA by wiping it with a soft, dry cloth. If FIVA is very dirty, wipe
it with a cloth that has been moistened with a weak solution of water
and a mild neutral detergent. Wring out all excess moisture before
wiping.
• Clean the LCD by wiping it with a soft, dry cloth. Never use water,
detergent, or chemical agents to clean the LCD. The surface of the
LCD is easily scratched. Never apply excess pressure when wiping
it.
• Thinner, benzene, or other organic agents can cause deformation or
discoloration of FIVA’s case, and even malfunction of FIVA. Never use
such agents when cleaning FIVA.
Maintenance
Never remove FIVA’S outer cover or otherwise try to take it a
part or modify it in anyway. High voltage inside the case
creates the danger of electric shock.
Whenever you notice any of the following symptoms, immediately shut
down the power, unplug the AC adaptor from the power outlet, and
contact your original dealer or authorized distributor.
• Damaged power cord or plug
• Liquid leaking from FIVA
• Exposure of FIVA to water or rain
• Unit being dropped
• Damaged unit cover
• Very abnormal function
• Abnormal operation
Never try to make any adjustments except as specifically instructed by
this User’s Guide. Improper adjustment or modification of FIVA can
permanently damage it and make it impossible to restore normal
operation.
Never attempt to repair or modify this unit in any way.
13
Page 16
The CE marking below applies to the EU region. Declarator of conformity is as follows:
CASIO ELECTRONICS CO. LTD.
Unit 6, 1000 North Circular Road, London NW2 7JD
GUIDELINES LAID DOWN BY FCC RULES FOR USE OF THIS UNIT IN THE U.S.A.
(not applicable to other areas).
NOTICE
This equipment has been tested and found to comply with the limits for a Class B digital
device, pursuant to Part 15 of the FCC Rules. These limits are designed to provide
reasonable protection against harmful interference in a residential installation. This
equipment generates, uses and can radiate radio frequency energy and, if not installed
and used in accordance with the instructions, may cause harmful interference to radio
communications. However, there is no guarantee that interference will not occur in a
particular installation. If this equipment does cause harmful interference to radio or television
reception, which can be determined by turning the equipment off and on, the user is
encouraged to try to correct the interference by one or more of the following measures:
• Reorient or relocate the receiving antenna.
• Increase the separation between the equipment and receiver.
• Connect the equipment into an outlet on a circuit different from that to which the
receiver is connected.
• Consult the dealer or an experienced radio/TV technician for help.
FCC WARNING
Changes or modifications not expressly approved by the party responsible for
compliance could void the user’s authority to operate the equipment.
Model Number:
Trade Name: CASIO
Responsible party: CASIO INC.
Address: 570 Mt. Pleasant Avenue, Dover, New Jersey 07801.
Telephone number: 973.361.5400
This device complies with Part 15 of the FCC Rules. Operation is subject to the
following two conditions: (1)This device may not cause harmful interference, and
(2)this device must accept any interference received, including interference that
may cause undesired operation.
MPC-205E and MPC-206E.
Industry Canada
Declaration of Conformity
“This digital apparatus does not exceed the Class B limits for radio
noise emissions from digital apparatus as set out in the interferencecausing equipment standard entitled “Digital Apparatus”, ICES-003 of
the Department of Communications.
Industrie Canada
“Cet appareil numérique respecte les limites de bruits radioélectriques
applicables aux appareils numeriques de Classe B prescrites dans la
norme sur le matériel brouilleur : “Appareils Numériques”, NMB-003
édictée par le ministre des Communications.”
14
Page 17

Contents
Packing List .................................................................................................1
Safety Precautions ......................................................................2
Before Using FIVA .......................................................................................8
Maintenance and Care ..............................................................................13
Normal Care .......................................................................................................13
Maintenance .......................................................................................................13
About This User’s Guide...........................................................................18
Chapter 1 Getting Ready........................................................19
Part Names and Their Functions .............................................................21
Opening FIVA .....................................................................................................21
Front ...................................................................................................................22
Back ....................................................................................................................24
Keyboard....................................................................................................26
Key Combinations.....................................................................................28
NumLock Keypad ......................................................................................29
Control Buttons and Stick ........................................................................30
Changing a stick cap ................................................................................32
Before Using FIVA for the First Time .......................................................33
Setting and Removing the Battery Pack .............................................................33
Charging the Battery Pack ..................................................................................34
1
2
3
Chapter 2 Using FIVA .............................................................37
Turning on Power the First Time ..............................................................39
Performing the Windows Me Setup ....................................................................39
Shutting Down the Power.........................................................................45
Using the Sleep function .....................................................................................50
Turning On Power .....................................................................................51
Using the Battery Pack .............................................................................52
Checking the Current Charge Level of the Battery Pack ....................................52
Using the Battery Pack Efficiently .......................................................................54
Using the Large-capacity Battery Pack...............................................................55
Using the One Touch Operation Buttons ................................................56
15
Appendix
Page 18

Chapter 3 Supplementary Information .................................59
Connecting Peripherals ............................................................................61
Connecting a pair of Headphones or a Microphone ...........................................61
Connecting to the LAN port ................................................................................62
Connecting to the modem port ...........................................................................63
Connecting to the USB port
Using External Monitor .......................................................................................67
Connecting to the IEEE1394 port .......................................................................69
Using a PC Card ........................................................................................70
Using a PC Card .................................................................................................70
Using a CF Card ........................................................................................73
Using a CF Card .................................................................................................73
Loading an Expansion Memory ...............................................................76
Using the “Mobile Cockpit II” ...................................................................80
q Switching the tool bar ....................................................................................81
Registering applications in the “Launcher bar” ...................................................81
w Panel .............................................................................................................84
Changing the display position of the tool bar ......................................................84
Pop-up menu ......................................................................................................85
e Settings .........................................................................................................86
One Touch Operation Button Setting ..................................................................86
Wake On Timer Setting.......................................................................................87
Power Management Setting ...............................................................................87
Settings (Preferences) ........................................................................................90
r Power management ......................................................................................91
t Brightness control .........................................................................................92
y Stop functioning of the hard disk ...................................................................92
u Adjusting the volume .....................................................................................92
i PC card properties ........................................................................................93
o Long-Run setting ...........................................................................................94
!0 Battery Control ..............................................................................................95
!1 Battery indicator ............................................................................................96
!2 Standby Mode ...............................................................................................96
!3 Hibernation Mode ..........................................................................................96
.......................................................................64
16
Page 19

Appendix ....................................................................................97
System Restoration ..................................................................................99
Starting up from the “Product Recovery CD-ROM” ..........................................100
Setting the Partition of Hard Disk/Initializing the Hard Disk ..............................101
Making Windows Me Settings........................................................................... 111
Installing applications from the “Product Recovery CD-ROM” ..........116
Installing the CASIO Applications ..................................................................... 116
Making Screen Settings .........................................................................118
Installing Microsoft Me Components ....................................................119
Making a Startup Disk ............................................................................121
Using the Terminal Equipment FB1456VQL12 .....................................122
For users in the United States ..........................................................................122
Notice Concerning FCC Radial Regulations.....................................................124
For users in Canada .........................................................................................125
Main functions of the modem............................................................................126
Connecting to telephone line ............................................................................127
Connecting to the FIVA .....................................................................................128
Caution on operation of the product .................................................................128
Troubleshooting ......................................................................................129
Basic Troubleshooting ......................................................................................129
System Outline .................................................................................................130
Memo about your system .................................................................................130
Power Supply....................................................................................................131
Display Problems ..............................................................................................132
Software Problems ...........................................................................................133
Peripheral Operation Problems ........................................................................134
Text Input Problems ..........................................................................................135
Printing Problems .............................................................................................135
General Operation Problems ............................................................................136
Problems Following Restoration of the System ................................................138
FIVA Malfunction ...............................................................................................138
Specifications..........................................................................................139
Options List .............................................................................................141
17
Page 20

About This User’s Guide
This User’s Guide is divided into the five sections shown below. Be sure
you read the section titled “Before Using FIVA” starting from page 8
before you do anything else.
Before Using FIVA
This section provides important safety precautions and things you need
to know about use of FIVA correctly.
Chapter 1 Getting Ready
This chapter provides you with general description of functions and
part names, and other information you need to know before trying to
use FIVA.
Chapter 2 Using FIVA
This chapter covers such operations as turning on power, setting up
Windows Me, and other operational procedures.
Chapter 3 Supplementary Information
This chapter contains information about how to connect peripherals
and about convenient functions.
Appendix When you run into trouble
This appendix tells you how to solve the problem and how to restore
FIVA to the default settings.
portant
Im
Note
Windows Me means Microsoft Windows Millennium edition operating system. This User’s
Guide described it as Windows Me.
: This mark indicates important cautions and things to which you need
to pay attention when you operate FIVA.
: This mark indicates that you need to memorize.
18
Page 21

Getting Ready
Chapter 1
This chapter provides you with
general description of functions
and part names, and other
information you need to know
before trying to use FIVA.
Page 22

Page 23
MODE B
MODE A
Part Names and Their Functions
The part names introduced in this chapter are used throughout the rest
of this User’s Guide. CASSIOPEIA FIVA has the port and the slot for PC
card in order to connect to peripherals such as a network, the USB
equipment, etc. As the part names are described in this User’s Guide
many times, remember these names introduced in this chapter.
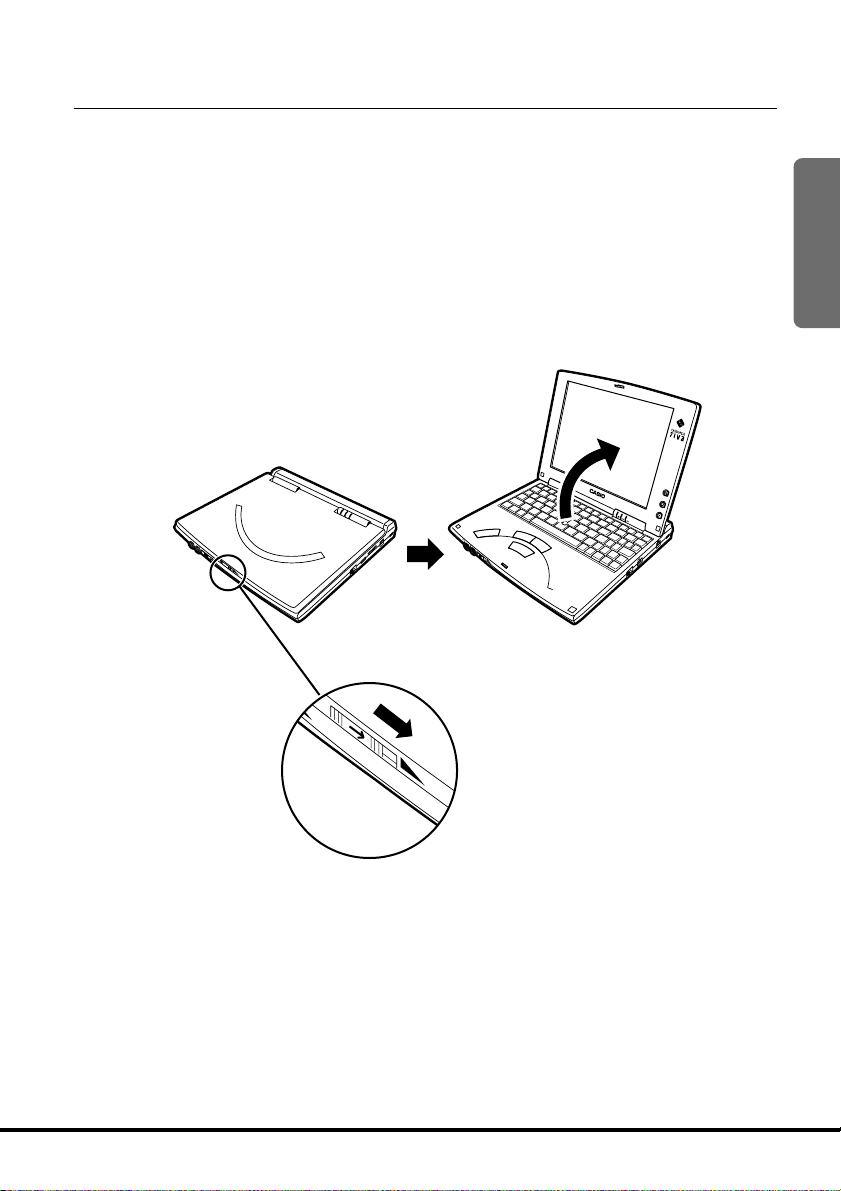
At first, open the display panel.
Opening FIVA
Slide the monitor release lever in the direction of the arrow and open
the display panel.
1
P
1
P
2
P
3
B
B
E
E
D
D
O
O
M
M
A
A
E
E
D
D
O
O
M
M
N
A
L
Release lever
21
Page 24
MODE B
MODE A
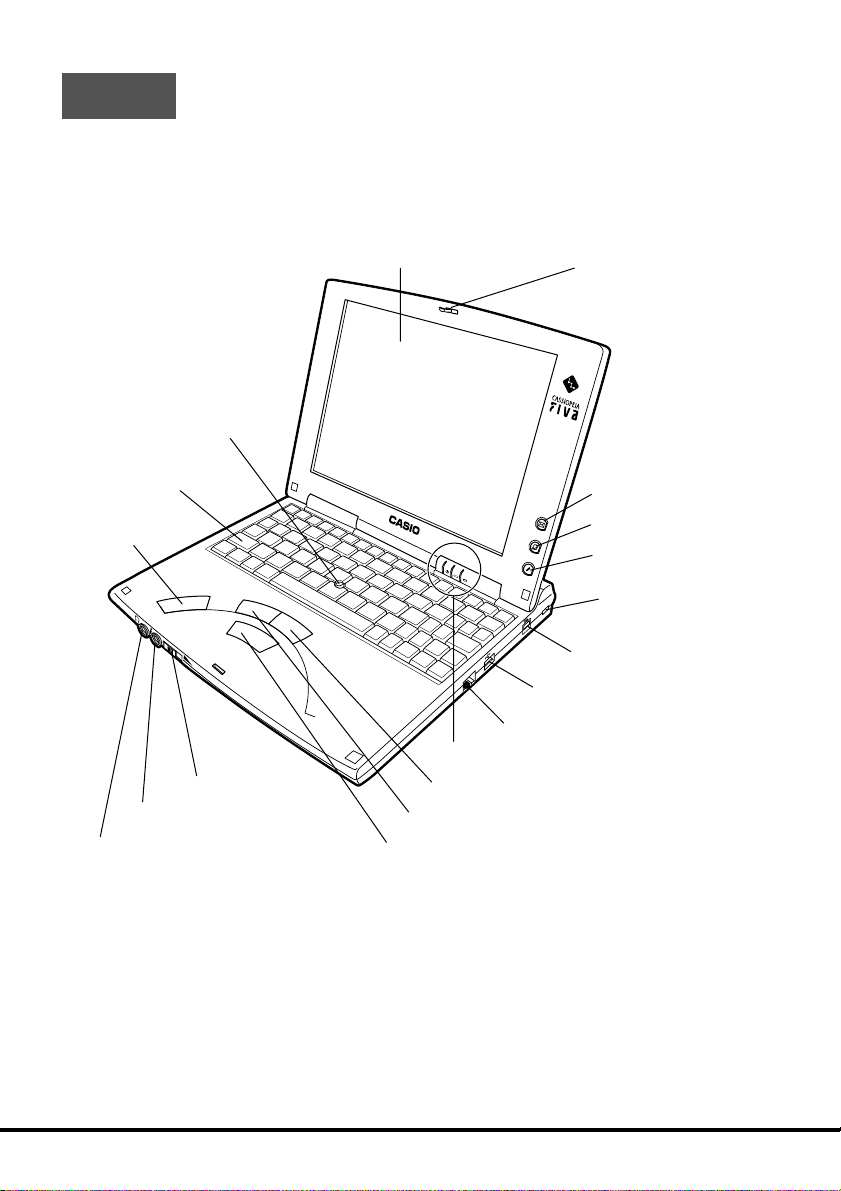
Front
!8
Keyboard
!7
Speaker
!5
!6
Headphone port
!9
Stick
!4
Power switch
Microphone port
q
Monitor
!2
!3
Center button
w
Monitor release lever and latch
P
1
P
2
P
3
B
B
E
E
D
D
O
O
M
M
A
A
E
E
D
D
O
O
M
M
N
A
L
!0
Indicator lamps
!1
Control button (right)
i
o
LAN port
USB port
Control button (left)
e
E-mail button
r
Internet button
t
Memo button
y
Software switch
u
AC adaptor IN
22
Page 25

q
Monitor
8.6-inch color TFT LCD (SVGA)
w
Monitor release lever ( ) and latch
Slide this lever to the right to open the monitor.
You can close the monitor securely using the latch.
e
E-mail button ( )
Press this button to start up the E-mail software.
r
Internet button ( )
Press this button to start up the Internet Browser.
t
Memo button ( )
Press this button to start up the Note pad software.
y
Software switch (
Slide this switch to select the start-up mode.
If you start up FIVA in MODE B, the Linux system will be in function. However, you can use only
the applications (MP3 player and FTP client) available for Linux.
u
AC adaptor IN port (DC IN 16V)
Connect the AC adaptor to this port.
i
USB port (
Connect a peripheral to this port.
o
LAN port (LAN)
Connect the Ethernet to this port.
!0
Indicator lamps
PW ( ): Power indicator lamp (page 53)
BAT (
HDD ( ): Hard disk access indicator lamp (The indicator lights green when the hard disk
!1
Control button (right)
This button functions like the mouse right button.
!2
Control button (left)
This button functions like the mouse left button.
!3
Center button
Move the stick !9 on the keyboard while holding down this button to scroll the display.
!4
Power switch (
Slide this switch to the right to turn ON and OFF the power of the unit.
!5
Microphone port ( )
Connect a commercially available microphone to this port.
!6
Headphone port ( )
Connect a pair of commercially available headphones or a speaker to this port.
!7
Speaker
!8
Keyboard
!9
Stick
Operating this stick moves the pointer.
): Battery pack status indicator lamp (page 35)
MODE A B
)
is in function.)
)
)
1
23
Page 26
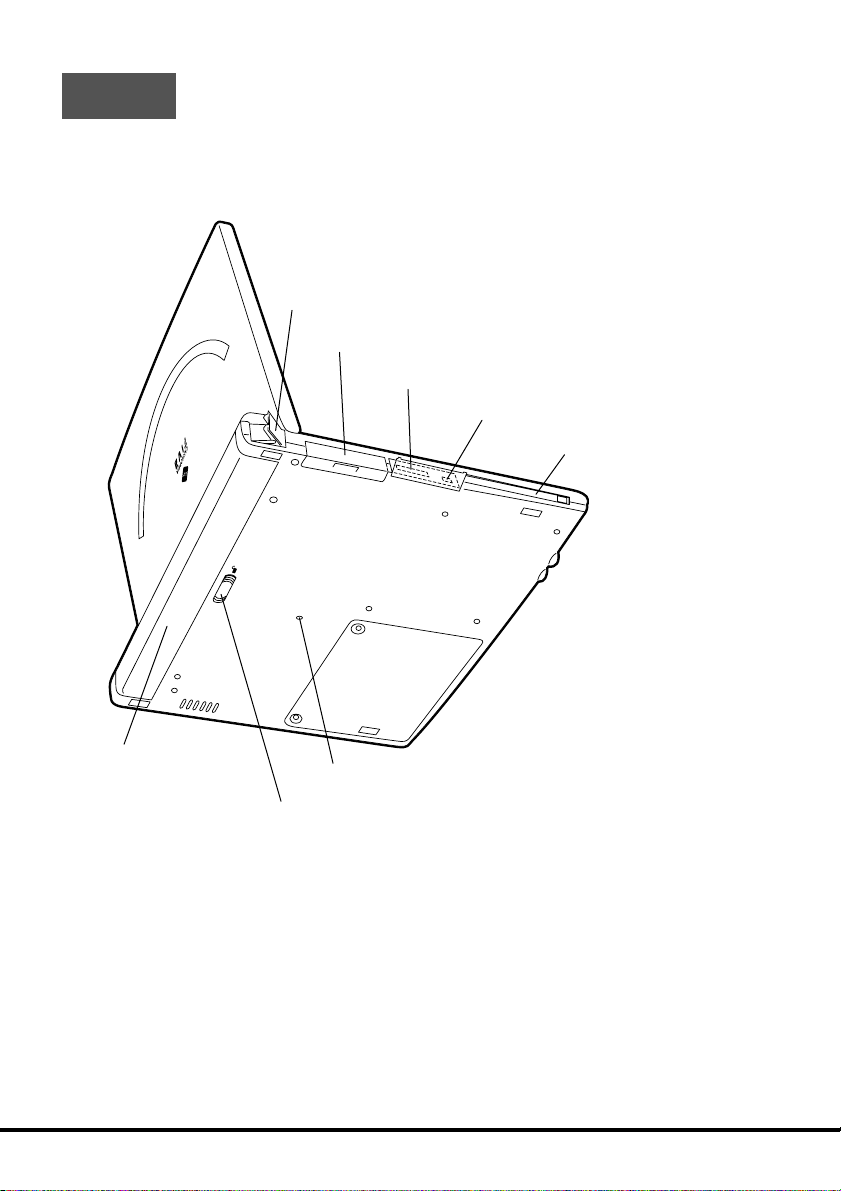
Back
q
Modem port
w
CF CARD slot
e
RGB port
r
IEEE1394 port
PCMCIA CARD
t
PC card
(PCMCIA CARD) slot
24
i
Battery pack
y
Reset switch
u
Battery pack release latch
Page 27

q
Modem port
Plug the modular cable into this port to connect the telephone line via the built-in modem.
w
CF CARD slot (CF CARD)
Insert a CF card into this slot.
e
RGB port (RGB)
Connect an external monitor using the supplied RGB cable.
r
IEEE1394 port (1394)
Connect a digital equipment, e.g., digital video camera to this port.
t
PC card slot (PCMCIA CARD)
Insert a PC card into this slot.
y
Reset switch
Press this switch with a thin, pointed object to forcibly turn off the unit. Use this switch only
when experiencing operational problems.
u
Battery pack release latch ( )
Slide the latch to remove the battery pack.
i
Battery pack
Install the removable battery pack.
1
25
Page 28
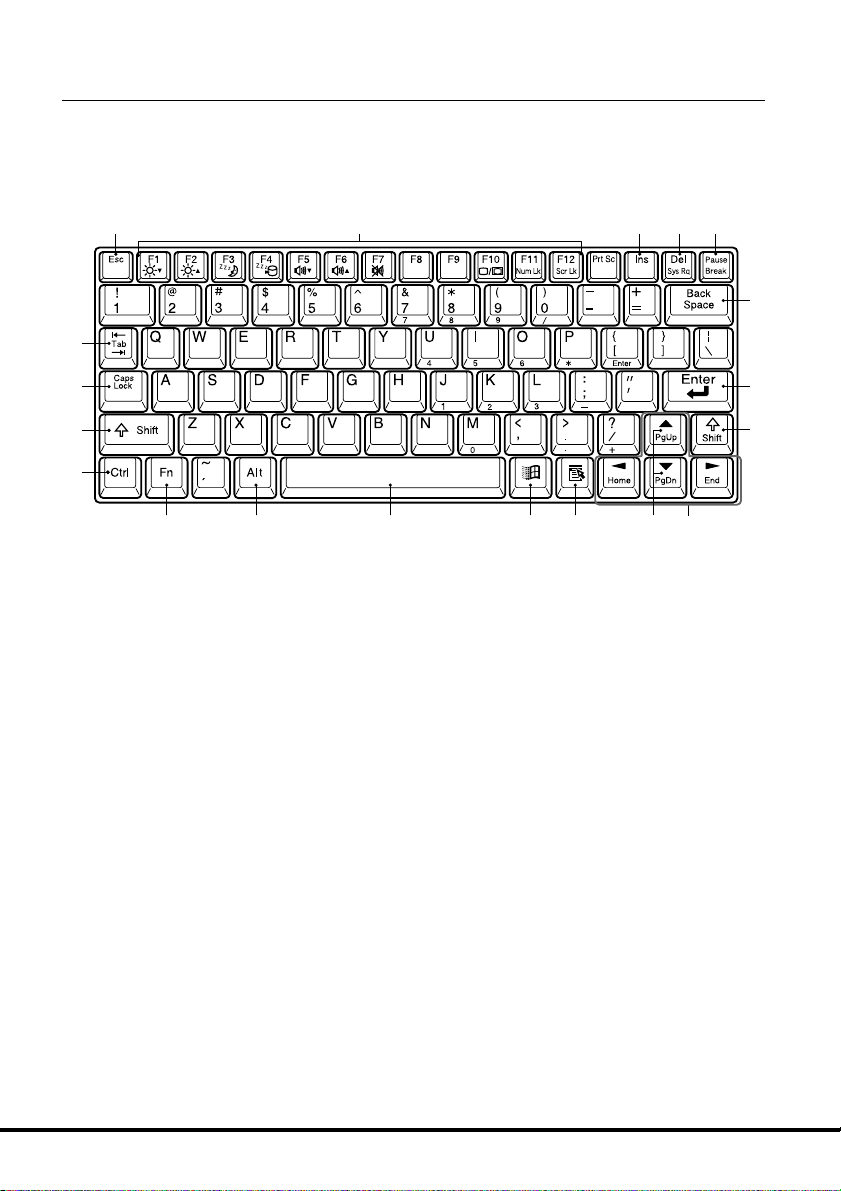
Keyboard
This section describes the basic functions of the keyboard. Actual
keyboard functions may differ in accordance with the application you
are using.
q w
!8
!7
i
!6
!5
The above keyboard layout shows the US version.
e r t
y
u
i
!3!4
!1 !0 o!2
26
Page 29
No.
q
w
e
r
t
y
u
i
o
!0
!1
!2
!3
!4
!5
!6
!7
!8
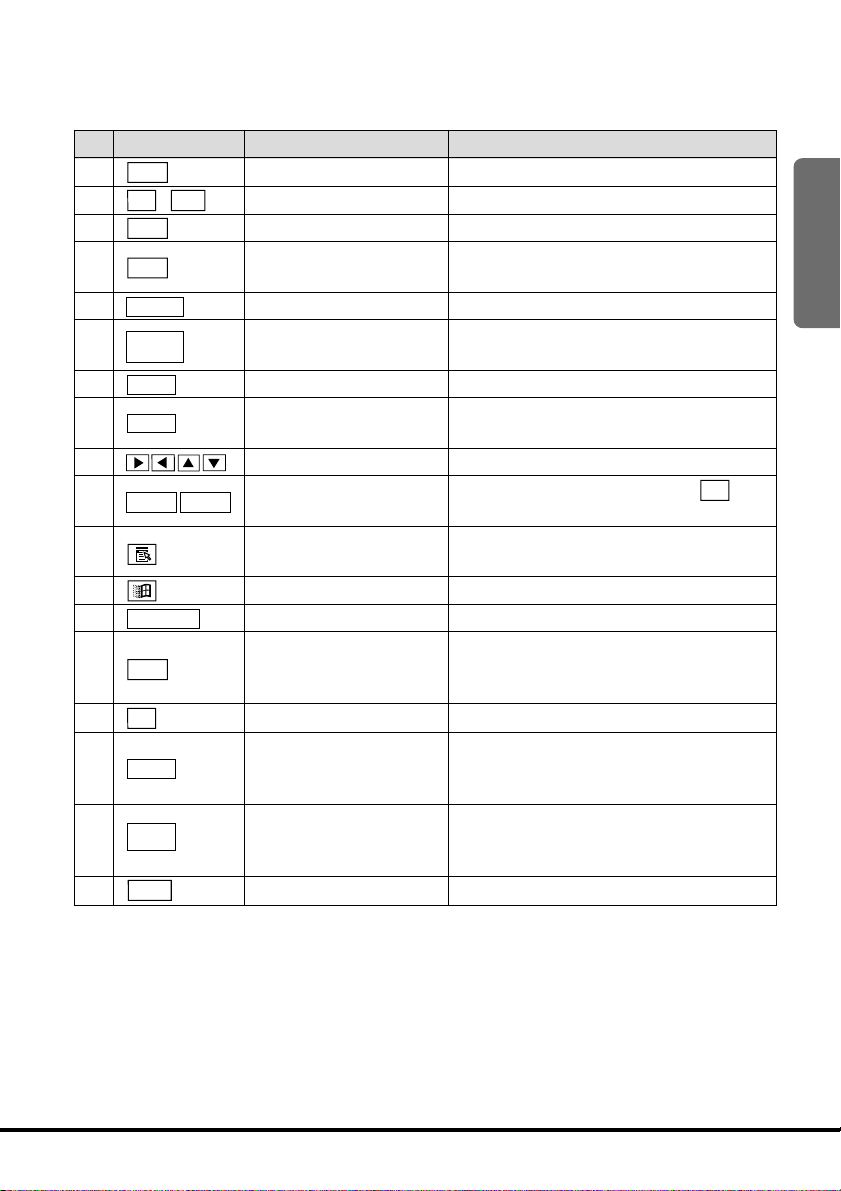
Key
Esc
F1~F12
Ins
Del
Pause
Back
Space
Enter
Shift
PgUp
Alt
Fn
Ctrl
Caps
Lock
Ta b
PgDn
Key Name
Escape
Function
Insert
Delete
Pause
Backspace
Enter (Return)
Shift
Cursor
Page Up, Page Down
Application
Windows
Space
Alternate
Fn
Control
Caps Lock
Ta b
Description
Cancels an operation.
Execute specific functions.
Toggles character insertion on and off.
Deletes the character to the right of the
cursor.
Pauses a process.
Deletes the character to the left of the
cursor.
Enters data or inserts a carriage return.
Shifts the keyboard between upper
case and lower case.
Moves the cursor on the screen.
Pressing these keys after the Fn key
scrolls the screen one page up or down.
Performs a mouse right button click
operation (context menu display).
Displays the Windows Me Start menu.
Inputs a blank space.
Used in combination with other keys to
perform operations and execute
commands.
Activates certain “hot keys” functions.
Used in combination with other keys to
perform operations and execute
commands.
Pressing this key while holding down
shift locks the keyboard in upper-case
input.
Inputs a tab operation.
1
27
Page 30
Key Combinations
• Key combinations where you must hold down one key and press a second key are
indicated by a plus symbol.
Shift
Ctrl
Fn+Prt sc
Alt
Caps
+
Lock
Alt
+
+
Fn
Del
+
+
Del
• The following shows the key combinations that are available with the key.
This key operation shift locks the keyboard for uppercase character input. Perform this operation again to
unshift the keyboard.
Restarts the system without turning off power.
Places a displayed image of the entire screen onto the
clipboard.
Places a displayed image of the active window onto
the clipboard.
Shift
Ctrl
+
R
M
+
+ +
F1
+
E
+
F
+
+ +
Ta b
+
+
Break
Displays the Run dialog.
Iconizes all windows.
M
Expands all icons to windows.
Displays online help.
Starts up Windows Explorer.
Displays the file or folder search screen.
F
Displays the computer search screen.
Sequentially selects the buttons on the Taskbar.
Displays System Properties.
28
Page 31

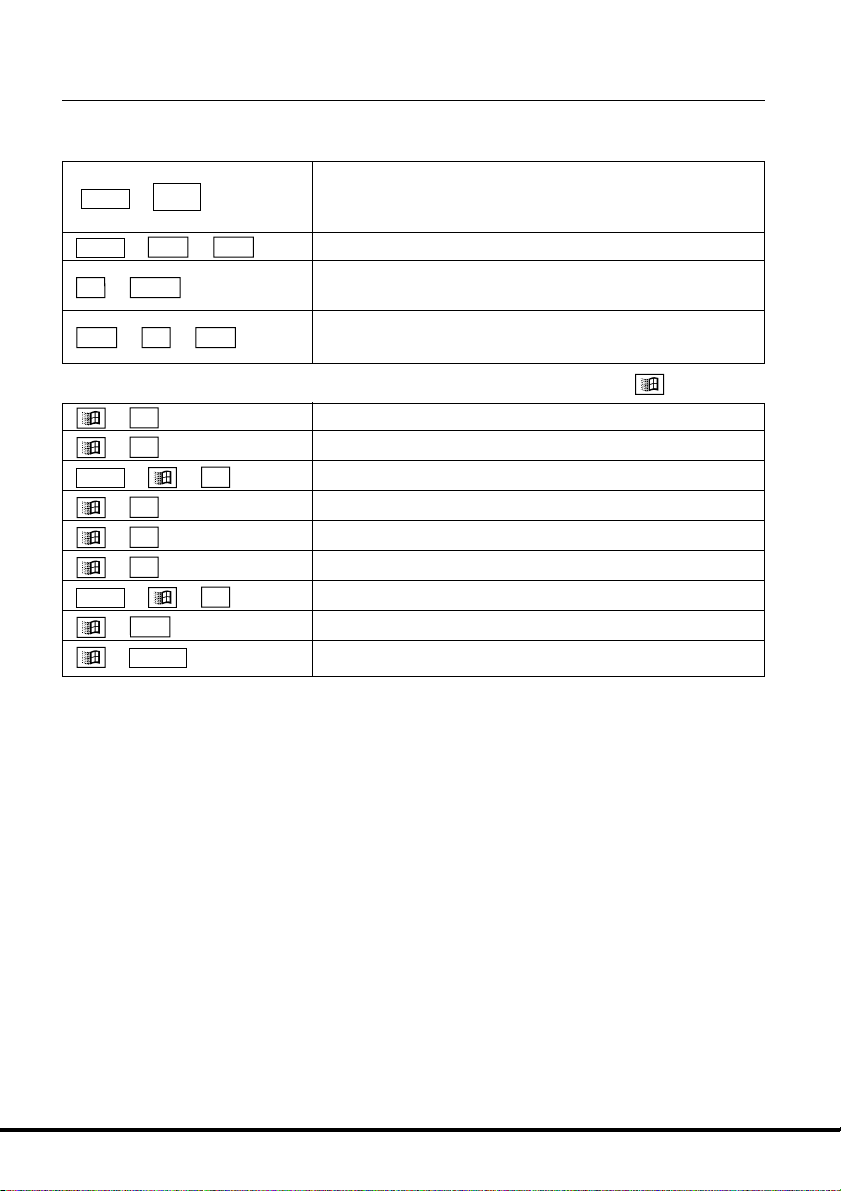
• The following shows the key combinations that are available with the Fn key. This is
called the “hot keys” function.
Fn
F1
Fn
Fn
Fn
Fn
+
F2
F3
+
F4
+
F5
+
F6
F7
+
Increases or decreases LCD brightness.
Puts FIVA into Standby Mode. (Pages 47, 96)
Puts FIVA into Hibernation Mode. (Pages 48, 96)
Increases or decreases speaker sound volume.
Stops speaker sound.
Cycles through monitor function in the following
F10
Fn
+
sequence: LCD(FIVA) → CRT* → CRT* and LCD(FIVA)
→ LCD(FIVA).
The keyboard enters the NumLock mode and the
Fn
F11
+
specific keys can be used as numeric keys (see next
page for details).
Fn
F12
+
, , and keys can be used when scrolling
the screen on some software.
*CRT = External monitor
• Some hot key combinations are not available while the system is
Note
starting up, or in Standby Mode or Hibernation Mode.
• Using hot key combinations during high-speed data communications
can cause data communication errors.
1
NumLock Keypad
Holding down Fn and pressing
numeric keypad functions to the keyboard keys shown below. Press
Fn
+
to cancel NumLock.
F11
activates NumLock, which assigns
F11
29
Page 32

Control Buttons and Stick
MODE B
MODE A
FIVA has a stick, two control buttons and a center button to control the
pointer (
• Stick
This can be used to control the pointer on the screen.
Put a finger on the stick and move it in every direction to control the
pointer on the screen.
The pointer speed can be changed according to the force you press
the stick.
When you press the stick strongly, the pointer speed becomes fast.
Pressing the stick straight is the same operation as pressing the left
control button.
• Control Buttons
Move the pointer to the desired item and select it with the left or right
control button.
The left and right control buttons function like the left and right buttons
of the mouse respectively.
• Center Button
The part which is not displayed on the screen can be viewed by
scrolling the display. While holding down this button, operate the stick
in the direction of the part you want to view (available only for the
software compatible with this function).
).
30
Im
portant
P
1
P
2
P
3
Stick
B
B
E
E
D
D
O
O
M
M
A
A
E
E
D
D
O
O
M
M
Control button (left)
Control button (right)
N
A
L
Do not touch the stick, buttons or keyboard with hands which have
hand cream or oil on them. Doing so may cause fingers to slip while
Center button
operating and intrusion of oil-based compounds into the unit may cause
a malfunction such as input failure.
Page 33

The following operations can be performed with the control buttons.
Function
Click
Double-click
Drag and
drop
Click with the
right control
button
Control Button Operation
Move the pointer to the desired position and press the left control
button once.
This button is used to select OK, Next, etc.
Move the pointer to the desired position and press the left control
button twice in succession.
You can start up an application.
While holding down the left control button, move the pointer with the
stick.
An object, e.g., icon, can be moved together with the pointer (drag).
When you reach the location where you want to place the object,
release the control button (drop).
When the right control button is pressed, the menu is displayed. The
various menus are displayed in accordance with the item you clicked.
Example 1) Press the right control button at the specified location.
1
Example 2) Press the right control button on the desk top.
Scroll
The setting of the pointer can be specified in the window setting menu opened by
selecting Control Panel and double-clicking Mouse. The speed of the double-click or
pointer can be adjusted.
While holding down the center button, operate the stick so that the
scroll bar on the software is moved upward, downward, leftward and
rightward.
31
Page 34

Changing a stick cap
The stick cap is an expendable item. It can be replaced with a supplied
new one when it is worn.
Stick cap (supplied)
Im
portant
Put the cap on the stick firmly. Otherwise, the cap may damage the
LCD monitor when you close the display panel.
32
Page 35

Before Using FIVA for the First Time
Though operation is possible using the AC adaptor only, it is a good
idea to attach the battery pack and charge it before using FIVA for the
first time.
Setting and Removing the Battery Pack
When you set the full-charged battery pack, you can use this unit without
connecting the AC adaptor.
Make sure you correctly set the battery pack so it does not come off
accidentally during unit operation. Set up and removal procedures are
the same for both standard battery pack and large-capacity battery
pack.
Im
portant
The battery pack that comes with FIVA is not charged when you purchase
it. Be sure to fully charge the battery pack before using it to power FIVA.
Use only the battery pack that comes with FIVA or a battery pack
specified in this User’s Guide. Use of other type of battery pack
creates the danger of fire.
To set the battery pack
1. Close FIVA and turn it over.
2. Carefully slide the battery pack onto FIVA as shown in the illustration
below until you hear it click securely into place. If you have trouble
getting the battery pack to connect to FIVA, try sliding the battery
pack release latch. Do not turn on FIVA yet.
1
Battery pack release latch
Make sure the battery pack is set securely to FIVA. Improper
setting can cause the battery pack to fall off during transport.
33
Page 36

Note
To remove the battery pack
Before removing the battery pack, be sure to turn off the power. (When
the AC adaptor is connected to FIVA and a power outlet, you can remove
the battery pack without turning off the power.)
1. Close FIVA and turn it over.
2. While sliding the battery release latch in the direction indicated in the
illustration below, pull the battery pack from FIVA.
Make sure you have a firm grasp of the battery pack when you
pull it from FIVA. Dropping the battery pack can cause it to fall on
your foot or otherwise cause personal injury.
• If you remove the battery pack while the power of FIVA is turned on
without connecting the AC adaptor, data may be erased. Also, if you
remove the battery pack while FIVA is in Sleep Mode, data may be
erased. To prevent data from erasing, be sure to connect the AC
adaptor.
Charging the Battery Pack
The battery pack is fully charged in about 2.5 hours while the AC adaptor
is connected and plugged into a power outlet, regardless of whether
the FIVA is turned on or not.
1. Connect the AC adaptor to one end of the power cord (q) and the
other to the power outlet (w).
Use the AC adaptor that comes with this product or the one
specified by the manufacturer. Otherwise, it may create the danger
of fire arisen from emitting smoke or catching fire.
34
Page 37

2. Connect the plug of the AC adaptor to the AC adaptor IN port (DC IN
q
w
e
16V) on the side panel of FIVA (e).
The BAT ( ) indicator lights orange while the battery is being charged,
and the indicator lights green when the battery is fully charged.
If the BAT (
internal protection circuitry has activated to cancel the charge operation.
If this happens, try disconnecting the AC adaptor and battery from FIVA,
and then resetting them. If this problem persists, it could indicate
malfunction of the battery pack or FIVA. Contact your original retailer or
authorized distributor.
) indicator lamp goes out during charging, it means FIVA’s
1
Battery Indicator Lamp
Green
Orange
Off at start of charge
Off during charge
When removing the AC adaptor from the AC adaptor IN port, hold the
plug of the AC adaptor firmly and pull it out straight as shown below.
Meaning
Full charge
Charging
Charging is disabled. Try charging again in an area where
temperature is within allowable range.
Charge was aborted. Remove battery pack from unit and
check it for external abnormality.
Do not pull the cord itself.
Doing so may damage the
cord and cause it to break or
short circuit, creating the
danger of a fire and electric
shock.
35
Page 38

Im
ote
N
portan
• If the battery pack is attached to FIVA, do not unplug the AC adaptor
until the BAT (
) indicator lamp turns green (full charge). This helps
to extend battery pack life.
• The battery pack requires period replacement. The end of a battery
pack’s service life is indicated when the battery pack powers FIVA for
a relatively short period after a full charge. When this happens, replace
the battery pack with a new one.
• See page 52 for information about battery pack life and charging
capacity.
t
• Locate the AC adaptor power cord in a place where it will not be
tripped over.
• Charge the battery pack in an area where the temperature is within
the range of 5°C to 35°C (41°F to 95°F). The battery pack may fail to
reach a full charge at temperatures outside this range. In this case
the BAT (
) indicator lamp does not light.
• If the power cord is connected to a power outlet for a long time, the
plug may become dusty. Clean the plug occasionally.
36
Page 39

Using FIVA
Chapter 2
This chapter covers such
operations as turning on power,
setting up Windows Me, and
other operational procedures.
Page 40

Page 41

Turning on Power the First Time
The first time you turn on the power, you must perform a Windows Me
setup procedure. You need to perform this procedure only once. After
that, Windows Me will boot up automatically when you turn on the power.
The Windows Me setup routine lets you make the settings listed below.
The “Product Key” is sealed on the bottom of this unit. Have it on hand
when performing the setup procedure for the first time.
Setting
End-user License
Agreement
Product Key
Performing the Windows Me Setup
When you turn on the power of this unit for the first time, perform the
Windows Me setup procedure.
Im
portant
Do not shut down the power once the Windows Me setup procedure
starts. Also, be sure to power FIVA with its AC adaptor while performing
the setup procedure.
1. Open up FIVA.
2. Slide the power switch (
Though it may take a few moments before anything appears on the
display, you do not need to keep the power switch slided. Simply
press it once and release it.
Read and agree to the terms and conditions of the Enduser License Agreement.
Input the correct Windows Me Product Key number.
Description
2
) to the right.
3. The message below appears after the “Windows Me” screen is shown.
Click Yes immediately to restart FIVA.
39
Page 42

4. The CASIO logo appears for a few moments.
And, the “Windows Me” screen appears.
After the CASIO logo appears, the screen goes blank and then
Windows Me starts up.
After that, “Welcome to Microsoft Windows” screen appears.
To use the Windows Me, follow the procedure below.
First, click
Next.
40
Page 43

5. “Select your time zone” appears.
Select your local area and click
6. Read and agree to the Software License Agreement.
• Be sure you read the terms and conditions of the Microsoft Software
End-user’s License Agreement.
• To read all, use the
(Fn + ) button to scroll the screen.
or button, or
Next.
PgUp
(Fn + ) or
2
PgDn
Click here.
• Click the option button next to “Yes, I accept this agreement.”,
and then click
Next.
41
Page 44

Im
portant
7. Input the Product Key number.
• Input the Product Key number that is printed on the Certificate of
Authenticity affixed to the back of this unit, and then click
Next.
All the letters and numbers you type in this screen are automatically
input in upper case, even if you do not press the
Shift
key.
Make sure you input the Product Key number correctly. Take care that
you distinguish between the letter O and the number 0 (zero).
• The message shown below appears if you do not input the correct
Product Key number. Click the OK button and input the correct
Product Key number.
42
Note
Your Product Key number is required whenever you request support or
when you need to restore the system. Store the “Windows Me Quick
Start” manual in a safe place so you can look up the Product Key number
when you need it.
Page 45

8. Register with the Microsoft.
You can register with the online system.
If you do not want to register immediately, you can register afterward.
9. When Setting is complete appears, click the Finish button.
2
43
Page 46

Note
• The above screen appears after Windows Me setup is complete.
Now Windows Me will start up whenever you turn on FIVA. For full
details on using Windows Me, see the “Windows Me Quick Start
Guide” manual that comes with FIVA.
This unit comes with a number of pre-installed applications. See page
80 of this User’s Guide for information about how to use these
applications.
44
Page 47

Shutting Down the Power
This section describes various ways to turn off the power.
Select “Shut down”, “Restart”, “Stand by” or “Hibernate” from the Start
menu.
The following ways are also available.
• Slide the power switch so that the unit enters the “Stand by”,
“Hibernate” or “Shut down” mode. However, if you keep sliding the
power switch for more than 4 seconds, the system is quit forcibly and
the power is turned off (see “Preferences “ on page 90).
• Close the display panel so that the unit enters the “Stand by” or
“Hibernate” mode.
The amount of power FIVA consumes when the power is turned off and
the time until Windows Me is reactivated differs in each of these power
save modes.
Fully understand the features of each of these power save modes, and
select the mode that best suits your particular requirements.
2
Mode
Power Off None Long (restart) Almost zero Off
Standby Memory Fast Yes Flashing
Hibernation
Im
Storage Time Unit Power
for state Recovery Consumption
Hard Disk Long Almost zero Off
FIVA’s default settings cause it to enter the Standby Mode if you do not
Note
portant
perform any key or thumb pad operation for about 10 minutes under
battery power alone. After another 10 minutes continuously without
operation, FIVA enters the Hibernation Mode.
FIVA with the power source only from battery pack may not completely
recover if left in the Standby Mode for a very long time. If you do not
plan to use FIVA for a long time, turn it off or put it in the Hibernation
Mode.
Indicator Lamp
45
Page 48

To shut down Windows Me from the Start menu
In this mode, Windows Me is completely shut down and FIVA is
consuming almost no battery power. This mode extends battery life but
requires that Windows Me be restarted from the very beginning to restore
power. This means that the status of Windows Me or any application
that is running is not maintained in memory when the Power Off mode is
entered. Enter the Power Off mode if you do not plan to use FIVA for a
long time and before installing expansion memory.
1. Click the Start button on the Taskbar or press
Select this command.
2. Select Shut Down....
3. Select Shut down and then click the OK to shut down the computer.
Choose this option.
on the keyboard.
46
To turn on the power again, slide the power switch to the right.
To restart Windows Me from the Start menu.
The current memory is saved in the hard disk and all the application are
closed automatically. After that, Windows Me is quit and the system is
restarted. If the performance speed becomes slow when an application
is in function, restarting the system may restore to the original speed.
Page 49

To enter the Standby Mode from the Start menu
The status of LCD, Windows Me and any applications that are running
is retained in memory, so they can be restored in a shortest time after
leaving the Standby Mode. In Standby Mode, FIVA always consumes
slight power.
Sliding the power switch restores FIVA to the mode before you turn off
the power.
Im
portant
If you leave from FIVA for a long time when supplying power only from
the battery pack, follow the procedure “To shut down Windows Me from
the Start menu” or select “Hibernate” by following the procedure on the
next page.
1. Click the Start button or press
Select this command.
2. Select Shut Down....
3. Click Stand by and then click OK. The screen is closed and the unit
to display the menu.
2
enters the Standby Mode.
Select this option.
47
Page 50

To enter the Hibernation Mode from the Start menu
The Hibernation Mode is recommended when you do not plan to use
your computer for a long time, but you want to restore the status of
Windows Me and your applications when you return.
The state of Windows Me and other applications that were active when
the power save mode is entered are written to FIVA’s hard disk. This
process takes some to complete, after which FIVA automatically powers
down so that almost no power is supplied.
Slide the power switch again to recover from the Hibernation Mode.
1. Click the Start button or press
Select this command.
2. Select Shut Down....
3. Click Hibernate and then click OK. The screen is closed and the unit
enters the Hibernation Mode.
to display the menu.
Select this option.
48
Page 51

Im
portant
• Avoid entering the Hibernation Mode while a communication operation
is in progress, or while a peripheral (disk, printer, etc.) is in use.
Entering the Hibernation Mode while a communication operation is in
progress will cause a communication error on the other computer.
• You can reset FIVA and force power to turn off by holding down the
power switch for 4 seconds. Note that FIVA does not beep if sound
output is muted. Use this method to reset FIVA only when operation
locks up and nothing else works.
To enter the Standby Mode and Hibernation Mode by closing
the display panel
FIVA automatically enters the Standby Mode whenever you close the
display panel. Reopening the display panel restores the Windows Me
screen that was displayed when you closed it.
If you leave the display panel closed for longer than about ten minutes,
FIVA automatically switches from the Standby Mode to the Hibernation
Mode. To recover from the Hibernation Mode, open the display panel
and slide the power switch. The Windows Me screen that was displayed
when you initially closed the display panel reappears, but it will take
more time than that of recovery from the Standby Mode.
2
49
Page 52

Using the Sleep function
FIVE has the Sleep function to save power as a standard function.
This means the Hibernation Mode or Standby Mode described before.
When this unit is not used temporarily, set the unit to the Sleep Mode so
that the available time of battery pack can be prolonged. (The time to
maintain the Sleep Mode differs according to the battery charge capacity
of battery pack.)
If this unit is enters the Sleep Mode while only the battery pack supplies
power, the PW-LED
indicator lamp will flash orange.
To enter the Sleep Mode, perform
the following procedure.
To recover from the
Sleep Mode, perform the
following procedure.
Close the display panel (see page
Open the display panel.
49).
Select the Standby Mode from the
Slide the power switch.
Start menu (see page 47).
Slide the power switch to enter the
Slide the power switch.
Hibernation Mode (see page 48).
Press
Fn
+
to enter the
F3
Slide the power switch.
Standby Mode (see page 29).
Press
Fn
+
to enter the
F4
Slide the power switch.
Hibernation Mode (see page 29).
Click ( ) from the mobile cockpit
Slide the power switch.
(see page 96).
Click ( ) from the mobile cockpit
Slide the power switch.
(see page 96).
When the unit is recovered from the Sleep Mode, the screen that was
displayed before entering the Sleep Mode is restored.
50
Page 53

Turning On Power
Im
portant
Slide and hold the power switch (
PW-LED lights up.
Turning on FIVA power after you set up Windows Me starts up Windows
Me.
First, perform the log-on operation to make the unit recognize the user.
If you use the unit alone and also not connected to a network, you can
set the unit so that the screen above does not appear.
Do not turn on and off in a short time.
When turning on the power again after turning it off, wait about 10
seconds after turning off the power.
When you want to adjust the LCD brightness, perform the following
procedure.
q Adjusting the LCD brightness with the keyboard (see page 29).
To increase the LCD brightness, press
To decrease the LCD brightness, press
w Adjusting the LCD brightness with the Mobile Cockpit (see page
92).
Click the LCD brightness button (
The LCD brightness can be adjusted up to 8 grades.
), and then release it when the
+
( ).
F1
Fn
+
( ).
F2
Fn
) from the Mobile Cockpit.
2
51
Page 54

Using the Battery Pack
FIVA comes with a standard battery pack when you purchase it. Once
you charge the battery pack, you can use FIVA without being connected
to a power outlet via the AC adaptor. FIVA also has a number of power
management functions that make battery operations more efficient.
See page 33 for details about how to set the battery pack to FIVA, and
ote
N
Checking the Current Charge Level of the Battery Pack
page 34 for information about charging the battery pack.
The battery pack discharges naturally even when you are not using it.
To prevent the malfunction caused by the wear of battery pack, make
sure you charge the battery pack fully before trying to use it to power
FIVA.
You can use any of the three following methods to check the current
charge level of the battery pack.
• The color of the BAT-LED indicator lamp
• The color of the PW-LED indicator lamp
• Mobile Cockpit
Checking the Battery Indicator Lamp Color
A green
adaptor indicates that the battery is fully charged. See page 35.
When this happens, the “COMPLETE” message is displayed on Mobile
Cockpit’s title bar. Charging is in progress when the
is orange.
indicator lamp lit while FIVA is being powered by the AC
indicator lamp
52
Page 55

Checking the Power Indicator Lamp Color
The indicator lamp will start flashing red and a warning screen will
appear if the battery charge level drops while FIVA is operating under
battery power only. When this happens, connect the AC adaptor and
charge the battery.
If you continue to use FIVA under the low power condition, FIVA will
automatically enter the Hibernation Mode when the battery charge level
drops more.
When a warning screen appears, perform one of the following
procedures.
• Connect the AC adaptor to this unit.
• Stop using this unit and turn off the power.
• Set this unit to the Sleep Mode and replace the battery pack with
the fully charged one.
Im
portant
If you turn on FIVA while the battery charge level drops, a warning
message will appear and then FIVA will automatically shut down the
power. When this happens, connect the AC adaptor and charge the
battery.
Power Indicator Meaning
Lit orange FIVA being powered by battery pack.
Flashing orange Standby mode (with only battery pack in
use)
Flashing Red Low battery pack charge level (with only
battery pack in use)
Lit Green FIVA being powered by AC adaptor.
Flashing Green Standby Mode (AC adaptor is used)
2
53
Page 56

Checking with Mobile Cockpit
Mobile Cockpit’s battery monitor function lets you graphically view the
charge level of the battery at any time. See page 86.
You can obtain even more detailed information about the battery pack
by displaying the Battery control.
Battery Control button
Click here.
Displays battery
information.
Using the Battery Pack Efficiently
The amount of operating time you get from the battery pack is greatly
affected by operating conditions and how you use it.
FIVA’s mobile computing Power Management Setting help to ensure
that you get maximum power out of the battery pack. See page 87.
When the battery pack is not in use, remove it from this unit. The available
Note
time of the battery pack will be prolonged.
Forced Hibernation Mode
To help ensure that you do not lose application data files, FIVA goes
into forced Hibernation Mode whenever the battery charge level drops
below a certain point. When this happens, connect the AC adaptor and
slide the power switch to recover from the Hibernation Mode.
When to Replace the Battery Pack
The battery pack is a consumable item, and after long use the amount
of operating time provided by a fully charged battery can become quite
short. This indicates it is time to replace the battery pack with a new
one.
54
Page 57

Im
Im
portant
portant
Be sure you use the correct battery pack. On the “Options List” (page
141) comes with FIVA, find the battery pack whose model number
matches the number marked on the battery pack.
You can also get an idea of the battery pack’s current condition by
checking the Mobile Cockpit’s Battery Control.
Click here.
2
See “BATTERY LIFE” in the Battery Control of the Mobile Cockpit. If the
signal is red, you have to replace with a new battery pack.
The values that appear in the Battery control are provided for general
reference only. Actual operability of the battery is affected by operating
environment and other conditions.
Using the Large-capacity Battery Pack
Use the optionally available large-capacity battery pack when you need
to operate FIVA for longer periods without AC adaptor power. The largecapacity battery pack provides about 9 hours of continuous operation
on a full charge. Use the same procedure as the standard battery pack
to attach and remove the large-capacity battery pack.
Im
portant
Be sure you use the correct battery pack. On the “Options List” (page
141) , find the battery pack whose model number matches the number
marked on the battery pack.
55
Page 58

Using the One Touch Operation Buttons
MODE B
MODE A
There are 3 types of Keys; “E-mail button”, “Internet button” and “Memo
button”.
P
1
P
2
P
3
B
B
E
E
D
D
O
O
M
M
A
A
E
E
D
D
O
O
M
M
E-mail button (P1)
When the E-mail button ( ) is pressed, the E-mail software starts up.
The “Microsoft Outlook Express” is installed as the E-mail software when
you purchase.
• For using the E-mail button, the setting to connect to an internet or
the contract with an internet provider is also necessary beforehand.
The various software applications, which allow you to connect to the
internet provider via an internet and to sign up, are available.
Internet button (P2)
When the Internet button ( ) is pressed, the internet browser starts
up.
The “Internet Explorer” is installed as the internet browser when you
purchase.
One touch operation buttons
56
• For using the Internet button, the setting to connect to an internet or
the contract with an internet provider is also necessary beforehand.
The various software, which allow you to connect to the internet
provider via an internet and to sign up, are available.
Page 59

Memo button (P3)
When the Memo button ( ) is pressed, the “Microsoft Notepad” software
starts up.
The “Notepad” is installed as the memo software when you purchase.
Changing the function of each button
The function of each button can be changed in the “Settings” → “One
Touch Operating Button Setting” of the Mobile Cockpit. (See page 86.)
Im
portant
The “Mobile Cockpit II” activates the application function of the one
touch operation buttons (P1: E-mail, P2: Internet, P3: Memo). Thus,
directly after recovering from the Standby Mode or Hibernation Mode,
or when there is no selected item, the one touch operation buttons may
not function. In this case, press the appropriate button again or click on
the screen.
2
57
Page 60

Page 61

Supplementary
Information
Chapter 3
This chapter contains information
about how to connect peripherals
and about convenient functions.
Page 62

Page 63
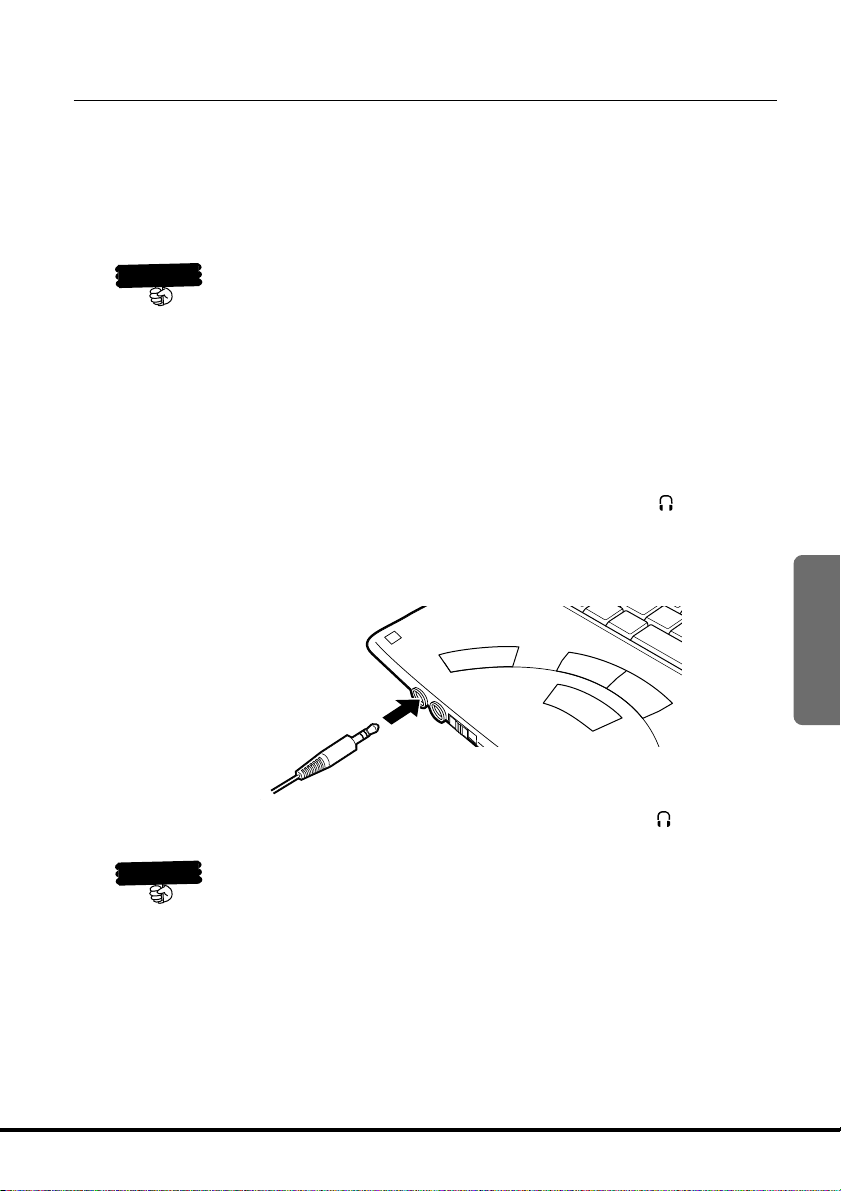
Connecting Peripherals
Peripherals mean a a CD-ROM drive, an external floppy disk drive, etc.
that can be connected to this unit. This section describes how to connect
peripherals and how to install PC cards or expansion memory.
For the peripherals that are not described in this User’s Guide, see the
manual that comes with the peripheral you are installing.
portant
Im
Connecting a pair of Headphones or a Microphone
Be sure to turn off the power of FIVA and unplug the power cord before
connecting peripherals. Even for the peripherals that are compatible
with the plug and play function, it is better to turn off the power before
connection.
By connecting commercially available headphones or microphone to
this unit, the sound function built in this unit can be used.
To connect the headphones
Connect the headphones plug to the headphones port ( ) on the front
of this unit. For details of the volume adjustment, see “u Adjusting volume”
on page 92.
Use a pair of headphones set which has the stereo mini jack (ø3.5 mm).
3
Im
portant
Connect the headphones plug to the headphones port ( ).
To disconnect the plug, pull it out from the port by holding the plug.
Do not use the headphones on the following occasions. Noise may be
heard.
• When turning on/off the power of this unit.
• When connecting/disconnecting the headphones.
61
Page 64

To connect microphone
MODE B
MODE A
Connect the microphone plug to the microphone port ( ) on the front of
this unit.
Use a microphone which has the monaural mini jack (ø3.5 mm).
Connect the microphone plug to the microphone port (
To disconnect the plug, pull it out from the port by holding the plug.
Connecting to the LAN port
By using the LAN port, you can connect to the standard Ethernet
(10Base-T/100Base-TX). An Ethernet cable is necessary when
connecting to the Ethernet. After connecting, setting the software is
necessary in order to connect to the network using the TCP/IP function.
1. Connect one end of the Ethernet cable to the LAN port on the right
side of the unit and the other end to the network.
).
MODE B
MODE B
A
A
E
E
D
D
O
O
M
M
62
N
A
L
2. After connecting, perform the setting of the software to use the
Ethernet.
Page 65

Connecting to the modem port
The built-in 56kbps modem provides a high-speed data communication
and facsimile transmission/reception capabilities. (The actual
communication speed depends on the local line conditions, etc.) You
can use this function by connecting the modular cable to the modem
port.
The built-in modem can be connected to the general telephone line
(analog). It cannot be connected directly to the digital line (the ISDN
circuit, etc.). Also, it cannot be connected to the line for a home telephone
or office telephone which uses the telephone switchboard. When
connecting to the ISDN circuit, the optional terminal adaptor (TA), dialup rooter, etc. is also necessary. After connecting, setting the software
is necessary in order to perform the connection for communication via
the telephone or facsimile line.
Modular cable
3
Im
portant
1. Confirm that the power of this unit is turned off.
Connecting or disconnecting the modular cable should be performed
after turning off the power.
2. Open the lid of the modem port and insert one end of the modular
cable securely until it clicks.
• Do not transport the unit when the modular cable is connected to the
modem port. It causes a damage of the modem port or the
disconnection of the modular cable.
• When you make a dial-up connection to the pulse system telephone
line using the built-in modem, it may malfunction and call up a wrong
phone number unintentionally and fail to connect to the correct phone
number. To avoid this, do not start up an application that causes
frequent accesses to the hard disk. Also, do not connect the
peripherals or access them before completing the dial-up connection.
63
Page 66

Connecting to the USB port
MODE B
MODE A
The USB (Universal Serial Bus) is a standard interface specification for
the connections of the USB compatible peripherals such as a keyboard,
mouse, printer, scanner, etc. to the computer.
Connecting to or disconnecting from the USB port can be performed
even when the power of this unit is turned on.
Insert the plug of the USB cable to the USB port securely with the plug’s
mark (
) facing upwards.
P1
P2
P3
B
B
E
E
D
D
O
O
M
M
A
A
E
E
D
D
O
O
M
M
64
Im
po
rtant
N
N
A
L
• When this unit enters the Sleep Mode such as the Hibernation or
Standby Mode while USB devices are connected, the USB devices
may not be used after the unit is restored from the Sleep Mode.
In this case, re-connect the USB devices or restart this unit.
• The compatible system (OS) and the driver is required for using USB
devices.
• The performance of any USB compatible device connected to this
unit must be checked thoroughly by the user.
• If one USB port on this unit is not enough, use commercially available
ote
USB hub. USB hub with power-supply capability is recommended.
Page 67

Note
Using the floppy disk drive
The optional USB compatible floppy disk drive (MPC-240FDD) is
available for this unit. The two types of floppy disk can be used with this
unit. One is 2DD floppy disk with the amount of 720 KB and the other is
2HD floppy disk with the amount of 1.44 MB. (For details, see the manual
that comes with the floppy disk drive.)
Connecting the floppy disk drive allows you to store data and to copy
data to other computer.
Connect the MPC-240FDD
to the USB port of this unit.
The access lamp on the floppy disk drive lights while data is being
written to or recalled from a disk. Never remove the floppy disk from the
drive while the access lamp is lit. Doing so may cause malfunction of
the floppy disk drive or corruption of data.
• When using the floppy disk that is not formatted for the Windows,
formatting is required. However, the disk cannot be formatted to the
disk with the amount of 1.2 MB.
• Once the disk is formatted, all data stored in the floppy disk is erased.
Be careful when formatting the disk.
• The floppy disk that is formatted on other computer may not be used.
• The 2HD floppy disk that is formatted in the 2DD type cannot be
used, and vice versa. Use a floppy disk that is formatted correctly.
To write protect a floppy disk
Floppy disks have a write protect tab that you can use to protect the
data on them from accidental deletion or change.
3
Write protect tab
Data cannot be written to
or deleted from the disk.
Data can be written to
the disk.
65
Page 68

Connecting a Printer
A USB compatible printer can be connected to the USB port of this
unit.
Installing the printer driver is required for using the printer. The printer
driver that comes with this unit or one (stored in a CD, floppy disk, etc.)
that comes with the printer can be used.
When a printer compatible with the plug and play function is connected
for the first time, the Add Printer Wizard screen appears. Follow the
procedure displayed on the screen to use the printer.
66
Page 69

Using External Monitor
Connect an external monitor to FIVA so that the operation can be
performed while viewing the big-screen. (Use the supplied RGB cable
for the connection.)
Opening the display panel is required for using the external monitor as
the unit enters the Sleep Mode automatically when the display panel is
closed.
To connect a Monitor
1. Turn on the power of FIVA after closing an application, etc.
Making sure that the cable is oriented correctly, connect one end of
the supplied RGB cable to the RGB port of this unit. Pull out the lid
on the left side of the unit so that the RGB port appears.
2. Making sure that the connecting cable from the external monitor is
oriented correctly, connect the connecting cable to the other end of
the RGB cable.
Connect the power cord of the monitor to other power outlet. (For
details, see the manual that comes with the monitor.)
3
Im
ortant
p
3. Turn on the power of the external monitor.
After that, turn on the power of FIVA and starts up Windows Me.
4. Press
Each time
following order: LCD → External monitor→ LCD and External monitor
→ LCD.
• When disconnecting the RGB cable, hold the connector firmly while
pressing the eject levers on both sides of the connector, and pull it
out straight. Failure to do so may cause damage to the connector, or
break the cable.
• When the external monitor connected to this unit is used, inserting
the PCMCIA card (including the CF card) or updating the device driver
with the System on the Control Panel may temporarily darken the
monitor screen.
• The display screen momentarily goes blank when you change from
one monitor function to another. This is not malfunction.
Fn
+
to switch to the external monitor.
F10
+
is pressed, the monitor function changes in the
F10
Fn
67
Page 70

You can specify the resolution and number of colors only when using
ote
N
an external monitor. Right click on the Windows Me desktop and select
Properties on the menu. The Display Properties appears.
Click the Setting tab and then make the Colors and Screen area settings
you want.
68
These settings can
be changed.
The following table shows the setting combinations that can be made
for Colors and Screen area.
Colors Size (Pixels)
16-bit 640×480/800×600/1024×768
256 Colors 640×480/800×600/1024×768/1280×1024
16 Colors 640×480/800×600/1024×768/1280×1024
The screen may not be always displayed in all resolutions and numbers
of colors depending on the external monitor.
Page 71

Connecting to the IEEE1394 port
Various devices such as digital video camera, etc. can be connected
to the IEEE1394 port. The procedure to connect a device to the IEEE1394
port is described in this section.
Connect the plug of the cable to the IEEE1394 port securely.
Pull out the lid on the left side of the unit so that the IEEE1394 port
appears.
When a device compatible with the plug and play function is connected,
the icon appears in the My Computer screen. Click the icon to perform
the operation.
3
Note
On the IEEE1394
• High-speed data transfer: It allows you to transfer multi-media
data, etc. at dozens of times of speed
compared with the speed when using
the Ethernet.
• Plug and play: Turning off the power or restarting the
unit is not necessary when connecting
or disconnecting. Also, the dip switch
or terminator is not necessary.
69
Page 72

Using a PC Card
Using a PC Card
FIVA has one PC Card Standard PCMCIA TYPE II PC card slot (including
card compatible with the Card BUS).
You can use a PC card to connect various peripherals such as the CDROM drive or scanner, etc. Almost of all PC cards can be inserted or
removed while the power of the unit is turned on. For the detail of using
the PC card, see the manual that comes with the PC card.
Im
ortant
p
N
• Long term use of PC card that generates a lot of heat can cause
unstable card operation and malfunction and also can create the
danger of burns.
• Never insert or remove a PC card while an application is running.
• Never insert or remove a PC card while the unit is in the Sleep Mode
such as the Hibernation Mode or Standby Mode. Doing so may cause
data to be erased.
• If you set the unit to the Sleep Mode or Hibernation Mode while a
device connected to the PC card is in use, the unit may lock up when
recovering. To prevent data from being erased or the unit from
unexpectedly malfunctioning, you are recommended to select the
Close all applications before entering Standby or Hibernation
setting.
• When using a PC card that is not compatible with the hot insertion
function, insert or remove the PC card after turning off the power of
the unit.
You can use the “Product Recovery CD-ROM” that comes with FIVA to
ote
restore the hard disk. Use the optional CD-ROM drive (MPC-142CDD)
that is for using a PC card.
Removing a PC card
Before removing a PC card from the slot, first click the Mobile Cockpit
PC Card button (
the PC card. Also, make sure that an application or system is not running.
The PC card can be inserted or removed even when the power of this
unit is turned on or off, but not when the unit is in the Sleep Mode.
) and disable PC card operation and then remove
70
Page 73

1. Stop using the PC card.
Click the Mobile Cockpit PC Card button (
PC Card button (
(PCMCIA) Properties. Select the card name from the list, and then
click Stop to cut off the power to the PC card.
) on the indicator area to open PC Card
Select the card here.
Click the Stop button.
) or double-click the
➔
When “You may safely remove this device.” appears, click OK.
2. Press the PC card eject button.
When the PC card is ejected, pull it out the rest of the way by hand.
• When removing the PC card,
do not pull the cable of the
Press the eject button.
PC card. Doing so causes
malfunction arisen from the
disconnection, etc.
• When the eject button is
pushed into the slot, press
the head of the button again.
3
71
Page 74

Inserting a PC card
Make sure that the PC card is oriented correctly when you insert it into
the PC card slot. Inserting the PC card into the slot upside down forcibly
may damage the cable or the slot.
1. Connect the cable to the PC card. And, push the eject button into
the slot.
2. Making sure that the PC card is oriented correctly, insert the PC
card into the PC card slot.
Though you may be aware of some resistance while inserting the
PC card, push the card carefully and horizontally until it goes to the
end.
The eject button should be
pushed into the slot.
72
When you use the PC card for the first time, Windows Me
automatically detects it and installs the appropriate software for it.
Page 75

Using a CF Card
Using a CF Card
FIVA has one CF TYPE I/II CF (Compact Flash) card slot. You can use a
CF card to load the expansion memory or hard disk. Almost all CF cards
can be inserted or removed while the power of the unit is turned on. For
the detail of using a CF card, see the manual that comes with the CF
card.
Im
portant
• Long term use of CF card that generates a lot of heat can cause
unstable card operation and malfunction and also can create the
danger of burns.
• Never insert or remove a CF card while an application is running.
• Never insert or remove a CF card while the unit is in the Sleep Mode
such as the Hibernation Mode or Standby Mode. Doing so may cause
data to be erased.
• When using a CF card that is not compatible with the hot insertion
function, insert or remove the CF card after turning off the power of
the unit.
Before using a CF card
The CF card is small so that it is hard to remove once you insert the
card into the slot. For many CF cards, the direction you insert the card
is printed on the card, but for some cards, the direction is not indicated
clearly. So, before using a CF card, stick the supplied puller tape on the
card as shown below.
3
The direction you insert the card
73
Page 76

Inserting a CF card
Make sure that PC card is oriented correctly when you insert it into the
CF card slot. Inserting the CF card into the slot upside down forcibly
may damage the connector or the slot.
1. Remove the CF card slot lid. (Keep the lid in order not to lose it.)
2. Making sure that the CF card is oriented correctly, insert the CF card
into the CF card slot.
Though you may be aware of some resistance while inserting the
CF card, push the card carefully and horizontally until it goes to the
last.
When you use the CF card for the first time, Windows Me
automatically detects it and installs the appropriate software for it.
74
3. Fold the puller tape inside as shown below and cover the CF card
slot with the lid.
Fold the tape inside.
Page 77

Removing a CF card
Before removing a CF card from the slot, first click the Mobile Cockpit
PC Card button ( ) and disable CF card operation and then remove
the CF card. And, be sure that an application or system is not running.
The CF card can be inserted or removed even when the power of this
unit is turned on or off, but not when the unit is in the Sleep Mode.
1. Stop using the CF card.
Click the Mobile Cockpit PC Card button (
PC Card button ( ) on the indicator area to open PC Card
Properties. Select the card name from the list, and then click Stop to
cut off the power to the CF card.
Select the card here.
Click the Stop button.
When “You may safely remove this device.” appears, click OK.
2. Remove the lid and pull out the puller tape on the card to remove the
CF card.
) or double-click the
3
3. Cover the CF card slot with the lid.
75
Page 78

Loading an Expansion Memory
You can expand the FIVA memory by installing an expansion memory
board. Expanded memory can help applications and large-volume data
to be operated at a high speed. Use the optional expansion memory
board (MPC-252RAM/253RAM) or one specified by CASIO.
To increase the memory to maximum 192 MB, it is necessary to remove
the expansion memory board from the expansion slot and install the
optional expansion memory board (MPC-253RAM: 128 MB).
Before installing or removing expansion memory board
Do not disassemble the unit except the part described below.
As the high-voltage components are inside FIVA, improper
usage causes damage to the unit.
Do not place containers of liquids near FIVA and do not allow
any foreign matter to get into it. Doing so creates the danger
of shorting, fire and electric shock. If water or other foreign
matter gets into FIVA, immediately shut down the power and
contact your original retailer or authorized distributor.
76
Im
portant
• The interior of FIVA can become quite hot during normal use. In this
case, leave the unit for about 10 minutes to allow the interior of the
unit to be cool before installing or removing the expansion memory.
• Shut down the power, unplug the AC adaptor and remove the battery
pack before installing or removing the expansion memory.
• As the expansion memory is the precision electric product, it may be
damaged by static electricity from your body. Be sure to touch a
metallic object to discharge any static electricity from your body before
installing the expansion memory.
Removing the expansion memory board
1. Quit all applications and shut down the power.
When the unit is in the Sleep Mode (Hibernation Mode or Standby
Mode), restore the system and shut it down.
2. Disconnect the AC adaptor, power cord and all peripheral cables
from FIVA. Then turn over the FIVA and remove the battery pack.
Page 79

3. Turn FIVA again so that it is facing up.
Push the attachments towards the unit and lift them slightly (q) and
then remove the hooks. And lift the attachments to remove them
(w).
w
q
w
q
hooks
4. Open the display panel. Remove the two screws (+) on both sides of
the keyboard and turn the keyboard toward you slowly. (Keep the
screws in order not to loose them).
When turning the keyboard toward you, do not hold the keys. The
keys may be removed.
Remove the screws.
After removing two
attachments, remove two
screws.
3
Turn the keyboard gently
so that the keyboard turns
over.
77
Page 80

5. When the keyboard is removed, the expansion memory slot appears.
Pushing the both sides of the expansion memory slot outwards (q),
pull the installed expansion memory board out (w). Do not press
down or bend the board when removing it.
q
q
6. Steps 6 to 7 are the reverse procedure of steps 3 to 4. Replace the
keyboard and secure it in place with the two screws (+).
w
78
7. Replace the two attachments.
Making sure that the direction and position are correct, put in the
attachments by pressing them down from the top.
Page 81

Installing the expansion memory board
Perform steps 1 to 4 of the procedure of “Removing the expansion
memory board.”
5. When the keyboard is removed, the expansion memory slot appears.
Aligning the depression of the expansion memory board (q) with
the protrusion of the expansion memory slot (w), insert the board
on the slant until it goes to the end (e) after making sure that the
board is oriented correctly, and then press it down (r) until it is
locked into place.
q
e
w
r
Perform steps 6 to 7 of the procedure of “Removing the expansion
memory board”.
Checking the capacity of the expansion memory
Be sure to check that the expansion memory board is installed correctly
and FIVA detects the expansion memory you installed. If the capacity
of the expansion memory does not increase, the following problems
are assumed:
• The memory board is not installed correctly, or
• The memory board is not a specified one by CASIO.
To check the capacity of the RAM (The amount subtracted 16 from the
system memory.), click Start → Settings → Control Panel → System
→ System Properties → General. 16 is the capacity of RAM for using
the system.
79
3
Page 82

Using the “Mobile Cockpit II”
The CASIO original application software “Mobile Cockpit II” is installed
in this unit. The “Mobile Cockpit II” is always displayed as a tool bar on
the desk top of the Windows Me and it allows you to perform the
convenient settings easily. When the “Mobile Cockpit II” is not displayed
on the screen, click
* After this, “Mobile Cockpit II” is described as the mobile cockpit.
q w e r t y iu !2 !3!0 !1o
in the indicator area to start up.
Function
q Switching the
tool bar
w Panel
e Settings
r Power
management
t Brightness
control
y Stop
functioning of
the hard disk
u Adjusting the
volume
i PC card
properties
o Long-Run
setting
!0 Battery Control
!1 Battery
indicator
!2 Standby Mode
Button
Description
Switches the display between the “Control
bar” and the “Launcher bar”
Changes the arrangement of the tool bar
or hides the display.
Specifies the “One Touch Operation
Buttons”, “Wake On Timer Setting”, “Power
Management Setting” or “Settings
(Preferences)”.
Set to each of the “Full power”, “Normal”,
“Economy” or “User”.
Adjusts the brightness of display.
Stops functioning the hard disk when the
hard disk is not used.
Adjusts sound level from the speaker
Specifies the settings to use the PC card.
Changes the speed of CPU.
Sets the warning for a low battery or
displays the information about a battery.
Displays the remaining power or the
remaining time of the battery pack, etc.
Sets this unit to the Standby Mode.
Page
81
84
86
91
92
92
92
93
94
95
96
96
!3 Hibernation
Mode
80
Set this unit to the Hibernation Mode.
96
Page 83

q
Switching the tool bar
The Mobile Cockpit has the Control bar and Launcher bar. You can
switch the display between them depending on your usage. When you
click
the Launcher bar.
• Control bar
• Launcher bar
or , the display is switched between the Control bar and
It allows you to specify each setting easily. When you click the
appropriate button, the window appears. So, you can follow the
procedure displayed in the window.
By registering the applications (up to 15 applications) in the tool bar,
the applications start up when you click the button. It is convenient
that you register the applications you often use.
Registering applications in the “Launcher bar”
To register applications you use from the Start menu.
1. Click Start in the Windows Me, select application from Program you
want to register and then drag and drop it in the Launcher bar.
Drag and drop the application you want to register in the tool bar.
3
81
Page 84

2. Confirm that the button of the application you registered is displayed
in the Launcher bar.
To register applications from the “My Computer”.
1. Drag and drop application you want to register from the My Computer
in the Windows Me to the Launcher bar.
Drag and drop the application you want to register
in the tool bar.
82
2. Confirm that the button of the application you registered is displayed
in the Launcher bar.
To start up the application you registered
1. Clicking the Switching the tool bar button in the Mobile Cockpit to
switch to the Launcher bar from the Control bar.
2. Click the button of the application you want to start up.
3. The application starts up.
Page 85

To delete the application you registered
1. Clicking the Switching the tool bar button in the Mobile Cockpit to
switch to the Launcher bar from the Control bar.
2. Right-click the button of the application you want to delete.
Right-click the icon of the application.
3. Click the Delete in the menu.
When you click the All Delete, all the applications you registered
are deleted.
4. Confirm that the button of the application you deleted is not displayed
in the “Launcher bar”. (The button of the application is only not
displayed. The application itself is not deleted.)
3
To move the application you registered
1. Clicking the Switching the tool bar button in the Mobile Cockpit to
switch to the Launcher bar from the Control bar.
2. Right-click the button of the application you want to move.
3. Click the Move in the menu.
When it is clicked, the frame appears around the icon of application.
4. Right-click the button of the application you want to move and then
drag to the desired position in the Launcher bar.
83
Page 86

w
Panel
Changing the display position of the tool bar
By dragging the panel, the “Mobile Cockpit II” can be displayed in the
following 5 positions of the desk top screen.
The upper part of the screen The lower part of the screen
The right side of the screen The left side of the screen
As the tool bar is displayed together with the taskbar in the Windows is
displayed preferentially, the short tool bar is displayed as shown above
when the tool bar in the Mobile Cockpit is displayed in the left or right
side of the screen.
84
Floating
The tool bar can be displayed on the
desired position of the screen.
Page 87

Pop-up menu
When you right-click this part, the pop-up menu is displayed.
Auto hide
When the check mark is put in the Auto hide, the tool bar is hidden. In
this setting, when you move the pointer to each corner of the screen,
the tool bar appears and when you move the pointer aside from the
corner of the screen, the tool bar is hidden. When the check mark is not
put, the tool bar is always displayed.
Always on top
The tool bar in the Mobile Cockpit is always displayed in front. This
setting allows you to display the tool bar in front even when other windows
are displayed.
Sound Effect
The effective sound can be heard when you click each button of the
Mobile Cockpit. This lets you know that inputting is performed.
3
Help
When you need the information about the Mobile Cockpit, this lets you
know how to operate.
85
Page 88

e
Settings
Version info
This displays the version information of the Mobile Cockpit.
Exit
This closes the application of the “Mobile Cockpit II”. When you want to
use the tool bar of the “Mobile Cockpit II” again after closing it, you
need to start up from the “FIVA tool”.
You can specify 4 settings of the “One Touch Operation Buttons”, the
Wake On Timer, Power Management and Settings.
One Touch Operation Button Setting
The one touch operation buttons have three buttons of P1 ( ) “Mail
button”, P2 (
you press each button, the application you registered in advance starts
up. You can register desired application in each of one touch operation
buttons.
) “Internet button” and P3 ( ) “Memo button”. When
86
Page 89

You can display the Windows standard files by pressing the referring
button and select desired application and then register it in each of one
touch operation buttons. If you do not register the application in the
button, leave the textbox vacant. In this case, the application does not
start up even when you press the button. In the default setting, the
“Microsoft Outlook Express”, the “Internet Explorer” and the “Note pad”
are registered in the “Mail button”, the “Internet button” and “Memo
button” respectively.
Wake On Timer Setting
You can specify the way to restore from the Sleep Mode by putting the
check mark
In the Sleep Mode (the Standby Mode or the Hibernation Mode), this
unit can be restored from the mode when the day and time you set
comes.
in the check box.
Power Management Setting
This allows you to prolong the using time of the battery pack when you
change the settings of the Sleep Mode, CPU, hard disk and the LCD
monitor and the power supply according to the conditions. (This function
is called “Power Management”.)
To make the change of the using condition easier, the three modes of
“FULL POWER”, “NORMAL” and “ECONOMY” are provided. And, for
the power, the two modes of “USER AC” and “USER DC” are provided.
The three modes and the two modes can be specified respectively. The
following items can be specified. In this window, the power management
setting for the system and the devices can be specified by selecting
“USER AC” or “USER DC”, and the setting for this unit can be specified
by selecting “FULL POWER”, “NORMAL” or “ECONOMY”.
• The time until this unit enters the Sleep Mode after the unit is not
used.
• The speed of CPU (Long-Run setting)
• The time until the function of hard disk stops after the unit is not used.
• The brightness of the display
• The time until nothing is displayed in the LCD monitor after the unit is
not used.
3
87
Page 90

Im
portant
You can also specify the power management setting of this unit by
selecting “Control panel” → “Power Management” → “The property of
Power Management”. Note that the setting in the “Power Management”
has priority over the setting of the “Power Management Setting” in the
Mobile Cockpit. The setting of the “Power Management Setting” in the
Mobile Cockpit is cancelled when the setting in the “Power Management”
is performed after the setting of the “Power Management Setting” in the
Mobile Cockpit is performed. Normally, you should specify only the
setting of the “Power Management Setting” in the Mobile Cockpit
because it is easier to operate.
FULL POWER
88
NORMAL
Page 91

ECONOMY
USER AC
This setting is when the power is supplied to this unit by the AC adaptor.
3
USER DC
This setting is when the power is supplied to this unit by the battery
pack.
89
Page 92

Settings (Preferences)
The initial setting can be set to use this unit. The 5 settings of “Built-in
LAN on/off”, “Priority of starting up devices (Boot sequence)”, “Power
Switch Action”, “LCD Panel Action” and “Switch the PC Card/PC Card
Pro button” can be specified.
When the restart is necessary after the setting is changed, the display
to restart this unit appears after you press the OK button.
Built-in LAN on/off
When you do not use the built-in LAN, remove the check mark from
the check box
.
90
Priority of starting up devices (Boot sequence)
The priority of the devices when the power of this unit is turned on (when
the unit is in function) can be specified from the selecting list. The unit
ignores the device that cannot be detected when searching, and
searches for the next device.
[The selecting list]
• FDD > CDROM (PCMCIA) > HDD
• FDD > HDD
• HDD > FDD
Page 93

Power Switch Action
You can set to each of the “Stand by”, the “Hibernate” or the “Shut
down” when you slide the power switch to turn off the power while the
unit is used.
LCD Panel Action
You can set to each of the “None”, the “Stand by”, the “Hibernate” or
the “Power Off” when you close the display panel while the unit is used.
Switch the PC Card/PC Card Pro button
You can change the setting of the “PC card” button of the tool bar in the
Mobile Cockpit according to this setting.
(See i PC card properties on page 93.)
r
Power management
When the button is depressed.
Full power Normal Economy User
When you press one of the “Full power”, the “Normal”, the “Economy”
and the “User” button to select the setting of the “Power Management
Setting” described before, the setting of the power management for
this unit can be specified.
The selected button is depressed. (The “Full power” button is selected
in the illustration shown above.)
The power condition is shown in the indicator of the selected button
when you switch to the AC adaptor or to the battery pack.
• When the AC adaptor is used, the indicator on the upper left of the
button is turned on or off according to the operation you click the
icon.
• When the battery pack is used, the indicator on the lower right of the
button is turned on or off according to the operation you click the
icon.
3
91
Page 94

t
Brightness control
You can adjust the brightness of
LCD monitor.
Adjust the brightness of LCD
monitor by dragging the control
bar. After adjusting it, click the
“Save the user mode” to save the
items of the “LCD monitor
setting” in the “Setting of power management” described before. If you
do not save the setting, the LCD monitor is displayed in the brightness
previously set in the “LCD monitor setting” of the “Setting of power
management” when you restart the unit.
• Also, you can adjust the brightness of LCD monitor using the hot key
combinations such as “
y
Stop functioning of the hard disk
This setting stops functioning the hard disk when the hard disk is not
used. So, you can prolong the using time of the battery pack because
the power to the hard disk is reduced. Even after the function of the
hard disk stopped, the hard disk resumes functioning when the access
to the hard disk occurs.
u
Adjusting the volume
You can adjust the volume for the speaker. Adjust
the volume by dragging the control bar. When you
put the check mark
“mute”, the sound is muted.
in the check box of the
+ F1 ( )” or “Fn + F2 ( )”.
Fn
92
• Also, you can adjust the volume using the hot
key combinations such as “
or “
+ F6 ( )”.
Fn
+ F5 ( )”
Fn
Page 95

i
PC card properties
This button has the two functions and the display can be switched in
the “Settings” described before.
The (
Windows.
The (
An example of “Settings”
) buttons connects or disconnects two PC cards each other.
) button opens the PC card properties (PCMCIA) of the
( ) button
Selects Control panel → PC card (PCMCIA) and opens the PC card
(PCMCIA) properties window.
When you remove the PC card, perform the operation in this window.
You can remove all storage devices including the connected PC card
using the Removing the hardware button in the indicator area.
93
3
Page 96

( ) button
Connects or disconnects the PC card (PCMCIA). When this button is
clicked, this unit confirms the connecting condition of the PC card, and
connects the PC card when the PC card is disconnected, or disconnects
it when it is connected.
• Connecting operation
After inserting the PC card into the slot of this unit, click the (
button. The connecting operation is automatically performed with the
plug and play function.
• Disconnecting operation
The unit stops the PC card function and disconnect the PC card. The
operation in the PC card (PCMCIA) properties window is not required.
When the screen of disconnecting disappears, remove the PC card.
o
Long-Run setting
By setting the function range of CPU of this unit, you can decrease the
power consumption and prolong the using time of the battery pack.
The CPU functions within the upper value and the lower value.
After setting it, click the Save the user mode to save the items of
“LongRun” in “Power Management Setting” described before. If you do
not save the setting, the unit functions in the CPU speed previously set
in “LongRun” of “Power Management Setting” when you restart the unit.
)
94
Click to display the upper value and lower value you specified.
When you click the displayed value, the display is switched between
the CPU speed and the voltage.
Page 97

!0
Battery Control
This window displays the condition of the battery pack. You can check
the connecting condition of the battery pack, the remaining power of
the battery pack or the time to replace with the new battery pack, etc.
The reading of the Rated capacity does not guarantee the actual
capacity of the battery pack which is being used. Therefore the capacity
of the full-charged battery pack and the Rated capacity do not coincide
with each other.
3
When you click the battery control button while power is supplied from
the AC adaptor, the “On AC power” screen shown below appears.
95
Page 98

!1
Battery indicator
This indicator always displays the remaining power or estimated
remaining time of the battery pack, etc.
• When using only the battery pack
The estimated remaining time of the battery pack is displayed.
• When using the AC adaptor and the battery pack
The estimated time to reach a full charge is displayed.
• When using only the AC adaptor
“NO BATTERY” appears.
• CALCULATE
“CALCULATE” appears right after the battery
pack is installed. If this message remains to
be displayed, install the battery pack once again, or the replacement
with the new battery pack is required because of the exhaustion of
the battery pack.
96
!2
Standby Mode
When you click the standby button ( ), this unit enters the Standby
Mode.
• You can also set to the Standby Mode by pressing “
selecting “Standby” after selecting the “Shut down”, or performing
the operation of “e Settings” described before. If you click this button
when the wake on timer setting is set to on, the unit is restored from
the Standby Mode when the time you set comes.
!3
Hibernation Mode
When you click the hibernation button ( ), this unit enters the
Hibernation Mode.
• You can also set to the Hibernation Mode by pressing “
( )”, selecting “Hibernation” after selecting the “Shut down”, or
performing the operation of “e Settings” described before. If you
click this button when the wake on timer setting is set to on, the unit is
restored from the Hibernation Mode when the time you set comes.
+ F3 ( )”,
Fn
Fn
+
F4
Page 99

Appendix
This appendix tells you how to
solve the problem and how to
restore FIVA to the default
settings.
Page 100

 Loading...