

Page 1
Energy Recovery Ventilators
Installation, Start-Up and
Service Instructions
62E
50 Hz
CONTENTS
Page
SAFETY CONSIDERATIONS
GENERAL . . . . . . . . . . . . . . . . . . . . . . . . . . . . . . . . . . . . . . 1-6
INSTALLATION . . . . . . . . . . . . . . . . . . . . . . . . . . . . . . . . 6-21
Step 1 — Inspect the Unit. . . . . . . . . . . . . . . . . . . . . . . . . . 6
Step 2 — Install Combination Roof Curb
(62EB-EU Units)
Step 3 — Install Drop in Damper Box
(62EB-EU Units) . . . . . . . . . . . . . . . . . . . . . . . . . . . . . . . . . 6
Step 4 — Install Horizontal Base and Transition
(62EB-EU and 62E2-E7 Units)
Step 5 — Install Standard Roof Curb . . . . . . . . . . . . . . 14
• VERTICAL STAND-ALONE APPLICATIONS
• HORIZONTAL STAND-ALONE APPLICATIONS
Step 6 — Rig and Place Unit . . . . . . . . . . . . . . . . . . . . 16
Step 7 — Make Electrical Connections . . . . . . . . . . 17
• POWER SUPPLY
• ELECTRICAL CONNECTIONS
START-UP . . . . . . . . . . . . . . . . . . . . . . . . . . . . . . . . . . . . 22-32
Unit Preparation . . . . . . . . . . . . . . . . . . . . . . . . . . . . . . . . . 22
Internal Wiring . . . . . . . . . . . . . . . . . . . . . . . . . . . . . . . . . . 22
Rain Hoods . . . . . . . . . . . . . . . . . . . . . . . . . . . . . . . . . . . . . 22
Energy Recovery Wheel. . . . . . . . . . . . . . . . . . . . . . . . . 22
• DRIVE BELT
•AIR SEALS
Airflow Settings and Adjustments. . . . . . . . . . . . . . . 22
• UNITS WITH EZERV CONROL OPTION
Operating Sequence . . . . . . . . . . . . . . . . . . . . . . . . . . . . 25
ComfortLink™ Interface Device . . . . . . . . . . . . . . . . . 27
Optional BACnet or LON Communications
Interface. . . . . . . . . . . . . . . . . . . . . . . . . . . . . . . . . . . . . . . 27
SERVICE . . . . . . . . . . . . . . . . . . . . . . . . . . . . . . . . . . . . . 32-36
Removing and Installing Non-Segmented
Wheel for Cleaning (62EB,E7 Units) . . . . . . . . . . . 32
Removing and Installing Non-Segmented Wheel
for Cleaning (62ECC and 62E2C Units). . . . . . . . 33
Removing Wheel Segments for Cleaning (62ECD,
62ED-EU, 62E2D, and 62E3-E6 Units) . . . . . . . . . 33
Installing Wheel Segments. . . . . . . . . . . . . . . . . . . . . . . 33
Wheel Drive Motor and Pulley Replacement
(62EC-EU and 62E2-E6 Units) . . . . . . . . . . . . . . . . . 34
Belt Replacement . . . . . . . . . . . . . . . . . . . . . . . . . . . . . . . 34
• ALTERNATE BELT REPLACEMENT METHODS
Removing the Service Door . . . . . . . . . . . . . . . . . . . . . 35
Replacing a Blower (All ERV Cabinets Except
62EB and 62E7 Units) . . . . . . . . . . . . . . . . . . . . . . . . . 35
• EXHAUST SIDE
• SUPPLY SIDE
Replacing a Blower (62EB and 62E7
Size Cabinets). . . . . . . . . . . . . . . . . . . . . . . . . . . . . . . . . 36
• EXHAUST OR SUPPLY SIDE
MAINTENANCE . . . . . . . . . . . . . . . . . . . . . . . . . . . . . . .36,37
Cleaning . . . . . . . . . . . . . . . . . . . . . . . . . . . . . . . . . . . . . . . . 36
Air Seals . . . . . . . . . . . . . . . . . . . . . . . . . . . . . . . . . . . . . . . . 36
. . . . . . . . . . . . . . . . . . . . . . . . . . . . . . . . . 6
. . . . . . . . . . . . . . . . . . . . . . . 1
. . . . . . . . . . . . . . . . . . . . 7
Wheel Drive Components . . . . . . . . . . . . . . . . . . . . . . . 37
Page
Air Filters . . . . . . . . . . . . . . . . . . . . . . . . . . . . . . . . . . . . . . . 37
Replacing the Throwaway Filters . . . . . . . . . . . . . . . . 37
TROUBLESHOOTING. . . . . . . . . . . . . . . . . . . . . . . . . . . . . . . 38
START-UP CHECKLIST . . . . . . . . . . . . . . . . . . . . . . . . . . .CL-1
SAFETY CONSIDERATIONS
Installation and servicing of air-conditioning equipment can
be hazardous due to system pressure and electrical components. Only trained and qualified service personnel should
install, repair, or service air-conditioning equipment.
Untrained personnel can perform the basic maintenance
functions of cleaning coils and filters and replacing filters. All
other operations should be performed by trained service
personnel. When working on air-conditioning equipment,
observe precautions in the literature, tags and labels attached to
the unit, and other safety precautions that may apply.
Follow all safety codes. Wear safety glasses and work
gloves. These instructions describe how to install, start up, and
service 62E energy recovery ventilator (ERV) units.
WARNING
Electrical shock can cause personal injury and death. Shut
off all power to this equipment during installation. There
may be more than one disconnect switch. Tag all disconnect locations to alert others not to restore power until work
is completed.
GENERAL
The 62E ERV units recover energy from building exhaust
air and pre-condition ventilation air. See Tables 1A-2B for unit
data. All 62EB-62EU units are configured for vertical discharge (through the bottom). Vertical units may be installed on:
• a stand-alone roof curb
• a combination curb for direct coupled connection to a
rooftop unit
If horizontal supply and return is desired using a vertical
unit, the vertical unit may be installed on a horizontal supply/
return base.
NOTE: The horizontal supply/return base accessory includes a
roof curb. The horizontal supply/return base should NOT be
used with a stand-alone roof curb.
All 62E2-62E7 units are configured for horizontal discharge
(through the side). Horizontal units may be installed on a
stand-alone roof curb.
DIRECT COUPLED APPLICATIONS (Vertical) — The
ERV unit can be installed directly coupled to a RTU (rooftop
unit). For vertical (through the roof) applications, the connection between the 62EB-62EU ERV unit and the RTU may be
Manufacturer reserves the right to discontinue, or change at any time, specifications or designs without notice and without incurring obligations.
Catalog No. 04-53620007-01 Printed in U.S.A. Form 62E-C1SI Pg 1 8-10 Replaces: New
Page 2
made with the use of a combination roof curb or by using the
drop in damper box accessory. The combination roof curb is a
single curb that supports both the ERV and the RTU and as
internal supply and exhaust air transitions. The drop in damper
box provides a means to make the supply and exhaust air transitions below the roof.
Table 1A — Physical Data — SI
UNIT 62E BA/7A BC/7C CC/2C CD/2D CG/2G DD/3D DG/3G
NOMINAL CAPACITY (L/s) 165 235 470 425 520 615 755
CAPACITY RANGE (L/s) 94-378 94-378 236-543 189-519 236-661 283-755 378-944
MAXIMUM SHIPPING WEIGHT (kg) 150 152 221 228 228 284 284
MAXIMUM OPERATING WEIGHT (kg) 127 130 199 205 205 262 262
UNIT DIMENSIONS (mm)
Length (includes hoods) 1123/1242 1570/1461 1717/1455
Width 790/925 980/1115 1128/1262
Height 879/793 1069/983 1064/1130
ROTARY ENERGY EXCHANGER
Typ e Monolithic Segmented
Size (Diam x Depth) (mm) 483 x 25 483 x 51 635 x 51 635 x 76 762 x 76
Nominal Drive Motor kW 0.07 0.07 0.07 0.07 0.07
SUPPLY/EXHAUST FANS
Typ e Centrifugal DWDI Backward Inclined, Single Width Single Inlet
Drive Type Direct EC Motor with Integral Frequency Drive
Fan Option Code
(see fan option table)
FILTERS
Typ e 51 mm Pleated
Exhaust Air – Qty...Size (L x W x D) (mm) 1...305 x 610 x 51 1...356 x 635 x 51 2…406 x 635 x 51
Outside Air – Qty...Size (L x W x D) (mm) 1...305 x 610 x 51 1...356 x 635 x 51 2…406 x 635 x 51
AA, B C C
UNIT 62E EB/4B ED/4D EF/4F EG/4G HB/5B HD/5D HF/5F HG/5G KD/6D KG/6G
NOMINAL CAPACITY (L/s) 660 1040 1040 1225 1415 2170 2170 2595 2125 3680
CAPACITY RANGE (L/s) 378-850 519-1227 614-1274 614-1652 661-1700
MAXIMUM SHIPPING
WEIGHT (kg)
MAXIMUM OPERATING
WEIGHT (kg)
UNIT DIMENSIONS (mm)
Length (includes hoods) 2172/1798 2639/2035 2908/2187
Width 1387/1521 1702/1836 1971/2106
Height 1283/1389 1420/1704 1572/1974
ROTARY ENERGY
EXCHANGER
Typ e Segmented
Size (Diam x Depth) (mm) 914 x 38 914 x 76 914 x 38 914 x 76
Nominal Drive Motor kW 0.1 0.1 0.1 0.1 0.1 0.1 0.2
SUPPLY/EXHAUST FANS
Typ e Backward Inclined, Single Width Single Inlet
Drive Type EC Motor with Integral Frequency Drive
Fan Option Code
(see fan option table)
FILTERS
Typ e 51 mm Pleated
Exhaust Air – Qty...Size
(L x W x D) (mm)
Outside Air – Qty...Size
(L x W x D) (mm)
508 525 508 525 789 803 789 803 1157 1157
485 503 485 503 766 781 766 781 1043 1043
1321 x 381321 x 761321 x 381321 x
C, E E, F E, F, L E, F, L, M F, L, M
2…508 x 635 x 51 3…508 x 635 x 51 6…406 x 610 x 51
2…508 x 635 x 51 3…508 x 635 x 51 6…406 x 610 x 51
1038-
2643
1038-
2550
1415-
3492
76
1180-
2595
1626 x 76
1888-
4955
LEGEND
DWDI — Double Width, Double Inlet
EC — Electronically Commutated
2
Page 3
Table 1A — Physical Data — SI (cont)
UNIT 62E LD LG MD MG ND NG PD PG
NOMINAL CAPACITY (L/s) 3585 4340 2830 5100 5200 6500 5950 7080
CAPACITY RANGE (L/s) 1650-4250 2360-5665 1415-3540 2595-6845 2595-6370 330-8260 2830-7315 3540-9440
MAXIMUM SHIPPING
WEIGHT (kg)
MAXIMUM OPERATING
WEIGHT (kg)
UNIT DIMENSIONS (mm)
Length (includes hoods) 2355 2532 2685 2812
Width 2162 2339 2492 2619
Height 1687 1712 1737 1824
ROTARY ENERGY
EXCHANGER
Typ e Segmented
Size (Diam x Depth) (mm) 1727 x 76 1880 x 76 2057 x 76 2184 x 76
Nominal Drive Motor kW 0.2 0.2 0.2 0.2
SUPPLY/EXHAUST FANS
Typ e Backward Inclined, Single Width Single Inlet
Drive Type EC Motor with Integral Frequency Drive
Fan Option Code
(see fan option table)
FILTERS
Typ e 51 mm Pleated
Exhaust Air – Qty...Size
(L x W x D) (mm)
Outside Air – Qty...Size
(L x W x D) (mm)
1232 1308 1397 1397 1482 1482 1533 1608
1118 1194 1283 1283 1368 1368 1420 1495
F, G, L, M F, G, M F, G, M F, G, M G, M F, G, M G, M
6…406 x 635 x 51 6…457 x 635 x 51 6…508 x 508 x 51 8…508 x 610 x 51
6…406 x 635 x 51 6…457 x 635 x 51 6…508 x 508 x 51 8…508 x 610 x 51
UNIT 62E RD RG SD SG TD TG UD UG
NOMINAL CAPACITY (L/s) 6500 8000 7800 9400 8500 10250 9700 11800
CAPACITY RANGE (L/s) 3300-8025 4250-11325 3775-9450 5190-13685 4250-10380 5665-14630 4720-11800 6600-16990
MAXIMUM SHIPPING
WEIGHT (kg)
MAXIMUM OPERATING
WEIGHT (kg)
UNIT DIMENSIONS (mm)
Length (includes hoods) 3015 3117 3294 3447
Width 2822 2924 3101 3251
Height 1824 1925 2068 2118
ROTARY ENERGY
EXCHANGER
Typ e Segmented
Size (Diam x Depth) (mm) 2337 x 76 2515 x 76 2642 x 76 2794 x 76
Nominal Drive Motor kW 0.2 0.2 0.2 0.2
SUPPLY/EXHAUST FANS
Typ e Backward Inclined, Single Width Single Inlet
Drive Type EC Motor with Integral Frequency Drive
Fan Option Code
(see fan option table)
FILTERS
Typ e 51 mm Pleated
Exhaust Air – Qty...Size
(L x W x D) (mm)
Outside Air – Qty...Size
(L x W x D) (mm)
LEGEND
DWDI — Double Width, Double Inlet
EC — Electronically Commutated
1974 1974 2126 2126 2486 2486 2486 2486
1860 1860 2013 2013 2373 2373 2373 2373
G, H, J, M,
N
10…508 x 508 x 51 8…610 x 610 x 51 8…635 x 635 x 51 8…635 x 635 x 51
10…508 x 508 x 51 8…610 x 610 x 51 8…635 x 635 x 51 8…635 x 635 x 51
G, H, J, N H, J, K, N
H, K, J,
N, P, R
K, J, N, P, R H, K, J, N, P, R
3
Page 4
Table 1B — Physical Data — English
UNIT 62E BA/7A BC/7C CC/2C CD/2D CG/2G DD/3D DG/3G
NOMINAL CAPACITY (cfm) 350 500 1000 900 1100 1300 1600
CAPACITY RANGE (cfm) 200-800 200-900 500-1150 400-1100 500-1400 600-1600 800-2000
MAXIMUM SHIPPING WEIGHT (lb) 331 336 488 502 502 627 627
MAXIMUM OPERATING WEIGHT (lb) 281 286 438 452 452 577 577
UNIT DIMENSIONS (in.)
Length (includes hoods) 44.2/48.9 61.8/57.5 67.6/57.3
Width 31.1/36.4 38.6/43.9 44.4/49.7
Height 34.6/31.2 42.1/38.7 41.9/44.5
ROTARY ENERGY EXCHANGER
Typ e Monolithic Segmented
Size (Diam x Depth) (in.) 19 x 1.0 19 x 2.0 25 x 2.0 25 x 3.0 30 x 3.0
Nominal Drive Motor Hp 0.09 0.09 0.09 0.09 0.09
SUPPLY/EXHAUST FANS
Typ e Centrifugal DWDI Backward Inclined, Single Width Single Inlet
Drive Type Direct EC Motor with Integral Frequency Drive
Fan Option Code
(see fan option table)
FILTERS
Typ e 2 in. Pleated
Exhaust Air – Qty...Size (L x W x D) (in.) 1...12 x 24 x 2 1…14 x 25 x 2 2…16 x 25 x 2
Outside Air – Qty...Size (L x W x D) (in.) 1...12 x 24 x 2 1…14 x 25 x 2 2…16 x 25 x 2
UNIT 62E EB/4B ED/4D EF/4F EG/4G HB/5B HD/5D HF/5F HG/5G KD/6D KG/6G
NOMINAL CAPACITY (cfm) 1,400 2,200 2,200 2,600 3,000 4,600 4,600 5,500 4,500 7,800
CAPACITY RANGE (cfm)
MAXIMUM SHIPPING
WEIGHT (lb)
MAXIMUM OPERATING
WEIGHT (lb)
UNIT DIMENSIONS (in.)
Length (includes hoods) 85.5/70.8 103.9/80.1 114.5/86.1
Width 54.6/59.9 67.0/72.3 77.6/82.9
Height 50.5/54.7 55.9/67.1 61.9/77.7
ROTARY ENERGY
EXCHANGER
Typ e Segmented
Size (Diam x Depth) (in.) 36 x 1.5 36 x 3.0 36 x 1.5 36 x 3.0 52 x 1.5 52 x 3.0 52 x 1.5 52 x 3.0 64 x 3.0
Nominal Drive Motor Hp 1/6 1/6 1/6 1/6 1/6 1/6 1/4
SUPPLY/EXHAUST FANS
Typ e Backward Inclined, Single Width Single Inlet
Drive Type EC Motor with Integral Frequency Drive
Fan Option Code
(see fan option table)
FILTERS
Typ e 2 in. Pleated
Exhaust Air – Qty...Size
(L x W x D) (in.)
Outside Air – Qty...Size
(L x W x D) (in.)
LEGEND
DWDI — Double Width, Double Inlet
EC — Electronically Commutated
800-
1,800
1,120 1,158 1,120 1,158 1,739 1,771 1,739 1,771 2,550 2,550
1,070 1,108 1,070 1,108 1,689 1,721 1,689 1,721 2,300 2,300
1,100-
2,600
AA, B C C
1,300-
2,700
C, E E, F E, F, L E, F, L, M F, L, M
2…20 x 25 x 2 3…20 x 25 x 2 6…16 x 24 x 2
2…20 x 25 x 2 3…20 x 25 x 2 6…16 x 24 x 2
1,300-
3,500
1,400-
3,600
2,200-
5,600
2,200-
5,400
3,000-
7,400
2,500-
5,500
4,000-
10,500
4
Page 5
Table 1B — Physical Data — English (cont)
UNIT 62E LD LG MD MG ND NG PD PG
NOMINAL CAPACITY (cfm) 7,600 9,200 6,000 10,800 11,000 13,800 12,600 15,000
CAPACITY RANGE (cfm) 3,500-9,000
MAXIMUM SHIPPING
WEIGHT (lb)
MAXIMUM OPERATING
WEIGHT (lb)
UNIT DIMENSIONS (in.)
Length (includes hoods) 92.7 99.7 105.7 110.7
Width 85.1 92.1 98.1 103.1
Height 66.4 67.4 68.4 71.8
ROTARY ENERGY
EXCHANGER
Typ e Segmented
Size (Diam x Depth) (in.) 68 x 3.0 74 x 3.0 81 x 3.0 86 x 3.0
Nominal Drive Motor Hp 1/4 1/4 1/4 1/4
SUPPLY/EXHAUST FANS
Typ e Backward Inclined, Single Width Single Inlet
Drive Type EC Motor with Integral Frequency Drive
Fan Option Code
(see fan option table)
FILTERS
Typ e 2 in. Pleated
Exhaust Air – Qty...Size
(L x W x D) (in.)
Outside Air – Qty...Size
(L x W x D) (in.)
2,715 2,883 3,079 3,079 3,267 3,267 3,381 3,545
2,465 2,633 2,829 2,829 3,017 3,017 3,131 3,295
F, G, L, M F, G, M F, G, M F, G, M G, M F, G, M G, M
6…16 x 25 x 2 6…18 x 25 x 2 8…20 x 20 x 2 8…20 x 24 x 2
6…16 x 25 x 2 6…18 x 25 x 2 8…20 x 20 x 2 8…20 x 24 x 2
5000-
12,000
3000-7500
5500-
14,500
5500-
13,500
7000-
17,500
6000-
15,500
7500-
20,000
UNIT 62E RD RG SD SG TD TG UD UG
NOMINAL CAPACITY (cfm) 13,800 17,000 16,500 20,000 18,000 21,700 20,500 25,000
CAPACITY RANGE (cfm)
MAXIMUM SHIPPING
WEIGHT (lb)
MAXIMUM OPERATING
WEIGHT (lb)
UNIT DIMENSIONS (in.)
Length (includes hoods) 118.7 122.7 129.7 135.7
Width 111.1 115.1 122.1 128.0
Height 71.8 75.8 81.4 83.4
ROTARY ENERGY
EXCHANGER
Typ e Segmented
Size (Diam x Depth) (in.) 92 x 3.0 99 x 3.0 104 x 3.0 110 x 3.0
Nominal Drive Motor Hp 1/3 1/3 1/3 1/3
SUPPLY/EXHAUST FANS
Typ e Backward Inclined, Single Width Single Inlet
Drive Type EC Motor with Integral Frequency Drive
Fan Option Code
(see fan option table)
FILTERS
Typ e 2 in. Pleated
Exhaust Air – Qty...Size
(L x W x D) (in.)
Outside Air – Qty...Size
(L x W x D) (in.)
LEGEND
DWDI — Double Width, Double Inlet
EC — Electronically Commutated
7,00017,000
4351 4351 4688 4688 5481 5481 5481 5481
4101 4101 4438 4438 5231 5231 5231 5231
G, H, J, M,
N
10…20 x 20 x 2 8…24 x 24 x 2 8…25 x 25 x 2 8…25 x 25 x 2
10…20 x 20 x 2 8…24 x 24 x 2 8…25 x 25 x 2 8…25 x 25 x 2
9,000-
24,000
G, H, J, N H, J, K, N
8,000-
20,000
11,000-
29,000
9,000-
22,000
H, K, J,
N, P, R
12,000-
31,000
K, J, N, P, R H, K, J, N, P, R
10,000-
25,000
14,000-
36,000
5
Page 6
Table 2A — Supply/Exhaust Fan Options Physical Data — SI
FAN OPTION CODE A B C E F G H
Wheels
Qty...Width (mm)
Nominal Motor kW
(per each fan)
1…128 x 110 2…128 x 110 1…400 1…500 2…500 3…500 4…500
0.45 0.45 0.88 2.70 2.70 2.70 2.70
FAN OPTION
CODE
Wheels
Qty...Width (mm)
Nominal Motor kW
(per each fan)
JKLMNPRS
5…500 6…500 1…630 2…630 3…630 7…500 8…500 1…250
2.70 2.70 2.90 2.90 2.90 2.70 2.70 2.70
Table 2B — Supply/Exhaust Fan Options Physical Data — English
FAN OPTION CODE A B C E F G H
Wheels
Qty...Width (in.)
Nominal Motor Hp
(per each fan)
FAN OPTION
CODE
Wheels
Qty...Width (in.)
Nominal Motor Hp
(per each fan)
DIRECT COUPLED APPLICATIONS (Horizontal) — For
horizontal applications (above the roof) using 62EB-EU units,
the horizontal supply/return base and transition accessories
may be used.
For horizontal applications using 62E2-E7 units, a standard
roof curb and transition accessories may be used.
1…5 x 4 1/8 2…5 x 4 1/8 1…15 3/4 1…19 3/4 2…19 3/4 3…19 3/4 4…19 3/4
0.61 0.61 1.18 3.62 3.62 3.62 3.62
JKLMNPRR
5…19 3/4 6…19 3/4 1…24 3/4 2…24 3/4 3…24 3/4 7…19 3/4 8…19 3/4 1…9 7/8
3.62 3.62 3.89 3.89 3.89 3.62 3.62 3.62
INSTALL DUCTWORK — Ductwork will be installed in the
curb for combination curb applications. The supply duct will
hang from the top of the curb. The return duct will attach to a
stub duct provided with the combination roof curb.
NOTE: Ductwork must be installed before the RTU is set in
place.
INSTALL GASKETS — The combination curbs come with a
INSTALLATION
Step 1 — Inspect the Unit —
claim with the shipping company if the unit is damaged. Check
the packing list to ensure that the correct items have been
received and notify your Carrier representative of any
discrepancy.
Inspect the unit; file a
Step 2 — Install Combination Roof Curb
(62EB-EU Units) —
tion roof curb is a single curb that supports both the ERV and
RTU and has internal supply and exhaust air transitions. See
Fig. 1.
NOTE: For horizontal applications with 62E2-E7 units, a standard roof curb and horizontal transition can be used.
LOCATE THE COMBINATION CURB — Prior to locating the combination curb, consider the structural support required for the rooftop system and the duct drop location in relation to the joists. Allow sufficient space for service, clearance,
and locations of vents or other sources of air. Refer to Fig. 2
and 3 for ERV clearance requirements. Refer to the rooftop installation instructions for more information regarding location
considerations.
PREPARE ROOF CURB LOCATION — Cut a hole in the
roof for duct openings. Your local Carrier sales representative
can provide dimensional drawing for the combination curb.
See this drawing for duct opening dimensions. Frame the opening to provide adequate structural support.
SET THE COMBINATION CURB — Set the combination
curb over the roof opening. Level the curb by placing shims
under the bottom flange of the curb. Secure the curb in place by
welding or fastening the curb to the roof.
For 62EB-EU units, the combina-
gasketing package to provide a seal between the RTU and ERV
units and the top perimeter of the combination curb. Install the
gasket around the top perimeter of the curb and around the supply and return opening. Gasket strips must fit tightly together,
leaving no gaps for leakage.
INSTALL ROOFING MATERIALS — Insulate and add a
cant strip to the combination curb. Follow suggested and acceptable roofing procedures for applying roofing materials.
The roofing material should extend up to the wood nailer and
be secured under the counter flashing. Follow all local, national, and industry roofing standards. Refer to Fig. 4 for roofing
recommendations.
Step 3 — Install Drop-In Damper Box (62EBEU Units) —
signed to fit into the return air openings of the standard factory
curb of Carrier RTUs. The damper box provides connections
for return air from the conditioned space, exhaust air to the
ERV, and ventilation air from the ERV. The ERV would be installed on a stand-alone roof curb and field-supplied ductwork
would be run between the damper box and ERV curb. See
Fig. 5. The maximum length of the field-supplied duct is 100
equivalent feet.
LOCATE THE ERV ROOF CURB — Prior to locating the
ERV roof curb consider the structural support required for the
rooftop system, the duct drop location in relation to the joists,
and the 100 equivalent foot duct length limitation between the
ERV and RTU. Allow sufficient space for service, clearance,
and locations of vents or other sources of air. Refer to Fig. 2
and 3 for ERV clearance requirements. Refer to the rooftop installation instructions for more information regarding location
and installation considerations for the RTU curb.
The drop-in damper box accessories are de-
6
Page 7
ASSEMBLE THE ERV ROOF CURB — Connect the curb
Fig. 1 — Typical Combination Curb
LEGEND
NOTES:
1. Return air ductwork sits 12 in. below bottom of
curb. (Stub duct provided.)
2. Dimensions shown in inches.
ERV — Energy Recovery Ventilator
RTU — Rooftop Unit
side and the curb end. Insert the tabs on the curb end into the
slots on the curb sides. See Fig. 6. Press firmly until the pieces
lock into place. It may be necessary to exert additional force on
top of the curb to lock the pieces in place. Ensure the curb pieces are locked together prior to proceeding further. Repeat for
other corners of the roof curb.
NOTE: If lifting or moving the roof curb assembly, hammer
the tabs over 90 degrees.
PREPARE ROOF CURB LOCATION — Cut a hole in the
roof for duct openings. See Fig. 7 for duct opening dimensions.
Frame the opening to provide adequate structural support.
SET THE ERV ROOF CURB — Fit the roof curb assembly
by measuring across the corners of the curb to ensure a square
fit. Set the roof curb over the roof opening. Level the curb by
placing shims under the bottom flange of the curb. Secure the
curb in place by welding or fastening the curb to the roof.
INSTALL DUCTWORK — Ductwork will be installed in the
ERV roof curb for applications utilizing the drop-in damper
box. The duct will hang from the top of the curb. Refer to
Fig. 7 to determine the duct size required. Provide fieldmanufactured duct and place into the supply and return openings in the curb.
NOTE: Ductwork must be installed in the ERV curb before the
ERV unit is set in place.
NOTE: Drop-in damper box must be installed in the RTU curb
before the RTU is set in place.
INSTALL GASKETS — The ERV roof curbs come with a
gasketing package to provide a seal between the ERV unit and
the top perimeter of the roof curb. Install the gasket around the
top perimeter of the curb and around the supply and return
opening. Gasket strips must fit tightly together, leaving no gaps
for leakage.
IMPORTANT: Gasket installation is critical for water
integrity. Improperly installed gaskets can result in air or
water leaks, leading to poor unit performance.
INSTALL ROOFING MATERIALS — Insulate and add a
cant strip to the roof curb. Follow suggested and acceptable
roofing procedures for applying roofing materials. The roofing
material should extend up to the wood nailer and be secured
under the counter flashing. Follow all local, national, and industry roofing standards. Refer to Fig. 4 for roofing recommendations.
INSTALL DROP-IN DAMPER BOX — Place the damper
box into the RTU curb. Allow the damper box flanges to rest
on the curb. Secure the damper box in place with 1-in. self-tapping screws. Install ductwork to connect the damper box to the
ERV curb. The upper damper box connection must be ducted
to the ERV supply air, and the lower damper box connection
must be ducted to the ERV exhaust air. See Fig 5. Refer to the
drop-in damper box dimensional sheets to determine the duct
size required. Your local Carrier sales representative can provide you with this dimensional data.
Step 4 — Install Horizontal Base and Transition (62EB-EU and 62E2-E7 Units) —
zontal transition accessory is used to connect the ERV to the
horizontal return of a Carrier rooftop unit. To provide horizontal exhaust and ventilation air connections on 62EB-EU units,
the horizontal base accessory must also be installed. The accessory is not needed on 62E2-E7 units. The rooftop unit must be
installed on a standard 14 in. high roof curb and positioned at a
specific distance relative to the ERV base. A typical arrangement is shown in Fig. 8 and 9. See Fig. 10 for 62E2-E7 unit dimensions. Your local Carrier sales representative can provide
you with dimensional data for the appropriate Carrier RTU and
62E model installation.
LOCATE THE ROOF CURB — Prior to locating the roof
curb consider the structural support required for the rooftop
system. Allow sufficient space for service, clearance, and locations of vent or other sources of air. Refer to Fig. 2, 3, and 10
for ERV clearance requirements. Refer to the rooftop installation instructions for more information regarding location
considerations.
Proper location of the roof curb in relationship to the RTU
roof curb is critical for proper fit of the horizontal transition.
See Fig. 8 and 9. Refer to the ERV unit submittals provided by
your local Carrier sales representative for the correct
dimensions.
The hori-
7
Page 8
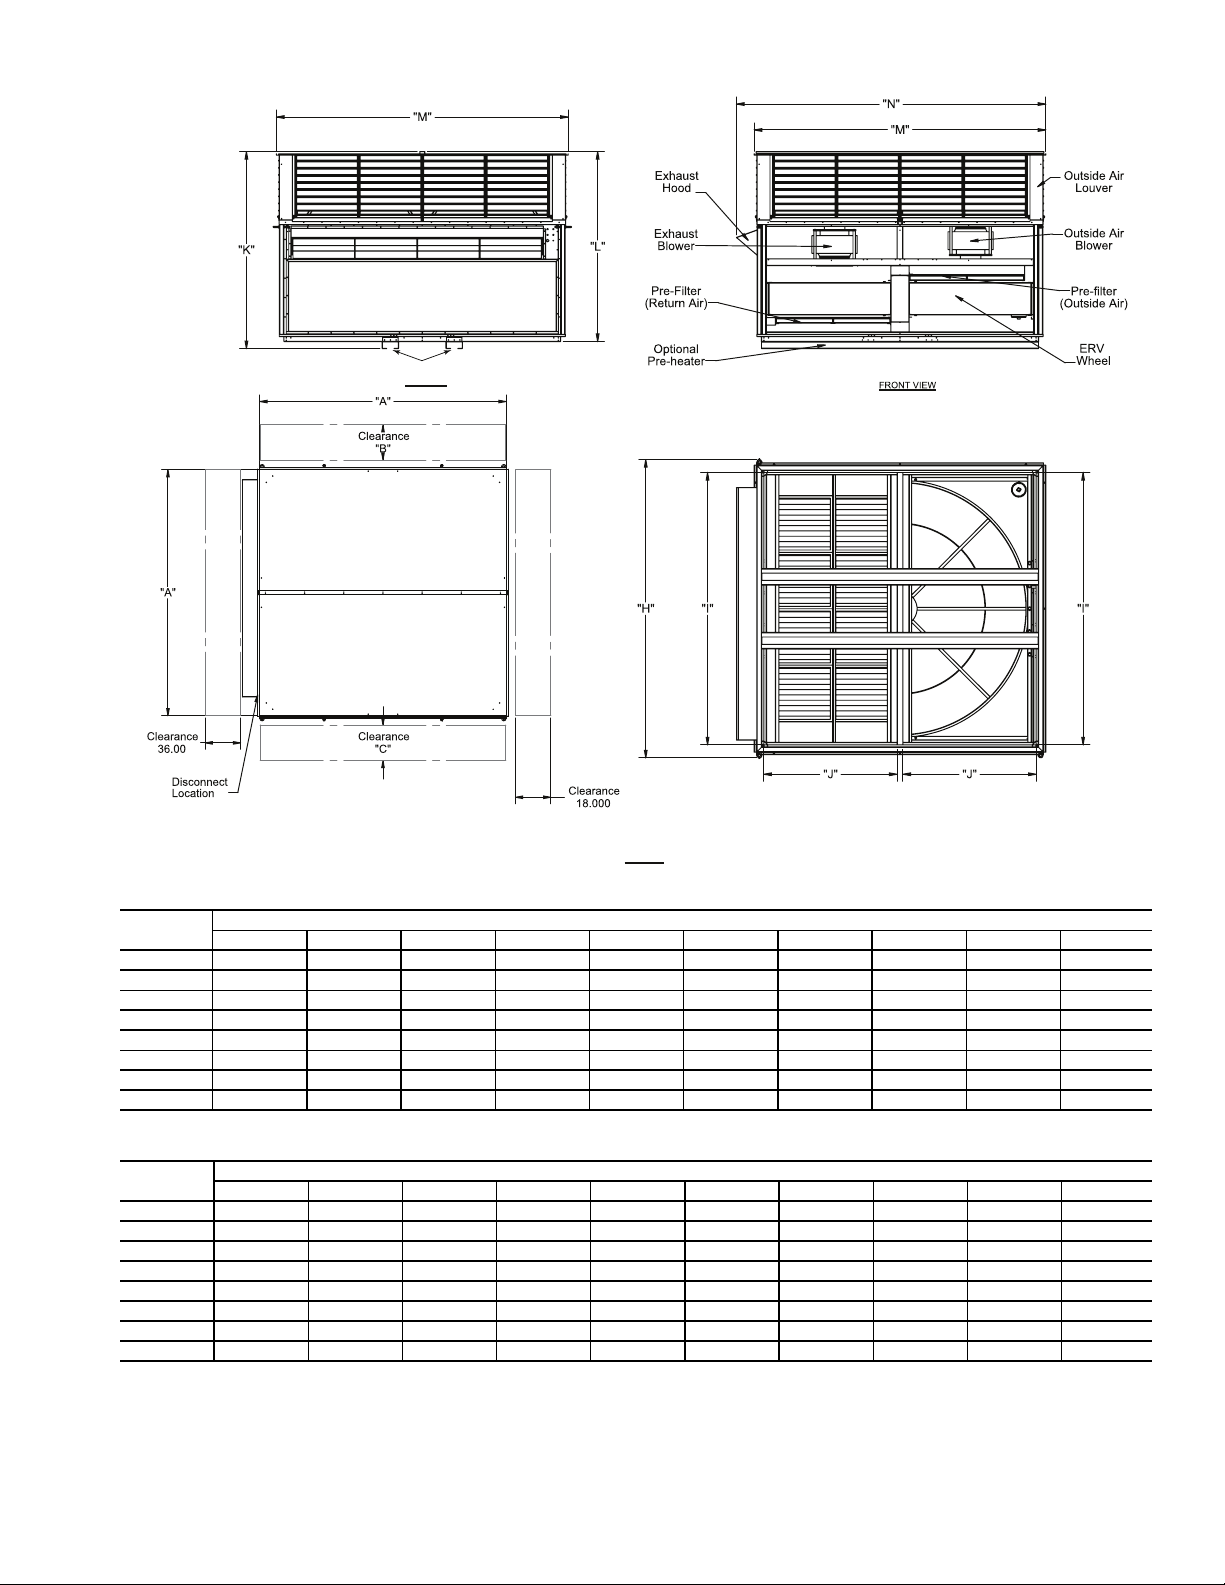
LEFT SIDE
TOP VIEW
Fork Pockets (Remove Before Installing on Curb)
62E UNIT
TYPE
DIMENSIONS (in.)
ABCDEFGH I J
B 31.138 36.000 36.000 37.645 34.559 5.850 5.757 35.076 24.971 11.801
C 38.625 18.000 36.000 45.183 42.078 8.916 14.239 43.875 32.471 15.485
D 44.425 18.000 45.000 45.043 41.938 8.916 14.239 49.675 38.271 18.260
E 54.625 20.000 55.000 53.562 50.458 11.677 19.165 59.875 48.495 22.997
H 67.045 20.000 65.000 59.022 55.918 11.677 25.164 72.294 60.915 29.207
K 77.625 27.000 75.000 64.972 61.868 11.677 25.164 82.875 71.495 34.247
a62-330
Fig. 2 — 62EB-62EK Vertical Unit Cabinet Dimensions
NOTES:
1. Clearance above cabinet is 24 inches (610 mm).
2. All dimensions shown in inches.
62E UNIT
TYPE
DIMENSIONS (mm)
ABCDEFGH I J
B 791 914 914 956 878 149 146 891 634 300
C 981 457 914 1148 1069 226 362 1114 825 393
D 1128 457 1143 1144 1065 226 362 1262 972 464
E 1387 508 1397 1360 1282 297 487 1521 1232 584
H 1703 508 1651 1499 1420 297 639 1836 1547 742
K 1972 686 1905 1650 1571 297 639 2105 1816 870
8
Page 9
LEFT SIDE
TOP VIEW
Fork Pockets (Remove Before Installing on Curb)
62E UNIT
TYPE
DIMENSIONS (in.)
ABCH I JKLMN
L 82.750 30.000 85.000 85.536 76.471 36.985 69.500 66.396 85.076 92.747
M 89.750 30.000 95.000 92.536 83.471 40.485 70.500 67.396 92.076 99.747
N 95.750 30.000 97.000 98.536 89.471 43.485 71.500 68.396 98.076 105.747
P 100.750 32.000 105.000 103.536 94.471 45.985 74.910 71.806 103.076 110.747
R 108.750 32.000 115.000 111.536 102.471 49.985 74.910 71.806 111.076 118.747
S 112.750 32.000 115.000 115.536 106.471 51.985 78.910 75.806 115.076 122.747
T 119.750 32.000 122.000 122.536 113.471 55.485 84.490 81.386 122.076 129.747
U 125.625 32.000 125.000 130.875 119.495 58.497 86.510 83.405 127.971 135.727
a62-331
Fig. 3 — 62EL-62EU Unit Cabinet Dimensions
NOTES:
1. Clearance above cabinet is 36 inches (915 mm).
2. All dimensions shown in inches.
62E UNIT
TYPE
DIMENSIONS (mm)
ABCH I JKLMN
L 2102 762 2159 2173 1942 937 1765 1686 2161 2356
M 2280 762 2413 2350 2120 1028 1791 1712 2339 2534
N 2432 762 2464 2503 2273 1105 1816 1737 2491 2686
P 2559 813 2667 2630 2400 1168 1903 1824 2618 2813
R 2762 813 2921 2833 2603 1270 1903 1824 2821 3016
S 2864 813 2921 2935 2704 1320 2004 1925 2923 3118
T 3042 813 3099 3112 2882 1409 2146 2067 3101 3296
U 3191 813 3175 3324 3035 1486 2197 2118 3250 3447
9
Page 10
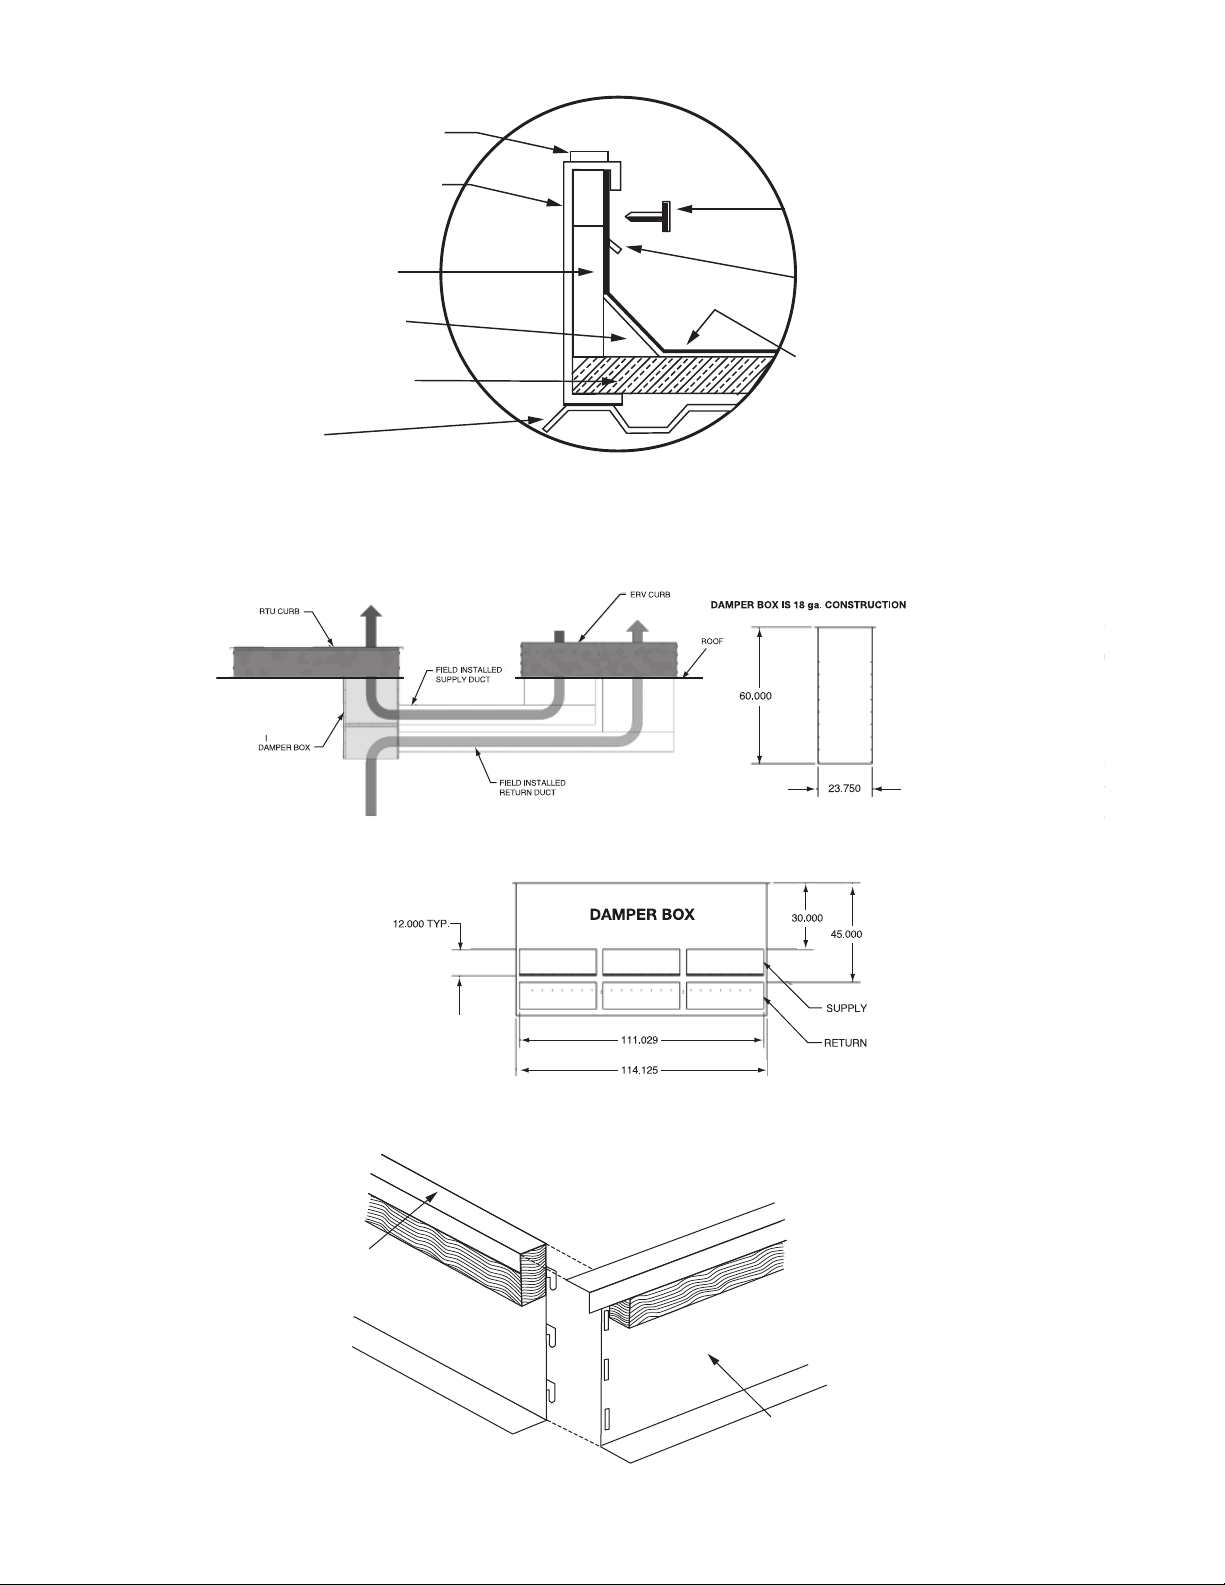
Fig. 5 — Typical Installation with Drop-in Damper Box
*Field provided.
Fig. 4 — Roofing Materials — Recommendation
Fig. 6 — Assembling the Roof Curb
A62-246ef
NOTE: All dimensions shown in inches.
a62-376.eps
NAIL*
FLASHING*
ROOF FELT*
ROOF*
ROOF DECK*
CANT STRIP*
RIGID
INSULATION*
GASKETING
ROOF CURB
A62-247ef
END
10
SIDE
Page 11
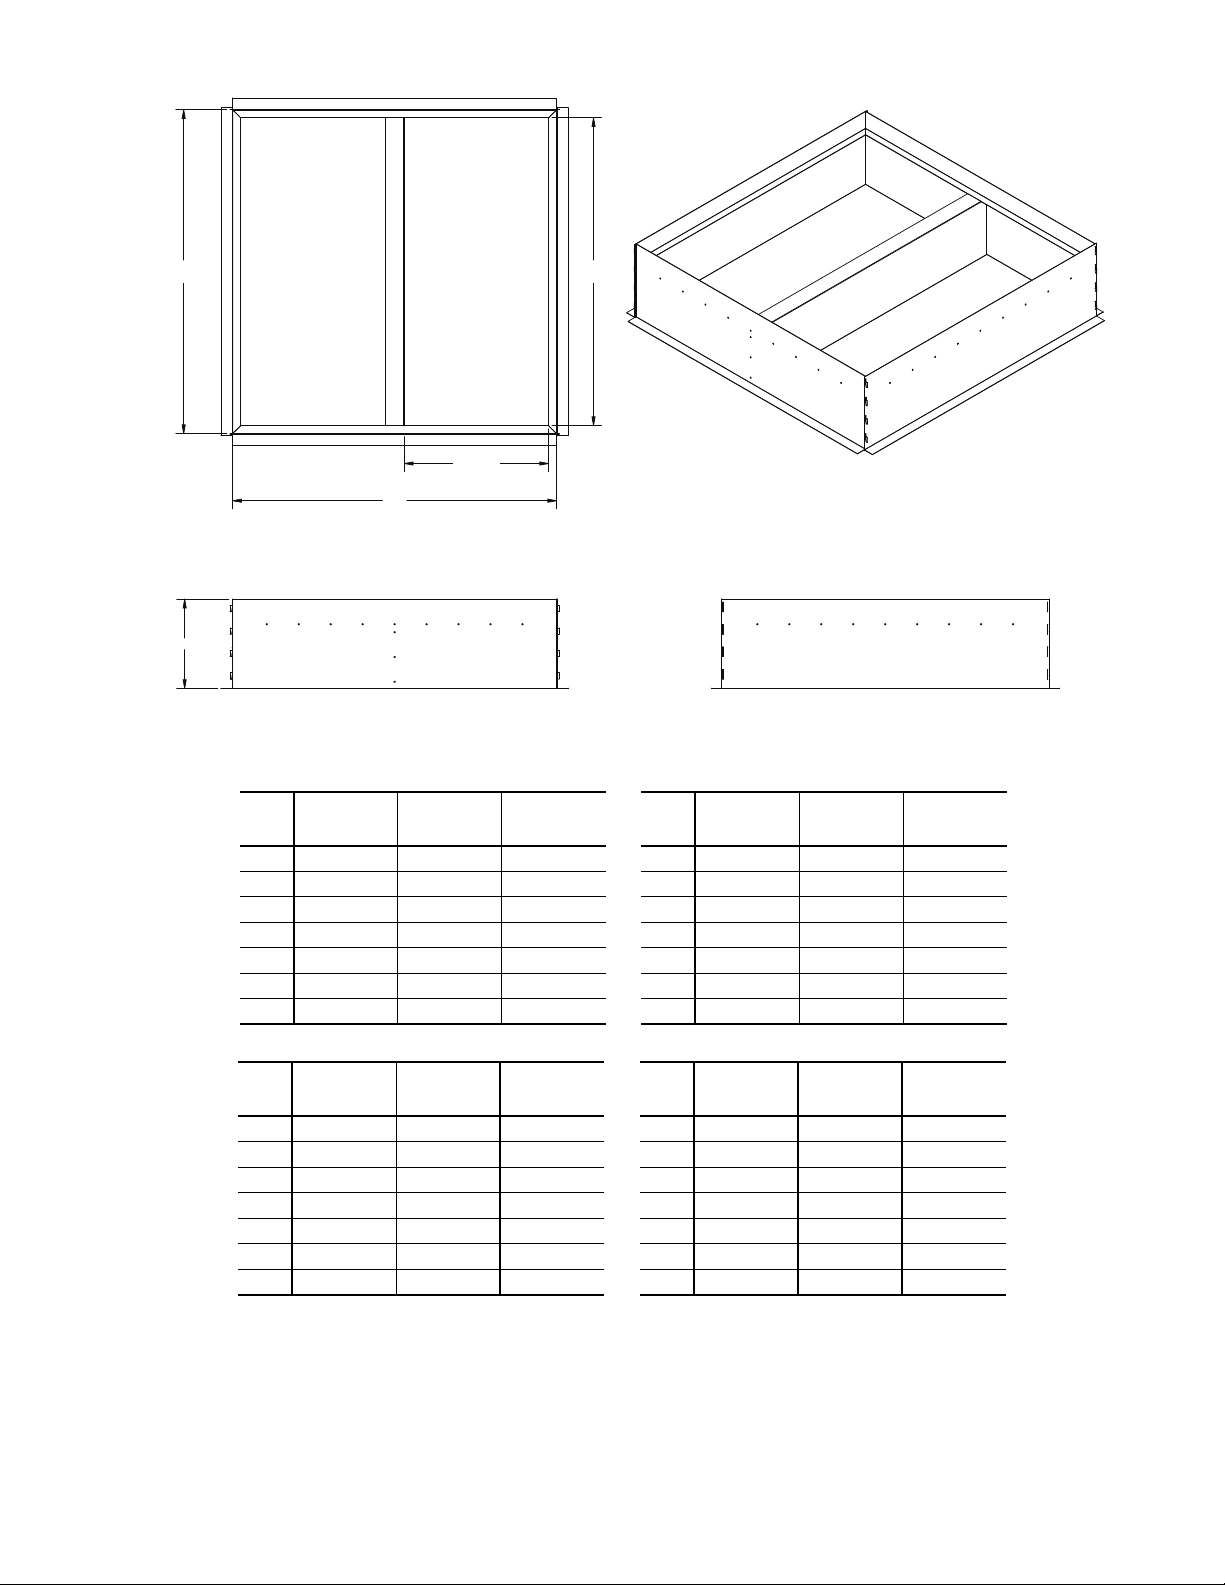
Fig. 7 — 62EB-62EU Unit Curb Dimensions
62E
UNIT
TYPE
DIMENSION
A (in.)
DIMENSION
B (in.)
DIMENSION
C (in.)
B 27.221 24.721 10.861
C 34.721 32.221 14.611
D 40.521 38.021 17.511
E 50.721 48.221 22.611
H 63.141 60.641 28.821
K 73.721 71.221 34.111
L 78.721 76.221 36.611
62E
UNIT
TYPE
DIMENSION
A (in.)
DIMENSION
B (in.)
DIMENSION
C (in.)
M 85.721 83.221 40.111
N 91.721 89.221 43.111
P 96.721 94.221 45.611
R 104.721 102.221 49.611
S 108.721 106.221 51.611
T 115.721 113.221 55.111
U 121.721 119.221 58.111
NOTES:
1. All dimensions shown in inches.
2. Nailer sits even with top of curb. Do not cover any existing holes with nailer.
"A"
a62-377
62E
UNIT
TYPE
DIMENSION
A (mm)
DIMENSION
B (mm)
DIMENSION
C (mm)
B 691 628 276
C 882 818 371
D 1029 966 445
E 1288 1225 574
H 1604 1540 732
K 1873 1809 866
L 2000 1936 930
62E
UNIT
TYPE
DIMENSION
A (mm)
DIMENSION
B (mm)
DIMENSION
C (mm)
M 2177 2114 1019
N 2330 2266 1095
P 2457 2393 1159
R 2660 2596 1260
S 2762 2698 1311
T 2939 2876 1400
U 3092 3028 1476
I.D.
"C"
TYP. 2X
"A"
I.D.
14.000
"B"
TYP. 2X
11
Page 12
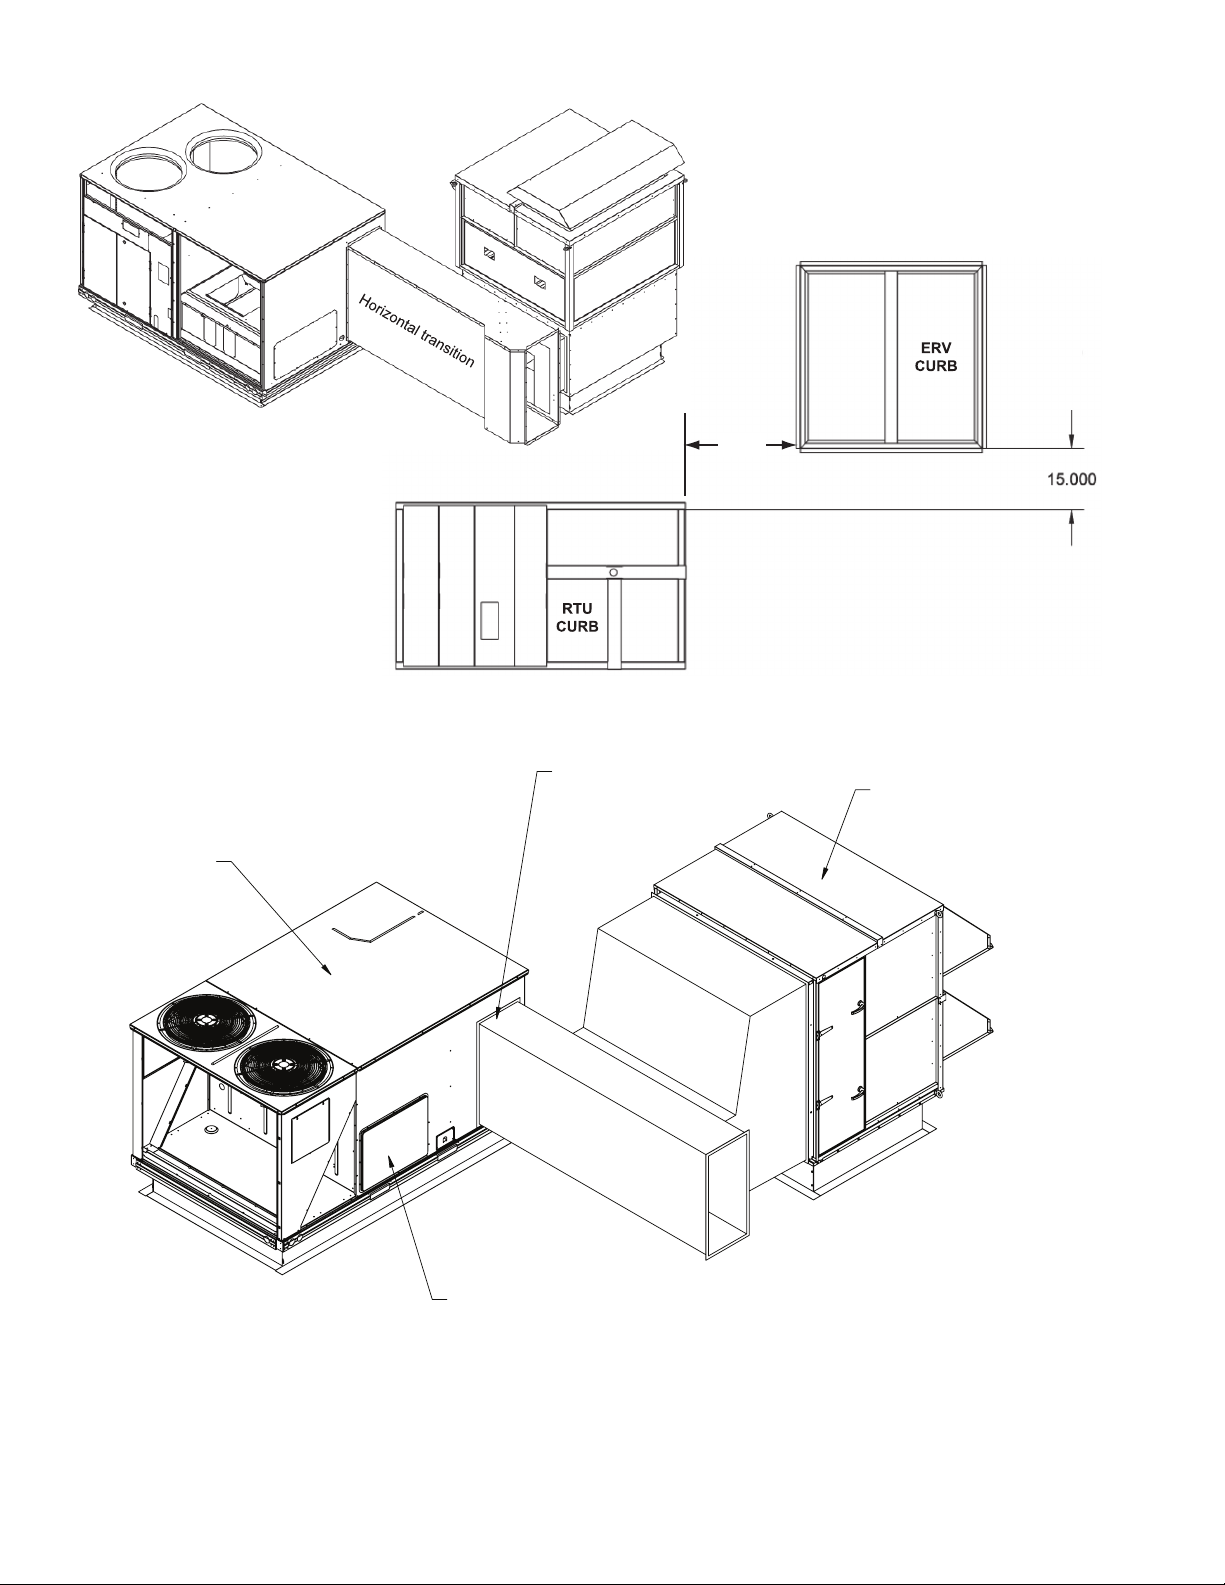
Fig. 8 — Typical 62EB-EU Unit Installation with Horizontal Base and Horizontal Transition
NOTE: All dimensions shown in inches.
a62-378
HVAC UNIT
RETURN AIR OPENING
ENERGY RECOVERY UNIT
HORIZONTAL
TRANSITION
SUPPLY OPENING
a62-443
Fig. 9 — Typical 62E2-E7 Unit Installation
25.00
12
Page 13

CLEARANCE
"A"
CLEARANCE
"B"
CLEARANCE
36.000
DUCT CONNECTION
SPACE IF NO HOODS
"C"
SEE NOTE 3
FIELD TERMINAL STRIP
ACCESS
OUTSIDE AIR
HOOD
EXHAUST
HOOD
WHEEL AND FILTER
ACCESS
ROOF CURB
ROOF CURB
DI
SCONNECT
LOCATION
OUTSIDE AIR
HOOD
EXHAUST
HOOD
DUCT CONNECTION
SPACE
"G"
"F"
"E"
DUCT O.D.
"D"
"H"
"I" "J"
DUCT O.D.
"D"
DUCT I.D.
"D" - 2.000
DUCT I.D.
"K"
DUCT I.D.
"K"
S/A
R/A
ONLY DUCT SLEEVE AND
ERV AIR DIVIDER SHOWING
62E UNIT TYPE
DIMENSIONS (in.)
A BCD E F G H I J K
7 36.000 36.000 1.869 28.995 31.734 36.375 32.176 31.186 11.984 36.905 12.813
2 18.000 36.000 1.179 36.495 39.171 43.875 39.663 38.673 16.215 41.239 16.497
3 18.000 40.000 3.795 42.295 44.847 49.675 45.463 44.473 16.215 41.099 19.272
4 18.000 50.000 4.238 52.495 55.066 59.875 55.673 54.673 21.132 49.631 23.997
5 24.000 64.000 4.516 64.915 67.486 72.295 68.093 67.093 27.131 53.013 30.207
6 18.000 75.000 9.542 75.495 78.066 82.875 78.673 77.673 27.131 58.963 35.247
Fig. 10 — 62E2-62E7 Unit Cabinet Dimensions
NOTES:
1. Clearance above cabinet is 24 in. (610 mm).
2. Dimensions are in inches.
3. Size the roof curb to allow for a clearance of 10-in. (254 mm) (minimum) between
the bottom of the exhaust hood and the top of the insulated roof material.
62E UNIT TYPE
DIMENSIONS (mm)
A BCD E F G H I J K
7 914 914 47 736 806 924 817 792 304 937 325
2 457 914 30 927 995 1114 1007 982 412 1047 419
3 457 1016 96 1074 1139 1262 1155 1130 412 1044 490
4 457 1270 108 1333 1399 1521 1414 1389 537 1261 610
5 610 1626 115 1649 1714 1836 1730 1704 689 1347 767
6 457 1905 242 1918 1983 2105 1998 1973 689 1498 895
13
Page 14

ASSEMBLE THE ROOF CURB — Connect the curb side
and the curb end. Insert the tabs on the curb end into the slots
on the curb sides. See Fig 6. Press firmly until the pieces lock
in to place. It may be necessary to exert additional force to the
top of the curb to lock the pieces in place. Ensure the curb pieces are locked together prior to proceeding. Repeat for other corners of the roof curb. See Fig. 7 and 11 for roof curb dimensions.
NOTE: If lifting or moving the roof curb assembly hammer
the tabs over 90 degrees.
SET THE ROOF CURB — Fit the roof curb assembly by
measuring across the corners of the curb to ensure a square fit.
Level the curb by placing shims under the bottom flange of the
curb. Secure the curb in place by welding or fastening the curb
to the roof.
INSTALL ROOFING MATERIALS — Insulate and add a
cant strip to the roof curb. Follow suggested and acceptable
roofing procedures for applying roofing materials. The roofing
material should extend up to the wood nailer and be secured
under the counter flashing. Follow all local, national, and industry roofing standards. Refer to Fig. 4 for roofing recommendations.
INSTALL THE HORIZONTAL BASE (62EB-EU UNITS
ONLY) — Remove the fork pockets from the bottom of the
horizontal base. After removing the fork pockets from the bottom of the horizontal base place the base on the roof curb. Secure the horizontal base to the curb using no. 14, 2-in. self-tapping sheet metal screws.
Apply the factory provided gasketing material to the top
of the horizontal base. Follow the rigging directions in the
Step 6 — Rig and Place Unit section to place the ERV on the
horizontal base. Position the ERV so that the ERV's LCD display is on the opposite side of the horizontal base's duct openings. Secure the ERV to the horizontal base using 1-in. self-tapping sheet metal screws every 18 in. around the perimeter.
NOTE: The ERV may also be mounted to the horizontal base
prior to being set on the roof curb.
INSTALL THE HORIZONTAL TRANSITION — Apply
the factory-provided gasketing material to the horizontal transition at all points where duct connections are made. Attach the
horizontal transition to the horizontal base (62EB-EU units) or
the ERV (62E2-E7 units) and RTU return connection using
1-in. self-tapping sheet metal screws. Ensure that all connections are water and air tight.
Step 5 — Install Standard Roof Curb
VERTICAL STAND-ALONE APPLICATIONS (62EBEU UNITS) — The ERV unit can be installed without being
coupled with a RTU. The ERV units can be installed in one of
two stand-alone applications: vertical discharge or horizontal
discharge. Vertical discharge requires the use of a standard roof
curb. When installing a stand-alone ERV in a vertical application complete the following steps:
Locate the Roof Curb
consider the structural support required for the rooftop system
and, the duct drop location in relation to the joists. Allow sufficient space for service, clearance, and locations of vents or
other sources of air. Refer to Fig. 2 and 3 for ERV clearance
requirements.
Assemble the Roof Curb
curb end. Insert the tabs on the curb end into the slots on the
curb sides. See Fig. 6. Press firmly until the pieces lock into
place. It may be necessary to exert additional force to the top of
the curb to lock the pieces in place. Ensure the curb pieces are
locked together prior to proceeding. Repeat for all corners of
the roof curb.
Prepare Roof Curb Location
openings. See Fig. 7 for duct opening dimensions. Frame the
opening to provide adequate structural support.
— Prior to locating the roof curb
— Connect the curb side and the
— Cut a hole in the roof for duct
Set the Roof Curb
across the corners of the curb to ensure a square fit. Set the roof
curb over the roof opening. Level the curb by placing shims
under the bottom flange of the curb. Secure the curb in place by
welding or fastening the curb to the roof.
Install Ductwork
curb for vertical discharge stand-alone applications. The duct
will hang from the top of the curb. Refer to Fig. 7 to determine
the duct size required. Provide field manufactured duct and
place into the supply and return openings in the curb.
NOTE: Ductwork must be installed in the ERV curb before the
ERV unit is set in place.
Install Gaskets
package to provide a seal between the ERV unit and the top perimeter of the roof curb. Install the gasket around the top perimeter of the curb and around the supply and return opening.
Install Roofing Materials
the roof curb. Follow suggested and acceptable roofing
practices for applying roofing materials. The roofing material
should extend up to the wood nailer and be secured under the
counterflashing. Follow all local, national, and industry roofing
standards. Refer to Fig. 4 for roofing recommendations.
HORIZONTAL STAND-ALONE APPLICATIONS (62EBEU and 62E2-E7 Units) — The ERV unit can be installed
without being coupled with a RTU. The ERV units can be installed in one of two stand-alone applications: vertical discharge or horizontal discharge. Horizontal discharge with a
62EB-EU units requires the use of the horizontal base accessory. The horizontal base accessory include a horizontal discharge box and a roof curb to support the box. The horizontal
base accessory is not required with 62E2-E7 units.
When installing a stand-alone ERV in a horizontal application complete the following steps:
Locate the Roof Curb
sider the structural support required for the rooftop system. Allow sufficient space for service, clearance, and locations of
vents or other sources of air. Refer to Fig. 2, 3, and 10 for ERV
clearance requirements.
Assemble the Roof Curb
curb end. Insert the tabs on the curb end into the slots on the
curb sides. See Fig 6. Press firmly until the pieces lock into
place. It may be necessary to exert additional force on top of
the curb to lock the pieces in place. Ensure the curb pieces are
locked together prior to proceeding further. Repeat for other
corners of the roof curb. See Fig. 7 and 11 for roof curb dimensions.
NOTE: If lifting or moving the roof curb assembly, hammer
the tabs over 90 degrees.
Set the Roof Curb
across the corners of the curb to ensure a square fit. Level the
curb by placing shims under the bottom flange of the curb. Secure the curb in place by welding or fastening the curb to the
roof.
Install Roofing Materials
the roof curb. Follow suggested and acceptable roofing procedures for applying roofing materials. The roofing material
should extend up to the wood nailer and be secured under the
counter flashing. Follow all local, national, and industry roofing standards. Refer to Fig. 4 for roofing recommendations.
Install the Horizontal Base (62EB-EU Units Only)
move the fork pockets from the bottom of the horizontal base.
After removing the fork pockets, place the base on the roof
curb. Secure the horizontal base to the curb using no. 14, 2-in.
self-tapping sheet metal screws.
— Fit the roof curb assembly by measuring
— Ductwork will be installed in the roof
— The ERV roof curbs come with a gasketing
— Insulate and add a cant strip to
— Prior to locating the roof curb con-
— Connect the curb side and the
— Fit the roof curb assembly by measuring
— Insulate and add a cant strip to
— Re-
14
Page 15

"D"
62E UNIT
TYPE
DIMENSIONS (in.)
ABCDE
7 28.286 10.143 31.397 36.927 33.816
2 35.882 13.941 38.993 40.446 37.335
3 41.682 16.841 44.793 40.306 37.195
4 51.882 21.941 54.993 48.826 45.715
5 64.302 28.151 67.413 54.286 51.175
6 74.882 33.441 77.993 60.236 57.125
a62-442
NOTE: Dimensions are in inches.
Fig. 11 — 62E2-62E7 Unit Roof Curb Dimensions
62E UNIT
TYPE
DIMENSIONS (mm)
ABCDE
7 718 258 797 938 859
2 911 354 990 1027 948
3 1059 428 1138 1024 945
4 1318 557 1397 1240 1161
5 1633 715 1712 1379 1300
6 1902 849 1981 1530 1451
AA
"C"
.500
"B" I.D. "B" I.D.
SECTION A-A
B
DETAIL B
SCALE 1 : 3
ERV RAIL SITS DOWN
IN CHANNEL
.941
"A"
the horizontal base. Follow the rigging directions in the
Step 6 — Rig and Place Unit section to place the ERV on the
horizontal base. Position the ERV so that the ERV's LCD (liquid crystal diode) display is on the opposite side of the horizontal base's duct openings. Secure the ERV to the horizontal base
using 1-in. self-tapping sheet metal screws every 18 in. around
the perimeter.
Apply the factory provided gasketing material to the top of
14.559
NOTE: The ERV may also be mounted to the horizontal base
prior to being set on the roof curb.
Install Ductwork
— Ductwork will be connected to the horizontal box (62EB-EU units) or directly to the ERV (62E2-E7
units) for stand-alone horizontal discharge and exhaust applications. See Fig. 12 for the horizontal box connection dimensions. See Fig. 10 for 62E2-E7 connection dimensions. Do not
support the duct from the horizontal box. Provide field
"E"
15
Page 16

manufactured duct and attach to the supply and exhaust open-
FORK POCKETS (REMOVE
BEFORE INSTALLING ON CURB)
62E UNIT
TYPE
DIMENSIONS (in.)
ABCDE
B 27.221 12.111 8.750 14.000 22.604
C 34.721 15.861 12.500 14.000 22.604
D 40.521 18.761 15.400 18.000 26.600
E 50.721 23.861 20.500 21.000 29.604
H 63.141 30.071 26.710 24.000 32.604
K 72.721 34.861 31.500 26.022 34.637
L 78.721 37.861 34.500 26.022 34.637
M 85.721 41.361 38.000 26.022 34.637
N 91.721 44.361 41.000 31.011 39.615
P 96.721 46.861 43.500 33.052 41.682
R 104.721 50.861 47.500 33.052 41.682
S 108.721 52.861 49.500 35.110 43.769
T 115.721 56.361 53.000 35.110 43.769
U 115.721 56.361 53.000 35.110 43.769
a62-379
Fig. 12 — 62EB-62EU Unit Horizontal Discharge Box Dimensions
ings on the horizontal box.
Step 6 — Rig and Place Unit — To transfer the unit
from the shipping platform to the storage or installation site, refer to the rigging label on the unit and these instructions.
CAUTION
All panels must be in place when rigging. Unit is not
designed for handling by fork truck. Damage to unit may
result.
Refer to Tables 1A and 1B for ERV unit weights. Check lift-
ing devices for capacity constraints.
Hook rigging shackles through the eyehooks in the ERV
unit. Connect lifting straps and spreader bars. See Fig 13.
Spreader bars must be positioned to prevent cables from rubbing against the ERV unit.
WARNING
Never attempt to lift the ERV in any way that does not use
all four (4) eyehooks. Lifting the unit with an uneven distribution of the weight may cause damage to the unit and/or
personal injury or death.
IMPORTANT: Remove the fork pockets from the ERV
unit before setting it on the roof curb.
Carefully lift the ERV unit and set on ERV roof curb. Do
not drop the ERV unit onto the roof curb, as damage may occur. Avoid twisting or uneven lifting of the unit. Never lift the
unit by the hoods or any means other than the provided lifting
holes or eyes.
16
Page 17

Fig. 13 — Rigging and Handling
EYE HOOK
a62-380
(HIDDEN)
EYE HOOK
EYE HOOKS
FORK POCKETS
Step 7 — Make Electrical Connections
WARNING
Prior to performing service or maintenance operations on
the ERV unit, turn off and disconnect all power switches to
the unit. Be aware that there may be more than one disconnect switch. Electrical shock could cause serious personal
injury or death.
IMPORTANT: Only trained, qualified installers and service technicians should install, wire, start-up and service
equipment.
POWER SUPPLY — The electrical characteristics of the
available power supply must agree with the unit nameplate
rating. Supply voltage must be within the limits shown. See Tables 3-5 for electrical and configuration data.
ELECTRICAL CONNECTIONS — The ERV unit must
have its own electrical disconnect box. If the disconnect option
has not been ordered from the factory, it must be field supplied
and installed per local codes. See Tables 3-5.
If the ERV unit has an electric pre-heater factory installed, it
will be wired through the ERV unit disconnect.
Low Voltage Wiring
— Wire low voltage per Fig. 14. The
field connection terminal strip is located behind the panel that
is adjacent to the control box. The correct panel is marked with
a green label stating “Attention: For field control of ERV, remove this panel to gain access to ERV field control terminal
strip.” The wires connecting to the field terminal strip can be
routed through the nearest
3
/4-in. hole and through conduit to
the RTU, or they can be routed down the sidewall of the cabinet using the wire pull provided and routed through the combination curb to the RTU.
CAUTION
When routing wires in the ERV always keep them away
from moving parts and sharp metal edges. Follow all local
and state codes when routing the ERV control wires.
If the ERV unit is mated to a RTU, terminals C and G on the
field control terminal strip of the ERV unit are connected to the
corresponding terminals on the RTU cabinet. Verify the jumper
is removed from the “ERV R” and “G” terminals; not doing so
may damage RTU control equipment.
When the ERV is to be run as a stand-alone configuration,
verify that a jumper is shorting the “ERV R” and “G” terminals
on the ERV field control terminal strip. This will enable the
ERV to turn on and run.
If the HVAC unit has an integrated economizer or power exhaust, it is sometimes necessary to provide an interface between the HVAC unit and the ERV controls to ensure proper
operation of the ERV’s supply/exhaust fan and energy recovery
wheel motors. The 62E has discrete inputs for this purpose and
damper end switches or relays may be used to coordinate the
economizer and power exhaust operation with the ERV.
When an ERV is mated to an electro-mechanical rooftop
unit with an economizer and a power exhaust, terminals C and
G on the ERV field control terminal strip are still connected to
the corresponding terminals on the rooftop unit cabinet (jumper
across R and G needs to be removed). However, in addition,
field supplied and installed end switches are required to coordinate operation with the unit. For unit economizer operation, it
is necessary to install an Normally Open end switch (field provided) on the economizer actuator and connect to terminals 5
and 6 (ERV Shutdown) on the ERV terminal strip. This will
cause the ERV to shut down during unit economizer operation.
For power exhaust, based on building pressure control, no additional ERV wiring is required, however if the ERV is to provide power exhaust functionality then a field-installed Normally Closed end switch is required to be installed between terminals 7 and 8 on the ERV terminal strip.
High Voltage Wiring
— Connect high voltage wiring to the
disconnect, see Fig. 14. Route the power wires in water tight
conduit from the disconnect switch box to the ERV distribution
block. To gain access to high voltage block, remove panel
marked with label stating, “High voltage terminal block located behind this panel.”
Table 3 — ERV Wheel Motor and Control
Transformer Electrical Data
UNIT
62EB,E7
62EC,E2
62ED,E3
62EE,E4
62EH,E5
62EK,EL,EM,
EN,EP,E6
62ER,ES,
ET,EU
FLA — Full Load Amps W—Watts
UNIT
V-P h
115-1 115-1 80.5 0.70 75 0.65
230-1 230-1 69.0 0.30 75 0.33
230-3 230-1 69.0 0.30 75 0.33
400-3 230-1 69.0 0.15 75 0.16
460-3 230-1 69.0 0.15 75 0.16
575-3 230-1 69.0 0.12 75 0.13
230-1 230-1 69.0 0.30 75 0.33
230-3 230-1 69.0 0.30 75 0.33
400-3 230-1 69.0 0.15 75 0.16
460-3 230-1 69.0 0.15 75 0.16
575-3 230-1 69.0 0.12 75 0.13
230-3 230-1 69.0 0.30 75 0.33
400-3 230-1 69.0 0.15 75 0.16
460-3 230-1 69.0 0.15 75 0.16
575-3 230-1 69.0 0.12 75 0.13
230-3 230-3 138.3 1.04 75 0.33
400-3 460-3 138.3 0.52 75 0.16
460-3 460-3 138.3 0.52 75 0.16
575-3 575-3 99.7 0.30 75 0.13
230-3 230-3 99.7 0.75 75 0.33
400-3 460-3 101.0 0.38 75 0.16
460-3 460-3 101.0 0.38 75 0.16
575-3 575-3 99.7 0.30 75 0.13
230-3 230-3 332.4 2.50 75 0.33
400-3 460-3 319.1 1.20 75 0.16
460-3 460-3 319.1 1.20 75 0.16
575-3 575-3 315.8 0.95 75 0.13
230-3 230-3 452.0 3.40 75 0.33
400-3 460-3 452.0 1.70 75 0.16
460-3 460-3 452.0 1.70 75 0.16
575-3 575-3 465.3 1.40 75 0.13
LEGEND
ERV WHEEL MOTOR
V-Ph W FLA V FLA
CONTROL
TRANSFORMER
17
Page 18

Table 4 — Supply and Exhaust Fans Electrical Data
FAN
OPTION
A B,7
B B,7
C
E
F
G
H
J
K S,T,U
L H,K,L
LEGEND
FLA — Full Load Amps
Qty — Quantity
W—Watts
62E
CHASSIS
C,2
D,E,3, 4
E,H,K,
4,5,6
H,K,L,
M,N,P,
4,6
L,M,N,
P, R
R,S,
T, U
R,S,
T, U
UNIT
V-Ph
V-Ph W FLA Q ty
FAN MOTOR
115-1 115-1 455 3.96 1
230-1 230-1 400 1.74 1
230-3 230-1 400 1.74 1
460-3 200-1 400 0.87 1
460-3 230-1 400 0.87 1
575-3 230-1 400 0.70 1
115-1 115-1 455 3.96 2
230-1 115-1 455 1.98 2
230-3 115-1 455 1.98 2
400-3 115-1 455 0.99 2
460-3 115-1 455 0.99 2
575-3 115-1 455 0.79 2
230-1 230-1 395 1.72 1
230-3 230-3 880 2.21 1
400-3 460-3 880 1.11 1
460-3 460-3 880 1.11 1
575-3 460-3 880 0.88 1
230-3 230-3 880 2.21 1
400-3 460-3 880 1.11 1
460-3 460-3 880 1.11 1
575-3 460-3 880 0.88 1
230-3 230-3 2700 6.79 1
400-3 460-3 2700 3.39 1
460-3 460-3 2700 3.39 1
575-3 460-3 2700 2.71 1
230-3 230-3 2700 6.79 2
400-3 460-3 2700 3.39 2
460-3 460-3 2700 3.39 2
575-3 460-3 2700 2.71 2
230-3 230-3 2700 6.79 3
400-3 460-3 2700 3.39 3
460-3 460-3 2700 3.39 3
575-3 460-3 2700 2.71 3
230-3 230-3 2700 6.79 4
400-3 460-3 2700 3.39 4
460-3 460-3 2700 3.39 4
575-3 460-3 2700 2.71 4
230-3 230-3 2700 6.79 5
400-3 460-3 2700 3.39 5
460-3 460-3 2700 3.39 5
575-3 460-3 2700 2.71 5
230-3 230-3 2700 6.79 6
400-3 460-3 2700 3.39 6
460-3 460-3 2700 3.39 6
575-3 460-3 2700 2.71 6
230-3 230-3 2900 7.29 1
400-3 460-3 2900 3.64 1
460-3 460-3 2900 3.64 1
575-3 460-3 2900 2.92 1
18
Page 19

Table 4 — Supply and Exhaust Fans Electrical Data (cont)
FAN
OPTION
M
N
P T, U
R T, U
LEGEND
FLA — Full Load Amps
Qty — Quantity
W—Watts
62E
CHASSIS
K,L,M,
N,P,R
R,S,
T, U
UNIT
V-Ph
V-Ph W FLA Q ty
230-3 230-3 2900 7.29 2
400-3 460-3 2900 3.64 2
460-3 460-3 2900 3.64 2
575-3 460-3 2900 2.92 2
230-3 230-3 2900 7.29 3
400-3 460-3 2900 3.64 3
460-3 460-3 2900 3.64 3
575-3 460-3 2900 2.92 3
230-3 230-3 2700 6.79 7
400-3 460-3 2700 3.39 7
460-3 460-3 2700 3.39 7
575-3 460-3 2700 2.71 7
230-3 230-3 2700 6.79 8
400-3 460-3 2700 3.39 8
460-3 460-3 2700 3.39 8
575-3 460-3 2700 2.71 8
Table 5 — Electric Heat Electrical Data
FAN MOTOR
kW FLA
2
5
8
10
15
20
LEGEND
FLA — Full Load Amps
W—Watts
HEATER
UNIT AND HEATER
V-Ph
62E CHASSIS
17.39 115-1 B,7
8.70 230-1 B,C,2,7
5.03 230-3 B,C,D,E,2,3,4,7
2.51 400-3 B,C,D,E,2,3,4,7
2.51 460-3 B,C,D,E,2,3,4,7
2.01 575-3 B,C,D,E,2,3,4,7
43.48 115-1 B,7
21.74 230-1 B,C,2,7
12.57 230-3 B,C,D,E,H,2,3,4,5,7
6.28 400-3 B,C,D,E,H,2,3,4,5,7
6.28 460-3 B,C,D,E,H,2,3,4,5,7
5.03 575-3 B,C,D,E,H,2,3,4,5,7
20.11 230-3 D,E,H,3,4,5
10.05 400-3 D,E,H,3,4,5
10.05 460-3 D,E,H,3,4,5
8.04 575-3 D,E,H,3,4,5
25.13 230-3 E,H,K,L,4,5,6
12.57 400-3 E,H,K,L,4,5,6
12.57 460-3 E,H,K,L,4,5,6
10.05 575-3 E,H,K,L,4,5,6
37.70 230-3 H,K,L,M,N,5,6
18.85 400-3 H,K,L,M,N,5,6
18.85 460-3 H,K,L,M,N,5,6
15.08 575-3 H,K,L,M,N,5,6
50.26 230-3 H,K,L,M,N,P,5,6
25.13 400-3 H,K,L,M,N,P,5,6
25.13 460-3 H,K,L,M,N,P,5,6
20.11 575-3 H,K,L,M,N,P,5,6
19
Page 20

Table 5 — Electric Heat Electrical Data (cont)
kW FLA
25
30
35
40
45
50
55
60
65
70
75
80
85
LEGEND
FLA — Full Load Amps
W—Watts
HEATER
UNIT AND HEATER
V-Ph
62E CHASSIS
62.83 230-3 H,K,L,M,N,P,R,S,5,6
31.42 400-3 H,K,L,M,N,P,R,S,5,6
31.42 460-3 H,K,L,M,N,P,R,S,5,6
25.13 575-3 H,K,L,M,N,P,R,S,5,6
75.40 230-3 K,L,M,N,P,R,S,T,U,6
37.70 400-3 K,L,M,N,P,R,S,T,U,6
37.70 460-3 K,L,M,N,P,R,S,T,U,6
30.16 575-3 K,L,M,N,P,R,S,T,U,6
87.96 230-3 L,M,N,P,R,S,T,U
43.98 400-3 L,M,N,P,R,S,T,U
43.98 460-3 L,M,N,P,R,S,T,U
35.18 575-3 L,M,N,P,R,S,T,U
100.53 230-3 M,N,P,R,S,T,U
50.26 400-3 M,N,P,R,S,T,U
50.26 460-3 M,N,P,R,S,T,U
40.21 575-3 M,N,P,R,S,T,U
113.09 230-3 N,P,R,S,T,U
56.55 400-3 N,P,R,S,T,U
56.55 460-3 N,P,R,S,T,U
45.24 575-3 N,P,R,S,T,U
125.66 230-3 P,R,S,T,U
62.83 400-3 P,R,S,T,U
62.83 460-3 P,R,S,T,U
50.26 575-3 P,R,S,T,U
138.23 230-3 R,S,T,U
69.11 400-3 R,S,T,U
69.11 460-3 R,S,T,U
55.29 575-3 R,S,T,U
150.79 230-3 S,T,U
75.40 400-3 S,T,U
75.40 460-3 S,T,U
60.32 575-3 S,T,U
163.36 230-3 S,T,U
81.68 400-3 S,T,U
81.68 460-3 S,T,U
65.34 575-3 S,T,U
175.92 230-3 S,T,U
87.96 400-3 S,T,U
87.96 460-3 S,T,U
70.37 575-3 S,T,U
188.49 230-3 T,U
94.24 400-3 T,U
94.24 460-3 T,U
75.40 575-3 T,U
201.06 230-3 U
100.53 400-3 U
100.53 460-3 U
80.42 575-3 U
213.62 230-3 U
106.81 400-3 U
106.81 460-3 U
85.45 575-3 U
20
Page 21

ERV OPTION BOARD #1
ERV OPTION BOARD #2
Fig. 14 — Typical Wiring Schematic
21
Page 22

START-UP
Fig. 15 — ERV Wheel Rotation
a62-383.eps
Use the following information to check unit PRIOR to start-up.
CAUTION
Before turning the disconnect switch on, verify that the
voltage being provided to the ERV unit matches the voltage shown on the ERV nameplate. Failure to do so could
result in equipment damage.
Unit Preparation — Check that the unit has been in-
stalled in accordance with these installation instructions and all
applicable codes.
Check all fasteners and set screws for tightness. Verify that
all of the panels are in place and secure. Verify that any openings to the ERV cabinet are clear of foreign materials.
Internal Wiring — Check all electrical connections in the
control box. Tighten as required.
Rain Hoods — The outside air hood will include alumi-
num water entrainment filters, which should be in place prior
to starting the unit.
Energy Recovery Wheel
DRIVE BELT — Turn the energy recovery wheel by hand to
verify free operation. Inspect the belt, which drives the energy
wheel rotation. Make sure the belt rides smoothly through the
pulley and over the wheel rim.
AIR SEALS — Check that the air seals located around the
outside of the wheel and across the center, on both sides of the
wheel, are secure and in good condition. Air seals which are
too tight will prevent proper rotation of the energy recovery
wheel.
Air seal clearance may be checked by placing a sheet of paper, like a feeler gage, against the wheel face. To adjust the air
seals, loosen all eight seal retaining screws. These screws are
located on the bearing support that spans the length of the
cassette through the wheel center. Tighten the screws so the air
seals tug slightly on the sheet of paper as the wheel is turned.
Re-check the air seals for tightness after adjustment.
Replace the access door and apply power. Check that the
wheel rotates freely. If the wheel does not rotate or is binding,
remove the cassette and adjust.
For units with three phase power only: Remove the service door to make sure the wheel is turning in the same direction as the sticker next to the motor shows. See Fig. 15. If the
wheel is turning in the wrong direction turn, off the disconnect
switch and have a qualified electrician swap any 2 of the power
leads on the load side of the disconnect switch.
Airflow Settings and Adjustments — With the
disconnect on, the display should show "ERV FAN SPEED"
on the top line of the display. The bottom line of the display
should show "OA=XXX EX=XXX" where the “X”s represent
the blower output percentage for the outside air blowers and
the exhaust air blowers.
NOTE: If any of the alarms are tripped, the LCD display will
scroll between the alarms and the normal display.
To measure the airflow the ERV units have factory-installed
airflow test ports, which allow the balancer of the job to easily
measure the static pressure across the ERV wheel. The static
pressure is measured on both the supply and return sides of the
wheel. Take this pressure reading and match up the wheel differential pressure ( P) to pressure chart to display the cfm that
is flowing through the ERV wheel. See Table 6.
To balance the airflow remove the small panel next to the
control panel cover to access the user input controls. Press the
push button and turn the knob clockwise to increase or counterclockwise to decrease the outside air blower speed (use the test
ports and charts described above to calculate cfm levels). Press
the push button again to change the exhaust air blower speed.
Press the button again to return to the main screen. Replace the
user control cover when ERV cabinet is operating at the correct
blower speeds.
22
Page 23

Table 6 — Airflow vs. Pressure Drop Across ERV Wheel
62E UNIT AIRFLOW VS. PRESSURE DROP ACROSS ERV WHEEL
BA,7A
BC,7C
CC,2C
CD,2D
CG,2G
DD,3D
DG,3G
EB,4B
ED,4D
EF,4F
EG,4G
HB,5B
HD,5D
HF,5F
HG,5G
KD,6D
KG,6G
NOTE: Pressure sensing ports are provided on both sides of the
ERV wheel for testing and balancing.
l/s 94 118 142 165 189 212 236 260 283 307 330 354 378 — — — —
pa 47 62 77 95 109 127 142 157 174 189 207 221 239 — — — —
l/s 94 118 142 165 189 212 236 260 283 307 330 354 378 401 425 — —
pa 60 75 90 104 119 134 149 164 179 194 209 224 239 254 1.08 — —
l/s 236 260 283 307 330 354 378 401 425 448 472 496 519 543 — — —
pa 112 124 137 149 162 174 187 199 211 224 236 249 261 274 — — —
l/s 189 212 236 260 283 307 330 354 378 401 425 448 472 496 519 543 —
pa 112 124 137 149 162 174 187 199 211 224 236 249 261 274 286 299 —
l/s 283 307 330 354 378 401 425 448 472 496 519 543 566 590 614 637 661
pa 112 124 137 147 159 169 182 194 204 216 229 239 251 261 274 286 296
l/s 283 330 378 425 472 519 566 614 661 708 755 — — — — — —
pa 114 132 149 167 184 199 216 234 251 269 286 — — — — — —
l/s 425 472 519 566 614 661 708 755 802 850 897 944 — — — — —
pa 117 132 149 164 179 197 211 226 244 259 274 291 — — — — —
l/s 378 425 472 519 566 614 661 708 755 802 850 — — — — — —
pa 164 177 192 207 221 234 249 264 276 291 306 — — — — — —
l/s 519 566 614 661 708 755 802 850 897 944 991 1038 1086 1133 1180 1227 —
pa 127 137 149 162 172 184 197 207 219 231 244 254 266 279 289 301 —
l/s 614 661 708 755 802 850 897 944 991 1038 1086 1133 1180 1227 1274 — —
pa 149 159 172 182 194 204 216 226 239 251 261 274 284 296 306 — —
l/s 661 755 850 944 1038 1133 1227 1322 1416 1510 1605 1699 1794 1841 — — —
pa 119 134 149 164 179 194 209 224 239 254 269 284 299 306 — — —
l/s 661 755 850 944 1038 1133 1227 1322 1416 1510 1605 1699 — — — — —
pa 144 157 172 184 199 211 224 239 251 266 279 294 — — — — —
l/s 1062 1180 1298 1416 1534 1652 1770 1888 2006 2124 2242 2360 2478 2596 2714 — —
pa 119 132 144 159 172 184 199 211 224 239 251 264 276 291 304 — —
l/s 1038 1133 1227 1322 1416 1510 1605 1699 1794 1888 1982 2077 2171 2266 2360 2454 2549
pa 119 129 142 152 162 174 184 194 204 216 226 236 249 259 269 281 291
l/s 1534 1770 2006 2242 2478 2596 2714 2832 2950 3068 3186 3304 3422 3540 3658 3776 3894
pa 119 147 164 182 199 207 216 224 234 241 251 259 269 276 286 294 304
l/s 1416 1652 1888 2124 2360 2596 2832 3068 3304 3540 3776 — — — — — —
pa 112 132 149 169 187 207 224 244 261 281 299 — — — — — —
l/s 1888 2124 2360 2596 2832 3068 3304 3540 3776 4012 4248 4484 4720 4956 5192 5428 5664
pa 114 127 139 152 162 174 187 199 211 224 236 249 261 274 286 299 311
23
Page 24

Table 6 — Airflow vs. Pressure Drop Across ERV Wheel (cont)
Fig. 16 — LCD Display
a62-384.eps
Fig. 17 — ERV Cfm Screen
a62-385.eps
Fig. 18 — Outside Air Cfm Screen
-386.eps
62E
UNIT
l/s 1652 1888 2124 2360 2596 2832 3068 3304 3540 3776 4012 4248 4484 — — — —
LD
pa 114 129 147 162 179 194 211 226 244 261 276 294 304 — — — —
l/s 2360 2832 3068 3304 3540 3776 4012 4248 4484 4720 4956 5192 5428 5664 5900 6136 6372
LG
pa 122 144 154 164 177 187 197 209 219 229 239 251 261 271 284 294 304
l/s 2124 2360 2596 2832 3068 3304 3540 3776 4012 4248 4484 4720 4956 5192 — — —
MD
pa 124 139 152 167 179 194 207 221 234 249 264 276 291 304 — — —
l/s 2832 3304 3776 4248 4720 4956 5192 5428 5664 5900 6136 6372 6608 6844 7080 7316 7552
MG
pa 124 142 162 179 197 207 216 224 234 244 251 261 271 279 289 299 306
l/s 2596 2832 3068 3304 3540 3776 4012 4248 4484 4720 4956 5192 5428 5664 5900 6136 6372
ND
pa 124 137 147 159 169 182 192 204 214 226 239 249 261 271 284 294 306
l/s 3540 4012 4484 4956 5428 5900 6372 6844 7316 7788 8260 8732 9204 — — — —
NG
pa 127 142 157 172 187 202 216 231 246 261 276 291 306 — — — —
l/s 2832 3304 3776 4012 4248 4484 4720 4956 5192 5428 5664 5900 6136 6372 6608 6844 7080
PD
pa 119 139 159 169 179 189 199 209 219 229 239 249 259 269 279 289 299
l/s 3776 4248 4720 5192 5664 6136 6608 7080 7552 8024 8496 8968 9440 9912 10384 — —
PG
pa 119 134 147 159 172 187 199 211 226 239 251 264 279 291 304 — —
l/s 3304 3776 4248 4720 5192 5428 5664 5900 6136 6372 6608 6844 7080 7316 7552 7788 8024
RD
pa 127 144 162 182 199 209 216 226 234 244 254 264 271 281 289 299 309
l/s 4248 4720 5192 5664 6136 6608 7080 7552 8024 8496 8968 9440 9912 10384 10856 11328 —
RG
pa 122 134 147 159 169 182 194 207 216 229 241 254 266 276 289 301 —
l/s 3776 4248 4720 5192 5664 6136 6372 6608 6844 7080 7316 7552 7788 8024 8260 8496 8732
SD
pa 122 137 152 167 182 197 204 211 219 226 234 241 249 256 264 271 279
l/s 5192 6136 7080 7552 8024 8496 8968 9440 9912 10384 10856 11328 11800 12272 12744 13216 13688
SG
pa 124 144 164 174 184 194 204 214 224 234 244 254 264 274 284 294 304
l/s 4248 4720 5192 5664 6136 6608 7080 7552 8024 8496 8968 9440 9912 10384 — — —
TD
pa 127 139 154 167 182 197 209 224 236 251 266 279 294 306 — — —
l/s 5664 6608 7552 8496 8968 9440 9912 10384 10856 11328 11800 12272 12744 13216 13688 14160 14632
TG
pa 124 144 162 182 189 199 209 216 226 236 246 254 264 274 281 291 301
l/s 4720 5192 5664 6136 6608 7080 7552 8024 8496 8968 9440 9912 10384 10856 11328 11800 —
UD
pa 100 134 147 159 172 184 197 207 219 231 244 256 269 281 294 306 —
l/s 6608 7552 8496 9440 10384 11328 11800 12272 12744 13216 13688 14160 14632 15104 15576 16048 16520
UG
pa 127 144 159 177 192 209 216 224 231 241 249 256 264 274 281 289 296
NOTE: Pressure sensing ports are provided on both sides of the
ERV wheel for testing and balancing.
AIRFLOW VS. PRESSURE DROP ACROSS ERV WHEEL
UNITS WITH EZERV CONTROL OPTION — With
the EzERV option, the LCD display will change to show the
amount of air moving through the cabinet in cubic feet per
minute (cfm). The screen is divided into two columns: The left
column showing the amount of outside air (Osa/CFM) and the
right column showing the exhaust air (Ext/CFM). To adjust the
fan speeds, remove the small panel next to the control panel
cover to access the user input controls. See Fig. 16.
Balanced Air Option
— Press the push button once to bring
up the ERV cfm screen. Turn the knob clockwise to increase or
counterclockwise to decrease the amount of outside air coming
into the building. See Fig. 17. The exhaust airflow will automatically adjust to equal the supply airflow. Press the button
again to return to the main screen. Replace the user control
cover.
Offset Air Option
— Press the push button once to bring up
the outside air cfm screen. Turn the knob clockwise to increase
or counterclockwise to decrease the amount of outside air coming into the building. See Fig. 18.
Press the push button again to bring up the exhaust air offset
screen. A negative exhaust air offset would equate to a smaller
amount of air being exhausted from the building when compared to the outside air being supplied to the building. Adjust
the knob clockwise to increase and counterclockwise to decrease the exhaust offset cfm level. See Fig. 19. Press the
24
Page 25

button again to return to the main screen. Replace the user con-
Fig. 19 — Exhaust Air Offset Screen
Fig. 20 — Modulating Cfm
a62-388.eps
Fig. 21 — Maximum Cfm Screen
a62-389.eps
Fig. 22 — Minimum CO2 Screen
a62-390.eps
Fig. 23 — Maximum CO2 Screen
a62-391.eps
trol cover.
Modulating CO
with Balanced Air Option (Fig. 20) —
2
This option allows the user to enter minimum and maximum
outside airflow levels. The user will then be allowed to enter
minimum and maximum CO
modulate the cfm of the ERV based on the building CO
To enter the user settings press the pushbutton once to display
levels. The EzERV program will
2
level.
2
the minimum cfm screen. Adjust the knob clockwise to
increase and counterclockwise to decrease the minimum cfm
level.
Press the push button again to display the maximum cfm
screen. Adjust the knob clockwise to increase and counterclockwise to decrease the maximum cfm level. See Fig. 21.
Press the push button again to display the minimum CO
level screen. Adjust the knob clockwise to increase and counterclockwise to decrease the minimum CO2 level. See Fig. 22.
Press the push button again to display the maximum CO
level screen. Adjust the knob clockwise to increase and counterclockwise to decrease the maximum CO
level. See Fig. 23.
2
The exhaust airflow will automatically adjust to equal the
supply airflow. Press the button again to return to the main
screen. Replace the user control cover.
NOTE: The scale for the cfm vs. CO
sensor that outputs 0-vdc at 0 ppm CO2 and 10-vdc at
2000 ppm CO
. For example, using the figures above, the air-
2
level is based on a CO
2
flow would modulate linearly from 1458 L/s (3090 cfm) at
3vdc to 2336 L/s (4950 cfm) at 5-vdc. A signal below 3-vdc
would result in a constant 1458 L/s (3090 cfm) while a signal
above 5-vdc would result in a constant 2336 L/s (4950 cfm).
Modulating CO
above for modulating CO2 with balanced air. After setting the
maximum CO
with Offset Air Option — Follow the steps
2
level press the push button again to display the
2
exhaust air offset screen. A negative exhaust air offset would
equate to a smaller amount of air being exhausted from the
building when compared to the outside air being supplied to the
building. Adjust the knob clockwise to increase and counterclockwise to decrease the exhaust offset cfm level. Press the
button again to return to the main screen. Replace the user control cover.
Building Pressure Control Option
— This option will hold
the outside air cfm level constant and will modulate the exhaust
airflow to maintain the building pressure set point. Press the
push button once to bring up the ERV cfm screen. Turn the
knob clockwise to increase or counterclockwise to decrease the
amount of outside air coming into the building. Press the push
button again to display the "Building Pressure Set Point"
screen. Adjust the knob clockwise to increase and counterclockwise to decrease the desired building pressure level. Press
the button again to return to the main screen. Replace the user
control cover.
Modulating CO
with Building Pressure Control Option —
2
This option will modulate the supply fan of the ERV based on
the building CO
to maintain the building pressure set point. Follow the proce-
level, and will modulate the exhaust airflow
2
dure outlined above to configure the minimum and maximum
outside airflow and CO
CO
level press the push button once more to display the build-
2
levels. After setting the maximum
2
ing pressure set point screen. Adjust the knob clockwise to
increase and counterclockwise to decrease the desired building
pressure level. Press the button again to return to the main
screen. Replace the user control cover.
Operating Sequence — When operation is called for
by the rooftop supply fan interlock or remote timer option, the
ERV supply blower(s), exhaust blower(s) and wheel motor will
be energized. The supply and exhaust blowers will provide the
adjusted/programmed airflow and the ERV wheel will rotate at
a constant speed unless influenced by one of the following con-
2
2
2
ditions. The sequence of operation is shown in Fig. 24.
LOW TEMPERATURE LOCKOUT — The optional low
temperature lockout function locks out the 62E ERV if the outdoor-air temperature entering the wheel is below the set point.
The low temperature lockout is factory set at –23.3 C (–10 F),
and can be field adjusted from –34.4 C to 37.8 C (–30 F to
100 F).
FROST PROTECTION — The frost protection option monitors the pressure drop across the ERV wheel. If the pressure
drop rises above an adjustable limit, the outside air fan will be
de-energized for a 5-minute period. The setting must be field
set at 50% above (1.5 times) the pressure drop measured at the
maximum adjusted airflow and a clean, dry wheel.
ERV WHEEL VARIABLE FREQUENCY DRIVE
(VFD) — The ERV wheel VFD option monitors the pressure
drop across the ERV wheel. If the pressure drop rises above an
adjustable limit, the ERV wheel rotational speed will be reduced for a minimum of 5 minutes to defrost the wheel. The
setting must be field set at 50% above (1.5 times) the pressure
drop measured at the maximum adjusted airflow and a clean,
dry wheel.
PRE-HEATERS — Units may be equipped with electric preheaters to prevent frost build-up on the wheel by slightly
warming the outdoor air. This feature monitors the pressure
drop across the ERV wheel and the outdoor-air temperature. If
the pressure drop rises above an adjustable limit and the outdoor-air temperature is below an adjustable set point, the heaters will be energized. The wheel pressure drop setting must be
field set at 50% above (1.5 times) the pressure drop measured
at the maximum adjusted airflow and a clean, dry wheel. The
outdoor air thermostat is factory set to activate at –20.6 C
(–5 F), and can be field adjusted from –34.4 C to 37.8 C (–30 F
to 100 F).
25
Page 26

FALSE
TRUE
FALSE
FALSE
FALSE
FALSE
FALSE
FALSE
FALSE
FALSE
TRUE
TRUE
TRUE
TRUE
TRUE
TRUE
TRUE
TRUE
ERV Wheel Off
Supply Blower Off
Exhaust Blower Off
2-Pos Motor Closed
Wheel Maintenance Indicator Off
Supply Blower Maintenance Indicator Off
Exhaust Blower Maintenance Indicator Off
ERV Wheel On
Supply Blower Off
Exhaust Blower On
2-Pos Motor Open
Wheel Maintenance Indicator On
Supply Blower Maintenance Indicator Off
Exhaust Blower Maintenance Indicator On
ERV Wheel Modulating
Supply Blower On
Exhaust Blower On
2-Pos Motor Open
Wheel Maintenance Indicator On
Supply Blower Maintenance Indicator On
Exhaust Blower Mainten
ance Indicator On
ERV Wheel Stop/Jog
Supply Blower Off
Exhaust Blower On
2-Pos Motor Open
Wheel Maintenance Indicator On
Supply Blower Maintenance Indicator Off
Exhaust Blower Maintenance Indicator On
ERV Wheel Stop/Jog
Supply Blower On
Exhaust Blower On
2-Pos Motor Open
Wheel Maintenance Indicator On
Supply Blower Maintenance Indicator On
Exhaust Blower Maintenance Indicator On
ERV Wheel On
Supply Blower On
Exhaust Blower On
2-Pos Motor Open
Wheel Maintenance Indicator On
Supply Blower Maintenance Indicator On
Exhaust Blower M
aintenance Indicator On
Preheat available if
pressure or temperature
are correct for usage
Low Temp
Lock Out
Option 51
Lockout
Activated
HVAC Supply Fan On
or ERV Timer Option Active
or Stand Alone Short
Pins 31 to 30 and 29 to 28
CO2 Level
Not High
Enough in
Space
Economizer
Full Open
End Switch
Frost Option
Wheel Iced
Frost Option
Wheel Iced
VFD
ERV Power
Exhaust
Mode
Free Cooling
Dry Bulb Enthalpy
Option and W1
and G a
re Off
Fig. 24 — ERV Sequence of Operation
a62-540
26
Page 27

MOTORIZED DAMPERS — Units may have an optional
two-position outside-air damper, exhaust-air damper, or both.
The dampers will modulate closed when the ERV is off.
MODULATING CO
CONTROL — The supply fan speed
2
will be modulated to provide supply airflow between minimum
and maximum levels based on a programmed indoor CO
level.
BUILDING PRESSURE CONTROL — The exhaust fan
speed will be modulated to provide supply airflow between
minimum and maximum levels based on a programmed indoor
building pressure.
ERV UNIT WITH ECONOMIZER, STOP JOG AND
EXHAUST BLOWER RUNNING — This option is used
when the RTU is equipment with an economizer without power exhaust. When the RTU opens the economizer to provide
free cooling, the ERV supply fan will turn off. The ERV wheel
will be periodically rotated to prevent build-up of contaminates
on the wheel. The ERV exhaust fan will continue to operate.
ERV UNIT WITH ECONOMIZER; ERV DOES NOT
RUN — This option is used when the RTU is equipped with
an economizer with power exhaust. When the RTU opens the
economizer to provide free cooling, the ERV supply and exhaust fans will turn off. The ERV wheel will also be turned off.
ComfortLink™ Interface Device — The purpose of
the device is to provide factory-installed “Plug and Play” control interface between the 62E and a Carrier rooftop unit Com-
fortLink control system. The interface allows for optimal system operation by sharing unit data and properly coordinating
energy recovery, economizer, and power exhaust operation.
For HVAC units with electro-mechanical controls, damper
end switches or relays may be used to coordinate the economizer and power exhaust operation with the ERV. On units
with ComfortLink controls, this becomes more of a challenge
since the economizer and power exhaust sequencing is determined through software logic and not electromechanical devices. The ComfortLink interface device allows the 62E controls
to read key data points and force critical operating parameters
in the 48/50A unit’s ComfortLink logic to ensure proper system operation. The factory-installed option includes a preprogrammed translator that allows the 62E controller to access
the ComfortLink controls through the unit’s LEN (local
equipment network) plug.
Optional BACnet or LON Communications
Interface —
LON (local operating network) communications interface
options use the UPC Open controller. The controller
The BACnet* Communication interface and
communicates using BACnet on an MS/TP network segment
communications at 9600 bps, 19.2 kbps, 38.4 kbps, or 76.8
kbps.
WIRING — Wire the controllers on an MS/TP network segment in a daisy-chain configuration. Wire specifications for the
2
cable are 22 AWG (American Wire Gage) or 24 AWG, low-capacitance, twisted, stranded, shielded copper wire. The maximum length is 2000 ft.
Install a BT485 terminator on the first and last controller on
a network segment to add bias and prevent signal distortions
due to echoing. See Fig. 25-27.
To wire the UPC Open controller to the BAS (buidling automation system) network:
1. Pull the screw terminal connector from the controller's
BAS Port.
2. Check the communications wiring for shorts and
grounds.
3. Connect the communications wiring to the BAS port’s
screw terminals labeled Net +, Net -, and Shield.
NOTE: Use the same polarity throughout the network
segment.
4. Insert the power screw terminal connector into the UPC
Open controller's power terminals if they are not currently connected.
5. Verify communication with the network by viewing a
module status report. To perform a module status report
using the BACview keypad/display unit, press and hold
the “FN” key then press the “.” Key.
To install a BT485 terminator, push the BT485, on to the
BT485 connector located near the BACnet connector.
NOTE: The BT485 terminator has no polarity associated with
it.
To order a BT485 terminator, consult Commercial Products
®
i-Vu
Open Control System Master Prices.
MS/TP WIRING RECOMMENDATIONS — Recommendations are shown in Tables 7 and 8. The wire jacket and UL
temperature rating specifications list two acceptable alternatives. The Halar specification has a higher temperature rating
and a tougher outer jacket than the SmokeGard specification,
and it is appropriate for use in applications where the user is
concerned about abrasion. The Halar jacket is also less likely to
crack in extremely low temperatures.
NOTE: Use the specified type of wire and cable for maximum
signal integrity.
Table 7 — UPC Open System Wiring Specifications and Recommended Vendors
WIRING SPECIFICATIONS RECOMMENDED VENDORS AND PART NUMBERS
Wire Type Description
22 AWG, single twisted shielded pair, low capacitance, CL2P,
TC foam FEP, plenum rated. See MS/TP Installation Guide for
MS/TP
Network (RS-485)
Rnet 4 conductor, unshielded, CMP, 18 AWG, plenum rated. W184C-2099BLB 6302UE 21450 CLP0442
LEGEND
AWG — American Wire Gage
CL2P — Class 2 Plenum Cable
CMP — Communications Plenum Rated
FEP — Fluorinated Ethylene Polymer
TC — Tinned Copper
specifications.
24 AWG, single twisted shielded pair, low capacitance, CL2P,
TC foam FEP, plenum rated. See MS/TP Installation Guide
for specifications.
* Sponsored by ASHRAE (American Society of Heating, Refrigerating, and Air Conditioning Engineers).
Connect Air
International
W221P-22227 — 25160PV CLP0520LC
W241P-2000F 82841 25120-OR —
Belden RMCORP
27
Contractors
Wire and Cable
Page 28

Fig. 25 — UPC Open Controller
8
7
6
5
4
3
2
1
0
9
8
7
6
5
4
3
2
1
0
9
BACNET
BAUD RATE
DIP SWITCHES
ADDRESS
ROTARY
SWITCHES
POWER LED
RUN LED
ERROR LED
BACNET
CONNECTION
(BAS PORT)
BT485
TERMINATOR
Tx2 LED
Rx2 LED
Tx1 LED
Rx1 LED
EIA-485
JUMPERS
Fig. 26 — Network Wiring
28
Page 29

Table 8 — MS/TP Wiring Recommendations
Fig. 27 — BT485 Terminator Installation
Fig. 28 — Address Rotary Switches
SPECIFICATION RECOMMMENDATION
Cable Single twisted pair, low capacitance, CL2P, 22 AWG (7x30), TC foam FEP, plenum rated cable
Conductor 22 or 24 AWG stranded copper (tin plated)
Insulation Foamed FEP 0.015 in. (0.381 mm) wall 0.060 in. (1.524 mm) O.D.
Color Code Black/White
Twi st Lay 2 in. (50.8 mm) lay on pair 6 twists/foot (20 twists/meter) nominal
Shielding Aluminum/Mylar shield with 24 AWG TC drain wire
Jacket
DC Resistance 15.2 Ohms/1000 feet (50 Ohms/km) nominal
Capacitance 12.5 pF/ft (41 pF/meter) nominal conductor to conductor
Characteristic Impedance 100 Ohms nominal
Weight 12 lb/1000 feet (17.9 kg/km)
UL Temperature Rating SmokeGard 167°F (75°C), Halar -40 to 302°F (-40 to 150°C)
Vo lt ag e 300 Vac, power limited
Listing UL: NEC CL2P, or better
LEGEND
AWG — American Wire Gage
CL2P — Class 2 Plenum Cable
DC — Direct Current
FEP — Fluorinated Ethylene Polymer
NEC — National Electrical Code
O.D. — Outside Diameter
TC — Tinned Copper
UL — Underwriters Laboratories
SmokeGard Jacket (SmokeGard PVC) 0.021 in. (0.5334 mm) wall 0.175 in. (4.445 mm) O.D.
Halar Jacket (E-CTFE) 0.010 in. (0.254 mm) wall 0.144 in. (3.6576 mm) O.D.
TO ADDRESS THE UPC OPEN CONTROLLER — The
user must give the UPC Open controller an address that is
unique on the BACnet network. Perform the following procedure to assign an address:
1. If the UPC Open controller is powered, pull the screw terminal connector from the controller's power terminals labeled Gnd and HOT. The controller reads the address
each time power is applied to it.
2. Using the rotary switches (see Fig. 25 and 28), set the
controller's address. Set the Tens (10's) switch to the tens
digit of the address, and set the Ones (1's) switch to the
ones digit.
As an example in Fig. 28, if the controller’s address is 25,
point the arrow on the Tens (10's) switch to 2 and the arrow on
the Ones (1's) switch to 5.
0
1
9
2
8
3
7
8
7
10's
4
6
5
0
1
9
2
3
1's
4
6
5
BACNET DEVICE INSTANCE ADDRESS — The UPC
Open controller also has a BACnet Device Instance address.
This Device Instance MUST be unique for the complete BACnet system in which the UPC Open controller is installed. The
Device Instance is auto generated by default and is derived by
29
Page 30

adding the MAC address to the end of the Network Number.
Fig. 29 — DIP Switches
The Network Number of a new UPC Open controller is 16101,
but it can be changed using i-Vu
®
Tools or BACView device.
By default, a MAC address of 20 will result in a Device Instance of 16101 + 20 which would be a Device Instance of
1610120.
CONFIGURING THE BAS PORT FOR BACNET MS/
TP — Use the same baud rate and communication settings for
all controllers on the network segment. The UPC Open controller is fixed at 8 data bits, No Parity, and 1 Stop bit for this
protocol's communications.
If the UPC Open controller has been wired for power, pull
the screw terminal connector from the controller's power terminals labeled Gnd and HOT. The controller reads the DIP
Switches and jumpers each time power is applied to it.
Set the BAS Port DIP switch DS3 to “enable.” Set the BAS
Port DIP switch DS4 to “E1-485.” Set the BMS Protocol DIP
switches DS8 through DS5 to “MSTP.” See Table 9.
Table 9 — SW3 Protocol Switch Settings
for MS/TP
DS8 DS7 DS6 DS5 DS4 DS3
OffOffOffOffOnOff
Verify that the EIA-485 jumpers below the CCN Port are set
to EIA-485 and 2W.
The example in Fig. 29 shows the BAS Port DIP Switches
set for 76.8k (Carrier default) and MS/TP.
Set the BAS Port DIP Switches DS2 and DS1 for the appropriate communications speed of the MS/TP network (9600,
19.2k, 38.4k, or 76.8k bps). See Fig. 29 and Table 10.
Table 10 — Baud Selection Table
BAUD RATE DS2 DS1
9,600 Off Off
19,200 On Off
38,400 Off On
76,800 On On
DIP switch 3 is used to set up which port the building network is connected to. This DIP switch will always be set to
OFF.
DIP switch 4 is used to tell the UPC controller the communication language of the building network. This should always
be set to ON, unless the network uses BACnet over ARC156.
DIP switches 5-8 are used to set up the communication protocol. See Table 11 for settings.
NETWORK POINTS AND DESCRIPTIONS — The points
list for the controller is shown in Table 12.
BP (AV:1)
— The BP (AV:1) parameter is a read-only value
that shows the current building pressure from the building pressure sensor inside the ERV. This parameter is only applicable
for a building pressure based mode of operation.
DCV CO2 INSIDE (AV:2)
ing from the CO
sensor that is connected to the ERV. The CO
2
— This parameter shows the read-
sensor is only provided with the ERV when the ERV has been
ordered with a CO2 based EzERV control scheme.
EAT SENSOR (AV:3), OAT SENSOR (AV:7), RAT SENSOR (AV:9), AND SAT SENSOR (AV:19) — These status
points show the temperatures in all 4 quadrants of the ERV. The
status points will only display values other than 0 if the ERV
was ordered with temperature sensors.
EXHAUST AIR CFM (AV:5) AND OUTSIDE AIR CFM
(AV:8) — These status points provide the airflow that each fan
is moving if the ERV was ordered with the EzERV option. This
option is an integrated airflow monitoring station.
EX FAN POS (AV:4) AND OA FAN POS (AV:6)
— The
fan speed status points provide feedback on a scale of 0 to
100% to show the output of each fan.
REMOTE AIRFLOW CONFIGURATION MODE (AV:10)
— This mode sets up the mode of operation for the ERV. The
setting is associated with the control scheme the ERV was
ordered with from the factory. The appropriate setting for this
mode correlates with the last 3 characters of the part number
on the ERV.
• For part number G-A, the mode is Offset Airflow Con-
trol (mode no. 1).
• For part number G-B, the mode is CO
Demand Control Ventilation with Offset Airflow Control
sensor based
2
(mode no. 2).
• For part number G-D, the mode is Building Pressure sen-
sor based Airflow Control (mode no. 3).
• For part number G-E, the mode is CO
sensor based
2
Demand Controlled Ventilation with Building Pressure
sensor based Airflow Control (mode no. 4).
• If the ERV part number does not have "G-" in it then
mode no. 0 should always be used.
2
Table 11 — UPC Communication Protocol Settings (DIP Switches 5-8)
PROTOCOL
TYPE
BACnet MSTP (m) OFF OFF OFF OFF
BACnet MSTP (s) ON OFF OFF OFF
BACnet PTP OFF ON OFF OFF
N2 ON ON OFF OFF
Modbus OFF OFF ON OFF
LON SLTA ON OFF ON ON
LON Plugin OFFONONON
Ethernet ON ON ON ON
5678
30
DIP SWITCH
Page 31

Table 12 — Network Points List
BACNET
OBJECT ID
AV:1 BP R bp_1
AV:2 DCV_CO2_INSIDE R dcv_co2_inside_1
AV:3 EAT_SENSOR R eat_sensor_1
AV:4 EX_FAN_POS R ex_fan_pos_1
AV:5 EXHAUST_AIR_CFM R exhaust_air_cfm_1
AV:6 OA_FAN_POS R oa_fan_pos_1
AV:7 OAT_SENSOR R oat_sensor_1
AV:8 OUTSIDE_AIR_CFM R outside_air_cfm_1
AV:9 RAT_SENSOR R rat_sensor_1
AV:10 REMOTE_AIRFLOW_CONFIGURATION_MODE R/W remote_airflow_configeration_mode_1
AV:11 REMOTE_BP_SENSOR R/W remote_bp_sensor_1
AV:12 REMOTE_BP_SETPOINT R/W remote_bp_setpoint_1
AV:13 REMOTE_EXHAUST_OFFSET_SETPOINT R/W remote_exhaust_offset_setpoint_1
AV:14 REMOTE_MAX_CFM_SETPOINT R/W remote_max_cfm_setpoint_1
AV:15 REMOTE_MAX_DCV_VALUE_SETPOINT R/W remote_max_dcv_value_setpoint_1
AV:16 REMOTE_MIN_CFM_SETPOINT R/W remote_min_cfm_setpoint_1
AV:17 REMOTE_MIN_DCV_VALUE_SETPOINT R/W remote_min_dcv_value_setpoint_1
AV:18 REMOTE_SENSOR_DCV_VALUE R/W remote_sensor_dcv_value_1
AV:19 SAT_SENSOR R sat_sensor_1
AV:20 UPC_SOFTWARE_VERSION_STAT R upc_software_version_stat_1
AV:21 UPC_SOFTWARE_VERSION R upc_software_version_1
AV:22 EX_FILTER_BP R ex_filter_bp_1
AV:23 OA_FILTER_BP R oa_filter_bp_1
AV:24 REMOTE_EX_FILTER_BP_SETPOINT R/W remote_ex_filter_bp_setpoint_1
AV:25 REMOTE_OA_FILTER_BP_SETPOINT R/W remote_oa_filter_bp_setpoint_1
AV:26 MMC_MAIN_BOARD_SOFTWARE_VERSION R/W mmc_main_board_software_version_1
AV:27 REMOTE_EX_FAN_SPEED_SETPOINT R/W remote_ex_fan_speed_setpoint_1
AV:28 REMOTE_OA_FAN_SPEED_SETPOINT R/W remote_oa_fan_speed_setpoint_1
AV:29 ERV_VFD_WHEEL_POS R erv_vfd_wheel_pos_1
AV:30 REMOTE_VFD_WHEEL_SPEED_SETPOINT R/W remote_vfd_wheel_speed_setpoint_1
BV:1 ERV_2POS_DAMPER_STAT R erv_2pos_damper_stat_1
BV:2 ERV_EX_STAT R erv_ex_stat_1
BV:3 ERV_OA_STAT R erv_oa_stat_1
BV:4 ERV_WHEEL_STAT R erv_wheel_stat_1
BV:5 EX_BLOWER_ALARM R ex_blower_alarm_1
BV:6 EX_DIRTY_FILTER_ALARM R ex_dirty_filter_alarm_1
BV:7 FIX_WHEEL_ALARM R fix_wheel_alarm_1
BV:8 OA_BLOWER_ALARM R oa_blower_alarm_1
BV:9 OA_DIRTY_FILTER_ALARM R oa_dirty_filter_alarm_1
BV:10 OA_LOWCFM R oa_lowcfm_1
BV:11 REMOTE_BP_SENSOR_ENABLE R/W remote_bp_sensor_enable_1
BV:12 REMOTE_DCV_SENSOR_ENABLE R/W remote_dcv_sensor_enable_1
BV:13 REMOTE_ERV_DOWN_ENABLE R/W remote_erv_down_enable_1
BV:14 REMOTE_PWR_EXHAUST_ENABLE R/W remote_pwr_exhaust_enable_1
BV:15 REMOTE_START_STOP R/W remote_star t_stop_1
BV:16 REMOTE_WHEEL_BYPASS_ENABLE R/W remote_wheel_bypass_enable_1
POINT NAME
READ/
WRITE
BACNET
OBJECT NAME
REMOTE BP SENSOR (AV:11)
— This parameter is only
applicable if the ERV is running in a building pressure based
mode of operation and the parameter REMOTE BP SENSOR
ENABLE (BV:11) is set to 1. If the parameter is set to 0, then
the ERV will use the BP (AV:1) parameter. The ERV will modulate the exhaust fan to try to achieve the number that is set into
REMOTE BP SETPOINT (AV:12).
REMOTE BP SENSOR SETPOINT (AV:12)
— This is the
desired building pressure. The ERV will modulate the exhaust
fan to try to achieve this set point. This parameter is only applicable for a building pressure based mode of operation. The
ERV will use this value for its calculations if the REMOTE
AIRFLOW CONFIGURATION MODE (AV:10) is not 0. If
the REMOTE AIRFLOW CONFIGURATION MODE
(AV:10) is set to 0, then the ERV will use the value that has
been loaded locally into the ERV control board.
REMOTE EXHAUST OFFSET SETPOINT (AV:13)
This parameter is applicable when REMOTE AIRFLOW
CONFIGURATION MODE (AV:10) is configured to 1 or 2.
This will set the difference by which the exhaust airflow will
follow the outside airflow. For example, if the demand control
ventilation set points are telling the outdoor air fan to run at
4,000 cfm, and the REMOTE EXHAUST OFFSET SETPOINT (AV:13) is set to -1,000, then the exhaust fan will be
running at 3,000 CFM.
REMOTE SENSOR DCV VALUE (AV:18)
— This parameter is also only applicable if the ERV is running in a CO
mode of operation and the parameter REMOTE DCV SENSOR ENABLE (BV:12) is set to 1. If REMOTE DCV
31
—
based
2
Page 32

SENSOR ENABLE (BV:12) is set to 0, then the ERV will use
the DCV CO2 INSIDE (AV:2) parameter. Any value can be
written into this parameter.
The ERV will look at this parameter along with parameters:
REMOTE MIN DCV VALUE SETPOINT (AV:17), REMOTE MAX DCV VALUE SETPOINT (AV:15), REMOTE
MIN CFM SETPOINT (AV:16), and REMOTE MAX CFM
SETPOINT (AV:14) to determine the settings for the ERV.
These 4 remote set points will only be used if the REMOTE
AIRFLOW CONFIGURATION MODE (AV:10) parameter is
not 0. Otherwise the values that have been loaded locally into
the ERV will be used.
EX FILTER BP (AV:22) AND OA FILTER BP (AV:23)
These status points show the pressure drop across each air filter. This pressure drop is used to determine when the air filters
are dirty. These numbers will always be 0 unless the ERV was
ordered with this option.
REMOTE EX FILTER BP SETPOINT (AV:24) AND
REMOTE OA FILTER BP SETPOINT (AV:25) — These
set points are related to the dirty filter indicator option of the
ERV. If the ERV has the dirty filter indicator option installed
this parameter will set the trip point for which the ERV will
give a dirty filter alarm. This number will be dependent on the
airflow that the ERV is set to. The best way to determine the
dirty filter set points is to use the unit status parameters called
EX FILTER BP (AV:22) and OA FILTER BP (AV:23). With
clean filters in the ERV, and the ERV running at its design conditions, note the values of the filter status parameters. Multiply
those numbers by 1.5 and use them for the filter set points.
These set points will overwrite the value that was set locally
into the ERV. If this value is changed locally it will overwrite
the value that was set remotely.
REMOTE EX FAN SPEED SETPOINT (AV:27) AND
REMOTE OA FAN SPEED SETPOINT (AV:28) — These
parameters allow for direct input to tell the fans how fast to run.
The parameter needs to be set to a number between 1% and
100%. When this parameter is set to 0% the ERV’s internal
control board will take control of the fans.
ERV WHEEL SPEED (AV:29)
speed that the ERV heat exchanger wheel is running on a scale
of 0 to 100%. If the ERV was not ordered with a variable frequency drive on the wheel this status will always read 100%.
REMOTE VFD WHEEL SPEED SETPOINT (AV:30)
This parameter allows for the wheel rotation speed to be varied.
This is often used to change the efficiency of the Energy Recovery Heat Exchanger Wheel to maintain a constant discharge
temperature. This needs to be entered as a number that is between 1% and 100%. Entering 0% will put the wheel speed in
automatic mode, and the ERV control board will take control.
To turn off the wheel use the REMOTE WHEEL BYPASS
ENABLE (BV:16) parameter.
ERV 2POS DAMPER STAT (BV:l)
the ERV is commanding the two-position dampers to open.
This status will update whether the ERV was ordered with twoposition dampers or not.
ERV EX STAT (BV:2) AND ERV OA STAT (BV:3)
These status points output a logic 1 to show when the fan is
ON.
ERV WHEEL STAT (BV:4)
tus shows whether or not the ERV heat exchange wheel is
running.
ERV EX BLOWER ALARM (BV:5) AND ERV OA
BLOWER ALARM (BV:8) — These alarms indicate a catastrophic failure of a blower in the ERV. The alarms can also indicate a missing leg of incoming power, over voltage, under
voltage or extremely dirty incoming power to the ERV. These
alarms will never go active if the ERV was not ordered with the
blower alarm options.
— This status shows the
— This status shows if
— The ERV WHEEL STAT sta-
—
—
—
FIX WHEEL ALARM (BV:7)
the ERV heat exchange wheel is not turning when it is supposed to be turning. This alarm will never go active if the ERV
was not ordered with this alarm option.
EX DIRTY FILTER ALARM (BV:6) AND OA DIRTY
FILTER ALARM (BV:9) — This alarm indicates that the air
filters in the ERV need to be changed. These alarms are related
to parameters REMOTE EX FILTER BP SETPOINT (AV:24)
and REMOTE OA FILTER BP SETPOINT (AV:25). The set
points determine when the ERV is going to give a dirty filter
alarm. This alarm will never go active if the ERV was not ordered with the dirty filter alarm options.
OA LOW CFM (BV:10)
desired outside air CFM set point is not being met. The alarm
will only trip if the desired outside air CFM set point has not
been satisfied for 5 minutes.
REMOTE BP SENSOR ENABLE (BV:11)
eter is set to OFF the ERV will use the building pressure reading off of the sensor inside the ERV. If the parameter is set to
ON, the ERV will use the building pressure value that is being
written in parameter REMOTE BP SENSOR VALUE.
REMOTE ERV DOWN ENABLE (BV:13)
ter is another start/stop command for the ERV. Turning this parameter to 1 will shut the ERV down. Unlike the REMOTE
START STOP (BV:15) parameter, it is not dependant on the
REMOTE AIRFLOW CONFIGURATION MODE (AV:10)
parameter.
REMOTE PWR EXHAUST ENABLE (BV:14)
rameter puts the ERV into a power exhaust mode that is usually
used in conjunction with the economizer of the rooftop unit.
The power exhaust mode turns off the wheel and the outside air
blower. The exhaust blower will continue to run at its current
set point. Setting this parameter to 1 will put the ERV into power exhaust mode.
REMOTE START STOP (BV:15)
the user to turn on/off the ERV. Setting this parameter to 1 will
turn the ERV ON. The REMOTE START STOP works in conjunction with the start/stop contact on the ERV field terminal
strip if the REMOTE AIRFLOW CONFIGURATION MODE
(AV:10) is set to 0. If the REMOTE AIRFLOW CONFIGURATION MODE (AV:10) is not set to 0, then the REMOTE
START STOP parameter will override the field terminal strip.
REMOTE WHEEL BYPASS ENABLE (BV:16)
this parameter to 1 will turn off the ERV heat exchange wheel.
This mode is normally used to disable the wheel when free
cooling is available.
— This alarm indicates that
— This alarm becomes active if the
— If this param-
— This parame-
— This pa-
— This parameter allows
— Setting
SERVICE
CAUTION
Disconnect electrical power before servicing energy recovery cassette. Failure to do so could result in personal injury.
Removing and Installing Non-Segmented Wheel
for Cleaning (62EB,E7 Units) —
ergy transfer wheels are secured to the shaft and bearing support beam by a Phillips head screw and hub cover. See Fig. 30.
To remove the energy transfer wheel, follow Steps 1-4
below. (See Fig. 30.) Reverse procedure for wheel installation.
1. Remove front seal assembly (pulley side of cassette) if
present.
2. Remove belt from pulley and position temporarily around
wheel rim.
3. Remove the hub cover from the wheel. Note the wheel to
shaft alignment pin under the hub cover. Ensure this pin
Non-segmented en-
32
Page 33

engages the notch at the end of the shaft when reinstalling
Fig. 30 — 62EB and 62E7 Energy
Transfer Wheel Assembly
A62-279ef
Fig. 31 — 62ECC and 62E2C Energy
Transfer Wheel Assembly
Fig. 32 — Unlocking the
Segment Retaining Brackets
A62-278ef
the wheel.
4. Pull the wheel straight off the shaft. Handle wheel with
care to prevent distorting of the wheel.
Removing and Installing Non-Segmented
Wheel for Cleaning (62ECC and 62E2C
Units) — Non-segmented energy transfer wheels include
the shaft and are secured to 2 wheel support beams by 2 flange
bearings with locking collars. See Fig. 31.
To remove the energy transfer wheel, follow Steps 1-4
below. Reverse procedure for wheel installation.
1. Pull the wheel with shaft straight out of the motor side
wheel support beam and bearing. Handle wheel with care
to prevent distorting of the wheel.
2. Remove the pulley side wheel support beam with bearing
by removing the 4 support beam screws.
Alignment
Pin
Cassette
Housing/Frame
Shaft
3. Remove the belt from the pulley and position temporarily
around the wheel rim.
4. Loosen the 2 set screws on each of the 2 wheel bearings.
See Fig. 31.
CAUTION
When replacing wheel, retighten the 4 bearing set screws.
Premature bearing failure could result.
Removing Wheel Segments for Cleaning
(62ECD, 62ED-EU, 62E2D, and 62E3-E6 Units)
1. Unlock and open the segment retaining brackets on both
sides of the selected segment opening. Refer to Fig. 32.
2. Gently lift segment outward.
3. Close segment retaining latches and rotate wheel 180 degrees to remove next segment. Follow this pattern to
remove all segments. This pattern will help keep wheel
balanced.
To install the segments, see the Installing Wheel Segments
section.
Hub Cover
FLANGE
BEARINGS
(2)
Wheel &
Hub
WHEEL,
HUB &
SHAFT
WHEEL SUPPORT BEAMS
Bearings (2)
SET
SCREWS
(2) EACH
Installing Wheel Segments
WARNING
Before performing service or maintenance operations on
unit, turn off main power switch to unit. Electrical shock
could cause personal injury.
NOTE: Both installation and removal procedures must be performed from the pulley side of the cassette.
CAUTION
Weight of the installed segment will cause the wheel to
accelerate in rotation. Failure to maintain control of the
wheel rotation while installing all segments could cause
severe injury to fingers or hand caught between revolving
spokes and the bearing support beam. Handle of hammer,
or other stop, should be inserted through spokes and above
or below bearing support beams to limit rotation of unbalanced wheel. See Fig. 33.
33
Page 34

HAMMER
Fig. 33 — Using a Stop on the Wheel
A62-280ef
Fig. 34 — Inserting a Segment of the Wheel
A62-281ef
Imbedded Stiffeners
Fig. 35 — Motor Side View of Segment
A62-282ef
CATCH
PULL TAB
Fig. 36 — Latch Segment Retaining Brackets
A62-283ef
USED AS
“STOP”
NOTE: The 62EBA, 62EBC, 62ECC, 62E7A, 62E7C, and
62E2C units contain non-segmented wheels which must be
completely removed to be cleaned.
1. Begin by positioning one segment opening at the top of
the cassette. Unlock and open the segment retaining
brackets on both sides of the selected segment opening.
2. Holding the segment as vertical as possible and
centered between spokes, insert nose of segment downward between the hub plates. See Fig. 34.
NOTE: The face of the segment, with the imbedded
stiffener (vertical support between nose and rim end of
segment) must face the motor side of the cassette. See
Fig. 35.
3. Ease the segment downward until its outer rim clears the
inside of the wheel rim. Then press the segment inward
against the spoke flanges.
4. Close and latch segment retaining brackets to the position
shown in Fig. 36. Make certain the retaining bracket is
fully engaged under the catch.
5. Slowly rotate, by hand, the first installed segment to the
bottom of the cassette, then install the second segment
opposite the first. Repeat this sequence with the 2 installed segments rotated to the horizontal position to balance the weight of installed segments. Continue this sequence with the remaining segments.
Wheel Drive Motor and Pulley Replacement
(62EC-EU and 62E2-E6 Units)
1. Disconnect power to wheel drive motor.
2. Remove belt from pulley and position temporarily around
wheel rim.
3. Loosen setscrew in wheel drive pulley using Allen
wrench and remove pulley from motor drive shaft.
4. While supporting weight of drive motor in one hand,
loosen and remove 4 mounting bolts.
5. Install replacement motor with hardware kit supplied.
6. Install pulley to dimension shown in Fig. 37 and secure
setscrew to drive shaft.
7. Stretch belt over pulley and engage in groove.
Belt Replacement
1. Obtain access to the pulley side bearing access plate.
Remove 2 bearing access plate retaining screws and the
access plate.
2. Using hexagonal wrench, loosen setscrew in bearing
locking collar. Using light hammer and drift (in drift pin
hole) tap collar in the direction of wheel rotation to
unlock collar. Remove collar.
3. Using socket wrench with extension, remove 2 nuts
which secure bearing housing to the bearing support
beam. Slide bearing from shaft.
NOTE: Slight hand pressure against wheel rim will lift weight
of wheel from inner race of bearing to assist bearing removal
and installation. If not removable by hand, use bearing puller.
CAUTION
Protect hands and belt from possible sharp edges of hole in
bearing support beam.
4. Using a wrench, remove diameter seal retaining screws or
hub seal retaining screws. Remove diameter seals or hub
seal from bearing beam. See Fig. 38.
5. Form a small loop of belt and pass it through the hole in
the bearing support beam. Grasp the belt at the wheel hub
and pull the entire belt down. Loop the trailing end of the
belt over the shaft (Fig. 38 shows belt partially through
the opening).
34
Page 35

6. Reinstall the bearing onto the wheel shaft, being careful
Wheel
Drive
Motor
Insulation
Seal
Plate
Pulley
Dimension A
Fig. 37 — Pulley Location
NOTE: The ERV wheel model number contains the wheel series number, and
is located on a label near the drive pulley. For example, ERC-5245 is a 52
series wheel.
A62-284ef
62E UNIT SIZE ERV WHEEL
WHEEL MODEL
NUMBER
DIMENSION A
mm in.
B,7
A ERC-1904 3.2 1/8
C ERC-1906 6.4 1/4
C,2
C ERC-2509 6.4 1/4
D ERC-2510C 3.2 1/8
G ERC-2513C 3.2 1/8
D,3
D ERC-3014C 3.2 1/8
G ERC-3019C 3.2 1/8
E,4
B ERC-3615 6.4 1/4
D ERC-3622 6.4 1/4
F ERC-3623 6.4 1/4
G ERC-3628 6.4 1/4
H,5
B ERC-5230 9.5 3/8
D ERC-5248 9.5 3/8
F ERC-5245 9.5 3/8
G ERC-5262 9.5 3/8
K,6
D ERC-6475 11.1 7/16
G ERC-6488 11.1 7/16
L
D ERC-6876 11.1 7/16
G ERC-68100 11.1 7/16
M
D ERC-7490 11.1 7/16
G ERC-74122 11.1 7/16
N
D ERC-81110C 11.1 7/16
G ERC-81146C 11.1 7/16
P
D ERC-86125C 11.1 7/16
G ERC-86170C 11.1 7/16
R
D ERC-92135C 11.1 7/16
G ERC-92180C 11.1 7/16
S
D ERC-99160C 11.1 7/16
G ERC-99215C 11.1 7/16
T
D ERC-104195C 11.1 7/16
G ERC-104250C 11.1 7/16
U
D ERC-110220C 11.1 7/16
G ERC-110290C 11.1 7/16
to engage the 2 locating pins into the holes in the bearing
support beam. Secure the bearing with 2 self-locking
nuts.
7. Install the belts around the wheel and pulley according to
the instructions provided with the belt.
8. Reinstall diameter seals or hub seal and tighten retaining
screws. Rotate wheel in clockwise direction to determine
that wheel rotates freely with slight drag on seals.
9. Reinstall bearing locking collar. Rotate collar by hand in
the direction the wheel rotates (see label provided on each
cassette for wheel rotation). Lock in position by tapping
drift pin hole with hammer and drift. Secure in position
by tightening setscrew.
10. Reinstall bearing access cover.
11. Apply power to wheel and ensure that the wheel rotates
freely without interference.
ALTERNATE BELT REPLACEMENT METHODS — Alternate belt replacement methods may be used in some applications depending upon accessibility of the cassette. Consult
instructions provided with the belt for further information.
Removing the Service Door — To open the cabinet,
turn the eight ¼-turn latches counter clockwise. With a hand on
each handle of the door, carefully pull the door straight out.
Replacing a Blower (All ERV Cabinets Except
62EB and 62E7 Units)
EXHAUST SIDE — Turn off power to the unit. Remove all
screws from the top panel on the exhaust side of the ERV. Be
sure to remove the screws on the center seam. Pry the top panel
up from its gasket seat, being careful not to bend the lid. Remove the cover from the blower motor and note the location of
all the wires. Disconnect the wiring from the terminals. Remove all the P-clips, wire ties, and hoses that will keep the
blower assembly from lifting out. Remove all the bolts that
hold the blower assembly in the ERV unit. Carefully lift the
blower assembly from its mounting plate.
NOTE: When removing 500 mm and 630 mm blowers it is
helpful to get assistance because of the blower's size and
weight.
Follow these instructions in reverse order to install the new
blower.
SUPPLY SIDE — Turn off the power to the unit. Remove the
intake air hood (if equipped). Remove all of the screws from
the top panel on the supply side of the ERV. Be sure to remove
the screws on the center seam. Pry the top panel up from its
gasket seat, being careful not to bend the lid. Remove the service doors on both sides and remove the filters or filter racks on
the supply side. Remove the cover from the blower motor and
note the location of all the wires. Disconnect the wiring from
the terminals.
NOTE: Push the wheel out from underneath the blower that is
being disconnected for more room to work.
Remove all of the P-clips, wire ties, and hoses that will keep
the blower assembly from lifting out. Remove all of the bolts
that hold the blower assembly in the ERV unit. Carefully lift
the blower assembly from its mounting plate.
NOTE: When removing 500 mm and 630 mm blowers it is
helpful to get assistance because of the blower's size and
weight.
Follow these instructions in reverse order to install the new
blower.
35
Page 36

Bearing
Access Plate
Locking
Collar
Locking
Nut (2)
Bearing
Housing
Bearing
Support
Beam
Belt (Shown in
Place)
Wheel Rim
Wheel
Hub (2)
Taper - Lock
Hub Collar (2)
Shaft
PULL
FEED
Pulley
Side
Motor
Side
Belt
Locating Pin
Drift Hole
Set Screw
Retaining
Screws
Fig. 38 — Belt Replacement (Diameter Seals Removed)
A62-285ef
Replacing a Blower (62EB and 62E7 Units)
EXHAUST OR SUPPLY SIDE — Turn off the power to the
unit. Remove all of the screws from the top panel. Pry the top
panel up from its gasket seat, being careful not to bend the lid.
Disconnect plug from the blower. Remove all of the P-clips,
wire ties and hoses that will keep the blower assembly from
lifting out. Remove all of the screws holding the blower in the
ERV unit and remove the blower. Follow these instructions in
reverse order to install the new blower.
Routine maintenance of the energy recovery cassettes
includes periodic cleaning of the energy recovery wheel as well
as inspection of the air seals and wheel drive components as
follows:
Cleaning — The need for periodic cleaning of the energy
MAINTENANCE
recovery wheel will be a function of operating schedule, climate and contaminants in the indoor air being exhausted, and
the outdoor air being supplied to the building.
The air exchange wheel is “self-cleaning” with respect to
dry particles due to its laminar flow characteristics. Smaller
particles pass through; larger particles land on the surface and
are blown clear as the flow direction is reversed. Any material
that builds up on the face of the wheel can be removed with a
brush or vacuum. The primary need for cleaning is to remove
oil-based aerosols that have condensed on energy transfer
surfaces.
A characteristic of all dry desiccants, such films can close
off micron sized pores at the surface of the desiccant material,
reducing the efficiency by which the desiccant can adsorb and
desorb moisture and also build up so as to reduce airflow.
In a reasonably clean indoor environment such as a school
or office building, measurable reductions of airflow or loss of
sensible effectiveness may not occur for several years.
Measurable changes in latent energy transfer can occur in
shorter periods of time in applications such as moderate occupant smoking or cooking facilities. In applications experiencing unusually high levels of occupant smoking or oil-based
aerosols such as industrial applications involving the ventilation of machine shop areas for example, annual washing of energy transfer may be necessary to maintain latent transfer efficiency. Proper cleaning of the energy recovery wheel will restore latent effectiveness to near original performance.
To clean, gain access to the energy recovery wheel and
remove wheel. Brush foreign material from the face of the
wheel. Wash the wheel in a 5% solution of non-acid based coil
cleaner or alkaline detergent and warm water.
Soak in the solution until grease and tar deposits are
loosened.
NOTE: Some staining of the desiccant may remain and is not
harmful to performance.
Before removing, rapidly run finger across surface of wheel
to separate polymer strips for better cleaning action. Rinse
dirty solution from wheel and remove excess water before
reinstalling.
CAUTION
Do not use acid based cleaners, aromatic solvents, steam or
temperatures in excess of 76.7 C (170 F); damage to the
wheel may result.
Air Seals — Diameter seals are provided on each cassette
to minimize transfer of air between the counter flowing
airstreams.
To adjust diameter seals, loosen diameter seal adjusting
screws and back seals away from wheel surface See Fig. 39.
Rotate wheel clockwise until 2 opposing spokes are hidden
behind the bearing support beam. Using a folded piece of paper
36
Page 37

as a feeler gage, position paper between the wheel surface and
Fig. 39 — Diameter Seal Adjustment
A62-286ef
diameter seals. Adjust seals towards wheel surface until a slight
friction on the feeler gage (paper) is detected when gage is
moved along the length of the spoke. Retighten adjusting
screws and recheck clearance with “feeler” gage.
Wheel Drive Components — The wheel drive motor
bearings are pre-lubricated and no further lubrication is necessary. Make certain air cooling ports are not blocked.
The wheel drive pulley is secured to the drive motor shaft
by a setscrew. The setscrew is secured with removable adhesive to prevent loosening. Annually confirm setscrew is secure.
The wheel drive belt is a urethane stretch belt designed to
provide constant tension through the life of the belt. No adjustment is required. Inspect the drive belt annually for proper
tracking and tension. A properly tensioned belt will turn
the wheel immediately after power is applied with no visible
slippage during start-up.
Rotation
To
Adjust
Air Filters — With this ERV unit and with most other
forced air heating, cooling and ventilation systems, regular air
filter maintenance is of utmost importance. Proper filter maintenance will improve indoor air quality, keep the building airhandling system clean for peak efficiency, and prolong the life
of the HVAC (Heating, Ventilation, and Air Conditioning)
equipment. The life of the air filters is directly related to the application to which the ERV unit is installed. The air filters
should be inspected every couple of weeks until a maintenance
schedule is established. The ERV unit is equipped from the factory with throwaway filters, however if the installer changed
the filter type, consult the installer for filter maintenance
instructions.
Replacing the Throwaway Filters — After remov-
ing the service door (see Removing the Service Door section)
remove the spacer plugs and pull the filters or filter racks out of
the cabinet. Replace the filters with the original equipment
manufacturer replacements or equivalents. Refer to Tables 1A
and 1B for filter sizes.
Adjusting Screws
Feeler Gage
37
Page 38

TROUBLESHOOTING
See Table 13 for troubleshooting information.
Table 13 — ERV Troubleshooting
SYMPTOM POSSIBLE CAUSES ACTION TO CHECK POSSIBLE REMEDY
ERV will not turn on
ERV is running but
blowers will not turn
Only one of the two
blowers is turning
Blowers are on but
the wheel is not
turning
Disconnect switch is in the off
position
No power to the ERV
One or more blown fuses
Control board transformer circuit
breaker is tripped
The fan speed / CFM level is set
too low
One or more blown fuses
Rooftop Economizer Option (if
equipped) has shut down the ERV
because the rooftop unit is in 'Free
Cooling' mode
Smoke Detector Option (if
equipped) has shut down the ERV
because it is sensing smoke in the
exhaust airstream on the ERV.
Low Temperature Lockout Option
(if equipped)
The fan speed / CFM level is set
too low
Rooftop Economizer with Power
Relief Option (if equipped) has
shut down the supply blower
because the rooftop unit is in 'Free
Cooling' mode
One of the blowers is wired
incorrectly
The ERV Standard Frost Protection Option has turned off the supply blower to defrost the wheel
The ERV Enthalpy Control, Dry
bulb Control / Wheel Bypass Stop /
Jog Option (if equipped) is
activated
The wheel motor is unplugged.
The wheel motor is wired
incorrectly.
The wheel belt is off or broken Check the wheel belt.
The air seals on the wheel are too
tight
Verify that the disconnect switch is
in the 'ON' position
Check for power at the disconnect
switch
Check for power at the bottom of
the fuse block
Look at the small transformer next
to the control circuit board to see if
the black circuit pushed out
Use the user interface push button
to view the 'Outside Air' and
'Exhaust Air' settings
Check for power at the bottom of
the fuse block
Check for continuity across the
mercury switch on the economizer
damper.
Check for wiring errors.
Check to see if the outside temperature is above –30 F
(–34.4 C). Check for wiring errors
Use the user interface push button
to view the 'Outside Air' and
'Exhaust Air' settings
Check for continuity across the
mercury switch on the economizer
damper
Check for wiring errors.
Check for frost on the wheel. Wait for Defrost mode to finish.
Check for Stop / Jog movement of
wheel.
Check to see if the connector
between the wheel motor and the
cabinet wiring is securely
connected.
Check for wiring errors.
Check to see if the wheel spins
freely.
Move the disconnect lever to the 'ON'
position.
Using a volt meter verify that the voltage
being supplied to the ERV matches the ERV's
operating voltage. If the ERV operates on
three phase power check all three legs.
Using a volt meter verify that the voltage on
the bottom side of the fuse block matches the
ERV's operating voltage. If the ERV operates
on three phase power check all three legs.
Depress the circuit breaker back in.
Adjust the fan speed / CFM demand levels by
pressing the user interface push button and
turning the adjust knob.
Using a volt meter verify that the voltage on
the bottom side of the fuse block matches the
ERV's operating voltage. If the ERV operates
on three phase power check all three legs.
Using a continuity meter check for continuity
across the two wires that connect to the mercury switch on the economizer damper. If the
contacts are open, the rooftop unit is in 'Free
Cooling'.
Using the wiring schematics verify that the
smoke detector is wired to the control board
properly.
Use a thermometer to measure the outside
temperature. Use the wiring schematics to
verify that temperature probe on the intake air
side of the ERV is wired properly.
Adjust the fan speed / CFM demand levels by
pressing the user interface push button and
turning the adjust knob.
Using a continuity meter check for continuity
across the two wires that connect to the mercury switch on the economizer damper. If the
contacts are open, the rooftop unit is in 'Free
Cooling'.
Using the wiring schematics verify that both
the power wires and the control wires are connect properly.
Wait until sequence is completed.
Plug the two connectors together.
Compare the wheel motor, control board and
relay are wired correctly.
Verify that the wheel belt is seated in the pulley and on the rim of the wheel.
Carefully rotate the wheel by grabbing the
outer rim and spinnig the wheel. After letting
go the wheel should continue to spin for three
to four seconds. Should the air seals need
adjusting see the maintainence section of this
book.
Copyright 2010 Carrier Corporation
Manufacturer reserves the right to discontinue, or change at any time, specifications or designs without notice and without incurring obligations.
Catalog No. 04-53620007-01 Printed in U.S.A. Form 62E-C1SI Pg 38 8-10 Replaces: New
Page 39

Page 40

START-UP CHECKLIST
I. PROJECT INFORMATION:
Job Name ____________________________ Start-Up Performed By __________________
ERV Unit Designation __________________ Date __________________________________
Phone Number ________________________
II. DESIGN INFORMATION:
Application ___________________________________________________________________________
CFM (Supply/Exhaust) _________________________________________________________________
External Static Pressure (Supply/Exhaust) __________________________________________________
Supply/Exhaust Configuration ____________________________________________________________
Voltage/Phase ________________________________________________________________________
ERV Unit Part Number _________________________________________________________________
Coupled to RTU or stand-alone ___________________________________________________________
Specify RTU.
NOTE: Complete This Section for Coupled Applications Only
Model Number ________________________________________________________________________
HVAC Unit Discharge Type (Down discharge or horizontal discharge.) ____________________________
Roof Curb (Option) Yes No
14-in. Tall Roof Curb (Field Installed)
Horizontal Supply/Return Base (Field Installed)
Combination ERV-RTU Curb (Field Installed)
Horizontal Transition
NOTE: Complete This Section for Coupled Applications Only.
Transition Part Number (Field Installed)
Electrical Disconnect (Option) Yes No
Fused (Factory Installed)
Switched (Factory Installed)
Two-Position Motorized Dampers (Option) Yes No
Outside Air Damper (Factory Installed)
Exhaust Air Damper (Factory Installed)
Pre-Heater (Option) Yes No
kW _______________
Temp Control (Factory Installed)
Temp and Static Pressure Control (Factory Installed)
Frost Protection (Option) (Factory Installed)
NOTE: Do Not Use With Pre-Heater.
Yes No
ERV Wheel VFD (Option) (Factory Installed) Yes No
Low Temperature Lock Out (Option) (Factory Installed) Yes No
Filter Maintenance Indicator (Option) (Factory Installed) Yes No
ERV Blower Maintenance Indicator (Option) (Factory Installed) Yes No
ERV Wheel Maintenance Indicator (Option) (Factory Installed) Yes No
Field-Installed Accessories Yes No
ERV Remote Mount Timer (Field Installed)
ERV Remote Control Readout (Field Installed)
Copyright 2010 Carrier Corporation
Manufacturer reserves the right to discontinue, or change at any time, specifications or designs without notice and without incurring obligations.
Catalog No. 04-53620007-01 Printed in U.S.A. Form 62E-C1SI Pg CL-1 8-10 Replaces: New
CUT ALONG DOTTED LINE CUT ALONG DOTTED LINE
- - - - - - - - - - - - - - - - - - - - - - - - - - - - - - - - - - - - - - - - - - - - - - - - - - - - - - - - - - - - - - - - - - - - - - - - - - - - - - - - - - - - - - - - - - - - - - - - - - - - - - - - - - - - - - - - - - - - - - - - - - - - - - - - - - - - - - - - - - - - - - - - - - - - - - - - - - - - - - - - - - - - - - - - - - - - -- - - - - - - - - - - - - - - - - - - -
 Loading...