

ENGLISH
ESPAÑOL
series
Guía de inicio
Asegúrese de leer este manual antes de utilizar la impresora. Consérvelo a mano para utilizarlo como referencia en el futuro.
Impresora de inyección de tinta Canon
Léame en primer lugar
Getting Started
Make sure to read this manual before using the printer. Please keep it in hand for future reference.
Canon Inkjet Printer
Read Me First

Contenido■
7 Uso desde ordenadores adicionales P.51
5 Configuración de una conexión USB
(instalación del software) P.20
9 Software de aplicación P.53
4 Selección del método de conexión P.18
3 Instalación del cabezal de impresión P.13
8 Carga del papel P.52
2 Instalación de los depósitos de tinta P.9
1 Preparación P.5
6 Configuración de una conexión cableada P.32
Instalación del software P.32
Registro (Macintosh) P.41
Información P.44
Número de modelo: K10350 (PRO-1)
Especificaciones P.56
Contents■
7 Use from Additional Computers P.51
5 Set Up a USB Connection (Software Installation) P.20
9 Application Software P.53
4 Select Connection Method P.18
3 Install the Print Head P.13
8 Load Paper P.52
2 Install the Ink Tanks P.9
1 Preparation P.5
6 Set Up a Wired Connection P.32
Software Installation P.32
Registration (Macintosh) P.41
Information P.44
Model Number: K10350 (PRO-1)
Specifications P.55

1
40
Minutes (approx.)
Minutos (aprox.)
20
Minutes (approx.)
Minutos (aprox.)
P.4 – 17
P.18 – 31 P.18, 32 – 50 P.51, 32 – 50
Preparación de la impresora
Instalación finalizada
Instalación del software
Instalación del software
Instalación del software
Conexión USB
Uso desde ordenadores
adicionales
(cuando la impresora ya está
conectada a la red y se quiere
añadir ordenadores desde los
cuales utilizarla)
Conexión de red
Conexión por cable
Flujo de instalación
de la impresora
■
Installation Complete
Software InstallationSoftware InstallationSoftware Installation
Printer Preparation
USB Connection
Using from Additional
Computers
(when the printer is already
connected to the network and you
want to add computers from which
to use the printer)
Network Connection
Wired Connection
Printer Installation
Flow
■
2
Instrucciones que incluyen información importante.
En esta guía, para referirse al sistema operativo Windows 7 se utiliza el
término Windows 7 y para referirse al sistema operativo Windows Vista
se utiliza el término Windows Vista.
Las pantallas de esta guía se basan en Windows 7 Home Premium
y Mac OS X v.10.6.x. (A menos que se indique lo contrario, las pantallas
serán de Windows 7.)
•
•
Símbolos utilizados en este documento■
Acciones prohibidas.
Microsoft es una marca comercial registrada de Microsoft Corporation.
Windows es una marca comercial o una marca comercial registrada de
Microsoft Corporation en EE.UU. y en otros países.
Windows Vista es una marca comercial o una marca comercial registrada
de Microsoft Corporation en EE.UU. y en otros países.
Internet Explorer es una marca comercial o una marca comercial registrada
de Microsoft Corporation en EE.UU. y en otros países.
Macintosh y Mac son marcas comerciales de Apple Inc., registradas en EE.UU.
y en otros países.
Safari es una marca comercial de Apple Inc., registrada en EE.UU. y en
otros países.
Bonjour es una marca comercial de Apple Inc., registrada en EE.UU. y en
otros países.
Adobe, Photoshop, Photoshop Elements, Lightroom, Adobe RGB y Adobe RGB
(1998) son marcas comerciales registradas o marcas comerciales de Adobe
Systems Incorporated en Estados Unidos y en otros países.
•
•
•
•
•
•
•
•
Symbols Used in This Document■
Instructions including important information.
Prohibited actions.
In this guide, Windows 7 operating system is referred to as Windows 7
and Windows Vista operating system as Windows Vista.
In this guide, the screens are based on Windows 7 Home Premium and
Mac OS X v.10.6.x. (Unless noted otherwise, the screens are those of
Windows 7.)
•
•
Microsoft is a registered trademark of Microsoft Corporation.
Windows is a trademark or registered trademark of Microsoft Corporation in the
U.S. and/or other countries.
Windows Vista is a trademark or registered trademark of Microsoft Corporation
in the U.S. and/or other countries.
Internet Explorer is a trademark or registered trademark of Microsoft Corporation
in the U.S. and/or other countries.
Macintosh and Mac are trademarks of Apple Inc., registered in the U.S. and
other countries.
Safari is a trademark of Apple Inc., registered in the U.S. and other countries.
Bonjour is a trademark of Apple Inc., registered in the U.S. and other countries.
Adobe, Photoshop, Photoshop Elements, Lightroom, Adobe RGB and Adobe
RGB (1998) are either registered trademarks or trademarks of Adobe Systems
Incorporated in the United States and/or other countries.
•
•
•
•
•
•
•
•
3
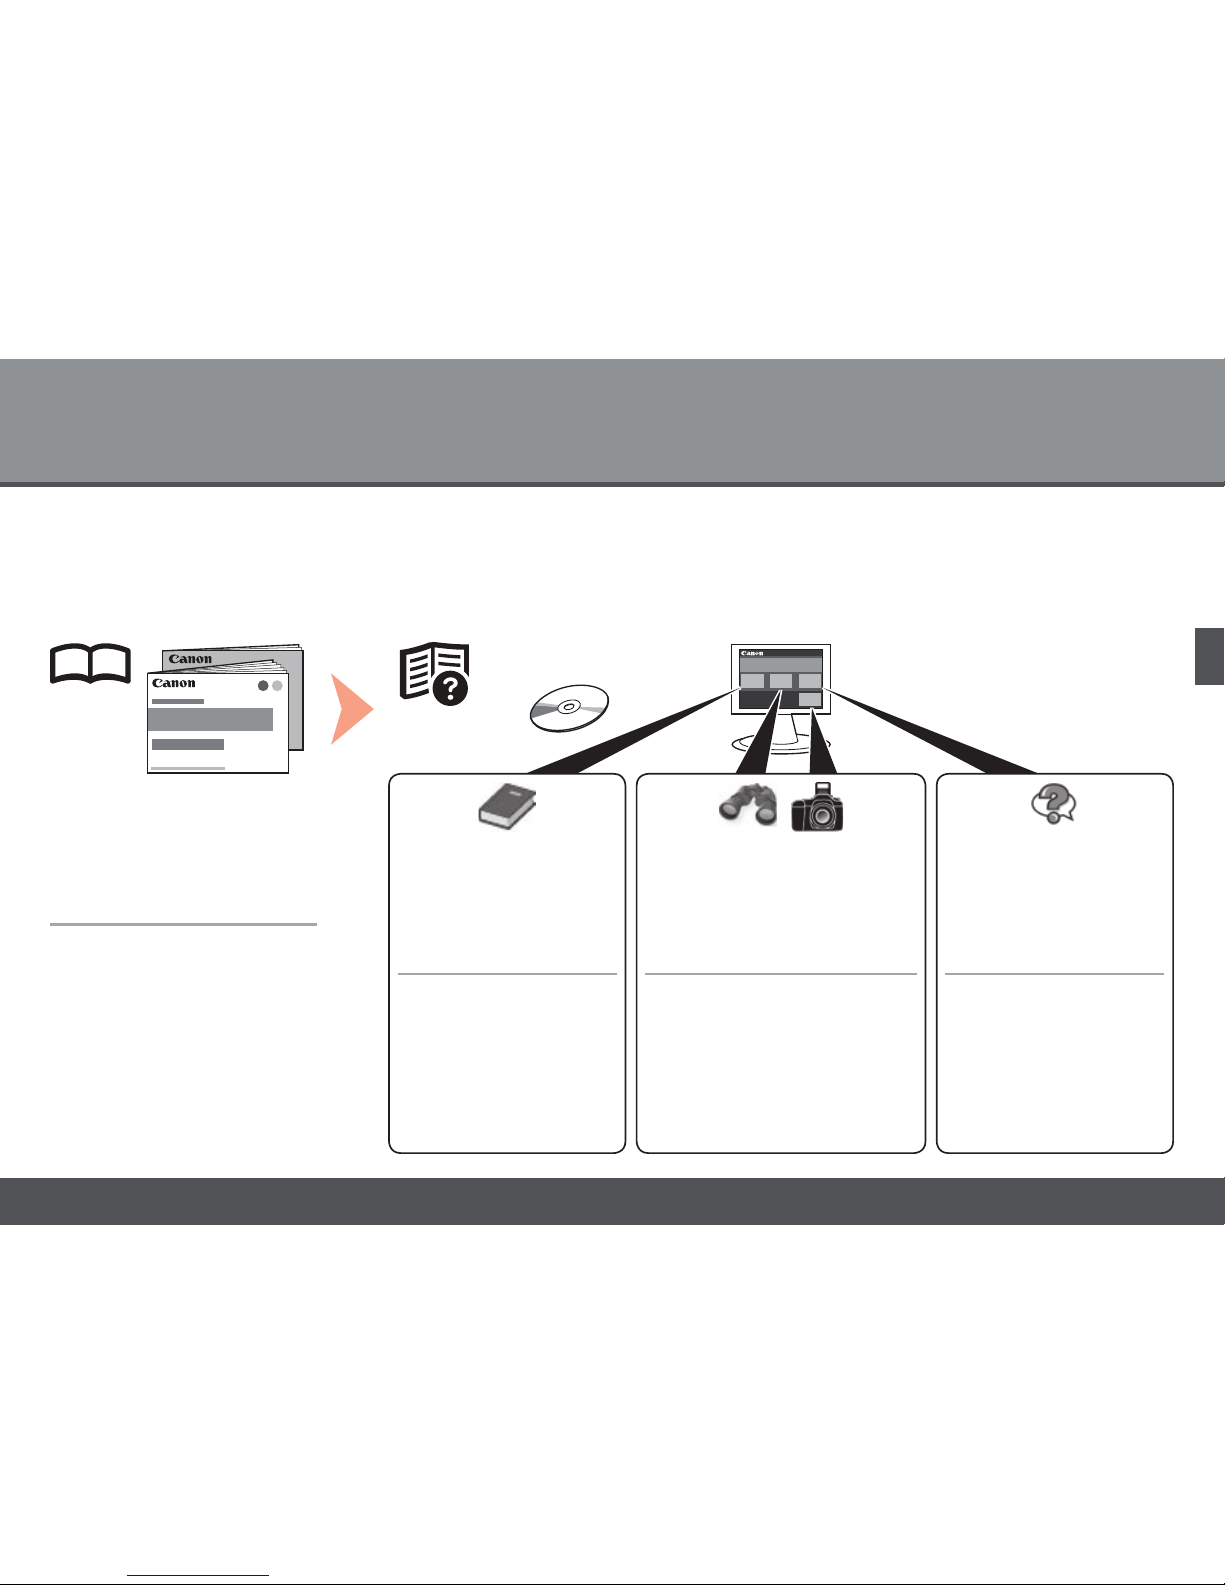
Los manuales en pantalla se pueden ver en un ordenador. Se incluyen en el CD-ROM de instalación (Setup CD-ROM) y se instalan durante el proceso de instalación
del software. Algunas partes del manual pueden aparecer en inglés. Para obtener más información sobre cómo abrir los manuales en pantalla, consulte la página 53.
Guía de inicio
(este manual)
•
Describe cómo se configura
y utiliza la impresora.
Solución de problemas
de configuración de red
•
Guía básica
Describe las operaciones
básicas y los soportes
y ofrece una introducción
a otras funciones
disponibles.
Describe los distintos procedimientos
operativos para sacar el máximo
provecho de la impresora.
Guía avanzada
Guía de impresión
de fotografía digital
Proporciona consejos para
solucionar los problemas
que puedan surgir al utilizar
la impresora.
Solución
de problemas
Getting Started
(this manual)
•
Describes various operating
procedures to make full use of
printer.
Describes troubleshooting
tips for problems you may
encounter when using the
printer.
Advanced Guide
Digital Photo Printing
Guide
TroubleshootingBasic Guide
Describes basic operations
and media, and gives
an introduction to other
functions available.
On-screen manuals can be viewed on a computer. They are included on the Setup CD-ROM and are installed during the software installation. Some parts of the
manual may be displayed in English. For details on opening the on-screen manuals, refer to page 53.
Describes how to set up and use
your printer.
Network Setup
Troubleshooting
•
4
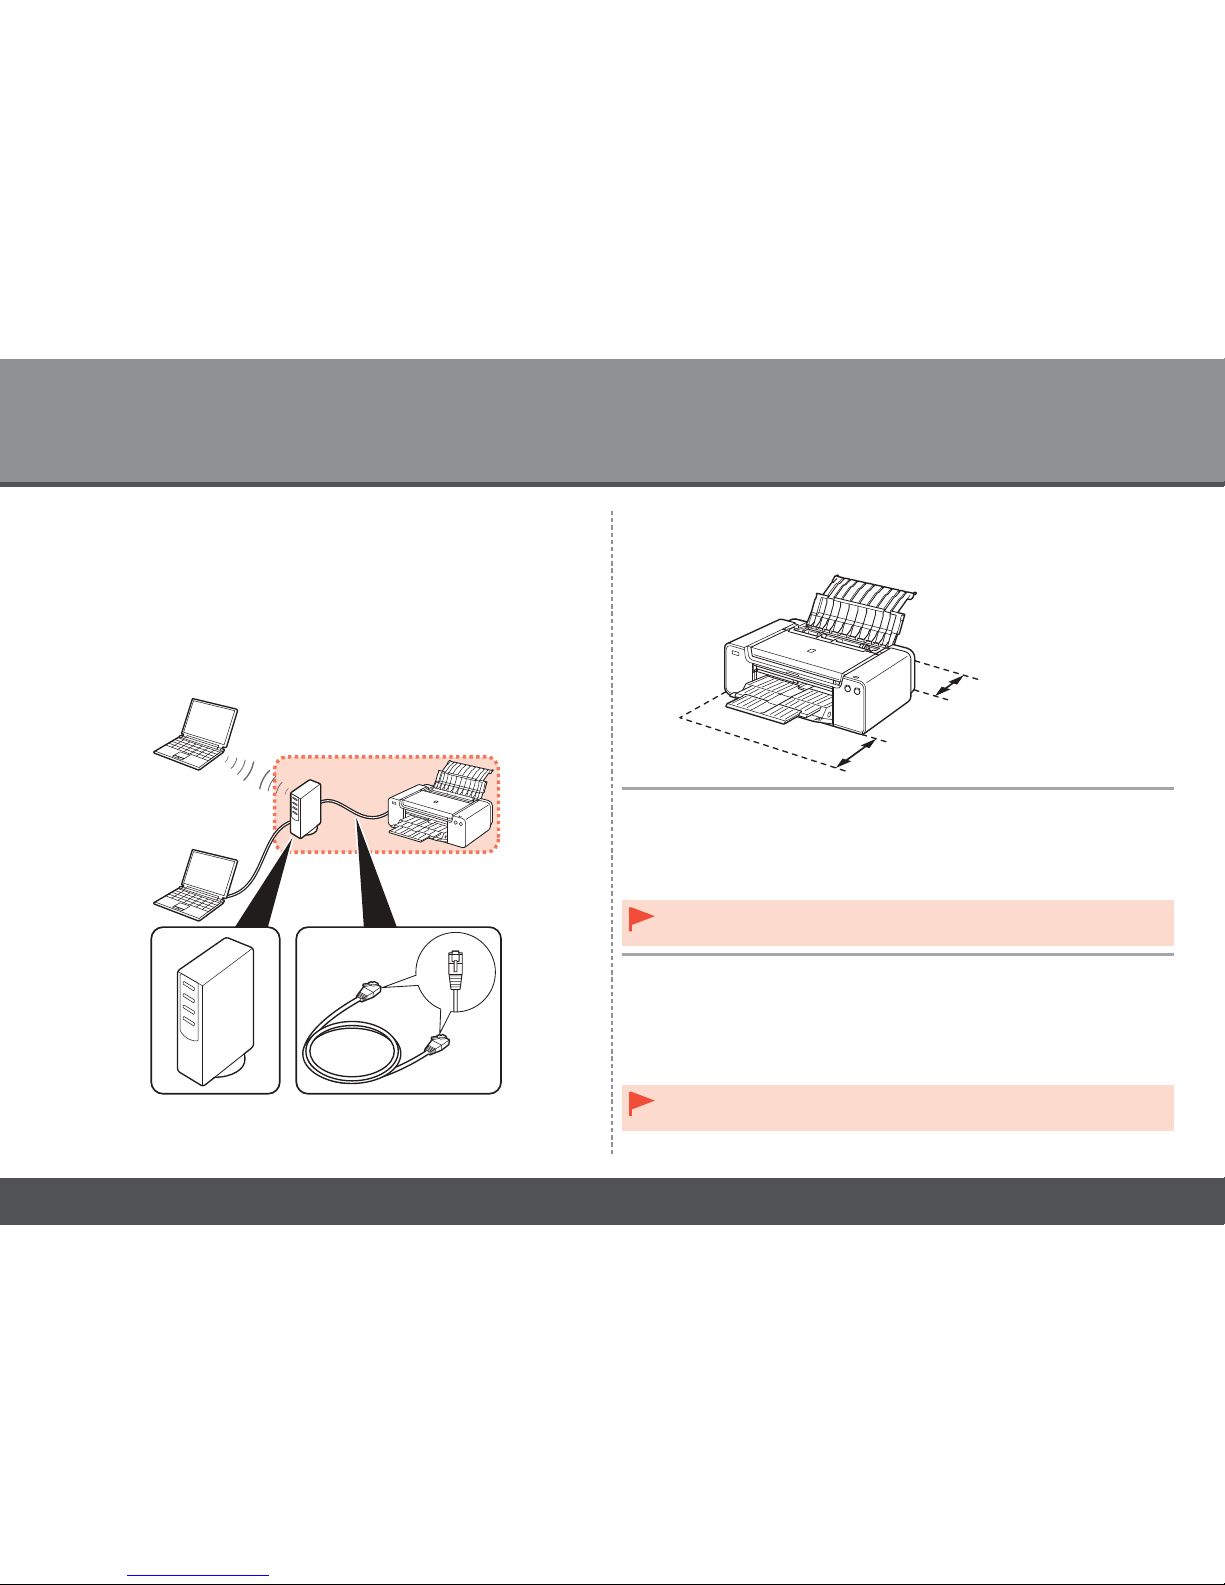
Router, etc. Cable Ethernet
Cuando la impresora se utilice mediante una conexión por cable,
se necesitará un dispositivo de red comercial (router, etc.) y un
cable Ethernet.
Dispositivos necesarios para la conexión
por cable
■
14 pulgadas (35 cm)
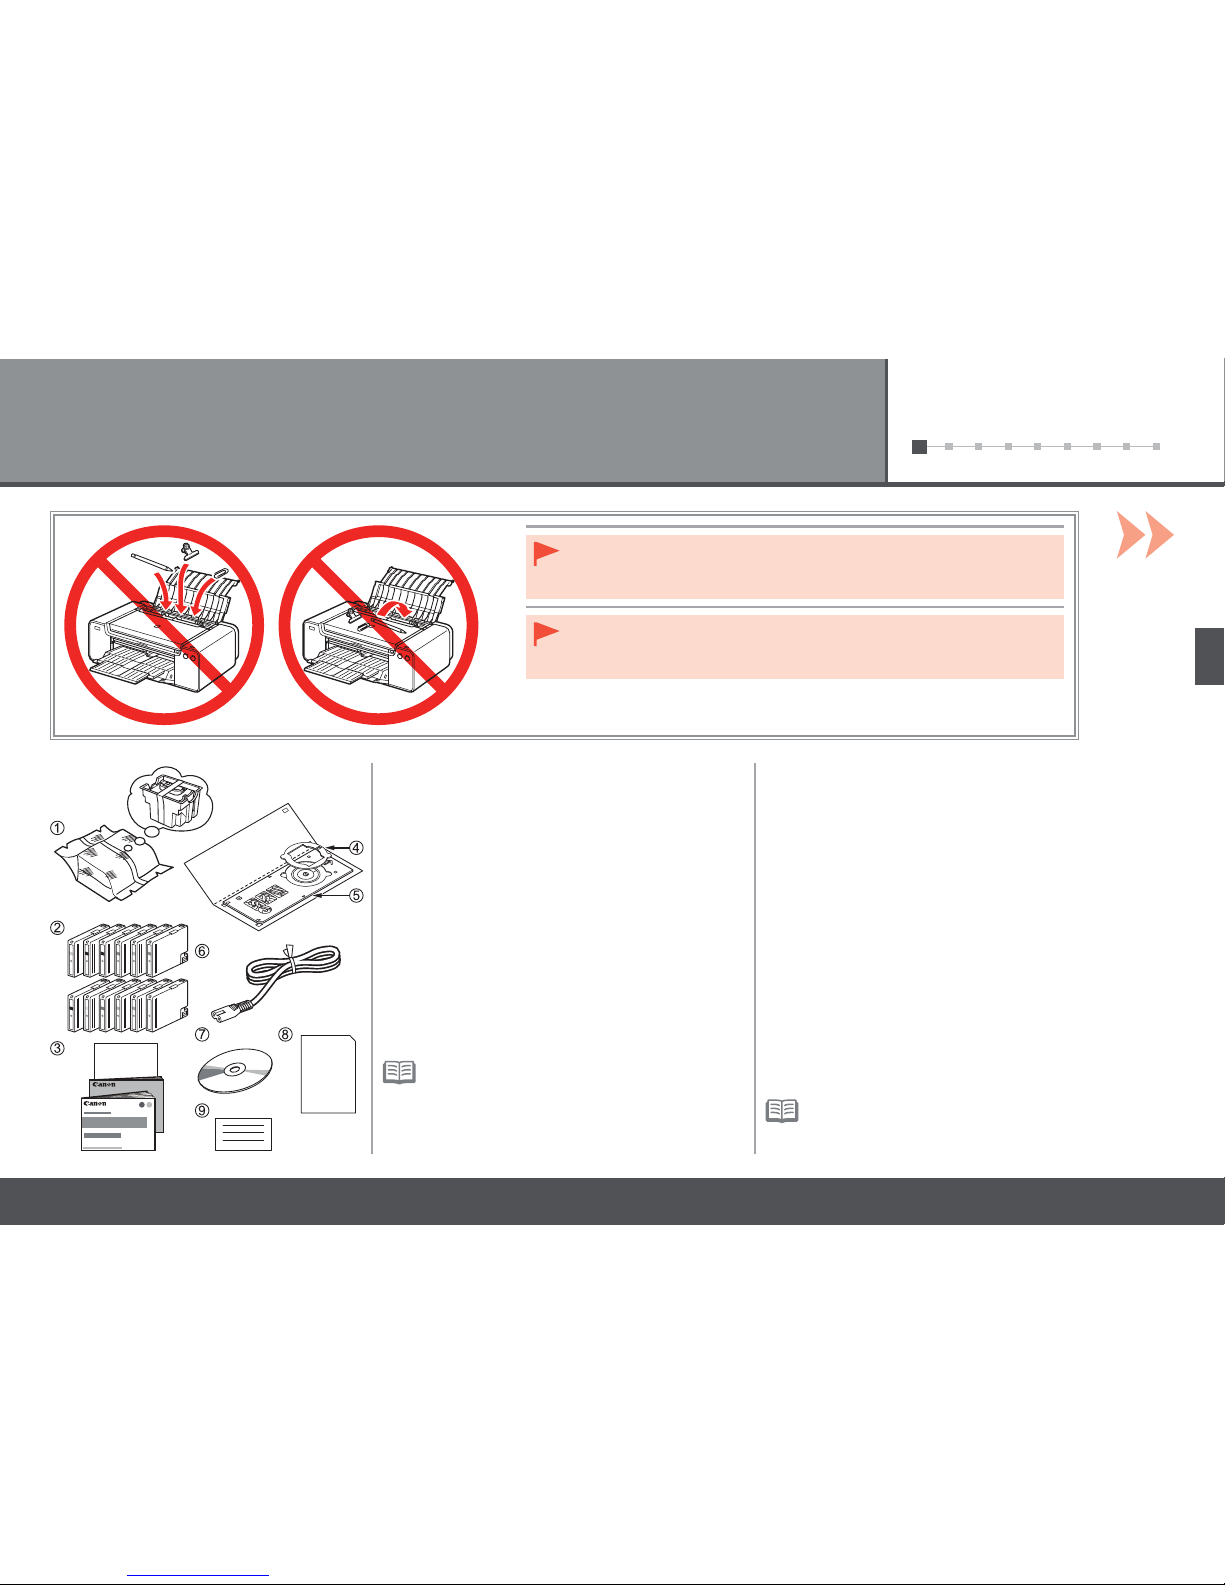
Coloque la impresora sobre una superficie plana.
No coloque ningún objeto delante de la impresora.
Para abrir el soporte del papel y la bandeja de salida del papel, deje un
espacio libre de 14 pulgadas (35 cm) delante de la impresora y un espacio
de 10 pulgadas (25 cm) detrás de ella.
•
•
•
Cuando instale la impresora, levántela y muévala con la ayuda de
otra persona.
•
10 pulgadas (25 cm)
Elección del emplazamiento■
When using the printer over a wired connection, a commercial network
device (router, etc.) and Ethernet cable are required.
Devices Required for Wired Connection■
Router, etc. Ethernet cable
Place the printer on a flat surface.
Do not place any object in front of the printer.
To open the Paper Support and Paper Output Tray, keep a space of 14
inches (35 cm) in front of the printer and a space of 10 inches (25 cm)
behind it.
•
•
•
When installing the printer, lift and move it with the help of another
person.
•
10 inches (25 cm)
14 inches (35 cm)
Choosing a Location■
5
1 23456789
1
1
Preparación
No instale la impresora donde le pueda caer algún objeto. Además, no
coloque ningún objeto encima de la impresora. Podría caer dentro de
la impresora al abrir la cubierta y provocar fallos en el funcionamiento.
•
Compruebe que no falta ninguno de los elementos
siguientes.
1. Cabezal de impresión
2. Depósitos de tinta (12: LGY, PBK, DGY, M, PC, GY,
MBK, Y, R, PM, C, CO)
3. Manuales
4. Adaptador de disco de 8 cm
5. Bandeja de disco
6. Cable de alimentación
7. CD-ROM de instalación (Setup CD-ROM) (contiene
los controladores, las aplicaciones y los manuales
en pantalla)
8. Papel Fotográfico Mate (Matte Photo Paper) MP-101
(para la alineación automática del cabezal de impresión)
9. Otros documentos
Se necesita un cable USB para conectar
la impresora al ordenador (solo mediante
conexión USB).
•
Preparation
Do not install the printer where an object may fall on it. In addition, do
not place any object on the top of the printer. It may fall into the printer
when opening covers, resulting in malfunction.
•
Make sure all the following items are supplied.
1. Print Head
2. Ink tanks (12: LGY, PBK, DGY, M, PC, GY, MBK, Y,
R, PM, C, CO)
3. Manuals
4. 8 cm disc adapter
5. Disc tray
6. Power cord
7. Setup CD-ROM (containing the drivers,
applications and on-screen manuals)
8. Matte Photo Paper MP-101 (for Automatic Print
Head Alignment)
9. Other documents
A USB cable is necessary to connect the
printer with your computer (USB connection
only).
•
6
1
2 34
A
1
2
B
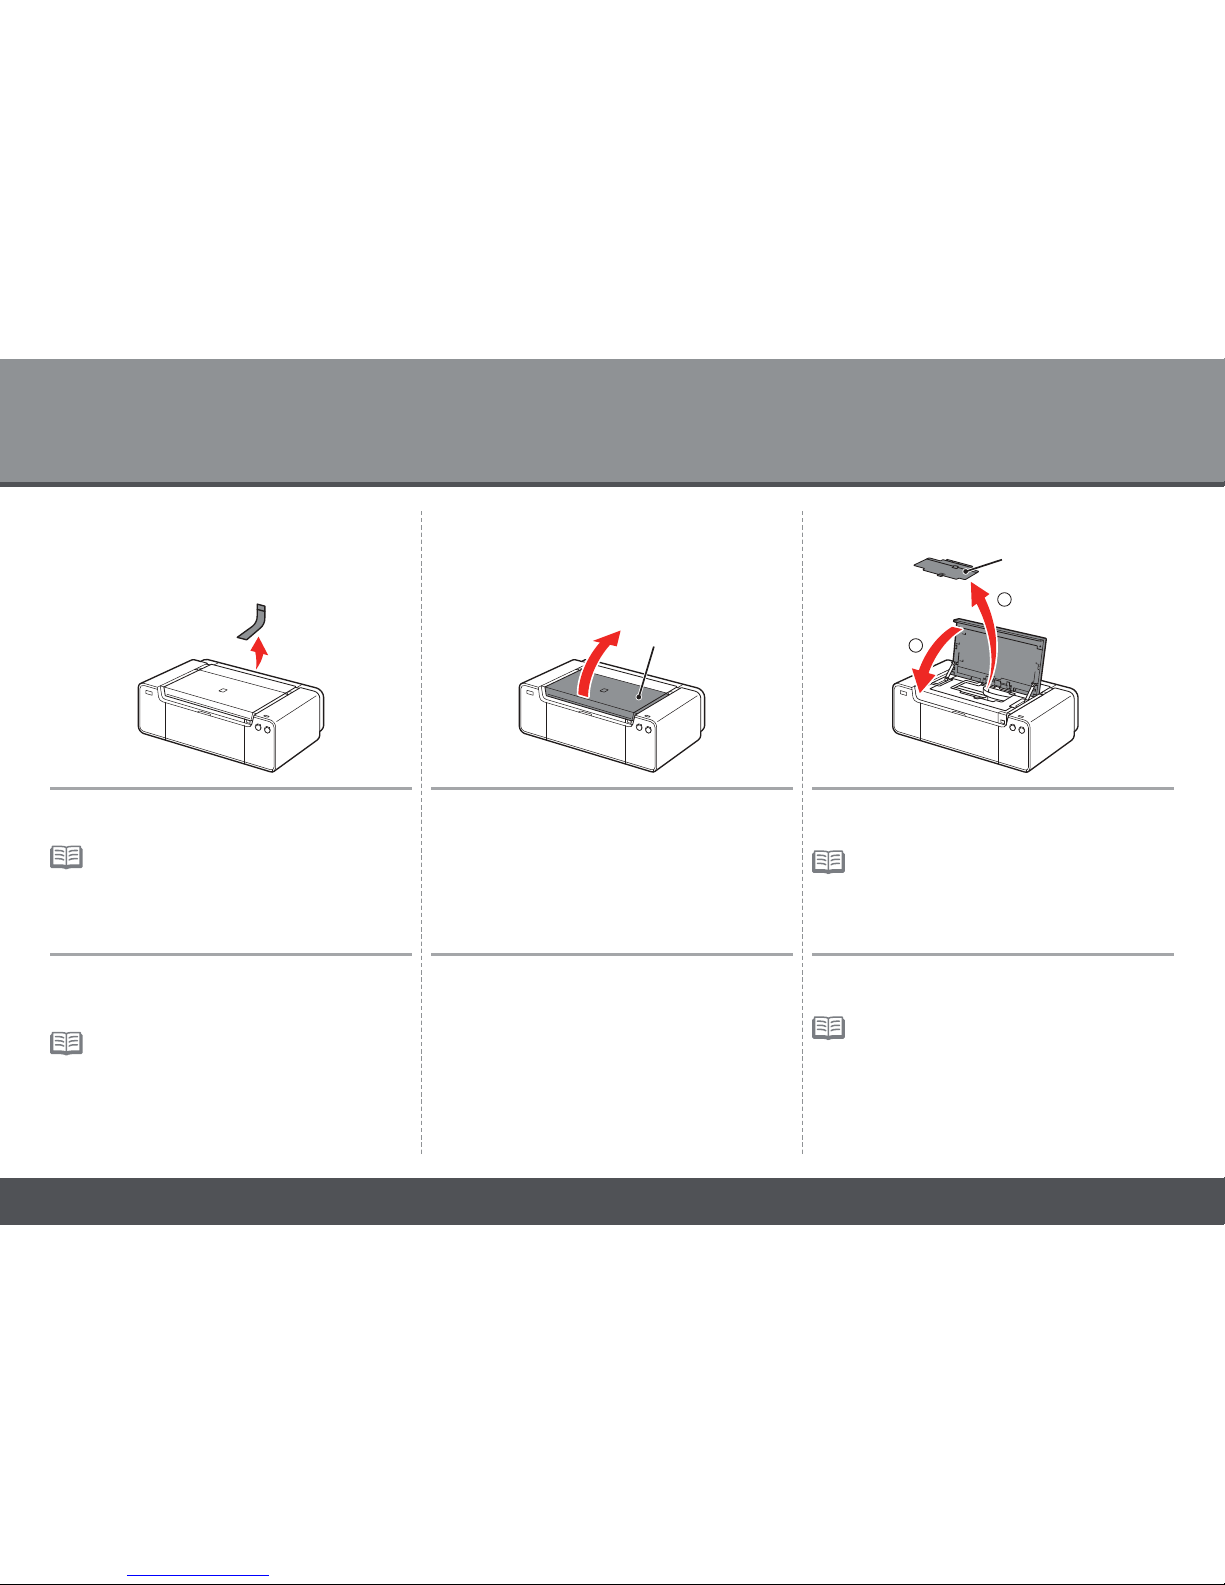
Retire todas las cintas naranja y todos los
materiales protectores del interior y el exterior
de la impresora.
La forma y la posición de la cinta y los
materiales protectores pueden variar
respecto a las que se muestran aquí.
•
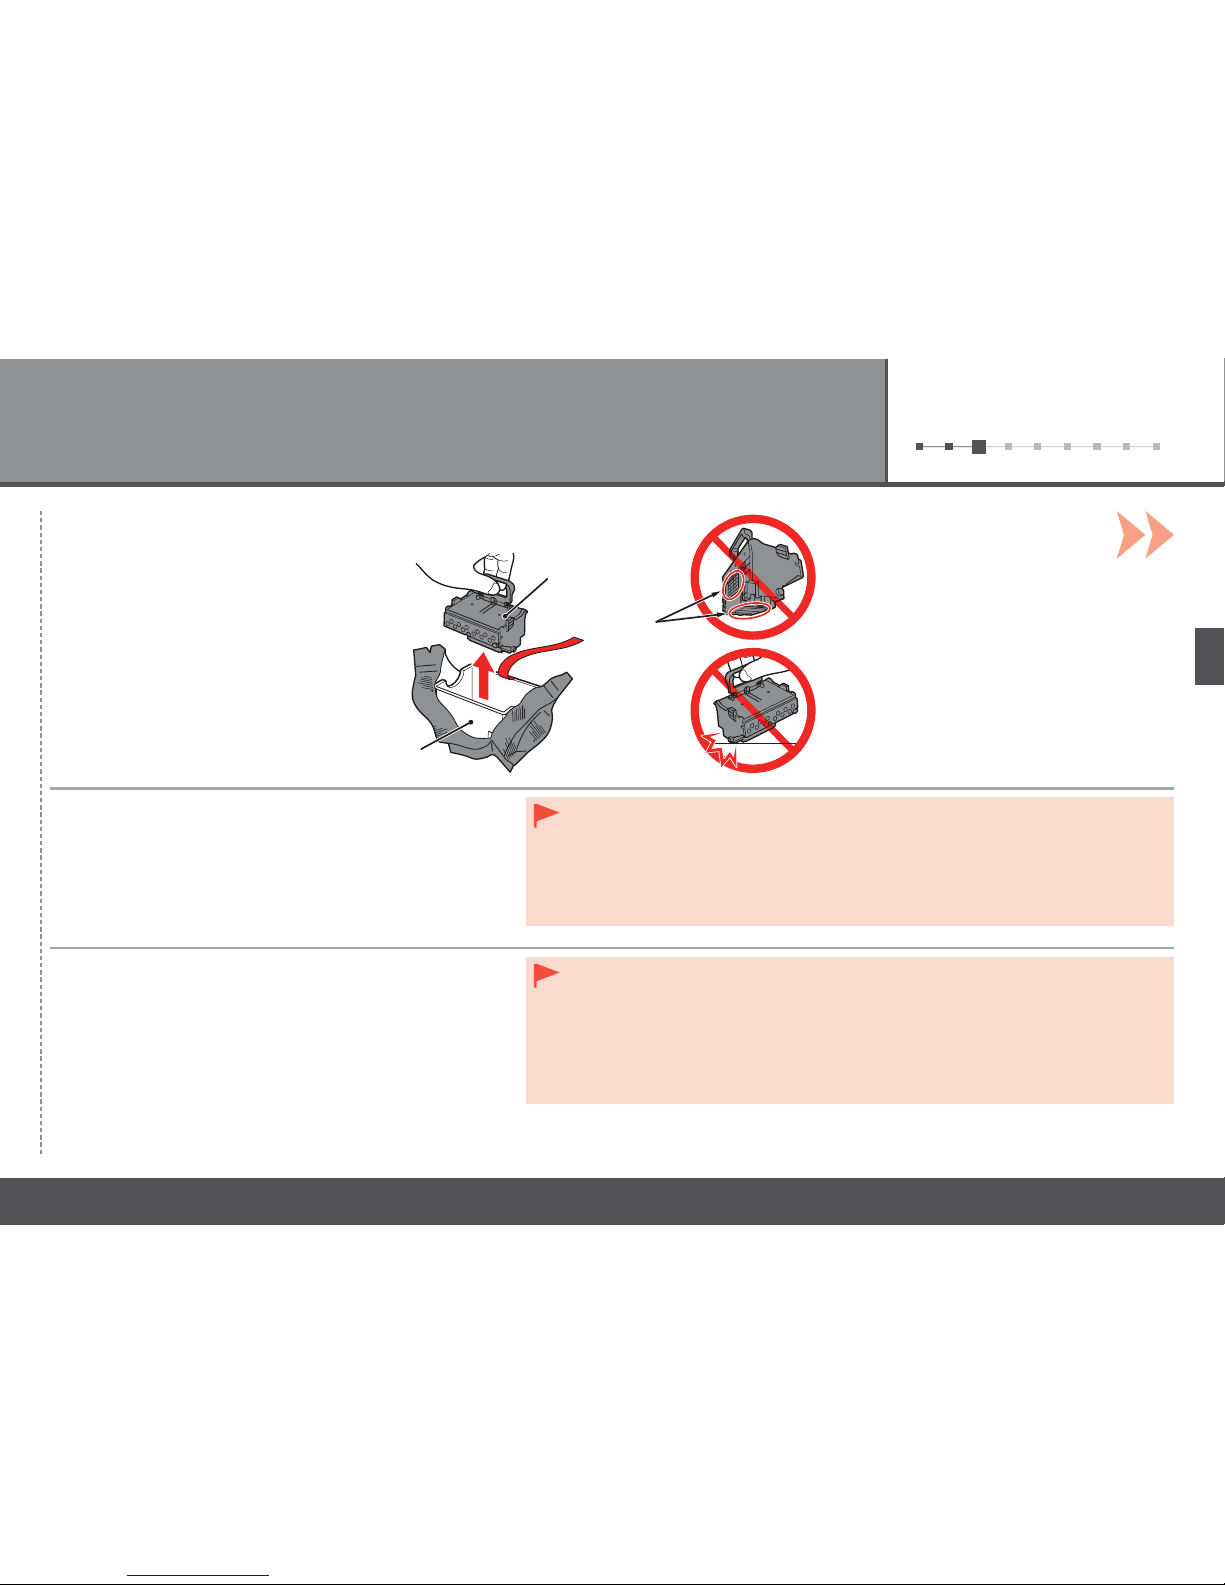
Abra la tapa superior (A). 1. Retire la cubierta del cabezal (B).
2. Cierre la tapa superior.
La cubierta del cabezal debe instalarse
durante la instalación de la impresora.
•
Remove all orange tape and protective materials
from the inside and outside of the printer.
The tape and protective materials may differ
in shape and position from those shown
here.
•
Open the Top Cover (A). 1. Remove the Head Cover (B).
2. Close the Top Cover.
The Head Cover is to be installed during the
printer installation.
•
7
1 23456789
567
C
D
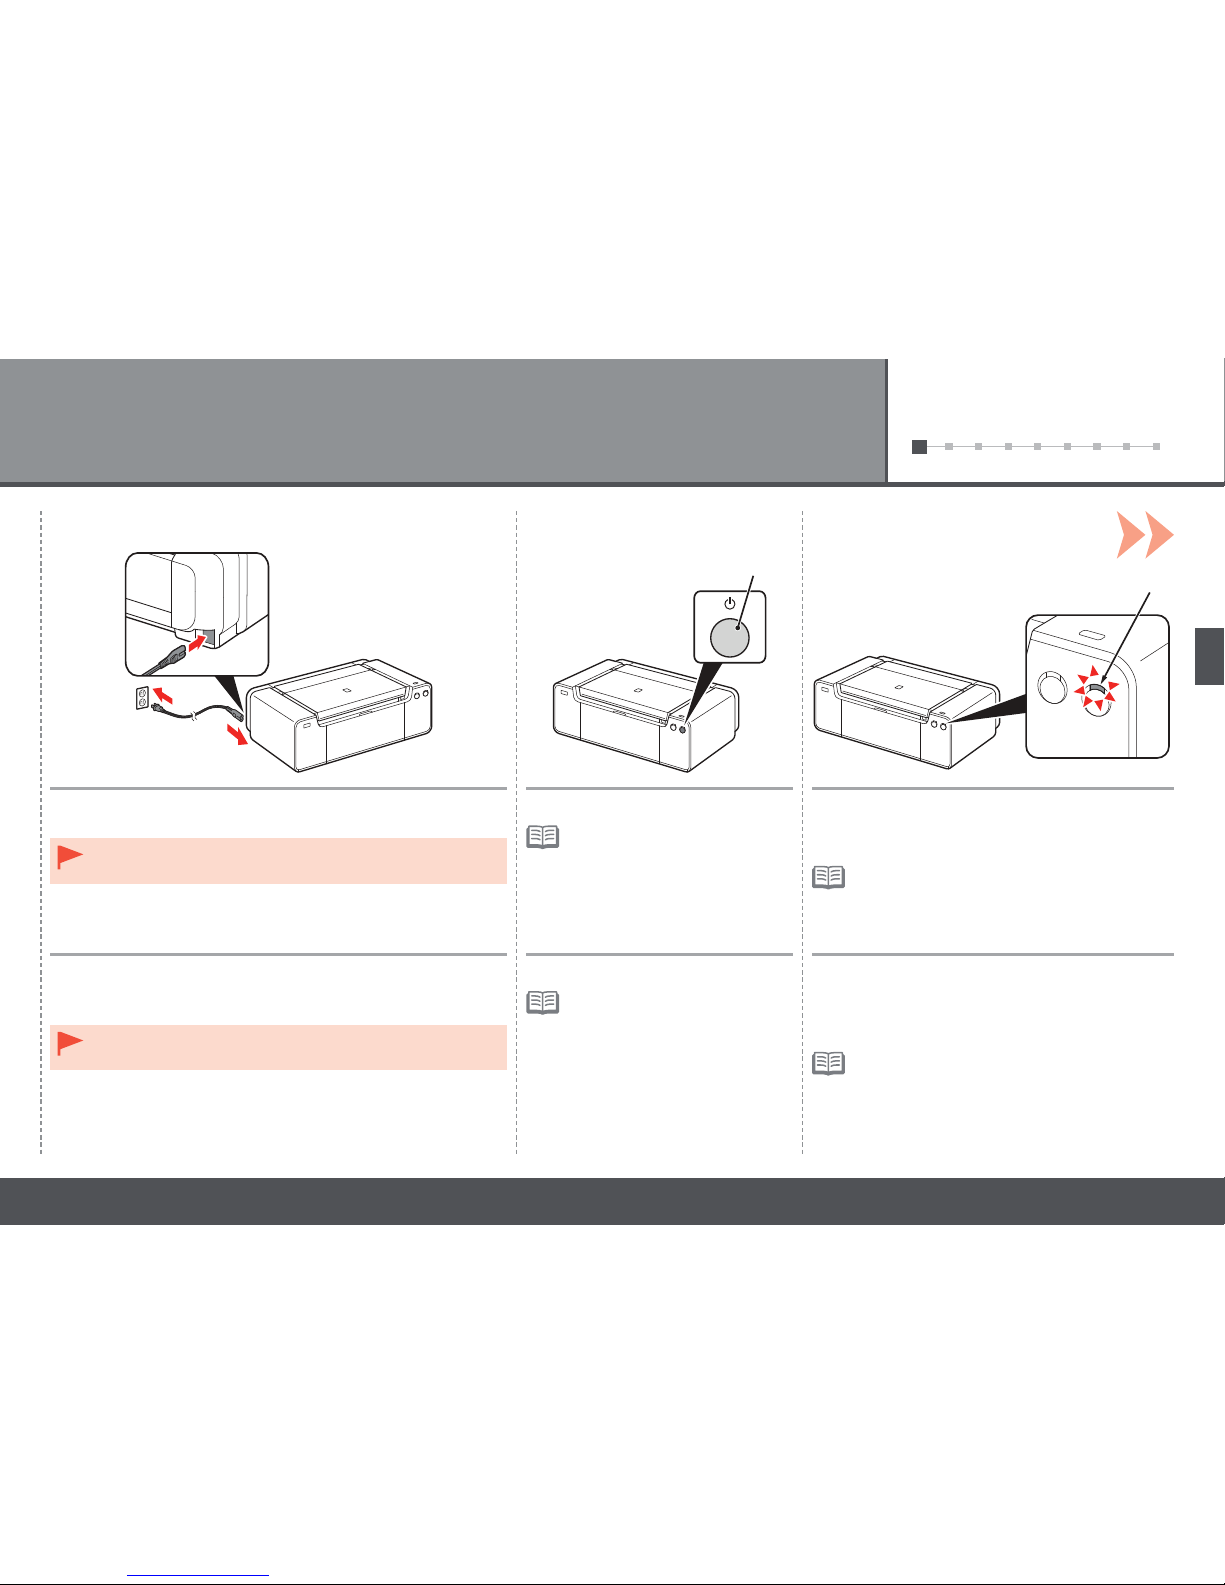
Introduzca firmemente el cable de alimentación en el
conector situado a la izquierda de la parte posterior de la
impresora y a la toma de corriente.
NO conecte el cable USB o Ethernet en este momento.•
Pulse el botón ACTIVADO (ON) (C).
Una vez conectado el cable de
corriente, el botón
ACTIVADO
(ON) tarda unos 5 segundos
en ponerse en funcionamiento.
•
Espere unos 2 minutos hasta que la luz
de encendido (POWER) (blanca) (D) deje
de parpadear y permanezca iluminada y,
a continuación, continúe con el paso siguiente.
La impresora puede producir algunos ruidos
durante el funcionamiento. Esto es parte del
funcionamiento normal.
•
Insert the power cord into the connector on the left side at the
back of the printer and into the wall outlet firmly.
Press the ON button (C). Wait for about 2 minutes until the POWER lamp
(white) (D) stops flashing and stays lit, then
proceed to the next step.
The printer may make some operating
noises. This is normal operation.
•
Do NOT connect the USB cable or Ethernet cable at this
stage.
•
It takes about 5 seconds for
the ON button to work after the
power cord is plugged in.
•

8
1
1 23456789
1 2
Cuando sea necesario desconectar la impresora
Asegúrese de seguir el procedimiento que se explica
a continuación.
Hasta que la impresora se apague, 60 segundos como máximo,
se puede seguir escuchando el ruido de funcionamiento.
1. Pulse el botón ACTIVADO (ON) para desconectar
la impresora.
2. Asegúrese de que la luz de
encendido (POWER)
no está iluminada.
Antes de retirar el cable de alimentación, asegúrese de que la luz de encendido
(POWER) no esté iluminada. Si se retira el cable de alimentación mientras la luz de
encendido (POWER) está encendida o parpadea, el cabezal de impresión se puede
secar y obstruir, teniendo como resultado una impresión de mala calidad.
•
Las especificaciones del cable de alimentación varían según el país o la región de uso.•
Before removing the power plug, make sure that the POWER lamp is not lit.
Removing the power plug while the POWER lamp is lit or flashing may cause drying
and clogging of the Print Head, resulting in poor printing.
•
The specification of the power cord differs for each country or region.•
Be sure to follow the procedure below.
Operating noise may continue for up to 60 seconds until the
printer turns off.
1. Press the ON button to turn off the printer.
2. Make sure that the
POWER lamp is not lit.
When it is necessary to turn off the printer
9
1 2 3456789
2
12
C
A
B
Instalación de los depósitos de tinta
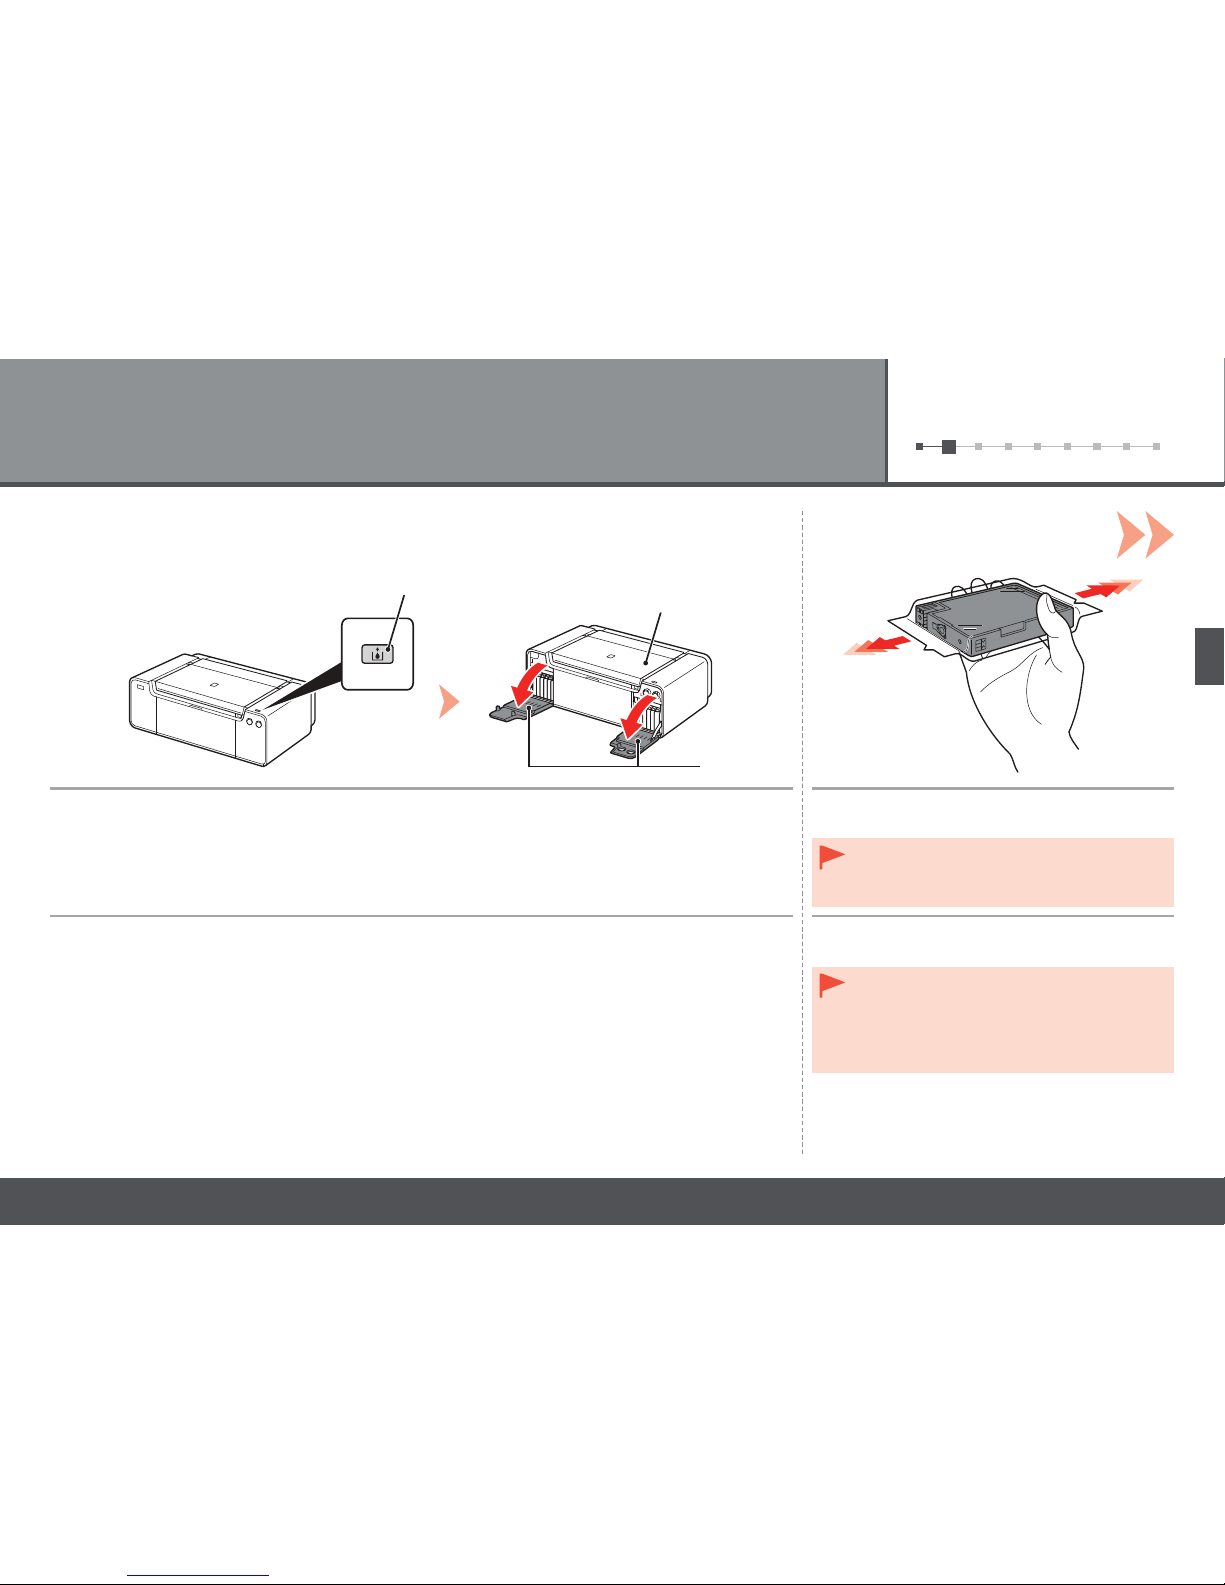
Pulse el botón Abrir cubierta del cartucho (Tank Cover Open) (A).
Las cubiertas del cartucho izquierda y derecha (B) se abren.
Asegúrese de que la tapa superior (C) esté cerrada.
Antes de retirar el depósito de tinta de su
envoltorio, agítelo 5 o 6 veces en horizontal.
Maneje los depósitos de tinta con cuidado.
No los tire ni aplique demasiada presión
sobre ellos.
Asegúrese de utilizar los depósitos de tinta
suministrados.
•
•
Install the Ink Tanks
Press the Tank Cover Open button (A). Before removing the ink tank from its package,
shake it 5 to 6 times horizontally.
The left and right Tank Covers (B) open.
Make sure the Top Cover (C) is closed.
Handle the ink tanks carefully. Do not drop or
apply excessive pressure to them.
Be sure to use the supplied ink tanks.
•
•
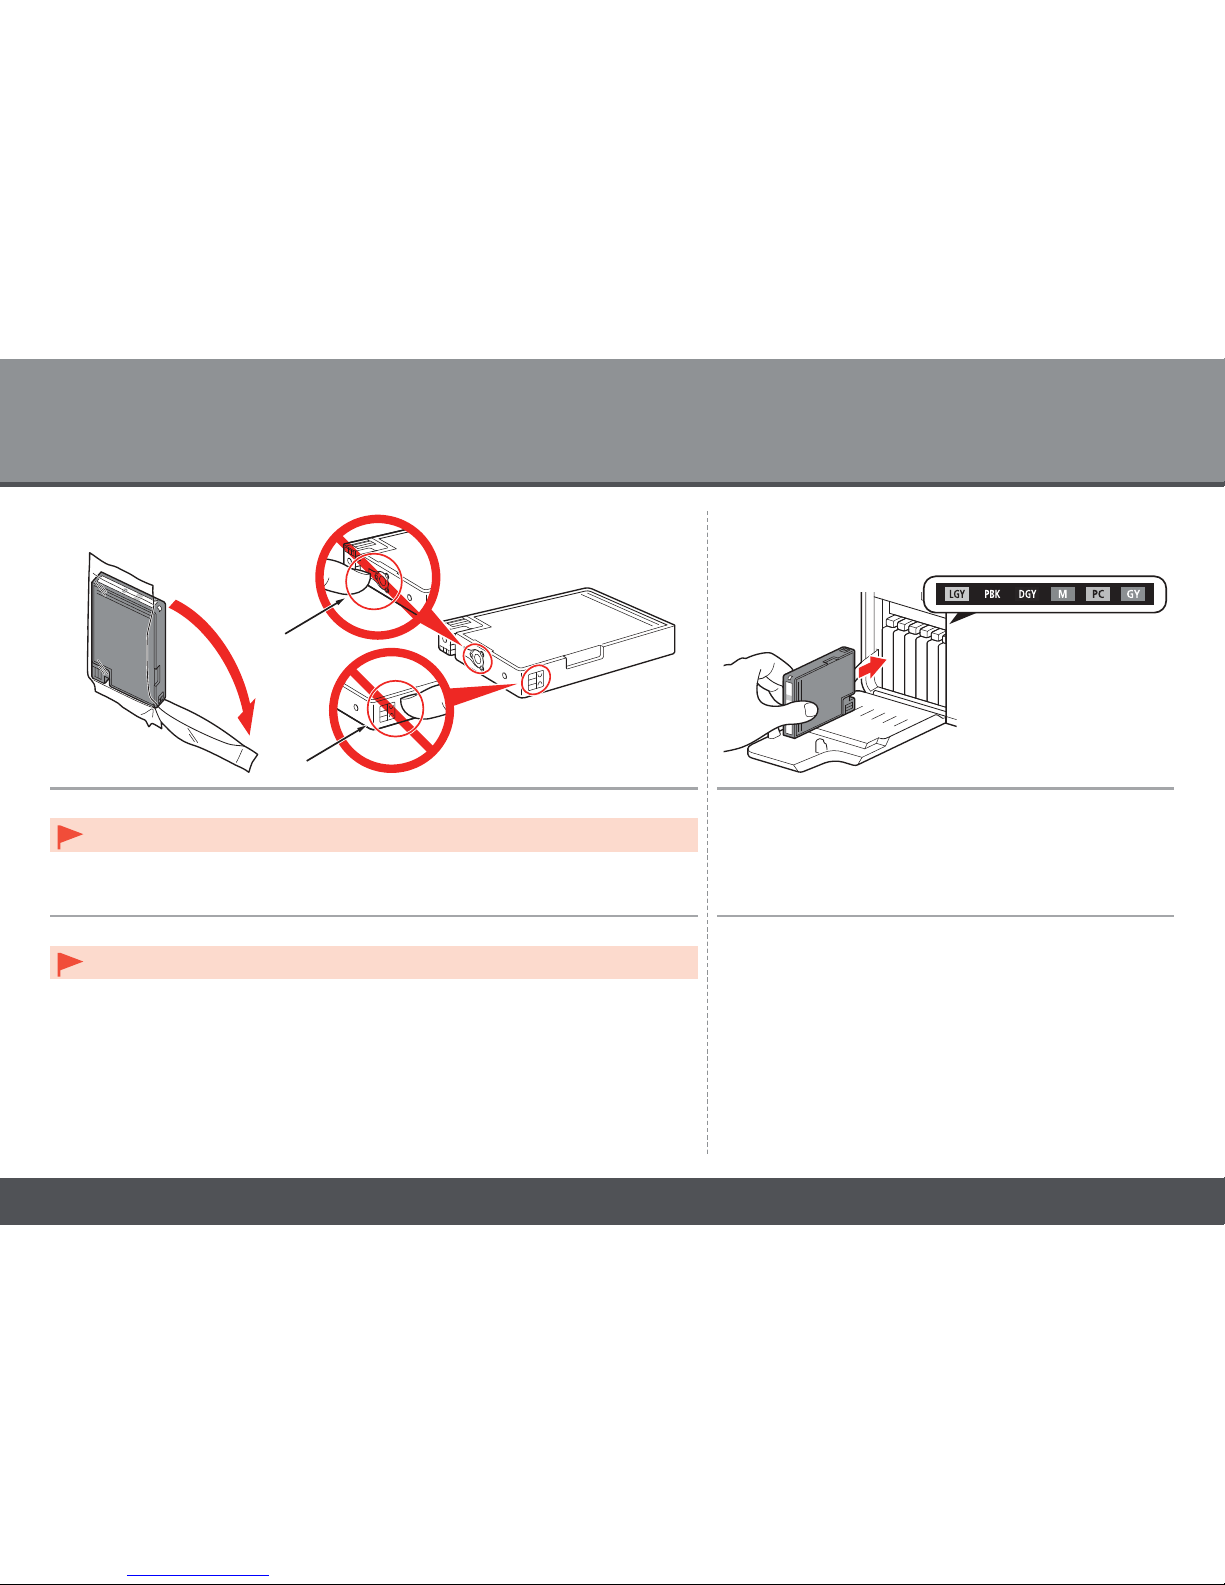
10
2
34
D
D
Retire el depósito de tinta del envoltorio.
No toque los contactos (D) de los depósitos de tinta.•
Coloque el depósito de tinta.
Presione la marca (PUSH) para colocar firmemente
el depósito de tinta en su lugar.
Cuando la instalación se complete correctamente, la lámpara
de
Tinta (Ink) se iluminará en rojo.
Asegúrese de que el color de la etiqueta coincida con el depósito
de tinta.
Remove the ink tank from the package. Set the ink tank.
Press the mark (PUSH) to set the ink tank firmly into place.
When the installation is completed properly, the Ink lamp lights red.
Make sure that the color of the label matches the ink tank.
Do not touch the contacts (D) of the ink tanks.•
11
1 2 3456789
5
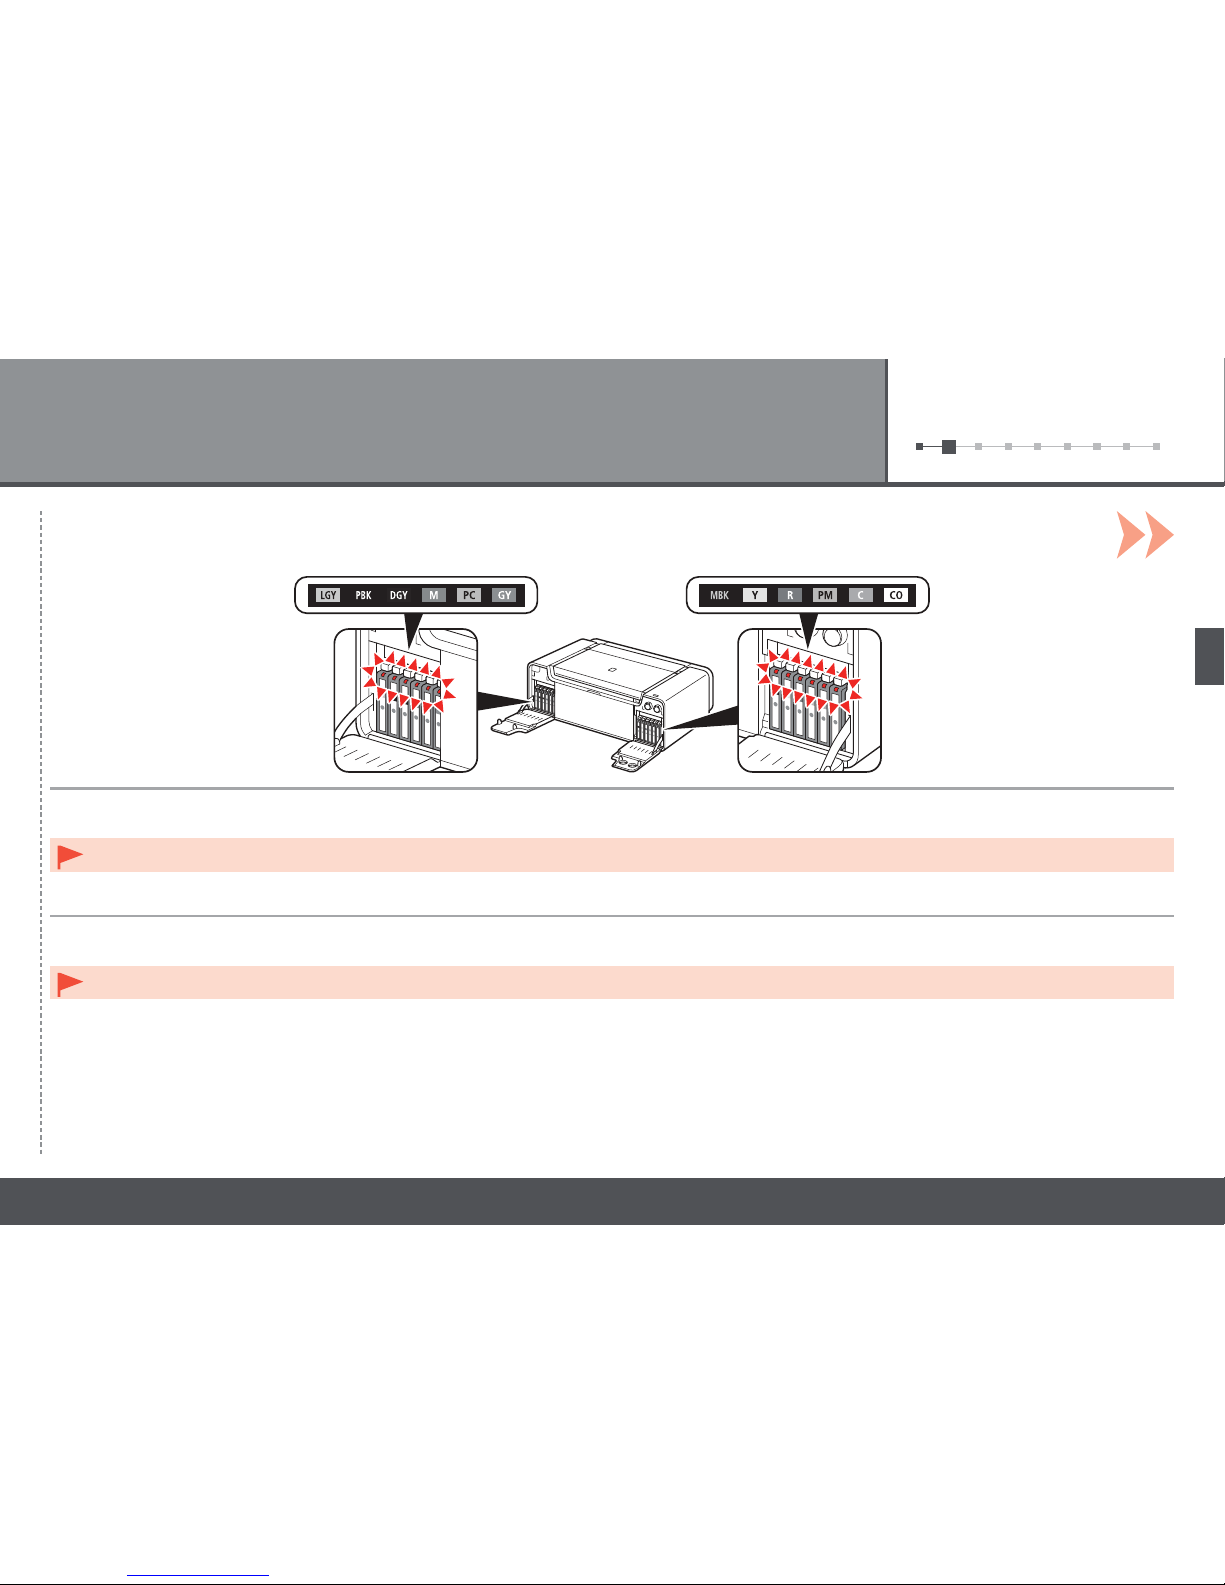
Instale los demás depósitos de tinta de la misma manera según el orden de los colores indicado en la etiqueta.
Asegúrese de que todas las lámparas de tinta (Ink) están encendidas de color rojo.
Cuando se hayan instalado los depósitos de tinta, no se deben extraer salvo que sea totalmente necesario.•
Install all the other ink tanks in the same way according to the color order indicated on the label.
Make sure all the Ink lamps light red.
Once you have installed the ink tanks, do not remove them unnecessarily.•

12
2
1 2 3456789
6
1. Cierre las cubiertas del cartucho izquierda y derecha hasta que encajen en su lugar.
2. Asegúrese de que el botón
Abrir cubierta del cartucho (Tank Cover Open) (azul) no esté iluminado y, a continuación, continúe con el paso siguiente.
Si el botón Abrir cubierta del cartucho (Tank Cover Open) (azul) permanece iluminado, asegúrese de que los depósitos de tinta estén instalados
correctamente.
•
1. Close the left and right Tank Covers until they click.
2. Make sure that the
Tank Cover Open button (blue) is not lit, then proceed to the next step.
If the Tank Cover Open button (blue) remains lit, make sure that the ink tanks are correctly installed.•
13
1 2 3 456789
3
12
A
B
Instalación del cabezal de impresión
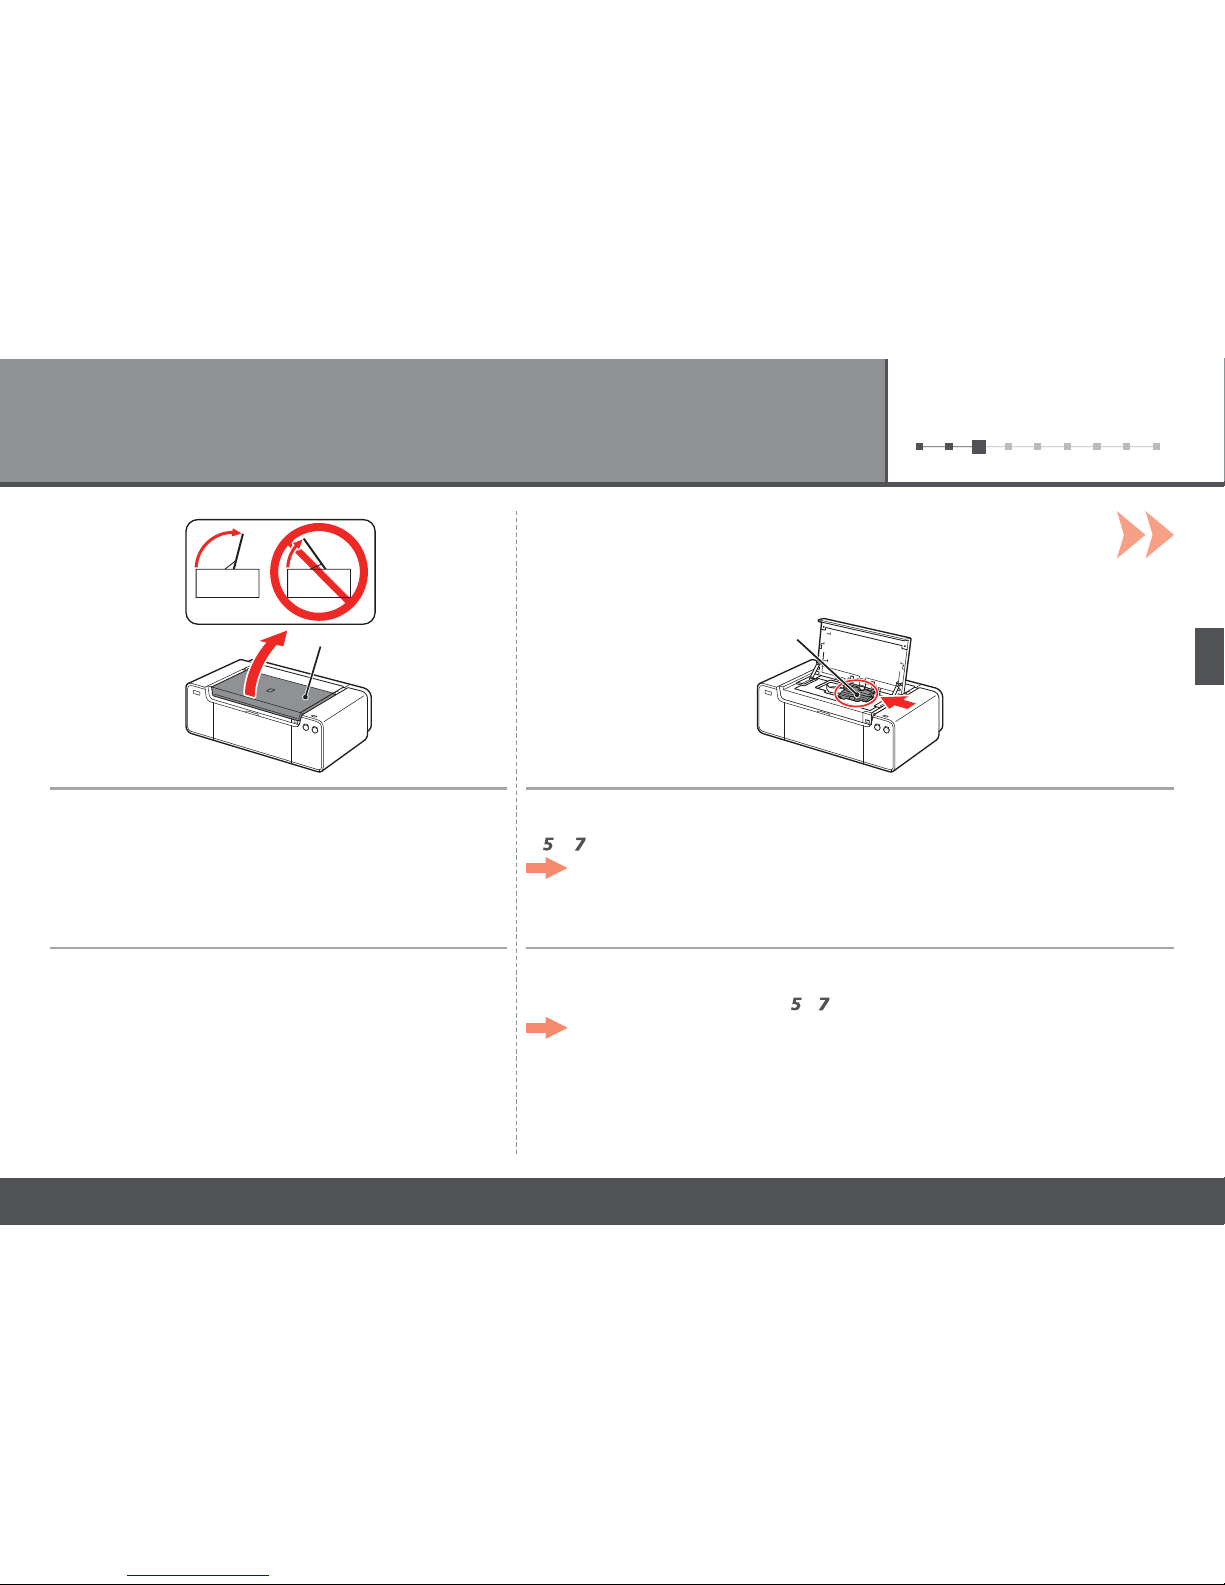
Abra la tapa superior (A) completamente. El soporte del cabezal de impresión (B) se desplazará a la posición de instalación.
Si el soporte del cabezal no se mueve, compruebe que la impresora está encendida. Para
conocer todos los detalles, consulte de
a en la página 7 de "1 Preparación".
Vaya a la siguiente página.
Install the Print Head
Open the Top Cover (A) completely. The Print Head Holder (B) moves to the installation position.
If the Print Head Holder does not move, make sure that the printer is turned on. For details, refer
to
to on page 7 in "1 Preparation."
Go to the next page.
14
3
34
C
D
E
F
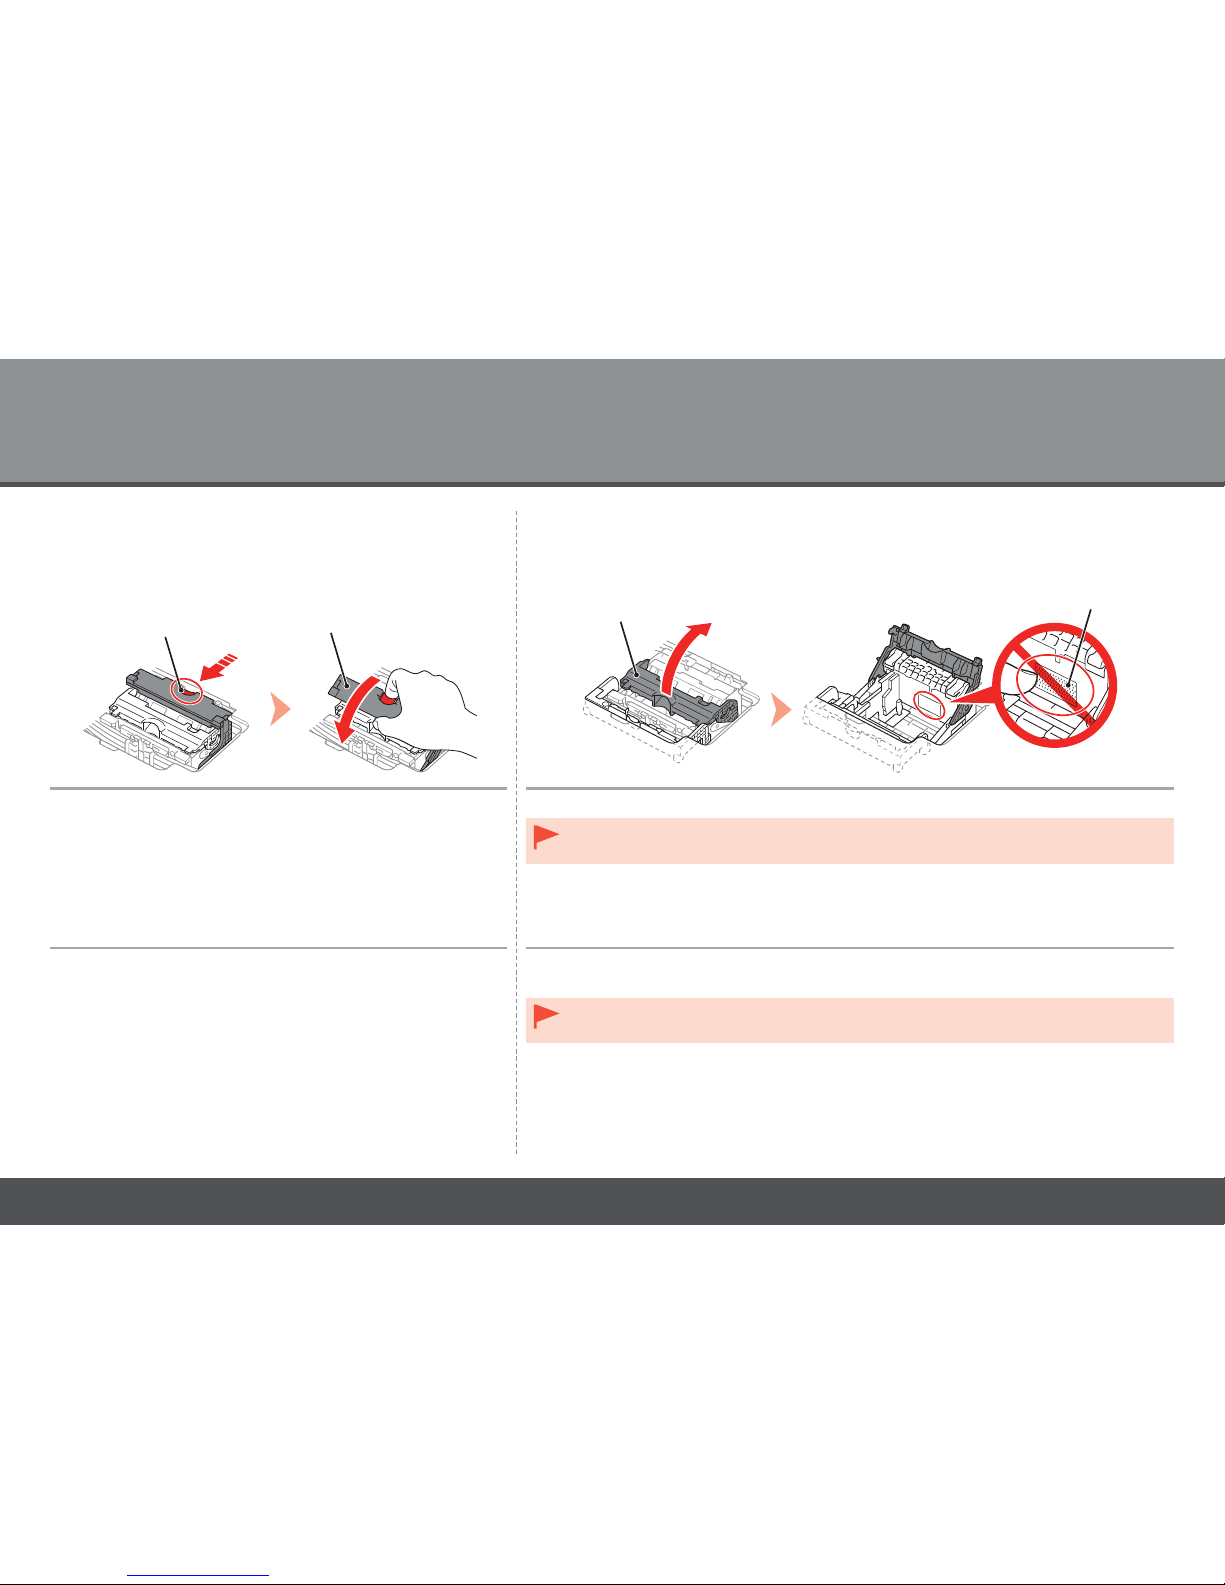
Mientras presiona el botón de bloqueo (C) en la dirección
de la flecha, abra la palanca de unión (1) (D) hacia delante.
Abra la palanca de bloqueo del cabezal de impresión (2) (E) completamente hasta
que se detenga.
No toque el interior del soporte del cabezal de impresión (F). Si se toca, es posible que
la impresora no imprima correctamente.
•
While pressing the Lock Button (C) in the direction of the
arrow, open the Joint Lever (1) (D) forward.
Open the Print Head Lock Lever (2) (E) fully until it stops.
Do not touch the inside of the Print Head Holder (F). The printer may not print properly
if you touch it.
•
15
1 2 3 456789
5
I
H
G
1. Retire la caja del cabezal (G) del embalaje plateado.
2. Retire la cinta.
3. Sujete el asa azul y retire el cabezal de impresión (H).
Maneje el cabezal de impresión con cuidado. No lo deje caer ni le aplique una presión
excesiva.
No toque las piezas metálicas (I) del cabezal de impresión. Si las toca, puede que la
impresora no imprima correctamente.
Puede haber un poco de tinta de color claro o transparente dentro de la bolsa en la que
viene el cabezal de impresión. Esto no afecta a la calidad de impresión. Tenga cuidado
para no mancharse de tinta al manipular estos componentes.
•
•
•
1. Remove the head case (G) from the silver package.
2. Remove the tape.
3. Hold the blue handle and remove the Print Head (H).
Handle the Print Head carefully. Do not drop or apply excessive pressure to it.
Do not touch the metal parts (I) of the Print Head. The printer may not print properly if
you touch them.
There may be some transparent or light color ink on the inside of the bag the Print Head
comes in - this has no effect on print quality. Be careful not to get ink on yourself when
handling these items.
•
•
•
16
3
78
D
6
E
Inserte el cabezal de impresión directamente desde arriba, como
se muestra, para colocarlo en su lugar.
No golpee el cabezal de impresión contra los laterales del soporte.•
Baje la palanca de bloqueo
del cabezal de impresión (3)
(E).
Cierre completamente la palanca de unión (4)
(D) hasta que encaje en su lugar.
Es posible que la palanca de unión (4) ofrezca
resistencia y haga un ruido mientras se cierra.
Una vez instalado el cabezal de impresión,
no lo retire si no es necesario.
•
Lower the Print Head Lock
Lever (3) (E).
Insert the Print Head from straight above as shown to set it in place.
Do not knock the Print Head against the sides of the holder.•
Close the Joint Lever (4) (D) completely until it
clicks.
The Joint Lever (4) may be tight and make a noise
while being closed.
Once you have installed the Print Head, do
not remove it unnecessarily.
•
17
1 2 3 456789
9
1
2
LK
J
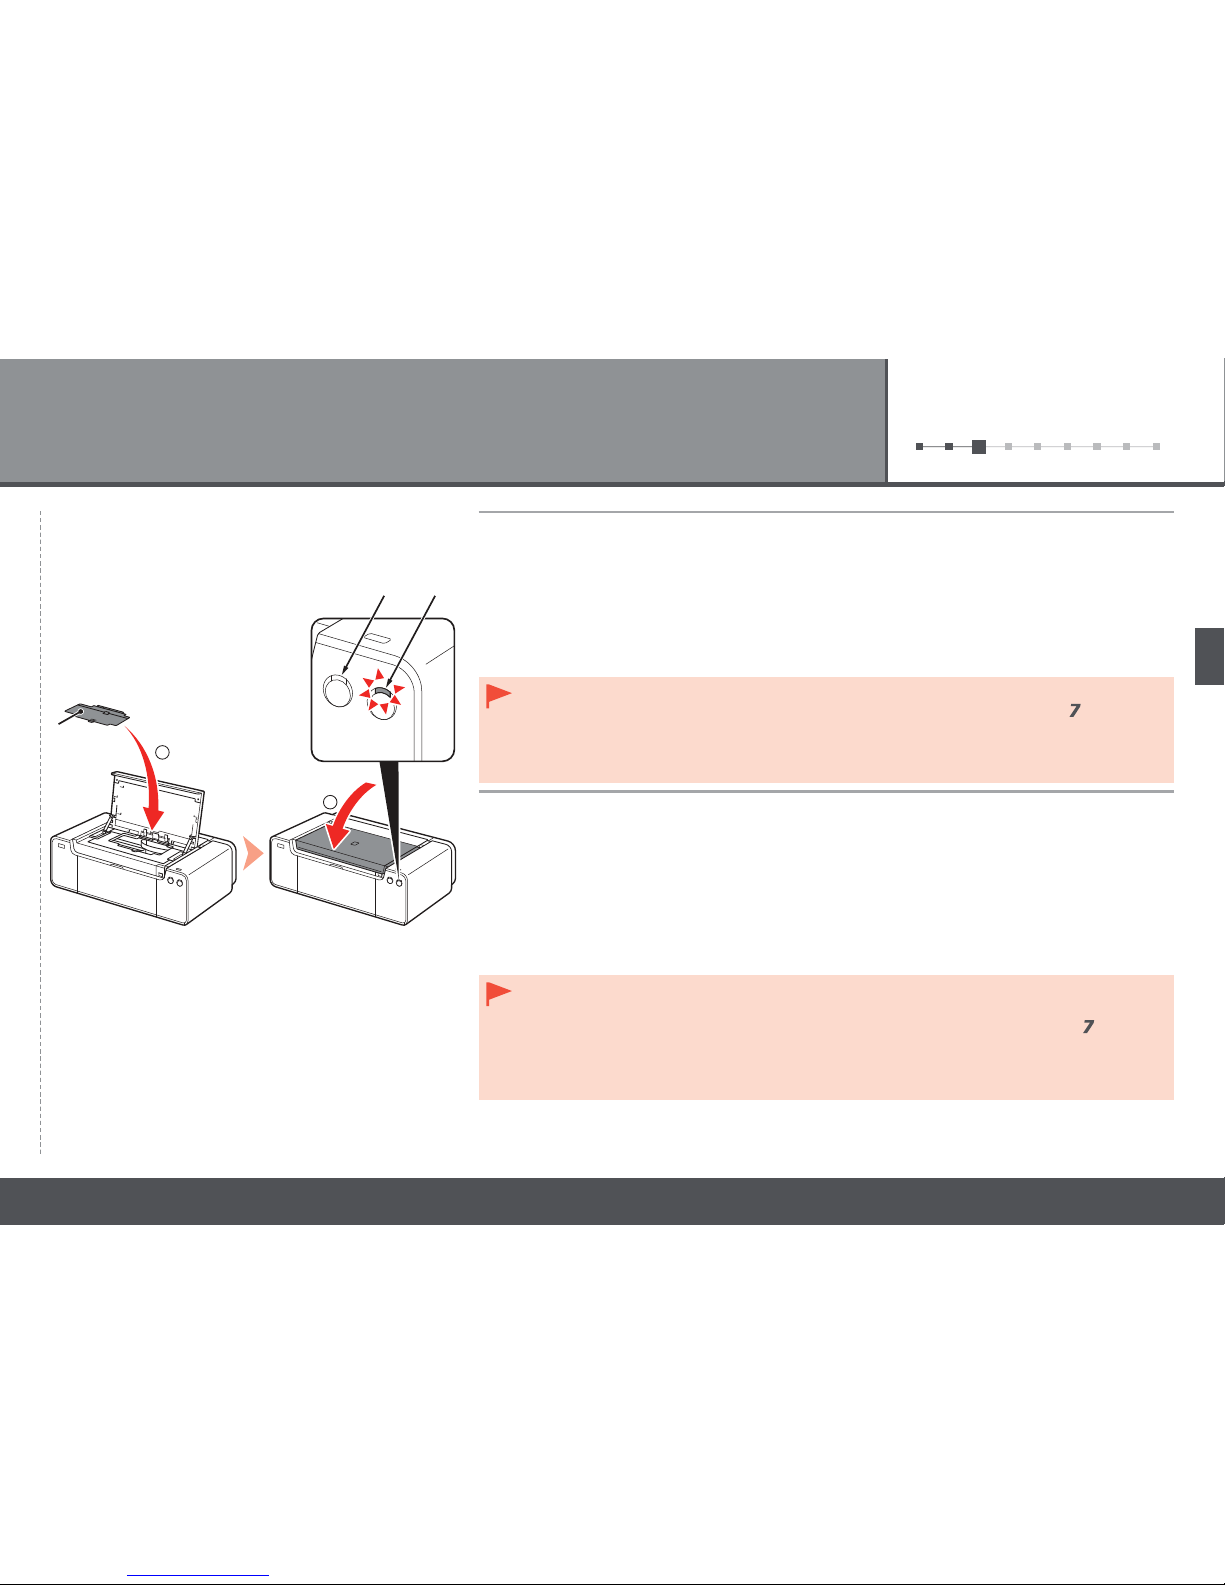
1. Instale la cubierta del cabezal (J).
2. Cierre la tapa superior.
3. Espere unos 20 minutos hasta que la lámpara de ENCENDIDO (POWER) (blanca) (K) deje
de parpadear y permanezca iluminada y, a continuación, continúe con el paso siguiente.
Esta operación es necesaria para preparar la impresora para su uso. No apague la
impresora hasta que la luz de ENCENDIDO (POWER) permanezca iluminada.
Es posible que la impresora emita ciertos ruidos de funcionamiento mientras se prepara para imprimir.
Esto es parte del funcionamiento normal.
Si la luz de Alarma (Alarm) (naranja) (L) parpadea, asegúrese de que la palanca de bloqueo
del cabezal de impresión esté cerrada correctamente. Abra la palanca de unión y la palanca
de bloqueo del cabezal de impresión y, a continuación, comience de nuevo desde
.
Cuando la impresora se enciende por primera vez, utiliza tinta para prepararse para la
impresión. Se puede comprobar el nivel de tinta restante desde el controlador de impresora
(
Windows) o Canon IJ Printer Utility (Macintosh) después de la instalación del software.
•
•
1. Install the Head Cover (J).
2. Close the Top Cover.
3. Wait for about 20 minutes until the POWER lamp (white) (K) stops flashing and stays lit,
then proceed to the next step.
This operation is required to make the printer ready for use. Do not turn off the printer until
the POWER lamp stays lit.
The printer may make some operating noises when preparing to print. This is normal operation.
If the Alarm lamp (orange) (L) flashes, make sure that the Print Head Lock Lever is closed
correctly. Open the Joint Lever and Print Head Lock Lever, then start again from
.
When the printer is turned on for the first time, ink is used to ready the printer for printing. The
remaining ink level can be checked from the printer driver (Windows) or Canon IJ Printer Utility
(Macintosh) after software installation.
•
•
18
4
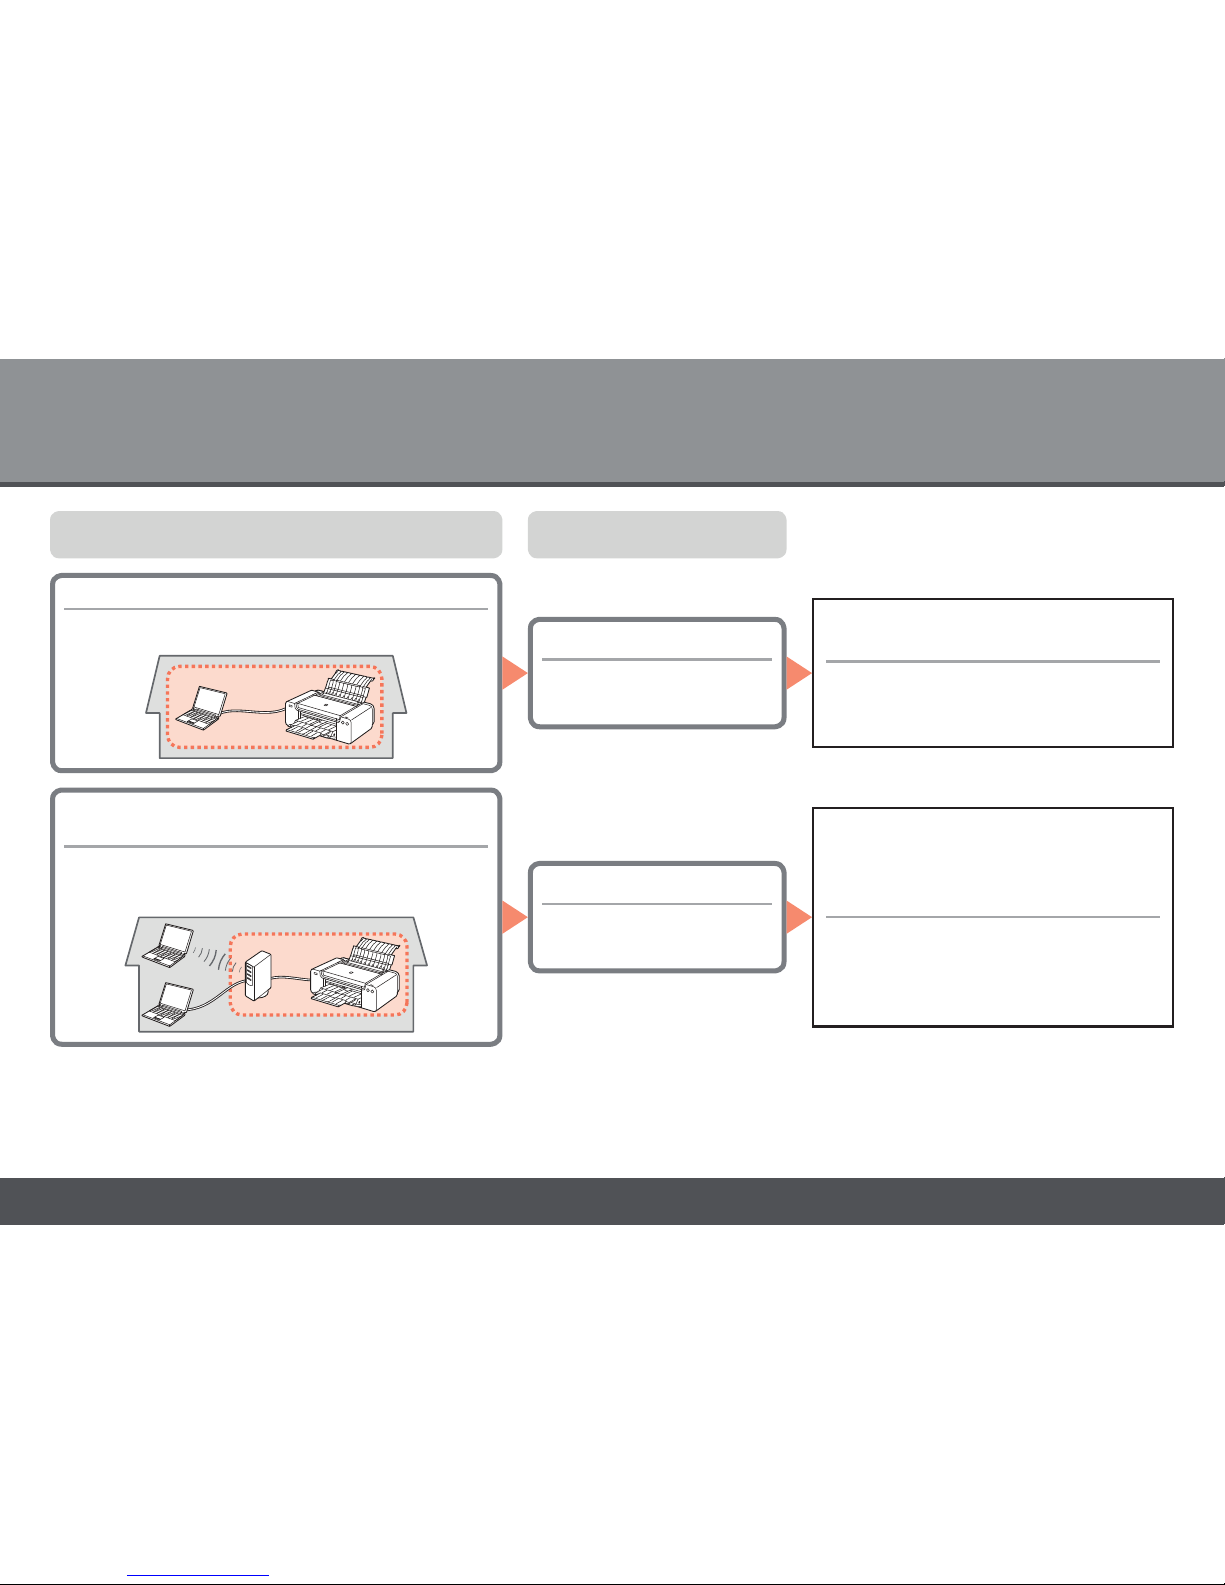
Vaya a "5 Configuración de una
conexión USB (instalación del
software)" en la página 20.
Conectar a un ordenador con un cable Ethernet.
Utilizar desde varios ordenadores.
•
•
Conexión por cable
Conexión USB
Selección del método de conexión
Método de conexiónUso previsto
Conectar a un ordenador con un cable USB.•
Vaya a "6 Configuración de una
conexión cableada" en la página 32.
Consulte también la información de
la página 19.
Select Connection Method
Connect to a computer with a USB cable.•
Intended Use Connection Method
Go to "6 Set Up a Wired Connection"
on page 32.
Also refer to the information on page
19.
Go to "5 Set Up a USB Connection
(Software Installation)" on page 20.
Connect to a computer with an Ethernet cable.
Use from multiple computers.
•
•
Wired Connection
USB Connection

19
1 234 56789
¿Qué es una red de área local (LAN)?
¿Qué es una red?
Un sistema de intercambio de información entre ordenadores mediante
la conexión de éstos entre sí con cables o a través de comunicaciones
inalámbricas. Internet y las redes de área local (LAN) son tipos de redes.
Un tipo de red que conecta ordenadores entre sí dentro de un área limitada
(habitación, edificio, etc.).
Si no sabe si el dispositivo (router, etc.) admite una conexión por cable,
consulte el manual proporcionado con el mismo o póngase en contacto
con el fabricante.
Si el dispositivo admite una conexión por cable, compruebe si es compatible
con la conexión simultánea de múltiples ordenadores y dispositivos de red.
What is LAN (Local Area Network)?
What is Network?
A system to exchange information between computers by connecting them
to each other with cables or via wireless communication. The Internet and
LAN are types of networks.
A type of network that connects computers to each other within a limited
area (room, building, etc.).
If you are not certain whether your device (router, etc.) supports wired
connection, refer to the manual supplied with the device, or contact its
manufacturer.
If your device supports wired connection, check if it supports simultaneous
connection of multiple computers and network devices.
20
5
Configuración de una conexión USB (instalación del software)
No conecte aún el cable USB.
Para utilizar la impresora conectándola a un ordenador, deberá copiar
(instalar) el software y los controladores necesarios en el disco duro del
ordenador. El proceso de instalación lleva unos 20 minutos. (El tiempo
necesario para instalar varía en función del entorno del ordenador o de
cuánto software de aplicación se vaya a instalar.)
Cierre las aplicaciones que se estén ejecutando antes de la instalación.
Inicie la sesión como administrador (o miembro del grupo de
administradores).
No cambie de usuario durante el proceso de instalación.
Durante la instalación, es posible que se tenga que conectar a Internet.
Esto puede implicar gastos de conexión. Consulte con el proveedor de
servicios de Internet.
Es posible que deba reiniciar el ordenador durante el proceso de
instalación. Siga las instrucciones de la pantalla y no retire el CD-ROM
de instalación (Setup CD-ROM) durante el reinicio.
La instalación se reanudará una vez reiniciado el ordenador.
Para obtener información sobre los requisitos del sistema, consulte
"Especificaciones".
•
•
•
•
•
•
Set Up a USB Connection (Software Installation)
To use the printer by connecting it to a computer, software including the
drivers needs to be copied (installed) to the computer's hard disk. The
installation process takes about 20 minutes. (The installation time varies
depending on the computer environment or the number of application
software to be installed.)
Do not connect the USB cable yet.
Quit all running applications before installation.
Log on as the administrator (or a member of the Administrators group).
Do not switch users during the installation process.
Internet connection may be required during the installation. Connection
fees may apply. Consult the internet service provider.
It may be necessary to restart your computer during the installation
process. Follow the on-screen instructions and do not remove the
Setup CD-ROM during restart.
The installation resumes once your computer has restarted.
For the system requirements, refer to "Specifications."
•
•
•
•
•
•
21
1 2345 6789
Para los usuarios de habla
hispana en EE. UU.
Easy-WebPrint EX
Easy-WebPrint EX es un software de impresión para web que se instala en el ordenador al instalar
el software incluido. Para utilizar este software es necesario Internet Explorer 7 o posterior (Windows)
o Safari 4 o posterior (Mac OS X v.10.5 o posterior). Para la instalación, es necesario estar conectado
a Internet.
Consulte la hoja "Información
adicional para usuarios
españoles" para instalar
la versión en español del
software.
Si se cierra el cuadro de diálogo,
continúe con el paso
de la
página 22.
1. Retire el cable USB que esté
conectado al ordenador.
2. Haga clic en
Cancelar
(Cancel).
3. Continúe con el paso
de
la página 22.
Para Windows 7
1. Retire el cable USB conectado
al ordenador.
2. Continúe con el paso
de la
página 22.
Para Windows Vista/
Windows XP
Puede aparecer este cuadro
de diálogo.
Si el cable USB está conectado
antes de instalar el software
For Spanish Users in the
U.S.A.
Refer to the "Información
adicional para usuarios
españoles" sheet to install
the Spanish version of the
software.
If the USB cable is connected
before the software is installed
If the dialog box
closes, proceed to
on page 22.
1. Remove the USB
cable connected to
your computer.
2. Click
Cancel.
3. Proceed to
on
page 22.
For Windows 7
1. Remove the USB
cable connected to
your computer.
2. Proceed to
on
page 22.
For Windows Vista/
Windows XP
This dialog box may
appear.
Easy-WebPrint EX
Easy-WebPrint EX is Web print software that is installed on the computer when installing the supplied
software. Internet Explorer 7 or later (Windows) or Safari 4 or later (Mac OS X v.10.5 or later) is required to
use this software. An Internet connection is required for installation.

22
5
12
BA
1. Asegúrese de que la lámpara de
encendido (POWER) (blanca)
(A) esté iluminada.
2. Pulse el botón
ACTIVADO
(ON) (B) para APAGAR LA
IMPRESORA.
Hasta que la impresora se apague,
60 segundos como máximo, se
puede seguir escuchando el ruido
de funcionamiento.
Aún no conecte la
impresora al ordenador
mediante el cable USB.
Si ya está conectado,
desconecte el cable
USB del ordenador.
•
1. Compruebe que la impresora
esté apagada.
2. Encienda el ordenador.
3. Introduzca el
CD-ROM de
instalación (Setup CD-ROM)
en la unidad de CD-ROM.
Si usa Windows, el programa de
instalación se inicia automáticamente.
Para Windows
Si el programa no se inicia
automáticamente, haga doble clic
en el icono del CD-ROM en Equipo
(Computer) o Mi PC (My Computer).
Cuando aparezca el contenido
del CD-ROM, haga doble clic en
MSETUP4.EXE.
•
1. Make sure that the POWER
lamp (white) (A) is lit.
2. Press the
ON button (B) to
TURN OFF THE PRINTER.
Operating noise may continue for up to
60 seconds until the printer turns off.
1. Make sure that the printer has
turned off.
2. Turn on the computer.
3. Insert the
Setup CD-ROM into
the CD-ROM drive.
If you are using Windows, the setup
program starts automatically.
If the program does not start
automatically, double-click the
CD-ROM icon in Computer or My
Computer. When the CD-ROM
contents appear, double-click
MSETUP4.EXE.
•
Do not connect the
printer to the computer
with the USB cable
yet. If it is already
connected, disconnect
the USB cable from the
computer.
•
For Windows
23
1 2345 6789
3
3
Windows XP
Windows 7/Windows Vista
Si no sabe su nombre o contraseña de administrador, haga clic en el botón de ayuda
y, a continuación, siga las instrucciones que aparezcan en pantalla.
Si la carpeta del CD-ROM no se abre automáticamente, haga doble clic en el icono
del CD-ROM del escritorio.
Haga doble clic en el icono Setup de la carpeta del CD-ROM para
pasar a la pantalla siguiente. Introduzca el nombre de administrador
y la contraseña; a continuación, haga clic en OK.
Haga clic en Ejecutar Msetup4.exe (Run Msetup4.exe)
en la pantalla Reproducción automática (AutoPlay)
y, a continuación, haga clic en Sí (Yes) o en Continuar
(Continue) en el cuadro de diálogo Control de cuentas
de usuario (User Account Control).
Si vuelve a aparecer el cuadro de diálogo Control de cuentas de
usuario (User Account Control) en los pasos siguientes, haga clic
en Sí (Yes) o en Continuar (Continue).
Click Run Msetup4.exe on the AutoPlay screen, then click
Yes or Continue on the User Account Control dialog box.
If the User Account Control dialog box reappears in following
steps, click
Yes or Continue.
If you do not know your administrator name or password, click the help button, then
follow the on-screen instructions.
If the CD-ROM folder does not open automatically, double-click the CD-ROM icon on
the desktop.
Double-click the Setup icon of the CD-ROM folder to proceed to the following
screen. Enter your administrator name and password, then click OK.
24
5
645
Haga clic en Instalación simple (Easy Install).
Se instalarán los controladores, el software de
aplicación y los manuales en pantalla.
Si desea seleccionar unos elementos
concretos para instalarlos, haga
clic en
Instalación personalizada
(Custom Install)
.
•
Haga clic en Instalar (Install).
Siga las instrucciones que aparezcan en pantalla
para continuar con la instalación del software.
Seleccione Utilizar la impresora
mediante USB (Use the printer via USB) y,
a continuación, haga clic en Siguiente (Next).
Click Easy Install.
The drivers, application software, and on-screen
manuals are installed.
If you want to select particular items to
install, click
Custom Install.
•
Follow any on-screen instructions to proceed with the
software installation.
Select Use the printer via USB, then click
Next.
Click Install.

25
1 2345 6789
7
C
E
D
8
Cuando aparezca la pantalla Conexión de impresora
(Printer Connection), conecte la impresora al ordenador
mediante un cable USB.
Después de conectar el cable, ENCIENDA LA IMPRESORA.
El puerto USB se encuentra en la parte posterior derecha
de la impresora. El puerto superior es para USB.
Puerto USB
Información importante para
la instalación
Cuando aparezca esta pantalla, abra el soporte
del papel (C).
Abra la cubierta de la ranura de
alimentación (D) y, a continuación,
mueva las guías del papel (E)
a ambos bordes.
USB Port
When the Printer Connection screen appears, connect
the printer to the computer with a USB cable.
After connecting the cable, TURN ON THE PRINTER.
The USB Port is located on the right side at the back of
the printer. The upper port is for USB.
Important Information for the
Installation
When this screen appears, open the Paper Support
(C).
Open the Feed Slot Cover (D), then
move the Paper Guides (E) to both
edges.

26
5
10
F
G
119
1
2
H
I
D
Cargue 2 hojas del papel especial suministrado
(Papel Fotográfico Mate (Matte Photo Paper)
MP-101) en la bandeja posterior (F).
Cargue el papel con orientación vertical de manera
que la esquina del corte (G) esté en la parte superior
derecha.
Asegúrese de usar el papel MP-101 para la
alineación del cabezal de impresión.
•
Deslice las guías del papel
izquierda y derecha contra ambos
bordes del papel.
1. Cierre suavemente la cubierta de la ranura
de alimentación (D).
2. Abra la bandeja de salida del papel (H) y, a
continuación, tire hacia fuera de la extensión
de la bandeja de salida (I).
No deslice las guías de papel
apretando demasiado contra
el papel.
•
Load 2 sheets of supplied specialty paper (Matte
Photo Paper MP-101) in the Rear Tray (F).
Load paper in portrait orientation so that the cut
corner (G) is at the top right.
Be sure to use the supplied MP-101 for Print
Head Alignment.
•
Slide the left and right Paper
Guides against both edges of the
paper.
1. Close the Feed Slot Cover (D) gently.
2. Open the Paper Output Tray (H), then pull out
the Output Tray Extension (I).
Do not slide the Paper Guides
too hard against the paper.
•

27
1 2345 6789
12
J
13
13
K
Haga clic en Ejecutar (Execute).
No abra la tapa superior (J) durante la impresión.
Haga clic en Aceptar (OK).
La alineación del cabezal de impresión tarda unos 7 – 8 minutos
en completarse.
Cuando aparezca la pantalla Iniciar alineación de cabezales de impresión
(Start Print Head Alignment) haga clic en Alinear cabezales de impresión
(Align Print Head). Haga clic en Aceptar (OK) en el mensaje subsiguiente.
La alineación del cabezal de impresión tarda unos 7 – 8 minutos
en completarse.
Si la luz de Alarma (Alarm) (naranja) (K) parpadea, compruebe
la pantalla de errores del equipo y, a continuación, vuelva a
empezar desde
.
•
Click Execute.
Do not open the Top Cover (J) while printing.
When the Start Print Head Alignment screen appears, click Align
Print Head. Click OK in the subsequent message.
Print Head Alignment takes about 7 – 8 minutes to complete.
Click OK.
Print Head Alignment takes about 7 – 8 minutes to complete.
If the Alarm lamp (orange) (K) flashes, check the error screen on
the computer, then start again from
.
•

28
5
14
K
L
Cuando se haya imprimido la segunda
página del patrón, la alineación del cabezal
de impresión habrá terminado.
Retire el papel.
En Windows, haga clic en Siguiente (Next) en la
pantalla Alineación de los cabezales de impresión
(Print Head Alignment).
Si vuelve a alinear automáticamente el cabezal de impresión, es posible que se
impriman patrones diferentes de los que se muestran más arriba.
Si la luz de Alarma (Alarm) (naranja) (K) parpadea, pulse el botón REANUDAR/
CANCELAR (RESUME/CANCEL) (L) de la impresora para que desaparezca el
error y haga clic a continuación en Siguiente (Next). Cuando finalice la instalación,
lleve a cabo la alineación del cabezal de impresión tal como se explica en "Cuando
la impresión es borrosa o los colores no son los correctos" del manual en pantalla:
Guía básica
.
•
•
Algunas secciones de los patrones impresos en la
primera página aparecen borrosas.
When the second page of the pattern is printed,
Print Head Alignment is complete.
Remove the paper.
In Windows, click Next on the Print Head Alignment
screen.
If you align the Print Head automatically again, patterns different from those shown
above may be printed.
If the Alarm lamp (orange) (K) flashes, press the RESUME/CANCEL button (L) on the
printer to clear the error, then click Next. After the installation is complete, perform Print
Head Alignment by referring to "When Printing Becomes Faint or Colors Are Incorrect"
in the on-screen manual: Basic Guide.
•
•
Some parts of patterns printed on the first page are
faint.

29
1 2345 6789
Información importante para la instalación
Si aparece la pantalla Extended Survey Program
Si desea admitir Extended Survey Program, haga clic en Aceptar (Agree).
Si hace clic en No aceptar (Do not agree), Extended Survey Program no se
instalará. (Esto no tiene ningún efecto en el funcionamiento de la impresora.)
Si el número de serie no aparece en la pantalla de registro, introduzca el que
viene en el interior de la impresora.
If the serial number is not displayed on the registration screen, input the
number found inside the printer.
If the Extended Survey Program screen appears
If you can agree to Extended Survey Program, click
Agree.
If you click Do not agree, the Extended Survey Program will not be installed.
(This has no effect on the printer's functionality.)
Important Information for the Installation

30
5
1615
Extraiga el CD-ROM de instalación (Setup CD-ROM) y guárdelo en un lugar seguro.
Para Windows
Se iniciará Solution Menu EX.
Solution Menu EX se iniciará al hacer clic en Aceptar (OK) en el cuadro de diálogo Canon
Solution Menu EX.
Para Macintosh
Los botones que muestre Solution Menu EX pueden variar en función del país o la
región de adquisición.
•
Haga clic en Salir (Exit) para finalizar
la instalación.
Remove the Setup CD-ROM and keep it in a safe place.
For Windows
Solution Menu EX starts.
Solution Menu EX starts when clicking OK in the Canon Solution Menu EX dialog.
For Macintosh
The buttons displayed on Solution Menu EX may vary depending on the country or
region of purchase.
•
Click Exit to complete the installation.

31
1 2345 6789
Enhorabuena. El proceso de instalación ha finalizado.
Para obtener información sobre Solution Menu EX
y el manual en pantalla, consulte la página 53.
Instalación del Controlador de impresora XPS (XPS Printer Driver)
En Windows 7 y Windows Vista SP1 o posterior, también se puede instalar el
Controlador de impresora XPS (XPS Printer Driver). Para instalarlo, ejecute
a partir de
de la página 22 de "5 Configuración de una conexión USB
(instalación del software)". Haga clic en Instalación personalizada (Custom
Install) en
y, a continuación, seleccione Controlador de impresora XPS
(XPS Printer Driver) en la pantalla Instalación personalizada (Custom
Install).
Para conocer todos los detalles sobre las prácticas funciones del Controlador
de impresora XPS (XPS Printer Driver), consulte el manual en pantalla:
Guía avanzada
.
Congratulations! Setup is complete.
To learn more about the Solution Menu EX and on-screen
manual, proceed to page 53.
Installing the XPS Printer Driver
In Windows 7 and Windows Vista SP1 or later, the XPS Printer Driver can be
installed additionally. To install, perform from
on page 22 in "5 Set Up a USB
Connection (Software Installation)." Click Custom Install in
, then select
XPS Printer Driver in the Custom Install screen.
For details on useful functions of the XPS Printer Driver, refer to the on-screen
manual: Advanced Guide.

32
6
Para utilizar la impresora conectándola a un ordenador, deberá copiar
(instalar) el software y los controladores necesarios en el disco duro del
ordenador. El proceso de instalación lleva unos 20 minutos. (El tiempo
necesario para instalar varía en función del entorno del ordenador o de
cuánto software de aplicación se vaya a instalar.)
Cierre las aplicaciones que se estén ejecutando antes de la instalación.
Inicie la sesión como administrador (o miembro del grupo de
administradores).
No cambie de usuario durante el proceso de instalación.
Durante la instalación, es posible que se tenga que conectar a Internet.
Esto puede implicar gastos de conexión. Consulte con el proveedor de
servicios de Internet.
Es posible que deba reiniciar el ordenador durante el proceso de
instalación. Siga las instrucciones en pantalla y no retire el CD-ROM
de instalación (Setup CD-ROM) mientras se reinicia el equipo.
La instalación se reanudará una vez reiniciado el ordenador.
Si tiene activada la función de firewall en el software de seguridad,
puede aparecer un mensaje indicando que el software de Canon está
intentando acceder a la red. Si aparece dicho mensaje, configure el
software de seguridad para que permita siempre el acceso.
Para obtener información sobre los requisitos del sistema, consulte
"Especificaciones".
•
•
•
•
•
•
•
Instalación del software
Configuración de una conexión cableada
Set Up a Wired Connection
To use the printer by connecting it to a computer, software
including the drivers needs to be copied (installed) to the
computer's hard disk. The installation process takes about
20 minutes. (The installation time varies depending on
the computer environment or the number of application
software to be installed.)
Quit all running applications before installation.
Log on as the administrator (or a member of the
Administrators group).
Do not switch users during the installation process.
Internet connection may be required during the
installation. Connection fees may apply. Consult the
internet service provider.
It may be necessary to restart your computer during the
installation process. Follow the on-screen instructions
and do not remove the Setup CD-ROM during restart.
The installation resumes once your computer has
restarted.
If the firewall function of your security software is turned
on, a warning message may appear that Canon software
is attempting to access the network. If such a warning
message appears, set the security software to always
allow access.
For the system requirements, refer to "Specifications."
•
•
•
•
•
•
•
Software Installation

33
1 23456 789
Para los usuarios de habla hispana en EE. UU.
Easy-WebPrint EX
Easy-WebPrint EX es un software de impresión para web que se
instala en el ordenador al instalar el software incluido. Para utilizar
este software es necesario Internet Explorer 7 o posterior (Windows)
o Safari 4 o posterior (Mac OS X v.10.5 o posterior). Para la instalación,
es necesario estar conectado a Internet.
Consulte la hoja "Información adicional para usuarios
españoles" para instalar la versión en español
del software.
For Spanish Users in the U.S.A.
Refer to the "Información adicional para usuarios
españoles" sheet to install the Spanish version of the
software.
Easy-WebPrint EX
Easy-WebPrint EX is Web print software that is installed on the computer
when installing the supplied software. Internet Explorer 7 or later
(Windows) or Safari 4 or later (Mac OS X v.10.5 or later) is required to use
this software. An Internet connection is required for installation.

34
6
Después de confirmar la conexión, siga las
instrucciones detalladas a continuación para
agregar (conectar) la impresora a la red.
Antes de configurar la conexión
cableada
Asegúrese de que el ordenador
y el router están conectados.
Internet
Router, etc.
After confirming the connection, perform the
following instructions to add (connect) the printer to
the network.
Make sure that the computer and
router are connected.
Internet
Router, etc.
Before Configuring Wired Settings

35
1 23456 789
1
Notas acerca de la conexión por cable■
La configuración, las funciones del router, los procedimientos de
instalación y la configuración de seguridad del dispositivo de red
varían en función del entorno del sistema. Si desea obtener más
información, consulte el manual de instrucciones del dispositivo
o póngase en contacto con el fabricante.
En una instalación corporativa, consulte con el administrador
de red.
Si se conecta a una red que no está protegida con medidas de
seguridad, existe el riesgo de divulgar información a terceros,
como sus datos personales.
Si tiene problemas con la conexión de red, consulte el manual
impreso: Solución de problemas de configuración de red.
•
•
•
•
Encienda el ordenador y, a continuación, introduzca el CD-ROM de instalación
(Setup CD-ROM) en la unidad de CD-ROM.
Si usa Windows, el programa de instalación se inicia automáticamente.
Si el programa no se inicia automáticamente, haga doble clic en el icono del CD-ROM
en Equipo (Computer) o Mi PC (My Computer). Cuando aparezca el contenido del
CD-ROM, haga doble clic en
MSETUP4.EXE.
•
Para Windows
Turn on the computer, then insert the Setup CD-ROM into the CD-ROM drive.
If you are using Windows, the setup program starts automatically.
If the program does not start automatically, double-click the CD-ROM icon in
Computer
or My Computer. When the CD-ROM contents appear, double-click MSETUP4.EXE.
•
Notes on Wired Connection■
The configuration, router functions, setup procedures and security
settings of the network device vary depending on your system
environment. For details, refer to your device's instruction manual
or contact its manufacturer.
In an office setup, consult your network administrator.
If you connect to a network that is not protected with security
measures, there is a risk of disclosing data such as your personal
information to a third party.
If you have trouble with the network connection, refer to the
printed manual: Network Setup Troubleshooting.
•
•
•
•
For Windows

36
6
2
2
Windows 7/Windows Vista
Windows XP
Haga clic en Ejecutar Msetup4.exe (Run Msetup4.exe)
en la pantalla Reproducción automática (AutoPlay)
y, a continuación, haga clic en Sí (Yes) o en Continuar
(Continue) en el cuadro de diálogo Control de cuentas
de usuario (User Account Control).
Si vuelve a aparecer el cuadro de diálogo Control de cuentas de
usuario (User Account Control) en los pasos siguientes, haga clic
en Sí (Yes) o en Continuar (Continue).
Si no sabe su nombre o contraseña de administrador, haga clic en el botón de ayuda y,
a continuación, siga las instrucciones que aparezcan en pantalla.
Si la carpeta del CD-ROM no se abre automáticamente, haga doble clic en el icono
del CD-ROM del escritorio.
Haga doble clic en el icono Setup de la carpeta del CD-ROM para pasar
a la pantalla siguiente. Introduzca el nombre de administrador y la contraseña;
a continuación, haga clic en OK.
Click Run Msetup4.exe on the AutoPlay screen, then click
Yes or Continue on the User Account Control dialog box.
If the User Account Control dialog box reappears in following
steps, click
Yes or Continue.
If you do not know your administrator name or password, click the help button, then
follow the on-screen instructions.
If the CD-ROM folder does not open automatically, double-click the CD-ROM icon on
the desktop.
Double-click the Setup icon of the CD-ROM folder to proceed to the following
screen. Enter your administrator name and password, then click OK.

37
1 23456 789
43 5
Haga clic en Instalación simple (Easy Install).
Se instalarán los controladores, el software de
aplicación y los manuales en pantalla.
Si desea seleccionar unos elementos
concretos para instalarlos, haga clic en
Instalación personalizada (Custom
Install).
•
Haga clic en Instalar (Install).
Siga las instrucciones que aparezcan en pantalla
para continuar con la instalación del software.
Seleccione Utilizar la impresora con conexión
LAN cableada (Use the printer with wired
LAN connection) y, a continuación, haga clic
en Siguiente (Next).
Follow any on-screen instructions to proceed with the
software installation.
Select Use the printer with wired LAN
connection, then click Next.
Click Install.Click Easy Install.
The drivers, application software, and on-screen
manuals are installed.
If you want to select particular items to
install, click
Custom Install.
•

38
6
6
Cuando aparezca la
pantalla Detección de
impresora (Printer
Detection), haga clic
en Siguiente (Next).
Si aparece la pantalla Conexión de impresora (Printer Connection) en vez de esta pantalla, significa que no se
ha seleccionado correctamente el método de conexión en
.
•
Para Windows
Haga clic en Cancelar (Cancel) y comience de nuevo desde
; a continuación, asegúrese de seleccionar
Utilizar la impresora con conexión LAN cableada (Use the printer with wired LAN connection) en
.
Para Macintosh
Siga las instrucciones que aparezcan en pantalla y continúe con la instalación. Haga clic en Salir (Exit) en la
pantalla de finalización de la instalación y, a continuación, vuelva a empezar desde
y asegúrese de seleccionar
Utilizar la impresora con conexión LAN cableada (Use the printer with wired LAN connection) en
.
−
−
When the Printer
Detection screen
appears, click Next.
If the Printer Connection screen appears instead of this screen, the connection method is not correctly selected in
.
•
For Windows
Click Cancel and start again from
, then be sure to select Use the printer with wired LAN connection in .
For Macintosh
Follow on-screen instructions and proceed with the installation. Click Exit on the installation complete screen,
then start again from
and be sure to select Use the printer with wired LAN connection in .
−
−

39
1 23456 789
7
B
A
Cuando aparezca el cuadro de diálogo Comprobar conexión de LAN cableada (Check Wired LAN Connection) o la pantalla Comprobar
la impresora (Check Printer):
1. Asegúrese de que la impresora esté encendida.
2. retire la tapa (A) y, a continuación, conecte un dispositivo de red (router, etc.) con un cable Ethernet (B).
3. Haga clic en
Aceptar (OK) en la pantalla.
El conector de LAN por cable se encuentra a la derecha de la parte trasera de la impresora. El puerto inferior es para un cable Ethernet.
When the Check Wired LAN Connection dialog box or the Check Printer screen appears:
1. Make sure the printer is turned on.
2. Remove the Cap (A), then connect a network device (router, etc.) with an Ethernet cable (B).
3. Click
OK on the screen.
The Wired LAN Connector is located on the right side at the back of the printer. The lower port is for an Ethernet cable.

40
6
8
8
Cuando aparezca la pantalla Lista de impresoras detectadas (Detected Printers List), seleccione
PRO-1 series y, a continuación, haga clic en Siguiente (Next).
Si se muestra la pantalla Configurar una nueva impresora (Set Up New Printer) o la impresora no se
muestra en la pantalla Lista de impresoras detectadas (Detected Printers List), consulte el manual
impreso: Solución de problemas de configuración de red.
•
Cuando aparezca el cuadro de diálogo Lista
de impresoras detectadas (Detected Printers
List), seleccione Canon PRO-1 series y,
a continuación, haga clic en Siguiente (Next).
Cuando aparezca el cuadro de diálogo
Finalización de la configuración (Setup
Completion), haga clic en Completar
(Complete).
Si se muestra la pantalla Configurar una nueva impresora
(Set Up New Printer) o la impresora no se muestra en el
cuadro de diálogo Lista de impresoras detectadas (Detected
Printers List), consulte el manual impreso: Solución de
problemas de configuración de red.
•
A continuación, lea "Registro (Macintosh)" en la página 41.
A continuación, lea "Información" en la página 44.
When the Detected Printers List screen appears, select PRO-1 series, then click Next.
If the Set Up New Printer screen is displayed or the printer is not displayed in the Detected Printers
List screen, refer to the printed manual: Network Setup Troubleshooting.
•
Next, read "Registration (Macintosh)" on page 41!
When the Detected Printers List
dialog box appears, select Canon
PRO-1 series, then click Next.
When the Setup Completion
dialog box appears, click
Complete.
If the Set Up New Printer screen is displayed or the printer is
not displayed in the Detected Printers List dialog box, refer to
the printed manual: Network Setup Troubleshooting.
•
Next, read "Information" on page 44!

41 41
1 23456 789
1
Registro (Macintosh)
En esta sección se describe cómo registrar la impresora
en un ordenador Macintosh.
Usuario de Windows: vaya a "Información" en la página 44.
Cuando aparezca la pantalla Registrar
impresora (Register Printer), haga clic en
Registrar impresora (Register Printer).
Mac OS X
v.10.6.x
v.10.5.x
v.10.4.11
Vaya a
en la página 42.
Vaya a
en la página 42.
Los caracteres alfanuméricos que aparecen a continuación
de
Canon PRO-1 series son el nombre del servicio Bonjour
o la dirección MAC de la impresora.
Si no se ha detectado la impresora, compruebe lo siguiente.
•
•
La impresora está encendida.
La función de cortafuegos de cualquier software de seguridad
está desactivada.
La impresora está conectada al dispositivo de red mediante
el cable Ethernet.
−
−
−
Registration (Macintosh)
This section describes how to register the printer on a Macintosh
computer.
Windows users: go to "Information" on page 44.
When the Register Printer screen appears,
click Register Printer.
Mac OS X
The alphanumeric characters after Canon PRO-1 series is the
printer's Bonjour service name or MAC address.
If the printer is not detected, make sure of the following.
•
•
The printer is turned on.
The firewall function of any security software is turned off.
The printer is connected to the network device with the Ethernet
cable.
−
−
−
v.10.6.x
v.10.5.x
v.10.4.11
Go to on page 42.
Go to
on page 42.

42
6
2-A 2-B
1
Mac OS X v.10.6.x/v.10.5.x
Mac OS X v.10.4.11
21
Mac OS X v.10.4.11
Seleccione Canon PRO-1 series
canonijnetwork y haga clic en
Añadir (Add).
Cuando aparezca la ventana Lista de
impresoras (Printer List), haga clic en
Añadir (Add).
Cuando aparezca la pantalla No hay
impresoras disponibles. (You have
no printers available.), haga clic en
Añadir (Add)
.
•
Haga clic en Más impresoras
(More Printers) en la ventana
Navegador de impresoras
(Printer Browser).
Vaya a en la página 43.
Select Canon PRO-1 series
canonijnetwork and click Add.
Click More Printers in the Printer
Browser window.
When the Printer List window appears, click
Add.
When the You have no printers
available. screen appears, click Add.
•
Go to on page 43.

43
1 23456 789
3
34
Seleccione Canon IJ Network
en el menú desplegable, elija
Canon PRO-1 series en la lista
de impresoras y, a continuación,
haga clic en Añadir (Add).
Asegúrese de que se ha
agregado Canon PRO-1 series
a la lista de impresoras.
Haga clic en Siguiente (Next) en la pantalla Registrar impresora
(Register Printer).
A continuación, lea "Información"
en la página 44!
Vaya a .
Select Canon IJ Network in the
pop-up menu, select Canon PRO-
1 series in the list of printers, then
click Add.
Make sure that Canon PRO-
1 series is added to the list of
printers.
Click Next on the Register Printer screen.
Next, read "Information" on page 44!
Go to .

44
6
12
C
B
A
Información
Cuando aparezca esta pantalla, abra el soporte del papel (A). Abra la cubierta de la ranura de
alimentación (B) y, a continuación,
mueva las guías del papel (C) a
ambos bordes.
Information
Open the Feed Slot Cover (B), then
move the Paper Guides (C) to both
edges.
When this screen appears, open the Paper Support (A).

45
1 23456 789
43
D
E
5
1
2
F
G
B
Cargue 2 hojas del papel especial suministrado
(Papel Fotográfico Mate (Matte Photo Paper)
MP-101) en la bandeja posterior (D).
Cargue el papel con orientación vertical de manera
que la esquina del corte (E) esté en la parte superior
derecha.
Asegúrese de usar el papel MP-101 para
la alineación del cabezal de impresión.
•
Deslice las guías del papel izquierda y derecha
contra ambos bordes del papel.
1. Cierre suavemente la cubierta de la ranura
de alimentación (B).
2. Abra la bandeja de salida del papel (F) y, a
continuación, tire hacia fuera de la extensión
de la bandeja de salida (G).
No deslice las guías de papel apretando
demasiado contra el papel.
•
Load 2 sheets of supplied specialty paper (Matte
Photo Paper MP-101) in the Rear Tray (D).
Load paper in portrait orientation so that the cut
corner (E) is at the top right.
Be sure to use the supplied MP-101 for Print
Head Alignment.
•
Slide the left and right Paper Guides against
both edges of the paper.
1. Close the Feed Slot Cover (B) gently.
2. Open the Paper Output Tray (F), then pull out
the Output Tray Extension (G).
Do not slide the Paper Guides too hard
against the paper.
•

46
6
6 7
7
H
I
Haga clic en Ejecutar (Execute).
No abra la tapa superior (H) durante la impresión.
Haga clic en Aceptar (OK).
La alineación del cabezal de impresión tarda unos
7 – 8 minutos en completarse.
Cuando aparezca la pantalla Iniciar alineación de cabezales de impresión
(Start Print Head Alignment) haga clic en Alinear cabezales de impresión
(Align Print Head). Haga clic en Aceptar (OK) en el mensaje subsiguiente.
La alineación del cabezal de impresión tarda unos 7 – 8 minutos
en completarse.
Si aparece la pantalla No se encuentra la cola de la impresora.
(Printer queue cannot be found.), haga clic en Registrar
impresora (Register Printer). Seleccione Canon PRO-1 series
(impresora) en Canon IJ Network (canonijnetwork) tal como se
explica en
o en la página 42 en "Registro (Macintosh)"
en "6 Configuración de una conexión cableada."
•
Para Macintosh
Si la luz de Alarma (Alarm) (naranja) (I) parpadea, compruebe
la pantalla de error del equipo y, a continuación, vuelva a empezar
desde
.
•
Click Execute.
Do not open the Top Cover (H) while printing.
When the Start Print Head Alignment screen
appears, click Align Print Head. Click OK in the
subsequent message.
Print Head Alignment takes about 7 – 8 minutes to
complete.
Click OK.
Print Head Alignment takes about 7 – 8 minutes to
complete.
If the Printer queue cannot be found. screen appears, click
Register Printer. Select Canon PRO-1 series (printer) in Canon
IJ Network (canonijnetwork) by referring to
or on page
42 in "Registration (Macintosh)" in "6 Set Up a Wired Connection."
•
For Macintosh
If the Alarm lamp (orange) (I) flashes, check the error screen on
the computer, then start again from
.
•

47
1 23456 789
8
I
J
Cuando se haya imprimido la segunda
página del patrón, la alineación del cabezal
de impresión habrá terminado.
Retire el papel.
En Windows, haga clic en Siguiente (Next) en la
pantalla Alineación de los cabezales de impresión
(Print Head Alignment).
Algunas secciones de los patrones impresos en la
primera página aparecen borrosas.
Si vuelve a alinear automáticamente el cabezal de impresión, es posible que se
impriman patrones diferentes de los que se muestran más arriba.
Si la luz de Alarma (Alarm) (naranja) (I) parpadea, pulse el botón REANUDAR/
CANCELAR (RESUME/CANCEL) (J) de la impresora para que desaparezca el
error y haga clic a continuación en Siguiente (Next). Cuando finalice la instalación,
lleve a cabo la alineación del cabezal de impresión tal como se explica en "Cuando
la impresión es borrosa o los colores no son los correctos" del manual en pantalla:
Guía básica
.
•
•
When the second page of the pattern is printed,
Print Head Alignment is complete.
Remove the paper.
In Windows, click Next on the Print Head Alignment
screen.
Some parts of patterns printed on the first page are
faint.
If you align the Print Head automatically again, patterns different from those shown
above may be printed.
If the Alarm lamp (orange) (I) flashes, press the RESUME/CANCEL button (J) on the
printer to clear the error, then click Next. After the installation is complete, perform Print
Head Alignment by referring to "When Printing Becomes Faint or Colors Are Incorrect"
in the on-screen manual: Basic Guide.
•
•

48
6
9
Información importante para la instalación
Si aparece la pantalla Extended Survey
Program
Si desea admitir Extended Survey
Program, haga clic en Aceptar (Agree).
Si hace clic en No aceptar (Do not
agree), Extended Survey Program no
se instalará. (Esto no tiene ningún efecto
en el funcionamiento de la impresora.)
Si el número de serie no aparece en la pantalla
de registro, introduzca el que viene en el interior
de la impresora.
Haga clic en Salir (Exit) para
finalizar la instalación.
If the serial number is not displayed on the registration
screen, input the number found inside the printer.
If the Extended Survey Program screen
appears
If you can agree to Extended Survey
Program, click
Agree.
If you click Do not agree, the Extended
Survey Program will not be installed. (This
has no effect on the printer's functionality.)
Important Information for the Installation
Click Exit to complete the
installation.

49
1 23456 789
10
Extraiga el CD-ROM de instalación (Setup
CD-ROM) y guárdelo en un lugar seguro.
Para Windows
Se iniciará Solution Menu EX.
Solution Menu EX se iniciará al hacer clic en
Aceptar (OK)
en el cuadro de diálogo Canon
Solution Menu EX.
Para Macintosh
Los botones que muestre Solution Menu EX
pueden variar en función del país o la región
de adquisición.
•
Enhorabuena. El proceso de
instalación ha finalizado.
Para obtener información sobre
Solution Menu EX y el manual en
pantalla, consulte la página 53.
Congratulations! Setup is complete.
To learn more about the Solution
Menu EX and on-screen manual,
proceed to page 53.
Remove the Setup CD-ROM and keep it in a safe
place.
For Windows
Solution Menu EX starts.
Solution Menu EX starts when clicking OK in the
Canon Solution Menu EX dialog.
For Macintosh
The buttons displayed on Solution Menu EX
may vary depending on the country or region
of purchase.
•

50
6
1 23456 789
Ahora que la impresora está configurada en la conexión por cable, puede instalar el software y los controladores en otros ordenadores de la misma red.
No es necesario establecer ninguna configuración adicional.
Para añadir ordenadores desde los que utilizar el equipo, vaya a "7 Uso desde ordenadores adicionales" en la página 51.
Uso de la impresora desde ordenadores adicionales
Instalación del Controlador de impresora XPS (XPS Printer Driver)
En Windows 7 y Windows Vista SP1 o posterior, también se puede instalar el Controlador de impresora XPS (XPS Printer Driver). Para instalarlo, ejecute desde
en la página 35 en "Instalación del software" en "6 Configuración de una conexión cableada." Haga clic en
Instalación personalizada (Custom Install) en
y,
a continuación, seleccione
Controlador de impresora XPS (XPS Printer Driver) en la pantalla Instalación personalizada (Custom Install).
Para conocer todos los detalles sobre las prácticas funciones del Controlador de impresora XPS (XPS Printer Driver), consulte el manual en pantalla:
Guía avanzada
.
Installing the XPS Printer Driver
In Windows 7 and Windows Vista SP1 or later, the XPS Printer Driver can be installed additionally. To install, perform from
on page 35 in "Software Installation" in
"6 Set Up a Wired Connection." Click Custom Install in
, then select XPS Printer Driver in the Custom Install screen.
For details on useful functions of the XPS Printer Driver, refer to the on-screen manual:
Advanced Guide.
Using the Printer from Additional Computers
Now that the printer is setup on your wired connection, you can install the software and drivers on additional computers on the same network.
Additional settings are not required.
To add computers from which to use the printer, go to "7 Use from Additional Computers" on page 51.

51
1 234567 89
7
Uso desde ordenadores adicionales
Otros ordenadores de la misma red
Permite que el ordenador utilice la impresora.
No se necesita establecer ninguna otra
configuración.
Inserte el CD-ROM de instalación (Setup
CD-ROM) en el ordenador desde el que
desee utilizar la impresora.
Siga las instrucciones que aparezcan
en pantalla para instalar el software.
2
1
Para utilizar desde ordenadores adicionales
Ordenador desde el que se puede usar la impresora actualmente
Si la impresora ya está conectada a una
conexión por cable, se puede utilizar desde
ordenadores adicionales de la misma red.
Para obtener más información sobre el procedimiento de instalación del
software, consulte "6 Configuración de una conexión cableada" en la página 32.
Use from Additional Computers
Additional computers on the same network
It enables the computer to use the printer.
If the printer is already connected to a wired
connection, it can be used from additional
computers on the same network.
Other settings are not required.
Insert the Setup CD-ROM into the computer
from which you want to use the printer.
Follow the on-screen instructions to install
the software.
2
1
To use from additional computers
Computer from which the printer can be used currently
For details on the software installation procedure, refer to "6 Set Up a
Wired Connection" on page 32.

52
8
1 2345678 9
A
D
C
B
Cargue papel en la bandeja posterior (A) y, a continuación, deslice las guías del papel
(B) contra ambos bordes del papel.
Cargue el papel con orientación vertical y el lado de impresión hacia arriba.
Asegúrese de que la altura de la pila de papel no supere la línea (C).
Para obtener más información sobre otros métodos para cargar papel y sobre los
tipos de papel compatibles, consulte "Carga de papel" en el manual en pantalla:
Guía básica
.
•
Cierre suavemente la cubierta de la ranura de alimentación (D). De lo contrario, puede
dañar el papel.
•
Carga del papel
Load paper in the Rear Tray (A), then slide the left and right Paper Guides (B) against
both edges of the paper.
Load paper in portrait orientation with the printing side facing up.
Make sure that the height of the paper stack does not exceed the line (C).
For details on other paper loading methods and supported paper types, refer to
"Loading Paper" in the on-screen manual: Basic Guide.
•
Close the Feed Slot Cover (D) gently. Otherwise it may damage the paper.•
Load Paper

53
1 23456789
9
Solution Menu EX
Software de aplicación
Junto con los controladores,
en el ordenador se instala
diverso software de
aplicación. Puede imprimir
elementos creativos
corrigiendo/mejorando fotos
con las aplicaciones.
Para obtener más
información sobre cómo
utilizar el software de
aplicación y la impresora,
consulte el manual en
pantalla.
Para conocer todos los detalles sobre Solution Menu EX, consulte el manual en pantalla:
Guía básica.
Haga clic en Ayuda y configuración (Help & Settings) y, a continuación, haga clic
en este icono para abrir el manual en pantalla.
Cómo abrir el manual en pantalla
Cómo iniciar Solution Menu EX
Haga clic en este icono del escritorio (Windows) o del Dock (Macintosh) para iniciar
Solution Menu EX.
Solution Menu EX es una puerta de acceso a funciones e información
que permiten aprovechar al máximo todas las funciones de la impresora.
Por ejemplo,
Apertura del manual en pantalla.
Inicio de diverso software de aplicación.
•
•
Solution Menu EX is a gateway to functions and information that allow you to
make full use of the printer! For example,
Various application
software are installed
on the computer along
with the drivers. You
can print creative items
by correcting/enhancing
photos using the application
software.
For details on how to use
the application software
and the printer, refer to the
on-screen manual.
Open the on-screen manual.
Open various application software.
•
•
Click Help & Settings, then click this icon to open the on-screen manual.
How to open the on-screen manual
How to start Solution Menu EX
Click this icon on the desktop (Windows) or on the Dock (Macintosh) to start Solution
Menu EX.
For details on Solution Menu EX, refer to the on-screen manual: Basic Guide.
Application Software

54
9
1 23456789
Easy-WebPrint EX Easy-PhotoPrint Pro
Para conocer todos los detalles sobre Easy-PhotoPrint
Pro, consulte el manual en pantalla: Guía avanzada.
Para la impresión de fotografías y la gestión del color,
consulte también el manual en pantalla: Guía de
impresión de fotografía digital.
Easy-PhotoPrint Pro permite imprimir
fotografías de alta calidad. Por ejemplo,
Imprima fotografías en colores muy similares a los colores
ideales utilizando la gestión del color con perfiles ICC.
•
Para conocer todos los detalles sobre Easy-WebPrint EX, consulte el manual
en pantalla: Guía básica.
Con Easy-WebPrint EX se pueden imprimir fácilmente páginas web
en Internet Explorer (Windows) o Safari (Macintosh). Entre otras
funciones, incluye:
Impresión de páginas web reduciendo el tamaño para que se ajuste automáticamente
a la anchura del papel sin tener que recortar los bordes.
Impresión únicamente de las páginas deseadas mediante su selección en la vista preliminar.
Impresión de partes seleccionadas de varias páginas después de editarlas.
•
•
•
Use Easy-WebPrint EX to easily print web pages in Internet
Explorer (Windows) or Safari (Macintosh). Some of its features
include:
Printing a web page by reducing its size to fit the paper width automatically without
cropping edges.
Printing only the pages you want by selecting them from preview.
Printing selected portions of various pages after editing them.
•
•
•
For details on Easy-WebPrint EX, refer to the on-screen manual: Basic Guide.
Easy-PhotoPrint Pro allows you to print high
quality photos. For example,
Print photos in colors that are closer to your ideal colors using
color management with ICC profiles.
•
For details on Easy-PhotoPrint Pro, refer to the onscreen manual: Advanced Guide. For photo printing and
color management, refer to the on-screen manual: Digital
Photo Printing Guide as well.

55
Specifications
General Specifications
Printing resolution (dpi)
4800* (horizontal) X 2400 (vertical)
* Ink droplets can be placed with a pitch of 1/4800 inch at minimum.
Interface
USB Port:
Hi-Speed USB *1
Direct Print Port:
PictBridge
LAN Port:
Wired LAN: 100BASE-TX/10BASE-T
*1 A computer that complies with Hi-Speed USB standard is required.
Since the Hi-Speed USB interface is fully upwardly compatible with
USB 1.1, it can be used at USB 1.1.
Print width
[Manual Feed Tray] 13.7 inches/348.8 mm
(for Borderless Printing: 14 inches/356 mm)
[Rear Tray] 12.7 inches/322.2 mm
(for Borderless Printing: 13 inches/329 mm)
Operating environment
Temperature: 5 to 35°C (41 to 95°F)
Humidity: 10 to 90 % RH (no condensation)
Storage environment
Temperature: 0 to 40°C (32 to 104°F)
Humidity: 5 to 95 % RH (no condensation)
Power supply
AC 100-240 V, 50/60 Hz
Power consumption
Printing: Approx. 24 W
Standby (minimum): Approx. 1.6 W *1*2
OFF: Approx. 0.4 W *1
*1 USB connection to PC
*2 The wait time for standby cannot be changed.
External dimensions
Approx. 27.4 (W) X 18.2 (D) X 9.5 (H) inches
Approx. 695 (W) X 462 (D) X 239 (H) mm
* With the Paper Support and Paper Output Tray retracted.
Weight
Approx. 27.7 kg (Approx. 60.9 lb)
* With the Print Head and ink tanks installed.
Print Head/Ink
Total 12288 nozzles (Y/M/C/R/PM/PC/MBK/PBK/DGY/GY/LGY/CO each
1024 X 12 nozzles)
Minimum System Requirements
Conform to the operating system’s requirements when higher than those given here.
Operating System/Processor/RAM
Windows 7
1 GHz or faster 32-bit (x86) or 64-bit (x64)
processor
1 GB (32-bit)/2 GB (64-bit)
Windows Vista, Vista SP1, Vista SP2
1 GHz processor
512 MB
Windows XP SP2, SP3
300 MHz processor
128 MB
Mac OS X v.10.6
Intel processor
1 GB
Mac OS X v.10.5
Intel processor, PowerPC G5, PowerPC G4
(867 MHz or faster)
512 MB
Mac OS X v.10.4.11
Intel processor, PowerPC G5, PowerPC G4,
PowerPC G3
256 MB
Browser
Internet Explorer 6 or later Safari 3 or later
Hard Disk Space
1.5 GB
Note: For bundled software installation.
The necessary amount of hard disk space
may be changed without notice.
1.5 GB
Note: For bundled software installation.
The necessary amount of hard disk space
may be changed without notice.
CD-ROM Drive
Required Required
Display
SVGA 800 x 600 XGA 1024 x 768
Easy-PhotoPrint Pro is a software plug-in for Canon Digital Photo Professional Ver. 2.1 or
later, Adobe Photoshop CS5, CS4, CS3, CS2, and CS, Adobe Photoshop Elements 6, 7*,
8 and 9, and Adobe Photoshop Lightroom 2 and 3.
* Windows only.
Windows: Operation can only be guaranteed on a PC with Windows 7, Windows Vista or
Windows XP pre-installed.
Windows: Uninstall software bundled with the Canon inkjet printer before upgrading from
Windows Vista to Windows 7, then, install the bundled software again.
Macintosh: Hard Disk must be formatted as Mac OS Extended (Journaled) or Mac OS
Extended.
Macintosh: After upgrading from Mac OS X v.10.5 or lower to Mac OS X v.10.6, install
software bundled with the Canon inkjet printer.
Internet Explorer 7 or later (Windows), or Safari 4 or later (for Mac OS X v.10.5 or later) is
required to install Easy-WebPrint EX.
•
•
•
•
•
•
Network Specifications
Communication protocol
TCP/IP
Wired LAN
Supported Standards: IEEE802.3u (100BASE-TX)/IEEE802.3 (10BASE-T)
Transfer speed: 10 M/100 Mbps (auto switching)
Specifications are subject to change without
notice.
About Consumables
Consumables (ink tanks / FINE Cartridges) are available for 5 years after production has stopped.

56
Especificaciones
Especificaciones generales
Resolución de impresión (ppp)
4800* (horizontal) x 2400 (vertical)
* Las gotas de tinta se pueden situar con una separación de
1/4800 pulgadas como mínimo.
Interfaz
Puerto USB:
Hi-Speed USB *1
Puerto de impresión directa:
PictBridge
Puerto LAN:
LAN cableada: 100BASE-TX/10BASE-T
*1 Es necesario un ordenador compatible con el estándar Hi-Speed USB.
Puesto que la interfaz Hi-Speed USB es totalmente compatible con
USB 1.1, también se puede utilizar con USB 1.1.
Ancho de impresión
[Bandeja de alimentación manual] 13,7 pulgadas/348,8 mm
(para Impresión sin bordes: 14 pulgadas/356 mm)
[Bandeja posterior] 12,7 pulgadas/322,2 mm
(para Impresión sin bordes: 13 pulgadas/329 mm)
Entorno de funcionamiento
Temperatura: de 5 a 35 °C (41 a 95 °F)
Humedad: del 10 al 90% (humedad relativa sin condensación)
Entorno de almacenamiento
Temperatura: de 0 a 40 °C (32 a 104 °F)
Humedad: del 5 al 95% (humedad relativa sin condensación)
Fuente de alimentación
100 a 240 V de CA, 50/60 Hz
Consumo
Impresión: 24 W aprox.
En espera (mínimo): 1,6 W aprox. *1*2
Apagado: 0,4 W aprox.*1
*1 Conexión USB al ordenador
*2 No se puede modificar el tiempo para que el equipo entre en espera.
Dimensiones externas
Aprox. 27,4 (An) X 18,2 (Pr) X 9,5 (Al) pulgadas
Aprox. 695 (An) X 462 (Pr) X 239 (Al) mm
* Con el soporte del papel y la bandeja de salida del papel retraídos.
Peso
27,7 kg aprox. (60,9 lb aprox.)
* Con el cabezal de impresión y los depósitos de tinta instalados.
Cabezal de impresión/tinta
Total 12288 inyectores (Y/M/C/R/PM/PC/MBK/PBK/DGY/GY/LGY/CO
cada 1024 X 12 inyectores)
Requisitos mínimos del sistema
Cumple los requisitos del sistema operativo cuando son mayores que los mencionados
aquí.
Sistema operativo/Procesador/RAM
Windows 7
Procesador a 1 GHz o superior de 32 bits
(x86) o 64 bits (x64)
1 GB (32 bits)/2 GB (64 bits)
Windows Vista, Vista SP1, Vista SP2
Procesador a 1 GHz
512 MB
Windows XP SP2, SP3
Procesador a 300 MHz
128 MB
Mac OS X v.10.6
Procesador Intel
1 GB
Mac OS X v.10.5
Procesador Intel, PowerPC G5, PowerPC G4
(867 MHz o superior)
512 MB
Mac OS X v.10.4.11
Procesador Intel, PowerPC G5, PowerPC G4,
PowerPC G3
256 MB
Zona de búsqueda
Internet Explorer 6 o posterior Safari 3 o posterior
Espacio en el disco duro
1,5 GB
Nota: para instalar el software incluido.
El espacio disponible en el disco duro puede
cambiar sin aviso.
1,5 GB
Nota: para instalar el software incluido.
El espacio disponible en el disco duro puede
cambiar sin aviso.
Unidad de CD-ROM
Necesario Necesario
Pantalla
SVGA 800 x 600 XGA 1024 x 768
Easy-PhotoPrint Pro es un plug-in de software para Canon Digital Photo Professional
Ver. 2.1 o posterior, Adobe Photoshop CS5, CS4, CS3, CS2 y CS, Adobe Photoshop
Elements 6, 7*, 8 y 9, y Adobe Photoshop Lightroom 2 y 3.
* Solo Windows.
Windows: solo se garantiza el funcionamiento en un PC conWindows 7, Windows Vista
o Windows XP preinstalado.
Windows: desinstale primero el software incluido con la impresora de inyección de tinta
Canon antes de actualizar de Windows Vista a Windows 7 y, a continuación, vuelva
a instalar el software incluido.
Macintosh: el disco duro debe estar formateado como Mac OS Plus (con registro)
o Mac OS Plus.
Macintosh: después de actualizar de Mac OS X v.10.5 o inferior a Mac OS X v.10.6,
instale el software que se incluye con la impresora de inyección de tinta Canon.
Se necesita Internet Explorer 7 o posterior (Windows) o Safari 4 o posterior (para
Mac OS X v.10.5 o posterior) para instalar Easy-WebPrint EX.
•
•
•
•
•
•
Especificaciones de red
Protocolo de comunicación
TCP/IP
LAN cableada
Estándares compatibles: IEEE802.3u (100BASE-TX)/IEEE802.3
(10BASE-T)
Velocidad de transferencia: 10 M/100 Mbps (cambio automático)
Especificaciones sujetas a cambios sin
previo aviso.
Acerca de los consumibles
Los consumibles (depósitos de tinta/cartuchos FINE (FINE Cartridges)) estarán disponibles durante
5 años después de haber dejado de fabricar el producto.

QT5-3395-V01 XXXXXXXX ©CANON INC.2011 PRINTED IN XXXXXXXX
CANON U.S.A. INC.
One Canon Plaza, Lake Success, NY 11042 U.S.A.
www.usa.canon.com
PGI-29LGY
PGI-29PBK
PGI-29DGY
PGI-29M
PGI-29PC
PGI-29GY
4872B002
4869B002
4870B002
4874B002
4876B002
4871B002
PGI-29MBK
PGI-29Y
PGI-29R
PGI-29PM
PGI-29C
PGI-29CO
4868B002
4875B002
4878B002
4877B002
4873B002
4879B002
PGI-29LGY
PGI-29PBK
PGI-29DGY
PGI-29M
PGI-29PC
PGI-29GY
4872B002
4869B002
4870B002
4874B002
4876B002
4871B002
PGI-29MBK
PGI-29Y
PGI-29R
PGI-29PM
PGI-29C
PGI-29CO
4868B002
4875B002
4878B002
4877B002
4873B002
4879B002
Soporte técnico por correo electrónico —
www.usa.canon.com/support
Los depósitos de tinta siguientes son compatibles con esta impresora.
Ayuda de Canon
Esta opción proporciona soporte técnico telefónico, libre de cargos,
de lunes a viernes (excepto festivos), durante el periodo de garantía.
El soporte mediante dispositivo telefónico para personas con discapacidad
auditiva (TDD) está disponible en 1-866-251-3752.
Soporte técnico telefónico gratuito: 1-800-OK-CANON
Información de pedidos
Tenga en cuenta que, desde esa página, tendrá que seleccionar el
producto y a continuación hacer clic en el vínculo “Support by Email”
situado bajo Service & Support.
Llame a 1-800-OK-CANON para localizar un distribuidor cercano o visite
la tienda en línea Canon en www.shop.usa.canon.com
N.º de referencia N.º de referencia
Email Tech Support — www.usa.canon.com/support
The following ink tanks are compatible with this printer.
Getting Help from Canon
This option provides live telephone technical support, free of service
charges, Monday-Friday (excluding holidays), during the warranty
period.
Telephone Device for the Deaf (TDD) support is available at
1-866-251-3752.
Toll-Free Tech Support— 1-800-OK-CANON
Ordering Information
Call 1-800-OK-CANON to locate a dealer near you, or visit the Canon
online store at www.shop.usa.canon.com
Please note, from there you will need to select your product, then click on
the "Support by Email" link under Service & Support.
Order # Order #

ENGLISHESPAÑOL
Solución de problemas de configuración de red
Network Setup Troubleshooting

1
ENGLISH
Network Setup Troubleshooting
This manual describes problems that may be encountered when setting up a network and their possible
causes and solutions.
Find a description related to your problem and follow the solution.
For problems not described here or which occur after setup, refer to the on-screen manual: Basic Guide/
Advanced Guide.
Screens are based on Windows 7 Home Premium and Mac OS X v.10.6.x.
Names of functions, etc. may differ from this manual depending on your network device (router, etc.) or
application software.
•
The following symbols are used in this manual.
Description for Windows users.
Description for Macintosh users.
Instructions as notes for operation or additional explanations.
Other Troubleshooting Tips
The Printer is Not Displayed (Detected)
The Printer is Not Detected after the Network Environment is Changed
P. 5
Connection Checklist P.7
P. 2
P. 2
P. 3Set Up New Printer Screen is Displayed
Problems during Software Installation
Reference Information P.5
P. 5
Restoring the Printer's Default LAN Settings to Perform Setup Again P.6
Specifying the Printer's IP Address P.5
P. 4Set Printer IP Address Screen is Displayed

2
D
C
E
B
B
1
2
A A
E
Check
Problems during Software Installation
The Printer is Not Displayed (Detected)
If the printer is not detected, set up a wired connection using a USB cable. Click Set Up
New Printer (B), then perform the following procedure.
If the printer is not connected to a network, perform setup again by following the
procedures from "Set Up a Wired Connection" in the printed manual: Getting Started.
Check 5
Check 4
Is the printer connected to a network?
To check if the printer is connected to a
network, print the Network Configuration
Page, then make sure that Link Status is set
to Active. To print the Network Configuration
Page, hold down the RESUME/CANCEL
button (C) on the printer until the POWER
lamp (D) flashes 6 times, then release the
RESUME/CANCEL button after the sixth
flash.
•
When the Connect Cable screen appears, connect the printer to the computer with
a USB cable.
For Macintosh, click Next.
When the Set Printer IP Address screen appears, check the IP address settings by referring
to Check 4 and onward in "Set Printer IP Address Screen is Displayed" on page 4.
•
Click Next (E) on the Set Up New Printer screen.
Make sure that you follow "Connection Checklist" on page 7, then click Redetect (A).
Check 1
Turn off the network device (router, etc.), turn it back on, then click Redetect (A).
Check 2
Make sure that the DHCP function of the network device (router, etc.) is active.
Check 3
Activate the DHCP function of the network device, then click Redetect (A).
To specify the IP address, set up a wired connection using a USB cable. Click Set Up New
Printer (B), then go to
in "Specifying the Printer's IP Address" on page 5.
For details on how to check settings of the network device, refer to the manual supplied with the
network device or contact its manufacturer.
•
•
For details on how to change settings of the network device, refer to the manual supplied with the
network device or contact its manufacturer.
•

3
ENGLISH
3
DA
C
B
1
DA
Set Up New Printer Screen is Displayed
DHCP function•
A function to automatically assign required information (IP address, etc.) to computers, printers or other
devices connected to the network.
IP address•
A numerical identification assigned to each computer or network device connected to a network.
When the Disconnect Cable screen appears, remove the USB cable, then click
Next.
The wired connection setup of the printer is now complete. Click Complete or OK.
Proceed with the setup by following the procedures from "Information" (Windows) or "Registration
(Macintosh)" (Macintosh) in the printed manual: Getting Started.
•
Glossary
Check
Turn off the network device (router, etc.), turn it back on, then click Redetect (A).
Make sure that you follow "Connection Checklist" on page 7, then click Redetect (A).
Check 2
Check 1
Activate the DHCP function of the network device, then click Redetect (A).
Make sure that the DHCP function of the network device (router, etc.) is active.
Check 3
To specify the IP address, set up a wired connection using a USB cable. Go to in "Specifying
the Printer's IP Address" on page 5.
For details on how to check settings of the network device, refer to the manual supplied with the
network device or contact its manufacturer.
•
•
For details on how to change settings of the network device, refer to the manual supplied with the
network device or contact its manufacturer.
•
Check 4
Is the printer connected to a network?
To check if the printer is connected to a
network, print the Network Configuration
Page, then make sure that Link Status is set
to Active. To print the Network Configuration
Page, hold down the RESUME/CANCEL
button (B) on the printer until the POWER
lamp (C) flashes 6 times, then release the
RESUME/CANCEL button after the sixth
flash.
•
If the printer is not connected to a network, perform setup again by following the
procedures from "Set Up a Wired Connection" in the printed manual: Getting Started.
If the printer is not detected, set up a wired connection using a USB cable. Perform the
following procedure.
Click Next (D).
Check 5

4
A
3
2
A
B
Check
Set Printer IP Address Screen is Displayed
Turn off the network device (router, etc.), turn it back on, then click Connect (A).
Check 2
Make sure that you follow "Connection Checklist" on page 7, then click Connect (A).
Check 1
Activate the DHCP function of the network device, then click Connect (A).
Make sure that the DHCP function of the network device (router, etc.) is active.
Check 3
To specify the IP address, refer to and onward in "Specifying the Printer's IP Address" on
page 5.
For details on how to check settings of the network device, refer to the manual supplied with the
network device or contact its manufacturer.
•
•
For details on how to change settings of the network device, refer to the manual supplied with the
network device or contact its manufacturer.
•
Check 4
In Windows, make sure that Get IP address automatically is selected, then click
Connect (A).
In Macintosh, make sure that Get IP address automatically is selected for TCP/IP
Setting (B) in the Set Printer IP Address screen, then click Connect (A).
For details on how to specify the IP address, refer to and onward in "Specifying the Printer's IP
Address" on page 5.
•
If the problem is not solved, specify the IP address.
Check 5
DHCP function•
A function to automatically assign required information (IP address, etc.) to computers, printers or other
devices connected to the network.
IP address•
A numerical identification assigned to each computer or network device connected to a network.
DHCP function•
A function to automatically assign required information (IP address, etc.) to computers, printers or other
devices connected to the network.
IP address•
A numerical identification assigned to each computer or network device connected to a network.
When the Disconnect Cable screen appears, remove the USB cable, then click
Next.
The wired connection setup of the printer is now complete. Click Complete or OK.
Proceed with the setup by following the procedures from "Information" (Windows) or "Registration
(Macintosh)" (Macintosh) in the printed manual: Getting Started.
•
Glossary
Glossary
When the Connect Cable screen appears, connect the printer to the computer with
a USB cable.
For Macintosh, click Next.
When the Set Printer IP Address screen appears, check the IP address settings by referring
to Check 4 and onward in "Set Printer IP Address Screen is Displayed" on page 4.
•

5
ENGLISH
2
1
A
3
A
Check
Other Troubleshooting Tips
The Printer is Not Detected after the Network Environment is Changed
IP address•
A numerical identification assigned to each computer or network device connected to a network.
Wait until the IP address is assigned to the computer. You may need to restart your
computer.
Search for the printer again after confirming a valid IP address is assigned to the computer.•
Glossary
Action
Specifying the Printer's IP Address
Reference Information
The printer's IP Address can be specified by the following procedure.
Make sure that the printer is connected to a network beforehand.•
Perform to in "Software Installation" in the printed manual: Getting Started.
Click Next (A) on the Set Up New Printer screen.
When the Connect Cable screen appears, connect the printer to the computer with
a USB cable.
For Macintosh, click Next.
If the Detected Printers List screen appears, click Set Up New Printer.•

6
1
2
4
B
A
C
D
B
B
C
D
5
Restoring the Printer's Default LAN Settings to Perform Setup Again
The LAN setting of the printer is now restored to the default state.
Use the RESUME/CANCEL button on the printer to restore the default state.
Hold down the RESUME/CANCEL
button (A) on the printer until the
POWER lamp (B) flashes 10 times,
then release the RESUME/
CANCEL
button after the tenth
flash.
Perform setup again by following the procedures from "Set Up a Wired Connection" in the printed
manual: Getting Started.
•
Disconnect the Ethernet cable.
IP address•
A numerical identification assigned to each computer or network device connected to a network.
Subnet mask•
A number used to distinguish the network and host portions of an IP address.
Default gateway•
A device required to connect to external networks.
The printer cannot be used on external networks such as the Internet.•
Select Use next IP address (B) in the
Set Printer IP Address screen.
Select Use following IP address for
TCP/IP Setting (B) in the Set Printer IP
Address screen.
Enter the value you want to specify for each of IP Address, Subnet Mask, and
Default Gateway or Router (C), then click Connect (D).
If the printer is not connected to a network, perform setup again by following the
procedures from "Set Up a Wired Connection" in the printed manual: Getting Started.
Follow the on-screen instructions to proceed with settings.
Glossary
Action

7
ENGLISH
Check
Connection Checklist
Before connecting the printer, are the computer and network device (router, etc.) configured and can the computer connect to the network?
When using a router, are the Ethernet cables of the printer and computer connected to the LAN side of the router?
If the Ethernet cable is connected to the WAN side of the router, connect it to the LAN side.
If the Ethernet cable is loose, connect it properly.
Configure the computer and network device.
Are the printer and network device (router, etc.) turned on?
Is the firewall function of your security software active?
A message may appear on the computer monitor warning that Canon software is attempting to access the network.
If the warning message appears, set the security software to always allow access.
Turn on each device.
If the printer is already turned on, turn it off, then turn it back on.
Check 1
Check 2
Check 3
For the procedures, refer to the manuals supplied with the computer and network device, or contact their manufacturers.•
Check 4
For details on how to check the connection, refer to the manual supplied with the router or contact its manufacturer.•
For the connection procedure, refer to the manual supplied with the router or contact its manufacturer.•
Firewall•
A system to use computers connected to the Internet and corporate networks safely. It protects computers and corporate networks against unauthorized access, or restricts unauthorized access to corporate
networks and the Internet.
Glossary

QT5-3402-V01 XXXXXXXX ©CANON INC.2011 PRINTED IN XXXXXXXX
Canon

PI}{MA
P R 0
-1
series
Setup
CD-ROM
m
11m
QH75104
1
1111~
m

1111111111111111111111111111111~11111
QT53415VOI
ENGLISH
Important Notice
Caution
Proper Handling
of
the Print Head
Handle the Print Head
of
this product properly, observing the cautions noted below. Improper handling
causes malfunction
or
other problems
in
the product, as well as damaging the Print Head.
Note:
The below illustrations may be different from your product.
1) When you
install the Print Head in the product, insert the Print Head into the Print Head Holder
carefully
not to knock it against the sides
of
the holder.
(For details, refer to
Getting Started.)
Print Head Holder
2) Do not handle the Print Head roughly such as applying it excessive pressure or dropping it.
3) Do not rinse or wipe the Print Head. Do not put the Print Head on a
table.
4) Once you have installed the Print Head,
do
not remove it unnecessarily.
QT5-3415-V01
122010FS
©CANON INC.
2011
PRINTED
IN
THAILAND
IMPRIME
EN THAI LANDE
FRANCAIS
Remarque importante
Avertissement
Manipulation correcte de Ia tete d'impression
Manipulez correctement
Ia
tete d'impression de ce produit en respectant les avertissements ci-dessous.
Une mauvaise
manipulation peut notamment perturber le fonctionnement du produit et endommager
Ia
tete d'impression.
Remarque :
Les illustrations ci-dessous peuvent differer de votre appareil.
1) Lorsque vous installez
Ia
tete d'impression, inserez-la dans son support avec precaution pour ne pas
Ia
heurter contre les bords du support.
(Pour en savoir
plus, voir
Demarrage.)
Support de
Ia
t~te
d'impression
2) Ne manipulez pas
Ia
tete d'impression avec brutalite (fortes pressions, chutes, etc.).
3) La
tete d'impression ne doit etre ni rincee ni essuyee. Ne placez pas
Ia
tete d'impression sur une
table.
4) Une fois installee, ne retirez pas
Ia
tete d'impression sans raison.

Beim ersten lnstallieren
Drucker betriebsbereit gemacht, indem der Abschnitt von der
Tintenpatrone bis zur Spitze des Druckkopfs mit Tinte
wird.
Deshalb
•
IIIII
III
~1111111~11111111111111~11111
QT5341
8
VOI
•
canon
2
:5
~~
Noti
ce
Aviso
Avertissement
Aviso
Hinweis
Avviso
Gebruiksaanwijzing
~rJI.JEiWO'l
Meddelande
Merknad
Bemrerk
Huomautus
Upozorneni
;.t~
Vyhlasenie
Uwaga
Megjegyzes
Yse,QOMneHI!Ie
nosi,QOMneHHH
Obvestilo
'-k)I.A
Uyan
PaziQojums
Pastaba
Markus
Nota
Cb06Ll.leHI-1e
•
•
Tintenpatrone bedruckt werden konnen geringer als bei den
nachfolgenden Tintenpatronen.
PR0-1
Quando si
prima
sezione
di Stampa con inchiostro. Pertanto
possono essere stampati con il prime serbatoio d'inchiostro
e
inferiore a quello
ulteriori informazioni su PR0-1 , visitare
Wanneer
geplaatst, is de printer gebruiksklaar nadat het gedeelte tussen
de inkttank en de punt van de Printkop met inkt gevuld is.
Daarom is het aantal
worden afgedrukt kleiner dan voor de volgende inkttanks .
Bezoek voor meer informative over PR0-1, onze website.
KaTe!
HJV
TTpWTfl
TO
T~~~a
EKTUTTWO"fl<;
TTOU
~TTOpOUV
EiVOI
~IKp6TEpo<;
mp1crcr6TEpE<;
TflV
Tono9wia
ist
besuchen Sie unsere Website.
installano
volta,
Ia
stampante diventa operativa riempiendo
dal serbatoio d'inchiostro fino
de
inkttanks voor de eerste keer in
EyKOTclcrTOcrfl
<j)Opci
, 0
OTT6
TO
~E
VO
TTAflpO<j)opiE<;
~a<;
der
Tintenpatronen im
die Anzahl der Blatter, die mit der ersten
FOr
nahere lnformationen
i serbatoi d'inchiostro in
alia
il
numero di
dei serbatoi
vellen
EKTUTTWT~<;
ooxEio
~EAciVfl
EKTUTTW90UV
OTTO
OTI
crTo
d'inchiostro successivi. Per
dat met de eerste inkttank kan
TWV
OOXEiWV
~EKIVclEI
~EAclVfl<;
.
Eno~f.vw<;
~E
TO
web.
~EAclVfl<;
Tfl
EW<;
TO
,
o
ap18~6<;
~E
TO
TTpWTO
ETT6~EVO
crxn1Ka
~E
PR0-1
PR0-1
punta
della
fogli
che
il
nostro sito web.
PR0-1
worden
O'TO
Amoupyia
<iKpo
OOXEia
TO
PR0
YE~i~OVTO<;
Tfl<;
KE<j)OA~<;
Twv
<j)UAAwv
OOXEiO
~EAclVfl<;
~EAclVfl<;.
PR0-1,EmcrKE<j)TEiTE
wird
gefOIIt
per
Ia
Ia
Testina
-1
der
Ober
y1a
na
y_!:g
"?
~
~)J1m"''l
P
~O)?'C!Jilii
9 o
:75'
•
•
•
•
GL,
When
printer becomes operational by
tank to the tip
of
the succeeding ink tanks. For more information on PR0-1,
please visit our website.
Cuando
PR0-1.
secci6n desde el dep6sito de tinta hasta
de lmpresi6n. Por lo tanto, el numero de hojas que podran
imprimirse con
los
PR0-1,
Apres
PR0-1
operationnelle apres
d'encre et le haut de
Par consequent,
imprimees avec les premieres cartouches d'encre est inferieur
a
installees
PR0-1, veuillez
Quando
vez, a impressora fica operacional enchendo a
cartucho de tinta
tinta. Como
•
como
cartuchos de tinta. Para obter mais
PR0-1, visite nosso site Web.
RO
-ll
d::flJ[QJ0)-{::;:75'
ll
B
:?13:c
-t-O)t
c
ilb
:fJJ[QJI<::
Y:7
J:IJEP
1r.!Wid:
sheets that can be printed with the first ink tank is fewer than
siguientes dep6sitos de tinta. Para mas
celui
!ii
3
tiili
installing
instale
Ia
impresora empezara a funcionar
visite nuestro sitio Web.
avoir
installe
pour
Ia
correspondant aux cartouches d'encre qui seront
par
Ia
instalar
tal,
primeiro cartucho de tinta
:/:7~~~
-1
Y:71<!'il'ltc
~
JE[
g
.Q
iJPJil
~o&~
tJ
-
b.""
-
Y'I
the ink tanks
of
the Print Head with ink. Therefore the number
por primera vez los dep6sitos de tinta en
el
primer dep6sito de tinta
des cartouches d'encre dans l'imprimante
premiere fois, l'imprimante devient
que
Ia
Tete
le
nombre de
suite. Pour
consulter notre site Web .
os cartuchos de tinta no
ate
a
ponta da
o numero de folhas que podem ser impressas
1<::
.
-1Y:75'Y:71J'571J
9
L.
C::
I
<::J:
IJ
ileffl
PJ
-{
:/:75'
:/:7
':l-'tJ:<fd:
<::""C
Ia
plus d'informations sur l'imprimante
1
IJ
3:9o
L:
!ii&'ol<
in
PR0-1
filling
section situee entre
d'lmpression a
feuilles
Cabec;:a
e
inferior ao dos pr6ximos
informac;:oes sobre o
/llit
<1:.
21QJ
§1-:J.Il
1d:<l5.
PR0
tcc!L,
1o
for the first time, the
the section from the ink
alllenar
Ia
punta del
sera inferior que con
informaci6n sobre
ete
qui peuvent etre
PR0-1
de lmpressao com
:/[--A-~
J:
t\:!ilil<::fd:
~I
<::~JE[
-
11
<::
~9
con tinta
Cabezal
Ia cartouche
rempli d'encre.
pela primeira
secc;:ao
do
g
IJ
3:
.Q
-{
-QE
:/
¥
Ia
Nar blackbehallarna installeras
blir skrivaren brukbar genom att
blackbehallaren till
Darfor
•
•
•
•
•
blackbehallaren farre
mer information om PR0-1 , var god
Nar du
blir
spissen av SkriverHodet med
kan skrives
etterf121lgende
PR0-1 pa
Nar blrekbeholderne installeres
printeren anvendes ved at fylde afsnittet fra
til toppen
som kan udskrives med den
de
mere information om PR0-1.
Kun mustesailioita
asetetaan toimintakuntoon tayttamalla mustetta mustesailiosta
Tulostuspaan
mustesailiolla
pienempi kuin seuraavilla mustesailioilla .
sivuillamme, kun haluat lisatietoja
Pri
dojde
inkoustem z
vytisknout s prvni
nasledujicich
PR0-1
i
PR0-1 for
blir antalet sidor som kan skrivas ut med den forsta
installerer blekktanken i
skriveren operativ ved
nettstedet
af
efterf121lgende
prvni instalaci
ke
zprovozneni tisku diky
viz
nase
spetsen av Skrivarhuvudet med
an
ut
med den
blekktankene. Du finner
Printhovedet med
karkeen saakka. Sen vuoksi
tulostettavissa olevien arkkien
teto nadrzky
nadrzek
f121rste
vart.
blrekbeholdere.
asennetaan ensi kertaa
nadrzky
nadrzkou
s inkoustem.
webove stranky.
fylla
med de
foljande blackbehallarna. For
PR0-1
a fylle
delen fra blekktanken
blekk.
blekktanken
i
PR0-1
blrek.
f121rste
Bes121g
PR0
s inkoustem
naplneni spicky
s inkoustem.
s inkoustem, je proto
forsta gangen,
sektionen
besok var
Derfor er
mer
Derfor er
blrekbeholder,
-1:sta.
Pocet listu, ktery
Dalsf
fran
webbplats.
for
f121rste
antall
fe~;me
informasjon om
f121rste
gang, kan
blrekbeholderen
antallet
vores website for at fa
PR0
-1:een, tulostin
ensimmaisella
maara
Vieraile
do tiskarny
Tiskove Hlavy
informace o
black.
gang ,
til
ark som
enn for de
af
ark,
mindre end
on
internet-
PR0-1
lze
mensi nez
tiskarne
u
QT5-3418-V01
032011FS
©CANON INC.
2011
PRINTED
1M
PRIME
IN
THAILAND
EN
THAI
LANDE

IIIII
I
~1m1~11111111
QT54355V01
canon
II
J:+ial!l~
•
•
*~a=EJ
-@~~~IL:ts-"Jcl
~~~~~~9-@1J5~1L:-:Jl'-cr~
<rccl'o
Notes for Energy Saving Setting
For purpose
after designated period without operation (The Auto Power
For instructions on how to change the setting, refer to the On-screen
1~
~I~(J)rc.(;/),
of
-:>L
l"t"0811
'*9
energy saving, this product
Stt
~fl=
uts-G
(§j}Jm)~;t7~~~)
'~lt~n'-~~rJJ~
r~r7?==t?JlJj
o
will
<
e:
E3
~c~)~b'tJJn
CI&t&§)tBJi~)
be
automatically
Off
~~~~u-c
turned
function).
off
Manual.
•
•
Notas para
A efectos de ahorro de energia, este producto se apagara automaticamente
despues
(funci6n de Apagado automatico).
Para
las
Manual en
Informations sur
Afin d'economiser
sion
apres
Pour
plus d'informations sur
Manuel en
Ia
configuraci6n
del
periodo de tiempo designado si no se
instrucciones sabre c6mo cambiar
pantalla
une certaine
ligne.
.
le reglage
l'energie, ce produit sera automatiquement mis hors ten-
duree d'inactivite (fonction
del
ahorro de energia
d'economie d'energie
Ia
modification de ce
realiza
Ia
configuraci6n,
Alim. auto desactivee).
reglage,
ninguna operaci6n
consulte el
reportez-vous au
QT5-4355-V01
062011AN
©CANON
INC.2011
PRINTED
IMPRIME
IN
THAILAND
EN
THAI
LANDE

lllllllllllll
QT52946V01
I
InformaciOn
•
Antes
Para
incluidos
seleccionar
Siga las
Para
1
2
usar
instrucciones
usuarios
Haga
Region>
Haga
seleccione
Cuando aparezca
instrucciones en pantalla
de
en
idioma
en
el
Espanol
de
clic
clic en
[Setup
en
Region and Language.
adicional
instalar
espanolla
CD-ROM/CD-ROM de instalaci6n],
en
su
configuraci6n
a
continuaci6n
Windows
Start
Ia
ficha
7
>
Control
Administrative
el
version
para
software
del
software y
regional
para
Panel
>
Spanish (United States)
Ia
pantalla
Change
para continuar con
usuarios
los
antes de
realizar Ia
configuraci6n
espanoles
manuales
es necesario
instalar
Clock, Language, and
>
Change
en
Current
System
system
system
Locale,
Ia
configuraci6n.
siga
locale,
en
pantalla
el
software.
regional.
y
locale.
las
Para
1
2
Si
aparece
las
instrucciones en
usuarios
Haga
Ia
de
Windows
clic en
pantalla
pantalla para continuar con
Start
>
User
Vista
Account
Control
Control
Panel >
durante
Clock, Language, and
Region > Regional and Language Options.
Haga
seleccione
Cuando aparezca
instrucciones en pantalla
Si
las
clic en
Ia
ficha
Spanish (United States)
aparece
instrucciones en
Ia
pantalla
Administrative
Ia
pantalla
User
pantalla
Change System Locale,
para continuar con
Account
para continuar con
>
Change
en
Current
Control
durante
Ia
configuraci6n, siga
Ia
configuraci6n.
system
system
Ia
configuraci6n.
Ia
configuraci6n, siga
Ia
configuraci6n.
locale,
locale.
siga las
y
QT5-2946-V01
042010FS
©CANON
INC.2010 PRINTED
IN
THAILAND

Para
usuaries
de
Windows
XP
1 Haga clic en
Regional
Options
2 Haga clic en
Language
Cuando aparezca
instrucciones en pantalla para continuar con
Para
Windows:
Para
usuaries
1 Haga clic en
& Text o International > Language.
for
Para
consulte
de
Macintosh
start > Control
> Regional
Ia
ficha
Advanced,
non-Unicode
Ia
pantalla Change Regional
obtener
System
mas
informacion
el manual
Preferences en el menU
de
Panel > Date, Time, Language,
and
Language
Options.
y seleccione Spanish (Mexico) en
programs.
usuario
sobre
de
su
Options,
Ia
configuraci6n.
Ia
configuraci6n
ordenador
de
Apple >
o Ia
ayuda
siga las
regional,
Language
and
en linea.
2 Seleccione
Espaiiol
como idioma prioritario.
• Microooft es una marca comercial registrada de Microsoft Corporation.
• Windows es una marca comercial o una marca comercial registrada de Microsoft Corporation en EE UU y/o en
otros paises.
• Windows Vista es una marca comercial o una marca comercial registrada de Microsoft Corporation en EE UU y/o
en
otros paises.
• Macintosh y Mac son marcas comerciales de Apple Inc., registradas en EE UU
yen
otros paises.

MP-101
•
Use
This
Paper
For
Print
Head
Alignment
This
alignment
Load
the
See
the
0
Utilisez
Get
alignement
Chargez
Pour
plus
e
Verwenden
Die
Druckkopfausrichtung
Legen
Weiter
8
Utilizzare
L'allineamento
Caricare
Per
maggiori
~
Utilice
Dicha
Cargue
Consulte
e
Gebruik
Dit
uitlijnen
Laad
het
Raadpleeg
~
~cnonb3YMT8
3Ta
onepai.jM51
3arpy>Ka~re
no):1p06Hbl8
e
Tento
Nastaven
VloZte
Podrobnosti
e
Ezt
a
papfrt
Erre
a
A
papfrt
B6vebben
Qa
Uiycie
Wyr6wnan
Zal
a
du
Wi~ej
G
Yaz1c1
Bu
hizal
Kag1d1
Aynnt11i
C.
Use
este
E
ste
alinhamento
Coloque
Consulte
•
XplJOl.IJ01TOl~OTE
Aur~
11
Tono9~0TE
AvaTp
e~TE
is
paper
with
Setup
Sheet
ce
papier
est
le
papi
ci
de
details,
Sie
dieses
Sie
das
Papier
e
lnformationen
questa
viene
Ia
carta
con
informazioni,
este
papel
alineaci6n
papir
papfr
becillitasra
papieru
j
papier
inforrnacji
Kafas1
a
daha
bilgi
crroiXLOTJ
se
el
papel
con
los
detalles
dit
papier
vindt
papier
met
het
installatieblad
3Ty
BblnonH51eTc51
6yt.tary
CB8):1eHiil51
pouiijte
f
tiskove
bi!lejs
najdete
hasznalja
a
a
feherebbik
inforrnaci6t
do
ie
poloienie
bi
a
lq
moina
h
;.;J
ma
makine
...
_.,,
az
i9in
K.t..
papel
no
o
papel
com
a
folha
de
e
TO
xapTi
OTlJV
ev6
performed
pour
en
carta
p"ra
plaats
6yt.tary
hl
a
f
stranou
kesztilek
wyr6wnania
stronq
iama
alan
. ·
alinh
e
exe
IXUTO
KTe>.eiTaL
T
when
setting
the
whiter
side
for
more
details.
l'alignement
effectue
lors
de
Ia
orientant
reportez-vous
eseguito
illato
lleva
Ia
en
voor
de
6onee
pro
vy
v
lnstalacnim
oldalaval
az
ayarlamrken
•lum
o
instala~iio
lJ
T
Papier
wird
mit
der
helleren
finden
Sie
per
l'allineamento
durante
piu
vedere
Ia
alineacion
a
cabo
cara
mas
Ia
hoja
het
uitlijnen
tijdens
wittere
voor
AJI!I
npM
6eno~
CM
. B
KpaTKO~
nastaveni
se
provadi
nahoru
a
nyomtat6fej
uzembe
felfele
UtbaigazMs
glowicy
jest
skierowan
znalezc
iyin
Bu
yuzu
yukan
Sayfas1'na
a
mento
c
ut
ado
rlur
lado
mais
para
TO
XIXPTi
KaTa
liE
TlJ
AEUKOTEPll
IX
"<ll
u
>.Ao
Ia
face
a
fur
die
bei
der
in
den
bianco
Ia
al
instalar
blanca
de
configuraci6n
het
instellen
kant
nadere
BblpaBHMBaHM!I
Hacrpo~Ke
cropoHo~
tiskove
pri
.
letaku.
helyezese
ti:iltse
polozenia
przeprowadzane
q
w
arkuszu
Kag1d1
yap11ir.
bakacak
bak1n.
do
a
nt
c
laro
obter
)'liX
TlJV
e
yK
m
up
the
machine.
face
up.
de
Ia
tete
d'impression
configuration
Ia
plus
Ia
fiche
Druckkopfausrichtung
Einrichtung
Seite
Einrichtungsanweisungen.
l'installazione
rivolto
documentazione
del
hacia
van
naar
boven.
details.
MHCTpyKI.jlillil
uvadeni
beigazitasahoz
be.
a
ki:innyu
gtowicy
do
gory
konfiguracji
Kullamn
ca~ote
e a
configura~
voltado
mais
OTOLXUYlJ
eyKaTaOTaffil
TTAEUpa
acrraffil
de
Ia
machine
blanche
vers
le
d'installation.
des
Geriits
nach
oben
ein.
della
testina
di
del
dispositive.
verso
I'
alto.
di
installazione
cabezal
de
impresion
el
equipo.
arriba
.
.
de
printkop
van
het
apparaat.
ne'laTHbiX
annapara.
ssepx.
no
ycraHOBKe.
hlavy
pristroje
do
provozu.
ki:izben
van
szukseg.
telepfteshez
.
~ekilde
de
para
detalhes.
Kecp(X}.~c;
npoc;
c;
"
yLa
Iapan
drukuj'lcej
podczas
.
yerle~tirin.
impressao
iio
da
ma
cima.
eKTimwaTlc;
Tou
llllXIXV~IIaToc;.
T()(
ETTWW.
ne
pLOu6
.
haut.
ausgeftihrt.
stampa
.
ronOBOK
taliil.
konfiguracji
quina
.
Te
pe
c;
>.
e
mo~J
urzqdzenia.
€
p
m
c;.
****
itft~6J
8
Fabrique
G
•
G
0
e
•
$
-
e
•
•
-
e
QX1-3297-V02
'canon
**'l~
I
au
l.leil
nanip
8MpiBHIOBaHH51
3aBaHTa>KT8
,[lOKna):1Hiwe
Uporabite
Ta
poravnava
Nalozite
Za
podrobnosti
~4J..II
.
~'.J
Tento
Zarovnanie
Papier
Dalsie
lzmantojiet
Dadu
levietojiet
PlaMku
£)a
popieri0
Dis
i
illygiavimas
Popierio
Daugiau
Kasutage
Joondamine
Laadige
Tiipsema
Bruk
Denne
Legg
inn
Se
Oppsettark
Anvand
Justeringen
Fyll
pa
Se
installationsarket
Brug
dette
Denne
llreg
papiret
Se
installationsarket
Kayta
Kohdistaminen
Lisiiii
Lis
ii
tietoja
Inc.
Made in Japan
Japan
BMKOpMCTOBY£TbC!I
3,Qi~CHIO€TbC51
nanip
):1MB.
y
ta
papir
se
izvede
papir
taka,
glejte
(,)"1.)
il,jl-..
~~
6~
.~1~¥1
papier
pouZite
sa
vykona
vloZte
belsou
inforrnacie
izlidziniiilanu
dette
juster
papperet
justering
tiitii
paperi
najdete
6o
papiru,
papiru
ar
informaciju
naudokite
atliekamas
adekite
baltesne
inforrnacijos
prindipea
toimub
paber
nii,
et
teabe
saamiseks
papiret
i
ngen
utf0res
papiret
med
hvis
det
har
papperet
utfiirs
niir
med
papir
til
udf0res,
med
den
paperia
suoritetaan
siten
, ettii
on
Asennusohjeissa.
6iniWOIO
CTOpOHOIO
CXeMi
ycraHOBKM.
za
poravnavo
pri
namestitvi
da
bo
bolj
bela
Namestitveni
·I.~!~~
.
j
~I
~~
t"'"IJ •
na
zarovnanie
pri
instalacii
stranou
smerom
v
ins
t
lai
veiktu
veic,
uzstadot
baltako
pusi
skatiet
uzstadillanas
spausdinimo
parengiant
puse
rasite
parengimo
joondamiseks
masina
seadistamisel.
valgem
pool
vaadake
til
skrivehodejustering
n~r
den
hviteste
du
vii
vite
vid
skrivaren
den
vitare
fi:ir
mer
information.
printhovedjustering
n~r
du
hvideste
for
at
fa
yderligere
tulostuspaan
,
kun
sen
valkoisempi
;-n...
~e
~~
A/Ill
BMpiBHIOBaHH!I
ni,Q
43C
HaCTp010BaHH51
AOropM
tiskalne
naprave.
stran
obmjena
prirocnik.
&-
J.»ll
~l
~~~)
~_,II~~
.::.L._,J....ll.:,..
tlacovej
zariadenia
nahor.
alacnom
harku.
drukas
ierici.
uz
augllu.
galvutei
arengina
a
virilo.
lape.
seda
jiiiib
iilespoole.
seadistuslehte
maskinen
mer.
justering
side
installeres.
siden
opp.
stalls
in.
sidan
upp
sretter
maskinen
opad.
oplysninger.
kohdistamiseen
kone
valmistellaan
puoli
£);_
C!~
APYKYIO'IOi
.
glave
navzgo
&-
t_,lll
~
;;JjWI
JJJ!I
..u_j.o
..,.k
hlavy
.
galviilas
lapa.
ialygiuoti
darbu
paberit
av
skrivhuvudet
.
op
jii.ii
yliispiiin
PP
~
l.i.a
~
i.
.
.
kii.yttiikuntoon
ronoBKM
npliiCTpoiO.
r.
!'.b.:i..u!
G
.
I.?.)~
~
~
izlidzinaaanu
.
.
if:JJlJit~~tHlHrtrEP~~3l=
if*~*mtt-.t~iltfrfT~P
t~~
S
1¥-.J-miioL.t:~.A~~IL
~*i$~mm.~,.
t~~rm•m:*~t~P]
~~*
0
,
ilffllil:ti~i!ffJIJE!Jii~~
tE'k
il*MII\J
.il
ff~J~
:ali~~
,
~.:J.~slr.J-iliiiol..tl!t.A~~
H~~~~~
Ol
§AI~
Ol
.!!.~
t:l/iil.~
:A
fAjJ
EJ'
·
~~M¥~'kil~~
A~§'6j-O:j
§.
~IE
~
~
'CJ
O/
4lj
£.
Ljj
§
.g
~
x
o
o
.!!.~§.3ft.=,~~~
~
.g
7
1
7/
~
~~
~i;
~;:;jJ
§A/
/
~
L.Jl
A
i
~ ~±
~'®tJ'L-IcJ-.
~
ll/1
~~
~
L-jq,
~
£ E
tJ'L-j
c
f.
i;
f
~
A/
2.
.
IIIIIIIIIIIIIIIIIIIUIIIIIIIIII

111111111111
QT53440V01
Read before Setting Up the Machine
I
Make sure to read this information before setting up the machine.
reference.
/A
Safety Precautions
Please
to use the machine
unexpected accident, fire, or electric shock.
read these safety
A
Warning
The
following
incorrect operation of the equipment. These must
A
Caution
The
following
by incorrect operation
are instructions that, if ignored, could
are instructions
warnings and cautions to ensure that you use the machine
in
any way not described here or
that, if ignored,
of
the equipment. These must
could
in
the accompanying
result
in
death or serious personal injury caused by
be
observed for safe operation.
result
in
personal injury or material damage caused
be
observed for safe operation.
• Choosing a location
A
Warning
Please
keep it
manuals.
in
hand for future
safely.
This may cause
Do not attempt
•
Do not
A
•
Do not
•
Do not
close
To
in
•
Do not
• Do not
•
Power
A
• Use the power
For the machine's operating requirements, refer to
Connect the machine to the specified power source.
•
Never attempt to
•
Always push the
•
Never damage, modify, stretch or excessively bend or twist the power cord. Do not
place heavy objects on the power cord.
place
the machine
close
to
flammable
solvents such as
alcohol
or thinners.
Caution
install
the machine
install the machine
to a heating source.
avoid the risk of fire or electric shocks, use the machine under the operating environment specified
"Specifications"
place the machine
place the machine with its back attached to the
in
in
a
location
in
locations that are very humid or dusty,
the
Getting Started.
on
a thick rug or carpet.
that
is
unstable or subject to excessive vibration.
in
direct sunlight, outdoors, or
wall.
supply
Warning
cable
included with the machine.
plug
in
plug all
"Specifications"
or unplug the machine from the power supply when your hands are wet.
the way into the power outlet.
in
the
Getting Started.

I
Never plug the machine into a power socket that is shared with other equipment
•
(extension lead/cord, 2- or
Never use the machine if the power cord is bundled or knotted.
•
you detect smoke, unusual
• If
machine at the power supply and
• Periodically,
collected
exposed to a
absorbs moisture and may cause insulation failure and fire.
you hear thunder, disconnect the power supply
• If
using
depending on the thunder storm.
Unplug the power cord once a month to see if power cord/plug shows anything unusual such as heat,
•
rust, bent, scratch, split and so on.
Unplug the cord/plug and
electric shock afterwards.
Caution
A
Ensure that the area around the power outlet is kept clear at
•
easily unplug the power cord if necessary.
unplug the machine and use a dry cloth to wipe off any dust or dirt
on the plug and the power outlet.
dust, smoke, or high humidity, the dust
of
lot
Leaving the machine plugged
it.
3-way adapter, etc.).
smells
call
or strange
for service.
call
in
for service if above is observed since they may lead to a fire or an
n0ises around the machine, immediately unplug the
the machine is placed at a location
If
collected
the machine and refrain from
of
may cause fire, electric shock, or damage to the machine,
all
on the plug
times so you can
Never remove the plug by
•
Pulling the cord may damage the power cord, leading to possible fire or electrical
shock.
Do not use an extension lead/cord.
•
• Cleaning
Warning
A
Use a damp cloth to clean the machine. Never use flammable solvents such as
•
alcohol, benzene or thinners.
flammable solvents come
If
machine, it could cause a fire or electric shock.
Always unplug the machine from the power outlet before
•
accidentally
If you
machine.
Maintaining the machine
•
the machine
switch the machine on while cleaning
pulling
on the cord.
contact with electrical components inside the
in
cleaning the machine.
you could injure yourself or damage the
it,
Warning
A
Do not attempt to disassemble or modify the machine. There are no user serviceable parts inside the
•
machine.
The machine contains high-voltage components. Never attempt any maintenance procedure not
this information.
described
Do not connect other than recommended devices to a connector on the machine (the cable connector
•
the Direct Print Port etc.).
or
in
could cause a fire or electric shock.
It

•
Working around the machine
A
Warning
•
Do not use highly flammable sprays near the machine.
This could cause a fire or electric shock if the spray comes into contact with electrical components
inside the machine.
•
This product emits
please move away from this product and consult your doctor.
A
Caution
•
Never put your hands or fingers
•
When moving the machine, carry
In
case the machine weighs more than 14 kg, it is recommended to have two people lifting the
machine.
Accidental dropping
For the machine's weight, refer to "Specifications"
•
Do not
Especially
(alcohol,
•
Be careful to prevent foreign objects from entering the inside
If
off, unplug the power cord, and
•
Do not transport or use the machine on a slant,
damage the machine.
place
do not place metal objects (paper
thinners, etc.) on top
any foreign objects (metal or liquid)
low level
of
any object
magnetic flux. If
in
the machine while it is printing.
the machine at both ends.
the machine causes injury.
on
the machine.
of
the machine.
fall
call for service.
you use a cardiac pacemaker and feel abnormalities,
clips, staples, etc.) or containers
into the machine, press the power button to turn the machine
vertically
in
the Getting Started.
of
the machine.
or upside-down, as the ink may
of
flammable solvents
leak
I
and
•
Working around the machine (For the
A
Caution
•
When loading a thick book on the Platen Glass, do not press hard on the Document Cover. The Platen
Glass
may break and cause injury.
• Print Heads/ink tanks and FINE
A
Caution
•
Keep ink
In
case ink* is
drink.
If
irritation or discomfort occurs, obtain medical advice immediately.
*
Clear Ink
•
In
case ink gets
In
case ink gets
If
irritation to eyes or skin persists, obtain medical advice immediately.
•
Never touch the
The metal parts may be very hot and could cause burns.
•
Do not throw ink tanks and
•
Do not attempt to disassemble or modify the Print Head, ink tanks, and
tanks out
contains nitrate salts (For models containing
of
the reach
accidentally
in
contact with eyes, rinse with water immediately.
in
contact with skin, wash with soap and water immediately.
electrical
of
children.
licked or
contacts on a Print Head or
FINE
swallowed,
Cartridges into fire.
Cartridges
rinse out mouth or give one or two glasses
multifunction printer)
Clear Ink).
FINE
Cartridges after printing.
FINE
Cartridges.
of
water to
• International
As an ENERGY
the ENERGY
ENERGY
STAR
STAR®
STAR
guidelines for efficiency.
Program
Partner, Canon
Inc.
has determined that this product meets

I
About the disposal
•
of the battery (For
models
battery)
Dispose of used batteries according to the local regulations.
•
the U.S.A.
Users
•
Regulatory Information
in
containing
lithium
FCC Notice (U.S.A.
120V, 60Hz model
For
Model Number:
This device complies with Part
conditions: (1) This device may not cause harmful interference, and (2) this device must accept any
interference received, including interference that may cause undesired operation.
Note: This equipment has been tested and found to comply with the limits for a
device, pursuant to Part 15 of the
protection against harmful interference
uses and can radiate radio frequency energy and, if not installed and used
instructions, may cause harmful interference to radio communications.
However, there
this equipment does cause harmful interference to radio or television reception, which can
determined by turning the equipment off and on, the user is encouraged to try to correct the
interference by one or more
Reorient or relocate the receiving antenna.
•
• Increase the separation between the equipment and receiver.
Connect the equipment into
•
connected.
Consult the dealer or
•
a shielded cable
of
Use
Rules.
Only)
K10350/K10362
of the FCC
15
Rules. These limits are designed to provide reasonable
FCC
in
no guarantee that interference will not occur
is
the following measures:
of
outlet on a circuit different from that to which the receiver
an
experienced radio/TV technician for help.
an
required to comply with
is
Rules. Operation
a residential installation. This equipment generates,
Class
B limits
subject to the following two
is
B digital
Class
accordance with the
in
a particular
in
Subpart B of Part 15 of the FCC
in
installation. If
be
is
not make any changes or modifications to the equipment unless otherwise specified
Do
such changes or modifications should
manual.
of the equipment.
Canon
One Canon
Lake Success,
1-516-328-5600
•
This product contains
Included
See
If
U.S.A., Inc.
Plaza
NY 11042
For California, USA only (PIXMA PR0-1 only)
internal battery for backup purposes.
an
battery contains Perchlorate Material-special handling may apply.
http://www.dtsc.ca.gov/hazardouswaste/perchlorate/ for details.
the
in
made, you could be required to stop operation
be

(
1
QTS-3440-
VO
122010FS
©CANON
INC.
2011
PRINTED
IMPRIME
THAILAND
IN
THAILANDE
EN

canon
La
garantfa limitada establecida a continuaci6n
reacondicionado
en
los Estados Unidos.
El
Producto esta garantizado contra defectos
de
partir
de
Establecimiento de Servicio Autorizado ("ASF", por sus siglas
que tiene defectos
Producto nuevo
Canon
al momenta
no
compatibles.
cubierto por
estaran regidas por los terminos
distribuirse
garantfa impllcita referente a
La
de
la
compra original
USA.
cubre accesorios ni consumibles como papel o cartuchos
Esta
garantfa limitada solo
unica garantfa,
los mismos.
Esta
garantla limitada
de
la
marca
Canon
(el
fecha de
La
con
la
compra original cuando
para
Productos reacondicionados.
sera
(a)
reparado utilizando piezas nuevas, reacondicionadas, reparadas
o;
(c)
intercambiado por
reparaci6n o sustituci6n
de
solicitar servicio
Canon
USA
una
garantfa por separado ("Garantfa por separado").
el
Producto,
si
la
hubiere,
cubre
en
virtud
se
aplicara
no
se
hara responsable por dichos artlculos a excepci6n del equipo periferico compatible
de
se
venden
la
comerciabilidad y de adecuaci6n para
en
relaci6n
todos
los
Canon
"Producto") empaquetado
se
un
Producto reacondicionado, segun lo determine
no
extendera
de
Ia
garantfa.
si
el
la
Garantfa por separado.
"tal
como estan" y sin garantfa de ninguna Indole de parte de
con
defectos encontrados durante
U.S.A.,
es
extendida por
en
materiales y mana de obra bajo uso y servicio normal
le
entreg6 nuevo yen
Un
Producto devuelto a
el
perlodo original de garantfa del Producto.
Una
Producto
los artlculos que
es
Inc.
GARANTiA
Canon
con
esta garantfa limitada, sola mente cuando
su
en
ingles)
de
copia
de
su
factura de compra fechada satisfara este requisito.
de
tinta,
para
utilizado junto
Las
reparaciones
El
equipo y software que
un
no
sean
el
uso
LIMITADA
U.S.A., Inc. ("Canon
empaque original o
un
establecimiento
Canon
USA,
los cuales
con
computadoras, equipo periferico y programas (software)
prop6sito
de
normal del Producto y nose a plica
la
en
marca
(b)
el cual despues
el
establecimiento
no
habra ninguna garantfa o reemplazo.
de
dichos equipos perifericos de
no
particular y todas
Canon
es
---
(Solamente
USA")
en
relaci6n
(a)
por
por noventa (90) dlas a partir
de
reparaci6n
de
una
y/o
recicladas;
Se
requiere el comprobante de compra
sean
de
la
Canon
esas
extend ida por el fabricante o productor
en
al
producto nuevo o
es
com
prado y utilizado
el
perlodo de
de
Canon
inspecci6n
(b)
intercambiado por
de
reparaci6n o
marca
USA,
garantfas
los
siguientes
se
de
la
la
Canon
incluyendo cualquier
son
EE.
UU.)
un
(1)
aiio a
de
la
fecha
USA
o a
comprueba
el
ASF
Esta
garantfa
marca
Canon
marca
Canon
que podrlan
denegadas.
casas:
un
un
de
(a)
La
perdida o daiio
alteraci6n, accidente, fluctuaciones
operaci6n
otra documentaci6n, o servicios prestados por terceros y noun establecimiento
lo
anterior, dejar
incumplimiento
(b)
El
uso
no
anormal
(c)
Si
CUALQUIER
CD-ROM
ES
VENDI
EN
EL
DENEGACIONES
DE
LICENCIA
NINGUNA
PROPOS
Y
NINGUNA
0
ENTIDAD
CUANTO
CANON
0
SERVICIO,
DEL
AUN
DE
NINGUNA
PRESUNTO
Y A
EL
PRODUCTO
AS
F.
EXCLUSION 0 LIMITACION
SEA
REMEDIO
SISTEMA
INCLUIDOS
DO
CONTRATO
GARANTfA
ITO
EN
OTRA
EN
TIEMPO
USA
NO
CARGOS
USO,
USO
Sl
CANON
DANO.
SU
PROPIEDAD
(ALGUNOS
EL
COMPRADOR
EXCLUSIVO.
"TAL
DEL
REFERENCIA
fNDOLE
VENDI
ode
de
piezas, medias, software o suministros
sean
de
para
el
numero
DE
SOFTWARE
CON, 0 QUE
COMO
DE
LICENCIA
EN
EL
MISMO.
FABRICANTE
IMPLfCITA,
PARTICULAR,
GARANTfA
TIENE
VIGENCIA
SERA
RESPONSABLE
POR
INAPROPIADO 0 LA
USA 0 SUS
CONTRA
SIN
LIMITAR
Y A
OTROS Y SU
DO
EST
ADOS
ORIGINAL
al
Producto debido
mantenimiento bajo, o
caer
el
Producto, encontrar raspones y abrasiones
al
operar
el
Producto
la
marca
Canon
o cartuchos
servicio o por problemas
de
serie o fecha
ACOMPANAN,
ESTA" Y SIN
DEL
POR
DEL
SOFTWARE.
INCLUYENDO
SE
APLICA
EXPRESA 0 UNA
AL
PRODUCTO
UNA
ALMACENAMIENTO,
ASF
HAN
CANON
LO
ANTERIOR,
POR
CANON
NO
PERMITEN
PODRfA
DEL
del Producto
(yA
SEA
INSTALADO
GARANTfA
FABRICANTE
FAVOR,
COMUNfQUESE
AL
PRODUCTO
OBLIGARA A CANON
GARANTfA
POR
LA
PERDIDA
INCAPACIDAD
SIDO
INFORMADOS
USA 0 SUS
PROPIEDAD
USA
QUE
LA
EXCLUSION 0 LIMITACION
NO
APLICARSE A USTED).
PRODUCTO 0 LA
al
abuso, negligencia, manejo inapropiado, empaquetado incorrecto por parte
de
la
corriente electrica,
en
condiciones ambientales prescritas
segun
lo
establecido
(que
de
tinta rellenados, que puedan daiiar
de
servicio.
ha
sido desfigurado, alterado o removido.
DE
FABRICA
EL
PRODUCTO), Y CUALQUIER
POR
CANON
DEL
SOFTWARE Y ES
CUALQUIER
GARANTfA,
IMPLfCITA,
LA
PERDIDA 0 CORRUPCION
DE
ASF
USTED
ASUME
COMO
NO
FUERA
USA.
CON
CANON
GARANTfA
DESPUES
DE
UTILIZAR
POR
CONSECUENCIA
PERSONA
DEL
EXCEPTO
USA,
DE
MANERA
INGRESOS 0 UTILIDADES,
EL
DE
LA
POSIBILIDAD
UNA
CANTIDAD
TODO
CAUSADO
ESTA
PARA
uso
inapropiado,
se
consideraran resultado del
en
el
manual del usuario o
no
fueran
los vendidos por
EN
EL
PRODUCTO 0 CONTENIDO
SOFTWARE
LA
UNICA
GARANTfA
DISTRIBUIDA
USA
IMPLfCITA
PERfODO
LO
MENCIONADO
0 A
SUS
QUE
DE
PRODUCTO
RIESGO Y RESPONSABILIDAD
DE
LA
EXCLUSIVA Y DIRECTAMENTE
DE
DANOS
GARANTfA
QUIEN
CON
INMEDIATAMENTE
REFERENTE A LA
DE
LA
ASF.
LA
LIMITACION
INCONVENIENCIA,
DATOS, 0 POR
NO
OBSTANTE
DE
LOS
MAYORAL
POSESION,
INCIDENTALES 0 RESULTANTES,
LIMITADA
FUERA
el
incumplimiento
en,
de
el
Producto o causar
UTILITARIO
EN
RELACION
EL
MISMO,
GARANTfA
ANTERIORMENTE,
(ALGUNOS
CUALQUIER
LA
REFERIDOS
PRECIO
USO,
NOSE
EXTEND
COMPRADO
de
el
manual del usuario
reparaci6n o
en
Canon
EN
DISTRIBUIDO
INCLUYENDO
Sl
NO
COMERCIABILIDAD 0 ADECUACION
LIMIT
ADA
ESTADOS
ANTERIOR
TEORfA
DANOS.
DE
COMPRA
POR
USO
INAPROPIADO 0 INCAPACIDAD
POR
COMO
ASF
uso
otra
documentaci6n
USA),
incluyendo cartuchos
LOS
DISQUETES
CON
DICHO
HA
RECIBIDO
EXPRESA
EXTENDIDA
NO
PERMITEN
PODRfA
GASTOS
LA
ERA A NINGUNA
POR
OTRO
DANO
LEGAL
EN
TAMPOCO
DEL
PERDIDA,
LA
NEGLIGENCIA
DE
REGALO, Y DECLARA
suya,
las
instrucciones
de
Canon
de
Canon
inapropiado, abuso o
una
frecuencia
DEL
SOFTWARE 0 EN
CON 0 PARA
SOFTWARE
TODAS
LAS
UNA
CO
INDICADA
POR
CUALQUIER
LIMITACIONES
NO
APLICAR
LA
SUSTITUCION
INCIDENTAL 0 RESULTANTE
QUE
SE
HABRA
PRODUCTO
DANO 0 LESIONES A USTED
DE
MAN
ERA
OTRA
de
USA o en
USA.
Sin
limitar
para
el
Producto.
de
tinta que
de
llamadas
EL
PRODUCTO,
ESTA
CONTENIDA
LIMITACIONES
PIA
DEL
CONTRA
PARA
ANTERIORMENTE,
PERSONA
SOBRE
PARA
USTED.)
DE
EQUIPO
BASE
EL
RECLAMO,
RECUPERACION
QUE
CAUSARA
DE
UTILIZAR
CANON
USA 0 SUS
QUE
LA
ANTERIOR
PERSONA
SU
RECURSO
QUE
LOS
Y
TO
UN
EL
NO
DE

USA
Canon
Resoluci6n
•
frecuentes
Soporte tecnico gratis
•
Dispositivo telef6nico
•
Opciones
•
que
caso
En
servicio
para
opciones
de
gama
una
ofrece
problemas, servicio tecnico por
interactiva
de
(www.usa.canon.com/support)
a viernes (excluyendo
tunes
de
personas
para
intercambio o reparaci6n:
de
servicio
para
equipo:
el
servicio
de
requiera
se
soporte tecnico*
de
problemas
con
Producto
el
•
de
durante
clientes:
para
electr6nico,
correo
feriados)
dlas
los
audici6n (TDD-1-866-251-3752)
vigencia
perlodo
el
de
descarga
all-800-0K-
Ia
de
garantla
los
de
CANON
Ctltimos
limitada,
drivers y respuestas
ofrece
USA
Canon
para
dos
preguntas
opciones
de
entrega
Servicio
El
media
cercano(s)
Canon
de
garantla
esta
Servicio
Un
por telefono.
dara
le
se
envlo del
el
El
del recibo del
Producto
su
reemplazo
explicaci6n completa
ASEGURESE
El
enviado
sera
no
USA
razonable.
perlodo restante
REEMPLAZO
PROPIEDAD
EN
durante
Hawai
de
entrega
servicio
de
establecimiento
servicio
durante
de
de
red
Ia
se
usted
a
all-800-0K-CANON,
USA
limitada
lntercambio
de
atenci6n
de
Centro
nose
Si
nCtmero
un
Producto
Producto
establecimiento
al
debe
y
QUEDARSE
DE
lntercambio instantaneo (lnstantExchange
de
mismo
el
Producto
El
QUE
DE
perlodo
el
el
de
SE
CANON
de
perlodo
garantiza
el
correo
por
personal
reparado
o
por
I
Servicio Autorizado
de
en
o
o cambiado,
personal
Establecimientos
puede(n) obtener del sitio
sera
instantaneo**
Canon
de
cliente
al
problema por
corregir
puede
referenda.
de
reemplazo
de
reparaci6n
de
reemplazo
de
nCtmero
el
incluir
problema.
del
CON
usted
si
dla
durante
envlo
reemplazo
de
garantla
su
ENVfA.
LE
USA.
garantla limitada escrita
Ia
indicado.
el
le
Se
(debe
de
(con
reparaci6n
de
de
INCLUYA
NO
CABEZAL
SU
solicita
mismo
el
que
limitada original.
programa
El
USA
CANON
Establecimiento
del
USA
Canon
de
correo
Canon
de
web
cualquier momenta mientras
sea
segCtn
(lnstantExchange
tecnico del
un
o
telefono,
nCtmero
solicitara
incluir
Canon
referenda,
este
recibe
el
direcci6n
una
enviara
USA
instrucciones y
Canon
de
UNA
NINGUN
IMPRESI6N,
DE
servicio antes
caso
en
dla
ser
podrla
TENGA
QUEDARA
SE
para
de
su
del servicio
USA.
COPIA
OTRO
de
EN
CON
Producto
de
brinda
de
(ASF)
enwww.usa.canon.com/support
USA
determinado por
Service**)
ASFtratara
usted
y
serie
de
fTsica).
Producto
el
hoja
una
Debe
SU
DE
ARTICULO
CARTUCHO(S)
Service)
las
de
eventos o
unidad reconstruida o reacondicionada y
una
CUENTA
PRODUCTO
EL
lntercambio instantaneo
y
servicio
un
Canon
conversa
del
de
devolver
3 p.m.
QUE
sola
autorizado
servicio
de
se
COMPROBANTE
cambia
factores
mente
de
USA.
con
Canon
diagnosticar
porIa
decide
Producto
reemplazo
de
prepagada),
ruta
Producto
su
EL
CON
TINTA
DE
su
del
hora
que
USAR
AL
QUE
sera
reparaci6n
nombre(s) y
(los)
El
persona
una
y devuelto porIa
USA,
naturaleza
Ia
opci6n
informacion
otra
y
los
con
siga
dentro
COMPRA
DE
PRODUCTO
YTANQUE(S).
Producto
ESTE
USTED
por
tunes
de
Este,
estuvieran
SERVICIO
COMPR6
(lnstantExchange)
valido dentro
USA,
Canon
Un
fuera
si
empac6
se
PARA
los
desde
EL
de
(de
atenci6n
de
Producto
Canon
DE
dlas
CON
CUAL
para
cubierto por
posible, corregirlo
direcci6n
una
USA.
poder enviar
para
Producto
el
COMPRA),
DEVOLUCI6N,
LA
normalmente
que
feriados.
punto
un
el
PRODUCTO
EL
CONVERTIRA
SE
usted
al
Despues
saldo del
solamente
Alaska
intercambio, a opci6n
ode
nCtmeros
los
o alllamar
servicio tecnico.
de
del problema y
lntercambio instantaneo (lnstantExchange),
de
referente
prepagados por
gastos
instrucciones adjuntas
las
caja
Ia
de
FECHADO
DE
CAJA
LA
EN
Producto
un
a viernes,
su
de
fuera
estara
SE
USTED
ORIGINALMENTE,
esta
Estados
los
de
telef6nicos del
centro
at
cargo.
sin
ASF
mismo y
at
donde
(FACTURA
ENVfO
reemplazo,
de
excepto
control
cubierta durante
QUEDARA
disponible
Unidos continental,
los)
cliente
para
y
Canon
vista
de
por
ASF
de
una
Y
DE
y
derechos
otorga
garantla
11042
NY
le
programa
del
lntercambio instantaneo
de
nuevas.
de
U.S.A.,
Plaza
limitada
especlficos
de
Inc.
garantla
Esta
*Los detalles
servicio
El
**
reacondicionadas o
Canon
Canon
One
Success,
Lake
USA
marca
y
una
tam
bien
Canones
Inc.
U.S.A.,
Canon
2009
©
los Estados Unidos
en
Inc.
Canon
otros pafses.
registrada
QTl-0927-VOl
en
especlficos
legales
sujetos a cambia
soporte
puede ser
estan
(lnstantExchange)
comercial registrada de
marca
una
bien
tam
y
comercial
podrla
sin
esta
tener otros
aviso.
previa
sujeto a
derechos,
disponibilidad
Ia
estados.
entre
varian
que
reemplazo
las
de
IMPRESO
unidades
de
TAILANDIA
EN
112009YT
111111111111111111
QTI0927VOI

canon
The
limited warranty set forth below
brand product ("Product")
The
Product
year from the date
the date
Service Facility
or recycled parts
or the
ASF.
required at the time
any accessories, or any consumables, such
is
warranted against defects
of
of
original purchase for refurbished Products. Product returned to a
("ASF"),
(b)
Warranty repair or replacement shall not extend the original warranty period
packaged with this limited warranty, when purchased and used
original purchase when delivered to you
and proven to
exchanged for new or;
of
warranty service. A copy
is
given
be
defective upon inspection will
Canon
by
Canon
in
materials and workmanship under normal
(c)
exchanged for a refurbished Product,
of
your dated bill
as
paper or ink cartridges,
U.S.A.,
U.S.A.,
in
new condition
Inc.
Inc. ("Canon
be
(a)
of
sale
will
as
to which there shall
LIMITED
USA")
in
its original container or
Canon
repaired utilizing new, remanufactured, repaired
satisfy this requirement. This warranty does not cover
WARRANTY---
with respect to the new or refurbished Canon-
in
the United States only.
use
and service
USA
repair facility or a
as
determined
of
the Product. A dated proof
be
(a)
(b)
for ninety (90) days from
by
the
Canon
no
warranty or replacement.
(USA
for a period
Canon
USA
USA
Only)
of
one
Authorized
and/
repair facility
of
purchase
(1)
is
This limited warranty
and software.
covered
the terms
"as is"
and without warranty
particular purpose, and
is
given
This
limited warranty
(a)
(b)
(c)
ANY
SYSTEM
CD-ROMS
PRODUCT,
CONTAINED
AND
DISCLAIMERS
MANUFACTURER'S
Canon
by
a separate warranty ("Separate Warranty").
of
the Separate Warranty. Non-Canon brand equipment and software that may
by
the manufacturer or producer thereof.
Loss
of
or damage to the Product due to abuse, neglect, mishandling, improper packaging
accident, electrical current fluctuations, improper
environmental conditions prescribed in,
performed
Product,
Product
Use
refilled ink cartridges, that
If
ENCLOSED
IS
SOLD
IN
scratches,
as
of
parts, media, software or supplies (other than those sold
the product
SOFTWARE
WITH,
"AS
THE
SOFTWARE
THEREON.
LICENSE
shall
only apply
USA
shall have
of
all such warranties
covers
all defects encountered
by
someone other than a
set forth
has
had
(WHETHER
OR
IS"
AND
PLEASE
AGREEMENT.
no
any kind
and
abrasions will
in
the user's manual or other documentation for the Product.
cause
its serial number or dating defaced, altered or removed.
FACTORY
ACCOMPANYING,
WITHOUT
MANUFACTURER'S
CONTACT
if
the Product
responsibility for such items except for compatible
by
Canon
are
disclaimed.
Canon
damage to the
LOADED
WARRANTY
CANON
is
Repairs
USA,
in
normal
Canon
USA
be
presumed to
THE
PRODUCD,
BY
LICENSE
USA
used
in
conjunction with compatible computers, peripheral equipment
of
such
Canon
brand peripheral equipment shall
be
including any implied warranty regarding merchantability or fitness for a
The
sole warranty,
use
of
the Product
use,
failure to follow operating or maintenance instructions in, or
USA's
user's manual or other documentation, or services
repair facility or
have
resulted
Product
ON
CANON
or
cause
THE
PRODUCT
AND
USA.
THE
AGREEMENT
IMMEDIATELY
if
any,
with respect to such non-Canon brand items
and
does not apply
AS
F.
Without limiting the foregoing, dropping the
from
misuse, abuse or failure to operate the
by
Canon
USA),
including non-Canon ink cartridges or
abnormally frequent service calls or service problems.
OR
CONTAINED
ANY
UTILITY
SOLE
DISTRIBUTED
IF
YOU
SOFTWARE,
WARRANTY
THEREWITH,
HAVE
NOT
Canon
brand peripheral equipment
be
governed
distributed with the Product
in
by
ON
THE
DISTRIBUTED
WITH
RESPECT
RECEIVED
the following
you, alteration,
SOFTWARE
TO
INCLUDING
A
COPY
cases:
WITH
SUCH
ANY
OF
THE
DISKETTES
OR
SOFTWARE
LIMITATIONS
by
are
sold
OR
FOR
THE
IS
SOFTWARE
NO
IMPLIED
APPLIES
EXPRESS
PRODUCT
LASTS,
INCONVENIENCE,
OTHER
REGARDLESS
THE
POSSIBILITY
AMOUNT
ASSUME
PROPERTY
SOLELY
LIMITATION
THIS
LIMITED
PERSON
WARRANTY,
TO
THE
WARRANTY
SHALL
SO
THE
ABOVE
SPECIAL,
OF
THAN
THE
ALL
RISK
ARISING
AND
DIRECTLY
OF
INCIDENTAL
WARRANTY
FOR
WHOM
INCLUDING
PRODUCT
BIND
EXPENSE
INCIDENTAL
THE
OF
AND
OUT
AFTER
OR
GUARANTY,
CANON
LIMITATION
FOR
LEGAL
SUCH
PURCHASE
LIABILITY
OF
THE
BY
THE
SHALL
IT
WAS
ANY
THE
APPLICABLE
EXCEPT
USA,
OR
MAY
NOT
SUBSTITUTE
OR
CONSEQUENTIAL
THEORY
DAMAGES.
OR
PURCHASED
ON
PRICE
OF
FOR
POSSESSION,
NEGLIGENCE
CONSEQUENTIAL
NOT
EXTEND
IMPLIED
AS
ITS
ASF.
APPLY
EQUIPMENT
WHICH
NOR
SHALL
THE
PRODUCT
LOSS,
USE,
OF
AS
A
GIFT,
WARRANTY
PERIOD
MENTIONED
(SOME
THE
DAMAGE
TO
STATES
TO
YOU.)
DAMAGES
CLAIM
RECOVERY
CAUSING
MISUSE,
CANON
DAMAGES,
ANYONE
AND
STATES
OF
CANON
OR
SERVICE,
CAUSED
IS
OR
INJURY
OR
USA,
SO
OTHER
OF
MERCHANTABILTY
THE
EXPRESS
ABOVE,
DO
BASED,
YOUR
GIVEN
NOT
ALLOW
USA
SHALL
STORAGE
BY
AND
OF
ANY
THE
ALLEGED
TO
INABILITY
OR
ITS
ASF.
THE
ABOVE
THAN
EXCLUSIVE
KIND
YOU
LIMITED
BY
LIMITATIONS
NOT
CHARGES,
THE
USE,
EVEN
AGAINST
DAMAGE.
AND
TO
USE
(SOME
EXCLUSION
THE
ORIGINAL
REMEDY.
ANY
BE
MISUSE,
IF
CANON
YOUR
THE
STATES
PRODUCT
OR
FITNESS
WARRANTY
PERSON
LIABLE
CANON
OR
ON
HOW
FOR
LOSS
OR
OR
USA
OR
USA
WITHOUT
PROPERTY
SOLD
DO
OR
LIMITATION
PURCHASER
FOR
A
STATED
LOSS
INABILITY
NOT
ABOVE,
ENTITY
CORRUPTION
ITS
LIMITING
LONG
OF
ASF
OR
ITS
AND
BY
CANON
ALLOW
MAY
OF
WITH
AN
REVENUES
TO
THE
PARTICULAR
AND
RESPECT
IMPLIED
OR
OF
DATA,
TO
USE
THE
HAS
BEEN
ADVISED
ASF
BE
GREATER
THE
FOREGOING,
OTHERS
THE
NOT
AND
USA
NOT
EXCLUSION
APPLY
PRODUCT
PURPOSE,
NO
OTHER
TO
THE
WARRANTY
PROFITS,
OR
ANY
PROUDCT
OF
IN
YOU
THEIR
CAUSED
OR
TO
YOU.)
OR
THE

of customer technical support* options:
offers a
USA
Canon
• Interactive
(www.usa.canon.com/
Toll-free
•
Telephone
•
Repair
•
the event service
In
options:
Authorized
Canon
Service
site at
speaking to a technical support person. A Product
Canon
by
live technical support Monday-Friday (excluding hoiidays)
or
Service
USA's
Facility
(ASF)
www.usa.canon.com/support
and
USA,
range
troubleshooting, e-mail technical support, the latest driver downloads
support)
(fDD-1-866-251-3752)
Deaf
for the
Device
Exchange
Service
is
Facility
Carry-In/Mail-In
network.
returned without
Options:
required for the Product during the limited warranty period,
Service
Mail-In
Carry-In
The
I
Service
name
or
charge
provides repair or
telephone number
and
calling the
by
the
by
covered
ASF.
Canon
by
1-800-0K-CANON
at
USA's
Canon
the
of
Customer
at
ASF(s)
near
Care
exchange,
USA
this limited warranty will
and
Canon
option, through
may
you
Center
at
be
answers to frequently
two
offers
USA
Canon
obtained
be
1-800-0K-CANON,
repaired or
from
exchanged,
questions
asked
hardware support
Authorized
USA's
Web
USA's
Canon
time while
any
or
determined
as
If
issued to
USA
Product must
Your
OTHER
ANY
USING
THAT
service
Alaska
Service**
or
Center
Care
the problem cannot
will
You
you.
repair facility
and
COPY
ITEMS
AND
Service
THIS
YOU
is
Hawaii during
and
gives
will
a prepaid
returned
be
DATED
YOUR
OF
WITH
TANK(S).
exchanges
p.m.
3
by
is
and
SERVICE
ORIGINALLY
available only during the
YOU
specific legal rights,
you
technician will attempt to diagnose the nature
ASF
corrected over the telephone,
be
for the Product serial number
asked
be
ship out the replacement Product prepaid
waybill),
THE
your Product with a replacement Product, which will normally
E.T.
will
WILL
PURCHASED,
such
follow the enclosed instructions
the shipping
in
PROOF
be
OF
PRODUCT
Monday through
covered
THE
KEEP
period.
carton
PURCHASE
THE
IN
for the balance
REPLACEMENT
WHICH
express
you
and
(BILL
RETURN
Friday,
SHALL
limited-warranty period for your Product
may
which the replacement Product
in
except holidays.
BECOME
also
lnstantExchange
Customer
Canon
A
over the telephone.
number will
for a ship-to location for the replacement Product (must include street address).
and
The
Product (with instructions
repair facility.
reference
INCLUDE
NOT
HEAD,
lnstantExchange
your request for this service
shipment
refurbished or reconditioned unit
NOTE
PRODUCT
THE
warranty
United States,
This
be
Canon
number, A
CARTRIDGE(S)
INK
the event of the occurrence of factors beyond its reasonable control.
in
BY
THAT
program
limited warranty
elect the lnstantExchange option, a
you
and
other information pertaining to your Product
and
Canon
by
how to ship your product to the
on
a complete explanation of the problem.
and
SALE),
OF
SHIPPING
of
PRODUCT
have
CARTON,
Canon
replacement Product
The
the period remaining
IS
THAT
PROPERTY
THE
other rights, which
the problem and,
of
After receipt of the replacement
USA.
was
SURE
BE
AND
does
USA
your original limited warranty.
on
YOU.
TO
SENT
CANON
OF
from
vary
if
packed
RETAIN
TO
shipped the
be
not guarantee
you
CANON
USA.
only
and
to
state
possible, correct it
reference
USA
Canon
include the
and
DO
PRINT-
YOUR
day
same
day
same
be
receive
USA
in
state.
may
RETAIN
WILL
lnstantExchange
the continental
if
a
subject to
are
service
is
Inc.
Plaza
NY
specifics
11042
*Support
**
Canon
One
Lake
program
lnstantExchange warranty
U.S.A.,
Canon
Success,
USA
registered
a
is
Canon
Inc.
U.S.A.,
Canon
2009
©
registered
a
be
also
may
and
the United
QT1-0926-V01
States
change
subject to the availability
trademark
without notice.
trademark of
in
Canon
other countries.
refurbished or
of
in
Inc.
replacement units.
new
THAILAND
PRINTED
IN
112009YT
1111111111111
QT10926V01
 Loading...