

Page 1

User’s Guide
ENG
QT5-0006-V05
Page 2

Getting Help from Canon
Help Us Help You Better
Before you contact Canon, please record the following information.
Serial Number (located inside the machine): ___________________________
Model Number (located on the front of the machine): ____________________
Machine Driver CD-ROM number (located on the CD-ROM): ______________
Purchase Date:__________________________________________________
Customer Technical Support Sequence*
1.Internet — www.canontechsupport.com
For quick and comprehensive self-help in an intuitively guided interactive troubleshooting
environment, the place to start is our helpful tech support web site. In addition, the latest
driver downloads, answers to frequently asked questions, product information, and
“where to buy” instructions are found here.
2.Email Tech Support — www.canontechsupport.com
For individual attention to a special issue, try emailing our friendly technical engineers,
specially trained to communicate quick, easy, and logical solutions to your inquiries within
24 hours.
3.Toll-Free Live Tech Support — (1-800-828-4040)
This option provides live telephone technical support, free of service charges, MondaySaturday (excluding holidays), during your product’s 1 year limited warranty period. Telephone Device for the Deaf (TDD) support is available at (1-866-251-3752).
4.Extended Service and Support — www.canonesp.com
Canon CarePAK Extended Service Plan is a cost-attractive and easy-to-use extended
service program that provides up to three full years of service and support coverage at a
very attractive price. CarePAK offers toll-free Canon technical support and includes
Canon’s superb InstantExchange product replacement program. For further information
about extending your Canon service and support, call (1-800-385-2155), or visit our Web
site at www.canonesp.com. CarePAK must be purchased during your product’s warranty period.
For more information and updated program specifics, please visit our web site at
www.canontechsupport.com.
* Support program specifics are subject to change without notice.
Page 3

Table of Contents
Copyright ........................................................3
Disclaimer.......................................................3
Model Name ...................................................3
Trademarks.....................................................4
How to Use the Documentation Provided.........4
Safety Precautions ...........................................5
Reading the Document...................................10
Symbols Used in This Guide ........................10
Legal Limitations on Use of Your Product
and Use of Images .........................................11
1 Before Printing .......................................12
Main Components and Their Functions........ 12
Turning the Machine ON and OFF ...............17
Loading Documents to Copy or Scan ...........18
Loading Paper ..............................................19
Changing the Print Settings..........................34
2 Copying...................................................38
Making Copies..............................................38
Changing the Copy Settings.........................40
Using Useful Copy Functions .......................40
3 Printing from a Memory Card................45
Using the Memory Card................................45
Printing Photograph......................................48
Other Useful Functions.................................51
4 Photo Printing from Photo or Film .......61
Scanning a Photo .........................................61
Scanning a Film............................................62
Printing Photographs ....................................67
Other Useful Functions.................................69
5 Printing Photographs Directly from a
Compliant Device ...................................71
Connecting to a PictBridge Compliant
Device...........................................................71
Printing Photographs Directly from a
PictBridge Compliant Device........................73
Printing Photographs Directly from a
Canon Bubble Jet Direct Compatible
Digital Camera..............................................76
6 Printing Photographs from a Wireless
Communication Device .........................78
Setting the Page Size, Media Type, and
Layout When Printing from a Mobile
Phone ...........................................................78
Performing Infrared Communication.............79
Performing Bluetooth Communication..........81
7 Printing from Your Computer ...............83
Printing with Windows...................................83
Printing with Macintosh................................. 85
8 Scanning Images ................................... 88
About Scanning Images ...............................88
Scanning Methods........................................88
9 Reading from and Writing to a
Memory Card.......................................... 91
Setting up the Card Slot as the Memory
Card Drive of the Computer..........................91
10 Changing the Machine Settings ........... 92
The Print Settings.........................................93
Wireless Print Settings .................................94
Bluetooth Settings ........................................94
Other Settings...............................................95
Language selection ......................................95
Reset setting.................................................95
Save settings................................................95
Load settings ................................................95
11 Routine Maintenance ............................ 96
Replacing an Ink Tank..................................96
Getting the Ink Level Information.................. 97
Knowing When to Replace Ink Tank ............ 97
Replacing Ink Tanks.....................................98
Keeping the Best Printing Results .............. 101
When Printing Becomes Faint or Colors
are Incorrect ...............................................102
Cleaning Your Machine ..............................109
12 Troubleshooting .................................. 113
An Error Message is Displayed on the
LCD ............................................................115
Cannot See the Display Properly on the
LCD/Cannot See the Display on the LCD ..117
Cannot Scan Films .....................................118
Ink Does Not Come Out/Printing is Blurred/
Colors are Wrong/White Streaks/Straight
Lines are Misaligned/Cannot Print to End of
Job..............................................................119
Back of Paper is Smudged/Paper Does
Not Feed Properly/Printed Surface is
Scratched ...................................................123
Paper Jams ................................................127
Cannot Print Properly from a Photo Index
Sheet ..........................................................130
Cannot Print Properly from the Digital
Camera.......................................................130
Cannot Print Properly through Wireless
Communication........................................... 133
Cannot Install the MP Drivers.....................134
Cannot Connect to the Computer
Properly ......................................................135
Problems Scanning ....................................136
1
Page 4

Cannot Scan Films .....................................140
An Error Message Appears on the
Screen ........................................................141
If You Cannot Resolve the Problem ...........145
13 Appendix...............................................146
Printing Area...............................................146
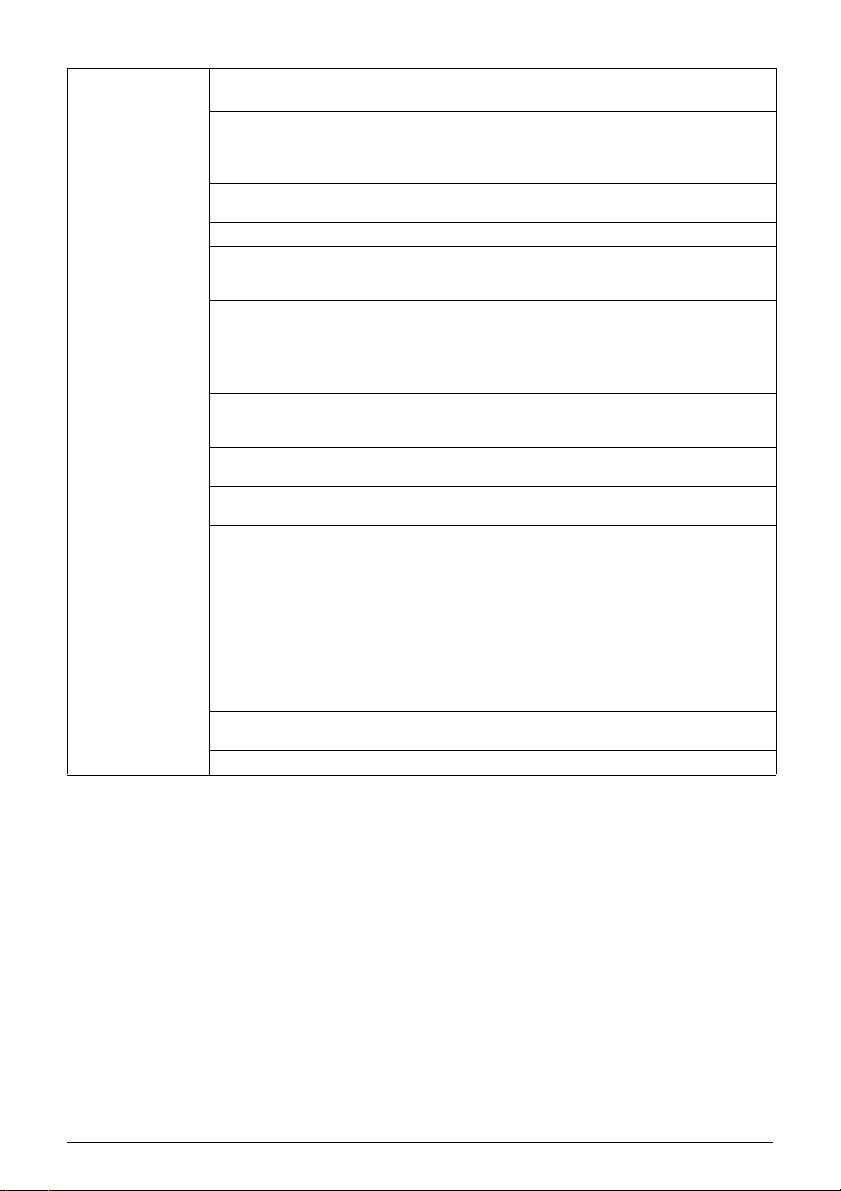
How to Read the On-screen Manuals.........148
Uninstalling the On-screen Manuals........... 148
Transporting Machine.................................149
Specifications..............................................149
Users in the U.S.A. .......................................154
FCC Notice .................................................154
Mercury Legislation.....................................154
Canon U.S.A., Inc. Limited Warranty
- U.S. Only ..................................................155
Users in Canada...........................................158
Customer Technical Supports ....................158
Index ............................................................159
2
Page 5
Canon MP950 User’s Guide
Copyright
This manual is copyrighted by Canon Inc. with all rights reserved.
Under the copyright laws, this manual may not be reproduced in any form, in whole or in part, without
the prior written consent of Canon Inc.
© 2005 Canon Inc.
Disclaimer
Canon Inc. has reviewed this manual thoroughly in order that it will be an easy-to-use guide to your
Canon MP950 Series. All statements, technical information and recommendations in this manual
and in any guides or related documents are believed reliable, but the accuracy and completeness
thereof are not guaranteed or warranted, and they are not intended to be, nor should they be
understood to be, representation or warranties concerning the products described.
Specifications are subject to change without notice.
As an ENERGY STAR partner, Canon Inc., has determined that this product
meets the ENERGY STAR guidelines for energy efficiency.
All information regarding non-Canon products was compiled from publicly available information. No
representation is made regarding the accuracy thereof.
This machine supports Exif 2.2 (also called “Exif Print”).
Exif Print is a standard for enhancing the communication between digital cameras
and printers.
By connecting to an Exif Print-compliant digital camera, the camera’s image data
at the time of shooting is used and optimized, yielding extremely high quality
prints.
Model Name
K10266 (PIXMA MP950)
3
Page 6
Trademarks
z "Windows" and "Internet Explorer" are trademarks of Microsoft Corporation, registered in the
United States and other countries.
z "Macintosh" and "Mac" are trademarks of Apple Computer, Inc., registered in the U.S. and other
countries.
z "SmartMedia" is a trademark of Toshiba Corporation.
z "MEMORY STICK", "Memory Stick PRO", "MEMORY STICK Duo" and "Memory Stick Pro Duo"
are trademarks of Sony Corporation.
z "xD-Picture Card" is a trademark of Fuji Photo Film Co., Ltd.
z "MultiMediaCard" is a trademark of Infineon Technologies AG.
z "SD Secure Digital memory card" and "miniSD Card" are trademarks of SD Association.
z "IrDA Feature Trademark" is owned by the Infrared Data Association and used under license
therefrom.
z "Bluetooth" is a trademark of Bluetooth SIG, Inc.,U.S.A. and are licensed to Canon Inc.
z Specifications are subject to change without notice.
How to Use the Documentation Provided
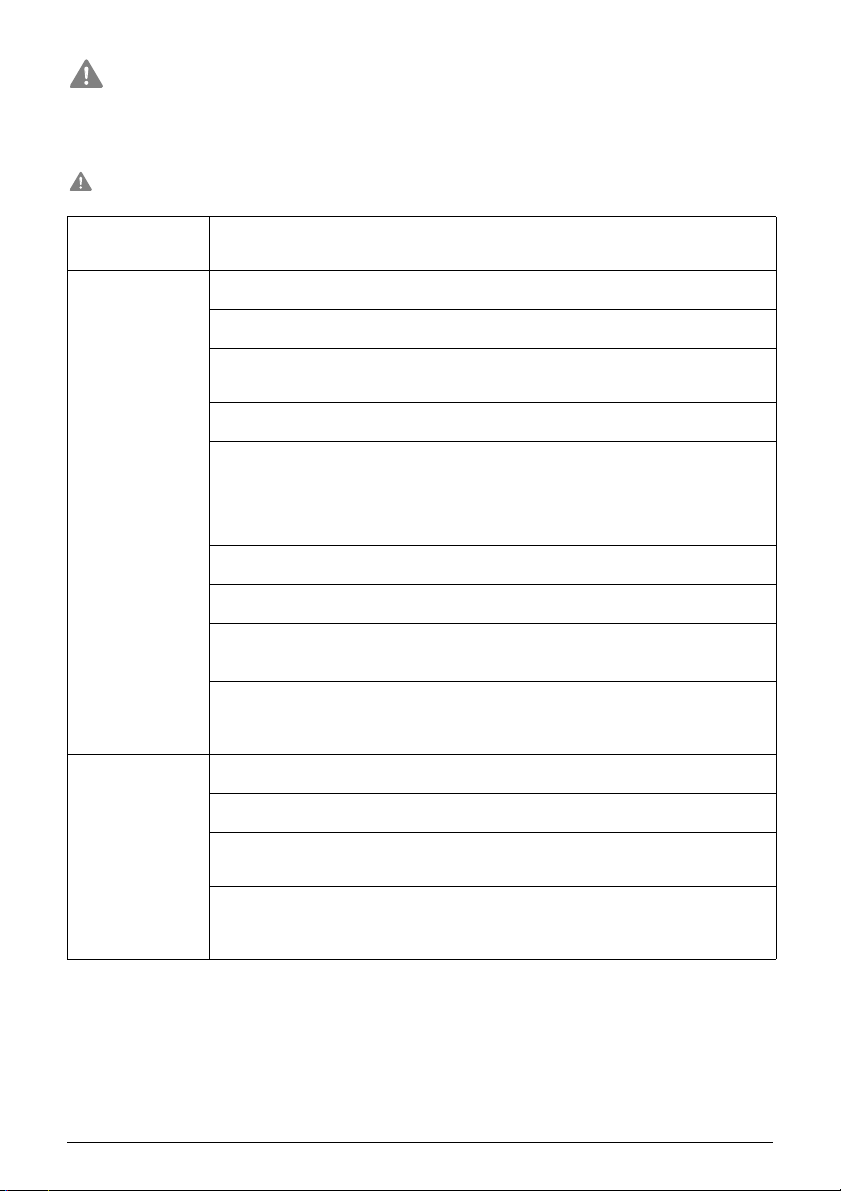
Easy Setup Instructions
(Printed documentation)
User’s Guide
(This guide)
On-screen Manuals Refer to these guides as needed for full instructions on some of the
Be sure to read this sheet first.
This sheet includes instructions for setting up your machine and getting
it ready for use.
Read this guide when starting to use the machine.
After following instructions in the Easy Setup Instructions, read this
guide for instructions on printing from your computer, direct photo
printing from selected digital cameras, copying, and scanning.
more advanced features.
Printer Driver Guide
Refer to this guide for full instructions on setting the printer driver.
Scan Guide
Refer to this guide for full instructions on scanning operation and
settings.
Photo Application Guide
Refer to this guide for instructions on using various application
software included on the Setup CD-ROM.
Bluetooth User’s Guide
Refer to this guide for full instructions on printing from computers and
devices that support Bluetooth communication, and on troubleshooting
them.
4
Page 7
Safety Precautions
Please read the safety warnings and cautions provided in this guide to ensure that you use your
machine safely. Do not attempt to use the machine in any way not described in this guide.
Warning
You may cause an electric shock/fire or damage the machine if you ignore any of
these safety precautions.
Location Do not place the machine close to flammable solvents such as alcohol or thinners. If
Power supply Never attempt to plug or unplug the machine from the power supply when your hands are
Maintenance Do not service the machine yourself except as specifically described in this guide. If further
flammable substances come into contact with electrical parts inside the machine, it may
result in fire or electrical shock.
wet. This may result in electrical shock.
Always push the plug all the way into the power outlet. If the prongs of the power plug
come into contact with metal objects, it may result in fire or electrical shock.
Never damage, modify, stretch or excessively bend or twist the power cord. Do not place
heavy objects on the power cord. These actions may cause electrical damage and result in
fire or electrical shock.
Never plug the machine into a power socket that is shared with other equipment (extension
lead/cord, 2- or 3-way adapter, etc.). This may result in fire or electrical shock.
Plug the machine into a standard 110-120 V AC, 50/60 Hz or 200-240 V AC, 50/60 Hz,
(depending on your local electrical requirements), two-prong* grounded outlet. Operate the
machine only from the type of power source indicated on the machine’s label or a fire,
electrical shock, or malfunction may occur. If you are unsure of the type of power available,
consult your local power company.
* The shape of the plug and outlet may vary depending on the country of purchase.
Do not allow the power cord to be near objects that emit heat. The outer cover of the power
cord may melt resulting in fire or electrical shock.
Never use the machine if the power cord is bundled or knotted. Knots in the cord may
result in fire or electrical shock.
If you detect smoke, unusual smells or strange noises around the machine, immediately
unplug the machine at the power supply and contact the Canon Customer Care Center.
Using the machine in such conditions may result in fire or electrical shock.
Periodically, unplug the machine and use a dry cloth to wipe off any dust or dirt collected
on the plug and the power outlet.
If the machine is placed at a location exposed to a lot of dust, smoke, or high humidity, the
dust collected on the plug absorbs moisture and may cause insulation failure and fire.
servicing is required, contact the Canon Customer Care Center.
When storing the machine, choose a location where the machine is not exposed to dust.
Dust accumulation may prevent the machine from operating properly.
Use a damp cloth to clean the machine. Never use flammable solvents such as alcohol,
benzene or thinners. If flammable solvents come in contact with electrical components
inside the machine, it could cause a fire or electrical shock.
Always turn OFF the power and unplug the machine from the power outlet before cleaning
the machine.
If you leave on or accidentally switch the machine ON while cleaning it, it may result in
injury or damage the machine.
5
Page 8

Handling Do not attempt to disassemble or modify the machine. There are no user serviceable parts
Others This product emits low level magnetic flux. If you use a cardiac pacemaker and feel
inside the machine.
The machine contains high-voltage components. Never attempt any maintenance
procedure not described in this guide. Incorrect maintenance procedures may damage the
machine, or cause a fire or electrical shock.
Do not drop paper clips, staples, or other metal objects inside the machine. Also do not
spill water, liquid, or flammable substances inside the machine. If these items come into
contact with high-voltage parts inside the machine, it may result in fire or electrical shock.
If these items are dropped or spilled in the machine, turn OFF the power and unplug the
power cord immediately with dry hands. Then contact the Canon Customer Care Center.
Do not use flammable sprays near the machine.
This could cause a fire or electrical shock if the spray comes into contact with electrical
components inside the machine.
There are high-voltage components inside the machine. If you are looking inside the
machine to clear paper jams etc., do not allow metal objects such as jewelry to come into
contact with the inside of the machine. Contact may result in burns or electrical shock.
abnormalities, please move away from this product and consult your doctor.
When setting the machine near electric products with fluorescent lighting, separate the
machine at least 5.9 inches (15 cm) from electric products equipped with fluorescent
lighting. If you place it near to them, the machine may malfunction as a result of the noise
emitted by the fluorescent lighting.
When turning OFF the power, be sure to press [ON/OFF] and confirm that the Alarm Lamp
has shut off. If you pull the power plug out of the wall outlet while the Alarm Lamp is lit or
flashing, the Print Head is not protected, and you may not be able to print later.
Caution
Location Do not block or cover the ventilation port or any openings on the machine with objects, as
You may cause injury or damage the machine if you ignore any of these safety
precautions.
it may cause the inside of machine to overheat and cause a fire.
Place the machine on a flat, stable, vibration-free surface that is strong enough to support
its weight. If the machine topples over, it may result in injury. (For the weight of the
machine, see “Appendix” on page 146.)
Do not use or store the machine outdoors.
Do not install the machine near devices that contain magnets or generate magnetic fields,
such as speakers.
To ensure proper ventilation, make sure the machine is approximately 4 inches (10 cm)
away from walls and other equipment.
Do not install the machine in a location that is very humid or dusty, in direct sunlight,
outdoors, or close to a heating source.
Installing in such a location may result in fire or electrical shock.
To avoid the risk of fire or electrical shocks, install the machine in a location with an
ambient temperature range of 41°F to 95°F (5°C to 35°C) and humidity of 10% to 90%
(condensation free).
Do not place the machine on a thick rug or carpet.
If fibers or dust come inside the machine, it could cause a fire.
6
Page 9
Power supply Never remove the plug by pulling on the cord.
Pulling on the power cord may damage the cord and cause a fire or electrical shock.
When turning OFF the power, be sure to press [ON/OFF] or unplug the machine.
However, if the machine is unplugged during printing, the Print Head is not protected with
the cap that prevents the ink from drying. This may affect the print quality of the machine
when printing later.
During electrical storms, turn OFF the power and disconnect the power cord from the
power outlet.
Do not use an extension cord as this may result in fire or electrical shock.
Ensure that the area around the power outlet is kept clear at all times so you can easily
unplug the power cord if necessary. Otherwise you will be unable to disconnect the power
plug in case of an emergency, and it may result in fire or electrical shock.
Never use a power supply source other than the one rated for the machine in the country
where you purchased the machine as it may result in fire or electrical shock.
The operating requirement of this machine is as follows:
110-120 V AC, 50/60 Hz or 200-240 V AC, 50/60 Hz (depending on local electrical
requirements)
Do not plug the machine into the same circuit as appliances such as an air conditioner,
television, or copier. These devices generate electrical noise which may interfere with your
machine’s operation.
Whenever you turn OFF the power and unplug the machine, wait at least five seconds
before you plug it in again.
Use only the power cord that came with the machine. Using a different power cord may
cause electric leakage or damage to the machine.
Turn OFF the power and unplug the machine in the following conditions:
z When the power cord or plug is damaged or frayed.
z If liquid has spilled into the machine.
z If the machine has been exposed to rain or water.
z If the machine does not operate normally when you have followed the instructions in the
guides included with your machine.
z If the machine does not operate normally when you have followed the instructions
provided in “Troubleshooting” on page 113.
z If the machine has been dropped or damaged.
z If the machine exhibits a distinct change in performance, indicating a need for servicing.
Turn OFF the power and disconnect the power cord if the machine will not be used for a
long period such as during holidays.
The socket-outlet shall be installed near the equipment and shall be easily accessible.
7
Page 10

Handling Close the Document Cover gently to avoid catching
your hand. Failing to do so may result in personal
injury.
Do not press down hard on the Document Cover when
using the Platen Glass to scan thick books. This may
damage the Platen Glass and Document Cover and/or
result in personal injury.
Do not place the following objects on top of the machine. If such objects come into contact
with internal electrical components, the machine may short-circuit, resulting in fire or
electrical shock.
z Metal objects such as jewelry and watches
z Containers of water or other liquids such as glasses, vases, or pot plants
If water does spill inside the machine, turn OFF the power immediately by pressing [ON/
OFF], and disconnect the power cord. Then, contact the Canon Customer Care Center.
Do not touch the high-voltage electrical parts as this may result in electrical shock.
Do not place heavy objects on top of the machine as these may topple over and result in
injury.
When removing paper jammed in the machine, be careful not to get ink on your hands or
clothing. If ink gets on your hands or clothing, wash them soon in running water. If you use
hot water, the ink may adhere and become difficult to remove.
After printing, do not touch the electrical contacts of the Print Head. They will be hot and
may result in burns or electrical shock.
Do not subject the machine to strong physical shock or vibration. This can damage the
machine’s components.
Before moving the machine, turn OFF the power and unplug the machine.
When moving the machine, carry the machine at both
ends.
A distinct change in performance may indicate a need for servicing.
Do not insert your hands into the machine while it is printing.
Parts inside the machine are moving and this may result in injury.
Do not turn the machine upside down.
Ink may leak out and stain clothing or the surrounding area.
Adjust only those controls that are covered by the instructions in the guides since
improper adjustment of other controls may result in damage and require extensive repair
by a qualified technician to restore the product to normal operation.
When storing or transporting the machine, do not tilt it, stand it on its side, or turn it upside
down. Doing so may cause ink to leak out.
8
Page 11

Print Head/Ink tanks For safety reasons, store print heads and ink tanks out of the reach of small children.
If a child ingests any ink, consult a doctor immediately.
Do not shake print heads or ink tanks.
Ink may leak out and stain clothing or the surrounding area.
Never touch the Print Head.
9
Page 12

Reading the Document
Symbols Used in This Guide
Please read the list below of symbols used in this guide. The following symbols are used to indicate
important instructions. Be sure to obey these instructions.
Warning
Caution
Important
Note
Indicates a warning concerning operations that may lead to death or injury
to persons if not performed correctly. In order to use the machine safely,
always pay attention to these warnings.
Indicates a caution concerning operations that may lead to injury to
persons or damage to property if not performed correctly. In order to use
the machine safely, always pay attention to these cautions.
Indicates operational warnings and restrictions. Be certain to read these
items to operate the machine correctly and to avoid damage to the
machine.
Indicates notes for operation or additional explanations. Reading these is
highly recommended.
Read this when the machine is connected to a Windows® system.
Read this when the machine is connected to a Macintosh® system.
10
Page 13

Legal Limitations on Use of Your Product
and Use of Images
It may be unlawful to make copies of, scan, print or use reproductions of the following documents.
The list provided is non-exhaustive. When in doubt, check with a legal representative in your
jurisdiction.
z Paper money
z Money orders
z Certificates of deposit
z Postage stamps (canceled or uncanceled)
z Identifying badges or insignias
z Selective service or draft papers
z Checks or drafts issued by governmental
agencies
z Motor vehicle licenses and certificates of
title
z Traveler’s checks
z Food stamps
z Passports
z Immigration papers
z Internal revenue stamps (canceled or
uncanceled)
z Bonds or other certificates of indebtedness
z Stock certificates
z Copyrighted works/works of art without
permission of copyright owner
11
Page 14
Chapter 1
Before Printing
Main Components and Their Functions
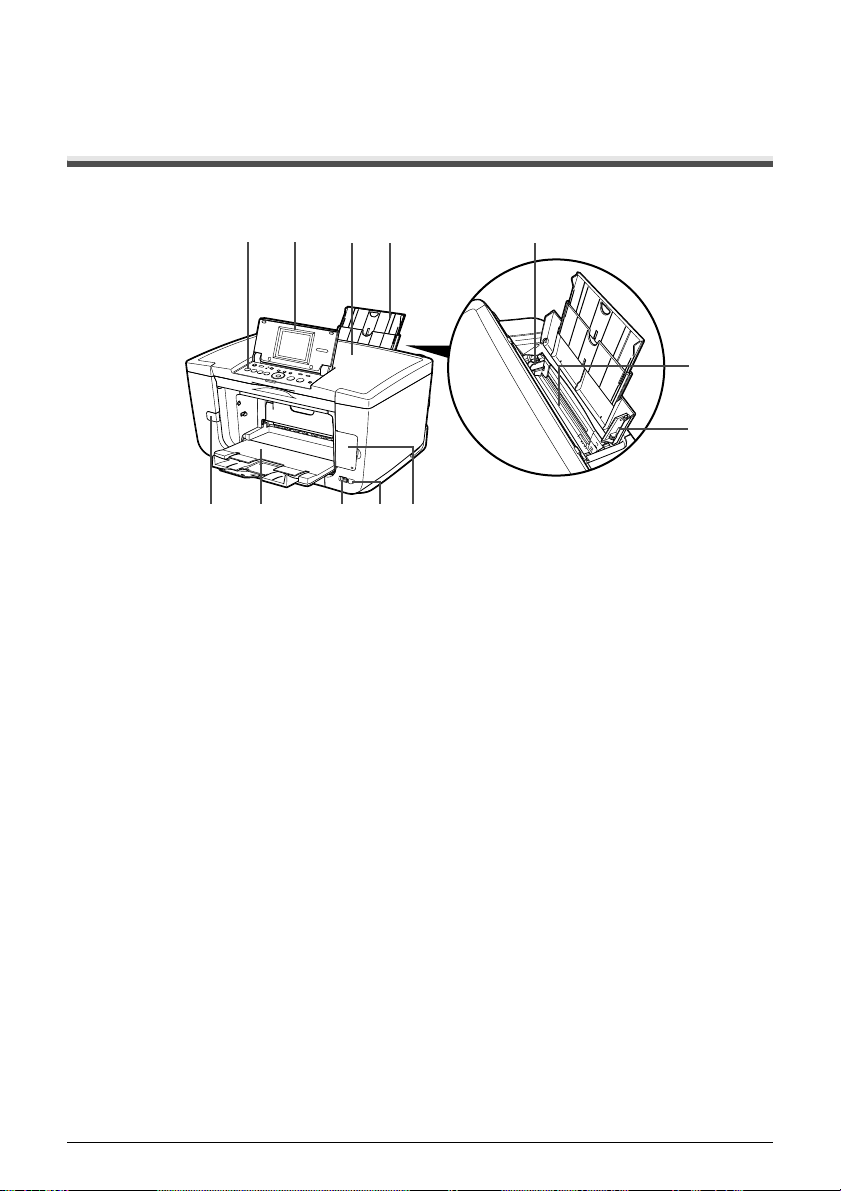
Front View
(1) (2)
(3)
(4)
(5)
(6)
(7)
(9)
(8)
(12)
(11)
(1) Operation Panel
Used to change the settings or operate the machine. See “Operation Panel Name and
Functions” on page 15.
(2) LCD (Liquid Crystal Display)
Displays messages, menu selections, and the operation status.
(3) Document Cover
Open this cover when loading a document on the Platen Glass.
(4) Paper Support
Supports paper loaded on the tray. Extend it before loading paper by putting your finger in
the rounded indent and pulling out the extension until it stops.
(5) Paper Guide
When loading paper, ensure that the left edge just touches this guide.
To move the Paper Guide, pinch the knob and slide in the appropriate direction.
(6) Auto Sheet Feeder
Load paper here before printing. Paper feeds automatically, one sheet at a time.
(7) Cover Guide
Align the right side of the paper to this guide.
(8) Card Slot Cover
Open to insert a memory card. For details, see “Inserting the Memory Card” on page 46.
(9) IrDA Port
Receives photo data sent from the mobile phone through infrared communication.
See “Performing Infrared Communication” on page 79.
(10)
12 Chapter 1
Before Printing
Page 15

(10) Direct Print Port
Used when printing directly from a digital camera or a digital video camcorder or a mobile
phone equipped with a camera compatible with the machine.
When using optional Bluetooth Unit*, connect it to this port. Refer to the Bluetooth User's
Guide.
*The Bluetooth Unit is not available to some regions due to the law of the countries or the
regulations. For details, contact the Canon Customer Care Center.
(11) Paper Output Tray
Open this tray before copying or printing by pressing the Open button. However, even if it
is closed, the tray will open automatically when copying or printing is started.
Close the tray when it is not in use.
(12) Open Button
Press this button to open the Paper Output Tray.
(13)
(17)
(16)
(15)
(14)
(13) FAU (Film Adapter Unit) Protective Sheet
Protects the FAU Lamp and the Platen Glass. The film guides used for scanning in film
are stored at the rear.
Remove when performing Film Direct Print. Always attach this cover when copying or
scanning originals other than film originals (e.g., documents or photographs).
(14) FAU Lamp
Lights up the film original when scanning films.
(15) Cassette
Load paper to be used regularly here. Paper feeds automatically, one sheet at a time.
*Legal-sized paper and 2.13" x 3.39"/ 54.0 x 86.0 mm size paper are not loadable in the
Cassette.
(16) Scanner Lock Switch
Locks the internal fluorescent lamp that is located underneath the Platen Glass (scanning
lamp), to be used when transporting the machine. Make sure to unlock it before turning
the machine on.
(17) Platen Glass
Used to load a document to be processed.
Chapter 1 13
Before Printing
Page 16
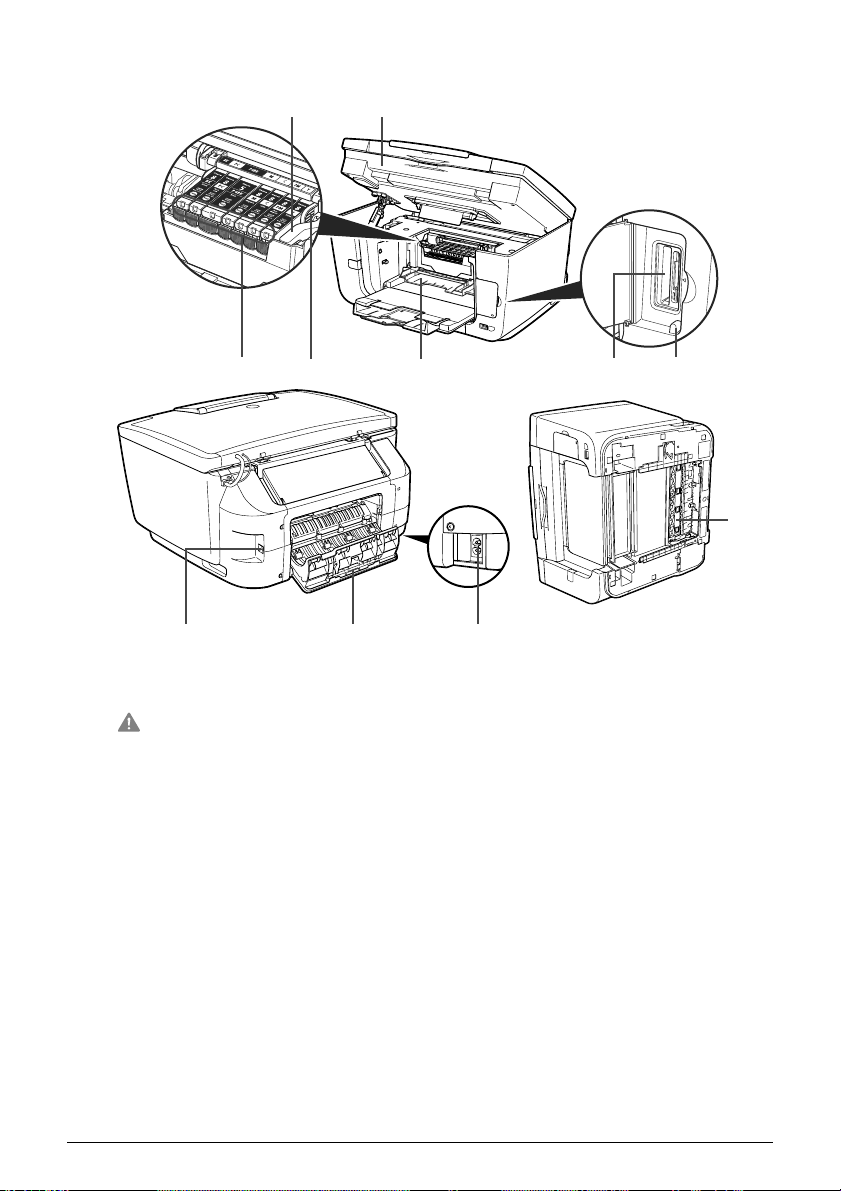
Rear View and Interior
(18)
(19)
(20)
(28) (27) (26)
(18) Print Head Lock Lever
Used to fix the Print Head.
Important
(19) Scanning Unit (Printer Cover)
This is the unit used to scan documents. Open when replacing the ink tanks or clearing
jammed paper.
(20) Ink Tank Lamp
Lights or flashes red to indicate the status of the ink tank. You can check the status of
each ink tank according to the way its lamp flashes. See “Ink Tank Lamps” on page 15.
(21) Print Head Holder
Used to install a Print Head.
(22) Inner Cover
Open this cover when replacing the ink tanks.
(23) Card Slot
Set the memory card here. For details, see “Inserting the Memory Card” on page 46.
(24) Access Lamp
Lights when a memory card is inserted into the Card Slot. This lamp flashes while the
machine is reading or writing data from/to the memory card. For details, see “Inserting
the Memory Card” on page 46.
(25) Duplexing Transport Unit
Open when clearing jammed paper after pulling out the Cassette.
(21)
Do not pull up this lever after installing the Print Head.
(22)
(23)
(24)
(25)
14 Chapter 1
Before Printing
Page 17

(26) Power Connector
This is the connector used to connect the provided power cord.
(27) Rear Cover
Open when clearing jammed paper.
(28) USB Connector (for computer)
This is the connector used to connect the machine to a computer using a USB cable.
Important
While the machine is printing from or scanning images to the computer, or
the computer is in the sleep mode or standby mode, do not disconnect
and connect the USB cable.
Note
z For information on how to install the Print Head and ink tanks, refer to
the Easy Setup Instructions.
Ink Tank Lamps
z You can check the status of each ink tank according to the way its
lamp flashes.
On: The machine is ready to print.
Slow flashing (about three seconds): Ink is low. Prepare a new ink
tank. For details, see “Getting the Ink Level Information” on page 97.
Fast flashing (about one second): Ink tank is empty, or the machine is
not ready due to an error.
Off: Make sure all the ink tanks are installed properly. If an Ink Tank
Lamp remains unlit even after reinstalling ink tanks, an error has
occurred and the machine is not ready to print.
Operation Panel Name and Functions
(5)
(4)(2)(1)
(3)
(12) (13) (14) (15) (17)(16) (18) (19) (20) (21)
(7)(6)
(8)
(11)(10)(9)
(1) [ON/OFF]
Turns the machine ON and OFF. Before turning ON the machine, make sure the
Document Cover is closed.
(2) Alarm Lamp
Lights or flashes orange, when an error occurs, or when paper or ink has run out.
(3) Cassette Lamp
Lit when the Cassette is selected.
(4) Auto Sheet Feeder Lamp
Lit when the Auto Sheet Feeder is selected.
(5) [Feed Switch]
Selects the paper source. Press this toggle switch to change the paper source between
the Auto Sheet Feeder and Cassette.
Chapter 1 15
Before Printing
Page 18

(6) [Menu]
Used to display menus.
(7) [Settings]
Use to configure the page size, media type, and image correction settings.
(8) [Back]
Allows you to return to the previous screen.
(9) [Search]
Looks up target photos in the memory card using the shooting date as the search key.
See “Searching for Photos with the Shooting Date (Search)” on page 51.
(10) [Trimming]
Use to crop the photo that is displayed. See “Printing a Specified Area (Trimming)” on
page 52.
(11) [Photo Index Sheet]
Switches to Photo Index Sheet mode. See “Printing by Using the Photo Index Sheet” on
page 57.
(12) [COPY]
Switches the machine to Copy mode.
(13) [SCAN]
Switches the machine to Scan mode. This button is used when the machine is connected
to a computer. (Refer to the Scan Guide.)
(14) [PHOTO/FILM]
Switches the machine to Photo/film mode.
(15) [MEMORY CARD]
Switches the machine to Memory card mode.
(16) [OK]
Finalizes your selection for the menu or setting item.
Restores the machine to normal operation after a printing error was resolved, or if paper
jams are cleared.
(17) [ ] [ ] [ ] [ ]
Scroll through menu selections, and increase or decrease the number of copies. You can
use these buttons when [ ], [ ], [ ], and [ ] are displayed on the LCD.
(18) Power Lamp
Lights or flashes green to indicate whether power is ON/OFF.
(19) [Black]
Starts black & white copying, or photo scanning.
(20) [Color]
Starts color copying, photo printing, or scanning.
(21) [Stop/Reset]
Cancels operations. If this button is pressed during printing, the machine aborts printing.
16 Chapter 1
Before Printing
Page 19

Turning the Machine ON and OFF
Turn on the machine before starting printing.
Turning on the Machine
Before turning on the machine, confirm that the Print Head and ink tanks are set into place.
Note
If preparatory operations above are not yet finished, follow the Easy
Setup Instructions to complete them.
1 Open the Operation Panel, then press [ON/OFF].
The Power Lamp flashes green for a while, and then turns on.
Note
If the Alarm Lamp lights or flashes orange and an error message is
displayed on the LCD, see “An Error Message is Displayed on the LCD”
on page 115.
Turning off the Machine
1 To turn off the machine, press [ON/OFF].
The machine is off when the Power Lamp stops flashing and all Operation Panel lamps are
off.
Important
Setting the Power Save Mode
The machine enters Power save mode if not operated for a certain interval. In the Power save
mode, the internal fluorescent lamp are turned off, and the selected Mode Lamp and the
Power Lamp stay lit. You can configure the interval that the machine waits before entering
Power save mode. See “Power save setting” on page 95.
When you try to copy or scan, the machine will exit from Power save mode.
If you use the machine frequently, we recommend that you set the Power save transfer time
to 1 hour or 8 hours.
The Screen-saver Mode
The LCD goes out if the machine is not operated for 5 minutes. Press any button to restore
the display. You cannot change the period before the LCD goes out.
When removing the power plug after turning off the machine, be sure to
check that all the lamps on the Operation Panel are not lit. If the power
plug is removed from the wall outlet with the lamps on the Operation
Panel lit or blinking, the machine cannot protect its Print Head and may
be unable to print.
See “Keeping the Best Printing Results” on page 101.
Chapter 1 17
Before Printing
Page 20
Loading Documents to Copy or Scan
This section describes how to load the document on the Platen Glass.
Document Requirements
The documents you load on the Platen Glass for copying or scanning must meet these
requirements:
Document
type
Size (W x L)
Thickness
z Documents
z Photographs
z Book
* For details on positive and negative 35 mm film strip and 35 mm slides, see “Photo
Printing from Photo or Film” on page 61.
Max. 8.5" x 11.7" / 216 x 297 mm
Max. 0.8" / 20 mm
Loading Documents
Load documents that you want to copy or scan on the Platen Glass. For how to load a photo,
see “Scanning a Photo” on page 61. For how to load a film, see “Scanning a Film” on page 62.
Note
Make sure any glue, ink, correction fluid, or the like is completely dry
before loading the document on the Platen Glass.
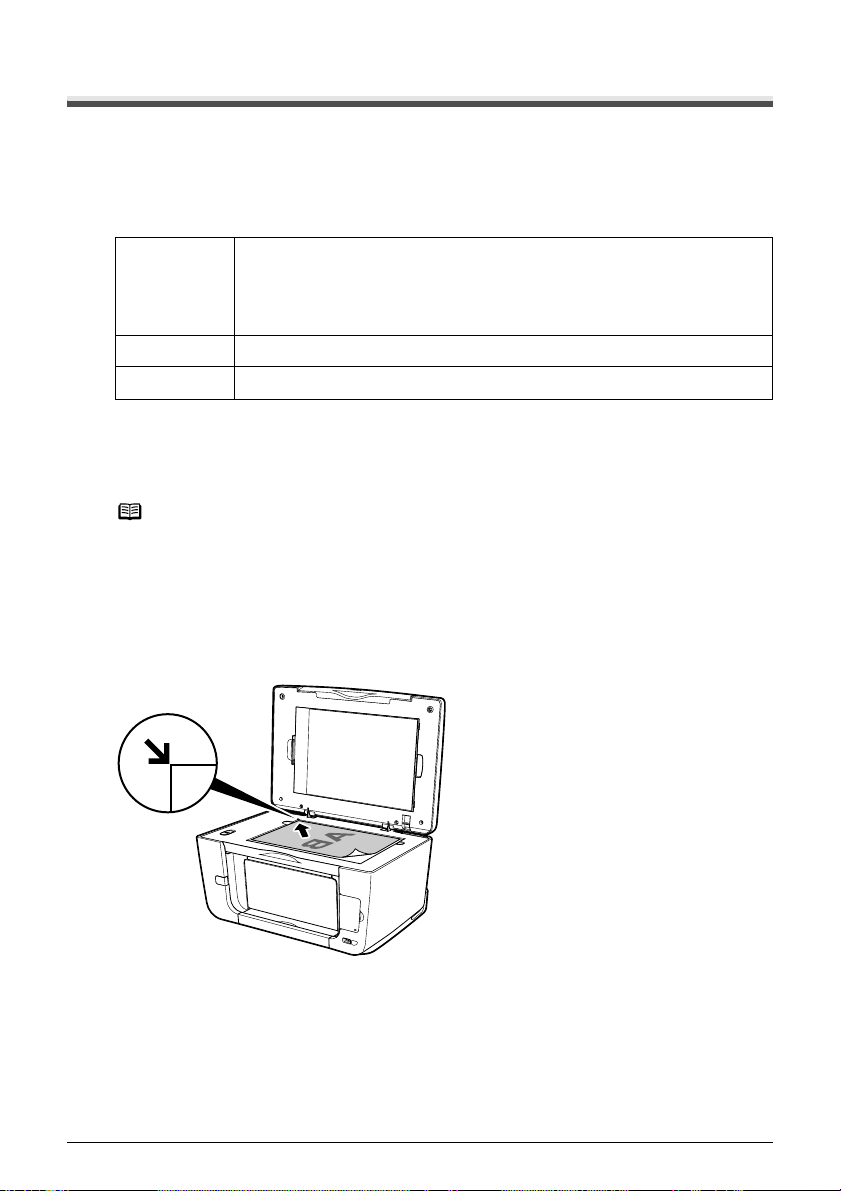
1 Lift the Document Cover.
2 Load your document on the Platen Glass.
z Place your document face down on the Platen Glass.
z Align the upper left corner of your document with the alignment mark on the upper left
corner of the Platen Glass.
18 Chapter 1
Before Printing
Page 21
Note
z The machine cannot scan the area within about 0.04" / 1 mm from the
rear edge, and within about 0.04" / 1 mm from the left edge of the
Platen Glass.
z You can also scan in originals that are up to 0.8" / 20 mm thick, such
as books. Set them on the Platen Glass in the same way as
documents.
3 Gently close the Document Cover.
Loading Paper
This section describes how to load paper in the Auto Sheet Feeder and the Cassette.
Paper Handling
z Recommended Paper and Requirements
Media Type
Plain Paper — 0.52"/13 mm 0.52"/13 mm [Plain Paper]
High
Resolution
Paper
Super White
Paper
Glossy Photo
Paper
Glossy Photo
Paper
“Everyday Use”
Matte Photo
Paper
Chapter 1 19
*1
Model
HR-101N 80 sheets (A4, Letter) 80 sheets (A4, Letter) [High Resolution
SW-201
GP-401 10 sheets (A4, Letter),
GP-501 10 sheets (A4),
MP-101 10 sheets (A4, Letter),
Paper Support Load Limit Printer Driver
Auto Sheet Feeder Cassette
0.52"/13 mm (A4, Letter)
20 sheets (4" x 6" /
101.6 x 152.4 mm,
Credit Card)
20 sheets (4" x 6" /
101.6 x 152.4 mm)
20 sheets (4" x 6" /
101.6 x 152.4 mm)
0.52"/13 mm (A4,
Letter)
10 sheets (A4, Letter),
20 sheets (4" x 6" /
101.6 x 152.4 mm), Not
supported (Credit
*5
Card)
10 sheets (A4),
20 sheets (4" x 6" /
101.6 x 152.4 mm)
10 sheets (A4, Letter),
20 sheets (4" x 6" /
101.6 x 152.4 mm)
Before Printing
Setting for
[Media Type]
Paper]
[Plain Paper]
[Glossy Photo
Paper]
[Glossy Photo
Paper]
[Matte Photo
Paper]
Page 22

Media Type
Photo Paper
Plus Double
*2, *3
Sided
*1
Model
Paper Support Load Limit Printer Driver
Auto Sheet Feeder Cassette
PP-101D 10 sheets (A4, Letter, 5"
x 7" / 127.0 x 177.8
mm)
10 sheets (A4, Letter, 5"
x 7" / 127.0 x 177.8
mm)
Setting for
[Media Type]
[Photo Paper
Plus Double
Sided]
Photo Paper
Plus Glossy
Photo Paper
Plus Semi-
*3
gloss
Photo Paper
*3
Pro
Photo
*4
Stickers
PP-101 10 sheets (A4, Letter, 5"
*3
x 7" / 127.0 x 177.8
mm),
20 sheets (4" x 6" /
101.6 x 152.4 mm)
SG-101 10 sheets (A4, Letter),
20 sheets (4" x 6" /
101.6 x 152.4 mm)
PR-101 10 sheets (A4, Letter),
20 sheets (4" x 6" /
101.6 x 152.4 mm)
PS-101 1 sheet Not loadable
10 sheets (A4, Letter, 5"
x 7" / 127.0 x 177.8
mm),
20 sheets (4" x 6" /
101.6 x 152.4 mm)
10 sheets (A4, Letter),
20 sheets (4" x 6" /
101.6 x 152.4 mm)
10 sheets (A4, Letter),
20 sheets (4" x 6" /
101.6 x 152.4 mm)
*5
[Photo Paper
Plus Glossy]
[Photo Paper
Plus Glossy]
[Photo Paper
Pro]
[Photo Paper
Plus Glossy]
Transparencies CF-102 30 sheets 30 sheets [Transparencies]
T-Shirt
Transfers
Envelopes
TR-301 1 sheet 1 sheet [T-Shirt
*2
*2
— 10 envelopes 5 envelopes [Envelope]
Transfers]
Paper having a "Model Number" is Canon specialty media.
You may not be able to purchase some Canon branded paper depending on your country.
*1
Paper is not sold in the US by Model Number. Purchase paper by the name.
*2
This is available only when printing from your computer.
*3
When loading a stack of paper, the printed side may be marked when it is fed in. If this
happens, load paper one sheet at a time.
*4
When Windows is being used, you can specify the print setting easily by using the Easy-Photo
Print provided with the Setup CD-ROM.
*5
Feeding from the Cassette can damage the machine. Always load in the Auto Sheet Feeder.
Note
z For specifying the page size and media type when performing copy
direct printing, see “Changing the Print Settings” on page 34.
z For specifying the page size and media type when printing photos
saved on mobile phones, see “Setting the Page Size, Media Type, and
Layout When Printing from a Mobile Phone” on page 78.
z When using plain paper (64 gsm or 17 lb), up to 150 sheets (13 mm or
0.52 inches in height) can be loaded in the Auto Sheet Feeder and
Cassette respectively. Select [Plain Paper] from [Media Type] in the
printer driver.
For a detailed description of printing media types, refer to the Printer
Driver Guide.
20 Chapter 1
Before Printing
Page 23

z Media types you cannot use
Do not use the following types of paper. Using such paper will not only produce unsatisfactory
results, but can also cause the machine to jam or malfunction.
z Folded, curled or wrinkled paper
z Damp paper
z Excessively thin paper (less than 64 gsm or 17 lb)
z Excessively thick paper* (more than 105 gsm or 28 lb)(non-Canon branded paper)
z Picture postcards
z Postcards affixed with photos or stickers
z Envelopes with double flaps
z Envelopes with sticker flaps
z Envelopes with an embossed or treated surface
z Any type of paper with holes
z Handling paper
z Hold the paper as closely as possible to its edges and try not to touch the print surface. Print
quality will deteriorate if the print surface is damaged or becomes dirty.
z Do not touch the print surface until the ink has dried. If prints get wet, do not touch the printed
side until they dry.
z Paper may curl or the print surface may become smudged if you use a large amount of ink for
printing. In this case, select <ON> for <Prevent paper abrasion> under <Device settings>.
See “If printing surface abrasion is not resolved even after taking the actions above:” on
page 126. Do not print photos or documents that contain graphics on paper that curls easily.
Remove this kind of paper for printing text-only documents.
z If the paper is curled, uncurl it before printing. To uncurl the paper, see “Paper is curled.” on
page 125.
z Put unused paper back into the package, and store them out of direct sunlight in a place
where the temperature and humidity are low. Keep them on a level surface to avoid curling
and wrinkling.
z If the printed area is traced with a highlight pen or paint-stick or stained with water or sweat,
ink may blur depending on the paper.
z Photo Paper Pro guidelines
z Do not touch the print surface until the ink is dry (approx. 30 minutes). Colors in dark images
may appear indistinct at first, but will become clearer after approx. 30 minutes.
z Images may become smudged if you place them in an album before the ink is completely dry.
It is recommended that you allow the ink to dry for 24 hours.
z Do not attempt to dry the ink with a hair dryer or by exposing printouts to direct sunlight.
z Do not store or display printouts in hot, damp, or humid conditions. Never expose them to
heat or direct sunlight.
z Store printouts in photo albums, photo frames, or presentation binders to protect them from
direct exposure to air or sunlight.
z Do not mount printouts in an adhesive-type album as you may not be able to remove them.
z Be aware that some types of clear plastic folders and albums may cause the edges of the
paper to turn yellow.
Chapter 1 21
Before Printing
Page 24

About the Auto Sheet Feeder and the Cassette
You can load paper in both the Auto Sheet Feeder and Cassette.
Loading paper in the Auto Sheet Feeder is easy, and is convenient if you frequently switch to
and print on various sizes or types of paper.
Loading paper in the Cassette allows you to print without reloading paper for each job. This is
convenient for loading a certain type of paper, such as plain paper, you regularly print onto.
Loading paper in both the Auto Sheet Feeder and Cassette makes the following paper feed
methods available:
* Some types of paper cannot be used on the Cassette. See “Recommended Paper and
Requirements” on page 19.
z Changing the paper source to feed different types/sizes of paper
If you load plain paper in the Cassette and photo paper in the Auto Sheet Feeder, changing the
paper source allows you to print on both types of paper without removing and reloading paper.
To change the paper source, use [Feed Switch] on the machine or printer driver.
You can also specify the type/size of paper to be fed from the Cassette for regular use with the
printer driver. For example, you can specify that Letter-sized plain paper is always fed from the
Cassette whenever you print.
Note
z For information on page size, media type, and paper support load limit
for Auto Sheet Feeder or Cassette, see “Recommended Paper and
Requirements” on page 19.
z For information on the printer driver settings, refer to the Printer Driver
Guide.
(A)
(A) You can switch between paper loaded in the Auto Sheet Feeder (e.g., 4" x 6" / 101.6 x 152.4
mm) or the Cassette (e.g., A4/Letter-sized paper).
z Continuous printing on the same type/size of paper by using both the
Auto Sheet Feeder and Cassette together
If the Auto Sheet Feeder or Cassette runs out of paper, the paper source automatically switches
to the other one. This is useful for printing onto a large volume of paper. To use this feature, you
can select this setting with the printer driver beforehand.
Important
22 Chapter 1
Before Printing
z This feature can be used only when printing from a computer.
z This feature can be used only when paper of the same size and media
type are loaded in the Cassette and Auto Sheet Feeder.
Page 25

Note
(A) If the Auto Sheet Feeder runs out of paper, the paper source automatically changes to the
Cassette.
z For information on page size, media type, and paper support load limit
for Auto Sheet Feeder or Cassette, see “Recommended Paper and
Requirements” on page 19.
z For information on the printer driver settings, refer to the Printer Driver
Guide.
(A)
Changing the Paper Source
Before printing, confirm that the location where you have loaded paper is selected as a paper
source. Press [Feed Switch] to change the paper source.
(A)
(B)
(C)
(A) Auto Sheet Feeder Lamp
(B) [Feed Switch]
(C) Cassette Lamp
Note
Chapter 1 23
z Press [Feed Switch] so that the Auto Sheet Feeder Lamp is lit when
feeding paper from the Auto Sheet Feeder and the Cassette Lamp is lit
when feeding paper from the Cassette.
z You can also select the paper source with the printer driver when
printing from the computer. For details, refer to the Printer Driver
Guide.
Before Printing
Page 26

Loading the Print Media in the Auto Sheet Feeder
z Loading Paper
Note
For detailed information on the specialty media Canon provides for use
with its various printers, see “Recommended Paper and Requirements”
on page 19.
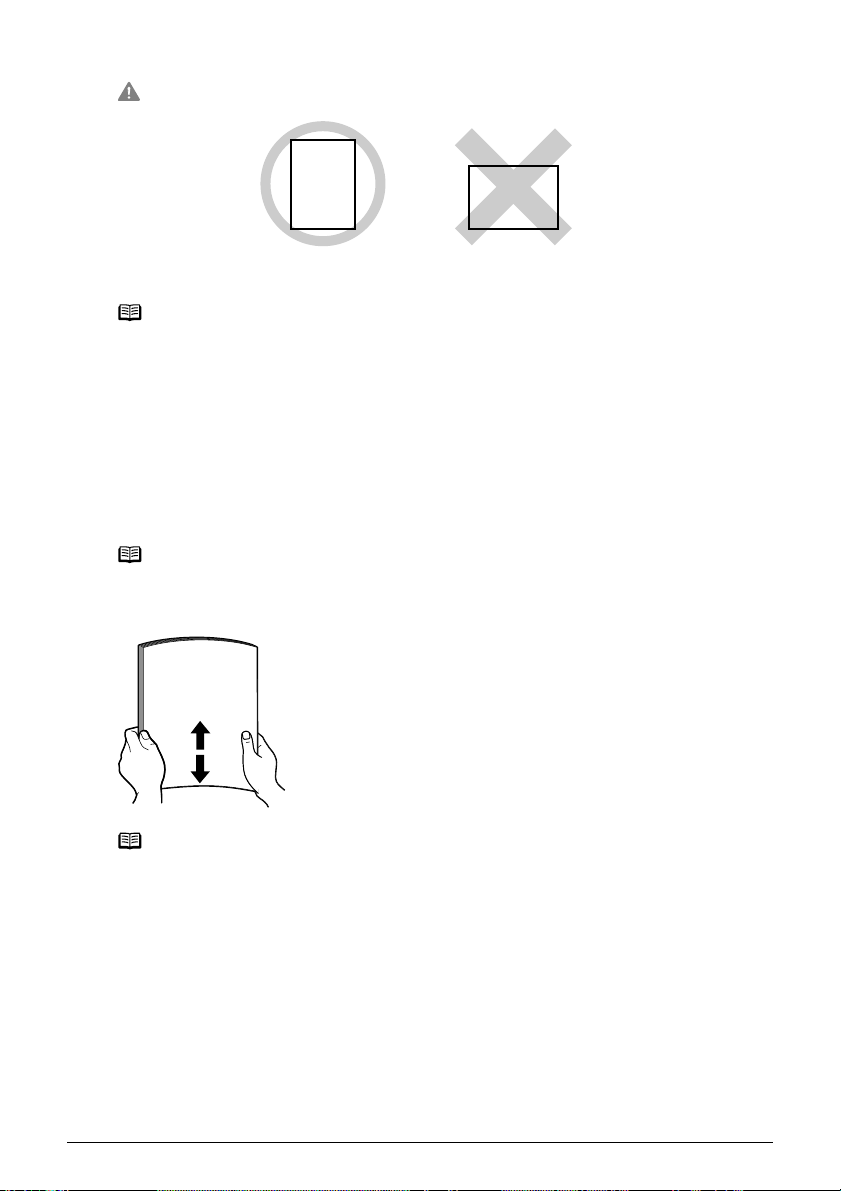
1 Flatten the four corners of the paper before loading it.
Note
z Align the edges of paper neatly before loading. Loading paper without
aligning the edges may cause paper jams.
z When paper is curled, hold the opposing curled corners and gently
bend them in the opposite direction until the paper becomes
completely flat. See “Paper is curled.” on page 125.
2 Prepare to load paper.
(1) Open the Paper Support, then pull out the Paper Support Extension to support the paper.
(2) Press the Open Button to open the Paper Output Tray.
(3) Pull out the Paper Output Tray Extension completely.
Note
(4) Press [Feed Switch] so that the Auto Sheet Feeder Lamp (A) lights.
After printing, to put back the Paper Output Tray Extension, push it back
while raising it a little.
(A)
Note
24 Chapter 1
Before Printing
You can also select the paper source with the printer driver. For details,
refer to the Printer Driver Guide.
(4)
(1)
(3)
(2)
Page 27
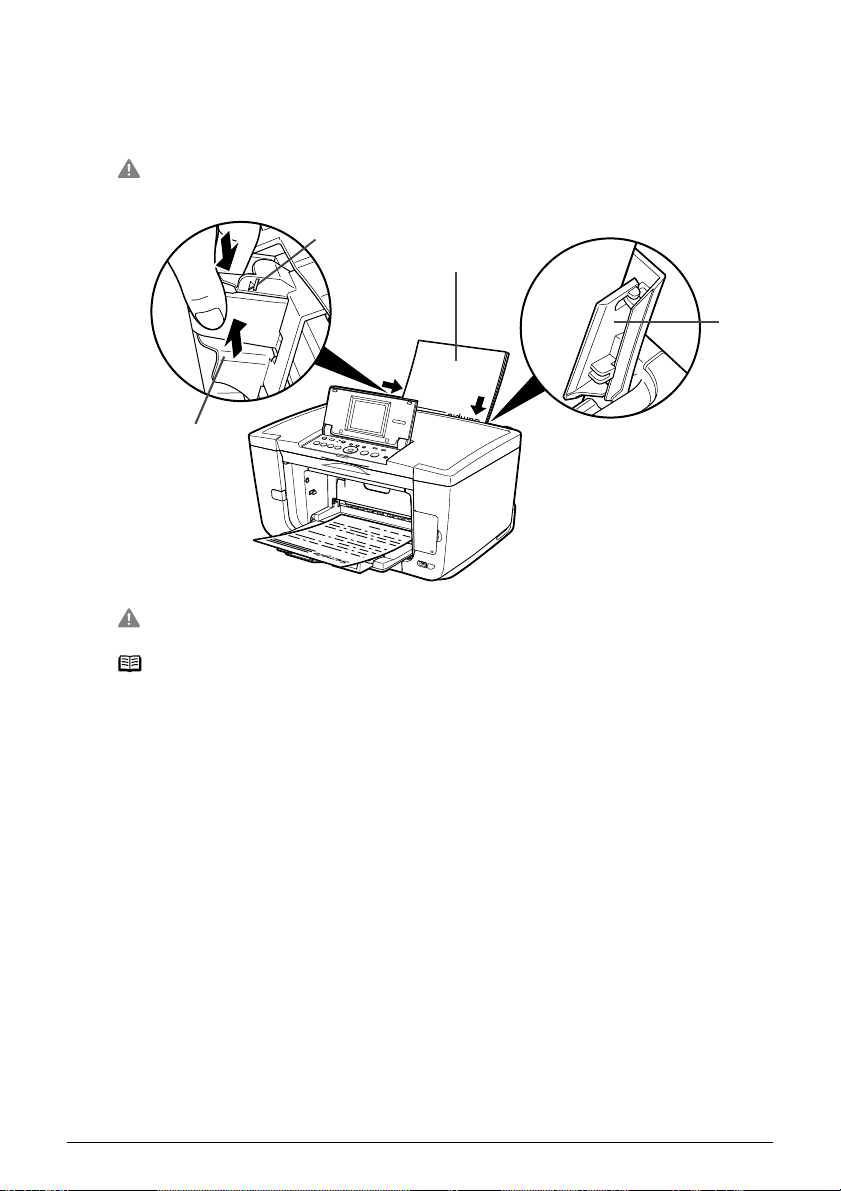
3 Load the paper.
(1) Load the paper into the Auto Sheet Feeder with the print side facing UP.
(2) Align the paper stack against the Cover Guide on the right side of the Paper Support.
Important
(3) Pinch the Paper Guide and slide it against the left side of the paper stack.
(3)
Ensure that the Cover Guide stands when you load paper in the Auto
Sheet Feeder.
(A)
(1)
(2)
Important
Note
Chapter 1 25
Do not load the paper beyond this Load Limit Mark (A).
z You can use general copy paper or Canon’s Super White Paper SW-
201.
z You can load up to 150 sheets of plain paper (64 gsm or 17 lb, 13 mm
or 0.52 inches in height) in the Auto Sheet Feeder. However, the paper
may not be fed normally depending on its media type or your
environment where the temperature and humidity are high or low. In
that case, reduce the amount of paper to half (approx. 0.2" / 5 mm in
height).
z Remove the printed sheets from the Paper Output Tray before the
count reaches 50.
z Do not touch the printed surfaces until the ink dries. For specific drying
times, refer to the instructions packaged with your media.
Before Printing
Page 28
z Loading Envelopes
Use either European DL or US Comm. Env. #10 size envelopes.
The address is rotated automatically to match the direction of the envelope when printing.
Important
z Envelopes can be used only when printing from a computer.
z Do not use envelopes with embossed or treated surfaces, a double
flap, pressure seals or sticker flaps.
z Select either [DL Env.] or [Comm. Env. #10] according to the envelope
size you are using.
z The printed image will be upside down depending on the application. If
this occurs, open the printer properties dialog box then select the
[Rotate 180 degrees] check box on the [Page Setup] tab.
For information on the printer driver settings, refer to the Printer Driver
Guide.
1 Load the envelope against the Cover Guide on the right side of the Paper Support
with the print side facing UP, and the rear flaps DOWN on the left.
Important
Ensure that the Cover Guide stands when you load paper in the Auto
Sheet Feeder.
Note
A maximum of 10 envelopes can be loaded at once.
2 Pinch the Paper Guide and slide it against the left side of the envelope.
3 Press [Feed Switch] so that the Auto Sheet Feeder Lamp lights.
4 Select [Envelope] in [Media Type], and then select [DL Env.] or [Comm. Env. #10] in
[Page Size].
For information on the printer driver settings, refer to the Printer Driver Guide.
(A)
1
2
3
(B)
Note
z Fold the envelope flap shut (A).
z Printing direction (B).
26 Chapter 1
Before Printing
Page 29

z Loading Other Small-Sized Paper in the Auto Sheet Feeder
Important
Loading plain paper cut to 4" x 6" / 101.6 mm x 152.4 mm, 5" x 7" / 127.0
x 177.8 mm, or 2.13" x 3.39" / 54.0 x 86.0 mm (Credit Card) size for a trial
printing can cause paper jams.
1 Load the paper into the Auto Sheet Feeder with the print side facing UP and align
the Cover Guide on the right side of the Paper Support.
Important
Note
Ensure that the Cover Guide stands when you load paper in the Auto
Sheet Feeder.
z Load the paper lengthways regardless of the direction of the
document.
z You can load up to 20 sheets of 4" x 6" or Credit Card-sized paper, and
10 sheets of 5" x 7"-sized paper.
2 Pinch the Paper Guide and slide it against the left side of the paper stack.
3 Press [Feed Switch] so that the Auto Sheet Feeder Lamp lights.
4 When performing copy direct printing without using a computer, press [Settings] to
select the page size. When using the machine connected to a computer, select the
page size of the loaded paper from [Page Size] in the printer driver.
For a detailed description of the printer driver settings, see “Printing with Windows” on
page 83, or “Printing with Macintosh” on page 85.
1
2
3
Chapter 1 27
Before Printing
Page 30
Important
Always load paper in portrait orientation (A). Loading paper in landscape
orientation (B) can cause the paper to be jammed.
(A) (B)
Note
We recommend using genuine Canon photo media when printing
photographs. See “Recommended Paper and Requirements” on
page 19.
Loading the Print Media in the Cassette
Depending on page size and media type, some paper must always be loaded in the Auto Sheet
Feeder.
If you intend to use only the Cassette, check any usage restrictions in advance.
See “Recommended Paper and Requirements” on page 19.
z Loading Paper
Note
For detailed information on the specialty media Canon provides for use
with its various printers, see “Recommended Paper and Requirements”
on page 19.
1 Flatten the four corners of the paper before loading it.
Note
z Align the edges of paper neatly before loading. Loading paper without
aligning the edges may cause paper jams.
z When paper is curled, hold the opposing curled corners and gently
bend them in the opposite direction until the paper becomes
completely flat. See “Paper is curled.” on page 125.
28 Chapter 1
Before Printing
Page 31

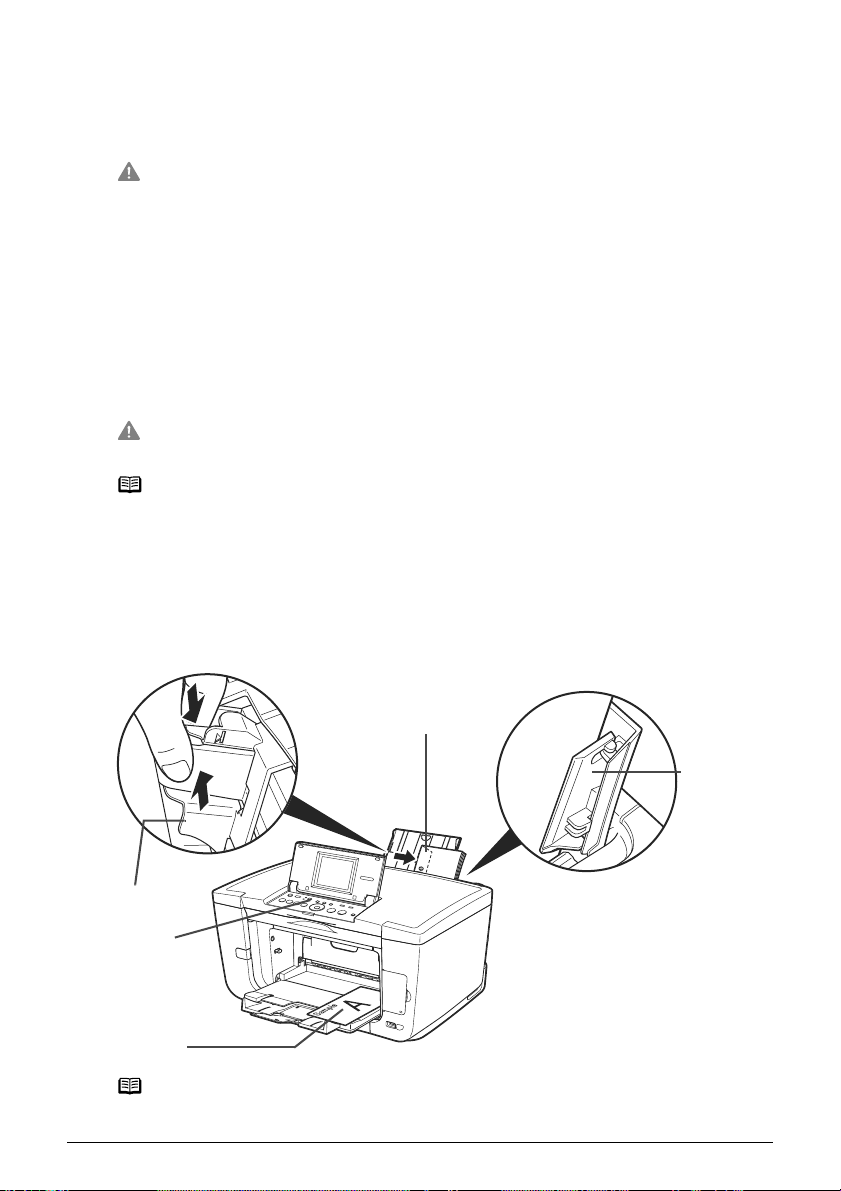
2 Prepare to load paper.
(1) Pull out the Cassette from the machine.
(2) Remove the Cover on the Cassette.
(1)
(2)
3 Load the paper. (Print side facing DOWN)
(1) Load the paper into the Cassette with the print side facing DOWN.
(2) Align the paper stack against the right side of the Cassette.
(3) Slide the Paper Guides to fit the loaded paper stack.
(A)
(1)
(2)
(3)
Important
Note
Chapter 1 29
Do not load the paper beyond this Load Limit Mark (A).
z You can use general copy paper or Canon’s Super White Paper SW-
201.
z You can load up to 150 sheets of plain paper (64 gsm or 17 lb, 13 mm
or 0.52 inches in height) in the Cassette. However, do not stack more
than 50 sheets in the Paper Output Tray.
z Do not touch the printed surfaces until the ink dries. For specific drying
times, refer to the instructions packaged with your media.
Before Printing
Page 32

4 Insert the Cassette into the machine.
(1) Set the Cover on the Cassette.
(2) Insert the Cassette into the machine.
Push the Cassette all the way into the machine.
5 Prepare the Paper Output Tray.
(1) Press the Open Button to open the Paper Output Tray.
(2) Pull out the Paper Output Tray Extension completely.
Note
(3) Press [Feed Switch] so that the Cassette Lamp (A) lights.
After printing, to put back the Paper Output Tray Extension, push it back
while raising it a little.
(1)
(3)
(A)
(2)
(1)
Note
30 Chapter 1
Before Printing
You can also select the paper source with the printer driver. For details,
refer to the Printer Driver Guide.
Page 33

z Loading Envelopes
Use either European DL or US Comm. Env. #10 size envelopes.
The address is rotated automatically to match the direction of the envelope when printing.
Important
z Envelopes can be used only when printing from a computer.
z Do not use envelopes with embossed or treated surfaces, a double
flap, pressure seals or sticker flaps.
z Select either [DL Env.] or [Comm. Env. #10] according to the envelope
size you are using.
z The printed image will be upside down depending on the application. If
this occurs, open the printer properties dialog box then select the
[Rotate 180 degrees] check box on the [Page Setup] tab.
For information on the printer driver settings, refer to the Printer Driver
Guide.
1 Align the envelope stack against the right side of the Cassette with the print side
facing DOWN, and the rear flaps UP on the left side.
Note
A maximum of 5 envelopes can be loaded at once.
2 Slide the Paper Guides against the sides of the envelope.
(A)
1
2
Note
Fold the envelope flap shut (A).
3 Press [Feed Switch] so that the Cassette Lamp lights.
3
(B)
Note
Chapter 1 31
Printing direction (B).
Before Printing
Page 34

4 Select [Envelope] in [Media Type], and then select [DL Env.] or [Comm. Env. #10] in
[Page Size].
For information on the printer driver settings, refer to the Printer Driver Guide.
z Loading 4" x 6"- or 5" x 7"-Sized Paper in the Cassette
Important
z Do not leave photo paper, such as Photo Paper Pro, in the Cassette
for a long time. This may cause paper discoloration due to natural
aging.
z If you are using photo paper such as Photo Paper Pro and have
loaded them in the Cassette, the printout may have roller traces on the
print surface. To avoid this, load paper in the Auto Sheet Feeder.
z Loading plain paper cut to 4" x 6" / 101.6 mm x 152.4 mm or 5" x 7" /
127.0 x 177.8 mm size for a trial printing can cause paper jams.
1 Load the paper into the Cassette with the print side facing DOWN.
Note
z Load the paper lengthways regardless of the direction of the
document.
z You can load up to 20 sheets of 4" x 6"-sized paper or up to 10 sheets
of 5" x 7"-sized paper.
2 Align the paper stack against the right side of the Cassette.
3 Slide the Paper Guides to fit the loaded paper stack.
1
2
3
4 Press [Feed Switch] so that the Cassette Lamp lights.
4
32 Chapter 1
Before Printing
Page 35

5 When performing copy direct printing without using a computer, press [Settings] to
select the page size. When using the machine connected to a computer, select the
page size of the loaded paper from [Page Size] in the printer driver.
For a detailed description of the printer driver settings, see “Printing with Windows” on
page 83, or “Printing with Macintosh” on page 85.
Important
Always load paper in portrait orientation (A). Loading paper in landscape
orientation (B) can cause the paper to be jammed.
(A) (B)
Note
We recommend using genuine Canon photo media when printing
photographs. See “Recommended Paper and Requirements” on
page 19.
Chapter 1 33
Before Printing
Page 36

Changing the Print Settings
This section describes the Settings screen that can be specified on the Operation Panel when
copying, or printing from memory card, photos or films.
To Change Print Settings
You can change the print settings such as page size, media type, bordered or borderless print,
etc.
z How to change the Settings screen
This section describes the steps to specify the page size for Memory card mode to <4" x 6"
(101.6 x 152.4)> as an example. For information on each item, see “Print Setting Items” on
page 35.
1 Display the Settings screen.
(1) Press [Settings].
The Settings screen is displayed.
2 Select the Setting tab.
(1) Use [ ] or [ ] to select the Setting tab.
Select tab 1 here.
3 Select the setting item.
(1) Use [ ] or [ ] to select the setting item.
Select <A4> here.
34 Chapter 1
Before Printing
Page 37

4 Change the setting.
(1) Use [ ] or [ ] to change the setting.
Change to <4" x 6" (101.6 x 152.4)> here.
5 Complete setting.
(1) Press [Settings].
Return to the Settings screen.
Print Setting Items
Each tab contains the following setting items. To change the tab, use [ ] to select the tab and
use [ ] or [ ].
Note
z Copy mode
This section describes the Settings screen for Copy mode.
Depending on the functions specified in the Copy, Memory card, or Photo/
film mode, some setting items cannot be specified in combination.
(1)
(2)
(3)
(4)
Tab 1
You can specify the paper settings for printing or print quality.
(1) You can specify the page size.
8.5" x 11" (215.9 x 279.4), A4, B5, A5, 4" x 6" (101.6 x 152.4), 5" x 7" (127 x 177.8),
Credit card
Important
Note
(2) You can specify the media type.
Plain paper, Photo Paper Pro, Photo Plus Glossy, Matte Photo Paper, Glossy Photo
Paper
(3) You can adjust image quality according to the documents you want to copy.
Fast, Standard, High
Chapter 1 35
Some page sizes cannot be loaded in the Cassette and should be loaded
in the Auto Sheet Feeder.
Some of these are not available depending on the country of purchase.
Before Printing
(5)
Page 38

Note
(4) You can specify the reduction or enlargement method.
Same magnification, Preset ratio, Zoom (25 - 400%), Fit-to-page
Tab 2
You can specify auto intensity.
(5) This function automatically adjusts the intensity of the document on the Platen Glass.
Auto intensity ON, Auto intensity OFF
z <Fast> can be selected when <Plain paper> is selected as the media
type.
z When using <Fast> with media type set to <Plain paper>, if the quality
is different from that expected, select <Standard> or <High> and try
copying again.
z Select <High> to copy in grayscale. Grayscale renders tones in a
range of grays instead of black or white.
z Memory card and Photo/film modes
This section describes the Settings screen for Memory card and Photo/film modes.
Tab 1
You can specify the settings such as the paper, bordered/borderless, and Date/file no.
Example: Memory card mode
(1)
(2)
(3)
(4)
(5)
Note
(1) Select the page size.
8.5" x 11" (215.9 x 279.4), A4, 4" x 6" (101.6 x 152.4), 5" x 7" (127 x 177.8), Credit card
Important
Note
(2) Select the media type.
Plain paper
Paper
(3) Select the print quality.
Standard, High
(4) Select bordered or borderless print.
Bordered, Borderless
Note
(5) Select whether to print the shooting date, file no., or not.
No date/file no., Print date only, Print file no. only, Print date & file no.
*1
Can be selected only in Memory card mode.
36 Chapter 1
Before Printing
You can change the print settings on this screen when a PictBridge
compliant device is connected to this machine.
Some page sizes cannot be loaded in the Cassette and should be loaded
in the Auto Sheet Feeder.
Some of these are not available depending on the country of purchase.
*1
, Photo Paper Pro, Photo Plus Glossy, Matte Photo Paper, Glossy Photo
When <Plain paper> is selected in <Media type>, bordered printing will
be performed even if you select <Borderless>.
*1
Page 39

Tab 2
Allows you to optimize photos with the functions below.
Memory card mode Photo/film mode
(1)
(2)
(3)
(4)
(5)
(1) Red eye correction ON, Red eye correction OFF
(6)
(7)
(11)
(8)
(9)
(10)
*1
When <Red eye correction ON> is selected, portraits with a red eye caused by flash
photography are corrected in print.
(2) Activate/deactivate Vivid photo function.
*1
This function makes green and blue more lively.
Vivid photo ON, Vivid photo OFF
(3) Activate/deactivate the Photo Optimizer pro function.
*1
This function automatically optimizes brightness and tone of a photo.
Photo optimizer pro ON, Photo optimizer pro OFF
(4) Activate/deactivate the Noise reduction function.
*1
This function reduces the noise on blue areas like the sky as well as on black areas.
Noise reduction ON, Noise reduction OFF
(5) Activate/deactivate Face brightener function.
*1
This function brightens a darkened face on the photo taken against the light.
Face brightener ON, Face brightener OFF
(6) Choosing <Image optimizer ON> enables you to correct and smooth the jagged contours
for printing.
*1
Image optimizer ON, Image optimizer OFF
(7) Adjust brightness.
*1
Brightness +2, Brightness +1, Brightness standard, Brightness -1, Brightness -2
(8) Adjust contrast.
*1
Contrast +2, Contrast +1, Contrast standard, Contrast -1, Contrast -2
(9) Adjust color hue.
*1
Color hue red +2, Color hue red +1, Color hue original, Color hue yellow +1, Color hue
yellow +2
(10) Select the type of special effects applied to the photo, such as printing in sepia tones or
with a sketch illustration like effect.
*1
No effects, Sepia, Simulate illustration
(11) Choosing <Fade restoration> corrects the color when printing photos that have faded or
color cast over time.
Choosing <Face brightener> brightens a darkened face on a portrait taken against the
*2
light.
No image enhancement, Fade restoration, Face brightener
*1
Can be selected only in Memory card mode.
*2
Can be selected only in Photo/film mode.
Chapter 1 37
Before Printing
Page 40

Chapter 2
Copying
Making Copies
This section describes the basic procedure to make copies.
1 Prepare for copying.
(1) Press [ON/OFF] to turn on the machine.
See “Turning on the Machine” on page 17.
(2) Press [COPY].
(3) Load paper.
See “Loading Paper” on page 19.
(4) Ensure that the proper paper source is selected.
See “Changing the Paper Source” on page 23.
Note
2 Start copying.
(1) Check the page size and media type.
Note
(2) Use [ ] or [ ] to specify the number of copies.
Specify [Feed Switch] so that the Auto Sheet Feeder Lamp is lit when
feeding paper from the Auto Sheet Feeder and the Cassette Lamp is lit
when feeding paper from the Cassette.
Press [Settings] to check or change the page size, media type, or other
settings. See “To Change Print Settings” on page 34.
(2)
(1)
The following information is displayed as well.
Intensity: Pressing [ ] decreases the intensity, and pressing [ ] increases the
(3) Load the document on the Platen Glass.
Note
(4) Press [Color] for color copying, or [Black] for black & white copying.
The machine starts copying.
Note
38 Chapter 2
Copying
intensity.
You can also use the auto intensity. See “Print Setting Items” on page 35.
For information on the types and conditions of documents which you can
copy, see “Loading Documents” on page 18.
To cancel copying, press [Stop/Reset].
Page 41

Reducing or Enlarging a Copy
You can reduce or enlarge copies.
1 Prepare for copying.
See “Prepare for copying.” on page 38.
2 Select the reduction/enlargement method.
The example below assumes that you will select <Zoom (25-400%)>.
(1) Press [Settings].
(2) Use [ ] or [ ] to select Tab 1.
(3) Use [ ] or [ ] to select <Magnification>, and use [ ] or [ ] to select <Zoom (25-
400%)>.
Specify the custom copy ratio for reducing or enlarging copies.
(3)
Besides <Zoom (25-400%)>, you can also choose from the following reduction/
enlargement methods.
Same magnification: Copies in the same size as an original.
Preset ratio: Preset ratios are convenient when changing between standard page
Fit-to-page: You can automatically reduce or enlarge the document to fit the size of
(4) Press [ ] to move the cursor down, and use [ ] or [ ] to select the setting value.
Holding down [ ] or [ ] steps through the values faster.
Note
sizes, for example, when reducing A4 to A5, or enlarging B5 to A4.
the paper which are loaded in the Auto Sheet Feeder or Cassette.
When you choose <Fit-to-page>, the document size may not be detected
correctly depending on the document. In that case, choose <Same
magnification>, <Preset ratio> or <Zoom (25-400%)>.
3 Finalize your selection.
(1) Press [Settings].
Return to the Copy standby screen.
4 Start copying.
See “Start copying.” on page 38.
Chapter 2 39
Copying
Page 42

Changing the Copy Settings
You can change the copy settings such as the page size, media type, or print quality.
For details on changing the copy settings and setting items, see “To Change Print Settings” on
page 34.
1
2
3
4
5
1 You can specify the page size.
2 You can specify the media type.
3 You can adjust print quality for the document to be copied.
4 You can specify the reduction/enlargement method.
See “Reducing or Enlarging a Copy” on page 39.
5 You can specify if auto intensity is performed.
Specifying <Auto intensity ON> automatically changes the icon above the intensity slide bar
on the LCD to <AUTO>.
Important
Even while <Auto intensity ON> is selected, you can change the intensity
by pressing [ ] or [ ]. Move the cursor to the center of the slide bar to
enable auto intensity again.
Using Useful Copy Functions
Special Copy
You can copy in various layouts.
1 Prepare for copying.
See “Prepare for copying.” on page 38.
2 Select the copy menu.
(1) Press [Menu].
40 Chapter 2
Copying
Page 43

(2) Use [ ] or [ ] to select <Special copy>, then press [OK].
The Special copy screen is displayed.
(2)
z Copying onto Both Sides of the Paper (Two-sided copy)
You can copy two document pages onto the sides of a single sheet of paper.
Long-side stapling and Short-side stapling
Procedure:
(1) Display the Special copy screen.
See “Special Copy” on page 40.
(2) Use [ ] or [ ] to select <Two-sided copy>, then press [OK].
(3) Use [ ] or [ ] to select the orientation of the document, then press [OK].
(4) Use [ ] or [ ] to select the binding margin, then press [OK].
(5) Follow the on-screen instructions to load the document to be printed on the front face on
the Platen Glass, then press [OK].
(6) Specify the necessary items.
See “To Change Print Settings” on page 34.
(7) Press [Color] for color copying, or [Black] for black & white copying.
(8) Load the document to be printed on the back face on the Platen Glass. If you have only
one document to scan, press [OK].
(9) Press [Color] or [Black]. Be sure to press the same button as you pressed in step (7).
Important
If you do not press the same button in step (7) and step (9), the machine
does not start copying.
Note
Chapter 2 41
z This function cannot be used in conjunction with <Fit-to-page> under
<Magnification> or other copy functions.
z If you perform black & white copying for <Two-sided copy>, print
intensity may be different from when performing black & white copying
for single-sided copy.
z This function can only be used when the page size is set to <8.5" x 11"
(215.9 x 279.4)> or <A4>.
z The media type is fixed to <Plain paper>. You cannot change this
setting.
Copying
Page 44

z Copying Two Pages to Fit onto a Single Page (2-on-1 copy)
This feature enables you to copy two documents (A) (B) onto a single sheet (C) of paper by
reducing each image.
(A)
Procedure:
(1) Display the Special copy screen.
See “Special Copy” on page 40.
(2) Use [ ] or [ ] to select <2-on-1 copy>, then press [OK].
(3) Follow the on-screen instructions to load the document to be printed on the left side on
the Platen Glass, then press [OK].
(4) Specify the necessary items.
See “To Change Print Settings” on page 34.
(5) Press [Color] for color copying, or [Black] for black & white copying.
(6) Load the document to be printed on the right side on the Platen Glass. If you have only
one document to scan, press [OK].
(7) Press [Color] or [Black]. Be sure to press the same button as you pressed in step (5).
Important
Note
If you do not press the same button in step (5) and step (7), the machine
does not start copying.
z This function cannot be used in conjunction with other functions.
z If <Device memory is full.> appears on the LCD when scanning, set
the print quality to <Standard> and try copying again.
z You can use this feature only when the page size is set to <8.5" x 11"
(215.9 x 279.4)> or <A4>.
z You cannot select <Magnification>.
(C)(B)
z Copying Four Pages to Fit onto a Single Page (4-on-1 copy)
This feature enables you to copy four documents onto a single sheet of paper by reducing each
image. Four types layouts can be selected.
Procedure:
(1) Display the Special copy screen.
See “Special Copy” on page 40.
42 Chapter 2
Copying
Page 45

(2) Use [ ] or [ ] to select <4-on-1 copy> and press [OK].
(3) Use [ ] or [ ] to select the layout, then press [OK].
(4) Follow the on-screen instructions to load the first document to print on the Platen Glass,
then press [OK].
(5) Specify the necessary items.
See “To Change Print Settings” on page 34.
(6) Press [Color] for color copying, or [Black] for black & white copying.
(7) Load the second document to print on the Platen Glass, and press the same button as
you pressed in step (6).
(8) Repeat step (7) until you finish loading the fourth document, then press the same button
as you pressed in step (6). If you have only one, two or three documents to scan, press
[OK] after loading the last document.
Important
If you do not press the same button in step (6), steps (7) and (8), the
machine does not start copying.
Note
z This function cannot be used in conjunction with other copy functions.
z If <Device memory is full.> appears on the LCD when scanning, set
the print quality to <Standard> and try copying again.
z This function can be used only when page size is set to <8.5" x 11"
(215.9 x 279.4)> or <A4>.
z You cannot specify <Magnification> for this function.
z Copying without Borders (Borderless copy)
This feature enables you to copy images so that they fill the entire page without borders.
Procedure:
(1) Display the Special copy screen.
See “Special Copy” on page 40.
(2) Use [ ] or [ ] to select <Borderless copy>, then press [OK].
(3) Specify the necessary items.
See “To Change Print Settings” on page 34.
(4) Press [Color] or [Black] to start copying.
Note
z The copied image may need to be enlarged to fit onto the selected
page size when making borderless copies. Some cropping may occur.
z You can use this feature only when the page size is set to <8.5" x 11"
(215.9 x 279.4)>, <A4>, <4" x 6" (101.6 x 152.4)>, <5" x 7" (127 x
177.8)>, or <Credit card>.
z You can use this feature only when the paper is set to <Photo Paper
Pro>, <Photo Plus Glossy>, <Matte Photo Paper>, <Glossy Photo
Paper>.
z You can specify print quality to either <Standard> or <High>.
z You can select the width to be cropped from the borders of the original
image according to the image size.
Chapter 2 43
Copying
Page 46

z Repeating an Image on a Page (Image repeat)
This feature enables you to copy an image multiple times onto a single page. You can set the
machine to automatically select the number of times it repeats the image, or you can specify the
number.
Procedure:
(1) Display the Special copy screen.
See “Special Copy” on page 40.
(2) Use [ ] or [ ] to select <Image repeat>, then press [OK].
(3) Use [ ] or [ ] to select <Auto layout> or <Manual layout>.
If you selected <Auto layout> and pressed [OK], go to step (7).
If you selected <Manual layout> and pressed [OK], go to step (4).
(4) Use [ ] or [ ] to set the vertical repeats.
(5) Press [ ] to move the cursor to the right.
(6) Use [ ] or [ ] to set the horizontal repeats, then press [OK].
(7) Specify the necessary items.
See “To Change Print Settings” on page 34.
(8) Press [Color] for color copying, or [Black] for black & white copying.
Important
z The area read from the documents depends on the enlargement/
reduction ratio.
z The size of the documents to copy should be no larger than one
division of the paper. For example, if you copy four documents at the
same size, their sizes must be one-fourth of the page size or smaller.
Note
44 Chapter 2
Copying
z <Credit card> cannot be selected for the page size.
z <Fit-to-page> cannot be selected for <Magnification>.
Page 47

Chapter 3
Printing from a Memory Card
Using the Memory Card
This section describes the compatible memory cards and how to insert and remove them.
Memory Cards Supported by This Machine
The following memory cards are compatible with this machine.
Memory cards that can be directly inserted into the Card Slot:
z Compact Flash (CF) Card
Supports Type I/II (3.3V)
z Microdrive
z SmartMedia
Supports 3.3V card only
1MB and 2MB cards are not supported
z MEMORY STICK
z MEMORY STICK PRO
z SD Secure Digital memory card
z MultiMedia Card
Memory cards that can be inserted in the Card Slot using the adapter:
xD-Picture Card
z MEMORY STICK Duo
z MEMORY STICK PRO Duo
miniSD Card*
Chapter 3 45
*1
*2
*2
2
Printing from a Memory Card
Page 48

*1
Requires purchase of a separate compact flash card adapter for xD-Picture cards.
*2
Use the special adapter provided with the card.
Important
z This machine supports image data created by DCF standard digital
cameras (based on Exif), and DPOF (based on Ver 1.00).
z Image data taken or saved on memory cards that do not guarantee the
action with the digital camera might be unreadable from the machine
or the image data might be damaged. For details on memory cards
guarantee the action with the digital camera, refer to the manuals
supplied with your digital camera.
z Format the memory card with a digital camera. The memory card
might not be usable with the machine if formatted on a computer.
z Images edited on a computer may not be printed correctly.
z Insert only one kind of memory card at a time.
Inserting the Memory Card
Note
z When <Read/write mode> is selected in Read/write attribute under
Other settings by using the Operation Panel on the machine, card
direct printing cannot be done. After using the Card Slot as the
memory card drive of the computer, remove the memory card, then be
sure to set Read/write attribute to <Read-only mode>. See “Read/write
attribute” on page 95.
z When you have edited or processed the data on a memory card on a
computer, be sure to print the data from the computer. If you print
using the Operation Panel, the data might not be printed correctly.
1 Press [ON/OFF] to turn on the machine.
See “Turning on the Machine” on page 17.
2 Open the Card Slot Cover.
46 Chapter 3
Printing from a Memory Card
Page 49

3 Insert a memory card into the Card Slot.
Card Type Inserting Card
z Compact Flash (CF) card
z Microdrive
z xD-Picture card*
Insert into the Card Slot on the left side.
The Access Lamp (A) lights up.
z SmartMedia
Insert into the Card Slot on the right side.
The Access Lamp (A) lights up.
z MEMORY STICK
z MEMORY STICK PRO
z MEMORY STICK Duo*
z MEMORY STICK PRO Duo*
z SD Secure Digital memory card
z miniSD Card*
z MultiMedia card
(A)
(A)
(A)
Insert into the center part of the Card Slot on the right side.
The Access Lamp (A) lights up.
* Be sure to attach the memory card to the special adapter before inserting it into the Card
Slot.
4 Ensure that the Access Lamp is lit after it stops flashing.
Caution
z The memory card sticks out of the Card Slot, but do not force it into the
slot any further. Doing so damages the machine and the memory card.
z Check if the right side of the memory card is facing up. If you force the
memory card with the wrong side up into the Card Slot, the machine
and/or the memory card may be damaged.
z While the Access Lamp is flashing, do not remove the memory card or
the card adapter containing the memory card, nor turn off the machine,
as this might damage the data on the memory card.
5 Close the Card Slot Cover.
Chapter 3 47
Printing from a Memory Card
Page 50

Removing the Memory Card
Note
If you use the Card Slot as a memory card drive for your computer,
removing operation from the computer is required before removing the
memory card.
z When Windows is being used, right-click the removable disk icon and
click [Eject]. If [Eject] is not displayed on the screen, ensure that the
Access Lamp is not flashing and remove the memory card.
z When Macintosh is being used, be sure to drag the icon into the
Trash.
1 Open the Card Slot Cover.
2 Ensure that the Access Lamp is not flashing, then remove the memory card.
Important
Removing the memory card or turning off the machine while the Access
Lamp is flashing can damage the data stored in the memory card.
3 Close the Card Slot Cover.
Printing Photograph
Let’s select a photo from the photos stored on the memory card of the digital camera, and print it.
Printing Photo Displayed on the LCD (Single-photo print)
Print a photo saved on the memory card.
1 Prepare for printing.
(1) Press [ON/OFF] to turn on the machine.
See “Turning on the Machine” on page 17.
(2) Load paper.
See “Loading Paper” on page 19.
(3) Ensure that the proper paper source is selected.
See “Changing the Paper Source” on page 23.
Note
(4) Insert a memory card into the Card Slot.
See “Inserting the Memory Card” on page 46.
Specify [Feed Switch] so that the Auto Sheet Feeder Lamp is lit when
feeding paper from the Auto Sheet Feeder and the Cassette Lamp is lit
when feeding paper from the Cassette.
48 Chapter 3
Printing from a Memory Card
Page 51

2 Select the print menu.
(1) Press [MEMORY CARD].
(2) Use [ ] or [ ] to select <Single-photo print>, then press [OK].
The photo selection screen is displayed.
Note
may be displayed on the LCD while reading the photo.
(2)
3 Select the photo you want to print.
(1) Use [ ] or [ ] to display the photo you want to print.
(2) Press [Color].
The print confirmation screen is displayed.
Note
Displaying Photos Automatically on the LCD (Slide Show)
You can automatically display photos in sequence when selecting
<Single-photo print>.
z To start the slide show, press [OK] when checking photos in <Single-
photo print>.
z To stop the slide show, press [Stop/Reset] during the slide show.
You can do...
z To search for photos with the shooting date (Search), see “Searching
for Photos with the Shooting Date (Search)” on page 51.
z To print a specified area (Trimming), see “Printing a Specified Area
(Trimming)” on page 52.
Chapter 3 49
Printing from a Memory Card
Page 52

4 Start printing.
(1) Check the page size and media type.
Note
(2) Use [ ] or [ ] to specify the number of prints.
(3) Press [Color].
The machine starts printing.
Note
Press [Settings] to check or change the page size, media type, or other
settings. See “To Change Print Settings” on page 34.
(2)
(1)
z To cancel printing, press [Stop/Reset].
z The printing is not started if you press [Black].
Specifying How Many Copies to Print for Each Photo (Multi-photo print)
You can specify the number of prints to be made for each photo.
1 Prepare for printing.
See “Prepare for printing.” on page 48.
2 Select the print menu.
(1) Press [MEMORY CARD].
(2) Use [ ] or [ ] to select <Multi-photo print>, then press [OK].
The photo selection screen is displayed.
3 Specify the number of prints for each photo.
(1) Use [ ] or [ ] to select the image you want to print.
(2) Use [ ] or [ ] to specify the number of prints.
(2)
(3) Repeat from step (1) to step (2) to specify the number of prints for each photo.
(4) Press [OK].
The print confirmation screen is displayed.
Note
50 Chapter 3
Printing from a Memory Card
You can do...
z To search for photos with the shooting date (Search), see “Searching
for Photos with the Shooting Date (Search)” on page 51.
z To print a specified area (Trimming), see “Printing a Specified Area
(Trimming)” on page 52.
Page 53

4 Start printing.
(1) Confirm the settings.
To change any of the settings, press [Settings].
See “Changing the Print Settings” on page 34.
(2) Press [Color].
The specified number of copies of each photo will be printed.
Note
z To cancel printing, press [Stop/Reset].
z The printing is not started if you press [Black].
Other Useful Functions
Searching for Photos with the Shooting Date (Search)
When there are a lot of photos saved on the memory card, you can choose to display and print
only photos shot on the specified date or within the specified range of dates.
Note
z By pressing [Search] to specify a date or date range, you can display
and print the photos shot on the specified date or within the specified
date range in <Single-photo print> or <Multi-photo print>, <Layout
print>, <Sticker print>, or <Captured info>(<Single photo>).
z If the number of prints to make is already specified for some photos
before searching with the shooting date, or if some photos are already
pasted on a layout, those photos will still be selected for printing even
if they were not shot on the specified date or within the specified date
range.
z When using <Print all photos>, <Photo index print> or <Captured
info>(<List>), only the photos shot on the specified date or within the
specified date range can be printed.
1 Set the search method.
(1) Press [Search].
The Search method screen is displayed.
(2) Use [ ] or [ ] to select the search method.
If you want to specify only one date for search, select <One date only>.
If you want to specify the date range for search, select <Select date range>.
(3) Press [OK].
The date input screen is displayed.
Note
It may take a while for the date input screen to be displayed depending
on the number of photos saved on the memory card.
2 Specify the date range.
z If you selected <One date only>:
(1) Use [ ] or [ ] to specify the date to search for.
(2) Go to main step 3.
z If you selected <Select date range>:
(1) Use [ ] or [ ] to specify the date of the oldest photos you want to print, then press
[OK].
(2) Use [ ] or [ ] to specify the date of the most recent photos you want to print.
(3) Go to main step 3.
Chapter 3 51
Printing from a Memory Card
Page 54

3 Start searching.
(1) Press [OK].
The machine starts searching and the photos within the specified date range are
displayed.
Note
z The date to be specified is displayed according to the settings of <Date
display>. See “Date display” on page 95.
z To exit Search mode, select <Cancel search> from the Search method
screen, and then press [OK]. You can also exit Search mode by
switching to any mode other than Memory card mode.
Printing a Specified Area (Trimming)
You can edit images displayed on the LCD by cropping them.
Note
Crop images after specifying the page size, media type, and bordered or
borderless printing in the Settings (Memory Card). If you change the
paper settings after cropping, the cropped area may be adjusted to match
the paper, or be disabled completely.
1 Select the photo you want to crop.
(1) Use [ ] or [ ] to select the photo you want to crop.
2 Display the trimming edit screen.
(1) Press [Trimming].
The trimming edit screen is displayed.
3 Choose the area you want to print.
(1) Use [ ], [ ], [ ], [ ] to position the cropping frame, then press [Trimming].
If you do not rotate or resize the cropping frame, go to main step 4.
(2) Use [ ] to enlarge or [ ] to reduce the cropping frame size, respectively.
52 Chapter 3
Printing from a Memory Card
Page 55

(3) Use [ ] or [ ] to switch the cropping frame between portrait and landscape.
4 Finalize your selection of trimming area.
(1) Press [OK].
The area to be cropped is specified, and the original photo is displayed.
Note
z The cropped image cannot be newly saved on the memory card.
z The trimming area is displayed only for photos which have been
trimmed.
z To change the trimming area once it has been set, press [Trimming]
again.
z To cancel trimming while editing the trimming frame, press [Stop/
Reset] while the trimming edit screen is displayed. You can also
cancel trimming by switching to any mode other than Memory card
mode.
z To cancel trimming after trimming has been set, press [Trimming] and
then press [Stop/Reset].
Printing Several Photos on a Single Sheet of Paper (Layout print)
You can print the specified photos in the specified layout.
1 Prepare for printing.
See “Prepare for printing.” on page 48.
2 Select the print menu.
(1) Press [MEMORY CARD].
(2) Use [ ] or [ ] to select <Special photo print>, then press [OK].
(3) Use [ ] or [ ] to select <Layout print>, then press [OK].
3 Specify the layout.
(1) Use [ ] or [ ] to select the layout, then press [OK].
The following layouts can be selected.
Bordered: x2/x4/x8, Half, Half (w/line)
Borderless: x2/x4/x8, Half, Half (w/line)
Album: Album (4/right), Album (4/left)
Mixed: Mixed 1, Mixed 2, Mixed 3
Note
Chapter 3 53
z When you select Borderless, the media type cannot be set to <Plain
paper>.
z You can select Mixed 1-3 only when the page size is set to <8.5" x 11"
(215.9 x 279.4)> or <A4>.
Printing from a Memory Card
Page 56

4 Specify the paste method.
(1) Use [ ] or [ ] to select the pasting method.
If you select <Paste all> then press [OK], all photos saved on the memory card are
automatically pasted in the specified layout. Go to step 6.
If you select <Paste one by one> then press [OK], the photo selection screen is
displayed.
5 Paste photos one by one.
(1) Use [ ] or [ ] to display the photo to be pasted, then press [OK].
Note
(2) Repeat step (1) to paste photos.
Press [Back] to cancel the last pasted photo.
Press [Stop/Reset] to cancel all pasted photos.
(3) Press [Color] after pasting all photos.
The print confirmation screen is displayed.
Note
You can do...
z To search for photos with the shooting date (Search), see “Searching
for Photos with the Shooting Date (Search)” on page 51.
z To print a specified area (Trimming), see “Printing a Specified Area
(Trimming)” on page 52.
Pasting cannot be done over multiple pages. When you finish pasting
photos for one page, print the page.
6 Start printing.
See “Start printing.” on page 50.
Printing on the Sticker (Sticker Print)
You can print your favorite photo with a frame on Canon Photo Stickers.
1 Prepare for printing.
See “Prepare for printing.” on page 48.
Note
z When you use this function, load paper in the Auto Sheet Feeder.
z You can only load one sheet of stickers at a time in the Auto Sheet
Feeder.
2 Select the print menu.
(1) Press [MEMORY CARD].
(2) Use [ ] or [ ] to select <Special photo print>, then press [OK].
(3) Use [ ] or [ ] to select <Sticker print>, then press [OK].
3 Select the layout for the sticker you want to print.
(1) Use [ ] or [ ] to select <Stickers x 16>.
You can only print in the Stickers x 16 layout though other layouts appear on the LCD.
(2) Press [OK].
The photo selection screen is displayed.
54 Chapter 3
Printing from a Memory Card
Page 57

4 Select the photo you want to print.
(1) Use [ ] or [ ] to display the photo to print, then press [OK].
The frame selection screen is displayed.
Note
You can do...
z To search for photos with the shooting date (Search), see “Searching
for Photos with the Shooting Date (Search)” on page 51.
z To print a specified area (Trimming), see “Printing a Specified Area
(Trimming)” on page 52.
5 Select the frame.
(1) Use [ ] or [ ] to select the frame, then press [OK].
The print confirmation screen is displayed.
Note
z If you do not select a frame using [ ] or [ ], the photo is printed
without any frame. When you want to print with no frame, just press
[OK].
z When the photo is upside down, use [ ] or [ ] to rotate it by 180
degrees to orient it properly against the frame.
z If you want to rotate the photo by 90 degrees to fit it within the frame,
use the trimming edit screen to rotate the cropping area. See “Printing
a Specified Area (Trimming)” on page 52.
6 Start printing.
See “Start printing.” on page 50.
Note
Other Printing Functions
The following print functions are also provided under the Special photo print menu.
Settings cannot be changed when printing stickers.
z <Print all photos>
You can print all photos saved on the memory card.
z <Photo index print>
You can print a list of all the photos saved on a memory card.
Note
Chapter 3 55
The following print methods are available:
<Standard>:
The number of photos printed on a single sheet of paper depends on
the size of the medium.
– Letter / A4: 80 photos
– 5" x 7" / 127.0 x 177.8 mm: 35 photos
– 4" x 6" / 101.6 x 152.4 mm: 24 photos
– Credit Card: 6 photos
<Contact print>:
35 mm film images are printed in its negative size as in contact print.
Printing from a Memory Card
Page 58

z <DPOF print>
If you have specified Digital Print Order Format (DPOF) settings on your digital camera, you can
print using these settings.
Note
z The machine supports the following DPOF functions:
Supported image formats:
CIFF, Exif and JFIF
Print Style Standard Print:
Prints photos that were specified as “Standard Print” with DPOF
Print Style Index Print:
Prints an index of photos that were specified as “Index Print” with
DPOF using the machine’s index printing layout (<Standard>)
Print Photo Select:
Prints only photos specified with DPOF (cannot be specified from the
Operation Panel)
Number of copies:
Prints the number of copies specified with DPOF (cannot be specified
from the Operation Panel)
Functions other than the above (adding captions or titles, cropping,
image rotation, etc.) are not supported.
z Prints are automatically enlarged or reduced to match the page size.
Edges of the photo may be clipped off depending on the page size.
z The shot date order setting by which photos are sorted follows that of
DPOF.
z <Captured info>
Information on photographs at the time of its shooting (Exif info) can be printed in the margin of
Photo index print or selected individual photos.
Note
The following print methods are available:
<List>:
Prints the information in the margin of Photo index print of all photos.
<Single photo>:
Prints the information in the margin of selected individual photos.
1 Prepare for printing.
See “Prepare for printing.” on page 48.
2 Select the print menu.
(1) Press [MEMORY CARD].
(2) Use [ ] or [ ] to select <Special photo print>, then press [OK].
56 Chapter 3
Printing from a Memory Card
Page 59

(3) Use [ ] or [ ] to select the print menu, then press [OK].
Note
z In <Photo index print> and <Captured info>, the print method selection
screen is displayed.
Use [ ] or [ ] to select the print method, then press [OK].
z If you selected <Single photo> for <Captured info>, the photo
selection screen is displayed.
Use [ ] or [ ] to select the photos to print, then press [OK].
You can do...
z To search for photos with the shooting date (Search), see “Searching
for Photos with the Shooting Date (Search)” on page 51.
z To print a specified area (Trimming), see “Printing a Specified Area
(Trimming)” on page 52.
3 Start printing.
See “Start printing.” on page 50.
Note
z For the <Print all photos>, all photos saved on the memory card will be
printed.
z For the <Photo index print>, an index of all photos saved on the
memory card will be printed.
z You cannot configure the number of prints when using <DPOF print>.
z For the <DPOF print>, the photos will be printed according to the
DPOF information on the memory card.
z When using <Captured info>, information on photographs are printed
in the margin of Photo index print or selected individual photos.
Printing by Using the Photo Index Sheet
With this machine, you can easily select print options as well as the photos to print using the
Photo Index Sheet and by marking its appropriate circles. Simply scanning the Photo Index
Sheet prints the selected photographs according to the settings you have made.
1 Prepare for printing.
(1) Press [ON/OFF] to turn on the machine.
See “Turning on the Machine” on page 17.
(2) Load A4 or Letter-size paper.
See “Loading Paper” on page 19.
Note
(3) Ensure that the proper paper source is selected.
See “Changing the Paper Source” on page 23.
Note
(4) Insert a memory card into the Card Slot.
See “Inserting the Memory Card” on page 46.
Use white plain paper when printing a Photo Index Sheet.
Specify [Feed Switch] so that the Auto Sheet Feeder Lamp is lit when
feeding paper from the Auto Sheet Feeder and the Cassette Lamp is lit
when feeding paper from the Cassette.
Chapter 3 57
Printing from a Memory Card
Page 60

2 Select the Photo Index Sheet menu.
(1) Press [Photo Index Sheet].
The Photo Index Sheet menu is displayed.
(2) Use [ ] or [ ] to select <Photo Index Sheet print>, then press [OK].
3 Select a range of image data to print.
(1) Use [ ] or [ ] to select a range of images you want to include in the Photo Index
Sheet, then press [OK].
<Print all photos>: All images are printed on the Photo Index Sheet.
<Set no. of copies>: Prints by specifying the number of photos.
<Search>: Prints by specifying the date range.
z If you selected <Print all photos>:
(2) Go to step 4.
z If you selected <Set no. of copies>:
(2) Use [ ] or [ ] to specify the number of photos to print starting with the newest one, then
press [OK].
(3) Go to step 4.
z If you selected <Search>:
(2) Use [ ] or [ ] to specify the oldest shot date to include in print, then press [OK].
(3) Use [ ] or [ ] to specify the newest shot date to include in print, then press [OK].
(4) Go to step 4.
Note
It may take time to display the Search screen depending on the number
of photos saved on the memory card.
58 Chapter 3
Printing from a Memory Card
Page 61

4 Start printing the Photo Index Sheet.
(1) Press [Color].
Printing of the Photo Index Sheet starts.
Note
(A) Select the page size and print type.
(B) Select date printing and/or photo optimizer as necessary. See “Print Setting Items” on
page 35.
(C) Mark this to print all photographs, one copy each.
*When you mark this, even if you mark the number of copies you want to print for each
photograph, those marks will be disregarded, and one copy each of all photographs will be
printed.
(D) Select the number of copies (fill in a circle under each photograph you want to print).
(E) Follow the procedure as described.
(F) Select the paper source.
(G) Mark this to print the same Photo Index Sheet again.
*If you mark this, all other marked settings will be disregarded.
When there are more than 37 images, two or more Photo Index Sheets
are printed.
(A)
(B)
(C)
(D)
(E)
(F)
(G)
5 Fill in the appropriate circles in the Photo Index Sheet.
Fill in the appropriate circles ( ) with a dark pencil or a black ink pen to select the photos to
print and their print options.
Chapter 3 59
Printing from a Memory Card
Page 62

z Good
z Bad
(A)
(A) Check mark
(B) Line only
(C) Too light
Important
(B)
z Be sure to fill a circle for every setting item (except options).
z If there is more than one Photo Index Sheet, fill in all the sheets.
z If the filled circles on the Photo Index Sheet are not dark enough, the
(C)
machine may not read the settings.
6 Scan the Photo Index Sheet and print photos.
(1) Load the paper you selected for the Photo Index Sheet.
See “Loading Paper” on page 19.
Note
(2) Press [Photo Index Sheet].
(3) Use [ ] or [ ] to select <Scan sheet and print>, then press [OK].
(4) Place the Photo Index Sheet on the Platen Glass, then press [OK].
When placing the Photo Index Sheet, place the front side down, and align the upper left
corner of the sheet precisely with the arrow mark (alignment mark) at the upper left
corner of the Platen Glass.
The Photo Index Sheet is scanned and the specified photos will be printed.
Important
z When printing images using the Photo Index Sheet, you can select 4"
x 6" (101.6 x 152.4 mm), 5" x 7" (127 x 177.8 mm), 8.5" x 11"
(LETTER), or A4 for the page size.
z Load paper in the location you selected under <The Paper Feeder> on
the Photo Index Sheet.
z If <Failed to scan Photo Index Sheet.> is displayed on the LCD, press
[OK]. Make sure that you have marked all the necessary circles on the
sheet, and confirm its orientation and position when it is set on the
Platen Glass for scanning.
z If the filled circles on the Photo Index Sheet are not marked dark
enough, the machine may not read the settings.
z Do not remove the memory card while the machine is printing.
z If the Platen Glass is dirty, the machine may not read the settings. See
“Cleaning the Platen Glass and Document Cover” on page 109.
z If the Photo Index Sheet is dirty, the machine may not read the
settings.
Note
60 Chapter 3
Printing from a Memory Card
z To cancel printing, press [Stop/Reset].
z To continue to print photographs using subsequent Photo Index
Sheets, repeat the procedure from step 5.
z If the memory card has been removed and then reinserted before
printing with the Photo Index Sheet, it may take some time before
printing starts.
Page 63

Chapter 4
Photo Printing from Photo or Film
You can scan and print printed photos and 35 mm film into the machine. For film, both film strips (six
connected frames per strip after regular developing) and slides (one frame per mounted slide) are
supported. Various effects can be applied to the images before printing them.
Note
Scanning a Photo
This section describes how to scan a printed photo.
You can set up to two 4"x 6"/ 101.6 x 152.4 mm sized or 5"x 7"/ 127 x 177.8 mm sized prints, or four
Credit Card sized prints at a time on the Platen Glass.
1 Press [ON/OFF] to turn on the machine.
See “Turning the Machine ON and OFF” on page 17.
2 Select the type of original to scan.
(1) Press [PHOTO/FILM].
(2) Use [ ] or [ ] to select <Print from photo>, then press [OK].
The photo placement guidance screen is displayed.
Image data scanned from photo or film cannot be saved in the machine’s
memory or on a memory card. For how to save it on a computer, refer to
the Scan Guide, located on your Setup CD-ROM.
(2)
3 Load the photos on the Platen Glass.
(1) Lift the Document Cover.
(2) Load the photos on the Platen Glass.
Place the photos face down on the Platen Glass as follows.
0.4"/ 10 mm
0.4"/ 10 mm
4"x 6"/ 101.6 x 152.4 mm or 5"x 7"/
127 x 177.8 mm sized originals
0.4"/ 10 mm
Chapter 4 61
0.4"/ 10 mm
Photo Printing from Photo or Film
0.4"/ 10 mm
0.4"/ 10 mm
0.4"/ 10 mm
Credit Card-sized originals
Page 64

Note
z Place the photograph(s) at least 0.4" / 10 mm away from and in square
with the edges of the Platen Glass.
z The Skew Correction function automatically compensates for
photographs placed at a slant of up to approximately 10 degrees. If the
slant is too large and the photograph fails to scan in, will be
displayed on the preview screen. Reset the photos, and scan them
again.
z When setting two or more photographs at the same time, place them
at least 0.4" / 10 mm apart from each other. If photographs are placed
closer, they may be scanned as a single image.
z Slanted photographs with a long edge of 7.1" / 180 mm or more
cannot be corrected.
z Photographs smaller than approx. 1" / 25 mm square will not be
scanned properly.
z The types of photographs listed below may not be scanned properly.
– Non-rectangular or irregular shaped (such as cut out photos)
– Photographs that are entirely white
z The borders of bordered photographs may not be scanned properly.
Perform trimming if necessary.
4 Slowly close the Document Cover and press [OK].
The photograph is scanned.
Note
z The photo or film is rescanned before printing starts. Do not open the
Document Cover or remove the photo or film from the Platen Glass
until printing is complete.
z Press [PHOTO/FILM] when loading the other photos. If <Do you want
to clear the scanned photo?> appears on the LCD, select <Yes>,
press [OK] to delete the previous image data, then go to main step 2.
Scanning a Film
This section describes how to scan 35 mm film strips and slides. Also mount film in the film guide in
the same way as that of scanning with the machine when scanning films from your computer.
35 mm film strip 35 mm slide
1 Press [ON/OFF] to turn on the machine.
See “Turning the Machine ON and OFF” on page 17.
62 Chapter 4
Photo Printing from Photo or Film
Page 65

2 Select the type of original to scan.
(1) Press [PHOTO/FILM].
(2) Use [ ] or [ ] to select <Print from film>, then press [OK].
The film placement guidance screen is displayed.
(2)
3 Select the type of film to scan.
(1) Use [ ] or [ ] to select the type of film to scan.
The following type of film can be selected.
Color negative film, Black & white negative film, Color positive film, and Mount (for slides)
(2) Press [OK].
The procedure to set the film is displayed.
Follow the screen to load the film. Press [OK] to move to the next display.
4 Remove the film guide.
(1) Remove the FAU Protective Sheet from the Document Cover.
Chapter 4 63
Photo Printing from Photo or Film
Page 66

(2) Remove the film guide for film strips from the rear of the FAU Protective Sheet.
Note
Before scanning 35 mm slides, prepare the film guide for slides provided
with the machine.
5 Mount film in the appropriate film guide as described below.
z Mounting a 35 mm Film Strip:
(1) On the film guide, open the film holder.
Gently squeeze in the edges (A) of the film holder to release it (B).
(A)
(B)
(2) Mount the film in the film guide with the front side (the side showing the correct image)
face down. Pass the tip of the film under the tabs of the film guide, then position the film
in the film guide so that the spaces between frames are aligned with the white line mark
of the film guide.
64 Chapter 4
Photo Printing from Photo or Film
Page 67

(3) Close the film holder completely with squeezing it inward while pressing.
Note
(4) With the front side of the film (the side showing the correct image) face down, align the
film guide with the indentations on the right and left sides of the Platen Glass.
z Ensure that all the tabs on its outer edges fit into the slots in the film
guide when closing the film holder. If the film holder is floating, press
the whole downward.
z If the film holder will not close properly, reposition the film so that its
perforations are set properly in the film guide slots, and try again.
Note
z When placing film strips that are shorter than the film guide, part of an
image near the open area may appear pale. In this case, place black
paper over the open area to shield it.
z Labels attached to areas of the film without images may be interpreted
as images and be included in the scan.
z Mounting 35 mm Slides:
(1) Align the film guide with the indentations on the right and left sides of the Platen Glass.
Chapter 4 65
Photo Printing from Photo or Film
Page 68

(2) Mount the slides in the film guide with the front side (the side showing the correct image)
face down and with the image upside down. Load the slides in the landscape orientation,
making sure they are not loose in the film guide.
Important
Note
The images may be unsatisfactory if the film is set beyond the reference
position (A) indicated by the white line. Do not set the film beyond the
reference position.
(A)
z Film is scanned in the order from left to right.
z Mount the film in the film guide with the upper edge of the photograph
towards you to prevent the scanned photographs from being displayed
upside down on the LCD. Depending on the model or brand of your
camera, the scanning order may differ from the frame order of the film.
Order to scan
35 mm film strip 35 mm slides
66 Chapter 4
Photo Printing from Photo or Film
Page 69

6 Slowly close the Document Cover and press [OK].
The film is scanned.
Note
z The photo or film is rescanned before printing starts. Do not open the
Document Cover or remove the photo or film from the Platen Glass
until printing is complete.
z If the film was not scanned properly, see “Cannot Scan Films” on
page 118.
z Press [PHOTO/FILM] when loading another film. If <Do you want to
clear the scanned photo?> appears on the LCD, select <Yes>, press
[OK] to delete the previous image data, then go to main step 2.
Printing Photographs
Let's select a scanned photo and specify the number of prints, and print it.
Printing Photo Displayed on the LCD (Single-photo print)
Print a scanned photo.
1 Prepare for printing.
(1) Load paper.
See “Loading Paper” on page 19.
(2) Ensure that the proper paper source is selected.
See “Changing the Paper Source” on page 23.
Note
(3) Scan a photo or a film.
See “Scanning a Photo” on page 61 or “Scanning a Film” on page 62.
Specify [Feed Switch] so that the Auto Sheet Feeder Lamp is lit when
feeding paper from the Auto Sheet Feeder and the Cassette Lamp is lit
when feeding paper from the Cassette.
2 Select the print menu.
(1) Use [ ] or [ ] to select <Single-photo print>, then press [OK].
The photo selection screen is displayed.
(2)
Chapter 4 67
Photo Printing from Photo or Film
Page 70

3 Select the photo you want to print.
(1) Use [ ] or [ ] to display the photo you want to print.
(2) Press [Color] or [Black].
The print confirmation screen is displayed.
Note
You can do...
z To print a specified area (Trimming), see “Printing a Specified Area
(Trimming)” on page 69.
4 Start printing.
(1) Check the page size and media type.
Note
(2) Use [ ] or [ ] to specify the number of prints.
(3) Press [Color] to print in color, or [Black] to print in black & white.
The machine starts printing.
Note
Press [Settings] to check or change the page size, media type, or other
settings. See “To Change Print Settings” on page 34.
(2)
(1)
To cancel printing, press [Stop/Reset].
Specifying How Many Copies to Print for Each Photo (Multi-photo print)
You can specify the number of prints to be made for each photo.
1 Prepare for printing.
See “Prepare for printing.” on page 67.
2 Select the print menu.
(1) Use [ ] or [ ] to select <Multi-photo print>, then press [OK].
The photo selection screen is displayed.
3 Specify the number of prints for each photo.
(1) Use [ ] or [ ] to select the image you want to print.
(2) Use [ ] or [ ] to specify the number of prints.
(2)
(3) Repeat from step (1) to step (2) to specify the number of prints for each photo.
68 Chapter 4
Photo Printing from Photo or Film
Page 71

(4) Press [OK].
The print confirmation screen is displayed.
Note
You can do...
z To print a specified area (Trimming), see “Printing a Specified Area
(Trimming)” on page 69.
4 Start printing.
(1) Confirm the settings.
To change any of the settings, press [Settings].
See “Changing the Print Settings” on page 34.
(2) Press [Color] or [Black].
The specified number of copies of each photo will be printed.
Other Useful Functions
Printing a Specified Area (Trimming)
You can edit images displayed on the LCD by cropping them.
For detailed operations, see “Printing a Specified Area (Trimming)” on page 52.
Printing on the Sticker (Sticker print)
You can print your favorite photo on Canon Photo Stickers to create your own stickers.
1 Prepare for printing.
See “Prepare for printing.” on page 67.
Note
z When you use this function, load paper in the Auto Sheet Feeder.
z You can only load one sheet of stickers at a time in the Auto Sheet
Feeder.
2 Select the print menu.
(1) Use [ ] or [ ] to select <Special photo print>, then press [OK].
(2) Use [ ] or [ ] to select <Sticker print>, then press [OK].
3 Select the layout for the sticker you want to print.
See “Select the layout for the sticker you want to print.” on page 54.
Note
When printing stickers in Photo/film mode, you cannot print frames.
4 Select the photo you want to print.
(1) Use [ ] or [ ] to display the photo to print, then press [OK].
The print confirmation screen is displayed.
Note
Chapter 4 69
You can do...
To print a specified area (Trimming), see “Printing a Specified Area
(Trimming)” on page 52.
Photo Printing from Photo or Film
Page 72

5 Start printing.
See “Start printing.” on page 68.
Printing All Photos (Print all photos)
You can print all scanned photos.
1 Prepare for printing.
See “Prepare for printing.” on page 67.
2 Select the print menu.
(1) Use [ ] or [ ] to select <Special photo print>, then press [OK].
(2) Use [ ] or [ ] to select <Print all photos>, then press [OK].
3 Start printing.
See “Start printing.” on page 68.
70 Chapter 4
Photo Printing from Photo or Film
Page 73

Chapter 5
Printing Photographs Directly from a
Compliant Device
Connecting a PictBridge compliant device such as a digital camera, camcorder or mobile phone to
the machine allows you to print recorded images directly without using a computer.
Note
z PictBridge is an industry standard enabling a range of digital photo solutions,
including the direct printing of photos from a digital still camera, camcorder or
mobile phone* without the need to use a computer.
z It is possible to specify which images to print and various print settings from
the operation panel of your camera or mobile phone.
z Canon Bubble Jet Direct allows you to print photos from a Canon Bubble Jet
Direct compatible (PictBridge incompatible) digital camera or digital video
camcorder without a computer, by simply connecting the digital camera or
digital video camcorder to this machine.
For details, see “Printing Photographs Directly from a Canon Bubble Jet
Direct Compatible Digital Camera” on page 76.
* Hereafter, the digital still camera, digital camcorder, and camera-equipped
mobile phone compatible with PictBridge are collectively called a PictBridge
compliant device.
(A)
(B)
(A) This mark indicates that the product is PictBridge-compatible. See
Directly from a PictBridge Compliant Device” on page 73
(B) See
“Printing Photographs Directly from a Canon Bubble Jet Direct Compatible Digital
Camera” on page 76
.
.
“Printing Photographs
Connecting to a PictBridge Compliant Device
To connect a PictBridge compliant device to this machine, use the USB cable supplied with the
device.
Caution
Chapter 5 71
Do not connect any equipment other than PictBridge compliant devices, Canon
Bubble Jet Direct compatible digital cameras or optional Bluetooth Units BU-20
to the Direct Print Port of the machine. If you do so, electric shock, fire, or
damage to the device could result.
Printing Photographs Directly from a Compliant Device
Page 74

Note
When printing photos with the digital device connected to the machine, it is
advisable to use the AC adapter supplied with the device. If you use the device
battery, be sure to charge it fully.
1 Set up the machine.
Refer to the Easy Setup Instructions to set up the machine and make it ready for printing.
Note
The Print Head cannot be aligned using the controls of the digital device.
If the Print Head alignment is not yet performed, execute automatic Print
Head alignment, see “Aligning Print Head automatically” on page 108.
2 Turn on the machine.
See “Turning on the Machine” on page 17.
3 Load the paper in the machine.
See “Loading Paper” on page 19.
4 Connect the PictBridge compliant device to the machine.
Note
(1) Ensure that the device is turned off.
(2) Connect the device to the machine using the USB cable (for connection to a computer)
supplied with the device.
Note
Depending on the model or brand of your device, you may have to select
a print mode compliant with PictBridge before connecting the device.
You may also have to turn on the device or select Play mode manually
after connecting the device to the machine.
Perform necessary operations according to the instruction manual
supplied with the PictBridge compliant device.
Some types of the PictBridge compliant devices do not turn on
automatically, when connected to the machine. If the device does not turn
on automatically, turn it on manually.
72 Chapter 5
Printing Photographs Directly from a Compliant Device
Page 75

(3) Turn on and set up the device for direct printing.
Either of the following icons will display on the LCD display of the device when the
machine is correctly connected.
A PictBridge compliant device.
A Canon Bubble Jet Direct compatible digital camera.
Note
If neither of these icons appear, see “Cannot Print Properly from the
Digital Camera” on page 130.
Printing Photographs Directly from a PictBridge
Compliant Device
When operating the device, be sure to follow the instructions given in the instruction manual supplied
with the PictBridge compliant device. Let’s take a look at the page size, media type, layout, image
optimization modes, and date/file no. printing that can be set on a PictBridge compliant device
connected to the machine.
Checking or Changing PictBridge Print Settings from Your Camera
To change the page size or media type operate the device to select the PictBridge print setup
mode and confirm or change the settings.
The settings below can be changed by pressing [Settings] in Memory card mode of this machine
when a PictBridge compliant device is connected. However, changes can be made on the
Settings screen (Memory Card) only when the corresponding items below are in the “Default”
setting items (selections based on the machine setting) using the controls of the device.
PictBridge compliant device
setting items
Page size : Default You can change the machine settings of (1), (2), and (4)
Media type : Default
Layout : Default
Image optimize : Default You can change the machine settings on tab 2 in Memory
Machine setting on the Print Setting screen
on tab 1 in Memory card mode.
For the setting items, see “Memory card and Photo/film
modes” on page 36.
card mode.
For the setting items, see “Memory card and Photo/film
modes” on page 36.
About the Settings Explained below
The settings explained on the following pages cannot be made on some PictBridge compliant
devices. If any setting cannot be made, the machine setting is used.
* Names of settings that are displayed on Canon PictBridge compliant device are used in the
description given below. Different names may be displayed on the PictBridge compliant device
depending on the brand or model.
About Image Data Format for Printing
This machine accepts images* taken with a camera compatible with the Design rule for Camera
File System and PNG files.
* Exif2.21 compliant
Chapter 5 73
Printing Photographs Directly from a Compliant Device
Page 76

About “Page size” and “Media type”
When the “Default” (selections based on the machine setting) is selected, the machine operates
based on the <Page size> and the <Media type> settings specified in the Memory card mode of
the machine.
To print on Photo Paper Pro, select “Fast Photo” from “Media type” on the display of the
PictBridge compliant device. Select “Photo” for Photo Paper Plus Glossy.
The following sizes and types of paper can be loaded in the machine by selecting options from
“Page size” and “Media type”.
“Page size” setting “Media type” setting Paper loaded in machine
10 x 15 cm/4" x 6" Photo Photo Paper Plus Glossy
Fast Photo Photo Paper Pro
Photo Photo Paper Plus Semi-gloss
Photo Glossy Photo Paper
Glossy Photo Paper "Everyday
Use"
*1
13 x 18 cm/5" x 7"
*2
A4/8.5" x 11" (Letter)
*3, *4
Photo Stickers
Photo Photo Paper Plus Glossy
Photo Photo Paper Plus Glossy
Fast Photo Photo Paper Pro
Photo Photo Paper Plus Semi-gloss
Photo Glossy Photo Paper
A4 Photo Glossy Photo Paper "Everyday
Use"
5.4 x 8.6 cm/Credit Card Photo Glossy Photo Paper
You may not be able to purchase some Canon branded paper depending on your country.
*1
This paper is exclusively used to print photo stickers. When printing on sticker paper, select 10
x 15 cm / 4" x 6" in “Page size”.
*2
This size can be selected only for Canon PictBridge compatible devices (note that it cannot be
selected for some models).
*3
“Plain Paper” can be selected for “Media type” when A4 or 8.5" x 11" (Letter) is selected for
“Page size”. When “Plain Paper” is selected for “Media type”, bordered printing will be performed
even when “Borderless” is selected for “Layout”.
*4
When A4 or 8.5" x 11" (Letter) is selected for “Page size”, you can print in 4-up layout.
About “Layout” and “Trimming”
For “Layout”, when the “Default” (selections based on the machine setting) is selected, the
machine operates based on the print setting specified in the Memory card mode of the machine.
Trimming is performed based on settings on the PictBridge compliant device.
74 Chapter 5
Printing Photographs Directly from a Compliant Device
Page 77

Note
About “Image optimize”
When the “Default” (selections based on the machine setting) is selected, the machine operates
based on the tab 2 of the print setting specified in Memory card mode of the machine. For the
setting items, see “Print Setting Items” on page 35.
If you use a Canon PictBridge compatible device, you can select “VIVID”, “NR”, “VIVID+NR”, or
“Face”. (Note that these options cannot be selected for some models.)
Note
About “Date/File No. print”
You cannot change this setting on this machine.
Selections of this setting will be based on that of the PictBridge compliant device.
If you select an image which has had the shooting date embedded in it using a camera with the
print mode, select “Off” for this function. If you select “Date”, “File No.”, or “Both”, the date and/or
file number will be printed over the embedded date.
Other Settings
If you use a Canon PictBridge-compliant device, you can use the following print settings.
(Note that these print settings cannot be used for some models.) For details, refer to your
device’s instruction manual.
z Shooting Info (Exif Data)
You can print shooting Info (Exif Data) on photos in list format, or in the margins of specified
photos.
Select Layout, then select the item displayed with the [i] icon.
z 35mm Film Style Layout (Contact Printing Layout)
You can print selected photos or index-specified photos in 35 mm film style layout (contact
printing layout).
Select Layout, then select the item displayed with the film icon.
z When printing onto Photo Stickers (PS-101) (16-up), use the following
settings.
1. Select the Auto Sheet Feeder as the paper source.
For details, see “Loading the Print Media in the Auto Sheet
Feeder” on page 24.
Always load Photo Stickers (PS-101) in the Auto Sheet Feeder.
2. Select 10 x 15 cm / 4" x 6" for the “Page size”, and “Photo” for the
“Media type”.
3. Select N-up for layout, then select 16-up.
z Some PictBridge compliant devices display the Layout option; 2-up, 4-
up, 9-up, and 16-up. In this case always select 16-up.
z If there are no options on the PictBridge compliant device that
correspond to 2-up, 4-up, 9-up, or 16-up, printing on stickers is not
possible.
z When you using Photo Stickers (PS-101), do not set “Borderless” in
“Layout” settings.
z When “VIVID” is selected, green and blue portions of photos are
printed vividly.
z When “NR” (Noise Reduction) is selected, noise in blue portions, such
as the sky, and dark portions is removed.
z When “VIVID+NR” is selected, functions of both “VIVID” and “NR” are
performed.
z When “Face” is selected, backlit images are corrected when printed.
Chapter 5 75
Printing Photographs Directly from a Compliant Device
Page 78

Note
z Never disconnect the USB cable during printing.
z When disconnecting the USB cable between the PictBridge compliant
device and machine, follow the instructions given in the device’s
instruction manual.
z Controls of the device cannot be used for the following:
– Print quality setting
– Machine maintenance
Printing Photographs Directly from a Canon Bubble
Jet Direct Compatible Digital Camera
The following is a list of media types that can be set on the Canon Bubble Jet Direct compatible
digital camera or digital video camcorder (PictBridge incompatible) along with their limitations when
connected to this machine.
Note
Media Types for Digital Camera
When you connect a digital camera, you can use the following media:
Digital Camera Setting Media Type
Card #1 Photo Paper Pro 4" x 6" / 101.6 x 152.4 mm
Card #2 Photo Paper Plus Glossy 4" x 6" / 101.6 x 152.4 mm
To connect the compatible digital camera to this machine, use the USB cable for
the computer connection supplied with the camera.
For details on connection, see “Connecting to a PictBridge Compliant Device”
on page 71.
Photo Paper Plus Semi-gloss 4" x 6" / 101.6 x 152.4 mm
Glossy Photo Paper 4" x 6" / 101.6 x 152.4 mm
Glossy Photo Paper "Everyday Use" 4" x 6" /101.6 x 152.4
mm
Card #3 Photo Paper Plus Glossy 5" x 7" / 127.0 x 177.8 mm
LTR Photo Paper Pro Letter
Photo Paper Plus Glossy Letter
Photo Paper Plus Semi-gloss Letter
Glossy Photo Paper Letter
A4 Photo Paper Pro A4
Photo Paper Plus Glossy A4
Photo Paper Plus Semi-gloss A4
Glossy Photo Paper A4
Glossy Photo Paper "Everyday Use" A4
76 Chapter 5
Printing Photographs Directly from a Compliant Device
Page 79

You may not be able to purchase some Canon branded paper depending on your country.
Printing Directly from a Digital Camera or a Digital Video Camcorder
This section describes how to print after connecting a camera to the machine.
Note
z For the digital camera operation method and troubleshooting, refer to
your digital camera manual.
z For print error messages, see “Cannot Print Properly from the Digital
Camera” on page 130.
1 Display the image you want to print in replay mode.
z If the camera will not change to replay mode, refer to the manual supplied with your digital
camera for instructions how to.
z When the digital camera is correctly connected, the icon will display on the LCD of the
digital camera.
2 Press [SET] on the digital camera.
The print setting menu is displayed on the LCD of the digital camera.
3 Select [Style] and specify the page size, bordered or borderless printing, and date
printing ON or OFF.
4 Specify the number of copies, select [Print], and then press [SET] on the digital
camera.
Note
z By operating the digital camera, you can make the following prints:
– You can make a standard print from the image displayed in the single
display mode or in the index display mode.
– You can print specified numbers of images, or make an index print
by editing the DPOF.
* Images other than Exif may not be index printed.
– For the images taken with an ExifPrint compatible digital camera, the
ExifPrint function can be used.
– If date printing is set from the digital camera, the date when the
photograph was taken is to be printed (excluding the index print).
– Images will be scaled automatically according to the image size set
on the digital camera and the size of the media set on the machine.
z The digital camera does not support the following functions:
– Print quality setting
– Machine maintenance
z To disconnect the USB cable connecting the digital camera to the
machine, follow the procedure below:
1. Disconnect the USB cable from the machine.
2. Turn OFF the digital camera.
3. Disconnect the USB cable from the digital camera.
When disconnecting the USB cable, be sure to hold the connector
by its sides.
Chapter 5 77
Printing Photographs Directly from a Compliant Device
Page 80

Chapter 6
Printing Photographs from a Wireless
Communication Device
If you have a mobile phone with an infrared port for wireless data transmission, you can print photos
through a cordless connection with the machine. If the optional Bluetooth Unit BU-20 is connected to
the machine, you can also perform wireless printing from Bluetooth compatible mobile phones.
When printing photos through Infrared Communication:
z See “Setting the Page Size, Media Type, and Layout When Printing from a Mobile Phone” on
page 78.
z See “Performing Infrared Communication” on page 79.
When printing photos through Bluetooth Communication:
z See “Setting the Page Size, Media Type, and Layout When Printing from a Mobile Phone” on
page 78.
z See “Performing Bluetooth Communication” on page 81.
Setting the Page Size, Media Type, and Layout When
Printing from a Mobile Phone
You can select the page size, media type, layout and borderless printing on the Wireless print
settings screen when printing from a mobile phone through Infrared communication or Bluetooth
communication. For how to print from a computer through Bluetooth communication, refer to the
Bluetooth User
* The initial setting is borderless printing on 4" x 6" Photo Paper Plus Glossy.
’s Guide.
Displaying the Wireless Print Screen and Specifying the Settings
1 Press [ON/OFF] to turn on the machine.
See “Turning on the Machine” on page 17.
2 Display the Wireless print settings screen.
(1) Press [Menu].
(2) Use [ ] or [ ] to select <Maintenance/settings> and then press [OK].
(3) Use [ ] or [ ] to select <Device settings> and then press [OK].
(4) Use [ ] or [ ] to select <Wireless print settings> and then press [OK].
The Wireless print settings screen is displayed.
3 Confirm or change the settings.
(1) Use [ ] or [ ] to select the item to set.
(2) Use [ ] or [ ] to change the setting.
(3) Press [OK] after finishing all settings you need.
The photos in the mobile phone can be printed according to the following settings.
78 Chapter 6
Printing Photographs from a Wireless Communication Device
Page 81

Setting Items
(1)
(2)
(3)
(4)
(1) Select the page size for the wireless print.
(2) Select the media type for the wireless print.
Note
(3) Correct the contours and smoothes out the jaggedness.
Image optimizer ON, Image optimizer OFF
(4) Select the layout of the photos as below.
Sticker print:
Stickers x 16
Printing on paper other than sticker:
Bordered x 1, x 2, x 4, x 8
Borderless x 1, x 2, x 4, x 8
Mixed 1, 2, 3
Note
For information on wireless print compatible page size and type, see
“Recommended Paper and Requirements” on page 19.
z <Mixed 1>, <Mixed 2>, or <Mixed 3> can be selected only when the
page size setting is <8.5" x 11" (215.9 x 279.4)> or <A4>.
z When printing on Canon Photo Stickers, make the settings as below.
Page Size Media Type Layout
Sticker Photo Paper Plus Glossy Stickers x 16
Performing Infrared Communication
You can print photos in your mobile phone.
When printing through infrared communication, also refer to your mobile phone manual.
1 Prepare for printing.
(1) Press [ON/OFF] to turn on the machine.
See “Turning the Machine ON and OFF” on page 17.
(2) Load paper.
See “Loading Paper” on page 19.
(3) Ensure that the proper paper source is selected.
See “Changing the Paper Source” on page 23.
2 Set the print setting.
See “Setting the Page Size, Media Type, and Layout When Printing from a Mobile Phone” on
page 78.
3 Start Infrared Communication.
Chapter 6 79
Printing Photographs from a Wireless Communication Device
Page 82

(1) Oppose the infrared port of the mobile phone (D) to that of the machine (B) at a distance
of less than 7.87" / 20 cm (C).
Note
(A)
(2) Select the photo to print and send the data to the machine using the infrared
communication function of the mobile phone.
Printing will start after receiving all data.
Note
z The effective angle of the IrDA port of the machine is about 10° from
the central axis in both vertical and horizontal directions (A).
z The allowable distance of communication with the machine depends
on the mobile phone you use. For this distance, refer to your mobile
phone manual.
(B)
(C)
(D)
z To perform printing correctly from a mobile phone through infrared
communication, the following conditions should be satisfied.
– Compatible devices: The mobile phones with an IrDA port,
compatible image data transmitting through Infrared communication
– Printable data: Shooting image with the camera of the mobile phone
z For the procedure to print from your mobile phone, refer to your mobile
phone manual.
z Do not place any obstacle between the infrared ports of the machine
and mobile phone. Data cannot be transmitted between them.
z During printing, be careful not to interrupt infrared communication with
the machine. If it is interrupted, send the data from the mobile phone
again.
z Depending on your device, the Fine print quality option may not be
available due to the restriction on the infrared transfer capacity.
z We recommend printing on sticker or credit card sized paper when the
print quality on other types of paper is not fine.
About transmittable data
z It does not support printing a downloaded content or photo and a
photo attached to an E-mail for security reason.
z It does not support printing video files.
z Depending on the size of a photo, it may take a while for this machine
to start to print after starting the infrared transfer.
z Depending on your device, it may not print data stored in a memory
card.
z It automatically sets the photo quality and orientation (horizontal or
landscape) according to the photo size.
z It automatically sets to the margin according to the photo size.
80 Chapter 6
Printing Photographs from a Wireless Communication Device
Page 83

Performing Bluetooth Communication
This section explains the procedure to print photos through Bluetooth communication from the
mobile phone with the optional Bluetooth Unit BU-20.
For the procedure to print through Bluetooth communication from the computer, refer to the
Bluetooth User's Guide.
Note
The mobile phone supporting the OPP (Object Push Profile) or BIP (Basic
Image Profile) can print photos. For details of profiles, refer to your product's
instruction manual.
Printing through Bluetooth Communication
When you print through Bluetooth communication from a mobile phone, refer to your mobile
phone manual.
1 Prepare for printing.
(1) Press [ON/OFF] to turn on the machine.
See “Turning the Machine ON and OFF” on page 17.
(2) Load paper.
See “Loading Paper” on page 19.
(3) Ensure that the proper paper source is selected.
See “Changing the Paper Source” on page 23.
2 Connect the Bluetooth Unit BU-20 to the Direct Print Port.
3 Set the print setting.
See “Setting the Page Size, Media Type, and Layout When Printing from a Mobile Phone” on
page 78.
4 Start printing from a mobile phone.
z When you select the device name, select the initial value "Canon MP950-1."
z If you are required to enter the passkey, enter the initial value "0000."
z You can change the device name of the machine, passkey, and so on in Bluetooth settings
on the machine. See “Changing the Bluetooth Settings - Bluetooth settings” on page 82.
Chapter 6 81
Printing Photographs from a Wireless Communication Device
Page 84

Note
z Communication is possible up to about 32.8 ft/10m depending on the
conditions below. The printing speed may change depending on the following
conditions:
– Presence of obstacles between the communication equipment and radio
wave conditions.
– Presence of magnetic fields, static electricity or electromagnetic
interference.
– Receiver sensitivity and antenna performance of the communication
equipment.
z For the transmittable data, see “About transmittable data” on page 80.
Changing the Bluetooth Settings - Bluetooth settings
You can change the device name of the machine, passkey, and so on in Bluetooth settings.
1 Press [ON/OFF] to turn on the machine.
See “Turning the Machine ON and OFF” on page 17.
2 Connect the Bluetooth Unit BU-20 to the Direct Print Port.
3 Display the Bluetooth settings screen.
(1) Press [Menu].
(2) Use [ ] or [ ] to select <Maintenance/settings> and then press [OK].
(3) Use [ ] or [ ] to select <Device settings> and then press [OK].
(4) Use [ ] or [ ] to select <Bluetooth settings> and then press [OK].
4 Confirm or change the settings.
(1) Use [ ] or [ ] to select the item to set.
(2) Use [ ], [ ], [ ], [ ] to select the item.
(3) Press [OK] after finishing all settings you need.
Setting Items
<Device name>: Select the device name of this machine displayed on the screen of the
<Access refusal>: Selecting <ON> will disable search this machine from Bluetooth devices.
<Security>: Selecting <Enable> will enable a passkey to be set or changed. Setting a
<Passkey>: You can change the passkey. The passkey refers to an identification
82 Chapter 6
Printing Photographs from a Wireless Communication Device
Bluetooth devices.
When you set <MP950-2> the machine name on the Bluetooth device is
"Canon MP950-2."
The initial value is set to <MP950-1>.
passkey will prevent incorrect access from other Bluetooth devices.
number to be determined. It is used to prevent incorrect access from
other Bluetooth devices.
The initial value is set to <0000>.
After you change the passkey, you are required to enter the new passkey
again. Enter the new passkey to Bluetooth device.
Page 85

Chapter 7
Printing from Your Computer
This section describes the basic printing procedure, taking the steps to print documents as an
example.
Printing with Windows
Note
Press [ON/OFF] to turn on the machine.
1
See “Turning on the Machine” on page 17.
z Menu and command names may differ between application softwares, and
more steps may be required. For details, refer to the documentation for each
application software you use.
z The steps described in this section are for printing in Windows XP Service
Pack 2 (hereafter, called Windows XP SP2).
2 Load the paper in the machine.
See “Loading Paper” on page 19.
3 Ensure that the proper paper source is selected.
When the Auto Sheet Feeder Lamp (A) is lit, paper is fed from the Auto Sheet Feeder.
When the Cassette Lamp (B) is lit, paper is fed from the Cassette.
(A)
(B)
Note
Specify [Feed Switch] so that the Auto Sheet Feeder Lamp is lit when
feeding paper from the Auto Sheet Feeder and the Cassette Lamp is lit
when feeding paper from the Cassette.
4 Create a document or open a file to print from the application software.
5 Open the printer properties dialog box.
(1) Select [Print] from the application software’s [File] menu.
The [Print] dialog box opens.
(2) Ensure that your machine is selected.
Note
Chapter 7 83
If another name of the machine is selected, click the name of the
machine to use.
Printing from Your Computer
Page 86

(3) Click [Preferences] or [Properties].
The [Main] tab of the [Printing Preferences] screen is displayed.
(2)
(3)
6 Specify the required settings.
(1) Click [Media Type] to select the type of media loaded in the machine.
(2) Ensure that [Paper Feed Switch] is selected from [Paper Source].
(3) Specify the print quality and other settings in [Print Quality] or [Color/Intensity].
Note
(4) Click [OK].
The [Print] dialog box opens.
For print settings, refer to the Printer Driver Guide.
(1)
(2)
(3)
(4)
84 Chapter 7
Printing from Your Computer
Page 87

Note
7 Print the document.
(1) Click [Print] or [OK].
The machine starts printing.
z To confirm the page size, click on the [Page Setup] tab. If it does not
match the document size set by the application software, select the
matching page size.
z This section describes the procedure for selecting [Paper Feed
Switch] from [Paper Source]. For a detailed description of the [Paper
Source] settings, refer to the Printer Driver Guide.
z For details about other printer driver functions, click [Instructions] or
[Help] to view the Printer Driver Guide. [Instructions] is only displayed
when the Printer Driver Guide is installed.
z Selecting the [Preview before printing] check box displays a preview
screen that allows you to confirm the selected printing effects and how
your document will look when printed. Some application softwares do
not have a preview function.
(1)
Note
z You can cancel a print job in progress by simply pressing [Stop/Reset]
on the machine.
z Click [Cancel Printing] on Canon IJ Status Monitor to stop printing. To
show Canon IJ Status Monitor, click [Canon MP950 Series Printer] on
the taskbar.
Printing with Macintosh
Note
Press [ON/OFF] to turn on the machine.
1
See “Turning on the Machine” on page 17.
Chapter 7 85
z Menu and command names may differ between application softwares, and
more steps may be required. For details, refer to the documentation for each
application software you use.
z The steps described in this section are for printing in Mac
Printing from Your Computer
®
OS X v.10.3.x.
Page 88

2 Load the paper on the machine.
See “Loading Paper” on page 19.
3 Ensure that the proper paper source is selected.
When the Auto Sheet Feeder Lamp (A) is lit, paper is fed from the Auto Sheet Feeder.
When the Cassette Lamp (B) is lit, paper is fed from the Cassette.
(A)
(B)
Note
Specify [Feed Switch] so that the Auto Sheet Feeder Lamp is lit when
feeding paper from the Auto Sheet Feeder and the Cassette Lamp is lit
when feeding paper from the Cassette.
4 Create a document or open a file to print from the application software.
5 Select the page size.
(1) Select [Page Setup] from the application software’s [File] menu.
The [Page Setup] dialog box opens.
(2) Confirm that [MP950] is selected in [Format for].
(3) Select the desired page size from [Paper Size].
(4) Click [OK].
(2)
(3)
(4)
6 Specify the required settings.
(1) Select [Print] from the application software’s [File] menu.
The [Print] dialog box opens.
(2) Select [Quality & Media] from the pop-up menu.
(3) Select the desired media type from [Media Type].
(4) Ensure that [Paper Feed Switch] is selected from [Paper Source].
86 Chapter 7
Printing from Your Computer
Page 89

(5) Select the print mode appropriate to your document from [Print Mode].
(2)
(3)
(4)
(5)
Note
7 Print the document.
(1) Click [Print].
The machine starts printing.
Note
z This section describes the procedure for selecting [Paper Feed
Switch] from [Paper Source]. For a detailed description of the [Paper
Source] settings, refer to the Printer Driver Guide.
z When you select the print mode appropriate to your document from
[Print Mode], the document will be printed in color and at a print quality
suited to the characteristics of the [Media Type] you have selected.
– [Printing a top-quality photo]: Select when printing documents
consisting mainly of photographs and graphics featuring fine color
gradation.
– [Printing tables and charts]: Select when printing documents
consisting mainly of graphs and graphics (illustrations) with strong
color definition.
– [Printing a composite document]: Select when printing documents
consisting mainly of text.
– [Detailed Setting]: Select to fine-tune the [Print Quality] and
[Halftoning] settings.
z For details about other printer driver functions, click to view the
Printer Driver Guide. If the Printer Driver Guide is not installed, the
Printer Driver Guide is not displayed even if is clicked.
z Clicking [Preview] displays a preview screen that allows you to confirm
the selected printing effects and how your document will look when
printed. Some application softwares do not have a preview function.
Double-clicking the name of your machine in the [Printer List] of the
[Printer Setup Utility] (When using Mac OS X v.10.2, double-clicking the
name of your machine in the [Printer list] of the [Print Center]) displays a
dialog that prompts you to confirm the status of the print job(s). To cancel
a job in progress, select the desired document, then click [Delete]. To
temporarily stop a job in progress, click [Pause]. To cancel all the jobs in
the list, click [Stop Printing].
Chapter 7 87
Printing from Your Computer
Page 90

Chapter 8
Scanning Images
This section describes how to scan images.
About Scanning Images
You can scan images from the machine to a computer without printing them and save them in
popular file formats, such as JPEG, Tiff, Bitmap. Scanned data saved on your computer can be
processed using image processing software. Furthermore, you can use the OCR (Optical Character
Recognition) software to convert scanned paper documents to text data.
Before Scanning
Before scanning images, confirm the following:
z Are the necessary software (MP Drivers and MP Navigator) installed?
If the software is not yet installed, refer to the Easy Setup Instructions.
z Does the document to be scanned meet the requirements for an original to be set on the
Platen Glass?
For details, see “Loading Documents” on page 18. For details on setting film originals, see
“Scanning a Film” on page 62.
z Is the machine connected to a computer correctly?
Confirm that the connection between the machine and the computer is physically secure.
Scanning Methods
Scanning Using the MP Navigator
MP Navigator enables you to scan in documents loaded on the Platen Glass and view images
saved on your computer or on a memory card. Scanned documents can be previewed and be
easily printed and edited according to your needs.
You can use the supplied application software to edit or print the document you have scanned.
Double-click the [MP Navigator 2.0] icon on your desktop to launch MP Navigator.
Select [Applications] from the [Go] menu, then double-click the [MP Navigator 2.0] icon to launch
MP Navigator.
You can launch the following application software from the MP Navigator.
z Easy-PhotoPrint (Photo Printing)
z ArcSoft PhotoStudio (Photo image editing)
z ScanSoft OmniPage SE (Converting scanned document to text)*
* This application software may not be supplied with this machine in some country.
Note
88 Chapter 8
Scanning Images
If you did a [Custom Install] and only installed the MP Driver and MP
Navigator, these application softwares were not installed and thus cannot
be launched. To launch any of the above application software from MP
Navigator, do a [Custom Install] once again to install them.
Page 91

For detailed operations of the MP Navigator, refer to the Scan Guide.
Scanning Using the Operation Panel of the Machine
You can scan documents to your computer by using the Operation Panel on the machine.
Important
z If you are using Windows XP
The program selection screen is displayed the first time you press [Color] or [Black] on the
machine. Specify [MP Navigator Ver2.0] as the application software to use, check [Always
use this program for this action], then click [OK]. From the next time, MP Navigator is
automatically started.
z When using Mac OS X
For the machine to start scanning when [Color] or [Black] is pressed, you need to set MP
Navigator as the starting application software in Image Capture under [Applications] of Mac
OS X.
Important
If you are using Mac OS X v.10.3.x
Select [Applications] from the [Go] menu, then double click [Image Capture]. Click
[Options] at lower left of the scanner window, select [MP Navigator 2.0] from [Application to
launch when scanner button is pressed], then click [OK].
Important
If you are using Mac OS X v.10.2.4 or later
Select [Applications] from the [Go] menu, then double click [Image Capture]. Select
[Preferences] from the [Image Capture] menu. Select [Others] from [When a scanner
button is pressed, open], select [MP Navigator 2] from [Applications], then click [Open].
Do not insert or remove USB cables when scanning images with the
machine connected to a computer, or when the computer is at sleep or
standby mode.
z If you are using Mac OS X v.10.4, the settings below are not
necessary.
z Make sure that the MP Navigator is installed and that the Macintosh is
connected to the machine before starting up Image Capture.
If you select [Preferences] from the [Image Capture] menu, click
[Scanner], and mark [Use TWAIN software whenever possible], [Options]
is not displayed. In this case, click [Use TWAIN software whenever
possible] to uncheck the option, exit the Image Capture, then start it
again.
1 Press [ON/OFF] to turn on the machine.
See “Turning on the Machine” on page 17.
2 Load the document on the Platen Glass.
For details on how to load documents, see “Loading Documents” on page 18.
For details on setting film originals, see “Scanning a Film” on page 62.
Chapter 8 89
Scanning Images
Page 92

3 Select the scan operation.
(1) Press [SCAN].
The scan process selection screen is displayed.
(2) Use [ ] or [ ] to select the scan operation, then press [OK].
Scan standby screen is displayed.
Save to PC: The document is scanned and saved.
Save as PDF file: The document is scanned and stored as a PDF file.
Attach to E-mail: The document is scanned, and the image is attached to an e-mail
Open with application: The document is scanned and displayed on the registered
Scan film and save: The film is scanned and saved.
using the e-mail application software.
application software.
4 Press [Color] or [Black].
The document is scanned. The settings configured from MP Navigator apply when scanning.
Important
If with some types of original the position and size of the image is not
scanned in correctly, please refer to “Selecting the Behavior of the
Operation Panel with MP Navigator” in the Scan Guide (On-screen
Manual) and change the MP Navigator [Document Type] and [Document
Size] to match those of the original being scanned.
Note
The operation to be performed after scanning the document depends on
the scan operation setting you have selected in step 3. For details on how
to modify the operation settings, refer to the Scan Guide.
Scanning from an Application Software
You can scan an image from a TWAIN- or WIA- (Windows XP only) compliant application
software and handle the scanned image in the application software. For detailed operations,
refer to the Scan Guide.
90 Chapter 8
Scanning Images
Page 93

Chapter 9
Reading from and Writing to a Memory
Card
Setting up the Card Slot as the Memory Card Drive of
the Computer
The Card Slot of the machine can also be used as the memory card drive of the computer.
Important
1 Display the Read/write attribute screen.
(1) Ensure that the memory card is not set.
If the memory card is set, remove it from the Card Slot. See “Inserting the Memory Card”
on page 46.
(2) Press [Menu].
(3) Use [ ] or [ ] to select <Maintenance/settings> and then press [OK].
(4) Use [ ] or [ ] to select <Device settings> and then press [OK].
(5) Use [ ] or [ ] to select <Other settings> and then press [OK].
(6) Use [ ] or [ ] to select <Read/write attribute> and then press [OK].
When <Read/write attribute> under <Device settings> is set to <Read/write
mode> using the Operation Panel of the machine, card direct printing cannot be
done. After using the Card Slot as the memory card drive of the computer,
remove the memory card, then be sure to set <Read/write attribute> to <Readonly mode>.
2 Specify the Read/write attribute.
(1) Use [ ] or [ ] to specify <Read/write attribute>.
Read-only mode: The Card Slot is used only for reading. Be sure to select this
Read/write mode: The Card Slot is used as the memory card drive of the
(2) Press [OK].
Note
When using the Card Slot as the memory card drive of the computer, the
removal operation from the computer is needed before removing the
memory card from the machine.
Right-click the removable disk icon and click [Eject]. If [Eject] is not
displayed on the screen, ensure that the Access Lamp is not flashing and
remove the memory card.
Be sure to drag the icon into the Trash.
Chapter 9 91
mode when printing photos from a memory card.
computer. Photo data can be written into the memory card.
Reading from and Writing to a Memory Card
Page 94

Chapter 10
Changing the Machine Settings
This section describes the procedure to change the settings in the Device settings screen, taking the
steps to specify Extended copy amount as an example.
1 Press [ON/OFF] to turn on the machine.
See “Turning the Machine ON and OFF” on page 17.
2 Press [Menu].
3 Display the Device settings screen.
(1) Use [ ] or [ ] to select <Maintenance/settings>, then press [OK].
The Maintenance/settings screen is displayed.
(1)
(2) Use [ ] or [ ] to select <Device settings>, then press [OK].
The Device settings screen is displayed.
(2)
4 Select the menu.
(1) Use [ ] or [ ] to select the setting item, then press [OK].
Example: select <Print settings>.
The setting screen for the selected item is displayed.
(1)
92 Chapter 10
Changing the Machine Settings
Page 95

(2) Use [ ] or [ ] to select the menu, then press [OK].
Example: select <Extended copy amount>.
(2)
5 Change the settings.
(1) Use [ ] or [ ] to select the setting item, then press [OK].
Example: select <Small>.
(1)
The Print Settings
Quiet mode
Use this function if you want to reduce the operation noise, such as when printing at night.
Important
z The printing speed may be reduced compared to when this setting is
set to <OFF>.
z This function may not be so effective depending on the print quality
setting.
z Furthermore, certain noise, such as when the machine is preparing for
printing, is not reduced.
Prevent paper abrasion
Use this setting only if the print surface becomes smudged.
Important
Be sure to revert this setting to <OFF> after printing since it may result in
lower print quality.
Extended copy amount
Selects the amount of image that extends off the paper when printing in Borderless (full).
Note
Chapter 10 93
z This setting can be applied only when Copy or Photo/film mode
selected.
z If you set <Large> for this function, the area of the image extending off
the paper becomes larger.
Changing the Machine Settings
Page 96

Wireless Print Settings
For details, see “Setting the Page Size, Media Type, and Layout When Printing from a Mobile
Phone” on page 78.
Page size
Specifies the page size for printing photos saved on a mobile phone.
Media type
Specifies the media type for printing photos saved on a mobile phone.
Image optimizer
Choosing <Image optimizer ON> enables you to correct and smooth the jagged contours for
printing.
Layout print
Specifies the layout for the paper when printing photos saved on a mobile phone.
Note
<Mixed 1>, <Mixed 2>, or <Mixed 3> can be selected only when the page
size is set to <8.5" x 11" (215.9 x 279.4)> or <A4>.
Bluetooth Settings
For details, see “Changing the Bluetooth Settings - Bluetooth settings” on page 82.
Device name
Specifies the name of this machine that is displayed on a Bluetooth compatible device.
Access refusal
When this is set to <ON>, the machine refuses access from a Bluetooth compatible device.
Security
When this is set to <Enable>, the passkey can be specified.
Passkey
Changes the passkey.
94 Chapter 10
Changing the Machine Settings
Page 97

Other Settings
Date display
Changes the display order for shooting dates to be printed.
Note
Read/write attribute
Selects whether to allow data to be written onto memory cards from a computer.
Important
Power save setting
Specifies the time until Power saving is enabled.
You can select from <5 minutes>, <15 minutes>, <1 hour> or <8 hours>. The initial value is set
to <1 hour>.
Slide show setting
Specifies the image display quality of the slide show.
Note
z When <Print date only> or <Print date & file no.> is selected for <Date/
file no.> in the tab 1 on the Settings (Memory Card) screen, the
shooting date is printed in the date display order you selected. For
Print settings, see “To Change Print Settings” on page 34.
z The shooting date format is as specified in the DPOF setting from
DPOF printing.
If you set this setting to <Read/write mode>, card direct printing cannot be
done. After you finish operation of the memory card dedicated drive, be
sure to revert this setting to <Read-only mode>.
When <Image quality: Std> is selected, images are displayed at 5-second
intervals. When <Image quality: High> is selected, images are displayed
at different time intervals according to their resolutions.
Language selection
Changes the language for LCD messages.
Reset setting
You can change the settings back to the default, except for the language for LCD messages and the
position of the Print Head.
Save settings
Saves the settings for the Settings screen.
Load settings
Loads the settings for the Settings screen that were saved.
Chapter 10 95
Changing the Machine Settings
Page 98

Chapter 11
Routine Maintenance
Replacing an Ink Tank
When ink runs out, replace the ink tank. The machine will not print if the wrong type of ink tank is
used, or if it is installed in the incorrect position.
The machine uses the following ink tanks.
Black: CLI-8BK Cyan: CLI-8C
Photo Cyan: CLI-8PC Photo Magenta: CLI-8PM
Black: PGI-5BK Yellow: CLI-8Y
Magenta: CLI-8M
Note
96 Chapter 11
z Be sure to install the ink tanks in the correct order. The proper arrangement
from the left is Black , Photo Cyan , Black , Magenta ,
Cyan Magenta Yellow .
z Should missing characters or white streaks appear despite sufficient ink
levels, see “When Printing Becomes Faint or Colors are Incorrect” on
page 102.
Routine Maintenance
Page 99

Getting the Ink Level Information
You can check the ink tank status by the ink tank lamp display. Open the Scanning Unit (Printer
Cover) of the machine and check the ink tank lamp.
When the ink level is low:
The ink tank lamp flashes slowly (about three seconds). Prepare a new ink tank.
...Repeats
When ink has run out:
The ink tank lamp flashes fast (about one second). Replace it with a new ink tank.
...Repeats
If an error message is displayed on the LCD, an ink tank error has occurred and the machine cannot
continue to print. See “An Error Message is Displayed on the LCD” on page 115.
Knowing When to Replace Ink Tank
It is important to identify the empty tank using the LCD and replace it.
When Low Ink is Detected: is displayed.
The message is displayed on the LCD when you start printing.
Obtain a new ink tank.
z To continue printing, select <Yes> and then press [OK].
z To cancel printing, select <No> and then press [OK].
When Ink has Run Out: is displayed.
z Press [OK] to resume printing with an empty ink tank. When printing is finished, replace the ink
tank immediately. If you continue printing with an empty ink tank, it will be a cause of trouble.
* Printing does not resume if any of the ink tanks are left uninstalled. Be sure to press [OK] with
all the ink tanks installed.
z Press [Stop/Reset] to cancel printing. Replace with a new ink tank.
Chapter 11 97
Routine Maintenance
Page 100

Replacing Ink Tanks
When an ink tank runs out of ink, replace it using the following steps.
Note
z To maintain optimal print quality, use an ink tank within six months of its first
use.
z Once an ink tank has been used, do not remove it from the machine and
leave it out in the open. This will cause the ink tank to dry out and the
machine may not operate properly if it is reinstalled.
z Color ink consumption may occur even when black-and-white or grayscale
printing is specified.
Color ink is consumed in the head cleaning and deep cleaning, which are
necessary to maintain the machine’s capabilities.
1 Open the Scanning Unit (Printer Cover) and the Paper Output Tray.
(1) Make sure the machine is turned on.
(2) Raise the Scanning Unit (Printer Cover) until it stops.
* The Paper Output Tray will open automatically after the Print Head Holder moves to the
center.
(A)
(A) Press the Open Button to open the Paper Output Tray if it does not open
automatically.
Caution
Important
98 Chapter 11
Routine Maintenance
Do not hold the LCD or the Operation Panel.
If the Scanning Unit (Printer Cover) is left open for more than 10 minutes,
the Print Head Holder moves to the right. Close and reopen the Scanning
Unit (Printer Cover) to return the Print Head Holder to the center.
 Loading...