

Canon Pixma IP4950, Pixma 9500 Pro MK II, Pixma IX6500, PX710W, R3000 Instruction Manual
...
USING A PRINTER PROFILE (FOR MAC OS X)
Pure Profiles
Version 1.0
A guide to installing and using custom printer profiles
www.pureprofiles.com
PURE PROFILES
USING A PRINTER PROFILE
(FOR MAC OS X)

PURE PROFILES
USING A PRINTER PROFILE (FOR MAC OS X)
P a g e 2 | www.pureprofiles.com
Table of Contents
Chapter 1 – Installing Your Printer Profile ......................................................................................................... 3
1.1 How to Install your Printer Profile ........................................................................................................... 4
Chapter 2 – Using Your Printer Profile ............................................................................................................... 6
2.1 Guide for Using Your Profile with Photoshop CS5 ................................................................................... 7
2.2 Guide for Using Your Profile with Photoshop Elements 10 ..................................................................... 10
2.3 Guide for Using Your Profile with Lightroom Version 3 .......................................................................... 13
Appendix A – Printer Driver Settings .............................................................................................................. 16
A.1 Epson PX710W ..................................................................................................................................... 17
A.2 Epson 1500 ........................................................................................................................................... 20
A.3 Epson R3000 ......................................................................................................................................... 22
A.4 Canon IP4950, IX6500, 9500 Pro Mk II ................................................................................................... 25
A.5 Other Printers ....................................................................................................................................... 27
Appendix B – Troubleshooting ......................................................................................................................... 28
B.1 Common Problems ............................................................................................................................... 29

USING A PRINTER PROFILE (FOR MAC OS X)
PURE PROFILES
www.pureprofiles.com | P a g e 3
1. INSTALLING YOUR PRINTER PROFILE
PURE PROFILES
USING A PRINTER PROFILE (FOR MAC OS X)
P a g e 4 | www.pureprofiles.com
1.1 How to Install Your Printer Profile
When you receive your custom profile from us, the profile will be delivered as an
attachment to your email. To install the profile, you must first save it on to the hard drive of your
computer (you could put it straight into the location where the operating system will recognise it as
a profile, but we would recommend creating a copy of the profile elsewhere first).
Most email software have an option to save the attachments, so choose or create a folder to
put the profile into, and save the profile into that location. When you save the profile, please don’t
change the name – the profile name is hardcoded into the profile, and you would need to get in
touch with us to get it changed.
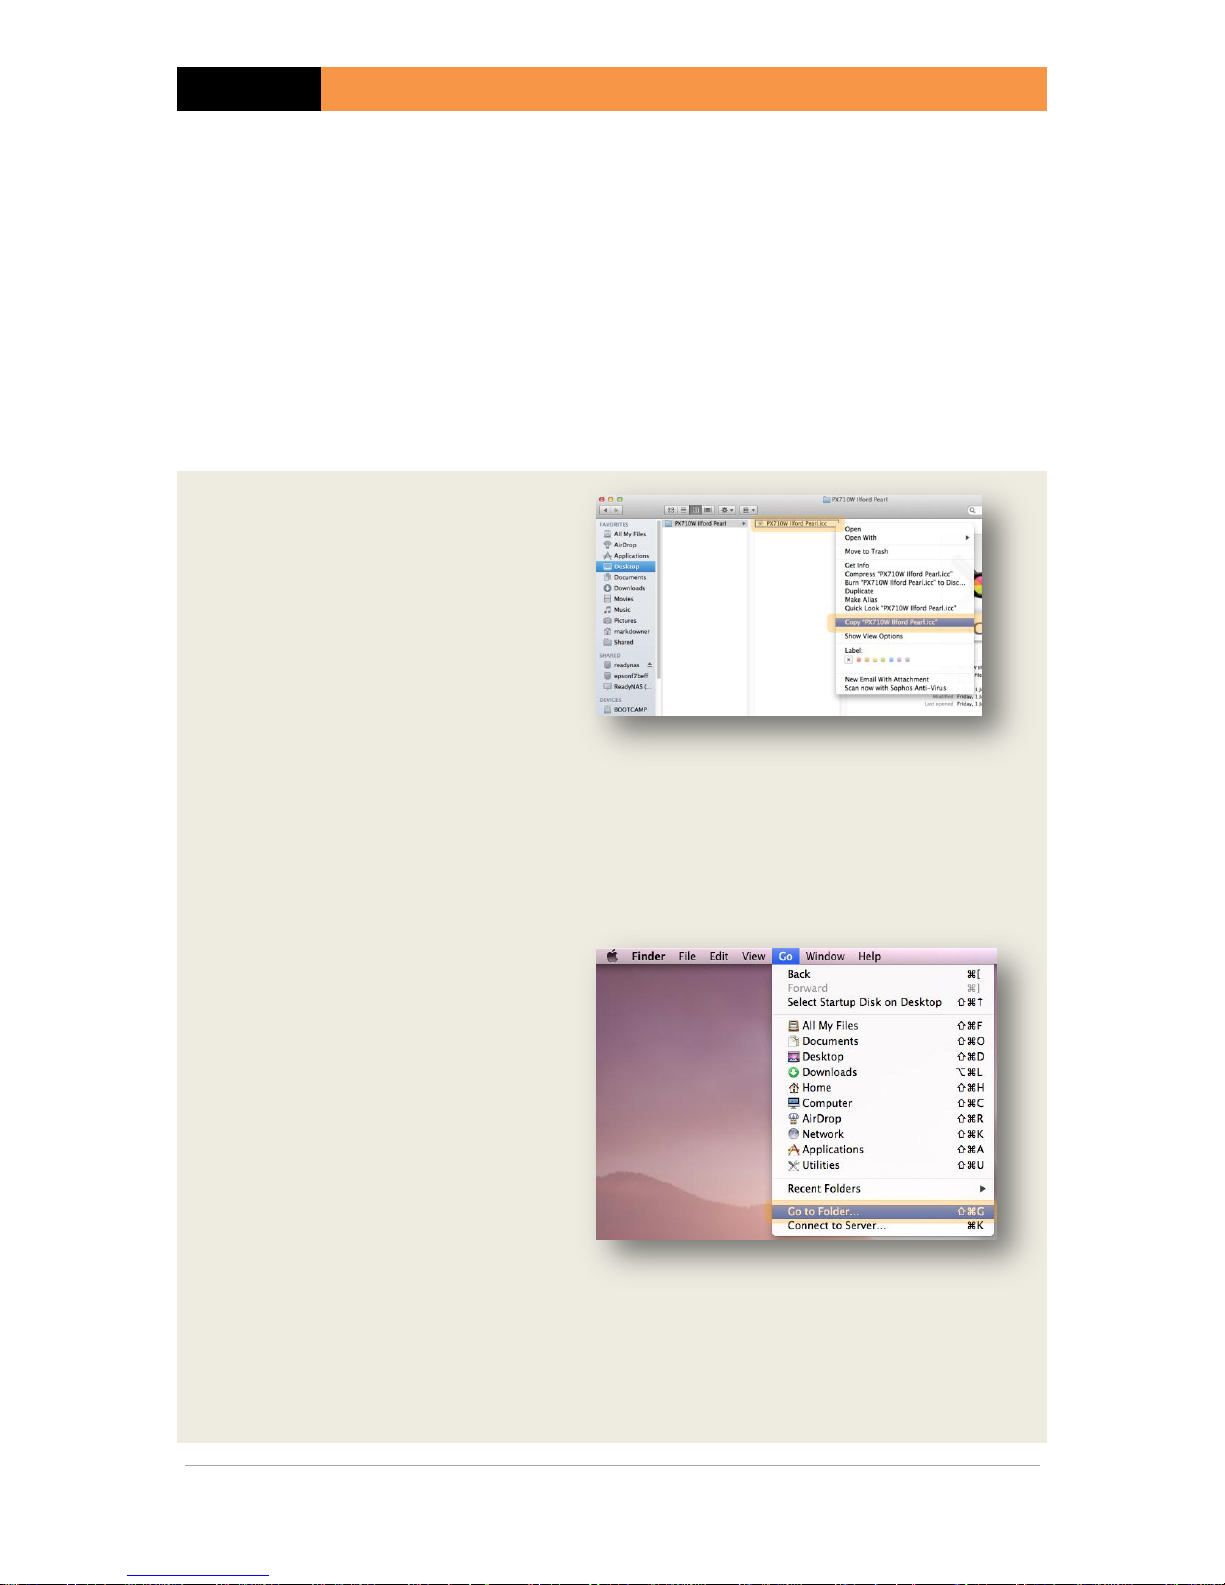
Step 1
Using Finder, go to the location
where you have saved the profile
(the file will have a .icc extension).
Click on the file and select Copy....
Step 2
Go to the top menu for Finder, and
select Go. From the menu that
appears, select Go to Folder....
USING A PRINTER PROFILE (FOR MAC OS X)
PURE PROFILES
www.pureprofiles.com | P a g e 5
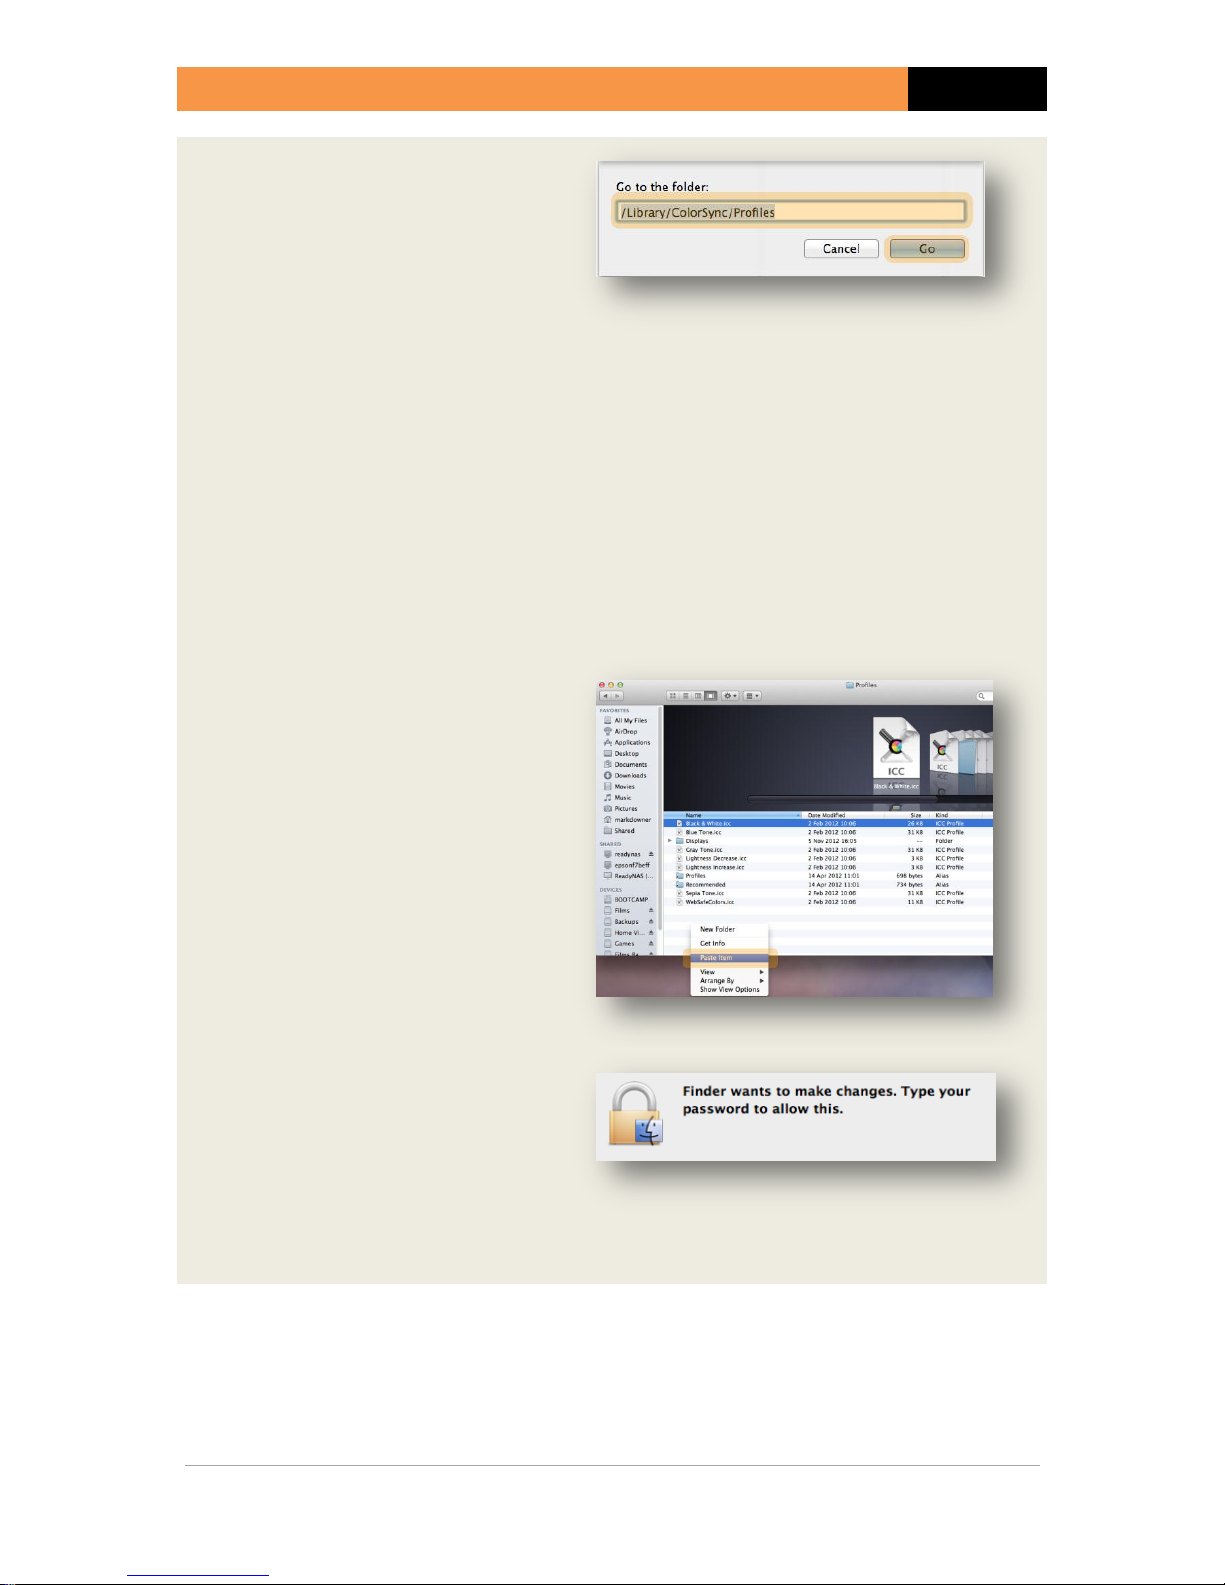
Step 3
Enter the folder name which you
want to use for the profile. This
has to be one of the following :
/Library/ColorSync/Profiles
This directory makes the profile
visibile to all users.
/Users/___/Library/ColorSync/Profiles
(where ___ is your username)
This directory makes the profile
visible only to the current user.
Click the Go button.
Step 4
In the new folder, click and select
Paste Item (you can also do this by
going to the Edit option in the top
menu for Finder).
Step 5
As this is a system folder, you will
likely get this warning message.
You will need to enter your
password to authorise this change.

PURE PROFILES
USING A PRINTER PROFILE (FOR MAC OS X)
P a g e 6 | www.pureprofiles.com
2. USING YOUR PRINTER PROFILE
2.1 Guide for Using Your Profile with Photoshop CS5 ............................... 7
2.2 Guide for Using Your Profile with Photoshop Elements 10 ................ 10
2.3 Guide for Using Your Profile with Lightroom Version 3 ..................... 13
USING A PRINTER PROFILE (FOR MAC OS X)
PURE PROFILES
www.pureprofiles.com | P a g e 7
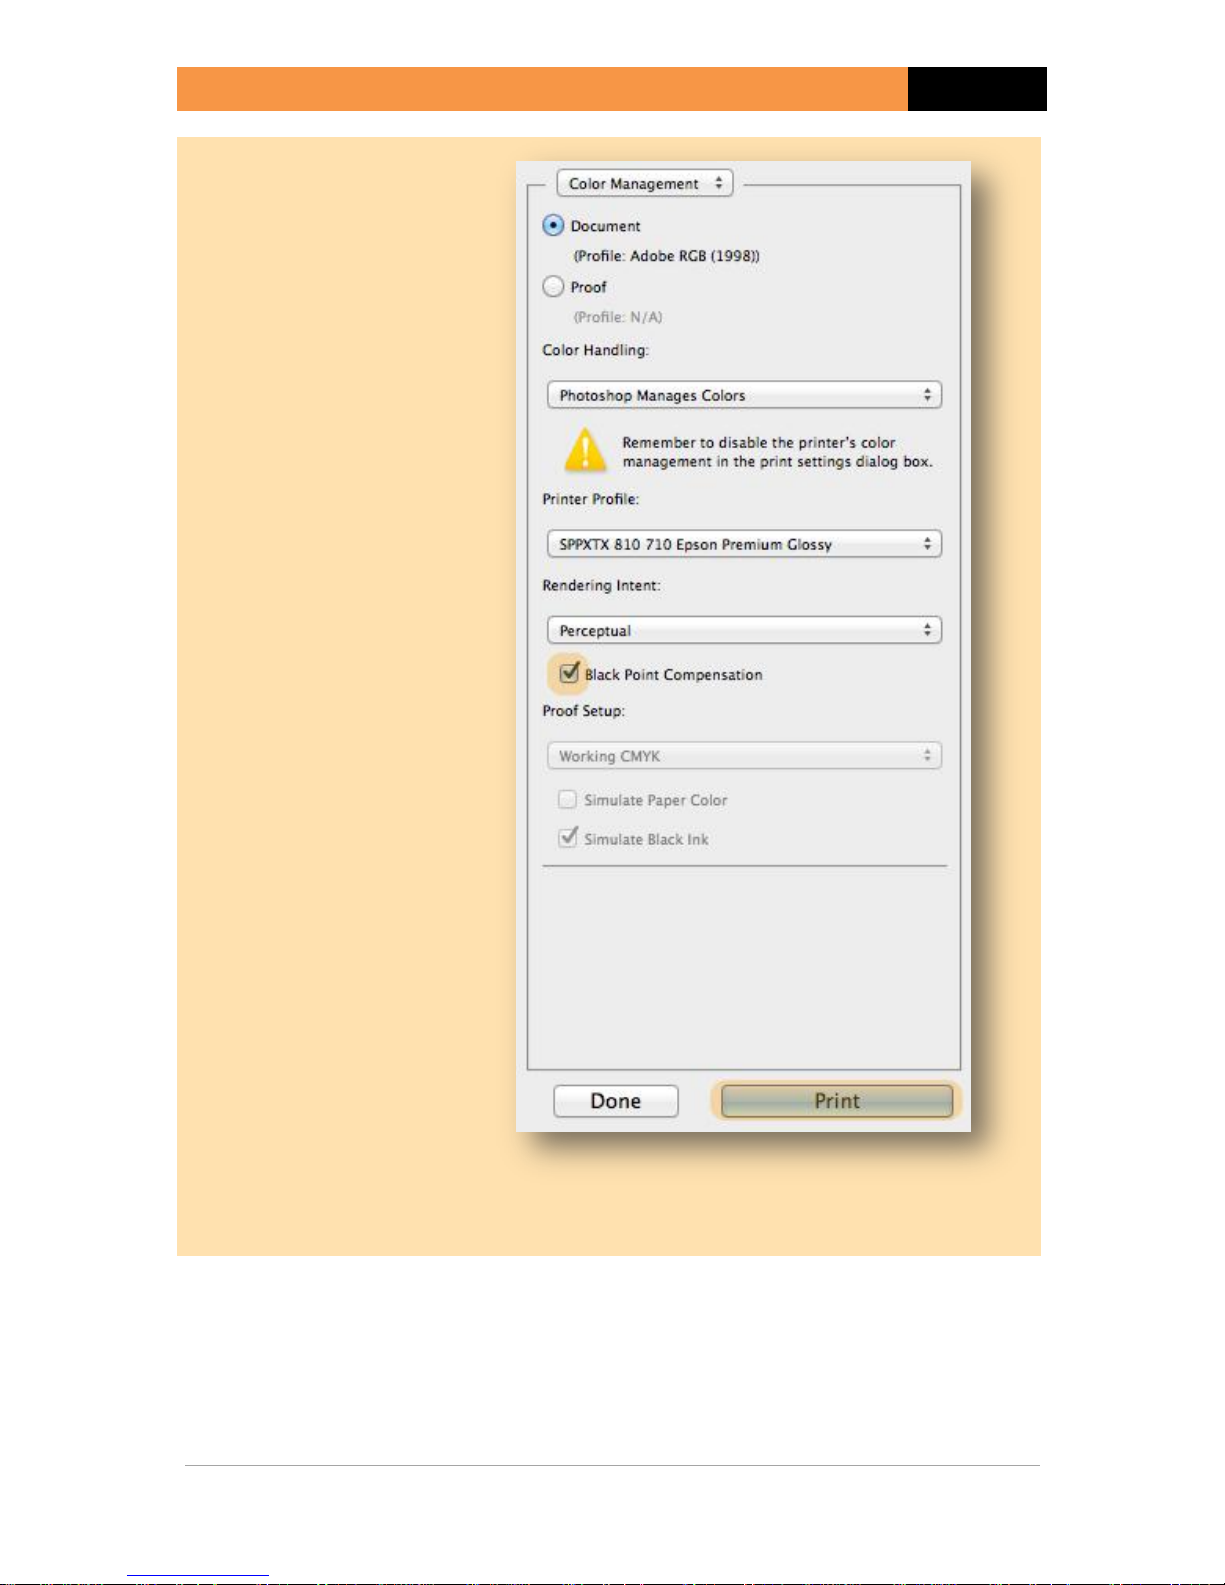
2.1 Guide for Using Your Profile with Photoshop CS5
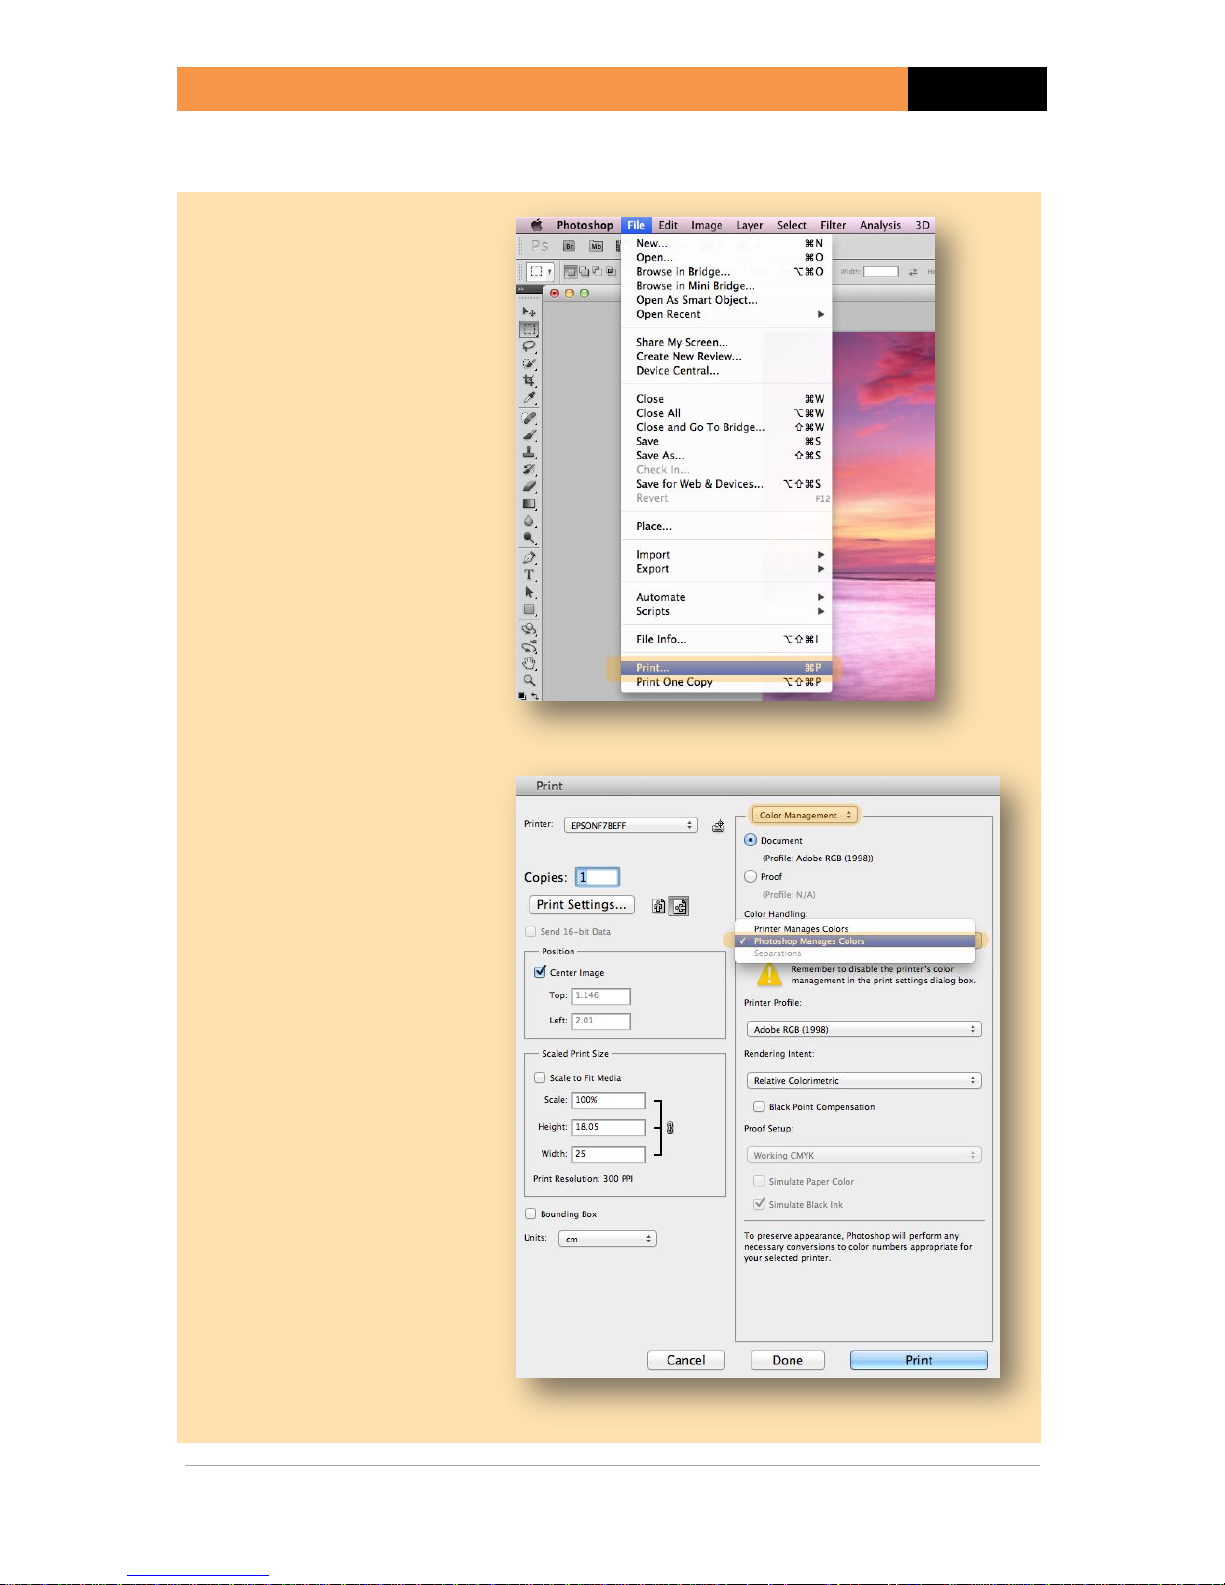
Step 1
With an image loaded, go
to the File menu and
select the Print... option.
Step 2
In the top right-hand
corner of the Print
dialog, set the dropdown to Color
Management.
In the Color
Management section,
click on the Color
Handling drop-down and
select Photoshop
Manages Colours.
PURE PROFILES
USING A PRINTER PROFILE (FOR MAC OS X)
P a g e 8 | www.pureprofiles.com
Step 3
Click on the Printer
Profile drop-down and
select the profile that
you have installed.
If the profile does not
appear, then please
check the earlier
installation instructions.
The profile will appear
with the name that you
entered when you placed
your order.
Step 4
Select the Rendering
Intent, based on the
content of the photo.
Perceptual is
recommended as the
best option for
photographic images
with saturated colours or
shadow detail. Out of
gamut (unprintable)
colours are remapped
broadly to printable
colours in order to keep
the overall colour and
contrast, at the expense
of a little accuracy. This is
a good choice for general
photography.
Relative Colorimetric is
the most accurate option
for in gamut colours, but
out of gamut colours are
more compressed in
their remapping to
printable colours.
USING A PRINTER PROFILE (FOR MAC OS X)
PURE PROFILES
www.pureprofiles.com | P a g e 9
Step 5
Tick the Black Point
Compensation box.
Once all the settings
have been done, click on
the Print button.
You will now be taken to
your printer driver
settings, which can be
found in Appendix A of
this guide. Please make
sure this is set up the
same as when the
profiling charts were
printed.
 Loading...