Canon NP6330 Service Handbook

SERVICE
HANDBOOK
REVISION 0
FY8-23AQ-000
MAY 1997
COPYRIGHT © 1997 CANON INC. CANON NP6330 REV.0 MAY 1997 PRINTED IN JAPAN (IMPRIME AU JAPON)

IMPORTANT
THIS DOCUMENTATION IS PUBLISHED BY CANON INC., JAPAN, TO SERVE AS A SOURCE OF
REFERENCE FOR WORK IN THE FIELD.
SPECIFICA TIONS AND OTHER INFORMATION CONTAINED HEREIN MA Y VARY SLIGHTLY FROM
ACTUAL MACHINE VALUES OR THOSE FOUND IN ADVERTISING AND OTHER PRINTED
MATTER.
ANY QUESTIONS REGARDING INFORMATION CONTAINED HEREIN SHOULD BE DIRECTED TO
THE COPIER SERVICE DEPARTMENT OF THE SALES COMPANY.
THIS DOCUMENTATION IS INTENDED FOR ALL SALES AREAS, AND MAY CONTAIN
INFORMATION NOT APPLICABLE TO CERTAIN AREAS.
COPYRIGHT © 1997 CANON INC.
Printed in Japan
Imprimé au Japon
Use of this manual should be
strictly supervised to avoid
disclosure of confidential
information.
Prepared by
OFFICE IMAGING PRODUCTS TECHNICAL SUPPORT DEPT. 1
OFFICE IMAGING PRODUCTS TECHNICAL SUPPORT DIV.
CANON INC.
5-1, Hakusan 7-chome, Toride-shi, Ibaraki 302, Japan
COPYRIGHT © 1997 CANON INC. CANON NP6330 REV.0 MAY 1997 PRINTED IN JAPAN (IMPRIME AU JAPON)

i
CONTENTS
CHAPTER 1 MAINTENANCE AND INSPECTION
A. Image Adjustment Basic
Procedure....................................1-1
B. Points to Note for
Scheduled Servicing ....................1-3
CHAPTER 2 STANDARDS AND ADJUSTMENTS
A. Adjusting the Images....................2-1
1. Adjusting the Image
Leading Edge
Margin [3] No.305 ...................2-1
2. Adjusting the Leading
Edge Non-Image Width
[3] No.306................................2-2
3. Adjusting the Trailing Edge
Non-Image width [3] No.307...2-3
4. Adjusting the Left/Right
Registration ............................2-4
5. Adjusting the Image
Left/Right Margin [3] No.308...2-6
6. AE Adjustment ........................2-8
7. Adjusting the Developing
Bias DC Component [3]
No.302...................................2-12
8. Adjusting the Horizontal
Registration Paper Edge
Sensor postion [3] No.324 ....2-13
9. Adjusting the Trailing Edge
Margin for Pick-Up from the
Multifeeder [3] No.327...........2-14
10.Adjusting the Book Erasing
Width [3] No.326 ...................2-15
B. Exposure System.......................2-16
1. Routing the Scanner Drive
Cable.....................................2-16
2. Adjusting the Position of the
Mirror (optical path length
between No.1 mirror and
No.2/No.3 mirror) ..................2-17
3. Adjusting the Tension of
the Scanner Cable ................2-19
4.
Adjusting the Tension of the
Lens Drive Belt
.......................2-20
5. Cleaning the No.4 Mirror ......2-20
6.
Cleaning the No.5/No.6 Mirror
.....2-21
C.
Image Formation System
.............2-23
1. Orientation of the Scanning
Lamp .....................................2-23
2. Position of the Blank Shutter
Solenoid ................................2-23
3. Routing the Blank Shutter
Cable.....................................2-24
4. Routing the Charging Wire ..2-25
5. Stringing the Guide Wire ......2-26
6. Adjusting the Height of
the Charging Wire.................2-26
7. Position of the Developing
Assembly Magnetic Seal.......2-27
8. After Replacing the Drum
unit ........................................2-27
D. Pick-Up/Feeding System............2-28
1. Orientation of the Pick-Up
Roller ....................................2-28
2. Orientation of the Separation
Roller ....................................2-28
3. Orientation of the Feeding
Roller.....................................2-28
4. Adjusting the Pressure of the
Separation Roller
(cassette/deck)......................2-29
5. Position of the Pick-Up Roller
Solenoid (pick-up assembly;
SL1,SL2) ...............................2-30
6. Orientation of the Multifeeder
Pick-Up Roller ......................2-30
1
2
3
4
5

7. Position of the Pick-Up Guide
Plate Cam
(multifeeder assembly) ..........2-31
8. Routing the Timing Belt
(multifeeder assembly) ..........2-31
9. Adjusting the Pressure of the
Separation Pad
(multifeeder assembly) ..........2-32
10.Routing the Drive Belt...........2-32
11.Adjusting the Position of the
Horizontal Registration
Solenoid ................................2-33
E. Fixing System.............................2-34
1. Points to Note When Installing
the Fixing Heater...................2-34
2. Adjusting the Nip (tightening
the pressure adjusting nut) ..2-35
3. Position of the Fixing
Assembly Paper Guide .........2-36
4. Position of the Cleaning Belt
Solenoid ................................2-36
F. Electrical System........................2-37
1. Registering the Cassette/
Multifeeder Paper Width
Basic Setting [4]....................2-37
2. Adjusting the Original Stop
Position with the DF in Use
[3] No.325..............................2-40
3. Checking the
Photointerrupters...................2-41
CHAPTER 3 ARRANGEMENT/FUNCTIONS OF
THE ELECTRICAL PARTS
A. Sensors........................................3-2
B. Switches clutches, and
solenoids......................................3-4
C. Heaters, lamps, and motors.........3-6
D. PCBs............................................3-8
E. Paper deck pedestal-M1............3-10
F. Variable Resistors, Light-
Emitting Diodes, and Check
Pins by PCB...............................3-12
CHAPTER 4 SERVICE MODE
A. Outline..........................................4-1
B. Using Service Mode.....................4-1
1. Starting Service Mode.............4-2
C. Using Adjustment Mode and
Optional Setting Mode..................4-3
D. Control/Display Mode [1]..............4-4
1. DC Controls PCB..................3-13
2. HVT.......................................3-14
3. Lamp Regulator PCB............3-14
4. Motor driver 1 PCB ...............3-15
5. Motor driver 2 PCB ...............3-15
6. Pedestal controller PCB
(Paper deck pedestal)...........3-16
E. I/O Display Mode [2] ..................4-19
F. Adjustment Mode [3]..................4-43
G. Function Mode [4] ......................4-45
H. Optional Settings [5]...................4-47
I. Counter Mode [6] .......................4-49
ii

CHAPTER 5 SELF DIAGNOSIS
A. Copier...........................................5-1
B. Pedestal Self Diagnosis...............5-5
APPENDIX
A. GENERAL TIMING CHART.........A-1
B.
SIGNALS AND ABBREVIATIONS
C. GENERAL CIRCUIT DIAGRAM ..A-5
(not available in electronic format)
D. PEDESTAL CONTROLLER.........A-7
(not available in electronic format)
....A-2
C. RDF/ADF Self Diagnosis ..............5-6
D. Sorter Self Diagnosis ...................5-7
E. SPECIFICATIONS .......................A-9
1. Copier .....................................A-9
2. Paper Deck Pedestal-M1......A-15
iii
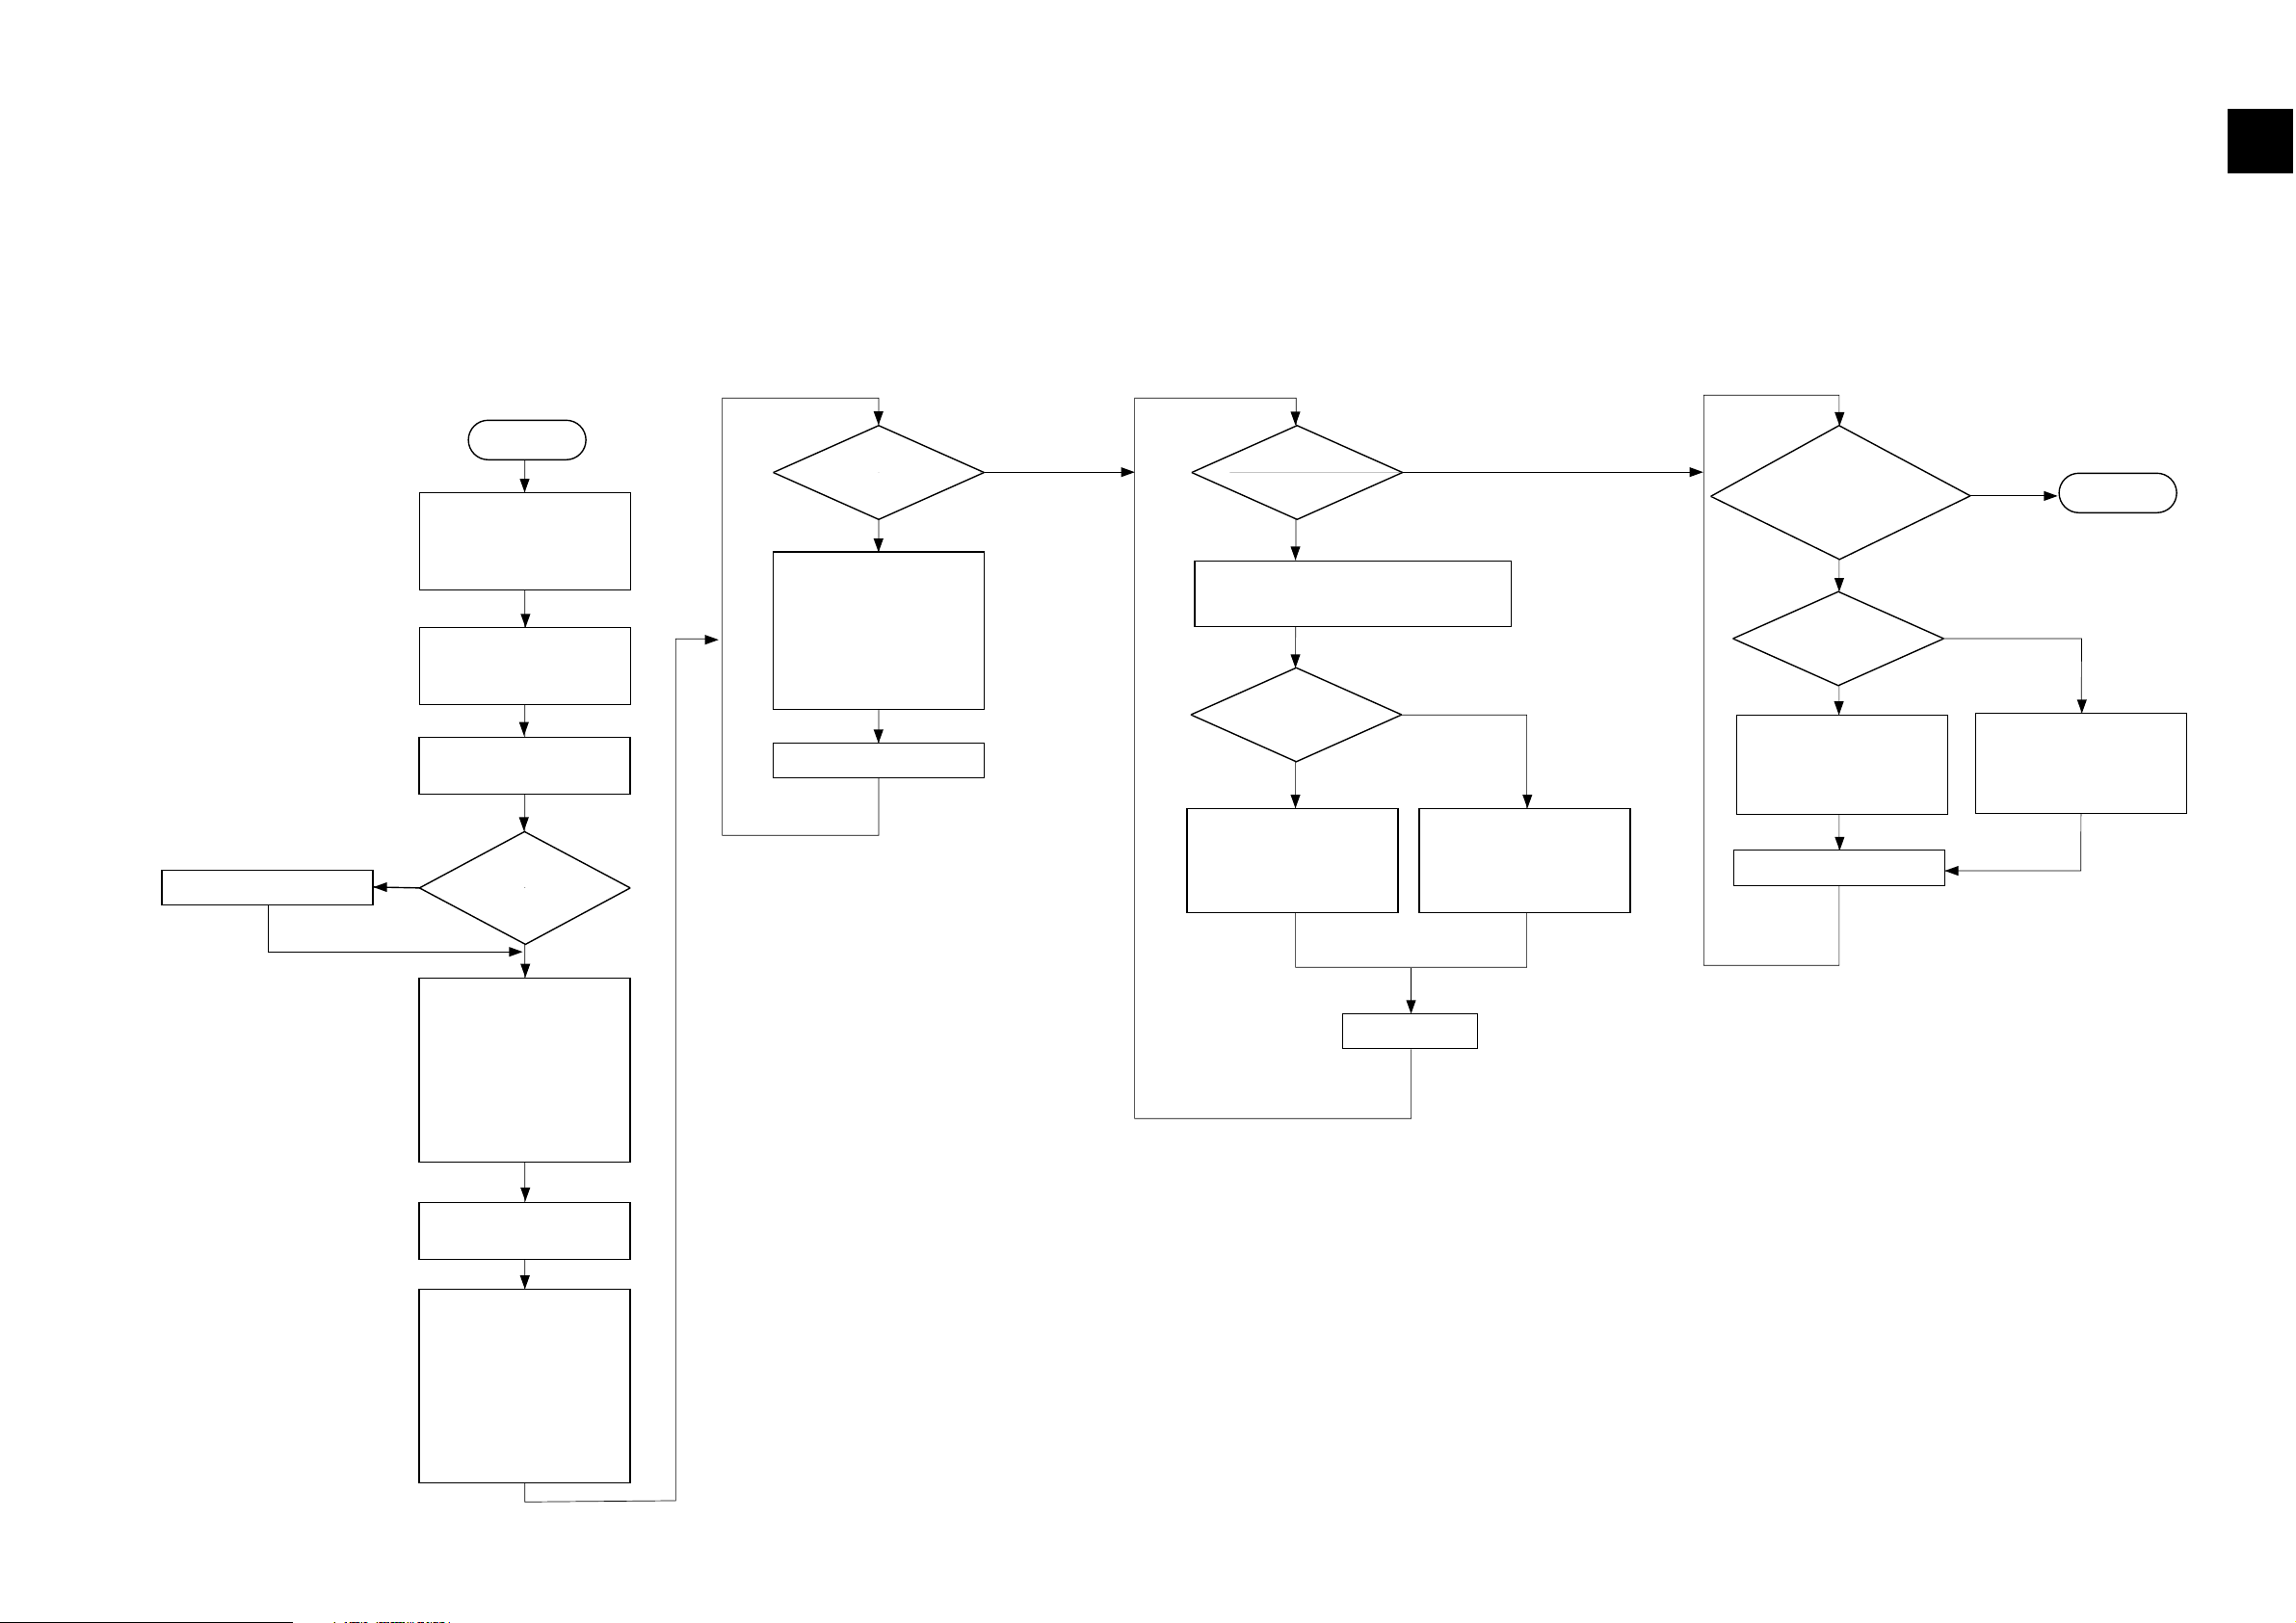
CHAPTER 1 MAINTENANCE AND INSPECTION
A. Image Adjustment Basic Procedure
non-AE, copy density at 5
1-1
Is the density of
gray scale No. 1
too light?
Is there a
difference in density between
front and rear?
Clean the primary
charging wire and the
static eliminator.
Execute 'U25' in user
mode (wire cleaning) to
clean the transfer
charging wire.
Make a copy.
Is it higher at front
Turn the adjusting screw
at the front of the primary
corona assembly
counterclockwise.
Turn the adjusting screw
at the front of the primary
corona assembly
clockwise.
Decrease the setting of
‘302’ in service mode [3]
so that the density of No.
9 decreases (Note 1)
Increase the setting of
‘302’ in service mode [3]
so that the density of No.
9 increases (Note 1)
Is the density
of gray scale No. 9
identical to the density of No. 8
through No. 9 of
the chart?
Is the density
of gray scale No. 9 too
high (dark)?
Pre-Check
Checks on Solid Black Density Adjustment on Density Slope
Optimum Density Adjustment
YES
NO NO
YES
NO
Make a copy.
YES
NO
YES
NO
YES
Start
Make a copy.
Adjust the slit according to the slit plate
adjustment procedure (next page)
Turn the adjusting screws
in the front and at the rear
of the primary corona
assembly counterclockwise
to move the primary corona
wire closer to the drum.
Check the height of the
corona wires.
Is the setting of ‘U21’
(density correction) in user
mode the middle
value?
Set it to the middle value.
Check to make sure that the
settings of ‘301’ and ‘302’ in
service mode [3] are as
indicated on the service
label attached to the front
door; otherwise, correct the
settings.
non-AE, copy density at 5,
2 to 3 copies (NA-3)
Check the following:
1. difference in density
between front and rear
2. density of gray scale
No. 9
3. presence/absence of
fogging in white
background
YES
NO
Note1: A shift is mode in the
control table for the
intensity of scanning
lamp.
End
1
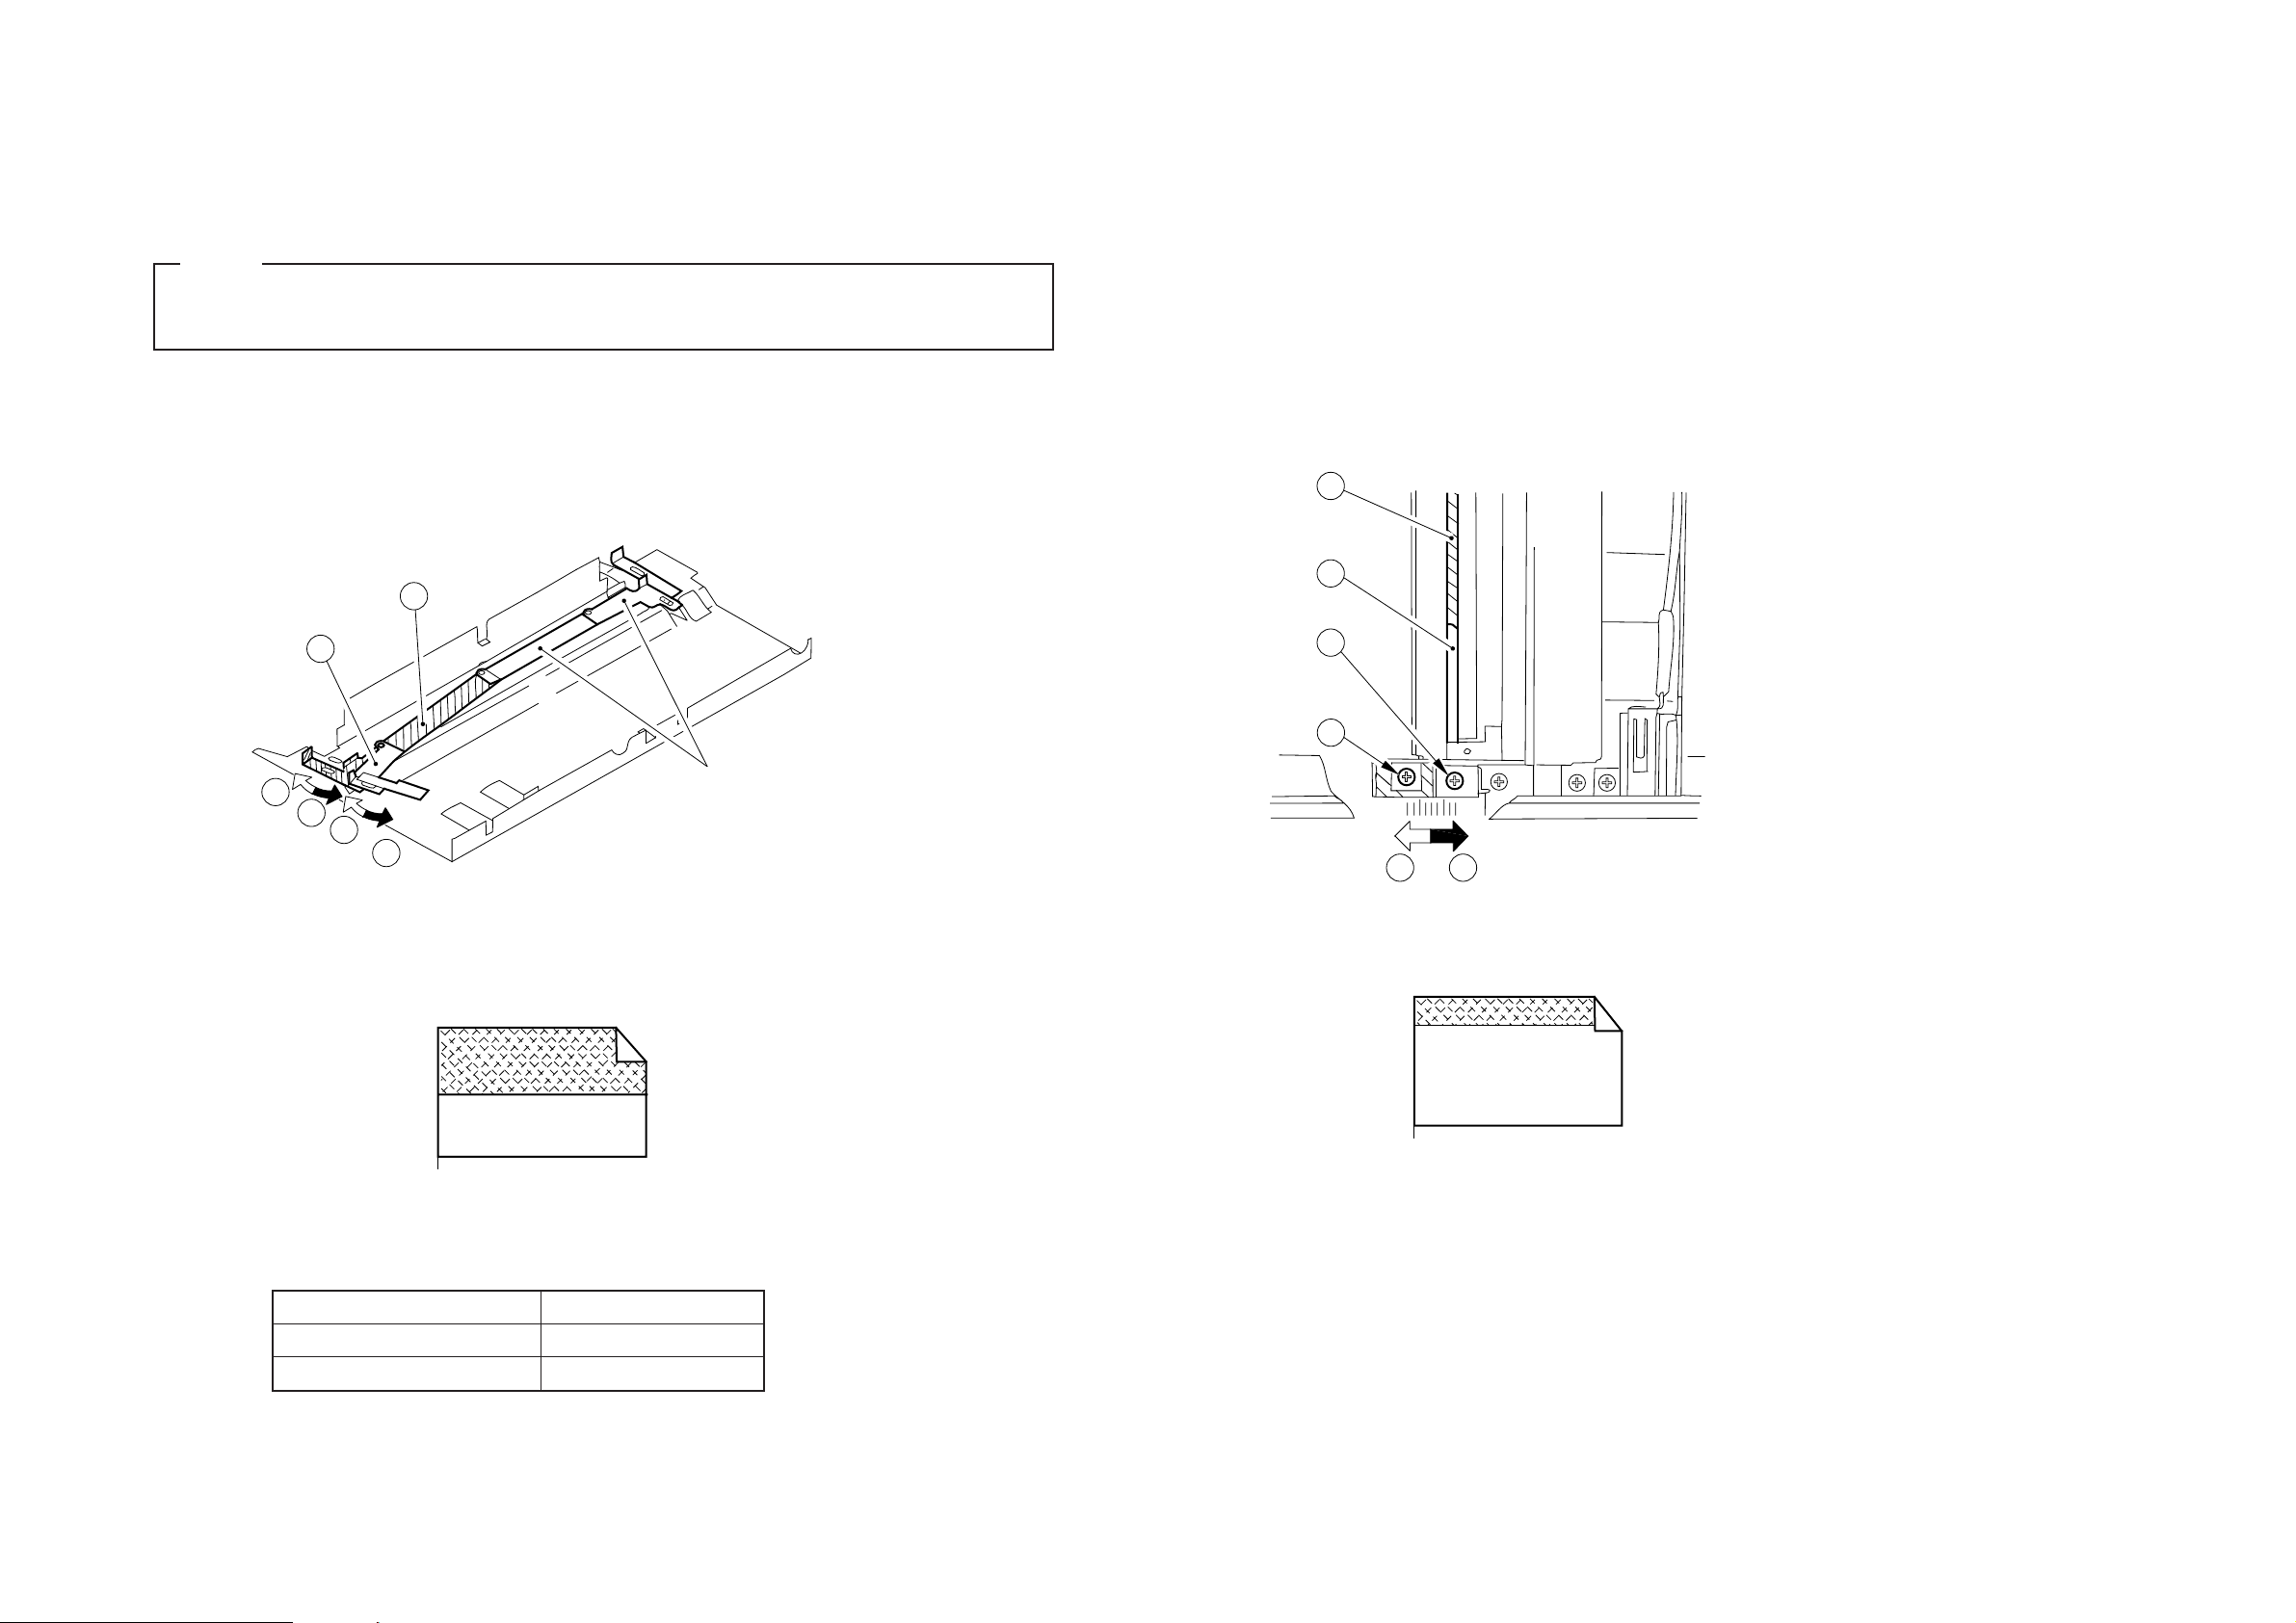
Adjusting the Slit Plate
q by loosening the screw r, the change will affect
the area from the center to the rear end.,
Note:
A
A
B
B
1
2
Rear slit plates
(These plates cannot be adjusted.)
1
2
3
4
BA
If you adjusted the slit w by loosening the screw e, the change will affect
the image end (up to a point about 30 mm from the rear).
A 3
Leading edge
A 3
{
30 mm (approx.)
Leading edge
Slit adjustment direction
A
B
Image density
Lighter
Darker
• Use only the slit plate at the front.
• If you must replace the drum unit, be sure to put the slit plate back to the white marking.
1) Turn off the power switch, and disconnect the power plug from the power outlet.
2) Remove the copyboard glass, and move the No.1 mirror mount to the center, where work is facilitated.
3) Adjust the slit plate at the front by referring to the table below.
If you adjusted the slit
1-2
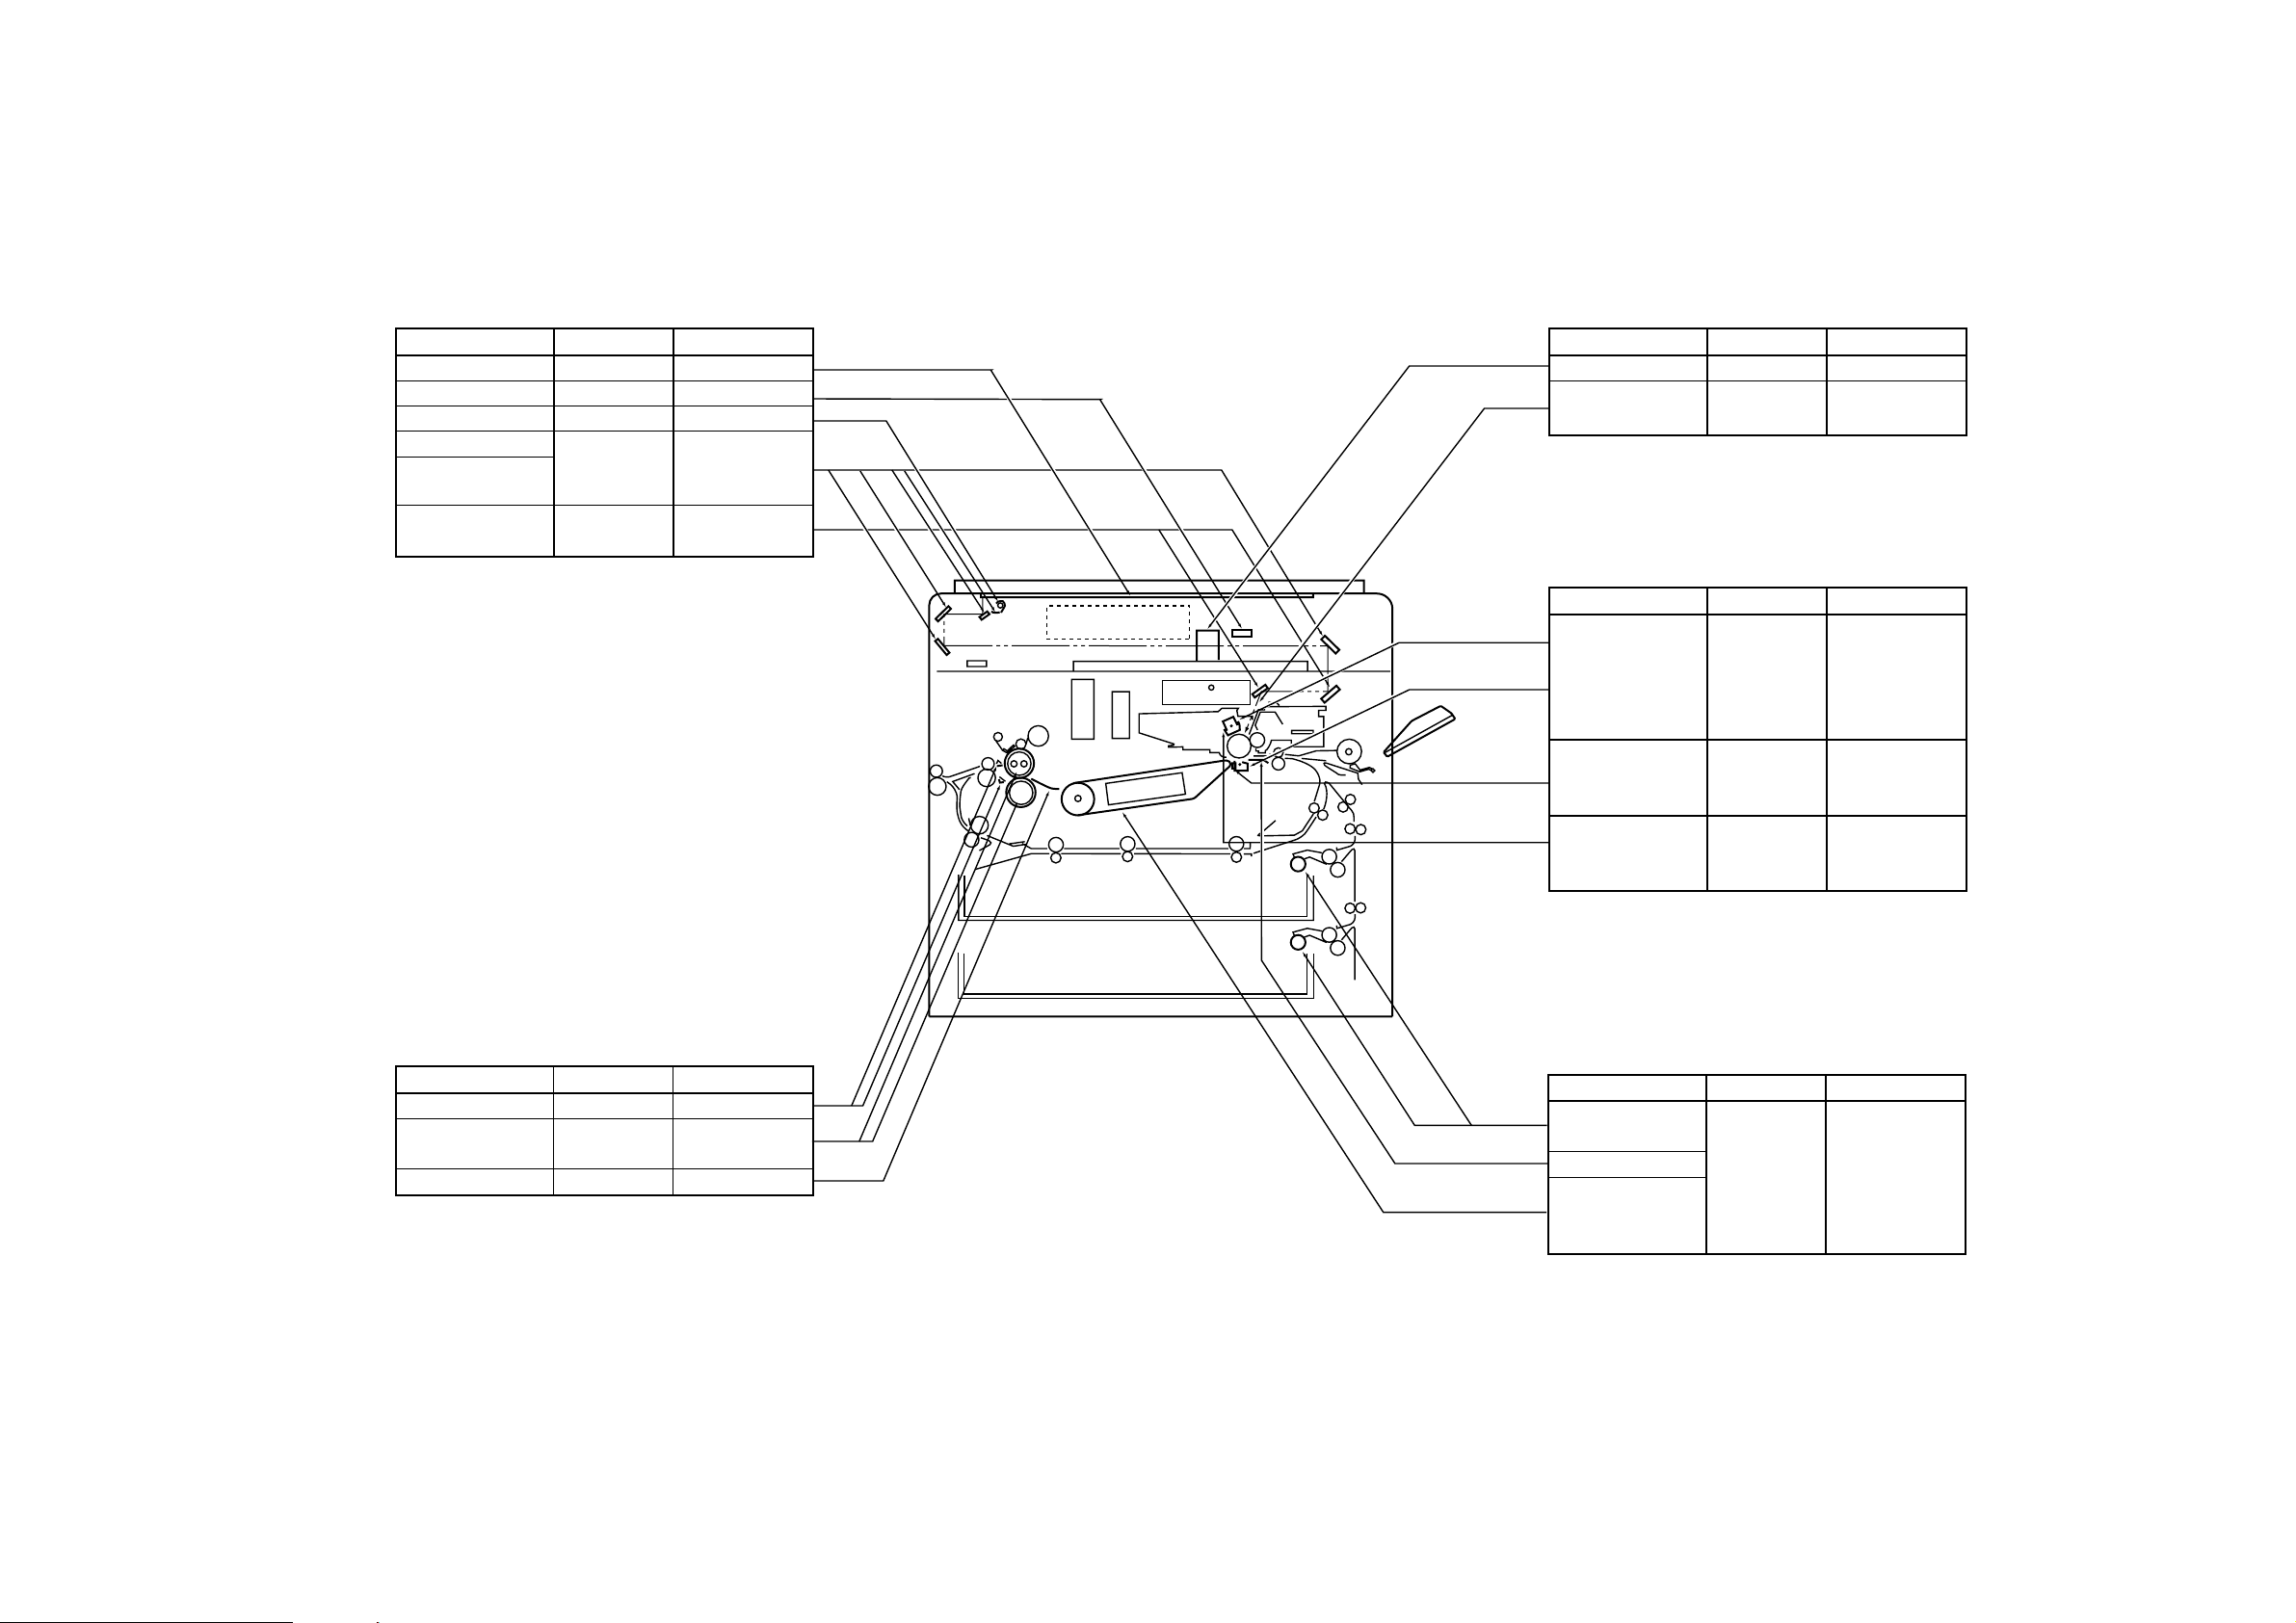
B. Points to Note for Scheduled Servicing
Copyboard/Scanning system
Part tool/solvent work/remarks
Copyboard glass Alchol Cleaning
Original size sensor Blower blush Cleaning
Scanning lamp Lint-free paper Dry-wiping
Reflecting plate Blower blush.
No.1 to No.4
mirrors
No.5 to No.6 Mirror cleaning Cleaning
mirrors tool
Fixing assembly
Part tool/solvent work/remarks
Separation claw Solvent Cleaning
Upper roller/ Cleaning oil Cleaning
Lower roller (TKN-0464)
Inlet guide Solvent Cleaning
Pick-up/feeding assembly
Part tool/solvent work/remarks
Pick-up Moist cloth* Cleaning
roller
Transfer guide
Feeding belt
Feeding
assembly mount
Corona units
Part tool/solvent work/remarks
Optical path
Part tool/solvent work/remarks
Lens Brower brush Cleaning
Dust-proofing Brower brush Cleaning
glass
*Make sure the parts are completely dry.
Primary
corona unit
Transfer
corona unit
Static
eliminator
Primary
corona unit
grid
Alchol
lint-free paper
Brush
Blower brush
Dry wipe it,
there after,
clean it using
lint-free paper
with alchol
Use a cleaning
brush
Cleaning
If dirt cannot be
removed, use
lint -free paper.
1-3

CHAPTER 2 STANDARDS AND ADJUSTMENTS
A. Adjusting the Images
1 Adjusting the Image Leading Edge Margin [3] No. 305
Select [3] No. 305 (leading edge margin adjustment) in service mode, and make
adjustments so that the image leading edge margin is 2.5 ±1.5 mm when the Test Sheet
is copied in Direct.
Figure 2-1
Reference:
2nd side of 2-sided copy: 2.5 ±2.0 mm
Making Adjustments
1) Start [3] in service mode, and select No. 305 using the keypad.
• The display indicates ‘305’.
2) Press the OK key.
• The indicator indicates the stored setting.
3) Using the keypad or the Zoom keys, change the setting.
• The indicator flashes the setting.
• To enter a negative setting, press the % key.
4) Press the OK key.
• The new setting is stored.
• The indicator stops flashing and remains on.
• A press on the Copy Start key starts copying.
5) To change the settings in succession, repeat steps 3) and 4).
6) Press the Clear key to return to item selection.
The settings and the image positions have the following relationships:
• For each ‘1’ in the setting, the margin width changes about 0.4 mm.
• A higher setting decreases the margin width.
CHAPTER 2 STANDARDS AND ADJUSTMENTS
2-1
2
2.5 ±1.5 mm
CHAPTER 2 STANDARDS AND ADJUSTMENTS
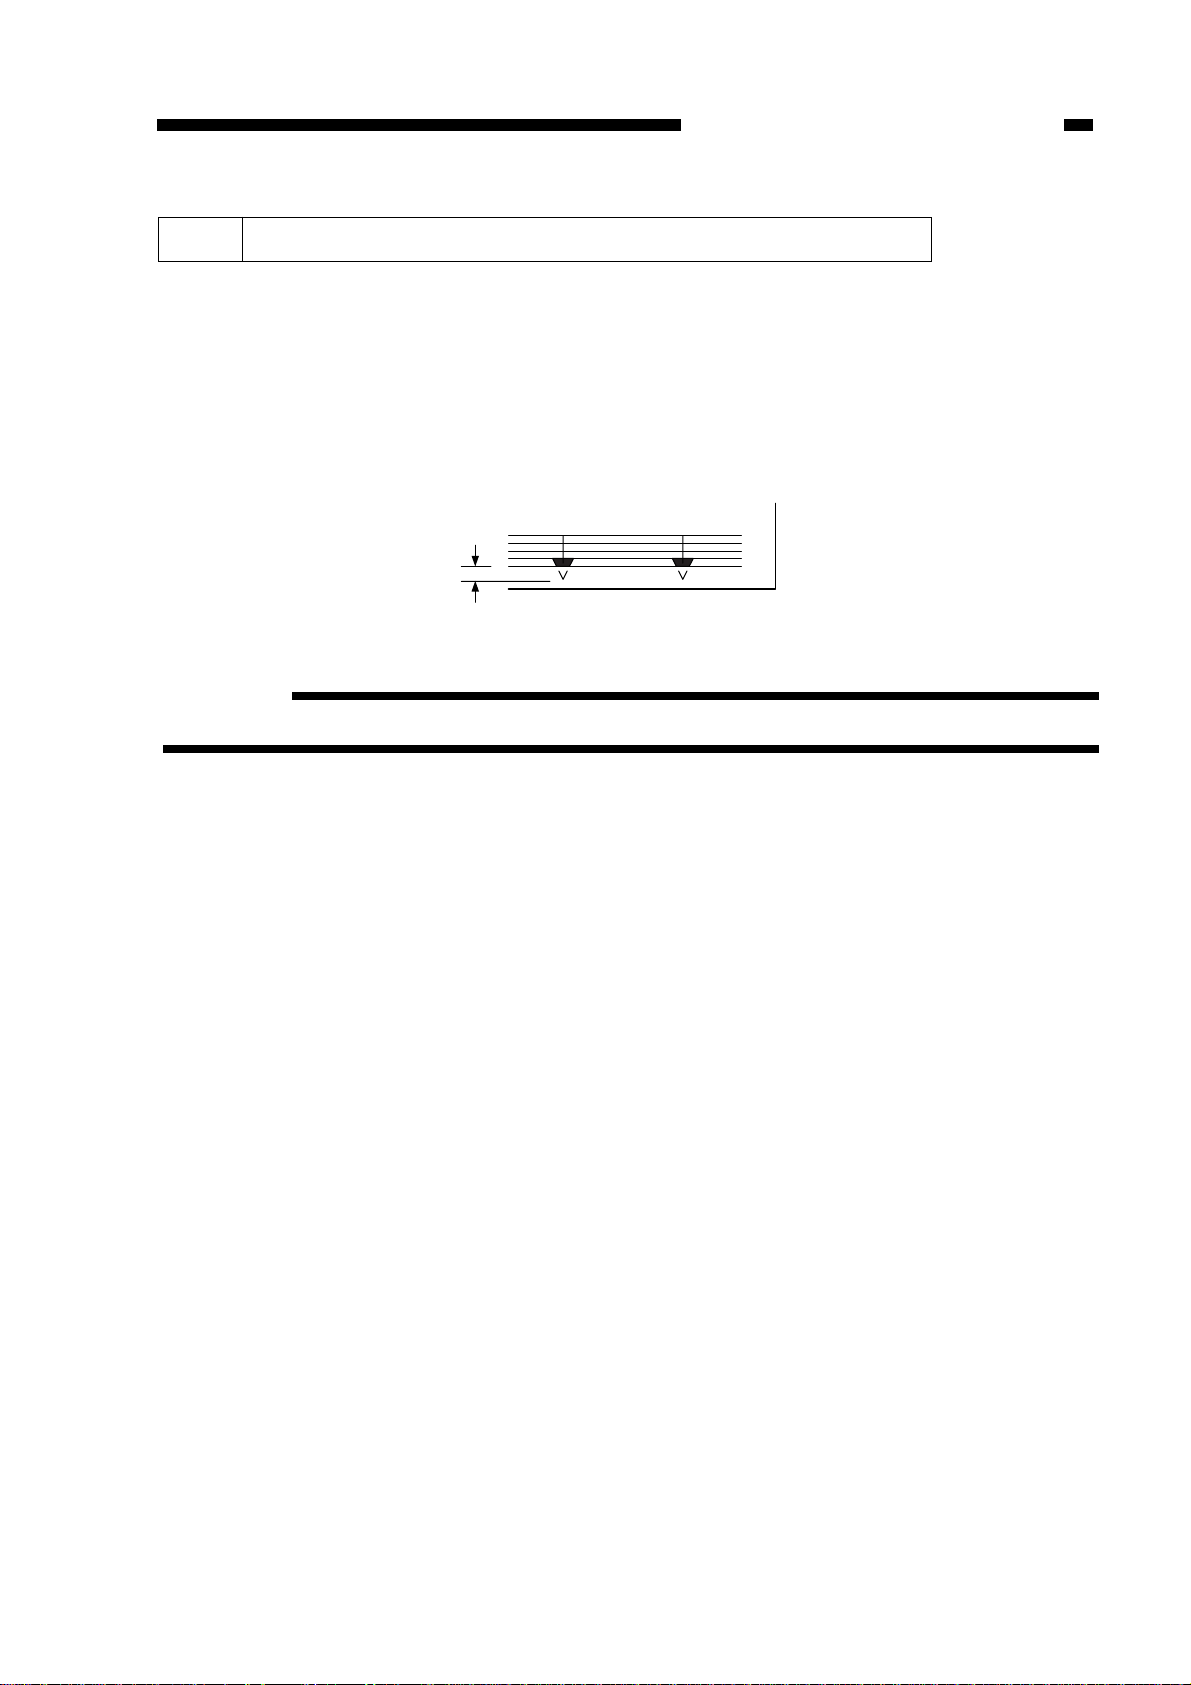
2 Adjusting the Leading Edge Non-Image Width [3] No. 306
Select [3] No. 306 in service mode (leading edge non-image width adjustment), and
make adjustments so that the leading edge non-image width is 2.0 ±1.0 mm when the
Test Sheet is copied in Direct.
The copier adjusts the leading edge non-image width in relation to the timing at
which the blank shutter is closed.
Be sure to perform the following steps whenever you have replaced the blank shutter
solenoid or the blank exposure assembly.
2.0 ±1.0 mm
Figure 2-2
Reference:
6 mm or less in Reduce or Enlarge mode (however, 8 mm or less at 50%)
Making Adjustments
1) Start [3] in service mode, and select No. 306 using the keypad.
• The indicator indicates ‘306’.
2) Press the OK key.
• The indicator indicates the stored setting.
3) Using the keypad or the Zoom keys, change the setting.
• The indicator flashes the setting.
• To enter a negative setting, press the % key.
4) Press the OK key.
• The new setting is stored.
• The indicator stops flashing and remains on.
• A press on the Copy Start key starts copying.
5) To change the settings in succession, repeat steps 3) and 4).
6) Press the Clear key to return to item selection.
The settings and the image positions have the following relationships:
• For each ‘1’ in the setting, the margin width changes about 0.4 mm.
• A higher setting increases the margin width.
2-2
CHAPTER 2 STANDARDS AND ADJUSTMENTS
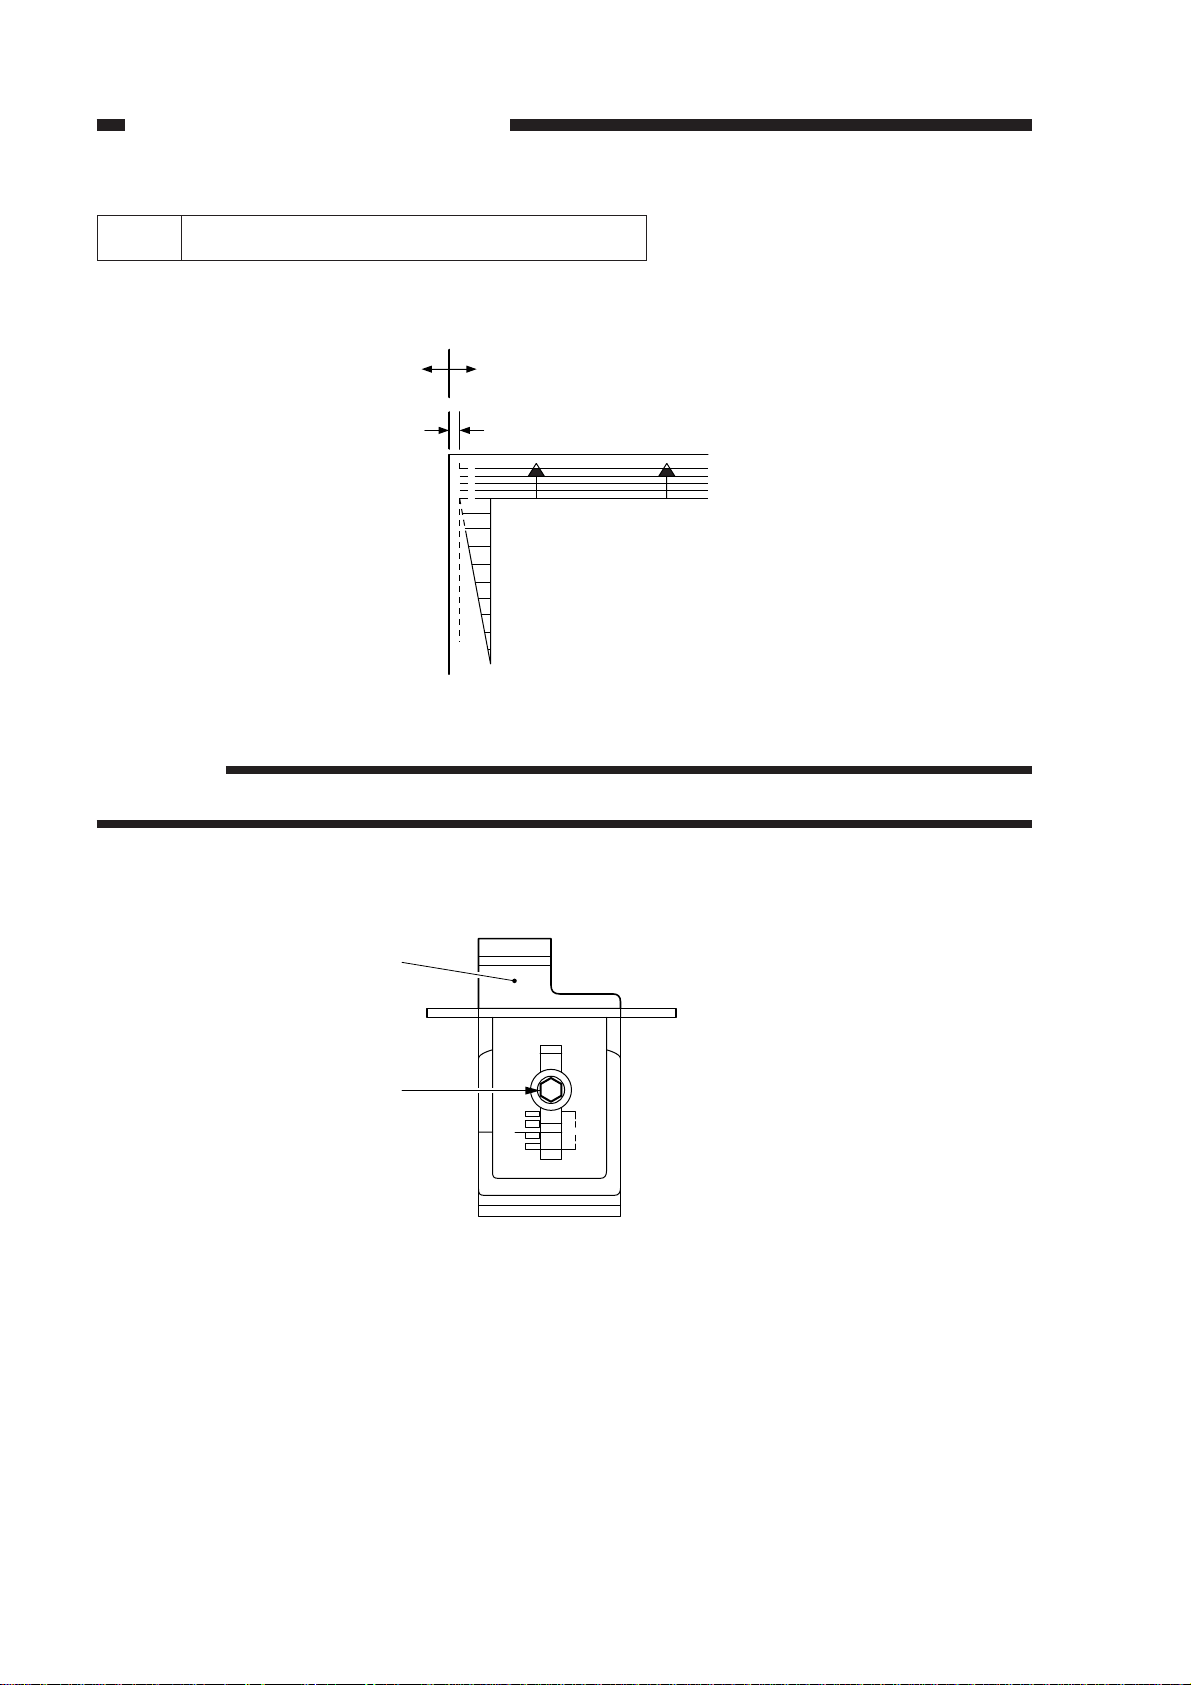
3 Adjusting the Trailing Edge Non-Image Width [3] No. 307
Select [3] No. 307 in service mode (trailing edge non-image width adjustment), and
make adjustments so that the trailing edge non-image width is 2.5 ±1.5 mm when the
Test Sheet is copied in Direct.
The copier adjusts the trailing edge non-image width in relation to the timing at which
the blank shutter is closed.
Be sure to perform the following steps whenever you have replaced the blank shutter
solenoid or the blank exposure assembly.
2.5 ±
1.5 mm
Figure 2-3
Reference:
8 mm or less in Reduce or Enlarge mode
Making Adjustments
1) Select [3] in service mode, and select No. 307 using the keypad.
• The indicator indicates ‘307’.
2) Press the OK key.
• The indicator indicates the stored setting.
3) Change the setting using the keypad or the Zoom keys.
• The indicator flashes the setting.
• To enter a negative setting, press the % key.
4) Press the OK key.
• The new setting is stored.
• The indicator stops flashing and remains on.
• A press on the Copy Start key starts copying.
5) To change the settings in succession, repeat steps 3) and 4).
6) Press the Clear key to return to item selection.
The settings and the image positions have the following relationships:
• For each ‘1’ in the setting, the margin width changes about 0.4 mm.
• A higher setting decreases the margin width.
2-3
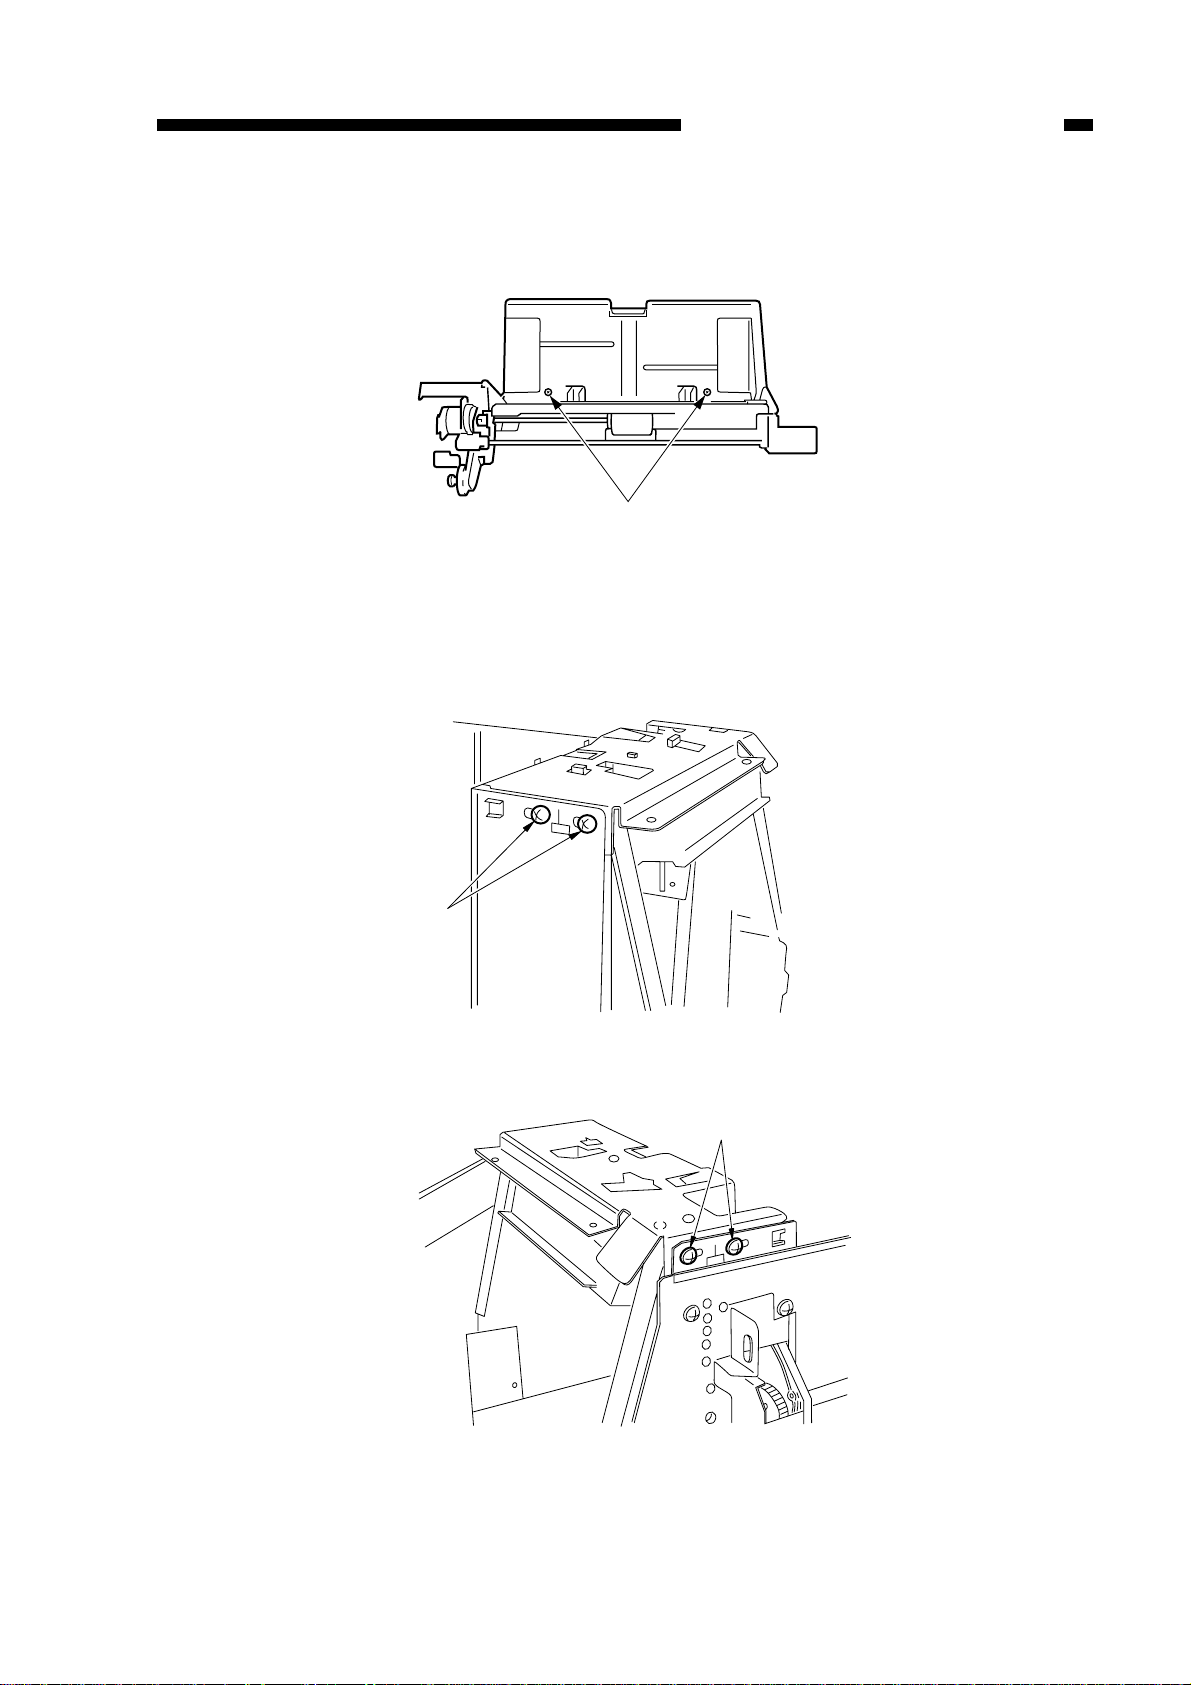
q, and adjust the position of the cassette hook plate w.
Figure 2-5
2-4
CHAPTER 2 STANDARDS AND ADJUSTMENTS
4 Adjusting the Left-Right Registration
Make adjustments so that the edges of the copy image and the copy are 0±1.5 mm
from each other.
(–) (+)
0 ±1.5 mm
0
2
4
6
8
10
Reference:
2nd side of 2-sided copy: 0 ±2.0 mm
a. Pick-Up from the Cassette
Loosen the screw
w
q
Figure 2-4
CHAPTER 2 STANDARDS AND ADJUSTMENTS
q
q
q
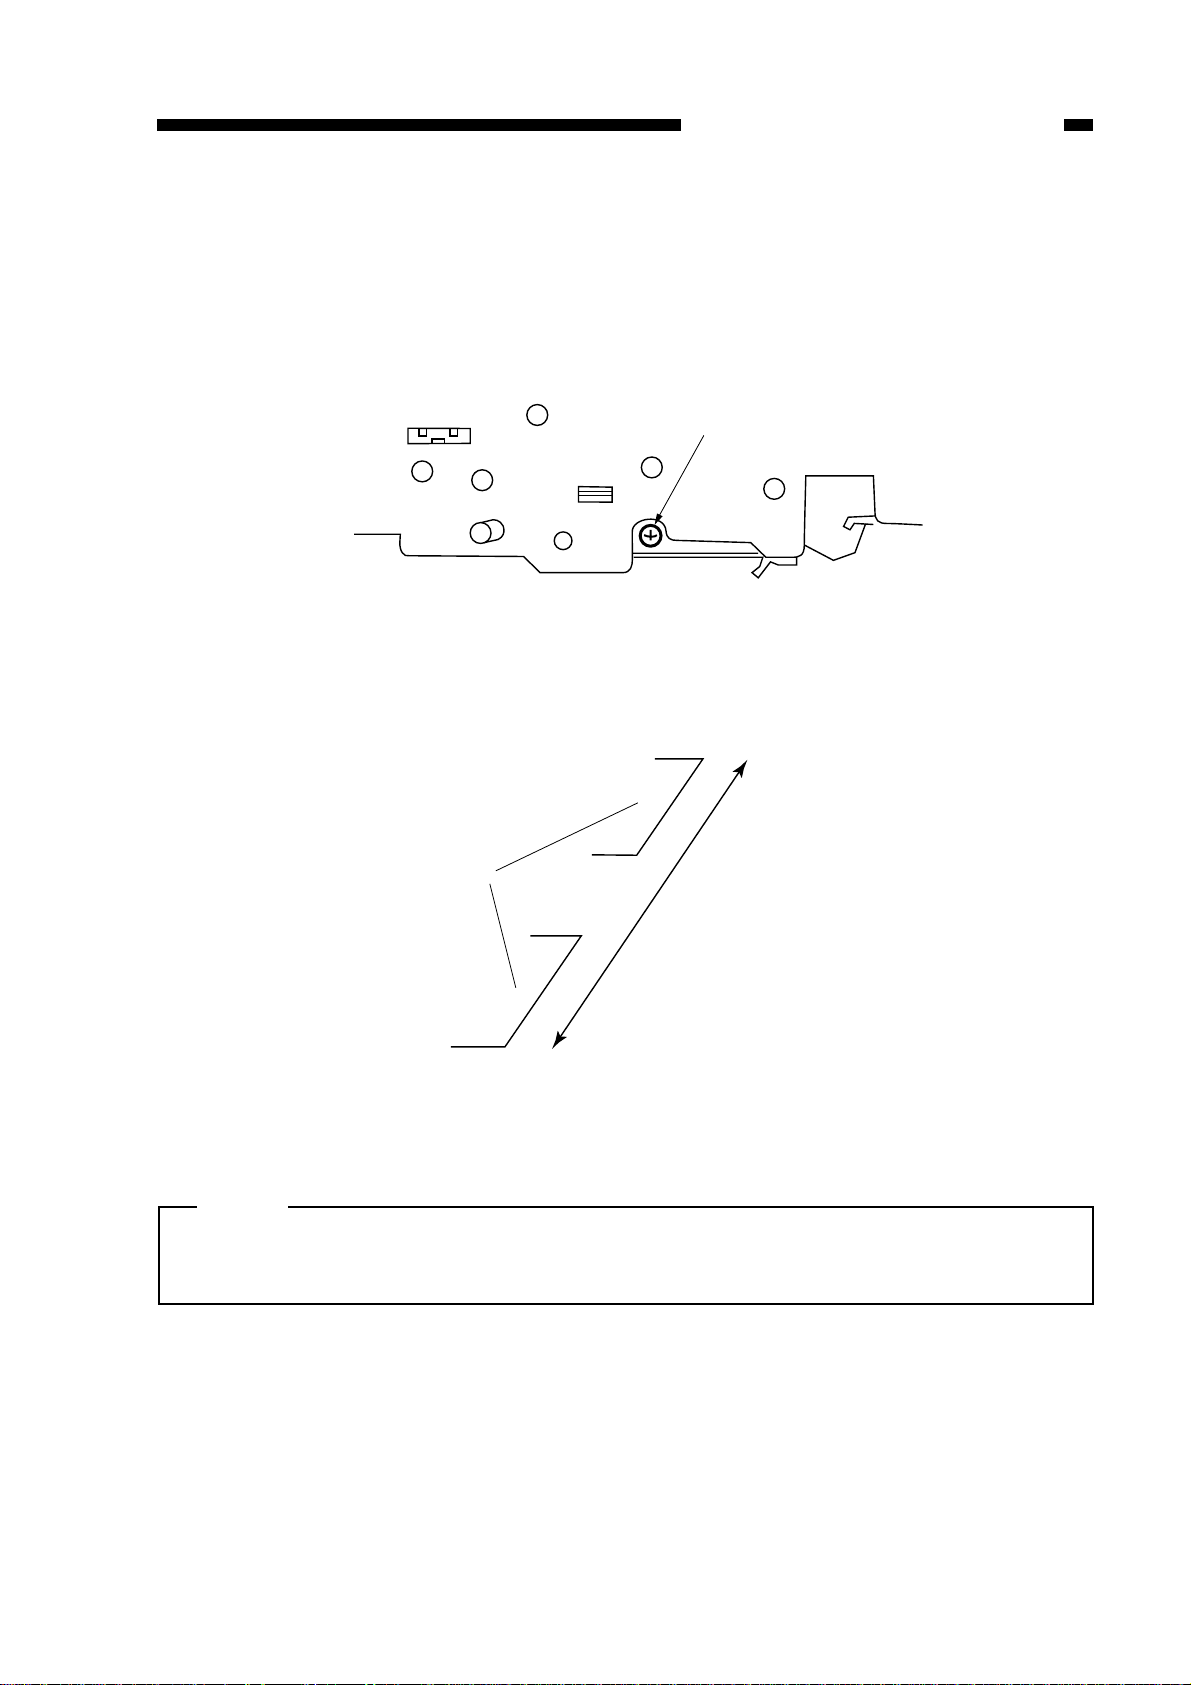
b. Pick-Up from the Multifeeder
Loosen the screw q, and adjust the position of the tray.
Figure 2-6
c. Pick-Up from the Paper Deck
Remove the deck front cover, and loosen the screw q (deck left/right); then, adjust
the position of the latch assembly in front/rear direction.
Figure 2-7
Figure 2-8
2-5

CHAPTER 2 STANDARDS AND ADJUSTMENTS
5 Adjusting the Image Left-Right Margin [3] No. 308
Select [3] No. 308 in service mode (left/right margin adjustment), and make
adjustments so that the image left/right margin is 2.5 ±1.5 mm when the Test Sheet is
copied in Direct.
Be sure you have adjusted the left/right registration before performing the following
steps.
Reference:
2nd side of 2-sided copies: 2.5 ±2.0 mm
Making Adjustments
a. Margin Width
1) Select [3] in service mode, and select No. 308 using the keypad.
• The indicator indicates ‘308’.
2) Press the OK key.
• The indicator indicates the stored setting.
3) Using the keypad or the Zoom keys, change the setting.
• The indicator flashes the new setting.
4) Press the OK key.
• The new setting is stored.
• The indicator stops flashing and remains on.
5) To change the settings in succession, repeat steps 3) and 4).
6) Press the Clear key to return to item selection.
The settings and the image positions have the following relationships:
• For each ‘1’ in the setting, the margin width changes about 0.37 mm.
• A higher setting increases the margin width.
Shutter
Adjusts the distance
between the two shutters
2-6
(+)
(-)
Figure 2-9
CHAPTER 2 STANDARDS AND ADJUSTMENTS
Adjusting screw
Shutter
Shifts the entire
shutter
b. Adjusting the Position of the Left/Right Margin
Turn the screw, and make adjustments to suit the standards.
• A clockwise turn moves the margin toward the front.
• A counterclockwise turn moves the margin to the rear.
• A full turn of the screw moves the image by about 1 mm.
Figure 2-10
Figure 2-11
Note:
For both a. and b., be sure to try different reproduction ratios after adjustments so
that a blank shutter home position search will be executed.
2-7

∆ as
necessary.
First, execute [4] No. 402 in service mode (AE auto adjustment) for automatic
adjustments.
If the appropriate adjustments cannot be made after several tries (density indicator
LED F5 and F9 flash), or if copies of the Test Sheet made in AE mode are too dark or
too light, execute [3] No. 304 in service mode (AE mode scanning lamp activation
voltage auto adjustment).
Be sure to follow the numerical sequence of the table.
Table 2-1
• In No. 402, auto adjustment is not executed for the AE slope, and the standard slope
is used. To adjust the slope, execute No. 303.
2-8
CHAPTER 2 STANDARDS AND ADJUSTMENTS
No.
1
2
3
Item
402
304
303
After replacing AE sensor
O
∆
∆
After replacing controller PCB
O
∆
∆
6 AE Adjustments
If you have replaced the scanning lamp, AE sensor, or DC controller PCB, you must
make the adjustments indicated by O; make the adjustments indicated by
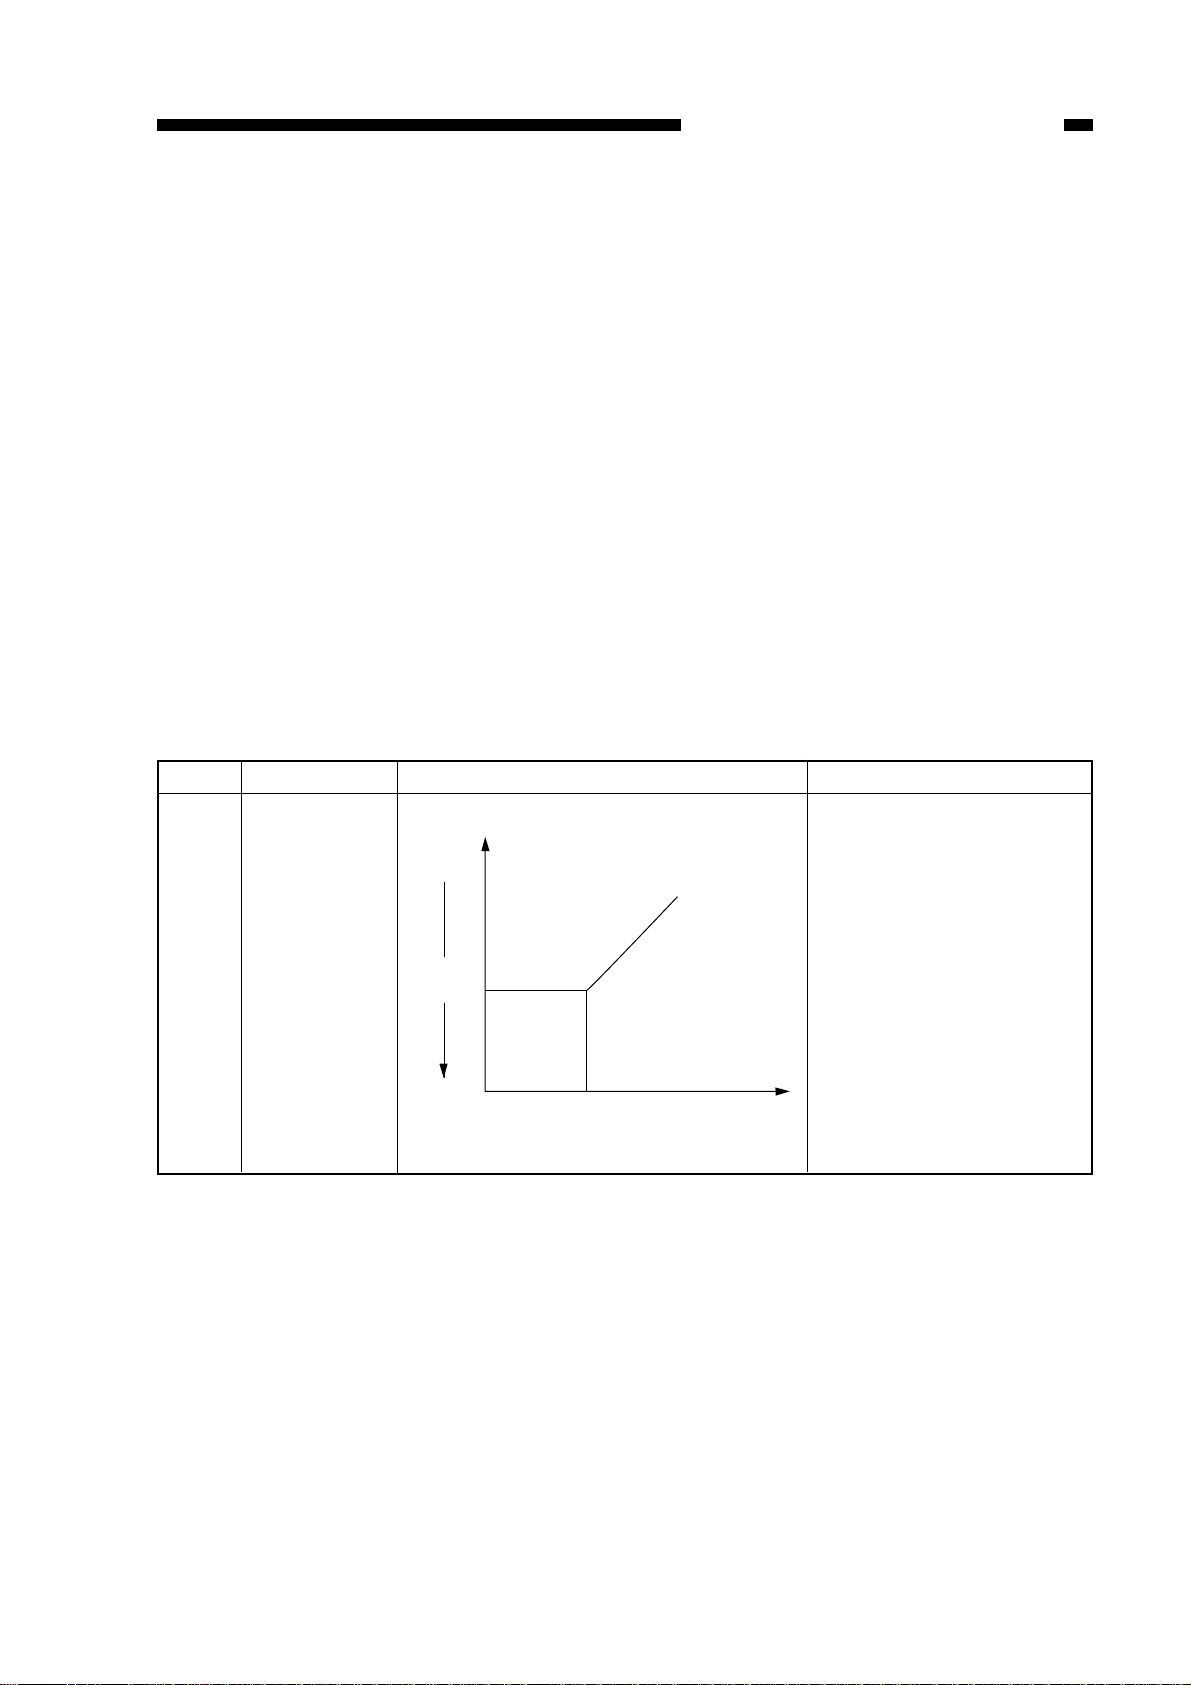
CHAPTER 2 STANDARDS AND ADJUSTMENTS
Lighter
Copy
density 5
Darker
Test Chart Original
density
• AE Auto Adjustment [4] No. 402
In AE auto adjustment, adjustments are made so that the intensity of the lamp in AE
mode matches the AE sensor output of manual copy density 5 in reference to copies of
an original (Test Sheet) on the copyboard glass.
Making Adjustments
1) Place the Test sheet (NA-3) on the Copyboard, and close the copyboard cover.
2) Start [4] in service mode, and select No. 402 using the keypad.
• The indicator indicates ‘402’.
3) Press the OK key.
• The scanning lamp turns on, and the scanner moves to the AE position.
• AE scanning is executed, and the intensity for AE scanning is automatically set.
• Thereafter , the scanner returns to home position, and the scanning lamp turns of f.
4) Press the Reset key.
• Mode selection mode starts, indicating [4].
• If necessary, execute No. 304.
Item
402
Function
AE scanning
intensity
automatic
adjustment
Description
Table 2-2
Remarks
Automatic adjustment
occurs so that the
original is copied at copy
density 5 when ‘402’ is
executed.
Note: If AE adjustment
fails, the density
indicator LED on
the control panel
F5 and F9 flash.
If such occurs,
make the adjustment once again.
2-9
Lighter
7.5
Copy
density 5
Darker
Test Chart Original
density
1
2
CHAPTER 2 STANDARDS AND ADJUSTMENTS
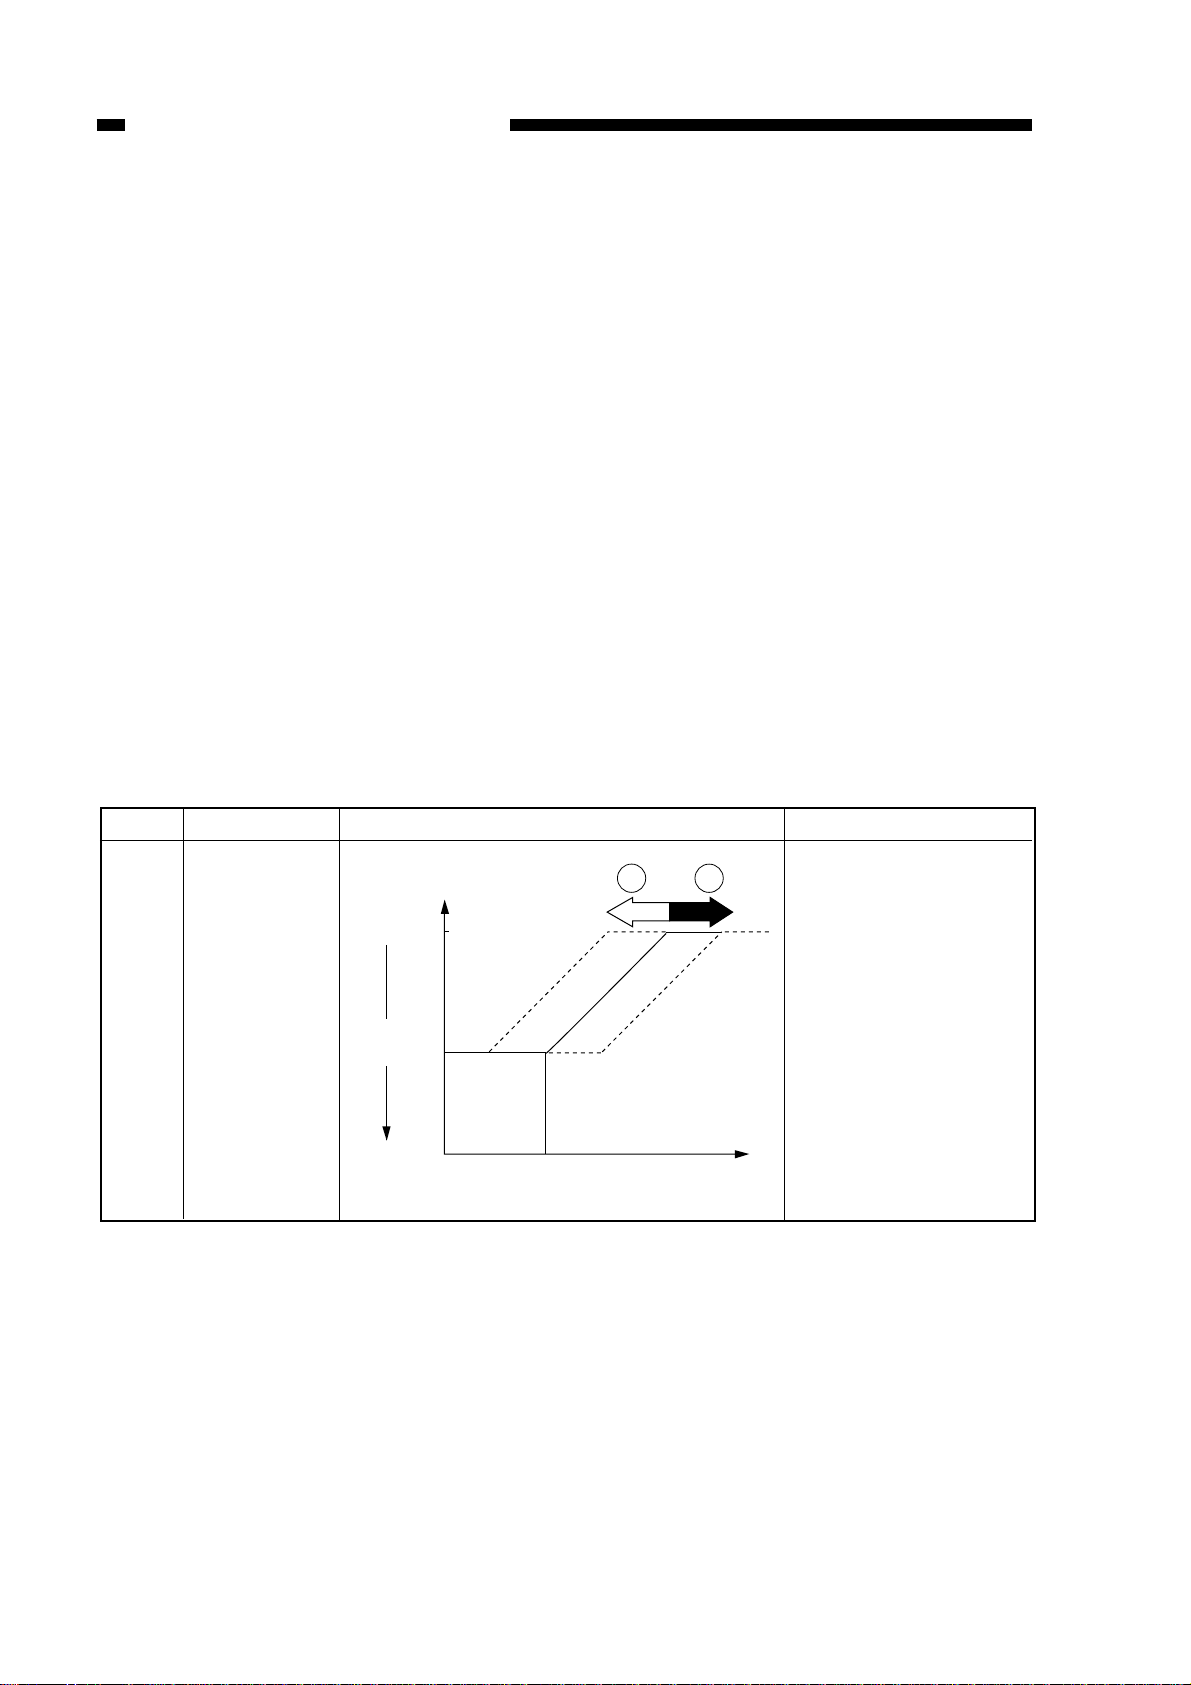
• Scanning Lamp Activation Voltage Auto Adjustment in AE Mode [3] No. 304
Making Adjustment
1) Start [3] in service mode, and select No. 304 using the keypad.
• The indicator indicates ‘304’.
2) Press the OK key.
• The indicator flashes the stored setting.
3) Using the keypad or the Zoom keys, change the settings according to the table
below.
• The indicator flashes the setting.
4) Press the OK key.
• The new setting is stored.
• The indicator stops flashing and remains on.
• A press on the Copy Start key starts copying.
5) Press the key.
• Item selection mode starts, indicating ‘304’.
• If necessary, execute No. 303.
Item
304
Function
AE scanning
intensity
adjustment
Description
Table 2-3
Remarks
q When the setting
is decreased in
service mode, the
AE copies will be
darker.
w If the setting is
increased in
service mode, the
AE copies will be
lighter.
2-10
CHAPTER 2 STANDARDS AND ADJUSTMENTS
Lighter
7.5
Copy
density 5
Darker
Test Chart
Newspaper
Original
density
1
2
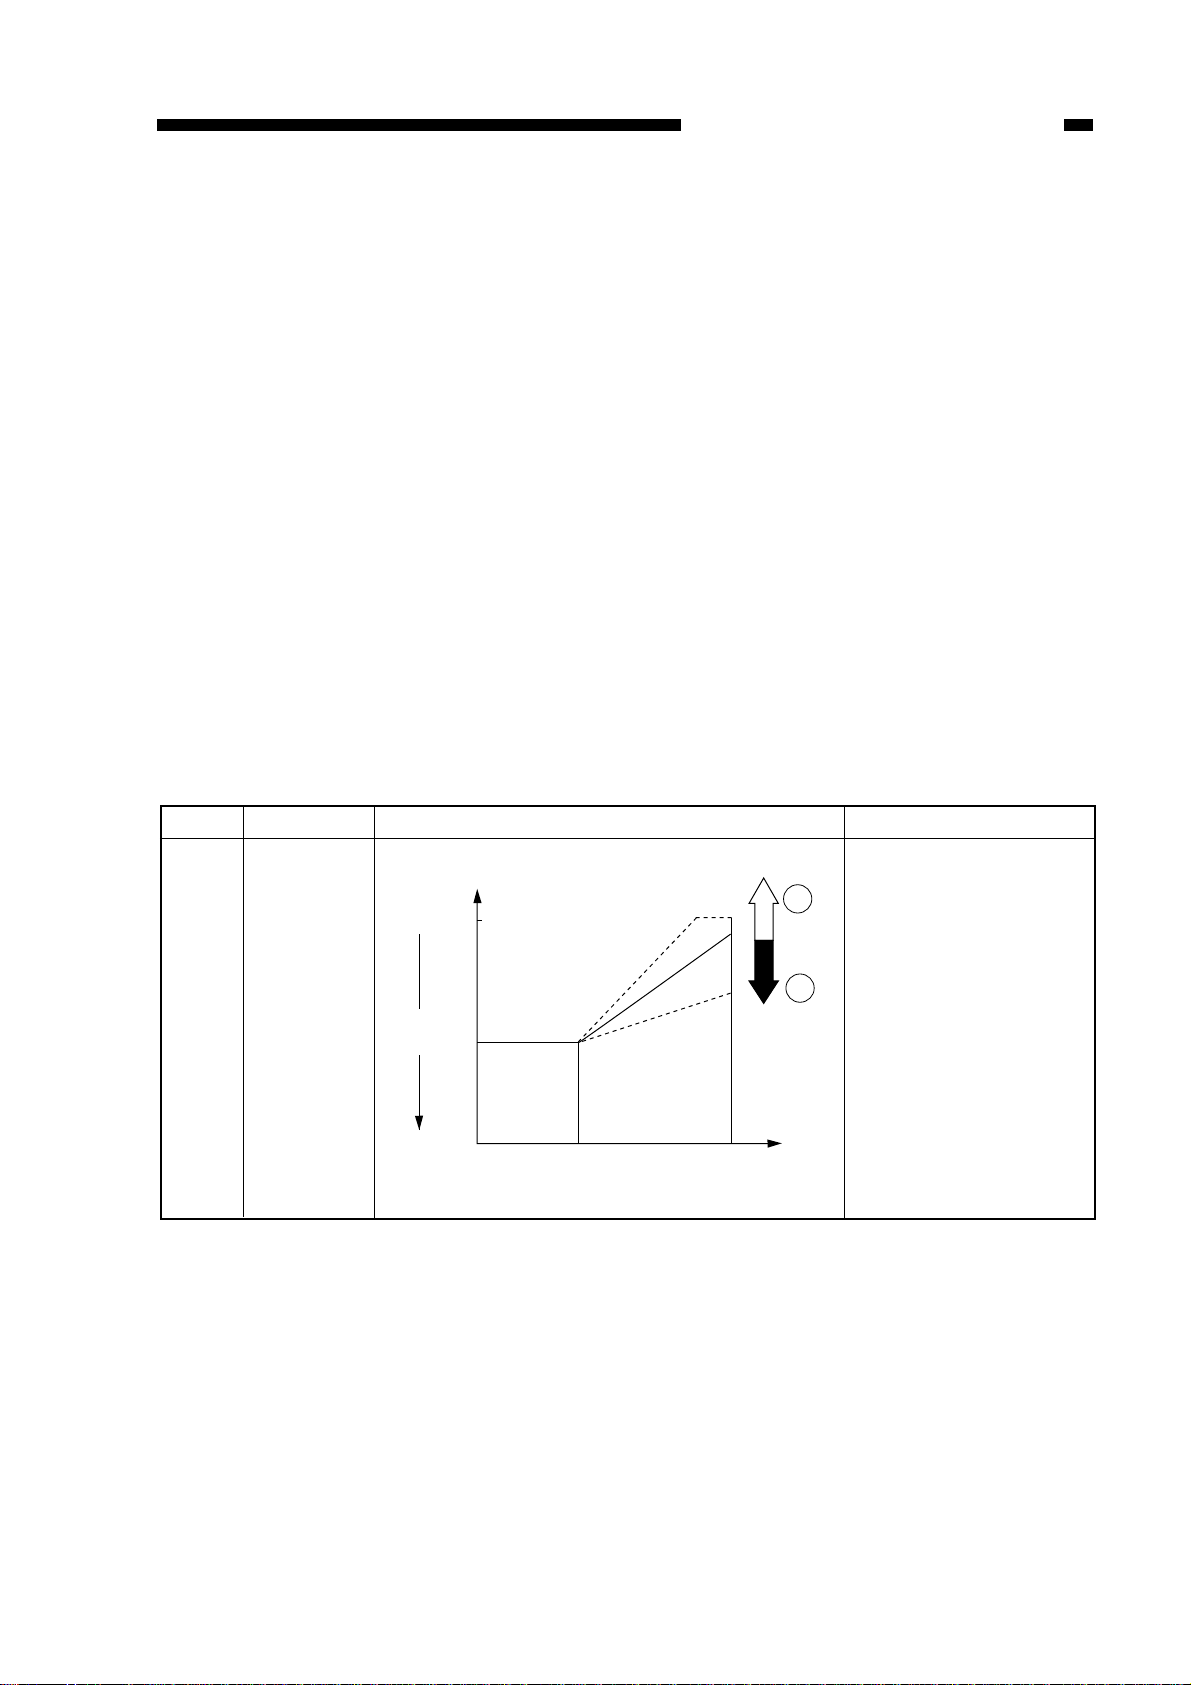
• Newspaper Original DC Bias Adjustment in AE Mode [3] No. 303
After executing No. 402 and No. 304, make a copy of a newspaper . If the copy is too
dark or too light, make the following adjustments:
Making Adjustments
1) Start [3] in service mode, and select No. 303 using the keypad.
• The indicator indicates ‘303’.
2) Press the OK key.
• The indicator flashes the stored setting.
3) Using the keypad or the Zoom keys, change the setting according to the table below.
• The indicator flashes the setting.
4) Press the OK key.
• The new setting is stored.
• The indicator stops flashing, and remains on.
• Press the Copy Start key to start copying.
5) Press the Reset key twice.
• These presses end service mode.
Item
303
Function
AE slope
Description
Table 2-4
Remarks
q If the setting is
decreased in
service mode, the
newspaper copies
will be lighter.
w If the setting is
increased in
service mode, the
newspaper copies
will be darker.
2-11

CHAPTER 2 STANDARDS AND ADJUSTMENTS
7 Adjusting the Developing Bias DC Component [3] No. 302
Make adjustments according to the Image Adjustment Basic Procedure.
Making Adjustments
1) Start [3] in service mode, and select No. 302 using the keypad.
• The indicator indicates ‘302’.
2) Press the OK key.
• The indicator flashes the stored setting.
3) Using the keypad or the Zoom keys, change the setting.
• The indicator flashes the setting.
• To enter a negative setting, press the % key.
4) Press the OK key.
• The setting is stored.
• The indicator stops flashing and remains on.
5) Press the Clear key to start copying.
The settings and the developing bias have the following relationships:
• For each ‘1’ of the setting, the output of the developing bias DC component
changes by about 5 V.
• A higher setting decreases the developing bias DC component, making the
copies darker.
• A lower setting increases the developing bias DC component, making the copies
lighter.
2-12

CHAPTER 2 STANDARDS AND ADJUSTMENTS
8 Adjusting the Horizontal Registration Paper Edge Sensor Position [3] No. 324
If a discrepancy is noted between front and rear margins on the second side of a two-
sided copy, make the following adjustments:
Making Adjustments
1) Start [3] in service mode, and select No. 324 using the keypad.
The indicator indicates ‘324’.
2) Press the OK key.
• The indicator indicates the stored setting.
3) Using the keypad or the Zoom keys, change the setting.
• The indicator flashes the setting.
• To enter a negative setting, press the % key.
4) Press the OK key.
• The new setting is stored.
• The indicator stops flashing and remains on.
• A press on the Copy Start key starts copying.
5) Press the Reset key twice.
• These presses end service mode.
The settings and the margin have the following relationships:
• For each ‘1’, the non-image width changes by about 0.5 mm.
• A higher setting increases the margin at the front.
• A lower setting decreases the margin at the rear.
Note:
After making adjustments, turn off and then on the power switch to move the
horizontal paper end sensor to home position.
2-13

CHAPTER 2 STANDARDS AND ADJUSTMENTS
9 Adjusting the Trailing Edge Margin for Pick-Up from the Multifeeder [3] No. 327
Make adjustments so that the trailing edge margin is 2.5 ±1.5 mm when free-size
copying is executed using the multifeeder.
2.5 ±
1.5 mm
Figure 2-12
Making Adjustments
1) Start [3] in service mode, and select No. 327 using keypad.
• The indicator indicates ‘327’.
2) Press the OK key.
• The indicator indicates the stored setting.
3) Using the keypad or the Zoom keys, change the setting.
• The indicator flashes the setting.
• To enter a negative setting, press the % key.
4) Press the OK key.
• The new setting is stored.
• The indicator stops flashing and remains on.
• A press on the Copy Start key starts copying.
5) To change the settings in succession, repeat steps 3) and 4).
6) Press the Clear key to return to item selection.
The settings and the image position have the following relationship:
• For each ‘1’, the margin width changes about 0.4 mm.
• A higher setting decreases the margin width.
2-14
CHAPTER 2 STANDARDS AND ADJUSTMENTS
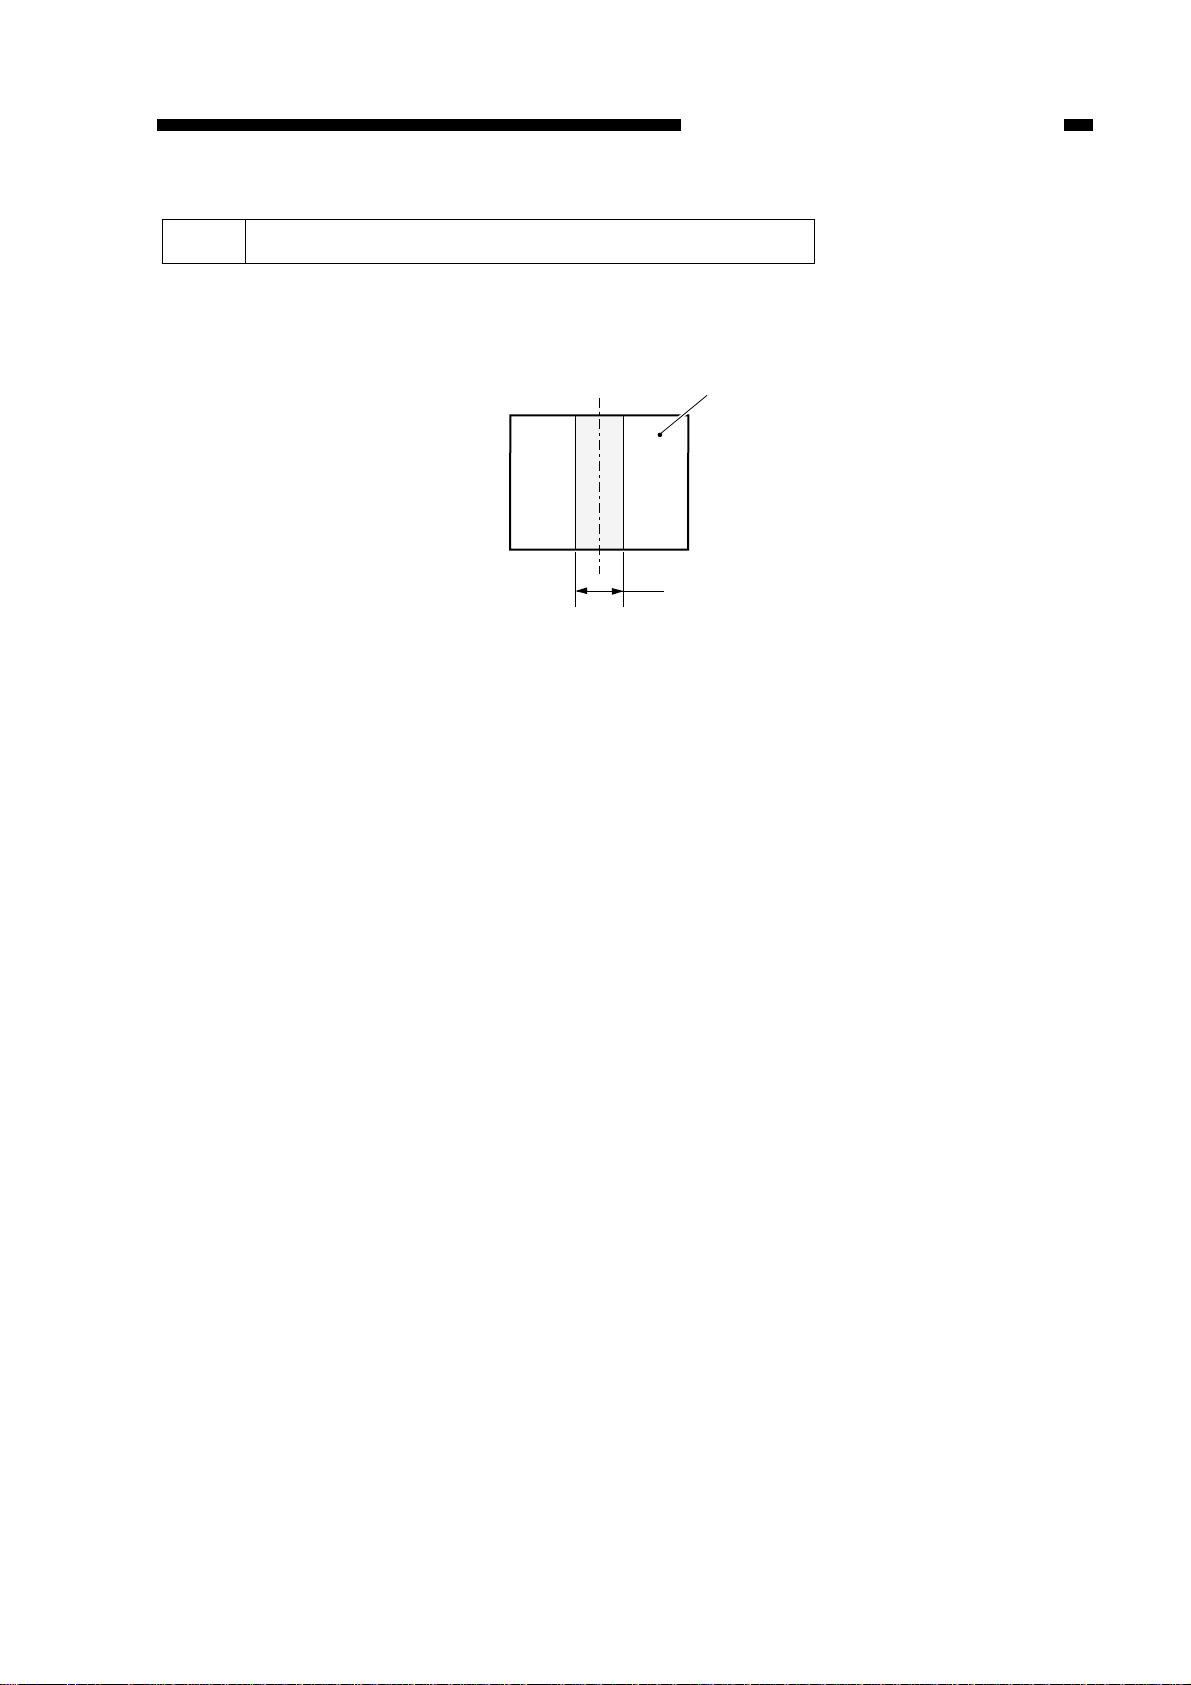
10 Adjusting the Book Erasing Width [3] No. 326
Adjust the width that runs in the middle of an original in book erase mode.
The Length of χin Figure 2-13 may be changed.
This mode does not allow changing the left/right edge of a book original.
Book original
χ
Figure 2-13
Making adjustment
1) Start [3] in service mode, and select No. 326 using the keypad.
• The indicator indicates ‘326’.
2) Press the OK key.
• The indicator indicates the stored setting.
3) Using the keypad or the Zoom keys, change the setting.
• The indicator flashes the setting.
• To enter a negative setting, press the % key.
4) Press the OK key.
• The new setting is stored.
• The indicator stops flashing and remains on.
• A press on the Copy Start key starts copying.
5) To change settings in succession, repeat steps 3) and 4).
6) Press the Clear key to return to item selection.
The settings and the book erasing width have the following relationship.
• For each ‘1’, the frame erasing width changes by about 1 mm.
• A higher setting increases the frame erasing width.
2-15
CHAPTER 2 STANDARDS AND ADJUSTMENTS
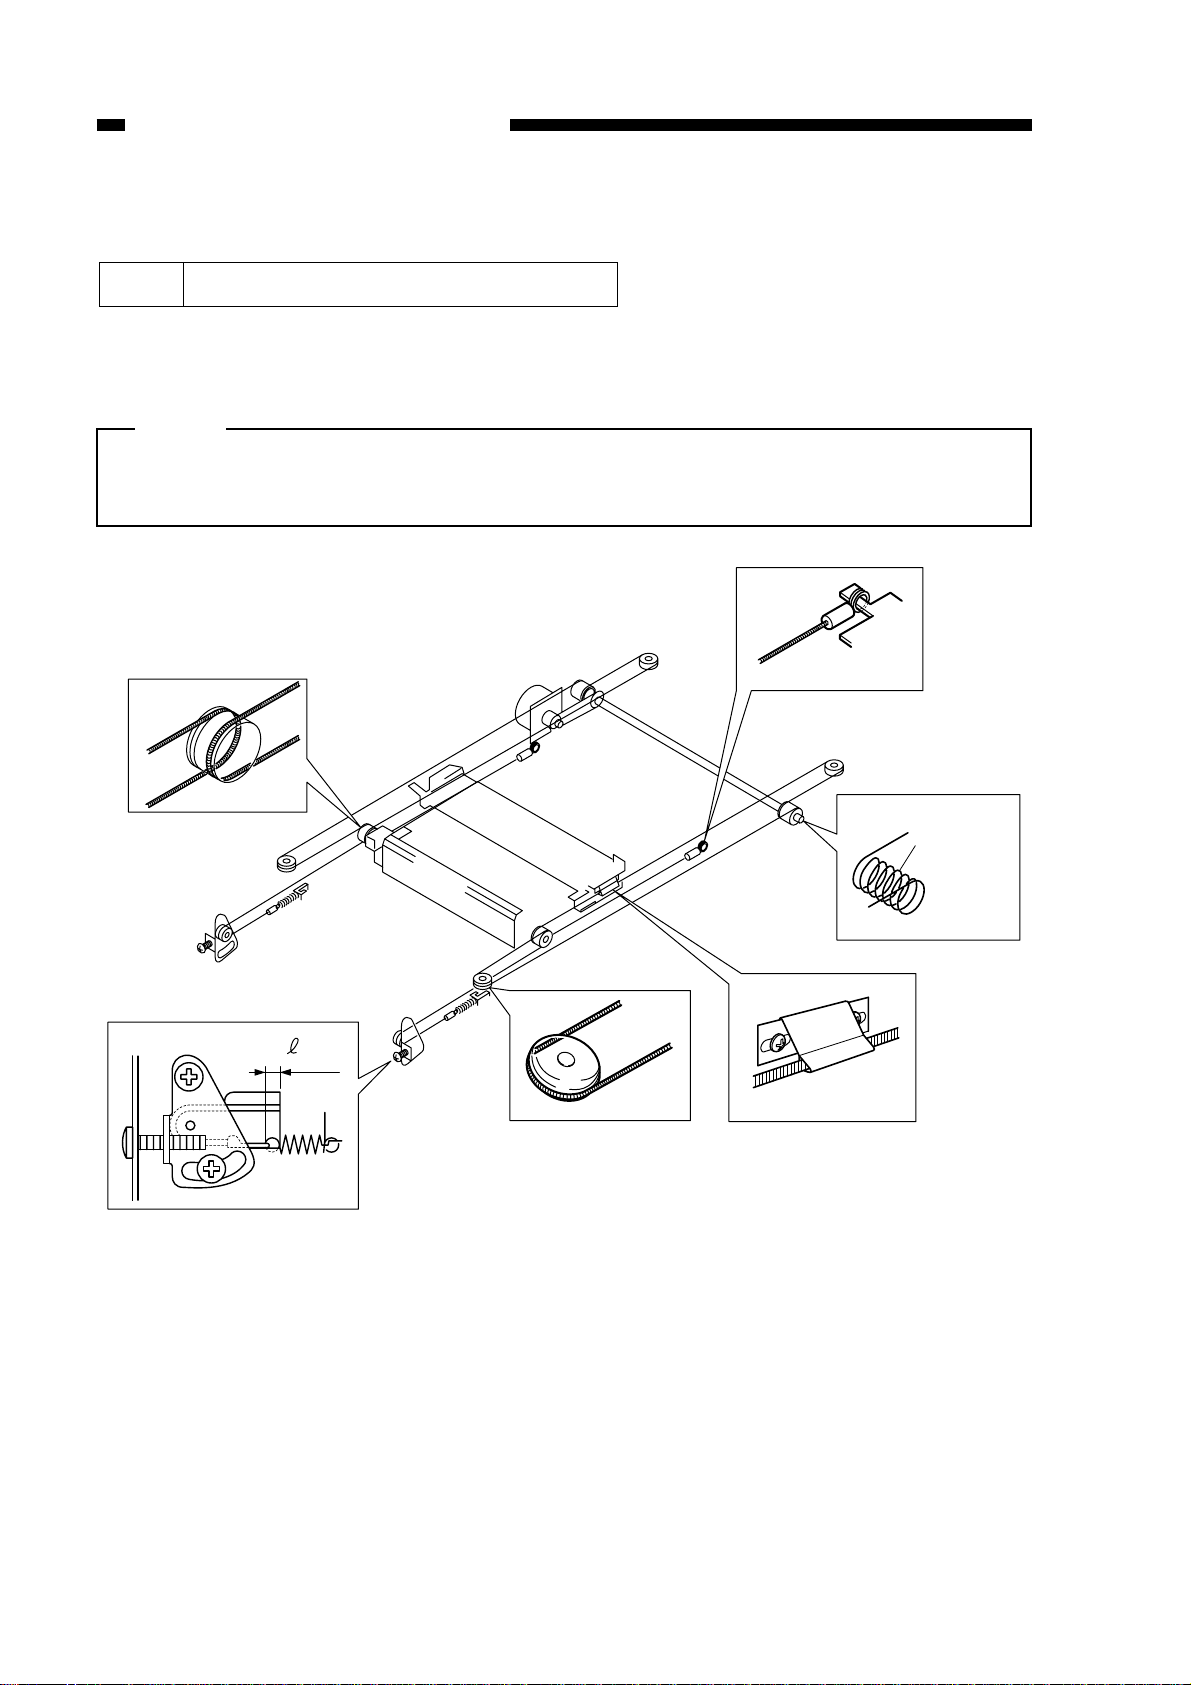
B. Exposure System
1 Routing the Scanner Drive Cable
Route the cable in the order indicated; then, adjust the tension of the cable and the
position of the mirror.
Note:
Before starting the work, be sure to fix the No. 2 mirror mount temporarily in place
to the front and rear side plates.
y
u
w
=0 –
3mm
i
Figure 2-14
t
o
q
e
Put the steel ball
r
Fix in place
temporarily.
into the hole
of the pully.
Wind
eight times.
2-16
CHAPTER 2 STANDARDS AND ADJUSTMENTS
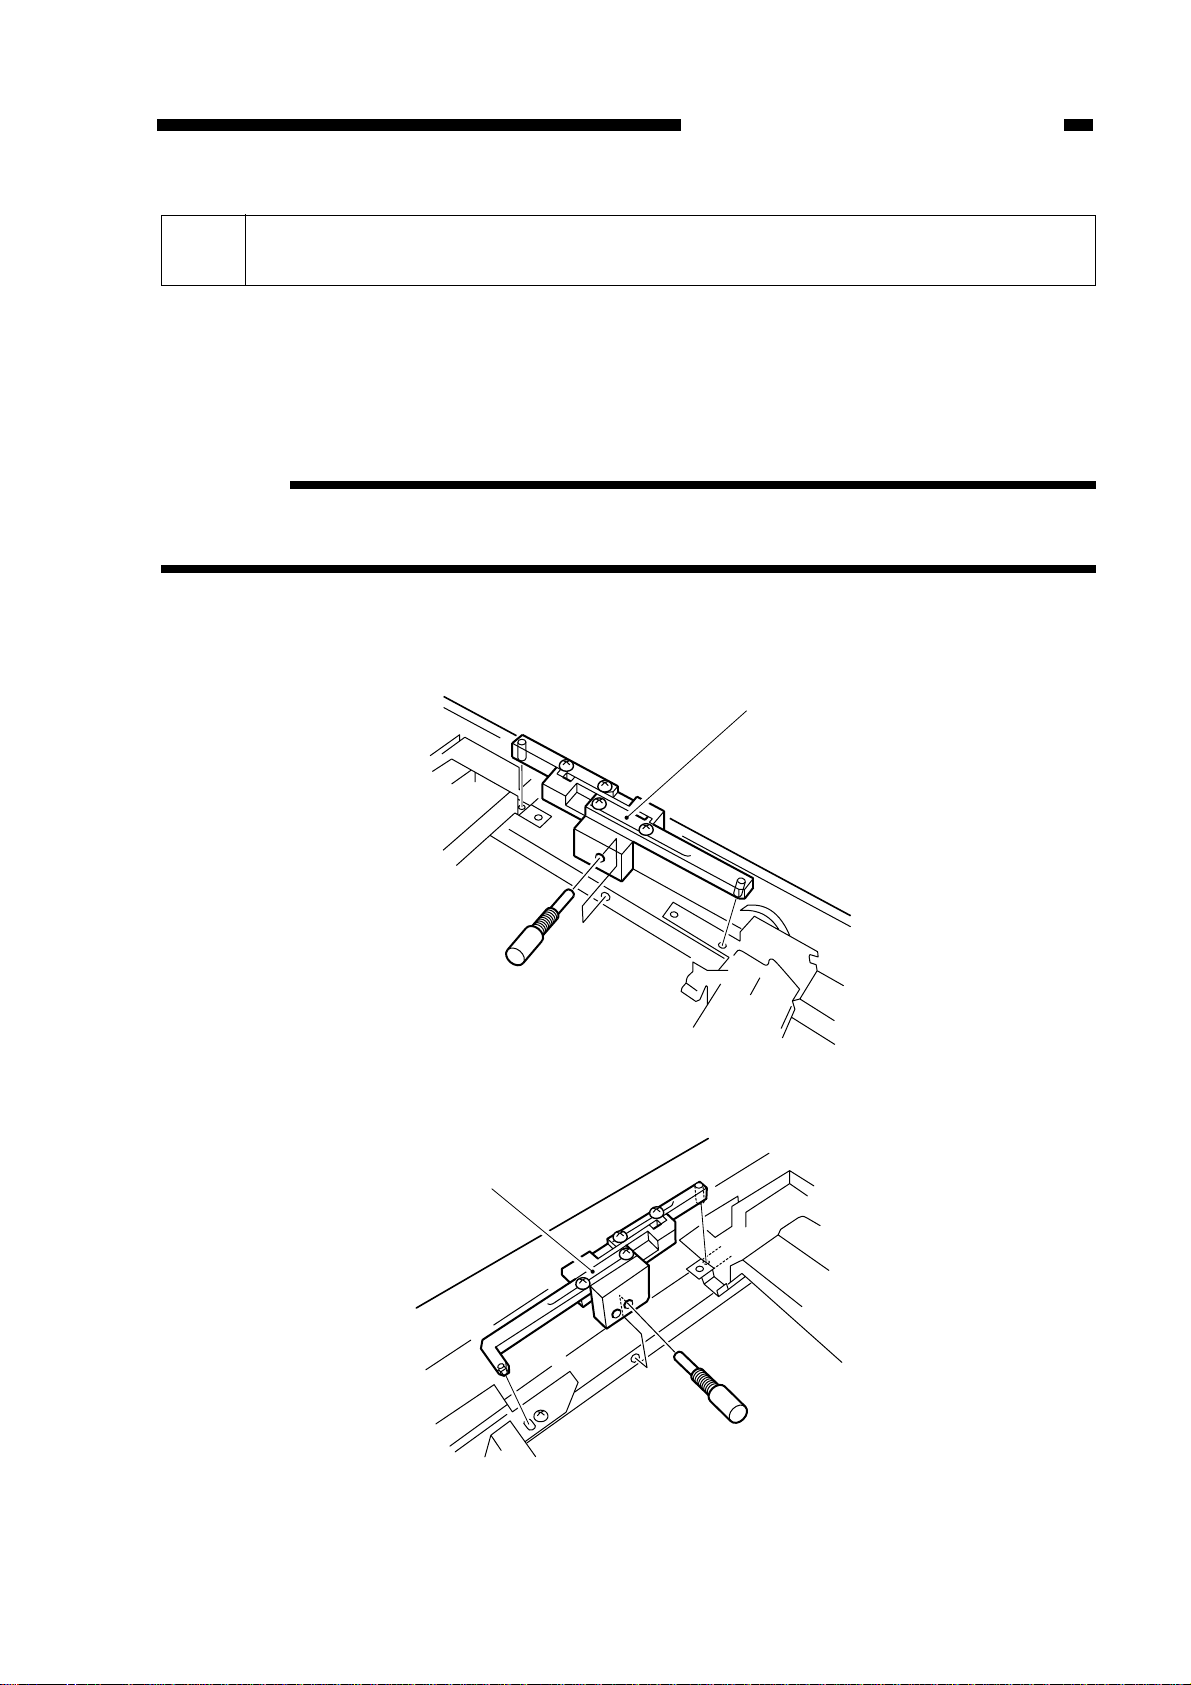
2 Adjusting the Position of the Mirror (optical path length between No. 1
mirror and No. 2/No. 3 mirror)
1) Remove the screw used to temporarily fix the No.2 mirror mount in position (both
front, rear).
2) Loosen the four screws on the mirror positioning tool (FY9-3002-000), and extend
the two arms fully; then, tighten the screws (both front and rear).
Reference:
The mirror positioning tool is used in common with other models. Adjust the length
of the arms to suit the copier in advance.
3) Remove the pin from the mirror positioning tool (front and rear).
4) Mount the mirror positioning tool q to the No.1 mirror mount and the No.2 mirror
mount.
q
q
(front)
Figure 2-15
(rear)
Figure 2-16
2-17
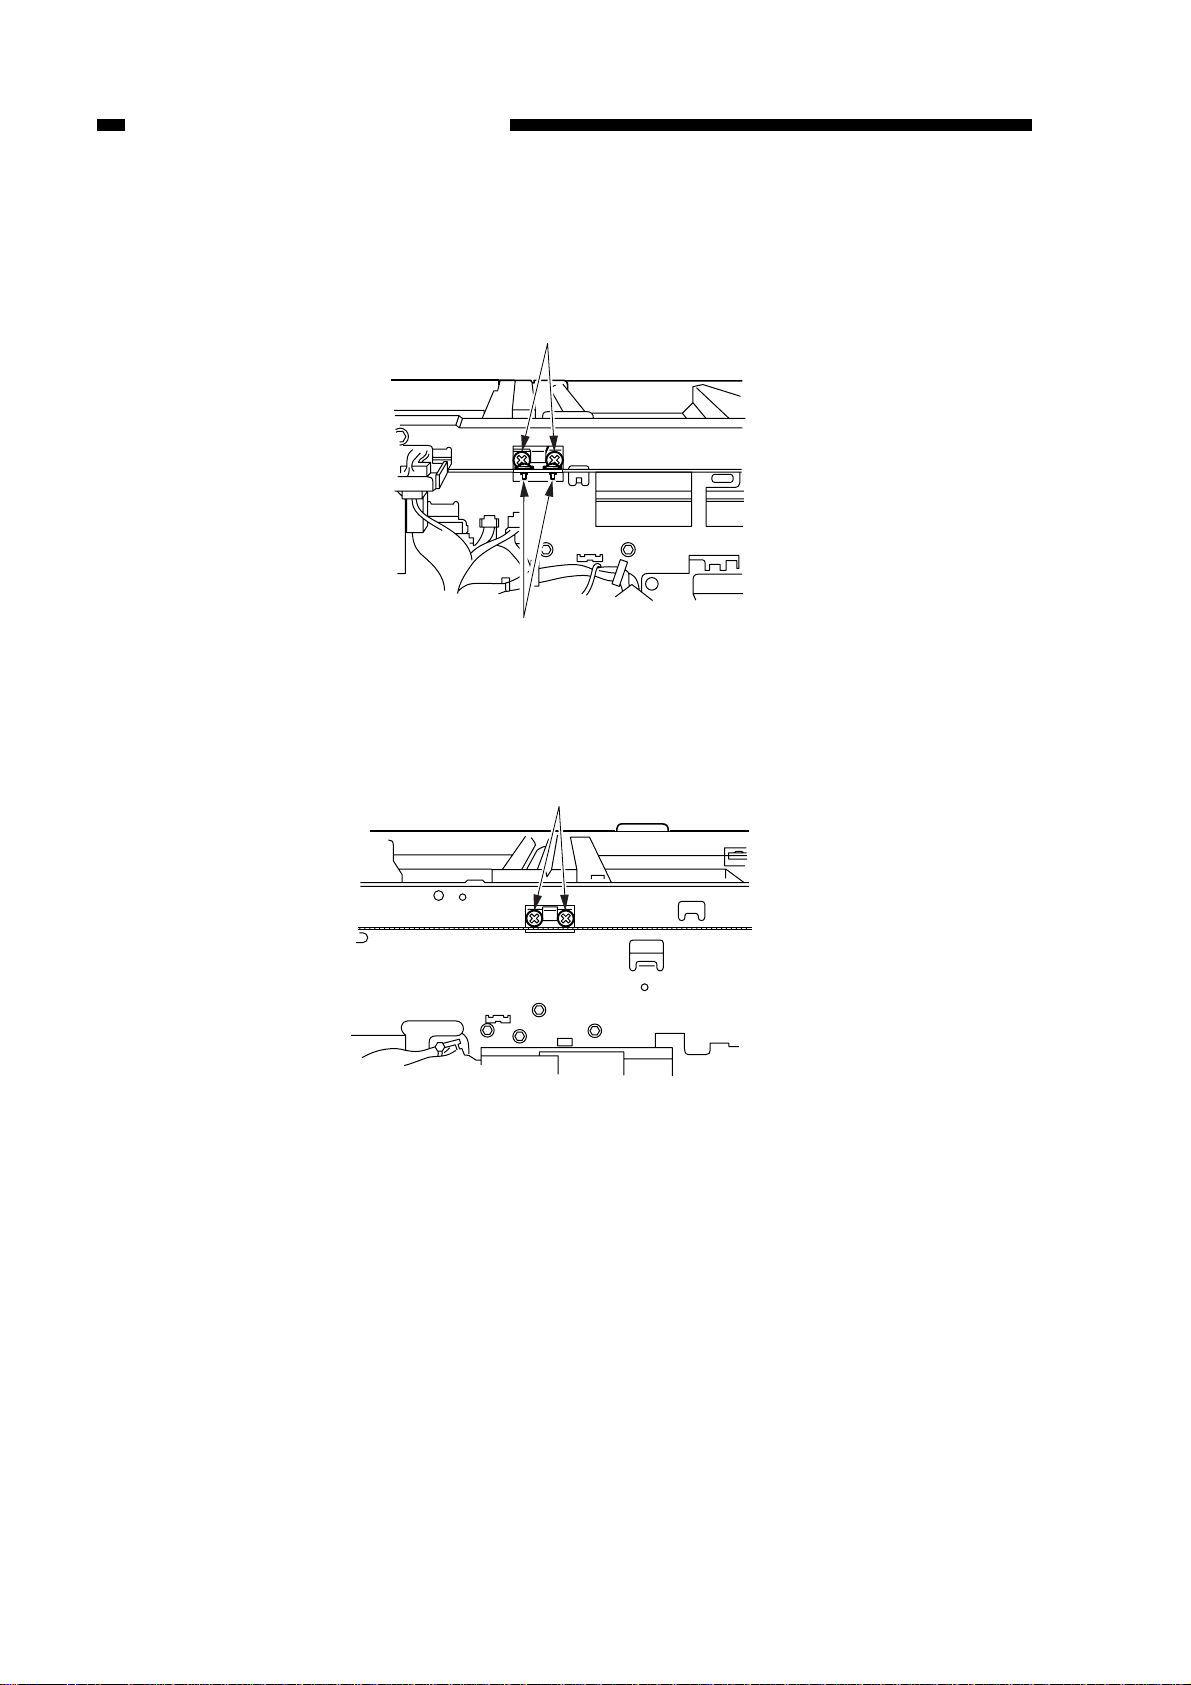
CHAPTER 2 STANDARDS AND ADJUSTMENTS
(rear)
w
w
5) Mount the fixing of the scanner cable to the No.1 mirror mount (both front and rear)
with screws w.
Figure 2-17
w
(front)
Figure 2-18
2-18
CHAPTER 2 STANDARDS AND ADJUSTMENTS
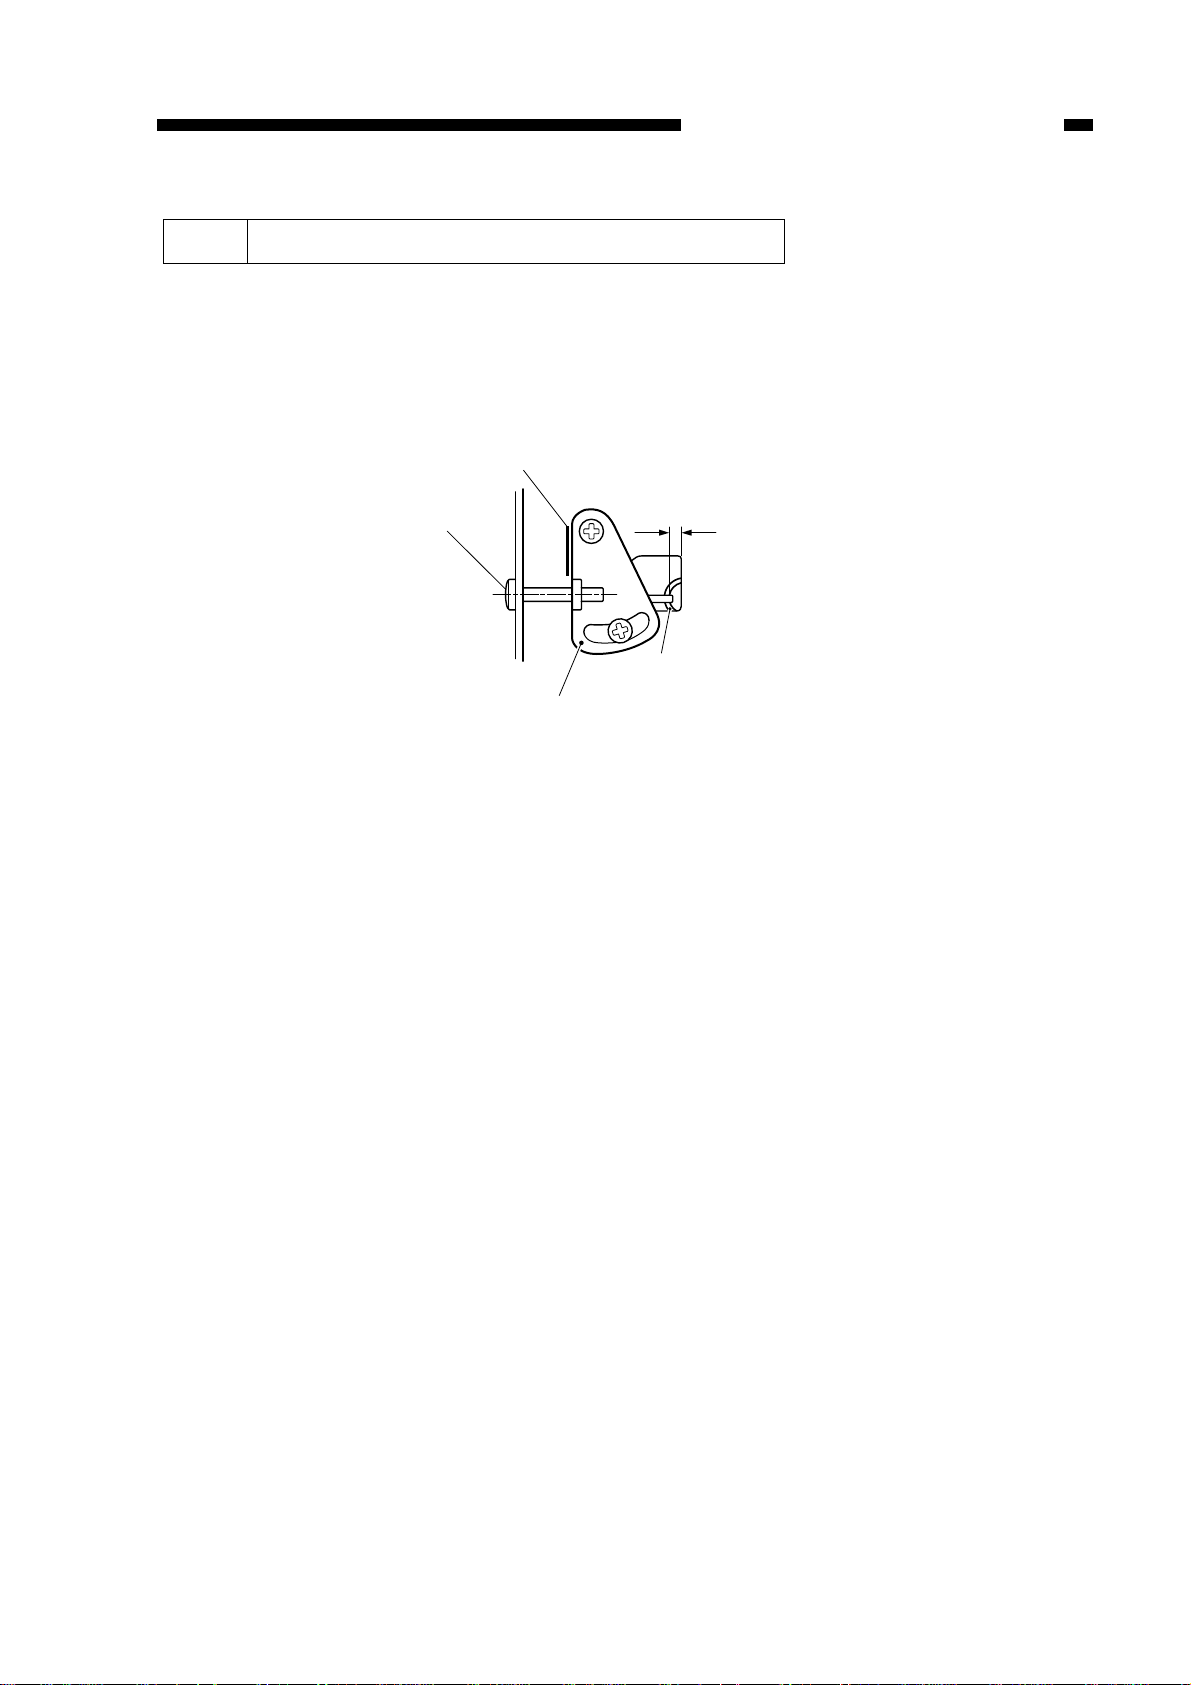
Line drawn with a scribe
Binding screw
r=0 – 3mm
Wire spring
Tensioner plate
3 Adjusting the Tension of the Scanner Cable
Loosen the binding screw, and align the tensioner plate to the line marked with a
scribe in advance.
Or, tighten the binding screw so that the wire spring and the hole in the side plate
shown in Figure 2-19 is 0 to 3 mm when viewed from the front.
Figure 2-19
2-19
CHAPTER 2 STANDARDS AND ADJUSTMENTS
A indicated in Figure 2-20.
Figure 2-20
5 Cleaning the No.4 Mirror
1) Remove the copyboard glass and the lens hood.
2) Remove the screw q and the mirror guide plate w; then, clean the No.4 mirror.
Figure 2-21
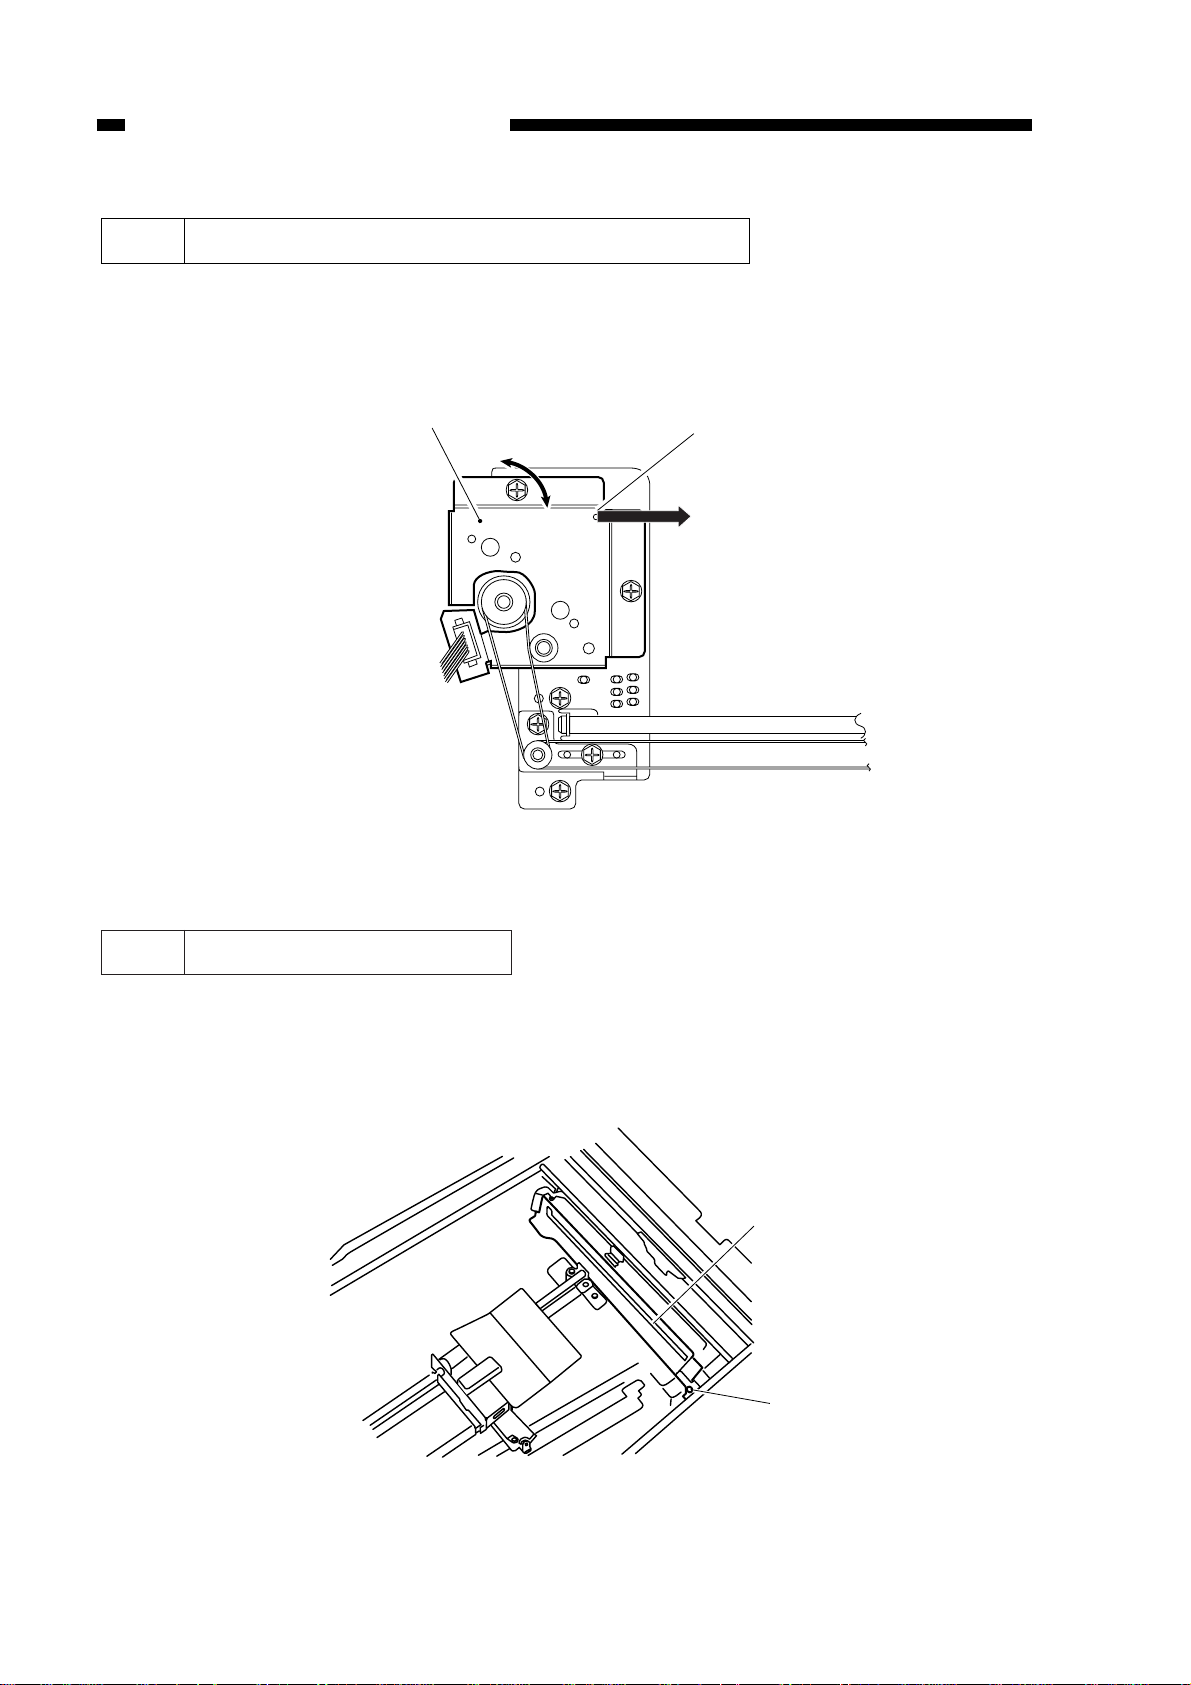
q
A
4 Adjusting the Tension of the Lens Drive Belt
Move the lens motor support q and fit it in place so that the reading of the spring
gauge is 1000 ± 50g when motor support q is pulled with a spring gauge in the direction
of the arrow at the point
w
q
2-20
CHAPTER 2 STANDARDS AND ADJUSTMENTS
q
w
q
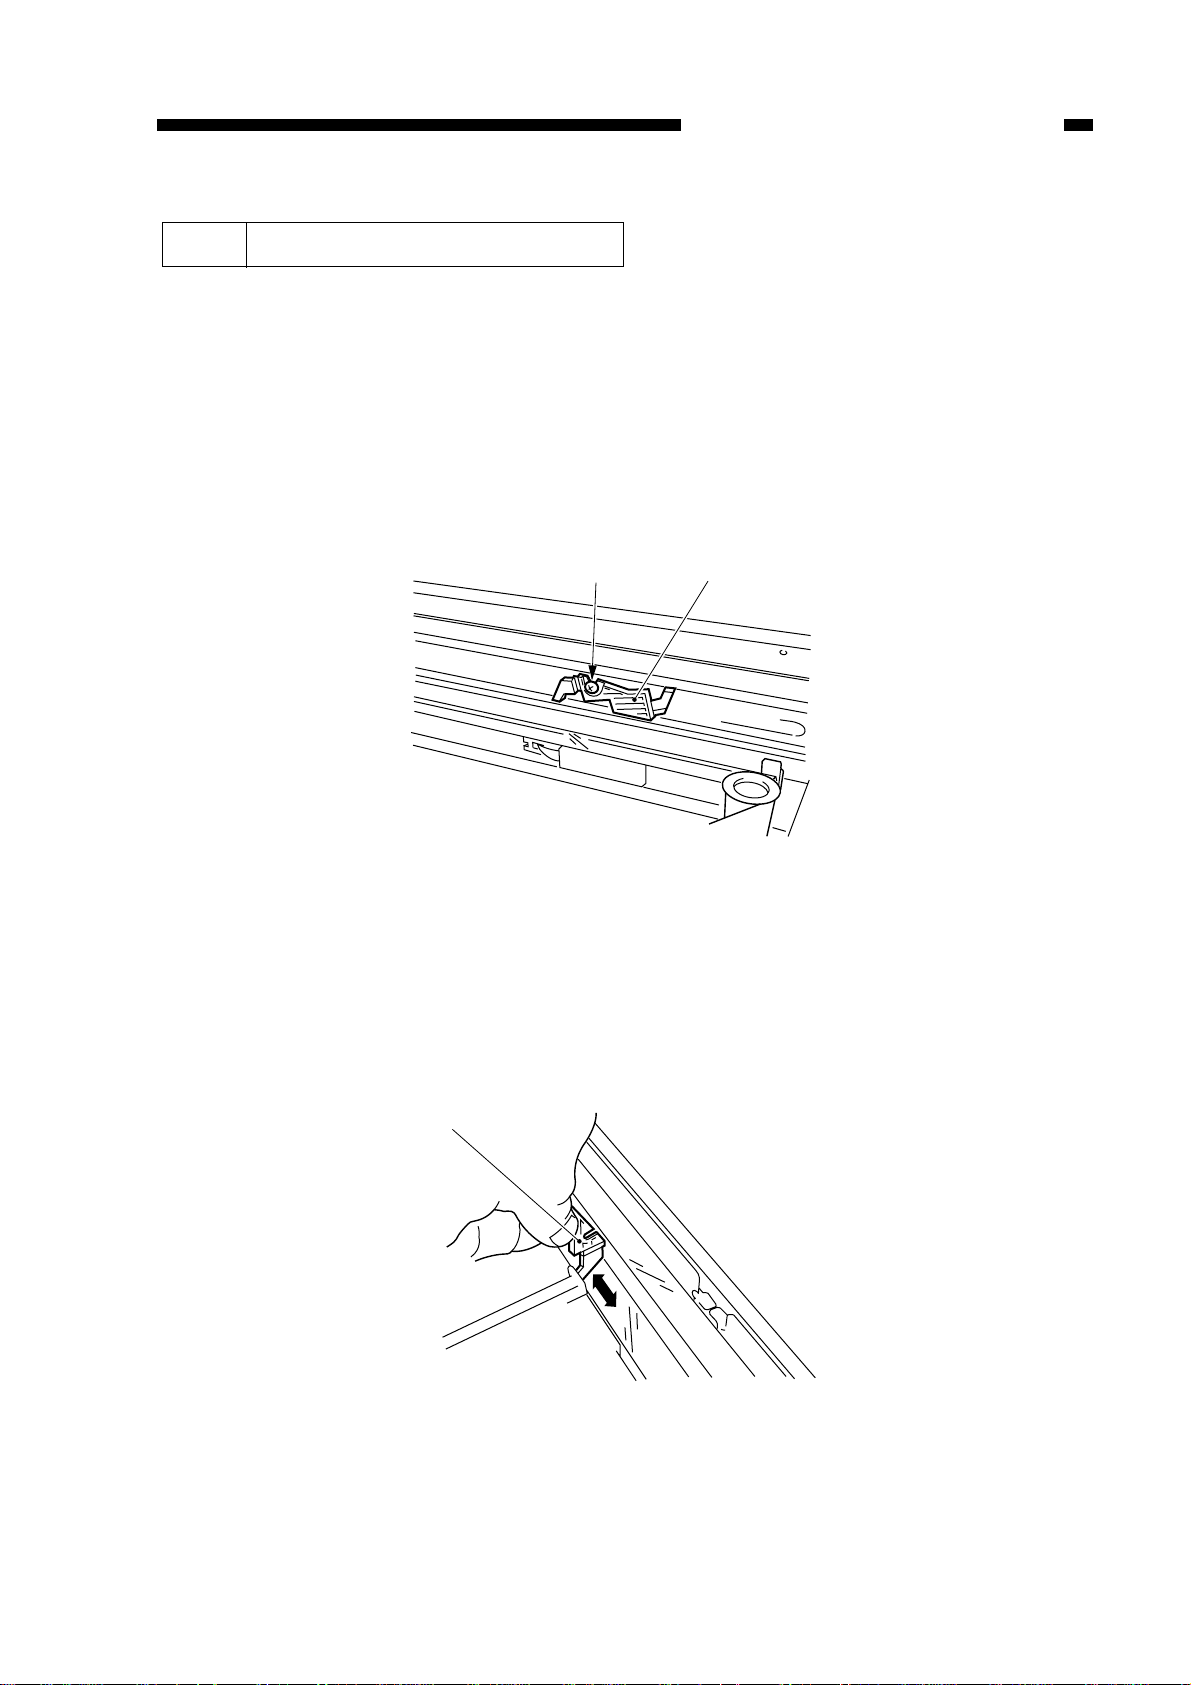
6 Cleaning the No.5/No.6 Mirror
a. Removing the Mirror Cleaning Tool
1) Remove the copyboard glass.
2) Remove the lens hood.
3) Remove the mirror guide plate.
4) Move the lens stage in enlargement direction.
5) Remove the screw q, and remove the mirror cleaning tool w.
Use the tool for cleaning the No.5/No.6 mirror.
Figure 2-22
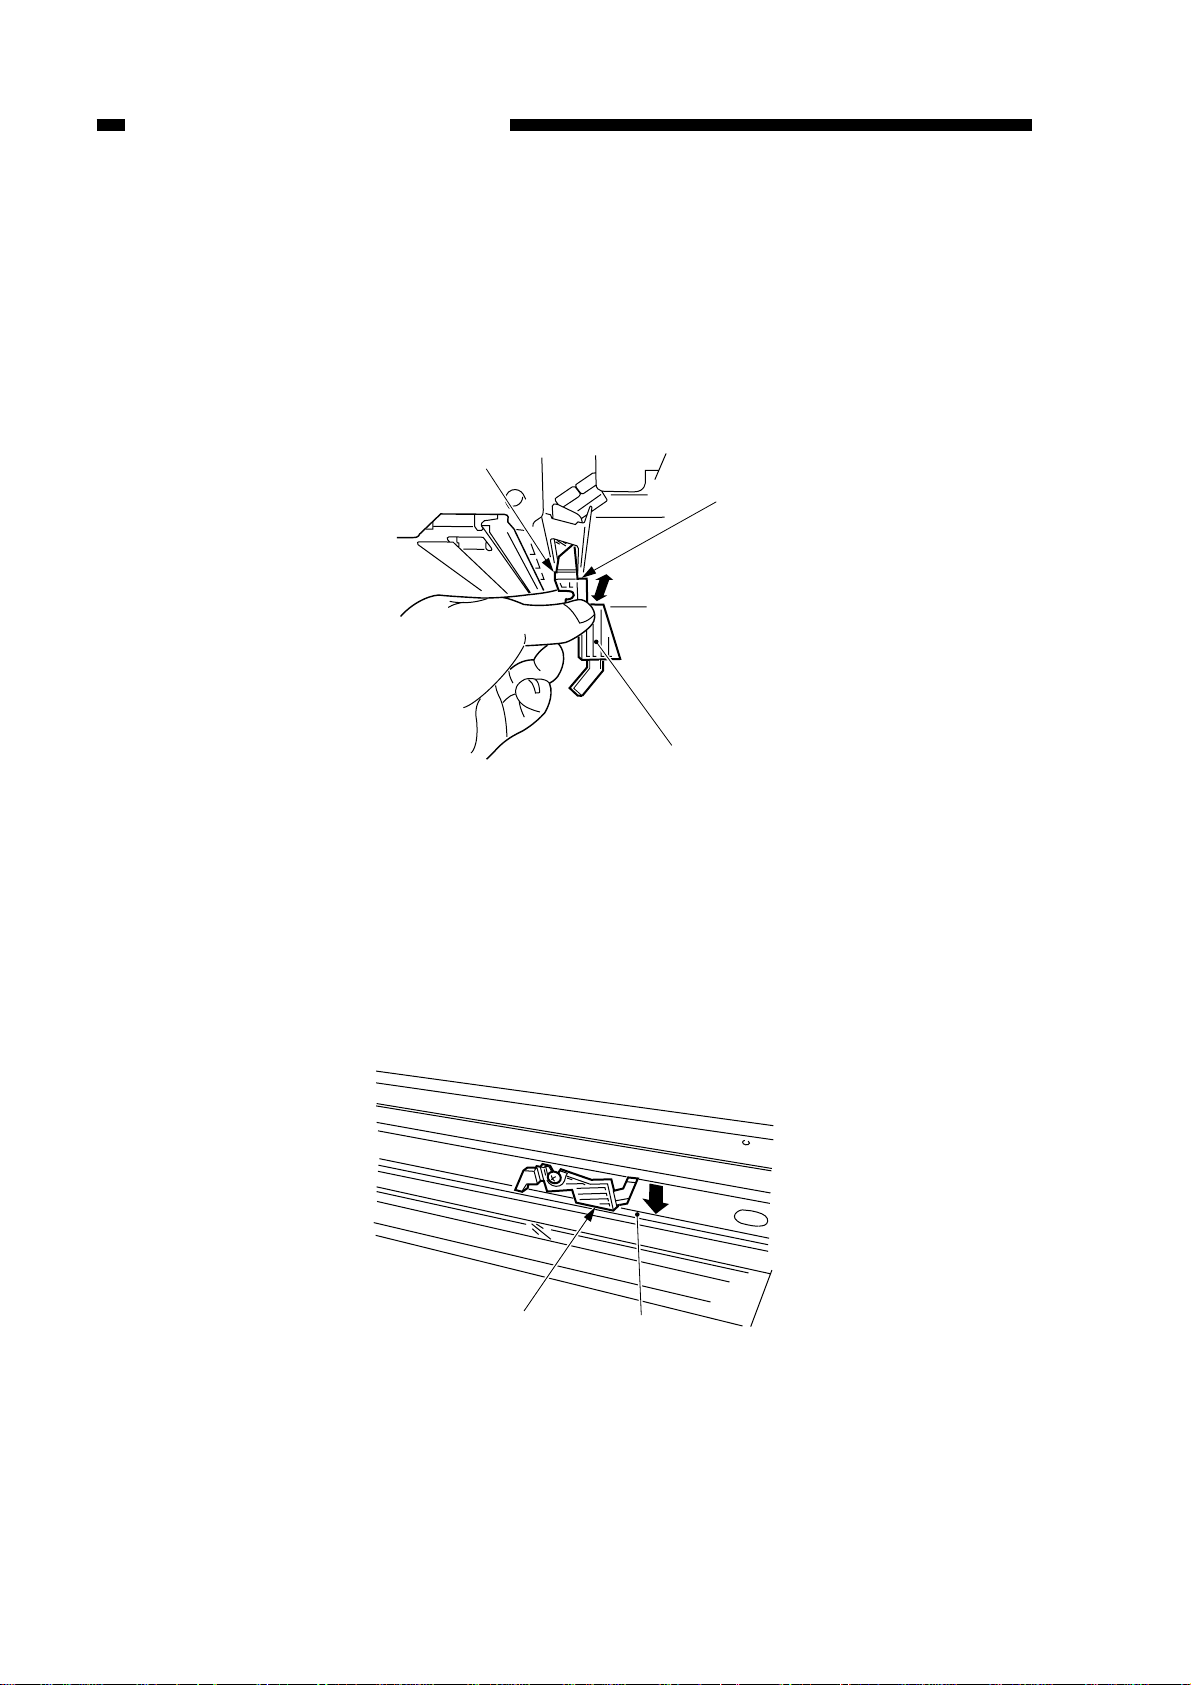
b. Cleaning the No.5 Mirror
1) Remove the mirror cleaning tool.
2) As shown, put the mirror cleaning tool q against the No.5 mirror, and move the tool
in the direction of the arrow to clean. (At this time, take care so that the cleaning tool
or your fingers will not touch the No.4 mirror.)
Figure 2-23
2-21
CHAPTER 2 STANDARDS AND ADJUSTMENTS
q
Side B
Side A
Side C
q
c. Cleaning the No.6 Mirror
1) Remove the mirror cleaning tool.
2) Open the front door, and remove the developing assembly and the drum unit.
3) Remove the dust-proofing glass.
4) While keeping the mirror cleaning tool q (sides A and B) against the lens mount,
move it in the direction of the arrow to clean.
Figure 2-24
d. Installing the Mirror Cleaning Tool
When installing the mirror cleaning tool to the right stay, butt the side C of the tool
against the right stay q and then fix it in place with a screw.
Thereafter, check to make sure that the cleaning tool and the No.1 mirror mount are
not interfering with each other.
Figure 2-25
2-22
 Loading...