Canon NP6045 Service Handbook

REVISION 1
COPYRIGHT © 1997 CANON INC. CANON NP6045 REV.1 MAR. 1997 PRINTED IN JAPAN (IMPRIME AU JAPON)
MAR. 1997
FY8-23AN-010

COPYRIGHT © 1997 CANON INC. CANON NP6045 REV.1 MAR. 1997 PRINTED IN JAPAN (IMPRIME AU JAPON)
COPYRIGHT © 1997 CANON INC.
Printed in Japan
Imprimé au Japon
Use of this manual should be strictly
supervised to avoid disclosure of confidential information.
IMPORTANT
THIS DOCUMENTATION IS PUBLISHED BY CANON INC., JAPAN, TO SERVE AS A SOURCE OF
REFERENCE FOR WORK IN THE FIELD.
SPECIFICATIONS AND OTHER INFORMATION CONTAINED HEREIN MAY VARY SLIGHTLY FROM
ACTUAL MACHINE VALUES OR THOSE FOUND IN ADVERTISING AND OTHER PRINTED
MATTER.
ANY QUESTIONS REGARDING INFORMATION CONTAINED HEREIN SHOULD BE DIRECTED TO
THE COPIER SERVICE DEPARTMENT OF THE SALES COMPANY.
THIS DOCUMENTATION IS INTENDED FOR ALL SALES AREAS, AND MAY CONTAIN
INFORMATION NOT APPLICABLE TO CERTAIN AREAS.
Prepared by
OFFICE IMAGING PRODUCTS TECHNICAL SUPPORT DEPT.1
OFFICE IMAGING PRODUCTS TECHNICAL SUPPORT DIV.
CANON INC.
30-2, Shimomaruko 3-chome, Ohta-ku, Tokyo 146 Japan

i
CONTENTS
CHAPTER 1 MAINTENANCE AND INSPECTION
A. Image Adjustment Basic
Procedure....................................1-1
B. Points to Note for
Scheduled Servicing ....................1-2
CHAPTER 2 STANDARDS AND ADJUSTMENTS
A. Image Adjustment ........................2-1
1. Adjusting the Leading Edge
Margin .....................................2-1
2. Adjusting the Leading Edge
Non-Image Width
(registration)............................2-1
3. Adjusting the Left/Right
Registration (paper deck and
cassette position)....................2-1
4. Adjusting the Left/Right
Registration (holding tray
position; 2nd side of
a two-sided/overlay copy) .......2-3
5. Adjusting the Left/Right
Margin .....................................2-4
6. AE Auto Adjustment................2-4
7. Adjusting the AE Slope...........2-5
B. Exposure System.........................2-6
1. Adjusting the Scanner Home
Position ...................................2-6
2. Routing the Scanner Drive
Cable.......................................2-7
3. Adjusting the Tension of
the Scanner Cable ..................2-8
4.
Adjusting the Mirror Position
.....2-8
5. Cleaning the Mirror
(No. 5 mirror)...........................2-9
6.
Installing the Light-Blocking Belts
...2-9
7. Installing the Lens X Direction
Drive Belt...............................2-10
C.
Image Formation System
.............2-11
1. Routing the Grid for the Primary
Charging Assembly...............2-11
2. Adjusting the Height of
the Charging Wire.................2-13
3. Adjusting the Blank Exposure
Lamp .....................................2-14
4.
Position of the Roller Electrode
..2-15
5. Position of the Side Seal in
the Cleaning Assembly .........2-15
6. Cleaning the Cleaner Side
Scraper..................................2-15
D. Pick-Up/Feeding System............2-17
1. Orientation of the Pick-Up Roller
(cassette/deck)......................2-17
2. Orientation of the Separation
Roller (cassette/deck) ...........2-18
3. Orientation of the Feeding Roller
(cassette/deck)......................2-18
4. Orientation of the Pick-Up Roller
(multifeeder)..........................2-19
5. Orientation of the Feeding Roller
(multifeeder)..........................2-20
6. Adjusting the Pressure of the
Separation Roller
(cassette/deck)......................2-20
7. Adjusting the Pressure of the
Separation Roller
(holding tray).........................2-21
8. Adjusting the Pressure of the
Pick-Up/Feeding Roller
(multifeeder)..........................2-21
9. Positioning the Pick-Up
Roller Releasing Solenoid
(cassette) ..............................2-22
10.Adjusting the Position of the
Pick-Up Roller Releasing
Solenoid (deck).....................2-22
11.Adjusting the Pick-Up Roller
Releasing Solenoid
(multifeeder)..........................2-23
12.Routing the Timing Belt for the
Multifeeder Assembly
Side Guide ............................2-23
1
2
3
4
5

13.Adjusting the Position of the
]4]).................2-49
CHAPTER 4 SERVICE MODE
A. Outline..........................................4-1
B. Using Service Mode.....................4-1
C. Using Adjustment Mode and Option
Settings Mode ..............................4-2
D. Control Display Mode
( ) ........................................4-3
E. I/O Display Mode ( ) ........4-14
F. Adjustment Mode ( )........4-50
G. Function Mode ( )............4-58
H. Options Mode ( )..............4-63
I. Counter Mode ( ).............4-70
]
6
]
]
5
]
]
4
]
]
3
]
]
2
]
]
1
]
A. Sensors........................................3-2
B. Switches and Solenoids...............3-6
C. Motors and Fans........................3-10
D. Clutches.....................................3-12
E. Lamps, Heaters, and
Photosensors .............................3-14
F. PCBs..........................................3-16
G. Variable Resistors, Light-
Emitting Diodes, and Check
Pins by PCB...............................3-18
1. DC Controls PCB..................3-18
2. AC Driver PCB......................3-21
3. DC Power Supply PCB.........3-21
4. Control CPU PCB .................3-22
5. Holding Tray Driver PCB.......3-23
6. Potential Measurement PCB.3-24
7. HVT1 PCB.............................3-25
8. HVT2 PCB.............................3-26
9. Inverter PCB..........................3-26
10.Lamp Regulator PCB............3-27
11.Counter PCB.........................3-27
Delivery Paper Deflecting Drive
Solenoid ................................2-24
14.Adjusting the Position of the
Holding Tray Paper Deflecting
Plate Drive Solenoid .............2-24
15.Installing the Holding Tray
Assembly Side Guide
Assembly...............................2-25
16.Installing the Holding Tray Paper
Jogging Guide Assembly ......2-25
17.Installing the Timing Belt for the
Holding Tray Assembly Paper
Jogging Guide Plate..............2-26
18.Adjusting the Position of the
Holding Tray Paper Jogging
Solenoid ................................2-26
19.Installing the Drive Belt .........2-27
E. Fixing System.............................2-28
1. Points to Note When Handling
the Fixing Heater...................2-28
2. Position of the Fixing Assembly
Paper Guide..........................2-28
3. Adjusting the Pressure of the
Lower Roller (nip)..................2-29
4. Adjusting the Fixing Clutch ...2-30
F. Electrical System........................2-31
1. When Replacing the DC
Controller PCB......................2-31
2. Checking the Surface Potential
Control System......................2-31
3. Checking the Potential Control
System ..................................2-35
4. Potential Control System
Conversion Table ..................2-37
5. Checking the Environment
Sensor...................................2-42
6.
Checking the Photointerrupters
....2-42
7. Registering the Cassette/
Multifeeder Paper Width
Basic Value (
CHAPTER 3 ARRANGEMENT AND FUNCTIONS OF THE ELECTRICAL PARTS
ii

CHAPTER 5 SELF DIAGNOSIS
A. Copier...........................................5-1
B. RDF Self Diagnosis ......................5-6
APPENDIX
A. GENERAL TIMING CHART.........A-1
B.
SIGNALS AND ABBREVIATIONS
C. GENERAL CIRCUIT DIAGRAM ..A-5
D. RDF-H1 GENERAL CIRCUIT
DIAGRAM....................................A-7
....A-2
C. Sorter Self Diagnosis ...................5-7
E. SPECIFICATIONS.......................A-9
1. Type........................................A-9
2. System....................................A-9
3. Performance .........................A-10
4. Others...................................A-13
iii

iv
1-1
1
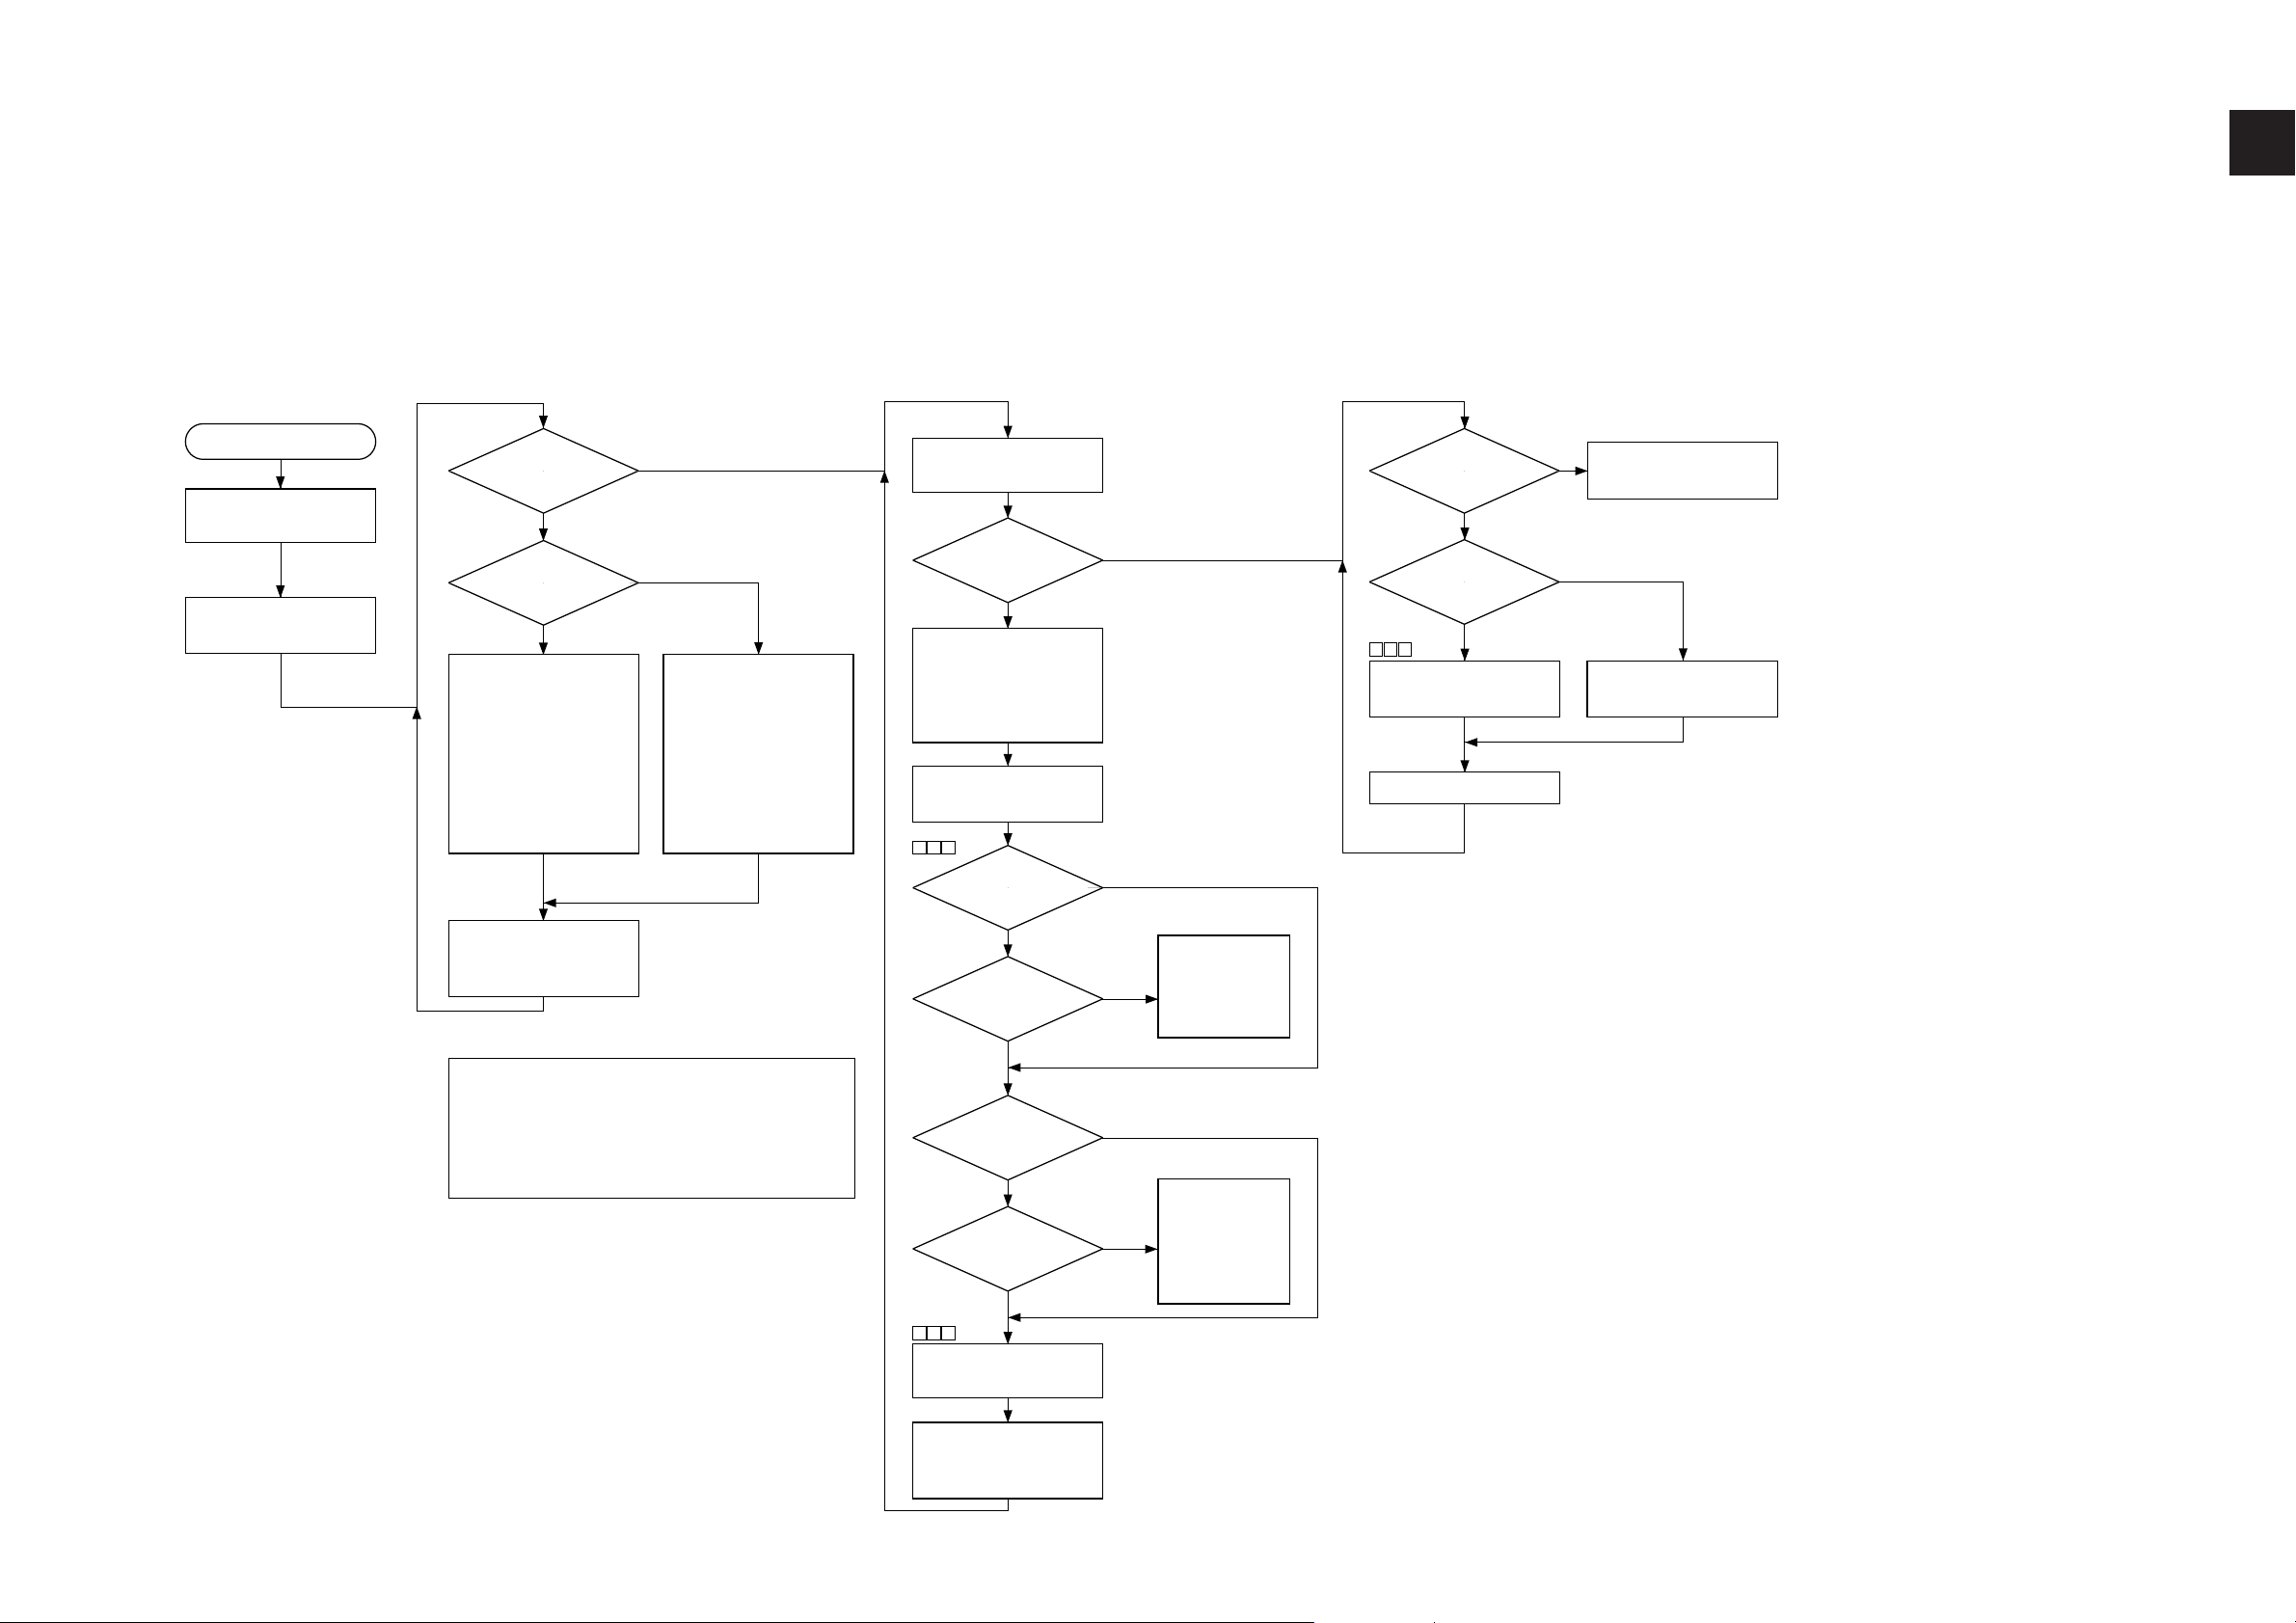
CHAPTER 1 MAINTENANCE AND INSPECTION
A. Image Adjustment Basic Procedure
Make adjustments in non-AE and at copy density 5.
Is there a difference
in density between
front and rear?
Is it lighter
at the rear?
Make two to three copies
of the Test Sheet.
Check the height of the
charging wire.
Turn OFF and then ON
the power switch, and
make a copy.
If the difference still exists after turning either
screw 1.5 mm (a full turn results in a change
of 0.7 mm), check the charging assembly and
the scanning lamp/scanner for dirt.
When turning it counterclockwise, be sure
that the height of the wire is not less than 7.5
mm.
Check the copy paper
and the transfer system.
Is the density
of gray scale No. 1
too light?
Clean the standard white plate,
mirror, lens, dust-proofing
glass, scanning lamp, and
reflecting plate/heat absorbing
glass.
Turn OFF and then ON the
power switch, and make a copy.
Is VDM VDT
±10 V?
Is PLMT '1'?
Is VL1M VL1T
±10 V?
Is LLMT '1'?
Check the potential
control system; if
normal, replace the
photosensitive
drum.
Check the scanning
lamp and the potential
control system; if
normal, replace the
photosensitive drum.
Increase the value of
VDT-SW.
Turn OFF and ON the
power switch, and
make a copy.
Increase the value of
LIGHT_5.
Decrease the value of
LIGHT_5.
Is the density of
gray scale No. 10
optimum?
Is the density of
gray scale No. 10
too dark?
Perform AE adjustment.
(Refer to P. 2-4)
Making Pre-Checks
Adjusting the Density Slope
Adjusting the Solid Black Density
YES
NO
YES
NO
YES
NO
YES
NO
YES
NO
YES
NO
YES
NO
YES
NO
NO
YES
✽
5
✽
✽ 1 ✽
✽3✽
Clean the charging wire.
Make a copy.
Note 1:
Note 2:
Turn the adjusting screw
at the rear of the primary
charging assembly
clockwise and the
adjusting screw at the
front counterclockwise
for the same degree.
(1.5 mm max. on either
screw)
Turn the adjusting screw
at the rear of the primary
charging assembly
counterclockwise and
the adjusting screw at
the front clockwise for
the same degree. (1.5
mm max. on either
screw)
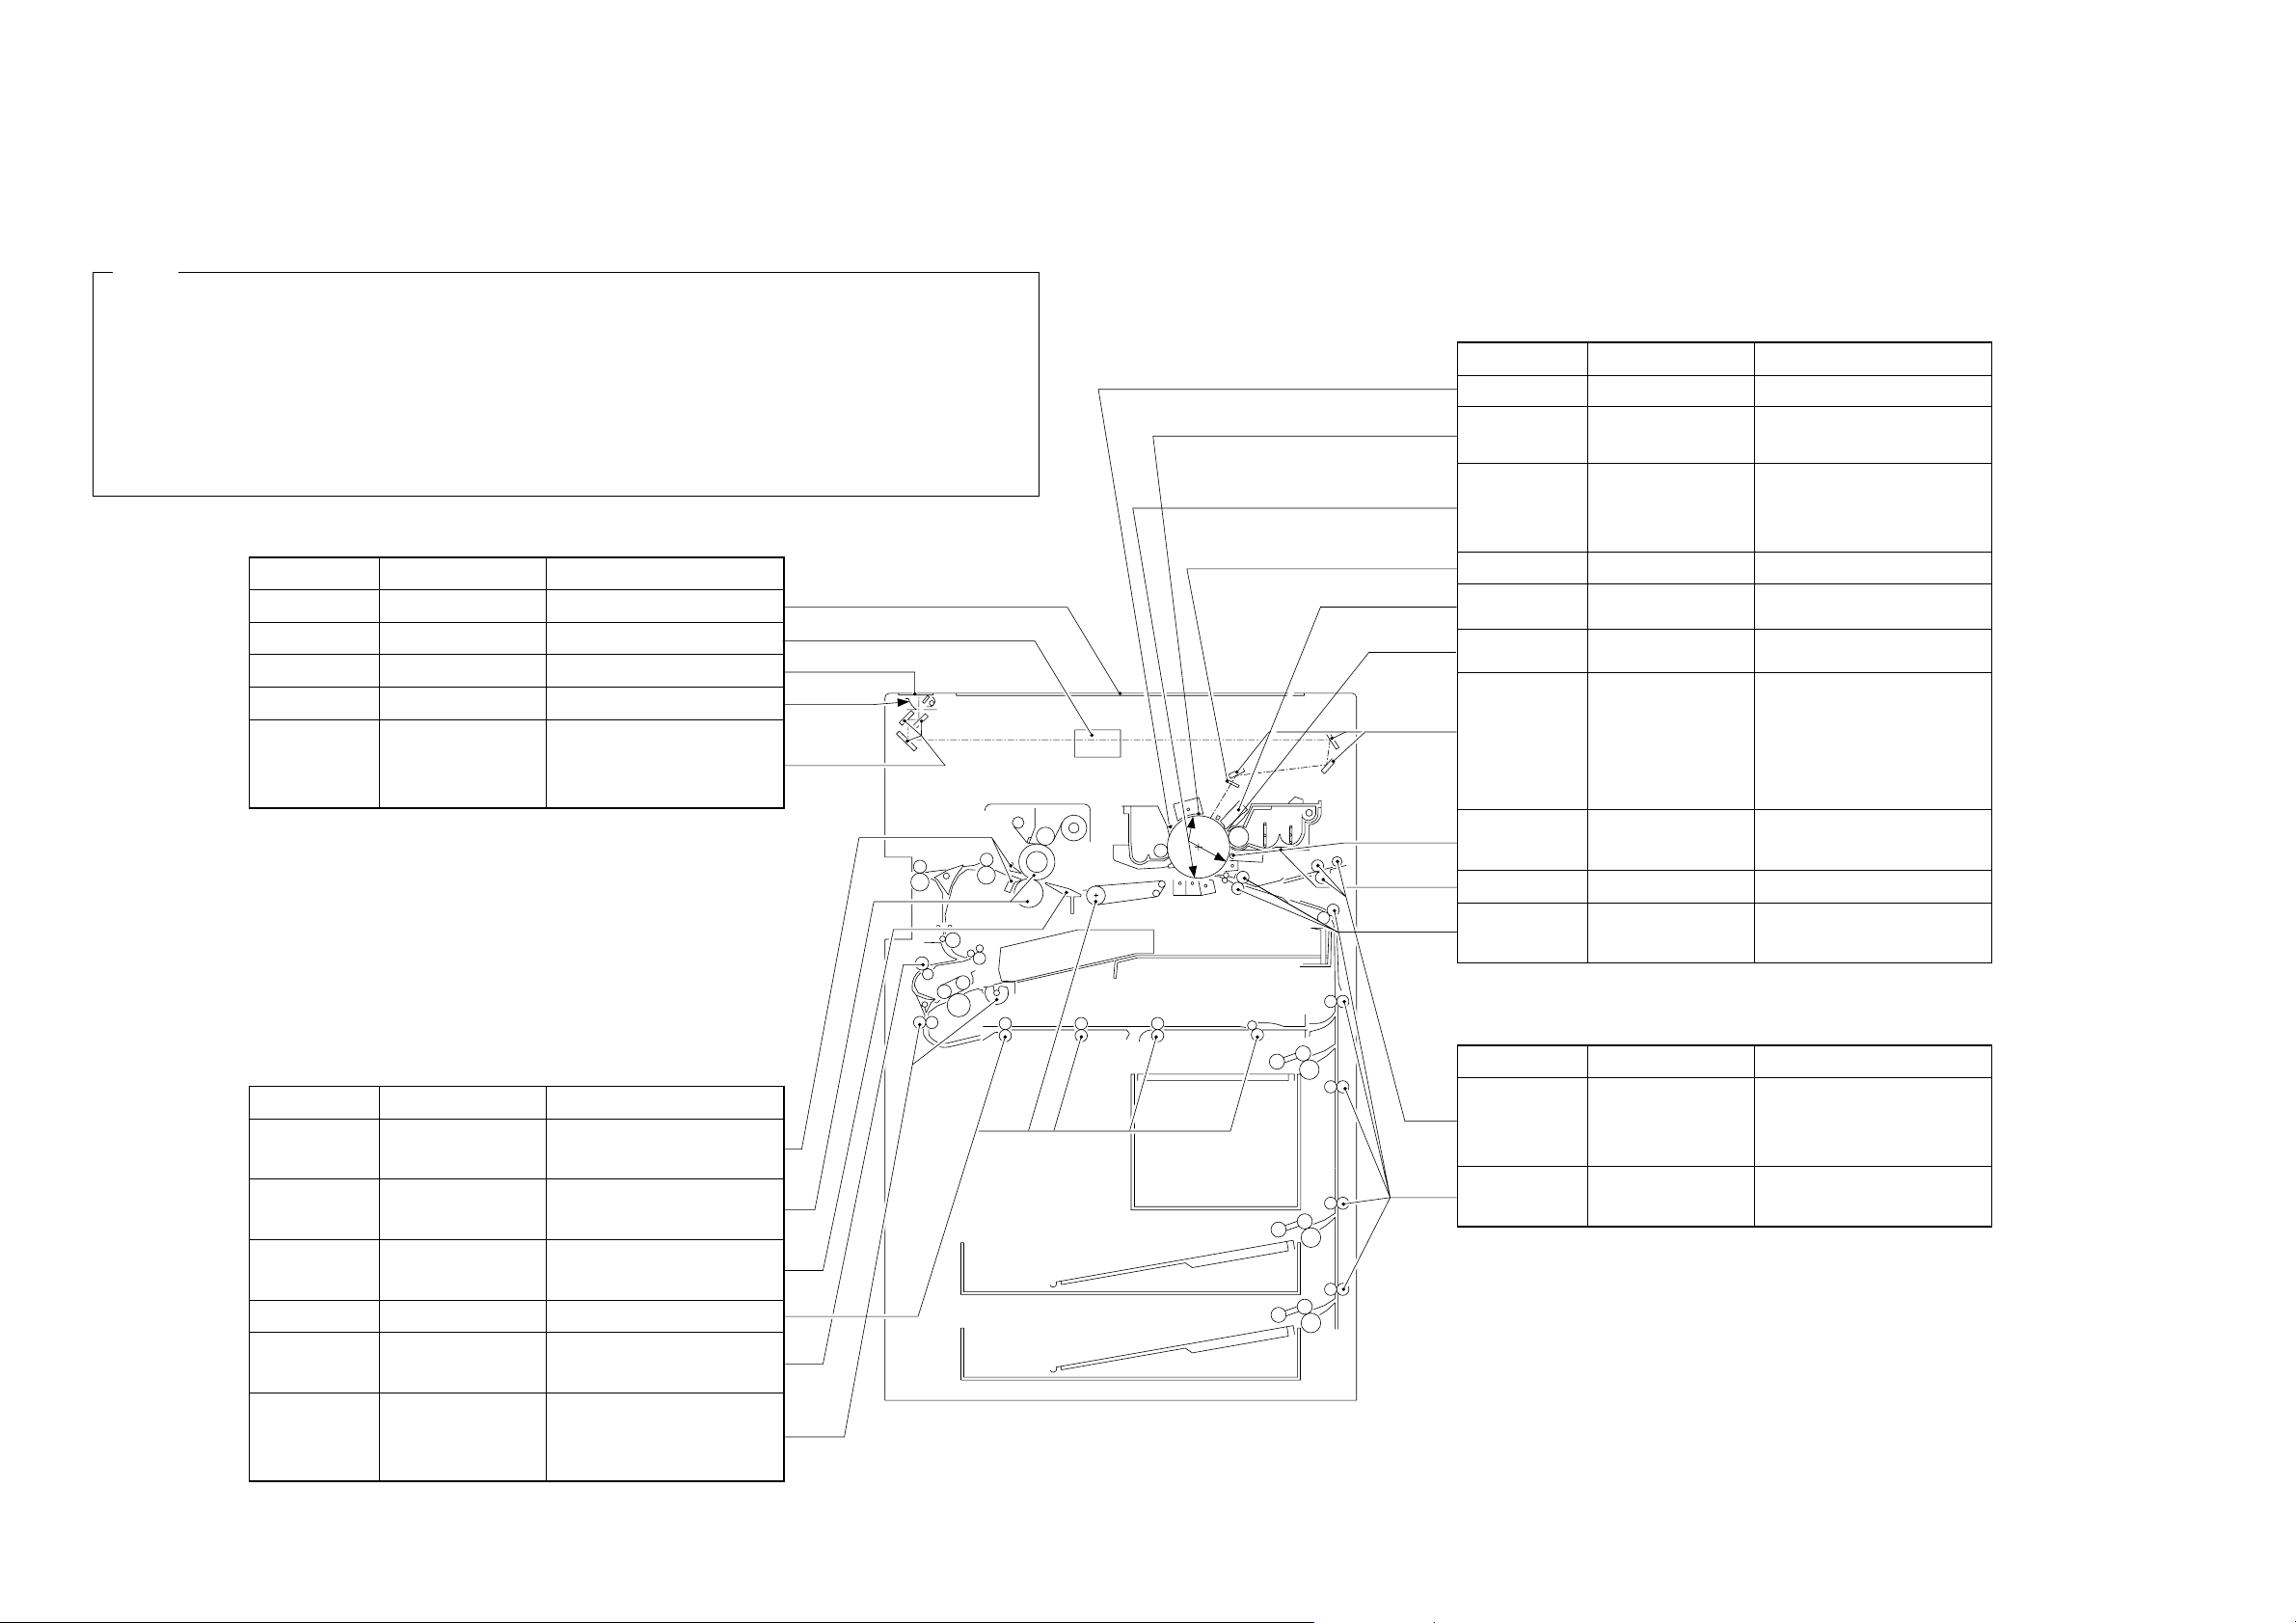
B. Points to Note for Scheduled Servicing
Cleaning
Part Tool/solvent
Work/remarks
Manual feed tray,
Pick-up roller,
Feeding roller
Vertical path roller
Alcohol and lint-free
paper
Alcohol and lint-free
paper
Cleaning
Cleaning
Part Tool/solvent
Work/remarks
Pre-exposure lamp
Primary charging
assembly,
Transfer/separation
assembly, Pretransfer assembly
Primary charging
anti-stray sheet
Dust-proofing glass
Blank exposure
lamp
No. 4 mirror to
No. 6 mirror
Roller electrode
Developing assembly base
Registration roller
Moist cloth (Note 1)
Alcohol and lint-free
paper
Lint-free paper
Blower brush or lintfree paper
Alcohol and lint-free
paper
Cleaning
Cleaning
Dry wiping; then, cleaning
with lint-fee paper moistened
with alcohol
Cleaning
Cleaning
Cleaning with a blower brush;
cleaning with lint-free paper if
dirt is excessive; use the mirror
cleaning tool for the No. 5
mirror
Disposing of the toner collecting
on the roller electrode
Cleaning
Cleaning
Note: Do not leave any droplets of water.
Copyboard glass
Part Tool/solvent
Work/remarks
Cleaning
Alcohol
Lens
Standard white plate
Reflecting plate
Blower brush
Lint-free paper
Blower brush
Cleaning
Dry wiping, cleaning
Cleaning
No. 1 mirror through
No. 3 mirror
Blower brush or lint-
free paper
Cleaning with a blower brush;
using lint-free paper if dirt is
excessive
Part Tool/solvent
Work/remarks
Separation claw
Upper roller,
Lower roller
Feeding assembly
Re-pick up assembly,
Reversing roller
Re-pick up assembly,
Pick-up roller,
Registration roller
Solvent and lint-free
paper
Cleaning oil and lint-
free paper
Moist cloth (Note 1)
Alcohol and lint-free
paper
Paper guide
Solvent and lint-free
paper
Alcohol and lint-free
paper
Cleaning
Cleaning
Cleaning
Cleaning
Cleaning
Cleaning
Developing antistray sheet
Note:
• Make thorough checks to be sure that the block (front, rear) is free of melting, thermal deformation,
cracking, and yellowing because of leakage. If an abnormal condition is noted, replace it with a new
part without delay.
• Inspect and clean both outside and inside of the block (front, rear).
• Do NOT use a cloth coated with metal powder.
• Do NOT use a moist cloth. Dry wipe with lint-free paper, and use alcohol. Make sure that the part is
completely dry before installing it.
• Be sure to complete scheduled servicing and replacement within a specific period of time.
1-2
CHAPTER 2 STANDARDS AND ADJUSTMENTS
A. Image Adjustment
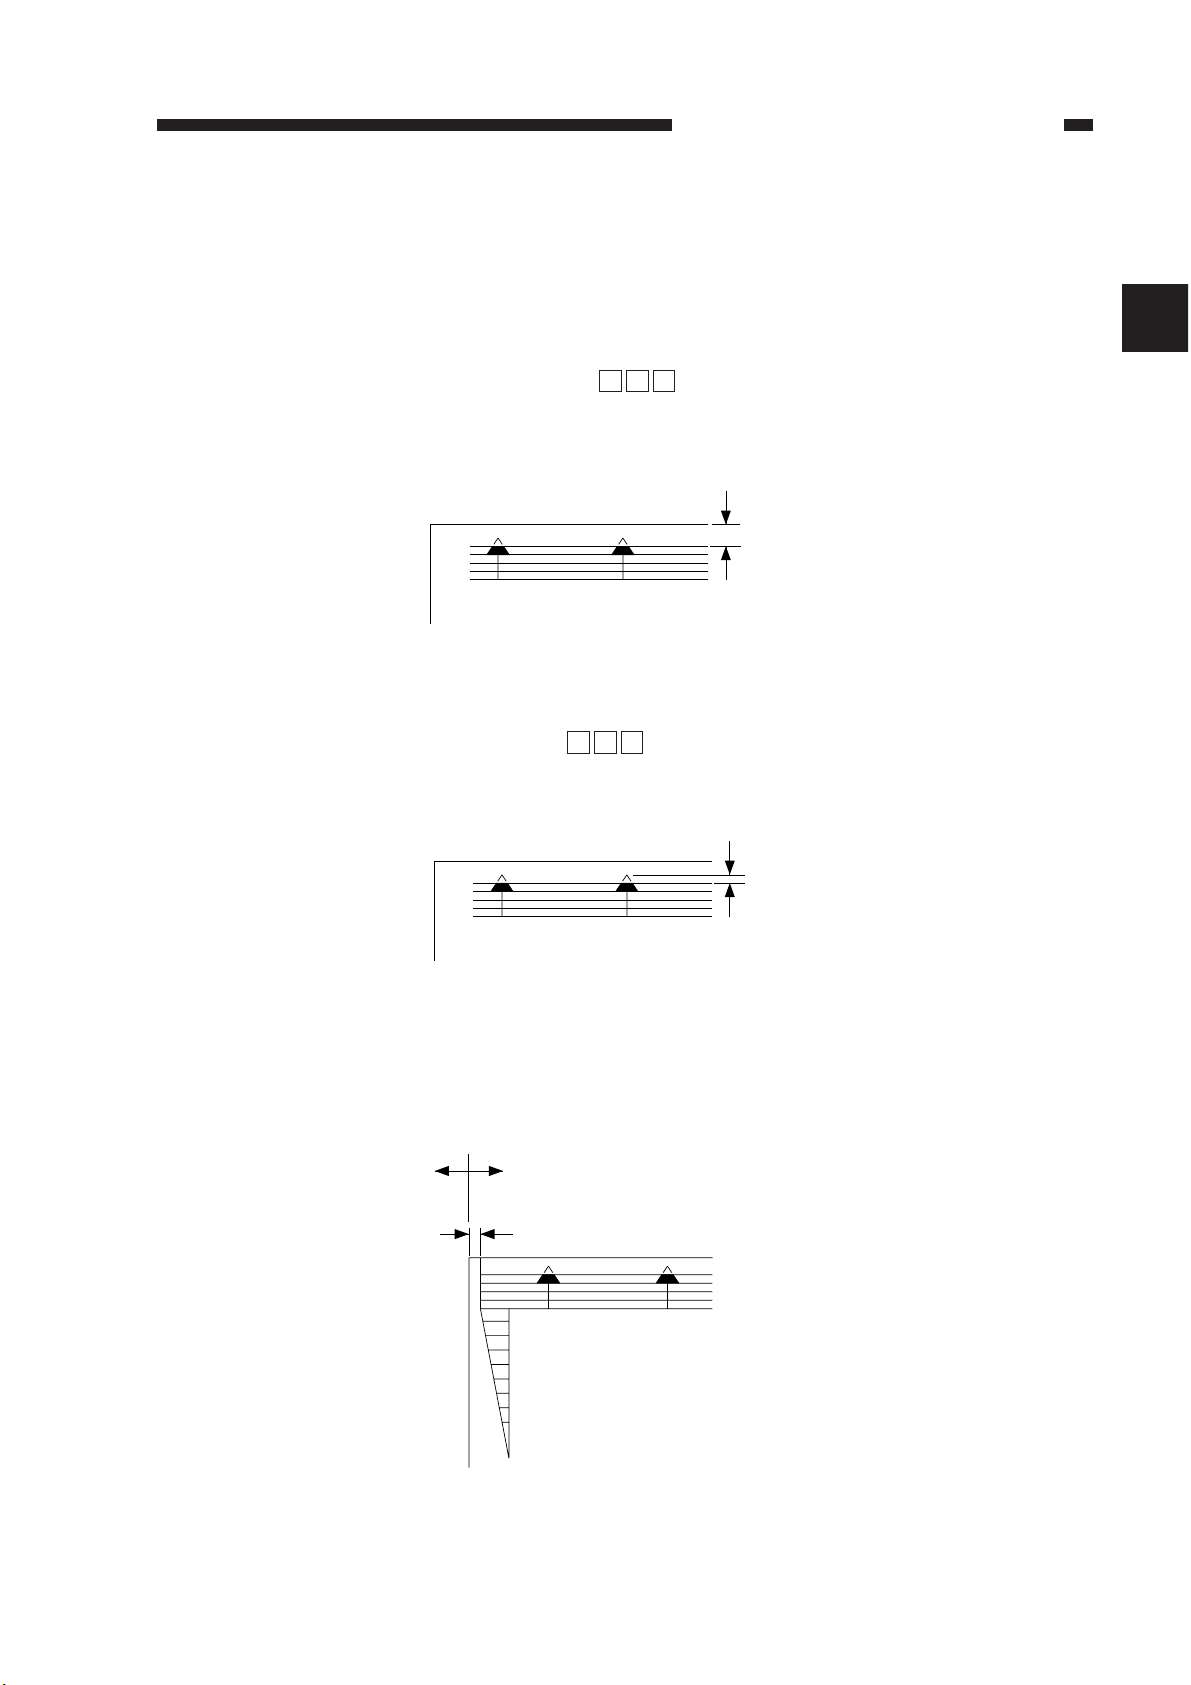
1. Adjusting the Leading Edge Margin
Select ‘LE_BLANK’ in service mode ( ).
Make adjustments so that the leading edge non-image width is 4.5±1.5 mm when the
Test Sheet is copied in Direct.
(unit: 0.1 mm)
Figure 2-1
2. Adjusting the Leading Edge Non-Image Width (registration)
Select ‘REGIST’ in service mode ( ).
Make adjustments so that the leading edge margin is 4.5±1.5 mm when the Test
Sheet is copied.
(unit: REGIST:0.1mm)
Figure 2-2
3. Adjusting the Left/Right Registration (paper deck and cassette position)
Make adjustments by moving the horizontal adjusting plate of the paper deck and
each cassette so that the distance between the edge of the copy image and that of the
copy paper is 0 ±1.5 mm when the Test Sheet is copied.
Figure 2-3
0±1.5mm
0
2
4
6
8
10
(+)(-)
4.5±1.5mm
]
3
]
]
3
]
CHAPTER 2 STANDARDS AND ADJUSTMENTS
2-1
2
4.5±1.5mm
Adjusting plate
Screw
Adjusting plate
Screw
CHAPTER 2 STANDARDS AND ADJUSTMENTS
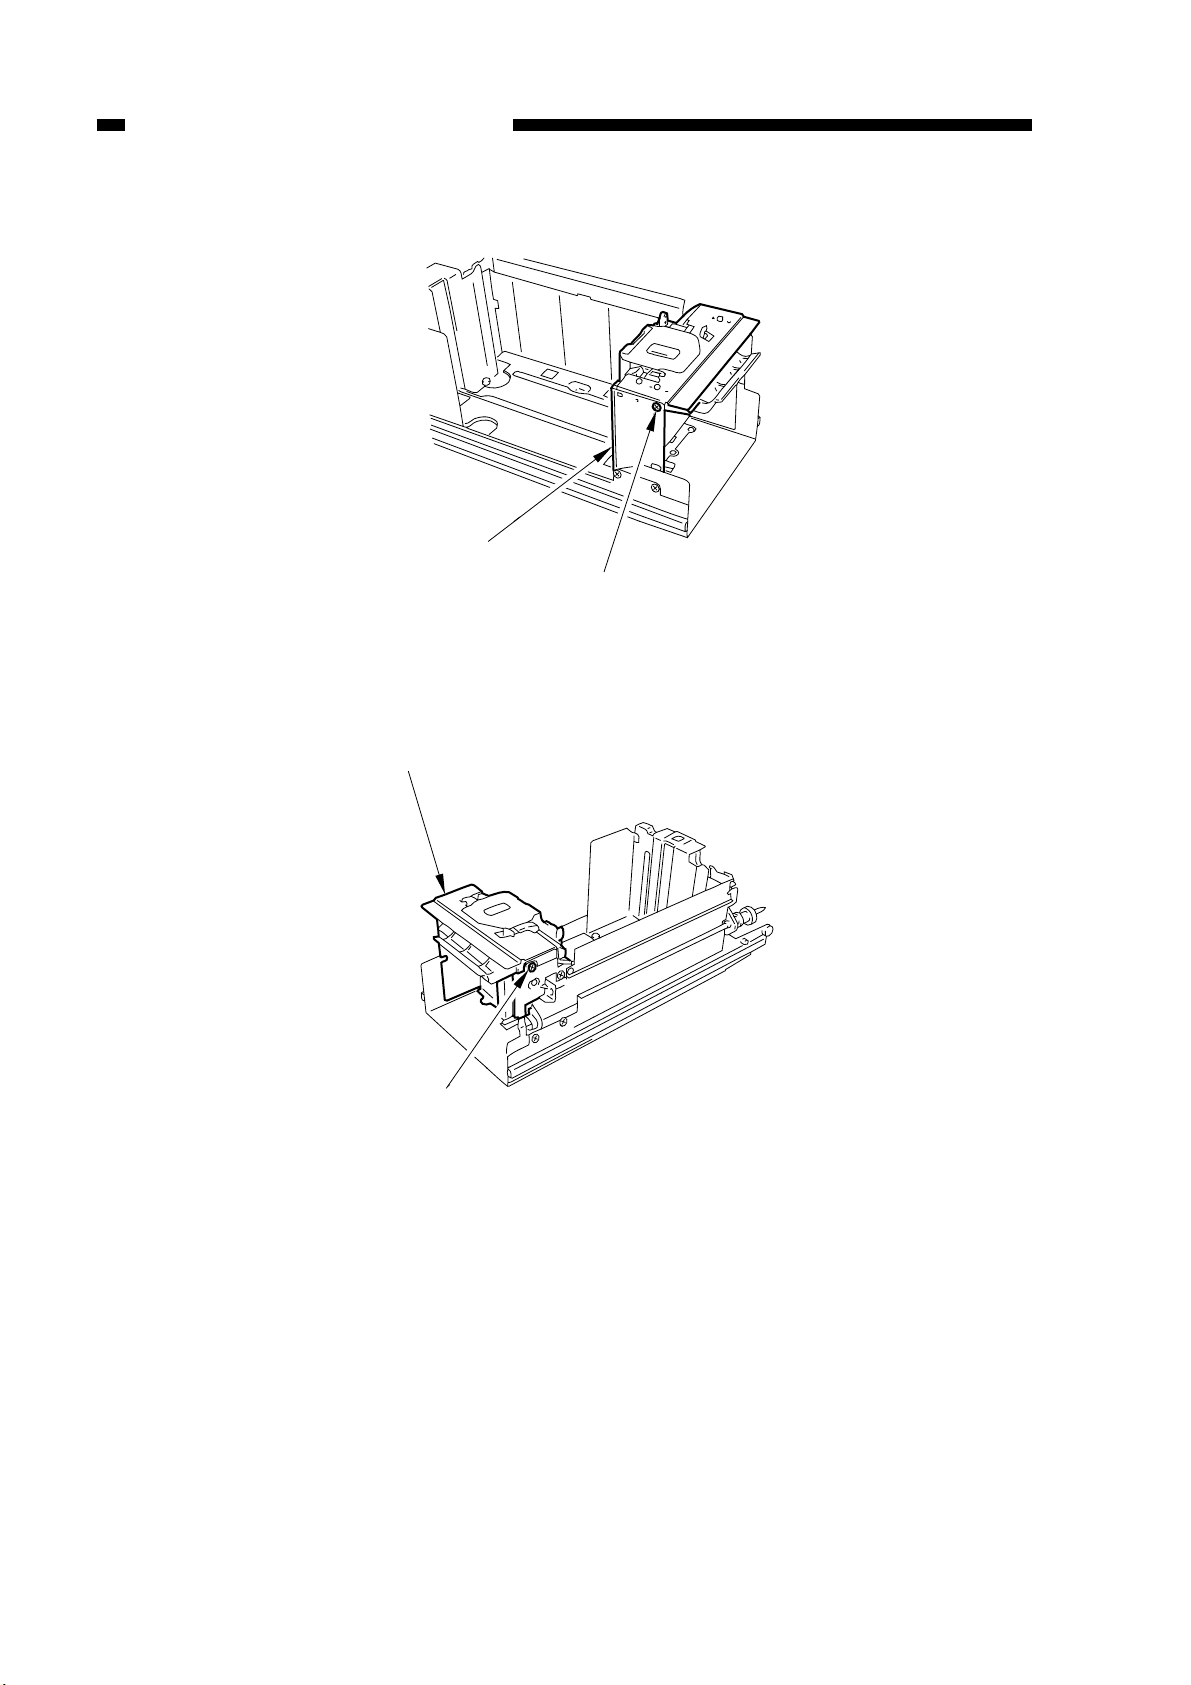
a. Paper Deck
Figure 2-4a
2-2
Figure 2-4b
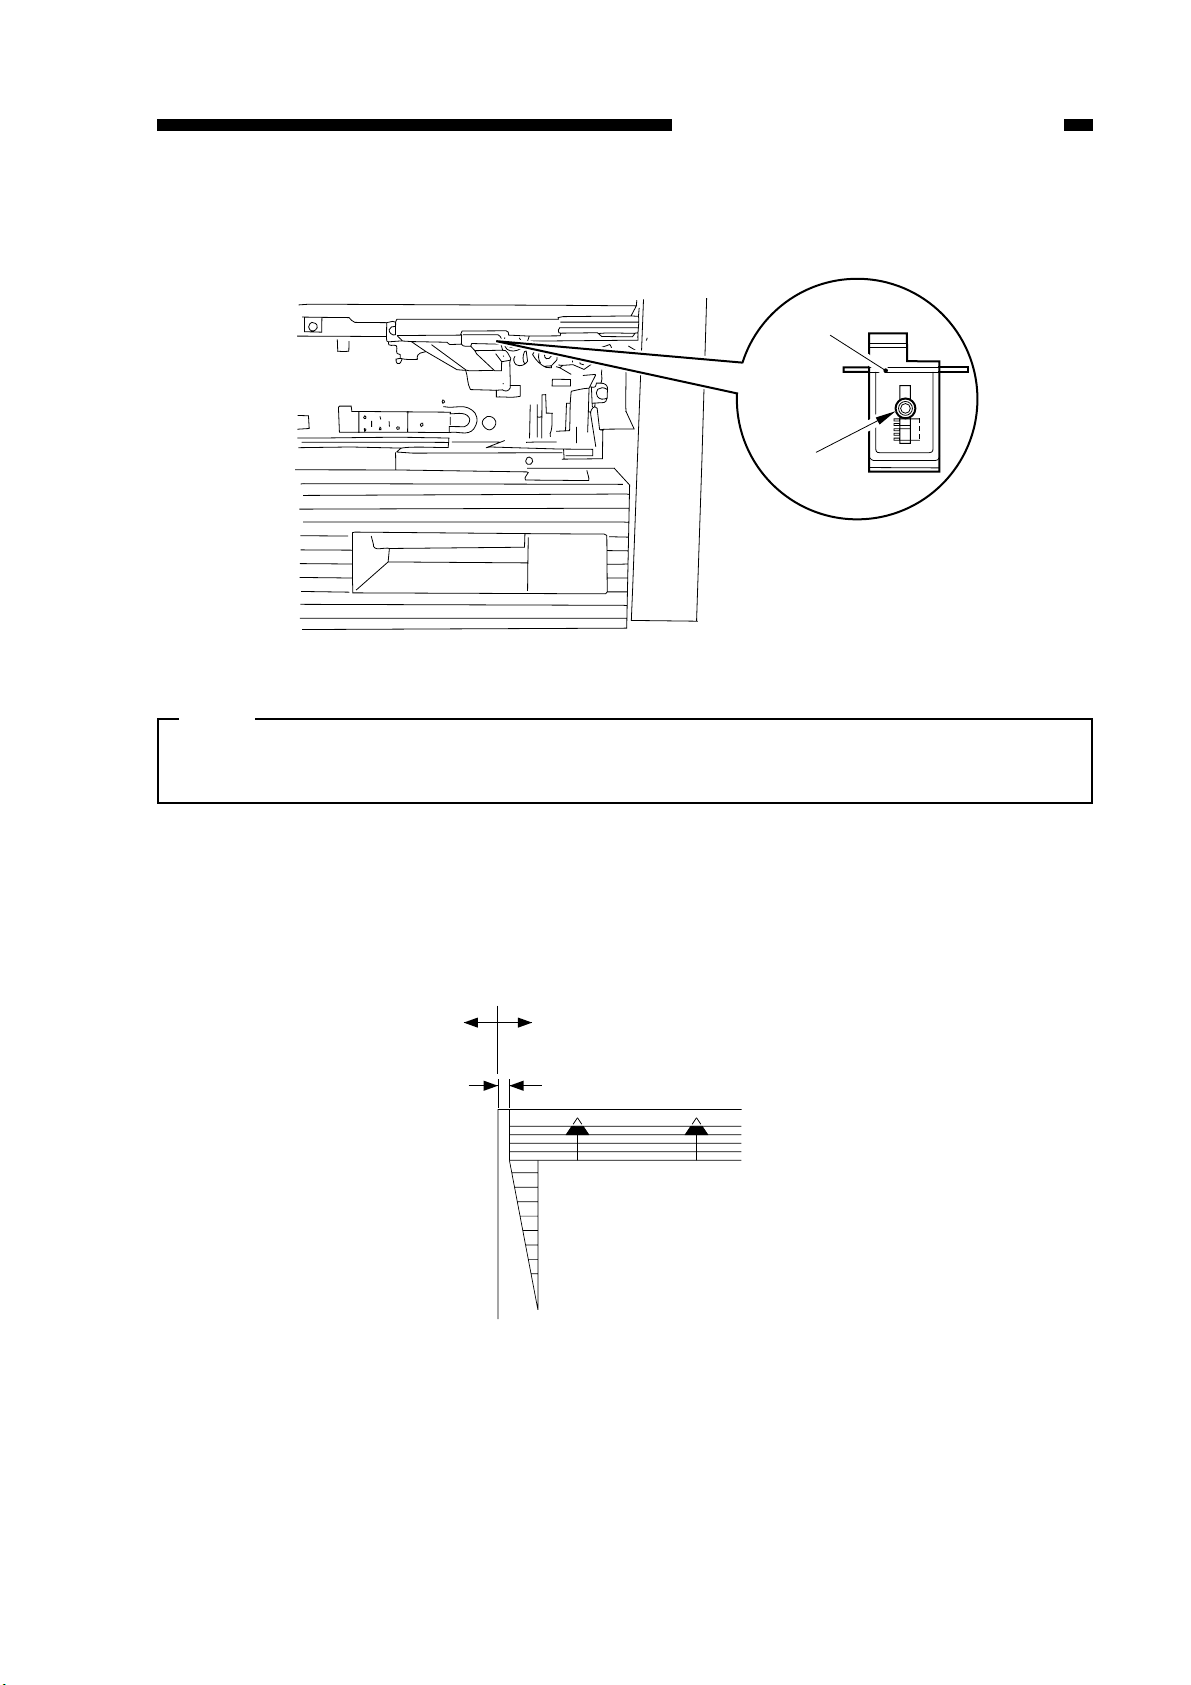
b. Cassette
0±2.0mm
0
2
4
6
8
10
(+)(-)
Screw
Adjusting
Plate
CHAPTER 2 STANDARDS AND ADJUSTMENTS
Figure 2-5
Note:
If you have adjusted the front/rear registration for the cassette, you will have to
register the paper width basic value. (p. 2-49)
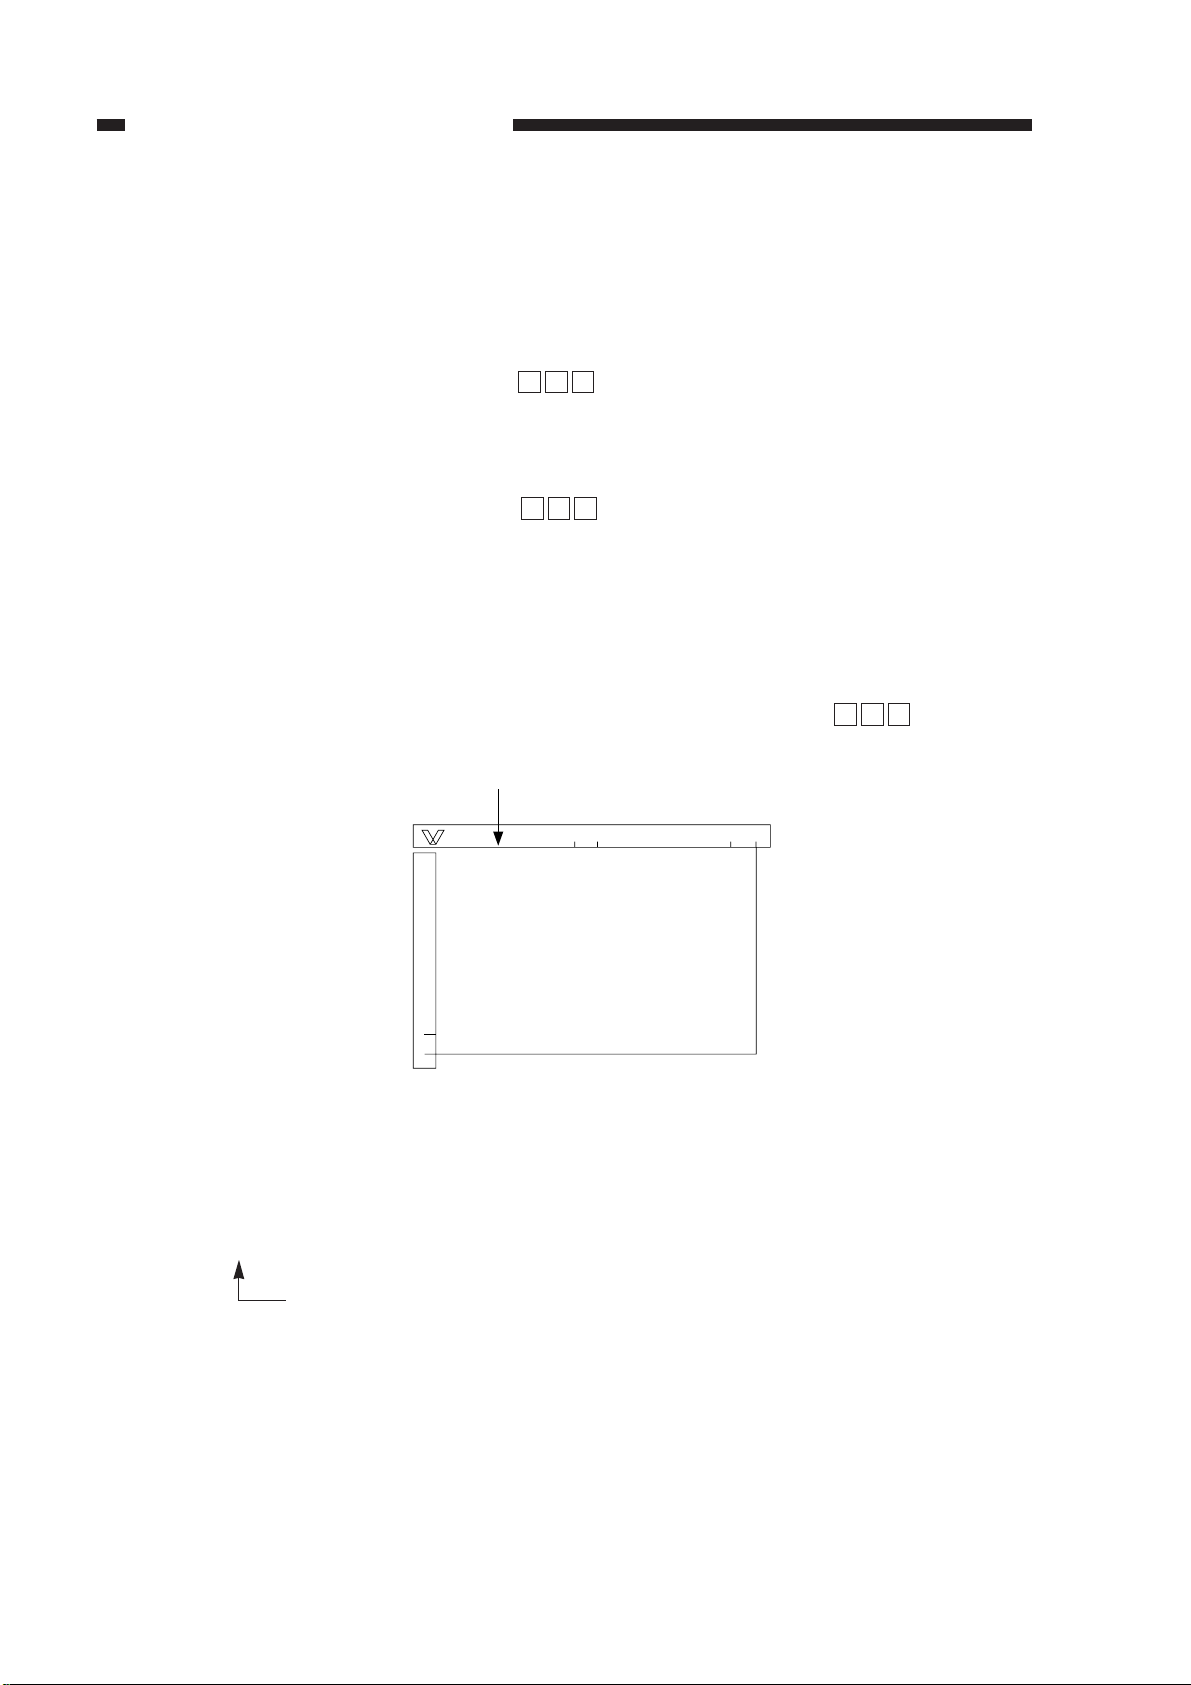
4. Adjusting the Left/Right Registration (holding tray position; 2nd side of a twosided/overlay copy)
Loosen the two screws, and move the position of the guide plate of the holding tray
assembly so that the distance between the edge of the copy image and that of the copy
paper is 0 ±2.0 mm in Direct mode.
Figure 2-6
2-3
← (]: START) (0: F5, 1: F9) in service mode ( ).
4) Place the Test Sheet on the copyboard, and close the copyboard cover.
Figure 2-7
5) Press the
]
user mode key once.
The scanning lamp will turn ON, and auto adjustment will be executed.
AE_ADJ : 1 ← (]:START)
Changes to ‘1’.
NA-3
Test Sheet
Butted.
]
4
]
]
3
]
]
3
]
CHAPTER 2 STANDARDS AND ADJUSTMENTS
2-4
5. Adjusting the Left/Right Margin
Make adjustments so that the image left/right margin is 2.75 ±2.5 mm when the Test
Sheet is copied in Direct mode.
You must have adjusted the “left/right registration” before making this adjustment.
a. Front Margin Adjustment (left margin)
Select ‘F-BLANK’ in service mode ( ), and change the setting.
Increasing the setting increases the front margin.
(unit: 0.1 mm)
b. Rear Margin (right margin)
Select ‘R-BLANK’ in service mode ( ), and change the setting.
Increasing the setting increases the rear margin.
(unit: 0.1 mm)
6. AE Auto Adjustment
1) Open the front door, and insert the door switch actuator into the door switch
assembly.
2) Push the service mode switch with a clip or the like over the cover.
3) Select AE_ADJ: 0

q If the setting was decreased in adjustment mode, the copy of a newspaper will be
lighter.
w If the setting was increased in adjustment mode, the copy of a newspaper will be
darker.
Note:
You can make copies by pressing the Copy Start key.
6) Press the Reset key twice to end service mode.
]
3
]
CHAPTER 2 STANDARDS AND ADJUSTMENTS
2-5
6) Place a newspaper on the copyboard, and close the copyboard cover.
7) Press the
user mode key once.
]
The scanning lamp will turn ON, and auto adjustment will be executed.
AE_ADJ : 0 ← (]:START)
Changes to ‘0’.
8) Press the Reset key twice to end service mode.
7. Adjusting the AE Slope
After executing AE auto adjustment, make a copy of a dark original (e.g.,
newspaper). If the copy is foggy or too light, perform the following:
1) Open the front door, and insert the door switch actuator into the door switch
assembly.
2) Press the service mode switch over the cover with a clip.
3) Select ‘AE_SLOP’ in service mode ( ).
4) Place a dark original (e.g., newspaper).
5) Change the setting using the keypad, and press the ] user mode key.
A is within section B.
Figure 2-8
B
No. 1 mirror mount
Electrode mount (front)
A (left) of wall
Glass support
(front)
Hole
]
3
]
CHAPTER 2 STANDARDS AND ADJUSTMENTS
2-6
B. Exposure System
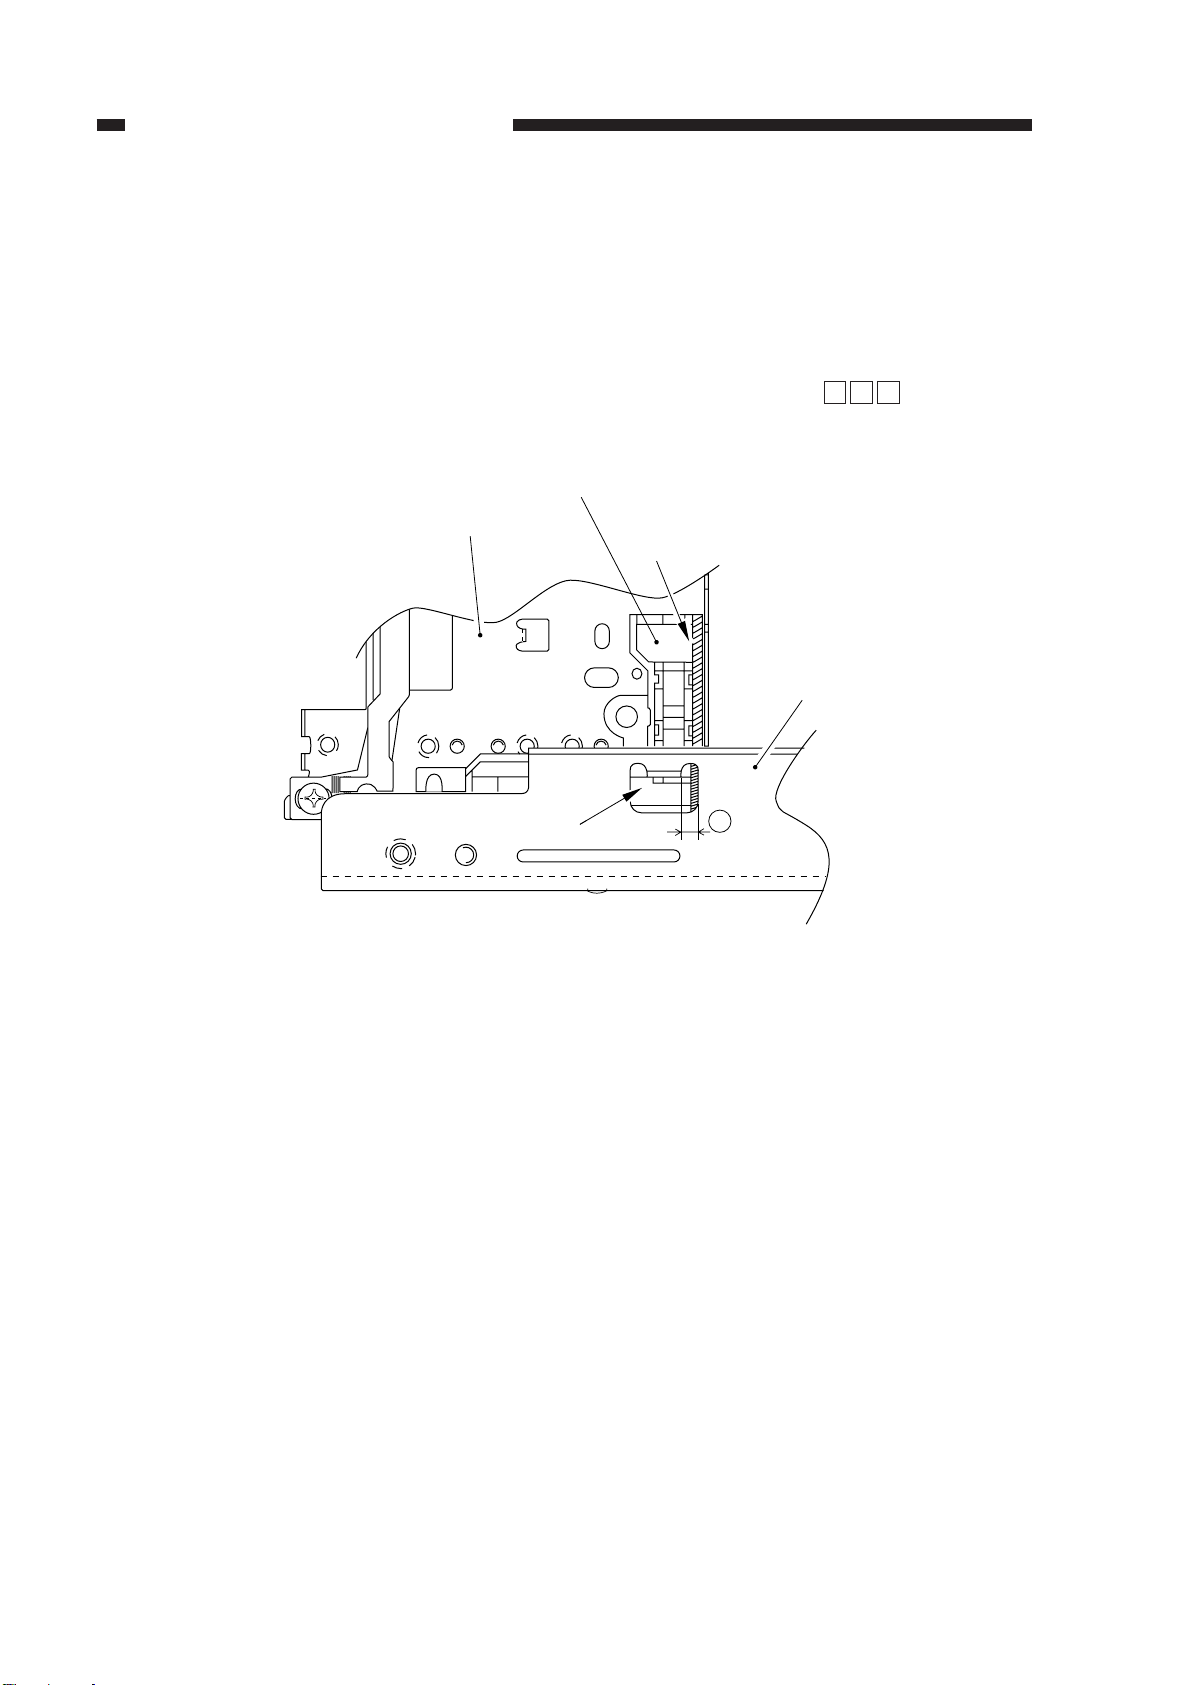
1. Adjusting the Scanner Home Position
Make copies, and remove the control panel; then, check to make sure that the line
in section A on the electrode (front) of the No. 1 mirror mount is within section B of the
hole in the glass support (front).
Otherwise, change the setting of ‘BRAKE_SC’ in service mode ( ) so that the
line in section
Steel ball
Wind eight times.
Fix in place temporaily.
1
3
4
8
5
6
2
7
6
2
CHAPTER 2 STANDARDS AND ADJUSTMENTS
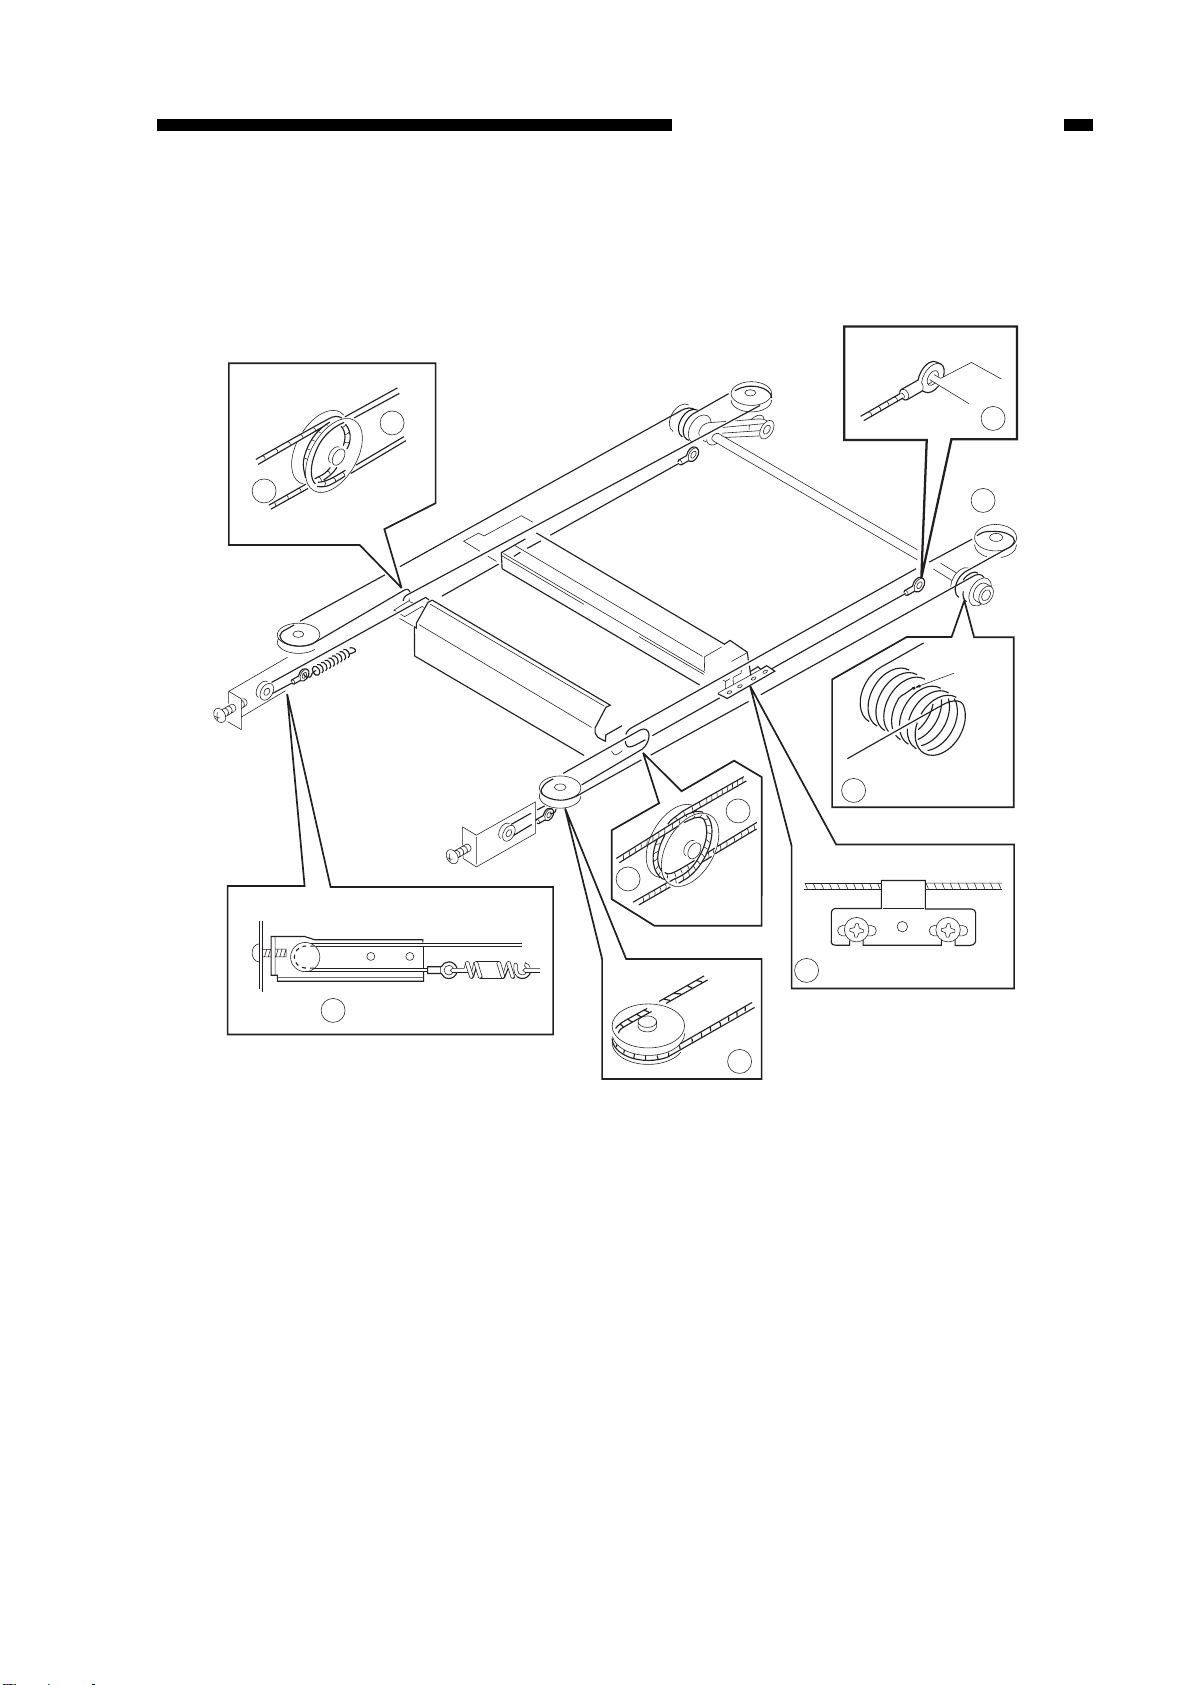
2. Routing the Scanner Drive Cable
Route the cable as indicated by numbers q through i, and perform “adjusting the
wire tension” and “adjusting the mirror position” shown on the next page.
Figure 2-9
2-7
A
A
10 mm
10 mm
(rear)
(front)
Mirror mount
CHAPTER 2 STANDARDS AND ADJUSTMENTS
3. Adjusting the Tension of the Scanner Cable
Be sure to perform the following whenever you have installed the scanner cable.
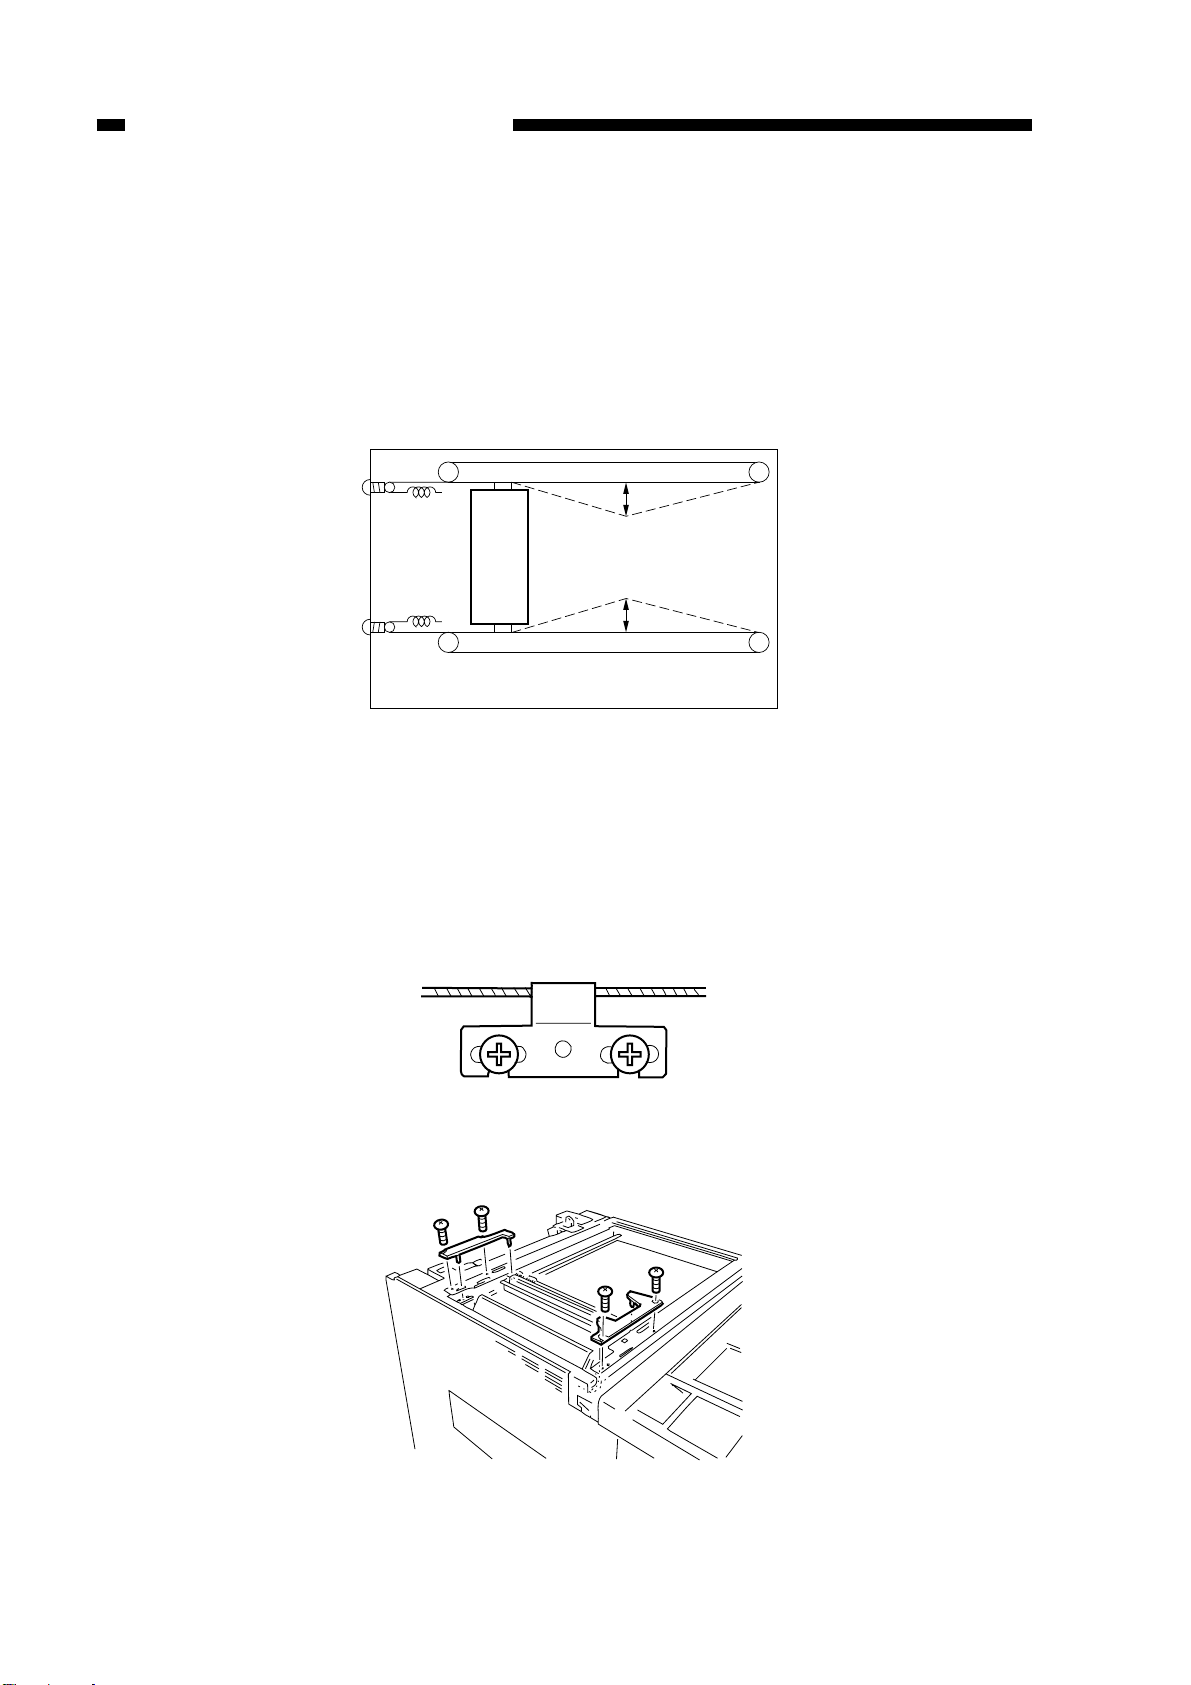
1) Remove the two mounting screws, and remove the left cover.
2) Loosen the fixing screw on the tension spring bracket.
3) Turn the tension adjusting screw so that the value is as indicated:
• Turn the tension adjusting screw A so that the reading of the spring gauge is
200 ±50 g when the middle of the scanner cable is pulled about 10 mm.
Figure 2-10
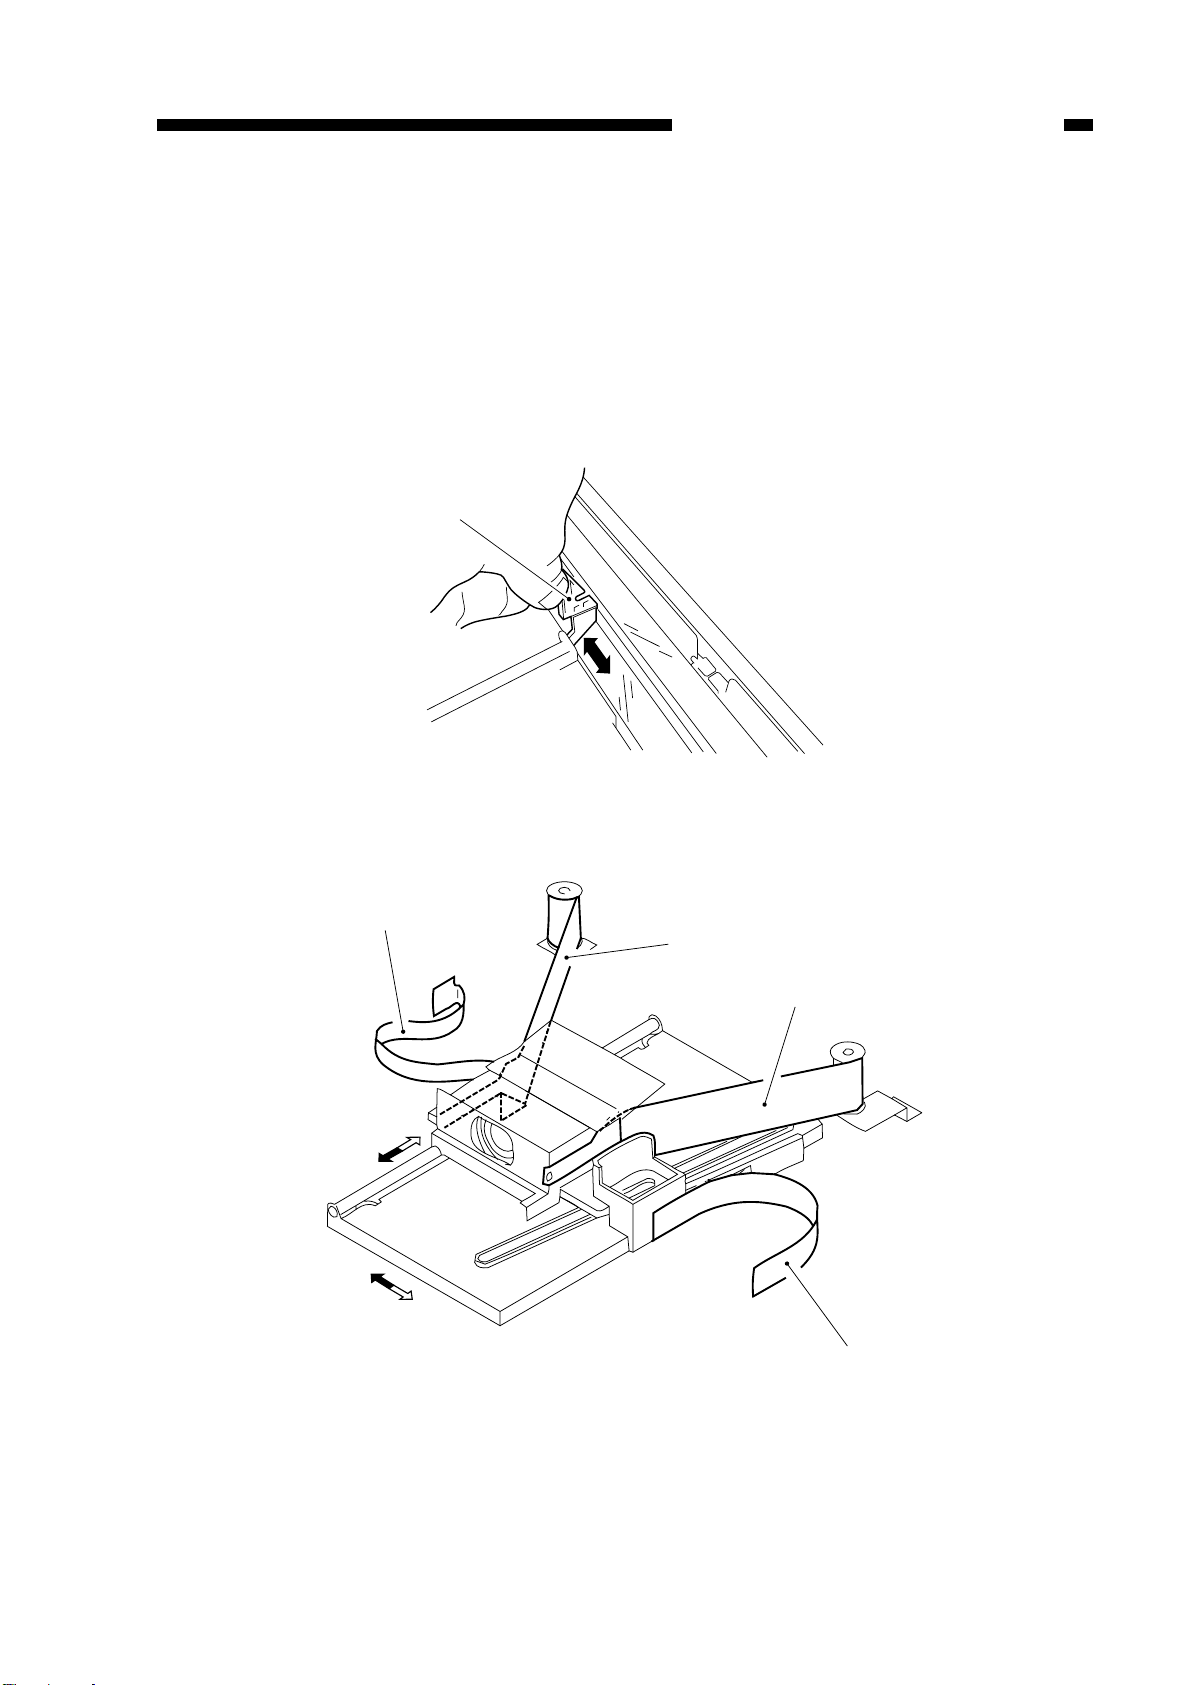
4. Adjusting the Mirror Position
1. Routing the Scanner Drive Cable and Adjusting the Mirror Position
Be sure to perform the following whenever you have installed the scanner drive wire:
1) Move the No. 1 mirror mount and the No. 2/No. 3 mirror mount to the left.
2) Set the mirror positioning tool (front, rear; FY9-3011) as shown:
Figure 2-11
Figure 2-12
2-8
q
w
e
r
q
CHAPTER 2 STANDARDS AND ADJUSTMENTS
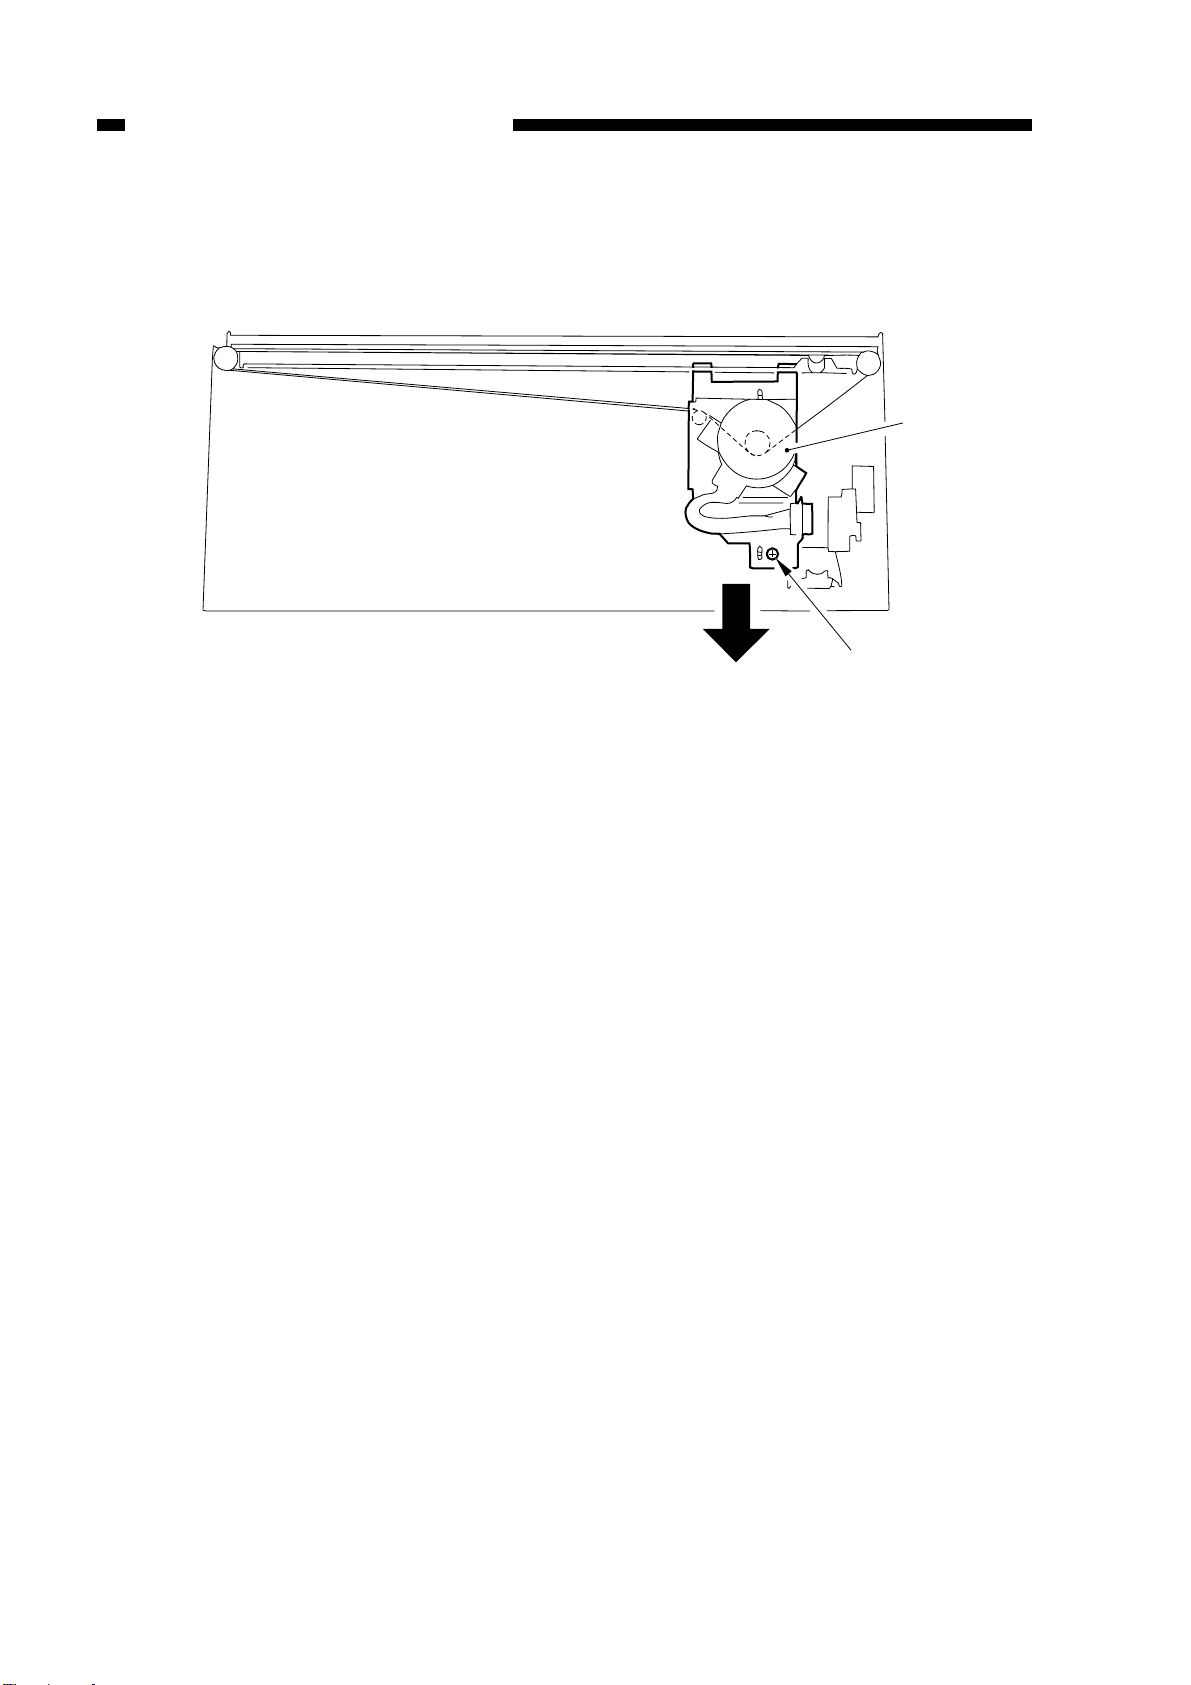
5. Cleaning the Mirror (No. 5 mirror)
1) Remove the copyboard glass.
2) Remove the lens hood.
3) Remove the mirror guide plate.
4) Move the lens stage in Enlarge direction.
5) Remove the screw, and remove the mirror cleaning tool.
6) As shown, butt the mirror cleaning tool q against the No. 5 mirror, and clean the
mirror by moving the tool in the direction of the arrows. (At this time, take care so that
the No. 4 mirror will not come into contact with the cleaning tool or your fingers.)
Figure 2-13
6. Installing the Light-Blocking Belts
q Light-blocking belt 1 e Light-blocking belt 3
w Light-blocking belt 2 r Light-blocking belt 4
Figure 2-14
2-9
q
w
Own weight
CHAPTER 2 STANDARDS AND ADJUSTMENTS
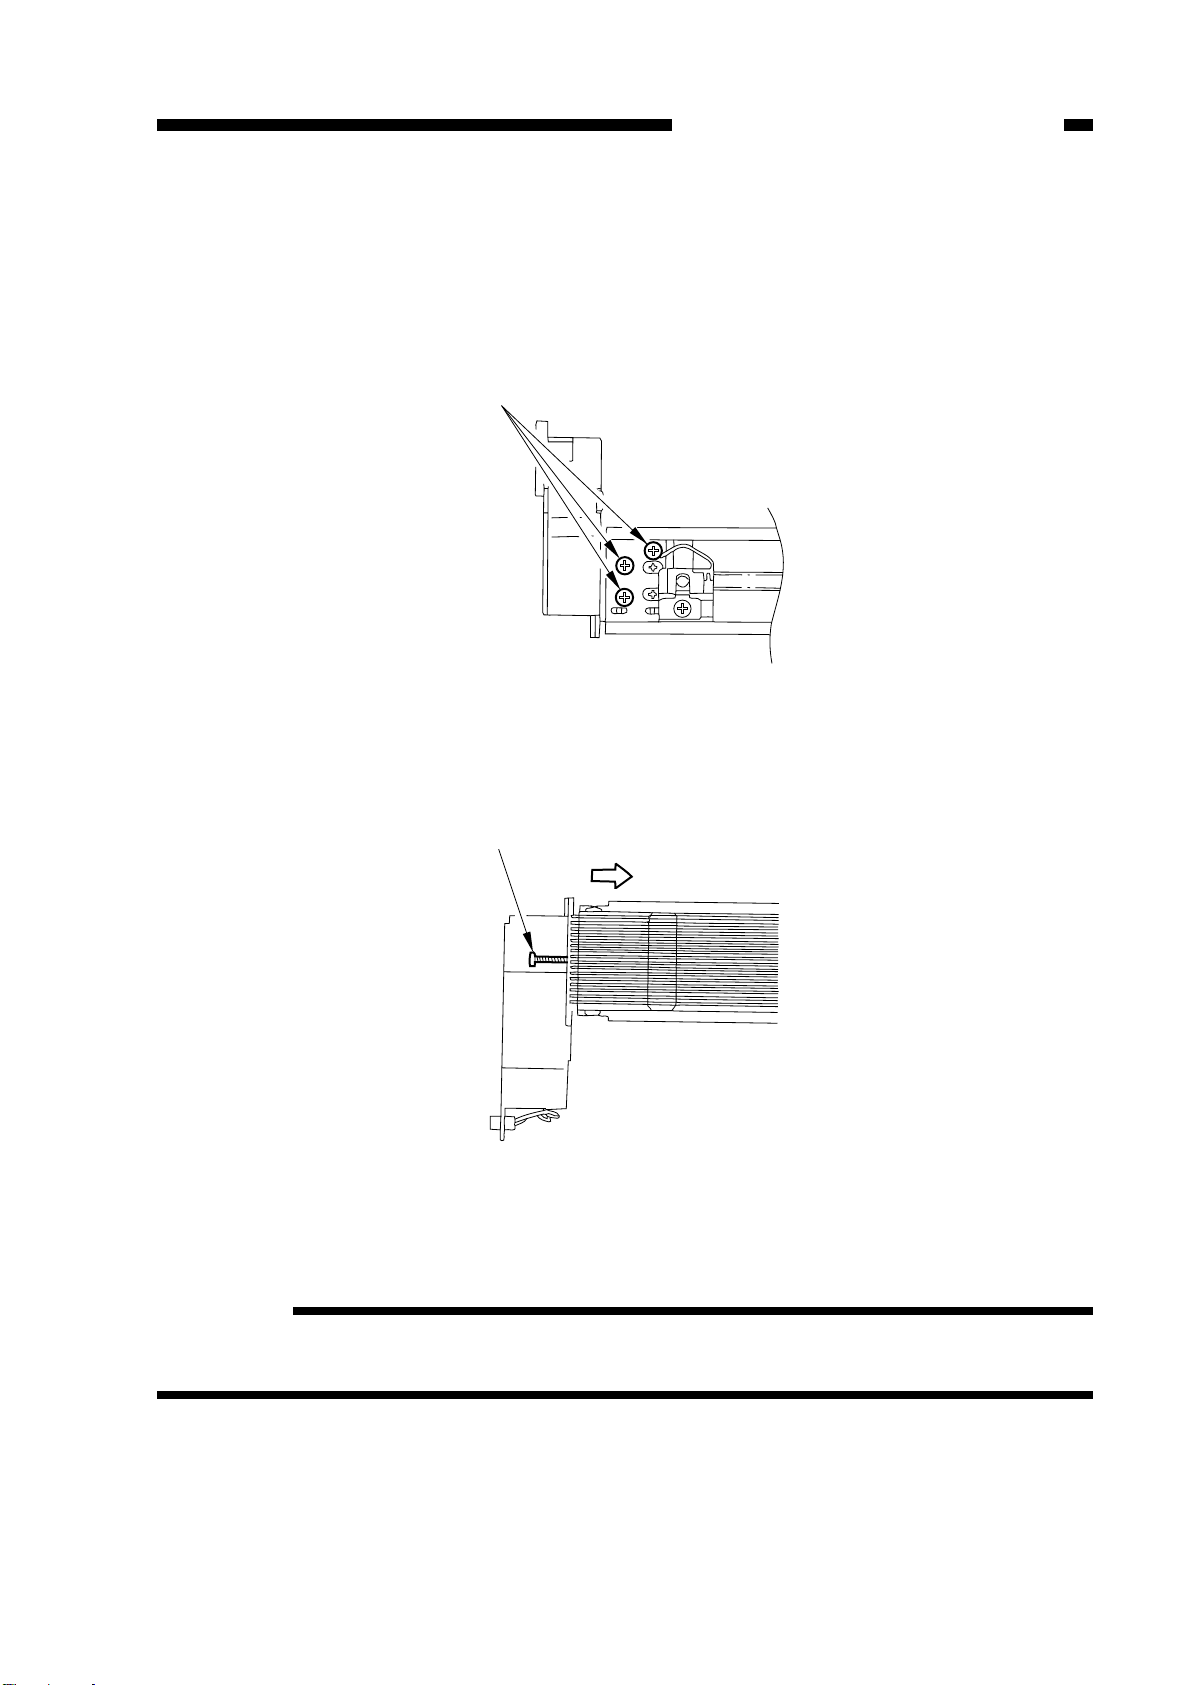
7. Installing the Lens X Direction Drive Belt
Install the lens X direction drive belt with a mounting screw w where the lens X
direction drive motor q has lowered on its own weight.
Figure 2-15
2-10
Screw
Screws
CHAPTER 2 STANDARDS AND ADJUSTMENTS
C. Image Formation System
1. Routing the Grid for the Primary Charging Assembly
1) Loosen the two mounting screws used to fix the left/right shielding plate in place.
2) Loosen the three mounting screws used to fix the motor unit in place at the front.
Figure 2-16
3) Loosen the mounting screw, and move it in the direction shown in Figure 2-17; then,
fix it temporarily.
Figure 2-17
4) Free a length of about 5 cm from a 0.1mm-dia. charging wire reel, and form a loop
of about 2 mm in diameter.
Reference:
When forming a loop, wind the charging wire around a hex key once, and twist the
hex key three to four times; then, twist the charging wire.
2-11
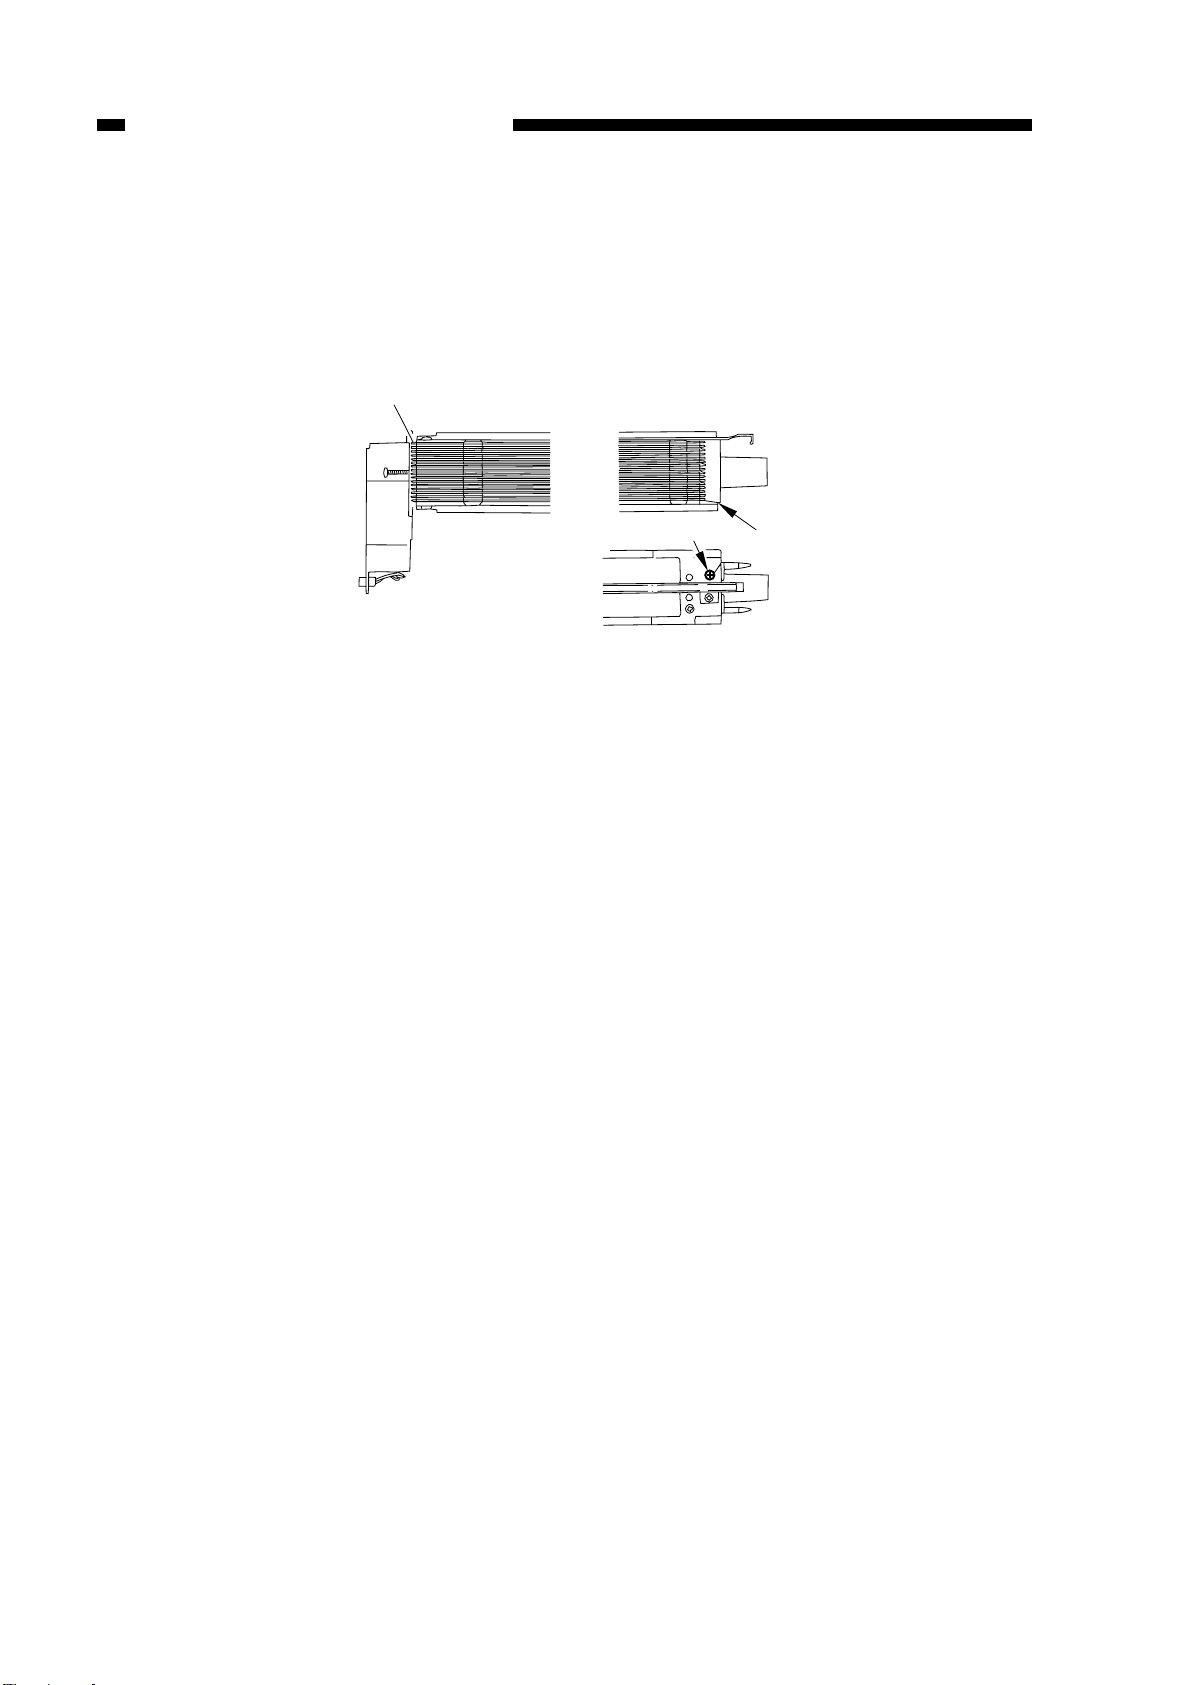
Stud A
Screw
CHAPTER 2 STANDARDS AND ADJUSTMENTS
5) Cut the twisted wire (excess wire) by a nipper.
6) Hook the loop on stud A shown in Figure 2-18.
7) When you have routed the wire for 31 runs, lead it through section B, give it a half
turn, and put it between the washer and the motor unit; then, wind it about once
(clockwise) around the mounting screw, and tighten the mounting screw.
Figure 2-18
8) Cut the excess charging wire with a nipper.
9) Tighten the mounting screw you loosened in step 3).
Keep tightening the screw until the tension of the grid wire is even.
Pay attention so that the charging assembly is not deformed; try to tighten the
mounting screw (front) on the left/right shielding plate as early as possible.
2-12
CHAPTER 2 STANDARDS AND ADJUSTMENTS
2-13
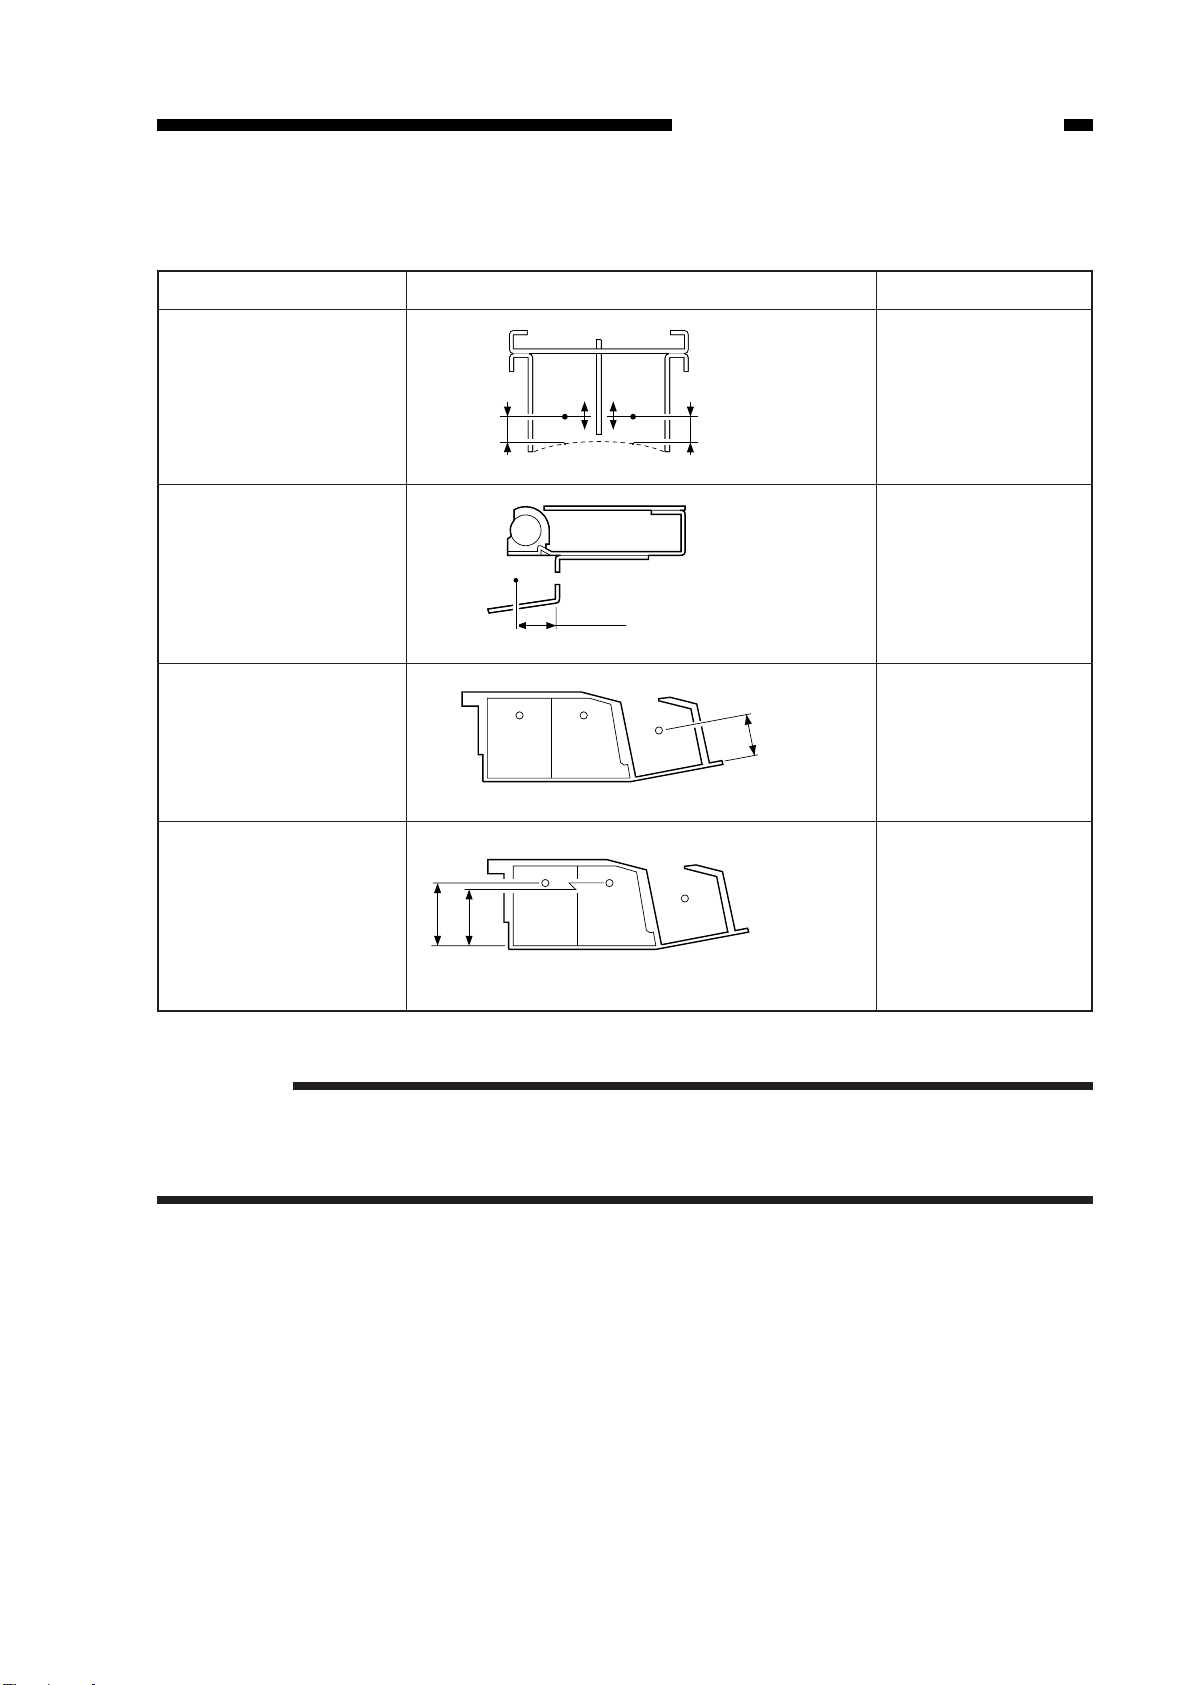
2. Adjusting the Height of the Charging Wire
Table 2-1
Reference:
The height (position) of the primary and transfer/separation charging wire may be
adjusted by turning the screw behind the charging assembly . A full turn of the screw
changes the position of the charging wire by about 0.7 mm.
Charging assembly
Primary
Pre-transfer
Transfer
Separation
Height of charging wire
A
B
C
D
7.5+1.5
-0mm
7.5+1.5
-0mm
9.5+1.0
-0mm
10.2±0.5mm
A:16.2±0.5mm B:14.9±0.5mm
AB
Range
±1mm
No adjusting
mechanism
±2mm
±2mm
Adjusting screw
0
2
4
6
8
12
10
0
2
3
6
8
12
10
W1 W1
CHAPTER 2 STANDARDS AND ADJUSTMENTS
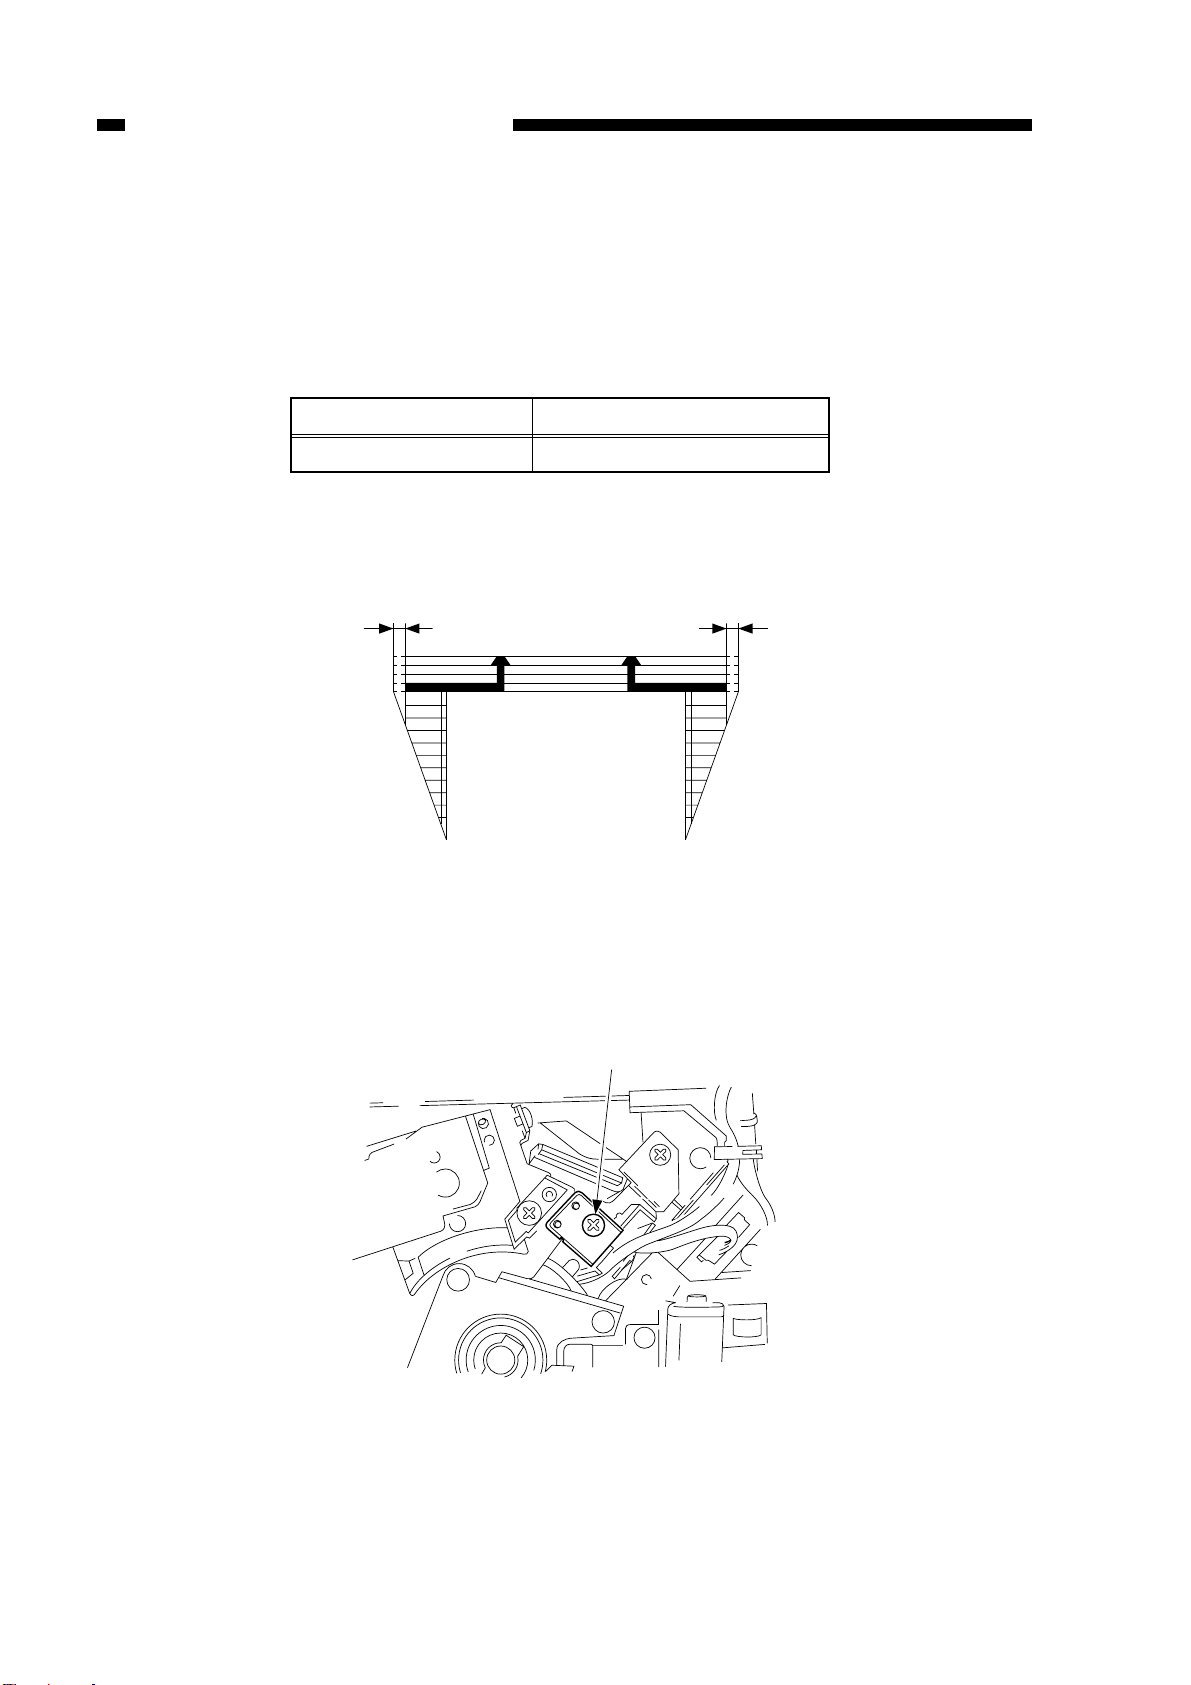
3. Adjusting the Blank Exposure Lamp
1) Place the Test Sheet on the copyboard.
2) Select A4.
3) Make a copy, and check to make sure that the left/right registration is correct.
4) Make a copy in Direct.
5) Check the image, and measure the non-image width shown in Figure 2-19.
Paper size
All paper sizes
Left/right non-image width
2.75±2.5mm
(with standard frame erasing ON)
Table 2-2
Figure 2-19
6) If the non-image width is not as specified, turn the adjusting screw to adjust the
position of the blank exposure lamp assembly.
2-14
Figure 2-20
Reference attachment
Side seal
Roller electrode
Scraper
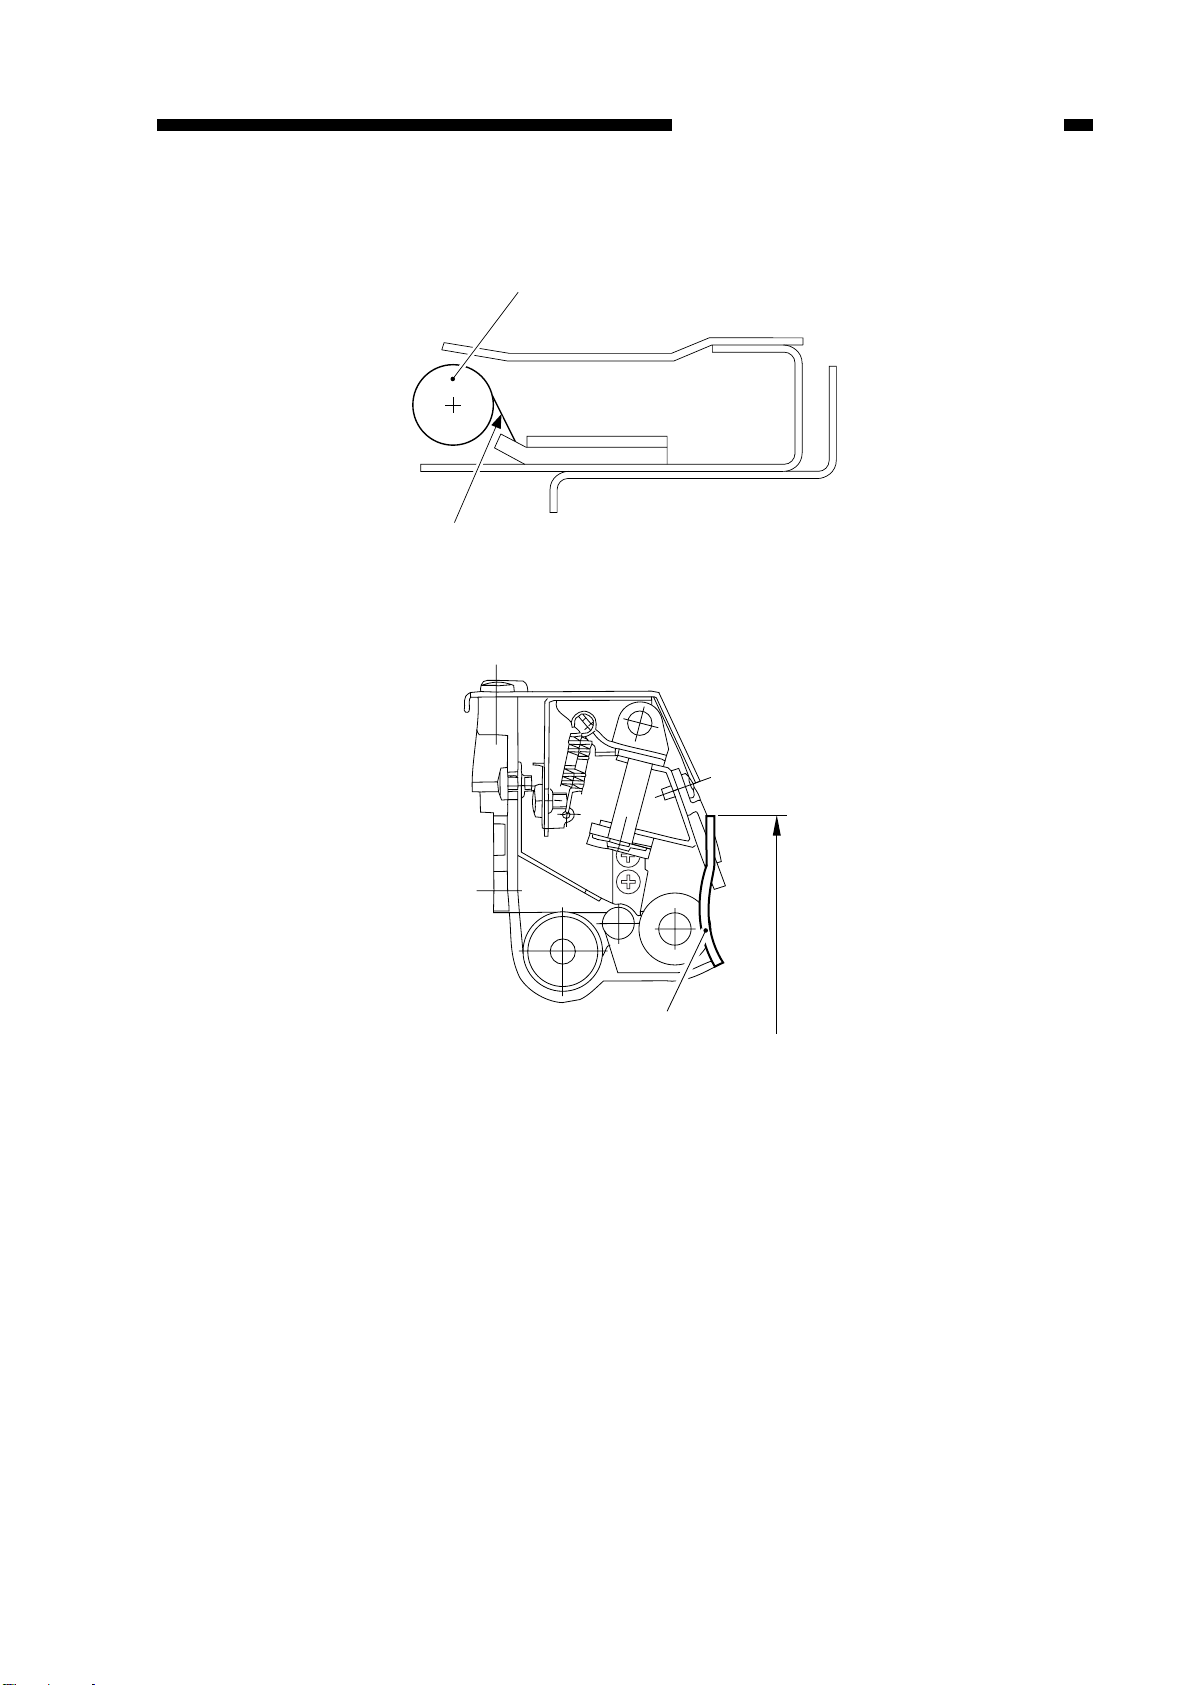
CHAPTER 2 STANDARDS AND ADJUSTMENTS
4. Position of the Roller Electrode
Figure 2-21
5. Position of the Side Seal in the Cleaning Assembly
Be sure that the side seal does not extend inside the cleaner housing.
Figure 2-22
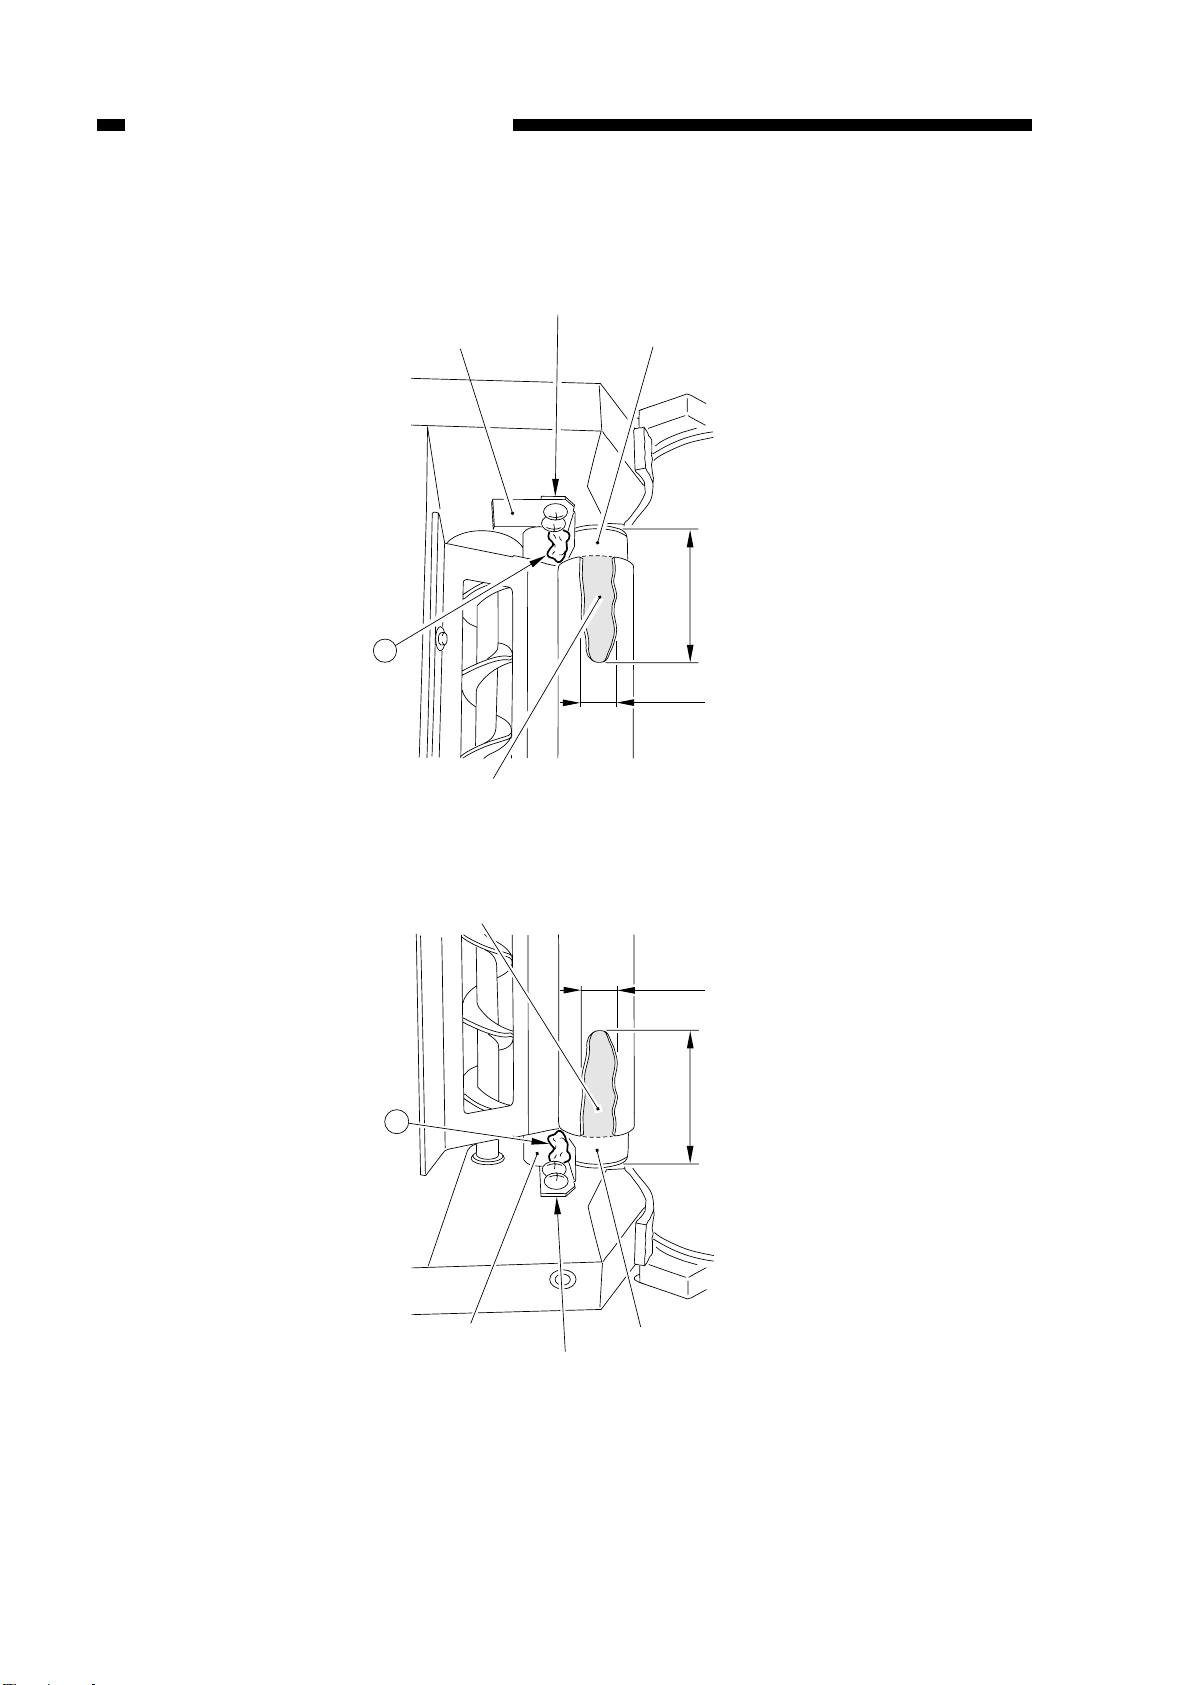
6. Cleaning the Cleaner Side Scraper
Perform the following when replacing the side scraper and, thereafter, for every
500,000 copies made.
1) Remove the cleaning blade.
2) Remove paper lint collecting at the tip of the side scraper (between the magnet roller
and the toner guide roller; A) with tweezers.
2-15
Toner guide roller
4~8mm
Side scraper (front)
Magnet roller
Remove waste toner.
(front)
30~40mm
A
Toner guide roller
4~8mm
Side scraper (rear)
Magnet roller
Remove waste toner.
(rear)
30~40mm
A
CHAPTER 2 STANDARDS AND ADJUSTMENTS
3) Remove the coating of toner from the surface of the magnet roller. (Use a sheet of
copy paper shaping it like the letter U.)
Figure 2-23
Figure 2-24
4) Turn the magnet roller clockwise (viewing from the front).
5) If a coating of toner develops again where toner was removed in step 3), repeat
steps 3) through 5).
2-16
r
t
Direction of
rotation
Collar (silver)
Rear (copier)
q
w
e
Direction of
rotation
Collar (gold)
Front (copier)
CHAPTER 2 STANDARDS AND ADJUSTMENTS
D. Pick-Up/Feeding System
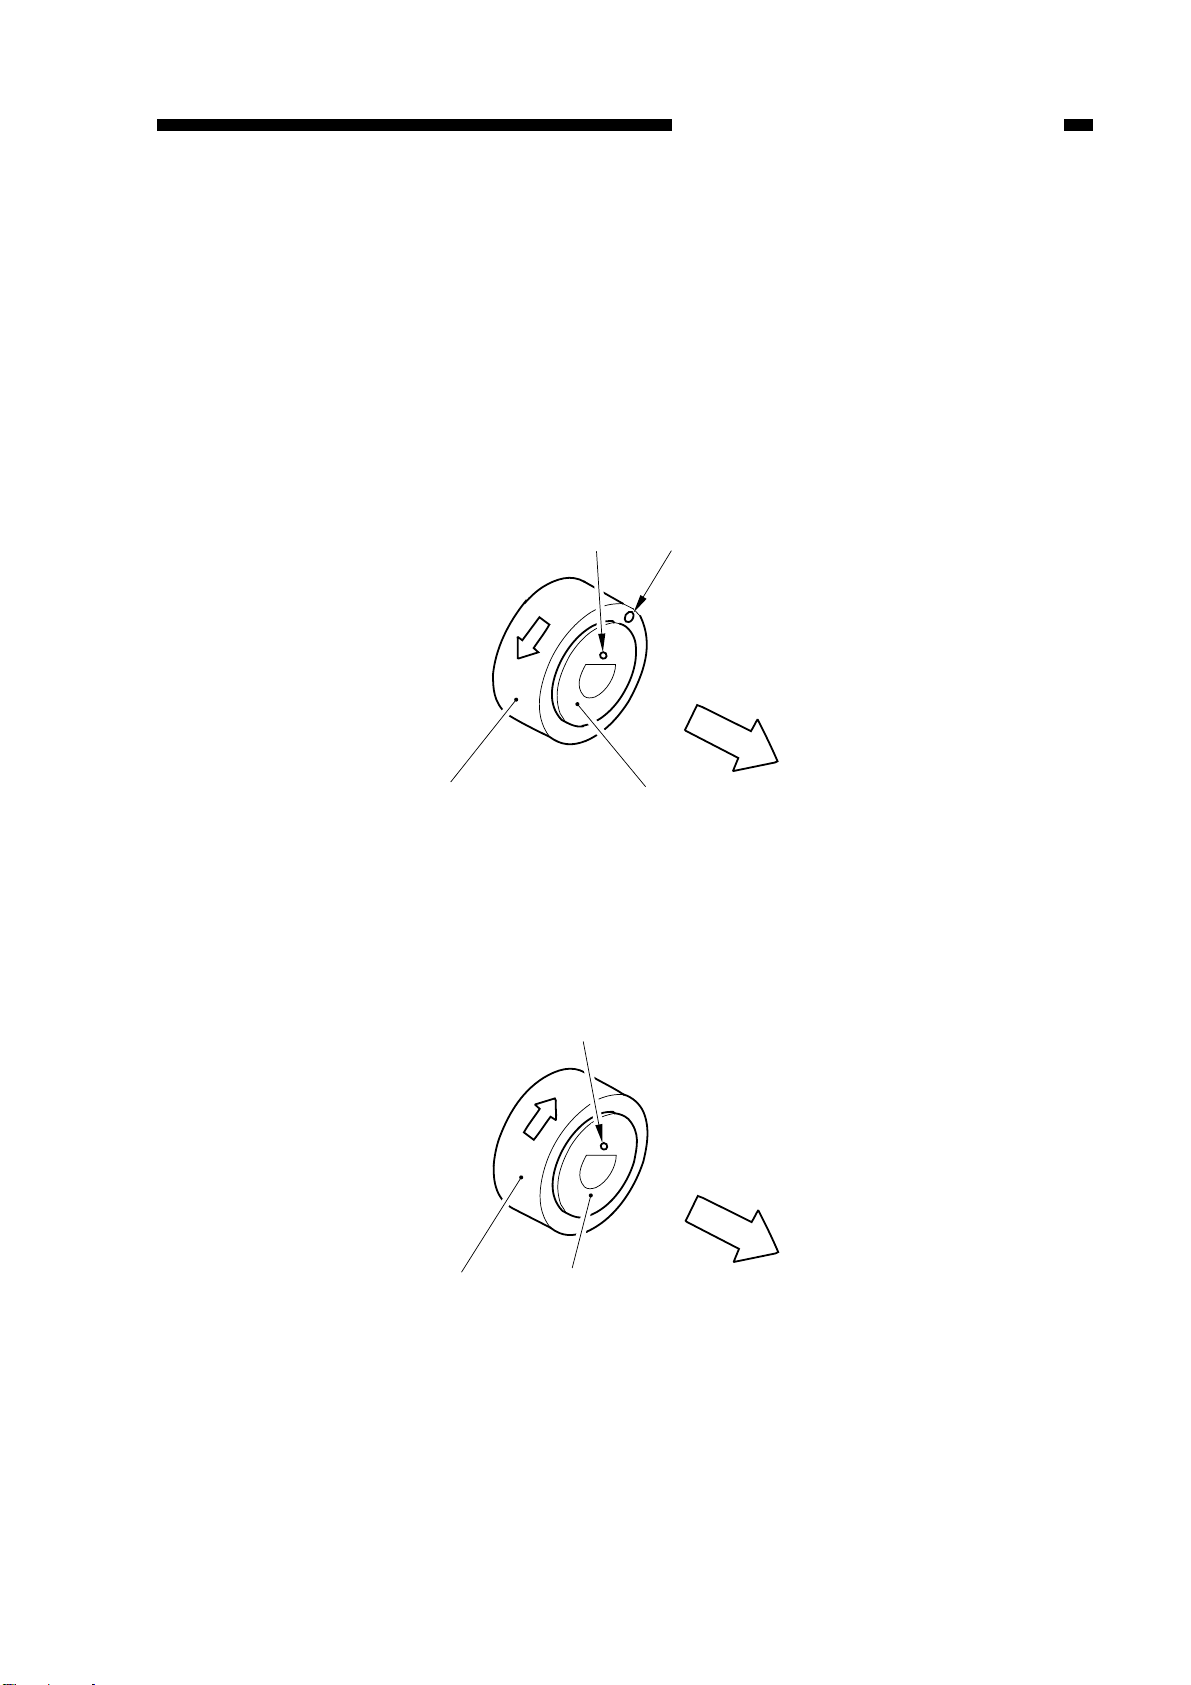
1. Orientation of the Pick-Up Roller (cassette/deck)
Install the pick-up roller by reversing the steps used to remove it with the following in
mind:
• The front and rear pick-up rollers are not interchangeable.
• The collar of the front pick-up roller is gold.
When installing the pick-up roller q to the pick-up assembly, make sure that the
round marking w on the side of the roller and the round marking e on the collar
(gold) are toward the front of the machine.
Figure 2-25
• The collar of the rear pick-up roller is silver. When installing the pick-up roller r to
the pick-up assembly, make sure that the round marking t on the collar (silver) is
toward the rear of the machine.
Figure 2-25a
2-17
w
q
r
5
5
e
t
Front (copier)
Wider groove
Narrower groove
(front of copier)
(rear of copier)
CHAPTER 2 STANDARDS AND ADJUSTMENTS
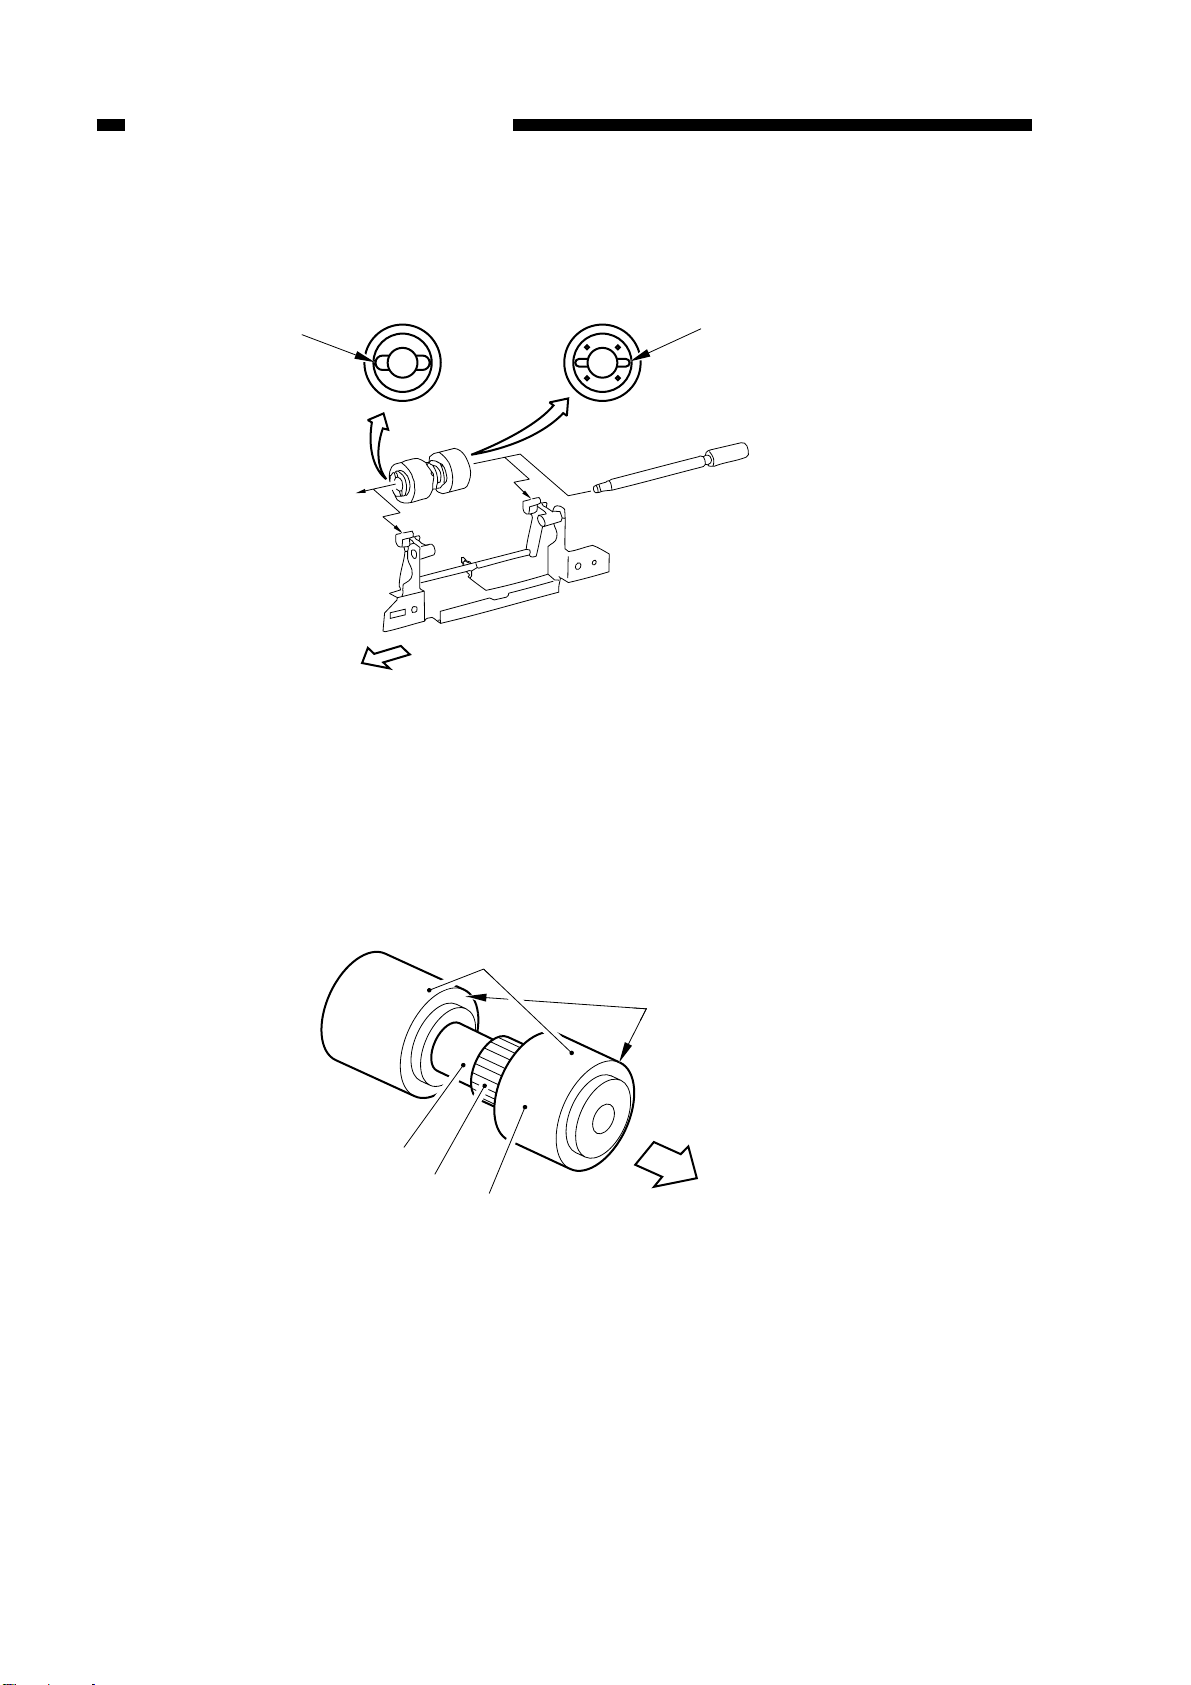
2. Orientation of the Separation Roller (cassette/deck)
Keep the following in mind when replacing the separation roller.
Figure 2-26
3. Orientation of the Feeding Roller (cassette/deck)
When installing the feeding roller assembly q to the cassette/deck pick-up
assembly, make sure that the belt pulley w is toward the front of the machine.
When installing the feeding roller e to the feeding roller shaft r, make sure that the
marking ‘5’ t is toward the front of the machine.
Figure 2-27
2-18
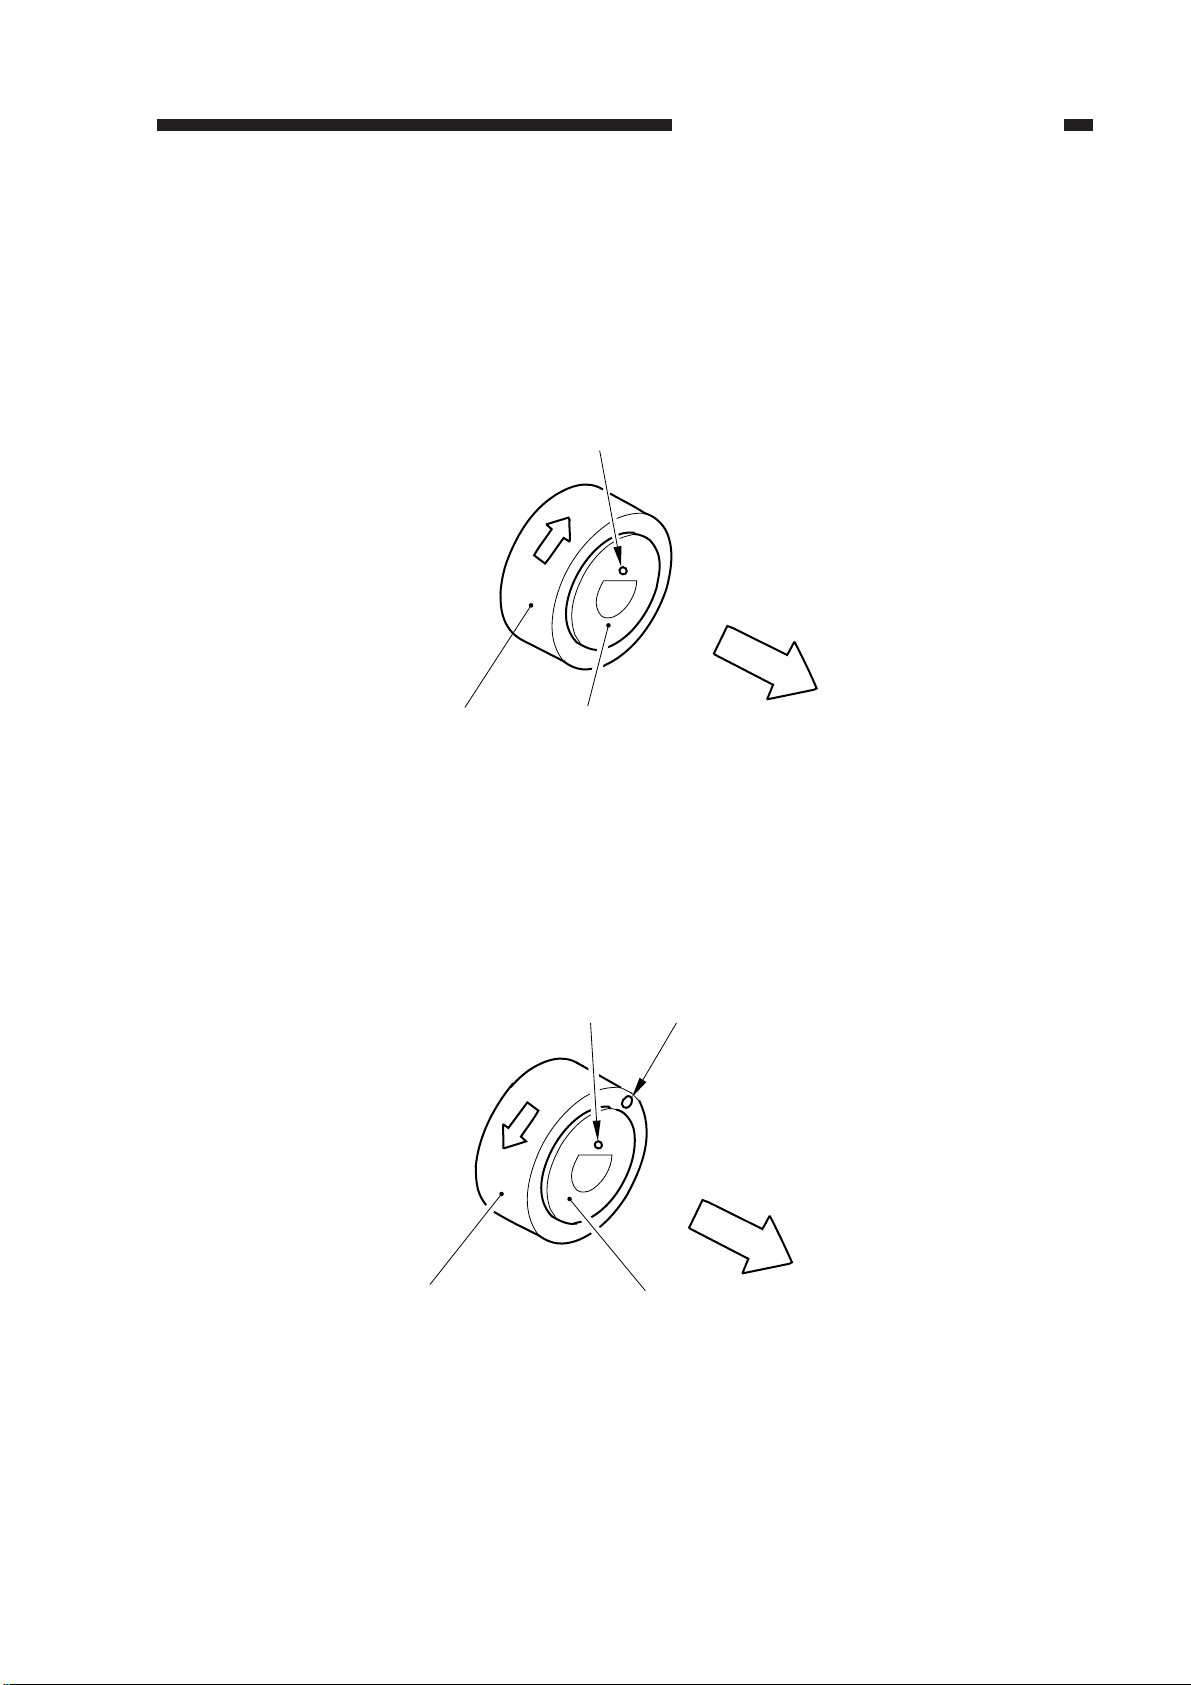
4. Orientation of the Pick-Up Roller (multifeeder)
Install the pick-up roller by reversing the steps used to remove it with the following in
mind:
• The front and rear pick-up rollers are not interchangeable.
• The collar of the front pick-up roller is silver.
When installing the pick-up roller q to the pick-up assembly, make sure that the
round marking w is toward the front of the machine.
q Pick-up roller
w Marking (collar)
Figure 2-28
• The collar of the rear pick-up roller is gold.
When installing the pick-up roller e to the pick-up assembly, make sure that the
round marking r on the side of the roller and the round marking t on the collar (gold)
are toward the rear of the machine.
e Pick-up roller
r Marking (roller)
t Marking (collar)
Figure 2-28a
e
r
t
Direction of
rotation
Collar (gold)
Copier
q
w
Direction of
rotation
Collar (silver) Front (copier)
CHAPTER 2 STANDARDS AND ADJUSTMENTS
2-19
q
w
e
r
A
B
q
w
e
5
(front)
5
CHAPTER 2 STANDARDS AND ADJUSTMENTS
5. Orientation of the Feeding Roller (multifeeder)
When installing the pick-up roller q to the multifeeder pick-up assembly, make sure
that the belt pulley w and the marking ‘5’ e are toward the front of the machine.
Figure 2-29
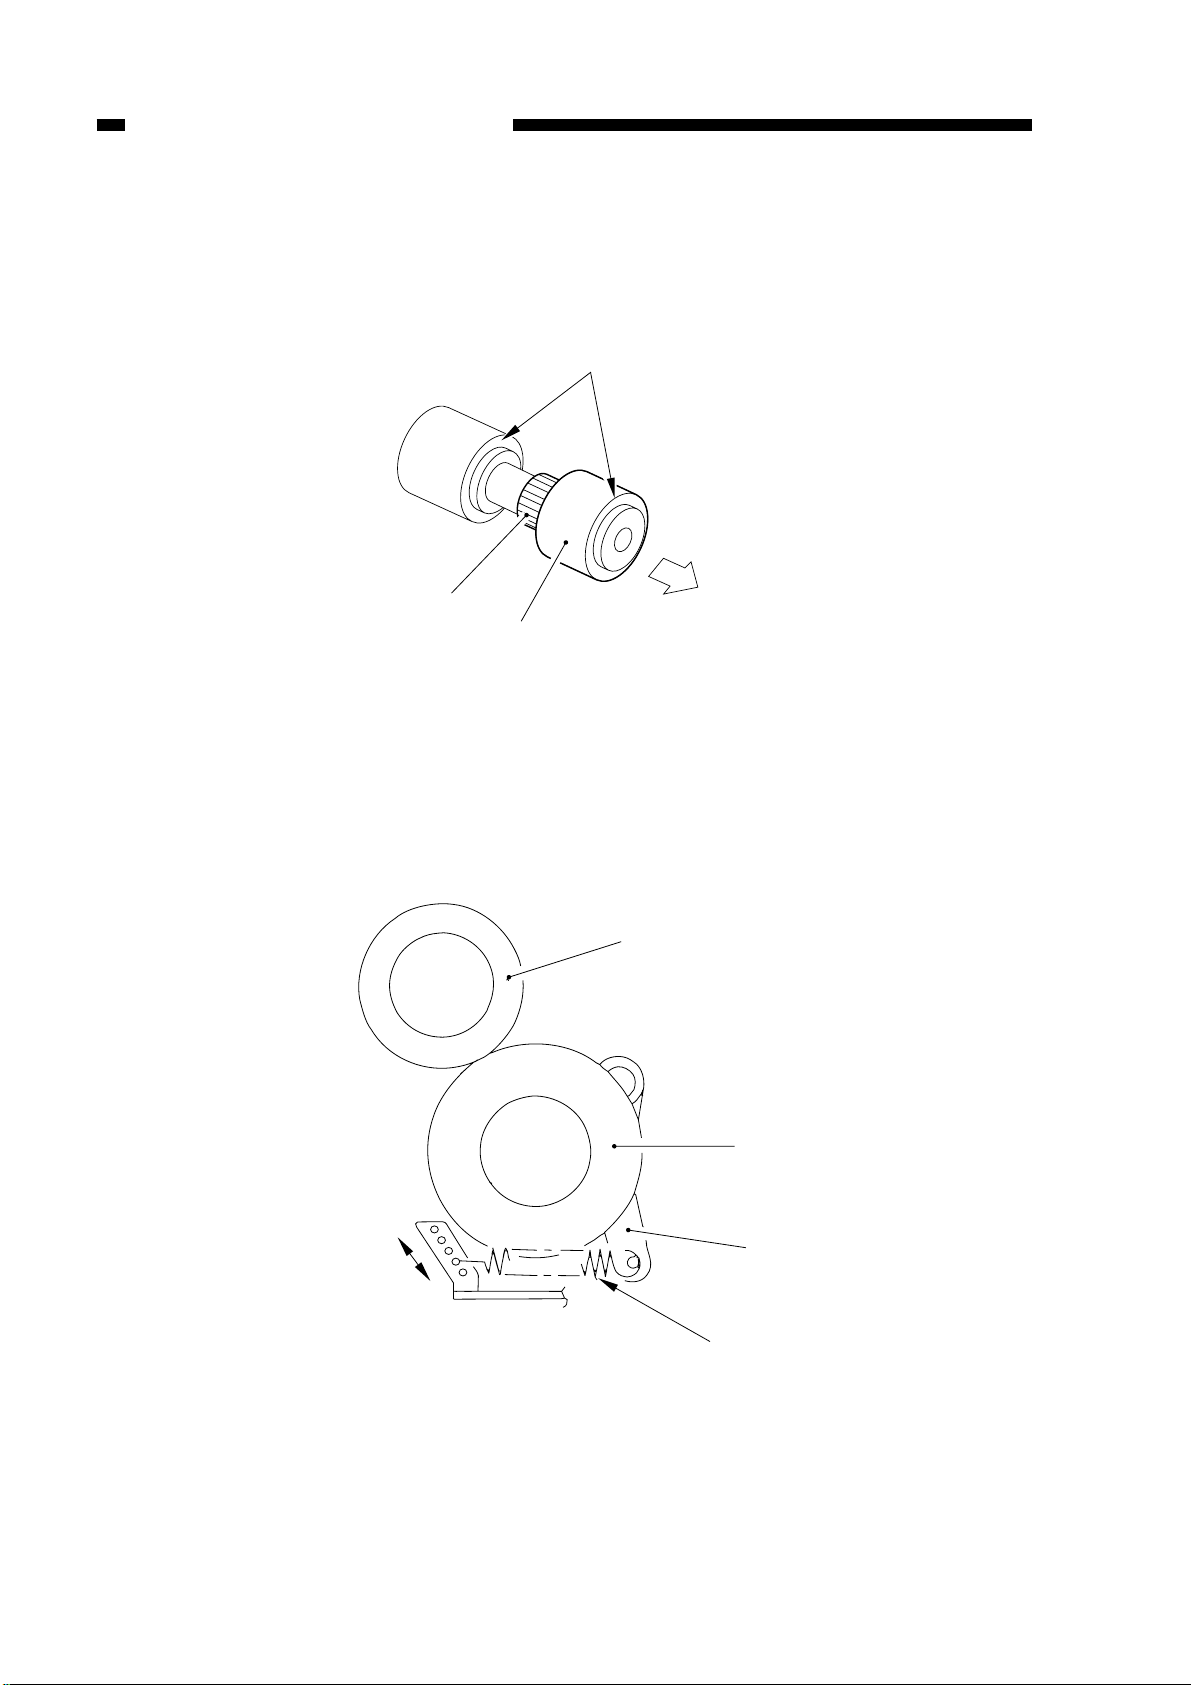
6. Adjusting the Pressure of the Separation Roller (cassette/deck)
If double feeding or pick-up failure occurs during pick-up operation, change the
position of the pressure spring of the separation roller:
• If double feeding occurs, change the position of the spring hook to side B.
• If pick-up failure occurs, change the position of the spring hook to side A.
2-20
q Feeding roller e Locking lever
w Separation roller r Pressure spring
Figure 2-30
B
A
32.7±0.1mm
CHAPTER 2 STANDARDS AND ADJUSTMENTS
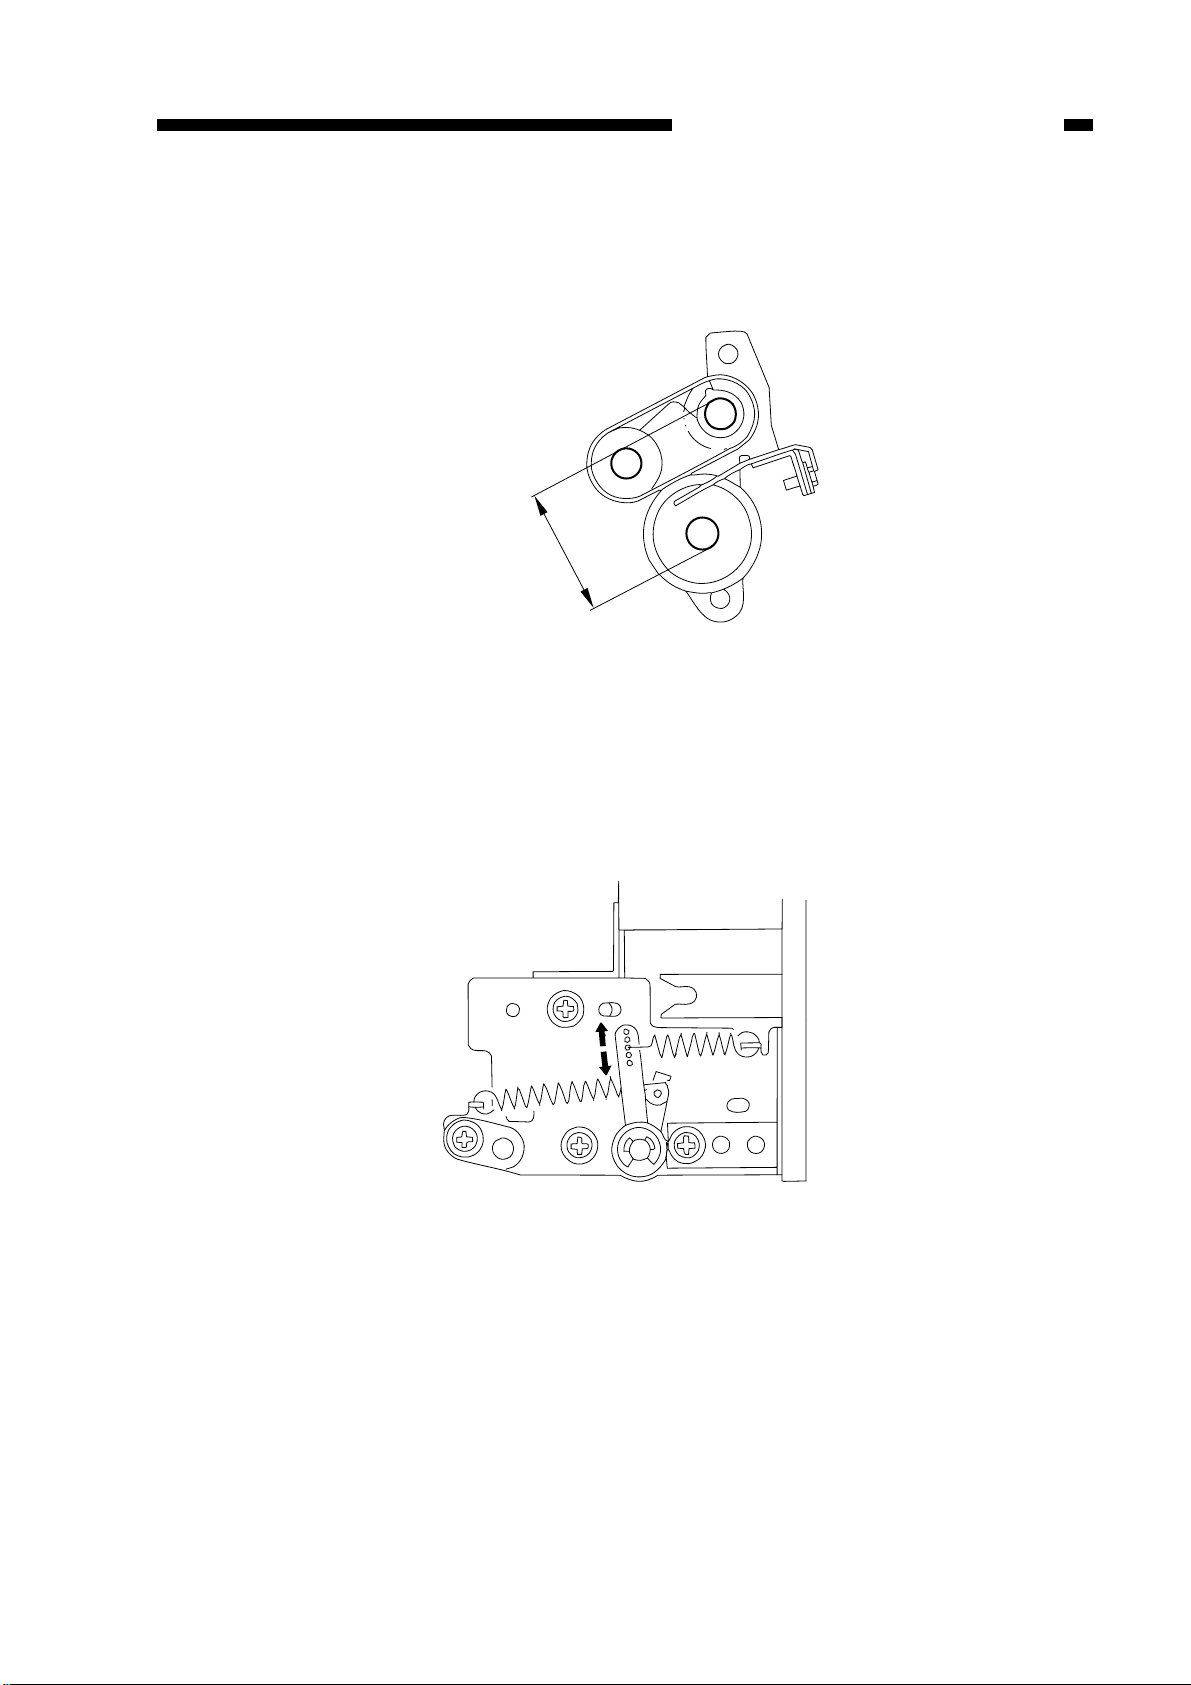
7. Adjusting the Pressure of the Separation Roller (holding tray)
Turn the separation adjusting roller so that the distance between the shafts are 32.7
±0.1 mm.
Figure 2-31
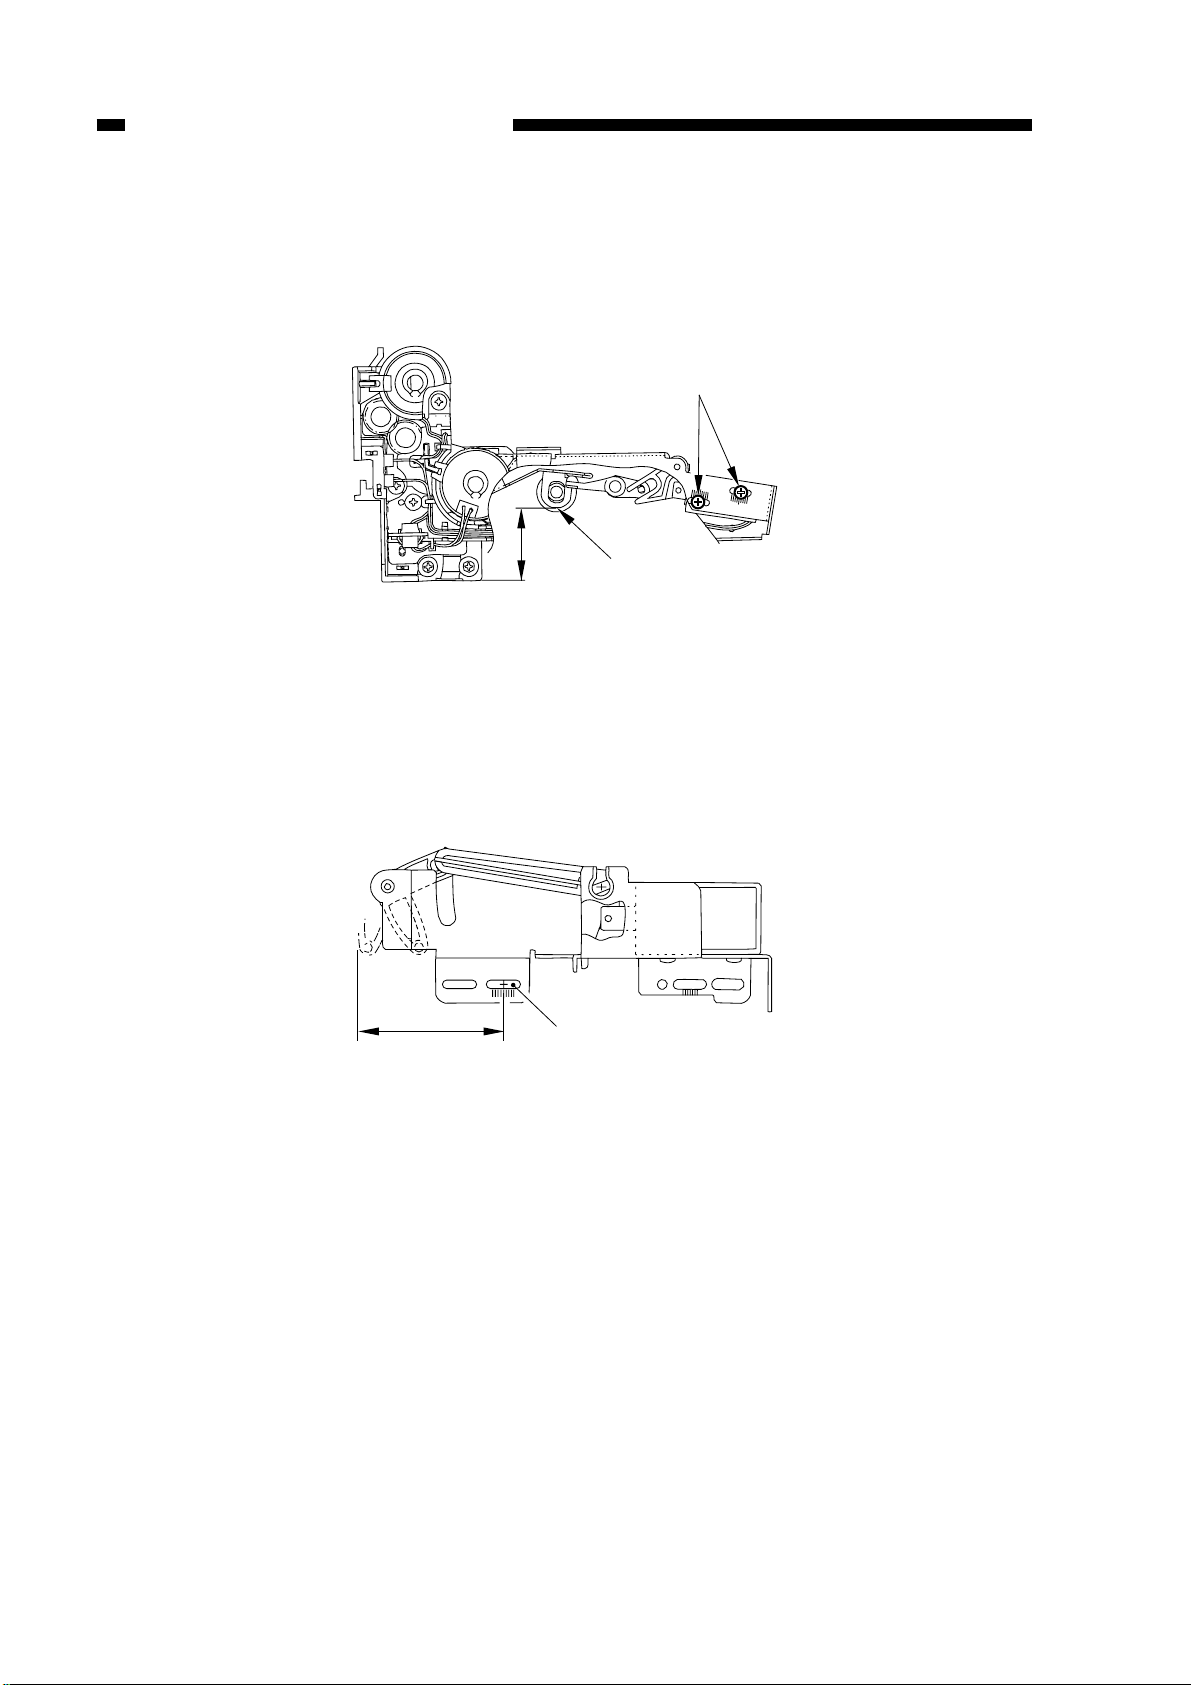
8. Adjusting the Pressure of the Pick-Up/Feeding Roller (multifeeder)
When pick-up double feeding or pick-up failure occurs during pick-up operation,
adjust the position of the pressure spring of the separation roller.
• If double feeding occurs, change the position of the spring hook to side A.
• If pick-up failure occurs, change the position of the spring hook to side B.
Figure 2-32
2-21
A
57.2±0.5mm
36±0.5
A
q
CHAPTER 2 STANDARDS AND ADJUSTMENTS
9. Positioning the Pick-Up Roller Releasing Solenoid (cassette)
Make adjustments so that the distance from the bottom of the pick-up unit in each
cassette holder to the bottom end of the bushing of the roller support A is 36 ±0.5 mm
when the plunger of the pick-up releasing roller is drawn as shown.
Figure 2-33
10.Adjusting the Position of the Pick-Up Roller Releasing Solenoid (deck)
Adjust the position of the solenoid so that the distance from the center of the hole A
in the solenoid to the left end of the right solenoid arm is 57.2 ±0.5 mm as shown in
Figure 2-34.
Figure 2-34
2-22
 Loading...