


User Manual
NA10
This manual describes the setup and operating procedures for the
NA10 Network Adapter for the Canon imageFORMULA DR series.
To use this device, read this manual together with the instructions for
the scanner to be connected.
Procedures and Example Screens
This manual describes operations using Windows 7 as examples.
Table of Contents
About This Device ...............................................................4
Setup.....................................................................................5
Connecting to the Wired Network......................................7
Scanning with the CaptureOnTouch Job Tool
from a Smart Device ............................................................9
Scanning from a Computer with
the CaptureOnTouch Job Tool.........................................16
Using the Web Menu .........................................................21
Troubleshooting ................................................................27
Specifications ....................................................................28

Trademarks
● Canon and the Canon logo are registered trademarks of Canon Inc.
in the United States and may also be trademarks or registered
trademarks in other countries.
● imageFORMULA is a trademark of CANON ELECTRONICS INC.
● Microsoft and Windows are registered trademarks of Microsoft
Corporation in the United States and other countries.
Copyright
Copyright 2018 by CANON ELECTRONICS INC. All rights reserved.
No part of this publication may be reproduced or transmitted in any
form or by any means, electronic or mechanical, including
photocopying and recording, or by any information storage or retrieval
system without the prior written permission of CANON
ELECTRONICS INC.
Disclaimers
The information in this document is subject to change without notice.
CANON ELECTRONICS INC. MAKES NO WARRANTY OF ANY
KIND WITH REGARD TO THIS MATERIAL, EITHER EXPRESS OR
IMPLIED, EXPECT AS PROVIDED HEREIN, INCLUDING WITHOUT
LIMITATION, THEREOF, WARRANTIES AS TO MARKETABILITY,
MERCHANTABILITY, FITNESS FOR A PARTICULAR PURPOSE
OF USE OR NON-INFRINGEMENT. CANON ELECTRONICS INC.
SHALL NOT BE LIABLE FOR ANY DIRECT, INCIDENTAL, OR
CONSEQUENTIAL DAMAGES OF ANY NATURE, OR LOSSES OR
EXPENSES RESULTING FROM THE USE OF THIS MATERIAL.
CANON ELECTRONICS INC. IS NOT LIABLE FOR THE STORAGE
AND HANDLING OF DOCUMENTS SCANNED WITH THIS
PRODUCT, OR THE STORAGE AND HANDLING OF RESULTING
SCANNED IMAGE DATA.
IF YOU INTEND TO DISCARD THE ORIGINALS OF SCANNED
DOCUMENTS, YOU THE CUSTOMER ARE RESPONSIBLE FOR
INSPECTING THE SCANNED IMAGES AND VERIFYING THAT
DATA IS INTACT.
THE MAXIMUM LIABILITY OF CANON ELECTRONICS INC.
UNDER THIS WARRANTY IS LIMITED TO THE PURCHASE PRICE
OF THE PRODUCT COVERED BY THE WARRANTY.
FCC REGULATIONS (For North America)
Network Adapter, Model 6830030, 6830050
This device complies with Part 15 of FCC Rules and Industry Canada
licence-exempt RSS standard(s). Operation is subject to the following
two conditions: (1) this device may not cause interference, and (2) this
device must accept any interference, including interference that may
cause undesired operation of this device.
Le présent appareil est conforme aux la partie 15 des règles de la
FCC et CNR d'Industrie Canada applicables aux appareils radio
exempts de licence. L'exploitation est autorisée aux deux conditions
suivantes : (1) l'appareil ne doit pas produire de brouillage, et (2)
l'utilisateur de l'appareil doit accepter tout brouillage radioélectrique
subi, même si le brouillage est susceptible d'en compromettre le
fonctionnement.
This equipment complies with FCC/IC radiation exposure limits set
forth for an uncontrolled environment and meets the FCC radio
frequency (RF) Exposure Guidelines in Supplement C to OET65 and
RSS-102 of the IC radio frequency (RF) Exposure rules. This
equipment has very low levels of RF energy that it deemed to comply
without maximum permissive exposure evaluation (MPE). But it is
desirable that it should be installed and operated keeping the radiator
at least 20cm or more away from person's body (excluding
extremities: hands, wrists, feet and ankles).
Cet équipement est conforme aux limites d'exposition aux
rayonnements énoncées pour un environnement non contrôlé et
respecte les règles les radioélectriques (RF) de la FCC lignes
directrices d'exposition dans le Supplément C à OET65 et
d'exposition aux fréquences radioélectriques (RF) CNR-102 de l'IC.
Cet équipement émet une énergie RF très faible qui est considérée
conforme sans évaluation de l'exposition maximale autorisée.
Cependant, cet équipement doit être installé et utilisé en gardant une
distance de 20 cm ou plus entre le dispositif rayonnant et le corps (à
l'exception des extrémités : mains, poignets, pieds et chevilles).
2
FCC CAUTION
Changes or modifications not expressly approved by the party
responsible for compliance could void the user's authority to operate
the equipment.
Note: This equipment has been tested and found to comply with the
limits for a Class B digital device, pursuant to Part 15 of the FCC
Rules. These limits are designed to provide reasonable protection
against harmful interference in a residential installation. This
equipment generates, uses, and can radiate radio frequency energy
and, if not installed and used in accordance with the instructions, may
cause harmful interference to radio communications. However, there
is no guarantee that interference will not occur in a particular
installation. If this equipment does cause harmful interference to radio
or television reception, which can be determined by turning the
equipment OFF and ON, the user is encouraged to try to correct the
interference by one or more of the following measures:
• Reorient or relocate the receiving antenna.
• Increase the separation between the equipment and receiver.
• Connect the equipment into an outlet on a circuit different from that
to which the receiver is connected.
• Consult the dealer or an experienced radio/TV technician for help.
Use of shielded cable is required to comply with Class B limits in
Subpart B of Part 15 of FCC Rules.
Do not make any changes or modifications to the equipment unless
otherwise specified in the manual. If such changes or modifications
should be made, you could be required to stop operation of the
equipment.
Canon U.S.A. Inc.
One Canon Park, Melville, NY 11747, U.S.A.
Tel. No. 1-800-OK-CANON (1-800-652-2666)
This transmitter must not be co-located or operated in conjunction with
any other antenna or transmitter.
AVERTISSEMENT
Ce produit émet un flux magnétique de faible niveau. Si vous utilisez
un stimulateur cardiaque ou pacemaker et éprouvez une sensation
inhabituelle, éloignez-vous de la machine et consultez votre médecin.
RADIO INTERFERENCE REGULATIONS (For 120 V
models)
This digital apparatus does not exceed the Class B limits for radio
noise emissions from digital apparatus as set out in the interference-
causing equipment standard entitled “Digital Apparatus”, ICES-003 of
the Industry Canada.
RÈGLEMENT SUR LE BROUILLAGE RADIOÉLECTRIQUE
(For 120 V models)
Cet appareil numérique respecte les limites de bruits radioélectriques
applicables aux appareils numériques de Classe B prescrites dans la
norme sur le matériel brouilleur: “Appareils Numériques”, NMB-003
édictée par l’Industrie Canada.
Für EMVG
Dieses Produkt ist zum Gebrauch im Wohnbereich, Geschäfts-und
Gewerbebereich sowie in Kleinbetrieben vorgesehen.
Model Names
The following names may be provided for the safety regulations in
each sales region of the Network Adapter.
NA10: Model 6830030, 6830050
European Union (and EEA) only.
This symbol indicates that this product is not to be
disposed of with your household waste, according to
the WEEE Directive (2002/96/EC) and your national
law. This product should be handed over to a
designated collection point, e.g., on an authorized
one-for-one basis when you buy a new similar product or to an
authorized collection site for recycling waste electrical and
electronic equipment (EEE). Improper handling of this type of
waste could have a possible negative impact on the environment
and human health due to potentially hazardous substances that
are generally associated with EEE. At the same time, your
cooperation in the correct disposal of this product will contribute
to the effective usage of natural resources. For more information
about where you can drop off your waste equipment for recycling,
please contact your local city office, waste authority, approved
WEEE scheme or your household waste disposal service. For
more information regarding return and recycling of WEEE
products, please visit www.canon-europe.com/environment
(EEA: Norway, Iceland and Liechtenstein)
.
3
About This Device
This device allows you to connect LAN-compatible computers to a
scanner via a network. By connecting a scanner to the device with a
USB cable, you can perform scanning operations from a computer via
the network.
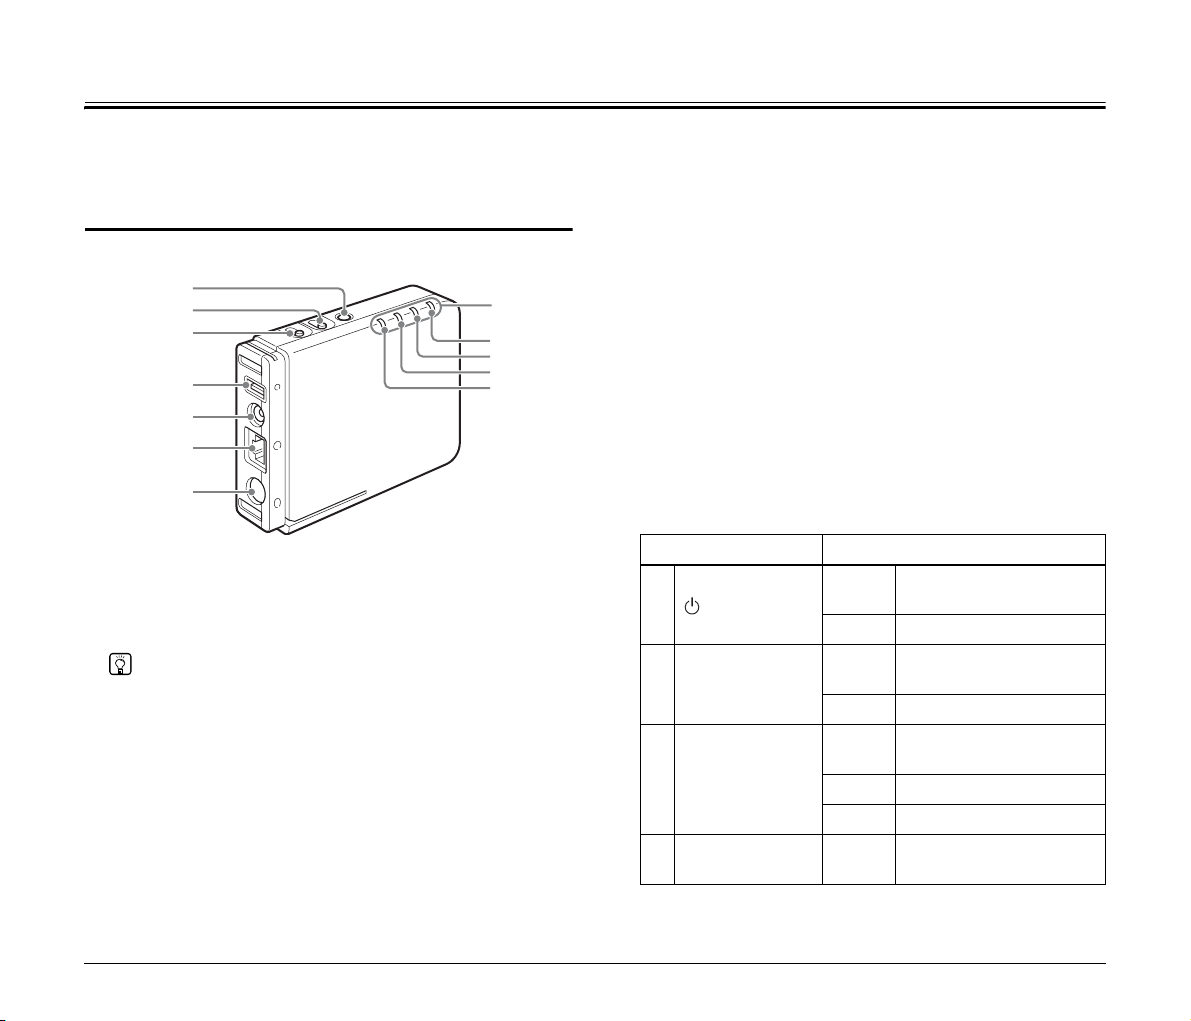
Names of Parts
A
B
C
D
E
F
G
A Power button
Turns on this device. The power lamp lights blue when the device
turns on.
When the device’s power is on, press and hold this button to turn it
(and the power lamp) off.
Hint
When a scanner is connected, the device’s power will be linked to
the scanner and will turn on/off when the scanner turns on/off.
B Reset button
Hold this button while turning the device on, and keep holding until
it starts up, to return the device to its factory default state.
Holding the button while the device is turned on resets only the
device’s settings to their initial values.
C DHCP On/Off button
Determines whether the device’s IP address is obtained
automatically via DHCP or whether a static address is used.
When DHCP is enabled, holding this button while turning on the
device turns off the DHCP lamp and disables DHCP.
H
1
2
3
4
When DHCP is disabled, holding this button while turning on the
device lights the DHCP lamp and enables DHCP.
Depending on the connection environment, it may take up to 2
minutes for the device to start up. Be sure to hold the button until
startup is complete.
D USB connector
Connect this device to the scanner using the USB cable.
E Power output connector
Use the supplied power relay cable to connect this to the scanner’s
power connector.
F LAN port
Connect a network cable that supports RJ-45 (10Base-T,
100Base-TX, 1000Base-T) here.
G Power input connector
Connect the AC adapter supplied with the scanner here.
H Lamps
The following lamps indicate the device state.
Lamps Meaning
1
(Power Lamp)
2 DHCP
3 Connection
4Status
Lit
(blue)
Unlit Power off
Lit
(green)
Unlit DHCP OFF
Lit
(green)
Lit (red) Initializing setup
Unlit LAN stopping
Lit
(green)
Powe r o n
DHCP ON
LAN connection
established
Network connection stable
4

Setup
(1) Installing the Scanner Driver
To use the device, the driver of the scanner to be used in conjunction
with the device must be updated to its latest version.
The scanner driver is available on the downloads page of the Canon
website. For details on acquiring and installing the driver, visit the
Canon support website.
http://www.canon-elec.co.jp/products/ims/softwareDownload/
index.html
Supported scanners
This unit supports the following scanners.
Scanner Driver version
DR-C230 1.0.11705.08001 SP2
DR-C240 1.1.11508.3001 SP4
DR-M140 1.2.11407.1001 SP7
DR-M160II 1.2.11402.06001 SP7
DR-M260 1.0.11705.30001 SP4
DR-M1060 1.0.11402.20001 SP6
An update is required for scanner driver versions indicated above and
earlier. For details on how to acquire the latest scanner driver and the
latest information on supported models, visit the Canon support
website.
(2) Connecting to the Scanner
A Connect the supplied USB cable to the USB ports on the device
and the scanner.
When connecting the device to a scanner that supports USB 3.0/
3.1, use the USB cable supplied with the scanner.
B Connect the supplied power relay cable to the power output
connector on the device and the power connector on the scanner.
C Plug the network cable’s connector (RJ-45) into the LAN port.
D Connect the AC adapter supplied with the scanner to the device,
and connect the power plug to a power outlet.
a
c
CAUTION
Connect and disconnect the AC adapter or power relay cables by
holding their plugs. Connecting and disconnecting by the cable may
result in damage to the cable.
b
d
5
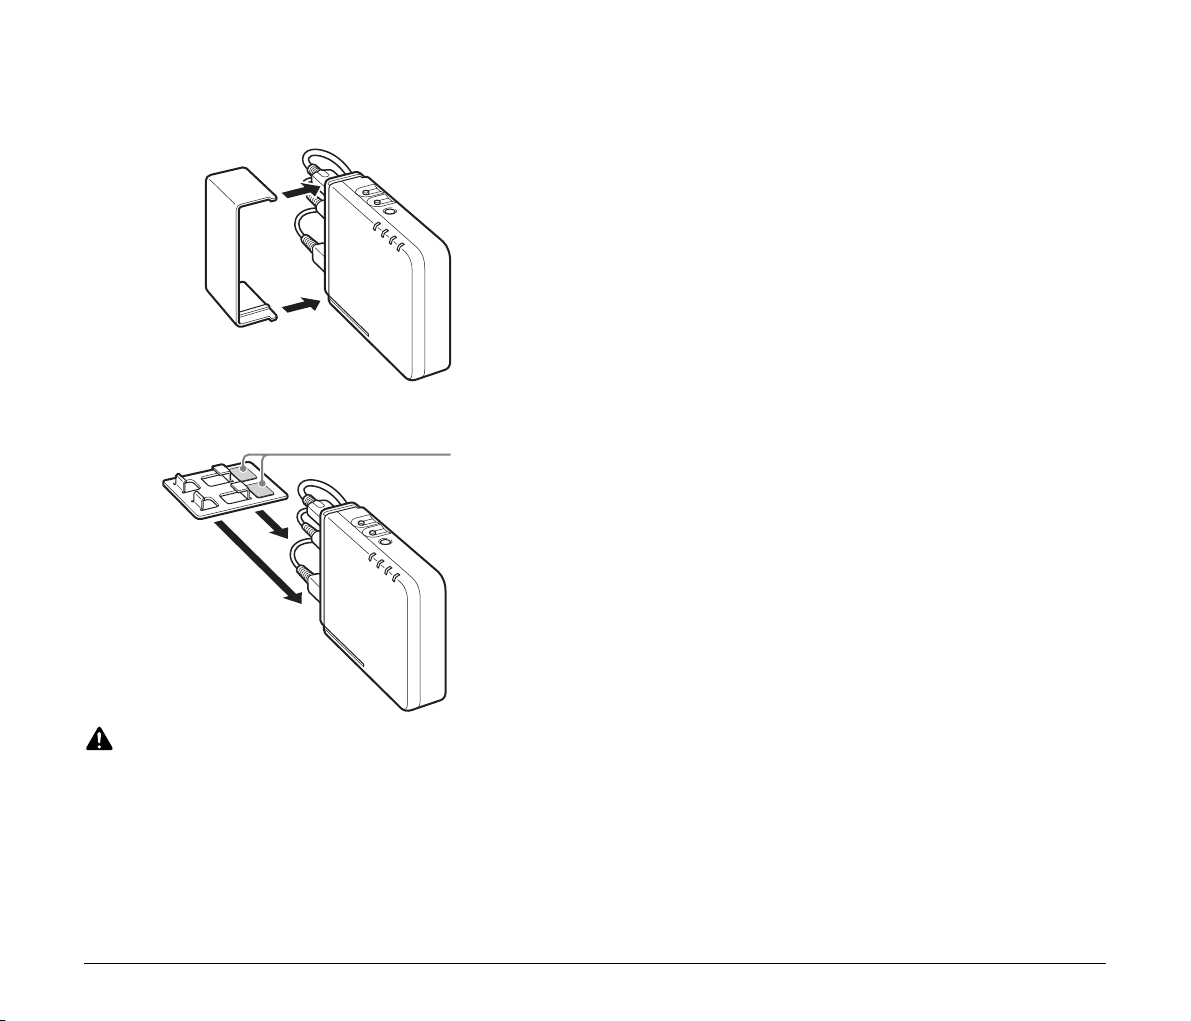
Cord Cover and Stand
You can attach the supplied cord cover to protect the connected
cable’s connector.
You can attach the stand to set the device upright. In addition, placing
the scanner on the stand will stabilize the device.
Place the
scanner here.
CAUTION
• When connecting the device to a scanner equipped with a fan,
maintain a space of at least 10 mm between the device and the
scanner so as not to obstruct the vents. If you attached the device to
the stand and are placing the scanner on the stand, be sure to
position the device so that it does not obstruct the scanner’s vents.
• When the stand is attached to the device, attach the cord cover as
well to prevent disconnection of the stand.
6
Connecting to the Wired Network
Under factory default conditions, the device will acquire its IP address
automatically from a DCHP server. If the network to which the device
will connect includes a DHCP server, the device will be usable simply
by connecting to that network.
You can check whether the device is connected to the network
properly and ready for use by performing the following and starting the
Driver Setting Tool.
Hint
This section describes operations for when the DR-M160II is being
used. When using a different model, replace any instance of the model
name with that of the model you are using.
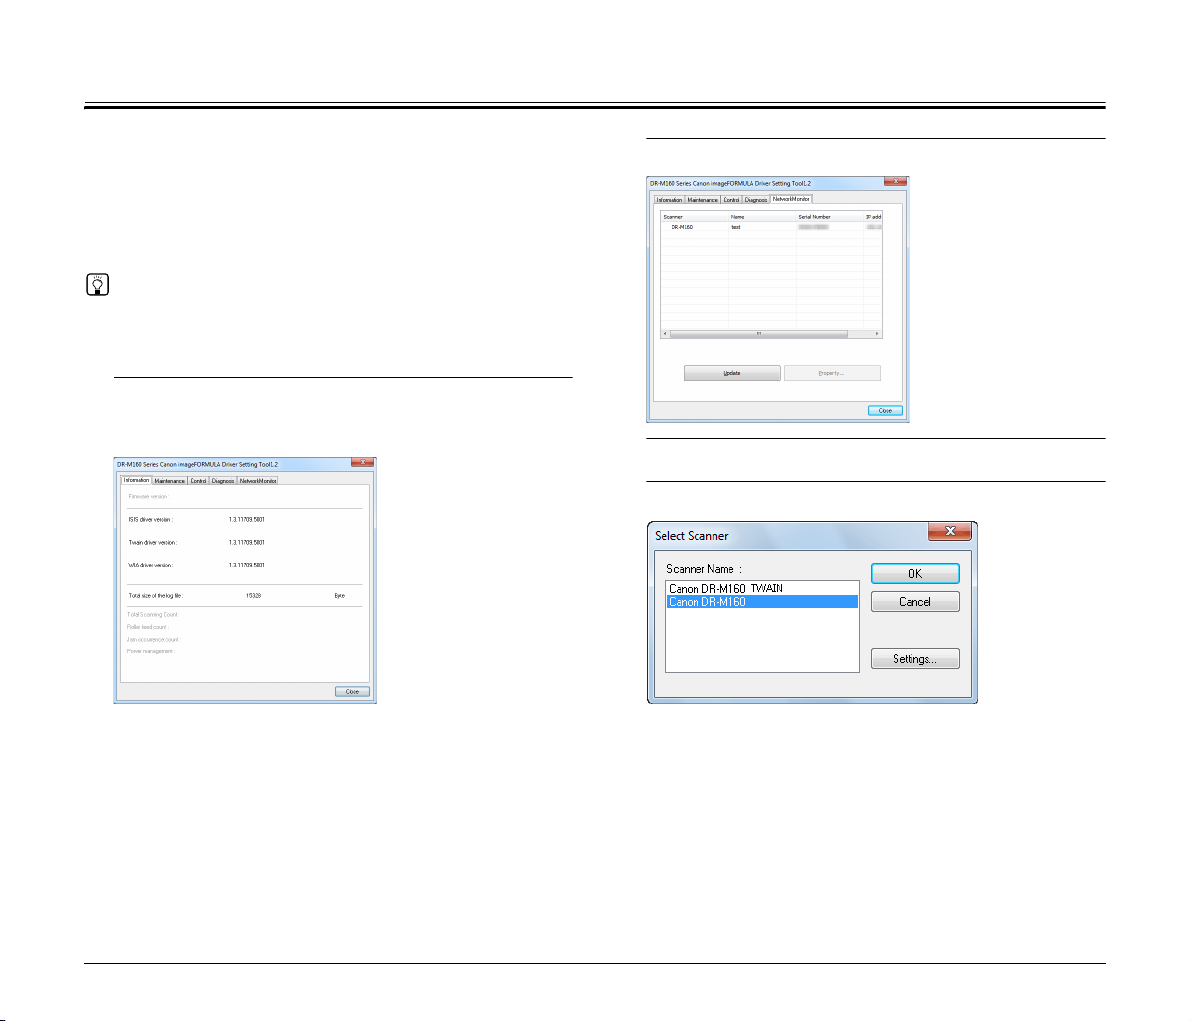
1
Click [All Programs] — [Canon <scanner name>] —
[Driver Setting Tool] in the start menu.
Driver Setting Tool starts.
2
Click the [NetworkMonitor] tab.
3
Check that the scanner appears in the list.
4
Select the scanner in your application.
7

Specifying a Static IP Address for the
Device
Perform the following when specification of a static IP address for the
device is necessary, such as when the network does not include a
DHCP server.
1
Turn on the device while holding the DHCP On/Off button.
The power lamp will light. (The other lamps will also light
momentarily and then turn off.) Hold the DHCP On/Off button until
the Connection lamp lights.
CAUTION
If the Connection lamp does not light even after holding the power
button for 3 minutes or more, check the network cable connection.
2
Temporarily change the network address of the computer
to which the device will be connected to “192.168.0.100”.
Connect this device to your computer by peer-to-peer connection,
and set a static IP address.
3
Start the web browser, and access the “http://
192.168.0.10/” URL.
The device’s web page opens, and the login screen is displayed.
4
Specify the IP address for the device in the [Network
Setting] screen of the web menu.
For details, see “Using the Web Menu” (p. 21).
8
Scanning with the CaptureOnTouch Job Tool from a Smart Device
The CaptureOnTouch Job Tool is an application for smart devices
(such as smart phones and tablet devices) for controlling scan
operations via this device (NA10).
The CaptureOnTouch Job Tool for smart devices provides the
following scanning methods.
Job Scanning from the App
Tap a job icon in the CaptureOnTouch Job Tool to scan according to
registered scan job settings.
Scanning with Scanner Start Button
You can copy a job registered in the CaptureOnTouch Job Tool to the
scanner, then run that job by pressing the scanner's start button.
Preparation Before Scanning
Install the CaptureOnTouch Job Tool on your smart device, connect
the NA10 to a computer, and connect your smart device to the
network.
1
Install the CaptureOnTouch Job Tool application on your
smart device.
• For iOS devices, download the CaptureOnTouch Job Tool from
the App Store and install it.
• For Android devices, download the CaptureOnTouch Job Tool
from Google Play and install it.
2
Connect the NA10 to a wired network.
For details, see “Connecting to the Wired Network” (p. 7).
3
Connect your smart device to the same network as this
device and the computer.
Job Scanning from a PC
When there is one or more computer on the same network, you can
use the CaptureOnTouch Job Tool to select and execute jobs
registered by CaptureOnTouch on each computer.
CAUTION
CaptureOnTouch Job Tool compatibility requires CaptureOnTouch
version 4.2 or later.
9
Granting Access Permission
When saving scanned data in a specific location, a screen asking for
permission to access the smart device is displayed. You can save
scanned data if you grant access permission. If you do not grant
access permission, you cannot save the scanned data. You can
change granting/denial of access permission by the following
procedure.
CAUTION
The operating procedure may differ depending on OS version and
terminal type.
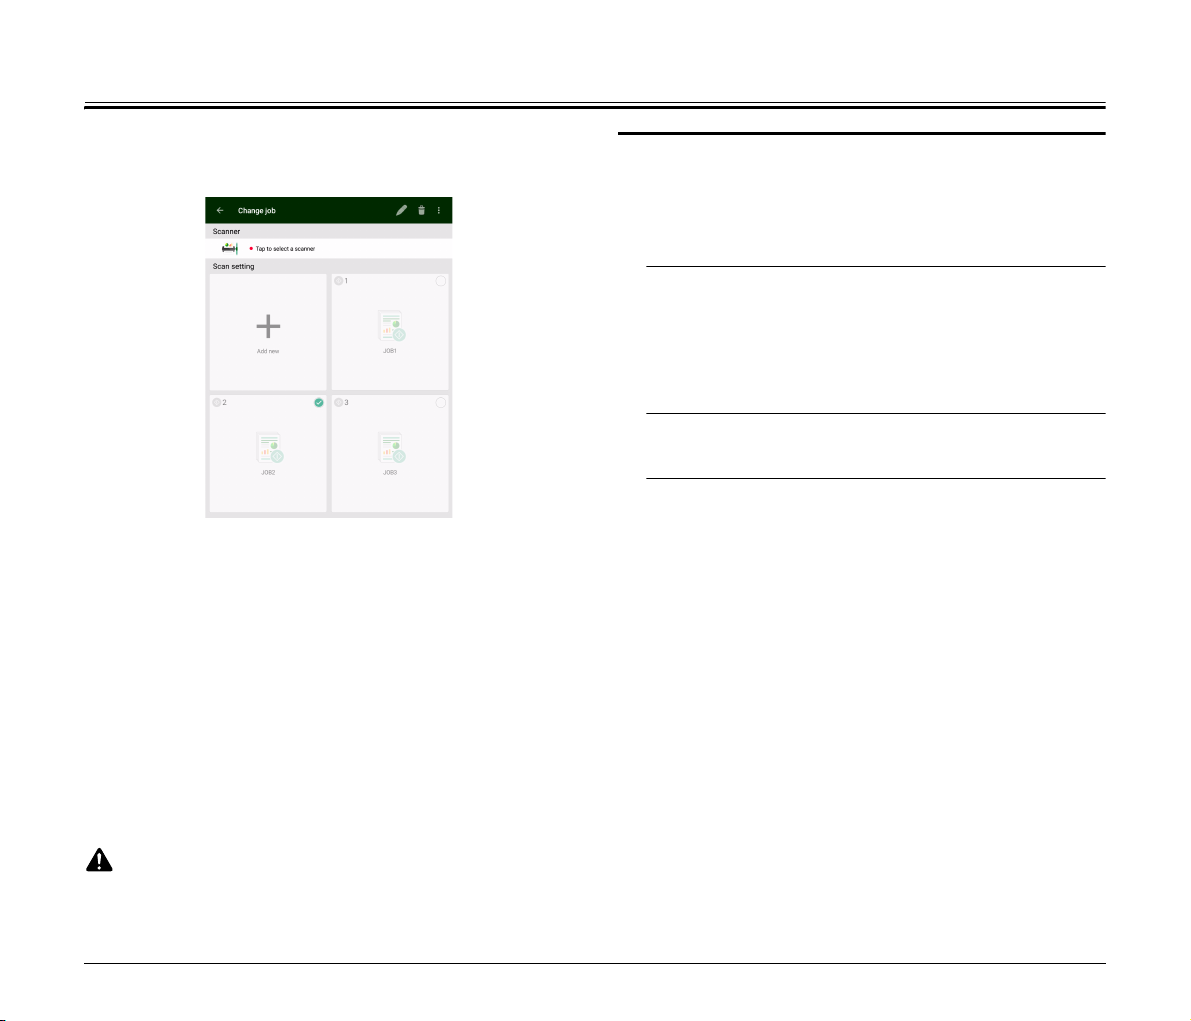
Job Scanning from the App
You can register a job in the CaptureOnTouch Job Tool and execute
scanning according to the job's scan settings. Scanned data is saved
in a shared folder on the specified computer or smart device.
1
Start the CaptureOnTouch Job Tool.
The [Scan from app job] screen appears.
Hint
You can change the screen displayed at startup by tapping [ ]
and selecting [Initial screen setting].
Android devices
1
Tap [Settings].
The [Settings] screen appears.
2
Tap [Apps].
The [Apps] screen appears.
3
Tap [COTJT].
The [App info] screen appears.
4
Tap [Permissions].
iOS devices
1
Tap [Settings].
The [Settings] screen appears.
2
Tap [COTJT].
The access permission setting screen is displayed.
3
Tap [Photos], and select [Add Photos Only] or [Never].
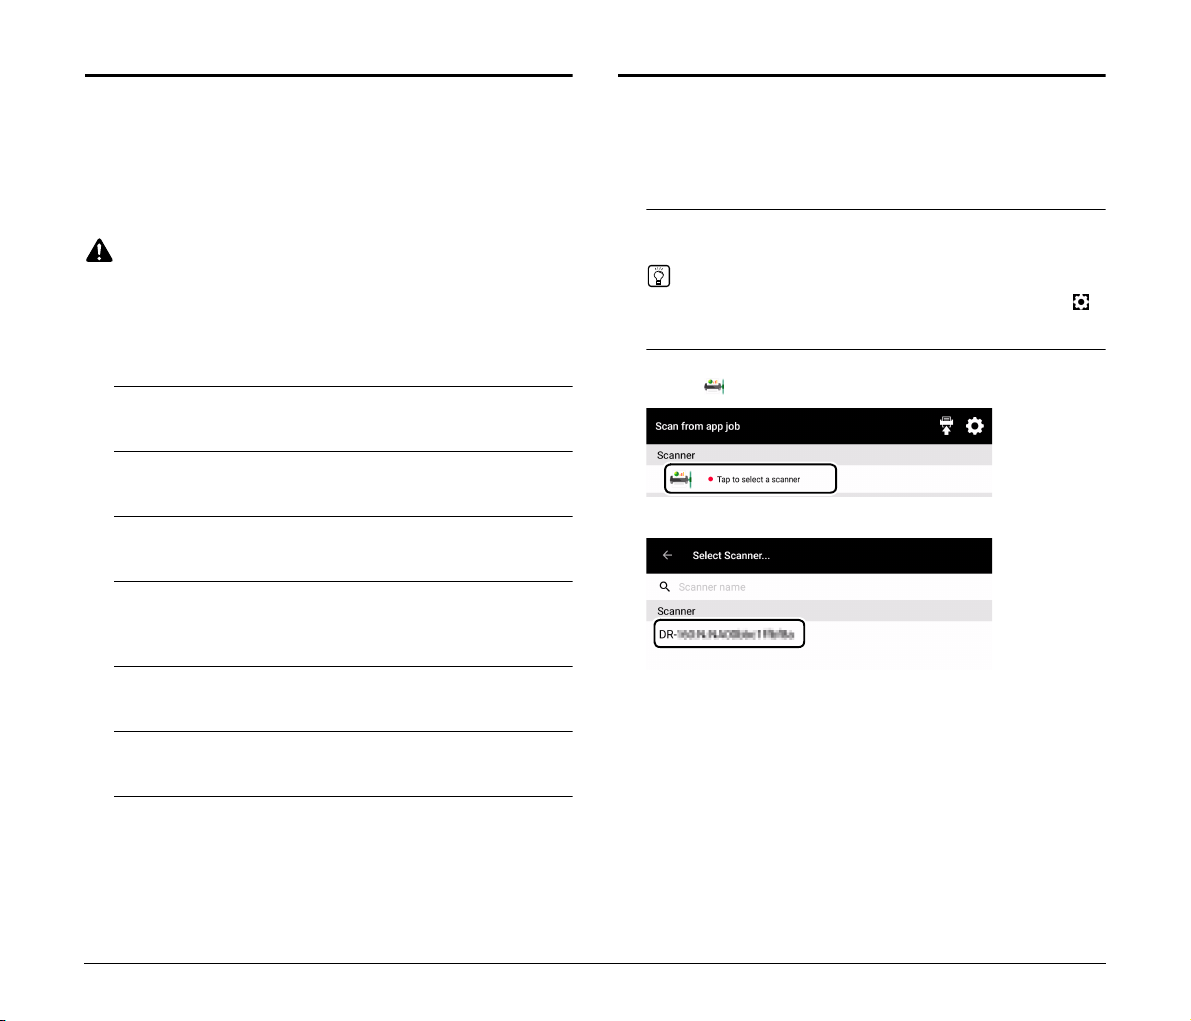
2
Select the scanner.
A Tap [ ].
B Select the scanner on the [Select Scanner] screen.
10
 Loading...