

Page 1

Quick Start Guide
BE
QT5-
0234
-V01
Page 2

Quick Start Guide
Table of Contents
Introduction 15
Document Handling 20
Paper Handling 23
Copying 29
Printing from a Memory Card 31
Printing Photographs Directly from a Compliant Device 35
Preparing Your Machine for Fax 36
Sending Faxes 43
Receiving Faxes 44
Maintenance 46
ENGLISH
Page 3

For information about the machine setup on pages 2 to 3, also refer to the Easy Setup Instructions.
ENGLISH
Preparing the machine
Unpack the machine
Please confirm bundled items against the illustration printed on the lid of the packing box.
.
Also read the Safety Precautions in the User's Guide. Observe the warnings and cautions to avoid personal
injury or damage to the machine.
IMPORTANT
• Do not connect the USB cable until after the software is installed.
• A printer cable is not included. You must purchase a USB cable (less than 10 ft. / 3 m) to connect your
machine to a computer.
1 Connect the telephone line and the power cord.
• If you connect the telephone line, see “Examples of Connecting the Machine” on page 36.
UK users only
If the connector of the external device cannot be connected to the jack on the machine, you will need to
purchase a B.T. adapter to connect as follows:
Connect the external device line to the B.T. adapter, then connect the B.T. adapter to the jack.
2 Turn on the machine.
• The language setting is only available for some countries.
• If you have an undesired language or country selection, refer to the User’s Guide.
3 Install the Print Head.
• If the Scanning Unit (Printer Cover) is left open for more than 10 minutes, the Print Head Holder moves
to the right. Close and reopen the Scanning Unit (Printer Cover) to return the Holder to the center.
• There might be some transparent or light blue ink on the inside of the bag the print head comes in - this
has no effect on print quality. Be careful not to get ink on yourself when handling these items.
• Do not reattach the protective cap once you have removed it.
4 Install the ink tanks.
• Ensure that all the ink tanks are installed in the order directed by the label. The machine cannot be used
unless all the ink tanks are installed.
• For safety reasons, store ink tanks out of the reach of small children.
• Do not drop or shake ink tanks as this may cause the ink to leak out and stain your clothes and hands.
• Be sure to remove the clear film from the ink tank in the exact order as shown in step 3.
• Do not reattach the protective cap once you have removed it.
• The Alarm Lamp still lights orange if an ink tank is not installed properly. Open the Scanning Unit
(Printer Cover) and make sure that all the ink tanks are installed in the correct order directed on the label.
2
Page 4

5 Align the Print Head from the Operation Panel.
Execute automatic Print Head alignment to keep high print quality.
• When executing automatic Print Head alignment, always load paper in the Auto Sheet Feeder. You can
load paper in both the Auto Sheet Feeder and Cassette when printing. For details, refer to the User's
Guide.
• If the automatic Print Head alignment screen is not displayed, see “Aligning the Print Head
Automatically” on page 49.
• When the Print Head position pattern is printed, Print Head alignment is complete.
For fax users
Select the receive mode according to your needs. See “Receive Modes” on page 44.
• If you want to receive only faxes automatically with your machine, or you have a dedicated telephone
line for fax use only:
<FAX only>
• If you receive mainly voice calls and sometimes faxes, or you want to receive faxes manually:
<Manual RX>
• If you want to receive voice messages on your answering machine and receive faxes automatically:
<Ans. machine connect.>
• If you want to receive faxes automatically as well as voice calls:
<FAX/TEL auto switch>
• If you have subscribed to a Distinctive Ring Pattern Detection (DRPD) service with your telephone
company (US and Canada only):
<DRPD>
• If you want your machine to automatically switch between fax and voice calls by the call ring patterns
(Network Switch):
<Network switch>
• To send a fax, you need to set the telephone line type setting properly on the machine. For details on
how to confirm and change this setting, refer to the User's Guide.
If you are unsure of your telephone line type, contact your telephone company.
ENGLISH
3
Page 5
For information about the software installation on this page, also refer to the Easy Setup
ENGLISH
Instructions.
Install the software
Select Easy Install in order to install the application software, On-screen Manual and MP drivers. Select
Custom Install in order to choose the options you would like to install.
IMPORTANT
• Temporarily close any open applications, including anti-virus software. Computer security programs
can be re-started after software installation.
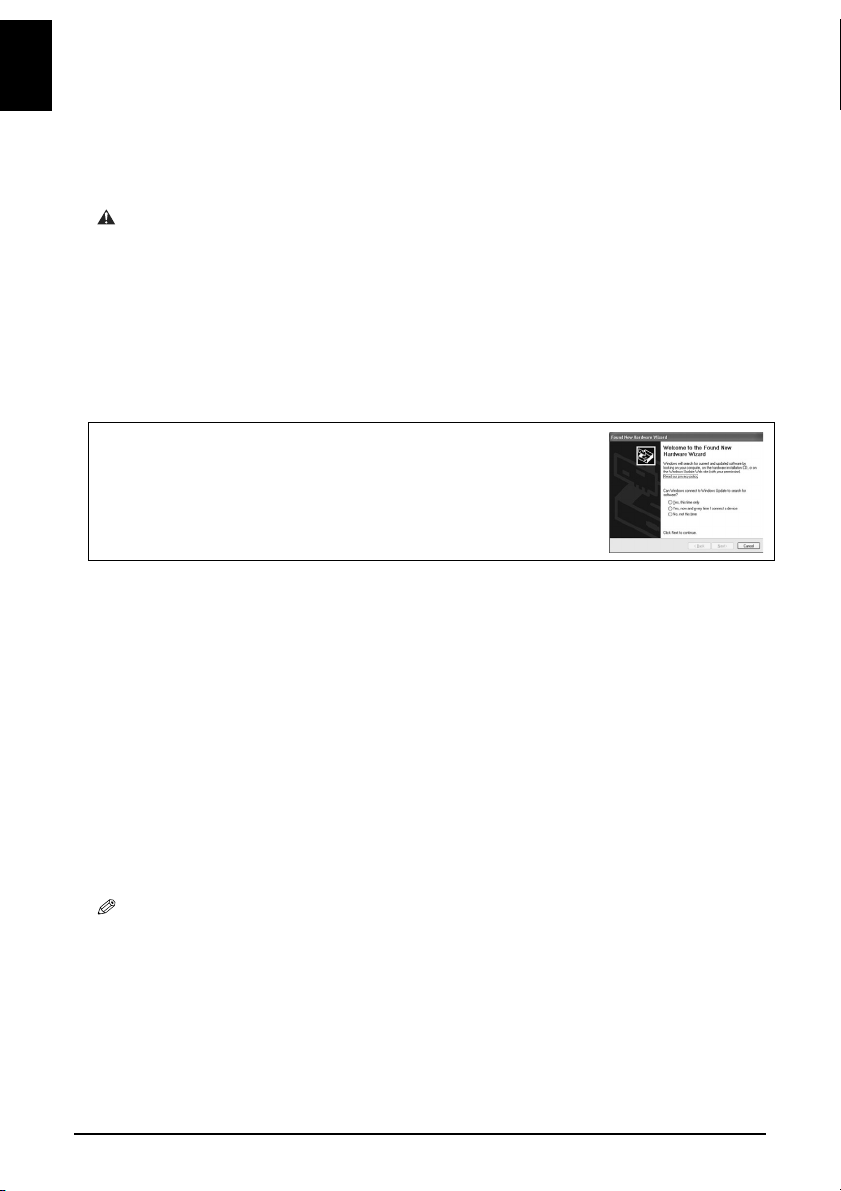
Installing the MP Driver - Windows
• If you have an earlier version of the MultiPASS Suite software installed on your computer, uninstall this
version before installing the new version. For instructions on uninstallation, refer to the guides for that
version of MultiPASS Suite.
• You must log on as an administrator or have administrative privileges in order to install the software in
Windows XP or Windows 2000.
• Do not switch users during the installation process.
• If the following screen appears, the USB cable is connected.
Perform the following steps.
1. Press [ON/OFF] to turn off the machine.
2. Disconnect the USB cable.
3. Click [Cancel].
®
Installing the MP Driver - Macintosh
• Do not connect the machine to Mac® OS 9 or Mac OS X Classic environments since they are not
supported.
• Enter the name and password for an Administrator Account if required.
Perform the following to make sure the driver has been installed correctly
1. Select [Applications] from the [Go] menu.
2. Double-click the [Utilities] folder, then the [Printer Setup Utility] ([Print Center] when using Mac OS
X v.10.2.x) icon.
If the printer is displayed in the [Printer List], the printer driver is installed.
If the printer is not displayed in the [Printer List], click [Add] in the [Printer List] and select [USB]
from the pop-up menu. Select [MP830] from the [Product] list and click [Add].
When connecting from Mac OS X v.10.3.3 or earlier:
Restarting the computer while connected to the machine may cause the machine not to be detected. To
resolve this, either unplug the USB cable then plug it back in again, or turn the machine OFF then back
ON again.
• [MP830 FAX] is shown in the Name list, but you cannot add [MP830 FAX]. You can fax the document
with the current print settings applied to it using the computer's internal modem. You cannot send faxes
from your computer via the machine.
®
4
Page 6

Canon MP830 Quick Start Guide
Copyright
This manual is copyrighted by Canon Inc. with all rights reserved.
Under the copyright laws, this manual may not be reproduced in any form, in whole or in
part, without the prior written consent of Canon Inc.
© 2006 Canon Inc.
Disclaimer
Canon Inc. has reviewed this manual thoroughly in order that it will be an easy-to-use
guide to your Canon MP830 Series. All statements, technical information and
recommendations in this manual and in any guides or related documents are believed
reliable, but the accuracy and completeness thereof are not guaranteed or warranted, and
they are not intended to be, nor should they be understood to be, representation or
warranties concerning the products described.
Specifications are subject to change without notice.
As an ENERGY STAR partner, Canon Inc., has determined that
this product meets the ENERGY STAR guidelines for energy
efficiency.
All information regarding non-Canon products was compiled from publicly available
information. No representation is made regarding the accuracy thereof.
Super G3 is a phrase used to describe the new generation of fax
machines that use ITU-T V.34 standard 33.6 Kbps* modems. Super
G3 High Speed Fax machines allow transmission time of
approximately 3 seconds* per page which results in reduced
telephone line charges.
* Approximately 3 seconds per page fax transmission time based on Canon FAX
Standard Chart (Standard Mode) at 33.6 Kbps modem speed.
The Public Switched Telephone Network (PSTN) currently supports 28.8 Kbps modem
speeds or lower, depending on telephone line conditions.
ENGLISH
5
Page 7

ENGLISH
Exif Print is a standard for enhancing the communication
between digital cameras and printers.
By connecting to an Exif Print-compliant digital camera, the
camera’s image data at the time of shooting is used and
optimized, yielding extremely high quality prints.
This equipment conforms with the essential requirements of EC
Directive 1999/5/EC. We declare that this product conforms with the
EMC requirements of EC Directive 1999/5/EC at nominal mains input
230V, 50 Hz although the rated input of the product is 200V–240V, 50/
60 Hz. If you move to another EU country and are experiencing trouble
please call the Canon Help Desk.
(For Europe Only)
Model Name
K10270 (PIXMA MP830)
Trademarks
• "Windows" and "Internet Explorer" are trademarks of Microsoft Corporation,
registered in the United States and other countries.
• "Macintosh" and "Mac" are trademarks of Apple Computer, Inc., registered in the U.S.
and other countries.
• "SmartMedia" is a trademark of Toshiba Corporation.
• "MEMORY STICK", "Memory Stick PRO", "MEMORY STICK Duo" and "Memory
Stick Pro Duo" are trademarks of Sony Corporation.
• "xD-Picture Card" is a trademark of Fuji Photo Film Co., Ltd.
• "MultiMediaCard" is a trademark of Infineon Technologies AG.
• "SD Secure Digital memory card" and "miniSD Card" are trademarks of SD
Association.
• Specifications are subject to change without notice.
This machine supports Exif 2.2 (also called “Exif Print”).
6
Page 8

X How to Use the Documentation Provided
Easy Setup Instructions (Printed documentation):
Be sure to read this sheet first.
This sheet includes instructions for setting up your machine and getting it ready for use.
Quick Start Guide (This guide)
Read this guide when starting to use the machine.
After following instructions in the Easy Setup Instructions, we recommend you read this
guide to familiarize yourself with the basic operation of some of the main functions that
can be performed on your machine.
On-screen Manuals
User’s Guide
Read this guide when starting to use the machine.
After following instructions in the Easy Setup Instructions, read this guide for instructions
on printing from your computer, direct photo printing from selected digital cameras,
faxing, copying, and scanning.
Refer to these guides as needed for full instructions on some of the more advanced
features.
Scan Guide
Refer to this guide for full instructions on scanning operation and settings.
Printer Driver Guide
Refer to this guide for full instructions on setting the printer driver.
FAX Driver Guide
Refer to this guide for full instructions on setting the fax driver.
Photo Application Guide
Refer to this guide for instructions on using various application software included on the
Setup CD-ROM.
ENGLISH
7
Page 9

X How to Read the On-screen Manuals
ENGLISH
The on-screen manuals are manuals to be viewed on your computer.
Read these manuals for detailed information on usage of the machine that is not
mentioned in this document, troubleshooting, or usage of the application softwares
supplied with the Setup CD-ROM, etc.
If you have not installed or have deleted the on-screen manuals, you can install them
using the Setup CD-ROM by either of the following.
• Select “Easy Install” to install the on-screen manuals along with the MP driver and
application softwares.
• Select “On-screen Manual” from “Custom Install” to install the on-screen manuals.
For Windows:
• Browser: Windows
• Microsoft Internet Explorer® 5.0 or later must be installed.
• The on-screen manual may not be displayed properly depending on your operating system or
Internet Explorer version. We recommend that you keep your system up to date with Windows
Update.
®
HTML Help Viewer
For Macintosh:
• Browser: Help Viewer
• The on-screen manual may not be displayed properly depending on your operating system. We
recommend that you keep your system up to date.
• We recommend using Safari as your Web browser to view the HTML format On-screen Manuals.
If Safari is not installed on your computer, download it from Apple Computer, Inc. website and
install it.
8
Page 10

X Reading the Document
Symbols Used in This Guide
ENGLISH
WARNING Indicates a warning concerning operations that may lead to death or
CAUTION Indicates a caution concerning operations that may lead to injury to
IMPORTANT Indicates operational warnings and restrictions. Be certain to read these
1. (Operation branch-step) Used to explain each operation of a branch procedure.
injury to persons if not performed correctly. In order to use the machine
safely, always pay attention to these warnings.
persons or damage to property if not performed correctly. In order to use
the machine safely, always pay attention to these cautions.
items to operate the machine correctly and to avoid damage to the
machine.
Indicates notes for operation or additional explanations. Reading these is
highly recommended.
Buttons Used in This Guide
[button name] Text enclosed in these brackets indicates a button on the Operation Panel of the
machine or an item on the computer to be manipulated.
Example: [Color]
<message> Text enclosed in these brackets indicates a message or selectable menu item
which appears on the LCD (Liquid Crystal Display).
Example: <Photo Paper Pro>, <OFF>
9
Page 11

Terms Used in This Guide
ENGLISH
machine General term used to represent MP830.
default A setting that remains in effect unless you change it.
documents The original sheets of paper, pages of a book, or photographs you copy, fax, or
scan with the machine.
paper Paper on which you can print with the machine.
menu A list of settings from which you select an item to set up or change. A menu has
a title which appears on the LCD.
X Selecting the Language for the LCD
1 Press [Menu].
2 Use [W] or [X] to select <Maintenance/settings>, then press [OK].
3 Use [W] or [X] to select <Device settings>, then press [OK].
4 Use [S] or [T] to select <Language selection>, then press [OK].
5 Use [S] or [T] to select the language, then press [OK].
10
Page 12

X Legal Limitations on Use of Your Product and Use of
Images
It may be unlawful to make copies of, scan, print or use reproductions of the following
documents. The list provided is non-exhaustive. When in doubt, check with a legal
representative in your jurisdiction.
.
• Paper money
• Money orders
• Certificates of deposit
• Postage stamps (canceled or uncanceled)
• Identifying badges or insignias
• Selective service or draft papers
• Checks or drafts issued by governmental
agencies
• Motor vehicle licenses and certificates of
title
• Traveler’s checks
• Food stamps
• Passports
• Immigration papers
• Internal revenue stamps (canceled or
uncanceled)
• Bonds or other certificates of
indebtedness
• Stock certificates
• Copyrighted works/works of art without
permission of copyright owner
ENGLISH
11
Page 13

X Users in Canada
ENGLISH
Pre-installation Requirements for Canon Facsimile Equipment
A. Location
Supply a suitable table, cabinet, or desk for the machine. See the Appendix for the
machine’s specific dimensions and weight.
B. Order Information
1. Provide only a single line touch-tone or rotary telephone set terminated with a standard
6-pin modular telephone plug. (Touch-tone is recommended if available in your area.)
2. Order a CA11A modular wall jack, which should be installed by the telephone
company. If the CA11A modular wall jack is not present, installation cannot occur.
3. Order a normal business line from your telephone company’s business representative.
The line should be a regular voice grade line or an equivalent one. Use one line per
machine.
DDD (Direct Distance Dial) line
-orIDDD (International Direct Distance Dial) line if you communicate overseas
• Canon recommends an individual line following industry standards, such as the 2500 (touch-tone)
or 500 (rotary/pulse dial) telephones. A dedicated extension off a PBX (Private Branch Exchange)
unit without “Call Waiting” can be used with your facsimile unit. Button telephone systems are not
recommended because they send non-standard signals to individual telephones for ringing and
special codes, which may cause a fax error.
C. Power Requirements
The power outlet should be a two-prong grounded receptacle (Single or Duplex). It
should be independent from copiers, heaters, air conditioners or any electric equipment
that is thermostatically controlled. The rated value is 120 volts and 15 amperes. The
CA11A modular jack should be relatively close to the power outlet to facilitate
installation.
Notice
This equipment meets the applicable Industry Canada terminal Specifications.
12
Page 14

Avis
Le présent matériel est conforme aux spécifications techniques applicables d'Industrie
Canada.
Before installing this equipment, users should ensure that it is permitted to be connected
to the facilities of the local telecommunications company. The equipment must also be
installed using an acceptable method of connection. In some cases, the company's inside
wiring associated with a single-line individual service may be extended by means of a
certified connector assembly (telephone extension cord). The customer should be aware
that compliance with the above conditions may not prevent degradation of service in
some situations.
The Ringer Equivalence Number is an indication of the maximum number of devices
allowed to be connected to a telephone interface. The termination on an interface may
consist of any combination of devices subject only to the requirement that the sum of the
RENs of all the devices does not exceed five.
Even if the dual-line option is installed, the REN is applicable to each port.
Avis
L'indice d'équivalence de la sonnerie (IES) sert à indiquer le nombre maximal de
terminaux qui peuvent être raccordés à une interface téléphonique. La terminaison d'une
interface peut consister en une combinaison quelconque de dispositifs, à la seule
condition que la somme d'indices d'équivalence de la sonnerie de tous les dispositifs
n'excède pas 5.
Repairs to certified equipment should be made by an authorized Canadian maintenance
facility designated by the supplier. Any repairs or alterations made by the user to this
equipment, or equipment malfunctions, may give the telecommunications company cause
to request the user to disconnect the equipment.
Users should ensure for their own protection that the electrical ground connections of the
power utility, telephone lines and internal metallic water pipe system, if present, are
connected together. This precaution may be particularly important in rural areas.
CAUTION
• Users should not attempt to make such connections themselves, but should contact the
appropriate electric inspection authority, or electrician, as appropriate.
• This Class B digital apparatus meets all requirements of the Canadian Interference-Causing
Equipment Regulations.
• Cet appareil numérique de la classe B respecte toutes les exigences du Règlement sur le
matériel brouilleur du Canada.
ENGLISH
13
Page 15

Customer Technical Supports
ENGLISH
Canon Canada Inc., offers a full range of customer technical support* options:
• For interactive troubleshooting, e-mail technical support, the latest driver downloads
and answers to frequently asked questions (www.canon.ca)
• Free live technical support Mon - Fri 9am-8pm EST (excluding holidays) for products
still under warranty (1-800-OK-CANON)
• The location of the authorized service facility nearest you (1-800-OK-CANON)
If the problem cannot be corrected by using one of the above technical support options,
repair options are available at the time of your call to the Free live technical support
number above or via the website at www.canon.ca
* Support program specifics are subject to change without notice.
CANON CANADA INC.
1-800-OK-CANON (1-800-652-2666)
http://www.canon.ca
14
Page 16
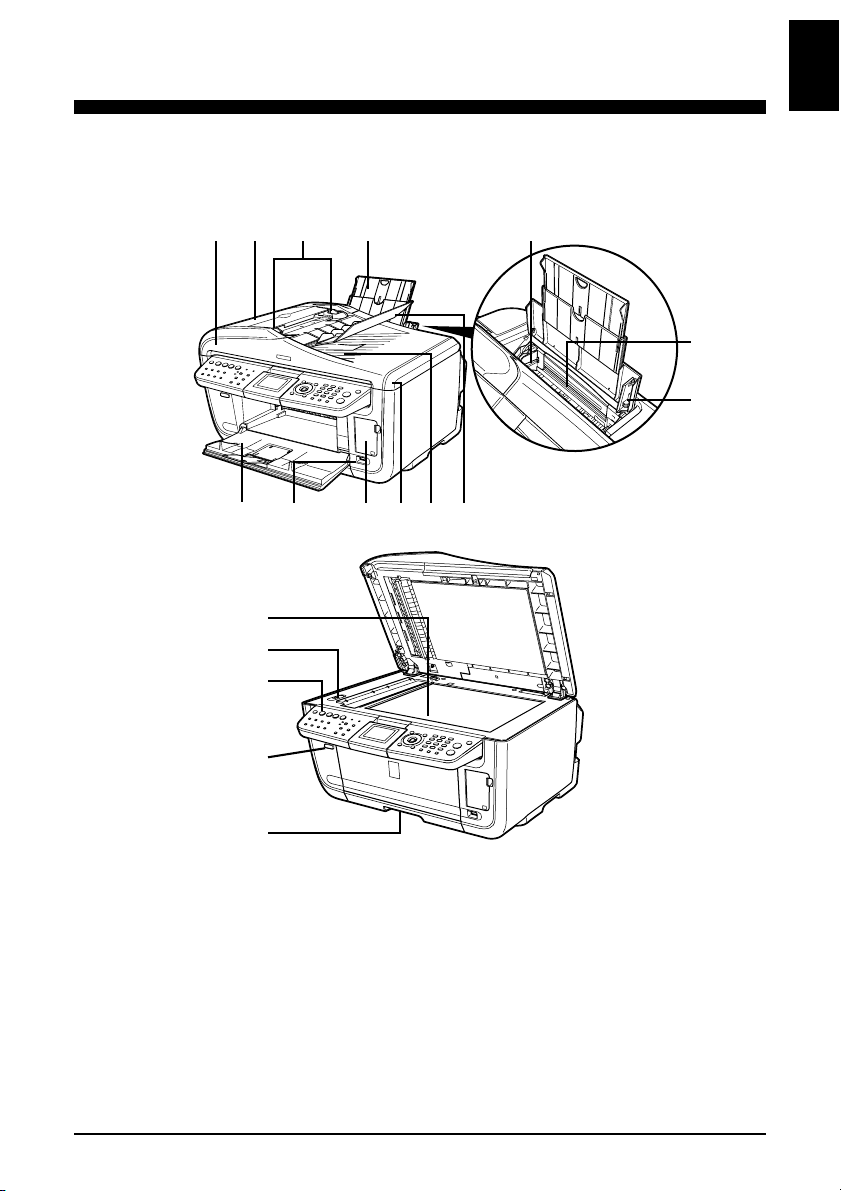
1Introduction
X Main Components and Their Functions
Front View
(1) (2)
(3)
(4)
(5)
ENGLISH
(6)
(7)
(11)
(13)
(12)
(14)
(15)
(16)
(17)
(18)
ADF (Automatic Document
(1)
Feeder)
Feeder Cover Open when clearing jammed documents.
(2)
Document Guides Adjust these guides to match the document width.
(3)
Paper Support Supports paper loaded on the tray. Extend it before loading paper
(4)
(10)
Automatically scans in documents loaded in the Document Tray.
by putting your finger in the rounded indent and pulling out the
extension until it stops.
(9)
(8)
Chapter 1 Introduction 15
Page 17

Paper Guide When loading paper, ensure that the left edge just touches this
ENGLISH
(5)
guide.
To move the Paper Guide, pinch the knob and slide in the
appropriate direction.
Auto Sheet Feeder Load paper here before printing. Paper feeds automatically, one
(6)
Cover Guide Align the right side of the paper to this guide.
(7)
Document Tray Open to load a document. Once loaded, the document is fed one
(8)
Document Output Slot Documents scanned from the Document Tray are delivered here.
(9)
Document Cover Open this cover when loading a document on the Platen Glass.
(10)
Card Slot Cover Open to insert a memory card.
(11)
Direct Print Port Used when printing directly from a digital camera or a digital
(12)
Paper Output Tray Open this tray before copying or printing by pressing the Open
(13)
Platen Glass Used to load a document to be processed.
(14)
Scanner Lock Switch Locks the internal fluorescent lamp that is located underneath the
(15)
Operation Panel Used to change the settings or operate the machine. See
(16)
Open Button Press this button to open the Paper Output Tray.
(17)
Cassette Load paper to be used regularly here. Paper feeds automatically,
(18)
sheet at a time.
page at a time. Load the document with the side you want to scan
facing up.
video camcorder compatible with PictBridge or Canon Bubble Jet
Direct.
Button. However, even if it is closed, the tray will open
automatically when copying or printing is started.
Close the tray when it is not in use.
Platen Glass (scanning lamp), to be used when transporting the
machine. Make sure to unlock it before turning the machine on.
“Operation Panel Name and Functions” on page 18.
one sheet at a time.
* Photo Stickers and 2.13" x 3.39"/ 54.0 x 86.0 mm size paper are
not loadable in the Cassette.
16 Introduction Chapter 1
Page 18

Rear View and Interior
ENGLISH
(22)
(19) (20) (21)
(31)
(30)
Print Head Lock Lever Used to fix the Print Head.
(19)
Ink Tank Lamp Lights or flashes red to indicate the status of the ink tank.
(20)
Print Head Holder Used to install a Print Head.
(21)
Scanning Unit
(22)
(Printer Cover)
Inner Cover Set the CD-R Tray here. Open when printing on a DVD/CD.
(23)
Card Slot Set the memory card here.
(24)
Access Lamp Lights when a memory card is inserted into the Card Slot. This
(25)
Duplexing Transport Unit Open when clearing jammed paper after pulling out the Cassette.
(26)
Power Connector This is the connector used to connect the provided power cord.
(27)
Rear Cover Open when clearing jammed paper.
(28)
External Device Jack Connects the external device.
(29)
Telephone Line Jack Connects with the telephone line.
(30)
USB Connector
(31)
(for computer)
(23)
(28)(29)
This is the unit used to scan documents. Open when replacing the
ink tanks or clearing jammed paper.
lamp flashes while the machine is reading or writing data from/to
the memory card.
This is the connector used to connect the machine to a computer
using a USB cable.
(27)
(24)
(25)
(26)
Chapter 1 Introduction 17
Page 19

Operation Panel Name and Functions
ENGLISH
(2)
(1)
(3)
(4)
(5)
(6)
(7)
(20)
(18)
(16)
(14)
(21)
(19)
(13)
[ON/OFF] Turns the machine ON and OFF. Before turning ON the machine,
(1)
[COPY] Switches the machine to Copy mode. Flashes when the machine is
(2)
[FAX] Switches the machine to Fax mode.
(3)
[SCAN]* Switches the machine to Scan mode. This button is used when the
(4)
[MEMORY CARD] Switches the machine to Memory card mode.
(5)
In Use/Memory Lamp Lights when the telephone line is in use. Lights also when there are
(6)
Alarm Lamp Lights or flashes orange, when an error occurs, or when paper or
(7)
LCD
(8)
(Liquid Crystal Display)
[Menu] Used to display menus.
(9)
[Settings] Use to configure the page size, media type, and image correction
(10)
Numeric Buttons Enter numerical values such as the number of copies, as well as
(11)
[Stop/Reset] Cancels operations. If this button is pressed during printing, the
(12)
One-Touch Speed Dial Key Push these buttons to dial pre-registered fax/telephone numbers or
(13)
Auto Sheet Feeder Lamp Lit when the Auto Sheet Feeder is selected.
(14)
Cassette Lamp Lit when the Cassette is selected.
(15)
(15)
(17)
make sure the Document Cover is closed.
turned on.
machine is connected to a computer. (Refer to the Scan Guide.)
documents stored in the machine's memory.
ink has run out.
Displays messages, menu selections, and the operation status.
settings.
fax/telephone numbers and characters.
machine aborts printing.
group.
(8)
(22)
(9)
(23)
(24)
(10)
(25)
(27)
(26)
(11) (12)
(29)
(28)
(31)(30)
18 Introduction Chapter 1
Page 20

[Feed Switch] Selects the paper source. Press this toggle switch to change the
(16)
[Photo Index Sheet] Switches to Photo Index Sheet mode.
(17)
[Enlarge/Reduce] Sets the enlargement or reduction ratio for copying.
(18)
[Search] Looks up target photos in the memory card using the shooting date
(19)
[Two-Sided] Specifies settings for <Two-sided copy>.
(20)
[FAX Quality] Sets the resolution of the fax you are sending.
(21)
[Back] Allows you to return to the previous screen.
(22)
[OK] Finalizes your selection for the menu or setting item.
(23)
[S] [T] [W] [X] Scroll through menu selections, and increase or decrease the
(24)
[Trimming] Use to crop the photo that is displayed.
(25)
[Tone] Switches temporarily to tone dialing. Also changes the mode when
(26)
[Redial/Pause] Redials the last dialed number using Numeric buttons. Also enters
(27)
[Coded Dial] Press this button and a two-digit code to dial a pre-registered fax/
(28)
[Hook] Engages or disengages the telephone line.
(29)
[Black] Starts black & white copying, scanning, or faxing.
(30)
[Color] Starts color copying, photo printing, scanning, or faxing.
(31)
paper source between the Auto Sheet Feeder and Cassette.
as the search key.
Restores the machine to normal operation after a printing error
was resolved, or if paper jams are cleared. Ejects documents
remaining in the ADF.
number of copies. You can use these buttons when <S>, <T>,
<W>, and <X> are displayed on the LCD. Also [W] cancels the
entered character, and [X] enters a space between characters when
entering characters.
entering characters.
pauses between or after numbers when dialing or registering
numbers.
telephone number or group.
ENGLISH
* The settings configured from MP Navigator apply when scanning from the machine's operation
panel.
If with some types of original the position and size of the image is not scanned in correctly, please
refer to "Selecting the Behavior of the Operation Panel with MP Navigator" in the Scan Guide
(On-screen Manual) and change the MP Navigator [Document Type] and [Document Size] to
match those of the original being scanned.
Chapter 1 Introduction 19
Page 21

2 Document Handling
ENGLISH
X Document Requirements
Document type • Documents
Size (W x L) Max. 8.5" x 11.7" / 216 x 297 mm Max. 8.5" x 14.0" (216 x 356 mm)
Quantity 1 sheet • Max. 35 pages of A4- or
Thickness Max. 0.8" / 20 mm 0.002" to 0.005" (0.06 to 0.13 mm)
Weight —
• Photographs
•Book
• Documents that are not suitable for
the ADF
Platen Glass ADF
Multipage documents of the same
size, thickness, and weight
Min. 5.8" x 5.8" (148 x 148 mm)
Only A4- or Letter-sized originals for
two-sided copying or scanning
Letter-sized sheets
(20 lb. or 75 g/m
5 mm in height
• Max. 30 pages of Legal-sized sheets
(20 lb. or 75 g/m
4 mm in height
• 1 sheet for sizes other than these
13 to 24 lb. (50 to 90 g/m
2
2
paper), up to
paper), up to
2
)
20 Document Handling Chapter 2
Page 22

X Loading Documents
Using the Platen Glass
1 Lift the Document Cover.
2 Load your document on the Platen Glass.
• Place your document face down on the Platen Glass.
• Align the upper left corner of your document with the alignment mark on the upper left corner
of the Platen Glass.
ENGLISH
3 Gently close the Document Cover.
Chapter 2 Document Handling 21
Page 23

Using The ADF
ENGLISH
1 Remove any documents from the Platen Glass.
2 Open the Document Tray.
3 Load the document in the ADF (1).
4 Adjust the Document Guides to match the document width (2).
(1)
(2)
(A)
• Ensure that the edge of the document stack is in line with the Paper Size Mark imprinted on the
Document Tray (A).
22 Document Handling Chapter 2
Page 24

3 Paper Handling
X Recommended Paper and Requirements
ENGLISH
Media Type Model Paper Support Load Limit Printer Driver
Auto Sheet Feeder Cassette
Plain Paper — 0.52" / 13 mm 0.52" / 13 mm [Plain Paper]
High Resolution
Paper
Super White Paper SW-201 0.52" / 13 mm
Glossy Photo
Paper
Glossy Photo
Paper “Everyday
Use”
Matte Photo Paper MP-101 10 sheets (A4, Letter),
Photo Paper Plus
Double Sided
Photo Paper Plus
Glossy
Photo Paper Plus
Semi-gloss
Photo Paper Pro PR-101 10 sheets (A4, Letter),
Photo Stickers PS-101 1 sheet Not loadable [Photo Paper Plus
Transparencies CF-102 30 sheets 30 sheets [Transparencies]
T-Shirt Transfers TR-301 1 sheet 1 sheet [T-Shirt Transfers]
Envelopes — 10 envelopes 5 envelopes [Envelope]
HR-101N 80 sheets (A4, Letter) 80 sheets (A4, Letter) [High Resolution
0.52" / 13 mm
(A4, Letter)
GP-401 10 sheets (A4, Letter),
20 sheets (4" x 6" / 101.6
x 152.4 mm, Credit Card)
GP-501 10 sheets (A4),
20 sheets (4" x 6" / 101.6
x 152.4 mm)
20 sheets (4" x 6" / 101.6
x 152.4 mm)
PP-101D 10 sheets (A4, Letter, 5"
x 7" / 127.0 x 177.8 mm)
PP-101 10 sheets (A4, Letter, 5"
x 7" / 127.0 x 177.8 mm),
20 sheets (4" x 6" /101.6
x 152.4 mm)
SG-101 10 sheets (A4, Letter),
20 sheets (4" x 6" / 101.6
x 152.4 mm)
20 sheets (4" x 6" / 101.6
x 152.4 mm)
(A4, Letter)
10 sheets (A4, Letter),
20 sheets (4" x 6" / 101.6
x 152.4 mm), Not
supported (Credit Card)
10 sheets (A4),
20 sheets (4" x 6" / 101.6
x 152.4 mm)
10 sheets (A4, Letter),
20 sheets (4" x 6" / 101.6
x 152.4 mm)
10 sheets (A4, Letter, 5" x
7" / 127.0 x 177.8 mm)
10 sheets (A4, Letter, 5" x
7" / 127.0 x 177.8 mm),
20 sheets (4" x 6" /101.6 x
152.4 mm)
10 sheets (A4, Letter),
20 sheets (4" x 6" / 101.6
x 152.4 mm)
10 sheets (A4, Letter),
20 sheets (4" x 6" / 101.6
x 152.4 mm)
Setting for [Media
Type]
Paper]
[Plain Paper]
[Glossy Photo Paper]
[Glossy Photo Paper]
[Matte Photo Paper]
[Photo Paper Plus
Double Sided]
[Photo Paper Plus
Glossy]
[Photo Paper Plus
Glossy]
[Photo Paper Pro]
Glossy]
Chapter 3 Paper Handling 23
Page 25

X Auto Sheet Feeder and Cassette
ENGLISH
Paper can be loaded into the machine at two locations: the Auto Sheet Feeder at the rear,
and the Cassette at the front. To switch the paper source, press [Feed Switch]. The
selected feeder is indicated on the Operation Panel.
Loading the Print Media in the Auto Sheet Feeder
1 Flatten the four corners of the paper before loading it.
2 Prepare to load paper.
1. Open the Paper Support, then pull out the Paper Support Extension to support the
paper.
2. Press the Open Button to open the Paper Output Tray.
3. Open the Paper Output Tray Extension completely.
4. Press [Feed Switch] so that the Auto Sheet Feeder Lamp (A) lights.
(2)
(4)
(1)
(3)
(A)
24 Paper Handling Chapter 3
Page 26

3 Load the paper.
1. Load the paper into the Auto Sheet Feeder with the print side facing UP.
2. Align the paper stack against the Cover Guide on the right side of the Paper
Support.
3. Pinch the Paper Guide and slide it against the left side of the paper stack.
(A)
(3)
IMPORTANT
• Do not load the paper beyond this Load Limit Mark (A).
ENGLISH
(1)
(2)
Chapter 3 Paper Handling 25
Page 27

Loading the Print Media in the Cassette
ENGLISH
1 Flatten the four corners of the paper before loading it.
2 Prepare to load paper.
1. Pull out the Cassette from the machine.
(1)
26 Paper Handling Chapter 3
Page 28

3 Load the paper. (Print side facing DOWN)
1. Load the paper into the Cassette with the print side facing DOWN.
2. Align the paper stack against the right side of the Cassette.
3. Slide the Paper Guides to fit the loaded paper stack.
(A)
(1)
(2)
(3)
IMPORTANT
• Do not load the paper beyond this Load Limit Mark (A).
ENGLISH
Chapter 3 Paper Handling 27
Page 29

ENGLISH
1. Insert the Cassette into the machine.
Push the Cassette all the way into the machine.
5 Prepare the Paper Output Tray.
1. Press the Open Button to open the Paper Output Tray.
2. Open the Paper Output Tray Extension completely.
3. Press [Feed Switch] so that the Cassette Lamp (A) lights.
(3)
(A)
4 Insert the Cassette into the machine.
(1)
(2)
28 Paper Handling Chapter 3
Page 30

4 Copying
X Making Copies
When making color or black & white copies, you can adjust the print resolution and
density. You can also change reduction or enlargement settings. For more information,
refer to the User’s Guide.
1 Press [ON/OFF] to turn on the machine.
2 Press [COPY].
3 Load paper.
4 Ensure that the proper paper source is selected.
5 Load the document on the Platen Glass or the ADF.
6 Adjust the settings for your document as necessary.
(4)
(5)
(1)
(2)
(3)
(1) Page size
The page size selected on the Settings (Copy) screen is displayed.*
(2) Media type
The media type selected on the Settings (Copy) screen is displayed.*
(3) Quality
The quality (Print quality) selected on the Settings (Copy) screen is displayed.*
(4) Copies
Use [S] or [T] to select the number of copies (max. 99 copies).
(5) Intensity
Pressing [W] decreases the intensity, and pressing [X] increases the intensity.
ENGLISH
Chapter 4 Copying 29
Page 31

ENGLISH
* For more information, refer to the User’s Guide.
X Advanced Copy Features
Two-sided copying Copies two document pages onto the sides of a single sheet of paper.*
2 on 1 copy Reduces two document pages to fit onto one page.*
4 on 1 copy Reduces four document pages to fit onto one page.*
Sticker copy Easily makes stickers from 4" x 6" / 101.6 mm x 152.4 mm photos or
graphics.*
Borderless copying Copies images so that they fill the entire page without borders.*
7 Press [Color] for color copying, or [Black] for black & white copying.
Repeating an image
on a page (Image
repeat)
Collation Delivers multiple copies of a multi-page document in sorted sets.*
Fading restoration
copy
DVD/CD label copy Easily makes DVD/CD label copy from scanned images.*
* For more information, refer to the User’s Guide.
Copies an image multiple times onto a single page.*
Helps to correct the color and scans documents that have faded due to the
passage of time or other causes.*
30 Copying Chapter 4
Page 32

5 Printing from a Memory Card
There are several ways you can print photos directly from a memory card.
X Inserting and Removing Memory Cards
Inserting the Memory Card
1 Press [ON/OFF] to turn on the machine.
2 Open the Card Slot Cover.
3 Insert a memory card into the Card Slot.
Card Type Inserting Card
• Compact Flash (CF) card
• Microdrive
• xD-Picture card*
ENGLISH
(A)
Insert into the Card Slot on the left side.
The Access Lamp (A) lights up.
Chapter 5 Printing from a Memory Card 31
Page 33

ENGLISH
Card Type Inserting Card
•SmartMedia
(A)
Insert into the Card Slot on the right side.
The Access Lamp (A) lights up.
• MEMORY STICK
• MEMORY STICK PRO
• MEMORY STICK Duo*
• MEMORY STICK PRO Duo*
• SD Secure Digital memory card
• miniSD Card*
• MultiMedia card
Insert into the center part of the Card Slot on the right
side. The Access Lamp (A) lights up.
* Be sure to attach the memory card to the special adapter before inserting it into the Card Slot.
(A)
4 Ensure that the Access Lamp is lit.
5 Close the Card Slot Cover.
Removing the Memory Card
1 Open the Card Slot Cover.
2 Ensure that the Access Lamp is not flashing, then remove the memory
card.
3 Close the Card Slot Cover.
32 Printing from a Memory Card Chapter 5
Page 34

X Easy Printing (Printing Photo Displayed on the LCD)
1 Press [ON/OFF] to turn on the machine.
2 Load paper.
3 Ensure that the proper paper source is selected.
4 Insert a memory card into the Card Slot.
5 Press [MEMORY CARD].
6 Use [W] or [X] to select <Single-photo print>, then press [OK].
7 Use [W] or [X] to select a photo, then press [Color].
8 Use [S] or [T], or the Numeric buttons to specify the number of prints.*
9 Press [Color].
* To change the page size and media type, refer to the User’s Guide.
ENGLISH
Chapter 5 Printing from a Memory Card 33
Page 35

X Advanced Memory Card Printing Features
ENGLISH
Single-photo print Views memory card images one at a time and easily prints.
Multi-photo print Specifies the number of prints to be made for each photo.*
Layout print Prints the specified photos in the specified layout.*
Creating Stickers (Sticker
Print)
Printing all photos Prints all images saved on the memory card.*
Photo Index print Prints a list of all the images saved on a memory card.*
DPOF (Digital Print Order
Format) Printing
Captured info Prints information on photographs at the time of its shooting (Exif
DVD/CD label print Easily makes DVD/CD label print from images of memory cards.*
Viewing Images (Slide Show) Automatically cycles through the images contained on a memory
Searching for Photos By
Date (Search)
Trimming Edit images displayed on the LCD by cropping them.*
* For more information, refer to the User’s Guide.
Easily makes stickers from images saved on a memory card.*
Prints by automatically applying DPOF settings.*
info) in the margin of Photo index print or selected individual
photos.*
card in sequence.*
Displays the photos within the specified date range.*
34 Printing from a Memory Card Chapter 5
Page 36

6 Printing Photographs Directly from a
Compliant Device
Connecting a PictBridge- or Canon Bubble Jet Direct-compatible digital camera,
camcorder or mobile phone to the machine allows you to print recorded images directly
without using a computer.
X Connecting to a PictBridge Compliant Device
1 Press [ON/OFF] to turn on the machine.
2 Load paper.
3 Ensure that the proper paper source is selected.
4 Ensure that the device is turned off.
5 Connect the device to the machine using the USB cable supplied with
the device.
Some types of the device turn on automatically, when connected to the machine. If the device
not turns on automatically, turn it on manually.
6 Turn on and set up the device for direct printing.
ENGLISH
Chapter 6 Printing Photographs Directly from a Compliant Device 35
Page 37

7 Preparing Your Machine for Fax
ENGLISH
X Examples of Connecting the Machine
Connecting to the Telephone Line
Connecting to an Analog Line
Telephone line (analog)
Connecting to an ADSL
Asymmetric Digital
Subscriber Line
ADSL modem
(splitter may be
built-in to the
modem)
Splitter
Computer
For details on ADSL connection and settings, see the manual supplied with your ADSL
modem. The illustrated connection is an example and is not guaranteed to suit every
connecting condition.
36 Preparing Your Machine for Fax Chapter 7
Page 38

Connecting to an ISDN Line
ENGLISH
ISDN line
Terminal adapter,
etc.
Analog port
Computer
For details on ISDN connection and settings, see the manuals supplied with your terminal
adapter or dial-up router.
Connecting External Devices
Connecting a Telephone or Answering Machine via a Computer
Telephone or Answering
Computer
Connecting a Telephone or Answering Machine Directly
Telephone
machine
Answering machine
Chapter 7 Preparing Your Machine for Fax 37
Page 39

X Setting the Telephone Line Type
ENGLISH
1 Press [FAX], then press [Menu].
2 Use [W] or [X] to select <Maintenance/settings>, then press [OK].
3 Use [W] or [X] to select <Device settings>, then press [OK].
4 Use [S] or [T] to select <Fax settings>, then press [OK].
5 Use [S] or [T] to select <User settings>, then press [OK].
6 Use [S] or [T] to select <Telephone line type>, then press [OK].
7 Use [S] or [T] to select the telephone line type, then press [OK].
- <Rotary pulse>: Suitable for pulse dialing.
- <Touch tone>: Suitable for tone dialing.
X Registering Sender Information
1 Press [FAX], then press [Menu].
2 Use [W] or [X] to select <Maintenance/settings>, then press [OK].
3 Use [W] or [X] to select <Device settings>, then press [OK].
4 Use [S] or [T] to select <Fax settings>, then press [OK].
5 Use [S] or [T] to select <User settings>, then press [OK].
6 Use [S] or [T] to select <Date/time setting>, then press [OK].
7 Use the Numeric buttons to enter the date and time (in 24-hour format),
then press [OK].
8 Use [S] or [T] to select <Unit name/TEL registr.>, then press [OK].
9 Use the Numeric buttons to enter your name (max. 24 characters,
including spaces), then press [OK].
10 Use the Numeric buttons to enter your fax/telephone number (max. 20
digits, including spaces), then press [OK].
38 Preparing Your Machine for Fax Chapter 7
Page 40

X Registering One-Touch Speed Dialing or Coded Speed
Dialing
There is also a group dialing method to send a document to all numbers in the registered
group. For details, see User's Guide.
1 Press [FAX], then press [Menu].
2 Use [W] or [X] to select <TEL number registration>, then press [OK].
3 Use [S] or [T] to select <One-touch speed dial> or <Coded speed dial>,
then press [OK].
If you select <One-touch speed dial>:
1. Use [S] or [T] to select an unoccupied One-Touch Speed Dial Key (01 to 08),
then press [OK].
If you select <Coded speed dial>:
1. Use the Numeric buttons or [S], [T], [W], [X] to select an unoccupied speed
dialing code (00 to 99), then press [OK].
4 Use the Numeric buttons to enter a name for the One-Touch Speed Dial
Key or the speed dialing code (max. 16 characters, including spaces),
then press [OK].
5 Use the Numeric buttons to enter the fax/telephone number (max. 60
characters, including spaces) you want to register.
6 Press [OK].
ENGLISH
Chapter 7 Preparing Your Machine for Fax 39
Page 41

Changing or Deleting a One-Touch Speed Dialing and a Coded
ENGLISH
Speed Dialing
z To change a registered name or number:
1. Follow steps from 1 to 3 under “Registering One-Touch Speed Dialing or Coded
Speed Dialing” on page 39.
2. Use [S] or [T] to select the One-Touch Speed Dial Key (01 to 08) or the Coded
Speed Dialing Code to edit, then press [OK].
3. Use [S] or [T] to select <Edit>, then press [OK].
4. Use the Numeric buttons to enter the new name (max. 16 characters, including
spaces), then press [OK].
5. Use the Numeric buttons to enter the new fax/telephone number (max. 60
characters, including spaces), then press [OK].
z To delete an entire entry:
1. Follow steps from 1 to 3 under “Registering One-Touch Speed Dialing or Coded
Speed Dialing” on page 39.
2. Use [S] or [T] to select the One-Touch Speed Dial Key (01 to 08) or the Coded
Speed Dialing Code to delete, then press [OK].
3. Use [S] or [T] to select <Delete>, then press [OK].
4. Use [S] or [T] to select <Yes>, then press [OK].
X Setting Daylight Saving Time (Summer Time)
1 Press [FAX], then press [Menu].
2 Use [W] or [X] to select <Maintenance/settings>, then press [OK].
3 Use [W] or [X] to select <Device settings>, then press [OK].
4 Use [S] or [T] to select <Fax settings>, then press [OK].
5 Use [S] or [T] to select <User settings>, then press [OK].
6 Use [S] or [T] to select <Summer time setting>, then press [OK].
7 Use [S] or [T] to select <ON> to enable summer time or <OFF>, then
press [OK].
8 Use [S] or [T] to select <Start date/time>, then press [OK].
9 Use [S] or [T] to select the month when summer time starts, then press
[OK].
40 Preparing Your Machine for Fax Chapter 7
Page 42

10 Use [S] or [T] to select the week when summer time starts, then press
[OK].
11 Use [S] or [T] to select the day of the week when summer time starts,
then press [OK].
12 Use the Numeric buttons to enter the time (in 24-hour format) when
summer time starts, then press [OK].
13 Use [S] or [T] to select <End date/time>, then press [OK].
14 Use [S] or [T] to select the month when summer time ends, then press
[OK].
15 Use [S] or [T] to select the week when summer time ends, then press
[OK].
16 Use [S] or [T] to select the day of the week when summer time ends,
then press [OK].
17 Use the Numeric buttons to enter the time (in 24-hour format) when
summer time ends, then press [OK].
X Guidelines for Entering Numbers, Letters, and Symbols
1 Press [ ] to switch to uppercase letter mode (:A), lowercase letter mode
(:a), or number mode (:1).
2 Use the Numeric buttons to enter a character.
Press the button repeatedly until the character you want appears.
z To enter a character that is under the same button as the previous entry:
1. Press [X], then press the same Numeric button.
z To enter a space:
1. Press [X] twice. In number mode, press [X] once.
z To delete a character:
1. Press [W].
z To delete an entire entry:
1. Press and hold [W].
ENGLISH
Chapter 7 Preparing Your Machine for Fax 41
Page 43

ENGLISH
Button Uppercase letter mode Lowercase letter mode
[1] 1
[2] ABCЕДБАГВЖЗ abcедбагвжз 2
[3] DEFËÉÈÊ defëéèê 3
[4] GH I Ï Í Ì Î gh i ï í ì î 4
[5] JKL jkl 5
[6] MNOСШЦУТХФ mnoсшцутхф 6
[7] PQRSÞ pqrsþ 7
[8] TUVÜÚÙÛ tuvüúùû 8
[9] WXYZÝ wxyzý 9
[0] 0
[#]
[]
-. #!",;:^`_=/|’?$@%&+()[]{}<>
Uppercase letter
mode (: A)
Lowercase letter
mode (: a)
Number mode
Number mode (:1)
Models without lowercase letter mode:
Button Letter mode Number mode
[1] 1
[2] ABCabc 2
[3] DEFdef 3
[4] GHIghi 4
[5] JKLjkl 5
[6] MNOmno 6
[7] PQRSpqrs 7
[8] TUVtuv 8
[9] WXYZwxyz 9
[0] 0
Models with lowercase letter mode:
[#]
-. #!",;:^`_=/|’?$@%&+()[]{}<>
42 Preparing Your Machine for Fax Chapter 7
Page 44

8 Sending Faxes
X Sending Methods
1 Press [ON/OFF] to turn on the machine.
2 Load the document on the Platen Glass or the ADF.
3 Press [FAX].
4 Adjust fax settings as necessary.
5 Dial the recipient's number using the Numeric buttons or speed dialing.
6 Press [Color] for color sending, or [Black] for black & white sending.
One-Touch Speed Dialing
1 Press the One-Touch Speed Dial Key (01 to 08) that has been assigned
the number you want to dial.
Coded Speed Dialing
1 Press [Coded Dial].
2 Use the Numeric buttons to enter the two-digit code (00 to 99) assigned
to the number you want to dial, then press [OK].
ENGLISH
Chapter 8 Sending Faxes 43
Page 45

9 Receiving Faxes
ENGLISH
X Receive Modes
If You Want to Receive Only Faxes Automatically with Your
Machine, or Have a Dedicated Telephone Line for Fax Use Only:
Select <FAX only>.
When you receive a fax call The machine will receive the fax automatically.
When you receive a voice call You will not be able to answer the call.
If You Receive Mainly Voice Calls and Sometimes Faxes, or Want
to Receive Faxes Manually:
Select <Manual RX>.
When you receive a fax call The telephone will ring. Pick up the handset and if you
hear a high-pitched signal, press [Color] or [Black] on the
machine to receive the fax. If the document is not set on
the sending side, your machine will go into the reception
When you receive a voice call The telephone will ring. Pick up the handset to answer
For remote receiving If you are far from your machine, dial 25 (the remote
If You Want to Receive Voice Messages on Your Answering
Machine and Receive Faxes Automatically:
Select <Ans. machine connect.>.
When you receive a fax call First the answering machine connected to your machine
When you receive a voice call The answering machine connected to your machine will
standby mode.
the call.
receiving ID) on your telephone to receive faxes.
will respond to an incoming call, and then the machine
will receive faxes automatically.
respond to an incoming call.
44 Receiving Faxes Chapter 9
Page 46

If You Want to Receive Faxes Automatically as well as Voice Calls:
Select <FAX/TEL auto switch>.
When you receive a fax call The machine will receive the fax automatically.
When you receive a voice call The telephone will ring. Pick up the handset to answer
the call. Some types of telephones may not ring,
however.
If You Have Subscribed to a Distinctive Ring Pattern Detection
(DRPD) Service with Your Telephone Company (US and Canada
only):
Select <DRPD>.
When you receive a fax call The machine will ring according to the ring pattern you
have chosen and receive the fax automatically.
When you receive a voice call The telephone will ring according to the ring pattern you
have chosen. Pick up the handset to answer the call.
If You Want Your Machine to Automatically Switch between Fax
and Voice Calls by the Call Ring Patterns (Network Switch):
Select <Network switch>.
When you receive a fax call The machine will ring and receive the fax automatically.
When you receive a voice call The telephone will ring. Pick up the handset to answer
the call.
X Setting the Receive Mode
1 Press [FAX], then press [Menu].
2 Use [W] or [X] to select <Receive mode settings>, then press [OK].
3 Use [S] or [T] to select a receive mode, then press [OK].
ENGLISH
Chapter 9 Receiving Faxes 45
Page 47

10 Maintenance
ENGLISH
X Replacing an Ink Tank
1 Open the Scanning Unit (Printer Cover) and the Paper Output Tray.
1. Make sure the machine is turned on.
2. Raise the Scanning Unit (Printer Cover) until it stops.
(A)
Press the Open Button (A) to open the Paper Output Tray if it does not open automatically.
2 Open the Inner Cover.
46 Maintenance Chapter 10
Page 48

3 Remove the ink tank whose lamp is flashing fast.
1. Push the tab (A) and remove the ink tank.
(A)
4 Prepare a replacement tank.
1. Remove the new ink tank from its packaging, then pull the orange tape (A) toward
the arrow so that the protective film does not remain on the air hole (C). Then
remove the film completely (B).
2. Remove the orange protective cap (D) from the bottom of the ink tank and discard
it. Carefully hold the protective cap when removing it to prevent the ink from
staining your fingers.
Discard the cap once it is removed.
ENGLISH
(A)
(B)
(C)
Chapter 10 Maintenance 47
(D)
Page 49

ENGLISH
1. Install the ink tank into the Print Head.
2. Press on the mark on the ink tank until the ink tank snaps firmly into place.
3. Ensure that the ink tank clicks into place and then its lamp lights red (A).
(A)
6 Close the Inner Cover.
5 Install the ink tank.
7 Slowly close the Scanning Unit (Printer Cover).
48 Maintenance Chapter 10
Page 50

X Maintaining the Print Head
Cleaning the Print Head
1 Press [ON/OFF] to turn on the machine.
2 Press [Menu].
3 Use [W] or [X] to select <Maintenance/settings>, then press [OK].
4 Use [W] or [X] to select <Maintenance>, then press [OK].
5 Use [S] or [T] to select <Cleaning> or <Deep cleaning> as necessary,
then press [OK].
6 Use [S] or [T] to select <Yes>, then press [OK].
Aligning the Print Head Automatically
1 Press [ON/OFF] to turn on the machine.
2 Press [Menu].
3 Use [W] or [X] to select <Maintenance/settings>, then press [OK].
4 Use [W] or [X] to select <Maintenance>, then press [OK].
5 Use [S] or [T] to select <Auto head align>, then press [OK].
6 Load two sheets of A4 or Letter-size plain paper in the Auto Sheet
Feeder.
7 Use [S] or [T] to select <Yes>, then press [OK].
8 The pattern is printed.
ENGLISH
Chapter 10 Maintenance 49
Page 51

ENGLISH
50
Page 52

...........................................................................................................................
...........................................................................................................................
...........................................................................................................................
...........................................................................................................................
...........................................................................................................................
...........................................................................................................................
...........................................................................................................................
...........................................................................................................................
...........................................................................................................................
...........................................................................................................................
...........................................................................................................................
...........................................................................................................................
...........................................................................................................................
...........................................................................................................................
...........................................................................................................................
...........................................................................................................................
...........................................................................................................................
...........................................................................................................................
...........................................................................................................................
...........................................................................................................................
...........................................................................................................................
...........................................................................................................................
...........................................................................................................................
...........................................................................................................................
...........................................................................................................................
...........................................................................................................................
...........................................................................................................................
...........................................................................................................................
...........................................................................................................................
Page 53

Page 54

Regulatory Information
For 110-120V, 50/60Hz model
Color Printer Model: K10270
This device complies with Part 15 of the FCC Rules. Operation is subject to the following two
conditions: (1) This device may not cause harmful interference, and (2) this device must accept
any interference received, including interference that may cause undesired operation.
Note: This equipment has been tested and found to comply with the limits for a Class B digital
device, pursuant to Part 15 of the FCC Rules. These limits are designed to provide reasonable
protection against harmful interference in a residential installation. This equipment generates,
uses and can radiate radio frequency energy and, if not installed and used in accordance with
the instructions, may cause harmful interference to radio communications.
However, there is no guarantee that interference will not occur in a particular installation. If this
equipment does cause harmful interference to radio or television reception, which can be
determined by turning the equipment off and on, the user is encouraged to try to correct the
interference by one or more of the following measures:
Reorient or relocate the receiving antenna.
Increase the separation between the equipment and receiver.
Connect the equipment into an outlet on a circuit different from that to which the receiver is connected.
Consult the dealer or an experienced radio/TV technician for help.
Use of a shielded cable is required to comply with Class B limits in Subpart B of Part 15 of the
FCC Rules.
Do not make any changes or modifications to the equipment unless otherwise specified in the
manual. If such changes or modifications should be made, you could be required to stop
operation of the equipment.
Canon U.S.A., Inc.
One Canon Plaza
Lake Success, NY 11042
1-516-328-5600
Canon Europa N.V., Bovenkerkerweg 59-61, 1185 XB Amstelveen, The Netherlands
Page 55

The following ink tanks are compatible with this machine.
For details on ink tank replacement, refer to “Replacing an Ink Tank” in this guide.
QT5-0234-V01 XXXXXXXX ©CANON INC.2006 PRINTED IN THAILAND
 Loading...