

Set-Up Instructions
Set-Up Instructions
Thank you for purchasing Canon imageCLASS MF5730.
To get your machine ready for use,please follow the instructions in this document before referring to any other documentation.
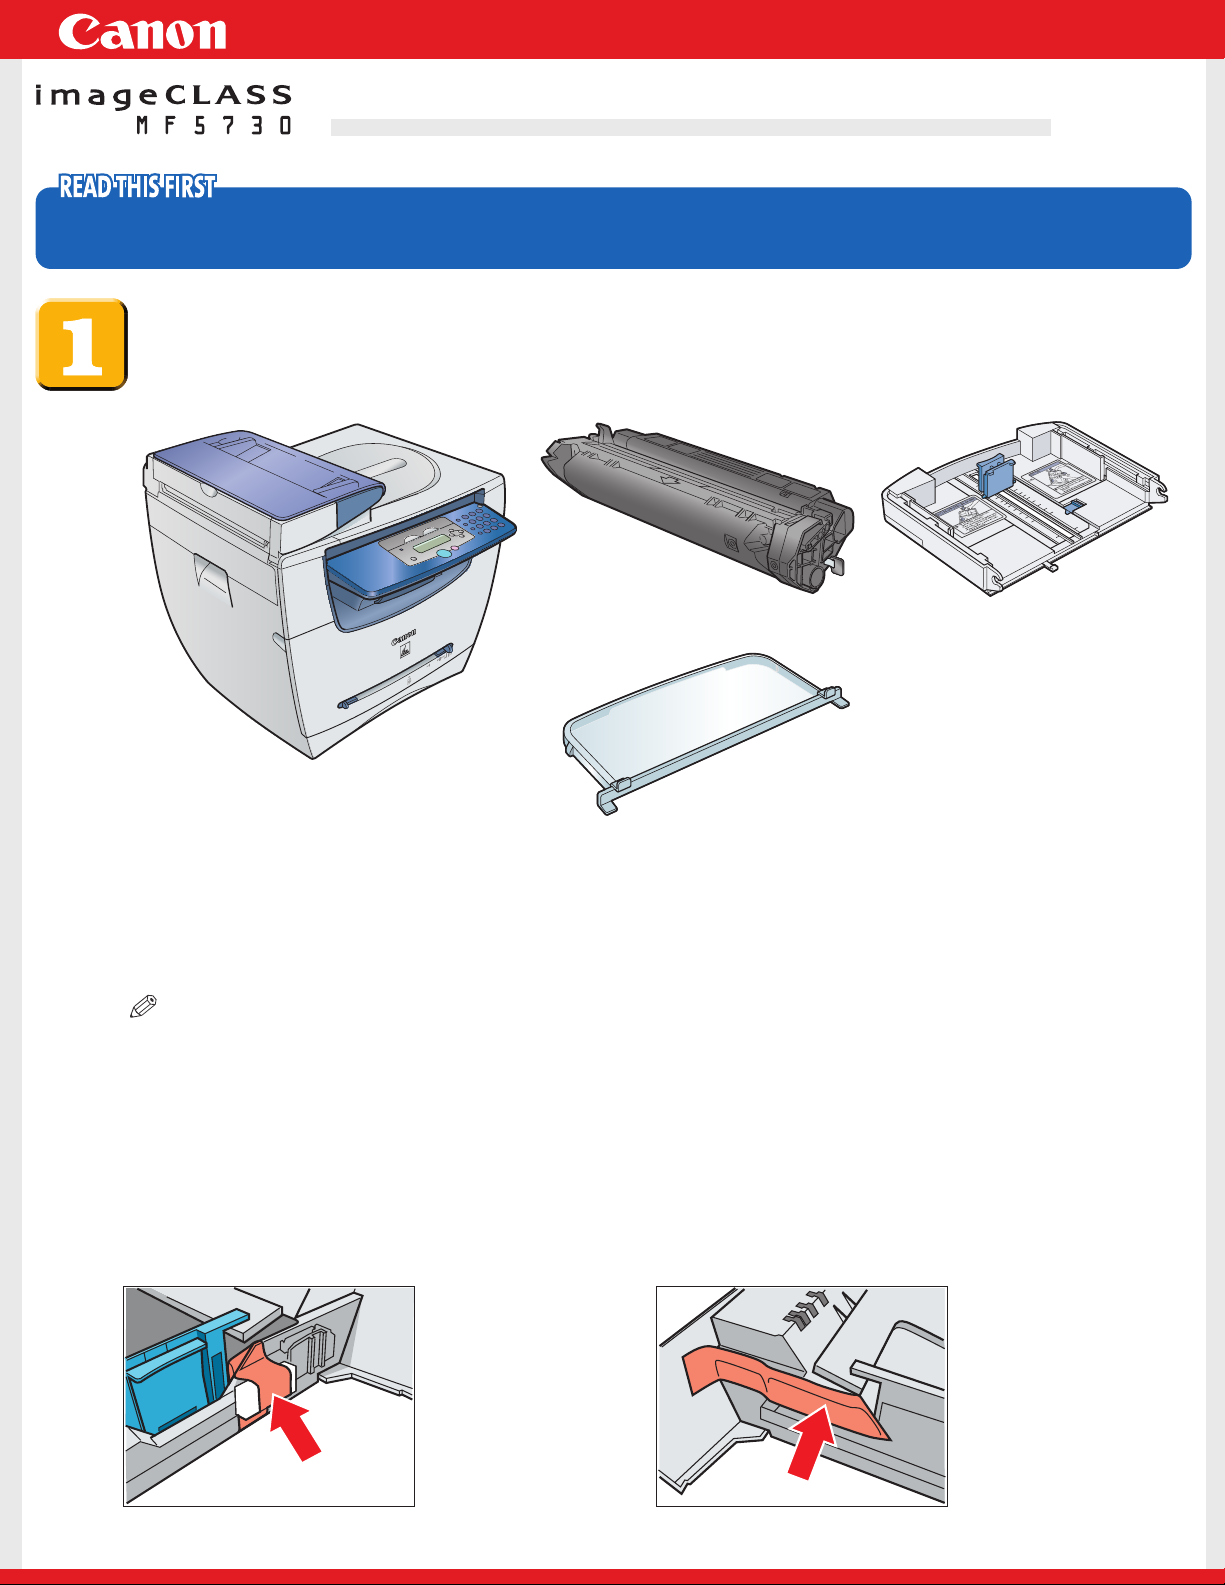
Unpack the machine and its components.
Check that you have the following:
●
Machine
●
Power cord
●
USB cable
●
Set-Up Instructions
●
Cartridge
●
Extension cover
●
Basic Guide
●
Warranty
●
Limited Warranty Note for Cartridge X25
●
Registration Card
●
MF5700 Series User Software CD-ROM
●
Cassette extension
NOTE
●
The cartridge included with the machine is Cartridge X25 that yields approximately 2,500 pages of printouts (Letter at 4%
dot coverage).
Before setting up the machine:
1 Place the machine on a flat, stable surface.
2 Remove all shipping tape from the exterior of the machine.
Referring to the following figure, remove the tape and spacers on both sides of the
cassette housed in the machine.
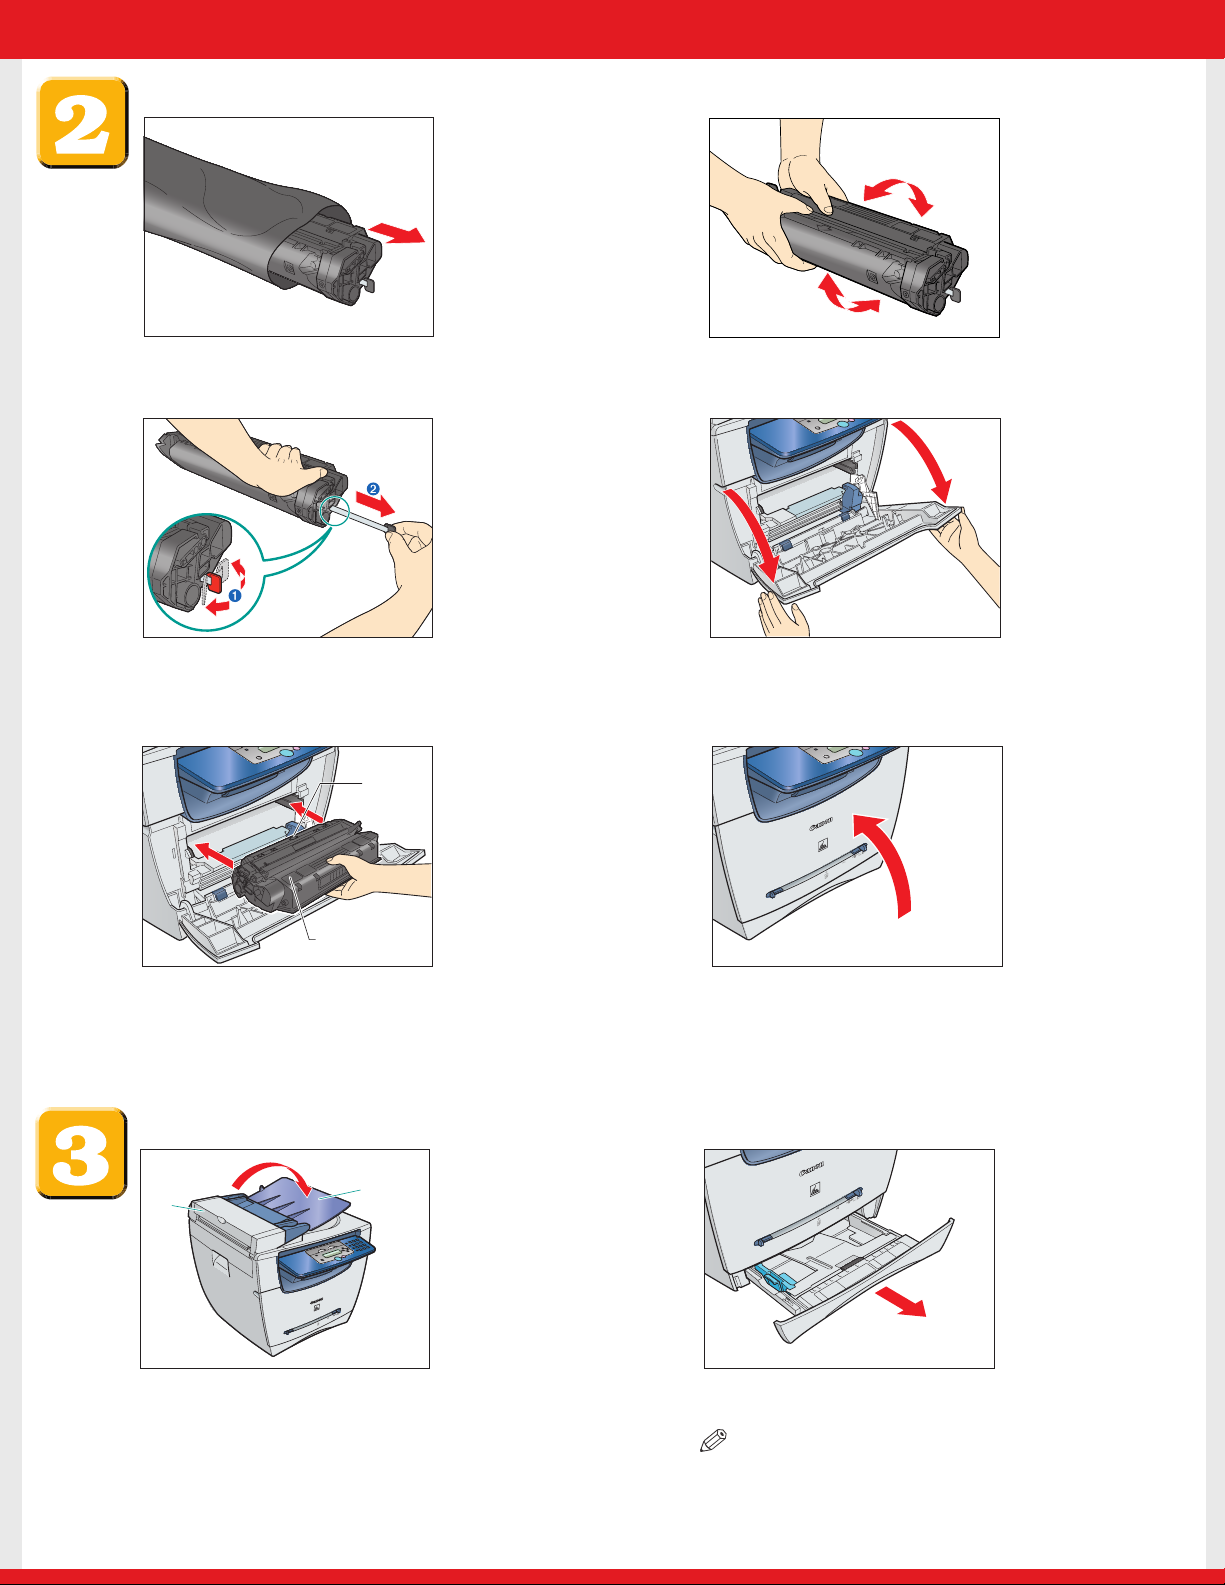
Install the cartridge.
1 Remove the cartridge from the bag. Keep the
bag in a safe place for future use.
3 Hold the cartridge on a flat stable surface with
one hand, and break the tab ➊ and pull out
the seal ➋ completely with the other hand.
B
A
2 Gently rock the cartridge several times to
evenly distribute the toner inside.
4 Pull open the front cover.
5 Hold the cartridge so that the instructions (A)
6 Close the front cover of the machine.
and the arrow (B) are facing up,and insert it in
the machine horizontally as far as it will go.
Assemble the cassette and load paper.
A
1
Hold the document feeder (A) with one hand,
and open the document feeder tray (B) with
the other.
B
2
●
Pull out the paper cassette completely.
NOTE
Pull the cassette straight/forward.Pulling it at an angle
may damage the paper sensing lever inside the
machine.
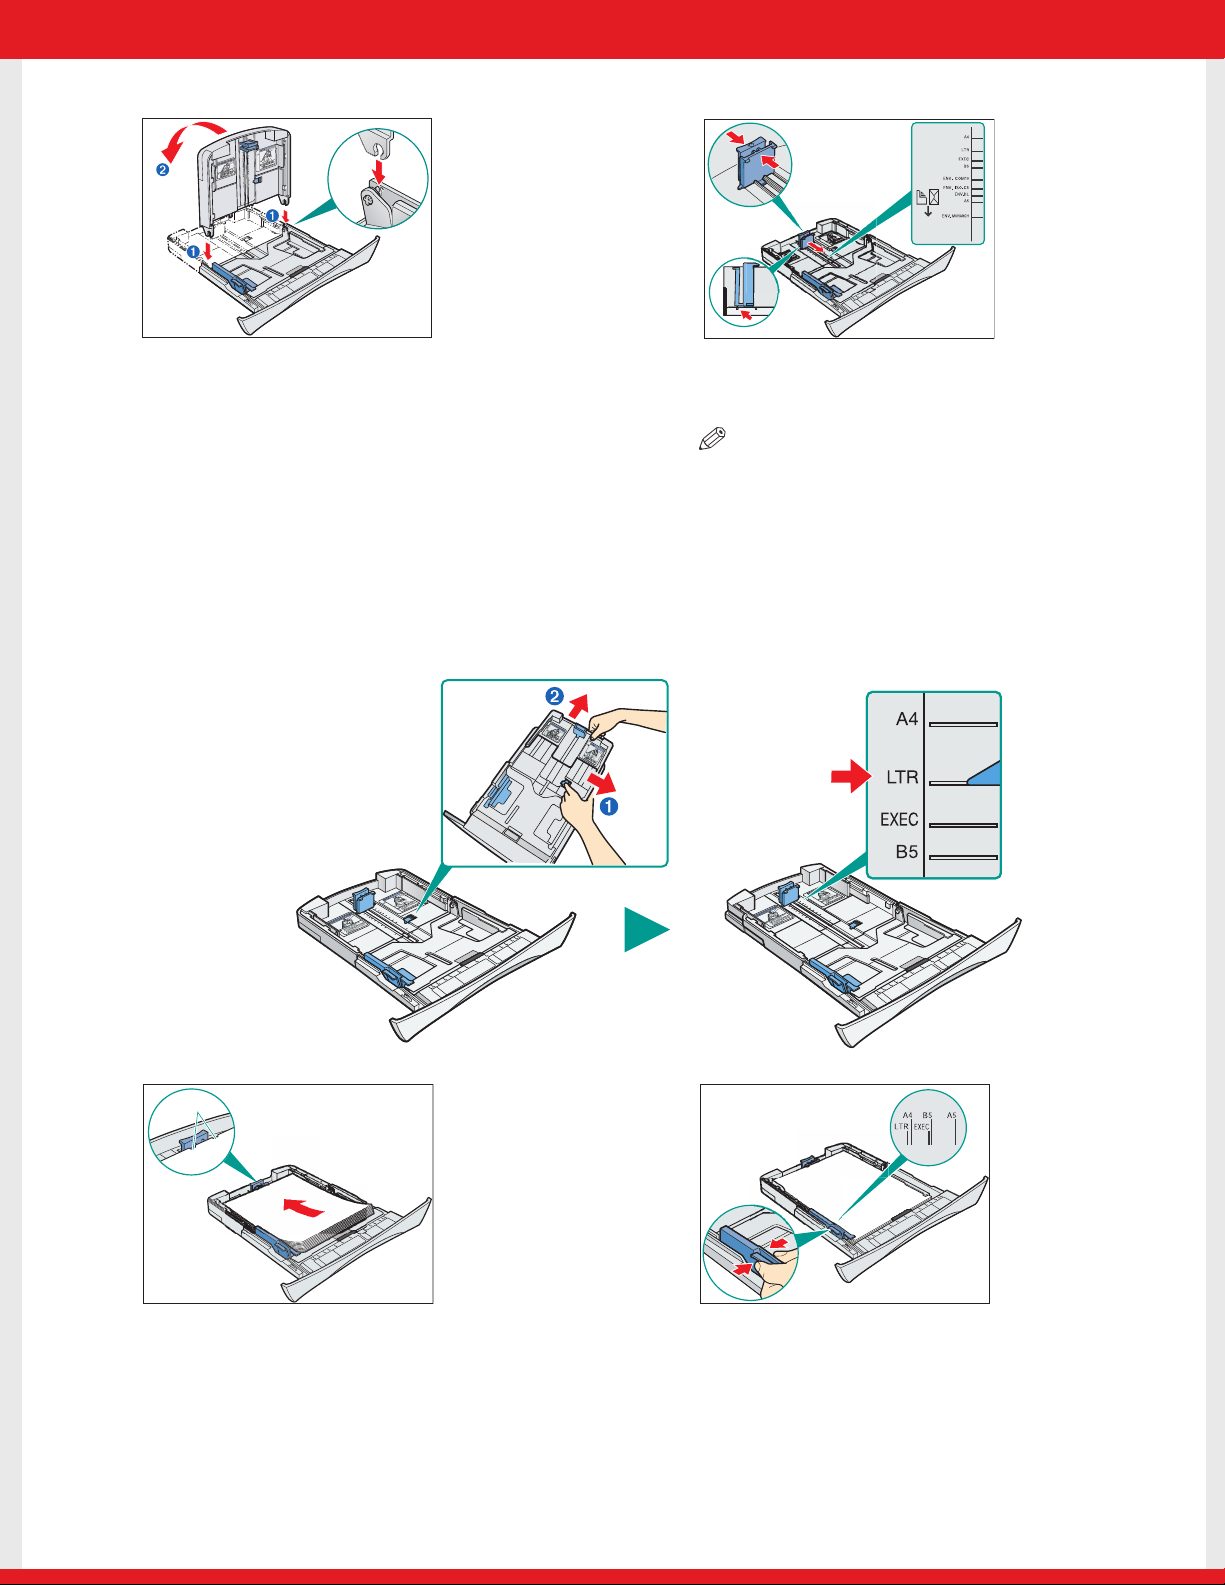
3 Attach the extension to the cassette.The slots
➊ are keyed and must be inserted at a 90°
4 Pinch and slide the rear paper end guide to
match the size of paper.
angle. Once inserted,fold the extension as
shown ➋.
NOTE
●
Confirm that the paper guide is fitted in the paper size
slit correctly.
To load Legal-size paper:
Pull the blue tab ➊ and extend the cassette ➋ as far as it will go. Keep the rear paper end guide to LT R
size mark. If you are not using Legal-size paper, skip to the next step without extending the cassette.
A
5 Load the paper into the cassette. Make sure
the paper stack sits below the hooks (A)
.
6 Pinch and slide the side paper end guides to
match the size of paper.

A
B
7 Even out the edges of the paper stack.
Make sure the height of the stack does not
exceed the limit marks (A) and that
the side edges of the stack are below the
hooks (B).
9 Insert the tabs on the extension cover into the
slots ➊ on the back of the machine,
and carefully lower the cover ➋ until it sits on
the cassette extension beneath it.
8 Insert the paper cassette back into the
machine as far as it will go.
NOTE
●
If you do not completely insert the cassette into the
machine, paper jams may occur.
IMPORTANT
●
Do not push in the cassette at an angle. Doing so
may damage the paper sensing lever inside the
machine.
IMPORTANT
●
Do not load paper from the back of the machine.
Doing so may damage the paper feeding assembly
inside the machine.

Connect the power cord.
1 Plug the power cord into the rear socket ➊.Then connect the other end to the wall outlet ➋.
2 Once it is warmed up,the standby display
appears in the LCD.
IMPORTANT
●
For important safety instructions on installation and handling of the machine, see “Important Safety
Instructions” in the Basic Guide.
NOTE
●
Make sure the correct paper size is specified in the machine. For details, see Chapter 2,“Paper Handling,”in the Basic
Guide.

Install the software.
IMPORTANT
●
Do not connect the USB cable before installing the software. If you connect the USB cable before installing the
software and the Found New Hardware Wizard screen appears,click [Cancel] and disconnect the USB cable.
●
Network Connection is not available for this model.If you selected [Network Connection] by mistake,go back to
the previous screen by clicking [Back],and select [USB Connection].
NOTE
●
The instructions below are for Windows XP/Server 2003.For Windows 98/Me/2000,see the Software Guide (included in
the User Software CD).
●
For Windows 2000/XP/Server 2003, log on as Administrator to install the software.
1 Turn on your computer.
2 Quit any open applications, including aniti-virus
software.
3 Insert the User Software CD into the CD-ROM drive.
4 When the MF Setup screen appears, click
[USB Connection].
NOTE
●
If the MF Setup screen is not displayed,on the Windows desktop,click [start] ➝
[My Computer]. Open the CD-ROM icon, then double-click
[Setup (Setup.exe)].
5 Click [Install Drivers].
NOTE
●
If you would like to install the Presto! PageManager file management software
and/or OmniPage SE OCR software,click [Install Applications] and follow the
instructions on the screen.
●
You can also click [Read Manuals] on this screen to read PDF manuals.
6 Click [Install MF Drivers].
7 When the MF Drivers-Setup Wizard screen
appears, click [Yes] and follow the instructions
on the screen.

8 When the installation is complete,click [Exit] to
close the MF Drivers-Setup Wizard screen.
9 On the MF Setup screen, click [Install MF Toolbox].
10 When the MF Toolbox-Setup Wizard screen
appears, click [Next] and follow the instructions
on the screen.
NOTE
●
Before installing MF Toolbox, make sure that all other
applications are closed and that any anti-virus software on
your computer is disabled.
11 When the installation is complete,click [Exit]
to close the MF Toolbox-Setup Wizard
screen.

Connect the machine to your computer.
1 Make sure the machine’s power is turned on.
Connect the cable to the USB port on the
back of the machine.Then connect the other
end of the cable to the USB port on your
computer.
2 After the installation is complete, click [Exit]
to close the MF Setup screen. Remove the
User Software CD from the CD-ROM drive
and store it in a safe place.
NOTE
●
If you would like to install the optional Presto! PageManager file management software and/or OmniPage OCR software,
click [Install Applications] and follow the instructions on the screen.
●
You can also click [Read Manuals] to read PDF manuals in the User Software CD. To view the manuals in PDF format,
Adobe Reader/Acrobat Reader/Acrobat is required. If Adobe Reader/Acrobat Reader/Acrobat is not installed on your
system, please download it from the Adobe Systems Incorporated website (http://www.adobe.com).
Congratulations! You have now completed the machine setup.
Where to go from here...
Once you have completed all steps in this document, see the Basic Guide for basic
operations of all functions of your machine.
For information on the driver software, see the Software Guide (included in the User
Software CD).
NOTE
●
Remember to register your machine to ensure product support.The serial number is located on the back of the
machine.
Part no.FA7-6515 (010)
For installation help and operational instructions,call us at:
1-800-828-4040 1-800 OK CANON
U.S.A. CUSTOMERS CANADA CUSTOMERS
Canon and imageCLASS are trademarks of Canon Inc.
All other products and brand names are registered
trademarks or trademarks of their respective owners.
Specifications subject to change without notice.
©2005 Canon Inc.
PRINTED IN CHINA
 Loading...