

Page 1

Set-Up Instructions
READ the Set-Up Instructions for the Machine FIRST, then read this document for Networking and Printing set-up.
READ the Set-Up Instructions for the Machine FIRST, then read this document for Networking and Printing set-up.
Set-Up Instructions
for Networking and Printing
Thank you for purchasing Canon imageCLASS MF5770.
To get your machine ready for network and printer functions, please follow the instructions in this document before referring to any
other documentation.
What is included in the User Software CD
●
MF Setup
This startup menu shows the driver software, applications, and manuals for your new machine.
●
CARPS Printer Driver
The CARPS printer driver enables you to use the machine as a printer.
For details, see the
●
Fax Driver
The fax driver enables you to fax a document from your computer.
For details, see the
●
Cover Sheet Editor
The Cover Sheet Editor enables you to create and edit a cover sheet for your fax.
For details, see the
●
Scanner Driver (ScanGear)
The scanner driver enables you to scan printed documents into your computer.
For details, see the
●
MF Toolbox
MF Toolbox enables you to process scanned documents in various ways.For details, see the
Software Guide.
●
NetSpot Device Installer (NSDI)
NetSpot Device Installer enables you to set up the machine for network operations.
For details, see the Readme file and Online Help for this program.
●
Applications
Software Guide.
Software Guide.
Software Guide.
Software Guide.
NewSoft Presto! PageManager
Presto! PageManager enables you to manage your documents in many ways.
For details, see the online manual for this program.
ScanSoft Omnipage SE
Omnipage SE enables you to “read” a scanned image and convert it to a text document.
For details, see the online manual for this program.
●
Manuals (PDF)
Software Guide
Explains how to install and use printer, fax, and scanner driver software.
Network Guide
Explains the network function of the machine.
Remote UI Guide
Explains how to monitor the machine status and change the settings remotely using a web
interface.
NOTE
●
To view the manuals in PDF format, Adobe Reader/Acrobat Reader/Acrobat is required. If Adobe Reader/Acrobat
Reader/Acrobat is not installed on your system, please download it from the Adobe Systems Incorporated website
(http://www.adobe.com).
Page 2
Installation Options:
•To use the machine as a local printer via USB connection, proceed to .
•To use the machine as a network printer, proceed to .
To Use the Machine as a Local Printer (USB Connection)
IMPORTANT
• Do not connect the USB cable before installing the software. If you connect the USB cable before installing the software and the Found New Hardware Wizard screen appears, click [Cancel] and disconnect the USB cable.
NOTE
• For Windows 2000/XP/Server 2003, log on as Administrator to install the software.
• The screenshots below are from Windows XP. However, the installation procedure is essentially the same for other versions
of Windows.
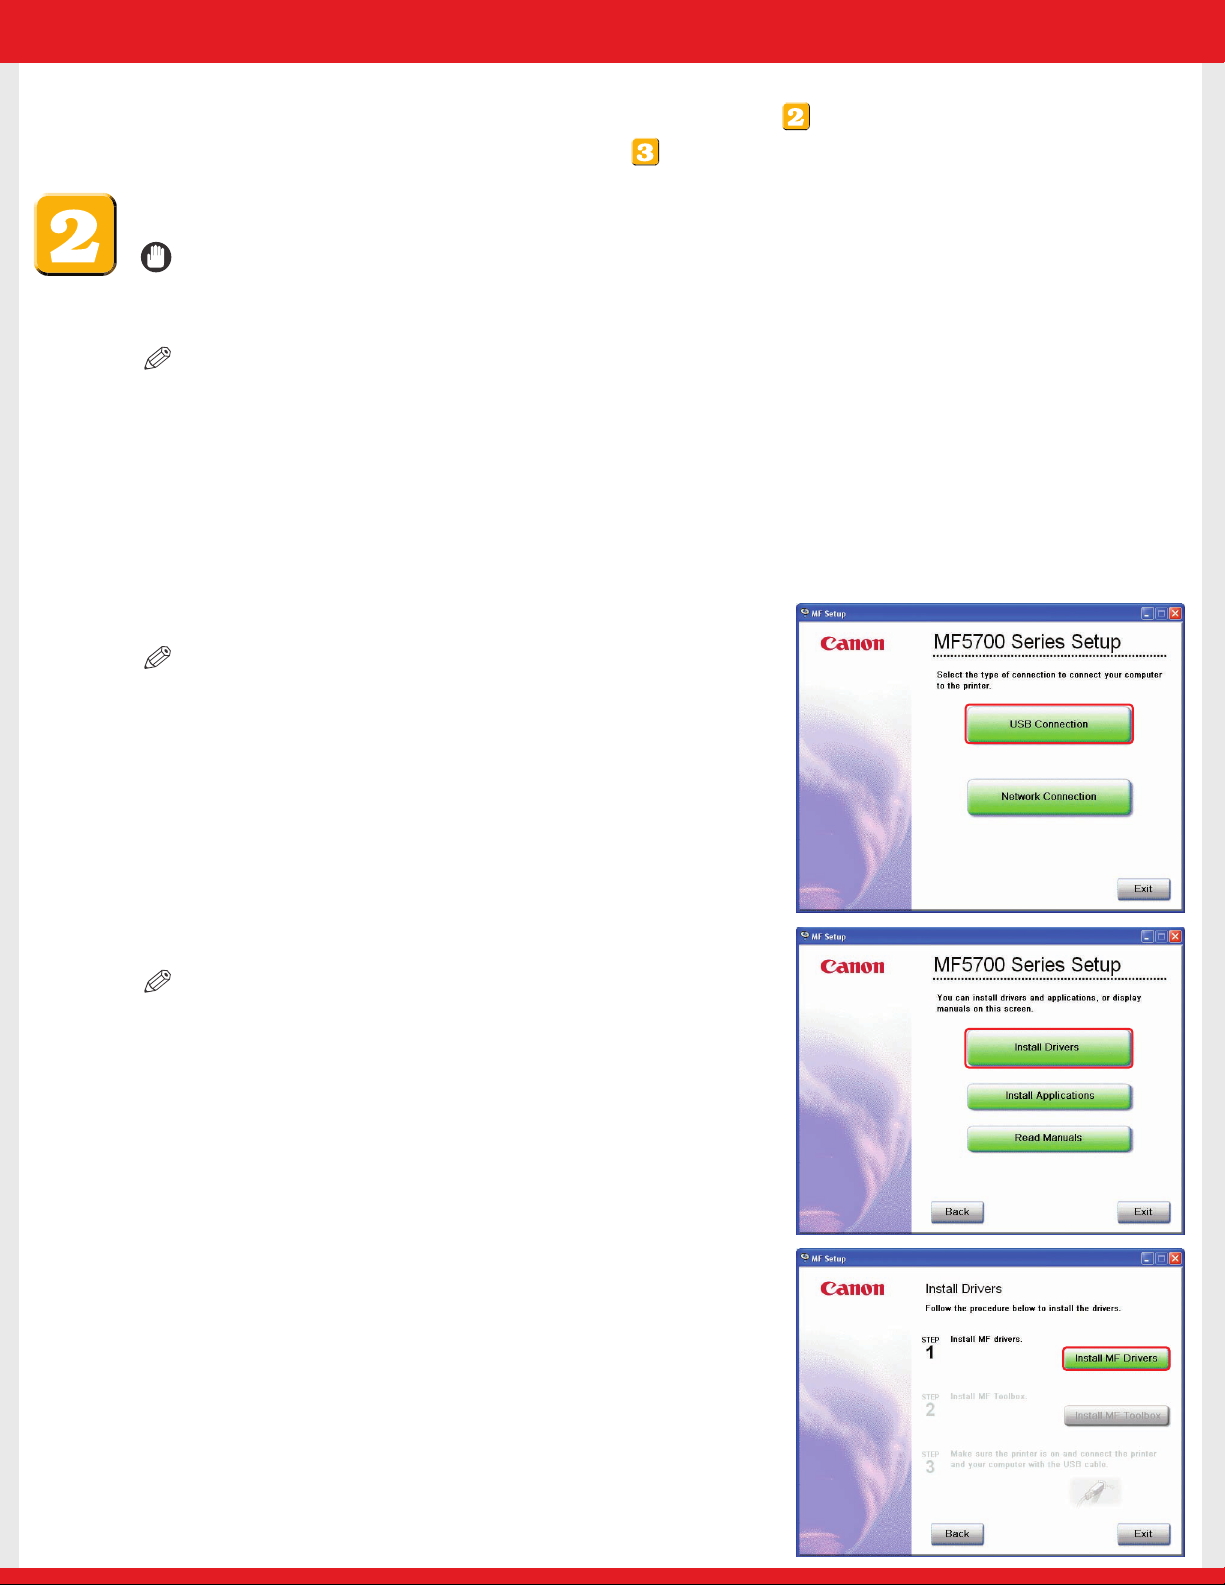
1 Turn on your computer.
2 Quit any open applications, including anti-virus software.
3 Insert the User Software CD into the CD-ROM drive.
4 When the MF Setup screen appears,click [USB Connection].
NOTE
• If the MF Setup screen is not displayed, on the Windows desktop,
click [start] ➝ [My Computer]. Open the CD-ROM icon, then double-click
[Setup (Setup.exe)].
5 Click [Install Drivers].
NOTE
• If you would like to install the Presto! PageManager file management
software and/or OmniPage SE OCR software, click [Install Applications] and
follow the instructions on the screen.
• You can also click [Read Manuals] on this screen to read PDF manuals.
6 Click [Install MF Drivers].
Page 3
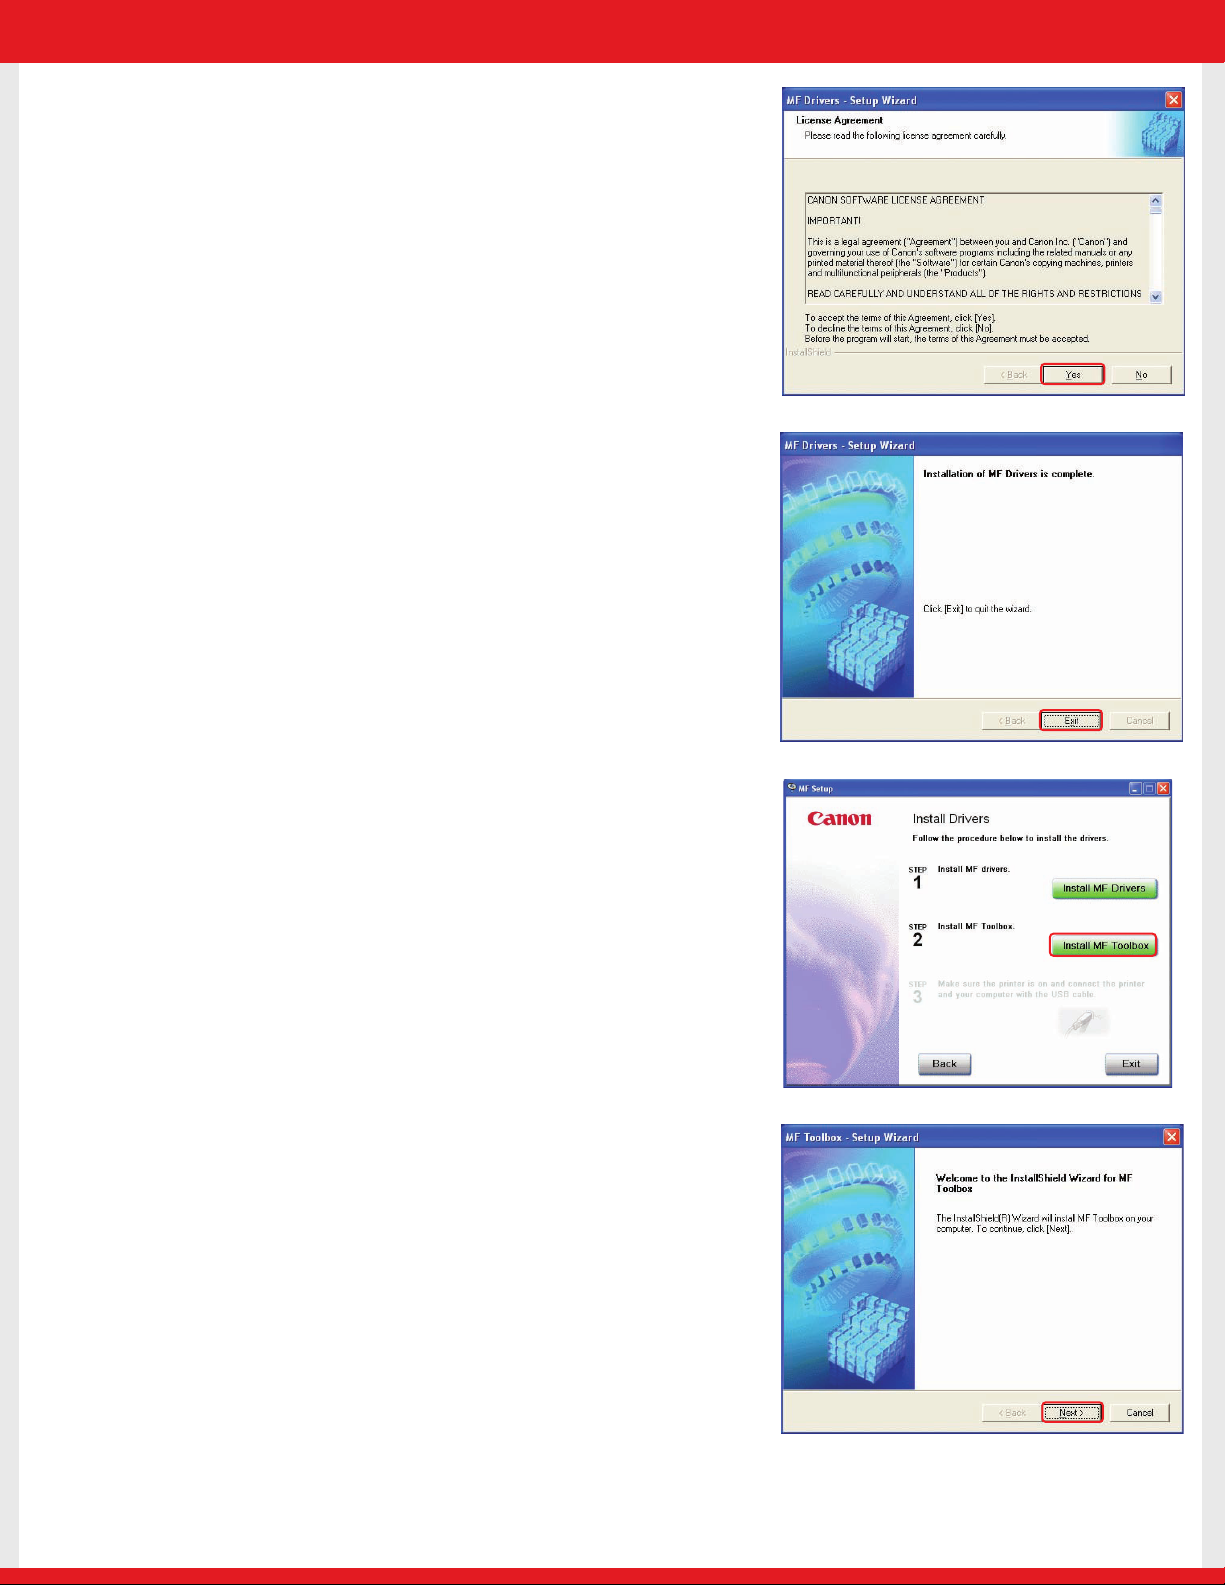
7 When the MF Drivers Setup screen appears, click [Yes] and
follow the instructions on the screen.
8 When the installation is complete, click [Exit] to close the MF
Drivers Setup screen.
9 On the MF Setup screen, click [Install MF Toolbox].
10 When the MF Toolbox Setup screen appears, click [Next]
and follow the instructions on the screen.
Page 4

NOTE
• Before installing MF Toolbox, make sure that all other applications are
closed and that any anti-virus software on your computer is disabled.
11 When the installation is complete, click [Exit] to close
the MF Toolbox Setup screen.
12 Make sure the machine’s power is turned on.
Connect the cable to the USB port on the back of
the machine.Then connect the other end of the
cable to the USB port on your computer.
13 After the installation is complete, click [Exit] to close the
MF Setup screen. Remove the User Software CD from the
CD-ROM drive and store it in a safe place.
Page 5

To Use the Machine as a Network Printer (Network Connection)
IMPORTANT
• The machine needs to be restarted for the specified settings to become effective.To restart the machine,
disconnect the power cord, wait for at least 10 seconds, and connect the power cord again.
NOTE
• For details on specifying network settings, see Chapter 2, “Specifying the Network Settings,” in the Network Guide.
• For additional network protocol settings, see the Network Guide.
• For the values of the network settings, consult your network administrator or internet service provider (ISP).
Specifying Network Settings
1 Press [Menu] ➝ or to select <6.NETWORK SETTINGS> on the LCD ➝ press [Set].
2 Press or to select <1.LAN SETTINGS> ➝ press [Set].
3 Press or to select <1.IP ADDRESS AUTO.> ➝ press [Set].
● To obtain an IP address automatically (dynamic allocation):
4 Press or to select <ON> ➝ press [Set].
5 Press or to select <1.DHCP>, <2.BOOTP>,or<3.RARP> ➝ press [Set].
6 Press or to select <ON> ➝ press [Set].
7 Press [Stop/Reset] to return to the standby display.
8 Restart the machine by disconnecting the power cord, and then reconnecting it.
● To specify an IP address manually (static allocation):
4 Press or to select <OFF> ➝ press [Set].
5 Press or to select <2.IP ADDRESS> ➝ press [Set].
6 Enter an IP address of the machine using the numeric keys ➝ press [Set].
Write down the IP address you entered: _______ . _______ . _______ . _______
7 Press or to select <3.SUBNET MASK> ➝ press [Set].
8 Enter the subnet mask using the numeric keys ➝ press [Set].
Write down the subnet mask you entered: _______ . _______ . _______ . _______
9 Press or to select <4.DEFAULT GATEWAY> ➝ press [Set].
10 Enter the default gateway address using the numeric keys ➝ press [Set].
Write down the gateway address you entered: _______ . _______ . _______ . _______
11 Press [Stop/Reset] to return to the standby display.
12 Restart the machine by disconnecting the power cord, and then reconnecting it.
Page 6

Connecting the Machine to a Network
1 Connect a Category 5 rated (Cat 5) twisted-pair LAN
cable to the 10Base-T/100Base-TX port on the back
of the machine. Connect the other end of the cable
to a network router or a hub.
Checking Network Settings
1 Press [Menu] ➝ or to select <6.NETWORK SETTINGS>
on the LCD ➝ press [Set].
2 Press or to select <2.VIEW IP ADDRESS> ➝ press [Set].
3 Press or to select the desired setting ➝ press [Set].
4 Press [Stop/Reset] to return to the standby display.
Installing Driver Software
NOTE
• For Windows 2000/XP/Server 2003, log on as Administrator to install the software.
• The screenshots below are from Windows XP. However, the installation procedure is essentially the same for other versions
of Windows.
1 Turn on your computer.
2 Quit any open applications, including anti-virus software.
3 Insert the User Software CD into the CD-ROM drive.
4 When the MF Setup screen appears, click [Network
Connection].
NOTE
• If the MF Setup screen is not displayed, on the Windows desktop, click [start]
➝ [My Computer].Open the CD-ROM icon, then double-click [Setup
(Setup.exe)].
5 Click [Install Drivers].
NOTE
• You can click [Read Manuals] to read PDF manuals.
Page 7

6 When the MF Network Drivers - Setup Wizard screen
appears, click [Next] and follow the instructions on the
screen.
7 Select the target machine in the Device List ➝ click [Next].
NOTE
• If the target machine is not listed in the Device List, click [Search by IP
Address] and enter the IP address ➝ click [OK]. If you do not know the
machine’s IP address, see “Checking Network Settings” on the previous
page.
8 Select the driver(s) to install ➝ click [Next]. Follow the
instructions on the screen to start installation.
9 After the drivers are installed, select the default printer ➝
click [Next].
Page 8

10 Select the driver type (Printer and/or Fax) ➝ click [Next] to
print/fax a test page (optional).
11 When the installation is complete, click [Exit] to close the
MF Network Drivers - Setup Wizard screen.
12 Click [Exit] to close the MF Setup screen. Remove the User
Software CD from the CD-ROM drive and store it in a safe
place.
Congratulations! You have now completed the machine setup for
networking and printing.
Where to go from here...
For basic operations of all functions of your machine,see the Basic Guide.
For details on sending and receiving faxes, see the
For information on the driver software, see the
CD).
For details on the network function of the machine, see the
User Software CD).
Facsimile Guide.
Software Guide (included in the User Software
Network Guide (included in the
For information on remotely monitoring and controlling machine functions through a
network, see the
For installation help and operational instructions, call us at:
Remote UI Guide (included in the User Software CD).
1-800-828-4040 1-800 OK CANON
U.S.A. CUSTOMERS CANADA CUSTOMERS
Part no. FA7-7080 (000)
©2005 Canon Inc.
Canon and imageCLASS are trademarks of Canon Inc.
All other products and brand names are registered
trademarks or trademarks of their respective owners.
Specifications subject to change without notice.
PRINTED IN CHINA
 Loading...