

CANON iR2800 User Manual
Remote UI Guide
Please read this guide before operating this equipment.
After you finish reading this guide, store it in a safe place for future reference.
ENG


iR105
iR8500
iR85
iR7200
iR6020/5020
Series
iR6000i/5000i
iR6000/5000
iR3300i/2200i
iR3300/2800/2200
Remote UI Guide
Manuals for the Machine
The manuals for this machine are divided as follows. Please refer to them for detailed information.
The manuals supplied with optional equipment are included in the list below. Depending on the system
configuration and product purchased, some manuals may not be needed.
Guides with this symbol are printed manuals.
Basic Operations
•
Troubleshooting
•
Copy Guide and Mail Box Guide do not exist for the iR6000/ 5000.
Explanations for them are all listed in the User's Guide.
Copying Instructions
•
Mail Box Instructions
•
The name of the manual for the products other than iR6020i/5020i and
iR5020N is Mail Box Function Guide.
Sending Instructions
•
The name of the manual for the products other than iR105, iR8500,
iR7200, iR6020i/5020i, and iR6000i/5000i is Sending Function Guide.
Sending and Fax Instructions
•
iR3300i/2200i
•
Fax Instructions
iR3300/2800/2200
•
Setting Up the Network Connection and
Installing the CD-ROM Software
The name of the manual for the products other than iR6020i/5020i and
iR5020N is Printer Setup Guide.
Guides with this symbol are PDF manuals included on the
CD-ROM
accompanying CD-ROM.
Reference Guide
User's Guide
Copying Guide
Mail Box Guide
Sending Guide
Sending Function/
Facsimile Guide
Facsimile Guide
Network Quick Start Guide
•
Remote User Interface Instructions
Network Connectivity and Setup
•
Instructions
Network ScanGear Installation and
•
Instructions
Remote UI Guide
(This Document)
Network Guide
Network ScanGear
User's Guide
CD-ROM
CD-ROM
CD-ROM

•
PS/PCL Printer Instructions
PCL Printer Driver Installation and
•
Instructions
PS Printer Driver Installation and
•
Instructions
•
Fax Driver Installation and Instructions
Installing MEAP Applications and
•
Using the Login Service
iR6020i/5020i
PS/PCL Printer Guide
PCL Driver Guide
PS Driver Guide
Fax Driver Guide
MEAP SMS Administrator
Guide
CD-ROM
CD-ROM
CD-ROM
CD-ROM
CD-ROM

How This Manual Is Organized
Chapter 1
Chapter 2
Chapter 3
Using the Remote UI
Remote UI Functions
Appendix
Includes the index.
Considerable effort has been made to ensure that this manual is free of inaccuracies and omissions. However, as we are constantly improving our
products, if you need an exact specification, please contact Canon.

Contents
Preface . . . . . . . . . . . . . . . . . . . . . . . . . . . . . . . . . . . . . . . . . . . . . . . . . . . . . . . . . vii
How To Use This Manual . . . . . . . . . . . . . . . . . . . . . . . . . . . . . . . . . . . . . . . . . . . vii
Symbols Used in This Manual . . . . . . . . . . . . . . . . . . . . . . . . . . . . . . . . . . . . . .vii
Keys and Buttons Used in This Manual . . . . . . . . . . . . . . . . . . . . . . . . . . . . . . viii
Displays Used in This Manual . . . . . . . . . . . . . . . . . . . . . . . . . . . . . . . . . . . . . . ix
Abbreviations Used in This Manual . . . . . . . . . . . . . . . . . . . . . . . . . . . . . . . . . . x
Legal Notices . . . . . . . . . . . . . . . . . . . . . . . . . . . . . . . . . . . . . . . . . . . . . . . . . . . . . xi
Trademarks . . . . . . . . . . . . . . . . . . . . . . . . . . . . . . . . . . . . . . . . . . . . . . . . . . . . xi
Copyright . . . . . . . . . . . . . . . . . . . . . . . . . . . . . . . . . . . . . . . . . . . . . . . . . . . . . . xi
Disclaimers . . . . . . . . . . . . . . . . . . . . . . . . . . . . . . . . . . . . . . . . . . . . . . . . . . . .xii
Chapter 1 Using the Remote UI
Machines Covered in This Manual . . . . . . . . . . . . . . . . . . . . . . . . . . . . . . . . . . .1-2
Overview of the Remote UI . . . . . . . . . . . . . . . . . . . . . . . . . . . . . . . . . . . . . . . . . 1-3
System Requirements. . . . . . . . . . . . . . . . . . . . . . . . . . . . . . . . . . . . . . . . . . . . .1-9
Before You Start the Remote UI . . . . . . . . . . . . . . . . . . . . . . . . . . . . . . . . . . . . 1-10
Setting the Remote UI to On . . . . . . . . . . . . . . . . . . . . . . . . . . . . . . . . . . . . . 1-11
Starting the Remote UI . . . . . . . . . . . . . . . . . . . . . . . . . . . . . . . . . . . . . . . . . . .1-15
Models Not Equipped with MEAP . . . . . . . . . . . . . . . . . . . . . . . . . . . . . . . . .1-15
Models Equipped with MEAP. . . . . . . . . . . . . . . . . . . . . . . . . . . . . . . . . . . . .1-16
Chapter 2 Remote UI Functions
Device Status and Information Display . . . . . . . . . . . . . . . . . . . . . . . . . . . . . . . 2-2
Job Management . . . . . . . . . . . . . . . . . . . . . . . . . . . . . . . . . . . . . . . . . . . . . . . . .2-4
Managing Print Jobs . . . . . . . . . . . . . . . . . . . . . . . . . . . . . . . . . . . . . . . . . . . .2-5
Managing Copy, Send, and Fax Jobs . . . . . . . . . . . . . . . . . . . . . . . . . . . . . .2-11
Managing Receive Jobs. . . . . . . . . . . . . . . . . . . . . . . . . . . . . . . . . . . . . . . . .2-16
Managing the iR3300/2800/2200 Fax Send and Receive Jobs . . . . . . . . . . . 2-20
Managing Inboxes . . . . . . . . . . . . . . . . . . . . . . . . . . . . . . . . . . . . . . . . . . . . . . .2-26
User Inboxes . . . . . . . . . . . . . . . . . . . . . . . . . . . . . . . . . . . . . . . . . . . . . . . . . 2-28
Memory RX Inbox . . . . . . . . . . . . . . . . . . . . . . . . . . . . . . . . . . . . . . . . . . . . .2-43
Confidential Fax Inboxes . . . . . . . . . . . . . . . . . . . . . . . . . . . . . . . . . . . . . . . . 2-48
Printing PDF or PS Files Directly (Direct Print) . . . . . . . . . . . . . . . . . . . . . . .2-53
Printing PDF Files Directly . . . . . . . . . . . . . . . . . . . . . . . . . . . . . . . . . . . . . . . 2-54
Printing PS Files Directly . . . . . . . . . . . . . . . . . . . . . . . . . . . . . . . . . . . . . . . .2-58
v

Managing the Address Book . . . . . . . . . . . . . . . . . . . . . . . . . . . . . . . . . . . . . 2-60
Managing the iR Address Book . . . . . . . . . . . . . . . . . . . . . . . . . . . . . . . . . . 2-61
Operating the Address Book . . . . . . . . . . . . . . . . . . . . . . . . . . . . . . . . . 2-62
Operating the System Reference Address. . . . . . . . . . . . . . . . . . . . . . . 2-72
Managing the iR3300/2800/2200 Address Book . . . . . . . . . . . . . . . . . . . . . 2-75
Customizing System Settings . . . . . . . . . . . . . . . . . . . . . . . . . . . . . . . . . . . . 2-81
Customizing System Information . . . . . . . . . . . . . . . . . . . . . . . . . . . . . . . . . 2-81
Restarting the Machine . . . . . . . . . . . . . . . . . . . . . . . . . . . . . . . . . . . . . . . . 2-86
Specifying LDAP Server Settings. . . . . . . . . . . . . . . . . . . . . . . . . . . . . . . . . . 2-90
Specifying Forwarding Settings . . . . . . . . . . . . . . . . . . . . . . . . . . . . . . . . . . . 2-94
Managing Department IDs. . . . . . . . . . . . . . . . . . . . . . . . . . . . . . . . . . . . . . . 2-101
Import/Export Function . . . . . . . . . . . . . . . . . . . . . . . . . . . . . . . . . . . . . . . . . 2-107
Saving iR Address Lists in Files. . . . . . . . . . . . . . . . . . . . . . . . . . . . . . . . . 2-108
Loading an Address Book . . . . . . . . . . . . . . . . . . . . . . . . . . . . . . . . . . . . . 2-111
Saving Forwarding Settings in Files (Export) . . . . . . . . . . . . . . . . . . . . . . . 2-114
Loading a Forwarding Settings File (Overwrite/Import) . . . . . . . . . . . . . . . 2-116
Saving Additional Functions Settings in Files (Export). . . . . . . . . . . . . . . . 2-118
Loading Additional Functions Settings Files (Overwrite/Import) . . . . . . . . 2-120
Saving an iR3300/2800/2200 Address Book as a File (Export) . . . . . . . . . 2-122
Loading an iR3300/2800/2200 Address Book from a File
(Overwrite/Import) . . . . . . . . . . . . . . . . . . . . . . . . . . . . . . . . . . . . . . . . . . . 2-124
Device Custom Settings . . . . . . . . . . . . . . . . . . . . . . . . . . . . . . . . . . . . . . . . 2-126
Chapter 3 Appendix
Index . . . . . . . . . . . . . . . . . . . . . . . . . . . . . . . . . . . . . . . . . . . . . . . . . . . . . . . . . . 3-2
vi

Preface
Thank you for purchasing this Canon product. Please read this manual thoroughly before
operating the product in order to familiarize yourself with its capabilities, and to make the
most of its many functions. After reading this manual, store it in a safe place for future
reference.
How To Use This Manual
Symbols Used in This Manual
The following symbols are used in this manual to explain procedures, restrictions,
handling precautions, and instructions that should be observed for safety.
CAUTION
IMPORTANT
NOTE
Indicates a caution concerning operations that may lead to injury to
persons, or damage to property if not performed correctly. In order to
use the machine safely, always pay attention to these cautions.
Indicates operational requirements and restrictions. Be sure to read
these items carefully in order to operate the product correctly, and to
avoid damage to the product.
Indicates a clarification of an operation, or contains additional
explanations for a procedure. Reading these notes is highly
recommended.
vii

Keys and Buttons Used in This Manual
The following symbols and key/button names are a few examples of how keys and
buttons to be pressed are expressed in this manual:
•
Touch Panel Display Keys: [Key Name]
Examples:
Control Panel Keys: <Key icon>+(Key Name)
•
Examples:
•
Buttons on Computer Operation Screens: [Button Name]
Examples:
[System Settings]
[Done]
(Additional Functions)
- (Numeric Keys)
[Job Status]
[OK]
viii
Displays Used in This Manual
r
o
pp
.
Screenshots of the display used in this manual are mainly those of the iR105.
Unless otherwise noted, they are the same as those of the iR8500, iR85, iR7200,
iR6020i/5020i, iR5020N, iR6000i/5000i, iR6000/5000, iR3300i/2200i, and iR3300/
2800/2200.
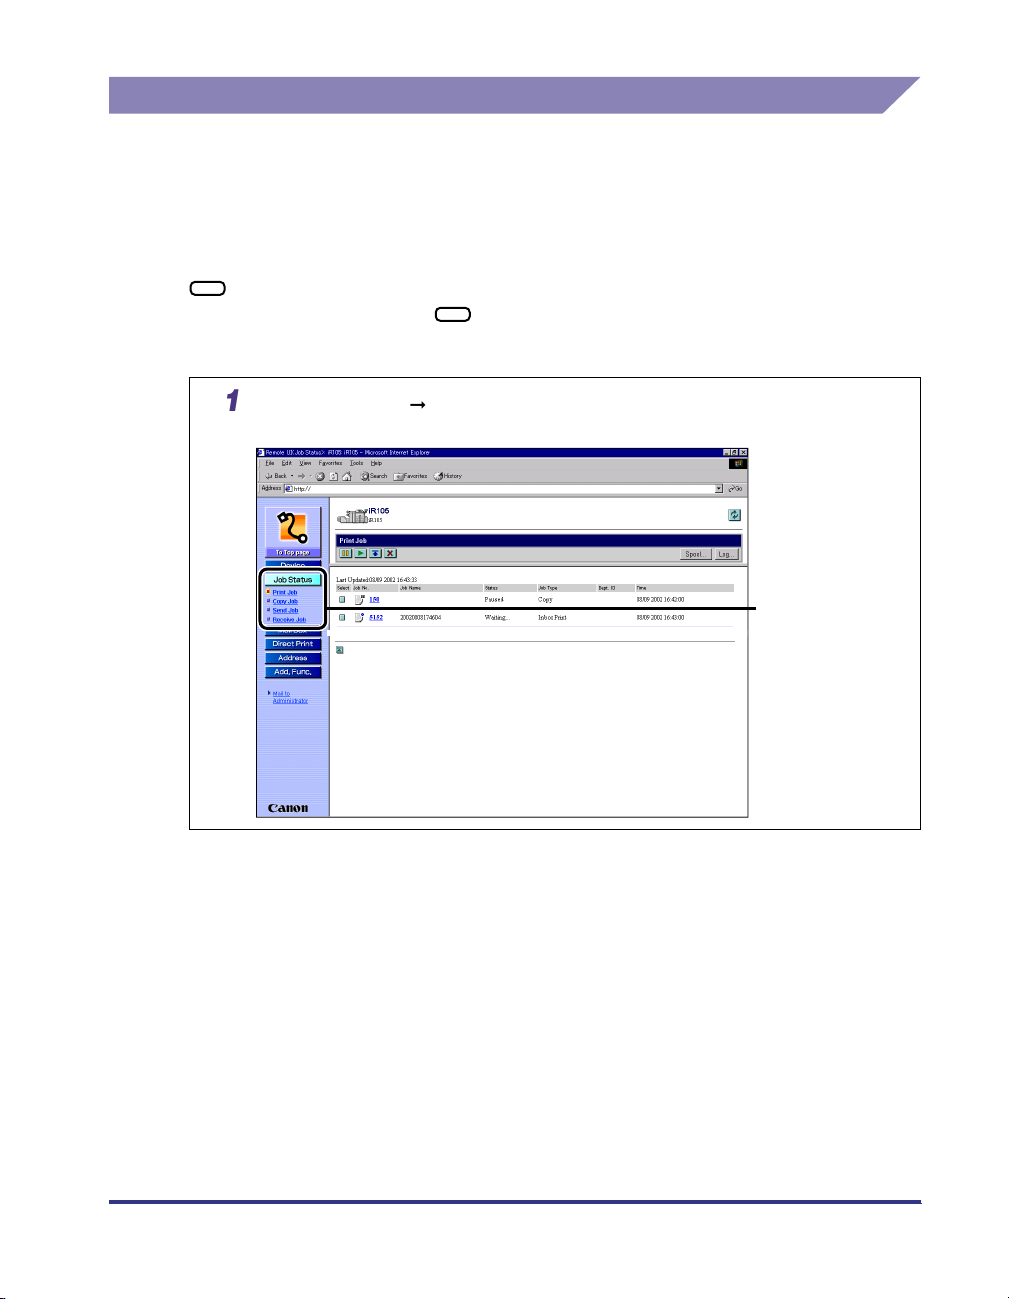
The keys or buttons that you need to press during the procedure are marked with
, as shown in the example below. If multiple keys or buttons can be pressed,
they are all enclosed within . Select the appropriate key or button according to
your needs.
Click [Job Status] select [Print Job] f
ears under [Job Status]
a
m the menu that
Click one of
these keys for
operation.
ix

Abbreviations Used in This Manual
In this manual, product names and model names are abbreviated as follows:
Microsoft® Windows® 2000 operating system: Windows 2000
Microsoft® Windows® 98 operating system: Windows 98
Microsoft® Windows® 95 operating system: Windows 95
Microsoft® Windows NT® 4.0 operating system: Windows NT
Microsoft® Windows® Millennium Edition operating system: Windows Me
Microsoft® Windows® XP Home Edition operating system: Windows XP
Microsoft® Windows® XP Professional Edition operating
system:
Microsoft® Windows® operating system: Windows
Windows XP
x

Legal Notices
Trademarks
Canon, the Canon logo, iR, MEAP and MEAP logo are trademarks of Canon Inc.
Adobe, Acrobat, and PostScript are trademarks of Adobe Systems Incorporated.
Macintosh and Mac OS are trademarks of Apple Computer, Inc.
Lotus Notes is the registered trademark of Lotus Development Corporation or Lotus
Corporation.
Active Directory, Microsoft, Windows, and Windows NT are registered trademarks
of Microsoft Corporation in the United States and other countries.
Netscape, Netscape Communicator, and Netscape Navigator are trademarks of
Netscape Communications Corporation.
Java and all Java-based trademarks and logos are trademarks or registered
trademarks of Sun Microsystems, Inc. in the U.S. and other countries.
Other product and company names herein may be the trademarks of
theiRrespective owners.
Copyright
Copyright 2003 by Canon Inc. All rights reserved.
No part of this publication may be reproduced or transmitted in any form or by any
means, electronic or mechanical, including photocopying and recording, or by any
information storage or retrieval system without the prior written permission of
Canon Inc.
xi

Disclaimers
The information in this document is subject to change without notice.
CANON INC. MAKES NO WARRANTY OF ANY KIND WITH REGARD TO THIS
MATERIAL, EITHER EXPRESS OR IMPLIED, EXCEPT AS PROVIDED HEREIN,
INCLUDING WITHOUT LIMITATION, THEREOF, WARRANTIES AS TO
MARKETABILITY, MERCHANTABILITY, FITNESS FOR A PARTICULAR
PURPOSE OF USE OR AGAINST INFRINGEMENT OF ANY PATENT. CANON
INC. SHALL NOT BE LIABLE FOR ANY DIRECT, INCIDENTAL, OR
CONSEQUENTIAL DAMAGES OF ANY NATURE, OR LOSSES OR EXPENSES
RESULTING FROM THE USE OF THIS MATERIAL.
xii

Using the Remote UI
This chapter describes the features and benefits of the Remote UI, and how to start it.
Machines Covered in This Manual . . . . . . . . . . . . . . . . . . . . . . . . . . . . . . . . . . . . . . . . . . 1-2
Overview of the Remote UI. . . . . . . . . . . . . . . . . . . . . . . . . . . . . . . . . . . . . . . . . . . . . . . . 1-3
System Requirements . . . . . . . . . . . . . . . . . . . . . . . . . . . . . . . . . . . . . . . . . . . . . . . . . . .1-9
Before You Start the Remote UI . . . . . . . . . . . . . . . . . . . . . . . . . . . . . . . . . . . . . . . . . . .1-10
Setting the Remote UI to On. . . . . . . . . . . . . . . . . . . . . . . . . . . . . . . . . . . . . . . . . . . . . . . . . . . .1-11
Starting the Remote UI . . . . . . . . . . . . . . . . . . . . . . . . . . . . . . . . . . . . . . . . . . . . . . . . . . 1-15
Models Not Equipped with MEAP . . . . . . . . . . . . . . . . . . . . . . . . . . . . . . . . . . . . . . . . . . . . . . .1-15
Models Equipped with MEAP. . . . . . . . . . . . . . . . . . . . . . . . . . . . . . . . . . . . . . . . . . . . . . . . . . .1-16
1
CHAPTER
1-1

Machines Covered in This Manual
1
This manual applies to the following machines:
• iR105
• iR8500
• iR85
• iR7200
• iR6020i/5020i
Using the Remote UI
• iR5020N
• iR6000i/5000i
• iR6000/5000
• iR3300i/2200i
• iR3300/2800/2200
1-2
Machines Covered in This Manual

Overview of the Remote UI
The Remote UI (User Interface) is preinstalled software in the machine that enables
you to access the machine's functions by using a web browser. For example, the
Remote UI enables you to access the machine to check job statuses, execute jobs,
and specify various settings. To be able to use the Remote UI, all you need is a web
browser and a network connection between your computer and the machine.
In order to use the Remote UI, you must first enter an IP (Internet Protocol) address
for the machine from the control panel and set up the necessary network
connection. Once this is achieved, start your web browser and enter the machine's
IP address. The Remote UI screen appears on your computer screen and is ready
for use.
You can operate the machine through the Remote UI
from a PC using a web browser.
PC Screen Shots
Windows Macintosh
1
Using the Remote UI
Touch Panel Display
Screen Shots
Control Panel of Machine
PC Connected to Network
iR
You can operate the machine from the control panel
and touch panel display.
Overview of the Remote UI
1-3
■ Checking the status of the machine from a networked computer
1
Using the Remote UI
The Remote UI enables you to access the machine via a network, enabling you to display
the current status and settings for the machine, and the status of all information and job
processing. You can manage the machine from a computer connected to the network
without having to perform operations on the machine itself.
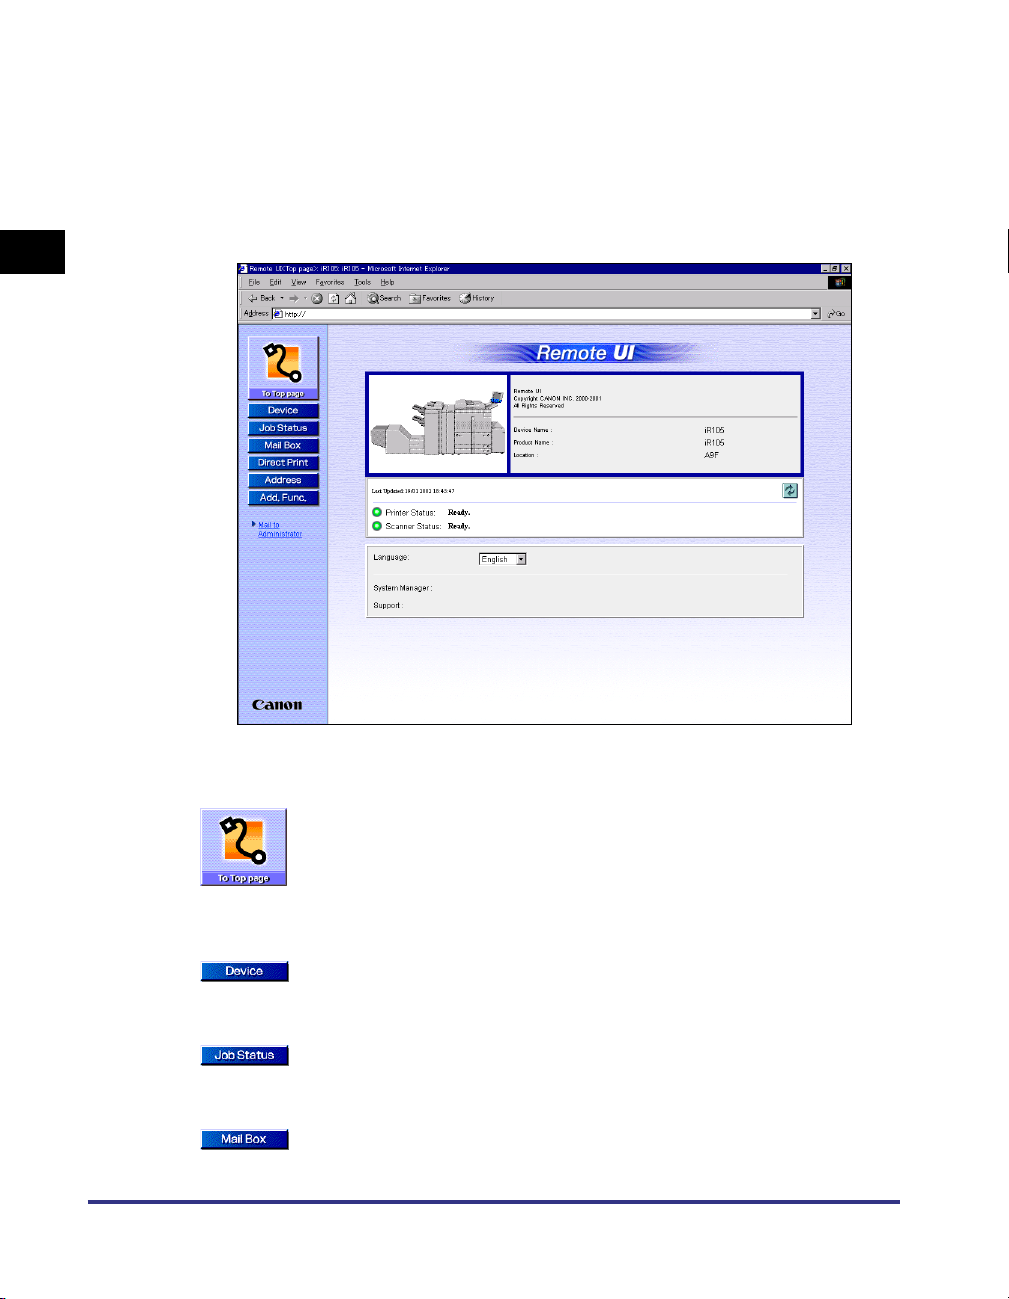
When you enter the machine's IP address into your web browser, the Remote UI's top
page or main screen is displayed on your computer screen, as shown below:
1-4
The left column of the Remote UI's top page contains the function buttons, which allow
you to navigate the functions of the Remote UI.
Takes you to the Remote UI top page.
Displays information such as the product name, printer status,
scanner status, and fax status. (The Fax function is only available
when the fax board is installed in the iR3300i/2200i or the iR3300/
2800/2200.)
Displays the machine's current status, settings information, and the
optional equipment that is attached to the machine.
Displays the current status of jobs, and permits changes to jobs
being processed by the machine.
Enables you to print, move, or send documents stored in inboxes.
Overview of the Remote UI

Enables you to print PDF (Portable Document Format) and PS
(PostScript) files that are stored in your computer or on the network
without opening the files. (This function can only be used when the
iR105, iR8500, iR85, iR7200, iR6020i/5020i, iR5020N, iR6000i/5000i,
or iR3300i/2200i is used as a PS or PCL printer.)
Enables you to manage the machine's Address Book, including the
storing and editing of addresses.
Enables you to specify or change various system settings on the
machine.
This updates or refreshes the currently displayed screen with the
latest information. Information is not updated automatically. When
you click this button, the latest information from the machine is
acquired.
NOTE
•
You can change the language displayed on the screen by clicking the Language
drop-down list and selecting the desired language. This function is available only if
[Language Switch] is set to 'On' in Common Settings (from the Additional Functions
screen). For more information on specifying this setting using the control panel, see
Chapter 3, "Selecting and Storing Settings to Suit your Needs," in the Reference Guide.
(This function is not available with the iR6000/5000.)
•
Changing the display language limits the types of characters that you can enter.
■ Setting and controlling the machine from a computer
The Remote UI enables you to pause and resume jobs, view and print jobs stored in
inboxes, and change various settings from a computer without using the machine's control
panel.
1
Using the Remote UI
Overview of the Remote UI
1-5
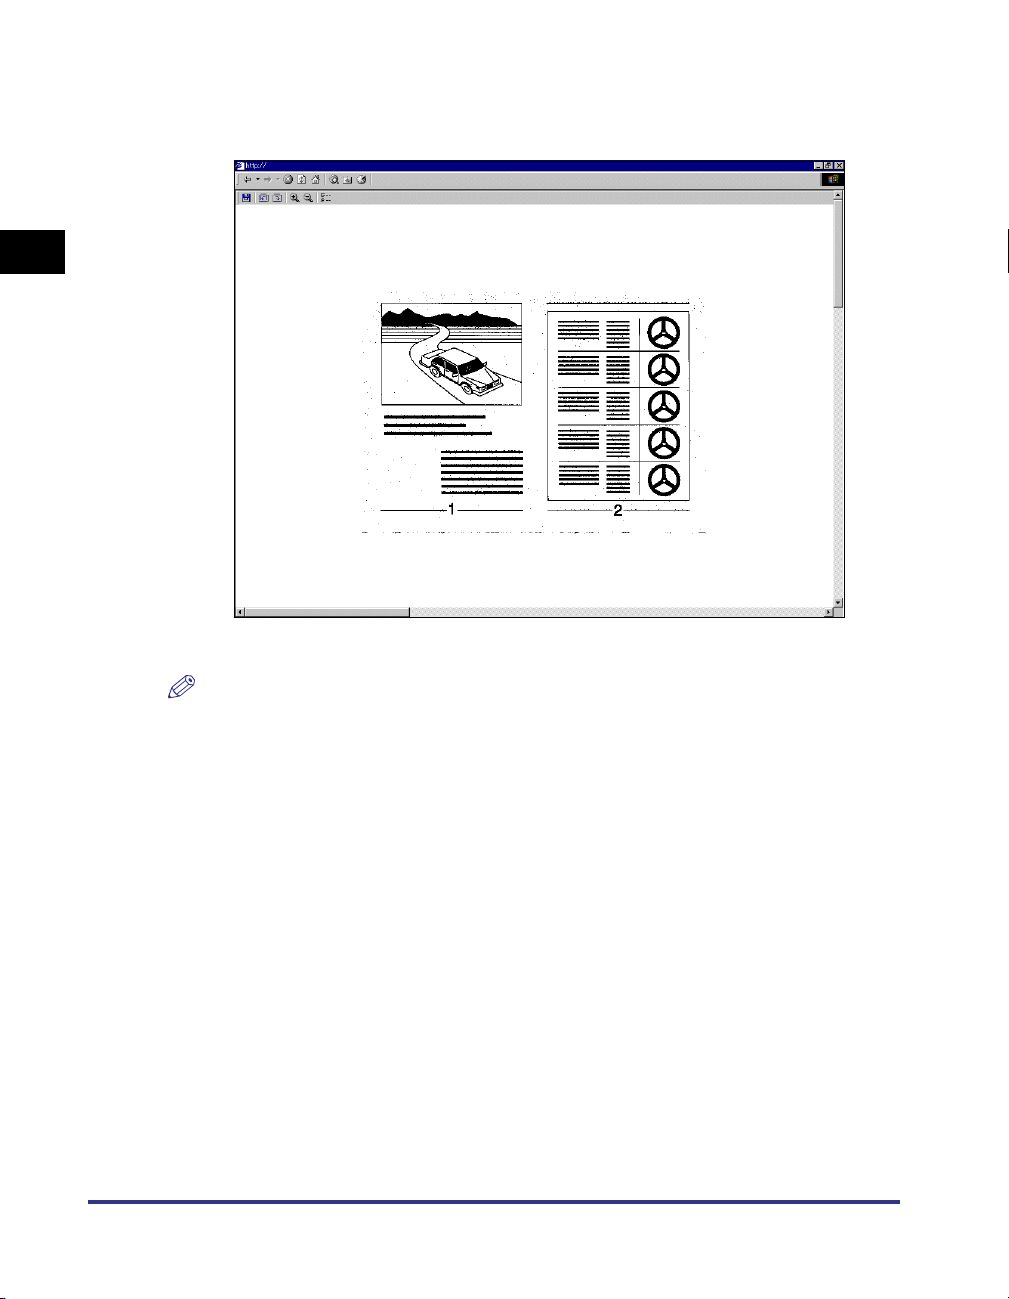
■ Viewing documents stored in inboxes on your computer screen
1
Using the Remote UI
The Remote UI enables you to display image files stored in mail boxes, from [Mail Box] on
your PC, using the JBIG Image Viewer.
Sample image that was scanned into a mail box
1-6
NOTE
To install and use the JBIG Image Viewer, see the \Jbig\readme.txt file on the CD-ROM
provided.
Overview of the Remote UI
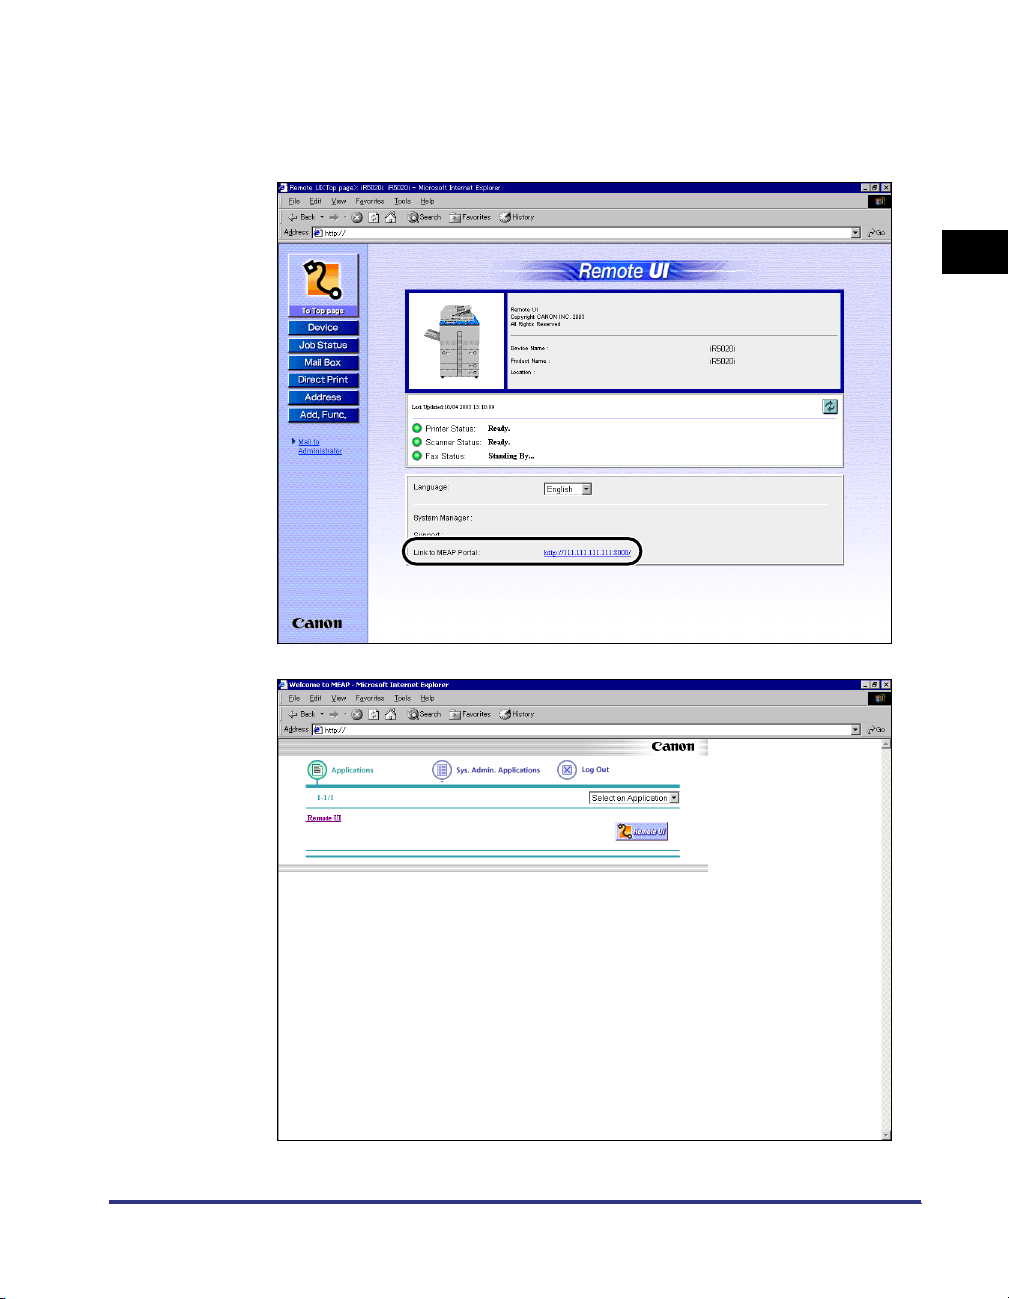
■ Link to MEAP Portal (Only for models equipped with MEAP)
A list of the MEAP (Multifunction Embedded Application Platform) applications can be
displayed by clicking [http://<the IP address of the device:8000>/] for Link to MEAP Portal
on the top page of the Remote UI.
1
Using the Remote UI
Overview of the Remote UI
1-7

1
Using the Remote UI
NOTE
•
You can set the application for management only, if you enter the authentication
screen by logging on as Administrator. (See Chapter 5, "Registering/Editing Login
Data," in the MEAP System Settings Guide.)
•
If Department ID Management is set to 'Off', and System Manager is not specified,
and depending on the login services you are using, all users may be considered as
Administrators without authentication. (See Chapter 4, "System Manager Settings,"
in the Referenc Guide.)
1-8
Overview of the Remote UI

System Requirements
The system requirements for the Remote UI are as follows:
■ Windows
• OS (Operating System)
- Microsoft Windows NT Workstation 4.0 + Service Pack 3, or later
- Microsoft Windows 95/98
- Microsoft Windows 2000 Professional
- Microsoft Windows Me
- Microsoft Windows XP
• Web Browser
- Microsoft Internet Explorer 4.01 SP1, or later
However, iR105, iR8500, iR85, iR7200, iR6020i/5020i, and iR5020N conform to
Microsoft Internet Explorer 5.01 SP2 or later.
- Netscape Communicator 4.6, or later
■ Macintosh
• OS (Operating System)
- Mac OS 8.6, or later
However, iR6000/5000 and iR3300i/2200i do not conform to Mac OS X.
• Web Browser
- Microsoft Internet Explorer 4.5, or later
However, iR105, iR8500, iR85, iR7200, iR6020i/5020i, and iR5020N conform to
Microsoft Internet Explorer 5.0 or later.
1
Using the Remote UI
IMPORTANT
If you are using Netscape 6.2, click [Edit] ➞ select [Preferences] ➞ click [Advanced]
menu under Category ➞ click [Cache] ➞ set [Compare the page in the cache to the page
on the network:] to [Once per session] or [Never]. If you do not make this setting, you
may have problems accessing the machine using other web browsers.
NOTE
•
Apart from those mentioned above, no other software, such as a web server, is
necessary. (There already is a web server inside the machine.)
•
To display the documents stored in a mail box, it is necessary to install the JBIG Image
Viewer. The JBIG Image Viewer is included with the PS/PCL package.
System Requirements
1-9

Before You Start the Remote UI
1
Before you start the Remote UI, perform the following:
■ Specify the Network Settings
■ MEAP Settings (Only for models equipped with MEAP)
Using the Remote UI
■ Set Remote UI to On
■ Install the JBIG Image Viewer
Specify the settings under Network Settings in System Settings (from the Additional
Functions screen) and find out the machine's IP address. If you do not know the
machine's IP address, consult your network administrator. (See Chapter 3, "Using a TCP/
IP Network," in the Network Guide.)
Set Use HTTP in MEAP Settings in System Settings (from the Additional Functions
screen) to 'On'. (See Chapter 4, "System Manager Settings," in the Reference Guide.)
Set Remote UI in System Settings (from the Additional Functions screen) to 'On'. It is also
recommended that Device Information Settings in System Settings be set up.
To display the documents stored in a mail box, it is necessary to install the JBIG Image
Viewer. To install and use the JBIG Image Viewer, see the \Jbig\readme.txt file on the
CD-ROM provided.
IMPORTANT
•
Connection via a proxy server is not possible. If your system environment has a proxy
server, perform the following setting. (Settings vary according to the system environment,
consult your network administrator.)
- Enter the IP address of the machine into Exceptions in the web browser proxy server
settings.
- You must set your web browser to enable all cookies and use Java Script. Otherwise,
you will not be able to change the machine's settings using the Remote UI.
•
If the control panel of the machine is being used for a particular operation, you cannot
perform the same operation using the Remote UI.
•
If multiple Remote UIs are running simultaneously, the latest setting that was made is
enabled. It is recommended that only one Remote UI be running at a time.
•
To enter characters from a web browser, use the characters that you can enter from the
touch panel display of the machine. If you use the other characters, they may not be
displayed/recognized properly on the machine.
1-10
Before You Start the Remote UI
Setting the Remote UI to On
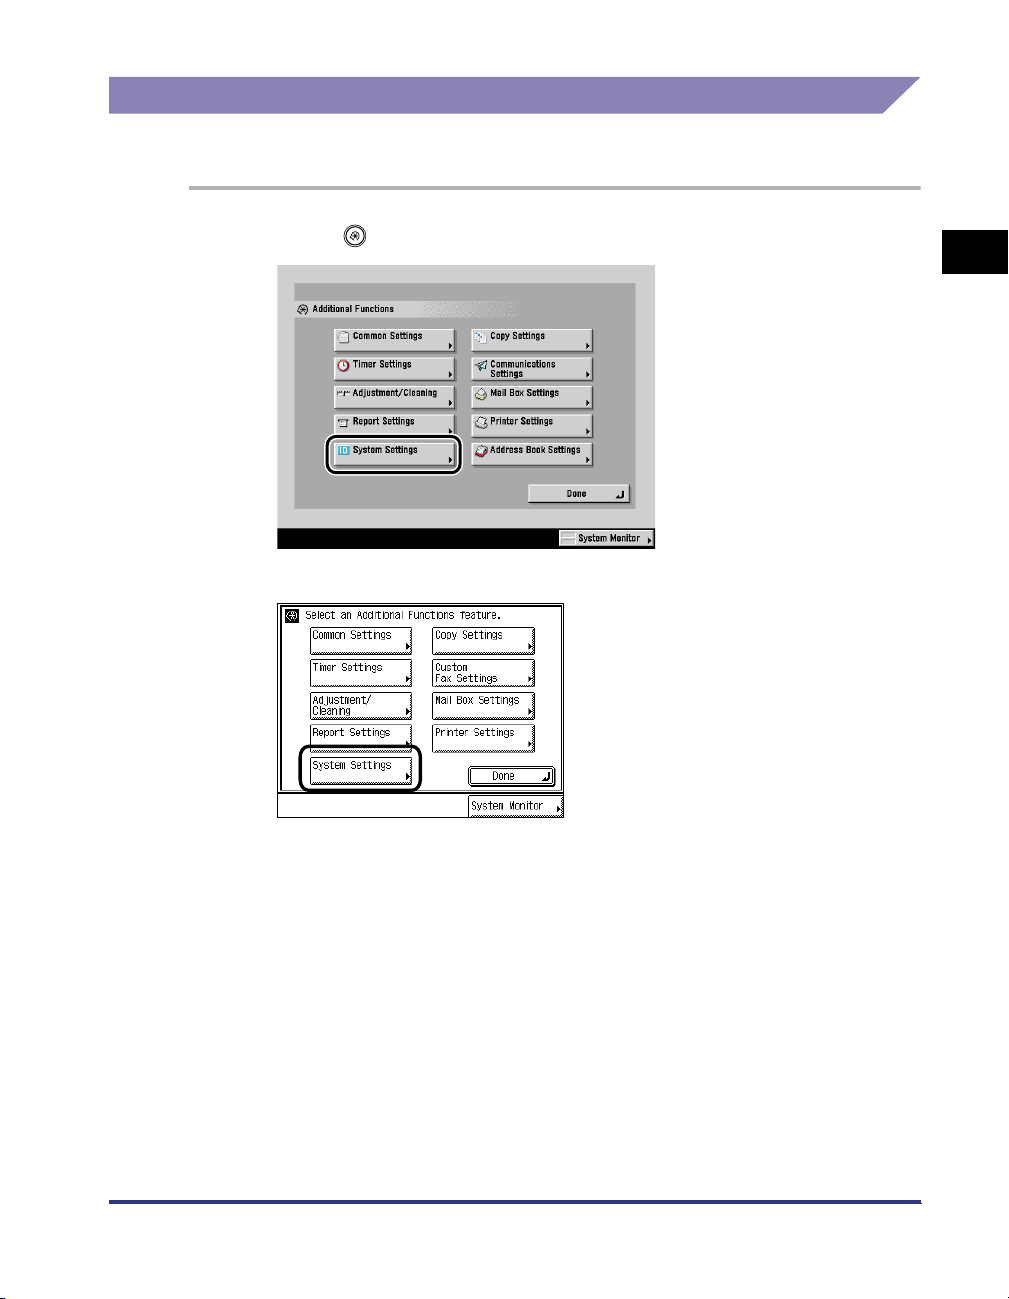
You must use the machine's control panel to set the Remote UI on or off.
1
Press (Additional Functions) ➞ [System Settings].
Colour display
1
Using the Remote UI
Black-and-white display
Before You Start the Remote UI
1-11
1
Using the Remote UI
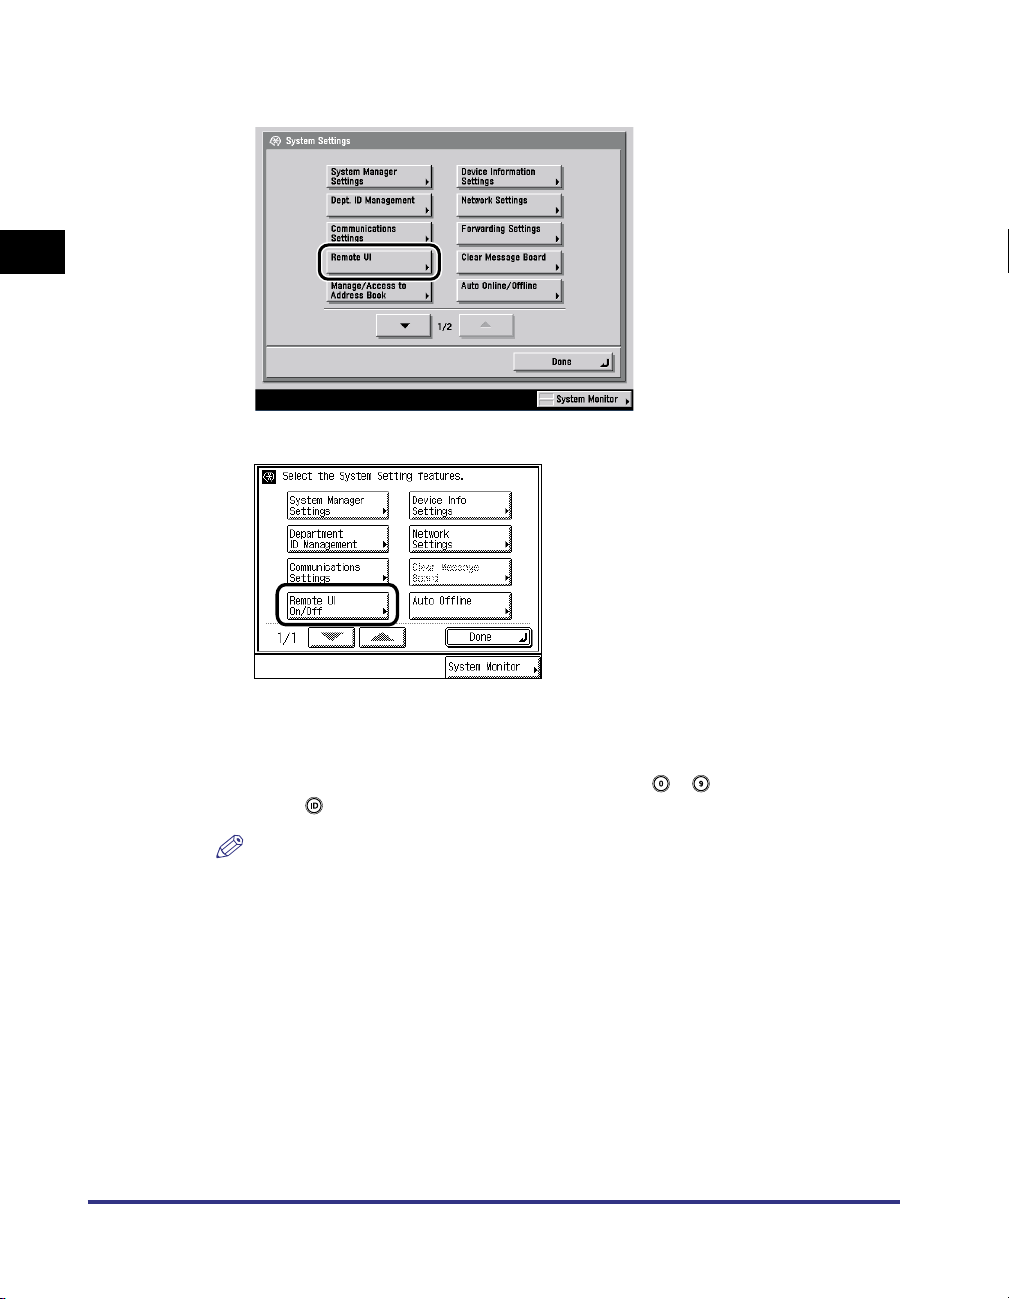
2
Press [Remote UI].
Colour display
1-12
Black-and-white display
If the System Manager ID and System Password have already been set, enter the
System Manager ID and System Password using - (numeric keys) ➞
press (ID).
NOTE
If the desired setting is not displayed, press [▼] or [▲] to scroll to the desired
setting.
Before You Start the Remote UI
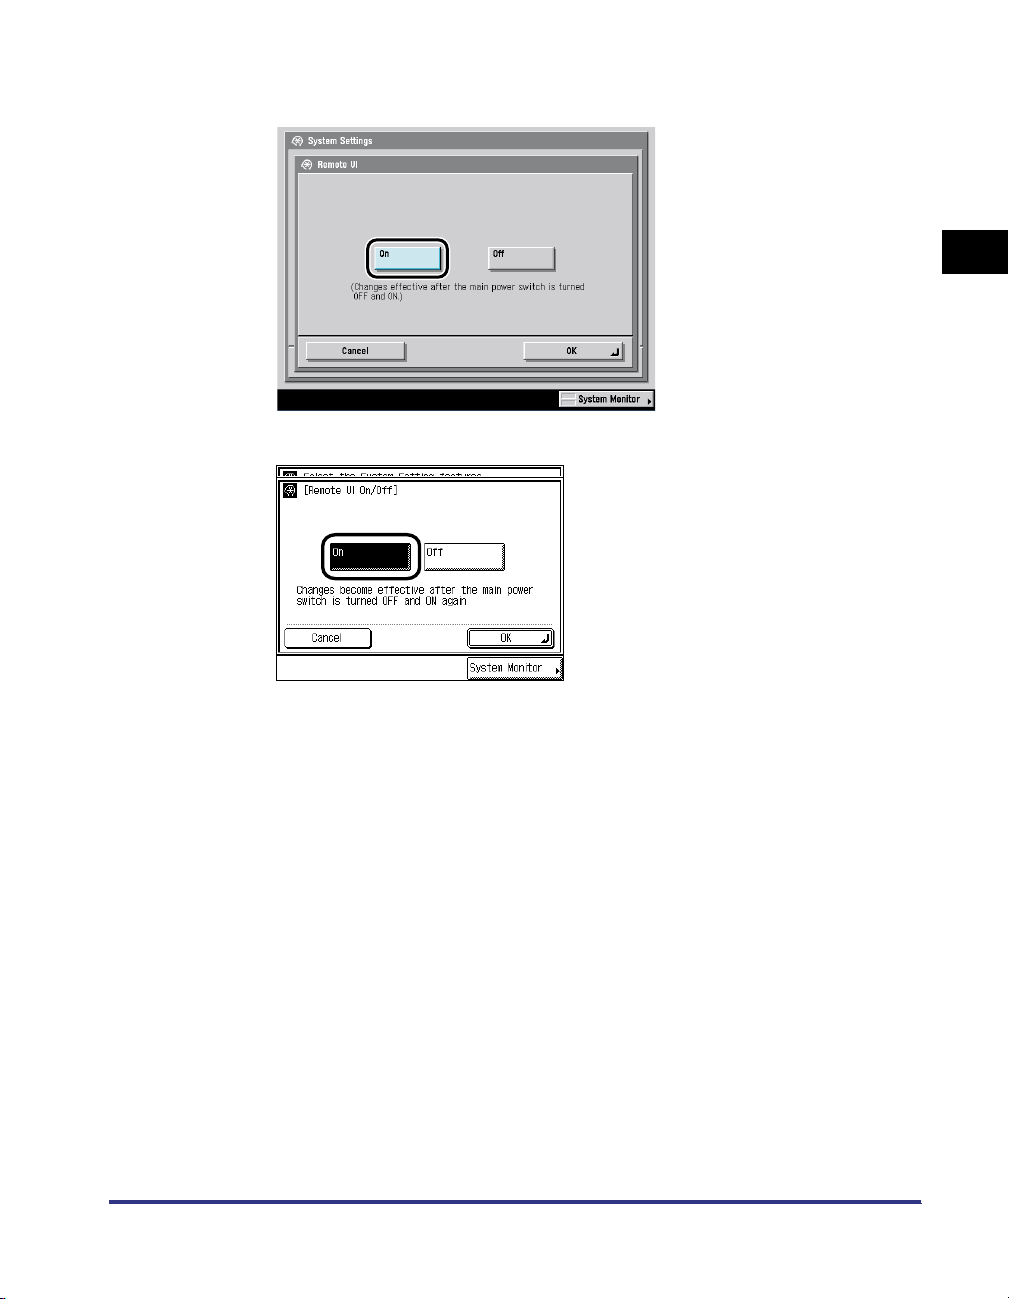
3
Press [On].
Colour display
1
Using the Remote UI
Black-and-white display
If you do not want to use the Remote UI, press [Off].
Before You Start the Remote UI
1-13
1
Using the Remote UI
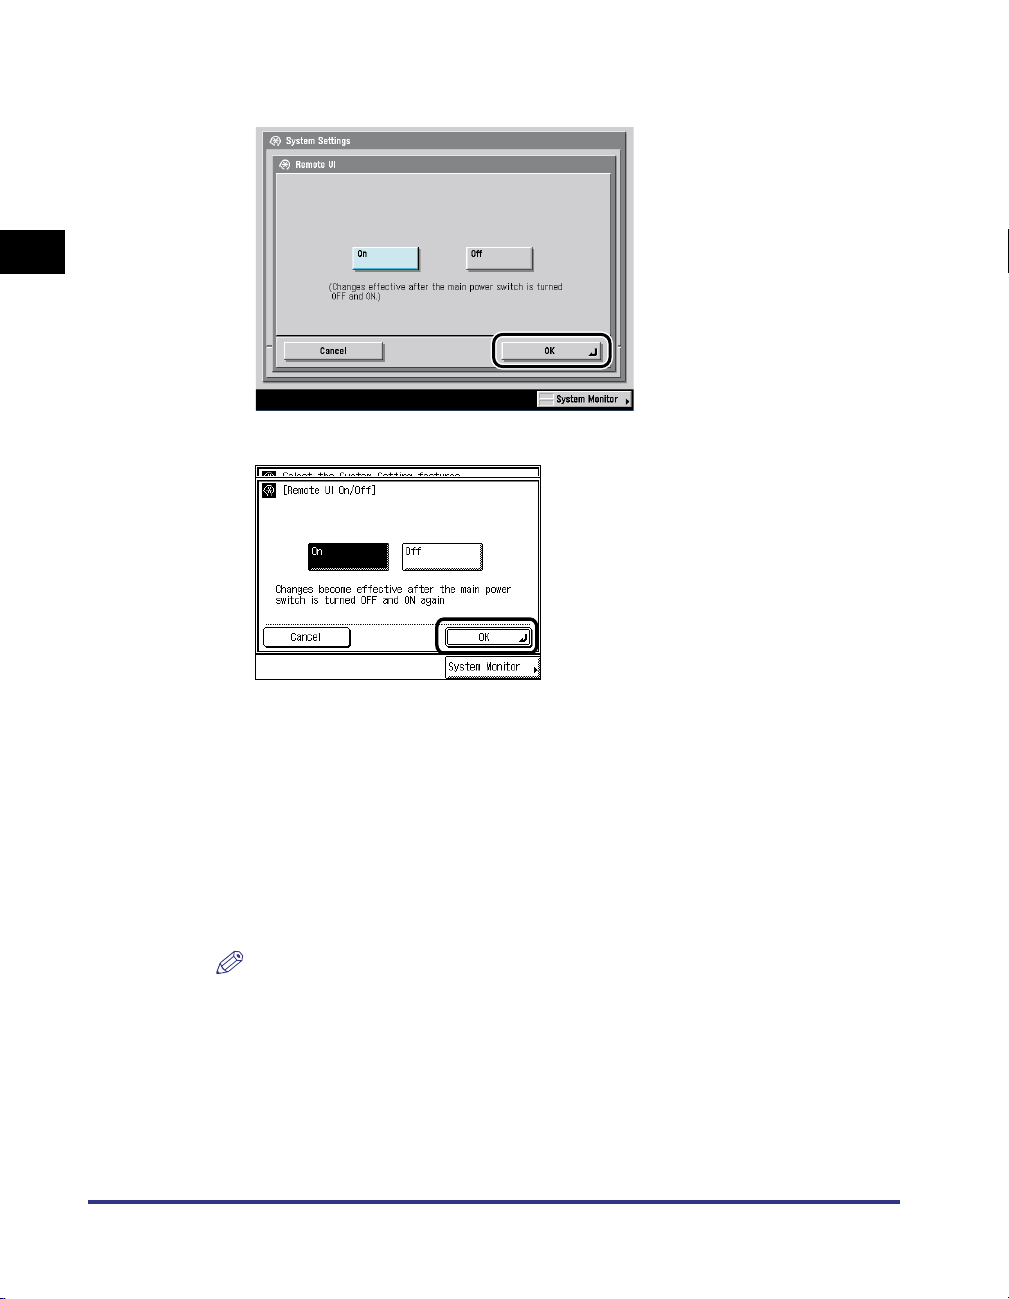
4
Press [OK].
Colour display
1-14
Black-and-white display
5
Press [Done] repeatedly until the Basic Features screen
appears.
6
Turn OFF the main power of the machine, wait 10 seconds,
and turn the power ON again.
NOTE
The [Remote UI] setting is made effective only after turning the machine's power
OFF and then ON again.
Before You Start the Remote UI

Starting the Remote UI
To start the Remote UI, follow the procedure described below.
Models Not Equipped with MEAP
For the models that are not equipped with MEAP (Multifunction Embedded
Application Platform), follow the procedure below.
1
Start your web browser.
2
Enter the appropriate URL into [Address] or [Location].
http://<the IP address of the device>/
The Remote UI screen is displayed.
1
Using the Remote UI
NOTE
If you do not know the appropriate URL, consult your system administrator.
Starting the Remote UI
1-15

Models Equipped with MEAP
For the models that are equipped with MEAP, follow the procedure below.
1
Using the Remote UI
IMPORTANT
•
The following models are described in this section:
- iR6020i/5020i
- iR5020N
NOTE
For details of selection and setting of login service, consult your system administrator.
1
Start your web browser.
2
Enter the appropriate URL into [Address] or [Location].
http://<the IP address of the device>/
NOTE
If login service is not set, it is unnecessary to proceed step 3 and later. However, if
System Manager Settings is set, log on using the contents set for the settings, or
click [Cancel] without logging on.
1-16
Starting the Remote UI
 Loading...