

Page 1

PS/PCL Printer Guide
PS/PCL Printer Guide
Series
Please read this guide before operating this equipment.
After you finish reading this guide, store it in a safe place for future reference.
ENG
Page 2
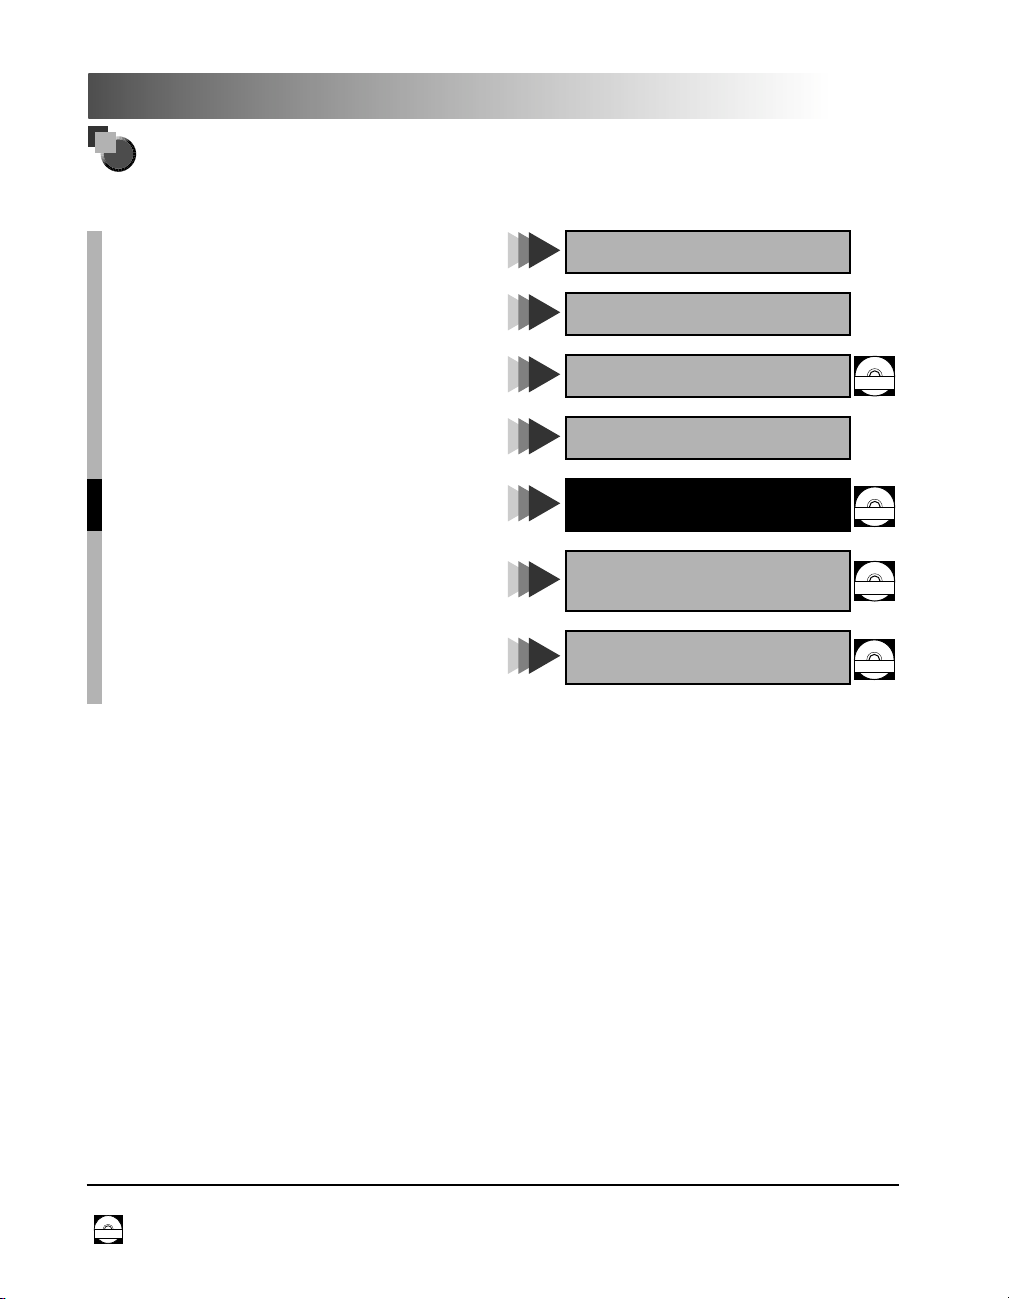
About the Manuals for the Machine
The manuals for this machine are divided as follows. Please read them to suit your needs.
For Basic Use ................................................
Troubleshooting .............................................
For Basic Copying ...........................................
For Convenient Copying ....................................
For Remote UI Use ..........................................
For Setting Up the Network Connection..................
For Printer Use...............................................
For Installing Printer Driver ...............................
For Connecting and Setting the Network.................
Reference Guide
Copying Guide
Remote UI Guide
Setup Guide
PS/PCL Printer Guide
(This Document)
PS Driver Guide
PCL Driver Guide
Network Guide
CD-ROM
CD-ROM
CD-ROM
CD-ROM
•
The product illustration on the cover may differ slightly from your product.
The volumes marked with this symbol are PDF manuals included in accowpanying CD-ROMs.
CD-ROM
Page 3
How the PS/PCL Printer Guide is Organized
Chap 1
Chap 2
Chap 3
Chap 4
Chap 5
Chap 6
Before You Start Using This Machine
Using the Printer
Summary of the Printer Menu
Printing Environment Settings
Troubleshooting
Appendix
Includes a Configuration page sample, Typeface Samples, Symbol Sets Supported,
Specifications and Index.
1
2
3
4
5
6
•
Some of the data contained herein may not exactly reflect the current model of the particular product with which this manual has been included. If you
have a need for an exact specification, please contact Canon for the current specification.
•
No part of this document may be photocopied, reproduced, or translated into another language without prior written consent of Canon Inc.
Page 4

Table of Contents
How to Use This Manual . . . . . . . . . . . . . . . . . . . . . . . . . . . . . . . . . . . . . . . . . . . .vi
Symbols Used in This Manual . . . . . . . . . . . . . . . . . . . . . . . . . . . . . . . . . . . . . . vi
Buttons Used in This Manual . . . . . . . . . . . . . . . . . . . . . . . . . . . . . . . . . . . . . . .vi
Illustrations Used in This Manual . . . . . . . . . . . . . . . . . . . . . . . . . . . . . . . . . . . .vi
Chapter 1 Before You Start Using This Machine
Features of the Product. . . . . . . . . . . . . . . . . . . . . . . . . . . . . . . . . . . . . . . . . . . 1-2
Standard Features . . . . . . . . . . . . . . . . . . . . . . . . . . . . . . . . . . . . . . . . . . . . . 1-2
Superior Print Quality . . . . . . . . . . . . . . . . . . . . . . . . . . . . . . . . . . . . . . . . 1-2
Software Compatibility and Language Switching. . . . . . . . . . . . . . . . . . . 1-2
Memory Saving Technology . . . . . . . . . . . . . . . . . . . . . . . . . . . . . . . . . . . 1-2
Paper Handling . . . . . . . . . . . . . . . . . . . . . . . . . . . . . . . . . . . . . . . . . . . . 1-2
Energy Saving . . . . . . . . . . . . . . . . . . . . . . . . . . . . . . . . . . . . . . . . . . . . . 1-2
Interface Features . . . . . . . . . . . . . . . . . . . . . . . . . . . . . . . . . . . . . . . . . . 1-3
Typefaces . . . . . . . . . . . . . . . . . . . . . . . . . . . . . . . . . . . . . . . . . . . . . . . . . 1-3
Printer drivers and Utilities . . . . . . . . . . . . . . . . . . . . . . . . . . . . . . . . . . . . 1-3
Remote UI Support. . . . . . . . . . . . . . . . . . . . . . . . . . . . . . . . . . . . . . . . . . 1-3
Optional Equipment . . . . . . . . . . . . . . . . . . . . . . . . . . . . . . . . . . . . . . . . . . . . 1-4
Adobe PostScript 3 . . . . . . . . . . . . . . . . . . . . . . . . . . . . . . . . . . . . . . . . . 1-4
250 Sheet Paper Feeding Module . . . . . . . . . . . . . . . . . . . . . . . . . . . . . . 1-4
Flash ROM Module. . . . . . . . . . . . . . . . . . . . . . . . . . . . . . . . . . . . . . . . . . 1-4
RAM DIMM Modules . . . . . . . . . . . . . . . . . . . . . . . . . . . . . . . . . . . . . . . . 1-4
Network Card . . . . . . . . . . . . . . . . . . . . . . . . . . . . . . . . . . . . . . . . . . . . . . 1-4
Functions of Printer Control Panel. . . . . . . . . . . . . . . . . . . . . . . . . . . . . . . . . . 1-5
Printer Control Panel . . . . . . . . . . . . . . . . . . . . . . . . . . . . . . . . . . . . . . . . . . . 1-5
Connecting to a Computer . . . . . . . . . . . . . . . . . . . . . . . . . . . . . . . . . . . . . . . . 1-7
Connecting to a Network . . . . . . . . . . . . . . . . . . . . . . . . . . . . . . . . . . . . . . . . 1-7
Connecting to a 100BASE-TX network. . . . . . . . . . . . . . . . . . . . . . . . . . . 1-8
Connecting to a 10BASE-T network . . . . . . . . . . . . . . . . . . . . . . . . . . . . . 1-9
Connecting through a Parallel Interface . . . . . . . . . . . . . . . . . . . . . . . . . . . . 1-10
Connecting to a DOS/Windows computer . . . . . . . . . . . . . . . . . . . . . . . 1-10
Connecting to other computers . . . . . . . . . . . . . . . . . . . . . . . . . . . . . . . 1-11
Connecting through a USB Interface . . . . . . . . . . . . . . . . . . . . . . . . . . . . . . 1-12
Connecting to a DOS/Windows computer . . . . . . . . . . . . . . . . . . . . . . . 1-12
Connecting to other computers . . . . . . . . . . . . . . . . . . . . . . . . . . . . . . . 1-13
ii
Page 5

Installing the Software . . . . . . . . . . . . . . . . . . . . . . . . . . . . . . . . . . . . . . . . . . . 1-14
For Windows . . . . . . . . . . . . . . . . . . . . . . . . . . . . . . . . . . . . . . . . . . . . . . . . .1-14
For DOS. . . . . . . . . . . . . . . . . . . . . . . . . . . . . . . . . . . . . . . . . . . . . . . . . . . . . 1-14
For Macintosh . . . . . . . . . . . . . . . . . . . . . . . . . . . . . . . . . . . . . . . . . . . . . . . .1-15
When this Machine is Connected to a Network . . . . . . . . . . . . . . . . . . . . . . .1-15
Chapter 2 Using the Printer
Entering the Printer Mode. . . . . . . . . . . . . . . . . . . . . . . . . . . . . . . . . . . . . . . . . . 2-2
Turning Off the Printer . . . . . . . . . . . . . . . . . . . . . . . . . . . . . . . . . . . . . . . . . . . .2-3
If the Printer is Not Using a Hard Disk . . . . . . . . . . . . . . . . . . . . . . . . . . . . . . .2-3
If the Printer is Using a Hard Disk . . . . . . . . . . . . . . . . . . . . . . . . . . . . . . . . . . 2-4
About On-line and Off-line . . . . . . . . . . . . . . . . . . . . . . . . . . . . . . . . . . . . . . . . .2-6
On-line . . . . . . . . . . . . . . . . . . . . . . . . . . . . . . . . . . . . . . . . . . . . . . . . . . . . . . .2-6
Off-line . . . . . . . . . . . . . . . . . . . . . . . . . . . . . . . . . . . . . . . . . . . . . . . . . . . . . . .2-7
Canceling a Print Job . . . . . . . . . . . . . . . . . . . . . . . . . . . . . . . . . . . . . . . . . . . . .2-8
Operating the Menu. . . . . . . . . . . . . . . . . . . . . . . . . . . . . . . . . . . . . . . . . . . . . . .2-9
How the Menus Are Organized . . . . . . . . . . . . . . . . . . . . . . . . . . . . . . . . . . . . 2-9
Going Off-line for Menu Display and Item Selection . . . . . . . . . . . . . . . . . . . 2-10
Making a Selection from a Menu . . . . . . . . . . . . . . . . . . . . . . . . . . . . . . . . . .2-10
Notes on the PostScript Personality . . . . . . . . . . . . . . . . . . . . . . . . . . . . . . . . 2-12
Chapter 3 Summary of the Printer Menus
SECURED JOB MENU . . . . . . . . . . . . . . . . . . . . . . . . . . . . . . . . . . . . . . . . . . . . . 3-3
About SECURED JOB MENU . . . . . . . . . . . . . . . . . . . . . . . . . . . . . . . . . . . . .3-3
Operation flow for SECURED JOB MENU. . . . . . . . . . . . . . . . . . . . . . . . . . . .3-3
SHUTDOWN MENU . . . . . . . . . . . . . . . . . . . . . . . . . . . . . . . . . . . . . . . . . . . . . . .3-4
About SHUTDOWN MENU . . . . . . . . . . . . . . . . . . . . . . . . . . . . . . . . . . . . . . . 3-4
Operation flow for SHUTDOWN MENU . . . . . . . . . . . . . . . . . . . . . . . . . . . . . . 3-4
TEST MENU . . . . . . . . . . . . . . . . . . . . . . . . . . . . . . . . . . . . . . . . . . . . . . . . . . . . .3-5
About TEST MENU . . . . . . . . . . . . . . . . . . . . . . . . . . . . . . . . . . . . . . . . . . . . . 3-5
Operation flow for TEST MENU . . . . . . . . . . . . . . . . . . . . . . . . . . . . . . . . . . . .3-5
PCL MENU . . . . . . . . . . . . . . . . . . . . . . . . . . . . . . . . . . . . . . . . . . . . . . . . . . . . . .3-6
About PCL MENU . . . . . . . . . . . . . . . . . . . . . . . . . . . . . . . . . . . . . . . . . . . . . . 3-6
Operation flow for PCL MENU. . . . . . . . . . . . . . . . . . . . . . . . . . . . . . . . . . . . . 3-6
PS MENU . . . . . . . . . . . . . . . . . . . . . . . . . . . . . . . . . . . . . . . . . . . . . . . . . . . . . . .3-7
About PS MENU . . . . . . . . . . . . . . . . . . . . . . . . . . . . . . . . . . . . . . . . . . . . . . .3-7
Operation flow for PS MENU . . . . . . . . . . . . . . . . . . . . . . . . . . . . . . . . . . . . . .3-7
FEEDER MENU . . . . . . . . . . . . . . . . . . . . . . . . . . . . . . . . . . . . . . . . . . . . . . . . . .3-8
About FEEDER MENU . . . . . . . . . . . . . . . . . . . . . . . . . . . . . . . . . . . . . . . . . .3-8
Operation flow for FEEDER MENU. . . . . . . . . . . . . . . . . . . . . . . . . . . . . . . . .3-8
iii
Page 6

CONFIG MENU . . . . . . . . . . . . . . . . . . . . . . . . . . . . . . . . . . . . . . . . . . . . . . . . . . 3-9
About CONFIG MENU . . . . . . . . . . . . . . . . . . . . . . . . . . . . . . . . . . . . . . . . . . 3-9
Operation flow for CONFIG MENU. . . . . . . . . . . . . . . . . . . . . . . . . . . . . . . . . 3-9
ENTER PASSWORD MENU . . . . . . . . . . . . . . . . . . . . . . . . . . . . . . . . . . . . . . . 3-10
About the ENTER PASSWORD MENU . . . . . . . . . . . . . . . . . . . . . . . . . . . . 3-10
Operation flow for the ENTER PASSWORD MENU. . . . . . . . . . . . . . . . . . . 3-10
JOB CONTROL MENU . . . . . . . . . . . . . . . . . . . . . . . . . . . . . . . . . . . . . . . . . . . 3-11
About JOB CONTROL MENU . . . . . . . . . . . . . . . . . . . . . . . . . . . . . . . . . . . 3-11
Operation flow for JOB CONTROL MENU . . . . . . . . . . . . . . . . . . . . . . . . . . 3-11
PARALLEL MENU. . . . . . . . . . . . . . . . . . . . . . . . . . . . . . . . . . . . . . . . . . . . . . . 3-12
About PARALLEL MENU . . . . . . . . . . . . . . . . . . . . . . . . . . . . . . . . . . . . . . . 3-12
Operation flow for PARALLEL MENU. . . . . . . . . . . . . . . . . . . . . . . . . . . . . . 3-12
USB MENU . . . . . . . . . . . . . . . . . . . . . . . . . . . . . . . . . . . . . . . . . . . . . . . . . . . . 3-13
About USB MENU . . . . . . . . . . . . . . . . . . . . . . . . . . . . . . . . . . . . . . . . . . . . 3-13
Operation flow for USB MENU. . . . . . . . . . . . . . . . . . . . . . . . . . . . . . . . . . . 3-13
ETHERNET MENU . . . . . . . . . . . . . . . . . . . . . . . . . . . . . . . . . . . . . . . . . . . . . . 3-14
About ETHERNET MENU . . . . . . . . . . . . . . . . . . . . . . . . . . . . . . . . . . . . . . 3-14
Operation flow for ETHERNET MENU. . . . . . . . . . . . . . . . . . . . . . . . . . . . . 3-14
LANGUAGE MENU . . . . . . . . . . . . . . . . . . . . . . . . . . . . . . . . . . . . . . . . . . . . . . 3-15
About LANGUAGE MENU . . . . . . . . . . . . . . . . . . . . . . . . . . . . . . . . . . . . . . 3-15
Operation flow for LANGUAGE MENU. . . . . . . . . . . . . . . . . . . . . . . . . . . . . 3-15
RESET MENU . . . . . . . . . . . . . . . . . . . . . . . . . . . . . . . . . . . . . . . . . . . . . . . . . . 3-16
About RESET MENU . . . . . . . . . . . . . . . . . . . . . . . . . . . . . . . . . . . . . . . . . . 3-16
Operation flow for RESET MENU . . . . . . . . . . . . . . . . . . . . . . . . . . . . . . . . 3-16
JOB LOG MENU . . . . . . . . . . . . . . . . . . . . . . . . . . . . . . . . . . . . . . . . . . . . . . . . 3-17
About JOB LOG MENU . . . . . . . . . . . . . . . . . . . . . . . . . . . . . . . . . . . . . . . . 3-17
Operation flow for JOB LOG MENU. . . . . . . . . . . . . . . . . . . . . . . . . . . . . . . 3-17
Chapter 4 Printing Environment Settings
List of Standard Printing Environment Settings . . . . . . . . . . . . . . . . . . . . . . . 4-3
SECURED JOB MENU . . . . . . . . . . . . . . . . . . . . . . . . . . . . . . . . . . . . . . . . . . . . 4-7
SHUTDOWN MENU . . . . . . . . . . . . . . . . . . . . . . . . . . . . . . . . . . . . . . . . . . . . . . 4-8
TEST MENU . . . . . . . . . . . . . . . . . . . . . . . . . . . . . . . . . . . . . . . . . . . . . . . . . . . . 4-9
PCL MENU . . . . . . . . . . . . . . . . . . . . . . . . . . . . . . . . . . . . . . . . . . . . . . . . . . . . 4-11
PS MENU. . . . . . . . . . . . . . . . . . . . . . . . . . . . . . . . . . . . . . . . . . . . . . . . . . . . . . 4-16
FEEDER MENU. . . . . . . . . . . . . . . . . . . . . . . . . . . . . . . . . . . . . . . . . . . . . . . . . 4-17
CONFIG MENU . . . . . . . . . . . . . . . . . . . . . . . . . . . . . . . . . . . . . . . . . . . . . . . . . 4-19
JOB CONTROL MENU . . . . . . . . . . . . . . . . . . . . . . . . . . . . . . . . . . . . . . . . . . . 4-22
PARALLEL MENU. . . . . . . . . . . . . . . . . . . . . . . . . . . . . . . . . . . . . . . . . . . . . . . 4-23
USB MENU . . . . . . . . . . . . . . . . . . . . . . . . . . . . . . . . . . . . . . . . . . . . . . . . . . . . 4-25
ETHERNET MENU . . . . . . . . . . . . . . . . . . . . . . . . . . . . . . . . . . . . . . . . . . . . . . 4-27
iv
Page 7

LANGUAGE MENU . . . . . . . . . . . . . . . . . . . . . . . . . . . . . . . . . . . . . . . . . . . . . . . 4-29
RESET MENU . . . . . . . . . . . . . . . . . . . . . . . . . . . . . . . . . . . . . . . . . . . . . . . . . . . 4-30
JOB LOG MENU. . . . . . . . . . . . . . . . . . . . . . . . . . . . . . . . . . . . . . . . . . . . . . . . .4-31
Chapter 5 Troubleshooting
When You Have Trouble Printing . . . . . . . . . . . . . . . . . . . . . . . . . . . . . . . . . . . .5-2
Problems and Solutions Without Messages . . . . . . . . . . . . . . . . . . . . . . . . . . .5-3
Printer Trouble . . . . . . . . . . . . . . . . . . . . . . . . . . . . . . . . . . . . . . . . . . . . . . . . . 5-3
Print Problems . . . . . . . . . . . . . . . . . . . . . . . . . . . . . . . . . . . . . . . . . . . . . . . . .5-4
Responding to Error Messages . . . . . . . . . . . . . . . . . . . . . . . . . . . . . . . . . . . . .5-7
Other Print Problems. . . . . . . . . . . . . . . . . . . . . . . . . . . . . . . . . . . . . . . . . . . . .5-14
Correcting Poor Print Quality . . . . . . . . . . . . . . . . . . . . . . . . . . . . . . . . . . . . .5-14
Chapter 6 Appendix
Checking the Printer Operation . . . . . . . . . . . . . . . . . . . . . . . . . . . . . . . . . . . . .6-2
Configuration Page . . . . . . . . . . . . . . . . . . . . . . . . . . . . . . . . . . . . . . . . . . . . .6-2
Test Print (Configuration Page) Sample . . . . . . . . . . . . . . . . . . . . . . . . . . .6-3
Font List . . . . . . . . . . . . . . . . . . . . . . . . . . . . . . . . . . . . . . . . . . . . . . . . . . . . . .6-6
PCL Font List Sample. . . . . . . . . . . . . . . . . . . . . . . . . . . . . . . . . . . . . . . . . 6-7
Typeface Samples . . . . . . . . . . . . . . . . . . . . . . . . . . . . . . . . . . . . . . . . . . . . . . . .6-9
Scalable Fonts (PCL). . . . . . . . . . . . . . . . . . . . . . . . . . . . . . . . . . . . . . . . . . . . 6-9
Bar Code Scalable Fonts (PCL). . . . . . . . . . . . . . . . . . . . . . . . . . . . . . . . . . .6-11
OCR Scalable Fonts (PCL) . . . . . . . . . . . . . . . . . . . . . . . . . . . . . . . . . . . . . . 6-12
Bitmapped Fonts (PCL) . . . . . . . . . . . . . . . . . . . . . . . . . . . . . . . . . . . . . . . . .6-13
PS Fonts . . . . . . . . . . . . . . . . . . . . . . . . . . . . . . . . . . . . . . . . . . . . . . . . . . . .6-14
Symbol Sets Supported . . . . . . . . . . . . . . . . . . . . . . . . . . . . . . . . . . . . . . . . . . 6-18
Character Code Tables . . . . . . . . . . . . . . . . . . . . . . . . . . . . . . . . . . . . . . . . .6-18
ISO Substitution Table . . . . . . . . . . . . . . . . . . . . . . . . . . . . . . . . . . . . . . . . . .6-41
Specifications . . . . . . . . . . . . . . . . . . . . . . . . . . . . . . . . . . . . . . . . . . . . . . . . . .6-42
Controller Specifications . . . . . . . . . . . . . . . . . . . . . . . . . . . . . . . . . . . . . . . .6-42
Software Specifications . . . . . . . . . . . . . . . . . . . . . . . . . . . . . . . . . . . . . . . . .6-42
Interface Specifications . . . . . . . . . . . . . . . . . . . . . . . . . . . . . . . . . . . . . . . . . .6-43
Parallel Interface (Centronics Compliant) . . . . . . . . . . . . . . . . . . . . . . . . . . .6-43
Location of signal lines and pins . . . . . . . . . . . . . . . . . . . . . . . . . . . . . . .6-43
Connector and cable . . . . . . . . . . . . . . . . . . . . . . . . . . . . . . . . . . . . . . . .6-44
Timing chart . . . . . . . . . . . . . . . . . . . . . . . . . . . . . . . . . . . . . . . . . . . . . . .6-44
Parallel Connections . . . . . . . . . . . . . . . . . . . . . . . . . . . . . . . . . . . . . . . .6-44
Index . . . . . . . . . . . . . . . . . . . . . . . . . . . . . . . . . . . . . . . . . . . . . . . . . . . . . . . . . .6-45
v
Page 8
Preface
Thank you for purchasing the Canon iR2000/iR1600 Series. Please read this manual
thoroughly before operating the iR2000/iR1600 Series in order to familiarize yourself with its
capabilities, and to make the most of its many functions. After reading this manual store it in
a safe place for future reference.
How to Use This Manual
Symbols Used in This Manual
The following marks are used in this manual to indicate safety precautions,
restrictions and notices for handling the product.
WARNING
CAUTION
IMPORTANT
NOTE
Indicates a warning concerning operations that may lead to death or
injury to persons if not performed correctly. In order to use the
machine safely, always pay attention to these warnings.
Indicates a caution concerning operations that may lead to injury to
persons or damage to property if not performed correctly. In order to
use the machine safely, always pay attention to these cautions.
Indicates operational warnings and restrictions. Be certain to read
these items to operate the machine correctly, and to avoid damage to
the machine.
Indicates notes for operation or additional explanations. Reading
these is recommended.
Buttons Used in This Manual
The control panel buttons used in this manual are indicated by illustrations and, if
necessary, their names in parentheses.
GO
•
e.g.
Illustrations Used in This Manual
Unless otherwise mentioned, illustrations used in this manual are those taken when
the Feeder (ADF-J1), Finisher-L1, and the Cassette Feeding Unit-F1 (iR1600 only)
are attached to the iR2000/iR1600.
vi
Page 9

Before You Start Using This Machine
CHAPTER
This chapter describes what you should know and do before printing, such as connecting to a
computer, installing the software, and the functions of the printer control panel.
Features of the Product . . . . . . . . . . . . . . . . . . . . . . . . . . . . . . . . . . . . . . . . . . . . . . . . . . 1-2
Standard Features . . . . . . . . . . . . . . . . . . . . . . . . . . . . . . . . . . . . . . . . . . . . . . . . . . . . . . . . . . . .1-2
Optional Equipment . . . . . . . . . . . . . . . . . . . . . . . . . . . . . . . . . . . . . . . . . . . . . . . . . . . . . . . . . . .1-4
Functions of Printer Control Panel . . . . . . . . . . . . . . . . . . . . . . . . . . . . . . . . . . . . . . . . . . 1-5
Printer Control Panel. . . . . . . . . . . . . . . . . . . . . . . . . . . . . . . . . . . . . . . . . . . . . . . . . . . . . . . . . . .1-5
Connecting to a Computer . . . . . . . . . . . . . . . . . . . . . . . . . . . . . . . . . . . . . . . . . . . . . . . . 1-7
Connecting to a Network . . . . . . . . . . . . . . . . . . . . . . . . . . . . . . . . . . . . . . . . . . . . . . . . . . . . . . .1-7
Connecting through a Parallel Interface. . . . . . . . . . . . . . . . . . . . . . . . . . . . . . . . . . . . . . . . . . .1-10
Connecting through a USB Interface . . . . . . . . . . . . . . . . . . . . . . . . . . . . . . . . . . . . . . . . . . . . .1-12
Installing the Software . . . . . . . . . . . . . . . . . . . . . . . . . . . . . . . . . . . . . . . . . . . . . . . . . .1-14
For Windows. . . . . . . . . . . . . . . . . . . . . . . . . . . . . . . . . . . . . . . . . . . . . . . . . . . . . . . . . . . . . . . .1-14
For DOS . . . . . . . . . . . . . . . . . . . . . . . . . . . . . . . . . . . . . . . . . . . . . . . . . . . . . . . . . . . . . . . . . . .1-14
For Macintosh. . . . . . . . . . . . . . . . . . . . . . . . . . . . . . . . . . . . . . . . . . . . . . . . . . . . . . . . . . . . . . .1-15
When this Machine is Connected to a Network . . . . . . . . . . . . . . . . . . . . . . . . . . . . . . . . . . . . .1-15
1
1-1
Page 10

Features of the Product
1
Standard Features
Before You Start Using This Machine
Your printer offers fast printing speed, superior print quality, sophisticated paper
handling, and ecology- and energy-sensitive features. The printer also
accommodates hardware options to meet your networking requirements.
Superior Print Quality
High resolution printing at 600 dpi (dots per inch) is further enhanced by Automatic
Image Refinement to smooth jagged edges along with the use of super fine toner.
Combined, these will ensure superior reproduction quality of text and graphics.
Software Compatibility and Language Switching
The printer supports Hewlett-Packard’s PCL 5e and PCL6 printer languages, which
enables the printer to work with a wide variety of software applications supporting
PCL. The printer can also support Adobe PostScript® 3™, which allows you to print
PostScript data files at 600 dpi. With the optional Canon PS Module-B1 (an add-in
ROM for Adobe PostScript 3) installed, the printer can sample the print data as it is
received and then automatically switch between the PCL and PostScript
personalities.
Memory Saving Technology
Memory Reduction Technology accomplishes 600 dpi printing with only 8 MB of
memory for Letter- or A4-printing. Complex page data is compressed to optimize
available resources.
1-2
Paper Handling
The standard paper cassette holds 250 sheets of paper while the Stack Bypass
holds about 100 sheets of standard paper. The Stack Bypass can hold a variety of
media for automatic feeding and operate as a manual feed station.
Energy Saving
The on-demand fusing technology of the printer provides improved energy
efficiency. Because of this power saving feature, the printer meets the guidelines for
the International Energy Star Program.
Features of the Product
Page 11

Interface Features
The printer has a standard IEEE-1284 compatible parallel interface, which supports
ECP and Compatible/Nibble protocols. It also supports Microsoft’s Plug & Play
technology. The printer also has a USB port for easy connection to a personal
computer or other USB devices. You can also insert a network card into the
expansion slot to enable network printing.
Typefaces
The printer comes with 45 scalable typefaces in 14 typeface families (Agfa 45
MicroType fonts) and 32 additional TrueType fonts (barcode and OCR fonts), all
compatible with application software supporting Microsoft Windows. In addition, 9
bitmapped typefaces of the Line Printer family are also included. The printer uses
the Universal Font Scaling Technology (UFST) for outline fonts, provided under
license from Agfa-Gevaert Japan, Ltd. Also supplied with the printer are the
TrueType screen fonts for 96 font solution and Canon Font Manager for easy
management of installed fonts in Microsoft® Windows® 95/98/2000 and Windows
NT version 4.0. A list of typeface samples is provided in the Appendix.
Printer drivers and Utilities
The printer comes with PCL printer drivers for Microsoft Windows 95/98/Me,
Windows 2000/XP, and Windows NT 4.0. This allows you to control most printer
settings from the Windows driver screens.
Remote UI Support
The printer supports a Remote UI function that allows you to control or monitor the
status of the printer from a personal computer. (See the Remote UI Guide.)
1
Before You Start Using This Machine
Features of the Product
1-3
Page 12

Optional Equipment
1
Before You Start Using This Machine
Below is a list of the options available for installation with this printer. For more
details, contact your local supplier.
Adobe PostScript 3
The software that enables your printer to perform Adobe PostScript 3 printing is
supplied in the Canon PS Module-B1 (hereafter referred to as the PostScript
module) as an optional ROM. This software includes a total of 136 fonts. (Typeface
samples are shown in Chapter 6.) The module comes with Adobe PostScript 3
printer drivers for Macintosh OS computers, Microsoft Windows 95/98/Me,
Windows 2000/XP, and Windows NT version 4.0.
250 Sheet Paper Feeding Module
The Canon Cassette Feeding Module-F1, G1 and H1 are designed for high volume
printing and sit underneath the universal paper cassette. Each unit holds 250
sheets (21 lb. or 80 g/m2 paper) and can be adjusted to accept different sizes of
paper, up to Legal-size. Up to three 250-sheet paper feed units can be installed
under the printer.
Flash ROM Module
Easily installed in the printer, this increases the amount of memory available for the
storage of fonts and macros in the printer.
1-4
RAM DIMM Modules
Easily installed in the printer, these increase the amount of memory available to the
printer.
Network Card
With the optional Canon Ethernet Network Interface Adapter iN-E5, your printer can
handle network jobs by connecting the printer to your network using a 10Base-T/
100Base-TX Ethernet cable.
Features of the Product
Page 13
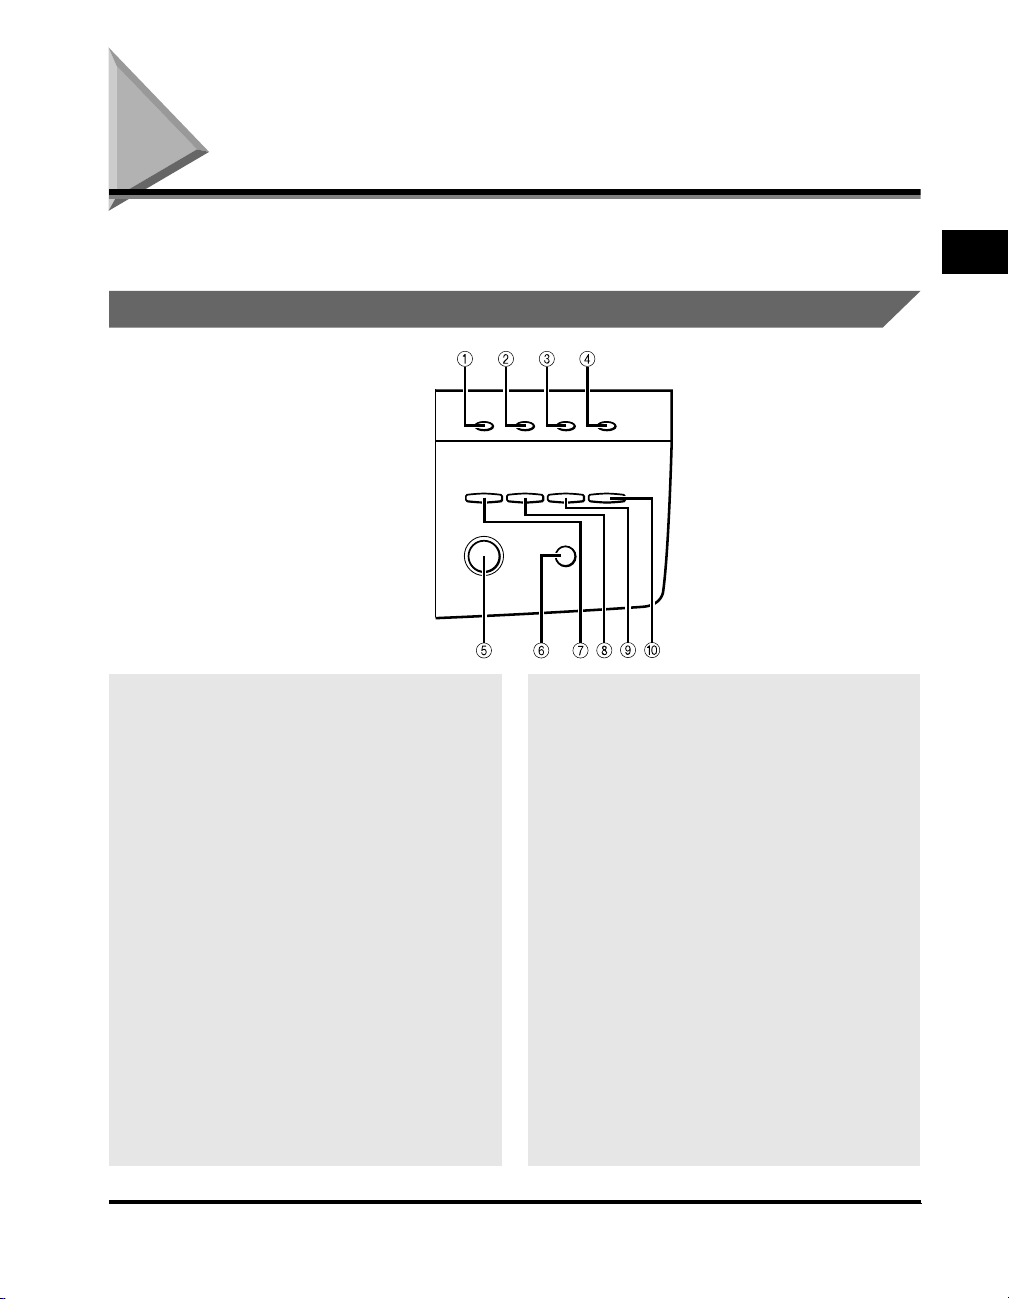
Functions of Printer Control Panel
The following section describes the functions of the buttons and indicators of the
printer control panel located on the right of the front panel.
Printer Control Panel
1111Online Indicator (green)
On:
The printer is on-line (power on, warmed up and
ready to receive data for printing). Before you
send a print job, this indicator must be on.
Blinking:
The printer is processing a print job. Do not turn
the power off, otherwise you may lose print data.
The page is printed when all of the data has been
processed.
Off:
The printer is off-line. You can now use the printer
control panel buttons to view and change
settings. When off-line, the printer cannot accept
data for printing.
2222Job Indicator (green)
On:
Part of a page has been processed and stored in
the printer’s memory.
Off:
There is no data stored in the printer’s memory.
Online Job HDD Alarm
MenuGOItem Value
Enter/Cancel
Shift
3333HDD Indicator (green)
On:
Indicates that the optional Canon Hard Disk HD65 has been installed.
Blinking:
The hard disk is being accessed.
Off:
Indicates that there is no optional hard disk
installed.
If a problem occurs on the optional hard disk, the
data stored on the hard disk may be lost. Be sure
to keep backup copies of any important data or
files that have been stored on the hard disk.
Canon cannot accept any responsibility for any
loss of data arising from the use of, or inability to
use, the hard disk.
1
Before You Start Using This Machine
Functions of Printer Control Panel
1-5
Page 14

4444Alarm Indicator (red)
1
5555“GO” Button
Before You Start Using This Machine
6666“Shift” Button
On:
An error has occurred and printing has stopped.
Check the display for a message describing the
problem.
Off:
Operation is normal and there is no error.
If the printer enters Sleep Mode while off-line,
only the Alarm indicator (red) lights, with other
indicators extinguishing.
Takes the printer off-line and brings it back online. When the Online indicator is on, the printer is
ready to receive data and print. When the Online
indicator is off, the printer is off-line and you can
use the other buttons on the printer control panel
to view and change settings.
Resumes printing after the printer stops printing
and displayed a message. For most situations,
after you press “GO” the message clears and
printing resumes. When the Stack Bypass is
being used as a manual feed station
(<MANUAL=ON> in the FEEDER MENU), you
have to press “GO” each time you feed a single
sheet of paper.
To perform a form feed and print any data
remaining in the printer, press “GO” twice in
succession.
Press this button to scroll through menu or
settings items in reverse order.
7777“Menu” Button
When the printer is off-line, press “Menu” to scroll
through the menu names and return to the first
menu name. To scroll through menu names in
reverse order, press “Shift” and “Menu.”
Depending on what options you have installed,
some menu names may not appear.
8888“Item” Button
With a menu name displayed, press “Item” to
scroll through all the items on a menu and return
to the first item. To scroll through the items in
reverse order, press “Shift” and “Item.”
Depending on what options you have installed,
some items may not appear.
9999“Value” Button
With an item name displayed, press “Value” to
scroll through the item’s values. Press “Shift” and
“Value” to step through the values in reverse
order. Some items have a large range of numbers
from which to choose a value. For example, for
COPIES you can set a value from 1 to 999. In this
case, to quickly scroll through the values, press
and hold down “Value.”
0000“Enter” Button
Saves a value you selected for an item in the
menu. An asterisk (*) marks the current default
setting.
“Cancel” Button
Press “Shift” and “Enter/Cancel” to cancel the
current operation.
If a cancel operation is performed while the
printer is receiving data, this will cause the input
data to be flushed from the printer’s memory. In
this case, <READY/FLUSHING...> will appear on
the display while the data is being flushed.
<READY> appears after the data has been
flushed from memory.
1-6
Functions of Printer Control Panel
Page 15
Connecting to a Computer
Connect the machine to a computer or network using an interface cable supporting
bi-directional communication or a 100Base-TX or 10Base-T Ethernet cable.
IMPORTANT
•
To avoid a risk of shock hazard, turn off the main power switch located on the right side of
the machine and unplug the power cord plug from the power outlet, before connecting an
interface cable or network cable. (See “Main Power and Control Panel Power” in the
Reference Guide.)
NOTE
•
This machine is not supplied with an interface cable or a network cable. Please
purchase the cable to match your computer or network.
Connecting to a Network
This machine has a built-in print server that is compatible with TCP/IP and
AppleTalk networks to allow using as a network printer for UNIX, Mac OS and
Windows. The print server is supplied with a 100-Base TX/10Base-T port, thus you
can simply connect it to a LAN.
The connection examples in this section show you how to connect this machine to
the network, depending on the type of LAN.
You need a LAN cable and hub to suit your network.
IMPORTANT
•
When two or more print servers are connected in the AppleTalk network, leave an
interval of more than 10 seconds between turning on the power of each print server.
1
Before You Start Using This Machine
NOTE
•
The print server of this machine may be compatible with the NetWare® network. For
details, consult your service representative.
•
The print server of this machine automatically detects the connected 100Base-TX or
10Base-T interface.
•
After connecting the network cable, perform the following setups. For details of each
setup, consult the corresponding manual.
- Installing the printer driver. (see p.1-14)
- Date/time setting and system management setting. (See “Reference Guide.”)
- Print server and network settings. (See “Network Guide.”)
Connecting to a Computer
1-7
Page 16
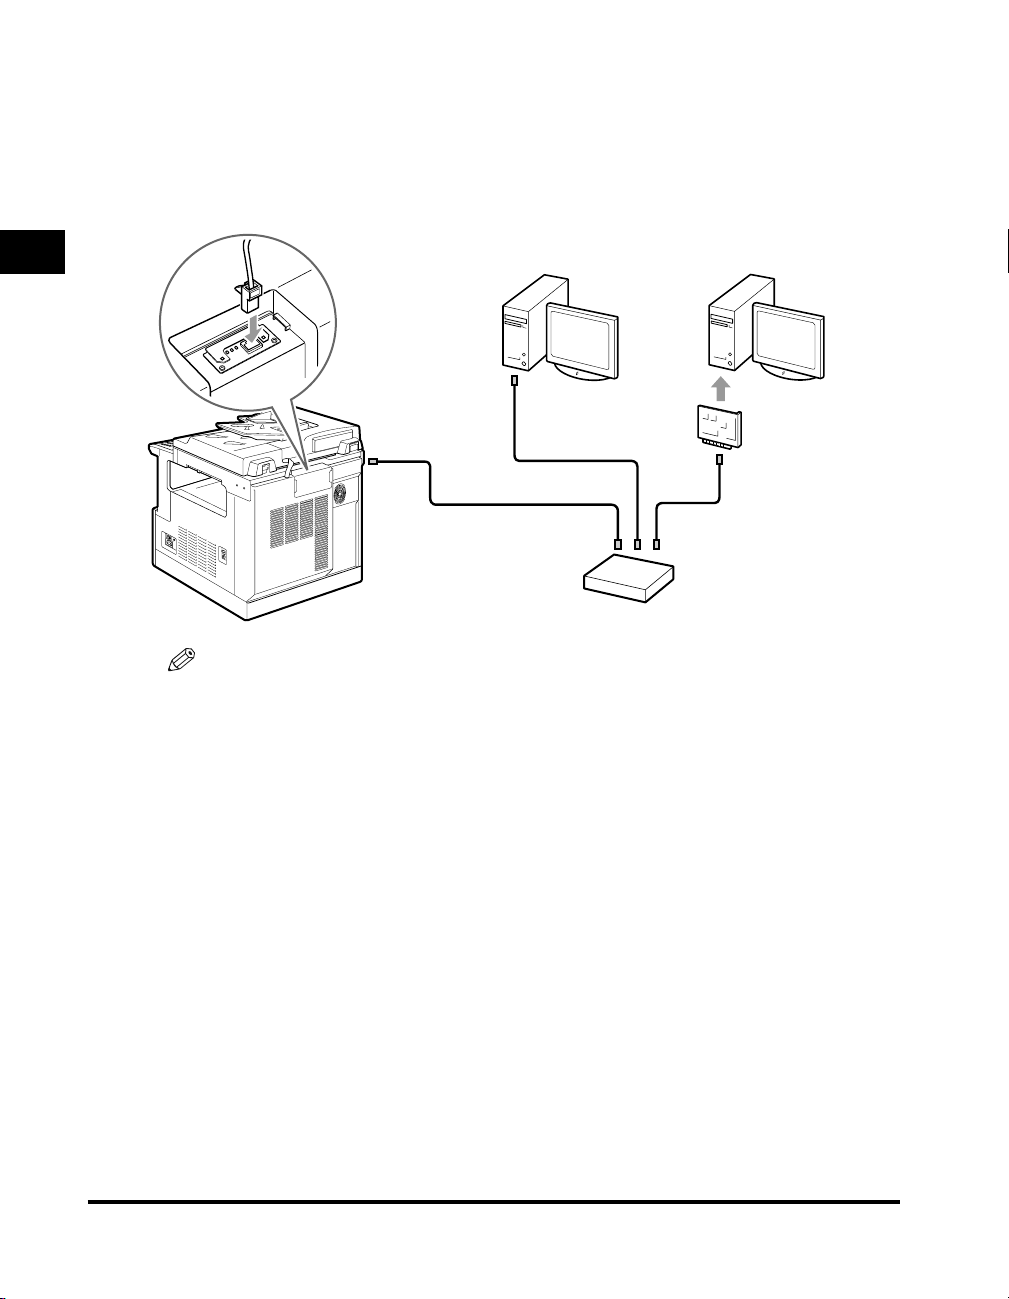
Connecting to a 100BASE-TX network
Connect the 10BASE-T/100BASE-TX port to the hub port using a Category 5 rated
twisted-pair LAN cable for the 100BASE-TX network. If your computer is not
compatible with the 100BASE-TX network, you also need a 100BASE-TX network
board.
1
Before You Start Using This Machine
10BASE-T/100BASE-TX
port
NOTE
•
The hub, LAN cable, and network board to be connected to the LAN should be
compatible with the 100BASE-TX network. For details, consult your dealer.
Computer with a
100BASE-TX port
100BASE-TX hub
Computer without a
100BASE-TX port
100BASE-TX
LAN board
100BASE-TX
cable
1-8
Connecting to a Computer
Page 17

Connecting to a 10BASE-T network
Connect the 10BASE-T/100BASE-TX port to the hub port using a Category 3 or
higher rated twisted-pair LAN cable for the 10BASE-T network. If your computer is
not compatible with the 10BASE-T network, you also need a 10BASE-T network
board.
10BASE-T/100BASE-TX
port
Computer with a
10BASE-T port
10BASE-T hub
Computer without a
10BASE-T port
10BASE-T
LAN board
10BASE-T cable
1
Before You Start Using This Machine
Connecting to a Computer
1-9
Page 18
Connecting through a Parallel Interface
1
Before You Start Using This Machine
This machine can connect to a computer through a parallel interface. After
connection, install the supplied printer driver and utility software to match the OS of
your computer.
For installing the printer driver and utility software, see “Installing the Software” on
p.1-14.
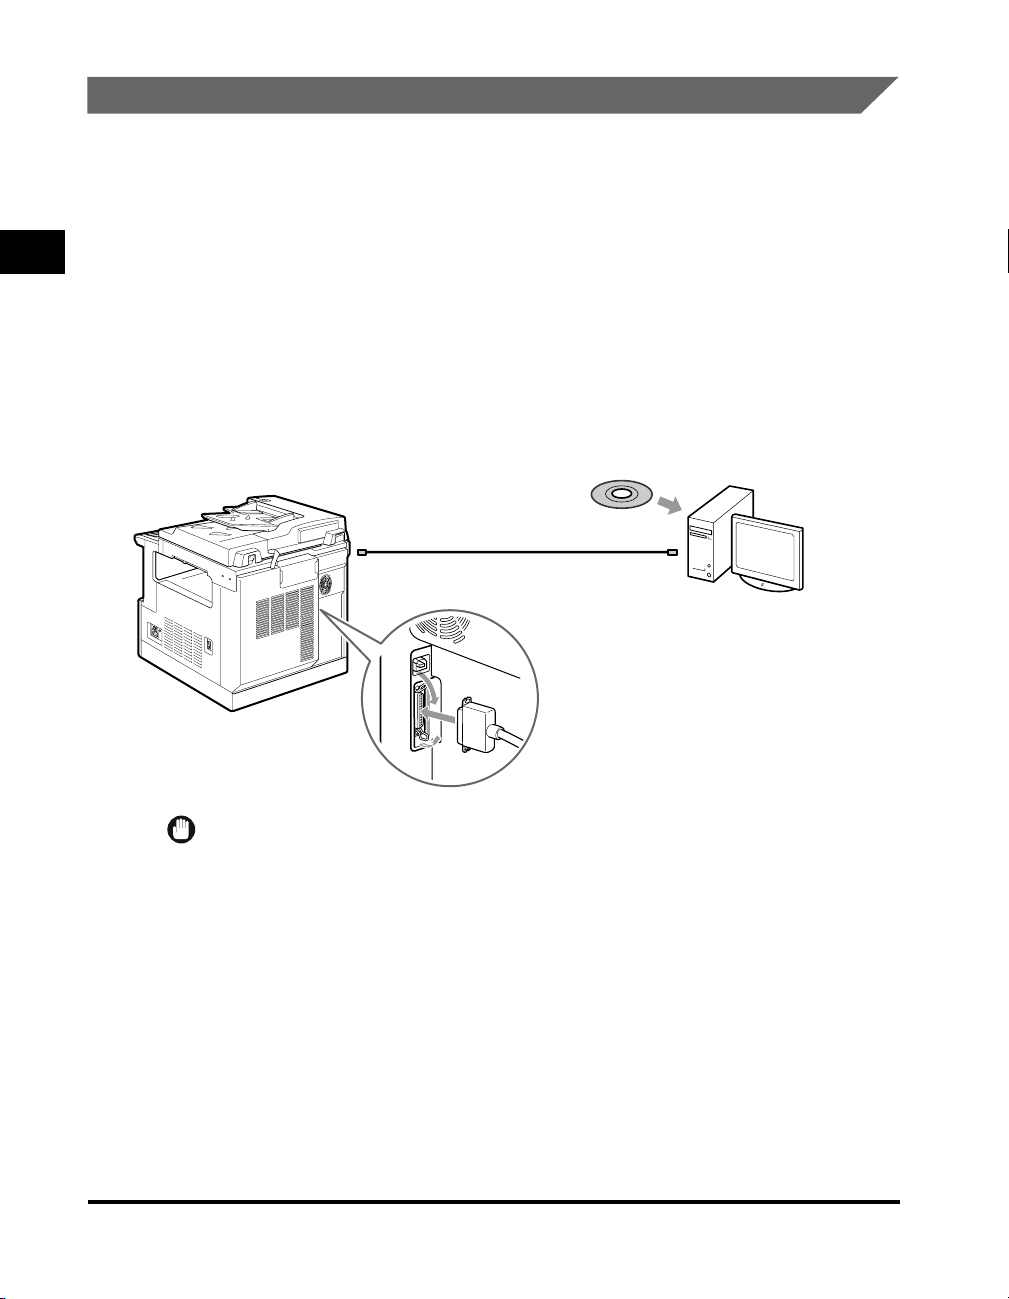
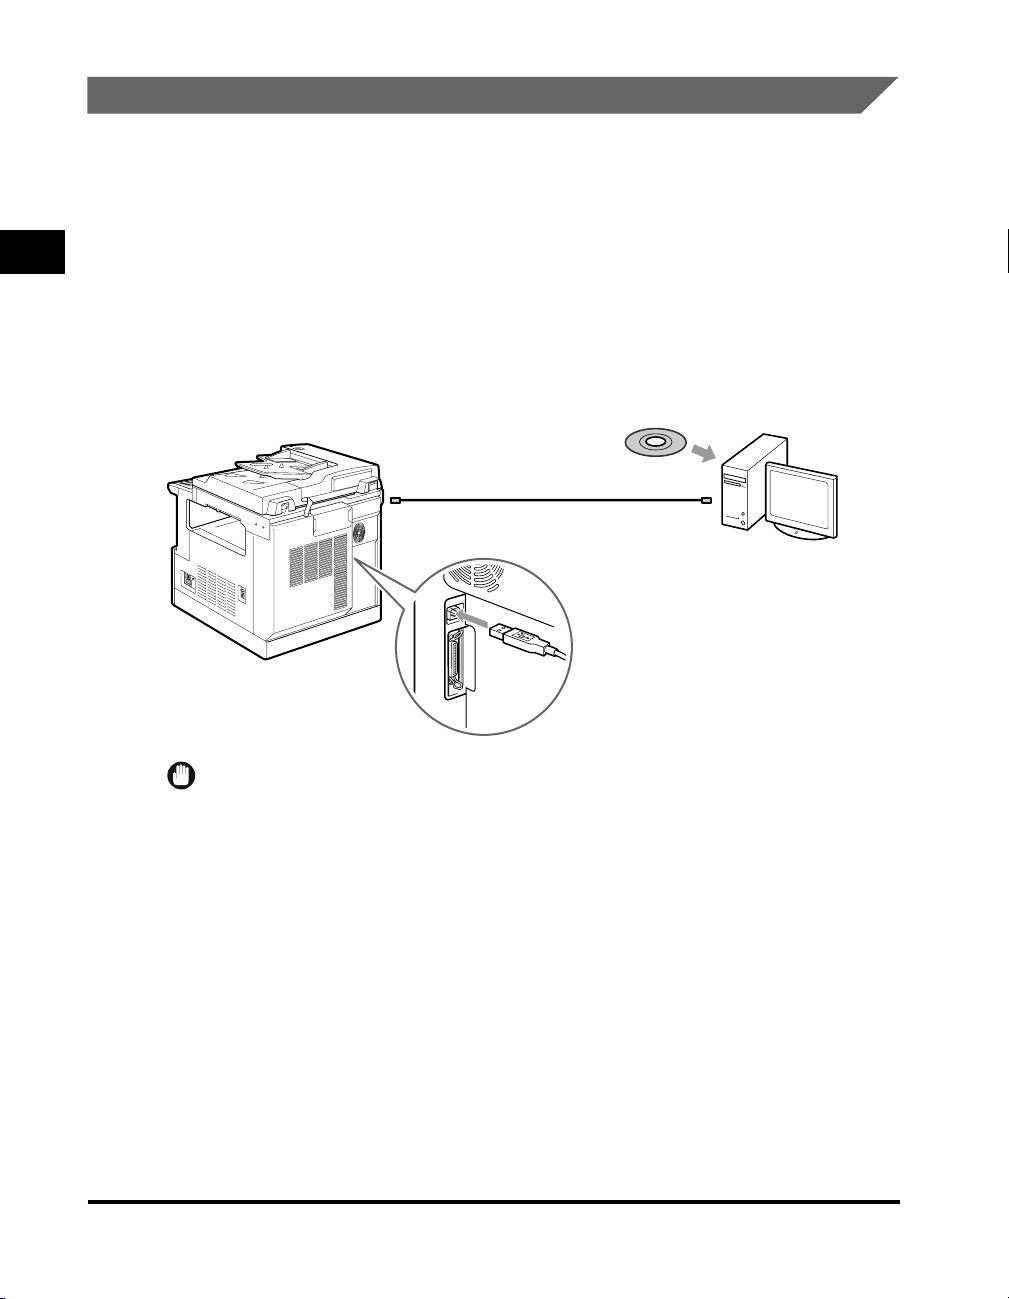
Connecting to a DOS/Windows computer
The printer port of an IBM PC/AT and other DOS/Windows compatible computers is
normally a parallel port (IEEE-1284 compliant). Connect the parallel port of this
machine to the printer port of the computer using an interface cable to match your
computer.
Printer driver software
Printer cable
Parallel port Printer port
1-10
Connect a 36-pin Centronics connector.
*
Be sure to secure the clips on both sides.
IMPORTANT
•
When you have connected a computer to the parallel port of this machine, some utility
software cannot be used. For details, see “PS Driver Guide” or “PCL Driver Guide.”
Connecting to a Computer
Page 19
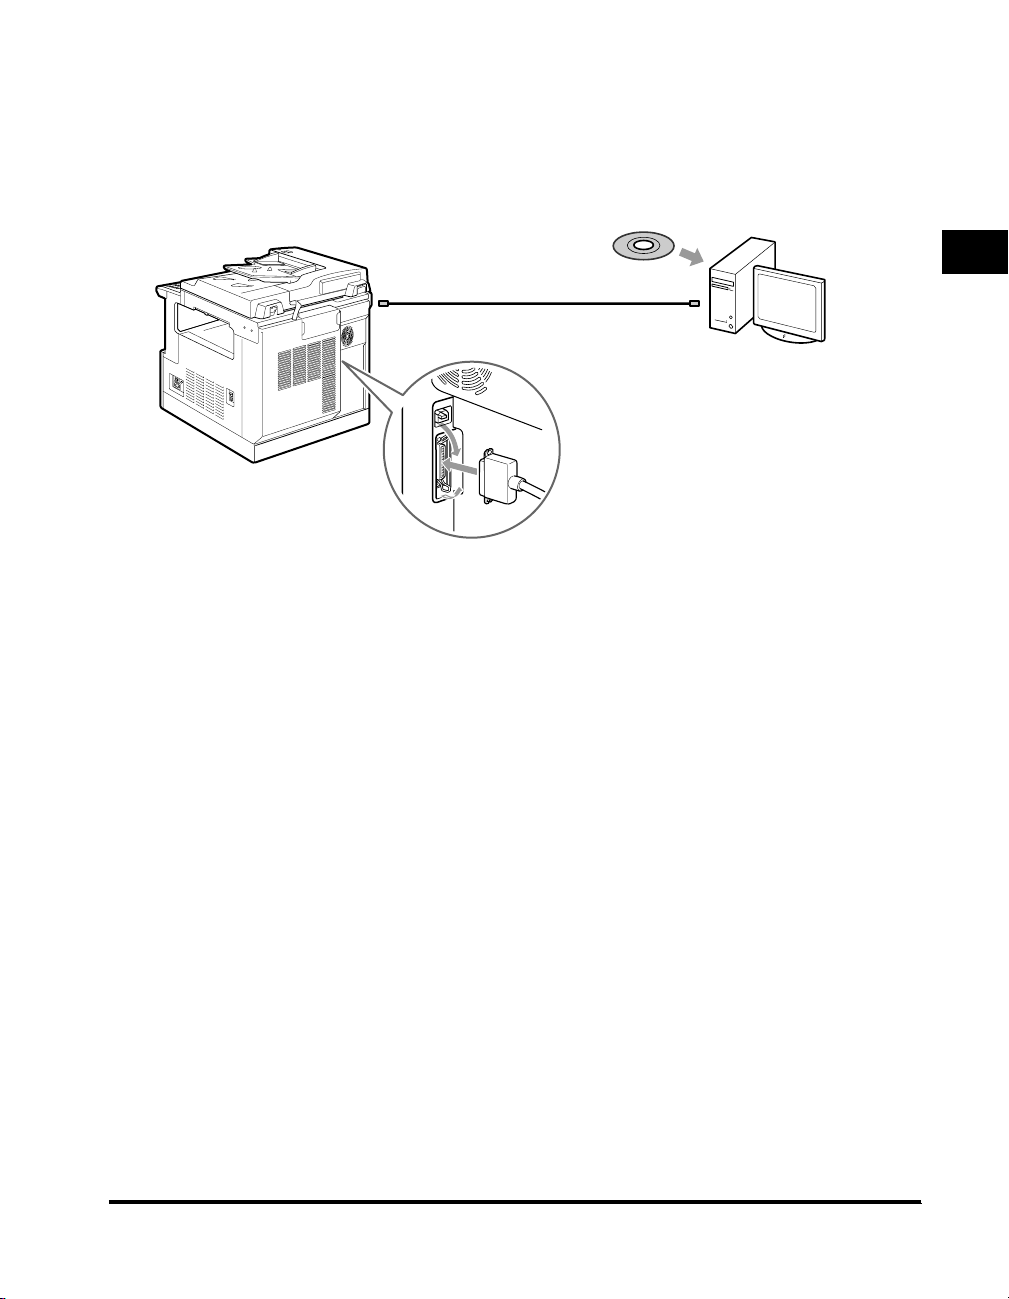
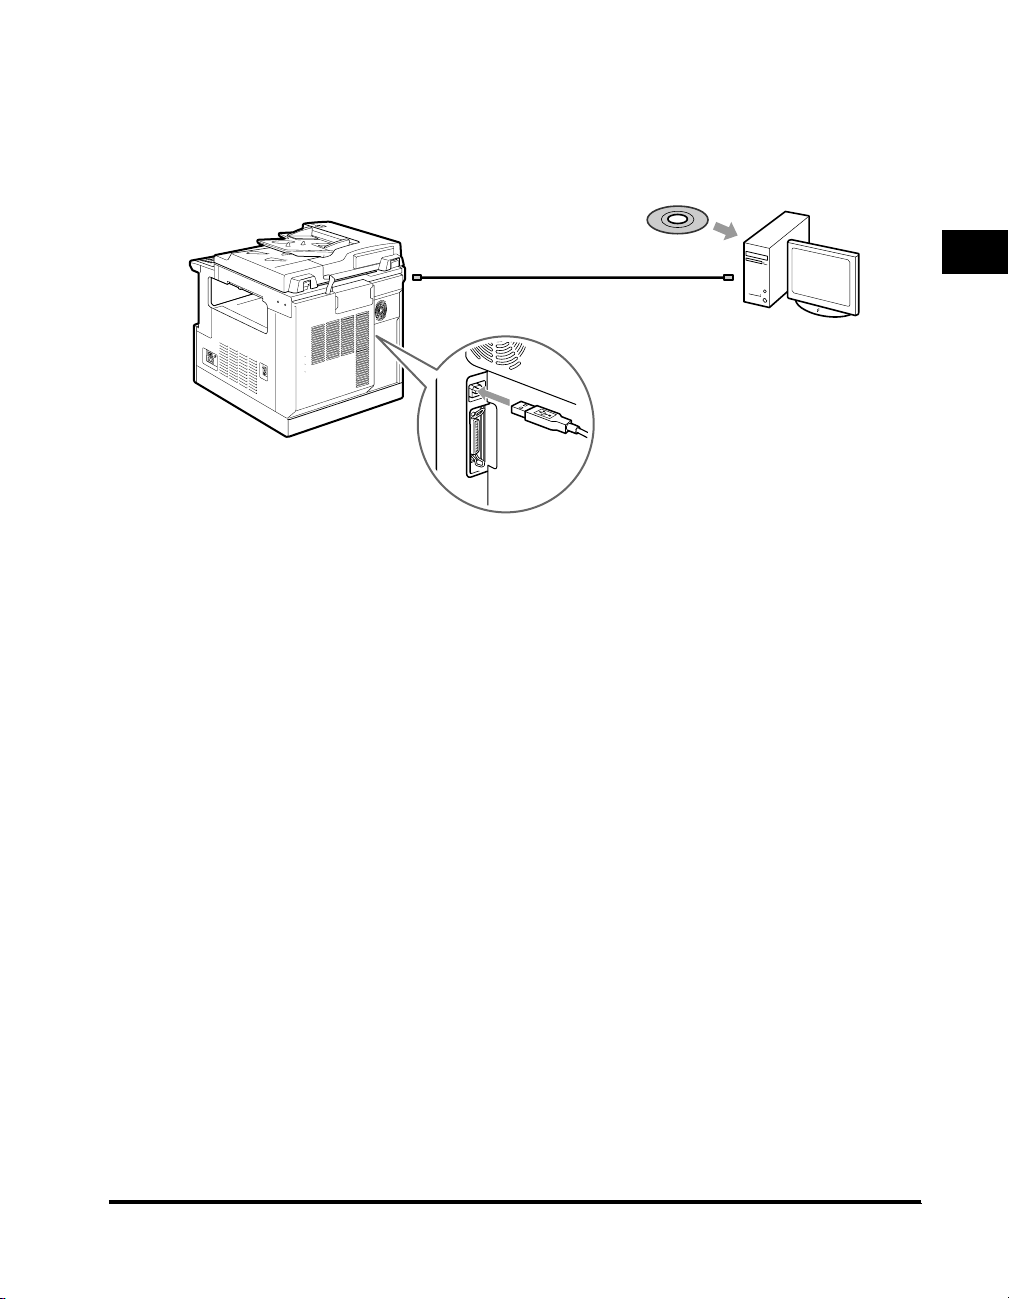
Connecting to other computers
When the printer port of your computer is a parallel port (IEEE-1284 compliant),
connect the parallel port of this machine to the printer port of the computer using an
interface cable to match your computer.
Printer driver software
Printer cable
Parallel port Printer port
Connect a 36-pin Centronics connector.
*
Be sure to secure the clips on both sides.
1
Before You Start Using This Machine
Connecting to a Computer
1-11
Page 20
Connecting through a USB Interface
1
Before You Start Using This Machine
This machine can connect to a computer through a USB interface. After
connection, install the supplied printer driver and utility software to match the OS of
your computer.
For installing the printer driver and utility software, see “Installing the Software” on
p.1-14.
Connecting to a DOS/Windows computer
Connect the USB port of this machine to the USB port of the computer using an
interface cable to match your computer.
Printer driver software
USB cable
USB port USB port
1-12
IMPORTANT
•
When you have connected a computer to the USB port of this machine, some utility
software cannot be used. For details, see “PS Driver Guide” or “PCL Driver Guide.”
Connecting to a Computer
Page 21
Connecting to other computers
When your computer has a USB port, connect the USB port of this machine to the
USB port of the computer using a USB cable to match your computer.
Printer driver software
USB cable
USB port USB port
1
Before You Start Using This Machine
Connecting to a Computer
1-13
Page 22

Installing the Software
1
For Windows
Before You Start Using This Machine
Before printing, you need to install the printer driver and utility software to your
computer. Install the software to match your computer.
To print from a Windows 95/98/Me, Windows 2000/XP or Windows NT 4.0
computer, install the printer driver and utility software from the supplied CD-ROM.
The following software is included in the supplied CD-ROM.
■ PCL Printer driver
This is essential software when you print from Windows applications. Be sure to install
this software.
■ NetSpot Job Monitor
This printer utility software allows you to display the printer status and operate a print job
in progress. Install this software if necessary.
■ NetSpot
This printer utility software allows you to display the printer status connected to a
computer or network on the computer screen. You can set the printer and network board,
and operate the printer from the connected computer in the same way as from the printer
control panel. Install this software if necessary,
NOTE
•
For the details of the printer drivers and the installation of the software, see “PCL Driver
Guide.”
For DOS
1-14
Select this printer or a compatible printer on the printer setting window of the
application software.
NOTE
•
For details on the printer setting, refer to the Operation Manual of the application
software.
Installing the Software
Page 23

For Macintosh
To print from a Macintosh computer, install the printer driver and utility software
from the supplied CD-ROM.
The following software is included in the supplied CD-ROM.
■ Post Script Printer driver
This is essential software when you print from Macintosh applications. Be sure to install
this software.
■ NetSpot
This printer utility software allows you to display the printer status connected to a
computer or network on the computer screen. You can set the printer and network board,
and operate the printer from the connected computer in the same way as from the printer
control panel. Install this software if necessary.
NOTE
•
For the details of the printer drivers and the installation of the software, see “PS Driver
Guide.”
When this Machine is Connected to a Network
Install the supplied “NetSpot” network administration software.
For the details of the NetSpot and its installation, see “PS Driver Guide.”
NOTE
•
When this machine is connected to a network, you need to set up the Network OS
(NetWare, UNIX, etc.) and the network board. For these settings, see “Network Guide.”
•
When this machine is connected to a network, print “PRINT EN CONFIG” on TEST
MENU to check the MAC address of the network board. Then set up the Network OS
(NetWare, UNIX, etc.) and the network board.
1
Before You Start Using This Machine
Installing the Software
1-15
Page 24

1
Before You Start Using This Machine
1-16
Installing the Software
Page 25

Using the Printer
This chapter describes the basics of how to use the printer.
Entering the Printer Mode. . . . . . . . . . . . . . . . . . . . . . . . . . . . . . . . . . . . . . . . . . . . . . . . . 2-2
Turning Off the Printer . . . . . . . . . . . . . . . . . . . . . . . . . . . . . . . . . . . . . . . . . . . . . . . . . . .2-3
If the Printer is Not Using a Hard Disk . . . . . . . . . . . . . . . . . . . . . . . . . . . . . . . . . . . . . . . . . . . . .2-3
If the Printer is Using a Hard Disk . . . . . . . . . . . . . . . . . . . . . . . . . . . . . . . . . . . . . . . . . . . . . . . .2-4
About On-line and Off-line . . . . . . . . . . . . . . . . . . . . . . . . . . . . . . . . . . . . . . . . . . . . . . . . 2-6
On-line . . . . . . . . . . . . . . . . . . . . . . . . . . . . . . . . . . . . . . . . . . . . . . . . . . . . . . . . . . . . . . . . . . . . .2-6
Off-line . . . . . . . . . . . . . . . . . . . . . . . . . . . . . . . . . . . . . . . . . . . . . . . . . . . . . . . . . . . . . . . . . . . . .2-7
Canceling a Print Job . . . . . . . . . . . . . . . . . . . . . . . . . . . . . . . . . . . . . . . . . . . . . . . . . . . . 2-8
Operating the Menu . . . . . . . . . . . . . . . . . . . . . . . . . . . . . . . . . . . . . . . . . . . . . . . . . . . . . 2-9
How the Menus Are Organized . . . . . . . . . . . . . . . . . . . . . . . . . . . . . . . . . . . . . . . . . . . . . . . . . .2-9
Going Off-line for Menu Display and Item Selection . . . . . . . . . . . . . . . . . . . . . . . . . . . . . . . . .2-10
Making a Selection from a Menu . . . . . . . . . . . . . . . . . . . . . . . . . . . . . . . . . . . . . . . . . . . . . . . .2-10
Notes on the PostScript Personality . . . . . . . . . . . . . . . . . . . . . . . . . . . . . . . . . . . . . . . .2-12
2
CHAPTER
2-1
Page 26
Entering the Printer Mode
This section describes how to enter the printer mode.
When you enter the printer mode, the printer gets ready for printing after
2
Using the Printer
automatically checking the status of the machine and any options installed.
1
Press the “I” side of the power switch located on the right side
of the machine, if the power of the machine is turned off.
The power is turned on and the indicators and the LCD display on the control
panel are turned on.
2
System
Press “System” on the control panel.
The indicator of the button lights up.
If there are no errors found, the Online indicator lights up, and the printer is ready
to print.
The information shown on the LCD display is as follows:
READY
2-2
IMPORTANT
•
See “Printer Trouble,” on p.5-3, if the printer does not operate normally or an error
message is shown.
Entering the Printer Mode
Page 27
Turning Off the Printer
The procedure for turning off the power is different for a printer with the optional
hard disk installed and the one without it.
IMPORTANT
•
If the printer has the optional hard disk installed, turning off the power should follow the
designated procedure to protect the hard disk. (See p.2-4)
•
If the printer is connected to a network, make sure that the printer is not printing data
from another personal computer before turning off the power.
•
If the power is turned off while the Job indicator is on, the print data remaining in the
memory of the printer and the print data being spooled in the hard disk are erased. Wait
for the necessary print data to be printed and turn off the power after printing has been
completed.
•
Do not turn off the power to the printer while it is printing.
•
Do not turn off the power to the printer during the self-diagnostic test performed
immediately after the power has been turned on.
•
If the printer has a hard disk installed, make sure that HDD indicator (green) is not on. If
the power is turned off while the HDD indicator is on (the hard disk is reading or writing
data), the hard disk may be damaged and become unusable.
•
If the message <FLASH FORMATTING...> is displayed, make sure that the message has
been canceled before turning off the power.
If the Printer is Not Using a Hard Disk
If the hard disk has not been installed on the printer, turn off the power as described
in the following procedure.
2
Using the Printer
1
Make sure that the Job indicator is off.
2
Press the “” side of the power switch on the right side of the
machine.
The power is turned off.
Turning Off the Printer
2-3
Page 28
2
Using the Printer
If the Printer is Using a Hard Disk
If the hard disk has been installed on the printer, turn off the power as described in
the following procedure.
IMPORTANT
•
If you shut down the printer when there is an aborted job or a secure print job on the hard
disk, the message <JOB IN PROGRESS +CANCEL/-CONTINUE> is displayed. All of the
jobs will be canceled by conducting a shut down.
•
Once shut down has been started, it is impossible to stop it. If the power needs to be
turned on again, turn off the power according to the messages before turning the power
on again.
1
Make sure that the Job indicator and HDD indicator (green)
are off.
GO
2
Press “GO” to turn off the Online indicator.
The printer gets ready for operation using the control panel.
PAUSED
Menu
Item
Value
Enter/Cancel
2-4
Turning Off the Printer
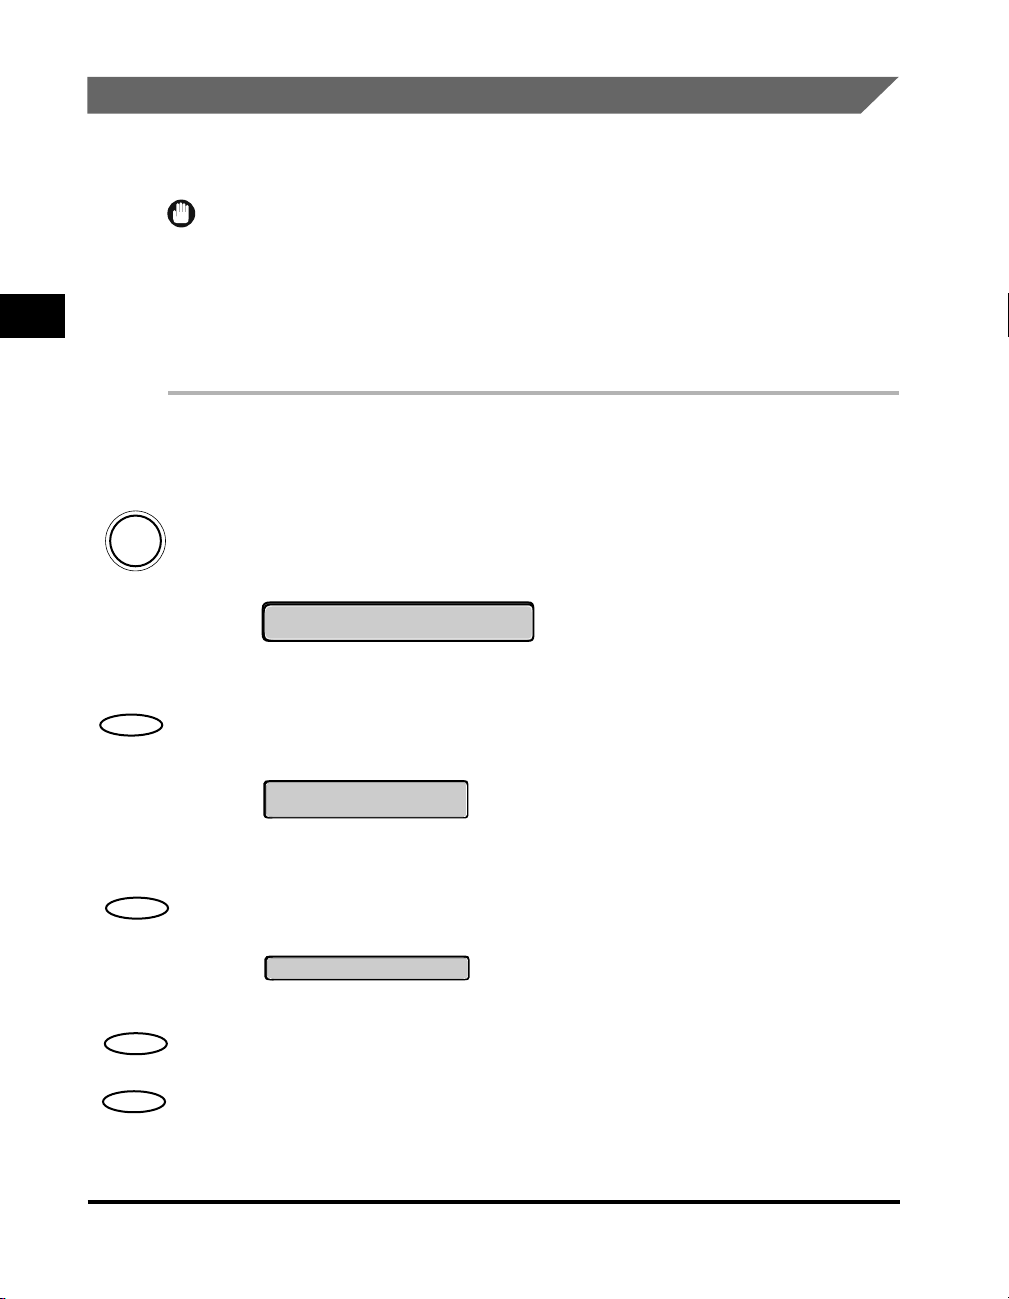
3
Press “Menu.”
The first menu will be displayed.
SHUTDOWN MENU
4
Press “Item” to select <SHUTDOWN=YES> or <SHUTDOWN
=NO>.
SHUTDOWN=YES
5
Press “Value” to select <SHUTDOWN=YES> and press
“Enter.”
The process to turn off the power has been conducted and the message, <SAFE
TO TURN OFF PRINTER> is shown when the printer gets ready.
Page 29

6
Press the “” side of the power switch at the right side of the
machine when the message <SAFE TO TURN OFF PRINTER>
is displayed.
The power is turned off.
2
Using the Printer
Turning Off the Printer
2-5
Page 30
About On-line and Off-line
The state in which the printer can receive data from a personal computer and it can
print the data is called <on-line> and the state in which the printer cannot receive
data is called <off-line>. The printer should be off-line when you operate the printer
2
Using the Printer
using the menu on the control panel.
On-line
When the printing data is coming from a personal computer, it is necessary that the
printer is on-line. Make sure that the printer is on-line when you print. If the printer is
not on-line, bring the printer on-line as described in the following procedure.
GO
1
Press “GO ” to turn on the Online indicator.
The printer comes on-line and is ready for printing.
READY
IMPORTANT
•
When the printer is in the error status (when the Alarm indicator (red) is on or the
digit part of the message is flushing), the printer will not become on-line. Remove
the cause of the error before bringing the printer on-line.
•
The printer does not come on-line during operations such as selecting a menu
function or a paper feeding procedure, or setting the paper size. Finish the
operation first before bringing the printer on-line.
•
Do not open the cover of the printer or the paper cassette while printing. If it is
opened, the printer will stop printing and the printing may not be able to resume
again.
● Saving the Power Consumption (Sleep Mode)
After a specific time period has passed without any operation or without any
data sent from the personal computer, the printer automatically switches to
Sleep Mode. The Sleep Mode is automatically canceled when any of the
buttons on the control panel are pressed or an error occurs. Sleep Mode is also
canceled if the printer has received data while it is on-line. Sleep Mode is also
canceled when the error has been canceled while the printer is off-line.
2-6
About On-line and Off-line
Page 31

Off-line
It is necessary that the printer is off-line when you use the menu on the control
panel, select the paper feeding method or set the paper size. Check that the printer
is in the offline state when you use keys on the control panel. If not, set the printer
to the offline state using the following procedure.
GO
1
Press “GO” to turn off the Online indicator.
The printer gets ready for operation using the control panel.
PAUSED
IMPORTANT
•
If you try to print data from the personal computer while the printer is off-line, the
message <PAUSED> is shown and the printer is not available for printing.
2
Using the Printer
About On-line and Off-line
2-7
Page 32

Canceling a Print Job
When you cancel a print job, one of the following two cases will apply.
■ Case 1:
2
Using the Printer
GO
After you cancel a print job from your software application, the printer may still have data
remaining in the printer memory. Follow the procedure below to cancel a print job from the
printer control panel and clear all print data from the printer memory.
1
Cancel the print job with your software application. For
details, refer to your software application user’s guide.
If you do not take care to stop the flow of data from the host computer, the printer
will continue to print out any data it receives after <READY> has appeared.
2
Press “GO” to take the printer off-line.
Menu
Item
Value
Enter/Cancel
2-8
Canceling a Print Job
3
Press “Menu” until you see RESET MENU.
4
Press “Item” and then “Value” to select <RESET=MENU>.
5
Press “Enter.” This clears all data from the printer memory.
6
After that, the printer will automatically come back on-line.
■ Case 2:
To cancel a job while the printer is off-line and <PAUSED> is displayed, press “Enter”
while holding down “Shift.”
Page 33

Operating the Menu
This is a brief introduction to the printer control panel buttons you can use to open
menus and view their contents or change their settings.
Take a few minutes to actually use the printer control panel buttons as you read
through this section.
How the Menus Are Organized
■ Quick Summary: Using the menu buttons
Button What it does
Press “GO” to take the printer off-line so you can see the menus and settings. The
GO
Menu
Item
Value
Enter
Cancel
printer must be off-line before you can use the menus. When you have finished
with the menus, press “GO” to bring the printer back on-line.
Press “Menu” to open the menu display and display the next menu title. Press
“Menu” repeatedly to scroll through the menu titles until you see the menu you
want to use. Press “Shift” and “Menu” repeatedly to scroll through the menu titles
in reverse order.
With the title of the menu you want to open on the LCD display, press “Item” to
display the first item in the menu. Press “Item” repeatedly to scroll through all the
item names. Press “Shift” and “Item” repeatedly to scroll through the item names
in reverse order.
With the name of the item you want to change on the LCD display, press “Value”
to display the first setting value. Press “Value” repeatedly to scroll through all the
values. Press “Shift” and “Value” to scroll through the values in reverse order.
With the value you want to select on the LCD display, press “Enter.” After you
press “Enter.” a small asterisk (*) appears next to the value. This indicates that the
displayed value is the current setting.
Press “Shift” and “Enter/Cancel” to cancel the current operation.
2
Using the Printer
Operating the Menu
2-9
Page 34

2
Using the Printer
Going Off-line for Menu Display and Item Selection
Press “GO” to switch the Online indicator on and off. When the Online indicator is
on, the printer is on-line and ready to print. The printer must be on-line to receive
data from the host computer. Every time you start a print job, check the Online
indicator to ensure it is on.
When the Online indicator is off, the printer is off-line. The printer must be off-line
before you can use the “Menu,” “Item,” and “Value” buttons.
Making a Selection from a Menu
Follow this example procedure to familiarize yourself with how to use the printer
control panel buttons to view or change menu settings. The example below shows
you how to view or change the density setting.
1
Check the control panel to ensure that the Job indicator is off.
GO
2
Press “GO” to take the printer off-line.
The Online indicator goes off and <PAUSED> is displayed in the top line.
2-10
Menu
Menu
Item
Operating the Menu
3
Press “Menu.”
SHUTDOWN MENU
4
Press “Menu” until you see CONFIG MENU.
5
Press “Item” to open the CONFIG MENU and display the first
item in the menu.
<JAM RECOVERY=OFF> is displayed in the bottom line of the LCD display.
Page 35

Item
Value
Value
6
Press “Item” until you see <DENSITY> in the bottom line.
7
Press “Value” to scroll through the values for the DENSITY
setting.
8
If you want to change the setting, press “Value” until the
values you want is displayed. Then press “Enter.”
To use a darker setting, select a higher number. A darker setting will use more
toner.
To use a lighter setting, select a lower number. A lighter setting will use less toner.
If you want to exit or return to the item level of the menu without making any
changes, press “Item.”
If you want to exit or return to the menu level without making any changes, press
“Menu.”
If you want to bring the printer back on-line without making any changes, press
“GO.”
NOTE
•
Some menus and items will not be displayed until the corresponding optional
equipment has been installed. For example, you will not see the PS MENU or any
of the PostScript items unless the optional PostScript module has been installed in
the printer.
•
When the printer is off-line and <PAUSED> is displayed in the control panel, you
can cancel a job by pressing “Enter” while holding down “Shift.”
2
Using the Printer
Operating the Menu
2-11
Page 36

Notes on the PostScript Personality
The Adobe PostScript personality is available as an option for the printer.
When the optional Canon PS Module-B1 is installed, the printer offers a variety of
PostScript 3 features. However, before you start printing, note the following
2
Using the Printer
important points:
• When the PostScript personality is in use, pressing “GO” will not print data
remaining in the printer when the Online indicator is blinking.
• If the amount of printer memory is insufficient when you print PostScript data, you
may experience some reduction in the quality of your printed images. To avoid
reduction in the quality of printed images, ensure you have enough memory in the
printer.
• Do not turn on the Level 1 Compatible option on the driver menu. This printer will
not work properly on PostScript created with this option.
• Avoid using commands with paper size compatibility operators such as A4, Letter,
etc. These operators are included for compatibility only with existing PostScript
Level 1 printer drivers. If one of these operators is used, the printer will not
respond according to the PageSize policy.
• To avoid problems with print results, do not use the OutputPage key command
(page device parameter) together with a @PJL JOB (a PJL job command).
2-12
Notes on the PostScript Personality
Page 37

Summary of the Printer Menus
This chapter provide a brief outline of the function of each of the printer menus, and an
example of how to use them.
SECURED JOB MENU. . . . . . . . . . . . . . . . . . . . . . . . . . . . . . . . . . . . . . . . . . . . . . . . . . . 3-3
About SECURED JOB MENU. . . . . . . . . . . . . . . . . . . . . . . . . . . . . . . . . . . . . . . . . . . . . . . . . . . .3-3
Operation flow for SECURED JOB MENU . . . . . . . . . . . . . . . . . . . . . . . . . . . . . . . . . . . . . . . . . .3-3
SHUTDOWN MENU . . . . . . . . . . . . . . . . . . . . . . . . . . . . . . . . . . . . . . . . . . . . . . . . . . . . . 3-4
About SHUTDOWN MENU . . . . . . . . . . . . . . . . . . . . . . . . . . . . . . . . . . . . . . . . . . . . . . . . . . . . . .3-4
Operation flow for SHUTDOWN MENU . . . . . . . . . . . . . . . . . . . . . . . . . . . . . . . . . . . . . . . . . . . .3-4
TEST MENU . . . . . . . . . . . . . . . . . . . . . . . . . . . . . . . . . . . . . . . . . . . . . . . . . . . . . . . . . . . 3-5
About TEST MENU . . . . . . . . . . . . . . . . . . . . . . . . . . . . . . . . . . . . . . . . . . . . . . . . . . . . . . . . . . . .3-5
Operation flow for TEST MENU . . . . . . . . . . . . . . . . . . . . . . . . . . . . . . . . . . . . . . . . . . . . . . . . . .3-5
PCL MENU . . . . . . . . . . . . . . . . . . . . . . . . . . . . . . . . . . . . . . . . . . . . . . . . . . . . . . . . . . . . 3-6
About PCL MENU. . . . . . . . . . . . . . . . . . . . . . . . . . . . . . . . . . . . . . . . . . . . . . . . . . . . . . . . . . . . .3-6
Operation flow for PCL MENU . . . . . . . . . . . . . . . . . . . . . . . . . . . . . . . . . . . . . . . . . . . . . . . . . . .3-6
PS MENU . . . . . . . . . . . . . . . . . . . . . . . . . . . . . . . . . . . . . . . . . . . . . . . . . . . . . . . . . . . . .3-7
About PS MENU . . . . . . . . . . . . . . . . . . . . . . . . . . . . . . . . . . . . . . . . . . . . . . . . . . . . . . . . . . . . . .3-7
Operation flow for PS MENU . . . . . . . . . . . . . . . . . . . . . . . . . . . . . . . . . . . . . . . . . . . . . . . . . . . .3-7
FEEDER MENU . . . . . . . . . . . . . . . . . . . . . . . . . . . . . . . . . . . . . . . . . . . . . . . . . . . . . . . . 3-8
About FEEDER MENU . . . . . . . . . . . . . . . . . . . . . . . . . . . . . . . . . . . . . . . . . . . . . . . . . . . . . . . . .3-8
Operation flow for FEEDER MENU . . . . . . . . . . . . . . . . . . . . . . . . . . . . . . . . . . . . . . . . . . . . . . . .3-8
CONFIG MENU . . . . . . . . . . . . . . . . . . . . . . . . . . . . . . . . . . . . . . . . . . . . . . . . . . . . . . . . 3-9
About CONFIG MENU . . . . . . . . . . . . . . . . . . . . . . . . . . . . . . . . . . . . . . . . . . . . . . . . . . . . . . . . .3-9
Operation flow for CONFIG MENU. . . . . . . . . . . . . . . . . . . . . . . . . . . . . . . . . . . . . . . . . . . . . . . .3-9
ENTER PASSWORD MENU . . . . . . . . . . . . . . . . . . . . . . . . . . . . . . . . . . . . . . . . . . . . . 3-10
About the ENTER PASSWORD MENU . . . . . . . . . . . . . . . . . . . . . . . . . . . . . . . . . . . . . . . . . . . .3-10
Operation flow for the ENTER PASSWORD MENU . . . . . . . . . . . . . . . . . . . . . . . . . . . . . . . . . .3-10
JOB CONTROL MENU. . . . . . . . . . . . . . . . . . . . . . . . . . . . . . . . . . . . . . . . . . . . . . . . . . 3-11
About JOB CONTROL MENU . . . . . . . . . . . . . . . . . . . . . . . . . . . . . . . . . . . . . . . . . . . . . . . . . .3-11
Operation flow for JOB CONTROL MENU . . . . . . . . . . . . . . . . . . . . . . . . . . . . . . . . . . . . . . . . .3-11
PARALLEL MENU . . . . . . . . . . . . . . . . . . . . . . . . . . . . . . . . . . . . . . . . . . . . . . . . . . . . . 3-12
About PARALLEL MENU . . . . . . . . . . . . . . . . . . . . . . . . . . . . . . . . . . . . . . . . . . . . . . . . . . . . . .3-12
Operation flow for PARALLEL MENU . . . . . . . . . . . . . . . . . . . . . . . . . . . . . . . . . . . . . . . . . . . . .3-12
3
CHAPTER
3-1
Page 38

3. Summary of the Printer Menus
USB MENU. . . . . . . . . . . . . . . . . . . . . . . . . . . . . . . . . . . . . . . . . . . . . . . . . . . . . . . . . . .3-13
About USB MENU . . . . . . . . . . . . . . . . . . . . . . . . . . . . . . . . . . . . . . . . . . . . . . . . . . . . . . . . . . . 3-13
Operation flow for USB MENU . . . . . . . . . . . . . . . . . . . . . . . . . . . . . . . . . . . . . . . . . . . . . . . . . 3-13
ETHERNET MENU. . . . . . . . . . . . . . . . . . . . . . . . . . . . . . . . . . . . . . . . . . . . . . . . . . . . .3-14
About ETHERNET MENU . . . . . . . . . . . . . . . . . . . . . . . . . . . . . . . . . . . . . . . . . . . . . . . . . . . . . 3-14
Operation flow for ETHERNET MENU . . . . . . . . . . . . . . . . . . . . . . . . . . . . . . . . . . . . . . . . . . . . 3-14
LANGUAGE MENU. . . . . . . . . . . . . . . . . . . . . . . . . . . . . . . . . . . . . . . . . . . . . . . . . . . . .3-15
About LANGUAGE MENU . . . . . . . . . . . . . . . . . . . . . . . . . . . . . . . . . . . . . . . . . . . . . . . . . . . . 3-15
3
Operation flow for LANGUAGE MENU . . . . . . . . . . . . . . . . . . . . . . . . . . . . . . . . . . . . . . . . . . . 3-15
RESET MENU . . . . . . . . . . . . . . . . . . . . . . . . . . . . . . . . . . . . . . . . . . . . . . . . . . . . . . . .3-16
About RESET MENU . . . . . . . . . . . . . . . . . . . . . . . . . . . . . . . . . . . . . . . . . . . . . . . . . . . . . . . . . 3-16
Operation flow for RESET MENU . . . . . . . . . . . . . . . . . . . . . . . . . . . . . . . . . . . . . . . . . . . . . . . 3-16
JOB LOG MENU. . . . . . . . . . . . . . . . . . . . . . . . . . . . . . . . . . . . . . . . . . . . . . . . . . . . . . . 3-17
About JOB LOG MENU. . . . . . . . . . . . . . . . . . . . . . . . . . . . . . . . . . . . . . . . . . . . . . . . . . . . . . . 3-17
Operation flow for JOB LOG MENU . . . . . . . . . . . . . . . . . . . . . . . . . . . . . . . . . . . . . . . . . . . . . 3-17
Summary of the Printer Menus
3-2
Page 39

SECURED JOB MENU
About SECURED JOB MENU
This menu is used to print secured jobs that are stored on the printer.
IMPORTANT
•
This menu will only appear if there is a secured job stored on the printer.
Operation flow for SECURED JOB MENU
To do this... Do this...
Take the printer off-line. Press “GO.”
1
Open the menus. Press “Menu.”
2
Open the SECURED JOB MENU. Press “Menu.”
3
3
Summary of the Printer Menus
Choose a secured print job. Press “Enter.”
4
Enter the password for the job
5
Bring the printer back on-line. Press “GO.”
6
Enter the password for the job by pressing
“Value” or “Shift” and “Value .”
SECURED JOB MENU
3-3
Page 40

SHUTDOWN MENU
About SHUTDOWN MENU
This menu is used to shut down the printer. You should always use this menu to
shut down the printer if the optional Canon Hard Disk HD-65 has been installed.
3
Operation flow for SHUTDOWN MENU
Follow the procedure below to shut down the printer using the SHUTDOWN MENU.
Do this... To do it...
Take the printer off-line. Press “GO.”
1
Open the menus. Press “Menu.”
2
Summary of the Printer Menus
Open the Shutdown menu.
3
Choose an item.
4
Bring the printer back on-line. Press “GO.”
5
Press “Menu” until <SHUT DOWN MENU>
appears in the display, then press “Enter.”
Press “Value” until you see the item in the
display, then press “Enter.”
3-4
SHUTDOWN MENU
Page 41

TEST MENU
About TEST MENU
This menu is used to print test prints and other configuration details for the printer.
Operation flow for TEST MENU
Use the example procedure below to open the TEST MENU and specify the option
you want to select.
Do this... To do it...
Take the printer off-line. Press “GO.”
1
Open the menus. Press “Menu.”
2
Open the Test menu.
3
Choose an item.
4
Example: PRINT JOB LOG
TEST MENU
PRINT JOB LOG
Press “Menu” to display <TEST MENU>,
then press “Enter.”
Press “Item” until you see the item in the
display, then press “Enter.”
3
Summary of the Printer Menus
TEST MENU
3-5
Page 42

PCL MENU
About PCL MENU
This menu is used to specify various print options for PCL print jobs.
3
Operation flow for PCL MENU
Use the example procedure below to open the PCL MENU and specify the option
you want to select.
Do this... To do it...
Take the printer off-line. Press “GO.”
1
Open the menus. Press “Menu.”
2
Summary of the Printer Menus
Open the PCL menu.
3
Choose an item.
4
Choose a setting.
5
Press “Item” until <PCL MENU> appears in
the display, then press “Enter.”
Press “Item” until you see the item in the
display, then press “Enter.”
Press “Value” until you see the setting you
want, then press “Enter.” To scroll through the
values quickly, press and hold “Value.”
3-6
6
PCL MENU
Bring the printer back on-line. Press “GO.”
Page 43

PS MENU
About PS MENU
This menu is used to specify various options for PostScript print jobs. This menu will
only appear if the optional Canon PS Module-B1 has been installed.
Operation flow for PS MENU
Use the example procedure below to open the PS MENU and specify the option
you want to select.
Do this... To do it...
Take the printer off-line. Press “GO.”
1
Open the menus. Press “Menu.”
2
Open the PS menu.
3
Choose an item.
4
Choose a setting.
5
Press “Menu” until <PS MENU> appears in
the display, then press “Enter.”
Press “Item” until you see the item in the
display, then press “Enter.”
Press “Value” until you see the setting you
want, then press “Enter.” To scroll through the
values quickly, press and hold “Value”.
3
Summary of the Printer Menus
Bring the printer back on-line. Press “GO.”
6
PS MENU
3-7
Page 44

FEEDER MENU
About FEEDER MENU
This menu is used to specify the paper size loaded in each of the paper sources
and to select other paper feed options.
3
Operation flow for FEEDER MENU
Use the example procedure below to open the FEEDER MENU and specify the
option you want to select.
Do this... To do it...
Take the printer off-line. Press “GO.”
1
Open the menus. Press “Menu.”
2
Summary of the Printer Menus
Open the Feeder menu.
3
Choose an item.
4
Choose a setting.
5
Press “Menu” until <FEEDER MENU>
appears in the display, then press “Enter.”
Press “Item” until you see the item in the
display, then press “Enter.”
Press “Value” until you see the setting you
want, then press “Enter.” To scroll through the
values quickly, press and hold “Value”.
3-8
Bring the printer back on-line. Press “GO.”
6
FEEDER MENU
Page 45

CONFIG MENU
About CONFIG MENU
This menu is used to specify various configuration options for printer, such as toner
density.
Operation flow for CONFIG MENU
Use the example procedure below to open the CONFIG MENU and specify the
option you want to select.
Do this... To do it...
Take the printer off-line. Press “GO.”
1
Open the menus. Press “Menu.”
2
Open the Config menu.
3
Choose an item.
4
Choose a setting.
5
Bring the printer back on-line. Press “GO.”
6
Press “Menu” until <CONFIG MENU>
appears in the display, then press “Enter.”
Press “Item” until you see the item in the
display, then press “Enter.”
Press “Value” or until you see the setting
you want, then press “Enter.”
3
Summary of the Printer Menus
CONFIG MENU
3-9
Page 46

ENTER PASSWORD MENU
About the ENTER PASSWORD MENU
This menu is used to enter the password for the printer. If a password has been set
for the printer, this menu will appear and you must enter the password to access the
advanced printing option menus. (See “List of Standard Printing Environment
3
Settings,” on p.4-3)
Operation flow for the ENTER PASSWORD MENU
Use the procedure below to open the ENTER PASSWORD menu and enter the
password for the printer.
Do this... To do it...
Take the printer off-line. Press “GO.”
1
Summary of the Printer Menus
3-10
Open the menus. Press “Menu.”
2
Open the ENTER PASSWORD menu.
3
Enter the password.
4
Bring the printer back on-line. Press “GO.”
5
ENTER PASSWORD MENU
Press “Menu” until <ENTER PASSWORD>
appears in the display, then press “Enter.”
Press “Value” or “Shift” and “Value” to
adjust the digits for the password, then
press “Enter.”
Page 47

JOB CONTROL MENU
About JOB CONTROL MENU
This menu is used to specify options for handling jobs received by the printer.
Operation flow for JOB CONTROL MENU
Use the example procedure below to open the JOB CONTROL MENU and specify
the option you want to select.
Do this... To do it...
Take the printer off-line. Press “GO.”
1
Open the menus. Press “Menu.”
2
Press “Menu” until <JOB CONTROL
Open the Job Control menu.
3
Choose an item.
4
Bring the printer back on-line. Press “GO.”
5
MENU> appears in the display, then press
“Enter.”
Press “Value” until you see the item in the
display, then press “Enter.”
3
Summary of the Printer Menus
JOB CONTROL MENU
3-11
Page 48

PARALLEL MENU
About PARALLEL MENU
This menu is used to specify the default printer personality and interface settings for
jobs received via the parallel interface port.
3
Operation flow for PARALLEL MENU
Use the example procedure below to open the PARALLEL MENU and specify the
option you want to select.
Do this... To do it...
Take the printer off-line. Press “GO.”
1
Open the menus. Press “Menu.”
2
Summary of the Printer Menus
Open the Parallel menu.
3
Choose an item.
4
Bring the printer back on-line. Press “GO.”
5
Press “Menu” until <PARALLEL MENU>
appears in the display, then press “Enter.”
Press “Value” until you see the item in the
display, then press “Enter.”
3-12
PARALLEL MENU
Page 49

USB MENU
About USB MENU
This menu is used to specify the default printer personality and interface settings for
jobs received via the USB port.
Operation flow for USB MENU
Use the example procedure below to open the USB MENU and specify the option
you want to select.
Do this... To do it...
Take the printer off-line. Press “GO.”
1
Open the menus. Press “Menu.”
2
Open the USB menu.
3
Choose an item.
4
Bring the printer back on-line. Press “GO.”
5
Press “Menu” until <USB MENU> appears
in the display, then press “Enter.”
Press “Value” until you see the item in the
display, then press “Enter.”
3
Summary of the Printer Menus
USB MENU
3-13
Page 50

ETHERNET MENU
About ETHERNET MENU
This menu is used to specify the default printer personality and interface settings for
jobs received via the optional Canon Ethernet Network Interface Adapter iN-E5
network card.
3
Operation flow for ETHERNET MENU
Use the example procedure below to open the ETHERNET MENU and specify the
option you want to select.
Take the printer off-line. Press “GO.”
1
Open the menus. Press “Menu.”
Summary of the Printer Menus
2
Do this... To do it...
3-14
Open the Ethernet menu.
3
Choose an item.
4
Bring the printer back on-line. Press “GO.”
5
ETHERNET MENU
Press “Menu” until <ETHERNET MENU>
appears in the display, then press “Enter.”
Press “Value” until you see the item in the
display, then press “Enter.”
Page 51

LANGUAGE MENU
About LANGUAGE MENU
This menu is used to specify the default language for the LCD display on the control
panel.
Operation flow for LANGUAGE MENU
Follow the procedure below to specify the language for the LCD display.
Do this... To do it...
Take the printer off-line. Press “GO.”
1
Open the menus. Press “Menu.”
2
Open the Language menu.
3
Choose a language for the LCD display.
4
Bring the printer back on-line. Press “GO.”
5
Press “Menu” until <LANGUAGE MENU>
appears in the display, then press “Enter.”
Press “Value” until you see the language in
the display, then press “Enter.”
3
Summary of the Printer Menus
LANGUAGE MENU
3-15
Page 52

RESET MENU
About RESET MENU
This menu is used to reset various settings to their default values.
3
Operation flow for RESET MENU
Use the example procedure below to open the RESET MENU and specify the type
of settings you want to reset to their default values.
Do this... To do it...
Take the printer off-line. Press “GO.”
1
Open the menus. Press “Menu.”
2
Summary of the Printer Menus
Open the Reset menu.
3
Choose the type of settings you want to
4
reset.
Bring the printer back on-line. Press “GO.”
5
Press “Menu” until <RESET MENU>
appears in the display, then press “Enter.”
Press “Value” until you see the item you
want to reset in the display, then press
“Enter.”
3-16
RESET MENU
Page 53

JOB LOG MENU
About JOB LOG MENU
This menu is used to specify various options for the job log.
Operation flow for JOB LOG MENU
Use the example procedure below to open the JOB LOG MENU and specify the
option you want to select.
Do this... To do it...
Take the printer off-line. Press “GO.”
1
Open the menus. Press “Menu.”
2
Open the Job Log menu.
3
Choose an item.
4
Bring the printer back on-line. Press “GO.”
5
Press “Menu” until <JOB LOG MENU>
appears in the display, then press “Enter.”
Press “Value” until you see the item in the
display, then press “Enter.”
3
Summary of the Printer Menus
JOB LOG MENU
3-17
Page 54

3
Summary of the Printer Menus
3-18
JOB LOG MENU
Page 55

Printing Environment Settings
CHAPTER
This chapter explains how to adjust printer settings to meet your own particular requirements.
List of Standard Printing Environment Settings . . . . . . . . . . . . . . . . . . . . . . . . . . . . . . . . 4-3
SECURED JOB MENU. . . . . . . . . . . . . . . . . . . . . . . . . . . . . . . . . . . . . . . . . . . . . . . . . . . 4-7
ENTER PASSWD. . . . . . . . . . . . . . . . . . . . . . . . . . . . . . . . . . . . . . . . . . . . . . . . . . . . . . . . . . . . . .4-7
COPIES. . . . . . . . . . . . . . . . . . . . . . . . . . . . . . . . . . . . . . . . . . . . . . . . . . . . . . . . . . . . . . . . . . . . .4-7
INVALID PASSWD REENTER . . . . . . . . . . . . . . . . . . . . . . . . . . . . . . . . . . . . . . . . . . . . . . . . . . . .4-7
SHUTDOWN MENU . . . . . . . . . . . . . . . . . . . . . . . . . . . . . . . . . . . . . . . . . . . . . . . . . . . . . 4-8
SHUT DOWN . . . . . . . . . . . . . . . . . . . . . . . . . . . . . . . . . . . . . . . . . . . . . . . . . . . . . . . . . . . . . . . .4-8
TEST MENU . . . . . . . . . . . . . . . . . . . . . . . . . . . . . . . . . . . . . . . . . . . . . . . . . . . . . . . . . . . 4-9
SHOW PAGE COUNT. . . . . . . . . . . . . . . . . . . . . . . . . . . . . . . . . . . . . . . . . . . . . . . . . . . . . . . . . .4-9
TEST PRINT . . . . . . . . . . . . . . . . . . . . . . . . . . . . . . . . . . . . . . . . . . . . . . . . . . . . . . . . . . . . . . . . .4-9
PRINT PCL FONTS . . . . . . . . . . . . . . . . . . . . . . . . . . . . . . . . . . . . . . . . . . . . . . . . . . . . . . . . . . . .4-9
PRINT PS FONTS . . . . . . . . . . . . . . . . . . . . . . . . . . . . . . . . . . . . . . . . . . . . . . . . . . . . . . . . . . . . .4-9
PRINT JOB LOG. . . . . . . . . . . . . . . . . . . . . . . . . . . . . . . . . . . . . . . . . . . . . . . . . . . . . . . . . . . . .4-10
CONTINUOUS TEST . . . . . . . . . . . . . . . . . . . . . . . . . . . . . . . . . . . . . . . . . . . . . . . . . . . . . . . . .4-10
PRINT EN CONFIG. . . . . . . . . . . . . . . . . . . . . . . . . . . . . . . . . . . . . . . . . . . . . . . . . . . . . . . . . . .4-10
PCL MENU . . . . . . . . . . . . . . . . . . . . . . . . . . . . . . . . . . . . . . . . . . . . . . . . . . . . . . . . . . . 4-11
RESOLUTION . . . . . . . . . . . . . . . . . . . . . . . . . . . . . . . . . . . . . . . . . . . . . . . . . . . . . . . . . . . . . . .4-11
COPIES. . . . . . . . . . . . . . . . . . . . . . . . . . . . . . . . . . . . . . . . . . . . . . . . . . . . . . . . . . . . . . . . . . . .4-11
PAGESIZE. . . . . . . . . . . . . . . . . . . . . . . . . . . . . . . . . . . . . . . . . . . . . . . . . . . . . . . . . . . . . . . . . .4-11
ORIENTATION . . . . . . . . . . . . . . . . . . . . . . . . . . . . . . . . . . . . . . . . . . . . . . . . . . . . . . . . . . . . . .4-11
FORM . . . . . . . . . . . . . . . . . . . . . . . . . . . . . . . . . . . . . . . . . . . . . . . . . . . . . . . . . . . . . . . . . . . . .4-12
FNTSRC . . . . . . . . . . . . . . . . . . . . . . . . . . . . . . . . . . . . . . . . . . . . . . . . . . . . . . . . . . . . . . . . . . .4-12
FONTNUM . . . . . . . . . . . . . . . . . . . . . . . . . . . . . . . . . . . . . . . . . . . . . . . . . . . . . . . . . . . . . . . . .4-13
PT. SIZE . . . . . . . . . . . . . . . . . . . . . . . . . . . . . . . . . . . . . . . . . . . . . . . . . . . . . . . . . . . . . . . . . . .4-13
PITCH . . . . . . . . . . . . . . . . . . . . . . . . . . . . . . . . . . . . . . . . . . . . . . . . . . . . . . . . . . . . . . . . . . . . .4-14
SYMSET . . . . . . . . . . . . . . . . . . . . . . . . . . . . . . . . . . . . . . . . . . . . . . . . . . . . . . . . . . . . . . . . . . .4-14
AUTO CR . . . . . . . . . . . . . . . . . . . . . . . . . . . . . . . . . . . . . . . . . . . . . . . . . . . . . . . . . . . . . . . . . .4-14
WIDE A4 . . . . . . . . . . . . . . . . . . . . . . . . . . . . . . . . . . . . . . . . . . . . . . . . . . . . . . . . . . . . . . . . . . .4-15
OVERRIDE . . . . . . . . . . . . . . . . . . . . . . . . . . . . . . . . . . . . . . . . . . . . . . . . . . . . . . . . . . . . . . . . .4-15
PS MENU . . . . . . . . . . . . . . . . . . . . . . . . . . . . . . . . . . . . . . . . . . . . . . . . . . . . . . . . . . . .4-16
RESOLUTION . . . . . . . . . . . . . . . . . . . . . . . . . . . . . . . . . . . . . . . . . . . . . . . . . . . . . . . . . . . . . . .4-16
COPIES. . . . . . . . . . . . . . . . . . . . . . . . . . . . . . . . . . . . . . . . . . . . . . . . . . . . . . . . . . . . . . . . . . . .4-16
PRINT ERRS . . . . . . . . . . . . . . . . . . . . . . . . . . . . . . . . . . . . . . . . . . . . . . . . . . . . . . . . . . . . . . . .4-16
4
4-1
Page 56

4. Printing Environment Settings
FEEDER MENU . . . . . . . . . . . . . . . . . . . . . . . . . . . . . . . . . . . . . . . . . . . . . . . . . . . . . . . 4-17
FEED . . . . . . . . . . . . . . . . . . . . . . . . . . . . . . . . . . . . . . . . . . . . . . . . . . . . . . . . . . . . . . . . . . . . . 4-17
TRAY SWITCH. . . . . . . . . . . . . . . . . . . . . . . . . . . . . . . . . . . . . . . . . . . . . . . . . . . . . . . . . . . . . . 4-17
CONFIG MENU . . . . . . . . . . . . . . . . . . . . . . . . . . . . . . . . . . . . . . . . . . . . . . . . . . . . . . .4-19
JAM RECOVERY . . . . . . . . . . . . . . . . . . . . . . . . . . . . . . . . . . . . . . . . . . . . . . . . . . . . . . . . . . . . 4-19
AUTOCONT . . . . . . . . . . . . . . . . . . . . . . . . . . . . . . . . . . . . . . . . . . . . . . . . . . . . . . . . . . . . . . . 4-19
DENSITY . . . . . . . . . . . . . . . . . . . . . . . . . . . . . . . . . . . . . . . . . . . . . . . . . . . . . . . . . . . . . . . . . . 4-20
ECONOMY MODE . . . . . . . . . . . . . . . . . . . . . . . . . . . . . . . . . . . . . . . . . . . . . . . . . . . . . . . . . . 4-20
REFINE . . . . . . . . . . . . . . . . . . . . . . . . . . . . . . . . . . . . . . . . . . . . . . . . . . . . . . . . . . . . . . . . . . . 4-21
JOB CONTROL MENU. . . . . . . . . . . . . . . . . . . . . . . . . . . . . . . . . . . . . . . . . . . . . . . . . . 4-22
JOB SECURING TIME. . . . . . . . . . . . . . . . . . . . . . . . . . . . . . . . . . . . . . . . . . . . . . . . . . . . . . . . 4-22
4
Printing Environment Settings
PARALLEL MENU . . . . . . . . . . . . . . . . . . . . . . . . . . . . . . . . . . . . . . . . . . . . . . . . . . . . . 4-23
PERSONALITY . . . . . . . . . . . . . . . . . . . . . . . . . . . . . . . . . . . . . . . . . . . . . . . . . . . . . . . . . . . . . 4-23
BIDIRECTION . . . . . . . . . . . . . . . . . . . . . . . . . . . . . . . . . . . . . . . . . . . . . . . . . . . . . . . . . . . . . . 4-23
I/O TIMEOUT. . . . . . . . . . . . . . . . . . . . . . . . . . . . . . . . . . . . . . . . . . . . . . . . . . . . . . . . . . . . . . . 4-24
USB MENU. . . . . . . . . . . . . . . . . . . . . . . . . . . . . . . . . . . . . . . . . . . . . . . . . . . . . . . . . . .4-25
PERSONALITY . . . . . . . . . . . . . . . . . . . . . . . . . . . . . . . . . . . . . . . . . . . . . . . . . . . . . . . . . . . . . 4-25
I/O TIMEOUT. . . . . . . . . . . . . . . . . . . . . . . . . . . . . . . . . . . . . . . . . . . . . . . . . . . . . . . . . . . . . . . 4-25
ETHERNET MENU. . . . . . . . . . . . . . . . . . . . . . . . . . . . . . . . . . . . . . . . . . . . . . . . . . . . .4-27
PERSONALITY . . . . . . . . . . . . . . . . . . . . . . . . . . . . . . . . . . . . . . . . . . . . . . . . . . . . . . . . . . . . . 4-27
I/O TIMEOUT. . . . . . . . . . . . . . . . . . . . . . . . . . . . . . . . . . . . . . . . . . . . . . . . . . . . . . . . . . . . . . . 4-28
LANGUAGE MENU. . . . . . . . . . . . . . . . . . . . . . . . . . . . . . . . . . . . . . . . . . . . . . . . . . . . .4-29
LANG . . . . . . . . . . . . . . . . . . . . . . . . . . . . . . . . . . . . . . . . . . . . . . . . . . . . . . . . . . . . . . . . . . . . 4-29
RESET MENU . . . . . . . . . . . . . . . . . . . . . . . . . . . . . . . . . . . . . . . . . . . . . . . . . . . . . . . .4-30
RESET . . . . . . . . . . . . . . . . . . . . . . . . . . . . . . . . . . . . . . . . . . . . . . . . . . . . . . . . . . . . . . . . . . . . 4-30
JOB LOG MENU. . . . . . . . . . . . . . . . . . . . . . . . . . . . . . . . . . . . . . . . . . . . . . . . . . . . . . . 4-31
AUTO PRINT LOG PER 50/30 JOBS. . . . . . . . . . . . . . . . . . . . . . . . . . . . . . . . . . . . . . . . . . . . . 4-31
AUTO CLEAR LOG EVERY 50/30 JOBS. . . . . . . . . . . . . . . . . . . . . . . . . . . . . . . . . . . . . . . . . . 4-31
GMT DIFFERENTIAL TIME . . . . . . . . . . . . . . . . . . . . . . . . . . . . . . . . . . . . . . . . . . . . . . . . . . . . 4-32
DAYLIGHT SAVING TIME . . . . . . . . . . . . . . . . . . . . . . . . . . . . . . . . . . . . . . . . . . . . . . . . . . . . . 4-32
4-2
Page 57

List of Standard Printing Environment Settings
You can access these menu items normally.
SECURED JOB MENU (See p.4-7)
Setting Name Setting Options Description
ENTER PASSWD 7 digits Prompts you to enter the password required
for printing the selected job.
COPIES 1-999 Sets the number of copies to printed for the
secured print job.
INVALID PASSWD
REENTER
SHUTDOWN MENU (See p.4-8)
Setting Name Setting Options Description
SHUT DOWN YES, NO Shuts down the printer.
TEST MENU (See p.4-9)
Setting Name Setting Options Description
SHOW PAGE COUNT TOTAL
TEST PRINT - Prints the Test Print page.
PRINT PCL FONTS - Prints the PCL Font List.
PRINT PS FONTS - Prints the PS Font List.
PRINT JOB LOG - Prints the job log.
CONTINUOUS TEST - Prints the Test Print page continuously.
PRINT EN CONFIG - Prints the Ethernet configuration page.
YES, NO Asks whether or not you want to reenter the
password.
Displays the total number of pages printed.
SMALL
LARGE
Displays the total number of small pages
printed.
Displays the total number of large pages
printed.
4
Printing Environment Settings
List of Standard Printing Environment Settings
4-3
Page 58

PCL MENU (See p.4-11)
Setting Name Setting Options Description
RESOLUTION 600 Displays the resolution used for printing.
COPIES 1-999 Sets the number of copies to be printed.
PAGESIZE LETTER, LEGAL, A3, A4, A5, B4,
11 × 17, EXEC, COMIO, MONARCH,
C5, DL, B5-JIS
ORIENTATION PORTRAIT, LANDSCAPE Sets the paper orientation.
FORM 5-64-128 lines Sets the number of lines on a page.
FNTSRC INTERNAL, SOFT, FLASH Sets the font source.
FONTNUM 0-999 Sets the font number.
4
PT.SIZE 4.00-12.00-999.75 point Sets the default point size.
PITCH 0.44-10.00-99.99 cpi Sets the default pitch.
SYMSET ROMAN-8, ISO L1, ISO L2, ISO L5,
PC-8, PC-8 D/N, PC-850, PC-852,
PC-8 TK, WIN L1, WIN L2, WIN L5,
DESKTOP, PS TEXT, VN INTL, VN
US, MS PUBL, MATH-8, PS MATH,
VN MATH, PI FONT, LEGAL, ISO 4,
ISO 6, ISO 11, ISO 15, ISO 17, ISO
21, ISO 60, ISO 69, WIN 3.0, MC
TEXT, PC-775, PC-860, PC-865, PC-8
GR, PC-1004, ISO L6, WIN BALT
Printing Environment Settings
AUTO CR ON, OFF Turns auto carriage return on or off.
WIDE A4 ON, OFF Turns wide A4 on or off.
OVERRIDE ON, OFF Turns override on or off.
Sets the default paper size to be used when
printing from the printer.
Sets the default symbol set.
PS MENU (See p.4-16)
Setting Name Setting Options Description
RESOLUTION 600 Displays the resolution of the printer.
COPIES 1-999 Sets the number of copies to print.
PRINT ERRS ON, OFF Specifies whether or not to print PS print
errors.
4-4
List of Standard Printing Environment Settings
Page 59

FEEDER MENU (See p.4-17)
Setting Name Setting Options Description
FEED STACK BYPASS, DRAWER 1,
DRAWER 2, DRAWER 3, DRAWER 4
TRAY SWITCH ON, OFF Enables the printer to switch to Stack Bypass
Sets the paper source to be used when
printing. (DRAWER 2 to 4 are only displayed
if optional cassettes have been installed.)
if the selected drawer is empty.
CONFIG MENU (See p.4-19)
Setting Name Setting Options Description
JAM RECOVERY ON, OFF Enables the printer to resume printing once a
paper jam has been cleared.
AUTOCONT ON, OFF Turns the Automatic Continue function, for
error handling, on or off.
DENSITY 0-7-15 Sets the relative darkness of the printouts.
ECONOMY MODE ON, OFF Turns Economy Mode, for reducing toner
usage, on or off.
REFINE ON, OFF Enables the printer to enhance the quality of
the printouts.
JOB CONTROL MENU (See p.4-22)
Setting Name Setting Options Description
JOB SECURING TIME 2HR, 8HR, 24HR Sets the length of time a secured job is held
on the printer.
PARALLEL MENU (See p.4-23)
4
Printing Environment Settings
Setting Name Setting Options Description
PERSONALITY
BIDIRECTION ON, OFF Specifies whether or not to use bidirectional
I/O TIMEOUT 5-15-3000 Sets the timeout interval for print jobs
AUTO, PCL, PS Sets the default print personality for the
parallel interface.
control.
received via the parallel interface.
USB MENU (See p.4-25)
Setting Name Setting Options Description
PERSONALITY AUTO, PCL, PS Sets the default print personality for the USB
port.
I/O TIMEOUT 5-15-3000 Sets the timeout interval for print jobs
received via the USB port.
List of Standard Printing Environment Settings
4-5
Page 60

ETHERNET MENU (See p.4-27)
Setting Name Setting Options Description
PERSONALITY AUTO, PS, PCL Sets the default print personality for the
optional network card.
I/O TIMEOUT 5-15-3000 Sets the timeout interval for the optional
network card.
LANGUAGE MENU (See p.4-29)
Setting Name Setting Options Description
LANG ENGLISH, DANISH, DUTCH,
FINNISH, FRENCH, GERMAN,
ITALIAN, NORWEGIAN,
4
PORTUGUESE, SPANISH, SWEDISH
Sets the default language for the LCD display
on the printer.
RESET MENU (See p.4-30)
Setting Name Setting Options Description
RESET MENU, FONTS, FORMS, STORED
JOBS, JOB LOG, ERRORLOG,
JAMLOG
Resets the selected settings to their default
values.
JOB LOG MENU (See p.4-31)
Setting Name Setting Options Description
AUTO PRINT LOG PER
50/30 JOBS
Printing Environment Settings
AUTO CLEAR LOG
EVERY 50/30 JOBS
JOB LOG FULL STOP, WARNING Sets the default action for when the job log
GMT DIFFERENTIAL
TIME
DAYLIGHT SAVING TIME OFF, ON Displays whether or not to use daylight
NO, YES Specifies whether or not to automatically
print the job log.
NO, YES Specifies whether or not to automatically
clear the job log.
becomes full.
-12.0-0-+12.0 Displays the time difference from Greewich
Mean Time.
saving time.
4-6
List of Standard Printing Environment Settings
Page 61

SECURED JOB MENU
ENTER PASSWD
7 digits
This item is used to enter the password for the selected secured job, stored on the
printer.
Press “Value” to increase the value of each digit in the password, or press “Shift”
and “Value” to decrease the values.
Press “Item” or “Shift” and “Item” to select the digit you wish to change. Press
“Enter” to accept the currently displayed password.
COPIES
1 to 999
This specifies the number of copies to be printed of the selected job.
INVALID PASSWD REENTER
YES, NO
This asks if you want to reenter the password or not, if the password was
incorrect.
4
Printing Environment Settings
SECURED JOB MENU
4-7
Page 62

SHUTDOWN MENU
SHUT DOWN
YES, NO
This setting enables you to shut down the printer.
YES
If there is a job in progress, the message <JOB IN PROGRESS +CANCEL/-
4
Printing Environment Settings
CONTINUE.> is displayed. Press “Value” to cancel the job and shut down the
printer, or “Shift” and “Value” to continue printing the job.
If there are no jobs in progress, the printer shuts down and the message <SAFE
TO TURN OFF PRINTER> is displayed. You can now turn off the power switch.
NO
Cancels the command.
4-8
SHUTDOWN MENU
Page 63

TEST MENU
SHOW PAGE COUNT
xxx
This displays the number of pages printed by the printer.
TOTAL
This displays the total number of pages, of all sizes, printed by the printer.
SMALL
This displays the number of small pages printed by the printer.
LARGE
This displays the number of large pages printed by the printer.
TEST PRINT
-
4
Prints the Test Print and lists the printing environment settings. Also displays
graphic and text printing capabilities.
PRINT PCL FONTS
-
Prints the PCL Font List.
PRINT PS FONTS
-
Available only after the PostScript module has been installed. Prints the PS Font
List.
TEST MENU
Printing Environment Settings
4-9
Page 64

PRINT JOB LOG
-
Prints the Job Log.
CONTINUOUS TEST
-
Prints the Test Print continuously. To stop continuous printing, press “Cancel.”
PRINT EN CONFIG
-
4
Prints the Ethernet configuration page.
Printing Environment Settings
4-10
TEST MENU
Page 65

PCL MENU
RESOLUTION
COPIES
600
Displays the printer resolution in dots per inch (dpi) used for print jobs.
1 to 999
Sets the number of copies to be printed for each print job.
1 copy is printed for each page.
To move to the next higher number, press “Value”; to quickly scroll to a higher
number in increments of 10, press and hold down “Value.” To move to the next
lower number, press “Shift” and “Value”; to quickly scroll to a lower number in
decrements of 10, press and hold down “Shift” and “Value.”
PAGESIZE
LETTER, LEGAL, A3, A4, A5, B4, 11 × 17, EXEC, COM10, MONARCH, C5, DL,
B5-JIS
Sets the size of the image the printer creates in the memory. The software
application determines the image size. If the print job does not specify the image
size, then PAGESIZE in the PCL MENU will be used.
ORIENTATION
PORTRAIT, LANDSCAPE
Sets the direction of printing on the page to Portrait or Landscape. Printing across
the width of the page is portrait orientation, and printing across the length of the
page is landscape orientation.
4
Printing Environment Settings
PCL MENU
4-11
Page 66

PORTRAIT
Prints from left to right across the width of the page (letter style.)
LANDSCAPE
Prints from bottom to top across the length of the page. Landscape orientation is
convenient for spreadsheets or other printouts that require increased width for
printing. The printer can rotate all fonts to make any of the resident fonts available
for either portrait or landscape printing.
FORM
5-64-128
This determines the number of lines of text printed on one page. Change this
4
setting only if you have a software application that does not enable you to set the
page length, lines per page, or lines per inch.
FNTSRC
INTERNAL, SOFT, FLASH
This (Font Source) setting enables you to set the default for font selection. After
you print a font list, you will see the fonts listed as internal fonts, soft fonts, or flash
fonts.
Printing Environment Settings
4-12
PCL MENU
INTERNAL
Selects internal (resident) fonts.
SOFT
Selects permanent soft fonts. Permanent soft fonts are downloaded to the printer’s
memory by software applications. These fonts are not erased from memory once a
job is completed. They remain in RAM until the printer is turned off.
FLASH
Selects fonts that have been downloaded and stored in the optional Flash ROM
module.
Page 67

FONTNUM
0, 1-999
This (Font Number) setting enables you to set the default font by its number. The
printer assigns a font number to every typeface. Print a PCL Font List to see the
numbers assigned to the fonts. The font number (Font #) is the first column in the
list.
0
Courier is selected unless you change the setting.
1-999
To increase the number, press “Value .” You can quickly scroll through the numbers
in increments of 10 by holding down “Value.” To decrease the number, press
“Shift” and “Valu e,” or press and hold “Shift” and “Value” to scroll backwards
quickly in decrements of 10.
PT. SIZE
4.00-12.00-999.75
When the selected font is a bitmap or fixed spacing font, this item will not appear
for selection.
4
The Point Size setting is the measured vertical height of a typeface. There are 72
points per inch, so a 36-point font is half an inch high, measured from the top of
the uppercase letters to the tail of the letter y.
12.00
The printer font source is set for 12-point.
4.00 to 999.75
To increase the number in increments of 0.25, press “Val ue.” To quickly scroll
through the numbers in increments of 1.00, hold down “Value.”
To decrease the number in decrements of 0.25, press “Shift” and “Value,” or press
and hold “Shift” and “Value” to quickly scroll backwards in decrements of 1.00.
PCL MENU
4-13
Printing Environment Settings
Page 68

PITCH
0.44-10.00-99.99
PITCH appears only if the font source you selected with FNTSRC (font source)
and FONTNUM (font number) above is a scalable font in a fixed pitch typeface.
Use this item to set the pitch of the font. Pitch is measured as the number of
equally spaced characters per inch.
10.00
The selected pitch is 10 characters per inch.
0.44 to 99.99
To increase the number in increments of 0.01, press “Val ue.” To quickly scroll
4
through the numbers in increments of 1.00, press and hold down “Value.”
To decrease the number in decrements of 0.01, press “Shift” and “Value,” or press
and hold “Shift” and “Value” to quickly scroll backwards in decrements of 1.00.
SYMSET
ROMAN-8, ISO L1, ISO L2, ISO L5, PC-8, PC-8 D/N, PC-850, PC-852, PC-8 TK,
WIN L1, WIN L2, WIN L5, DESKTOP, PS TEXT, VN INTL, VN US, MS PUBL,
MATH-8, PS MATH, VN MATH, PI FONT, LEGAL, ISO 4, ISO 6, ISO 11, ISO 15,
ISO 17, ISO 21, ISO 60, ISO 69, WIN 3.0, MC TEXT, PC-775, PC-860, PC-865,
PC-8 GR, PC-1004, ISO L6, WIN BALT
Printing Environment Settings
AUTO CR
4-14
PCL MENU
SYMSET (symbol set) enables you to select the symbol set, a collection of letters,
numbers, punctuation marks and special symbols.
“Symbol Sets Supported” (See p.6-18) shows the names of internal symbol sets
you can select.
If the currently selected font does not support the orientation or symbol set you
have selected, the control panel font selection returns to the factory default
setting.
ON, OFF
This appends a CR (carriage return) to each line feed for the print job. Some
environments, such as UNIX, indicate a new line using only the line feed control
code. This option automatically appends the required CR to each line feed.
If the currently selected font does not support the orientation or symbol set you
have selected, the control panel font selection returns to the factory default setting.
Page 69

WIDE A4
OFF
The printer does not append a CR to each line feed.
ON
The printer appends a CR to each line feed automatically.
ON, OFF
WIDE A4 changes the number of characters that can be printed on a single line of
A4 paper. This feature only applies to A4 paper. When this feature is set to ON,
the right and left margins narrow to about 1/8 in. (3 mm).
OFF
Up to seventy-eight 10-pitch characters can be printed on one line.
ON
Up to eighty 10-pitch characters can be printed on one line.
OVERRIDE
ON, OFF
This changes LTR (Letter) size requests from the printer driver to A4 size or vice
versa. Either A4 or Letter-size paper should be loaded in the printer.
OFF
The printer does not override paper size A4 with letter or vice versa.
ON
The printer overrides paper size A4 with letter or vice versa.
4
Printing Environment Settings
PCL MENU
4-15
Page 70

PS MENU
This menu is only displayed if the optional PostScript module has been installed.
RESOLUTION
600
Displays the printer resolution in dots per inch (dpi) used for print jobs.
4
Printing Environment Settings
COPIES
1 to 999
Sets the number of copies printed for each print job.
1
One copy is printed for each page.
1 to 999
To increase the number, press “Value ,” or to quickly scroll to a higher number in
increments of 10, press and hold down “Value .”
To decrease the number, press “Shift” and “Value,” or to quickly scroll to a lower
number in decrements of 10, press and hold down “Shift” and “Value .”
PRINT ERRS
ON, OFF
This setting (print errors) turns on the error report feature so the printer prints an
error report every time an error occurs.
OFF
4-16
A print error status report is not printed.
ON
A print error status report is printed. Because no error messages are displayed on
the printer control panel during PostScript printing, you may want to turn this
feature on for PostScript printing.
PS MENU
Page 71

FEEDER MENU
FEED
STACK BYPASS, DRAWER1, DRAWER2, DRAWER3, DRAWER4
FEED (feed source) enables you to determine the paper source. The software
application selects the paper source. If the print job does not specify the paper
feed source, then FEEDER MENU settings will be used. If the paper size you
have selected is not loaded, the printer will display a message to tell you which
feed source to load the required paper size into.
STACK BYPASS
Sets the Stack Bypass as the paper feed source to function as an automatic feed
tray.
The Stack Bypass performs two important functions. Firstly, it can be used as an
automatic feed tray for standard or special media such as transparent film or
adhesive labels, etc. Secondly, it can also be used as a manual feed tray for
feeding media one sheet at a time.
DRAWER1
4
Sets the standard 250-sheet drawer as the paper feed source.
DRAWER2, DRAWER3, DRAWER4
Sets the last optional 250-sheet paper feed unit as the paper feed source. This
item only appears when the optional 250-sheet paper feed units have been
installed.
TRAY SWITCH
ON, OFF
TRAY SWITCH enables the printer to switch paper feed to the Stack Bypass if the
selected cassette is out of paper or contains the wrong size paper.
ON
The printer checks the other cassettes in order of capacity: standard 250 Sheet
drawer, optional 250 Sheet Cassette Feeding Module (if installed), or Stack
Bypass.
FEEDER MENU
Printing Environment Settings
4-17
Page 72

OFF
The printer displays an error message and asks you to load the correct paper in
the cassette.
4
Printing Environment Settings
4-18
FEEDER MENU
Page 73

CONFIG MENU
JAM RECOVERY
ON, OFF
This setting enables printing to resume automatically once a paper jam has been
removed. JAM RECOVERY can be set for PCL and PostScript personalities.
OFF
The printer does not resume printing automatically after the paper jam has been
removed. You must start printing again. You may want to use this setting to
conserve memory.
ON
The printer reserves enough memory to hold the data for the page that jams and
automatically reprints the page that jammed. With this setting, printing speed is
slightly slower. Use this setting if there is sufficient memory available.
AUTOCONT
ON, OFF
AUTOCONT (automatic continue) determines how the printer reacts to errors. If
the printer is part of a network or remote spooling system, set AUTOCONT=ON.
ON
The printer displays a message, goes off-line for about 10 seconds and then
automatically goes back on-line and resumes printing.
OFF
The printer displays a message, goes off-line and waits for you to correct the
problem. Press “GO” to resume operation.
4
Printing Environment Settings
CONFIG MENU
4-19
Page 74

DENSITY
0-7-15
This setting refers to the relative darkness of print on the paper.
For a darker setting, select a higher number. A darker setting consumes more
toner.
For a lighter setting, select a lower number. A lighter setting consumes less toner.
7
Standard density setting.
0 to 15
4
Printing Environment Settings
Press “Value” to move to a higher number. Press and hold to scroll through the
settings quickly.
Press “Shift” and “Value” to move to a lower number. Press and hold to scroll back
through the settings quickly. If the buffer is large, the printer will be able to
smoothly handle all data sent from the computer.
ECONOMY MODE
ON, OFF
ECONOMY MODE is a cost saving feature that can extend the life of your toner
cartridge by using less toner to print documents. Documents printed in the
economy mode are lighter, but ideal for printing and checking rough drafts. The
economy mode is similar to the draft mode found on some dot matrix printers.
OFF
The printer uses a normal amount of toner for printing.
ON
The printer uses less toner for printing and the printed page appears much lighter.
4-20
CONFIG MENU
Page 75

REFINE
ON, OFF
This setting enables you to enhance the print quality of characters and graphics
by smoothing the gradations (so-called “jaggies”) along the angles and curves of
printed images.
OFF
No automatic image refinement.
ON
Printing with automatic image refinement. Jagged stepping along angles and
curves is smoothed.
4
CONFIG MENU
Printing Environment Settings
4-21
Page 76

JOB CONTROL MENU
JOB SECURING TIME
2 HR, 8 HR, 24 HR
This setting specifies the amount of time that a job is held on the printer.
2 HR
Stores a job for two hours.
4
8 HR
Stores a job for eight hours.
24 HR
Stores a job for 24 hours.
Printing Environment Settings
4-22
JOB CONTROL MENU
Page 77

PARALLEL MENU
PERSONALITY
AUTO, PCL, PS
PERSONALITY is displayed only after the PostScript module is installed. Until you
install the module, PCL is the standard personality of your printer.
With this setting you can set the parallel port for automatic personality switching or
dedicate the parallel port for only one personality. This feature sets the personality
only for printer streams received on the parallel port.
AUTO
The printer samples the print stream on the parallel port and automatically
switches to the personality required to print the job.
PCL
The parallel port is dedicated to the PCL personality and will print only PCL data
and will not switch to the PostScript personality if a PostScript print stream is
received on the parallel port. However, special commands sent to the printer with
the print stream can force the printer to switch to the PostScript personality.
PS
4
Printing Environment Settings
The parallel port is dedicated to the PostScript personality and will print only
PostScript data and will not switch to the PCL personality if a PCL print stream is
received on the parallel port. However, special commands sent to the printer with
the print stream can force the printer to switch to the PCL personality.
BIDIRECTION
ON. OFF
BIDIRECTION is the ability of the printer to send status read-back messages to
the host computer. Although this feature increases reliability in operation,
personality switching may be slower.
ON
The printer sends queries and responses about its status to the host computer.
PARALLEL MENU
4-23
Page 78

OFF
No query/response and status output from the printer to the host.
I/O TIMEOUT
5-15-3000 sec.
I/O TIMEOUT (input/output timeout) is the amount of time (measured in seconds)
that the printer waits for more data before it ends a print job. If data from other
ports frequently arrives during a print job, increase the setting.
This timeout setting is for the parallel interface only.
15
4
Printing Environment Settings
The timeout is set for 15 seconds.
5 to 3000
To increase the number, press “Value;” to quickly scroll to a higher number in
increments of 10, press and hold down “Value .”
To decrease the number, press “Shift” and “Value;” to quickly scroll back to a lower
number in decrements of 10, press and hold down “Shift” and “Value .”
4-24
PARALLEL MENU
Page 79

USB MENU
PERSONALITY
AUTO, PCL, PS
PERSONALITY is displayed only after the PostScript module is installed. Until you
install the module, PCL is the standard personality of your printer.
With this setting you can set the USB port for automatic personality switching or
dedicate the USB port to only one personality. This feature sets the personality
only for printer streams received via the USB port.
AUTO
The printer samples the print stream on the USB port and automatically switches
to the personality required to print the job.
PCL
The USB port is dedicated to the PCL personality and will print only PCL data and
will not switch to the PostScript personality if a PostScript print stream is received
on the parallel port. However, special commands sent to the printer with the print
stream can force the printer to switch to the PostScript personality.
PS
4
Printing Environment Settings
The USB port is dedicated to the PostScript personality and will print only
PostScript data and will not switch to the PCL personality if a PCL print stream is
received on the parallel port. However, special commands sent to the printer with
the print stream can force the printer to switch to the PCL personality.
I/O TIMEOUT
5-15-3000 sec.
The I/O TIMEOUT (input/output timeout) setting is the amount of time (measured
in seconds) that the printer waits for more data before it ends a print job. If data
from other ports frequently arrives during a print job, increase the setting.
This timeout setting is for the USB interface only.
USB MENU
4-25
Page 80

15
The timeout is set for 15 seconds.
5 to 3000
To increase the number, press “Value;” to quickly scroll to a higher number in
increments of 10, press and hold down “Value .”
To decrease the number, press “Shift” and “Value;” to quickly scroll back to a lower
number in decrements of 10, press and hold down “Shift” and “Value .”
4
Printing Environment Settings
4-26
USB MENU
Page 81

ETHERNET MENU
The ETHERNET MENU is only displayed when the optional Ethernet Network
Interface Adapter iN-E5 is installed.
PERSONALITY
AUTO, PS, PCL
PERSONALITY is displayed only after the PostScript module is installed. Until you
install the module, PCL is the standard personality of your printer.
With this setting you can set the network card for automatic personality switching
or dedicate the network card to only one personality. This feature sets the
personality only for printer streams received via the network card.
AUTO
The printer samples the print stream from the network and automatically switches
to the personality required to print the job. This setting is recommended when
using the printer on a network.
PS
4
The network card is dedicated to the PostScript personality and will print only
PostScript data and will not switch to the PCL personality if a PCL print stream is
received on the parallel port. However, special commands sent to the printer with
the print stream can force the printer to switch to the PCL personality.
PCL
The network card is dedicated to the PCL personality and will print only PCL data
and will not switch to the PostScript personality if a PostScript print stream is
received from the network. However, special commands sent to the printer with
the print stream can force the printer to switch to the PostScript personality.
ETHERNET MENU
4-27
Printing Environment Settings
Page 82

I/O TIMEOUT
5-15-3000 sec.
I/O TIMEOUT (input/output timeout) is the amount of time (measured in seconds)
that the printer waits for more data before it ends a print job. If data from other
ports frequently arrives during a print job, increase the setting.
This timeout setting is for the Ethernet network card only.
15
The timeout is set for 15 seconds.
5 to 3000
To increase the number, press “Value;” to quickly scroll to a higher number in
4
increments of 10, press and hold down “Value .”
To decrease the number, press “Shift” and “Value;” to quickly scroll back to a lower
number in decrements of 10, press and hold down “Shift” and “Value .”
Printing Environment Settings
4-28
ETHERNET MENU
Page 83

LANGUAGE MENU
LANG
ENGLISH, DANISH, DUTCH, FINNISH, FRENCH, GERMAN, ITALIAN,
NORWEGIAN, PORTUGUESE, SPANISH, SWEDISH
The LANG setting allows you to select the default language setting used for the
messages and menu items on the display.
4
Printing Environment Settings
LANGUAGE MENU
4-29
Page 84

RESET MENU
RESET
4
MENU, FONTS, FORMS, STORED JOBS, JOB LOG, ERRORLOG, JAMLOG
This resets various settings to their default values.
MENU
Resets most menu items to their default values.
FONTS
Clears memory of all fonts.
FORMS
Clears memory of all forms.
STORED JOBS
Clears memory of all stored jobs.
Printing Environment Settings
4-30
RESET MENU
JOBLOG
Clears the log job.
ERRORLOG
Clears the error log.
JAMLOG
Clears the jam log.
Page 85

JOB LOG MENU
This menu is used to control the job log.
AUTO PRINT LOG PER 50/30 JOBS
YES, NO
This setting allows you to specify whether or not to print the job log after a certain
number of jobs have been stored in the log. If you are using the optional hard disk,
the job log is printed after every 50 jobs. Otherwise, the log is printed after every
30 jobs.
YES
Prints the job log automatically after every 50 or 30 jobs.
NO
Does not print the job log.
AUTO CLEAR LOG EVERY 50/30 JOBS
4
YES, NO
This setting allows you to specify whether or not to clear the job log after a certain
number of jobs have been stored in the log. If you are using the optional hard disk,
the job log is cleared after every 50 jobs. Otherwise, the log is cleared after every
30 jobs.
YES
Clears the job log automatically after every 50 or 30 jobs.
NO
Does not clear the job log.
JOB LOG MENU
4-31
Printing Environment Settings
Page 86

JOB LOG FULL
STOP, WARNING
This setting specifies how the printer should respond when the job log becomes
full. The job log can store information for up to 32 jobs when the hard disk is not
installed, or 1280 jobs when the hard disk is installed.
STOP
The printer stops printing when the job log become full.
WARNING
The printer displays a warning message when the job log becomes full, but does
not stop printing.
4
GMT DIFFERENTIAL TIME
–12.0-0-+12.0
This displays the time difference from GMT (Greenwich Mean Time) for the time
zone where the printer is being used.
DAYLIGHT SAVING TIME
Printing Environment Settings
4-32
JOB LOG MENU
ON, OFF
This displays whether or not daylight saving time is used in the time zone where
the printer is being used.
ON
Daylight saving time is used.
OFF
Daylight saving time is not being used.
Page 87

Troubleshooting
CHAPTER
This chapter describes printing problems that can be solved by following a few simple
procedures. Do not attempt to solve problems other than those described in this chapter. If you
cannot solve a problem, call your local supplier.
When You Have Trouble Printing . . . . . . . . . . . . . . . . . . . . . . . . . . . . . . . . . . . . . . . . . . . . 5-2
Problems and Solutions Without Messages . . . . . . . . . . . . . . . . . . . . . . . . . . . . . . . . . . . 5-3
Printer Trouble . . . . . . . . . . . . . . . . . . . . . . . . . . . . . . . . . . . . . . . . . . . . . . . . . . . . . . . . . . . . . . .5-3
Print Problems . . . . . . . . . . . . . . . . . . . . . . . . . . . . . . . . . . . . . . . . . . . . . . . . . . . . . . . . . . . . . . .5-4
Responding to Error Messages . . . . . . . . . . . . . . . . . . . . . . . . . . . . . . . . . . . . . . . . . . . . 5-7
Other Print Problems . . . . . . . . . . . . . . . . . . . . . . . . . . . . . . . . . . . . . . . . . . . . . . . . . . . 5-14
Correcting Poor Print Quality . . . . . . . . . . . . . . . . . . . . . . . . . . . . . . . . . . . . . . . . . . . . . . . . . . .5-14
5
5-1
Page 88

When You Have Trouble Printing
If your printer is unable to print or you have problems with the printer or print quality,
use this map to find the appropriate page for help.
Printer is
unable to print
No
5
Ye s
The media setting does not match the layout.
(See the PCL Driver Guide.)
Troubleshooting
Layout
problems
No
Print quality
problems
No
Other problems
Ye s
Fonts are replaced.
(See the PCL Driver Guide.)
The printer settings in the application software
do not match the layout.
(See the manual for the application software.)
Print results are changed because of a memory
shortage.
An incorrect media type is loaded.
The toner cartridge is almost out of toner.
5-2
When You Have Trouble Printing
Page 89

Problems and Solutions Without Messages
Use the following procedures to solve problems that do not cause the printer to
display a message.
IMPORTANT
•
Refer to “Responding to Error Messages” (See p.5-7) when messages are displayed.
•
If symptoms not specified in this section occur, a problem persists even after following
these procedures, or the cause cannot be figured out at all, contact your local supplier.
Printer Trouble
Indicators off and display blank.
Cause1 : Power switch is not turned on.
Remedy : Check the power switch to ensure this machine is turned on.
Cause2 : Power cord is not connected.
Remedy : Check the power cord and be sure it is connected at both ends.
Cause3 : No power at the AC outlet.
Remedy : Check the AC outlet. Consult an electrician or the local power company. If you
are using a power strip, ensure the power lead is connected at the source and
turned on.
Printing does not start.
Cause1 : The printer is off-line.
Remedy : Press “System” and “GO” to bring the printer on-line.
Reference : “About On-line and Off-line” (See p.2-6)
Cause2 : The printer could not receive the data from the host computer because the
printer took too long to process the current data in the printer.
Remedy : You may have to increase the I/O TIMEOUT setting or disable it in the
ETHERNET MENU, PARALLEL MENU, or USB MENU.
Reference : “I/O TIMEOUT” (See p.4-24, p.4-25 or p.4-28)
5
Troubleshooting
Problems and Solutions Without Messages
5-3
Page 90

Cause3 : The printer and host computer are not properly connected.
Remedy : Check the cable connection at the host computer and printer.
Reference : “Connecting an Interface Cable” (See the Setup Guide.)
Cause4 : The printer is off-line.
Remedy : Press “System” and “GO” to bring the printer on-line.
Reference : “About On-line and Off-line” (See p.2-6)
Cause5 : A failure occurred in the printer or an optional device.
Remedy : Take appropriate measures according to the message on the display.
Reference : “Responding to Error Messages” (See p.5-7)
Printing stops.
5
Troubleshooting
Cause : Printing stops midway during a job and the printer will not print the remaining
pages. The flow of data from the host computer has been interrupted for some
reason and this has caused a timeout. If no data is received for a specified
length of time, the job is terminated.
Remedy : You may have to increase the I/O TIMEOUT setting or disable it in the
PARALLEL MENU, ETHERNET MENU, or USB MENU.
Reference : “I/O TIMEOUT” (See p.4-24, p.4-25 or p.4-28)
Paper excessively curled after coming out of the printer.
Cause : You may be using paper that curls too easily.
Remedy : Ensure the paper you are using meets the specifications described in
“Specifications” on p.6-42. Remove the paper stack, turn it over, reload in the
cassette and try again.
Print Problems
Printer not using the font you want.
Cause : You have specified a font that is not available.
Remedy : Check if the font you specified is available with this printer.
Reference : “Typeface Samples” (see p.6-9)
“Symbol Sets Supported” (see p.6-18)
5-4
Problems and Solutions Without Messages
Page 91

First page prints correctly in the font and format specified in the software application, but
midway through the job the font and format changes.
Cause : The printer has initiated a job timeout. When a job timeout occurs, the
downloaded fonts and formatting commands specified in the software
application are lost, so printing after the job timeout is completed without the
downloaded font and format.
Remedy : If the print job came via the parallel port or USB port, increase the I/O TIMEOUT
setting or disable it on the PARALLEL MENU or USB MENU.
Reference : “I/O TIMEOUT” (See p.4-24, p.4-25 or p.4-28)
One edge of the document is cut off.
Cause : You are attempting to print something outside the printable area of the page.
Remedy : Use your software application to adjust the margins of the page. Check and
ensure that your software application is not trying to print graphics or text
outside the printable area.
Reference : See the PCL Driver Guide.
High jam rates, misfeeds, or multiple sheet feed errors.
Cause : You may be using unsuitable paper.
Remedy : Always use paper that is suitable for this printer.
Reference : “Specifications” (see p.6-42)
5
Troubleshooting
Printing garbled text.
Cause1 : If unexpected letters and symbols are printed on the page, the operating mode
setting may be incorrect.
Remedy : Make sure that the PERSONALITY item in the ETHERNET MENU, PARALLEL
MENU or USB MENU is set to AUTO or the correct personality (PCL or PS) is
selected, if the printer is dedicated to one personality.
Reference : “PERSONALITY” (See p.4-23, p.4-25 or p.4-27)
Cause2 : The printer selection you made when you set up or installed your software
application was incorrect.
Remedy : Make sure the correct printer is selected.
Reference : See the PCL Driver Guide.
Problems and Solutions Without Messages
5-5
Page 92

5
Troubleshooting
Cause3 : If different portions of the text are garbled every time you print, the interface
cable may be too long, and spurious noise is corrupting the data.
Remedy : The maximum length for the parallel cable is 3 meters. If your cable is longer
than this, replace it with a shorter cable.
Cause4 : The printer is plugged into an outlet shared with another electrical device
capable of generating noise, such as a photocopier, shredder or air conditioner.
Remedy : Plug the printer into a different outlet or consult a qualified technician to install a
noise filter.
Printing overlap.
Cause : If another print job starts before the current job is finished, the flow of data from
the host computer has been interrupted for some reason, and a job timeout has
occurred. If data is not received for a specified length of time, the printer initiates
a job timeout and terminates the job. After the job timeout, the printer
automatically switches to the other interface when there is data waiting.
Remedy : You may have to increase the I/O TIMEOUT setting or disable it in the
PARALLEL MENU, ETHERNET MENU or USB MENU.
Reference : “I/O TIMEOUT” (See p.4-24, p.4-25 or p.4-28)
Data originally printed as one page now printing as two or more pages.
Cause : If the time interval of the data sent by the software application to the printer is
longer than the time interval before the printer regards a job as completed (the
time to job timeout), the printer executes a job timeout, prints out only the data
that has already been received, and terminates the job even if it is only partially
completed. If the rest of the data is sent after the printer terminates the job, then
the printer receives the data as a new job and starts printing on new pages.
What was originally formatted to print on one page has been broken up into two
or more pages.
5-6
Remedy : You may have to increase the I/O TIMEOUT setting or disable it in the
PARALLEL MENU, ETHERNET MENU or USB MENU.
Reference : “I/O TIMEOUT” (See p.4-24, p.4-25 or p.4-28)
Problems and Solutions Without Messages
Page 93

Responding to Error Messages
If printing is disabled during a print job for some reason, the alarm indicator will light
up and an error message(s) will appear on the display. In addition, for any
phenomenon that does not affect printing function of the printer but requires some
measure to be taken, a warning message will appear on the display. When any of
these messages appear on the display, follow one of the remedies listed to respond
to the message.
NOTE
•
When two or more problems that are indicated by warning messages occur
simultaneously, the corresponding messages will appear alternately.
•
When two or more error messages appear on the display simultaneously, warning
messages will not appear there.
•
For messages attached with <Error Skip>, the printer will be able to continue printing by
“skipping errors” when you press “'GO.” It should be remembered, however, that some
pieces of print data may be omitted or may not be printed correctly. If you want to stop the
procedure, perform software reset and remove the cause. Then press “GO” to start
printing again.
5
FLASH OVERFLOW
Cause1 : A memory overflow has occurred in the optional Flash ROM.
Remedy : Format the Flash ROM or delete font and macro data to create more space.
Cause2 : The printer has received more font and macro data than it can hold in the
available memory of the Flash ROM. The printer goes off-line.
Remedy : Press “GO” to bring the printer back on-line.
FLASH ERROR
Cause : An error has occurred when trying to format, or read or write data to the optional
Flash ROM.
Remedy : Replace the Flash ROM.
Responding to Error Messages
Troubleshooting
5-7
Page 94

FLASH FORMAT RESTART
Cause : The optional Flash ROM has been formatted using the FORMAT FLASH item.
The printer will restart.
Remedy : No action required.
FLASH FORMATTING...
Cause : The optional Flash ROM is being formatted.
Remedy : No action required.
E001 ERROR CALL FOR SERVICE
Cause : A fuser overheating error.
Remedy : Turn the printer off, wait 15 minutes and then turn the printer back on. If this
5
E100-ERROR CALL FOR SERVICE
Cause : A scanner motor or laser unit error.
error persists, turn the printer off, unplug power cord from the AC outlet and call
for service.
Troubleshooting
5-8
Remedy : If this error persists, call for service.
E805-ERROR CALL FOR SERVICE
Cause : A fan failure error.
Remedy : Turn the printer off, wait 15 minutes and then turn the printer back on. If this
error persists, turn the printer off, unplug power cord from the AC outlet and call
for service.
E677/6F-61 CALL FOR SERVICE
Cause : An internal ROM check error.
Remedy : If this error persists, call for service.
E677/6F-7A CALL FOR SERVICE
Cause : An SRAM error in the AIR chip.
Remedy : If this error persists, call for service.
Responding to Error Messages
Page 95

DRAWER1 MISSING
Cause : The drawer is not installed in the printer or is not correctly positioned.
Remedy : Install the paper drawer in the printer. If the paper drawer is installed in the
printer, remove it, insert it again and make sure it is securely in position.
Reference : “Loading Paper” in Reference Guide
DRAWER2 MISSING (If installed.)
Cause : The drawer for the optional paper feed unit is not installed in the printer or is not
correctly positioned.
Remedy : Install the paper drawer in the printer. If the paper drawer is installed in the
printer, remove it, insert it again and make sure it is securely in position.
Reference : “Loading Paper” in Reference Guide
DRAWER3 MISSING (If installed.)
Cause : The drawer for the optional paper feed unit is not installed in the printer or is not
correctly positioned.
Remedy : Install the paper drawer in the printer. If the paper drawer is installed in the
printer, remove it, insert it again and make sure it is securely in position.
Reference : “Loading Paper” in Reference Guide
DRAWER4 MISSING (If installed.)
Cause : The drawer for the optional paper feed unit is not installed in the printer or is not
correctly positioned.
Remedy : Install the paper drawer in the printer. If the paper drawer is installed in the
printer, remove it, insert it again and make sure it is securely in position.
Reference : “Loading Paper” in Reference Guide
LOAD <size> IN <trays>
Cause : The indicated paper size needs to be loaded in the indicated paper tray.
Remedy : The specified paper source must be loaded with the requested paper size. To
continue the print job, you may have to press “GO.” If a paper source runs out of
paper during printing, reloading the paper source will allow the printer to
continue printing. For manual feed, you need to press “GO” to continue printing.
5
Troubleshooting
Responding to Error Messages
5-9
Page 96

LOAD <SIZE> IN MANUAL
Cause : The specified paper needs to be loaded in the Stack Bypass.
Remedy : Load the Stack Bypass with the specified paper. You must press “GO” to
continue printing.
Reference : “Making Prints Using the Stack Bypass” in Reference Guide
MEM ALLOC ERROR
Cause : There is not enough memory available to process the data and print the page. If
AUTOCONT is ON (CONFIG MENU), the print job will resume after 10 seconds.
Remedy : If AUTOCONT is OFF, you must press “GO” to resume printing. Check the
printed page to ensure that it is complete.
Reference : “AUTOCONT” (see p.4-19)
5
Troubleshooting
MEMORY OVERFLOW
Cause : A memory overflow has occurred.
Remedy : The printer has received more data than it can hold in the available memory on
the printer. This can occur if too many soft fonts, macros or complex graphics
are sent to the printer. If AUTOCONT is ON (CONFIG MENU), the print job will
resume after 10 seconds. If AUTOCONT is OFF, you must press “GO” and the
job will continue printing, although data may be lost. Simplify the print job by
deleting unnecessary fonts or macros from the printer memory.
MRT COMPRESSION
Cause : The printer is using MRT Compression, which can result in a reduction in print
quality (loss compression).
Remedy : No action required.
RESTORING DEFAULTS
Cause : This message is displayed when <RESET=MENU> is selected in the RESET
MENU.
Remedy : No action required.
5-10
Responding to Error Messages
Page 97

OPTION RAM ERROR
Cause : This is an error caused by a RAM (DIMM) installed in the printer.
Remedy : An optional RAM has failed its startup diagnostic check. The optional RAM must
be reinstalled or replaced.
PAPER JAM
Cause : A paper jam has occurred in the printer.
Remedy : Remove the jammed paper. The top cover must be opened and closed to
resume printing. Press “GO” to bring the printer back on-line.
Reference : “Clearing Paper Jams” in Reference Guide
TOTAL:####
Cause : This message is displayed when SHOW PAGE COUNT is selected in the TEST
MENU. #### is the total number of pages that have been printed by the printer.
Remedy : No action required.
PAUSED
Cause : The printer is off-line.
Remedy : Press “GO” to bring the printer on-line.
PRINTER OPEN
Cause : The printer cover is open.
Remedy : Close the printer front cover. Press “GO” to bring the printer back on-line.
PRINTING...
Cause : The printer is processing a print job.
You will see this message if you try to take the printer off-line by pressing “GO”
during printing. This message is also displayed when you are printing one of the
internal demonstration or test pages.
Remedy : No action required. Wait for printing to finish.
5
Troubleshooting
Responding to Error Messages
5-11
Page 98

KEY NOT VALID
Cause : This message is displayed when a button that is not enabled in the current
function is pressed.
Remedy : Press the correct button to complete the current function.
WARMING UP...
Cause : The printer is warming up.
Remedy : Wait until the printer has warmed up and displays <READY>.
WRONG PAPER SIZE
Cause : A paper size mismatch has occurred. More than one paper size has been found
in the same tray.
5
Troubleshooting
Remedy : Inspect the mismatched paper and correct.
PARALLEL INTERFACE ERROR
Cause : The parallel port is not communicating with the controller.
Remedy : Restart the printer. If this error persists, call for service.
USB INTERFACE ERROR
Cause : The USB port is not communicating with the controller.
Remedy : Restart the printer. If this error persists, call for service.
PS OPTION ERROR
Cause : The optional PS ROM DIMM has failed its startup test.
Remedy : Replace the ROM DIMM.
+FORMAT FLASH - IGNORE FLASH
Cause : This message appears when the <FORMAT FLASH> item is selected to format
the optional Flash ROM. It may also appear when a Flash ROM with an
unsupported format is installed and when the power is turned on.
5-12
Remedy : Select + (press “Value”) to format the Flash ROM. Select - (press “Shift” and
“Value”) to cancel the operation.
Responding to Error Messages
Page 99

+REALLY FORMAT - IGNORE FLASH
Cause : This message appears asking you to confirm that you want to format the
optional Flash ROM if <+FORMAT FLASH> is selected in the message above.
Remedy : Select + (press “Value”) to begin formatting the Flash ROM. Select - (press
“Shift” and “Value”) to cancel the operation.
5
Troubleshooting
Responding to Error Messages
5-13
Page 100

Other Print Problems
Correcting Poor Print Quality
Printed text faded or streaked with white.
Cause : The level of toner remaining in the toner cartridge may be low, or the toner is not
evenly distributed inside the cartridge.
Remedy : Replace the Toner Cartridge.
Reference : “Replacing the Toner Cartridge” in Reference Guide
5
Troubleshooting
Printed pages are dirty or have white specks.
Cause : The fixing roller inside the fixing assembly has become dirty with toner dust.
Remedy : Clean the fixing assembly inside the printer.
Reference : “Roller Cleaning” in Reference Guide
Text is too light or too dark.
Cause1 : The printed image on your page is too light or too dark.
Remedy : Adjust the print density.
Reference : “CONFIG MENU” (See p.4-19)
Cause2 : Economy Mode is selected in CONFIG MENU.
Remedy : Set Economy Mode to <OFF> in CONFIG MENU.
Reference : “CONFIG MENU” (See p.4-19)
Black spots on the top and back of the printed pages
Cause : The fixing roller inside the fixing assembly unit may be dirty.
Remedy : Clean the fixing roller.
Reference : “Roller Cleaning” in Reference Guide
5-14
Other Print Problems
 Loading...