

Page 1

Remote UI Guide
Remote UI Guide
Series
Please read this guide before operating this equipment.
After you finish reading this guide, store it in a safe place for future reference.
ENG
Page 2
About the Manuals for the machine
The manuals for this machine are divided as follows. Please read them to suit your needs.
For Basic Use ................................................
Troubleshooting .............................................
For Basic Copying ...........................................
For Convenient Copying ....................................
For Remote UI Use ..........................................
For Setting Up the Network Connection..................
For Printer Use...............................................
For Installing Printer Driver ...............................
For Connecting and Setting the Network.................
Reference Guide
Copying Guide
Remote UI Guide
(This Document)
Setup Guide
PS/PCL Printer Guide
PS Driver Guide
PCL Driver Guide
Network Guide
CD-ROM
CD-ROM
CD-ROM
CD-ROM
•
The product illustration on the cover may differ slightly from your product.
The volumes marked with this symbol are PDF manuals included in accompanying CD-ROMs.
-
Page 3

Page 4

How This Manual Is Organized
Chap 1
Chap 2
Chap 3
Using the Remote UI
Functions of the Remote UI
Appendix
1
2
3
•
Some of the data contained herein may not exactly reflect the current model of the particular product with which this manual has been included. If you
have a need for an exact specification, please contact Canon for the current specification.
No part of this document may be photocopied, reproduced, or translated into another language without prior written consent of Canon Inc.
•
Page 5

Table of Contents
How to Use This Manual . . . . . . . . . . . . . . . . . . . . . . . . . . . . . . . . . . . . . . . . . . .viii
Symbols Used in This Manual . . . . . . . . . . . . . . . . . . . . . . . . . . . . . . . . . . . . . viii
Displays Used in This Manual . . . . . . . . . . . . . . . . . . . . . . . . . . . . . . . . . . . . . viii
Trademarks. . . . . . . . . . . . . . . . . . . . . . . . . . . . . . . . . . . . . . . . . . . . . . . . . . . . . . .ix
Chapter 1 Using the Remote UI
Features of the Remote UI . . . . . . . . . . . . . . . . . . . . . . . . . . . . . . . . . . . . . . . . 1-2
System Requirements . . . . . . . . . . . . . . . . . . . . . . . . . . . . . . . . . . . . . . . . . . . . 1-5
Starting the Remote UI . . . . . . . . . . . . . . . . . . . . . . . . . . . . . . . . . . . . . . . . . . . 1-6
Chapter 2 Functions of the Remote UI
Device Status and Information Display . . . . . . . . . . . . . . . . . . . . . . . . . . . . . . 2-2
Managing Jobs and Viewing the Job Log . . . . . . . . . . . . . . . . . . . . . . . . . . . . 2-4
Managing Print Jobs . . . . . . . . . . . . . . . . . . . . . . . . . . . . . . . . . . . . . . . . . . . 2-4
Managing Jobs Stored on the Machine . . . . . . . . . . . . . . . . . . . . . . . . . . . . . 2-7
Viewing the Print Log . . . . . . . . . . . . . . . . . . . . . . . . . . . . . . . . . . . . . . . . . . 2-10
Viewing and Editing Device Settings . . . . . . . . . . . . . . . . . . . . . . . . . . . . . . . 2-11
Viewing Additional Information . . . . . . . . . . . . . . . . . . . . . . . . . . . . . . . . . . . 2-13
Chapter 3 Appendix
Index . . . . . . . . . . . . . . . . . . . . . . . . . . . . . . . . . . . . . . . . . . . . . . . . . . . . . . . . . . 3-2
vii
Page 6

How to Use This Manual
Symbols Used in This Manual
The following marks are used in this manual to indicate safety precautions,
restrictions and notices for handling the product.
Indicates operational warnings and restrictions. Be certain to
IMPORTANT
NOTE
Displays Used in This Manual
Screenshots of the display used in this manual are those taken when the machine
and network options are installed on the iR2000/iR1600 Series.
read these items to operate the machine correctly, and to avoid
damage to the machine.
Indicates notes for operation or additional explanations. Reading
these is recommended.
viii
Page 7

Trademarks
Microsoft, Windows and Windows NT are registered trademarks of Microsoft
Corporation in the United State and/or other countries.
Netscape, Netscape Communicator and Netscape Navigator are trademarks of
Netscape Communications Corporation.
NetWare and Novell are registered trademarks of Novell Inc.
Adobe, Acrobat and PostScript are trademarks of Adobe Systems Incorporated.
Macintosh and Mac OS are trademarks of Apple Computer, Inc. (US)
PCL is a trademark of Hewlett-Packard Company.
Canon and the Canon logo are trademarks of Canon Inc.
Other company or product names used in this manual and not included in the list
above are trademarks of those companies and may be registered in certain
jurisdictions.
ix
Page 8

Using the Remote UI
Features of the Remote UI . . . . . . . . . . . . . . . . . . . . . . . . . . . . . . . . . . . . . . . . . . . . . . . .1-2
System Requirements . . . . . . . . . . . . . . . . . . . . . . . . . . . . . . . . . . . . . . . . . . . . . . . . . . .1-5
Starting the Remote UI . . . . . . . . . . . . . . . . . . . . . . . . . . . . . . . . . . . . . . . . . . . . . . . . . . . 1-6
1
CHAPTER
CHAPTER
1-1
Page 9
Features of the Remote UI
1
Using the Remote UI
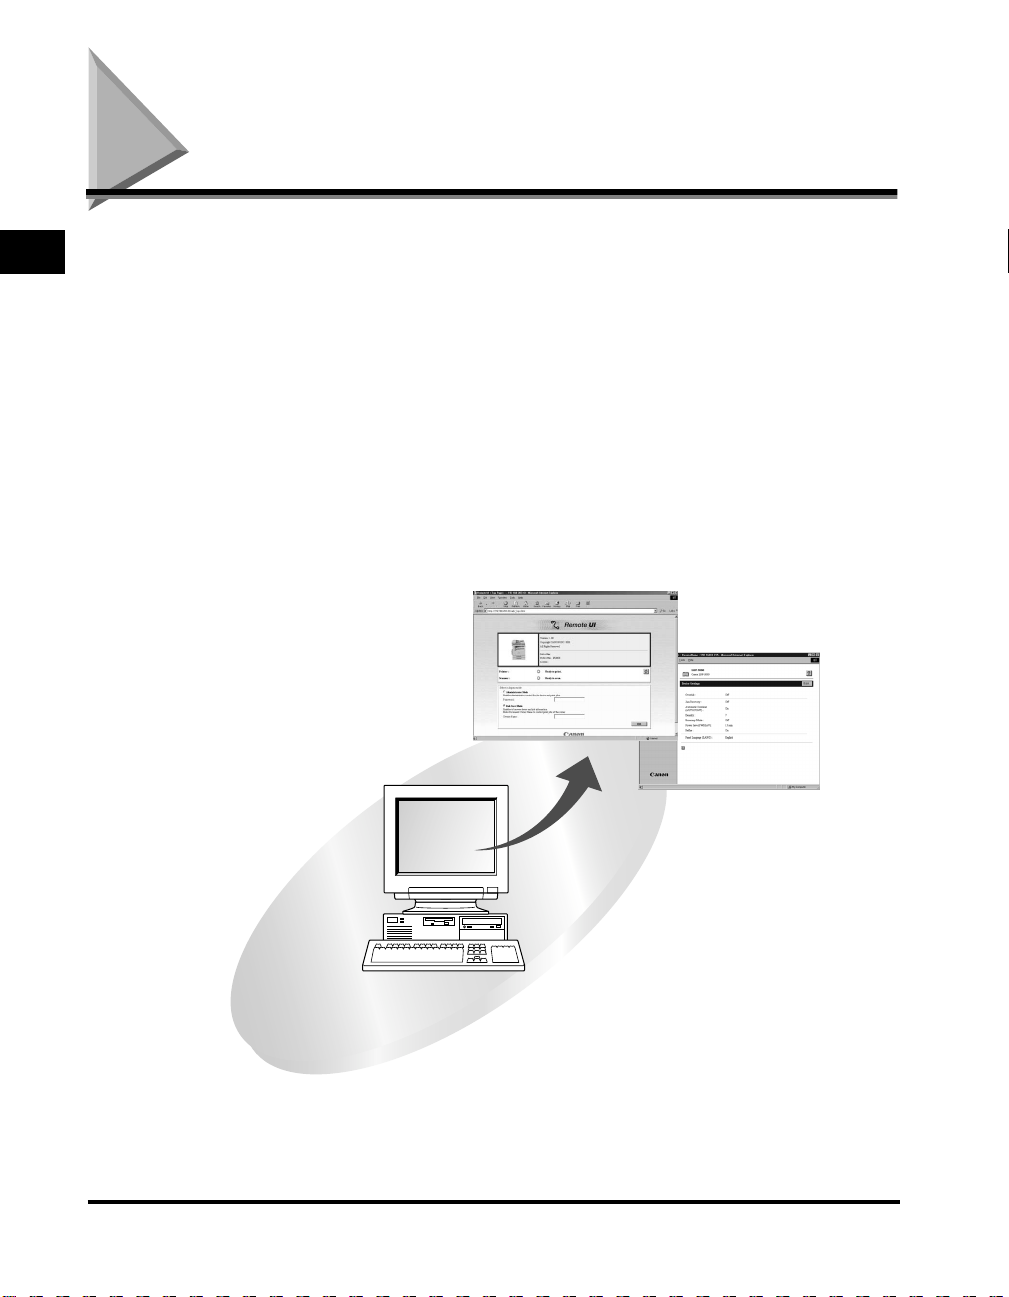
The Remote UI software allows you to access and manage a device connected to a
network using a web browser. If you specify the address of the machine in your web
browser, the Remote UI screen appears from where you can manage and control
the machine.
The machine is supplied with pre installed web server software that enables you to
use the Remote UI. This means that you do not need to have any special software,
other than a web browser, installed on your computer. You can use the Remote UI
when you start your web browser by entering the IP address for the machine to
display the Remote UI screen.
1-2
Features of the Remote UI
Page 10

■
Device status check from a network computer
The Remote UI allows you to access the device via a network, enabling you to display the
current status for the device, and the status of all information and job processing. You can
manage the device from a personal computer connected to the network, without having to
perform operations on the device itself.
When you specify the IP address of the device with your web browser, the Remote UI top
page appears as follows:
1
Using the Remote UI
After you have selected the logon mode, the Device Manager page is displayed. This
includes the following buttons which are used in other pages of the Remote UI.
Takes you to the Remote UI top page.
Displays the current status of the machine, and the logon form for
selecting the mode to use.
Displays the current status of the machine, information about the
device, various features and options, network settings and counter.
Displays the current status of print jobs and jobs stored on the
machine. It also displays the job log with information about jobs that
have already been processed by the machine.
Displays a list of settings for the machine.
Displays links to support information, such as the on-line manual.
Features of the Remote UI
1-3
Page 11

This updates the currently displayed screen with the latest information.
Information is not updated automatically. When you click this button,
the latest information from the device will be acquired.
This displays the online help for the Remote UI. Use this button to
access detailed information about the Remote UI.
1
■
Using the Remote UI
This takes you back to the previous page.
Set and control the device from a PC
The Remote UI allows you to stop and restart jobs, view and print jobs stored on the
machine and to make various settings. If you logon using Administrator Mode, you can
adjust settings and control the device from a PC without using the control panel on the
machine.
1-4
Features of the Remote UI
Page 12

System Requirements
The Remote UI has been confirmed to work in the following system environments.
■
Windows
•
OS
- Microsoft Windows NT Workstation 4.0 + Service Pack 5 or later
- Microsoft Windows 95/98
- Microsoft Windows 2000 Professional
- Microsoft Windows Me
- Microsoft Windows XP
•
Web Browser
- Microsoft Internet Explorer 4.01SP1 or later
- Netscape Communicator/Navigator 4.7 or later, except Netscape Communicator
6
■
Macintosh
•
OS
- Mac OS8.6 or later
•
Web Browser
- Microsoft Internet Explorer 4.0 or later
NOTE
Apart from the software listed above, no other software, such as a web server, is
•
necessary. (The machine includes its own web server software.)
1
Using the Remote UI
System Requirements
1-5
Page 13

Starting the Remote UI
1
To start the Remote UI, follow the procedure below.
Using the Remote UI
1
Start your web browser.
2
Enter the URL into Address or Location field.
http://<the IP address of the device>/
The Remote UI screen loads.
1-6
Select the logon mode.
3
Administrator Mode: Select the radio button and enter the password.
End-User Mode: Select the radio button and enter the owner name.
4
Click [OK].
The Device Manager - Status page appears.
Starting the Remote UI
Page 14

Functions of the Remote UI
CHAPTER
CHAPTER
This chapter describes the various functions of the Remote UI, along with brief descriptions of
how to use the functions.
Device Status and Information Display. . . . . . . . . . . . . . . . . . . . . . . . . . . . . . . . . . . . . . . 2-2
Managing Jobs and Viewing the Job Log. . . . . . . . . . . . . . . . . . . . . . . . . . . . . . . . . . . . . 2-4
Managing Print Jobs . . . . . . . . . . . . . . . . . . . . . . . . . . . . . . . . . . . . . . . . . . . . . . . . . . . . . . . . . .2-4
Managing Jobs Stored on the Machine . . . . . . . . . . . . . . . . . . . . . . . . . . . . . . . . . . . . . . . . . . . .2-7
Viewing the Print Log . . . . . . . . . . . . . . . . . . . . . . . . . . . . . . . . . . . . . . . . . . . . . . . . . . . . . . . . .2-10
Viewing and Editing Device Settings . . . . . . . . . . . . . . . . . . . . . . . . . . . . . . . . . . . . . . . 2-11
Viewing Additional Information . . . . . . . . . . . . . . . . . . . . . . . . . . . . . . . . . . . . . . . . . . . .2-13
2
2-1
Page 15

Device Status and Information Display
Using the Remote UI, you can view the current status of the machine, such as for
the amount and size of paper in the Drawers, or display other status information.
You can also view information about the administrator in charge of the machine, the
2
Functions of the Remote UI
installation location and various machine settings.
Click the button and then click the item that you
1
want to display from the menu that appears under the button.
2-2
Status: Displays the current status of the machine and paper information
such as the amount and size of paper in the Drawers and allows
you to view error information. If you are using Administrator Mode,
you can also use the Utility and Device Control buttons to check or
adjust settings.
Information: Displays information about the machine, including information
about the administrator, the display language used on the Remote
UI, and any security settings that have been enabled. If you are
using Administrator Mode, you can also adjust these settings.
Device Status and Information Display
Page 16

Features: Displays information about various features and expansion options
for the machine, including the maximum print speed, total and
available memory, Flash ROM (if installed), hard disk space (if
installed), number of Drawers installed and status of the stapler and
sorter unit.
Network: Displays information about the network interface, firmware version
and any network protocols that are enabled. If you are using
Administrator Mode, you can also adjust these settings.
Counter: Displays the total count number.
The information is displayed for the selected item.
(Example) When Network is selected.
2
Functions of the Remote UI
Device Status and Information Display
2-3
Page 17

Managing Jobs and Viewing the Job Log
The Remote UI enables you to manage print jobs and jobs stored on the machine’s
optional hard disk (if installed). It also allows you to view the print log of processed
jobs. The Job Manager page includes the following sections.
2
Managing Print Jobs
Functions of the Remote UI
Print Job
•
Stored Job
•
Print Log
•
You can use the Remote UI to manage print jobs that are being processed by the
machine, or are held in the print queue.
NOTE
•
If you logon in End-User Mode, you will only see jobs for which you have owner
privileges.
•
If the “Permit End-user Job Operation” option in the Security section of the Device
Manager - Information page is set to No, you will not be able to adjust the job settings
when logged on in End-User Mode.
2-4
1
Click the button and then click [Print Job] from the
menu that appears below the button.
Managing Jobs and Viewing the Job Log
Page 18

A list of print jobs being processed by the machine appears.
You can perform the following operations for the job by
2
selecting the
checkbox to the left of the job, and then
clicking the operation button displayed under the title.
Stops printing of the selected print job.
Resumes printing of a print job that has been stopped.
Moves a job up in the queue so it will be printed immediately after the job
currently being printed.
Deletes the selected job (cancels processing). The job cannot be retrieved
once this is done.
Displays the detailed information about the selected job. The detailed
information can only be displayed for the jobs indicated as “Pause” in the
Status column.
2
Functions of the Remote UI
NOTE
•
These buttons are not displayed when the print log is being displayed, and
operations for print log cannot be performed.
Managing Jobs and Viewing the Job Log
2-5
Page 19

If you want to display the details for the job, click the
3
button.
The Print Job Details screen appears.
2
Functions of the Remote UI
If the job is a secured print job, enter the password and click the [OK] button to
print the job.
Press the button to return to the previous page.
2-6
Managing Jobs and Viewing the Job Log
Page 20

Managing Jobs Stored on the Machine
The Remote UI allows you to manage documents stored in boxes on the optional
hard disk:
1
Click the
menu that appears under the button.
button and then click [Stored Job] from the
2
Functions of the Remote UI
If the menu is already displayed, you can skip this step.
A list of boxes appears.
If the list of boxes does not include the box you want, select the box with either of
the following two methods.
•
Enter the box number in the text box and click [GO!].
•
Select the range of box numbers from the list box and click [GO!].
Managing Jobs and Viewing the Job Log
2-7
Page 21

Select the box containing the document you wish to manage.
2
2
A list of documents stored in the box, is displayed.
Functions of the Remote UI
3
You can perform the following operations for the document by
selecting the checkbox to the left of the document, and
then clicking the operation button displayed under the title.
Adds the selected document to the Print Job list. When you click this button,
the Print Stored Job page appears to allow you to confirm the print job
settings.
Deletes the selected document from the box. You cannot retrieve
documents once they are deleted.
2-8
Managing Jobs and Viewing the Job Log
Page 22

Displays detailed information about the selected document. The detailed
information can only be displayed for the documents indicated as “Stored”
in the Status column.
If you want to display details of a document, click the
4
document name or the icon.
The Stored Job Details screen appears.
2
Functions of the Remote UI
To confirm and change the print job settings
By selecting the document and clicking the (resume) button on the Stored Job
screen, the Print Stored Job screen appears.
Confirm the settings and, if necessary, change the settings. Click the [OK] button to
add the document to the Print Job list.
Managing Jobs and Viewing the Job Log
2-9
Page 23

Viewing the Print Log
The Remote UI allows you to view the print log of processed jobs.
1
2
Functions of the Remote UI
Click the
menu that appears under the button.
If the menu is already displayed, you can skip this step.
The print log appears displaying information about jobs that have already been
processed by the machine.
button and then click [Print Log] from the
2-10
Managing Jobs and Viewing the Job Log
Page 24

Viewing and Editing Device Settings
The Remote UI can be used to view and edit some of the settings for the machine.
NOTE
You can only edit the device settings if you are using Administrator Mode.
•
1
Click the button.
A list of the device settings that can be edited appears.
2
Functions of the Remote UI
2
To edit the device settings, click [Edit...].
The Edit Device Settings screen appears.
You can only edit the device settings if you are using Administrator Mode.
Viewing and Editing Device Settings
2-11
Page 25

3
2
Functions of the Remote UI
Set each of the items and click [OK].
2-12
Viewing and Editing Device Settings
Page 26

Viewing Additional Information
You can use the Remote UI to access additional information and help about your
machine.
NOTE
You may need a connection to the internet to access some of this additional information.
•
Click the button.
1
A list of the various additional information resources appears.
2
Functions of the Remote UI
2
Click on the item you want to access.
NOTE
You can specify up to three link destinations by clicking the [Edit...] button:
•
- Link 1
- Link 2
- Download Site
The Download Site includes the URL for Canon’s Down load Service; the Link 1
•
and Link 2 allow you to set the link destinations such as Help Desk and Manual.
Viewing Additional Information
2-13
Page 27

2
Functions of the Remote UI
2-14
Viewing Additional Information
Page 28

Appendix
Index . . . . . . . . . . . . . . . . . . . . . . . . . . . . . . . . . . . . . . . . . . . . . . . . . . . . . . . . . . . . . . . . . 3-2
3
CHAPTER
CHAPTER
3-1
Page 29

3
Appendix
Index
A
Administrator Mode ..................................................................................... 1-4, 1-6, 2-2, 2-3, 2-11
C
Counter ........................................................................................................................................2-3
D
Delete button........................................................................................................................ 2-5, 2-8
Detail button ......................................................................................................................... 2-5, 2-9
Device ................................................................................................................................ 2-2
device.........................................................................................................................................2-11
Device Control button................................................................................................................... 2-2
Device Manager button ........................................................................................................ 1-3
Device Settings button ....................................................................................................... 1-3, 2-11
,
2-11
,
2-2
E
Edit Device Settings screen ....................................................................................................... 2-11
Edit... .......................................................................................................................................... 2-11
End-User Mode .................................................................................................................... 1-6, 2-4
F
Features ............................................................................................................................... 1-2, 2-3
H
Help button...................................................................................................................................1-4
3-2
Index
Page 30

I
Information................................................................................................................................... 2-2
IP address.............................................................................................................................1-3, 1-6
J
Job Manager button............................................................................................ 1-3, 2-4, 2-7, 2-10
L
logon mode .................................................................................................................................. 1-6
3
M
Macintosh .................................................................................................................................... 1-5
Move Up button............................................................................................................................ 2-5
N
Network........................................................................................................................................ 2-3
network ........................................................................................................................................ 1-2
O
OS................................................................................................................................................ 1-5
P
Print Job................................................................................................................................2-4, 2-7
Print Job Details screen............................................................................................................... 2-6
Print Log .................................................................................................................................... 2-10
Print Stored Job screen ............................................................................................................... 2-9
Appendix
Index
3-3
Page 31

3
Appendix
R
Remote UI screen ........................................................................................................................ 1-6
Remote UI software .....................................................................................................................1-2
Resume button..................................................................................................................... 2-5
S
Status ........................................................................................................................................... 2-2
Stop button...................................................................................................................................2-5
Stored Job....................................................................................................................................2-7
Stored Job Details screen ............................................................................................................ 2-9
Support Links button ........................................................................................................... 1-3
System Requirements.................................................................................................................. 1-5
T
To Top Page button....................................................................................................................... 1-3
top page ....................................................................................................................................... 1-3
U
,
2-13
,
2-8
Update button............................................................................................................................... 1-4
URL .............................................................................................................................................. 1-6
Utility button..................................................................................................................................2-2
W
Web Browser................................................................................................................................ 1-5
web browser..................................................................................................................1-2, 1-3, 1-6
web server software ............................................................................................................. 1-2
Windows....................................................................................................................................... 1-5
3-4
Index
,
1-5
Page 32

3
Appendix
Index
3-5
Page 33

CANON INC.
W
30-2, Shimomaruko 3-chome, Ohta-ku, Tokyo 146-8501, Japan
CANON U.S.A., INC.
One Canon Plaza, Lake Success, NY 11042, U.S.A.
CANON CANADA INC.
6390 Dixie Road Mississauga, Ontario L5T 1P7, Canada
CANON EUROPA N.V.
Bovenkerkerweg 59-61 P.O. Box 2262, 1180 EG Amstelveen, The Netherlands
CANON FRANCE S.A.
17,quai du President Paul Doumer 92414 Courbevoie Cedex, France
CANON (U.K.) LTD.
oodhatch, Reigate, Surrey, RH2 8BF, United Kingdom
CANON DEUTSCHLAND GmbH
Europark Fichtenhain A10, 47807 Krefeld, Germany
CANON ITALIA S.p.A.
Palazzo L Strada 6 20089 Milanofiori Rozzano (MI) Italy
CANON LATIN AMERICA, INC.
703 Waterford Way, Suite 400, Miami, Florida 33126, U.S.A.
CANON AUSTRALIA PTY. LTD
1 Thomas Holt Drive, North Ryde, Sydney, N.S.W. 2113, Australia
CANON SINGAPORE PTE. LTD.
79 Anson Road #09-01/06, Singapore 079906
CANON HONGKONG CO., LTD
9/F, The Hong Kong Club Building, 3A Chater Road, Central, Hong Kong
FA7-3035-010 C CANON INC. 2001
 Loading...