

Canon IR1018 series, IR1022 series Quick Start Manual
Quick Start Guide
Please read this guide before operating this equipment.
After you finish reading this guide, store it in a safe place for future reference.
Series
EnglishFrançaisDeutschItalianoEspañol
Guide de démarrage rapide
Lisez ce guide avant d'utiliser cet appareil.
Quand vous avez terminé la lecture de ce guide, rangez-le en lieu sûr afin de pouvoir le consulter ultérieurement.
Kurzanleitung
Bitte lesen Sie diese Anleitung sorgfältig durch, bevor Sie mit diesem Gerät arbeiten.
Bewahren Sie diese Anleitung danach zum späteren Nachschlagen griffbereit auf.
Guida rapida all’avvio
Leggere attentamente la presente Guida prima di utilizzare il dispositivo.
Dopo averla letta, riporre la Guida in un luogo sicuro per poterla consultare in seguito.
Guía de inicio rápido
Lea esta guía antes de poner en funcionamiento este equipo.
Cuando haya terminado de leer esta guía, guárdela en un lugar seguro para posteriores consultas.
Downloaded from ManualsPrinter.com Manuals

English
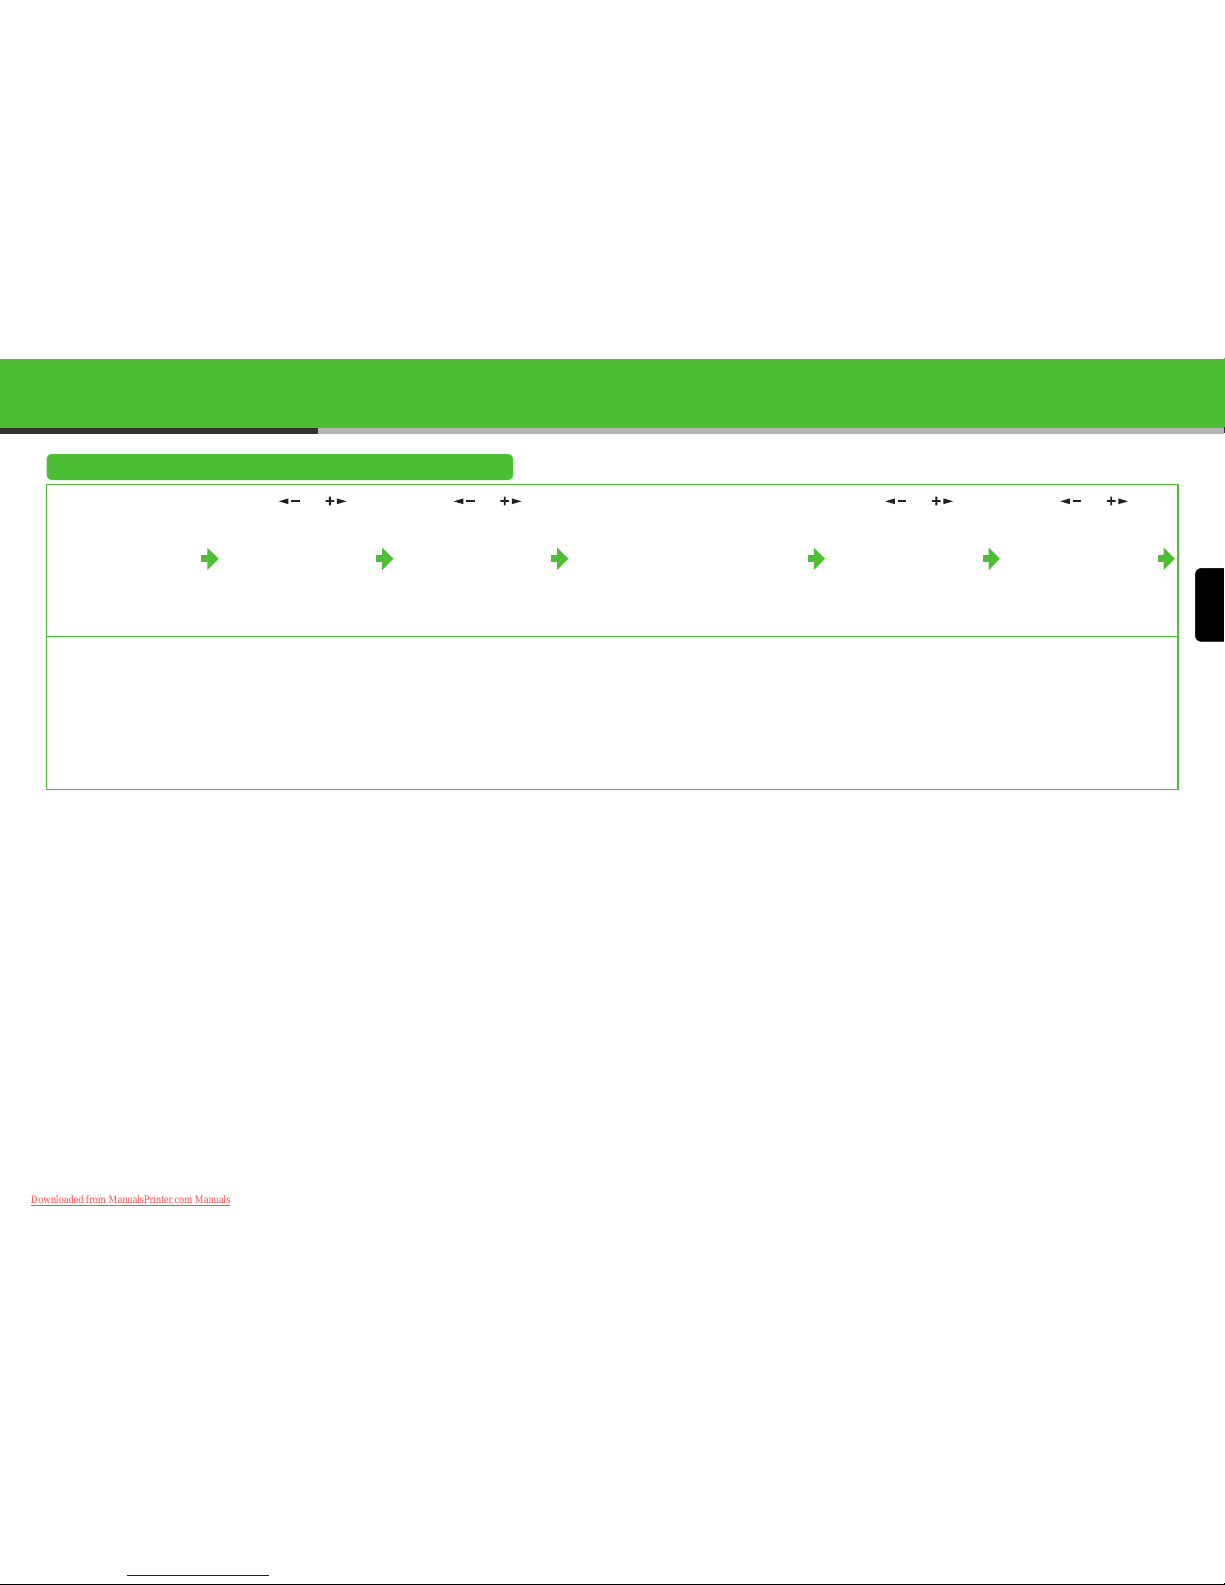
Set Up the Machine
Unless otherwise mentioned, illustrations used in this manual are those taken when no optional
equipment is attached to the iR1022iF, and also the menus described in this manual are based on
the iR1022iF.
Depending on the model of your machine, some settings may not be available and the number on
the top of each menu may vary.
Do You Have Everything?
Before Setting Up the Machine Manuals for the Machine
● Remove all shipping tape on the machine.
● When moving the machine, be sure at least
two people carry it using the provided hand
grips on the left and right sides, as seen in the
illustration right.
● The shapes of your machine and supplies may
differ slightly from those listed in this manual.
● Quick Start Guide (This Document): Machine set-up and software installation
● Basic Operation Guide: (in User Software CD)*: Basic features, maintenance, machine
settings, and specifications
● Advanced Operation Guide (in User Software CD)*: Advanced features, network and remote
user interface, system monitor, and reports and lists
● Scanner Driver Guide (in User Software CD): Scanner settings from a computer
* Included in User Manual CD for iR1018J
● Machine
● Paper Drawer (optional)
● Bracket (optional)*****
● Toner Cartridge**** ● Power Cord ● Telephone Cable******
● Handset (optional)*****
* iR1022F/1022i/1022iF only
** iR1018 and iR1022 Series only
*** iR1018J only
**** Installed in the machine, depending on the models purchased
***** Not available in UK
****** iR1022F/1022iF only
● Handset Cradle
(optional)*****
● Screws (x 2 for each type)
(optional)*****
● Destination Labels*
● Quick Start Guide
● User Software CD**
● User Manual CD***
● Unpacking Instructions
● Drum Unit
1
2
Downloaded from ManualsPrinter.com Manuals
English
3
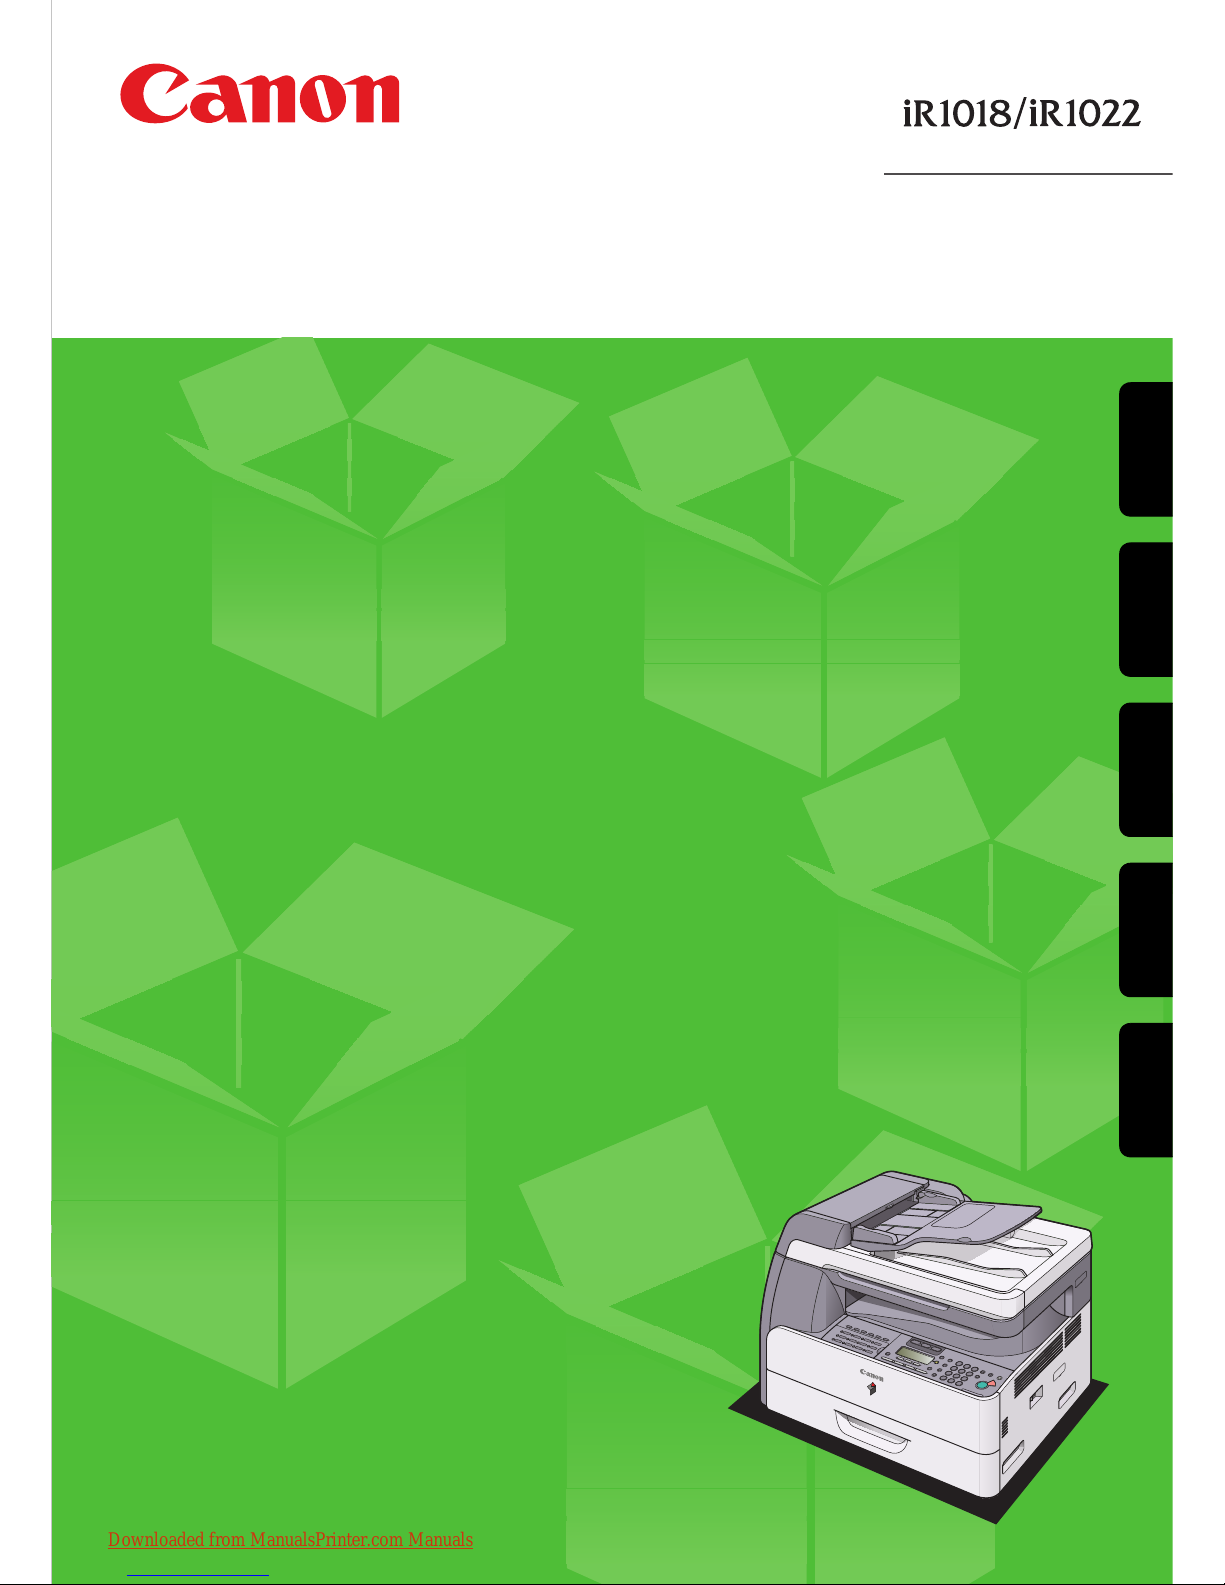
Install the Toner Cartridge
1
Remove the plastic case from the box.
2
Open the case and remove the toner cartridge.
Keep the box and case for future use.
CAUTION
– Do not touch the por tions (A) and (B).
– Do not pull out the seal (C) before insertin g the
cartridge into the machine as the toner may spill
out.
3
Open the front cover.
4
Pull the toner cartridge lever (A) towards you and
insert the cartridge into the machine with the
arrow (B) pointing towards the machine.
5
Holding the cartridge steady with one hand, pull
out the seal completely with the other hand.
NOTE
Do not pull out the seal at an angle.
6
Turn the cartridge lever (A) as far as it will go
counterclockwise.
7
Push down the lever.
8
Close the front cover.
CAUTION
– Be careful not to get your fingers caught.
– If you cannot close the front cover, do not force it to
close. Open the cover and make sure the toner
cartridge is properly set in the machine.
NOTE
If the cartridge is already set in your machine, begin
with step 5.
A
C
B
A
B
A
4
Downloaded from ManualsPrinter.com Manuals
English
5
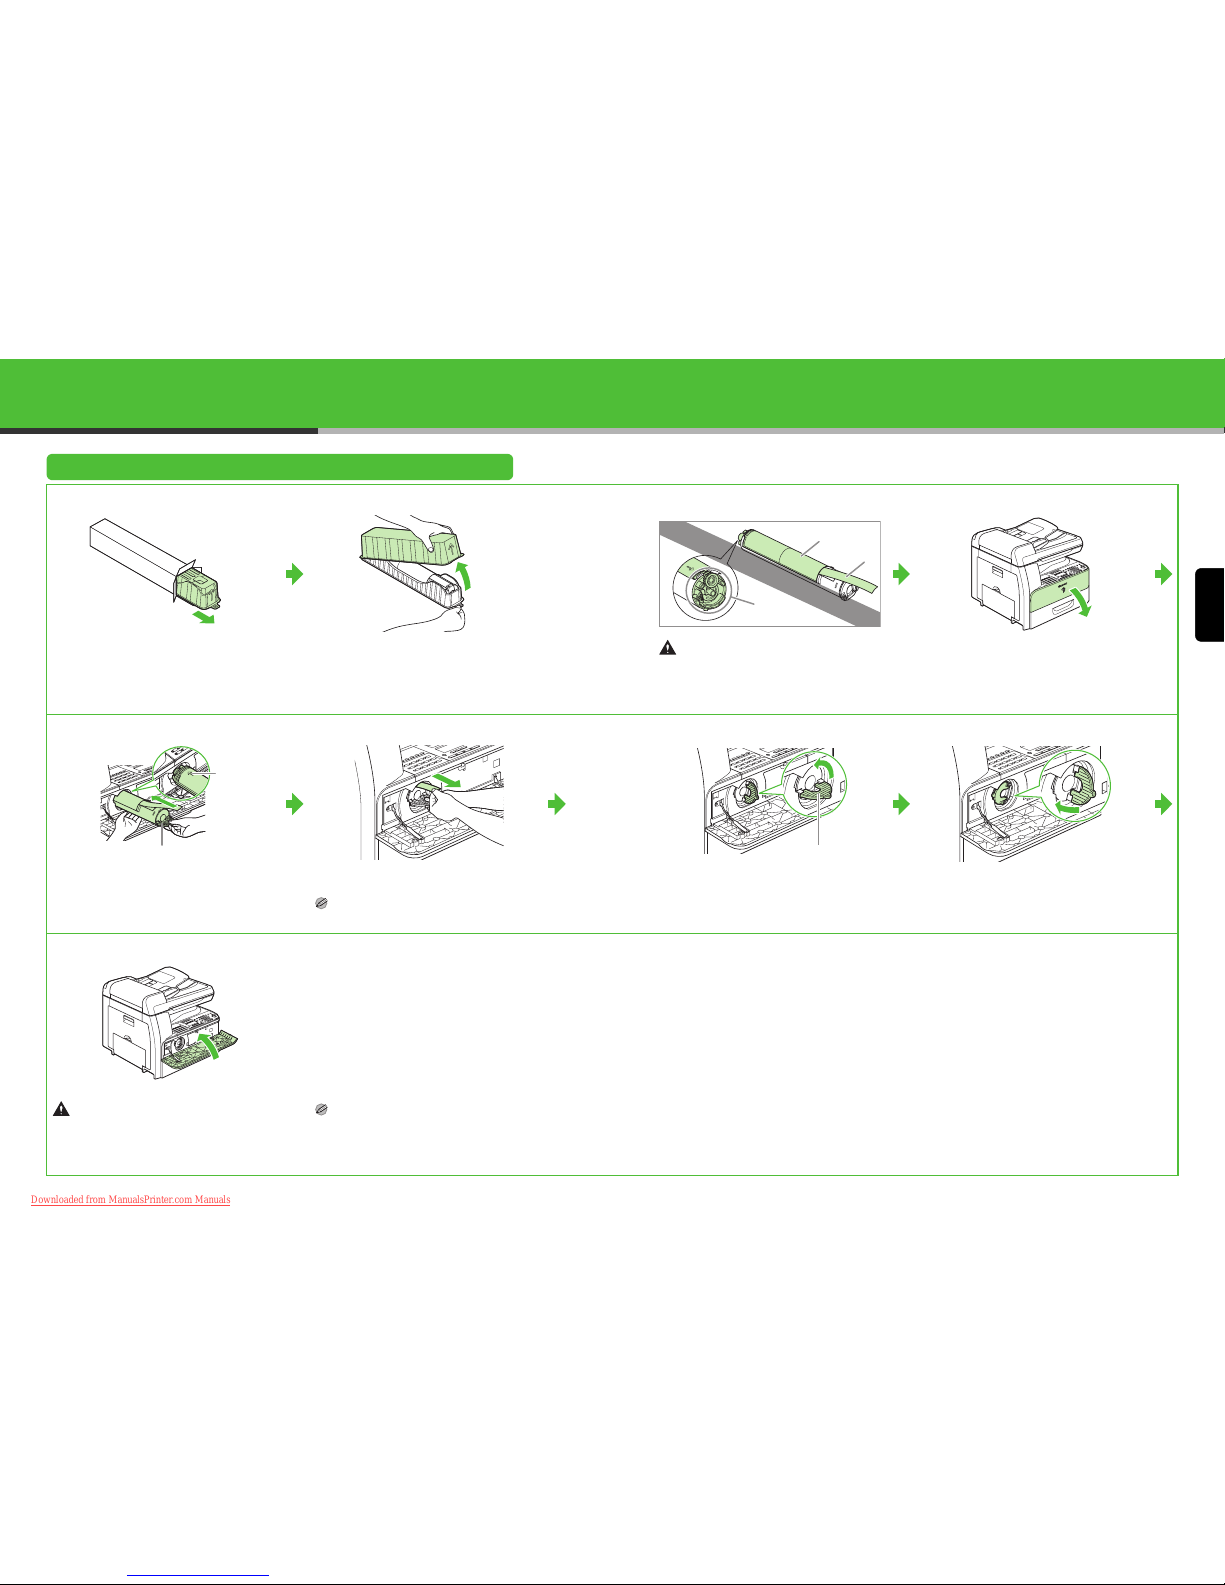
Install the Drum Unit
1
Open the left cover.
2
Open the package of the new drum unit and
remove the protective packing material (A).
3
Hold the unit by its grips on both sides.
4
Align the marks on both sides of the drum unit
(B) with the marks on the machine (A), and
push the unit into the machine as far as it will go.
5
After the unit is completely inserted, remove the
orange paper.
6
Close the left cover.
CAUTION
Be careful not to get your fingers caught.
CAUTION
Do not touch the portion (A) as the image quality of
printouts may deteriorate.
A
BB
A
A
A
6
Downloaded from ManualsPrinter.com Manuals
English
7
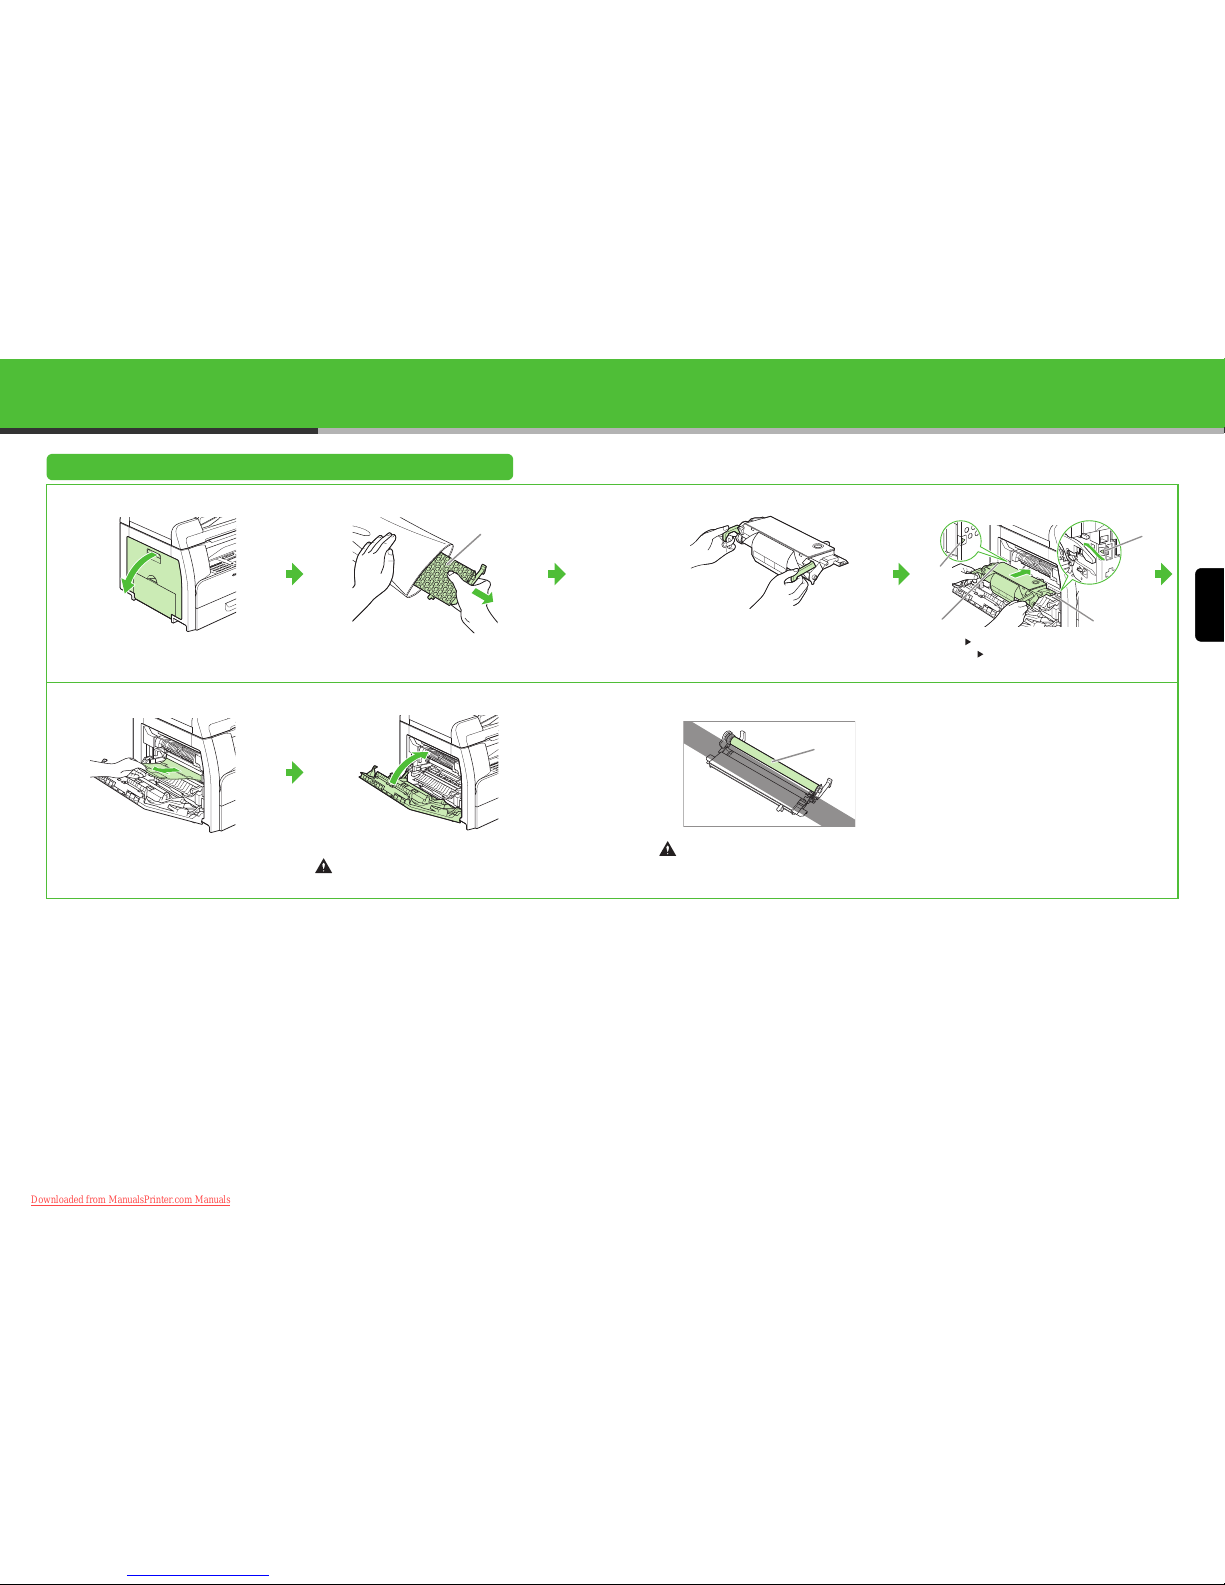
Load Paper
1
Pull out the paper drawer until it stops.
2
Even the edges of the paper stack.
3
Load the paper stack print side up.
NOTE
Make sure the back edge of the paper stack touches
the rear paper end guide (C), the paper stack should
not exceed the load limit mark (A), and the load is
under the hooks (B) on the paper guides.
4
Gently insert the paper drawer as far as it will go.
CAUTION
Be careful not to get your fingers caught.
NOTE
For loading paper in the stack bypass, see Chapter 3,
“Print Media,” in the Basic Operation Guide.
A
B
B
C
8
Downloaded from ManualsPrinter.com Manuals
English
9
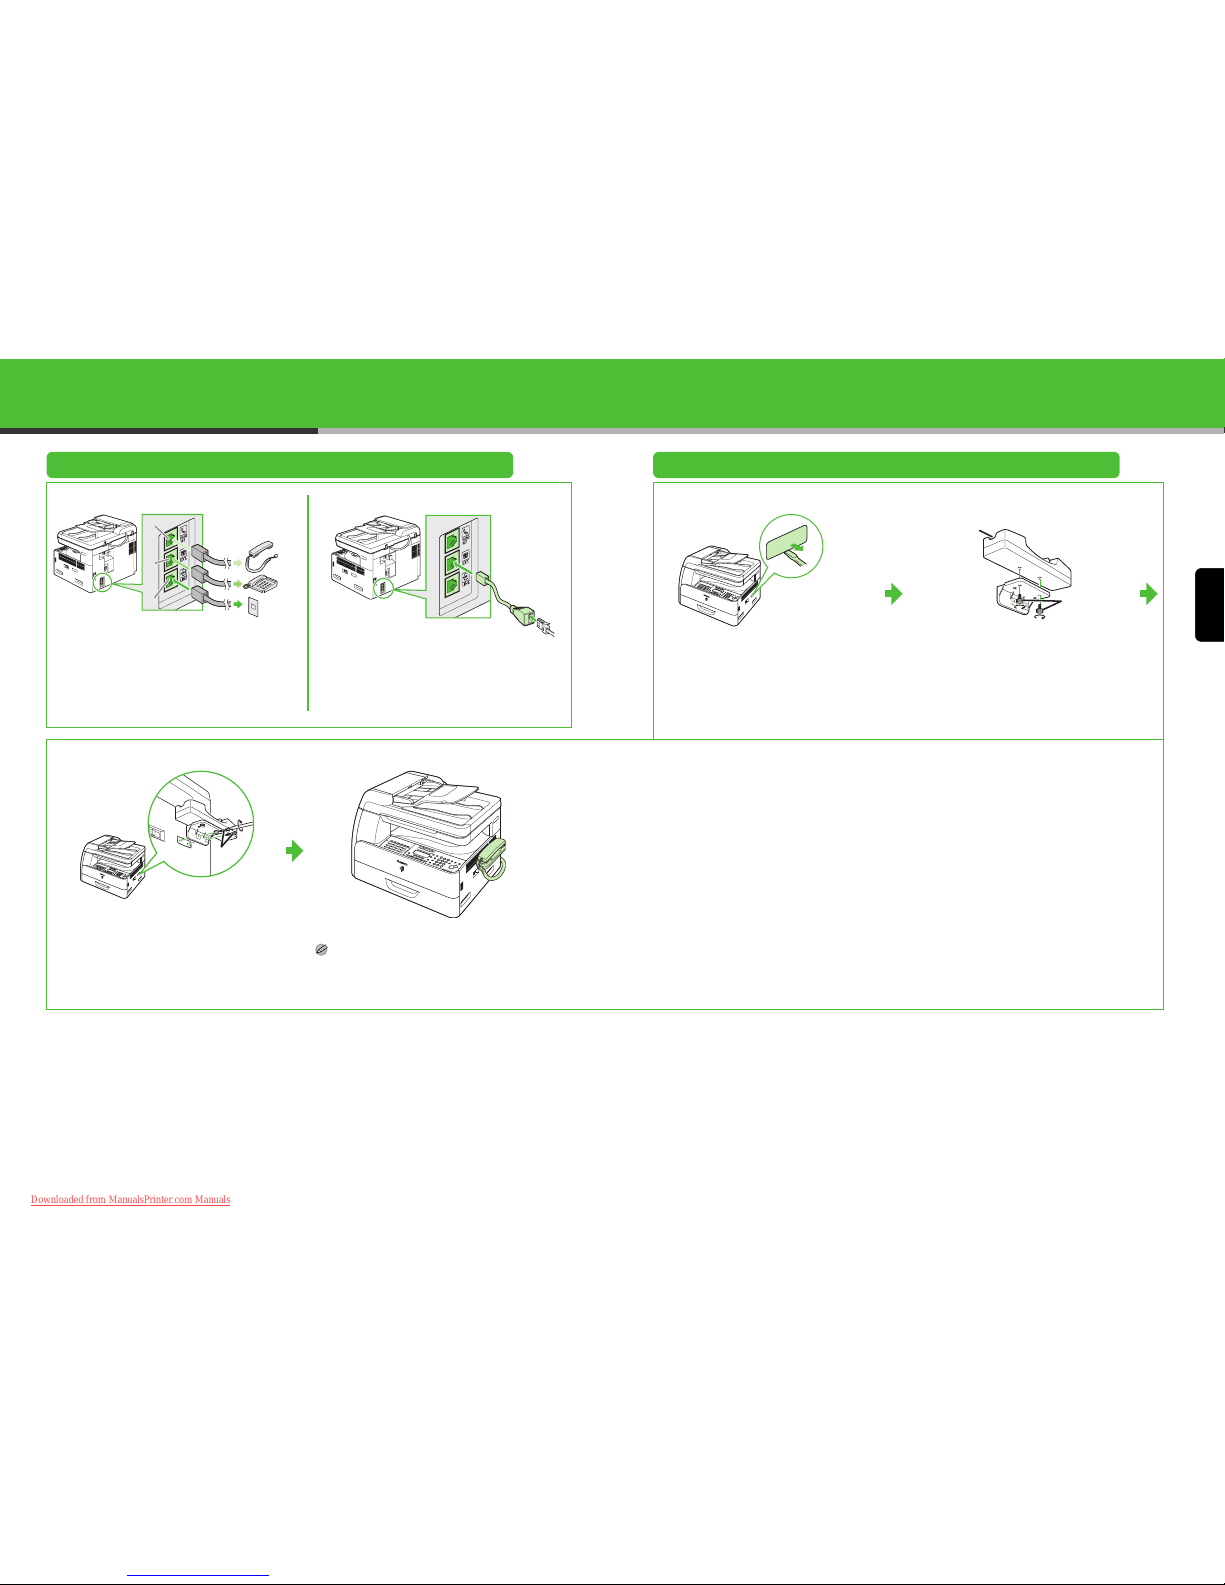
Connect the Telephone Cables (iR1022F/1022iF Only) Install Handset (Optional)
Connect the supplied telephone cable to the line
jack (A) and the wall jack.
Connect your external telephone to the external
device jack (B) if required.
If you have the optional handset, connect the cable
to the handset jack (C).
Users in UK:
If required, use a separately available B.T.
adaptor to connect an external device.
1
Use a screwdriver to remove the cover on the
right side of the machine.
2
Screw the handset cradle onto the bracket with
the screws (A). Make sure the groove (B) side
of the cradle faces to the left.
3
Screw the bracket onto the machine with the
screws (A).
4
Place the handset on the cradle.
NOTE
If using the handset or an external telephone, make
sure to set the fax receive mode to <FaxTel> or
<Manual>. For how to set the receive mode, see “Set
the Receive Mode,” on p. 22.
A
B
C
B
A
A
10
Downloaded from ManualsPrinter.com Manuals

English
11
Connect the Power Cord, Turn On the Machine, and Select Language and Country
12 34
Connect the supplied power cord into the rear
socket and the wall outlet and press the [I] side of
the main power switch to ON.
If <DISPLAY LANGUAGE> appears, press []
or [
] to select a language for the LCD, then
press [OK].
If <COUNTRY SELECT> appears, press
[]
or [ ]
to select a country, then press [OK].
The machine enters the standby mode.
What if...
● <CLOSE COVER/FRONT OR LEFT COVER> is displayed:
Make sure that the front or left cover is closed properly.
(See “Install the Toner Cartridge,” on p. 3, or “Install the Drum Unit,” on p. 5.)
● <OUT OF TONER/CHANGE TONER> is displayed:
Make sure that the toner cartridge is installed properly.
(See “Install the Toner Cartridge,” on p. 3.)
● <DRUM IS NOT SET/INSERT THE DRUM> is displayed:
Make sure that the drum unit is installed properly.
(See “Install the Drum Unit,” on p. 5.)
● <LOAD PAPER> is displayed:
Make sure that paper is loaded in the paper drawer properly.
(See “Load Paper,” on p. 7.)
WARNING
This product emits low level magnetic flux. If you use a
cardiac pacemaker and feel abnormalities, please move
away from this product and consult your doctor.
NOTE
– During electr ical storms, disconnect the power cord
from the power outlet. (Please note that any
documents stored in the machine’s memory will be
deleted when you unplug the power cord.)
– Whenever you unplug the machine, wait at least five
seconds before you plug it in again.
– Do not plug the machine into an uninterru ptible power
supply (UPS).
Main power switch
DISPLAY LANGUAGE
ENGLISH
Ex.
COUNTRY SELECT
UK
Ex.
100% A4
TEXT
A
100% AUTO
TEXT
A
01
01
Without optional drawer
With optional drawer
12
Downloaded from ManualsPrinter.com Manuals
English
13
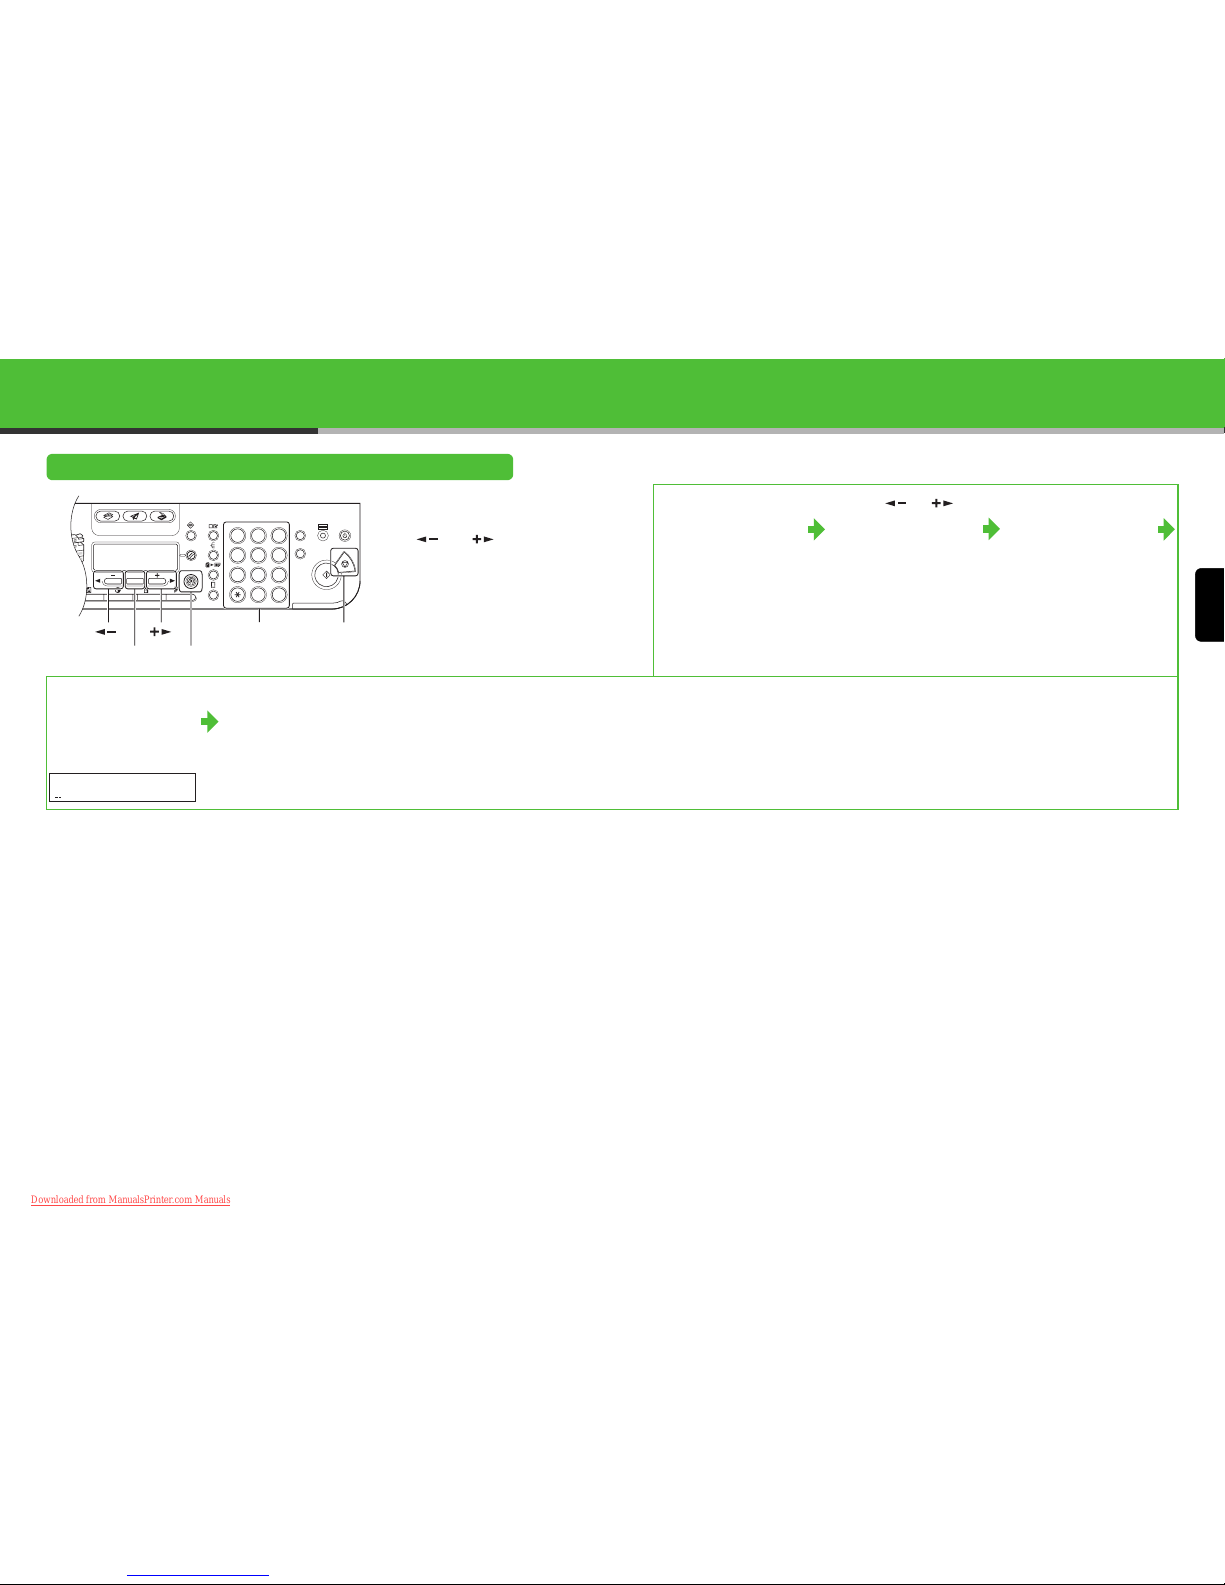
Set the Date and Time
● Entering Information
– Numeric keys: Enter numbers.
– [ ] and [ ]: Move the
cursor position.
1 Press [Additional
Functions].
2 Press [] or [] to
select <6. TIMER
SETTINGS>, then press
[OK].
3
Confirm that
<1. DATE&TIME
SETTING> is displayed,
then press [OK].
4 Use the numeric keys to
enter the date (day/
month/year) and time (in
24-hour format), then
press [OK].
5 Press [Stop] to return to
the standby mode.
1 2 3
C
COPY SEND SCAN
OK
GHI
@./
PQRS
T
JKL
ABC
TUV
MNO
DEF
ON/OFF
WXYZ
1
4
7
2
5
8
0#
3
ID
6
9
◆
Log In/Out
[OK]
[Stop]Numeric Keys[][]
[Additional Functions]
Ex.
DATE&TIME SETTING
31/12 ´06 11:19
14
Downloaded from ManualsPrinter.com Manuals
English
15
Set the Machine for Sending Faxes
(iR1022F/1022iF Only)
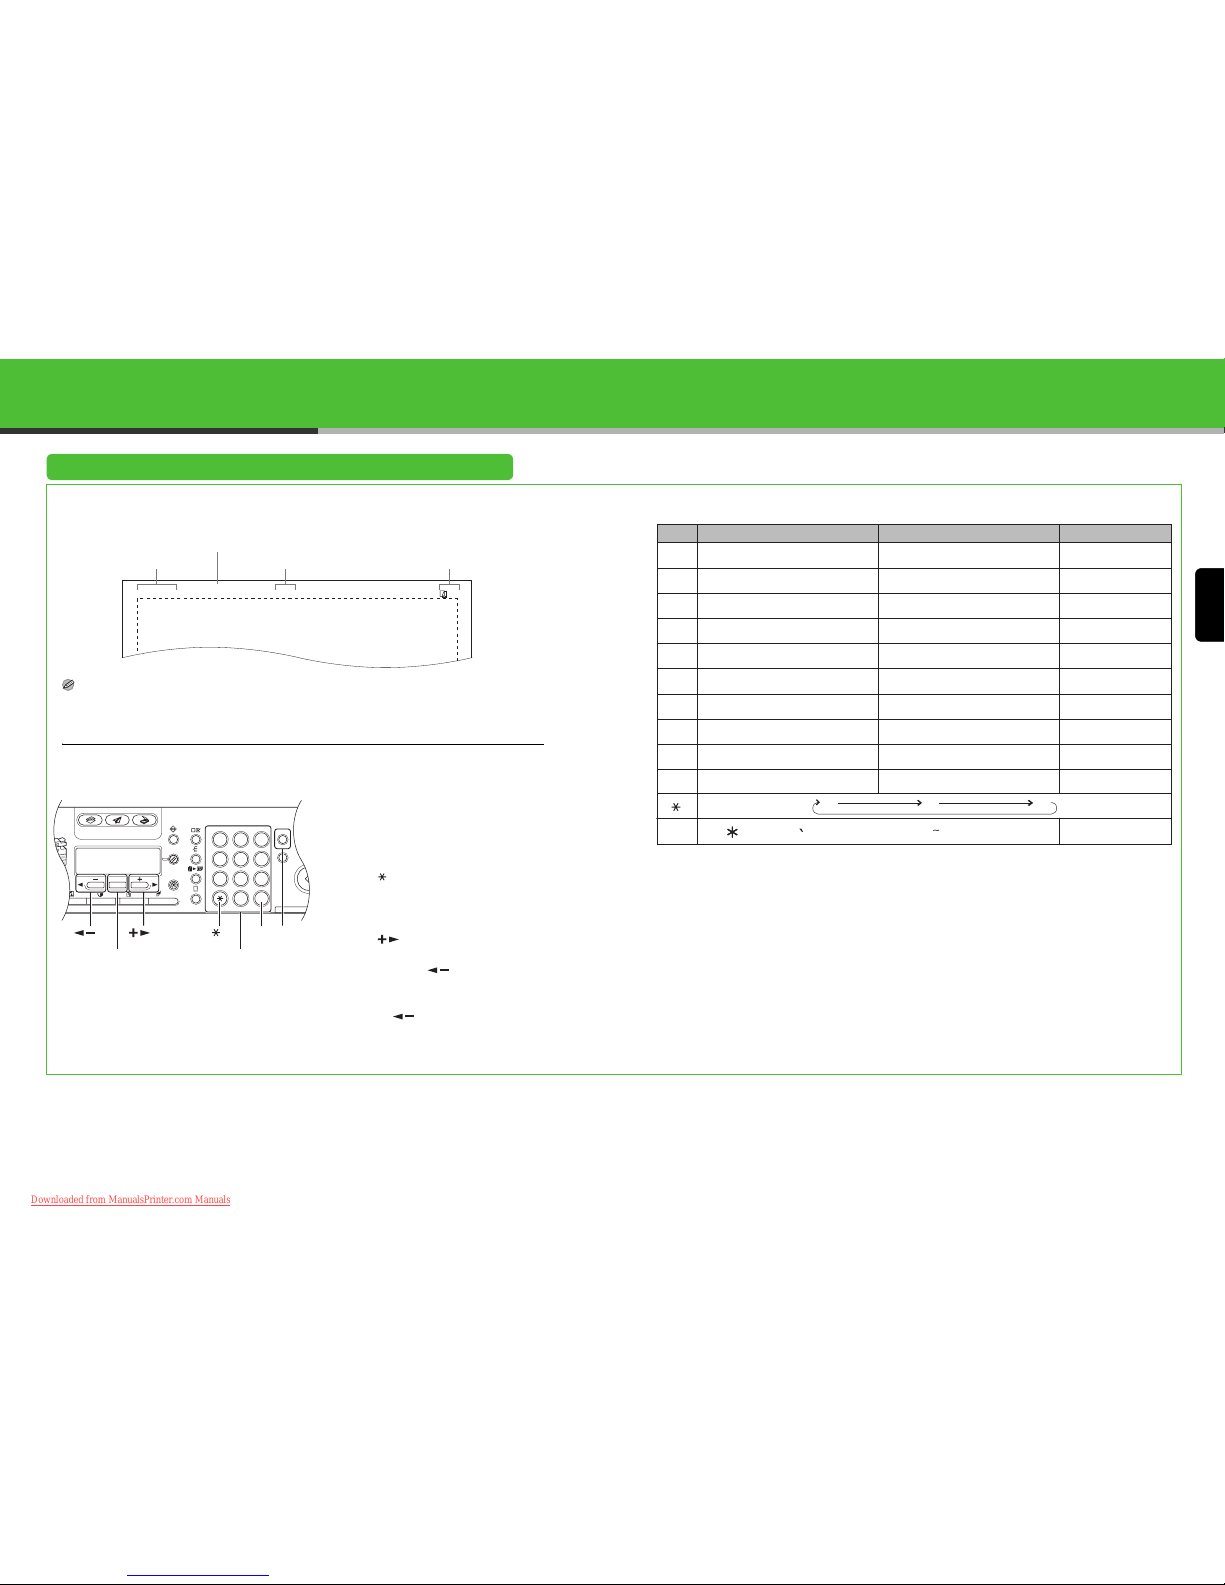
Guidelines for Entering Information
The sender information you register in the machine appears in the header of each page received
by your recipient.
NOTE
Before sending a fax, you MUST register your fax number, unit name, and the current date and time in the machine.
Entering Information
Use the following keys to enter information in the machine.
You can enter the following characters in each input mode:
● Use the numeric keys to enter
characters. Press the numeric key
repeatedly until the required character
appears.
● Press [#] to enter symbols.
● Press [ ] to switch among input modes:
– [:A]: Letter (uppercase) mode
– [:a]: Letter (lowercase) mode
– [:1]: Number mode
● Press [ ] to move the cursor position
right.
● Press [Clear] or [ ] to delete the
character before the cursor position.
Hold [Clear] to delete the entire entry.
Pressing [ ] and [Clear] for entering
the unit name moves the cursor left and
deletes the character at the position.
● Press [OK] to confirm the entry.
CANON
0001
31/12 2006 10:50 FAX 123XXXXXXX
Date and time
Fax/telephone number
Unit name
Page number
:1
:A
:a
[1] @.-_/ @.-_/
1
[2] ABC abc 2
[3] DEF def 3
[4] GHI ghi 4
[5] JKL jkl 5
[6] MNO mno 6
[7]
PQRS pqrs
7
[8]
TUV tuv
8
[9]
WXYZ wxyz
9
[0] 0
[ ]
[#]
– . # ! " , ; : ^ _ = / | ’ ? $ @ % & + \ ( ) [ ] { } < >
:1
:a
:A
1 2 3
C
COPY SEND SCAN
OK
GHI
@./
PQRS
T
JKL
ABC
TUV
MNO
DEF
WXYZ
1
4
7
2
5
8
0#
3
ID
6
9
◆
Log In/Out
[] [#]
[OK]
[Clear]
Numeric Keys
[][]
16
Downloaded from ManualsPrinter.com Manuals
English
17
Register Sender Information
● Entering Information
– Numeric keys: Enter letters and
numbers.
– [ ]: Enter symbols.
– [ ]: Switches letter and
number input modes.
– [ ]: Move the cursor
position right.
– [Clear]/[ ]: Deletes the
character before the cursor
position. Hold [Clear] to delete
the entire entry.
Pressing [ ] and [Clear] for
entering the unit name moves
the cursor left and deletes the
character at the position.
1 Press [Additional
Functions].
2 Press [] or [] to
select <3. TX/RX
SETTINGS>, then press
[OK].
3 Press [ ] or [ ] to
select <2. FAX
SETTINGS>, then press
[OK].
4
Confirm that <1. USER
SETTINGS> is
displayed, then press
[OK].
5 Confirm that <1. UNIT
TELEPHONE #>
is
displayed
, then press
[OK].
6 Use the numeric keys to
enter your fax/telephone
number (max. 20 digits,
including spaces), then
press [OK].
7 Press [Additional
Functions] twice.
8 Press [] or [] to
select <1. COMMON
SETTINGS>, then press
[OK].
9 Confirm that <1. TX
SETTINGS> is
displayed, then press
[OK].
10 Confirm that <1. UNIT
NAME> is displayed,
then press [OK].
11 Use the numeric keys
to enter the unit name
(up to 24 characters),
then press [OK].
12 Press [Stop] to return
to the standby mode.
1 2 3
C
COPY SEND SCAN
OK
GHI
@./
PQRS
T
JKL
ABC
TUV
MNO
DEF
ON/OFF
WXYZ
1
4
7
2
5
8
0#
3
ID
6
9
◆
Log In/Out
[OK]
[Stop]
Numeric Keys
[]
[]
[Additional Functions]
[Clear][]
[]
Ex.
UNIT TELEPHONE #
Ex.
UNIT NAME :a
18
Downloaded from ManualsPrinter.com Manuals
English
Set the Telephone Line Type
1 Press [Additional
Functions].
2 Press [ ] or [ ] to
select <3. TX/RX
SETTINGS>, then press
[OK].
3 Press [] or [] to
select <2. FAX
SETTINGS>, then press
[OK].
4 Confirm that <1. USER
SETTINGS> is
displayed, then press
[OK].
5 Press [] or [] to
select <2. TEL LINE
TYPE>, then press [OK].
6 Press [ ] or [ ] to
select the telephone line
type, then press [OK].
<TOUCH TONE>: Tone dialing
(default)
<ROTARY PULSE>: Pulse dialing
7 Press [Stop] to return to
the standby mode.
19
20
Downloaded from ManualsPrinter.com Manuals

English
Set the Machine for Receiving Faxes
(iR1022F/1022iF Only)
Select the Receive Mode that Suits Your Needs
Follow the chart below to determine the correct receive mode for your needs.
NOTE
– The answering machine must be connected directly to the machine for <AnsMode> to work.
– The optional handset or an external telephone must be connected to the machine for <FaxTel> or <Manual> to work.
– Voice mail is not supported with <AnsMode>.
Do you intend to use the machine to
receive voice calls?
No
<FaxOnly>
Answers all calls as faxes.
Do you intend to use an answering
machine with the machine?
Yes <AnsMode>
Receives faxes automatically
and records voice messages.
Do you intend to receive faxes
automatically?
No
<Manual>
Does not answer any calls.
You have to manually receive
faxes.
<FaxTel>
Switches between fax and
voice calls automatically if a
telephone is connected to the
machine.
Yes
No
Yes
Set the Receive Mode
1 Press [Additional
Functions].
2 Press [ ] or [ ] to
select <3. TX/RX
SETTINGS>, then press
[OK].
3 Press [] or [] to
select <2. FAX
SETTINGS>, then press
[OK].
4 Press [ ] or [ ] to
select <3. RX
SETTINGS>, then press
[OK].
5 Press [ ] or [ ] to
select <2. RX MODE>,
then press [OK].
6 Press [] or [] to
select the receive mode,
then press [OK].
7 Press [Stop] to return to
the standby mode.
NOTE
For details, see the Advanced
Operation Guide.
21
22
Downloaded from ManualsPrinter.com Manuals
English
23
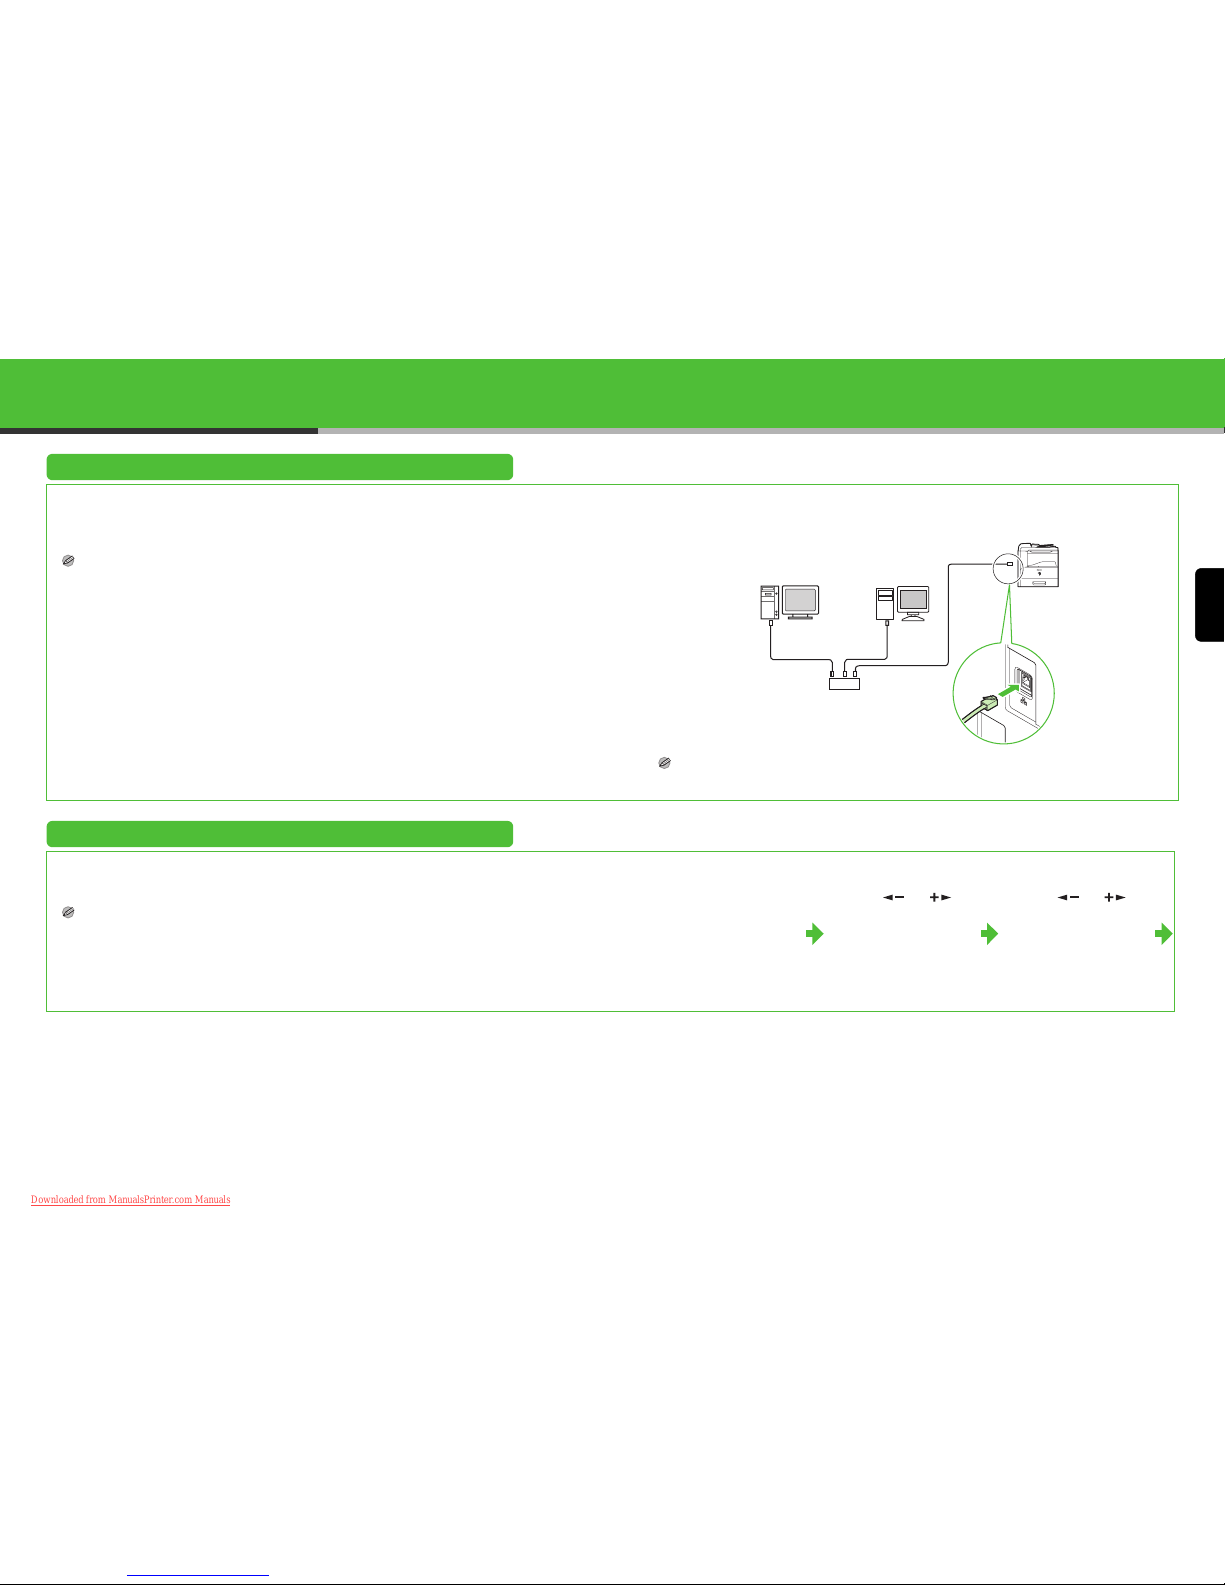
Set the Machine for Network Usage
(iR1022i/1022iF Only)
Connect the Machine to a Network
This machine has a USB connector and LAN connector. If the machine is connected to a network
using a LAN cable, you can use the machine as a network printer, or use functions such as the I-fax
function, which lets you send and receive faxes over the Internet.
NOTE
– The machine does not come with a LAN cable.
– You can use the iR1018/1022A/1022F in a network environment if the optional network board is installed.
1 Connect a Category 5 or greater twisted pair LAN cable to the 10Base-T/100Base-TX port on
the back of the machine. Connect the other end of the cable to a network router or a hub.
NOTE
If you use the machine as a local printer, connect the machine directly to a computer using a USB cable.
(See “Installing/Uninstalling Software (iR1018 and iR1022 Series Only),” on p. 27.)
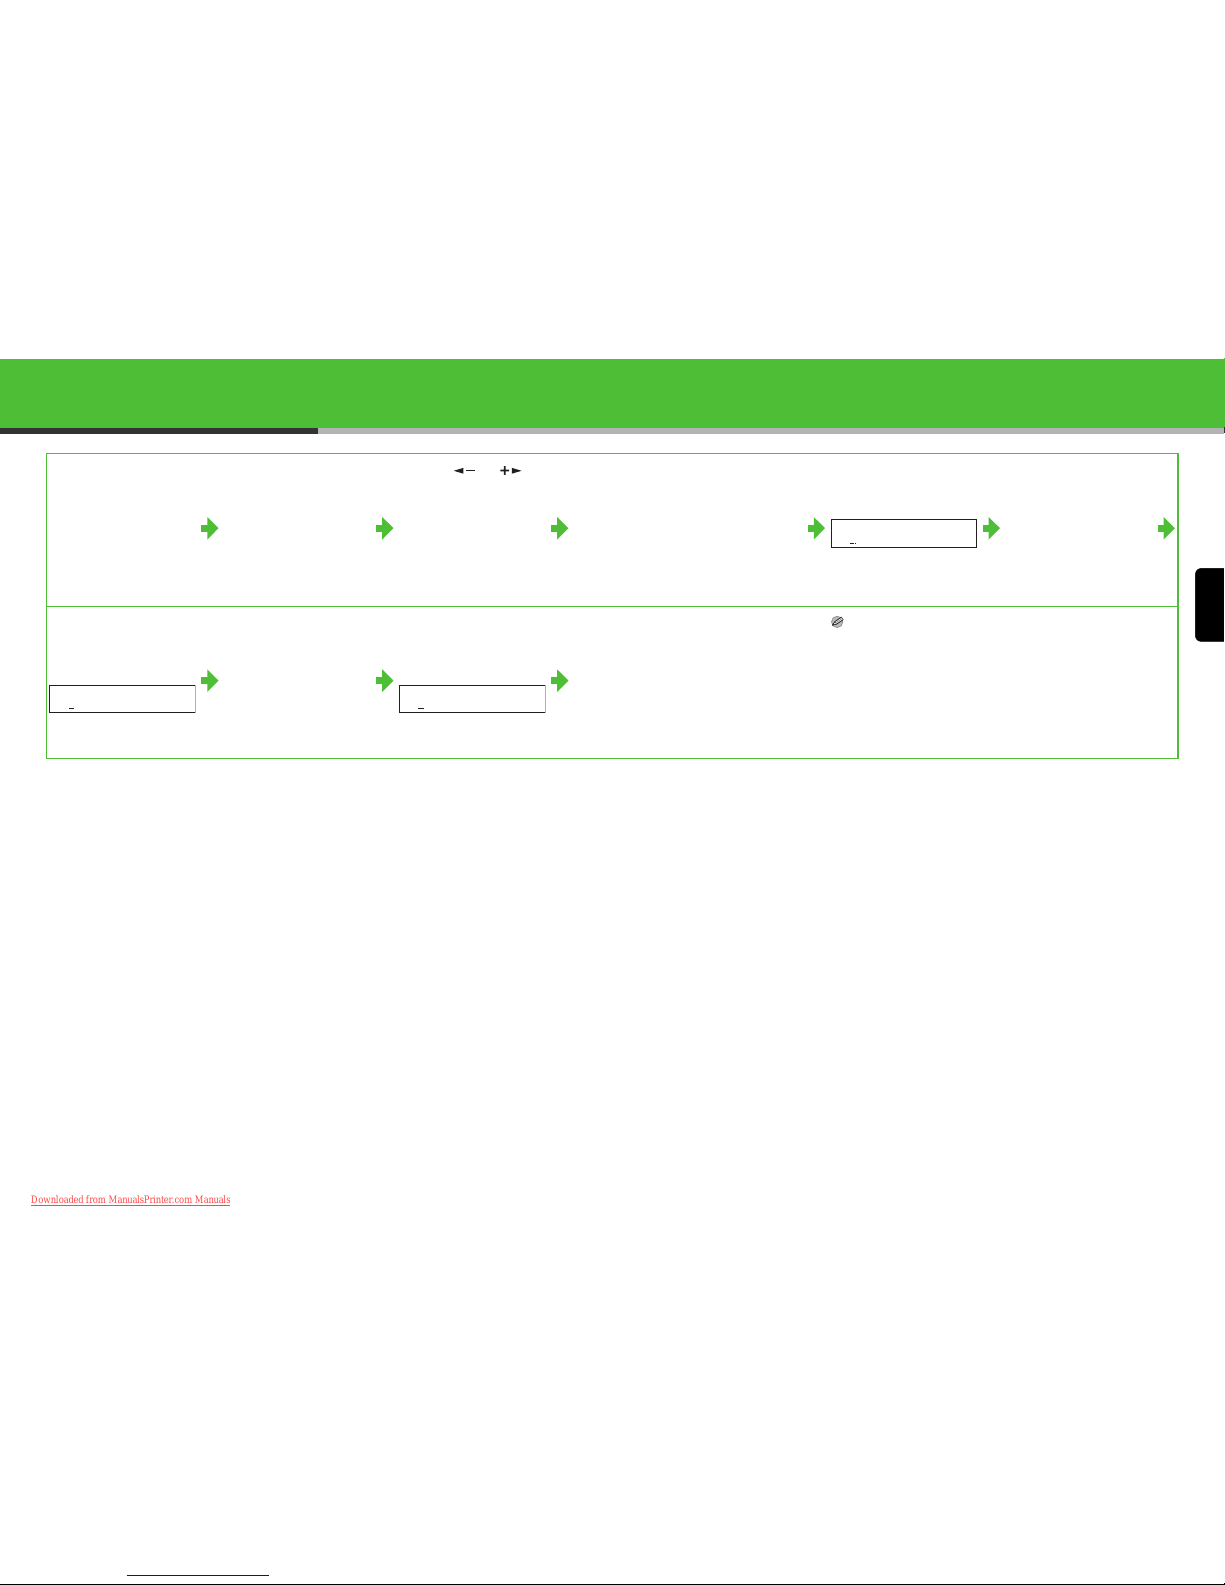
Specify the IP Address Settings
An IP address must be specified in order to enable communication between the machine and a
computer.
NOTE
– Before performing the following procedure, make sure that the machine is turned on and connected to a network.
– This machine is set by default to automatically draw an IP address using DHCP. If your network server or router is
configured to provide a DHCP address, all you need to do is connect a network cable and turn on the machine. The
machine will draw an IP address automatically.
– This ma chine also supports automatic IP addresses using BOOTP and RARP protocols. If you use these protocols,
select <ON> at step 6 of the following procedures, then specify the <2. BOOTP> or <3. RARP> settings.
Specify the IP Address Manually
1 Press [Additional
Functions].
2 Press [ ] or [ ] to
select <9. SYSTEM
SETTINGS>, then press
[OK].
3 Press [ ] or [ ] to
select <5. NETWORK
SETTINGS>, then press
[OK].
PC with
10Base-T Connector
PC with
100Base-TX Connector
Hub
Ethernet Cable
24
Downloaded from ManualsPrinter.com Manuals
English
25
4 Confirm that <1. TCP/IP
SETTINGS> is
displayed, then press
[OK].
5 Confirm that <1. IP
ADDRESS AUTO.> is
displayed, then press
[OK].
6 Press [ ] or [ ] to
select <OFF>, then
press [OK].
7 Confirm that <2. IP
ADDRESS> is
displayed, then press
[OK].
8 Use the numeric keys to
enter the IP address,
then press [OK].
9 Confirm that <3.
SUBNET MASK> is
displayed, then press
[OK].
10 Use the numeric keys
to enter the subnet
mask, then press
[OK].
11 Confirm that
<4. GATEWAY
ADDRESS> is
displayed, then press
[OK].
12 Use the numeric keys
to enter the gateway
address number, then
press [OK].
13 Turn off the main
power on the right side
of the machine, then
turn on the power to
restart the machine.
NOTE
If you send documents via e-mail
and I-fax, specify the
E-MAIL/I-FAX settings. (See
Chapter 3, “Network,” in the
Advanced Operation Guide.)
E
x.
IP ADDRESS
000.000.000.000
Ex.
SUBNET MASK
000.000.000.000
Ex.
GATEWAY ADDRESS
000.000.000.000
26
Downloaded from ManualsPrinter.com Manuals
English
27
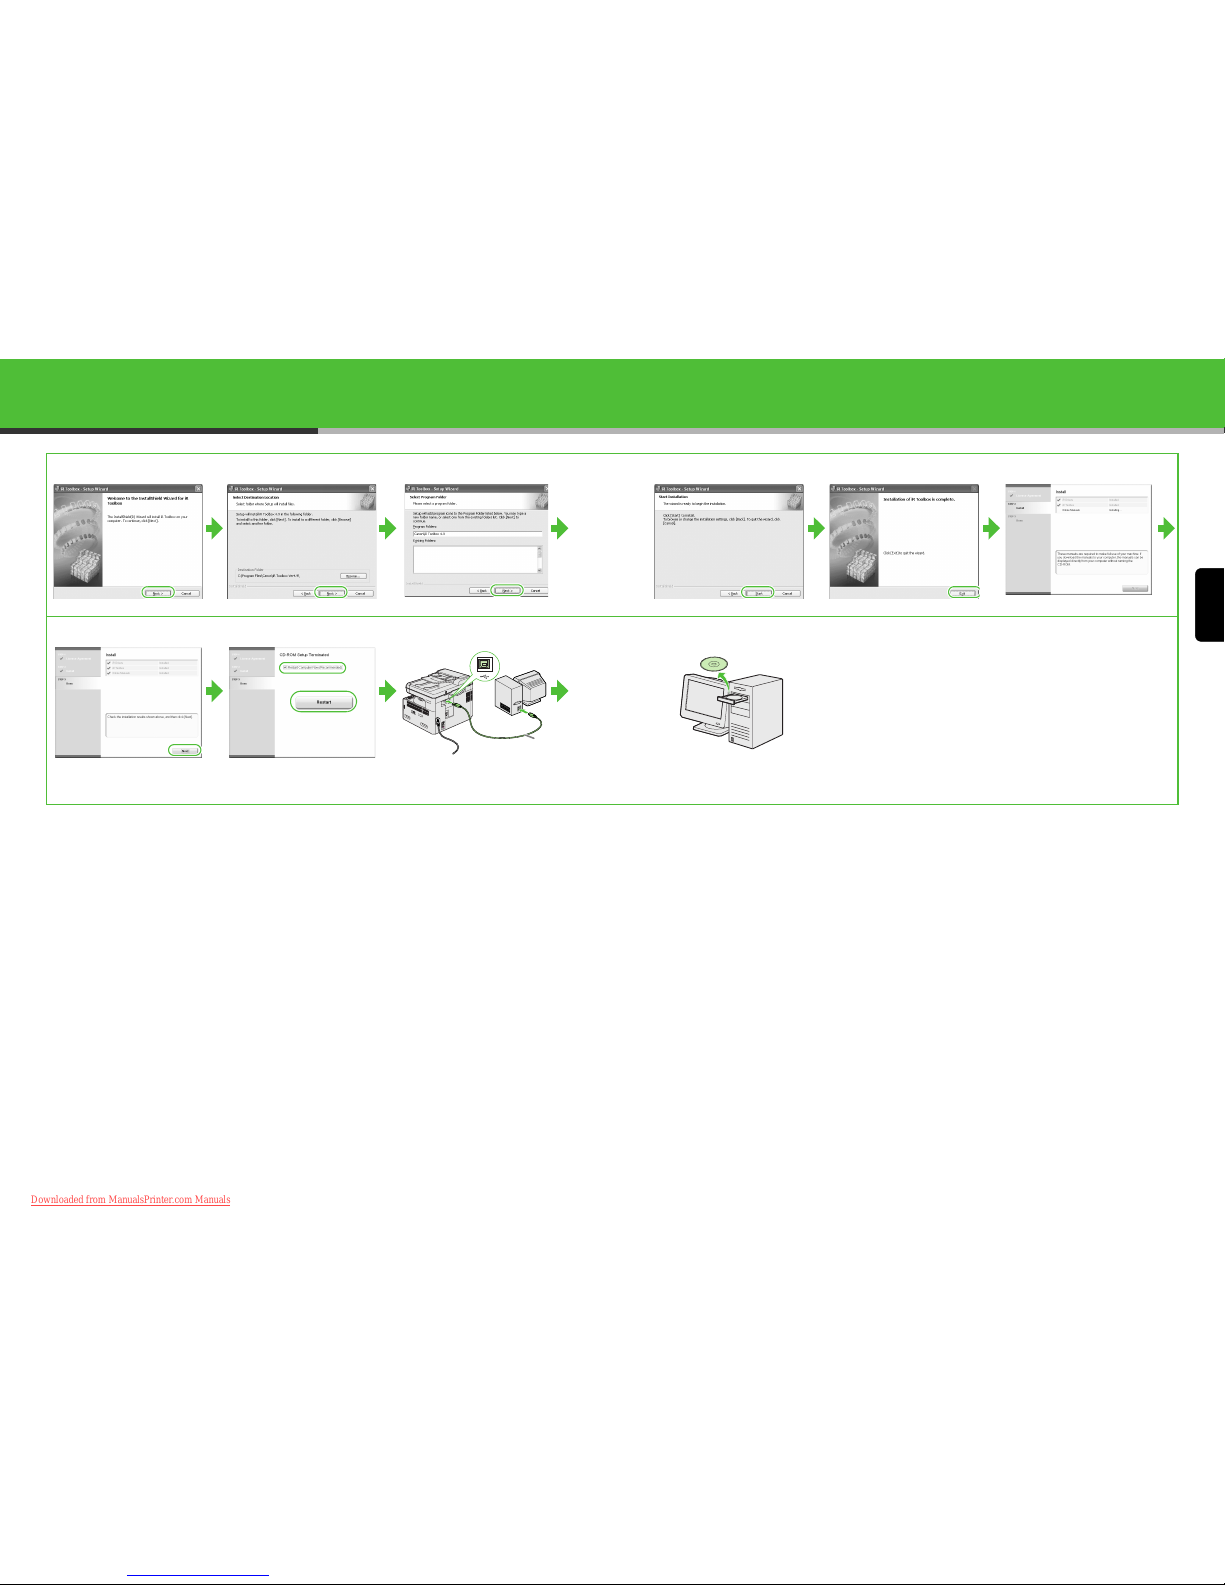
Installing/Uninstalling Software
(iR1018 and iR1022 Series Only)
Installation Procedure
Perform the following procedure to install the printer, fax, and scanner drivers. If you install these
drivers, you can print and send faxes from your computer, and scan documents into your computer.
Printer drivers are divided into two types: PCL and UFRII LT.
● PCL: This is the Hewlett-Packard’s PCL printer driver, which includes the PCL5c, PCL5e, and PCL6
drivers. The PCL5c printer driver is for color printers, while the PCL5e and PCL6 printer drivers are
for black-and-white printers. PCL6 is an advanced version of PCL5e and offers superior printing
quality and speed. This machine supports the PCL5e and PCL6 printer drivers.
● UFRII LT: This is the Canon UFRII LT printer driver. Using this driver, the various data processing
tasks conventionally executed within the printer are appropriately divided between the host PC and
the printer to greatly reduce the overall printing time. The workload can be delegated to match the
output data, thus realizing a significant increase in speed through optimization.
NOTE
– The PCL printer dr iver is optional for iR1018/1022A/1022F. You can use the PCL printer driver if the optional PCL kit is
installed.
– The fax driver is available only for the iR1022F/1022iF.
– The scanner dri ver is available only through a USB connection.
– You can use the iR1018/1022A/1022F as a network printer if the optional network board is installed.
Before Installation:
System Requirements
Microsoft Windows 98/98SE
CPU: Intel Pentium/90 MHz or faster
Memory: 128 MB or more
Available Hard Disk Space: 355 MB or more
Microsoft Windows Me
CPU: Intel Pentium/150 MHz or faster
Memory: 128 MB or more
Available Hard Disk Space: 295 MB or more
Microsoft Windows 2000
CPU: Intel Pentium/133 MHz or faster
Memory: 128 MB or more
Available Hard Disk Space: 1.0 GB or more
USB Connection
• Do not connect the USB cable before installing the
software. If you connect the USB cable before
installing the software and the Found New Hardware
Wizard screen appears, click [Cancel].
• For Windows 2000/XP/Server 2003, logon as
Administrator to install the software.
• Make sure the machine is turned on before
connecting the USB cable.
• On the screen shown at each step, click on the
circled button to proceed.
• The machine does not come with a USB cable.
Microsoft Windows XP (32-bit
version)
CPU: Intel Pentium/Celeron series
300 MHz or faster
Memory: 128 MB or more
Available Hard Disk Space: 1.5 GB or
more
Microsoft Windows Server 2003
(32-bit version)*
CPU: Intel Pentium/Celeron series
133 MHz or faster
Memory: 128 MB or more
Available Hard Disk Space: 2.0 GB or
more
* Only for network connection.
12
If the CD-ROM Setup screen
is not displayed, on the
Windows desktop double-click
[My Computer]. Open the CDROM icon, then double-click
[MInst (MInst.exe)].
34 567
28
Downloaded from ManualsPrinter.com Manuals
English
29
8 9 10 11 12
13 14 15
Connect the machine and
your computer with a USB
cable (A).
16
You have now completed
installation.
A
30
Downloaded from ManualsPrinter.com Manuals
English
31
Network Connection (iR1022i/1022iF Only)
12
If the CD-ROM Setup screen is
not displayed, on the Windows
desktop double-click [My
Computer]. Open the CD-ROM
icon, then double-click [MInst
(MInst.exe)].
3
While installing the software
on a computer running
Windows Server 2003, the
display in this step does not
appear.
4
567 8910
Repeat this step for each
driver that you have selected.
11 12 13 14 15
16 17
You have now completed
installation.
32
Downloaded from ManualsPrinter.com Manuals
English
33
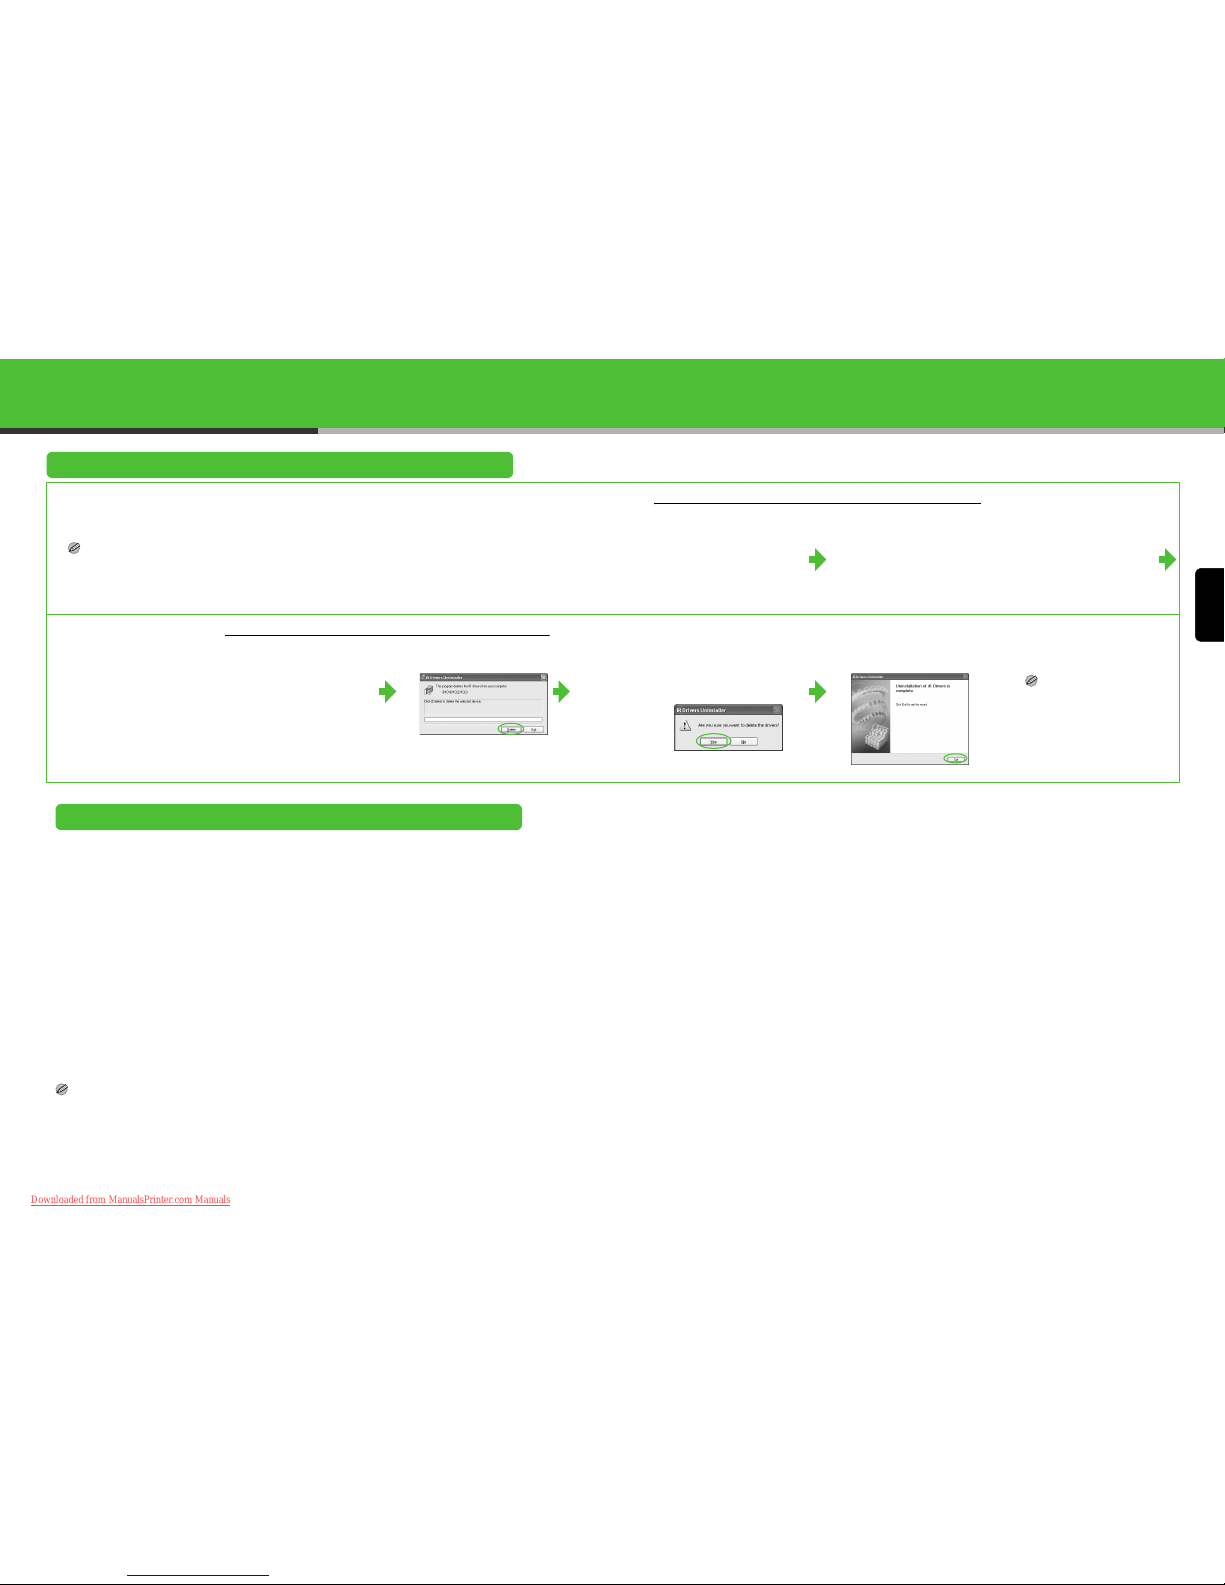
Uninstallation Procedure
Before you uninstall the driver, make sure of the following:
● You have the installation software available for installation.
● No application is running on your computer.
NOTE
– To uninstall the software in Windows 2000/XP/Server 2003, you must be
the user with administrative privileges.
– When uninstalling the software, first uninstall the iR Toolbox, and then
the iR drivers.
Uninstalling the iR Toolbox
1 Click [start] on the
Windows task bar →
[(All) Programs] →
[Canon] → [iR Toolbox
4.9] → [Toolbox
Uninstall].
2 Follow the on-screen
instructions.
When the Repair or Remove program
selection screen is displayed, check
[Remove], then click [Next >].
If asked to confirm removal of an
application etc., click [Remove].
Restart your computer if asked to do
so.
Removing the iR Drivers
3 Click [Exit]. 1 Click [start] on the
Windows task bar →
[(All) Programs] →
[Canon] → [iR1018 1022
1023] → [Uninstall
Drivers].
The [iR Drivers Uninstaller] dialog
box appears.
2 Click [Delete]. 3 Click [Yes].
Uninstallation proceeds
automatically and next dialog box
appears.
4 Click [Exit].
NOTE
Restart your computer if asked to
do so.
Bundled Programs on the User Software CD
● Canon Cover Sheet Editor
The Canon Cover Sheet Editor enables you to create original fax cover sheet templates for use with a
Canon fax driver. For details, see online help for this program.
● NetSpot Device Installer (NSDI)
NetSpot Device Installer enables you to set up the machine for network operations.
For details, see the Readme file and online help for this program.
● Canon Font Manager
Canon Font Manager is utility software that allows you to install and uninstall fonts, etc..
For details, see the Readme file for this program.
● PCL Barcode
30 barcode scalable fonts are included. For details, see the Readme file for this program.
To use these programs, double-click the .exe file for each program, then follow the on-screen
instructions.
For Canon Cover Sheet Editor and NetSpot Device Installer, you can also click [Additional Software
Programs] on the CD-ROM Setup screen to use them.
NOTE
Canon Font Manager and PCL Barcode are available only for PCL printer users.
34
Downloaded from ManualsPrinter.com Manuals

English
35
Using Help
The user software CD includes programs (driver software and application software) which
the supplied instruction guides do not cover. When you utilize such programs, refer to the
online help and context sensitive help following the instructions below.
Online Help
You can locate additional help in the online help
file provided with the driver software. In the
[Properties] dialog box, you can click [Help] to
display information about every feature and
option in the drivers.
In the help dialog box, you can click
[Contents], then double-click your desired
title to display information.
In the help dialog box, you can click
[Index], then double-click your desired
keyword in the list to display information. To
search the desired keyword quickly, enter a
keyword in the upper text box. The nearest
keyword is located in the list below.
Context Sensitive Help
Context sensitive help displays an
explanation of each item in the current
dialog box. Use one of the following
methods to show context sensitive help.
– Click (Help) in the title bar of the
dialog box → click the desired item.
– Right-click the desired item → select
[What’s This?]
– Select the desired item → press [F1]
36
Downloaded from ManualsPrinter.com Manuals
English
37
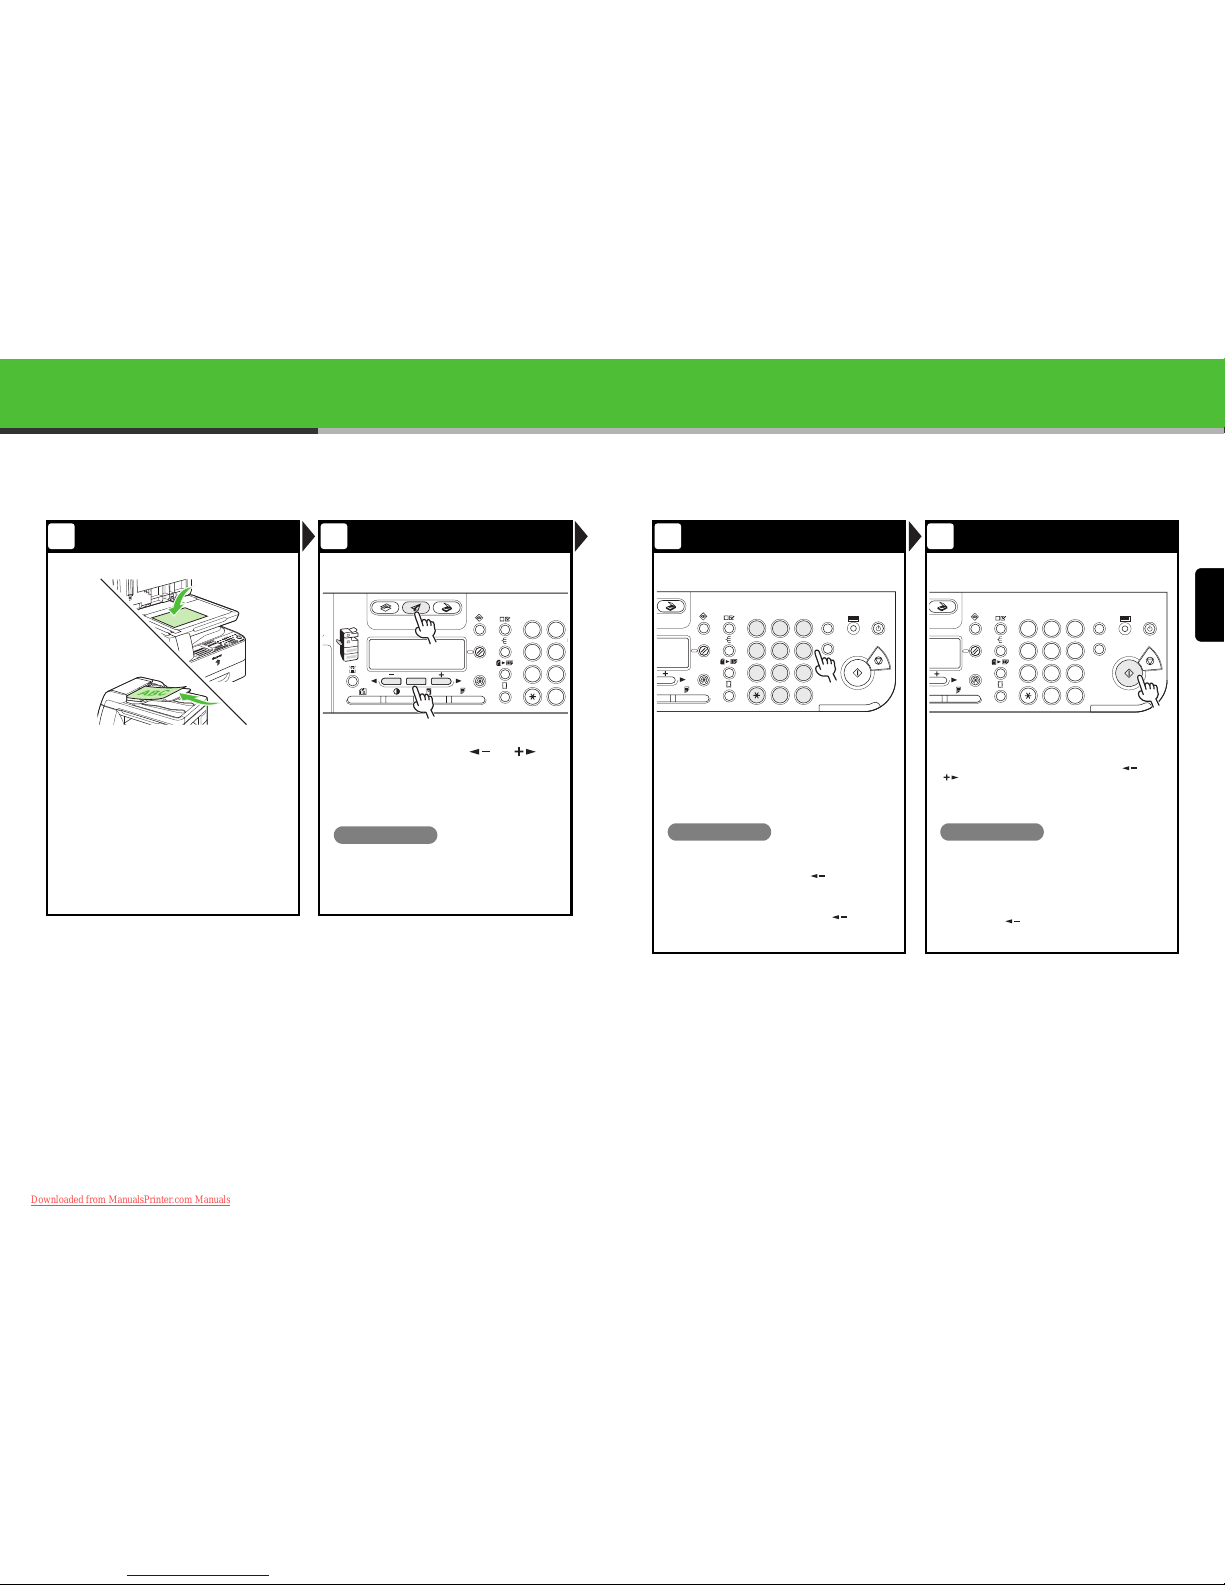
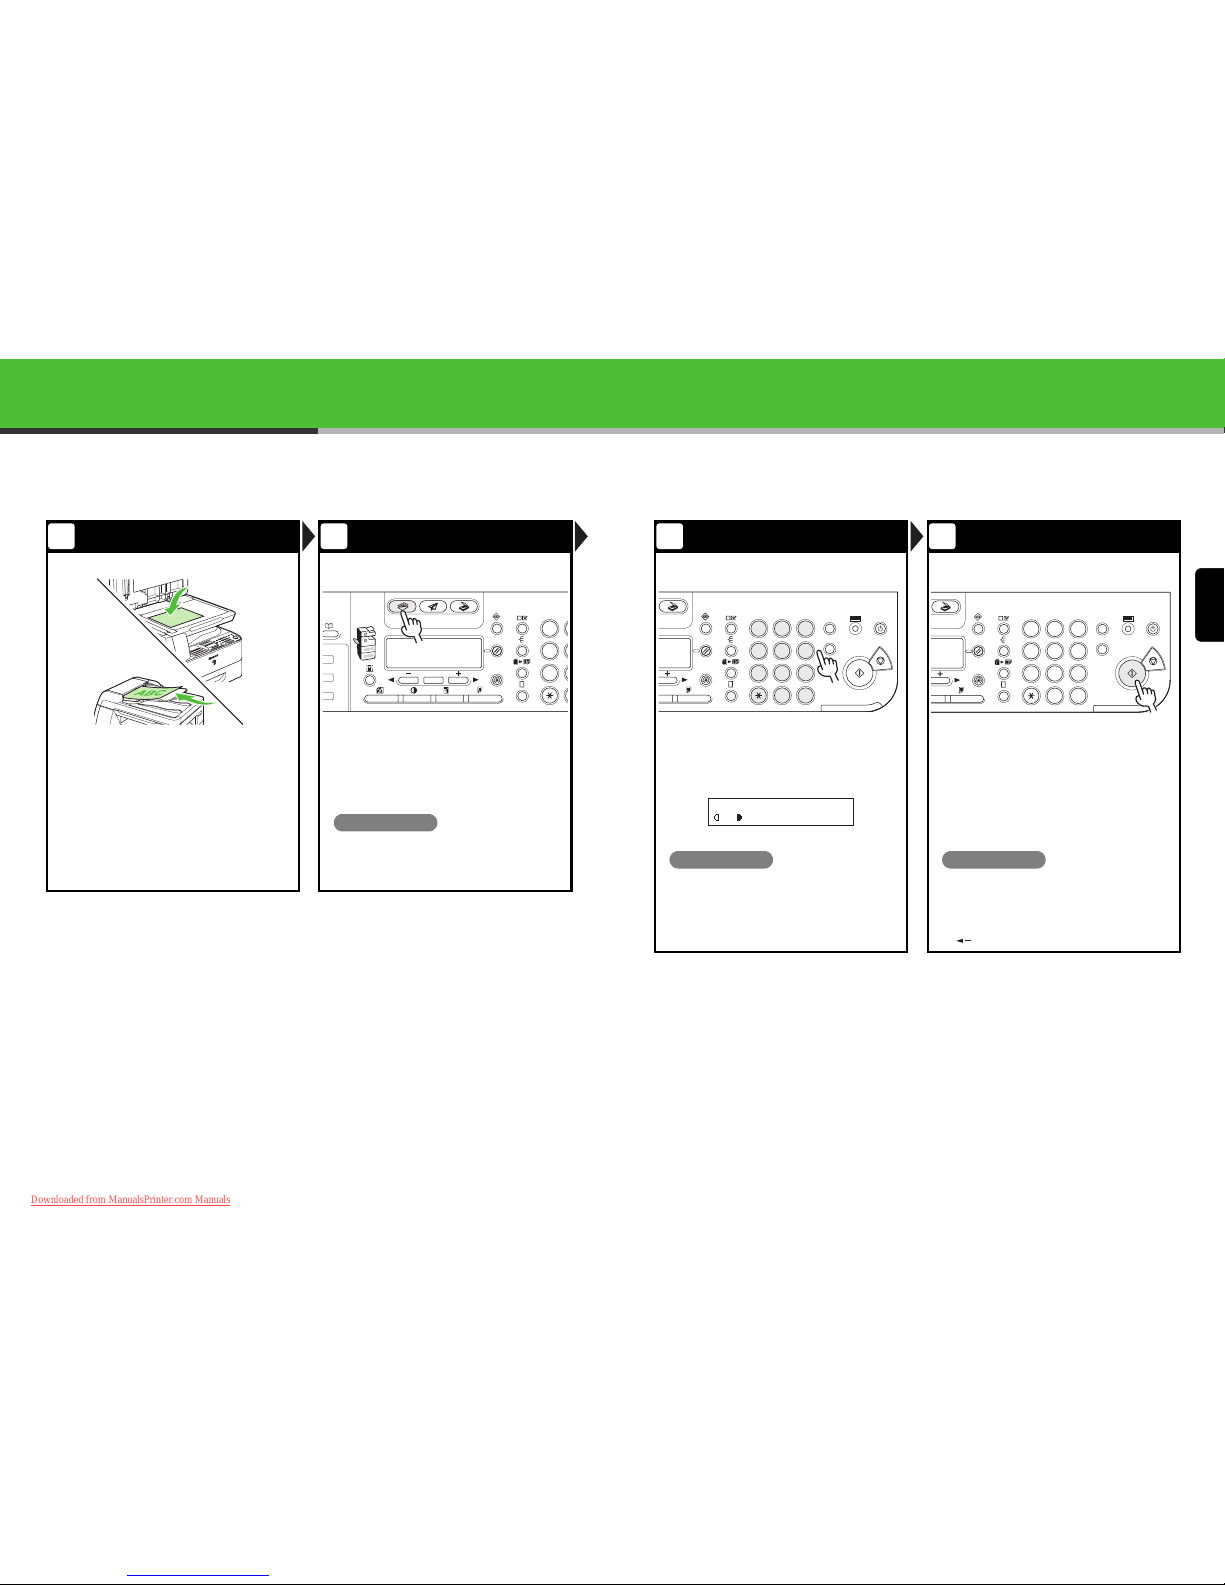
Sending Documents
Follow this procedure to send faxes, e-mails, and I-faxes, or to send documents to a file server.
For advanced sending features, see Chapter 1, “Advanced Send Features,” in the Advanced Operation
Guide.
Set a Document Select the Sending Method
Place the document on the platen glass or
load it in the ADF.
For documents you can send, see Chapter 2, “Document Handling,” in
the Basic Operation Guide.
Press [SEND]/[FAX], press [ ] or [ ] to
select the sending method, then press [OK].
(For the iR1022F, press [FAX].)
The SEND/FAX indicator lights up and the machine enters the send/
fax standby mode.
What if...
● You want to send document to a file server:
You can specify the file server addresses only with
one-touch keys, coded dial codes, or [Address
Book] key. (See Chapter 4, “Sending Documents,” in
the Basic Operation Guide.)
1 2
ABC
COPY SEND SCAN
OK
GHI
@./
PQRS
T
JKL
ABC
TUV
M
W
1
4
7
2
5
8
0
◆
(iR1022F/1022i/1022iF Only)
Specify the Destination Send the Document
Specify the fax number or e-mail/
I-fax address with the numeric keys.
Press [Start].
When you set the documents on the platen glass, press [ ] or
[ ] to select the document size, then press [Start] for each
document. When scanning is complete, press [OK] to start dialing.
What if...
● You enter a wrong number when specifying a fax
number:
Go back to the wrong digit with [ ].
● You enter a wrong character when specifying an
e-mail or I-fax address:
Go back to the wrong character with [ ], then
press [Clear]. Or press and hold [Clear] to delete the
entire entry.
What if...
● You want to cancel sending:
Press [Stop] on the operation panel.
When <STOP KEY PRESSED> appears, press
[OK].
When <CANCEL DURING TX/RX?> appears, select
<YES> with [ ].
3 4
1 2 3
C
SCAN
GHI
@./
PQRS
T
JKL
ABC
TUV
MNO
DEF
ON/OFF
WXYZ
1
4
7
2
5
8
0#
3
ID
6
9
◆
Log In/Out
1 2 3
C
SCAN
GHI
@./
PQRS
T
JKL
ABC
TUV
MNO
DEF
ON/OFF
WXYZ
1
4
7
2
5
8
0#
3
ID
6
9
◆
Log In/Out
38
Downloaded from ManualsPrinter.com Manuals
English
39
Copying
Follow this procedure to make a copy.
For advanced copying features, see Chapter 2, “Advanced Copy Features,” in the Advanced Operation
Guide.
Set a Document Enter the Copy Mode
Place the document on the platen glass or
load it in the ADF.
For documents you can copy, see Chapter 2, “Document Handling,” in
the Basic Operation Guide.
Press [COPY].
The COPY indicator lights and the machine enters the copy standby
mode.
What if...
● You want to adjust the image quality and
density:
See Chapter 6, “Copying,” in the Basic Operation
Guide.
1 2
ABC
COPY SEND SCAN
OK
GHI
@./
PQRS
T
JK
L
AB
C
TU
V
1
4
7
4
Enter the Copy Quantity Start Copying
Enter the copy quantity (1 to 99) with the
numeric key.
Press [Start].
What if...
● You enter a wrong number:
Press [Clear], then enter a new number.
What if...
● You want to cancel copying:
Press [Stop] on the operation panel.
When <STOP KEY PRESSED> appears, press
[OK].
When <CANCEL COPYING?> appears, press
[ ] to select <YES>.
3 4
1 2 3
C
SCAN
GHI
@./
PQRS
T
JKL
ABC
TUV
MNO
DEF
ON/OFF
WXYZ
1
4
7
2
5
8
0#
3
ID
6
9
◆
Log In/Out
100% A4
TEXT
Ex.
A
03
1 2 3
C
SCAN
GHI
@./
PQRS
T
JKL
ABC
TUV
MNO
DEF
ON/OFF
WXYZ
1
4
7
2
5
8
0#
3
ID
6
9
◆
Log In/Out
40
Downloaded from ManualsPrinter.com Manuals
English
41
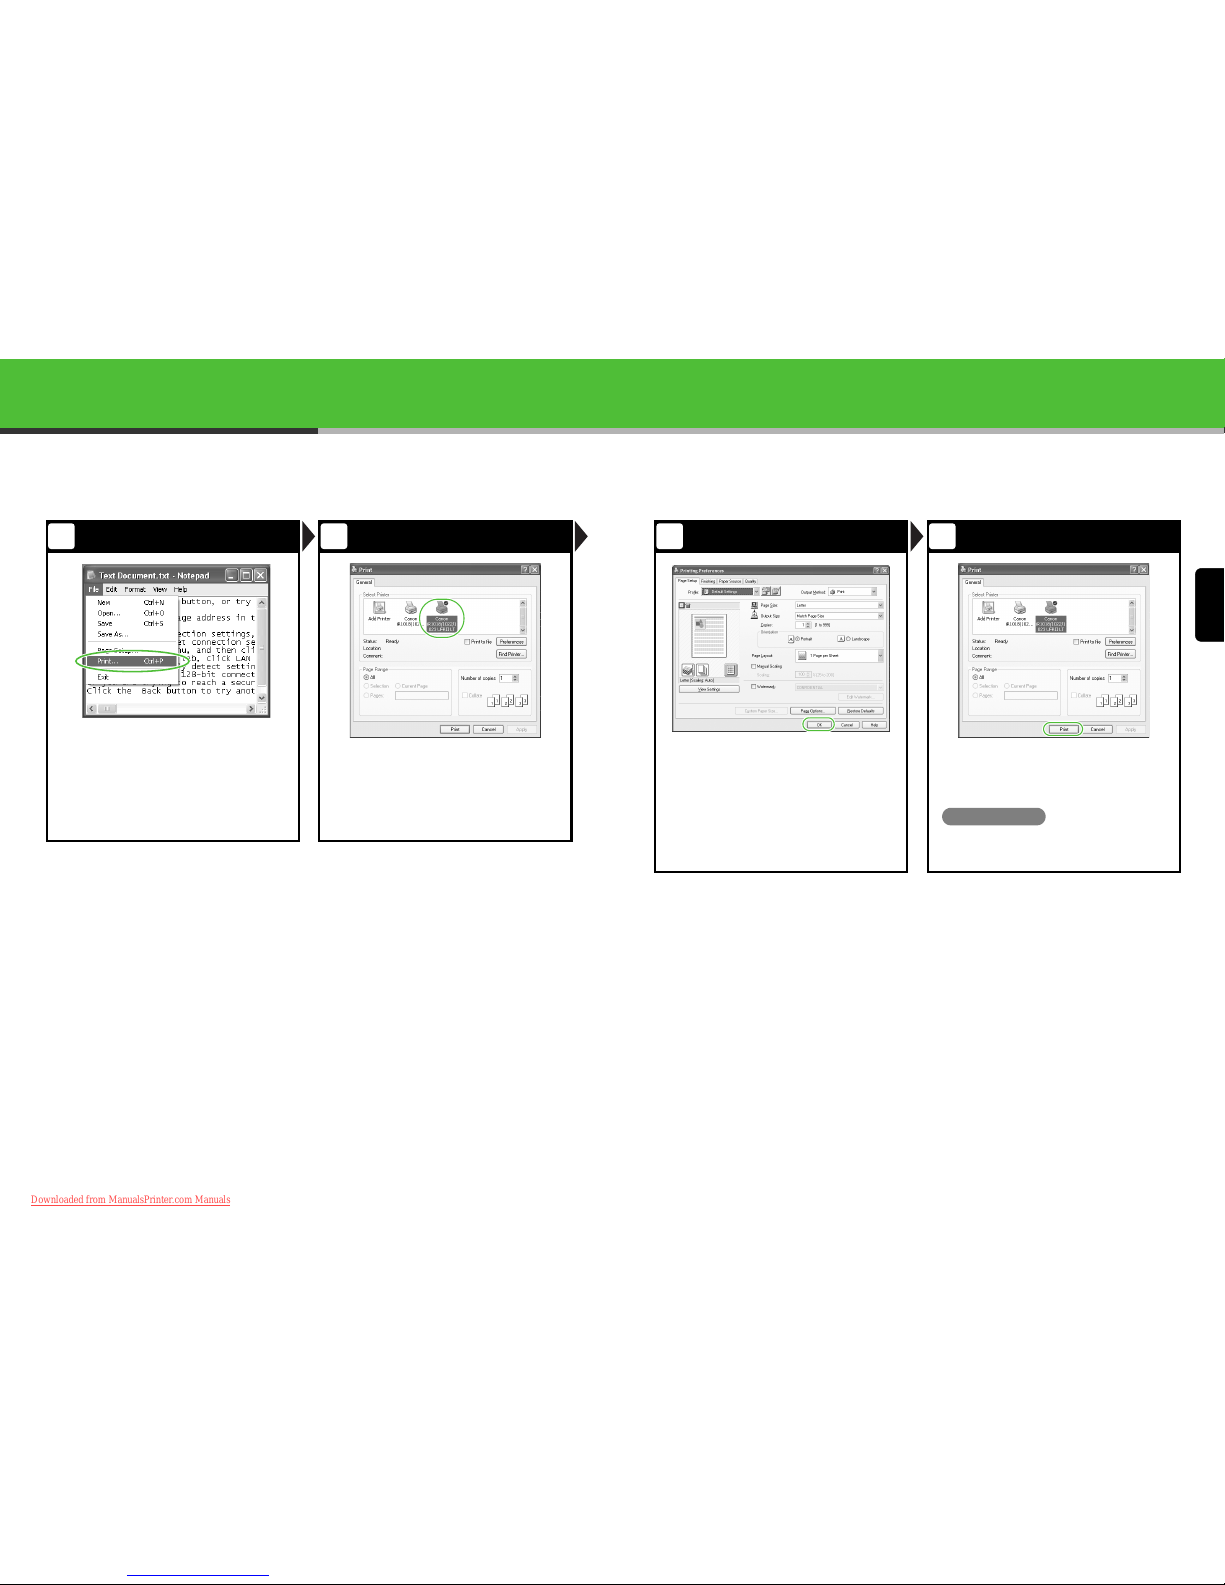
Printing (iR1018 and iR1022 Series Only)
Follow this procedure to print a document from your computer.
Make sure that the printer driver is installed.
For details on the printer driver settings, see online help.
Start the Print Command Select the Printer
From an open document on an application,
click [File] > [Print].
Select the printer icon for the machine
([Canon iR1018/1022/1023 UFRII LT],
[Canon iR1018/1022/1023 PCL5e]*, or
[Canon iR1018/1022/1023 PCL6]*).
*Only for users of the PCL Printer Kit
1 2
Adjust Preferences Print the Document
Click [Preferences] or [Properties] to open
the dialog box. After finished, click [OK].
Click [Print] or [OK].
What if...
● You want to cancel printing:
See Chapter 5, “System Monitor,” in the Advanced
Operation Guide.
3 4
42
Downloaded from ManualsPrinter.com Manuals
English
43
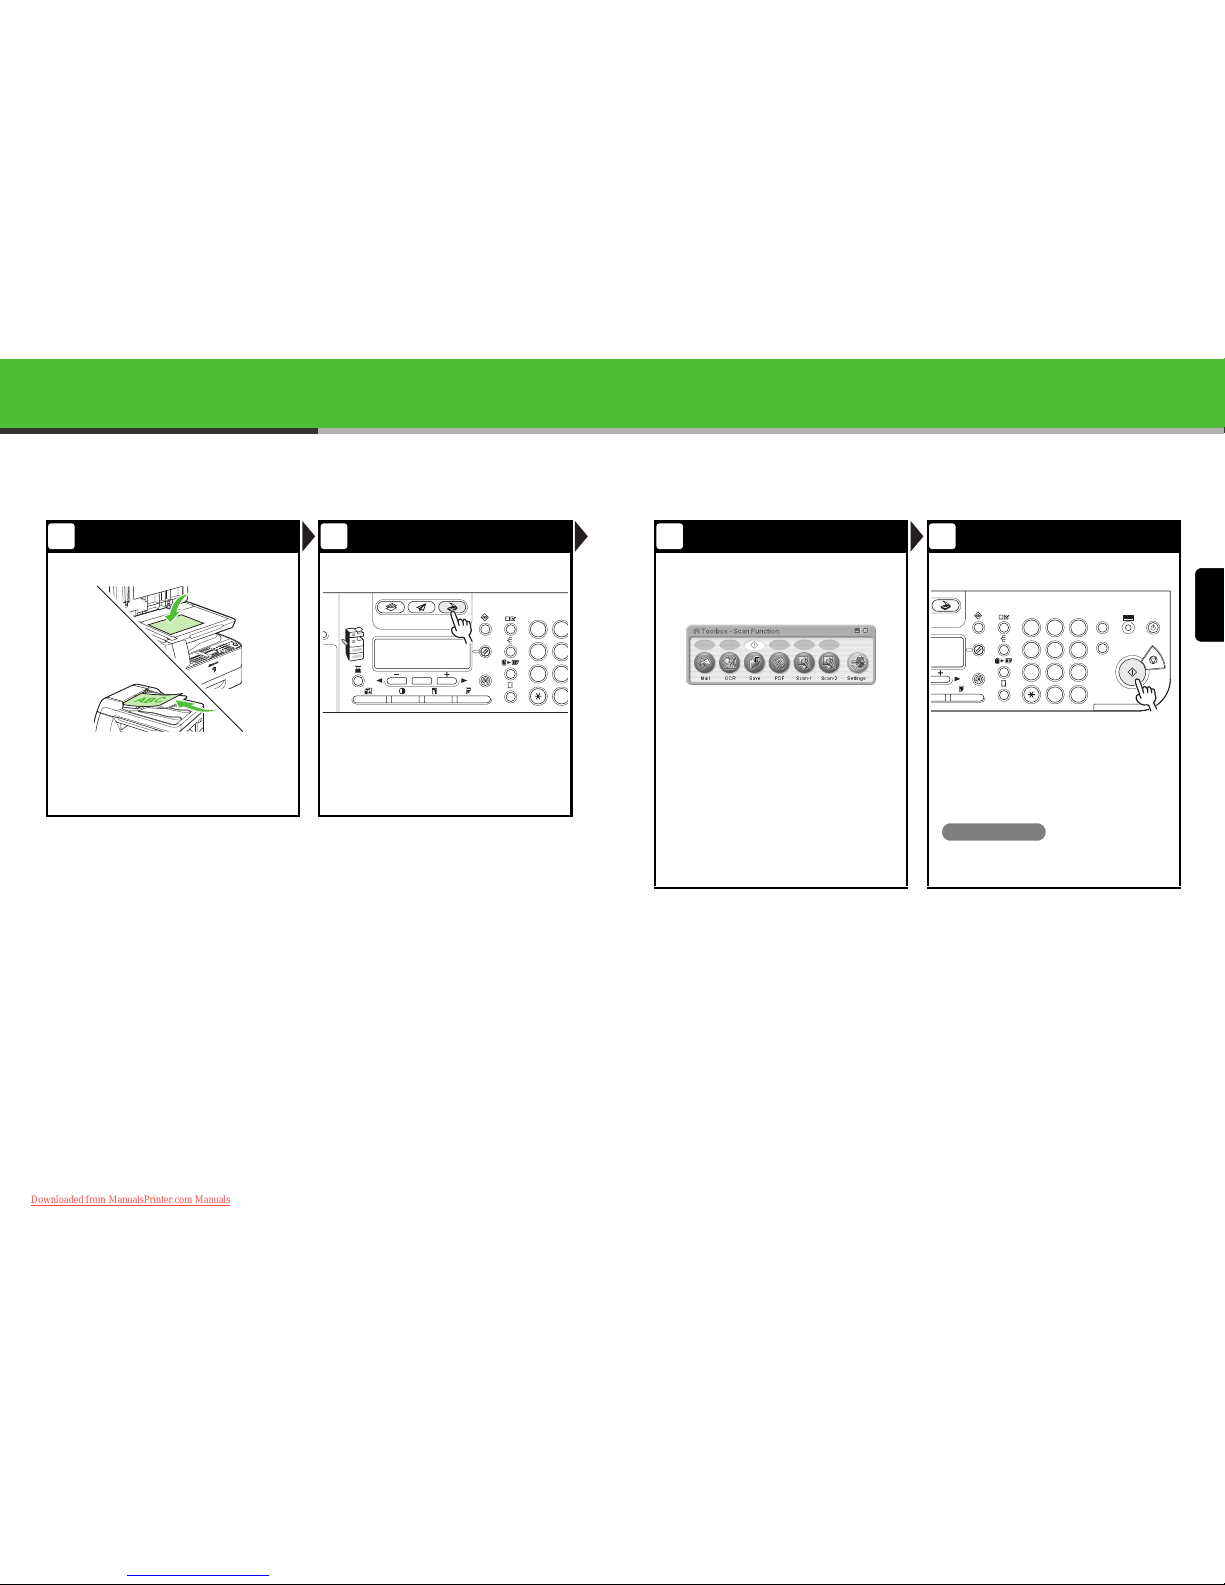
Scanning (iR1018 and iR1022 Series Only)
Follow this procedure to scan a document to your computer.
Make sure that the scanner driver is installed.
For details on the scanner driver settings, see the Scanner Driver Guide (in the User Software CD).
Set a Document Enter the Scan Mode
Place the document on the platen glass or
load it in the ADF.
For documents you can scan, see Chapter 2, “Document Handling,” in
the Basic Operation Guide.
Press [SCAN].
The SCAN indicator lights up and the machine enters the scan
standby mode.
1 2
ABC
COPY SEND SCAN
OK
GHI
@./
PQRS
T
JKL
ABC
TUV
1
4
7
2
5
8
0
Set the Scan Method Start Scanning
Start iR Toolbox, then set the scanning
format.
The mark will be displayed above the button you select.
Press [Start].
What if...
● You want to cancel scanning:
Press [Stop] on the operation panel, then click [OK]
on the computer screen.
3 4
1 2 3
C
SCAN
GHI
@./
PQRS
T
JKL
ABC
TUV
MNO
DEF
ON/OFF
WXYZ
1
4
7
2
5
8
0#
3
ID
6
9
◆
Log In/Out
44
Downloaded from ManualsPrinter.com Manuals
English
45
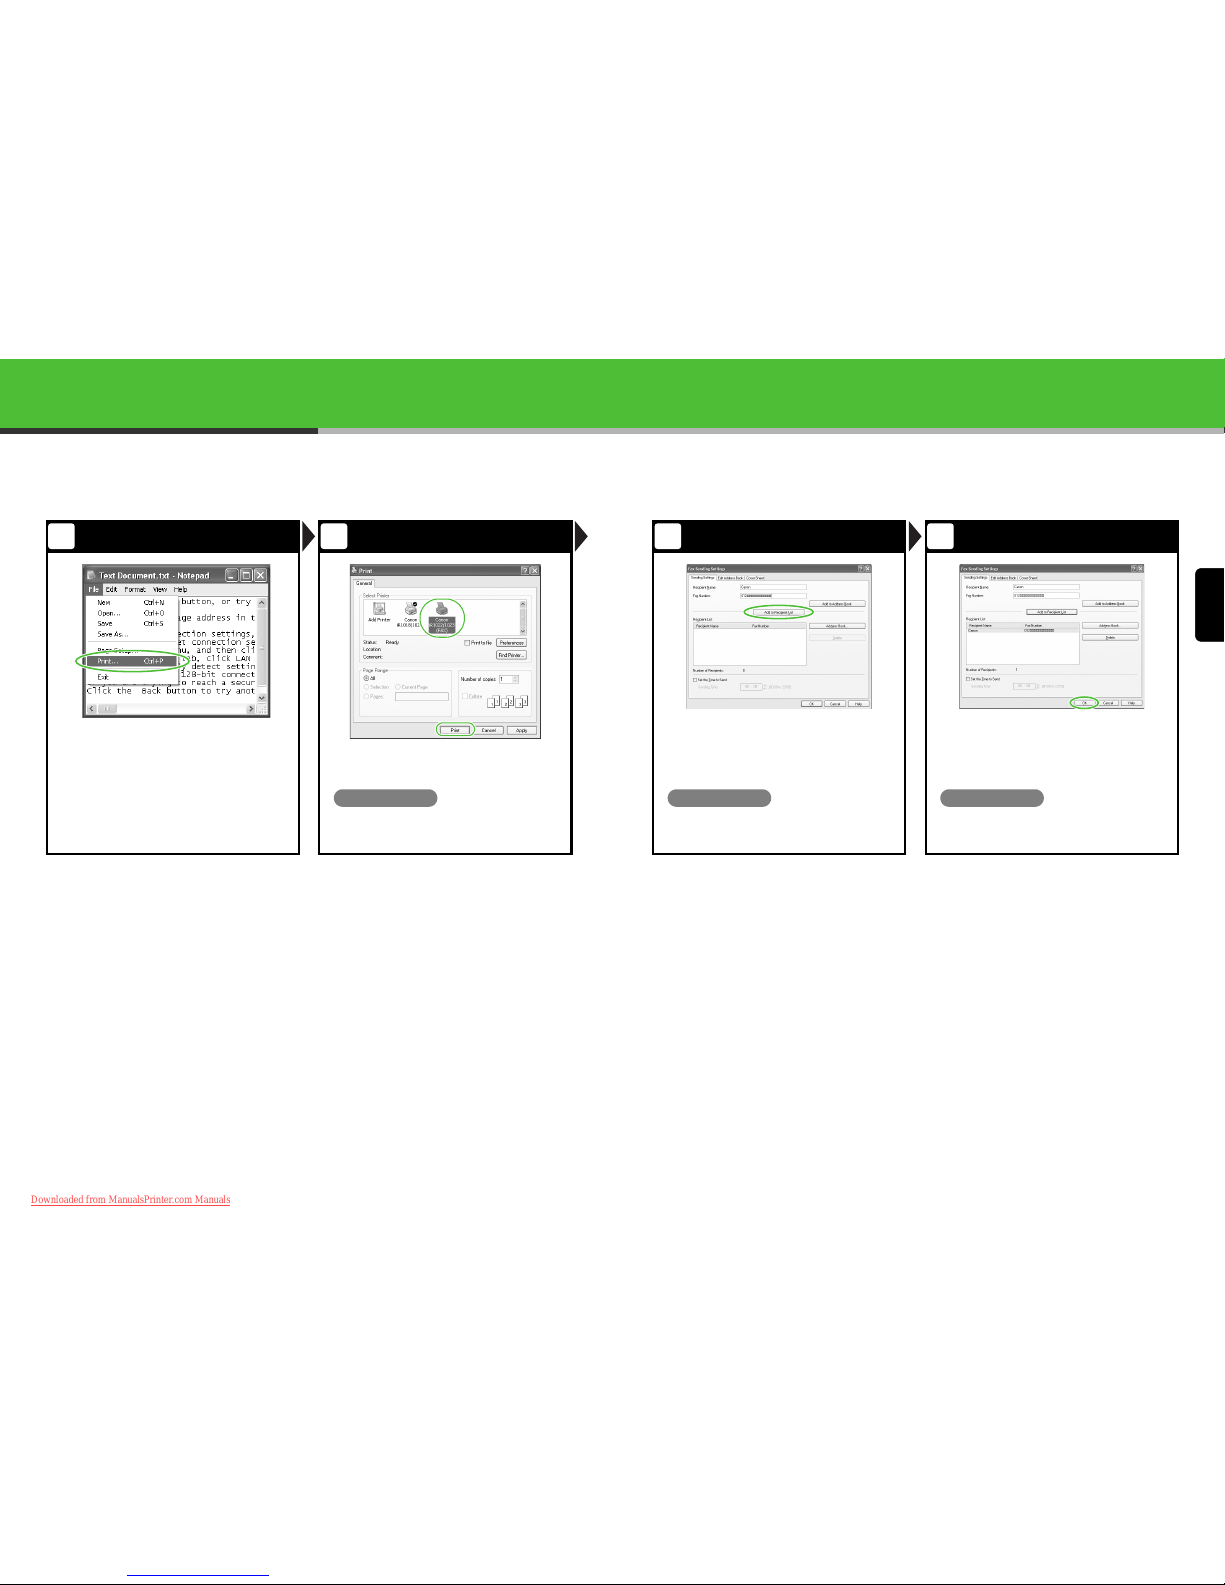
PC Faxing
Follow this procedure to send a fax from your computer.
Make sure that the fax driver is installed.
For details on the fax driver settings, see online help.
Start the Print Command Select the Fax
From an open document on an application,
click [File] > [Print].
Select the fax icon ([Canon iR1022/
1023 (FAX)]), then click [Print] or [OK].
What if...
● You want to adjust the fax properties:
Click [Preferences] or [Properties] and adjust the
settings.
1 2
(iR1022F/1022iF Only)
Set the Destination Send the Document
Specify the name and fax number in [Sending
Settings], then click [Add to Recipient List].
Click [OK] in the Fax Sending Settings.
What if...
● You want to send a fax with a cover sheet:
Click the [Cover Sheet] tab and set the format for the
cover sheet attachment.
What if...
● You want to cancel sending a fax:
See Chapter 5, “System Monitor,” in the Advanced
Operation Guide.
3 4
46
Downloaded from ManualsPrinter.com Manuals
English
47
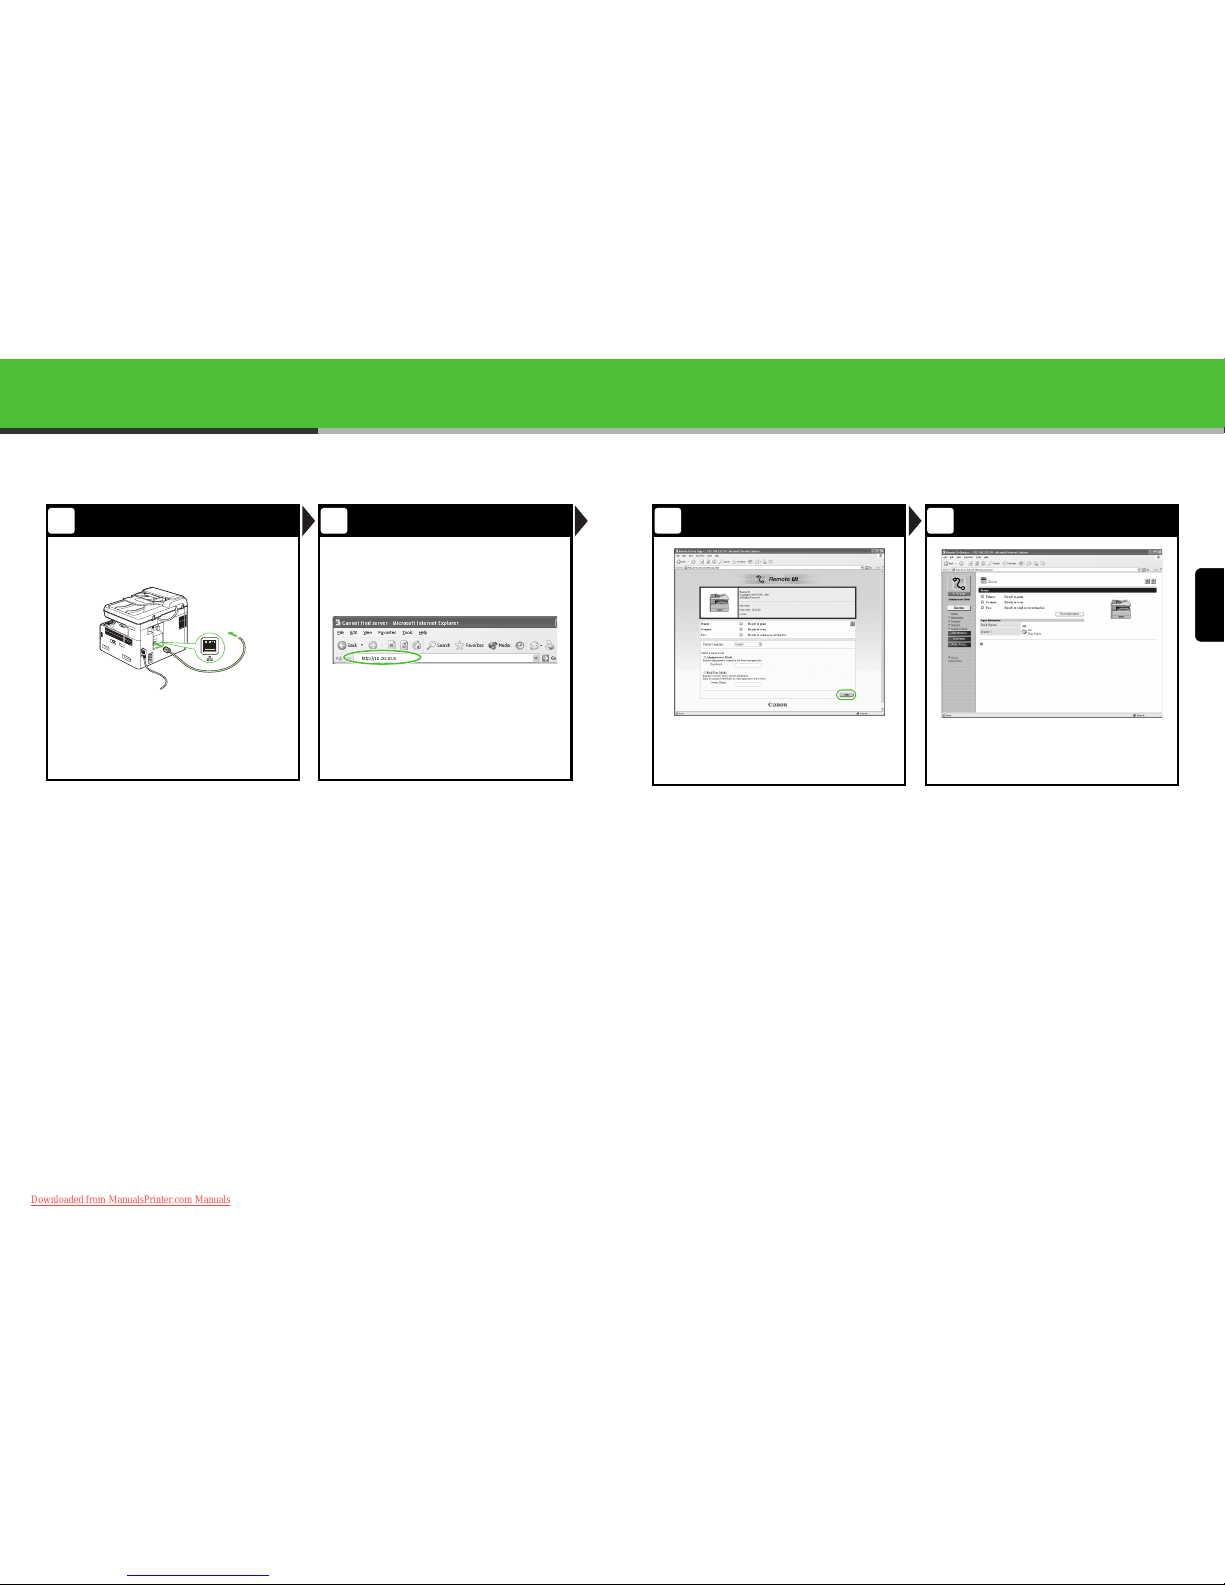
Remote UI
Follow this procedure for Remote UI management.
For details, see Chapter 4, “Remote UI,” in the Advanced Operation Guide.
Prepare the Network Startup
Set up the machine for use in a network, then
connect the machine and the PC to your
network router or a hub.
Start the web browser, enter the IP address of
the machine, then press [Enter] on the
keyboard.
1 2
(iR1022i/1022iF Only)
Log on Operate the Machine
Select the logon mode, then click [OK].
Now you can manage the machine on the
web browser.
For details, see Chapter 4, “Remote UI,” in the Advanced Operation
Guide.
3 4
48
Downloaded from ManualsPrinter.com Manuals
English
49
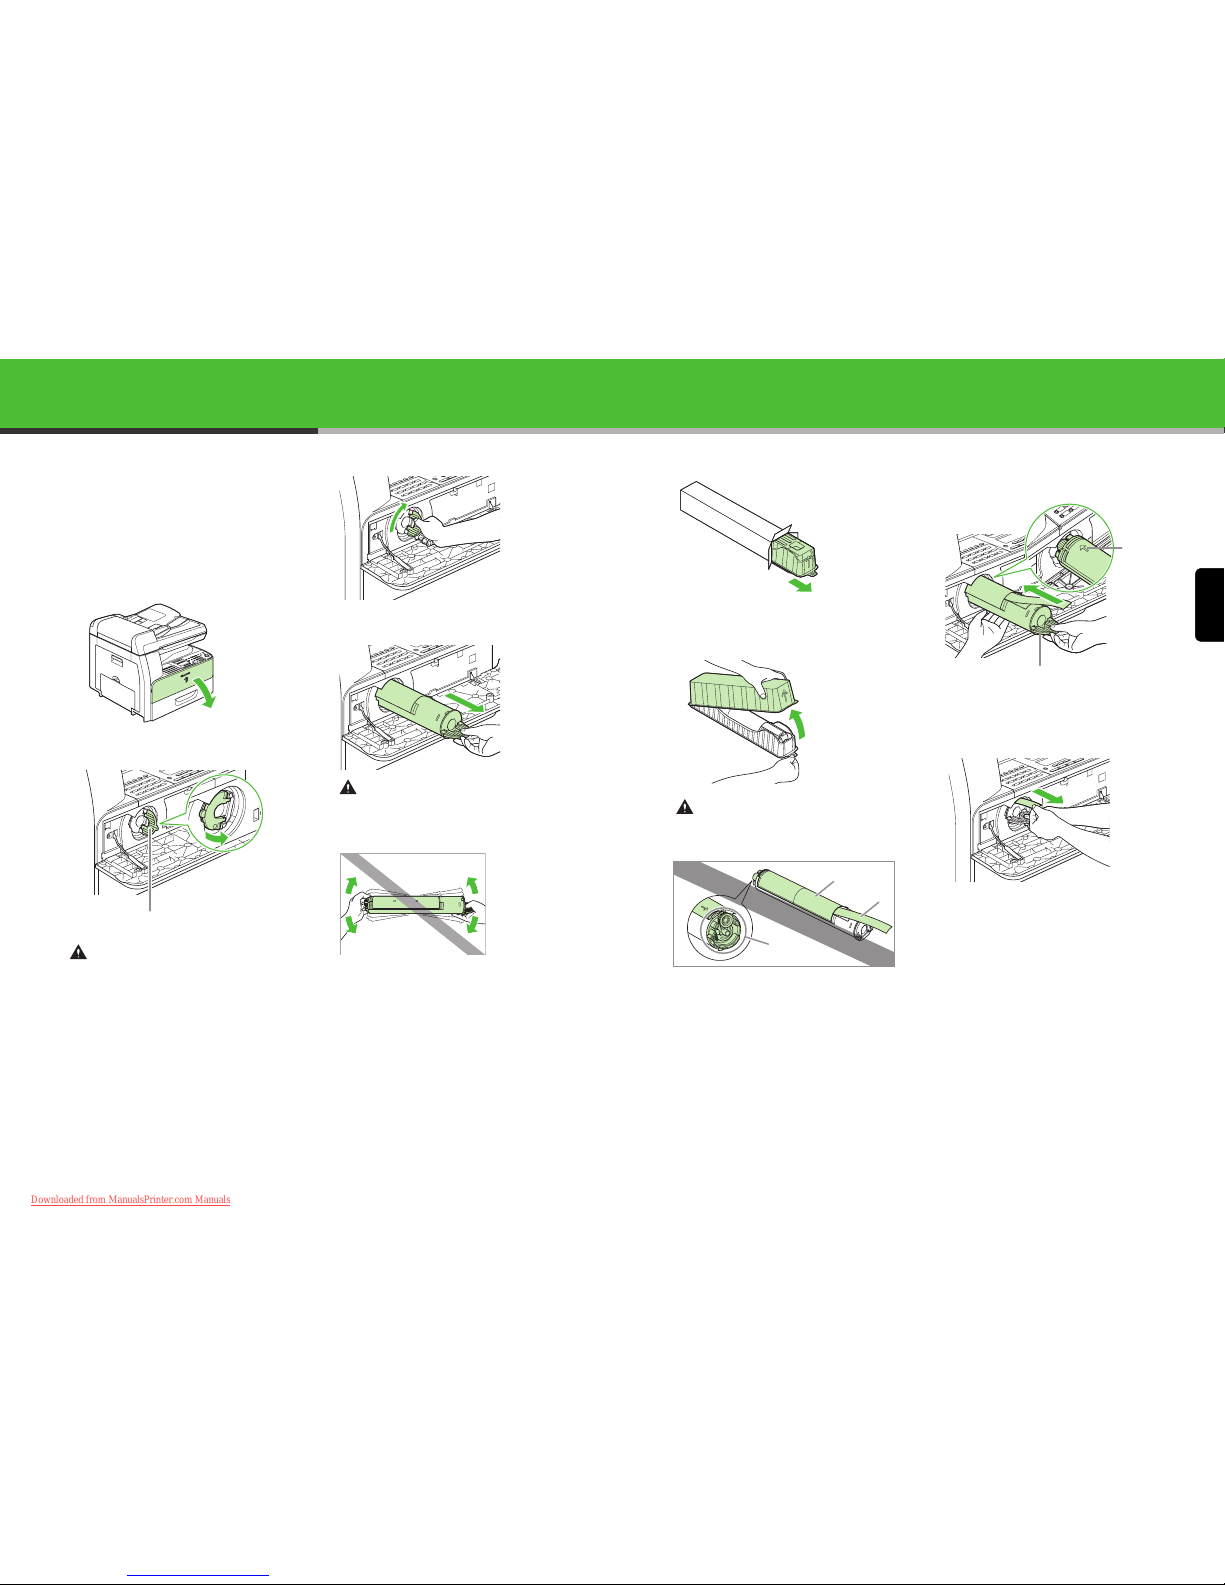
Replacing the Toner Cartridge/Drum Unit
Toner Cartridge
When toner runs out completely and prints can no
longer be made, <OUT OF TONER/CHANGE
TONER> appears on the LCD display. Follow the
procedure described below to help you replace the
toner cartridge.
1 Open the front cover.
2 Pull the toner cartridge lever (A) towards you.
CAUTION
Do not pull the toner cartridge out until <OUT OF
TONER/CHANGE TONER> appears on the LCD display.
3 Turn the lever as far as it will go clockwise.
4 Pull the cartridge out of the machine.
CAUTION
Do not shake the used toner cartridge or hold it in a
vertical position. Doing so may cause the toner to spill.
Put the toner cartridge in the original plastic case for
disposal.
A
5 Remove the plastic case from the box.
6 Open the case and remove the new toner
cartridge.
CAUTION
– Do not touch the por tions (A) and (B).
– Do not pull out the seal (C) before inserting the
cartridge into the machine as the toner may spill out.
7 Pull the toner cartridge lever (A) towards you
and insert the cartridge into the machine with
the arrow (B) pointing towards the machine.
8 Holding the cartridge steady with one hand,
pull out the seal completely with the other
hand.
A
C
B
A
B
50
Downloaded from ManualsPrinter.com Manuals
English
51
9 Turn the lever as far as it will go
counterclockwise.
10Push down the lever.
11Close the front cover.
CAUTION
– Be careful not to get your fingers caught.
– If you cannot close the front cover, do not force it to
close. Open the cover and make sure the toner
cartridge is properly set in the machine.
Drum Unit
When <REPLACE THE DRUM> appears on the
LCD display, replace the drum unit.
WARNING
Do not throw used drum unit into open flames, as they may
ignite the toner remaining inside the unit, and result in burns or
a fire.
CAUTION
If you use the machine without inserting the drum unit
<INSERT THE DRUM> appears on the LCD display. In this
case, turn OFF the main power, and install the drum unit into
the machine.
1 Open the left cover.
2 Holding the grips on the drum unit, slightly
lower and remove it from the machine.
CAUTION
Do not touch the fixing assembly as it becomes very hot
during use.
A
3 Open the package of the new drum unit and
remove the protective packing material (A).
4 Hold the unit by its grips on both sides.
5 Align the marks on both sides of the drum
unit (B) with the marks on the machine (A),
and push the unit into the machine as far as it
will go.
CAUTION
Do not touch the fixing assembly as it becomes very hot
during use.
6 After the unit is completely inserted, remove
the orange paper.
7 Close the left cover.
CAUTION
– Be careful not to get your fingers caught.
– Do not touch the por tion (A) as the image quality of
printouts may deteriorate.
A
BB
A
A
A
52
Downloaded from ManualsPrinter.com Manuals
English
53
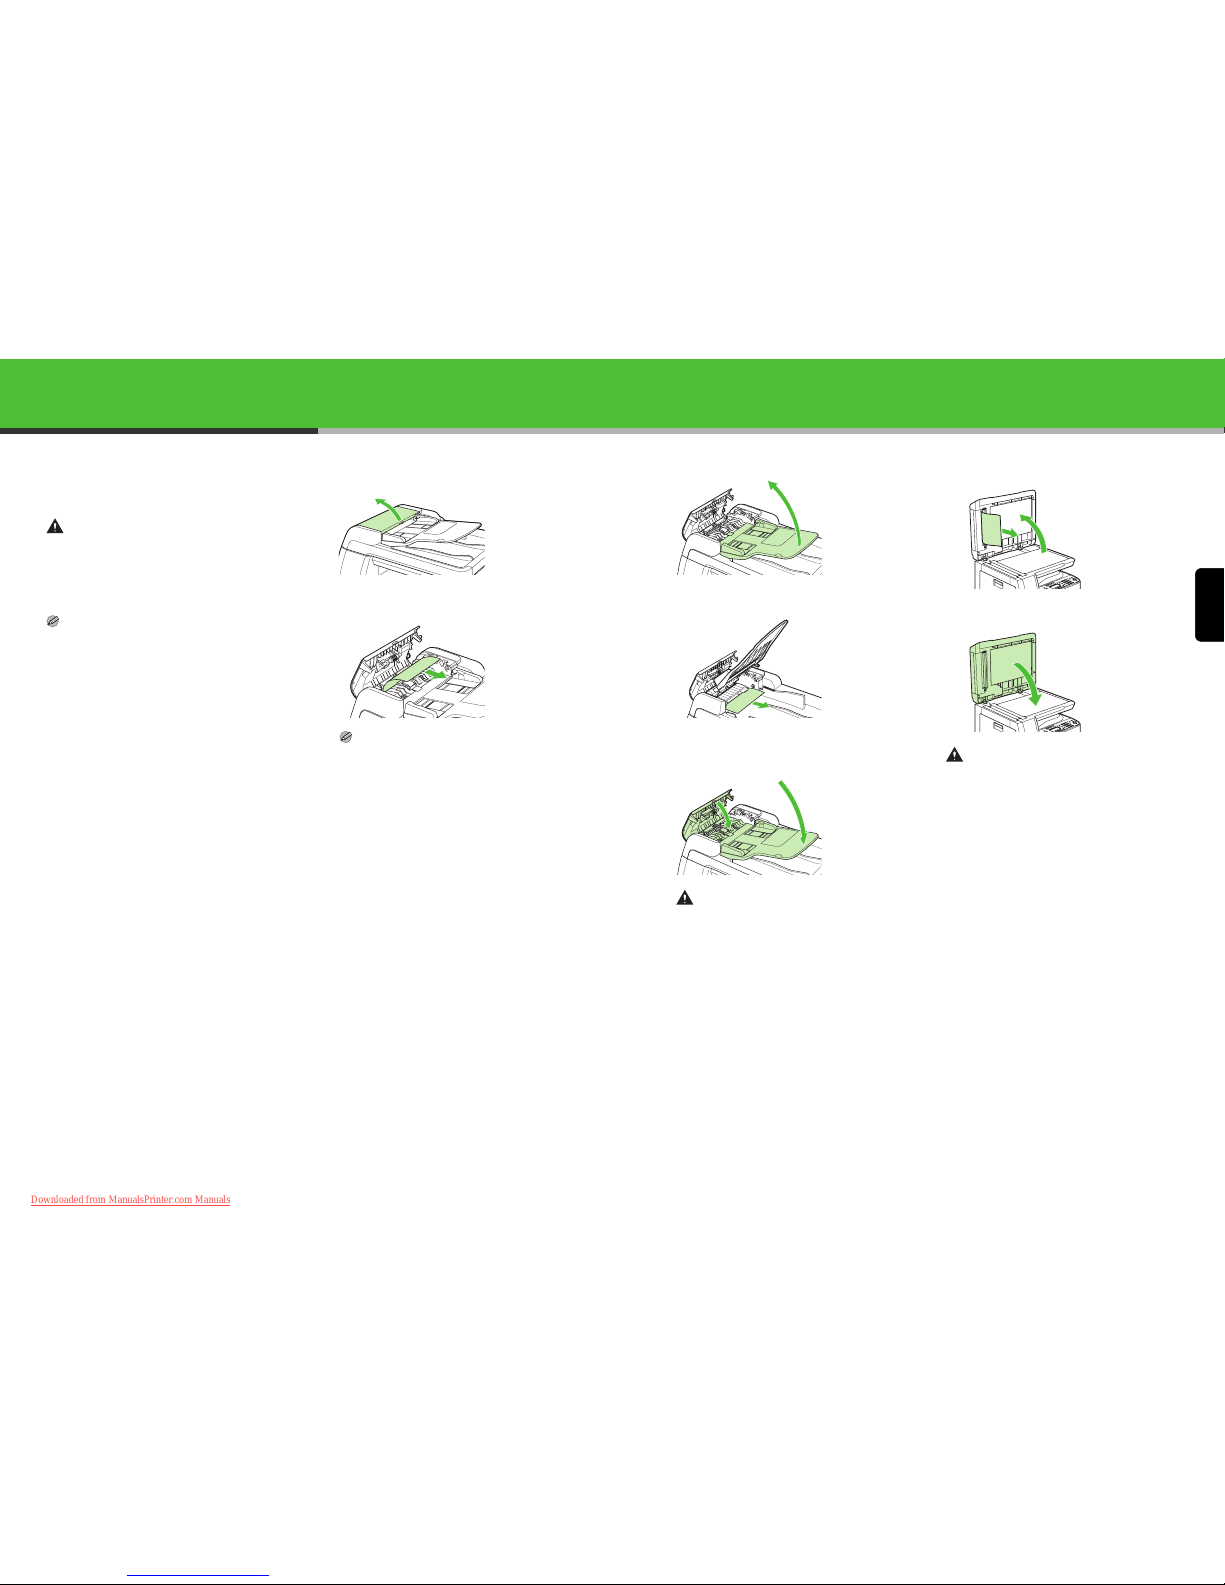
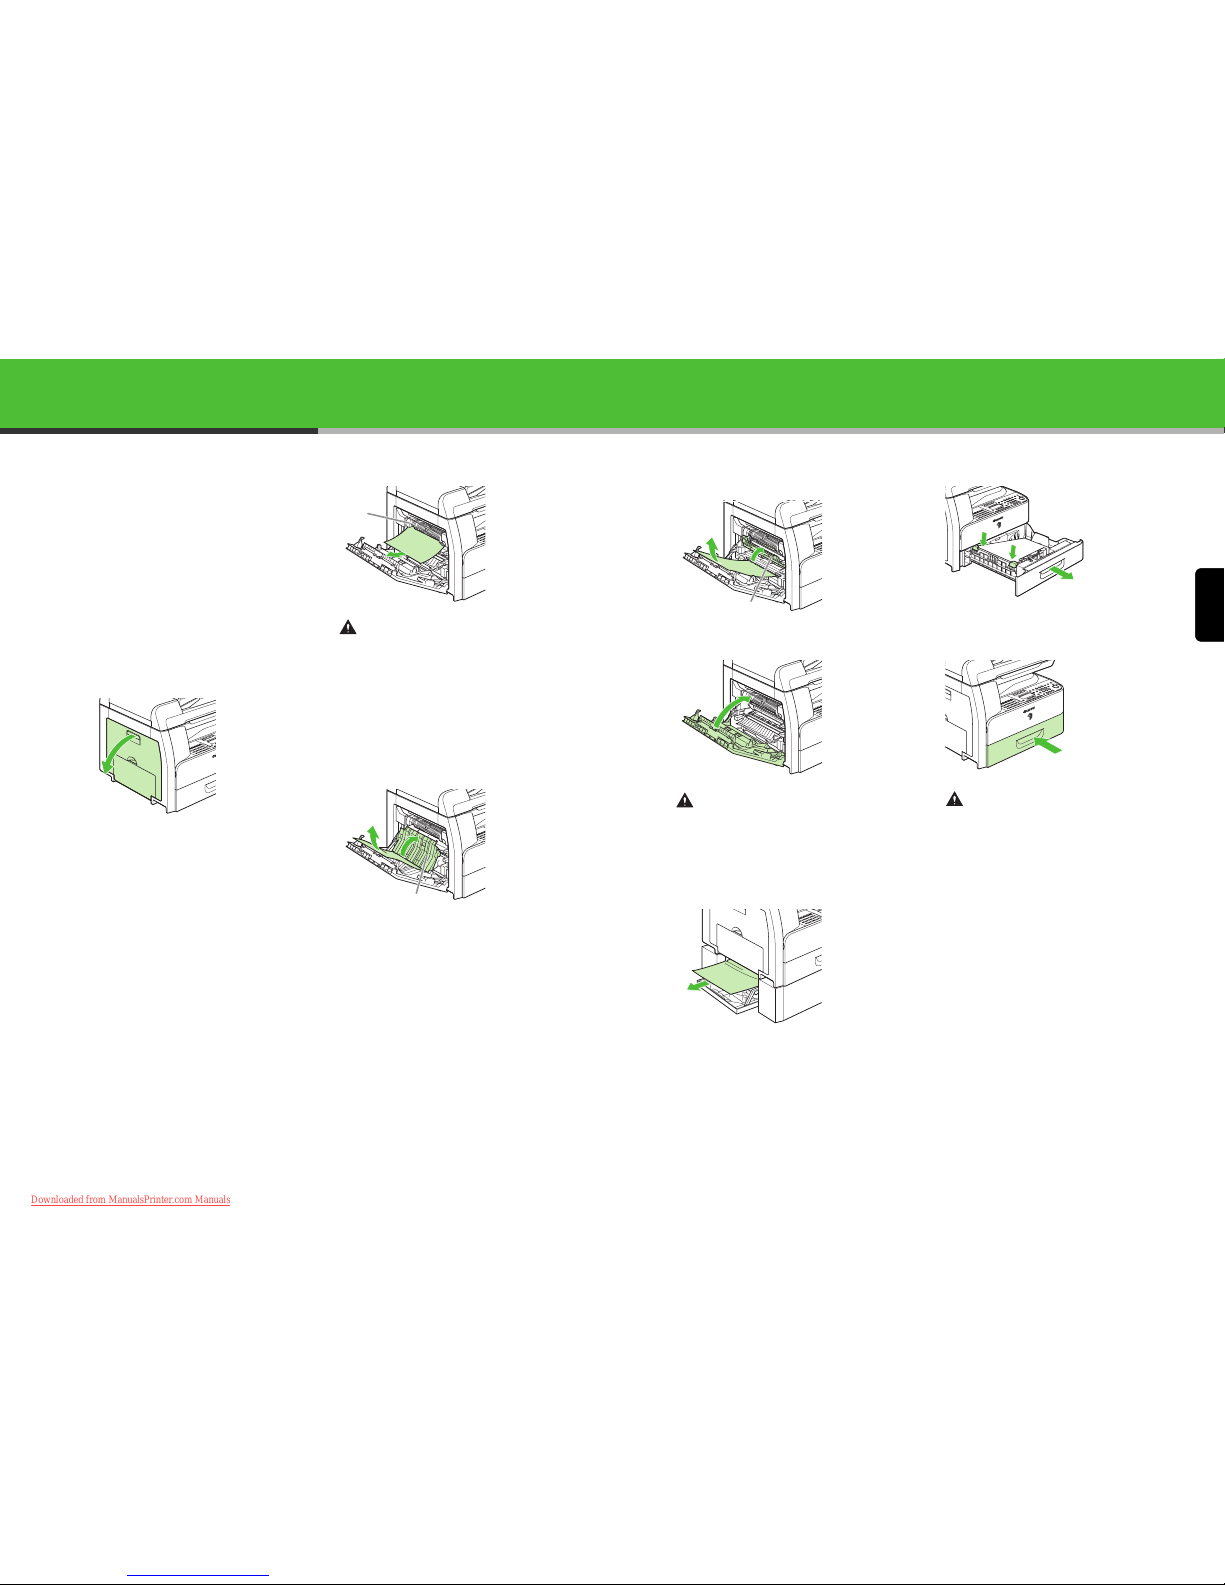
Clearing Jams
When a jam occurs in the machine, the paper
jam message appears on the LCD display.
Check the jam location indicator where the jam
occurs, then remove the jammed paper.
CAUTION
– When removing jammed documents or paper, take care not
to cut your hands on the edges of the document or paper.
– When removing jammed paper or when inspecting the inside
of the machine, do not allow necklaces, bracelets, or other
metal objects to touch the inside of the machine, as this may
result in burns or electrical shock.
NOTE
Do not force a jammed document or paper out of the machine.
Contact your local authorized Canon dealer for assistance if
needed.
Document Jams
When <CHECK DOCUMENT> or <DOCUMENT
TOO LONG> appears on the LCD display, remove
a jammed document from the ADF or the document
delivery slot.
1 Open the ADF cover.
2 Remove any jammed documents.
NOTE
Do not pull the document forcefully as it may tear.
3 Lift the document feeder tray.
4 Remove any jammed documents.
5 Lower the document feeder tray and close the
ADF cover.
CAUTION
Be careful not to get your fingers caught.
6 Open the ADF/platen glass cover, and remove
any jammed documents.
7 Close the ADF/platen glass cover.
CAUTION
Be careful not to get your fingers caught.
54
Downloaded from ManualsPrinter.com Manuals
English
55
Paper Jams
When <PAPER JAM> appears on the LCD display,
remove jammed paper from inside the machine
first, then from the paper drawer if necessary.
Check the following if you experience repeated
paper jams:
– Even the edge of the paper stack by a flat
surface before loading it in the machine.
– Check that the paper you are using meets the
requirements for use. (See Chapter 3, “Print
Media,” in the Basic Operation Guide.)
– Make sure you have removed any scraps of
paper from inside the machine.
1 Open the left cover.
2 Carefully pull the jammed paper out of the
machine.
CAUTION
– Do not touch the fixing assembly (A) as it becomes
very hot during use.
– If you tear the paper, remove any torn pieces to avoid
further jams.
– If loose toner comes into contact with your skin or
clothing, wash with cold water. Warm water will set the
toner.
3 Tilt the 2-sided transport guide (A) toward the
machine, then remove the jammed paper (Only
for 2-sided copying).
A
A
4 Lift and hold the transcription frame (A), then
remove the jammed paper (Only for 2-sided
copying).
5 Close the left cover.
CAUTION
Be careful not to get your fingers caught.
6 If you use the optional paper drawer, open the
cover on the left side of the optional paper
drawer. Remove any jammed paper, then close
the cover.
7 Pull out the paper drawer and push the corners
of the stack under the tabs.
8 Gently push the paper drawer back into the
machine until it clicks.
CAUTION
Be careful not to get your fingers caught.
A
56
Downloaded from ManualsPrinter.com Manuals
English
57
Important Safety Instructions
The following symbols are used throughout the manuals for the
machine and indicate the warnings, cautions and notes you should
keep in mind when using the machine.
WARNING
Indicates a warning that may lead to death or serious injury if
not observed.
CAUTION
Explains how to avoid actions that could injure you or damage
your machine.
NOTE
Explains operating restrictions and how to avoid minor
difficulties.
Handling and Maintenance
– Follow all warnings and instructions marked on the machine.
– Do not subject the machine to strong physical shocks or vibrations.
– Always unplug the machine before moving or cleaning it.
– To avoid paper jams, never unplug the power cord, open the left
cover, or add or remove paper in the machine while printing.
– Always grip the handle on the sides of the machine when you lift the
machine. Never lift the machine by any of its trays or attachments.
– Do not insert any objects into the slots or openings on the machine
since they may touch dangerous voltage points or short out parts.
This could result in fire or electric shock.
– Do not allow small objects (such as pins, paper clips, or staples) to
fall into the machine. If something does fall into it, unplug the
machine immediately and contact your local authorized Canon
dealer.
– To avoid spillage in or around the machine, do not eat or drink near
it. If you spill liquid or if any substance falls into it, unplug the power
cord immediately and contact your local authorized Canon dealer.
– Keep the machine clean. Dust accumulation can prevent the
machine from operating properly.
– Unplug the machine from the wall outlet and contact your local
authorized Canon dealer in any of the following cases:
– When the power cord or plug is damaged or frayed.
– If liquid has spilled into the machine.
– If the machine has been exposed to rain or water.
– If the machine does not operate normally when you have followed
the instructions in this guide. Adjust only those controls that are
covered by the instructions in this guide. Improper adjustment of
other controls may result in damage and may require extensive
work by a qualified technician to restore the product to normal
operation.
– If the machine has been dropped.
– If the machine exhibits a distinct change in performance,
indicating a need for servicing.
Location
– Place the machine on a flat, stable, vibration-free surface that is
strong enough to support its weight.
– Place the machine in a cool, dry, clean, well ventilated place.
– Make sure the area is free from dust.
– Make sure the location is not exposed to high temperature or
humidity.
– Keep the machine away from direct sunlight as this can damage it. If
you have to place it near a window, install heavy curtains or blinds.
– Do not use the machine near water. Make sure that no wet or humid
objects come into contact with the machine.
– Do not use or store the machine outdoors.
– Do not install the machine near devices that contain magnets or
generate magnetic fields, such as speakers.
– If possible, place the machine near an existing telephone line outlet
for easy connection of the telephone line cord, and to avoid the
expense of installing a new outlet.
– Place the machine near a standard 220–240 V AC (50/60 Hz) power
outlet.
– To ensure reliable operation of the machine and to protect it from
overheating (which can cause it to operate abnormally and create a
fire risk), do not block the exhaust vent. Never block or cover any
openings on the machine by placing it on a bed, sofa, rug, or other
similar surface. Do not place the machine in a cupboard or built-in
installation, or near a radiator or other heat source unless proper
ventilation is provided. Leave enough space around all sides of the
machine, and make sure that the clearance between the machine’s
ventilation slot and wall or other equipment is more than 5 cm.
– Do not stack boxes or furniture around the power outlet. Keep the
area free so you can reach the outlet quickly. If you notice anything
unusual (smoke, strange odors, noises) around the machine, unplug
the power cord immediately. Contact your local authorized Canon
dealer.
– Do not allow anything to rest on the power cord, and do not place
the machine where the cord will be walked on. Make sure the cord is
not knotted or kinked.
WARNING
Except as specifically described in the manuals of the
machine, do not attempt to service the machine yourself.
Never attempt to disassemble the machine: opening and
removing its interior covers will expose you to dangerous
voltages and other risks. For all service, contact your local
authorized Canon dealer.
Model Names
F189204 (iR1018J)
F189200 (iR1018/1022A/1022i)
F189202 (iR1022F/1022iF)
Laser Safety Information
Laser radiation could be hazardous to the human body. For this
reason, laser radiation emitted inside this equipment is hermetically
sealed within the protective housing and external cover. No radiation
can leak from the machine in the normal operation of the product by
the user.
This machine is classified as a Class 1 Laser Product under
IEC60825-1:1993+A1:1997 +A2:2001, EN60825-1:1994+A1:2002
+A2:2001
220–240 V Model
The label shown below is attached to the laser scan unit on the
machine.
This machine has been classified under IEC60825-1:1993+A1:1997
+A2:2001, EN60825-1:1994+A1:2002 +A2:2001 and conforms to the
following classes:
CLASS 1 LASER PRODUCT
LASER KLASSE 1
APPAREIL A RAYONNEMENT LASER DE CLASSE 1
APPARECCHIO LASER DI CLASSE 1
PRODUCTO LASER DE CLASE 1
APARELHO A LASER DE CLASSE 1
CAUTION
Use of controls, adjustments, or performance of procedures
other than those specified in the manuals for the machine may
result in hazardous radiation exposure.
Trademarks
Canon, the Canon logo, iR and NetSpot are trademarks of Canon Inc.
Microsoft and Windows are registered trademarks of Microsoft
Corporation.
All other product and brand names are registered trademarks,
trademarks or service marks of their respective owners.
Copyright
Copyright © 2006 by Canon Inc. All rights reserved. No part of this
publication may be reproduced, transmitted, transcribed, stored in a
retrieval system, or translated into any language or computer language
in any form or by any means, electronic, mechanical, magnetic,
optical, chemical, manual, or otherwise, without the prior written
permission of Canon Inc.
Disclaimers
The information in this document is subject to change without notice.
CANON INC. MAKES NO WARRANTY OF ANY KIND WITH
REGARD TO THIS MATERIAL, EITHER EXPRESS OR IMPLIED,
EXCEPT AS PROVIDED HEREIN, INCLUDING WITHOUT
LIMITATION, THEREOF, WARRANTIES AS TO MARKETABILITY,
MERCHANTABILITY, FITNESS FOR A PARTICULAR PURPOSE OF
USE OR NON-INFRINGEMENT. CANON INC. SHALL NOT BE
LIABLE FOR ANY DIRECT, INCIDENTAL, OR CONSEQUENTIAL
DAMAGES OF ANY NATURE, OR LOSSES OR EXPENSES
RESULTING FROM THE USE OF THIS MATERIAL.
WEEE Directive
European Union (and EEA) only.
This symbol indicates that this product is not to
be disposed of with your household waste,
according to the WEEE Directive (2002/96/EC)
and your national law. This product should be
handed over to a designated collection point,
e.g., on an authorized one-for-one basis when
you buy a new similar product or to an
authorized collection site for recycling waste
electrical and electronic equipment (EEE).
Improper handling of this type of waste could
have a possible negative impact on the
environment and human health due to
potentially hazardous substances that are
generally associated with EEE. At the same
time, your cooperation in the correct disposal
of this product will contribute to the effective
usage of natural resources. For more
information about where you can drop off your
waste equipment for recycling, please contact
your local city office, waste authority, approved
WEEE scheme or your household waste
disposal service. For more information
regarding return and recycling of WEEE
products, please visit www.canon-europe.com/
environment.
(EEA: Norway, Iceland and Liechtenstein)
This equipment conforms to the essential
requirements of EC Directive 1999/5/EC.
We declare that this product conforms to the
EMC requirements of EC Directive 1999/5/EC
at nominal mains input 230 V, 50/60 Hz
although the rated input of the product is 220–
240 V, 50/60Hz. If you move to another EU
country and are experiencing trouble, please
call the Canon Help Desk. (For Europe Only)
• Use of shielded cable is necessary to
comply with the technical requirements of
EMC Directive.
As an E
NERGY STAR Partner, Canon Inc. has
determined that this product meets the
E
NERGY STAR Program for energy efficiency.
The International E
NERGY STAR Office
Equipment Program is an international
program that promotes energy saving through
the use of computers and other office
equipment.
The program backs the development and
dissemination of products with functions that
effectively reduce energy consumption. It is an
open system in which business proprietors can
participate voluntarily.
The targeted products are office equipment,
such as computers, displays, printers,
facsimiles, and copiers. The standards and
logos are uniform among participating nations.
58
Downloaded from ManualsPrinter.com Manuals
 Loading...