

Canon iP1500 User Manual
Photo Printer
Quick Start Guide

Getting Help from Canon
Help Us Help You Better
Before you contact Canon, please record the following information.
Serial Number (located on the inside of the printer):
Model Number (located on the front of the printer):
Setup Software and User’s Guide version number (USCD X.X)
located on the CD-ROM:
Purchase Date:
Canon U.S.A. Customer Technical Support Sequence*
1. Internet — www.canontechsupport.com
For quick and comprehensive self-help in an intuitively guided interactive troubleshooting
environment, the place to start is our helpful tech support web site. In addition, the latest
driver downloads, answers to frequently asked questions, product information, and
“where to buy” instructions are found here.
2. Email Tech Support — www.canontechsupport.com
For individual attention to a special issue, try emailing our friendly technical engineers,
specially trained to communicate quick, easy, and logical solutions to your inquiries within
24 hours.
3. Toll-Free Live Tech Support — (1-800-828-4040)
This option provides live telephone technical support, free of service charges, MondaySaturday (excluding holidays), during your product's 1 year limited warranty period.
Telephone Device for the Deaf (TDD) support is available at ((1-866-251-3752).
4. Extended Service and Support — www.canonesp.com
Canon CarePAK Extended Service Plan is a cost-attractive and easy-to-use extended service
program that provides up to three full years of service and support coverage at a very
attractive price. CarePAK offers toll-free Canon technical support and includes Canon’s
superb InstantExchange product replacement program. For further information about
extending your Canon service and support, call (1-800-385-2155), or visit our Web site at
www.canonesp.com. CarePAK must be purchased during your product’s warranty period.
For more information and updated program specifics, please refer to our Web site at
www.canontechsupport.com.
* Support program specifics are subject to change without notice.
Photo Printer
Quick Start Guide

Canon PIXMA iP1500 Photo Printer Quick Start Guide.
Copyright
This manual is copyrighted by Canon U.S.A., Inc. with all rights reserved. Under the copyright laws,
this manual may not be reproduced in any form, in whole or in part, without the prior written
consent of Canon U.S.A., Inc.
© 2004 Canon U.S.A., Inc.
Disclaimer
Canon U.S.A., Inc. has reviewed this manual thoroughly in order that it will be an easy-to-use
guide to your Canon PIXMA iP1500 Photo Printer. All statements, technical information and
recommendations in this manual and in any guides or related documents are believed reliable, but
the accuracy and completeness thereof are not guaranteed or warranted, and they are not intended
to be, nor should they be understood to be, representation or warranties concerning the products
described.
Specifications are subject to change without notice.
ENERGY STAR partner, Canon U.S.A., Inc., has determined that this product meets
As an
the ENERGY STAR guidelines for energy efficiency.
All information regarding non-Canon products was compiled from publicly available information. No
representation is made regarding the accuracy thereof.
Trademarks
• Canon is a registered trademark of Canon Inc.
• PIXMA is a trademark of Canon Inc.
• PhotoRecord is a trademark of Canon Information System Research Australia.
• Macintosh, Mac and the Mac logo are registered trademarks of Apple Computer, Inc., registered
in the U.S. and other countries.
• Microsoft® and Windows® are registered trademarks of Microsoft Corporation in the U.S. and
other countries.
• All other product and brand names are trademarks of their respective owners.
Canon U.S.A., Inc.
One Canon Plaza
Lake Success, NY 11042

Contents
Basic Printing
Turning on the Printer . . . . . . . . . . . . . . . . . . . . . . . . . . . . . . . . . . . . . . . . . . . . . . . . . . . . . . . . . . . . . . . 2
Loading Paper . . . . . . . . . . . . . . . . . . . . . . . . . . . . . . . . . . . . . . . . . . . . . . . . . . . . . . . . . . . . . . . . . . . . . 3
Using Speciality Media . . . . . . . . . . . . . . . . . . . . . . . . . . . . . . . . . . . . . . . . . . . . . . . . . . . . . . . . . . . . . . 7
Printing with Windows . . . . . . . . . . . . . . . . . . . . . . . . . . . . . . . . . . . . . . . . . . . . . . . . . . . . . . . . . . . . . . 9
Printing with Macintosh . . . . . . . . . . . . . . . . . . . . . . . . . . . . . . . . . . . . . . . . . . . . . . . . . . . . . . . . . . . . 11
Canceling Printing . . . . . . . . . . . . . . . . . . . . . . . . . . . . . . . . . . . . . . . . . . . . . . . . . . . . . . . . . . . . . . . . . 13
Advanced Printing
Accessing Printer Driver . . . . . . . . . . . . . . . . . . . . . . . . . . . . . . . . . . . . . . . . . . . . . . . . . . . . . . . . . . . . 14
Adjusting Print Quality for Photographs . . . . . . . . . . . . . . . . . . . . . . . . . . . . . . . . . . . . . . . . . . . . . . . 15
Using the Bundle Software . . . . . . . . . . . . . . . . . . . . . . . . . . . . . . . . . . . . . . . . . . . . . . . . . . . . . . . . . . 22
Printing Borderless Photographs. . . . . . . . . . . . . . . . . . . . . . . . . . . . . . . . . . . . . . . . . . . . . . . . . . . . . 23
Printing Maintenance
When Printing Becomes Faint or Colors are Incorrect . . . . . . . . . . . . . . . . . . . . . . . . . . . . . . . . . . . . 26
Printing the Nozzle Check Pattern . . . . . . . . . . . . . . . . . . . . . . . . . . . . . . . . . . . . . . . . . . . . . . . . . . . . 27
Print Head Cleaning. . . . . . . . . . . . . . . . . . . . . . . . . . . . . . . . . . . . . . . . . . . . . . . . . . . . . . . . . . . . . . . . 31
Print Head Deep Cleaning . . . . . . . . . . . . . . . . . . . . . . . . . . . . . . . . . . . . . . . . . . . . . . . . . . . . . . . . . . . 34
Aligning the Print Head . . . . . . . . . . . . . . . . . . . . . . . . . . . . . . . . . . . . . . . . . . . . . . . . . . . . . . . . . . . . . 37
Replacing an Ink Tank . . . . . . . . . . . . . . . . . . . . . . . . . . . . . . . . . . . . . . . . . . . . . . . . . . . . . . . . . . . . . . 41
Troubleshooting
Cannot Install the Printer Driver. . . . . . . . . . . . . . . . . . . . . . . . . . . . . . . . . . . . . . . . . . . . . . . . . . . . . . 49
Print Quality is Poor or Contains Errors . . . . . . . . . . . . . . . . . . . . . . . . . . . . . . . . . . . . . . . . . . . . . . . . 50
Troubleshooting Printer Hardware. . . . . . . . . . . . . . . . . . . . . . . . . . . . . . . . . . . . . . . . . . . . . . . . . . . . 52
Paper Does Not Feed Properly . . . . . . . . . . . . . . . . . . . . . . . . . . . . . . . . . . . . . . . . . . . . . . . . . . . . . . . 53
Handling Error Messages . . . . . . . . . . . . . . . . . . . . . . . . . . . . . . . . . . . . . . . . . . . . . . . . . . . . . . . . . . . 54
An Error Message Appears on the Screen . . . . . . . . . . . . . . . . . . . . . . . . . . . . . . . . . . . . . . . . . . . . . . 55
Contents
Appendix
Installing the Printer Driver when using Mac OS 9.x . . . . . . . . . . . . . . . . . . . . . . . . . . . . . . . . . . . . . 57
User’s Guide Table of Contents . . . . . . . . . . . . . . . . . . . . . . . . . . . . . . . . . . . . . . . . . . . . . . . . . . . . . . 59
Specifications . . . . . . . . . . . . . . . . . . . . . . . . . . . . . . . . . . . . . . . . . . . . . . . . . . . . . . . . . . . . . . . . . . . . 60
Safety Precautions . . . . . . . . . . . . . . . . . . . . . . . . . . . . . . . . . . . . . . . . . . . . . . . . . . . . . . . . . . . . . . . . 62
Regulatory Information . . . . . . . . . . . . . . . . . . . . . . . . . . . . . . . . . . . . . . . . . . . . . . . . . . . . . . . . . . . . . 64
CANON U.S.A., INC. LIMITED WARRANTY --- (USA Only). . . . . . . . . . . . . . . . . . . . . . . . . . . . . . . . . . . 65
Index. . . . . . . . . . . . . . . . . . . . . . . . . . . . . . . . . . . . . . . . . . . . . . . . . . . . . . . . . . . . . . . . . . . . . . . . . . . . . . . . . . . . . . 67
1
Basic Printing
Basic Printing
This
Note
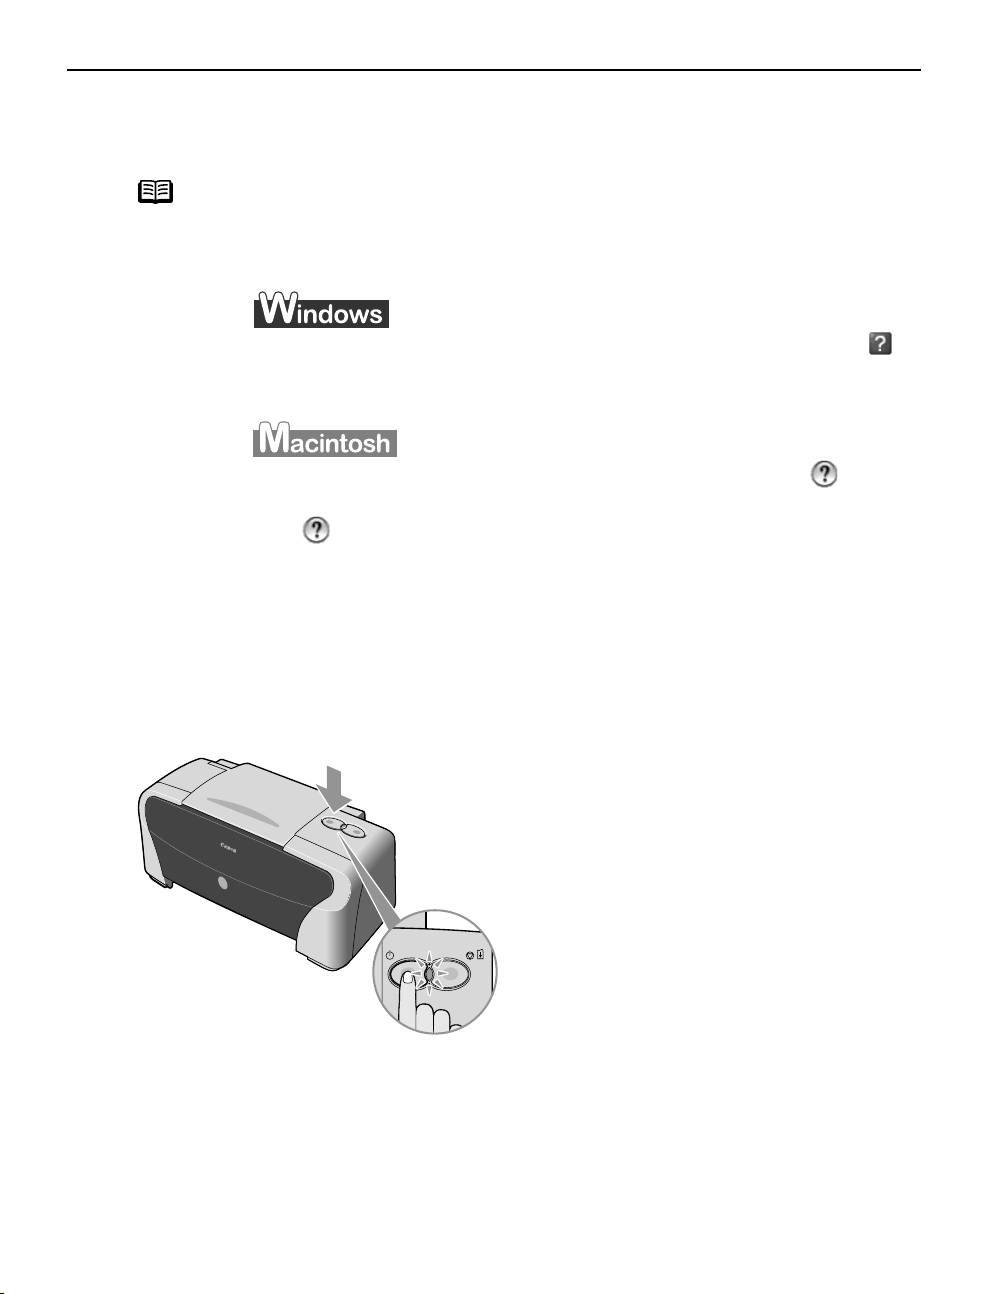
Turning on the Printer
Quick Start Guide
printer and how to use them. For more information, view the iP1500
User's Guide
your printer driver interface:
While in the printer's Properties window, press the FF1 key, or click in
the upper right corner. Then click the feature you want to know more
about, or click H
While in the PPage Setup dialog box or PPrint dialog box, click in the
lower left corner.
Click provides detailed information about each setting.
When the Help window appears, select your desired topic.
installed on your computer, or use the online help within
describes some of the features of your iP1500
Help when displayed.
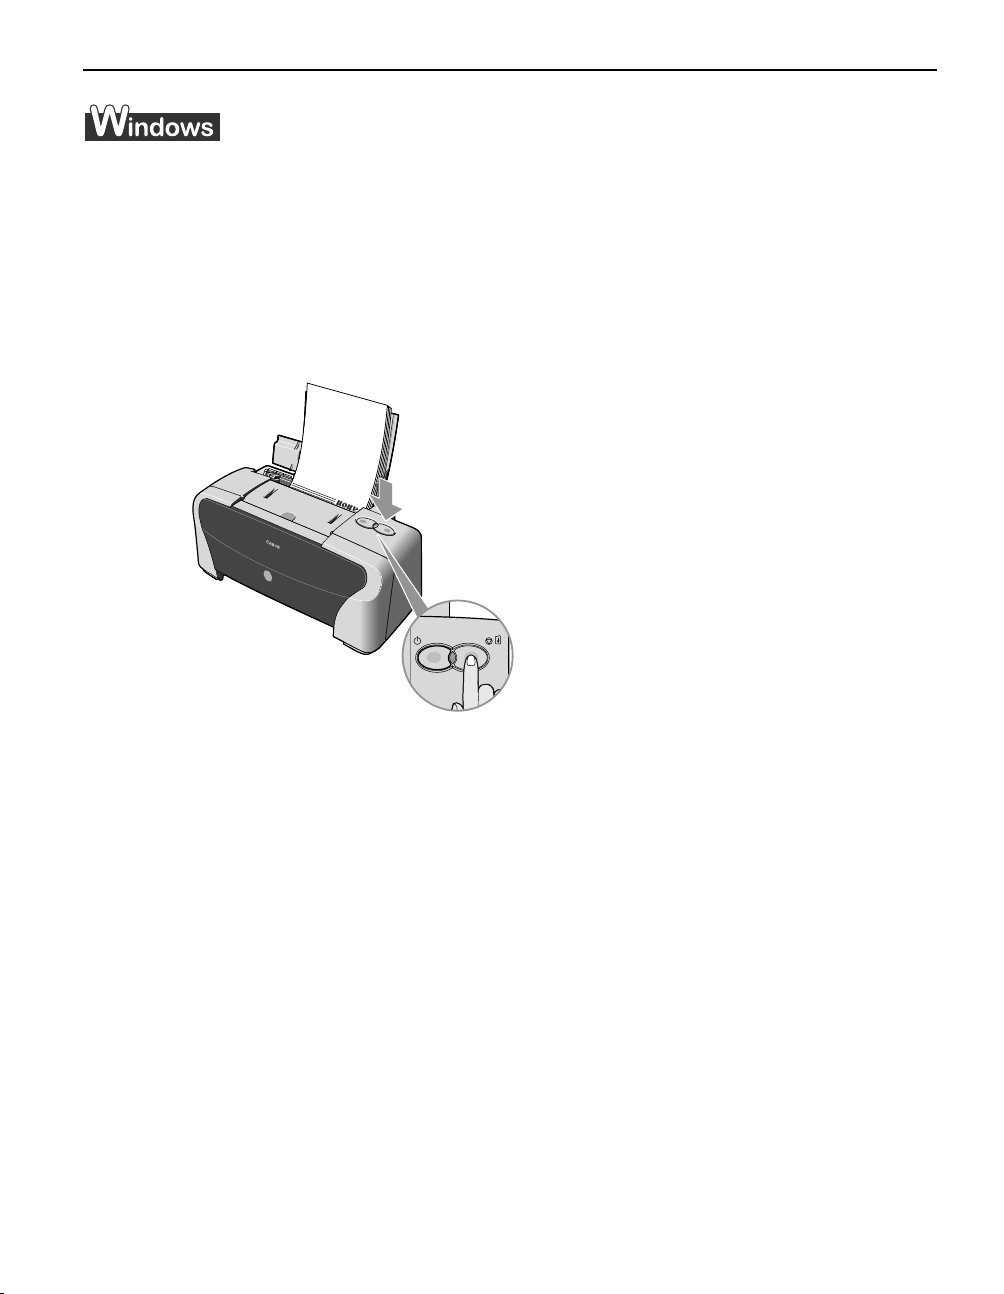
1 Press the POWER button.
The PPOWER lamp flashes while the printer warms up and changes to steady (non-
flashing) green when the printer is ready.
Important • Before unplugging the power cord, turn off the printer and ensure
that the green lamp has gone out.
• If the P
2
POWER lamp changes to orange and begins flashing, refer to
the section "H
Handling Error Messages" on page 54.

Loading Paper
Print Media to Avoid
Do not use the following types of paper. Using such paper will not only produce
unsatisfactory results, but can also cause the printer to jam or malfunction.
• Folded, curled or wrinkled paper
• Damp paper
• Paper that is too thin (less than 64 gsm or 17 lb)
• Paper that is too thick* (more than 105 gsm or 28 lb)
*non-Canon branded paper
• Picture postcards
• Postcards with an affixed photo or sticker
• Envelopes with a double flap
• Envelopes with pressure seals
• Envelopes with an embossed or treated surface
• Paper with holes (such as Loose-leaf paper)
Basic Printing
Loading Paper
This section describes how to load plain paper into your printer.
• For detailed information on the speciality media Canon provides for use with its
various printers, refer to the section "U
• Consult “Printing Media” in the
envelopes and speciality media into the printer.
Using Speciality Media" on page 7.
User’s Guide
for detailed instructions on how to load
1 Flatten the four corners of the paper before loading it.
Important When paper is curled, gently bend them in the opposite direction until
the paper becomes completely flat.
3

Basic Printing
2 Prepare to load paper.
Open the Paper Support.
Note
• Place the printer on a flat surface.
• Do not place any obstacles in front of the printer to secure the space
for paper output. If the Paper Output Slot is stacked with printed
sheets, they may be folded or jammed.
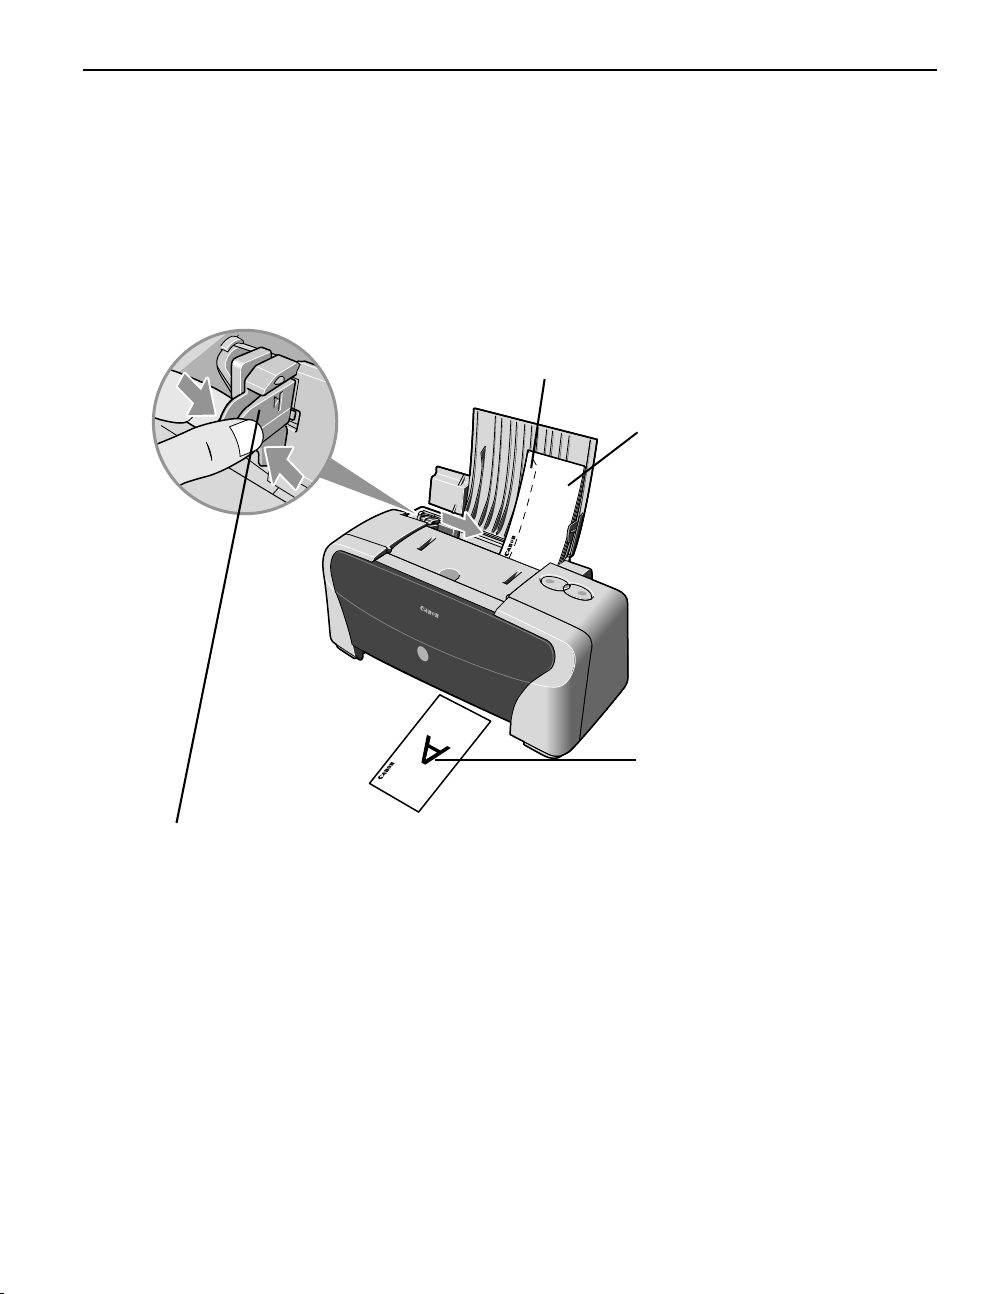
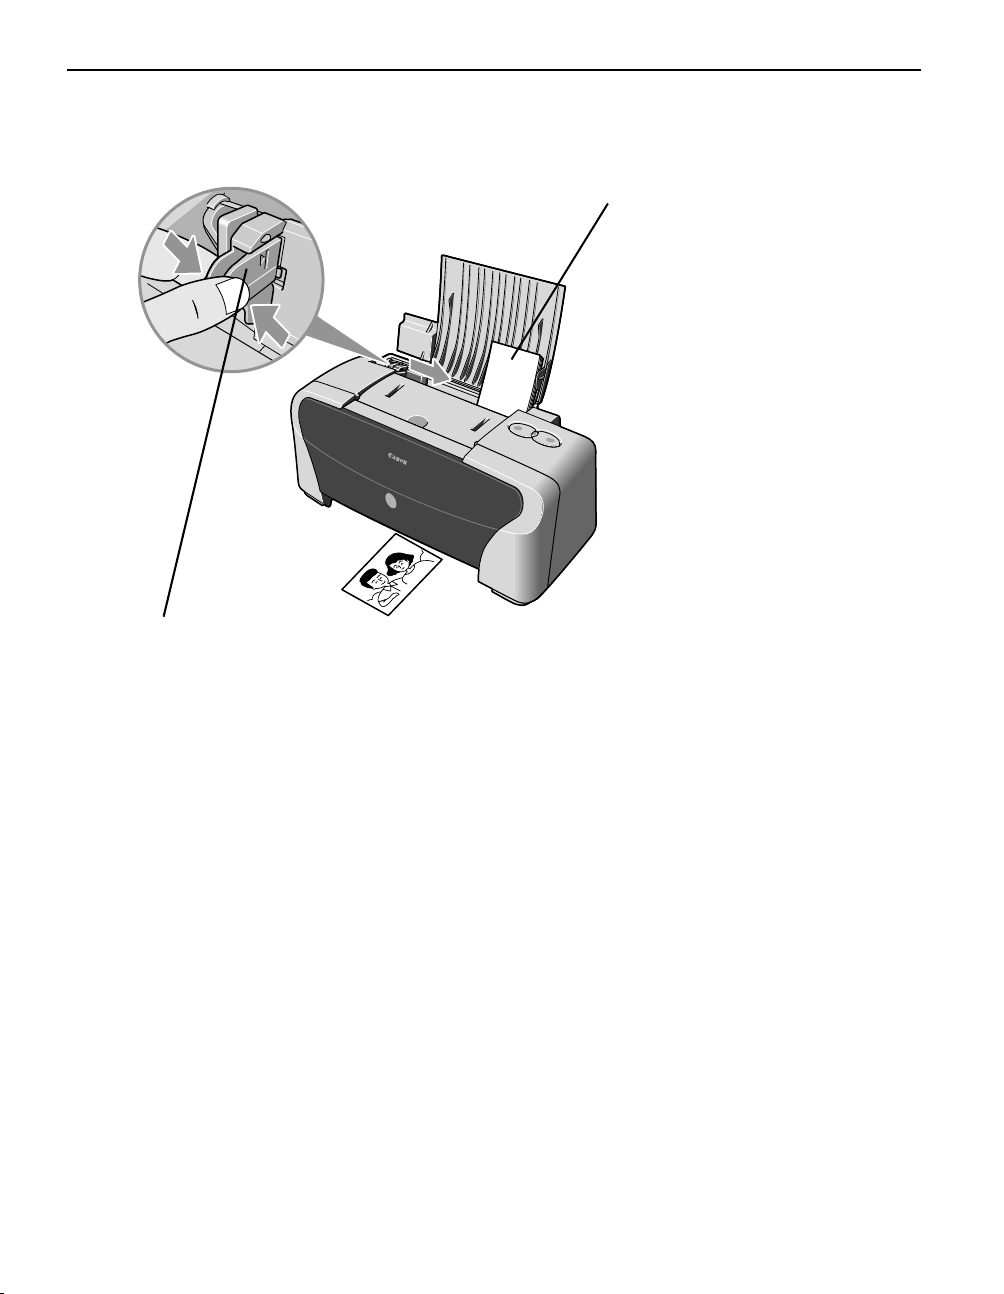
3 Load the paper.
Loading the Plain Paper
Load Limit Mark
Do not load beyond this Load Limit Mark.
(3) Pinch the Paper
Guide and slide it
against the left
side of the stack of
paper.
(1) Insert the paper into the
Auto Sheet Feeder with
print side facing up.
(2) Align the paper stack
against the right side of
the Auto Sheet Feeder.
Note
• Remove the printed papers as necessary from the Paper Output Slot.
• Do not touch the printed surfaces until the ink dries. For specific
drying times, refer to the instructions packaged with your media.
4
Loading the Envelopes
Use either DL or US Comm. #10 size envelopes.
Important • Do not use the envelopes with embossed or treated surface, with a
double flap or pressure seals, with sticker flaps.
• Select either D
size you are using.
DL Env. or CComm. Env. #10 According to the envelope
Fold the envelope flap.
(1) Align the envelope
against the right side of
the Auto Sheet Feeder.
Set the envelope with its
flap on the left side.
A maximum of 10
envelopes can be loaded
at once.
Basic Printing
(2) Pinch the Paper Guide and slide it against
the left side of the envelope.
(3) Select E
Page Size.
For the printer driver setting, refer to "P
"P
Envelope in MMedia Type, and then select CComm. Env. #10 or DDL Env. in
Printing with Windows" on page 9,
Printing with Macintosh" on page 11.
Printing direction
5
Basic Printing
Loading the 4" x 6" size papers
You can print on the 4" x 6" size papers.
(2) Pinch the Paper Guide and slide it against
the left side of the stack of paper.
(1) Align the paper stack
against the right side of the
Auto Sheet Feeder.
Despite the direction of the
photograph, load the paper
in the vertical direction.
You can load a maximum of
20 papers in 4" x 6" size.
(3) Select 4
For the printer driver setting, refer to "P
"P
4 x 6 in in PPage Size.
Printing with Windows" on page 9,
Printing with Macintosh" on page 11.
6
Basic Printing
Using Speciality Media
Canon recommends that you use genuine Canon media to ensure optimal print quality.
Photo Quality Media
• Photo Paper Pro
• Photo Paper Plus Glossy
• Photo Paper Plus Double Sided
• Photo Paper Plus Semi-Gloss
• Matte Photo Paper
• Glossy Photo Paper
Media Suited to Business
Documents
• High Resolution Paper
• Transparencies
7
Basic Printing
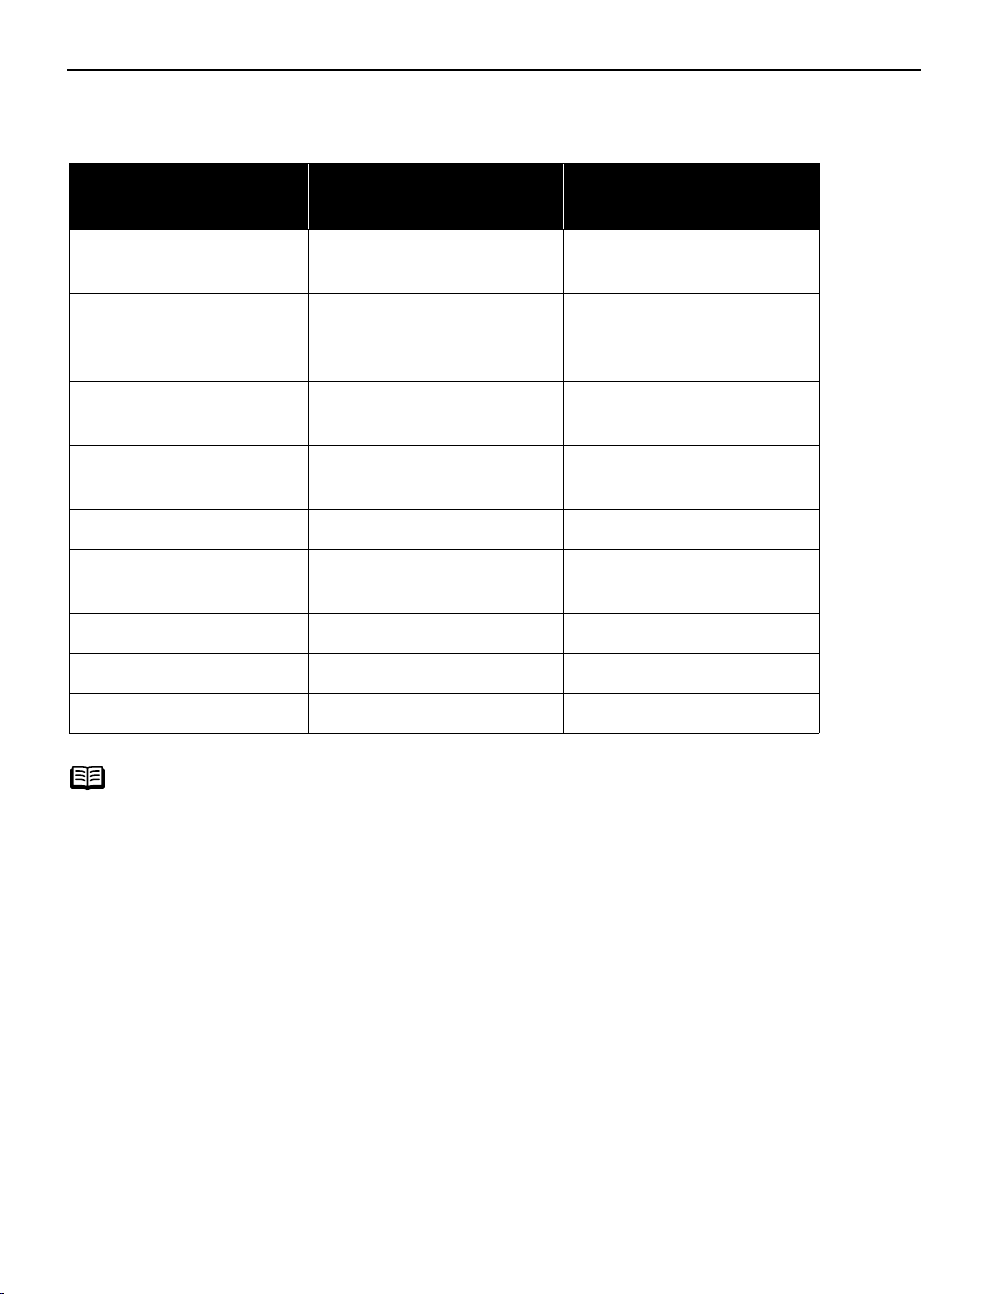
Canon Speciality Media
Media Name Paper Support Load Limit Printer Driver Settings
for Media Type
Photo Paper Pro Letter: up to 10 sheets*
4"×6": up to 20 sheets
Photo Paper Plus Glossy Letter: up to 10 sheets*
5"×7": up to 10 sheets
4"×6": up to 20 sheets
Photo Paper Plus
Double Sided
Photo Paper Plus
Semi-Gloss
Matte Photo Paper Letter: up to 10 sheets Matte Photo Paper
Glossy Photo Paper Letter: up to 10 sheets*
High Resolution Paper Letter: up to 80 sheets High Resolution Paper
T-Shirt Transfers 1 sheet T-Shirt Transfer
Transparencies Up to 30 sheets* Transparency
Note
• When using plain paper (64 gsm or 17 lb), up to 100 sheets can be set.
Select P
• For detailed description of print media types, refer to “Printing Media” in the
User’s Guide
* When paper cannot be fed normally, load the necessary number of sheets in
the Auto Sheet Feeder with them separating from each other to avoid them
from sticking together.
For instructions on how to print from the software applications, refer to the
Photo Application Guide
Letter: 1 sheet
5"×7": 1 sheet
Letter: up to 10 sheets*
4"×6": up to 20 sheets
4"×6": up to 20 sheets
Plain Paper from the printer driver MMedia Type.
.
.
Photo Paper Pro
Photo Paper Plus Glossy
Photo Paper Plus Double
Sided
Photo Paper Plus Glossy
Glossy Photo Paper
8

l
Printing with Windows
Basic Printing
Note
• The menu screens and dialog boxes that appear may vary, depending on the
software application you are using.
• The steps described in this section are for printing in Windows XP.
1 Create a document or open a file to print.
2 Open Printer Properties dialog box.
(1) Select PPrint from the application software's FFile menu.
(2) Ensure that CCanon PIXMA
iP1500 is selected.
(3)
Click PPreferences or
Properties
.
Note
In Windows 2000, click the M
Main tab in the PPrint dialog box.
9
Basic Printing
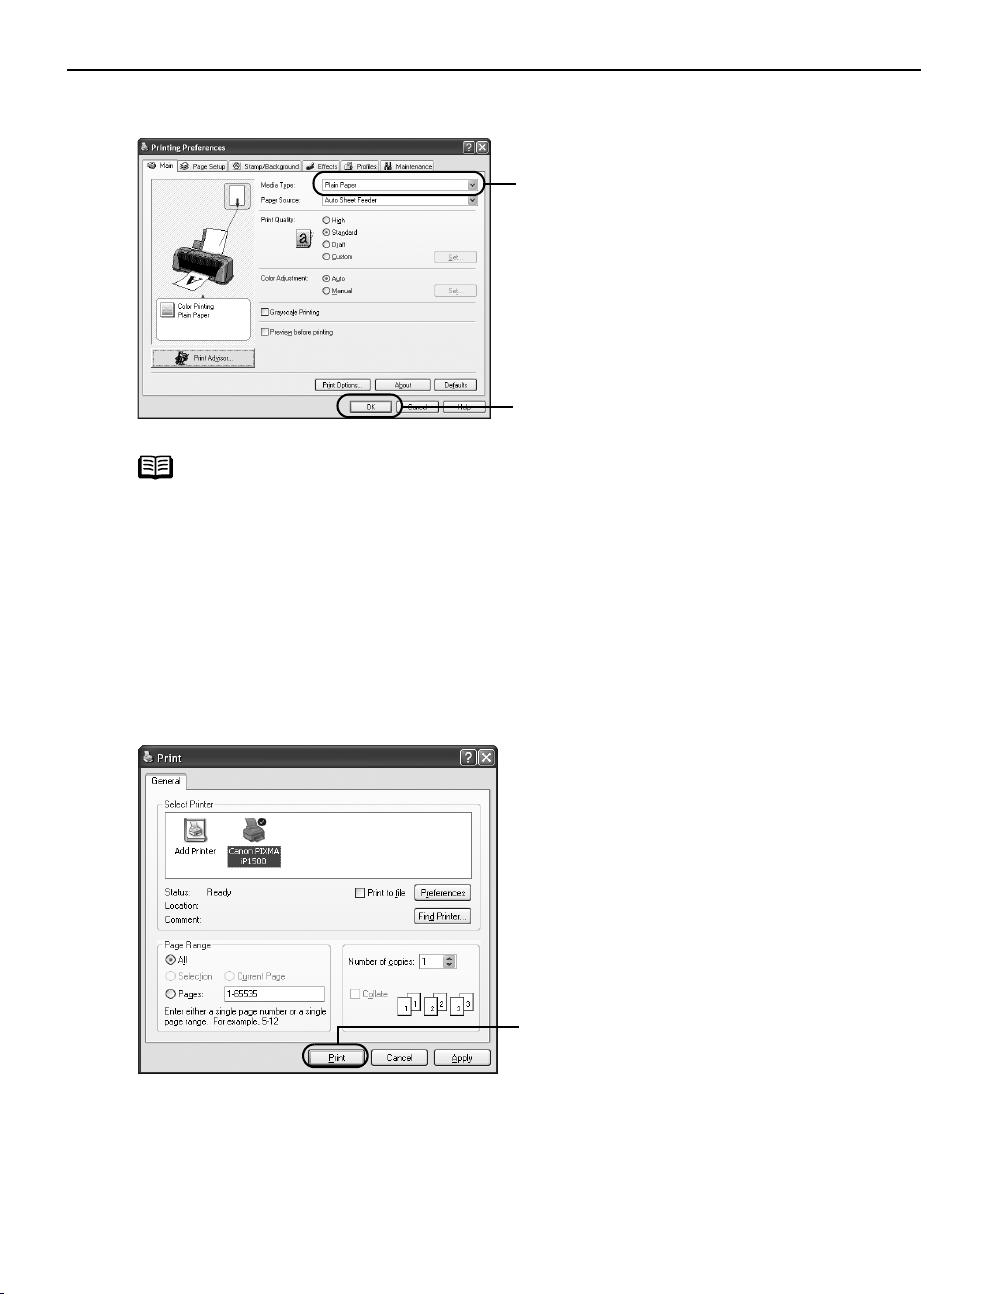
3 Specify the required settings.
(1) Click MMedia Type to select
the media loaded in the
printer.
(2) Click OOK.
Note
•From the P
printed.
• To adjust Print Quality settings, select C
Main tab. You can control quality in the S
• For details about other printer driver functions, refer to “Printer
Driver Functions” in the
• Select P
displays a preview screen that allows you to confirm the selected
printing effects and how your document will look when printed.
Some applications do not contain the function to display the preview.
4 Print the document.
Page Setup tab select the correct document size to be
Custom and click SSet on the
Set Print Quality dialog box.
User’s Guide
Preview before printing by clicking the check box. This
(1) Click PPrint.
or Help.
10
Basic Printing
Note
• You can cancel a print job in progress by simply pressing the
RESUME/CANCEL button on the printer.
See "CCanceling Printing" on page 13.
•Click CCencel Printing on BJ Status Monitor to stop printing. To show BJ
Status Monitor, click C
BJ Status Monitor opens automatically when a printer error occurs.
Canon PIXMA iP1500 on the taskbar.
Printing with Macintosh
Note
• The menu screens and dialog boxes that appear may vary, depending on the
software application you are using.
• The steps described in this section are for printing in Mac OS X v.10.3.
1 Create a document or open a file to print.
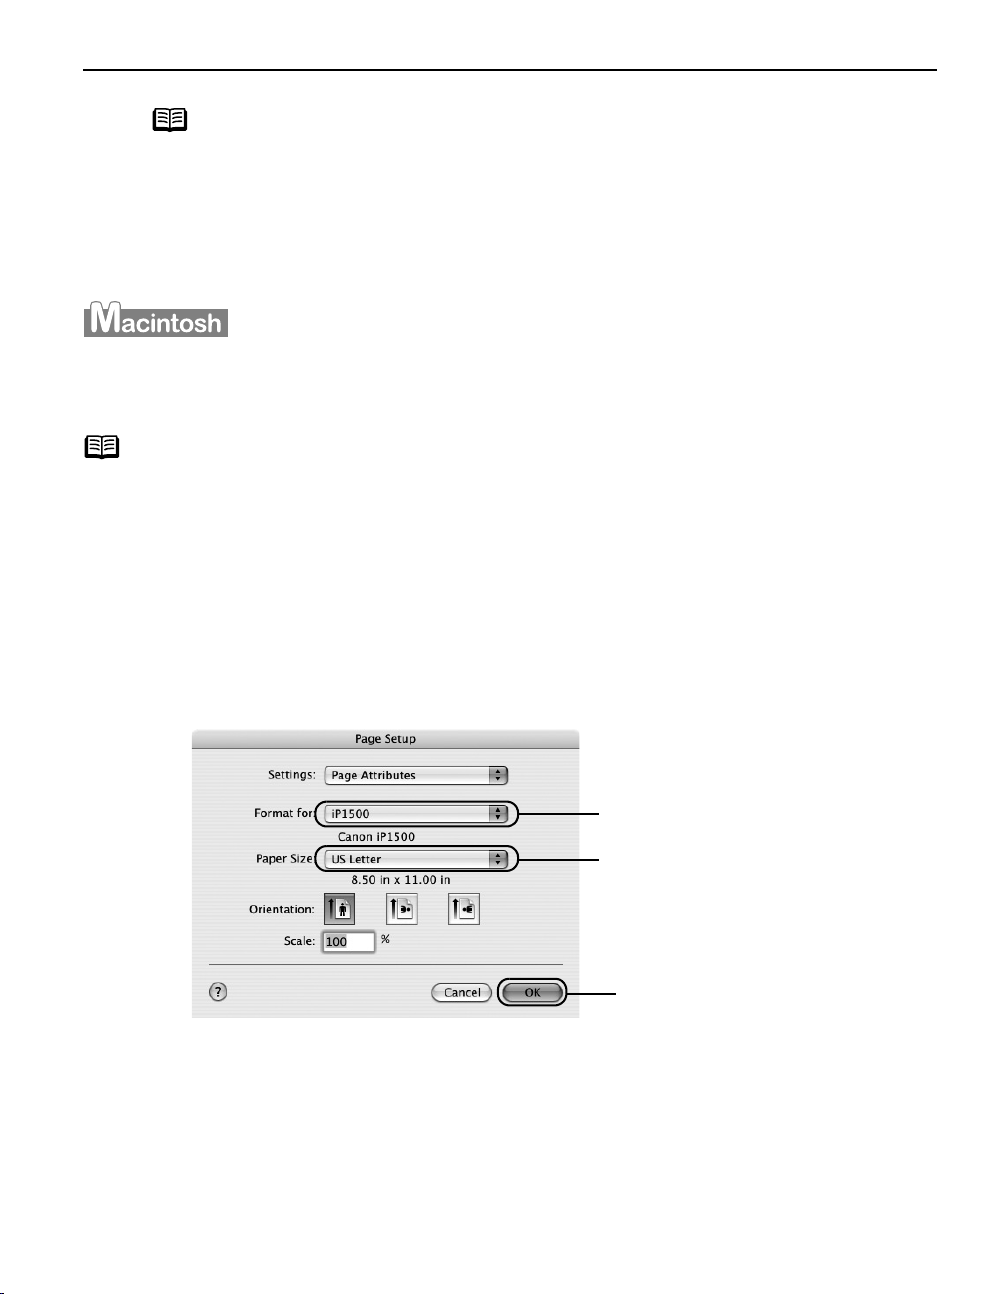
2 Select Paper Size.
(1) Select the PPage Setup from the application software's FFile menu.
Page Setup dialog box opens.
(2) Select iiP1500 from FFormat for.
(3) Select the desired paper
size from the P
pop-up menu.
(4) Click OOK.
Paper Size
11
Basic Printing
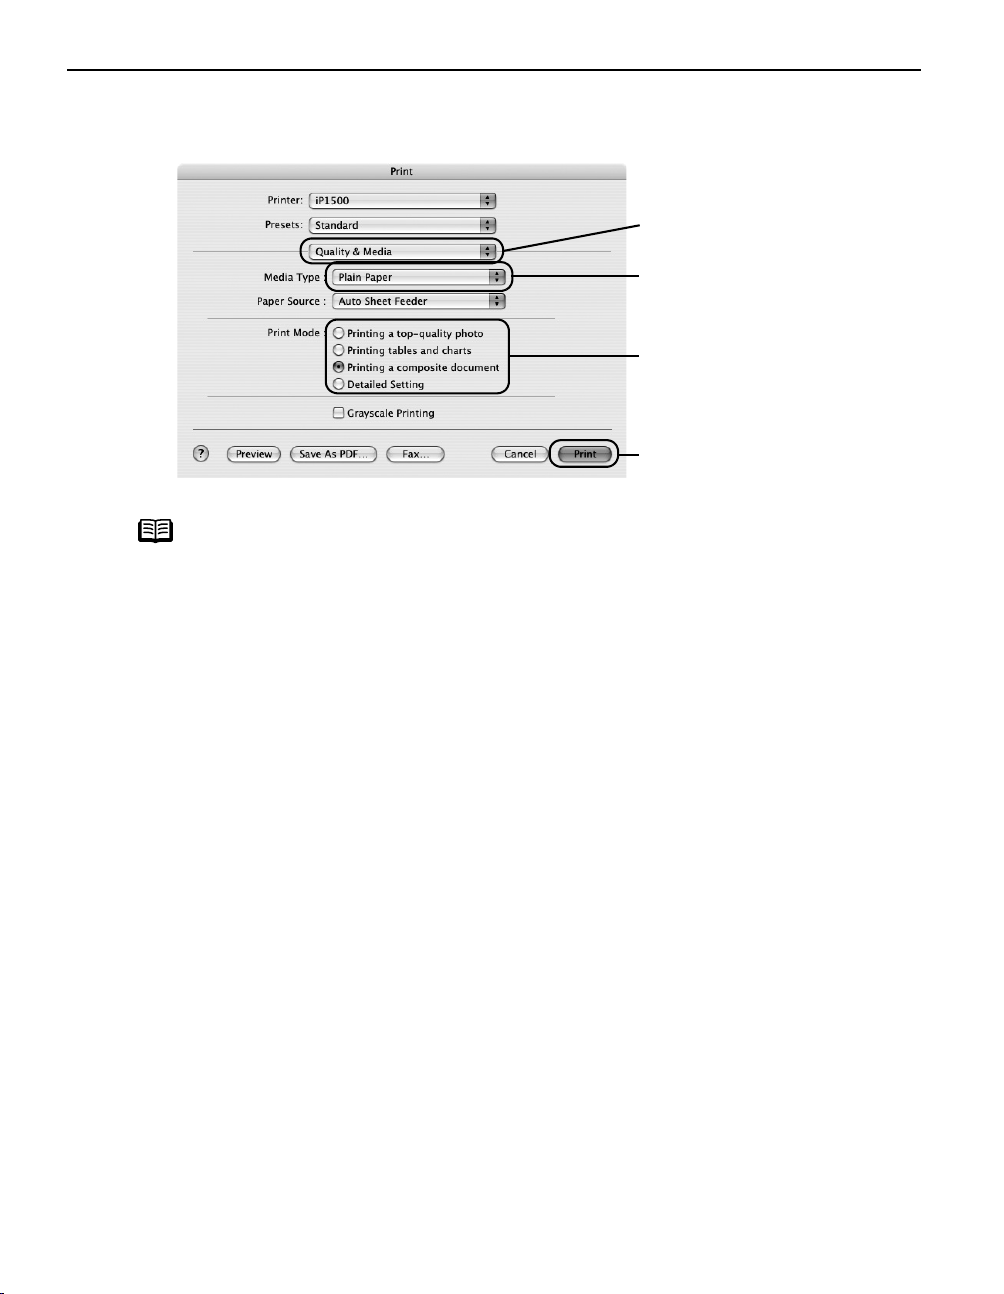
3 Specify the required settings.
(1) Select PPrint from the application software's FFile menu.
(2) Select QQuality & Media
from the pop-up menu.
(3) Select the MMedia Type
from the pop-up menu.
(4) Select the print mode
appropriate to your
document from the P
Mode.
(5) Click PPrint.
Print
Note
• When you select the print mode appropriate to your document from
Print Mode, the document will be printed in color and print
the P
quality suited to the characteristics of the M
selected.
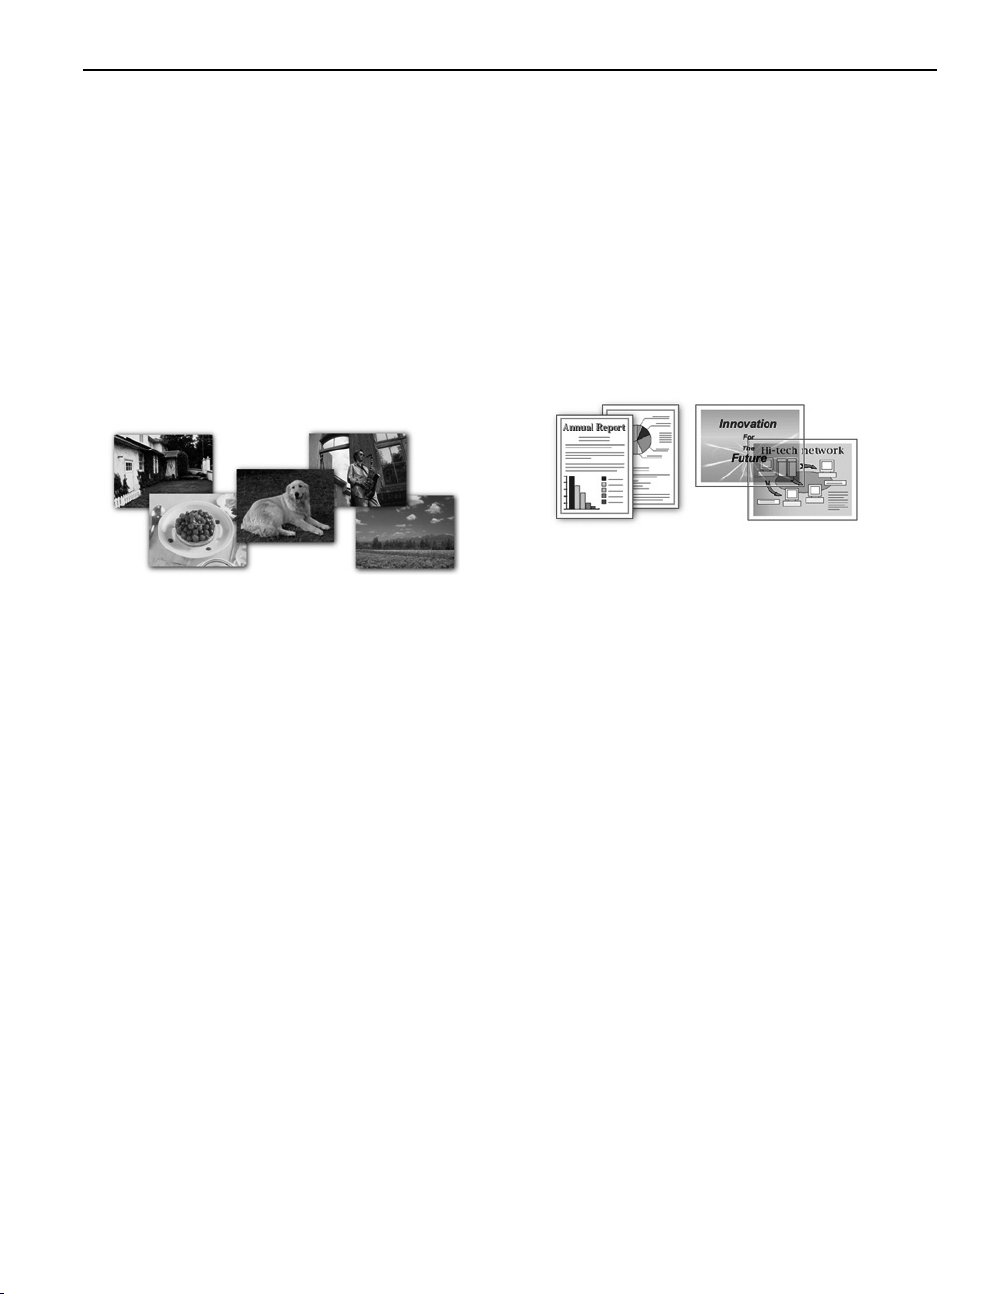
Printing a top-quality photo: Select when printing documents
consisting mainly of photographs and graphics featuring fine color
gradation.
Printing tables and charts: Select when printing documents
consisting mainly of graphs and graphics (illustrations) with strong
color definition.
Printing a composite document: Select when printing documents
consisting mainly of text.
Detailed Setting: You can fine-tune the Print Quality and Halftoning
settings.
See "AAdjusting Print Quality" on page 15.
• For details about other printer driver functions, refer to “Printer
Driver Functions” in the
• Double-clicking the name of your printer in the Printer list displays a
dialog that prompts you to confirm the status of the print job(s). To
cancel a job in progress, select the desired document, then click
Delete. To temporarily stop a job in progress, click P
all the jobs in the list, click S
User’s Guide
Stop Printing.
Media Type you have
or Help.
Pause. To cancel
12
Basic Printing
Canceling Printing
You can cancel a print job while printing with the RRESUME/CANCEL button on the printer.
1 Press the RESUME/CANCEL button while printing.
Printing is canceled and paper is fed out.
13

Advanced Printing
Advanced Printing
Accessing Printer Driver
The PPrinter Properties dialog box can be opened from either within an
application, or directly from the Windows S
Start menu.
Note
• This manual refers to Windows XP operation.
The operations may vary depending on your operating system.
• Depending on your application program, the command and menu names
may differ, and there may be more steps involved in opening the P
Properties dialog box. For more details, see the user's manual for your
application.
Printer
Opening the Printer Properties Dialog Box from Your Application
Program
1 In your application, select the command to print a document.
The PPrint dialog box can usually be opened by selecting PPrint from the FFile menu.
2 Ensure that the Canon PIXMA iP1500 is selected. Then click Preferences (or
Properties).
The PPrinter Properties dialog box opens.
Opening the Printer Properties Dialog Box Directly from the Start
Menu
This method is used for maintenance operations such as Print Head cleaning, or to
specify printer settings common to all application programs.
When the P
appear, including the D
dialog box is opened from within an application.
Printer Properties dialog box is opened from the SStart menu, additional tabs
Details tab. These do not appear when the PPrinter Properties
For more information about these additional tabs, refer to your Windows
documentation.
1 Click Start and select Control Panel, Printers and Other Hardware, and then
Printers and Faxes.
For non-Windows XP users, click SStart, select SSettings, and then PPrinters.
2 Select the Canon PIXMA iP1500 icon.
14
Advanced Printing
3 Open the File menu and select Printing Preferences (or Properties).
The PPrinter Properties dialog box opens.
Adjusting Print Quality for Photographs
Improving Printed Images
Two important factors control the quality and output of your printed images:
Paper and Ink
Using recommended Canon paper, speciality media, and inks for printing
photographs can significantly improve the quality of your printouts. See inside the
back cover for a list of Canon media and inks for this printer.
For more detailed information, refer to “Printing Media” in the
Printer Driver Settings
The printer driver has a variety of settings that can be used to enhance the colors
and output of your photographs. Many of these features are covered in this chapter.
User's Guide
.
Note
You can also access the online help in either of the following ways
depending on your operating system:
•Press the FF1 key
• Click in the upper right corner, then click the feature you want to
know more about.
•Click H
•Click in the PPage Setup dialog box or the PPrint dialog box.
Help when displayed.
Adjusting Print Quality
Features that affect the appearance and quality of your printed images can be
controlled with the printer driver.
The iP1500 automatically adjusts printer settings to improve print quality based on the
media type (plain paper, Photo Paper Pro, and so on). You can also customize the P
Quality settings if desired.
Print
15
Advanced Printing
To manually adjust Print Quality settings:
1 Open the Printer Properties dialog box.
See"OOpening the Printer Properties Dialog Box from Your Application Program"
on page 14.
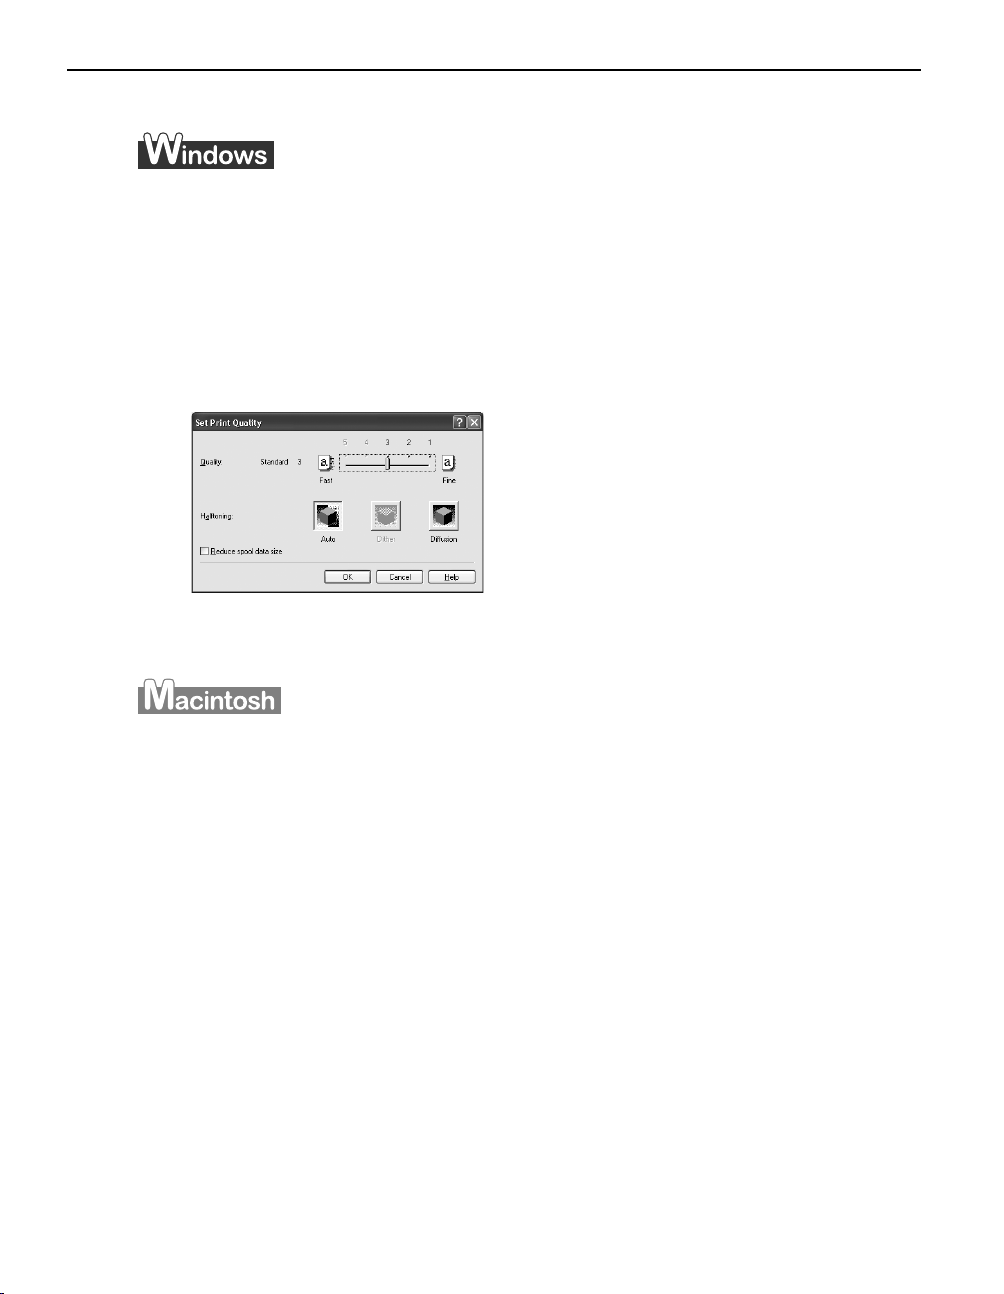
2 Select Custom in Print Quality, then click Set... to open the Set Print
Quality dialog box.
3 Move the slide bar to adjust the Print Quality.
4 When the process is complete, click OK.
16
1 Open the Print dialog box.
See "PPrinting with Macintosh" on page 11.
2 Select Quality & Media from the pop-up menu, and then click Detailed
Setting.
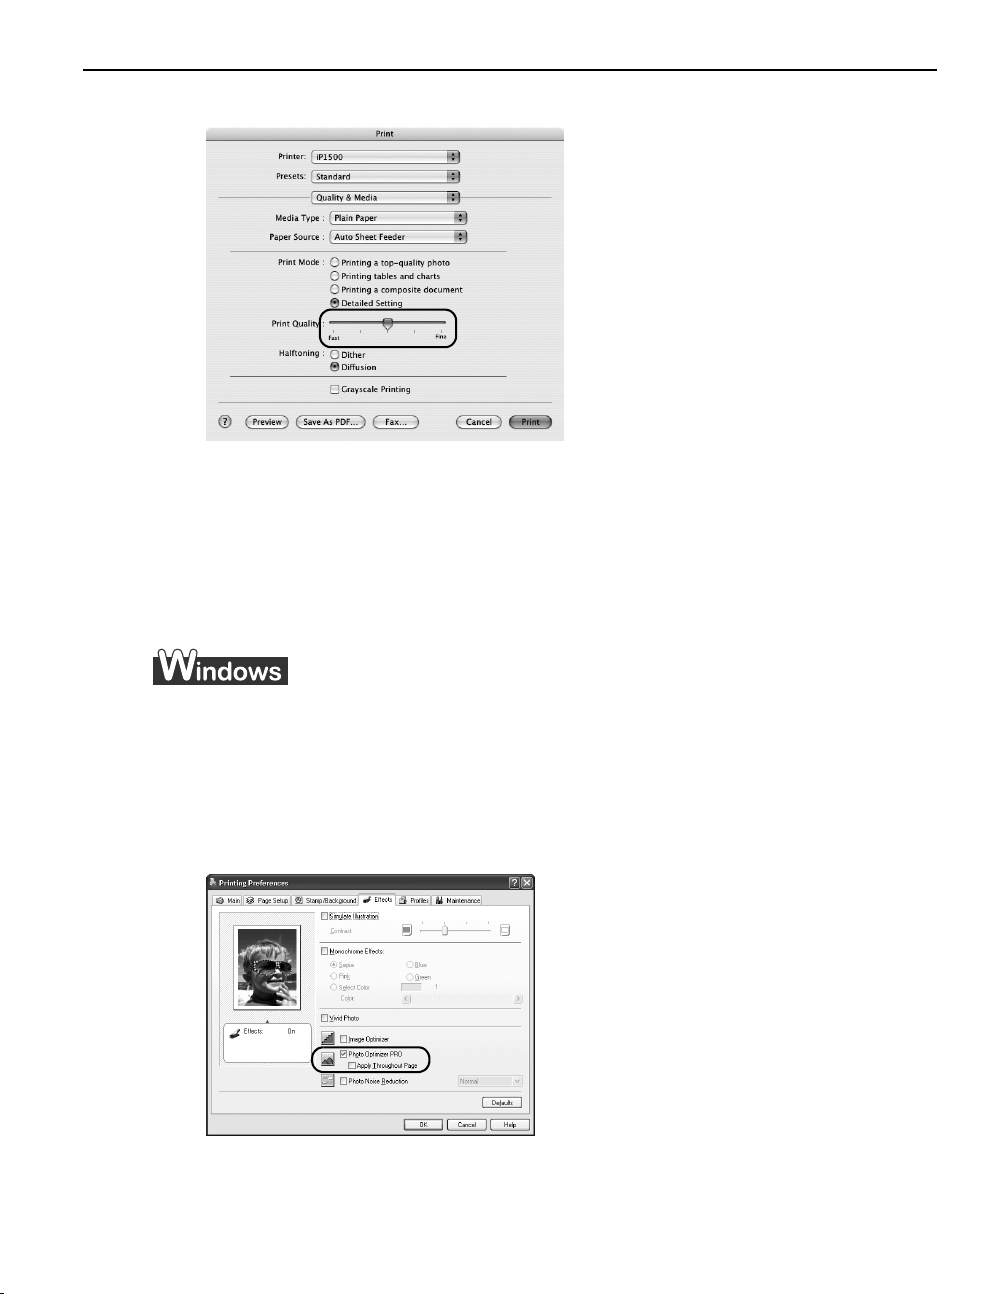
3 Move the slide bar to adjust the Print Quality.
4 When the process is complete, click OK.
To automatically optimize the image:
Photo Optimizer PRO automatically adjusts the photographic image created with a
digital camera. Use this feature to compensate for unsatisfactory color balance and
over- or under-exposure before printing.
Advanced Printing
1 Open the Printer Properties dialog box.
See"OOpening the Printer Properties Dialog Box from Your Application Program"
on page 14.
2 Click the Effects tab.
3 Select the Photo Optimizer PRO check box.
17
Advanced Printing
4 Click OK.
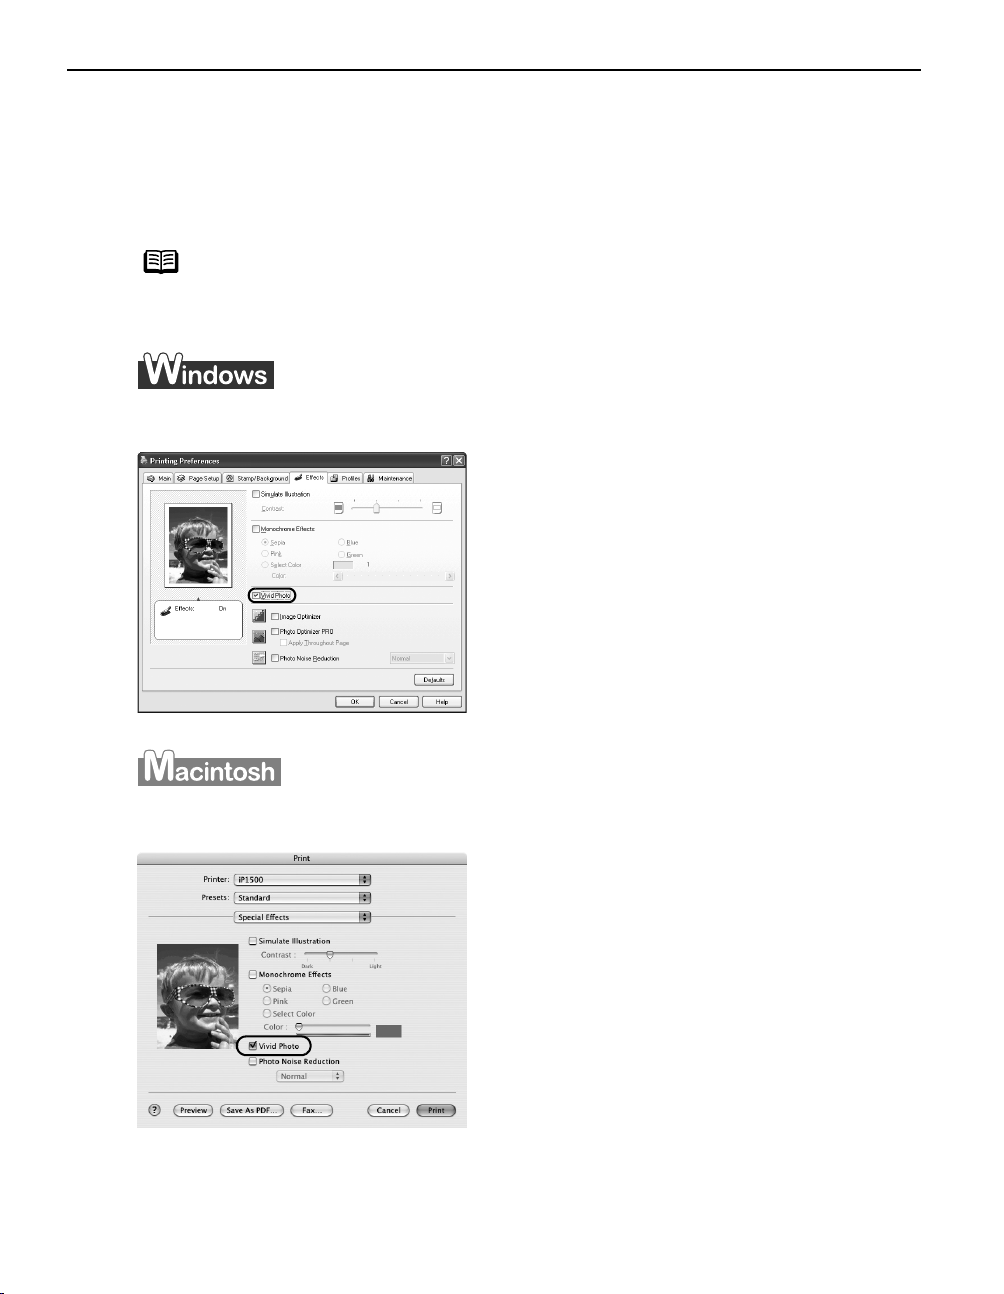
To use Vivid Photo option:
Vivid Photo intensifies background colors such as fields, trees, oceans and skies,
while maintaining natural skin tones in the images.
Note
To use Vivid Photo, select the VVivid Photo check box on the EEffects tab.
To use Vivid Photo, select the VVivid Photo check box under SSpecial Effects.
In Windows Me or Windows 98
If Background Printing has been disabled, the Vivid Photo function is
not available.
18
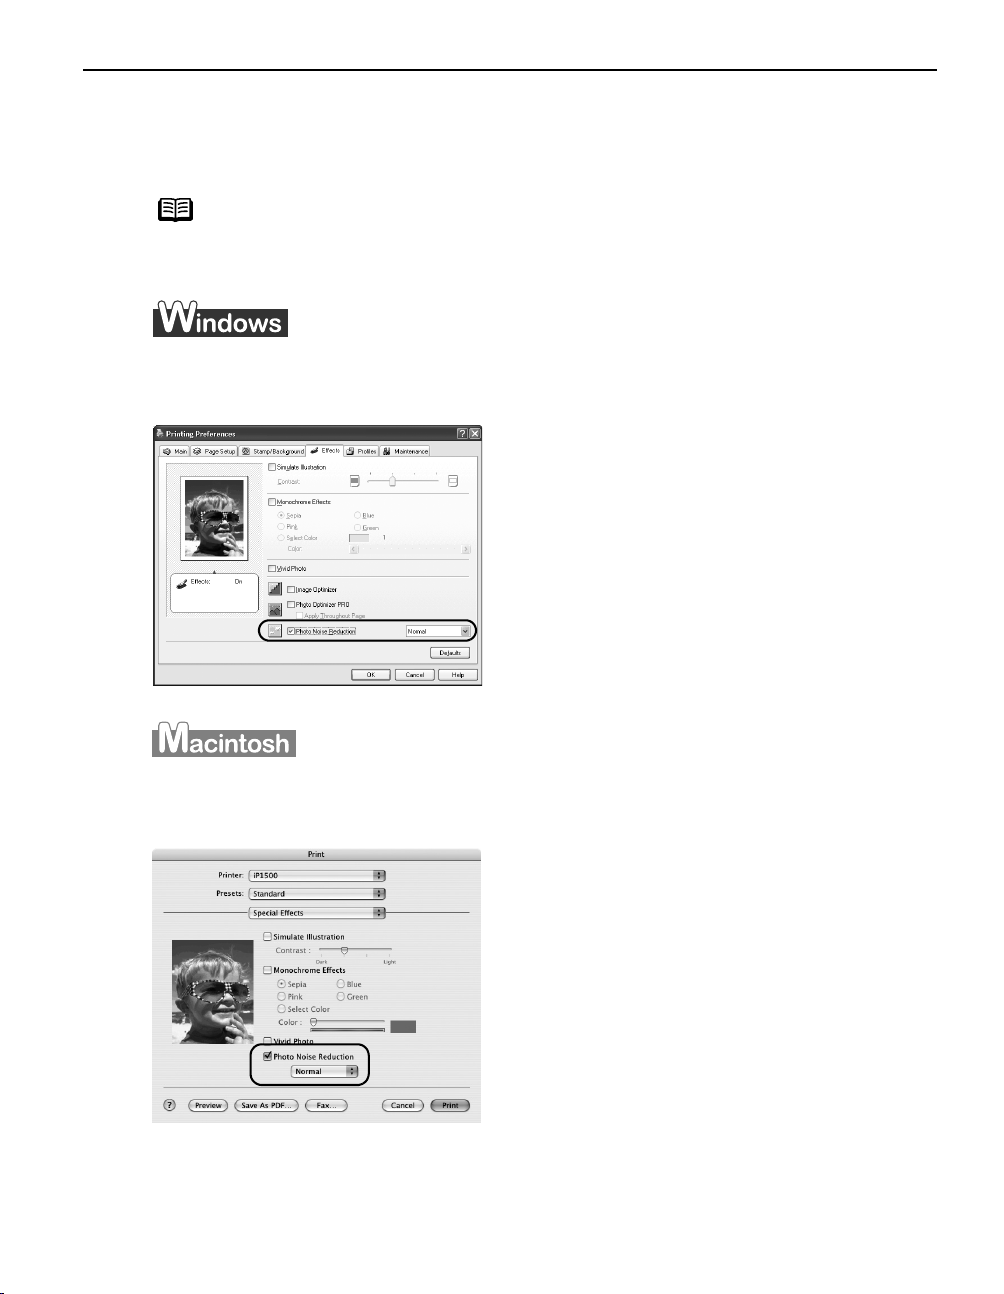
To reduce noise from images captured with a digital camera:
Photo Noise Reduction function reduces noise from blue portions, such as the sky
and dark portions of the images captured with your digital camera.
Advanced Printing
Note
To use Photo Noise Reduction, select the PPhoto Noise Reduction check box on the
Effects tab.
In Windows Me or Windows 98
If Background Printing has been disabled, the Photo Noise Reduction
function is not available.
To use Photo Noise Reduction, select the PPhoto Noise Reduction check box under
Special Effects.
19
 Loading...