

Page 1
User's Guide
1
MP-0911-V2.00
FAQs
How to Use This Manual
Safety Precautions
Before Printing
Main Components
Loading Printing Paper
Basic Printing
Printing with Windows
Printing with Macintosh
Printing Media
Compatible Media Types
High Resolution Paper HR-101N
Glossy Photo Paper GP-401 / Glossy Photo Paper "Everyday Use" GP-501
Matte Photo Paper MP-101
Photo Paper Plus Double Sided PP-101D
Photo Paper Plus Glossy PP-101
Photo Paper Plus Semi-gloss SG-101, SG-201
Photo Paper Pro PR-101
Photo Stickers PS-101
T-Shirt Transfers TR-301
Envelopes
Routine Maintenance
Page 2

Replacing an Ink Tank
2
Keeping the Best Printing Results
When Printing Becomes Faint or Colors Are Incorrect
Printing the Nozzle Check Pattern
Examining the Nozzle Check Pattern
Print Head Cleaning
Print Head Deep Cleaning
Aligning the Print Head
Cleaning Your Printer
Using the Canon Setup Utility
Features of the Canon Setup Utility
Starting the Canon Setup Utility
Canon Setup Utility Menu (Windows)
Canon Setup Utility Menu (Macintosh)
Troubleshooting
Cannot Install the Printer Driver
Cannot Connect to Computer Properly
Print Results Not Satisfactory
Printer Does Not Start or Stops During Print Jobs
Paper Does Not Feed Properly
Paper Jams
ALARM Lamp Flashes Orange
Error Message Appears on the Screen
Windows-specific Problems
Cannot Print Properly from a Digital Camera
If You Cannot Resolve the Problem
Appendix
Included Items
Printing Area
Uninstalling the On-Screen Manuals
Transporting the Printer
Specifications
Opening the Printer Properties Dialog Box (Windows)
Opening the Page Setup and Print Dialog Box (Macintosh)
Opening the Printer Setup Utility (Print Center) (Macintosh)
Page 3

Opening the Canon IJ Printer Utility (Macintosh)
3
Page 4
How to Use This Manual
4
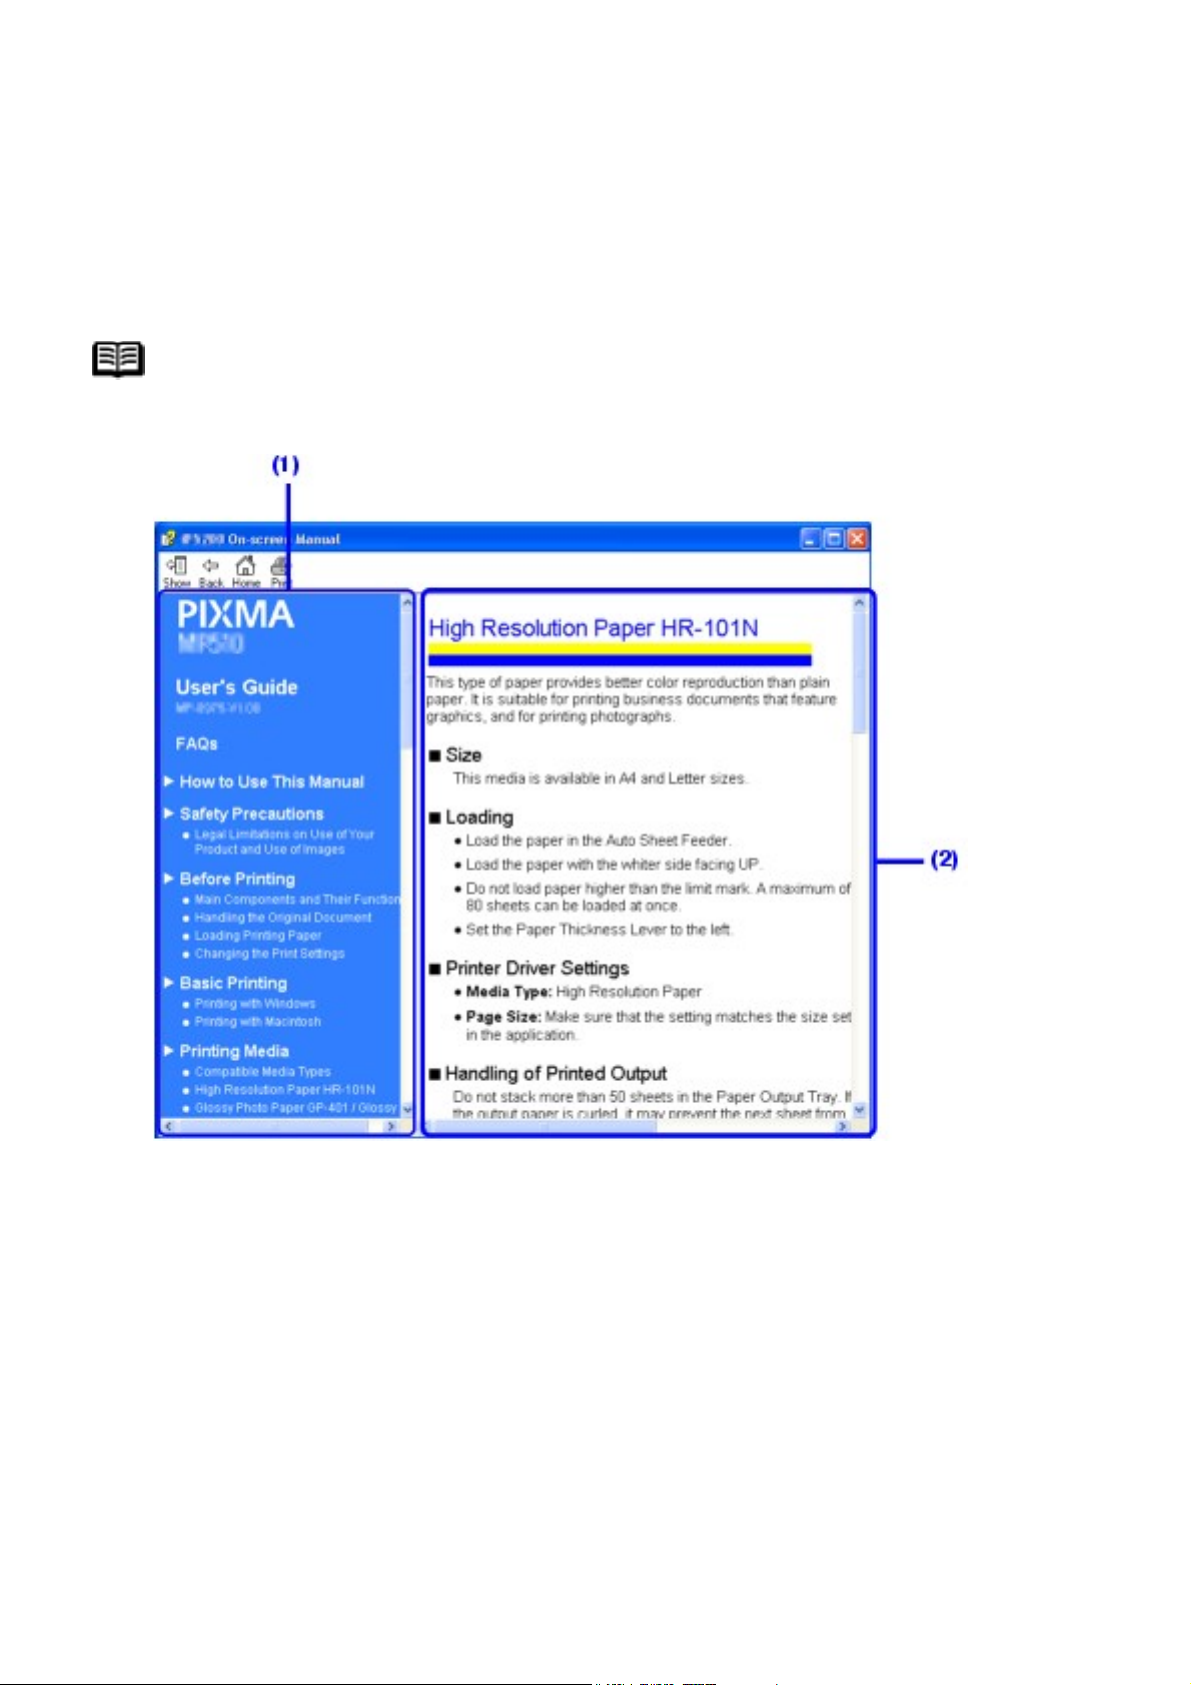
The screen of this on-screen manual consists of two parts: the Menu frame (on the
left) and the Content frame (on the right).
Note
The example screenshots in this section are in English.
(1) Menu frame
(2) Content frame
Page 5
Note
5
Operations explained in this manual are specific to
computers running Windows® XP with Service Pack 2
(hereafter referred to as "Windows XP SP2") or Mac® OS
X v.10.4.x operating systems. Operation may vary
depending on your operating system.
The example above is the screen in Windows. The
appearance of the screen in Macintosh® differs slightly.
Navigating from the Menu
Click a title on the Menu frame. The corresponding topic will appear on the
Content frame.
Navigating in the Content Frame
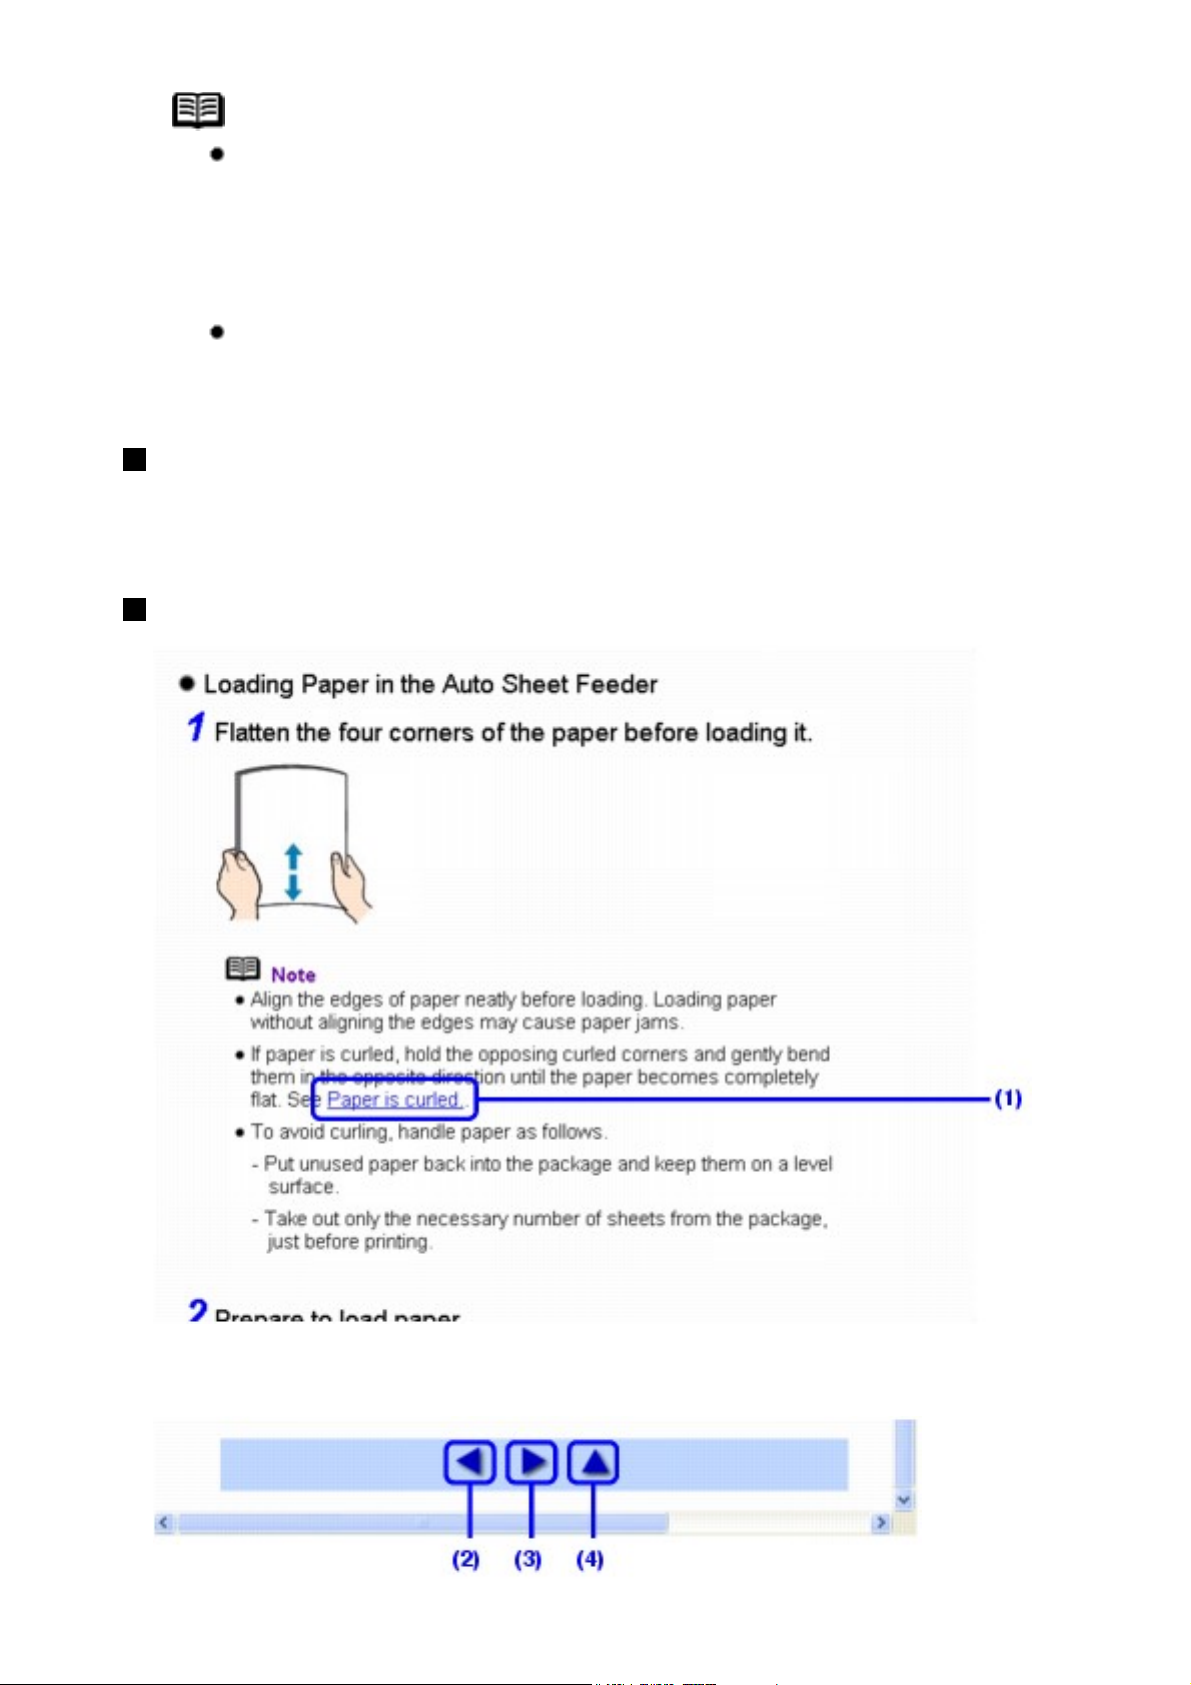
(1) Click a character string with a blue underline to jump to the associated
page.
Page 6
(2) : Click to jump to the previous page.
6
(3)
(4)
: Click to jump to the next page.
: Click to jump to the beginning of this page.
Printing This Manual
To print a topic, click on a blank area of the Content frame to make sure it is
active, then click the Print button.
Note
Clicking the Print button without making the Content frame
active can print the Menu frame instead.
To print a topic, click on a blank area of the Content frame to make sure it is
active, then select Print on the File menu, and click the Print button.
Note
Clicking the Print button without making the Content frame
active can print the Menu frame instead.
Searching Topics by Keywords
You can search for a topic by entering keywords.
Click the Show button. In the search screen, enter a keyword and click the
List Topics button.
Select a topic to read from the list of search results, then click the Display
button. The page is displayed.
Page 7
Note
7
This searches all the on-screen manuals installed on your
computer.
Enter keywords in the (search field), then press the
Return key. Double-click the topic to read from the list of search results to
display the page.
Note
You can click
to specify the search scope.
Search iP3300 User's Guide:
Searches in the on-screen manual currently opened.
Search All Help:
Searches all the online help installed on your computer.
Symbols Used in This Manual
Warning
Indicates a warning concerning operations that may lead to
death or injury to persons if not performed correctly. In order
to use the printer safely, always pay attention to these
warnings.
Caution
Indicates a caution concerning operations that may lead to
injury to persons or damage to property if not performed
correctly. In order to use the printer safely, always pay
attention to these cautions.
Important
Indicates operational warnings and restrictions. Be certain to
read these items to operate the printer correctly, and avoid
damage to the printer.
Page 8
Note
8
Indicates notes for operation or additional explanations.
Indicates operations in Windows.
Indicates operations in Macintosh.
Trademarks
"Windows" and "Internet Explorer" are trademarks of Microsoft
Corporation, registered in the United States and other countries.
"Macintosh" and "Mac" are trademarks of Apple Computer, Inc., registered
in the U.S. and other countries.
Page 9

Safety Precautions
9
Please read the safety warnings and cautions provided in this manual to ensure
that you use the printer safely. Do not attempt to use the printer in any way not
described in this manual.
Warning
You may cause an electric shock, fire, or damage the printer if you ignore
any of these safety precautions.
Choosing a
location
Power supply Never attempt to plug in or unplug the
Do not place the printer close to
flammable solvents such as alcohol
or thinners.
printer from the power supply when
your hands are wet.
Always push the plug all the way into
the power outlet.
Never
damage,
modify, stretch
or excessively
bend or twist
the power
cord. Do not place heavy objects on
the power cord.
Never plug the
printer into a
power socket
that is shared
with other
equipment
(extension lead/cord, 2- or 3-way
adapter, etc.).
Never use the printer if the power
cord is bundled or knotted.
Page 10
If you detect smoke, unusual smells
10
or strange noises around the printer,
immediately unplug the printer at the
power supply and call for service.
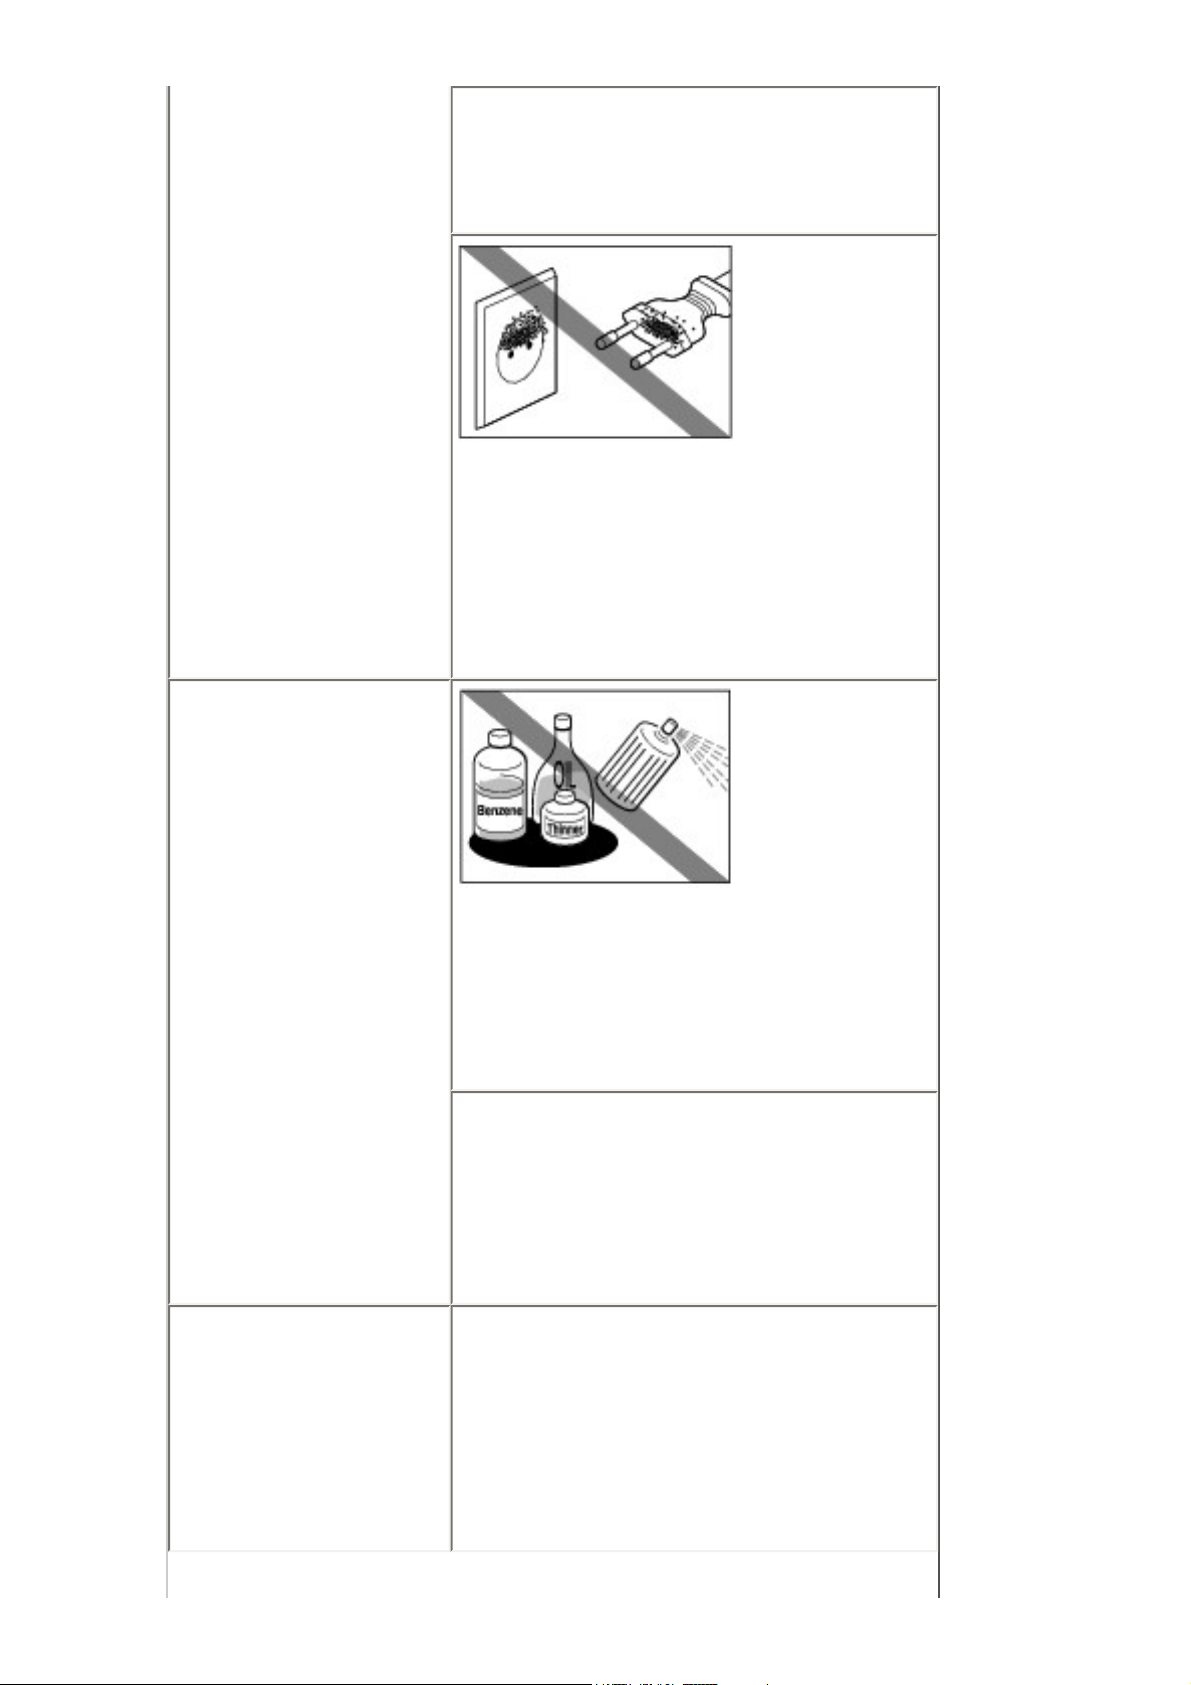
Periodically,
unplug the
printer and
use a dry cloth
to wipe off any
dust or dirt
collected on the plug and the power
outlet. If the printer is placed at a
location exposed to a lot of dust,
smoke, or high humidity, the dust
collected on the plug absorbs
moisture and may cause insulation
failure and fire.
Cleaning the
printer
Use a damp
cloth to clean
the printer.
Never use
flammable
solvents such
as alcohol,
benzene or thinners.
If flammable solvents come in contact
with electrical components inside the
printer, it could cause a fire or electric
shock.
Always unplug the printer from the
power outlet before cleaning the
printer.
If you accidentally switch the printer
on while cleaning it, you could injure
yourself or damage the printer.
Maintaining the
printer
Do not attempt to disassemble or
modify the printer. There are no user
serviceable parts inside the printer.
The printer contains high-voltage
components. Never attempt any
maintenance procedure not described
in this guide.
Page 11
Working around
11
the printer
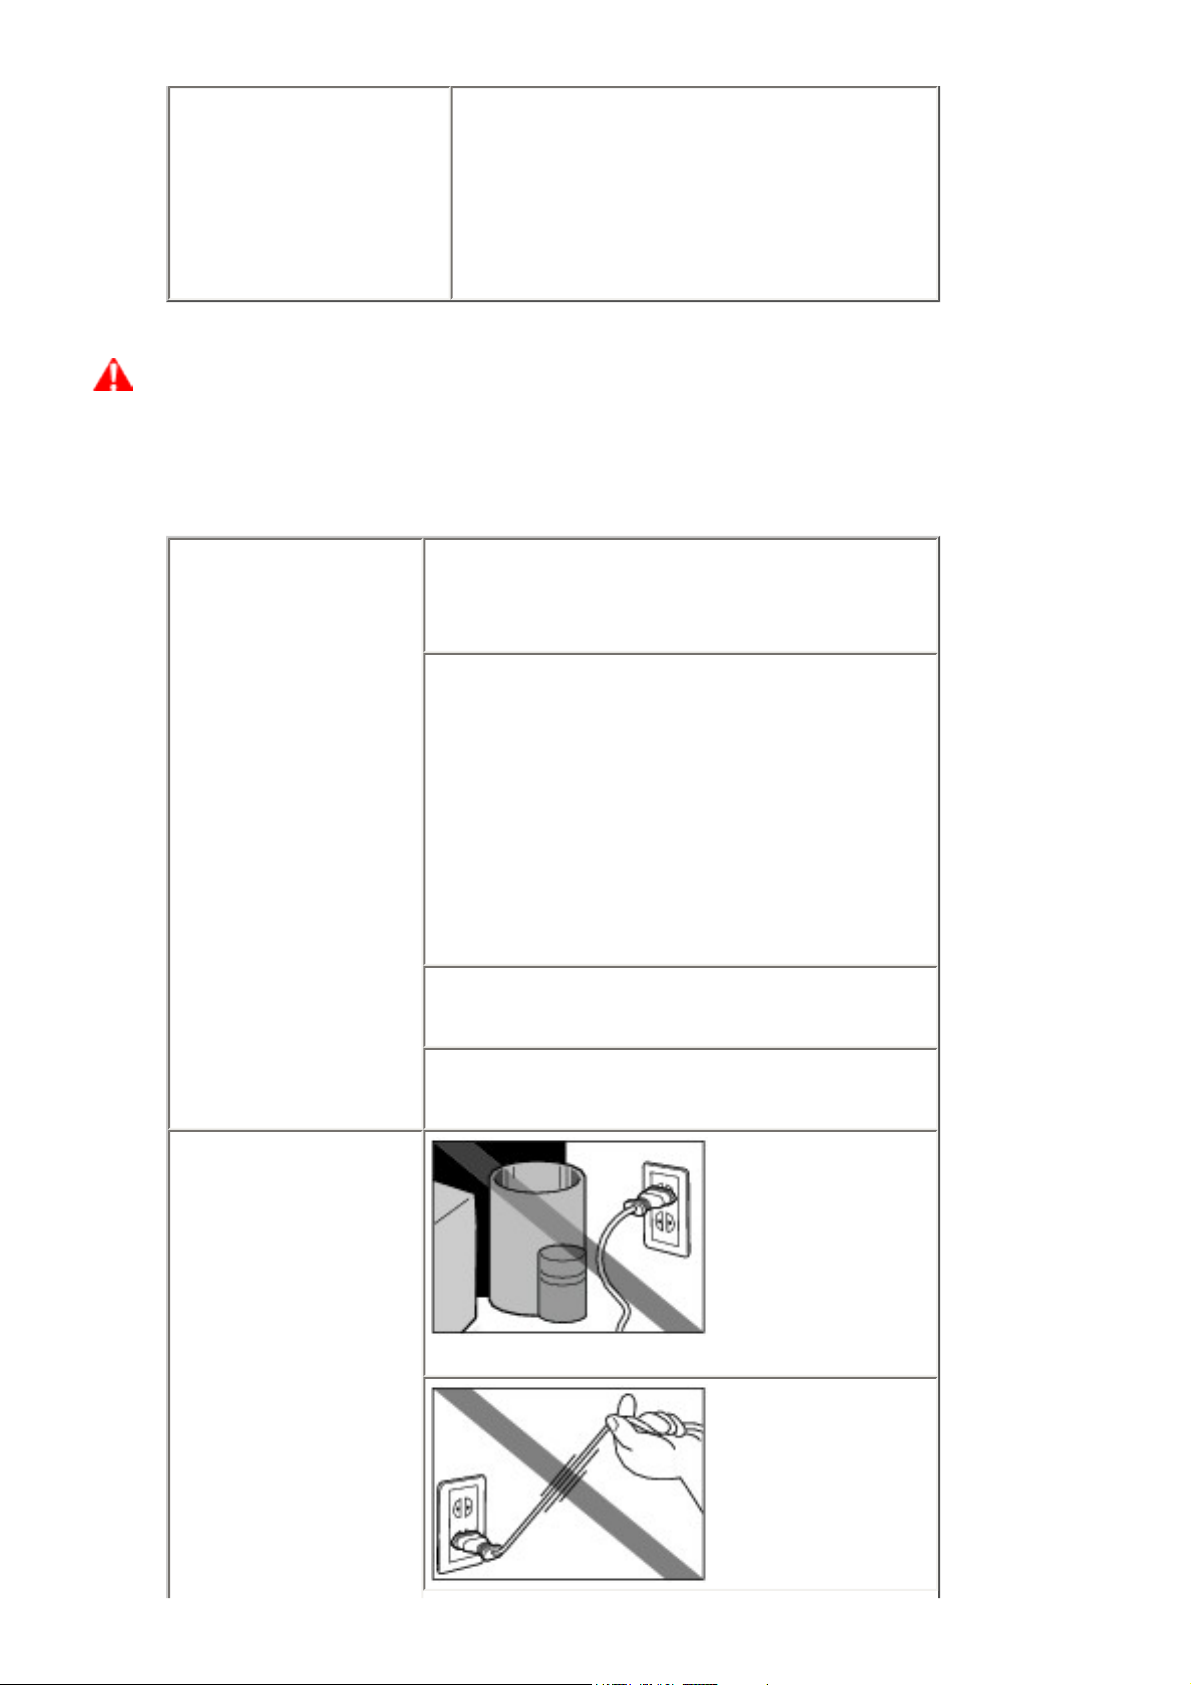
Do not use highly flammable sprays
near the printer.
This could cause a fire or electric
shock if the spray comes into contact
with electrical components inside the
printer.
Caution
You may cause injury or damage the printer if you ignore any of these
safety precautions.
Choosing a
location
Do not install the printer in a location
that is unstable or subject to excessive
vibration.
Do not install the printer in locations that
are very humid or dusty, in direct
sunlight, outdoors, or close to a heating
source.
To avoid the risk of fire or electric
shocks, install the printer in a location
with an ambient temperature range of 5°
C to 35°C (41°F to 95°F) and humidity
of 10% to 90% (condensation free).
Do not place the printer on a thick rug or
carpet.
Do not place the printer with its back
attached to the wall.
Power supply
Ensure that the
area around the
power outlet is
kept clear at all
times so you can
easily unplug the
power cord if necessary.
Never remove
the plug by
pulling on the
cord.
Page 12
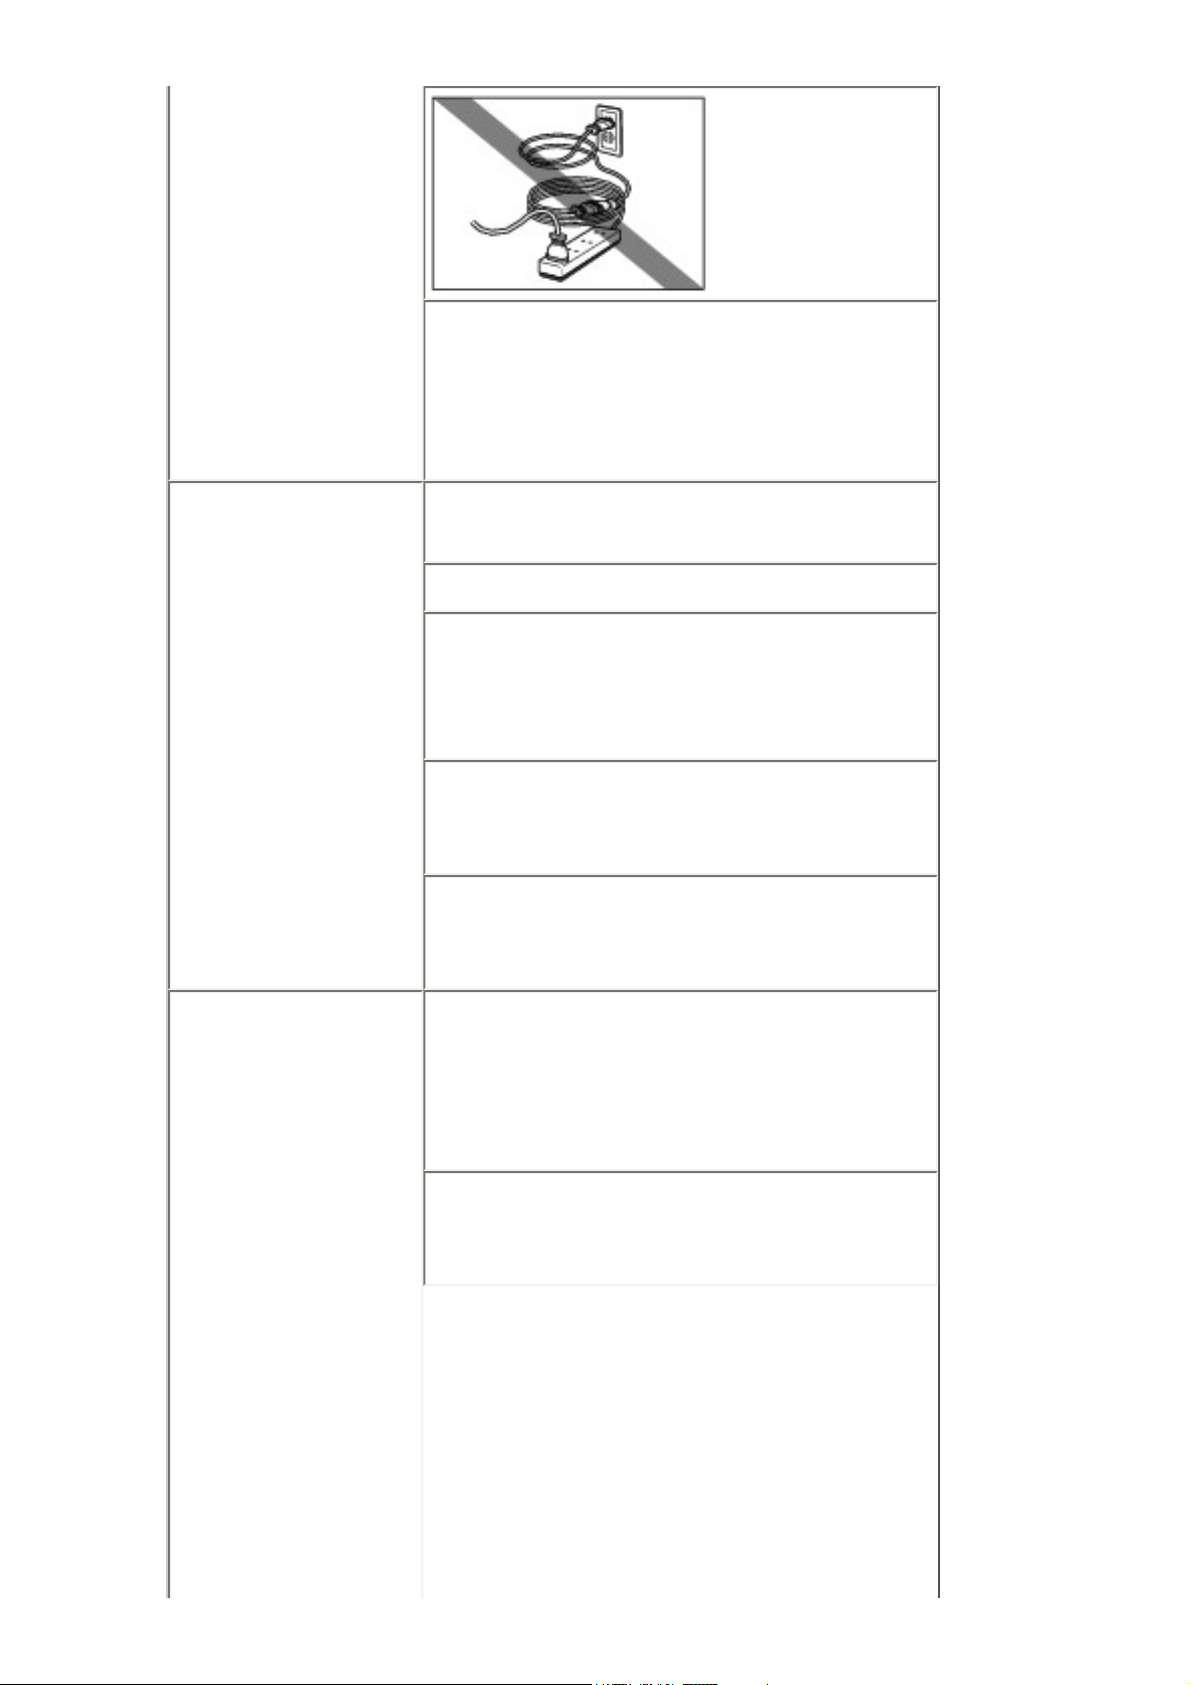
Do not use an
12
extension lead/
cord.
Never use a power supply source other
than the one rated for the printer in the
country of where you purchased the
printer.
AC 100-240 V, 50/60 Hz
Working around
the printer
Print Heads and
ink tanks
Never put your hands or fingers in the
printer while it is printing.
Do not place any object on the printer.
Do not place metal objects (paper clips,
staples, etc.) or containers of flammable
solvents (alcohol, thinners, etc.) on top
of the printer.
If any foreign object (metal or liquid) fall
into the printer, unplug the power cord
and call for service.
Do not transport or store the printer on a
slant, vertically or upside-down, as the
ink may leak and damage the printer.
For safety reasons, store Print Heads
and ink tanks out of the reach of small
children.
If a child ingests any ink, consult a
doctor immediately.
Do not shake Print Heads or ink tanks.
Ink may leak out and stain clothing or
the surrounding area.
Page 13
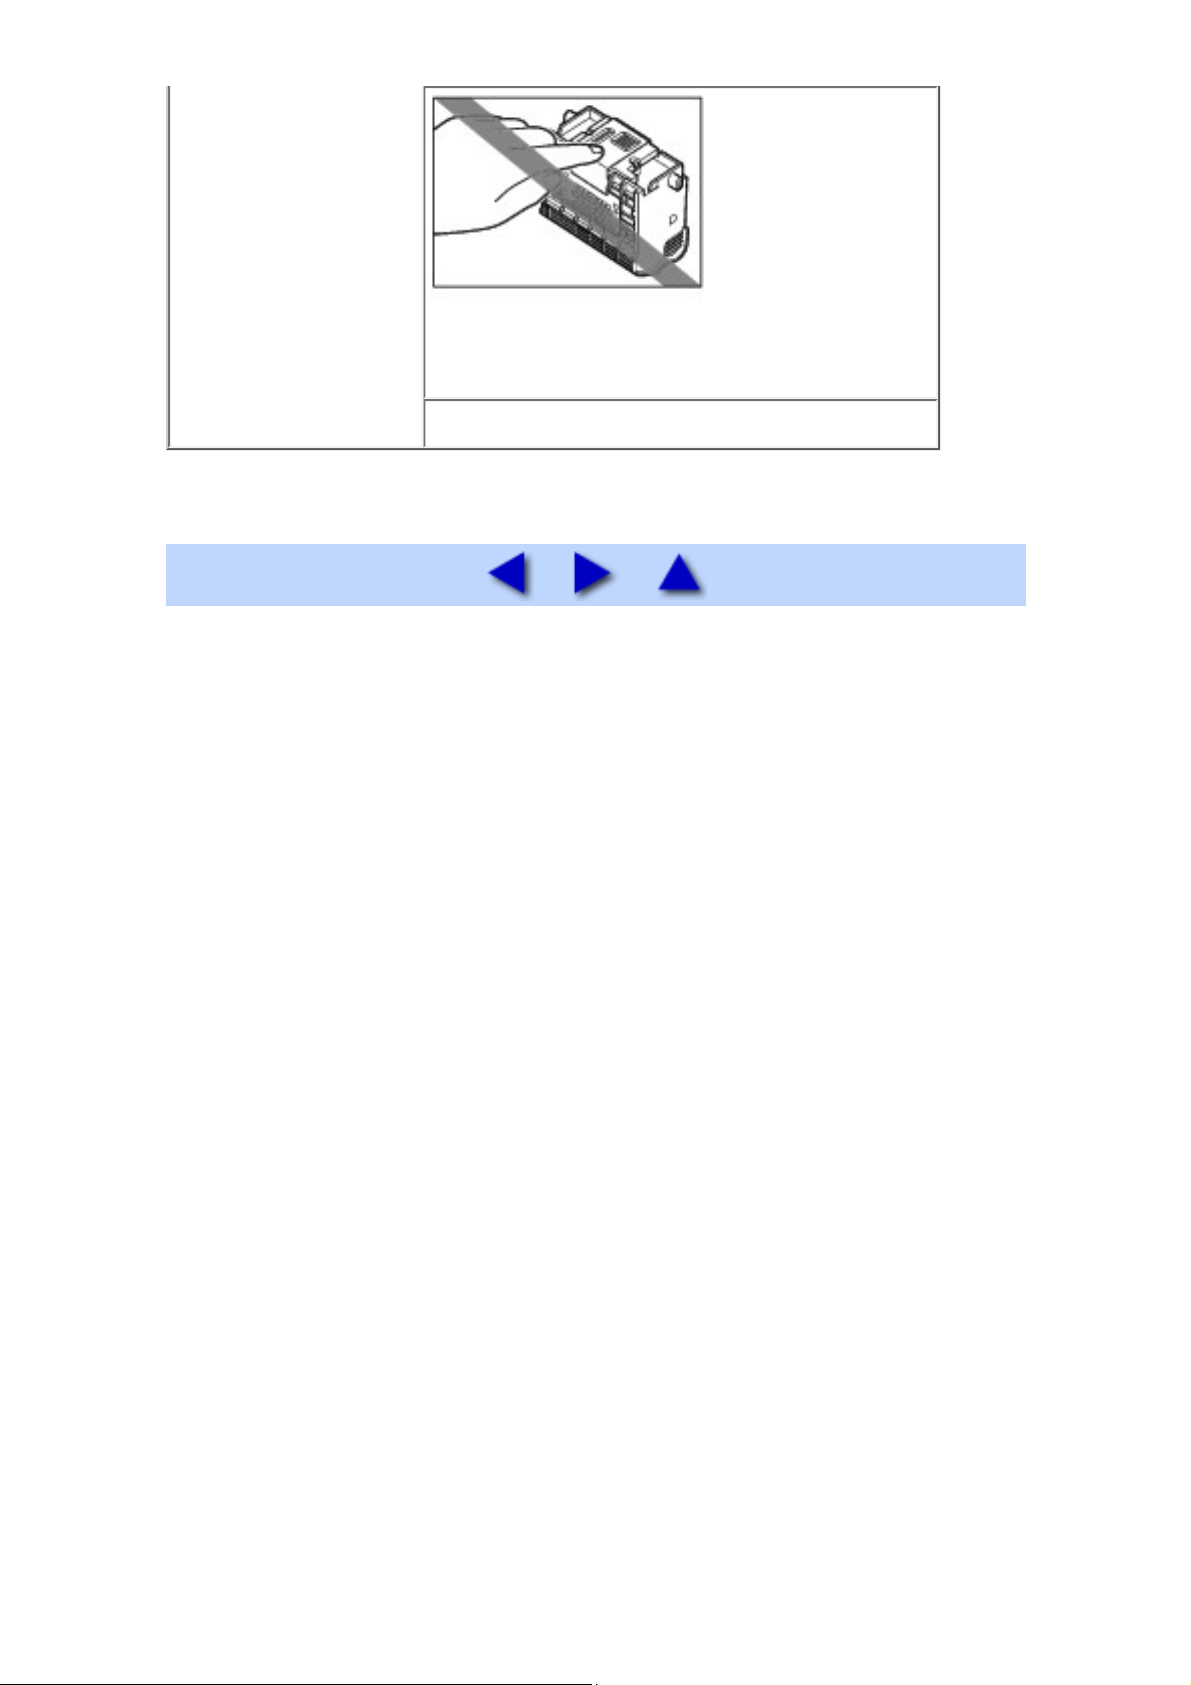
Never touch the
13
electrical
contacts on a
Print Head after
printing. The
metal parts may
be very hot and
could cause burns.
Do not throw ink tanks into fire.
Page 14
Before Printing
14
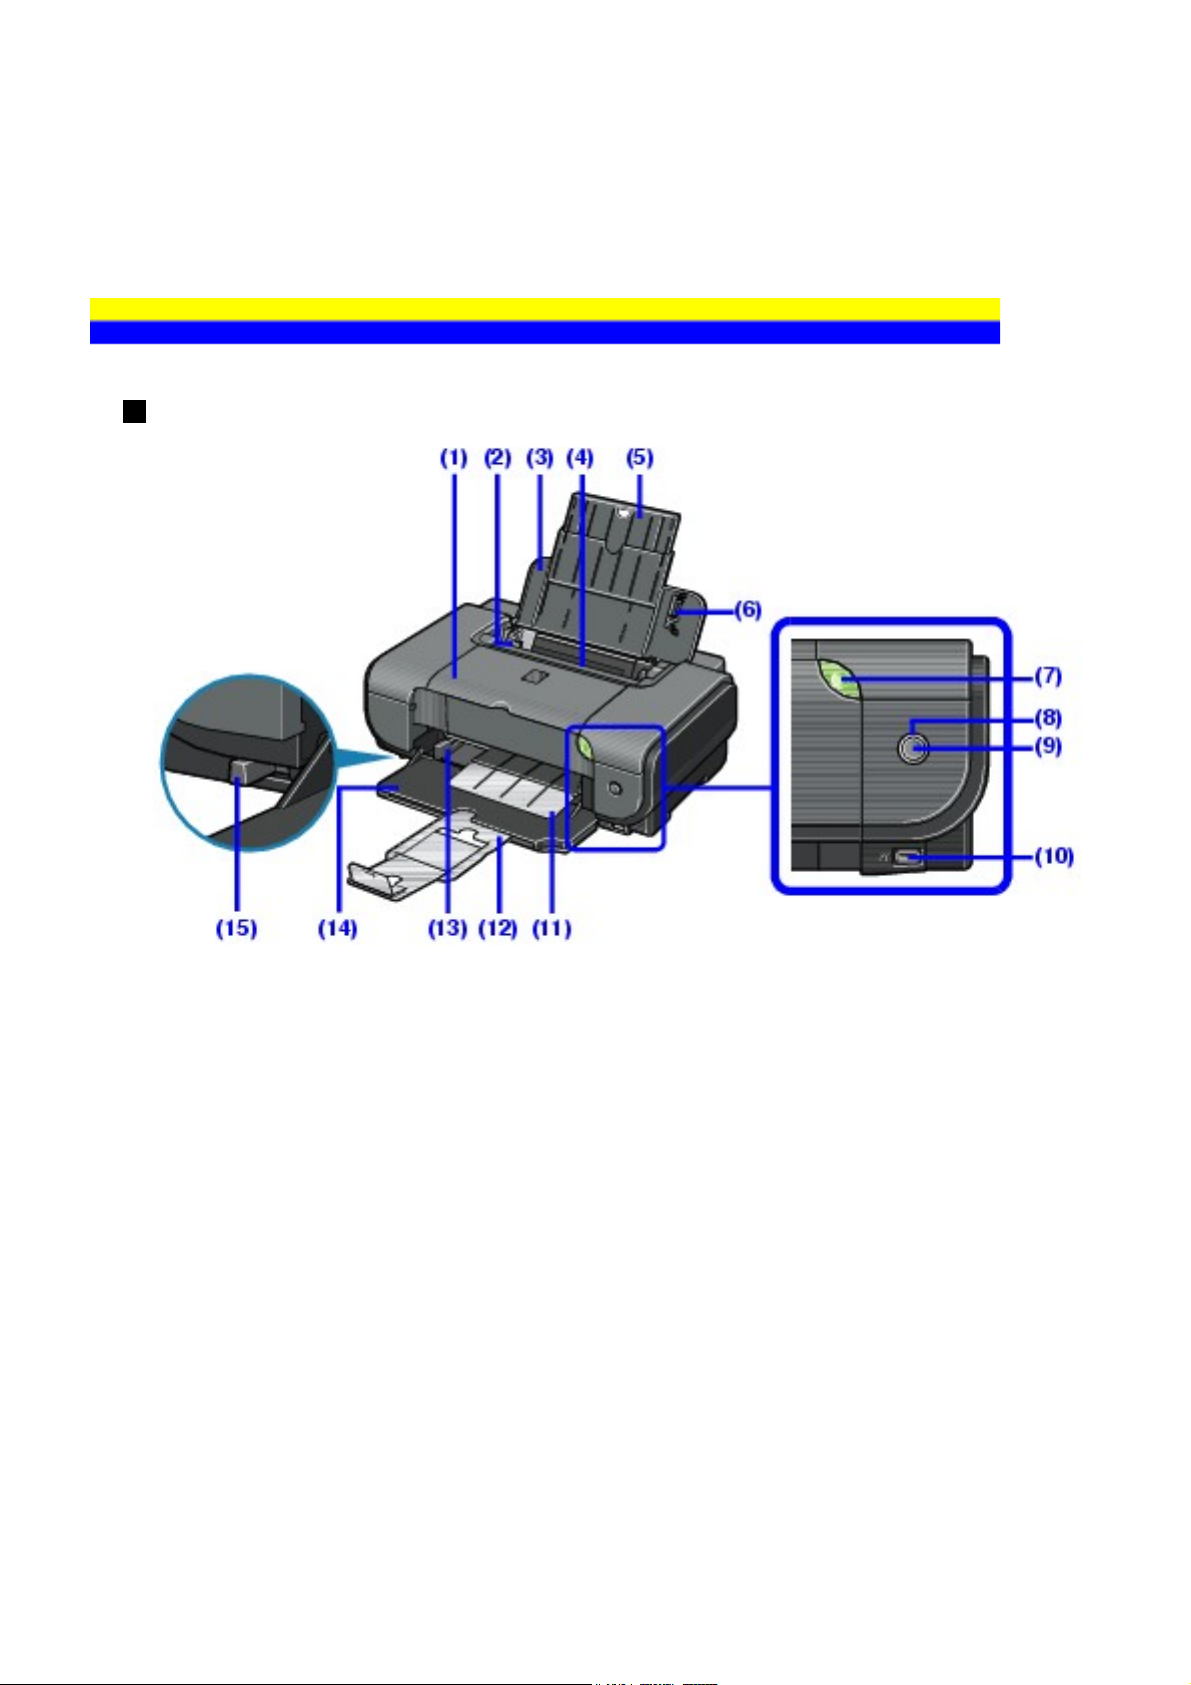
Main Components
Front View
(1) Top Cover
Open when replacing the ink tanks, or when removing jammed paper.
(2) Paper Guide (Auto Sheet Feeder)
After loading paper, pinch the knob and slide it so that it just touches the
left edge of the paper.
(3) Sheet Feeder Cover
Open to load paper in the Auto Sheet Feeder.
(4) Auto Sheet Feeder
Load paper here before printing. Paper feeds automatically, one sheet at
a time.
(5) Paper Support
Supports paper loaded on the tray. Extend it before loading paper. To
extend it, put your finger in the rounded indent and pull out the extension
until it stops.
Page 15

(6) Cover Guide
15
Align the right side of the paper to this guide.
(7) POWER Button / Power Lamp
Turns the printer on and off. Lights or flashes green to indicate the power
status.
(8) Alarm Lamp
Lights or flashes orange when an error has occurred, or when paper or ink
has run out.
(9) RESUME/CANCEL Button
Press after resolving a printer error to dismiss an error message and
resume printing. Press to cancel a print job in progress.
(10) Direct Print Port
When printing directly from a digital camera, a digital video camcorder, or
mobile camera phone compliant with the PictBridge, connect the device
here. Refer to "Printing Photographs Directly from a Compliant Device" in
the Quick Start Guide.
(11) Paper Output Tray
Printouts are output to this tray.
(12) Output Paper Support
Supports output printouts. Extend it before printing.
(13) Paper Guide (Front Feeder)
After loading paper, pinch the knob and slide it so that it just touches the
left edge of the paper.
(14) Front Feeder
Load A4, Letter, or B5-sized plain paper here. Paper feeds automatically,
one sheet at a time.
(15) Paper Thickness Lever
Switches the clearance between the Print Head and the loaded paper to
match the paper type. Adjust its position according to the type of paper
you are printing on.
Page 16
Note
16
POWER Lamp and ALARM Lamp
You can check the status of the printer by the POWER and
ALARM lamps.
POWER lamp Off: The power is off.
POWER lamp lit green: The printer is ready to print.
POWER lamp flashing green: The printer is getting
ready to print, or printing is in progress.
ALARM lamp flashing orange: An error has occurred
and the printer is not ready to print. For details, see
ALARM Lamp Flashes Orange.
POWER lamp flashes green once and ALARM lamp
flashes orange once alternately: An error that requires
contacting your Canon Service representative may have
occurred. For details, see
POWER Lamp Flashes Green
and ALARM Lamp Flashes Orange Alternately.
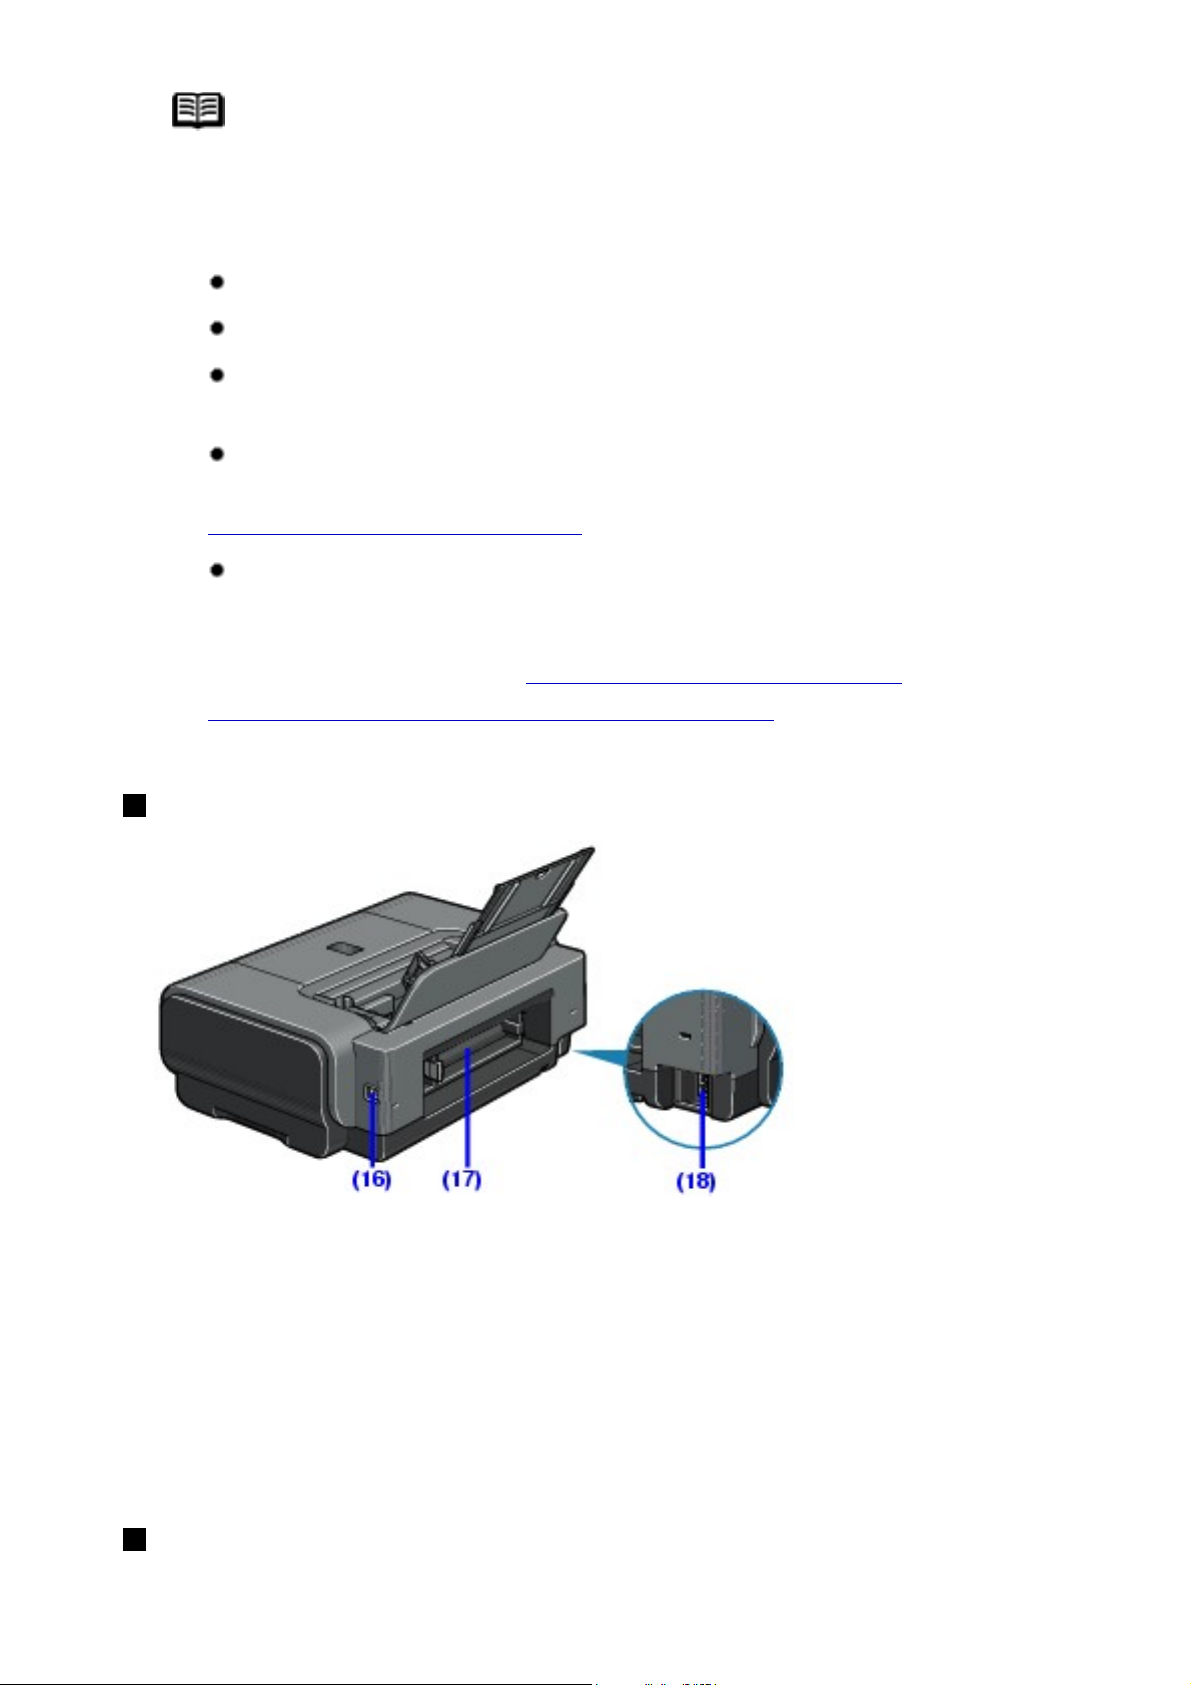
Rear View
(16) USB Connector (for computer)
Plug in the USB cable connecting the printer to a computer here.
(17) Rear Cover
Open when removing jammed paper.
(18) Power Connector
Plug in the supplied power cord here.
Inside
Page 17
17
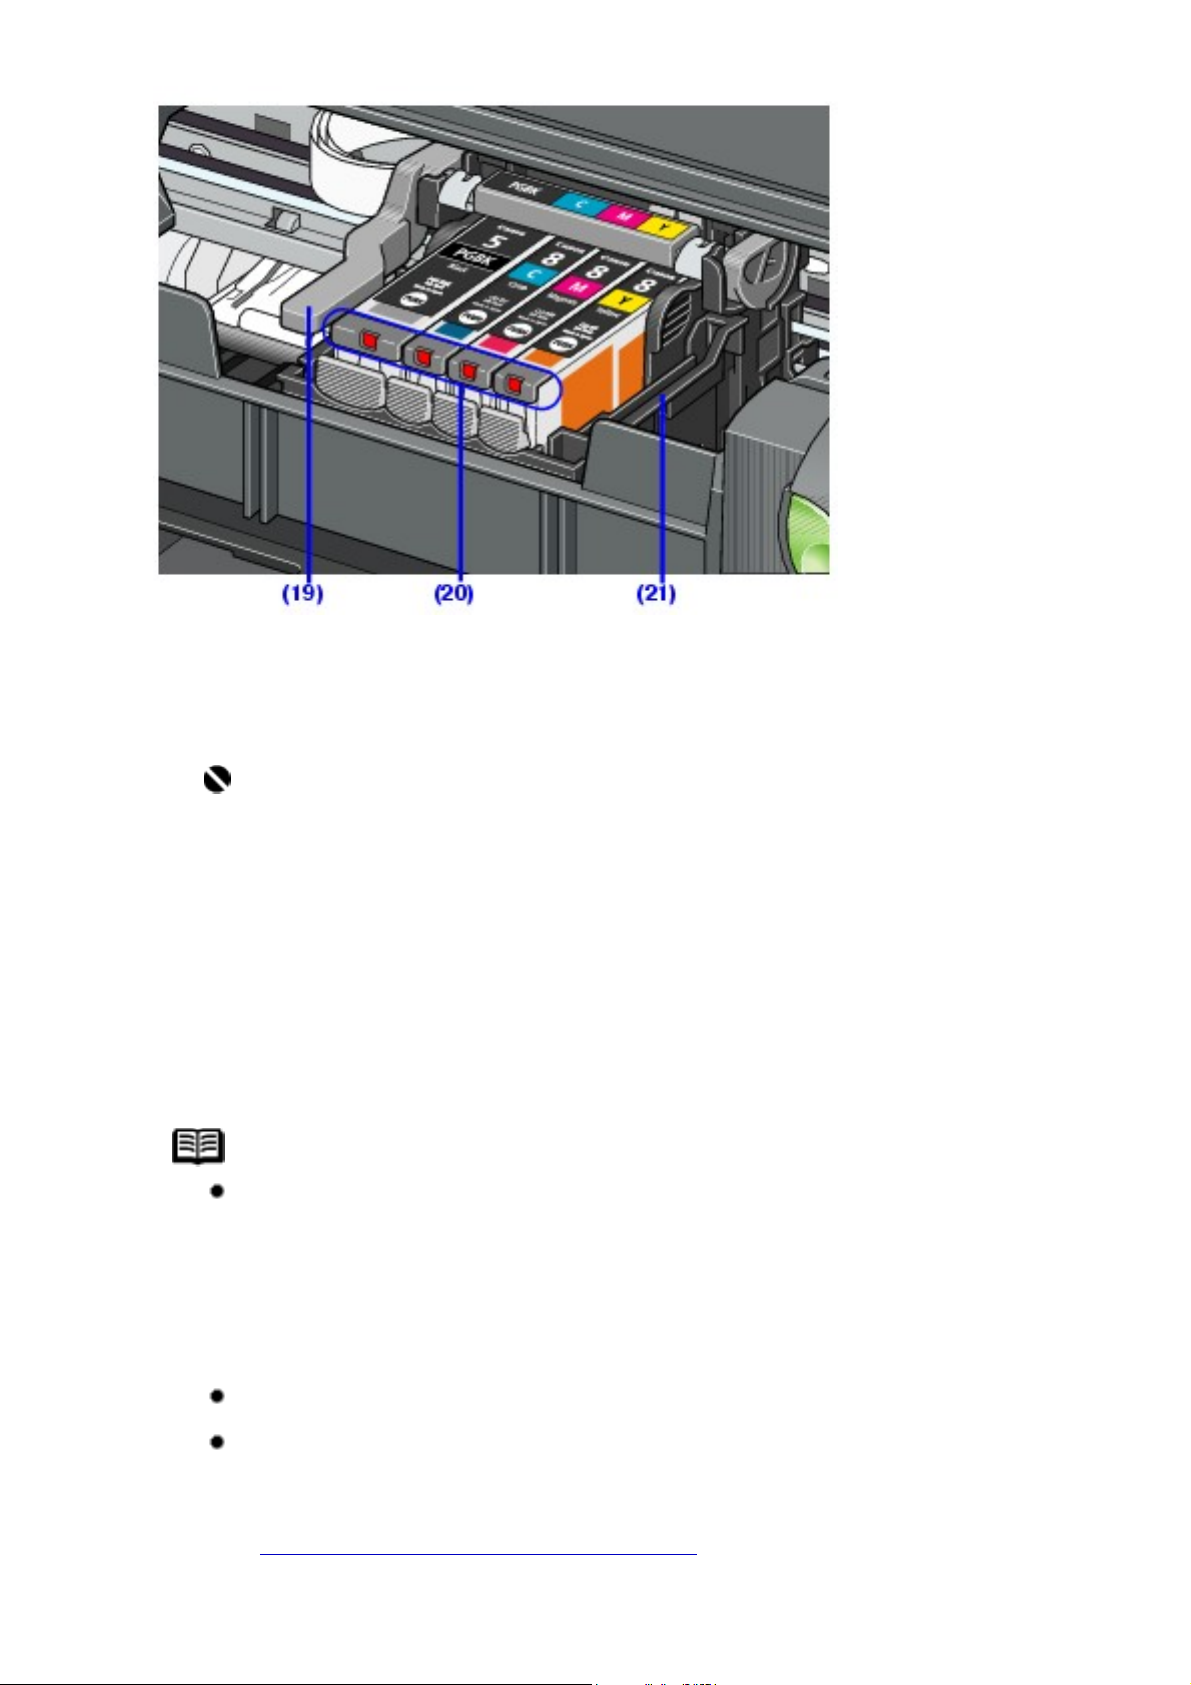
(19) Print Head Lock Lever
Locks the Print Head into place.
Important
Do not pull up this lever after installing the Print Head.
(20) Ink Lamp
Lights or flashes red to indicate the status of the ink tank.
(21) Print Head Holder
Holds the Print Head.
Note
For information on how to install the Print Head and ink
tanks, refer to the Easy Setup Instructions.
Ink Lamps
You can check the status of each ink tank according to the
way its lamp flashes.
On: The printer is ready to print.
Slow flashing (at around 3-second intervals): Ink is low.
You can continue printing for a while, but we recommend
you to have a replacement ink tank available. For details,
see Knowing When to Replace Ink Tank.
Page 18

Fast flashing (at around 1-second intervals): Ink tank is
18
empty, or the printer is not ready due to an error. For
details, see ALARM Lamp Flashes Orange.
Off: Make sure that the ink tanks are inserted properly. If
the lamps are still off after reinserting the ink tanks, there
has been an error and the printer cannot print. Check the
number of times the orange ALARM lamp flashes and take
appropriate action. For details, see
ALARM Lamp Flashes
Orange.
Page 19

Loading Printing Paper
19
This section describes how to load printing paper in the Auto Sheet Feeder and the
Front Feeder.
Paper Handling
Recommended Paper and Requirements
Paper Support Load
Limit
Media
Type
Model
*1
Auto
Sheet
Feeder
Plain
Paper
- 0.52
inches /
13 mm
Envelopes - 10
envelopes
High
Resolution
Paper
HR101N
80 sheets
(A4,
Letter)
Front
Feeder
0.39
inches /
10 mm
(A4,
Letter,
B5)
Not
loadable
Not
loadable
Printer
Paper
Thickness
Lever
Driver
Setting for
Media
Type
Left
Plain
Paper
Right Envelope
*2
High
Resolution
*2
Left
Paper
Super
White
Paper
Glossy
Photo
Paper
SW-201 0.52
inches /
13 mm
(A4,
Letter)
GP-401 10 sheets
(A4,
Letter),
20 sheets
(4" x 6" /
101.6 x
152.4
mm,
Credit
card)
0.39
inches /
10 mm
(A4,
Letter)
Not
loadable
*2
Left
Left
Plain
Paper
Glossy
Photo
Paper
Page 20

Glossy
20
Photo
Paper
"Everyday
Use"
GP-501 10 sheets
(A4,
Letter),
20 sheets
(4" x 6" /
101.6 x
152.4
mm)
Not
loadable
*2
Left
Glossy
Photo
Paper
Matte
Photo
Paper
Photo
Paper
Plus
Glossy
*3
MP-101 10 sheets
(A4,
Letter),
20 sheets
(4" x 6" /
101.6 x
152.4
mm)
PP-101 10 sheets
(A4,
Letter, 5"
x 7" /
127.0 x
177.8
mm),
20 sheets
(4" x 6" /
101.6 x
152.4
mm)
Not
loadable
*2
Not
loadable*2
Left
Left
Matte
Photo
Paper
Photo
Paper Plus
Glossy
Photo
Paper
Plus
Double
Sided
*4
PP101D
1 sheet
(A4,
Not
loadable*2
Left
Letter, 5"
x 7" /
127.0 x
Photo
Paper Plus
Double
Sided
177.8
mm)
Page 21
Photo
21
Paper
Plus Semi-
*3
gloss
SG101,
SG-201
10 sheets
(A4,
Letter), 10
sheets (8"
x 10" /
203.2 x
254.0 mm)
*5
,
20 sheets
(4" x 6" /
101.6 x
152.4
mm)
Not
loadable*2
Left
Photo
Paper Plus
Glossy
Photo
Paper
*3
Pro
Photo
Stickers
*6
T-Shirt
Transfers
PR-101 10 sheets
(A4,
Letter, 8"
x 10" /
203.2 x
254.0
mm),
20 sheets
(4" x 6" /
101.6 x
152.4
mm,
Wide)
PS-101 1 sheet Not
TR-301 1 sheet Not
Not
loadable*2
loadable*2
loadable
*2
Left
Left
Right
Photo
Paper Pro
Photo
Paper Plus
Glossy
T-Shirt
Transfers
Paper with a Model Number is Canon specialty media.
You may not be able to purchase some Canon genuine papers depending on
your country.
*1
Paper is not sold in the US by Model Number. Purchase paper by name.
*2
Feeding this paper from the Front Feeder can damage the printer. Load in
the Auto Sheet Feeder.
*3
When loading a stack of paper, the printed side may become marked when it
is fed in. In this case, load paper one sheet at a time.
Page 22

*4
22
Cannot be used on a Macintosh.
*5
SG-201 only
*6
You can specify the print setting easily by using the Easy-PhotoPrint
provided with the Setup CD-ROM.
Note
For a detailed description of printing media types, see
Printing
Media.
Media Types You Cannot Use
Do not use the following types of paper. Using such paper will not only produce
unsatisfactory results, but can also cause the printer to jam or malfunction.
Additionally, when printing on A5 or smaller sized paper, do not use paper
thinner than a post card, including plain paper or notepad paper cut to a small
size.
Folded, curled, or wrinkled paper
Damp paper
Paper that is too thin (weighing less than 64 gsm / 17 lb)
Paper that is too thick (non-Canon genuine paper weighing more than 105
gsm / 28 lb)
Picture postcards
Postcards affixed with photos or stickers
Envelopes with double flaps
Envelopes with sticker flaps
Envelopes with an embossed or treated surface
Any type of paper with holes
Paper that is not rectangular
Paper bound with staples or glue
Paper with adhesives
Paper decorated with glitter, etc.
Photo Paper Pro Guidelines
Do not touch the print surface until the ink is dry (approximately 30
minutes). Colors in dark images may appear indistinct at first, but will
become clearer after approximately 30 minutes.
Page 23
Images may become smudged if you place printouts in an album before
23
the ink is completely dry. We recommend to allow the ink to dry for 24 hours
before placing your printouts in an album.
Do not attempt to dry the ink with a hair dryer or by exposing printouts to
direct sunlight.
Do not store or display printouts in hot or humid conditions. Never expose
them to heat or direct sunlight.
Store printouts in photo albums, photo frames, or presentation binders to
protect them from direct exposure to air or sunlight.
Do not mount printouts in an adhesive-type album as you may not be able
to remove them. Note that some types of clear plastic folders and albums
may cause the edges of the paper to turn yellow.
Using the Auto Sheet Feeder and the Front Feeder
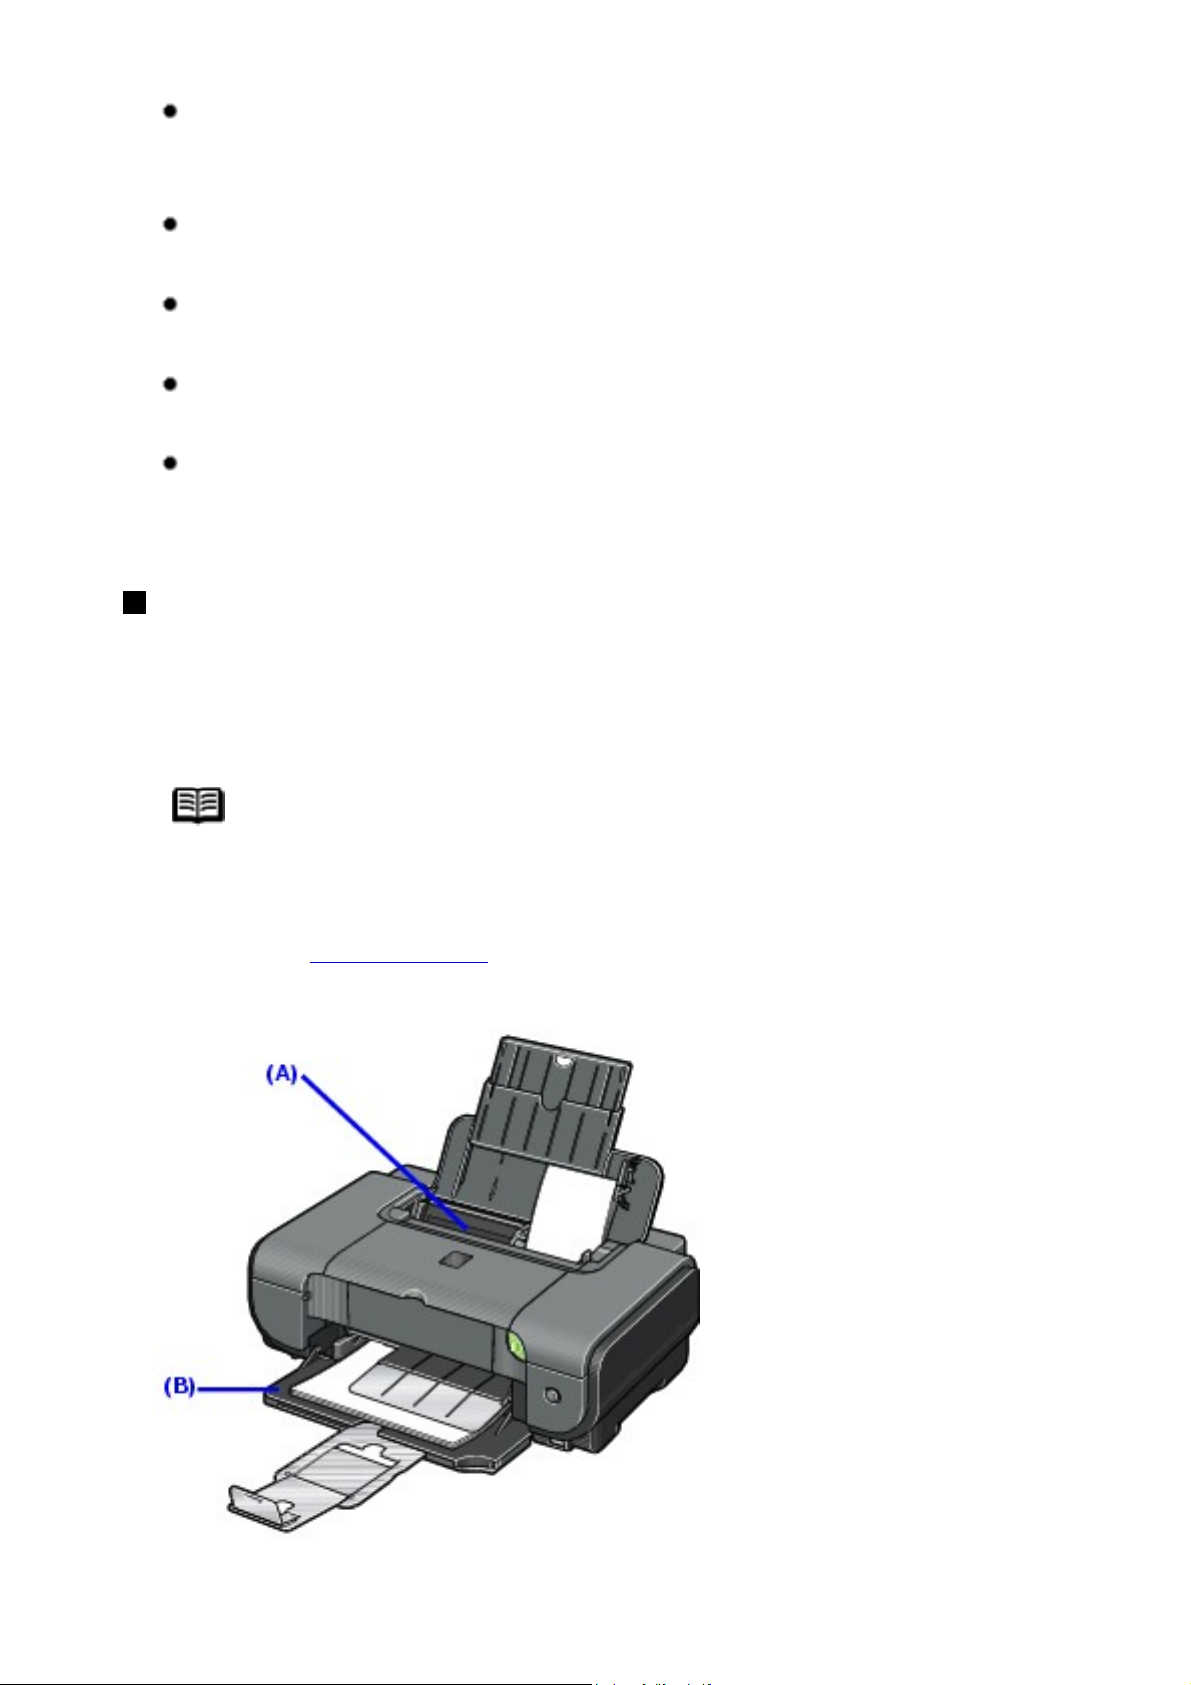
This printer offers two paper sources to load printing paper; the Auto Sheet
Feeder, found at the top of the printer, and the Front Feeder, found at the front
of the printer.
Note
You cannot load paper other than A4, Letter, or B5-sized
plain paper in the Front Feeder. When using any other type of
paper, load it in the Auto Sheet Feeder. For details on loading
paper, see
Loading Paper.
(A) Auto Sheet Feeder
Page 24
(B) Front Feeder
24
When Printing for the First Time
At purchase, the printer is set to feed from the Auto Sheet Feeder.
If you are printing without changing paper source settings, load paper in the
Auto Sheet Feeder.
Note
For details on loading paper, see
Sheet Feeder.
Loading Paper in the Auto
(A) Load plain paper in the Auto Sheet Feeder.
To Change the Paper Source
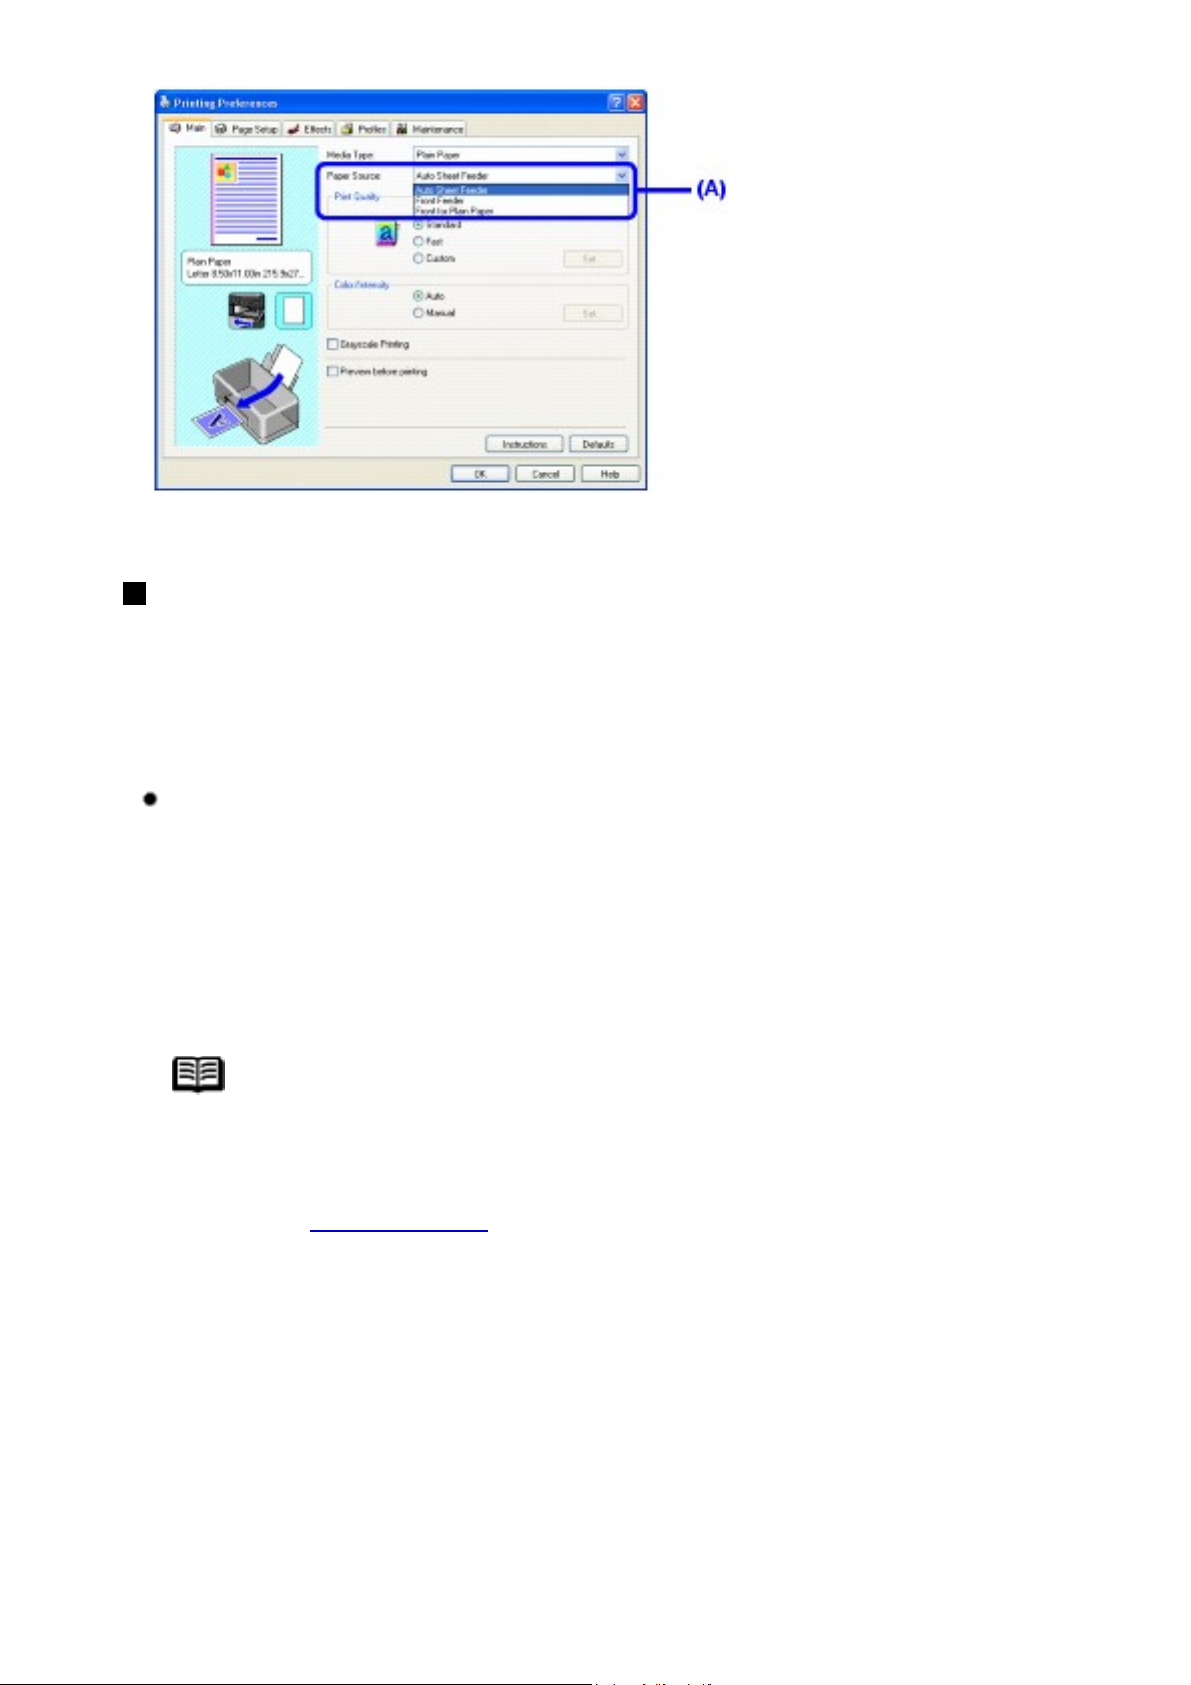
In the printer driver, select a Paper Source. For details on printer driver
settings, see
Note
If you select Front for Plain Paper, the printer will
automatically switch to the Front Feeder when Plain Paper is
specified for Media Type.
Printing with Windows or Printing with Macintosh.
Page 25
25
(A) Switch paper source here.
Paper Source Selection Scenarios
Deciding on the usage of the two paper sources to print with minimum
reloading of paper depends mainly on the variety of the type of paper you use
regularly, and also on space limitations of the location you are setting the
printer.
If you print a lot on photo paper as well as on plain paper
If you use photo paper as much as plain paper, you can load photo paper in
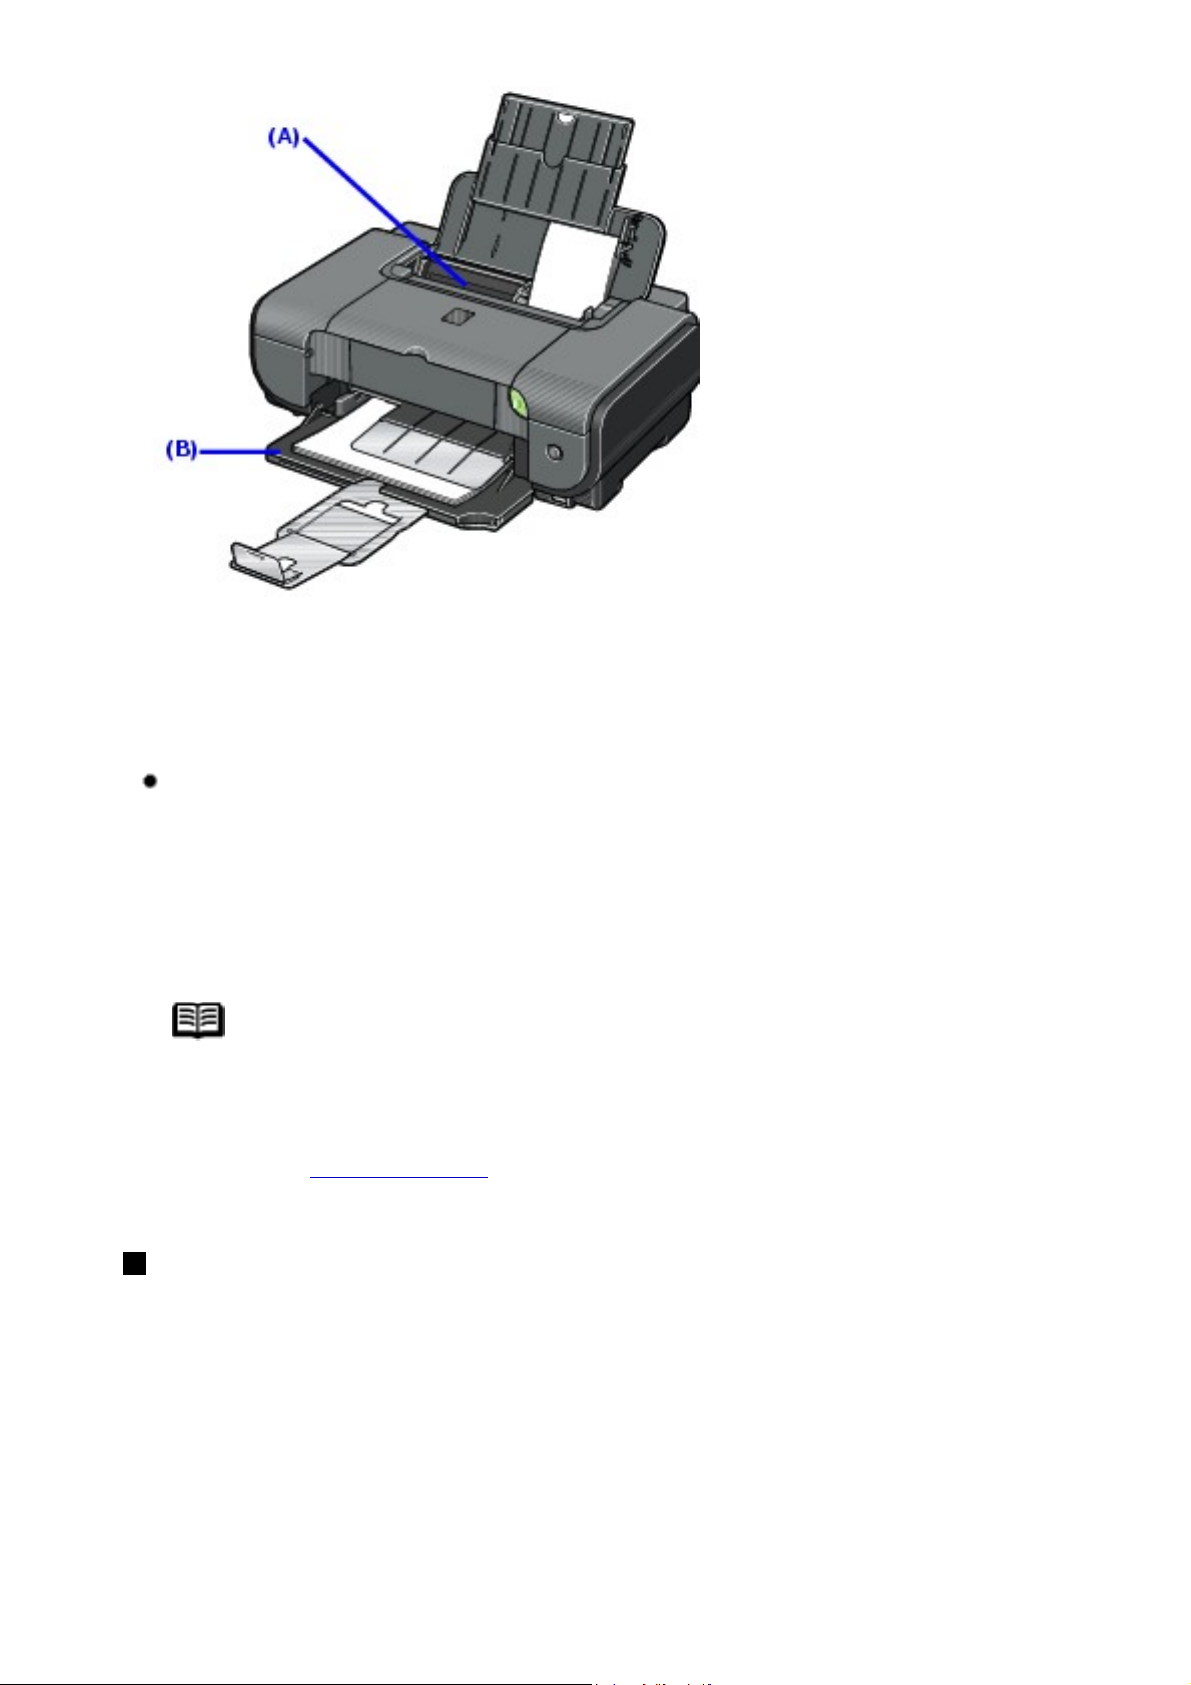
the Auto Sheet Feeder and plain paper in the Front Feeder. In the printer
driver, select Front for Plain Paper for Paper Source. The printer will
automatically switch to the Front Feeder when Plain Paper is specified for
Media Type.
Note
You cannot load paper other than A4, Letter, or B5-sized
plain paper in the Front Feeder. When using any other type of
paper, load it in the Auto Sheet Feeder. For details on loading
paper, see
Loading Paper.
Page 26
26
(A) Auto Sheet Feeder: Load paper of various types and sizes, including
photo paper
(B) Front Feeder: Load A4, Letter, or B5-sized plain paper
Choosing the paper source to match the location of the printer
You can choose to use only either the Auto Sheet Feeder or Front Feeder
according to the location of the printer. For example, if you intend to install
the printer in a small place, such as on a shelf with minimal space, you can
use just the Front Feeder for printing.
Note
You cannot load paper other than A4, Letter, or B5-sized
plain paper in the Front Feeder. When using any other type of
paper, load it in the Auto Sheet Feeder. For details on loading
paper, see
Loading Paper.
Loading Paper
Page 27
Important
27
If you cut plain paper to 4" x 6" / 101.6 x 152.4 mm, 5" x
7" / 127.0 x 177.8 mm, or 2.13" x 3.39" / 54.0 x 86.0 mm
(credit card-size) for a trial print, it can cause paper jams.
You cannot print on postcards affixed with photos or
stickers.
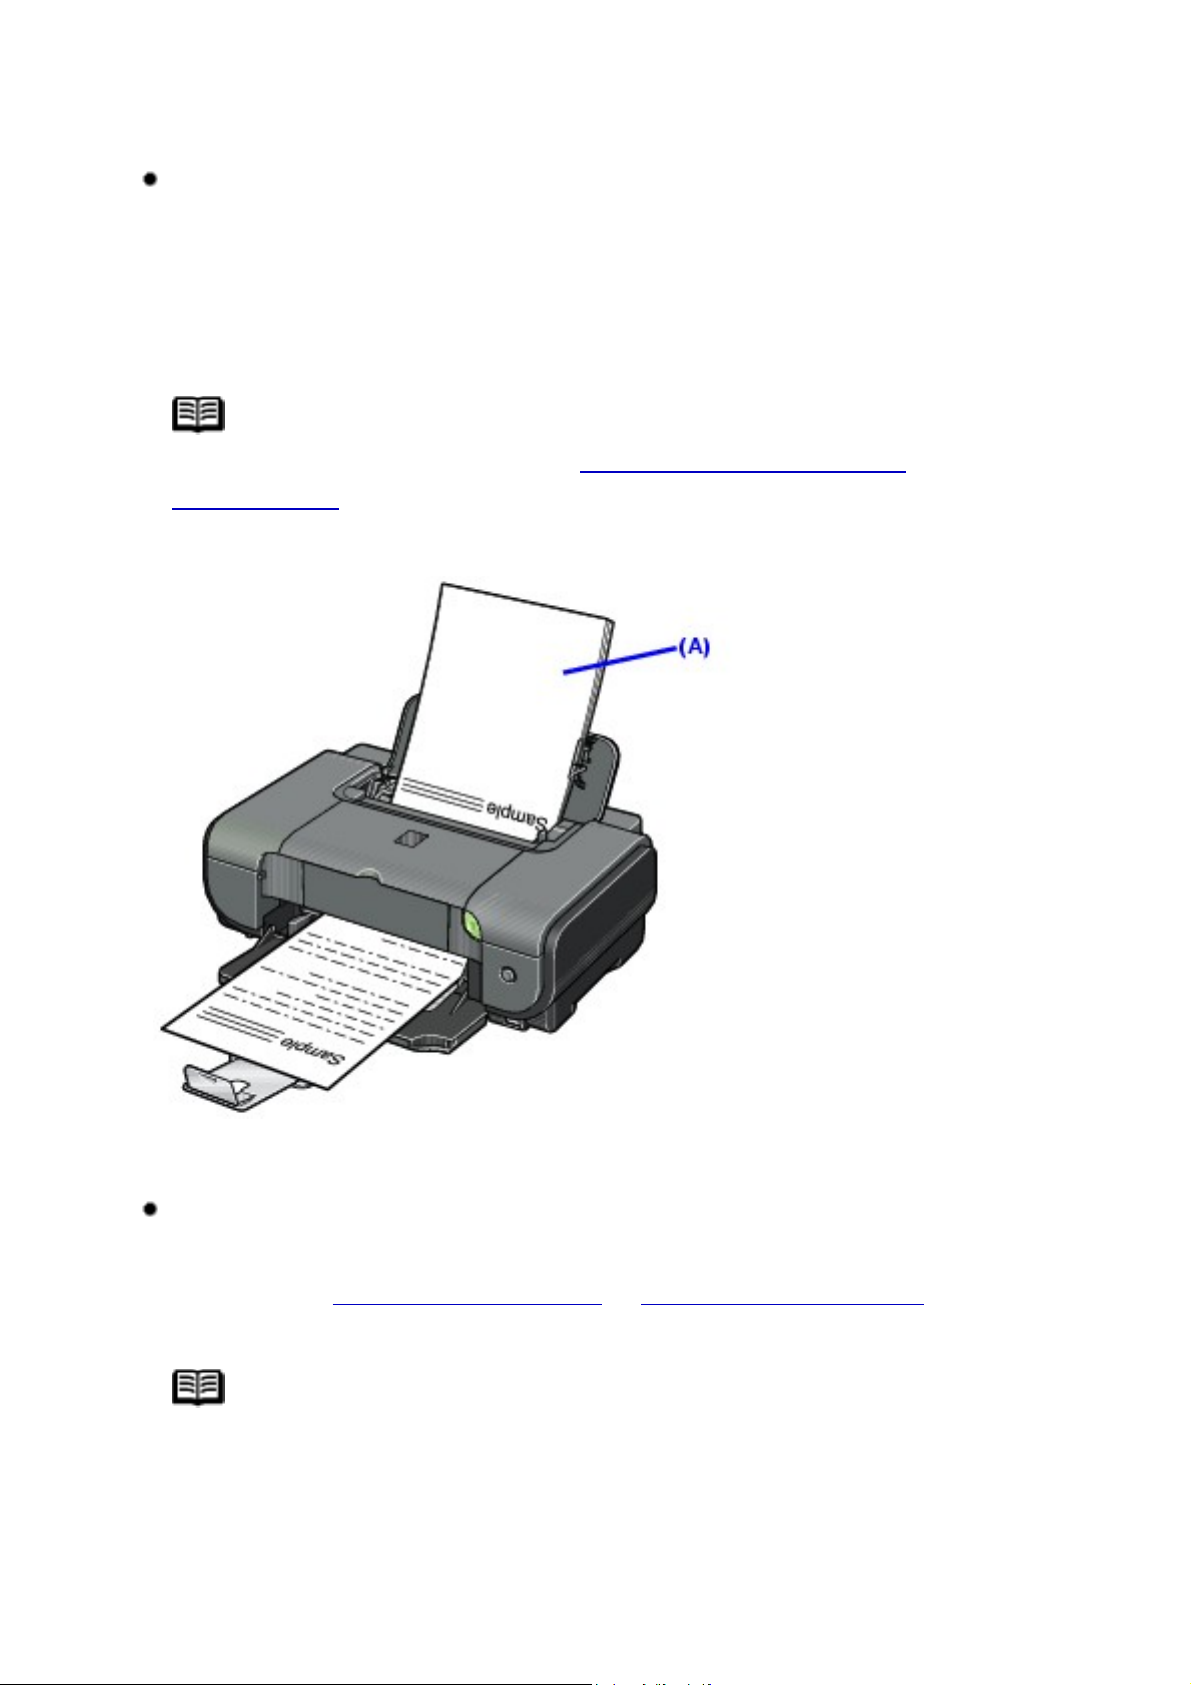
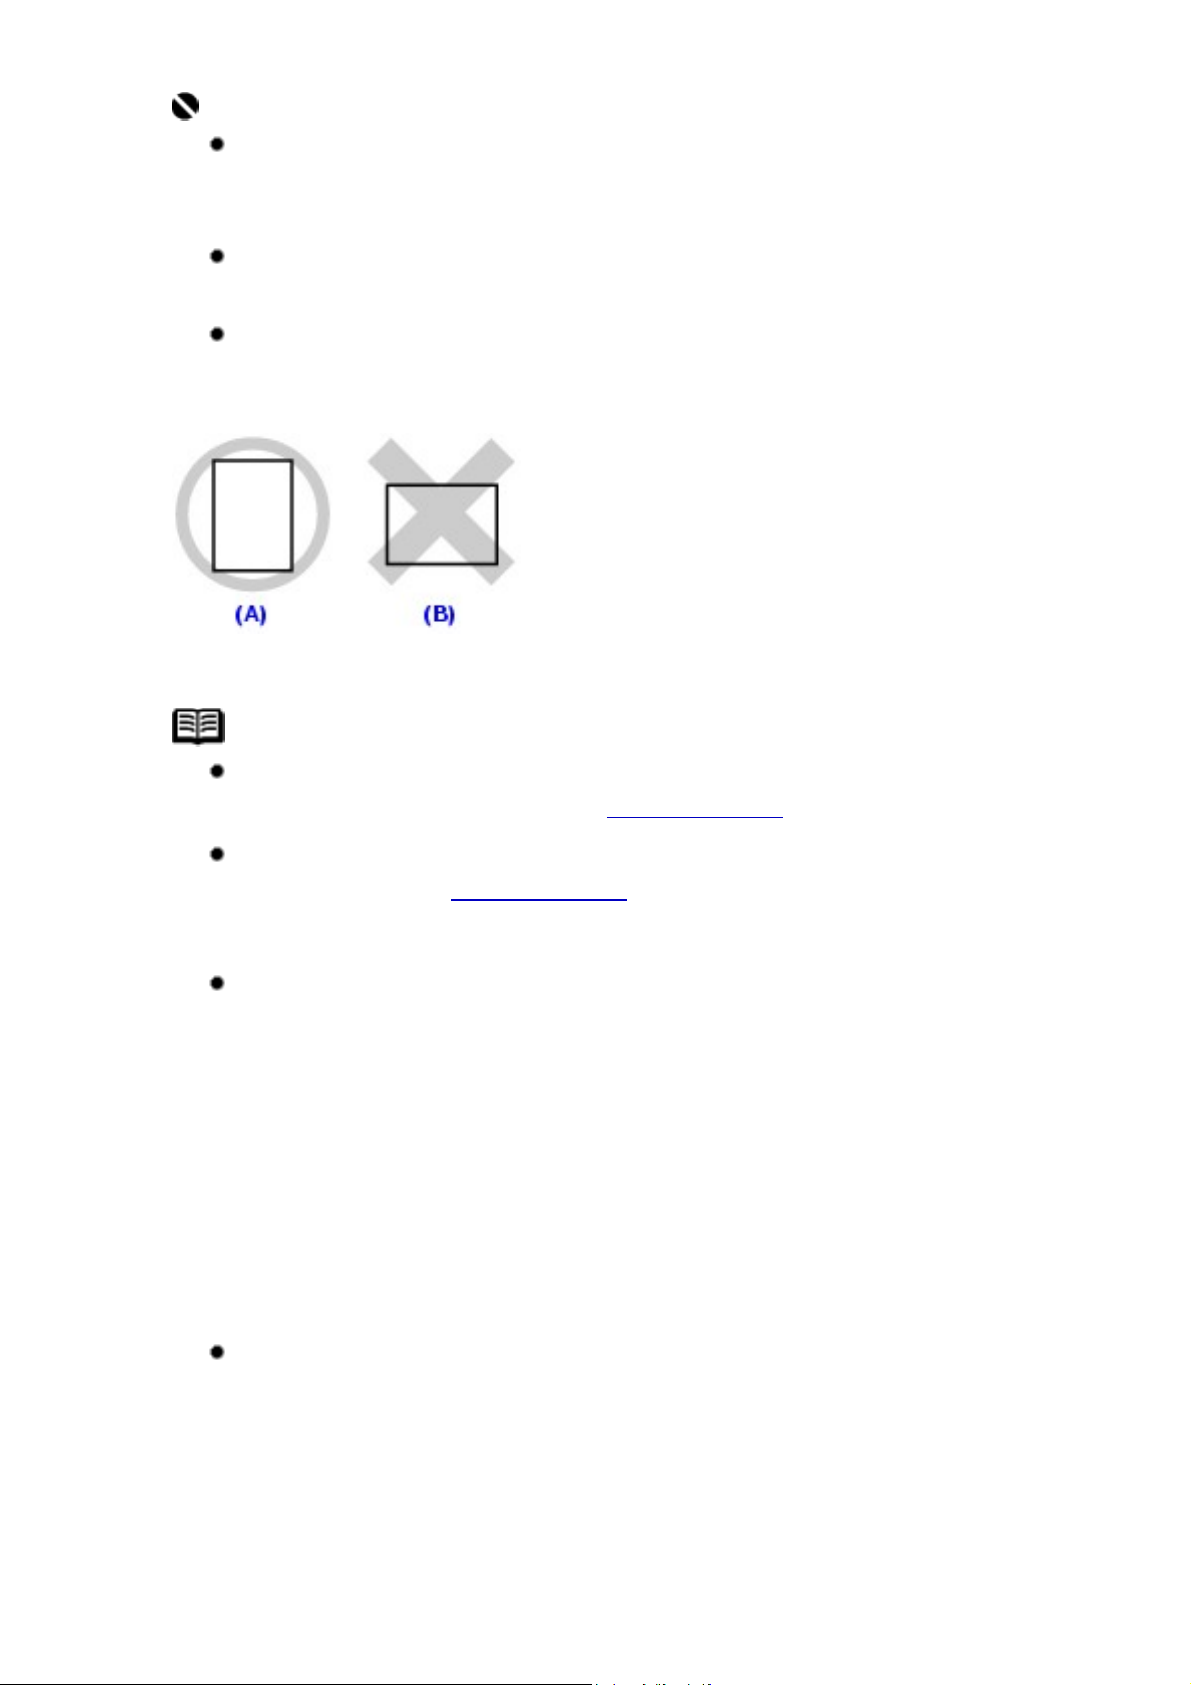
Always load paper in portrait orientation (A). Loading
paper in landscape orientation (B) can cause the paper to
be jammed.
Note
For details on the specialty media Canon provides for
use with its various printers, see Printing Media.
For detailed instructions on how to load specialty media
into the printer, see Printing Media.
When Printing on Plain Paper
You can use general copy paper or Canon's Super
White Paper. When printing on both sides, we recommend
Canon's Super White Paper Double-Sided.
Paper size:
- Standard sizes: A4, B5, A5 (Auto Sheet Feeder only),
Letter, and Legal (Auto Sheet Feeder only)
- Non-standard sizes for the Auto Sheet Feeder: 2.13" x
3.39" to 8.5" x 23" / 54.0 x 86.0 mm to 215.9 x 584.2 mm
Paper weight: 17 to 28 lb / 64 to 105 gsm
You can load up to 150 sheets of plain paper (17 lb / 64
gsm, 0.52 inches / 13 mm in height) in the Auto Sheet
Feeder, and up to 110 sheets of plain paper (17 lb / 64
gsm, 0.39 inches / 10 mm in height) in the Front Feeder.
However, proper feeding of paper may not be possible at
this maximum capacity depending on the type of paper or
environmental conditions (either very high or low
temperature and humidity). In such cases, reduce the
Page 28
sheets of paper you load at a time to around half (around
28
0.2 inches / 5 mm in paper stack height).
Do not stack more than 50 sheets in the Paper Output
Tray.
When Printing on 5" x 7", 4" x 6", or 2.13" x 3.39" (Credit
Card-sized) paper
Load paper only in the Auto Sheet Feeder.
You can load up to 20 sheets of 4" x 6" or 2.13" x
3.39" (credit card-sized) paper and 10 sheets of 5" x 7"
paper.
We recommend using genuine Canon photo media
when printing photographs.
See Printing Media.
Loading Paper in the Auto Sheet Feeder
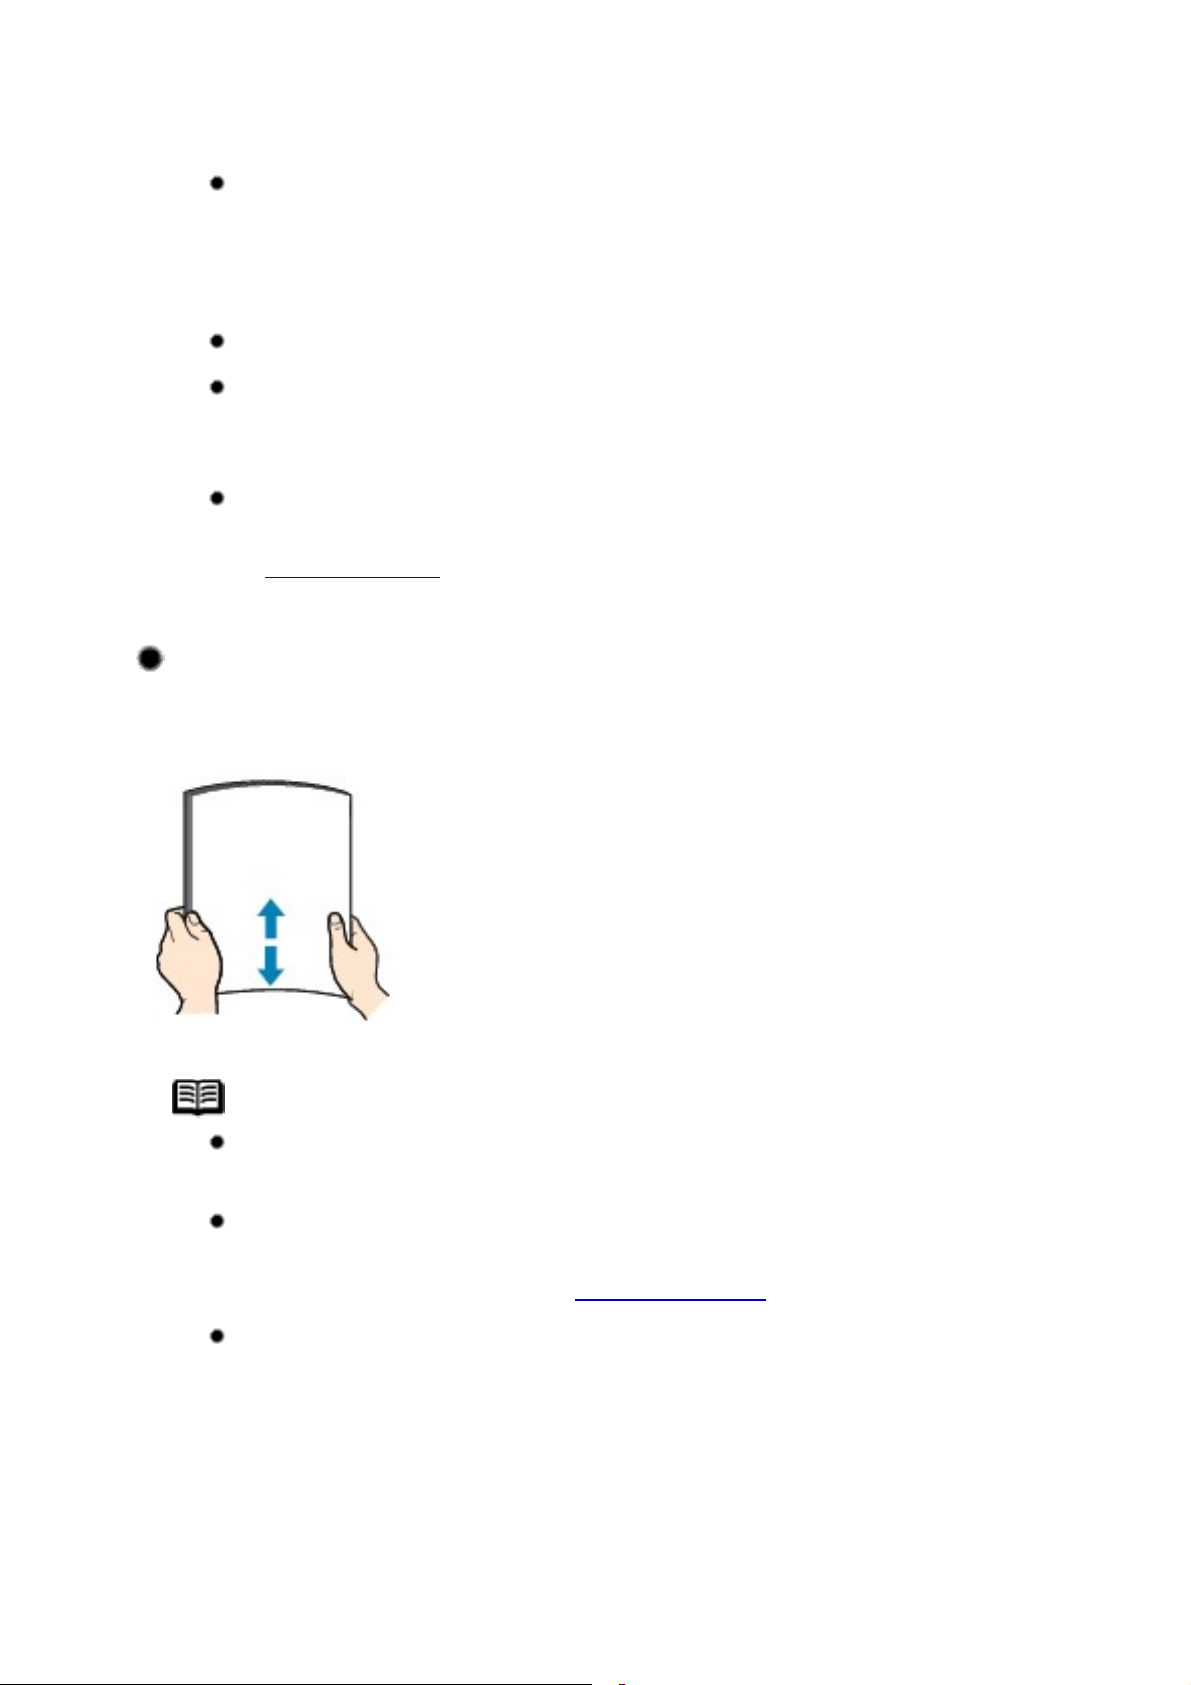
1 Flatten the four corners of the paper before loading it.
Note
Align the edges of paper neatly before loading. Loading
paper without aligning the edges may cause paper jams.
If paper is curled, hold the opposing curled corners and
gently bend them in the opposite direction until the paper
becomes completely flat. See Paper is curled..
To avoid curling, handle paper as follows.
- Put unused paper back into the package and keep
them on a level surface.
- Take out only the necessary number of sheets from the
package, just before printing.
Page 29
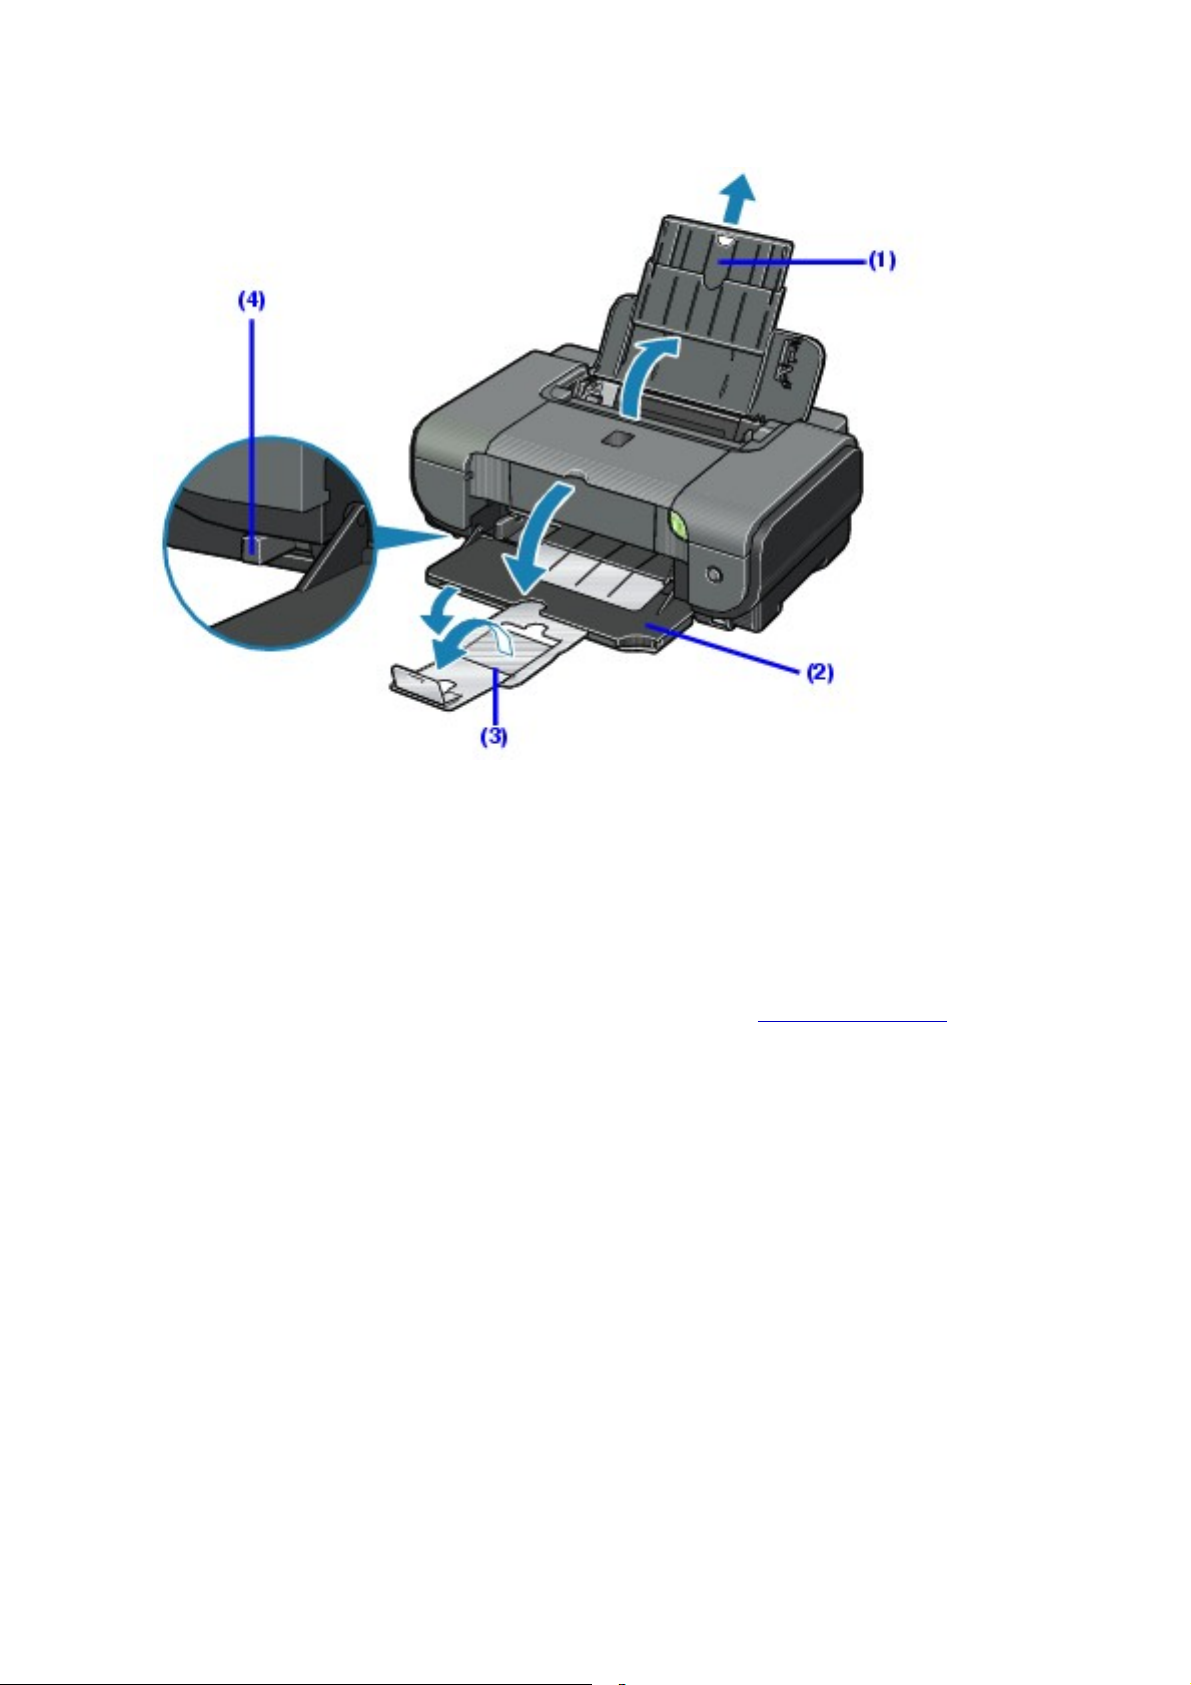
2 Prepare to load paper.
29
(1) Open the Sheet Feeder Cover and pull out the Paper Support.
(2) Open the Front Feeder.
(3) Extend the Paper Output Support.
(4) Adjust the position of the Paper Thickness Lever.
Set it to the right when printing on envelopes or T-shirt transfers, and left
when printing on any other type of paper. See
Paper Handling.
3 Load the paper.
Page 30
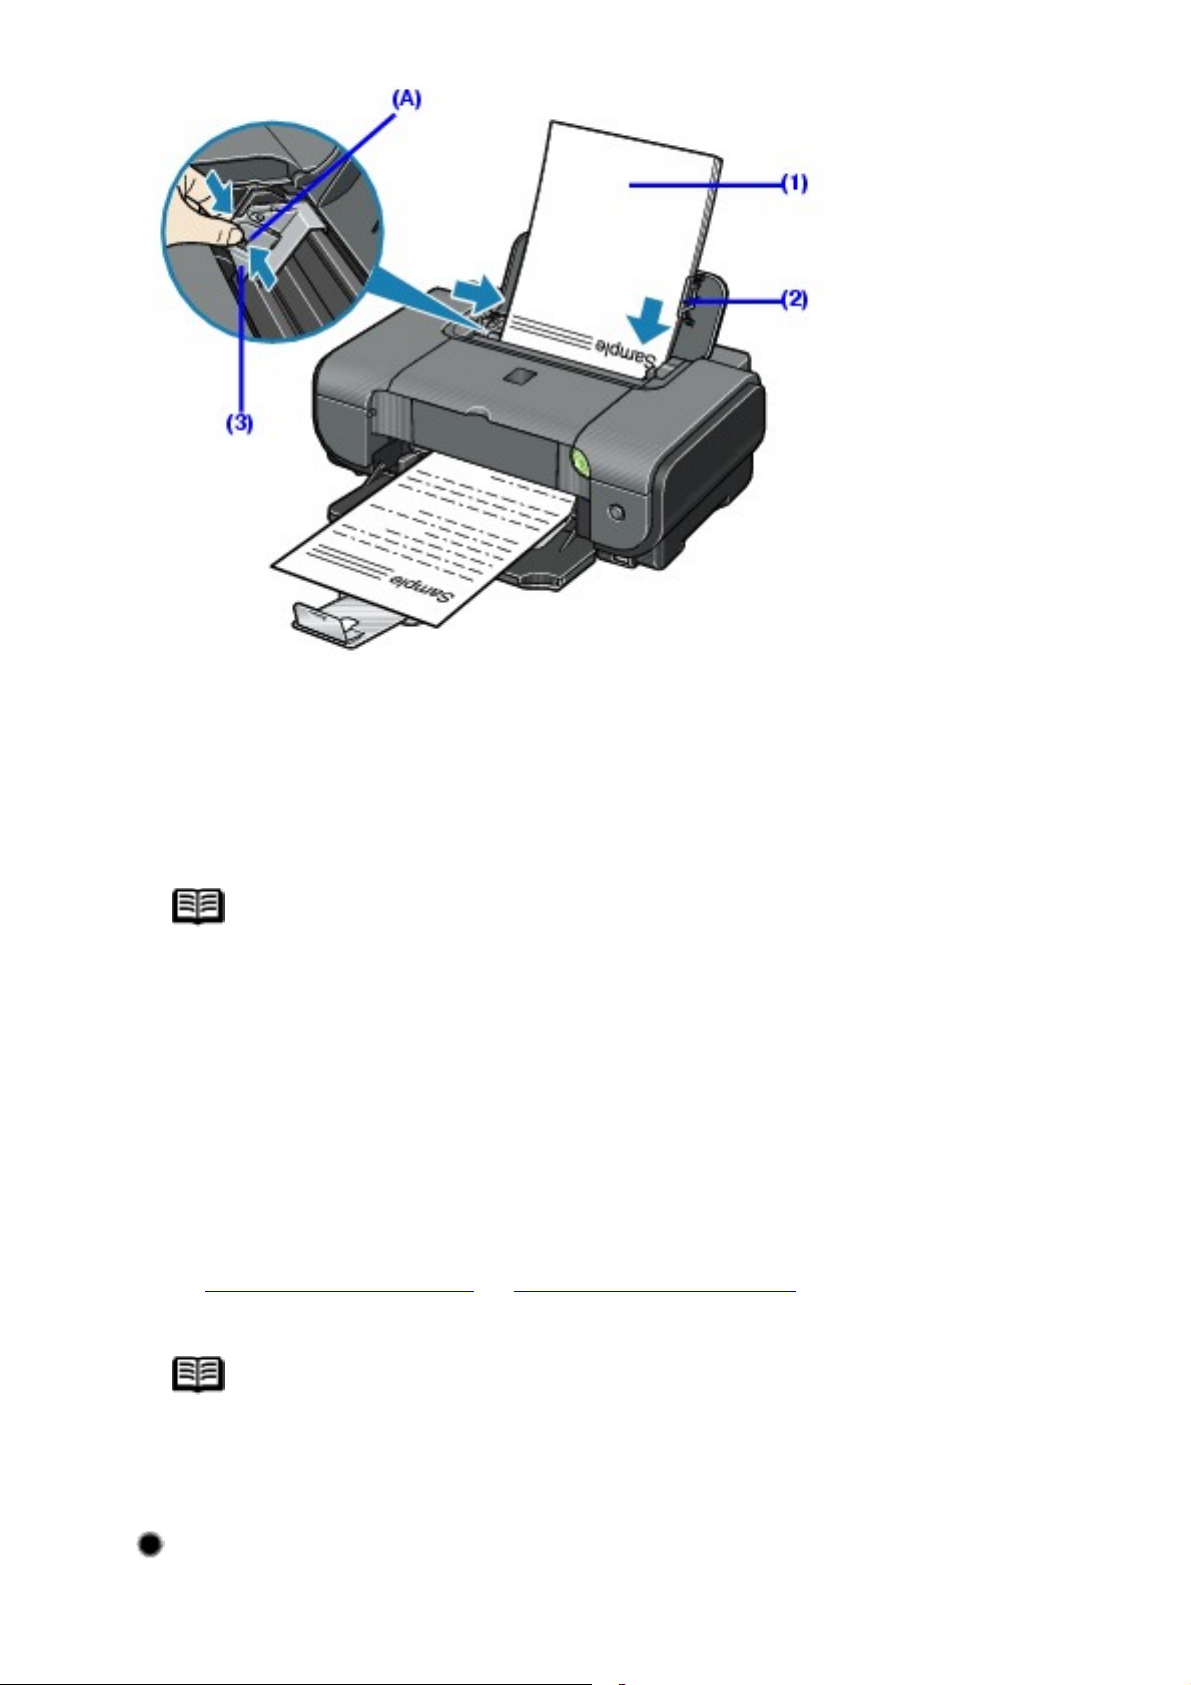
30
*1
Do not load higher than the Load Limit Mark (A).
(1) Load the paper in the Auto Sheet Feeder with the print side facing UP.
(2) Align the paper stack against the Cover Guide on the right side of the
Paper Support.
Note
Make sure that the Cover Guide is set upright when you load
paper in the Auto Sheet Feeder.
(3) Pinch the Paper Guide and slide it against the left side of the paper
stack.
4 In the printer driver, select Auto Sheet Feeder for Paper
Source
See Printing with Windows or Printing with Macintosh.
Note
Select the page size of the loaded paper in Page Size in the
printer driver.
Loading Paper in the Front Feeder
Page 31
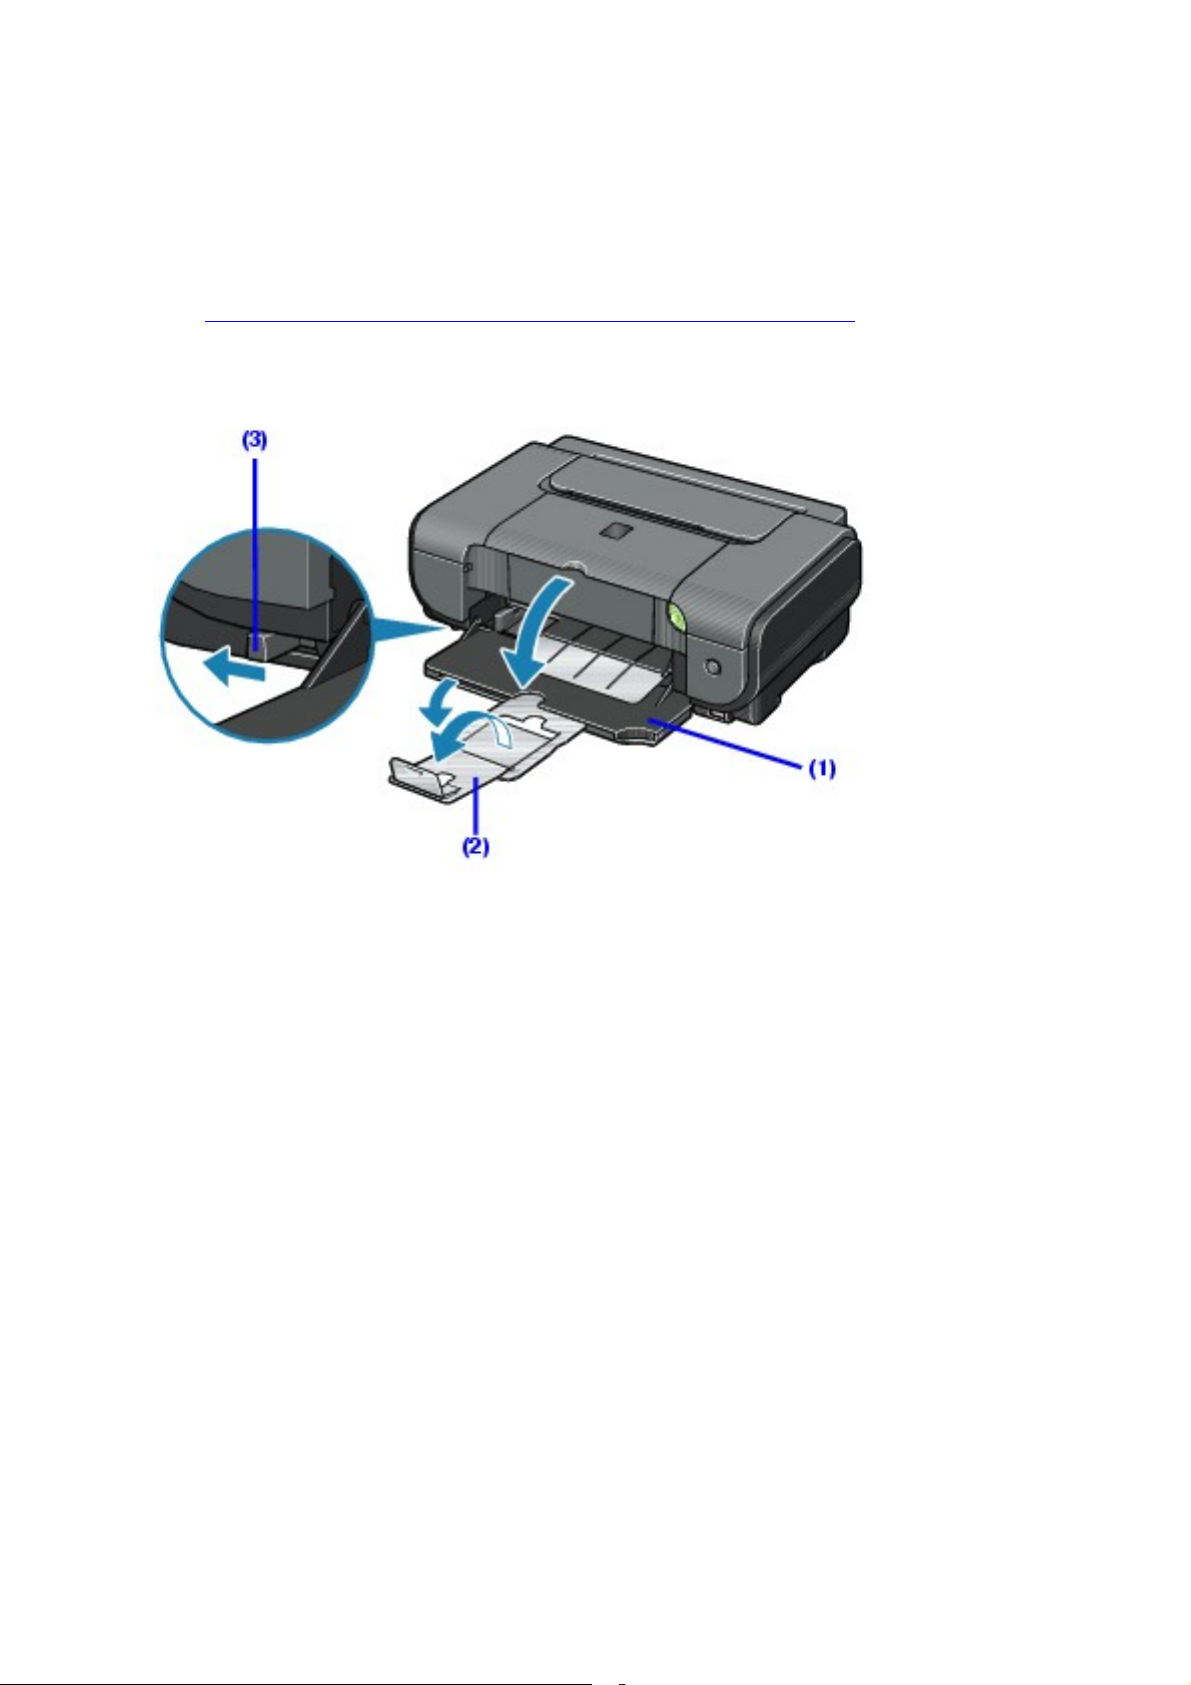
You can load A4, Letter, or B5-sized plain paper (such as Canon Super White
31
Paper SW-201) in the Front Feeder. You cannot load any other paper in the
Front Feeder.
1 Flatten the four corners of the paper before loading it.
See Flatten the four corners of the paper before loading it..
2 Prepare to load paper.
(1) Open the Front Feeder.
(2) Extend the Paper Output Support.
(3) Set the Paper Thickness Lever to the left.
3 Load the paper with the print side facing DOWN.
Page 32
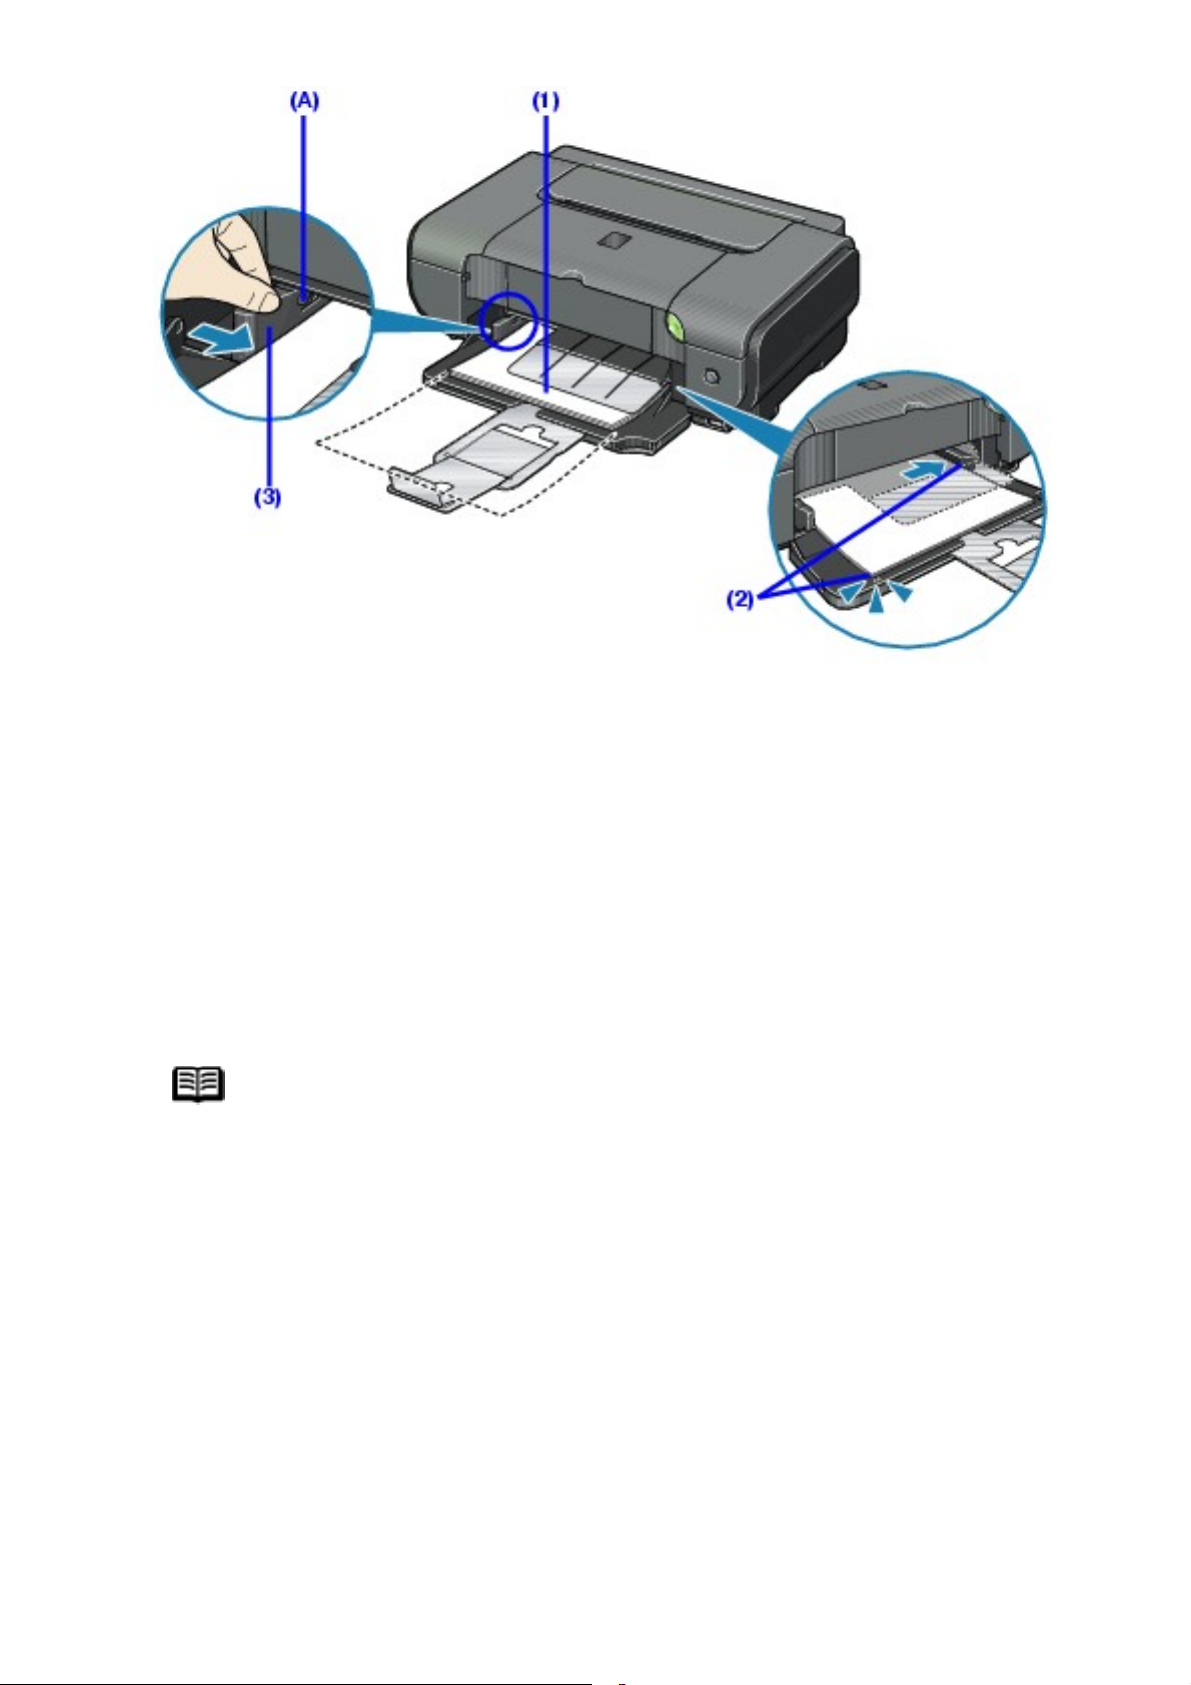
*1
32
Do not load higher than the Load Limit Mark (A).
(1) Load the paper in the Front Feeder with the print side facing DOWN
and the leading edge to the far side.
(2) Align the right edge of the paper stack against the inner face of the
Front Feeder, and the near and left edges with the Paper Size Mark.
(3) Pinch the Paper Guide and slide it against the left side of the loaded
paper stack.
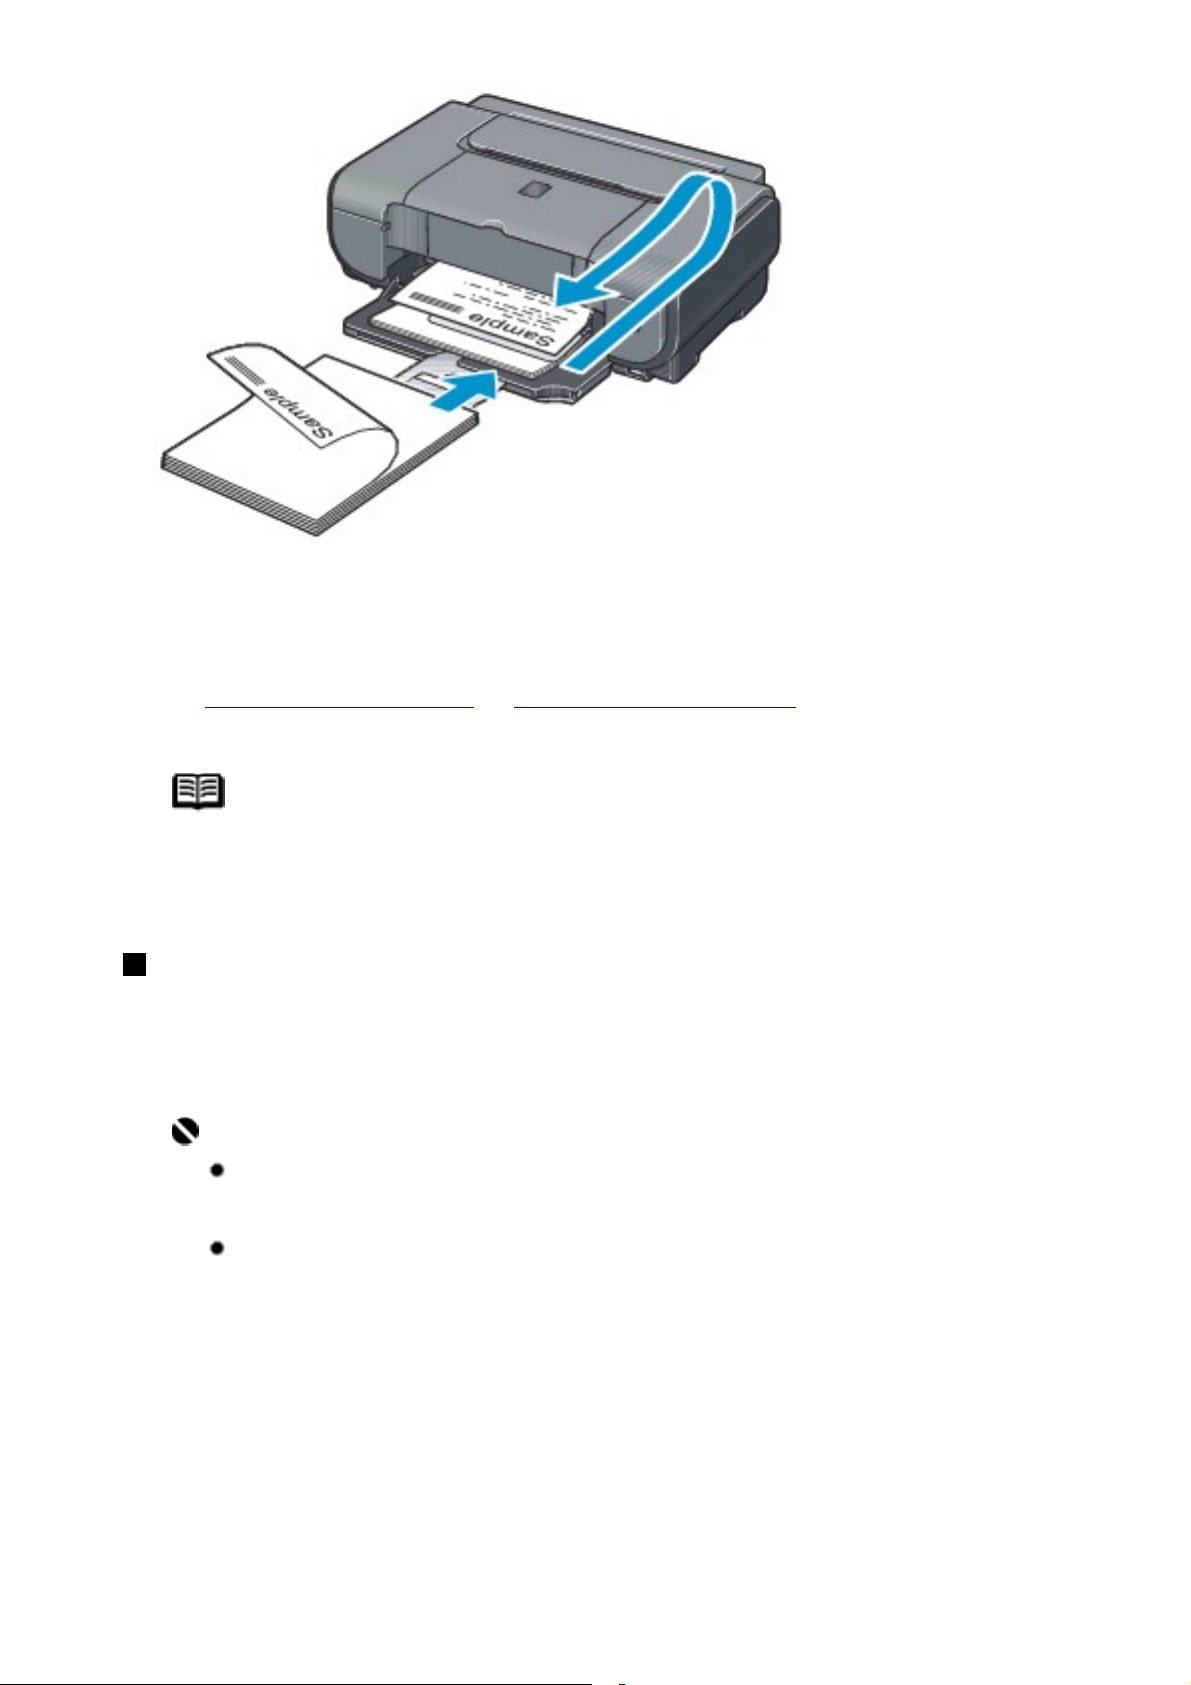
Note
When loading paper in the Front Feeder, refer to the
illustration below and make sure not to load paper with the
wrong side up.
Page 33
33
4 In the printer driver, select Front Feeder for Paper
Source.
See Printing with Windows or Printing with Macintosh.
Note
Select the page size of the loaded paper in Page Size in the
printer driver.
Loading Envelopes
Envelopes must be fed from the Auto Sheet Feeder. Use either European DL
or US Comm. Env. #10-sized envelope.
Important
Do not use envelopes with embossed or treated
surfaces, a double flap, pressure seals, or sticker flaps.
Select either DL Env. or Comm. Env. #10 in the printer
driver according to the envelope size you are using. If you
do not, the address will be printed in the wrong direction.
1 Retract the Paper Support.
Page 34
Important
34
Envelopes may not be fed properly if the Paper Support is
extended.
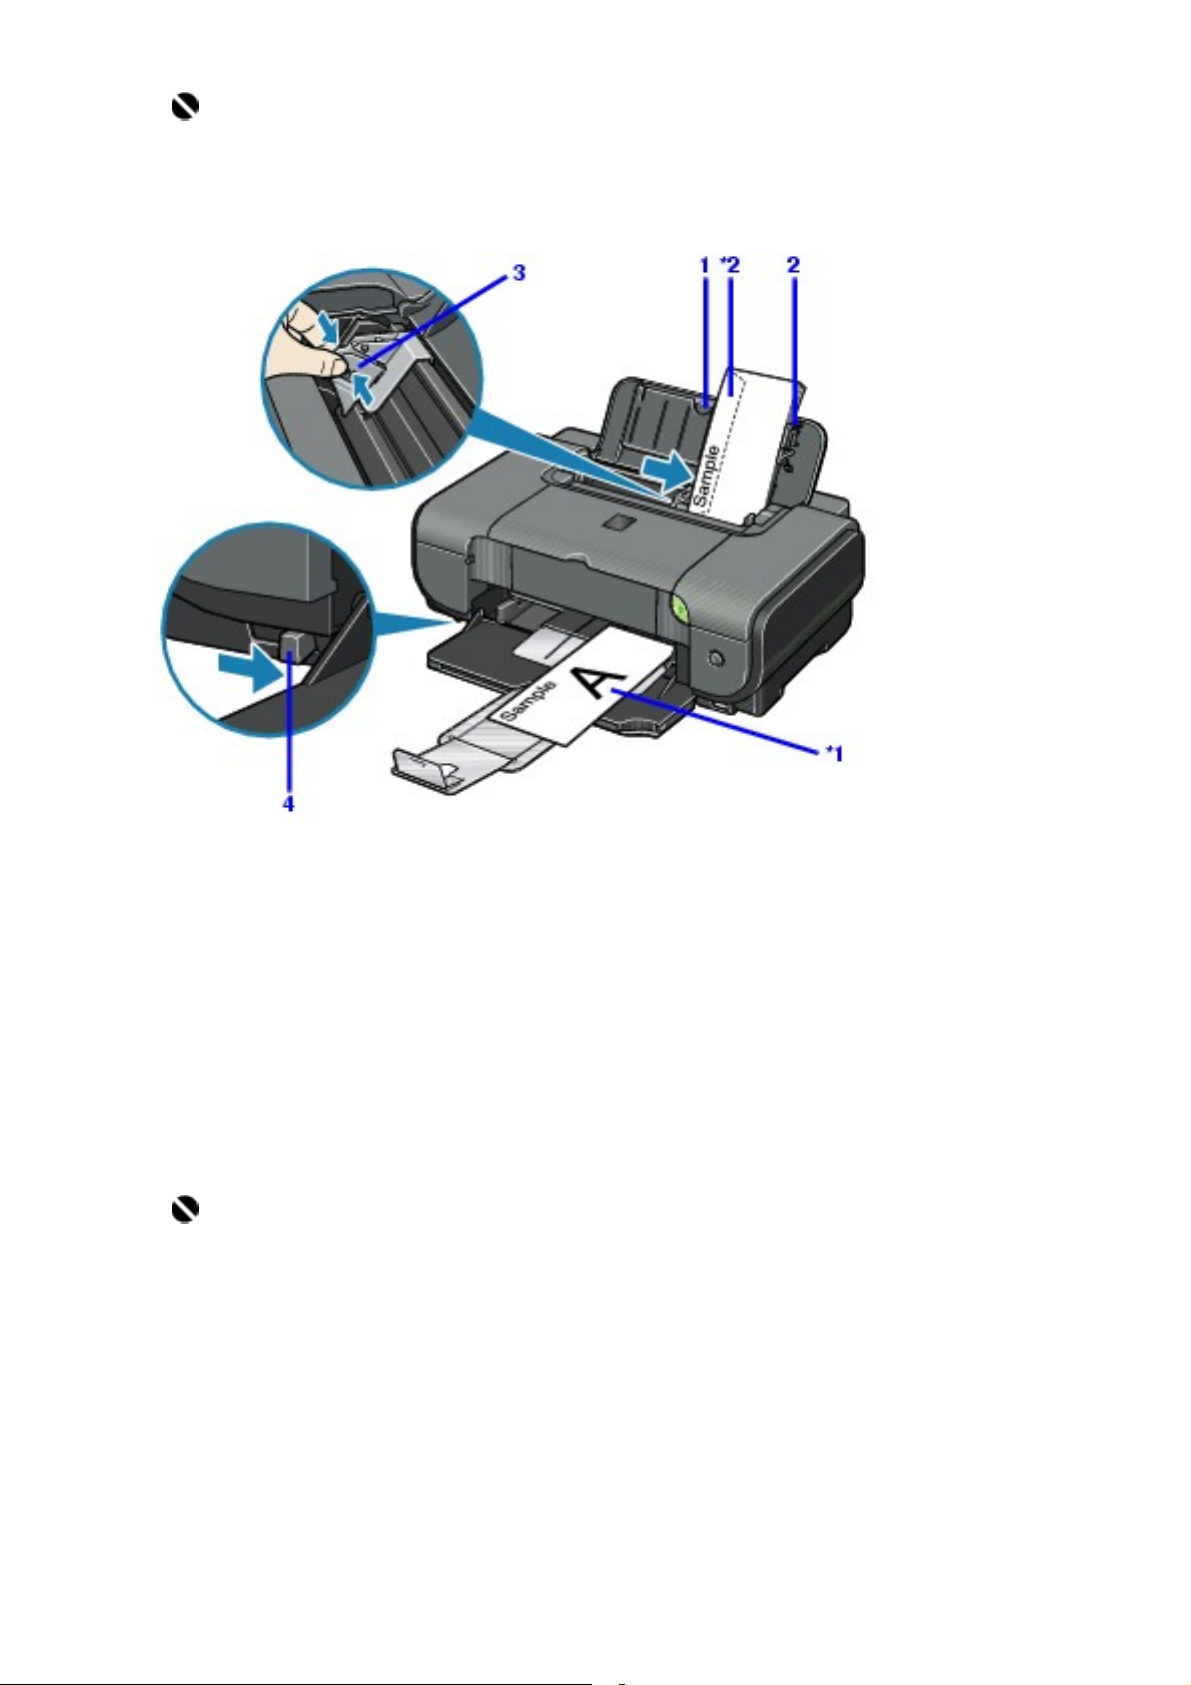
2 Load the envelope against the Cover Guide (the right side
of the Paper Support).
Load with the front face UP and the rear flaps DOWN on the left.
A maximum of 10 envelopes can be loaded at once.
*1 Printing orientation
*2 Make sure the flaps are folded.
Important
Make sure that the Cover Guide is set upright.
3 Pinch the Paper Guide and slide it against the left side of
the envelope.
4 Set the Paper Thickness Lever to the right.
5 In the printer driver, select Envelope in Media Type, and
Page 35

then select DL Env. or Comm. Env. #10 in Page Size.
35
For details on printer driver settings, see Printing with Windows or Printing
with Macintosh.
Page 36
Basic Printing
36
This section describes the procedure for basic printing. When printing photographs,
you can also use Easy-PhotoPrint to easily specify print settings. Easy-PhotoPrint
is provided on the Setup CD-ROM. For details on using Easy-PhotoPrint, refer to
the Photo Application Guide on-screen manual.
Printing with Windows
Note
Menu and command names may differ between software applications,
and more steps may be required. For details, refer to the instruction
manual of your software application.
The steps described in this section are for printing in Windows XP SP2.
1 Turn on the printer and load the paper in the printer.
See Loading Printing Paper.
2 Create a document or open a file to print using an
appropriate application software.
3 Open the printer properties dialog box.
(1) Select Print on the application software's File menu.
The Print dialog box opens.
Page 37
37
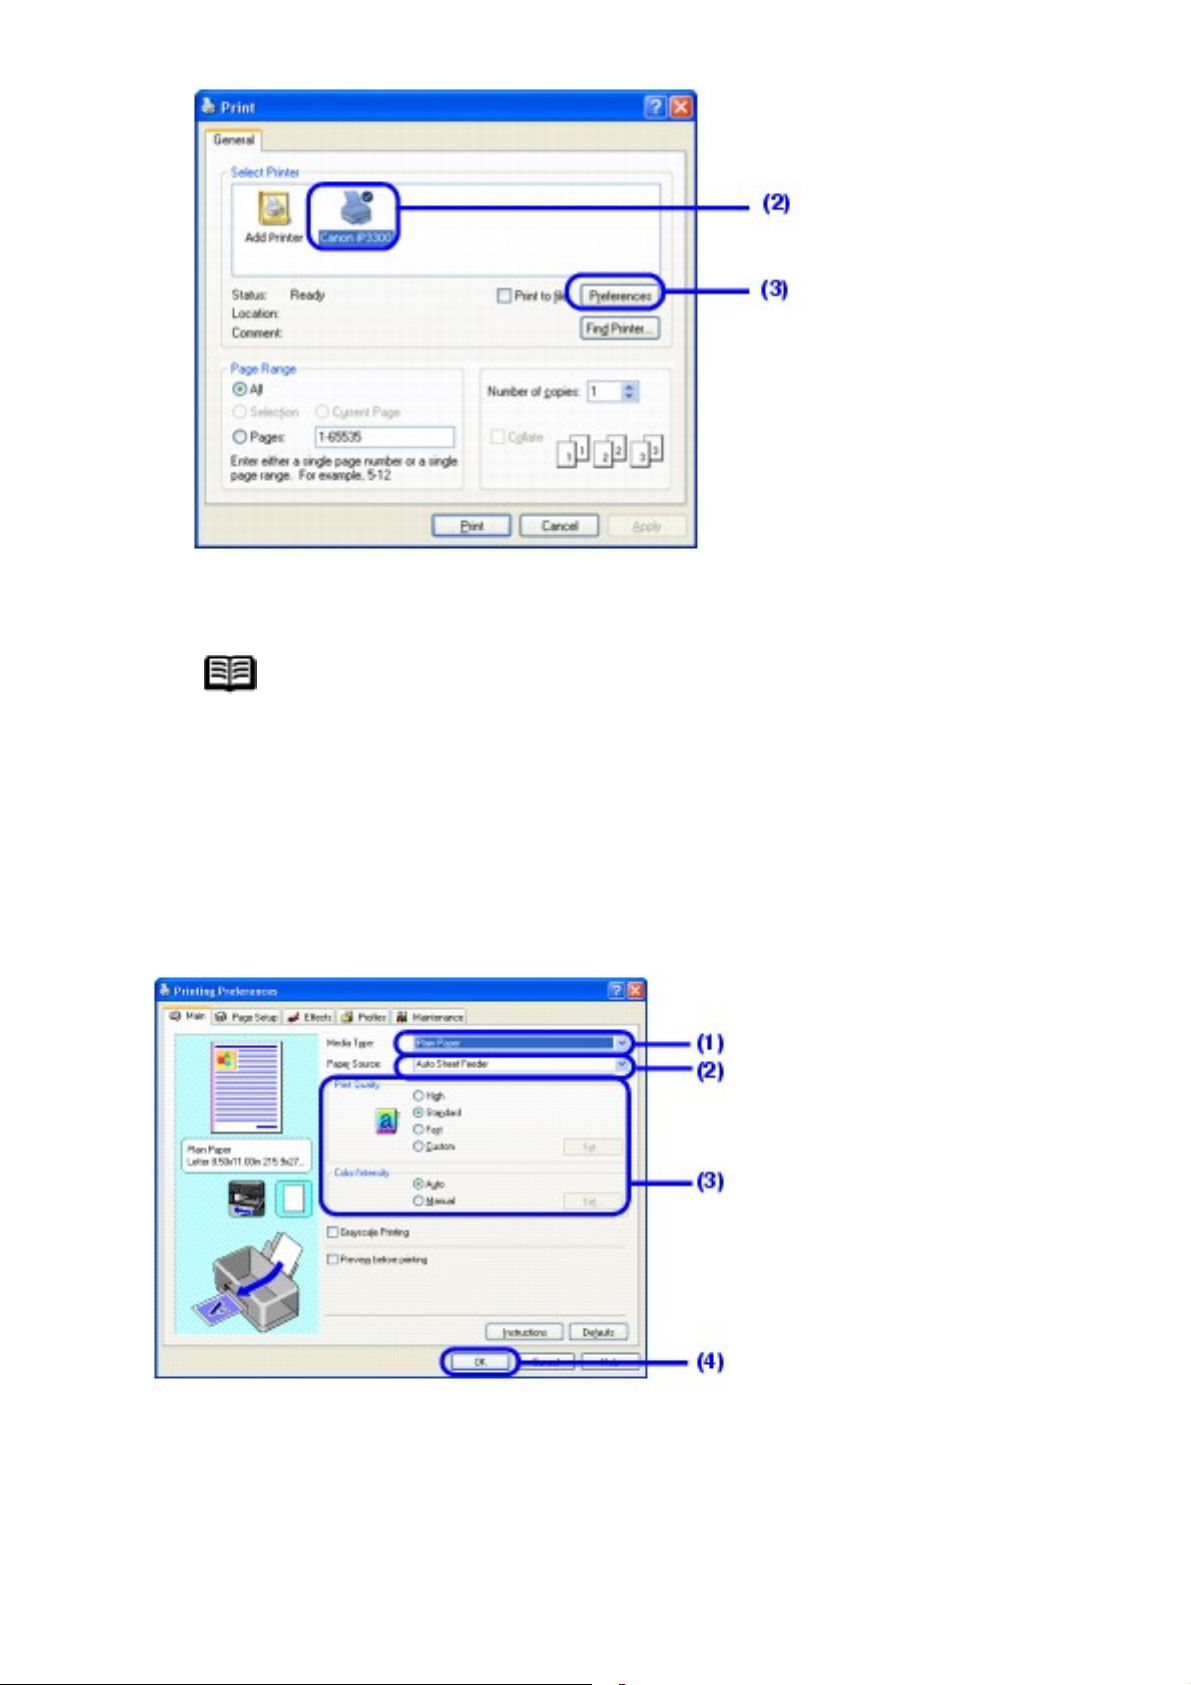
(2) Make sure that Canon iP3300 is selected.
Note
If a different printer is selected, click Canon iP3300.
(3) Click Preferences (or Properties).
The Main sheet of the Printing Preferences dialog box appears.
4 Specify the required settings.
(1) Click Media Type to select the type of media loaded in the printer.
(2) Select Auto Sheet Feeder or Front Feeder for Paper Source
depending on the paper source where you loaded the paper in step 1.
Page 38
Note
38
If you select Front for Plain Paper, the printer will
automatically switch to the Front Feeder when Plain Paper
is specified for Media Type. You cannot load paper other
than A4, Letter, or B5-sized plain paper in the Front
Feeder.
(3) Set Print Quality and Color/Intensity as needed.
Note
For details on print quality settings, refer to the Printer
Driver Guide on-screen manual.
(4) Click OK.
The Print dialog box is displayed.
Note
To confirm the paper size, click the Page Setup tab. If
the setting does not match the document's paper size you
set in the application software, you need to set the paper
size to the same size, or otherwise use Scaled Printing or
Fit-to-Page printing. For details, refer to the Printer Driver
Guide on-screen manual.
For details on other printer driver functions, click Help or
Instructions to view the online help or the Printer Driver
Guide on-screen manual. The Instructions button is
displayed on the Main and Maintenance sheets when the
on-screen manuals are installed on your computer.
To display the preview and confirm how your document
will look when printed, select the Preview before printing
check box. Some application software may not have a
preview function.
5 Print the document.
Page 39
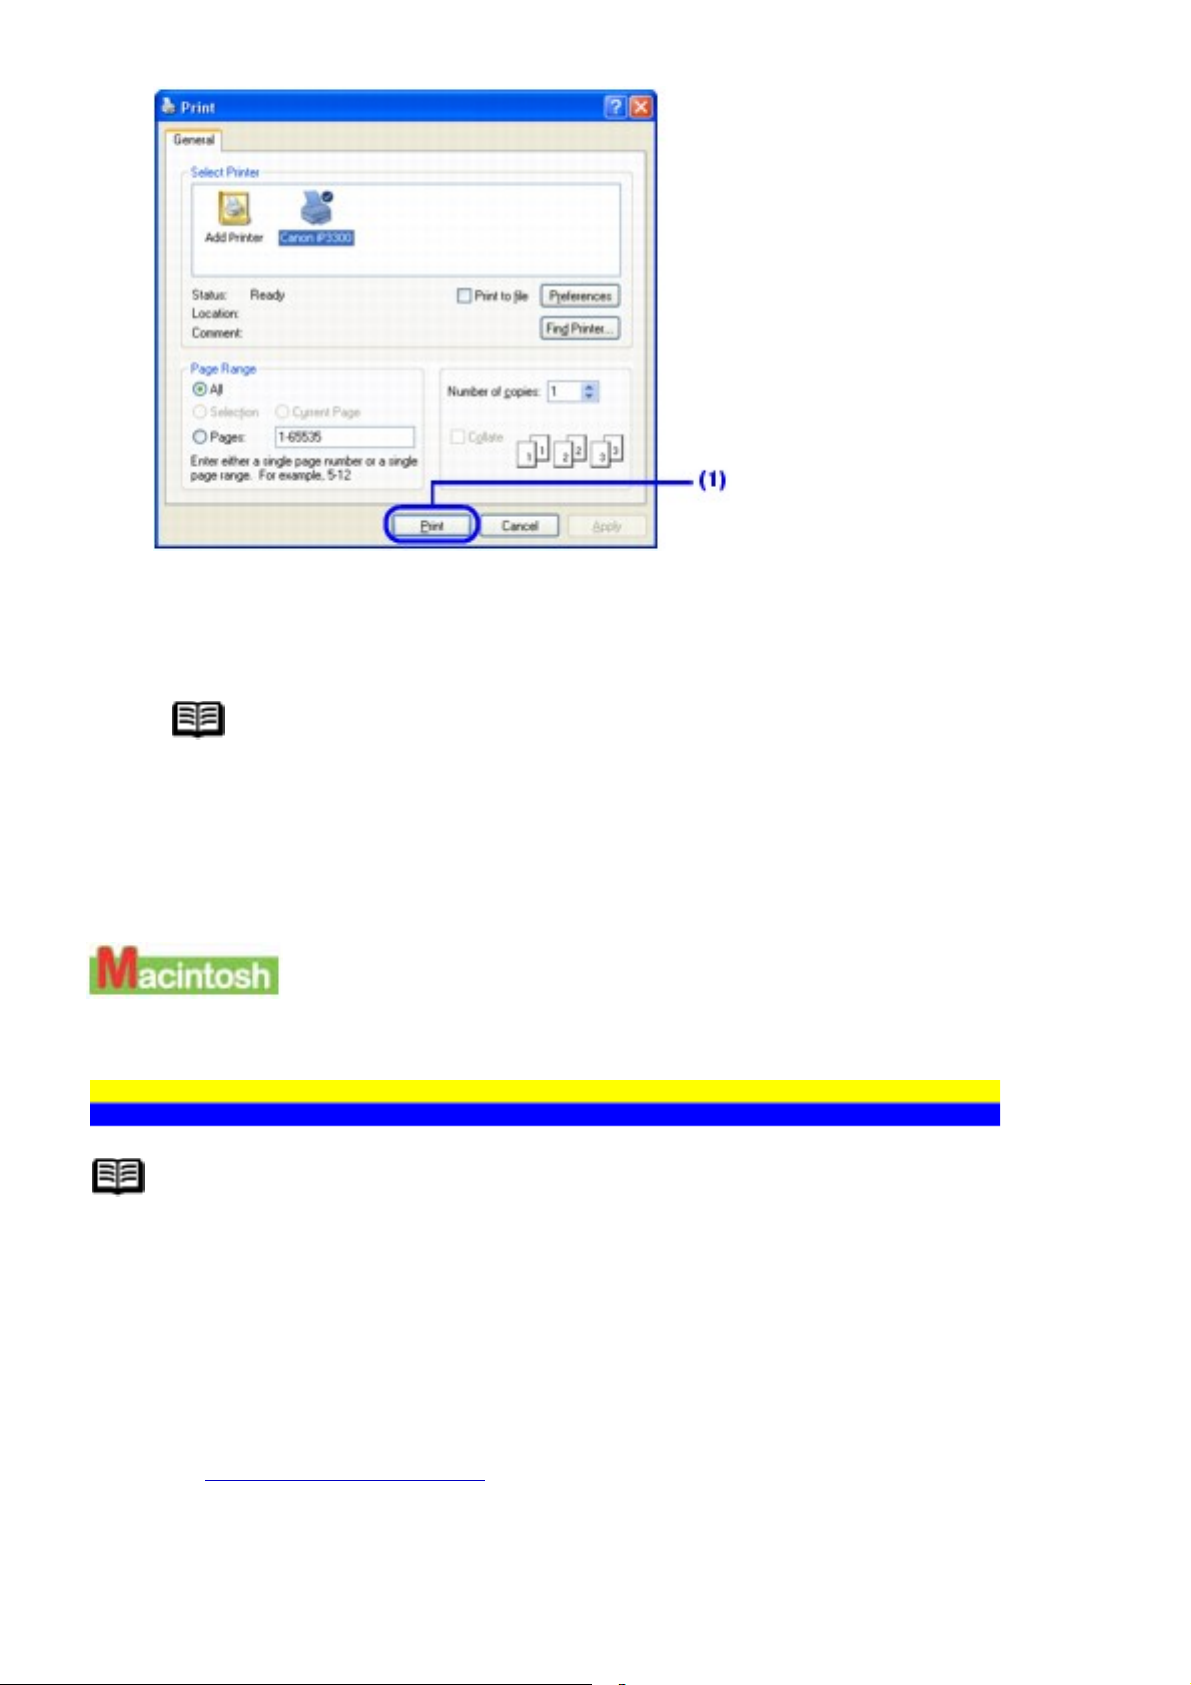
(1) Click Print (or OK).
39
Printing begins. Do not open the Top Cover while printing.
Note
To cancel a print job in progress, press the RESUME/
CANCEL button on the printer or click Cancel Printing on
the Canon IJ Status Monitor. To display the Canon IJ
Status Monitor, click Canon iP3300 on the taskbar.
Printing with Macintosh
Note
Menu and command names may differ between software applications,
and more steps may be required. For details, refer to the instruction
manual of your software application.
The steps described in this section are for printing in Mac OS X v.10.4.x.
1 Turn on the printer and load the paper in the printer.
See Loading Printing Paper.
2 Create a document or open a file to print using an
Page 40
appropriate application software.
40
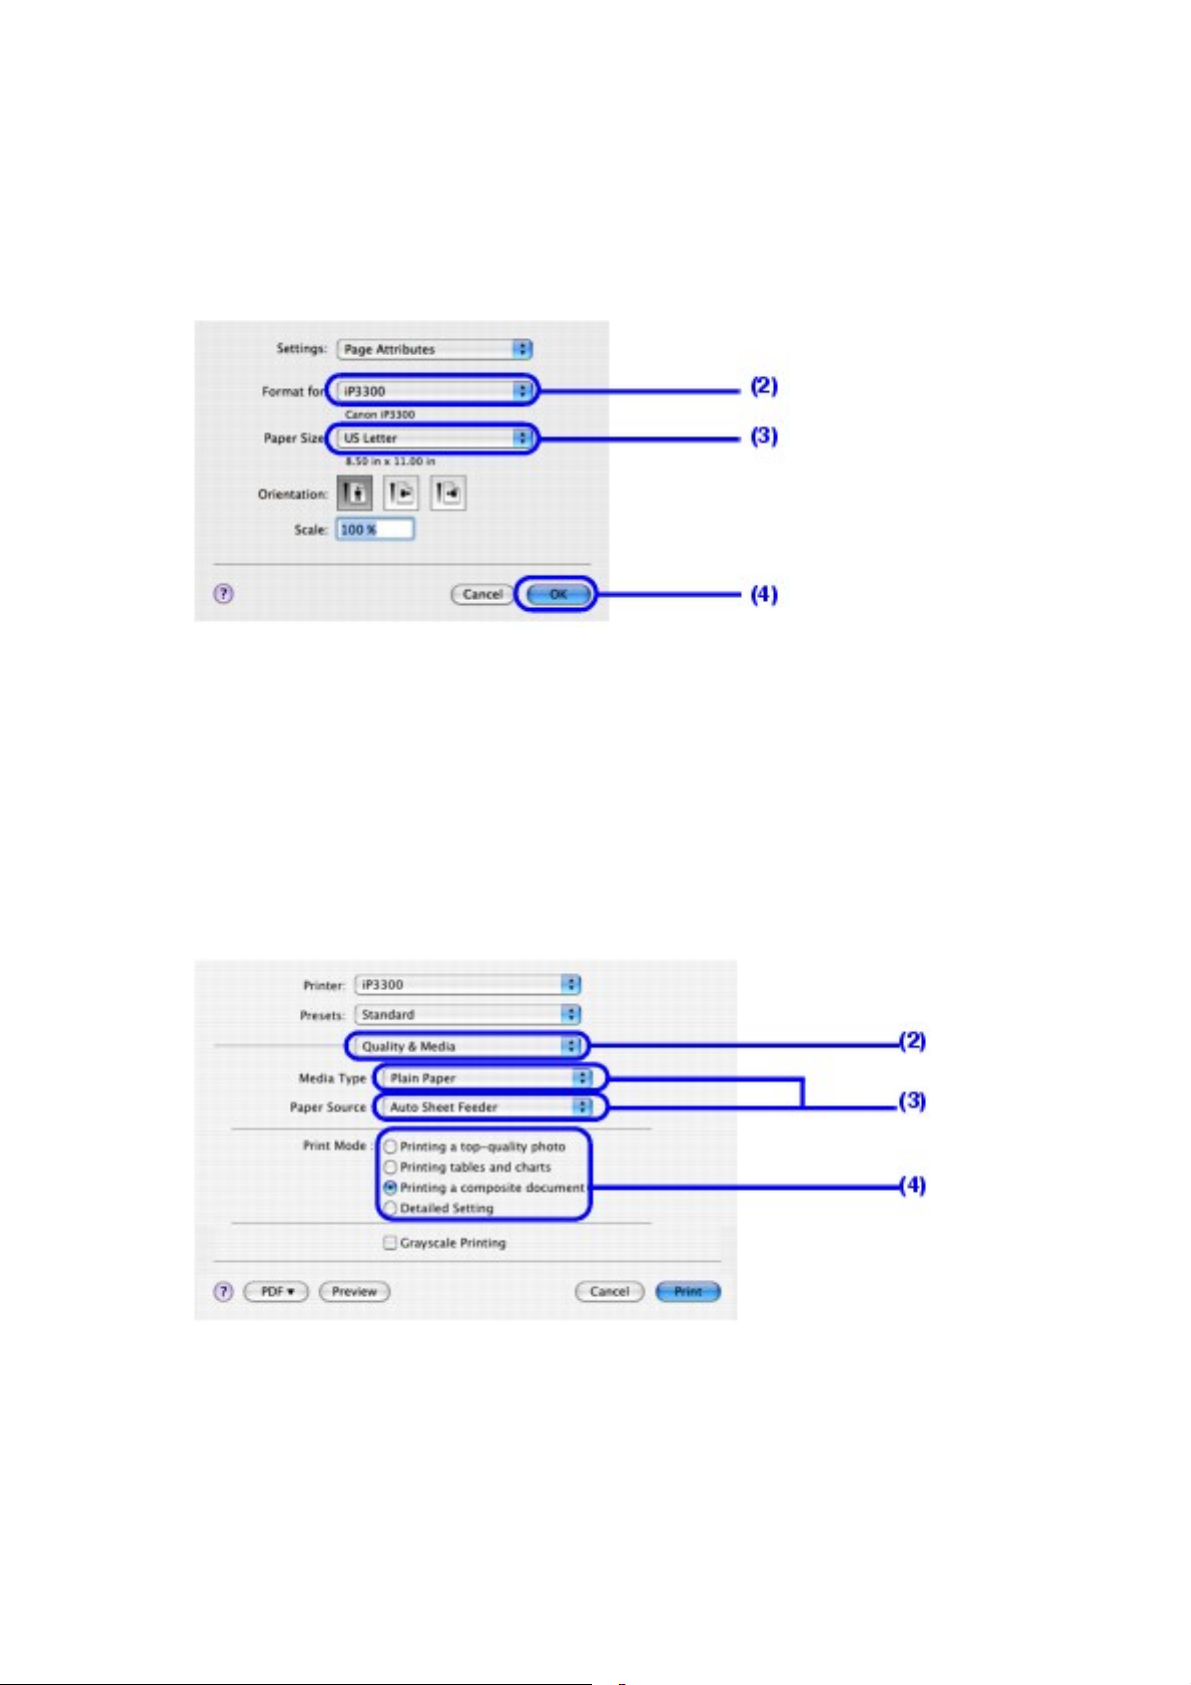
3 Select Paper Size.
(1) Select Page Setup on the application software's File menu.
The Page Setup dialog box opens.
(2) Confirm that iP3300 is selected in Format for.
(3) Select the desired paper size in Paper Size.
(4) Click OK.
4 Specify the required settings.
(1) Select Print on the application software's File menu.
The Print dialog box opens.
(2) Select Quality & Media in the pop-up menu.
(3) Select the desired media type in Media Type.
Select Auto Sheet Feeder or Front Feeder for Paper Source depending
on the paper source where you loaded the paper in step 1.
Page 41

Note
41
If you select Front for Plain Paper, the printer will
automatically switch to the Front Feeder when Plain Paper
is specified for Media Type. You cannot load paper other
than A4, Letter, or B5-sized plain paper in the Front
Feeder.
(4) Select the print mode appropriate to your document in Print Mode.
Note
When you select the print mode appropriate to your
document in Print Mode, the document will be printed in
color and at a print quality suited to the characteristics of
the Media Type you have selected.
- Printing a top-quality photo: Select when printing
documents consisting mainly of photographs and
graphics featuring fine color gradation.
- Printing tables and charts: Select when printing
documents consisting mainly of graphs and graphics
(illustrations) with strong color definition.
- Printing a composite document: Select when printing
documents consisting mainly of text.
- Detailed Setting: Select to fine-tune the Print Quality
and Halftoning settings.
For details on other printer driver functions, click on
the Quality & Media, Color Options, Special Effects,
Borderless Printing, or Margin sheet to view the Printer
Driver Guide on-screen manual. If the on-screen manuals
are not installed, the Printer Driver Guide on-screen
manual is not displayed even if
To display the preview and confirm how your document
will look when printed, click Preview. Some application
software may not have a preview function.
is clicked.
5 Print the document.
(1) Click Print.
Printing begins. Do not open the Top Cover while printing.
Page 42

Note
42
Click the printer icon in the Dock to display the list of print
jobs in progress. If you are using Mac OS X v.10.2.8, click the
printer icon in the Dock to start up the Print Center and
double-click the name of your printer in the Printer List.
To cancel a print job in progress, select the desired document
in the Name list and click Delete. To temporarily stop a job in
progress, click Hold. To cancel all the jobs in the list, click
Stop Jobs.
Page 43

Printing Media
43
Compatible Media Types
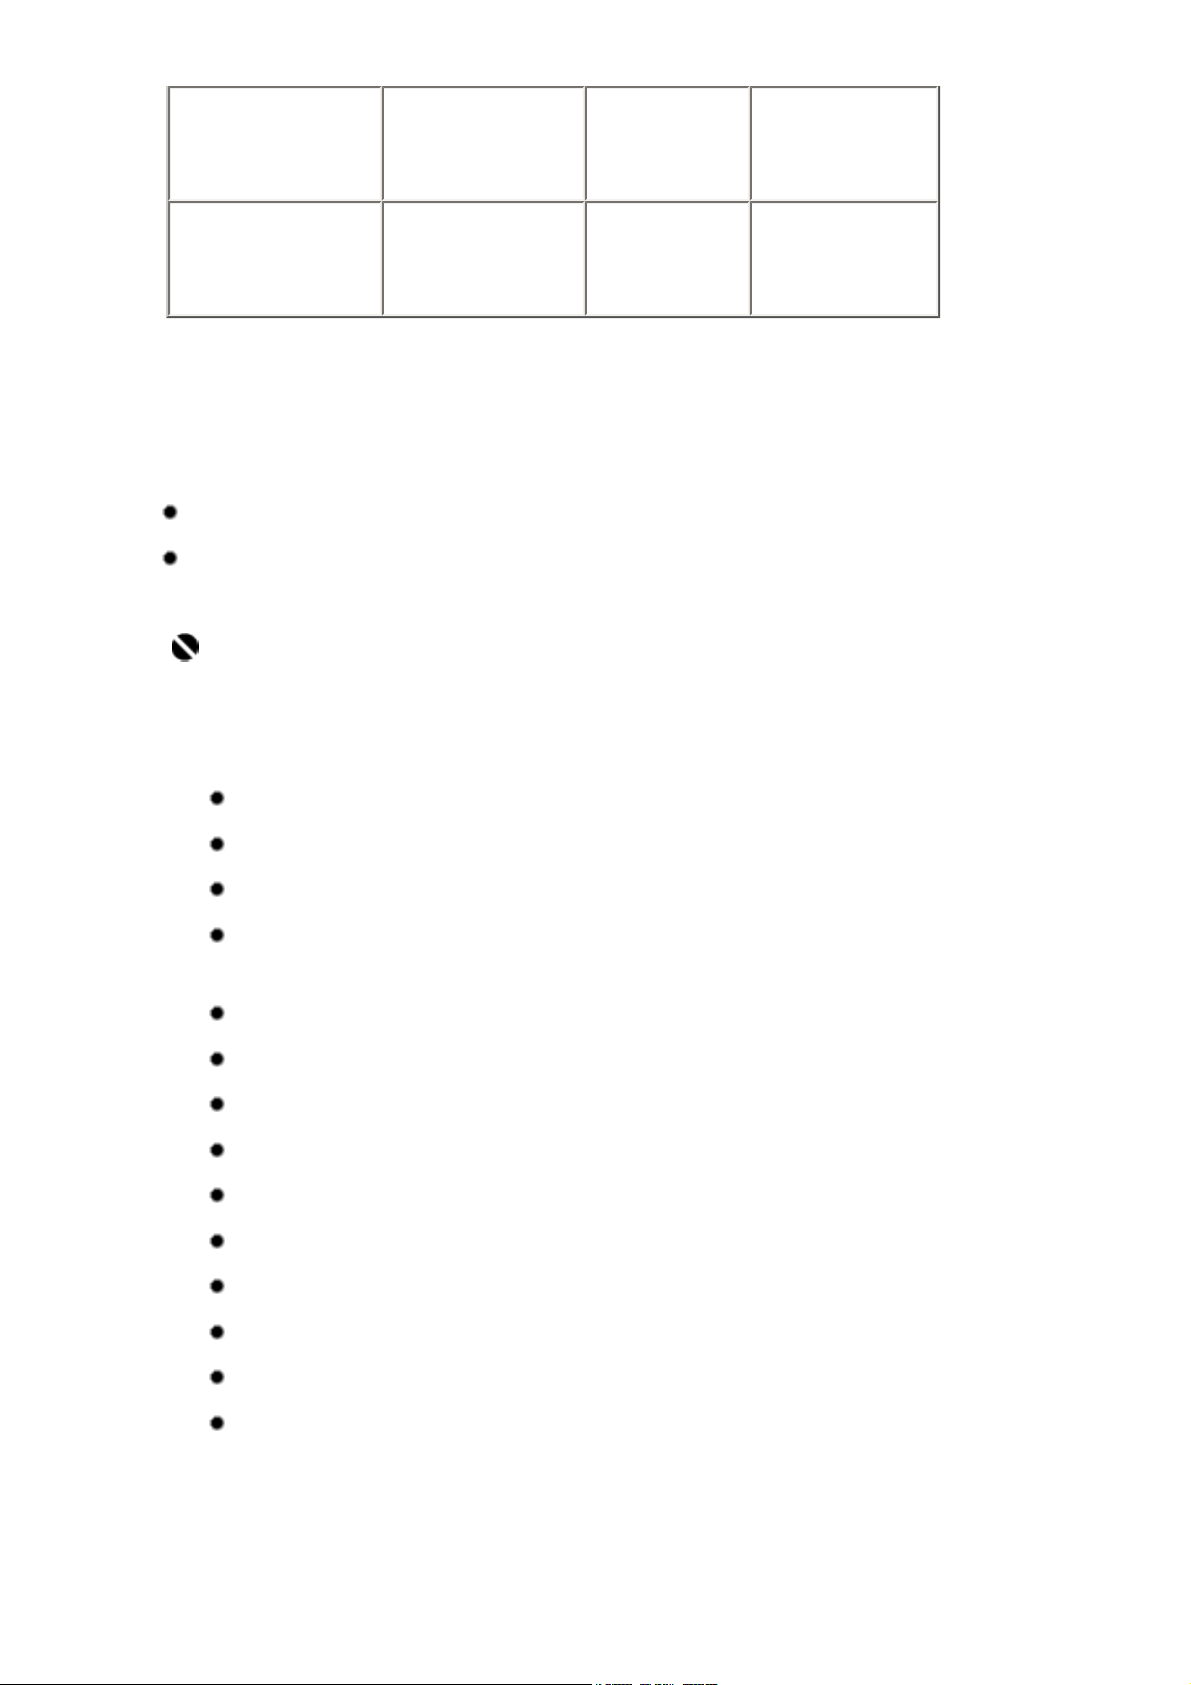
You can use the following sizes and types of paper and other media.
Size
The following table shows paper sizes that can be used and where they can be
loaded.
O:Available -:Unavailable
Paper Size
Width x
Height
Letter 8.5 x 11
inches / 215.9
x 279.4 mm
Legal 8.5 x 14
inches / 215.9
x 355.6 mm
A5 5.83 x 8.27
inches / 148.0
x 210.0 mm
A4 8.27 x 11.69
inches / 210.0
x 297.0 mm
B5 7.17 x 10.12
inches / 182.0
x 257.0 mm
Auto
Front
Sheet
Feeder
Feeder
O O
O -
O -
O O
O O
4" x 6" 4 x 6 inches /
101.6 x 152.4
mm
4" x 8" 4 x 8 inches /
101.6 x 203.2
mm
O -
O -
Page 44

5" x 7" 5 x 7 inches /
44
127.0 x 177.8
mm
O -
8" x 10" 8 x 10 inches /
203.2 x 254.0
mm
L 3.50 x 5
inches / 89.0 x
127.0 mm
2L 5 x 7.01
inches / 127.0
x 178.0 mm
Hagaki 3.94 x 5.83
inches / 100.0
x 148.0 mm
Hagaki 2 7.87 x 5.83
inches / 200.0
x 148.0 mm
Comm. Env.
#10
4.13 x 9.5
inches / 104.8
x 241.3 mm
O -
O -
O -
O -
O -
O -
DL Env. 4.33 x 8.66
inches / 110.0
x 220.0 mm
Choukei 3* 4.72 x 9.25
inches / 120.0
x 235.0 mm
Choukei 4* 3.54 x 8.07
inches / 90.0 x
205.0 mm
Youkei 4 4.13 x 9.25
inches / 105.0
x 235.0 mm
Youkei 6 3.86 x 7.48
inches / 98.0 x
190.0 mm
Credit Card 2.13 x 3.39
inches / 54.0 x
86.0 mm
O -
O -
O -
O -
O -
O -
Page 45
Card 2.17 x 3.58
45
inches / 55.0 x
91.0 mm
O -
Wide 4 x 7.1
O inches / 101.6
x 180.6 mm
* Not supported in Macintosh.
For paper to be loaded in the Auto Sheet Feeder, you can also set custom
paper sized manually. Specify custom paper sizes within the following range.
Minimum size: 2.13 x 3.39 inches / 54.0 x 86.0 mm
Maximum size: 8.5 x 23 inches / 215.9 x 584.2 mm
Important
Do not use the following types of paper. Using such paper will
not only produce unsatisfactory results, but can also cause
the printer to jam or malfunction.
Folded, curled, or wrinkled paper
Damp paper
Paper that is too thin (weighing less than 64 gsm / 17 lb)
Paper that is too thick (non-Canon genuine paper
weighing more than 105 gsm / 28 lb)
Picture postcards
Postcards affixed with photos or stickers
Envelopes with double flaps
Envelopes with sticker flaps
Envelopes with an embossed or treated surface
Any type of paper with holes
Paper that is not rectangular
Paper bound with staples or glue
Paper with adhesives
Paper decorated with glitter, etc.
Additionally, when printing on A5 or smaller sized paper, do
not use paper thinner than a post card, including plain paper
or notepad paper cut to a small size.
Page 46

Note
46
Media Types Suitable for Borderless Printing
The following media are compatible with Borderless
Printing:
Glossy Photo Paper (A4, Letter, 4" x 6" / 101.6 x 152.4 mm,
and 2.13" x 3.39" / 54.0 x 86.0 mm)
Glossy Photo Paper "Everyday Use" (A4 and 4" x 6" / 101.6 x
152.4 mm)
Matte Photo Paper (A4, Letter, and 4" x 6" / 101.6 x 152.4
mm)
Photo Paper Plus Double Sided (A4, Letter, and 5" x 7" /
127.0 x 177.8 mm)
Photo Paper Plus Glossy (A4, Letter, 5" x 7" / 127.0 x 177.8
mm, and 4" x 6" / 101.6 x 152.4 mm)
Photo Paper Plus Semi-gloss (A4, Letter, 4" x 6" / 101.6 x
152.4 mm, and 8" x 10" / 203.2 x 254.0 mm)
Photo Paper Pro (A4, Letter, 4" x 6" / 101.6 x 152.4 mm, 8" x
10" / 203.2 x 254.0 mm, and Wide)
Weight
64 to 105 gsm (17 to 28 lb) (plain paper except for genuine Canon media)
Do not use paper heavier or lighter than this (except for genuine Canon
media), as it could jam in the printer.
Types
The following types of media can be used.
For details on the media and the printing methods, see the specific sections.
You may not be able to purchase some Canon genuine papers depending on
your country.
Plain paper
You can use general copy paper or Canon's Super White Paper SW-201.
See Loading Printing Paper.
Other types of paper
See
High Resolution Paper HR-101N.
Page 47

See Glossy Photo Paper GP-401 / Glossy Photo Paper "Everyday Use" GP-
47
501.
See
Matte Photo Paper MP-101.
See
Photo Paper Plus Double Sided PP-101D.
See
Photo Paper Plus Glossy PP-101.
See
Photo Paper Plus Semi-gloss SG-101, SG-201.
See
Photo Paper Pro PR-101.
See
Photo Stickers PS-101.
See
T-Shirt Transfers TR-301.
See
Envelopes.
Important
Put unused paper back into the package, and store them
avoiding heat, humidity, and direct sunlight.
Page 48

High Resolution Paper HR-101N
48
This type of paper provides better color reproduction than plain paper. It is suitable
for printing business documents that feature graphics, and for printing
photographs.
Size
This media is available in A4 and Letter sizes.
Loading
Load the paper in the Auto Sheet Feeder.
Load the paper with the whiter side facing UP.
Do not load paper higher than the limit mark. A maximum of 80 sheets can
be loaded at once.
Set the Paper Thickness Lever to the left.
Printer Driver Settings
Media Type: High Resolution Paper
Page Size: Make sure that the setting matches the size set in the
application.
Handling of Printed Output
Do not stack more than 50 sheets in the Paper Output Tray. If the output paper
is curled, it may prevent the next sheet from being ejected. In this case, or if
the ink takes a long time to dry, remove each sheet as soon as it is printed.
Printable Area
See Printing Area.
Page 49

Glossy Photo Paper GP-401 / Glossy Photo
49
Paper "Everyday Use" GP-501
This paper is thicker than High Resolution Paper and has a glossy printing surface
to produce printouts close to photograph quality.
It is suitable for borderless printing.
Size
Glossy Photo Paper is available in A4, Letter, 4" x 6" / 101.6 x 152.4 mm, and
Credit card sizes.
Glossy Photo Paper "Everyday Use" is available in A4, Letter, and 4" x 6" /
101.6 x 152.4 mm sizes.
Loading
Load the paper in the Auto Sheet Feeder.
Load the paper with the whiter side facing UP.
Be sure to set the paper in portrait orientation regardless of the printing
orientation. Loading in the landscape orientation can cause paper jams.
A maximum of the following number of sheets can be loaded at once,
depending on the paper size; A4 (GP-401 / GP-501) or Letter-sized (GP401 / GP-501) paper, up to 10 sheets; 4" x 6" / 101.6 x 152.4 mm (GP-401 /
GP-501) or Credit card-sized (GP-401) paper, up to 20 sheets.
Set the Paper Thickness Lever to the left.
Printer Driver Settings
Media Type: Glossy Photo Paper
Page Size: Make sure that the setting matches the size set in the
application.
Handling of Printed Output
Do not stack more than 10 sheets in the Paper Output Tray.
Do not touch the printed surface nor stack the printed sheets until the ink is
fixed (approximately 2 minutes).
Printable Area
See Printing Area.
Page 50
Note
50
To prepare the data to be printed with Borderless Printing,
create a document with the same size as the size of paper
you are printing on, and then paste the image so that it fills
the document area without leaving any margins. If you are
using an application that allows you to set margins, set the
left, right, top and bottom margins to 0 inches / mm. For
instructions on setting margins, refer to the instruction manual
of your application.
Page 51

Matte Photo Paper MP-101
51
This is a thick matte water-resistant paper and provides superior color
reproduction. It is suitable for a variety of printing purposes such as paper crafts,
calendars, and photos with matte finish.
It is suitable for borderless printing.
Size
This media is available in A4, Letter, and 4" x 6" / 101.6 x 152.4 mm sizes.
Loading
Load the paper in the Auto Sheet Feeder.
Load the paper with the whiter side facing UP.
A maximum of the following number of sheets can be loaded at once,
depending on the paper size; A4 or Letter-sized paper, up to 10 sheets; 4" x
6" / 101.6 x 152.4 mm paper, up to 20 sheets.
Set the Paper Thickness Lever to the left.
Printer Driver Settings
Media Type: Matte Photo Paper
Page Size: Make sure that the setting matches the size set in the
application.
Handling of Printed Output
Remove each sheet as soon as it is printed.
Colors may slightly change if papers are stacked up before the ink is
completely dry. We recommend drying the ink for 24 hours.
Do not attempt to dry the ink with a hair dryer or by exposing printed
sheets to direct sunlight.
Do not touch the printed surface nor stack the printed sheets until the ink is
fixed.
Storing Printed Output
Do not store or display printouts in hot or humid conditions. Never expose
them to heat or direct sunlight.
Store printouts in photo albums, plastic folders, or photo frames to protect
them from direct exposure to air.
Page 52
* This will help protect printouts from color fading.
52
* Do not mount printouts in an adhesive-type album, as you may not be able
to remove them.
When storing printouts in albums with pockets, firmly insert them fully into
the pocket. The edges of the printouts may turn yellow depending on the
type of plastic folder or pocket album.
Printable Area
See Printing Area.
Note
To prepare the data to be printed with Borderless Printing,
create a document with the same size as the size of paper
you are printing on, and then paste the image so that it fills
the document area without leaving any margins. If you are
using an application that allows you to set margins, set the
left, right, top and bottom margins to 0 inches / mm. For
instructions on setting margins, refer to the instruction manual
of your application.
Page 53

Photo Paper Plus Double Sided PP-101D
53
This paper is provided with glossy coating on both sides, ensuring superior color
reproduction. You can print high quality photographs onto both sides of this paper
and bind the prints into a booklet to create a photo album.
It is suitable for borderless printing.
Important
When using Photo Paper Plus Double Sided PP-101D, be sure to
clean the inside of the printer before printing. If the inside of the printer
is dirty, the printout may become smudged.
See Cleaning the Inside of the Printer.
You cannot use Photo Paper Plus Double Sided PP-101D on a
Macintosh.
Note
You can use Easy-PhotoPrint or PhotoRecord (Windows only) to easily
specify print settings. Easy-PhotoPrint and PhotoRecord (Windows only)
are provided in the Setup CD-ROM. Install them on your computer in
order to use them. For details on using Easy-PhotoPrint or PhotoRecord
(Windows only), refer to the Photo Application Guide on-screen manual.
Size
This media is available in A4, Letter, and 5" x 7" / 127.0 x 177.8 mm sizes.
Loading
Load the paper in the Auto Sheet Feeder one sheet at a time.
If paper is curled, flatten it before loading.
Set the Paper Thickness Lever to the left.
Note
When Performing Duplex Printing
When you have finished printing on the front side, reload the
paper in the paper source according to the printer driver
messages to print on the reverse side.
Page 54

Printer Driver Settings
54
Media Type: Photo Paper Plus Double Sided
Page Size: Make sure that the setting matches the size set in the
application.
Handling of Printed Output
Remove each sheet as soon as it is printed.
Use the drying stand included in the Photo Paper Plus Double Sided PP101D package to dry the printouts for more than 30 minutes. When printouts
need to be stacked up, allow them to dry for about 48 hours with a drying
sheet, also provided in the package, inserted between each printout sheet.
For details, refer to the instruction manual of Photo Paper Plus Double Sided
PP-101D.
Do not attempt to dry the ink with a hair dryer or by exposing printed
sheets to direct sunlight.
Do not touch the printed surface nor stack the printed sheets until the ink is
fixed.
Storing Printed Output
Store printouts in photo albums or plastic folders to protect them from
direct exposure to air.
This will help protect printouts from color fading.
Avoid storing printouts in a hot or humid location or in direct sunlight. Store
them in regular room temperature.
Avoid displaying or exhibiting printouts outdoors or in direct sunlight.
Printable Area
See Printing Area.
Note
To prepare the data to be printed with Borderless Printing,
create a document with the same size as the size of paper
you are printing on, and then paste the image so that it fills
the document area without leaving any margins. If you are
using an application that allows you to set margins, set the
left, right, top and bottom margins to 0 inches / mm. For
instructions on setting margins, refer to the instruction manual
of your application.
Page 55

55
Page 56

Photo Paper Plus Glossy PP-101
56
This is a thick paper with a glossy water-resistant coating and provides superior
color reproduction. It is ideal for printing high quality photographs.
It is suitable for borderless printing.
Size
This media is available in A4, Letter, 4" x 6" / 101.6 x 152.4 mm, and 5" x 7" /
127.0 x 177.8 mm sizes.
Loading
Load the paper in the Auto Sheet Feeder.
Load the paper with the glossier side facing UP.
A maximum of the following number of sheets can be loaded at once,
depending on the paper size; A4, Letter, or 5" x 7" / 127.0 x 177.8 mm paper,
up to 10 sheets; 4" x 6" / 101.6 x 152.4 mm paper, up to 20 sheets.
If paper is curled, flatten it before loading.
Loading paper in stacks may cause the print side to be marked as it is fed
in. In this case, load one sheet at a time.
Set the Paper Thickness Lever to the left.
Printer Driver Settings
Media Type: Photo Paper Plus Glossy
Page Size: Make sure that the setting matches the size set in the
application.
Handling of Printed Output
Remove each sheet as soon as it is printed.
When printouts can be arranged without stacking them up, allow them to
dry for about 24 hours. When printouts need to be stacked up, first allow
each printout to dry for about 15 minutes, stack them with a sheet of plain
paper, such as copying paper, inserted between each printout sheet, and
allow them to dry for about 24 hours.
Do not attempt to dry the ink with a hair dryer or by exposing printed
sheets to direct sunlight.
Do not touch the printed surface nor stack the printed sheets until the ink is
fixed.
Page 57

Storing Printed Output
57
Store printouts in photo albums, plastic folders, or photo frames to protect
them from direct exposure to air.
* This will help protect printouts from color fading.
* Avoid storing printouts in an adhesive-type album, as you may not be able
to remove them.
When storing printouts in a pocket-type album, insert them in the pockets
as far as they will go. The edges of the printouts may turn yellow depending
on the type of plastic folder or pocket album.
Avoid storing printouts in a hot or humid location or in direct sunlight. Store
them in regular room temperature.
Avoid displaying or exhibiting printouts outdoors or in direct sunlight.
Printable Area
See Printing Area.
Note
To prepare the data to be printed with Borderless Printing,
create a document with the same size as the size of paper
you are printing on, and then paste the image so that it fills
the document area without leaving any margins. If you are
using an application that allows you to set margins, set the
left, right, top and bottom margins to 0 inches / mm. For
instructions on setting margins, refer to the instruction manual
of your application.
Page 58

Photo Paper Plus Semi-gloss SG-101, SG-201
58
This paper provides the same excellent water-resistant coating and superior color
reproduction as the Photo Paper Plus Glossy PP-101, while offering a less
reflective surface, closer to a traditional matte finish.
This paper is suitable for borderless printing.
Size
Photo Paper Plus Semi-gloss SG-101 is available in A4, Letter, and 4" x 6" /
101.6 x 152.4 mm sizes.
Photo Paper Plus Semi-gloss SG-201 is available in A4, Letter, 4" x 6" / 101.6
x 152.4 mm, and 8" x 10" / 203.2 x 254.0 mm sizes.
Loading
Load the paper in the Auto Sheet Feeder.
Load the paper with the whiter side facing UP.
A maximum of the following number of sheets can be loaded at once,
depending on the paper size; A4 (SG-101, SG-201), Letter (SG-101, SG-
201), or 8" x 10" / 203.2 x 254.0 mm (SG-201) paper, up to 10 sheets; 4" x
6" / 101.6 x 152.4 mm (SG-101, SG-201) paper, up to 20 sheets.
If paper is curled, flatten it before loading.
Loading paper in stacks may cause the print side to be marked as it is fed
in. In this case, load one sheet at a time.
Set the Paper Thickness Lever to the left.
Printer Driver Settings
Media Type: Photo Paper Plus Glossy
Page Size: Make sure that the setting matches the size set in the
application.
Handling of Printed Output
Remove each sheet as soon as it is printed.
When printouts can be arranged without stacking them up, allow them to
dry for about 24 hours. When printouts need to be stacked up, first allow
each printout to dry for about 15 minutes, stack them with a sheet of plain
paper, such as copying paper, inserted between each printout sheet, and
allow them to dry for about 24 hours.
Page 59
Do not attempt to dry the ink with a hair dryer or by exposing printed
59
sheets to direct sunlight.
Do not touch the printed surface nor stack the printed sheets until the ink is
fixed.
Storing Printed Output
Store printouts in photo albums, plastic folders, or photo frames to protect
them from direct exposure to air.
* This will help protect printouts from color fading.
* Avoid storing printouts in an adhesive-type album, as you may not be able
to remove them.
When storing printouts in a pocket-type album, insert them in the pockets
as far as they will go. The edges of the printouts may turn yellow depending
on the type of plastic folder or pocket album.
Avoid storing printouts in a hot or humid location or in direct sunlight. Store
them in regular room temperature.
Avoid displaying or exhibiting printouts outdoors or in direct sunlight.
Printable Area
See Printing Area.
Note
To prepare the data to be printed with Borderless Printing,
create a document with the same size as the size of paper
you are printing on, and then paste the image so that it fills
the document area without leaving any margins. If you are
using an application that allows you to set margins, set the
left, right, top and bottom margins to 0 inches / mm. For
instructions on setting margins, refer to the instruction manual
of your application.
Page 60

Photo Paper Pro PR-101
60
This is a thick paper with a treated surface that enhances gloss and provides
superior color reproduction. It is ideal for printing high quality photographs.
It is suitable for borderless printing.
Size
This media is available in A4, Letter, 4" x 6" / 101.6 x 152.4 mm, 8" x 10" /
203.2 x 254.0 mm, and Wide sizes.
Loading
Load the paper in the Auto Sheet Feeder.
Load the paper with the glossier side facing UP.
A maximum of the following number of sheets can be loaded at once,
depending on the paper size; A4, Letter, or 8" x 10" / 203.2 x 254.0 mm
paper, up to 10 sheets; 4" x 6" / 101.6 x 152.4 mm or Wide paper, up to 20
sheets.
If paper is curled, flatten it before loading.
Loading paper in stacks may cause the print side to be marked as it is fed
in. In this case, load one sheet at a time.
Set the Paper Thickness Lever to the left.
Printer Driver Settings
Media Type: Photo Paper Pro
Page Size: Make sure that the setting matches the size set in the
application.
Handling of Printed Output
When printing on A4, Letter, or Wide paper, remove each sheet as soon
as it is printed. When printing on 8" x 10" / 203.2 x 254.0 mm paper, do not
stack more than 10 sheets in the Paper Output Tray. When printing on 4" x
6" / 101.6 x 152.4 mm paper, do not stack more than 20 sheets in the Paper
Output Tray.
When printouts can be arranged without stacking them up, allow them to
dry for about 24 hours. When printouts need to be stacked up, first allow
each printout to dry for about 15 minutes, stack them with a sheet of plain
paper, such as copying paper, inserted between each printout sheet, and
allow them to dry for about 24 hours.
Page 61

Do not attempt to dry the ink with a hair dryer or by exposing printed
61
sheets to direct sunlight.
Do not touch the printed surface nor stack the printed sheets until the ink is
fixed.
Storing Printed Output
Store printouts in photo albums, plastic folders, or photo frames to protect
them from direct exposure to air.
* This will help protect printouts from color fading.
* Avoid storing printouts in an adhesive-type album, as you may not be able
to remove them.
When storing printouts in a pocket-type album, insert them in the pockets
as far as they will go. The edges of the printouts may turn yellow depending
on the type of plastic folder or pocket album.
Avoid storing printouts in a hot or humid location or in direct sunlight. Store
them in regular room temperature.
Avoid displaying or exhibiting printouts outdoors or in direct sunlight.
Printable Area
See Printing Area.
Note
To prepare the data to be printed with Borderless Printing,
create a document with the same size as the size of paper
you are printing on, and then paste the image so that it fills
the document area without leaving any margins. If you are
using an application that allows you to set margins, set the
left, right, top and bottom margins to 0 inches / mm. For
instructions on setting margins, refer to the instruction manual
of your application.
Page 62

Photo Stickers PS-101
62
This is a peel-and-stick sheet that allows you to make your original stickers from
your favorite photo. It is a glossy sheet and is highly resistant to water. On each
sheet, you can print 16 photo stickers with excellent printing quality.
Note
You can use Easy-PhotoPrint or PhotoRecord (Windows only) to easily
specify print settings. Easy-PhotoPrint and PhotoRecord (Windows only)
are provided in the Setup CD-ROM. Install them on your computer in
order to use them. For details on using Easy-PhotoPrint or PhotoRecord
(Windows only), refer to the Photo Application Guide on-screen manual.
Size
This media is available in 4" x 6" / 101.6 x 152.4 mm size.
Loading
Load one sheet in the Auto Sheet Feeder at a time. Do not load Photo
Stickers in the Front Feeder as this may damage the printer.
Load each sheet with the side to be peeled off facing UP. Printing on the
back side can stain the inside of the printer or your clothes.
Place the sheet in portrait orientation with the smaller margin pointing
downward. For details, refer to the instructions on the back of the sheet
package.
If a sheet is curled, flatten it before loading.
Do not use a sheet from which stickers are about to come off or a sheet
you have reattached peeled off stickers.
Set the Paper Thickness Lever to the left.
Printer Driver Settings
Media Type: Photo Paper Plus Glossy
Page Size: 4" x 6" / 101.6 x 152.4 mm
Handling of Printed Output
Remove each sheet as soon as it is printed.
Page 63

63
Page 64

T-Shirt Transfers TR-301
64
This paper is used to create iron-on transfers. The image is printed inverted.
Note
Create an image for printing onto A4-sized paper.
The image is printed with the left and right inverted to the transfer.
When it is ironed onto the T-shirt, you will get the correct, uninverted
image.
Loading
Load the paper in the Auto Sheet Feeder one sheet at a time.
Load the paper with the side that does not have green lines facing UP.
If the T-shirt transfer is curled, flatten it by curling it in the opposite
direction.
Set the Paper Thickness Lever to the right.
Printer Driver Settings
Media Type: T-Shirt Transfers
Page Size: A4
Handling of Printed Output
Remove each T-shirt transfer as soon as it is printed.
The T-shirt transfer with the printed image should be used as soon as
possible. For details on how to use this paper, refer to the instructions
supplied with the transfer.
Printable Area
See Printing Area.
Page 65
Envelopes
65
Use either European DL or US Comm. Env. #10 size envelopes.
Important
Select either DL Env. or Comm. Env. #10 in the printer driver according
to the envelope size you are using. If you do not, the address will be
printed in the wrong direction.
Preparation for Printing
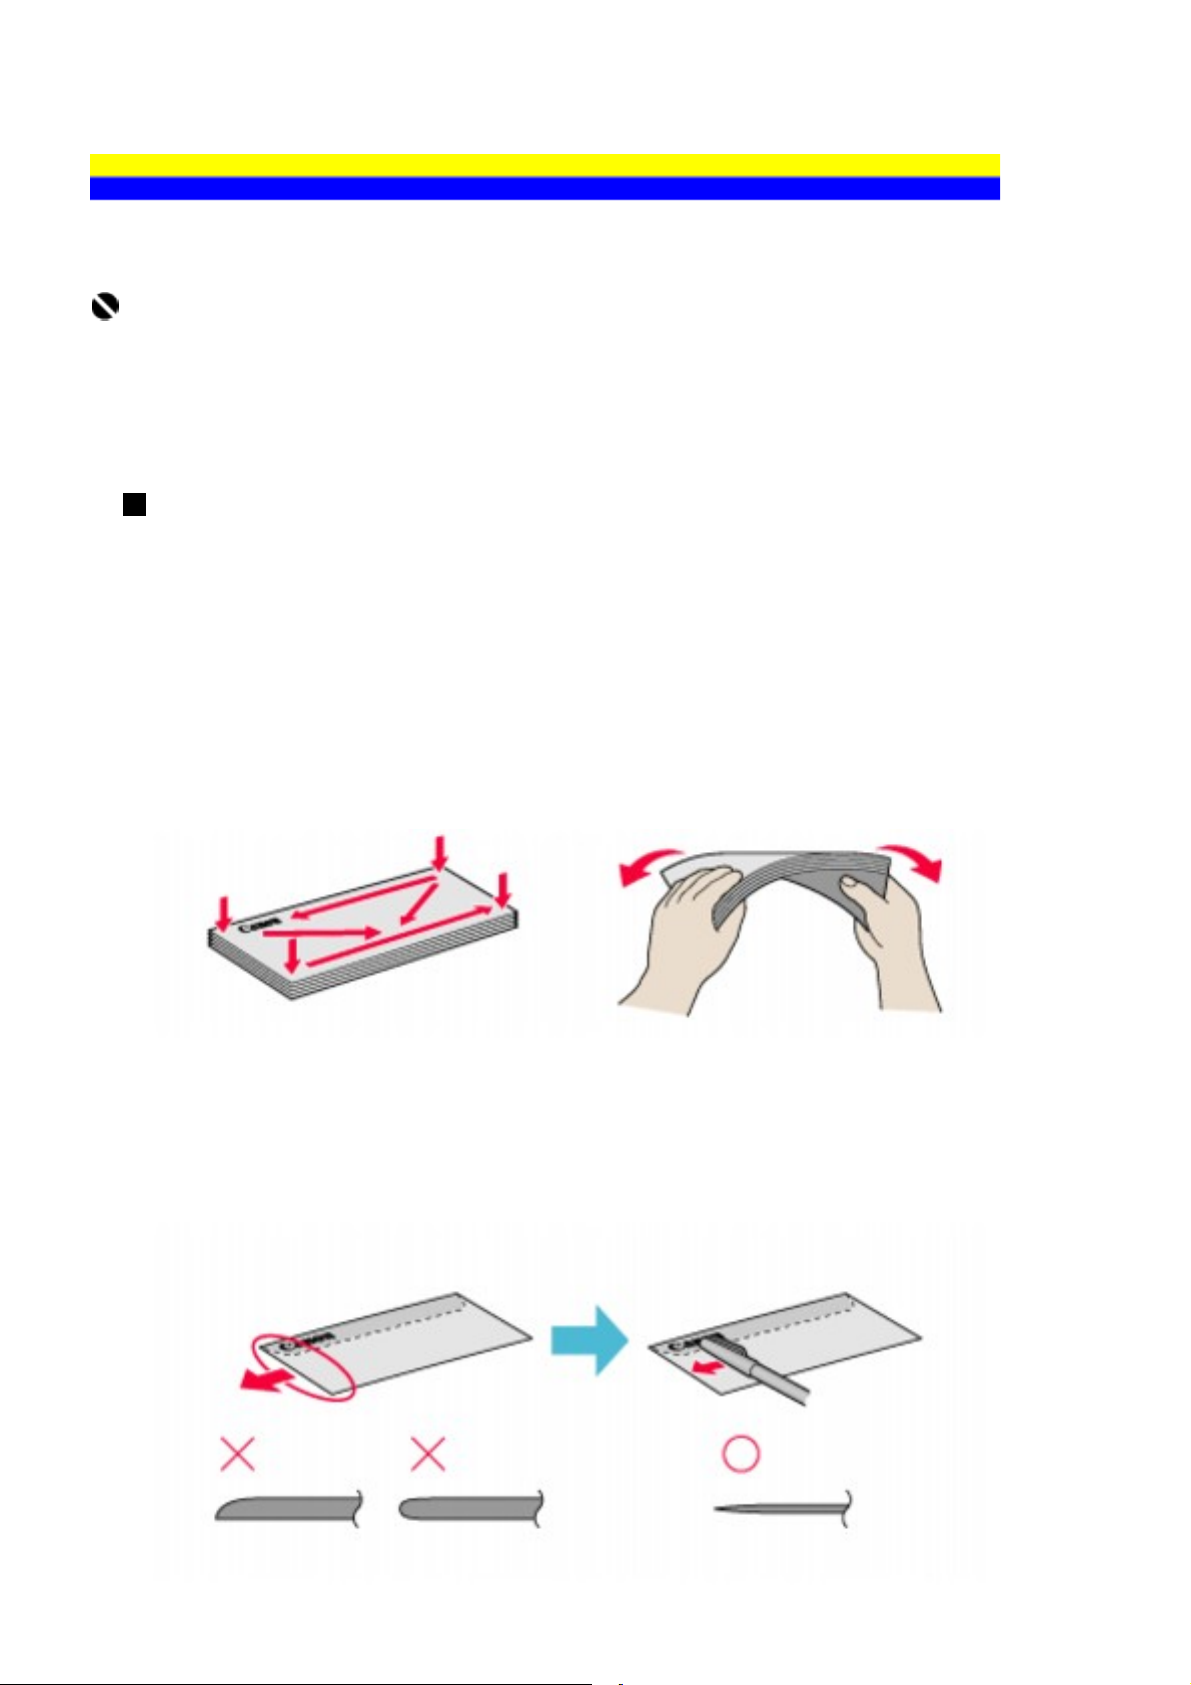
1 Press down on all four corners and edges of the
envelopes to flatten them as shown below.
2 If the envelopes are curled, hold the opposite corners and
gently twist them in the opposite direction.
Make sure that the flap of the envelope is perfectly straight.
3 If the leading edge of an envelope is puffed up or curled,
use a pen to press the envelope flat and sharpen the crease.
Press the envelope completely flat, working from the middle to the edge.
Page 66
* The above illustrations show a side view of the leading edge of the
66
envelope.
The envelopes may jam in the printer if they are not completely flat or the
edges are not aligned.
Make sure that no curl or puff exceeds 0.2 inches / 5 mm.
Size
Use either European DL or US Comm. Env. #10 size envelopes.
Unsuitable Envelopes
Envelopes with an embossed or treated surface
Envelopes with a double flap or pressure seals
Envelopes with sticker flaps
Loading
Load envelopes in the Auto Sheet Feeder.
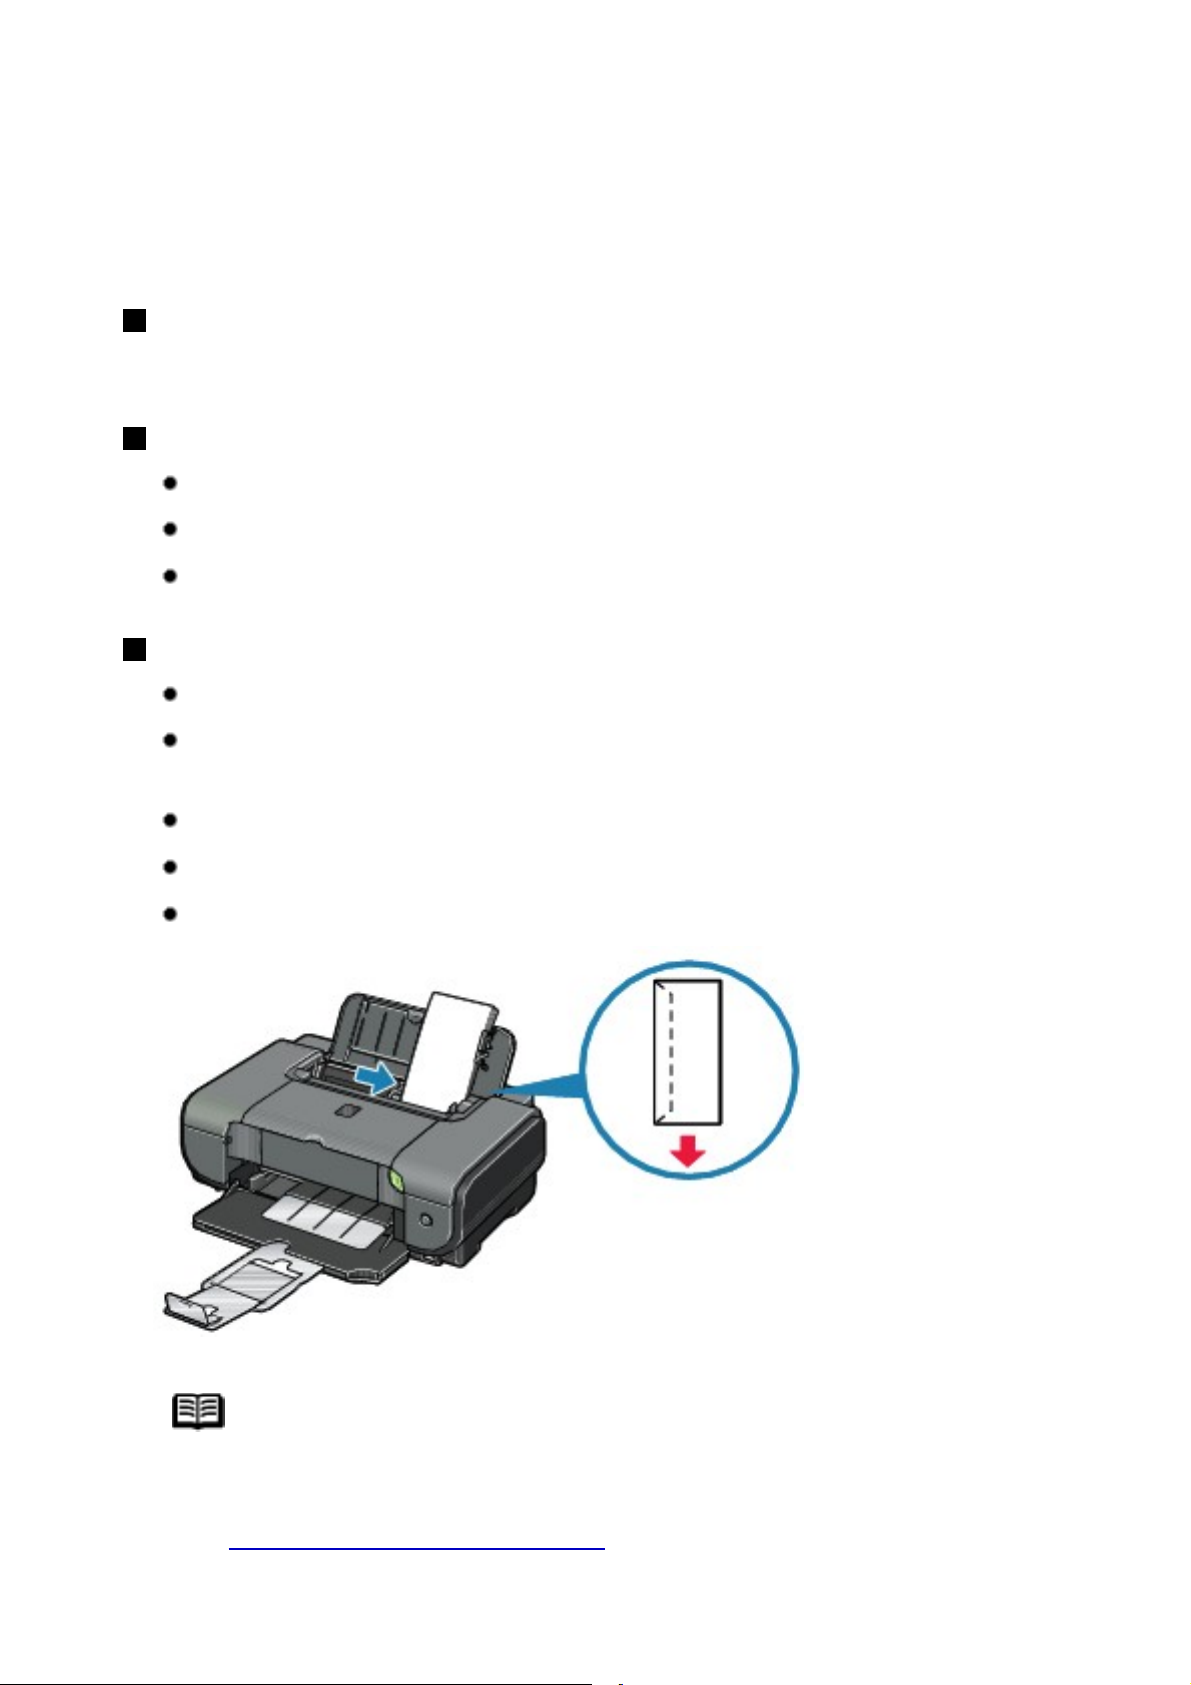
Load envelopes in portrait orientation with the rear flaps DOWN on the left
and the address side facing UP.
Up to 10 envelopes can be loaded at once.
Do not pull out the Paper Support.
Set the Paper Thickness Lever to the right.
Note
If the envelopes do not feed properly, even after removing
curl, clean the Paper Feed Roller.
See
Paper Does Not Feed Properly.
Page 67

Printer Driver Settings
67
Media Type: Envelope
Page Size: Select either DL Env. or Comm. Env. #10 according to the
envelope size you are using.
Handling of Printed Output
Remove each envelope as soon as it is printed.
Do not touch the printed surface nor stack the printed sheets until the ink is
fixed.
Printable Area
See Printing Area.
Page 68
Routine Maintenance
68
Replacing an Ink Tank
When ink runs out, replace the ink tank. The printer will not print if the wrong type
of ink tank is used, or if it is installed in the incorrect position.
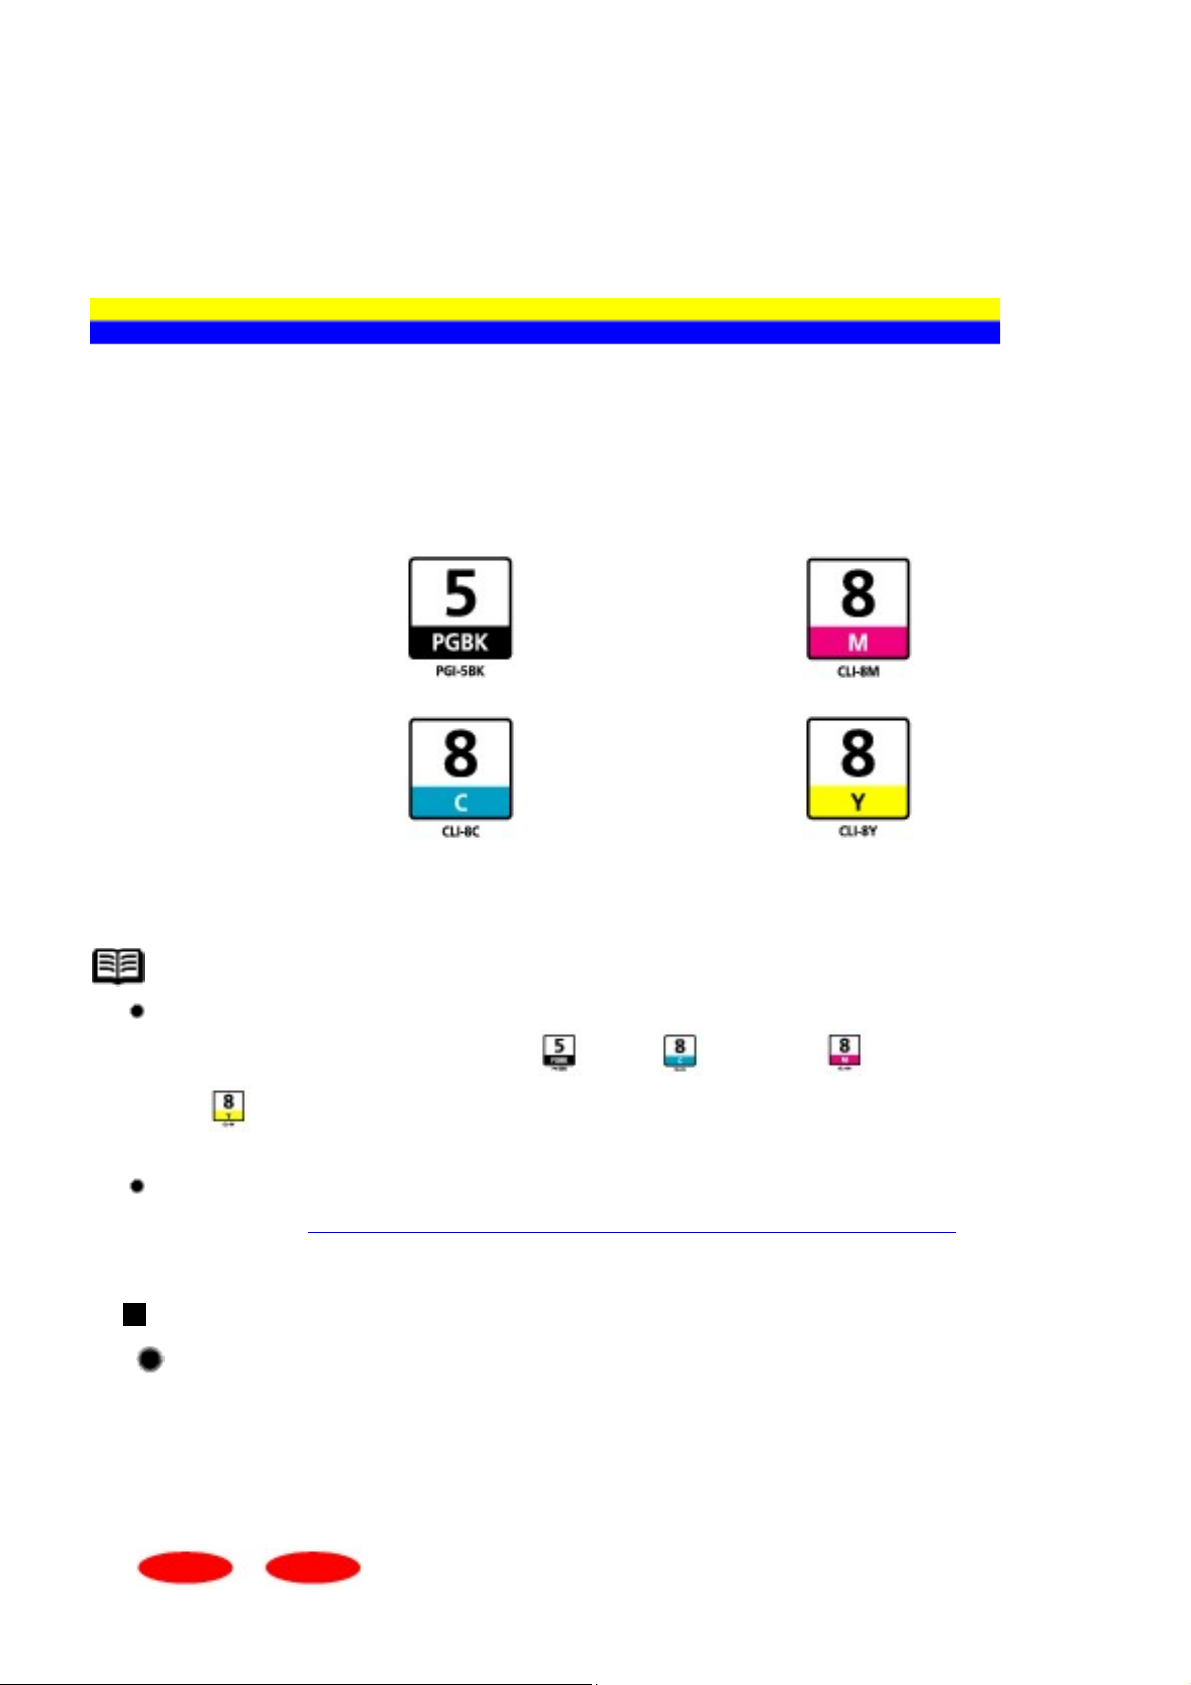
The printer uses the following ink tanks.
Black: PGI-5BK
Cyan: CLI-8C
Magenta: CLI-8M
Yellow: CLI-8Y
Note
Be sure to install the ink tanks in the correct order. The proper
arrangement from the left is Black
Yellow
.
, Cyan , Magenta ,
If printing becomes faint or white streaks appear despite sufficient
ink levels, see When Printing Becomes Faint or Colors Are Incorrect.
Getting the Ink Level Information
Ink Level Indication on the Printer
You can confirm the ink level in each ink tank by the ink lamps. Open the Top
Cover of the printer to confirm how the ink lamps light or flash.
Ink is low:
......Repeats
Page 69
The ink lamp flashes slowly (at around 3-second intervals). You can continue
69
printing for a while, but we recommend you to have a replacement ink tank
available.
Ink is out:
......Repeats
The ink lamp flashes quickly (at around 1-second intervals), and the ALARM
lamp on the printer flashes orange four or sixteen times. Replace the ink tank
with a new one.
* When the ALARM lamp on the printer flashes orange seven, thirteen,
fourteen, or fifteen times, an error has occurred and the printer is unable to
print. For details, see
ALARM Lamp Flashes Orange.
Ink Level Indication on the Computer
Open the Canon IJ Status Monitor to check the ink level information.
(1) Open the printer properties dialog box.
Opening the Printer Properties Dialog Box (Windows).
See
(2) Click View Printer Status on the Maintenance sheet.
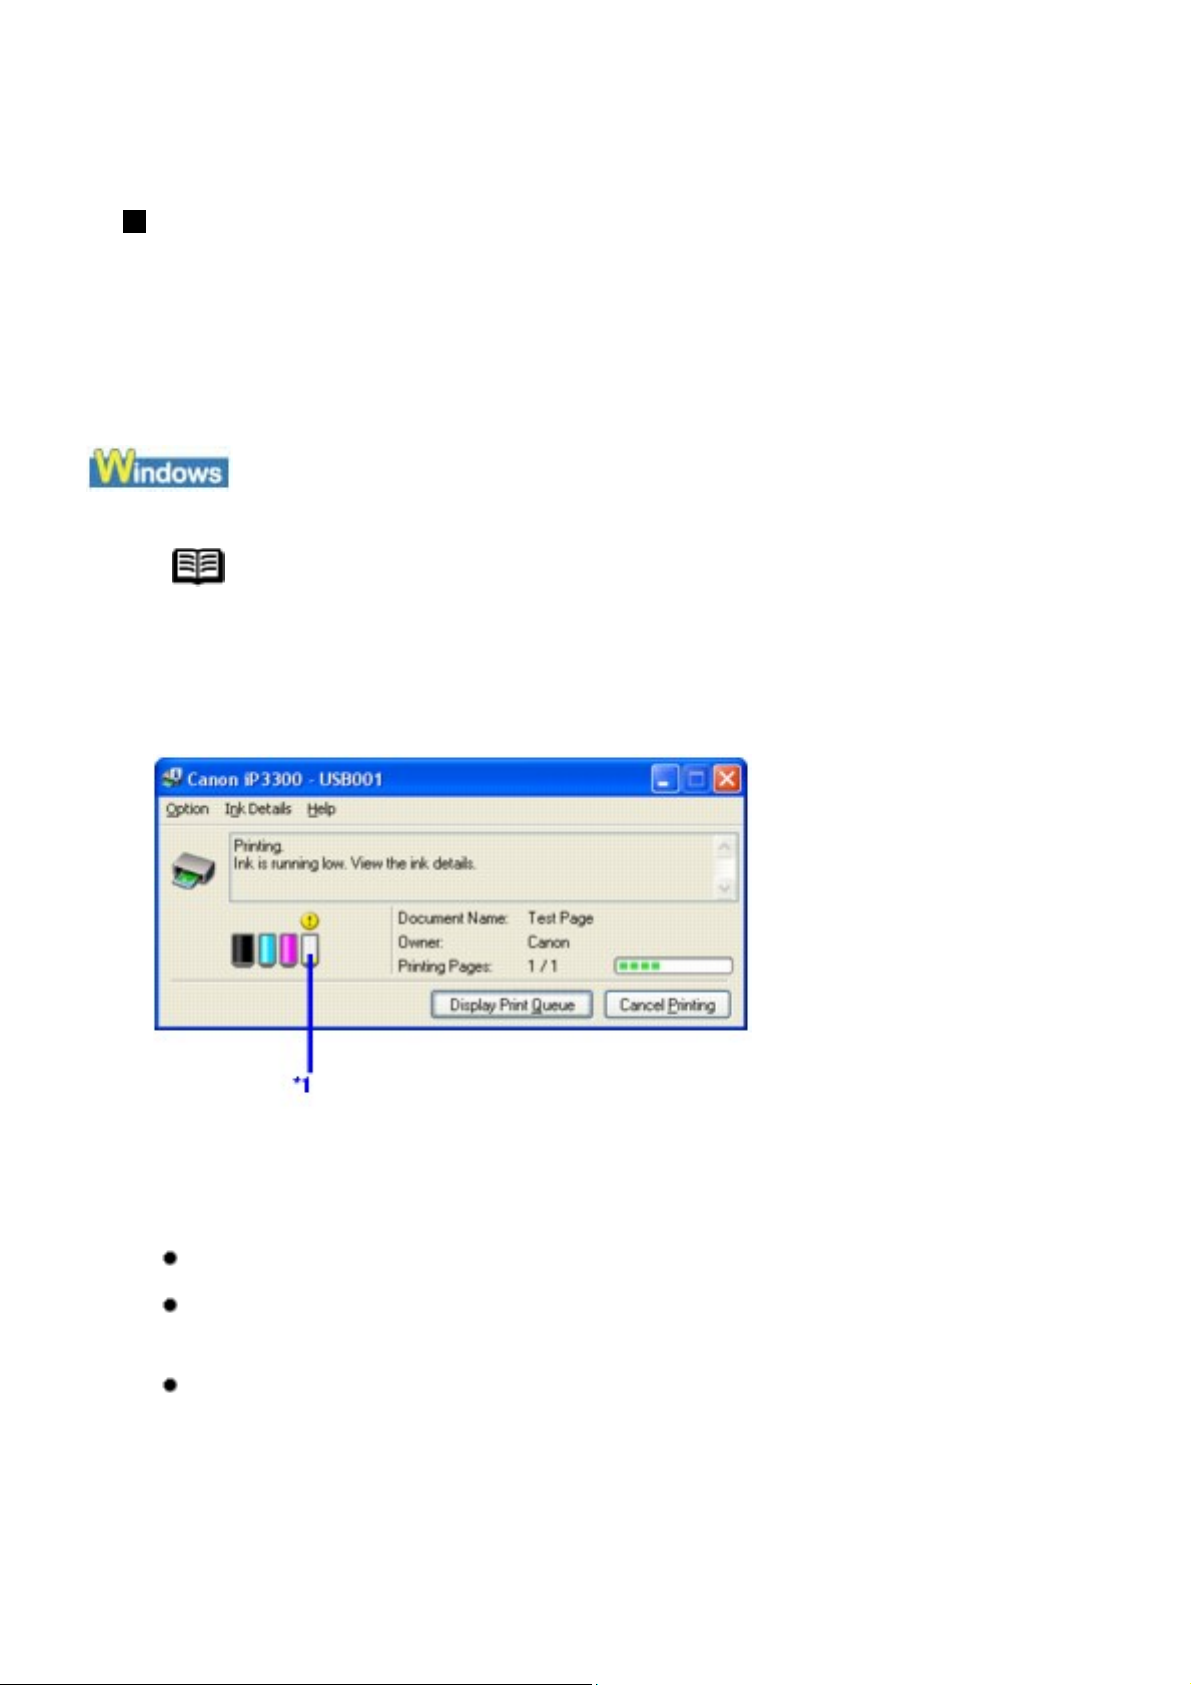
The following message is displayed.
*1 Confirm whether any symbols are displayed here.
Ink is low:
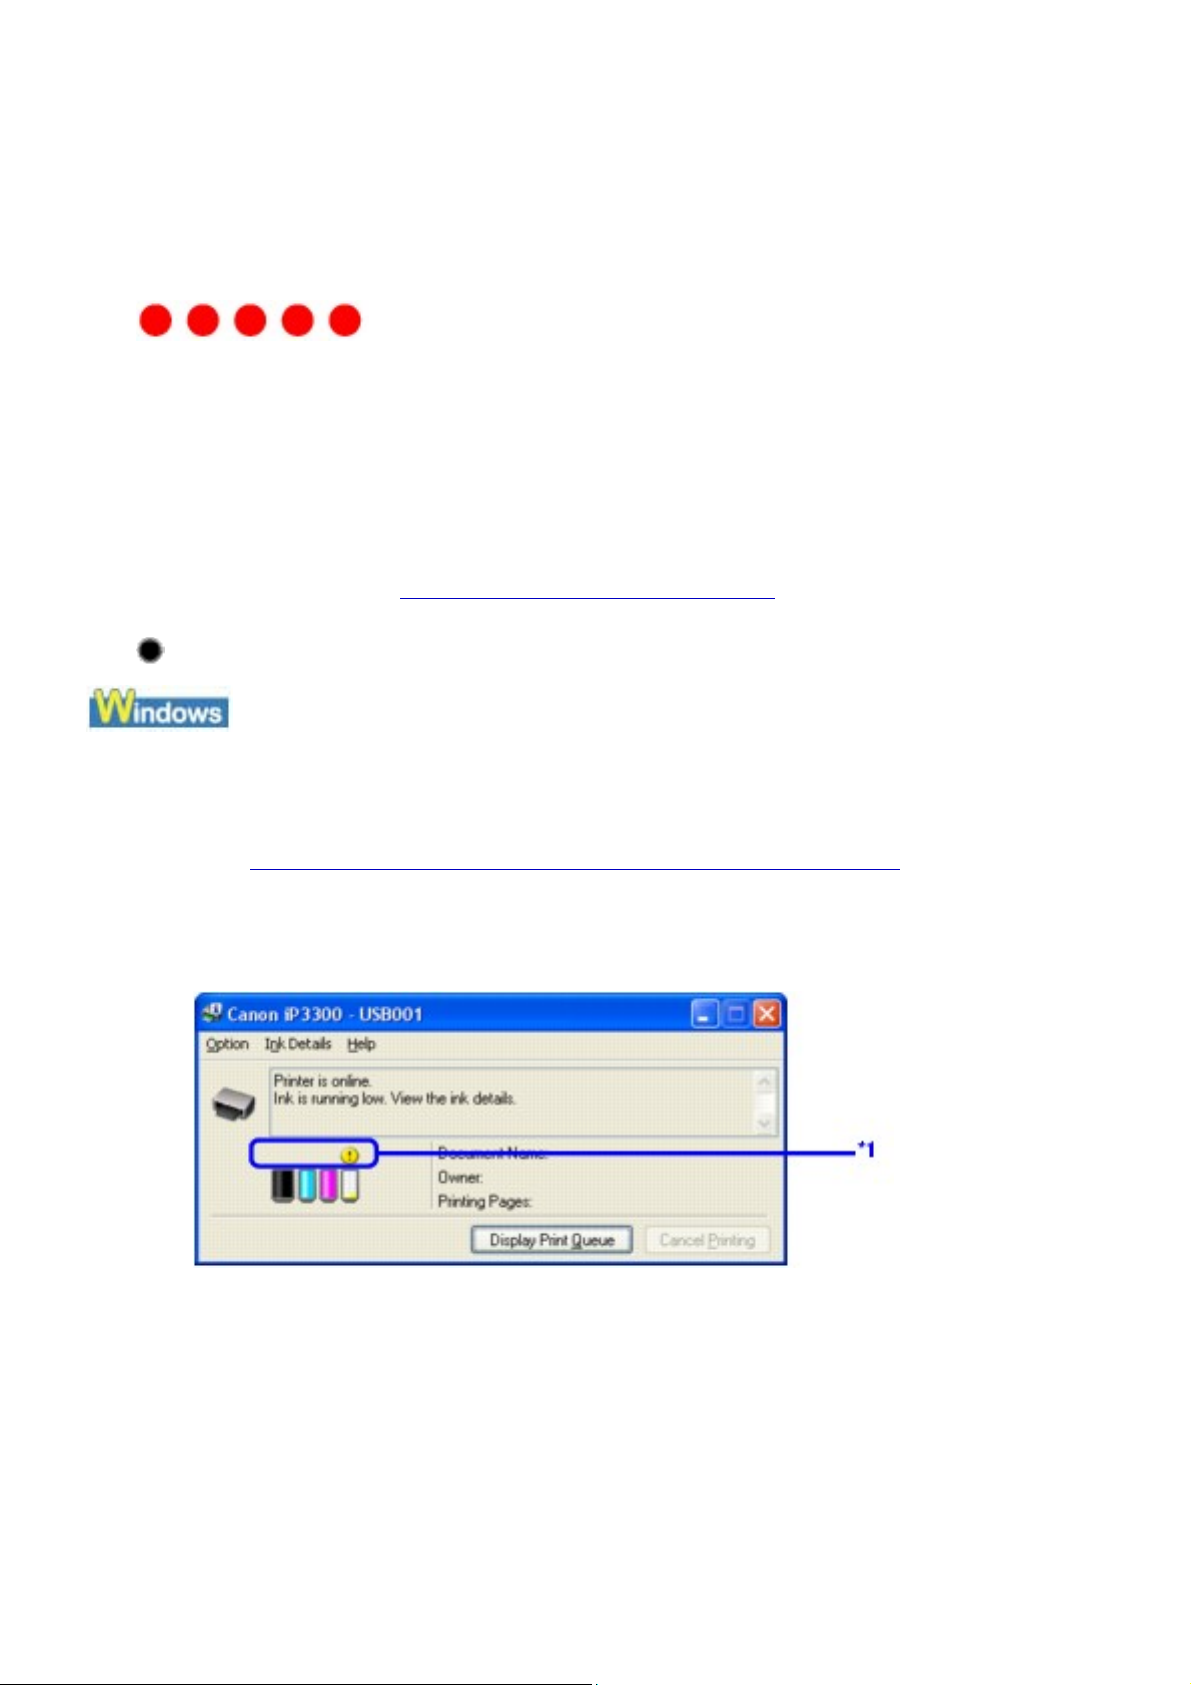
The "!" symbol appears above an ink tank with low ink. Obtain a
replacement tank as soon as possible.
Ink may have run out:
The "x" symbol appears above a tank that may have run out of ink and the
"Ink may have run out." message is displayed. Replace the ink tank with a
Page 70
new one.
70
Ink is out:
The "x" symbol appears above a tank has run out of ink and the "Ink has
run out." message is displayed, and then an error message informing you
that you need to replace the ink tank is displayed. Replace the ink tank
with a new one immediately.
* To confirm the ink tank information, click the Ink Details menu.
* You can also display the Canon IJ Status Monitor by clicking the Canon IJ
Status Monitor button which appears on the taskbar during printing.
Open the Canon IJ Printer Utility to check the ink level information.
(1) Open the Canon IJ Printer Utility.
Opening the Canon IJ Printer Utility (Macintosh).
See
The Canon IJ Printer Utility is displayed.
(2) Select Ink Level Information in the pop-up menu.
The following dialog box is displayed.
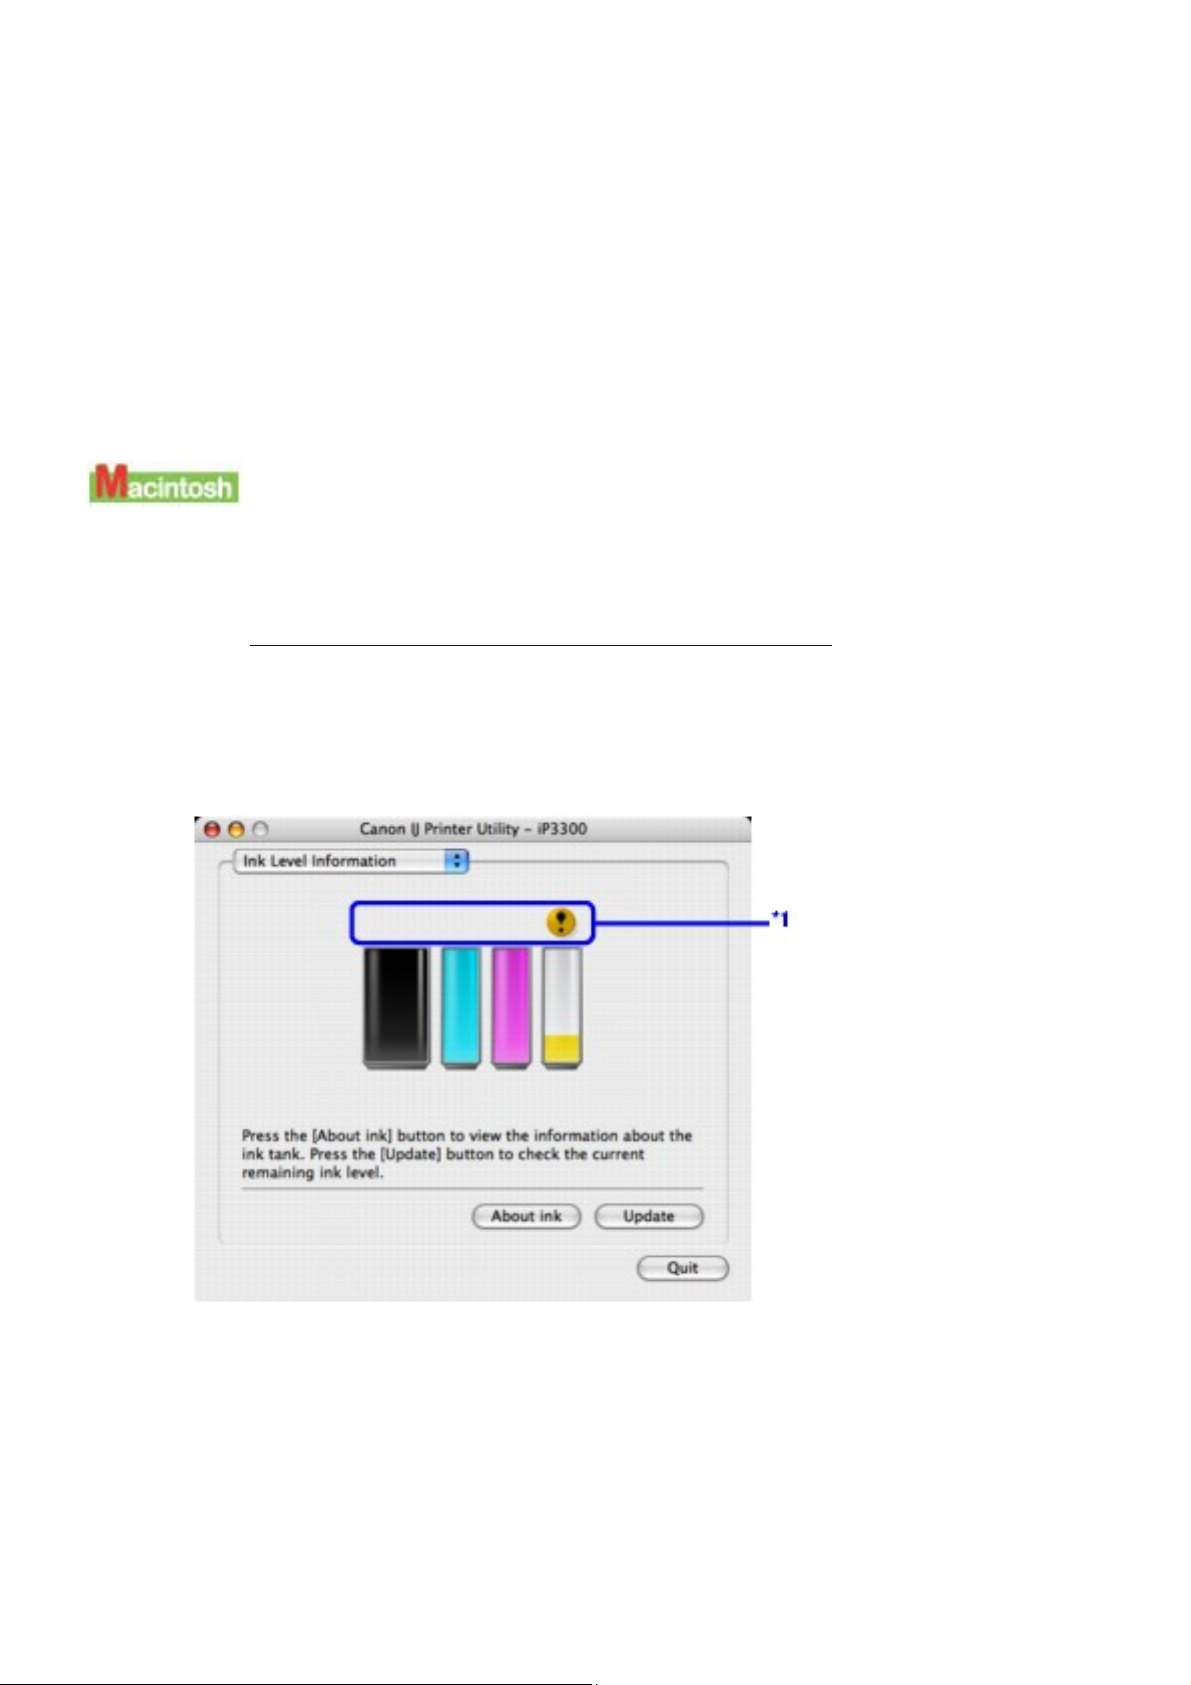
*1 Confirm whether any symbols are displayed here.
Ink is low:
The "!" symbol appears above an ink tank with low ink. Obtain a
replacement tank as soon as possible.
Ink is out or may have run out:
The "x" symbol appears above a tank that is out or may have run out of
Page 71
ink. Replace the ink tank with a new one.
71
* To confirm the ink tank information, click About ink.
Knowing When to Replace Ink Tank
When ink has run out or may have run out in an ink tank, the ALARM lamp
flashes orange four or sixteen times. When ink has run out or may have run
out in an ink tank while printing, one of the following messages is displayed on
your computer. Confirm the empty tank and replace it with a new one. After
replacing the tank, close the Top Cover to resume printing.
Note
When ink is low, the "!" symbol appears above an ink tank
with low ink in the Canon IJ Status Monitor. Obtain a
replacement tank as soon as possible.
*1 Ink tank with low ink
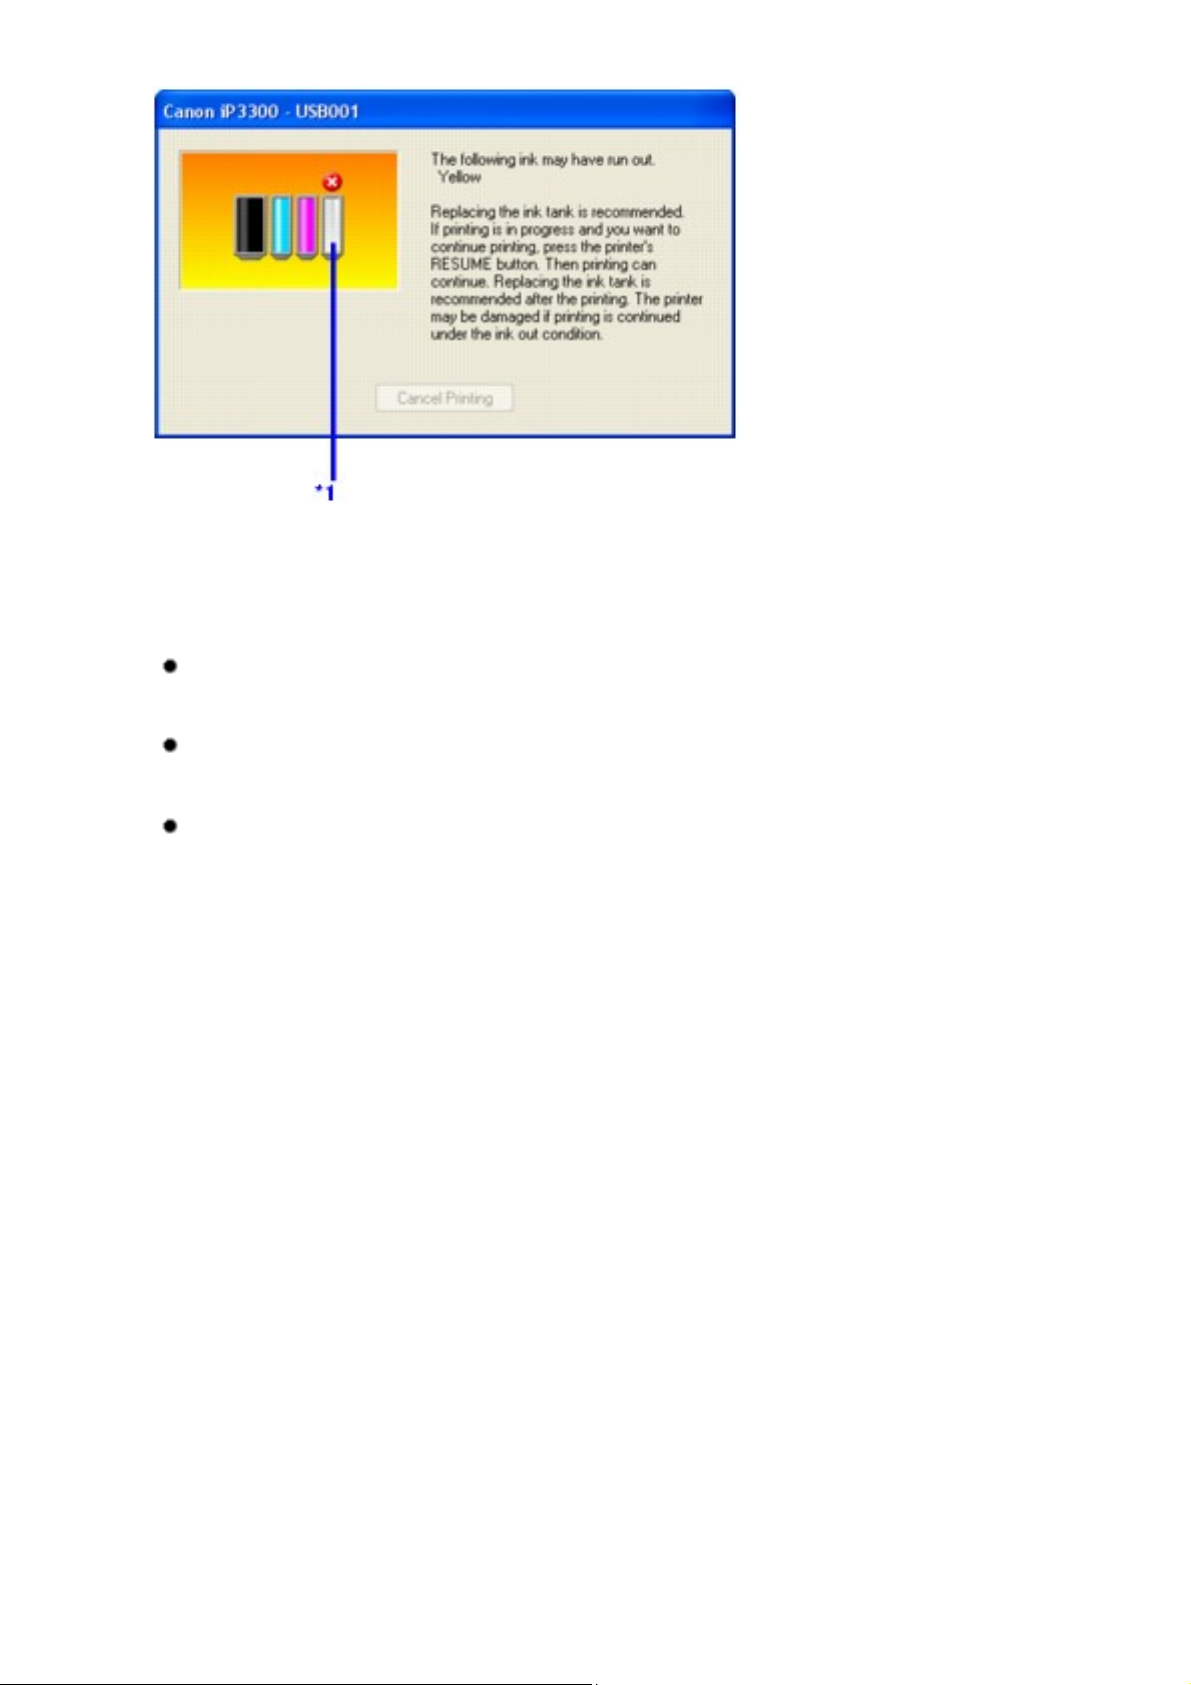
If the ALARM lamp flashes orange four times
Ink may have run out. Replacing the ink tank is recommended.
Click Cancel Printing to cancel printing. Replace the ink tank with a new
one.
If printing is in progress and you want to continue printing, press the
RESUME/CANCEL button with the ink tank installed. Then printing can
continue. Replacing the ink tank is recommended after the printing. The
printer may be damaged if printing is continued under the ink out condition.
Page 72
72
*1 Ink tank that may have run out of ink
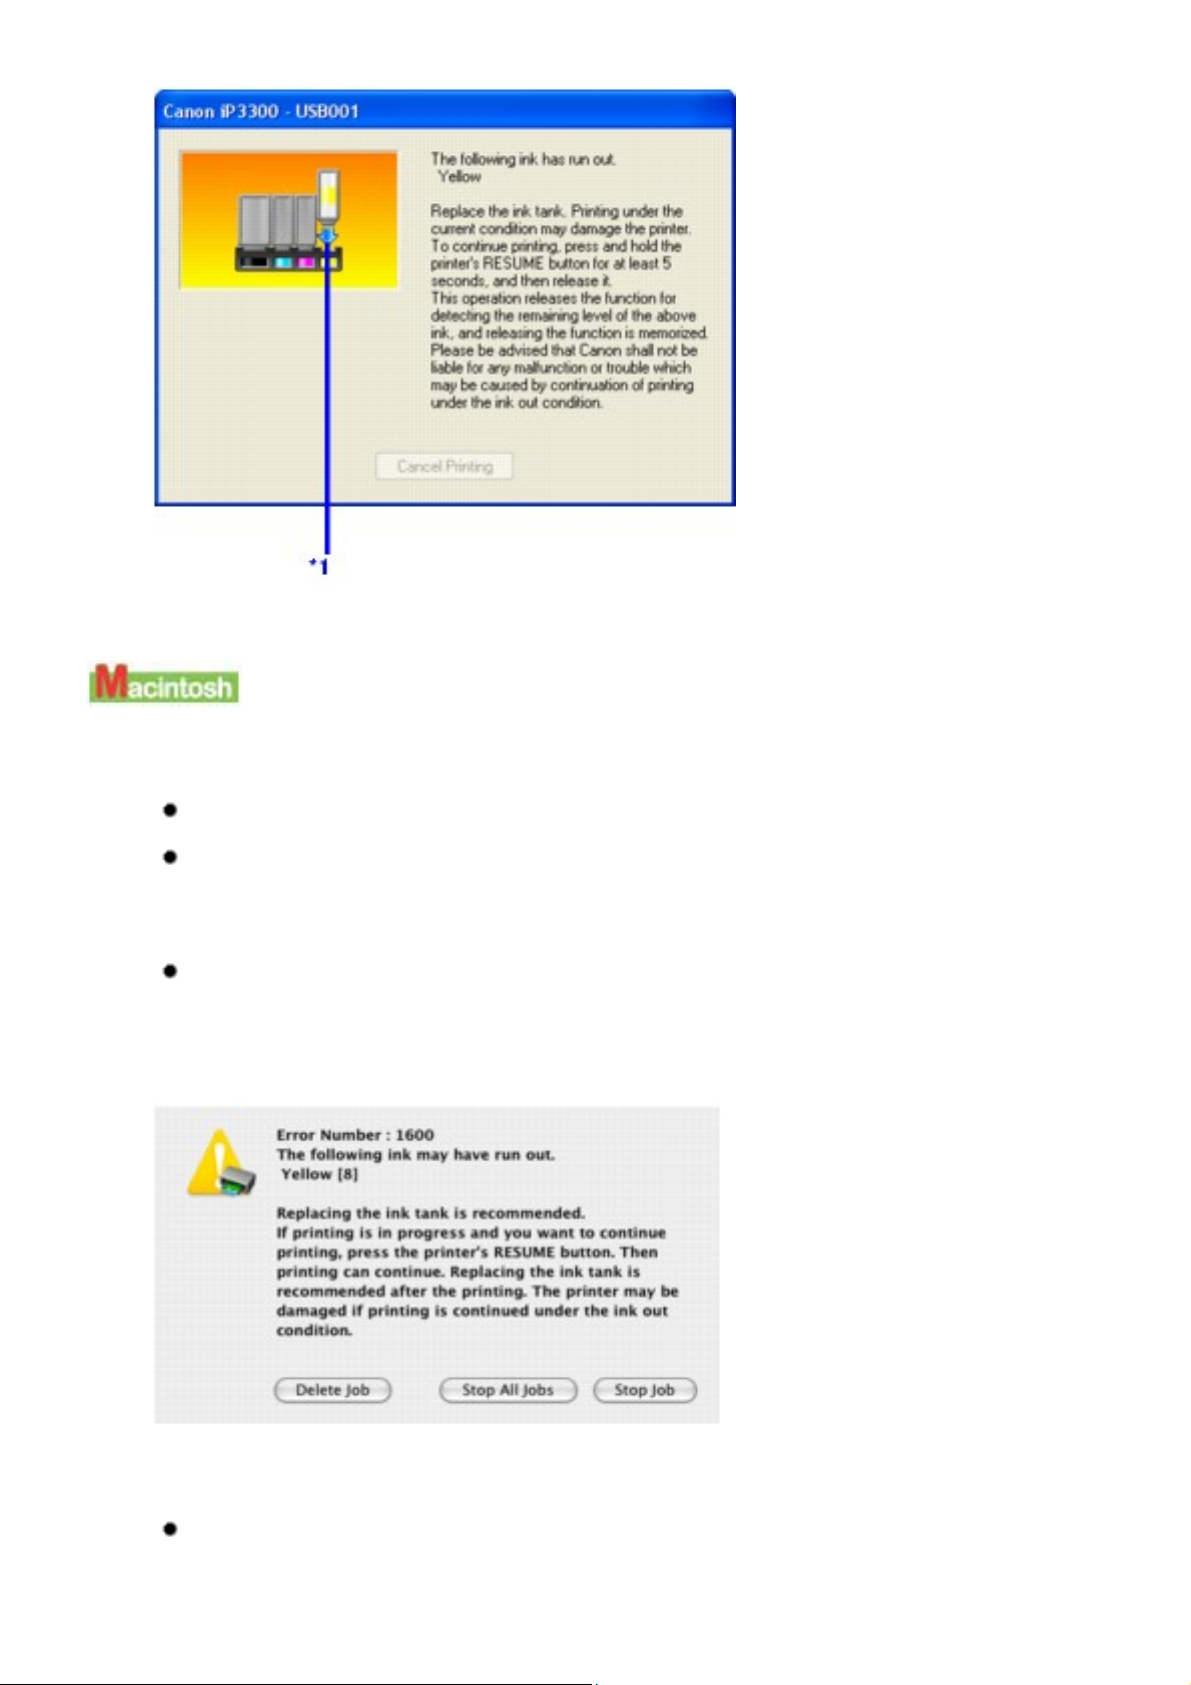
If the ALARM lamp flashes orange sixteen times
Ink has run out. Replace the ink tank.
Printing under the current condition may damage the printer.
Click Cancel Printing to cancel printing. Replace the ink tank with a new
one.
If you want to continue printing in this condition, you need to release the
function for detecting the remaining ink level. Press and hold the RESUME/
CANCEL button for at least 5 seconds, and then release it.
* With this operation, releasing the function for detecting the remaining ink
level is memorized, and the Canon IJ Status Monitor will no longer display
the remaining ink level. Please be advised that Canon shall not be liable for
any malfunction or trouble which may be caused by continuation of printing
under the ink out condition.
Page 73
73
*1 Ink tank with no ink
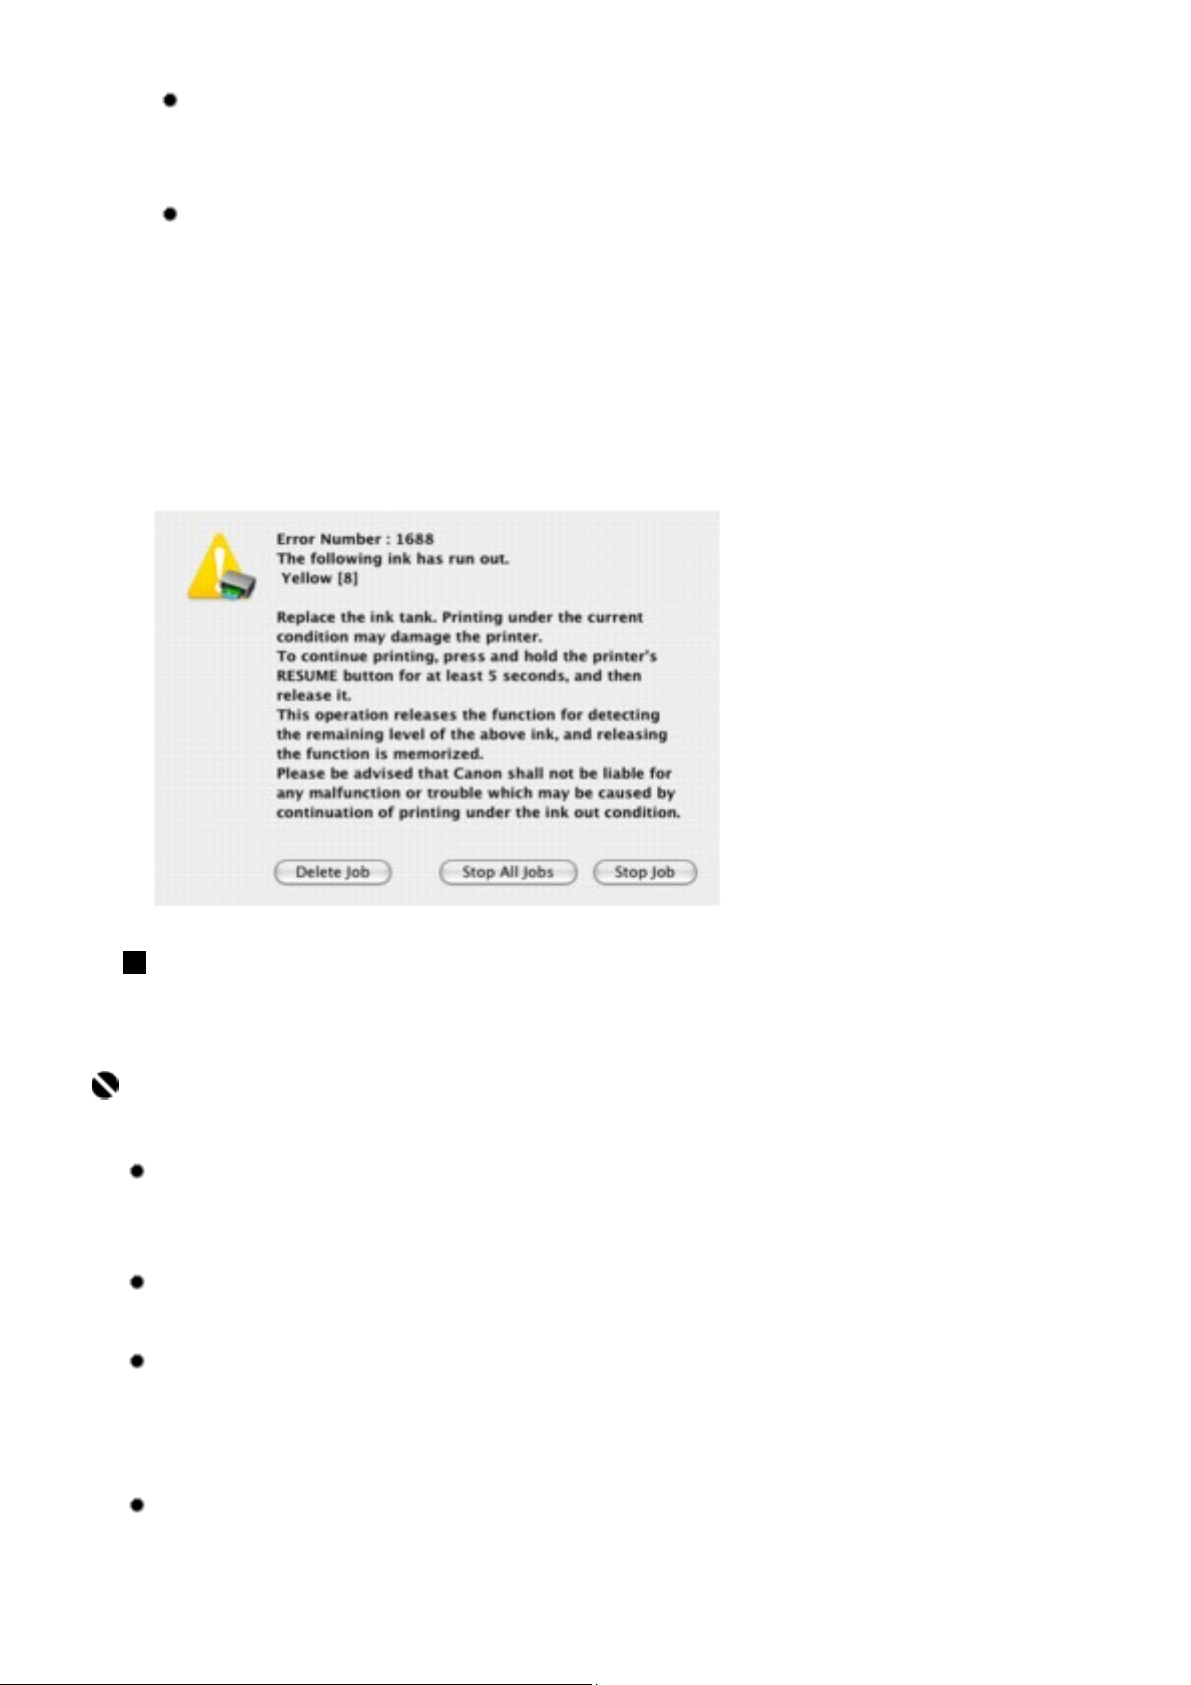
If the ALARM lamp flashes orange four times
Ink may have run out. Replacing the ink tank is recommended.
Click Delete Job to cancel the current printing job. Click Stop Job to stop
the current printing job. Click Stop All Jobs to stop all printing jobs. Replace
the ink tank with a new one.
If printing is in progress and you want to continue printing, press the
RESUME/CANCEL button with the ink tank installed. Then printing can
continue. Replacing the ink tank is recommended after the printing. The
printer may be damaged if printing is continued under the ink out condition.
If the ALARM lamp flashes orange sixteen times
Ink has run out. Replace the ink tank.
Printing under the current condition may damage the printer.
Page 74
Click Delete Job to cancel the current printing job. Click Stop Job to stop
74
the current printing job. Click Stop All Jobs to stop all printing jobs. Replace
the ink tank with a new one.
If you want to continue printing in this condition, you need to release the
function for detecting the remaining ink level. Press and hold the RESUME/
CANCEL button for at least 5 seconds, and then release it.
* With this operation, releasing the function for detecting the remaining ink
level is memorized, and the Canon IJ Printer Utility will no longer display
the remaining ink level. Please be advised that Canon shall not be liable for
any malfunction or trouble which may be caused by continuation of printing
under the ink out condition.
Replacing Ink Tanks
When ink tanks run out of ink, replace them using the following steps.
Important
Handling Ink
To maintain optimal printing quality, we recommend the use of
specified Canon brand ink tanks.
Refilling ink is not recommended.
Once you remove an ink tank, replace it immediately. Do not leave
the printer with ink tanks removed.
Replace empty tanks with new ones. Inserting partially used ink
tanks may cause the nozzles to clog. Furthermore, with such tanks,
the printer will not be able to inform you when to replace the tanks
properly.
Once an ink tank has been installed, do not remove it from the
printer and leave it out in the open. This will cause the ink tank to dry
out, and the printer may not operate properly when it is reinstalled. To
Page 75
maintain optimal printing quality, use an ink tank within six months of
75
first use.
Color ink may be consumed even when printing a black-and-white
document or when black-and-white printing is specified.
Color ink is also consumed in Print Head Cleaning and Print Head
Deep Cleaning, which may be necessary to maintain the printer's
performance. When an ink tank is out of ink, replace it immediately
with a new one.
1 Open the Front Feeder.
2 Make sure that the printer is on, and then open the Top
Cover.
The Print Head Holder moves to the center.
Caution
Do not hold the Print Head Holder to stop or move it.
Do not touch the metallic parts inside the printer.
Important
If the Top Cover is left open for more than 10 minutes, the
Print Head Holder moves to the right. Close and reopen the
Top Cover to return the holder to the center.
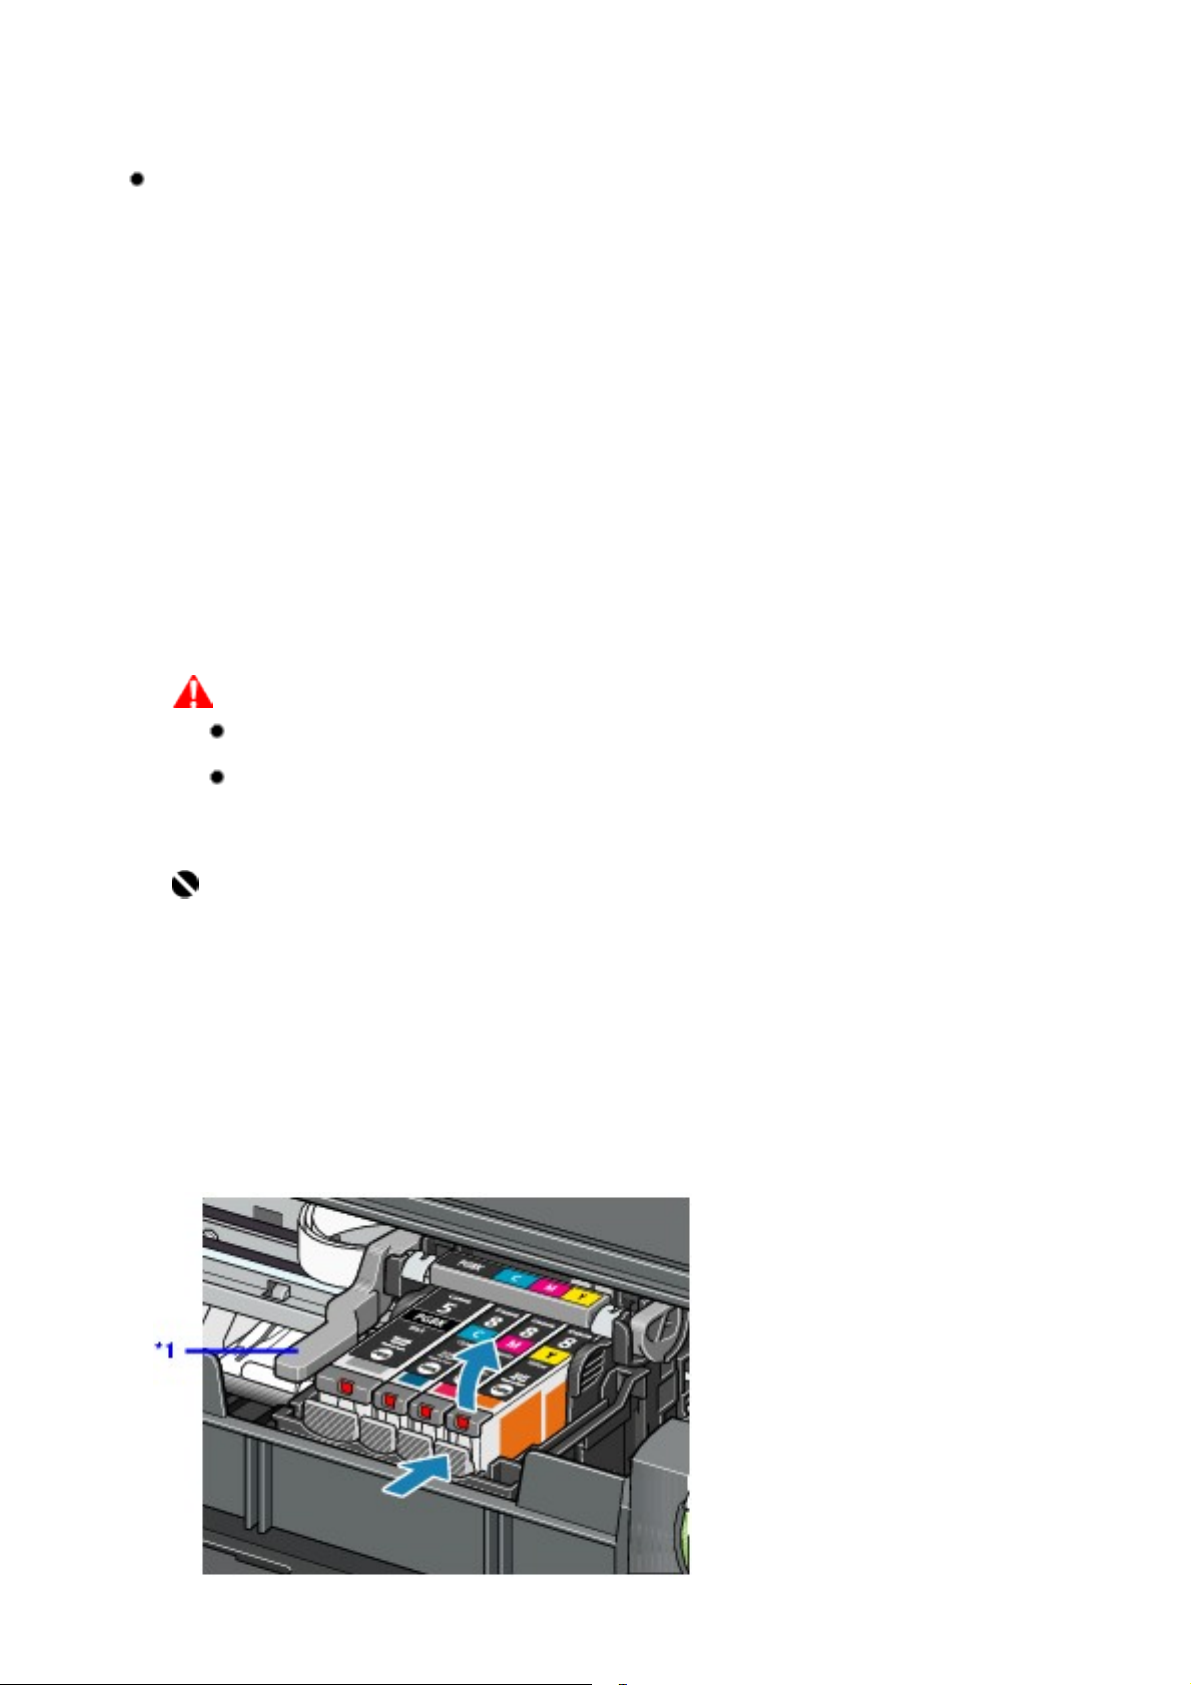
3 Remove the ink tank whose lamp is flashing fast.
(1) Push the tab and remove the ink tank.
Page 76

*1 Do NOT touch the Print Head Lock Lever; remove only the ink tank.
76
Important
Handle ink tanks carefully to avoid staining clothing or
the surrounding area.
Discard empty ink tanks according to the local laws and
regulations regarding disposal of consumables.
Note
Do not remove more than one ink tank at a time. Be sure
to replace ink tanks one by one when replacing more than
one ink tank.
For details on ink lamp flashing speed, see Getting the
Ink Level Information.
4 Prepare the replacement tank.
(1) Remove the new ink tank from its packaging, then pull the orange tape
in the direction of the arrow (A) so that the protective film does not remain
on the air hole (B). Then remove the film completely (C).
Important
Make sure that all the orange tape has been peeled off along
the perforation. If part of the orange tape is remaining, ink
may leak out when you remove the protective cap and may
not eject properly when printing.
(2) Remove the orange protective cap from the bottom of the ink tank.
Discard the cap once it is removed.
Page 77
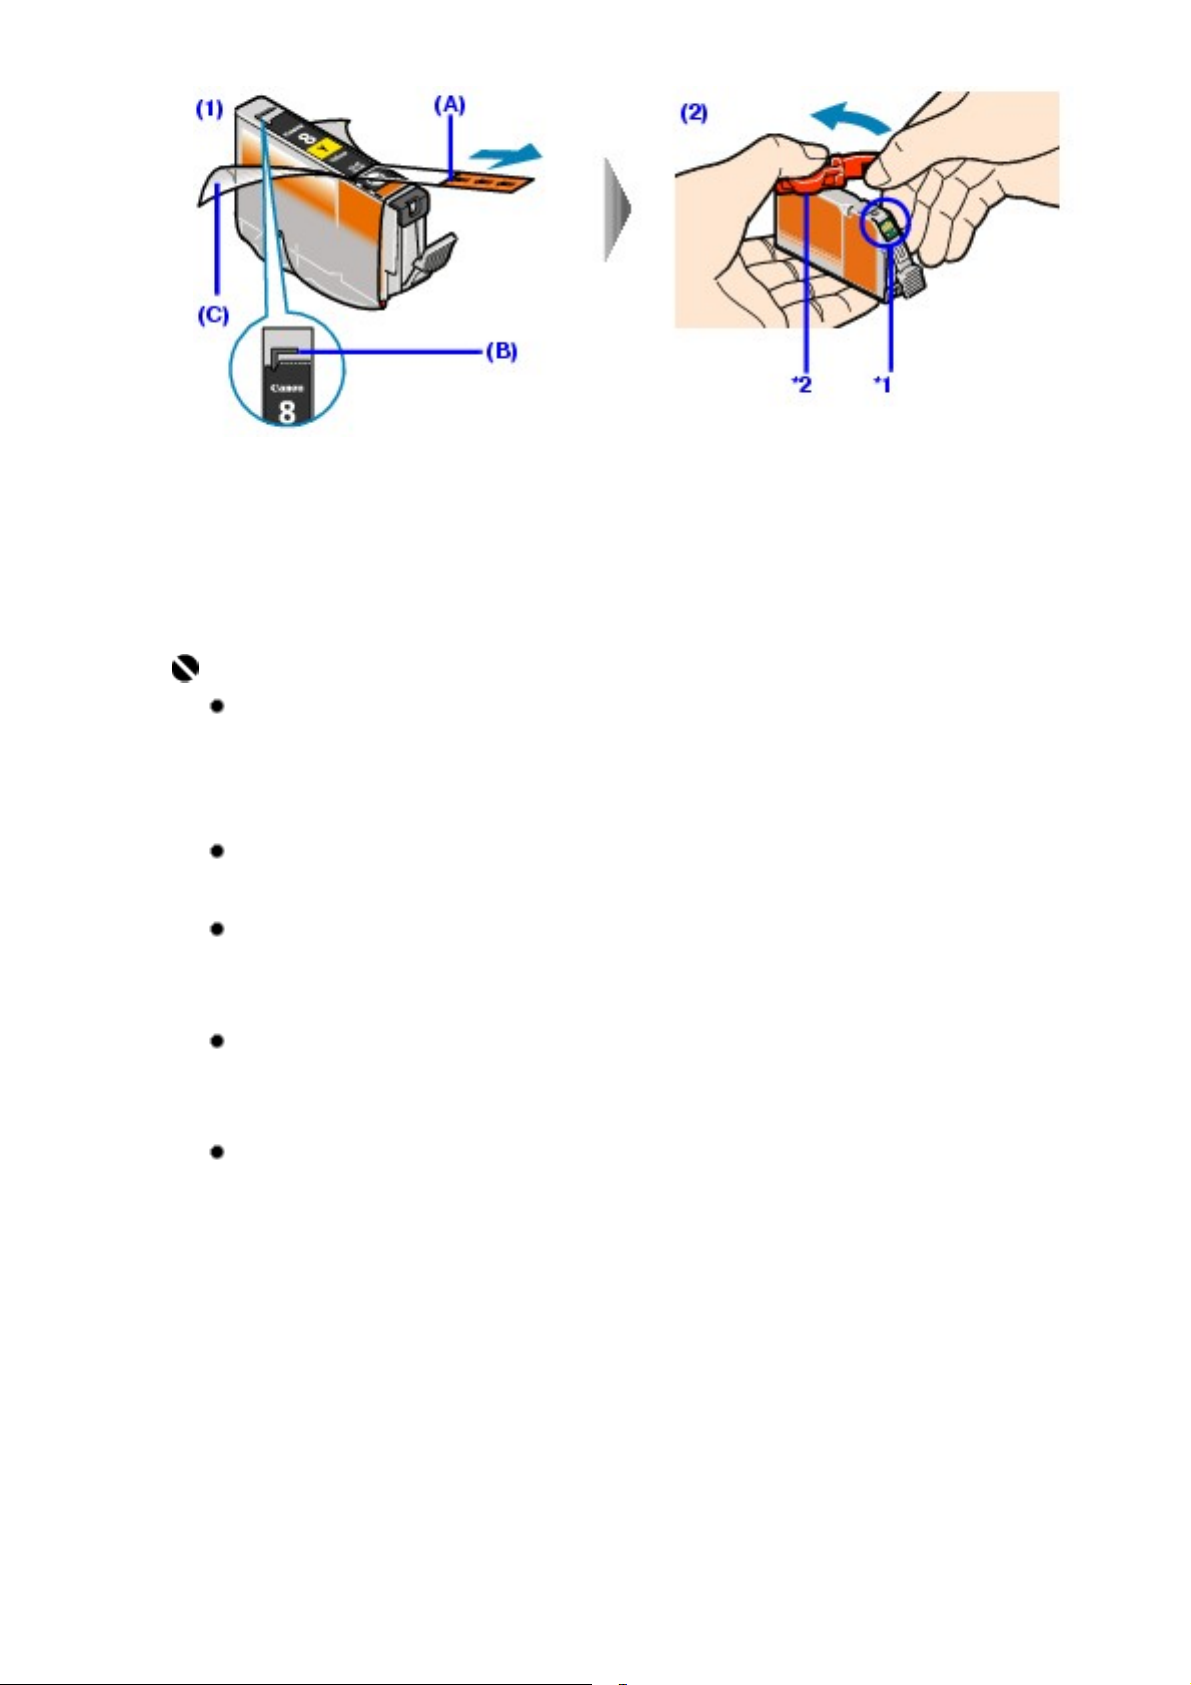
*1 Do not touch the electrical contacts on the ink tank. Doing so can cause
77
the printer to malfunction or become unable to print.
*2 Carefully hold the protective cap when removing it to prevent the ink from
staining your fingers.
Important
Be sure to remove the clear film from the ink tank in the
exact order shown in step 4-(1), as failure to follow this
step may cause the ink to leak and stain your clothes and
hands.
Do not squeeze the side of ink tanks as this may cause
the ink to leak out and stain your clothes and hands.
Do not re-attach the protective cap once you have
removed it. Discard it according to the local laws and
regulations regarding disposal of consumables.
Do not touch the open ink port once the protective cap is
removed, as this may prevent the ink from being ejected
properly.
Be careful not to stain your clothes and hands with ink
on the removed protective cap.
5 Install the ink tank.
Page 78
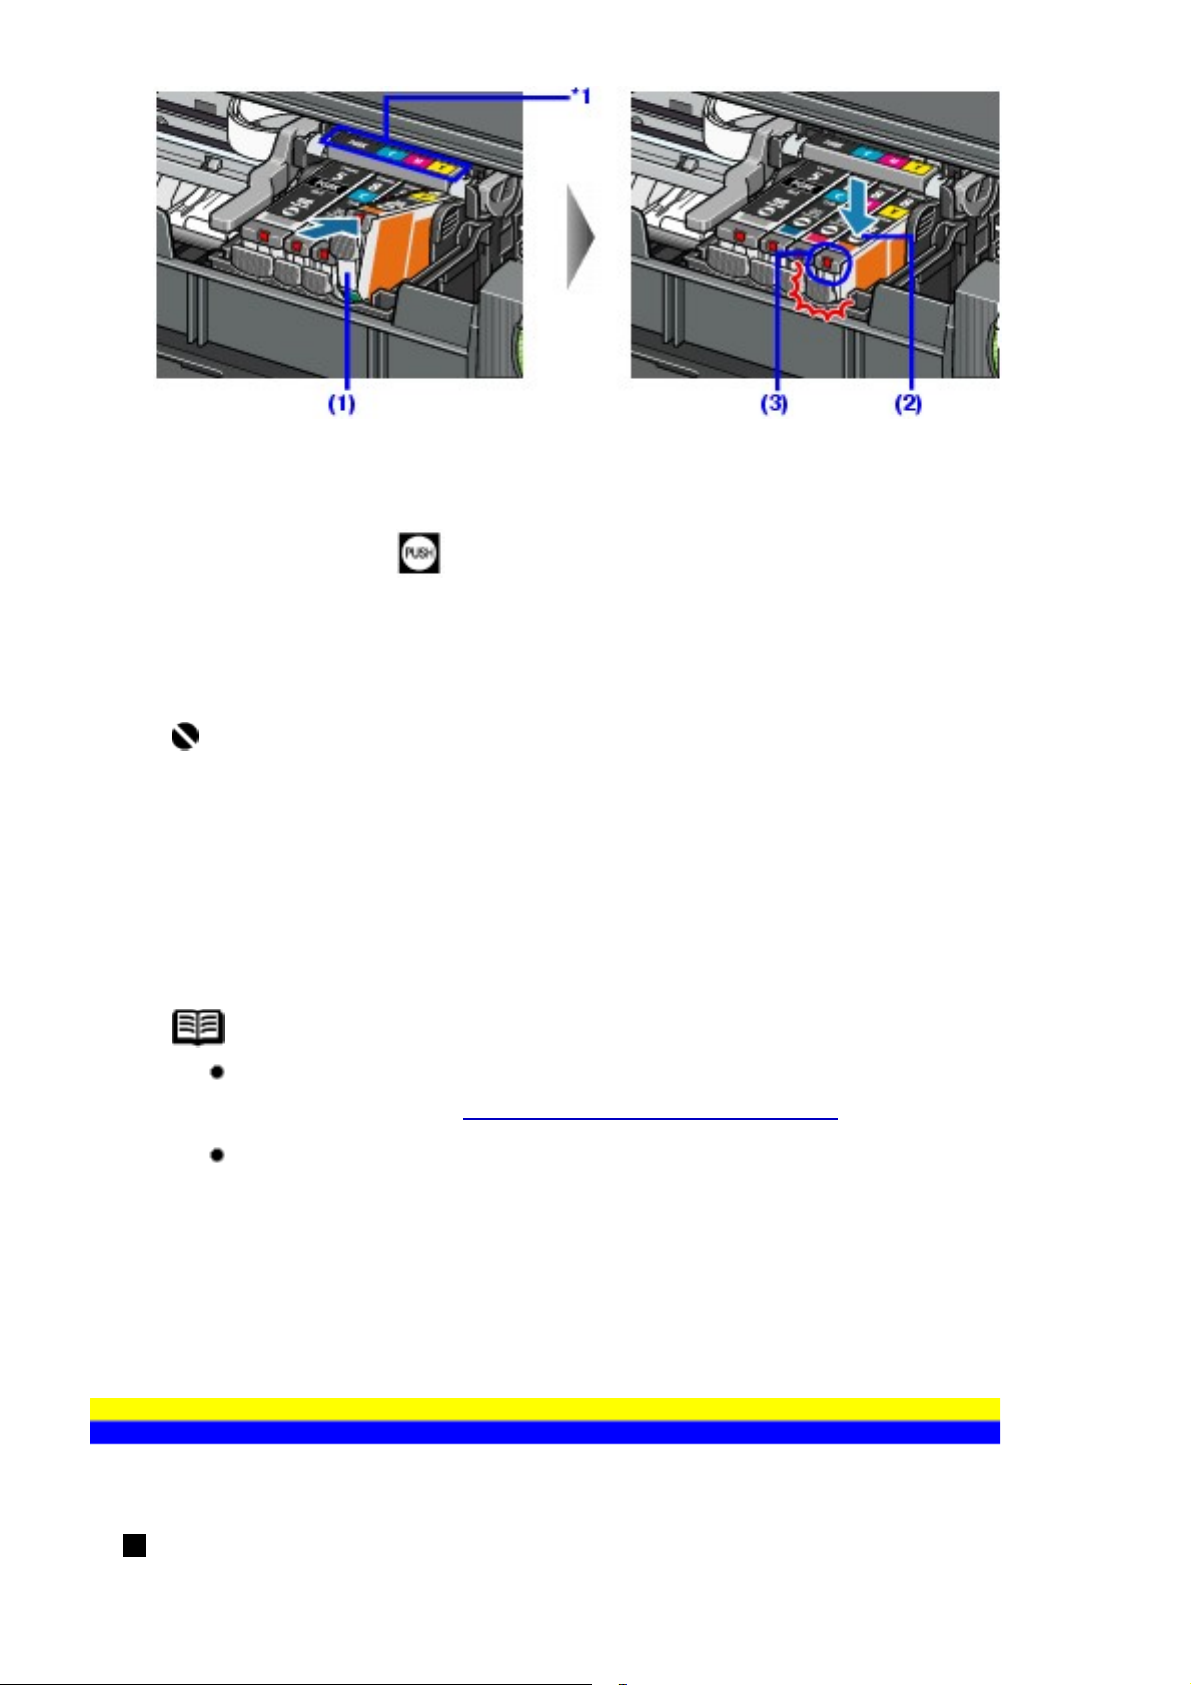
(1) Insert the front end of the ink tank into the Print Head.
78
*1 Make sure the position of the tank matches the label.
(2) Press on the
into place.
(3) Make sure that the ink lamp lights up red.
Important
The printer cannot be used unless all the ink tanks are
installed.
mark on the ink tank until the ink tank snaps firmly
6 Close the Top Cover.
Note
If the ALARM lamp still flashes orange after the Top
Cover is closed, see
ALARM Lamp Flashes Orange.
When you start printing after replacing the ink tank, Print
Head Cleaning is performed automatically. Do not perform
any other operations until Print Head Cleaning finishes.
The POWER lamp flashes green during cleaning.
Keeping the Best Printing Results
To avoid drying of the Print Head and clogging of the nozzles, note the following.
When You Turn Off the Printer
Page 79

Follow the procedure below to turn off the printer.
79
(1) Press the POWER button to turn off the printer.
(2) Confirm that the POWER lamp has gone out.
This takes a few seconds or as long as around 20 seconds.
(3) Unplug the power cord from the wall outlet.
If you are using a power outlet strip, you can switch it off instead.
When you press the POWER button to turn off the printer, the printer
automatically puts a protective cap on the Print Head to prevent the ink from
drying. If you remove the power cord or switch off the power outlet strip before
the POWER lamp goes out, this capping will not be done properly, causing the
Print Head to dry and clog.
When You Are Not Using the Printer for a Long Time
When you are not using the printer for a long time, print in both black & white
and in color, or perform Print Head Cleaning, about once a month to prevent
degradation of the Print Head.
Numerous nozzles are installed in the Print Head for high-precision printing.
Just as the uncapped tip of a ballpoint pen or marker becomes dry and
unusable if it is not used for a long period of time, the print head nozzles
become blocked by dried ink. Periodically printing or cleaning the Print Head
can prevent this blockage.
Note
If the printed area is traced with a highlight pen or paintstick or stained with water or sweat, ink may blur
depending on the paper.
If the print head nozzles get clogged, printouts will
become faint or particular colors will not be printed
properly. For details, see When Printing Becomes Faint or
Colors Are Incorrect.
Page 80
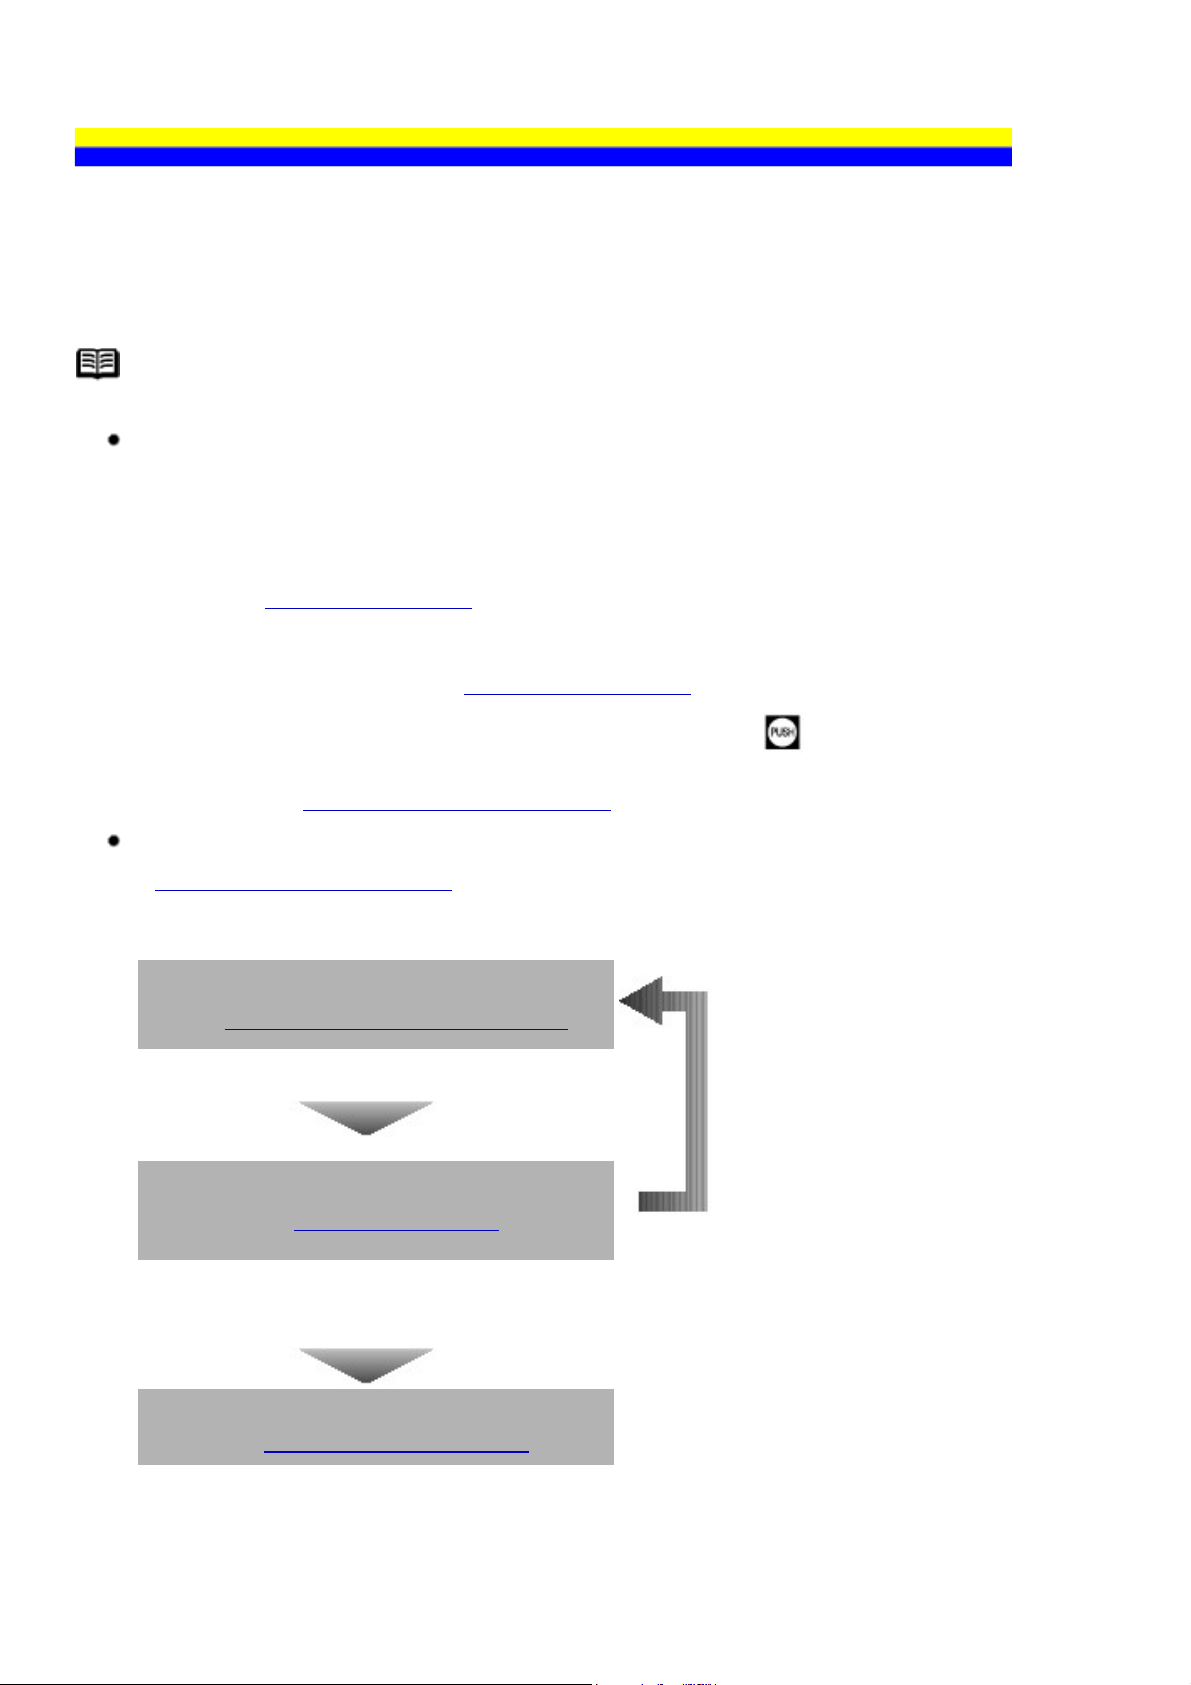
When Printing Becomes Faint or Colors Are Incorrect
80
When printing becomes faint or colors are incorrect even if ink remains in the ink tanks, the print head
nozzles are probably clogged. Print the nozzle check pattern to confirm the condition of the nozzles
and then perform Print Head Cleaning.
If the ruled lines are shifted after running print head maintenance, align the Print Head.
Note
Before performing maintenance
Open the Top Cover and make sure that all lamps for the ink tanks are lit red.
- If any one of the lamps is flashing slowly, the associated ink tank is running low. You
can continue printing for a while, but we recommend you to have a replacement ink
tank available.
- If any one of the lamps is flashing fast, the associated ink tank is empty. Replace the
ink tank. See
If an ink lamp is flashing fast even though ink remains in that ink tank, it is inserted in
the wrong position. Make sure that the ink tank of the correct color is inserted in each
position, matching the label. See
Replacing Ink Tanks.
Replacing an Ink Tank.
- If the ink lamp is not lit, the tank is not set properly. Press the
mark on the ink
tank until the tank clicks into place. Make sure that all packaging material is peeled off
the ink tank. See
Prepare the replacement tank..
Increase the Print Quality setting in the printer driver settings.
Print Results Not Satisfactory.
See
Step 1
See Printing the Nozzle Check Pattern.
If lines are missing or if white streaks appear
After cleaning the Print
Head, print and examine
the nozzle check pattern.
Step 2
See Print Head Cleaning.
If the problem is not resolved after
performing
Print Head Cleaning twice
Step 3
See Print Head Deep Cleaning.
Page 81

Note
81
If Print Head Deep Cleaning does not resolve the problem, the Print Head may be
damaged. Contact your Canon Service representative.
If the Ruled Lines Are Shifted
Step 1
See Aligning the Print Head.
Page 82

Printing the Nozzle Check Pattern
82
Print the nozzle check pattern to determine whether the ink ejects properly from the
print head nozzles.
Note
You cannot feed paper from the Front Feeder to print the Nozzle
Check Pattern. Always load paper in the Auto Sheet Feeder.
Printing the Nozzle Check Pattern Without a Computer
Nozzle check pattern printing can be performed also from the printer
itself using the RESUME/CANCEL button.
1. Make sure that the printer is on, load a sheet of A4 or Letter-sized
plain paper in the Auto Sheet Feeder.
2. Set the Paper Thickness Lever to the left.
3. Open the Front Feeder and extend the Paper Output Support.
4. Hold down the RESUME/CANCEL button until the POWER lamp
flashes green twice, and then release it immediately.
The nozzle check pattern is printed. Do not open the Top Cover while
printing.
1 Make sure that the printer is on, load a sheet of A4 or
Letter-sized plain paper in the Auto Sheet Feeder.
Set the Paper Thickness Lever to the left.
2 Open the Front Feeder and extend the Paper Output
Support.
3 Open the printer properties dialog box.
See Opening the Printer Properties Dialog Box Directly from the Start Menu.
4 Print the Nozzle Check Pattern.
(1) Click the Maintenance tab.
(2) Click Nozzle Check.
(3) Read the message and click Print Check Pattern.
Page 83
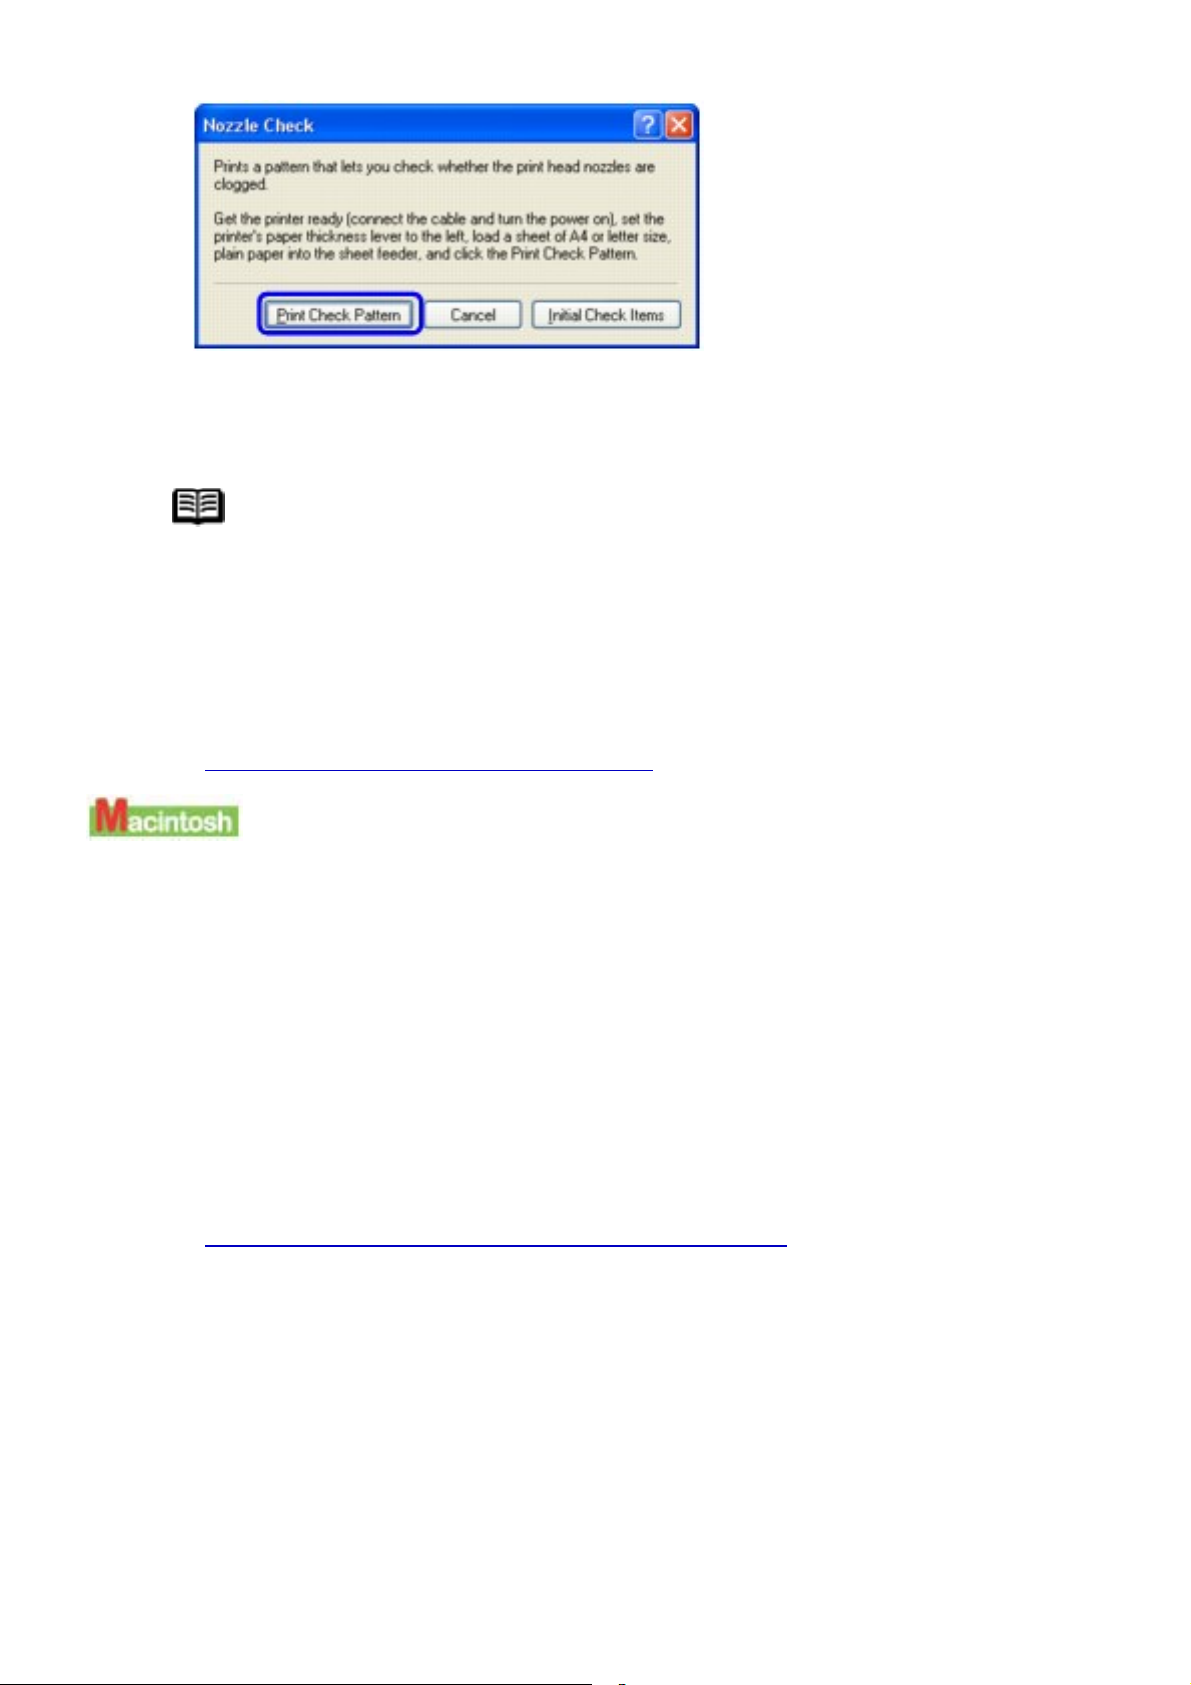
83
The nozzle check pattern is printed. Do not open the Top Cover while
printing.
Note
Clicking Initial Check Items displays the items to be checked
before printing the pattern.
5 Examine the pattern and take the appropriate action.
See Examining the Nozzle Check Pattern.
1 Make sure that the printer is on, load a sheet of A4 or
Letter-sized plain paper in the Auto Sheet Feeder.
Set the Paper Thickness Lever to the left.
2 Open the Front Feeder and extend the Paper Output
Support.
3 Open the Canon IJ Printer Utility dialog box.
See Opening the Canon IJ Printer Utility (Macintosh).
4 Print the Nozzle Check Pattern.
(1) Select Test Print in the pop-up menu.
(2) Click Nozzle Check.
(3) Read the message and click Print Check Pattern.
Page 84
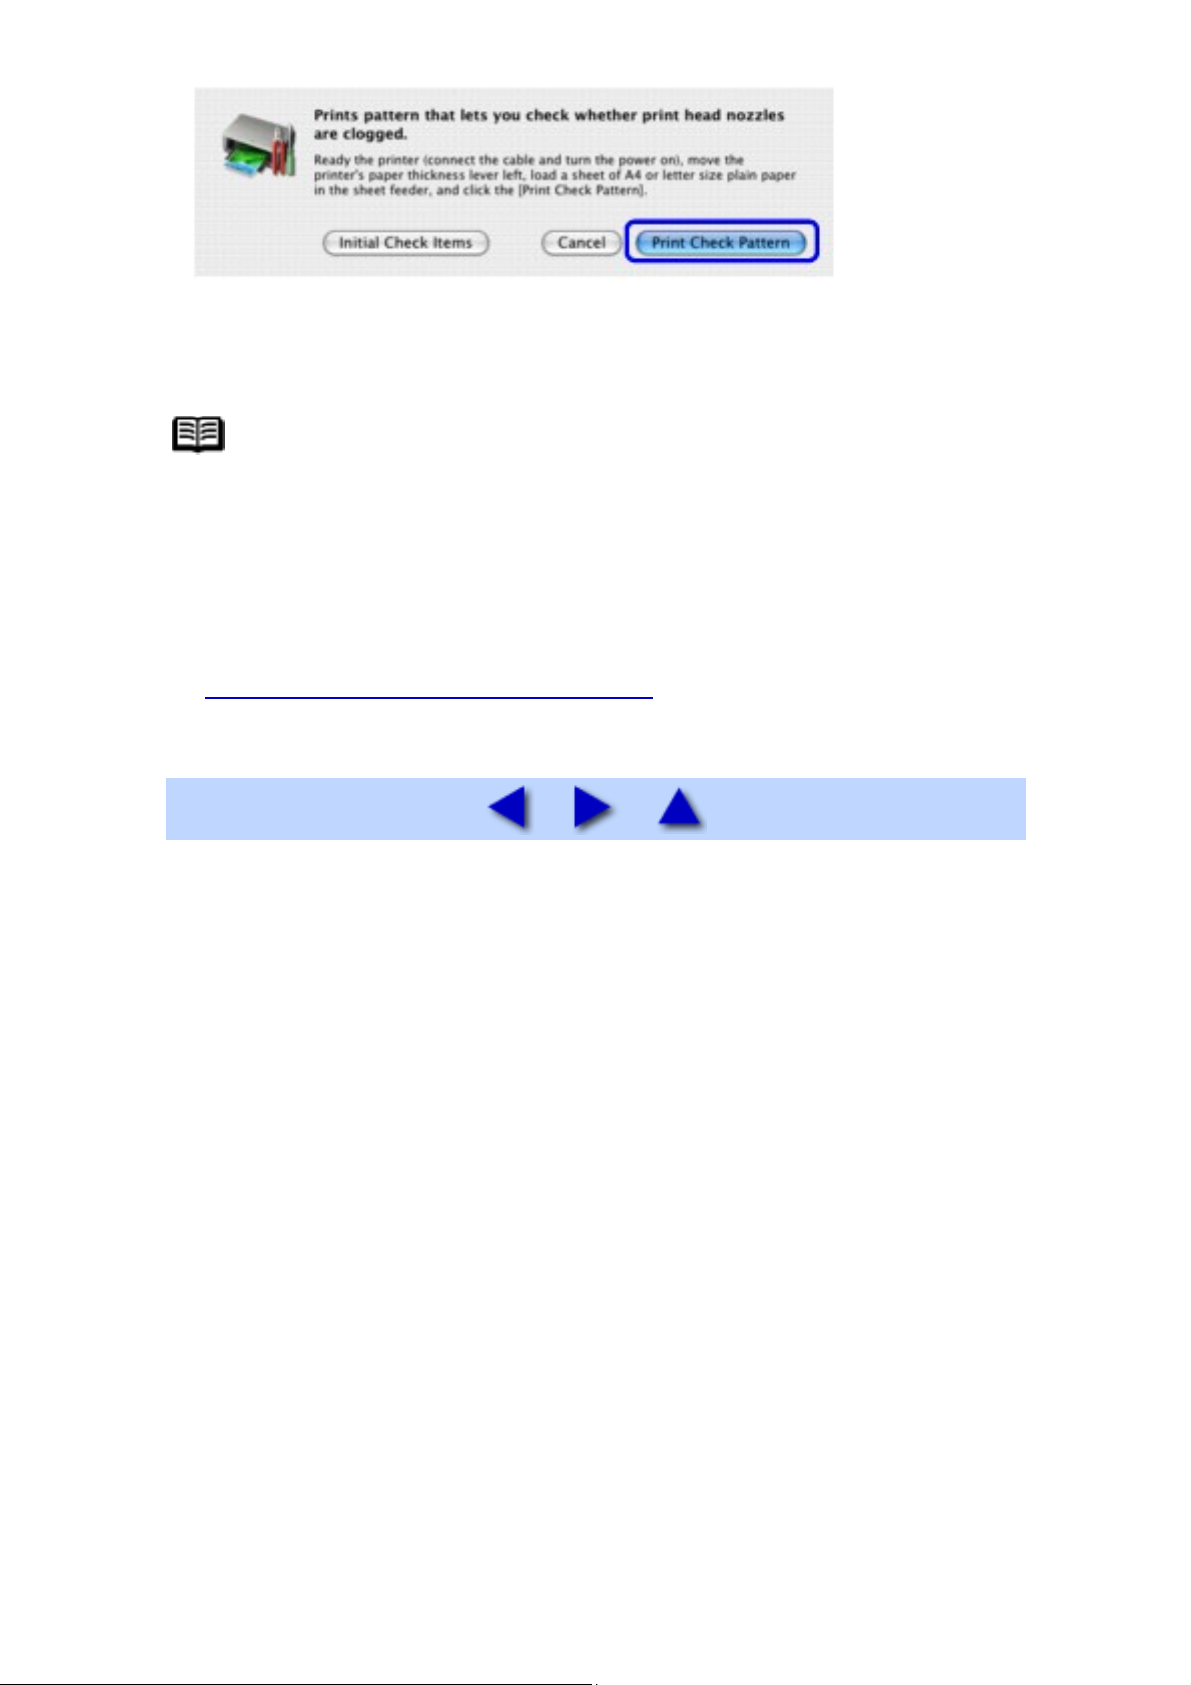
84
The nozzle check pattern is printed. Do not open the Top Cover while
printing.
Note
Clicking Initial Check Items displays the items to be checked
before printing the pattern.
5 Examine the pattern and take the appropriate action.
See Examining the Nozzle Check Pattern.
Page 85
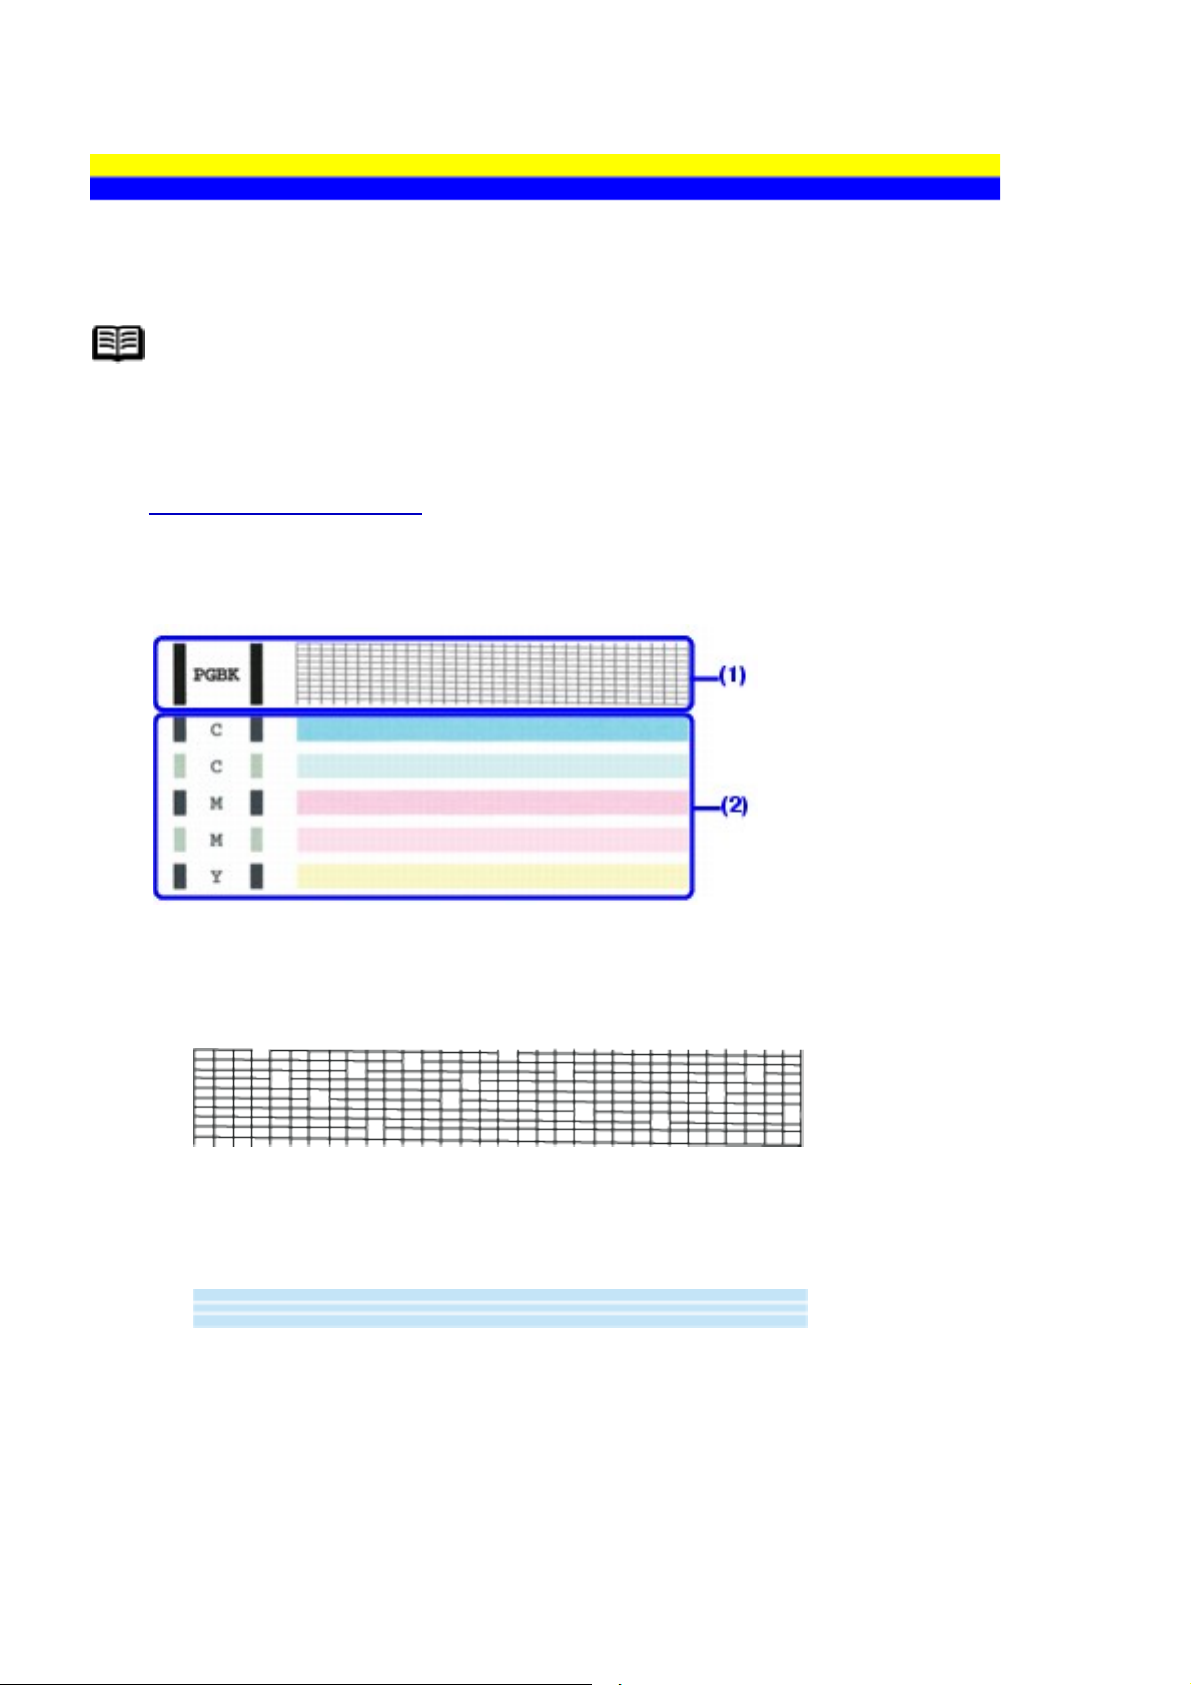
Examining the Nozzle Check Pattern
85
Examine the nozzle check pattern output by the printer, and clean the Print Head if
necessary.
Note
The nozzle check pattern will not be printed correctly if there is not
enough ink. Replace the ink tank if the remaining amount of ink is
insufficient.
See
Replacing an Ink Tank.
1 Confirm the printed nozzle check pattern.
(1) If lines of this pattern are missing, the Black print head nozzle needs
cleaning.
Example: When lines are missing
(2) If these patterns have white streaks, the Color print head nozzle
needs cleaning.
Example: When white streaks appear
2 When cleaning is necessary, click Cleaning on the
Pattern Check dialog box.
Page 86
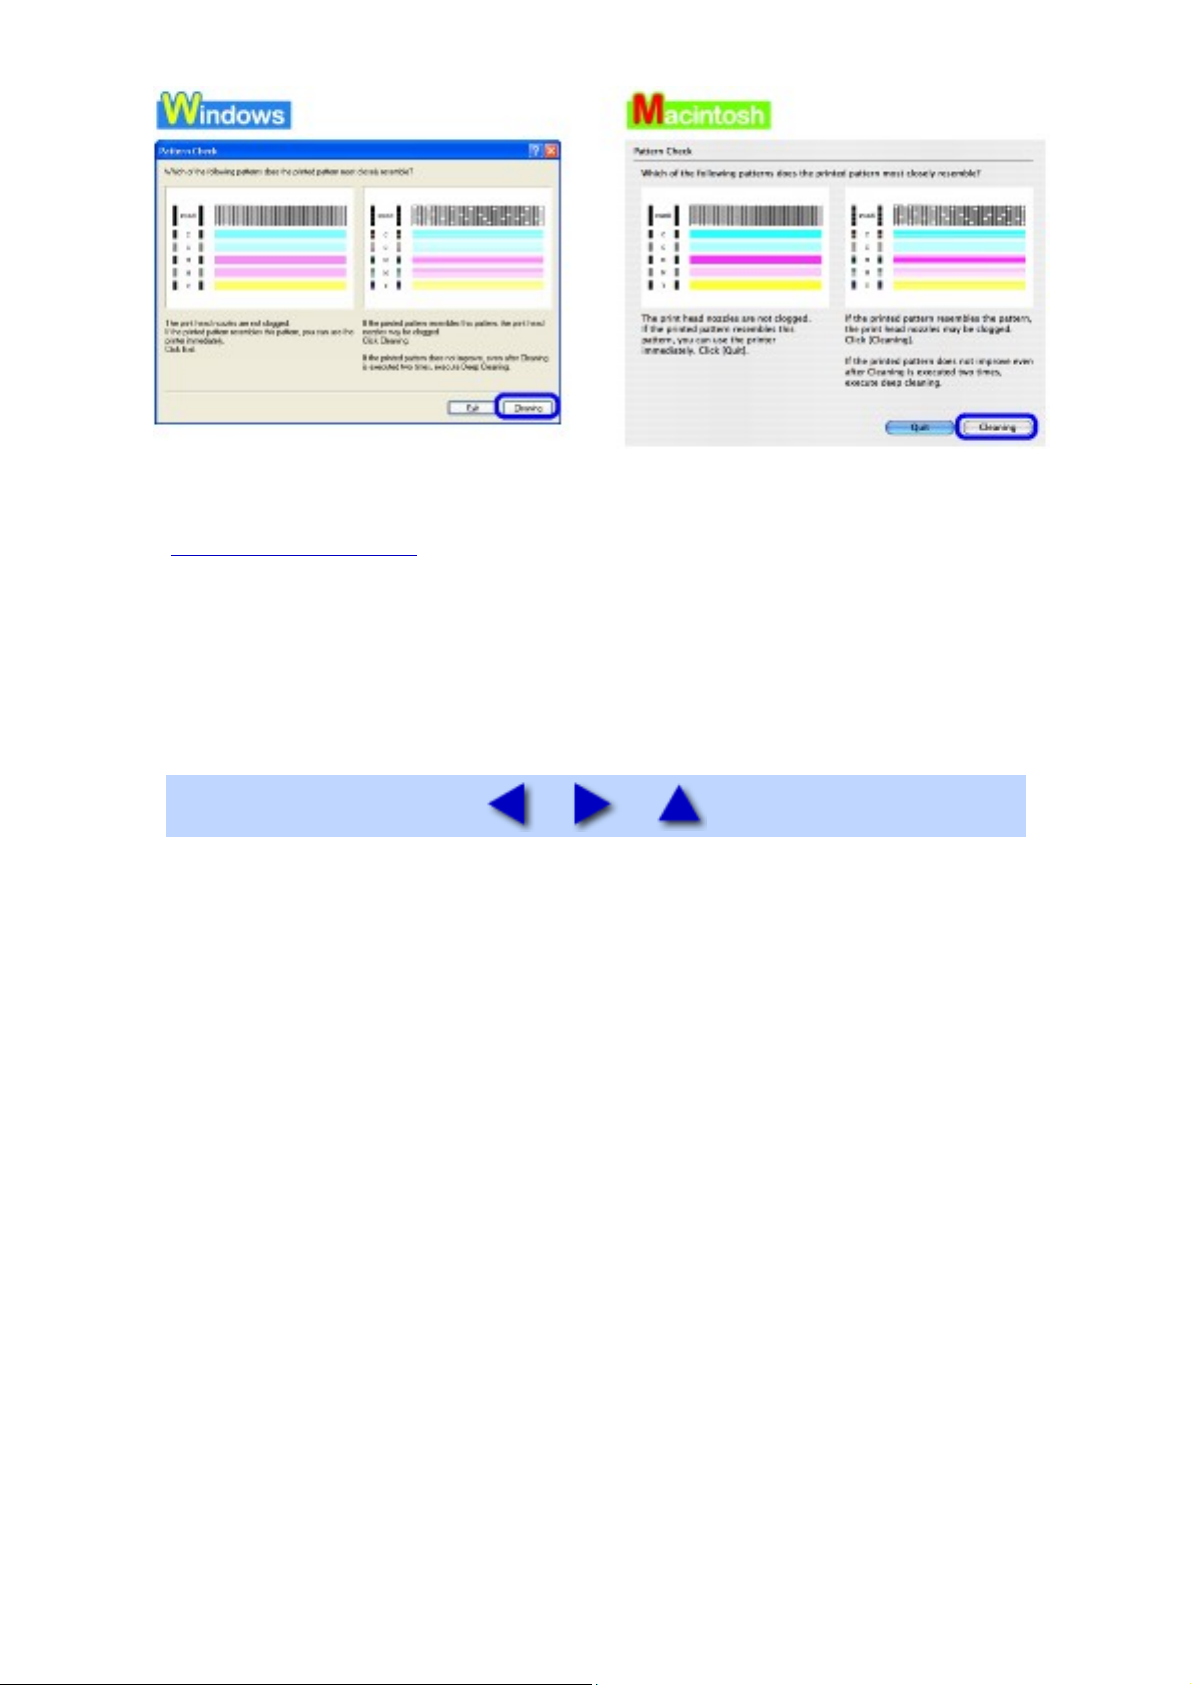
86
To proceed to cleaning of the Print Head, go to step 4-(3) of the Windows or
Macintosh Print Head Cleaning procedure, depending on your platform. See
Print Head Cleaning.
If no lines of the group (1) pattern are missing and the group (2) patterns
have no white streaks, click Exit or Quit to exit nozzle check pattern
examination.
Page 87

Print Head Cleaning
87
Clean the Print Head if lines are missing or if white streaks appear in the printed
nozzle check pattern. Cleaning unclogs the nozzles and restores the print head
condition. Note that cleaning the Print Head causes used ink to be absorbed in the
ink absorber. Cleaning the Print Head consumes ink, so perform Print Head
Cleaning only when necessary.
Note
Cleaning the Print Head Without a Computer
The Print Head can also be cleaned from the printer itself, using the
RESUME/CANCEL button.
1. Make sure that the printer is on.
2. Hold down the RESUME/CANCEL button until the POWER lamp
flashes green once, and then release it immediately.
If you click Cleaning on the Pattern Check dialog box that is displayed after
printing the nozzle check pattern, the Print Head Cleaning dialog box shown in of
step 4-(3) in the following procedure will appear.
1 Make sure that the printer is on.
2 Open the Front Feeder and extend the Paper Output
Support.
3 Open the printer properties dialog box.
See Opening the Printer Properties Dialog Box Directly from the Start Menu.
4 Start Print Head Cleaning.
(1) Click the Maintenance tab.
(2) Click Cleaning.
Page 88
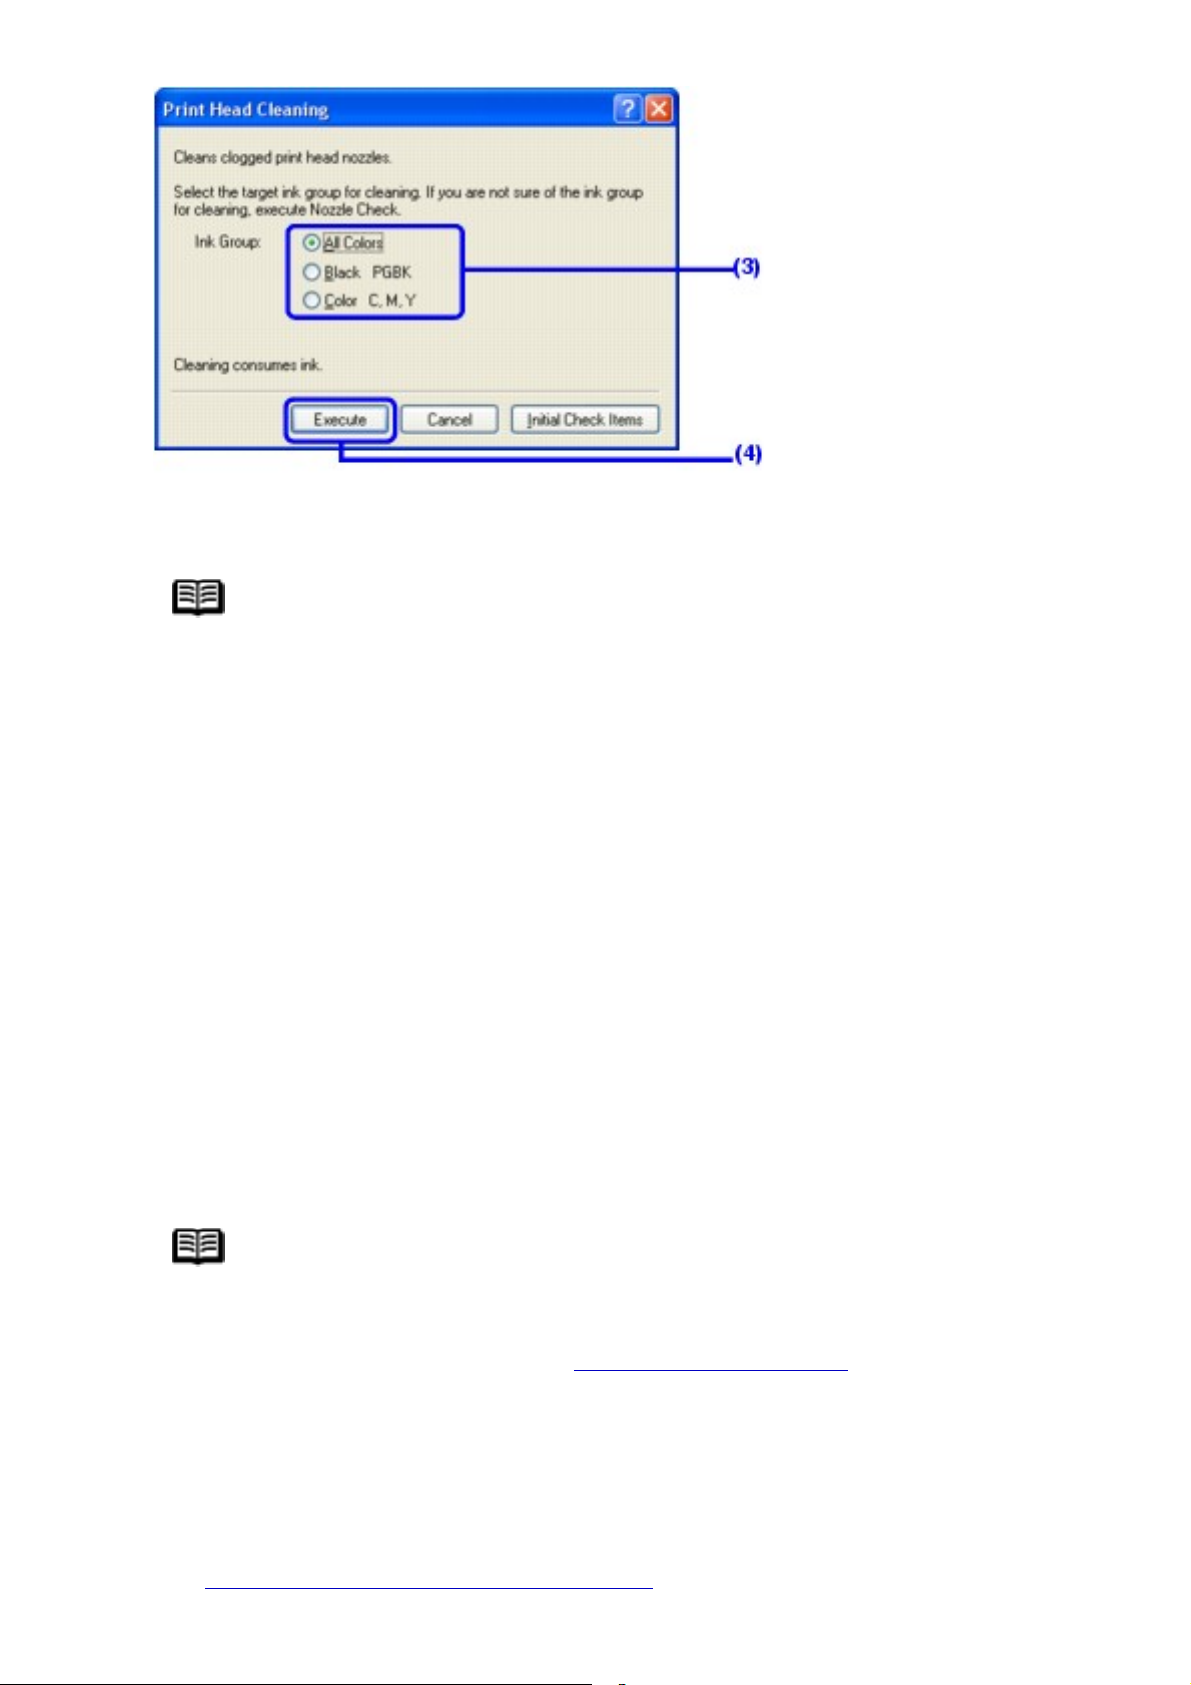
88
(3) Select the ink group to be cleaned.
Note
Clicking Initial Check Items displays the items to be checked
before cleaning.
(4) Click Execute.
Print Head Cleaning starts when the POWER lamp starts flashing green.
Do not perform any other operations until Print Head Cleaning finishes.
This takes about 50 seconds.
(5) Load a sheet of A4 or Letter-sized plain paper in the Auto Sheet
Feeder and set the Paper Thickness Lever to the left.
(6) Click Print Check Pattern.
The nozzle check pattern is printed.
Do not perform any other operations until the nozzle check pattern
finishes printing.
Note
The nozzle check pattern will not be printed correctly if there
is not enough ink. Replace the ink tank if the remaining
amount of ink is insufficient. See
Replacing an Ink Tank.
5 Check the print head condition with the printed nozzle
check pattern, and take appropriate action.
See Examining the Nozzle Check Pattern.
Page 89
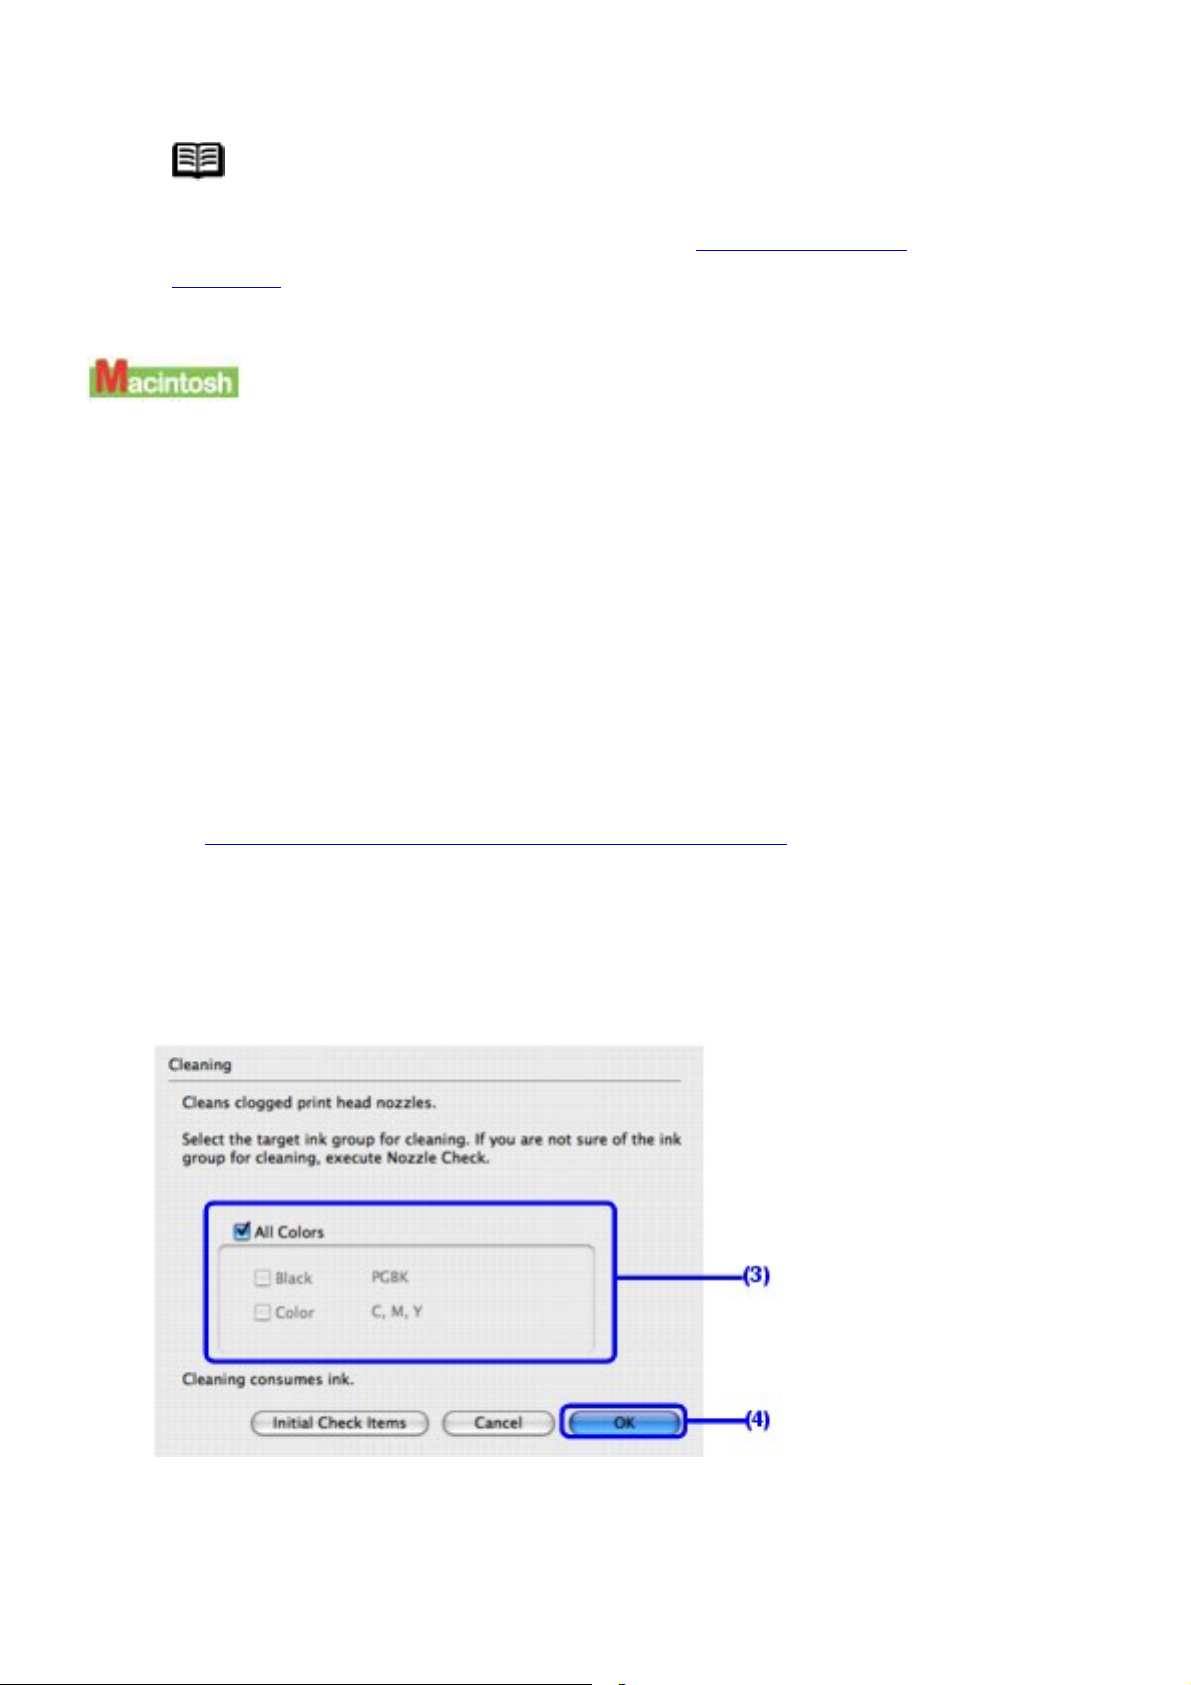
Note
89
If the problem is not resolved after performing steps 4 and 5
twice, try Print Head Deep Cleaning. See
Cleaning.
If you click Cleaning on the Pattern Check dialog box that is displayed after
printing the nozzle check pattern, the Print Head Cleaning dialog box shown in of
step 4-(3) in the following procedure will appear.
Print Head Deep
1 Make sure that the printer is on.
2 Open the Front Feeder and extend the Paper Output
Support.
3 Open the Canon IJ Printer Utility dialog box.
See Opening the Canon IJ Printer Utility (Macintosh).
4 Start Print Head Cleaning.
(1) Make sure that Cleaning is selected in the pop-up menu.
(2) Click Cleaning.
(3) Select the ink group to be cleaned.
Page 90

Note
90
Clicking Initial Check Items displays the items to be checked
before cleaning.
(4) Click OK.
Print Head Cleaning starts when the POWER lamp starts flashing green.
Do not perform any other operations until Print Head Cleaning finishes.
This takes about 50 seconds.
(5) Load a sheet of A4 or Letter-sized plain paper in the Auto Sheet
Feeder and set the Paper Thickness Lever to the left.
(6) Click Print Check Pattern.
The nozzle check pattern is printed.
Do not perform any other operations until the nozzle check pattern
finishes printing.
Note
The nozzle check pattern will not be printed correctly if there
is not enough ink. Replace the ink tank if the remaining
amount of ink is insufficient.
See
Replacing an Ink Tank.
5 Check the print head condition with the printed nozzle
check pattern, and take appropriate action.
See Examining the Nozzle Check Pattern.
Note
If the problem is not resolved after performing steps 4 and 5
twice, try Print Head Deep Cleaning. See
Cleaning.
Print Head Deep
Page 91
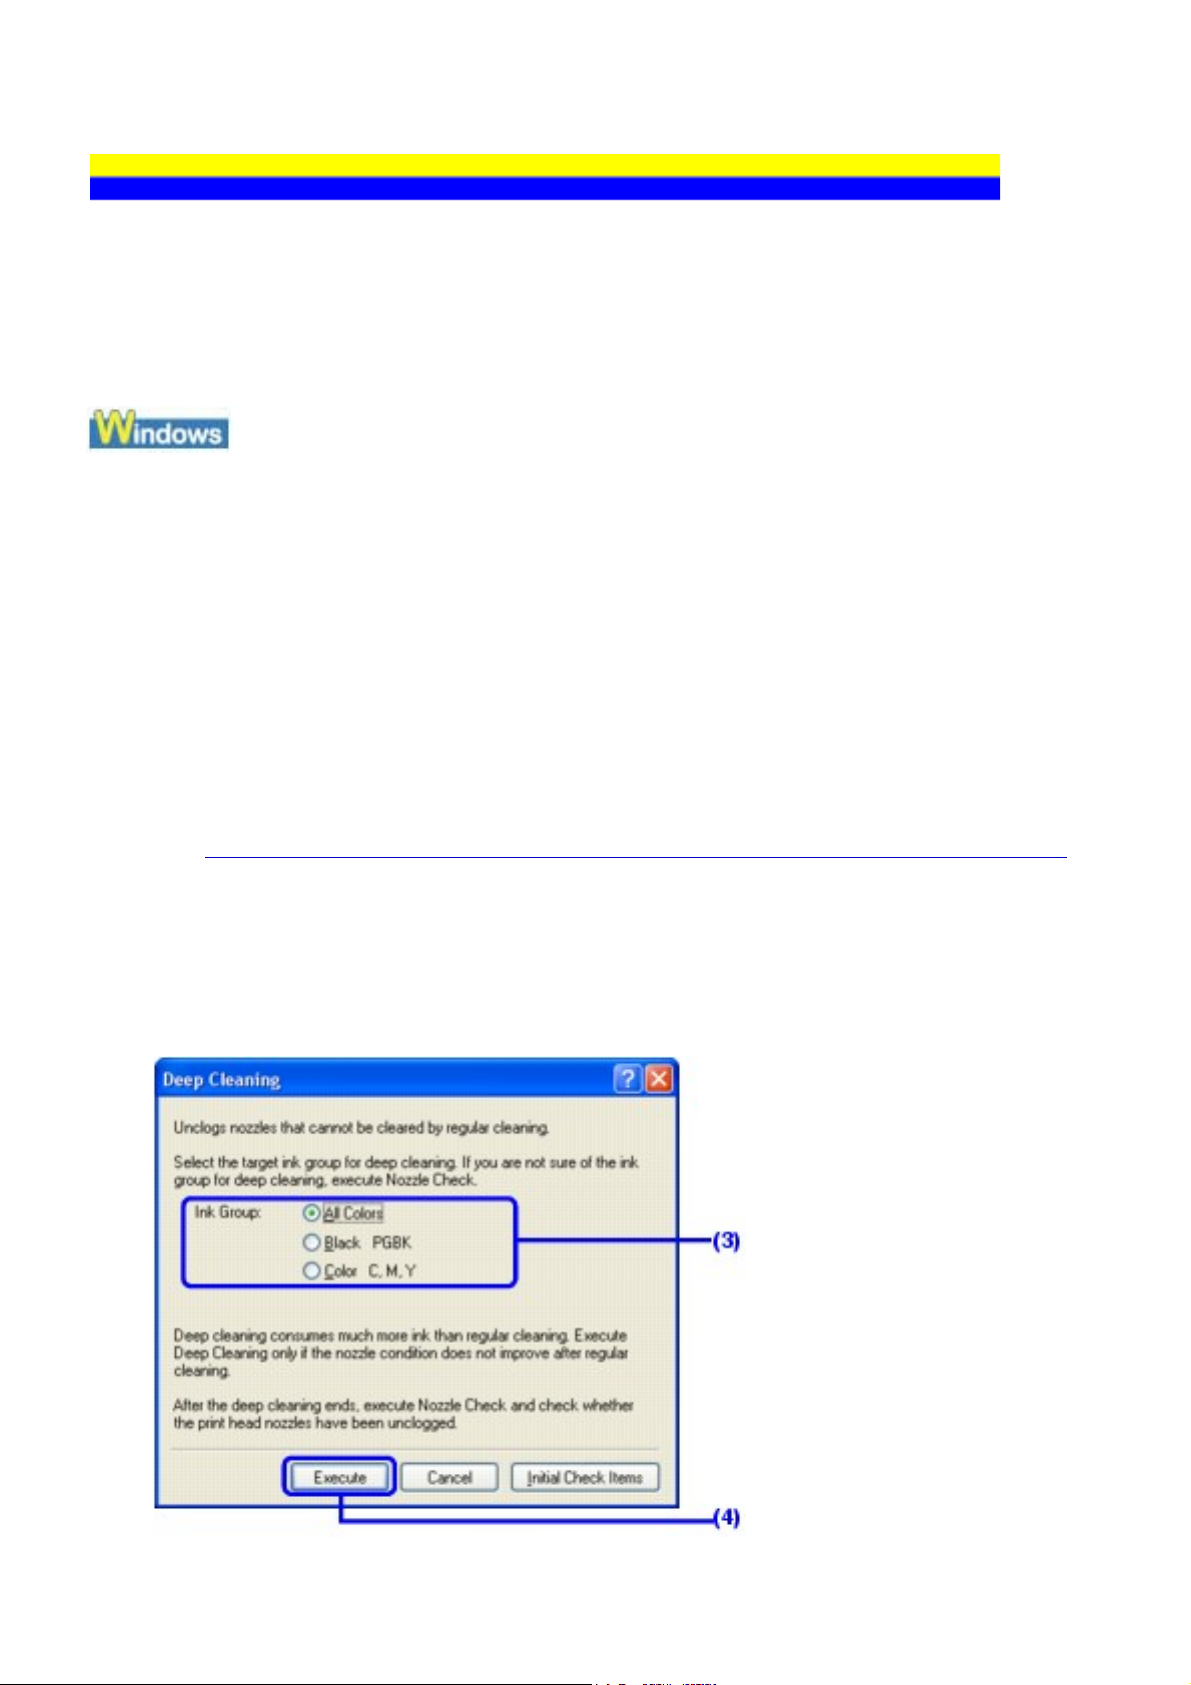
Print Head Deep Cleaning
91
If print quality does not improve by standard Print Head Cleaning, try Print Head
Deep Cleaning, which is a more powerful process. Note that cleaning the Print
Head causes used ink to be absorbed in the ink absorber. Print Head Deep
Cleaning consumes more ink than standard Print Head Cleaning, so perform this
procedure only when necessary.
1 Make sure that the printer is on, and then load a sheet of
A4 or Letter-sized plain paper in the Auto Sheet Feeder.
Set the Paper Thickness Lever to the left.
2 Open the Front Feeder and extend the Paper Output
Support.
3 Open the printer properties dialog box.
See Opening the Printer Properties Dialog Box Directly from the Start Menu.
4 Start Print Head Deep Cleaning.
(1) Click the Maintenance tab.
(2) Click Deep Cleaning.
(3) Select the ink group to be deeply cleaned.
Page 92

Note
92
Clicking Initial Check Items displays the items to be checked
before deep cleaning.
(4) Click Execute.
(5) When the confirmation message is displayed, click OK.
Print Head Deep Cleaning starts when the POWER lamp starts flashing
green.
Do not perform any other operations until Print Head Deep Cleaning
finishes. This takes about 100 seconds.
5 Check the condition of the Print Head.
(1) Print the nozzle check pattern to check the print head condition.
Printing the Nozzle Check Pattern.
See
If a particular color is not printed properly, replace the ink tank of that
color.
See
Replacing an Ink Tank.
(2) If the print head nozzles are still not clean, turn off the printer and
perform another Print Head Deep Cleaning after 24 hours.
(3) If this does not solve the problem, the Print Head may be damaged.
Contact your Canon Service representative.
1 Make sure that the printer is on, and then load a sheet of
A4 or Letter-sized plain paper in the Auto Sheet Feeder.
Set the Paper Thickness Lever to the left.
2 Open the Front Feeder and extend the Paper Output
Support.
3 Open the Canon IJ Printer Utility dialog box.
See Opening the Canon IJ Printer Utility (Macintosh).
4 Start Print Head Deep Cleaning.
Page 93
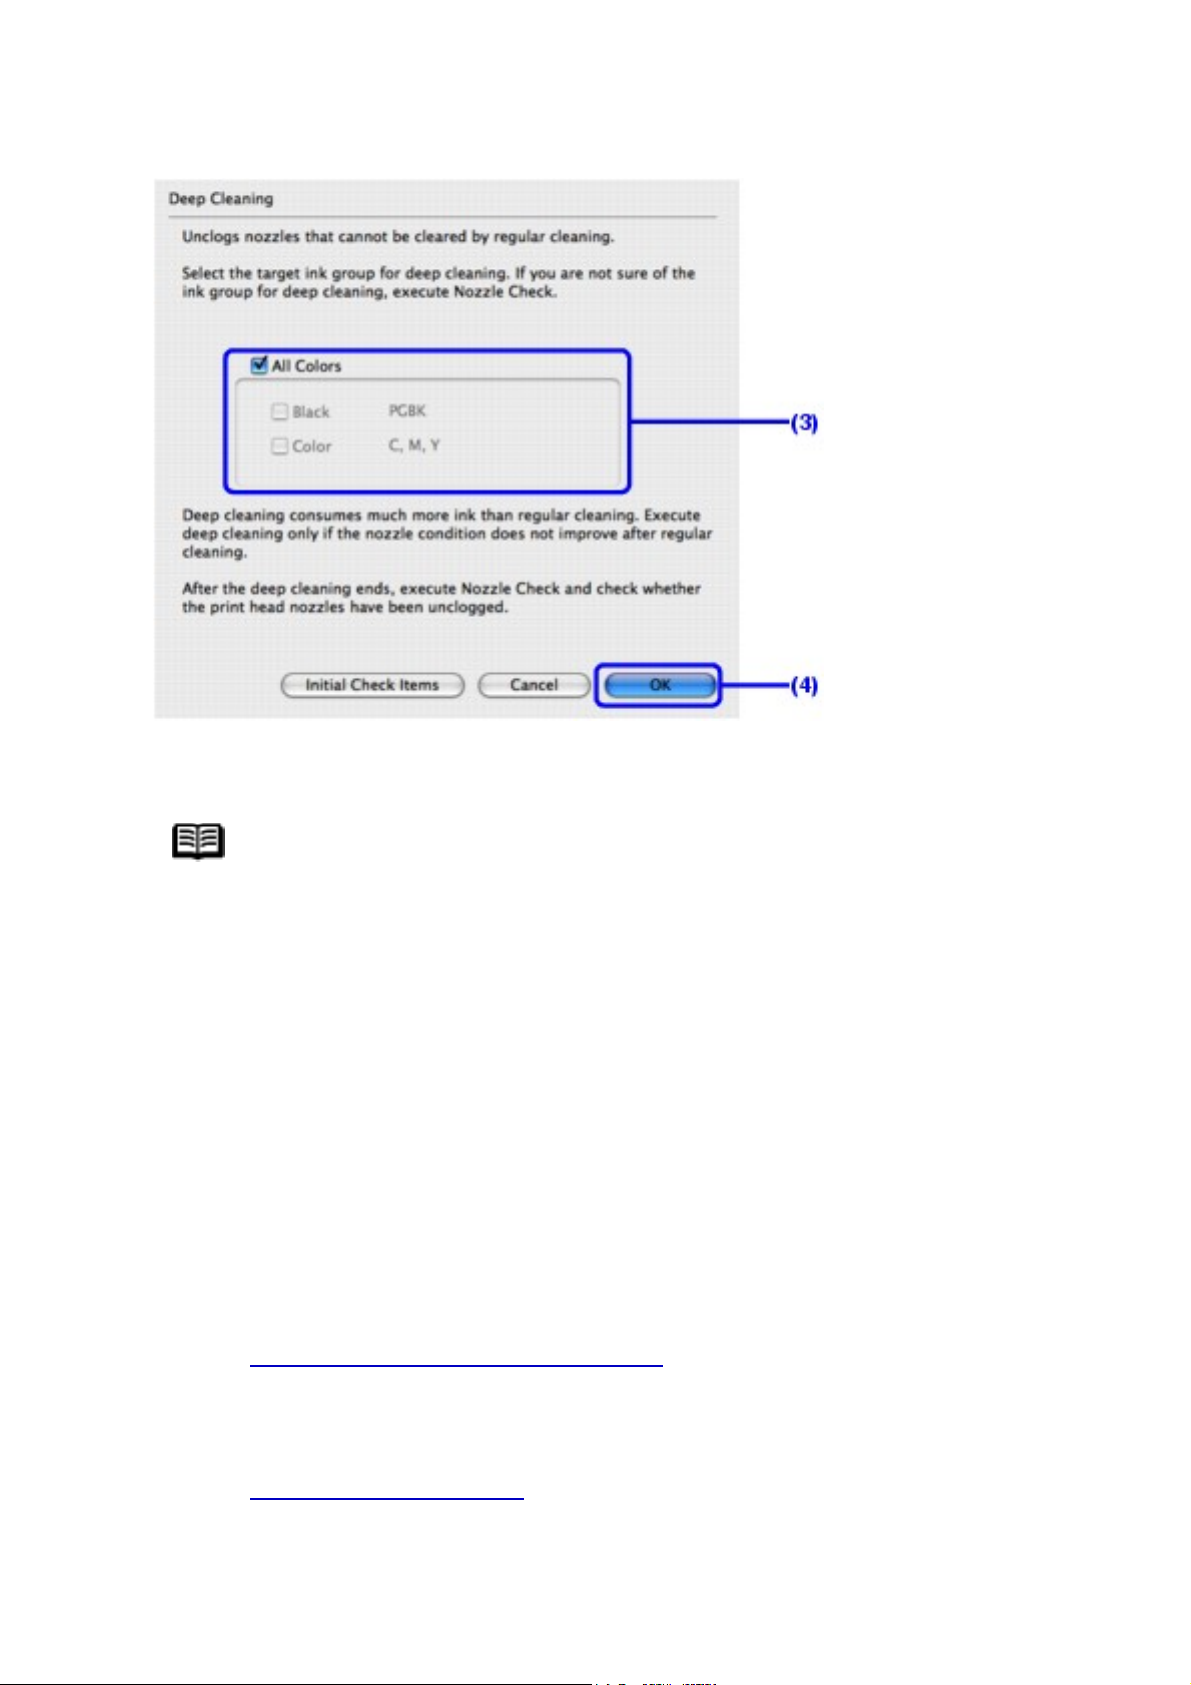
(1) Make sure that Cleaning is selected in the pop-up menu.
93
(2) Click Deep Cleaning.
(3) Select the ink group to be deeply cleaned.
Note
Clicking Initial Check Items displays the items to be checked
before deep cleaning.
(4) Click OK.
Print Head Deep Cleaning starts when the POWER lamp starts flashing
green.
Do not perform any other operations until Print Head Deep Cleaning
finishes. This takes about 100 seconds.
5 Check the condition of the Print Head.
(1) Print the nozzle check pattern to check the print head condition.
Printing the Nozzle Check Pattern.
See
If a particular color is not printed properly, replace the ink tank of that
color.
See
Replacing an Ink Tank.
(2) If the print head nozzles are still not clean, turn off the printer and
perform another Print Head Deep Cleaning after 24 hours.
Page 94

(3) If this does not solve the problem, the Print Head may be damaged.
94
Contact your Canon Service representative.
Page 95

Aligning the Print Head
95
If ruled lines are printed misaligned or print results are otherwise unsatisfactory,
adjust the print head position.
Note
You cannot feed paper from the Front Feeder when performing Print
Head Alignment. Always load paper in the Auto Sheet Feeder.
1 Make sure that the printer is on, and then load two sheets
of A4 or Letter-sized plain paper in the Auto Sheet Feeder.
Set the Paper Thickness Lever to the left.
Important
You cannot print the print head alignment pattern if paper of
size other than A4 or Letter is loaded. Be sure to use A4 or
Letter-sized plain paper.
2 Open the Front Feeder and extend the Paper Output
Support.
3 Open the printer properties dialog box.
See Opening the Printer Properties Dialog Box Directly from the Start Menu.
4 Click the Maintenance tab and then Print Head
Alignment.
5 When the confirmation message is displayed, click Print
Head Alignment.
Important
Do not open the Top Cover while printing.
Page 96
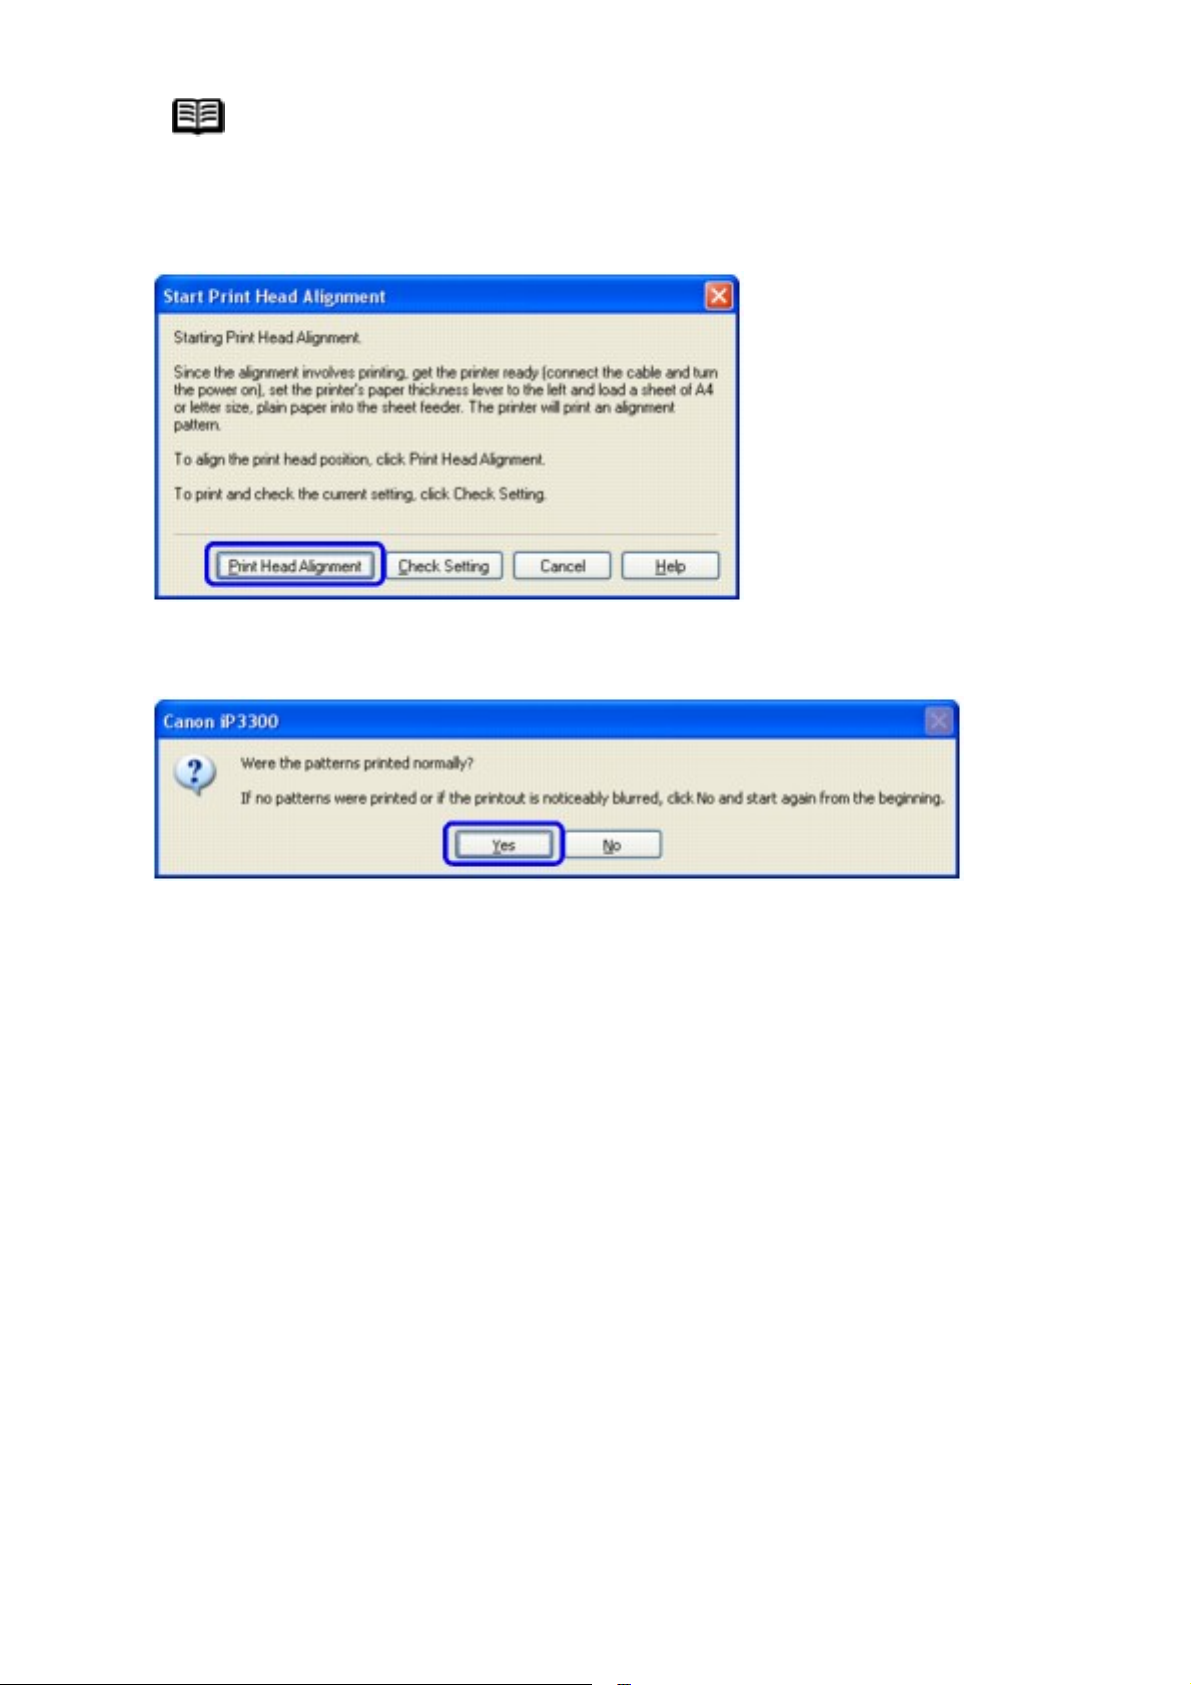
Note
96
Clicking Check Setting prints the current settings and
finishes Print Head Alignment.
6 After the pattern is printed, click Yes.
7 Look at the printout. From the patterns, select the most
even, least irregular patterns for each column and enter their
numbers. Click OK.
Page 97
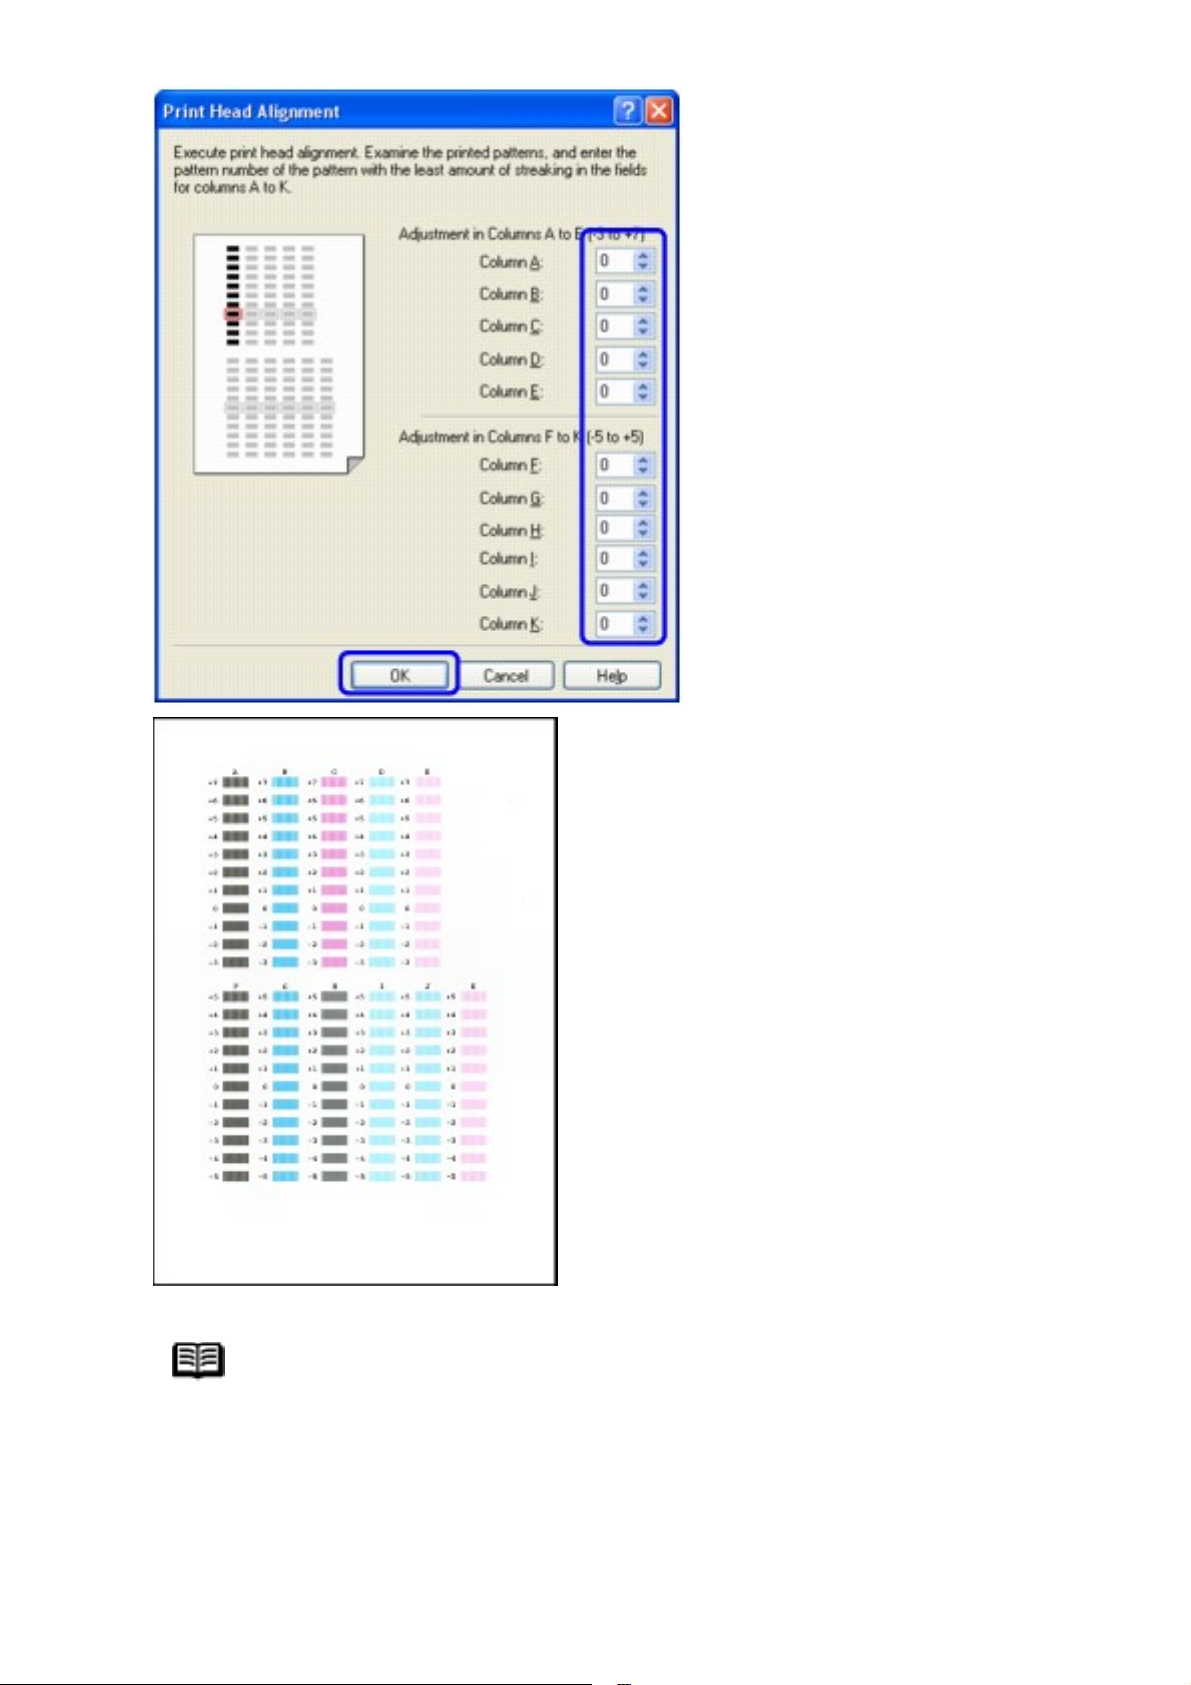
97
Note
If it is difficult to pick the best pattern, pick the setting that
produces the least noticeable vertical white streaks.
Page 98
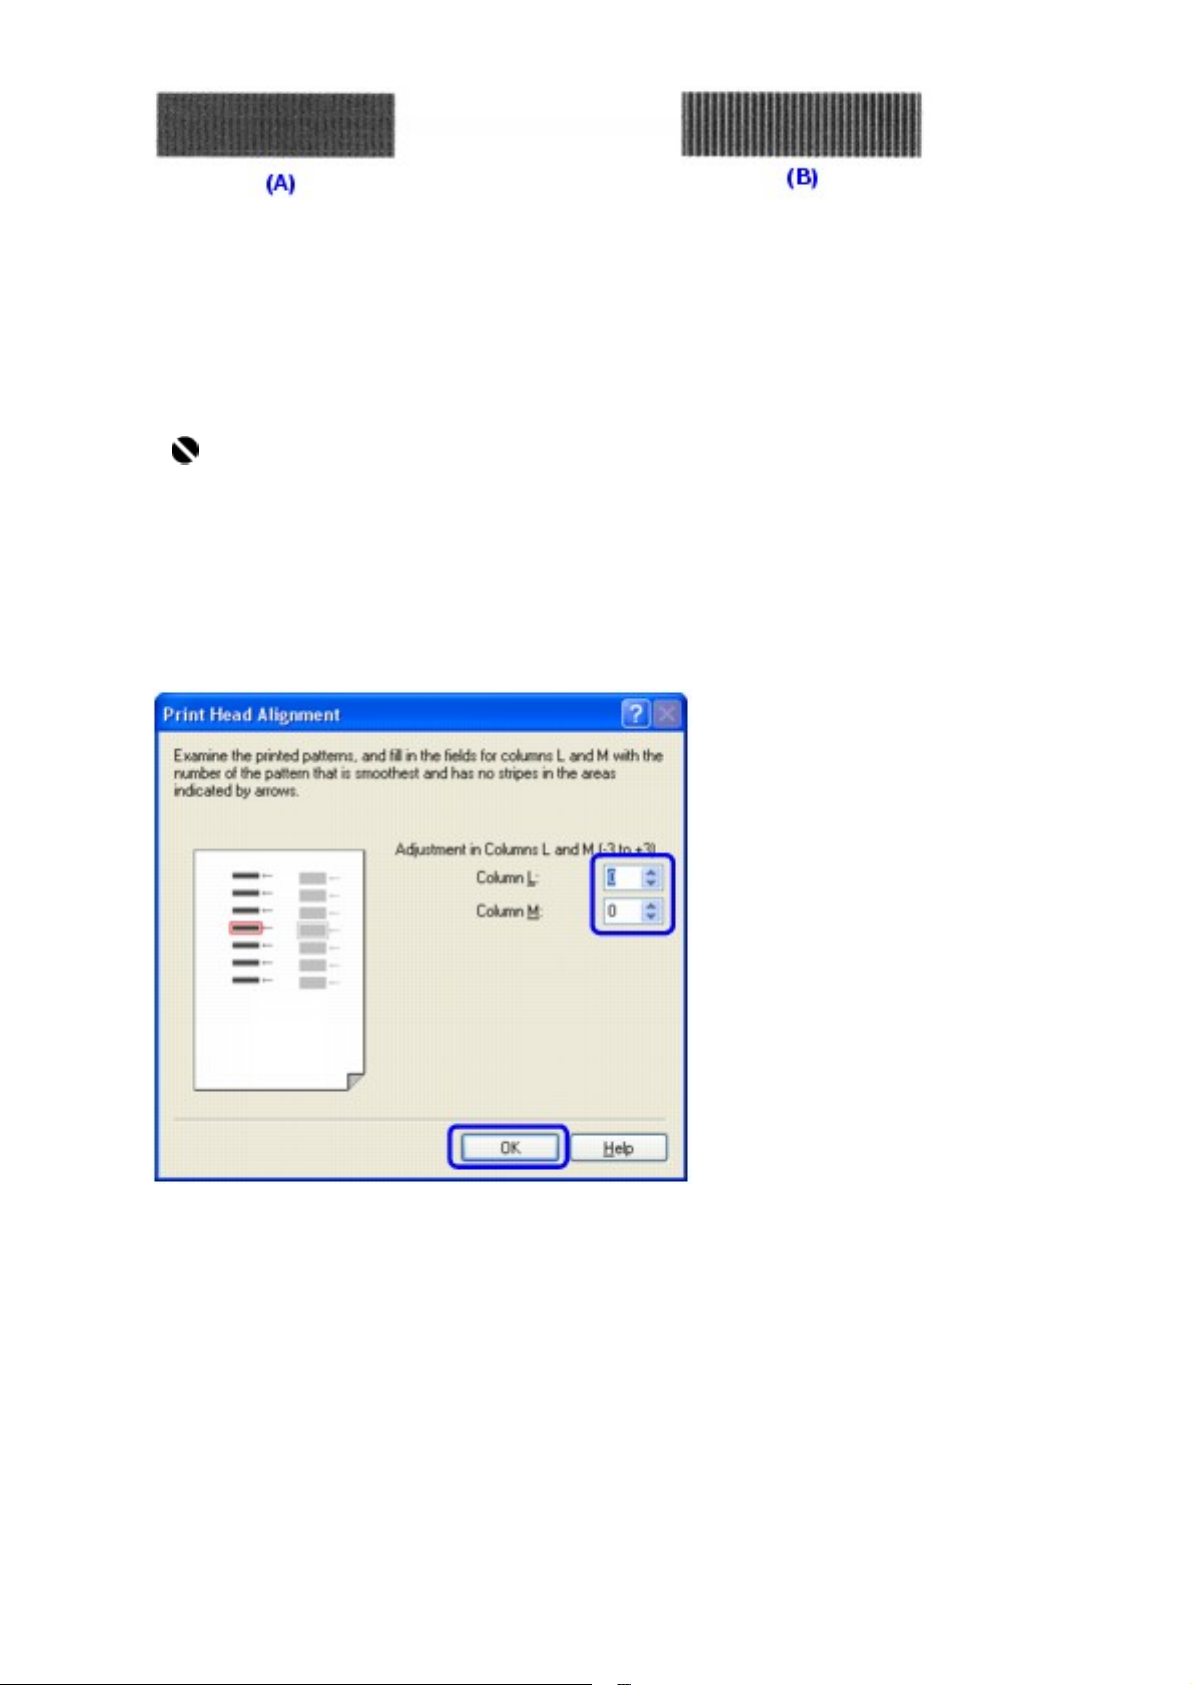
98
(A) Less noticeable white streaks
(B) More noticeable white streaks
8 Confirm the message, and then click OK.
Important
Do not open the Top Cover while printing.
9 In the same way, select the best patterns for each column,
enter their numbers, then click OK.
Page 99
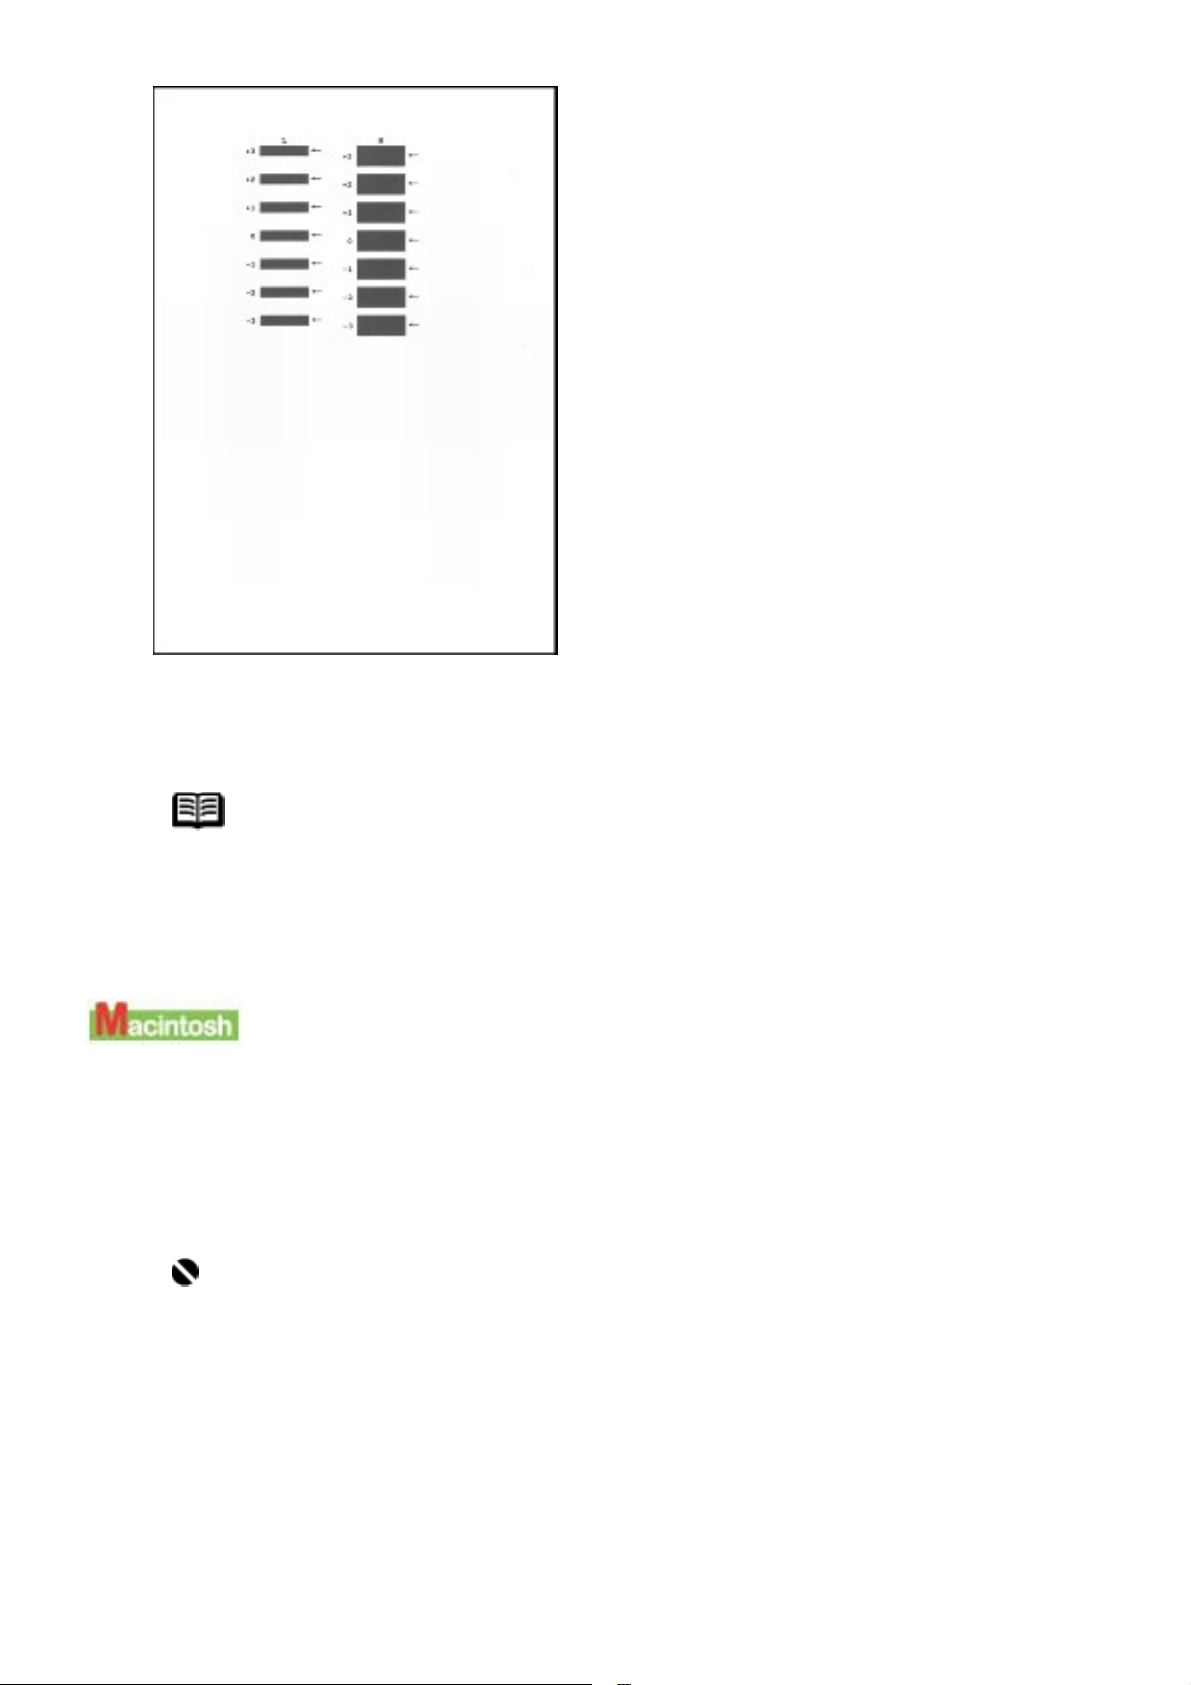
99
10 When the confirmation message is displayed, click OK.
Note
When you turn off the printer, be sure to press the POWER
button on the printer. Otherwise, the settings made here will
not be saved.
1 Make sure that the printer is on, and then load two sheets
of A4 or Letter-sized plain paper in the Auto Sheet Feeder.
Set the Paper Thickness Lever to the left.
Important
You cannot print the print head alignment pattern if paper of
size other than A4 or Letter is loaded. Be sure to use A4 or
Letter-sized plain paper.
2 Open the Front Feeder and extend the Paper Output
Support.
Page 100
3 Open the Canon IJ Printer Utility dialog box.
100
See Opening the Canon IJ Printer Utility (Macintosh).
4 Select Test Print in the pop-up menu.
5 Click Print Head Alignment.
6 When the confirmation message is displayed, click Print
Head Alignment.
Important
Do not open the Top Cover while printing.
Note
Clicking Check Setting prints the current settings and
finishes Print Head Alignment.
7 Look at the printout. From the patterns, select the most
even, least irregular patterns for each column and enter their
numbers. Click Send.
 Loading...