

Canon imageRUNNER 2645i, imageRUNNER 2645, imageRUNNER 2630i, imageRUNNER 2630, imageRUNNER 2625i Getting Started
...
Getting Started
Quick Setup
NEXT PAGE
Quick Operation
Please read "Important Safety Instructions" before operating this product. After you finish
reading this guide, store it in a safe place for future reference.
The information in this document is subject to change without notice.
https://oip.manual.canon
P. 5

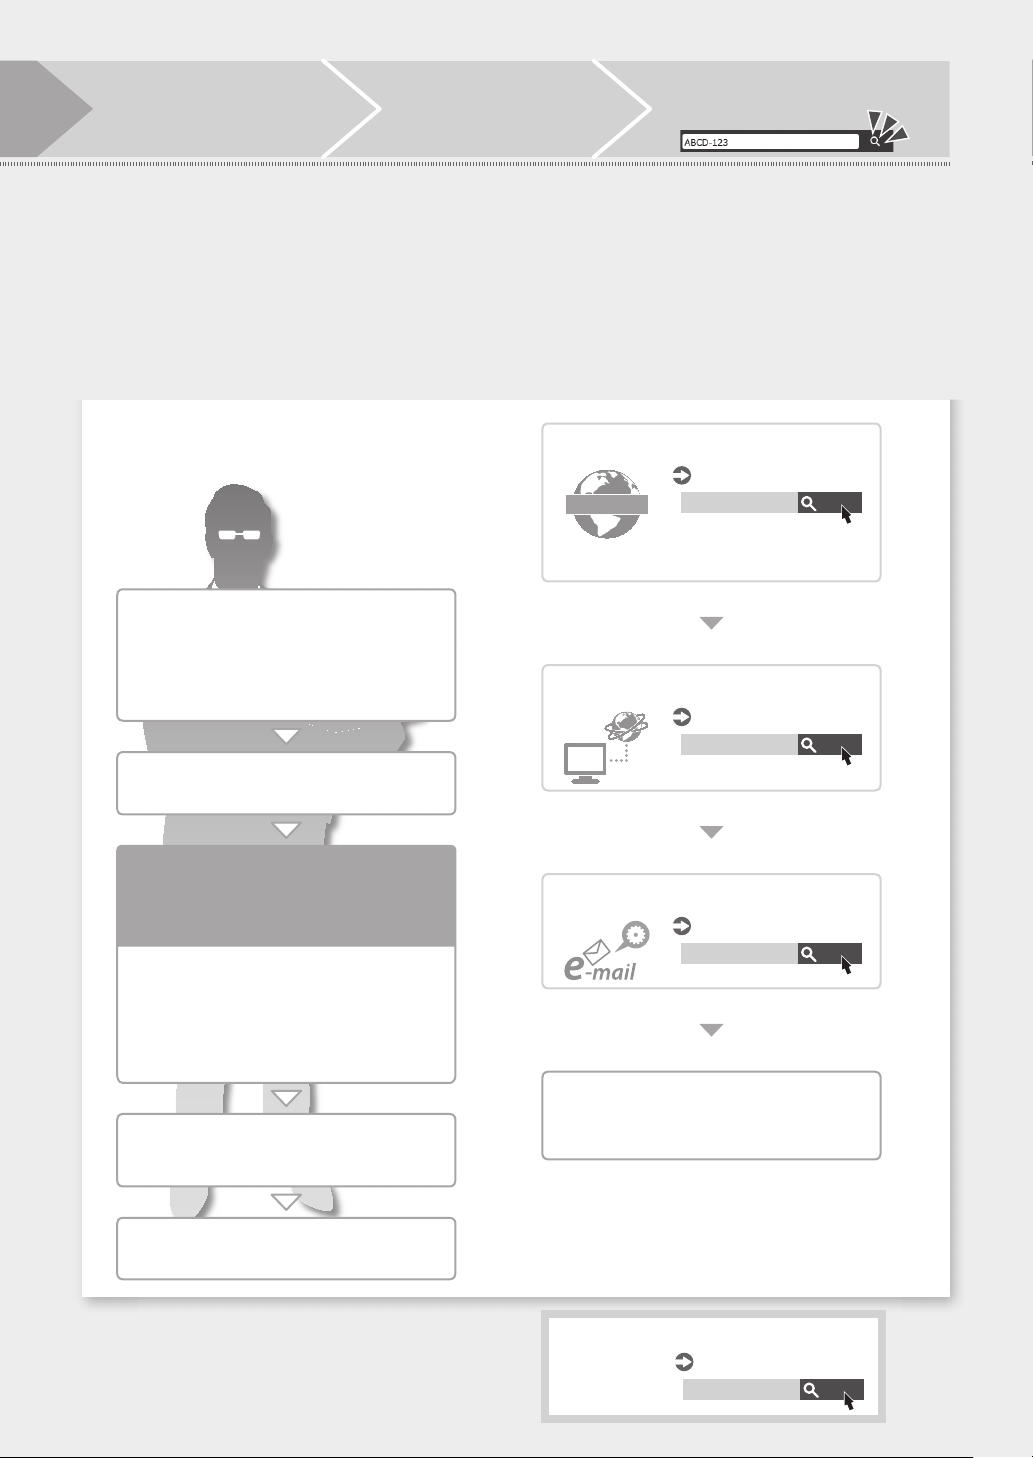
Quick Setup
How to use the search number
Configuring the Machine
ABCD-123
Configuring the Initial Settings
of the Machine
When the power is turned ON for the first time after installing the machine
The "Setup Guide" screen is
displayed automatically
(ON)
CASE1
All users can make the following
settings
Search
If you want to use copy function first of all...
proceed to CASE1
If you want to use all functions of the
machine...
Language/Keyboard Layout
1.
Settings
Toner mixing
2.
Paper Size/Type Settings
3.
*1
Press <Skip> on the
"Authentication Login" screen
Gradation Adjustment
4.
Report Printing
5.
First Setup finished!
Now you can use a limited variety of functions
including copying.
proceed to CASE2
*1 To select a language that is not displayed, follow
the procedure in CASE2.
2
Quick Setup
Display the online manual
1.
website for user's guides
https://oip.manual.canon
CASE2
Administrator privileges are required
to make the following settings
Language/Keyboard Layout
1.
Settings
Toner mixing
2.
Paper Size/Type Settings
3.
Logging In as an Administrator
4.
The default PIN is '7654321'.
*2
Select the appropriate
2.
user's guide
[imageRUNNER] ► [Black &
White] ► Select this machine
Setting up the Network Environment
Installing Drivers
IP:192.168.
To access information in the User's
3.
Guide, use the search number
User's Guide
PMW-STNW
See this topic also when making
connection via wireless LAN
User's Guide
PMW-INDR
Search
Search
Only the Administrator is
allowed to configure the
following settings
User Authentication Settings
5.
Date/Time Settings
6.
Network Setting
7.
Fax Settings
8.
Gradation Adjustment
9.
Report Printing
10.
You can also configure the settings listed on the
right half of this page, as necessary.
*2 To select a language that is not displayed, select
<Add More Languages> and follow the on-screen
instructions. You can also configure this setting
later.
*3 Only for the machine with fax board
*3
Setting E-mail/I-Fax Communication
User's Guide
PMW-STCM
Search
Setup finished!
Now you can use all functions including printing
and sending faxes from a computer.
For more information about the "Setup Guide"
User's Guide
PMW-STSG
Search
3

Memo
44

Quick
Operation
5
Quick Operation
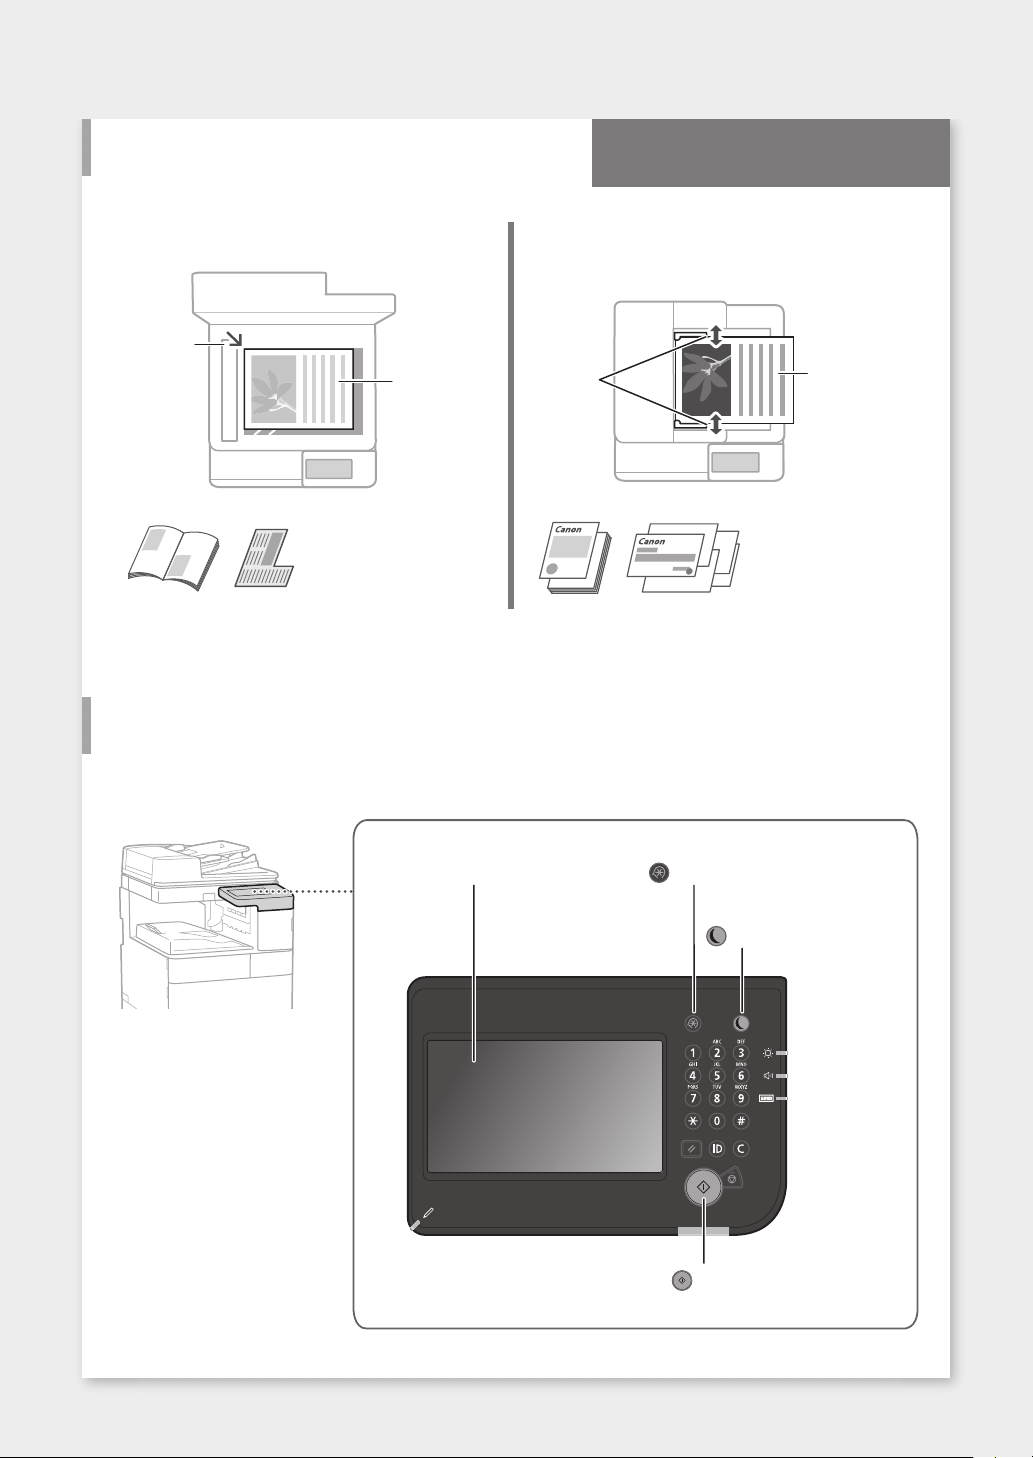
Place the Original Document Properly
Remember before
You Start Operation
Place your original on the platen glass Place your originals into the feeder*
* This operation is available only on models that have a feeder
attached.
Place to fit
inside the
corner.
Place the
document with
the scan side
face down.
Suitable for scanning book
pages, magazine pages and
newspaper clips.
Adjust
the slide
guides.
Place the
document with
the scan side face
up.
Suitable for continuously
scanning many pages of
literature, quotation, etc.
Start the Operation from the Operation Panel
Machine
Operation Panel
Touch panel display
([Settings/Registration] key)
([Energy Saver] key)
([Start] key)
6

Copying
1. Place the original document.
2. Select <Copy> on the Home screen.
3. Specify the copy settings, as necessary.
4. Enter the desired number of copies.
5. Press
Useful copy settings
.
■
N on 1
■
2-Sided or 1-Sided
■
Enlarging or reducing
Copying
User's Guide
PMW-CPIG
Quick Operation
Search
Printing
1. Open the document to print, and select the print function of the
application.
2. Select the printer driver for the machine, and select [Preferences] or
[Properties].
3. Specify the paper size.
4. Specify the paper source and paper type.
5. Specify the print settings, as necessary.
6. Select [OK].
7. Select [Print] or [OK].
Useful print settings
■
2-sided
■
N on 1
■
Booklet Printing
Printing
User's Guide
PMW-PTIG
Search
7

Quick Operation
Faxing* * This function is available only if the FAX Board is installed.
1. Place the original document.
2. Select <Fax> on the Home screen.
3. Enter the destination information.
4. Specify the fax settings, as necessary.
5. Press
Useful fax functions
■
Sequential Broadcast
■
Memory Reception
■
PC Fax
.
Fax ing
User's Guide
PMW-FXIG
Search
Scanning
1. Place the original document.
2. Select <Scan and Send> or <Scan and Store> on the Home screen.
3. Select the type of scan, and enter the necessary information.
4. Press
Types of scan
.
■
Store in USB memory device
■
Send e-mail
■
Send to file server
To scan from a computer
■
Use the scanner driver
supplied with the machine
Scanning
User's Guide
PMW-SCIG
Search
8

Loading Paper
Loading in the Paper Drawer
Quick Operation
Specifying Paper Size and Type in the Paper Drawer
User's Guide
PMW-SPDR
Search
In the following, the operations that are common
to paper drawers 1 and 2 are described by taking
drawer 2 as example.
1
Slide the light blue knobs to adjust the
2
positions of the paper guides.
Place the paper drawer back into the
4
machine.
CAUTION!
Be careful not to get your fingers caught
e
tween the paper drawer and the
b
machine.
NOTE
If you have changed the paper size,
lace the label with one corresponding
p
re
to the paper size as necessary.
If you have changed the paper type, be
sure to change the paper settings.
Select <Settings/Regist. Shortcut> on the
5
Home screen.
Select <Paper Settings>.
6
Specify the size and type of paper,
7
according to the screen.
Align the protrusion to the
appropriate paper size marking.
First fan the paper stack well and then load
3
it.
Make sure that this
line is not
exceeded.
The print side face up
9

Quick Operation
Loading Paper
Loading in the Multi-Purpose
Tray
Specifying Paper Size and Type in the Multi-purpose Tray
User's Guide
PMW-SPMT
Search
CAUTION!
When using coated paper or paper that does
t feed well, load one sheet at a time.
no
1
Adjust the position of the paper guides.
2
Tray e xtension
Align the paper guides
to the paper size
markings.
NOTE
Pull out the tray extension when loading
sized paper.
large-
Check the paper size and type, and press
4
<OK> on the screen.
If the paper size/type setting does not
match the paper you have loaded on the
screen shown in step 4, change the setting
manually.
Press <Standard Size>.
5
Specify the paper size.
6
Press <Change>.
7
Specify the paper type.
8
10
Fan the paper stack well, align the edges on
3
a flat surface, and then load it.
Make sure that this line is not exceeded.
The print side face down

If a Problem Has Occurred
Quick Operation
Maintenance
User's Guide
PMW-MNTC
Search
The Machine Does Not Seem to
Work
Check the following.
• Is the power turned ON?
• Is the machine out of sleep mode?
If both the display and
power switch.
• Is the power cord connected correctly?
are not lit, press the
(ON)
Power switch
Paper Jams Have Occurred
When paper is jammed, a screen, as shown below
appears.
Clear the paper jams, according to the on-screen
instructions.
Replacing Consumables
Toner Cartridge
If the problem persists, see the User's Guide.
Canon genuine toner cartridge
• Canon NPG-84 Toner Black
Staple
Staple-P1
This can be used with the following options.
• Inner Finisher-J
11

Quick Operation
If a Problem Has Occurred
Printing Results Are Not
Satisfactory
Images Are Shifted/Slanted
Solution
Adjust the paper guides.
Adjust the guide exactly.
Multi-purpose tray
Irregularities Appear in Images/Images
Are Faint
Solution 1
The paper may have absorbed moisture.
Replace it with paper that has not absorbed
moisture.
Solution 2
Perform gradation adjustment.
1. Press
2. Press <Adjustment/Maintenance>
Follow the instructions on the screen to perform
gradation adjustment.
For more information, see the User's Guide.
.
Image Quality>
the screen.
Adjusting gradation
User's Guide
PMW-AJGR
<Adjust
<Auto Adjust Gradation> on
Search
12

Quick Operation
Black Streaks Appear in Images*
* Only for the model with a feeder attached.
Solution
Clean the document feed scanning areas.
1. Open the feeder, and clean the lower side
document feed scanning area using the
supplied glass-cleaning sheet. If the glasscleaning sheet is not supplied, use a cloth
dampened with water. Then, wipe the area
with a soft, dry cloth.
NOTE
Do not use glass cleaner or an alcohol
lution, etc., as they will strip away the
o
s
stain-proof coating.
Maintenance
User's Guide
PMW-MNTC
Bleed-through Occurs
Solution 1
Set the type of original properly.
If bleed-through is observed with the copy result,
setting the type of original can improve the
problem, giving a neat copy.
1. Press <Copy (Prevent Bleed-Thru)> on the
2. Press <Yes>.
Search
Home screen.
Tro ubl es hoo tin g
User's Guide
PMW-TROB
Search
2. Close the feeder.
NOTE
If black streaks still appear after dirt
oval, perform the following procedure
rem
to execute <Clean Feeder>.
For more information, see the User's
Guide.
Solution 2
Set a lower background density.
1. Select the function on the Home screen.
2. Press <Options>.
Example: Fax
3. Press
4. Press
5. Press <OK>.
13

Appendix
Important Safety
Instructions
This chapter describes important safety
instructions for the prevention of injury to users
of this machine and others, and damage to
property. Read this chapter before using the
machine, and follow the instruc tions to use the
machine properly. Do not perform any
operations not described in this manual. Canon
will not be responsible for any damages
resulting from operations not described in this
manual, improper use, or repair or changes not
performed by Canon or a third party authorized
by Canon. Improper operation or use of this
machine could result in personal injury and/or
damage requiring extensive repair that may not
be covered under your Limited Warrant y.
WARN ING
Indicates a warning concerning operations
that may lead to death or injury to persons if
not performed correctly. To use the machine
safely, always pay at tention to these
warnings.
CAUTION
Indicates a caution concerning operations
that may lead to injury to persons if not
performed correctly. To use the machine
safely, always pay at tention to these
cautions.
IMPORTANT
Indicates operational requirements and
restrictions. Be sure to read these items
carefully to operate the machine correctly,
and avoid damage to the machine or
property.
Installation
To use this machine safely and comfortably,
carefully read the following precautions and
install the machine in an appropriate location.
WARN ING
Do not install in a location that may result in a
fire or electrical shock
• A location where the ventilation slots are
blocked (too close to walls, beds, sofas, rugs,
or similar objects)
• A damp or dusty location
• A location exposed to direct sunlight or
outdoors
• A location subject to high temperatures
• A location exposed to open flames
• Near alcohol, paint thinners or other
flammable substances
Other warnings
• Do not connect unapproved cables to this
machine. Doing so may result in a fire or
electrical shock.
• Do not place necklaces and other metal
objects or containers filled with liquid on the
machine. If foreign substances come in
contact with electrical parts inside the
machine, it may result in a fire or electrical
shock.
• If any foreign substance falls into this
machine, unplug the power plug from the AC
power outlet and contact your local
authorized Canon dealer.
CAUTION
Do not install in the following locations
The machine may drop or fall, resulting in injury.
• An unstable location
• A location exposed to vibrations
Leveling feet (only for products with leveling
feet)
Do not remove the machine's leveling feet after
the machine has been installed, as this may
cause the machine to fall or tip over, resulting in
personal injury.
IMPORTANT
Do not install in the following locations
Doing so may result in damage to the machine.
• A location subject to temperature and
humidity extremes, whether low or high
• A location subject to dramatic changes in
temperature or humidity
• A location near equipment that generates
magnetic or electromagnetic waves
• A laboratory or location where chemical
reactions occur
• A location exposed to corrosive or toxic gases
• A location that may warp from the weight of
the machine or where the machine is liable to
sink (a carpet, etc.)
Avoid poorly ventilated locations
This machine generates a slight amount of
ozone and other emissions during normal use.
These emissions are not harmful to health.
However, they may be noticeable during
extended use or long production runs in poorly
ventilated rooms. To maintain a comfortable
working environment, it is recommended that
the room where the machine operates be
appropriately ventilated. Also avoid locations
where people would be exposed to emissions
from the machine.
Do not install in a location where
condensation occurs
Water droplets (condensation) may form inside
the machine when the room where the machine
is installed is heated rapidly, and when the
machine is moved from a cool or dry location to
a hot or humid location. Using the machine
under these conditions may result in paper jams,
poor print quality, or damage to the machine.
Let the machine adjust to the ambient
temperature and humidity for at least 2 hours
before use.
Avoid installing the machine near computers
or other precision electronic equipment.
Electrical interference and vibrations generated
by the machine while printing can adversely
affect the operation of such equipment.
Avoid installing the machine near televisions,
radios, or similar electronic equipment.
The machine might interfere with sound and
picture signal reception.
Insert the power plug into a dedicated power
outlet, and maintain as much space as possible
between the machine and other electronic
equipment.
Avoid installing the machine on a sheet or the
like made of material with low thermal
resistance.
The machine has a built-in cassette heater, and
the bottom of the main unit gets heated when
the machine is powered on. Therefore, when
you install the machine on a desk top without
attaching any optional cassette, avoid, as much
as possible, using a sheet or mat with poor
thermal resistance such as a vinyl desk mat,
between the machine and the desk top.
In altitudes of above sea level 3,000 m or
higher
Machines with a hard disk may not operate
properly when used at high altitudes of about
3,000 meters above sea level, or higher.
Connecting the Telephone Line
This machine conforms to a analog telephone
line standard. The machine can be connected to
the public switched telephone network (PSTN)
only. If you connect the machine to a digital
telephone line or a dedicated telephone line, it
might impede proper operation of the machine
and could be the cause of damage. Make sure to
confirm a type of telephone line before
connecting the machine. Contact your optical
fiber line or IP telephone line ser vice providers if
you want to connect the machine to those
telephone lines.
When using wireless LAN
• Install the machine at a distance of 50 meters
or less from the wireless LAN router.
• As far as possible, install in a location where
communication is not blocked by intervening
objects. The signal may be degraded when
passing through walls or floors.
• Keep the machine as far as possible from
digital cordless phones, microwave ovens, or
other equipment that emits radio waves.
• Do not use near medical equipment. Radio
waves emitted from this machine may
interfere with medical equipment, which may
result in malfunctions and accidents.
If the operating noise concerns you
Depending on the use environment and
operating mode, if the operating noise is of
concern, it is recommended that the machine be
installed in a place other than the office.
Moving the Machine
If you intend to move the machine, even to a
location on the same floor of your building,
contact your local authorized Canon dealer
beforehand. Do not attempt to move the
machine yourself.
Power Supply
WARN ING
• Use only a power supply that meets the
specified voltage requirements. Failure to do
so may result in a fire or electrical shock.
• The machine must be connected to a
socket-outlet with grounding connec tion by
the provided power cord.
• Do not use power cords other than the one
provided, as this may result in a fire or
electrical shock.
• The provided power cord is intended for use
with this machine. Do not connect the power
cord to other devices.
• Do not modify, pull, forcibly bend, or perform
any other act that may damage the power
cord. Do not place heavy objects on the
power cord. Damaging the power cord may
result in a fire or electrical shock.
• Do not plug in or unplug the power plug
with wet hands, as this may result in an
electrical shock.
• Do not use extension cords or multi-plug
power strips with the machine. Doing so may
result in a fire or electrical shock.
• Do not wrap the power cord or tie it in a knot,
as this may result in a fire or electrical shock.
• Insert the power plug completely into the AC
power outlet. Failure to do so may result in a
fire or electrical shock.
• Remove the power plug completely from the
AC power outlet during a thunder storm.
Failure to do so may result in a fire, electrical
shock, or damage to the machine.
• Make sure that the power supply for the
machine is safe, and has a steady voltage.
• Keep the power cord away from a heat
source; failure to do this may cause the power
cord coating to melt, resulting in a fire or
14

electrical shock.
Avoid the following situations:
If excessive stress is applied to the connection
part of the power cord, it may damage the
power cord or the wires inside the machine may
disconnect. This could result in a fire.
• Connecting and disconnecting the power
cord frequently.
• Tripping over the power cord.
• The power cord is bent near the connection
part, and continuous stress is being applied
to the power outlet or the connection part.
• Applying excessive force on the power plug.
CAUTION
Install this machine near the power outlet and
leave sufficient space around the power plug so
that it can be unplugged easily in an emergency.
IMPORTANT
When connecting power
• Do not connect the power cord to an
uninterruptible power source. Doing so may
result in malfunction of or damage to the
machine at power failure.
• If you plug this machine into an AC power
outlet with multiple sockets, do not use the
remaining sockets to connect other devices.
• Do not connect the power cord to the
auxiliary AC power outlet on a computer.
Other precautions
Electrical noise may cause this machine to
malfunction or lose data.
Handling
WARN ING
• Immediately unplug the power plug from the
AC power outlet and contact an authorized
Canon dealer if the machine makes an
unusual noise, emits an unusual smell, or
emits smoke or excessive heat. Continued use
may result in a fire or electrical shock.
• Do not disassemble or modify this machine.
There are high-voltage and high-temperature
components inside the machine. Disassembly
or modification may result in a fire or
electrical shock.
• Place the machine where children will not
come in contac t with the power cord and
other cables or gears and electrical par ts
inside the machine. Failure to do so may
result in unexpected accidents.
• Do not use flammable sprays near this
machine. If flammable substances come into
contact with electrical parts inside this
machine, it may result in a fire or electrical
shock.
• When moving this machine, be sure to turn
OFF the power of this machine, and then
unplug the power plug and interface cables.
Failure to do so may damage the power cord
or interface cables, resulting in a fire or
electrical shock.
• When plugging or unplugging a USB cable
when the power plug is plugged into an AC
power outlet, do not touch the metal part of
the connector, as this may result in an
electrical shock.
If you are using a cardiac pacemaker
This machine generates a low level magnetic
flux and ultrasonic waves. If you use a cardiac
pacemaker and feel abnormalities, please move
away from this machine and consult your
physician immediately.
CAUTION
• Do not place heavy objects on this machine
as they may fall, resulting in injury.
• For safety, unplug the power plug if the
machine will not be used for a long period of
time.
• Use caution when opening and closing
covers to avoid injury to your hands.
• Keep hands and clothing away from the
rollers in the output area. If the rollers catch
your hands or clothing, this may result in
personal injury.
• The inside of the machine and the output slot
are very hot during and immediately after
use. Avoid contact with these areas to prevent
burns. Also, printed paper may be hot
immediately af ter being output, so use
caution when handling it. Failure to do so
may result in burns.
Feeder or platen glass cover
• Do not press down hard on the feeder or the
platen glass cover when using the platen
glass to make copies of thick book s. Doing so
may damage the platen glass and result in
personal injury.
• Close the feeder or the platen glass cover
gently to avoid catching your hands, as this
may result in personal injury.
• Be careful not to put your hands or fingers
into the feeder or the platen glass cover.
Otherwise, you may be injured.
Paper drawer
• Do not insert your hand into the machine
while the paper drawer is removed, as this
may result in personal injury.
Energy Saver key
Laser Safety
This product is confirmed as a Class 1 laser
product in IEC60825-1:2014 and EN60825-1:2014.
CLASS 1 LASER PRODUCT
LASER KLASSE 1
APPAREIL À LASER DE CLASSE 1
APPARECCHIO LASER DI CLASSE 1
PRODUCTO LÁSER DE CLASE 1
APARELHO A LASER DE CLASSE 1
LUOKAN 1 LASER-TUOTE
LASERPRODUKT KLASS 1
The laser beam can be harmful to human bodies.
Since radiation emitted inside the product is
completely confined within protective housings
and external covers, the laser beam cannot
escape from the machine during any phase of
user operation. Read the following remarks and
instructions for safety.
(Energy Saver) for safety when the
• Press
machine will not be used for a long period of
time, such as overnight. Also, turn OFF the
main power switch, and disconnect the
power cord for safety when the machine will
not be used for an extended period of time,
such as during consecutive holidays.
• Never open covers other than those
instructed in the manuals for this machine.
• If the laser beam should escape and enter
your eyes, exposure may cause damage to
your eyes.
• Use of controls, adjustments, or performance
of procedures other than those specified in
this manual may result in hazardous radiation
exposure.
Laser Safety Caution
Fixing Unit
When removing jammed paper or when
inspecting the inside of the machine, do not
expose yourself to the heat emitted from the
fixing unit and its surroundings for a prolonged
period of time. Doing so may result in low
temperature burns, even though you did not
touch the fixing unit and its surroundings
directly.
IMPORTANT
• Follow the caution instructions on labels and
the like found on this machine.
• Do not subject the machine to strong shocks
or vibration.
• Do not forcibly open and close doors, covers,
and other parts. Doing so may result in
damage to the machine.
• Do not turn the main power switch OFF or
open the covers while the machine is in
operation. This may result in paper jams.
• Use a modular cable that is shor ter than 3
meters.
• Use a USB cable that is shorter than 3 meters.
Safety-Related Symbols
Power switch: “ON” position
Power switch: “OFF” position
Power switch: “STAND-BY” position
15

Push-push switch “ON” “OFF”
Protective ear thing terminal
Dangerous voltage inside. Do not open
covers other than instructed.
CAUTION: Hot surface. Do not touch.
Class II equipment
Moving parts: Keep body parts away from
moving parts
CAUTION: An electrical shock may occur.
Remove all the power plugs from the power
outlet.
There are sharp edges. Keep body parts
away from sharp edges.
[NOTE]
Some of symbols shown above may not be
affixed depending on the product.
Maintenance and Inspections
Clean this machine periodically. If dust
accumulates, the machine may not operate
properly. When cleaning, be sure to observe the
following. If a problem occurs during operation,
see “Troubleshooting” in the User's Guide.
WARN ING
• Before cleaning, turn OFF the power and
unplug the power plug from the AC power
outlet. Failure to do so may result in a fire or
electrical shock.
• Unplug the power plug periodically and
clean with a dry cloth to remove dust and
grime. Accumulated dust may absorb
humidity in the air and may result in a fire if it
comes into contact with electricity.
• Use a damp, well wrung-out cloth to clean
the machine. Dampen cleaning cloths with
water only. Do not use alcohol, benzine, paint
thinner, or other flammable substances. Do
not use tissue paper or paper towels. If these
substances come into contact with electrical
parts inside the machine, they may generate
static electricity or result in a fire or electrical
shock.
• Check the power cord and plug periodically
for damage. Check the machine for rust,
dents, scratches, cracks, or excessive heat
generation. Use of poorly-maintained
equipment may result in a fire or electrical
shock.
CAUTION
• The inside of the machine has hightemperature and high-voltage components.
Touching these components may result in
burns. Do not touch any part of the machine
that is not indicated in the manual.
• When loading paper or removing jammed
paper, be careful not to cut your hands with
the edges of the paper.
Consumables
WARN ING
• Do not throw toner cartridges or waste toner
containers into open flame, or do not store
them or printing/copy paper in a place
exposed to open flame. This may cause them
to ignite, resulting in burns or fire.
• If you accidentally spill or scatter toner,
carefully gather the toner par ticles together
or wipe them up with a soft, damp cloth in a
way that prevents inhalation. Never use a
vacuum cleaner that does not have
safeguards against dust explosions to clean
up spilled toner. Doing so may cause a
malfunction in the vacuum cleaner, or result
in a dust explosion due to static discharge.
CAUTION
• Keep toner and other consumables out of the
reach of small children. If these items are
ingested, consult a physician immediately.
• If toner touches your clothes or skin, wash it
away with water immediately. Do not use
warm water, as this may cause toner to fix,
resulting in a permanent stain.
• Do not dismantle the toner car tridge, as
doing so may cause toner to fly out and enter
your eyes or mouth. If toner gets into your
eyes or mouth, wash them immediately with
cold water and immediately consult a
physician.
• If toner escapes from the toner cartridge,
make sure not to ingest the toner or allow it
to directly touch your skin. If toner touches
your skin, wash it away with soap and water. If
your skin still feels irritated after washing it or
you ingest toner, consult a physician
immediately.
• When pulling out the waste toner container,
be careful not to let it fall. This may result in
injury.
• Do not touch the electrical contacts.
IMPORTANT
• Store toner cartridges in a cool location, away
from direct sunlight.
• Do not store toner cartridges in an upright
position.
Notice
Product Name
Safety regulations require the product's name to
be registered. In some regions where this
product is sold, the following name(s) in
parentheses ( ) may be registered instead.
imageRUNNER 2645i/2645/2635i/2630i/2630/26
25i/2625 (F177400)
EMC requirements of EC Directive
This equipment conforms with the essential EMC
requirements of EC Directive. We declare that
this product conforms with the EMC
requirements of EC Directive at nominal mains
input 230 V, 50 Hz although the rated input of
the product is 220 to 240 V, 50/60 Hz. Use of
shielded cable is necessary to comply with the
technical EMC requirements of EC Directive.
India E-Waste Rule
You can see the information about proper
handling equipment after use in the latest User's
Guide (HTML manual) from the Canon website
(https://oip.manual.canon).
Wireless LAN Regulatory Information
imageRUNNER 2645i/2645/2635i/2630i/2630/26
25i/2625 includes approved Wireless LAN
Module (Model name: K30365).
Regulator y information for users in Singapore
Complies with
IMDA Standards
DB00671
Legal Limitations on the Usage of Your
Product and the Use of Images
Using your produc t to scan, print or otherwise
reproduce certain documents, and the use of
such images as scanned, printed or otherwise
reproduced by your product, may be prohibited
by law and may result in criminal and/or civil
liability. A non-exhaustive list of these
documents is set forth below. This list is
intended to be a guide only. If you are uncertain
about the legality of using your product to scan,
print or otherwise reproduce any particular
document, and/or of the use of the images
scanned, printed or otherwise reproduced, you
should consult in advance with your legal
advisor for guidance.
• Paper Money
• Travelers Checks
• Money Orders
• Food Stamps
• Certificates of Deposit
• Passports
• Postage Stamps (canceled or uncanceled)
• Immigration Papers
• Identifying Badges or Insignias
• Internal Revenue Stamps (canceled or
uncanceled)
• Selective Service or Draft Papers
• Bonds or Other Certificates of Indebtedness
• Checks or Drafts Issued by Governmental
Agencies
• Stock Certificates
• Motor Vehicle Licenses and Cer tificates of
Title
• Copyrighted Works/Works of Art without
Permission of Copyright Owner
Disclaimers
• The information in this document is subject
to change without notice.
• CANON INC. MAKES NO WARRANTY OF ANY
KIND WITH REGARD TO THIS MATERIAL,
EITHER EXPRESS OR IMPLIED, EXCEPT AS
PROVIDED HEREIN, INCLUDING WITHOUT
LIMITATION, THEREOF, WARRANTIES AS TO
MARKETABILITY, MERCHANTABILITY, FITNESS
FOR A PARTICULAR PURPOSE OF USE, OR
NON-INFRINGEMENT. CANON INC. SHALL
NOT BE LIABLE FOR ANY DIRECT, INCIDENTAL,
OR CONSEQUENTIAL DAMAGES OF ANY
NATURE, OR LOSSES OR EXPENSES RESULTING
FROM THE USE OF THIS MATERIAL.
About This Manual
Screens
Screens of the touch panel display used in this
manual are those taken when the imageRUNNER
2645i has the following optional equipment
attached to it:
• Cassette Feeding Unit-AN
• Super G3 FAX Board
Note that functions that cannot be used
depending on the model or options do not
appear on the touch panel display.
Illustrations
Illustrations used in this manual are those
displayed when the imageRUNNER 2645i has the
16

following optional equipment at tached to it:
• Cassette Feeding Unit-AN
Tra dem ark s
macOS is a trademark of Apple Inc.
Other product and company names herein may
be the trademarks of their respective owners.
Third Party Software
This Canon product (the “PRODUCT” ) includes
third-par ty software modules. Use and
distribution of these sof tware modules,
including any updates of such software modules
(collectively, the “SOFT WARE”) are subject to
license conditions (1) through (9) below.
(1) You agree that you will comply with any
applicable export control laws, restrictions or
regulations of the countries involved in the
event that this PRODUCT including the
SOFTWARE is shipped, transferred or
exported into any countr y.
(2) Rights holders of the SOFT WARE retain in all
respects the title, ownership and intellectual
property rights in and to the SOFT WARE.
Except as expressly provided herein, no
license or right, expressed or implied, is
hereby conveyed or granted by rights
holders of the SOFTWARE to you for any
intellectual propert y of rights holders of the
SOFTWARE.
(3) You may use the SOFTWARE solely for use
with the PRODUCT.
(4) You may not assign, sublicense, market,
distribute, or transfer the SOFTWARE to any
third part y without prior writ ten consent of
rights holders of the SOFTWARE.
(5) Notwithstanding the foregoing, you may
transfer the SOFTWARE only when (a) you
assign all of your rights to the PRODUCT and
all rights and obligations under the license
conditions to transferee and (b) such
transferee agrees to be bound by all these
conditions.
(6) You may not decompile, reverse engineer,
disassemble or otherwise reduce the code of
the SOFT WARE to human readable form.
(7) You may not modify, adapt, translate, rent,
lease or loan the SOFTWARE or create
derivative works based on the SOFT WARE.
(8) You are not entitled to remove or make
separate copies of the SOFTWARE from the
PRODUCT.
(9) The human-readable portion (the source
code) of the SOFTWARE is not licensed to
you.
Notwithstanding (1) through (9) above, the
PRODUCT includes third-party software
modules accompanying the other license
conditions, and these sof tware modules are
subject to the other license conditions.
Please check Plat form Version of the PRODUCT
and refer to the other license conditions of
third-par ty software modules described in
Appendix of Manual for the corresponding
Platform Version. This Manual is available at
https://oip.manual.canon/.
By using the PRODUCT, you shall be deemed to
have agreed to all applicable license conditions.
If you do not agree to these license conditions,
please contac t your service representative.
V_190228
17

Memo
1818

Memo
1919

CANON INC.
30-2, Shimomaruko 3-chome, Ohta-ku, Tokyo
146-8501, Japan
CANON AUSTRALIA PTY LTD
Building A, The Park Estate, 5 Talavera Road,
Macquarie Park, NSW 2113, Australia
CANON U.S.A., INC.
One Canon Park, Melville, NY 11747, U.S.A.
CANON CANADA INC.
8000 Mississauga Road Brampton ON L6Y 5Z7,
Canada
CANON EUROPA N.V.
Bovenkerkerweg 59, 1185 XB Amstelveen, The
Netherlands
(See http://www.canon-europe.com/ for details on
your regional dealer)
FT6-2308 (000) XXXXXXXXXX Copyright CANON INC. 2019 PRINTED IN THAILAND
CANON SINGAPORE PTE LTD
1 Fusionopolis Place, #15-10, Galaxis, Singapore
1385 22
 Loading...