


Canon imageRunner 2204F, imageRunner 2004, imageRunner 2204N, imageRunner 2004N Getting Started

Getting Started
FT6-1425 (000)

Contents
Installation Requirements ................................................................................................. 3
About the Supplied Manuals ...........................................................................................3
Navigating the Menu and Text Input Method ...........................................................4
Turning ON/OFF the Power ..............................................................................................4
Specifying the Initial Settings .......................................................................................... 5
Choosing the Method to Connect the Machine to the Computer .....................5
Connecting via a LAN (imageRUNNER 2204F/2204N/2004N) ............................. 5
Connecting via a USB Cable .............................................................................................6
Connecting via a Wireless LAN (imageRUNNER 2204F/2204N/2004N) ............ 6
Setting Wireless LAN (imageRUNNER 2204F/2204N/2004N) ............................... 7
Checking That the Wireless LAN Setting is Completed
(imageRUNNER 2204F/2204N/2004N) .........................................................................9
Setting a Paper Size and Type .......................................................................................... 9
Perform Useful Tasks .........................................................................................................10
Clearing Paper Jams ..........................................................................................................11
Replacing Toner Cartridge ..............................................................................................12
2

Installation Requirements
imageRUNNER 2204F/2204N/2004N
100 mm or more
533 mm
1,022.9 mm
imageRUNNER 2004
100 mm or more
1,285 mm
1,285 mm
About the Supplied Manuals
①
Getting Started (This manual):
Read this manual rst. This manual describes the basic machine
settings, operations, and cautions. Be sure to read this manual
before using the machine.
②
MF Driver Installation Guide (User Software and Manuals
CD-ROM/DVD-ROM):
Read this manual next. This manual describes software
installation.
③
e-Manual (User Software and Manuals CD-ROM/
DVD-ROM):
Read the desired chapter to suit your needs. The e-Manual is
categorized by subject to nd desired information easily.
1,022.9 mm
533 mm
Viewing the e-Manual from the CD-ROM/DVD-ROM
1 Insert the User Software and Manuals CD-ROM/DVD-ROM in
your computer.
• Select a language and click [OK] if you are prompted to do so.
2 Click [Manuals].
3 Click [e-Manual].
Depending on the operating system you are using, a security
protection message appears.
If the User Software and Manuals CD-ROM/DVD-ROM has been already
inserted in your computer and the setup screen is not displayed,
remove the CD-ROM/DVD-ROM and insert it again.
3
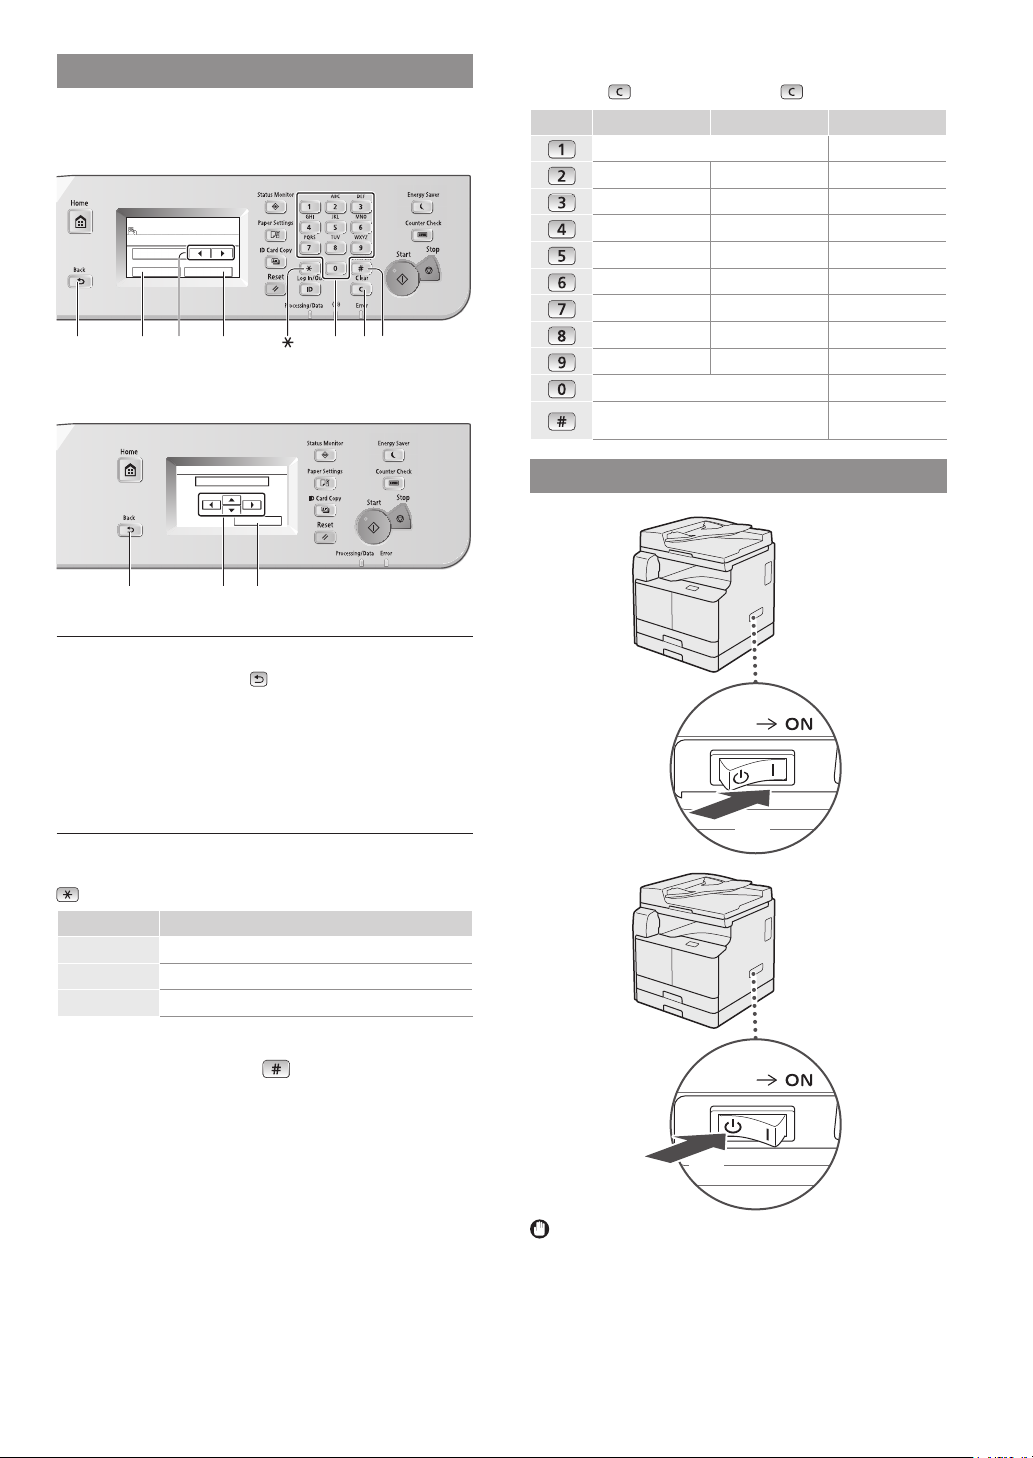
Navigating the Menu and Text Input Method
imageRUNNER 2204F/2204N/2004N
The operation panel shown here is for the imageRUNNER
2204F. The available keys vary depending on the model.
Register Unit Name
Canon-1
Symbol
<A/a/12>Back
◄►
imageRUNNER 2004
aA
ApplyA/a/12
<Apply>
Numeric
key
Clear
#
Deleting characters
Delete with . Pressing and holding deletes all characters.
Entry mode: <A> Entry mode: <a> Entry mode: <12>
@ . - _ / 1
ABC abc 2
DEF def 3
GHI ghi 4
JKL jkl 5
MNO mno 6
PQRS pqrs 7
TUV tuv 8
WXYZ wxyz 9
(Not available) 0
(space) - . * # ! “ , ; : ^ ` _ = / | ‘ ? $ @ % & + \ ˜ ( )
[ ] { } < >
(Not available)
Current Date/Time Settings
01/08 2014 10:00 AM
(0:00-12:59)
Apply
Back <Apply>
◄►
Navigating the Menu
Item selection
Tap an item to select it. Press to return to the previous
screen.
Setting conrmation
Tap the item. However, when <Apply> appears, tap <Apply>.
Text Input Method
(imageRUNNER 2204F/2204N/2004N)
Changing entry mode
Tap <A/a/12> to change the entry mode. You can also press
to change the entry mode.
Entry mode Available text
<A> Uppercase alphabetic letters and symbols
<a> Lowercase alphabetic letters and symbols
<12> Numbers
Entering text, symbols, and numbers
Enter with the numeric keys or
Moving the cursor (Entering a space)
Tap <◄> or <►> to move the cursor. To enter a space, move
the cursor to the end of the text, and tap <►>.
.
Turning ON/OFF the Power
ON
OFF
• Make sure that the power plug is rmly inserted into the
power outlet.
• Do not connect the USB cable at this time. Connect it
when installing software.
4
Specifying the Initial Settings
Follow the instructions on the screen to perform the following:
• Set the language
• Set the country and region
• Set the time zone
• Set the date and time
• Register the Purchase Information
• Set the Remote UI Access PIN*
• Set the Wireless LAN Connecting*
* imageRUNNER 2204F/2204N/2004N only
For details on navigating the menu and how to input the
numbers, see “Navigating the Menu and Text Input Method”
P.4).
(
Setting the Remote UI Access PIN is recommended when
using Remote UI to prevent unauthorized access by a third
party. The Remote UI uses a Web browser to operate the
machine, check the status, and specify settings, enabling you
to manage the machine while remaining at your desk. For
information on using the Remote UI, see the e-Manual.
Choosing the Method to Connect the Machine to the Computer
•
Connecting via a Wireless LAN
(imageRUNNER 2204F/2204N/2004N)
You can connect the machine to the computer through a
wireless router*. Since it is connected to wireless, no LAN
cables are needed.
* A wireless router (access point), which supports IEEE802.11b/g/n,
is required.
If you do not sure whether your router is wireless or wired:
See the instruction manual provided with your network
device, or contact the manufacturer.
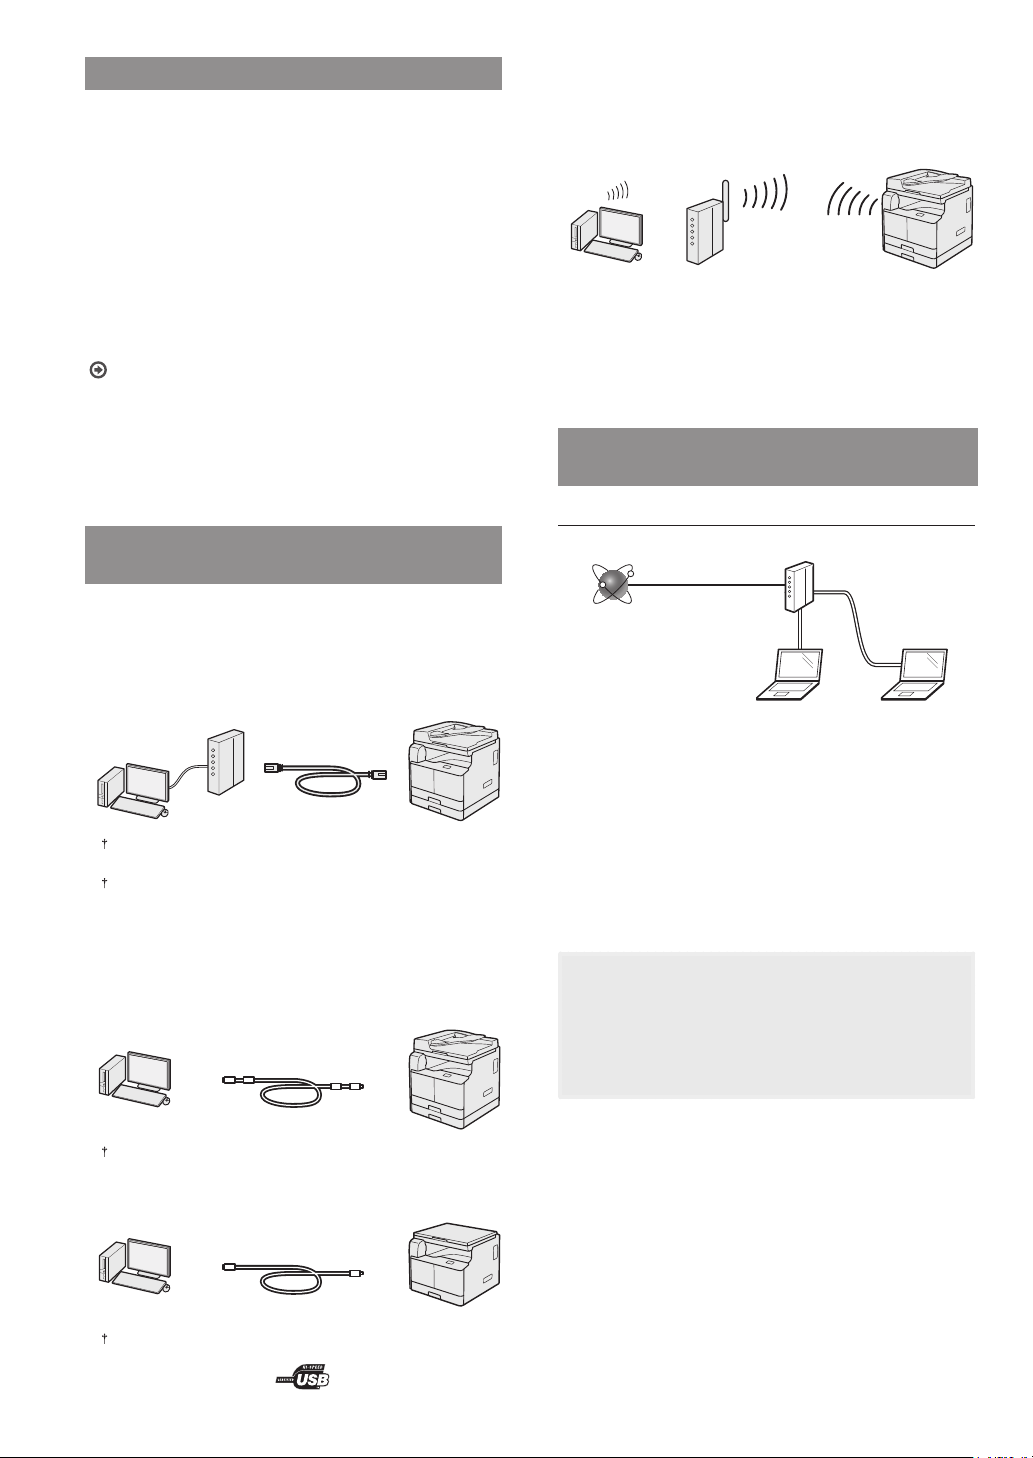
Connecting via a LAN (imageRUNNER 2204F/2204N/2004N)
Checking Before the Setup
Internet
Router
•
Connecting via a LAN
(imageRUNNER 2204F/2204N/2004N)
You can connect the machine to the computer through a
wired LAN router. Use a LAN cable to connect the machine
to the router.
Make sure that there are ports available on the router to connect
the machine and the computer.
Have a Category 5 or higher twisted pair LAN cable ready.
•
Connecting via a USB cable
You can connect the machine to the computer using a USB
cable.
imageRUNNER 2204F/2204N/2004N
A USB cable is included with the machine.
LAN cable
Are the computer and the router properly connected using
a LAN cable?
For more information, see the instruction manual for the
network device you are using, or contact the networking
device manufacturer.
Have the network settings on the computer been
completed?
If the computer is not properly congured, you may not use
the wired LAN connection even after completing the following
settings.
NOTE
• When you connect to a network environment that is not
security protected, your personal information could be
disclosed to third parties. Please use caution.
• If you connect through a LAN in the oce, contact your
network administrator.
imageRUNNER 2004
A USB cable is not included in this package. Please obtain a
suitable cable for your computer. Make sure that the USB cable you
use has the following mark.
5
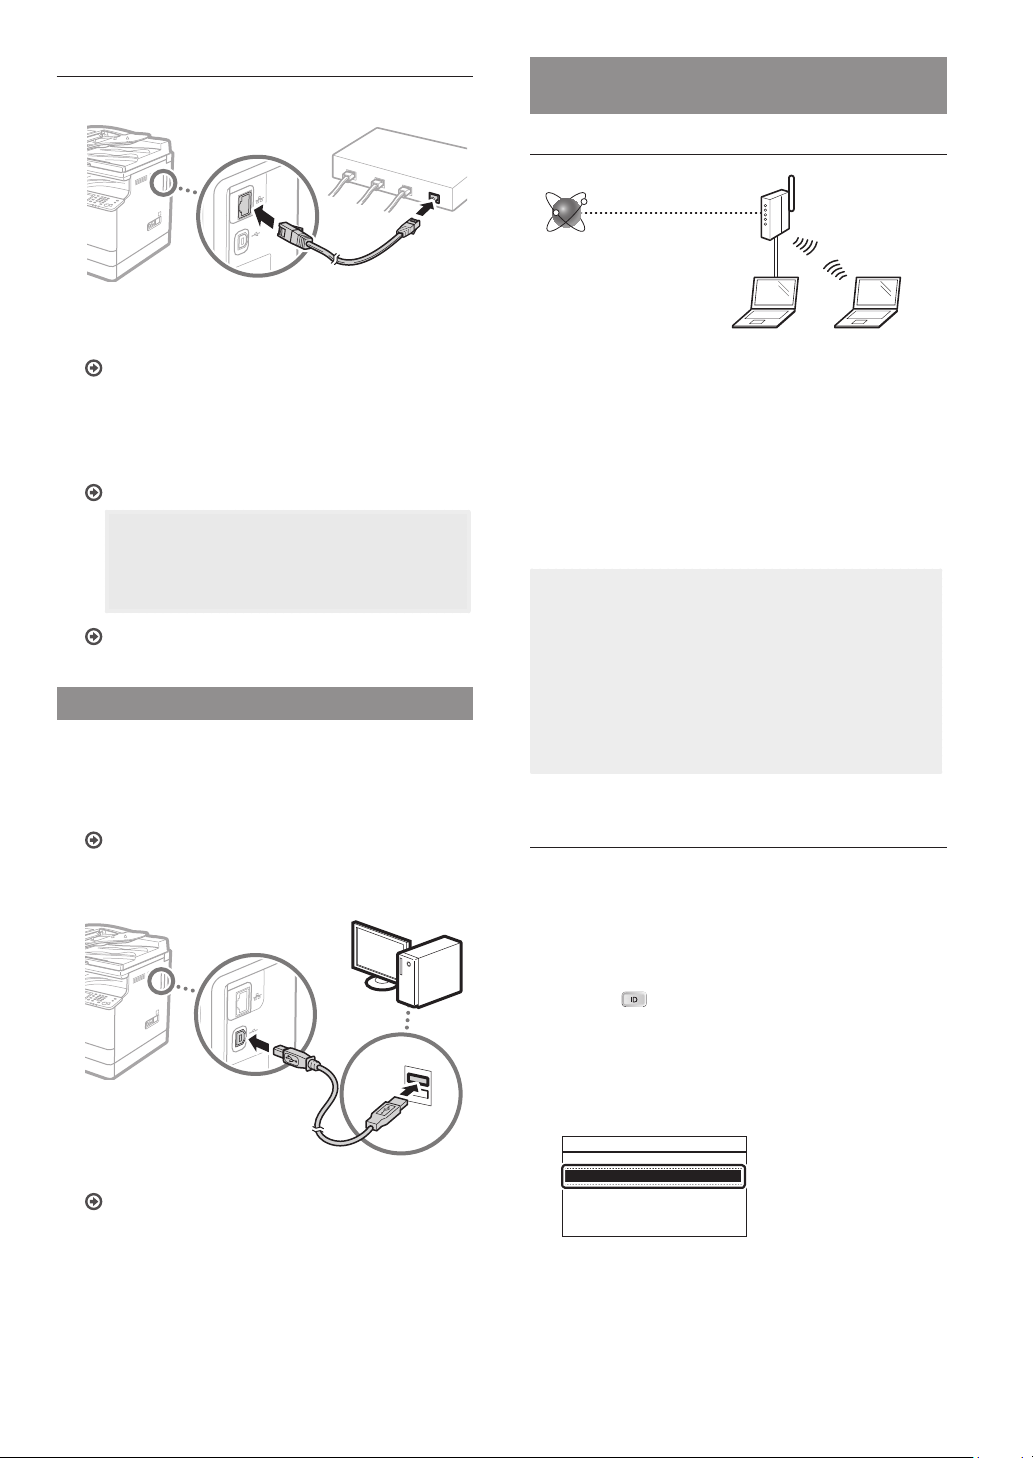
Setting Up the LAN Connection
Connect the LAN cable.
1
The IP address will be automatically congured in 2
minutes. If you want to set the IP address manually, see
the following items.
e-Manual “Network” ► “Connecting to a Network” ►
“Setting IP Addresses”
Install the drivers on your computer using the User
2
Software and Manuals CD-ROM/DVD-ROM.
See “For details on the installation procedures:” (P.9).
NOTE
The scanner driver cannot be installed if the
machine and your computer are connected in an
IPv6 environment.
Proceed to “Setting a Paper Size and Type” (P.9).
Connecting via a USB Cable
Connect the USB cable after installing the drivers.
Install the drivers on your computer using the User
1
Software and Manuals CD-ROM/DVD-ROM.
See “For details on the installation procedures:” (P.9).
Connecting via a Wireless LAN (imageRUNNER 2204F/2204N/2004N)
Checking Before the Setup
Wireless LAN Router
Internet
Is the computer connected to the router (access point)
correctly by a LAN cable or wireless LAN?
For more information, see the instruction manual for the
network device you are using, or contact the networking
device manufacturer.
Have the network settings on the computer been
completed?
If the computer is not properly congured, you may not use
the wireless LAN connection even after completing the
following settings.
NOTE
• You cannot connect both the wired LAN and wireless
LAN at the same time. In addition, the machine is set to
the “Wired LAN” by default.
• When you connect to a network environment that is
not security protected, your personal information
could be disclosed to third parties. Please use caution.
• If you connect through a LAN in the oce, contact your
network administrator.
Switching the Connection Method to Wireless LAN
Connect the USB cable.
2
Proceed to “Setting a Paper Size and Type” (P.9).
6
Tap <Menu> in the Home Screen.
1
Tap <Network Settings>.
2
If a screen for entering a System Manager ID and PIN is
displayed, enter the System Manager ID and PIN, tap <Apply>,
and press .
Tap <Select Wired/Wireless LAN>.
3
Tap <Wireless LAN>.
4
Select LAN
Wired LAN
Wireless LAN