

Canon imageRUNNER 2030i, imageRUNNER 2200, imageRUNNER 2220i, imageRUNNER 2220N, imageRUNNER 2870 Guide for Mac
...Page 1
Mac Fax Driver Guide
Mac Fax Driver Ver. 1.40
Please read this guide before operating this equipment.
After you finish reading this guide, store it in a safe place for future reference.
ENG
Page 2

Page 3

Mac Fax Driver Guide
Page 4

Page 5

How This Manual Is Organized
Chapter 1
Chapter 2
Chapter 3
Chapter 4
Chapter 5
Chapter 6
Before You Start
Getting Started
Fax Driver Options
Special Fax Driver Options
Troubleshooting
Appendix
Includes the available paper sizes list, glossary, and index.
Considerable effort has been made to ensure that this manual is free of inaccuracies and omissions. However, as we are constantly improving our
products, if you need an exact specification, please contact Canon.
Page 6

Contents
Preface . . . . . . . . . . . . . . . . . . . . . . . . . . . . . . . . . . . . . . . . . . . . . . . . . . . . . . . . . vii
How to Use This Manual . . . . . . . . . . . . . . . . . . . . . . . . . . . . . . . . . . . . . . . . . . . vii
Symbols Used in This Manual . . . . . . . . . . . . . . . . . . . . . . . . . . . . . . . . . . . . . vii
Buttons Used in This Manual . . . . . . . . . . . . . . . . . . . . . . . . . . . . . . . . . . . . . . vii
Displays Used in This Manual . . . . . . . . . . . . . . . . . . . . . . . . . . . . . . . . . . . . . viii
Legal Notices . . . . . . . . . . . . . . . . . . . . . . . . . . . . . . . . . . . . . . . . . . . . . . . . . . . . .ix
Trademarks . . . . . . . . . . . . . . . . . . . . . . . . . . . . . . . . . . . . . . . . . . . . . . . . . . . . ix
Copyright . . . . . . . . . . . . . . . . . . . . . . . . . . . . . . . . . . . . . . . . . . . . . . . . . . . . . . ix
Disclaimers. . . . . . . . . . . . . . . . . . . . . . . . . . . . . . . . . . . . . . . . . . . . . . . . . . . . . ix
Chapter 1 Before You Start
Supported Canon Products . . . . . . . . . . . . . . . . . . . . . . . . . . . . . . . . . . . . . . . .1-2
System Requirements . . . . . . . . . . . . . . . . . . . . . . . . . . . . . . . . . . . . . . . . . . . . .1-5
Where to Find Help . . . . . . . . . . . . . . . . . . . . . . . . . . . . . . . . . . . . . . . . . . . . . . .1-6
Chapter 2 Getting Started
Installing the Software. . . . . . . . . . . . . . . . . . . . . . . . . . . . . . . . . . . . . . . . . . . . .2-2
Installing the Fax Driver . . . . . . . . . . . . . . . . . . . . . . . . . . . . . . . . . . . . . . . . . .2-2
Uninstalling the Fax Driver . . . . . . . . . . . . . . . . . . . . . . . . . . . . . . . . . . . . . . . .2-5
Specifying the Fax Settings . . . . . . . . . . . . . . . . . . . . . . . . . . . . . . . . . . . . . . .2-10
Mac OS X 10.2.8 - 10.3.9. . . . . . . . . . . . . . . . . . . . . . . . . . . . . . . . . . . . . . . .2-10
USB Connection . . . . . . . . . . . . . . . . . . . . . . . . . . . . . . . . . . . . . . . . . . . .2-10
TCP/IP Protocol Connection . . . . . . . . . . . . . . . . . . . . . . . . . . . . . . . . . . .2-12
Mac OS X 10.4 or later. . . . . . . . . . . . . . . . . . . . . . . . . . . . . . . . . . . . . . . . . .2-14
USB Connection . . . . . . . . . . . . . . . . . . . . . . . . . . . . . . . . . . . . . . . . . . . .2-14
TCP/IP Protocol Connection . . . . . . . . . . . . . . . . . . . . . . . . . . . . . . . . . . .2-16
Setting Up the Fax Configuration/Confirming the Printer Status . . . . . . . . .2-19
Chapter 3 Fax Driver Options
Faxing a Document . . . . . . . . . . . . . . . . . . . . . . . . . . . . . . . . . . . . . . . . . . . . . . .3-2
Sending a Document . . . . . . . . . . . . . . . . . . . . . . . . . . . . . . . . . . . . . . . . . . . .3-2
Sending to a Remote Memory Box . . . . . . . . . . . . . . . . . . . . . . . . . . . . . . . . .3-4
Specifying the Paper Orientation . . . . . . . . . . . . . . . . . . . . . . . . . . . . . . . . . . . .3-7
Scaling a Document. . . . . . . . . . . . . . . . . . . . . . . . . . . . . . . . . . . . . . . . . . . . . . .3-8
Specifying the Paper Size . . . . . . . . . . . . . . . . . . . . . . . . . . . . . . . . . . . . . . . . . .3-9
iv
Page 7

Specifying the Output Range . . . . . . . . . . . . . . . . . . . . . . . . . . . . . . . . . . . . . . 3-10
Faxing Multiple Pages on One Sheet. . . . . . . . . . . . . . . . . . . . . . . . . . . . . . . .3-11
Saving the Fax Settings . . . . . . . . . . . . . . . . . . . . . . . . . . . . . . . . . . . . . . . . . .3-13
Specifying Recipients . . . . . . . . . . . . . . . . . . . . . . . . . . . . . . . . . . . . . . . . . . . . 3-15
Adding a New Name and Fax Number . . . . . . . . . . . . . . . . . . . . . . . . . . . . .3-15
Adding a Recipient from the Address Book . . . . . . . . . . . . . . . . . . . . . . . . . . 3-17
Defining Address Book Entries . . . . . . . . . . . . . . . . . . . . . . . . . . . . . . . . . . . .3-19
Person (Single) Entry. . . . . . . . . . . . . . . . . . . . . . . . . . . . . . . . . . . . . . . . . . .3-19
Group Entry . . . . . . . . . . . . . . . . . . . . . . . . . . . . . . . . . . . . . . . . . . . . . . . . . .3-22
Importing/Exporting Address Book Entries . . . . . . . . . . . . . . . . . . . . . . . . . . 3-25
Importing Address Book Entries . . . . . . . . . . . . . . . . . . . . . . . . . . . . . . . . . . 3-25
Exporting Address Book Entries . . . . . . . . . . . . . . . . . . . . . . . . . . . . . . . . . . 3-27
Attaching a Cover Sheet to a Fax. . . . . . . . . . . . . . . . . . . . . . . . . . . . . . . . . . .3-29
Registering an Original Cover Sheet as a Template . . . . . . . . . . . . . . . . . . . 3-36
Chapter 4 Special Fax Driver Options
Setting the Fax Send Time (Mac OS X 10.3 or later) . . . . . . . . . . . . . . . . . . . .4-2
Changing the Order of Pages (Mac OS X 10.3 or later) . . . . . . . . . . . . . . . . . .4-4
Specifying the Color Filter (Mac OS X 10.3 or later). . . . . . . . . . . . . . . . . . . . . 4-6
Saving a Document in PDF Format . . . . . . . . . . . . . . . . . . . . . . . . . . . . . . . . . .4-7
Mac OS X 10.2.8 - 10.3.9 . . . . . . . . . . . . . . . . . . . . . . . . . . . . . . . . . . . . . . . .4-7
Mac OS X 10.4 or Later . . . . . . . . . . . . . . . . . . . . . . . . . . . . . . . . . . . . . . . . . . 4-8
Saving a Document as a File (Mac OS X 10.2.8 - 10.3.9) . . . . . . . . . . . . . . . .4-10
Specifying the Fax Resolution . . . . . . . . . . . . . . . . . . . . . . . . . . . . . . . . . . . . . 4-11
Specifying the Telephone Number Prefix . . . . . . . . . . . . . . . . . . . . . . . . . . . . 4-12
Selecting a Telephone Line for Fax Transmission . . . . . . . . . . . . . . . . . . . . . 4-14
Customizing Telephone Line Names . . . . . . . . . . . . . . . . . . . . . . . . . . . . . . . . 4-16
Specifying the Sender. . . . . . . . . . . . . . . . . . . . . . . . . . . . . . . . . . . . . . . . . . . .4-18
Using the Sent Fax Notification Option . . . . . . . . . . . . . . . . . . . . . . . . . . . . . . 4-20
Setting the Fax Send Time . . . . . . . . . . . . . . . . . . . . . . . . . . . . . . . . . . . . . . . . 4-22
Job Accounting Feature . . . . . . . . . . . . . . . . . . . . . . . . . . . . . . . . . . . . . . . . . . 4-24
Job Accounting Overview . . . . . . . . . . . . . . . . . . . . . . . . . . . . . . . . . . . . . . . 4-24
Specifying the ID and Password . . . . . . . . . . . . . . . . . . . . . . . . . . . . . . . . . .4-24
Faxing with Job Accounting . . . . . . . . . . . . . . . . . . . . . . . . . . . . . . . . . . . . . . 4-26
With Confirm ID/Password when Sending Fax Selected . . . . . . . . . . . . . 4-26
With Confirm ID/Password when Sending Fax Not Selected. . . . . . . . . . 4-27
Using the Faxmonitor . . . . . . . . . . . . . . . . . . . . . . . . . . . . . . . . . . . . . . . . . . . . 4-28
Starting the Faxmonitor . . . . . . . . . . . . . . . . . . . . . . . . . . . . . . . . . . . . . . . . . 4-28
File Menu . . . . . . . . . . . . . . . . . . . . . . . . . . . . . . . . . . . . . . . . . . . . . . . . . . . .4-29
Printer Menu . . . . . . . . . . . . . . . . . . . . . . . . . . . . . . . . . . . . . . . . . . . . . . . . .4-30
Faxmonitor Window . . . . . . . . . . . . . . . . . . . . . . . . . . . . . . . . . . . . . . . . . . . . 4-31
v
Page 8

Confirming the Printer Status. . . . . . . . . . . . . . . . . . . . . . . . . . . . . . . . . . . . . .4-33
Chapter 5 Troubleshooting
Problems and Solutions . . . . . . . . . . . . . . . . . . . . . . . . . . . . . . . . . . . . . . . . . . .5-2
Chapter 6 Appendix
Available Paper Sizes List. . . . . . . . . . . . . . . . . . . . . . . . . . . . . . . . . . . . . . . . . .6-2
About the Address Book and Cover Sheets . . . . . . . . . . . . . . . . . . . . . . . . . . .6-3
Maximum Entries for the Address Book. . . . . . . . . . . . . . . . . . . . . . . . . . . . . .6-3
Maximum Recipients and Cover Sheet Options. . . . . . . . . . . . . . . . . . . . . . . .6-3
Glossary . . . . . . . . . . . . . . . . . . . . . . . . . . . . . . . . . . . . . . . . . . . . . . . . . . . . . . . .6-4
Index . . . . . . . . . . . . . . . . . . . . . . . . . . . . . . . . . . . . . . . . . . . . . . . . . . . . . . . . . . .6-5
vi
Page 9

Preface
Thank you for purchasing this Canon product. Please read this manual thoroughly before
operating the product in order to familiarize yourself with its capabilities, and to make the
most of its many functions. After reading this manual, store it in a safe place for future
reference.
How to Use This Manual
Symbols Used in This Manual
The following symbols are used in this manual to explain procedures, restrictions,
handling precautions, and instructions that should be observed for safety.
IMPORTANT
NOTE
Indicates operational requirements and restrictions. Be sure to read
these items carefully in order to operate the product correctly, and to
avoid damage to the product.
Indicates a clarification of an operation, or contains additional
explanations for a procedure. Reading these notes is highly
recommended.
Buttons Used in This Manual
The following button names are a few examples of how buttons to be clicked are
expressed in this manual:
Buttons on Computer Operation Screens: [Button Name]
Examples: [OK]
[Print]
vii
Page 10
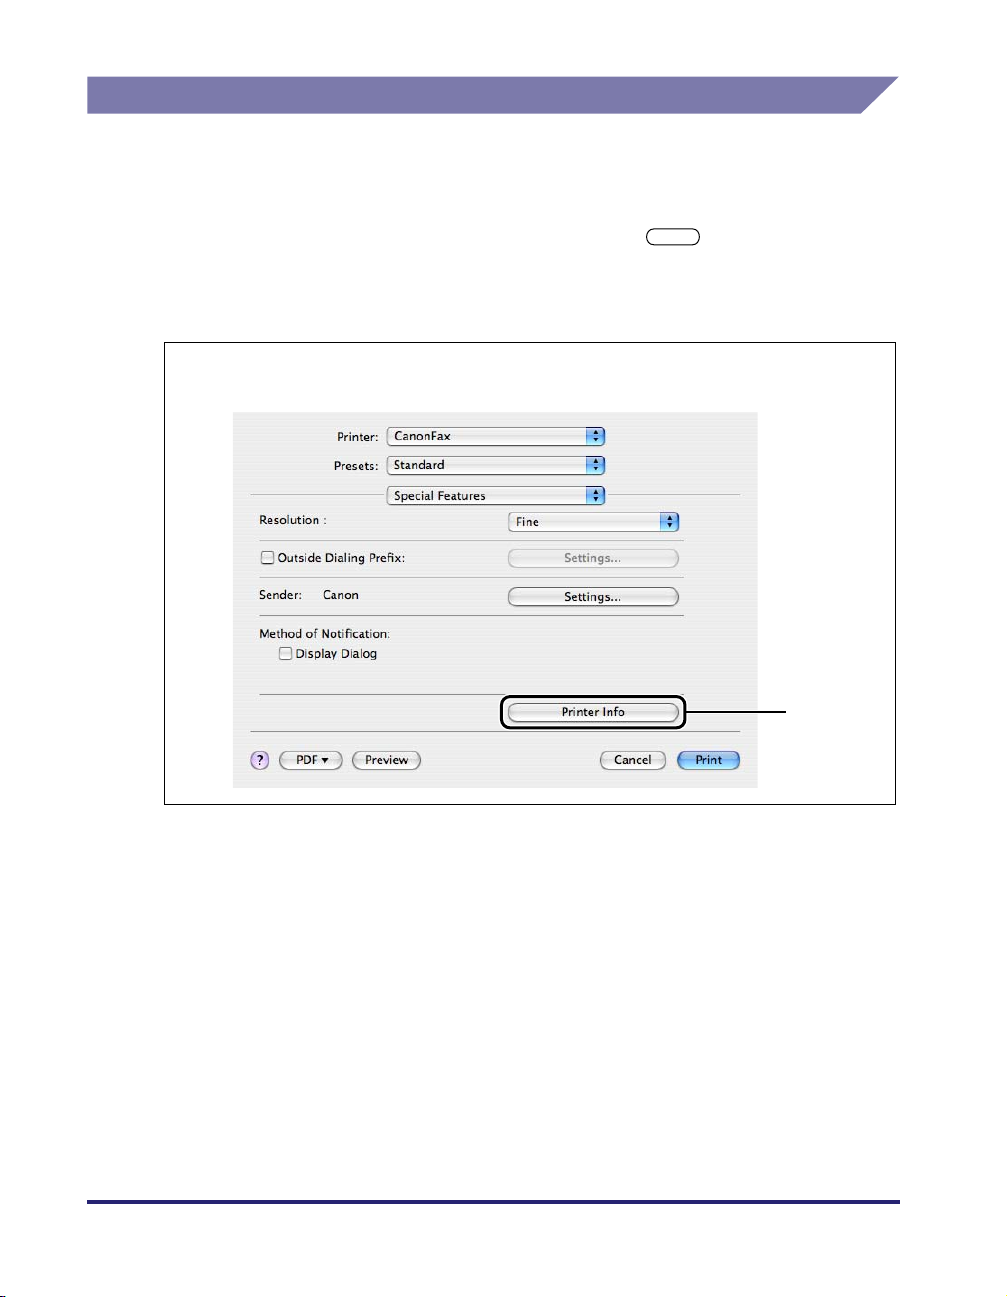
Displays Used in This Manual
Screen shots of computer operation screens used in this manual may differ from
the ones you actually see, depending on the operating system and the model or
options that come with your machine.
The buttons which you should click are marked with a , as shown below.
When multiple buttons can be clicked, they are highlighted and mentioned in the
order in which they should be clicked.
3
Click [Printer Info].
viii
Click this
button for
operation.
Page 11

Legal Notices
Trademarks
Canon, the Canon logo, imageRUNNER, imageCLASS, imagePASS, and iR are
trademarks of Canon Inc.
Apple, ColorSync, Mac OS, and Macintosh are trademarks of Apple Computer, Inc.
Other product and company names herein may be the trademarks of their
respective owners.
Copyright
Copyright 2005 by Canon Inc. All rights reserved.
No part of this publication may be reproduced or transmitted in any form or by any
means, electronic or mechanical, including photocopying and recording, or by any
information storage or retrieval system without the prior written permission of
Canon Inc.
Disclaimers
The information in this document is subject to change without notice.
CANON INC. MAKES NO WARRANTY OF ANY KIND WITH REGARD TO THIS
MATERIAL, EITHER EXPRESS OR IMPLIED, EXCEPT AS PROVIDED HEREIN,
INCLUDING WITHOUT LIMITATION, THEREOF, WARRANTIES AS TO
MARKETABILITY, MERCHANTABILITY, FITNESS FOR A PARTICULAR
PURPOSE OF USE OR AGAINST INFRINGEMENT OF ANY PATENT. CANON
INC. SHALL NOT BE LIABLE FOR ANY DIRECT, INCIDENTAL, OR
CONSEQUENTIAL DAMAGES OF ANY NATURE, OR LOSSES OR EXPENSES
RESULTING FROM THE USE OF THIS MATERIAL.
ix
Page 12

x
Page 13

Before You Start
This chapter describes the system environments required for using the fax driver. It also
explains where to find help and information regarding the installation and use of this driver.
Supported Canon Products . . . . . . . . . . . . . . . . . . . . . . . . . . . . . . . . . . . . . . . . . . . . . . .1-2
System Requirements . . . . . . . . . . . . . . . . . . . . . . . . . . . . . . . . . . . . . . . . . . . . . . . . . . .1-5
Where to Find Help. . . . . . . . . . . . . . . . . . . . . . . . . . . . . . . . . . . . . . . . . . . . . . . . . . . . . . 1-6
1
CHAPTER
1-1
Page 14
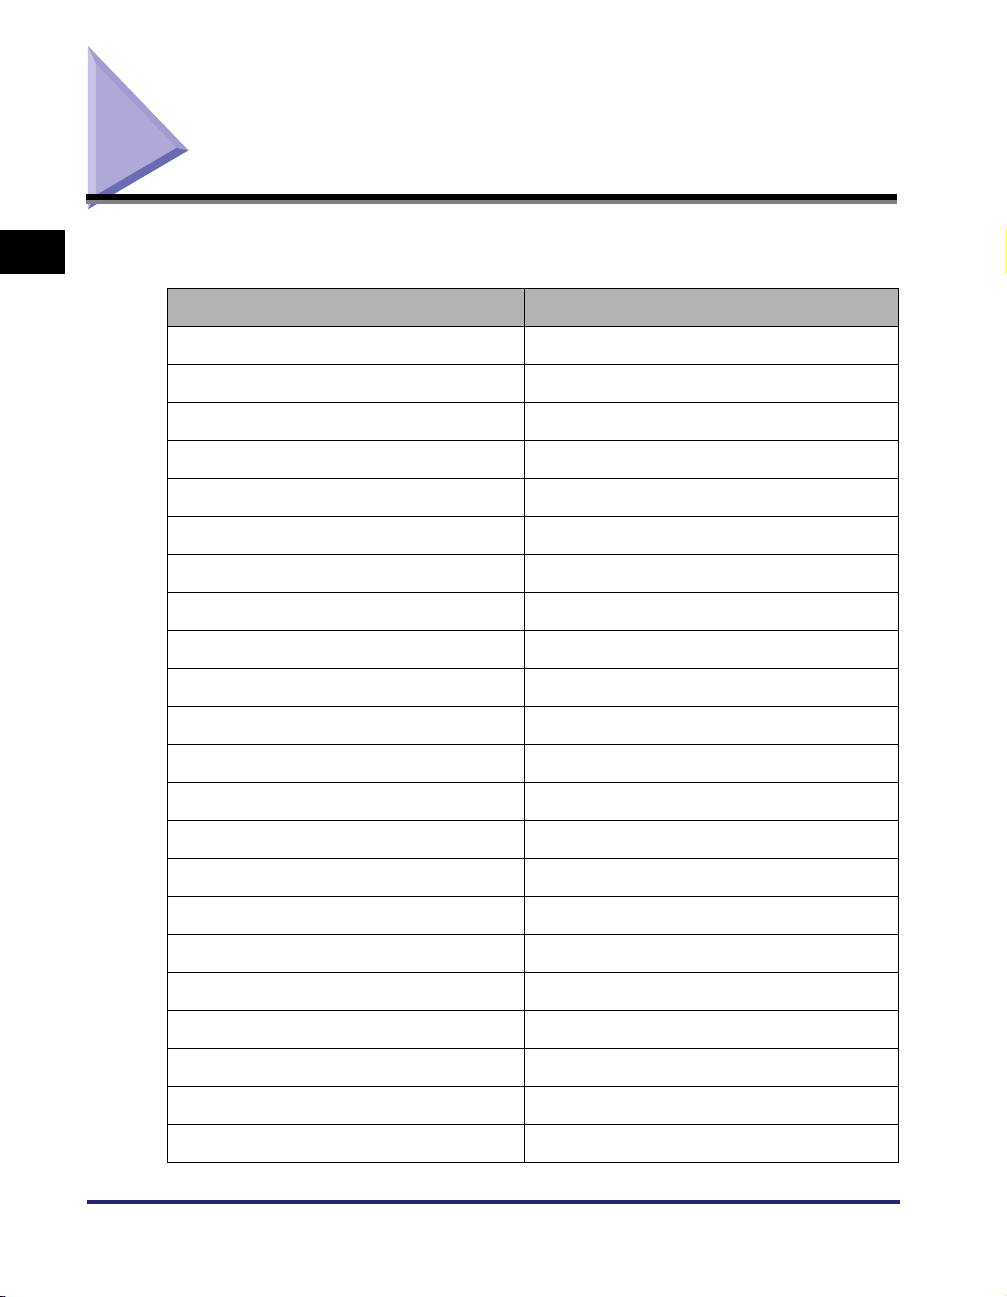
Supported Canon Products
1
Before You Start
the following table to select the driver name that corresponds to your printer.
Printer Name Driver Name
Color imageRUNNER C2620 Canon iR C2620 (FAX)
imagePASS-C1 (Color iR C2620-C1) Canon iR C2620-C1 (FAX)
imagePASS-C2 (Color iR C2620-C2) Canon iR C2620-C2 (FAX)
Color imageRUNNER C3200 Canon iR C3200 (FAX)
imagePASS-C1 (Color iR C3200-C1) Canon iR C3200-C1 (FAX)
Color imageRUNNER C3220 Canon iR C3220 (FAX)
imagePASS-C1 (Color iR C3220-C1) Canon iR C3220-C1 (FAX)
imagePASS-C2 (Color iR C3220-C2) Canon iR C3220-C2 (FAX)
imageRUNNER C3100 Canon iR C3100 (FAX)
imagePASS-E1 (iR C3100-E1) Canon iR C3100-E1 (FAX)
imageRUNNER C3170i Canon iR C3170 (FAX)
imageRUNNER C3170U Canon iR C3170 (FAX)
imageRUNNER C5800 Canon iR C5800 (FAX)
The fax driver version 1.40 is available for the following Canon Products. Refer to
1-2
imagePASS-D1 (iR C5800-D1) Canon iR C5800-D1 (FAX)
imageRUNNER C5870U Canon iR C5870 (FAX)
imagePASS-G1 (iR C5870-G1) Canon iR C5870-G1 (FAX)
imageRUNNER C6800 Canon iR C6800 (FAX)
imagePASS-D1 (iR C6800-D1) Canon iR C6800-D1 (FAX)
imageRUNNER C6870U Canon iR C6870 (FAX)
imagePASS-G1 (iR C6870-G1) Canon iR C6870-G1 (FAX)
imageRUNNER 2010F Canon iR1600-2000 (FAX)
imageRUNNER 2016 Canon iR2016 (FAX)
Supported Canon Products
Page 15
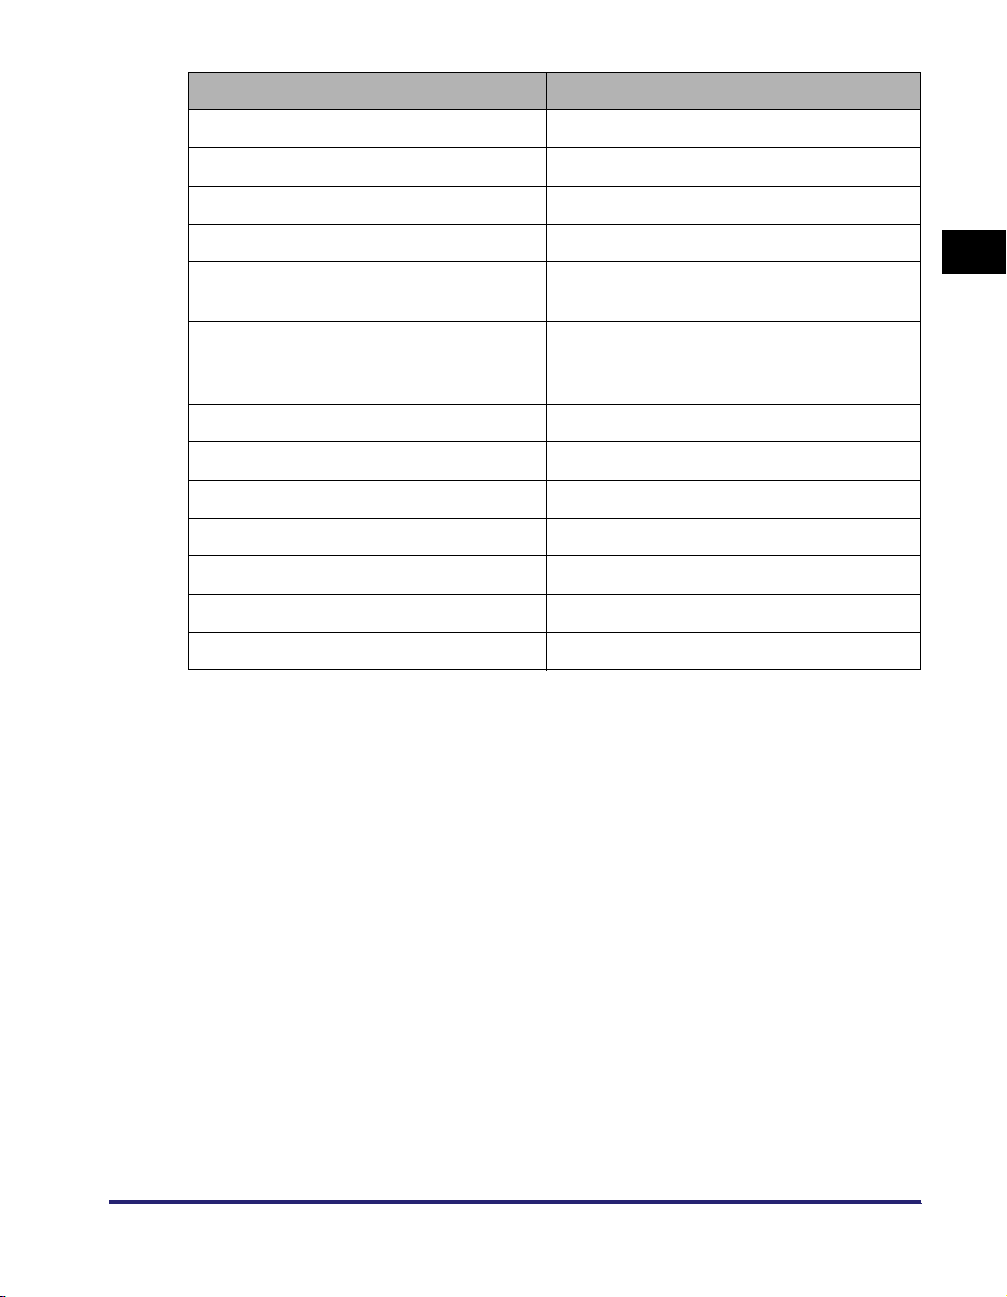
Printer Name Driver Name
imageRUNNER 2020 Canon iR2020 (FAX)
imageRUNNER 2230 Canon iR2230 (FAX)
imageRUNNER 2830 Canon iR2830 (FAX)
imageRUNNER 2870/2270 Canon iR2270/iR2870 (FAX)
imageRUNNER 3300/2800/2200
imageRUNNER 3300i
imageRUNNER 3320G
imageRUNNER 3320i/2220i
imageRUNNER 3320N/2220N
imageRUNNER 3530 Canon iR3530 (FAX)
imageRUNNER 4570/3570 Canon iR3570/iR4570 (FAX)
imageRUNNER 5070 Canon iR5070 (FAX)
imageRUNNER 6570/5570 Canon iR5570/iR6570 (FAX)
imagePASS-M3 (iR6570/5570-M3) Canon iR5570/iR6570-M3 (FAX)
imageCLASS 2300 Canon iC2300 (FAX)
MF7200 Series Canon MF7200 Series (FAX)
Canon iR2200-3300 (FAX)
Canon iR2220/iR3320 (FAX)
1
Before You Start
Supported Canon Products
1-3
Page 16

IMPORTANT
•
The fax options are available only if a fax board is installed in your printer.
•
In this guide, these printer names are hereafter referred to as the following:
- imagePASS-C1 (Color iR C2620-C1): Color imageRUNNER C2620-C1
- imagePASS-C1 (Color iR C3200-C1): Color imageRUNNER C3200-C1
- imagePASS-C1 (Color iR C3220-C1): Color imageRUNNER C3220-C1
1
Before You Start
- imagePASS-C2 (Color iR C2620-C2): Color imageRUNNER C2620-C2
- imagePASS-C2 (Color iR C3220-C2): Color imageRUNNER C3220-C2
- imagePASS-D1 (iR C5800-D1): imageRUNNER C5800-D1
- imagePASS-D1 (iR C6800-D1): imageRUNNER C6800-D1
- imagePASS-E1 (iR C3100-E1): imageRUNNER C3100-E1
- imagePASS-G1 (iR C5870-G1): imageRUNNER C5870-G1
- imagePASS-G1 (iR C6870-G1): imageRUNNER C6870-G1
- imagePASS-M3 (iR6570/5570-M3): imageRUNNER 6570/5570-M3
- imageRUNNER C3170i: imageRUNNER C3170
- imageRUNNER C3170U: imageRUNNER C3170
- imageRUNNER C5870U: imageRUNNER C5870
- imageRUNNER C6870U: imageRUNNER C6870
- imageRUNNER 3320G: imageRUNNER 3320i
- imageRUNNER 3320N/2220N: imageRUNNER 3320i/2220i
1-4
Supported Canon Products
Page 17

System Requirements
The fax driver can be used in the following system environments:
■ Operating System Software
Mac OS X (version 10.2.8 or later)
■ Computer
Any computer which runs Mac OS X properly
1
Before You Start
System Requirements
1-5
Page 18

Where to Find Help
1
Before You Start
Here's where to get immediate help if you are having problems installing or using
the fax driver.
■ ReadMe.rtf file
Any hints, enhancements, limitations, and restrictions you need to be aware of when
installing and using your fax driver are included in the ReadMe.rtf file provided with the
driver. The ReadMe.rtf file is located in the [MacOSX] folder.
■ Online Help
You can locate additional help for questions you may have regarding your fax in the Online
Help file provided with the driver software. In the [Page setup] dialog box or the [Print]
dialog box, you can click [ ] to display additional information about every feature and
option in the fax driver.
■ Canon Authorized Dealers or Service Providers
If the Online Help file does not provide the information you need, contact your local
authorized Canon dealer.
1-6
Where to Find Help
Page 19

Getting Started
This chapter describes instructions for installing the fax driver and setting the system
configuration.
Installing the Software . . . . . . . . . . . . . . . . . . . . . . . . . . . . . . . . . . . . . . . . . . . . . . . . . . . 2-2
Installing the Fax Driver . . . . . . . . . . . . . . . . . . . . . . . . . . . . . . . . . . . . . . . . . . . . . . . . . . . . . . . .2-2
Uninstalling the Fax Driver . . . . . . . . . . . . . . . . . . . . . . . . . . . . . . . . . . . . . . . . . . . . . . . . . . . . . .2-5
Specifying the Fax Settings . . . . . . . . . . . . . . . . . . . . . . . . . . . . . . . . . . . . . . . . . . . . . . 2-10
Mac OS X 10.2.8 - 10.3.9 . . . . . . . . . . . . . . . . . . . . . . . . . . . . . . . . . . . . . . . . . . . . . . . . . . . . . .2-10
Mac OS X 10.4 or later . . . . . . . . . . . . . . . . . . . . . . . . . . . . . . . . . . . . . . . . . . . . . . . . . . . . . . . .2-14
Setting Up the Fax Configuration/Confirming the Printer Status . . . . . . . . . . . . . . . . . . 2-19
2
CHAPTER
2-1
Page 20
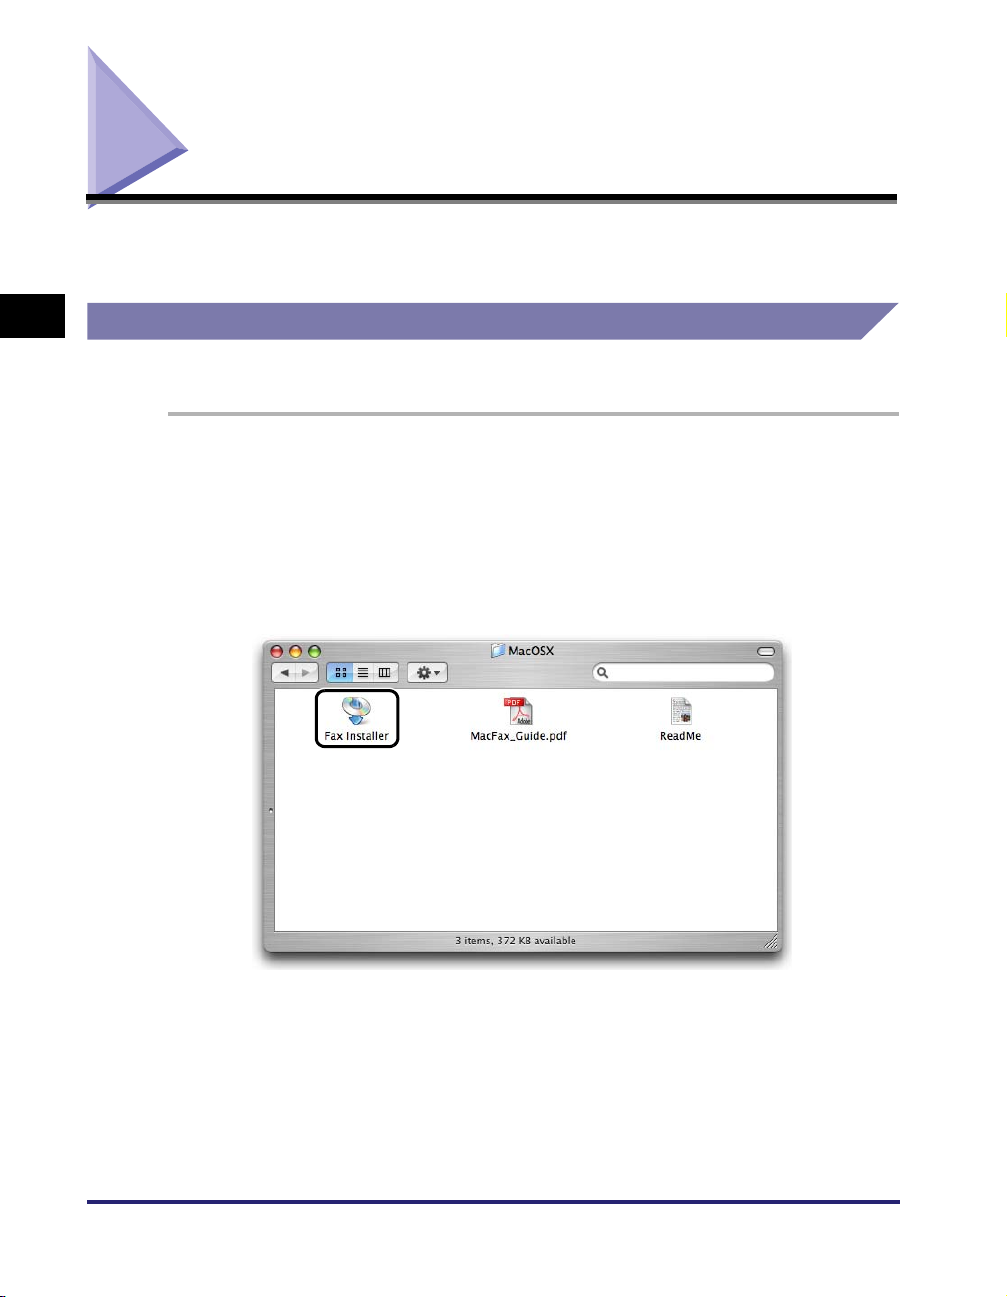
Installing the Software
This section describes instructions for installing the fax driver and uninstalling the
fax driver.
2
Getting Started
Installing the Fax Driver
Before using the fax, you must install the fax driver for it.
1
Close all application software.
2
Open the [MacOSX] folder.
3
Double-click the [Fax Installer] icon.
2-2
The [Authenticate] dialog is displayed.
Installing the Software
Page 21
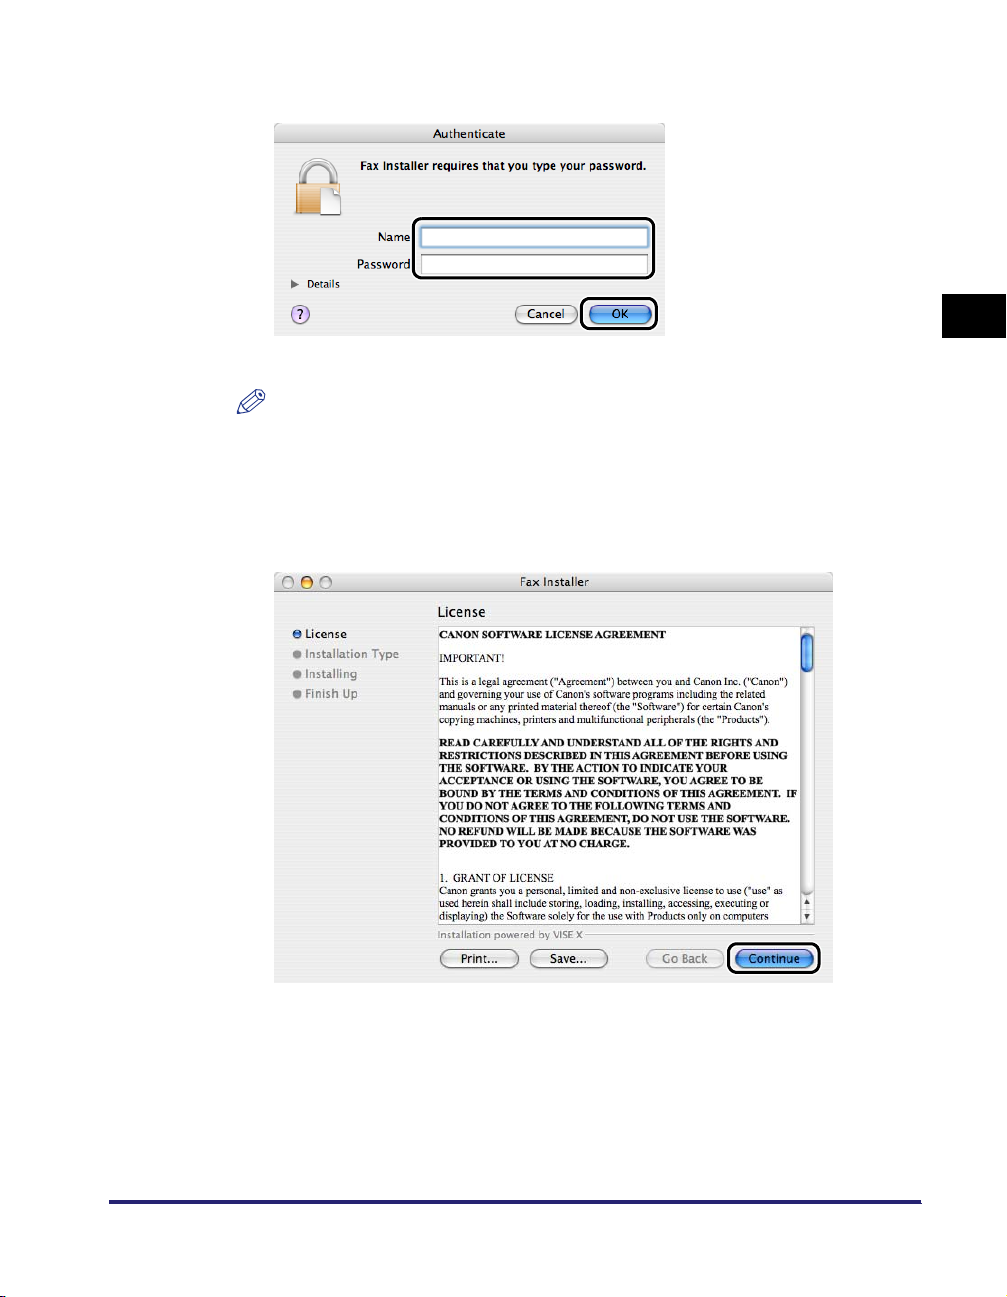
4
Enter the administrator’s name and password ➞ click [OK].
The installer starts.
NOTE
Depending on the system environment, the [Authenticate] dialog box may not be
displayed. In that case, skip to step 5.
5
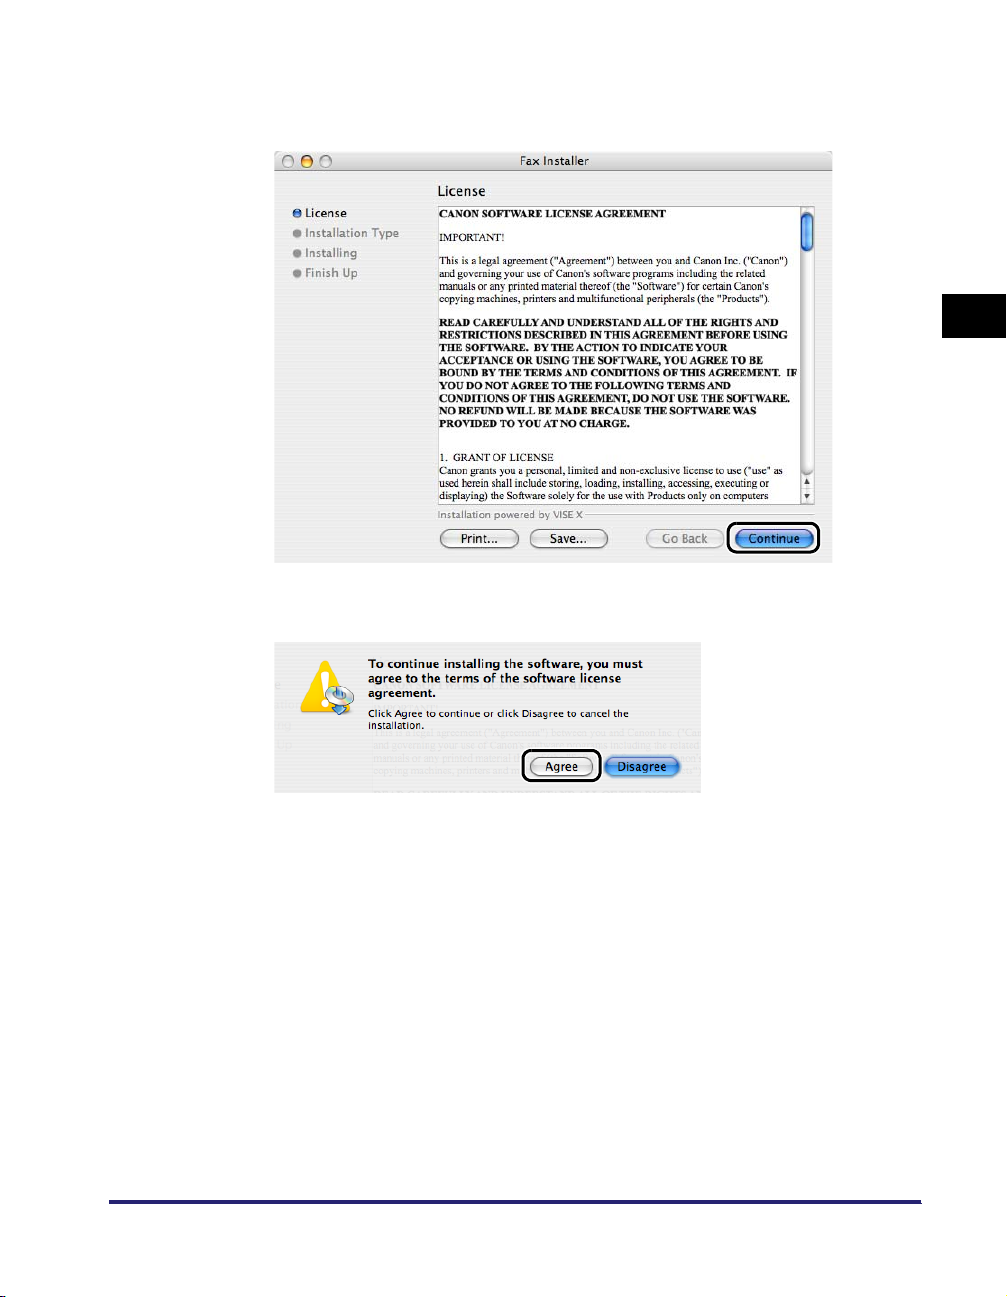
Read the Software License Agreement carefully. If you agree
to the terms, click [Continue].
2
Getting Started
Installing the Software
2-3
Page 22

6
Click [Agree] in the message box to proceed.
2
Getting Started
7
Confirm that [Easy Install] is selected ➞ click [Install].
8
Click [Continue] in the message box to proceed.
2-4
Installation starts.
Installing the Software
Page 23
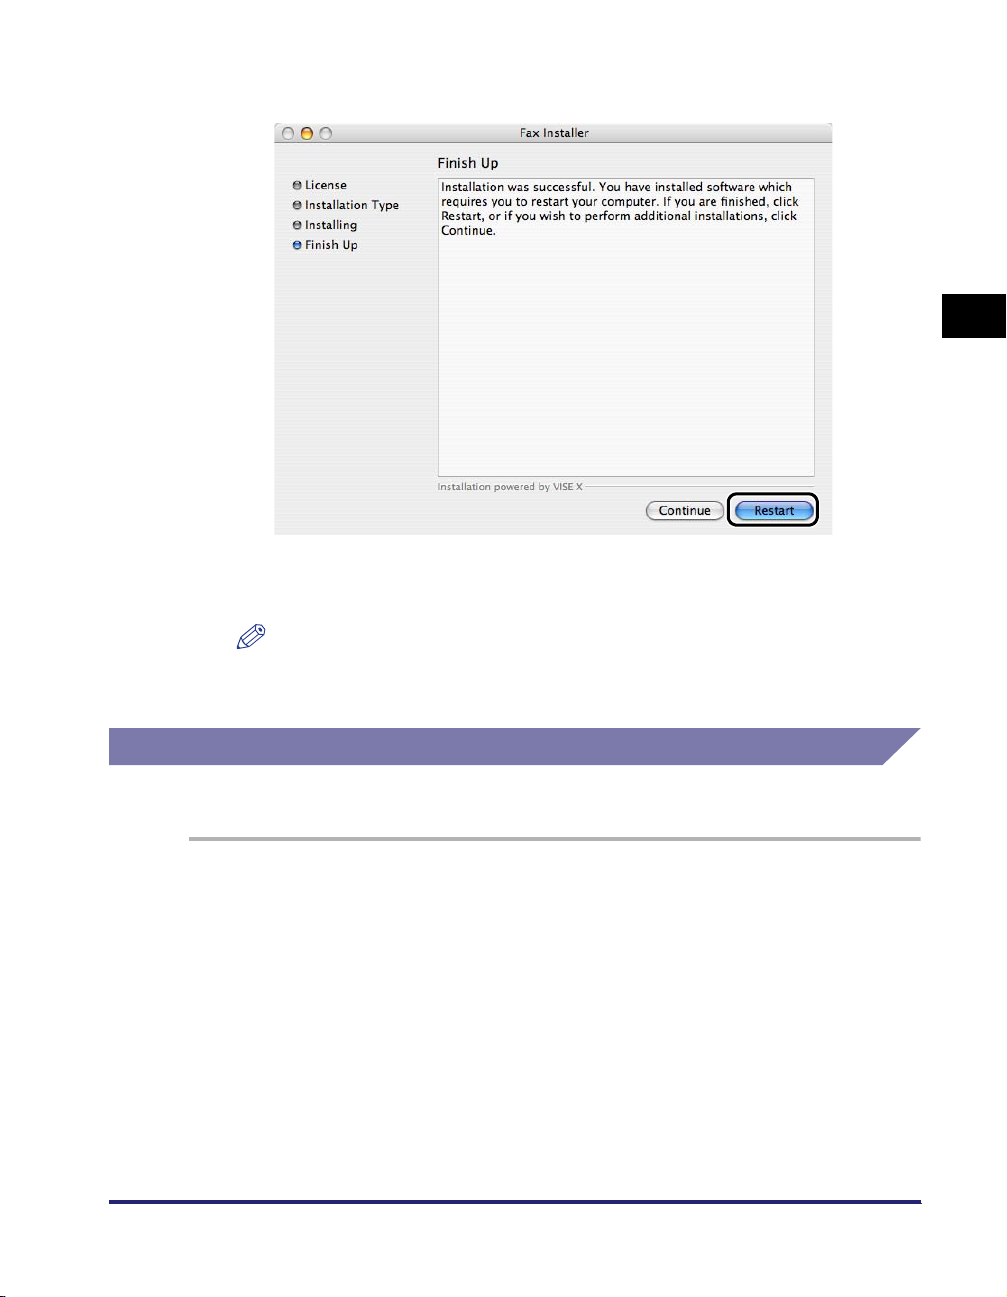
9
Click [Restart] to restart your computer.
The computer is restarted.
Installation is complete.
NOTE
•
The fax utility software "Faxmonitor" is installed simultaneously.
•
For details about using the Faxmonitor, see "Using the Faxmonitor," on p. 4-28.
2
Getting Started
Uninstalling the Fax Driver
It is recommended that you use the Installer to uninstall an unnecessary driver.
1
Close all application software.
2
Open the [MacOSX] folder.
Installing the Software
2-5
Page 24
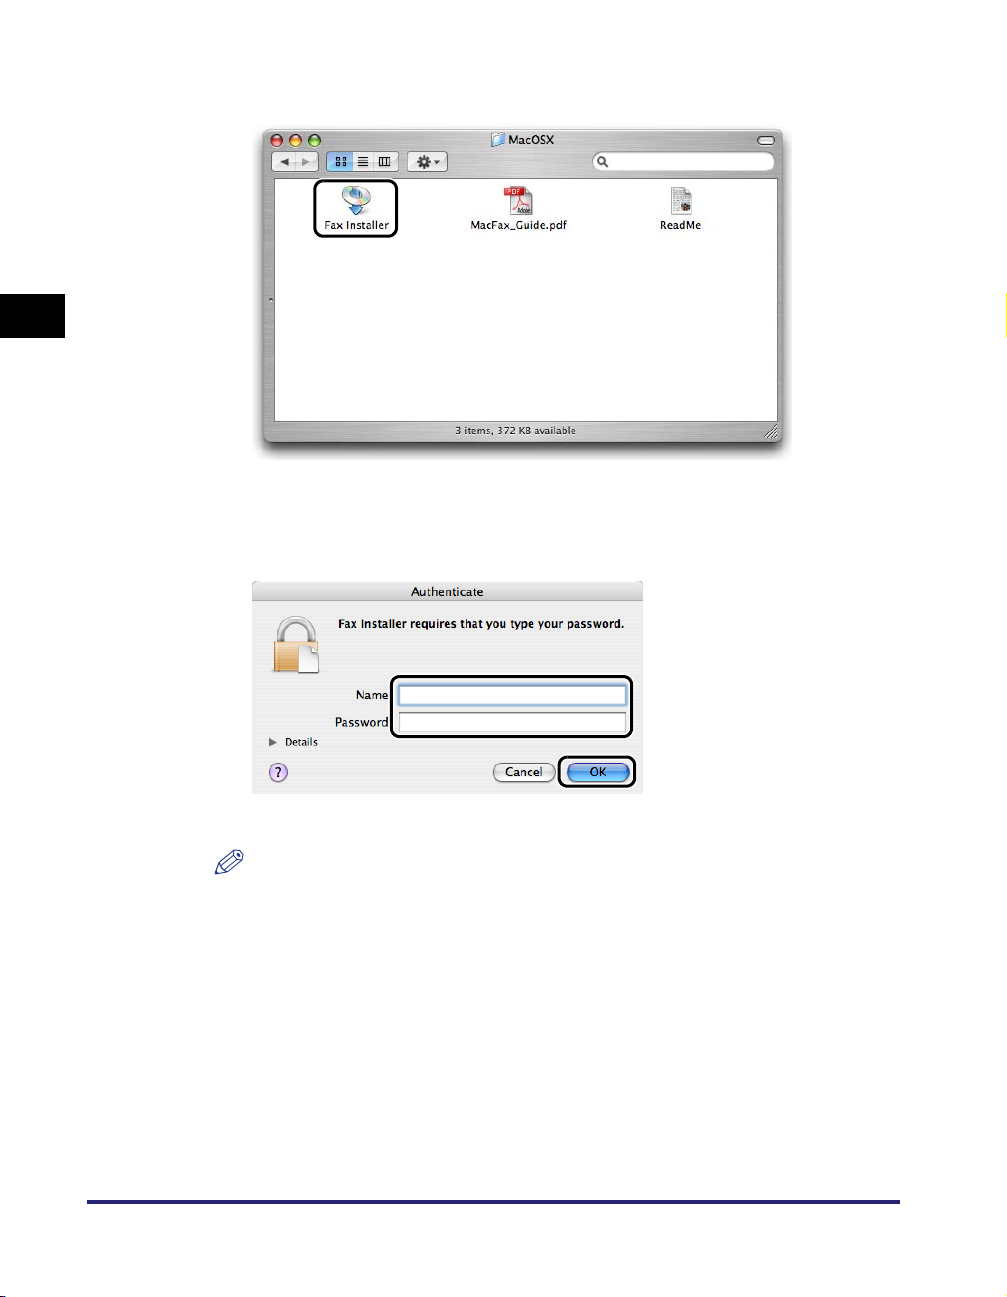
3
Double-click the [Fax Installer] icon.
2
Getting Started
The [Authenticate] dialog box is displayed.
4
Enter the administrator’s name and password ➞ click [OK].
The installer starts.
NOTE
Depending on the system environment, the [Authenticate] dialog box may not be
displayed. In that case, skip to step 5.
2-6
Installing the Software
Page 25
5
Read the Software License Agreement carefully. If you agree
to the terms, click [Continue].
6
Click [Agree] in the message box to proceed.
2
Getting Started
Installing the Software
2-7
Page 26
7
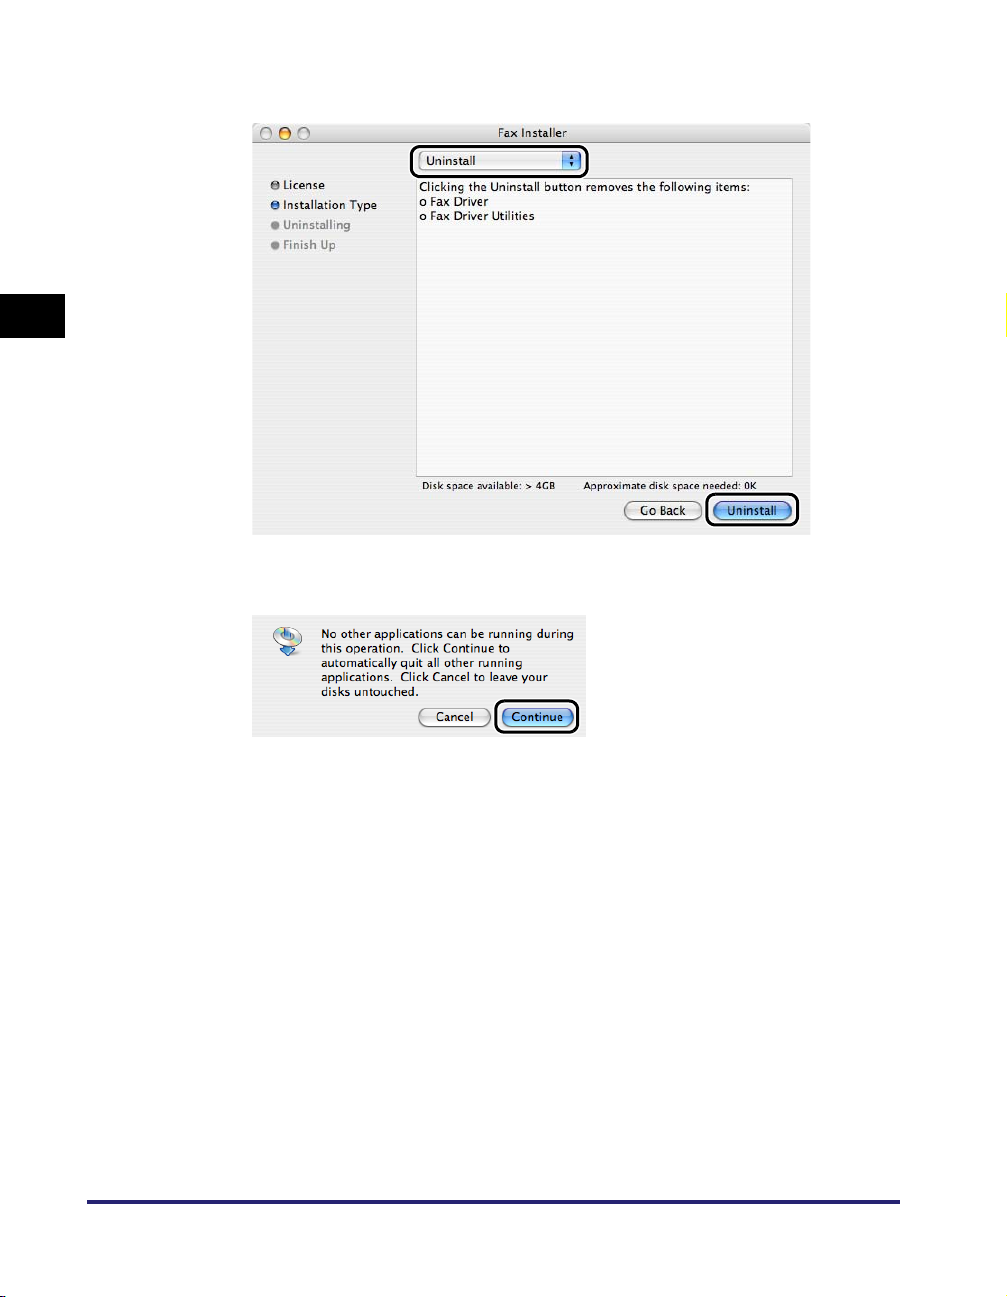
Select [Uninstall] from the drop-down list ➞ click [Uninstall].
2
Getting Started
8
Click [Continue] in the message box to proceed.
2-8
Uninstallation starts.
Installing the Software
Page 27
9
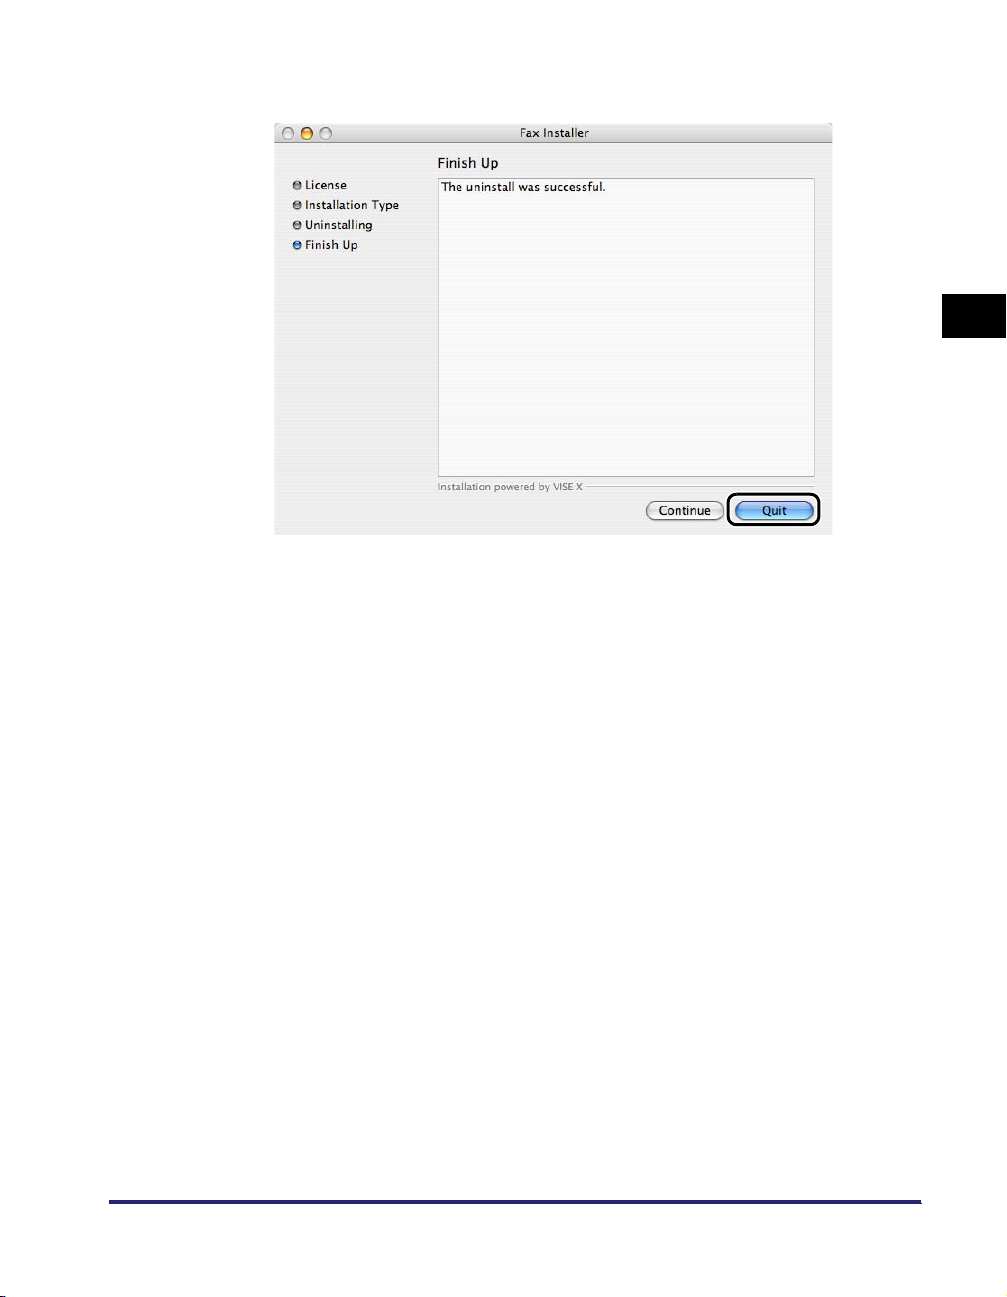
In the [Fax Installer] dialog box, click [Quit].
Uninstallation is complete.
2
Getting Started
Installing the Software
2-9
Page 28
Specifying the Fax Settings
After installing the fax driver, you need to specify the fax you want to use in the
Printer Setup Utility in order to print a document.
2
NOTE
The Printer Setup Utility is called Print Center on Mac OS X 10.2.8.
Mac OS X 10.2.8 - 10.3.9
USB Connection
Getting Started
1
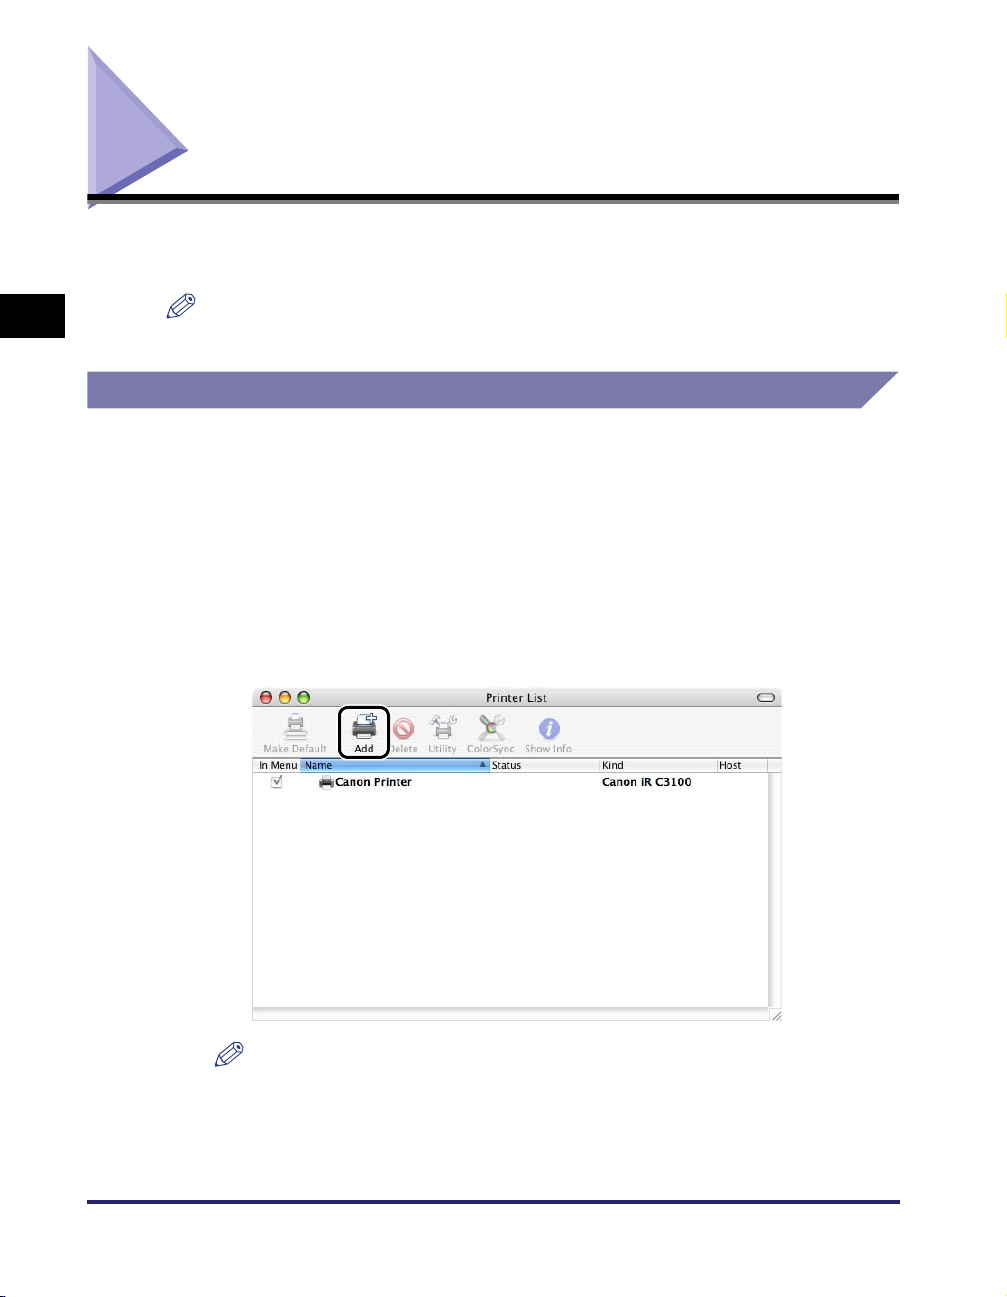
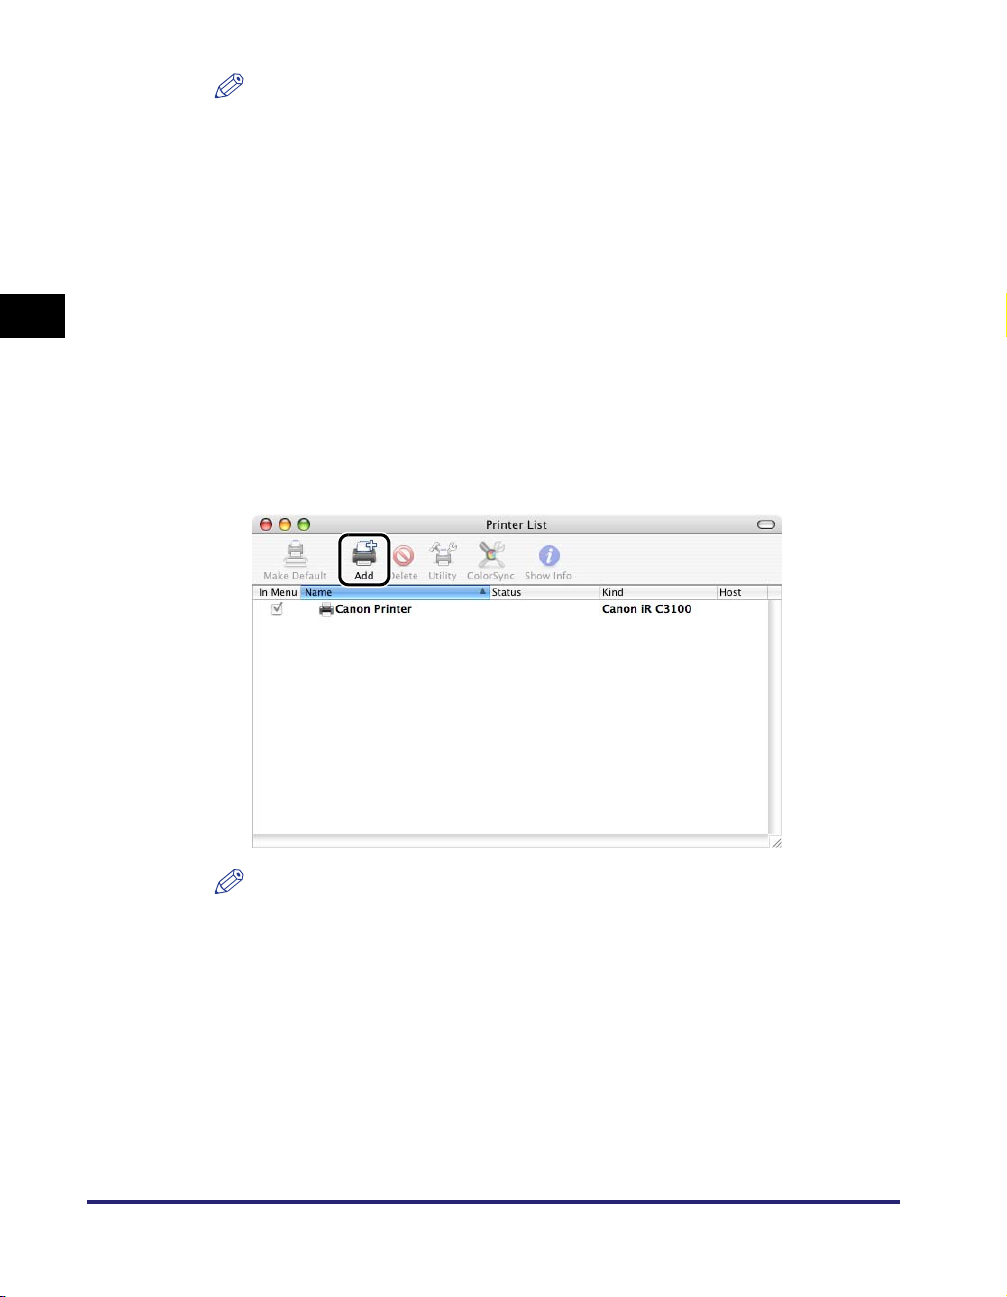
Select the hard disk drive you are using ➞ click [Applications]
➞ [Utilities] ➞ double-click the [Printer Setup Utility] icon.
The [Printer List] dialog box is displayed.
2
Click the [Add] icon.
2-10
NOTE
The [Printer List] dialog box may vary in appearance depending on the version of
Mac OS X you are using.
Specifying the Fax Settings
Page 29
3
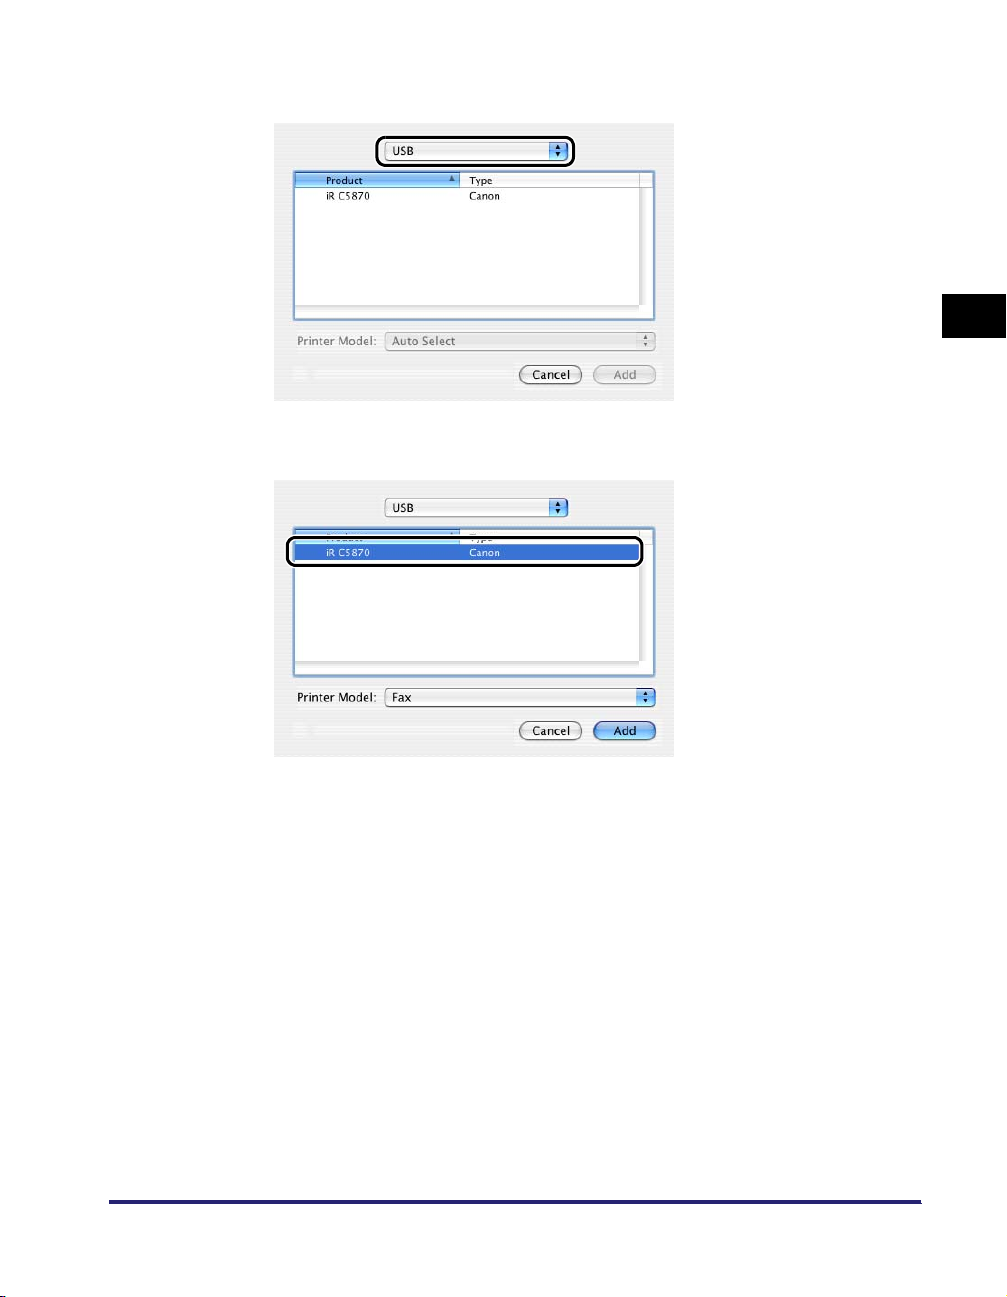
Select [USB].
4
Select the printer name.
2
Getting Started
For Mac OS X 10.2.8, select a printer whose [Type] is [Fax].
For Mac OS X 10.3, select a printer whose [Type] is [Canon] ➞ select [Fax] from
[Printer Model].
5
Click [Add] in the [Printer List] dialog box.
6
Confirm that the printer has been added in the [Printer List]
dialog box ➞ close the dialog box.
Specifying the Fax Settings
2-11
Page 30
NOTE
•
Confirm that the driver name corresponding to your printer is displayed under
[Kind] in the [Printer List] dialog box.
•
For the driver name corresponding to your printer, see "Supported Canon
Products," on p. 1-2.
•
If the driver name for your printer does not exist in the table on p. 1-2, [CanonFax]
will be displayed.
TCP/IP Protocol Connection
2
1
Select the hard disk drive you are using ➞ click [Applications]
➞ [Utilities] ➞ double-click the [Printer Setup Utility] icon.
The [Printer List] dialog box is displayed.
Getting Started
2
Click the [Add] icon.
NOTE
The [Printer List] dialog box may vary in appearance depending on the version of
Mac OS X you are using.
2-12
Specifying the Fax Settings
Page 31

3
Select [Canon IP (Fax)].
4
Enter your printer's IP address or DNS name in [Printer's
Address] ➞ enter a queue name in [Queue Name].
NOTE
•
If you want to use the IP address as the printer name, leave [Queue Name] blank.
•
If you are using the Color imageRUNNER C2620-C1, Color imageRUNNER
C2620-C2, Color imageRUNNER C3200-C1, Color imageRUNNER C3220-C1,
Color imageRUNNER C3220-C2, imageRUNNER C3100-E1, imageRUNNER
C5800-D1, imageRUNNER C5870-G1, imageRUNNER C6800-D1,
imageRUNNER C6870-G1, or imageRUNNER 6570/5570-M3, do not change the
default queue name (<CanonFax>). Otherwise the fax driver may not work
properly.
2
Getting Started
5
Click [Add] in the [Printer List] dialog box.
6
Confirm that the printer has been added in the [Printer List]
dialog box ➞ close the dialog box.
NOTE
•
Confirm that the driver name corresponding to your printer is displayed under
[Kind] in the [Printer List] dialog box.
•
For the driver name corresponding to your printer, see "Supported Canon
Products," on p. 1-2.
•
If the driver name for your printer does not exist in the table on p. 1-2, [CanonFax]
will be displayed.
Specifying the Fax Settings
2-13
Page 32

Mac OS X 10.4 or later
USB Connection
1
Select the hard disk drive you are using ➞ click [Applications]
➞ [Utilities] ➞ double-click the [Printer Setup Utility] icon.
The [Printer List] dialog box is displayed.
2
2
Click the [Add] icon.
Getting Started
2-14
The [Printer Browser] dialog box is displayed.
Specifying the Fax Settings
Page 33

3
Click [Default Browser].
4
Select the printer ➞ select [Fax] from [Print Using].
2
Getting Started
Select a printer that has [USB] displayed in its [Connection] column.
Specifying the Fax Settings
2-15
Page 34

5
Click [Add] in the [Printer List] dialog box.
6
Confirm that the printer has been added in the [Printer List]
dialog box ➞ close the dialog box.
NOTE
•
Confirm that the driver name corresponding to your printer is displayed under
[Kind] in the [Printer List] dialog box.
•
2
For the driver name corresponding to your printer, see "Supported Canon
Products," on p. 1-2.
•
If the driver name for your printer does not exist in the table on p. 1-2, [CanonFax]
will be displayed.
TCP/IP Protocol Connection
Getting Started
1
Select the hard disk drive you are using ➞ click [Applications]
➞ [Utilities] ➞ double-click the [Printer Setup Utility] icon.
The [Printer List] dialog box is displayed.
2
Click the [Add] icon.
2-16
The [Printer Browser] dialog box is displayed.
Specifying the Fax Settings
Page 35

3
Click [More Printers].
4
Select [Canon IP (Fax)].
2
Getting Started
5
Enter your printer's IP address or DNS name in [Printer's
Address] ➞ enter a queue name in [Queue Name].
Specifying the Fax Settings
2-17
Page 36

NOTE
•
If you want to use the IP address as the printer name, leave [Queue Name] blank.
•
If you are using the Color imageRUNNER C2620-C1, Color imageRUNNER
C2620-C2, Color imageRUNNER C3200-C1, Color imageRUNNER C3220-C1,
Color imageRUNNER C3220-C2, imageRUNNER C3100-E1, imageRUNNER
C5800-D1, imageRUNNER C5870-G1, imageRUNNER C6800-D1,
imageRUNNER C6870-G1, or imageRUNNER 6570/5570-M3, do not change the
default queue name (<CanonFax>). Otherwise the fax driver may not work
properly.
2
6
Click [Add] in the [Printer List] dialog box.
7
Confirm that the printer has been added in the [Printer List]
dialog box ➞ close the dialog box.
Getting Started
NOTE
•
Confirm that the driver name corresponding to your printer is displayed under
[Kind] in the [Printer List] dialog box.
•
For the driver name corresponding to your printer, see "Supported Canon
Products," on p. 1-2.
•
If the driver name for your printer does not exist in the table on p. 1-2, [CanonFax]
will be displayed.
2-18
Specifying the Fax Settings
Page 37

Setting Up the Fax Configuration/Confirming the Printer Status
Before sending a document, you need to set up the fax configuration in order to use
the functions of an optional unit attached to the fax.
You can also check the following fax information: the name of the fax model, the
number of telephone lines, and whether Job Accounting is set.
NOTE
If you are using a printer with a USB connection, [Device Settings] may be displayed
instead of [Printer Info], depending on the printer model you are using. You cannot obtain
fax information from [Device Settings].
1
From the [File] menu of the application software, select
[Print].
The [Print] dialog box is displayed.
2
Select the [Special Features] preferences pane.
The [Special Features] preferences pane is displayed.
3
Click [Printer Info] (or [Device Settings]).
2
Getting Started
Setting Up the Fax Configuration/Confirming the Printer Status
2-19
Page 38

The [Printer Info] (or [Device Settings]) dialog box is displayed.
NOTE
If the [Printer Info] (or [Device Settings]) dialog box is not displayed, check whether
the fax is turned on.
4
Check or set the device information.
● If the [Printer Info] dialog box is displayed:
❑
2
Getting Started
Check the displayed printer name, whether Job Accounting is active, whether
the printer is ISDN compatible, and the number of lines.
2-20
● If the [Device Settings] dialog box is displayed:
If the printer is using Job Accounting, select [Use Job Accounting].
❑
5
Click [OK].
Setting Up the Fax Configuration/Confirming the Printer Status
Page 39

Fax Driver Options
This chapter describes instructions for specifying the various basic settings for faxing a
document.
Faxing a Document. . . . . . . . . . . . . . . . . . . . . . . . . . . . . . . . . . . . . . . . . . . . . . . . . . . . . . 3-2
Sending a Document . . . . . . . . . . . . . . . . . . . . . . . . . . . . . . . . . . . . . . . . . . . . . . . . . . . . . . . . . . 3-2
Sending to a Remote Memory Box . . . . . . . . . . . . . . . . . . . . . . . . . . . . . . . . . . . . . . . . . . . . . . . 3-4
Specifying the Paper Orientation . . . . . . . . . . . . . . . . . . . . . . . . . . . . . . . . . . . . . . . . . . .3-7
Scaling a Document . . . . . . . . . . . . . . . . . . . . . . . . . . . . . . . . . . . . . . . . . . . . . . . . . . . . . 3-8
Specifying the Paper Size. . . . . . . . . . . . . . . . . . . . . . . . . . . . . . . . . . . . . . . . . . . . . . . . . 3-9
Specifying the Output Range . . . . . . . . . . . . . . . . . . . . . . . . . . . . . . . . . . . . . . . . . . . . .3-10
Faxing Multiple Pages on One Sheet . . . . . . . . . . . . . . . . . . . . . . . . . . . . . . . . . . . . . . . 3-11
Saving the Fax Settings . . . . . . . . . . . . . . . . . . . . . . . . . . . . . . . . . . . . . . . . . . . . . . . . .3-13
Specifying Recipients . . . . . . . . . . . . . . . . . . . . . . . . . . . . . . . . . . . . . . . . . . . . . . . . . . .3-15
Adding a New Name and Fax Number . . . . . . . . . . . . . . . . . . . . . . . . . . . . . . . . . . . . . . . . . . .3-15
Adding a Recipient from the Address Book. . . . . . . . . . . . . . . . . . . . . . . . . . . . . . . . . . . . . . . . 3-17
Defining Address Book Entries. . . . . . . . . . . . . . . . . . . . . . . . . . . . . . . . . . . . . . . . . . . .3-19
Person (Single) Entry . . . . . . . . . . . . . . . . . . . . . . . . . . . . . . . . . . . . . . . . . . . . . . . . . . . . . . . . .3-19
Group Entry . . . . . . . . . . . . . . . . . . . . . . . . . . . . . . . . . . . . . . . . . . . . . . . . . . . . . . . . . . . . . . . .3-22
Importing/Exporting Address Book Entries. . . . . . . . . . . . . . . . . . . . . . . . . . . . . . . . . . .3-25
Importing Address Book Entries . . . . . . . . . . . . . . . . . . . . . . . . . . . . . . . . . . . . . . . . . . . . . . . .3-25
Exporting Address Book Entries . . . . . . . . . . . . . . . . . . . . . . . . . . . . . . . . . . . . . . . . . . . . . . . .3-27
Attaching a Cover Sheet to a Fax . . . . . . . . . . . . . . . . . . . . . . . . . . . . . . . . . . . . . . . . . . 3-29
Registering an Original Cover Sheet as a Template. . . . . . . . . . . . . . . . . . . . . . . . . . . .3-36
3
CHAPTER
3-1
Page 40

Faxing a Document
This section describes how to fax a document and how to send a document to the
memory box of a recipient's fax.
IMPORTANT
No more than 512 recipients can be stored on the printer at any one time for fax sending.
If the number of recipients exceeds 512, subsequent recipients will be deleted. Take care
3
Sending a Document
when continuously sending faxes to multiple groups.
To send a document by fax, follow the procedure below.
Fax Driver Options
1
Start the application software, and then display the document
you want to fax.
2
From the [File] menu, select [Page Setup].
The [Page Setup] dialog box is displayed.
3
Select [Page Attributes] from [Settings].
The [Page Attributes] preferences pane is displayed.
3-2
Faxing a Document
Page 41

4
Select the fax to use from [Format for].
5
Specify the paper size, scale, and paper orientation.
6
Click [OK] in the [Page Setup] dialog box.
7
From the [File] menu, select [Print].
The [Print] dialog box is displayed.
8
Verify or select the fax name from [Printer].
3
Fax Driver Options
9
Specify the pages to fax.
10
Select the [General Settings] preferences pane ➞ specify the
recipients.
For instructions on how to specify the recipients, see "Specifying Recipients," on
p. 3-15.
11
Click [Print] in the [Print] dialog box.
Faxing starts.
Faxing a Document
3-3
Page 42

NOTE
•
The [Copies] and [Collated] settings are ignored because only one copy is allowed
with the fax driver.
•
If you cancel faxing before job completion, make sure to reset the fax settings.
•
There are additional features available using other panes. See Chapter 3, "Fax
Driver Options," Chapter 4, "Special Fax Driver Options," or the Online Help.
Sending to a Remote Memory Box
This mode is useful for sending a confidential document by fax. Documents that are
to be sent and stored in the memory box of a recipient's fax require a valid
subaddress and password.
3
NOTE
In order to use this mode, you need to obtain the subaddress and password of the
memory box of the recipient's fax in advance.
1
From the [File] menu of the application software, select
Fax Driver Options
[Print].
The [Print] dialog box is displayed.
3-4
2
Select the [General Settings] preferences pane.
The [General Settings] preferences pane is displayed.
Faxing a Document
Page 43

3
Click [Add Recipient].
3
The [Add Recipient] dialog box is displayed.
4
Enter the recipient's name and fax number.
5
Select [Use Subaddress] under [Advanced Function] ➞ enter
the subaddress and password of the memory box of the
recipient's fax.
Fax Driver Options
Faxing a Document
3-5
Page 44

6
Click [OK].
7
Specify the various settings in the [Print] dialog box ➞ click
[Print].
The document is sent and stored in the memory box of the recipient's fax.
3
Fax Driver Options
3-6
Faxing a Document
Page 45

Specifying the Paper Orientation
You can specify the paper orientation.
1
From the [File] menu of the application software, select [Page
Setup].
The [Page Setup] dialog box is displayed.
2
Select [Page Attributes] from [Settings].
The [Page Attributes] preferences pane is displayed.
3
Select the paper orientation from [Orientation].
3
Fax Driver Options
4
Click [OK].
Specifying the Paper Orientation
3-7
Page 46

Scaling a Document
You can enlarge or reduce the size of the document to be sent.
1
3
2
Fax Driver Options
3
From the [File] menu of the application software, select [Page
Setup].
The [Page Setup] dialog box is displayed.
Select [Page Attributes] from [Settings].
The [Page Attributes] preferences pane is displayed.
Specify the zoom ratio for [Scale].
3-8
4
Click [OK].
Scaling a Document
Page 47

Specifying the Paper Size
The paper size set in the application software is the one usually used for the output.
However, you can specify a paper size different from the size set in the application
software. In this case, the scaling is automatically set to fit the document onto the
selected paper.
1
From the [File] menu of the application software, select [Page
Setup].
The [Page Setup] dialog box is displayed.
2
Select [Page Attributes] from [Settings].
The [Page Attributes] preferences pane is displayed.
3
Specify the paper size to be printed from [Paper Size].
3
Fax Driver Options
The paper sizes which can be selected differ according to the printer model you
are using. For details, see "Available Paper Sizes List," on p. 6-2.
4
Click [OK].
Specifying the Paper Size
3-9
Page 48

Specifying the Output Range
You can specify which pages will be sent.
1
From the [File] menu of the application software, select
[Print].
3
Fax Driver Options
The [Print] dialog box is displayed.
2
Confirm that the [Copies & Pages] preferences pane is
displayed ➞ specify an output range for [Pages].
3-10
If you want to send only a part of the document, enter the first and last page
numbers.
NOTE
The settings for [Copies] and [Collated] are ignored because only one copy is
allowed with the fax driver.
3
Click [Print] in the [Print] dialog box.
Specifying the Output Range
Page 49

Faxing Multiple Pages on One Sheet
Multiple pages of the original can be faxed on one sheet of paper by reducing the
output size.
NOTE
If a cover sheet is attached to the fax, the layout settings described in this section will not
be applied to the cover sheet.
1
From the [File] menu of the application software, select
[Print].
The [Print] dialog box is displayed.
3
2
Select the [Layout] preferences pane.
The [Layout] preferences pane is displayed.
3
Select the number of pages you want to send on one sheet of
paper from [Pages per Sheet].
Fax Driver Options
Faxing Multiple Pages on One Sheet
3-11
Page 50

4
For [Layout Direction], select the page layout direction.
3
5
Select the type of the page border for [Border].
Fax Driver Options
3-12
6
Click [Print] in the [Print] dialog box.
Faxing Multiple Pages on One Sheet
Page 51

Saving the Fax Settings
You can save fax driver settings that you frequently use as a Preset. If you select a
Preset when faxing a document, it will be output with the saved settings.
1
From the [File] menu of the application software, select
[Print].
The [Print] dialog box is displayed.
2
In each pane, specify the fax driver settings you want to save.
3
Select [Save As] from [Presets].
3
Fax Driver Options
The [Save Preset] dialog box is displayed.
4
Enter a name for the settings in [Save Preset As] ➞ click [OK].
The current settings are saved as a Preset.
Saving the Fax Settings
3-13
Page 52

NOTE
To fax a document with the saved settings, select the Preset from [Presets] in the
[Print] dialog box.
3
Fax Driver Options
3-14
Saving the Fax Settings
Page 53

Specifying Recipients
You can specify the names and fax numbers of people you want to send a fax to, by
adding them to [Recipient List] in the [General Settings] preferences pane. You can
add recipients by:
• Entering a new name and a new fax number in [Recipient Name] and [Fax
Number] in the [General Settings] preferences pane.
• Selecting a recipient from the Canon Fax Driver Address Book.
NOTE
The maximum number of recipients you can send a fax to at any one time differs
depending on whether a cover sheet is attached to the fax. For details, see "Maximum
Recipients and Cover Sheet Options," on p. 6-3.
Adding a New Name and Fax Number
1
From the [File] menu of the application software, select
[Print].
The [Print] dialog box is displayed.
3
Fax Driver Options
2
Select the [General Settings] preferences pane.
The [General Settings] preferences pane is displayed.
Specifying Recipients
3-15
Page 54

3
Click [Add Recipient].
3
Fax Driver Options
The [Add Recipient] dialog box is displayed.
4
Enter the name and fax number you want to add in [Recipient
Name] and [Fax Number] ➞ click [OK].
The new recipient is displayed in [Recipient List] in the [General Settings]
preferences pane.
NOTE
To change the name and fax number of an added recipient, select the recipient
➞
from [Recipient List]
click [Edit Recipient].
3-16
Specifying Recipients
Page 55

Adding a Recipient from the Address Book
1
From the [File] menu of the application software, select
[Print].
The [Print] dialog box is displayed.
2
Select the [General Settings] preferences pane.
The [General Settings] preferences pane is displayed.
3
Click [Address Book].
3
Fax Driver Options
The [Select Recipient from Address Book] dialog box is displayed.
Specifying Recipients
3-17
Page 56

4
Select a recipient from the list under [Address Books] ➞ click
[] (Below Arrow).
3
Fax Driver Options
3-18
The selected recipient is displayed in [Recipient List].
5
Click [OK] in the [Select Recipient from Address Book] dialog
box.
The new recipient is displayed in [Recipient List] in the [General Settings]
preferences pane.
NOTE
To change the name and fax number of an added recipient, select the recipient
from [Recipient List]
Specifying Recipients
➞
click [Edit Recipient].
Page 57

Defining Address Book Entries
This section describes how to define person and group entries for the Address
Book.
Person (Single) Entry
You can create or edit a person entry in the Address Book.
1
From the [File] menu of the application software, select
[Print].
The [Print] dialog box is displayed.
2
Select the [General Settings] preferences pane.
The [General Settings] preferences pane is displayed.
3
Click [Address Book].
The [Select Recipient from Address Book] dialog box is displayed.
3
Fax Driver Options
Defining Address Book Entries
3-19
Page 58

4
Click [Add Person].
3
Fax Driver Options
3-20
The [Add Person] dialog box is displayed.
NOTE
To edit a person entry in the Address Book, select the entry from the list under
[Address Book] ➞ click [Edit].
Defining Address Book Entries
Page 59

5
Enter information about the person, such as [Recipient Name]
and [Company].
3
Fax Driver Options
6
Enter the fax number.
You can enter two fax numbers: a primary number and a secondary number.
7
Enter information about the fax numbers in each
[Description].
8
Enter any additional information about the person in [Notes].
Defining Address Book Entries
3-21
Page 60

Group Entry
9
Click [OK] in the [Add person] dialog box.
NOTE
•
To delete an entry from the Address Book, select the entry from the list under
[Address Books] in the [Select Recipient from Address Book] dialog box ➞ click
[Delete].
•
If you specify two fax numbers for one person, two entries for that person are
displayed in the list under [Address Books] in the [Select Recipient from Address
Book] dialog box.
3
You can create or edit a group entry in the Address Book.
1
From the [File] menu of the application software, select
[Print].
The [Print] dialog box is displayed.
Fax Driver Options
2
Select the [General Settings] preferences pane.
The [General Settings] preferences pane is displayed.
3
Click [Address Book].
The [Select Recipient from Address Book] dialog box is displayed.
3-22
Defining Address Book Entries
Page 61

4
Click [Add Group].
3
Fax Driver Options
The [Add Group] dialog box is displayed.
NOTE
To edit a group entry in the Address Book, select the entry from the list under
[Address Book] ➞ click [Edit].
Defining Address Book Entries
3-23
Page 62

5
Enter a name for the group in [Group Name].
3
Fax Driver Options
3-24
6
Select persons or groups you want to add to the group from
the list under [Address Book] ➞ click [ ] (Below Arrow).
The selected persons or groups are displayed in [Current Group Members].
NOTE
To remove an entry from [Current Group Members], select it ➞ click [ ] (Above
Arrow).
7
Click [OK] in the [Add Group] dialog box.
Defining Address Book Entries
Page 63

Importing/Exporting Address Book Entries
You can import recipients from the address books of other applications and register
them in the fax driver address book. You can also export recipients that have been
registered in the fax driver address book and save it in a file format that can be used
by other applications.
NOTE
The following file formats are supported:
- CSV format (*.csv)
- Entourage X for Mac format
- Entourage 2001 for Mac format
- Outlook Express for Mac format
- LDIF format (*.abk)
3
Importing Address Book Entries
1
From the [File] menu of the application software, select
[Print].
The [Print] dialog box is displayed.
2
Select the [General Settings] preferences pane.
The [General Settings] preferences pane is displayed.
3
Click [Address Book].
The [Select Recipient from Address Book] dialog box is displayed.
Fax Driver Options
Importing/Exporting Address Book Entries
3-25
Page 64

4
Click [Import].
3
Fax Driver Options
3-26
Importing/Exporting Address Book Entries
Page 65

5
Select the file you want to import ➞ click [Open].
The data of the selected file is imported and displayed in the list under [Address
Books] in the [Select Recipient from Address Book] dialog box.
3
Exporting Address Book Entries
1
From the [File] menu of the application software, select
[Print].
The [Print] dialog box is displayed.
2
Select the [General Settings] preferences pane.
The [General Settings] preferences pane is displayed.
3
Click [Address Book].
The [Select Recipient from Address Book] dialog box is displayed.
Fax Driver Options
Importing/Exporting Address Book Entries
3-27
Page 66

4
Click [Export].
3
Fax Driver Options
3-28
5
Specify [Save As], [Where], and [Format] ➞ click [Save].
The exported file is saved at the specified destination.
NOTE
If you are saving a file in Outlook Express for Mac format, select [Entourage X for
Mac format] in [Format].
Importing/Exporting Address Book Entries
Page 67

Attaching a Cover Sheet to a Fax
This section describes how to attach a cover sheet to an outgoing fax.
NOTE
The maximum number of recipients you can send a fax to at any one time differs
depending on whether a cover sheet is attached to the fax. For details, see "Maximum
Recipients and Cover Sheet Options," on p. 6-3.
1
From the [File] menu of the application software, select
[Print].
The [Print] dialog box is displayed.
2
Select the [Cover Sheet] preferences pane.
The [Cover Sheet] preferences pane is displayed.
3
Select an option for attaching the cover sheet to the fax from
[Cover Sheet Attachment].
3
Fax Driver Options
4
Select a cover sheet template from [Style].
Attaching a Cover Sheet to a Fax
3-29
Page 68

5
Click [Item Settings] to specify the items to include on the
cover sheet.
The [Item Settings] dialog box opens.
6
If you want to add a label or comment to the cover sheet,
display the [Labels and Comments] sheet.
If you do not want to use this option, skip to step 9.
7
To add a label, select [Insert Attention Note] ➞ select a label
3
Fax Driver Options
from the list or enter label text.
3-30
NOTE
You can enter a maximum of 30 characters as label text.
8
To add a comment, enter the comment in [Comment to
Include].
NOTE
You can enter a maximum of 255 characters.
Attaching a Cover Sheet to a Fax
Page 69

9
Click the [Sender] tab ➞ select the information you want to
print on the cover sheet ➞ enter the information in the text
boxes for the selected items.
You can select the following items:
• Sender
• Company
• Dept./Div.
• Fax Number
3
Fax Driver Options
Attaching a Cover Sheet to a Fax
3-31
Page 70

10
Click the [Recipient] tab ➞ click the check boxes to select the
information you want to print on the cover sheet.
3
Fax Driver Options
You can select the following items:
• Recipient Name
• Company
• Dept./Div.
• Fax Number
NOTE
The recipient information specified in the Address Book will be printed on the cover
sheet.
11
If you want to print a logo or signature, click the [Logo] or
[Signature] tab.
If you do not want use this option, skip to step 15.
3-32
Attaching a Cover Sheet to a Fax
Page 71

12
Select [Print with Logo] or [Print with Signature] to include a
logo or signature on the cover sheet.
13
Click [Browse] ➞ specify a bitmap logo or signature file name.
NOTE
The supported file format is bitmap only.
3
Fax Driver Options
14
Specify the magnification and position of the selected logo or
signature.
Attaching a Cover Sheet to a Fax
3-33
Page 72

15
If you want to print the number of faxed pages, click the
[Sheets to Send] tab ➞ select [Include Number of Sheets to
Send] ➞ specify the number of pages.
NOTE
You can specify the number of pages from 1 to 9999.
3
Fax Driver Options
If you do not want to use this option, skip to step 16.
3-34
NOTE
•
The number of pages sent is not calculated automatically. The number of pages
displayed on the cover sheet must be entered by hand.
•
For the number of pages to be sent, specify a number from 1 to 9999.
16
Click [OK] in the [Item Settings] dialog box.
Attaching a Cover Sheet to a Fax
Page 73

17
If you want to check a preview image of the cover sheet, click
[Sheet Preview].
18
Click [Print].
The specified cover sheet is attached to the fax when it is sent.
3
Fax Driver Options
Attaching a Cover Sheet to a Fax
3-35
Page 74

Registering an Original Cover Sheet as a Template
You can register a cover sheet file created with the Canon Cover Sheet Editor in
Windows as a template for the fax driver.
IMPORTANT
•
You can register up to 30 additional templates with the fax driver, not including the three
templates supplied by default.
•
3
You cannot create a cover sheet template with the Canon Cover Sheet Editor on the Mac
OS, as it is a Windows program.
1
From the [File] menu of the application software, select
[Print].
Fax Driver Options
The [Print] dialog box is displayed.
2
Select the [Cover Sheet] preferences pane.
The [Cover Sheet] preferences pane is displayed.
3
Click [Register].
3-36
Registering an Original Cover Sheet as a Template
Page 75

4
Select a cover sheet file created with the Canon Cover Sheet
Editor ➞ click [Open].
The selected cover sheet file is registered as a template.
3
Fax Driver Options
Registering an Original Cover Sheet as a Template
3-37
Page 76

3
Fax Driver Options
3-38
Registering an Original Cover Sheet as a Template
Page 77

Special Fax Driver Options
This chapter describes instructions for specifying the various special settings for printing a
document.
Setting the Fax Send Time (Mac OS X 10.3 or later) . . . . . . . . . . . . . . . . . . . . . . . . . . . . 4-2
Changing the Order of Pages (Mac OS X 10.3 or later) . . . . . . . . . . . . . . . . . . . . . . . . . . 4-4
Specifying the Color Filter (Mac OS X 10.3 or later). . . . . . . . . . . . . . . . . . . . . . . . . . . . . 4-6
Saving a Document in PDF Format . . . . . . . . . . . . . . . . . . . . . . . . . . . . . . . . . . . . . . . . .4-7
Mac OS X 10.2.8 - 10.3.9 . . . . . . . . . . . . . . . . . . . . . . . . . . . . . . . . . . . . . . . . . . . . . . . . . . . . . . .4-7
Mac OS X 10.4 or Later . . . . . . . . . . . . . . . . . . . . . . . . . . . . . . . . . . . . . . . . . . . . . . . . . . . . . . . .4-8
Saving a Document as a File (Mac OS X 10.2.8 - 10.3.9) . . . . . . . . . . . . . . . . . . . . . . .4-10
Specifying the Fax Resolution . . . . . . . . . . . . . . . . . . . . . . . . . . . . . . . . . . . . . . . . . . . . 4-11
Specifying the Telephone Number Prefix . . . . . . . . . . . . . . . . . . . . . . . . . . . . . . . . . . . .4-12
Selecting a Telephone Line for Fax Transmission. . . . . . . . . . . . . . . . . . . . . . . . . . . . . .4-14
Customizing Telephone Line Names . . . . . . . . . . . . . . . . . . . . . . . . . . . . . . . . . . . . . . .4-16
Specifying the Sender. . . . . . . . . . . . . . . . . . . . . . . . . . . . . . . . . . . . . . . . . . . . . . . . . . . 4-18
Using the Sent Fax Notification Option . . . . . . . . . . . . . . . . . . . . . . . . . . . . . . . . . . . . . . 4-20
Setting the Fax Send Time . . . . . . . . . . . . . . . . . . . . . . . . . . . . . . . . . . . . . . . . . . . . . . . 4-22
Job Accounting Feature . . . . . . . . . . . . . . . . . . . . . . . . . . . . . . . . . . . . . . . . . . . . . . . . . 4-24
Job Accounting Overview . . . . . . . . . . . . . . . . . . . . . . . . . . . . . . . . . . . . . . . . . . . . . . . . . . . . .4-24
Specifying the ID and Password . . . . . . . . . . . . . . . . . . . . . . . . . . . . . . . . . . . . . . . . . . . . . . . .4-24
Faxing with Job Accounting . . . . . . . . . . . . . . . . . . . . . . . . . . . . . . . . . . . . . . . . . . . . . . . . . . . .4-26
Using the Faxmonitor . . . . . . . . . . . . . . . . . . . . . . . . . . . . . . . . . . . . . . . . . . . . . . . . . . . 4-28
Starting the Faxmonitor . . . . . . . . . . . . . . . . . . . . . . . . . . . . . . . . . . . . . . . . . . . . . . . . . . . . . . .4-28
File Menu . . . . . . . . . . . . . . . . . . . . . . . . . . . . . . . . . . . . . . . . . . . . . . . . . . . . . . . . . . . . . . . . . .4-29
Printer Menu . . . . . . . . . . . . . . . . . . . . . . . . . . . . . . . . . . . . . . . . . . . . . . . . . . . . . . . . . . . . . . . .4-30
Faxmonitor Window . . . . . . . . . . . . . . . . . . . . . . . . . . . . . . . . . . . . . . . . . . . . . . . . . . . . . . . . . .4-31
Confirming the Printer Status . . . . . . . . . . . . . . . . . . . . . . . . . . . . . . . . . . . . . . . . . . . . . 4-33
4
CHAPTER
4-1
Page 78

Setting the Fax Send Time (Mac OS X 10.3 or later)
You can specify the time to send a document, as well as the sending priority.
1
From the [File] menu of the application software, select
[Print].
The [Print] dialog box is displayed.
4
Special Fax Driver Options
2
Select the [Scheduler] preferences pane.
The [Scheduler] preferences pane is displayed.
3
Specify when to send the document.
If you select [At], specify the time to send the document.
4-2
Setting the Fax Send Time (Mac OS X 10.3 or later)
Page 79

4
Select the sending priority from [Urgent], [High], [Medium],
and [Low].
4
Setting the Fax Send Time (Mac OS X 10.3 or later)
Special Fax Driver Options
4-3
Page 80

Changing the Order of Pages (Mac OS X 10.3 or later)
You can change the print order of the pages.
1
From the [File] menu of the application software, select
[Print].
The [Print] dialog box is displayed.
4
Special Fax Driver Options
2
Select the [Paper Handling] preferences pane.
The [Paper Handling] preferences pane is displayed.
3
Specify the page order.
If you are using Mac OS X version 10.4 or later, select the page order from [Page
Order].
If you are using Mac OS X version 10.3 to 10.3.9, to send in reverse page order,
select [Reverse page order].
4-4
Changing the Order of Pages (Mac OS X 10.3 or later)
Page 81

4
Select which pages to send from among [All pages], [Odd
numbered pages], and [Even numbered pages].
4
Changing the Order of Pages (Mac OS X 10.3 or later)
Special Fax Driver Options
4-5
Page 82

Specifying the Color Filter (Mac OS X 10.3 or later)
You can apply a color filter to an outgoing fax.
1
From the [File] menu of the application software, select
[Print].
The [Print] dialog box is displayed.
4
Special Fax Driver Options
2
Select the [ColorSync] preferences pane.
The [ColorSync] preferences pane is displayed.
3
Specify a color filter you want to output with from [Quartz
Filter].
4-6
Specifying the Color Filter (Mac OS X 10.3 or later)
Page 83

Saving a Document in PDF Format
As an alternative to faxing a document, you can save your document as a PDF file.
Mac OS X 10.2.8 - 10.3.9
1
From the application software, open the document you want
to save as a PDF (Portable Document Format) file.
2
From the [File] menu, select [Print].
The [Print] dialog box is displayed.
3
In any of the panes under the [Print] dialog box, click [Save as
PDF].
The [Save to File] dialog box is displayed.
4
4
Specify the file name and the save location in the [Save to
File] dialog box.
5
Click [Save].
The document is saved as a PDF file.
Saving a Document in PDF Format
Special Fax Driver Options
4-7
Page 84

Mac OS X 10.4 or Later
1
From the application software, open the document you want
to save as a PDF (Portable Document Format) file.
2
From the [File] menu, select [Print].
The [Print] dialog box is displayed.
3
In any of the panes under the [Print] dialog box, select [Save
as PDF] from [PDF].
4
Special Fax Driver Options
You can select other options for handling the file as a PDF.
The [Save] dialog box is displayed.
4-8
Saving a Document in PDF Format
Page 85

4
Specify the file name and save location in the [Save] dialog
box.
5
Click [Save].
The document is saved as a PDF file.
4
Saving a Document in PDF Format
Special Fax Driver Options
4-9
Page 86

Saving a Document as a File (Mac OS X 10.2.8 - 10.3.9)
As an alternative to faxing a document, you can save it as a file.
1
From the [File] menu of the application software, select
[Print].
The [Print] dialog box is displayed.
4
Special Fax Driver Options
2
Select the [Output Options] preferences pane.
The [Output Options] preferences pane is displayed.
3
Select [Save as File] ➞ select the file format from [Format].
4
Click [Save] in the [Print] dialog box.
4-10
Saving a Document as a File (Mac OS X 10.2.8 - 10.3.9)
Page 87

Specifying the Fax Resolution
This section describes how to specify the resolution that the fax will be sent at.
1
From the [File] menu of the application software, select
[Print].
The [Print] dialog box is displayed.
2
Select the [Special Features] preferences pane.
The [Special Features] preferences pane is displayed.
3
Select the resolution from [Resolution].
Available options are:
- [Ultra Fine]
- [Fine]
4
Special Fax Driver Options
Specifying the Fax Resolution
4-11
Page 88

Specifying the Telephone Number Prefix
This section describes how to specify the outside dialing prefix, needed by some
business telephone systems to make external calls.
1
From the [File] menu of the application software, select
[Print].
The [Print] dialog box is displayed.
4
2
Select the [Special Features] preferences pane.
The [Special Features] preferences pane is displayed.
3
Select [Outside Dialing Prefix] ➞ click [Settings].
Special Fax Driver Options
4-12
The [Outside Dialing Prefix Settings] dialog box is displayed.
Specifying the Telephone Number Prefix
Page 89

4
Enter the outside dialing prefix ➞ click [OK].
NOTE
You can enter a maximum of five numeric characters.
4
Specifying the Telephone Number Prefix
Special Fax Driver Options
4-13
Page 90

Selecting a Telephone Line for Fax Transmission
This section describes how to specify the telephone line used for fax transmission.
NOTE
This option is available for the imageRUNNER C3170, imageRUNNER C5870,
imageRUNNER C5870-G1, imageRUNNER C6870, imageRUNNER C6870-G1,
imageRUNNER 2010F, imageRUNNER 2870/2270, imageRUNNER 3300/2800/2200,
imageRUNNER 3300i, imageRUNNER 3320i/2220i, imageRUNNER 4570/3570, and
imageRUNNER 6570/5570.
4
1
From the [File] menu of the application software, select
[Print].
The [Print] dialog box is displayed.
2
Select the [Special Features] preferences pane.
The [Special Features] preferences pane is displayed.
Special Fax Driver Options
4-14
3
Select the telephone line for fax transmission from [Line
Selection].
Selecting a Telephone Line for Fax Transmission
Page 91

NOTE
If the optional fax board is not installed in your fax, this setting is fixed at [Auto].
4
Selecting a Telephone Line for Fax Transmission
Special Fax Driver Options
4-15
Page 92

Customizing Telephone Line Names
This section describes how to edit the name of the telephone line used for fax
transmission.
NOTE
This option is available for the imageRUNNER C3170, imageRUNNER C5870,
imageRUNNER C5870-G1, imageRUNNER C6870, imageRUNNER C6870-G1,
imageRUNNER 2010F, imageRUNNER 2870/2270, imageRUNNER 3300/2800/2200,
imageRUNNER 3300i, imageRUNNER 3320i/2220i, imageRUNNER 4570/3570, and
imageRUNNER 6570/5570.
4
1
From the [File] menu of the application software, select
[Print].
The [Print] dialog box is displayed.
2
Select the [Special Features] preferences pane.
The [Special Features] preferences pane is displayed.
Special Fax Driver Options
3
Click [Customize Name of Line].
4-16
Customizing Telephone Line Names
Page 93

The [Customize Name of Line] dialog box is displayed.
4
Enter a name for each line ➞ click [OK].
NOTE
You can enter a maximum of 12 characters for each line name.
4
Customizing Telephone Line Names
Special Fax Driver Options
4-17
Page 94

Specifying the Sender
You can specify the sender name, which is recorded in the fax headers.
NOTE
This option is not available for the imageRUNNER 2010F and imageCLASS 2300.
1
From the [File] menu of the application software, select
[Print].
4
Special Fax Driver Options
The [Print] dialog box is displayed.
2
Select the [Special Features] preferences pane.
The [Special Features] preferences pane is displayed.
3
Click [Settings].
4-18
The [Sender Settings] dialog box is displayed.
Specifying the Sender
Page 95

4
Enter the sender name ➞ click [OK].
NOTE
You can enter a maximum of 24 characters.
4
Specifying the Sender
Special Fax Driver Options
4-19
Page 96

Using the Sent Fax Notification Option
You can receive notification with a message box when a fax has been sent.
1
From the [File] menu of the application software, select
[Print].
The [Print] dialog box is displayed.
4
Special Fax Driver Options
2
Select the [Special Features] preferences pane.
The [Special Features] preferences pane is displayed.
3
Select [Display Dialog] from [Method of Notification].
4-20
Using the Sent Fax Notification Option
Page 97

4
Click [Print] in the [Print] dialog box.
The fax is sent, and the message box below is displayed.
4
Using the Sent Fax Notification Option
Special Fax Driver Options
4-21
Page 98

Setting the Fax Send Time
By temporarily storing data in the printer, you can set the time at which a fax will be
sent.
1
From the [File] menu of the application software, select
[Print].
The [Print] dialog box is displayed.
4
2
Select the [General Settings] preferences pane.
The [General Settings] preferences pane is displayed.
3
Specify the name and fax number of the fax recipient.
NOTE
For instructions on how to specify the name and fax number of the fax recipient,
see "Specifying Recipients," on p. 3-15.
Special Fax Driver Options
4-22
Setting the Fax Send Time
Page 99

4
Select [Set the Time to Send] ➞ click [Settings].
The [Send Time Settings] dialog box is displayed.
5
Specify the time to fax the document ➞ click [OK].
4
The specified time is shown on the right of [Set the Time to Send] in the [General
Settings] preferences pane.
6
Click [Print] in the [Print] dialog box.
The data is stored temporarily in the printer, and the fax is sent at the specified
time.
Setting the Fax Send Time
Special Fax Driver Options
4-23
Page 100

Job Accounting Feature
This section describes an overview of the Job Accounting feature, how to specify
the ID and password for the Job Accounting feature, and how to fax with the Job
Accounting feature.
IMPORTANT
In order to use the Job Accounting feature, the ID and password need to be registered on
the printer beforehand.
4
Job Accounting Overview
This feature enables you to sum fax totals for each department or user for
management purposes by assigning an ID and password to each department or
user.
A document will be faxed only if the specified ID and password are verified as valid.
Specifying the ID and Password
Special Fax Driver Options
4-24
1
From the [File] menu of the application software, select
[Print].
The [Print] dialog box is displayed.
2
Select the [Special Features] preferences pane.
The [Special Features] preferences pane is displayed.
Job Accounting Feature
 Loading...