

Canon i475D Series, 475D - i Color Inkjet Printer Printing Manual

Series
Series
SeriesSeries
Desktop Photo Printer
Desktop Photo Printer
Desktop Photo PrinterDesktop Photo Printer
Direct Printing Guide
Direct Printing Guide
Direct Printing GuideDirect Printing Guide

Contents
Contents
Contents
ContentsContents
Operation Panel Names and Functions
Operation Panel Names and Functions
Operation Panel Names and FunctionsOperation Panel Names and Functions
Operation Panel . . . . . . . . . . . . . . . . . . . . . . . . . . . . . . . . . . . . . . . . . . . . . . . . . . . . . . . . . . . . . . . . . . . . 3
Icons on the LCD . . . . . . . . . . . . . . . . . . . . . . . . . . . . . . . . . . . . . . . . . . . . . . . . . . . . . . . . . . . . . . . . . . . . 4
Printing Flow
Printing Flow . . . . . . . . . . . . . . . . . . . . . . . . . . . . . . . . . . . . . . . . . . . . . . . . . . . . . . . . . . . . . . . . . . . . . . . . . . . . . .6
Printing FlowPrinting Flow
Using a Memory Card
Using a Memory Card
Using a Memory CardUsing a Memory Card
Types of Available Memory Cards . . . . . . . . . . . . . . . . . . . . . . . . . . . . . . . . . . . . . . . . . . . . . . . . . . . . . . 8
Inserting a Memory Card . . . . . . . . . . . . . . . . . . . . . . . . . . . . . . . . . . . . . . . . . . . . . . . . . . . . . . . . . . . . .8
Removing a Memory Card . . . . . . . . . . . . . . . . . . . . . . . . . . . . . . . . . . . . . . . . . . . . . . . . . . . . . . . . . . . 10
Printing a Photograph
Printing a Photograph
Printing a PhotographPrinting a Photograph
Printing an Image List – Print Index . . . . . . . . . . . . . . . . . . . . . . . . . . . . . . . . . . . . . . . . . . . . . . . . . . . 11
Selecting and Printing an Image – Print One . . . . . . . . . . . . . . . . . . . . . . . . . . . . . . . . . . . . . . . . . . . . 12
Loading Paper
Loading Paper. . . . . . . . . . . . . . . . . . . . . . . . . . . . . . . . . . . . . . . . . . . . . . . . . . . . . . . . . . . . . . . . . . . . . . . . . . . . 15
Loading PaperLoading Paper
Using the Photo Viewer
Using the Photo Viewer . . . . . . . . . . . . . . . . . . . . . . . . . . . . . . . . . . . . . . . . . . . . . . . . . . . . . . . . . . . . . . . . . 18
Using the Photo ViewerUsing the Photo Viewer
Other Useful Functions
Other Useful Functions
Other Useful FunctionsOther Useful Functions
Printing According to the Settings Made on the Camera – DPOF Printing . . . . . . . . . . . . . . . . . . . .20
Changing the Date Style. . . . . . . . . . . . . . . . . . . . . . . . . . . . . . . . . . . . . . . . . . . . . . . . . . . . . . . . . . . . .22
Setting up the Card Slot as the Memory Card Drive of the Computer . . . . . . . . . . . . . . . . . . . . . . . .23
Printing Photographs Directly from a Digital Camera
Printing Photographs Directly from a Digital Camera. . . . . . . . . . . . . . . . . . . . . . . . . . . . . . . 25
Printing Photographs Directly from a Digital CameraPrinting Photographs Directly from a Digital Camera
Printing Maintenance
Printing Maintenance
Printing MaintenancePrinting Maintenance
When Printing Becomes Faint or Colors are Incorrect . . . . . . . . . . . . . . . . . . . . . . . . . . . . . . . . . . . . .28
Printing the Nozzle Check Pattern. . . . . . . . . . . . . . . . . . . . . . . . . . . . . . . . . . . . . . . . . . . . . . . . . . . . .29
Examining the Nozzle Check Pattern . . . . . . . . . . . . . . . . . . . . . . . . . . . . . . . . . . . . . . . . . . . . . . . . . .29
Print Head Cleaning . . . . . . . . . . . . . . . . . . . . . . . . . . . . . . . . . . . . . . . . . . . . . . . . . . . . . . . . . . . . . . . . 30
Print Head Deep Cleaning . . . . . . . . . . . . . . . . . . . . . . . . . . . . . . . . . . . . . . . . . . . . . . . . . . . . . . . . . . . 31
Aligning the Print Head . . . . . . . . . . . . . . . . . . . . . . . . . . . . . . . . . . . . . . . . . . . . . . . . . . . . . . . . . . . . . 32
Replacing an Ink Tank
Replacing an Ink Tank
Replacing an Ink TankReplacing an Ink Tank
Replacing Ink Tanks . . . . . . . . . . . . . . . . . . . . . . . . . . . . . . . . . . . . . . . . . . . . . . . . . . . . . . . . . . . . . . . . 34
How Low Ink Setting Works . . . . . . . . . . . . . . . . . . . . . . . . . . . . . . . . . . . . . . . . . . . . . . . . . . . . . . . . . . 37
Troubleshooting
Troubleshooting
TroubleshootingTroubleshooting
An Error Message is Displayed on the Operation Panel . . . . . . . . . . . . . . . . . . . . . . . . . . . . . . . . . . .38
Cannot Print Properly from the Digital Camera . . . . . . . . . . . . . . . . . . . . . . . . . . . . . . . . . . . . . . . . . . 41
An Error Message is Displayed While Using the Photo Viewer. . . . . . . . . . . . . . . . . . . . . . . . . . . . . .42
Index
Index . . . . . . . . . . . . . . . . . . . . . . . . . . . . . . . . . . . . . . . . . . . . . . . . . . . . . . . . . . . . . . . . . . . . . . . . . . . . . . . . . . . . . . 43
IndexIndex
2

Operation Panel Names and Functions
Operation Panel Names and
Operation Panel Names and
Operation Panel Names and Operation Panel Names and
Functions
Functions
FunctionsFunctions
Names and functions of the controls on the operation panel and meanings of the icons displayed
on the LCD are summarized below.
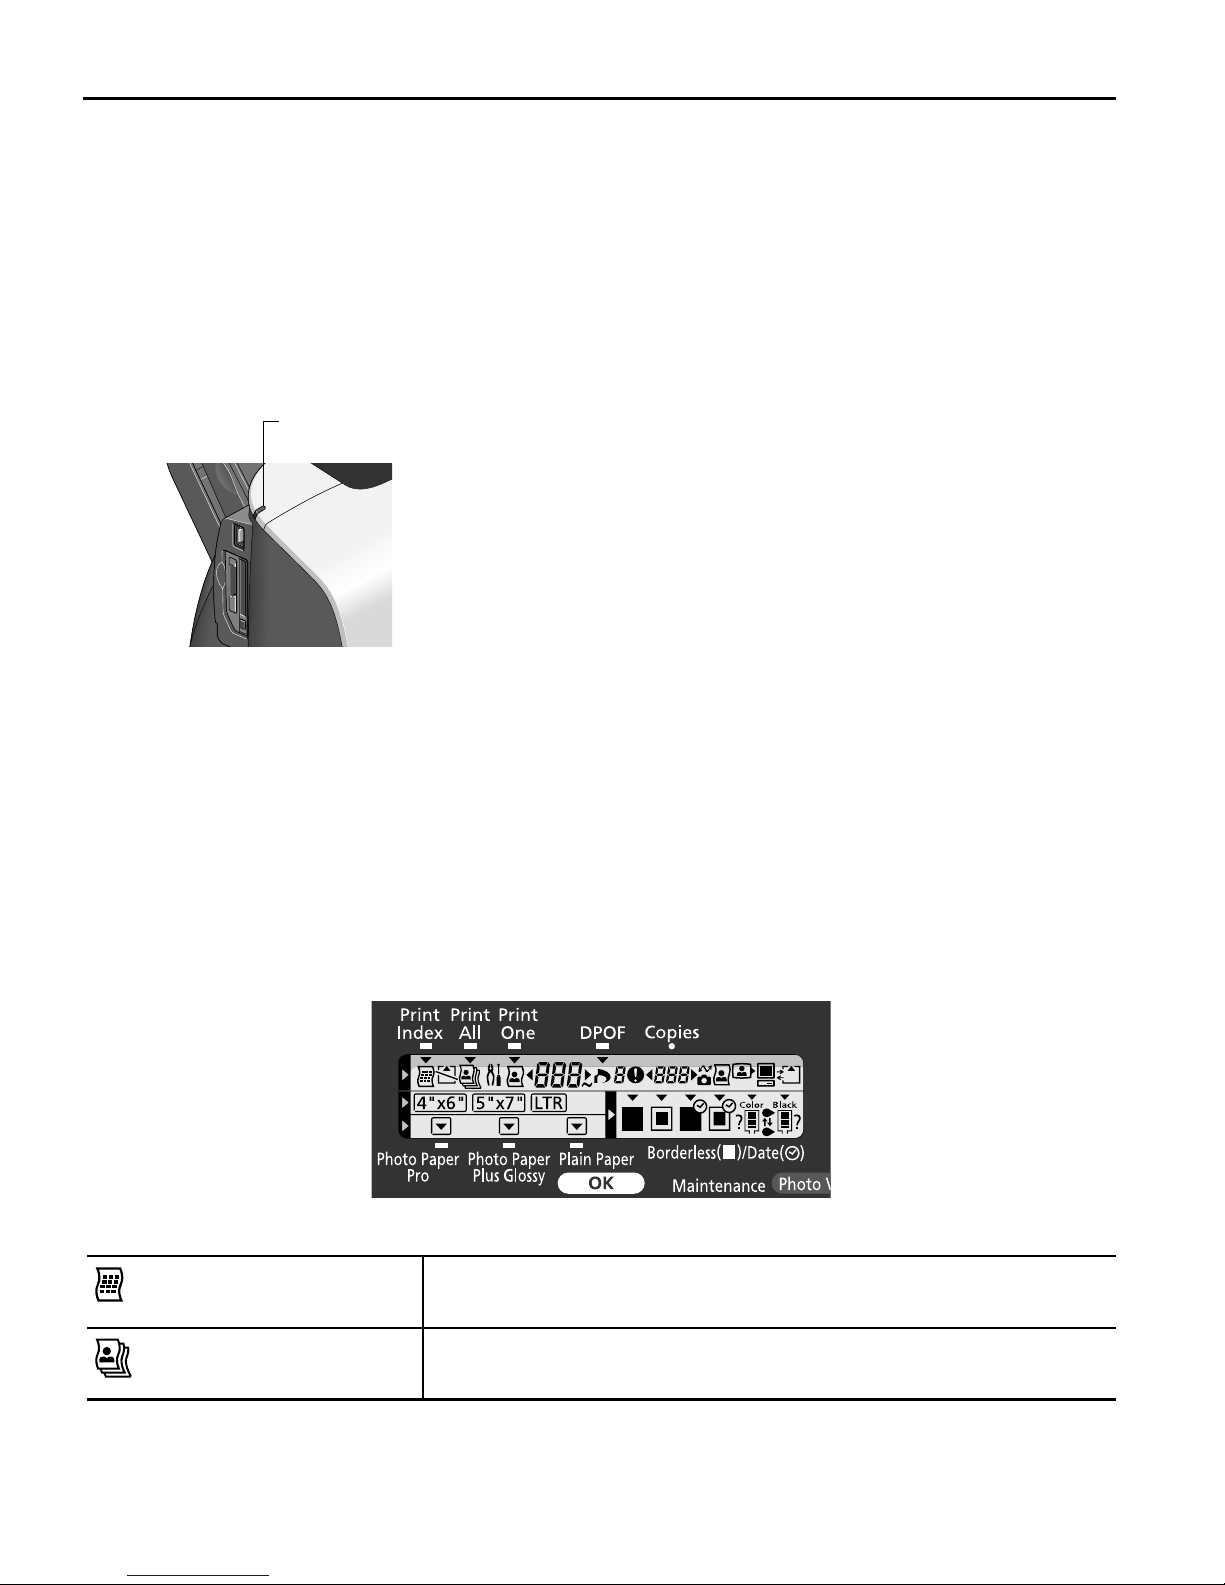
Operation Panel
(1) (2)
(3) (4) (5) (6) (7) (8) (9)
(1)
(1) Power Button
Power Button
(1)(1)
Power ButtonPower Button
Press to turn the printer on or off.
(2)
(2) Power Lamp
Power Lamp
(2)(2)
Power LampPower Lamp
Off: the printer is turned off.
Green: the printer is ready to print.
Flashing green: the printer is preparing to print, or is currently printing.
Flashing orange: an error has occurred and the printer is not ready to print.
Flashing orange and green alternately: an error has occurred that may require a service call.
(3)
(3) Resume Button
Resume Button
(3)(3)
Resume ButtonResume Button
Press this button after resolving a printer problem to resume printing. If this button is
pressed during printing, the printer aborts printing.
(4)
(4) Cursor Buttons
Cursor Buttons
(4)(4)
Cursor ButtonsCursor Buttons
These buttons are used to select setting items and enter numeric values.
(5)
(5) OK Button
OK Button
(5)(5)
OK ButtonOK Button
Press this button to allow the setting you have just made to take effect and proceed to the
next setting item. To return to the previous setting item, keep pressing this button until the
desired setting item is displayed.
(6)
(6) Maintenance Button
Maintenance Button
(6)(6)
Maintenance ButtonMaintenance Button
Press this button when you want to perform maintenance such as printing a nozzle check
pattern, print head cleaning, and print head alignment. Also press this button when you
want to change the date style.
3
Operation Panel Names and Functions
(7)
(7) Photo Viewer Button
Photo Viewer Button
(7)(7)
Photo Viewer ButtonPhoto Viewer Button
Press this button to start/exit the Photo Viewer. This button is also used to save the data
stored in the memory card on the hard disk of the computer.
For details about the Photo Viewer, see “Using the Photo Viewer” on page 18.
(8)
(8) Print Button
Print Button
(8)(8)
Print ButtonPrint Button
Press this button to start printing according to the settings displayed on the LCD.
(9)
(9) Cancel Button
Cancel Button
(9)(9)
Cancel ButtonCancel Button
Press this button to cancel printing.
(10)
(10)
(10) Indicator Lamp
Indicator Lamp
(10)(10)
Indicator Lamp Indicator Lamp
The indicator lamp is lit when memory card reading is enabled and flashes while the memory
card is being read.
Important Removing the memory card or turning off the printer while the Indicator
Lamp is flashing can damage the data stored in the memory card.
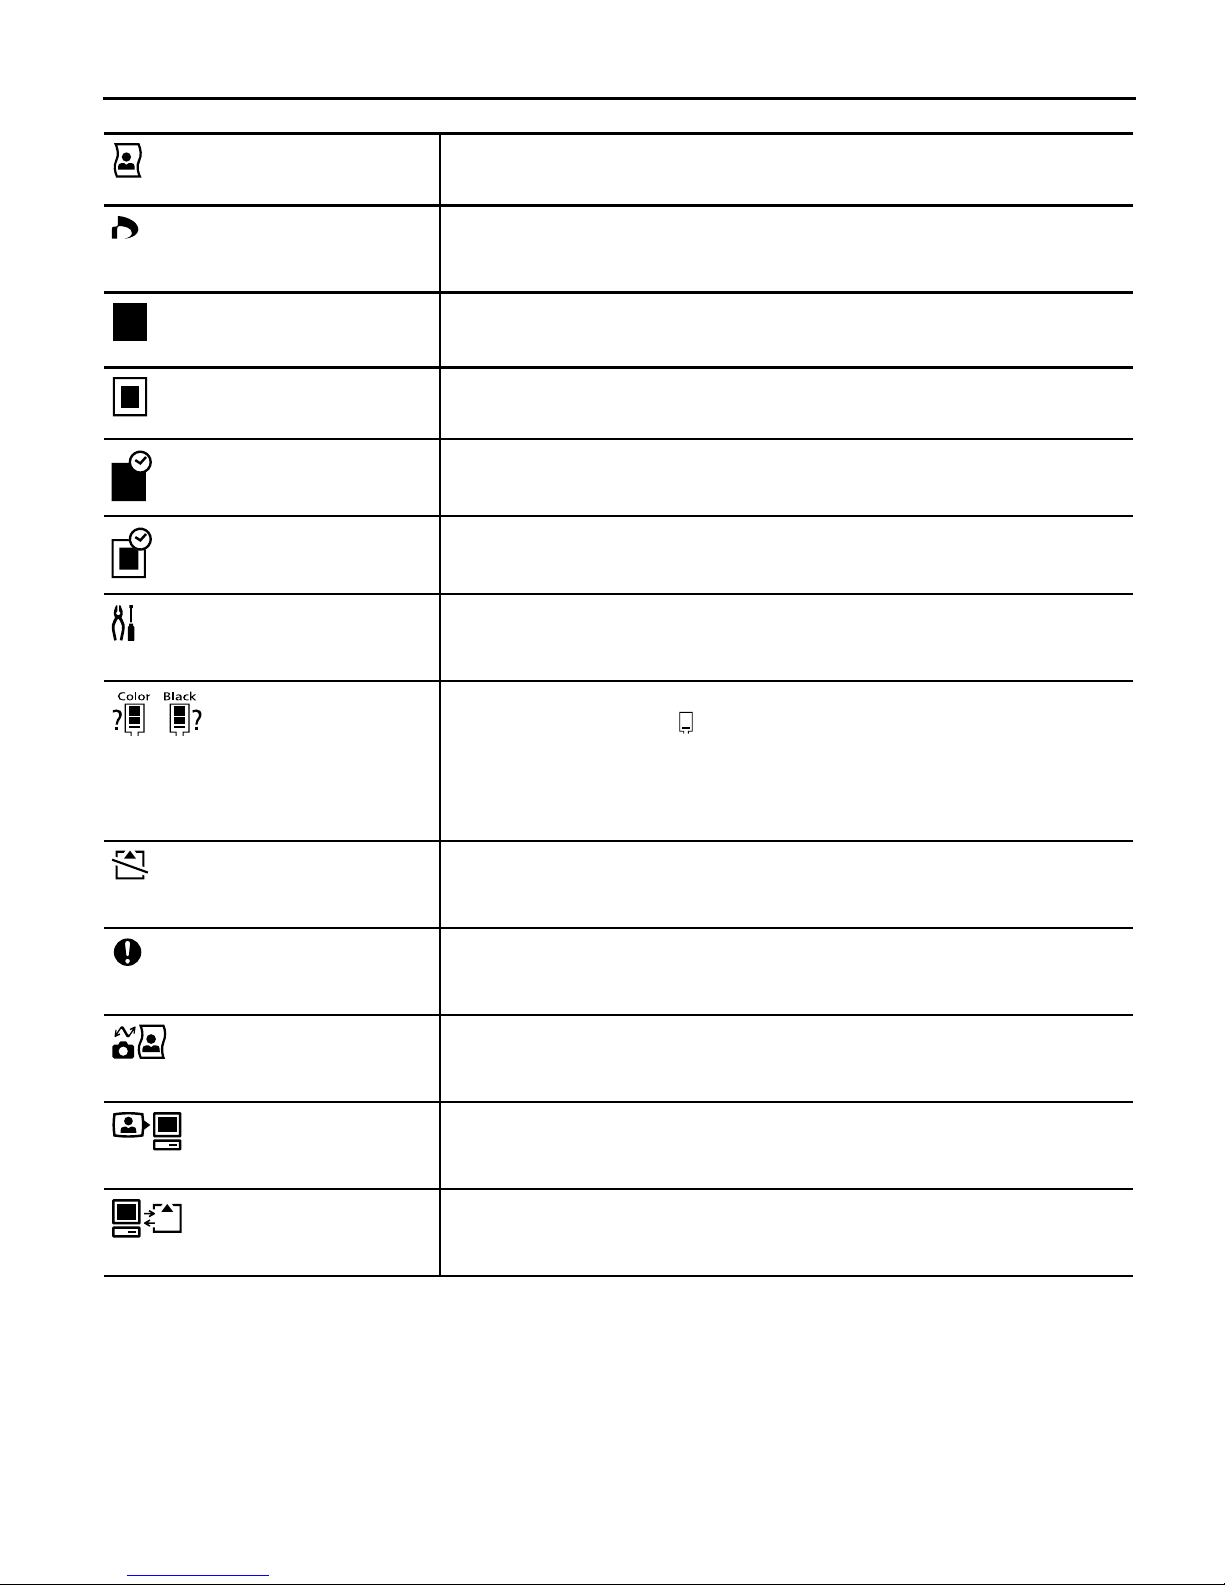
Icons on the LCD
Meanings of the icons displayed on the LCD on the operation panel are as follows:
Print Index
Print Index
Print IndexPrint Index
A list of images stored in the memory card in the card slot is printed,
allowing you to check image numbers.
Print All
Print All
Print AllPrint All
4
All images stored in the memory card in the card slot are printed (one
copy per image).
Operation Panel Names and Functions
Print One
Print One
Print OnePrint One
DPOF
DPOF
DPOFDPOF
Borderless
Borderless
Borderless Borderless
printing
printing
printingprinting
Bordered printing
Bordered printing
Bordered printingBordered printing
Borderless
Borderless
Borderless Borderless
printing with date
printing with date
printing with dateprinting with date
Bordered printing
Bordered printing
Bordered printing Bordered printing
with date
with date
with datewith date
Maintenance
Maintenance
Maintenance Maintenance
Mode
Mode
ModeMode
Remaining ink
Remaining ink
Remaining ink Remaining ink
levels
levels
levelslevels
The image with the image number you have specified is printed. You can
specify a number of copies.
This icon appears when a memory card containing DPOF information is
inserted in the card slot. Images are printed according to the DPOF
information edited on the digital camera.
When Print All
Print All, Print One
Print AllPrint All
without a border.
When Print All
Print All, Print One
Print AllPrint All
with a border.
When Print All
Print All or Print One
Print AllPrint All
border with the date of photographing added.
When Print All
Print All or Print One
Print AllPrint All
border with the date of photographing added.
This icon appears when the Maintenance
cursor buttons, enter the number of the maintenance you want to
perform. See “Printing Maintenance” on page 28.
These icons indicate the remaining levels of color ink and black ink.
If the ink volume is low, is displayed.
If the remaining level of either ink is unknown, the “?” mark is displayed
beside its ink tank icon. Replace the ink tank and reset the ink counter.
Then, the “?” mark will disappear. See “An Error Icon is Displayed on the
Operation Panel.” on page 39.
Print One or DPOF
Print OnePrint One
Print One or DPOF
Print OnePrint One
Print One is specified, each image is printed without a
Print OnePrint One
Print One is specified, each image is printed with a
Print OnePrint One
DPOF is specified, each image is printed
DPOFDPOF
DPOF is specified, each image is printed
DPOFDPOF
Maintenance button is pressed. Using the
MaintenanceMaintenance
No memory card/
No memory card/
No memory card/No memory card/
data
data
datadata
Error number
Error number
Error number Error number
indication
indication
indicationindication
Digital camera
Digital camera
Digital camera Digital camera
connected
connected
connectedconnected
Photo Viewer
Photo Viewer
Photo Viewer Photo Viewer
running
running
runningrunning
Card slot in use
Card slot in use
Card slot in useCard slot in use
This icon is displayed when no memory card is inserted in the card slot.
It flashes when the memory card in the card slot has no data that can be
printed.
The number of the error related to the printer or memory card, that
occurs when a digital camera is connected, is displayed. See
“Troubleshooting” on page 38.
This icon is displayed when a digital camera or digital video camcorder
that is compatible with this printer is connected. See “Printing
Photographs Directly from a Digital Camera” on page 25.
This icon is displayed when Photo Viewer is running with the printer
connected to the computer with a USB cable. See “Using the Photo
Viewer” on page 18.
The memory card inserted in the card slot is in use from the computer. To
use the printer, start the memory card utility from the computer and stop
using the memory card.
5

Printing Flow
Printing Flow
Printing Flow
Printing FlowPrinting Flow
Let’s take a look at the procedure for printing images from the memory card inserted in the card
slot of the printer.
Step 1
Turn on the Printer.
Step 2
Step 3
Load the paper.
Insert the memory card.
6
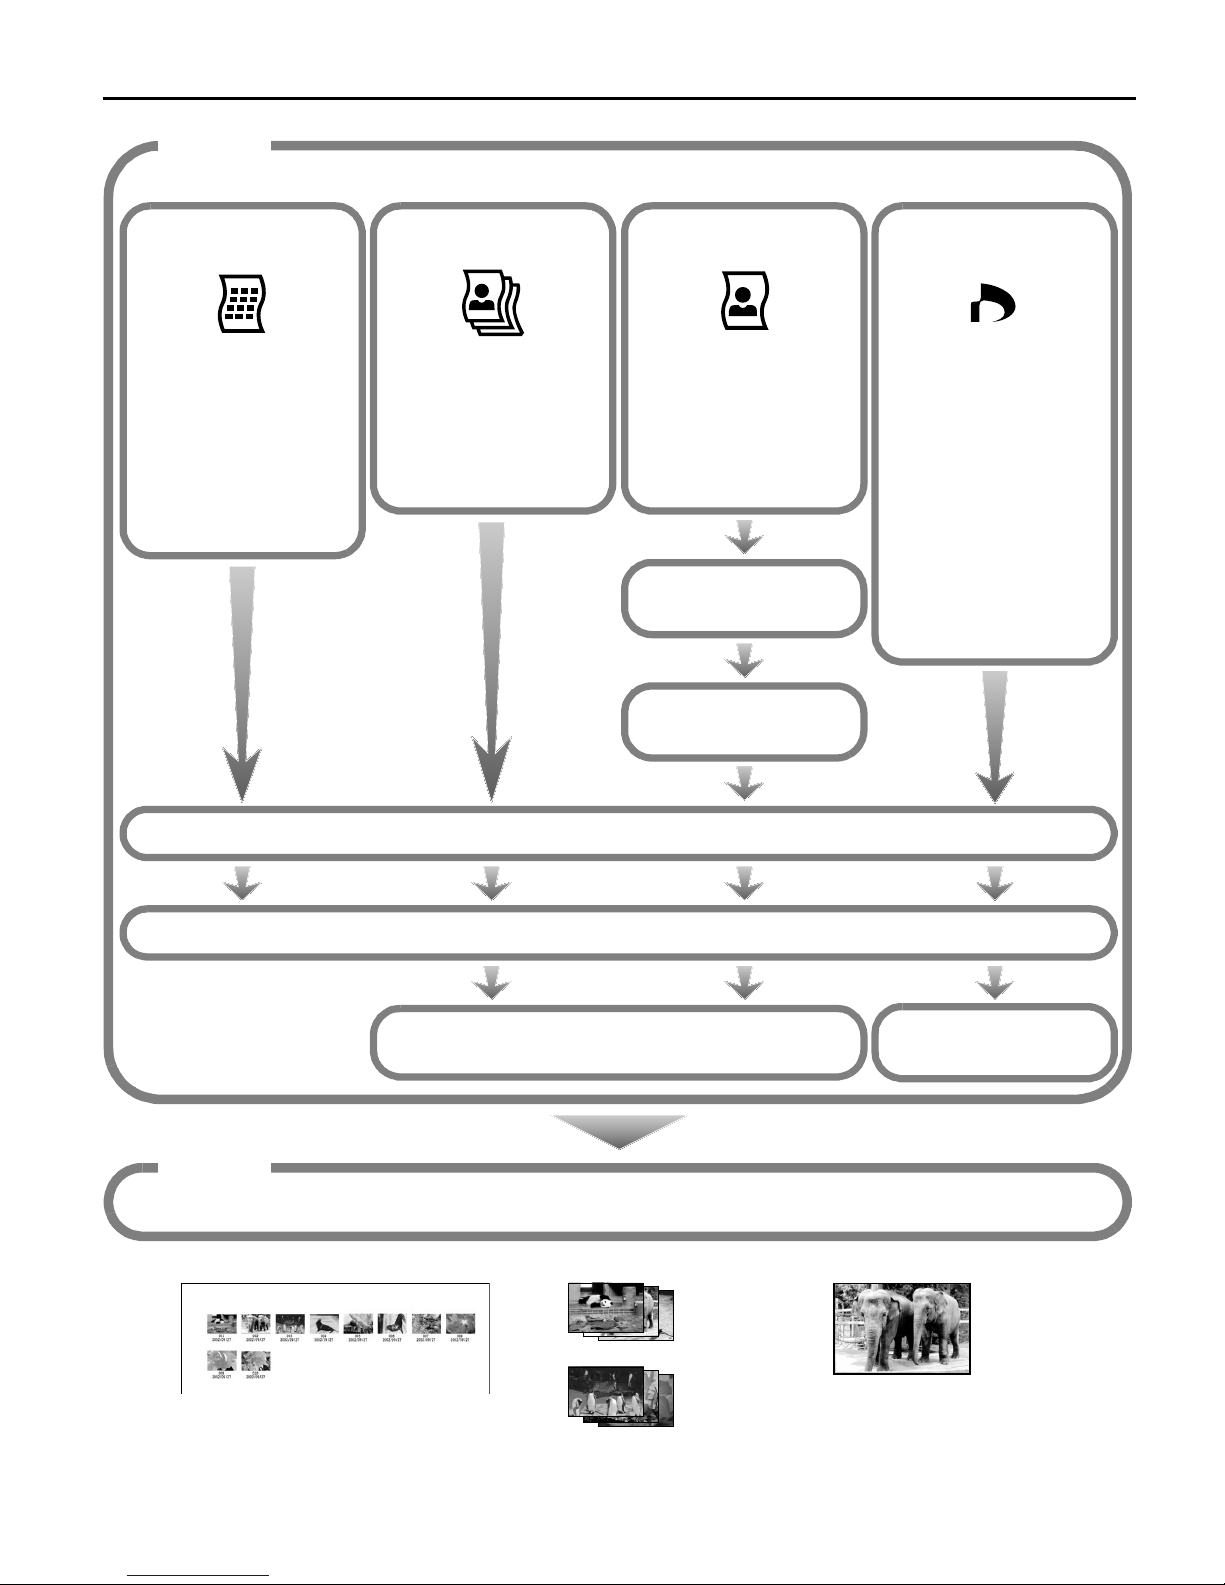
Step 4
Printing Flow
Make print settings.
Print index
A list of images
stored in the
memory card in the
card slot is printed
with an image
number added to
each image.
Print All
All images stored in
the memory card
are printed (one
copy per image).
Print One
The image with the
image number you
have specified is
printed.
Specify an image
number.
Specify a number of
copies.
DPOF
This icon appears
when the memory
card inserted in the
card slot contains
DPOF information.
See “Printing
According to the
Settings Made on
the Camera – DPOF
Printing” on
page 20.
Step 5
Select a paper size.
Select a media type.
Select “bordered” or “borderless” and
”
select “with date
Index printing One-image printingAll-image printing
or “without date.
Start printing
.
Select “bordered
”
or “borderless”.
”
7
Using a Memory Card
Using a Memory Card
Using a Memory Card
Using a Memory CardUsing a Memory Card
Let’s take a look at types of available memory cards and how to insert and remove them.
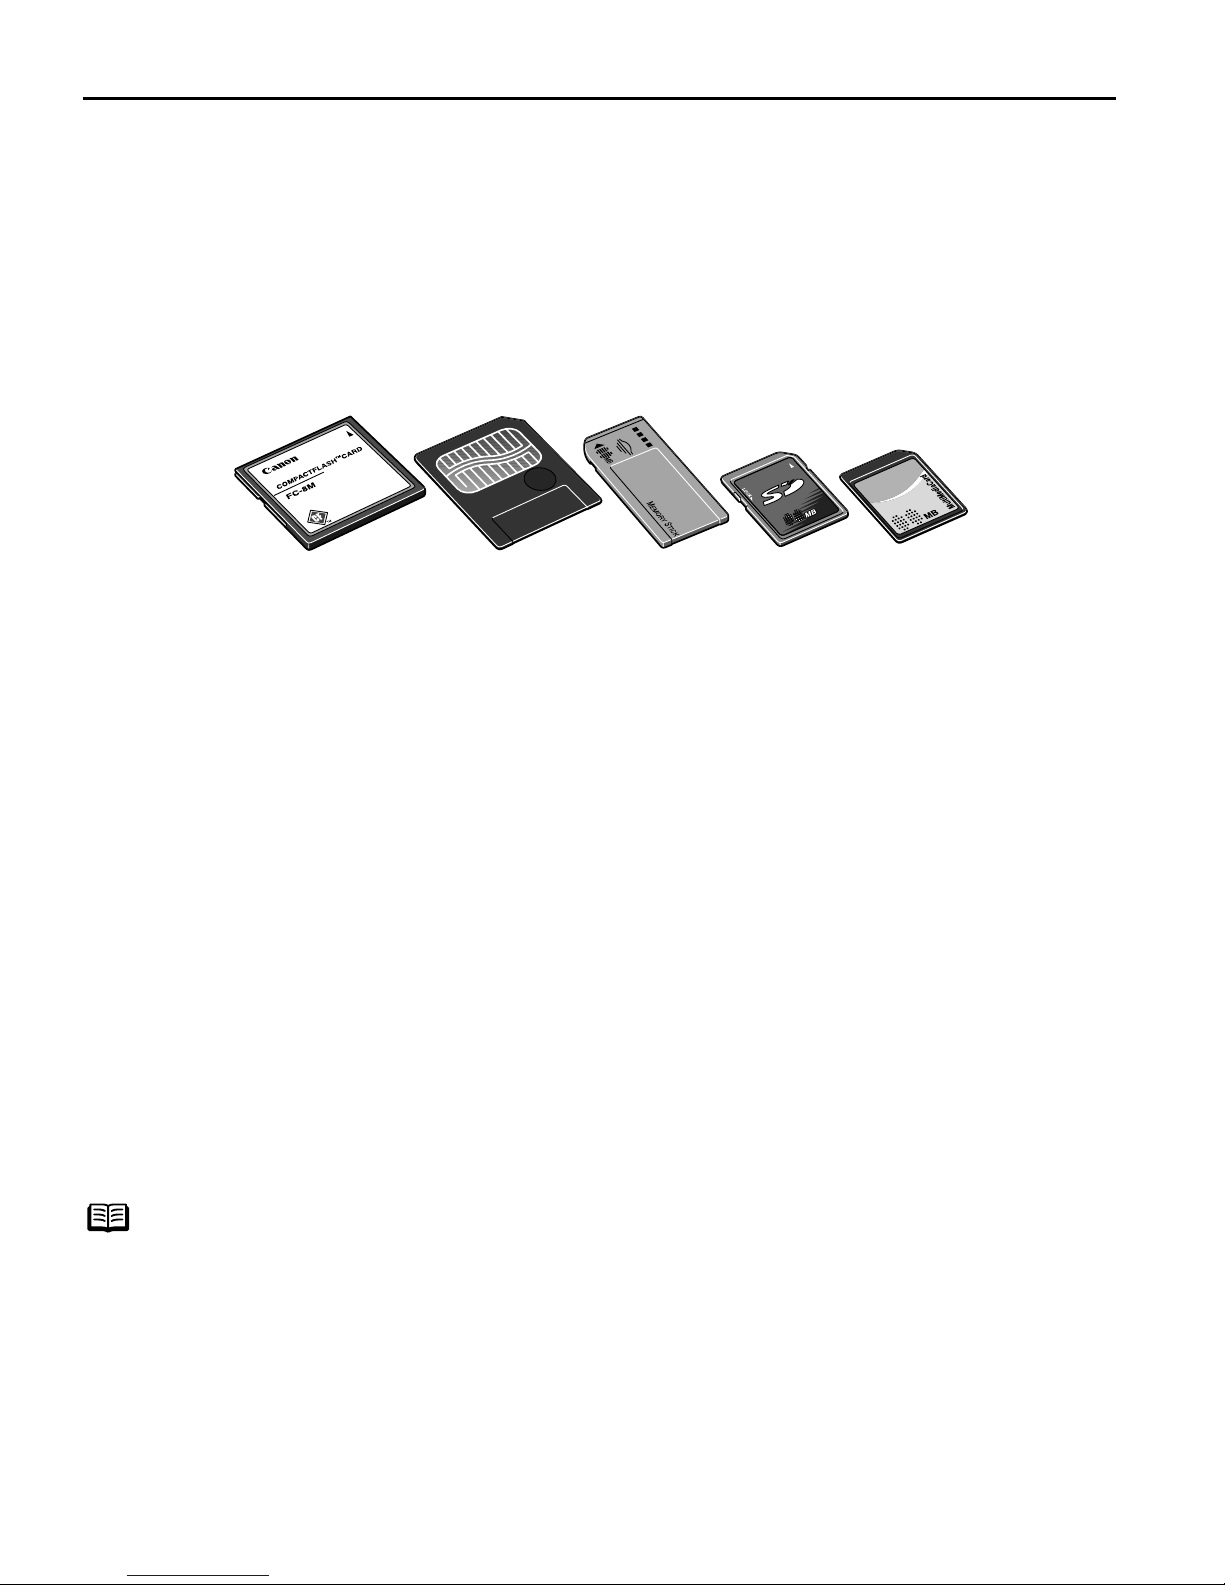
Types of Available Memory Cards
Types of available memory cards are as follows:
•CompactFlash™ (CF) Card/Microdrive
* Ready for TYPE I/TYPE II (3.3V or 5V).
•SmartMedia
* Ready for 3.3V card only (Not ready for
1MB and 2MB cards)
• Memory Stick
Other memory cards can be used through the adapter which is compatible with the above.
Important z Images stored in a memory card not supported by the digital camera may
z To format a memory card, use the digital camera. Memory card formats are
z Images edited on the computer may result in improper printing.
z Please use only one type of memory card at a time. If you use more than 2
™
Card
®
fail in loading or damage. For types of memory cards supported by the
digital camera, refer to your digital camera user’s manual.
not compatible with computer-specific formats.
types of memory cards at the same time, you could lose data or data could
be read incorrectly from the cards.
™
• Secure Digital™ (SD) Card
•MultiMedia
™
Card.
Inserting a Memory Card
Notes
z When Read/write mode
BJ Utility (Macintosh), neither printing nor maintenance can be done. After
completion of the operation of the card slot used as the memory card drive
of the computer, be sure to select Read-only mode
the Card Slot as the Memory Card Drive of the Computer” on page 23.
z If you used a computer to edit or process the data stored in the memory
card, be sure to print images from the computer. Using the operation panel
to print images may result in improper printing.
8
Read/write mode is selected in the Memory Card Utility (Windows) or
Read/write modeRead/write mode
Read-only mode again. See “Setting up
Read-only modeRead-only mode
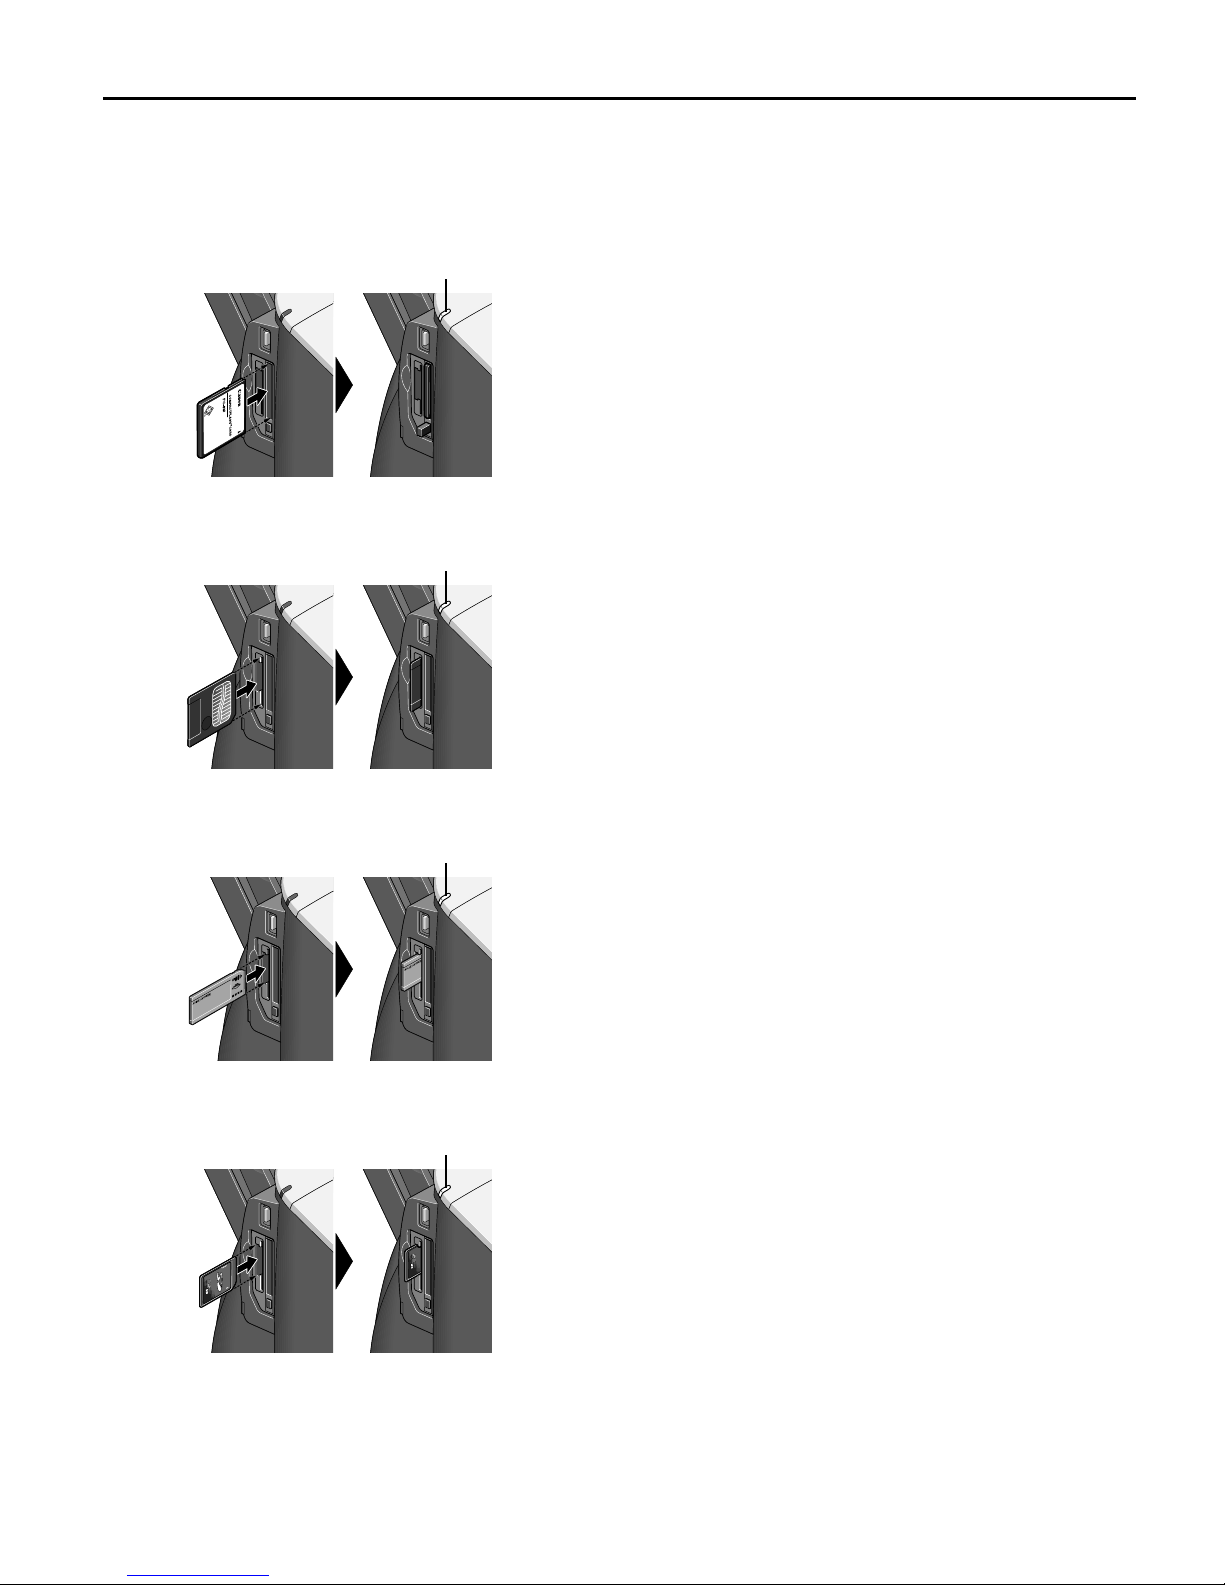
1 Turn on the printer.
2 Insert the memory card in the card slot.
Using a Memory Card
The Indicator lamp lights.
The Indicator lamp lights.
•If you use CompactFlash (CF) card/Microdrive,
insert it as far as it will go as shown left.
•If you use a SmartMedia card, insert it until it
stops with its end projecting as shown left.
The Indicator lamp lights.
The Indicator lamp lights.
•If you use a Memory Stick, insert it until it stops
with its end projecting as shown left.
•If you use SD card/MultiMedia card, insert it
until it stops with its end projecting as shown
left.
9
Using a Memory Card
Removing a Memory Card
Note
If you use the printer and memory card slot as a removable disk drive, follow
the instructions for removal of the memory card from the computer. For the
procedure, refer to the electronic
User’s Guide
on the CD-ROM.
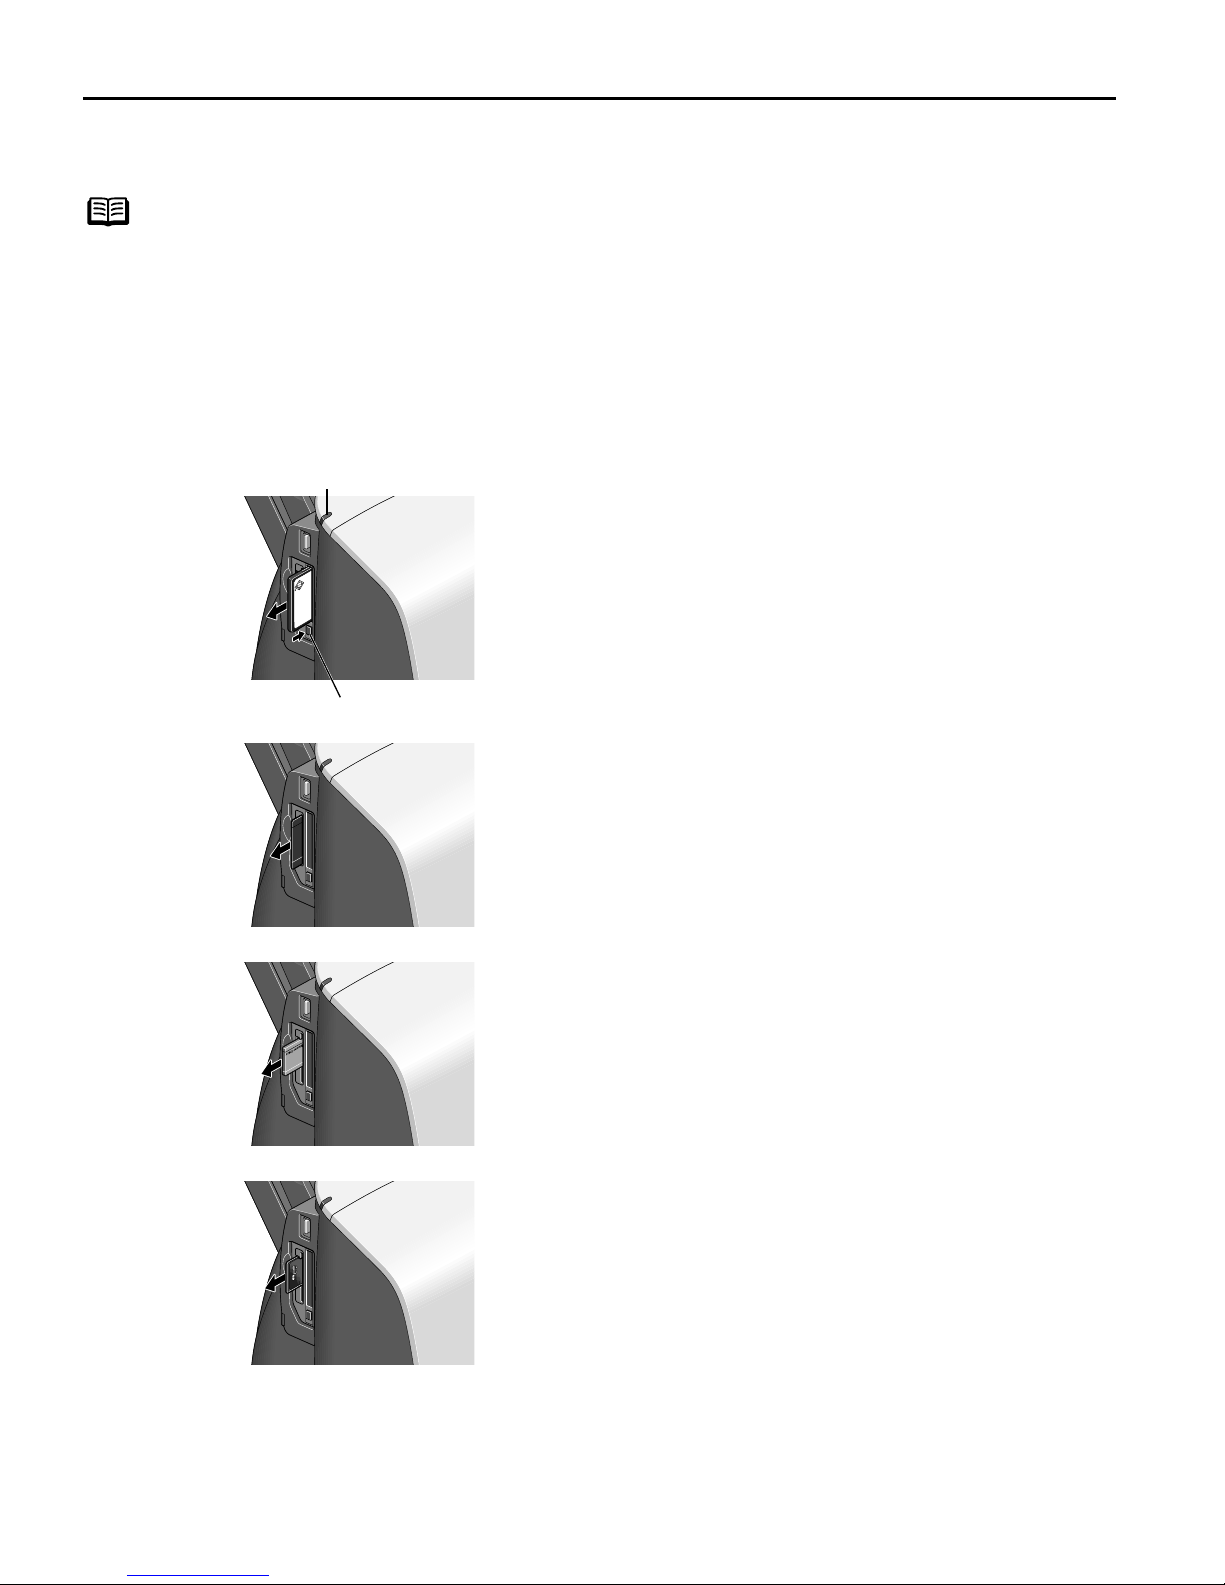
1 Ensure that the Indicator lamp is not flashing, then remove the memory card.
Important Removing the memory card or turning off the printer while the Indicator
lamp is flashing can damage the data stored in the memory card.
Indicator lamp
Card eject button
•If you use CompactFlash (CF) card/Microdrive,
push the card eject button to remove the card.
•If you use a SmartMedia card, remove the card
holding the exposed portion of the card with
your fingers.
10
•If you use a Memory Stick, remove the card
holding the exposed portion of the card with
your fingers.
•If you use SD card/MultiMedia card, remove
the card holding the exposed portion of the
card with your fingers.
Printing a Photograph
Printing a Photograph
Printing a Photograph
Printing a PhotographPrinting a Photograph
Let’s select an image from the images stored on the memory card of the digital camera and print
it. First, make an index print to confirm the image number of the image you want to print. Specify
the image number of the image you want to print and print the image.
Note
The settings made on the Operation Panel will be remembered until they are set
again.
Printing an Image List –––– Print Index
Make an index print of all images stored on the memory card together with their image numbers.
1 Turn on the printer.
2 Load the paper.
See “Loading Paper” on page 15.
3 Insert the memory card in the card slot.
See “Using a Memory Card” on page 8.
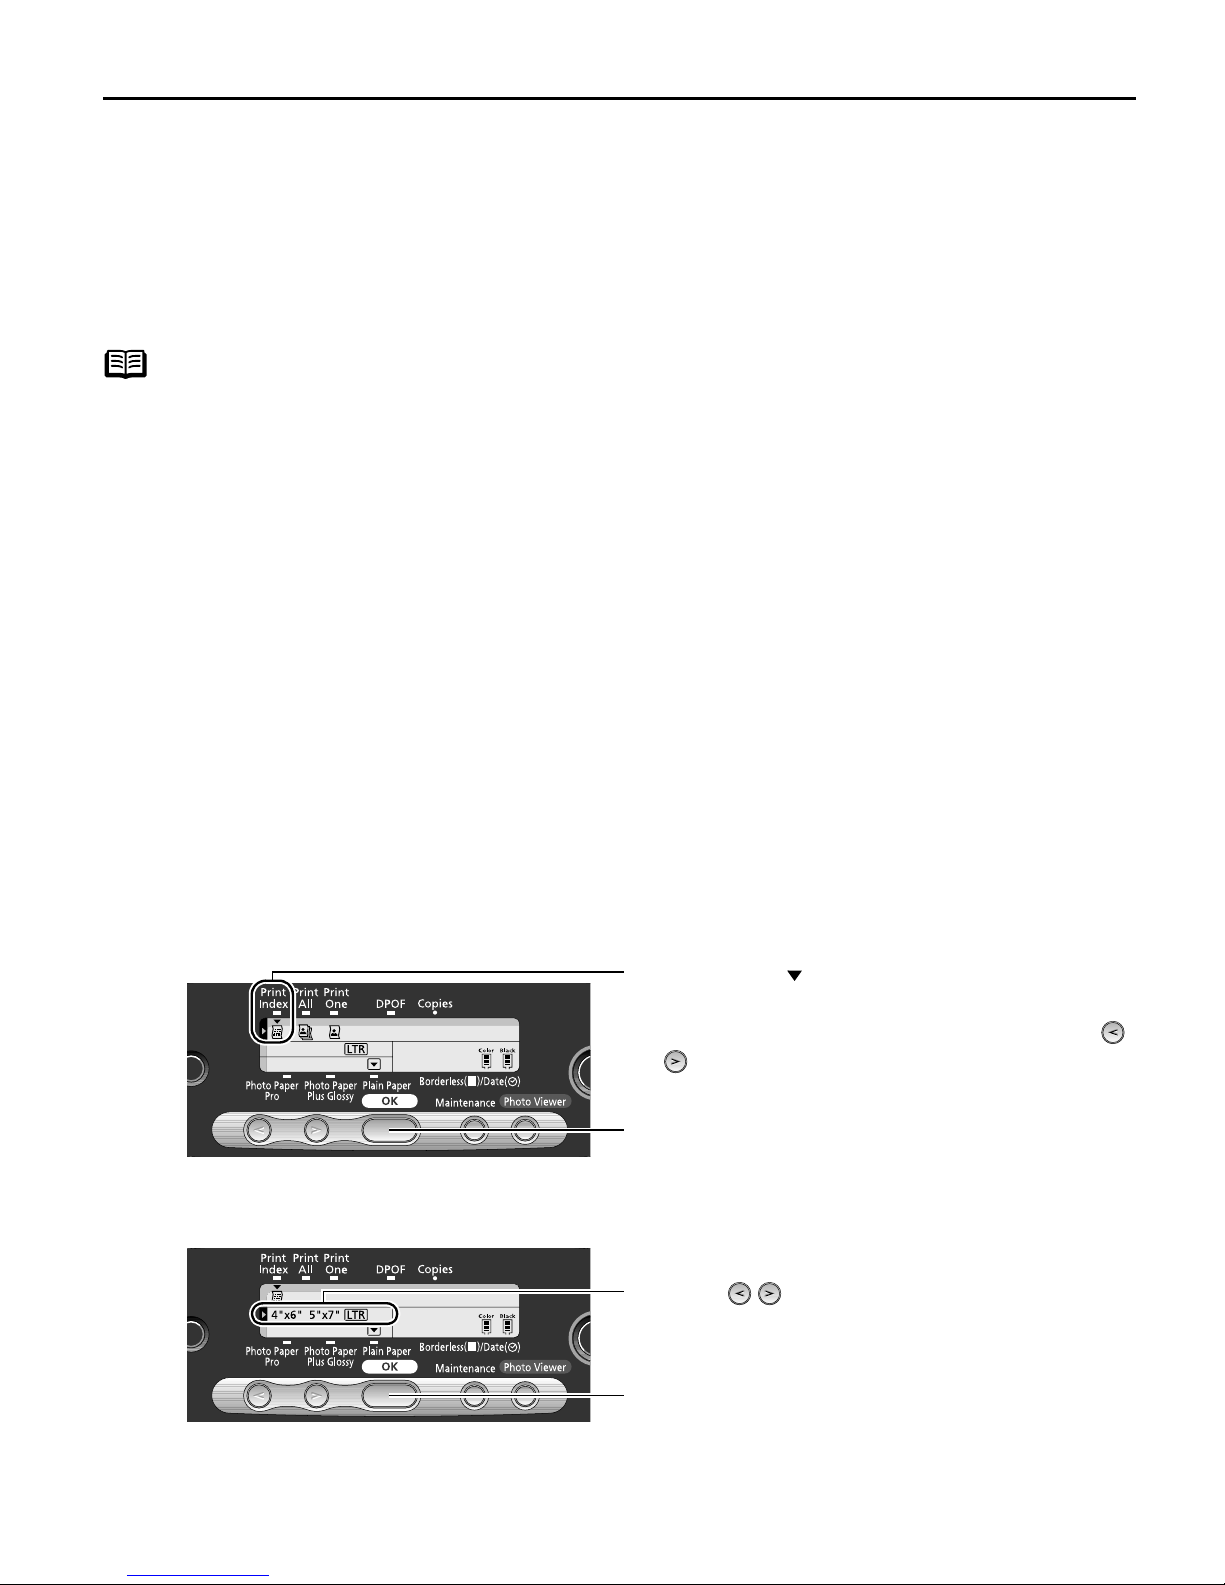
4 Select Print Index.
5 Select a paper size.
(1) Ensure that is displayed above the Print
Index
Index icon.
IndexIndex
If Print Index
Print Index is not selected, select it using
Print IndexPrint Index
(cursor buttons).
(2) Press the OK
(1) Using (cursor buttons), select a paper
size.
(2) Press the OK
OK button.
OKOK
OK button.
OKOK
Print
Print Print
11
Printing a Photograph
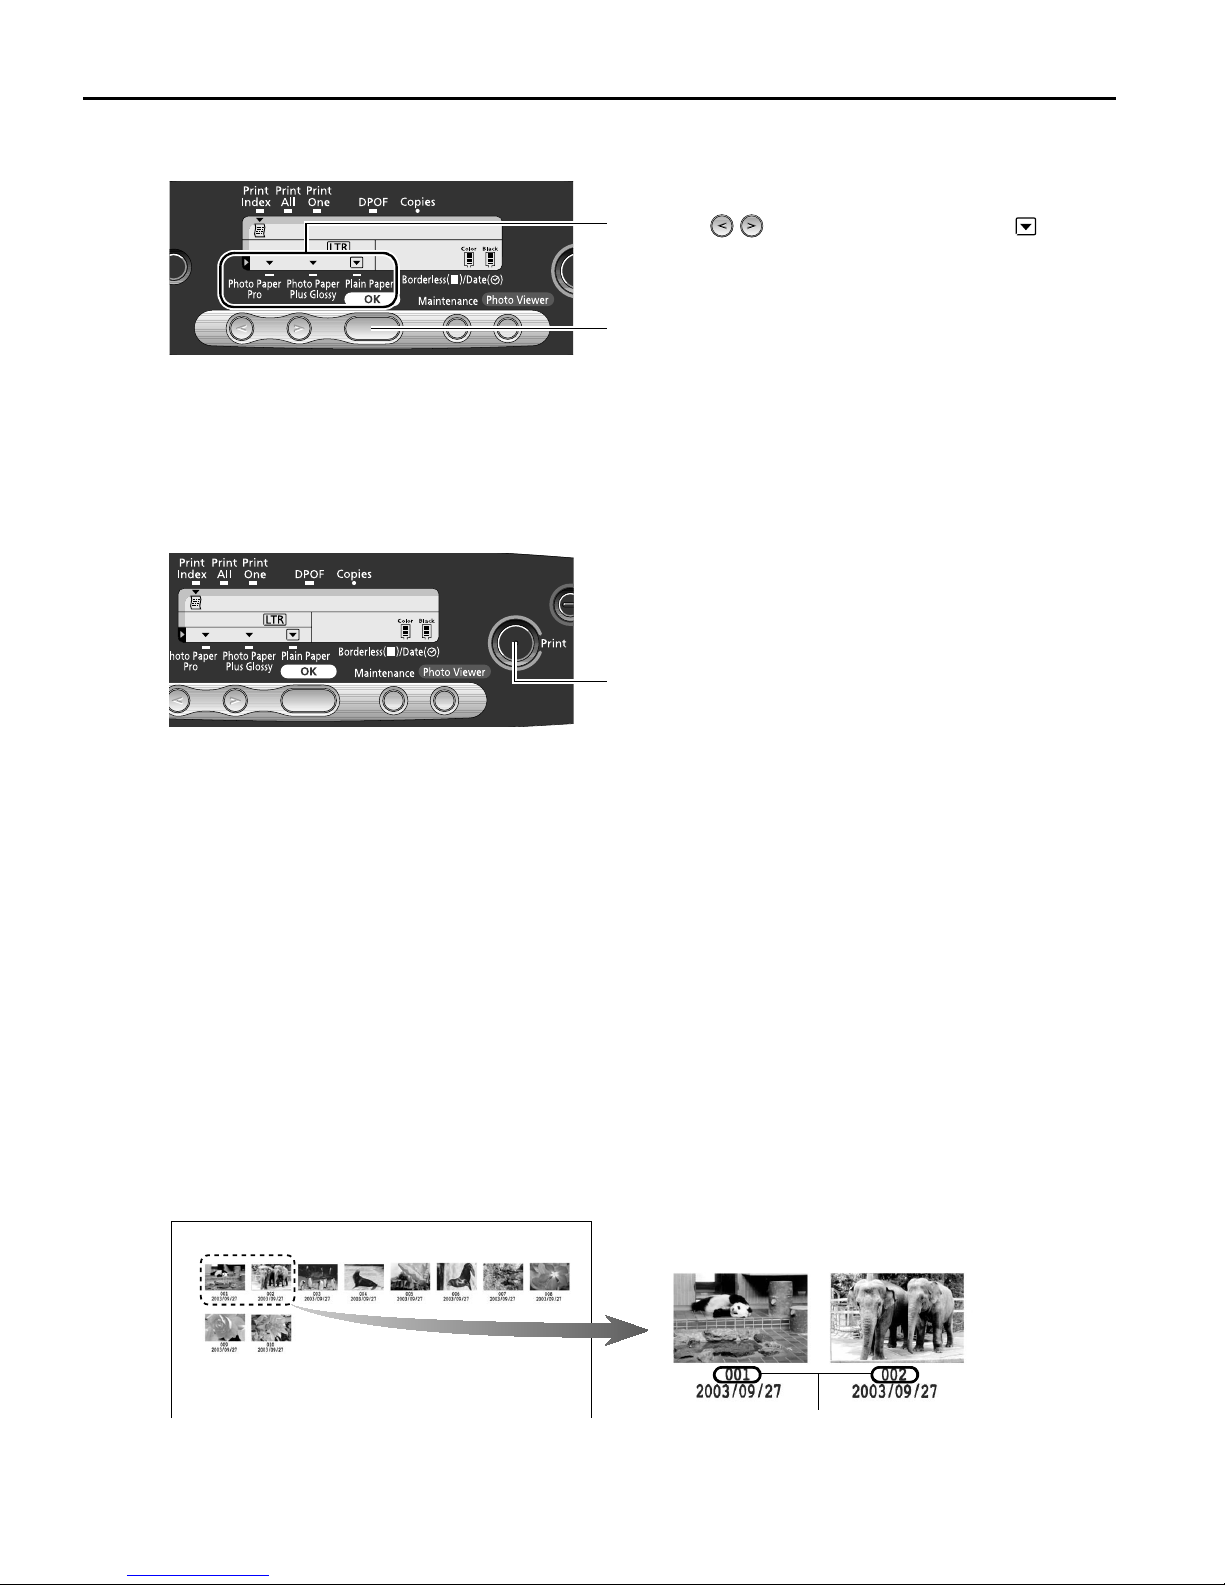
6 Select a media type.
(1) Using (cursor buttons), locate above
the type of the printing media.
(2) Press the OK
OK button.
OKOK
7 Start printing.
(1) Confirm the settings.
To modify a setting that has already been made, keep pressing the OK
display the setting.
(2) Press the Print
All images stored in the memory card are
printed as an index print.
Print button.
PrintPrint
Selecting and Printing an Image –––– Print One
After confirming the images (stored in the memory card) by printing an index, specify the image
number of the image you want to print and then print it.
OK button to
OKOK
1 Load the paper.
See “Loading Paper” on page 15.
2 Confirm the image number.
Make an index print following the procedure described in “Printing an Image List ––––
Print Index” and confirm the image number of the image you want to print.
12
The image number
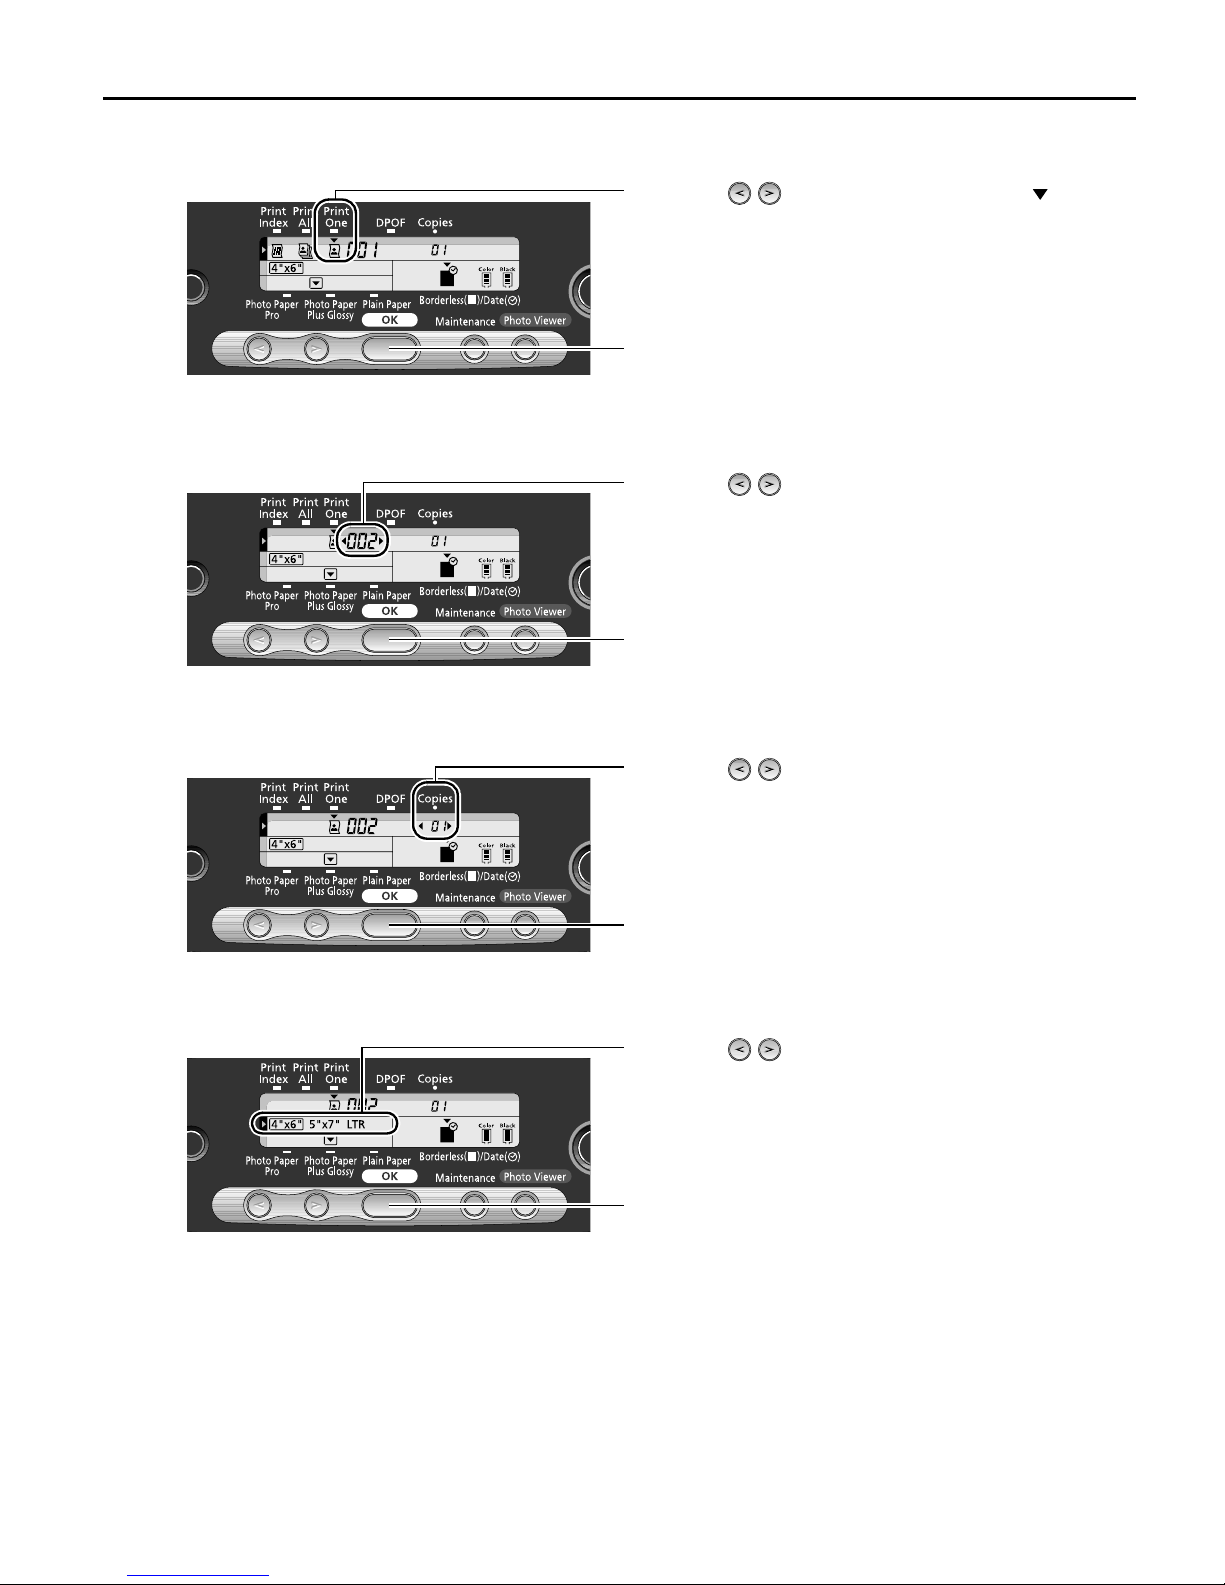
3 Select Print One as a print mode.
Printing a Photograph
(1) Using (cursor buttons), locate above
the Print One
Print One icon.
Print One Print One
(2) Press the OK
OK button.
OKOK
4 Specify the image number of the image you want to print.
(1) Using (cursor buttons), display the
image number of the image you want to print.
(2) Press the OK
OK button.
OKOK
5 Specify a number of copies.
(1) Using (cursor buttons), display the
number of copies of the image you want to
print.
(2) Press the OK
OK button.
OKOK
6 Select a paper size.
(1) Using (cursor buttons), select a paper
size.
(2) Press the OK
OK button.
OKOK
13
Printing a Photograph
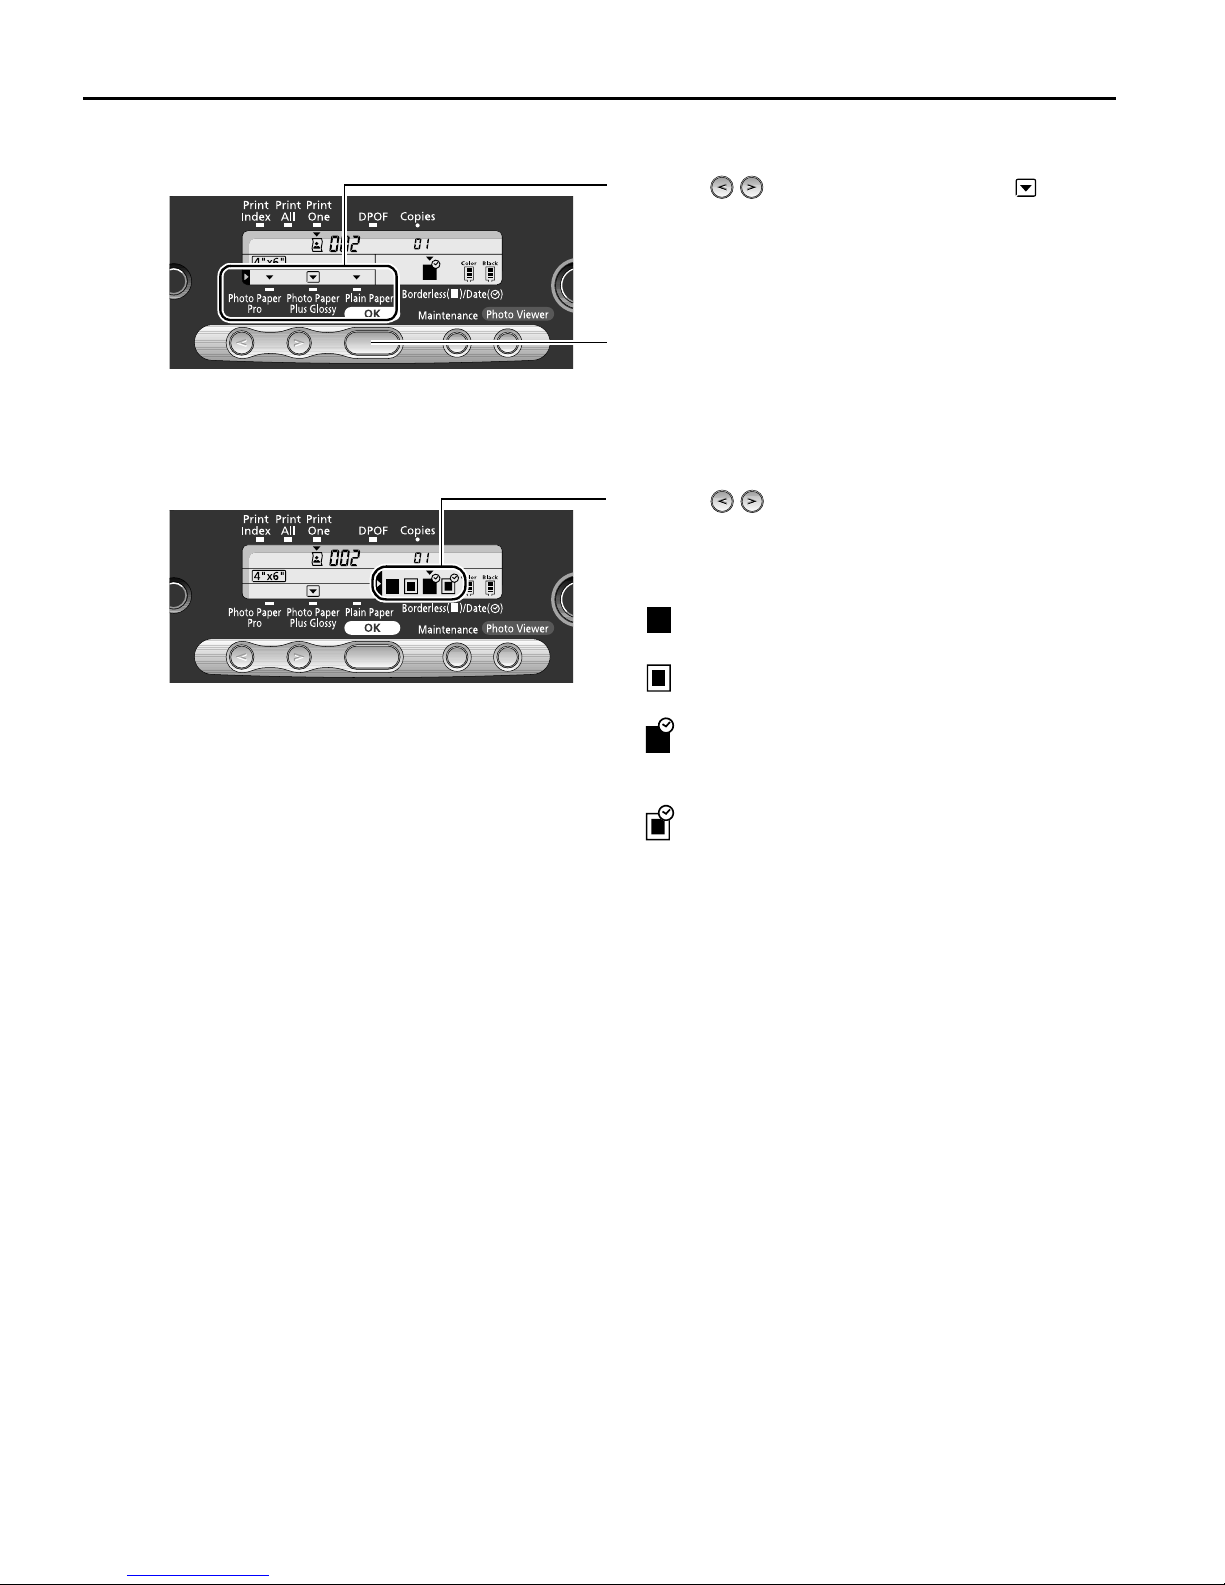
7 Select a media type.
(1) Using (cursor buttons), locate above
the type of the printing media.
(2) Press the OK
OK button.
OKOK
8 Determine whether the image is to be printed with or without a border. Also
determine whether the image is to be printed with the date added.
(1) Using (cursor buttons), select
“bordered” or “borderless.” Also select “with
date” or “without date.”
: The image is printed without border.
: The image is printed with border.
: The image is printed without border with
the date added.
: The image is printed with border with the
date added.
Important When Plain Paper
printed without border.
Plain Paper is selected as a media type, the image cannot be
Plain PaperPlain Paper
9 Start printing.
(1) Confirm the settings.
To modify the setting made previously, keep pressing the OK
the setting.
(2) Press the Print
The specified number of copies of the image with the specified image number
will be printed.
14
Print button.
PrintPrint
OK button to display
OKOK
 Loading...