

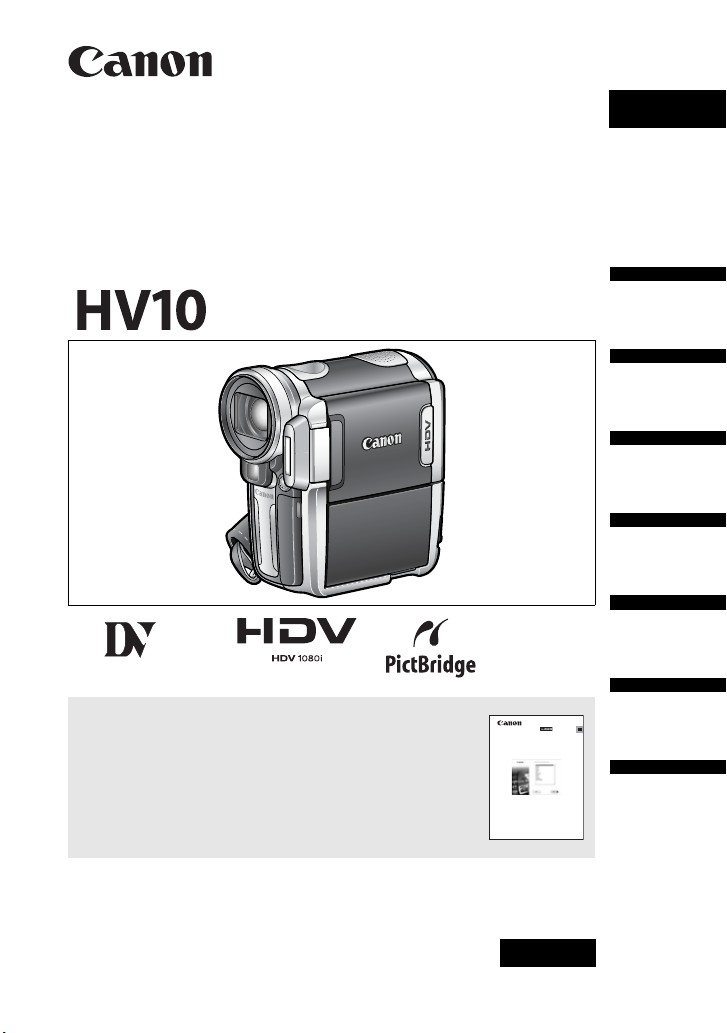
CANON HV10 User Manual
PUB.DIE-266
Mini
Digital
Video
Cassette
HDV Camcorder
Instruction Manual
English
Introduction
Prerparations
Basic
Functions
Advanced
Functions
Editing
Functions
Please read also the following instruction manual
(electronic version on PDF file).
• Digital Video Software
Digital Video Software
Instruction Manual
PAL
Version 23
External
Connections
E
Additional
Information
2
Introduction
Important Usage Instructions
WARNING!
WARNING!
TO REDUCE THE RISK OF ELECTRIC SHOCK, DO NOT REMOVE COVER (OR
BACK). NO USER SERVICEABLE PARTS INSIDE. REFER SERVICING TO
QUALIFIED SERVICE PERSONNEL.
TO REDUCE THE RISK OF FIRE OR ELECTRIC SHOCK, DO NOT EXPOSE THIS
PRODUCT TO RAIN OR MOISTURE.
CAUTION:
CAUTION:
DISCONNECT THE MAINS PLUG FROM THE SUPPLY SOCKET WHEN NOT IN USE.
The Mains plug is used as the disconnect device. The Mains plug shall remain readily operable to
disconnect the plug in case of an accident.
While using the compact power adapter, do not wrap it or cover it with a piece of cloth, and do not
place it in confined narrow spaces. Heat may build up, the plastic case may deform and it could
result in electric shock or fire.
CA-570 identification plate is located on the bottom.
European Union (and EEA) only.
type of waste could have a possible negative impact on the environment and human health due
to potentially hazardous substances that are generally associated with EEE. At the same time,
your cooperation in the correct disposal of this product will contribute to the effective usage of
natural resources. For more information about where you can drop off your waste equipment for
recycling, please contact your local city office, waste authority, approved WEEE scheme or your
household waste disposal service. For more information regarding return and recycling of WEEE
products, please visit
www.canon-europe.com/environment
(EEA: Norway, Iceland and Liechtenstein)
TO REDUCE THE RISK OF ELECTRIC SHOCK AND TO REDUCE ANNOYING
INTERFERENCE, USE THE RECOMMENDED ACCESSORIES ONLY.
Using any device other than the Compact Power Adapter CA-570 may damage the
camcorder.
This symbol indicates that this product is not to be disposed of with your household
waste, according to the WEEE Directive (2002/96/EC) and your national law. This
product should be handed over to a designated collection point, e.g., on an authorized
one-for-one basis when you buy a new similar product or to an authorized collection site
for recycling waste electrical and electronic equipment (EEE). Improper handling of this
.
3
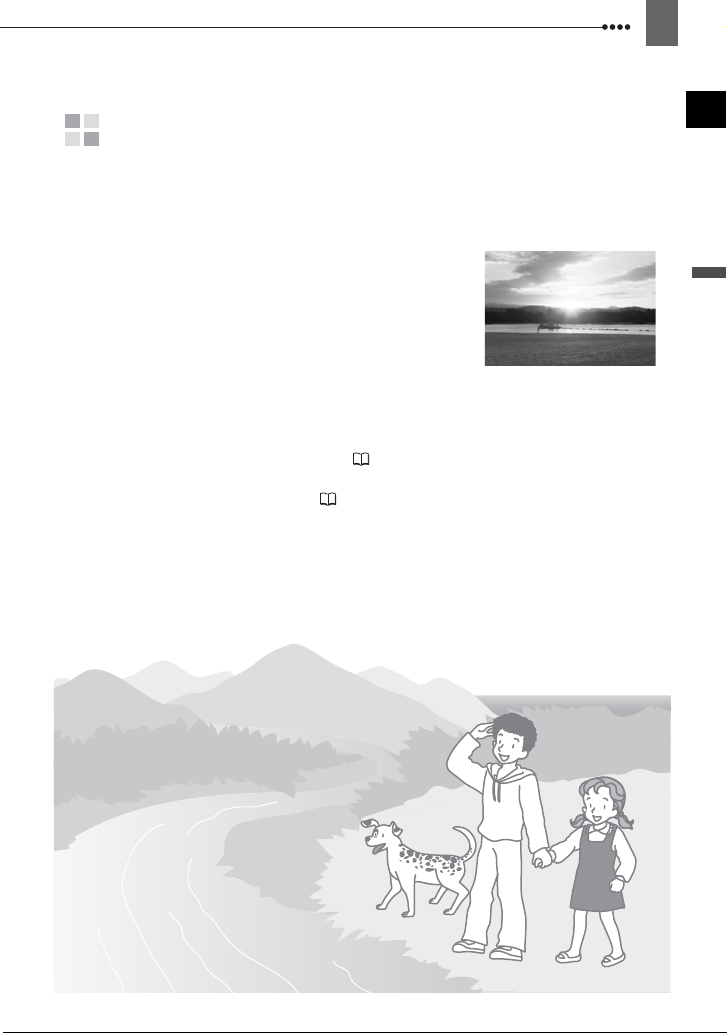
Enjoying High-Definition Video
Preserve your most treasured memories, be it unforgettable scenic beauty or
cherished moments spent with family and friends, with high definition video
recordings of a quality second only to actually being there.
What is High-Definition Video?
High-definition video (HDV) allows you to record
video of unparalleled high quality on regular miniDV
tapes. HDV is composed of 1,080 horizontal lines
–that is more than twice the number of horizontal
lines and approximately 4 times the number of
pixels in standard definition TV broadcasts–
resulting in incredibly beautiful and richly detailed
video recordings.
How to play back your HDV recordings?
On a high-definition TV (HDTV) ( 55)
HDV recordings will be played back in their original high quality.
On standard definition TVs ( 56)
HDV recordings will be down-converted to match the resolution of the TV set.
1,080 lines
E
Introduction

4
Table of contents
Introduction
Enjoying High-Definition Video .......................................................................3
About this Manual ...........................................................................................7
Getting to Know the Camcorder
Supplied Accessories......................................................................................9
Components Guide .......................................................................................10
Screen Displays ............................................................................................13
Preparations
Getting Started
Charging the Battery Pack............................................................................16
Inserting and Removing a Tape....................................................................17
Inserting and Removing a Memory Card ...................................................... 18
Preparing the Camcorder..............................................................................18
The Wireless Controller ................................................................................19
Adjusting the LCD Screen.............................................................................19
Using the Menus
Selecting a MENU Option.............................................................................20
Selecting a FUNC. Menu Option...................................................................21
First Time Settings
Changing the Language................................................................................21
Changing the Time Zone...............................................................................22
Setting the Date and Time ............................................................................22
Basic Functions
Recording
Recording Movies.........................................................................................23
Recording Still Images.................................................................................. 24
Zooming........................................................................................................24
Playback
Playing Back Movies.....................................................................................25
Locating the End of the Last Scene.............................................................. 26
Locating Scenes by Recording Date.............................................................27
Viewing Still Images......................................................................................27
Magnifying the Playback Image....................................................................28
Advanced Functions
Menu Options Lists
MENU Options..............................................................................................29
Camera Setup (Digital Zoom, Image Stabilizer, etc.)..........................29
Recording/Video Input Setup
(HD Standard, DV Recording Mode, etc.)........................................ 30
Card Operations (Initialization, Erase All Images, etc.) ...................... 32
Playback/Video Output Setup
(Playback Standard, Component Video Out, DV Out etc.)............... 32
Display Setup (LCD Brightness, Language, etc.) ...............................34
System Setup (Beep, etc.).................................................................. 35
Date/Time Setup.................................................................................35

FUNC. Menu Options ....................................................................................35
Recording Programs
Using the Recording Programs .....................................................................38
Flexible Recording: Changing the Aperture and Shutter Speed ...............39
Special Scene: Recording Programs to Match Special Conditions ........40
Adjusting the Picture: Exposure, Focus and Color
Manual Exposure Adjustment........................................................................41
Light Metering Mode......................................................................................41
Automatic Focus Modes ................................................................................42
Manual Focus Adjustment .............................................................................42
Focus Assist Functions..................................................................................43
White Balance ...............................................................................................43
Image Effects.................................................................................................44
Still Image Recording Options
Selecting the Size and Quality of Still Images ...............................................45
Capturing a Still Image while Recording Movies ...........................................46
Continuous Shooting and Exposure Bracketing ............................................47
Other Functions
On-Screen Displays.......................................................................................48
Flash..............................................................................................................49
Mini Video Light.............................................................................................50
Self Timer ......................................................................................................50
Digital Effects.................................................................................................51
Editing Functions
Still Image Options
Erasing Still Images.......................................................................................53
Protecting Still Images...................................................................................53
Initializing the Memory Card..........................................................................54
External Connections
Connecting to a TV or VCR
Connection Diagrams ....................................................................................55
Playback on a TV Screen..............................................................................57
Recording to a VCR or Digital Video Recorder .............................................58
Analog Line-In Recording..............................................................................59
Digital Video Dubbing....................................................................................60
Analog/Digital Conversion .............................................................................61
Connecting to a Computer
PC Connection Diagrams ..............................................................................62
Transferring Video Recordings......................................................................63
Transferring Still Images – Direct Transfer....................................................64
Transfer Orders .............................................................................................65
Connecting to a Printer
Printing Still Images – Direct Print .................................................................66
Selecting the Print Settings ...........................................................................67
Trimming Settings..........................................................................................68
Print Orders ...................................................................................................69
5
E
Introduction

6
Additional Information
Trouble?
Troubleshooting ............................................................................................71
List of Messages ........................................................................................... 74
Do’s and Don’ts
Handling Precautions....................................................................................77
Maintenance/Others......................................................................................80
Cleaning the Video Heads ............................................................................ 80
Using the Camcorder Abroad .......................................................................81
General Information
System Diagram ...........................................................................................82
Optional Accessories ....................................................................................83
Specifications................................................................................................85
Index .............................................................................................................87
7
About this Manual
Thank you for purchasing the Canon HV10. Please read this manual carefully before
you use the camcorder and retain it for future reference. Should your camcorder fail to
operate correctly, refer to the
Conventions Used in the Manual
IMPORTANT: Precautions related to the camcorder operation.
NOTES: Additional topics that complement the basic operating procedures.
POINTS TO CHECK: Restrictions that apply if the function described is not
available in all operating modes (the operating mode to which the camcorder should be
set, etc.).
: Reference page number.
“Screen” refers to the LCD and the viewfinder screen.
The photos included in the manual are simulated pictures taken with a still camera.
Brackets [ ] and capital letters are used to refer to menu
options as they are displayed on screen. Menu options in
boldface indicate the default setting (for example [ON],
[OFF]).
Menu item shown at its default position
Buttons and switches to be operated
Names of buttons and switches are indicated within a
“button” frame (for example ).
Troubleshooting
MENU
table ( 71).
E
Introduction
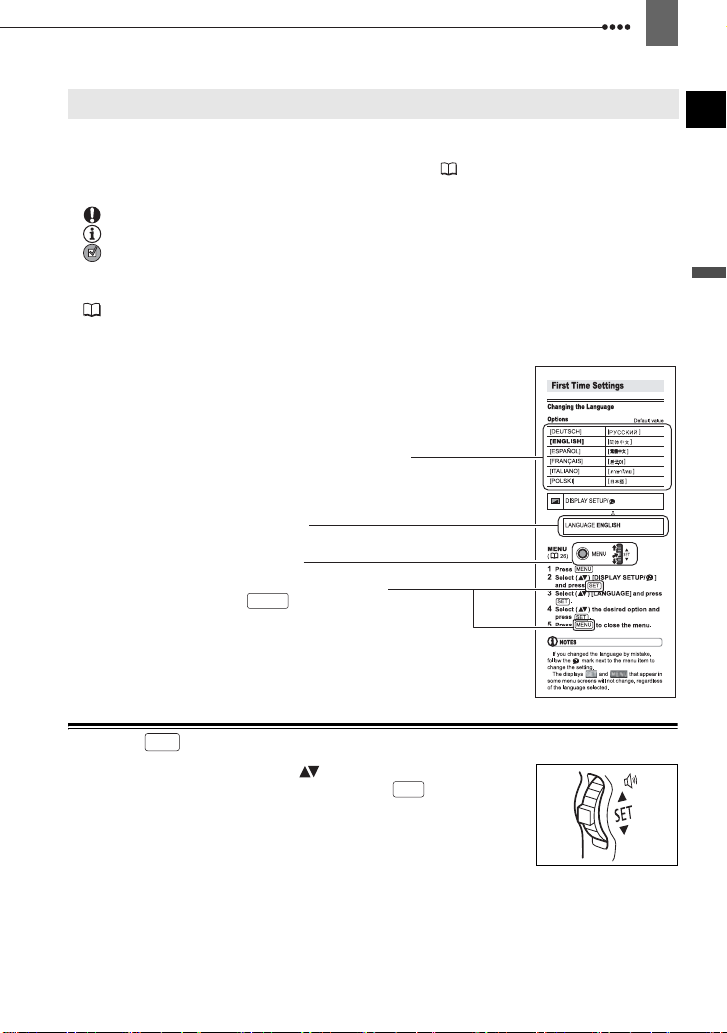
About the dial
SET
Turn the SET dial up and down ( ) to select options in a menu,
change setting, etc. Press the SET dial itself ( ) to make a
SET
selection or change a setting.
8
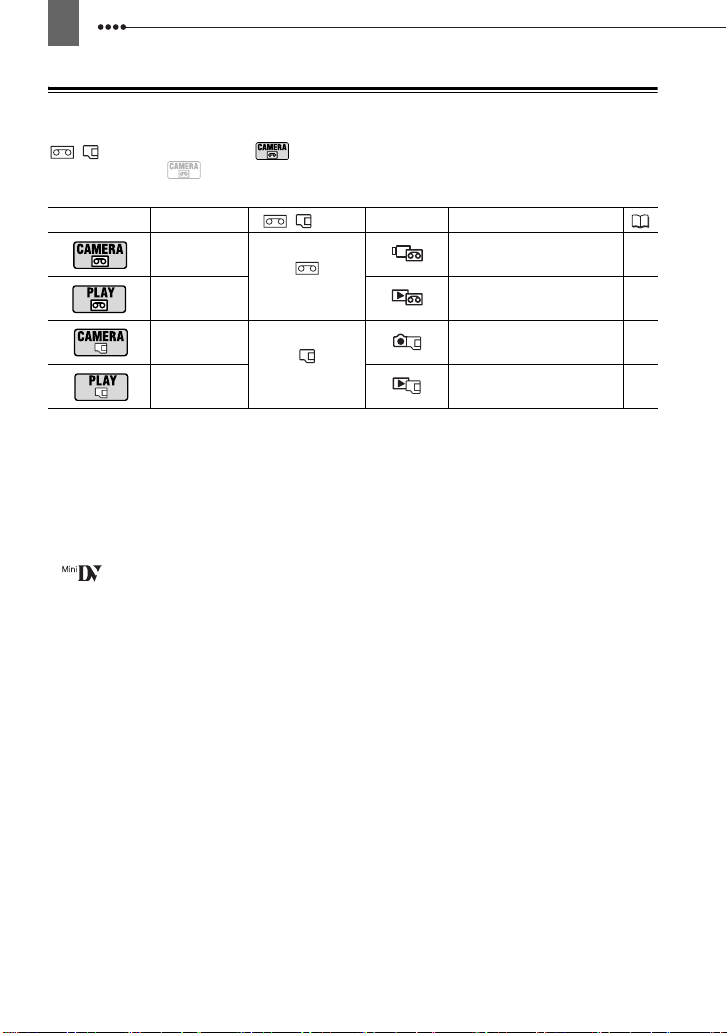
About the Operating Modes
The camcorder’s operating mode is determined by the positions of the power switch and the
/ switch. In the manual, indicates that a function is available in the operating
mode shown and indicates that the function is not available. When no operating mode
icons are given, the function is available in all operating modes.
Operating Mode POWER Switch
CAMERA
PLAY
CAMERA
PLAY
/
Switch Icon Display Operation
(Tape)
(Memory card)
Recording movies
on the tape
Playing movies
from the tape
Recording still images
on the memory card
Viewing still images
from the memory card
23
25
24
27
Trademark Acknowledgements
• miniSD™ is a trademark of SD Card Association.
• Windows
• Macintosh and Mac OS are trademarks of Apple Computer, Inc., registered in the United
• is a trademark.
• HDV and the HDV logo are trademarks of Sony Corporation and Victor Company of Japan,
• Other names and products not mentioned above may be trademarks or registered
• ANY USE OF THIS PRODUCT OTHER THAN CONSUMER PERSONAL USE IN ANY MANNER
®
other countries.
States and other countries.
Ltd. (JVC).
trademarks of their respective companies.
THAT COMPLIES WITH THE MPEG-2 STANDARD FOR ENCODING VIDEO INFORMATION
FOR PACKAGED MEDIA IS EXPRESSLY PROHIBITED WITHOUT A LICENSE UNDER
APPLICABLE PATENTS IN THE MPEG-2 PATENT PORTFOLIO, WHICH LICENSE IS
AVAILABLE FROM MPEG LA, L.L.C., 250 STEELE STREET, SUITE 300, DENVER,
COLORADO 80206.
is a registered trademark of Microsoft Corporation in the United States and/or
Getting to Know the Camcorder
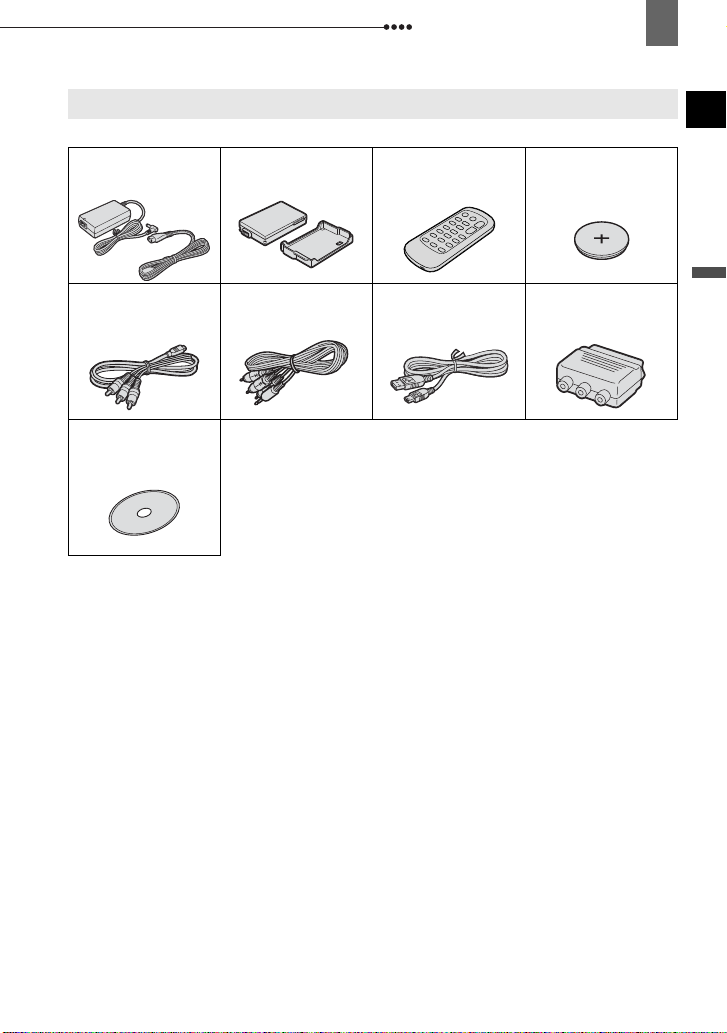
Supplied Accessories
Getting to Know the Camcorder
9
E
CA-570 Compact Power
Adapter
(incl. power cord)
CTC-100 Component
Cable
DIGITAL VIDEO
SOLUTION DISK
Software CD-ROM**
BP-310 Battery Pack WL-D87 Wireless
STV-250N Stereo Video
Cable
* Europe only.
** Includes the electronic version of the
Controller
IFC-300PCU
USB Cable
Digital Video Software
Lithium Button Battery
CR2025 for Wireless
Controller
PC-A10 SCART
Adapter*
instruction manual on PDF file.
Introduction
10
Getting to Know the Camcorder
Components Guide
Left side view
Right Side View
Front view
REC PAUSE button ( 59, 60)/
Self timer button ( 50)
BACKLIGHT button ( 20)
D.EFFECTS button ( 51)
(record review) button ( 23)/
(rewind) button ( 25)/
Card – button ( 27)
(flash) button ( 49)/
/ (play/pause) button ( 25)
LIGHT button ( 50)/
(fast forward) button ( 25)/
Card + button ( 27)
DISP. (display) button ( 48)
DRIVE MODE button ( 47)/
(stop) button ( 25)
RESET button ( 71)
BATT. RELEASE switch ( 17)
Serial number
Battery attachment unit ( 16)
MENU button ( 20, 29)
SET dial ( 7)
(print/share) button ( 64, 66)
Speaker
/
(tape/card) switch ( 8)
PHOTO button ( 24)
Zoom lever ( 24)
Grip belt ( 18)
Instant AF sensor ( 29)
Mini video light ( 50)
Terminal cover
Flash ( 49)
AV IN/OUT terminal ( 55)
COMPONENT OUT terminal ( 55)
HDV/DV terminal ( 55, 62)
Names of buttons and switches are indicated within
a
“button” frame (for example ).
MENU
Getting to Know the Camcorder
11
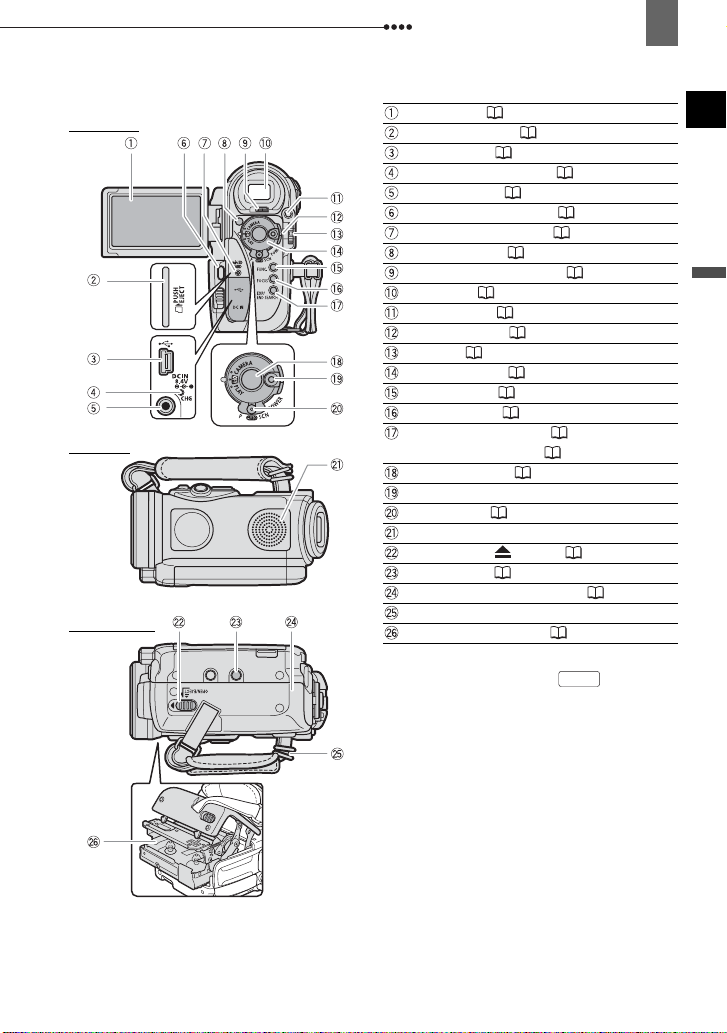
Back view
Top view
Bottom view
LCD screen ( 19)
Memory card slot ( 18)
USB terminal ( 62)
CHG (charge) indicator ( 16)
DC IN terminal ( 16)
FOCUS ASSIST button ( 43)
CARD access indicator
Remote sensor ( 19)
Dioptric adjustment lever ( 18)
Viewfinder ( 18)
MENU button ( 20, 29)
Power indicator ( 8)
SET dial ( 7)
POWER switch ( 8)
FUNC. button ( 21, 35)
FOCUS button
EXP (exposure) button
END SEARCH button
Start/stop button ( 23)
Lock button
Mode switch ( 38)
Stereo microphone
OPEN/EJECT switch
Tripod socket
Cassette compartment cover
Strap mount
Cassette compartment
Names of buttons and switches are indicated within
a
“button” frame (for example ).
(24)
(42)
(41)
(26)
(24)
(17)
/
(17)
( 17)
MENU
E
Introduction

12
Getting to Know the Camcorder
Wireless Controller WL-D87
START/
STOP
DATE SEARCH
REW
PAUSE
ZERO SET
MEMORY
WIRELESS CONTROLLER WL-D87
PHOTO
CARD
PLAY
STOP
SLOW
DISP. TV SCREEN
ZOOM
FF
START/STOP button ( 23)
CARD –/+ buttons ( 27)
DATE SEARCH / buttons ( 27)
REW button ( 25)
–/ button ( 25)
PAUSE button ( 25)
SLOW button ( 25)
ZERO SET MEMORY button ( 26)
DISP. (on-screen display) button ( 48)
PHOTO button ( 24)
Zoom buttons ( 24)
PLAY button ( 25)
FF button ( 25)
STOP button ( 25)
+/ button ( 25)
button ( 25)
TV SCREEN button ( 34)
Getting to Know the Camcorder
13
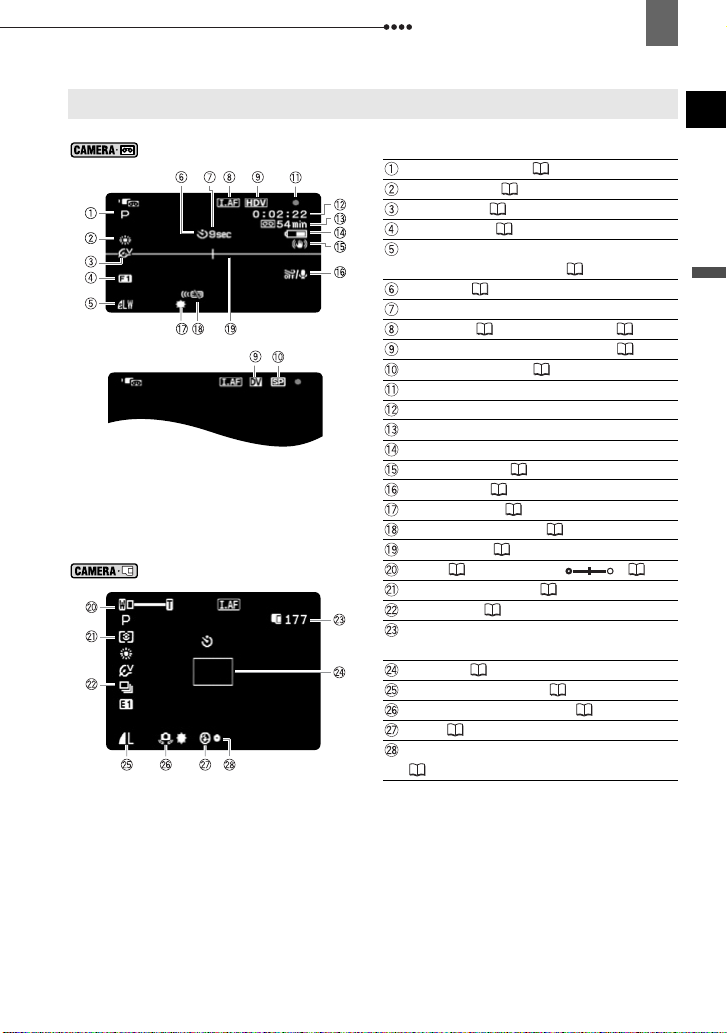
Screen Displays
Recording Movies
Recording Still Images
Recording program ( 38)
White balance ( 43)
Image effect ( 44)
Digital effects ( 51)
Still image quality/size
(simultaneous recording) ( 46)
Self timer ( 50)
Recording reminder
Instant AF ( 29)/Manual focus ( 42)
Recording standard (HDV or DV) ( 30)
DV recording mode ( 30)
Tape operation
Time code (hours : minutes : seconds : frames)
Remaining tape
Remaining battery charge
Image stabilizer ( 30)
Wind screen ( 31)
Mini video light ( 50)
Remote sensor mode ( 35)
Level marker ( 34)
Zoom ( 24), Exposure ( 41)
Light metering mode ( 41)
Drive mode ( 47)
Number of still images available on the
memory card
AF frame ( 42)
Still image quality/size ( 45)
Camcorder shake warning ( 29)
Flash ( 49)
AF/AE locked during still image recording
(24)
E
Introduction
14
Getting to Know the Camcorder
Recording reminder
The camcorder counts from 1 to 10
seconds when you start recording. This is
helpful to avoid scenes that are too short.
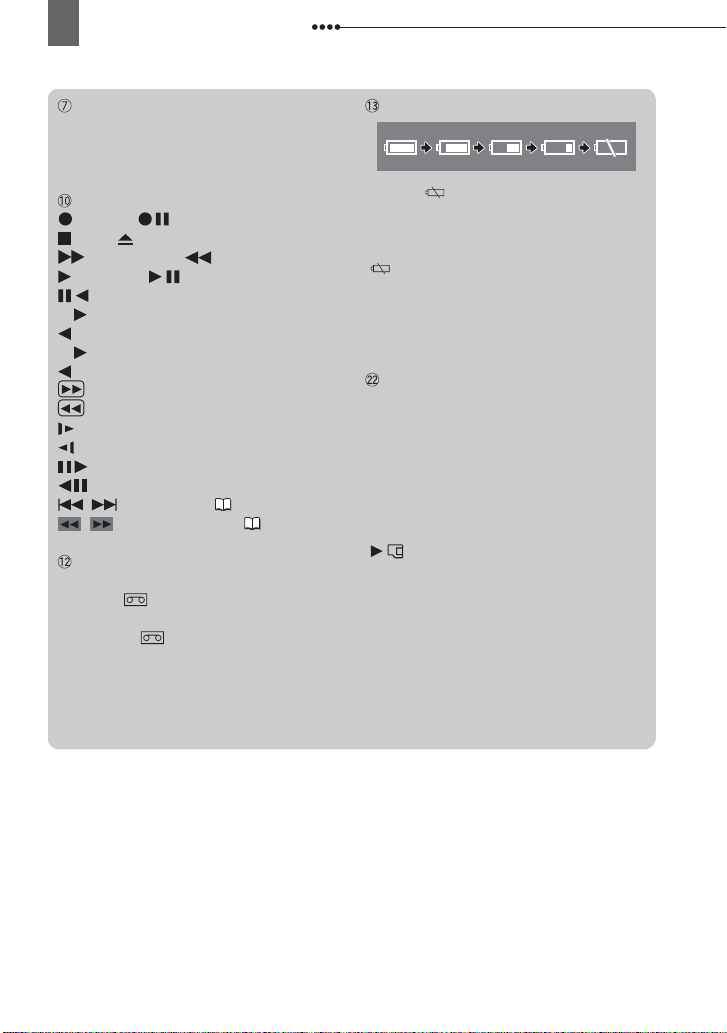
Tape operation
Record, Record pause,
Stop, Eject,
Fast forward, Rewind,
Playback, Playback pause,
Reverse playback pause,
x1 Playback (normal speed),
x1 Reverse playback (normal speed),
x2 Playback (double speed),
x2 Reverse playback (double speed),
Fast forward playback,
Rewind playback,
Slow playback,
Slow reverse playback,
Frame advance,
Frame reverse,
/ Date search ( 27),
/ Zero set memory ( 26)
Remai ning tape
Indicates the remaining time of the tape in
minutes. “ ” moves during recording.
When the tape reaches its end, the display
changes to “ END”.
• When the time left is less than 15
seconds, the remaining tape time may not
appear.
• Depending on the type of the tape, the
indication may not be displayed correctly.
Remaining batter y charge
• When “ ” starts flashing in red replace
the battery pack with a fully charged one.
• When you attach an empty battery pack,
the power may turn off without displaying
“”.
• Depending on the conditions under which
the camcorder and the battery pack are
used, the actual battery charge may not be
indicated accurately.
Number of still images available on the
memory card
Depending on the recording conditions, the
number of still images available displayed
may not decrease even after a recording
has been made, or may decrease by 2 still
images at once.
Card Access Display
“ ” is displayed next to the number of
images available while the camcorder is
writing on the memory card.
Getting to Know the Camcorder
15
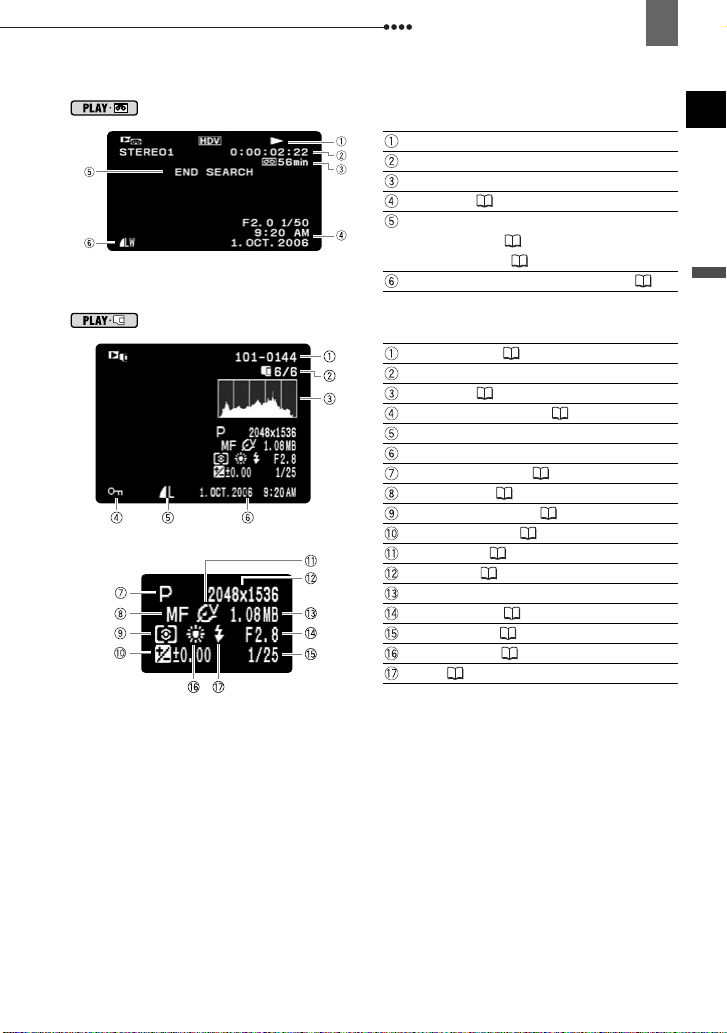
Playing Movies
Tape operation
Time code (hours : minutes : seconds : frames)
Remaining tape
Data code ( 49)
Search function display
END SEARCH ( 26)/
DATE SEARCH ( 27)
Quality/size for capturing still images ( 47)
E
Introduction
Viewing Still Images
Image number ( 31)
Current image / Total number of images
Histogram ( 49)
Image protection mark ( 53)
Still image quality/size
Date and time of recording
Recording program ( 38)
Manual focus ( 42)
Light metering mode ( 41)
Manual exposure ( 41)
Image effect ( 44)
Image size ( 45)
File size
Aperture value ( 39)
Shutter speed ( 39)
White balance ( 43)
Flash ( 49)

16
Getting Started
Preparations
Getting Started
Getting Started
Charging the Battery Pack
The camcorder can be powered with a
battery pack or directly using the compact
power adapter. Charge the battery pack
before use.
Remove the battery
terminal cover
before attaching the
battery
BATT. RELEASE switch
1 Turn off the camcorder.
2 Attach the battery pack to the
camcorder.
• Open the LCD panel.
• Slide in the connector end of the
battery in the direction of the arrow and
press it gently until it clicks.
CHG (charge)
indicator
3 Connect the power cord to the
compact power adapter.
4 Plug the power cord into a power
outlet.
5 Connect the compact power adapter
to the camcorder’s DC IN terminal.
• The CHG (charge) indicator starts
flashing. The indicator will stay on
when the charging is completed.
Charging, Recording and Playback Times
The times given in the table below are approximate and vary depending on the actual
charging, recording or playback conditions.
BP-310 (Supplied) BP-315 (Optional)
HDV
Standard Maximum Typical* Maximum Typical*
Recording (viewfinder) 75 min. 45 min. 140 min. 85 min.
Recording (LCD normal) 75 min. 45 min. 135 min. 85 min.
Recording (LCD bright) 70 min. 45 min. 130 min. 80 min.
Playback 85 min. 160 min.
DV
Standard Maximum Typical* Maximum Typical*
Recording (viewfinder) 90 min. 55 min. 165 min. 95 min.
Recording (LCD normal) 85 min. 50 min. 160 min. 95 min.
Recording (LCD bright) 80 min. 50 min. 150 min. 90 min.
Playback 95 min. 180 min.
Charging Time 150 min. 230 min.
* Approximate times for recording with repeated operations such as start/stop, zooming, power on/off.
Getting Started
17
• You can also use the compact power
adapter without attaching a battery
pack.
• When the compact power adapter is
connected, even if a battery is
attached its power will not be
consumed.
O
NCE THE BATTERY IS FULLY CHARGED
1 Disconnect the compact power
adapter from the camcorder.
2 Unplug the power cord from the
power outlet and the compact
power adapter.
TO
REMOVE THE BATTERY PACK
Slide down to release
BATT.RELEASE
the battery pack, and pull out the
battery pack holding it from the ridge
on its bottom part.
IMPORTANT
You may hear some noise from the compact
power adapter during use. This is not a
malfunction.
We recommend charging the battery pack in
temperatures between 10 C and 30 C.
Outside the temperature range of 0 C to
40 C, the charging will not start.
Do not connect to the camcorder’s DC IN
terminal or to the compact power adapter any
electrical equipment that is not expressly
recommended for use with this camcorder.
To prevent equipment breakdowns and
excessive heating, do not connect the supplied
compact power adapter to voltage converters for
overseas travels or special power sources such
as those on aircraft and ships, DC-AC inverters,
etc.
NOTES
If you connect a faulty power adapter or
battery pack, the CHG (charge) indicator
flashes approx. twice per second and the
charging stops.
The CHG (charge) indicator also serves as a
rough estimate of the battery charge status.
Continuously on: Battery fully charged.
Flashes approx. twice per second: Battery over
50% charged.
Flashes approx. once per second: Battery less
than 50% charged.
The charging time will vary depending on the
surrounding temperature and the battery pack’s
initial charge condition. In cold places, the
effective usage time of the battery will
decrease.
We recommend that you prepare battery
packs 2 to 3 times longer than you think you
might need.
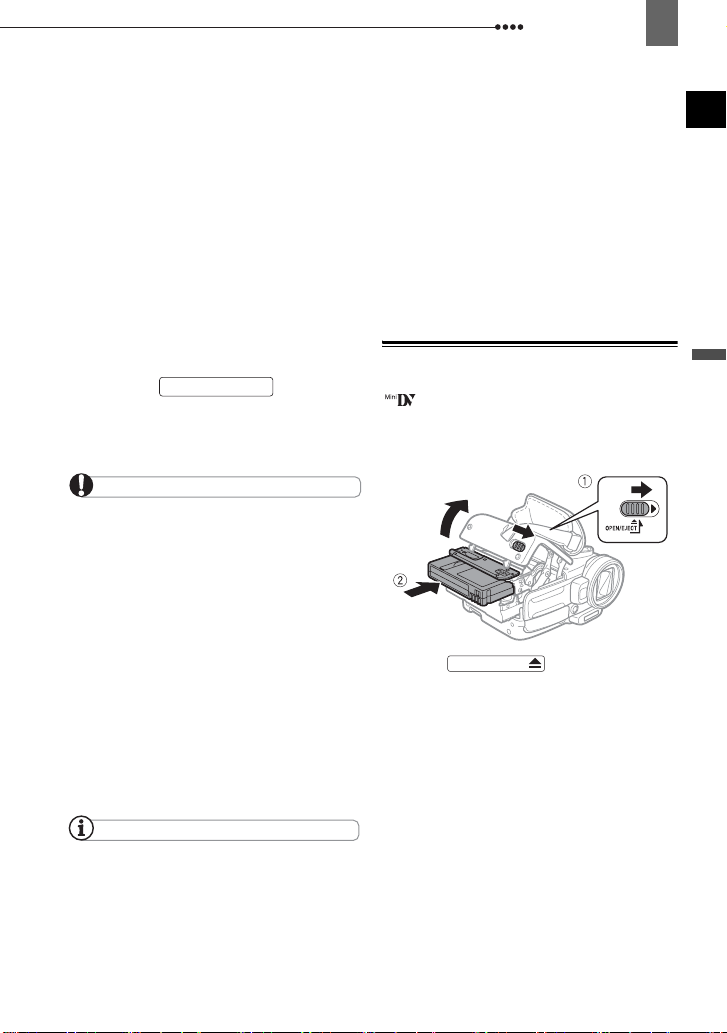
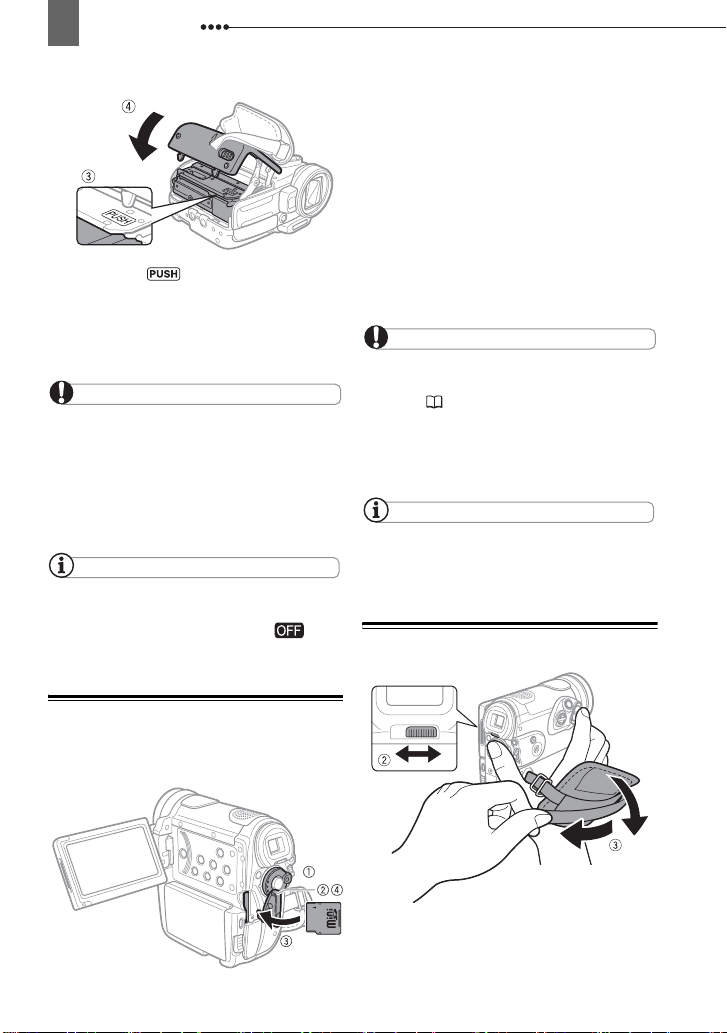
Inserting and Removing a Tape
Use only videocassettes marked with the
logo. To record in HDV standard we
recommend using tapes specifically
designed for high definition.
1 Slide fully in the
OPEN/EJECT
direction of the arrow and open the
cassette compartment cover.
The cassette compartment opens
automatically.
2 Insert the cassette.
• Insert the cassette with the window
facing the grip belt.
• To remove a cassette pull it straight
out.
E
Preparations
18
Getting Started
3 Press the mark on the
cassette compartment until it clicks.
4 Wait for the cassette compartment
to retract automatically and close
the cassette compartment cover.
IMPORTANT
Do not interfere with the cassette
compartment while it is opening or closing
automatically, or attempt to close the cover
before the cassette compartment has fully
retracted.
Be careful not to get your fingers caught in
the cassette compartment cover.
NOTES
If the camcorder is connected to a power
source, cassettes can be inserted/removed
even if the POWER switch is set to
.
1 Turn off the camcorder.
2 Open the memory card slot cover.
3 Insert the memory card straight all
the way into the memory card slot.
4 Close the cover.
Do not force the cover closed if the
memory card is not correctly inserted.
TO
REMOVE THE MEMORY CARD
First push the memory card once to
release it, and then pull the card out.
IMPORTANT
Make sure to initialize all memory cards
before using them with this camcorder for the
first time ( 54).
Memory cards have front and back sides that
are not interchangeable. Inserting a memory
card facing the wrong direction can cause a
malfunction of the camcorder.
NOTES
Performance cannot be guaranteed for all
miniSD cards.
Preparing the Camcorder
Inserting and Removing a Memor y Card
Use only commercially available miniSD
cards.
1 Turn on the camcorder.
The lens cover will open automatically.
Getting Started
19
2 Adjust the viewfinder.
Keep the LCD panel closed to use the
viewfinder and adjust the dioptric
adjustment lever as necessary.
3 Fasten the grip belt.
Adjust the grip belt so that you can
reach the zoom lever with your index
finger, and the start/stop button with
your thumb.
I.AF sensor
NOTES
To make use of the full capabilities of the instant
AF function ( 29), be careful not to obstruct
the I.AF sensor.
The Wireless Controller
Inserting the Battery
(Lithium Button Battery CR2025)
3 Insert the battery holder.
Using the Wireless Controller
Point the controller at the camcorder’s
remote sensor when you press the
buttons.
NOTES
The wireless controller may not work properly
when the remote sensor is situated under
strong light sources or direct sunlight.
If the wireless controller does not work, check
that [WL.REMOTE] is not set to [OFF ]
( 35). Otherwise, replace the battery.
Adjusting the LCD Screen
Rotating the LCD Panel
Open the LCD panel 90 degrees.
You can rotate the panel 90 degrees
downward.
180°
E
Preparations
Ta b
1 Press the tab in the direction of the
arrow and pull out the battery
holder.
2 Place the lithium button battery with
the + side facing up.
90°
You can rotate the panel 180 degrees
toward the lens (allowing the subject to
monitor the LCD screen while you use the
viewfinder). Rotating the panel 180

20
Using the Menus
degrees is also useful if you wish to
include yourself when recording with the
self timer.
Subject can monitor
the LCD screen
LCD Backlight
You can set the brightness of the LCD
screen at normal or bright.
BACKLIGHT
Press .
Repeatedly pressing toggles
BACKLIGHT
between the normal and bright settings.
NOTES
This setting does not affect the brightness of
the recording or the viewfinder screen.
Using the bright setting will shorten the
effective usage time of the battery pack.
The LCD brightness can also be changed
from the menu ( 34).
Using the Menus
Using the Menus
Many of the camcorder’s functions can be
adjusted from the menus that open after
pressing the MENU button ( ) and
the FUNC. button ( ).
FUNC.
For details about the available menu
options and settings, refer to
Options Lists - MENU/FUNC
Selecting a MENU Option
1 Press .
MENU
2 Select ( ) the desired menu from
the left side column and press
.
SET
The title of the selected menu appears
on top of the screen and under it the
list of settings.
3 Select ( ) the setting you want to
change and press .
• An orange frame will indicate the
menu item currently selected. Menu
items not available will appear grayed
out.
• To return to the menu selection
screen, select ( ) [ RETURN] and
SET
press .
MENU
Menu
. ( 29).
SET

First Time Settings
21
4 Select ( ) the desired option and
press to save the setting.
SET
5 Press .
MENU
You can press to close the
MENU
menu at any time.
Selecting a FUNC. Menu Option
1 Press .
FUNC.
2 Select ( ) the icon of the function
you want change from the left side
column and press .
SET
3 Select ( ) the desired setting from
the available options at the bottom
bar.
The selected option will be highlighted
in light blue. Menu items not available
will appear grayed out.
4 Press to save the settings
FUNC.
and close the menu.
• You can press to close the
FUNC.
menu at any time.
• With some settings you will need to
SET
press and make further
selections. Follow the additional
operation guides that will appear on
the screen (such as the icon,
small arrows, etc.).
First Time Settings
First Time Settings
Changing the Language
Options
[DEUTSCH] [ ]
[ENGLISH]
[ESPAÑOL] [ ]
[FRANÇAIS] [ ]
[ITALIANO] [ ]
[POLSKI] [ ]
DISPLAY SETUP/
LANGUAGE
MENU
(20)
1 Press .
ENGLISH
MENU
2 Select ( ) [DISPLAY SETUP/ ]
and press .
SET
3 Select ( ) [LANGUAGE] and press
.
SET
4 Select ( ) the desired option and
press .
SET
5 Press to close the menu.
If you changed the language by mistake,
follow the mark next to the menu item to
change the setting.
The displays
some menu screens will not change, regardless
of the language selected.
MENU
NOTES
and that appear in
Default value
[]
E
Preparations
22
First Time Settings
Changing the Time Zone
Default value
DATE/TIME SETUP
T. ZO N E /D S T
MENU
(20)
1 Press .
MENU
PARIS
2 Select ( ) [DATE/TIME SETUP]
and press .
SET
3 Select ( ) [T.ZONE/DST] and
press .
SET
The time zone setting appears. The
default setting is Paris.
4 Select ( ) your time zone and
press .
SET
To adjust for daylight saving time,
select the time zone with the mark
next to the area.
Time Zones
Once you have set the time zone, date
and time, you do not need to reset the
clock every time you travel to another
time zone. Select the time zone referring
to the date and time displayed on the
screen.
Setting the Date and Time
DATE/TIME SETUP
DATE/TIME
MENU
(20)
1 Press .
MENU
1.JAN.2006 12:00 AM
2 Select ( ) [DATE/TIME SETUP]
and press .
SET
3 Select ( ) [DATE/TIME] and press
.
SET
Blinking arrows will be displayed
around the day.
4 Select ( ) the day and press
.
SET
• Blinking arrows will be displayed
around the next field in the date/time.
• Set the month, year, hours and
minutes in the same way.
5 Press to close the menu and
When you do not use the camcorder for about
3 months, the built-in rechargeable lithium
battery may discharge completely and the date
and time setting may be lost. In such case,
recharge the battery ( 79) and set the time
zone, date and time again.
You can also change the date format ( 35).
MENU
start the clock.
IMPORTANT

Basic Functions
Recording
Recording
Recording Movies
Before You Begin Recording
Make a test recording first to check if the
camcorder operates correctly. If
necessary, clean the video heads ( 80).
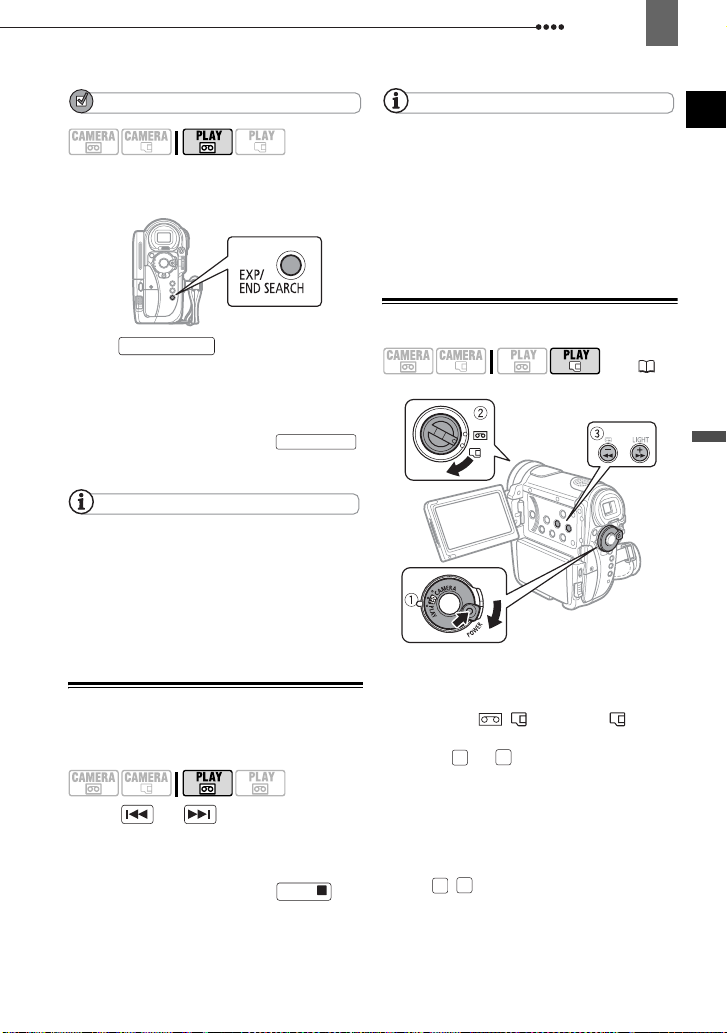
(8)
1 Holding the lock button pressed
down, set the POWER switch to
CAMERA.
2 Move the / switch to
(tape).
If necessary, you can change the
recording standard (HDV or DV)
( 30).
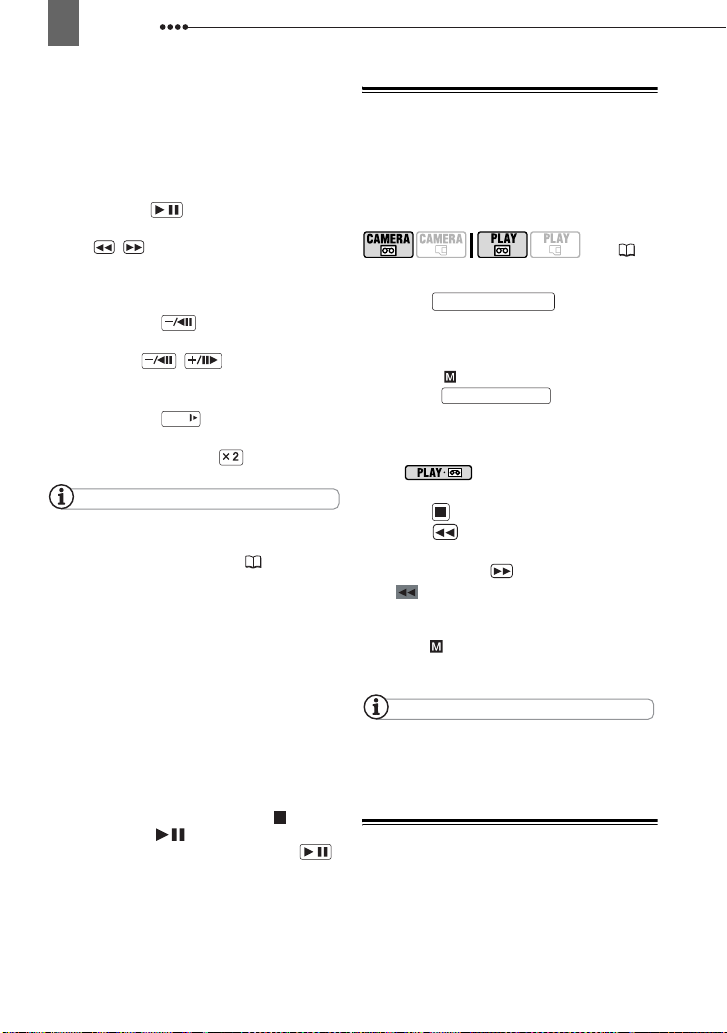
3 Press to begin recording.
TO
Start/Stop
Start/Stop
Press again to pause the
recording.
REVIEW THE LAST SCENE RECORDED
Recording
23
Press .
The camcorder will play back a few
seconds of the last recording made and
return to record pause mode. If the
currently selected recording standard is
different from that of the last recording,
the picture may not be played back
correctly.
W
HEN YOU HAVE FINISHED RECORDING
1
Close the LCD panel
.
2 Turn off the camcorder.
3 Remove the tape.
4 Disconnect the power source and
remove the battery pack.
NOTES
Previous recordings overwritten by a new
recording cannot be recovered. Before you start
recording, search for the end of the last
recording ( 26).
To protect the tape and video heads, the
camcorder will enter the stop mode ( ) if left in
record pause ( ) mode for 4 minutes 30
seconds. To resume recording press .
When recording in very loud places (such as
fireworks shows or concerts), sound may
become distorted or it may not be recorded at
the actual levels. This is not a malfunction.
About the Power Save mode
when the camcorder is powered by a battery
pack, the camcorder will automatically shut off if
left without any operations for 5 minutes
( 35). To restore the power, turn the
camcorder off and then on again.
About the LCD and viewfinder screen
screens are produced using extremely highprecision manufacturing techniques, with more
than 99.99% of the pixels operating to
specification. Less than 0.01% of the pixels
may occasionally misfire or appear as black,
red, blue or green dots. This has no effect on
the recorded image and does not constitute a
malfunction.
: To save power
Start/Stop
: The
E
Basic Functions
24
Recording
When using a tripod
leave the viewfinder exposed to
direct sunlight as it may melt
(due to concentration of the light
by the lens). Do not use tripods
with fastening screws longer
than 5.5 mm. Doing so may
damage the camcorder.
: Do not
Recording Still Images
Before using a memory card for the first
time, be sure to initialize it with this
camcorder ( 54).
(8)
IMPORTANT
Avoid the following actions while the card
access display ( ) appears on screen and
when the CARD access indicator is on or
flashing. Failing to do so may result in
permanent data loss.
- Do not open the memory card slot cover and
do not remove the memory card.
- Do not disconnect the power source or turn off
the camcorder.
- Do not change the position of the
switch or the operating mode.
/
NOTES
If the subject is not suitable for autofocus,
turns yellow. Adjust the focus manually ( 42).
When the subject is too bright, “OVEREXP.”
starts flashing. In such case, use the optional
FS-H37U ND filter.
Zooming
POINTS TO CHECK
1 Holding the lock button pressed
down, set the POWER switch to
CAMERA.
2 Move the / switch to
(memory card).
3 Press halfway.
4 Press fully.
PHOTO
• Once the focus is automatically
adjusted, will turn green and one or
more AF frames appear.
• When you press on the
PHOTO
wireless controller, the still image is
recorded immediately.
PHOTO
The CARD access indicator will flash
as the image is being recorded.
(8)
: In addition to the 10x optical
zoom, the 200x digital zoom is also
available ( 29).
Zoom out
Zoom in

Playback
25
10x Optical Zoom
Move the zoom lever toward W to
zoom out (wide-angle). Move it toward
T to zoom in (telephoto).
You can also change the zoom speed
( 29). You can select one of three fixed
zoom speeds or a variable speed that
depends on how you operate the zoom
lever: Press gently for a slow zoom; press
harder for faster zooms.
NOTES
You can also use the T and W buttons on the
wireless controller. The zoom speed with the
wireless controller will be the same as with the
camcorder (when one of the fixed zoom speed
levels is selected) or fixed at [SPEED 3] (when
[VARIABLE] is selected).
When set to [VARIABLE], the zoom speed will
be faster in the record pause mode.
Keep at least 1 m to the subject. At wideangle, you can focus on a subject as close as
1cm.
Playback
Playback
Playing Back Movies
Play back the tape on the LCD display or
close the LCD panel to use the
viewfinder.
(8)
1 Holding the lock button pressed
down, set the POWER switch to
PLAY.
2 Move the / switch to
(tape).
3 Locate the point where you want to
begin the playback.
Press to rewind or to fast
forward the tape.
4 Press to begin the playback.
If necessary, adjust ( ) the volume
with the dial ( ).
D
URING PLAYBACK
5 Press again to pause the
playback.
6 Press to stop the playback.
/
SET
/
E
Basic Functions
26
Playback
S
PECIAL PLAYBACK MODES
To operate the special playback modes
use the buttons on the wireless controller.
There is no sound during the special
playback modes. To return to normal
playback from the special playback
modes, press .
Fast Playback:
/
During normal playback
press / . Keep the button pressed
to rewind/fast forward the tape while
continuing the playback.
Reverse Playback:
During normal
playback press .
Frame Reverse/Advance:
During playback
pause press / . Keep pressed
for continuous frame-by-frame playback.
Slow Playback:
playback press .
Double Speed Playback:
During normal or reverse
SLOW
During normal or
reverse playback press .
NOTES
You can display the date and time of the
recording and other camcorder data registered
when the recording was made ( 49).
During some special playback modes, you
may notice some video problems (blocky video
artifacts, banding, etc.) in the playback picture.
During playback, you may notice some video
problems at the point where the standard of the
recording (HDV/DV) changes.
During the playback of HDV recordings:
though their icons will appear on screen, the
following special playback modes are not
available.
- Reverse slow playback
- Frame reverse
- Double speed playback (forward or reverse)
To protect the tape and video heads, the
camcorder will enter the stop mode ( ) if left in
playback pause ( ) mode for 4 minutes 30
seconds. To resume the playback press .
Sound from the built-in speaker will be muted
while the STV-250N Stereo Video Cable is
connected to the camcorder.
Even
/
Returning to a Pre-marked Position
If you wish to return to a particular scene
later, mark the point with the zero set
memory and the tape will stop at that
point when you rewind/fast forward the
tape.
(8)
1 While recording or during playback,
press on the
ZERO SET MEMORY
wireless controller at the point you
wish to return to later.
• The time code changes to
“0:00:00 ”.
• Press again to
ZERO SET MEMORY
cancel the memory.
2 If you marked the zero memory
while recording, set the camcorder
to mode. If you marked
the zero memory during playback,
press .
3 Press to locate the zero mark.
• If the tape counter shows a negative
number, press instead.
• appears and the camcorder
rewinds/fast forwards the tape.
• The tape stops at or near the zero
mark, disappears and the correct
time code will be displayed again.
NOTES
If there are blank sections between recordings,
the zero set memory may not work correctly.
Locating the End of the Last Scene
After playing back a tape, use this
function to locate the end of the last
scene recorded in order to continue
recording form that point.
Playback
27
POINTS TO CHECK
Stop the playback before using this
function.
END SEARCH
Press .
• “END SEARCH” appears.
• The camcorder rewinds/fast forwards
the tape, plays back the last few seconds
of the recording and stops the tape.
• To cancel the search press
again.
NOTES
End search cannot be used once you remove
the cassette.
If there are blank sections between
recordings, or sections recorded in different
standards (HDV/DV) on the same tape, the end
search may not work correctly.
END SEARCH
Locating Scenes by Recording Date
You can locate the change of the date/
time zone with the date search function.
Press or on the wireless
controller.
• Press more than once to search for
further date changes (up to 10 times).
• To cancel the search press .
STOP
NOTES
Recordings shorter than 1 minute per date/
time zone cannot be located with this function.
Date search may not function if the date, time
or data code are not correctly displayed.
If there are sections recorded in different
standards (HDV/DV) on the same tape, the date
search may not work correctly.
Viewing Still Images
(8)
1 Holding the lock button pressed
down, set the POWER switch to
PLAY.
2 Move the / switch to
(memory card).
3 Press or to move between the
images.
I
MAGE JUMP
You can jump ahead to a specific image
without having to browse all images one
by one.
Press / and hold it pressed down.
+
Release the button when the image
number gets to the image you want to
display.
-
+
-
E
Basic Functions
 Loading...