

Canon HJ40E Operation Manual

BCTV Zoom Lens
INFORMATION DISPLAY
取 扱 説 明 書
(情 報 ディスプレイ編 )
OPERATION MANUAL
使用说明书
(信 息显 示屏 汇 编 )
(DISPLAY)
ご使用の前に必ずこの取扱説明書をお読みください。
なお、取扱説明書は必要に応じてご覧になれるよう大切に保管してください。
Read this operation manual before using the product.
Keep the manual in place for future reference.
在使用本产品之前 , 请务必先仔细阅读本使用说明书。
请务必妥善保管好本书 , 以便日后能随时查阅 ( 保留备用 )。 请在充分理解内容的基
础上 , 正确使用。
J/E/C


ENGLISH


Introduction
Thank you for purchasing a Canon BCTV zoom lens.
This documentation includes the Lens Manual and Information Display CD-ROM.
This Information Display Manual describes operating instructions and procedures for the information display.
Refer to the manual as needed.
Introduction
E3

Introduction
Contents
Introduction E
General Safety Information ......................................................................... E
Handling the Product ........................................................................................................................ E8
Dealing with Abnormalities ............................................................................................................... E9
Maintenance and Inspection ............................................................................................................ E9
Storage ............................................................................................................................................. E9
Legal Notices ................................................................................................................................. E10
Manual Layout ............................................................................................ E
Manual Conventions ...................................................................................................................... E12
Part Names ................................................................................................. E
Part Names and Functions ............................................................................................................. E13
Using the Control Keys .................................................................................................................. E13
Basic Sequence of Operations ................................................................. E
3
7
11
13
14
Screen Organization E
1.1
Top Screen
1.2
Menu Screen
............................................................................................ E
........................................................................................ E
Mode Selection E
2.1
Modes
................................................................................................... E
Operation in Basic Mode E
3.1
Configuration from the Top Screen
3.1.1 Selecting Basic Mode .......................................................................................................... E25
3.1.2 Top Screen ........................................................................................................................... E26
.................................................... E
15
16
18
21
22
23
24
3.1.3 Specifying Auto Iris Gain ...................................................................................................... E28
E4

Introduction
3.1.4 Switching the IS Compensation Mode of the Horizontal Direction ....................................... E29
3.1.5 Switching the IS Compensation Mode of the Vertical Direction ........................................... E30
3.1.6 Zoom Tracking ON/OFF ....................................................................................................... E31
3.1.7 Assigning Functions to the AUX Switch ............................................................................... E32
3.1.8 Assigning Functions to the AUX1 Switch ............................................................................. E33
3.1.9 Assigning Functions to the AUX2 Switch ............................................................................. E34
3.1.10 Specifying Iris Torque ........................................................................................................... E35
3.1.11 Specifying Zoom Curve Mode .............................................................................................. E36
3.2
Configuration from the Menu Screen
3.2.1 User Screen Settings ........................................................................................................... E39
3.2.2 Switch Screen Settings ........................................................................................................ E45
3.2.3 IS Screen Settings ............................................................................................................... E49
3.2.4 Preset Screen Settings ........................................................................................................ E55
3.2.5 Iris Screen Settings .............................................................................................................. E59
3.2.6 Zoom Screen Settings ......................................................................................................... E65
3.2.7 Focus Screen Settings ......................................................................................................... E69
3.2.8 Info Screen Settings ............................................................................................................. E71
3.2.9 Fol. Screen Settings ............................................................................................................. E74
3.3
List of Settings
..................................................................................... E
................................................ E
Operation in Full Mode E
4.1
Configuration from the Top Screen
.................................................... E
38
76
79
80
4.1.1 Selecting Full Mode ............................................................................................................... E81
4.1.2 Top Screen ............................................................................................................................ E82
4.1.3 Switching Users .................................................................................................................... E84
4.1.4 Switching to Basic Mode ....................................................................................................... E85
4.1.5 Zoom Tracking ON/OFF ........................................................................................................ E86
4.1.6 Switching the IS Compensation Mode of the Horizontal Direction ....................................... E87
4.1.7 Switching the IS Compensation Mode of the Vertical Direction ........................................... E88
4.1.8 Assigning Functions to the AUX Switch ................................................................................ E89
4.1.9 Specifying Iris Gain ............................................................................................................... E90
4.1.10 Assigning Functions to the AUX1 Switch ............................................................................ E92
4.1.11 Assigning Functions to the VTR Switch ............................................................................... E93
4.1.12 Assigning Functions to the AUX2 Switch ............................................................................ E94
4.1.13 Assigning Functions to the RET Switch............................................................................... E95
4.1.14 Specifying Iris Torque .......................................................................................................... E96
4.1.15 Specifying Zoom Curve Mode ............................................................................................. E97
E5

Introduction
4.1.16 Specifying Iris A/M Switch ................................................................................................... E99
4.1.17 Assigning Functions to the Seesaw .................................................................................. E100
4.1.18 Escape Operation ............................................................................................................. E101
4.2
Configuration from the Menu Screen
4.2.1 User Screen Settings .......................................................................................................... E103
4.2.2 Switch Screen Settings ....................................................................................................... E120
4.2.3 IS Screen Settings .............................................................................................................. E128
4.2.4 Preset Screen Settings ....................................................................................................... E134
4.2.5 Iris Screen Settings ............................................................................................................. E140
4.2.6 Zoom Screen Settings ......................................................................................................... E146
4.2.7 Focus Screen Settings ........................................................................................................ E157
4.2.8 Info Screen Settings ............................................................................................................ E159
4.2.9 Fol. Screen Settings ............................................................................................................ E162
4.3
List of Settings
................................................................................... E
.............................................. E
Operation in Analog Mode E
5.1
Configuration from the Top Screen
.................................................. E
102
164
167
168
5.1.1 Selecting Analog Mode ....................................................................................................... E169
5.1.2 Top Screen .......................................................................................................................... E170
5.1.3 Specifying Auto Iris Gain .....................................................................................................
5.1.4 Switching to Basic Mode .....................................................................................................
5.2
Configuration from the Menu Screen
5.2.1 User Screen Settings .......................................................................................................... E174
5.3
List of Settings
................................................................................... E
.............................................. E
Index E
E171
E172
173
179
181
E6

Introduction
General Safety Information
The safety warnings and cautions provided on the product or in this operation manual must be observed.
Failure to observe these warnings and cautions provided to guard against hazards may result in injury or accident.
Read this manual carefully to familiarize yourself with its contents and to ensure proper operation of this product.
Also, keep this manual in a safe place where it can easily be referenced whenever required.
This manual uses the following symbols and terms in the warning and caution notices for preventing accidents and
protecting the safety of the customer and others.
Warning
Caution
Note
This indicates a potentially hazardous situation which, if not heeded, may result in
death or serious injury to you or others.
Be sure to heed all warning notices to ensure safe operation at all times.
This indicates a potentially hazardous situation which, if not heeded, may result in a
minor injury to you or others, or damage to property.
Be sure to heed all caution notices to ensure safe operation at all times.
This indicates cautions and recommendations for operation.
It contains information which, if not heeded, may result in this product failing to function
properly.
These notices also contain useful information for operation.
E7

Introduction
Handling the Product
Warning
1. Do not get this product wet or allow liquid inside. If water gets inside, stop using the product
immediately. Continuing to use the product under this condition may cause a fire or electric
shocks.
2. Do not stare at the sun or other bright objects through the lens. It may injure your eyes.
3. Be sure to hold the connector when disconnecting the cable. Pulling on the cable may sever or
damage it and pose a risk of a re or electric shocks from a short circuit.
Caution
Note
1. Be careful not to drop the product when carrying it. Dropping the product may cause injury.
2. Ensure that all mountings are securely tightened. If a mounting becomes loose, parts may fall off
and cause injury.
3. Inspect mountings regularly (about every six months to one year) to ensure they are securely
tightened. If a mounting becomes loose, parts may fall off and cause injury.
4. When this product is used under a blazing sun, the inside of the unit may be heated to high
temperature. When it is expected that the unit is exposed to elevated temperature, take
measures against heat as appropriate on the customer’s side.
1. When service is required, contact your dealer or Canon's representative.
2. Striking or dropping the lens may cause the malfunction of the product.
3. This product is not waterproof. Take measures to avoid direct contact with rain, snow, or moisture.
Otherwise it may cause the malfuction of the product.
4. In dusty environments, cover the lens mount when using, attaching or removing the lens. If dust
enters inside, it may cause the malfunction of the product.
5. Take measures to avoid sudden changes in temperature where the lens is used, which may
prevent operation temporarily if condensation forms in the lens.
6. Before use in particular environments, such as places where chemical products are used, contact
your Canon representative. Otherwise it may cause the malfuction of the product.
E8

Dealing with Abnormalities
Warning
If any of the following situations occurs, immediately disconnect the lens cable from the camera
and contact your dealer or a Canon representative listed on the next page.
• Smoke, fumes, or unusual noises
• Entry of foreign objects (such as liquid or metal objects) inside the product
Maintenance and Inspection
Warning
Be sure to disconnect the cable and remove the lens from the camera before cleaning outside of
the lens. Do not use benzene, thinner, or other flammable substances to clean the product. This
may cause re or electric shocks.
Introduction
Note
1.
Clean off any dust on the lens surface using a lens blower or a soft lens brush. In case of getting
2.
Routine inspection about once a year is recommended, depending on the conditions and
Storage
Caution
Always attach the lens cap, hood cap, dust cap or covers before storage. Storing the lens without
Note
ngerprints or stains on the lens, use a clean cotton cloth moistened with commercial lens
cleaning fluid, or use lens cleaning paper. Gently wipe in a spiral pattern from the center of the
lens. Be careful not to rub dust across the lens, which may scratch the lens surface.
environment of use. Request overhaul, if needed.
the caps or covers attached poses a risk of re if the lens concentrate light in direct sunlight.
Immediately wipe off any moisture on the lens from misty or foggy environments, using a dry
cloth. Seal the lens in a plastic bag with a desiccant (preferably new) to prevent moisture inside.
Otherwise it may cause the mold or the malfunction of the product.
E9

Introduction
Legal Notices
1. Canon shall bear no responsibility for damage resulting from improper operation of this product
by the customer.
2. Canon shall make no guarantees about the product quality, functions, or operation manual and
its marketability and suitability for the customerʼs purpose.
Moreover, Canon shall bear no responsibility for any damage, direct or incidental, that results
from usage for the customerʼs purpose.
3. Canon shall make no guarantees about the results obtained using this product.
4. The product specications, conguration, and appearance are subject to change without prior
notice.
5. For further information on repairs, maintenance, or adjustments not mentioned in this operation
manual, contact your Canon dealer or your Canon sales representative.
6. Note that Canon may be unable to undertake servicing or repair of a product if it is modified
without consulting Canon or your Canon sales representative.
CANON INC.
30-2, Shimomaruko 3-chome, Ohta-ku, Tokyo 146-8501, Japan
Canon Europe Ltd.
3 The Square, Stockley Park, Uxbridge, Middlesex, UB11 1ET UK
The copyright for this manual is retained by Canon Inc.
Unauthorized copying or reproduction in whole or part is prohibited.
E10
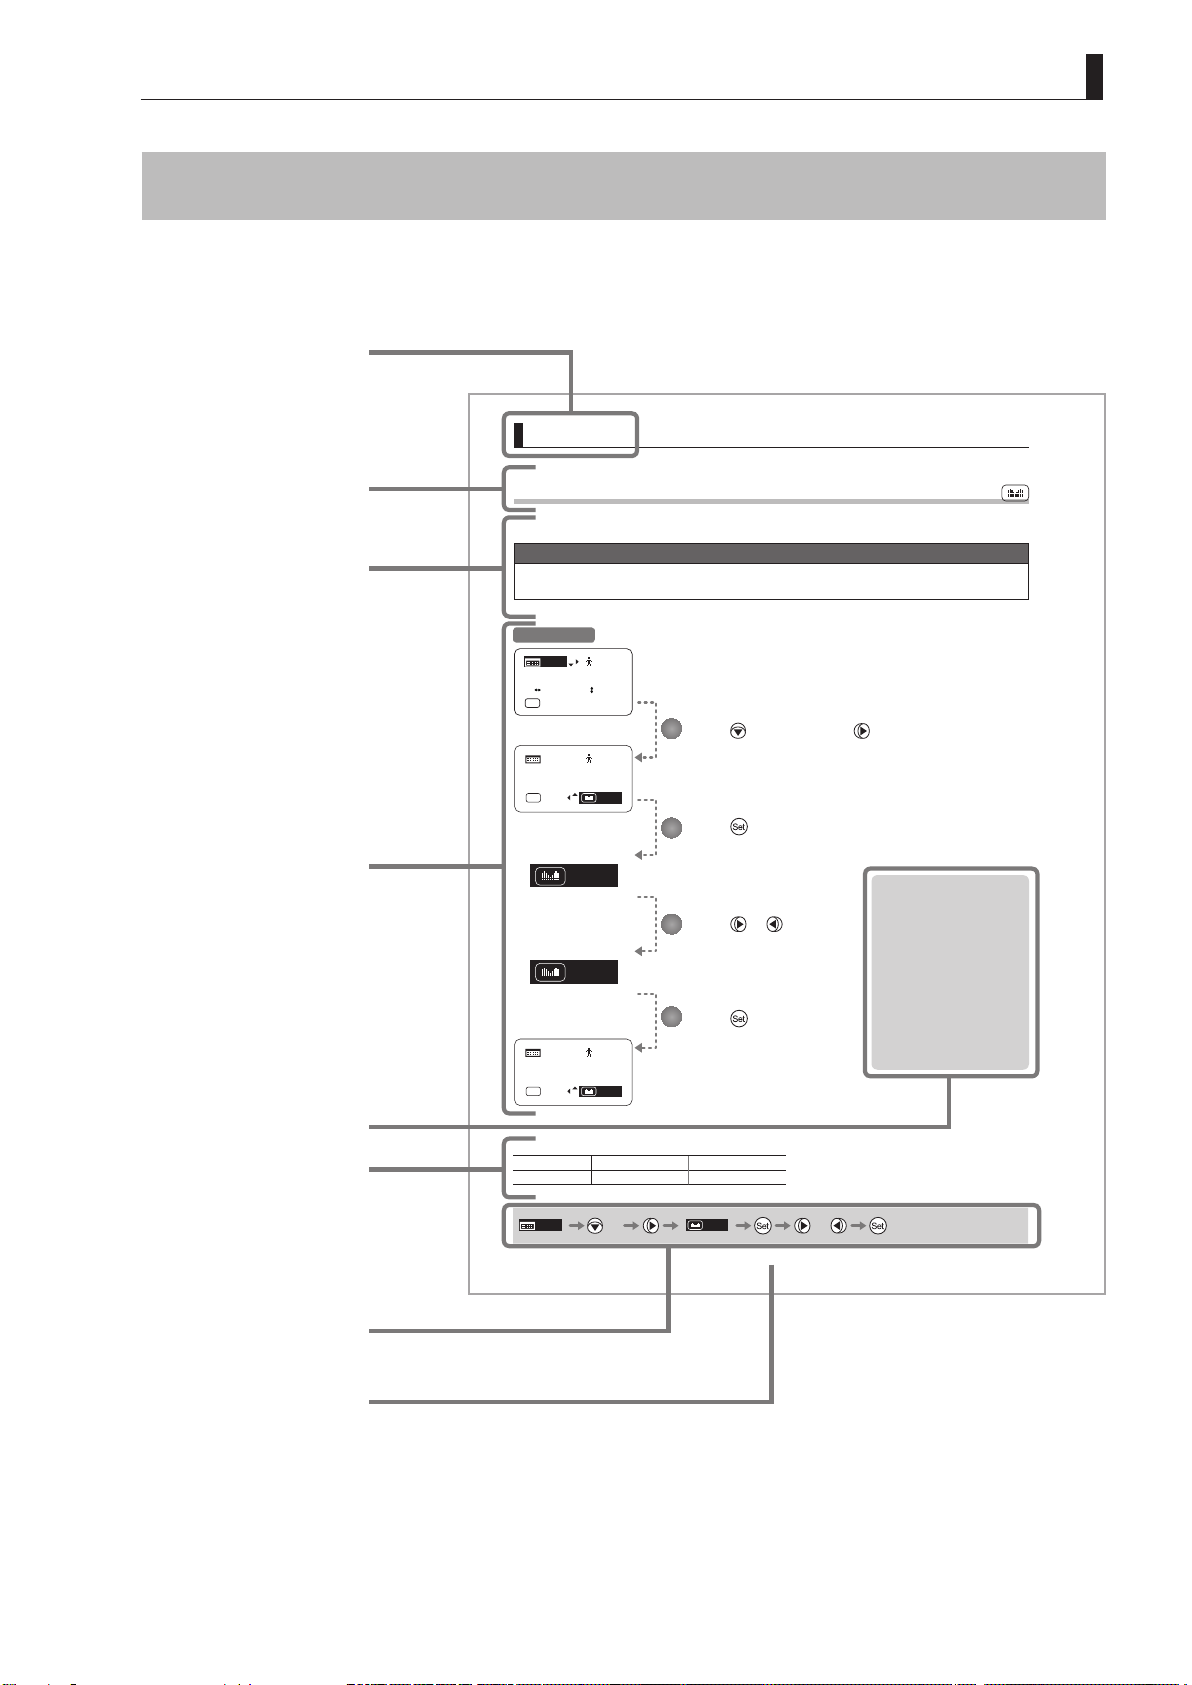
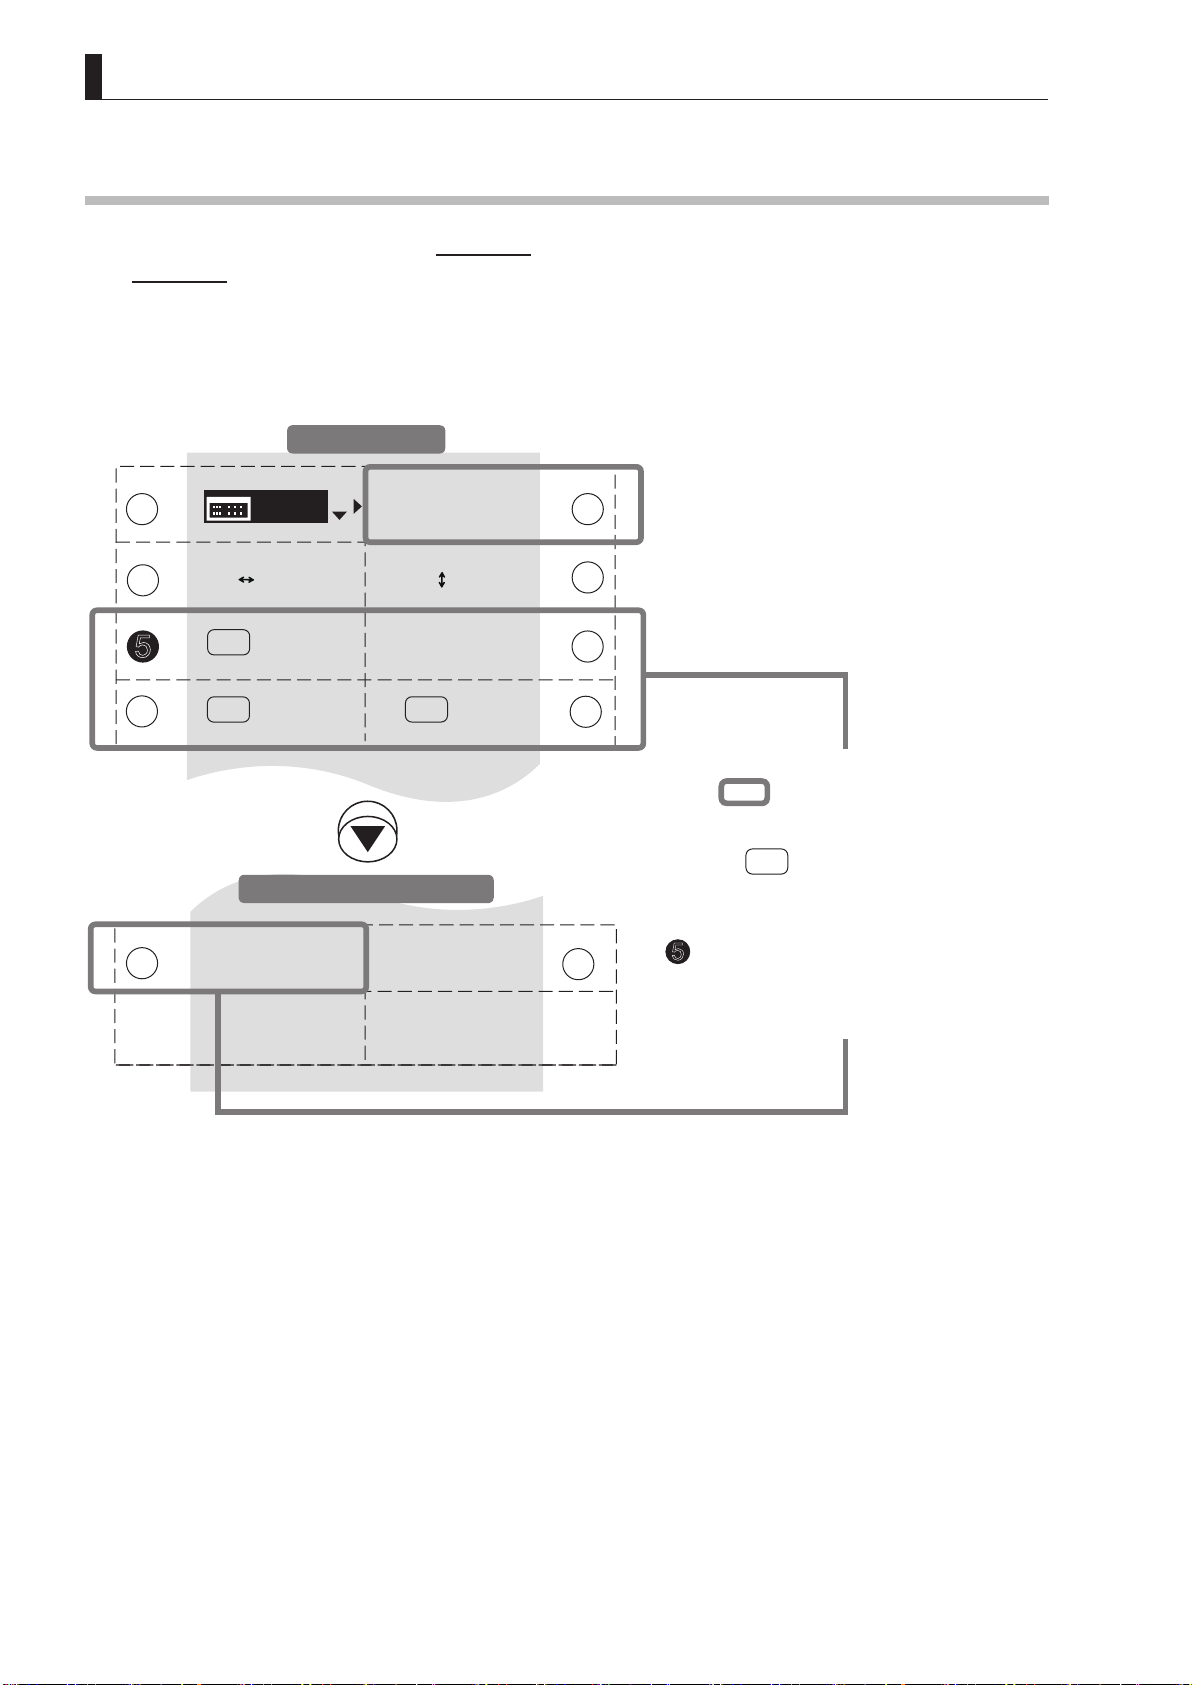
Manual Layout
Pages with instructions are organized as follows.
Chapter title
Introduction
4. Operation in Full Mode
Function title
Summary of function,
points to note
Operating procedure
4.1.17
Assigning Functions to the Seesaw
The zoom seesaw switch can be programmed to control either the {Zoom} or {Iris}.
Important
First, switch to the user for whom the settings apply.
(For instructions, see “4.1.3 Switching Users” or “4.2.1 User Screen Settings: Switching Users.”)
Initial Top Screen
[ ]
MENU
[ Basic ]
ISSTD ISSTD
A
Fr1P
MENU
[ Frm1 ] [ Frm2 ]
[ I-Tq ] H
NormAMZoom
1
[Trk ]
OFF
[ I-Gain ]
[ ]
1
[ Z.M. ]
Zoom
1
Press seven times and once.
The previous or default function is highlighted.
Press .
2
The display starts blinking.
3
Press or .
Press left or right to switch the function to
{Zoom} or {Iris}.
Note: Note on Iris Assignment
Iris
4
Press .
The display changes from blinking to
[ ]
MENU
[ Frm1 ] [ Frm2 ]
[ I-Tq ] H
[ Z.M. ]
NormAMIris
1
highlighted, indicating confirmation.
1. The seesaw switch will no
longer control zooming.
2. To control the iris with the
rocker switch, you must set
the iris mode to manual.
3. Press the Telephoto side to
open the iris, or press the
Wide end side to close it.
4. Zoom speed control
adjustments also apply to iris
control, and you can specify
the maximum iris speed. (See
“4.2.5 Zoom Screen Settings:
fying Maximum Zoom
Speci
Speed Control”.)
Notes
List of available
functions or options
Quick reference for
operating procedure
Page number
Options
Description
MENU
(D)
Zoom Iris
Zoom operation Iris operation
(D): Default value
× 7
Zoom
E11
or
E100

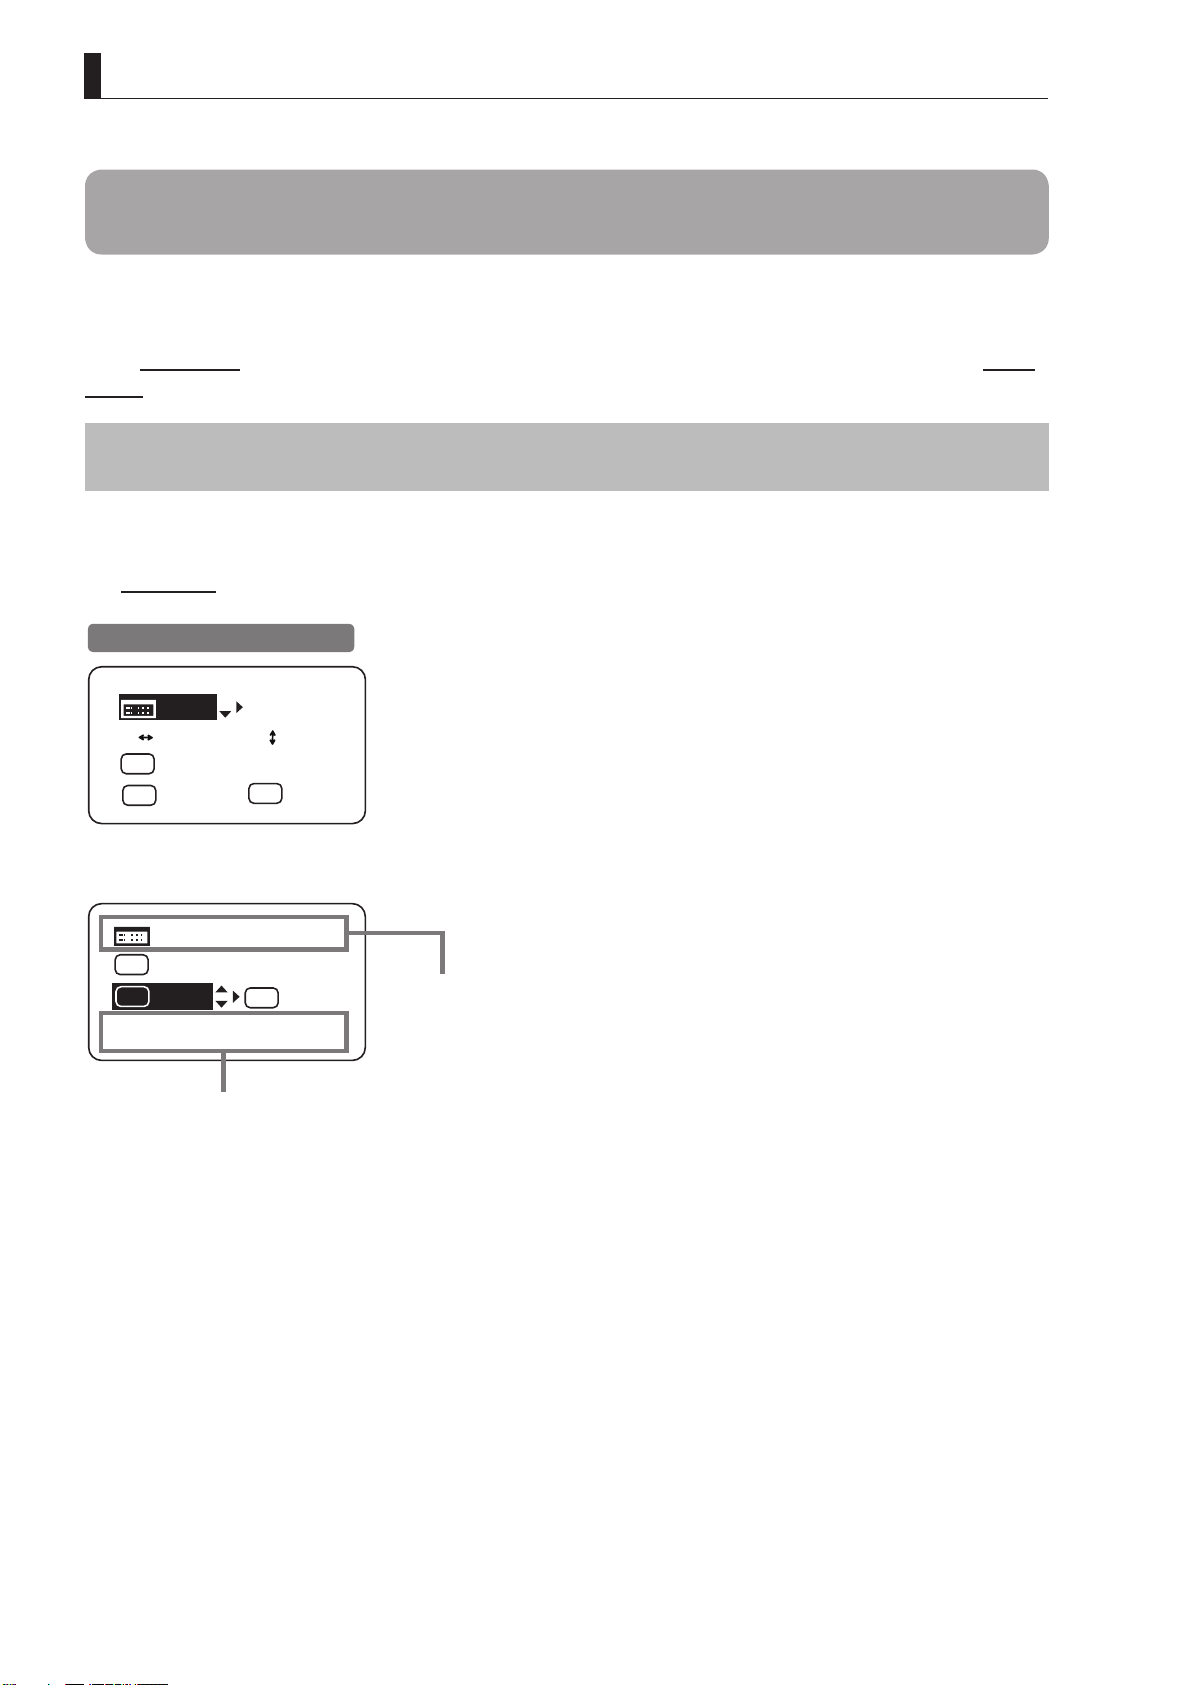
Introduction
Manual Conventions
The following conventions are used in this manual.
Convention Description Example
** screen
[ ] Names of setting items are enclosed in square brackets. [Frame 1] is underlined.
{ } Names of options are enclosed in curly brackets. Select {Sped}.
Names of screens are underlined. The
Top screen
is displayed.
E12
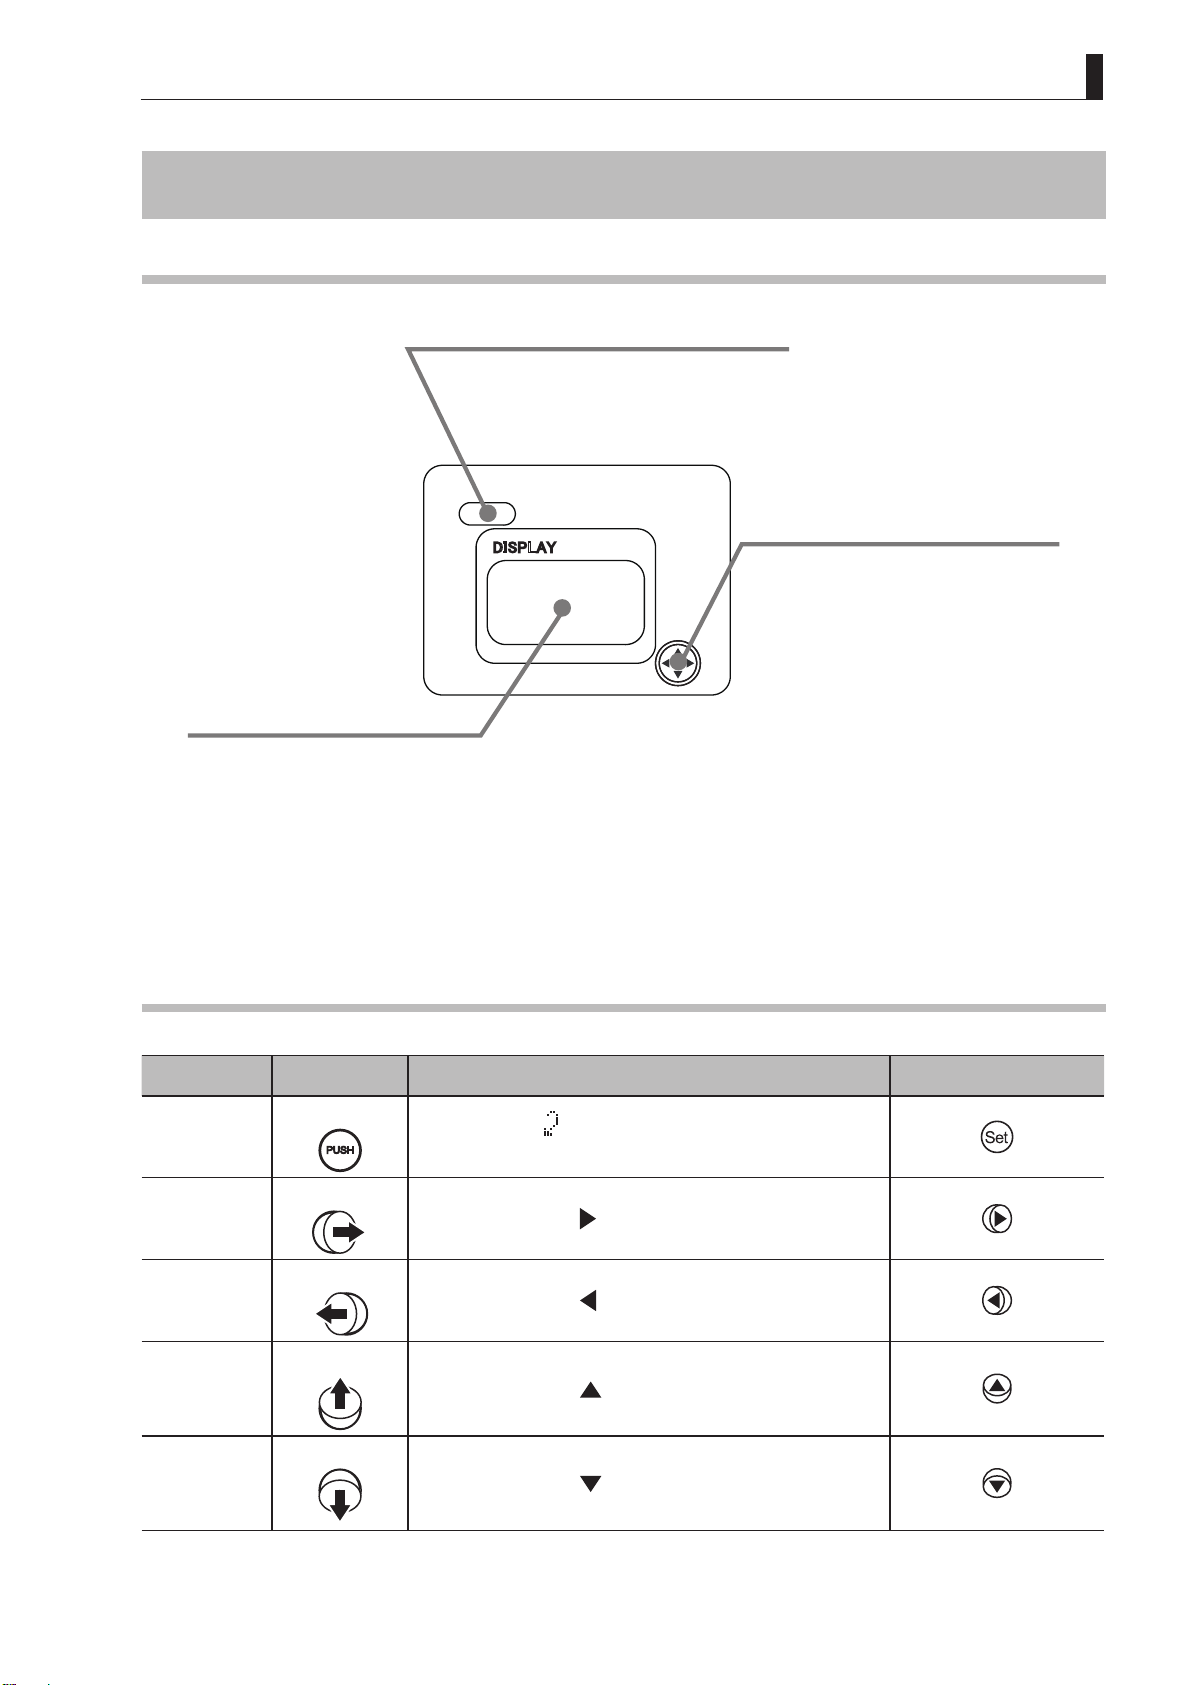
Part Names
Part Names and Functions
Display switch
Press to activate the display.
One press turns on the display, and
another turns it off.
Introduction
㻰㻵㻿㻼㻸 㻭㼅
Used to congure all settings shown
on the display.
Identied with ve key names,
depending on how this interface is
used.
Display
Activated when the Display switch is
pressed.
Turns off automatically if left idle for
two minutes.
(See the following table, “Using the
Control Keys.”)
Using the Control Keys
Key Operation Details Manual Convention
Control keys
Set key
Right key
Left key
Up key
Down key
Press
Move right
Move left
Move up
Move down
Pressed when { } is displayed, or when entering a
selection.
Can be used when { } is displayed.
Can be used when { } is displayed.
Can be used when { } is displayed.
Can be used when { } is displayed.
E13
Introduction
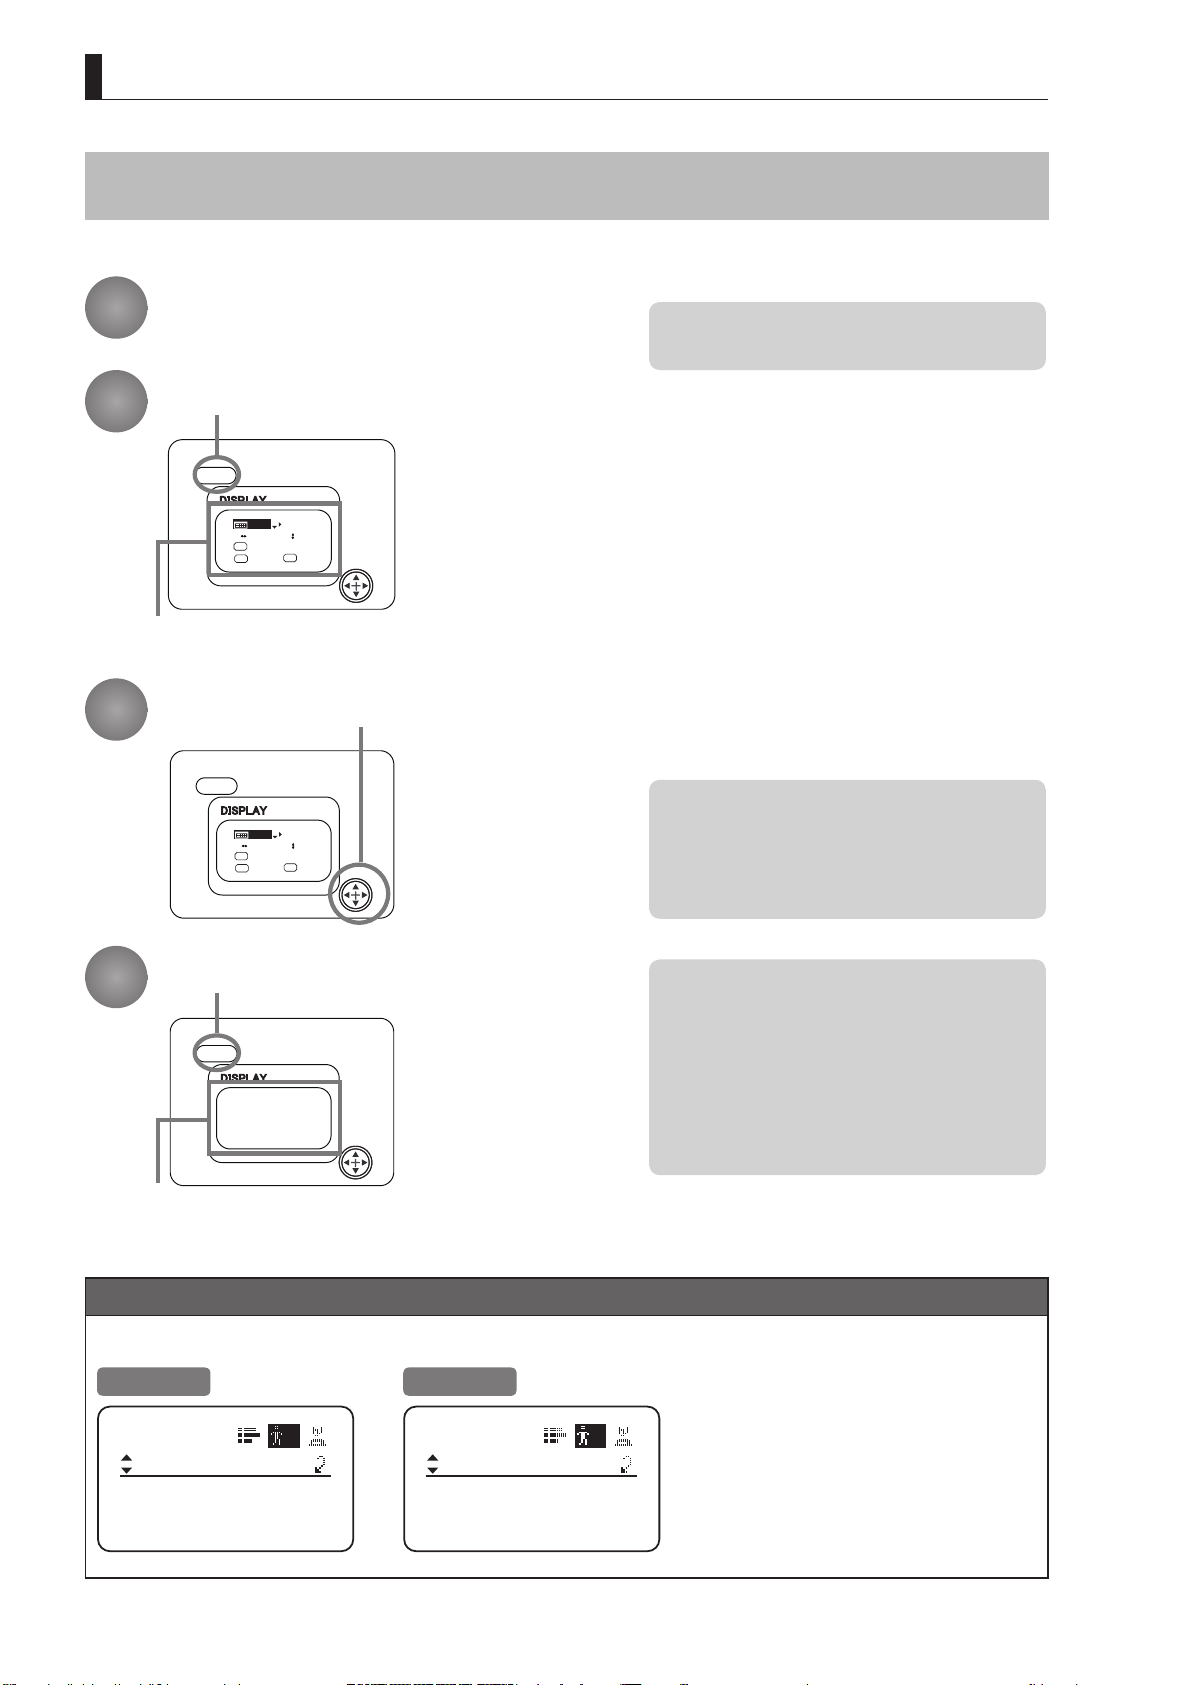
Basic Sequence of Operations
1
2
Turn on the lens.
Press the Display switch.
㻰㻵㻿㻼㻸㻭 㼅
IG: 50
MENU
ISSTD
ISSTD
A
[Trk ]
OFF
Fr1P
A 2
A 1
Fr1P
Shtl
The display is now illuminated.
3
Use the control keys to complete settings.
㻰㻵㻿㻼㻸㻭 㼅
IG: 50
MENU
ISSTD
ISSTD
A
[Trk ]
OFF
Fr1P
A 2
A 1
Fr1P
Shtl
Note: For instructions on turning the lens on, refer
to the camera manual.
Note: The display turns off automatically after two
minutes if no control keys are pressed. (Auto
Off.) However, the display remains active as
long as the Fol. screen is shown. In this case,
it is only deactivated when you press the
Display switch.
4
Press the Display switch.
㻰㻵㻿㻼㻸㻭 㼅
Note: Any changes to settings are saved even if the
display is automatically deactivated, just as
they are when it is switched off manually.
When the display is deactivated manually,
changes to settings are saved and the display
is turned off.
However, if the lens is turned off while the
display is on, changes to settings may not be
saved.
The display is turned off.
Changes are saved.
Important
For Reference: Display appearance when restoring original settings
Basic Mode
User
B
ResetAll
User:
y/n
Full Mode
User
ResetAll
User:
AllUser:
1
y/n
y/n
Restoring the Original
Settings
The original settings can be restored, in
the case of incorrect settings or if you
have tried some settings tentatively.
For details, see “Resetting Values” in “3.
Operation in Basic Mode” or “4. Operation
in Full Mode.”
E14

1
Screen Organization
INFORMATION DISPLAY
1. Screen Organization
1
. Screen Organization
Screens contain 22 setting items in Basic mode, 35 in Full mode, and 3 in Analog mode, with Basic and Full modes also
including a “follow” screen containing three setting items that have relative values. Frequently used items are displayed
Top screen
on the
screen
, which also includes advanced settings. (See “Menu Screen” in “1. Screen Organization.”)
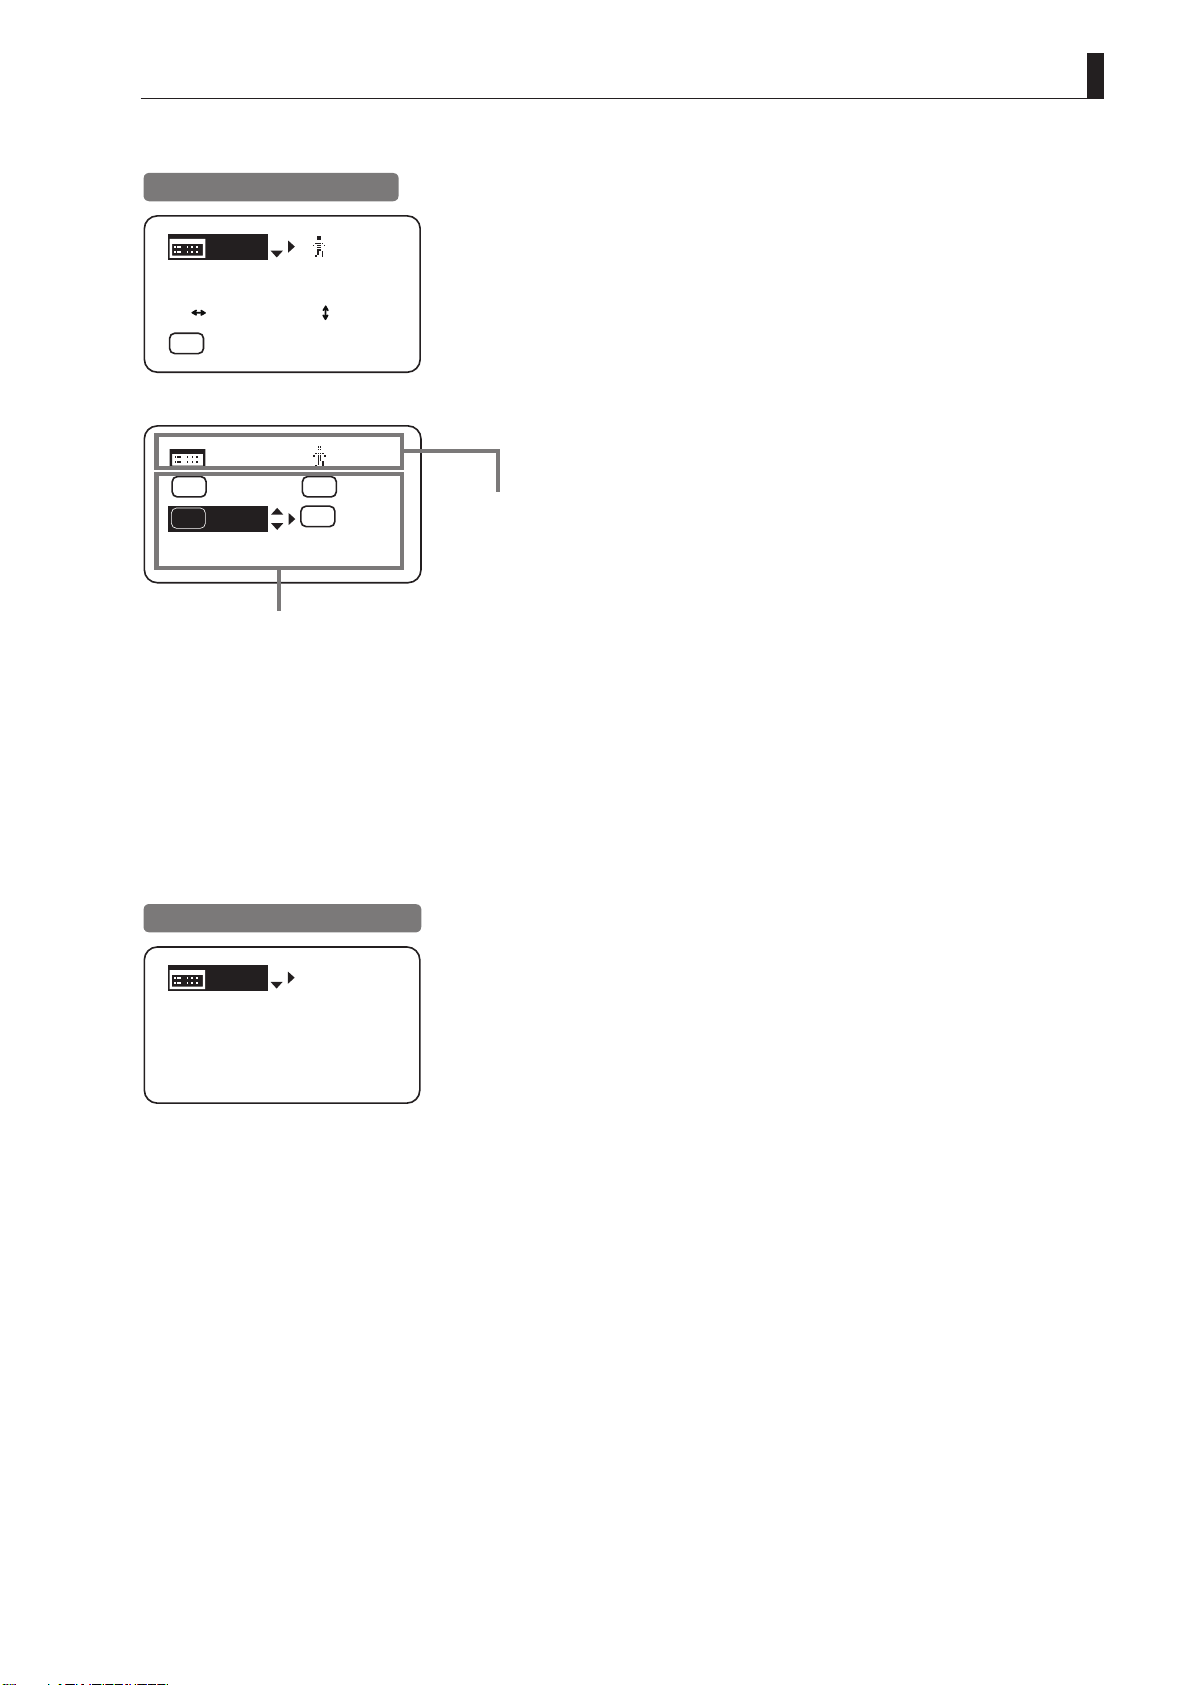
1.1
Top Screen
(For instructions on conguring the settings, see “Conguration from the Top Screen” in each mode.)
Top screen
The
(the screen displayed by pressing the Display switch). All settings can be congured from the
contains 10 setting items in Basic mode, 16 in Full mode, and 3 in Analog mode.
Menu
Initial Top Screen in Basic Mode
MENU
ISSTD
A
Fr1P
A 1
Shtl
MENU
A
Fr1P
A 1
Shtl
[I-Tq]H
Items displayed by scrolling
IG: 50
ISSTD
[Trk]
OFF
A 2
Fr1P
IG: 50
[Trk]
OFF
A 2
Fr1P
[Z.M.]
Items not scrolled
Top Screen in Basic Mode
1. Go to Menu screen
2. Auto iris gain settings
3. IS compensation mode switching (horizontal direction)
4. IS compensation mode switching (vertical direction)
5. AUX switch assignment
6. Zoom Tracking ON/OFF
7. AUX1 switch assignment
8. AUX2 switch assignment
9. Iris torque settings
10. Zoom curve mode settings
E16
1. Screen Organization
Initial Top Screen in Full Mode
[ ]
[Trk]
1
OFF
MENU
[ Basic ]
ISSTD ISSTD
A
Fr1P
MENU
A 1 V
Shtl
A 2
Fr1P
[ I-Gain ]
[ ]
1
VTR
R
RET
[ Z.M. ][ I-Tq ] H
Items displayed by scrolling
Items not scrolled
Top Screen in Full Mode
Of the 14 setting items in Full mode, the 8 most common are
shown on the Top screen. The other 6 can be accessed by
pressing down to scroll down the screen.
1. Go to Menu screen
2. Switch users
3. Switch to Basic mode
4. Zoom TrackingON/OFF
5. IS compensation mode switching (horizontal direction)
6. IS compensation mode switching (vertical direction)
7. AUX switch assignment
8. Iris gain settings
9. AUX1 switch assignment
10. VTR switch assignment
11. AUX2 switch assignment
12. RET switch assignment
13. Iris torque settings
14. Zoom curve mode settings
15. Iris A/M switch setting
16. Seesaw switch assignment
Initial Top Screen in Analog Mode
MENU
IG: 50
[ Basic ]
Top Screen in Analog Mode
1. Go to Menu screen
2. Auto iris gain settings
3. Switch to Basic mode
E17
1. Screen Organization
[ ]
1.2
Menu Screen
(For instructions on conguring the settings, see the "Menu Screen" section in the descriptions of each mode.)
Setting items in each mode and on the “follow” screen are organized by function. All of these screens are collectively
referred to as the
Menu screen
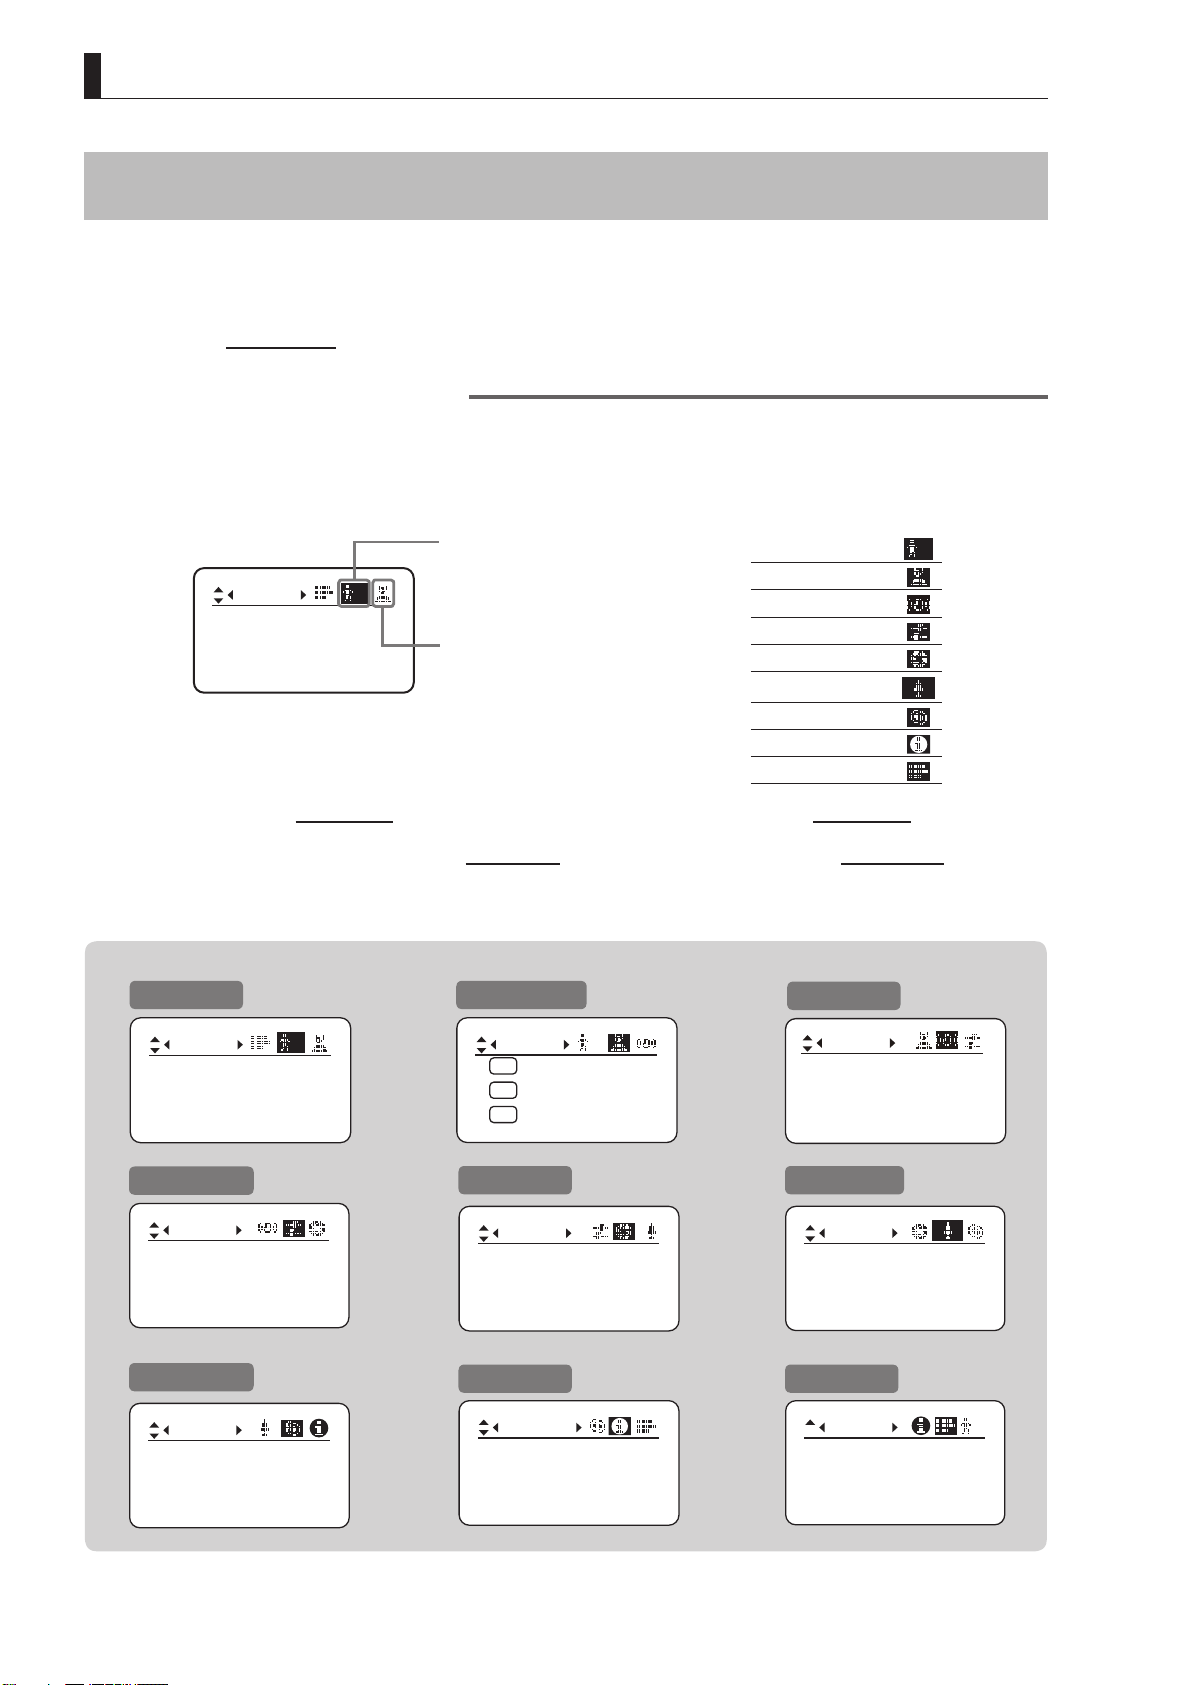
Menu Screen in Basic Mode
*1
.
In Basic mode, the 22 setting items and three “follow” settings with relative values are organized by function into the
following 9 screens.
User
Mode:
ResetAll
Access:
Basic
Unlock
Icon of selected screen
is highlighted.
B
Other icons, for
unselected screens, are
not highlighted.
1. User screen
2. Switch screen
3. IS screen
4. Preset screen
5. Iris screen
6. Zoom screen
B
7. Focus screen
8. Info screen
9. Fol. screen
*1:
There is no single
Menu screen
To access these screens, select [MENU] on the
.
Instead, these 9 screens are collectively referred to as the
Top screen
and press the Set key. Initially, the
Menu screen
User screen
.
is displayed.
To access other screens, press left or right.
Menu Screen in Basic Mode
User screen
User
Mode:
ResetAll
Access:
Preset screen
Preset
Frame1:
Frame2: Zoom
ZSpeed: 800
Focus screen
Focus
CurveMode
B
Basic
Unlock
Zoom
[ ]
Switch screen
Switch
A
AUX:
A 1
AUX1:
A 2
AUX2:
Iris screen
Iris
[ I-Gain ]
Torque: High
Comp: OFF
Info screen
Info
Encoder:
CamSeri:
B
Fr1P
Shtl
Fr1P
OFF3D
OFF
ON
[ ]
IS screen
IS
Mode
: OFF
Offstate
SwSetting
Zoom screen
Zoom
CurveMode
VR-Dem: ON
Fol. screen
Fol.
Iris:
Zoom:
Focus:
[ ]
B
1000
0000
0000
E18
1. Screen Organization
[ ]
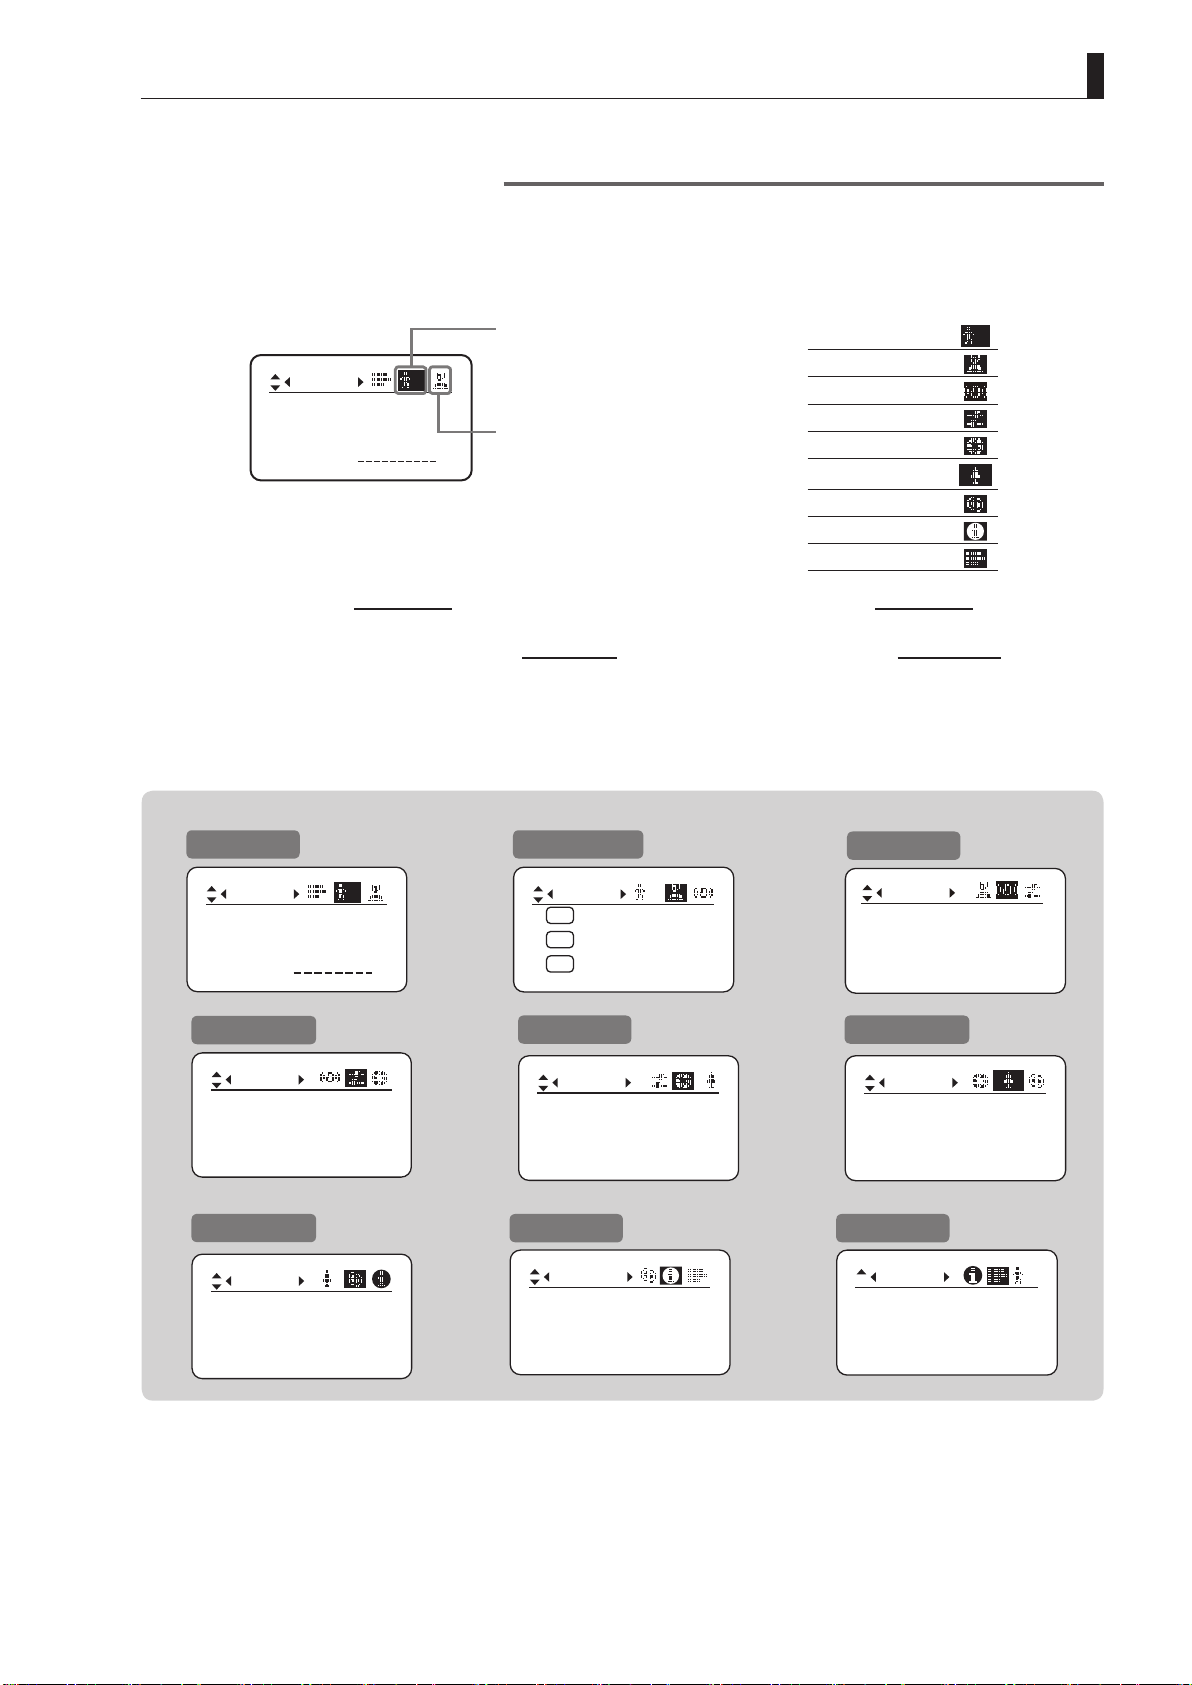
Menu Screen in Full Mode
In Full mode, the 35 setting items and three “follow” settings with relative values are organized by function into the
following 9 screens.
User
Mode:
No. :
Name:
Full
Icon of selected screen
is highlighted.
1
1
Other icons, for
unselected screens, are
not highlighted.
1. User screen
2. Switch screen
3. IS screen
4. Preset screen
5. Iris screen
6. Zoom screen
1
7. Focus screen
8. Info screen
9. Fol. screen
*1
: There is no single
Menu screen
. Instead, these 8 screens are collectively referred to as the
Menu screen
.
To access these screens, select [MENU] on the
Top screen
and press the Set key. Initially, the
User screen
is displayed.
To access other screens, press left or right.
Menu Screen in Full Mode
User screen
User
Mode:
No. :
Name:
Preset screen
Preset
Frame1:
Frame2: Zoom
ZSpeed: 800
Focus screen
Focus
CurveMode
1
Full
1
Zoom
[ ]
Switch screen
Switch
A
AUX:
A 1
AUX1:
A 2
AUX2:
Iris screen
Iris
[ I-Gain ]
Torque: High
Comp: OFF
Info screen
Info
3D:
Encoder:
CamSeri:
1
Fr1P
Shtl
Fr1P
OFF
OFF
ON
[ ]
IS screen
IS
Mode
Offstate
SwSetting
Zoom screen
Zoom
Tracking:
Movement
CurveMode
Fol. screen
Fol.
Iris:
Zoom:
Focus:
: OFF
[ ]
OFF
1
1000
0000
0000
E19

1. Screen Organization
Menu Screen in Analog Mode
In Analog mode, 2 setting items are presented as the
User
Mode:
Access:
*1
: There is no single Menu screen. Instead, these screens displayed by selecting [Menu] are collectively referred to as the Menu
To access this screen, select [MENU] on the
screen.
A
Analog
Unlock
Icon of selected screen is
highlighted.
Top screen
Menu Screen in Analog Mode
User screen
User
Mode:
Access:
A
Analog
Unlock
User screen
and press the Set key. The
.
1. User Screen
User screen
A
is now displayed.
E20

2
Mode Selection
INFORMATION DISPLAY

2. Mode Selection
2
. Mode Selection
2.1
Modes
The following 3 modes are available. Choose a mode that suits your purpose or preference.
1
. Basic Mode:
2
. Full Mode:
3
. Analog Mode:
For details, see “3. Operation in Basic Mode,” “4. Operation in Full Mode,” or “5. Operation in Analog Mode.”
Restricted settings and information. Recommended for users who do not require sophisticated
settings. This is the default mode.
All settings and information are available.
This mode is selected when the digital functions are not used at all.
E22

3
Operation in Basic Mode
INFORMATION DISPLAY

3. Operation in Basic Mode
3
. Operation in Basic Mode
3.1
Configuration from the Top Screen
The screen displayed by pressing the Display switch is referred to as the
A total of 10 items can be congured on the
Initial Top screen
Initial Top Screen in Basic Mode
MENU
ISSTD
A
Fr1P
A 1
Shtl
. Status of some items can be checked simply by accessing this screen.
IG: 50
ISSTD
[Trk]
OFF
A 2
Fr1P
Top screen
in Basic mode. The rst screen displayed is referred to as the
Top screen
.
E24
3. Operation in Basic Mode
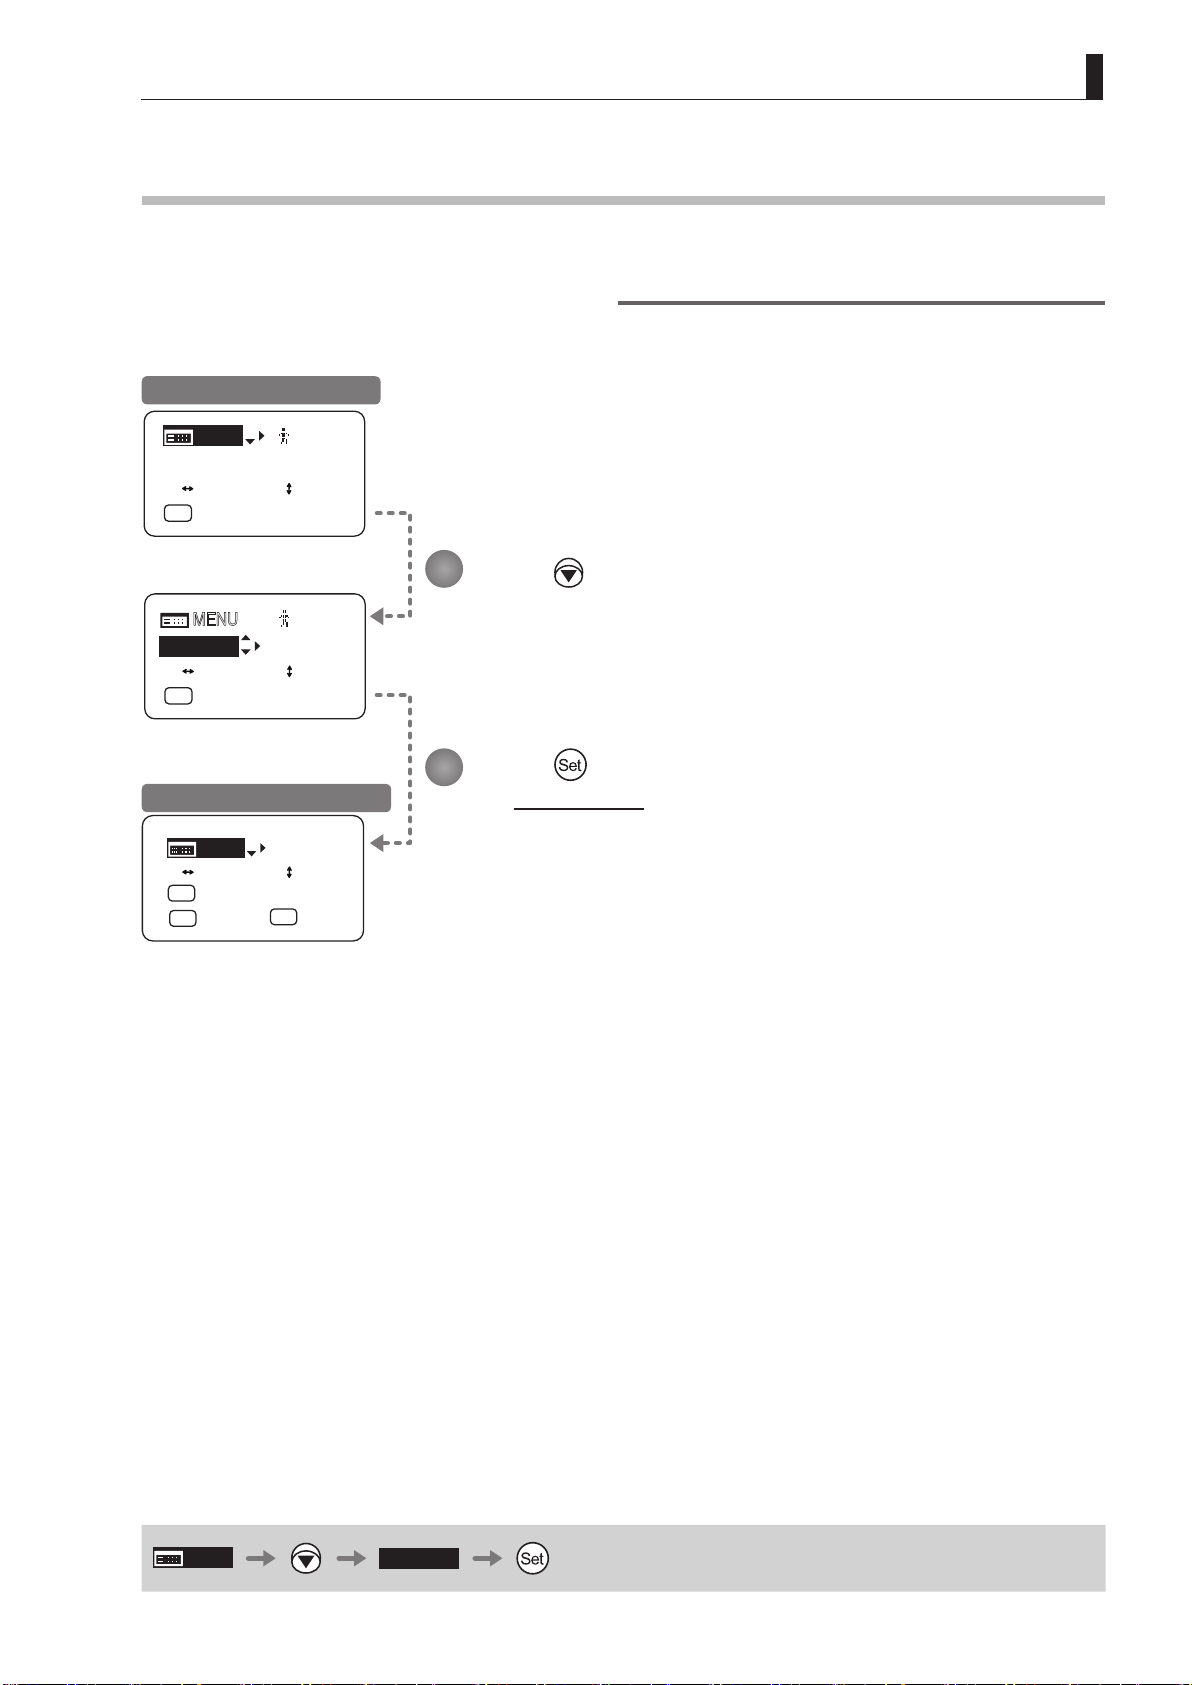
[ Basic ]
3.1.1
Basic mode is the default mode, but it can also be accessed from other modes as follows.
Switching from Full to Basic Mode
Initial Top Screen in Full Mode
[ Basic ]
ISSTD ISSTD
[ Basic ][ Basic ]
ISSTD ISSTD
Initial Top Screen in Basic Mode
Selecting Basic Mode
[ ]
1
[Trk]
OFF
[ I-Gain ]
[ ]
1
[Trk]
OFF
[ I-Gain ]
1
2
A
A
MENU
Fr1P
MENU
MENU
Fr1P
Press
[Basic] is highlighted.
Press
Initial Top screen
The
in Basic mode is displayed.
MENU
ISSTD
A
Fr1P
A 1
Shtl
IG: 50
ISSTD
[Trk]
OFF
A 2
Fr1P
MENU
E25
3. Operation in Basic Mode
Shtl
5
3.1.2
A total of 10 items can be congured on the
Initial
(See the following gure.)
Status of some items can be checked simply by accessing this screen. (Shown in the gure below.*1)
Top Screen
Top screen
1
3
5
7
, which displays 8 items. The other items can be displayed by pressing down to scroll down the screen.
MENU
ISSTD ISSTD
A
Fr1P
A 1
Shtl
Initial Top Screen
IG: 50
[Trk]
A 2
Top screen
OFF
Fr1P
in Basic mode, and the rst screen shown is referred to as the
2
4
6
8
*1
9
Items Displayed by Scrolling
[I-Tq]H
[ Z.M. ]
10
Inside : Items that show the current
setting status.
Example:
: White numbers against a black background
A 1
switch is assigned to the Shuttle
function.
indicate the number of the switch on a drive
unit to which the function is assigned.
indicates that the AUX1
E26

3. Operation in Basic Mode
1
MENU
6
2
7
3
8
4
9
5
10
Menu screen
See “3.2 Conguration from the Menu Screen.”
Auto iris gain
IG
Adjust the auto iris gain value.
See “3.1.3 Specifying Auto Iris Gain.”
IS
Switch the IS compensation mode of the hori-
zontal direction.
See "3.1.4 Switching the IS Compensation
Mode of the Horizontal Direction."
[Trk]
Zoom tracking
Switch to ON when using zoom tracking.
See “3.1.6 Zoom Tracking ON/OFF.”
AUX1 switch
A 1
By default, the AUX1 switch for a zoom demand
is assigned to the {Shuttle} function, but it can
be reassigned as needed.
See “3.1.8 Assigning Functions to the AUX1
Switch.”
A 2
By default, the AUX2 switch for a zoom demand
is assigned to the {Frame Preset 1} function,
but it can be reassigned as needed.
See “3.1.9 Assigning Functions to the AUX2
Switch.”
AUX2 switch
IS
Switch the IS compensation mode of the vertical
direction.
See "3.1.5 Switching the IS Compensation
Mode of the Vertical Direction."
AUX switch
A
By default, the AUX switch for a drive unit is
assigned to the “Frame Preset 1” function, but it
can be reassigned as needed.
See “3.1.7 Assigning Functions to the AUX
Switch.”
[I-Tq]
[Z.M.]
Iris torque
Adjust the level of torque in manual control of
the iris ring as needed.
See “3.1.10 Specifying Iris Torque.”
Zoom curve mode
Adjust zoom speed in response to pressing
the zoom seesaw switch or tilting the analog
demand thumb ring.
See “3.1.11 Specifying Zoom Curve Mode.”
E27
3. Operation in Basic Mode
MENU
IG
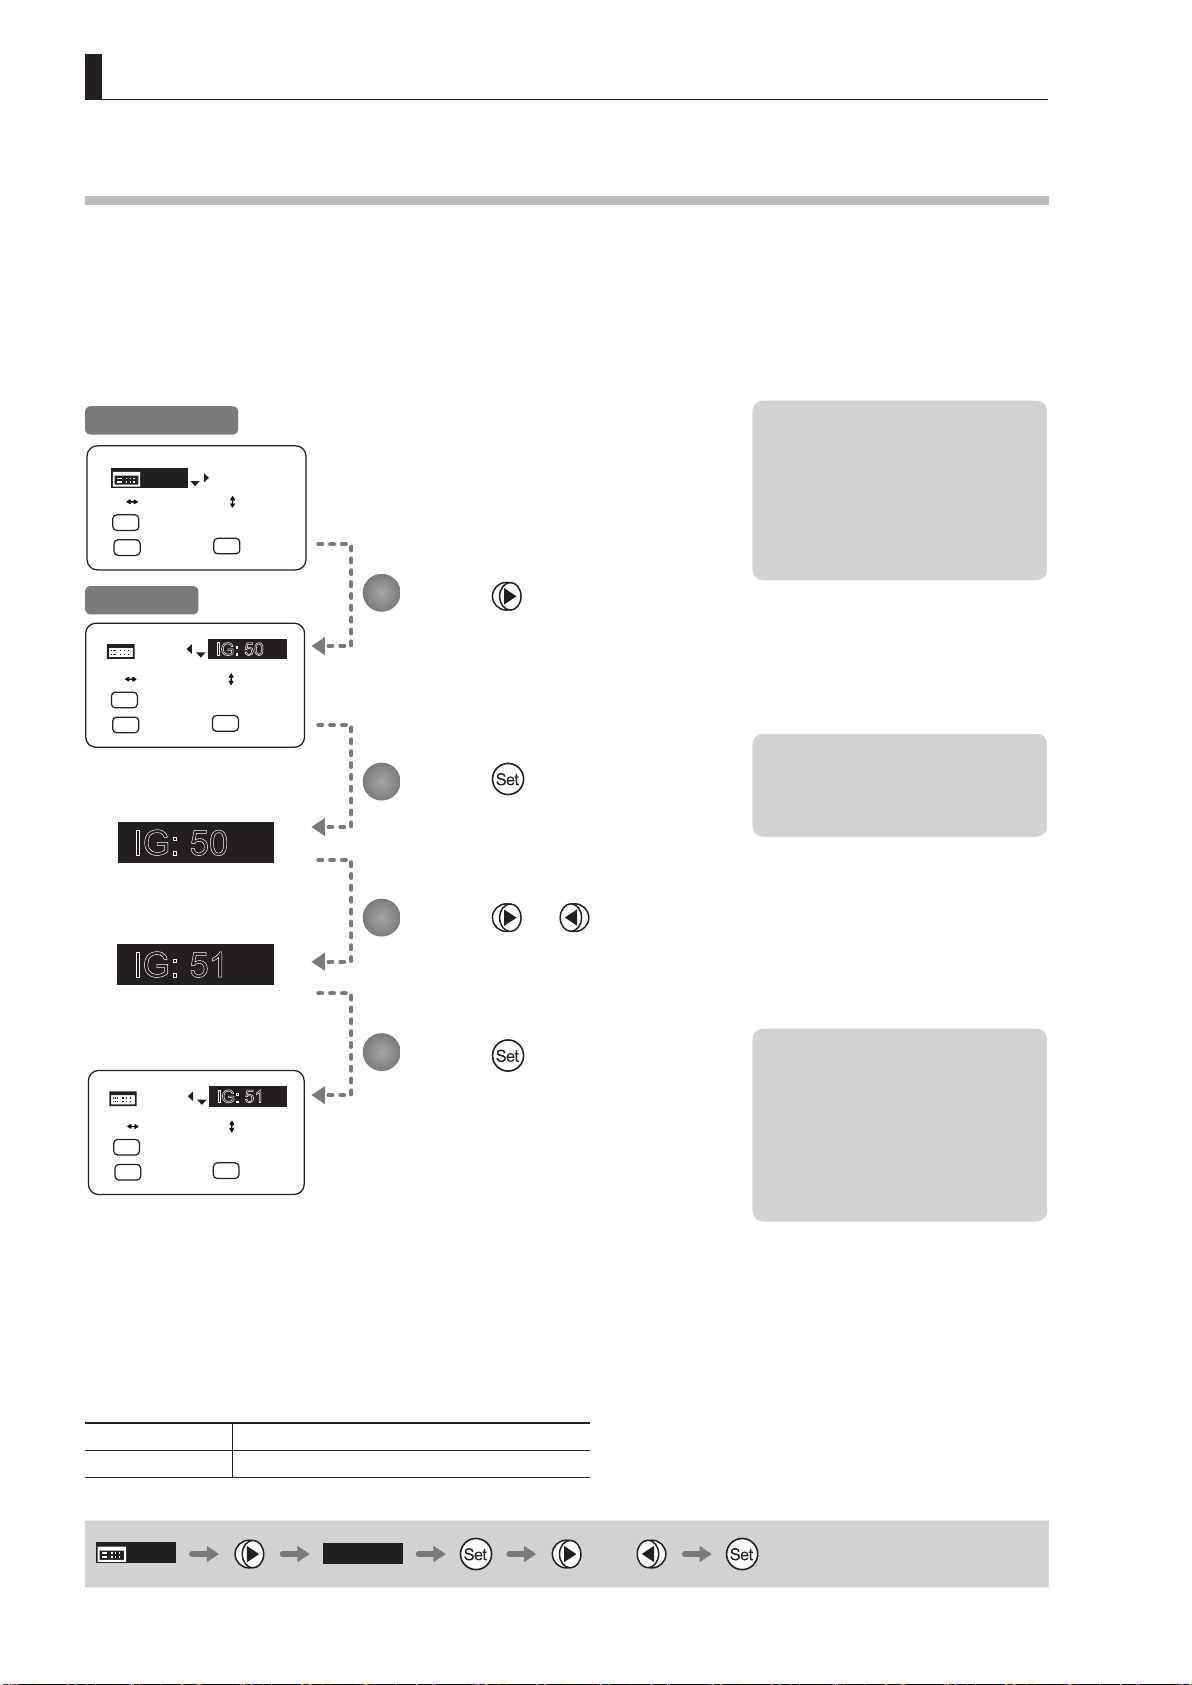
3.1.3
Specifying Auto Iris Gain
Although this value is factory-set, it can be adjusted as needed.
To adjust the value, use either the auto iris gain adjustment trimmer (refer to the Lens Manual) or display operations.
Regardless of the method of adjustment used, the most recent setting takes precedence.
The same auto iris gain value applies to all users.
Initial Top Screen
MENU
ISSTD
A
Fr1P
A 1
Shtl
Screen A
MENU
ISSTD
A
Fr1P
A 1
Shtl
IG: 50
ISSTD
[Trk]
IG: 50
ISSTD
[Trk]
A 2
A 2
OFF
Fr1P
OFF
Fr1P
1
Press .
Your selection is now highlighted.
Press .
2
The display starts blinking.
Note: Do the following when
adjusting gain while checking
iris operation.
→ Conrm that the drive unit A/M
switch is set to [Auto] mode.
→ Set the camera iris mode to
[Auto].
Note: As you look at the lens iris
ring, set it to the position of
maximum gain at which “focus
hunting” does not occur.
IG: 50
[IG]
IG: 51
MENU
ISSTD
A
Fr1P
A 1
Shtl
Options
Description
3
Press or .
Press left or right until you reach
the desired value.
4
Press .
IG: 51
ISSTD
[Trk]
OFF
A 2
Fr1P
01 to 99
Minimum gain Maximum gain
Default: Varies depending on the factory-set value, but corresponds to the value determined with the iris gain adjustment trimmer.
The display changes from blinking to
highlighted, indicating conrmation.
Note: The current iris gain value
is retained even if you reset
other settings as described in
“3.2.1 Resetting Values.” For
this reason, you will no longer
be able to view the default
setting. If necessary, make
a note of the default setting
before adjusting this value.
or
E28
 Loading...