

Please read this guide before operating this equipment.
After you finish reading this guide, store it in a safe place
for future reference.

FAX-L380S/L390 User’s Guide
About the Manuals for the Machine
The manuals for this machine are divided as follows. Please refer to them for detailed information.
The manuals supplied with optional equipment are included in the list below.
Guides with this symbol are book manuals.
CD-ROM
Guides with this symbol are PDF manuals included on the
accompanying CD-ROM.
• Setting up the Machine
• Installing CARPS
• Feature Overviews
• Maintenance and Troubleshooting
Starter Guide
• Setting up the Machine
• Document and Paper Handling
• Sending and Receiving Faxes
• Speed Dialling
• Making Copies
• Maintenance
• Troubleshooting
• The Menu System
User’s Guide
(This Document)
CD-ROM
• Installing CARPS Software
• Printer Properties
• Troubleshooting Printer Driver Issues
Software Guide
CD-ROM

IMPORTANT!
Appendix C describes important information
exclusively for specified countries. If you find your
country name in Appendix C, be sure to read it.
This equipment conforms to the essential requirements of EC
Directive 1999/5/EC.
We declare that this product conforms to the EMC
requirements of EC Directive 1999/5/EC at nominal mains
input 230 V, 50Hz although the rated input of the product is
200–240 V, 50/60Hz. This equipment has been tested in a
typical system to comply with the technical requirements of
EMC Directive. Use of shielded cable is required to comply
with the technical requirements of EMC Directive.
If you move to another EU country and are experiencing
trouble please call the Canon Help Desk.
(For Europe Only)
H12425 (FAX-L380S)
H12425 (FAX-L390)
Model Name

Trademarks
Canon® is a registered trademark, and UHQ™ is a trademark of Canon Inc.
IBM
®
is a registered trademark.
Microsoft
®
and Windows® are registered trademarks of Microsoft
Corporation.
Other brand and product names may be trademarks or registered trademarks
of their respective companies.
As an ENERGY STAR® Partner, Canon has determined
that this product meets the ENERGY STAR® guidelines
for energy efficiency. The International ENERGY
STAR® Office Equipment Program is an international
program that promotes energy saving through the use
of computers and other office equipment. The program
backs the development and dissemination of products
with functions that effectively reduce energy
consumption. It is an open system in which business
proprietors can participate voluntarily. The targeted
products are office equipment such as computers,
displays, printers, facsimiles, and copiers. Their
standards and logos are uniform among participating
nations.

Safety Information
Laser Safety Information
Laser radiation could be hazardous to the human body.
For this reason, laser radiation emitted inside this product
is hermetically sealed within the protective housing and
external cover. No radiation can leak from the product in
the normal operation of the product by the user.
This product is classified as a Class 1 Laser Product
under IEC 60825-1: 1993 and EN 60825-1: 1994.
200V-240V model
The label shown below is attached to the laser scan
machine on the product.

Contents
Chapter 1 Introducing FAX-L380S/L390
Welcome . . . . . . . . . . . . . . . . . . . . . . . . . . . . . . . . . . . . . . . . . . . . . . . . . . . . . . . . . . . . . . . . . . . . . . . . 1-1
The Main Features of the Machine . . . . . . . . . . . . . . . . . . . . . . . . . . . . . . . . . . . . . . . . . . . . . . . . . . . 1-2
Plain Paper Fax Features. . . . . . . . . . . . . . . . . . . . . . . . . . . . . . . . . . . . . . . . . . . . . . . . . . . . . . . . 1-2
Printer Features . . . . . . . . . . . . . . . . . . . . . . . . . . . . . . . . . . . . . . . . . . . . . . . . . . . . . . . . . . . . . . . 1-3
Copier Features . . . . . . . . . . . . . . . . . . . . . . . . . . . . . . . . . . . . . . . . . . . . . . . . . . . . . . . . . . . . . . . 1-3
Telephone Features*. . . . . . . . . . . . . . . . . . . . . . . . . . . . . . . . . . . . . . . . . . . . . . . . . . . . . . . . . . . . 1-3
Using the Machine With the Printer Driver . . . . . . . . . . . . . . . . . . . . . . . . . . . . . . . . . . . . . . . . . . . . . 1-4
System Requirements . . . . . . . . . . . . . . . . . . . . . . . . . . . . . . . . . . . . . . . . . . . . . . . . . . . . . . . . . . 1-4
Using Your Documentation . . . . . . . . . . . . . . . . . . . . . . . . . . . . . . . . . . . . . . . . . . . . . . . . . . . . . . . . . 1-5
Type Conventions Used in This Guide . . . . . . . . . . . . . . . . . . . . . . . . . . . . . . . . . . . . . . . . . . . . . . 1-5
Illustrations Used in This Guide . . . . . . . . . . . . . . . . . . . . . . . . . . . . . . . . . . . . . . . . . . . . . . . . . . . 1-5
Safety Instructions . . . . . . . . . . . . . . . . . . . . . . . . . . . . . . . . . . . . . . . . . . . . . . . . . . . . . . . . . . . . . . . . 1-6
Customer Support . . . . . . . . . . . . . . . . . . . . . . . . . . . . . . . . . . . . . . . . . . . . . . . . . . . . . . . . . . . . . 1-7
Chapter 2 Setting Up Your Machine
Choosing a Location for Your Machine. . . . . . . . . . . . . . . . . . . . . . . . . . . . . . . . . . . . . . . . . . . . . . . . 2-1
Unpacking Your Machine . . . . . . . . . . . . . . . . . . . . . . . . . . . . . . . . . . . . . . . . . . . . . . . . . . . . . . . . . . . 2-2
Do You Have Everything?. . . . . . . . . . . . . . . . . . . . . . . . . . . . . . . . . . . . . . . . . . . . . . . . . . . . . . . . 2-2
Removing Shipping Materials. . . . . . . . . . . . . . . . . . . . . . . . . . . . . . . . . . . . . . . . . . . . . . . . . . . . . 2-3
Replaceable Parts . . . . . . . . . . . . . . . . . . . . . . . . . . . . . . . . . . . . . . . . . . . . . . . . . . . . . . . . . . . . . 2-4
Assembling the Machine . . . . . . . . . . . . . . . . . . . . . . . . . . . . . . . . . . . . . . . . . . . . . . . . . . . . . . . . . . . 2-5
Attaching Components . . . . . . . . . . . . . . . . . . . . . . . . . . . . . . . . . . . . . . . . . . . . . . . . . . . . . . . . . . 2-5
Document Output Tray . . . . . . . . . . . . . . . . . . . . . . . . . . . . . . . . . . . . . . . . . . . . . . . . . . . . . . 2-5
Output Tray. . . . . . . . . . . . . . . . . . . . . . . . . . . . . . . . . . . . . . . . . . . . . . . . . . . . . . . . . . . . . . . 2-5
Installing the Paper Cassette* . . . . . . . . . . . . . . . . . . . . . . . . . . . . . . . . . . . . . . . . . . . . . . . . . . . . 2-6
Making Connections. . . . . . . . . . . . . . . . . . . . . . . . . . . . . . . . . . . . . . . . . . . . . . . . . . . . . . . . . . . . . . . 2-7
Connecting the Machine to Your PC. . . . . . . . . . . . . . . . . . . . . . . . . . . . . . . . . . . . . . . . . . . . . . . .2-7

Chapter 3 Registering Information in the Machine
Guidelines for Entering Information . . . . . . . . . . . . . . . . . . . . . . . . . . . . . . . . . . . . . . . . . . . . . . . . . . 3-1
Entering Numbers, Letters, and Symbols . . . . . . . . . . . . . . . . . . . . . . . . . . . . . . . . . . . . . . . . . . . 3-1
Personalizing Your Machine . . . . . . . . . . . . . . . . . . . . . . . . . . . . . . . . . . . . . . . . . . . . . . . . . . . . . . . . 3-3
Identifying Your Documents . . . . . . . . . . . . . . . . . . . . . . . . . . . . . . . . . . . . . . . . . . . . . . . . . . . . . . 3-3
Entering the Date and Time. . . . . . . . . . . . . . . . . . . . . . . . . . . . . . . . . . . . . . . . . . . . . . . . . . . . . . 3-3
Registering Your Fax Number and Name. . . . . . . . . . . . . . . . . . . . . . . . . . . . . . . . . . . . . . . . . . . . 3-4
Setting the Telephone Line Type . . . . . . . . . . . . . . . . . . . . . . . . . . . . . . . . . . . . . . . . . . . . . . . . . . 3-5
Setting the Summer Time*. . . . . . . . . . . . . . . . . . . . . . . . . . . . . . . . . . . . . . . . . . . . . . . . . . . . . . . 3-5
Chapter 4 Paper Handling
Print Media Requirements . . . . . . . . . . . . . . . . . . . . . . . . . . . . . . . . . . . . . . . . . . . . . . . . . . . . . . . . . . 4-1
Printing Areas . . . . . . . . . . . . . . . . . . . . . . . . . . . . . . . . . . . . . . . . . . . . . . . . . . . . . . . . . . . . . . . . 4-2
Loading Paper. . . . . . . . . . . . . . . . . . . . . . . . . . . . . . . . . . . . . . . . . . . . . . . . . . . . . . . . . . . . . . . . . . . . 4-3
Loading Paper in the Cassette. . . . . . . . . . . . . . . . . . . . . . . . . . . . . . . . . . . . . . . . . . . . . . . . . . . . 4-3
Loading Envelopes in the Cassette . . . . . . . . . . . . . . . . . . . . . . . . . . . . . . . . . . . . . . . . . . . . . . . . 4-5
Loading Paper in the Multi-Purpose Feeder . . . . . . . . . . . . . . . . . . . . . . . . . . . . . . . . . . . . . . . . . 4-8
Loading an Envelope in the Multi-Purpose Feeder . . . . . . . . . . . . . . . . . . . . . . . . . . . . . . . . . . . . 4-9
Orientation of the Document and the Paper Loading. . . . . . . . . . . . . . . . . . . . . . . . . . . . . . . . . . 4-11
Selecting the Paper Output Area. . . . . . . . . . . . . . . . . . . . . . . . . . . . . . . . . . . . . . . . . . . . . . . . . . . . 4-12
Paper Type and Paper Output Area. . . . . . . . . . . . . . . . . . . . . . . . . . . . . . . . . . . . . . . . . . . . . . . 4-12
Face Down Paper Output Area . . . . . . . . . . . . . . . . . . . . . . . . . . . . . . . . . . . . . . . . . . . . . . . . . . 4-13
Face Up Paper Output Area. . . . . . . . . . . . . . . . . . . . . . . . . . . . . . . . . . . . . . . . . . . . . . . . . . . . . 4-13
Chapter 5 Speed Dialing
Speed Dialing Methods . . . . . . . . . . . . . . . . . . . . . . . . . . . . . . . . . . . . . . . . . . . . . . . . . . . . . . . . . . . . 5-1
One-Touch Speed Dialing . . . . . . . . . . . . . . . . . . . . . . . . . . . . . . . . . . . . . . . . . . . . . . . . . . . . . . . . . . 5-2
Storing Numbers for One-Touch Speed Dialing . . . . . . . . . . . . . . . . . . . . . . . . . . . . . . . . . . . . . . . 5-2
Changing or Deleting a Number/Name Stored Under a One-Touch Speed Dial Button . . . . . . . . 5-3
Using One-Touch Speed Dialing . . . . . . . . . . . . . . . . . . . . . . . . . . . . . . . . . . . . . . . . . . . . . . . . . . 5-4
Coded Speed Dialing . . . . . . . . . . . . . . . . . . . . . . . . . . . . . . . . . . . . . . . . . . . . . . . . . . . . . . . . . . . . . . 5-5
Storing Numbers for Coded Speed Dialing . . . . . . . . . . . . . . . . . . . . . . . . . . . . . . . . . . . . . . . . . . 5-5
Changing or Deleting a Number/Name Stored under a Coded Speed Dialing Code. . . . . . . . . . . 5-6
Using Coded Speed Dialing. . . . . . . . . . . . . . . . . . . . . . . . . . . . . . . . . . . . . . . . . . . . . . . . . . . . . . 5-7
Group Dialing . . . . . . . . . . . . . . . . . . . . . . . . . . . . . . . . . . . . . . . . . . . . . . . . . . . . . . . . . . . . . . . . . . . . 5-9

Canceling Sending . . . . . . . . . . . . . . . . . . . . . . . . . . . . . . . . . . . . . . . . . . . . . . . . . . . . . . . . . . . . . . . 6-10
Canceling Memory Sending . . . . . . . . . . . . . . . . . . . . . . . . . . . . . . . . . . . . . . . . . . . . . . . . . . . . .6-10
While Documents Are Being Scanned Using the ADF . . . . . . . . . . . . . . . . . . . . . . . . . . . . 6-10
After All Documents Are Scanned . . . . . . . . . . . . . . . . . . . . . . . . . . . . . . . . . . . . . . . . . . . . 6-10
Redialing . . . . . . . . . . . . . . . . . . . . . . . . . . . . . . . . . . . . . . . . . . . . . . . . . . . . . . . . . . . . . . . . . . . . . . . 6-11
Manual Redialing . . . . . . . . . . . . . . . . . . . . . . . . . . . . . . . . . . . . . . . . . . . . . . . . . . . . . . . . . . . . . 6-11
Automatic Redialing With Memory Sending . . . . . . . . . . . . . . . . . . . . . . . . . . . . . . . . . . . . . . . . . 6-11
Canceling Automatic Redialing . . . . . . . . . . . . . . . . . . . . . . . . . . . . . . . . . . . . . . . . . . . . . . 6-11
Setting Up Automatic Redialing* . . . . . . . . . . . . . . . . . . . . . . . . . . . . . . . . . . . . . . . . . . . . . 6-11
Sequential Broadcasting . . . . . . . . . . . . . . . . . . . . . . . . . . . . . . . . . . . . . . . . . . . . . . . . . . . . . . . . . . 6-13
Sending a Document to More Than One Destination. . . . . . . . . . . . . . . . . . . . . . . . . . . . . . . . . . 6-13
Sending a Document Using Group Dialing. . . . . . . . . . . . . . . . . . . . . . . . . . . . . . . . . . . . . . . . . . 6-14
Delayed Sending . . . . . . . . . . . . . . . . . . . . . . . . . . . . . . . . . . . . . . . . . . . . . . . . . . . . . . . . . . . . . . . . . 6-15
Chapter 7 Receiving Faxes
Different Ways to Receive a Fax . . . . . . . . . . . . . . . . . . . . . . . . . . . . . . . . . . . . . . . . . . . . . . . . . . . . . 7-1
Setting the Receive Mode . . . . . . . . . . . . . . . . . . . . . . . . . . . . . . . . . . . . . . . . . . . . . . . . . . . . . . . 7-2
Receiving Faxes and Phone Calls Automatically:
FaxTel Mode . . . . . . . . . . . . . . . . . . . . . . . . . . . . . . . . . . . . . . . . . . . . . . . . . . . . . . . . . . . . . . . . . . 7-2
Setting the Options for FaxTel Mode . . . . . . . . . . . . . . . . . . . . . . . . . . . . . . . . . . . . . . . . . . . 7-2
What Happens When FaxTel Mode is Selected. . . . . . . . . . . . . . . . . . . . . . . . . . . . . . . . . . . 7-3
Receiving Faxes Manually: Manual Mode . . . . . . . . . . . . . . . . . . . . . . . . . . . . . . . . . . . . . . . . . . . 7-4
Receiving Faxes Automatically: FaxOnly Mode . . . . . . . . . . . . . . . . . . . . . . . . . . . . . . . . . . . . . . . 7-5
Using an Answering Machine: AnsMode . . . . . . . . . . . . . . . . . . . . . . . . . . . . . . . . . . . . . . . . . . . . 7-5
Using the Machine With an Answering Machine . . . . . . . . . . . . . . . . . . . . . . . . . . . . . . . . . . 7-5
Receiving Faxes in Memory When a Problem Occurs. . . . . . . . . . . . . . . . . . . . . . . . . . . . . . . . . . . . 7-6
Receiving While Performing Other Tasks . . . . . . . . . . . . . . . . . . . . . . . . . . . . . . . . . . . . . . . . . . . . 7-7
Canceling an Incoming Fax . . . . . . . . . . . . . . . . . . . . . . . . . . . . . . . . . . . . . . . . . . . . . . . . . . . . . . 7-7
Chapter 8 Setting Up and Using Polling
What’s Polling? . . . . . . . . . . . . . . . . . . . . . . . . . . . . . . . . . . . . . . . . . . . . . . . . . . . . . . . . . . . . . . . . . . . 8-1
Before You Use Polling Receiving . . . . . . . . . . . . . . . . . . . . . . . . . . . . . . . . . . . . . . . . . . . . . . . . . 8-1
Polling Other Fax Machines to Receive Documents . . . . . . . . . . . . . . . . . . . . . . . . . . . . . . . . . . . . . 8-2
Requesting Another Fax to Send a Document . . . . . . . . . . . . . . . . . . . . . . . . . . . . . . . . . . . . . . . . 8-2
Setting Up Polling Sending . . . . . . . . . . . . . . . . . . . . . . . . . . . . . . . . . . . . . . . . . . . . . . . . . . . . . . . . . 8-3
Setting Up a Polling Box . . . . . . . . . . . . . . . . . . . . . . . . . . . . . . . . . . . . . . . . . . . . . . . . . . . . . . . . . 8-3
Scanning a Document into the Memory for Polling Sending . . . . . . . . . . . . . . . . . . . . . . . . . . . . . 8-4

Restricting Use of the Machine. . . . . . . . . . . . . . . . . . . . . . . . . . . . . . . . . . . . . . . . . . . . . . . . . . . . . 10-4
Enabling Restriction of Your Machine . . . . . . . . . . . . . . . . . . . . . . . . . . . . . . . . . . . . . . . . . . . . . 10-4
Canceling Restriction of Your Machine . . . . . . . . . . . . . . . . . . . . . . . . . . . . . . . . . . . . . . . . . . . . 10-5
Using Memory Lock . . . . . . . . . . . . . . . . . . . . . . . . . . . . . . . . . . . . . . . . . . . . . . . . . . . . . . . . . . . . . . 10-6
Turning Memory Lock ON and Setting the Password. . . . . . . . . . . . . . . . . . . . . . . . . . . . . . . . . . 10-6
Turning Memory Lock OFF and Printing Documents. . . . . . . . . . . . . . . . . . . . . . . . . . . . . . . . . . 10-7
Chapter 11 Making Copies
Making Copies . . . . . . . . . . . . . . . . . . . . . . . . . . . . . . . . . . . . . . . . . . . . . . . . . . . . . . . . . . . . . . . . . . 11-1
Specifying the Paper Size and Type (Common for Cassette and Multi-Purpose Feeder) . . . . . . 11-2
Specifying the Paper Size . . . . . . . . . . . . . . . . . . . . . . . . . . . . . . . . . . . . . . . . . . . . . . . . . . . . . . 11-2
Specifying the Paper Type . . . . . . . . . . . . . . . . . . . . . . . . . . . . . . . . . . . . . . . . . . . . . . . . . . . . . . 11-3
Setting Enlarging/Reducing . . . . . . . . . . . . . . . . . . . . . . . . . . . . . . . . . . . . . . . . . . . . . . . . . . . . . . . 11-4
Enlarging/Reducing Using Preset Copy Ratios . . . . . . . . . . . . . . . . . . . . . . . . . . . . . . . . . . . . . . 11-4
Enlarging/Reducing Using Custom Copy Ratios . . . . . . . . . . . . . . . . . . . . . . . . . . . . . . . . . . . . . 11-5
Improving Copied Image . . . . . . . . . . . . . . . . . . . . . . . . . . . . . . . . . . . . . . . . . . . . . . . . . . . . . . . . . . 11-6
Adjusting the Image Quality (Resolution). . . . . . . . . . . . . . . . . . . . . . . . . . . . . . . . . . . . . . . . . . . 11-6
Adjusting the Exposure (Density). . . . . . . . . . . . . . . . . . . . . . . . . . . . . . . . . . . . . . . . . . . . . . . . . 11-6
Adjusting Automatically . . . . . . . . . . . . . . . . . . . . . . . . . . . . . . . . . . . . . . . . . . . . . . . . . . . . 11-6
Adjusting Manually . . . . . . . . . . . . . . . . . . . . . . . . . . . . . . . . . . . . . . . . . . . . . . . . . . . . . . . 11-7
Special Features . . . . . . . . . . . . . . . . . . . . . . . . . . . . . . . . . . . . . . . . . . . . . . . . . . . . . . . . . . . . . . . . . 11-8
Collate Copy. . . . . . . . . . . . . . . . . . . . . . . . . . . . . . . . . . . . . . . . . . . . . . . . . . . . . . . . . . . . . . . . . 11-8
Reserve Copy . . . . . . . . . . . . . . . . . . . . . . . . . . . . . . . . . . . . . . . . . . . . . . . . . . . . . . . . . . . . . . . 11-9
Confirming the Copy Job You Reserved . . . . . . . . . . . . . . . . . . . . . . . . . . . . . . . . . . . . . . 11-10
Deleting the Copy Job You Reserved . . . . . . . . . . . . . . . . . . . . . . . . . . . . . . . . . . . . . . . . 11-10
Chapter 12 System Monitor
Checking the Status of Copy, Fax, Print and Report Jobs . . . . . . . . . . . . . . . . . . . . . . . . . . . . . . . 12-1
Confirming Transmission Status . . . . . . . . . . . . . . . . . . . . . . . . . . . . . . . . . . . . . . . . . . . . . . . . . 12-1
Confirming Transmission Results and Sending Reservation . . . . . . . . . . . . . . . . . . . . . . . . . . . . 12-2
Deleting a Fax Job. . . . . . . . . . . . . . . . . . . . . . . . . . . . . . . . . . . . . . . . . . . . . . . . . . . . . . . . . . . . 12-2
Confirming and Deleting a Copy Job . . . . . . . . . . . . . . . . . . . . . . . . . . . . . . . . . . . . . . . . . . . . . . 12-3
Confirming and Deleting a Print Job . . . . . . . . . . . . . . . . . . . . . . . . . . . . . . . . . . . . . . . . . . . . . . 12-3
Confirming and Deleting a Report Job. . . . . . . . . . . . . . . . . . . . . . . . . . . . . . . . . . . . . . . . . . . . . 12-4
Chapter 13 Reports and Lists

Chapter 14 Troubleshooting
Clearing Jams . . . . . . . . . . . . . . . . . . . . . . . . . . . . . . . . . . . . . . . . . . . . . . . . . . . . . . . . . . . . . . . . . . . 14-1
Removing Jammed Paper from Inside the Machine. . . . . . . . . . . . . . . . . . . . . . . . . . . . . . . . . . . 14-1
Removing Jammed Paper from the ADF . . . . . . . . . . . . . . . . . . . . . . . . . . . . . . . . . . . . . . . . . . . 14-7
LCD Messages . . . . . . . . . . . . . . . . . . . . . . . . . . . . . . . . . . . . . . . . . . . . . . . . . . . . . . . . . . . . . . . . . . 14-8
Error Codes . . . . . . . . . . . . . . . . . . . . . . . . . . . . . . . . . . . . . . . . . . . . . . . . . . . . . . . . . . . . . . . . . . . . 14-11
Paper Feeding Problems . . . . . . . . . . . . . . . . . . . . . . . . . . . . . . . . . . . . . . . . . . . . . . . . . . . . . . . . . 14-12
Faxing Problems . . . . . . . . . . . . . . . . . . . . . . . . . . . . . . . . . . . . . . . . . . . . . . . . . . . . . . . . . . . . . . . . 14-15
Sending Problems . . . . . . . . . . . . . . . . . . . . . . . . . . . . . . . . . . . . . . . . . . . . . . . . . . . . . . . . . . . 14-15
Receiving Problems . . . . . . . . . . . . . . . . . . . . . . . . . . . . . . . . . . . . . . . . . . . . . . . . . . . . . . . . . . 14-17
Telephone Problems. . . . . . . . . . . . . . . . . . . . . . . . . . . . . . . . . . . . . . . . . . . . . . . . . . . . . . . . . . . . . 14-20
Copying Problems . . . . . . . . . . . . . . . . . . . . . . . . . . . . . . . . . . . . . . . . . . . . . . . . . . . . . . . . . . . . . . 14-21
Print Quality Problems . . . . . . . . . . . . . . . . . . . . . . . . . . . . . . . . . . . . . . . . . . . . . . . . . . . . . . . . . . . 14-22
Printing Problems . . . . . . . . . . . . . . . . . . . . . . . . . . . . . . . . . . . . . . . . . . . . . . . . . . . . . . . . . . . . . . . 14-24
If You Cannot Solve the Problem. . . . . . . . . . . . . . . . . . . . . . . . . . . . . . . . . . . . . . . . . . . . . . . . . . . 14-25
Chapter 15 Maintaining Your Machine
Cleaning the Machine . . . . . . . . . . . . . . . . . . . . . . . . . . . . . . . . . . . . . . . . . . . . . . . . . . . . . . . . . . . . . 15-1
Cleaning the Machine’s Exterior. . . . . . . . . . . . . . . . . . . . . . . . . . . . . . . . . . . . . . . . . . . . . . . . . . 15-2
Cleaning the ADF Area. . . . . . . . . . . . . . . . . . . . . . . . . . . . . . . . . . . . . . . . . . . . . . . . . . . . . . . . . 15-2
Transporting the machine . . . . . . . . . . . . . . . . . . . . . . . . . . . . . . . . . . . . . . . . . . . . . . . . . . . . . . . . . 15-5
Chapter 16 The Menu System
Accessing the Menu . . . . . . . . . . . . . . . . . . . . . . . . . . . . . . . . . . . . . . . . . . . . . . . . . . . . . . . . . . . . . . 16-1
Menu Descriptions . . . . . . . . . . . . . . . . . . . . . . . . . . . . . . . . . . . . . . . . . . . . . . . . . . . . . . . . . . . . . . . 16-2
1. PAPER SETTINGS . . . . . . . . . . . . . . . . . . . . . . . . . . . . . . . . . . . . . . . . . . . . . . . . . . . . . . . . . . 16-2
2. COMMON SETTINGS . . . . . . . . . . . . . . . . . . . . . . . . . . . . . . . . . . . . . . . . . . . . . . . . . . . . . . . 16-3
3. COPY SETTINGS . . . . . . . . . . . . . . . . . . . . . . . . . . . . . . . . . . . . . . . . . . . . . . . . . . . . . . . . . . 16-5
4. FAX SETTINGS . . . . . . . . . . . . . . . . . . . . . . . . . . . . . . . . . . . . . . . . . . . . . . . . . . . . . . . . . . . . 16-6
5. ADD. REGISTRATION . . . . . . . . . . . . . . . . . . . . . . . . . . . . . . . . . . . . . . . . . . . . . . . . . . . . . . 16-14
6. PRINTER SETTINGS. . . . . . . . . . . . . . . . . . . . . . . . . . . . . . . . . . . . . . . . . . . . . . . . . . . . . . . 16-14
7. TIMER SETTINGS . . . . . . . . . . . . . . . . . . . . . . . . . . . . . . . . . . . . . . . . . . . . . . . . . . . . . . . . . 16-15
8. SYSTEM SETTINGS . . . . . . . . . . . . . . . . . . . . . . . . . . . . . . . . . . . . . . . . . . . . . . . . . . . . . . . 16-16
9. PRINT LISTS . . . . . . . . . . . . . . . . . . . . . . . . . . . . . . . . . . . . . . . . . . . . . . . . . . . . . . . . . . . . . 16-18

Appendix C Country-Specific Features
United Kingdom . . . . . . . . . . . . . . . . . . . . . . . . . . . . . . . . . . . . . . . . . . . . . . . . . . . . . . . . . . . . . . . . . . C-1
Connecting External Device. . . . . . . . . . . . . . . . . . . . . . . . . . . . . . . . . . . . . . . . . . . . . . . . . . . . . . C-1
Ringer Equivalence Number (R.E.N.) . . . . . . . . . . . . . . . . . . . . . . . . . . . . . . . . . . . . . . . . . . . . . . C-1
Germany . . . . . . . . . . . . . . . . . . . . . . . . . . . . . . . . . . . . . . . . . . . . . . . . . . . . . . . . . . . . . . . . . . . . . . . . C-2
Applicable Standards. . . . . . . . . . . . . . . . . . . . . . . . . . . . . . . . . . . . . . . . . . . . . . . . . . . . . . . . . . . C-2
Connecting the Telephone Line Cord. . . . . . . . . . . . . . . . . . . . . . . . . . . . . . . . . . . . . . . . . . . . . . . C-2
Connecting a Telephone . . . . . . . . . . . . . . . . . . . . . . . . . . . . . . . . . . . . . . . . . . . . . . . . . . . . . . . .C-3
Connecting an Answering Machine . . . . . . . . . . . . . . . . . . . . . . . . . . . . . . . . . . . . . . . . . . . . . . . . C-3
Customer Support . . . . . . . . . . . . . . . . . . . . . . . . . . . . . . . . . . . . . . . . . . . . . . . . . . . . . . . . . . . . . C-3
Glossary
Index

CHAPTER
1
Introducing FAX-L380S/L390
This chapter introduces you to the main features of the machine. It also explains how to get the most out of the
documentation that comes with the machine, and gives important safety instructions.
Welcome
Thank you for purchasing the new Canon FAX-L380S/L390 models. We are sure that your machine will
meet your printing and copying needs easily and conveniently, as well as your fax and phone
requirements.

Introducing FAX-L380S/L390
1
The Main Features of the Machine
The machine is a multifunction system for your home or small office, and combines a plain paper fax
machine, a printer, a copier, and a telephone* into a single, convenient desktop machine.
The machine’s multitasking ability enables you to perform multiple operations simultaneously. For
example, you can print a document or make copies at the same time you are sending a fax.
The compact size of the machine makes it ideal for desktop use, and allows you to use it in places
where other machines may not fit.
Plain Paper Fax Features
■ UHQ™ Image Processing System
The machine uses Canon’s Ultra High Quality Image Processing System to provide enhanced definition in faxed
photos.
■ Error Correction Mode (ECM)
The machine’s Error Correction Mode (ECM) reduces transmission errors while communicating with another
ECM-capable machine.
■ Automatic switching between fax and voice calls*
The machine can automatically distinguish between fax and voice calls, so that you can receive both through a
single phone line.
■ Answering machine connection
You can connect an answering machine to receive telephone messages while you are away.
■ Transmission speed
The machine uses G3 data encoding methods that increase transmission speed to approx. 3 seconds** per page.
■ Memory sending/receiving
The machine can store up to 510** fax pages of A4-size in its memory, and can receive faxes while printing.

Introducing FAX-L380S/L390
1
Printer Features
■ Excellent print quality
The machine offers 1,200 dpi enhanced × 600 dpi laser beam printing, providing you with high resolution text and
graphics.
■ Simple maintenance
The Cartridge T Starter and the regular Cartridge T for the machine contain both the toner and drum, making
installation and replacement simple.
■ Economy toner-saving printing
The machine includes an economy printing mode which allows you to reduce toner consumption by approx. 30%.
Copier Features
■ Up to 99 copies
The machine can make up to 99 copies of a document at a time, at a rate of up to 18 copies per minute.
■ Resolution
The machine scans documents at 300 × 300 dpi. Printing resolution is 1,200 dpi enhanced × 600 dpi.
■ Copy enlargement/reduction
The machine can reduce or enlarge copies in the range between 50% and 200% of their original size.
■ Collate copy
The machine can sort copies in page order. It is convenient when you make multiple copies of a multiple page
document.
Telephone Features*
■ Automatic dialing

Introducing FAX-L380S/L390
1
Using the Machine With the Printer Driver
The printer driver that is included with your machine allows you to use the machine’s printing function
directly from your PC.
• Use the machine as the default printer for Windows applications
For more information on using the printer driver with your machine, refer to the Software Guide also
stored on the CD-ROM.
System Requirements
The printer driver for Windows 98/Me/2000/XP can be used in the following system environments.
■ Operating System
Windows 98, Windows Me, Windows 2000, or Windows XP (x86 architecture).
■ Computer
Any computer on which Windows 98, Windows Me, Windows 2000, or Windows XP runs properly.
■ Hardware Environment
Using the CARPS software requires following computer environment:
• IBM or IBM-compatible PC
• CD-ROM drive or network environment with the access to the CD-ROM
• PC equipped with a USB port and the USB class driver installed
OS CPU RAM Available free disk space
Windows 98 Intel Pentium® 90 MHz or greater 32 MB or greater** 115 MB or greater****
Windows Me Intel Pentium® 150 MHz or greater 32 MB or greater** 115 MB or greater****

Introducing FAX-L380S/L390
1
Using Your Documentation
Your machine includes the following documentation to help you learn how to use your machine:
• Starter Guide
This Guide provides basic information on how to set up and use the machine.
• User’s Guide (this Guide)
This Guide provides detailed information on how to use and troubleshoot your machine.
• Software Guide
This Guide (stored in the CD-ROM) describes how to use the machine to print from your PC.
Type Conventions Used in This Guide
This Guide follows the conventions below to emphasize certain information that will help you use your
machine correctly and safely:
CAUTION
Cautions tell you how to avoid actions that could injure you or damage your machine.
NOTE
Notes provide advice for using your machine more effectively, describe operating restrictions, and tell how to avoid
minor operating difficulties.
In addition, this Guide uses brackets to show button and switch names on the machine, such as [Start],
and [OK]. Text that appears in the machine’s display is shown in capital letters, such as: <RECEPTION
OK>.

Introducing FAX-L380S/L390
1
Safety Instructions
Read these safety instructions thoroughly before using your machine, and keep them handy in case
you need to refer to them later.
CAUTION
Except as specifically described in this User’s Guide, do not attempt to service the machine yourself.
Never attempt to disassemble the machine: opening and removing its interior covers will expose you
to dangerous voltages and other risks. For all service, contact your local authorized Canon dealer or
the Canon help line.
• Always follow all warnings and instructions marked on the machine.
• Use the machine only on a sturdy, stable, level surface. If the machine falls, it could be seriously
damaged.
• Do not use the machine near water. If you spill liquid on or into the machine, unplug it immediately
and call your local authorized Canon dealer or the Canon help line.
• The back of the machine includes slots and openings for ventilation. To keep the machine from
overheating (which can cause it to operate abnormally and create a fire risk), take care not to block
or cover these openings. Do not operate the machine on a bed, sofa, rug, or other similar soft
surface, or near a radiator or other heat source. Do not place the machine in a closet or cabinet or on
shelves unless adequate ventilation is available. See “Choosing a Location for Your Machine,” on
p. 2-1 for guidelines on how much space the machine needs for ventilation.
• Operate the machine only from the type of power source indicated on the machine’s label. If you are
unsure of the type of power available from your wall outlets, contact your local power company.
• Make sure the total amperage used by all devices plugged into the wall outlet does not exceed the
ampere rating of the outlet’s circuit breaker.
• Do not allow anything to rest on the power cord and do not place the machine where the cord will be
walked on. Make sure the cord is not knotted or kinked.
• Do not insert object of any kind into the slots or openings on the machine’s cabinet, as they could
touch dangerous voltage points or short out parts, and result in fire or electric shock.
Introducing FAX-L380S/L390
1
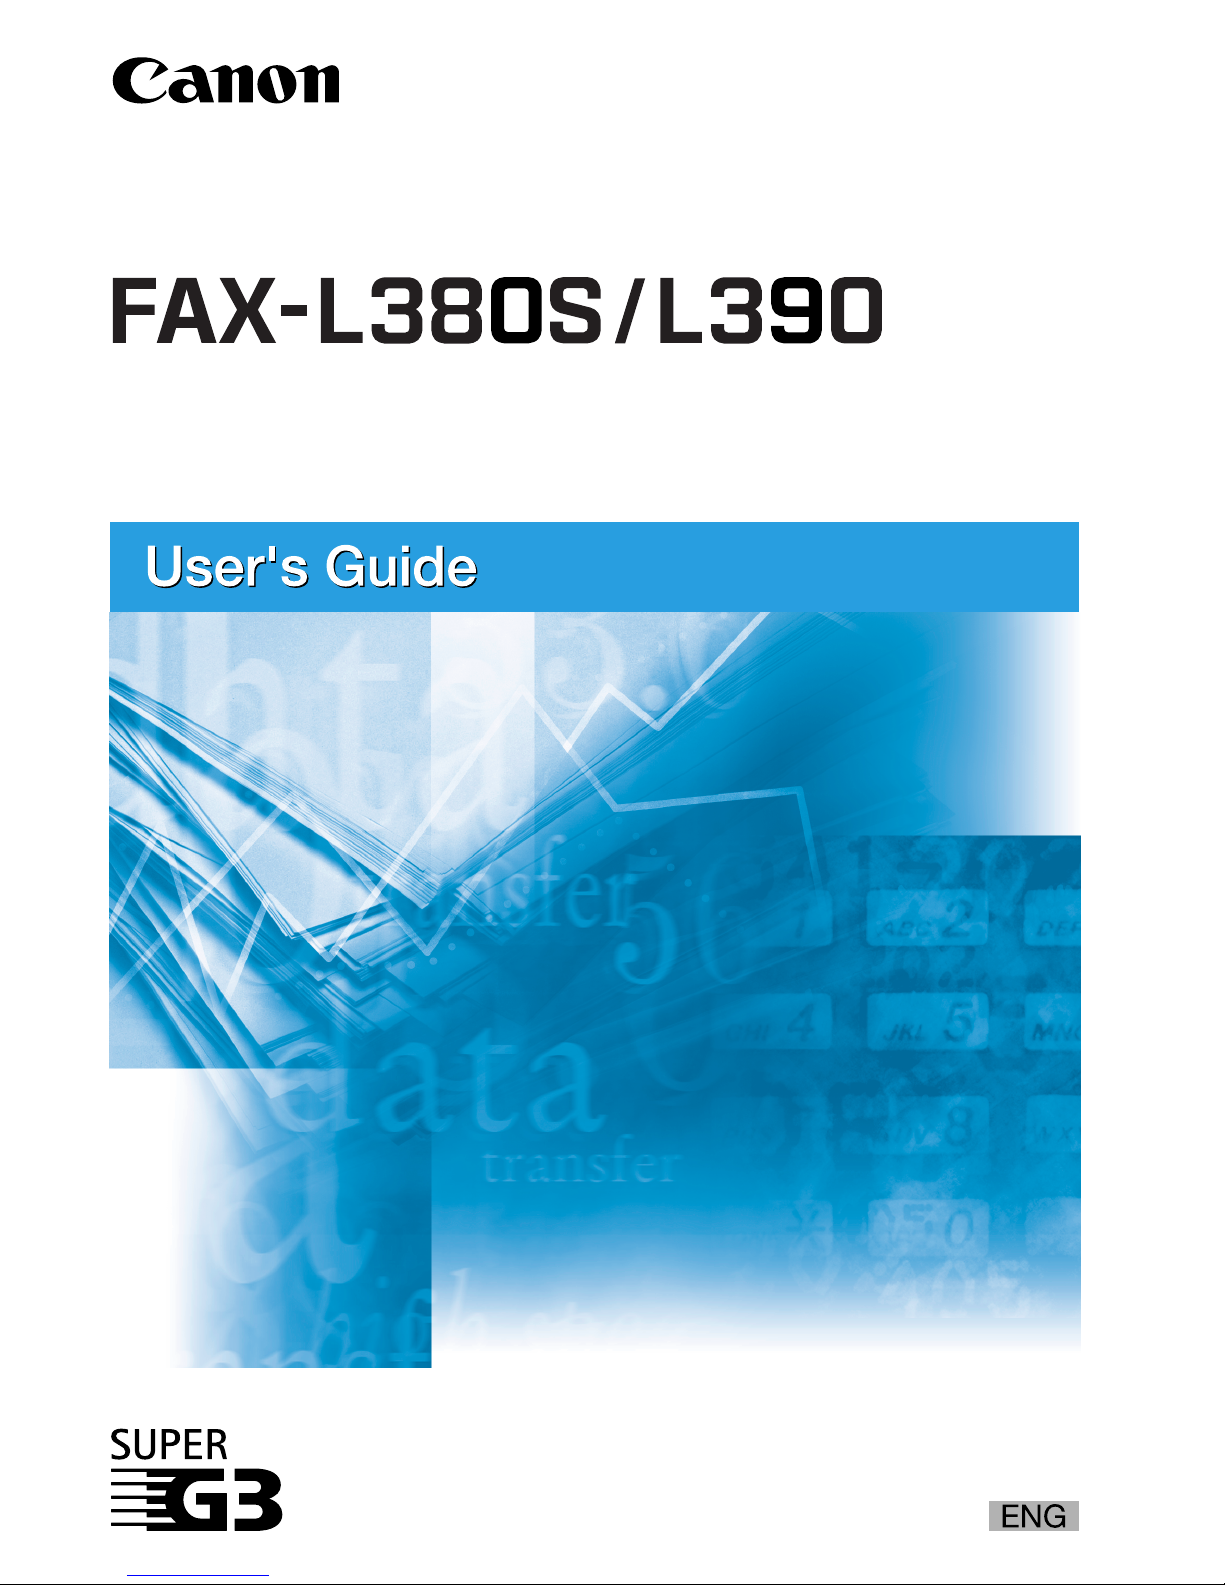
• Always lift the machine as shown below. Never lift it by its paper cassette or other supports.
CAUTION
Unplug the machine and contact your local authorized Canon dealer or the Canon help line in any of
these situations:
- If the power cord or plug is damaged or frayed.
- If liquid spills into the machine, or if it is otherwise exposed to rain or liquids.
- If you notice smoke, unusual noises or odor coming from it.
- If the machine does not operate normally when you follow the operating instructions. Adjust only
those controls that are covered by the operating instructions in this User’s Guide, or you can
damage the machine and require extensive repair work.
- If the machine is dropped or its cabinet damaged.
- If the machine begins performing poorly, and you cannot correct the problem by following the
procedures in Chapter 14, “Troubleshooting.”
- This product emits low level electromagnetic waves. If you use a cardiac pacemaker and feel
abnormalities, please move away from this product and consult your doctor.
Customer Support
Your machine is designed with the latest technology to provide trouble-free operation. If you encounter
a problem with the machine’s operation, try to solve it by using the information in Chapter 14.
If you cannot solve the problem or if you think your machine needs servicing, contact your local
authorized Canon dealer or the Canon help line.

CHAPTER
2
Setting Up Your Machine
This chapter tells you how to unpack, assemble, and connect your machine, install the toner cartridge, and load paper
— everything you need to know to get your machine ready to use.
Choosing a Location for Your Machine
Before unpacking your machine, follow these guidelines to choose an appropriate location for the
machine.
CAUTION
Please review the information provided in “Safety Instructions,” on p. 1-6, to make sure you are
installing your machine for safe use.
• Put the machine in a cool, dry, clean, well ventilated place:
- Make sure the area is free from dust.
- Make sure the location is not affected by extreme temperature fluctuations, and remains between

Setting Up Your Machine
2
Unpacking Your Machine
Follow the directions below to unpack your machine properly, and to make sure you have all of its
components and documentation.
Do You Have Everything?
As you unpack the machine, save the carton and packing material in case you want to move or ship the
machine in the future.
Carefully remove all items from the box. You should have someone help by holding the box while you
lift the machine and its protective packaging out of the carton.
Make sure you have the following items:
MAIN UNIT DOCUMENT OUTPUT TRAY
OUTPUT TRAY
FAX-L380S FAX-L390

Setting Up Your Machine
2
NOTE
•
The actual items may differ in shape and quantity from the ones shown on p. 2-2.
•
Note that the items included with your machine may vary depending on the country of purchase.
•
Important! Save your sales receipt for proof of purchase in case your machine requires warranty service.
•
If you have purchased the optional handset, see Appendix B for the items included.
•
In addition to the items shipped with your machine, if you wish to use the machine as a printer, you will need a
USB cable, which you can purchase from your Canon dealer. For best results, use a cable that is no more than 5
meters long.
Removing Shipping Materials
In order to protect your machine during shipping, the machine has been packed with protective
material that you must remove before using. Follow these steps:
NOTE
The actual shipping materials may differ in shape, quantity, and position from the ones shown in the illustrations
below.
1
Remove all pieces of shipping tape from the exterior of the machine.
2
Open the document feeder tray.
3
Open the operation panel by grasping it at the center and gently pulling it up.
Remove protective sheet from the Automatic Document Feeder (ADF), then gently close the operation
panel by pressing it down until it clicks.

Setting Up Your Machine
2
Replaceable Parts
The only component of the machine that needs regular service or replacement is the Cartridge T.
The Cartridge T Starter comes with your machine but you should purchase the regular Cartridge T for
replacement.
Although Canon manufactures many types of toner cartridges, the Cartridge T is the only one designed
to be used with your machine. The Cartridge T can be purchased at any Canon authorized dealer.

Setting Up Your Machine
2
Assembling the Machine
Use the following instructions to assemble the main unit and its components. To see how the machine
will look fully assembled, see “Getting Acquainted With Your Machine,” on p. 2-11.
Attaching Components
NOTE
Make sure the tabs are inserted into the slot completely.
Document Output Tray
Insert the tabs into the slots on the back of the machine.
Output Tray
Insert the tray into the corresponding slots.
Setting Up Your Machine
2
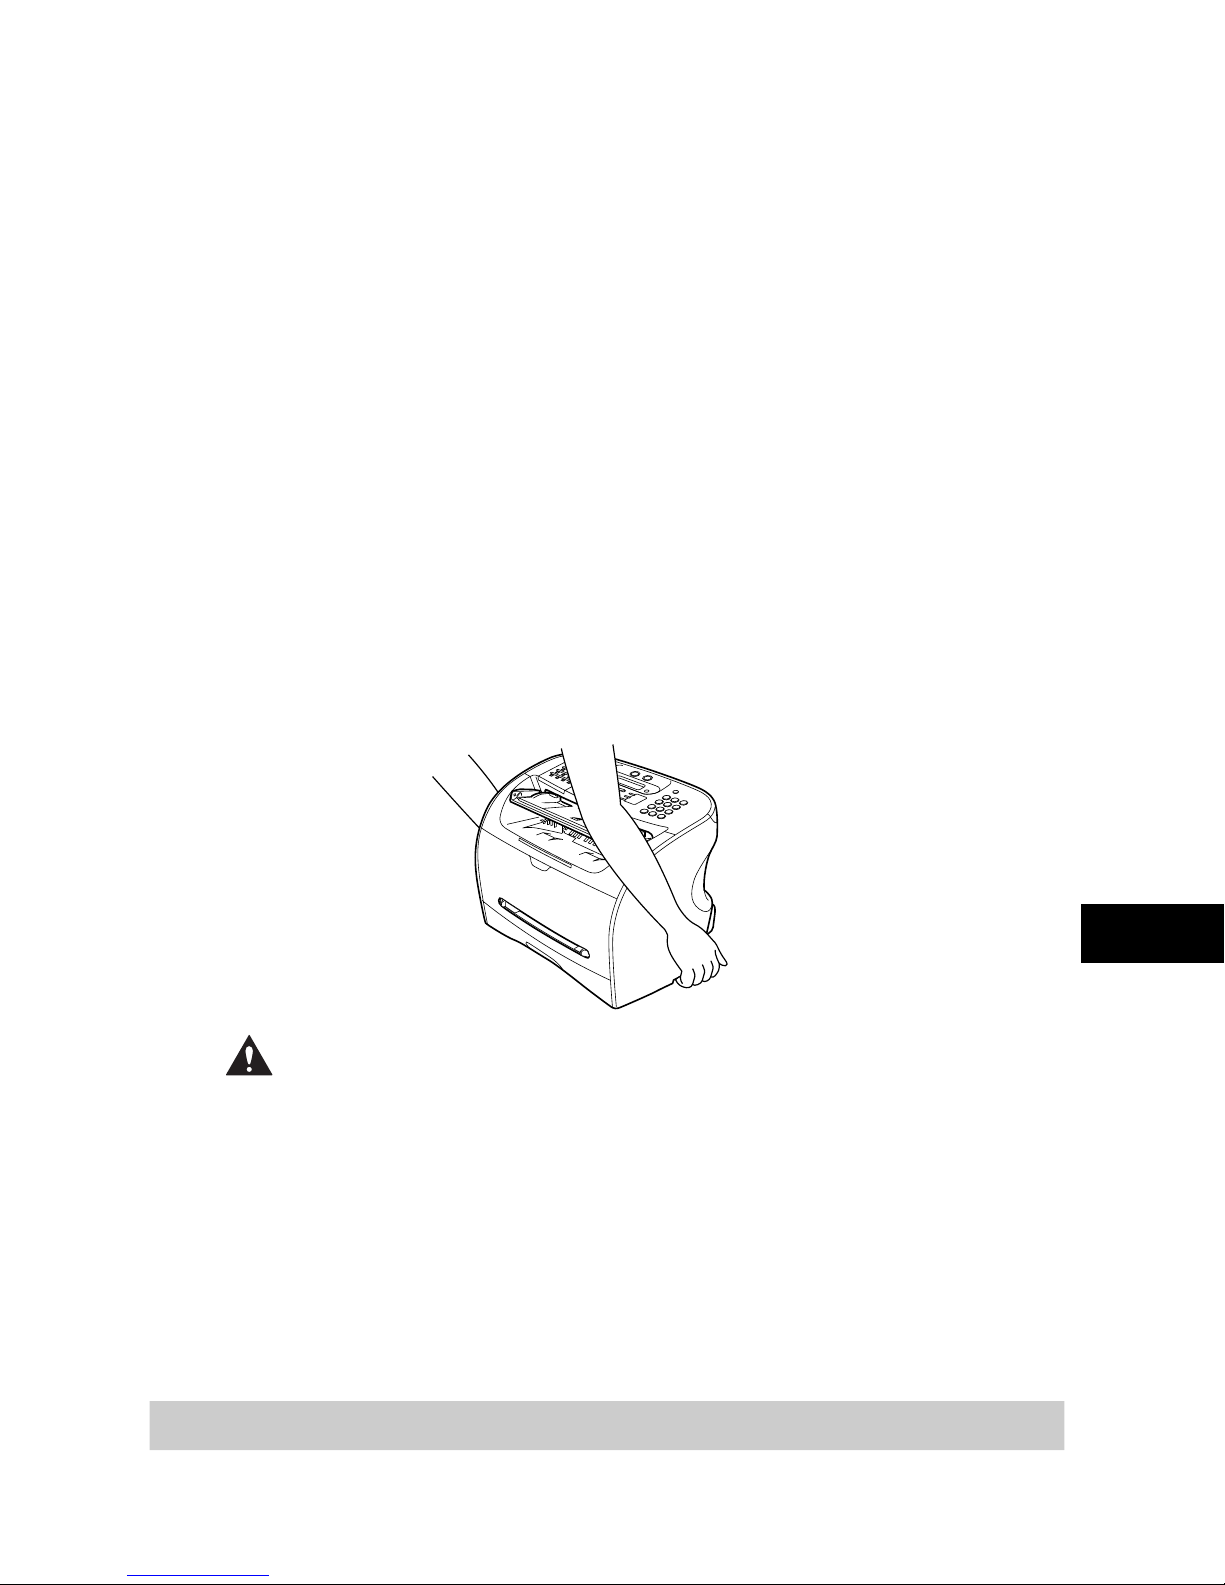
Installing the Paper Cassette*
1
Pull out the paper cassette.
2
Attach the cassette extension to the cassette.
3
Attach the extension cover on the back of the machine.

Setting Up Your Machine
2
Making Connections
NOTE
•
The use of the jacks may differ in certain countries. See Appendix C, “Country-Specific Features.” for details.
•
Be sure to connect any external device before using your machine.
•
Canon cannot guarantee that all answering machines will be compatible with your machine, due to varying
specifications.
•
If you have connected an external device to your machine, be sure to set the correct receive mode. (See Chapter
7, “Receiving Faxes.”)
•
To connect an extension phone as well as an answering machine, connect the extension phone to the answering
machine, and then the answering machine to your machine.
•
If you connect a data modem to your machine and you use it extensively, or others access your PC frequently
through the data modem, you may want a dedicated telephone line for your data modem.
Connecting the Machine to Your PC
Your machine has a USB port that allows you to connect it to a PC. To do this, you need to purchase a
USB cable from your dealer.
NOTE
For best results, use a cable that is 5 meters in length or shorter.
Connect the machine to your computer as follows:
1
Make sure the computer is turned off and the machine is unplugged.

Setting Up Your Machine
2
Connecting the Telephone Line
Connect the telephone line to the jack on the left side of the machine:
If you connect an answering machine to the machine, be sure to read your answering machine’s
manual.
NOTE
You can also connect the extension phone to the jack marked if you have not connected the optional
handset.
Connecting the Power Cord
CAUTION
Follow these guidelines when connecting your machine to a power source:
- The machine is intended for domestic use only and requires 200-240 V AC. Do not use it outside the
country where it was purchased.
- Use only the power cord that came with the machine. Using a longer cord or extension cord can
cause the machine to malfunction.
- Unplug the machine only by pulling on the plug itself. Never pull on the cord.
- Do not plug the machine into an outlet shared with an appliance such as an air conditioner,
computer, electric typewriter, or copier. These devices generate electrical noise, which can interfere
Connect the optional handset to .
Connect an extension phone or answering
machine to .
Connect the supplied telephone line to .
Connect the other end of line to a wall telephone jack.
Setting Up Your Machine
2
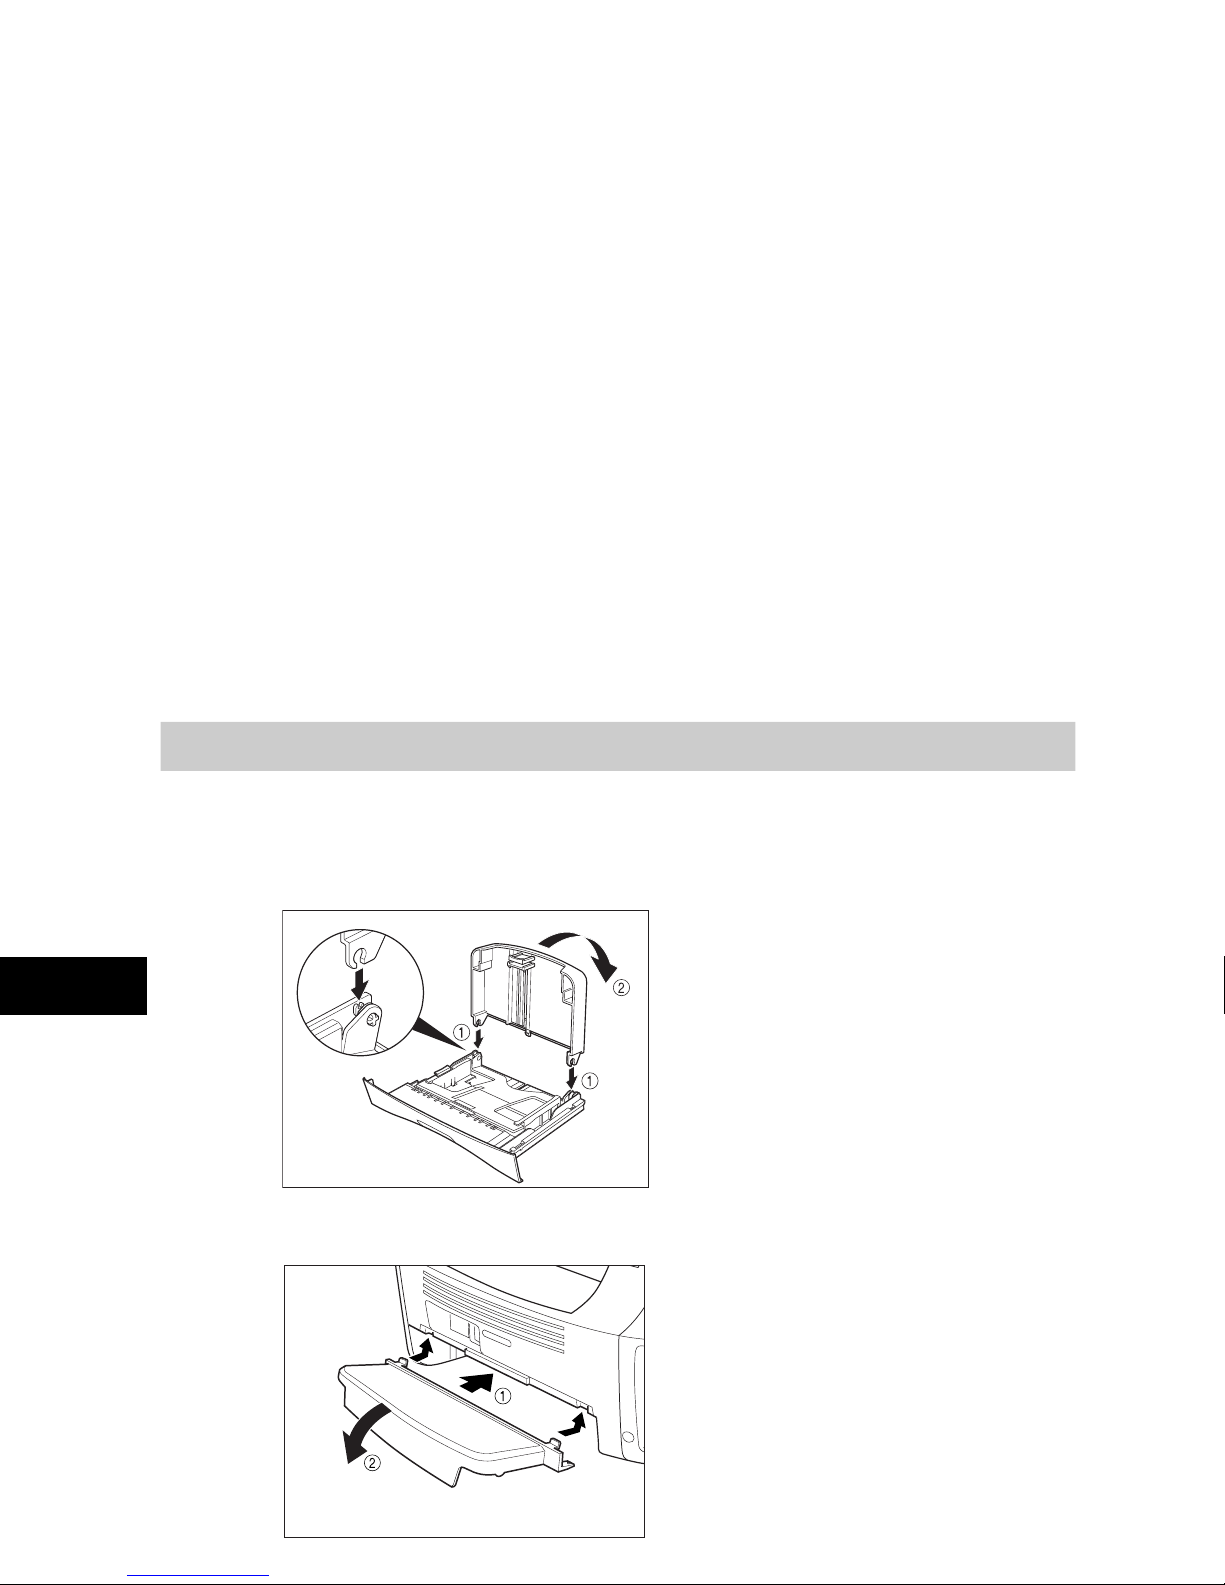
Connect the power cord as follows:
1
Plug the supplied power cord into the power connector on the back of the machine.
2
Plug the other end of the power cord into the outlet.
NOTE
The machine has no power switch, so its power is on as long as it is plugged in. Once connected, though, the
machine still needs to warm up before you can use it.
While the machine is warming up, the message <PLEASE WAIT> appears in the LCD display:
When you connect the power cord to an AC outlet for the first time after purchase, <DISPLAY LANGUAGE> will
appear in the LCD display after <PLEASE WAIT>. In this case, set the language for the LCD display, and the
country*. (See “Setting the Display Language and Country*,” on p. 2-10.)
The Fax standby mode appears:
PLEASE WAIT
31/12 2005 SAT 15:11
FaxOnly STANDARD

Setting Up Your Machine
2
Setting the Display Language and Country*
When you connect the power cord to an AC outlet for the first time, you need to select the language for
the LCD display. For some countries, you also need to select the country where you are using the
machine. The machine automatically switches the selectable settings and the default settings in the
menus to suit the selected country.
Follow these steps to set the display language and country.
After connecting the power cord, the display changes from <PLEASE WAIT> to the <DISPLAY
LANGUAGE> menu.
1
Use [ (-)] or [ (+)] to select the preferred language for the LCD display ➞ press [OK].
If <COUNTRY SELECT> does not appear after <DATA ENTRY OK> is displayed:
Setting is completed and the machine enters the Fax standby mode.
If <COUNTRY SELECT> appears after <DATA ENTRY OK> is displayed:
Go to step 2.
2
Use [ (-)] or [ (+)] to select the country where you are using the machine ➞ press [OK].
If your country name does not appear, select <OTHERS>.
Once you have selected the language and country, these setting menus will not appear next time you connect the
➞
COUNTRY SELECT
UK
DISPLAY LANGUAGE
< ENGLISH >
➞
COUNTRY SELECT
UK
31/12 2005 SAT 15:11
FaxOnly STANDARD
Setting Up Your Machine
2
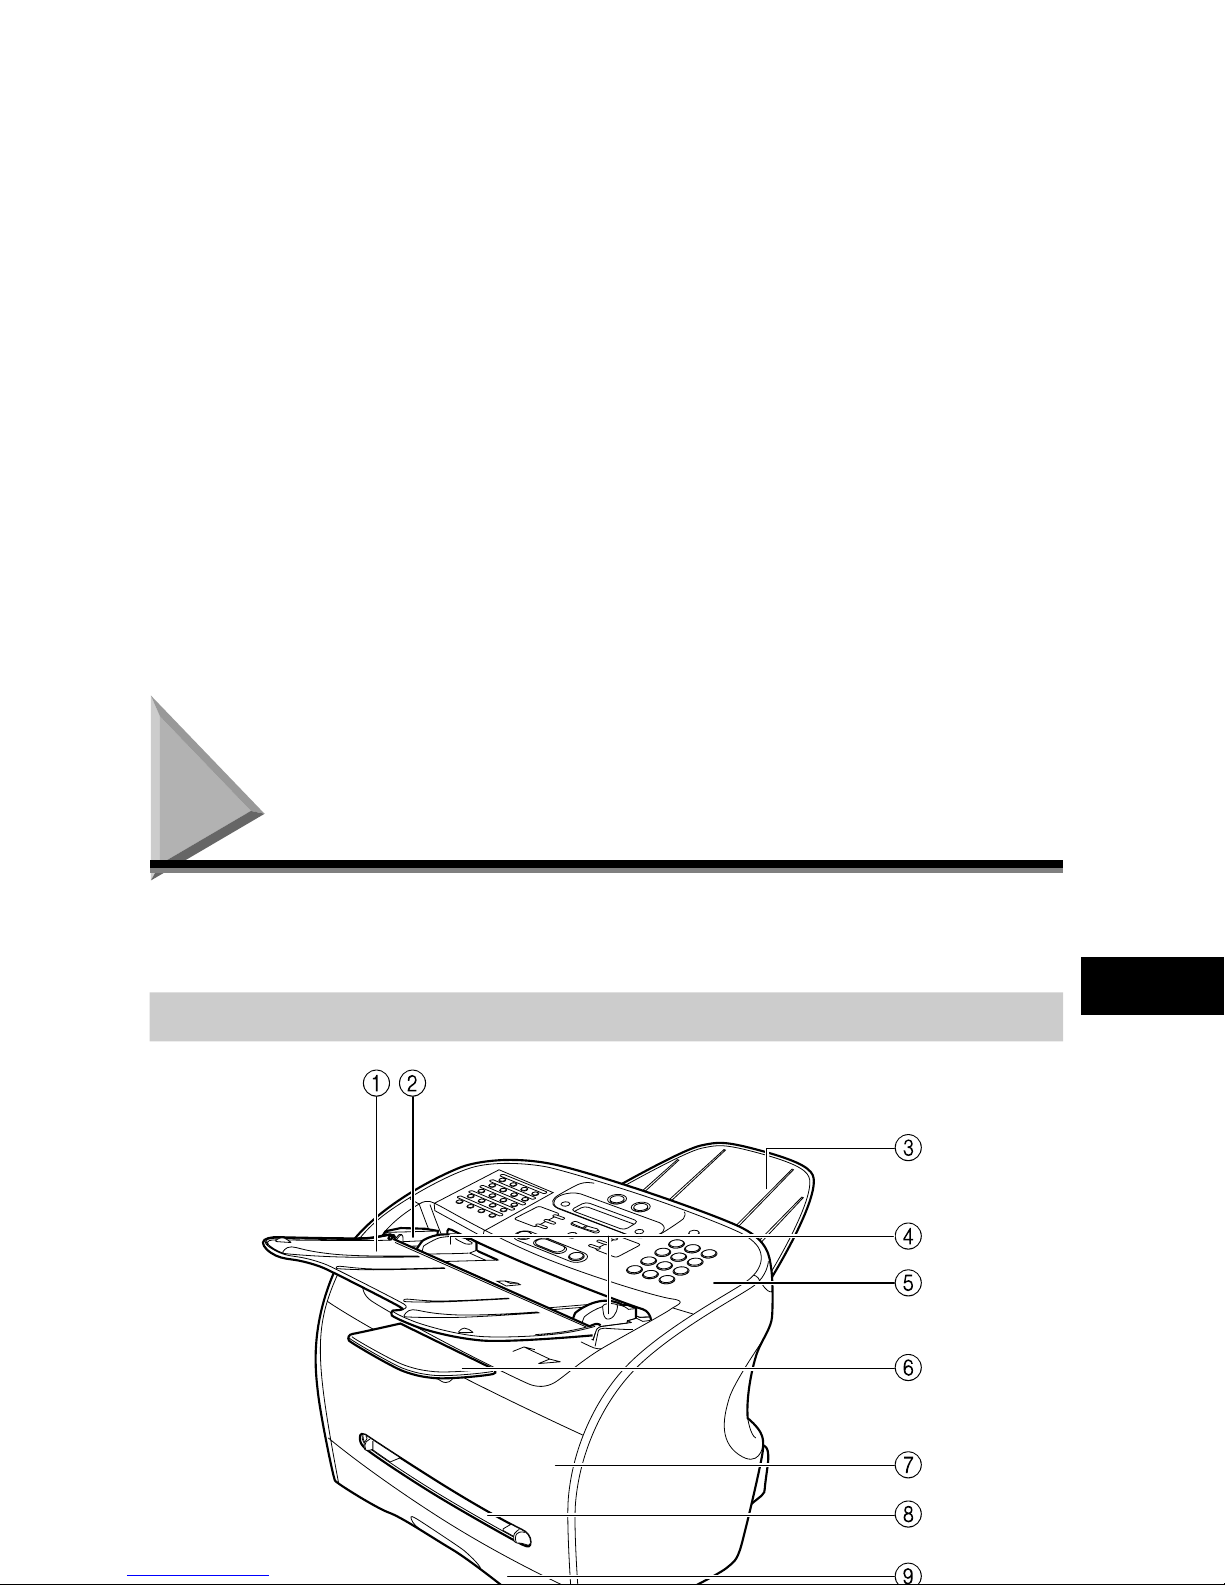
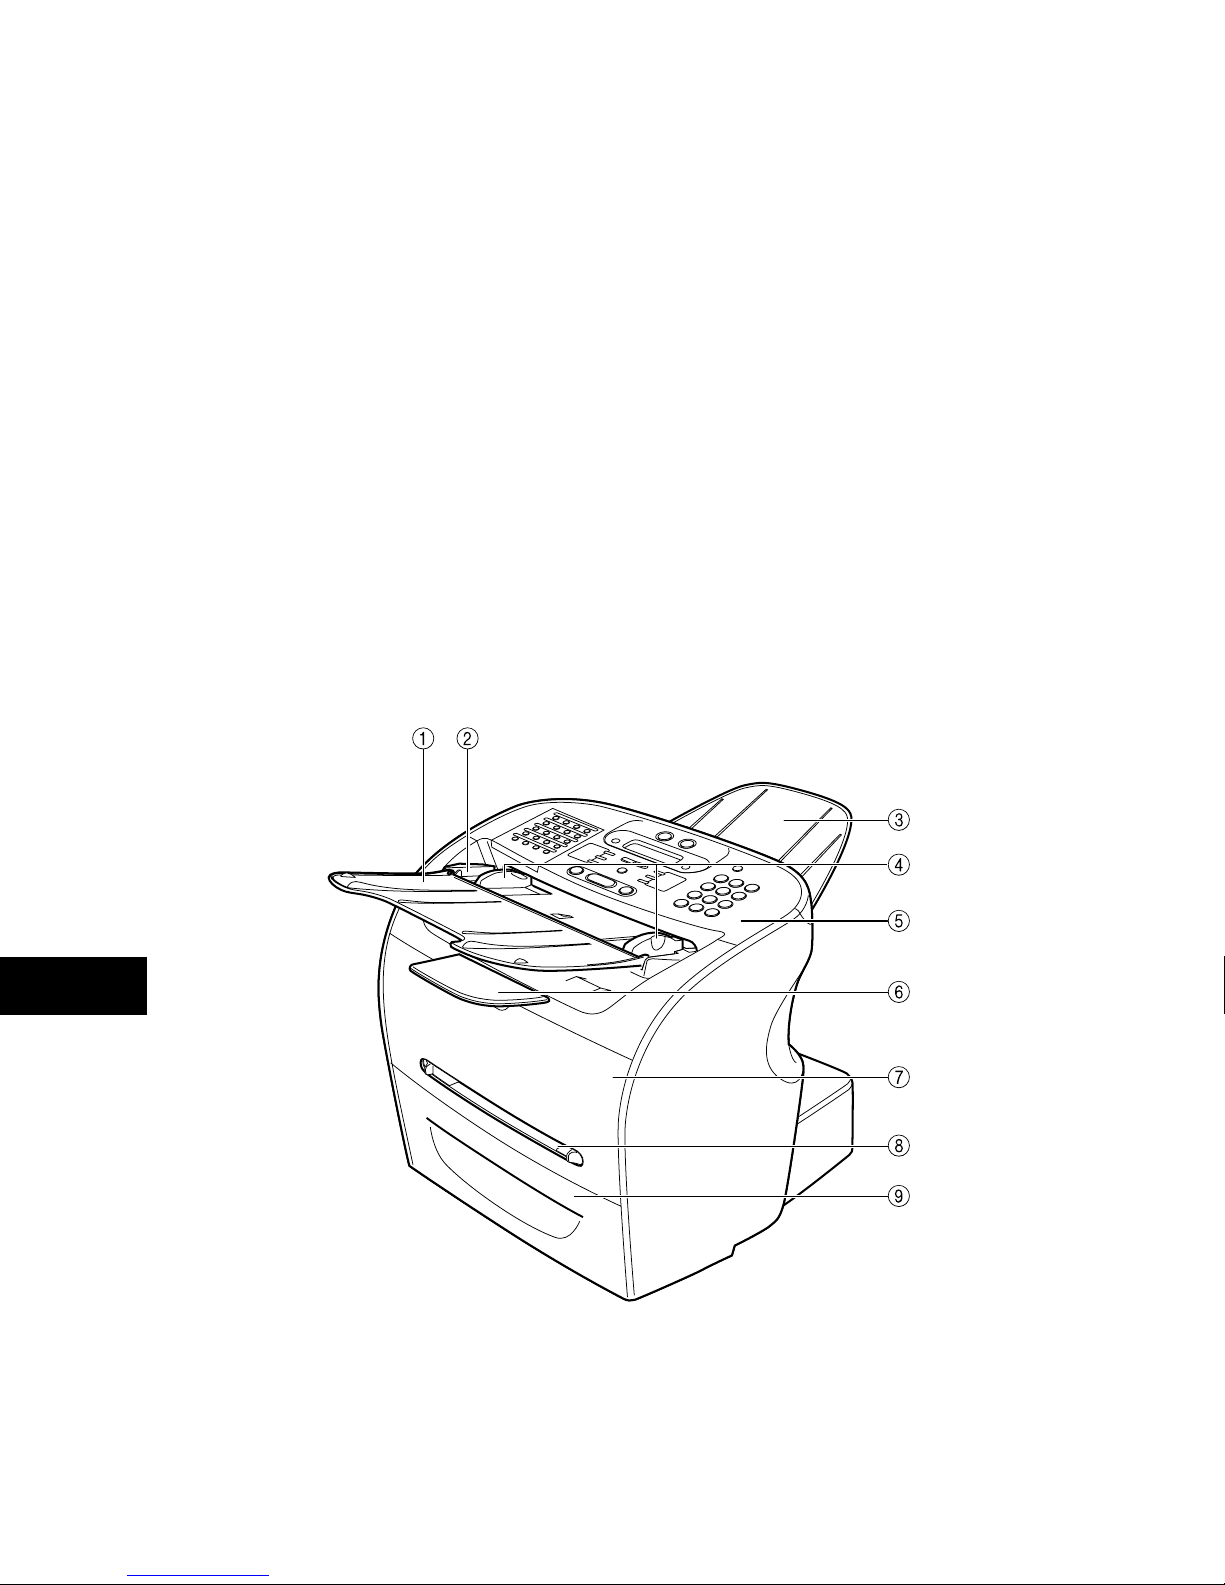
Getting Acquainted With Your Machine
Before using your machine, look over the diagrams on these pages to become familiar with the
machine’s components.
Front View
FAX-L380S
Setting Up Your Machine
2
a Document feeder tray
Place documents.
b ADF (Automatic Document Feeder)
Holds documents and feeds them automatically into the scanning
machine.
c Document output tray
Documents come out here.
d Slide guides
Adjust to the width of documents.
e Operation panel
Controls the machine.
f Output tray
Outputs printouts.
g Printer cover
Open it when you install the cartridge, or remove jammed
paper.
h Multi-purpose feeder
Used when printing paper one by one manually.
i Cassette
Holds the paper supply.
FAX-L390
 Loading...