

Page 1

Service Bulletin
Issued by Canon Europa N.V.
COPIER
Model :
Location :
Subject :
Reason :
GP405/335
SERVICE MANUAL (FY8-13FV-000)
UPDATING IMAGE BASIC ADJUSTMENT PROCEDURE
No.:
DATE:
GP405-010
(FF-T01-J7-000028-01)
10.09.99
The descriptions for the “Image Basic Adjustment Procedure” found on p. 14-3 of the
Service Manual (FY8-13FV-000) are not adequate, requiring modification.
Reference:
In the case of a digital copier, the following mechanisms are employed to enhance the reproduction of
images:
1. edge emphasis processing
2. density processing
As a result, the overall density of images tends to appear higher (darker) when compared with the
density of images produced by an analog copier.
Details :
For specific changes, see the pages that follow.
-
1 / 7 -
Page 2
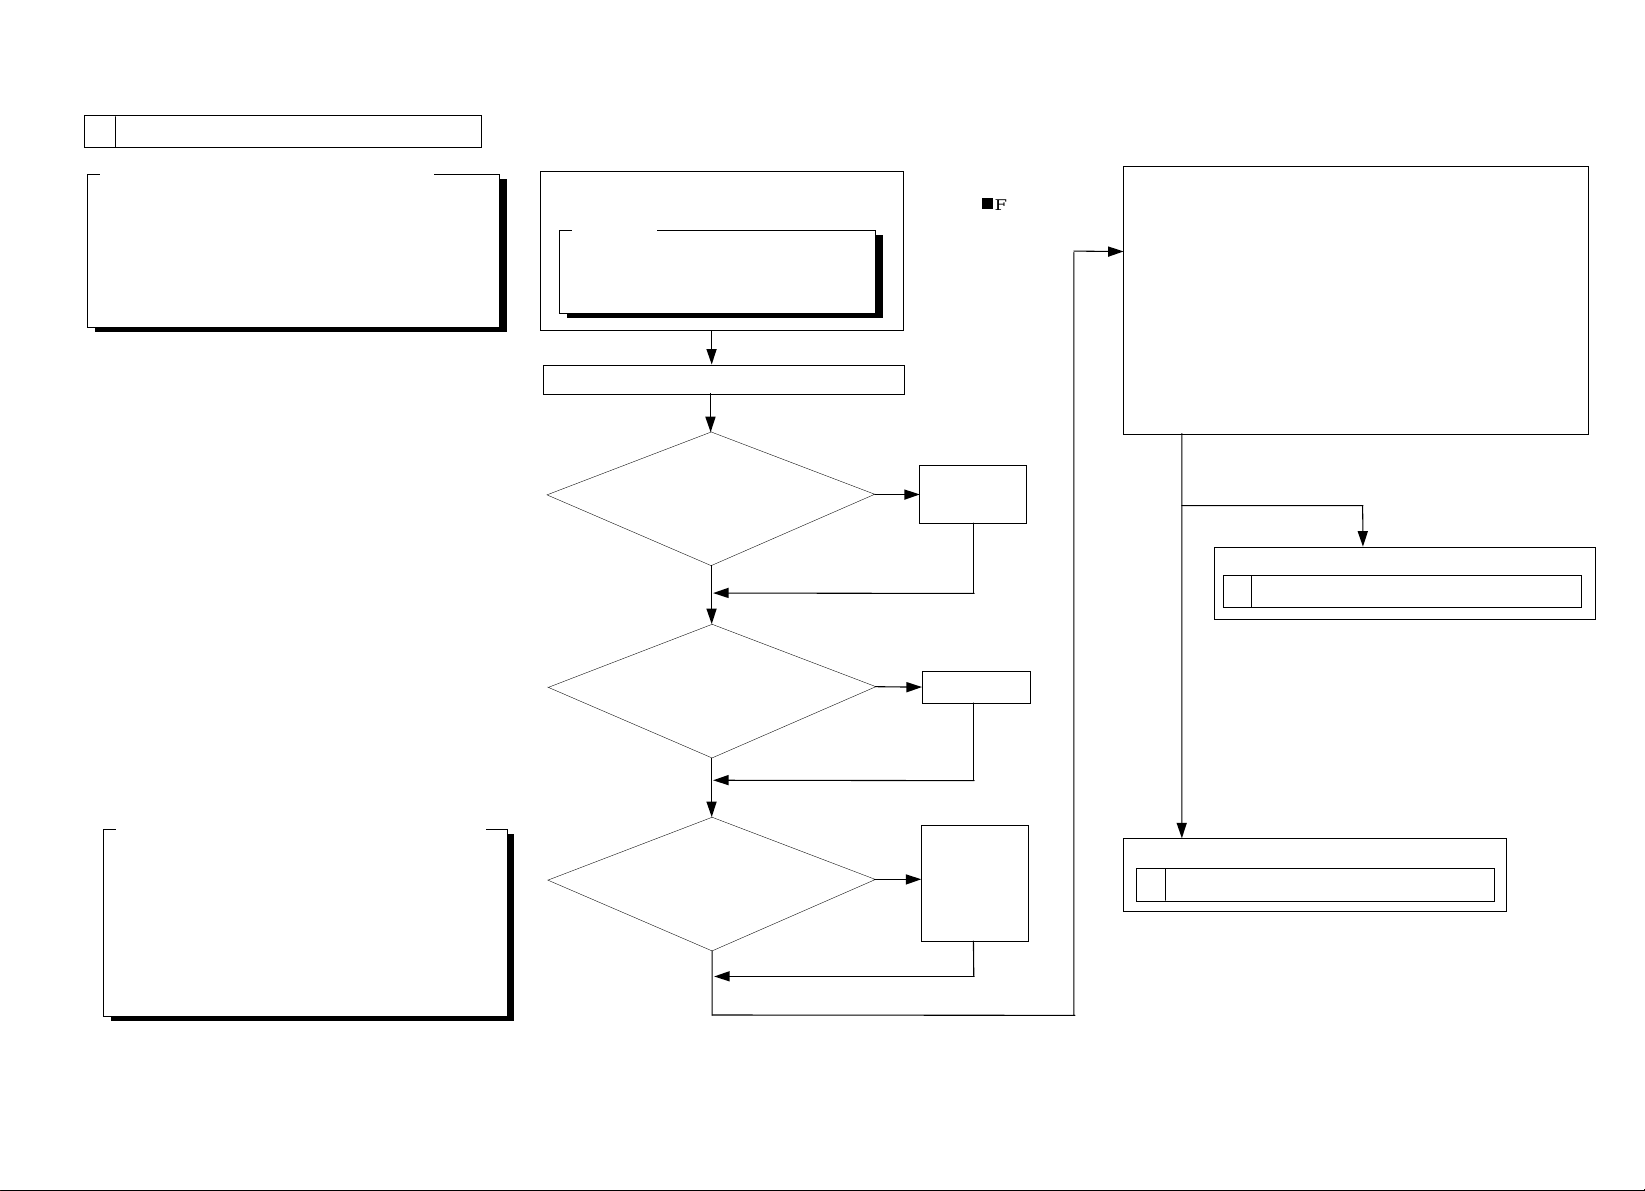
1 Making Initial Checks
GP405-010
Conditions for Mak ing I m age A djus tm e nts
1. Be sure to use copy paper fresh out of package.
(Moist paper will ma ke e valuation of image qu ality
difficult.)
2. Be sure to use copy paper with a high degree of
whiteness.
3. If possible, be sure to use A3 paper.
Execute ‘roller cleaning’, which is unde r
‘ADJUSTMENT/CLEANING’ of user mode.
Reference:
Execute cleaning for the following:
1. Primary charging roller
2. Transfer charging roller
Clean t he se paration static eliminato r.
Is the setting
of ‘density correction’, which
is under ‘A DJ USTMENT/CLEANING’
of use r mode, at the
middle?
Yes
Is the se tting of
ADJUST>DENS>DENS-ADJ
of service mode ‘5’?
No
No
Output Con dition
F value = 5
Set it to the
middl e.
Set it to ‘5 ’.
Using the NA3 Test Chart, make 2 copies in the following
mode:
1. text mode
Refere nce: At the optimum density, the copy sh ould barely
show gray scale No. 10.
Generate 2 each of the following test prints:
COPIER>TEST>PG
1. TYPE 4 (solid w hite )
2. TYPE 5 (halftone)
3. TYPE 6 (solid black)
If only the copy images have a fault,
Go to
2 Checking the Scanner Side (1/2)
Items under COPI ER> ADJUST of se r vice m ode
1. AE>AE-TBL
2. DEVELOP>DE-DC
3. DEVELOP>DE-NO-D
4. DEVELOP>DE-OFST
5. HV-PRI>P-DC
6. HV-PRI>P-NO-DC
7. HV-PRI>OFST1-DC
Yes
Are the seven
items on the left in service
mod e identical to those
indicated on the service
label?
Yes
No
Ente r the
settin gs
indicated on
the service
label.
If the test print images have faults,
Go to
4 Checking the Printer Si de ( 1 / 3)
-
2 / 7 -
Page 3
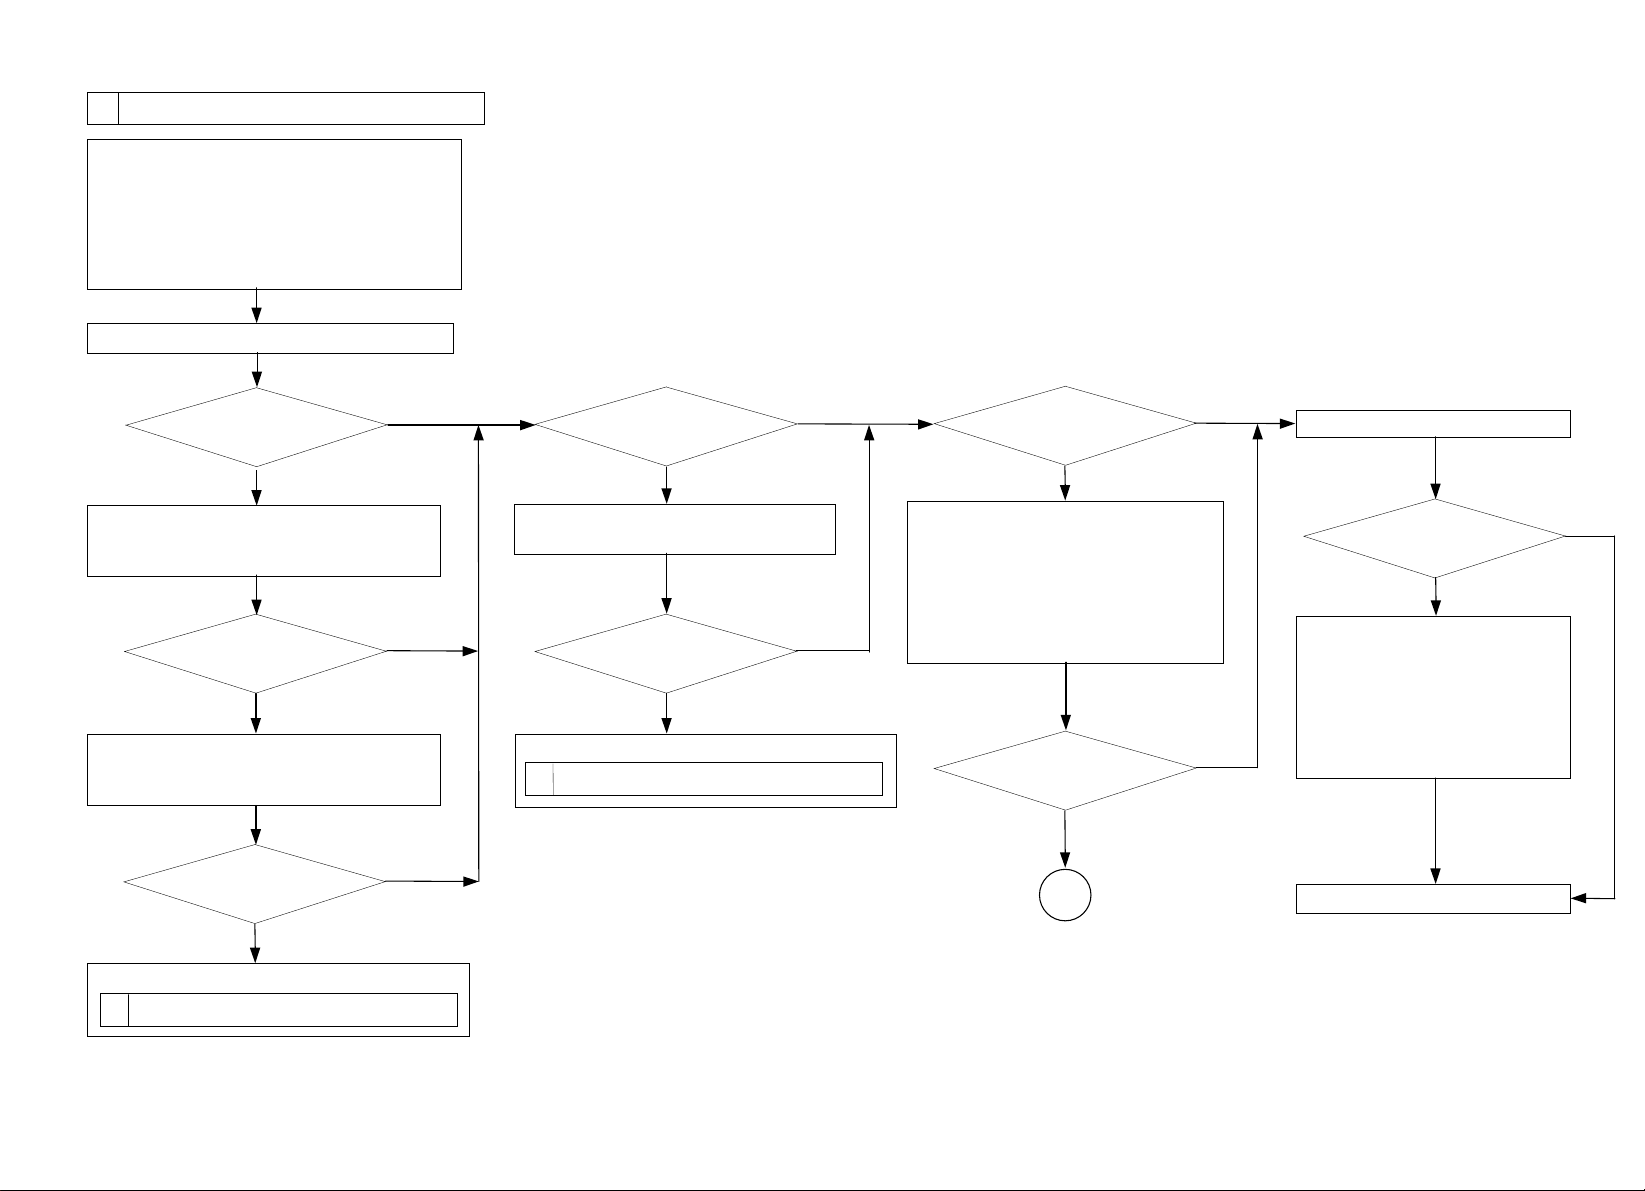
2 Checking the Scanner Side (1/2)
Check/clean the following; if the scanning lamp
has reached the end of its life, replace it:
1. mirrors 2. lens
3. standard white plate 4. copyboard glass
5. dust-proo fing glass 6. scanning lamp
7. reflecting plate
Make a copy in text mode.
GP405-010
Are there
vertical lines in the
image?
Yes
Execute the following in service mode:
COPIER>FUNCTION>CCD>CCD-ADJ.
For detailed instructions, see the Service Manual.
Are there
vertical lines in the
image?
Yes
Execute the following in service mode:
COPIER>FUNCTION>CCD>MAN-ADJ.
For detailed instructions, see the Service Manual.
Are there
vertical lines in the
image?
Yes
No
No
No
Go to
4 Checking the Printer Si de ( 1 / 3)
Is the wh ite
background of the copy
foggy?
Yes
Execute the following in service mode:
COPIER>FUNCTION>CCD>CCD-ADJ.
Is the image foggy?
Yes
No
No
Go to
6 Checking the Printer Si de ( 3 / 3)
Is the
density of the copy image
normal?
No
Change the setting of the following in
service mode:
COPIER>ADJUST>DENS>DENS-ADJ.
If the density is too high (dark), decrease
the setting.
If the dens ity is to o low (light), increase
the setting.
Is the
density of the copy image
normal?
No
A
Yes
Yes
Make a copy in AE mode.
Is the
density of the copy image
normal?
No
Change the setting of the following
in se rvice mode:
COPIER>ADJUST>AE>AE-TBL.
If the density is too high (dark),
decrease the setting.
If the dens ity is to o low (light),
increase the setting.
End.
Yes
-
3 / 7 -
Page 4

3 Checking the Scanner Side (2/2)
A
GP405-010
Reference:
Changing the setting of D EN S -ADJ wil l
change the density in al l the fol l ow ing modes:
auto
•
text
•
text/photo
•
photo
•
Set the foll owing to ‘5’ in serv ice m ode:
COPIER>ADJUST>DENS>DENS-ADJ.
Execute the foll owing in serv ice m ode:
COPIER>FUNCTION>CCD>MAN-ADJ.
Execute the foll owing in serv ice m ode:
COPIER>FUNCTION>DPC>D-GAMMA.
Yes
Is the result ‘0’ or ‘1’?
No
Replace the drum cartridg e; then, execute the
follow ing in serv ice m ode:
COPIER>FUNCTION>DPC>D-GAMM.
Execute the foll ow ing under
COPIER>FUNCTION>DENS
in service mode:
1. WHITE- M E
2. PD-DEN S
3. PD-ME
4. DZ-DENS
5. DZ-ME
Yes
Is the result ‘0’ or ‘1’?
No
Is the
density of the copy image
made in text mode
normal?
Yes
End.
Replace the composite
power supply PCB.
No
Change the setting of
COPIER>ADJUST>DENS>DENS-ADJ in
service mode.
If the density is too high (dark ), decrease the
setting.
If the density is too l ow (l ig ht), increase the
setting.
Yes
Go to
Is the copy image
density normal?
No
4 Checking the Printer Side (1/3)
-
4 / 7 -
Page 5

4 Checking the Printer Si de ( 1 / 3)
GP405-010
Are there
vertical lines in the
image?
Yes
Clean the following:
1. Dust-proofing glass
2. No. 1 mirror
3. No. 2 mirror
4. No. 3 mirror
Are there
vertical images in the
image?
Yes
Check the surface of the sleeve of
th e de v eloping assembly by t he
naked eye.
Are there
vertical images on the
surface of the
sleeve?
Yes
Generate 10 test prints using the
following: COPIER>TEST>PG
1. T YPE 6 ( so lid black)
Are there
vertical lines on the surface
of the developing
sleeve?
Yes
No
No
No
No
Are there
vertical lines in the
image?
Yes
Replace the drum cartridge.
Execute the following in service mode:
COPIER>FUNCTION>DPC>D-GAMM
(initialization)
Yes
Is the result ‘0’ or ‘1’?
No
Replace the composite power
supply PCB.
No
test p r int) nor mal in term s of
Check the following; if there are faults,
correct them:
1. engagement of the feeding assembly
2. electrode of the transfer roller
No
Cha nge the follo wing in ser v ice mode:
COPIER>ADJUST>DEVELOP>DE-DC
•
COPIER>ADJUST>DEVELOP>DE-NO-DC
•
If the density is too l ow (l ig ht), decrease the setting .
If the density is too high (dark ), increase the
Caution:
setting.
Be sure to change all the settings for the same
degree.
Is the image
density correct?
No
Replace the developing assembly, and start over
with “Making Initial C hecks” to make image
adjustments.
Yes
Is the image
of TYPE 6 (solid black;
density and free of
blurring?
No
Does the image
show blurring?
Yes
Is the image
density correct?
Yes
No
Yes
B
-
5 / 7 -
Page 6

5 Checking the Printer Si de ( 2 / 3)
GP405-010
B
Replace the pre-exposure unit.
Check the imag e density using
test prints (TYPE 5).
Is the density
between right and left of the
ima ge diff e ren t?
Yes
Clean the fol l owi ng:
1. dust-proofing g l ass
2. No. 1 mirror
3. No. 2 mirror
4. No. 3 mirror
Is the density
between right and left of the
ima ge diff e ren t?
Yes
No
pre-exposure lamp on at both
Is the
rear and front ends?
Yes
No
No
C
Is the feeding
assembly (transfer roller)
engaged properly?
No
Yes
Engage it properly. If the pressure
spring is faulty, replace it.
Generate 10 test prints (TYPE 6);
then, if the coating of toner on the
developing sl eev e is unev en,
replace the developing assem bl y.
No
Yes
Is the developin g
assembly en gaged (locked
in place)?
Yes
Is the coating
of toner on the developing
sleeve unev en?
No
Engage the feeding assembly
(transfer roller) properl y.
If the engag em ent is not proper,
replace the transfer unit.
Replace the laser unit.
B
-
6 / 7 -
Page 7

6 Checking the Printer Si de ( 3 / 3)
GP405-010
C
Check the imag e density using test prints
(TYPE 4).
No
Yes
Increase the foll owi ng in serv ice m ode:
COPIER>ADJUST>DEVELOP>DE-DC
•
COPIER>ADJUST>DEVELOP>DE-NO-DC
•
Note:
Be sure to change the settings for the sam e
degree.
If, how ever, the abov e settings hav e been
changed under “Checking the Printer S ide (1/3),”
decrease the follow ing in serv ice m ode:
COPIE R> A D JU S T>H V-PRI >P- D C
•
COPIER>ADJUST>HV-PRI>P-NO-DC
•
Note:
Be sure to change the settings for the sam e
degree.
Is the copy image faulty?Is the image foggy?
Yes
Go to
2 Checking the Scanner Side (1/2)
No
End.
Is the image
density of the test prints
(TYPE 6) normal?
No
Replace the devel oping assembly ; then,
start over with “Mak ing I nitial Check s” to
make im ag e adjustm ents.
Yes
-
7 / 7 -
 Loading...