


Windows
Generic Fax Driver
User's Guide
USRMA-0433-03 2020-10 en Copyright CANON INC. 2020

Contents
Introduction ....................................................................................................................................................... 2
How to Use the Manual ............................................................................................................................................. 3
Notations Used in the Manual ................................................................................................................................ 4
Disclaimers ............................................................................................................................................................... 5
Copyright .................................................................................................................................................................. 6
Trademarks .............................................................................................................................................................. 7
About This Driver ........................................................................................................................................... 9
Before Use ......................................................................................................................................................... 11
Fax Sending ...................................................................................................................................................... 13
Sending a Fax from a Computer ............................................................................................................................... 14
About Communication Methods That Can Be Used with Fax Transmissions ............................................................... 18
Attaching a Cover Sheet .......................................................................................................................................... 19
Setting Condential Transmission ........................................................................................................................... 22
Managing Transmission Logs ................................................................................................................................... 24
Changing the Default Settings ................................................................................................................................. 26
Editing the Address Book ..................................................................................................................... 28
Adding the Address of a Person to the Address Book ................................................................................................ 29
Adding a Group to the Address Book ........................................................................................................................ 30
Importing/Exporting an Address Book ..................................................................................................................... 31
Editing Favorite Settings ....................................................................................................................... 34
Registering Favorite Settings ................................................................................................................................... 35
Editing the Favorite Settings List ............................................................................................................................. 36
Linking the Driver and the Device ................................................................................................ 39
Setting Device Information ...................................................................................................................................... 40
Setting the Authentication Function ........................................................................................................................ 42
Setting the User Name ............................................................................................................................................ 44
Settings List ..................................................................................................................................................... 47
Common Settings for Certain Sheets ........................................................................................................................ 48
[Select Destination] Sheet ........................................................................................................................................ 49
[Enter Destination] Sheet ......................................................................................................................................... 55
[Special] Sheet ......................................................................................................................................................... 58
[Sent Fax Information and Image] Sheet .................................................................................................................. 60
[Device Settings] Sheet ............................................................................................................................................ 61
I

Troubleshooting ........................................................................................................................................... 65
Cannot use the acquire device information function/authentication function ........................................................... 66
Cannot view or edit the Address Book ...................................................................................................................... 68
II

Introduction
Introduction
Introduction .......................................................................................................................................................... 2
How to Use the Manual ......................................................................................................................................... 3
Notations Used in the Manual .......................................................................................................................... 4
Disclaimers ............................................................................................................................................................. 5
Copyright ............................................................................................................................................................... 6
Trademarks ............................................................................................................................................................ 7
1

Introduction
How to Use the Manual(P. 3)
Disclaimers(P. 5)
Copyright(P. 6)
Trademarks(P. 7)
Introduction
2

Introduction
How to Use the Manual
This explains things that you need to know in order to use this manual.
Notations Used in the Manual(P. 4)
3

Introduction
Notations Used in the Manual
This explains symbols and settings used in this manual.
Symbols Used in This Manual
In this manual, explanations of items and operations that must be followed while using the driver are set forth
the symbols that indicate the following.
IMPORTANT
● Indicates operational requirements and restrictions. Be sure to read these items carefully to operate the
product correctly, and avoid damage to the product.
NOTE
● Indicates a clarication of an operation, or contains additional explanations for a procedure. Reading these
notes is highly recommended.
About Settings
In this manual, setting names displayed on the computer screen are represented as shown in the following
examples.
Example:
[Send]
[OK]
4

Introduction
Disclaimers
The information in this document is subject to change without notice.
CANON INC. MAKES NO WARRANTY OF ANY KIND WITH REGARD TO THIS MATERIAL, EITHER EXPRESS OR
IMPLIED, EXCEPT AS PROVIDED HEREIN, INCLUDING WITHOUT LIMITATION, THEREOF, WARRANTIES AS TO
MARKETABILITY, MERCHANTABILITY, FITNESS FOR A PARTICULAR PURPOSE OF USE OR NON-INFRINGEMENT.
CANON INC. SHALL NOT BE LIABLE FOR ANY DIRECT, INCIDENTAL, OR CONSEQUENTIAL DAMAGES OF ANY
NATURE, OR LOSSES OR EXPENSES RESULTING FROM THE USE OF THIS MATERIAL.
5

Introduction
Copyright
Copyright CANON INC. 2020
No part of this publication may be reproduced, transmitted, transcribed, stored in a retrieval system, or
translated into any language or computer language in any form or by any means, electronic, mechanical,
magnetic, optical, chemical, manual, or otherwise, without the prior written permission of Canon Inc.
6

Introduction
Trademarks
Microsoft, Windows, Windows Server, Internet Explorer, and Microsoft Edge are either registered trademarks or
trademarks of Microsoft Corporation in the United States and/or other countries.
macOS and Safari are trademarks of Apple Inc.
Other product and company names herein may be the trademarks of their respective owners.
7

About This Driver
About This Driver
About This Driver ............................................................................................................................................... 9
8

About This Driver
About This Driver
This driver is a fax driver for Windows that supports Canon multi-function devices for oce use.
Features
You can send faxes without printing documents or images created with a computer.
● Reduces work time and printing costs
● Sends clean, clear images and ne text
Main Features
Attaching a Cover Sheet
You can attach a cover sheet to data to be transmitted. Templates are already provided in the driver. The items
listed in the cover sheet can be customized. When sending to multiple destinations, you can change the
information on the cover sheet for each destination.
Destination Management Using an Address Book
Registering frequently-used destinations in the Address Book makes specifying destinations easier. You can
export the Address Book as a CSV format le etc. You can also import an address book that is being used by
another application.
Detailed Setting of Transmission Data
You can set the paper size as well as the page layout, which arranges the page data on each sheet of paper.
You can also specify the transmission time and set an email notication of the transmission result.
Strengthening Security
You can set the driver so that conrmation input of the specied destination is required, in order to avoid
sending the fax to a wrong destination. You can also record when, by whom, what, and to where faxes are
transmitted with the login authentication function and fax information and image storing function.
If the subaddress function is supported, you can send faxes to memory boxes at the destination.
NOTE
● If you install the Canon Driver Information Assist Service when connected locally or sharing a printer, you can
retrieve device information. In this manual, the function for retrieving device information using the Canon
Driver Information Assist Service is referred to as the device information retrieval function.
9

Before Use
Before Use
Before Use ............................................................................................................................................................ 11
10

Before Use
Before Use
● To enable the functions supported by the device you are using and send faxes, you need to set the options of
the device. The options of the device can be retrieved from the [Device Settings] sheet > [Retrieve Device
Information], but if you cannot retrieve them, set them manually in the [Device Settings] sheet.
● Depending on the device, jobs sent by fax from the driver may not be noted in the PS print server log. Also,
for jobs sent via NetWare, the logged information may not be noted correctly.
● If you select a fax board that is not compatible with the printer model you are using, and select a line that
does not match a valid line to send from, there is a possibility that the fax will be sent via a different line.
● If you set a function in the driver that is not supported by the device you are using, it may lead to an
unintended transmission result. It may also cause an inability to send faxes.
Examples thereof are shown below.
- Setting the driver so that sender designation, transmission time designation, subaddress functions,
authentication functions, or the function for [Set the number of destinations that can be specied at once
to 2000] are used, regardless of whether those functions are supported by the device you are using.
- Setting authentication modes and an IP fax communication mode that are unsuitable for the device you
are using.
● The newest driver software is posted on the Canon web site. Please verify the operating environment etc.
and download the appropriate software as required.
Canon Global Site: https://global.canon/
● The functions that you can use may vary according to the following conditions.
- The device you are using and its settings
- The rmware version of the device
- The option structure of the device
- The driver version
- The computer environment you are using
● When sending a fax from a Windows Store app, because you cannot display the fax transmission settings
screen of the driver, the number of functions you can set is limited.
● Do not change the settings related to the country or region in the operating system. Doing so may cause
problems with the display of the address book.
● The screen content, procedures, etc. displayed and described in the manual may differ from those actually
displayed.
● In this manual, examples using Windows 10 are explained.
11

Fax Sending
Fax Sending
Fax Sending ......................................................................................................................................................... 13
Sending a Fax from a Computer ......................................................................................................................... 14
About Communication Methods That Can Be Used with Fax Transmissions ................................................... 18
Attaching a Cover Sheet ...................................................................................................................................... 19
Setting Condential Transmission ..................................................................................................................... 22
Managing Transmission Logs ............................................................................................................................. 24
Changing the Default Settings ........................................................................................................................... 26
12

Fax Sending
Sending a Fax from a Computer(P. 14)
About Communication Methods That Can Be Used with Fax Transmissions(P. 18)
Attaching a Cover Sheet(P. 19)
Setting Condential Transmission(P. 22)
Managing Transmission Logs(P. 24)
Changing the Default Settings(P. 26)
Fax Sending
13

Fax Sending
Sending a Fax from a Computer
This explains the basic procedure for fax transmission from a computer of documents created in an application.
NOTE
● When using a device connected via a WSD port, enable [Use WSD] at the device.
Prerequisites
● Setting Device Information(P. 40)
If you cannot retrieve the device information, you need to manually set the options installed in the device.
Procedures
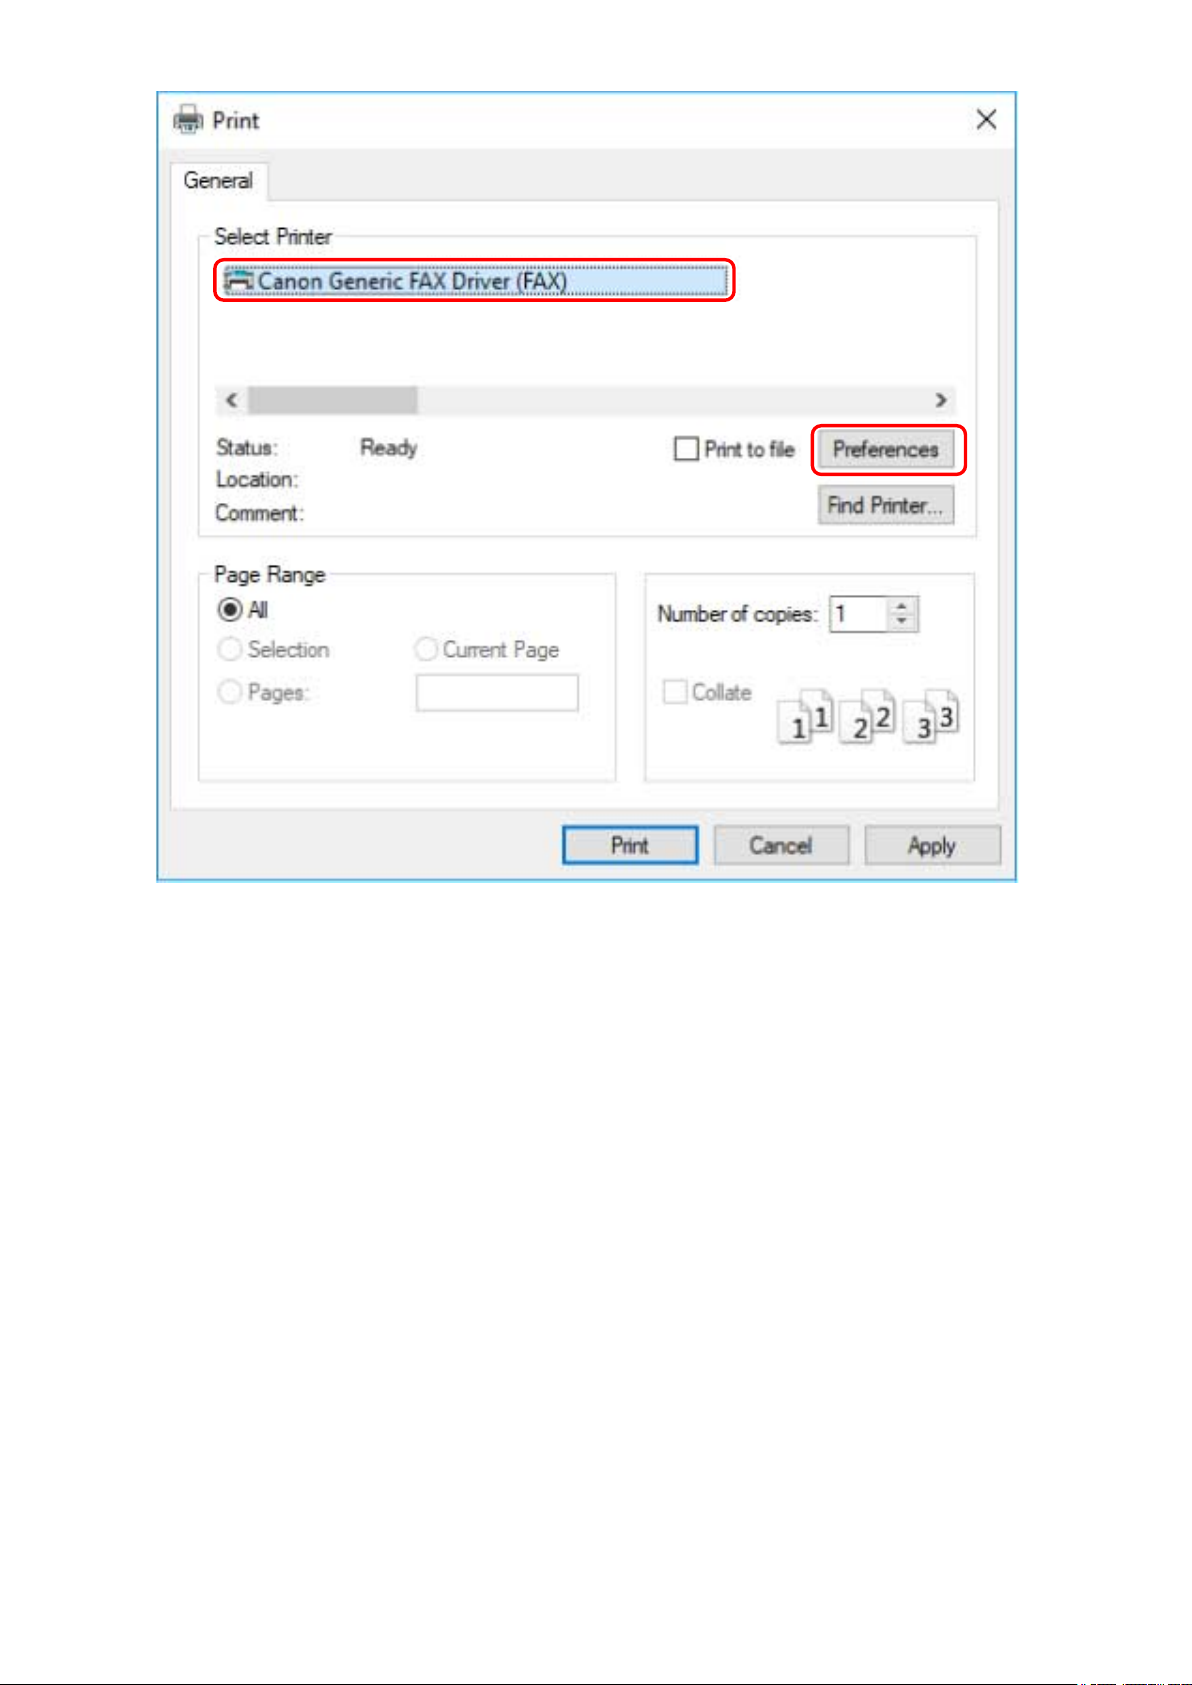
Select the print menu of the application.
1
In the displayed print screen, select the device you are using → click [Preferences].
2
Depending on the application, [Preferences] may be called "Printer properties" or "Properties."
If you do not need detailed fax transmission settings, click [Print] or [OK] and proceed to step 5.(P. 16)
14
Fax Sending
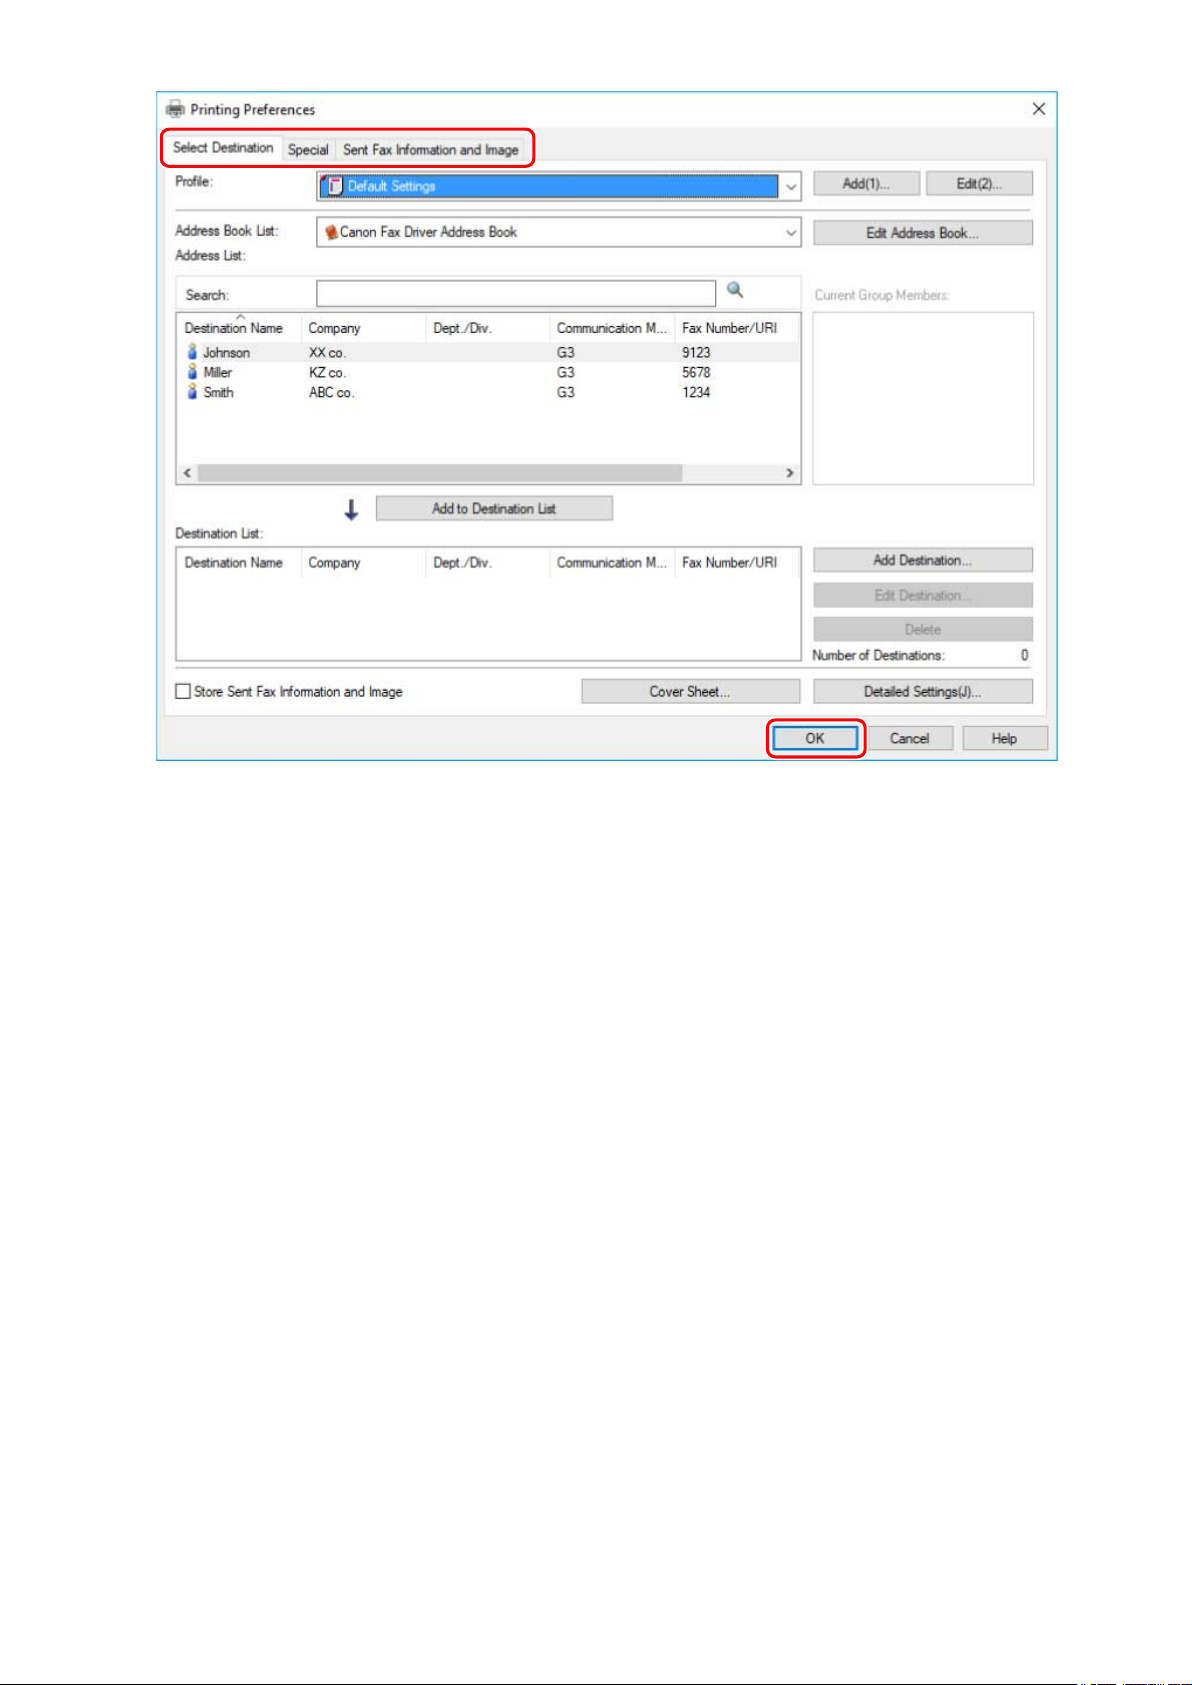
Set the necessary items in the print settings screen of the driver → click [OK].
3
If necessary, switch sheets and congure other settings.
[Select Destination] sheet > [Store Sent Fax Information and Image], [Cover Sheet] and [Detailed Settings] can
also be set when sending a fax in step 5.(P. 16)
15
Fax Sending
For details about the setting methods for the main functions, click the subsequent "Open details" below.
To arrange multiple pages on a single sheet of paper
Specify the number of pages to be arranged in [Special] sheet > [Page Layout].
To enter conrmation of the destination
Click [Special] sheet > [Security Settings] → enable [Conrm Fax Number/URI when Setting Destination] in the
[Security Settings] dialog box.
To specify the send time *
Click [Select Destination] sheet > [Detailed Settings] → enable [Set the Time to Send] to specify time in the
[Detailed Settings] dialog box → click [OK].
To send notication of the transmission result by email *
Click [Select Destination] sheet > [Detailed Settings] → enable [Job Done Notice] and set the notication
conditions and email address in the [Detailed Settings] dialog box → click [OK].
* To set these functions, the functions must be enabled beforehand in the [Device Settings] sheet. Set them by
referring to the procedures for setting device information.
Click [Print] or [OK] in the print screen of the application.
4
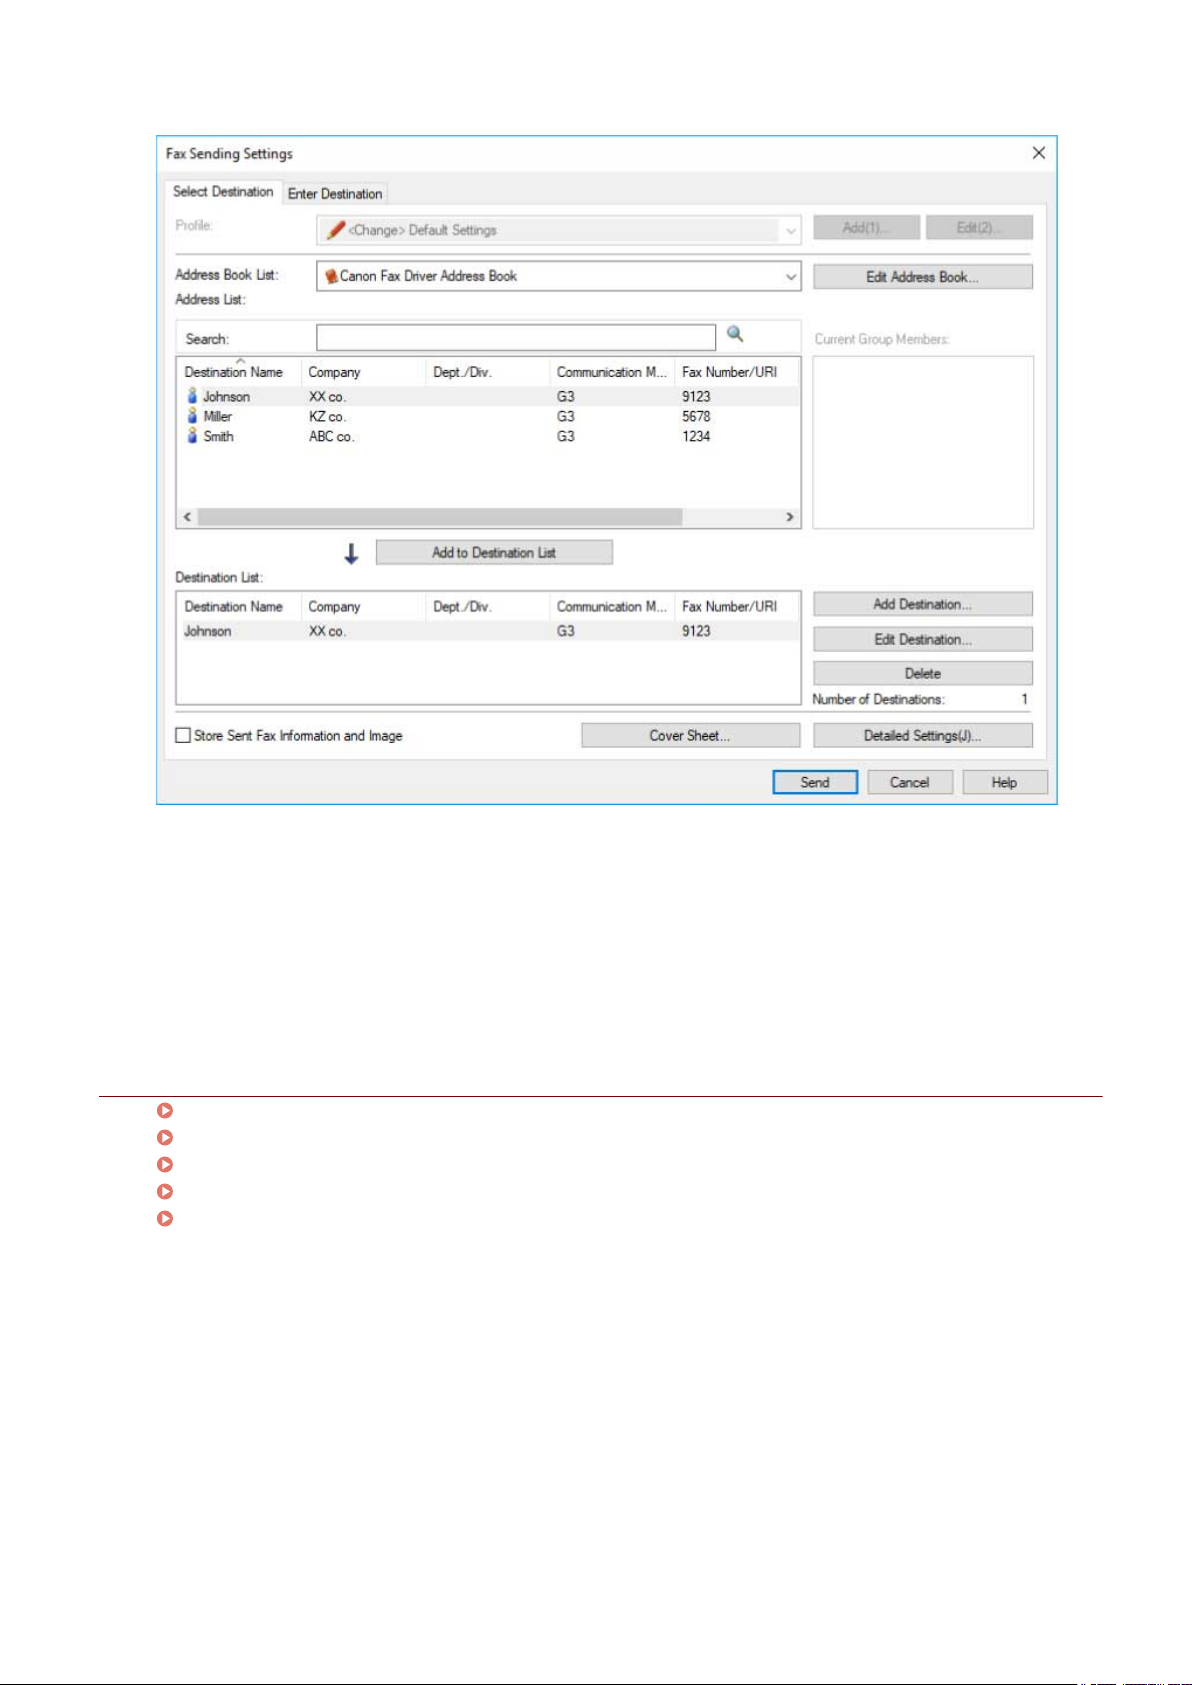
Specify a destination from the displayed [Fax Sending Settings] screen.
5
When specifying a destination from the address book
(1) Display the [Select Destination] sheet.
(2) Select the address book from [Address Book List] → select a destination → click [Add to Destination List].
When entering a destination directly
(1) Display the [Enter Destination] sheet.
(2) Select the communication mode to use from [Communication Mode].
(3) Select [Fax Number/URI] → specify [Fax Number] or [URI].
16
If necessary, set other items.
Fax Sending
If destinations are added to [Destination List] before changing the destination details in the address book, the
changes made in the address book are not reected. If you registered destinations from the address book with
the default settings, check whether the destinations are correct.
Click [Send].
6
Related Topics
[Select Destination] Sheet(P. 49)
[Enter Destination] Sheet(P. 55)
[Special] Sheet(P. 58)
[Sent Fax Information and Image] Sheet(P. 60)
Changing the Default Settings(P. 26)
17

Fax Sending
About Communication Methods That Can Be Used with Fax Transmissions
Communication methods that can be used with fax transmissions are determined by the fax board supported
by the device you are using and the fax settings of the destination.
Congure communication settings such as the fax board, communication mode, etc. to their appropriate
settings in the [Device Settings] sheet. Also, check the fax settings of the destination and set the address
correctly. If the communication settings are not congured appropriately, a mistransmission or transmission
error may occur.
The connection environments that correspond to IP fax communication modes that can be set with this driver
are as follows.
● Intranet
When using an IP fax compatible device or SIP server in an intranet
● VoIP Gateway
G3 fax compatible devices via a VoIP gateway
Related Topics
[Device Settings] Sheet(P. 61)
[Select Destination] Sheet(P. 49)
[Enter Destination] Sheet(P. 55)
Setting Device Information(P. 40)
18

Fax Sending
Attaching a Cover Sheet
You can attach a cover sheet to the top of the transmission data.
As well as the transmission origin and destination information, cover sheets can also be created with logos
and/or signatures.
An example of an arrangement of cover sheet items in a template is introduced below.
Arrangement Example of Items Set in a Cover Sheet(P. 20)
To Attach a Cover Sheet
Display the [Select Destination] or [Enter Destination] sheet.
1
You can display these from the fax transmission settings screen.
You can also display the [Select Destination] sheet when changing the default settings.
Click [Cover Sheet] → select [Different Sheet to Each Destination] or [Same Sheet to All
2
Destinations] from [Cover Sheet Attachment] in the [Cover Sheet] dialog box.
When you select [Different Sheet to Each Destination], the destination information is set in the cover sheet
according to the destination.
When you select [Same Sheet to All Destinations], the destination information for all members is set in the
cover sheet.
Select a template from [Style].
3
Check the set state of items in [Items to Include] → when changing items or
4
conguring detailed settings, click [Settings].
If you do not want to set items, proceed to step 6.(P. 19)
In the [Item Settings] dialog box, set the required items → click [OK].
5
Refer to the following arrangement example for set items and the positions in which they are displayed on the
cover sheet.
Arrangement Example of Items Set in a Cover Sheet(P. 20)
NOTE
● If you register the information included in the cover sheet as a default setting, you can reduce the effort
required to congure settings when sending faxes.
If you want to attach a label such as "Urgent" or "Condential", select [Insert
6
Attention Note] → select a label from [Attention Note].
You can also enter desired text in [Attention Note].
19

Fax Sending
If necessary, enter a comment in [Comment to Include] → click [Preview] to check the
7
preview.
In the [Cover Sheet] dialog box, click [OK].
8
Arrangement Example of Items Set in a Cover Sheet
The default template [Template 1] is shown below as an example of how to arrange items after they are set.
Items set in the [Cover Sheet] dialog box
(1) [Insert Attention Note]
(2) [Items to Include] > [Item Settings] dialog box > [Details] sheet
(3) [Items to Include] > [Item Settings] dialog box > [Sender] sheet
(4) [Items to Include] > [Item Settings] dialog box > [Destination] sheet
(5) [Comment to Include]
20

Fax Sending
When setting a le for a logo or signature in [Item Settings] dialog box > [Logo] or [Signature] sheet, if you click
[Cover Sheet] dialog box > [Preview], you can check how the logo or signature is displayed.
Related Topics
[Cover Sheet] Dialog Box(P. 53)
[Item Settings] Dialog Box(P. 53)
Changing the Default Settings(P. 26)
21

Fax Sending
Setting Condential Transmission
You can send fax data to a memory box at the destination.
Since a password must be entered to output the sent data, this is convenient when sending condential
documents.
To Enable the Condential Transmission Function
Prerequisites
● When starting the computer, logon as a member of Administrators.
Procedures
Display the Windows printer properties screen from the device to be set.
1
If displaying from [ Settings] in the Start menu
(1) Display [Devices] > [Printers & scanners] → select the device to be set → click [Manage].
(2) In the [Manage your device] screen, click [Printer properties].
If displaying from [Control Panel]
(1) Display [Devices and Printers].
(2) From the printer list, right-click the device to be set → select [Printer properties] from the displayed menu.
Display the [Device Settings] sheet.
2
Select the authentication mode to use from [Subaddress Authentication].
3
Congure this setting to match the authentication method set at the device.
Click [Detailed Settings] → in the [Detailed Settings] dialog box, select [Use Subaddress]
4
→ click [OK].
In the [Device Settings] sheet, click [OK] or [Apply].
5
22

Fax Sending
To Set Condential Information at the Destination
To perform condential transmissions, set the condential information (subaddress and password) registered
in the destination fax device in the address.
An example of the procedure for setting condential information when adding an address from the [Select
Destination] is shown below.
Prerequisites
● Condential information (subaddress and password) registered in the destination fax device
Procedures
Display the [Select Destination] sheet.
1
You can display this from the fax transmission settings screen when sending a fax or changing the default
settings.
Click [Add Destination] beside [Destination List].
2
In the [Add Destination] dialog box, specify [Destination Name], [Communication
3
Mode], etc.
Select [Use Subaddress] → enter [Subaddress] and [Password] → click [OK].
4
The address is added to [Select Destination] sheet > [Destination List].
As well as the above procedure, condential information can be set when adding or editing either one of the
following addresses.
● Address of a person in the Address Book
When transmitting by specifying [G3 Fax Number], you can specify a maximum of two fax numbers. You can
set condential information for the respective fax number from [Advanced Function].
● Address entered manually in the [Enter Destination] sheet
Related Topics
[Detailed Settings] Dialog Box(P. 63)
[Add Destination] Dialog Box(P. 49)
[Enter Destination] Sheet(P. 55)
About Communication Methods That Can Be Used with Fax Transmissions(P. 18)
Changing the Default Settings(P. 26)
23

Fax Sending
Managing Transmission Logs
You can save and manage logs of transmission data images, transmission times, destinations, etc. as
transmission images.
If you are using the driver with multiple devices, you can view the log for each device. Also, for logs transmitted
to multiple addresses, you can check transmission images for each address.
NOTE
● Depending on the environment, sent images may not be able to be saved when faxes are sent.
When both of the following conditions are met, use this function after selecting [Spooling at Host] >
[Enabled] in the [Device Settings] sheet.
- When using the 64-bit version of Windows 7/Server 2008/Server 2008 R2
- When sending faxes from a 32-bit application
To Save Transmission Logs
Display the [Select Destination] sheet.
1
You can display this from the fax transmission settings screen when sending a fax or changing the default
settings.
Select [Store Sent Fax Information and Image].
2
If you want to set the save destination for transmission logs and the maximum number that can be saved,
perform the following procedure.
If you do not want to set them, click [OK].
Display the [Sent Fax Information and Image] sheet.
3
Click [Store Settings].
4
In the [Store Settings] dialog box, set the save destination for transmission logs and
5
the maximum number that can be saved → click [OK].
In the [Sent Fax Information and Image] sheet, click [OK].
6
NOTE
● You can also select the [Store Sent Fax Information and Image] in the [Enter Destination] sheet.
24

Fax Sending
To Check Transmission Logs
Display the [Sent Fax Information and Image] sheet.
1
You can display this from the fax transmission settings screen when sending a fax or changing the default
settings.
If you are using the driver with multiple devices, select the driver names
2
corresponding to those devices in [Driver to Display From].
Select the transmission log to be checked from [Sent Fax Information and Image].
3
If the transmission log you want to check is not displayed, click [Refresh] to update the display.
Check the details of the transmission log in the preview.
4
If you click [Enlarge], you can further enlarge and check the transmission log in the viewer.
If the log spans multiple pages, switch between pages with [Back] or [Next].
If you transmitted to multiple destinations, select and check the destination of the log you want to check in
[Destination List].
Related Topics
[Select Destination] Sheet(P. 49)
[Store Settings] Dialog Box(P. 60)
[Enter Destination] Sheet(P. 55)
Changing the Default Settings(P. 26)
25

Fax Sending
Changing the Default Settings
You can change the default settings to desired fax transmission settings. If you change them to settings that
you use frequently, you can reduce the effort required to congure settings when sending faxes.
Display the print settings screen of the driver from the device to be set.
1
If displaying from [ Settings] in the Start menu
(1) Display [Devices] > [Printers & scanners] → select the device to be set → click [Manage].
(2) In the [Manage your device] screen, click [Printing preferences].
If displaying from the [Control Panel] of Windows
(1) Display [Devices and Printers].
(2) From the printer list, right-click the device to be set → select [Printing Preferences] from the displayed
menu.
In the displayed print settings screen, set the required items.
2
If necessary, switch sheets and congure relevant settings.
Click [OK] or [Apply].
3
26

Editing the Address Book
Editing the Address Book
Editing the Address Book ............................................................................................................................ 28
Adding the Address of a Person to the Address Book ....................................................................................... 29
Adding a Group to the Address Book ................................................................................................................. 30
Importing/Exporting an Address Book .............................................................................................................. 31
27

Editing the Address Book
Editing the Address Book
Adding the Address of a Person to the Address Book(P. 29)
Adding a Group to the Address Book(P. 30)
Importing/Exporting an Address Book(P. 31)
28

Editing the Address Book
Adding the Address of a Person to the Address Book
You can register the address information of a person to the Address Book. You can also set the communication
mode according to the destination fax device.
Display the [Select Destination] sheet.
1
You can display this from the fax transmission settings screen when sending a fax or changing the default
settings.
Select [Canon Fax Driver Address Book] from [Address Book List] → click [Edit Address
2
Book].
In the [Edit Address Book] dialog box, click [Add Person].
3
In the [Add Person] dialog box, enter items such as the destination name, company
4
name, etc.
Enter [Notes] if necessary.
If you are using G3 communication, select the [G3 Fax Number] sheet and enter the fax
5
number.
If necessary, set the subaddress function from [Settings].
If you are using IP fax communication, select the [IP Fax Number] sheet and set each
6
item.
If necessary, set the subaddress function or enter [Description].
In the [Add Person] dialog box, click [OK].
7
The address is added to [Address Book] in the [Edit Address Book] dialog box.
In the [Edit Address Book] dialog box, click [OK].
8
Related Topics
[Edit Address Book] Dialog Box(P. 51)
[Add Person] Dialog Box(P. 51)
About Communication Methods That Can Be Used with Fax Transmissions(P. 18)
Changing the Default Settings(P. 26)
29

Editing the Address Book
Adding a Group to the Address Book
You can register addresses that are registered in the Address Book as a group. This is a convenient function
when you want to send data with the same content to multiple destinations.
Display the [Select Destination] sheet.
1
You can display this from the fax transmission settings screen when sending a fax or changing the default
settings.
Select [Canon Fax Driver Address Book] from [Address Book List] → click [Edit Address
2
Book].
In the [Edit Address Book] dialog box, click [Add Group].
3
In the [Add Group] dialog box, set the group name.
4
Select the addresses to be registered as a group from [Destinations to Add] → click
5
[Add].
You can switch the category to be displayed in [Show].
If you add one, the added address is displayed in [Details] > [Current Group Members].
If you want to delete an address from the group, select the address to be deleted from [Current Group
Members] → click [Delete].
In the [Add Group] dialog box, click [OK].
6
The group address is added to [Address Book] in the [Edit Address Book] dialog box.
In the [Edit Address Book] dialog box, click [OK].
7
Related Topics
[Edit Address Book] Dialog Box(P. 51)
[Add Group] Dialog Box(P. 51)
Changing the Default Settings(P. 26)
30

Editing the Address Book
Importing/Exporting an Address Book
You can import the content of an address book used in another application into the Address Book of the driver.
You can also export the content of the Address Book and use it in other applications.
NOTE
● If you want to protect an exported address book with a password, you can set it in [Special] sheet > [Security
Settings].
● When importing an address book, use a CSV le, ABK le, or DCM le exported with security level 1.
You cannot import device setting information les (*.dcm) with all device settings exported from a device
with a security level other than security level 1 specied.
To Export the Address Book
Display the [Select Destination] sheet.
1
You can display this from the fax transmission settings screen when sending a fax or changing the default
settings.
Select [Canon Fax Driver Address Book] from [Address Book List] → click [Edit Address
2
Book].
Click [Export] in the [Edit Address Book] dialog box.
3
Specify the save location and le name → click [Save] or [OK].
4
The le formats and character codes that can be selected when saving the address book are as follows:
- File format: CSV Files (*.csv) / Canon Address Book (*.abk)
- Character code (when saving as a Canon Address Book): ANSI / UTF-8
The [Notes] item in the address book is not exported.
Click [OK].
5
To Import an Address Book
Display the [Select Destination] sheet.
1
You can display this from the fax transmission settings screen when sending a fax or changing the default
settings.
Select [Canon Fax Driver Address Book] from [Address Book List] → click [Edit Address
2
Book].
31

In the [Edit Address Book] dialog box, click [Import] → select the address book le to
3
be imported → click [Open].
Click [OK].
4
Related Topics
[Edit Address Book] Dialog Box(P. 51)
Changing the Default Settings(P. 26)
[Special] Sheet(P. 58)
Editing the Address Book
32

Editing Favorite Settings
Editing Favorite Settings
Editing Favorite Settings ............................................................................................................................. 34
Registering Favorite Settings ............................................................................................................................. 35
Editing the Favorite Settings List ....................................................................................................................... 36
33

Editing Favorite Settings
Editing Favorite Settings
Registering Favorite Settings(P. 35)
Editing the Favorite Settings List(P. 36)
34

Editing Favorite Settings
Registering Favorite Settings
You can register frequently used settings as a prole.
Display the [Select Destination] or [Special] sheet → congure the settings you want to
1
register.
You can display this from the fax transmission settings screen when sending a fax or changing the default
settings.
Click [Add] beside [Prole].
2
In the [Add Prole] dialog box, set [Name] and [Icon].
3
Enter a comment in [Comment] if required.
Click [OK].
4
The new prole is added to [Prole]. You can apply registered fax transmission settings by simply selecting an
item from [Prole].
Related Topics
[Add Prole] Dialog Box(P. 48)
Changing the Default Settings(P. 26)
35

Editing Favorite Settings
Editing the Favorite Settings List
You can edit the [Prole] list. You can also import or export proles to be used on other computers.
The [Select Destination] or [Special] sheet displayed for editing proles is displayed in the fax transmission
settings screen when sending a fax or changing the default settings.
To Edit the [Prole] List
Display the [Select Destination] or [Special] sheet.
1
Click [Edit] beside [Prole].
2
In the [Edit Prole] dialog box, select the prole you want to edit from [Prole List] →
3
set [Name] and [Icon].
Enter a comment in [Comment] if required.
If you want to delete a prole, select the prole from [Prole List] → click [Delete] → click [Yes].
Click [OK].
4
To Export a Prole
Display the [Select Destination] or [Special] sheet.
1
Click [Edit] beside [Prole].
2
In the [Edit Prole] dialog box, select the prole you want to export from [Prole List]
3
→ click [Export].
Specify the storage location and le name → click [Save] or [OK].
4
Click [OK].
5
The selected prole is saved as a "*.cfg" le.
36

Editing Favorite Settings
To Import a Prole
Display the [Select Destination] or [Special] sheet.
1
Click [Edit] beside [Prole].
2
In the [Edit Prole] dialog box, click [Import] → select a prole le to be imported →
3
click [Open].
The imported prole is displayed in [Prole List].
Click [OK].
4
Related Topics
[Edit Prole] Dialog Box(P. 48)
Registering Favorite Settings(P. 35)
37

Linking the Driver and the Device
Linking the Driver and the Device
Linking the Driver and the Device ......................................................................................................... 39
Setting Device Information ................................................................................................................................ 40
Setting the Authentication Function ................................................................................................................. 42
Setting the User Name ........................................................................................................................................ 44
38

Linking the Driver and the Device
Linking the Driver and the Device
Setting Device Information(P. 40)
Setting the Authentication Function(P. 42)
Setting the User Name(P. 44)
39

Linking the Driver and the Device
Setting Device Information
In the following cases, it is necessary to set the options of the device according to this procedure.
● The device information was not retrieved during installation.
● The device function and options are not set correctly in the [Device Settings] sheet.
● An option has been added to the device.
● The fax transmission settings of the device have been changed.
Prerequisites
● Settings at the device
- If the device is connected via a WSD port, [Use WSD Browsing] is already enabled.
- If the device is connected by specifying a standard TCP/IP port, [Retrieve Printer Mngt. Information from
Host] is already enabled.
For details, refer to the manual of the device.
● When starting the computer, log on as a member of Administrators.
Procedures
Display the Windows printer properties screen from the device to be set.
1
If displaying from [ Settings] in the Start menu
(1) Display [Devices] > [Printers & scanners] → select the device to be set → click [Manage].
(2) In the [Manage your device] screen, click [Printer properties].
If displaying from [Control Panel]
(1) Display [Devices and Printers].
(2) From the printer list, right-click the device to be set → select [Printer properties] from the displayed menu.
Display the [Device Settings] sheet.
2
40

Linking the Driver and the Device
Click [Retrieve Device Information].
3
If the message "Do you want to retrieve the device information?" is displayed, click
4
[Yes].
If the information has been retrieved, conrm the automatically set option conguration.
If the information is not retrieved, set the option conguration manually. Select the options attached to the
device.
Click [Detailed Settings] → set as required.
5
The items in [Detailed Settings] are not set automatically. If necessary, set them manually.
In the [Device Settings] sheet, click [OK] or [Apply].
6
Related Topics
[Device Settings] Sheet(P. 61)
Cannot use the acquire device information function/authentication function(P. 66)
41

Linking the Driver and the Device
Setting the Authentication Function
You can manage fax transmission by means of the department ID management function or the user
authentication function.
Prerequisites
● When starting the computer, log on as a member of Administrators.
Procedures
Display the Windows printer properties screen from the device to be set.
1
If displaying from [ Settings] in the Start menu
(1) Display [Devices] > [Printers & scanners] → select the device to be set → click [Manage].
(2) In the [Manage your device] screen, click [Printer properties].
If displaying from [Control Panel]
(1) Display [Devices and Printers].
(2) From the printer list, right-click the device to be set → select [Printer properties] from the displayed menu.
Display the [Device Settings] sheet.
2
Select the authentication function you want to use from [User Management] → click
3
[Settings].
In the [Department ID/PIN Settings] or [User Authentication Settings] dialog box,
4
select [Allow PIN Settings] or [Allow Password Settings] → enter the authentication
information.
To use the department ID management function, enter the information in [Department ID] and [PIN].
To use the user authentication function, enter the information in [User Name] and [Password].
You can check whether the authentication information set in the device and the entered content match by
clicking [Verify].
Select [Conrm Department ID/PIN When Sending Faxes] or [Conrm Authentication
5
Information When Sending Faxes] if necessary → click [OK].
In the [Device Settings] sheet, click [OK] or [Apply].
6
42

If the [Conrm Department ID/PIN] or [Conrm User Name/Password] dialog box is displayed when sending a
fax, conrm or set the authentication information.
Related Topics
[Department ID/PIN Settings] Dialog Box(P. 61)
[User Authentication Settings] Dialog Box(P. 61)
[Conrm Department ID/PIN] Dialog Box(P. 63)
[Conrm User Name/Password] Dialog Box(P. 63)
Linking the Driver and the Device
43

Linking the Driver and the Device
Setting the User Name
You can set a user name to be used for fax sending jobs.
The set user name is displayed on the control panel of the device, and is applied to the headers or footers of fax
data.
Prerequisites
● When starting the computer, log on as a member of Administrators.
Procedures
Display the Windows printer properties screen from the device to be set.
1
If displaying from [ Settings] in the Start menu
(1) Display [Devices] > [Printers & scanners] → select the device to be set → click [Manage].
(2) In the [Manage your device] screen, click [Printer properties].
If displaying from [Control Panel]
(1) Display [Devices and Printers].
(2) From the printer list, right-click the device to be set → select [Printer properties] from the displayed menu.
Display the [Device Settings] sheet.
2
Select [Set User Information] → click [Settings].
3
In the [User Information Settings] dialog box, enter the name in [User Name] → click
4
[OK].
If you want to change the default user name setting, click [User Name Management] → set [Name to Set for
User Name] → click [OK].
If you want to prevent changes to user names, click [User Name Management] → select [Do Not Allow User
Name Changes] → click [OK].
In the [Device Settings] sheet, click [OK] or [Apply].
5
44

Related Topics
[User Information Settings] Dialog Box(P. 62)
Linking the Driver and the Device
45

Settings List
Settings List
Settings List ......................................................................................................................................................... 47
Common Settings for Certain Sheets ................................................................................................................. 48
[Select Destination] Sheet ................................................................................................................................... 49
[Enter Destination] Sheet .................................................................................................................................... 55
[Special] Sheet ...................................................................................................................................................... 58
[Sent Fax Information and Image] Sheet ........................................................................................................... 60
[Device Settings] Sheet ........................................................................................................................................ 61
46

Settings List
Common Settings for Certain Sheets(P. 48)
[Select Destination] Sheet(P. 49)
[Enter Destination] Sheet(P. 55)
[Special] Sheet(P. 58)
[Sent Fax Information and Image] Sheet(P. 60)
[Device Settings] Sheet(P. 61)
Settings List
47

Settings List
Common Settings for Certain Sheets
You can register frequently used settings as proles.
You can set proles in the [Select Destination] and [Special] sheets.
[Prole]
Applies registered fax transmission settings. Registered proles can be edited or deleted.
Because proles with a red dot (
) are preset proles, you cannot edit or delete them.
[Add] [Add Prole] Dialog Box
Enables you to register the current fax transmission settings as a prole.
Set [Name] and [Icon]. If necessary, enter a comment in [Comment]. If you want to check the current settings
on a list, click [View Settings].
[Edit] [Edit Prole] Dialog Box
Enables you to edit the content of a prole. You can also specify a le to import a prole to, and save the
current prole to a le.
[Prole List]
Enables you to display a list of registered proles. If you click [
selecting a prole, you can change its place in the order of proles.
[View Settings]
Enables you to display the content of a selected prole in list form. You can also copy the content of the
settings to the clipboard.
[Delete]
Deletes the selected prole.
[Name]/[Icon]/[Comment]
Displays the name, icon, and comment of the selected prole. Registered names, icons, and comments of
proles can be edited.
[Import]
Imports the prole saved as a le (*.cfg) and adds it to [Prole List].
[Export]
Exports the prole selected in [Prole List] and saves it as a le (*.cfg).
[Apply Settings from Application]
Gives the settings from the application priority over the [Special] sheet > [Page Size] and [Orientation] settings.
[View Settings] Dialog Box
] (Move Up) or [ ] (Move Down) after
Related Topics
[Select Destination] Sheet(P. 49)
[Special] Sheet(P. 58)
Registering Favorite Settings(P. 35)
Editing the Favorite Settings List(P. 36)
48

Settings List
[Select Destination] Sheet
You can set an address when sending a fax, edit the Address Book, etc.
[Address Book List]
Select the Address Book to be used. When the Address Book is selected, a list of destinations is displayed in
[Address List].
Individual destinations (
In [Current Group Members], individual destinations and groups registered in the selected group are displayed.
An Address Book can be registered in [Special] sheet > [Address Book Type].
) and groups ( ) can be distinguished by the icons at the head of the list.
[Edit Address Book]
Enables you to edit an Address Book of the driver saved in a local folder.
Address Books stored in a folder on the network cannot be edited.
When Business IJ FAX Driver is installed in your computer, the Address Book (Canon Fax Driver Address Book)
is shared between drivers. Even if the destination folder to save the Address Book is changed, the new setting
is shared.
[Edit Address Book] Dialog Box(P. 51)
[Address List]
You can search for a specied character string.
[Add to Destination List]
Enables you to add an address registered in the Address Book to [Destination List].
When you double-click an entry in [Address List], it is similarly added to [Destination List].
[Select Destination Fax Number] Dialog Box
If multiple fax numbers are registered in a group, the [Select Destination Fax Number] dialog box is displayed.
Select a fax number to add to [Destination List].
The types of destinations you can select in the [Select Destination Fax Number] dialog box vary according to the
type of address book selected in [Address Book List].
[Destination List]
Displays a list of fax transmission destinations (or group names). [Number of Destinations] shows the total
number of destinations that have been added to the list.
[Add Destination]
Enables you to enter and set a new destination and add it to [Destination List].
[Add Destination] Dialog Box
[Edit Destination] [Edit Destination] Dialog Box
Enables you to edit the destination selected in [Destination List]. When you double-click an entry in
[Destination List], you can similarly edit the destination.
[Destination Name]
Enter a destination name.
[Communication Mode]/[Fax Number/URI]
Select the communication mode that matches the environment of the destination and specify a fax number or
URI.
49

Settings List
When [Conrm Fax Number/URI when Setting Destination] is enabled in the [Special] sheet > [Security
Settings], [Conrm Fax Number] or [Conrm URI] is displayed. Enter the same fax number or URI.
[Use Subaddress]
Sends data to a memory box in the destination.
Enter the values registered in the destination fax machine in [Subaddress] and [Password]. The password must
be entered to output the sent data at the destination fax machine.
You can specify this when [Use Subaddress] is enabled in the [Device Settings] sheet > [Detailed Settings].
[Register to Address Book]
Registers the set destination in the Address Book (Canon Fax Driver Address Book).
[Add Next Destination]
Continues to add destinations.
[Delete]
Deletes the destination selected in [Destination List].
[Store Sent Fax Information and Image]
Saves the transmitted document name, transmission time, etc. as a transmission image. You can keep and
manage a transmission image log.
You can check the log in the [Sent Fax Information and Image] sheet.
NOTE
● When using this function in an environment that meets both of the following conditions, select [Spooling at
Host] > [Enabled] in the [Device Settings] sheet.
- When using the 64-bit version of Windows 7/Server 2008/Server 2008 R2
- When sending faxes from a 32-bit application
[Cover Sheet]
Enables you to set a cover sheet.
[Cover Sheet] Dialog Box(P. 53)
[Detailed Settings] [Detailed Settings] Dialog Box
Enables you to specify the external line connection number and send time, and set the line to be used.
[Select G3 Line]
Select the line to be used for fax transmission.
[Customize Line Name] [Customize Line Name] Dialog Box
Enables you to set a name for each line.
[Add Outside Dialing Prex to G3/IP Fax Number]
Specify an external line connection number to be assigned to the fax number for each communication mode.
[Set the Time to Send]
Sends a fax at the time specied in [Sending Time]. The data to be sent is temporarily saved in the device, then
sent at the specied time.
To specify this item, [Device Settings] sheet > [Set the Time to Send] needs to be enabled.
[Job Done Notice]
Enables notication of fax transmission results to be sent to a specied email address.
The notication conditions that can be set vary according to the set content of [Device Settings] sheet > [[Job
Done Notice] Setting].
50

Settings List
Error notications are limited to errors that occur between the device and the destination fax.
Notications are not given for errors that occur between the computer and the device, even if [Only Notify for
Errors] is selected.
To conrm whether a fax has been sent correctly, check the fax transmission log or print queue at the device,
and check the transmission result between the computer and the device.
[Edit Address Book] Dialog Box
[Address Book]
Displays the content of the Address Book as a list. You can switch categories to be displayed in [Show].
Details about a selected destination are displayed in [Details].
[Add Person]
Enables you to add the address of a single person.
[Prex]/[Last]/[First]/[Sux]
Species the name of the destination.
[Destination Name]
Species the [Destination Name] to be displayed in the cover sheet. If a name is not specied, [Prex]/[Last]/
[First]/[Sux] is displayed in the cover sheet.
[Company]/[Dept./Div.]/[Notes]
Enter the respective items if necessary.
[G3 Fax Number] Sheet
[Primary Number]/[Secondary Number]
Enter the fax number of the destination. If you enter hyphens (-), the number is sent to the device without
the hyphens.
You can enter a desired character string in [Description] for each number.
[Advanced Function]
Displays the usage conditions of the subaddress (internal line number) function.
[Settings]
Enables you to set the detailed information necessary to use the subaddress functions.
[IP Fax Number] Sheet
[Communication Mode]/[Fax Number/URI]
Select the communication mode that matches the environment of the destination and specify a fax number
or URI.
[Use Subaddress]
Sends data to a memory box in the destination.
Enter the values registered in the destination fax device in [Subaddress] and [Password].
The password must be entered to output the sent data at the destination fax device.
[Description]
Enter a desired character string.
[Add Person] Dialog Box
[Advanced Function Settings] Dialog Box
[Add Group]
Enables you to add a group destination.
[Group Name]
Enter the name of the group to be added.
[Destinations to Add]
Displays a list of destinations that can be added to the group in [Available Destinations].
In [Show], you can switch between individual and group display.
[Add Group] Dialog Box
51

Settings List
[Add]
Adds the destination selected in [Available Destinations] to the group members.
[Delete]
Deletes the destination selected in [Current Group Members] from the group members.
[Details]
Displays individuals and groups registered in the group in [Current Group Members].
You can enter notes about the group to be added in [Notes].
[Edit]
Enables you to edit the selected item.
Items that can be edited are the same as those that can be edited when the individual or group is added.
[Edit Person]/[Edit Group] Dialog Box
[Delete]
Deletes the selected destination from the Address Book.
[Specify a Folder]
Enables you to specify the destination folder to save the Address Book of the driver (Canon Fax Driver Address
Book).
If you specify a folder on the network, you can only browse the folder. You cannot edit or import.
[Import]
Enables you to import the content of an address book used in another application into the Address Book of the
driver.
The le formats that can be imported are shown below.
● CSV Files (*.csv)
● Canon Address Book (*.abk)
● Device Setting Information Files (*.dcm)
When importing a CSV format le, you can specify the separator. Characters that can be specied are the
following single-byte characters.
! # $ % & ' ( ) * + , - . / : ; < = > ?
[Export]
Enables you to save the content of the Address Book of the driver in another le format.
The saved le is convenient for use with other applications and for backing up the content of the Address Book.
The le formats that can be saved are shown below.
● CSV Files (*.csv)
● Canon Address Book (*.abk)
When saving in CSV format, you can specify the separator. Characters that can be specied are the following
single-byte characters.
! # $ % & ' ( ) * + , - . / : ; < = > ?
When saving as a Canon Address Book, you can specify ANSI or UTF-8 as the character code.
When [Protect with Password when Exporting Address List] is enabled in the [Special] sheet > [Security Settings],
a dialog box requesting that you enter a password is displayed before saving the content of the Address Book.
[About]
Displays information about the driver version.
52

Settings List
Return to [Edit Address Book](P. 49)
[Cover Sheet] Dialog Box
[Cover Sheet Attachment]
Enables you to specify whether to attach a cover sheet. If you attach a cover sheet, you can select whether to
display information for each destination or information for all destinations.
[Style]
Select a cover sheet template.
[Manage] [Cover Sheet Management] Dialog Box
Displays a list of the cover sheet templates that can be used with this driver. You can also delete unnecessary
templates.
[Style]
Displays registered cover sheet templates in a list.
Also, if you click [Preview], a detailed preview is displayed.
[Recover]
Re-registers deleted default templates.
[Delete]
Deletes the cover sheet selected in [Style].
[Items to Include]
Displays the content of items displayed in the cover sheet.
[Settings]
Enables you to set items to be displayed in the cover sheet.
[Sender] Sheet
Displays information relating to the sender in the cover sheet.
If you click [Import Sender] and [Save Sender], you can import sender information from a le or save it to a
le. Files that can be imported and les created when saving are both CSV format les with commas as
separators.
[Destination] Sheet
Displays information relating to the destination in the cover sheet.
The values set in the [Select Destination] sheet are displayed in enabled items.
[Logo]/[Signature] Sheet
Displays a logo or signature in the cover sheet.
You can specify a BMP format le for the logo or signature.
Click [Browse] and select the le to be used.
You can adjust the ratio and position while checking the preview of the selected le.
[Details] Sheet
Displays the number of pages being sent or the subject name in the cover sheet.
The number of pages being sent is not counted automatically. The number of sheets entered here is displayed
in the cover sheet.
[Item Settings] Dialog Box
53

Settings List
[Insert Attention Note]
Displays a label such as "Urgent" etc. in the cover sheet.
Select [Attention Note] from the list or enter a desired character string.
[Comment to Include]
Enables you to enter a comment to be displayed in the cover sheet.
[Preview]
Displays a preview of the cover sheet to which the selected template, descriptive items, etc. have been applied.
Return to [Cover Sheet](P. 50)
Related Topics
[Special] Sheet(P. 58)
[Sent Fax Information and Image] Sheet(P. 60)
[Device Settings] Sheet(P. 61)
About Communication Methods That Can Be Used with Fax Transmissions(P. 18)
Attaching a Cover Sheet(P. 19)
Setting Condential Transmission(P. 22)
Managing Transmission Logs(P. 24)
Adding the Address of a Person to the Address Book(P. 29)
Adding a Group to the Address Book(P. 30)
Registering Favorite Settings(P. 35)
54

Settings List
[Enter Destination] Sheet
You can specify each set of destination information when sending a fax.
Be sure to specify items with "*."
[* Communication Mode]/[* Fax Number/URI]
Select the communication mode that matches the environment of the destination and specify a fax number or
URI.
When [Conrm Fax Number/URI when Setting Destination] is enabled in the [Special] sheet > [Security Settings],
[Conrm Fax Number] or [Conrm URI] is displayed. Enter the same fax number or URI.
[Destination Name]
Enter a destination name.
[Use Subaddress]
Sends data to a memory box in the destination.
Enter the values registered in the destination fax machine in [Subaddress] and [Password]. The password must
be entered to output the sent data at the destination fax machine.
You can specify this when [Use Subaddress] is enabled in the [Device Settings] sheet > [Detailed Settings].
[Add to Address Book]
Registers the set destination in the Address Book (Canon Fax Driver Address Book).
[Store Sent Fax Information and Image]
Saves the transmitted document name, transmission time, etc. as a transmission image. You can keep and
manage a transmission image log.
You can check the log in the [Sent Fax Information and Image] sheet.
NOTE
● When using this function in an environment that meets both of the following conditions, select [Spooling at
Host] > [Enabled] in the [Device Settings] sheet.
- When using the 64-bit version of Windows 7/Server 2008/Server 2008 R2
- When sending faxes from a 32-bit application
[Cover Sheet]
Enables you to set a cover sheet.
[Cover Sheet] Dialog Box(P. 56)
[Detailed Settings]
Enables you to specify the external line connection number and send time, and set the line to be used.
[Select G3 Line]
[Detailed Settings] Dialog Box
55

Settings List
Select the line to be used for fax transmission.
[Customize Line Name] [Customize Line Name] Dialog Box
Enables you to set a name for each line.
[Add Outside Dialing Prex to G3/IP Fax Number]
Specify an external line connection number to be assigned to the fax number for each communication mode.
[Set the Time to Send]
Sends a fax at the time specied in [Sending Time]. The data to be sent is temporarily saved in the device, then
sent at the specied time.
To specify this item, [Device Settings] sheet > [Set the Time to Send] needs to be enabled.
[Job Done Notice]
Enables notication of fax transmission results to be sent to a specied email address.
The notication conditions that can be set vary according to the set content of [Device Settings] sheet > [[Job
Done Notice] Setting].
Error notications are limited to errors that occur between the device and the destination fax.
Notications are not given for errors that occur between the computer and the device, even if [Only Notify for
Errors] is selected.
To conrm whether a fax has been sent correctly, check the fax transmission log or print queue at the device,
and check the transmission result between the computer and the device.
[Cover Sheet] Dialog Box
[Cover Sheet Attachment]
Enables you to specify whether to attach a cover sheet. If you attach a cover sheet, you can select whether to
display information for each destination or information for all destinations.
[Style]
Select a cover sheet template.
[Manage]
Displays a list of the cover sheet templates that can be used with this driver. You can also delete unnecessary
templates.
[Style]
Displays registered cover sheet templates in a list.
Also, if you click [Preview], a detailed preview is displayed.
[Recover]
Re-registers deleted default templates.
[Delete]
Deletes the cover sheet selected in [Style].
[Cover Sheet Management] Dialog Box
[Items to Include]
Displays the content of items displayed in the cover sheet.
[Settings]
Enables you to set items to be displayed in the cover sheet.
[Sender] Sheet
[Item Settings] Dialog Box
56

Settings List
Displays information relating to the sender in the cover sheet.
If you click [Import Sender] and [Save Sender], you can import sender information from a le or save it to a
le. Files that can be imported and les created when saving are both CSV format les with commas as
separators.
[Destination] Sheet
Displays information relating to the destination in the cover sheet.
The values set in the [Select Destination] sheet are displayed in enabled items.
[Logo]/[Signature] Sheet
Displays a logo or signature in the cover sheet.
You can specify a BMP format le for the logo or signature.
Click [Browse] and select the le to be used.
You can adjust the ratio and position while checking the preview of the selected le.
[Details] Sheet
Displays the number of pages being sent or the subject name in the cover sheet.
The number of pages being sent is not counted automatically. The number of sheets entered here is displayed
in the cover sheet.
[Insert Attention Note]
Displays a label such as "Urgent" etc. in the cover sheet.
Select [Attention Note] from the list or enter a desired character string.
[Comment to Include]
Enables you to enter a comment to be displayed in the cover sheet.
[Preview]
Displays a preview of the cover sheet to which the selected template, descriptive items, etc. have been applied.
Return to [Cover Sheet](P. 55)
Related Topics
[Select Destination] Sheet(P. 49)
[Special] Sheet(P. 58)
[Sent Fax Information and Image] Sheet(P. 60)
[Device Settings] Sheet(P. 61)
About Communication Methods That Can Be Used with Fax Transmissions(P. 18)
Attaching a Cover Sheet(P. 19)
Setting Condential Transmission(P. 22)
Managing Transmission Logs(P. 24)
57

Settings List
[Special] Sheet
You can set the page layout and resolution for the transmitted data when it is printed at the destination.
You can also re-enter the fax number or URI in order to prevent a transmission error. You can also congure
security settings to protect the Address Book.
[Page Size]
Select the paper size of transmitted data created in an application.
[Orientation]
Select the orientation at which the transmitted data is printed.
[Page Layout]
Specify the number of pages when the transmitted data is printed on one sheet of paper. You can set the layout
by clicking the preview at the side of the screen.
If you specify that the transmitted data is to be printed on multiple pages, you can select [Page Order].
[Resolution]
Select a resolution when transmitting a fax.
[Security Settings]
Enables you to congure settings for checking destinations and security settings when saving (exporting) an
address book to a le.
When these are set, a dialog box requesting that the fax number and password be entered for each operation is
displayed.
[Security Settings] Dialog Box
[Address Book Type] [Address Book Type] Dialog Box
Enables you to register an address book being viewed when transmitting, change its name, etc.
[Address Book Type]
The registered address book is displayed in a list.
[Register] [Register Address Book] Dialog Box
Enables you to select and register an address book from [Available Address Books].
The types of address books that you can register other than the address book of this driver are shown below.
- Canon Fax Driver Address Book: The Address Book of this driver.
- Messaging API: The Microsoft Outlook address book.
If the driver is being used in a 64-bit environment, you can register a 64-bit version of the Microsoft Outlook
address book.
However, the Microsoft Outlook address book cannot be registered if it is shared in a virtual environment
such as a Citrix XenApp environment.
- Windows Address Book: The Microsoft Outlook Express address book.
[Edit] Add/Edit Dialog Box
Enables you to change the name etc. of a selected address book. The items that you can change vary
according to the type of address book.
58

In the case of the Messaging API, you can change the prole to be used.
In the case of the Windows Address Book, you can change the path where the address book is stored. If you
do not specify the path, the default Windows Address Book is used.
[Delete]
Deletes the selected address book. You can delete address books other than the Canon Fax Driver Address
Book.
[Restore Defaults]
Returns all the settings to their standard (default) values.
Related Topics
[Select Destination] Sheet(P. 49)
Importing/Exporting an Address Book(P. 31)
Registering Favorite Settings(P. 35)
Editing the Favorite Settings List(P. 36)
Settings List
59

Settings List
[Sent Fax Information and Image] Sheet
You can manage saved transmission logs of transmission data images, transmission times, destinations, etc.
[Driver to Display From]
Switch between lists of logs to be displayed in [Sent Fax Information and Image], if you are using the driver with
multiple devices.
[Sent Fax Information and Image]
Displays a fax transmission log as a list.
If there are multiple pages, you can switch between pages using [Back] and [Next]. For transmission logs of
faxes sent to multiple destinations, you can also switch between each destination.
If you click [Enlarge], you can enlarge and check the selected transmission log.
[Sending Time] is the time of transmission from the driver to the device. It differs from the time when the fax is
actually transmitted from the device.
[Delete All]
Deletes all logs.
[Delete]
Deletes the selected log.
[Refresh]
Updates the logs to their newest status.
[Destination List]
Displays the destination of the selected log.
[Store Settings]
Enables you to set the save destination of sent fax information and images, and the maximum number of sent
fax information and images that can be saved.
[Store Settings] Dialog Box
Related Topics
[Select Destination] Sheet(P. 49)
[Enter Destination] Sheet(P. 55)
Managing Transmission Logs(P. 24)
60

Settings List
[Device Settings] Sheet
You can set device options, authentication methods, etc.
Also, if conrmation of authentication information is set in [User Management] in this sheet, a conrmation
dialog box is displayed when sending faxes.
Here, the content of the [Device Settings] sheet and the dialog box for conrming authentication information
are explained.
Descriptions of Settings
[Sender]
Enter a sender name to be displayed in the header of the fax.
[Fax Board Options]
Select the fax board installed in the device.
[Subaddress Authentication]/[Department ID Management Authentication]
Select respective authentication modes.
Congure this setting to match the authentication method set at the device.
[Spooling at Host]
Select whether to process the data on the host (computer) or the device.
[User Management]
Enables you to set the type of authentication function to be used.
[Settings]
Enables you to set details when [Department ID Management] is selected from [User Management].
[Allow PIN Settings]
Enable this when setting [PIN].
If you want to disable the PIN setting on a client computer in a shared printer environment, deselect this item
at the server.
[Department ID]
Set the department ID set at the device.
[PIN]
Set a PIN for department ID management. If a PIN is not set at the device, this is blank.
[Verify]
Veries that the entered department ID and PIN match those set at the device.
[Conrm Department ID/PIN When Sending Faxes]
Displays a dialog box for setting or conrming a department ID and PIN, when sending a fax.
[Department ID/PIN Settings] Dialog Box
[Settings]
Enables you to set details when [User Authentication] is selected from [User Management].
[User Authentication Settings] Dialog Box
61

Settings List
[Allow Password Settings]
Enable this when setting [Password].
If a password is not set here, enter the password when sending the fax.
[User Name]
Set a user name to be used for user authentication.
[Password]
Set a password to be used for user authentication. If a password is not set at the device, this is blank.
[Verify]
Veries that the entered password matches that set at the device.
[Conrm Authentication Information When Sending Faxes]
Displays a dialog box for setting or conrming a user name and password, when sending a fax.
[Set User Information]
Enables you to set the user name displayed in the fax transmission log of the device.
[Settings]
[User Name]
Set a user name to be used for fax transmission jobs.
[User Name Management] [User Name Management] Dialog Box
Enables you to set a user name to be used as a default.
[Name to Set for User Name]
As the user name, specify your Windows logon name, the computer name, or any other desired name.
[Do Not Allow User Name Changes]
Prohibits changes to the user name in the [User Information Settings] dialog box.
[IP Fax Communication Mode]
Enables you to set the communication mode that can be used with the device. For information about IP fax
connection environments, refer to the manual for the device.
[User Information Settings] Dialog Box
[IP Fax Communication Mode Settings] Dialog Box
[Set the Time to Send]
Specify the fax transmission time in [Select Destination] or [Enter Destination] sheet > [Detailed Settings].
[[Job Done Notice] Setting]
Enables notication of fax transmission results to be sent to a specied email address.
Items that are enabled here can be set in the [Select Destination] or [Enter Destination] sheet > [Detailed
Settings].
[Set the number of destinations that can be specied at once to 2000]
Expands the maximum number of destinations that can be specied at one time to 2,000.
[Use Unicode (UTF-8) for Communication with Device]
Transmits and receives internal information such as user information etc. to and from the device in Unicode
(UTF-8).
62

Settings List
[Detailed Settings] [Detailed Settings] Dialog Box
Enables you to set detailed functions such as the conrmation message display function when faxing.
Since this function is not set even if device information is retrieved, set it manually.
[Retrieve Device Information]
Retrieves device information and applies it to each setting.
[About]
Displays information about the driver version.
Authentication Information Conrmation Dialog Box
[Conrm Department ID/PIN] Dialog Box
[Department ID]
Set the department ID set at the device.
[PIN]
Set a PIN for department ID management. If a PIN is not set at the device, this is blank.
[Conrm User Name/Password] Dialog Box
[User Name]
Set a user name to be used for user authentication.
[Password]
Set a password to be used for user authentication. If a password is not set at the device, this is blank.
Related Topics
[Select Destination] Sheet(P. 49)
[Enter Destination] Sheet(P. 55)
About Communication Methods That Can Be Used with Fax Transmissions(P. 18)
Setting Condential Transmission(P. 22)
Setting Device Information(P. 40)
Setting the Authentication Function(P. 42)
Setting the User Name(P. 44)
Cannot use the acquire device information function/authentication function(P. 66)
63

Troubleshooting
Troubleshooting
Troubleshooting ............................................................................................................................................... 65
Cannot use the acquire device information function/authentication function .............................................. 66
Cannot view or edit the Address Book ............................................................................................................... 68
64

Troubleshooting
This explains solutions to common problems.
Cannot use the acquire device information function/authentication function(P. 66)
Cannot view or edit the Address Book(P. 68)
Troubleshooting
65

Troubleshooting
Cannot use the acquire device information function/ authentication function
If you cannot acquire the device information, or cannot use the department ID management function or the
user authentication function, check the following.
Cause 1.
The device is turned off, or the cable is not plugged in properly.
Remedy
Check the status of the device.
Cause 2.
The function has not been set to match the connection environment.
Remedy
Conrm the printable area of the device, and correct the transmission data in the application you are using.
In a print server environment
● Install the Canon Driver Information Assist Service in the server computer using the driver installer.
● Install TCP/IP as a protocol in your environment from the CD-ROM for the operating system you are using.
When the device is connected in a USB connection or port connection environment
You cannot use the acquire device information, department ID management, and user authentication
functions. Also, you cannot use them in the following port connection environments:
● An environment in which the computer is directly connected to the device using the SMB function
● An environment in which [Enable printer pooling] in the [Ports] sheet of the printer properties screen of
Windows * is enabled
Use another connection environment such as a TCP/IP network connection environment for the acquire device
information, department ID management, and user authentication functions.
Cause 3.
The name of the device is too long.
Remedy
Conrm that the name of the device registered in the printer list of Windows does not exceed the following
number of characters.
● Device name: within 209 characters
● Share name: within 260 characters
If it exceeds the above numbers, change the name in the [General] or [Sharing] sheet of the Windows printer
properties screen *.
* The Windows printer properties screen can be displayed by either one of the following procedures.
66

If displaying from [ Settings] in the Start menu
(1) Display [Devices] > [Printers & scanners] → select the target device → click [Manage].
(2) In the [Manage your device] screen, click [Printer properties].
If displaying from [Control Panel]
(1) Display [Devices and Printers].
(2) From the printer list, right-click the device to be set → select [Printer properties] from the displayed menu.
Related Topics
Setting Device Information(P. 40)
Setting the Authentication Function(P. 42)
Troubleshooting
67

Troubleshooting
Cannot view or edit the Address Book
If you cannot view or edit the Address Book registered in the driver, the following causes can be considered.
Follow the instructions described in "Remedy."
Cause
You have no access privileges for the destination folder of the Address Book.
Remedy1.
Request your administrator to assign you access privileges for the destination folder.
Remedy2.
Change the save location of the Address Book to a folder for which you have access privileges in [Select
Destination] sheet > [Edit Address Book] dialog box > [Specify a Folder].
Related Topics
[Edit Address Book] Dialog Box(P. 51)
Adding the Address of a Person to the Address Book(P. 29)
Adding a Group to the Address Book(P. 30)
Importing/Exporting an Address Book(P. 31)
68

SIL OPEN FONT LICENSE
This Font Software is licensed under the SIL Open Font License,
Version 1.1.
This license is copied below, and is also available with a FAQ at:
http://scripts.sil.org/OFL
----------------------------------------------------------SIL OPEN FONT LICENSE Version 1.1 - 26 February 2007
-----------------------------------------------------------
PREAMBLE
The goals of the Open Font License (OFL) are to stimulate worldwide
development of collaborative font projects, to support the font
creation efforts of academic and linguistic communities, and to
provide a free and open framework in which fonts may be shared and
improved in partnership with others.
The OFL allows the licensed fonts to be used, studied, modied and
redistributed freely as long as they are not sold by themselves. The
fonts, including any derivative works, can be bundled, embedded,
redistributed and/or sold with any software provided that any reserved
names are not used by derivative works. The fonts and derivatives,
however, cannot be released under any other type of license. The
requirement for fonts to remain under this license does not apply to
any document created using the fonts or their derivatives.
DEFINITIONS
"Font Software" refers to the set of les released by the Copyright
Holder(s) under this license and clearly marked as such. This may
include source les, build scripts and documentation.
"Reserved Font Name" refers to any names specied as such after the
copyright statement(s).
"Original Version" refers to the collection of Font Software
components as distributed by the Copyright Holder(s).
"Modied Version" refers to any derivative made by adding to,
deleting, or substituting -- in part or in whole -- any of the
components of the Original Version, by changing formats or by porting
the Font Software to a new environment.
"Author" refers to any designer, engineer, programmer, technical
writer or other person who contributed to the Font Software.
PERMISSION & CONDITIONS
Permission is hereby granted, free of charge, to any person obtaining
a copy of the Font Software, to use, study, copy, merge, embed,
modify, redistribute, and sell modied and unmodied copies of the
Font Software, subject to the following conditions:
69

SIL OPEN FONT LICENSE
1) Neither the Font Software nor any of its individual components, in
Original or Modied Versions, may be sold by itself.
2) Original or Modied Versions of the Font Software may be bundled,
redistributed and/or sold with any software, provided that each copy
contains the above copyright notice and this license. These can be
included either as stand-alone text les, human-readable headers or
in the appropriate machine-readable metadata elds within text or
binary les as long as those elds can be easily viewed by the user.
3) No Modied Version of the Font Software may use the Reserved Font
Name(s) unless explicit written permission is granted by the
corresponding Copyright Holder. This restriction only applies to the
primary font name as presented to the users.
4) The name(s) of the Copyright Holder(s) or the Author(s) of the Font
Software shall not be used to promote, endorse or advertise any
Modied Version, except to acknowledge the contribution(s) of the
Copyright Holder(s) and the Author(s) or with their explicit written
permission.
5) The Font Software, modied or unmodied, in part or in whole,
must be distributed entirely under this license, and must not be
distributed under any other license. The requirement for fonts to
remain under this license does not apply to any document created using
the Font Software.
TERMINATION
This license becomes null and void if any of the above conditions are
not met.
DISCLAIMER
THE FONT SOFTWARE IS PROVIDED "AS IS", WITHOUT WARRANTY OF ANY KIND,
EXPRESS OR IMPLIED, INCLUDING BUT NOT LIMITED TO ANY WARRANTIES OF
MERCHANTABILITY, FITNESS FOR A PARTICULAR PURPOSE AND NONINFRINGEMENT
OF COPYRIGHT, PATENT, TRADEMARK, OR OTHER RIGHT. IN NO EVENT SHALL THE
COPYRIGHT HOLDER BE LIABLE FOR ANY CLAIM, DAMAGES OR OTHER LIABILITY,
INCLUDING ANY GENERAL, SPECIAL, INDIRECT, INCIDENTAL, OR CONSEQUENTIAL
DAMAGES, WHETHER IN AN ACTION OF CONTRACT, TORT OR OTHERWISE, ARISING
FROM, OUT OF THE USE OR INABILITY TO USE THE FONT SOFTWARE OR FROM
OTHER DEALINGS IN THE FONT SOFTWARE.
70
 Loading...