

Canon INC.
Canon Europa N.V.
P.O.Box 2262, 1180 EG Amstelveen, the Netherlands
Canon UK Ltd
Camera Division, Ribcon Way Luton Bedfordshire LU4 9UR, United Kingdom
Telephone 0870 241 2161
Canon Australia Pty. Ltd
1 Thomas Holt Drive, North Ryde, N.S.W. 2113, Australia
Telephone 805-2000, Fax 887-4484
Canon New Zealand Ltd
Fred Thomas Drive, Takapuna, P.O.Box 33-336, Auckland, New Zealand
Telephone 486-1570, Fax 486-6420
Canon Singapore Pte. Ltd
79 Anson Road #09-01/06, Singapore 079906
Telephone (65)-532-4400, Fax (65)-221-2939
Canon Hongkong Company Ltd
9/F, The Hong Kong Club Building, 3A Chater Road, Central, Hong Kong
Canon Latin America, Inc.
Sales & Enquiries: 6505 Blue Lagoon Drive Suite 325 Miami FL 33126 USA
PUB.DIE-156 © CANON INC. 2001 PRINTED IN KOREA
DY8-9020-092-000 IMPRIME EN COREE
8mm VIDEO CAMCORDER
Instruction Manual
E
PAL
This manual explains how to use the G2000/G15Hi and
G20Hi camcorders. In certain areas, all of these three
models may not be available.
Introduction
Basic
Operation
Advanced
Functions
Additional
Information
2
Introduction
E
CAUTION:
CUSTOMERS IN THE U.K. SHOULD READ THIS BEFORE USING THIS PRODUCT.
CHANGING THE FUSE
THE MAINS LEAD ON THIS PRODUCT IS FITTED WITH A NON-REWIREABLE
(MOULDED) PLUG, INCORPORATING A 3 AMP FUSE. SHOULD THE FUSE NEED TO
BE REPLACED AN ASTA OR BSI APPROVED BS1632 FUSE OF THE SAME RATING
MUST BE USED.
ALWAYS REFIT THE FUSE COVER AFTER REPLACING THE FUSE.NEVER USE THE
PLUG WITH THE FUSE COVER OMITTED.
CHANGING THE PLUG
IF THE FITTED PLUG IS NOT SUITABLE FOR YOUR SOCKET OUTLETS, IT SHOULD
BE CUT OFF AND AN APPROPRIATE PLUG FITTED IN ITS PLACE. IF POSSIBLE FIT
AN APPROPRIATE 3 AMP FUSE.IF THE NEW PLUG HAS NO FUSE, THEN FIT A 5
AMP FUSE AT THE DISTRIBUTION BOARD.
AC POWER CORD CONNECTION (CA-550KB only)
The wires in the mains lead of this apparatus are coloured in accordance with the
following cord.
(IMPORTANT)
As the colours of the wires in the mains lead may not correspond with the coloured
markings identifying the terminals in your plug, proceed as follows:The wire which
is coloured BLUE must be connected to the terminal which is marked with the letter
N or coloured black.The wire which is coloured BROWN must be connected to the
terminal which is marked with the letter L or coloured red. Neither Blue wire or
Brown wire is to be connected to the Earth pin of a 3 pin plug.
THE SEVERED PLUG MUST BE DESTROYED IMMEDIATELY TO AVOID ANY
POSSIBLE ELECTRIC SHOCK HAZARD.
Important Usage Instructions
CAUTION:
TO REDUCE THE RISK OF ELECTRIC SHOCK, DO NOT REMOVE COVER
(OR BACK). NO USER SERVICEABLE PARTS INSIDE. REFER SERVICING
TO QUALIFIED SERVICE PERSONNEL.
WARNING:
TO REDUCE THE RISK OF FIRE OR ELECTRIC SHOCK, DO NOT EXPOSE
THIS PRODUCT TO RAIN OR MOISTURE.
CAUTION:
TO REDUCE THE RISK OF ELECTRIC SHOCK AND TO REDUCE ANNOYING
INTERFERENCE, USE THE RECOMMENDED ACCESSORIES ONLY.
Mains Lead
BLUE..............NEUTRAL
BROWN..........LIVE

3
Introduction
E
Contents
Important Usage Instructions . . . . . . . . . . . . . . . . . . . . . . . . . . . . . . . . . . . . . . . . . .2
Thank you for Choosing a Canon . . . . . . . . . . . . . . . . . . . . . . . . . . . . . . . . . . . . . .4
Introducing the Camcorder . . . . . . . . . . . . . . . . . . . . . . . . . . . . . . . . . . . . . . . . . . .5
Finding Your Way Around the G2000/G15Hi/G20Hi
. . . . . . . . . . . . . . . . . . . . . . . .6
Powering Your Camcorder . . . . . . . . . . . . . . . . . . . . . . . . . . . . . . . . . . . . . . . . . . . .8
Loading a Cassette . . . . . . . . . . . . . . . . . . . . . . . . . . . . . . . . . . . . . . . . . . . . . . . .11
Basic Recording . . . . . . . . . . . . . . . . . . . . . . . . . . . . . . . . . . . . . . . . . . . . . . . . . .13
Zooming . . . . . . . . . . . . . . . . . . . . . . . . . . . . . . . . . . . . . . . . . . . . . . . . . . . . . . . .15
Playing Back a Cassette . . . . . . . . . . . . . . . . . . . . . . . . . . . . . . . . . . . . . . . . . . . .17
Connecting for Playback on a TV Screen . . . . . . . . . . . . . . . . . . . . . . . . . . . . . . .19
Tips for Making Better Videos
. . . . . . . . . . . . . . . . . . . . . . . . . . . . . . . . . . . . . . . .21
Selecting from the Menus . . . . . . . . . . . . . . . . . . . . . . . . . . . . . . . . . . . . . . . . . . .23
Setting Custom Keys . . . . . . . . . . . . . . . . . . . . . . . . . . . . . . . . . . . . . . . . . . . . . . .25
Image Stabilizer (G15Hi/G20Hi) . . . . . . . . . . . . . . . . . . . . . . . . . . . . . . . . . . . . . .27
Using the Wireless Controller . . . . . . . . . . . . . . . . . . . . . . . . . . . . . . . . . . . . . . . .28
Setting the Date and Time . . . . . . . . . . . . . . . . . . . . . . . . . . . . . . . . . . . . . . . . . . .30
Adding Titles . . . . . . . . . . . . . . . . . . . . . . . . . . . . . . . . . . . . . . . . . . . . . . . . . . . .32
Fade . . . . . . . . . . . . . . . . . . . . . . . . . . . . . . . . . . . . . . . . . . . . . . . . . . . . . . . . . . .34
Searching and Reviewing While Recording . . . . . . . . . . . . . . . . . . . . . . . . . . . . . .35
Using the Various Recording Programs . . . . . . . . . . . . . . . . . . . . . . . . . . . . . . . . .36
Focusing . . . . . . . . . . . . . . . . . . . . . . . . . . . . . . . . . . . . . . . . . . . . . . . . . . . . . . . .38
Adjusting the Exposure Manually . . . . . . . . . . . . . . . . . . . . . . . . . . . . . . . . . . . . .40
Taking Still Pictures (Photo Mode) (G20Hi) . . . . . . . . . . . . . . . . . . . . . . . . . . . . .43
Using Digital Effects . . . . . . . . . . . . . . . . . . . . . . . . . . . . . . . . . . . . . . . . . . . . . . .44
Using the Built-in Video Light (G20Hi) . . . . . . . . . . . . . . . . . . . . . . . . . . . . . . . . .48
Simple Editing to a VCR . . . . . . . . . . . . . . . . . . . . . . . . . . . . . . . . . . . . . . . . . . . .49
Preparing the Camera . . . . . . . . . . . . . . . . . . . . . . . . . . . . . . . . . . . . . . . . . . . . . .50
Notes on Using the Batteries . . . . . . . . . . . . . . . . . . . . . . . . . . . . . . . . . . . . . . . . .52
Video System
. . . . . . . . . . . . . . . . . . . . . . . . . . . . . . . . . . . . . . . . . . . . . . . . . . . .55
Optional Accessories
. . . . . . . . . . . . . . . . . . . . . . . . . . . . . . . . . . . . . . . . . . . . . . .56
Cautions and Maintenance
. . . . . . . . . . . . . . . . . . . . . . . . . . . . . . . . . . . . . . . . . . .59
Troubleshooting
. . . . . . . . . . . . . . . . . . . . . . . . . . . . . . . . . . . . . . . . . . . . . . . . . .63
Viewfinder Displays
. . . . . . . . . . . . . . . . . . . . . . . . . . . . . . . . . . . . . . . . . . . . . . .66
Specifications
. . . . . . . . . . . . . . . . . . . . . . . . . . . . . . . . . . . . . . . . . . . . . . . . . . . .68
Index
. . . . . . . . . . . . . . . . . . . . . . . . . . . . . . . . . . . . . . . . . . . . . . . . . . . . . . . . . . .69
Introduction
Quick Overview
Advanced Functions
Additional Information

4
Introduction
E
First, we’d like to thank you for buying
this Canon camcorder. Its advanced
technology makes it very easy to use —
you will soon be making high-quality
home videos which will give you
pleasure for years to come.
To get the most out of your new
camcorder, you should read this manual
thoroughly — there are many
sophisticated features which will add to
your recording enjoyment.
Thank you for Choosing a Canon
WL-85 Wireless
Controller
BP-911K
Battery Pack
CA-550K Compact
Power Adapter
Two Lithium button
battery (CR2025)
SS-500
Shoulder Strap
C-250 AV Cable
PC-A5 SCART
Adapter
(Europe and Asia)
Lens cap and lens cap cord
(Attached to camera)
Check that this package contains the
following accessories:
Getting started
To get started we suggest that you
master the basic operations of the
camcorder first, before moving on to
use its full range of features.
For quick reference (in addition to the
contents and index) please refer to:
• Finding Your W ay Around the
G2000/G15Hi/G20Hi (p. 6)
• Screen displays (p. 66)
• Troubleshooting — in case you run
into any problems (p. 63)
Note that capital letters are used to
refer to settings that appear in the
display and buttons labeled on the
camcorder itself e.g. Press the EJECT
5 button.
5
Introduction
E
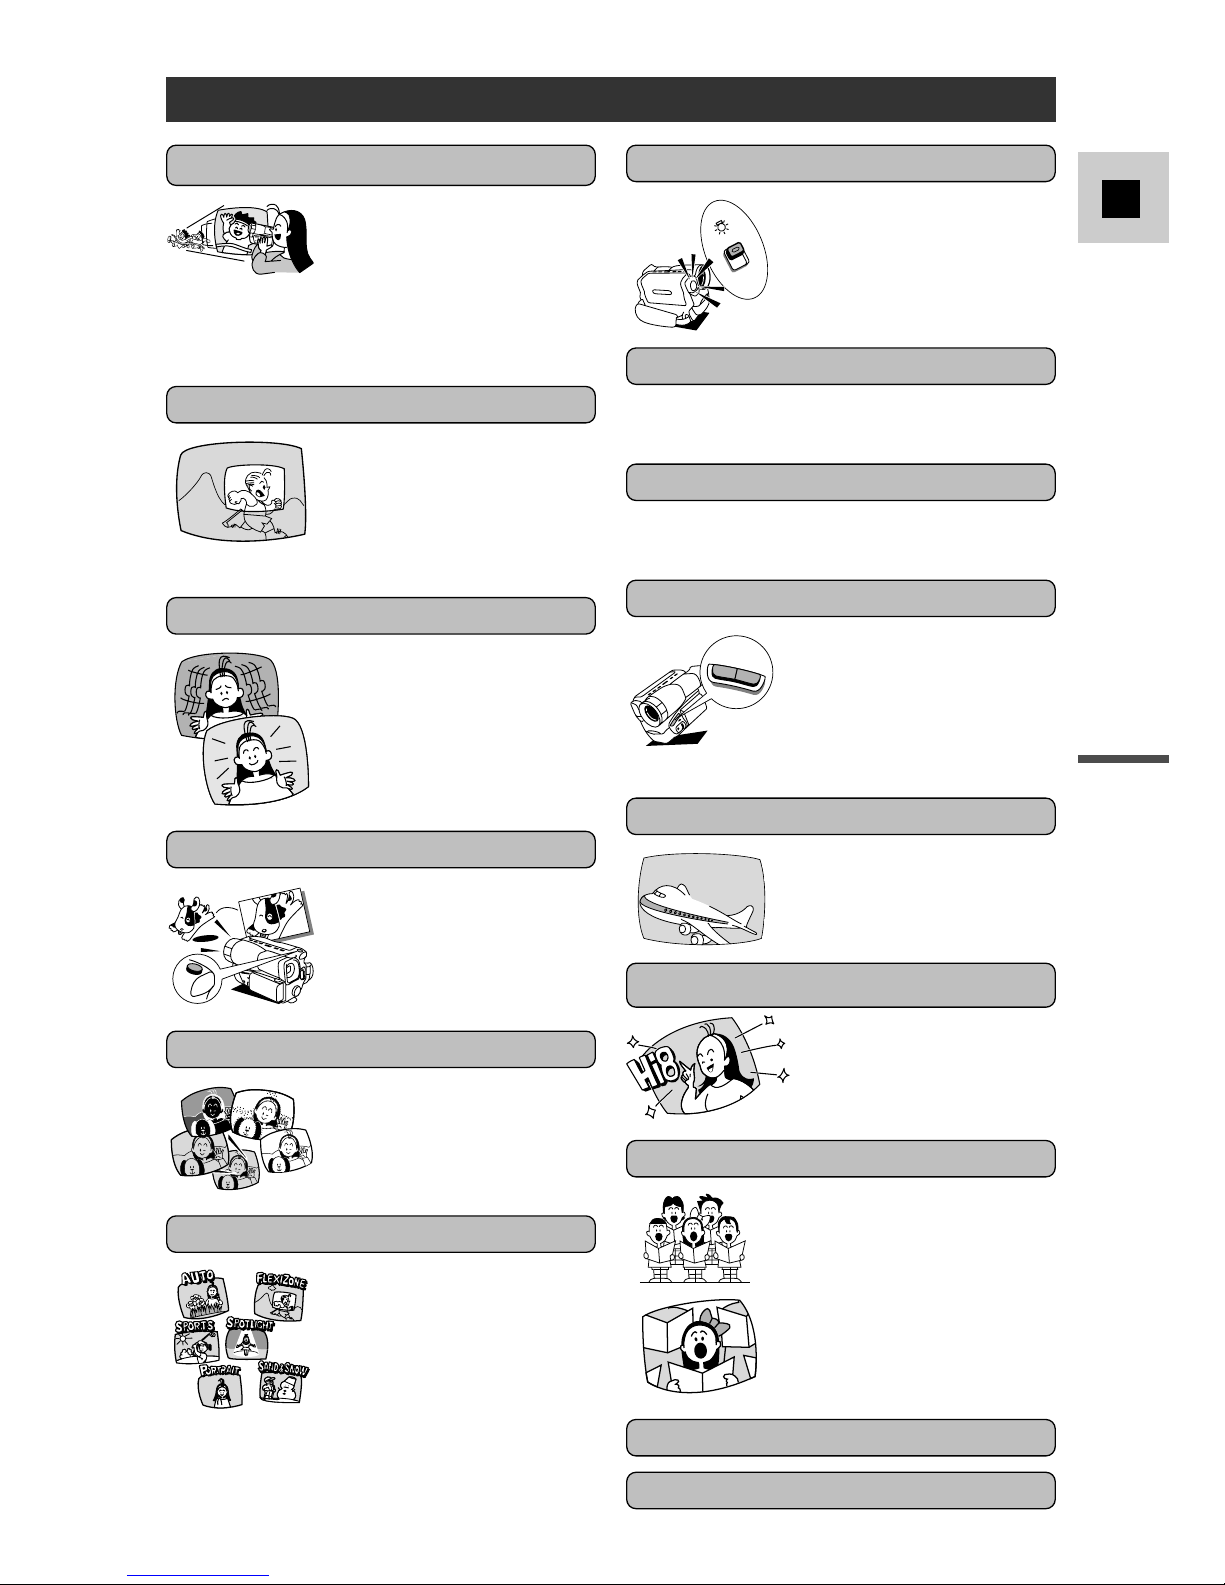
Introducing the Camcorder
22× lens (700× Digital Zoom)
Image stabilizer (G15Hi/G20Hi)
From wide-angle to 22×
telephoto — with
unparalleled optical quality.
The digital zoom multiplies
this magnification by more
than 22× for even more
dramatic results.
Images are stabilized even in
long telephoto shots.
Digital effects
Advanced digital technology
allows you to add special
effects during recording and
playback.
Powerful recording programs
Titles
Six recording programs deal
with everything from simple
point-and-shoot operation to
the most challenging
recording conditions.
You can choose from a
selection of preset titles to
add to your recording.
Colour viewfinder (G20Hi)
Remote control
You don’t have to wait until
playback to see your shots in
colour. Thanks to the highresolution LCD viewfinder,
you can see just what you’re
getting on tape, making it
easy to shoot colourful,
well-composed video.
Custom Keys
With the unique Custom
Keys, you can decide which
functions you want at your
fingertips. Assign frequently
used functions to the keys on
the camera body.
CUSTOM KEYS
2
1
WEDDING
Easier than manual operation
and more flexible than
automatic functions, Canon’s
FlexiZone Control is a
completely new way to use a
video camera.
FlexiZone Control
The built-in video light
brightens at the touch of a
switch. Recording in low
light (or no light) has never
been easier.
ON
OFF
Video light (G20Hi)
Fade
Photo Mode (G20Hi)
PHOTO
You can record still pictures
like a photograph for
approximately 7 seconds.
Digitally compensates for picture jitter during
playback resulting in a stable picture.
Time base corrector
A small but powerful battery pack that can be
charged at any time.
Lithium ion power supply
Hi8 is the format that
most video professionals
rely on for high quality
and long recording times.
Hi8 (G15Hi/G20Hi)
6
Quick Overview
E
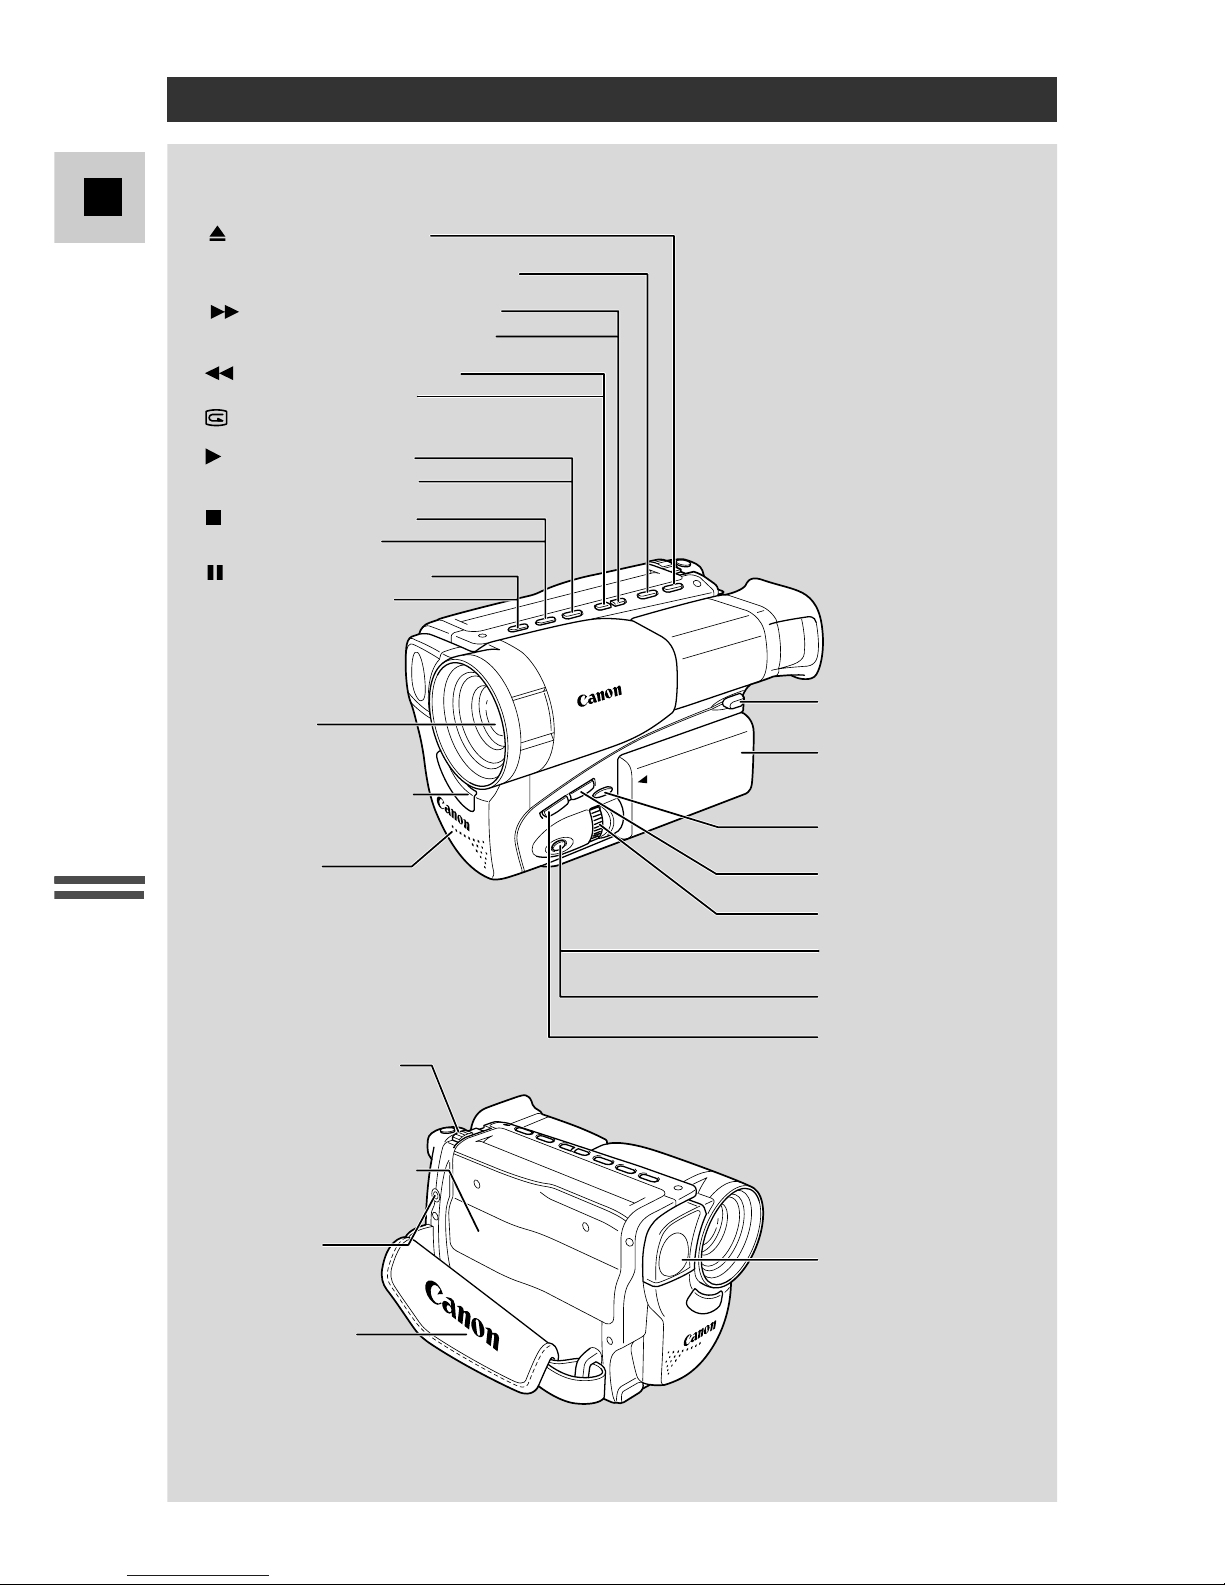
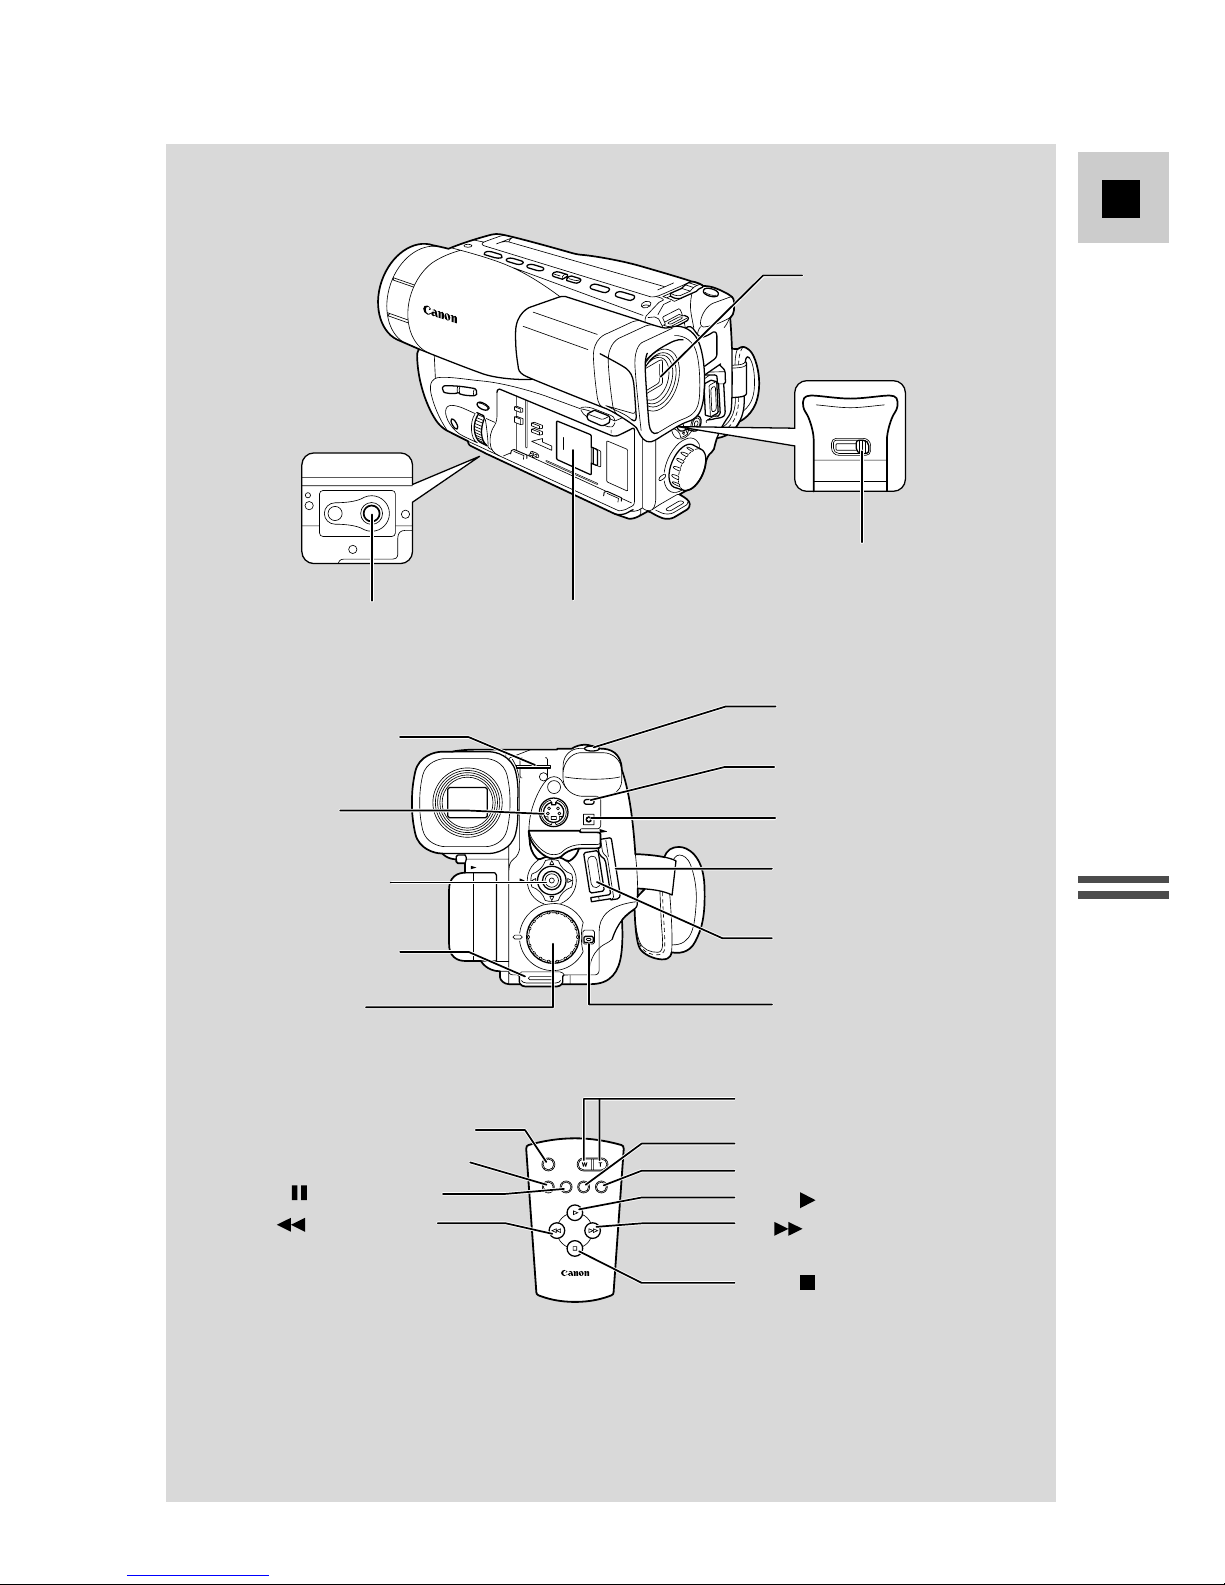
Finding Your Way Around the G2000/G15Hi/G20Hi
Battery pack
(p. 9–10, 52–53)
MENU button
(p. 23, 24)
Custom key 2 (p. 25)
Custom key 1 (p. 25)
SELECT dial (p. 24)
FOCUS button
(p. 38, 39)
SET button (p. 24)
Audio/Video
Output terminal
(p. 20)
Video light (G20Hi)
(p. 48)
BATTERY RELEASE
button (p. 9)
C. (counter) RESET button (p. 18)
(pause) button (p. 17)
FADE button (p. 34)
(stop) button (p. 17)
BLC button (p. 40)
(play) button (p. 17)
D.ZOOM button (p. 15)
(rewind) button (p. 17)
REC SEARCH – and
(record review) button (p. 35)
(fast forward) button (p. 17)
REC SEARCH + button (p. 35)
EJECT button (p. 11)
Microphone
Lens (p. 60)
Remote sensor (p. 28)
Cassette compartment
(p. 11)
Zoom control (p. 15)
Grip belt (p. 50)
7
Quick Overview
E
Start/stop button (p. 13)
STANDBY cover (p. 13)
Viewfinder
focusing
switch (p. 50)
Video light switch (G20Hi)
(p. 48)
PHOTO button (G20Hi)
(p. 43)
DC IN terminal (p. 8)
ZOOM buttons (p. 15)
TAPE RETURN button (p. 18)
COUNTER RESET button (p. 18)
FF button (p. 17)
PLAY button (p. 17)
STOP button (p. 17)
Viewfinder (p. 50, 60)
Strap attachment bar
(p. 51)
Strap attachment bar
(p. 51)
S-video output
terminal (G15Hi/G20Hi)
(p. 19)
Program selector
(p. 13–14, 36–37)
FlexiZone controller
(p. 38)
Backup battery
holder (p. 54)
ON SCREEN button (p. 66)
START/STOP button (p. 13)
PAUSE button (p. 17)
REW button (p. 17)
Tripod socket
(p. 21)
CHARGE indicator (p. 9)
8
Quick Overview
E
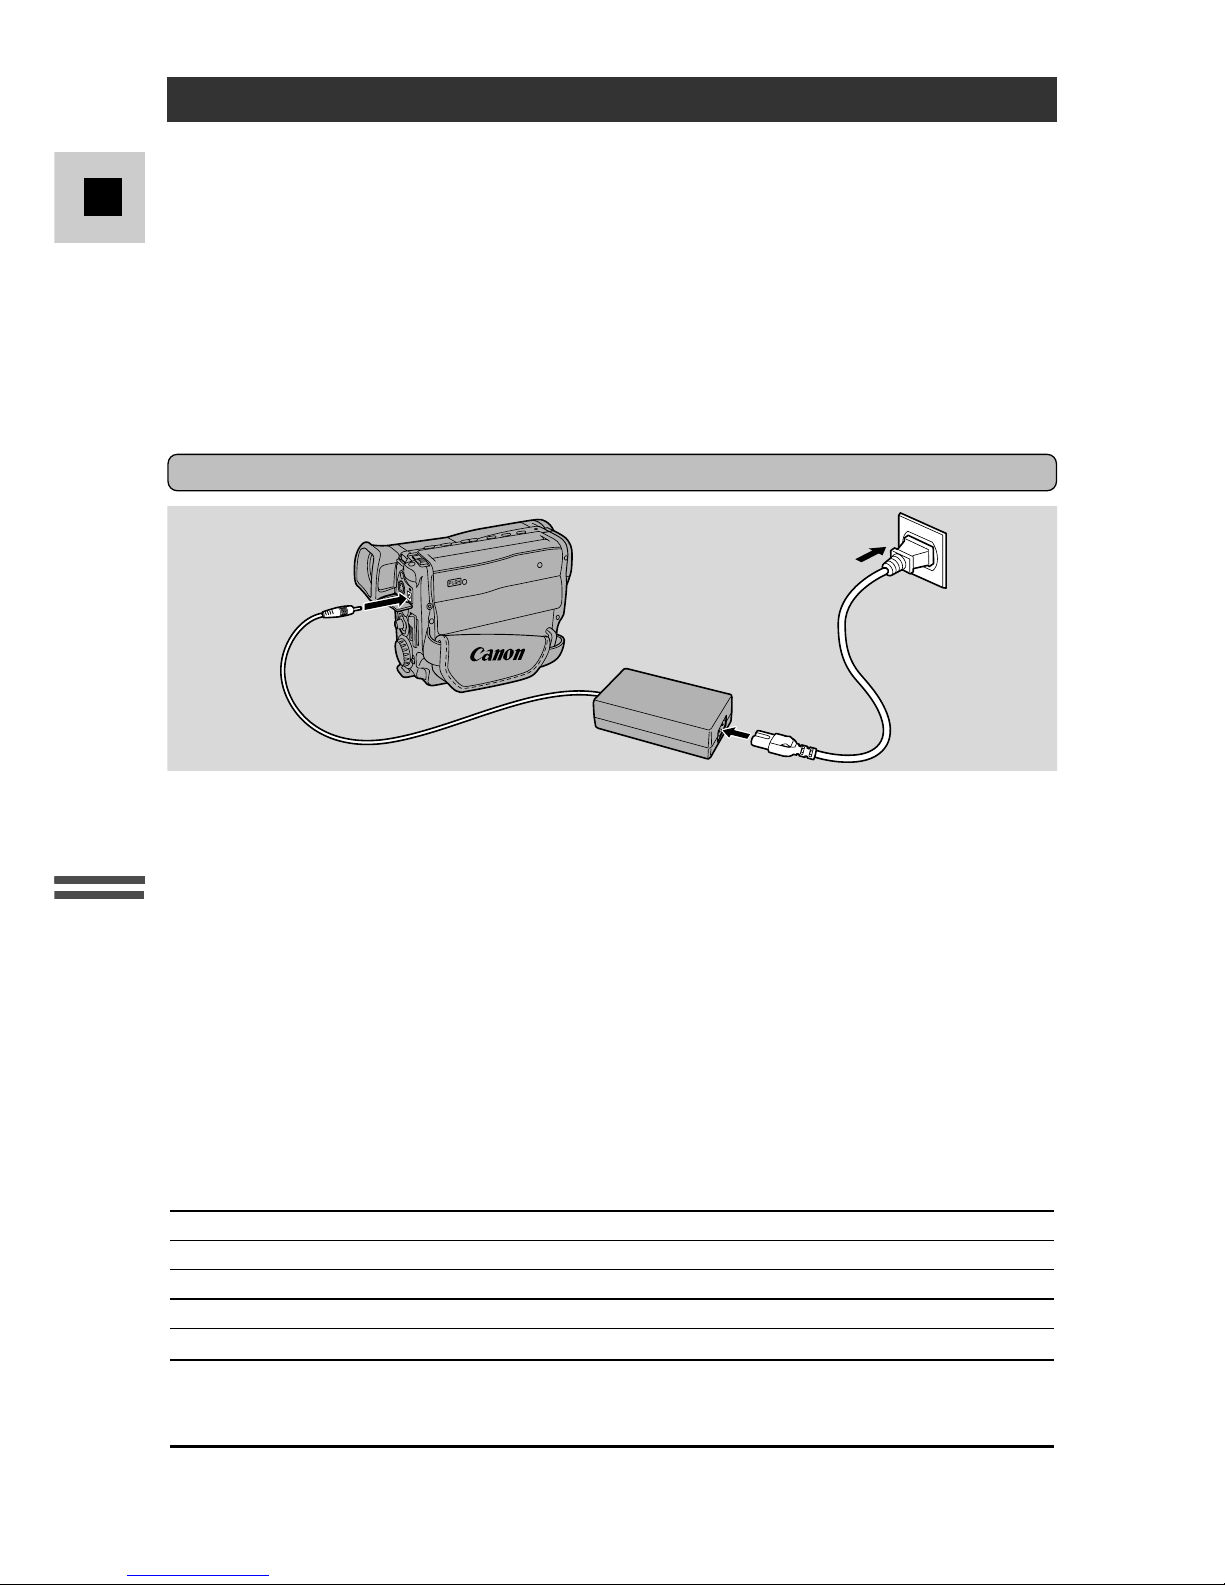
Powering Y our Camcorder
Connecting the camera to a mains outlet
2
1
3
Before operating your camera, you will need to use the power adapter to:
Provide power from an AC outlet
or
Charge a battery pack
Notes:
• The power adapter converts current from a household power socket (100–240 V AC,
50/60 Hz) to the DC current used by your camera.
• If the adapter is used next to a TV, it may cause noise bars to appear on the TV—
move the adapter away from the TV or the aerial cable.
Use the power adapter to provide your camera with instant power from an AC
outlet.
1. Connect the AC cable to the power adapter.
2. Open the terminal cover from its top and connect the power adapter to
the camera’s DC IN terminal.
3. Connect the power adapter to a mains outlet.
4. Remove the power adapter after use.
• Always turn the camera off before connecting/removing the power source.
• For the power adapter, use only Canon CA-550K (or CA-550). Do not use
other equipment.
CA-550K Compact power adapter
Specifications
Power supply 100–240 V AC, 50/60 Hz
Power consumption 20 W
Rated output 8.4 V, 1.5 A DC
Operating temperature range 0°–40°C (32°–104°F)
Dimensions 105 × 30 × 56 mm (4 1/8 × 1 1/8 × 2 1/4 in)
Weight 270 g (9
1
/2 oz)
UK Model: 305 g (10
3
/4 oz)
Australia Model: 290 g (10 1/4 oz)
Weight and dimensions are approximate. Errors and omissions excepted.
Subject to change without notice.
9
Quick Overview
E
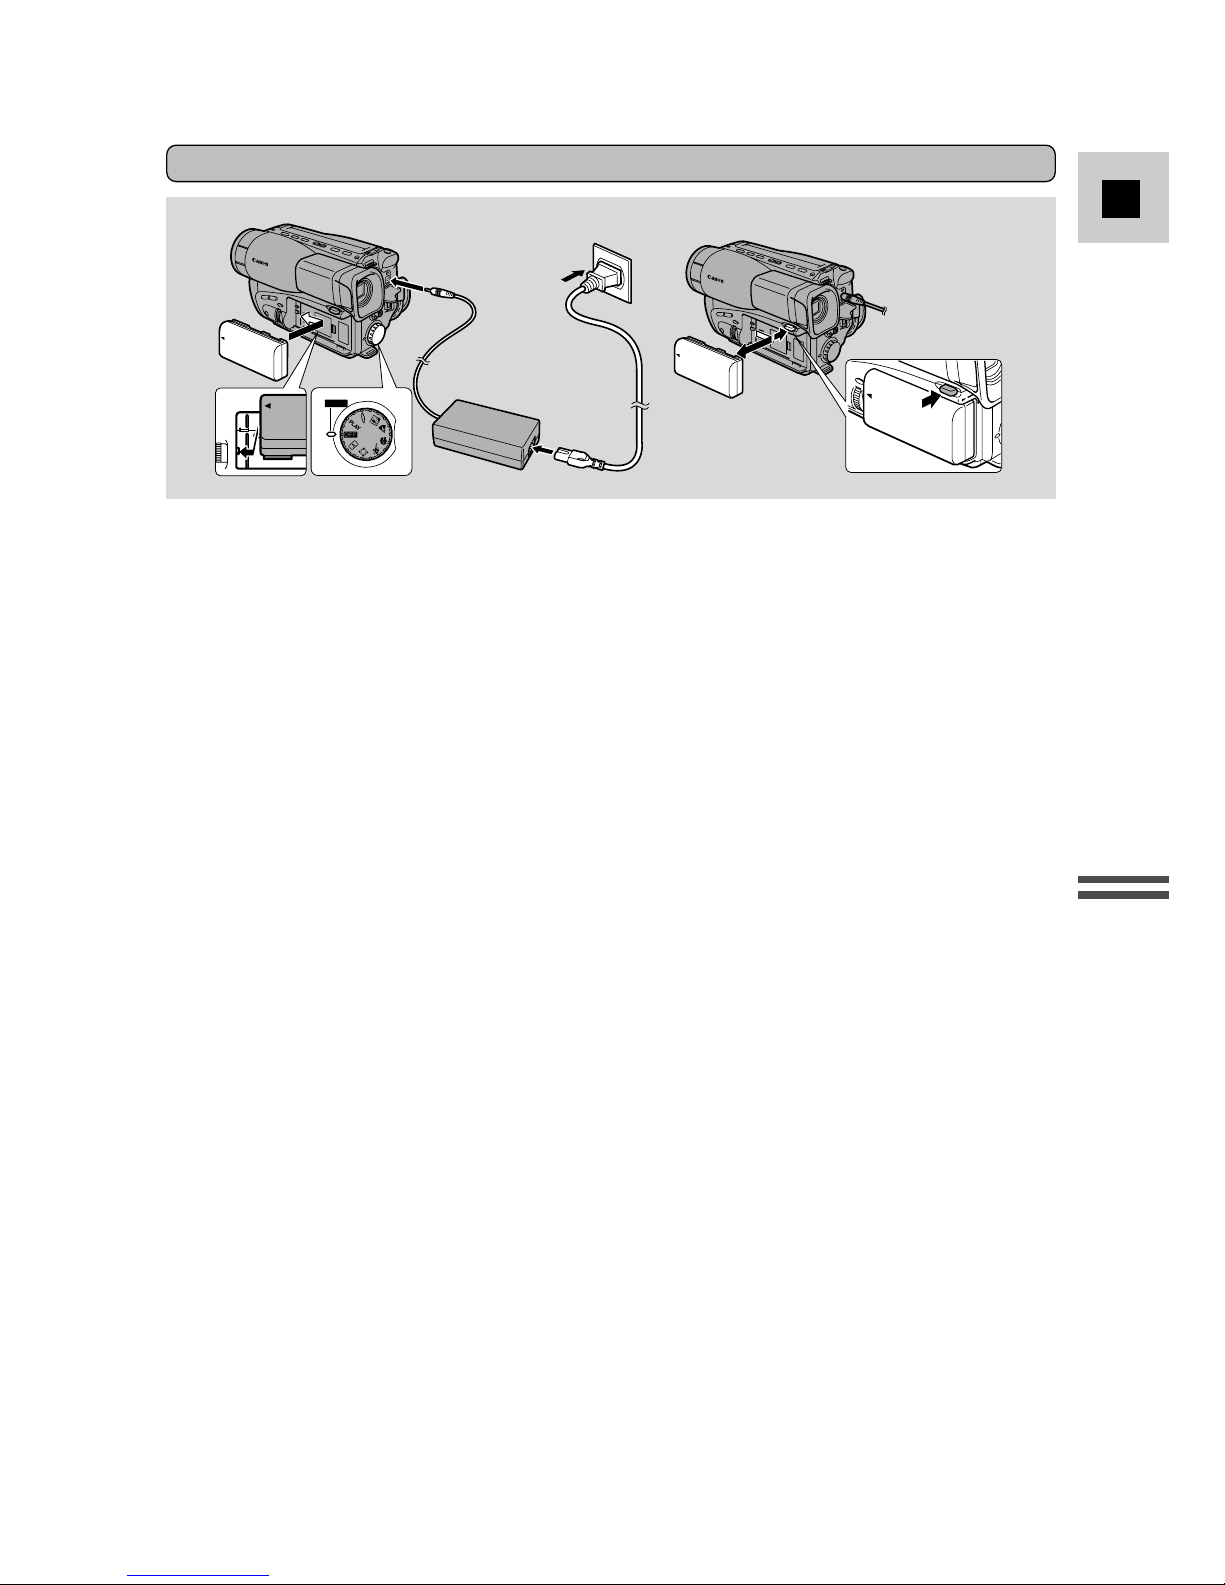
Charging and attaching the battery pack
Your battery pack was partially charged before it left the factory. It should have
enough power for you to check that your camera is working properly. However,
you must charge the battery pack fully if you want it to power the camera for
more than a few minutes.
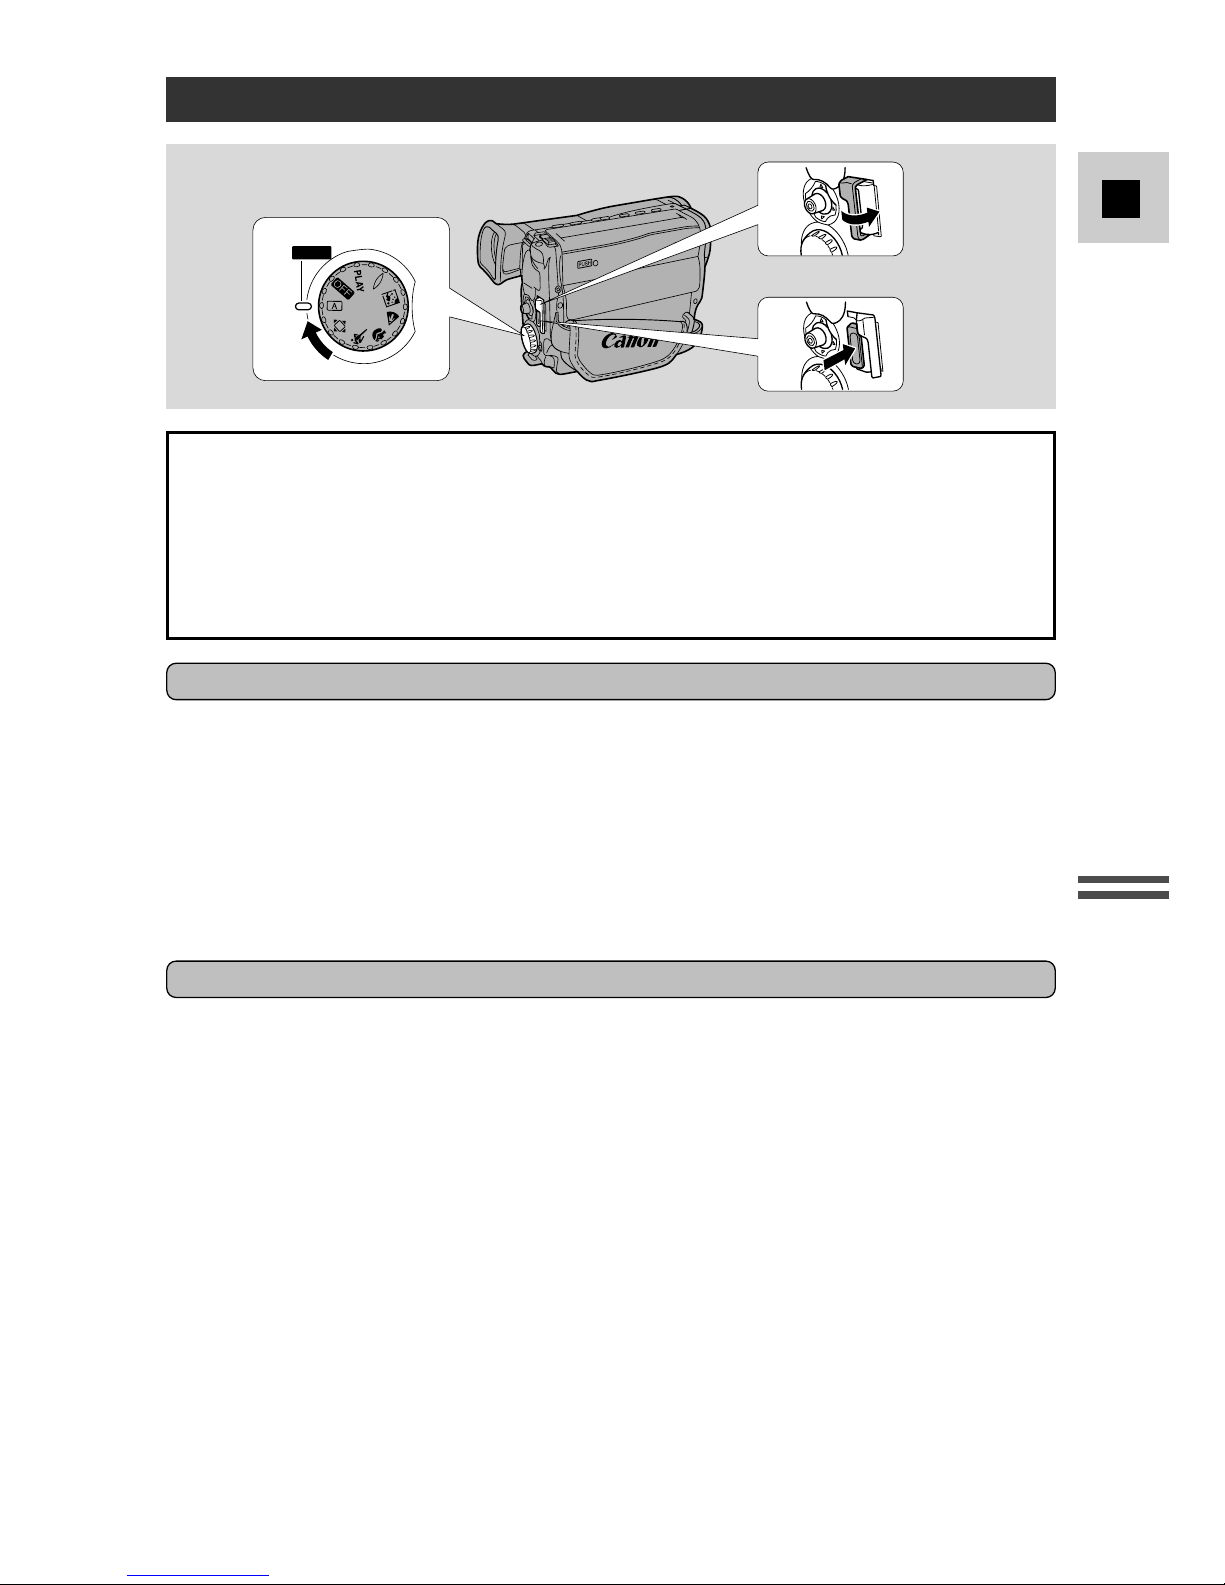
1. Set the Program selector to OFF before you charge the battery pack.
2. Open the terminal cover from its top and connect the power adapter
to the camera’s DC IN terminal.
3. Attach the battery pack to the camera.
• Align the triangle on the battery pack with the line on the camera. Slide the
battery in the direction of the arrow until it clicks into place.
4. Plug the adapter into a mains outlet.
• The charge indicator flashes to show that charging is in progress. Single
flashes mean that the battery pack is less than 50% charged. Double flashes
mean that it is between 50% and 75% charged. Triple flashes mean that it is
more than 75% charged. The indicator glows steadily when the battery pack
is fully charged.
5. When charging is complete, disconnect the power adapter.
6. Detach the battery pack after use.
• Press and hold the BATTERY RELEASE button while you slide the battery
off the camera.
• Always turn the camera off before removing the power source.
Note:
• You can find detailed notes for using the batteries in the “Notes on Using the
Batteries” on p. 52. These notes include charging and recording times and how to
install the backup battery.
3
2
4
BATTERY
POWER
6
BATTERY RELEASE

10
Quick Overview
E
* Continuous recording time will be reduced by approx. 50% with continued
use of the video light. (G20Hi)
• These times vary — the safest policy is always to have 2 or 3 times as many
battery packs as you think you will need.
Continuous recording time (G20Hi: video light off) *
G2000 G15Hi/G20Hi*
BP-911K (supplied) 2 hrs. 30 min. 2 hrs. 10 min.
BP-915 (optional) 2 hrs. 35 min. 2 hrs. 10 min.
BP-930 (optional) 5 hrs. 10 min. 4 hrs. 20 min.
BP-945 (optional) 7 hrs. 55 min. 6 hrs. 40 min.
Charging time
BP-911K (supplied) 3 hrs.
BP-915 (optional) 4 hrs.
BP-930 (optional) 6 hrs.
BP-945 (optional) 8 hrs. 30 min.
Charging and recording times
11
Quick Overview
E
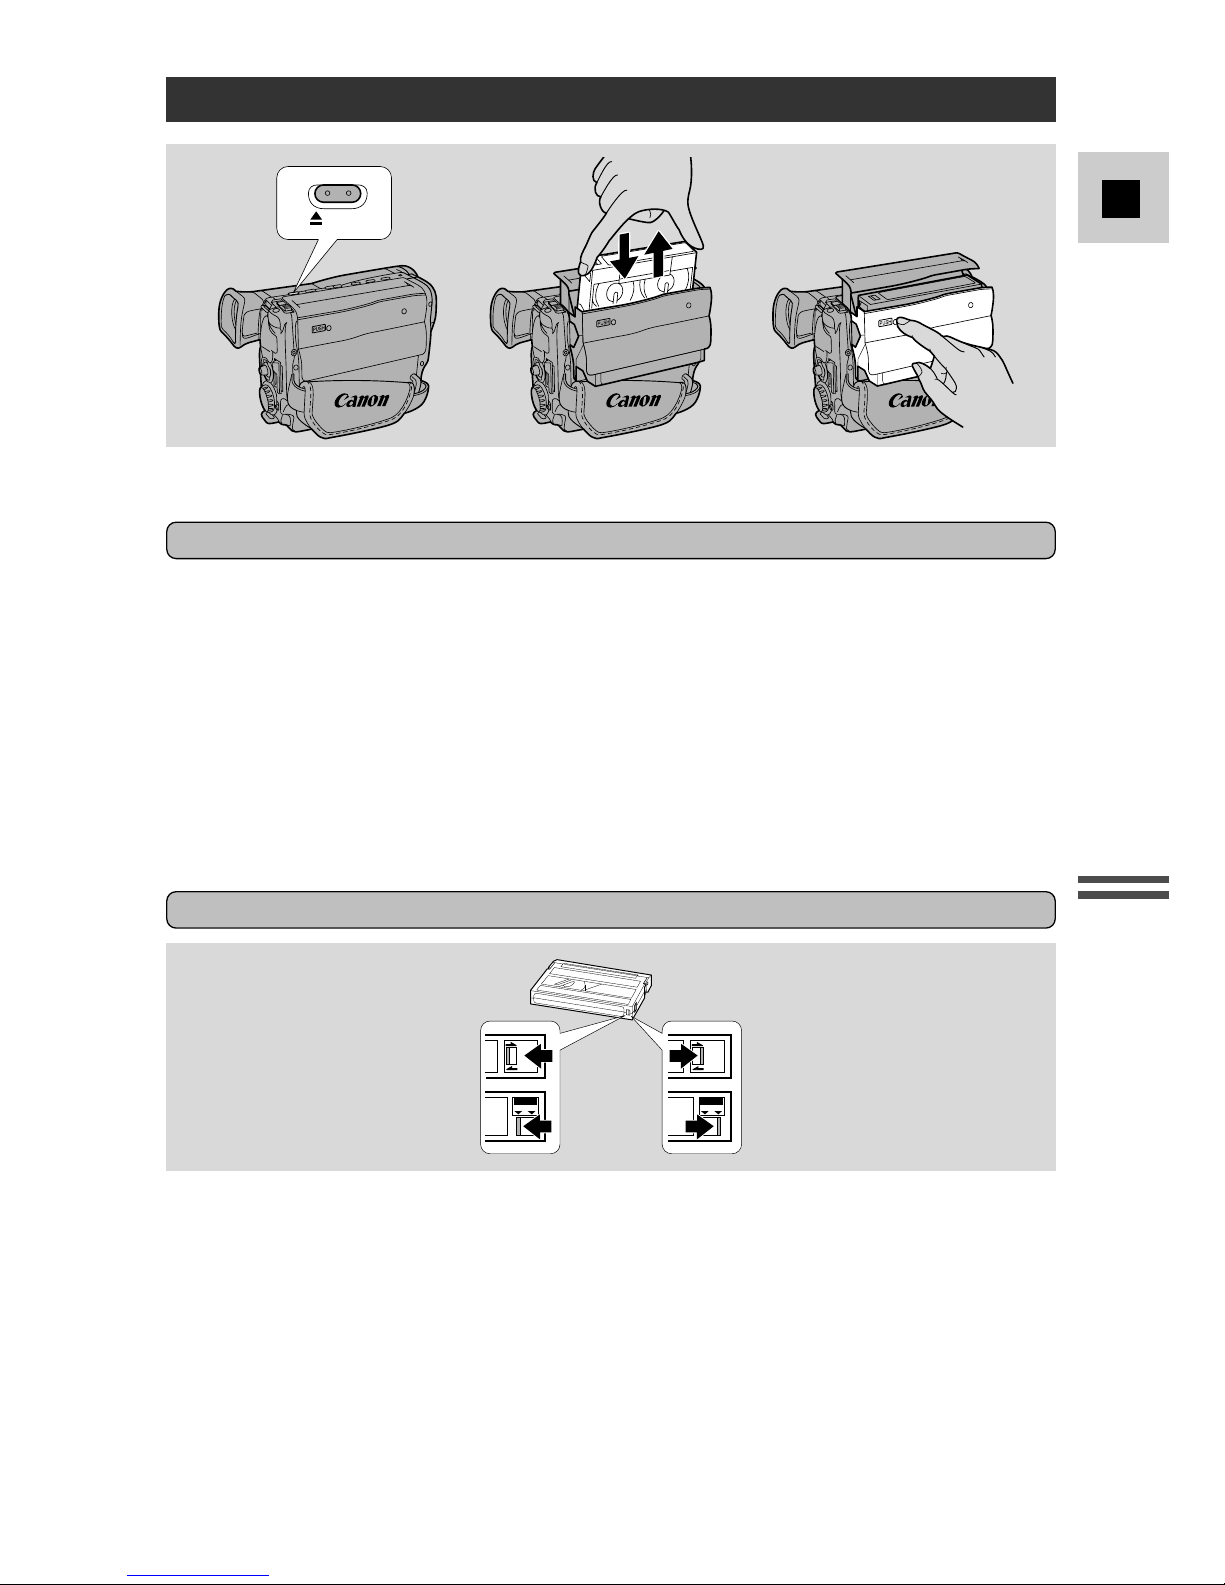
Loading a Cassette
34
2
EJECT
Use video cassettes marked with an f(or
g
for G15Hi/G20Hi).
Loading and unloading
1. Make sure that you have attached or connected a power source.
2. Press the 5 EJECT button and wait for the cassette compartment to
open.
3. Load/unload the cassette.
• Insert the cassette gently with the window facing out.
• Remove the cassette by pulling it straight out.
4. Press the P mark on the compartment until it clicks, and wait for it
to close.
• Never push down the top of the compartment.
Protecting tapes from accidental erasure
REC
SAVE
REC
SAVE
ERASE
OFF
ON
ERASE
OFF
ON
To protect your recordings from accidental erasure, slide the red switch on the
cassette so that it covers the hole. (This switch position is usually labeled SAVE
or ERASE OFF.) If you load this cassette and power on the camera, “v” flashes
in the viewfinder.
If you want to record on the cassette again, slide the red switch back so the hole is
open. (This position is usually labeled REC or ERASE ON.)

12
Quick Overview
E
Notes:
• Do not interfere with the compartment while it is opening or closing automatically.
• After loading a cassette, use record search (p. 35) to find the point where you want
to start recording.
• Do not leave the cassette in the camera after use — return it to its case and store it
in a cool, clean, dry place.
• The holes in the back of the cassette are used for transferring information — do not
cover them.
Handling cassettes
• To protect the tape heads, transfer cassettes directly from the tape case to the
camcorder – do not open the tape protect cover or touch the tape itself.
• Do not use cassettes where the tape has been damaged or rejoined – they may
damage the camcorder.
• Do not insert anything into the small holes on the cassette or cover them with
cellophane tape.
• Handle cassettes with care – dropping them or exposing them to external shocks
may cause internal damage.
• Store cassettes in the provided case, rewinding them to the start of the tape first,
and then storing them upright.
To record or play back in the Hi8 format, you need both a Hi8 camcorder and a
Hi8 cassette (you can use either Metal-P or Metal-E Hi8 cassettes).
A Hi8 camcorder can record or play back in either the Hi8 format or standard
8mm format, depending on the tape used.
The superior quality of Hi8 can best be appreciated on a TV which has an S-video
input terminal.
About Hi8 (G15Hi/G20Hi)
13
Quick Overview
E
Basic Recording
2
3,4
1
POWER
Before you start recording
Have you completed the following steps?
• Attach a power source (p. 8).
• Load a cassette (p. 11).
• Adjust the viewfinder and fasten the grip belt (p. 50).
• Remove the lens cap (p. 50).
You may also want to install the backup battery (p. 54) in order to set date and
time display (p. 30).
To record
1. Turn the program selector to the aposition.
• This selects the camera’s Automatic recording program. It allows you to
simply point and shoot without making any manual adjustments.
2. Open the STANDBY cover.
• PAUSE appears in the viewfinder — the camera is now in “record pause
mode.”
3. Press the start/stop button to begin recording.
• REC appears in the viewfinder.
4. Press the start/stop button again to pause recording.
• The camera returns to record pause mode and PAUSE reappears in the
viewfinder.
• You can stop and restart recording as often as you like by pressing the
start/stop button.
• The camera will turn itself off if you leave it in record pause mode for more
than about 5 minutes. To return to record pause mode, close and reopen the
STANDBY cover, or set the program selector to OFF and then back to
camera mode.
Safe cassette operation
When you turn the power off or remove the power source, be sure to set the
camcorder first to record pause, stop or still pause mode.
Turning the power off or removing the power source while the tape is moving
(during recording, play, rewind for example), will make the counter display
appear wrong or may cause tape damage.
14
Quick Overview
E
When you have finished recording
• Replace the lens cap.
• Unload the cassette.
• Set the program selector to OFF.
• Disconnect the power source.
Notes:
• To check that the camera is recording correctly, be sure to make a test recording
first.
• Before making important recordings, clean the video heads using Canon CC-8
Video Head Cleaning Cassette or a commercially available dry-type head cleaning
cassette.
• For tips on how to make better videos, see page 21.
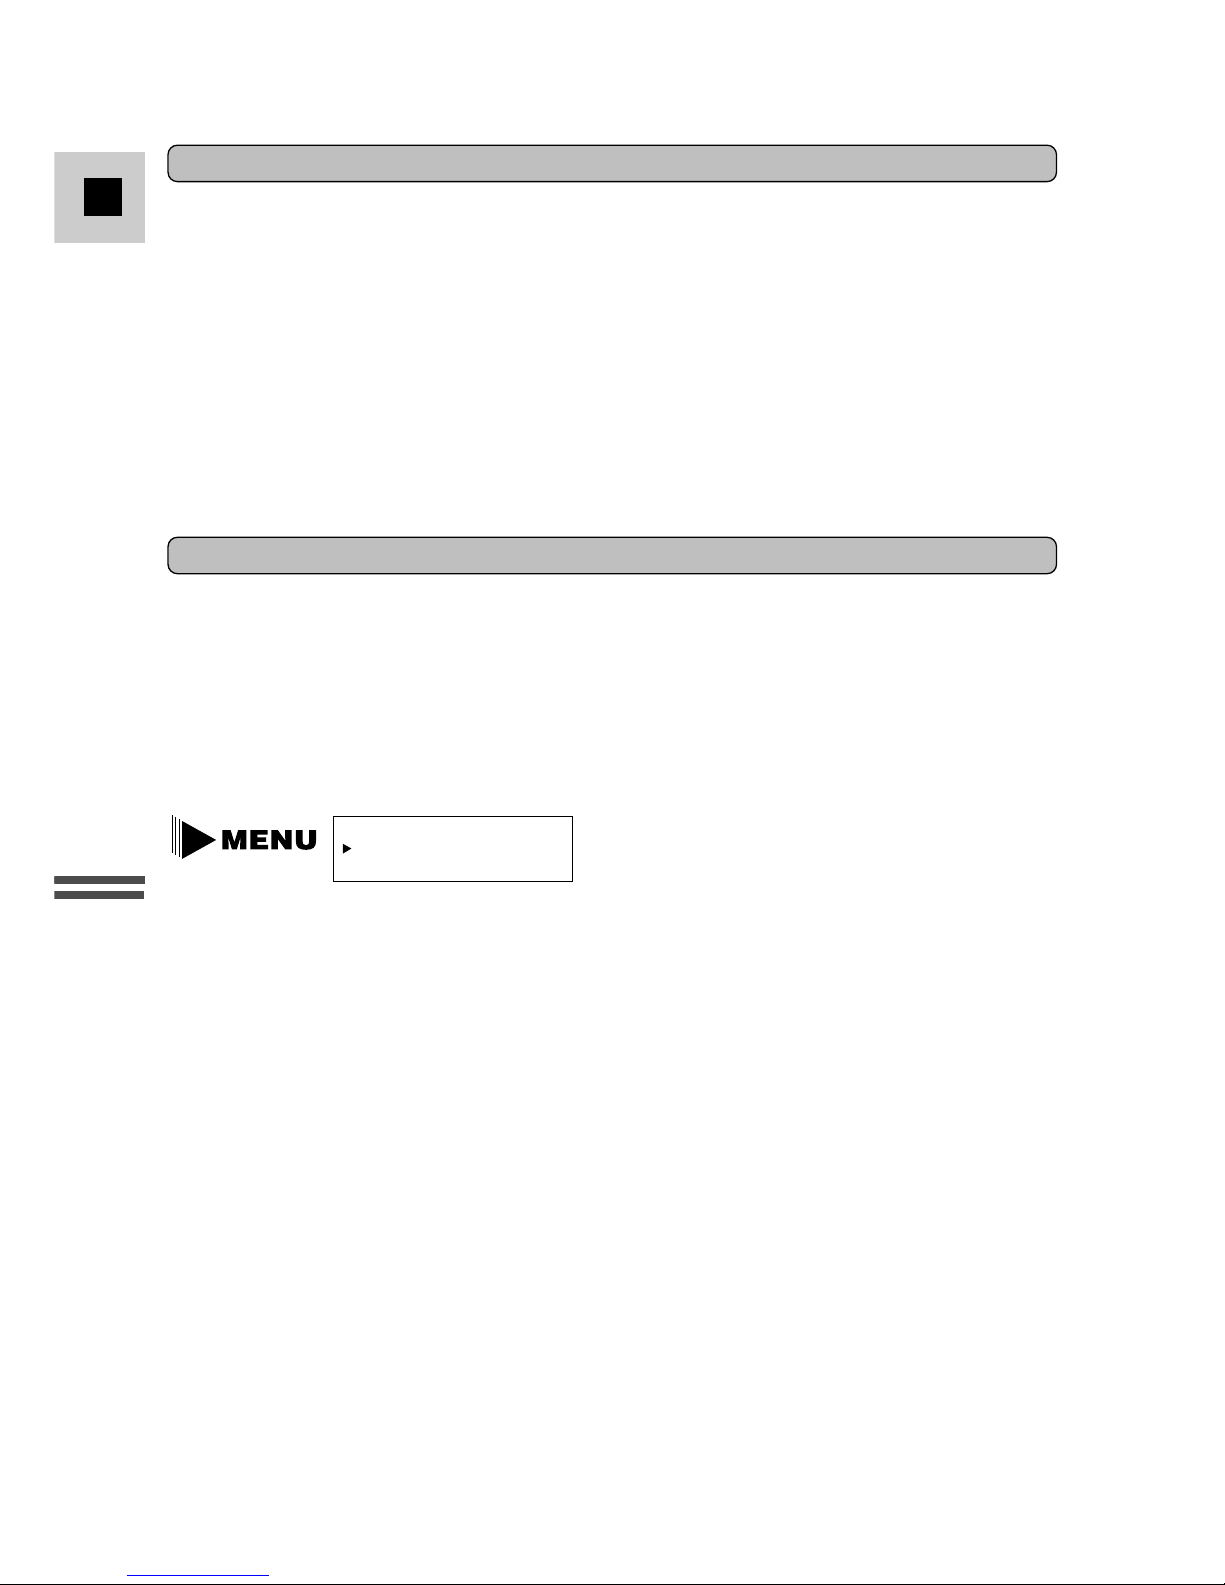
To see a demonstration of the camera’s main features, before loading the cassette,
go to the DEMONSTRATION option in the camera menu. Select the ON setting
and close the menu. The demonstration also starts automatically if the power has
been on for ten minutes without a cassette loaded into the cassette compartment.
(You can avoid this by turning the DEMONSTRATION to OFF through the
camera menu.) To cancel the demonstration once it has begun: push the menu
button, turn off the power, or load a cassette.
Demonstration
DEMONSTRATION ON
...
(see p. 23)
15
Quick Overview
E
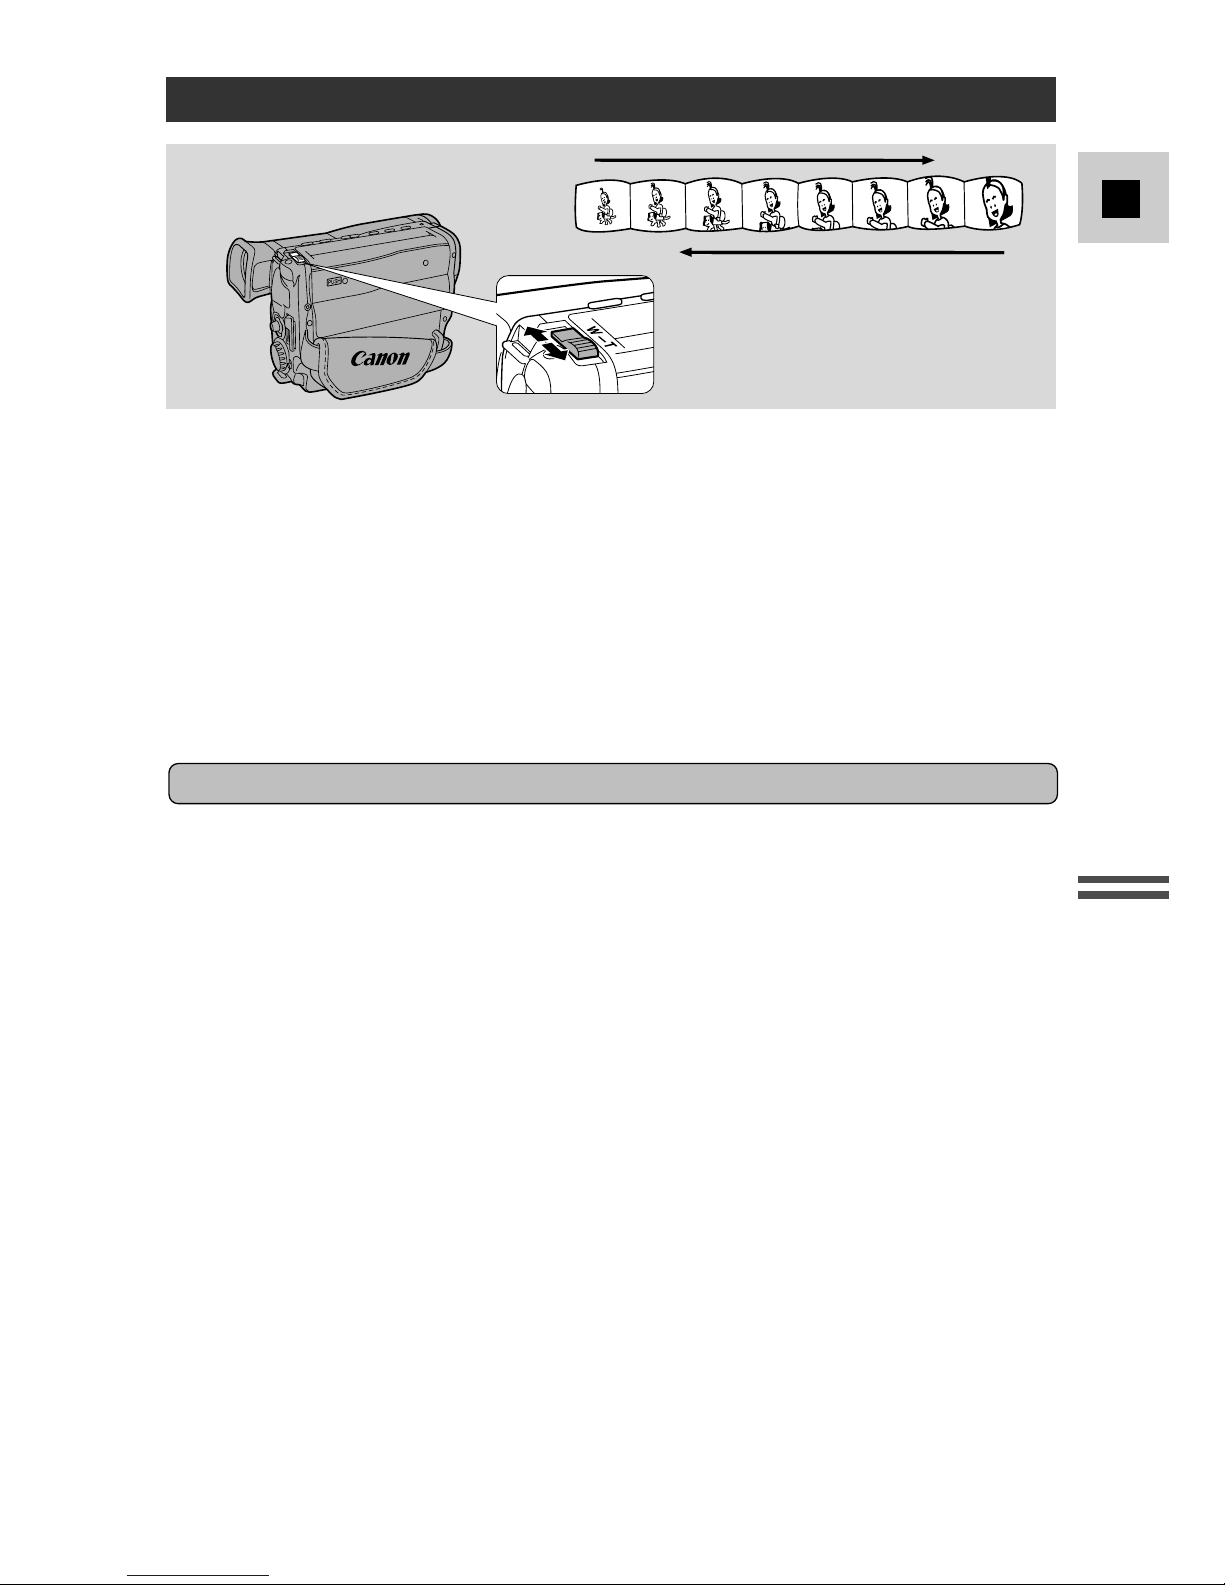
Zooming
Turning the 700× digital zoom on/off
Zoom in
Zoom out
T
W
The camera’s 22× zoom lens allows you to choose the best picture angle for each
scene:
• Turn the zoom control towards W to zoom out to wide-angle.
• Turn it towards T to zoom in to telephoto.
You can also control the speed of zooming:
• Move the control slightly to zoom slowly.
• Turn it farther to zoom more quickly. (The farther you turn the zoom control,
the faster the zoom speed.)
The T and W buttons on the wireless controller adjust the picture angle, but not
the zoom speed.
Turn the digital zoom on/off by pressing the D.ZOOM button, to magnify the
camera’s zoom range by more than 22×.
• In addition, for the G15Hi/G20Hi, you can assign CUSTOM KEY 1 to turn the
digital zoom on/off (see p. 25).
The zoom control continues to work as usual. You can freely zoom in and out
between 1× and 700× magnification — the camera automatically switches
between optical zooming (up to 22×) and digital zooming (22× to 700×).
Note:
• When you enter the digital zoom range in FlexiZone mode, the FlexiZone frame
becomes locked in the centre of the viewfinder.
16
Quick Overview
E
Notes:
• The viewfinder display stays lit for approximately 4 seconds following an
adjustment to the picture angle.
• Overuse of the zoom may make recordings seem too busy. It is generally better to
use it sparingly, or in order to reframe between shots.
• When you want to get as close as possible to your subject, keep the zoom at the
wide-angle position. You can focus on a subject as close as 1 cm (
3
/8 in).
• When you turn the digital zoom on, “700×” appears in the viewfinder.
• Image resolution is lower when the magnification is greater than 22×.
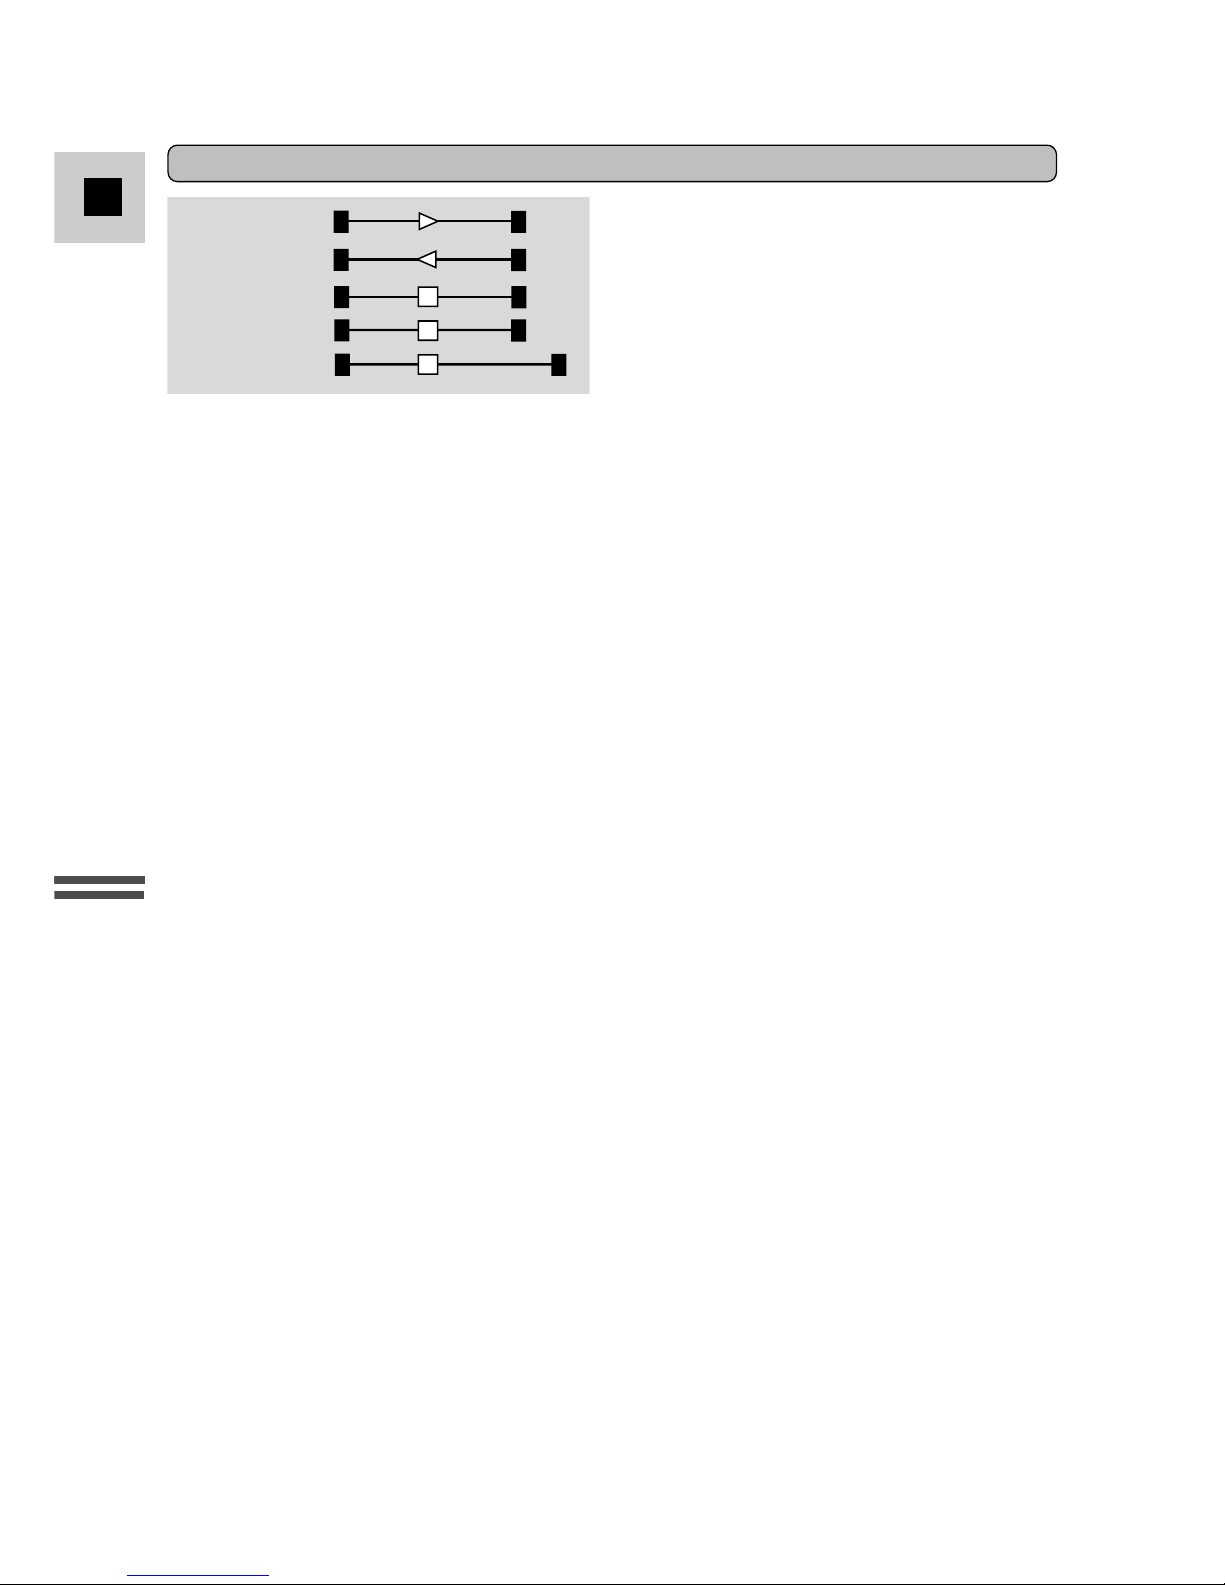
Viewfinder displays
Zoom in
Zoom out
Stationary
T
W
T
W
T
W
T
W
T
W
Optical zoom
Digital zoom
700×
17
Quick Overview
E
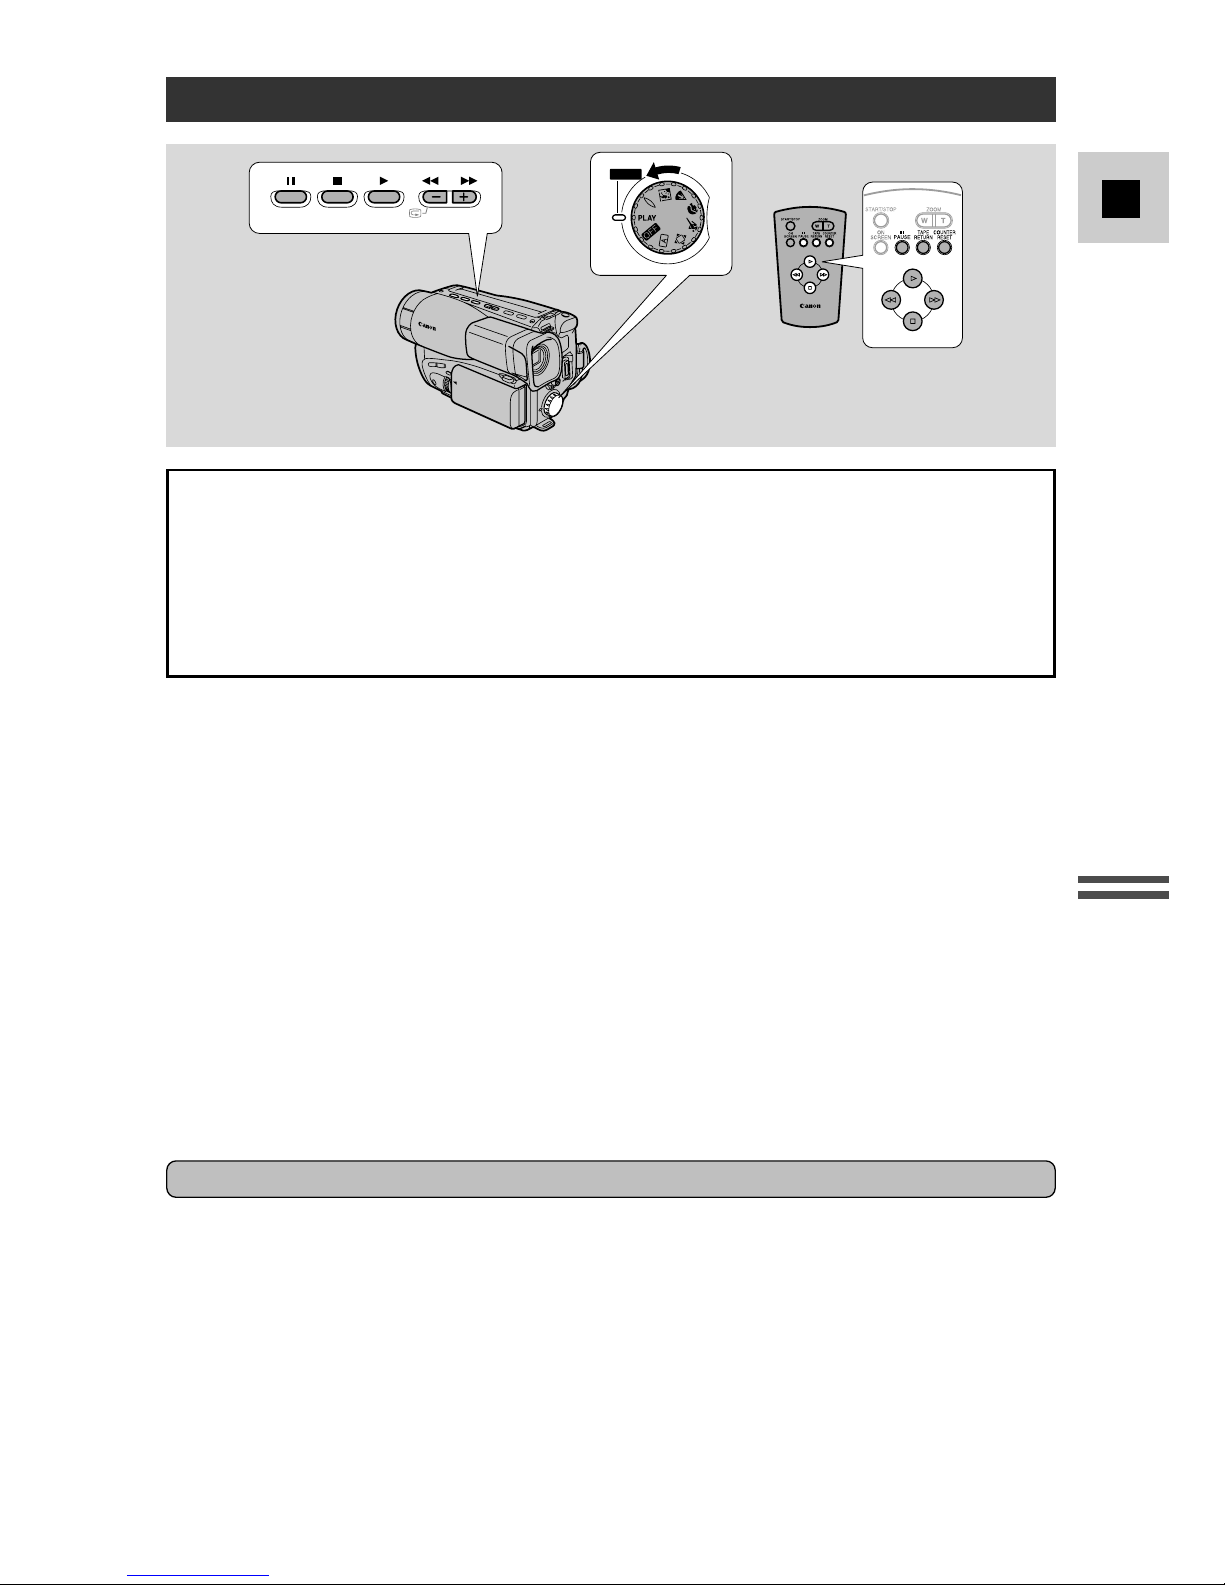
Playing Back a Cassette
Special playback
FADE BLC
D.ZOOM REC SEARCH
POWER
Still playback
To view the video as a still picture press the a button. To resume normal
playback, press it again, or press the e button. The camera automatically goes
into stop mode after about five minutes’ playback pause.
Fast forward playback
To play back the recording at about 9 times normal speed, press and hold the 1
button during normal playback.
Rewind playback
For reverse playback at about 7 times normal speed, press and hold the `
button during normal playback.
You can use the viewfinder screen for instant, on-the-spot playback.
To play back your recordings on a TV, see p. 19–20.
To use the wireless controller, see p. 28.
1. Attach a power source and turn the program selector to PLAY.
2. Load the cassette.
3. Press the ebutton to start playback.
• To end playback, press the 3 button.
• To wind the tape forwards, stop playback and press the
1
(fast forward)
button.
• To wind the tape backwards, stop playback and press the
`
(rewind)
button.
• If the playback picture is rough, clean the video heads using a Canon CC-8
Video Head Cleaning Cassette or a commercially available dry-type head
cleaning cassette.
Safe cassette operation
When you turn the power off or remove the power source, be sure to set the
camcorder first to record pause, stop or still pause mode.
Turning the power off or removing the power source while the tape is moving
(during recording, play, rewind for example), will make the counter display
appear wrong or may cause tape damage.
18
Quick Overview
E
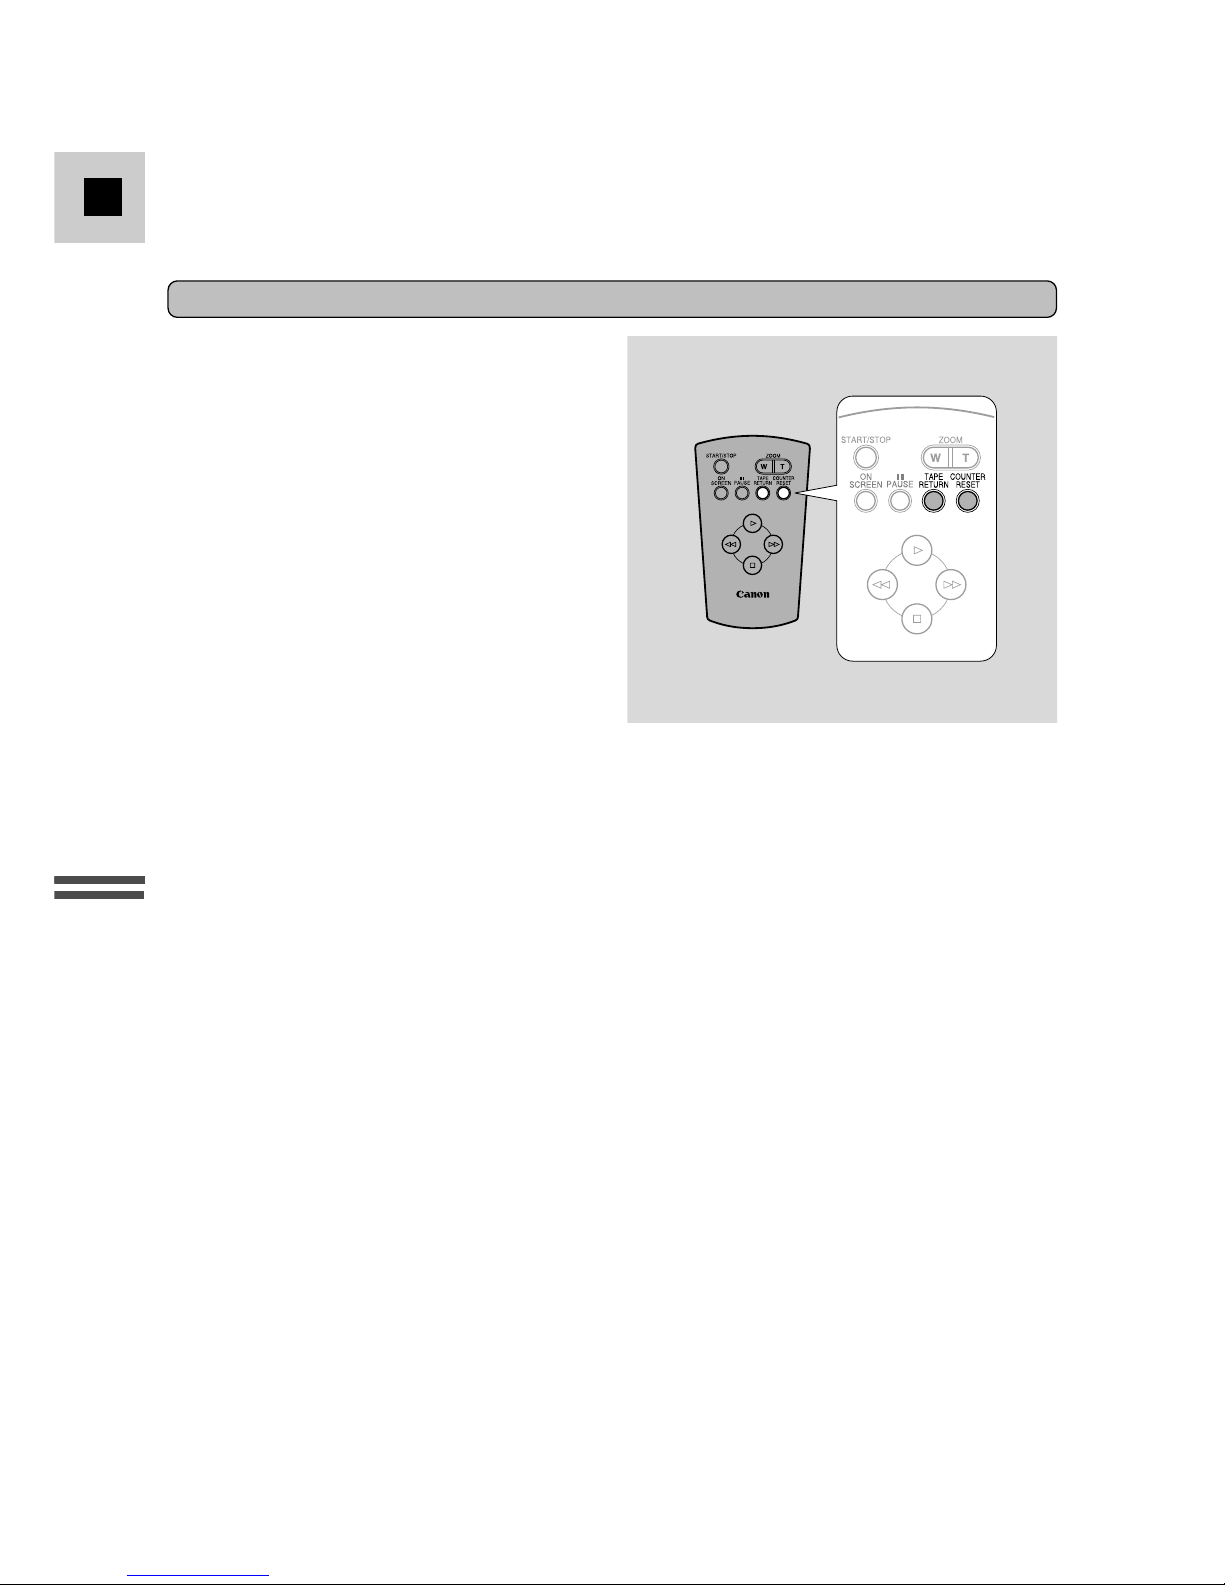
Tape return
Use the wireless controller’s TAPE
RETURN button to quickly return to a
scene you want to see again. You can
operate this function from the wireless
controller only.
1. Press the COUNTER RESET button during playback if you come
across a scene you want to watch again later.
• The tape counter is reset to 0:00:00.
2. When you have ended playback, press the TAPE RETURN button.
• The tape rewinds and stops when the counter nears 0:00:00.
• You can cancel tape return by pressing the 3button.
3. Start playback.
Notes:
• When the tape reaches the end during normal playback it rewinds automatically.
• Noise bars appear and the soundtrack cannot be heard during special playback. The
picture may roll and divide, appear black and white and the picture may not be
visible during high-speed search.
• During still playback, the picture flickers, and fast action scenes may appear
blurred.
• The tape counter is reset when a cassette is loaded.
• You cannot use the tape return if the tape counter is already near 0:00:00.
• When you playback a cassette suffered considerable vibration or shaking during
recording, you may find that the playback picture is not stable, depending on the TV
you use.
High-speed search
To play back the recording at about 15 times normal speed, press and hold the
1 button during normal fast forward. For reverse playback at about 15 times
normal speed, press and hold the ` button during normal rewind.
19
Quick Overview
E
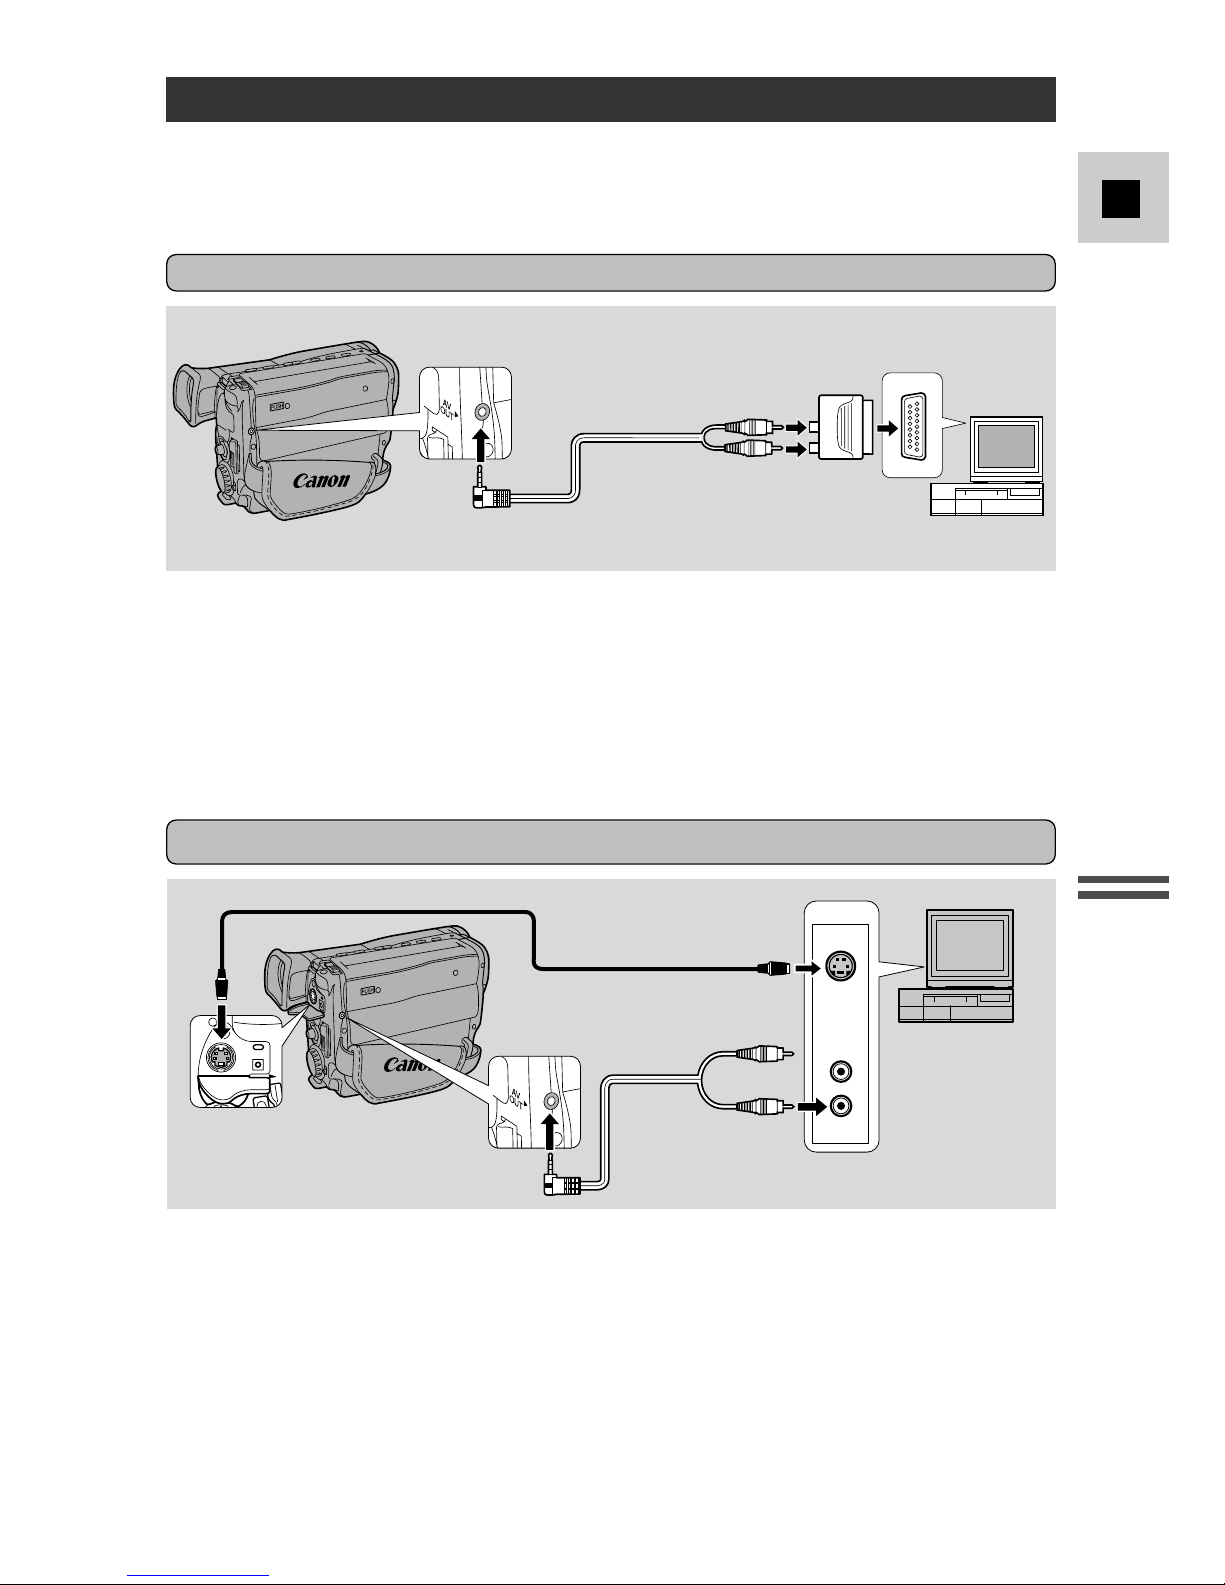
Connecting for Playback on a TV Screen
You can connect the camera to a TV or VCR in order to play back your
recordings. You will need to attach a power source to the camera (see p. 8).
See your TV or VCR instruction manual for further details.
• Use the optional S-150 S-video Cable to connect the S-video terminal. Use the
C-250 AV Cable white plug to connect the audio terminal.
• Set the TV/VIDEO selector on the television to VIDEO.
• If you are connecting the camera to a VCR, set the input selector on the VCR to
LINE.
INPUT
VIDEO
AUDIO
S-VIDEO
S-150 S-video Cable
C-250 AV Cable
If your TV (or VCR) has an S-video input terminal (for G15Hi/G20Hi)
C-250 AV Cable
AUDIO
(R)
AUDIO
(L/MONO)
VIDEO
PC-A5
SCART
Adapter
• Connect the PC-A5 SCART adapter to the TV or VCR’s SCART terminal.
• Connect the camera to the adapter. Connect the camera by using the C-250 AV
Cable. Connect the white plug to the white audio terminal 7 (left). Connect the
yellow plug to the yellow video terminal 0.
• Set the TV/VIDEO selector on the television to VIDEO.
• If you are connecting the camera to a VCR, set the input selector on the VCR to
LINE.
If your TV (or VCR) has a SCART terminal (without S-video)
20
Quick Overview
E
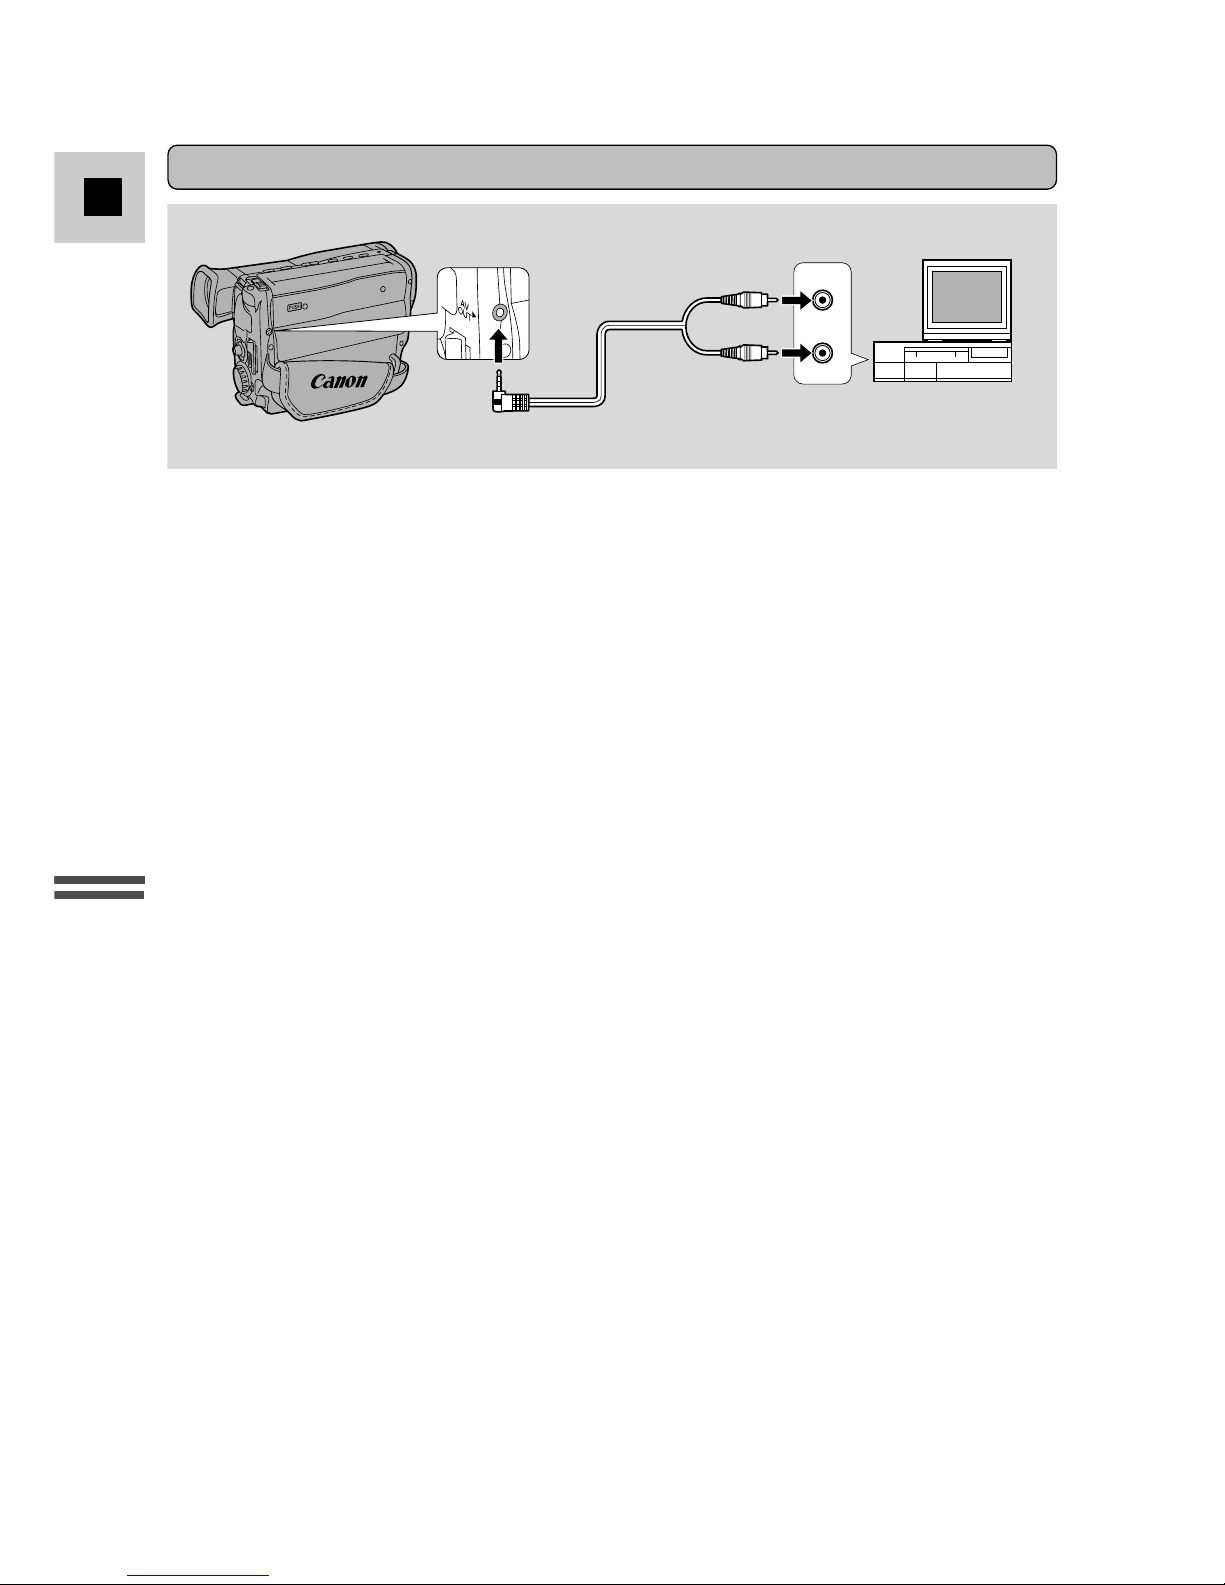
Note:
• If you are going to use the TV as a monitor while you are shooting, remember to
keep the TV volume turned down as long as the camera’s audio terminals are
connected. If the sound from the TV speakers is picked up by the microphone, an
unpleasant high-pitched squeal, called feedback, may be produced.
AUDIO IN
VIDEO IN
C-250 AV Cable
• Connect the camera by using the C-250 AV Cable to connect the AV terminal.
Connect the white plug to the white AUDIO terminal. Connect the yellow plug
to the yellow VIDEO terminal.
• Set the TV/VIDEO selector on the television to VIDEO.
• If you are connecting the camera to a VCR, set the input selector on the VCR to
LINE.
If your TV (or VCR) has audio/video input terminals
21
Quick Overview
E
Tips for Making Better Videos
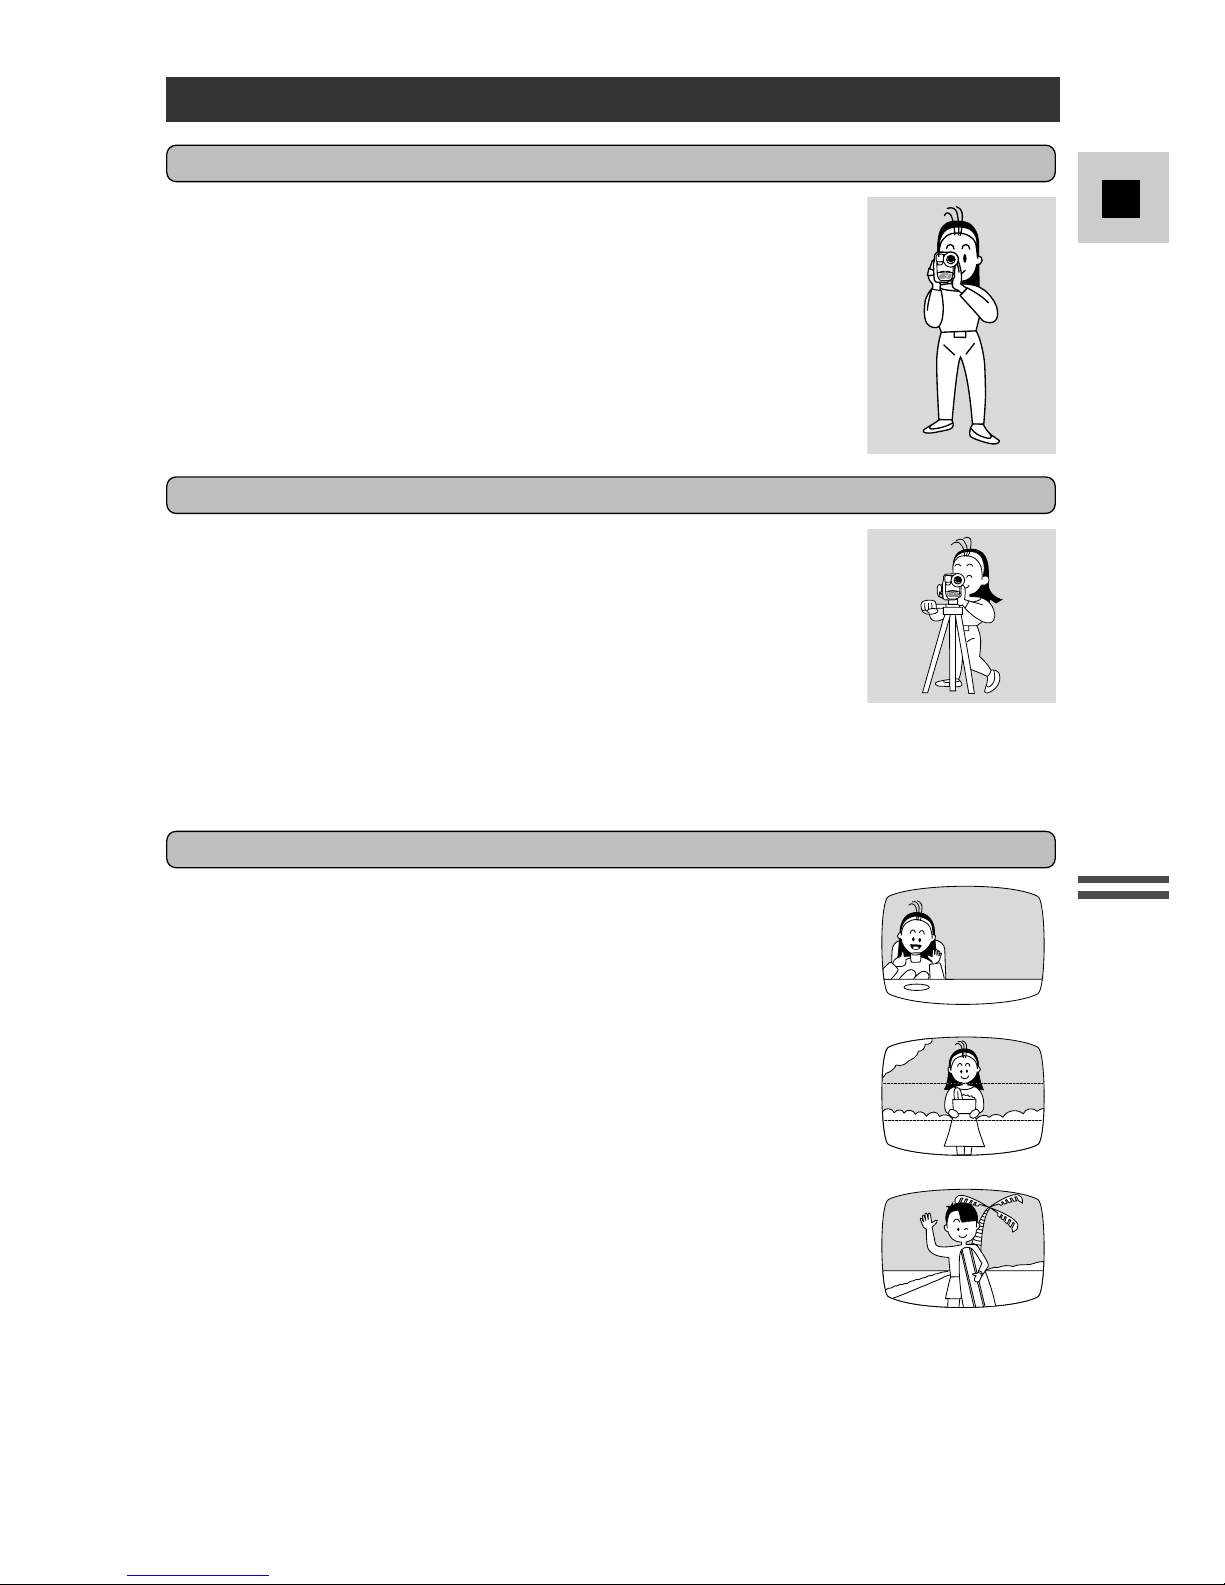
Holding the camera
For maximum stability, place your right hand through the grip
belt and keep your right elbow pressed against your body. Rest
your left hand lightly on the side of the camera. With practice,
you will be able to operate the controls by touch, without taking
your eye off the action.
Using a tripod
To prevent any unwanted movement, you can mount the camera
on a tripod, (or any flat surface at a suitable height) and operate
it with the wireless controller.
• When you are using a tripod, be careful not to leave the
viewfinder exposed to bright sunlight or it may melt. (The
light is concentrated by the viewfinder lens.) Avoid damage
by returning the eyepiece to its retracted position.
• Make sure that the fastening screw of the tripod is no longer
than 6 mm (1/4inch), or it will damage the camera.
Composition
The most important element in the scene does not have to be in
the centre. For a more interesting picture, try to position your
subject so it is slightly to one side. Leave some space on the
side of the frame that the subject is facing or moving towards.
Don’t cut off the top of the subject’s head, and don’t cut people
off at the neck, hips or knees (move a little bit above or below).
Watch out for distracting objects in the background.
 Loading...