

Canon FaxPhone L380, FAX-L380 Quick Reference Manual

FAX-L380 Quick Reference Guide
About the Manuals for the Machine
The manuals for this machine are divided as follows. Please refer to them for detailed information.
The manuals supplied with optional equipment are included in the list below.
Guides with this symbol are book manuals.
CD-ROM
Guides with this symbol are PDF manuals included on the
accompanying CD-ROM.
• Setting up the Machine
• Installing CARPS
• Document and Paper Handling
• Sending and Receiving Faxes
• Speed Dialling
• Making Copies
• The Menu System
Quick Reference Guide
(This Document)
• Setting up the Machine
• Document and Paper Handling
• Sending and Receiving Faxes
• Speed Dialling
• Making Copies
• Maintenance
• Troubleshooting
• The Menu System
User’s Guide
CD-ROM
• Installing CARPS Software
• Printer Properties
• Troubleshooting Printer Driver Issues
Software Guide
CD-ROM
• To view the manual in PDF format, Adobe Reader/Adobe Acrobat Reader is required. If Adobe Reader/Adobe Acrobat Reader is not installed on your
system, please download it from the Adobe Systems Incorporated website.
ENGLISH

Contents
ii
Contents
How to Use This Manual . . . . . . . . . . . . . . . . . . . . . . . . . . . . . . . . . . . . . . . . . . . . . . . . . . . . . . . . . . . . . v
Symbols Used in This Manual . . . . . . . . . . . . . . . . . . . . . . . . . . . . . . . . . . . . . . . . . . . . . . . . . . . . . . v
Button Used in This Manual. . . . . . . . . . . . . . . . . . . . . . . . . . . . . . . . . . . . . . . . . . . . . . . . . . . . . . . . v
Displays Used in This Manual . . . . . . . . . . . . . . . . . . . . . . . . . . . . . . . . . . . . . . . . . . . . . . . . . . . . . . vi
Abbreviations Used in This Manual . . . . . . . . . . . . . . . . . . . . . . . . . . . . . . . . . . . . . . . . . . . . . . . . . . vi
Legal Notices . . . . . . . . . . . . . . . . . . . . . . . . . . . . . . . . . . . . . . . . . . . . . . . . . . . . . . . . . . . . . . . . . . . . . vi
Trademarks . . . . . . . . . . . . . . . . . . . . . . . . . . . . . . . . . . . . . . . . . . . . . . . . . . . . . . . . . . . . . . . . . . . .vi
Copyright . . . . . . . . . . . . . . . . . . . . . . . . . . . . . . . . . . . . . . . . . . . . . . . . . . . . . . . . . . . . . . . . . . . . . . vi
Notice . . . . . . . . . . . . . . . . . . . . . . . . . . . . . . . . . . . . . . . . . . . . . . . . . . . . . . . . . . . . . . . . . . . . . . . vii
Chapter 1 Setting Up Your Machine
Unpacking Your Machine . . . . . . . . . . . . . . . . . . . . . . . . . . . . . . . . . . . . . . . . . . . . . . . . . . . . . . . . . . 1-1
Do You Have Everything? . . . . . . . . . . . . . . . . . . . . . . . . . . . . . . . . . . . . . . . . . . . . . . . . . . . . . . . 1-1
Removing Shipping Materials . . . . . . . . . . . . . . . . . . . . . . . . . . . . . . . . . . . . . . . . . . . . . . . . . . . . 1-3
Assembling the Machine . . . . . . . . . . . . . . . . . . . . . . . . . . . . . . . . . . . . . . . . . . . . . . . . . . . . . . . . . . . 1-4
Attaching Components . . . . . . . . . . . . . . . . . . . . . . . . . . . . . . . . . . . . . . . . . . . . . . . . . . . . . . . . . 1-4
Document Output Tray . . . . . . . . . . . . . . . . . . . . . . . . . . . . . . . . . . . . . . . . . . . . . . . . . . . . . 1-4
Output Tray . . . . . . . . . . . . . . . . . . . . . . . . . . . . . . . . . . . . . . . . . . . . . . . . . . . . . . . . . . . . . . 1-4
Installing the Paper Cassette. . . . . . . . . . . . . . . . . . . . . . . . . . . . . . . . . . . . . . . . . . . . . . . . . . . . . 1-5
Making Connections . . . . . . . . . . . . . . . . . . . . . . . . . . . . . . . . . . . . . . . . . . . . . . . . . . . . . . . . . . . . . . 1-6
Connecting the Machine to Your PC . . . . . . . . . . . . . . . . . . . . . . . . . . . . . . . . . . . . . . . . . . . . . . . 1-6
Connecting the Telephone Line . . . . . . . . . . . . . . . . . . . . . . . . . . . . . . . . . . . . . . . . . . . . . . . . . . . 1-7
Connecting the Power Cord. . . . . . . . . . . . . . . . . . . . . . . . . . . . . . . . . . . . . . . . . . . . . . . . . . . . . . 1-7
Setting the Display Language and Country* . . . . . . . . . . . . . . . . . . . . . . . . . . . . . . . . . . . . . . . . . . . 1-9
Getting Acquainted With Your Machine. . . . . . . . . . . . . . . . . . . . . . . . . . . . . . . . . . . . . . . . . . . . . . 1-10
Front View . . . . . . . . . . . . . . . . . . . . . . . . . . . . . . . . . . . . . . . . . . . . . . . . . . . . . . . . . . . . . . . . . . 1-10
Rear View . . . . . . . . . . . . . . . . . . . . . . . . . . . . . . . . . . . . . . . . . . . . . . . . . . . . . . . . . . . . . . . . . . 1-11
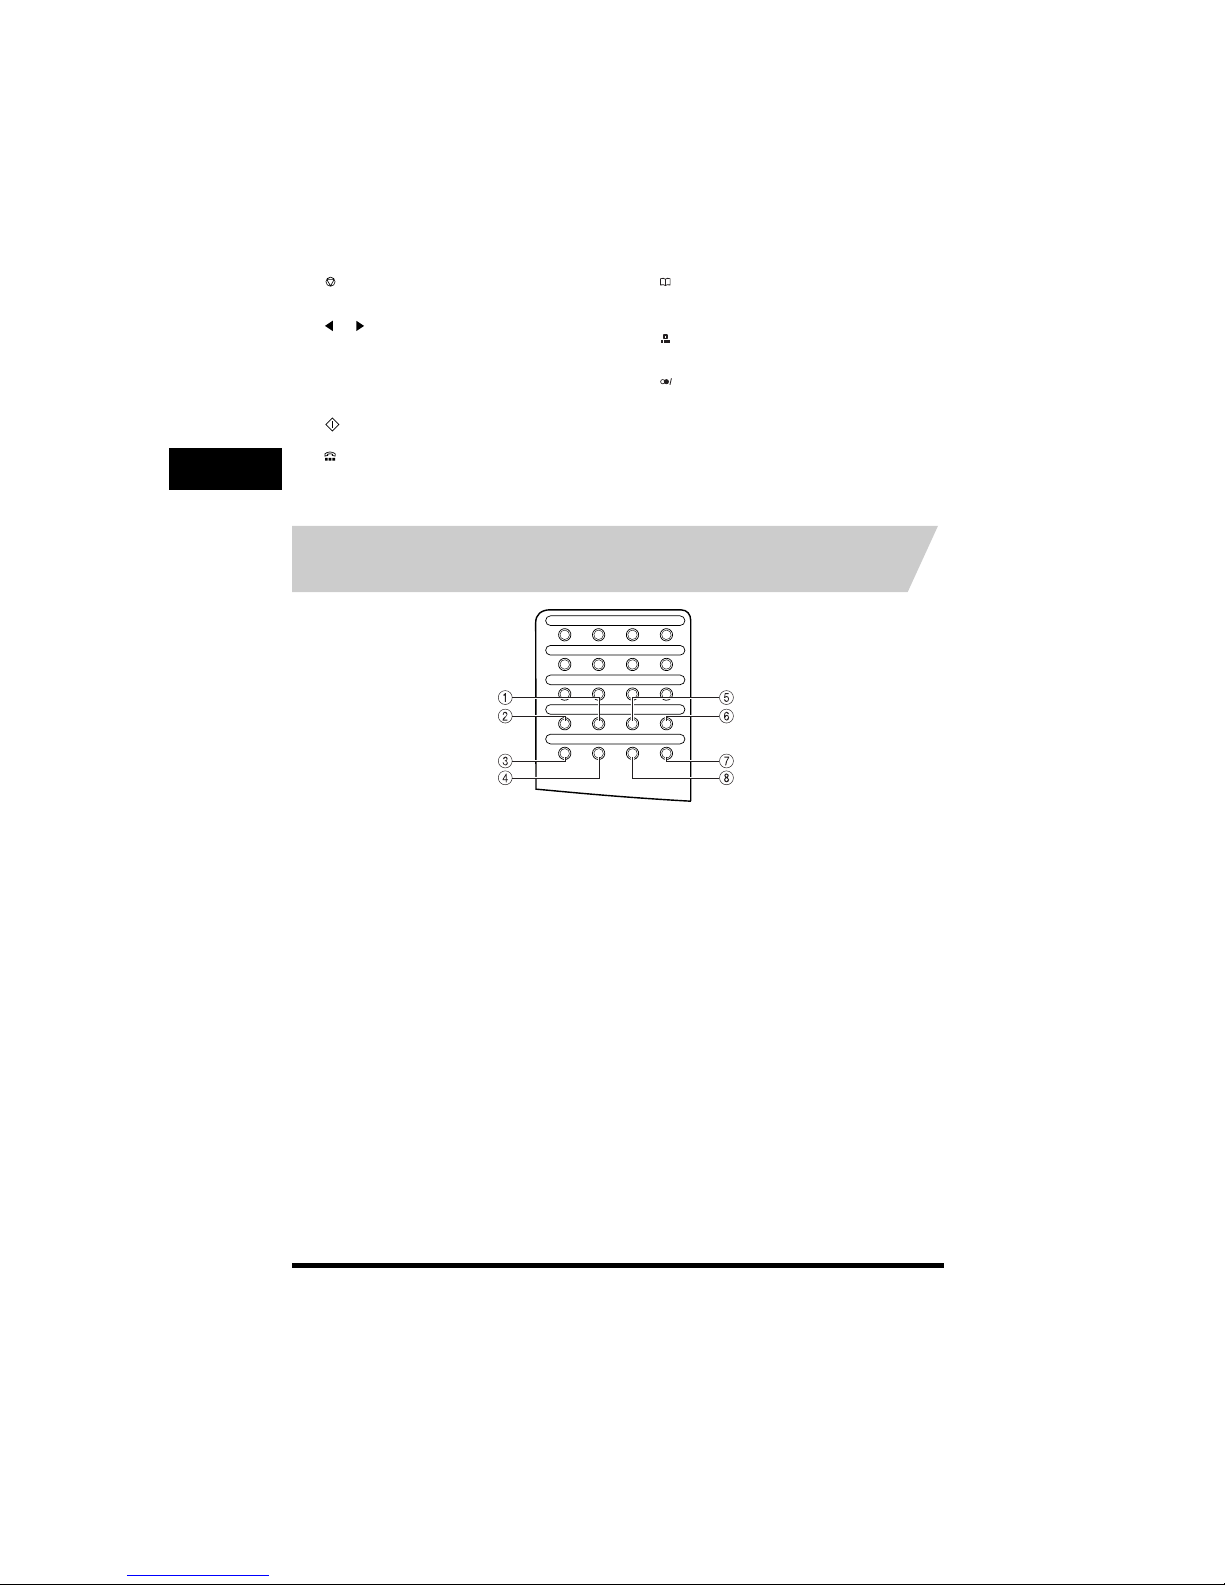
The Operation Panel . . . . . . . . . . . . . . . . . . . . . . . . . . . . . . . . . . . . . . . . . . . . . . . . . . . . . . . . . . 1-12
Special Function Buttons (One-Touch Speed Dial Panel Open) . . . . . . . . . . . . . . . . . . . . . . . . . 1-13
The Toner Cartridge. . . . . . . . . . . . . . . . . . . . . . . . . . . . . . . . . . . . . . . . . . . . . . . . . . . . . . . . . . . . . . 1-14
Handling and Storing Cartridges . . . . . . . . . . . . . . . . . . . . . . . . . . . . . . . . . . . . . . . . . . . . . . . . . 1-14
Installing/Replacing the Toner Cartridge . . . . . . . . . . . . . . . . . . . . . . . . . . . . . . . . . . . . . . . . . . . 1-15
Loading Recording Paper . . . . . . . . . . . . . . . . . . . . . . . . . . . . . . . . . . . . . . . . . . . . . . . . . . . . . . . . . 1-18
Loading Paper in the Cassette . . . . . . . . . . . . . . . . . . . . . . . . . . . . . . . . . . . . . . . . . . . . . . . . . . 1-19
Chapter 2 Registering Information in the Machine
Guidelines for Entering Information. . . . . . . . . . . . . . . . . . . . . . . . . . . . . . . . . . . . . . . . . . . . . . . . . . 2-1
Entering Numbers, Letters, and Symbols . . . . . . . . . . . . . . . . . . . . . . . . . . . . . . . . . . . . . . . . . . . 2-1
Personalizing Your machine . . . . . . . . . . . . . . . . . . . . . . . . . . . . . . . . . . . . . . . . . . . . . . . . . . . . . . . . 2-3
Identifying Your Documents. . . . . . . . . . . . . . . . . . . . . . . . . . . . . . . . . . . . . . . . . . . . . . . . . . . . . . 2-3
Entering the Date and Time. . . . . . . . . . . . . . . . . . . . . . . . . . . . . . . . . . . . . . . . . . . . . . . . . . . . . . 2-3
Registering Your Fax Number and Name . . . . . . . . . . . . . . . . . . . . . . . . . . . . . . . . . . . . . . . . . . . 2-4
Setting the Telephone Line Type . . . . . . . . . . . . . . . . . . . . . . . . . . . . . . . . . . . . . . . . . . . . . . . . . . 2-5
User’s Data List . . . . . . . . . . . . . . . . . . . . . . . . . . . . . . . . . . . . . . . . . . . . . . . . . . . . . . . . . . . . . . . . . . 2-6

Contents
iii
Chapter 3 Installing the Printer Driver
System Requirements . . . . . . . . . . . . . . . . . . . . . . . . . . . . . . . . . . . . . . . . . . . . . . . . . . . . . . . . . . . . . 3-1
Installing CARPS on Your Computer . . . . . . . . . . . . . . . . . . . . . . . . . . . . . . . . . . . . . . . . . . . . . . . . . 3-3
Chapter 4 Document Handling
Document Requirements . . . . . . . . . . . . . . . . . . . . . . . . . . . . . . . . . . . . . . . . . . . . . . . . . . . . . . . . . . . 4-1
Scanning Area . . . . . . . . . . . . . . . . . . . . . . . . . . . . . . . . . . . . . . . . . . . . . . . . . . . . . . . . . . . . . . . . 4-2
Loading Documents in the ADF . . . . . . . . . . . . . . . . . . . . . . . . . . . . . . . . . . . . . . . . . . . . . . . . . . . 4-3
Chapter 5 Paper Handling
Print Media Requirements . . . . . . . . . . . . . . . . . . . . . . . . . . . . . . . . . . . . . . . . . . . . . . . . . . . . . . . . . . 5-1
Printing Areas . . . . . . . . . . . . . . . . . . . . . . . . . . . . . . . . . . . . . . . . . . . . . . . . . . . . . . . . . . . . . . . . . 5-2
Orientation of the Document and the Paper Loading . . . . . . . . . . . . . . . . . . . . . . . . . . . . . . . . . . . 5-3
Selecting the Paper Output Area . . . . . . . . . . . . . . . . . . . . . . . . . . . . . . . . . . . . . . . . . . . . . . . . . . . . . 5-4
Paper Type and Paper Output Area . . . . . . . . . . . . . . . . . . . . . . . . . . . . . . . . . . . . . . . . . . . . . . . . 5-5
Face Down Paper Output Area . . . . . . . . . . . . . . . . . . . . . . . . . . . . . . . . . . . . . . . . . . . . . . . . . . .5-5
Face Up Paper Output Area . . . . . . . . . . . . . . . . . . . . . . . . . . . . . . . . . . . . . . . . . . . . . . . . . . . . . . 5-6
Chapter 6 Speed Dialing
Storing Numbers for One-Touch Speed Dialing . . . . . . . . . . . . . . . . . . . . . . . . . . . . . . . . . . . . . . . . 6-1
Storing Numbers for Coded Speed Dialing . . . . . . . . . . . . . . . . . . . . . . . . . . . . . . . . . . . . . . . . . . . . 6-3
Chapter 7 Sending Faxes
Preparing to Send a Fax . . . . . . . . . . . . . . . . . . . . . . . . . . . . . . . . . . . . . . . . . . . . . . . . . . . . . . . . . . . . 7-1
Adjusting the Image Quality (Resolution) . . . . . . . . . . . . . . . . . . . . . . . . . . . . . . . . . . . . . . . . . . . . 7-1
Adjusting the Exposure (Density) . . . . . . . . . . . . . . . . . . . . . . . . . . . . . . . . . . . . . . . . . . . . . . . . . . 7-2
Sending Methods . . . . . . . . . . . . . . . . . . . . . . . . . . . . . . . . . . . . . . . . . . . . . . . . . . . . . . . . . . . . . . 7-3
Manual Sending Via the Handset* . . . . . . . . . . . . . . . . . . . . . . . . . . . . . . . . . . . . . . . . . . . . . 7-3
Memory Sending . . . . . . . . . . . . . . . . . . . . . . . . . . . . . . . . . . . . . . . . . . . . . . . . . . . . . . . . . . 7-3
Dialing Methods . . . . . . . . . . . . . . . . . . . . . . . . . . . . . . . . . . . . . . . . . . . . . . . . . . . . . . . . . . . . . . . 7-4
Sending Documents . . . . . . . . . . . . . . . . . . . . . . . . . . . . . . . . . . . . . . . . . . . . . . . . . . . . . . . . . . . . . . . 7-5
Memory Sending . . . . . . . . . . . . . . . . . . . . . . . . . . . . . . . . . . . . . . . . . . . . . . . . . . . . . . . . . . . . . . 7-5
Manual Sending via the Handset* . . . . . . . . . . . . . . . . . . . . . . . . . . . . . . . . . . . . . . . . . . . . . . . . .7-6
Chapter 8 Receiving Faxes
Different Ways to Receive a Fax . . . . . . . . . . . . . . . . . . . . . . . . . . . . . . . . . . . . . . . . . . . . . . . . . . . . . 8-1
Setting the Receive Mode . . . . . . . . . . . . . . . . . . . . . . . . . . . . . . . . . . . . . . . . . . . . . . . . . . . . . . . 8-2
Receiving Faxes and Phone Calls Automatically: FaxTel Mode . . . . . . . . . . . . . . . . . . . . . . . . . . 8-2
Setting the Options for FaxTel Mode . . . . . . . . . . . . . . . . . . . . . . . . . . . . . . . . . . . . . . . . . . . 8-2
What Happens When FaxTel Mode is Selected . . . . . . . . . . . . . . . . . . . . . . . . . . . . . . . . . . 8-4
Receiving Faxes Manually: Manual Mode . . . . . . . . . . . . . . . . . . . . . . . . . . . . . . . . . . . . . . . . . . . 8-6
Receiving Faxes Automatically: FaxOnly Mode . . . . . . . . . . . . . . . . . . . . . . . . . . . . . . . . . . . . . . . 8-7
Using an Answering Machine: AnsMode . . . . . . . . . . . . . . . . . . . . . . . . . . . . . . . . . . . . . . . . . . . . 8-7

Contents
iv
Chapter 9 Making Copies
Making Copies . . . . . . . . . . . . . . . . . . . . . . . . . . . . . . . . . . . . . . . . . . . . . . . . . . . . . . . . . . . . . . . . . . . 9-1
Specifying the Paper Size and Type (Common for Cassette and Multi-Purpose Feeder). . . . . . . 9-2
Specifying the Paper Size . . . . . . . . . . . . . . . . . . . . . . . . . . . . . . . . . . . . . . . . . . . . . . . . . . . . . . . 9-2
Specifying the Paper Type. . . . . . . . . . . . . . . . . . . . . . . . . . . . . . . . . . . . . . . . . . . . . . . . . . . . . . . 9-3
Chapter 10 The Menu System
Accessing the Menu . . . . . . . . . . . . . . . . . . . . . . . . . . . . . . . . . . . . . . . . . . . . . . . . . . . . . . . . . . . . . 10-1
Menu Descriptions . . . . . . . . . . . . . . . . . . . . . . . . . . . . . . . . . . . . . . . . . . . . . . . . . . . . . . . . . . . . . . . 10-2
1. PAPER SETTINGS . . . . . . . . . . . . . . . . . . . . . . . . . . . . . . . . . . . . . . . . . . . . . . . . . . . . . . . . . 10-2
2. COMMON SETTINGS . . . . . . . . . . . . . . . . . . . . . . . . . . . . . . . . . . . . . . . . . . . . . . . . . . . . . . . 10-3
3. COPY SETTINGS . . . . . . . . . . . . . . . . . . . . . . . . . . . . . . . . . . . . . . . . . . . . . . . . . . . . . . . . . . 10-5
4. FAX SETTINGS. . . . . . . . . . . . . . . . . . . . . . . . . . . . . . . . . . . . . . . . . . . . . . . . . . . . . . . . . . . . 10-6
5. ADD. REGISTRATION . . . . . . . . . . . . . . . . . . . . . . . . . . . . . . . . . . . . . . . . . . . . . . . . . . . . . 10-13
6. PRINTER SETTINGS . . . . . . . . . . . . . . . . . . . . . . . . . . . . . . . . . . . . . . . . . . . . . . . . . . . . . . 10-14
7. TIMER SETTINGS. . . . . . . . . . . . . . . . . . . . . . . . . . . . . . . . . . . . . . . . . . . . . . . . . . . . . . . . . 10-15
8. PRINT LISTS . . . . . . . . . . . . . . . . . . . . . . . . . . . . . . . . . . . . . . . . . . . . . . . . . . . . . . . . . . . . . 10-16

v
Preface
Thank you for purchasing the Canon FAX-L380. Please read this manual thoroughly before operating the
product in order to familiarize yourself with its capabilities, and to make the most of its many functions. After
reading this manual, store it in a safe place for future reference. Before using the machine, make sure to read
“Safety Instructions” on p. 1-6 in the User’s Guide included in the CD-ROM.
How to Use This Manual
Symbols Used in This Manual
This manual uses the following symbols to indicate important safety precautions or useful information
about using the machine.
IMPORTANT
Indicates operational requirements and restrictions. Be sure to read these items to
avoid problems caused by incorrect operation.
NOTE
Indicates notes for operation or additional explanations. Reading these is highly
recommended.
Button Used in This Manual
A button or an item is referred to in [brackets] as follows in this manual.
• A button or an item on the screen ........[OK]
• Name of window or dialog box..............[Add Printer Wizard]
• A button on a toolbar............................ (Help)
See the User’s Guide Refer to the User’s Guide for details on the topic of the previous sentence.
machine The word “machine” refers to Canon FAX-L380.
default A setting that remains in effect unless you change it.

vi
Legal Notices
Displays Used in This Manual
Screen shots of computer operation screens used in this manual may differ from the ones you actually
see depending on the model or options that come with your machine.
Abbreviations Used in This Manual
In this manual, product names and model names are abbreviated as follows:
Microsoft
®
Windows® 98 operating system is referred to as Windows 98.
Microsoft Windows Millennium Edition operating system is referred to as Windows Me.
Microsoft Windows 2000 operating system is referred to as Windows 2000.
Microsoft Windows XP operating system is referred to as Windows XP.
Legal Notices
Trademarks
Canon and the Canon Logo are trademarks of Canon Inc.
Microsoft and Windows are either registered trademarks or trademarks of Microsoft Corporation in the
United States and/or in other countries.
Other brand and product names are trademarks or registered trademarks of their respective
companies.
In this manual, Microsoft and Microsoft Windows are referred to as Microsoft and Windows
respectively.
Copyright
Copyright
©
2004 Canon Inc. All rights reserved.
No part of this publication may be reproduced, transmitted, transcribed, stored in a retrieval system, or
translated into any language or computer language, in any form or by any means, electronic,
mechanical, magnetic, optical, chemical, manual, or otherwise, without the prior written permission of
Canon Inc.

vii
Legal Notices
Notice
The information in this document is subject to change without notice.
CANON INC. MAKES NO WARRANTY OF ANY KIND WITH REGARD TO THIS MATERIAL, EITHER
EXPRESS OR IMPLIED, EXCEPT AS PROVIDED HEREIN, INCLUDING WITHOUT LIMITATION,
THEREOF, WARRANTIES AS TO MARKETABILITY, MERCHANTABILITY, FITNESS FOR A
PARTICULAR PURPOSE OF USE OR AGAINST INFRINGEMENT OF ANY PATENT. CANON INC.
SHALL NOT BE LIABLE FOR ANY DIRECT, INCIDENTAL, OR CONSEQUENTIAL DAMAGES OF
ANY NATURE, OR LOSSES OR EXPENSES RESULTING FROM THE USE OF THIS MATERIAL.

Unpacking Your Machine
1-1
CHAPTER
1
Setting Up Your Machine
Unpacking Your Machine
Follow the directions below to unpack your machine properly, and to make sure you have all of its
components and documentation.
Do You Have Everything?
As you unpack the machine, save the carton and packing material in case you want to move or ship
the machine in the future.
Carefully remove all items from the box. You should have someone help you by holding the box while
you lift the machine and its protective packaging.
Unpacking Your Machine
1-2
Setting Up Your Machine
1
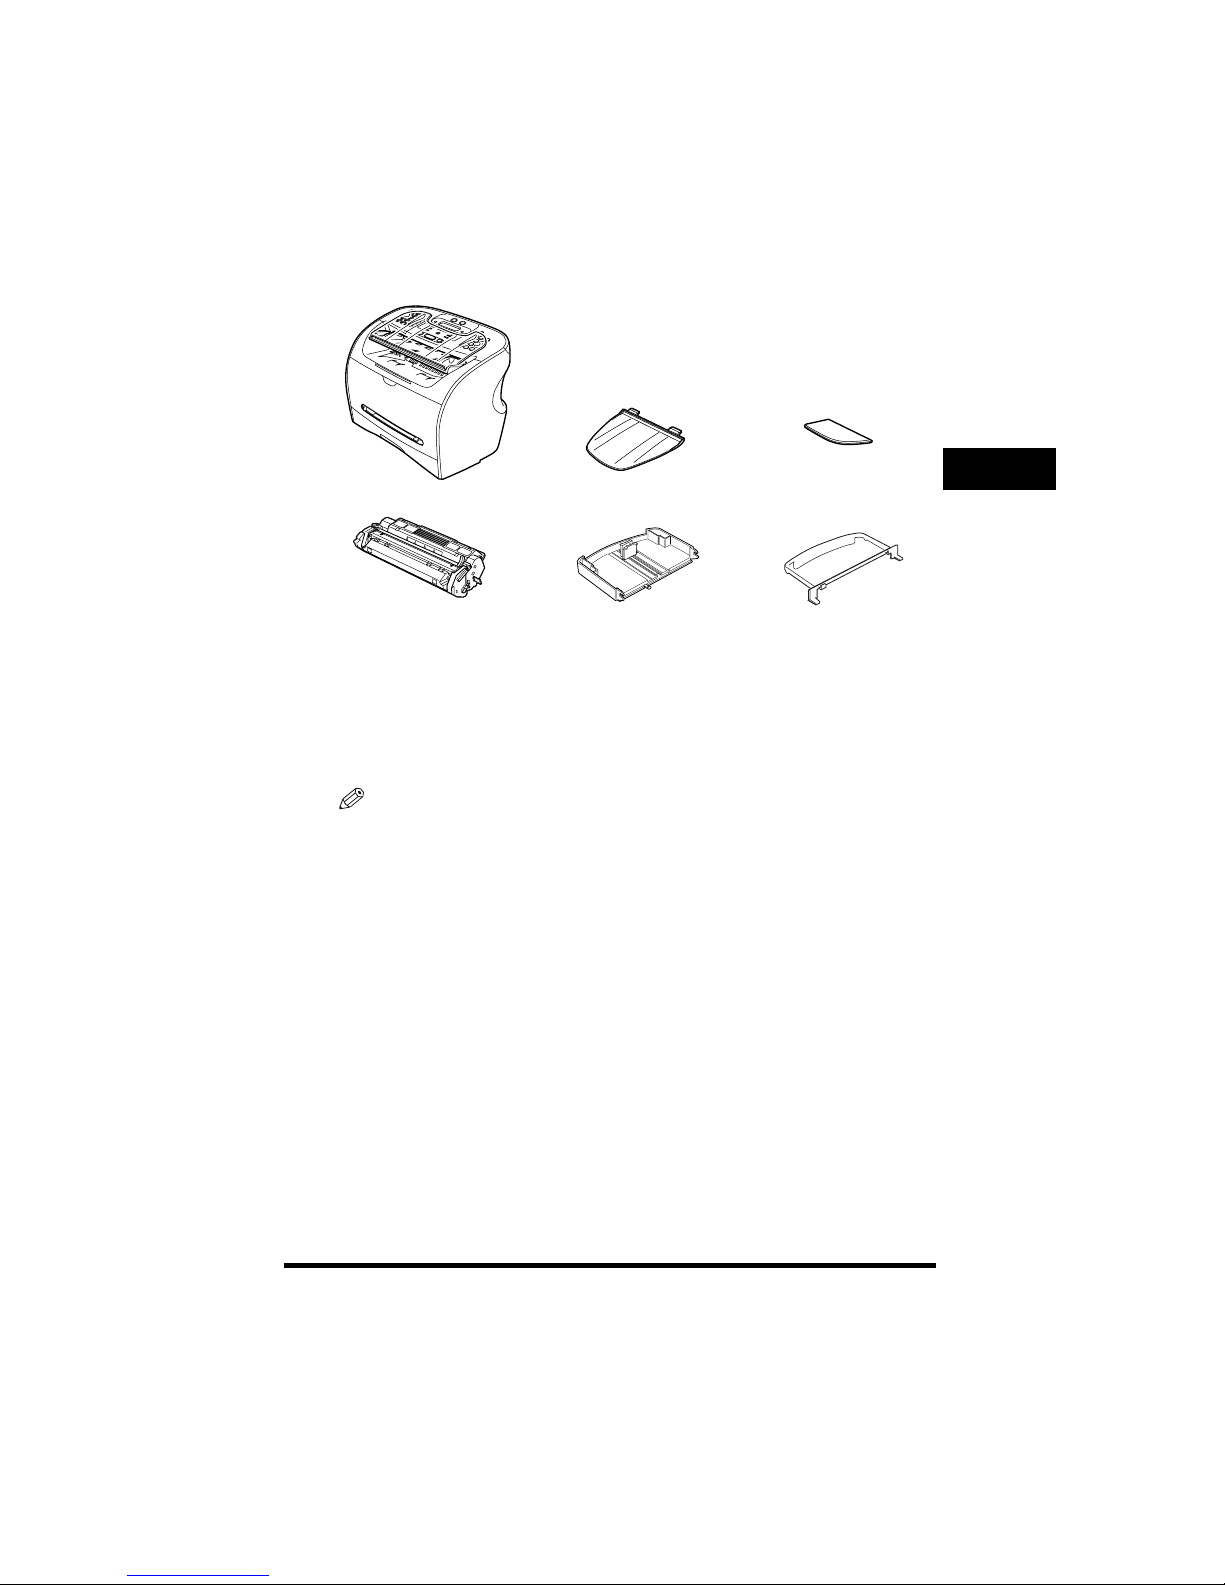
Make sure you have the following items:
• POWER CORD
• TELEPHONE LINE CORD
• DOCUMENTATION
• DESTINATION LABELS
• CD-ROM
If any item is damaged or missing, notify your local authorized Canon dealer immediately.
NOTE
•
The actual items may differ in shape and quantity from the one shown above.
•
Note that the items included with your machine may vary depending on the country of purchase.
•
Important! Save your sales receipt for proof of purchase in case your machine requires warranty service.
•
If you have purchased the optional handset, see Appendix B of User’s Guide for the items included.
•
In addition to the items shipped with your machine, if you wish to use the machine as a printer, you will need a
USB cable, which you can purchase from your Canon dealer. For best results, use a cable that is no more than
5 meters long.
MAIN UNIT DOCUMENT OUTPUT TRAY OUTPUT TRAY
CARTRIDGE T STARTER CASSETTE EXTENSION EXTENSION COVER

Unpacking Your Machine
1-3
Setting Up Your Machine
1
Removing Shipping Materials
In order to protect your machine during shipping, the machine has been packed with protective
material that you must remove before using. Follow these steps:
NOTE
The actual shipping materials may differ in shape, quantity, and position from the ones shown in the illustrations
below.
1
Remove all pieces of shipping tape from the exterior of the machine.
2
Open the document feeder tray.
3
Open the operation panel by grasping it at the center and gently pulling it up.
Remove protective sheet from the Automatic Document Feeder (ADF), then gently close the operation
panel by pressing it down until it clicks.
4
Open the printer cover.
5
Remove all pieces of shipping tape from the inside of the machine.
Assembling the Machine
1-4
Setting Up Your Machine
1
Assembling the Machine
Use the following instructions to assemble the main unit and its components. To see how the machine
will look fully assembled, see “Getting Acquainted With Your Machine,” on p. 1-10.
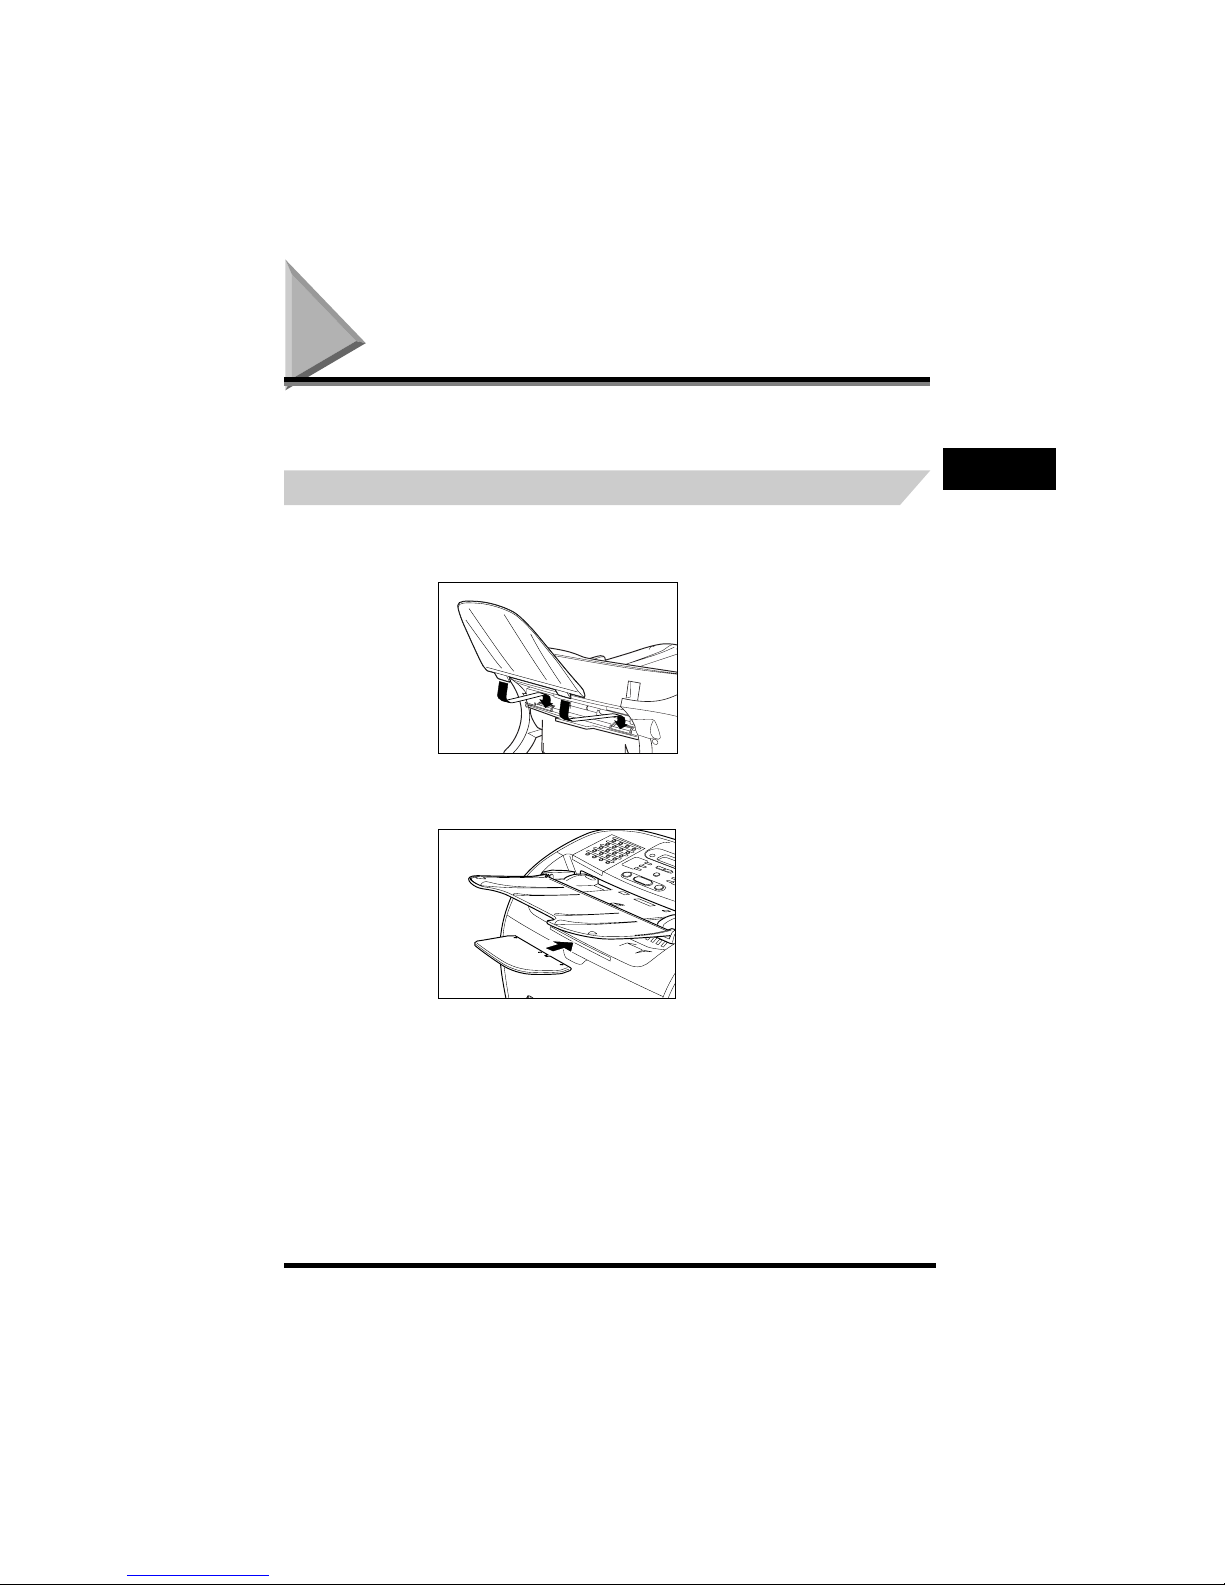
Attaching Components
Document Output Tray
Insert the tabs into the corresponding slots on the back of the machine.
Output Tray
Insert the output tray into the corresponding slot.
Assembling the Machine
1-5
Setting Up Your Machine
1
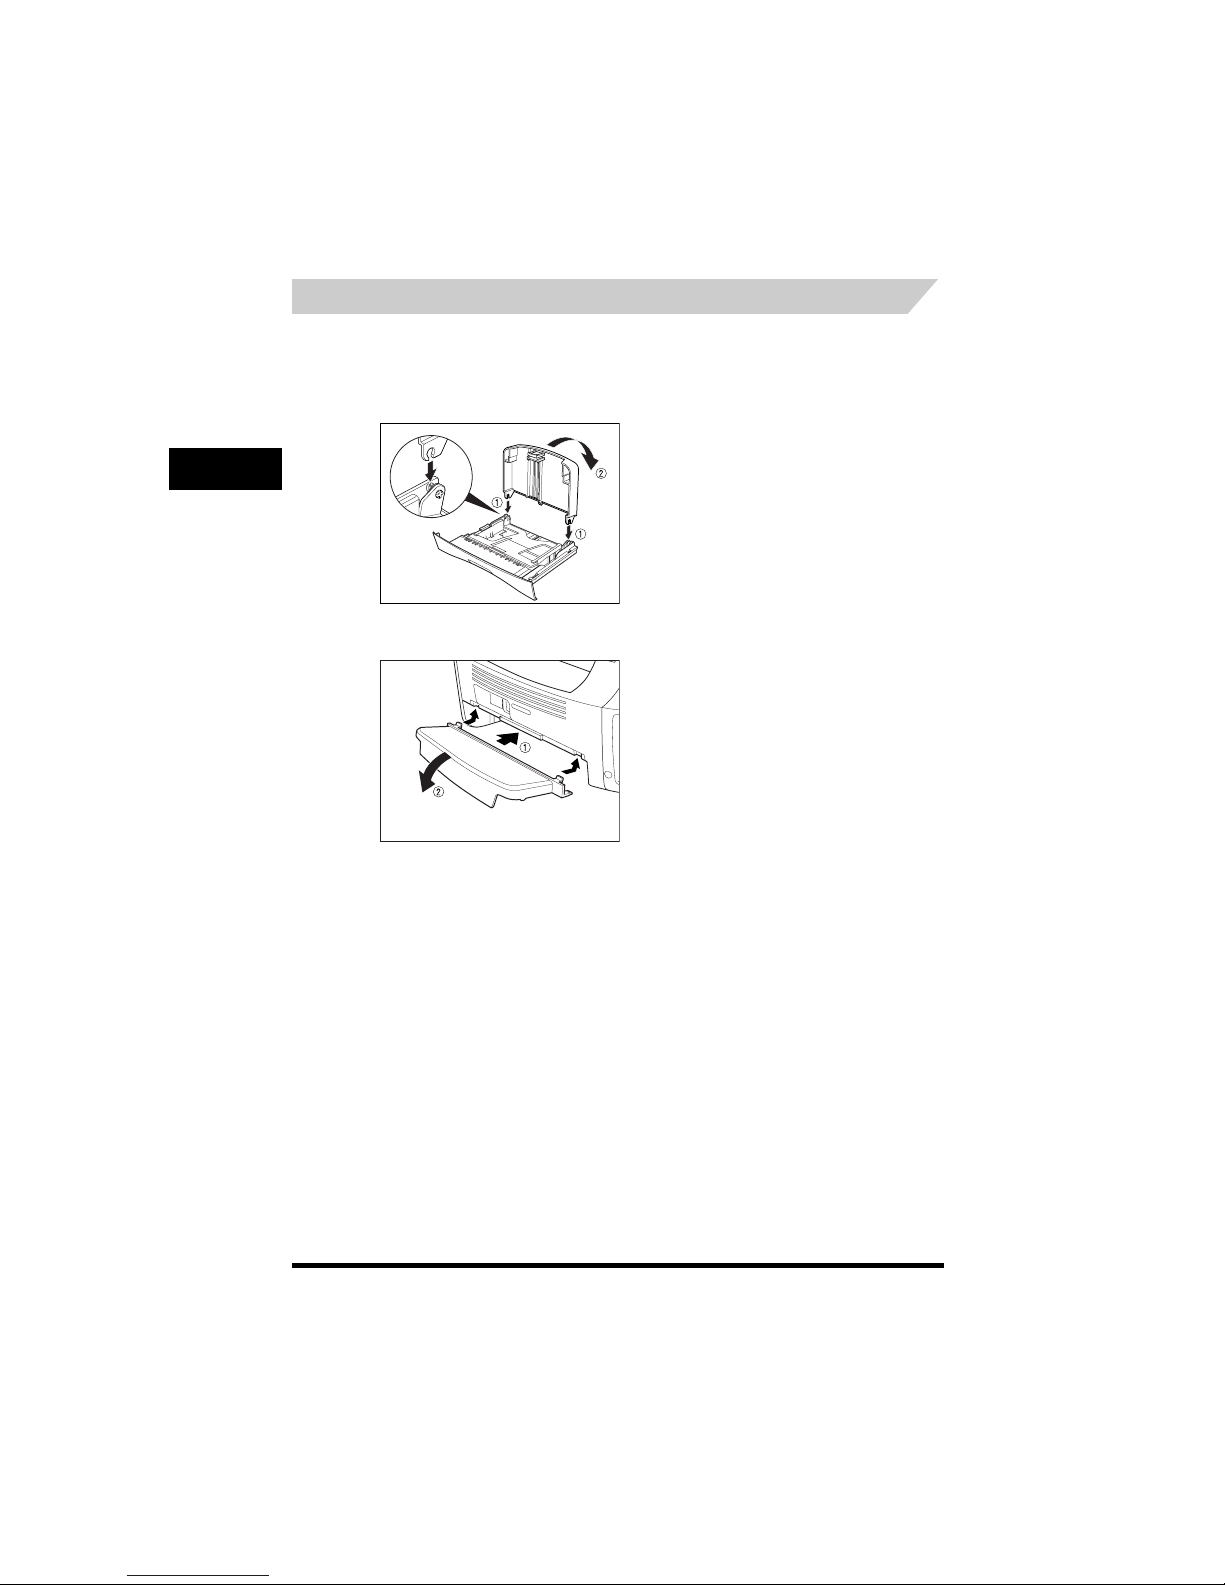
Installing the Paper Cassette
1
Pull out the paper cassette completely.
2
Attach the cassette extension to the cassette.
3
Attach the extension cover on the back of the machine.
4
Insert the paper cassette back into the machine.
Making Connections
1-6
Setting Up Your Machine
1
Making Connections
NOTE
•
The use of the jacks may differ in certain countries. See Appendix C, “Country-Specific Features,” of the User’s
Guide for details.
•
Be sure to connect any external device before using your machine.
•
Canon cannot guarantee that all answering machines will be compatible with your machine, due to varying
specifications.
•
If you have connected an external device to your machine, be sure to set the correct receive mode.
See Chapter 8, “Receiving Faxes.”
•
To connect an extension phone as well as an answering machine, connect the extension phone to the answering
machine, and then the answering machine to your machine.
•
If you connect a data modem to your machine and you use it extensively, or others access your PC frequently
through the data modem, you may want a dedicated telephone line for your data modem.
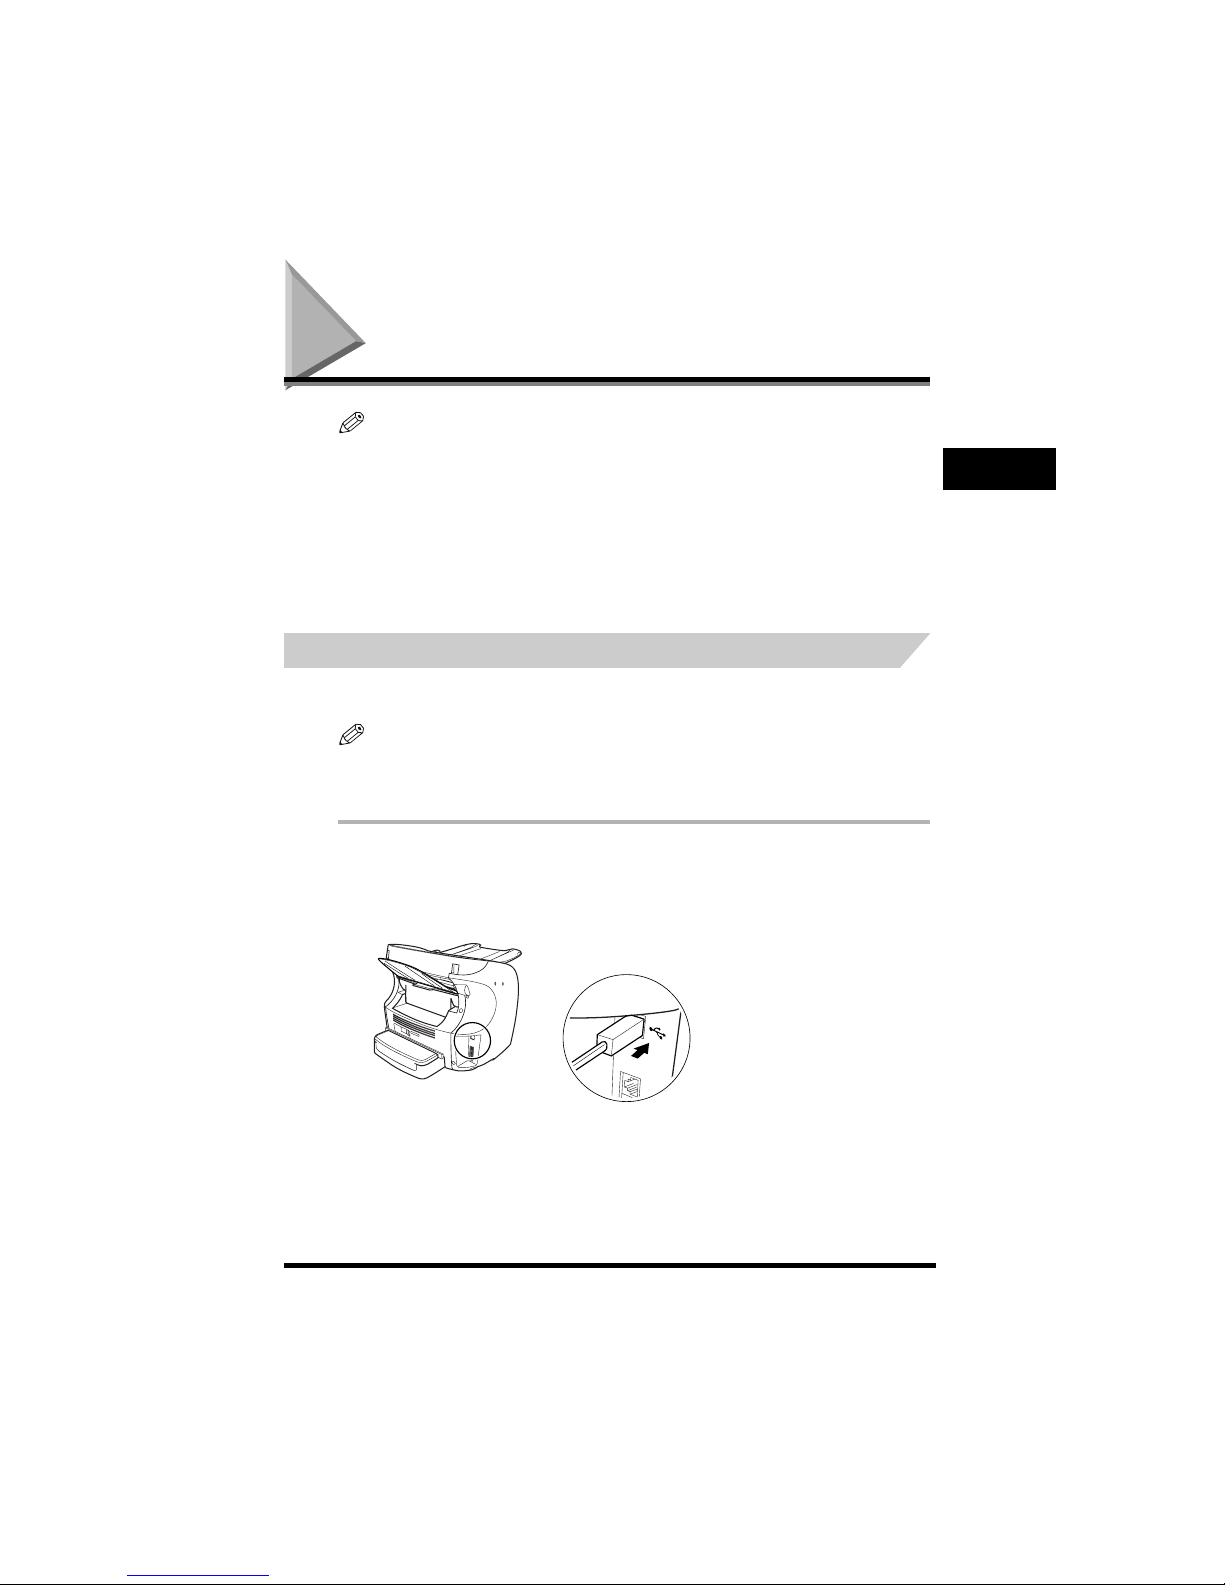
Connecting the Machine to Your PC
Your machine has a USB port that allows you to connect it to a PC. To do this, you need to purchase a
USB cable from your dealer.
NOTE
For best results, use a cable that is 5 meters in length or shorter.
Connect the machine to your computer as follows:
1
Make sure the computer is turned off and the machine is unplugged.
2
Connect the USB cable to your machine and PC during software installation to ensure the proper
operation of the printer driver. (See the Software Guide.)

Making Connections
1-7
Setting Up Your Machine
1
Connecting the Telephone Line
Connect the telephone line to the jack on the left side of the machine.
If you connect an answering machine to the machine, be sure to read your answering machine’s
manual.
NOTE
You can also connect the extension phone to if you have not connected the optional handset.
Connecting the Power Cord
CAUTION
Follow these guidelines when connecting your machine to a power source:
- The machine is intended for domestic use only and requires 200-240 V AC. Do not use it outside the
country where it was purchased.
- Use only the power cord that came with the machine. Using a longer cord or extension cord can
cause the machine to malfunction.
- Unplug the machine only by pulling on the plug itself. Never pull on the cord.
- Do not plug the machine into an outlet shared with an appliance such as an air conditioner,
computer, electric typewriter, or copier. These devices generate electrical noise, which can interfere
with the operation of the machine.
- Make sure nothing is laying on the power cord, and that the cord cannot be walked on or tripped
over.
- Do not overload the electrical outlet. Make sure the total amperage used by all the machines plugged
into the outlet does not exceed the ampere rating of the outlet’s circuit breaker.
- Do not plug the machine into an uninterruptible power supply (UPS).
Connect the optional handset to .
Connect an extension phone or answering machine to .
Connect the supplied telephone line to .
Connect the other end of line to a wall telephone jack.
Making Connections
1-8
Setting Up Your Machine
1
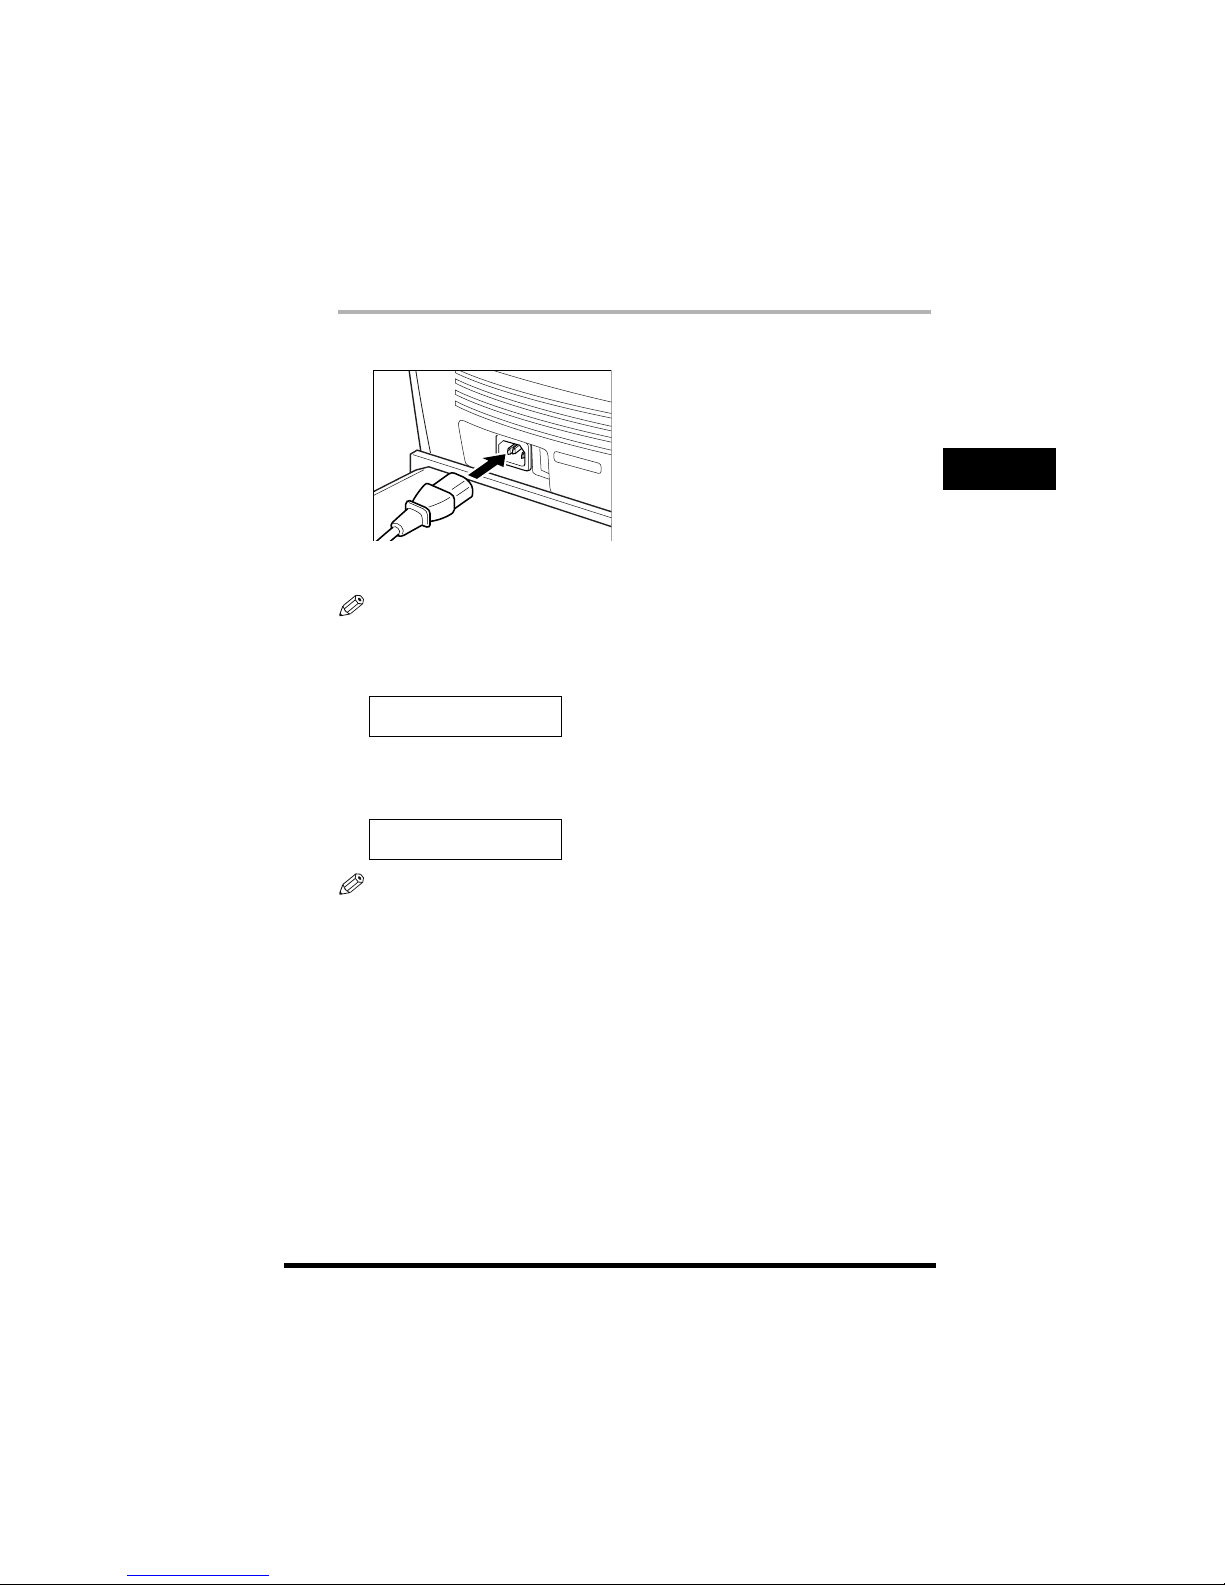
Connect the power cord as follows:
1
Plug the supplied power cord into the power connector on the back of the machine.
2
Plug the other end of the power cord into the outlet.
NOTE
The machine has no power switch, so its power is on as long as it is plugged in. Once connected, though, the
machine still needs to warm up before you can use it.
While the machine is warming up, the message <PLEASE WAIT> appears in the LCD display:
When you connect the power cord to an AC outlet for the first time after purchase, <DISPLAY LANGUAGE> will
appear in the LCD display after <PLEASE WAIT>. In this case, set the language for the LCD display, and the
country*. (See “Setting the Display Language and Country*,” on p. 1-9.)
The Fax standby mode appears:
NOTE
If the toner cartridge has not been installed yet, the message <
INSTALL CARTRIDGE
> appears in the LCD
display, and the Alarm indicator flashes. In this case, install the toner cartridge. (See “Installing/Replacing the
Toner Cartridge,” on p. 1-15.)
PLEASE WAIT
31/12/2003 WED 15:11
FaxOnly STANDARD
* The country selection feature is available for certain countries only.

Setting the Display Language and Country*
1-9
Setting Up Your Machine
1
Setting the Display Language and Country*
When you connect the power cord to an AC outlet for the first time, you need to select the language for
the LCD display. For some countries, you also need to select the country where you are using the
machine. The machine automatically switches the selectable settings and the default settings in the
menus to suit the selected country.
Follow these steps to set the display language and country.
After connecting the power cord, the display changes from <PLEASE WAIT> to the <DISPLAY
LANGUAGE> menu.
1
Use [ (-)] or [ (+)] to select the preferred language for the LCD display ➞ press [OK].
If <COUNTRY SELECT> does not appear after <DATA ENTRY OK> is displayed:
Setting is completed and the machine enters the Fax standby mode.
If <COUNTRY SELECT> appears after <DATA ENTRY OK> is displayed:
Go to step 2.
2
Use [ (-)] or [ (+)] to select the country where you are using the machine ➞ press [OK].
If your country name does not appear, select <OTHERS>.
Once you have selected the language and co untry, these setting menus will not appear next time you connect the
power cord.
• To check the settings made by the country selection, you can print the USER’S DATA LIST. (See “User’s Data
List,” on p. 2-6.)
• You can change the display language or country setting using the <SYSTEM SETTINGS> menu in the <FAX
SETTINGS> menu. (See Chapter 10, “The Menu System.”)
DISPLAY LANGUAGE
< ENGLISH >
➞
COUNTRY SELECT
UK
COUNTRY SELECT
FRANCE
➞
31/12/2003 WED 15:11
FaxOnly STANDARD
* The country selection feature is available for certain countries only.
Getting Acquainted With Your Machine
1-10
Setting Up Your Machine
1
Getting Acquainted With Your Machine
Before using your machine, look over the diagrams on these pages to become familiar with the
machine’s components.
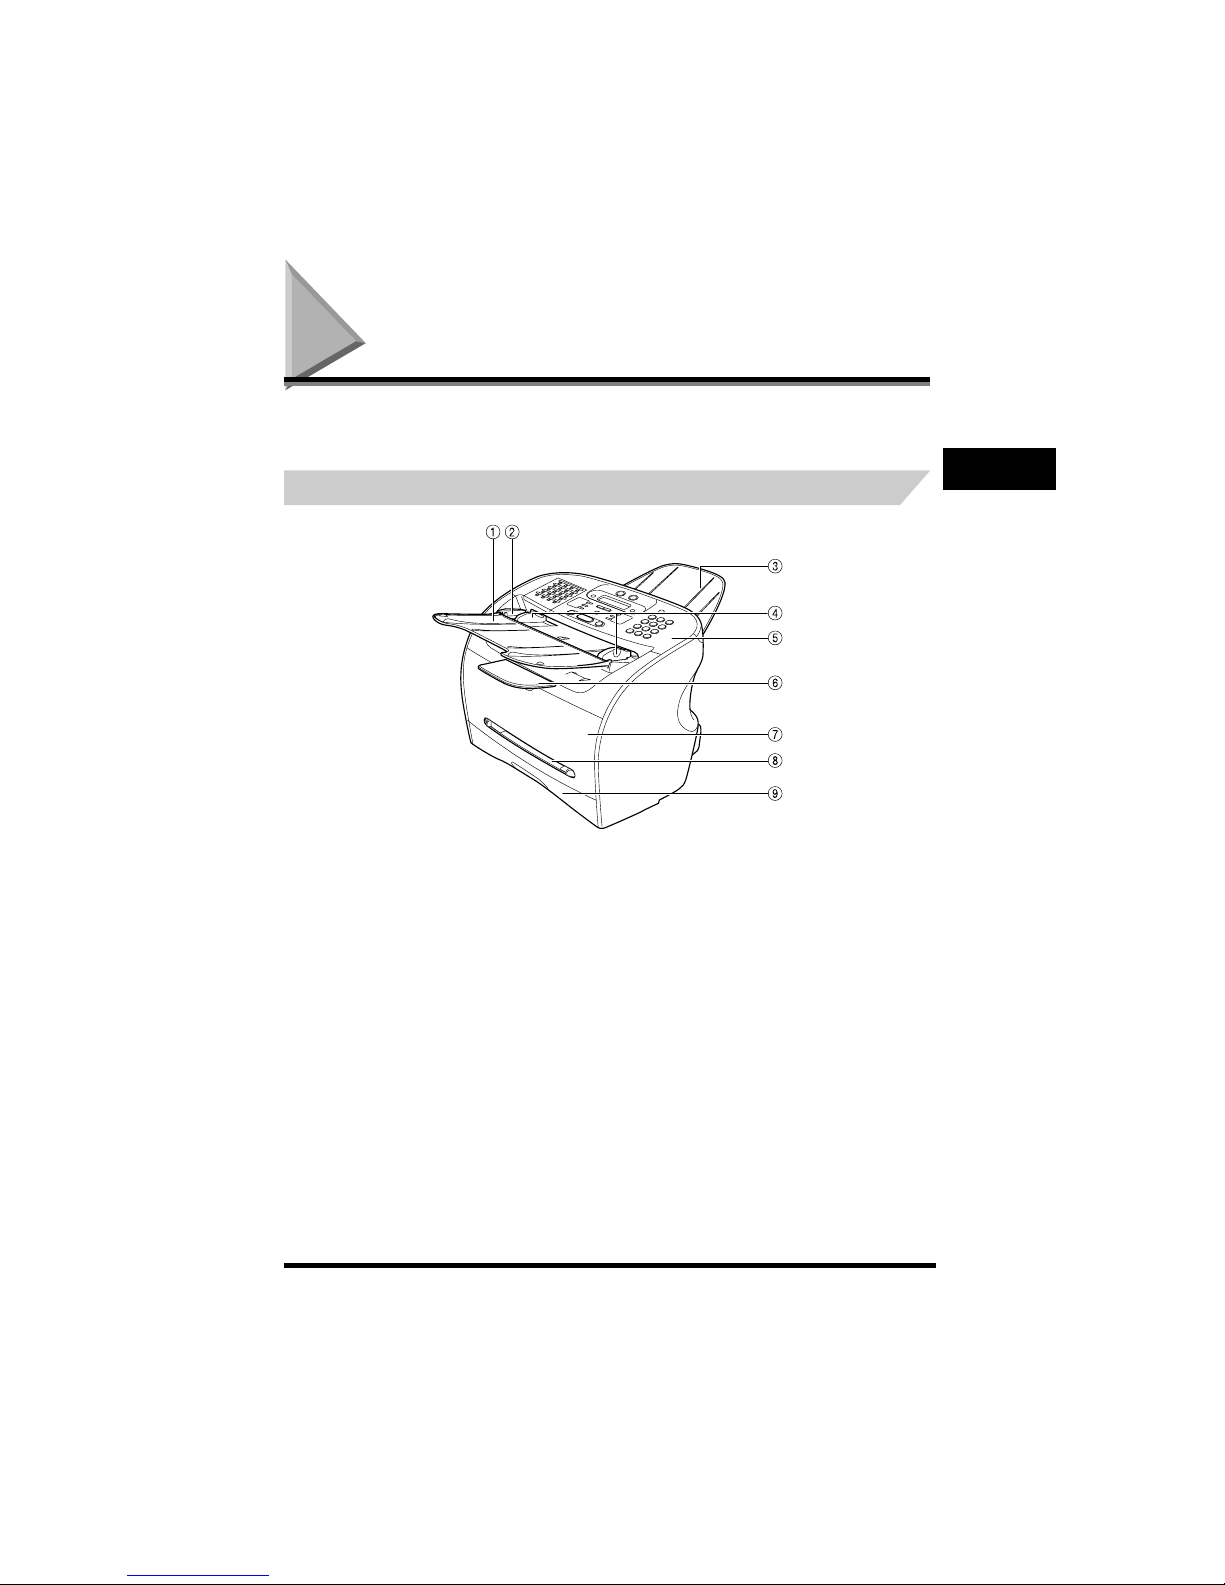
Front View
a Document feeder tray
Place documents.
b ADF (Automatic Document Feeder)
Holds documents and feeds them automatically into the scanning
machine.
c Document output tray
Documents come out here.
d Slide guides
Adjust to the width of do cuments.
e Operation panel
Controls the machine.
f Output tray
Outputs printouts.
g Printer cover
Open it when you install the cartridge, or remove jammed
paper.
h Multi-purpose feeder
Used when printing paper one by one manually.
i Cassette
Holds the paper supply .
Getting Acquainted With Your Machine
1-11
Setting Up Your Machine
1
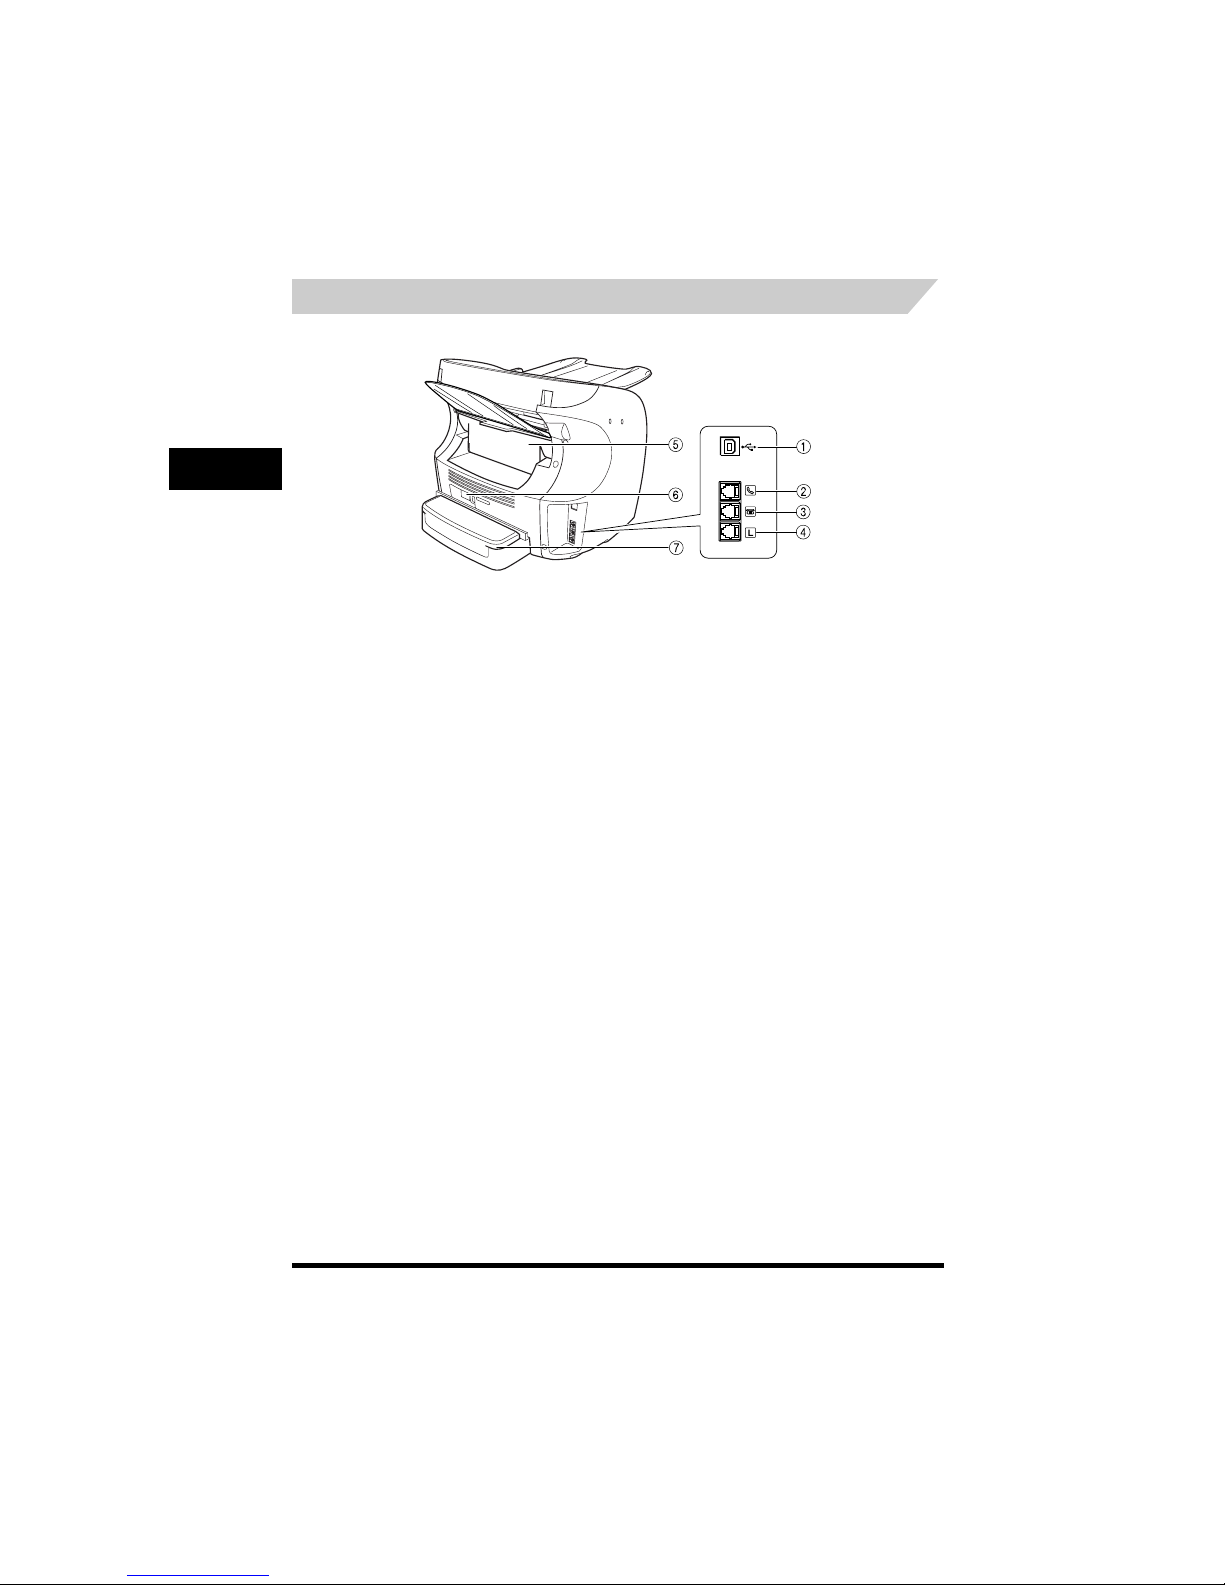
Rear View
The use of the jacks on the side may differ in certain countries. See Appendix D of the User’s Guide.
a USB port
Connect the USB (Universal Serial Bus) cable.
b Handset jack
Connect the handset (optional).
c Extension phone jack
Connect an extension phone.
d Telephone line jack
Connect the telephone cable.
e Face up cover
Open it when you output paper face up, or remove jammed
paper.
f Power socket
Connect the power cord .
g Extension cover
Protects paper supply in the cassette from dirt and dust.
Getting Acquainted With Your Machine
1-12
Setting Up Your Machine
1
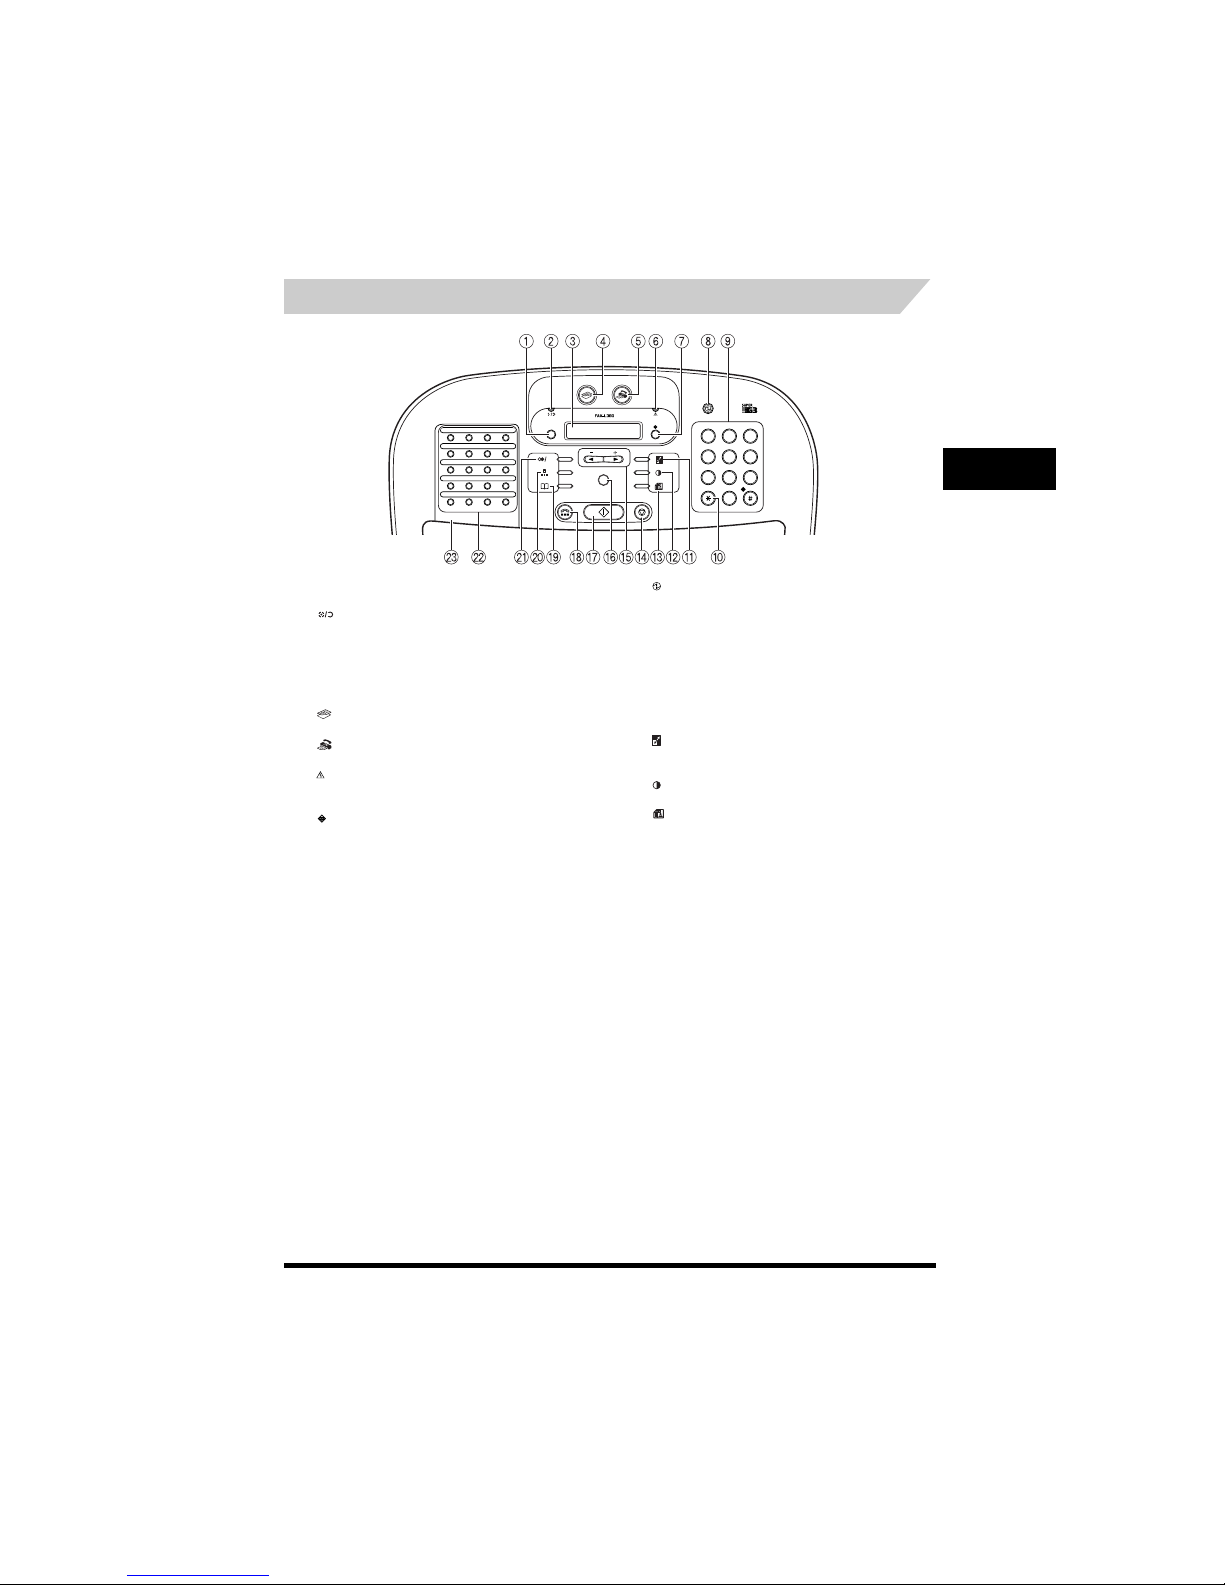
The Operation Panel
a Menu button
Use this button to cust omize the operation of the machine.
b In Use/Memory indicator
Lights when the telepho ne line is being used or a document has
been received in memor y.
c LCD display
The LCD display shows messages and prompts during operation,
and displays selections, text, numbers, and names when
registering information.
d COPY button
Use this button to switch standby display to Copy mode.
e FAX button
Use this button to switch standby display to Fax mode.
f Alarm indicator
This lamp flashes when an error occurs, or when the machine is
out of paper or toner.
g System Monitor button
Use this button to check the status of copy, fax, print and report
jobs.
h Energy Saver button
Use this button to set or cancel the energy saver mode manually.
The button lights green when the energy saver mode is set, and
goes off when the mode is canceled.
i Numeric buttons
Use these buttons to enter numbers and names when registering
information, and to dial fax/telephone numbers that are not
registered for automatic dialing.
j Tone button
Use this button to use tone dialing temporarily when your
machine is set for pulse dialing.
k Enlarge/Reduce button
Use this button to set a n enlargement or reduction ratio of the
copy.
l Exposure button
Use this button to adju st the copy exposure.
m Image Quality button
Use this button to sele ct the resolution the machine will use for
the document you want to fax, or copy.
3
OK
01
02
03
04
080706
05
11 1210
09
161514
13
18 2019
17
12
456
78
0
ABC
DEF
GHI JKL MNO
PQRS TUV WXYZ
T
9
Menu
COPY FAX
P
Getting Acquainted With Your Machine
1-13
Setting Up Your Machine
1
Special Function Buttons (One-Touch Speed Dial Panel
Open)
n Stop/Reset button
Use this button to cancel sending or receiving faxes and other
operations, and bring back the standby display in the LCD.
o (-), (+) buttons
Use this button to scro ll through the selections so you can see
other settings.
p OK button
Use this button to determine the conten ts you set or register. Also,
if the document being scanned stops in the ADF, pressing this
button makes the docum ent come out automatically.
q Start button
Use this button to begin faxing, or copy ing.
r Hook button
Use this button to dial, ev en with the optional handset still in the
handset cradle.
s Directory button
Use this button to search for fax/te lephone numbers by the name
under which they are registered for speed dialing, and then use
the number for dialing.
t Coded Dial button
Use this button to dial a fax/telephone number that you have
registered for Coded Speed Dialing.
u Redial/Pause button
Use this button to redial the last num ber that was dialed using the
numeric buttons, or to enter pause s between digits when dialing
or registering fax numbers.
v One-Touch Speed Dial buttons
Use these buttons for One-Touch Speed Dialing.
w One-Touch Speed Dial panel
Open this panel to access the registration buttons.
a Report button
Use this button to print activity reports.
b Receive Mode button
Use this button to select the receive mode for receiving faxes.
c R button
Use this button to dial an outside line access number when the
machine is connected throug h a switchboard (PBX).
d Space button
Use this button to enter a space between letters and numbers
when you are registeri ng information.
e Delayed Transmission button
Use this button to register a time for delayed sending.
f Polling button
Use this button to set a document for pollin g sending, and to poll
the other fax to receive a document.
g Clear button
Use this button to clea r an entire entry during information
registration.
h Delete button
Use this button to delete character s one by one.
P
21
22
23
24
282726
25
31 3230
29
Receive
Mode
Delayed
Transmission
Report
R Space Delete Clear
Polling
The Toner Cartridge
1-14
Setting Up Your Machine
1
The Toner Cartridge
Handling and Storing Cartridges
• Do not open the drum protective shutter on the cartridge. If the drum surface is exposed to light and
damaged, print quality may deteriorate.
• Do not stand the cartridge on end, and do not turn it upside down. If toner becomes caked in the
cartridge, it may prove impossible to free it even by shaking the cartridge.
• Keep the cartridge away from computer screens, disk drives, and floppy disks. The magnet inside
the cartridge may harm these items.
• Never touch the drum protective shutter. When holding the cartridge avoid touching the drum
protective shutter with your hands.
HDD

The Toner Cartridge
1-15
Setting Up Your Machine
1
• Do not expose the cartridge to direct sunlight or bright light for longer than 5 minutes.
• Do not store the cartridge in direct sunlight.
• Avoid locations subject to high temperature, high humidity, or rapid changes in temperature. Store
the cartridge between 0° and 35° C.
• Store the cartridge in its protective bag. Do not open the bag until you are ready to install the
cartridge in the machine.
• Save the protective bag. You may need to repack and transport the cartridge at a later date.
• Do not store the cartridge in salty air or where there are corrosive gases such as from aerosol
sprays.
• Do not remove the cartridge from the machine unless necessary.
• Be sure to remove the toner cartridge from the machine when disposing of the machine.
CAUTION
DO NOT PLACE THE CARTRIDGE IN FIRE. TONER POWDER IS FLAMMABLE.
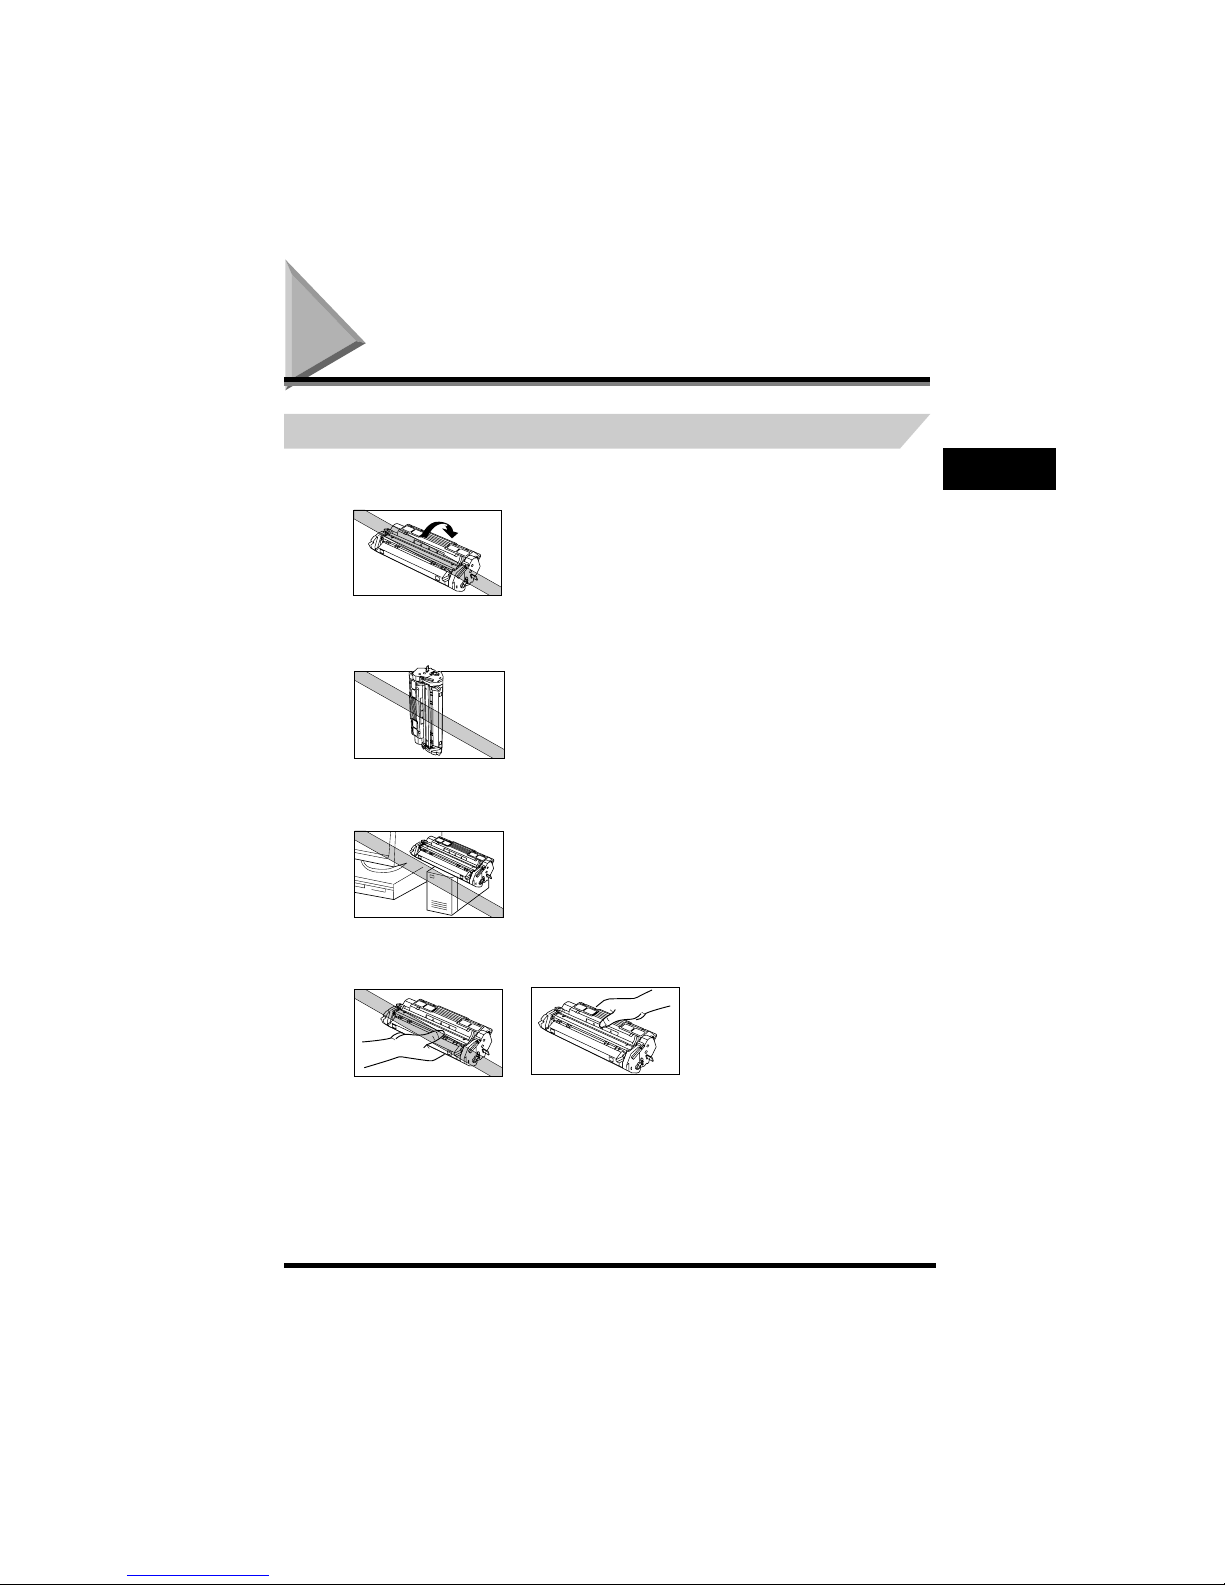
Installing/Replacing the Toner Cartridge
The machine uses a Canon Cartridge T. The procedure below explains how to install the cartridge for
the first time, and how to replace it when the toner runs out.
When the message <REPLACE CARTRIDGE> appears, the toner in the cartridge may simply be
unevenly distributed. Before replacing the cartridge, follow the instructions on p. 1-16 to evenly
distribute the toner. If after doing this the message remains displayed or the print quality is low, replace
the cartridge as described below.
NOTE
Canon makes numerous cartridges. However, the Cartridge T Starter and the regular Cartridge T is the only one
which Canon recommends you to use with your machine. The Cartridge T Starter that comes with your machine
can yield approx. 2,500 page of printouts, while the Cartridge T you purchase can yield approx. 3,500 page of
printouts. But the Cartridge T Starter is identical to the regular Cartridge T otherwise.
1
Remove any documents and/or printed pages from the machine.
2
Make sure the machine is plugged in.
3
Remove the cartridge from the bag. Keep the bag in a safe place for future use.

The Toner Cartridge
1-16
Setting Up Your Machine
1
4
Gently rock the cartridge several times to evenly distribute the toner inside.
5
Hold the cartridge on a flat stable surface with one hand, and break the tab and pull out the seal
completely with the other hand.
6
Open the printer cover.
NOTE
If you are replacing the old cartridge with the new one, remove the old cartridge from the machine. Then, discard
the old toner cartridge immediately according to the local laws and regulations for disposal of consumables.
7
Hold the cartridge and position the arrow mark on the cartridge towards the inside of the machine as
shown below.
INSTRUCTIONS
DRUM PROTECTIVE SHUTTER
TAB

The Toner Cartridge
1-17
Setting Up Your Machine
1
8
Align the projections on both sides of the cartridge to the guides in the machine and slide the
cartridge completely into the machine.
9
Close the printer cover.

Loading Recording Paper
1-18
Setting Up Your Machine
1
Loading Recording Paper
When the message <SUPPLY REC. PAPER> appears in the LCD display, you need to add paper to
the paper cassette. Here are a few tips you should follow when you load paper into the paper cassette.
• Be sure to load paper of the correct size, weight, and quantity recommended for your machine.
See Chapter 5, “Paper Handling.”
• Stack the paper so that the top and bottom edges and sides are straight and even before placing it in
the paper cassette.
• Do not print on both sides of the paper. Doing so may cause several sheets to feed into the machine
at the same time.
• Let the paper run out before you refill the paper cassette.
• Avoid mixing new stock with paper already loaded in the paper cassette. When adding new stock to
the cassette, be sure to remove the remaining paper on the cassette and reload it together with the
new stock. Failure to do so may cause paper jams.
NOTE
•
Do not use damp, curled, wrinkled, or torn paper as these can cause paper jams or poor print quality.
•
Highly textured, extremely smooth or shiny paper does not print well.
•
The laser printing process uses high temperatures to fuse toner to the paper. Use paper that will not melt,
vaporize, discolor, or emit dangerous fumes at temperatures near 170ºC. For example, do not use vellum paper in
a laser printer. Make sure any letterhead or colored paper you use can withstand high temperatures.
Make sure the paper is free of dust, lint, and oil stains.
•
To keep the paper from curling, do not open paper packs until you are ready to use the paper. Store unused paper
from opened packs in a cool, dry location in the original packaging.
•
Your machine is factory-set to use A4-size paper in the paper cassette.
If you wish to use different sized paper, you must change the setting using the <
PAPER SETTINGS
> menu.
See Chapter 10, “The Menu System.”
•
Refer to Chapter 5, “Paper Handling,” for more details on the types of media you can load in the paper cassette.
CAUTION
Do not load paper in the multi-purpose feeder when the machine is printing.
Loading Recording Paper
1-19
Setting Up Your Machine
1
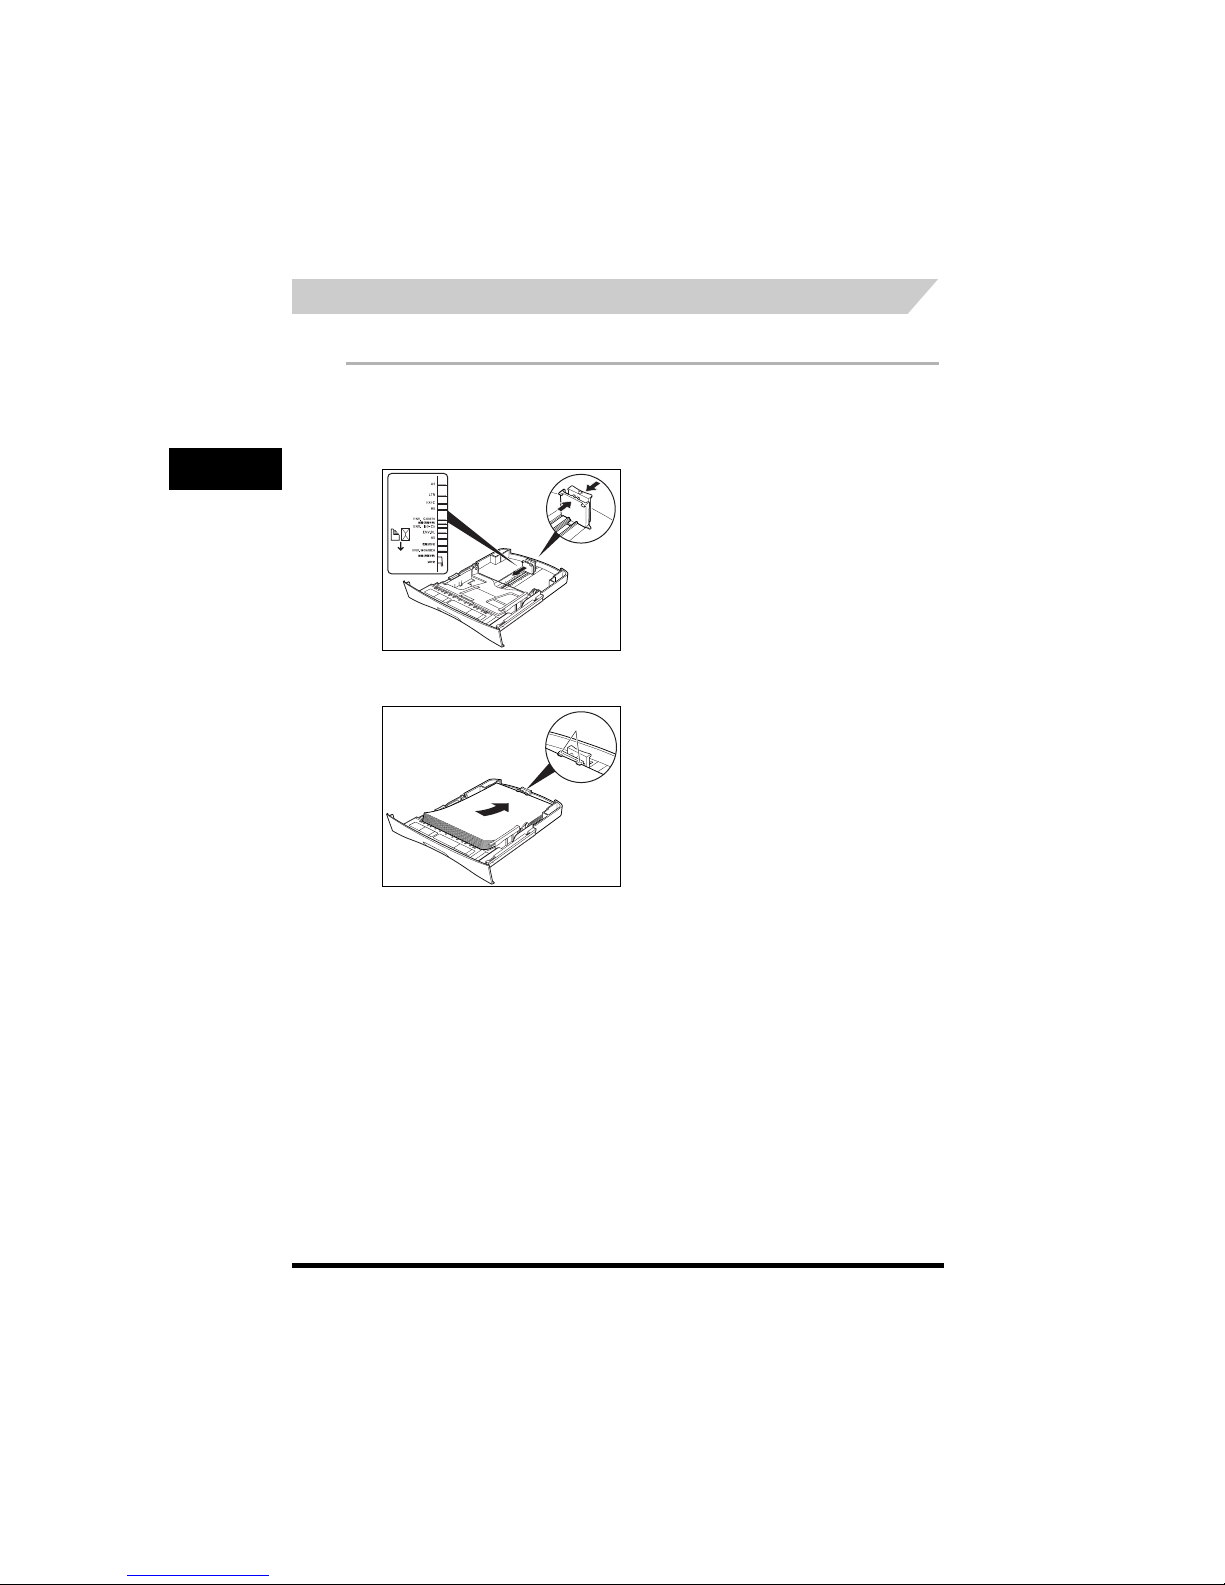
Loading Paper in the Cassette
Follow these steps to load paper in the paper cassette.
1
Pull out the paper cassette completely.
2
Pinch and slide the rear paper end guide to match the size of paper.
3
Load the paper into the cassette. Make sure the paper stack sits below the hooks.
HOOKS

Loading Recording Paper
1-20
Setting Up Your Machine
1
4
Pinch and slide the side paper end guides to match the size of paper.
5
Even out the edges of the paper stack.
Make sure the height of the paper stack does not exceed the limit marks .
6
Insert the paper cassette back into the machine as far as it will go.
NOTE
If you do not completely insert the cassette into the machine, paper jams may occur.
HOOK

Guidelines for Entering Information
2-1
CHAPTER
2
Registering Information in the
Machine
Guidelines for Entering Information
The following section explains how to enter user information into the machine.
NOTE
If you pause while entering information and do not make an entry for more than 60 seconds, the machine returns
to standby mode and loses all information you had entered up to that point. You will then have to start again.
Entering Numbers, Letters, and Symbols
Each numeric button has a number and a group of uppercase and lowercase letters assigned to it. Use
the chart below to determine which numeric button to press for each character.
NOTE
The characters that appear when you press the numeric buttons differ depending on the display language you
select. For details on selecting the display language, see “Setting the Display Language and Country” on p. 1-9.
Guidelines for Entering Information
2-2
Registering Information in the Machine
2
Follow this procedure when you come to a step that requires you to enter a name or number.
1
Press [ ] to switch to the uppercase letter mode (:A), lowercase letter mode (:a), or the number
mode (:1).
You can see what mode you are in by the character indicated on the top right corner of the LCD display.
2
Use the numeric buttons to enter the letter or number.
Press the button repeatedly until the letter or number you want appears.
● To enter two letters or symbols that are under the same button:
❑ Press the numeric button ➞ [ (+)] ➞ press the same numeric button again.
For example, to enter <DD> you would press [3] ➞ [ (+)] ➞ [3].
● To enter a space:
❑ Press [ (+)] twice.
● To delete a character:
❑ Press [Delete] under the One-Touch Speed Dial panel.
● To delete an entire entry:
❑ Press [Clear] under the One-Touch Speed Dial panel.
1
@ . – _ / @ . – _ /
2 ABC abc
3 DEF def
4 GHI ghi
5 JKL jkl
6 MNO mno
7
PQRS pqrs
8
TUV tuv
9
WXYZ wxyz
0
#
– . # ! “ , ; : ^ _ = / | ’ ? $ @ % & + \ ( ) [ ] { } < >
Button Uppercase Lowercase
Uppercase Lowercase Number
:A
_
Personalizing Your machine
2-3
Registering Information in the Machine
2
Personalizing Your machine
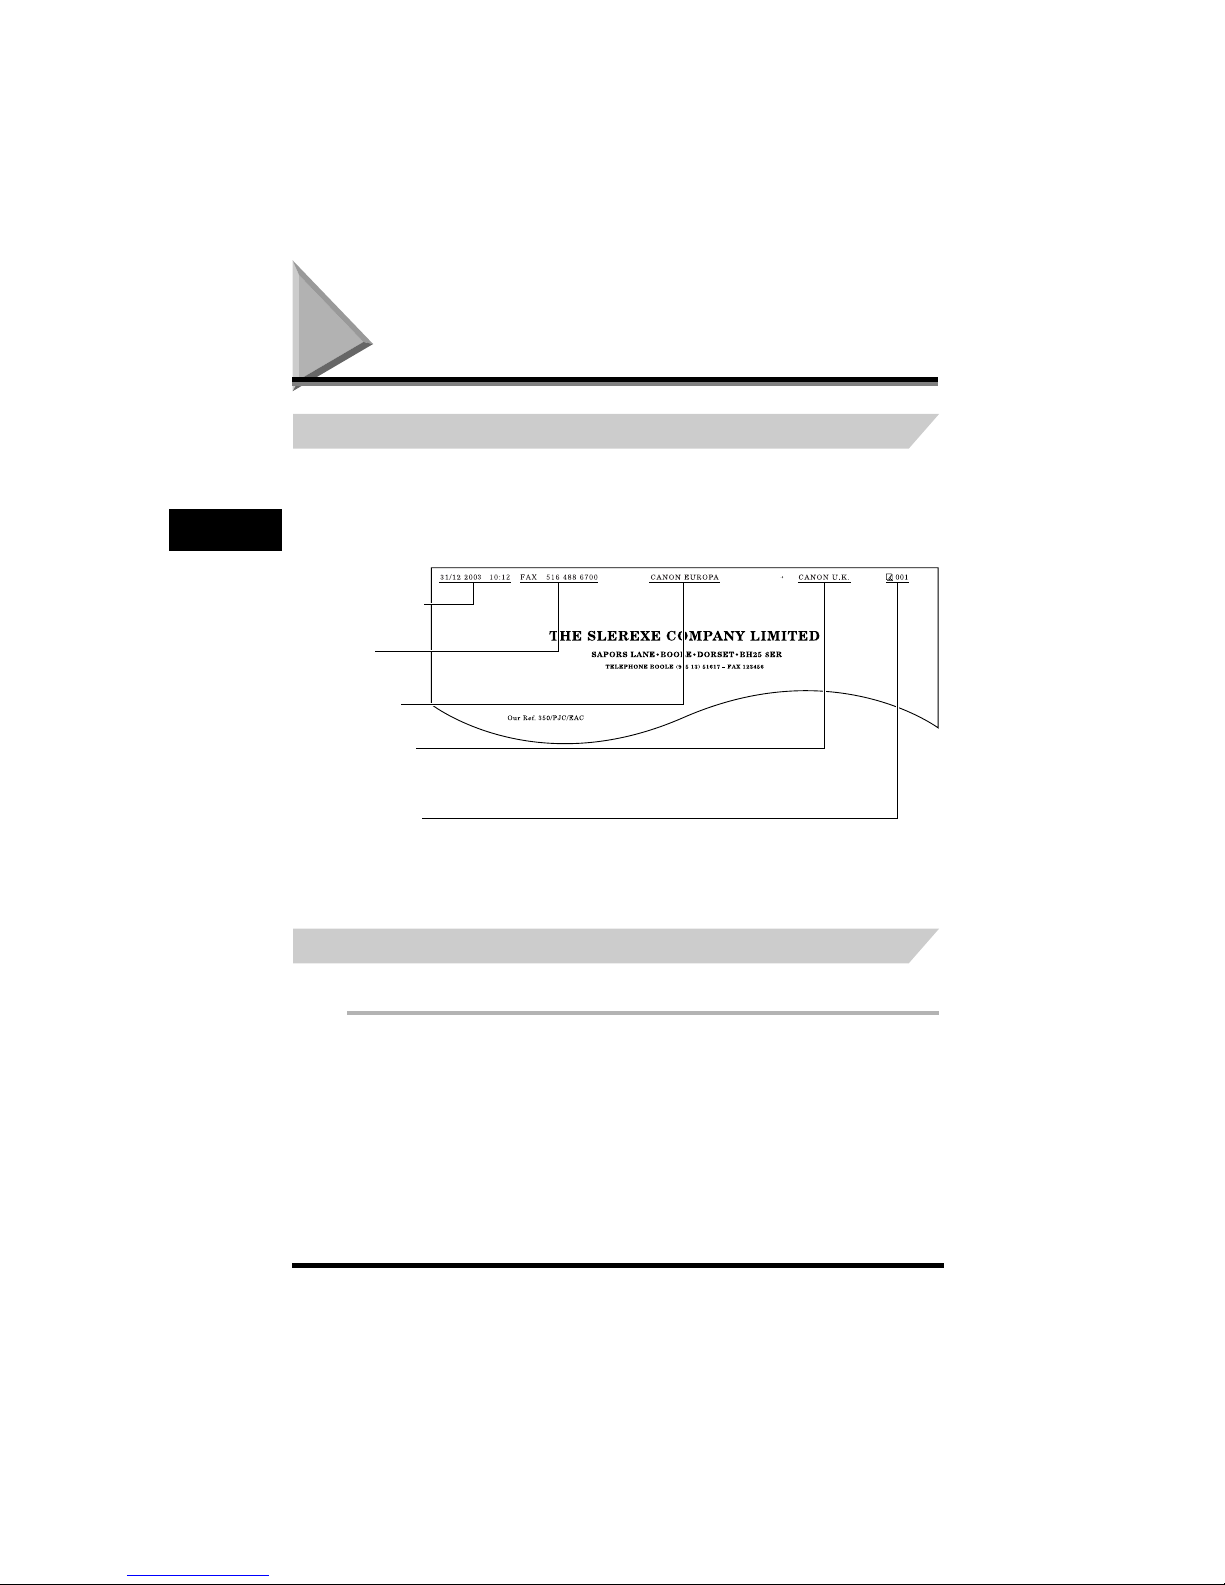
Identifying Your Documents
When sending documents, you can have your fax number, your name, and the current date and time
printed out by the receiving fax. This information is called your TTI (Transmit Terminal Identification)
and appears at the top of the faxed document in small type.
By identifying the documents you send, the receiving party can recognize your fax messages at a
glance. Here is a sample document with the identifying information:
* If you send a fax using speed dialing, the top line also includes the name registered under the speed dialing button
or code you entered.
The following pages explain how to enter this information.
Entering the Date and Time
Follow these steps to enter the date and time.
1
Press [Menu].
THE DATE AND TIME
YOU SENT THE
DOCUMENT
YOUR FAX/
TELEPHONE
NUMBER
YOUR NAME OR
COMPANY NAME
THE NAME OF THE
PARTY WHO IS
RECEIVING THE FAX*
THE PAGE NUMBER
 Loading...