

Canon FaxPhone L360, H12249, FAX-L360 User Manual
ii
Preface
Copyright
Copyright © 2002 by Canon, Inc. All rights reserved. No part of this
publication may be reproduced, transmitted, transcribed, stored in a
retrieval system, or translated into any language or computer language in
any form or by any means, electronic, mechanical, magnetic, optical,
chemical, manual, or otherwise, without the prior written permission of
Canon, Inc.
IMPORTANT!
Appendix D describes important information
exclusively for specified countries. If you find your
country name in Appendix D, be sure to read it.
This equipment conforms with the essential requirements of
EC Directive 1999/5/EC.
We declare that this product conforms with the EMC
requirements of EC Directive 1999/5/EC at nominal mains
input 230V, 50Hz although the rated input of the product is
200V–240V, 50/60Hz.
If you move to another EU country and are experiencing
trouble please call the Canon Help Desk.
(For Europe Only)
H12249 (FAX-L360)
Model Name

Preface
iii
Trademarks
Canon® is a registered trademark, and UHQ™ is a trademark of Canon
Inc.
IBM
®
is a registered trademark.
Microsoft
®
and Windows® are registered trademarks of Microsoft
Corporation.
Other brand and product names may be trademarks or registered
trademarks of their respective companies.
As an ENERGY STAR® Partner, Canon has
determined that the FAX-L360 meets the Energy
Star guidelines for energy efficiency.
Super G3 is a phrase used to describe the new
generation of fax machines that use ITU-T V.34
standard 33.6Kbps* modems. Super G3 High Speed
Fax machines allow transmission time of
approximately 3 seconds* per page which results in
reduced telephone line charges.
* Approximately 3 seconds per page fax data transmission time based on Canon
FAX Standard Chart No.1, (Standard Mode) at 33.6Kbps modem speed. The
Public Switched Telephone Network (PSTN) currently supports 28.8Kbps
modem speeds or lower, depending on telephone line conditions.
iv
Preface
Safety Information
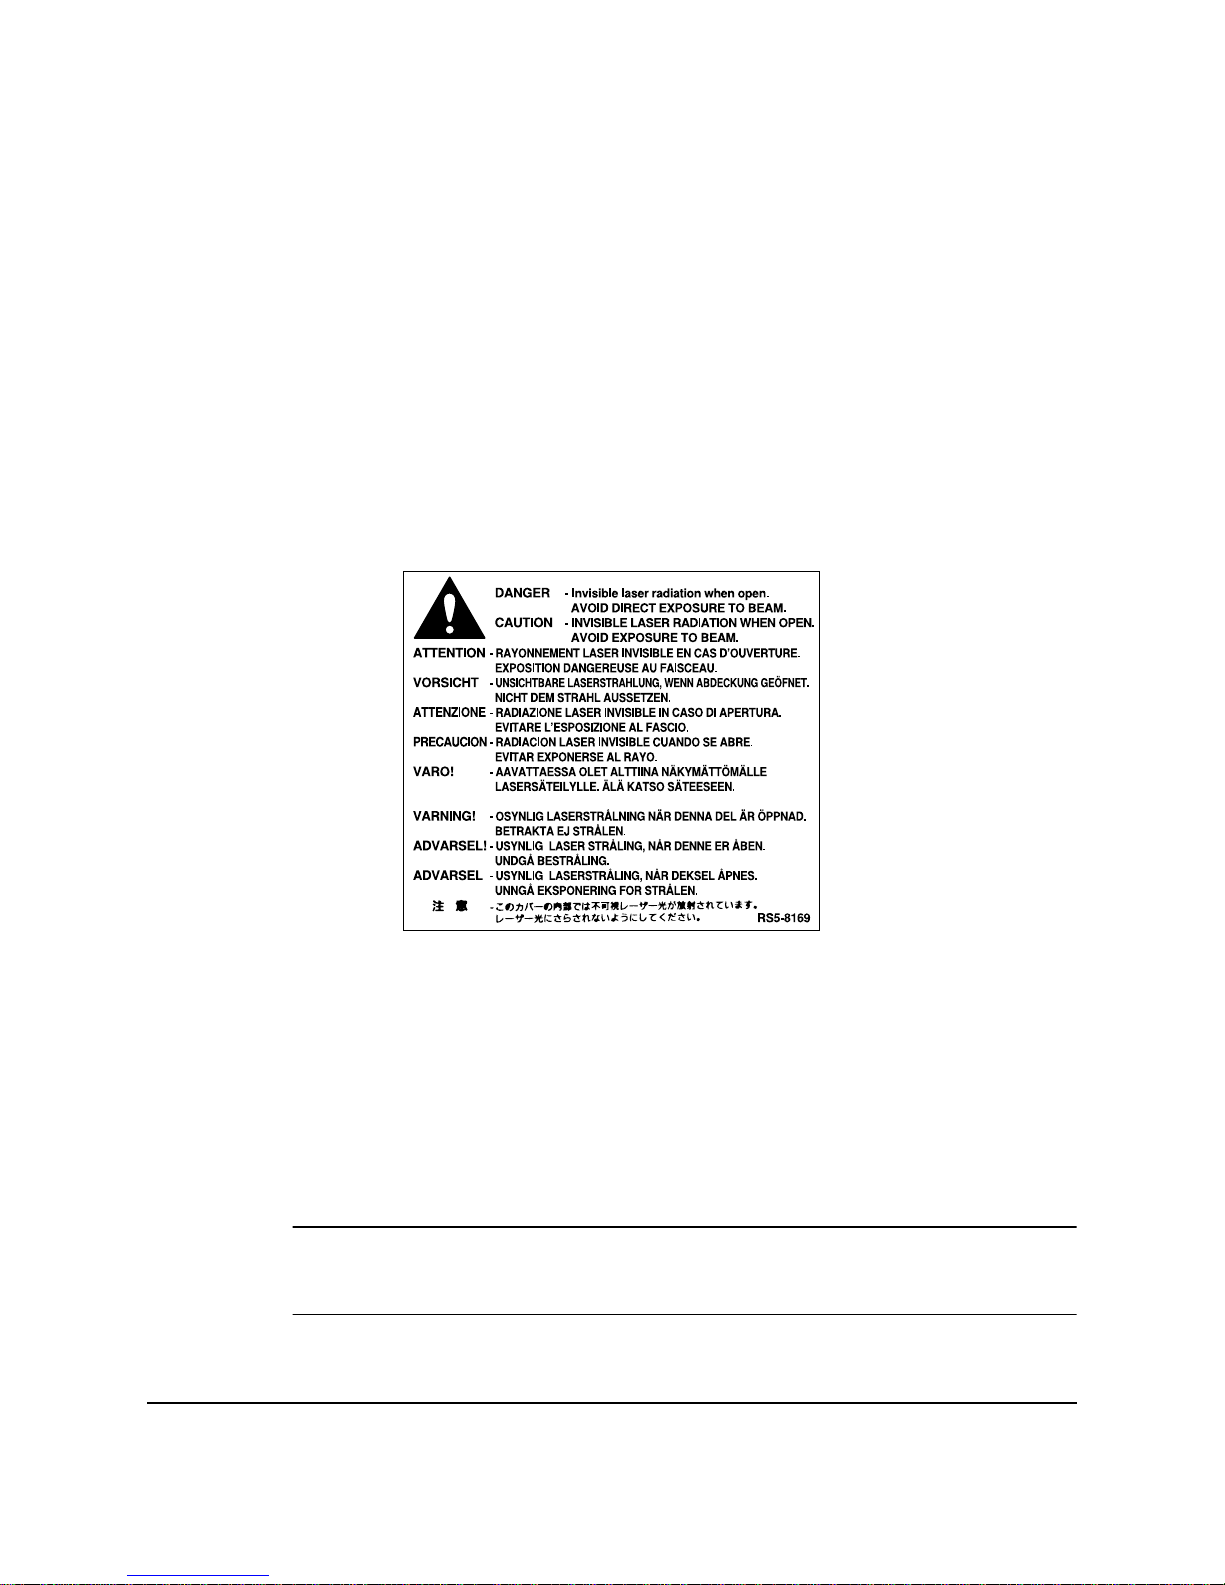
Laser Safety Information
Laser radiation could be hazardous to the human body. For this reason,
laser radiation emitted inside this unit is hermetically sealed within the
protective housing and external cover. No radiation can leak from the
machine in the normal operation of the product by the user.
This fax is classified as a Class 1 Laser Product under EN 60825-1: 1994.
200V-240V model
The label shown below is attached to the laser scan unit on the fax.
This fax has been classified under EN60825-1: 1994 and conforms to the
following classes:
CLASS 1 LASER PRODUCT
LASER KLASSE 1
APPAREIL A RAYONNEMENT LASER DE CLASSE 1
APPARECCHIO LASER DI CLASSE 1
PRODUCTO LASER DE CLASE 1
APARELHO A LASER DE CLASSE 1
PERFORMANCE OF PROCEDURES OTHER THAN THOSE SPECIFIED
IN THIS GUIDE MAY RESULT IN HAZARDOUS RADIATION
EXPOSURE.
C

Contents
v
Contents
Chapter 1 Introducing the FAX-L360
............................................................................1-1
Welcome...........................................................................................................1-2
The Main Features of the FAX-L360.............................................................1-3
Plain Paper Fax Features..........................................................................1-3
Printer Features..........................................................................................1-4
Copier Features..........................................................................................1-5
Telephone Features...................................................................................1-5
Using the FAX-L360 With the Printer Driver .............................................1-6
System Requirements ...............................................................................1-6
Using Your Documentation...........................................................................1-8
How to Use This User’s Guide................................................................1-8
Type Conventions Used in This User’s Guide......................................1-9
Customer Support.........................................................................................1-10
Safety Instructions.........................................................................................1-11
Chapter 2 Setting Up Your FAX-L360
............................................................................2-1
Choosing a Location for Your FAX-L360 ....................................................2-3
Dimensions.................................................................................................2-4
Unpacking Your FAX-L360 ...........................................................................2-5
Do You Have Everything? .......................................................................2-5
Lifting the FAX-L360.................................................................................2-6
Removing Shipping Materials.................................................................2-7
Replaceable Parts.......................................................................................2-9
Assembling the FAX-L360...........................................................................2-10
Attaching Components...........................................................................2-10
Attaching the Paper Loading Warning Label................................2-10
Attaching the Extension Tray ..........................................................2-11
Straightening the Multi-Purpose Tray............................................2-11
Attaching the Support Trays............................................................2-12
Making Connections.....................................................................................2-13
Connecting the FAX-L360 to Your PC..................................................2-13
Connecting the Telephone Line ............................................................2-14
Connecting the Optional Handset........................................................2-14
Connecting an Extension Phone or Answering Machine..................2-15
Connecting the Power Cord ..................................................................2-16
Setting the Display Language and Country..............................................2-19
Getting Acquainted With Your FAX-L360................................................2-21
Front View ..............................................................................................2-21

vi
Contents
Inside View ..............................................................................................2-22
Rear View ...............................................................................................2-23
The Operation Panel ..............................................................................2-24
Special Function Buttons (One-Touch Speed Dial panel open)
...2-27
The Toner Cartridge .....................................................................................2-29
Handling and Storing Cartridges .........................................................2-29
Installing/Replacing the Toner Cartridge...........................................2-31
Loading Recording Paper............................................................................2-37
Loading Paper in the Cassette .........................................................2-39
Loading Paper in the Multi-Purpose Tray.....................................2-42
Testing the FAX-L360...................................................................................2-44
Chapter 3 Registering Information in the FAX-L360
.................................................3-1
Guidelines for Entering Information............................................................3-2
Entering Numbers, Letters, and Symbols..............................................3-2
Editing Information.............................................................................3-4
Using the One-Touch Speed Dial button/
One-Touch Speed Dial Panel................................................................3-5
Using the Special Function Buttons........................................................3-5
Using the Menu System............................................................................3-6
Personalising Your FAX-L360.......................................................................3-8
Identifying Your Documents...................................................................3-8
Entering the Date and Time.....................................................................3-9
Registering Your Fax Number and Name...........................................3-10
Setting the Telephone Line Type...........................................................3-12
Setting the Summer Time.......................................................................3-13
Chapter 4 Paper Handling
...............................................................................................4-1
Guidelines for Selecting Print Media...........................................................4-2
Plain Paper .................................................................................................4-4
Envelopes....................................................................................................4-4
Labels ..........................................................................................................4-5
Transparencies...........................................................................................4-5
The Paper Path ................................................................................................4-6
Selecting Paper Delivery................................................................................4-8
Face-Down Delivery .................................................................................4-9
Face-Up Delivery.....................................................................................4-10
Loading Paper ...............................................................................................4-12
The Paper Cassette..................................................................................4-12
The Multi-Purpose Tray.........................................................................4-12
Loading Envelopes in the Multi-Purpose Tray ........................................4-13
Changing the Paper Size Setting.................................................................4-16

Contents
vii
The Multi-Purpose Tray.........................................................................4-16
Chapter 5 Speed Dialling
................................................................................................5-1
Speed Dialling Methods.................................................................................5-2
One-Touch Speed Dialling.............................................................................5-3
Storing Numbers for One-Touch Speed Dialling .................................5-3
Changing a Number/Name Stored Under a One-Touch Speed
Dialling Button.......................................................................................5-7
Using One-Touch Speed Dialling .........................................................5-10
Coded Speed Dialling...................................................................................5-12
Storing Numbers for Coded Speed Dialling .......................................5-12
Changing a Number/Name Stored under a Coded Speed Dialling
Code.......................................................................................................5-17
Using Coded Speed Dialling .................................................................5-21
Group Dialling...............................................................................................5-23
Creating Groups for Group Dialling....................................................5-23
Using Group Dialling .............................................................................5-27
Chapter 6 Sending Faxes
.................................................................................................6-1
Preparing to Send a Fax .................................................................................6-3
Document Requirements..........................................................................6-3
Scanning Area ......................................................................................6-5
Selecting Automatic/Manual Document Feed.....................................6-6
Loading Documents for Automatic Feed.........................................6-7
Loading Documents for Manual Feed............................................6-11
Setting the Resolution and Contrast.....................................................6-13
Setting the Scanning Resolution......................................................6-13
Setting the Scan Contrast..................................................................6-14
Sending Methods.....................................................................................6-15
Manual Sending Via the Handset ...................................................6-15
Memory Sending ...............................................................................6-15
Dialling Methods.....................................................................................6-17
Sending Documents......................................................................................6-18
Manual Sending Via the Handset.........................................................6-18
Memory Sending.....................................................................................6-20
Adding Pages to the Document in the Automatic Document Feeder
(ADF)...........................................................................................................6-22
Cancelling Sending.......................................................................................6-23
Removing the Document From the Automatic Document Feeder
(ADF) .....................................................................................................6-24
Redialling .......................................................................................................6-26
Manual Redialling...................................................................................6-26

viii
Contents
Automatic Redialling With Memory Sending ....................................6-26
Cancelling Automatic Redialling ....................................................6-27
Setting Up Automatic Redialling ....................................................6-28
Sequential Broadcasting...............................................................................6-31
Sending a Document to More Than One Destination........................6-31
Sending a Document Using Group Dialling .......................................6-33
Delayed Sending ...........................................................................................6-34
Sending Other Documents While the FAX-L360 is Set for Delayed
Sending..................................................................................................6-36
Chapter 7 Receiving Faxes
..............................................................................................7-1
Different Ways to Receive a Fax ...................................................................7-2
FAX/TEL AUTO SW ..........................................................................7-2
FAX ONLY MODE..............................................................................7-2
Setting the RX MODE...............................................................................7-4
Setting the Receive Mode.........................................................................7-5
Receiving Faxes and Phone Calls Automatically: Fax/Tel Mode......7-5
Setting Up Fax/Tel Mode...................................................................7-5
What Happens When Fax/Tel Mode is Selected...........................7-7
Receiving Faxes Manually: MANUAL MODE...................................7-10
Receiving Faxes Automatically: FAX ONLY MODE.........................7-11
Using an Answering Machine: ANS.MACHINE MODE..................7-12
Using the FAX-L360 With an Answering Machine......................7-12
Documents Received in Memory ...............................................................7-13
Messages Displayed When Documents are Received in
Memory.................................................................................................7-13
Receiving While Registering, Copying, or Printing...........................7-14
Cancelling an Incoming Fax........................................................................7-15
Chapter 8 Using the Memory Features .........................................................................8-1
Documents Stored in Memory......................................................................8-2
Printing a List of Documents Stored in Memory..................................8-2
Printing Documents Stored in Memory.................................................8-3
Method 1...............................................................................................8-3
Method 2...............................................................................................8-4
Sending Documents Stored in Memory.................................................8-6
Deleting a Document Stored in Memory...............................................8-8
Method 1...............................................................................................8-8
Method 2...............................................................................................8-9
Chapter 9 Setting Up and Using Polling ......................................................................9-1
What’s Polling?................................................................................................9-2

Contents
ix
Before You Use Polling Receiving ..........................................................9-2
Polling to Receive Faxes.................................................................................9-3
Requesting Another Fax to Send a Document......................................9-3
Cancelling a Polling ..................................................................................9-5
Setting Up Polling Sending............................................................................9-6
Before You Can Be Polled to Send..........................................................9-6
Setting Up a Polling Box...........................................................................9-6
Scanning a Document into the Memory for Polling Sending.............9-9
Changing the Polling Box Setup ...........................................................9-11
Cancelling a Polling Box.........................................................................9-13
Chapter 10 Special Features ............................................................................................10-1
Special Dialling..............................................................................................10-2
Dialling Through a Switchboard...........................................................10-2
Registering the Access Type and Outside Line Access Number
Under the R button ........................................................................10-2
Long Distance Dialling...........................................................................10-4
How to Enter Pauses.........................................................................10-4
Confirming a Dial Tone..........................................................................10-5
Using Tone Dialling On a Pulse Line...................................................10-6
Restricting Use of the FAX-L360.................................................................10-8
Restricting Reception..................................................................................10-10
Chapter 11 Making Copies .............................................................................................11-1
Making Copies...............................................................................................11-2
Chapter 12 Reports and Lists ..........................................................................................12-1
Activity Report..............................................................................................12-2
Transmission (TX) Reports..........................................................................12-4
Error TX Report .......................................................................................12-4
TX Report..................................................................................................12-5
Multi TX/RX Report...............................................................................12-6
Reception (RX) Report..................................................................................12-7
Memory Clear Report...................................................................................12-8
Speed Dialling Lists......................................................................................12-9
One-Touch Speed Dial List..................................................................12-11
Coded Speed Dial List .........................................................................12-12
Group Dial List......................................................................................12-13
User’s Data List ...........................................................................................12-14
Doc Memory List.........................................................................................12-16

x
Contents
Chapter 13 Frequently Asked Questions .....................................................................13-1
If You Cannot Solve the Problem ...............................................................13-2
Problems Index..............................................................................................13-3
Paper Jams................................................................................................13-5
Jams in the Automatic Document Feeder (ADF)? ........................13-5
Jams in the Output Slots? .................................................................13-7
Jams in the Paper Cassette?..............................................................13-8
Jams Inside the Unit? ......................................................................13-10
Jams in the Front Area of the Unit?...............................................13-15
Jams in the Rear Cover of the Unit?..............................................13-18
After Clearing a Paper Jam.............................................................13-20
Problems Feeding Paper into the FAX-L360 .....................................13-21
Faxing Problems....................................................................................13-24
Sending Faxes...................................................................................13-24
Receiving Faxes................................................................................13-27
Telephone Problems..............................................................................13-31
Copying Problems.................................................................................13-32
Printing Problems..................................................................................13-33
Print Quality Problems.........................................................................13-35
General Problems..................................................................................13-36
If the Power Goes Out................................................................................13-37
Error Codes, Messages, and Solutions.....................................................13-38
Chapter 14 Maintaining Your FAX-L360 ......................................................................14-1
Cleaning the FAX-L360................................................................................14-2
Cleaning the FAX-L360 Exterior ...........................................................14-2
Cleaning the Inside of the FAX-L360....................................................14-3
Cleaning the Scanner Components.......................................................14-6
Transporting the FAX-L360.........................................................................14-9
Chapter 15 The Menu System ........................................................................................15-1
Understanding the Menu System...............................................................15-2
Accessing the USER SETTINGS Menu ......................................................15-3
Accessing the REPORT SETTINGS Menu.................................................15-5
Accessing the TX SETTINGS Menu ...........................................................15-7
Accessing the RX SETTINGS Menu...........................................................15-9
Accessing the PRINTER SETTINGS Menu .............................................15-11
Accessing the POLLING BOX Menu .......................................................15-13
Accessing the SYSTEM SETTINGS Menu...............................................15-15
Appendix A Specifications .................................................................................................A-1
General.............................................................................................................A-2

Contents
xi
Plain Paper Fax...............................................................................................A-4
Copier ..............................................................................................................A-6
Telephone........................................................................................................A-7
Printer..............................................................................................................A-8
Printable Area: Papers.............................................................................A-9
Printable Area: Envelopes.....................................................................A-10
Document Sizes............................................................................................A-11
PC Interface...................................................................................................A-13
Printer Driver................................................................................................A-13
Appendix B Attaching the Optional Handset to the FAX-L360 .................................. B-1
Handset ........................................................................................................... B-2
Attaching the Handset to Your Unit................................................ B-3
Adjusting the Ringer Volume Switch.................................................... B-6
Maintaining Your Handset..................................................................... B-6
Appendix C Default Settings for Each Country ............................................................C-1
Default Settings for Each Country...............................................................C-2
UK, GERMANY, FRANCE, IRELAND ......................................................C-3
AUSTRALIA, NEW ZEALAND, HONG KONG, MALAYSIA,
SINGAPORE..........................................................................................C-4
Appendix D Country-specific Features ............................................................................D-1
United Kingdom ............................................................................................D-2
Connecting External Device....................................................................D-2
Ringer Equivalence Number (R.E.N.) ...................................................D-2
Germany..........................................................................................................D-3
Applicable Standards...............................................................................D-3
Connecting the Telephone Line Cord ...................................................D-3
Connecting a Telephone..........................................................................D-4
Connecting an Answering Machine......................................................D-4
Customer Support....................................................................................D-5
Australia..........................................................................................................D-6
For your safety..........................................................................................D-6
Telstra FaxStream™ Duet .......................................................................D-6
Setting the FAX-L360 for Network Switch......................................D-7
Network Switch System Operation..................................................D-8
New Zealand ..................................................................................................D-9
Caution.......................................................................................................D-9
Telecom FaxAbility ................................................................................D-10
Setting the FAX-L360 for Network Switch....................................D-10
Network Switch System Operation................................................D-11

xii
Contents
Glossary ..................................................................................................................................G-1
Index ......................................................................................................................................... I-1

Introducing the
FAX-L360
Chapter 1 Introducing the FAX-L360
1-1
Chapter 1
Introducing the
FAX-L360
This chapter introduces you to the main features of the FAX-L360. It also
explains how to get the most out of the documentation that comes with
the unit, and gives important safety instructions.
❏
Welcome ................................................................................................ 1-2
❏
The Main Features of the FAX-L360.................................................. 1-3
• Plain Paper Fax Features................................................................ 1-3
• Printer Features............................................................................... 1-4
• Copier Features ............................................................................... 1-5
• Telephone Features ......................................................................... 1-5
❏
Using the FAX-L360 With the Printer Driver................................... 1-6
• System Requirements..................................................................... 1-6
❏
Using Your Documentation................................................................ 1-8
• How to Use This User’s Guide ..................................................... 1-8
• Type Conventions Used in This User’s Guide............................ 1-9
❏
Customer Support ............................................................................... 1-10
❏
Safety Instructions ............................................................................... 1-11
1-2
Introducing the FAX-L360 Chapter 1
Welcome
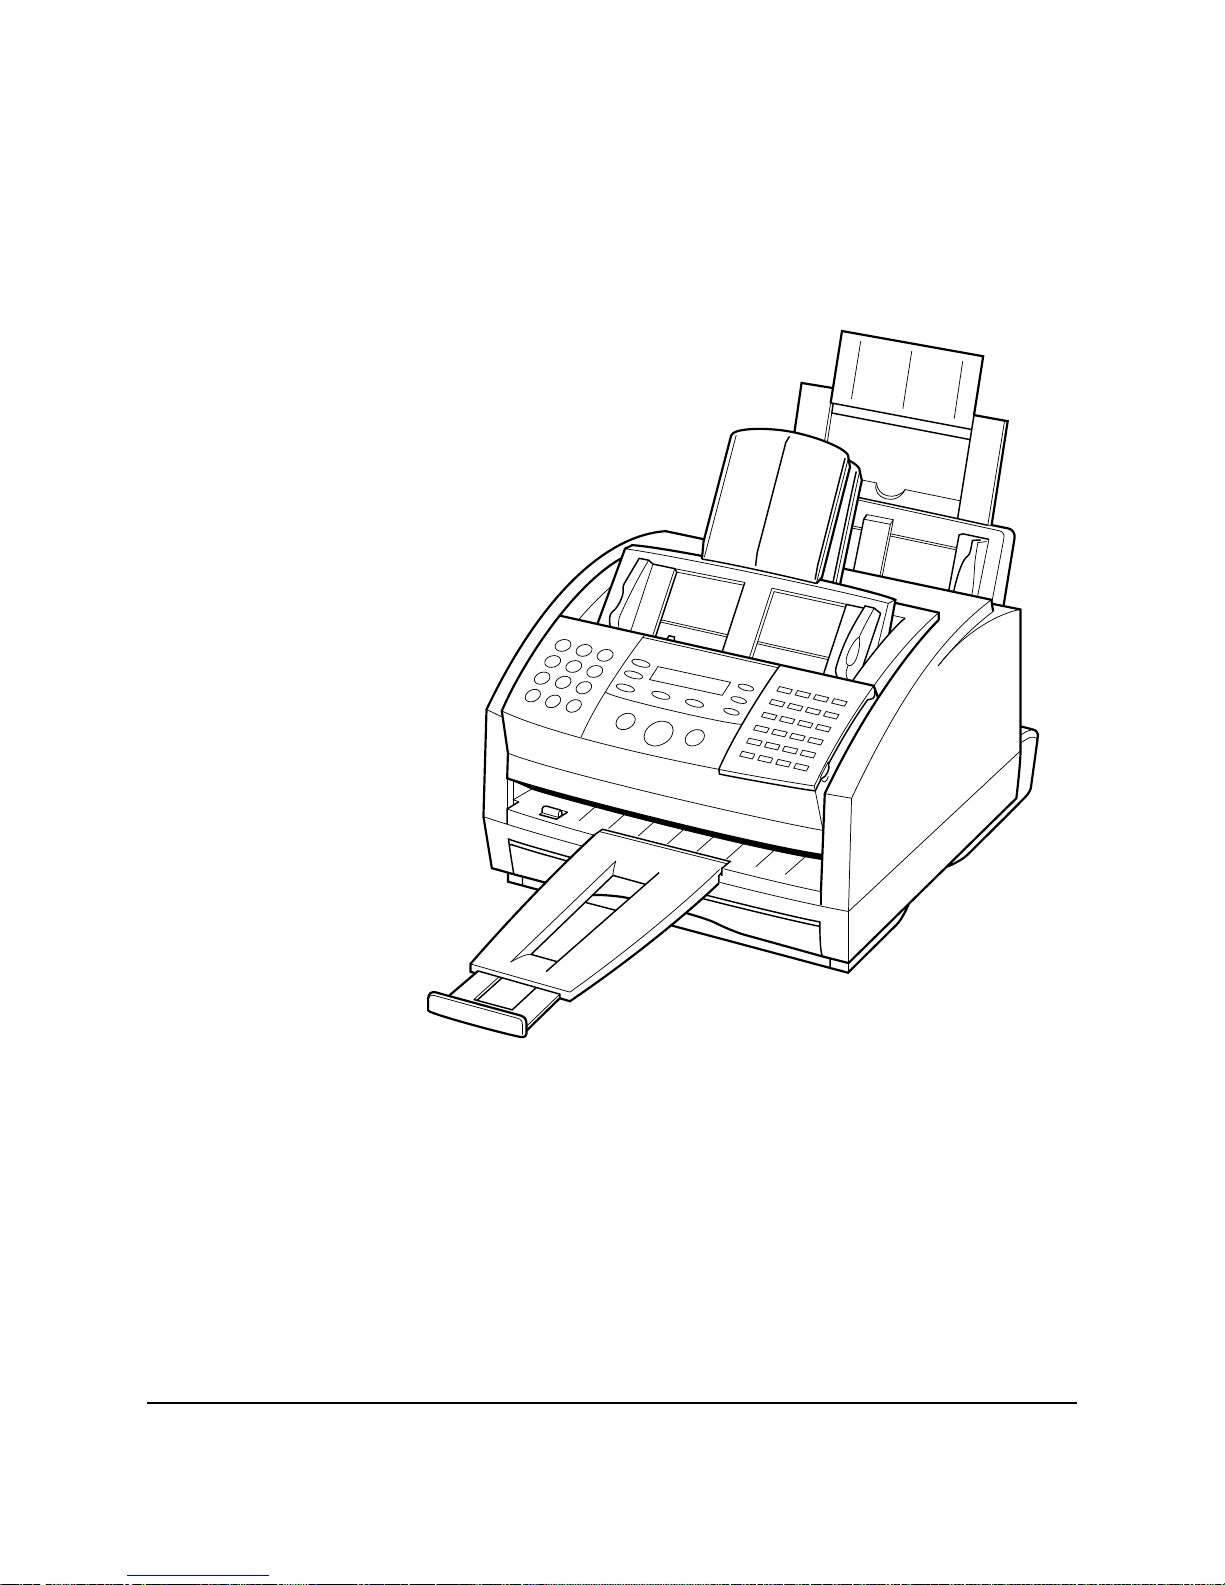
Thank you for purchasing the new Canon FAX-L360. We are sure that
your FAX-L360 will meet your printing and copying needs easily and
conveniently, as well as your fax and phone requirements.
FAX-L360

Introducing the
FAX-L360
Chapter 1 Introducing the FAX-L360
1-3
The Main Features of the FAX-L360
The FAX-L360 is a multifunction system for your home or small office.
The FAX-L360 combines a plain paper fax machine, a copier, and a
telephone* into a single, convenient desktop unit.
The FAX-L360’s multitasking ability enables you to perform a number of
operations simultaneously. For example, you can print a document or
make copies at the same time you are sending a fax or receiving a fax into
memory.
The compact size of the FAX-L360 makes it ideal for desktop use, and
allows you to use it in places where other machines may not fit.
Plain Paper Fax Features
UHQ
™
Image Processing System
The F AX-L360 uses Canon’s Ultra High Quality Image Pr ocessing System
to provide enhanced definition in faxed photos.
Error Correction Mode (ECM)
Using the FAX-L360’s Error Correction Mode (ECM) reduces
transmission errors when sending faxes to or receiving faxes from other
fax machines that also have ECM capability.
Automatic switching between fax and voice calls
The FAX-L360 can automatically distinguish between fax calls and
normal telephone calls, so that you can receive both through a single
phone line.
Answering machine connection
You can connect an answering machine to the FAX-L360 to let it receive
telephone messages and faxes while you are away from your desk.
* With optional handset or other telephone connected. This featur e is available for
certain countries only.
❏ Plain Paper Fax Machine
❏ Printer
❏ Copier
❏ Telephone*

1-4
Introducing the FAX-L360 Chapter 1
Transmission speed
The FAX-L360 uses G3 data encoding methods that increase transmission
speed to approximately 3 seconds* per page.
Memory sending/receiving
The F AX-L360 can stor e up to 400* fax pages (either received or to be sent)
in its built-in memory, and can receive faxes while printing.
Reduced-size printing
The FAX-L360 automatically scales received faxes to fit the size of the
paper loaded in the paper cassette or the multi-purpose tray. So if your
client is sending you a fax on A4-size paper and you have letter-size
paper in the multi-purpose tray, the fax will be scaled down and printed
on letter-size paper.
Automatic dialling and broadcasting
To make faxing even easier, the FAX-L360 provides several automatic
dialling methods: One-Touch Speed Dialling, Coded Speed Dialling, and
Group Dialling. The FAX-L360 also enables you to broadcast faxes or
send faxes at a preset time to as many as 133 locations at once.
Flexible document feeding
The FAX-L360 includes an Automatic Document Feeder (ADF) that can
be set for automatic document feed or manual document feed, according
to your needs. This allows you to fax a variety of documents, from
multipage documents, to a single photo or business card.
Printer Features
Excellent print quality
The FAX-L360 offers 600 × 600 dpi laser beam printing, providing you
with high resolution text and graphics.
Simple maintenance
The FX-3 toner cartridge for the FAX-L360 contains both the toner and
drum, making installation and replacement simple.
Economy toner-saving printing
The FAX-L360 includes an economy printing mode which allows you to
reduce toner consumption by 30% to 40% approximately.
* Based on Canon FAX Standard Chart No.1, standard mode

Introducing the
FAX-L360
Chapter 1 Introducing the FAX-L360
1-5
Copier Features
Up to 99 copies
The FAX-L360 can make up to 99 copies of a document at a time, at a rate
of up to 6 copies per minute.
Resolution
The FAX-L360 scans documents at 400 × 300 dpi when using direct
copying and 200 × 300 dpi when using memory copying. Printing
resolution is 600 × 600 dpi.
Copy reduction
The F AX-L360 can r educe copies to 90%, 80% or 70% of their original size.
This allows you to copy legal-size documents onto A4-size paper, for
example.
Telephone Features*
Automatic dialling
The FAX-L360’s three automatic dialling methods (One-Touch Speed
Dialling, Coded Speed Dialling, and Group Dialling) can be used to store
phone numbers and fax numbers for easy and efficient calling.
Connection for the optional handset, an answering machine, or a
telephone
Connecting the optional handset or a telephone to the FAX-L360 allows
you to use it to make and receive normal telephone calls. In addition,
connecting an answering machine allows you to receive faxes and phone
messages while you are away from your desk.
*This feature is available for certain countries only.

1-6
Introducing the FAX-L360 Chapter 1
Using the FAX-L360 With the Printer Driver
The printer driver that is included with your F AX-L360 unit allows you to
use the FAX-L360’s printing function directly from your PC.
❏ Use the FAX-L360 as the default printer for Windows applications
For more information on using the printer driver with your FAX-L360,
refer to the Printer Driver Guide also stored on this CD-ROM.
The supplied printer driver is designed to operate with Windows 98,
Windows Me, Windows 2000, or Windows XP.
System Requirements
The following hardware and software ar e necessary to operate the printer
driver with the FAX-L360. These are the minimum requirements.
❏ Windows Operating System
Microsoft Windows 98, Windows Me, Windows 2000, or Windows
XP.
❏ USB port
❏ Computer Processor
• Windows 98: A 90-megahertz (MHz) Pentium processor or higher
• Windows Me: A 150-MHz Pentium processor or higher
• Windows 2000: A 133-MHz Pentium processor or higher
• Windows XP: A 233-MHz Pentium processor or higher
❏
Memory
• Windows 98/Me: 32 megabytes (MB) of RAM, 64 MB of RAM or
more is recommended.
• Windows 2000/XP: 64 MB of RAM, 128 MB of RAM or more is
recommended.
N

Introducing the
FAX-L360
Chapter 1 Introducing the FAX-L360
1-7
❏ Hard Disk Space
15 MB of available hard disk space
❏ Disk Drive
CD-ROM drive, or access to one over a network connection
❏ Monitor
256-colour SVGA monitor or greater
❏ Printer Cable
A USB cable 5 meters (16.4 feet) in length or shorter.
For help in purchasing the correct cable, consult your dealer or
retailer.

1-8
Introducing the FAX-L360 Chapter 1
Using Y our Documentation
Your FAX-L360 includes the following documentation to help you learn
how to use your unit quickly and easily:
❏ Quick Start Guide — This guide provides basic information on how
to set up and operate the FAX-L360.
❏ FAX-L360 User’s Guide (this guide) — This guide provides detailed
information on how to set up, operate, maintain, and troubleshoot
your FAX-L360.
❏ Printer Driver Guide — This Guide is also stored on this CD-ROM,
and describes how to use your FAX-L360 to print from within your
PC’s Windows environment. Refer to this Guide whenever you need
information about printing from your PC.
How to Use This User’s Guide
To make the best use of this user’s guide in learning how to set up and
operate your FAX-L360, be sure to do the following:
❏ Read this chapter to learn about the F AX-L360’s main features and for
guidelines on using the unit safely.
❏ Carefully follow the instructions in Chapter 2 to get your unit
unpacked and assembled properly.
❏
Read Chapter 3 to learn how to enter information in the FAX-L360
and to register your user information.
❏
Read Chapter 4 to learn about the types of print media you can use
with your FAX-L360, and for instructions on selecting paper delivery
and loading paper.
❏ Read Chapter 5 to learn how to register numbers for speed dialling,
how to change them, and how to use speed dialling to send faxes.
❏ Read Chapter 6 through 11 to master the FAX-L360 operating
procedures (such as sending faxes, receiving faxes, and making
copies) and to learn more about its special features (such as
restricting use of the unit and special dialling features).
❏ Refer to Chapter 12 to learn about the reports and lists that can be
automatically or manually printed from your FAX-L360.
❏
If your FAX-L360 begins operating improperly, use Chapter 13 to try
to solve the problem.

Introducing the
FAX-L360
Chapter 1 Introducing the FAX-L360
1-9
❏ Look over Chapter 14 to become familiar with procedures for
cleaning your FAX-L360 and replacing the toner cartridge.
❏ Refer to Chapter 15 to learn how to change the settings of the FAX-
L360.
❏ Refer to Appendix A for the FAX-L360 technical specifications.
If you still have questions about how to use your FAX-L360, contact your
local authorised Canon dealer or the Canon help line. They will be happy
to answer your questions.
Type Conventions Used in This User’s Guide
This user’s guide follows the conventions below to emphasize certain
information that will help you use your FAX-L360 correctly and safely:
Cautions tell you how to avoid actions that could injure you or damage
your FAX-L360.
Notes provide advice for using your FAX-L360 more effectively, describe
operating restrictions, and tell how to avoid minor operating difficulties.
In addition, this user’s guide uses bold letters to show the names of
buttons and switches on the F AX-L360, such as Stop , Set , and Start/Copy .
Text that appears in the unit’s display is shown in plain capital letters,
such as: RECEPTION OK.
Also, Appendixes C and D describe the country specific features.
C
N

1-10
Introducing the FAX-L360 Chapter 1
Customer Support
Your FAX-L360 is designed with the latest technology to provide troublefree operation. If you encounter a problem with the unit’s operation, try
to solve it by using the information in Chapter 13. If you cannot solve the
problem or if you think your FAX-L360 needs servicing, contact your
local authorised Canon dealer or the Canon help line.

Introducing the
FAX-L360
Chapter 1 Introducing the FAX-L360
1-11
Safety Instructions
Read these safety instructions thoroughly before using your FAX-L360,
and keep them handy in case you need to refer to them later.
Except as specifically described in this user’s guide, do not attempt to
service the FAX-L360 yourself. Never attempt to disassemble the unit:
opening and removing its interior covers will expose you to dangerous
voltages and other risks. For all service, contact your local authorised
Canon dealer or the Canon help line.
❏ Always follow all warnings and instructions marked on the
FAX-L360.
❏
Use the FAX-L360 only on a sturdy, stable, level surface. If the unit
falls, it could be seriously damaged.
❏
Do not use the FAX-L360 near water. If you spill liquid on or into the
unit, unplug it immediately and call your local authorised Canon
dealer or the Canon help line.
❏
The back of the F AX-L360 includes slots and openings for ventilation.
To keep the FAX-L360 from overheating (which can cause it to
operate abnormally and create a fire risk), take care not to block or
cover these openings. Do not operate the unit on a bed, sofa, rug, or
other similar soft surface, or near a radiator or other heat source. Do
not place the FAX-L360 in a closet or cabinet or on shelves unless
adequate ventilation is available. See “Choosing a Location for Your
FAX-L360” on page 2-3 for guidelines on how much space the unit
needs for ventilation.
❏
Operate the FAX-L360 only from the type of power source indicated
on the unit’s label. If you are unsure of the type of power available
from your wall outlets, contact your local power company.
❏
Make sure the total amperage used by all devices plugged into the
wall outlet does not exceed the ampere rating of the outlet's circuit
breaker.
❏
Do not allow anything to rest on the power cord and do not place the
FAX-L360 where the cord will be walked on. Make sure the cord is
not knotted or kinked.
❏
Do not insert object of any kind into the slots or openings on the
FAX-L360’s cabinet, as they could touch dangerous voltage points or
short out parts, and result in fire or electric shock.
C

1-12
Introducing the FAX-L360 Chapter 1
❏
Do not allow small objects (such as pins, paper clips, or staples) to fall
into the FAX-L360. If something does fall into it, unplug the unit
immediately and call your local authorised Canon dealer or the
Canon help line.
❏
Do not plug the power cord into an uninterruptible power supply
(UPS).
❏ Always unplug the FAX-L360 before moving or cleaning it.
❏ Whenever you unplug the FAX-L360, wait at least five seconds before
you plug it back in.
❏ Keep the FAX-L360 away from direct sunlight, as this can damage it.
If you have to place it near a window, install heavy curtains or blinds.
❏ Do not expose the FAX-L360 to extreme temperature fluctuations.
Install the unit in a place with temperatures between 10˚ and 32.5˚C.
❏ Always unplug the FAX-L360 during thunderstorms.
❏ Before you transport the FAX-L360, remove the toner cartridge.
❏ Always lift the FAX-L360 as shown below. Never lift it by its multi-
purpose tray or other supports.

Introducing the
FAX-L360
Chapter 1 Introducing the FAX-L360 1-13
Unplug the FAX-L360 and contact your local authorised Canon dealer or
the Canon help line in any of these situations:
❏ If the power cord or plug is damaged or frayed.
❏ If liquid spills into the unit, or if it is otherwise exposed to rain or
liquids.
❏ If you notice smoke, unusual noises or odor coming from it.
❏ If the FAX-L360 does not operate normally when you follow the
operating instructions. Adjust only those contr ols that ar e cover ed by
the operating instructions in this user’s guide, or you can damage the
unit and require extensive repair work.
❏ If the FAX-L360 is dropped or its cabinet damaged.
❏ If the FAX-L360 begins performing poorly, and you cannot correct the
problem by following the procedures in Chapter 13, “Frequently
Asked Questions.”
❏ This product emits low level electromagnetic waves. If you use a
cardiac pacemaker and feel abnormalities, please move away from
this product and consult your doctor.
C

1-14 Introducing the FAX-L360 Chapter 1

Setting Up Your
FAX-L360
Chapter 2 Setting Up Your FAX-L360
2-1
Chapter 2
Setting Up Your
FAX-L360
This chapter tells you how to unpack, assemble, and connect your
FAX-L360, install the FX-3 toner cartridge, and load paper— everything
you need to know to get your FAX-L360 ready to use.
❏
Choosing a Location for Your FAX-L360.......................................... 2-3
• Dimensions ...................................................................................... 2-4
❏
Unpacking Your FAX-L360................................................................. 2-5
• Do You Have Everything? ............................................................. 2-5
• Lifting the FAX-L360....................................................................... 2-6
• Removing Shipping Materials....................................................... 2-7
• Replaceable Parts ............................................................................ 2-9
❏
Assembling the FAX-L360.................................................................. 2-10
• Attaching Components .................................................................. 2-10
Attaching the Paper Loading Warning Label......................... 2-10
Attaching the Extension Tray ................................................... 2-11
Straightening the Multi-Purpose Tray..................................... 2-11
Attaching the Support Trays..................................................... 2-12
❏
Making Connections............................................................................ 2-13
• Connecting the FAX-L360 to Your PC.......................................... 2-13
• Connecting the Telephone Line .................................................... 2-14
• Connecting the Optional Handset................................................ 2-14
• Connecting an Extension Phone or Answering Machine.......... 2-15
• Connecting the Power Cord.......................................................... 2-16
❏
Setting the Display Language and Country .................................... 2-19
❏
Getting Acquainted With Your FAX-L360........................................ 2-21
• Front View........................................................................................ 2-21
• Inside View....................................................................................... 2-22
• Rear View ......................................................................................... 2-23
• The Operation Panel....................................................................... 2-24

2-2
Setting Up Your FAX-L360 Chapter 2
Special Function Buttons
(One-Touch Speed Dial panel open).................................. 2-27
❏
The Toner Cartridge ............................................................................ 2-29
• Handling and Storing Cartridges................................................. 2-29
• Installing/Replacing the Toner Cartridge................................... 2-31
❏
Loading Recording Paper................................................................... 2-37
Loading Paper in the Cassette.................................................. 2-39
Loading Paper in the Multi-Purpose Tray.............................. 2-42
❏
Testing the FAX-L360........................................................................... 2-44

Setting Up Your
FAX-L360
Chapter 2 Setting Up Your FAX-L360
2-3
Choosing a Location for Your FAX-L360
Before unpacking your FAX-L360, follow these guidelines to choose an
appropriate location for the unit.
Please review the information provided in “Safety Instructions” on pages
1-11 to 1-13, to make sure you are installing your FAX-L360 for safe use.
❏ Put the FAX-L360 in a cool, dry, clean, well ventilated place:
• Make sure the area is free from dust.
• Make sure the location is not affected by extreme temperature
fluctuations, and remains between 10º and 32.5ºC.
• Make sure the area’s relative humidity is always between 20%
and 80%.
❏ Keep the FAX-L360 away from direct sunlight.
❏
If possible, place the FAX-L360 near an existing telephone outlet, to
allow for an easy connection of the telephone line to the unit.
❏
Place the FAX-L360 near an electrical wall outlet that provides 200 to
240-volt AC (50 to 60 Hz) power.
❏ Place the FAX-L360 near the PC you will be connecting it to. Make
sure you can reach it easily, as you will be using the FAX-L360 as a
printer, fax machine, copier, and telephone.
❏ Do not plug the FAX-L360 into the same circuit as an appliance such
as an air conditioner, electric typewriter, television, or copier. Such
devices generate electrical noise that can interfere with your unit’s
ability to send or receive faxes.
❏
Set the FAX-L360 on a flat, stable, vibration-free surface that is str ong
enough to support its weight (about 13 kg).
C
2-4
Setting Up Your FAX-L360 Chapter 2
Dimensions
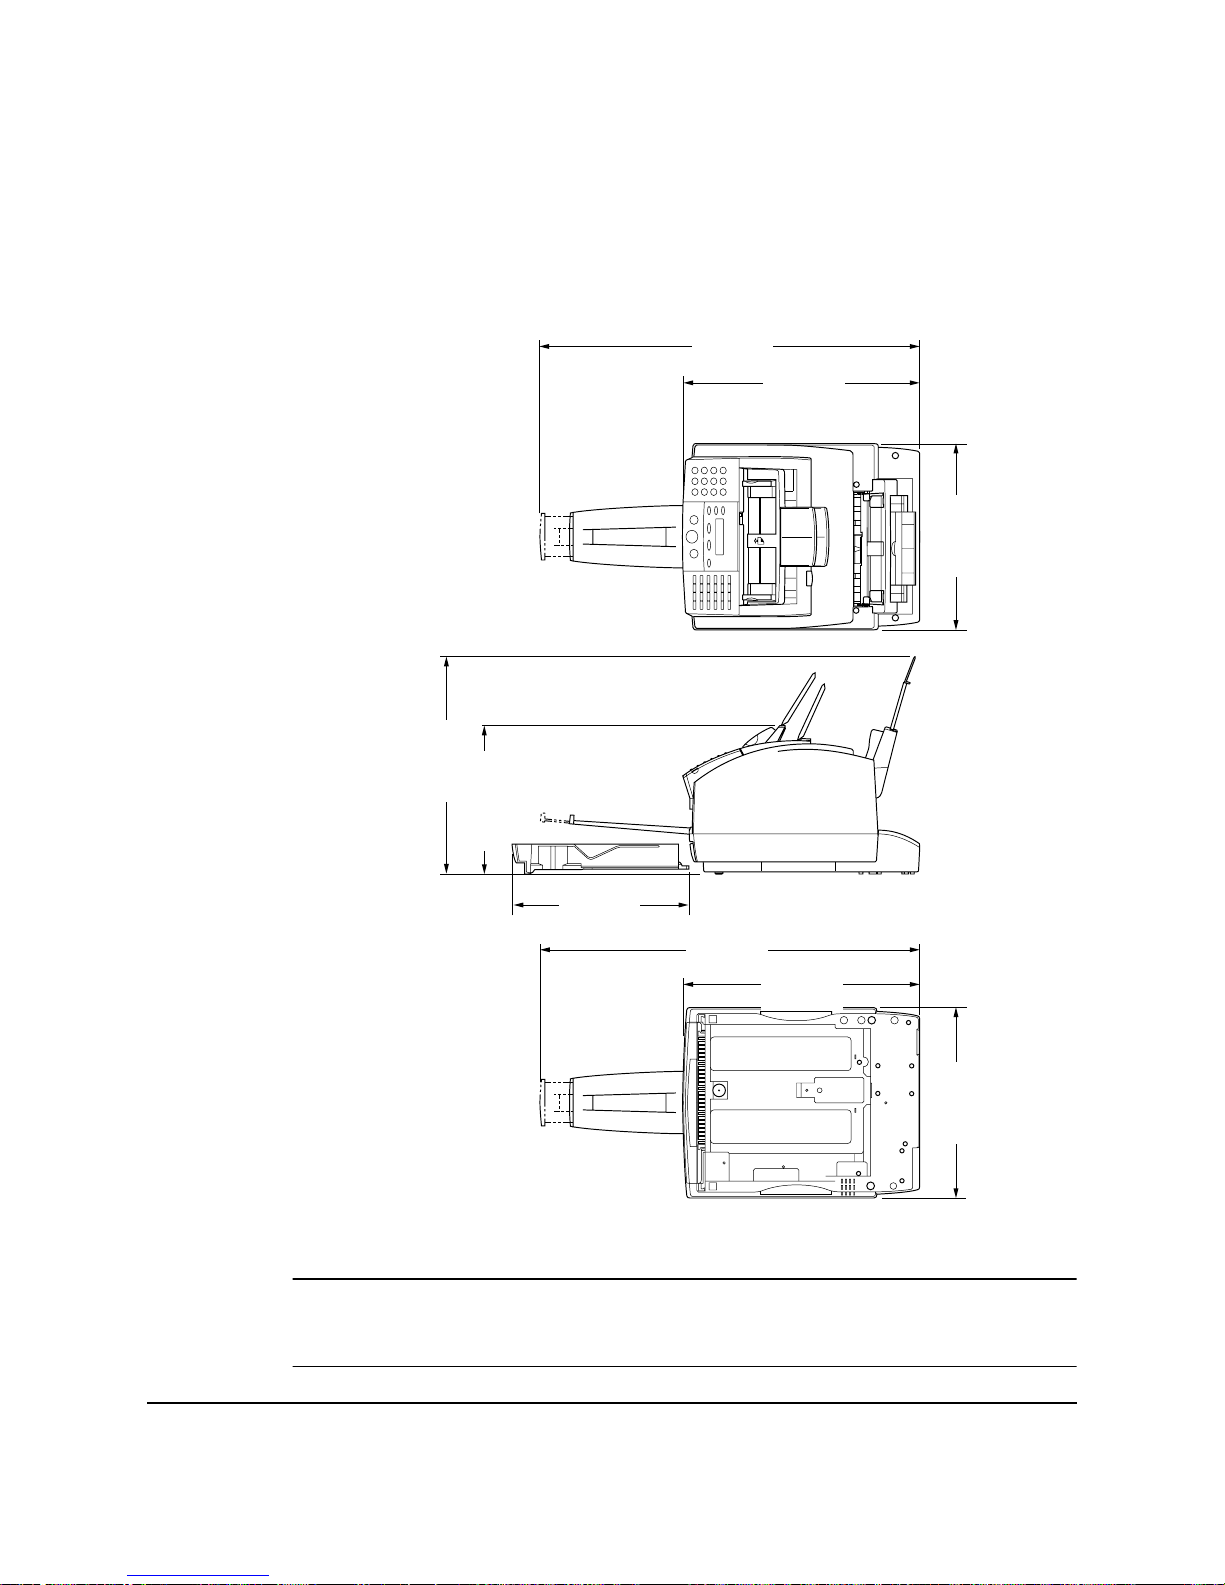
Make sure the location you choose provides enough space around the
FAX-L360 for adequate ventilation, and to allow paper to flow freely into
and out of the unit. The figure below shows the minimum space required
for the unit.
If you need help installing your F AX-L360 or have any questions about it,
contact your local authorised Canon dealer or the Canon help line.
773 mm
483 mm
380 mm
448 mm
303.5 mm
TOP VIEW
SIDE VIEW
BOTT OM VIEW
773 mm
483 mm
361 mm
380 mm
N
Setting Up Your
FAX-L360
Chapter 2 Setting Up Your FAX-L360
2-5
Unpacking Y our F AX-L360
Follow the directions below to unpack your FAX-L360 properly, and to
make sure you have all of its components and documentation.
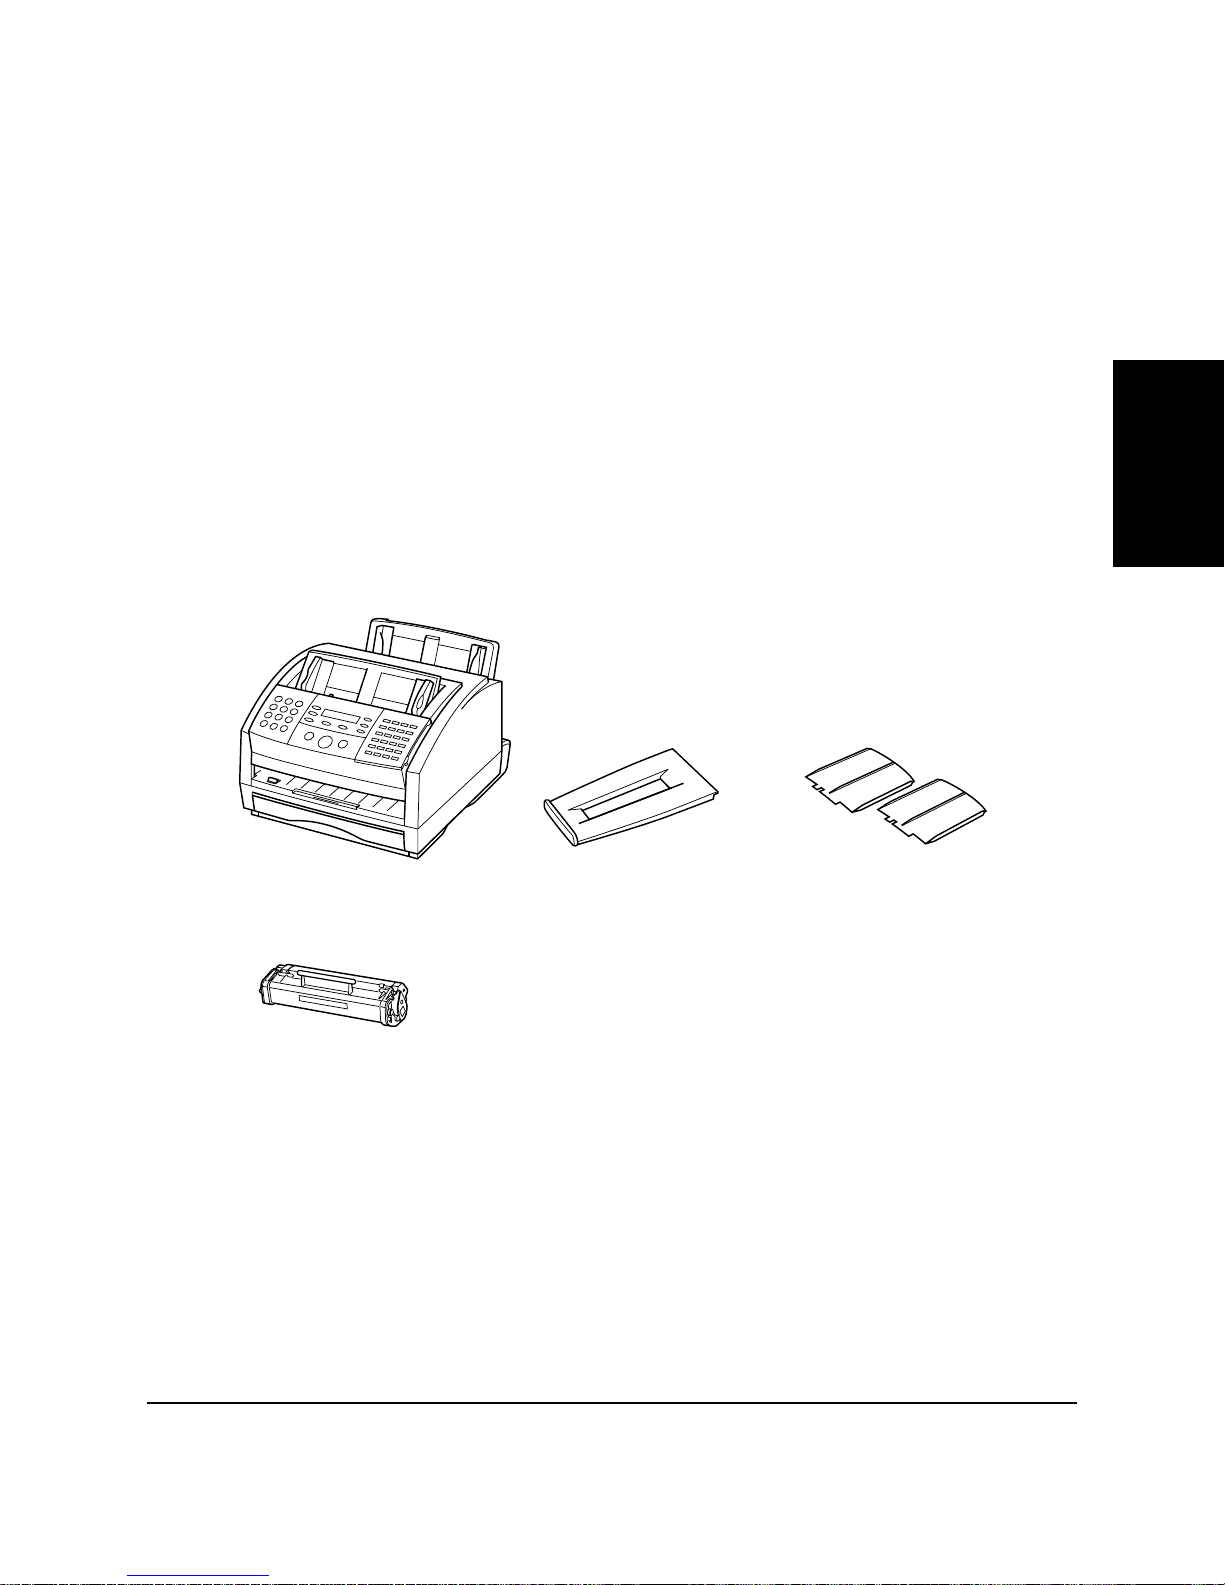
Do You Have Everything?
As you unpack the FAX-L360, save the carton and packing material in
case you want to move or ship the unit in the future.
Carefully remove all items from the box. You should have someone help
by holding the box while you lift the FAX-L360 and its protective
packaging out of the carton.
Make sure you have the following items:
POWER CORD
TELEPHONE LINE CORD
DOCUMENTATION
PAPER LOADING WARNING LABEL
DESTINATION LABELS
If any of the above items are damaged or missing, notify your local
authorised Canon dealer immediately.
MAIN UNIT SUPPORT TRAYSEXTENSION TRA Y
FX-3 TONER CARTRIDGE
 Loading...