


Part 1
Product
Overview
Part 1: Product Overview
1-1
1. OVERVIEW
1.1 PRODUCT OVERVIEW
The EOS LINK SOFTWARE ES-E1 consists of the following two software programs compatible with Windows 98 (Japanese or English version indicated by J/E) and Windows
98/2000 (Japanese, English, or French version indicated by J/E/F), a connecting cable,
and a USB driver for the connecting cable.
The instruction manual (in electronic form) and installation manual are provided in
Japanese and English (J/E) or Japanese, English, French, German, and Spanish
(J/E/F).
1) Two application programs
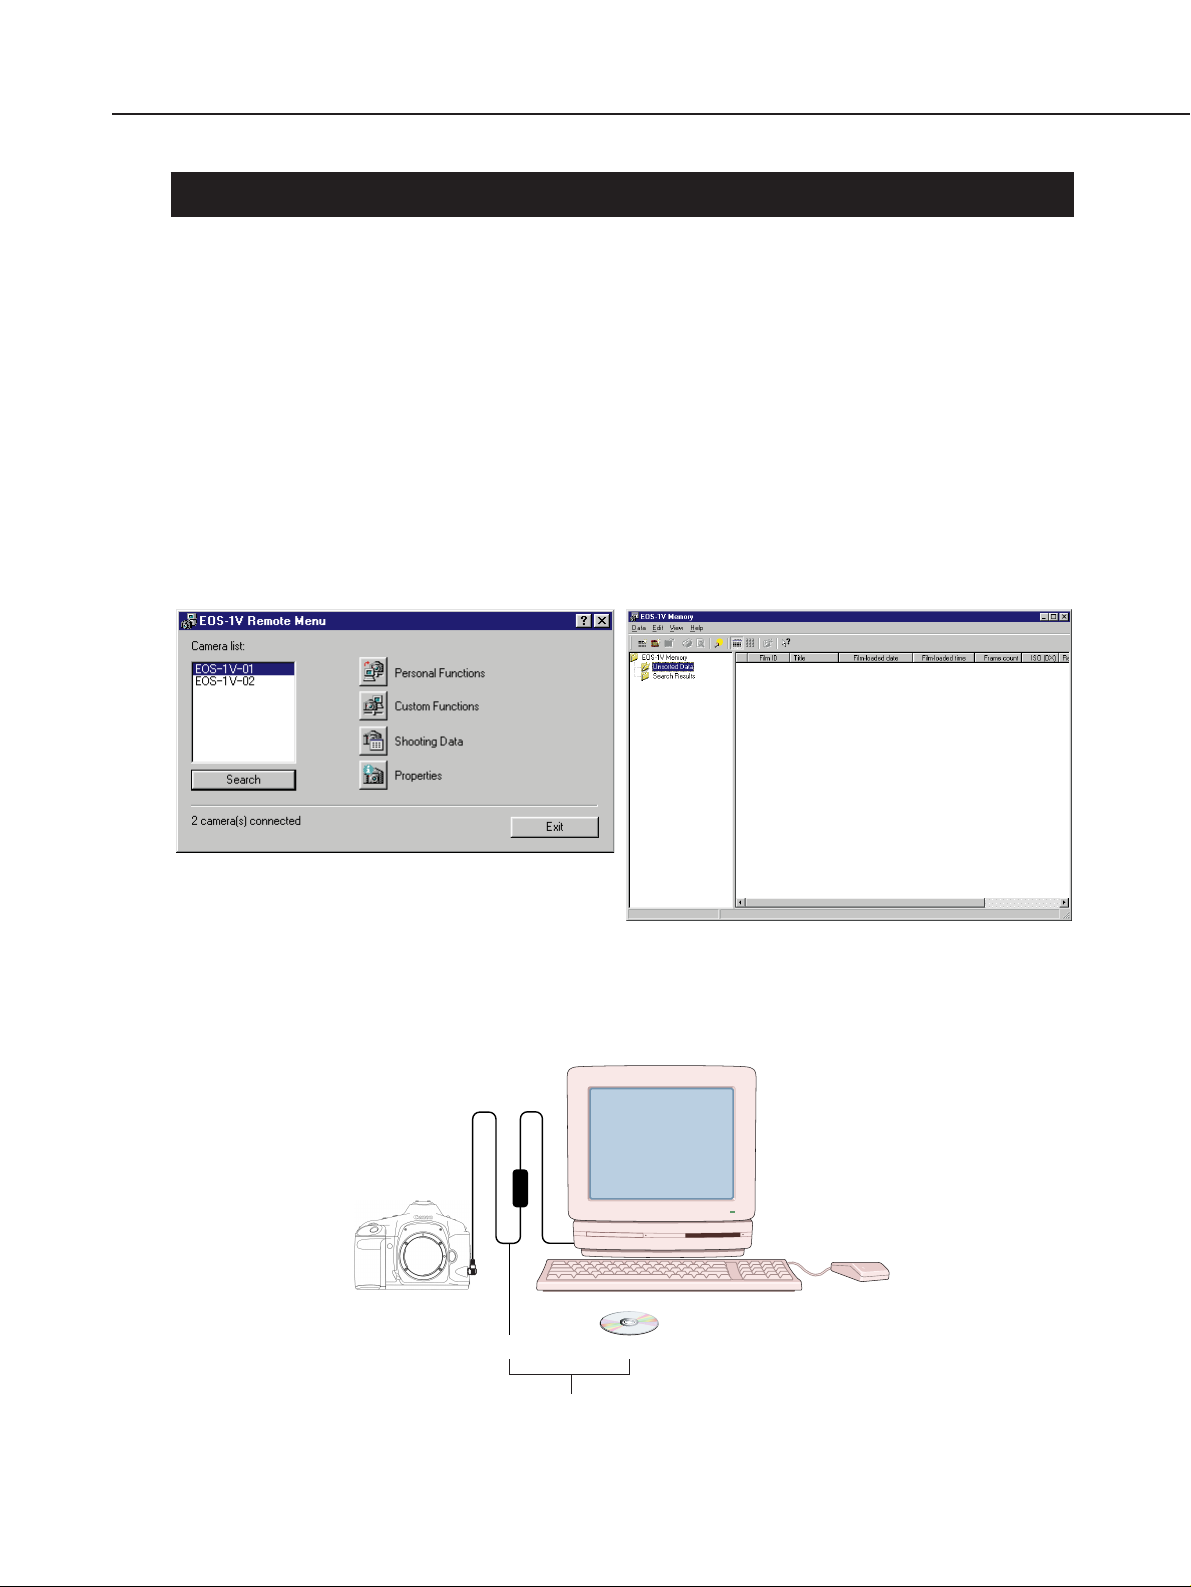
q EOS-1V Remote (Fig. 1-1) enables EOS-1V customization, shooting data down-
loading, and other functions.
w EOS-1V Memory (Fig. 1-2) enables the shooting data to be viewed and managed.
2) Dedicated connecting cable
The cable connects the EOS-1V's remote control/data transfer terminal to the computer's USB port.
Fig. 1-3 System configuration.
Fig. 1-1 EOS-1V Remote menu. Fig. 1-2 EOS-1V Memory main window.
EOS-1V
EOS Link Software ES-E1
Connecting cable
CD-ROM
1.2 SOFTWARE OVERVIEW
1) EOS-1V Remote
This program is used for EOS-1V customization, shooting data downloading, selecting the shooting data items to be recorded, setting the film ID, setting the date and
time, and other functions.
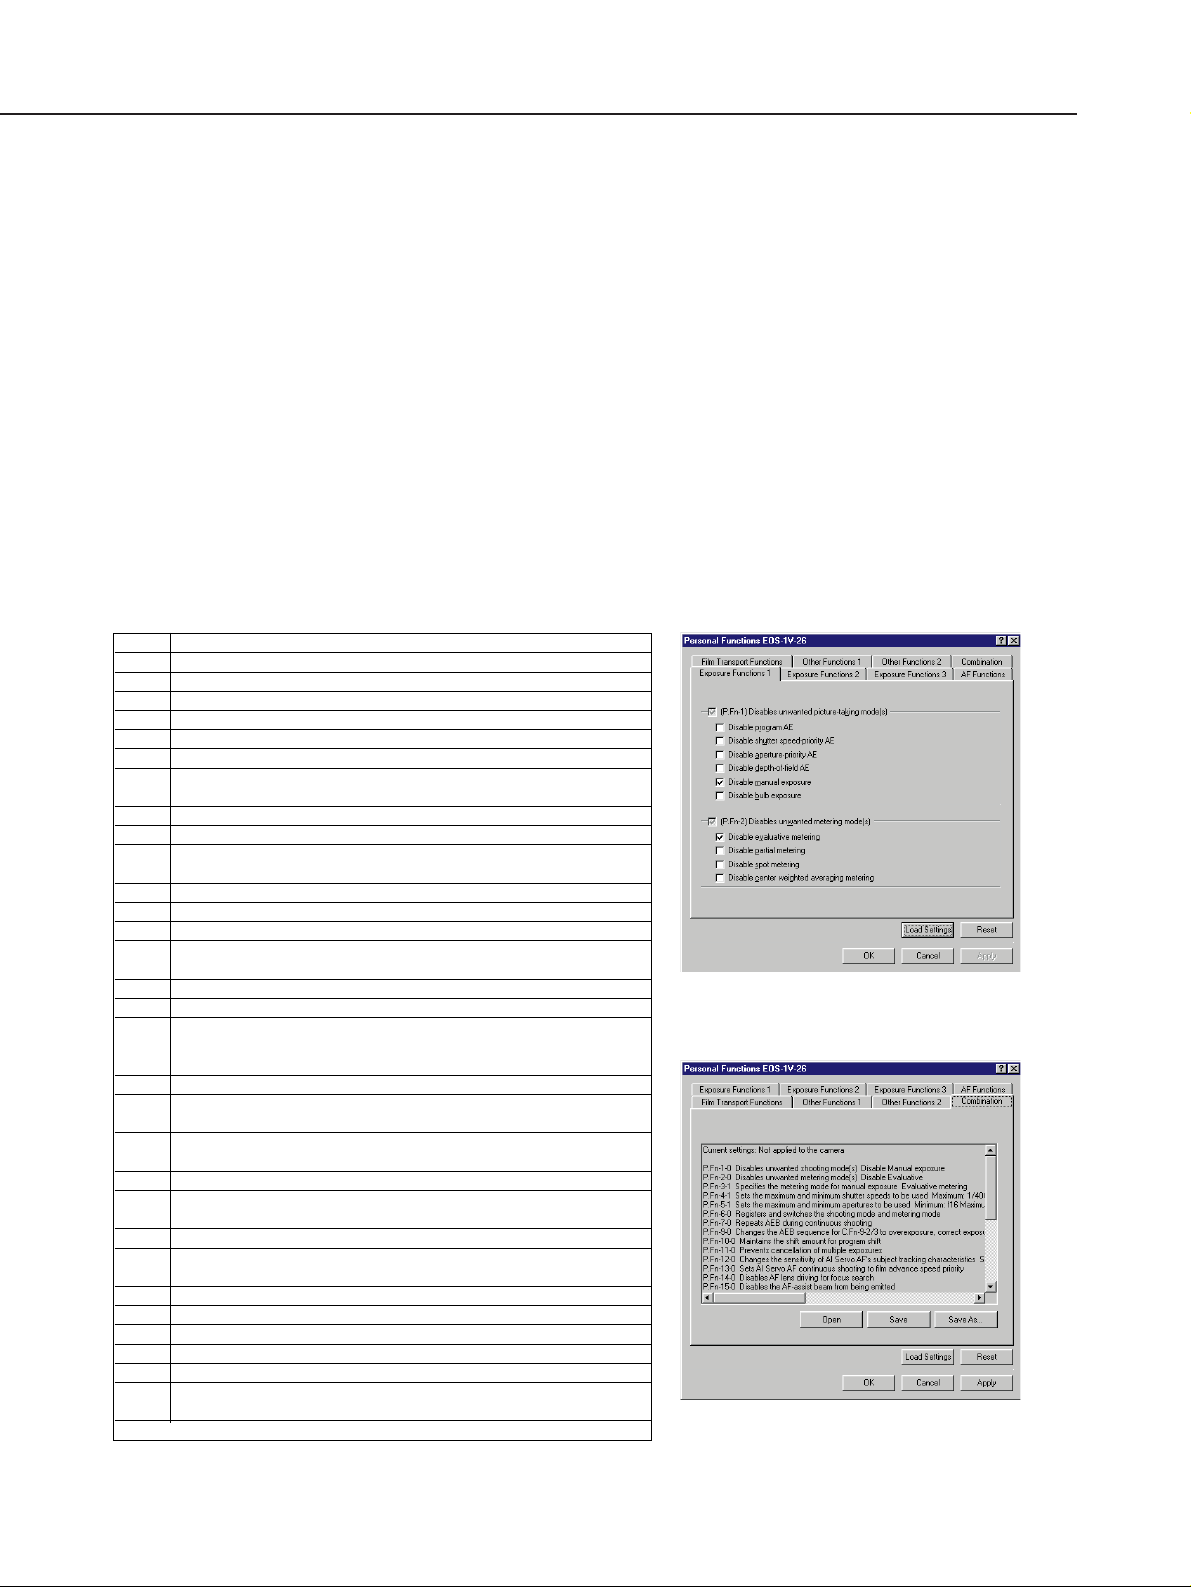
(1) Customizable functions
Thirty-one P.Fn (Personal Functions) can be set (see Table 1-1). The settings and
descriptions are displayed on-screen (Fig. 1-4). The help menu also explains the
effects of the Personal Functions. (P.Fn-0 is set with a Custom Function.) The
Personal Function settings can be saved in the personal computer and read by the
camera later. The Combination dialog box (Fig. 1-5) lists the descriptions of Personal
Function settings. (This is also possible for Custom Function settings.)
The Personal Functions set with the EOS Link Software ES-E1 can be enabled or
disabled with the EOS-1V individually. However, the P.Fn setting itself cannot be
changed with the EOS-1V.
Part 1: Product Overview
1-2
Fig. 1-4 Personal Function setting
dialog box.
Fig. 1-5 Combination dialog box.
Table 1-1 List of Personal Functions
P.Fn No.
Function
0 Registers custom function groups.
1 Disables unwanted picture-taking mode(s).
2 Disables unwanted metering mode(s).
3 Specifies the metering mode for manual exposure.
4 Sets the maximum and minimum shutter speeds to be used.
5 Sets the maximum and minimum apertures to be used.
6 Registers and switches the picture-taking mode and metering
mode.
7 Repeats AEB during continuous shooting.
8 Sets AEB only for the first two frames.
9 Changes the AEB sequence for C.Fn-9-2/3 to overexposure, cor-
rect exposure, and underexposure.
10 Retains the program shift amount.
11 Prevents cancellation of multiple exposures.
12 Sets the AI Servo AF's subject-tracking sensitivity.
13 AI Servo AF continuous shooting is executed according to the film
advance speed.
14 Disables AF lens driving for focus search.
15 Disables the AF-assist beam from being emitted.
16 Enables the picture to be taken automatically when focus is
achieved at the fixed point of focus while the shutter button is
pressed completely.
17 Disables automatic focusing point selection.
18 Enables automatic focusing point selection when C.Fn-11-2 has
been set.
19 Sets the shooting speed of the various film advance modes for
when the Power Drive Booster is attached.
20 Limits the number of frames exposed during continuous shooting.
21 Enables silent (low-speed) film rewind when the shutter button is
OFF after picture-taking.
22 Disables the shutter release when film has not been loaded.
23 Changes the function activation timer after the button is pressed to
a different time length (6 sec., 16 sec., etc.).
24 Keeps the LCD panel illuminated during bulb exposures.
25 Changes the default settings for when the CLEAR button is ON.
26 Shortens the shutter release time lag.
27 Reverses the rotational function of the electronic dial.
28 Prevents exposure compensation with the Quick Control Dial.
29 Issues a warning when there is enough memory to store shooting
data for only a few more rolls of film.
30 Changes the imprinting density of the film ID.
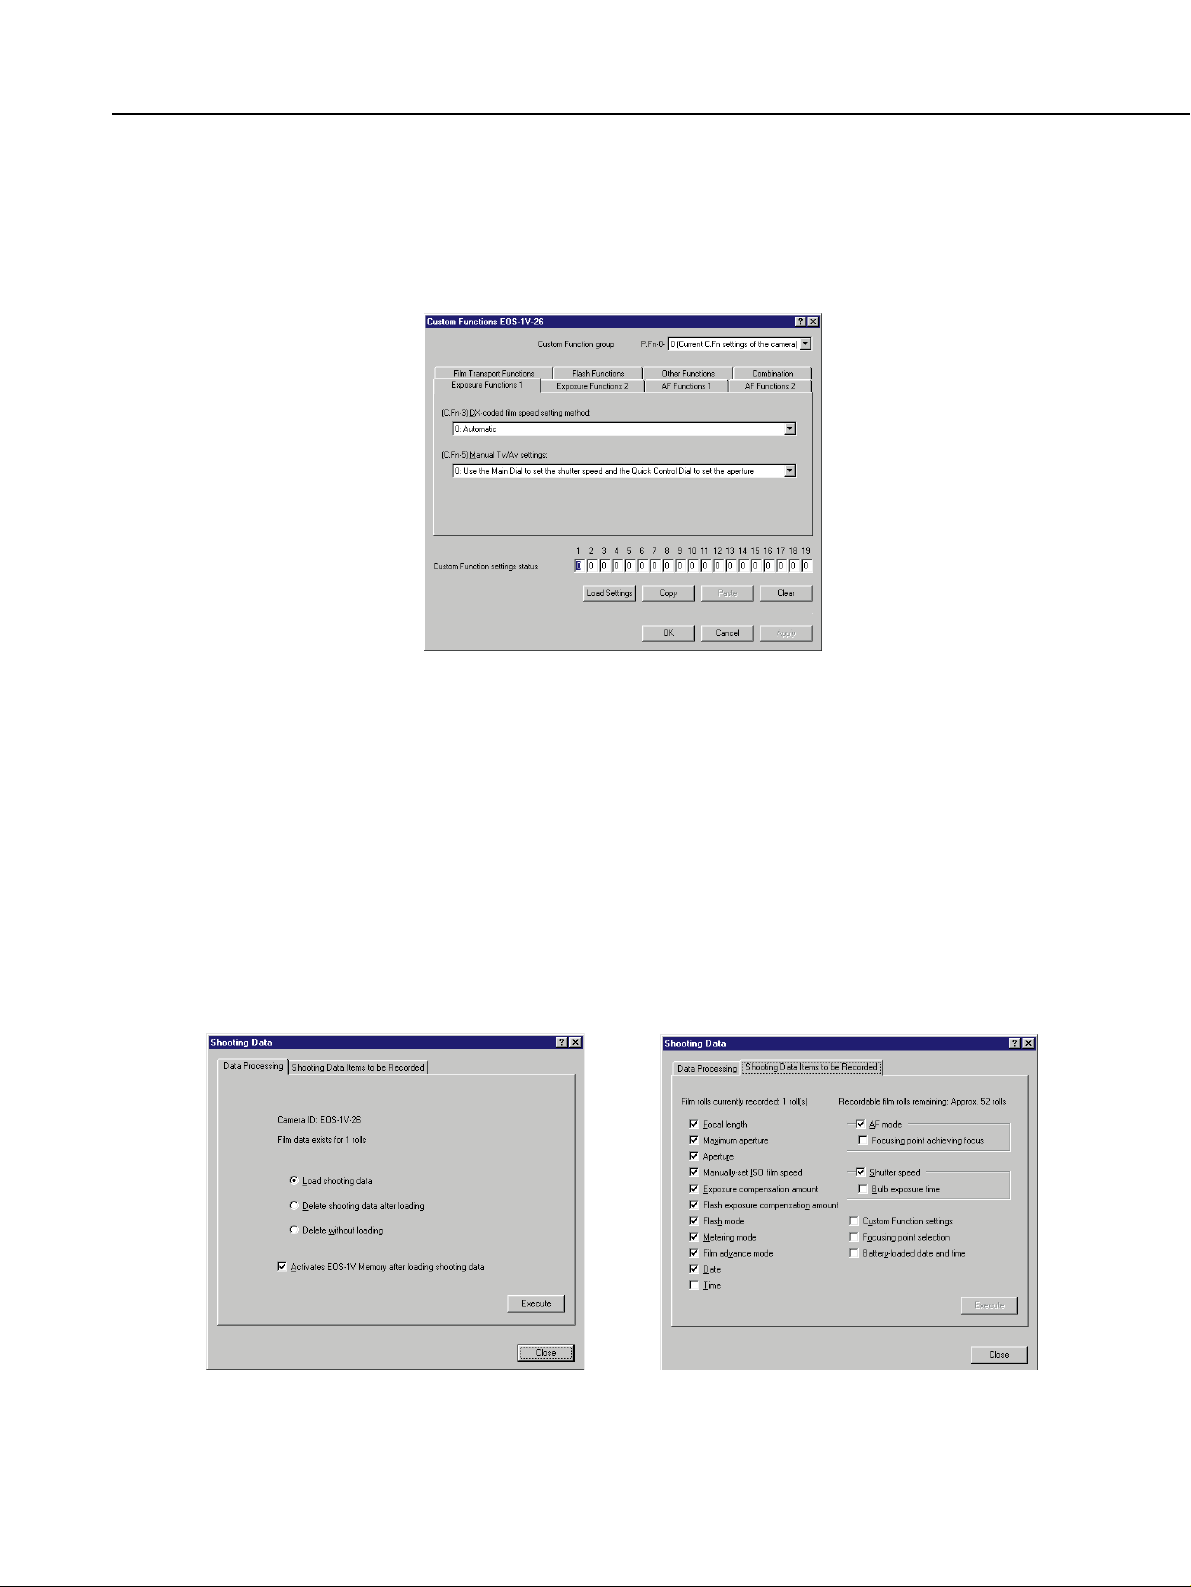
(2) Custom Functions
Excluding C.Fn-0, you can set 19 Custom Functions. P.Fn-0 is set with the Custom
Functiondialog box.
* To prevent its accidental setting which will result in exposure error, EOS Link
Software ES-E1 excludes C.Fn-0 from being user-settable.
(3) Shooting data
The Data Handling dialog box (Fig. 1-7) provides options to download the EOS-1V's
shooting data to the computer, delete the shooting data in the EOS-1V, or to start up
EOS-1V Memory after the shooting data is downloaded. It also indicates the number
of film rolls whose shooting data is stored in the EOS-1V.
The Shooting Data Items to be Recorded dialog box (Fig. 1-8) shows the shooting
data items recorded by the camera and the number of film rolls recorded. Table 1-22 shows the shooting data items that can be recorded. The user can select which
shooting data items are to be recorded by the camera. (This can also be done while
film is in the camera.) The number of film rolls whose shooting data can be recorded
by the camera will vary depending on the number of shooting data items that are
recorded.
Part 1: Product Overview
1-3
Fig. 1-7 Data Handling dialog box.
Fig. 1-8 Shooting Data Items to be Recorded dialog
box.
Fig. 1-6 Custom Function dialog box.
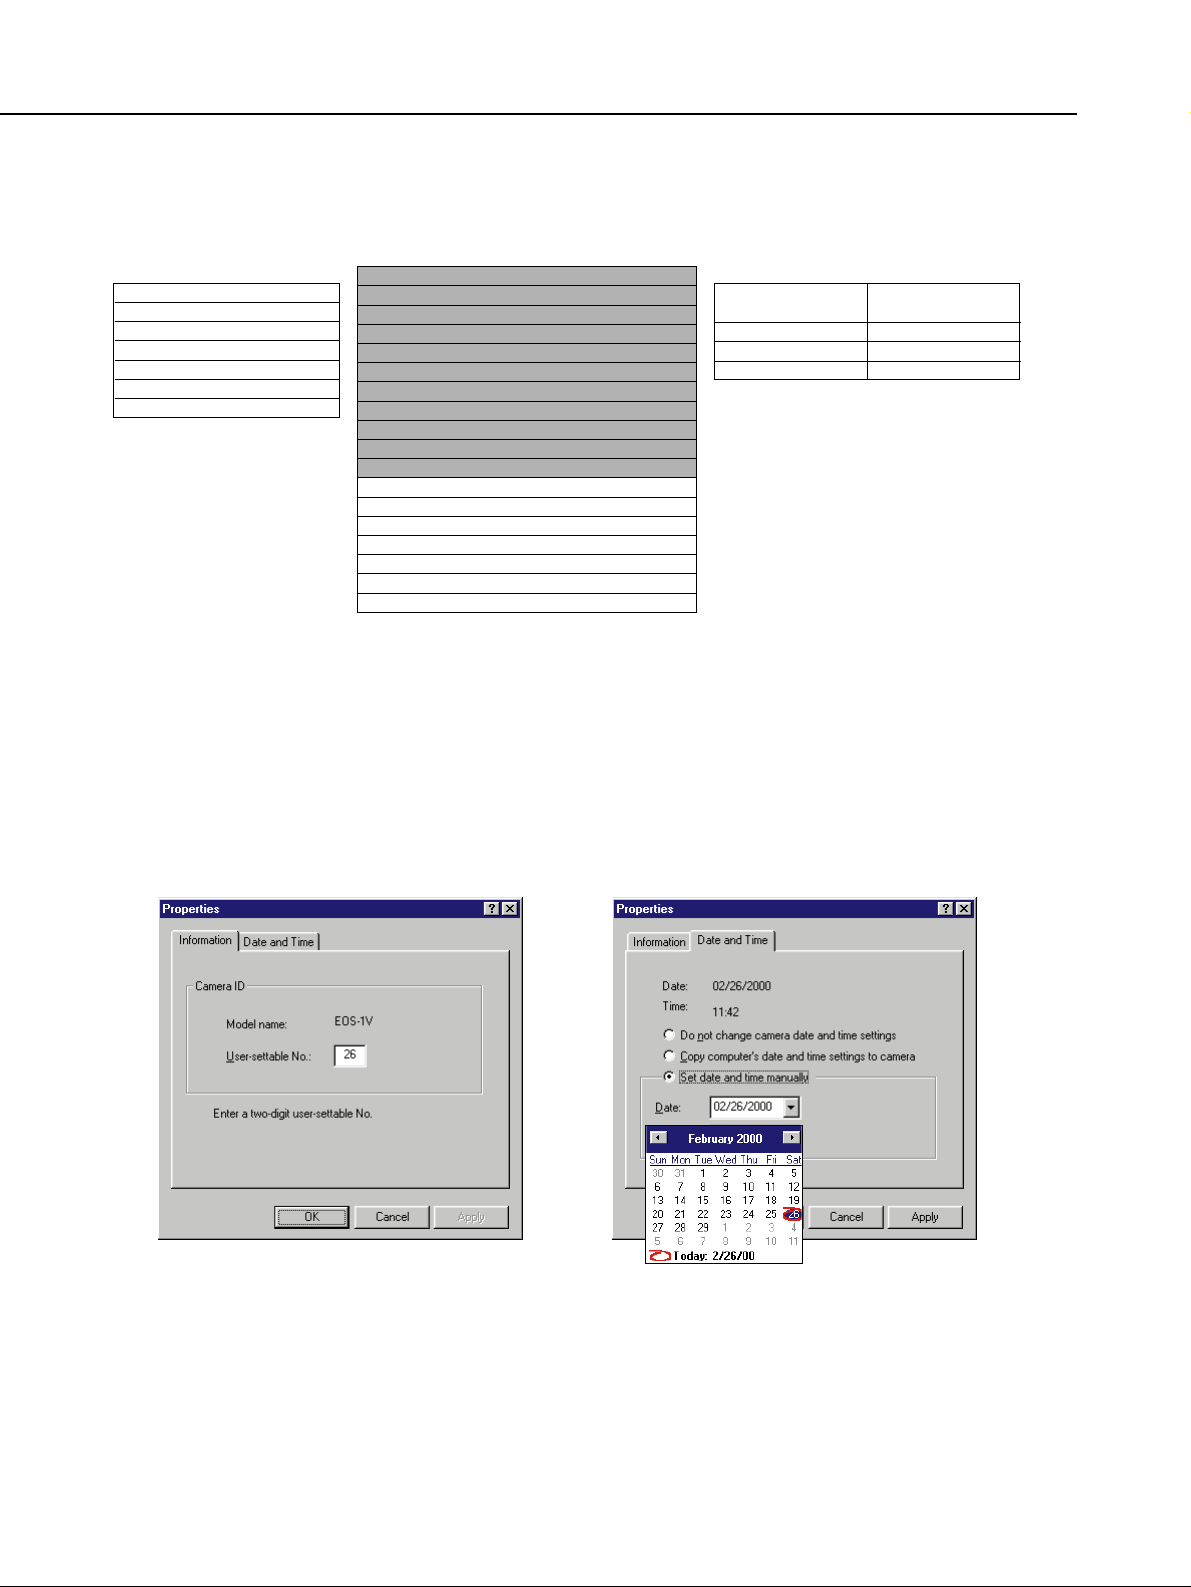
Table 1-2 Shooting Data Items
(4) Properties
The Information dialog box (Fig. 1-9) shows the model name of the EOS-1V currently
connected to the computer. If the camera does not contain film, you can enter the
user-settable No. and apply it to the camera.
The Date and Time dialog box (Fig. 1-10) is for setting the EOS-1V's date and time.
You can either apply the computer's date and time to the camera or enter the date
and time manually.
Part 1: Product Overview
1-4
Table 1-2-1 Items
recorded by
default.
1. User-settable No. (1)
2. Film ID No. (2)
3. Film-loaded date (6)
4. DX-coded film speed (1)
5. Frame No. (1)
6. Picture-taking mode (1)
7 Multiple exposures (1)
Table 1-3 Correlation between
recordable film rolls
and bytes recorded.
Total Bytes
Recorded
0 ~ 4
5 ~ 12
13 ~ 28
Recordable Film
Rolls
200
100
52
Table 1-2-2 Optional items that can be
recorded.
1. Focal length (2)
2. Lens max. aperture (1)
3. Shutter speed (1)
4. Aperture (1)
5. Manually-set ISO speed (1)
6. Exposure compensation amount (1)
7. Flash exposure compensation amount (1)
8. Flash mode (1)
9. Metering mode (1)
10. Film advance mode (1)
11. AF mode (1)
12. Bulb exposure time (2)
13. Date (3)
14. Time (3)
15. Custom Function settings (11)
16. Focusing point selection (1)
17. Focusing points achieving focus (7)
18. Battery-loaded date and time (6)
The number of bytes required
is in parentheses.
* The shaded items in Table 1-
2-2 are initially set to be
recorded.
* The total number of bytes
required by all the items in
Table 1-2-2 is 28.
* The total bytes do not
include the 12 bytes required
by the items in Table 1-2-1.
Fig. 1-9 Information dialog box. Fig. 1-10 Date and Time dialog box.
2) EOS-1V Memory
EOS-1V Memory enables you to view, edit, and search the shooting data downloaded
with EOS-1V Remote. You can also add thumbnail images to the shooting data by
using a scanner to input the images. The shooting data can also be exported in CSV
(Comma-Separated Values) format (text only) to applications such as Microsoft Excel
which support the CSV format. EOS-1V Remote can also start up within EOS-1V
Memory to download the shooting data.
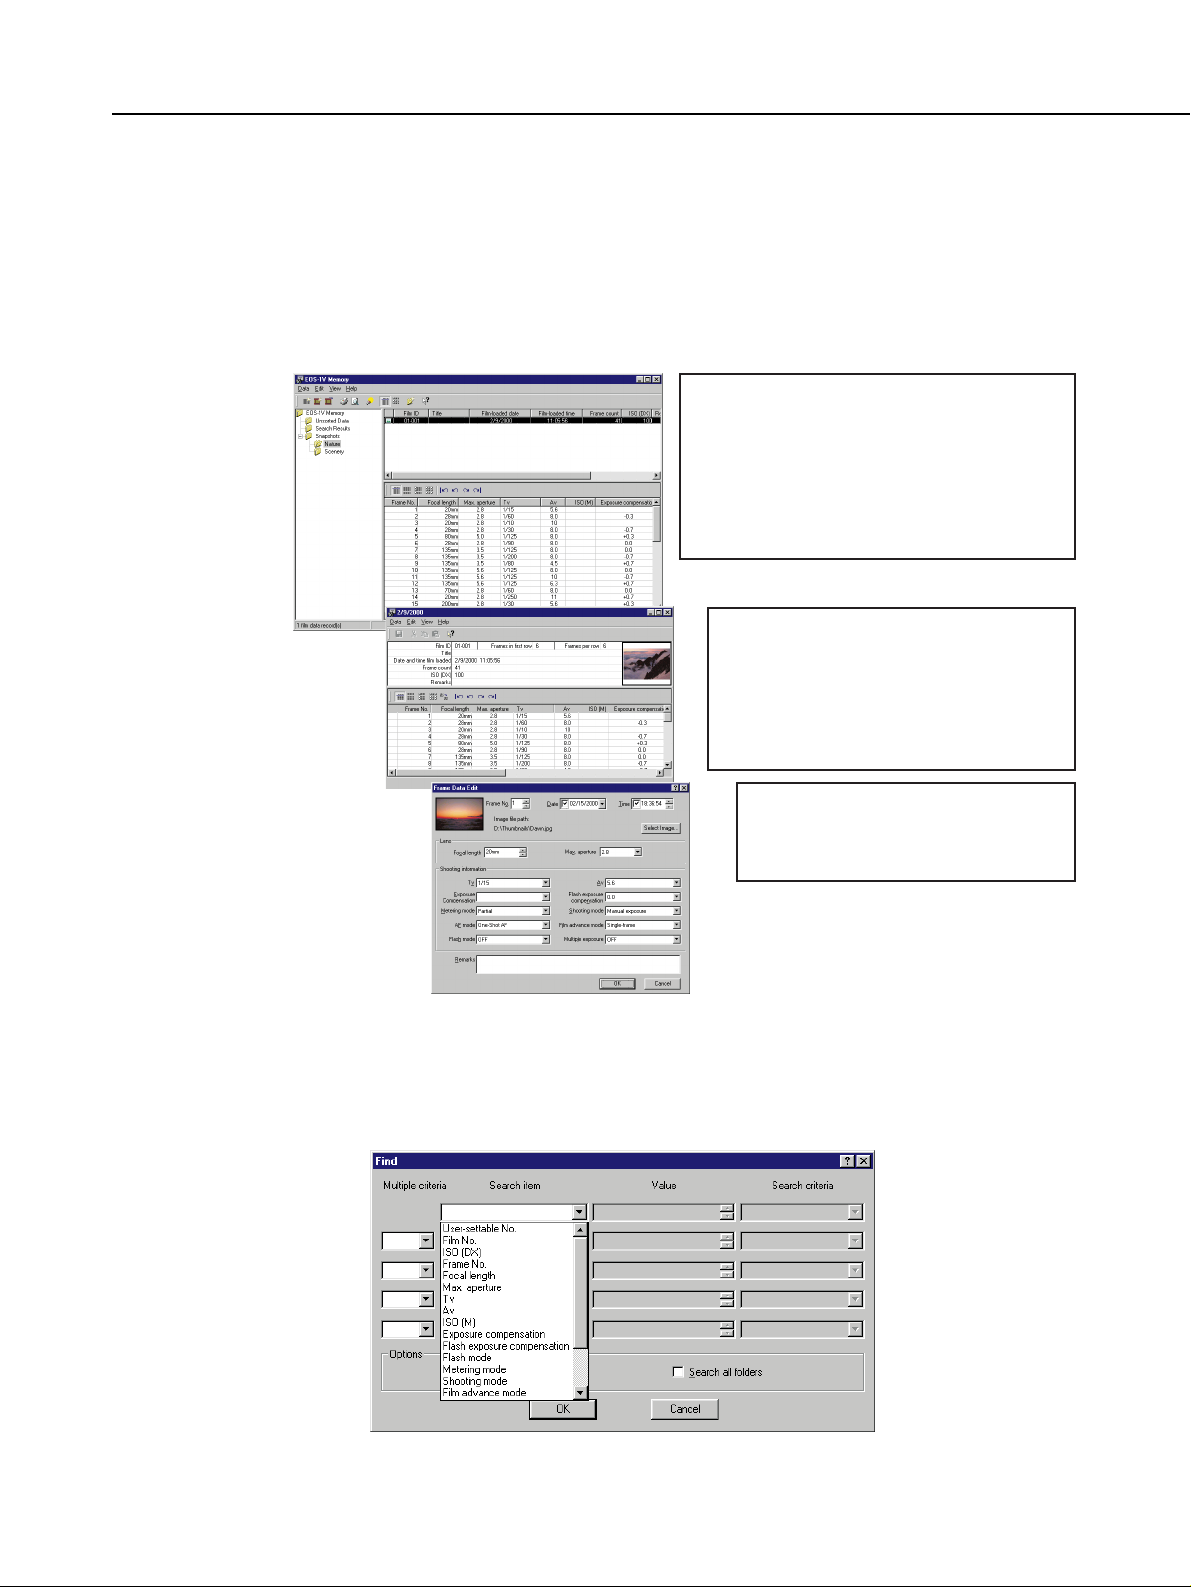
EOS-1V Memory's main screens and their functions are shown below in Fig. 1-11.
* If it can be resized, it is called a window. If it cannot be resized, it is called a dialog
box.
Fig. 1-11 EOS-1V Memory main screens and functions.
Fig. 1-12 Shooting data search box.
Part 1: Product Overview
1-5
Main window
Displayed when EOS-1V Memory starts up.
●
View shooting data.
●
Create and delete folders.
●
Organize shooting data into folders.
●
Search for shooting data (Fig. 1-12).
●
Create or delete film data.
●
Export the shooting data.
●
Print the shooting data.
Opens from within the main window.
●
Edit the film data.
●
Create, delete, or update the
thumbnails.
●
Cut, copy, paste, or delete frame
data. Insert new or copied frame
data.
Opens from within the main window
or film data-editing window.
●
Edit the frame data.
●
Create thumbnails.
Film data-editing
window
Frame data-editing
dialog box

Fig. 1-13 Sample frame data in the main window and film data-editing window.
* Applies to both the main window and film data-editing window.
Fig. 1-14 Choose Frame Data Items Displayed dialog box.
Part 1: Product Overview
1-6
List view Detailed view (without thumbnails)
Detailed view Thumbnail view
List view Detailed view
* This applies to the Detailed view with or
without thumbnails.
* For the Windows 2000 and later versions,
all the frame data items are set to be displayed in the Detailed view by default.

Fig. 1-15 Sample printout of shooting data.
Part 1: Product Overview
1-7
Film List Frame List
Frame List with Thumbnails Frame List without Thumbnails

2. FEATURES
1) Customizing EOS-1V
● Thirty-one Personal Functions for further customization.
● The Custom Functions (except C.Fn-0) found in the EOS-1V can be easily set while
you can confirm the meaning and effect (with the Help menu) of the Custom Function
setting.
● The shooting data items to be recorded by the EOS-1V can be selected.
2) Using the shooting data
● The shooting data recorded automatically by the EOS-1V can be downloaded to a personal computer for data manipulation.
● Data searches can be conducted according to film ID, shooting date, etc.
● Thumbnail images scanned separately can be incorporated in the shooting data.
3) Simple plug-and-play with USB
● Only one dedicated connecting cable is required to connect the EOS-1V to a personal
computer.
● After the cable is connected, transmissions with the EOS-1V can be executed immediately.
Part 1: Product Overview
1-8

3. DESIGN SPECIFICATIONS
1. System
1-1 Type: Computer link system for EOS-1V.
1-2 Components: CD-ROM and Connecting Cable ES
1-3 CD-ROM contents: EOS-1V Remote and EOS-1V Memory (application pro-
grams) EOS USB Driver (driver software)
Electronic manual (PDF)
Adobe Acrobat Reader 4.0 (for viewing electronic manual)
1-4 Compatible OS languages: J/E: Japanese and English
J/E/F: Japanese, English, French
1-5 Connection to computer: Connecting Cable ES (1.5 m) connects the EOS-1V's
Remote control/Data transfer terminal to the computer's
USB port.
2. Operating Environment
2-1 Computer: IBM PC/AT-compatible equipped with CD-ROM drive and
USB port.
2-2 OS: Windows 98 Second Edition preinstalled (J/E).
* For machines preinstalled with Window 98, upgrading
to Service Pack 1 is recommended.)
Windows 98 Second Edition/Windows 2000 preinstalled
(J/E/F).
* For machines preinstalled with Window 98, upgrading
to Service Pack 1 is recommended.)
2-3 CPU: Pentium or higher for J/E.
Pentium 133 MHz or higher for J/E/F.
2-4 Required hard disk space: Minimum 50 MB
2-5 Main memory: Minimum 48 MB for J/E.
Minimum 64 MB for J/E/F.
2-6 Display: 640 x 480 pixels and 256 colors or more.
3. EOS-1V Remote
3-1 Personal Functions: Sets various functions such as exposure, AF, and film
transport for the EOS-1V. The settings can be saved in
the personal computer.
3-2 Custom Functions: Nineteen Custom Functions related to exposure, AF, film
transport, flash, etc., can be set for the EOS-1V. Custom
Function settings can be registered in three groups.
Custom Function settings can be saved in the personal
computer.
3-3 Shooting data: The shooting data recorded by the EOS-1V can be down-
loaded or deleted. EOS-1V Memory can be started within
EOS-1V Remote. The shooting data items to be recorded
can be selected.
3-4 Properties: The user-settable No. and date and time can be set for
the EOS-1V.
4. EOS-1V Memory Downloads the shooting data to the personal computer
and enables the shooting data to be organized, viewed,
edited, searched, printed, or exported in CSV format.
Part 1: Product Overview
1-9

Part 1: Product Overview
1-10
Function Type
P.Fn
No.
Function Description
Application
Remarks
Disables unwanted
picture-taking
mode(s).
While the picture-taking mode is being
selected, the one(s) that are disabled are
skipped.
This makes it faster to select the
desired picture-taking mode.
• All items cannot be checked.
• If P is disabled, pressing the
CLEAR button sets the picture-taking mode to P which can then be
used. However, P will not be selectable in the normal way.
Exposure
Functions
1
Disables unwanted
metering mode(s).
When the metering mode is being selected, the one(s) that are disabled are
skipped.
This makes it faster to select the
desired metering mode.
• All items cannot be checked.
• If evaluative metering is disabled,
pressing the CLEAR button sets
the metering mode to evaluative
which can then be used. However,
evaluative metering cannot be
selected in the normal way.
2
Specifies the metering mode for manual exposure.
The metering mode to be used when the
camera is set to manual exposure can be
set.
When the manual exposure mode
is set, the metering mode selected
here will be set. Effective when
you want to use a specific metering mode during manual exposure.
• The metering mode button can still
be used as a flash exposure compensation button.
3
Sets the maximum
and minimum shutter speeds that can
be used.
The settable range of shutter speeds can
be set.
For example, if the maximum shutter
speed is set to 1/2000 and the minimum
shutter speed is set to 1/60 sec., the
shutter speeds that can be used will be
limited to 1/60 to 1/2000 sec.
This is to make shutter speed
selection faster. Also effective
when you do not want the camera
to set a slow sync speed in aperture-priority AE mode with flash.
• To ensure that a proper flash sync
speed is set in the program AE
mode, the 1/60 sec. - 1/200 sec.
range cannot be set.
• If safety shift has been set with a
Custom Function, it will override
the P.Fn-4 setting.
4
Sets the maximum
and minimum apertures that can be
used.
The settable range of apertures can be
set.
For example, if the maximum aperture
limit is set to f/1.4 and the minimum aperture limit is set to f/8.0, the apertures that
can be used will be limited to f/1.4 to
f/8.0.
By limiting the selectable apertures, aperture selection becomes
faster.
• If safety shift has been set with a
Custom Function, it will override
the P.Fn-5 setting.
• If the maximum aperture of the
attached lens is smaller than the
set aperture range's maximum
aperture limit, the maximum aperture limit will be set to the lens'
maximum aperture. And if the minimum aperture of the attached lens
is smaller than the set aperture
range's minimum aperture limit, the
minimum aperture limit will be set
to the lens' minimum aperture.
5
Personal Function (P.Fn) List

Part 1: Product Overview
1-11
Exposure
Functions
Registers and
switches the shooting mode and
metering mode.
LCD panel display
immediately after
registration.
● The desired picture-taking mode
(except DEP and bulb), exposure settings (shutter speed, aperture, manual
exposure setting), metering mode, and
exposure compensation amount can
be registered as follows:
q Set the desired picture-taking mode
and exposure settings.
↓
w Press the exposure compensation
button.
↓
e Press the Assist button.
↓
r The box displayed on the frame
counter indicates that the registration is completed.
This enables the user to instantly
switch to the registered settings to
suit the front or backlighting conditions.
• Depth-of-field AE and bulb cannot
be registered.
• If P.Fn-3 has been set and P.Fn-6
is used to register manual exposure together with a metering
mode different from the one set
with P.Fn-3, the metering mode set
with P.Fn-3 will override the one
registered with P.Fn-6.
• If C.Fn-4-1/3 has been set, pressing the Assist button will start
AF/AE.
• If a Custom Function like C.Fn-18
is set to enable the Assist button to
function by itself, the Custom
Function setting will override P.Fn-
6.
• For the registration procedure, first
press the exposure compensation
button, then press the Assist button. If the Assist button is pressed
first, registration will not occur and
it will revert to the P.Fn-6 setting
step.
• If any item disabled with P.Fn-1, 2,
3, 4, and 5 is set, use the camera
to cancel that Personal Function
temporarily. Then set P.Fn-6.
Afterward when P.Fn-1, 2, 3, 4, or
5 takes effect, items disabled with
P.Fn-1, 2, 3, 4, and 5 that have
been set with P.Fn-6 will remain
effective with P.Fn-6.
• The Programmed Image Control
mode and metering mode cannot
be switched during continuous
shooting.
6
Repeats AEB during continuous
shooting.
While the shutter button is held down,
AEB repeats during continuous shooting
at the current film advance mode.
Effective when you want to repeat
AEB during continuous shooting.
7
Sets AEB only for
the first two frames.
AEB, which normally takes three frames,
takes only two frames with this P.Fn.
Effective when the third AEB
frame is unnecessary.
• The exposure scale on the LCD
panel and in the viewfinder will still
display the bracketing amount for
three AEB frames.
8

Part 1: Product Overview
1-12
Exposure
Functions
AF Functions
Changes the AEB
sequence for C.Fn9-2/3 to overexposure, correct
exposure, and
underexposure.
The AEB sequence set with C.Fn-9-2/3
(underexposure, correct exposure, overexposure) is changed to overexposure,
correct exposure, underexposure.
Effective when you want to start
the AEB with an overexposed shot
instead of an underexposed one.
• Effective when C.Fn-9-2/3 has
been set.
9
Retains the program shift amount.
The program shift amount can be
retained instead of being canceled after
the picture is taken.
The program shift amount is retained
even after the lens is interchanged. For
example, when the program is shifted by
two stops toward a higher shutter speed,
the exposure will shift by two stops
toward a faster shutter speed when the
lens is interchanged or zoomed.
Effective when you want the standard program to be biased toward
the shutter speed or aperture.
The program shift is retained until it
is shifted back manually or the battery is replaced or the CLEAR button is pressed.
10
Prevents cancellation of multiple
exposures.
The set number of multiple exposures is
taken repeatedly (after the set number of
multiple exposures is taken, the frame
advances and the set number of multiple
exposures is taken again) until the EOS1V's multiple exposure setting is set to 0.
Effective when you want to repeat
the same number of multiple
exposures for subsequent frames.
Since the frame counter displays the
number of multiple exposures at all
times, you cannot see how many
exposures are left in the roll while
multiple exposures are being taken.
11
Sets the AI Servo
AF's subject-tracking sensitivity.
The AF subject-tracking sensitivity during
AI Servo AF can be set to one of five levels: Slow, slightly slow, standard, slightly
fast, and fast.
At the "Fast" setting, the AF
response to the subject's movement is very sensitive. It is effective for fast-moving subjects and
for shooting multiple subjects at
different distances.
The "Slow" setting has a slow
response. It is effective when a
subject is being focused and an
obstruction passes in front of the
camera. There is less chance of
the focus being thrown off by the
obstruction. The AI Servo AF can
thereby continue without disruption.
Even at the "Slow" setting, the AI
Servo AF mode's subject-tracking
performance does not decrease.
12

Part 1: Product Overview
1-13
AF Functions
AI Servo AF continuous shooting is
executed according
to the film advance
speed.
Normally, during continuous shooting
when the AF lens drive cannot keep up
with the shooting speed, the film advance
speed is decreased to give priority to
focusing. P.Fn-13 can be set to override
the focusing priority and enable the film
advance speed to be maintained to allow
picture-taking even if focus has not been
achieved.
Effective when obtaining an image
is more important even if it might
be slightly out of focus.
If the AF lens drive can keep up with
the film advance speed, focus priority is maintained. However, if it cannot keep up, the film advance speed
is given priority.
13
Disables AF lens
driving for focus
search.
If the shutter button is pressed halfway
and focus cannot be detected, this
Personal Function prevents focus search
and lens drive occurring throughout the
entire focusing range.
When focus has been achieved
once and focusing is attempted
again only to fail, the subsequent
lens driving search results in
grossly inaccurate focus. This
Personal Function prevents this
so that the user does not miss the
shot.
It is effective with a super telephoto lens since it has difficulty recognizing even the subject outline
when the lens is way out of focus.
Since AF does not work when the
lens is way out of focus beyond the
predictive AF capability, it will be
necessary to focus manually until
the AF can detect the subject outline.
14
Disables the AFassist beam from
being emitted.
This prevents the external Speedlite's
AF-assist beam from turning on.
At a joint photo session, etc., the
AF-assist beam's pattern on the
subject may be photographed by
someone else's camera.
15
Enables the picture
to be taken automatically when
focus is achieved at
the fixed point of
focus while the
shutter button is
pressed completely.
● The focus is first set manually at a
fixed point. When the shutter button is
held down completely and the subject
comes into focus, the picture is taken
automatically. (Any of the 45 focusing
points can be selected. Automatic
focusing point selection selects the
center focusing point.) The exposure is
set at the moment of exposure.
Effective for unmanned, automated picture-taking.
• Without the Power Drive Booster
attached and with a new battery,
the camera can wait for the subject
for up to about 7 hours.
• Using the Remote Switch is recommended.
• In the single-frame film advance
mode, a picture is taken each time
focus is achieved. In the continuous shooting mode, when focus is
achieved once, the picture will be
taken continuously until the film
runs out. Therefore, limiting the
number of continuous frames with
P.Fn-20 is recommended.
• When a Speedlite is used with continuous shooting, the shooting will
continue even if the Speedlite cannot keep up.
16

Part 1: Product Overview
1-14
AF Functions
Film Transport
Functions
Disables automatic
focusing point
selection.
During manual focusing point selection,
this prevents automatic focusing point
selection from being set when the user
tries to select a focusing point beyond a
peripheral focusing point.
This prevents the camera from
switching to automatic focusing
point selection at an inconvenient
time. Since the focusing point
selection stops at the periphery, it
makes it faster to select a peripheral focusing point.
• During picture-taking with C.Fn-112, pressing the focusing point
selector enables automatic focusing point selection.
• If automatic focusing point selection is registered before P.Fn-17 is
set, pressing the Assist button and
focusing point selector enables
automatic focusing point selection.
17
Enables automatic
focusing point
selection when
C.Fn-11-2 has been
set.
With C.Fn-11-2, normally you use the
Quick Control Dial alone to select the
focusing point. When the selection stops
at a peripheral focusing point, automatic
focusing point selection does not take
effect. However, the horizontal focusing
points at the center can be selected and
automatic focusing point selection can be
used as well.
Effective when you want to use
automatic focusing point selection
while C.Fn-11-2 has been set.
• If P.Fn-17 is also set, P.Fn-17 will
override P.Fn-18 and automatic
focusing point selection will be disabled.
18
Sets the shooting
speed of the film
advance modes for
when the Power
Drive Booster is
attached.
The maximum shooting speed can be set
within the following ranges. Depending
on the power source and AF mode, the
continuous shooting speed you set might
not be attained.
Ultra-high continuous shooting: 8 - 10 fps
High-speed continuous shooting: 4 - 7 fps
Low-speed continuous shooting: 1 - 3 fps
This setting cannot be altered with the
EOS-1V alone.
Effective when you want to attain
more stable AI Servo AF continuous shooting or when you set the
continuous shooting speed to suit
the subject's speed.
It is also effective if you want to
set it to the same continuous
shooting speed as the EOS-1N.
19
Limits the number
of frames exposed
during continuous
shooting.
This enables you to set the maximum
number of frames (1 - 36) to be exposed
during a single burst of continuous shooting.
Effective when you do not want to
photograph an unwanted scene
that follows.
20

Part 1: Product Overview
1-15
Film Transport
Functions
Other Functions
& Operations
Enables silent (lowspeed) film rewind
when the shutter
button is OFF after
picture-taking.
When the EOS-1V without the Power
Drive Booster is set for single-frame
shooting, releasing the shutter button
from the fully depressed position
advances the film silently at low speed.
This is useful when the film
advance noise after taking a picture would be disturbing.
• The shutter is actually cocked at
low speed to make it quiet. (The
film advance operation itself
remains the same.)
• With the Power Drive Booster and
single-frame shooting mode,
releasing the shutter button from
the fully depressed position to the
halfway position advances the film
and cocks the shutter normally.
• During continuous shooting, normal film advance is used.
• If C.Fn-12 is also set for mirror
lockup, the camera noise can be
further reduced.
21
Disables the shutter
release when film
has not been
loaded.
If film has not been loaded and the camera back is closed, pressing the shutter
button will have the film cartridge icon
and P.Fn-22 indicator blink on the LCD
panel to warn that shutter release has
been disabled since no film has been
loaded. The P.Fn-22 indicator will also be
displayed in the viewfinder.
This prevents the user from trying
to take pictures without having film
loaded.
• The shutter button can work while
the camera back is open. In this
case, the shutter speed will be
fixed at 1/8000 sec.
22
The function activation timer can be
changed to a different time length (6
sec., 16 sec., etc.).
The activation time can be changed anywhere from 0 to 3600 sec. (60 min.) for
the following buttons:
q Shutter button halfway position and
AE lock button (standard activation
time: 6 sec.).
w FE lock button (standard activation
time: 16 sec.).
e Shutter button fully depressed posi-
tion (standard activation time: 2
sec.).
The user's preferred activation
time after pressing the button can
be set. Also, setting the activation
time to 0 sec. conserves battery
power.
In the case of e, metering
remains active for 2 sec. after the
shutter button is pressed completely. This enables AE lock or
FE lock to remain active.
• If the activation time is long, more
battery power will be required and
fewer rolls of film can be shot with
the battery.
• The function activation can be
turned off by pressing the MODE
button, AF button, or metering
mode button.
23
Keeps the LCD
panel illumination
turned on during
bulb exposures.
After the bulb exposure starts, pressing
the LCD panel illumination button turns
on the illumination until the bulb exposure
ends.
This sets the picture-taking mode, metering mode, film advance mode, AF mode,
and focusing point selection (center
focusing point or automatic selection).
Effective when you want to monitor the elapsed bulb exposure
time. Normally, the LCD panel illumination turns off when the bulb
exposure starts.
Since this will consume more battery
power, the bulb exposure time cannot be as long or fewer rolls of film
can be shot with the battery.
24
Sets the default settings when the
CLEAR button is
ON.
When the often-used settings are
set, just pressing the CLEAR button can call up those settings.
25

Part 1: Product Overview
1-16
Other Functions
& Operations
Shortens the shutter
release time lag.
Normally, after focus is achieved and the
shutter button is pressed completely, the
shutter release time lag is fixed at 55 ms.
This is the time it takes for the aperture to
stop down by 3 stops. However, when
the aperture stops down by fewer than 3
stops, the shutter release time lag can be
shortened by as much as about 20 percent.
This increases the chances of
capturing the decisive moment.
Since the difference will only be 10
milliseconds, you might not be able
to sense the difference.
26
Enables the electronic dial's function
to be used in the
reverse direction.
This reverses the electronic dial's setting
(rotation) direction. The sequence for
selecting a focusing point and setting the
shutter speed or aperture will be reversed
when the dial is turned.
This can be set individually for the Main
Dial and Quick Control Dial.
Even if the Main Dial's rotation function is
reversed, the rotation direction for selecting a focusing point remains the same.
With C.Fn-11-2 set and the Power
Drive Booster attached during vertical shooting, selecting the focusing point with the Quick Control
Dial might not match the dial's
rotation direction (the same goes
for the exposure level movement).
This Personal Function remedies
this.
Rotation direction during vertical
shooting with P.Fn-27 not set.
27
Prevents exposure
compensation with
the Quick Control
Dial.
Setting exposure compensation with the
Quick Control Dial is disabled.
This prevents exposure compensation from being set accidentally
while the focusing point is being
selected.
28
Issues a warning
when there is
enough memory to
store shooting data
for only a few more
rolls of film.
This can be set to 1 to 20 rolls of film.
When the remaining memory capacity
can store the shooting data only for this
number of rolls, the communications icon
blinks on the LCD panel as a warning.
This prevents previous shooting
data from being overwritten when
the memory capacity becomes
full.
29
Changes the
imprinting density of
the film ID.
The film ID imprinting can be made darker or lighter by about one stop.
This is effective when you want to
match the imprinting density with
the film type.
30

4. COMPARISON WITH COMPETING PRODUCTS
Table 1-4
(Shaded items indicate the EOS Link Software ES-E1 specifications superior to Nikon's
AC-1WJ/1MJ.)
Part 1: Product Overview
1-17
Maker Canon Nikon Nikon MINOLTA
Product
EOS Link
Software ES-E1
AC-2WJ AC-1WJ / 1MJ DM-9
Picture-taking
Items
User-settable No.
●
--- ---
●
Film ID No.
●
--- ---
●
Film-loaded date
●
--- --- ---
DX-coded film speed
●
--- ---
●
Frame No.
●●
--- ---
Picture-taking mode ●●●●
Shutter speed used
●●●●
Aperture used ●●●●
Manually-set ISO speed
●
--- --- ---
Exposure compensation amount ●●●●
Flash exposure compensation
amount
●●
---
●
Flash mode ●●●●
Metering mode
●●●●
Focal length used ●●●●
Film advance mode
●
--- ---
●
AF mode
●
--- ---
●
Bulb exposure time
●
--- --- ---
Date of picture
●
---
●●
Time of picture ●
---
●●
Custom Function settings
●
--- --- ---
Focusing point selection
●
●
●
●
Canon format
--- ---
●
Multiple exposures ●
--- ---
Active focusing point
--- --- ---
Battery-loaded date
--- --- ---
File Format Nikon format Nikon format
---
2 formatsSave Formats 2 formats 2 formats
---
●Data-Editing Feature ●●
---
●
Data Search Feature
●●
---
---
Remote Control Functions
●●
---
19
Customization
Custom Functions 22 24
---
31
Personal Functions
--- --- ---
BMP, JPEG,
TIFF
Compatible Image Formats BMP BMP
---
●/●
Display Format
(Thumbnails provided/not provided)
●/●●/●
---
Max. aperture of lens ●●●●

* The shooting data capacity depends on the number of exposures on the roll and the
number of data items recorded.
Part 1: Product Overview
1-18
Maker Canon Nikon Nikon MINOLTA
PC/AT-
compatible
Compatible Computers
PC/AT-
compatible
PC/AT-
compatible
---
--- ---
Macintosh
---
J/E: 98
J/E/F: 98/2000
Compatible
OS
95, 98, NT4.0 95
---
Dedicated
transmission
cable
Compatible Cable
Dedicated
transmission
cable
Dedicated
transmission
cable
---
Remote control
/ Data transfer
terminal
10-pin terminal 10-pin terminalCamera Terminal
---
---
Software:
22,000 yen
Cable:
12,000 yen
Software:
45,000 yen
Cable:
12,000 yen
Price in Japan 68,000 yen
---
1999/** 1998/**Marketing Date 1998/**
Only the
Windows
version is
available.
The Windows
and Macintosh
versions are
sold
separately.
Remarks
• Smart Media is
used as the
storage media.
• The data is
viewed with
the camera's
LCD panel.
• The data can
be printed out
by the service
center.
USB port Serial port Serial port
Computer
Terminal
PC/AT-compatible
---
Approx.
52 - 200 rolls
70 78Shooting Data Capacity* (36-ex. rolls) 400
---
Serial port Serial portMacintosh
Windows
Mac OS
---
--- ---
7.1~7.6
---
 Loading...