

Page 1

Part 1
General
Information
Page 2

1. FEATURES
1.1 High-Performance, High-Precision Area AF
● The world’s fastest continuous shooting speed of 9 fps in predictive AI Servo AF
mode.
● 8 × 15mm Area AF for easy subject capture.
● Improved AF performance.
● Focusing point registration and shifting and limiting the selectable focusing
points to 11 or 9 result in faster focusing point selection.
● Active, superimposed focusing points are brighter by over 2 stops.
1.2 High-Speed, Quiet Film Transport
● AF SLR camera boasting the world’s fastest continuous shooting speed at approx.
10 fps (in the One Shot AF mode w/PB-E2 and NP-E2).
● Built-in motor drive enables approx. 3.5 fps continuous shooting.
● Film transport noise level is on par with the EOS-1N’s.
1.3 High Reliability
● Moving parts are thoroughly sealed for excellent water and dust resistance.
• Grip’s new battery chamber cover is lined with packing.
• The Remote control/Data transfer terminal cap is fixed on the camera to pre-
vent loss and it protects the terminal against water.
• New lens mount coupling surface which matches the EF 300mm f/2.8L IS USM
and later lenses equipped with an O-ring for enhanced water and dust resistance.
● Rigid magnesium alloy top and front covers with highly durable metallic finish.
● Shutter durability of 150,000 cycles.
● The grip mount and electrical contacts (system connector) are bipolar to enhance
reliability.
● Ambient temperature range for normal operation is -20°C to +45°C with 95%
maximum humidity. (Film ID imprinting is assured down to -10°C.)
1.4 Excellent Basic Features
● The algorithm for 21-zone evaluative metering and E-TTL autoflash metering has
been improved for better metering stability.
● Ultra-high speed, high-precision shutter for 30 sec. - 1/8000 sec. and X-sync at
1/250 sec.
● 100% viewfinder coverage, dioptric correction, and built-in eyepiece shutter.
● Laser Matte focusing screen with Area AF ellipse.
● Short viewfinder blackout time of 87 ms (approx. 38% shorter than the EOS-1N’s
140 ms and 17% shorter than the EOS-3’s 105 ms). Insures stable viewfinder
image during continuous shooting.
● Shutter release time lag is short and fixed at 55 ms for all lenses set at the maximum aperture or up to three stops smaller. See 3. Specifications, item 5-4.
● Infrared film can be used.
● Film ID imprinting enabled for easier identification and organization of film rolls.
1-1
Part 1: General Information
Page 3

1.5 Outstanding Operation Ease
● Camera control layout conforms to the EOS-1N’s
• EOS-1N users will feel at home with the EOS-1V. Using the EOS-1V and the
EOS-1N at the same time presents no familiarity problems with the camera
controls.
● Comfortable hold and feel with rubber covering on all grip surfaces.
● Fast Main Dial and Quick Control Dial operations.
● With full-time manual focusing lenses, manual focusing is enabled after One
Shot AF or AI Servo AF operation.
● Hidden buttons inside the side door improve operational ease.
1.6 More Custom Functions
● Enhanced flexibility with 20 Custom Functions and 63 settings (two more
Custom Functions and 11 more settings than the EOS-3).
● Three groups of Custom Function settings can be set to suit the particular subject.
• Personal Functions can be used to switch the EOS-1V’s Custom Function set-
tings on the fly.
1.7 Shooting Data and Personal Computer Linkage
● Shooting data for up to 100 rolls of 36-ex. film can be recorded.
● With EOS Link software ES-E1, the shooting data can be viewed or edited.
1-2
Part 1: General Information
Page 4

2. OVERVIEW
2.1 EOS-1V
The EOS-1V combines the EOS-1N’s outstanding reliability and the EOS-3’s
advanced features (enhanced as described below). Its overall perfor mance surpasses that of the Nikon F5 to become the world’s top-performance AF SLR camera.
Specifications surpassing the EOS-1N’s
● The EOS-3’s 45-point Area AF improved for EOS-1V
• More focusing point selection methods (described later) with focusing point registration and shifting and CF-13-1 for limiting the selectable focusing points to
9.
• Improved AF mechanism and Area AF sensor for better focusing precision.
• The superimposed focusing point display is two stops brighter than the EOS3’s.
● AI Servo AF at 9 fps for subjects moving up to 50 kph as close as 8 m (EOS-1N:
5 fps as close as 10 m, EOS-3: 7 fps as close as 8 m)
● Max. continuous shooting speed of 10 fps (in the One Shot AF mode with PB-E2
and NP-E2 attached) (EOS-1N: 6 fps, EOS-3: 7 fps)
● Moving parts sealed against water and dust
• The grip’s battery chamber cover is lined with packing.
• The camera’s remote control/Data transfer terminal cap keeps out water and it
cannot be lost. (The terminal has the same shape and pin count as the EOS-3’s
remote control terminal and it can be connected to remote switches like the RS80N3 as well as to the EOS Link Software ES-E1 cable.)
● The first EOS-1 series camera to have highly rigid magnesium alloy top and front
covers.
● The first EOS-1 series camera to have a durability of 150,000 shutter cycles
(same as the Nikon F5, and exceeding the EOS-1N and EOS-3’s 100,000 cycles).
● Twenty Custom Functions with 63 settings (compared to the EOS-3’s 18 Custom
Functions and 52 settings and the EOS-1N’s 14 Custom Functions and 35 settings)
● Three groups of Custom Function settings can be set to suit the shooting objective
● Shooting data can be recorded by the camera
● By connecting the camera to a personal computer via EOS Link Software ES-E1,
you can view and edit the shooting data and modify EOS-1V Personal Function
settings.
● A user-selectable No. and film ID No. ar e imprinted on the film leader
● Automatic battery check (EOS Elan II/50/55 type) displays the battery level at all
times on the LCD panel.
● Bulb exposures up to 23 hours, 59 min., 59 sec. indicated digitally
● Incorporates the EOS-3’s state-of-the-art exposure control system
• 21-segment evaluative metering (not found on the EOS-1N), focusing point-
linked spot metering, multi-spot metering, E-TTL autoflash, FP flash, FEL, FEB,
and wireless multi-Speedlite flash. (The algorithm for evaluative metering and
E-TTL flash metering has been improved.)
• Safety shift enabled in the shutter speed-priority AE and aperture-priority AE
modes (set with a Custom Function).
● Viewfinder blackout time of 87 ms (EOS-1N: 140 ms, EOS-3: 105 ms)
● Digital frame counter in the viewfinder
• Frame countdown icon (not found on the EOS-3) provided and a Custom
1-3
Part 1: General Information
Page 5

Function can set the frame counter to be the same as the EOS-1N’s
Specifications Exceeding the EOS-3’s
● 100% viewfinder coverage, dioptric correction, built-in eyepiece cover, and other
viewfinder specs on par with the EOS-1N’s
• Newly-developed Laser Matte focusing screen (also compatible with the EOS-3)
● Compatible with infrared film
● Rubber skin on all camera grip surfaces (like the EOS-1N)
There is no Eye Control since priority was given to 100% viewfinder coverage,
0.72 × viewfinder magnification, dioptric correction, and the built-in eyepiece shut-
ter.
1-4
Part 1: General Information
Page 6
EOS-1V
8 m
9 fps
–
●●
100%
20 mm
-3 - +1 dpt
●●
21
●●
30 - 1/8000 sec., 1/250 sec.
150,000 cycles
●●
●●
●●
3.5 fps
10 fps
●●
20/63
●●
●●
Magnesium alloy
161 × 120.8 × 70.8
945 g
1-5
Part 1: General Information
Item
AF
View
finder
Metering
Shutter
Flash
Control
Film
Transport
Custom Functions/Settings
Film ID Imprinting/Data Recording
PC Link
Water/Dust Resistance
Top/Front Cover Material
Dimensions (W × H × D mm)
Weight (excluding battery)
Camera
Focusing Area
■ : f/2.8 high-precision focusing
Predictive AF at 50 kph &
Continuous Shooting Speed
w/PB-E2+300mm/2.8L
Eye Control
Focusing Point Registration/Shift
Coverage
Eye Relief
Dioptric Correction
Eyepiece Shutter
Sensor Segments
Multi-spot Metering
Speeds, X-sync
Durability
E-TTL Autoflash, FP Flash
FE Lock, FEB
Wireless Multi-Speedlite Flash
Max. Speed
Infrared Film
EOS-1N
10 m
5 fps
–
–
100%
20 mm
-3 - +1 dpt
●●
16
–
30 - 1/8000 sec., 1/250 sec.
100,000 cycles
–
–
–
3 fps
6 fps
●●
14/35
–
–
●●
Plastic
161 × 112.1 × 71.8
855 g
EOS-3
8 m
7 fps
●●
–
97%
19.5 mm
–
–
21
●●
30 - 1/8000 sec., 1/200 sec.
100,000 cycles
●●
●●
●●
4.3 fps
7 fps
✕
18/52
–
–
●●
Plastic
161 × 119.2 × 70.8
780 g
Body Only
w/PB-E2
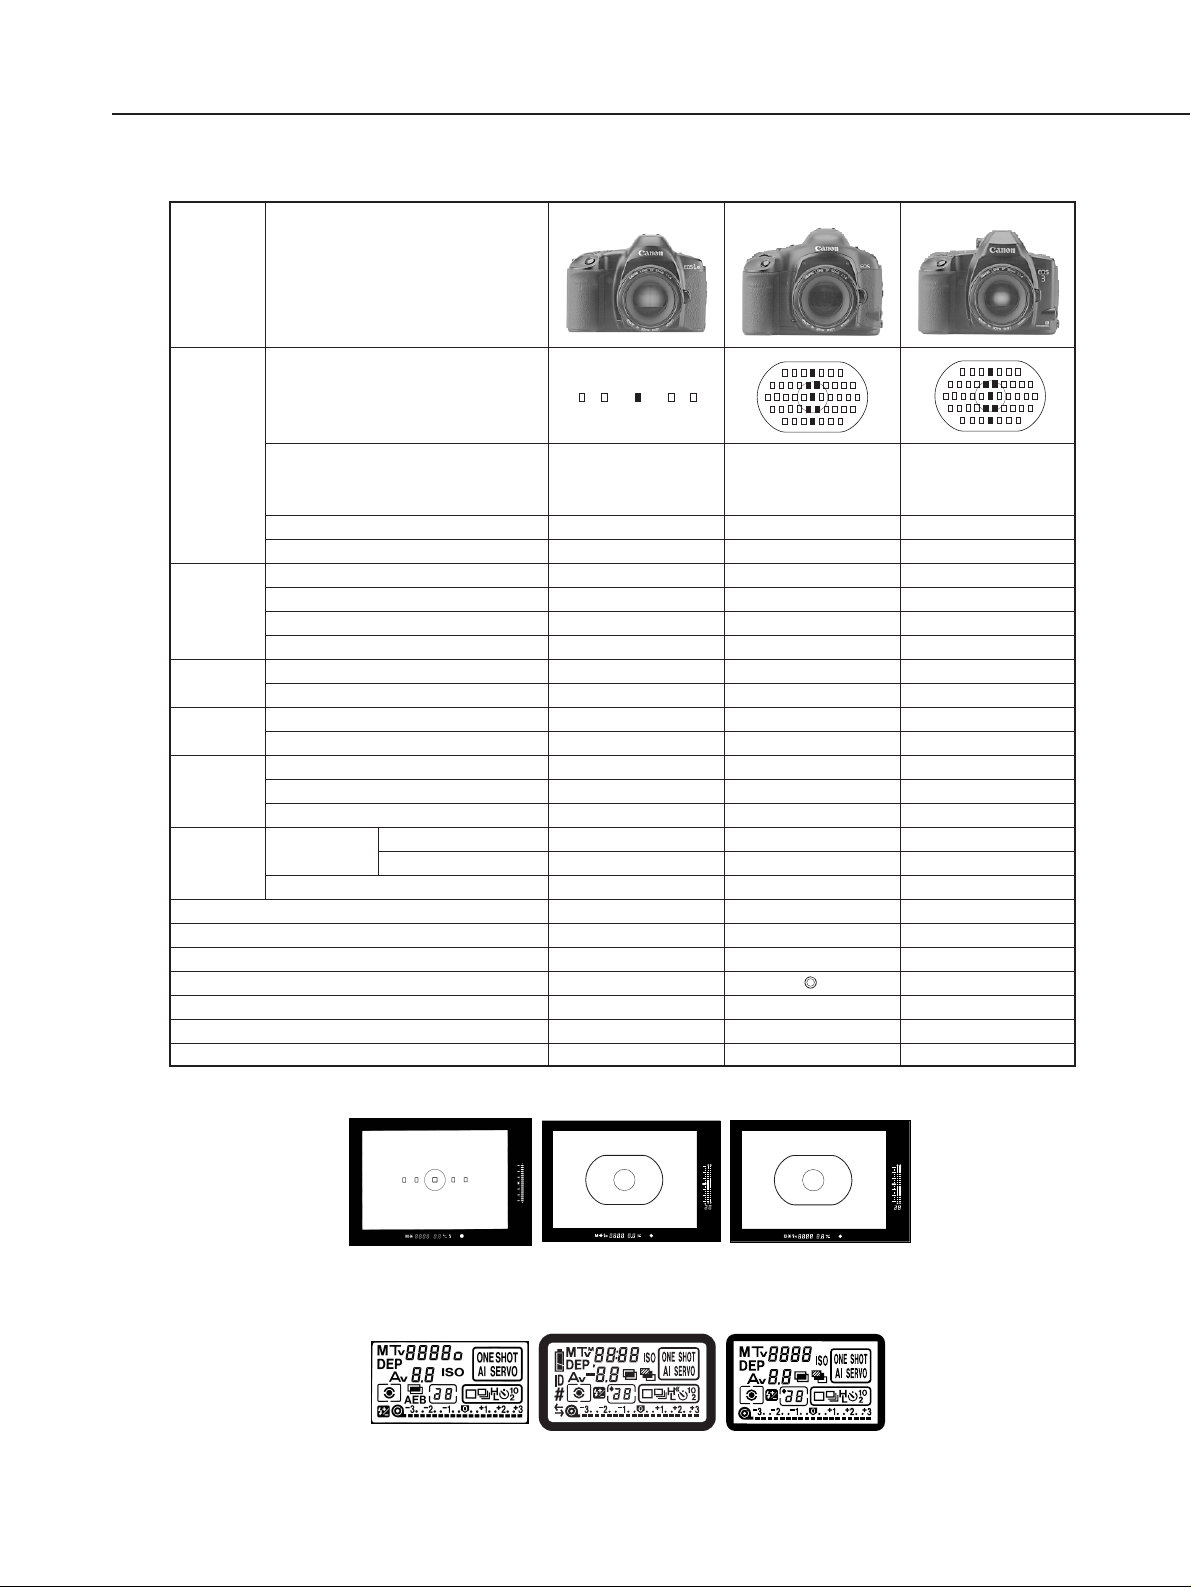
Table 1-1 Comparison with EOS-1N and EOS-3
Fig. 1-1 Viewfinder comparison.
EOS-3EOS-1N EOS-1V
EOS-3EOS-1N EOS-1V
Fig. 1-2 LCD panel comparison.
Page 7
1) Exterior design
As an imaging tool for advanced amateurs and
pros, the EOS-1V’s basic design concept is
based on the EOS-1-series. The following were
emphasized in the design:
q Imposing and refined exterior while looking
tough and elegant
The camera has been sculptured like a top-
notch athlete with a lean and tough body.
The smooth, curved surfaces are elegant to
the smallest detail exuding a strong presence.
w Highly rigid, luxurious exterior
The magnesium-alloy top and front covers
are very durable and coated with a deepblack metallic finish. Also, like the EOS-1N,
a rubber skin covers all the surfaces held by
the hands. The result is a better grip, holding comfort, and enhanced joy of ownership.
e Improved operation ease
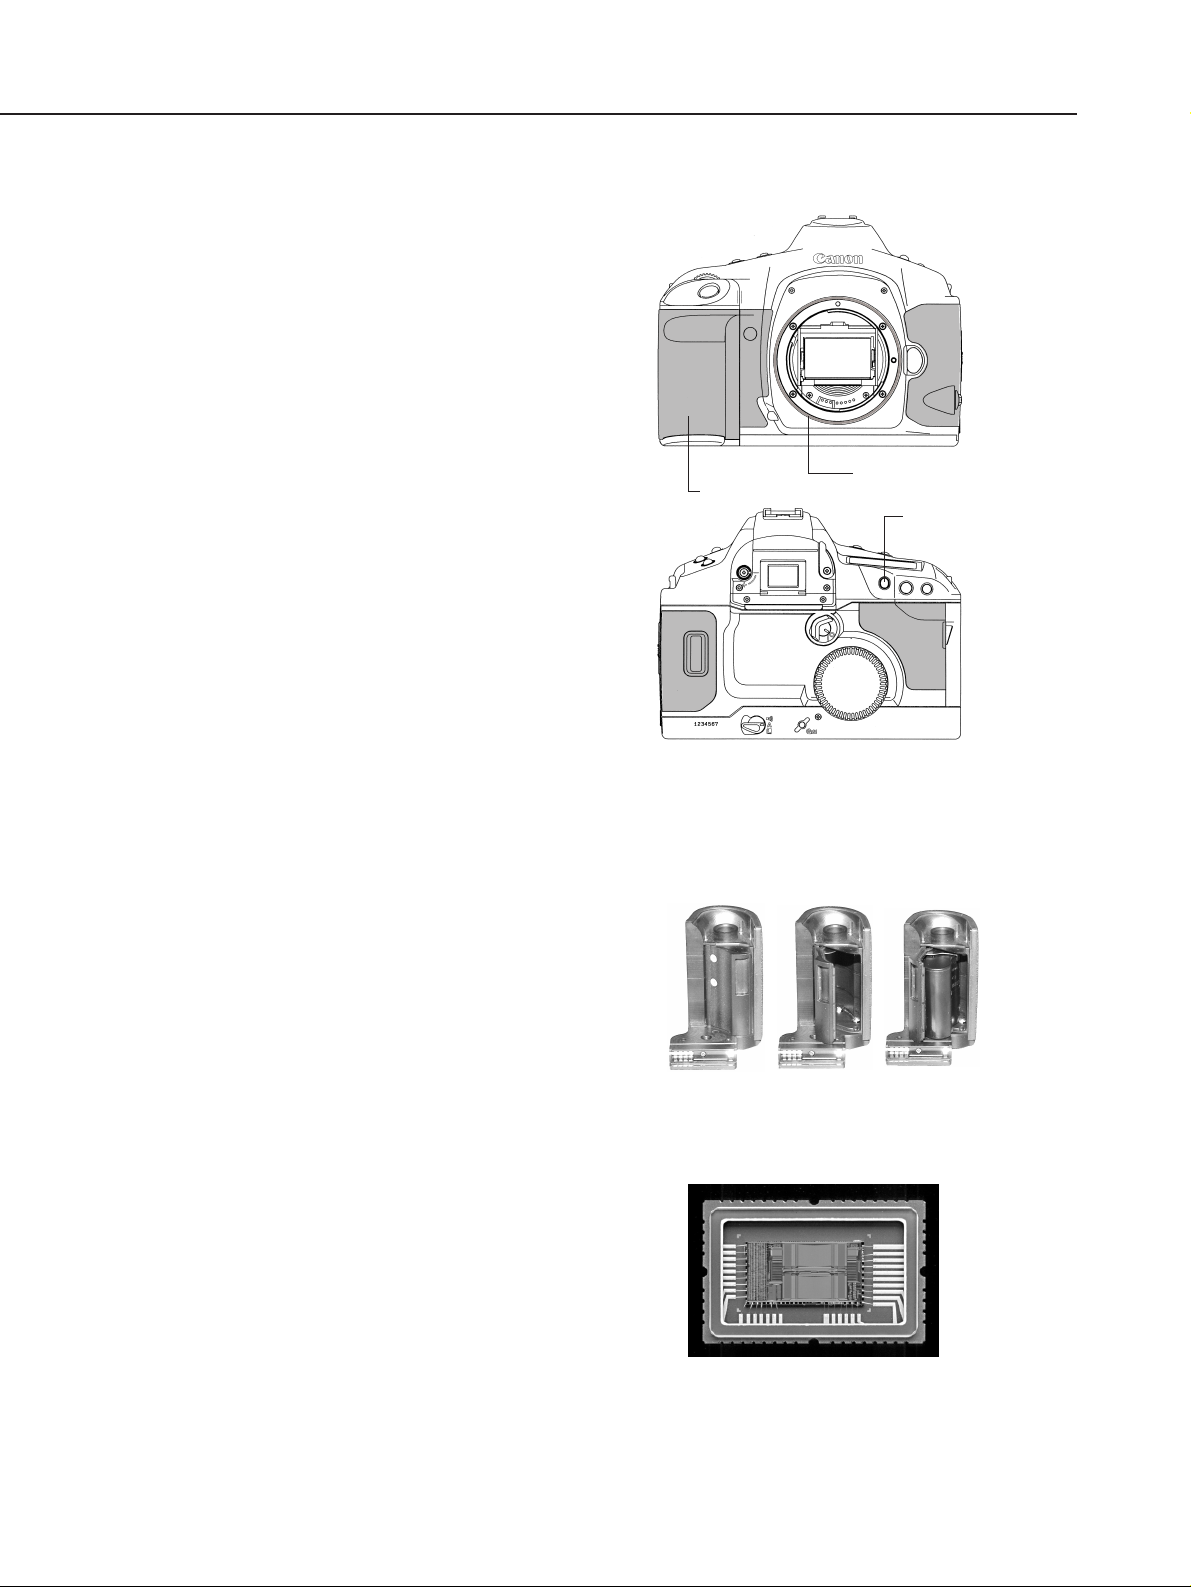
The new Assist button (see Fig. 1-3), used for
focusing point selection and other functions,
is strategically positioned. The remote control/Data transfer terminal has a rubber cap
to keep out water and dust. The EOS-1V
retains the EOS-1N’s basic camera controls
while adopting additional ones to enhance operation ease.
2) Water- and Dust-Resistant
All the switches and major body seams are
sealed, and the camera back edges are lined
with packing. The grip’s battery chamber cover
is also lined with packing (see Fig. 1-4).
Countermeasures against water and dust
enable the camera to be used even in harsh
environments.
To better seal out dust and water, the lens
mount perimeter also has a new coupling surface where the rubber O-ring on EF 300mm
f/2.8L IS and later lenses contact against.
3) AF
The EOS-3’s Area AF sensor (Fig. 1-5) has been
refined for the EOS-1V. The S/N ratio is better
and the AF optics have been revamped to
improve AF perfor mance. In the One Shot AF
mode, the AF speed and predictive AF performance exceed the EOS-3’s.
For fast focusing point selection even without
Eye Control, a focusing point can be registered
for instant shifting to it. There are also more
focusing point selection methods. These improvements reflect the suggestions of
EOS-3 professional users. (See next page.)
1-6
Part 1: General Information
Fig. 1-5 Area AF sensor
Fig. 1-4 Water-resistant grip
Fig. 1-3 EOS-1V exterior.
Lens rubber O-ring
coupling surface
Assist button
Rubber covering
Page 8

EOS-1V’s New AF Features (For details, see “4. Nomenclature”.)
Focusing Point Registration and Shifting (HP: Home
position)
This feature was suggested by many pro users of
the EOS-3. It enables the user to register the most
often-used focusing point and shift the focusing to
this registered one. Among the 45 focusing
points, only one focusing point can be registered.
Or, the camera can be set for automatic focusing
point selection with the 45 focusing points (the
automatic selection of 2 focusing points can also
be registered). Using a registered focusing point
gives priority to composition, while automatic
selection of 45 focusing points results in shutter
release priority. The focusing point can thereby be
registered to suit the objective.
The focusing point is shifted mainly with the new
Assist button provided for this purpose. When CF18-1/2 is set, pressing the Assist button alone can shift the focusing point instantly.
New focusing point selection method (CF-13-3)
In addition to limiting the selectable focusing
points to 11 (with CF-13-1/2), a new Custom
Function setting (CF-13-3) can also limit it to 9.
Turning the Main Dial selects one of the three
horizontal focusing points at the center or sets the
automatic selection of 45 focusing points.
Meanwhile, turning the Quick Control Dial selects
one of the 8 peripheral focusing points. Thus, the
user can quickly select the often-used center
focusing point, a peripheral focusing point, or the
45 focusing points to achieve focus.
Also, the new CF-18-1/2 settings enable the
Assist button alone to instantly select the center
focusing point, and the Quick Control Dial and
Assist button can be used to select one of the 9 focusing points.
Limiting the selectable focusing points (CF-13-1/2/3)
and expanding the focusing point range (CF-17-1/2)
By limiting the selectable focusing points to 11
(CF-13-1/2) or 9 (CF-13-3) and expanding the
focusing point range (CF-17-1/2), all 45 focusing
points can be used to cover the subject.* This
combination enables both quick focusing point
selection and quick subject capture.
* With CF-13-3 and CF-17-1, 37 focusing points
will be usable. With CF-17-2, the focusing
point coverage varies depending on the lens
focal length and AF mode.
1-7
Part 1: General Information
Shifting to the registered focusing point (normal)
Shift with Assist button + Focusing point selector.
Focusing point registration
Focusing
point selection
Register with Assist button
+ FEL button.
The focusing points shown
on the left can also be registered.
+FEL
Press and turn to switch between horizontal
focusing point shifting and automatic focusing point selection.
Press and turn.
Automatic selection
Manual selection of horizontal
focusing points
Automatic selection
Selectable peripheral
focusing points
Selectable focusing points
9 selectable focusing points
Fig. 1-6 Focusing point registration and
shifting.
Fig. 1-7 Focusing point selection method
with CF-13-3.
Selected focusing point.
Focusing point range
expanded with CF-17-1.
Focusing point range
expanded with CF-17-2.
+
* During One Shot AF, the selected focusing point and the
focusing point achieving focus light up.
Fig. 1-8 CF-13 and focusing point
expansion. (With CF-13-3)
Page 9
4) The Viewfinder and Information Display
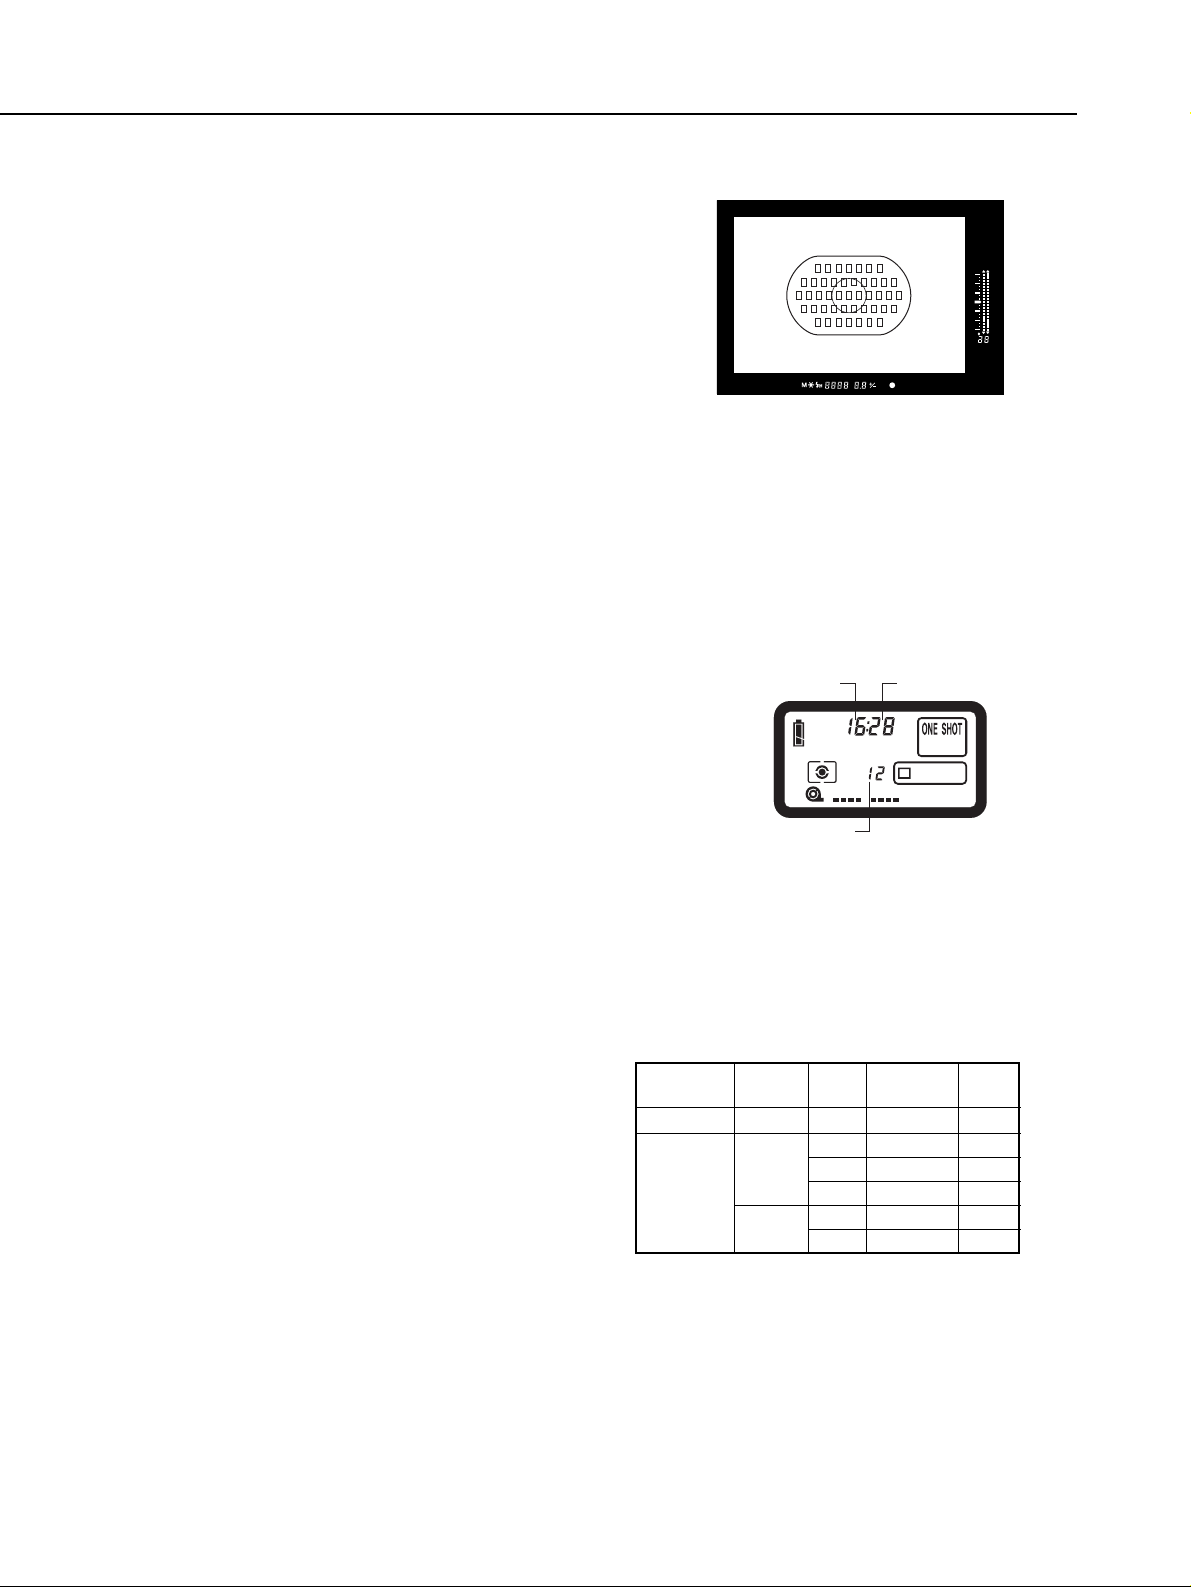
Like the EOS-1N, the EOS-1V’s viewfinder coverage is
100 percent, the viewfinder magnification is 0.72 ×, the
eye relief is 20 mm, and the dioptric correction range is
-3 to +1 dpt. The viewfinder blackout time is shorter at
87 ms (EOS-1N: 140 ms, EOS-3: 105 ms). The
viewfinder image is also stable even during continuous
shooting.
The standard focusing screen is the newly developed
Laser Matte focusing screen with the Area AF ellipse.
Other Ec-series focusing screens can also be used.
The superimposed focusing point is two stops brighter
than the EOS-3’s. It is easier to see under bright conditions. The viewfinder display
on the right and bottom of the image area is almost the same as the EOS-1N’s.
The new FP flash icon has been added below the image area, and the new flash
exposure level scale is on the right of the image area. The frame counter is fully
digital, and it reflects the frame counter displayed on the LCD panel. There is also a
frame countdown icon (new) which indicates that the frames are being counted in
reverse order. With CF-8-2, the same frame counter display (F 9 - 0) as the EOS1N’s can be set.
5) Metering, Exposure Control, and the Shutter
The algorithm for evaluative metering and E-TTL autoflash
metering has been changed to attain better stability.
Otherwise, the exposure control and metering modes are
the same as the EOS-3’s. The shutter is based on the
highly reliable rotary magnet-controlled shutter used in
the EOS-3. It has carbon curtains. Improved shutter cocking has made the curtain speed faster to attain a maximum X-sync of 1/250 sec. and shutter speeds from 30 to
1/8000 sec. The shutter durability is 150,000 cycles.
Bulb exposures can be as long as 23 hr., 59 min., and 59
sec. The bulb exposure’s elapsed time is indicated digitally on the LCD panel.
6) Film Transport
The continuous shooting speed is shown in
Table 2. With PB-E2 and NP-E2, the EOS-1V is
the world’s fastest 35mm AF SLR camera at 10
fps. This applies when the scene is metered for
each shot, and it does not apply to stoppeddown shooting. With PB-E2 and NP-E2, the
EOS-1V can be set to one of four film advance
modes: Single-frame, low-speed, high-speed,
and ultra-high speed continuous advance. The
EOS-1V is also compatible with bottom-attachable accessories for the EOS-1, EOS-1N, and EOS-3.
With silencing technologies such as floating supports for film advance and shutter
cocking, the film transport noise level is almost the same as the EOS-1N’s (6 fps)
during high-speed continuous shooting (7 fps). Film rewind noise is also the same
level as the EOS-1N’s.
Although an infrared sensor is used to detect the film transport, infrared film can
be used with the EOS-1V since new optics prevent the picture area from getting
fogged.
1-8
Part 1: General Information
Fig. 1-9 Viewfinder.
sec.
Hour
Min.
Fig. 1-10 Bulb exposure
time indicator.
Table 1-2 Continuous Shooting Speed
L: Low speed, H: High speed, H‹‹: Ultra-high speed
Configu-
ration
EOS-1V only
w/PB-E2
2CR5
NP-E2
LR6
L
H
‹‹
H
L
H
L
3.5 fps
10 fps
7 fps
3 fps
6 fps
3 fps
3 fps
9 fps
7 fps
3 fps
5 fps
3 fps
Power
Source
Mode
One Shot
Manual
AI
Servo
Page 10
7) Custom Functions
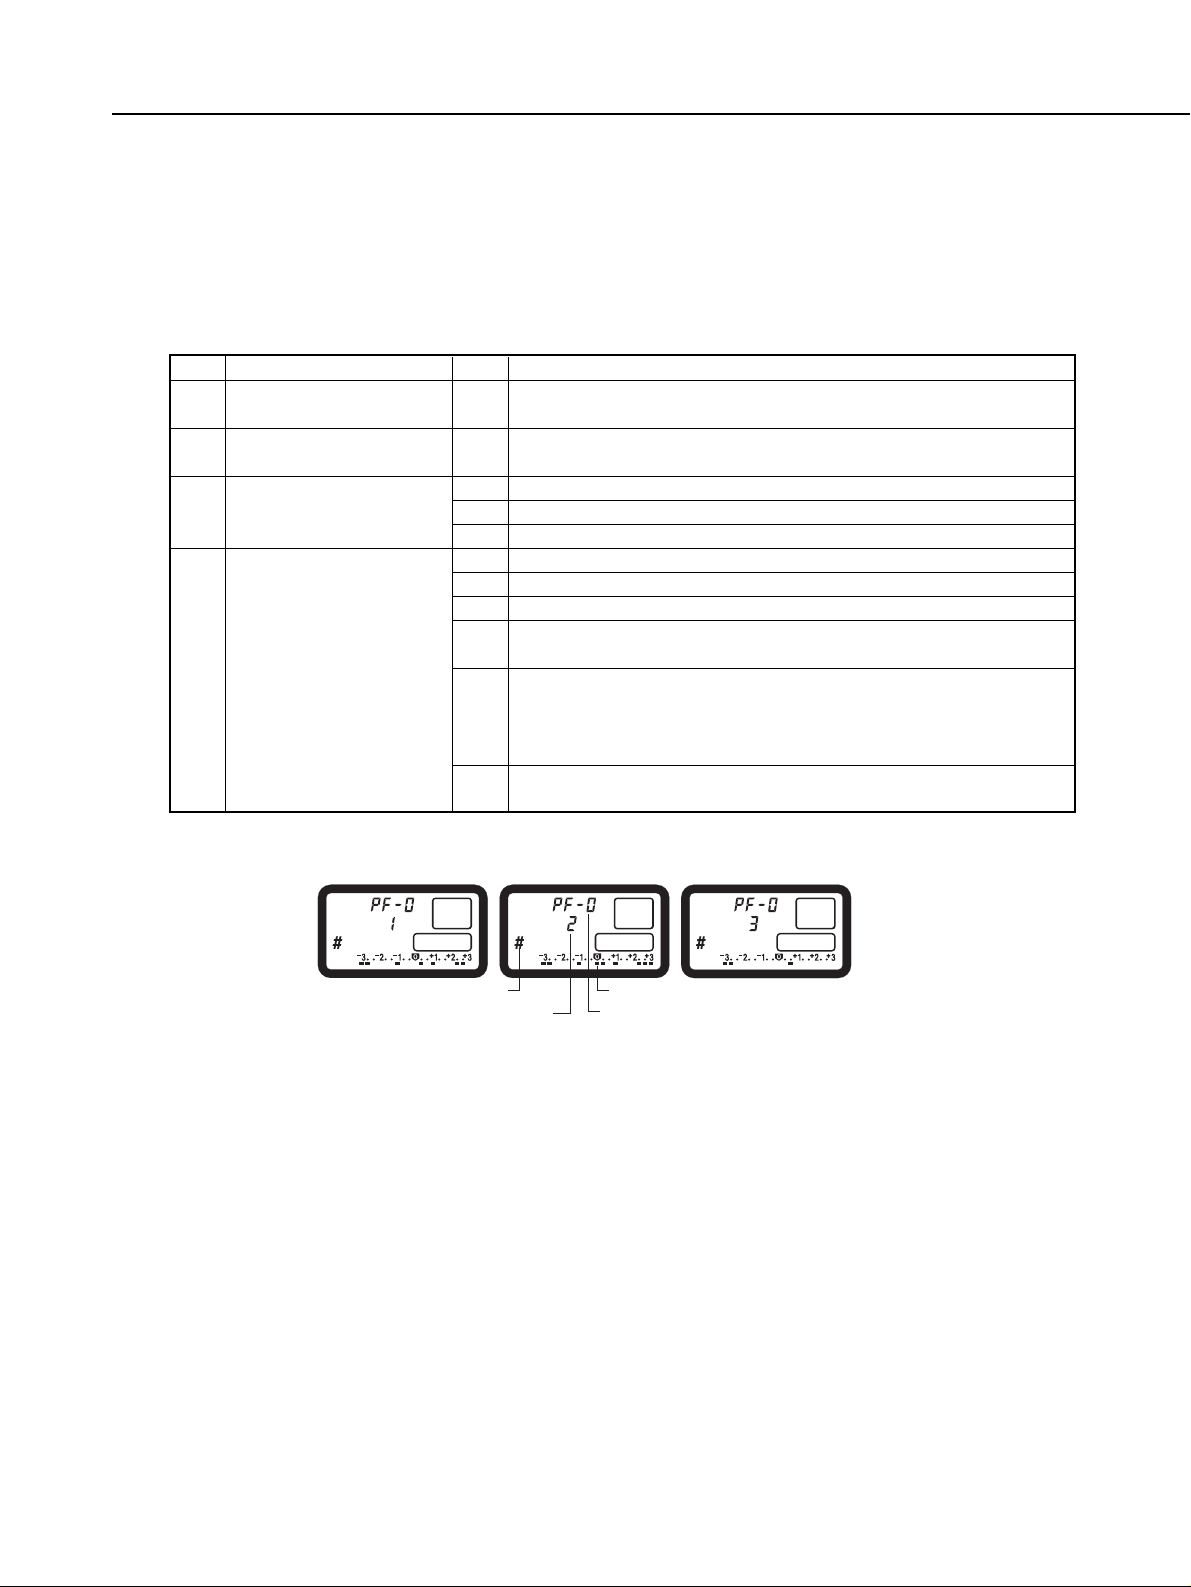
Besides having the EOS-3’s Custom Functions, the EOS-1V has the following new
Custom Functions. Personal Functions also enable the user to set three groups of
Custom Function settings (Fig. 1-11). C.Fn-0 cannot be registered in a Custom
Function group.
Table 1-3 New Custom Functions
Fig. 1-11 Sample Custom Function groups.
1-9
Part 1: General Information
For mirror lockup
For sports photography 2For sports photography 1
Personal mode icon
Custom Function setting
Personal Function No.
The Custom Function is 0.
The remaining Custom Functions are set with ES-E1.
Custom Function group No.
Function
Frame counter
Focusing point and spot
metering linkage
Shift to registered focusing
point (home position)
AF stop button function
(Provided for IS lenses
and super telephoto lenses)
3
3
0
1
2
0
1
2
3
4
5
Description
Makes the viewfinder's frame counter display identical to the EOS1N's (F 9 - 0)
The selectable focusing points are limited to 9 which are also linked
to spot metering.
Shifts with the Assist button and focusing point selector.
Shifts with the Assist button.
Shifts only while the Assist button is held down.
AF stop while the button is held down.
AF operates while the button is held down.
AE lock (while metering is active) when the button is pressed.
Automatic selection of 45 focusing points while the button is held
down.
Toggles between One Shot AF and AI Servo AF while the button is
held down. For example, in the One Shot AF mode while the shutter
button is pressed halfway for AF lock, pressing the button switches to
AI Servo AF and releasing the button switches back to One Shot AF.
Image Stabilizer operates while the button is held down (the IS
switch must be on).
CF No.
8
13
18
19
Page 11
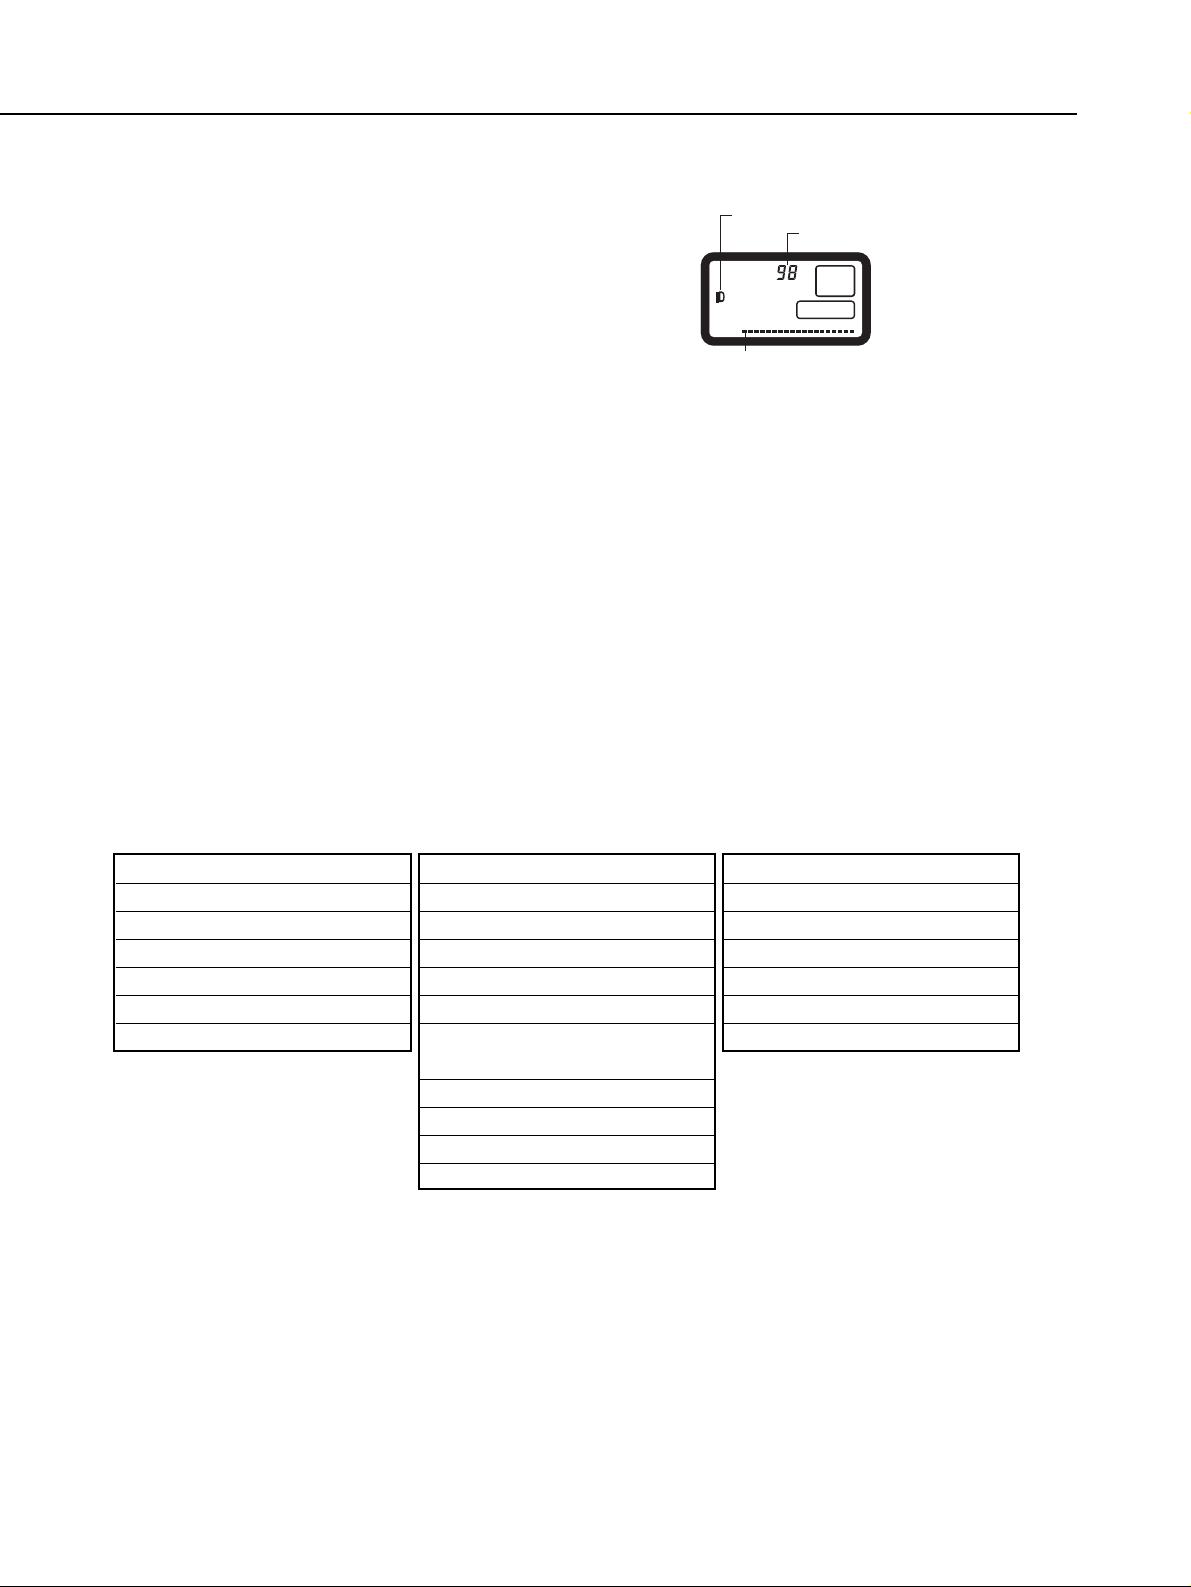
8) Recording shooting data
The shooting data (see Table 1-4) is recorded automatically in the camera’s built-in memory. With EOS
Link Software ES-E1, the data can be transferred to
a personal computer and then viewed and edited.
The memory can hold the standard shooting data
(shown by Table 1-4-1 and 1-4-2) for 100 rolls of 36ex. film. When the memory becomes full, the oldest
data for 1 roll is deleted and the data for the latest
roll is written in its place. Any of the 27 items of
shooting data can be recorded. The shooting data
items in Table 1-4-1 are recorded at all times. The
shooting data items in Tables 1-4-2 and 1-4-3 can be
recorded as selected by the user with EOS Link Software ES-E1. However, all 27
items of data cannot be selected for recording because the CPU’s processing speed
is unable to handle all of them. With the maximum number of shooting data items
selected for recording, the memory can store data for 50 rolls of 36-ex. If only the
minimum number of shooting data items are selected for recording, the memory
can store data for 200 rolls of 36-ex. film.
The EOS-1V can only display the remaining number of data-recordable rolls (see
Fig. 1-12 for 36-ex. rolls). The shooting data can be viewed only with the EOS Link
Software ES-E1. Also, date and time information such as the shooting date and
time and film loading date and time are not recorded unless EOS Link Software ESE1 is used to enable the date and time to be recorded.
Table 1-4 Shooting Data Items
1-10
Part 1: General Information
Each bar represents 5 data-recordable
rolls remaining.This bar display
indicates that 91 or more rolls are
data-recordable.
Remaining number of
data-recordable rolls
Data recording mode icon
Fig. 1-12 Remaining number of
data-recordable rolls.
1. User-selectable No.
2. Film ID No.
3. Film-loaded date and time
4. DX-coded film speed
5. Frame No.
6. Picture-taking mode
7. Multiple exposures
Table 1-4-1 Items Always
Recorded
1. Focal length
2. Lens max. aperture
3. Shutter speed
4. Aperture
5. Manually-set ISO speed
6. Exposure compensation amount
7. Flash exposure compensation
amount
8. Flash mode
9. Metering mode
10. Film advance mode
11. AF mode
Table 1-4-2 Items Always
Recorded
1. Bulb exposure time
2. Date
3. Time (hr., min., sec.)
4. Custom Function settings
5. Focusing point selection
6. Focusing points achieving focus
7. Battery-loaded date and time
Table 1-4-3 Extra Shooting
Data Items
Page 12
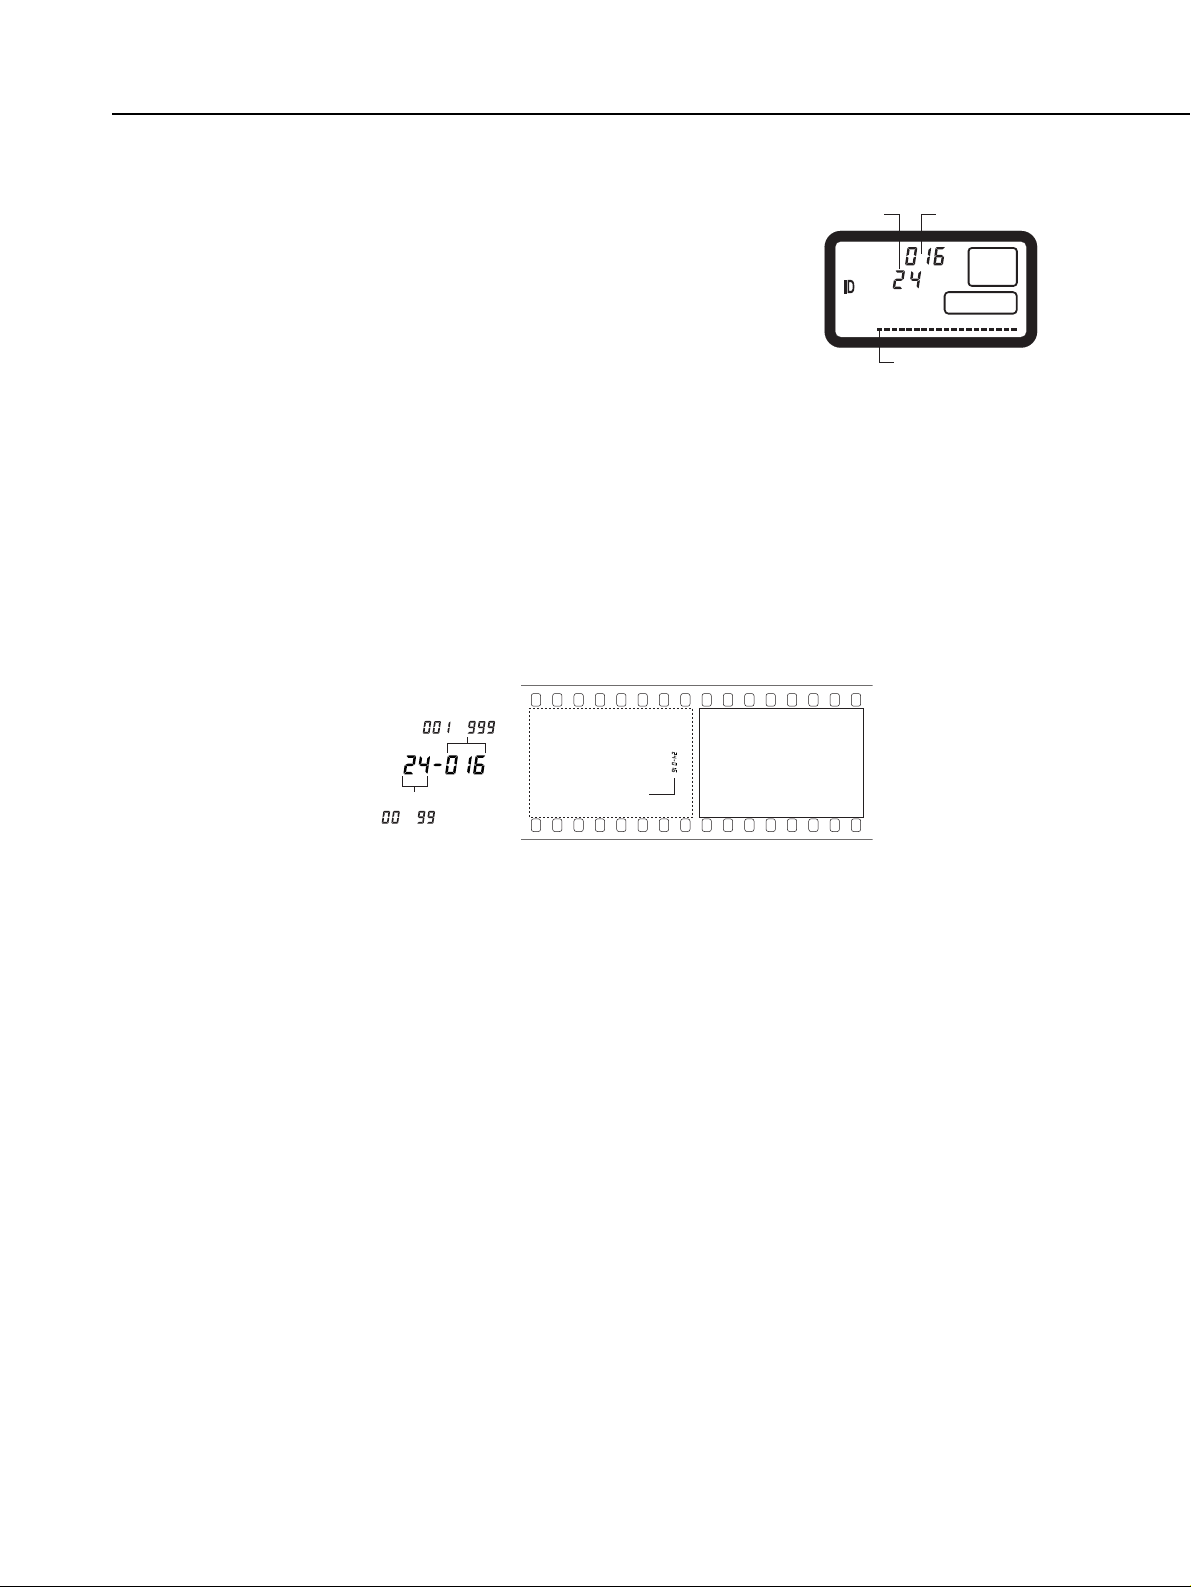
9) Film ID Imprinting
The film leader is always imprinted with a user -selectable 2-digit number (00 - 99) and a sequential 3-digit
(001 - 999) film ID No. (See Figs. 1-13 and 1-14.) When
multiple EOS-1V cameras are used, the user -selectable
No. can be used to identify which EOS-1V was used to
shoot that particular roll of film. The film ID No. counts
up automatically each time a new roll of film is loaded.
The film ID No. is used as a reference to view or edit the
shooting data of the corresponding roll with EOS Link
Software ES-E1.
The imprinting mechanism is on the standard camera
back. Immediately after the film advances to frame 1, a
transparent LCD numeral is imprinted on the film by a mini lamp. The imprinting
time is 25 ms to 180 ms (depending on the ISO film speed) at 20°C. The power
source is the same as the camera’s. The imprinting cannot be turned off. The EOS1V camera back cannot be attached to the EOS-1N because the hinge length differs. It also cannot be attached to the EOS-3 because its inner parts will hit the
EOS-3’s film transport detector. Closing the camera back by force will have it pop
up. (The Dateback DB-E2 can be attached to the EOS-1V.)
Fig. 1-14 Imprinting position of user-selectable No. and film ID No. (Actual size)
10) Power Source
The power source is one lithium 2CR5 battery which can power the film transport
for 50 rolls of 36-ex. film at 20°C.
11) Dimensions and Weight
The camera dimensions are 161 (W) × 120.8 (H) × 70.8 (D) mm. Body thickness is
54.8 mm. The camera body weighs 945 g without the battery. (The 2CR5 battery
weighs 40 g.)
1-11
Part 1: General Information
Bars indicating the
remaining number
of data-recordable rolls.
Film ID No.User-selectable
No
Fig. 1-13 User-selectable No. and
film ID No. display.
Frame 1
User-selectable No.
( ~ )
Imprinting
position
Film ID No.
( ~ )
Page 13
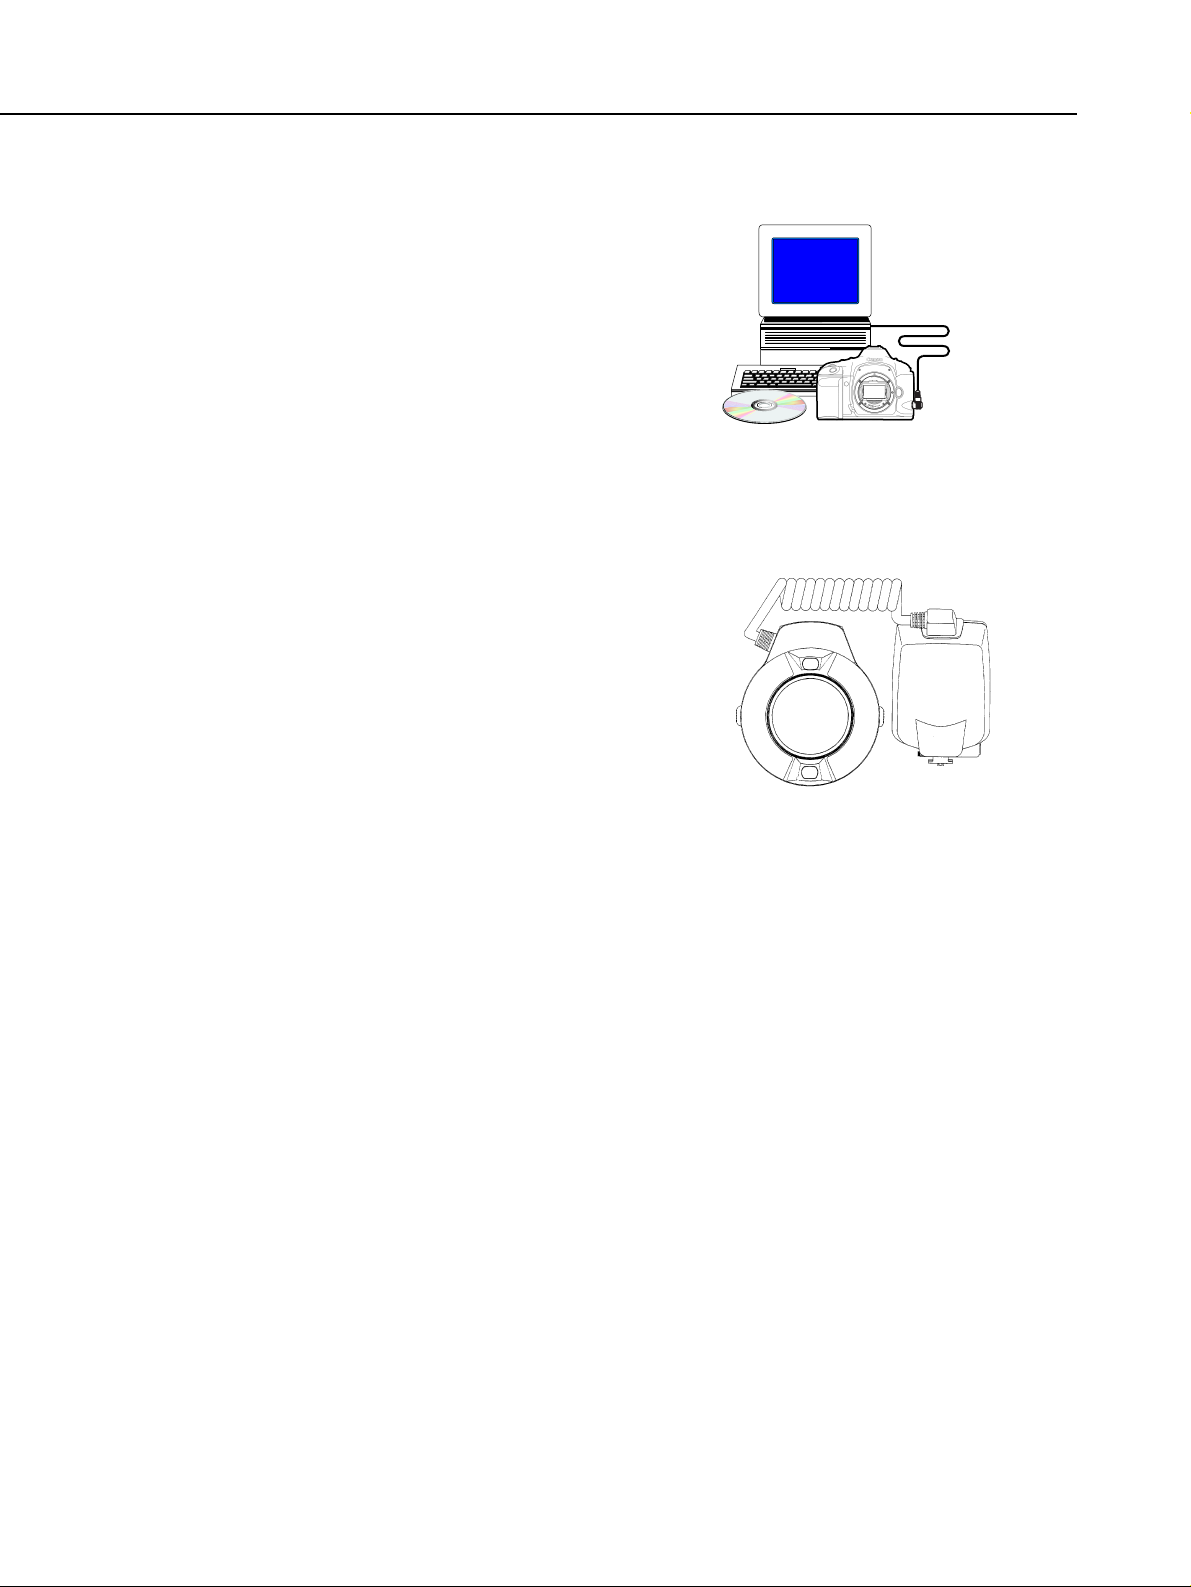
2.2 New Accessories
The following system accessories were developed at the
same time as the EOS-1V.
(1) EOS Link Software ES-E1
EOS Link Software ES-E1 consists of driver software
and a cable which connects the EOS-1V’s remote control/Data transfer terminal to the personal computer’s
USB port. It has the following functions:
q Transfer, viewing, and editing of the shooting data.
w EOS-1V control
• Personal Functions (Fine-tune settings of EOS-1V
functions such as limiting the shooting modes and
changing the metering time.)
(2) MACRO RING LITE MR-14EX
Macro Speedlite (Guide No. 14) with E-TTL autoflash
control and two curved flash tubes. A flash ratio can be
set between the left and right flash tubes. FEB, FEL,
wireless multi-Speedlite flash, and other flash exposure
control features found on the 550EX are possible. It
can also use external power packs, including the existing Speedlite power packs.
1-12
Part 1: General Information
EOS-1VCD-ROM
Communication
cable
Fig. 1-15 EOS Link Software ES-E1
Fig. 1-16 MACRO RING LITE
MR-14EX
Page 14

3. SPECIFICATIONS
1. Type
1-1 Type: 35mm AF/AE single-lens reflex camera with focal-
plane shutter (vertical travel) and built-in motor drive
1-2 Picture size: 24 mm × 36 mm
1-3 Compatible lenses: Canon EF lenses
1-4 Standard lens: Canon EF 50mm f/1.4
1-5 Lens mount: Canon EF mount
2. AF
2-1 Type: TTL-AREA-SIR** with a CMOS sensor
2-2 Focusing points: 45-point Area AF, 8 mm (vertical) × 15 mm (horizontal)
* The 7 focusing points at the center ar e cross-type
sensors which are also vertical-line sensitive.
2-3 Focusing modes: The mode can be switched between the following three:
(1) One-Shot AF
Autofocus locks when focus is achieved.
* AF-priority: The shutter can be released only when
focus is achieved.
* During evaluative metering, AE lock is set at the
same time as AF lock. (In the other metering modes,
exposure metering continues in real-time until the
shutter is released.)
(2) AI Servo AF
Constantly tracks subject movement up to the start
of exposure.
* While the shutter button is pr essed halfway, the
shutter button can be depressed fully at anytime to
release the shutter regardless of focus. (Shutter
release-priority)
* When the shutter button is pr essed completely with-
out pressing it halfway first, the shutter is released
after AF operation is executed once.
* During continuous shooting of a moving subject, the
lens is driven (taking 0 to 250 ms) from the second
successive frame to track the subject, then the shutter is released.
* No in-focus indicator. The indicator only blinks (8 Hz)
if AF fails.
(3) Manual focusing
Switching from AF to manual focusing
* With mechanical manual-focus lenses, the focus
mode is switched to manual with the lens.
* With electronic manual-focus lenses, the focus mode
can be switched to manual as above or automatically
with CF-7-0).
When focus is achieved, the in-focus indicator and
superimposed focusing point light up. If focus fails,
neither is displayed.
1-13
Part 1: General Information
Page 15

During continuous shooting, electronic-ring manual
focusing is enabled during film advance and disabled during exposure (but enabled with PB-E2 +
NP-E2 attached).
(1) Manual selection of focusing point
Horizontal focusing point selection: Focusing point
selector + Main Dial
Vertical focusing point selection: Focusing point
selector + Quick Control Dial
* Focusing point selector pr essed → Assist button +
Main Dial
* Focusing point selector + FE lock button pr essed →
Hold down the Focusing point selector and turn
Main Dial
(2) Automatic selection of focusing point
* In the One-Shot AF mode: Based on the subject
information obtained by the Area AF focusing points,
the optimum focusing point is selected automatically.
* In the AI Servo AF mode: The center focusing point is
initially selected. If the subject moves to another
focusing point, AI Servo AF will continue to track the
subject.
* If CF-11-2 is set, pr essing the focusing point selector
while the shutter button is pressed halfway or com-
pletely will select the focusing point automatically.
(3) Center focusing point selection CF-13-3
* Focusing point selector pr ess → Assist button ON
The focusing point is superimposed in the viewfinder.
Focusing point registration: After selecting the focusing
point, press the Assist button and FEL button (the
center focusing point is the default setting)
Shifting to registered focusing point: Press Assist button and focusing point selector.
* 45-point and 2-point automatic selection also can be
registered.
2-7 AF activation: AF is activated by pressing the shutter button halfway.
2-8 AF operation speed: Same as or faster than the EOS-3.
2-9 In-focus indicators: Focusing point superimposed in viewfinder (cancelable
with Custom Function), in-focus indicator (dot), and
electronic beeper (which can be enabled or disabled
with the main switch)
2-10 AF precision: Same as the EOS-1N’s
2-11 AF working range: EV 0-18 (at ISO 100), according to Canon’s testing
conditions.
2-6 Focusing point
registration and
shifting (HP:
Home position):
2-5 Active focusing
point indicator:
2-4 Focusing point
selection:
1-14
Part 1: General Information
Page 16

2-12 AF-assist beam: With an EOS Speedlite attached (with built-in AF-
assist light) and turned on, a near-infrared beam (peak
wavelength of 700 nm) is emitted automatically by the
Speedlite when necessary.
550EX and ST -E2: Linked to the 45-point Area AF.
540EZ: Emitted during automatic focusing point
selection or when a focusing point along the center
horizontal row is selected.
Other EOS Speedlites: Emitted during automatic
focusing point selection or when the center focusing
point is selected.
* The camera has no built-in AF-assist beam emitter.
3. Viewfinder
3-1 Type: SLR-type, fixed eye-level pentaprism with condenser
lens
Interchangeable
Laser -matte screen with Area AF ellipse, focusing
points, and fine spot metering circle provided as the
standard screen.
Interchangeable with Ec-series focusing screens.
Metering correction data can be set with a Custom
Function for the Laser Matte and New Laser Matte
screens.
3-3 Standard diopter: -1 diopter. Adjustable from -3 diopter to +1 diopter.
3-4 Eye relief: 20mm
3-5 Picture coverage: 100 percent vertically and horizontally
3-6 Magnification: 0.72 × (with 50mm lens at infinity, -1 diopter)
(1) On the screen
q Area AF ellipse
w Focusing points
e Fine spot metering circle
(2) Below the screen (Main indicators)
q Manual exposure level
w AE lock (Blinks at 2 Hz during AEB.)
e Flash ready (Blinks when the FE lock setting is
unsuitable)
r High-speed sync (FP flash)
t Shutter speed (If unsuitable, it blinks at 2 Hz as a
warning.)
y FE lock (FEL)
u Bulb (buLb)
i Focusing point selection mode
o Depth-of-field AE mode (DEP1, DEP2)
!0 Aperture setting (If unsuitable, it blinks at 2 Hz as a
warning.)
!1 Exposure compensation / Flash exposure compen-
sation
!2 In-focus indicator (Blinks at 8 Hz if focus cannot be
achieved.)
3-7 Viewfinder
information:
3-2 Standard focusing
screen:
1-15
Part 1: General Information
Page 17

(3) Right of screen
q Exposure level scale in 1/3-stop increments ±3
stops)
w Exposure level
w-1. AE exposure compensation amount
w-2. AE lock and real-time metering indicator
w-3. Manual exposure level
w-4. AEB amount (3 dots)
w-5. Background exposure with flash (camera
metering reading)
w-6. Multi-spot metering
e Metering level
e-1. Flash exposure compensation amount
e-2. Reverse highlight of dot bars during FE lock
e-3. FEB amount (3 dots)
e-4. Multi-spot metering value
r Frame counter
t Frame countdown icon
3-8 Mirror: Quick-return half mirror (T ransmittance:r eflectance
ratio of 37:63)
Viewfinder blackout time: 87 ms or less at 1/60
sec. or faster speeds.
3-9 Mirror lockup: Enabled with CF-12-1
* Mirror locks up when the shutter button is pr essed
completely. The shutter is then released when the
shutter button is released and pressed completely
again.
Mirror lockup lasts for 30 sec. after which the mirror
returns. There is no exposure during this time.
3-10 Mirror vignetting: No vignetting with lenses up to EF 1200mm f/5.6
Enabled with depth-of-field preview button
* With Speedlites capable of wireless flash, a modeling
flash fires when the depth-of-field preview button is
pressed.
Provided
3-13 Misc.: Eyecup Ec-II provided (same as for EOS-1N)
* E-series dioptric adjustment lenses, Angle Finder B
and C, and Magnifier S attachable.
3-12 Built-in eyepiece
shutter:
3-11 Depth-of-field
preview:
1-16
Part 1: General Information
Page 18

4. Exposure Control
4-1 Metering modes: TTL metering at the maximum aperture with a 21-zone
silicon photocell sensor. The following four metering
modes can be selected:
(1) Evaluative (linkable to any focusing point)
(2) Partial
Metering area: Approx. 8.5% of screen.
(3) Center spot metering (CF-13-0, 2)
Metering area: Approx. 2.4% of screen
(4) Focusing point-linked spot metering: CF-13-1 (11
points), CF-13-3 (9 points)
Metering area: Approx. 2.4% of screen, fixed at center during automatic focusing point selection
* For (3) and (4), real-time metering occurs while the
shutter button is pressed halfway. During continuous shooting, the same meter reading taken for the
first shot is locked (AE lock) for subsequent shots.
(5) Multi-spot metering
For (3) or (4), pressing the FEL button enables up to
8 spot meter readings (when flash is not used).
(6) Centerweighted averaging metering
4-2 AE modes: The following seven AE modes and manual mode can
be set:
q Shutter speed-priority AE (Safety shift enabled with
CF-16-1)
w Aperture-priority AE (As above)
e Depth-of-field AE (Non-shiftable)
1) With a manually-selected focusing point: The
selected focusing point can be used to set the
two DEP points. When a pair of manually-selected focusing points is selected automatically, the
focusing point focused at the closer distance is
used to set the two DEP points.
2) With an automatically selected focusing point:
The center focusing point is used to set the two
DEP points.
r Program AE (Shiftable)
t E-TTL program flash AE (21-segment flash meter-
ing)
y A-TTL program flash AE (3-segment flash metering)
u TTL program flash AE (3-segment flash metering)
i Manual exposure
* To set the aperture, the exposure compensation
button + Main Dial can be used.
o Bulb
1-17
Part 1: General Information
Page 19
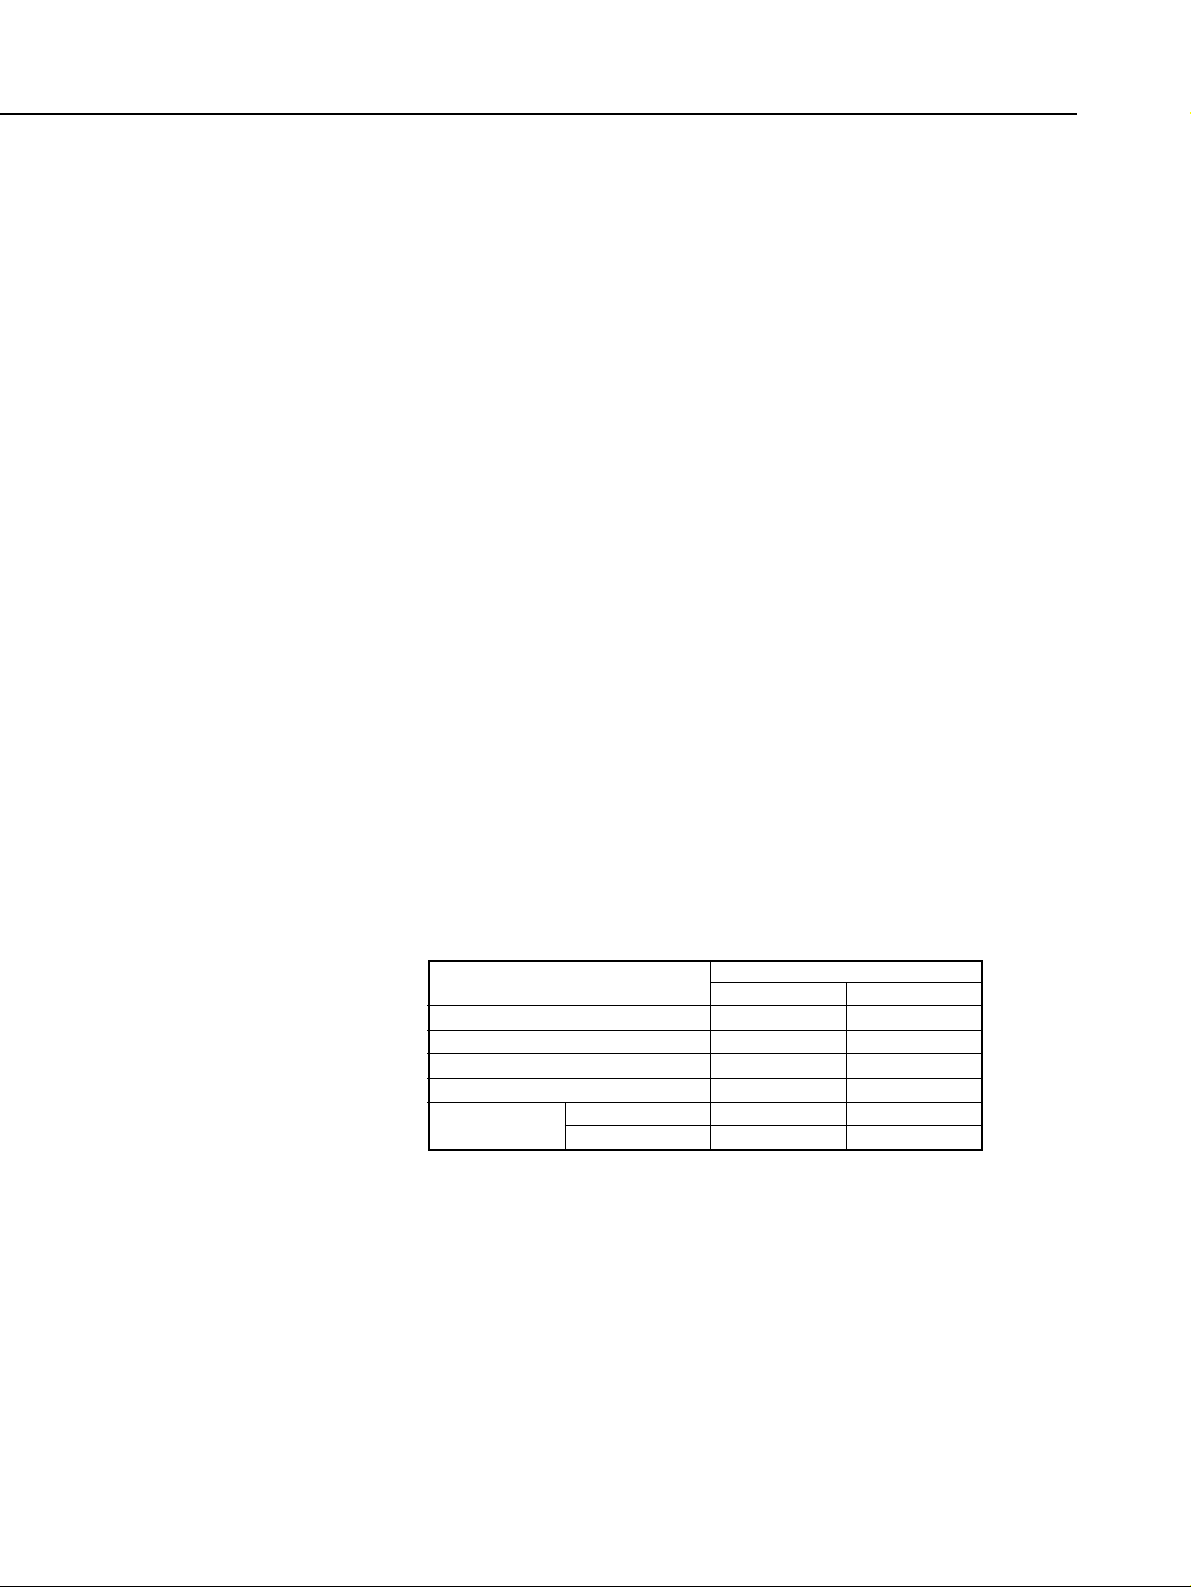
4-3 Metering range: EV 0-20 in all metering modes (at 20°C with 50mm
f/1.4 lens, ISO 100)
Shutter speed or aperture display blinks at 2 Hz.
4-5 Exposure metering: Activated when shutter button is pressed halfway.
* Before shutter r elease: Metering remains active for 6
sec. after the halfway-depressed shutter button is
released.
* After shutter release: Metering r emains active for 2
sec. after the halfway-depressed shutter button is
released.
Automatically set with DX-coded film at ISO 25-5000
or settable manually at ISO 6-6400. Settable in 1/3stop increments.
* The manually set ISO film speed and exposure com-
pensation are displayed during film rewind and after
film rewind before the film cartridge is removed.
* With non-DX-coded film, the ISO speed set previous-
ly will blink to indicate that manual setting of ISO is
required.
(1) AEB: Autoexposure bracketing
* Set by pressing the Shooting mode selector and AF
mode button and turning Main Dial. Bracketing
amount: Up to ±3 stops in 1/3-stop increments
* The bracketing sequence is correct exposure, under-
exposure, and overexposure, taken according to the
film advance mode.
If the self-timer is used, the three bracketed shots
will be exposed successively after the self-timer
delay.
* AEB cancellation
AEB is canceled with any of the following: 0 bracketing amount, CLEAR, flash ready, bulb, main
switch set to L, lens interchange, film loading and
initial advance, or rewind.
* If the battery is replaced during AEB, AEB will start
from the first shot (correct exposure) again.
(2) Manual exposure compensation
* Turn Quick Control Dial or press exposure compen-
sation button and turn Main Dial. Set up to ±3 stops
in 1/3-stop increments.
(3) (1) and (2) above can be set in combination.
4-7 Exposure
Compensation:
4-6 ISO Film Speed
Range:
4-4 Unsuitable expo-
sure warning:
1-18
Part 1: General Information
Aperture
●
—
—
●
—
●
Shooting Mode
1 Shutter speed-priority AE
2 Aperture-priority AE
3 Depth-of-field AE
4 Program AE
5 Manual
Shutter speed
—
●
●
●
●
—
Bracketing Method
CF-5-0
CF-5-1
Bracketing method of each shooting mode
Page 20

4-8 AE Lock (1) Auto AE lock
In the One-Shot AF mode with evaluative metering,
AE lock is set when focus is achieved.
(2) Manual AE lock
Set with the AE lock button (resets when pressed
again). Enabled in all metering modes.
* AE lock cancels when any of the following occurs:
The metering turns off, main switch is set to L, a
mode button (CLEAR, REW, Custom Function, etc.)
is pressed.
* When a Speedlite is used and it is charged and
ready, the AE lock button will not function.
4-9 Multiple exposures: Maximum 9 multiple exposures per frame.
(Cancelable and resettable at any time.)
Cancels automatically after all the multiple exposures
are taken. Multiple exposures during continuous
shooting enabled (exposure shift less than 0.1 mm).
5. Shutter
5-1 Type: Vertical-travel, focal-plane shutter with all speeds elec-
tronically-controlled.
* Front and rear shutter curtains both have dedicated
rotary magnet control. (Curtain speed: 2.2 ms/24mm)
5-2 Shutter speeds: 30 to 1/8000 sec., X-sync at 1/250 sec.
In the shutter speed-priority AE and manual exposure
modes, shutter speeds in 1/3-stop increments can be
set.
◆For bulb exposur es, the exposure time is displayed
on the LCD panel from 1 - 23 hours and 00:00 59:59 min. and sec. (LCD panel shows three bars for
every 30 min. up to 120 min.)
5-3 Shutter release: Soft-touch electromagnetic release (no cable release
socket)
5-4 Release time lag: Shutter release time lag for stopping down three stops
from the maximum aperture (excludes AF operation
time):
(1) Time lag from SW-1 ON to SW -2 ON and film exposure: 55 ms
(2) Time lag from SW-1 and SW -2 to film exposure:
191 ms
5-5 Self-timer: 10- or 2-sec. delay.
* Self-timer in progress is cancelable by turning the
main switch to L.
* Self-timer operation indicated by self-timer lamp (2
Hz for the first 8 sec., then 8 Hz for the remaining
two sec.)
Self-timer countdown displayed on frame counter.
None
5-6 Camera shake
warning:
1-19
Part 1: General Information
Page 21
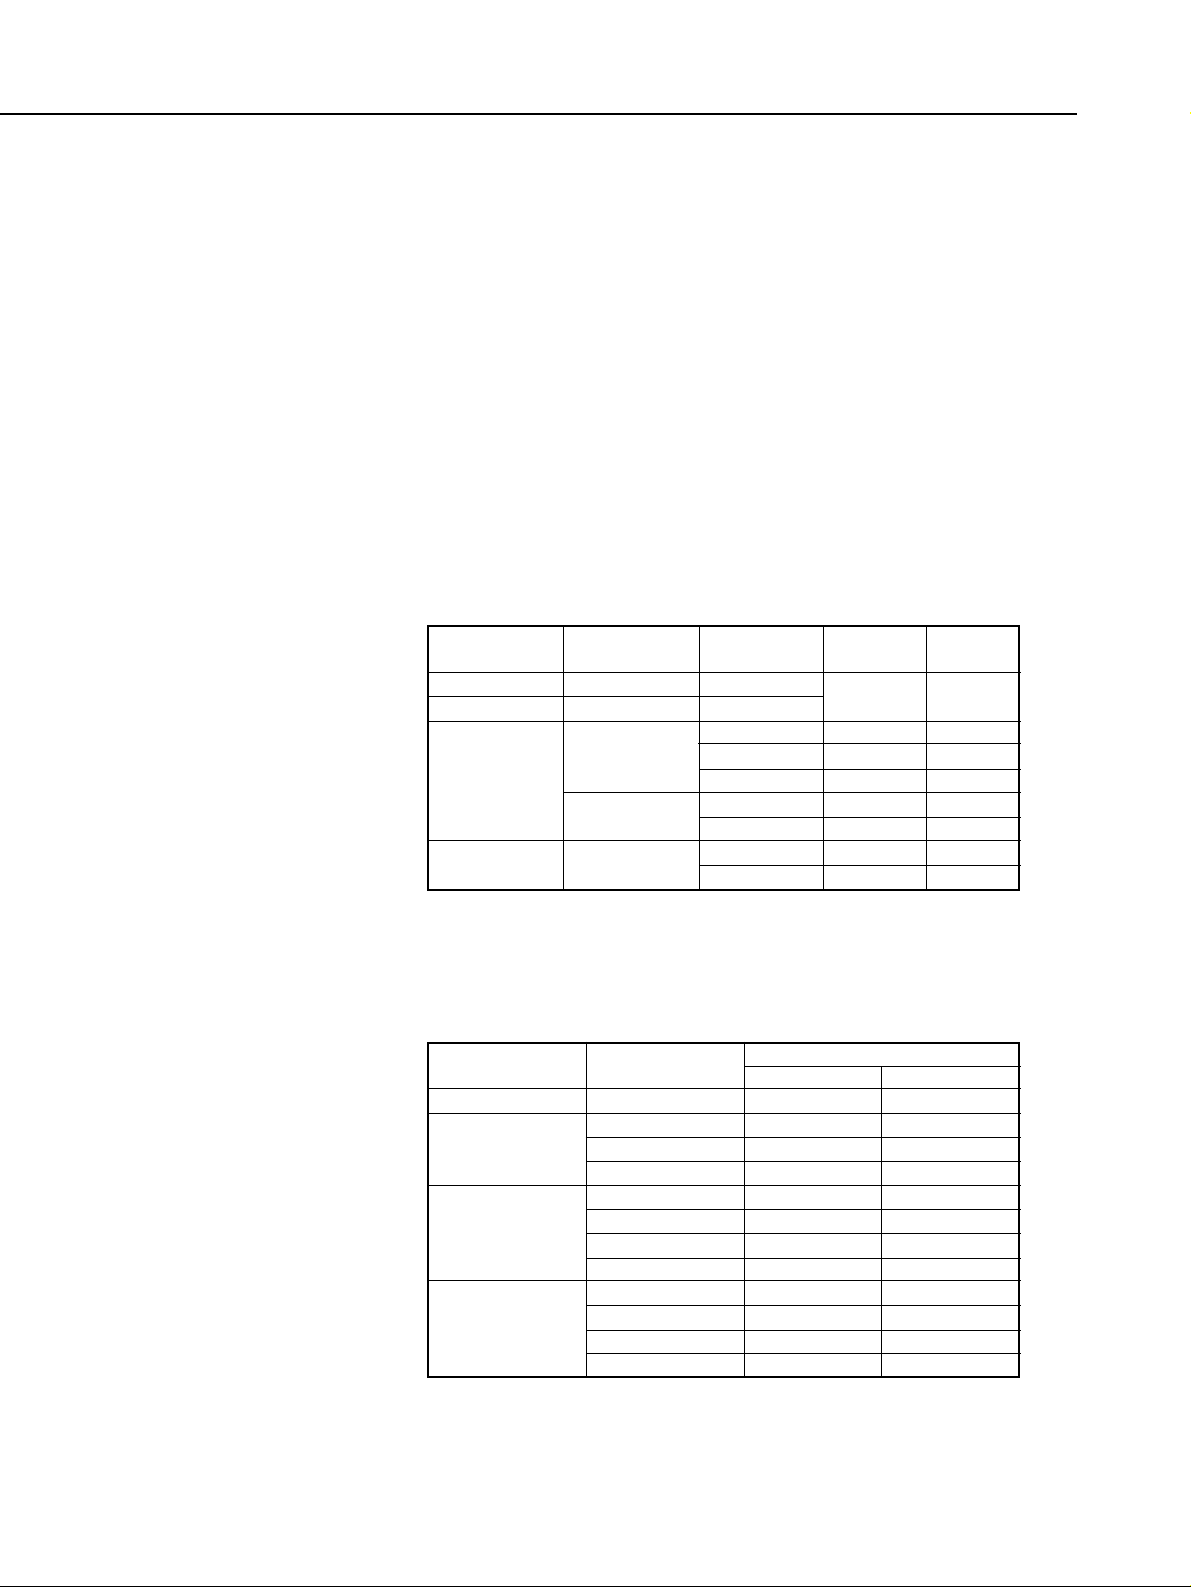
6. Film Transport
Autoloading with a sprocketless system.
After the film leader is set properly and the back is
closed, the film advances to frame 1 automatically
(taking about 1 sec.). If the main switch is set to L,
the film does not advance to frame 1.
Automatic film advance with a small coreless motor
dedicated to film transport. Film perforation detected
with an infrared photo reflector.
Compatible.
Starts with the exposure completed signal
Confirmable with LCD panel bars and frame counter
(on lower right in viewfinder)
(1) See table below for continuous shooting at 1/250
sec. or faster shutter speeds:
L: Low-speed H: High-speed H‹: Ultra-high speed Approx. fps
(2)Single-frame shooting: Single frame advances at
the same speed as during continuous shooting.
6-7 Shooting capacity: Indicated by the table below with a new battery and EF
50mm f/1.4 lens.
24-ex. rolls (36-ex. rolls)
When an AA nickel-hydrogen storage battery (Ni-MH)
is used, the level is the same as when an AA Ni-Cd
battery (KR15/51) is used.
6-6 Film advance
modes and speed:
6-5 Film transport
confirmation:
6-4 Film advance
start:
6-3 Infrared film
compatibility:
6-2 Film advance
system:
6-1 Film loading and
initial film
advance:
1-20
Part 1: General Information
Configuration
EOS-1V
w/BP-E1
w/PB-E2
w/PDB-E1
Power Source
2CR5
LR6/FR6
NP-E2
LR6/FR6
LR6/FR6/
Ni-Cd Pack E1
Film Advance
Mode
L
L
H
‹
H
L
H
L
H
L
One Shot
AF/Manual
3.5
10
7
3
6
3
6
3
AI
Servo AF
3
9
7
3
5
3
5
3
Configuration
EOS-1V
w/BP-E1
w/PB-E2
w/PDB-E1
Power Source
2CR5 × 1
2CR5 × 1
LR6 × 4
KR15/51 × 4
LR6 × 8
FR6 × 8
KR15/51 × 8
NP-E2
LR6 × 8
FR6 × 8
KR15/51 × 8
Ni-Cd Pack E1
At 20°C
75 (50)
75 (50)
60 (40)
20 (14)
125 (85)
180 (120)
50 (35)
100 (70)
120 (85)
180 (120)
50 (35)
65 (45)
At -20°C
18 (12)
18 (12)
0 (0)
15 (10)
7 (5)
75 (50)
36 (24)
30 (20)
7 (5)
75 (50)
35 (24)
45 (30)
Ambient Temperature
Page 22

6-8 Film rewind system: Automatic film rewind with a small coreless motor.
(1) Automatic rewind
Rewind initiated automatically in the following
cases:
* After the DX-coded number of exposures are taken.
* After the end of the film is detected.
* After 36 exposures have been taken.
(2) Midroll film rewind
Pressing the midroll rewind button rewinds the film
in midroll.
During film rewind in cases (1) and (2) above, the
midroll rewind button can toggle between high-
speed and silent rewind.
Confirmable with the bars and frame counter on the
LCD panel.
6-11 Film rewind time: For 24-exposure (36-ex.) film, with new battery, and
in room temperature.
* The film rewind time is the same with or without the
PB-E2.
Stops automatically when the film leader is wound into
the cartridge.
Indicated by the film cartridge icon blinking at 2 Hz on
the LCD panel.
Indicated by the film cartridge symbol displayed on the
LCD panel and visually confirmable with the film window.
6-15 Frame counter: (1) Digital counter on LCD panel and lower right of
viewfinder screen.
* The viewfinder frame counter is not displayed during
film rewind.
High-speed rewind: 59 dB Silent rewind: 49 dB
* At 15 cm from the camera back:
7. Flash Specifications
7-1 Flash contacts: (1) Hot shoe: Sync contacts
(2) Side terminal: Threaded sync terminal (Shock pro-
tection feature on hot shoe)
* The PC terminal’s cap is the same as the EOS-1N’s.
* Flash connectable and usable simultaneously on
both (1) and (2) above.
7-2 Hot shoe: Locking pin hole provided to prevent Speedlite slip-
page.
6-16 Film transport
noise:
6-14 Film-loaded
confirmation:
6-13 Film rewind
completed
indicator:
6-12 Film rewind
stoppage:
6-10 Film rewind
confirmation:
6-9 Film rewind
initiation:
1-21
Part 1: General Information
High-speed rewind Approx. 4.5/(8) sec.
Silent rewind Approx. 12/(18) sec.
Page 23

(1) Manual setting
1) Increments: →3 stops in 1/3-stop increments
2) Procedure: Metering mode button + Quick
Control Dial or Metering mode button + Focusing
point selector + Main Dial
(2) FEB (Flash Exposure Bracketing)
Enabled and set with the 550EX, MR-14EX.
When the flash is unable to fire anymore during
FEB continuous shooting, the shutter release locks.
The shutter release unlocks when the SW-2 is
released. If the flash is not ready, the AE mode
takes effect.
* If flash exposure compensation has been set with
both the EOS-1V and external Speedlite, the
Speedlite’s setting will take effect.
7-4 FE lock: With E-TTL autoflash Speedlites, FE lock is set with
the FE lock button.
* FE lock is effective for 6 sec. Pressing the button
again renews FE lock.
* FE lock is canceled if any of the following occurs: 6
sec. elapse, the main switch is set to L, one of the
mode buttons (BC, CLEAR, REW, CF) is pressed.
7-5 Wireless flash: Enabled.
* With the 550EX, MR-14EX, or ST -E2, those
Speedlites set as slave units will fire a preflash and
meter the light reflected off the subject with the AE
metering sensor. The flash output is then set and
stored in memory and wireless flash is fired.
* Wireless high-speed sync (FP flash), FE lock, and
automatic fill-in flash are also possible.
8. Film ID Imprinting
(Built-in with EOS-1V’s camera back.)
User -selectable two-digit number (00 - 99) and 3-digit
film ID No. (001 - 999).
8-2 User -selectable No.: With no film loaded, press the Multi Function button
to set the film ID setting mode, then turn the Main
Dial to set the desired two-digit No. (00 - 99).
Imprinted on frame 0 on the film leader. Text height is
about 1 mm.
8-4 Imprinting method: After the film loads, a minilamp imprints transparent
LCD digits through the film base (imprinting cannot be
disabled).
During imprinting, the ID symbol is displayed on the
LCD panel.
* If the shutter is released during imprinting, the shut-
ter release will override the imprinting.
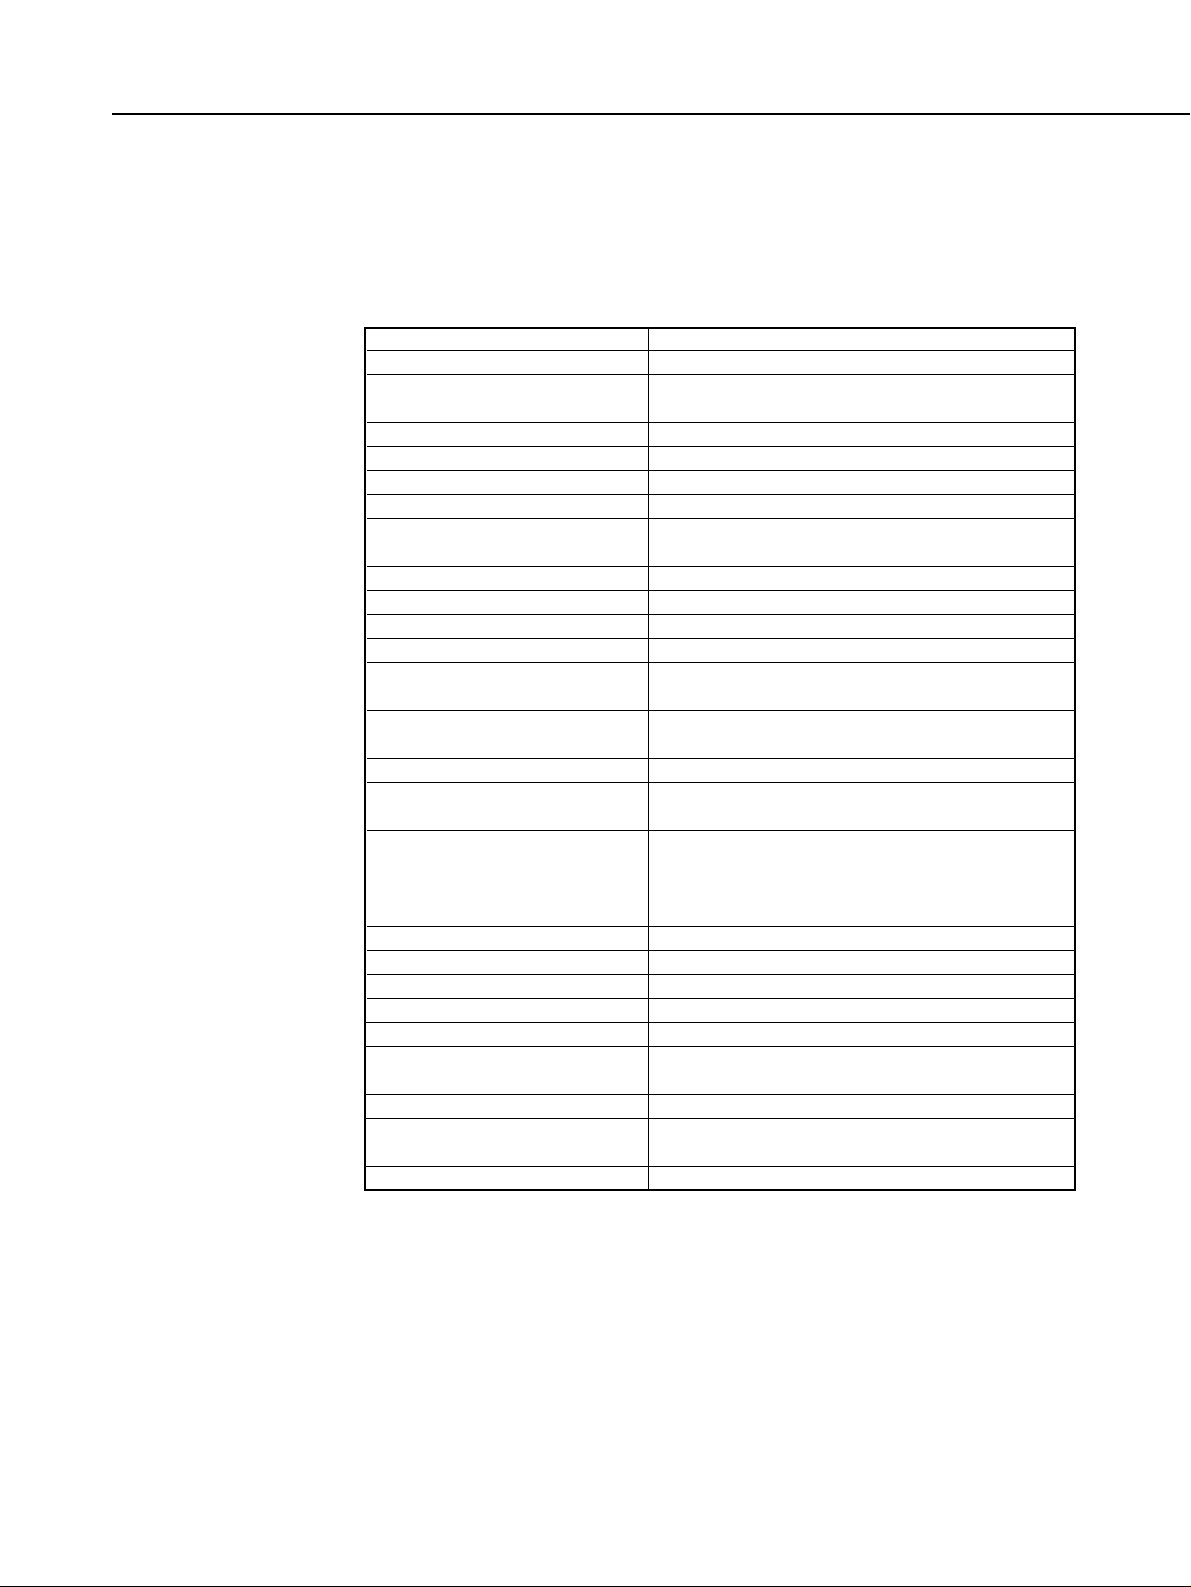
8-6 Imprinting time:
8-7 Power source: Same as used by the camera.
8-5 Imprint confirma-
tion:
8-3 Imprinting posi-
tion/size:
8-1 Imprinted infor-
mation:
7-3 Flash exposure
compensation:
1-22
Part 1: General Information
ISO
[ms]
64 or lower
180
80 ~ 125
120
160 ~ 25080320 ~ 50040640 or higher
25
NON DX
88
Page 24
9. Shooting data
When a picture is taken, the shooting data is automatically recorded in the camera’s built-in memory. With the ES-E1, the data can be transferred to a personal
computer for viewing and editing.
9-1 Shooting data
* The user-selectable No. and film ID No. are imprinted
automatically on the film leader when the film is loaded.
Enabled only with the EOS Link Software ES-E1 and a
personal computer (not possible with the camera only).
9-3 Data configuration: The recording of data items 6 to 25 is optional. EOS
Link Software ES-E1 is used to select the items to be
recorded.
Film data: Recorded when the film is loaded and
advanced to frame 1.
Shooting data: Recorded when the shutter button is
pressed completely.
9-4 Data recording
timing:
9-2 Viewing and edit-
ing shooting data:
1-23
Part 1: General Information
Item
1. Selectable No.
2. Film ID
3. Film-loaded date and time
4. DX-coded film speed
5. Frame No.
6. Lens focal length used
7. Shooting mode
8. Lens max. aperture
9. Shutter speed used
10. Aperture used
11. Manually set ISO speed
12. Exposure
compensation amount
13. Flash exposure
compensation amount
14. Flash mode
15. Metering mode
16. Film advance mode
17. AF mode
18. Bulb exposure time
19. Picture-taking date
20. Picture-taking time
21. Custom Function settings
22. Focusing point selection
23. Multiple exposures
24. Focusing points
achieving focus
25. Battery-loaded time and date
Description
Any 2 digits from 00 to 99.
A 3-digit No. from 001 to 999 counts up each time
a roll of film is loaded in the camera.
Year, month, day, hour, and minute.
25 - 5000
1 - 36
0 - 9999mm
Shutter speed-priority AE, aperture-priority AE,
depth-of-field AE, program AE, manual, bulb, AEB
f/00 - f/91
30 - 1/8000 sec.
f/00 - f/91
6 - 6400
-6.0 - +6.0 (including any AEB amount)
-6.0 - +6.0 (including any FEB amount)
E-TTL, A-TTL, TTL autoflash, manual, OFF
Evaluative, partial, spot, and centerweighted
metering
Single frame, continuous (w/o Power Drive
Booster), low-speed continuous, high-speed continuous, ultra-high-speed continuous, self-timer (10
sec. or 2 sec. delay)
One Shot AF, AI Servo AF, manual focusing
0 to 23 hr. 59 min. 59 sec.
Year, month, day
Hr., min., sec.
CF-0 to CF-19
One focusing point among the 45, or automatic
selection
ON/OFF
Multiple focusing points recorded (Only in the
One-Shot AF mode)
Year, month, day, hour, and minute.
Page 25

50 to 200 36-ex. rolls
* The maximum number depends on the number of
data items to be recorded. When setting the data
configuration with EOS Link Software ES-E1, the
maximum number of recordable rolls an be checked.
* The recorded data is retained even when the camera
battery is removed.
* When the memory becomes full, the oldest data is
deleted and the newest data is written.
* The memory capacity cannot be expanded.
9-6 Memory check: While the Assist button is active in the film ID setting
mode, the LCD panel displays the remaining number
of data-recordable 36-ex. rolls.
* The film transport bars also indicate the remaining
number of data-recordable 36-ex. rolls (one bar rep-
resents 5 rolls).
Done with EOS Link Software ES-E1 (not possible with
the camera)
10. Personal Computer Connection (Camera)
10-1 Multi functions: After the camera is connected to the personal comput-
er, press the Multi Function button to set the data
transfer mode. Subsequent operations are done with
the EOS Link Software ES-E1.
Serial interface
10-3 Connector port: Remote Control/Data transfer terminal
9.6 kbps - 115.2 kbps
10-5 Data transmitted: Set with EOS Link Software ES-E1.
11. Date Function
11-1 Auto calendar: Built-in and compatible with the Gregorian calendar
year (year 2000 - 2099) and adjusts automatically for
short and long months and leap years (including the
leap year of 2000).
11-2 Date setting: Press the Multi Function button to set the date mode.
Press the Assist button to select the number to be
adjusted. Turn the Main Dial to adjust the number.
* The date and time must first be set with the EOS
Link Software ES-E1 before the date and time can be
adjusted with the camera. Otherwise, pressing the
Multi Function button will not set the date setting
mode.
* With the EOS-1V, only the last two digits of the year
can be adjusted.
11-3 Date imprinting: None (provided with Dateback DB-E2)
11-4 Clock backup: Backup for 24 hours after battery removal.
10-4 Transmission
speed:
10-2 Interface stan-
dards:
9-7 Shooting data
deletion:
9-5 No. of rolls
recordable:
1-24
Part 1: General Information
Page 26

12. Camera Specifications
12-1 Camera back: Opens and detaches with a camera back r elease lever
(with lock-release button). Film window provided.
12-2 Custom Functions: 20 user-selectable Custom Functions (No. 0 - 19)
* The LCD panel’s exposure level scale bars indicate
the Custom Functions (except CF-0) already set.
12-3 Personal functions: (1) Custom Functions settable in 3 groups
q After setting the Custom Functions, use the Multi
Function button to create Personal Functions.
w Turn the Main Dial to select PF-0, then press the
Custom Function set button to select PF-0-1, PF-02, or PF-0-3.
e Press the Assist button to complete the setting.
To call up the Personal Function, follow steps q
and w above, then press the shutter button
halfway.
* EOS Link Software ES-E1 can also be used to set
Custom Functions (except C.Fn-0).
* C.Fn-0 cannot be registered in a Custom Function
group.
(2) ON/OFF of Personal Functions set with EOS Link
Software ES-E1
q Press the Multi Function button to set the Personal
Function.
w Turn the Main Dial to select the Personal Function
from PF-1 to PF-30.
e Press the Custom Function set button to select 0
(OFF) or 1 (ON).
r Press the shutter button halfway to complete the
procedure.
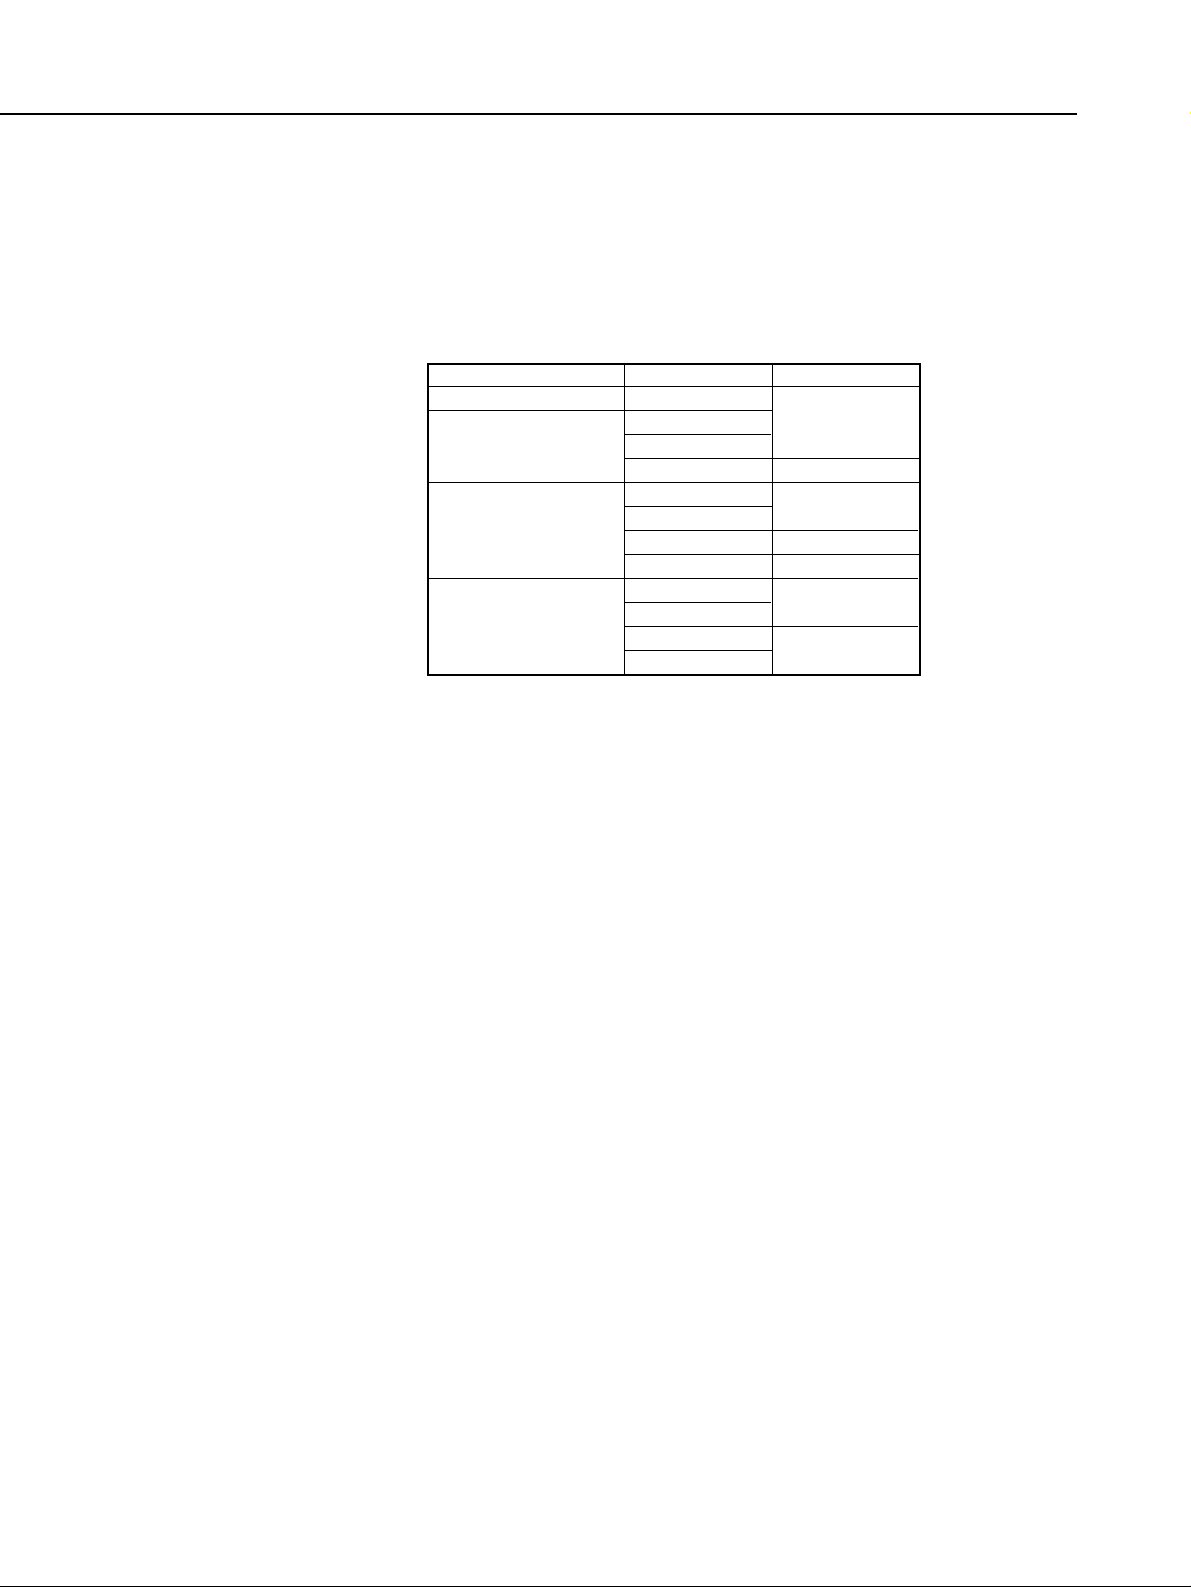
12-4 Clear button: (1) Pressing this button resets the settings to default
shown in the table below
(2) Pressing the Clear button while a Custom Function
can be set resets all Custom Functions (except CF-
0) to the default.
1-25
Part 1: General Information
No. Item
1. Shooting mode
2. AF mode
3. Metering mode
4. Film advance mode
5. Focusing point selection mode
6. Focusing point home position
7. Multiple exposures
8. Exposure compensation
9. Flash exposure compensation
10. AE lock
11. FE lock
12. AEB
Default
Program AE
One Shot AF
Evaluative metering
Single frame
Automatic
Center focusing point
Canceled/Default setting
Canceled
Page 27
(3) When the CLEAR button is pressed in the Personal
Function mode, all Custom Functions will be reset
P.Fn-*-0.
* Personal Functions which were set with EOS Link
Software ES-E1 can be set again even after the
Personal Functions have been reset. For the setting
procedure, see 12-3 (2).
12-5 Power source:
When an AA nickel-hydrogen storage battery (Ni-MH)
is used, the level is the same as when an AA Ni-Cd
battery (KR15/51) is used.
12-6 Main switch: Three settings: OFF/ON/Signal on.
12-7 Battery check: Automatic battery check when the main switch is
turned on. The battery level is indicated by one of four
battery check icons (not including OFF) on the LCD
panel.
12-8 External display: Large LCD panel provided. Built-in, uniform illumina-
tion (EL).
Pressing the ELEMENT button turns on the illumination for 6 sec. During illumination, the 6-sec.
period is restarted if another switch is touched.
Illumination turns off after 6 sec. or if the EL button is pressed again.
Same as for EOS-1N.
12-10 Tripod socket: CU 1/4.
12-11 Remote control: Remote Contr ol/Data transfer ter minal provided
* The terminal is protected against water and dust
with a pressure-fixed cap.
* The terminal is also used for connecting to EOS Link
Software ES-E1.
12-12 Standard grip: New for EOS-1V. Battery chamber cover designed to be
water and dust resistant.
Compatible with GR-E1, PB-E2, BP-E1, and PDB-E1.
12-14 Body material: Magnesium (top and front covers), aluminum diecast
(aperture portion) and polycarbonate resin with glass
fiber.
12-15 Exterior color: Black
12-13 Interchangeable
grip:
12-9 Film advance
coupler cap:
1-26
Part 1: General Information
Configuration
EOS-1V
w/Battery Pack
BP-E1
w/Power Drive
Booster PB-E2
w/Power Drive
Booster E1
Voltage [V]
6
4.8
12
9.6
12
12
9.6
Power Source
2CR5 × 1
2CR5 × 1
LR6 × 4
KR15/51 × 4
LR6 × 8
FR6 × 8
KR15/51 × 8
NP-E2
LR6 × 8
FR6 × 8
KR15/51 × 8
Ni-Cd Pack E1
Page 28

12-16 Dimensions: 161 (W) × 120.8 (H) × 70.8 (D) mm (Body thickness:
54.8 mm)
6.34 (W) × 4.72 (H) × 2.79 (D) in (Body thickness: 2.16
in.)
12-17 Weight: 945 g (add 40 g for the lithium battery)
33.3 oz. (add 1.41 oz. for the lithium battery)
13. Major Accessories
13-1 New accessories: (1) EOS Link Software ES-E1
(2) MACRO RING LITE MR-14EX
(3) EOS-1V standard grip GR-E2 (Also attachable to
EOS-1N, EOS-1, and EOS-3)
(4) Laser Matte focusing screen with Area AF ellipse
See “6. Accessory Compatibility (Compatible System
Accessories).”
14. Misc.
14-1 Battery service life testing conditions
q Batteries used: Primary battery is new (less than 3 months old)
Secondary battery is fully charged.
w Lens: EF 50mm f/1.4 USM
e Shooting mode: Shutter speed-priority AE (at 1/1000 sec.)
r Subject brightness: EV 15
t Film advance mode: Continuous
y Film rewind mode: Standard (CF-1-0)
u AF mode: AI Servo AF
i SI display: On (Standard CF-10-0)
o Film: Kodak Tri-X, 36-ex. (fresh roll)
!0
Shooting conditions:
The following operation sequence was executed as
described below: AF search (infinity to near focus to
infinity), shutter button pressed halfway for 6 sec.,
shutter released, and meter active for 2 sec.
● At 20°C
Film loaded, continuous shooting of 36 frames, automatic film rewind, film cartridge removed, 20-sec.
break, stop down to f/5.6 for 5 sec., depth-of-field preview.
● At -20°C
After the camera and film were exposed to a temperature of -20°C for three hours, the following operation
was executed: Film loaded, continuous shooting of 5
frames at 20-sec. intervals until 36 frames exposed
(the last frame is exposed singly), automatic film
rewind, film cartridge removed, and 20 sec. break, stop
down to f/5.6 for 5 sec., depth-of-field preview, and 3min. break.
* One roll is considered to be one whose film was
advanced and rewound completely. Specifications for
24-exposure are interpolated from 36-exposure
results.
13-2 Major EOS
System
Accessories:
1-27
Part 1: General Information
Page 29
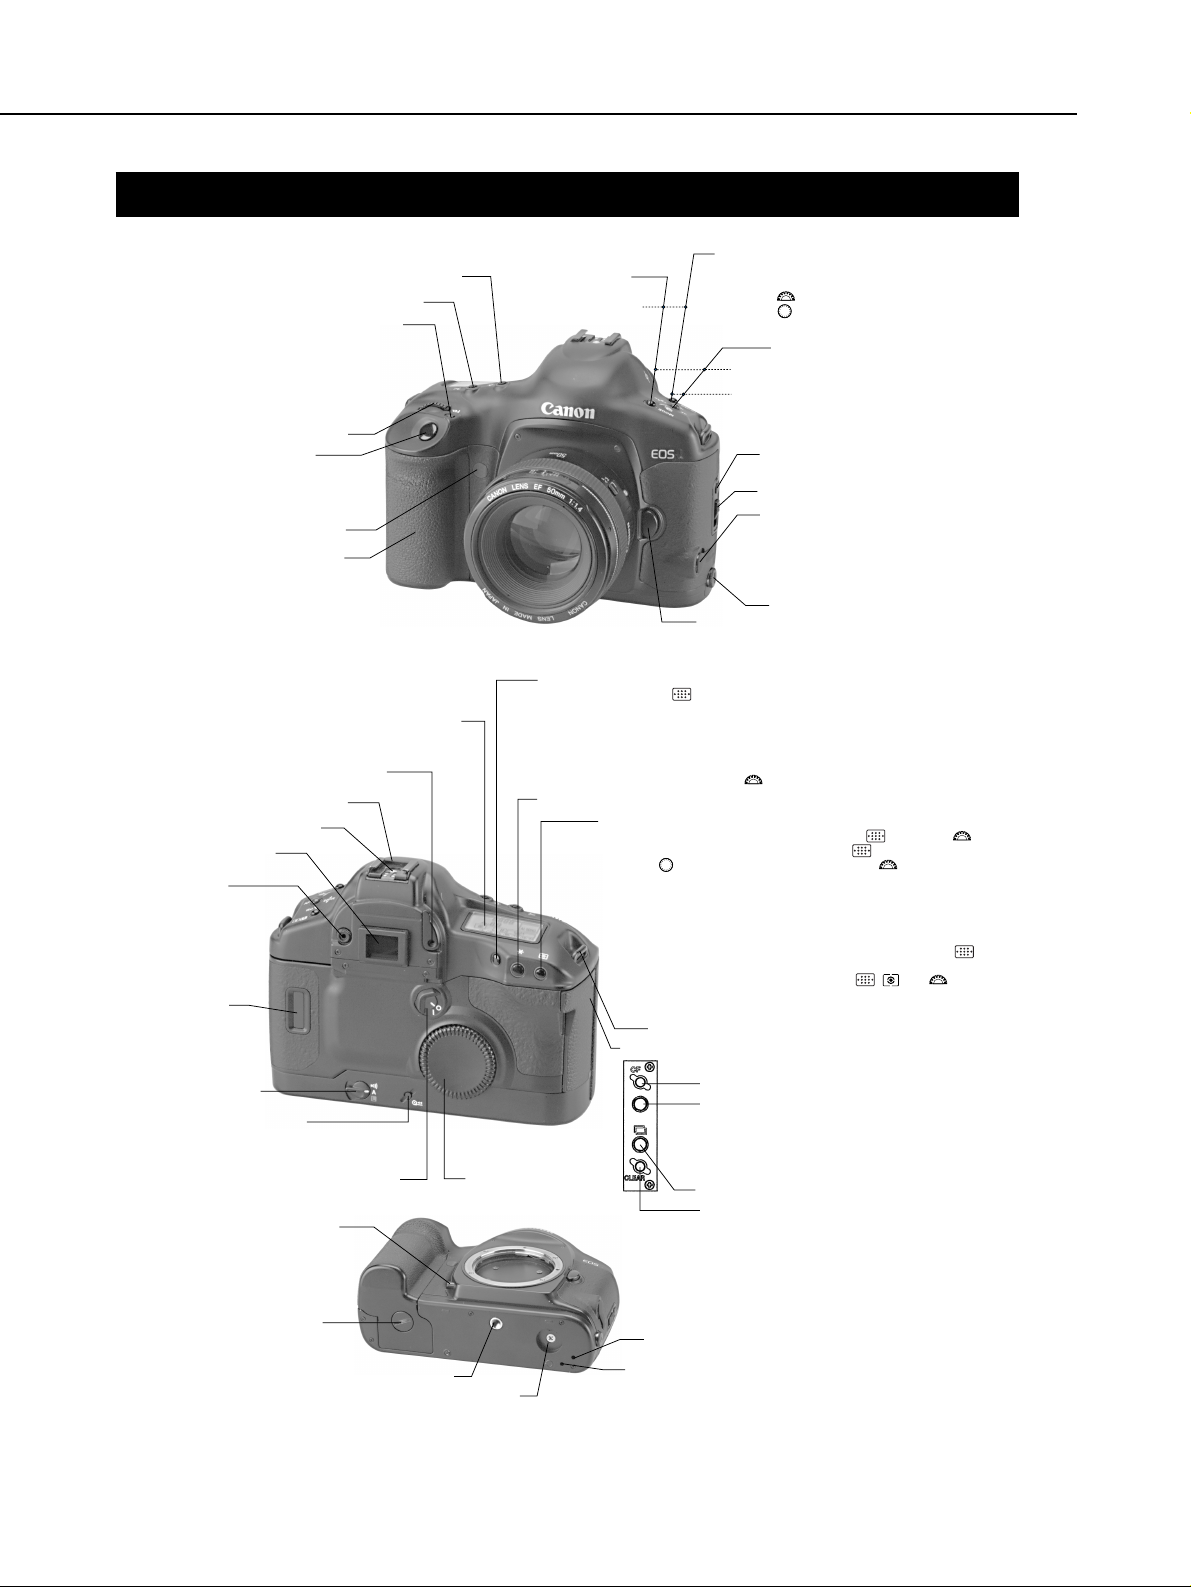
4. NOMENCLATURE
Fig. 1-17
1-28
Part 1: General Information
LCD panel illumination button
Exposure compensation button / Aperture button
FE lock button / Multi-spot metering button
● A single press for center FE lock or multi-spot metering.
● With CF-13-1/3 during manual focusing point selection,
FE lock or spot metering can be linked
to the focusing point.
● For multi-spot metering, up to 8 readings
(additional readings are ignored)
can be taken for one picture.
Main Dial
Shutter button
● Halfway position (SW1):
Metering and AF
● Full position (SW2):
Shutter release
Self-timer lamp
Grip
Shooting mode button
✩Film advance
mode button
AF mode button
ISO film speed button
✩AEB button
Camera back lock release button
Camera back lever
Remote control/Data transfer
terminal (N3 type*)
* Compatible with accessories
whose name ends with "N3" such
as the RS-80N3, TC-80N3,
and ET-1000N.
PC terminal
Lens release button
LCD panel
Eyepiece shutter lever
Hot shoe
Eyepiece
Flash-sync contacts
Dioptric
adjustment knob
●-3 dpt - +1 dpt
Film window
Main switch
Midroll rewind button
● Toggles between high-speed and
silent rewind modes during film rewind.
Quick Control Dial ON/OFF switch
Quick Control Dial
Side door
AE lock button
Custom Function set button
✩ Multi Function button
●
Pressing the button changes the mode in the
following loop: Data recording, clock setting,
Personal Function, and Communication mode.
The clock can be set only after EOS Link Software
ES-E1 is first used to set the date and time.
✩* Multiple exposure button
Clear button
Depth-of-field preview button
● With a wireless multi-Speedlite system,
this button fires a modeling flash for
approx. 1 sec.
Grip screw
Tripod socket
Power Drive
Booster coupler
Power Drive Booster coupling pin
Positioning hole
Assist button
● With CF-13-3 and the pressed, pressing
the Assist button selects the center focusing point.
● With CF-18, pressing the Assist button selects the registered focusing point.
● Pressing the Assist button in the data recording mode displays
the remaining number of recordable rolls.
● In the time setting mode, pressing the Assist button shifts
the number to be changed with the .
Strap eyelet
Focusing point selection button
● To select a horizontal focusing point, press the and turn the .
● To select a vertical focusing point, press the and
turn the or press the Assist button and turn the .
Focusing point registration and shifting
(Automatic 45-point selection or 2-point selection)
To register: After selecting the focusing point,
press the Assist button and FEL.
To shift: Press the Assist button and the focusing point selector .
With CF-11-2, any focusing point can be selected. Pressing the
during SW1 sets it to automatic selection.
● Flash exposure compensation is set with the , , and .
Metering mode button /
Flash exposure compensation button
● While pressing the button,
turn the to select the metering mode or
turn the to set flash exposure
compensation.
* Battery check is automatic.
Page 30
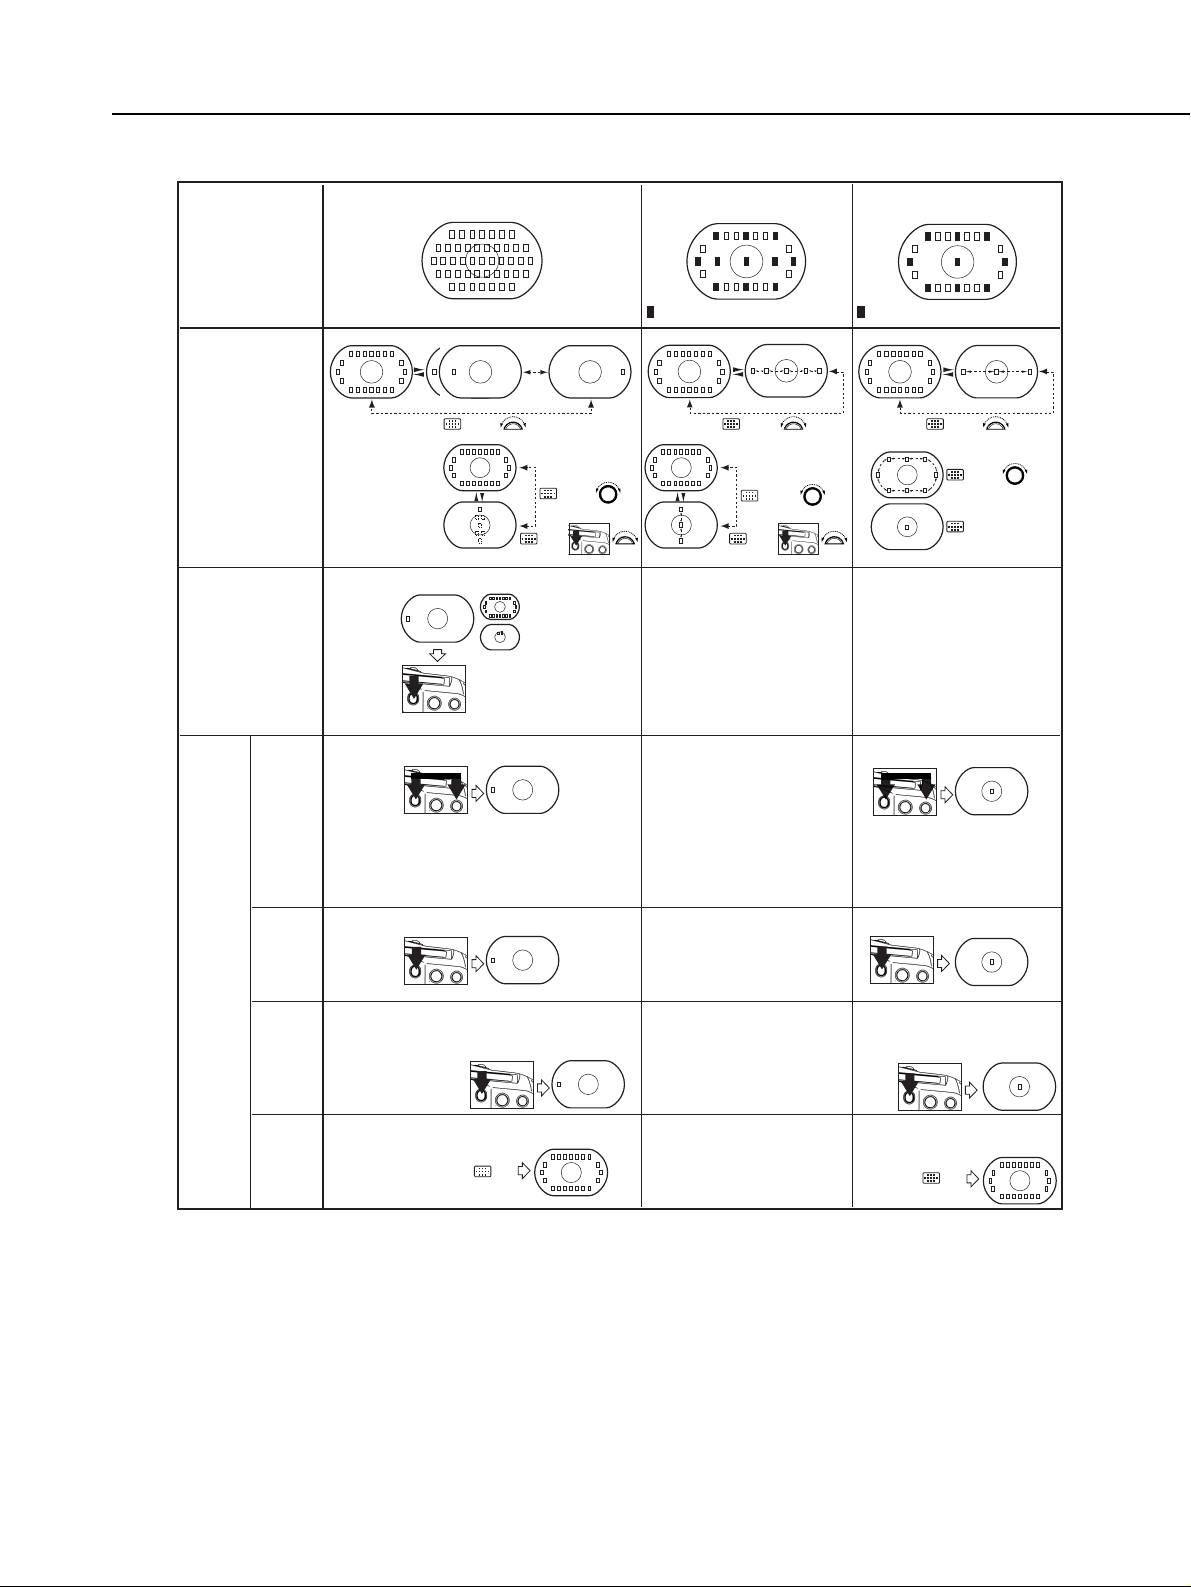
Fig. 1-18 Focusing point selection, registration, and shifting.
1-29
Part 1: General Information
ON/
or
Standard
CF-13-1,2
CF-13-3
Standard
Focusing Point
Selection
Focusing Point
Registration
Shifting to the Registered Focusing Point
and Automatic Selection/Center Focusing Point Selection
Standard
Setting
CF-11-2
CF-18-1
CF-18-2
Selectable
Focusing
Points
ON/
ON/
ON/ ON/
ON
Shift to registered focusing point
Focusing point selection
Hold down the Assist
button, then press
FEL to register
the focusing point.
Automatic selection
Shift to registered focusing point
Press the button to shift to the registered
focusing point.
Release the button to return to the original
focusing point.
and
registration
are enabled
Procedure is the
same as left.
Eleven focusing points
are user-selectable and
automatic selection
can be registered.
ON
/
ON
/
+FEL
During SW1 or SW2,
press the focusing
point selector.
ON
Automatic
selection
During SW1 or SW2,
press the focusing
point selector.
Not possible.
Center focusing point selected.
Center focusing point selected.
Press the button to select
the center focusing point.
Release the button to return to the
original focusing point.
ON/Assist
button
ON/
or
Same as left.
Same as left.
Same as left.
Same as left.
:
User-selectable focusing points. : User-selectable focusing points.
With CF-11-2:
+/- button + Assist button
With CF-11-3:
FEL button + Assist button
With CF-11-2:
+/- button + Assist button
With CF-11-3:
FEL button + Assist button
* To register a focusing point, you press the Assist button and FE lock button simultaneously. However, if the
Speedlite is ready and you press the FE lock button first, FE lock will result and the focusing point selection mode
will be canceled. The Assist button must be pressed before the FE lock button.
Page 31
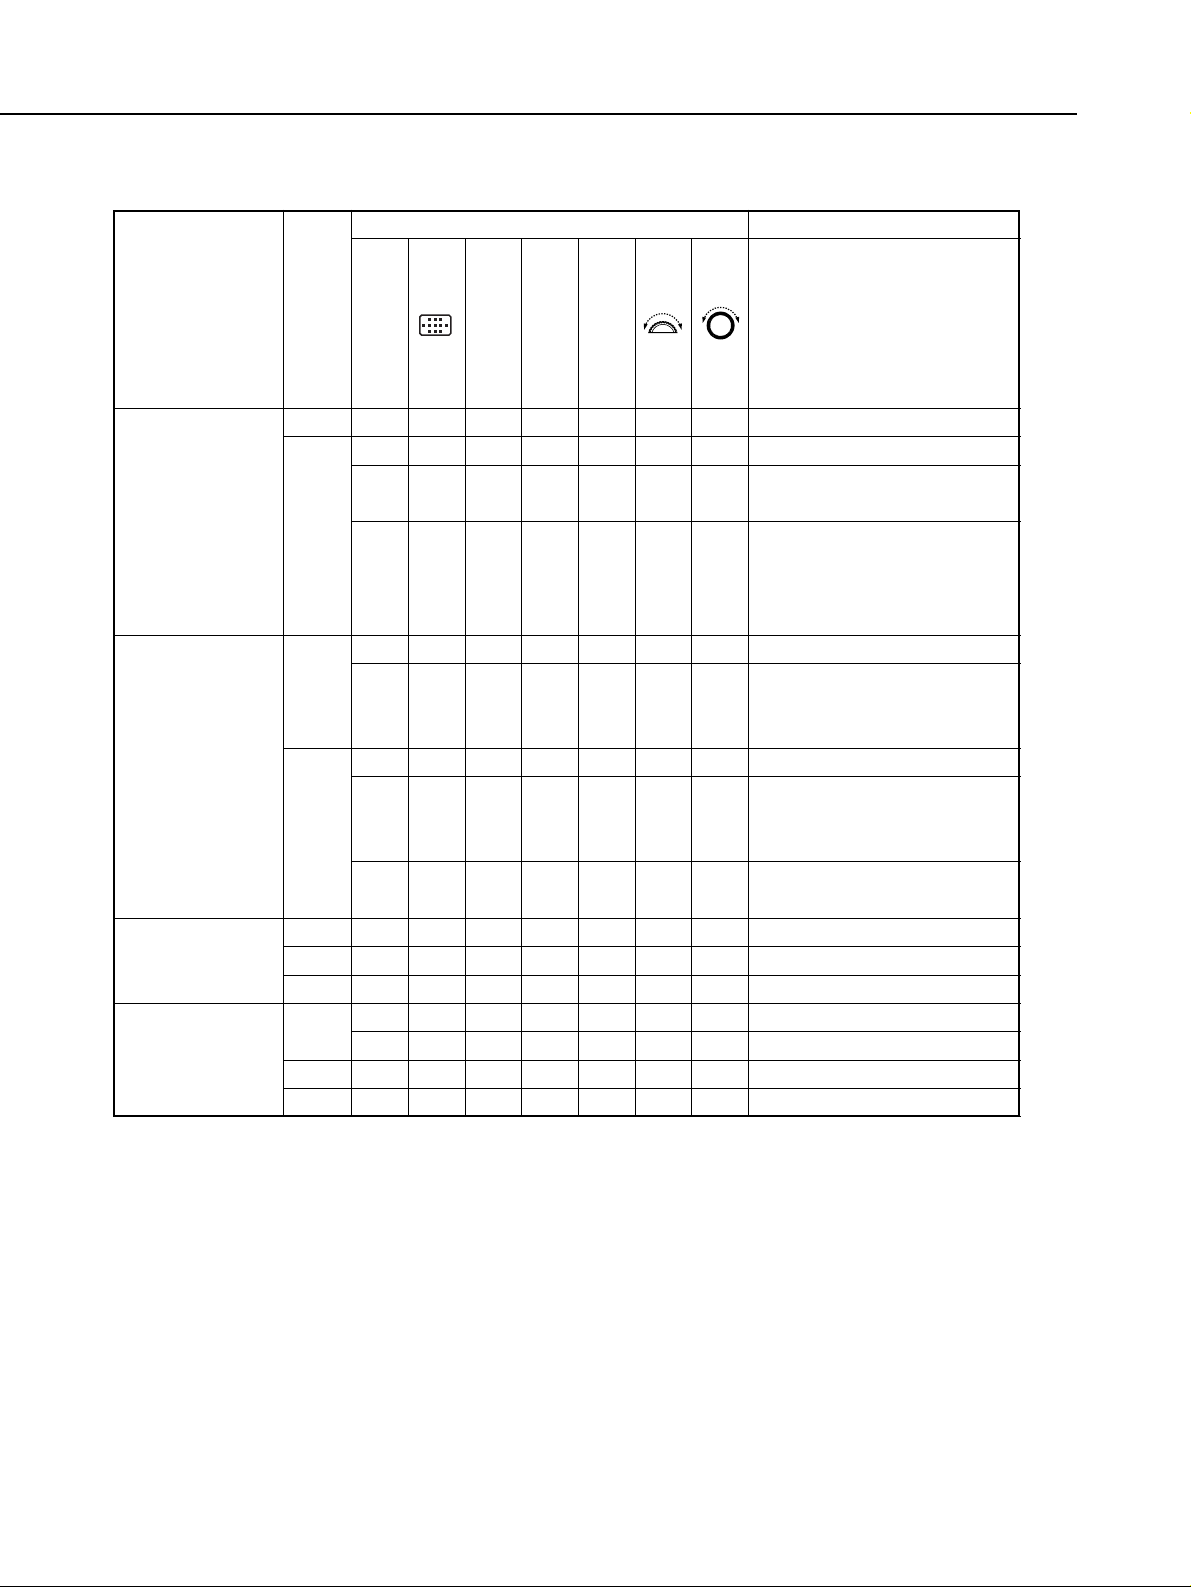
1-30
Part 1: General Information
Table 1-5 Focusing Point Selection Methods
Setting
Selection of 45
focusing points
(Same as with
CF-13-1/2)
Selection of 45
focusing points +
CF-11-2
(Same as with
CF-13-1/2)
Selection of 9
focusing points
with CF-13-3
Selection of 9
focusing points
with CF-13-3 +
CF-11-2
Remarks
/ : After the button is
pressed, it can be
released to continue the
operation.
+ : Hold down the button for
the operation.
Convenient when the Quick
Control Dial switch is off.
After pressing the buttons
simultaneously, release only
the FEL button and turn the
Main Dial.
The extreme left or right
focusing point is selected. No
automatic selection.
The extreme left or right
focusing point is selected. No
automatic selection.
Convenient when the Quick
Control Dial switch is off.
Selection
Range
Left/right
Up/down
Left/right
Up/down
Left/right
Periphery
Center
Left/Right
Periphery
Center
During
Metering
●
●
●
● /
● /
● /
● +
● /
● /
● /
● /
Assist
Button
● +
● +
● +
●
●
+ / -
● /
● /
● /
● /
, ●
FEL
● /
●
●
●
●
●
●
●
●
●
●
●
●
●
●
Selection Operation
Page 32

Table 1-6 Custom Function List
1-31
Part 1: General Information
Function CF-No.
Setting
Description
Setting for New Laser Matte
screens (Ec-N, Ec-R).
Setting for Laser Matte screens
(Ec-A, Ec-B, Ec-C, Ec-CII, Ec-D,
Ec-H, Ec-I, Ec-L, EOS-1V standard
screen).
New Old Remarks
●
●
0
1
CF-1-1 and CF-1-3 are ideal when film
rewind noise would be disturbing.
0
1
3
●
●
●
●
High-speed automatic film rewind.
No automatic film rewind. High-
speed film rewind with midroll
rewind button.
Silent (low-speed) automatic film
rewind.
No automatic film rewind. Silent film
rewind with midroll rewind button.
This is convenient if you develop the
film yourself.
With CF-2-1, the shutter speed will
always be 1/8000 sec. if you release
the shutter with the camera back open.
●
●
Leaves film leader outside the cartridge.
Rewinds film leader into the cartridge.
0
1
0
1
2
3
0
●
●
●
●
●
●
●
This is for when you want to set the film
speed yourself.
It saves you from setting the film speed
each time you load film.
This is effective when you want to focus
and meter at different portions of the
scene.
This is effective when you want to stop
AI Servo AF operation momentarily.If
an obstruction comes between the
camera and subject, it will not throw off
the AF. The exposure is set at the
moment of exposure.
When you use AI Servo AF, you can
toggle between AI Servo AF and focus
lock just by pressing the (*) button.This
is useful for subjects which keep moving and stopping repeatedly. The exposure is also set at the moment when
the picture is taken. Thus, the focusing
and exposure are always set correctly
and all you do is wait for the right
moment to capture the shot.
Set automatically with the DX code.
Set manually.
Enables AF and AE operation with
the shutter button pressed halfway.
● AE lock with the (*) button.
Enables AE and AF operations with
the M-16 button.
● AE lock with the shutter button
pressed halfway.
Enables AF and AE operations with
shutter button pressed halfway.
● AF lock (no AE lock) with the (*)
button.
Enables AF and AE operation (no
AE lock) with the (*) button.
● Pressing the shutter button com-
pletely releases the shutter
(pressing it halfway executes AE
operation only).
Shutter speed: Set with Main Dial
Aperture: Set with Quick Control
Dial or +/- button and Main Dial.
1
●
This makes it easier to change the
aperture during studio sessions with
studio flash units. Also, when AEB is
used in the manual exposure mode, the
shutter speed can be fixed while only
the aperture is shifted for AEB.
Aperture: Set with Main-Dial.
Shutter speed: Set with Quick
Control Dial or +/- button and Main
Dial.
● The functions of the Main Dial
and Quick Control Dial are
reversed.
Manual Tv/Av
settings
Focusing screen
characteristics
Auto film rewind
mode
Film leader
position
Film speed
setting
method
AF activation
CF-0
CF-1
CF-2
CF-4
CF-5
CF-3
●: Also provided with the EOS-3.
2
0
1
Page 33

1-32
Part 1: General Information
Function CF-No.
Setting
Description New Old
●
2
●
0
Exposure level
increments
CF-6
CF-5
Manual Tv/Av
settings
3
1
2
●
●
●
If you are using a super telephoto lens
with more than one EOS-1V body, you
can still set the aperture with the camera(s) not attached to the lens. This
function is mainly for pro photographer
assistants.
Same as CF-5-2.
This is suited for slide films which have
a narrow exposure latitude.
The shutter speed and aperture can be
set in the familiar full-stop increments.
Suited for negative films which have a
wide exposure latitude.
The shutter speed and aperture are
set in the same way as with CF-5-
0. In the aperture-priority AE or
manual mode, the aperture can be
set with the EOS-1V even while the
lens is detached.
The shutter speed and aperture are
set in the same way as with CF-5-
1. In the aperture-priority AE or
manual mode, the aperture can be
set with the EOS-1V even while the
lens is detached.
1/3-stop increments in all cases.
Whole-stop increments for the shutter speed and aperture, and 1/3stop increments for exposure compensation and flash exposure compensation.
1/2-stop increments in all cases.
0
1
2
0
1
2
●
0
1
2
3
●
●
●
●
●
●
●
●
●
The lenses listed on the right
enable electronic manual focusing
after AF operation.
EF 50mm f/1.0L USM
EF 200mm f/1.8L USM
EF 400mm f/2.8L USM
EF 600mm f/4L USM
EF 28-80mm f/2.8-4.0L USM.
EF 85mm f/1.2L USM
EF 300mm f/2.8L USM
EF 500mm f/4.5L USM
EF 1200mm f/5.6L USM
This prevents the focus from being
thrown off by inadvertent turning of the
focusing ring after One-Shot AF.
When CF-7-0/1 and CF-4-1/3 are set,
the focusing ring can be used to focus
before AF operation. However, this is
disabled with this setting.* When CF-71/2 is set, you must first set the lens
focus switch to MF (or M) to focus manually.
You can see how many frames are left
in the roll.
AEB is not canceled even when the
lens is interchanged or when the film is
replaced. Therefore you can keep taking AEB shots (with the correct exposure first).
You can keep taking AEB shots in this
sequence.
Disables electronic manual focusing after AF operation.
Disables electronic manual focusing at all times.
The frame counter counts up.
The frame counter counts down
(indicates the remaining number of
frames).
The frame counter in the viewfinder
is displayed in the same way as the
EOS-1N.
Correct exposure, underexposure,
overexposure, then automatic cancellation.
Correct exposure, underexposure,
overexposure, and no automatic
cancellation.
Underexposure, correct exposure,
overexposure, then automatic cancellation.
Underexposure, correct exposure,
overexposure, and no automatic
cancellation.
CF-7
CF-8
USM lens
electronic ring MF
Frame counter
CF-9
AEB sequence
and auto
cancellation
Remarks
Page 34

1-33
Part 1: General Information
Function CF-No.
Setting
Description New Old
Focusing point
selection method
CF-11
CF-10
Focusing point
flashing mode
CF-12
Mirror lockup
1
3
0
●
●
●
●
If the flashing of the focusing point is
annoying, you can disable it.
For the standard mode, this disables
the focusing point from lighting dimly
after focus is achieved.
This makes the focusing point easier to
see even in bright light.
This applies during manual focusing
point selection.
During automatic focusing point selection, the focusing point does not light
dimly after focus is achieved.
No flashing at all.
No flashing after focus is achieved.
Standard mode
● Flashes when focus is achieved,
lights dimly while you press the
shutter button halfway after focus
is achieved.
2
Flashes brightly.
0
1
2
3
●
●
●
●
When CF-11-2 and CF-13-3 are set,
turning the Quick Control Dial selects
one of 8 off-center focusing points, and
pressing the Assist button selects the
center focusing point.
This reverses the functions between
the standard mode's focusing point
selector and exposure compensation
button. This enables the exposure compensation and manual exposure's aperture to be set in the same way as with
the EOS-1.
This setting is identical to the EOS-1N's
CF-11-2 for selecting the left or right
focusing point. With this setting, you
can select the focusing point while
pressing the shutter button halfway (or
while the metering is active) or during
continuous shooting in the AI Servo AF
mode. The focusing point selection
stops at the extreme left or right focusing point.
● During AF operation, pressing the
focusing point selector enables you
to switch from manual focusing point
selection to automatic focusing point
selection. You can thereby instantly
switch to automatic focusing point
selection.
This reverses the functions between
the focusing point selector button and
FEL button. The button next to the AE
lock button then functions as an FEL
button.
Enables the focusing point to be
selected by pressing the focusing
point selector and turning the Main
Dial or Quick Control Dial.
● Turn the Main Dial to select a
focusing point on the right or left,
and turn the Quick Control Dial
to select a focusing point on the
top or bottom.
Enables the focusing point to be
selected by pressing the exposure
compensation button and turning
the Main Dial or Quick Control Dial.
Turn the Quick Control Dial alone to
select a left or right focusing point,
and press the Assist button and
turn the Main Dial to select a focusing point on the top or bottom.
● CF-11-1 operations can also be
executed.
Enables the focusing point to be
selected by pressing the FEL button and turning the Main Dial or
Quick Control Dial.
0
1
●
●
Effective for close-up shots and with
super telephoto lenses.
Mirror lockup eliminates camera vibration caused by the mirror's reflex
action. A tripod is required.
No mirror lockup (normal position).
Mirror lockup
Remarks
Page 35

1-34
Part 1: General Information
Function CF-No.
Setting
Description New Old
Automatic
reduction of fill-in
flash output
CF-14
CF-13
Focusing point
and spot metering
linkage
CF-15
Shutter curtain
synchronization
0
1
2
3
●
●
●
●
No linkage.
● Spot metering is always at the
center.
The selectable focusing points are limited to 11. This makes focusing point
selection faster and links spot metering
to the focusing point you select. This
setting is effective for spotlighted subjects on-stage, etc., when you want to
control the framing of the subject.
Compared to CF-13-0, this setting
makes focusing point selection faster.
(* When automatic focusing point selection is used with CF-13-1/2/3, all 45
focusing points will be subject to automatic selection.)
Compared to CF-13-1/2, this setting
makes focusing point selection faster.
Spot metering linked to the focusing point.
● Spot metering is linked to one of
11 focusing points selected manually.
No linkage.
● Spot metering is always at the
center.
●You can select only one of 11
focusing points.
Spot metering linked to the focusing point.
● Spot metering is linked to one of
9 focusing points selected manually.
0
1
●
●
Natural-looking fill-in flash effects are
obtained automatically.
Effective for backlit subjects in front of a
sunset, etc., to prevent underexposure
of the subject.
Enabled.
Disabled.
0
1
●
●
By using a slow sync speed, you can
create a light trail following a moving
subject.
(* Works with Speedlite 380EX and
220EX.)
(* This is effective for EX-series
Speedlites which do not have shuttercurtain synchronization setting capability. Speedlite 550EX has this capability
and its shutter-curtain synchronization
setting overrides the camera's.)
First-curtain synchronization.
● The flash fires immediately after
the shutter opens.
Second-curtain synchronization.
● At slow sync speeds, the flash
fires immediately before the shutter closes.
1
0
●
●
Even if the exposure settings you have
set are not suitable, the camera will
automatically alter the settings to obtain
a correct exposure. This feature is convenient when the scene's brightness
changes suddenly.
Enabled.
l Safety shift works in the shutter
speed-priority AE and aperturepriority AE modes.
● If a correct exposure cannot be
obtained with the shutter speed
or aperture you have set, then
the camera automatically shifts
the shutter speed or aperture so
that a correct exposure can be
obtained.
Disabled.
CF-16
Safety shift
Remarks
Page 36
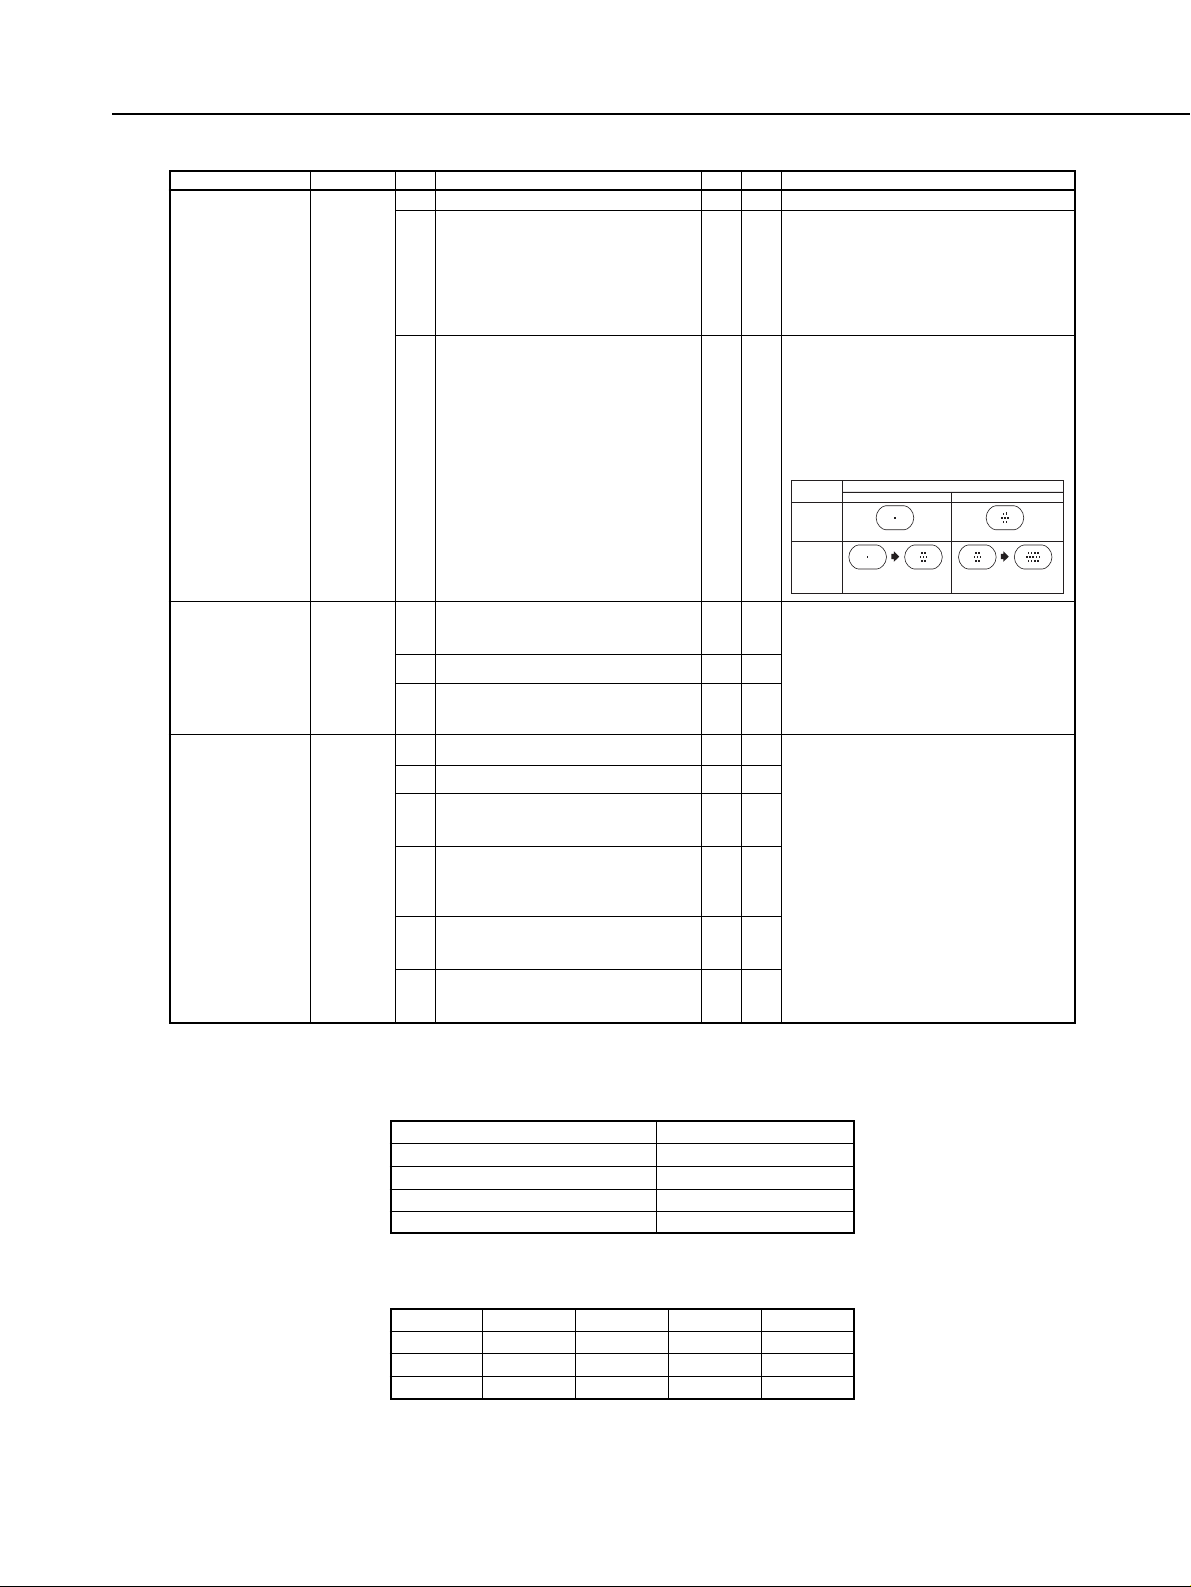
1-35
Part 1: General Information
Function CF-No.
Setting
Description New Old
Selection of
preselected
focusing point
CF-18
CF-17
Manual focusing
point selection
range
CF-19
AF stop button
(Works with super
telephoto IS
lenses)
0
1
2
●
●
●
The focusing point selection range
expands by one point all around the
manually-selected focusing point. This
setting is effective when the manuallyselected focusing point is unable to
focus track a subject moving irregularly.
The camera automatically sets this
focusing point selection range (as
shown below) to suit the lens focal
length, AF mode, and the subject's
movement during predictive AF. This
is effective when the subject's movement is unpredictable.
Standard
Expanded selection
Automatically-selected range
Lens Focal Length
Shorter than 300mm
AF Mode
One Shot AF
AI Servo AF
300mm or Longer
No expansion. Expanded by 1 point.
For slow-moving
subjects.
For fast-moving
subjects.
For slow-moving
subjects.
For fast-moving
subjects.
0
●
1
●
2
●
Selectable with the Assist button +
Focusing point selector.
Selectable with the Assist button.
Selectable only while the Assist
button is pressed.
0
●
3
●
4
●
AF stop when pressed.
1
●
AF operation when pressed.
2
●
AE lock when pressed while metering is active.
3: When the button is released, the pre-
vious focusing point is selected.
4: When pressed while in the One Shot
AF mode, AI Servo AF is set. When
pressed while in the AI Servo AF
mode, One Shot AF is set. Toggling
is possible even during shutter
release.
5: The IS switch must be turned ON.
When pressed, the focusing point
is selected from among the 45
points.
When pressed, toggles between
One Shot AF and AI Servo AF.
5
●
When pressed, Image Stabilization
operates.
Table 1-8 USM Electronic Ring Manual Focusing
* Before focus/After focus ●●: USM electronic ring manual focusing enabled. ✕: Disabled.
CF-7-0
CF-7-1
CF-7-2
CF-4-0
✕/ ●●
✕ / ✕
✕/ ✕
CF-4-1
●●/ ●●
●●
/ ✕
✕/ ✕
CF-4-2
✕/ ●●
✕ / ✕
✕/ ✕
CF-4-3
●●/ ●●
●●
/ ✕
✕/ ✕
Remarks
Table 1-7 Using CF-4 and CF-19 Together (AF start/stop operation with the EOS-1V and lens)
Result
AF stop
No AF start
No AF start again
AF stop maintained
Operation
During AF start / AF stop
During AF stop / AF start
During AF start / AF start
During AF stop / AF stop
Page 37
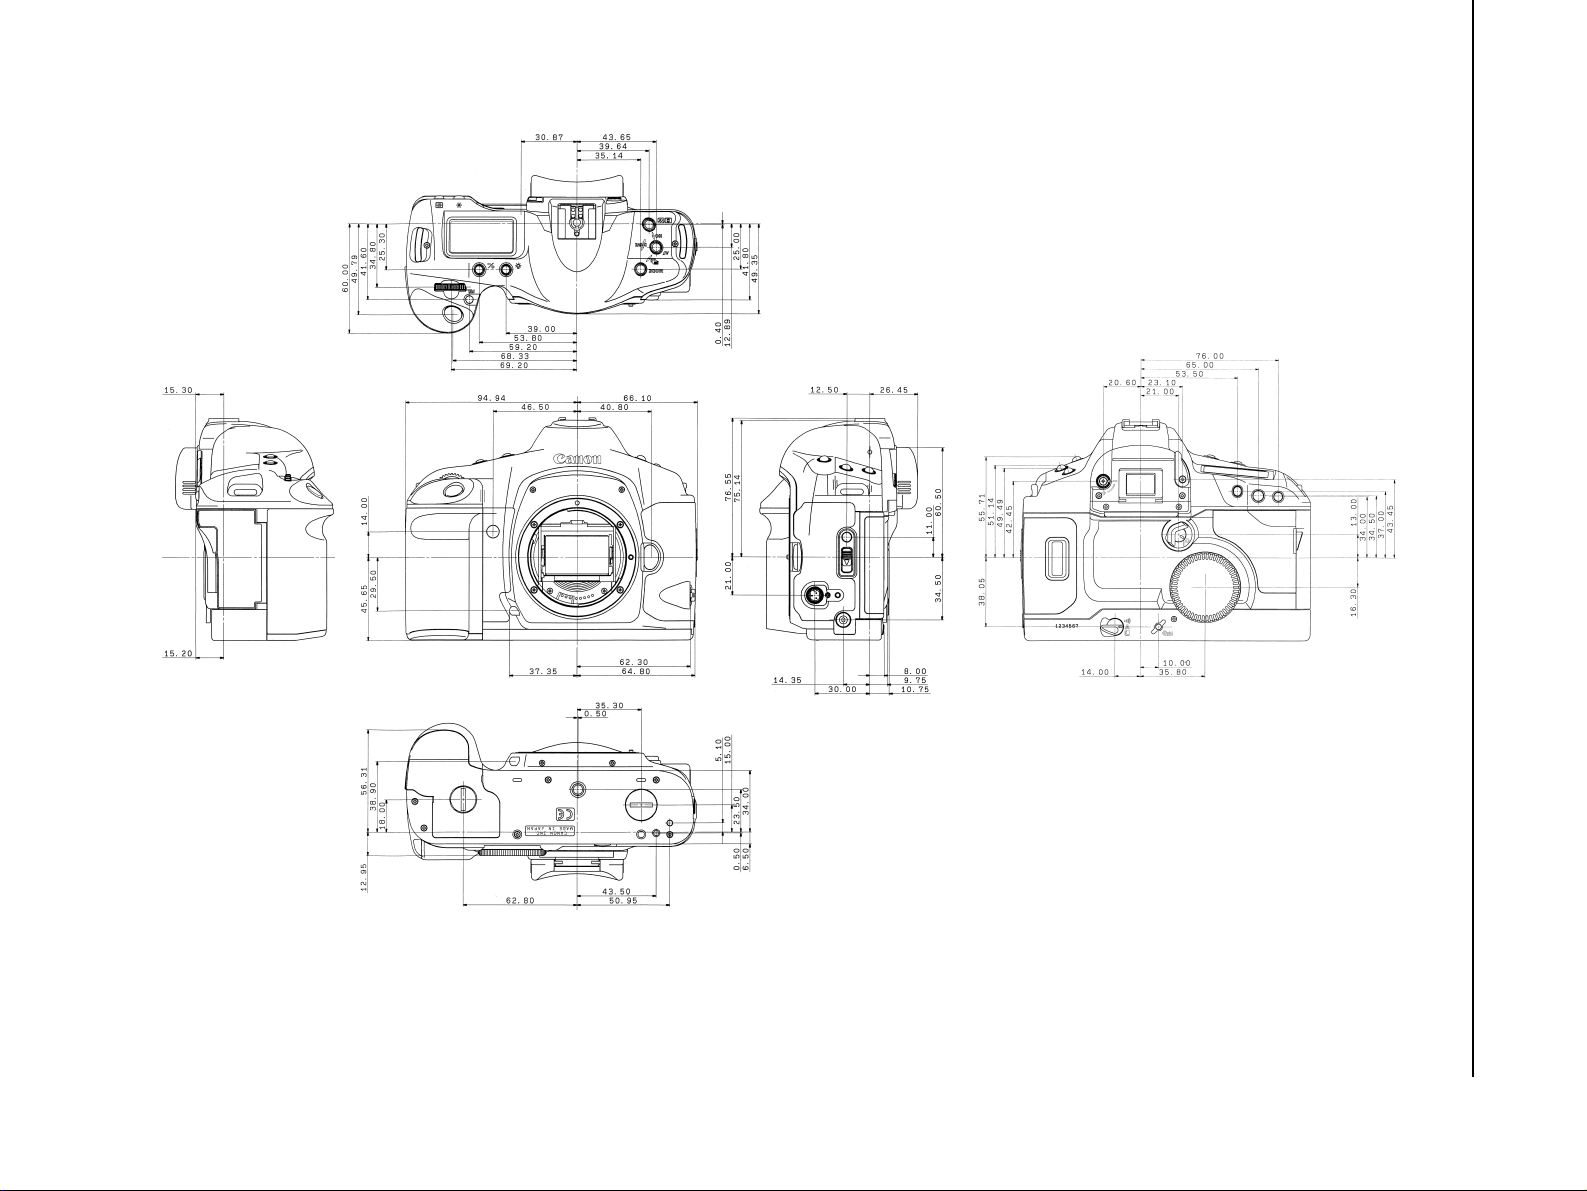
1-36
Part 1: General Information
✩Figures with stars are official dimensions, rounded OFF to two
decimal places.
✩
✩✩
✩
✩
The body thickness is the total of
this number and the flange back of 44 mm.
✩
Fig. 1-19 Six external views
Page 38
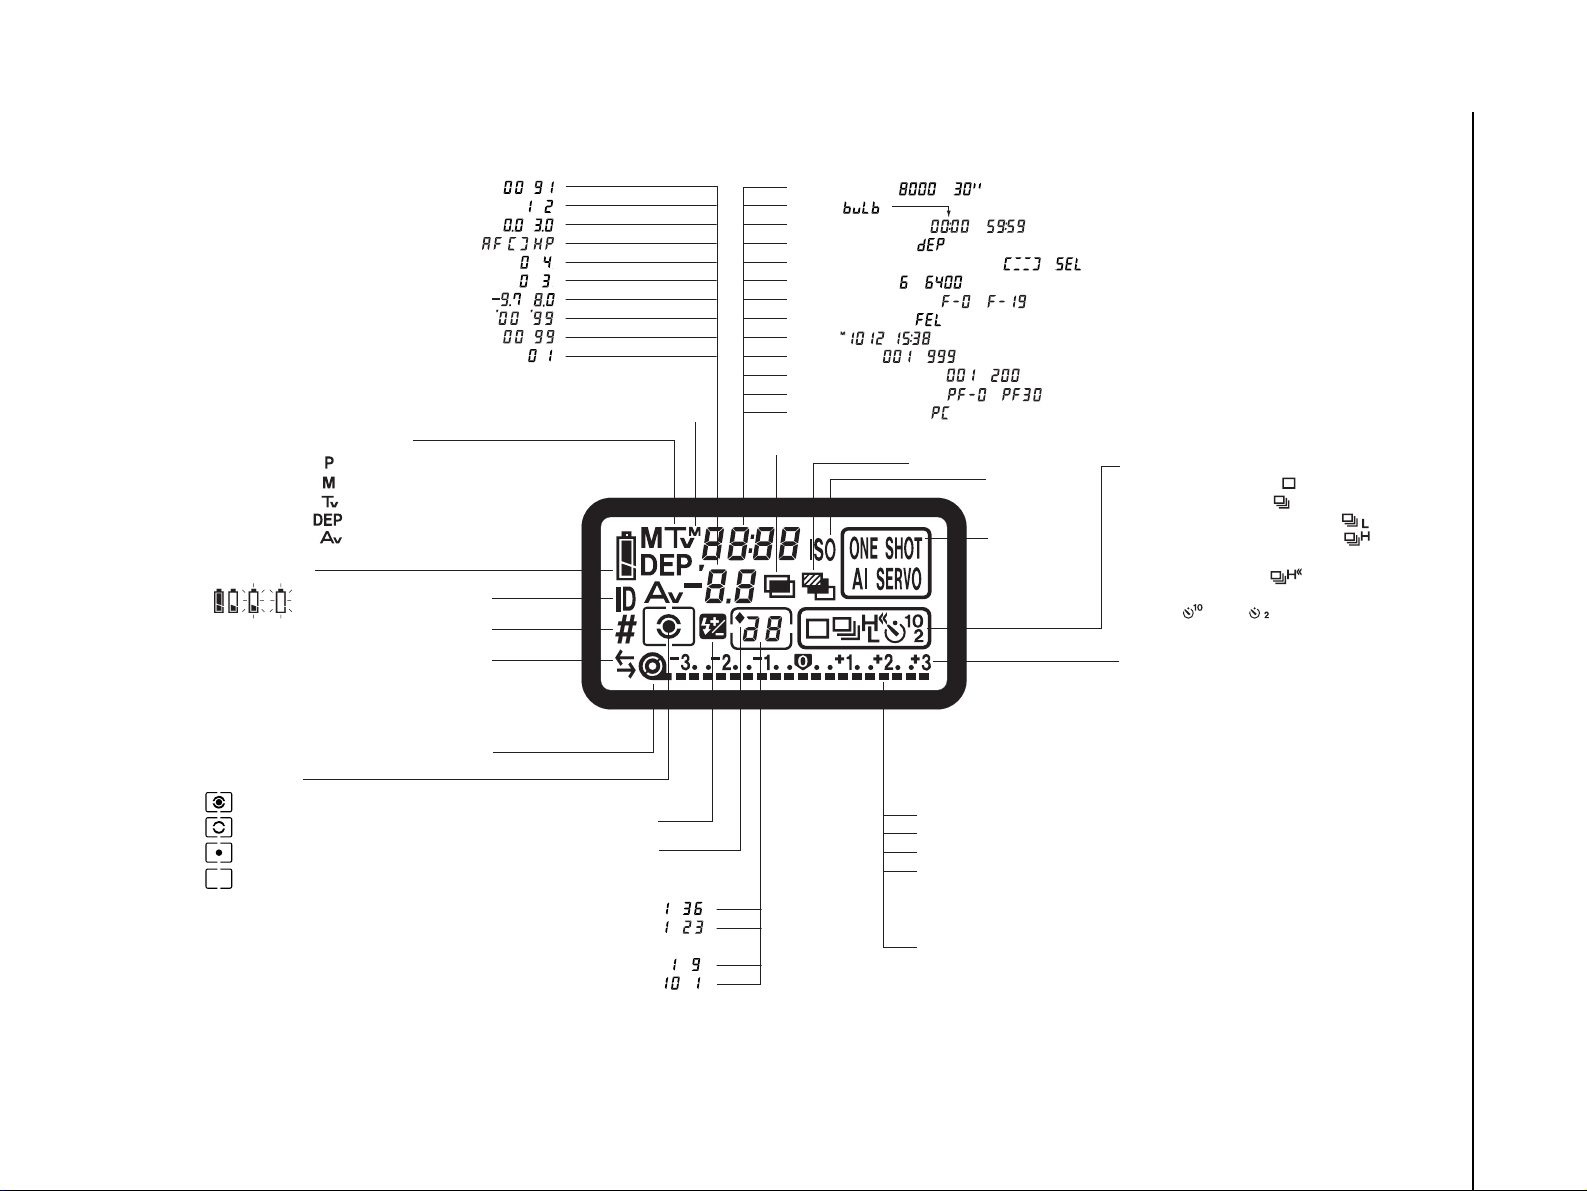
1-37
Part 1: General Information
Min.and sec.display during bulb exposures.
Aperture setting ( ~ )
DEP points ( , )
AEB amount ( ~ )
Focusing point selection mode ( , , )
Custom Function setting ( ~ )
Custom Function group No. ( ~ )
ISO film speed stops ( ~ )
Date ( ~ )
Numeric setting ( ~ )
Personal Function setting ( , )
Shooting mode
: Program AE
: Manual exposure mode
: Shutter speed-priority AE mode
: Depth-of-field AE mode
: Aperture-priority AE mode
Metering mode
Evaluative metering
Partial metering
Spot metering
Center-weighted averaging metering
Film-loaded indicator
Flash exposure compensation
Frame countdown icon
Frame counter ( ~ )
Bulb exposure time indicator ( ~ )
(hours)
Multiple exposures set ( ~ )
Self-timer countdown ( ~ )
Multiple exposures
Exposure level
AEB amount
Flash exposure compensation amount
Film transport indicator
Film transport operation (AL, film advance, rewind)
Film transport failure indicator (blinks)
Film advance completed indicator
Custom Function setting indicator
Exposure level scale
Film transport mode
Single-frame shooting ( )
Continuous shooting ( )
Low-speed continuous shooting ( )
High-speed continuous shooting ( )
Ultra-high speed
continuous shooting ( )
Self-timer
(10 sec. ,2 sec. )
AEB
AF mode
One-Shot AF
AI Servo AF
ISO icon
Shutter speed ( ~ )
Bulb ( )
Bulb exposure time ( ~ )
Depth-of-field AE ( )
Focusing point selection mode ( , )
ISO film speed ( ~ )
Custom Function No. ( ~ )
FE lock indicator ( )
Date ( , )
Film roll No. ( ~ )
No. of recordable rolls ( ~ )
Personal Function No. ( ~ )
Data Transfer mode ( )
ID icon
Personal Function icon
Data Transfer icon
Battery level icon
Month
Fig. 1-20 LCD Panel Nomenclature
Page 39
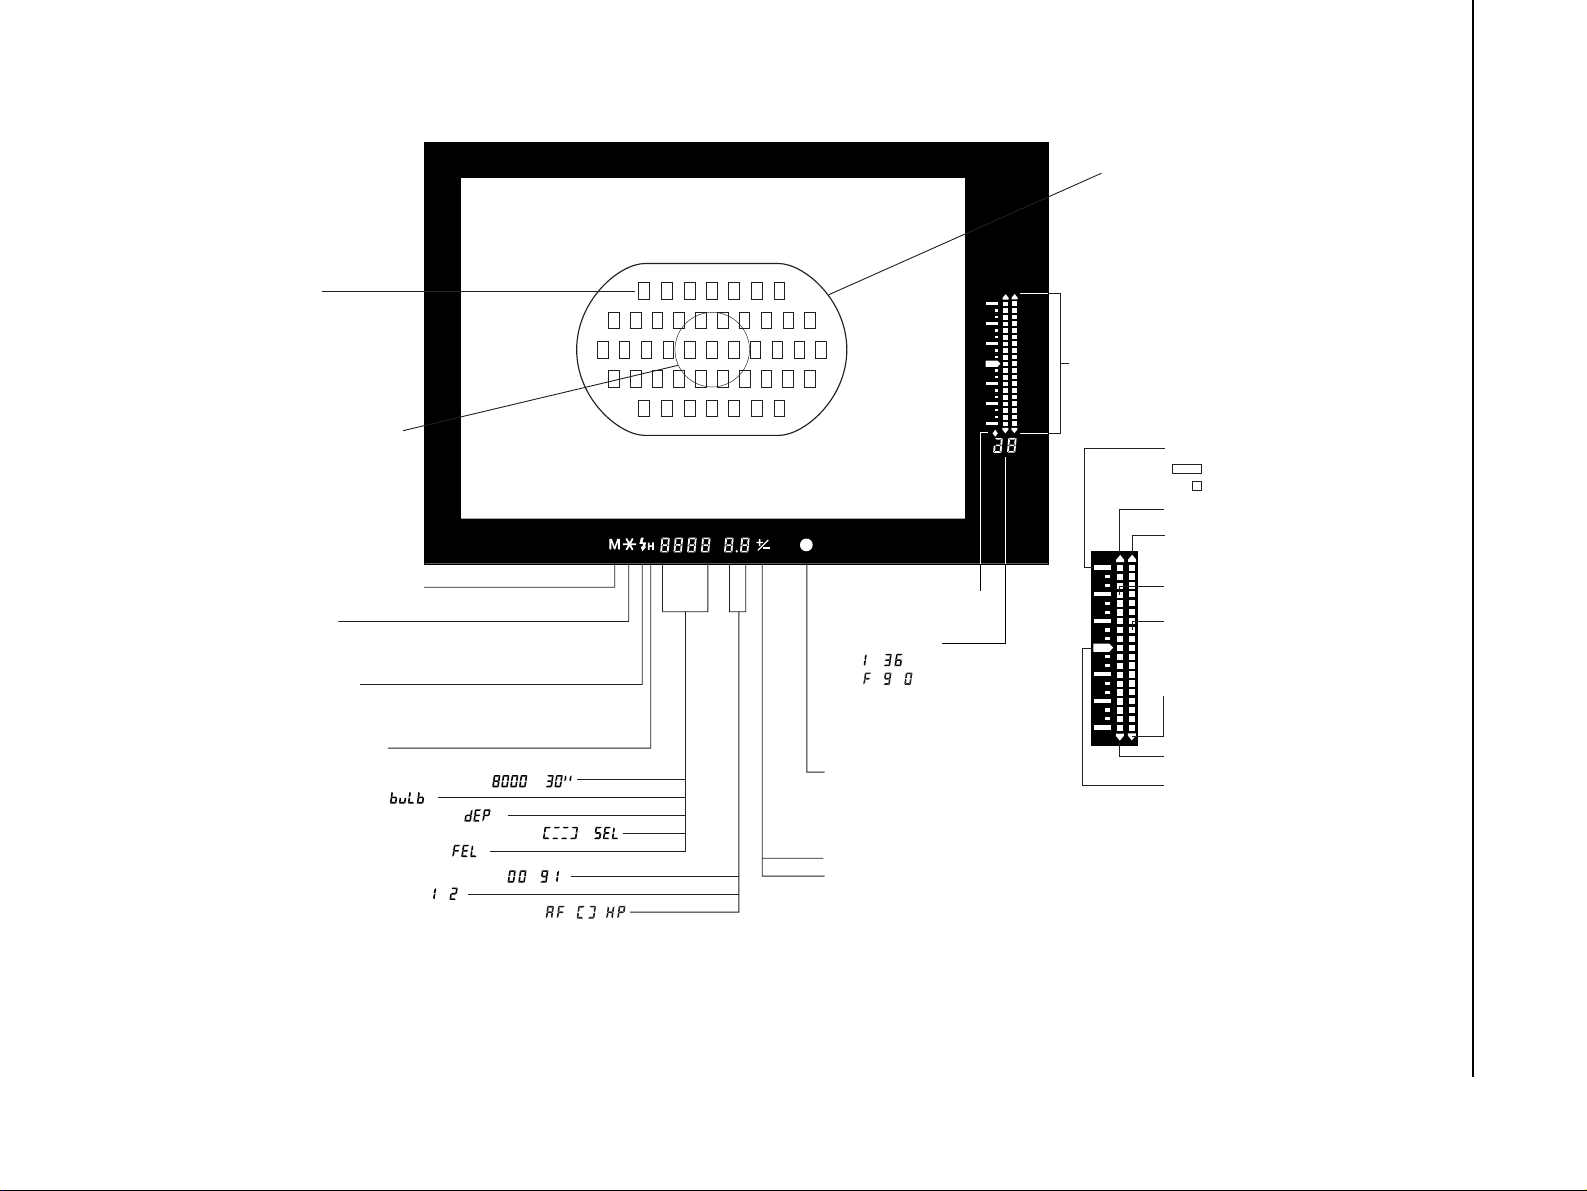
1-38
Part 1: General Information
Frame counter
( ~ )
( , ~ ) CF-8-2
Shutter speed display ( ~ )
Bulb ( )
Depth-of-field AE ( )
Focusing point selection mode ( ~ )
FE lock display ( )
Aperture display (digital) ( ~ )
DEP points ( , )
Focusing point selection mode ( , , )
Area AF ellipse
Focusing points
Spot metering position
● Normally off. Lights when
the focusing point is selected
or when a picture is taken.
Spot metering circle
(5 mm dia./2.4%)
Manual exposure icon
AE lock indicator
* Blinks during AEB shooting.
* Lights during multi-spot metering.
Flash-ready indicator
* Lights when flash is ready.
* Blinks when FE lock setting is invalid.
High-speed sync indicator
(FP flash)
Exposure compensation icon
Flash exposure compensation icon
In-focus indicator
* Lights when autofocus is achieved,
blinks at 8Hz when autofocus is not achieved.
* During manual focusing, lights when focus is achieved.
Frame countdown icon
Flash underexposure indicator
Overexposure indicator
Exposure level increments
: 1 stop
: 1/3 stop
Correct exposure index
Exposure level indicator
Flash exposure level indicator
* Lights in reverse during FE lock.
Exposure level indicator
Flash overexposure
indicator
Underexposure indicator
Fig. 1-21 Viewfinder Information
Page 40
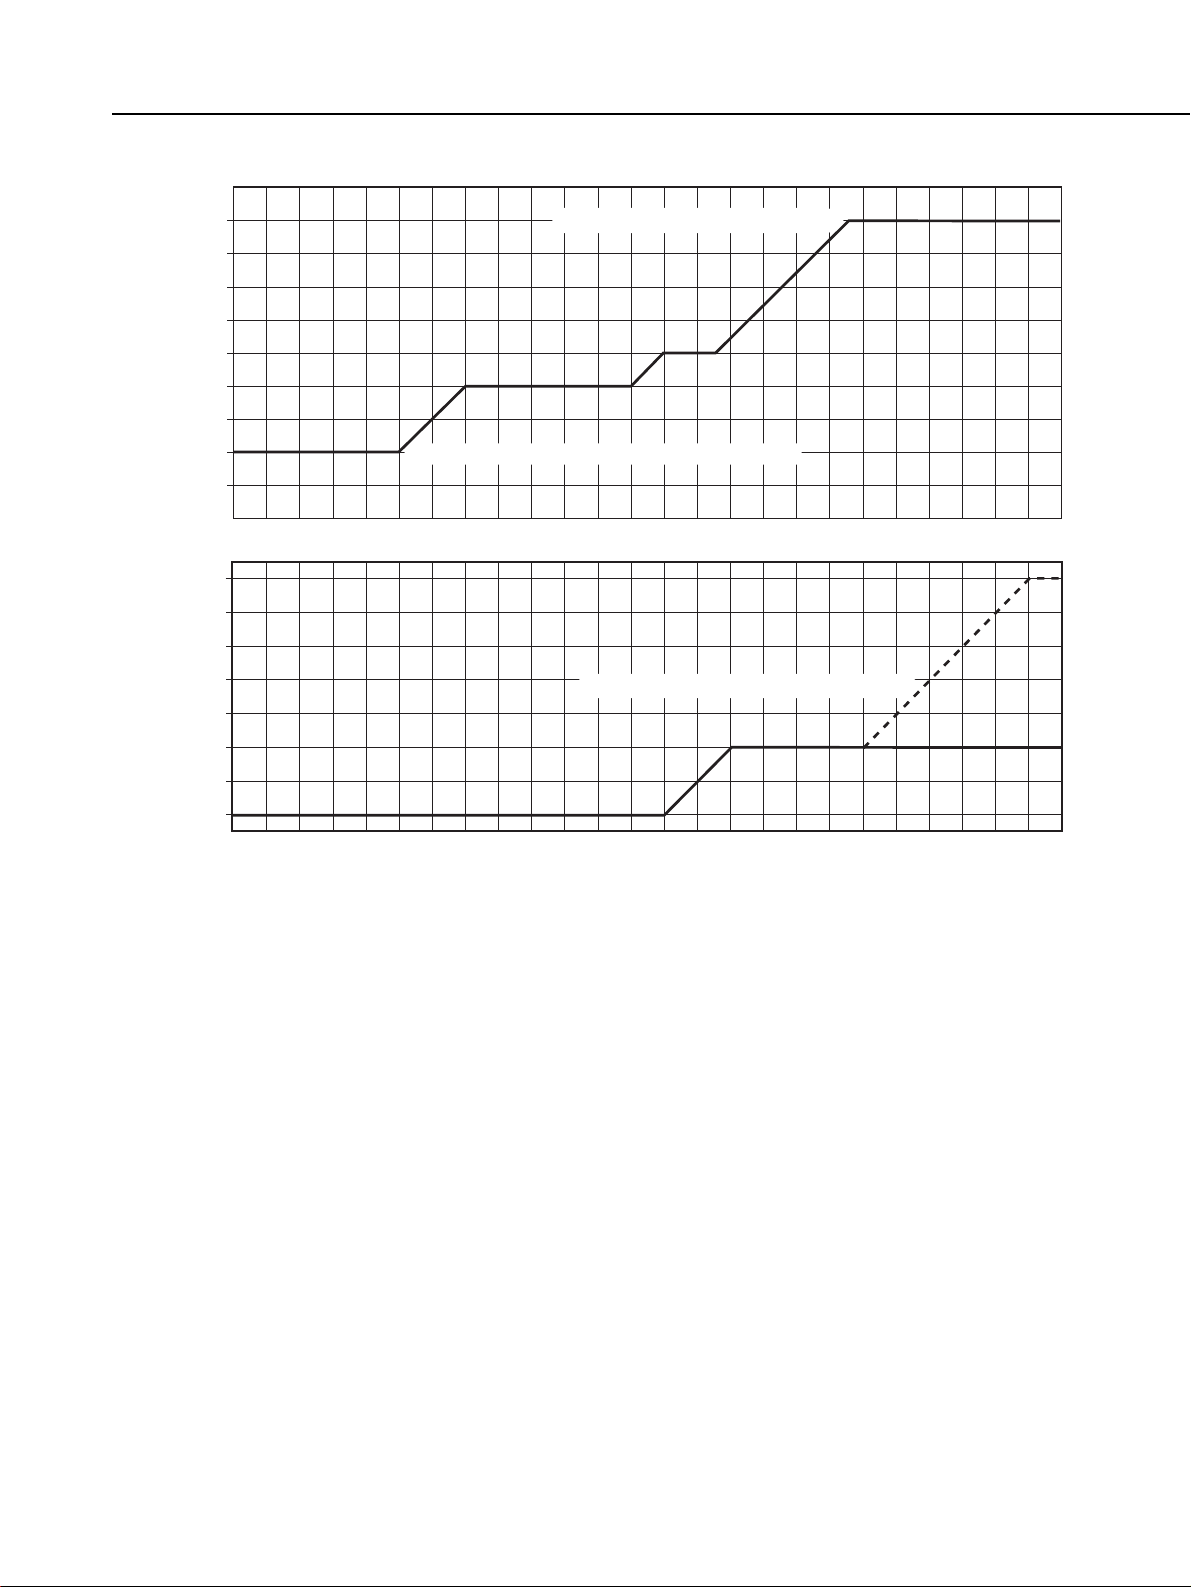
Fig. 1-22 E-TTL autoflash program line (With EF50mm f/1.8 at ISO 100)
1-39
Part 1: General Information
32
22
16
11
5.6
2.8
1.4
1.0
8
2
Av
4
60
125
250
Tv
500
1000
2000
4000
4 22 EV-2 -1 2 10111213141516171819202101 3 56789
8000
Limited by lens' minimum aperture/
High-speed sync (FP flash) (dotted line)/
,Limited by lens' maximum aperture (max. f/2.0)
Page 41
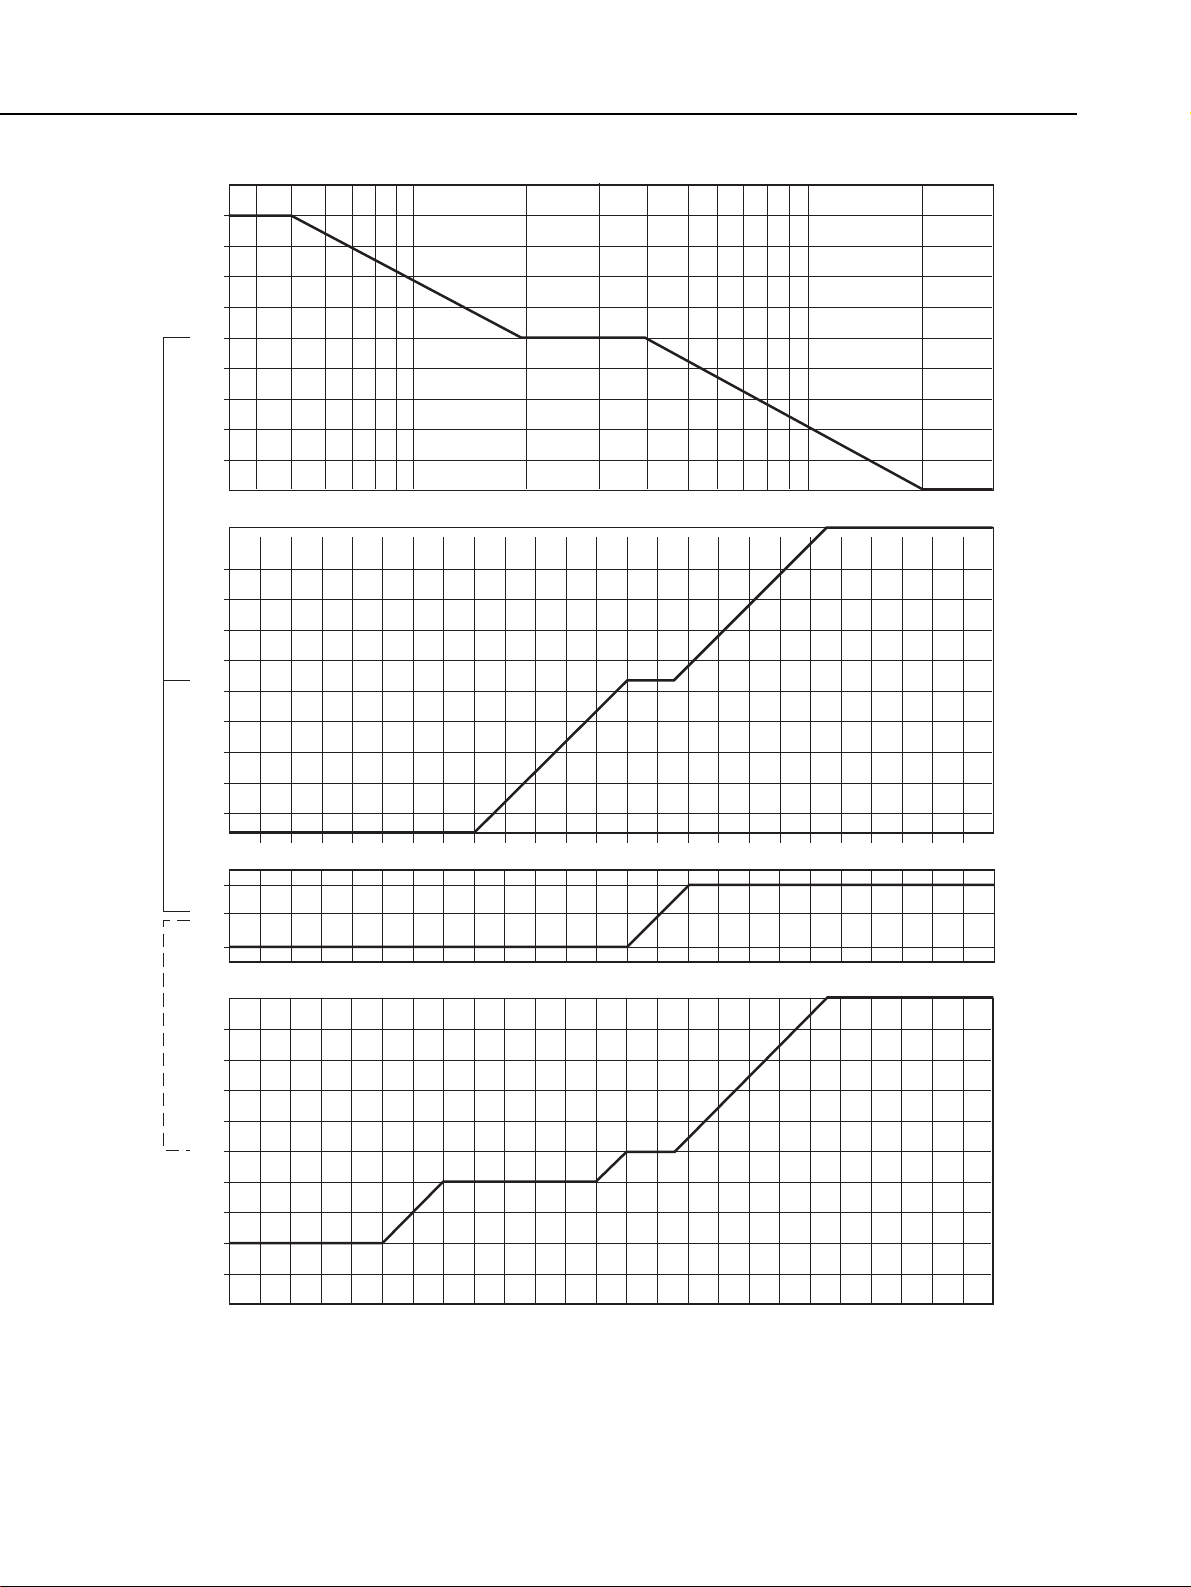
Fig. 1-23 A-TTLautoflash program lines (With EF 50mm f/1.8 at ISO 100)
1-40
Part 1: General Information
32
22
16
11
5.6
4
2.8
2
1.4
1.0
AV
8
32
22
16
11
5.6
4
2.8
1.4
1.0
AV
2
8
0.35 0.5 1 2 3 4 5 7 10 20
30m
32
22
16
11
5.6
4
2.8
2
1.4
1.0
AV
8
60
125
250
TV
2801 4-2 -1 3 5 6 7 9 101112131415161718192021 EV22
A-TTL autoflash program linesTTL autoflash program lines
Page 42
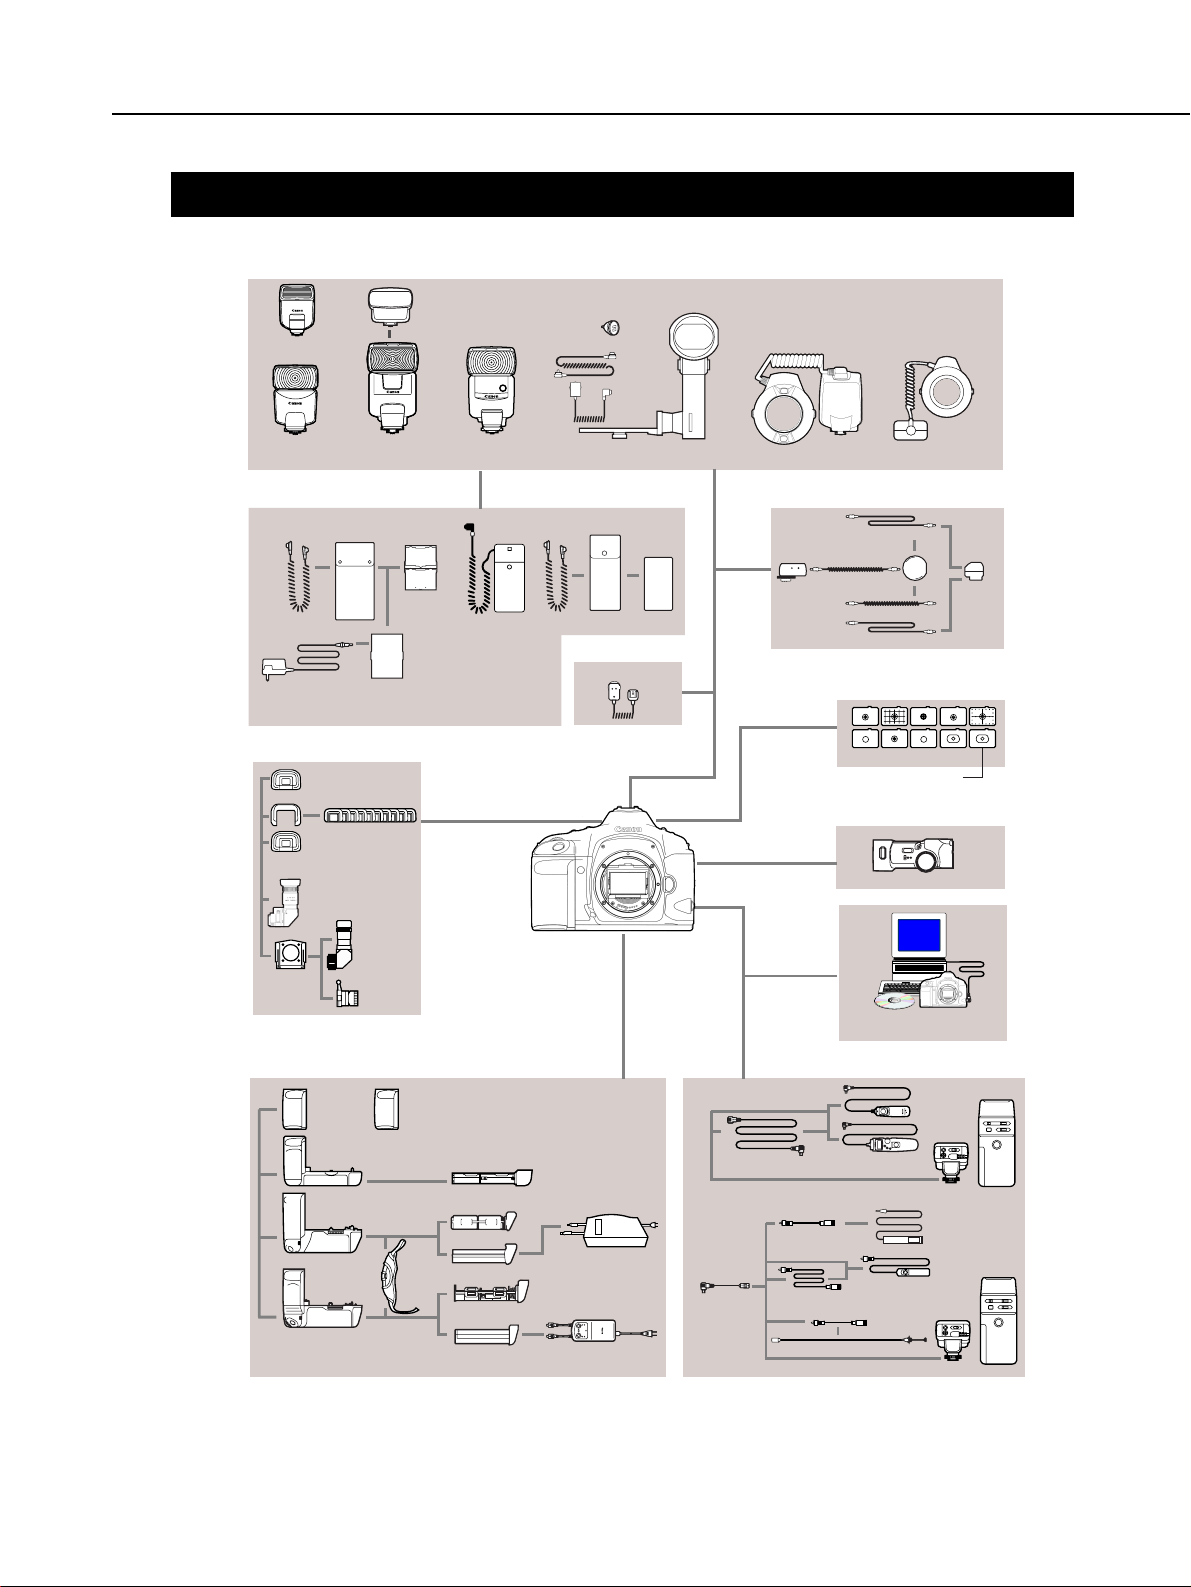
5. ACCESSORIES
Fig. 1-24 Compatible System Accessories
1-41
Part 1: General Information
Off-Camera Shoe Cord 2
Connecting
Cord EL
Slave Unit E
Connecting
Cord ET
Compact Battery
Pack CP-E2
Macro Ring Lite ML-3
MACRO RING LITE MR-14EX
Speedlite
480EG
Speedlite
540EZ
Speedlite
380EX
Speedlite
220EX
Off-Camera
Shoe
Adapter
OA2
TTL Hot Shoe
Adapter 3
TTL Distributor
Connector Cord 60
Connecting Cord 300
Connecting Cord 60
Connecting Cord 300
Sync Cord 480
(included with 480EG)
TTL Shoe Cord E
(included with 480EG)
High-Voltage Pack E315 Set (includes A, B)
Transistor Pack E Set
Battery Magazine (includes C, D, E)
Transistor Pack E Set
N-Cd Pack (includes C, D, F, G)
0210 High-Voltage
Battery
Battery
Magazine TP
Ni-Cd Pack TP
Ni-Cd Charger TP
F
G
E
A
C
D
B
Speedlite
Transmitter ST-E2
Speedlite
550EX
Dateback DB-E2
EOS Link Software ES-E1
Cable Release Adapter T3
Release 50
Remote Switch 60T3
Remote Switch RS-80N3
Timer Remote
Controller TC-80N3
Remote Switch 3
Wireless Remote Controller LC-3 Set
Extension Cord 1000T3
Extension Cord
ET-1000N3
Remote Switch
Adapter T3
Remote Switch
Adapter RA-N3
Wireless Controller LC-4 Set
Standard Grip Grip GR-E1
Battery Magazine BM-1
Battery Magazine E1
Battery Magazine BM-E2
Hand
Strap E1
Battery
Pack BP-E1
Power Drive
Booster E1
Power Drive
Booster PB-E2
Ni-Cd Pack E1
Nickel Hydride Pack NP-E2
Nickel Hydride
Charger NC-E2
Ni-Cd Charger E1
Angle Finder B
Angle Finder C
Magnifier S
Ec focusing screens
Eyecup Ec-II
Antifog Eyepiece Ec
Rubber Frame Ec
Dioptric
Adjustment Lens E
+ 3, + 2, + 1.5, + 1, + 0.5
0 , - 0.5, - 2, - 3, - 4
( )
Angle
Finder
Adapter EdII
Speedlites
Focusing Screens
Viewfinder Accessories
Remote Control UnitsGrips, Battery Packs, & Boosters
Dateback
Off-Camera Shoe
Speedlite Battery Packs
Multi-Speedlite System
EOS-1V
Japan Only
Image
EOS-1VCD-ROM
Communication
cable
Standard screen
Page 43
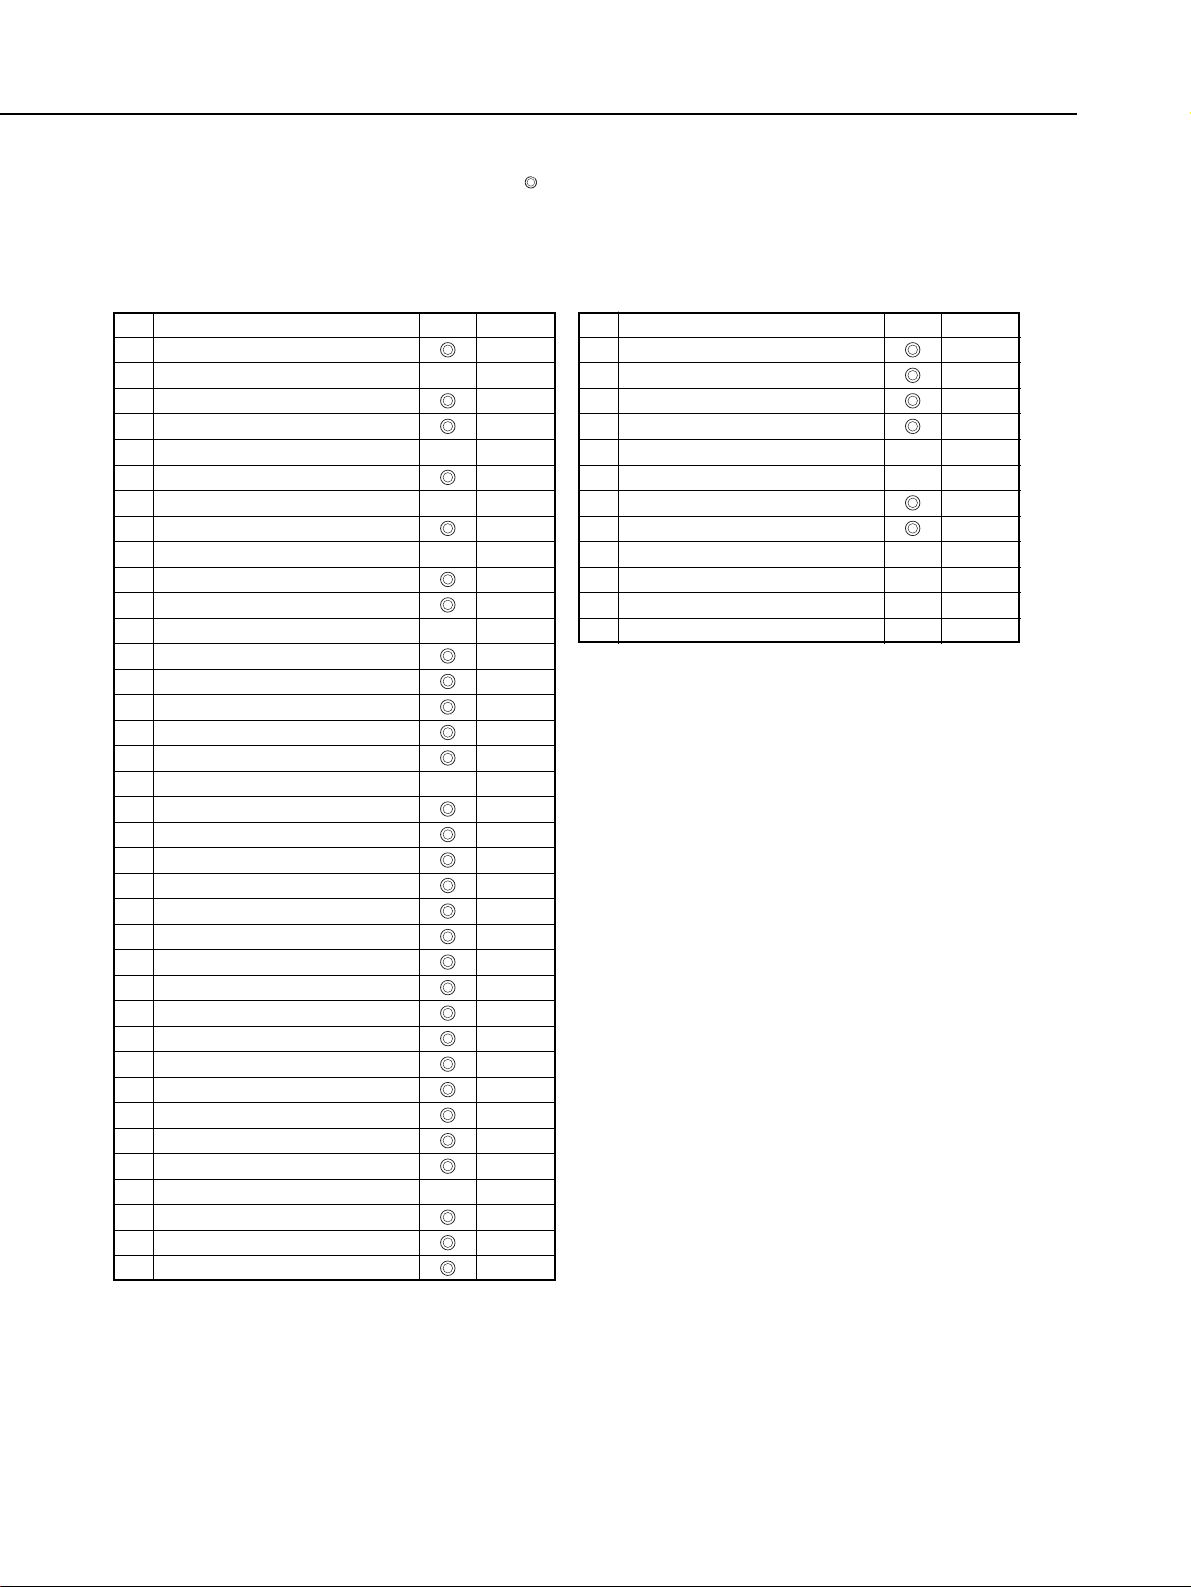
: Compatible.
●● : AF and EMD can be driven simultaneously.
● : Compatible under certain conditions.
✕ : Not compatible.
1. Compatible Single Focal Length Lenses
1-42
Part 1: General Information
No
1
2
3
4
5
6
7
8
9
10
11
12
13
14
15
16
17
18
19
20
21
22
23
24
25
26
27
28
29
30
31
32
33
34
35
36
37
Accessory
EF 14mm f/2.8 L USM
EF 15mm f/2.8 FE
EF 20mm f/2.8 USM
EF 24mm f/1.4 L
EF 24mm f/2.8
EF 28mm f/1.8 USM
EF 28mm f/2.8
EF 35mm f/1.4 L USM
EF 35mm f/2
EF 50mm f/1 L USM
EF 50mm f/1.4 USM
EF 50mm f/1.8
EF 50mm f/1.8II
EF 85mm f/1.2 L USM
EF 85mm f/1.8 USM
EF 100mm f/2 USM
EF 135mm f/2 L USM
EF 135mm f/2.8 SF
EF 180mm f/3.5 L USM MACRO
EF 200mm f/1.8 L USM & II USM
EF 200mm f/2.8 L USM & II USM
EF 300mm f/2.8 L USM & II USM
EF 300mm f/2.8 L IS USM
EF 300mm f/4 L USM
EF 300mm f/4 IS L USM
EF 400mm f/2.8 L USM & II USM
EF 400mm f/2.8 L IS USM
EF 400mm f/5.6 L USM
EF 500mm f/4 L IS USM
EF 500mm f/4.5 L USM & II USM
EF 600mm f/4 L USM & II USM
EF 600mm f/4 L IS USM
EF 1200mm f/5.6 L USM
EF 50mm f/2.5 MACRO
EF 100mm f/2.8 MACRO
MACRO PHOTO LENS MP-E 65mm F/2.8 1-5 ✕
TS-E 24mm f/3.5 L
Note
No
38
39
40
41
42
43
44
45
46
47
48
49
Accessory
TS-E 45mm f/2.8
TS-E 90mm f/2.8
Extender EF 2x
Extender EF 1.4x
Extension Tube EF12
Extension Tube EF25
Life-size Converter EF
Lens Mount Converter FD-EOS
Macro Lens Mount Converter FD-EOS
Close-up Lens 250D
Close-up Lens 500D
Close-up Lens 500
Status Note
*1
*1
*1
*1
*1
*1
*1 Compatible with the Laser Matte focusing
screen. With the New Laser Matte Ec-N and Ec-R
focusing screens, the exposure level may be
thrown off. Test shots are recommended.
●
●
●
●
●
●
Status
●●
●●
●●
●●
●●
●●
●●
Page 44
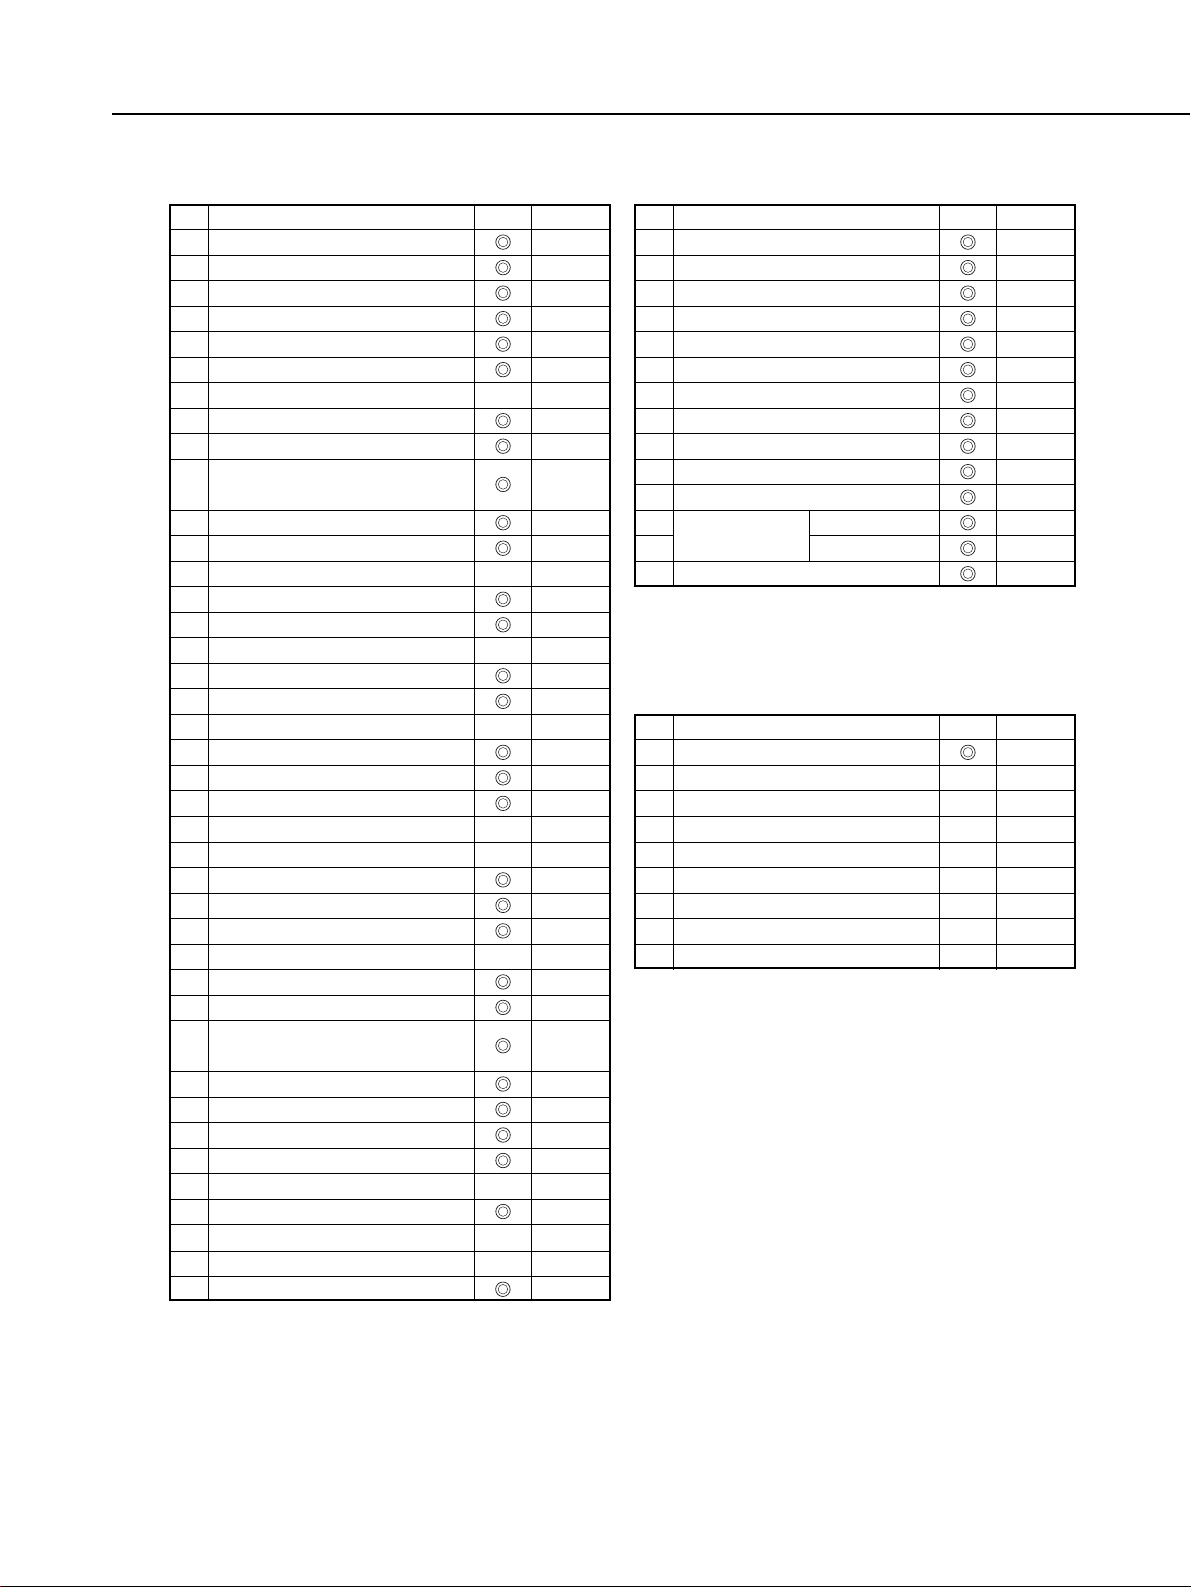
1-43
Part 1: General Information
2. Compatible Zoom Lenses
No
50
51
52
53
54
55
56
57
58
59
60
61
62
63
64
65
66
67
68
69
70
71
72
73
74
75
76
77
78
79
80
81
82
83
84
85
86
87
88
89
Accessory
EF 17-35mm f/2.8 L USM
EF 20-35mm f/2.8 L
EF 20-35mm f/3.5-4.5 USM
EF 22-55mm f/4-5.6 USM
EF 24-85mm f/3.5-4.5 USM
EF 28-70mm f/2.8 L USM
EF 28-70mm f/3.5-4.5 & II
EF 28-80mm f/2.8-4 L USM
EF 28-80mm f/3.5-5.6 & II
EF 28-80mm f/3.5-5.6 USM
& II & III & IV & V USM
EF 28-105m f/3.5-4.5 USM
EF 28-135mm f/3.5-4 IS USM
EF 35-70mm f/3.5-4.5 & A
EF 35-80mm f/4-5.6 & PZ & II & III
EF 35-80mm f/4-5.6 USM
EF 35-105mm f/3.5-4.5
EF 35-105mm f/4.5-5.6
EF 35-105mm f/4.5-5.6 USM
EF 35-135mm f/3.5-4.5
EF 35-135mm f/4-5.6 USM
EF 35-350mm f/3.5-5.6 L USM
EF 38-76mm f/4.5-5.6
EF 50-200mm f/3.5-4.5
EF 50-200mm f/3.5-4.5 L
EF 55-200mm f/4.5-5.6 USM
EF 70-200mm f/2.8 L USM
EF 70-200mm f/4 L USM
EF 70-210mm f/4
EF 70-210mm f/3.5-4.5 USM
EF 75-300mm f/4-5.6 & II & III
EF 75-300mm f/4-5.6 USM
& II USM & III USM
EF 75-300mm f/4-5.6 IS USM
EF 80-200mm f/2.8 L
EF 80-200mm f/4.5-5.6 & II
EF 80-200mm f/4.5-5.6 USM
EF 100-200mm f/4.5 A
EF 100-300mm f/4-5.6 USM
EF 100-300mm f/5.6
EF 100-300mm f/5.6 L
EF 100-400mm f/4.5-5.6 L IS USM
Status
●●
●●
●●
●●
●●
●●
●●
●●
●●
●●
Note
No
1
2
3
4
5
6
7
8
9
10
11
12
13
14
Accessory
550EX
Speedlite Transmitter ST-E2
220EX
380EX
540EZ
480EG system
430EZ
420EZ
300EZ
200E
160E
Macro Ring
Lite
Multi-Speedlite System (Wired)
ML-3
MR-14EX
Status Note
4. EOS Camera Cases
No
1
2
3
4
5
6
7
8
9
Accessory
EOS-3 case
EOS 650 & EOS 620 cases
EOS-1 cases
EOS 5/A2/A2E cases
EOS 100/ELAN cases
EOS 500/Rebel X cases
EOS-1N cases
EOS 50 E/ELAN II E cases
EOS IXE cases
Status
✕
✕
✕
✕
✕
✕
✕
✕
Note
3. Speedlites
Page 45
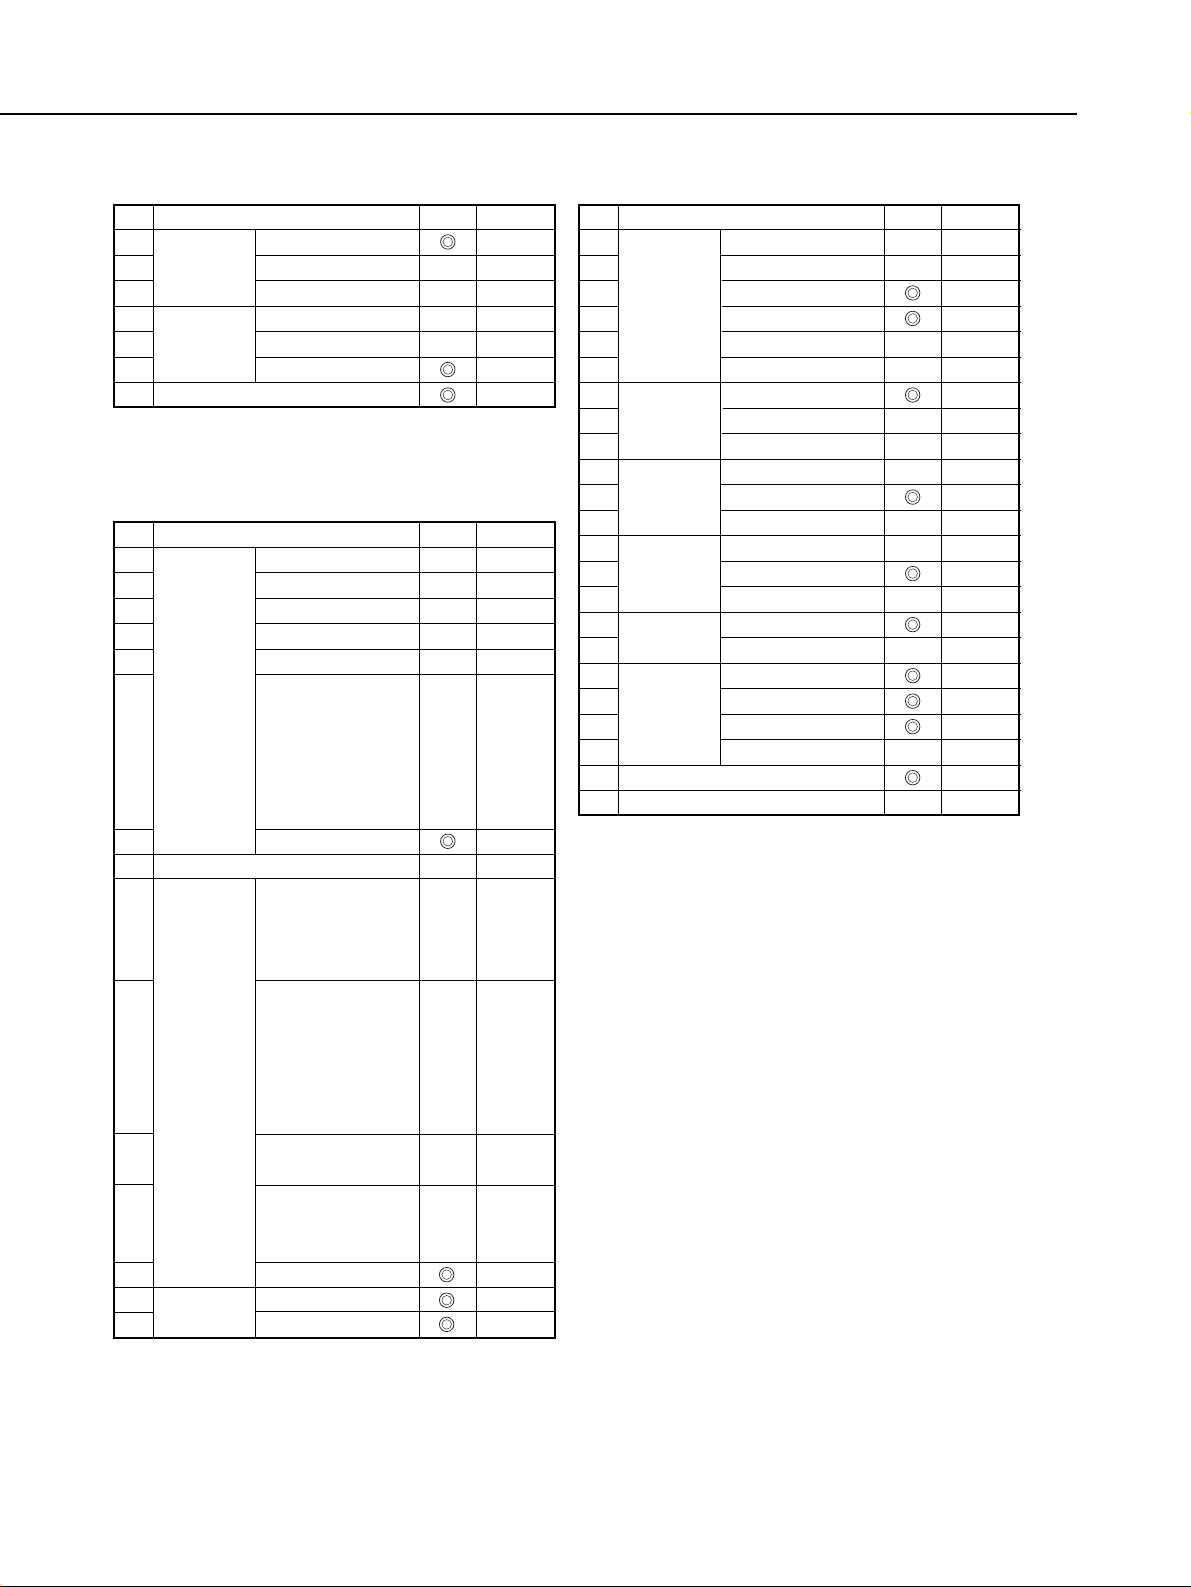
1-44
Part 1: General Information
No
1
2
3
4
5
6
7
Accessory
Remote
Switch
Remote
Controller
Timer Remote Controller TC-80N3
RS-80N3
60T3
RS-60E3
RC-1
LC-3
LC-4
Status
●
✕
✕
●
Note
*2
*2
No
1
2
3
4
5
6
7
8
9
10
11
12
13
14
15
Accessory
Grips
Battery
Pack
Power Drive
Booster
Vertical Grip VG10 (EOS A2/A2E/5)
GR10
GR20
GR50(EOS750,850)
GR60(EOS10)
GR70(EOS1000)
GR-80TP (EOS
Rebel X/Rebel
XS/500/Kiss,
888/5000, Rebel
G/500 N/New EOS
Kiss)
GR-E1
BP-5 (EOS
A2/A2E/5, Elan
II/Elan II E/50/50
E/55)
BP-8 (EOS Rebel
X/Rebel
XS/500/Kiss,
888/5000, Rebel
G/500 N/New EOS
Kiss)
BP-200 (EOS
Rebel 2000/300)
BP-50 (EOS Elan
II/Elan II E/50/50
E/55)
BP-E1 (EOS-1, 1N)
PDB-E1
PB-E2
Status
✕
✕
✕
✕
✕
✕
✕
✕
✕
✕
✕
Note
No
1
2
3
4
5
6
7
8
9
10
11
12
13
14
15
16
17
18
19
20
21
22
23
Accessory
Eyecup
Dioptric
Adjustment
Lenses
Rubber
Frame Eb
Focusing
Screen
Antifog
Eyepiece
Angle
Finder
Magnifier S
Eyepiece Extender EP-EX15
E (650,620)
Eb (750,850)
Ec (EOS-1)
Ec-II (EOS-IN)
Ed (EOS5,3)
Ed-E (EOS5,3)
E (10 types)
Ed (EOS5,55,3)
Ee (EOSIXE)
Eb
Ec (EOS-1)
Ed (EOS5,3)
E (7 types)
Ec (11 types)
Ed (6 types)
Ec (for EOS-1N)
Ed (for EOS-3)
C
B
Adapter Ed
Adapter EdII
Status
✕
✕
✕
✕
✕
✕
✕
✕
✕
✕
✕
✕
✕
Note
5. Remote Control
6. Grips and Motor Drives
7. Viewfinder Accessories
*2 Usable with the Remote Switch Adapter RA-N3.
Page 46
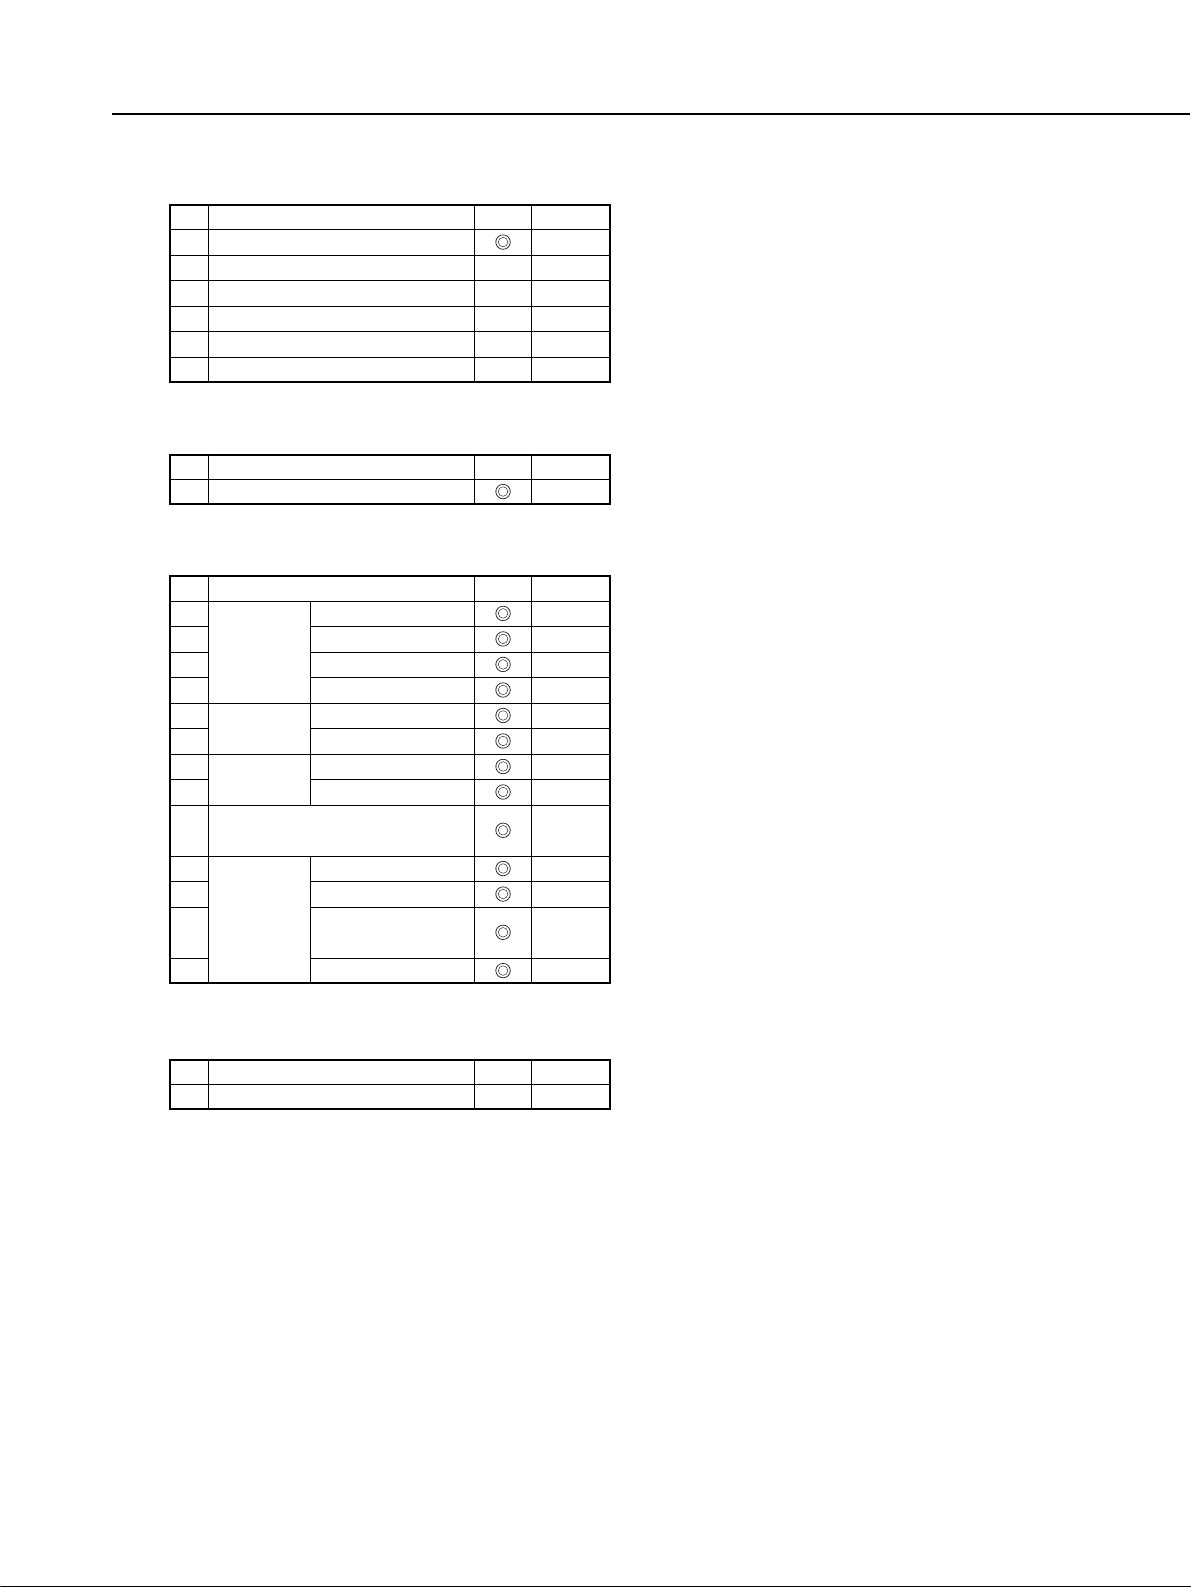
1-45
Part 1: General Information
10. Filters
No
1
2
3
4
5
6
7
8
9
10
11
12
13
Accessory
Circular
Polarizing
Filter
Drop-in Circular
Polarizing Filter
Drop-in Gelatin
Filter
Gelatin
Filter
Holder
Drop-in Threaded Filter Holder
52
PL-C52mm
PL-C58mm
PL-C72mm
PL-C77mm
PL-C52
PL-C48mm
Holder II
Holder 52
E52,58,72,77mm
III / IV
ADIII / IV
52,58,67,72,77mm
Hood III/IV
Status Note
8. Databacks
No
1
2
3
4
5
6
Accessory
Databack DB-E2
Quartz Dateback E
Technical Back E
Keyboard Unit TB
Interface Unit TB
Command Back EOS-1N
Status
✕
✕
✕
✕
✕
Note
9. PC Link
No
1
Accessory
EOS Link Software ES-E1
Status Note
11. Misc.
No
1
Accessory
Panorama Adapter PA-1000
Status✕Note
Page 47
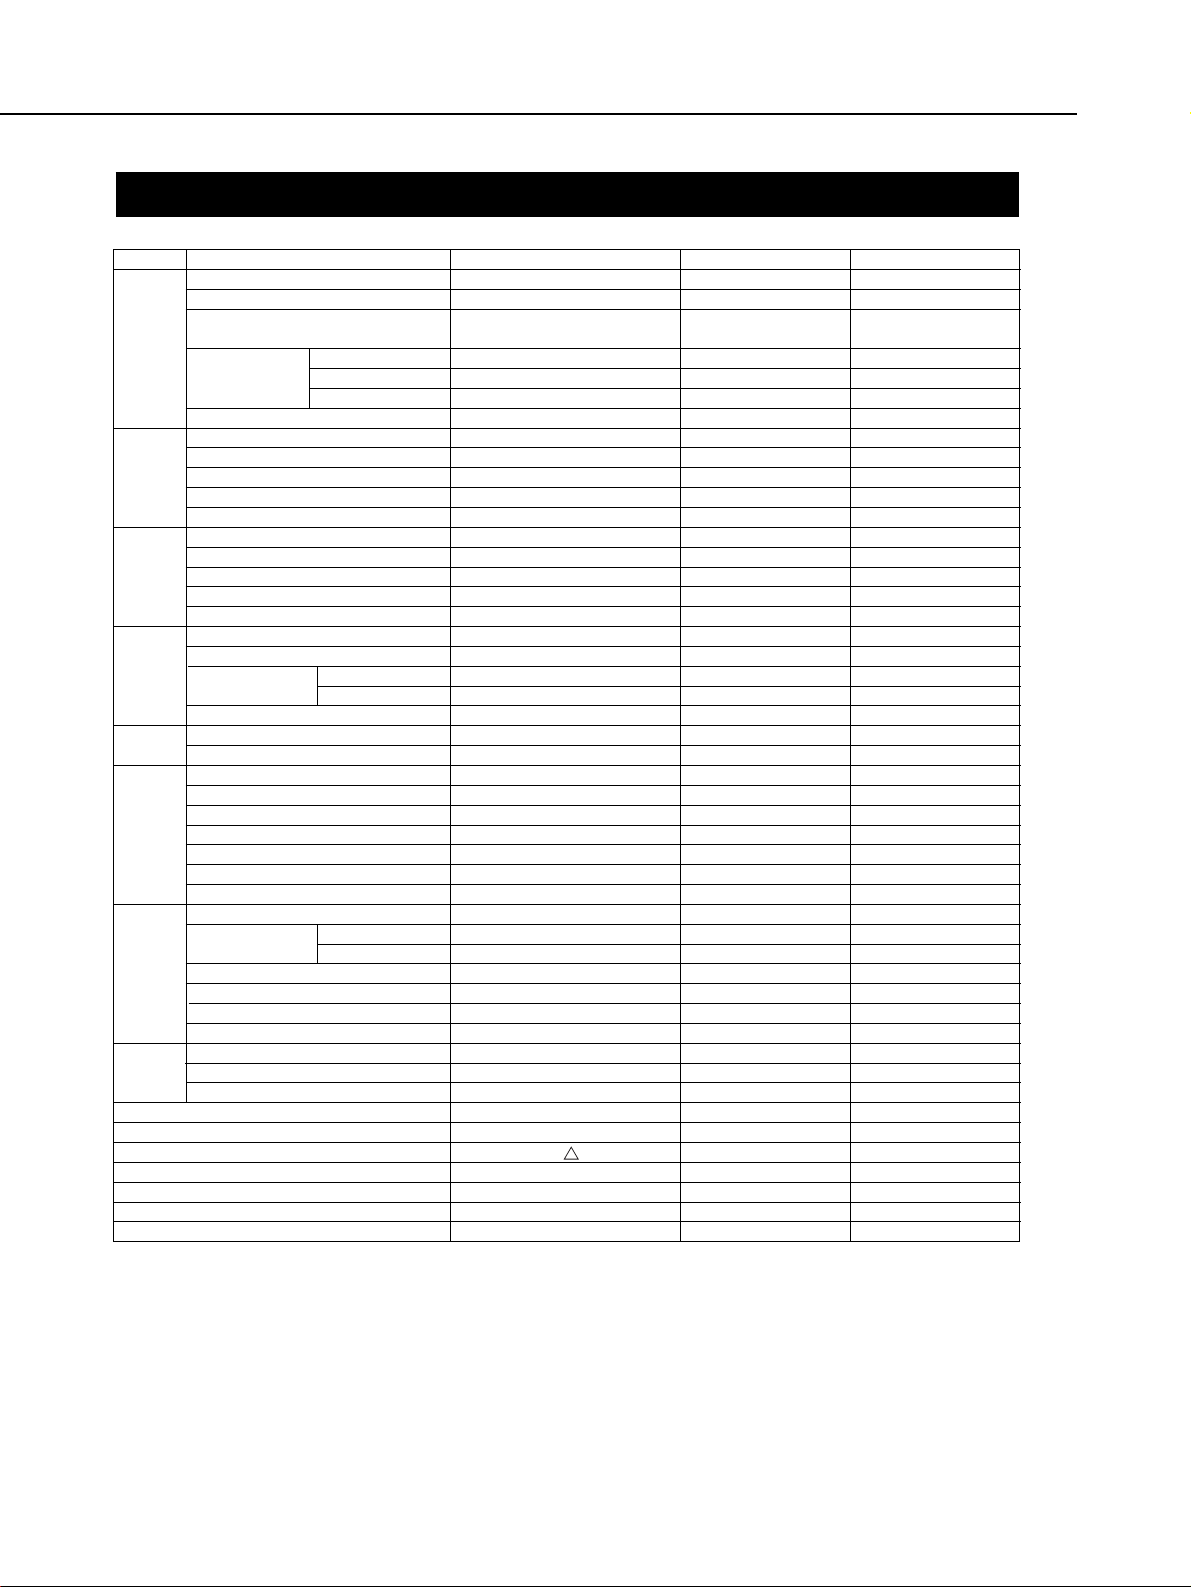
6. COMPARISON WITH COMPETING MODELS
1-46
Part 1: General Information
AF
View
finder
Metering
Exposure
Control
Shutter
Flash
Control
Film
Transport
Power
Source
Custom Functions/Groups
Shooting Data Recording/Viewing
Camera Control with PC
Dimensions (W
× H × D) (mm)
Weight (excluding batteries) g
Marketing Date
Price in Japan (yen)
Camera
Focusing Area
High-precision Focusing (f/2.8)
Predictive AF Performance at 50 kph
(300mm f/2.8)
Focusing Point
Selection
Working Range (EV)
Pentaprism
Coverage (%) / Magnification
Eye Relief (mm)
Dioptric Correction (dpt)
Eyepiece shutter
Evaluative
Centerweighted Averaging
Spot
Multi-spot
Metering Range (EV at 20°C)
Tv, Av, Program, M
Depth-of-field AE
Exposure Control
Multiple Exposures
Range
Durability
TTL Flash Control
Focusing Point Linkage
FP Flash
FE Lock
FEB
Flash Exposure Compensation w/Camera
Wireless Multi-Speedlites
Silent Film Advance/Rewind
Shooting Speed
(fps)
Rewind Time (36-ex.)
Infrared Film Compatibility
Battery Life (Rolls) at 20 C/Low C
Film ID Imprinting
Main Power Source
High-Speed Film Advance Power Source
Separate Battery Pack
EOS-1V
45-point Area AF
●● (7 points at center)
8 m, 9 fps
●● / ●●
●●
●●
0 - 18
Fixed pentaprism
100% / 0.72x
20
-3 to +1 dpt
●●
21
●●
●●
(11 points, linked to 9 points (2.4%)
●●
0 - 20
●●
●●
●● / ●●
±3, 1/3, <1/2>
●● (9)
30 sec. - 1/8000 sec., X-sync: 1/250 sec.
150,000 cycles
E-TTL, A-TTL, TTL
●● (21 zones or 3 zones)
●●
●●
●●
●●
●● Flash ratio range: 8:1 - 1:8
—/ ●●
3.5
10
8 sec. (Silent mode: 18 sec.)
●●
50 / 12 (-20°C)
●● (Built-in)
2CR5
Nickel hydride battery pack
2CR5 & size-AA × 4
20/3
●● / ES-E1
161 × 120.8 × 70.8
945
2000
Nikon F5
+ + +
—
8 m, 8 fps
●● / —
—
●●
-1 - 19
Interchangeable pentaprism
100% / 0.75x
20.5
-3 - +1
●●
1005
●●
●●
(linked to 5 points [1.5%])
—
0 - 20
●●
—
●● / ●●
±5. 1/3
●● (Unlimited)
30 sec. - 1/8000 sec., X-sync: 1/250 sec.
150,000 cycles
3D Multi-sensor BL
●● (5 segments)
●●
—
●●
—
—
●● / ●● (Manual)
3
8
4
●●
90 / 10 (-10°C)
With MF-28 back (sold separately)
Size-AA alkaline × 8
Nickel hydride battery pack
—
24 / 2
●● /with software and PC
●●
158 × 149 × 79
1210
1996.10
325,000
Minolta alpha 9
| + |
—
9 m, 4.5 fps
●● / ●●
—
●●
-1 - 18
Fixed pentaprism
100% / 0.73x
22.1
-3 - +1
●●
14
●●
●● (2.8%)
—
0 - 20
●●
—
●● / ●●
±3. 1/3
●● (Unlimited)
30 sec. - 1/12000 sec., X-sync: 1/300 sec.
100,000 cycles
Dual interactive
●● (4 segments)
●●
—
●●
●●
●●
Flash ratio: 2:1, 1:1, 1:2
—/ ●●
2
5.5
6
30 / 28 (-20°C)
With DM-9 back (sold separately)
CR123A × 2
—
CR123A, 2CR5, size-AA
21 / —
●●
/with software, PC, & camera
—
155 × 111 × 75
910
1998.09
250,000
Manual/Auto
Memory/Shift
Multi-point Tracking
Manual/AEB
Increments
Standard
Max. Speed
Item
–
–
* Settings in < > apply when a Custom Function is set.
Page 48
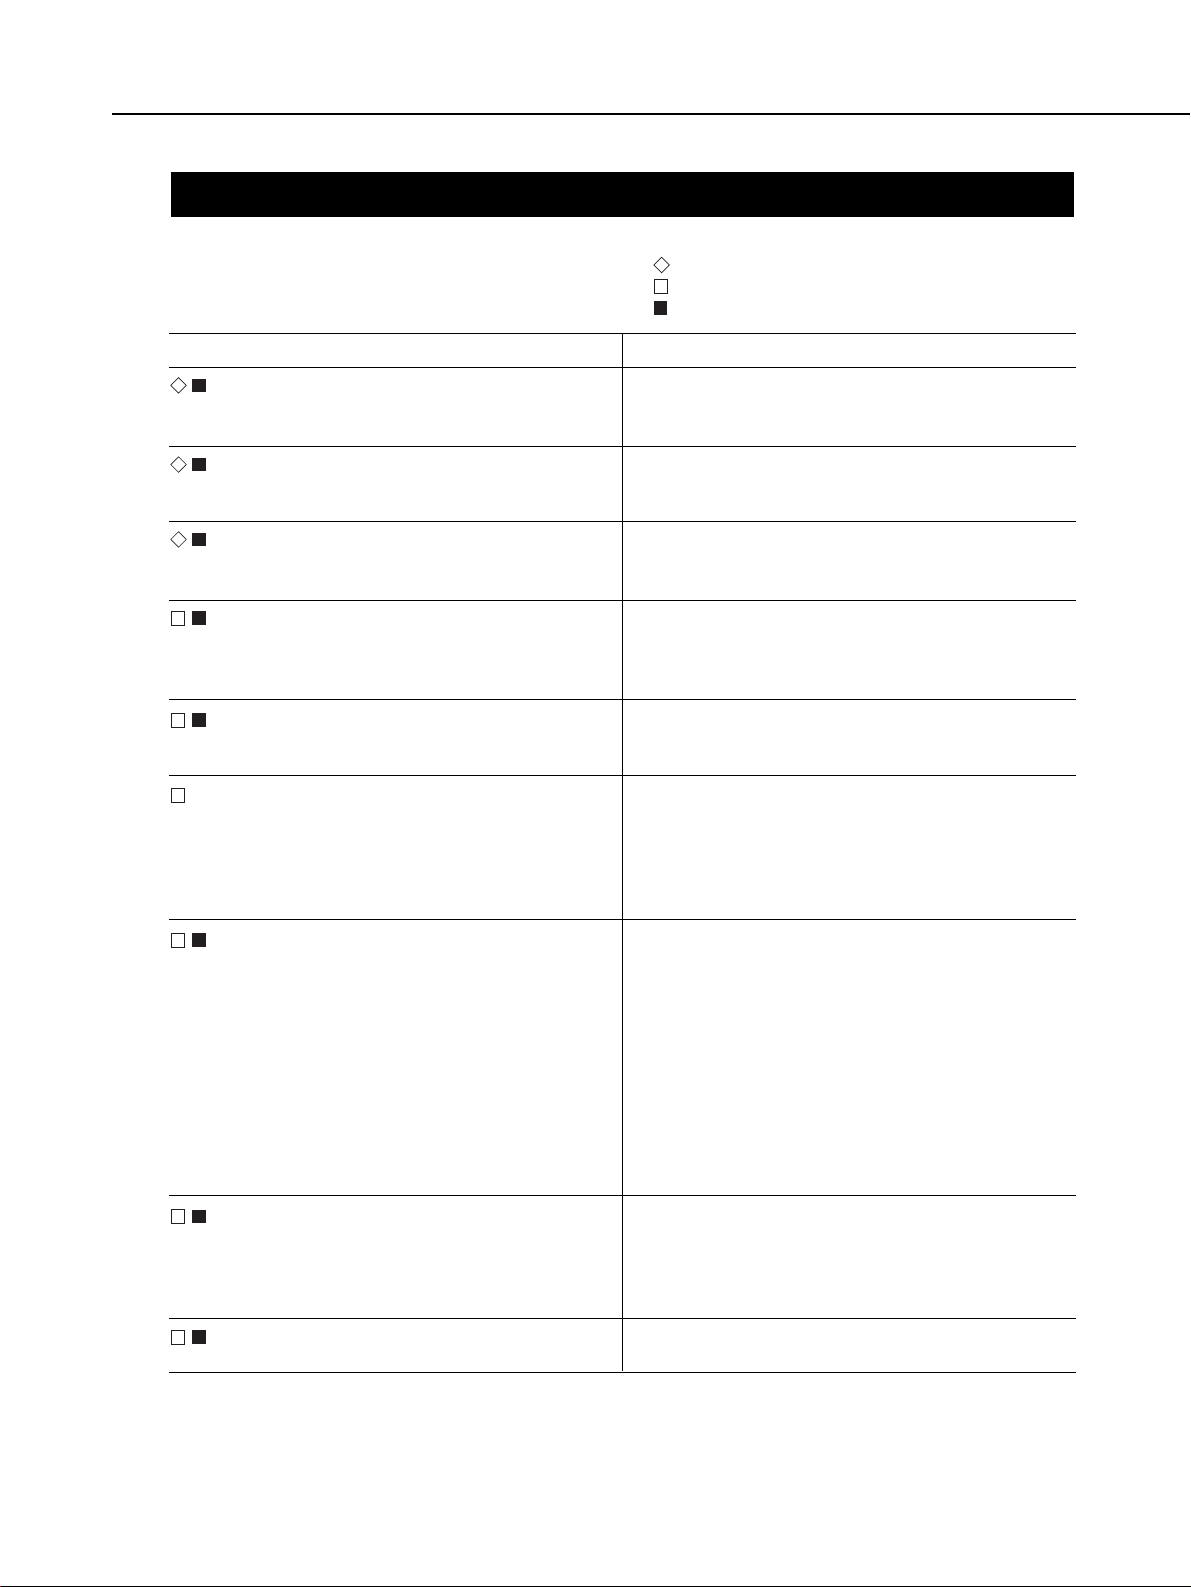
7. OPERATION CAUTIONS
1-47
Part 1: General Information
No. Cautions
1. Be sure to set CF-0 to either 0 or 1 to suit
the focusing screen.
2. For CF-0, the CF button must be held down
at least 2 sec. to set 0 or 1.
3. Even if the CLEAR button is pressed immediately after the CF button is pressed, CF-0
will not be cleared.
4. If CF-6-1 is set for whole-stop increments
with Tv and Av settings, the aperture reading
on the camera may differ from the
Speedlite's.
5. When CF-12-1 is set and mirror lockup is in
progress, do not point the camera toward the
sun or any other bright light.
6. When CF-12-1 is set and mirror lockup and
the self-timer are used together, the mirror
will lockup when the shutter button is
pressed completely the first time. After the
self-count, the film is exposed and the mirror
returns.
7. With CF-12-1's mirror lockup, self-timer, and
bulb exposure set together, the mirror will
lockup when the shutter button is pressed
completely the first time. After the self
count, the exposure starts (front curtain
starts). When the shutter button is released,
the exposure ends (rear curtain starts) and
the mirror returns. If the shutter button is
released from a complete pressing during
the self count, the shot will be canceled. The
shutter curtains close and the mirror returns.
The film does not advance.
8. When PB-E2 or PDB-E1 is attached to the
camera, align the positioning guide pin and
screw. Keep the camera bottom, PB-E2, and
PDB-E1 mounting surfaces parallel and
tighten the knob.
9. Do not touch the electrical contacts on the
PB-E2, PDB-E1, and EOS-1V.
Remarks
The camera has two types of compensation data to
suit the two types of focusing screens. Therefore, if
the setting is wrong, an exposure error will result.
CF-0 is for changing the focusing screen's compensation value and for preventing a wrong setting to be
set accidentally.
This prevents the focusing screen compensation data
from being cleared unnecessarily when the Custom
Function settings are cleared.
The accuracy of the information transmitted between
the camera and Speedlite is 1/8 stop. When a wholestop display is used, different readings may be
unavoidable.
This is to prevent burn-in of the shutter curtains and
light damage.
As per the design.
As per the design.
If the positioning guide pin is first inserted and then
the knob screw is aligned with the socket, proper
attachment will not result. The electrical contacts will
not connect properly and proper operation will not
occur.
Doing so may cause faulty connections and the camera may not operate properly.
: Items which are different from the EOS-1N's.
: Items which also apply to the EOS-1N.
: Items to be mentioned in the Instructions.
Page 49
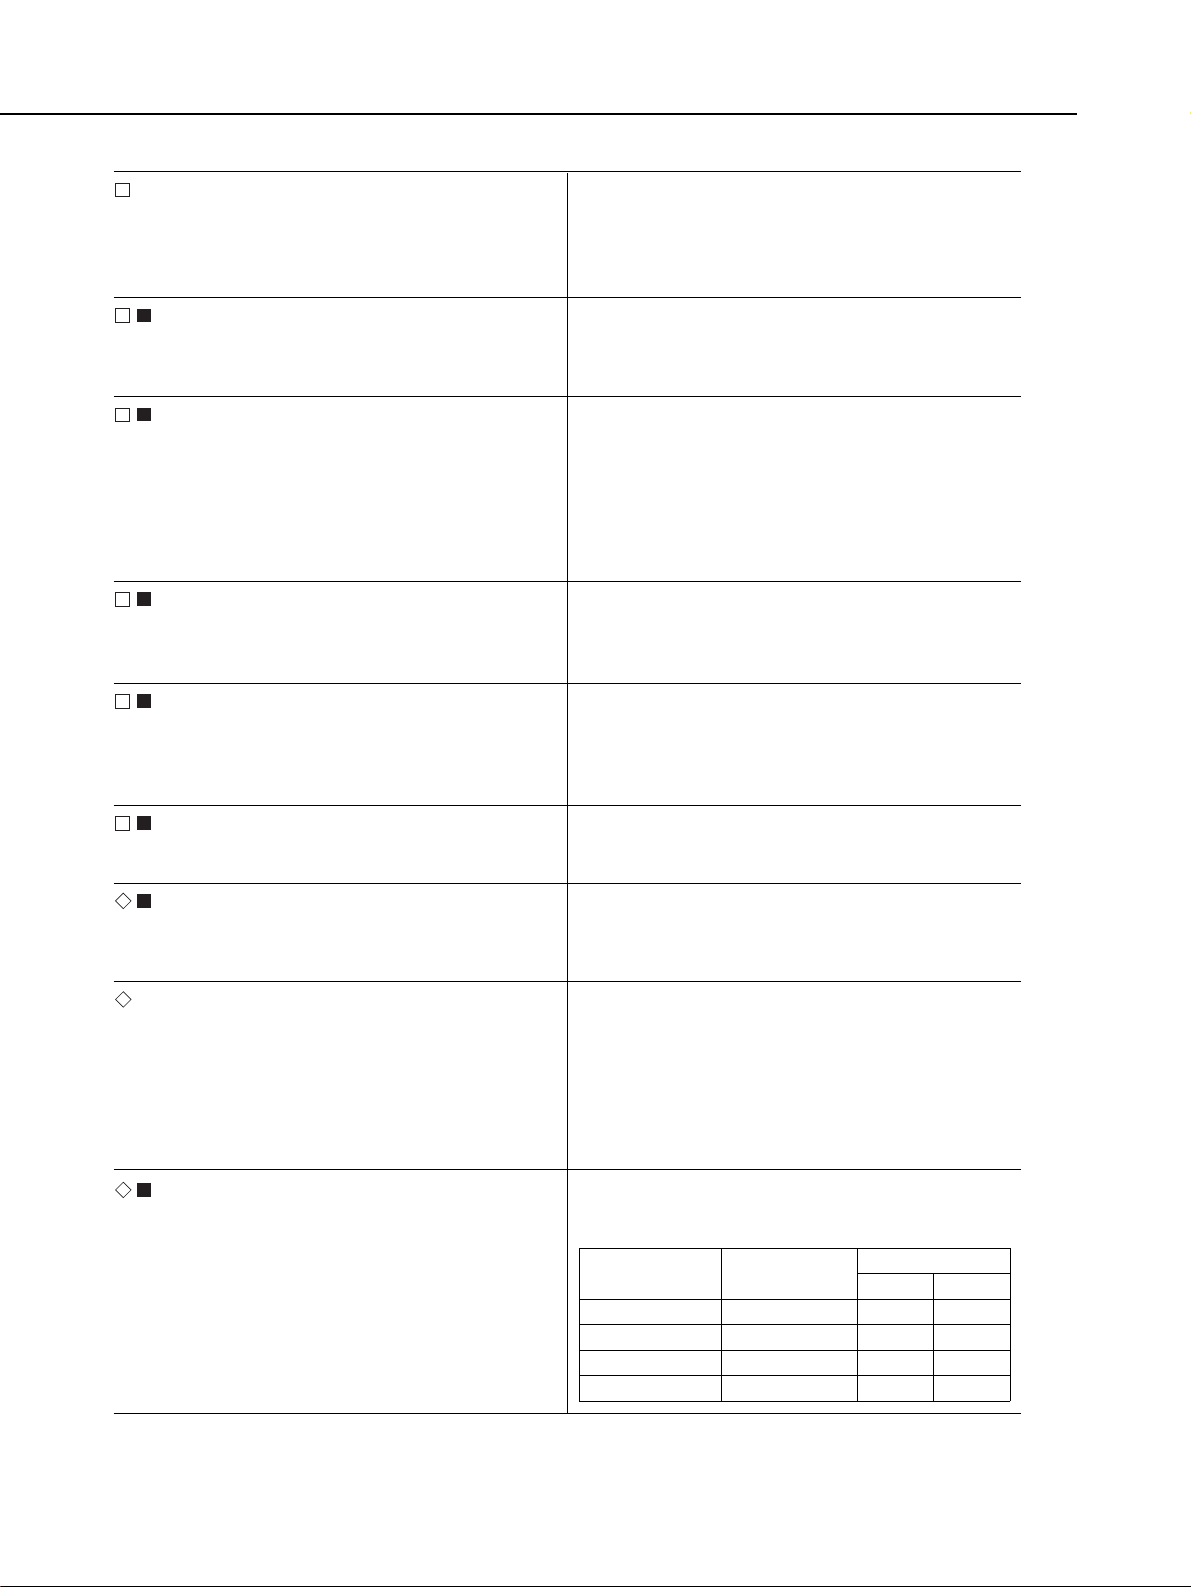
1-48
Part 1: General Information
10. When automatic focusing point selection,
AI Servo AF, and continuous shooting are
used in combination, the continuous shooting speed may become irregular if the subject moves to another focusing point.
11. With interchangeable focusing screens EcA, Ec-B, Ec-I, and Ec-L, only spot metering
or centerweighted averaging metering can
be used.
12. When using spot metering during continuous shooting, the first shot will be used for
AE lock and subsequent frames will be
based on the AE lock of the first image.
Even with single-frame shooting, pressing
the shutter button completely during film
advance will retain the previous AE lock
setting.
13. To remove the focusing screen from the
camera, turn the lens mount upward and
release the locks for the screen's frame.
14. If AI Servo AF is set for flash photography,
the Speedlite's built-in AF-assist beam will
not be emitted. (In the One-Shot AF mode,
the beam is emitted automatically when
necessary.)
15. When Battery Pack BP-E1 is attached,
size-AA lithium batteries cannot be used.
16. With the 550EX attached, the FEB shooting
sequence follows the 550EX's settings
instead of the CF-9 (AEB sequence
change).
17. The AEB sequence is different from the
EOS-1N's (including CF-9). The standard
sequence is 0, -, and +. With the Custom
Function, it is -, 0, +.
18. When date imprinting is enabled during continuous shooting, the continuous shooting
speed will be slower.
If the subject moves from one focusing point to
another, focusing might be disrupted for an instant. It
takes time to refocus. (Same as with EOS-1N).
The focusing screen's prism at the center is clear.
Therefore, evaluative, partial, focusing point-linked
spot metering (A0: center used) may result in error.
Designed to suit the actual picture-taking conditions.
It is not necessary to release the shutter button from
the halfway position first to take the next picture.
If the lock is released while the camera is upright on
a table, the screen will bound when it drops to the
replacement position. The resulting shock may cause
the screen to jump out.
Since it does not match predictive AF very well, this
has been incorporated in the design.
One-Shot AF is recommended for flash photography.
New lithium batteries initially have a high effective
voltage which may damage electronic circuits in cameras and lenses.
For flash exposure compensation, the Speedlite takes
priority. This is to prevent confusion on FEB and give
the Speedlite priority.
With the EOS A2/A2E/5 and later EOS cameras, the
AEB sequence starts with a correct exposure (0, -,
+). This gives the user a better chance of capturing a
great picture. The EOS-1N's AEB sequence is based
on the EOS-1's with -, 0, and +. There are plans to
apply this AEB bracketing sequence to APS cameras
as well. Canon's AEB bracketing sequence will be
standardized to 0, -, +.
This is due to the time it takes to imprint the date.
Approx. shooting speed (fps) with One Shot AF at
20°C with a new battery:
Film Speed
ISO 160 or higher
ISO 80-125
ISO 64 or lower
No imprinting
With EOS-1V Only
3.5
3.5
2.6
3.5
NP-E2
6
5
3
10
EOS-1V + PB-E2
BM-E2
6
5
3
6
Page 50
1-49
Part 1: General Information
19. When the focusing point is camera-selected (automatic), focus aid will apply only to
the center focusing point.
20. If the 550EX, MR-14EX fails to recharge
fast enough during continuous shooting
with FEB, the shutter release locks. After
the shutter button is released from the fully
depressed position, AE metering takes
effect before the flash is ready.
21. If the lens focal length is 85mm or longer,
the 550EX and ST-E2's AF-assist beam
pattern spacing will look wider. Therefore,
some of the 45 focusing points will not be
covered by the AF-assist beam.
22. When the camera is shaken, the camera
orientation switch will make a sound.
23. With a EF 70-200mm f/2.8L USM and EXT.
1.4x attached to the camera, the center
focusing point must be used for AF.
24. To register a focusing point, the Assist button and FE lock button are pressed simultaneously. In this case, the Assist button
should be pressed before the FE lock button.
25. If the film ID No. has been imprinted on
slide film and you want the slides to be
mounted, be sure to request the lab to
return the film leader together with the
mounted slides. Some labs discard the film
leader.
26. In low temperatures, imprinting the film ID
takes longer. Since taking a picture while
the film ID is being imprinted (indicated by
the ID mark displayed on the LCD panel)
may prevent the ID from being imprinted,
you must wait until the ID mark turns off.
From the time the camera back is closed
and the imprinting is completed, it takes a
maximum of about 2 sec. in -10°C and
about 8 sec. in -20°C.
27. If the shutter button is pressed completely
while the film ID is being imprinted, the
imprinting will be canceled and frame 1 will
be exposed.
Sometimes the user will not know which focusing point
is active.The wrong focusing point might also be
active. Focus aid fixed at the center focusing point is
therefore best.
Normally, AE metering takes effect if the Speedlite is
not ready. If during FEB continuous shooting the flash
fails to recharge and AE takes immediate effect, the
AE-metered picture in the shooting sequence would
look unnatural.
The center focusing point must be selected for focusing.
As per the design.
Although focusing is possible at all 45 focusing
points, the focusing precision is guaranteed only at
the center focusing point.
During AE, either button may be pressed first.
However, when a Speedlite is used and the flash is
ready, pressing the FE lock button first will result in
FE lock and the focusing point selection mode will be
canceled. The focusing point will not be registered.
In low temperatures, the response of the liquid crystal
is slower. Film ID imprinting is assured from -10°C to
45°C.
Due to shutter release-priority, pressing the shutter
button overrides the film ID imprinting.
Depending on the timing of the shutter release, the
film ID imprinting might be light or indiscernible. At 20
C, imprinting is completed within 180 ms after the film
loads. Therefore, there is hardly any waiting time until
the imprinting is completed and frame 1 can be
exposed almost immediately.
Page 51
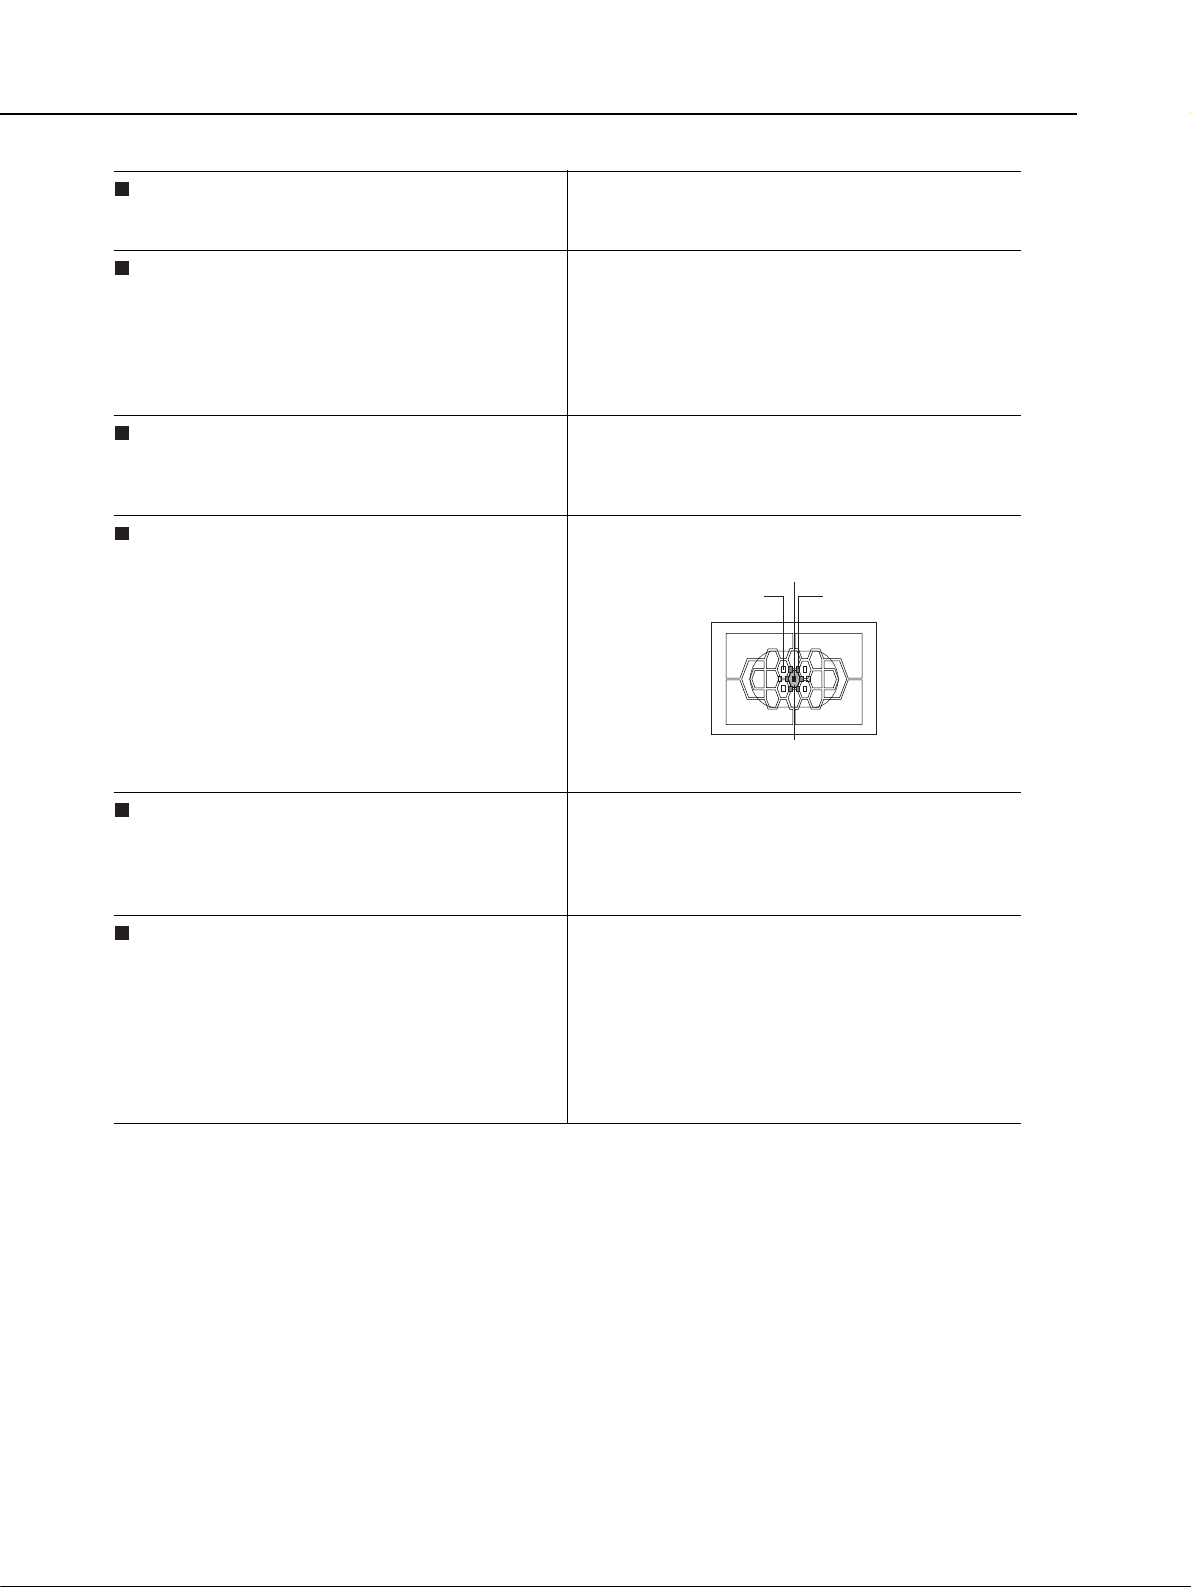
1-50
Part 1: General Information
28. Although infrared film can be used with the
camera, slight fogging will occur along the
edges outside the picture area.
29. Be aware that the Ec-N (standard on the
EOS-3) focusing screen looks the same as
the EOS-1V's standard focusing screen
even though the former is a New Laser
Matte screen and the latter is a Laser
Matte screen. Be sure not to set the wrong
CF-0 setting.
30. If a roll of film already partially exposed
with the EOS-1V is rewound in midroll and
then reloaded in the EOS-1V again, a new
film ID will be imprinted over the old one.
31. When CF-13 and CF-17 have been set and
focus is achieved with a focusing point
other than the one selected, spot metering
might not cover the subject whose magnification is low. The same applies to center
spot metering and CF-17.
32. Do not attached the EOS-1V's camera
back to the EOS-3.
33. C.Fn-0 cannot be registered in a Custom
Function group.
As per the design.
The EOS-1V's standard focusing screen can be distinguished by the C III mark on the protruding tab.
The camera cannot distinguish between a new roll of
film and a partially exposed one.
Fig. 23 Spot metering with CF-17 focusing point
The camera back's inner part will hit against the EOS3's film transport detector and the camera will be
unable to close completely. The camera back also cannot be attached to the EOS-1 and EOS-1N due to the
different hinge length.
The EOS-1V's C.Fn-0 is set to C.Fn-0-1 as the
default setting to suit the standard Lasermatte focusing screen that comes with the camera. However,
when the Custom Functions are reverted to the
default settings with the EOS Link Software ES-E1,
they will all be C.Fn-*-0. So if the user forgets to set
C.Fn-0-0 back to C.Fn-0-1, exposure error will occur.
This is prevented by excluding C.Fn-0 from any
Custom Function group.
Selected focusing point
Focusing point range
expanded with CF-17-1.
Focusing point range
expanded with CF-17-2.
Spot metering area
Page 52

1-51
Part 1: General Information
The following must be mentioned in the EOS Link Software ES-E1 Instructions.
34. All 20 optional shooting data items cannot
be selected and stored.
35. Before the date and time can be set with
the EOS-1V, the date and time must be set
with the EOS Link Software ES-E1 the first
time.
36. Although the year is recorded in four digits
according to the Gregorian calendar, the
EOS-1V can only set the year with the last
two digits.
37. To store date-related shooting data, the
date must be set beforehand.
38. If the number of multiple exposures is
extremely large, data can be recordable for
fewer subsequent rolls of film.
As per the design.
Since this feature is only for EOS Link Software ESE1 users, the date and time must initially be set with
EOS Link Software ES-E1. Otherwise, the date setting mode cannot be set even when the menu button
is pressed.
The LCD panel's two-digit aperture display is used to
display the year.
The date is not set upon shipment.
Shooting data is recorded for each multiple exposure.
For example, if 36 multiple exposures are taken for
one frame, the amount of data recorded will be the
same as for a 36-exposure roll of film.
 Loading...