

Canon EOS 1, EOS-1 N HS Instructions Manual

E
English Edition
INSTRUCTIONS
00. Part.0 RS (E) (P.01~12) 27-01-2003 11:51 Page 1

Welcome to the World of the EOS-1 N, The Flagship Camera of the EOS Series
2
Thank you for selecting a Canon EOS camera.
Thousands of professional photographers throughout the world are devoted users of the EOS-1 — a flexible, high-precision tool responsible for
recording on film countless decisive moments and masterpieces of photographic art. The EOS-1 N continues the EOS-1 tradition and extends the
state of the art even further by combining all of the superb features of the
EOS-1 with several new functions and mechanisms requested by EOS-1
users to create the ultimate professional photographic tool.
New Features include:
1. Advanced Multi-BASIS AF (autofocus) sensor with five selectable
focusing points for wide-area coverage.
2. Improved focus prediction and object tracking performance.
3. Improved shooting speed (up to 6 frames/sec. with Power Drive
Booster E1).
4. Choice of five metering patterns, including 16-zone evaluative, center-weighted average, 9% partial, 3.5% spot metering linked to
each focusing point, and 2.3% fine spot metering.
5. Enhanced multiple-zone TTL flash sensor plus built-in flash exposure compensation control up to ±3 steps in 1/3-step increments.
6. Silent drive mechanism for super-quiet film rewinding.
7. Improved and expanded custom functions for greatly enhanced
operational flexibility, letting you customize many facets of the camera's operation to match your shooting style. New custom functions
include:
• Choice of silent or high-speed rewind
•Mirror lock
• Flash output reduction control
• Ability to set shutter speeds and aperture values in 1-step, 1/2-step or
1/3-step increments
• Ability to select individual focusing points with quick control dial
• Ability to change AEB exposure order and prevent cancellation
8. Built-in eyepiece shutter.
00. Part.0 RS (E) (P.01~12) 27-01-2003 11:51 Page 2

3
The EOS-1 N family consists of the following three models in addition to
the standard model:
• EOS-1 N DP: This model combines the BP-E1* AA-size battery pack with the
EOS-1 N, allowing the user to switch between the standard
2CR5 lithium battery or AA-size batteries depending on the
shooting situation. (Refer to page 93.)
• EOS-1 N HS: This model combines the Power Drive Booster E1* with the
EOS-1 N, providing high-speed continuous shooting and
increased shooting capacity. (Refer to page 96.)
• EOS-1 N RS**:
This model features a non-moving, hard-coated new pellicle mirror
which provides non-interrupted viewing through the viewfinder and
rapid-fire continuous shooting at 10 frames/sec. Moreover, the
camera’s release time lag (the time between when the shutter button is pressed and when the exposure occurs) is reduced to a
mere 0.006 sec. (Refer to page 100.)
* BP-E1 and Power Drive Booster E1 must be purchased separately in North America.
**The EOS-1 N RS is scheduled for availability in Spring 1995.
● General Precautions
• Before an important event such as a trip or wedding, be sure to test the camera to make
sure it is operating correctly.
• The
EOS-1 N will give optimum performance together with exclusively designed Canon
EF lenses, flash and other Canon brand accessories. It is possible that the use of incompatible lenses or other accessories may result in unsatisfactory performance or damage to
your EOS-1 N. We therefore suggest the use of Canon EF lenses and accessories.
Damage to your Canon camera as a result of malfunction or improper connections caused
by the use of incompatible products may void its warranty.
●
Throughout this manual special precautions relating to the various camera
operations are enclosed in boxes marked with the following symbols.
: Cautionary measures to ensure proper camera use and prevent undesired
results or malfunction.
: Reference information for helping you gain maximum functionality from your
camera.
:
Helpful hints for using your camera productively and with maximum efficiency.
• To keep your camera in top working condition, be sure to read the Camera Care
and Precautions section on page 6.
• After reading this manual, store it in a convenient place that is quick and easy to
access when necessary.
00. Part.0 RS (E) (P.01~12) 27-01-2003 11:51 Page 3

IV Configuring the
Camera
1. Setting and Resetting Custom
Functions...............................82
●
Setting a Custom Function
.....82
Additional Information for the
EOS-1 N DP Model
........................93
Additional Information for the
EOS-1 N HS Model
........................96
VI Custom Functions
VUsing Flash
1. Selecting the Five Focusing
Points ( ) ............................29
● Selecting a Focusing
Point ..................................29
● Focus Lock ........................31
2. Selecting the AF Mode..........32
● One-Shot Autofocus ..........32
II Selecting the AF and
Metering Modes
I Shooting Preparations
and Basic Operation
● Attaching the Strap ............13
1. Loading the Battery ...............14
2. Checking the Battery Level
(Film Shooting Capacity).......15
3. Operating the Main Switch ....16
4.
Setting and Adjusting Basic Functions
.17
Camera Care and Precautions
..........6
1.
Handling, Cleaning and Storage
.......6
2.
Liquid Crystal Display Information
........7
1. Shutter-priority AE [Tv]..........49
2. Aperture-priority AE [Av] .......52
3. Depth-of-Field AE [DEP] .......55
● Using Manual Focusing
1.
Manually Setting the Film Speed
.....66
2.
Changing the Film Winding Mode
....67
●
Film Winding Automatic Gear
Switching Function
................68
●
Maximum Continuous Shooting
Speed in Different AF Modes
1.
Using EOS Dedicated Speedlites
....77
● Automatic Flash Output
Reduction Control ..............77
III Selecting the Shooting
Mode
4
•
New functions appearing on the EOS-1 N for the first time are indicated by an ( ). If you
are already familiar with the operation of the EOS-1, you can quickly familiarize yourself with
the EOS-1 N by just reading the text sections indicated by an ( ).
00. Part.0 RS (E) (P.01~12) 27-01-2003 11:51 Page 4
Exposure Compensation
.......79
3. Using Non-dedicated Flash
Equipment .............................80
● Combined Use of Custom
Functions F-5 and F-11 .....92
Program Line Characteristics
........108
Specifications............................109
Quick Guide to EOS-1 N Functions
...115
● Removing Film...................25
●
Removing Film in Mid-Roll
( )25
9. Custom Functions .................25
10. Program AE mode [P] ...........26
● Program Shift Function ......27
●
Remaining Frame Counter
.....27
5. Lens Attachment
.....................
18
● Removing the Lens............18
6. Dioptric Adjustment ...............19
7. Shutter Button Operation
and Autofocus .......................20
8. Film Loading..........................22
3. Blinking “ ” Display ..............7
4. Battery Information..................8
● Partial Metering ( ) .........38
● Fine Spot Metering
()().............................39
6. AE Lock.................................40
7. Exposure Compensation.......42
8. Auto Exposure Bracketing
[AEB].....................................45
5. Bulb Exposure [ ] ...........61
6. Multiple Exposures ( ) .......63
5.
Locking the Mirror Up
()........72
6. Infrared Photography ............73
7.
Checking the Depth of Field
......74
8.
Illuminating the LCD Panel
........74
9. Resetting the Camera to Its
Initial Settings........................75
5
● AI Servo Autofocus ............33
3.
Difficult Subjects for Autofocus
..34
4. Manual Focusing...................36
● Full-time Manual Focusing
with USM Lenses...............36
5.
Selecting the Metering Mode
.....37
●
Evaluative Metering
()........38
Point Selection Mode.........55
●
Using Automatic Focusing
Point Selection Mode
..........57
4. Manual Exposure [M] ............59
(frames/sec.)
........................68
3. Changing the Film
Rewinding Mode ( )............69
4.
Using the Self-Timer
().......70
● Using the Eyepiece
Shutter ( ) .......................71
2. Flash Exposure Compensation
().......................................78
●
Speedlites Capable of Flash
● Resetting a Custom
Function .............................83
2.
Custom Function Chart
().......84
Attaching the Standard Grip
............99
Additional Information for the
EOS-1 N RS Model...................100
Troubleshooting ........................106
5. Camera Operation with a Low
Battery ....................................8
Nomenclature ...............................9


Camera Care and Precautions
6
1. Handling, Cleaning and Storage
• This camera is a high-precision instrument. Be careful not to drop it or subject
it to shock.
• The Canon EOS-1 N has been designed for increased resistance to moisture.
However, this camera is not waterproof and must therefore be handled with
reasonable care. Keep the camera out of salt spray and protect it from excessive moisture. If used at the beach, clean it thoroughly afterward with a dry
cloth. If dropped in water, contact an authorized Canon service facility.
• This camera contains high-precision circuits. Do not attempt to disassemble
the camera yourself. Always take it to an authorized Canon service facility for
repair.
• Do not touch the camera’s electronic contacts with your fingers. Touching the
contacts can cause corrosion and affect proper camera operation.
• After removing a lens from the camera, place it face down on a flat surface to
avoid damaging the electronic contacts on the lens mount.
• Condensation is a problem when bringing cold equipment into a warm place.
If the autofocus optics cloud over, accuracy may be seriously affected. Before
entering a warm place, put equipment in a plastic bag so condensation forms
on the outside of the bag.
•
To remove dust from the lens, viewfinder eyepiece, mirror, focusing screen or
film chamber, gently blow the dust away using a commercially-available bulbtype blower. Avoid directly touching any of these surfaces. Do not wipe the
camera body or lens with any type of cleaner containing organic solvents.
When further cleaning is necessary, consult your nearest Canon service center.
• The shutter curtain operates with extremely high precision and can be easily
damaged if touched. When loading or unloading film, be careful not to touch
the shutter curtain accidentally with your finger or the tip of the film. To
remove dust from the shutter curtain or surrounding area, only use a blower
and be careful not to blow air onto the curtain too strongly. Strongly blowing
air onto the curtain may deform or damage it. Aerosol spray dust removers
are not recommended for the shutter curtain.
• When storing the camera, wrap it in a clean, soft cloth and place it in a wellventilated, cool, dry, dust-free place. Be sure to keep the camera out of direct
sunlight, and away from “hot spots” such as the trunk or rear window shelf of
a car. Avoid places where moth balls are used, and in extreme humidity, use
a desiccant. To prevent corrosion, avoid storing the camera in a laboratory or
other location where chemicals are used. Also, do not store the camera in a
drawer or other non-ventilated place. Remove the battery if you do not expect
to use the camera for about three weeks or longer. It is also recommended to
take the camera out and release the shutter occasionally to prevent build up
of mold or corrosion.
00. Part.0 RS (E) (P.01~12) 27-01-2003 11:51 Page 6

Camera Care and Precautions
7
•A minute amount of battery power is used for the display even when the main
switch is set to . This does not affect the camera’s shooting capacity (number of film rolls possible per battery).
• Carefully check the camera’s operation after lengthy storage. When the camera has not been used for a long time, or before an important trip or shooting
assignment, we recommend having the camera thoroughly tested at a Canon
service center.
2. Liquid Crystal Display Information
The LCD panel uses liquid crystal to indicate camera settings. Due to the characteristics of the liquid crystal, the display may become difficult to read because of its
life span which varies according to the condition of use. If this occurs, have it
replaced at an authorized Canon service facility. Replacement is at the owner’s
expense in case of out of warranty term.
Liquid crystal may also respond relatively slowly in temperatures below 32°F/0°C. It
may also darken in temperatures of around 140°F/60°C. The LCD panel will return
when the temperature returns to normal.
3. Blinking “ ” Display
There are two conditions in which the blinking “ ” will appear in the LCD panel:
(1) when the battery is nearly exhausted or (2) when the camera’s self-test process
detects an internal malfunction. If the blinking “ ” indicator appears, perform the
following operations:
1. Press the battery check button to check the battery level. If the battery level is
low, replace the battery with a new one.
2. If the indicator shows a sufficient battery level, remove the battery, wipe the battery terminals and reload it.
3. Release the shutter once.
If the “ ” display stops blinking, the problem is corrected and you can continue using the camera normally. If the blinking does not stop, the camera needs to
be examined by an authorized Canon service facility.
00. Part.0 RS (E) (P.01~12) 27-01-2003 11:51 Page 7

Camera Care and Precautions
8
4. Battery Information
This camera requires battery power for operation. Always check the battery at the
following times:
1. When loading a new battery
2. After lengthy storage
3. If the shutter will not release
4. In cold weather
5. Before an important shooting assignment
• Wipe the battery terminals with a clean, dry cloth to ensure proper contact.
• The battery may explode or cause burns if disassembled, recharged, shorted,
exposed to high temperatures, or disposed of in fire. Be sure to observe all precautions indicated on the battery package. Always keep batteries out of the
reach of children.
• Lithium battery performance deteriorates slightly in temperatures below
0°C/32°F. Keep the camera and especially a spare battery close to your body or
in an inside pocket to keep it warm until use.
5. Camera Operation with a Low Battery
Even if the battery indicator blinks or does not appear in the LCD panel during battery check, exposure will be correct as long as the shutter releases. When the battery power drops below a certain level, film advance and rewinding stop operating
and “ ” blinks in the display. Film winding automatically resumes after a new
battery is loaded. To resume rewinding, press the film rewind button ( ).
00. Part.0 RS (E) (P.01~12) 27-01-2003 11:51 Page 8
9
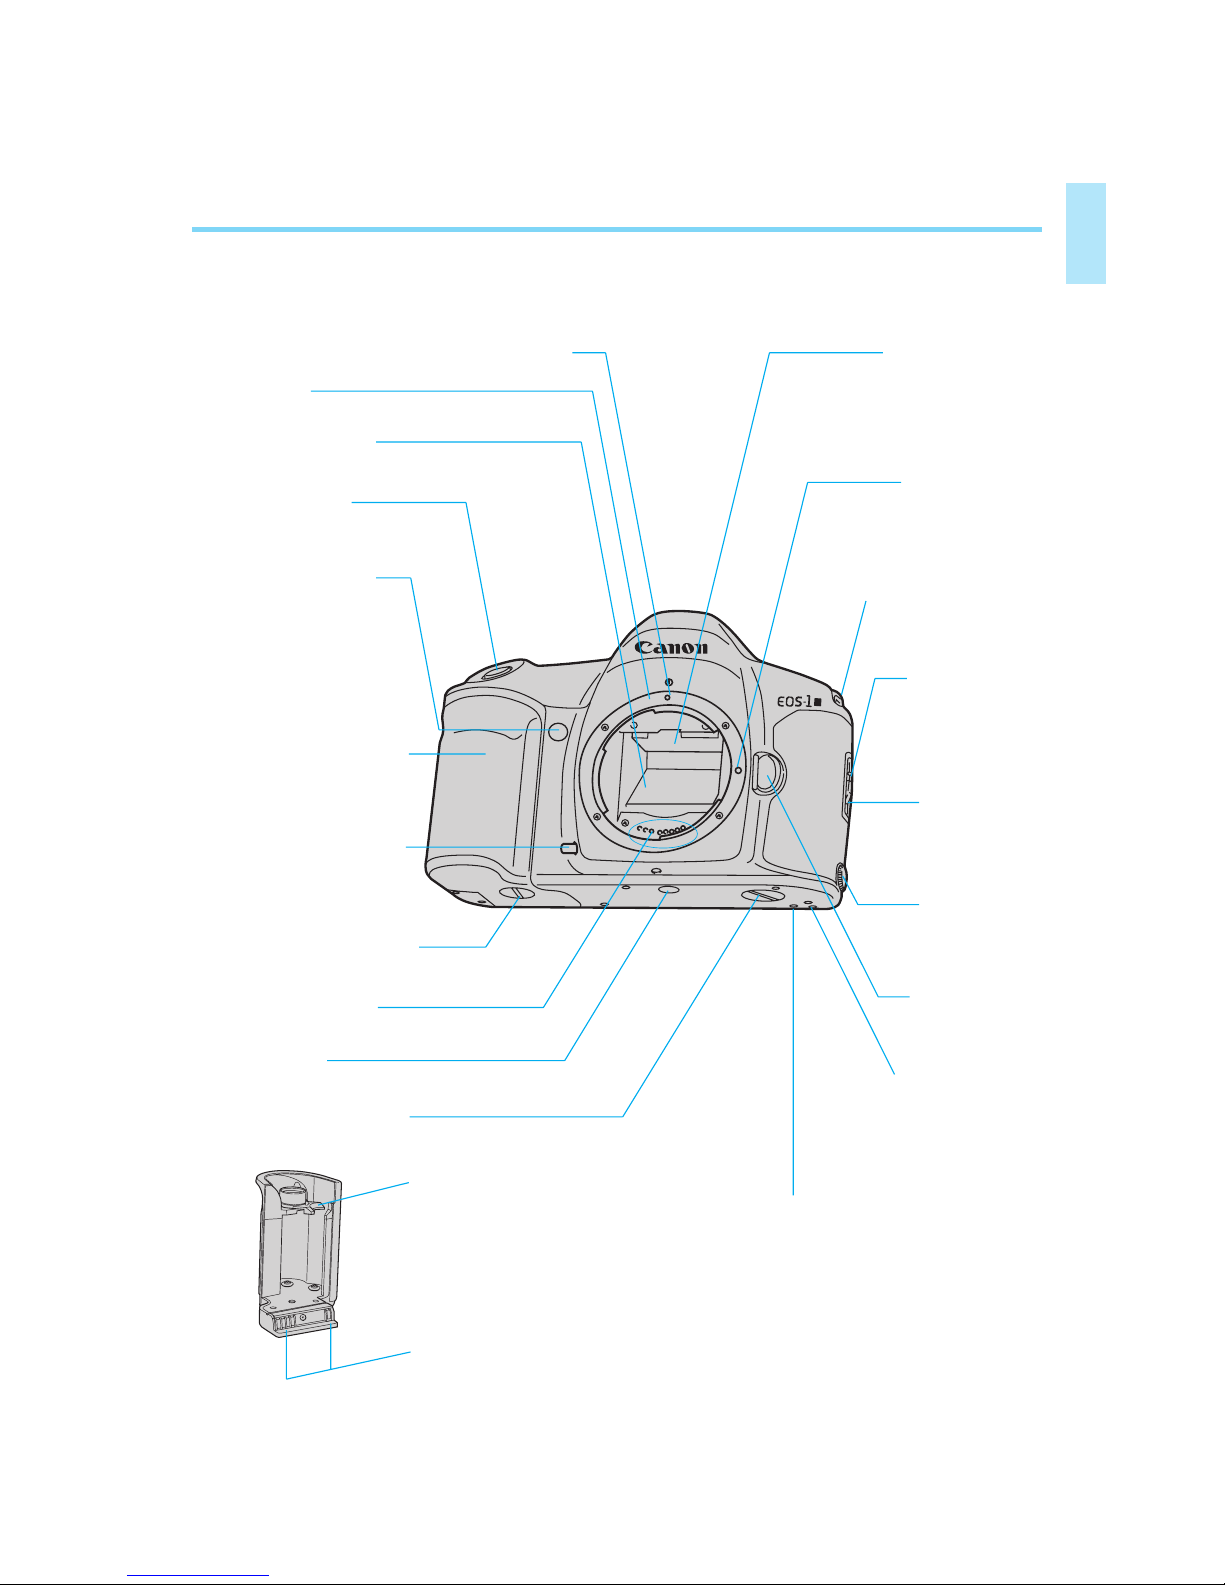
Nomenclature
• Page numbers of sections related to each component are indicated in
parentheses.
N
Lens Attachment Mark (red) (→ page 18)
Lens Mount
Mirror (→ page 72)
Shutter Button
(→ page 20)
Self-Timer Indicator
(→ page 70)
Grip / Battery Chamber
(→ page 14)
Depth-of-Field Preview
Button (→ page 74)
Grip Screw (→ page 14)
Electronic Contacts
Tripod Socket
Booster Coupler Cover
Battery Release Lever (→ page 14)
Electronic Contacts
Focusing Screen
Lens Lock Pin
Strap Fixture (→ page 13)
Back Cover
Lock Release
Button
(→ page 23)
Back Cover
Latch
(→ page 23)
PC Terminal
(cover)
(→ page 80)
Lens Release
Button
(→ page 18)
Booster Coupling Pin
Booster / Battery Pack
Attachment Hole
00. Part.0 RS (E) (P.01~12) 27-01-2003 11:51 Page 9
10
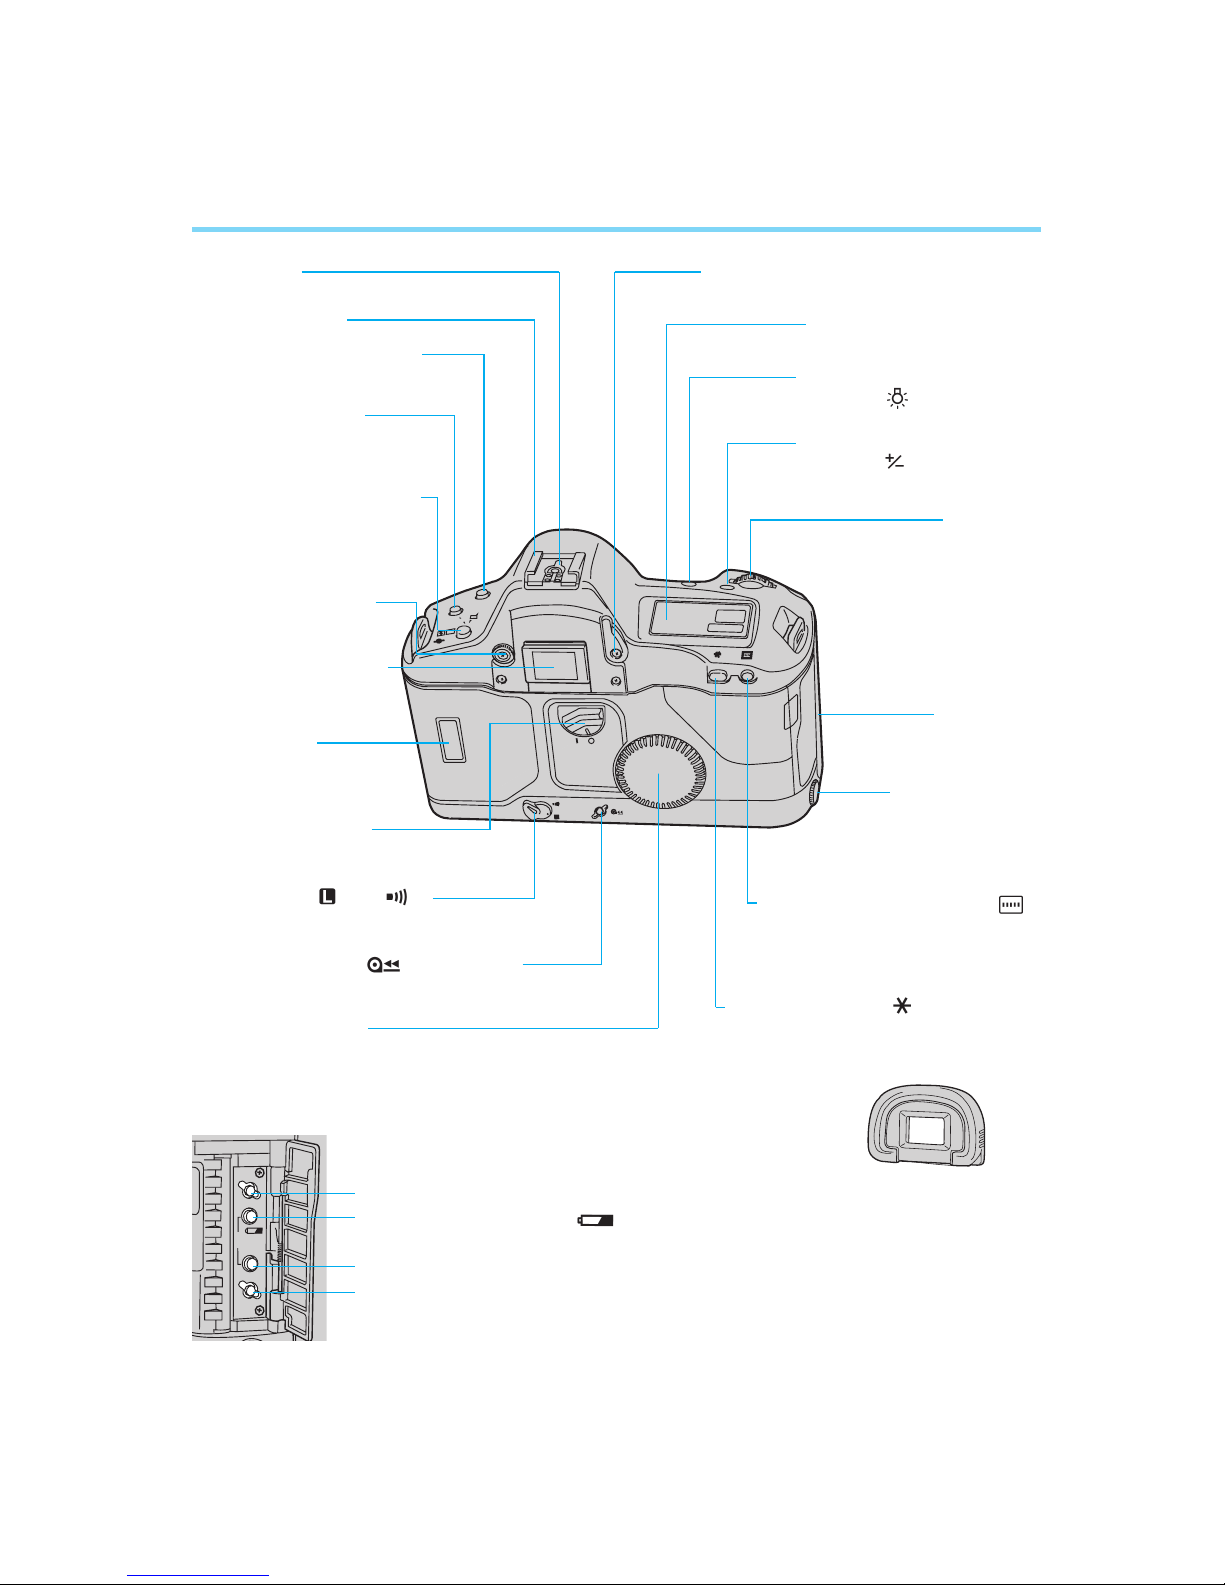
Nomenclature
X Contacts
Accessory Shoe
Shooting Mode Selector
(→ page 17)
AF Mode Selector
(→ page 32)
Metering Mode Selector /
Flash Exposure
Compensation Button
(→ page 37, 78)
Dioptric Adjustment
Dial (→ page 19)
Viewfinder Eyepiece
Film Window
Quick Control Dial
Switch
Film Rewind Button ( ) (→ page 25)
Quick Control Dial
AE Lock Button ( ) (→ page 40)
Focusing Point Selector ( )
(→ page 29)
Remote Control
Socket (cover)
(→ page 61)
Palm Door
Main Dial
Exposure Compensation
Button ( ) (→ page 44)
LCD Panel Illumination
Button ( ) (→ page 74)
LCD Panel (→ page 11)
Eyepiece Shutter Lever (→ page 71)
Custom Function Set Button (→ page 82)
Battery Check Button ( ) (→ page 15)
Film Winding Mode Selector (blue) (→ page 67)
Clear Button (white) (→ page 75)
Eyecup Ec II (→ page 19)
Main Switch ( , A, )
(→ page 16)
A
L
A
F
MODE
13
0
DRIVE
CLEAR
CF
AEB
00. Part.0 RS (E) (P.01~12) 27-01-2003 11:51 Page 10

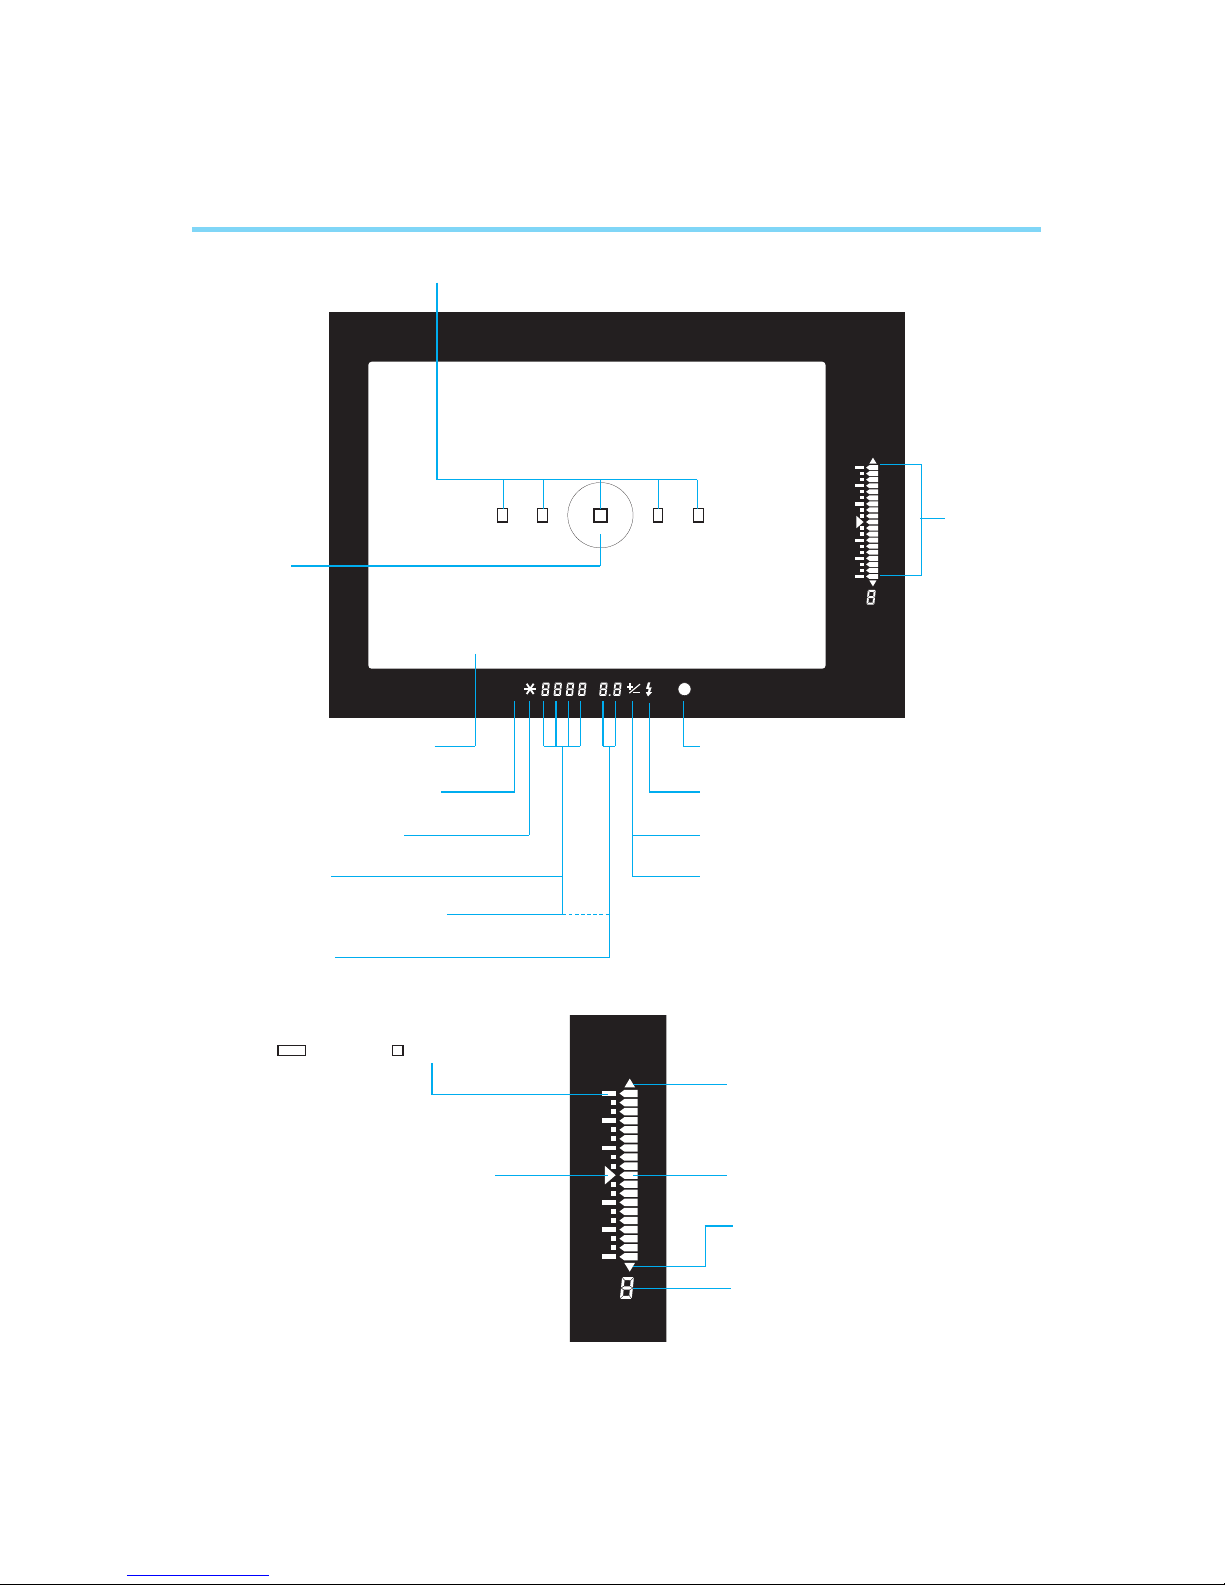
11
Nomenclature
Shooting Modes
Manual Exposure: M
Shutter-priority AE: Tv
BulbExposure:
Program AE: P
Aperture-priority AE: Av
* Depth-of-Field AE: DEP
Shutter Speed
Film Speed
Battery Check ( )
Bulb ( )
* Depth-of-Field AE ( )
Custom Function Control
Aperture Value
Custom Function
Control
AEB Value
*
Depth-of-Field AE
Metering Modes
Evaluative Metering
Partial Metering
Fine Spot Metering
Flash Exposure
Compensation
Film -Load Check
Film Rewind Completion
Multiple Exposures
AEB
Frame Counter
Bulb Exposure Time
No. of Multiple Exposures
Self-Timer Countdown
This diagram shows all the information displayed
simultaneously for explanation only. The LCD
panel never actually appears like this.
Focusing Points
ISO Indicator
Exposure Compensation
Value Index
AF Mode Indicator
One-shot AF
AI Servo AF
Film Winding Mode Indicator
Single Exposure:
Continuous Exposure:
Low-Speed Continuous Exposure:
(EOS-1 N HS, EOS-1 N RS only)
High-Speed Continuous Exposure:
(EOS-1 N HS, EOS-1 N RS only)
Self-Timer:
10 (10-second timer),
(2-second timer)
2
10
Film Transport (Wind/Rewind )
Film Wind Completion/Error
Battery Check
Exposure Level Indicator
Bulb Exposure Time
AEB Value Amount Indicator
Flash Exposure Compensation
Value Indicator
Custom Function Setting Indicator
ONE SHOT
AI SERVO
10
2
AEB
3 2 1 1 2 3
ISO
v
A
v
M
T
DEP
0
* Not available on the EOS-1 N RS.
00. Part.0 RS (E) (P.01~12) 27-01-2003 11:51 Page 11
12
Nomenclature
M
Focusing Points/Spot Metering Position Indicators
Fine Spot
Metering Area
Laser-matte Screen Ec-CII
Manual Exposure Indicator
AE Lock / AEB Indicator
Shutter Speed
* Depth-of-Field AE Indicator
Aperture Value
Flash Charge Completion Indicator
Exposure Compensation Indicator
Flash Exposure Compensation Indicator
In-focus Indicator
Correct Exposure Indicator
Exposure Step Indicator
(: 1-stop, : 1/3-stop)
Overexposure Indicator
(+3 stops or more)
Exposure Level Indicator
Underexposure Indicator
(–3 stops or more)
Remaining Frame Counter
(F: more than 9, 9~0)
* Not available on the EOS-1 N RS.
Exposure
Level
Display
00. Part.0 RS (E) (P.01~12) 27-01-2003 11:51 Page 12

13
I Shooting Preparations and
Basic Operation
This section explains the preparations necessary to set up the camera before use, as well
as the basic operation of the camera.
● Attaching the Strap
Thread the ends of the strap through
the strap fixtures as shown. Pull firmly
on the strap to make sure it is held
securely by the buckles.
00. Part.1 RS (E) (P.13~27) 27-01-2003 11:54 Page 13
14
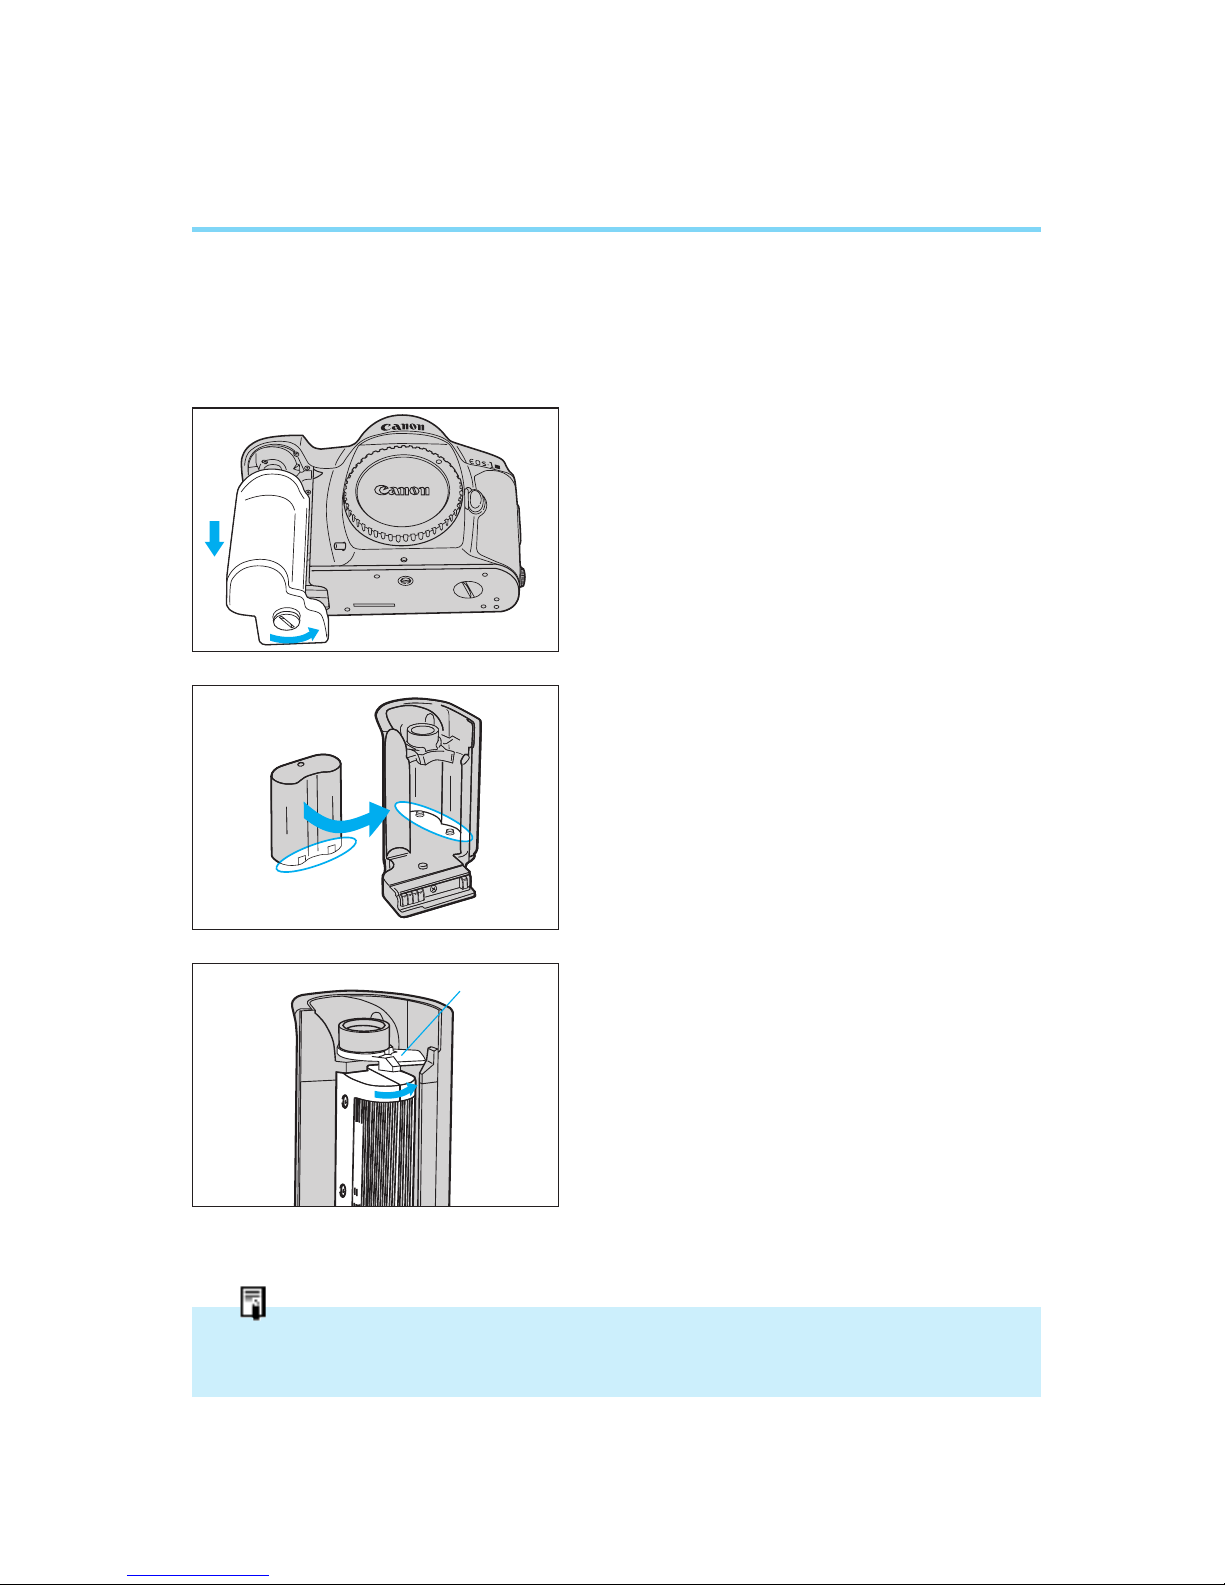
1. Loading the Battery
This camera operates on a 6-volt, 2CR5 lithium battery, housed in the
grip.
• Refer to page 93 for additional information on the batteries of the EOS-1 N DP
model and page 96 for the EOS-1 N HS model and the EOS-1 N RS model.
m
u
I
h
t
I
L
m
u
I
h
t
I
L
1
Using a coin or similar object, turn
the grip screw counterclockwise to
loosen the grip. The screw cannot
be removed from the grip.
2
Slide the grip down to remove.
3
Load the battery upside down into
the grip so that its terminals align
with the terminals in the battery
compartment.
• The battery label should be facing
toward you and the terminals should
be on the bottom after the battery is
installed.
4
After placing the battery into the
front of the compartment, push it all
the way into the compartment as
shown in the illustration.
• To remove the battery from the grip,
press the battery ejector lever.
5
Replace the grip on the camera and
turn the screw clockwise to firmly
lock it in place.
Lithium batteries may not be available in some areas. Be sure to take along a spare when
going on a trip or embarking on an important shooting assignment.
N
Battery Ejector Lever
1
2
00. Part.1 RS (E) (P.13~27) 27-01-2003 11:54 Page 14
0
15
2CR5 Lithium Battery Shooting Capacity
• Data based on Canon’s Standard Test Method using a new battery, EF50mm
f/1.4 USM lens and 24-exposure film. Values in parentheses are for 36-exposure film.
• Repeated autofocus operation without taking any pictures will reduce the overall
shooting capacity.
• Refer to page 93 for the shooting capacity of the EOS-1 N DP model, page 96
for the EOS-1 N HS model and page 100 for the EOS-1 N RS model.
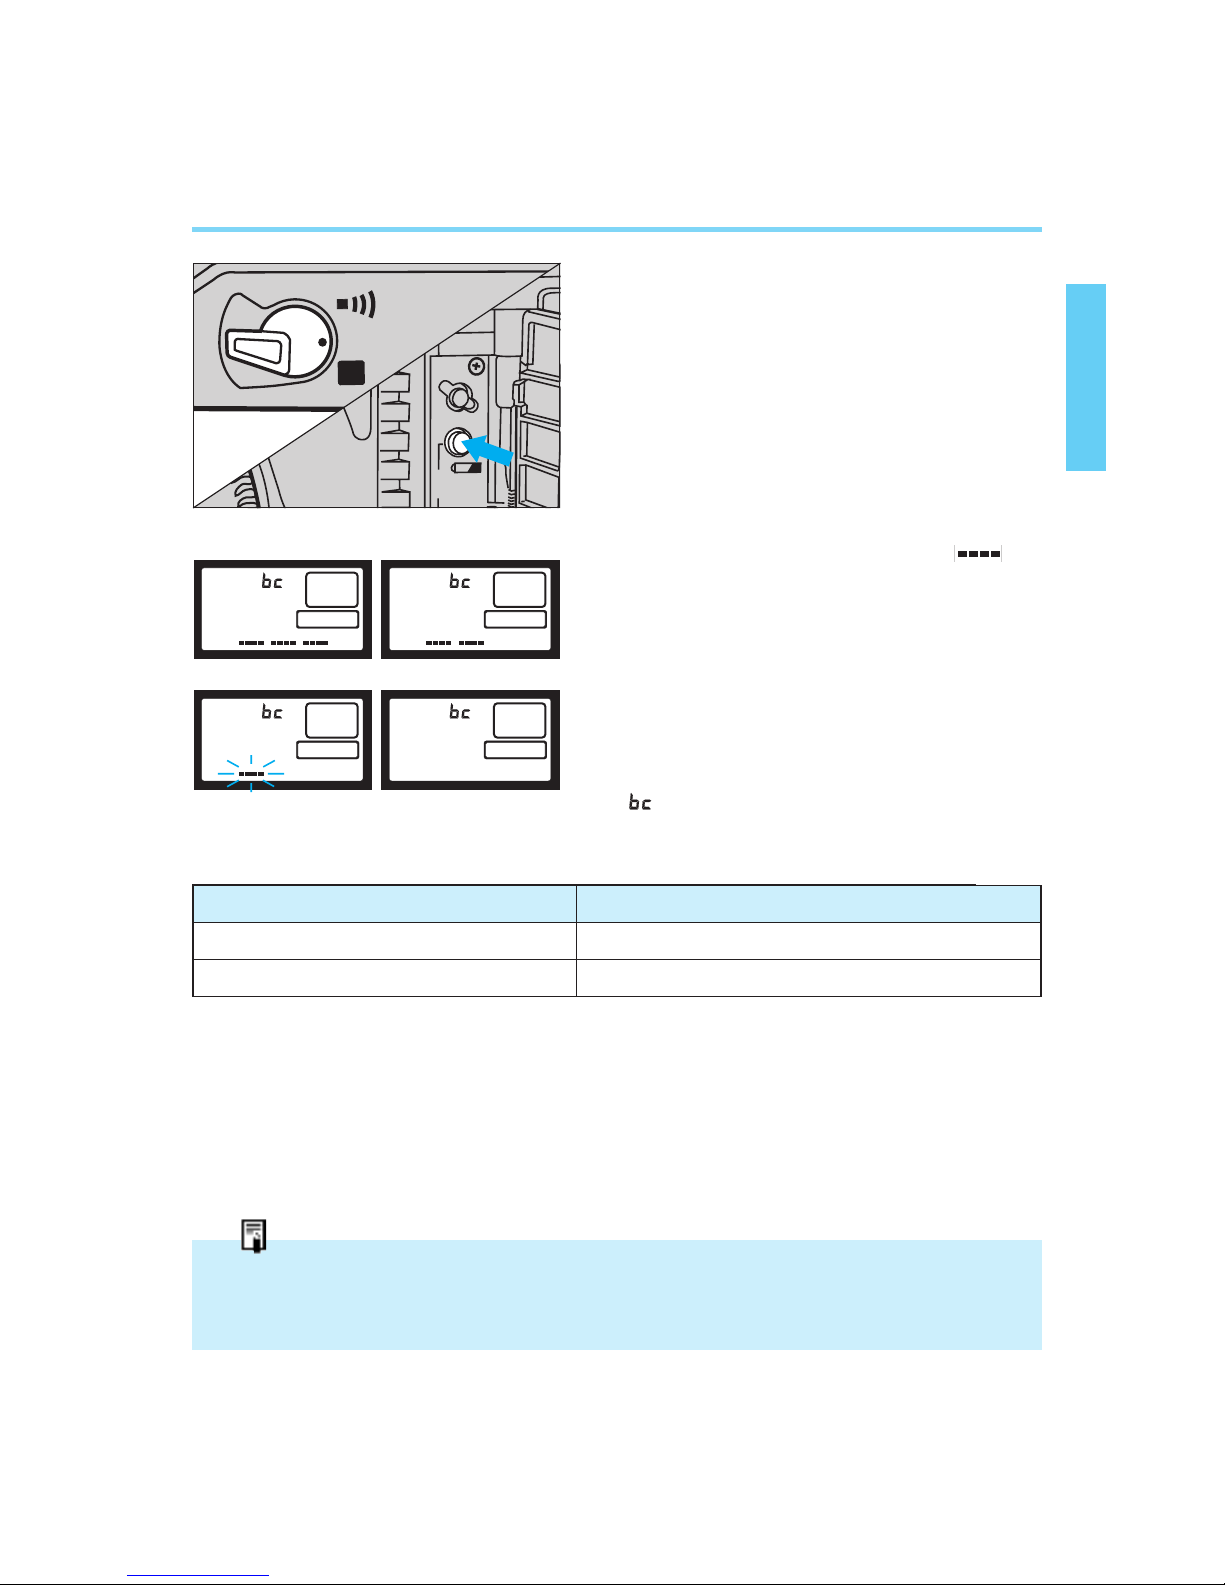
2. Checking the Battery Level
1
Set the main switch to “A”.
2
Open the palm door and press the
battery check button.
3
The battery check indicator ( ) is
displayed in the LCD panel. The
battery level is indicated as follows:
Fig. 1: Battery power sufficient.
Fig. 2:
Have a new spare battery handy.
Fig. 3: (blinking) The battery will soon
be exhausted.
Fig. 4: (no display) Replace the battery
with a new one.
(blinking): Refer to page 7.
• If nothing appears on the LCD panel when the main switch is set to “A”, the battery
may be inserted backwards. Remove the battery and reinsert it correctly.
• Exposure will be okay as long as the shutter releases.
Temperature Shooting capacity (rolls)
Normal (+20°C/68°F) 75 (50)
Low (–20°C/–4°F) 12 ( 8)
A
L
DRIVE
CF
AEB
0 0
12
0
34
00. Part.1 RS (E) (P.13~27) 27-01-2003 11:54 Page 15
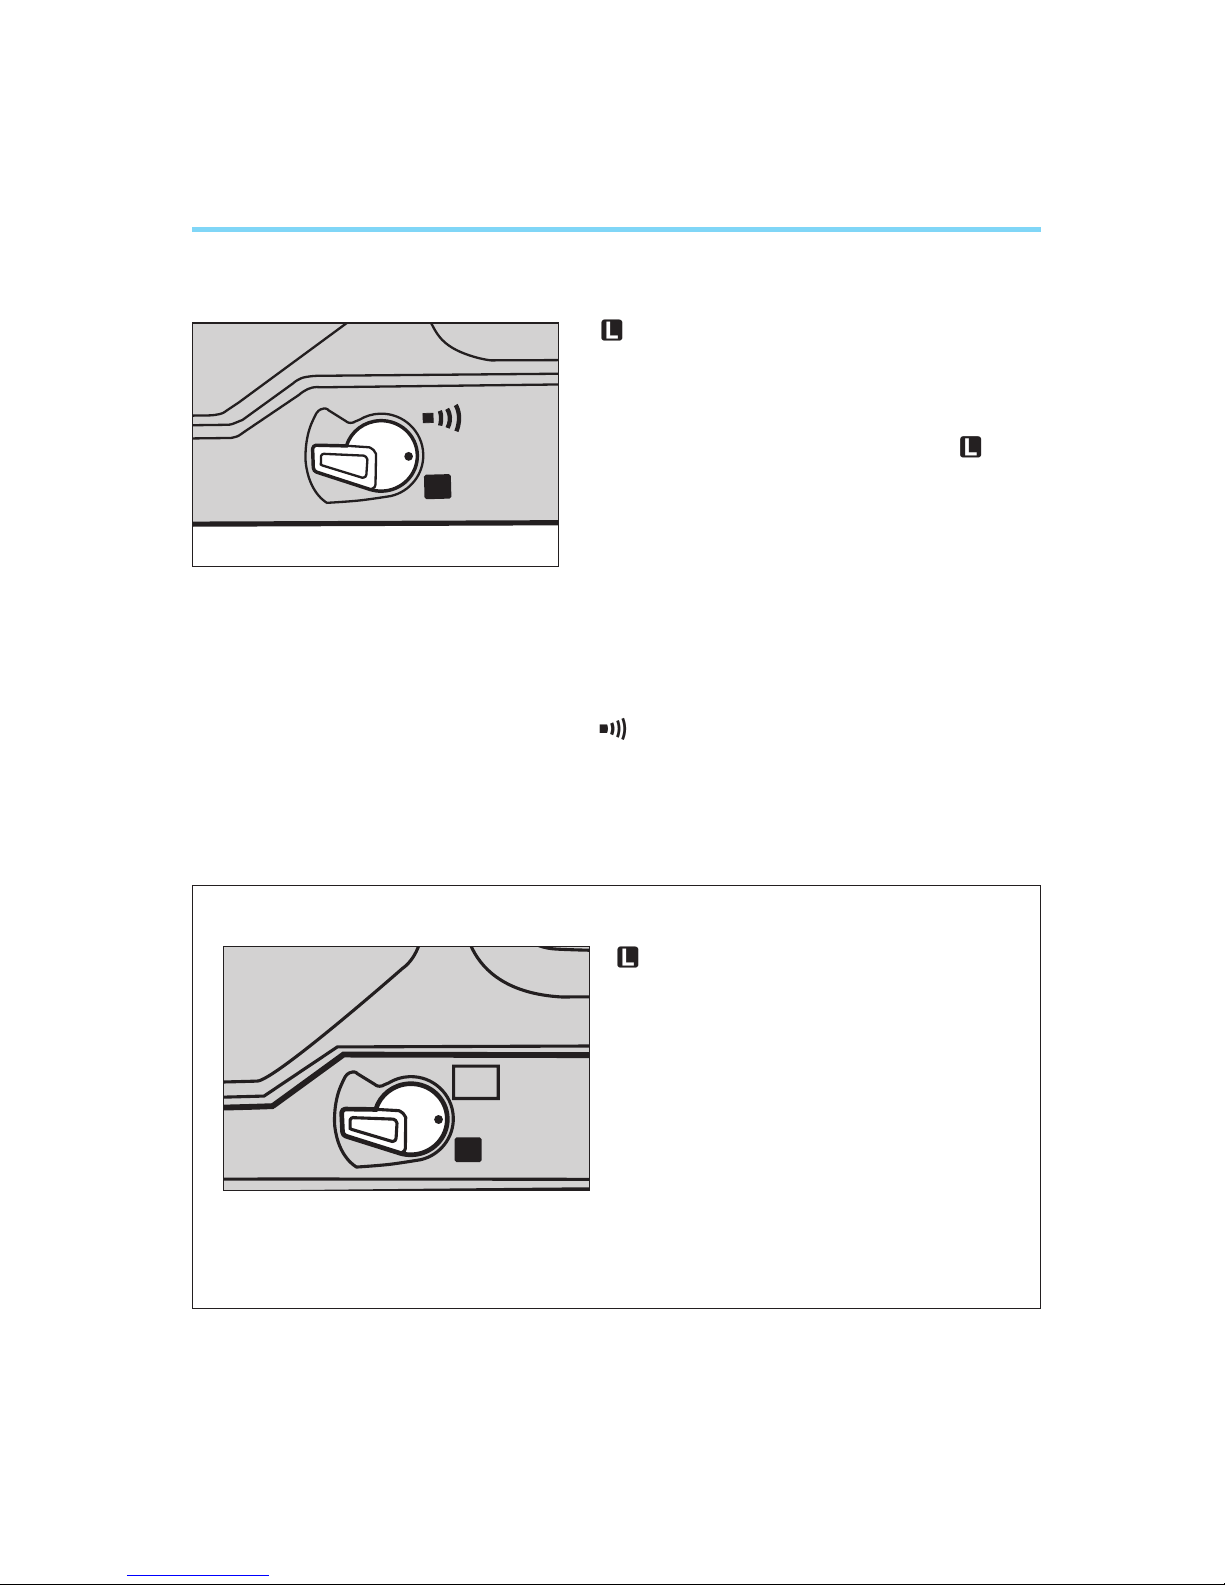
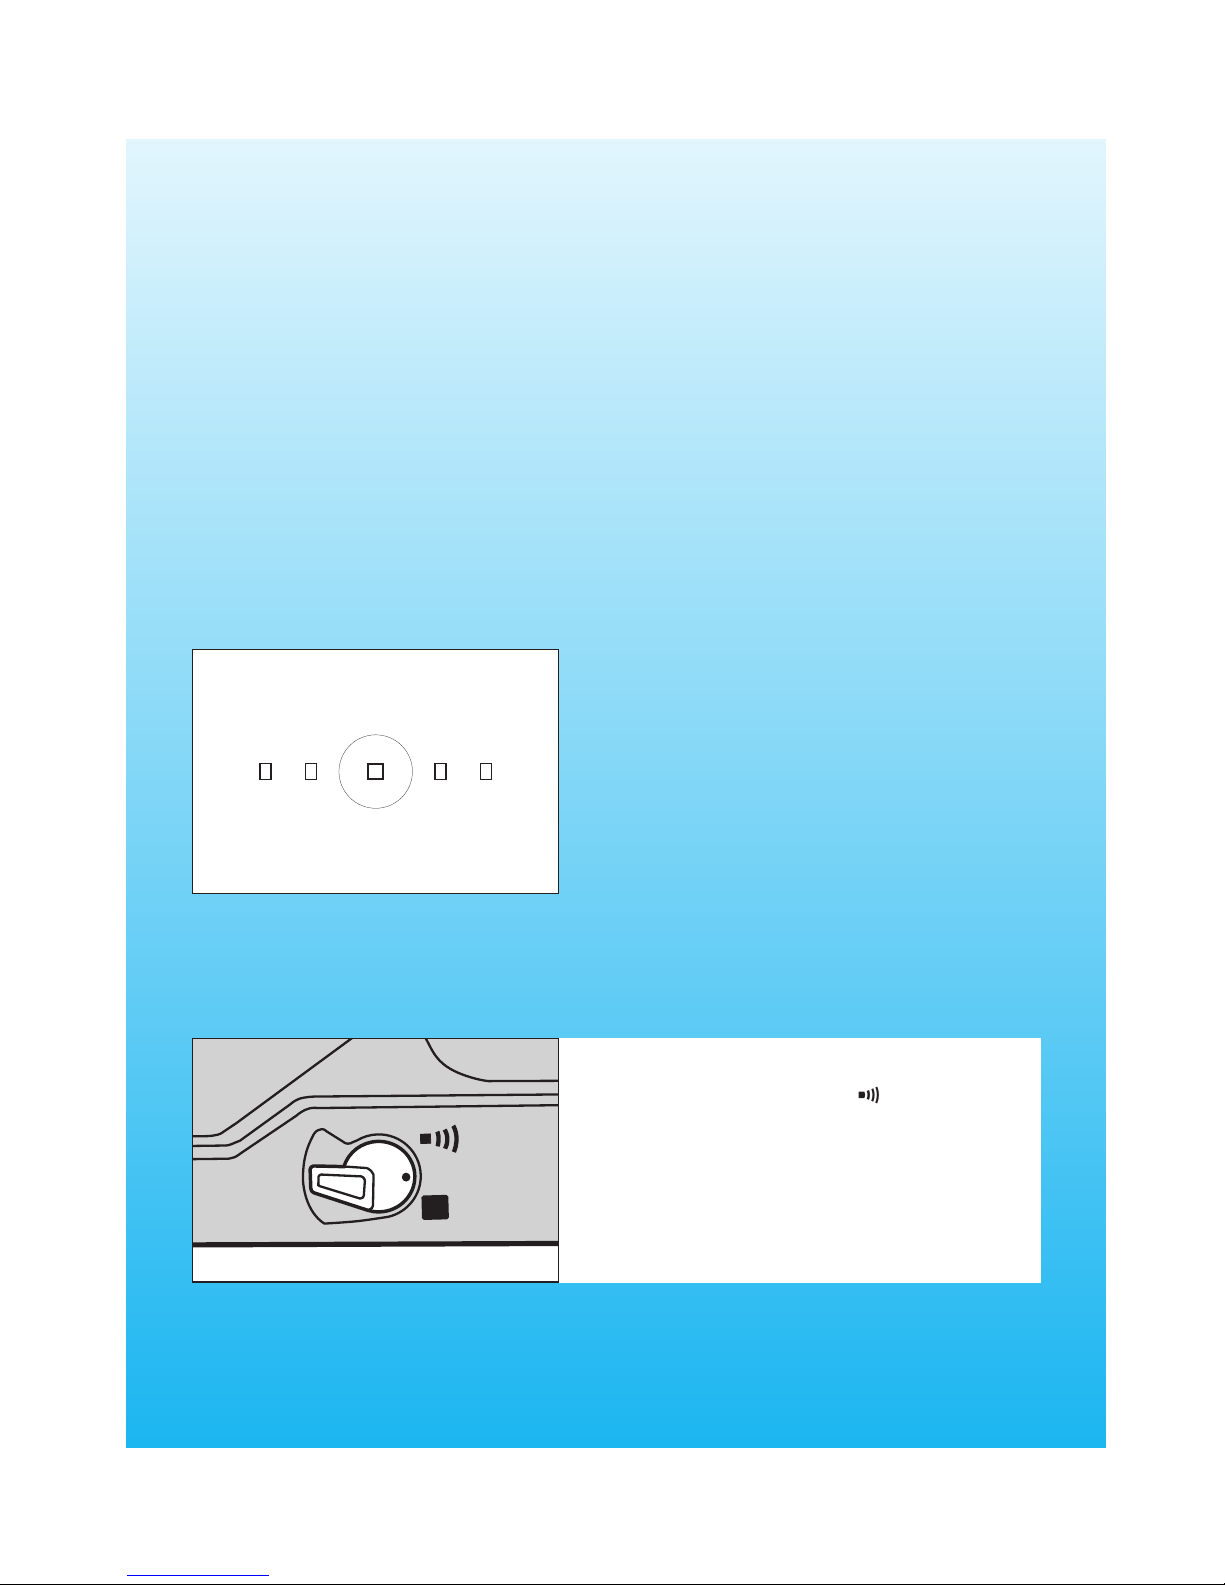
● EOS-1 N RS Main Switch
: Turns off the camera and
makes it inoperational.
A : Turns on the camera and
makes it operational.
RS : Same as “A” except that the
RS (Rapid Shot) mode is
also set. This enables a
continuous shooting speed
of about 10 frames per second with a shutter release
time lag of 0.006 sec.
16
3. Operating the Main Switch
The main switch has three settings, as described below:
A
L
RS
A
L
: The power is off and the cam-
era does not operate. Set the
main switch to this position
when not using the camera.
Setting the switch to prevents unintentional power drain
which can be caused by objects
pressing against the shutter
button during transport or storage.
A : Set to this position when
preparing and operating the
camera.
: This position is the same as the
A position except that a beep
sound is emitted when the subject is focused in One-shot AF
or manual focusing mode.
00. Part.1 RS (E) (P.13~27) 27-01-2003 11:54 Page 16
17
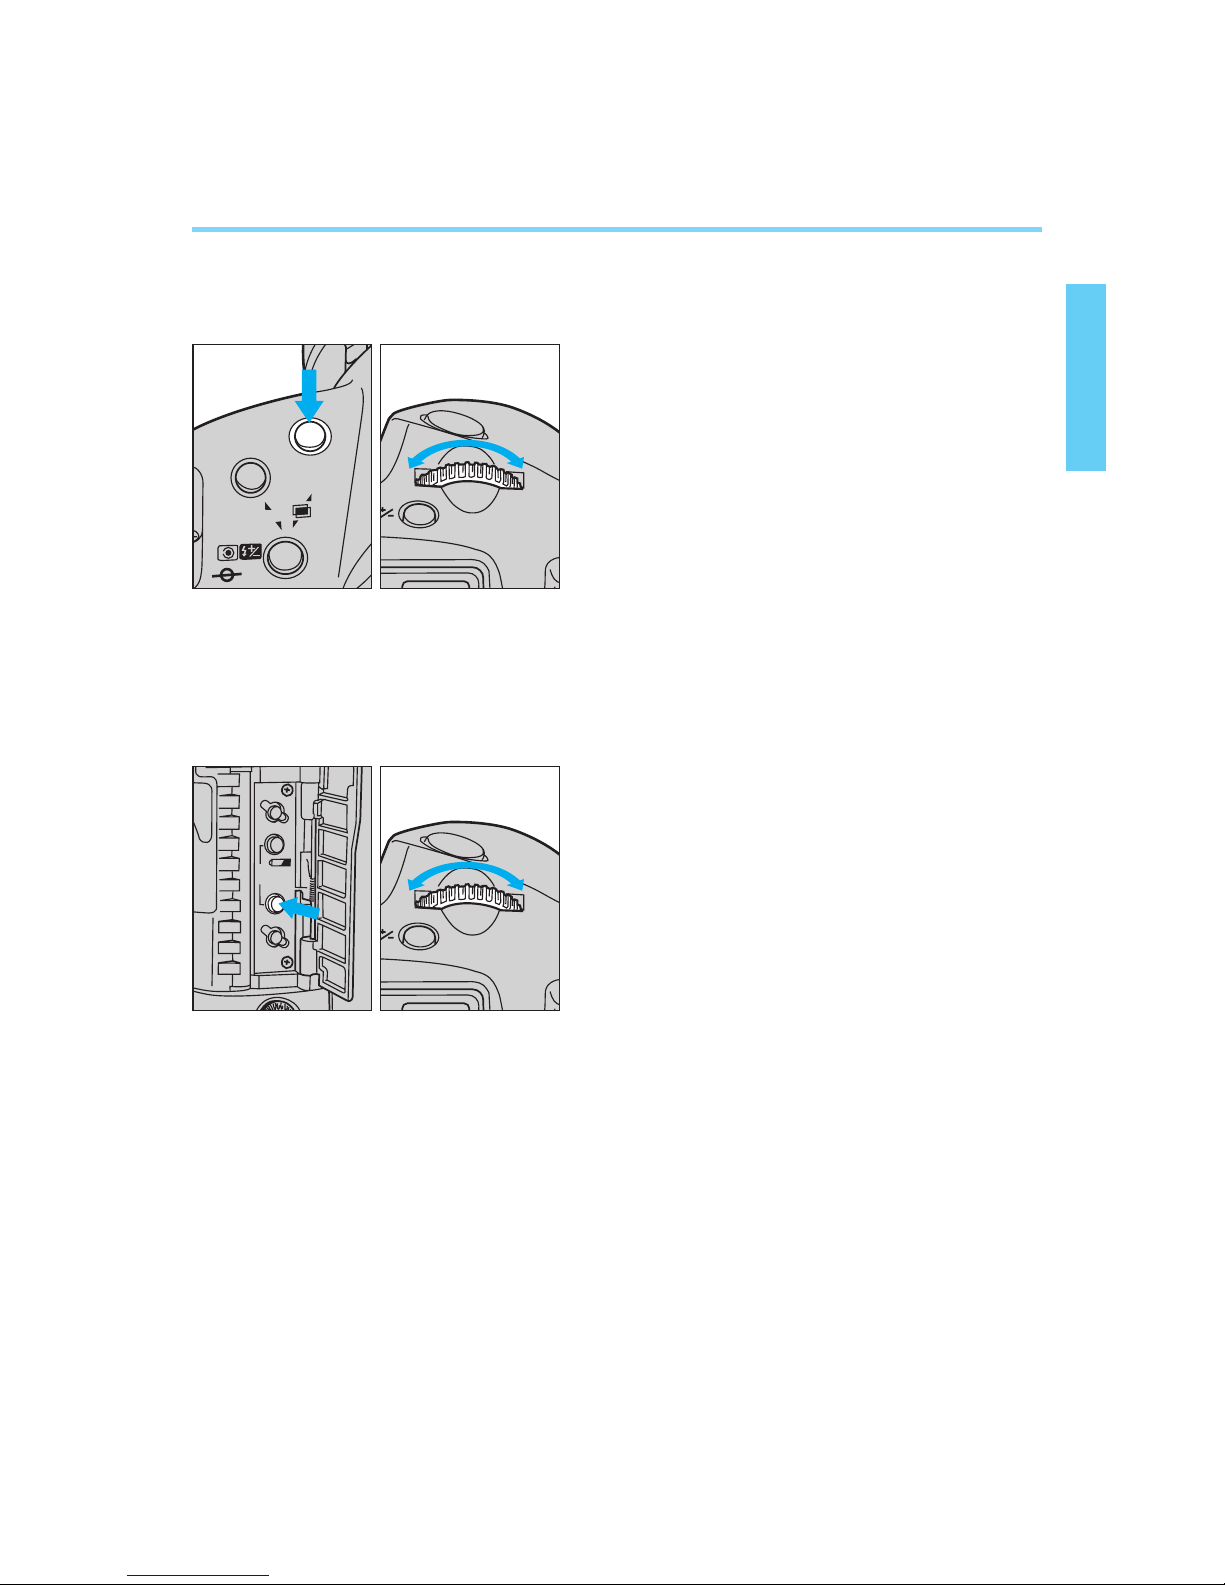
4. Setting and Adjusting Basic Functions
This camera’s shooting mode, AF mode and metering mode are set and
changed as follows:
1
Set the main switch to “A”.
2
Press the shooting mode selector
(or AF mode selector or metering
mode selector) and hold it down
while turning the main dial to the left
or right until the desired setting
appears in the LCD panel.
3
Release the shooting mode selector
(or AF mode selector or metering
mode selector).
To change the film winding mode, use the following procedure:
AF
ISO
MODE
1
Set the main switch to “A”.
2
Open the palm door and press the
film winding mode selector.
3
Turn the main dial to the left or right
until the desired setting appears in
the LCD panel.
4
The setting is completed when the
shutter button is pressed halfway or
six seconds elapse.
Pressing a button and turning a dial are the basic procedures for setting
most camera functions. Some functions require that two buttons be held
down simultaneously while turning the main dial. Detailed instructions are
provided where necessary throughout this instruction book.
DRIVE
CLEAR
CF
AEB
00. Part.1 RS (E) (P.13~27) 27-01-2003 11:54 Page 17
18
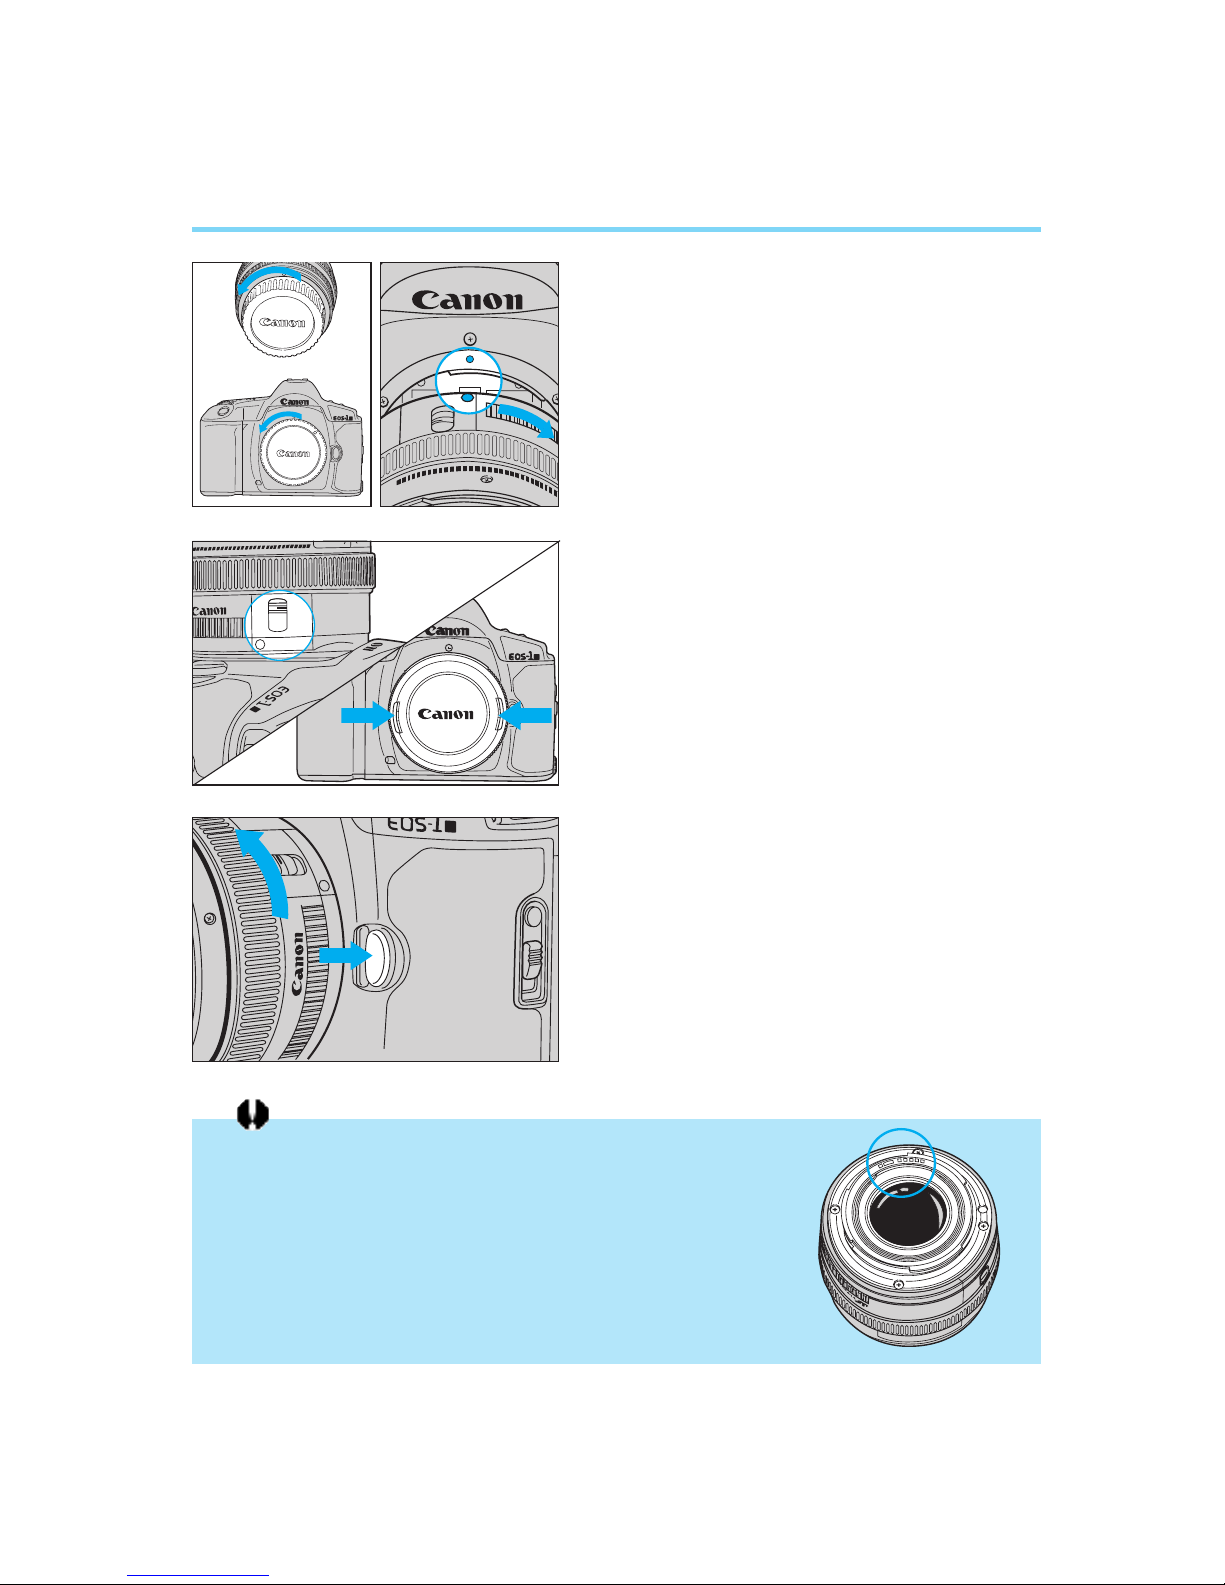
5. Lens Attachment
1
Remove the lens' rear dust cap and
the camera's body cap by turning
them counterclockwise.
2
Align the red dots on the lens and
camera body, then rotate the lens
clockwise until it locks in place with
a click.
3
Set the lens’ focus mode switch to
“AF”.
• Autofocus is not possible when the
switch is set to “M”.
• During autofocusing, do not touch the
rotating part of the lens.
4
Remove the front lens cap.
● Removing the Lens
To remove the lens, press the lens
release button and turn counterclockwise.
When the lens is removed from the camera, place it face down
on a stable surface to prevent damage to the electronic contacts.
5
0
m
m
AF
M
AF
N
AF
M
MODE
AF
ISO
AF
M
22
22
50mm
N
AF
M
N
ULTRASONIC
C
A
N
O
N
N
L
E
S
E
F
5
0
m
m
1
1
:
4
C
A
N
O
N
N
L
E
S
M
D
A
E
I
N
J
A
A
P
N
N
12
3
4
00. Part.1 RS (E) (P.13~27) 27-01-2003 11:54 Page 18
19
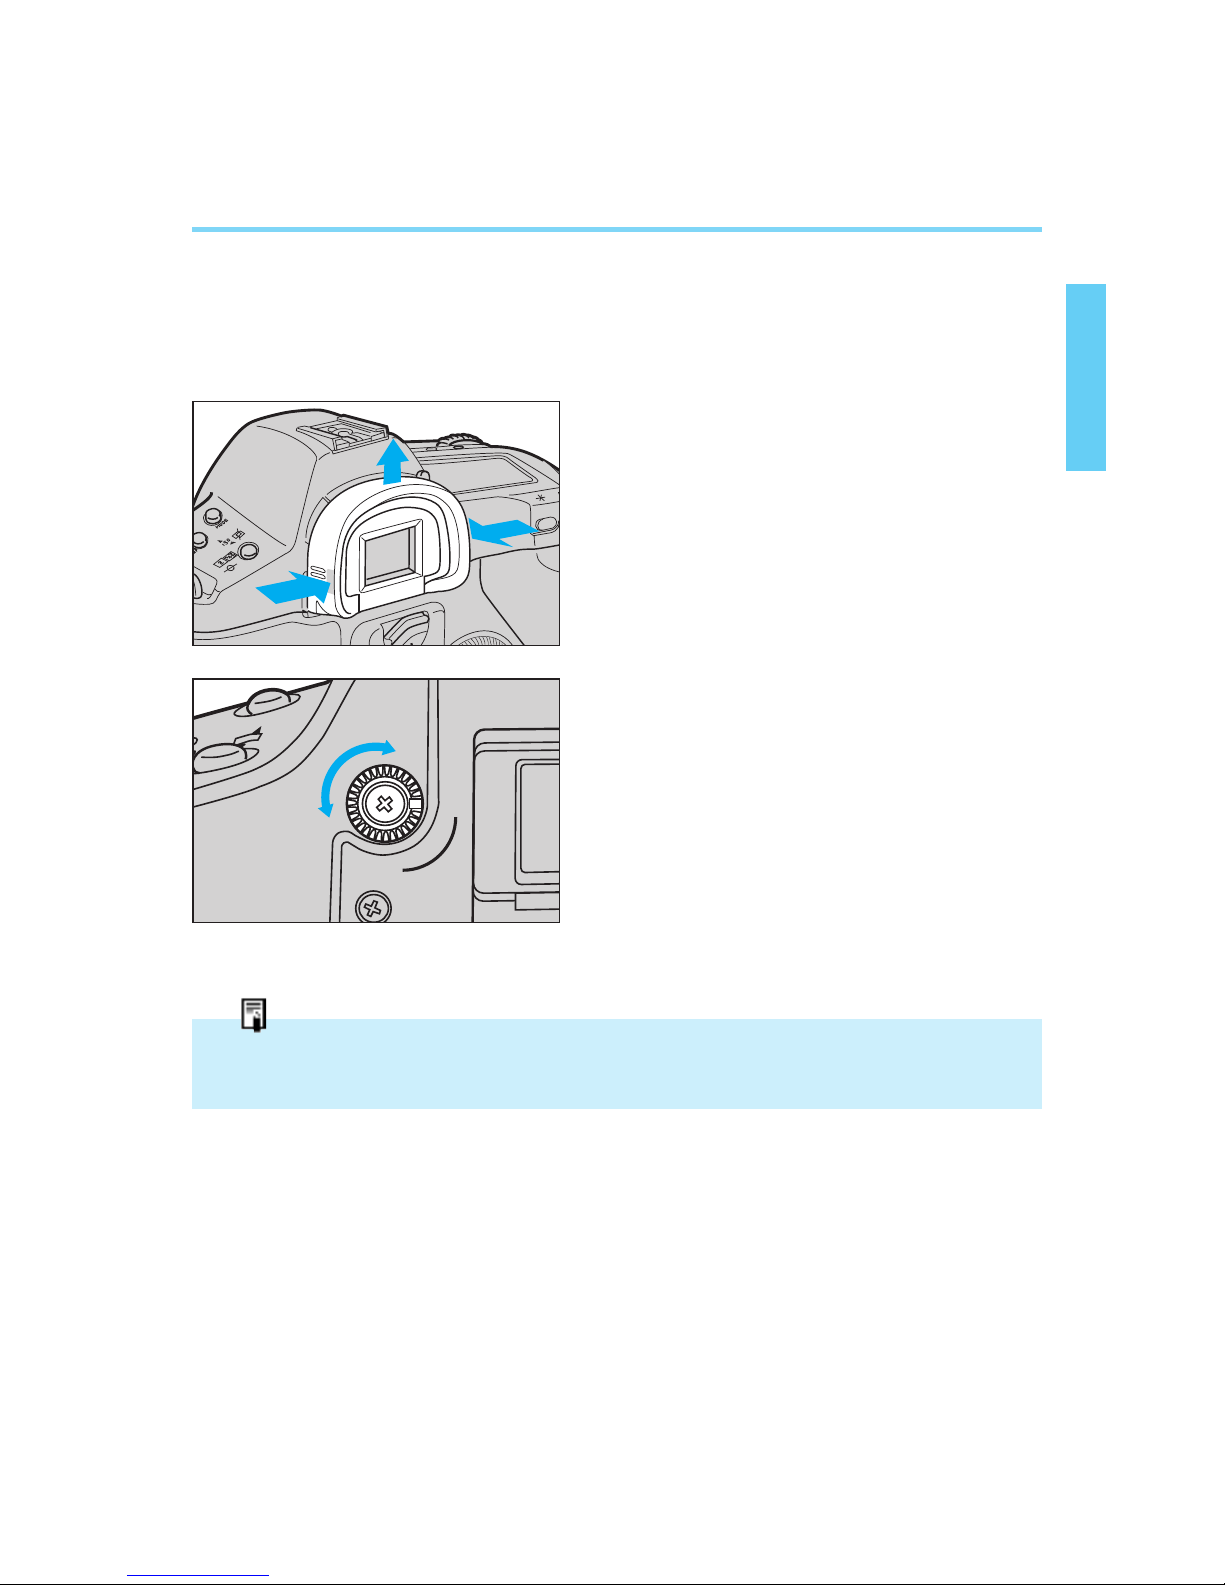
6. Dioptric Adjustment
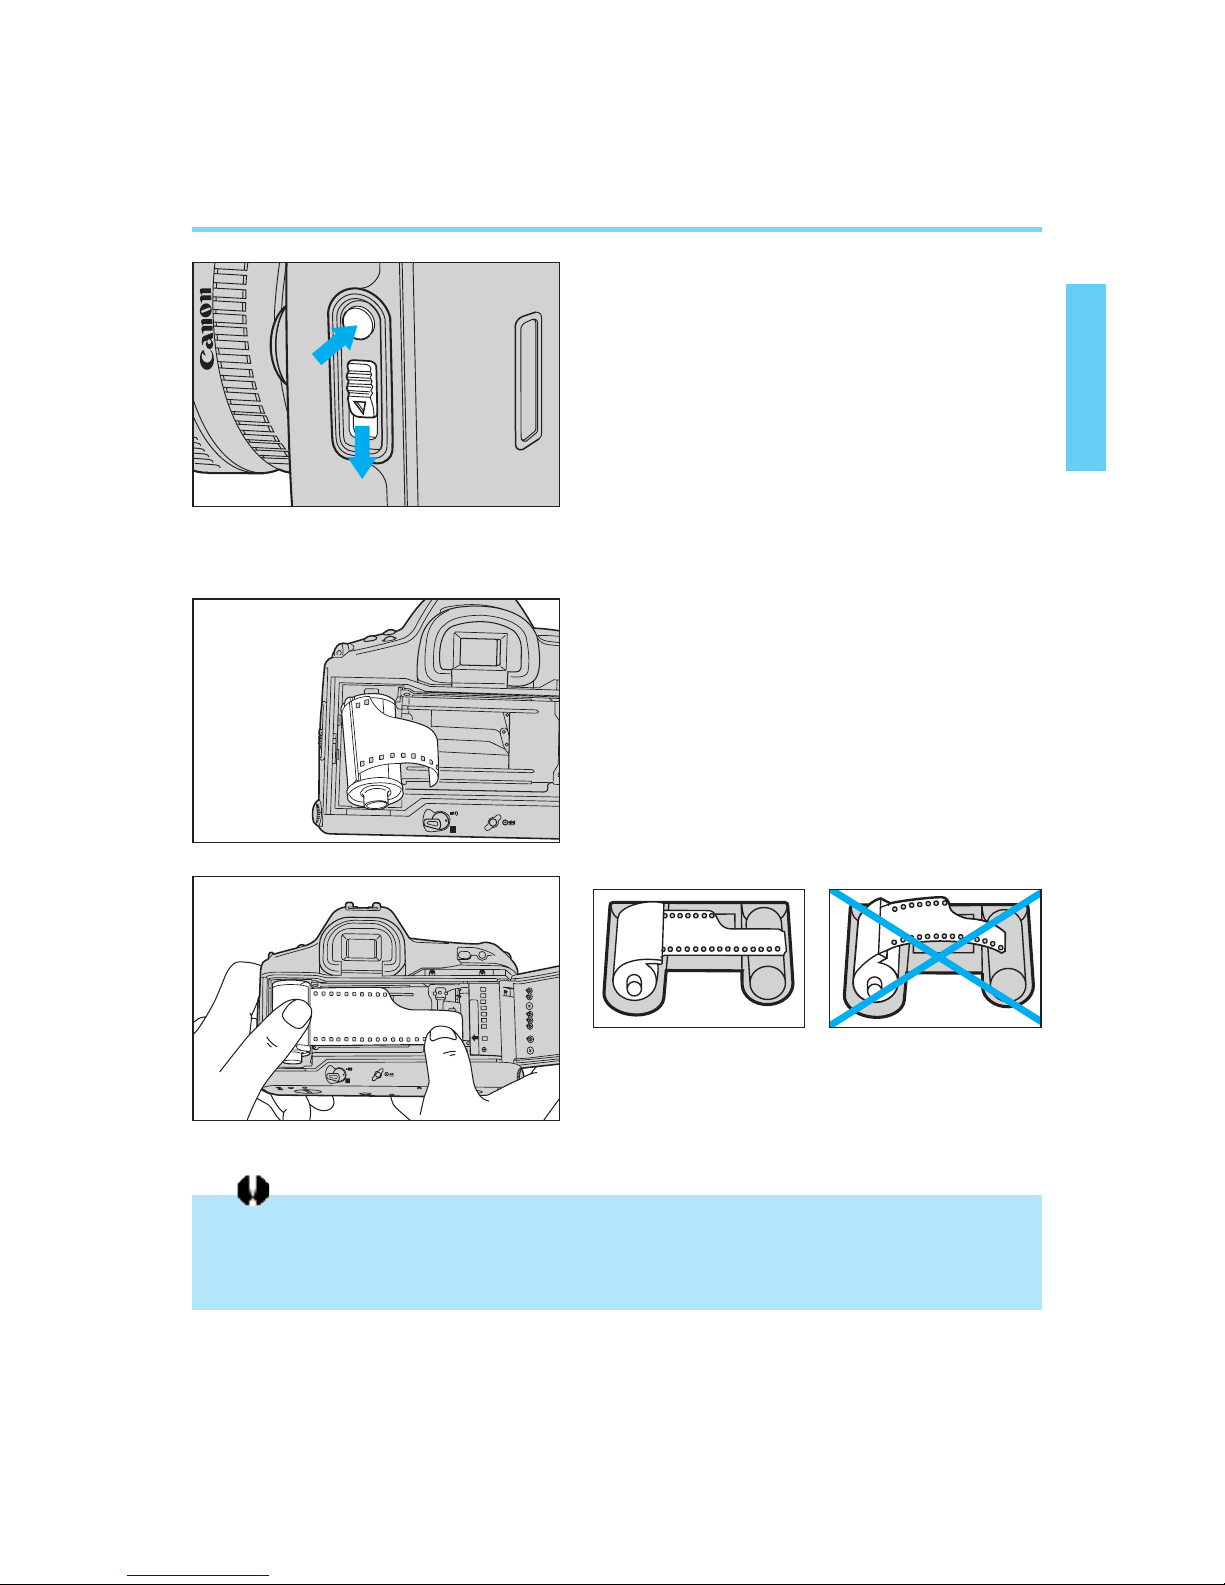
The viewfinder has a built-in dioptric adjustment mechanism that lets you
adjust the eyesight correction to achieve a sharp viewfinder image. This
also allows near- or far-sighted users to take pictures without wearing
glasses. The diopter can be adjusted within a range of –3~+1 dpt.
1
Press inward on both sides (nonslip
grip sections) of the eyecup frame.
2
While pressing in on the sides, slide
the eyecup frame up to remove.
3
Look into the viewfinder and turn the
dioptric adjustment dial in either
direction until the five focusing
points or the fine spot metering area
mark appear sharp.
• The diagram shows the dial in the
standard position (no compensation:
–1 dpt).
4
Reattach the eyecup to the camera.
MODE
{
|
The adjustment range is from –3 dpt to +1 dpt (diopter). For adjustment exceeding this
range, use one of the optionally available Dioptric Adjustment Lenses.
00. Part.1 RS (E) (P.13~27) 27-01-2003 11:54 Page 19
20
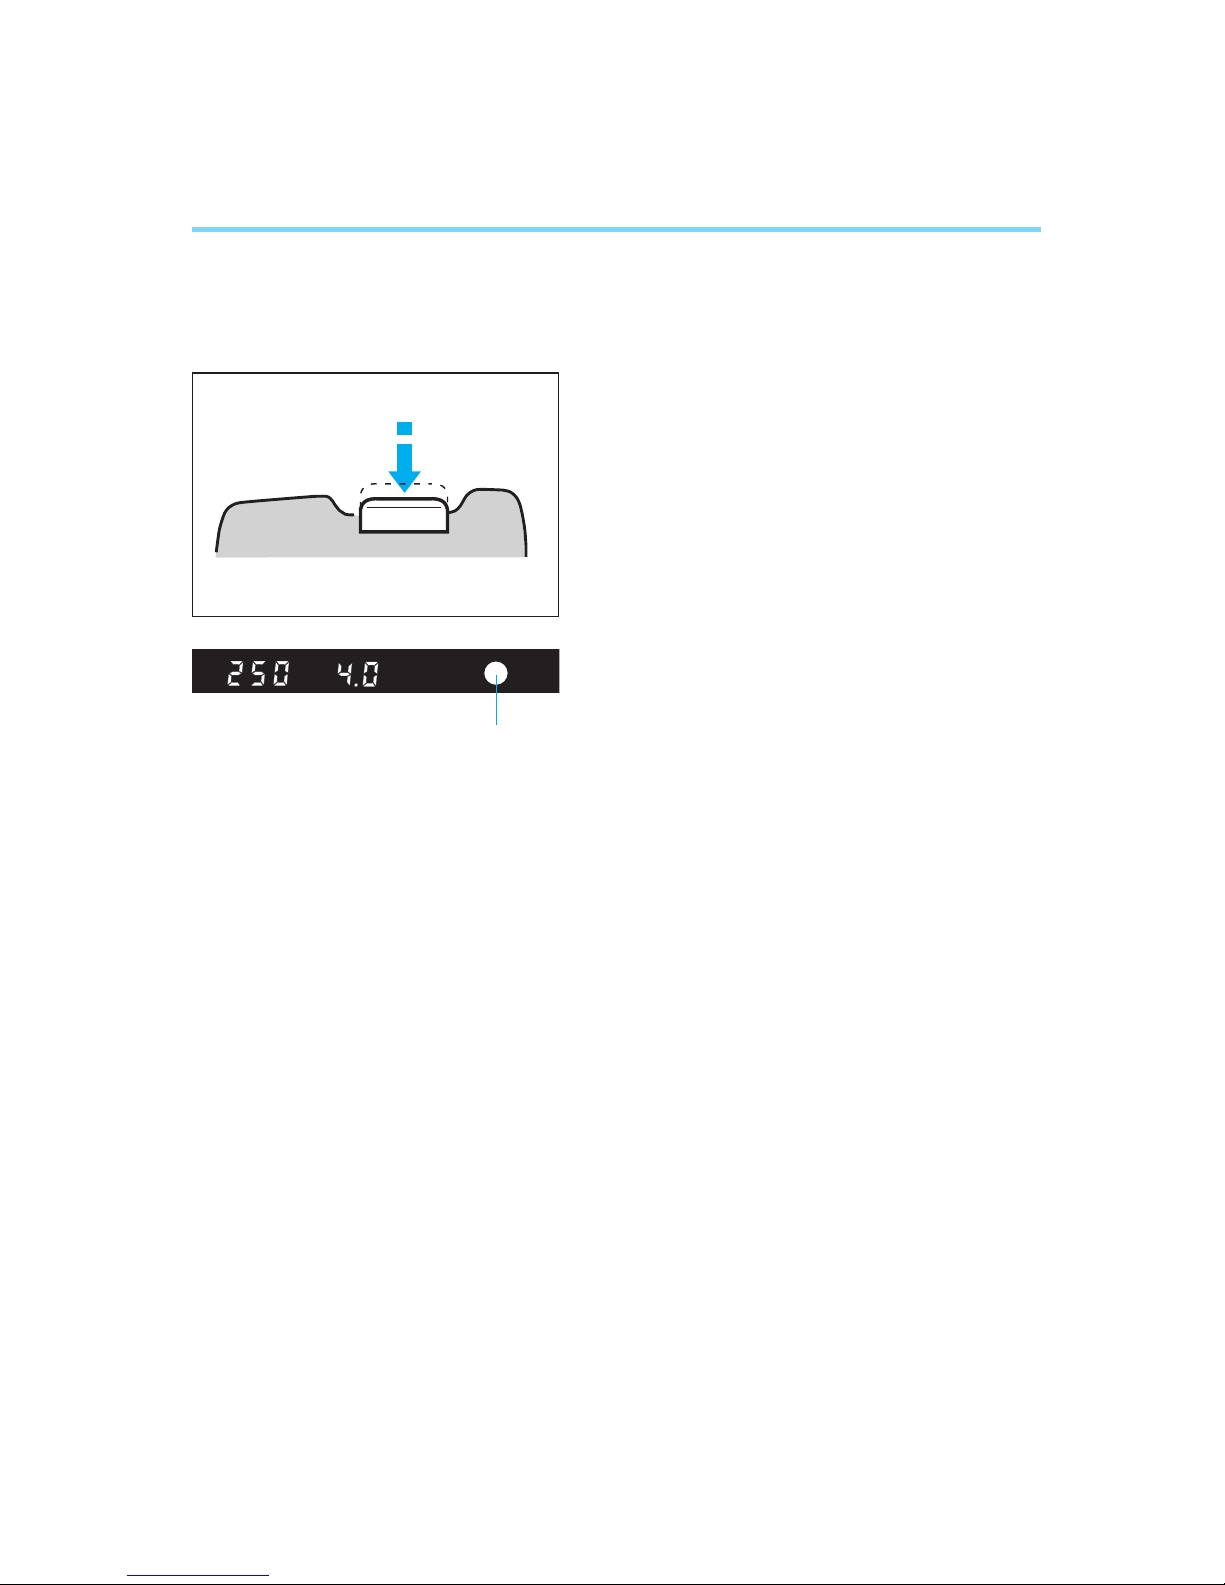
7. Shutter Button Operation and Autofocus
The shutter button has a two step construction. Press halfway (to the first
step) to activate focusing and metering, and press completely (to the second step) to release the shutter and make the exposure.
1. Pressing Halfway
1) This activates autofocus. When the
subject is focused, the corresponding focusing point momentarily lights
red and the green in-focus indicator
lights up in the viewfinder (in Oneshot AF mode).
• The autofocus system uses five
focusing points.
• The focusing point does not light
up in automatic focus point selection mode when the AF mode is
set to AI Servo.
• The in-focus indicator does not
light up in AI Servo AF mode.
2) At the same time, the camera determines the shutter speed and aperture value combination (exposure
value), and the results are displayed
in the LCD panel and viewfinder. If
you remove your finger from the
shutter button, a timer operates to
continuously display the exposure
settings for six seconds.
In-focus indicator
1
00. Part.1 RS (E) (P.13~27) 27-01-2003 11:54 Page 20
Shutter Button Operation and Autofocus
21
2. Pressing Completely
This releases the shutter and takes the
picture, then advances the film. The
LCD panel’s frame counter displays
the frame number.
• Viewfinder data is extinguished during
exposure.
• If the camera moves at the instant the shutter is released, the motion during exposure
may cause an unsharp picture. This occurrence, called “camera shake,” can be prevented by following these guidelines:
(1) Hold the camera with your right hand and the lens with your left hand firmly so that
they do not move when you take the picture.
(2) Gently press the shutter button from the halfway position to the fully-pressed posi-
tion with the fat part of your index finger. The trick to keeping the camera still when
taking a picture is to press the shutter button by gently squeezing the camera with
your right hand.
• The shutter button stroke (height) can be changed according to your preference by tak-
ing the camera to an authorized Canon service center (modification will be at the owner's expense).
2
00. Part.1 RS (E) (P.13~27) 27-01-2003 11:54 Page 21
22
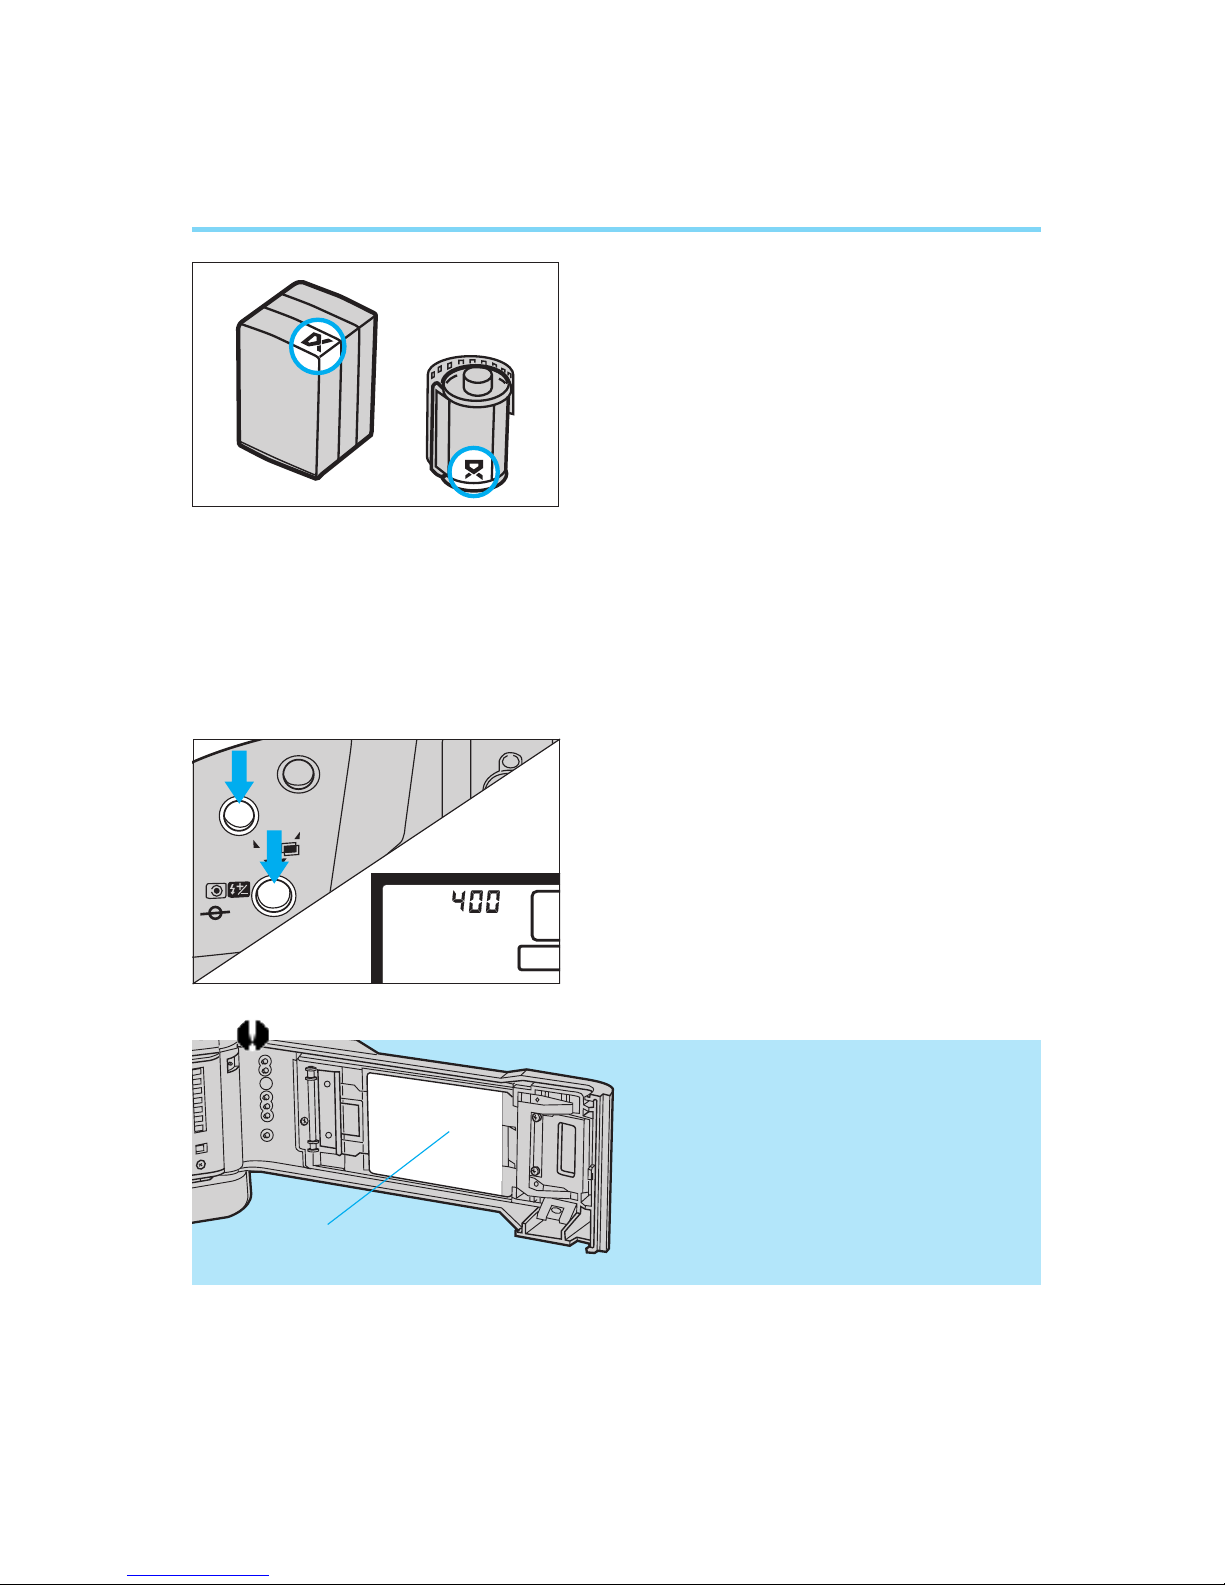
8. Film Loading
When DX film is loaded, the film speed
is set automatically according to the
DX code on the film cartridge.
• The automatic film speed setting
range is ISO 25~5000.
• If non-DX film is loaded, the ISO
indicator and the numbers for the
previously-set film speed blink in the
LCD panel. Set the appropriate film
speed according to instructions in
“1. Manually Setting the Film Speed”
on page 66.
• To set a film speed other than the
automatically-set DX film speed, see
“1. Manually Setting the Film Speed”
on page 66.
• The currently set film speed can be
checked by simultaneously pressing
the AF mode selector and metering
mode selector. The “ISO” indicator
and the currently set film speed are
displayed in the LCD panel.
–
v
X
‘
b
N
J
o
[
˝
O
˜
¤
˜
”
‡
¢
B
PLEASE REMOVE THIS SHEET
@BEFORE USING CAMERA.
PRIERE D'ENLEVER CETTE FEUILLE
@AVANT D'UTILISER L'APPAREIL.
BITTE ENTFERNEN SIE DIESES BLATT
@VOR GEBRAUCH DER KAMERA.
POR FAVOR, RETIRE ESTA HOJA
@ANTES DE USAR LA CÁMARA.
PRIMA DI USARE L'APPARECCHIO,
@TOGLIERE QUESTO SCHERMO
@DI PLASTICA.
• Before loading film for the first time, be
sure to remove the plastic protector from
inside the back cover.
If the plastic protector is left inside the
camera while taking pictures, the characters printed on the plastic may appear in
the exposed image.
Plastic protector
400
36
EXP
400
36
EXP
00
00
AF
ISO
MODE
ISO
00. Part.1 RS (E) (P.13~27) 27-01-2003 11:54 Page 22
23
Film Loading
1
Set the main switch to “A”.
2
Open the back cover by using your
thumb to press the back cover lock
release button while sliding the
latch down.
• If you find it difficult to perform both
operations with one finger, use one finger to press the back cover release
button and another finger to operate
the latch.
A
L
L
FILM
A
3
Insert the film cartridge at a slant
with the flat end facing up and the
bottom end entering the camera
first.
4
Carefully pull the film tip across until
it reaches the orange mark.
• Hold down the film cartridge while
aligning the film to prevent slack.
The shutter curtain operates with extremely high precision and can be easily damaged if
touched. When loading or unloading film, BE CAREFUL not to touch the shutter curtain
accidentally with your finger or the tip of the film.
• If you pull out too much film, wind the
excess back into the cartridge.
CORRECT WRONG
1
2
00. Part.1 RS (E) (P.13~27) 27-01-2003 11:54 Page 23
24
Film Loading
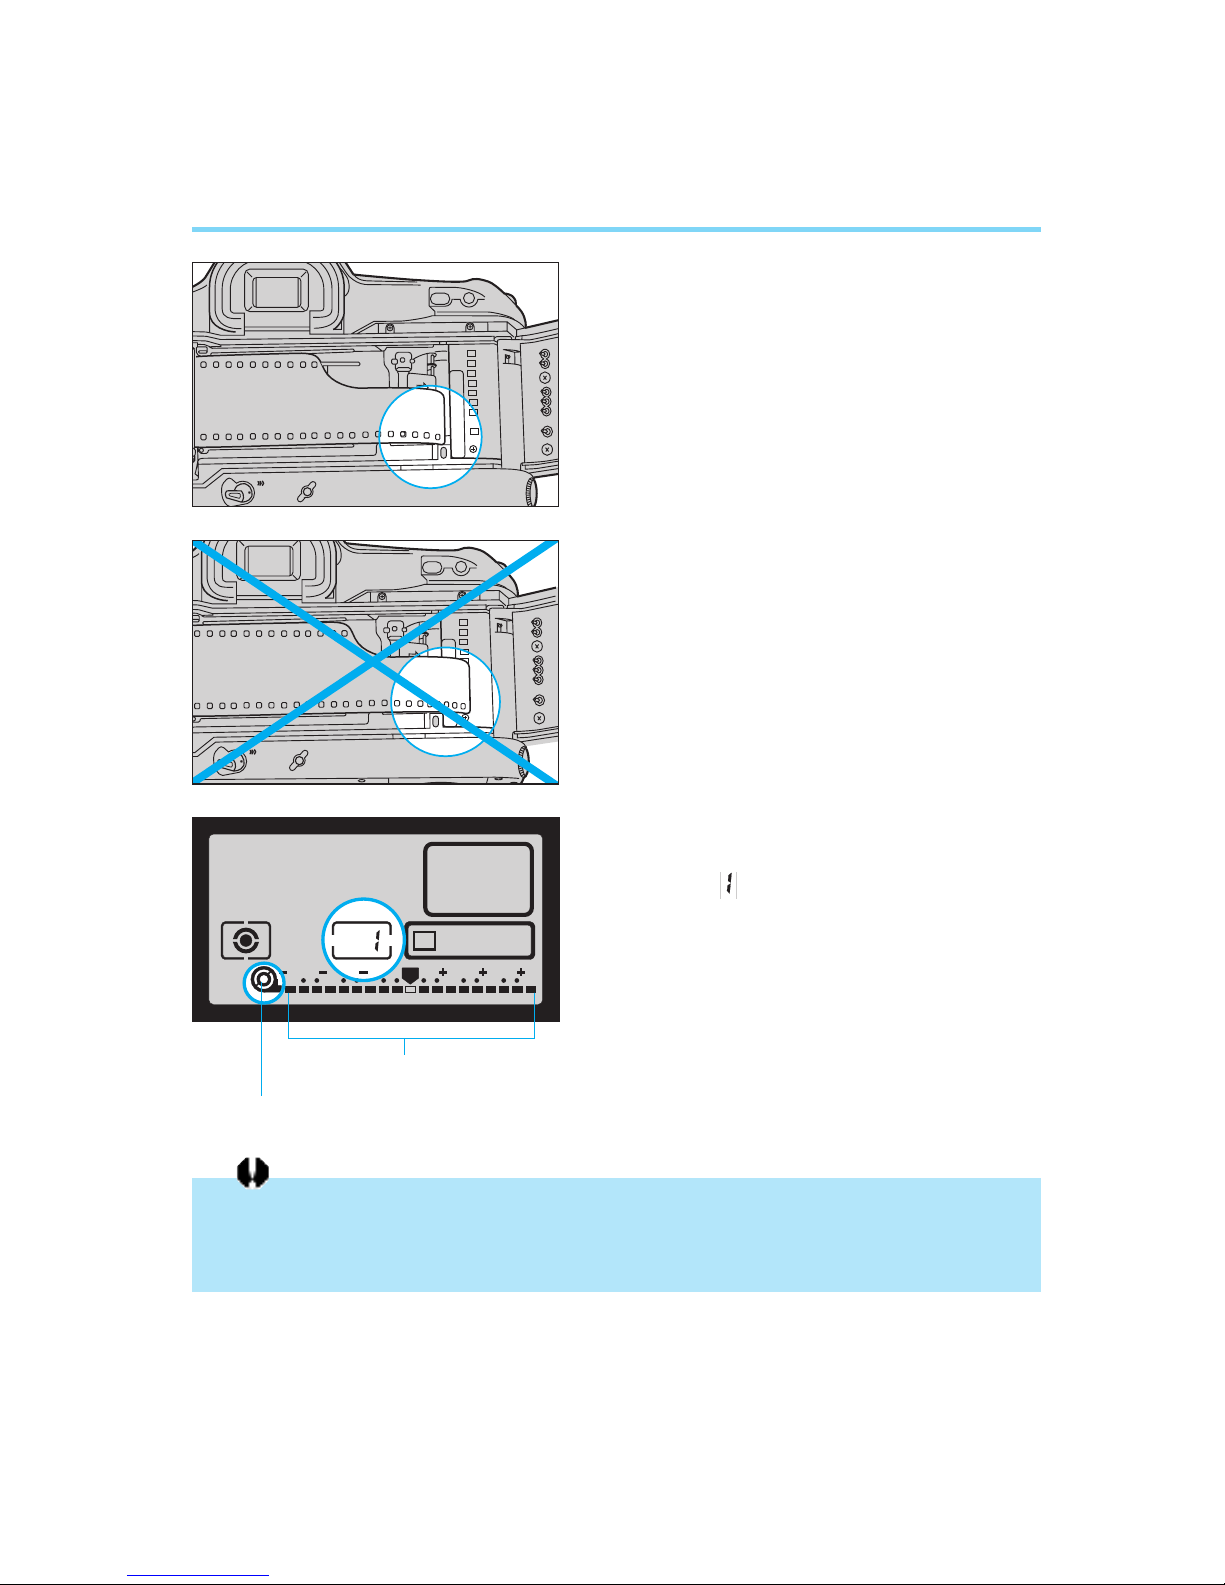
5
After checking that the film tip is
aligned with the orange mark and
that the film perforations are
engaged with the sprockets, close
the back cover until it clicks shut.
• DO NOT pull the film tip past the
orange mark. If the film tip passes the
orange mark, advancing the film may
damage the film or cause the camera
to malfunction.
ONE SHOT
3 2 1 1 2 3
P
0
6
The film automatically advances to
the first frame, the frame counter
shows “ ” and the film-load check
symbol is displayed in the LCD
panel.
• If the film transport (wind/rewind)
blinks, the film is not loaded correctly,
and the shutter will not release when
the shutter button is pressed. Reload
the film.
CORRECT
WRONG
Film-load check symbol
Film transport (wind/rewind)
Using film which has been exposed to high humidity may cause the film perforations to
tear when the camera advances the film. In humid locations, do not remove the film from
its original sealed package until immediately prior to loading it into the camera.
L
A
FILM
FILM
L
A
FILM
FILM
00. Part.1 RS (E) (P.13~27) 27-01-2003 11:54 Page 24

25
Film Loading
● Removing Film
The film automatically rewinds at the end of the roll.
1
When rewinding starts, the film
rewind indicator moves from right to
left to show that the film is rewinding. At the same time, the LCD
panel’s frame counter counts down
the number of frames.
2
Automatic rewind stops when completed. Film rewind completion “ ”
blinks in the LCD panel to indicate
that you can now safely open the
back cover and remove the film.
● Removing Film in Mid-Roll ()
To rewind the film in mid-roll, press the
film rewind button ( ). The film
immediately starts rewinding.
Custom function settings let you modify the camera’s basic functions to
match your shooting style. Custom function numbers appear in various
sections throughout this instruction book, indicating that the function being
described can be further modified by changing the relevant custom function setting. For details on the types of custom functions available and
how to change them, refer to the “VI Custom Functions” section starting
on page 81.
9. Custom Functions
A
L
00. Part.1 RS (E) (P.13~27) 27-01-2003 11:54 Page 25

26
10. Program AE mode [P]
In Program AE mode the camera automatically sets the shutter speed
and aperture value according to the subject brightness. This mode allows
anyone to start taking pictures quickly without worrying about exposure
settings. Five focusing points provide a wide focusing area, making it
easy to try out various picture compositions.
1
Turn on the main switch.
2
Press the shooting mode selector
while turning the main dial until “P”
appears in the LCD panel.
3
Look through the viewfinder and
cover the subject with one of the five
focusing points, then press the shutter button halfway to focus it.
• When the subject is focused, the AF
frame used for focusing temporarily
lights red and the in-focus indicator
lights up in the viewfinder in One-shot
AF mode.
• If the in-focus indicator blinks, the autofocus system cannot focus the subject and the shutter will not release.
Refer to “4. Manual Focusing” on page
36 for instructions on how to focus the
subject manually.
• Exposure settings are displayed in the
LCD panel and viewfinder.
4
After confirming that the exposure
settings are not blinking, press the
shutter button completely to take the
picture.
ONE SHOT
3 2 1 1 2 3
P
0
In-focus IndicatorFocusing points
AF
ISO
MODE
Shutter speed
Aperture value
00. Part.1 RS (E) (P.13~27) 27-01-2003 11:54 Page 26
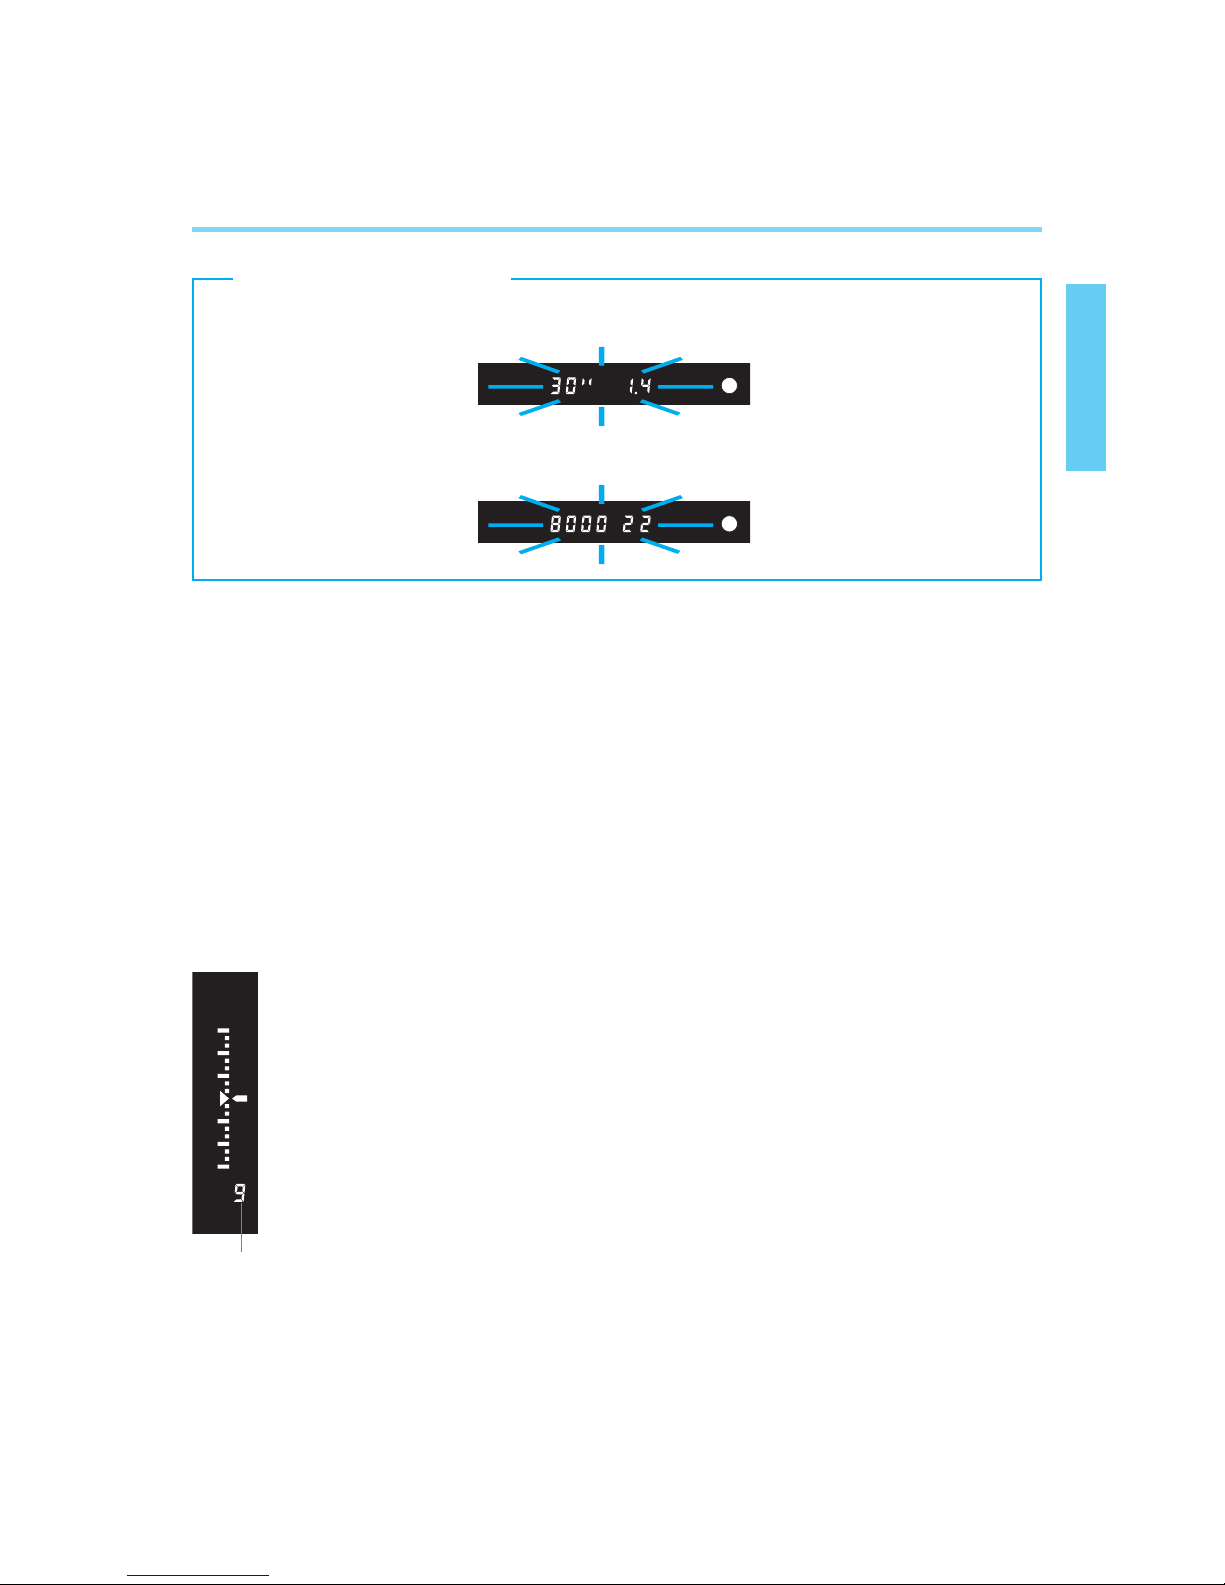
• If a shutter speed of 30” and the maximum aperture value blink in the display, the subject is too dark. Switch to flash photography, referring to “V. Using Flash” on page 76.
• If a shutter speed of 8000 and the minimum aperture value blink in the display, the
subject is too bright. Attach a neutral density (ND) filter to the lens.
27
Program AE mode [P]
● Six-Second Timer
When you release the shutter button after pressing it halfway, the LCD
panel and viewfinder displays remain active for six seconds.
● Program Shift Function
When taking pictures in Program AE mode, you can “shift the program” to
change the set shutter speed and aperture value combination while maintaining the same exposure.
After pressing the shutter button halfway, turn the main dial until the
desired shutter speed/aperture value combination is displayed.
[Exposure Warnings]
Remaining frame counter
● Remaining Frame Counter
When nine frames or less remain on the roll, the number of
remaining frames is displayed in the viewfinder below the exposure level display. “F” indicates that 10 or more frames remain on
the roll. When less than 10 frames remain, the display counts
down the frames in descending order: 9, 8 ... 2, 1.
• Non-DX films are identified as 36-exposure rolls, and the remaining
frame counter operates accordingly.
00. Part.1 RS (E) (P.13~27) 27-01-2003 11:54 Page 27
28
II Selecting the AF and
Metering Modes
• First make sure the camera's main
switch is set to “A” or “ ”
A
L
This camera’s wide-zone autofocus
system lets you freely select from five
focusing points, allowing you to keep
the scene composed as desired while
concentrating on the subject. Also, a
rich selection of exposure options lets
you select the metering mode appropriate for the subject or shooting situation, and flexible exposure compensation capabilities let you fine tune
the exposure in real time.
00. Part.2 RS (E) (P.28~47) 27-01-2003 11:56 Page 28
29
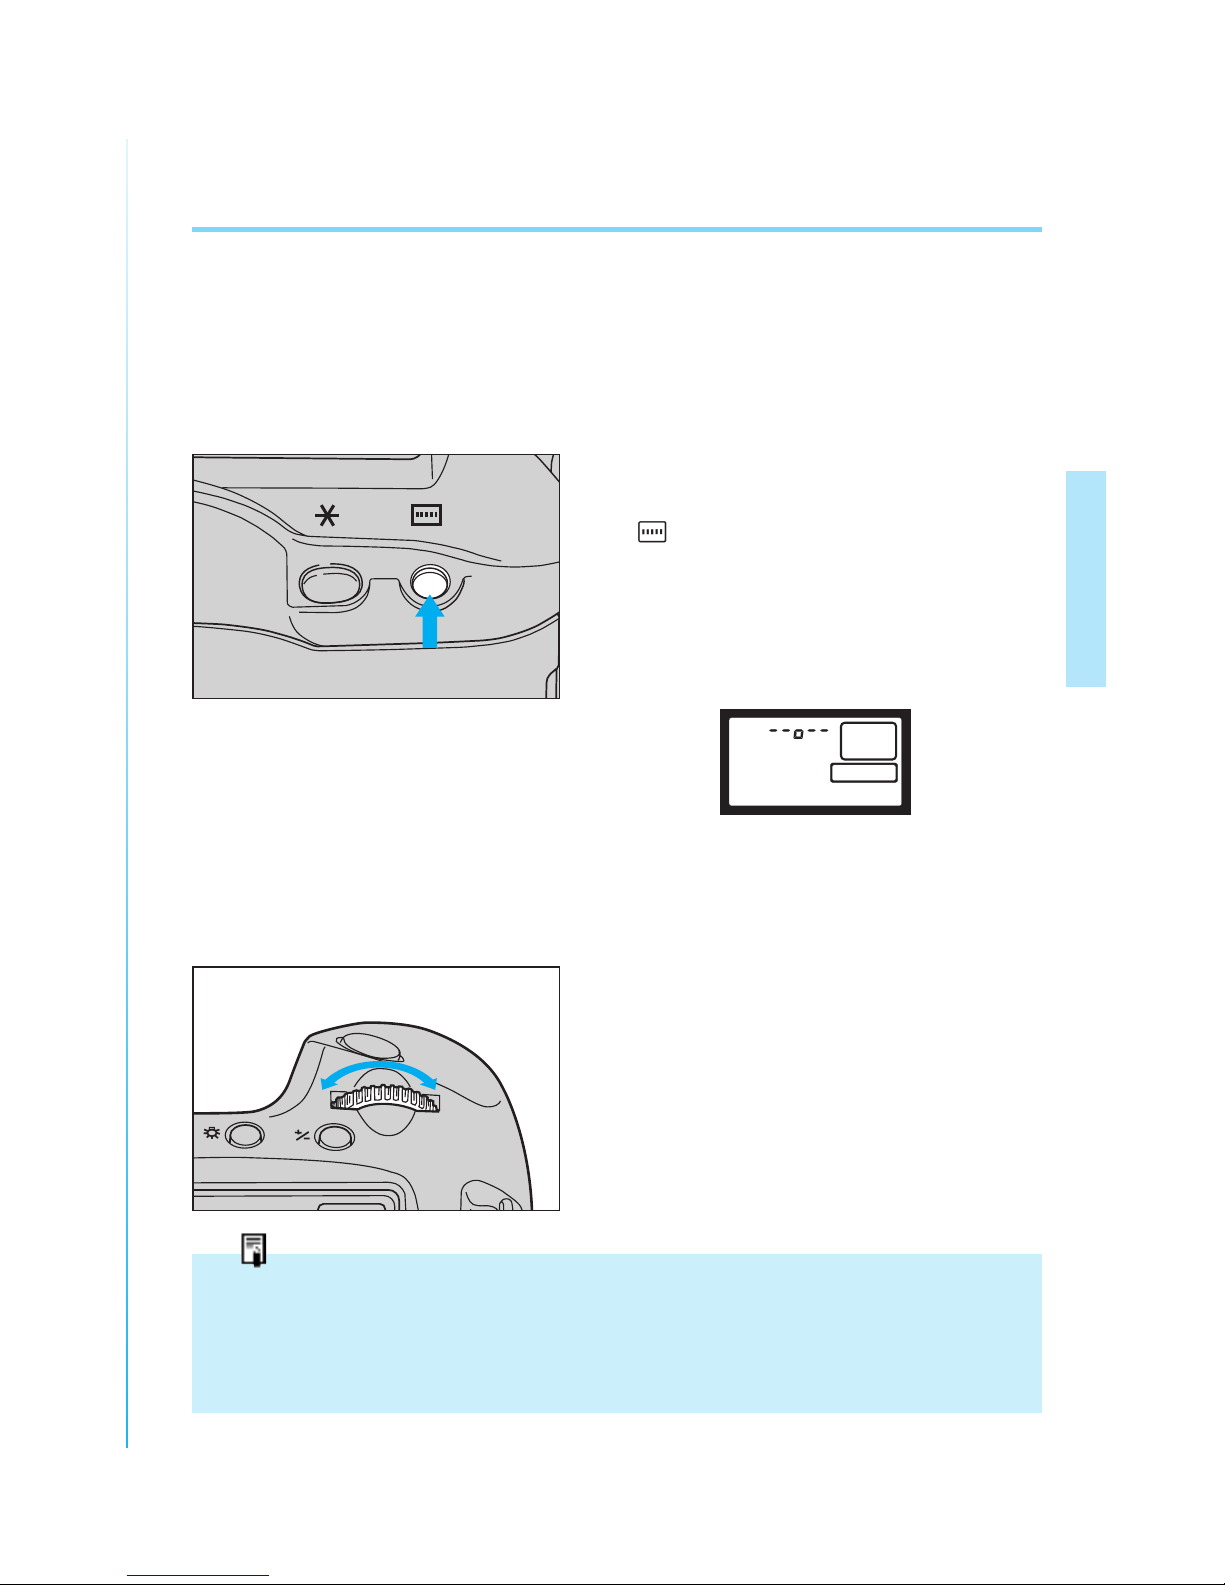
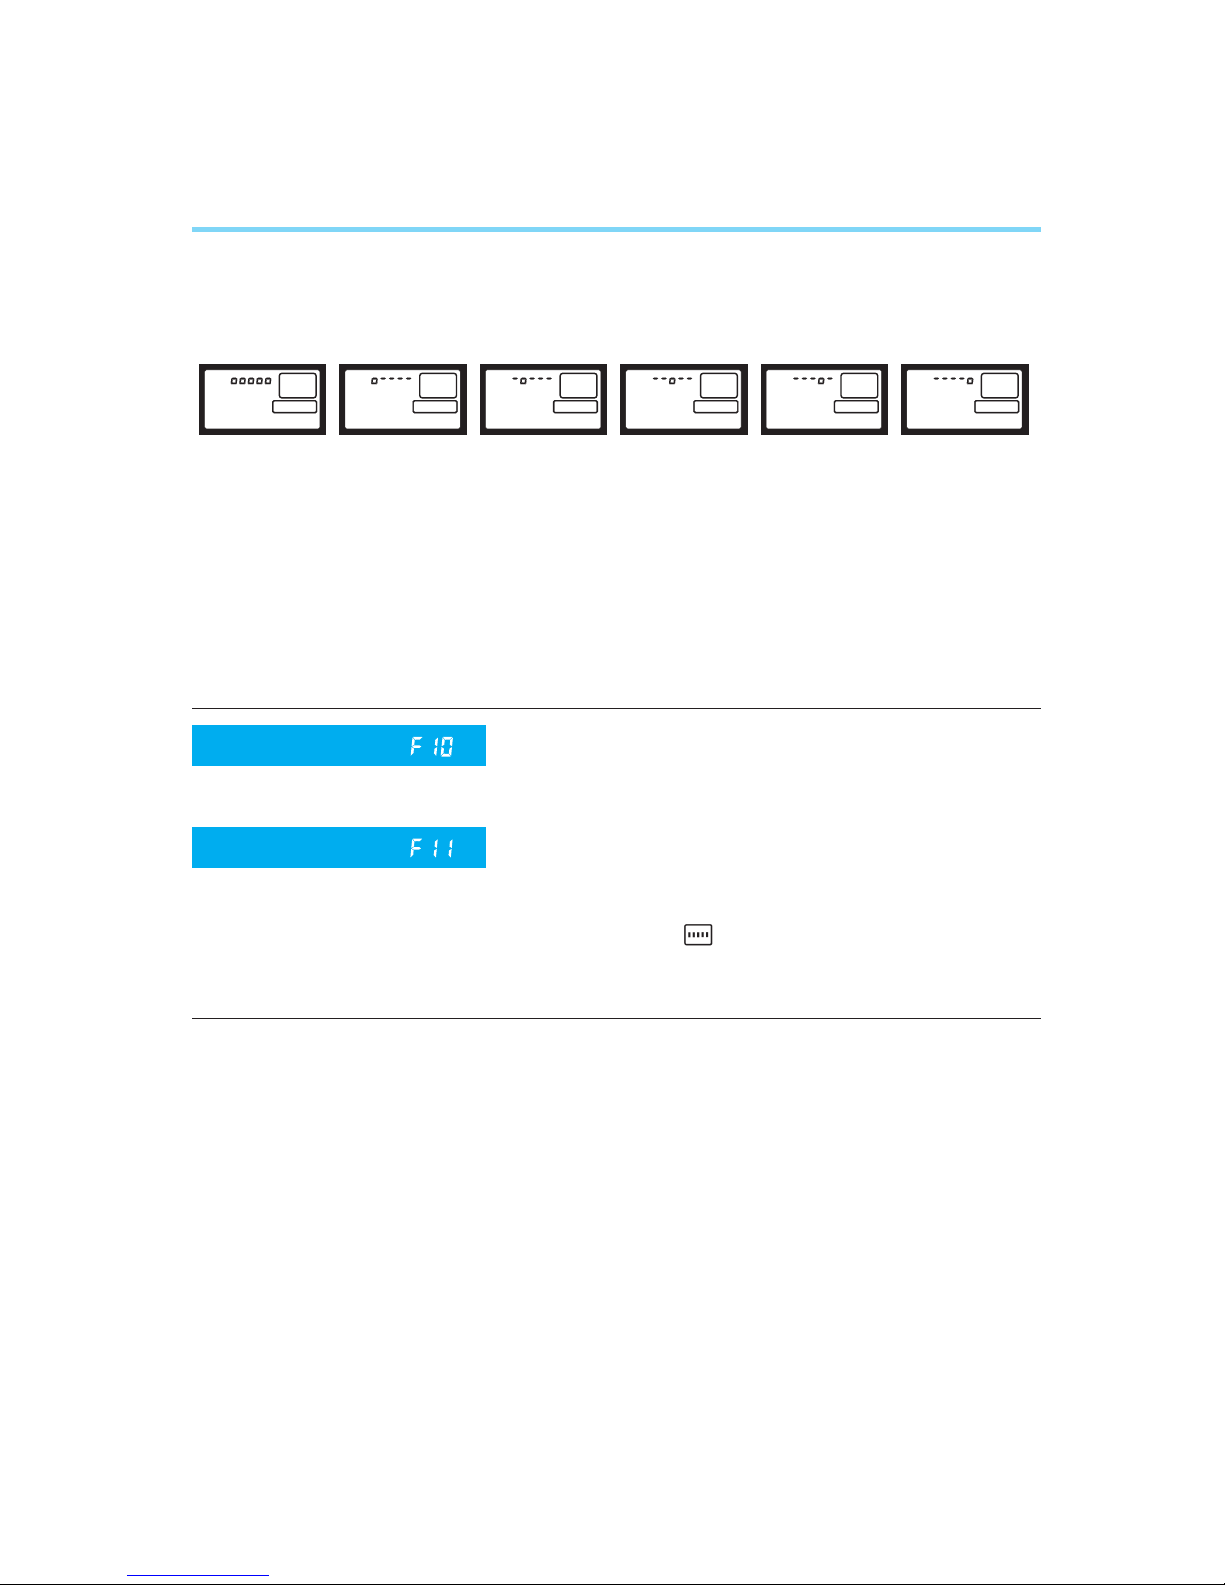
1. Selecting the Five Focusing Points
This camera incorporates a high-precision AF sensor called Multi-BASIS
(Multi Base-Stored Image Sensor), equipped with five focusing points for
wide autofocusing coverage.
You can freely select any of the focusing points to compose the scene as
desired, or you can let the camera select the focusing point for you (automatic focusing selection mode).
● Selecting a Focusing Point
1
Press the focusing point selector
().
2
The currently selected focusing
point lights red in the viewfinder and
the focusing point indicator is displayed in the LCD panel.
• All five focusing points light up in the
viewfinder and LCD panel when the
camera is set for automatic focusing
point selection mode.
3
Turn the main dial to select the
desired focusing point.
● Automatic Focusing Point Selection Mode
•
The camera automatically selects an individual focusing point after evaluating all 5 points simultaneously.
• In One-shot AF mode, the system usually gives priority to the closest reliable subject.
• In AI Servo AF mode, the system always gives priority to the central (cross-type) focusing point for the first exposure. (For more information, refer to page 33.)
00. Part.2 RS (E) (P.28~47) 27-01-2003 11:56 Page 29
30
Selecting the Five Focusing Points
• Turning the main dial selects the focusing points in the following order: automatic focusing point selection (all five focusing points are displayed) ↔ far left ↔
left center ↔ center ↔ right center ↔ far right.
4
The setting is completed when you
press the shutter button halfway or
after six seconds elapse.
• The selected focusing point lights red in the viewfinder and is also displayed in
the LCD panel.
Custom Function
(Refer to pages 88–89)
(Refer to pages 90–91)
This function lets you select the focusing
point using the exposure compensation
button (instead of the focusing point
selector ( )) in combination with the
main dial, or by only turning the quick
control dial.
Prohibits superimposed focusing points in
the viewfinder.
Custom Function
00. Part.2 RS (E) (P.28~47) 27-01-2003 11:56 Page 30
 Loading...