

Canon EOS-1D - Digital Camera SLR Instructions Manual
Software
INSTRUCTIONS
EOS DIGITAL SOLUTION DISK Ver. 3
Windows
Please read these instructions carefully before using
the EOS-1D software.
This guide should be kept in a safe place so that it can
be used for future reference.
CT1-1230-002 © CANON INC. 2002 PRINTED IN JAPAN
´
English Edition

READ CAREFULLY BEFORE USING!
CANON SOFTWARE LICENSE AGREEMENT
IMPORTANT - READ THIS AGREEMENT BEFORE USING THE SOFTWARE ON THE
CD-ROM IN THIS BOX. BY USING THE SOFTWARE, YOU AGREE TO BE BOUND BY THE
TERMS OF THIS AGREEMENT.
This is a license agreement (the [Agreement]) between you and Canon Inc. ([Canon]).
IF YOU DO NOT AGREE TO THE TERMS AND CONDITIONS OF THIS AGREEMENT, DO
NOT USE THE SOFTWARE PROGRAM ON THE CD-ROM AND THE USER MANUAL IN
THIS BOX (COLLECTIVELY, THE [SOFTWARE]) AND RETURN THE SOFTWARE WITHIN
30 DAYS FROM THE DATE OF PURCHASE TO YOUR POINT OF PURCHASE FOR A
REFUND.
In consideration of the right to use the SOFTWARE, you agree to abide by the terms and
conditions of this Agreement.
1. LICENSE: Canon grants you the non-exclusive right to use the SOFTWARE only on a
single computer. You may physically transfer the SOFTWARE from one computer to
another provided that the SOFTWARE is used on only one computer at a time. You shall
not install or use the SOFTWARE on a network, multiple CPU, multiple site arrangement,
or any other hardware configuration where the SOFTWARE is accessible to more than one
CPU or to more than one user.
YOU SHALL NOT ASSIGN, SUBLICENSE, RENT, LEASE, LOAN, CONVEY OR
OTHERWISE USE, TRANSFER, COPY, TRANSLATE, CONVERT TO ANOTHER
PROGRAMMING LANGUAGE, ALTER, MODIFY, DECOMPILE OR DISASSEMBLE THE
SOFTWARE, IN WHOLE OR IN PART, EXCEPT AS EXPRESSLY PROVIDED IN THIS
AGREEMENT.
2. BACK-UP COPY: You may make one copy of the SOFTWARE solely for back-up
purposes, or copy the SOFTWARE onto the permanent storage device (e.g. a hard disk) of
your computer and retain the original for back-up purposes. Any other copying of the
SOFTWARE is a violation of this Agreement. You must reproduce and include the
copyright notice on the back-up copy.
3. SUPPORT AND UPDATES: Canon is not responsible for providing maintenance or
support for use of the SOFTWARE. No updates, fixes or support will be made available for
the SOFTWARE.
4. LIMITED WARRANTY AND LIMITATION OF LIABILITY: It is your responsibility to choose,
maintain and match the hardware and software components of your computer system.
Thus Canon does not guarantee uninterrupted service or correction of errors or that the
functions or performance of the SOFTWARE will meet your requirements. THE
SOFTWARE IS LICENSED ON AN [AS IS] BASIS AND WITHOUT WARRANTY OF ANY
KIND. The CD-ROM storing the SOFTWARE is warranted only against defective material
under normal use for a period of ninety (90) days after purchase from an authorized Canon
dealer as evidenced by your sales receipt. Your sole remedy for a defective CD-ROM shall
be replacement of the same without charge when returned by you at your expense to your
point of purchase and proven to be defective upon inspection. The replacement CD-ROM
will be warranted for the remainder of the original ninety (90) day warranty period of the
defective CD-ROM. The limited warranty does not apply if the failure of the CD-ROM
resulted from accident, abuse or misapplication of the SOFTWARE and shall not extend to
anyone other than the original user of the SOFTWARE.
EXCEPT AS SPECIFICALLY SET FORTH IN THIS PARAGRAPH 4, CANON, CANON’S
I

READ CAREFULLY BEFORE USING!
SUBSIDIARIES, DISTRIBUTORS AND DEALERS DISCLAIM ALL WARRANTIES, EXPRESS
OR IMPLIED, INCLUDING ANY WARRANTY OF MERCHANTABILITY OR FITNESS FOR A
PARTICULAR PURPOSE, WITH RESPECT TO THE SOFTWARE.
NEITHER CANON NOR ANY OF CANON’S SUBSIDIARIES, DISTRIBUTORS OR DEALERS
IS LIABLE FOR ANY DAMAGES HOWSOEVER CAUSED, INCLUDING WITHOUT
LIMITATION, DIRECT, CONSEQUENTIAL OR INCIDENTAL LOSS OR DAMAGE INCLUDING
LOSS OF PROFITS, EXPENSE OR INCONVENIENCE HOWSOEVER CAUSED OR
ARISING OUT OF THE SOFTWARE OR THE USE THEREOF.
NEITHER CANON, NOR ANY OF CANON’S SUBSIDIARIES, DISTRIBUTORS OR DEALERS
SHALL HAVE ANY OBLIGATION TO INDEMNIFY YOU AGAINST ANY CLAIM OR SUIT
BROUGHT BY A THIRD PARTY ALLEGING THAT THE SOFTWARE OR THE USE THEREOF
INFRINGES ANY INTELLECTUAL PROPERTY OF SUCH THIRD PARTY.
5. TERM: This Agreement is effective upon your using the SOFTWARE and remains in effect
until expiration of all copyright interests in the SOFTWARE unless earlier terminated. You
may terminate this Agreement by destroying the SOFTWARE. This Agreement will also
terminate without notice to you if you fail to comply with any of the terms of this Agreement
and you must then promptly return the SOFTWARE. In addition, Canon may enforce its
other legal rights.
6. U.S. GOVERNMENT RESTRICTED RIGHTS NOTICE: The SOFTWARE is provided with
restricted rights. Use, duplication or disclosure is subject to restrictions as set forth in
either subparagraph (c) (1) (ii) of the Rights in Technical Data and Computer software
clause at DFARs 252.227-7013 or subparagraph (c) (1) and (2) of the Commercial
Computer Software Restricted Rights Clause at FAR 52.227-19, as applicable.
7. SEVERABILITY: In the event that any provision of this Agreement is declared or found to
be illegal by any court or tribunal of competent jurisdiction, such provision shall be null and
void with respect to the jurisdiction of that court or tribunal and all the remaining provisions
of this Agreement shall remain in full force and effect.
8. CONTROLLING LAW: The terms of this Agreement as it relates to purchases of the
Software in the United States of America shall be governed and construed in all respects in
accordance with the laws and regulations of the State of New York, without reference to
choice of law principles. The terms of this Agreement as it relates to purchases of the
Software in Canada shall be governed by the laws of the province of Ontario.
9. OWNERSHIP: All rights, including but not limited to copyrights and trade secret rights, to
the SOFTWARE belong to Canon, its affiliated corporations and third party licensors. Your
use of the SOFTWARE is subject to the United States, Canada and other applicable
copyright and trademark laws and nothing in this Agreement constitutes a waiver of the
rights of Canon, its affiliated corporations and third party licensors under such laws.
Nothing contained in Paragraph 1 shall be construed to give Canon any ownership rights in
any images, graphics or textual material that you save in connection with the Software.
10
.ACKNOWLEDGEMENT: BY USING THE SOFTWARE, YOU ACKNOWLEDGE THAT YOU
HAVE READ THIS AGREEMENT, UNDERSTOOD IT, AND AGREE TO BE BOUND BY ITS
TERMS AND CONDITIONS. YOU ALSO AGREE THAT THIS AGREEMENT IS THE
COMPLETE AND EXCLUSIVE STATEMENT OF AGREEMENT BETWEEN YOU AND
CANON CONCERNING THE SUBJECT MATTER HEREOF AND SUPERSEDES ALL
PROPOSALS OR PRIOR AGREEMENTS, VERBAL OR WRITTEN, AND ANY OTHER
COMMUNICATIONS BETWEEN THE PARTIES RELATING TO THE SUBJECT MATTER
HEREOF. NO AMENDMENT TO THIS AGREEMENT SHALL BE EFFECTIVE UNLESS
SIGNED BY A DULY AUTHORIZED OFFICER OF CANON.
Introduction
II
Contents
READ CAREFULLY BEFORE USING! ....... I
About These Instructions and the
Symbols Used ......................................... IV
Safety Precautions .................................... V
Disclaimer ................................................. V
Trademark Acknowledgments .................. V
About the ZoomBrowser EX Software
User Guide .............................................. VI
About QuickTime ..................................... VI
About the Software ................................. VII
EOS DIGITAL SOLUTION DISK ............. VII
Adobe Photoshop 5.0 LE DISK ............. VIII
Computer System Requirements ........... IX
Installing the Software ............ 1-1
1
Installing the Software ........................... 1-2
EOS DIGITAL SOLUTION DISK
Installation ............................................. 1-2
Installing Photoshop 5.0 LE ................... 1-4
Complete the Installation of the TWAIN
and WIA Drivers ..................................... 1-5
Please Register Your Camera! .............. 1-8
Getting Ready to Work with
2
Images ...................................... 2-1
Connecting the Camera to Your
Computer ................................................ 2-2
Inserting a CF Card into Your Card
Reader ..................................................... 2-4
Selecting Images .................................. 3-13
Selecting Images with the Mouse ........ 3-13
Selecting Images from the Control
Panel ................................................... 3-13
Working with Selected Images ........... 3-14
Operations that Can Be Used with
Images ................................................. 3-14
Attaching Checkmarks to Selected
Images ................................................. 3-15
Protecting Images ................................ 3-16
Selecting Images by Condition ............ 3-17
Checking the Image Information .......... 3-17
Rotating Images .................................. 3-18
Playing Back Sound ............................ 3-18
Erasing Images .................................... 3-19
Processing RAW Images ..................... 3-20
Selecting the Color Matrix ................... 3-21
Correcting the Brightness (Digital
Exposure Compensation) .................... 3-22
Adjusting the Color and Brightness
(Adjust Tone Curve) ............................. 3-23
Adjusting the White Balance ............... 3-26
Saving the White Balance ................... 3-29
Setting the IPTC Information ............... 3-30
Saving Images ...................................... 3-35
Saving Images from the Camera to
Your Computer .................................... 3-35
Specifying the Preferences ................. 3-38
Transferring Images to Photoshop 5.0 LE
............................................................... 3-41
Working with Images in the
3
TWAIN Driver ........................... 3-1
Starting the TWAIN Driver ..................... 3-2
Displaying Images.................................. 3-6
Displaying Images by Connecting the
Camera to Your Computer ..................... 3-6
Displaying Images by Connecting a
Card Reader .......................................... 3-7
Selecting the Image Display Format .... 3-9
Selecting the Display Mode and
Display Size .......................................... 3-10
Selecting the Display Mode ................. 3-10
Selecting the Display Size ................... 3-12
III
Downloading Images with the
4
WIA Driver ................................ 4-1
Downloading Images ............................. 4-2
Downloading with the Scanner and
Camera Wizard ...................................... 4-2
Downloading with Windows Explorer .... 4-3
Downloading with the WIA TWAIN ........ 4-5
Working with Images in RAW
5
Image Converter ...................... 5-1
Using RAW Image Converter ................ 5-2
Contents
Specifying Camera Settings from
6
Your Computer ........................ 6-1
Specifying the Camera Settings ........... 6-2
Basic Settings ........................................ 6-2
Detailed Settings ................................... 6-5
Personal Function Settings................... 6-6
Setting Up Personal Functions .............. 6-6
Description of Personal Functions ......... 6-9
Checking, Saving, and Loading
Personal Function Settings ................. 6-21
Setting the Parameters ........................ 6-24
Setting the Parameters ........................ 6-24
Selecting the Personal White Balance
............................................................... 6-30
Selecting the Personal White Balance .. 6-30
Operating the Camera from Your
7
Computer ................................. 7-1
Starting RemoteCapture ........................ 7-2
Taking Shots from Your Computer ....... 7-4
Using RemoteCapture ........................... 7-4
Default Settings ..................................... 7-5
Printing Images ...................................... 7-7
Timer Shooting ...................................... 7-7
Interval Timer Shooting.......................... 7-8
Working with Images in
8
ZoomBrowser EX .................... 8-1
Starting ZoomBrowser EX..................... 8-2
The ZoomBrowser EX Window ............. 8-3
Downloading and Saving Images ......... 8-5
ZoomBrowser EX Features ................... 8-7
Switching the Display Mode .................. 8-7
Registering a Folder as a Image Folder
............................................................... 8-8
Refreshing a Folder ............................... 8-8
Processing RAW Images with
ZoomBrowser EX .................................. 8-9
Merging Panoramic Images with
PhotoStitch ........................................... 8-10
Printing Images .................................... 8-11
Troubleshooting and
9
Uninstallation........................... 9-1
Troubleshooting ..................................... 9-2
Uninstallation Procedure ....................... 9-6
Uninstalling the Software ....................... 9-6
Uninstalling the Driver ........................... 9-7
Uninstalling Photoshop 5.0 LE ............ 9-16
Index ...................................................... 9-17
Adobe Customer Support ................... 9-19
Introduction
About These Instructions and the Symbols Used
The information in these instructions is valid for the Windows 98 Second Edition, Windows
Me, Windows 2000, and Windows XP Home Edition/Professional (referred to hereafter as
Windows XP) operating systems. However, where explanations are common to all the
operating systems, the screens shown are form Windows 98 Second Edition (referred to
hereafter as Windows 98 SE).
Descriptions of EOS-1D operations assume that the reader is familiar with the information
in the bundled EOS-1D Instructions. For detailed information on how to use the software
products and the restrictions that apply to those products, refer also to the Help and
Readme files for the respective products.
: Marks information that should be read before use to prevent damage to the camera,
camera malfunction, or problems that would interfere with the functioning of software
and computer.
: Marks additional information that you will find helpful when using the camera or software.
: These sections provide brief descriptions of the Custom Function Settings for
the respective camera functions. For more details, refer to “Custom Function
Settings” in the EOS-1D Instructions.
IV

Safety Precautions
Please read the safety precautions carefully before using this product. Ensure that you use the
product correctly according to the procedures described in these instructions.
The following safety precautions are intended to instruct you in the safe and correct operation
of the product and its accessories to prevent injuries or damage to yourself, other persons and
property. Please read and ensure that you understand them before you proceed to the other
sections of these instructions.
Warning
Do not play the supplied CD-ROM(s) in any CD-ROM Player that does not support data
CD-ROMs. The extremely loud sound that may result from playing the CD-ROM(s) in an
audio CD player (music player) could damage the speakers. It is also possible to suffer
hearing losses from listening with headphones to the loud sounds of a data CD-ROM played
on a music CD player.
Disclaimer
• While every effort has been made to ensure that the information contained in these
instructions is accurate and complete, no liability can be accepted for any errors or omissions.
Canon reserves the right to change the specifications of the hardware and software
described herein at any time without prior notice.
• No part of these instructions may be reproduced, transmitted, transcribed, stored in a
retrieval system, or translated into any language in any form, by any means, without the
prior written permission of Canon.
• Canon makes no warranties for damages resulting from corrupted or lost data due to a
mistaken operation or malfunction of the camera, the software, the CompactFlash™ cards
(CF cards), personal computers, peripheral devices, or use of non-Canon CF cards.
Trademark Acknowledgments
• Canon and EOS are trademarks of Canon Inc.
• Adobe and Photoshop are trademarks of Adobe Systems Incorporated.
• CompactFlash is a trademark of SanDisk Corporation.
• IBM is a registered trademark of International Business Machines Corporation.
• Microsoft and Windows are registered trademarks or trademarks of Microsoft Corporation in
the United States and/or other countries.
• Macintosh is a trademark of Apple Computer Inc., registered in the United States and other
countries.
• QuickTime is a trademark of Apple Computer Inc.
• Other names and products not mentioned above may be registered trademarks or
trademarks of their respective companies.
V
Safety Precautions
About the ZoomBrowser EX Software User Guide
A PDF-format Software Guide that provides detailed instructions for using ZoomBrowser EX is
included on the EOS DIGITAL SOLUTION DISK. You will need Adobe Acrobat Reader to view
the Software Guide. If you have not already installed Adobe Acrobat Reader on your computer,
install it using the procedure below.
Installing Acrobat Reader
1 Load the EOS DIGITAL SOLUTION DISK into the CD-ROM drive.
2 From [My Computer], open the CD-ROM drive containing the SOLUTION DISK and double-
click the following in sequence: [Readme] folder s [English] folder s [Acrobat] folder s
[Ar405eng].
3 Proceed with the installation as directed by the on-screen messages.
Viewing the ZoomBrowser EX Software User Guide
1 Load the EOS DIGITAL SOLUTION DISK into the CD-ROM drive.
/ The Installer panel appears automatically.
2 Click [Using the software].
3 Click [ZoomBrowser EX].
/ Acrobat Reader starts up and the [ZoomBrowser EX Software User Guide] appears.
Introduction
About QuickTime
To save composite images made using PhotoStitch in the QuickTime VR format, you will need
QuickTime 3.0 or later. If you have not already installed QuickTime 3.0 or later on your
computer, install it using the procedure below.
1 Load the EOS DIGITAL SOLUTION DISK into the CD-ROM drive.
/ The Installer panel appears automatically.
2 Click [QuickTime 5.0 Installation].
3 Proceed with the installation as directed by the on-screen messages.
VI
About the Software
This section briefly describes the main functions of the software provided on the bundled CDROM.
■ EOS DIGITAL SOLUTION DISK
TWAIN Driver
● This is a driver for Windows 98 SE and Windows 2000 that allows you to connect the
EOS-1D to your computer using the interface cable and display the images stored on a CF
card in the EOS-1D.
● Enables you to display, save and erase images.
● Allows you to process RAW images and then perform image processing.
WIA Driver
● This is a driver for Windows Me and Windows XP that allows you to connect the EOS-1D to
your computer using the interface cable and that automatically starts the [Scanner and
Camera Wizard] to download your images.
● It also allows you to copy camera images using standard file copying procedures in
Windows Explorer (but it cannot upload computer files to the camera).
ZoomBrowser EX
● When you connect the EOS-1D to your computer with the interface cable, images on the
CF card in the EOS-1D are displayed.
● This program displays downloaded images in lists and allow you to sort and organize them
by content.
● This program can display images in order according to the shooting date.
● This program can start your email program* and send images as file attachments to it.
Since the file size and compression rate can be controlled, you can reduce large image files
to sizes small enough for easy transmission.
* The automatic start of email programs is supported by Windows and the email programs must be
enabled as MAPI clients.
PhotoRecord
● This program permits you to add backgrounds and borders, as well as titles and comments,
and print out the images. You can enjoy preparing prints of your images appearing as if they
were pasted into a photo album. Naturally, you can also use it to make artistic single-image
layouts.
● Allows you to make index prints using the images saved on your computer and on the
camera.
● This program can output your original photo cards or labels (8-label sheets) to Card Photo
Printer CP-10 (optional) connected to the computer by interface cable PIF-100 (optional).
VII
About the Software
RAW Image Converter
● This program processes RAW images that you shot on the EOS-1D and saved onto your
computer. You can also use this program to save your images in popular formats such as
TIFF (8 or 16 bits/channel) and JPEG.
PhotoStitch
● PhotoStitch provides an easy way to merge a series of overlapping images into a single,
seamless panorama by automatically arranging the frames in order. You can use this
feature to stitch your shots together into one complete 360° cylinder-shaped panorama
image.
RemoteCapture
● RemoteCapture allows you to operate the EOS-1D remotely and download images to your
computer. RemoteCapture also lets you take pictures using a timer shooting or interval
timer shooting function, in addition to single-frame shooting.
■ Adobe Photoshop 5.0 LE DISK
Photoshop 5.0 LE
● This is a full-featured image retouching program equipped with a complete range of image
processing functions. You can also use Photoshop 5.0 LE to start the TWAIN Driver.
● You can use this program with the WIA Driver to display and image-process the images
saved on your computer.
* If you already have Photoshop 5.0 LE installed on your computer, you do not need to install it again.
* Explanations for the TWAIN Driver-compatible application in these instructions all use examples from
Photoshop 5.0 LE.
Introduction
VIII
Computer System Requirements
Computer
OS
CPU
RAM
Interface
Hard disk space
Display
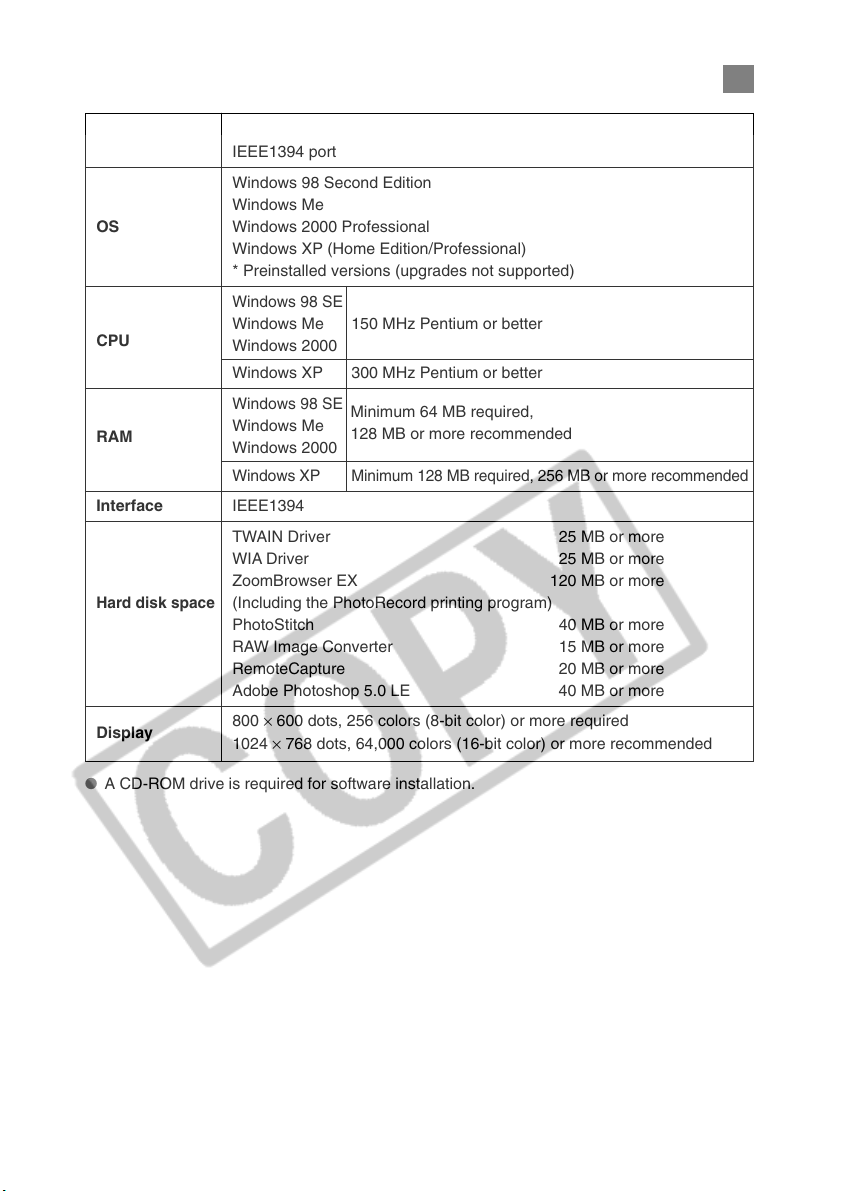
IBM PC/AT-compatible machine equipped with an OHCI-compatible
IEEE1394 port
Windows 98 Second Edition
Windows Me
Windows 2000 Professional
Windows XP (Home Edition/Professional)
* Preinstalled versions (upgrades not supported)
Windows 98 SE
Windows Me 150 MHz Pentium or better
Windows 2000
Windows XP 300 MHz Pentium or better
Windows 98 SE
Windows Me
Windows 2000
Windows XP
IEEE1394
TWAIN Driver 25 MB or more
WIA Driver 25 MB or more
ZoomBrowser EX 120 MB or more
(Including the PhotoRecord printing program)
PhotoStitch 40 MB or more
RAW Image Converter 15 MB or more
RemoteCapture 20 MB or more
Adobe Photoshop 5.0 LE 40 MB or more
800 × 600 dots, 256 colors (8-bit color) or more required
1024 × 768 dots, 64,000 colors (16-bit color) or more recommended
Minimum 64 MB required,
128 MB or more recommended
Minimum 128 MB required, 256 MB or more recommended
● A CD-ROM drive is required for software installation.
IX

1
Installing the Software
This chapter describes the procedure for installing the software for EOS-1D
and Photoshop 5.0 LE.

Installing the Software
● You must follow the procedure given below to install the software.
1. EOS DIGITAL SOLUTION DISK
2. Photoshop 5.0 LE
3. Connect the camera and complete the installation.
\ When you connect the camera to your computer, the driver is automatically
installed and driver installation ends. (On Windows 98 SE and Windows 2000, the
TWAIN Driver is installed, and on Windows Me and Windows XP, the WIA Driver is
installed.)
Do not connect the camera to your computer before you have installed the
software as this will prevent successful software installation.
EOS DIGITAL SOLUTION DISK Installation
Start up your computer.
1
● Windows 2000 or Windows XP Professional users should log on with
[Administrator] privileges.
● Close any programs that are running before you begin installing the software.
Load the SOLUTION DISK into the CD-ROM drive.
2
\ The Installer panel automatically appears.
● If the Installer panel does not appear, double-click [My Computer] on desktop s
the icon for the CD-ROM drive containing the SOLUTION DISK s [Setup] icon.
(Windows XP users should click the [Start] button s [My Computer], then double-
click the icon for the CD-ROM drive containing the SOLUTION DISK s [Setup]
icon.)
Click [Software Installation].
3
1-2
Installing the Software
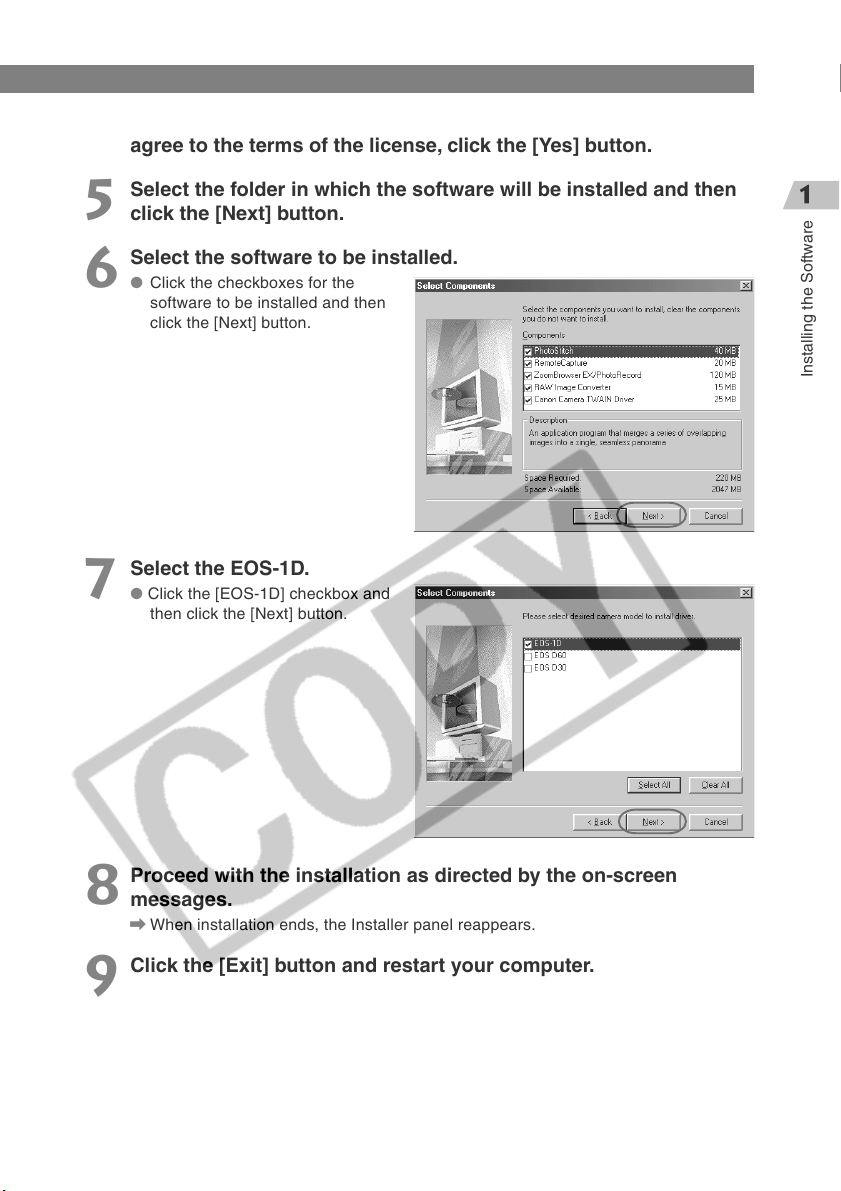
Read all of the Software User License Agreement carefully. If you
4
agree to the terms of the license, click the [Yes] button.
Select the folder in which the software will be installed and then
5
click the [Next] button.
Select the software to be installed.
6
● Click the checkboxes for the
software to be installed and then
click the [Next] button.
Select the EOS-1D.
7
● Click the [EOS-1D] checkbox and
then click the [Next] button.
Installing the Software
Proceed with the installation as directed by the on-screen
8
messages.
\ When installation ends, the Installer panel reappears.
Click the [Exit] button and restart your computer.
9
1-3

Installing the Software
Installing Photoshop 5.0 LE
● You are required to enter the serial number during Photoshop 5.0 LE installation. The serial
number is shown on the CD-ROM’s label.
Load the Adobe Photoshop 5.0 LE CD-ROM into the CD-ROM
1
drive.
Double-click [My Computer] on the desktop to open.
2
● Windows XP users should click the [Start] button and then [My Computer].
Double-click [Photosle] CD-ROM s [English] folder s [Photosle]
3
folder.
Double-click the [Setup.exe] icon.
4
Proceed with the installation as directed by the on-screen
5
messages.
● For more information on the installation procedure, refer to the [Install] file in the
[English] folder on the Photoshop 5.0 LE CD-ROM.
1-4
Installing the Software
Complete the Installation of the TWAIN
and WIA Drivers
● Before you connect the camera to your computer, you must install the TWAIN
Driver or WIA Driver from the EOS DIGITAL SOLUTION DISK on your
computer.
● Set the camera’s Auto power off function to [Off] before you start installing
the driver.
● You must not set the camera’s main switch to <OFF> until installation ends.
● For the limitations of the WIA Driver, please click the [Start] button and select
[Programs] ([All Programs] on Windows XP) s [Canon Utilities] s [EOS-1D
WIA Driver] s [WIA Driver Readme].
For Windows 98 SE Users:
Connect the camera to your computer correctly. (➞2-2)
1
Set the camera’s main switch to <ON>.
2
\ The [Creating driver information database] dialog box appears, followed shortly by
the [Insert Disk] dialog box.
Click the [OK] button without loading the EOS DIGITAL
3
SOLUTION DISK.
Installing the Software
\ The [Insert Disk] dialog box (details window) appears.
1-5

Installing the Software
Select the drive browse destination.
4
● Click the [Browse] button, open
the [Program Files] folder on the
drive where you installed the
software and select [Canon] folder
s [eos-1d twain] folder s
[cap_1d.cat]. Then click the [OK]
button.
Click the [OK] button.
5
\ Driver installation is completed.
● This installation is only performed the first time you connect the camera to your
computer after installing the EOS DIGITAL SOLUTION DISK.
● When the message appears prompting you to restart your computer, restart your
computer as directed by the message.
1-6
Installing the Software
For Windows 2000, Windows Me and Windows XP Users:
Connect the camera to your computer correctly (➞2-2).
1
Set the camera’s main switch to <ON>.
2
\ The [Found new hardware] dialog box appears and driver installation is completed.
\ If you are using Windows Me, driver installation is completed without the dialog box
being displayed.
● This automatic installation is only performed the first time you connect the camera
to your computer after installing the EOS DIGITAL SOLUTION DISK.
● If you are using Windows Me or Windows XP, the dialog box listed below appears
when installation ends. Click the [Cancel] button to close the displayed dialog box.
Windows Me: The [Scanner and Camera Wizard] dialog box appears.
Windows XP: The [EOS-1D] dialog box appears.
● When the message appears prompting you to restart your computer, restart your
computer as directed by the message.
Installing the Software
1-7

Installing the Software
When you have problems with driver installation
If you have problems with driver installation, check the items listed below. If the [Add New
Hardware Wizard] ([Found New Hardware Wizard] in Windows 2000) dialog box appears while
you are checking these items, click the [Cancel] button and disconnect the camera from your
computer. Then re-install the driver software.
(1) Does your computer comply with these requirements?
● The system has a built-in OHCI-compatible IEEE1394 port and it comes with Windows
98 SE, Windows Me, Windows 2000 or Windows XP preinstalled. (The IEEE1394
interface is not supported for systems not complying with the above conditions.)
(2) Is the camera connected correctly?
● See “Connecting the Camera to Your Computer” (➞2-2) for more information.
(3) Are the camera and computer set up correctly for communication?
● Is the camera’s main switch set to <ON>?
● Even when the camera’s main switch is set to <ON>, operation of the Auto power off
function will automatically switch the camera off. To prevent this, set the Auto power off
to [Off]. (Refer to “Menu Settings” in the EOS-1D Instructions.)
(4) Is there sufficient charge left in the camera battery?
● When you connect your camera to a computer, you should use the DC Coupler Kit so
that you can continue to use your camera regardless of battery level.
If you have checked that none of the above problems apply and you still have problems with
the driver installation, refer to “Uninstalling the Driver” (➞9-7) and perform the driver
installation procedure once more from the beginning.
Please Register Your Camera!
We recommend you take a moment to register your camera, in order to receive further product
information.
To proceed to the online User Registration page, simply click the [User Registration] button
from the [EOS DIGITAL SOLUTION DISK].
If there is no response when you click the [User Registration] button, please double-click on
the file “/SOFTWARE/INSTDATA/ENGLISH/REGIST.HTM” from Windows Explorer.
1-8

2
Getting Ready to Work with
Images
This chapter explains how to connect the camera to your computer and
how to use a card reader (third-party product).
Connecting the Camera to Your Computer
Connect the EOS-1D to your computer with the interface cable so that they can communicate.
You can connect the camera while your computer is running.
● When you connect the camera to your computer, be sure to follow the
procedure below.
● Never perform the following operations while the software installed from the
SOLUTION DISK runs after connecting the camera to the computer as a
communications error may occur.
• Setting the camera’s main switch to <OFF>
• Opening the CF card slot cover
• Disconnecting the interface cable, the power cord, or the AC adapter’s plug
• Removing the DC coupler or the battery
Before you perform the operations above, be sure to end the software being
used.
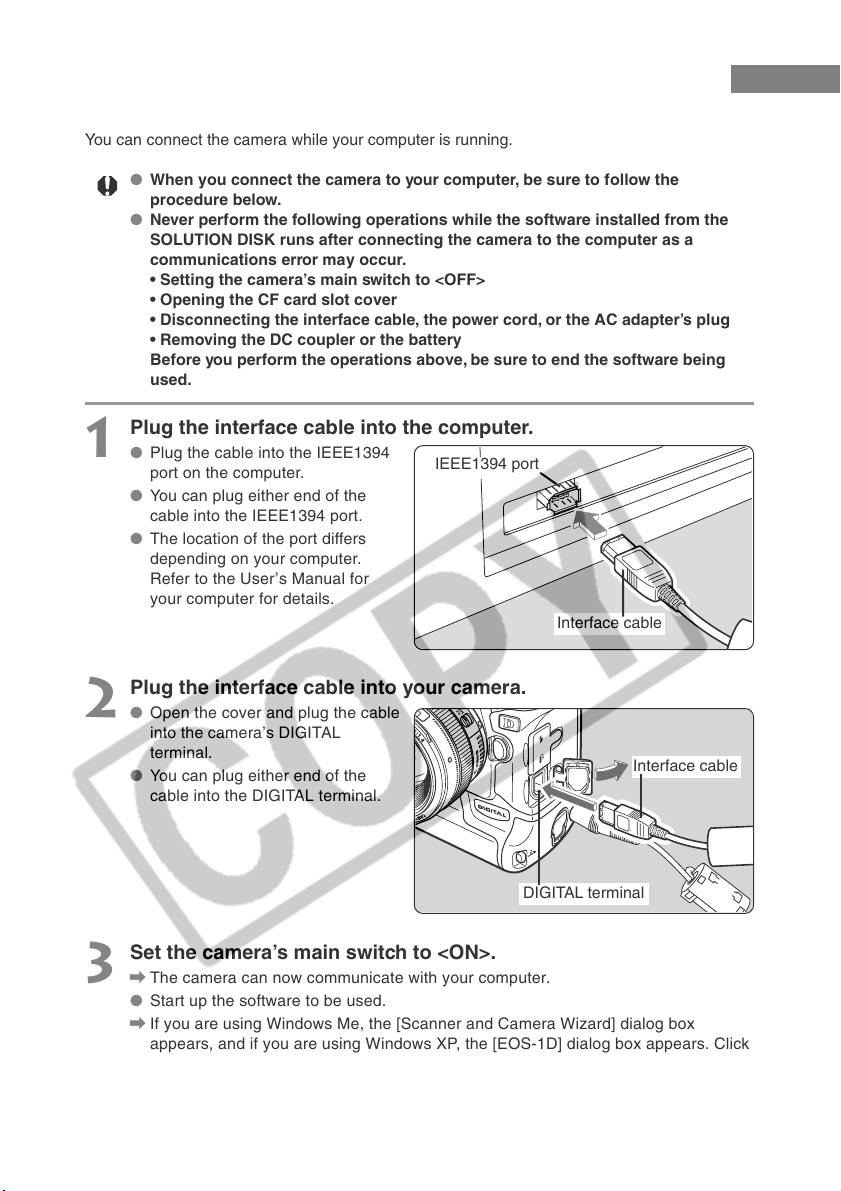
Plug the interface cable into the computer.
1
● Plug the cable into the IEEE1394
port on the computer.
● You can plug either end of the
cable into the IEEE1394 port.
● The location of the port differs
depending on your computer.
Refer to the User’s Manual for
your computer for details.
IEEE1394 port
Interface cable
Plug the interface cable into your camera.
2
● Open the cover and plug the cable
into the camera’s DIGITAL
terminal.
● You can plug either end of the
cable into the DIGITAL terminal.
DIGITAL terminal
Set the camera’s main switch to <ON>.
3
\ The camera can now communicate with your computer.
● Start up the software to be used.
\ If you are using Windows Me, the [Scanner and Camera Wizard] dialog box
appears, and if you are using Windows XP, the [EOS-1D] dialog box appears. Click
the [Cancel] button to close the displayed dialog box.
2-2
Interface cable
Connecting the Camera to Your Computer
● Use only the interface cable bundled with the camera to connect the camera to
your computer.
● Push the plug firmly all the way into the socket. Loose connections can cause
faults or malfunctions.
● Connect the camera to the computer directly using the interface cable. The camera
and computer may not operate correctly if you connect them via a hub or if you
connect to multiple IEEE1394 devices.
● Do not connect more than one camera to the same computer. The connections
may not operate correctly.
● While the camera and your computer are communicating, the camera’s LCD
panel may blink and, if you are using the LCD monitor, the image on the monitor
may flicker. This is not malfunction.
● If you leave the camera unused for approximately 5 minutes while it is connected
to your computer, a confirmation message appears on the computer screen
asking whether you wish to continue communicating with the camera. If you do
not do anything, the connection to the camera is terminated after approximately 1
minute. (If you are using a household power source, no message is displayed and
the connection is not terminated.) To re-establish the connection, press the
shutter button down halfway or set the camera’s main switch to <OFF> and then
back to <ON>.
Refer to the EOS-1D Instructions provided with the camera for details.
● Do not put your computer to sleep while it is connected to the camera.
If you do put your computer to sleep while it is connected to the camera, never
disconnect the interface cable while your computer is still in sleep mode. Always
wake your computer up before disconnecting the camera. On some types of
computer, disconnecting the interface cable while your computer is in sleep mode
could prevent the computer from waking up correctly. Refer to the computer
User’s Manual for more information on Sleep mode.
Getting Ready to Work with Images
● When you connect your camera to a computer, you should use the DC Coupler Kit
so that you can continue to use your camera regardless of battery level. It is
recommended that you should set the camera’s Auto power off function to [Off].
● If your computer has a 4-pin IEEE1394 port, purchase a separate third-party 4-pin
to 6-pin interface cable.
2-3
Inserting a CF Card into Your Card Reader
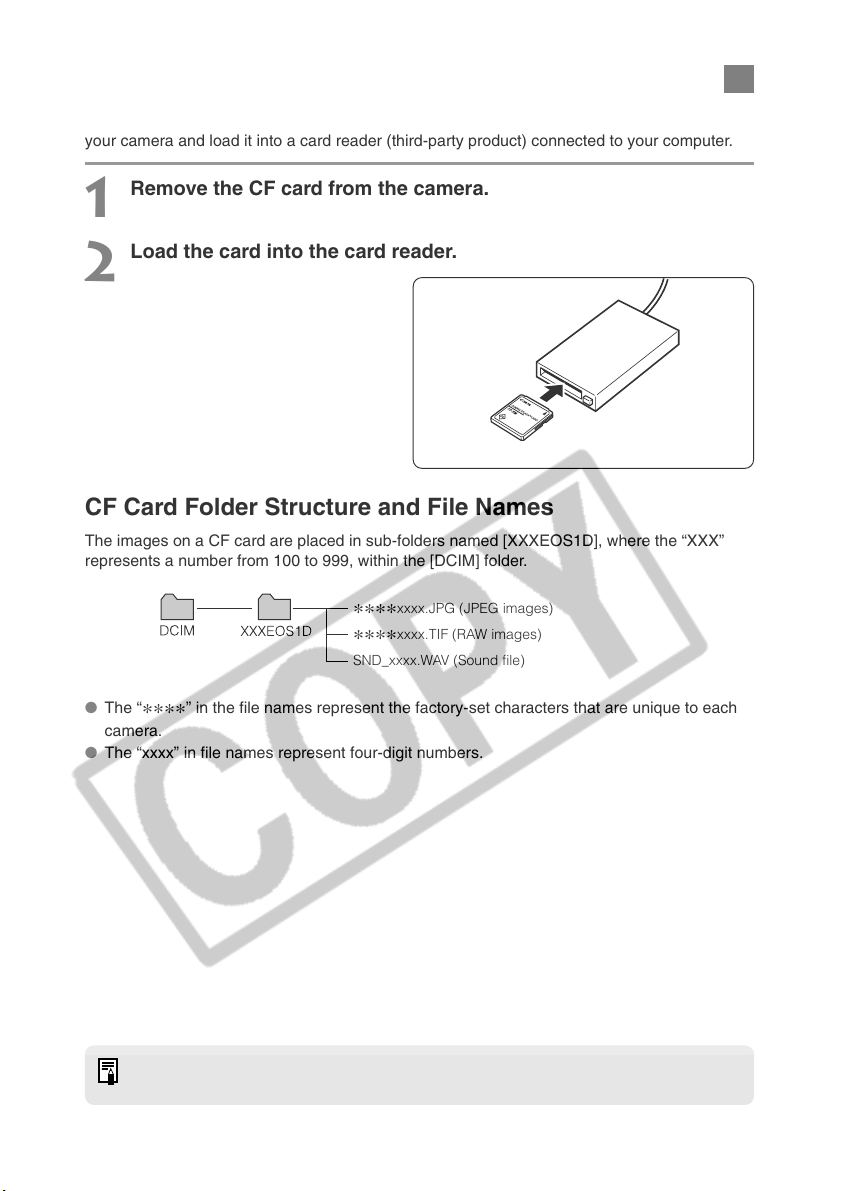
To download images from a CF card directly onto your computer, remove the CF card from
your camera and load it into a card reader (third-party product) connected to your computer.
Remove the CF card from the camera.
1
Load the card into the card reader.
2
CF Card Folder Structure and File Names
The images on a CF card are placed in sub-folders named [XXXEOS1D], where the “XXX”
represents a number from 100 to 999, within the [DCIM] folder.
xxxx.JPG (JPEG images)
****
xxxx.TIF (RAW images)
****
SND_xxxx.WAV (Sound file)
● The “
camera.
● The “xxxx” in file names represent four-digit numbers.
2-4
” in the file names represent the factory-set characters that are unique to each
****
For information on connecting the card reader to your computer, refer to the User’s
Manual provided with the card reader.

3
Working with Images in the
TWAIN Driver
This chapter explains how to use the TWAIN Driver to display and save
images stored on a CF card loaded in the camera and describes how to
process RAW images and process captured images.
The TWAIN Driver is the driver software used for Windows 98 SE and
Windows 2000.

Starting the TWAIN Driver
The TWAIN Driver is the driver software used for Windows 98 SE and Windows 2000 and is
started from a TWAIN Driver-compatible application (such as Adobe Photoshop 5.0 LE).
The descriptions given here use the bundled Photoshop 5.0 LE software as an example.
If you are using TWAIN Driver-compatible application other than Photoshop 5.0 LE, refer to
the User’s Manuals provided with your software for information on setting up and using a
TWAIN devices.
Start Photoshop 5.0 LE.
1
● Click the [Start] button and select [Programs] s [Adobe] s [Photoshop 5.0 Limited
Edition] s [Adobe Photoshop 5.0 Limited Edition].
\ Photoshop 5.0 LE starts up.
Select [File] menu s [Import] s [Select TWAIN_32 Source].
2
\ The [Select Source] dialog box
appears.
3-2

Select [Canon EOS-1D] and click the [Select] button.
3
Select [File] menu s [Import] s [TWAIN_32].
4
\ The TWAIN Driver starts up.
\ When you start the TWAIN Driver,
the main window opens. In the
main window, you can display and
process the images saved on the
CF card in the camera.
● To close the TWAIN Driver, click
the [Exit] button in the main
window.
Starting the TWAIN Driver
● Steps 2 and 3 are not required for every operation. Only perform these steps the
first time you start the driver software following installation, or when you change the
setting to another TWAIN Driver.
● To modify images from Photoshop 5.0 LE when you are using the WIA Driver
(Windows Me or Windows XP), use the WIA TWAIN to modify the images (see
“Downloading with the WIA TWAIN” (➞4-5)).
Working with Images in the TWAIN Driver
3-3
Starting the TWAIN Driver
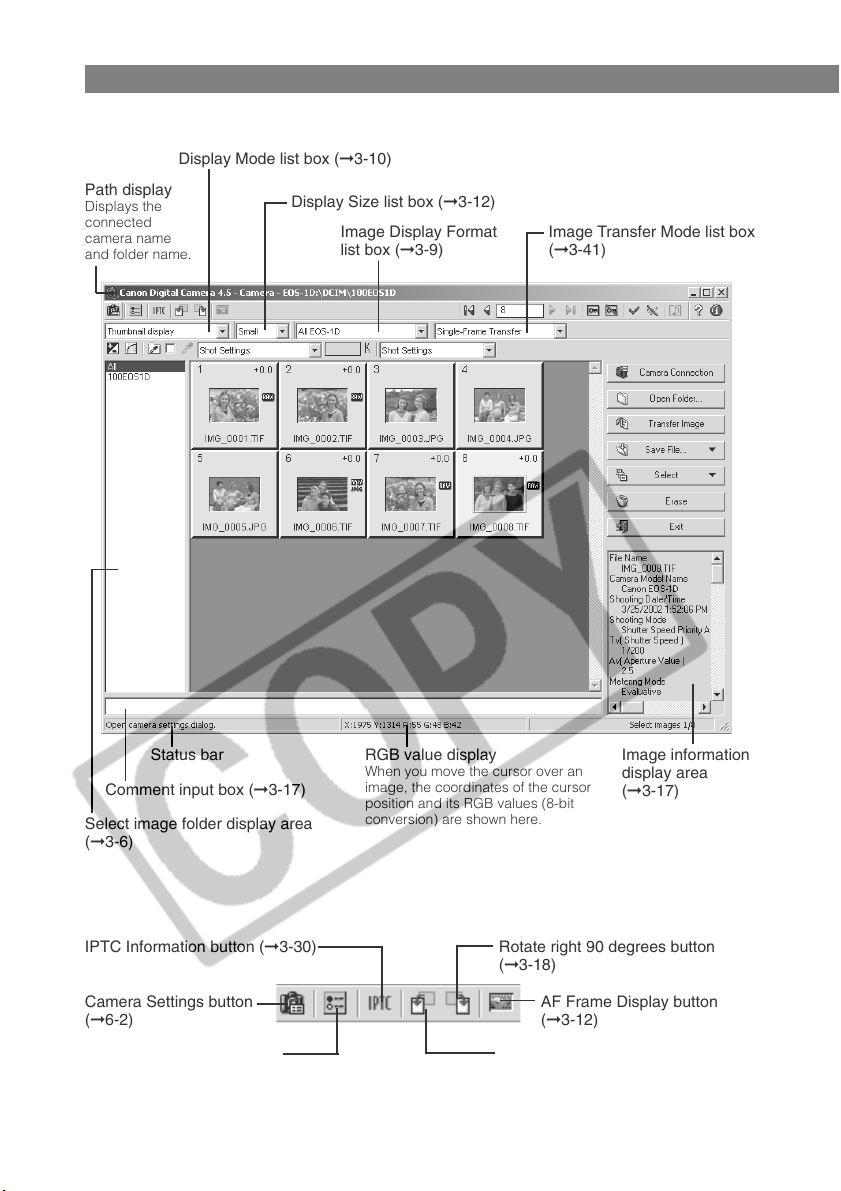
Display Mode list box (➞3-10)
Path display
Displays the
connected
camera name
and folder name.
TWAIN Driver main window
Display Size list box (➞3-12)
Image Display Format
list box (➞3-9)
Image Transfer Mode list box
(➞3-41)
Status bar
Comment input box (➞3-17)
Select image folder display area
(➞3-6)
IPTC Information button (➞3-30)
Camera Settings button
(➞6-2)
Preferences button (➞3-38)
3-4
RGB value display
When you move the cursor over an
image, the coordinates of the cursor
position and its RGB values (8-bit
conversion) are shown here.
Rotate right 90 degrees button
(➞3-18)
AF Frame Display button
(➞3-12)
Rotate left 90 degrees button
(➞3-18)
Image information
display area
(➞3-17)
Starting the TWAIN Driver
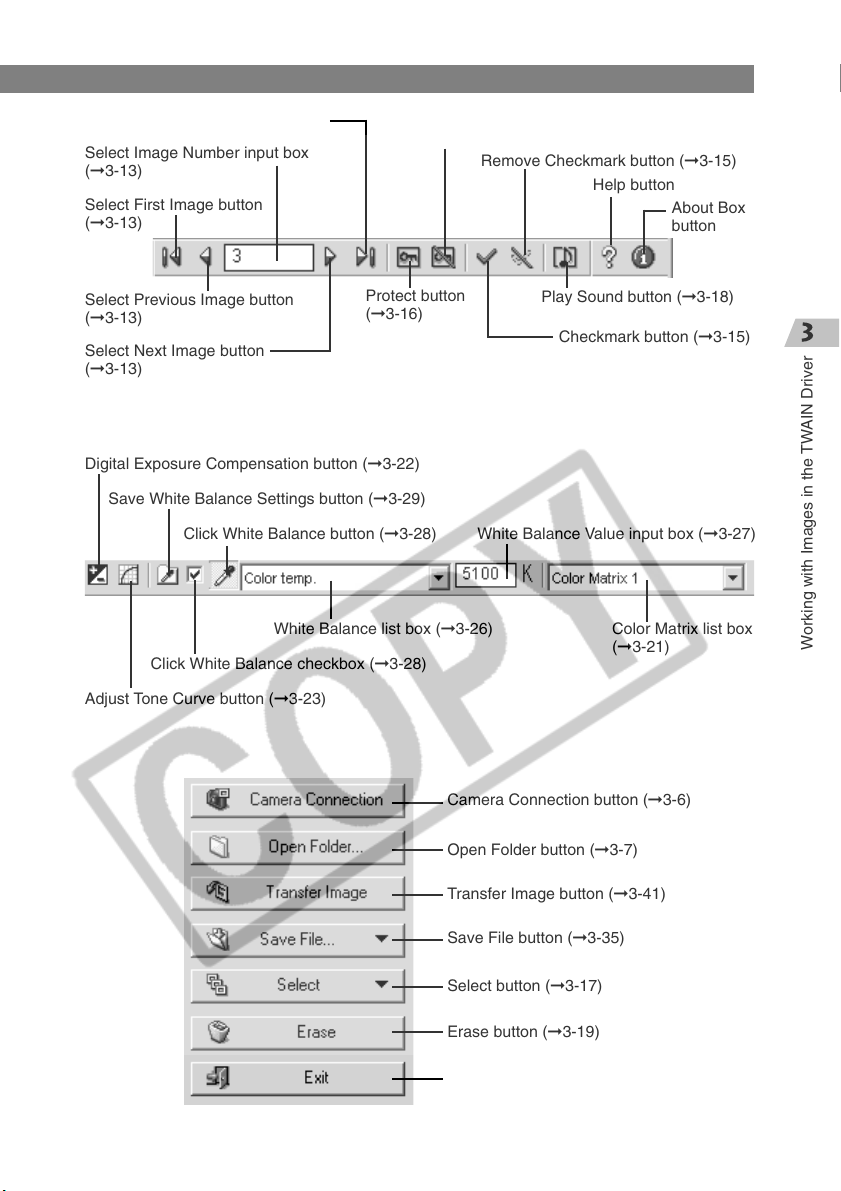
Select Final Image button (➞3-13)
Select Image Number input box
(➞3-13)
Select First Image button
(➞3-13)
Select Previous Image button
(➞3-13)
Select Next Image button
(➞3-13)
Digital Exposure Compensation button (➞3-22)
Save White Balance Settings button (➞3-29)
Click White Balance button (➞3-28)
White Balance list box (➞3-26)
Click White Balance checkbox (➞3-28)
Adjust Tone Curve button (➞3-23)
Remove Protect button (➞3-16)
Protect button
(➞3-16)
Remove Checkmark button (➞3-15)
Help button
About Box
button
Play Sound button (➞3-18)
Checkmark button (➞3-15)
White Balance Value input box (➞3-27)
Color Matrix list box
(➞3-21)
Working with Images in the TWAIN Driver
Camera Connection button (➞3-6)
Open Folder button (➞3-7)
Transfer Image button (➞3-41)
Save File button (➞3-35)
Select button (➞3-17)
Erase button (➞3-19)
Exit button (➞3-3, 3-42)
3-5
Displaying Images
This section describes how to display images stored on a CF card.
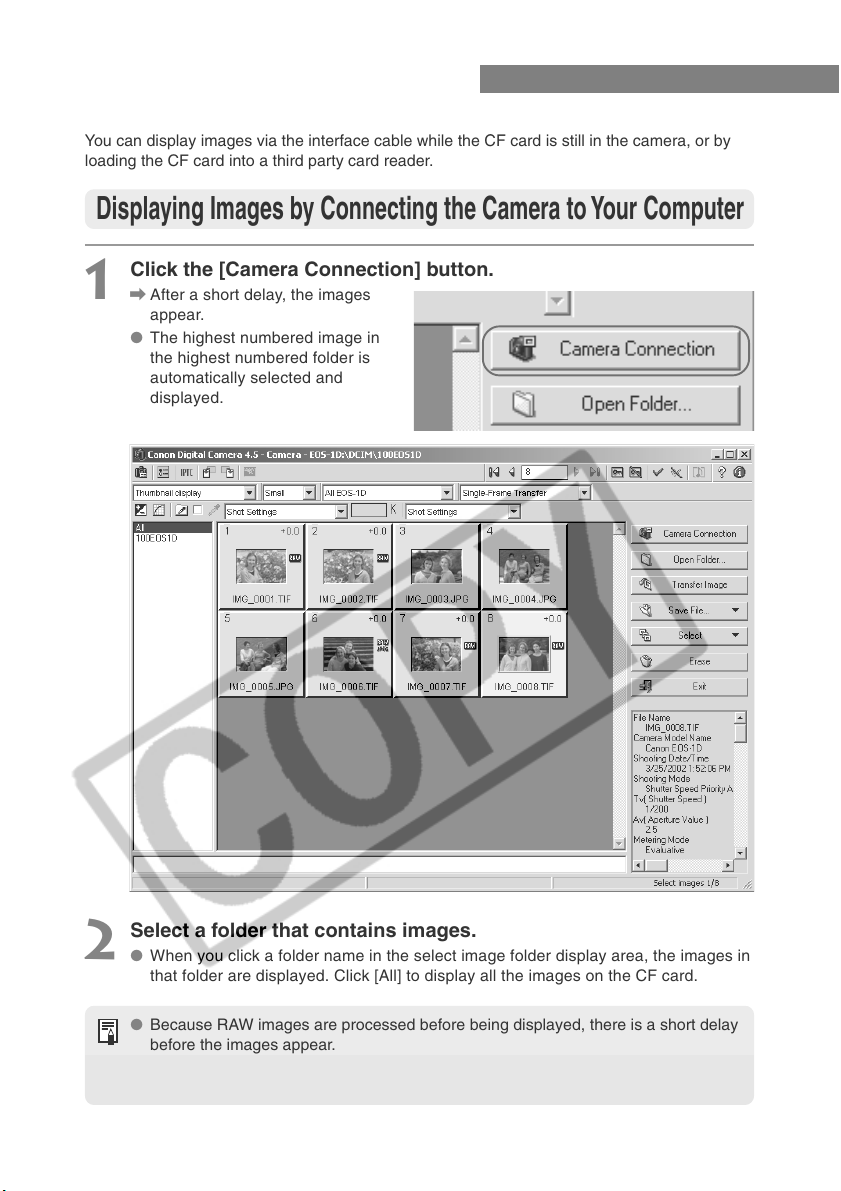
You can display images via the interface cable while the CF card is still in the camera, or by
loading the CF card into a third party card reader.
Displaying Images by Connecting the Camera to Your Computer
Click the [Camera Connection] button.
1
\ After a short delay, the images
appear.
● The highest numbered image in
the highest numbered folder is
automatically selected and
displayed.
Select a folder that contains images.
2
● When you click a folder name in the select image folder display area, the images in
that folder are displayed. Click [All] to display all the images on the CF card.
● Because RAW images are processed before being displayed, there is a short delay
before the images appear.
● You can specify which image is selected first when the [Camera Connection] button
is clicked. (➞3-38)
3-6
Displaying Images
Displaying Images by Connecting a Card Reader
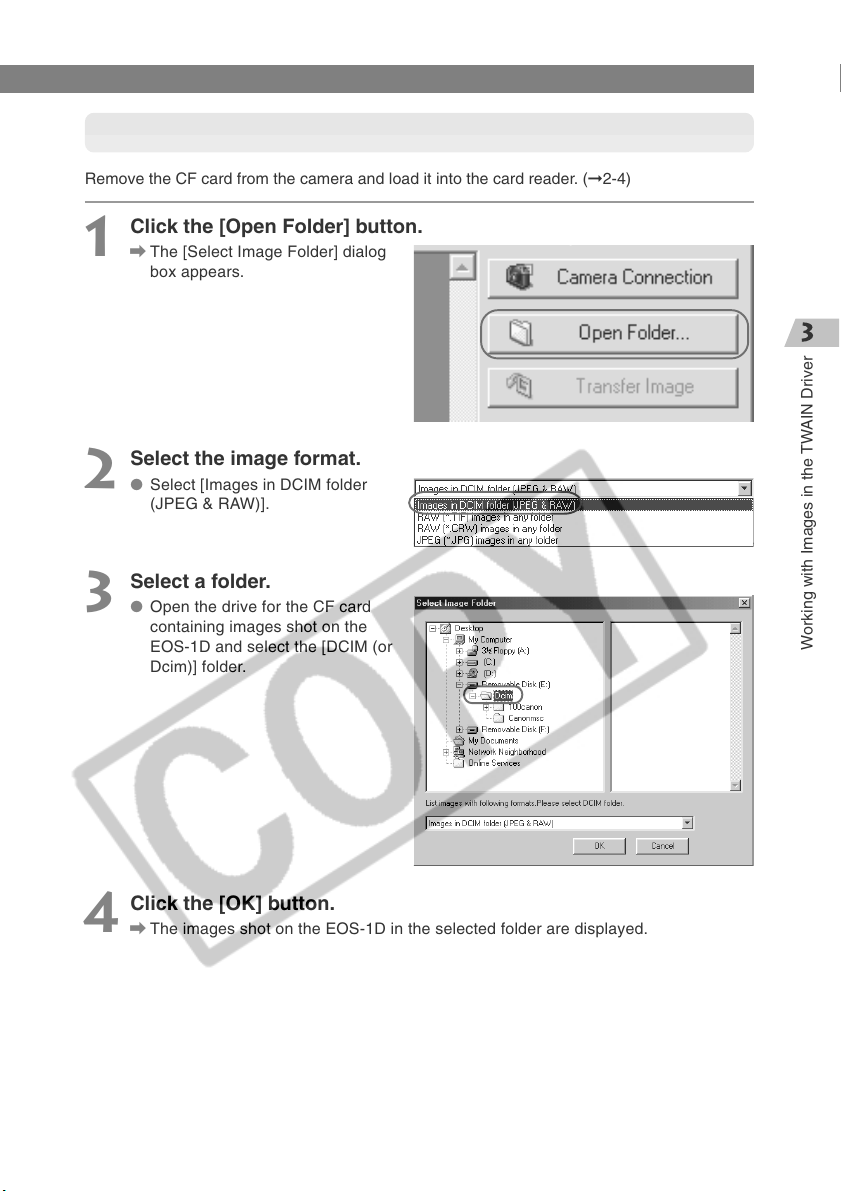
Remove the CF card from the camera and load it into the card reader. (➞2-4)
Click the [Open Folder] button.
1
\ The [Select Image Folder] dialog
box appears.
Select the image format.
2
● Select [Images in DCIM folder
(JPEG & RAW)].
Select a folder.
3
● Open the drive for the CF card
containing images shot on the
EOS-1D and select the [DCIM (or
Dcim)] folder.
Working with Images in the TWAIN Driver
Click the [OK] button.
4
\ The images shot on the EOS-1D in the selected folder are displayed.
3-7

Displaying Images
Image Display Formats
[Images in DCIM folder (JPEG&RAW)]
Use this option to display the JPEG and RAW images saved in the DCIM folder.
In step 3, you can also select any folder in the DCIM folder and display only the images saved
in that folder.
If you display images in this format, do not rename any of the folders on the CF card.
Renaming folders such as the DCIM folder or 100EOS1D folder may make it impossible to
display the images in those folders.
[RAW (*.TIF) images in any folder]
Use this option to display only the TIFF-format RAW images (EOS-1D etc.) saved in the
selected folder. Select this format in step 2, then select a folder containing TIFF-format RAW
images.
[RAW (*.CRW) images in any folder]
Use this option to display only the CRW-format RAW images (EOS D60 and D30 etc.) saved
in the selected folder. Select this format in step 2, then select a folder containing CRW-format
RAW images.
[JPEG (*.JPG) images in any folder]
Use this option to display only the JPEG images saved in the selected folder. Select this
format in step 2, then select a folder containing JPEG images.
Depending on the type of device that originally created the image, you may not be able to
display some JPEG images.
To save the images on a CF card to your computer or to another media, you must
select and then save the displayed images (➞3-35) or copy the DCIM folder to your
computer or to the target media.
● Because RAW images are processed before being displayed, there is a short delay
before the images appear.
● To display the images saved on your computer’s hard disk, use the procedure
described in “Displaying Images by Connecting a Card Reader” (➞3-7).
3-8
 Loading...