

Canon CX-G6400 User Manual

CX-G6400
COLOR CARD PRINTER
User's Guide
CANON FINETECH NISCA INC.2017
4Y1-8612-010

Table of Contents
Before You Begin
Conventions
Sample Screens
Trademarks
Abbreviations
Important Notices
Legal Notice
・・・・・・・・・・・・・・・・・・・・・
・・・・・・・・・・・・・・・・・・・
・・・・・・・・・・・・・・・・・・・・・
・・・・・・・・・・・・・・・・・・・・
・・・・・・・・・・・・・・・・・
・・・・・・・・・・・・・・・・・・・・・
1. Before Using the
Printer
Printer Part Names and Functions
Front/Right Side View
Left Side View
Inside the Printer
Operation Panel
Online and Sleep Modes
・・・・・・・・・・・・・・・
・・・・・・・・・・・・・・・・・・・
・・・・・・・・・・・・・・・・・・
・・・・・・・・・・・・・・・・・・
・・・・・・・・・・・・・
・・・・・・
Canceling Printing
・・・・・・・・・・・・・・・・
33
Canceling Print Jobs from the Status
1
1
Monitor
Pausing Printing
・・・・・・・・・・・・・・・・・・・・・・・
・・・・・・・・・・・・・・・・・・
33
34
1
2
2
2
3. How to Use the
Printer Driver
Opening the Printer Driver
・・・・・・・・・・
36
Opening the Printer Driver Setup Window
from the Application Sof tware
・・・・・・・・
36
Opening the Printer Driver Setup Window
・・・・
・・
37
38
39
41
46
48
4
4
5
6
7
9
from the [Devices and Printers] Folder
Opening the Printer Properties Window
Using Page Setup Features
Registration of Favorites
Selecting the Paper Size
Setting a Custom Paper Size
・・・・・・・・・・
・・・・・・・・・・・・・
・・・・・・・・・・・・
・・・・・・・・・
Connecting the Printer and Computer ・10
Connecting with USB Cable
Connecting with LAN Cable
Turning on/of f Printer
Turning on the Printer
Turning of f the Printer
Loading Paper
・・・・・・・・・・・・・・・・・・・
・・・・・・・・・・・
・・・・・・・・・・
・・・・・・・・・・・・・
・・・・・・・・・・・・・・・
・・・・・・・・・・・・・・
2. How to Print
Making Prints
ii
・・・・・・・・・・・・・・・・・・・・
12
13
13
14
15
30
Selecting the Paper Type
11
Selecting the Orientation
・・・・・・・・・・・
・・・・・・・・・・・
55
56
Setting the Print with the Selected
Orientation
Checking the Setting Contents
Checking the Version Information
Using Print Quality Features
Selecting a Resolution
Selecting a Half-tone
Selecting a Color Correction
Printing in Black and White
・・・・・・・・・・・・・・・・・・・・・
・・・・・・・
・・・・・・・
・・・・・・・・・
・・・・・・・・・・・・・・
・・・・・・・・・・・・・・
・・・・・・・・・
・・・・・・・・・・・
58
60
61
62
64
65
66
67

Table of Contents
Adjusting the Color Balance
Adjusting the Brightness
Adjusting the Density
Adjusting the Contrast
Print the Gradation Smoothly
Setting the Sharpness
・・・・・・・・・・
・・・・・・・・・・・・
・・・・・・・・・・・・・・
・・・・・・・・・・・・・・
・・・・・・・・・
・・・・・・・・・・・・・・
Using the Overlay Settings Feature
Printing a Form to a File
Carrying out Overlay Printing
Using Advanced Settings
Selecting Print Order
Adjusting the Paper Feed Interval
Using Utility Features
Switching the Printer to the Sleep State
Changing the Sleep Timer/Off Timer
・・・・・・・・・・・・・・・・・・・・・・・
Setting
・・・・・・・・・・・・・
・・・・・・・・・
・・・・・・・・・・・
・・・・・・・・・・・・・・
・・・・・・
・・・・・・・・・・・・・・
・・・・
・・
67
69
70
72
73
75
76
79
84
85
86
87
90
92
71
5. Maintenance
Cleaning the Print Head
Print Head Cleaning
Cleaning during Printing
Adjusting Print Head Position
Detailed Printhead Position Adjustment
Checking Setting Values
Replacing the Ink Tank
Replacing the Ink Tank
Checking the Ink Information
Replacing the Maintenance Cartridge ・14 8
Replacing the Maintenance Cartridge
Checking the Maintenance Cartridge
Information
・・・・・・・・・・・・・・・・・・・・
・・・・・・・・・・・・
・・・・・・・・・・・・・・・
・・・・・・・・・・・・
・・・・・・・・
・・・・・・・・・・・
・・・・・・・・・・・・・
・・・・・・・・・・・・・
・・・・・・・・・
・
・・・
116
117
118
119
131
13 8
141
141
14 7
14 8
152
Changing Special Settings
・・・・・・・・・・・
Changing the Ink Jetting Amount for
・・・・・・・・・・・・・・・・・・・・・・・
Prin ting
4. How to Use the
Status Monitor
Displaying the Status Monitor
Starting the Status Monitor
How to Star t and Display the Status
Monitor
・・・・・・・・・・・・・・・・・・・・・・・
Using the Status Monitor
・・・・・・
・・・・・・・・・・
・・・・・・・・・・・
95
99
10 6
10 6
10 7
110
Cleaning the Printer
Cleaning the Exterior of the Printer
Cleaning the Transport Area
Cleaning the Pick-up Roller
・・・・・・・・・・・・・・
・・・・・
・・・・・・・・・
・・・・・・・・・・・
6. Troubleshooting
For Troubleshooting Operations
Power Does not Turn On
Printing Does not Start/Complete
Slow to Print
・・・・・・・・・・・・・・・・・・・・
Printing Does Not Stop/Data is Not Sent/
Settings are Not Sent from Utility
・・・・・・・・・・・
・・・・・
・・・・・・
・・・・・・
15 3
153
15 4
157
16 2
16 2
16 2
16 6
16 6
iii

Table of Contents
Paper is Not Feeding Correctly
Status Monitor Does Not Start
Improving the Print Qualit y
Paper Is Jammed
・・・・・・・・・・・・・・・・・
"Request print head inspection"
Appears on the Screen
・・・・・・・・・・・・・
List of Error Messages/Warning
Messages
Error Message
Warning Message
・・・・・・・・・・・・・・・・・・・・・・
・・・・・・・・・・・・・・・・・・・
・・・・・・・・・・・・・・・・
7. Appendix
Moving the Printer
Shipping the Printer
・・・・・・・・・・・・・・・
・・・・・・・・・・・・・・
・・・・・・・・
・・・・・・・・
・・・・・・・・・・
16 7
16 9
17 0
17 3
17 5
17 6
17 6
18 3
18 6
19 0
Uninstall Printer Driver
About Network Utility
Starting the Network Utility
Configuring the Network
・・・・・・・・・・・・
・・・・・・・・・・・・
・・・・・・・・・・
・・・・・・・・・・・
Configuring Network Using the Network
・・・・・・・・・・・・・・・・・・・・・・・・
Utility
Specifications
・・・・・・・・・・・・・・・・・・・・・・・・・
Index
・・・・・・・・・・・・・・・・・・・・
iv
19 4
19 7
19 7
19 8
208
211
213
Before You Begin
Conventions
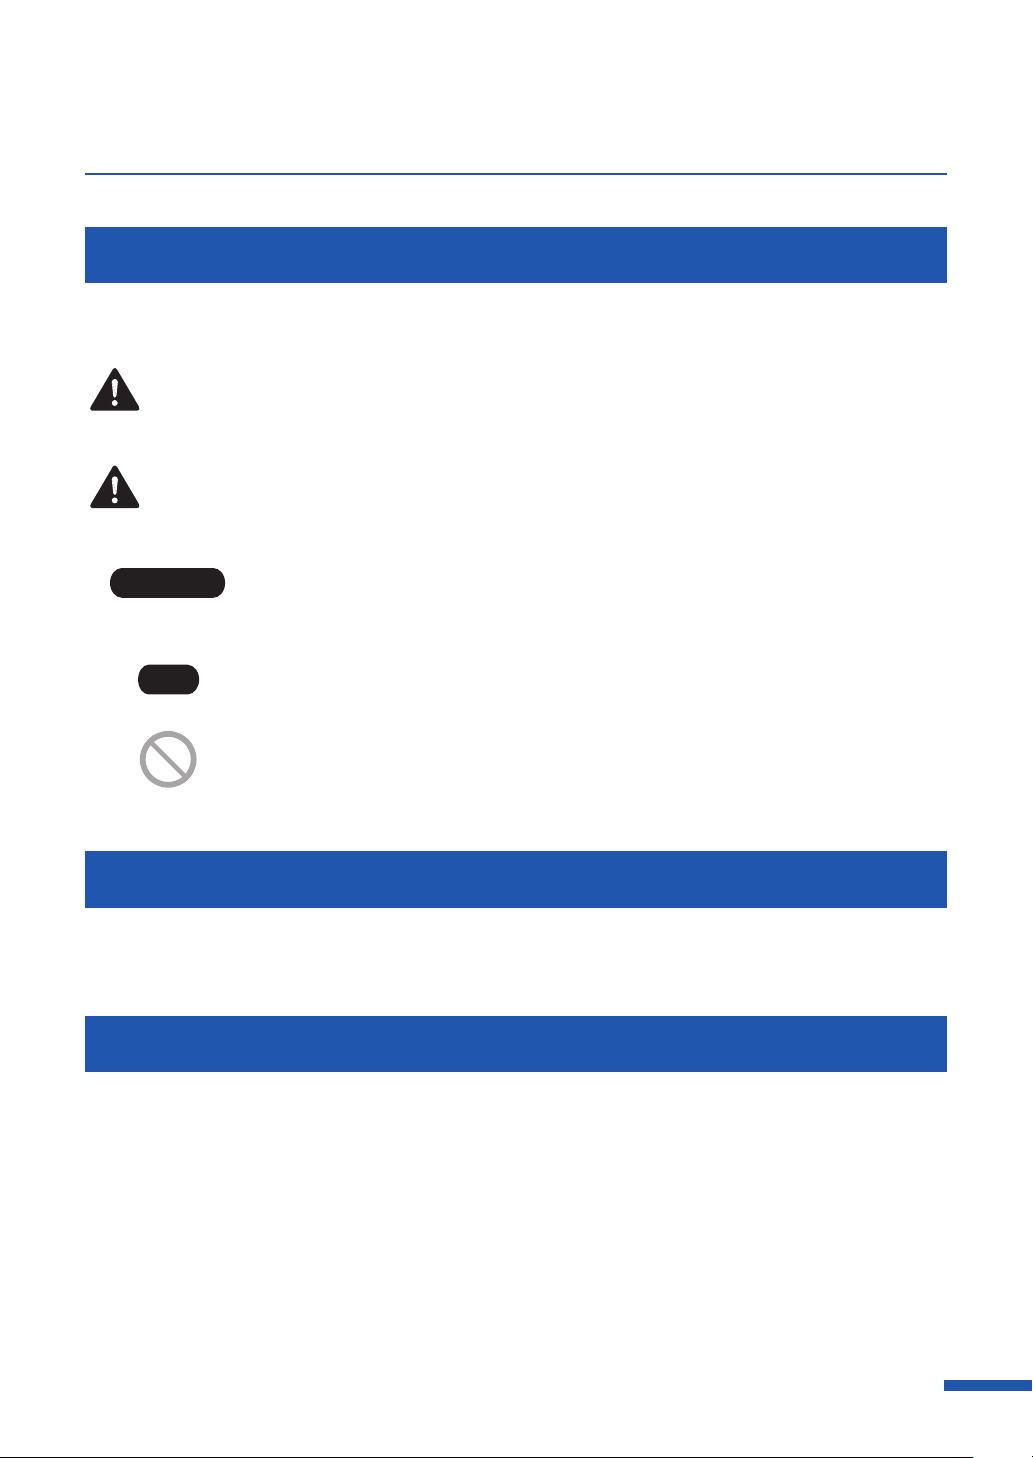
The following marks are used in this manual.
Warning
Caution
Important
Note
Indicates a warning concerning operations that may lead to death or injury
to persons if not performed correctly. To use the machine safely, always pay
attention to these warnings.
Indicates a caution concerning operations that may lead to injury to persons
if not performed correctly. To use the machine safely, always pay attention to
these cautions.
Indicates operational requirements and restrictions. Be sure to read these
items carefully to operate the machine correctly, and avoid damage to the
machine or property.
Indicates a clarification of an operation, or contains additional explanations
for a procedure. Reading these notes is highly recommended.
Indicates an operation that must not be performed. Read these items
carefully, and make sure not to perform the described operations.
Sample Screens
The sample CX-6400 printer driver screens displayed in this manual were created with Windows 10.
Trademarks
Canon and the Canon logo are registered trademarks of Canon Inc.
•
Microsoft and Windows are trademarks or registered trademarks of Microsoft Corporation in the
•
United States and/or other countries.
Adobe and Acrobat are trademarks or registered trademarks of Adobe Systems Incorporated in the
•
United States and/or other countries.
Other brand and product names may be trademarks or registered trademarks of their respective
•
companies.
1

Before You Begin
Abbreviations
Throughout this manual the following abbreviations are used in text.
Microsoft Windows 10 is abbreviated as "Windows 10"
•
Microsoft Windows 8.1 is abbreviated as "Windows 8.1"
•
Microsoft Windows 7 is abbreviated as "Windows 7"
•
Microsoft Windows is abbreviated as "Windows"
•
Important Notices
Copying this manual or any part of this manual without permission is strictly forbidden.
•
The specifications for this printer and software provided with the printer are subject to change
•
without prior notice.
We have done our best to make this manual as complete and accurate as possible, and we ask you
•
to contact your place of purchase. If you find any omissions or mistakes in this manual.
We can accept no responsibility for loss or damages resulting from the use of this printer or its
•
software; please accept this before you use the printer.
Legal Notice
■Legal Limitations on the Usage of Your Product and the Use of Images
It is illegal to reproduce currency, bills, negotiable securities and other documents prohibited by
•
law. Reproduction of such items may be subject to criminal prosecution.
It is illegal to reproduce legal certificates, licenses, and certain public and private documents
•
prohibited from reproduction by law. Reproduction of such items may be subject to criminal
prosecution.
Please note that intellectual property protected by copyright may not be reproduced without the
•
express permission of the copyright holder except for personal or household use under limited
circumstances.
■ Product Name
CX-G6400
2

Chapter 1
Before Using the Printer
This section describes how to prepare the printer and procedures you should know before you use
the printer.
Printer Part Names and Functions .......................................................................................................4
Connecting the Printer and Computer ......................................................................................... 10
Turning on/off Printer ............................................................................................................................... 13
Loading Paper ............................................................................................................................................... 15
Printer Part Names and Functions
Names and functions of the components of this printer are described below.
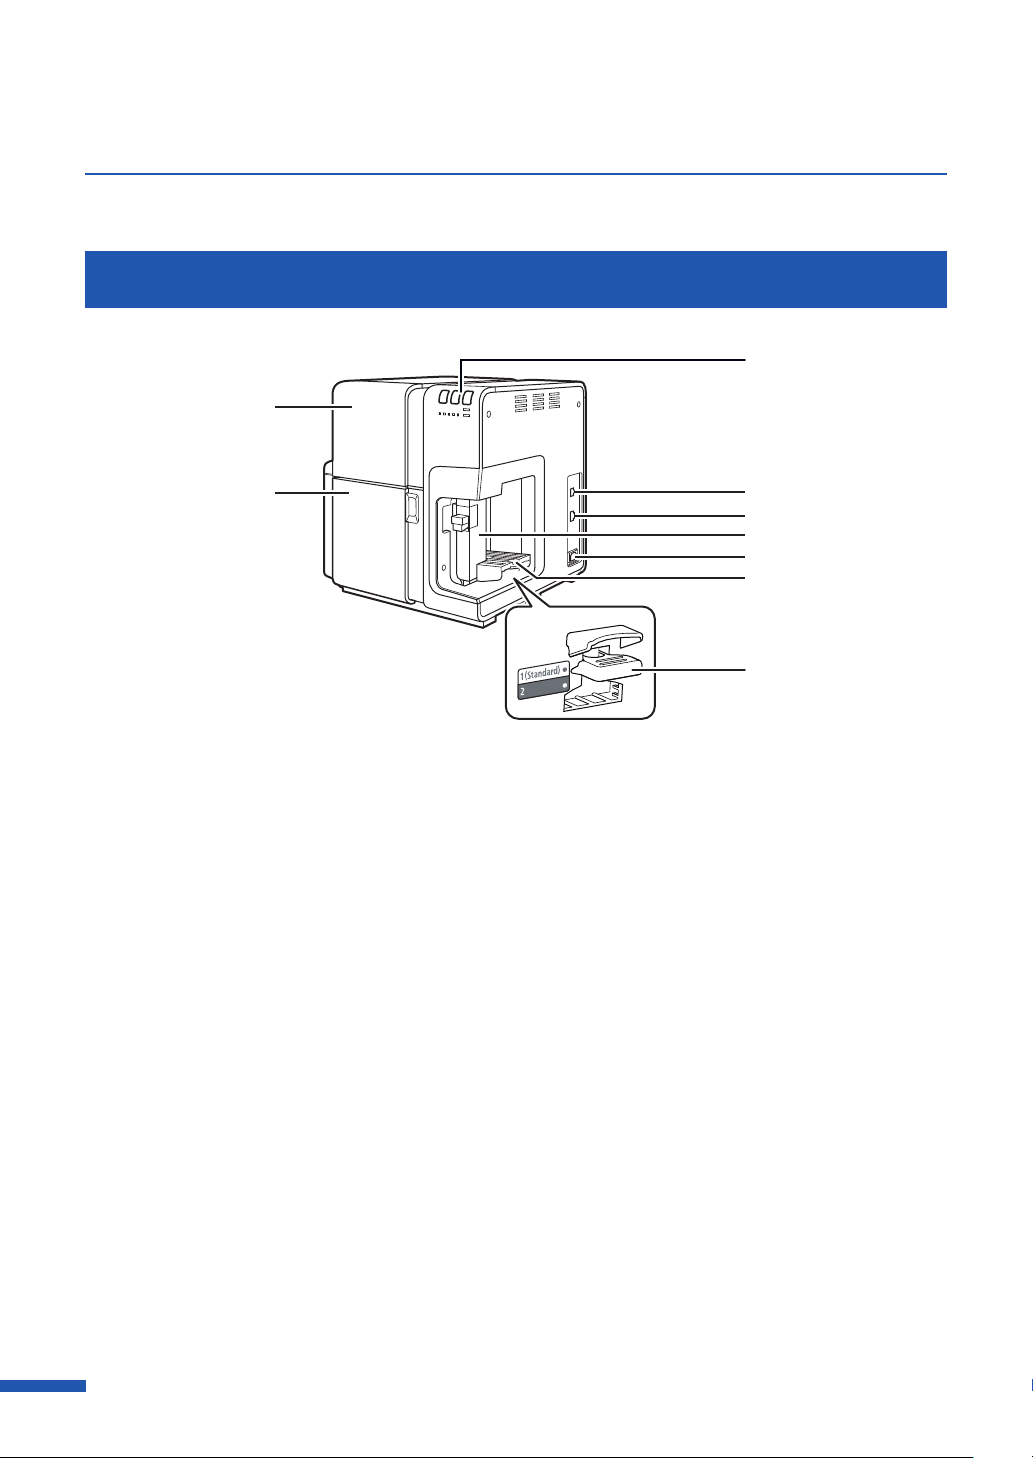
Front/Right Side View
[1]
[9]
[8]
[1] Operation panel(→ P. 10 ) [7] T r a y s w i t c h l e v e r
Keys necessary for operation and lamps to
indicate the state of printer are provided
on this panel.
[2] USB port(→ P.11) [8] Ink tank door
Connect a USB cable here to connect to
the computer.
[3]
LAN port(→ P. 12 ) [9] Upper unit
Connect a LAN cable here to connect to
the computer.
[4] Side guide(→ P. 2 3)
Adjust the position of this guide according
to the paper width.
Use in the "1 (Standard)" position.
Normally, this does not need to be
changed. If paper cannot be fed properly,
switch the lever position.
Open this door when replacing ink tanks
or opening the upper unit.
Open this unit when loading paper or
removing the paper jammed in the paper
feed path or cleaning inside of the
machine. Holds the printhead.
[2]
[3]
[4]
[5]
[6]
[7]
[5] Power socket
Connect the power cord here.
[6] Feeder lift tray(→ P.1 9)
Load the paper.
4
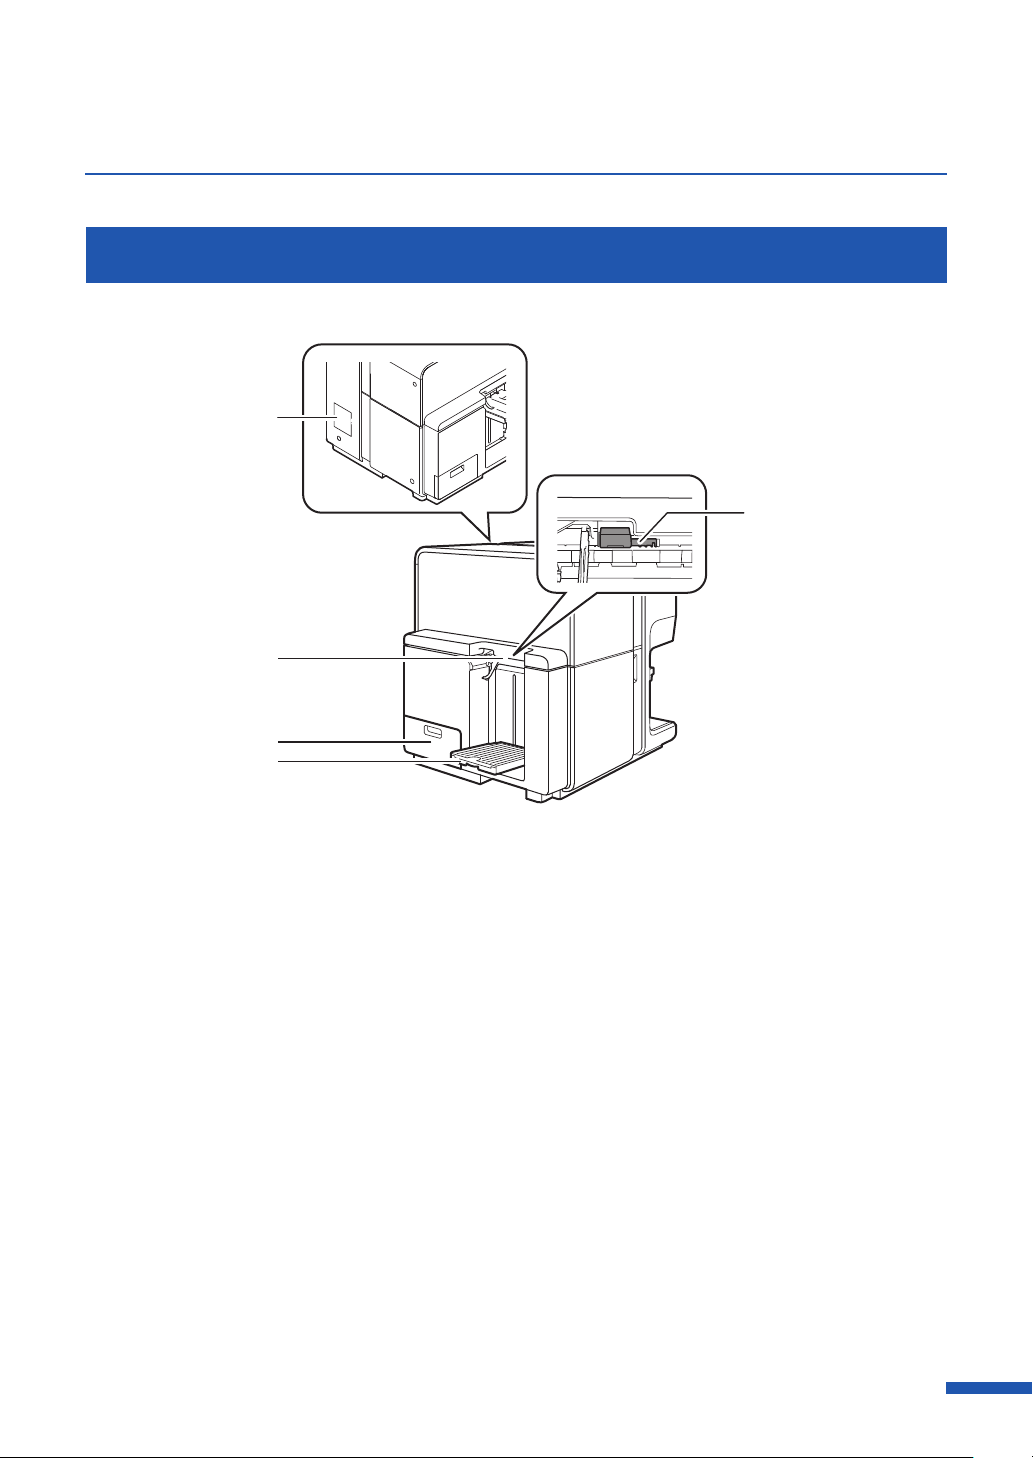
Left Side View
[1]
[2]
Printer Part Names and Functions
[5]
[3]
[4]
[1] Rating plate [4] Auto stacker(→ P. 2 6)
A serial number for identifying the printer
is shown on this plate.
(The serial number is required when you
ask for customer support or repair of the
printer.)
[2] Paper delivery slot
Printed paper is delivered through this
slot.
[3] Maintenance cartridge door(→ P.14 8 )
Open this door when replacing the
maintenance cartridge.
Receives printed paper output from the
printer.
[5] Thick paper transport lever(→ P. 2 5)
Pull out this lever to use the special heavy
paper and thick plastic card.
5
Chapter 1 Before Using the Printer
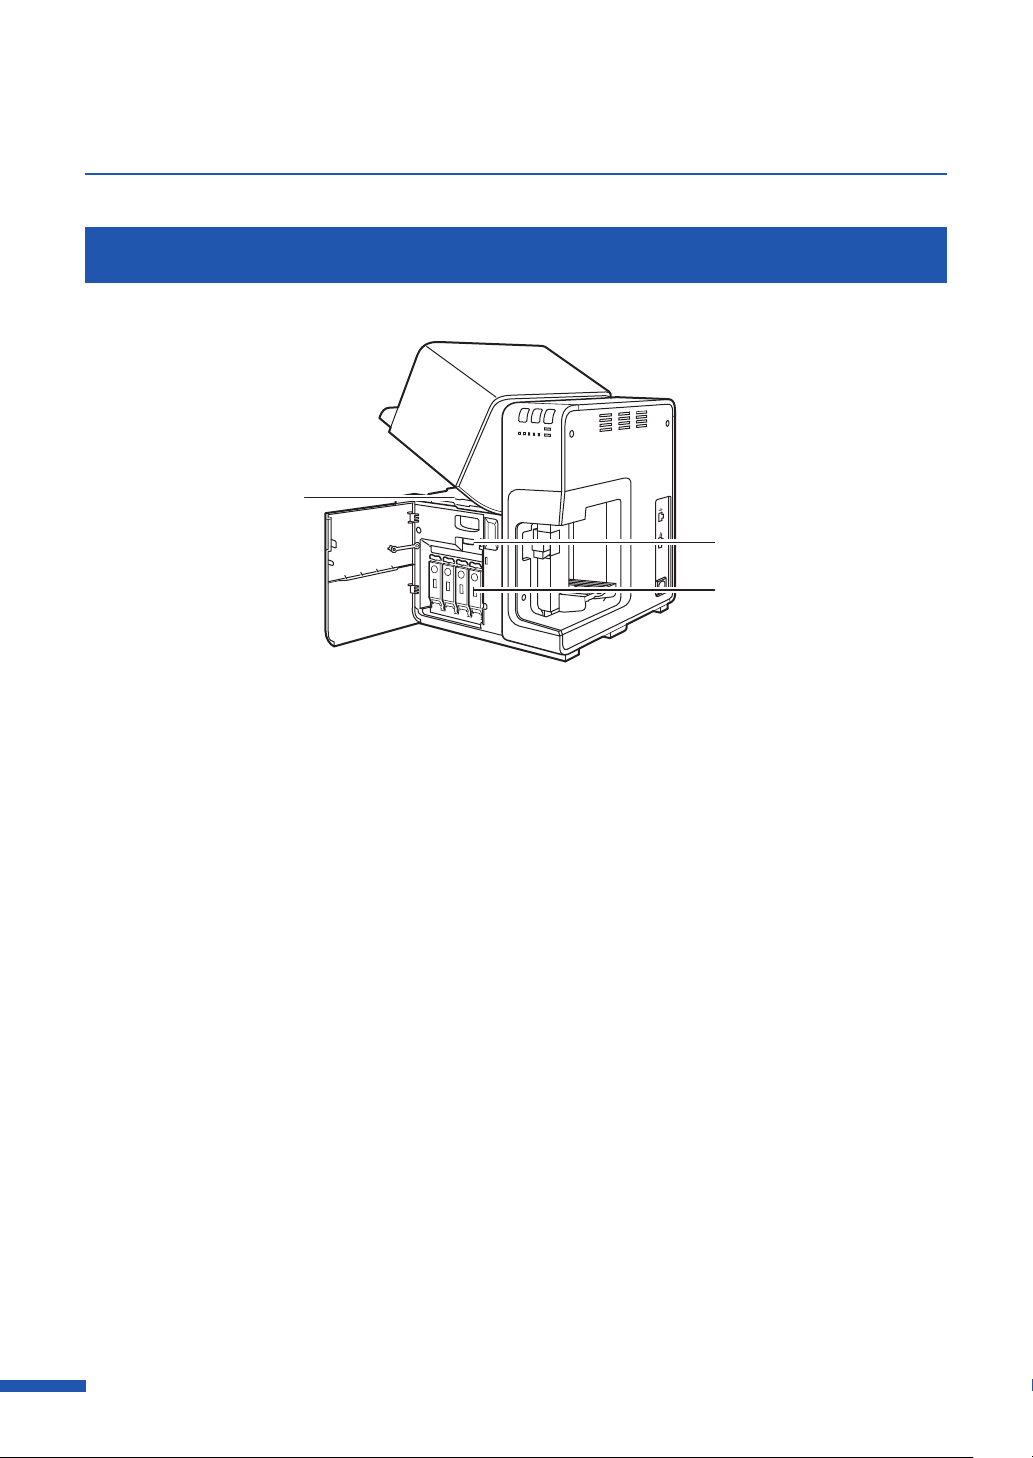
Inside the Printer
[1]
[2]
[3]
[1] Transport area [3] Ink tank cover(→ P.1 41)
Transports paper. Clean paper dust and ink
stains here.
[2] Upper unit open lever
Open the Upper unit.
(→
P.1 5 4
)
Open this door when replacing the ink
tank.
6
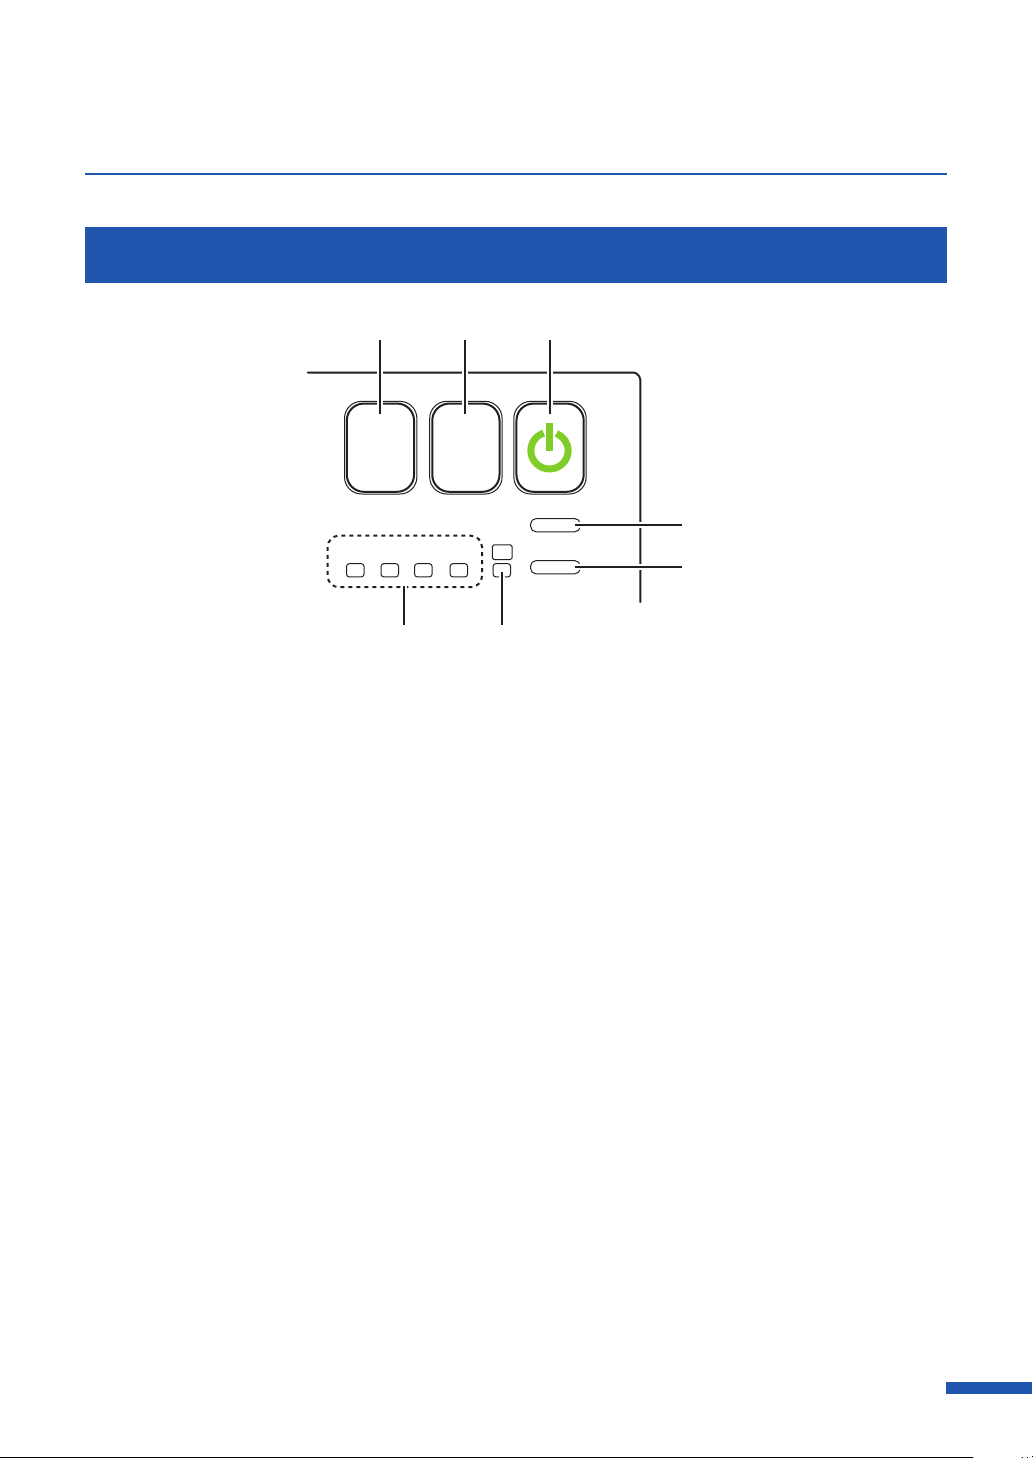
Operation Panel
[1] [2] [3]
Printer Part Names and Functions
TRAY
Bk
[1] Tray key [4] Status lamp
Use this key to move the feeder lift tray
upward/downward.
[2] Pause key
Pressing this key suspends printing.
Pressing this key restarts printing.
[3] Power key/lamp
Press this key to turn on/off the printer.
This lamp lights up or blinks depending
C
PAUSE
MY
STATUS
MC
ERROR
[6][7]
This lamp lights up or blinks.
On: Printing from the computer is
possible. (Online mode)
Blink: The printer is processing or
operating (printing, cleaning, etc.)
Off: Instructions and print data cannot
be received from the computer
(offline mode) or Sleep mode.
on the power supply status.
[4]
[5]
On: The printer is powered.
Blink: The printer is in sleep mode
(power-saving mode).
Off: The printer is not powered.
7

Chapter 1 Before Using the Printer
[5] Error lamp(→ P.17 6) [7]
Lights when an error occurs.
Lit: An operator call error has occurred.
Blink: A service call error has occurred.
[6] Maintenance cartridge warning lamp
(→ P. 15 2 )
This lamp lights up or blinks when there
remains a small or no maintenance
cartridge space to collect ink.
Lit: The maintenance cartridge has no
free space or it is faulty.
Blink: The maintenance cartridge has a
small free space.
Off : The maintenance cartridge has a
sufficient free space.
Ink warning lamp (Bk/C/M/Y)
(→ P. 14 7 )
These lamps indicate the remaining
amounts of Black (Bk), Cyan (C), Magenta
(M) and Yellow (Y) inks.
Lit: The ink tank is out of ink or faulty.
Blink: The ink tank is short of ink.
Off : The ink tank is sufficient of ink.
Important
Opening the ink tank door or maintenance cartridge door during printing will cause an error and
•
suspends printing. Do not open the ink tank door or maintenance cartridge door except when
replacing an ink tank or maintenance cartridge or opening/closing the upper unit.
Never attempt to open the upper unit by force or hit the upper unit. This could damage the printer
•
or result in poor print quality. Always open and close the upper unit slowly.
8

Online and Sleep Modes
Printer Part Names and Functions
Online mode:
Sleep mode:
Status of the printer Receive data Power lamp Status lamp
This mode can print data from the computer. The power lamp and status lamp stays
lit.
The printer is in power-saving mode. The printer automatically switches to sleep
mode to save power when a certain amount of time elapses without receiving a
print job or operating printer controls. Power lamp is blinking and the Status lamp
stays lit. When print data is received, the printer is automatically placed in the online
status to start printing.
Online Printable Lighting Lighting
Sleep Printable Blinking OFF
9

Connecting the Printer and Computer
This section explains how to connect the printer to the computer. The printer is compatible with HiSpeed USB and LAN.
Important
The USB cable is hot-swappable. However, it should be noted that the USB cable should not be
•
connected or disconnected in the following cases:
When the computer is being booted. (before the desktop appears)
–
When the printer is printing.
–
When the printer driver is being installed.
–
When disconnecting the USB cable with the computer or printer powered, be sure to remove the
USB plug on the computer side (USB hub side) in advance.
When reconnecting the USB cable, wait for at least 5 seconds after disconnecting it. If you connect
the USB cable too early, the printer may malfunction.
Note
A USB cable is not provided with the printer. Please prepare a cable that matches the port on your
•
computer.
10

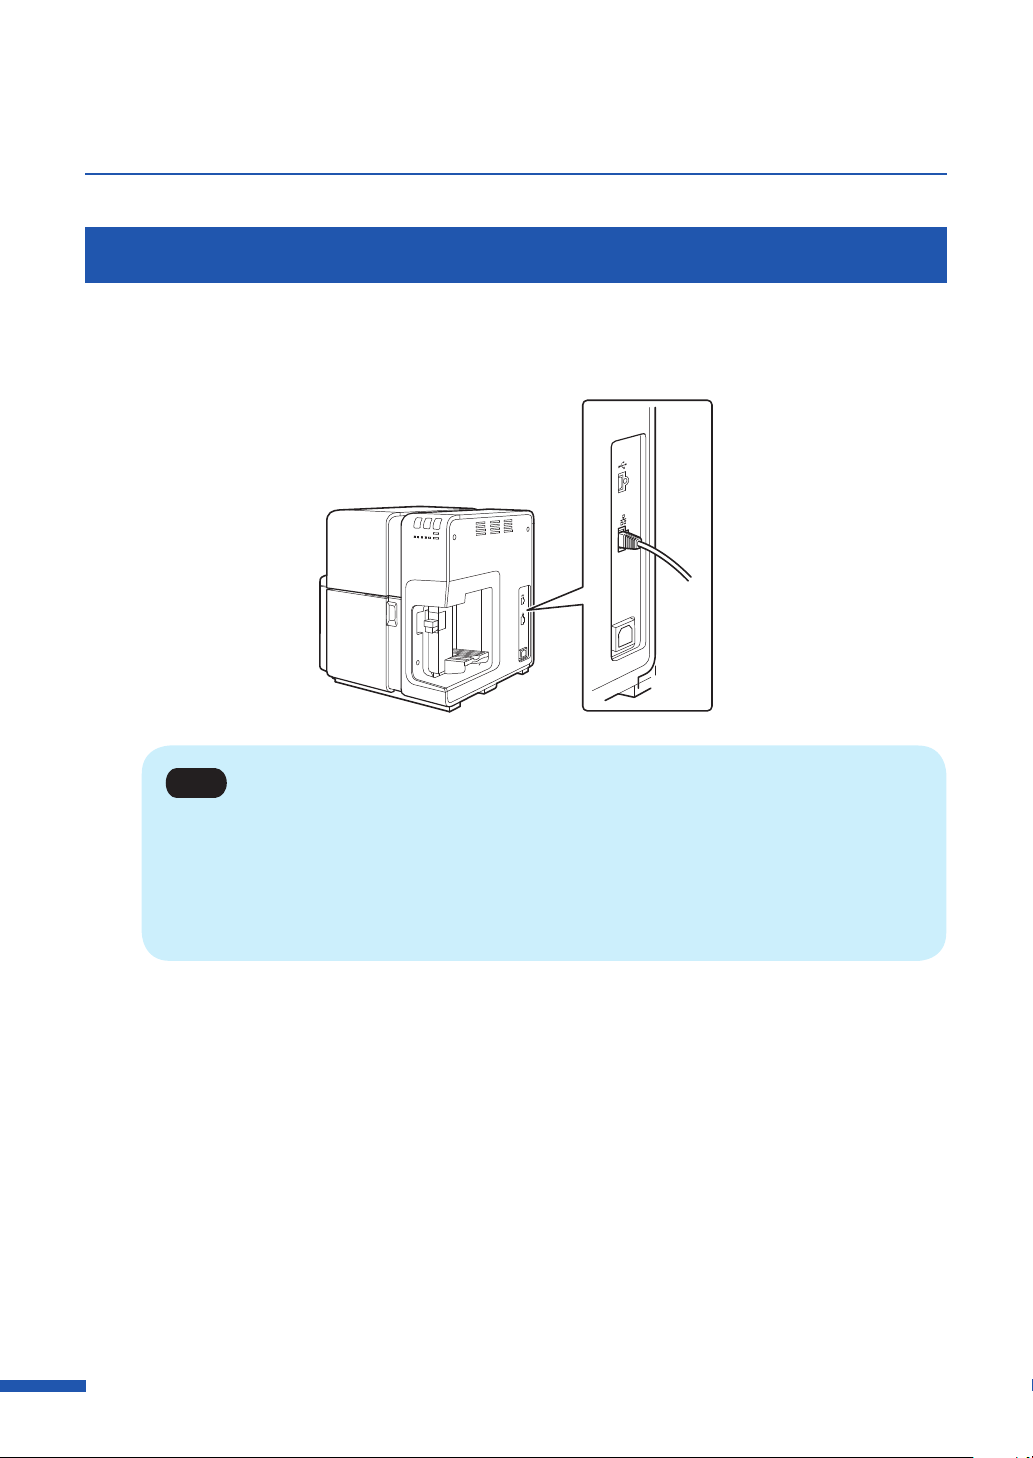
Connecting the Printer and Computer
Connecting with USB Cable
Connect the USB cable to the printer and then to the computer.
1
Note
The printer driver must be installed before connecting the USB cable.
•
For instructions on how to install the printer driver, refer to the Getting Started Guide.
•
11
Chapter 1 Before Using the Printer
Connecting with LAN Cable
Connect the printer to the network (LAN) using a LAN cable.
1
Note
Use a Category 5e or better twisted pair Ethernet cable.
•
Connection to a corporate LAN must be made by a network administrator.
•
For instructions on how to install the printer driver and how to connect a printer to a
•
network, refer to the Getting Started Guide.
12
Turning on/o Printer
This section explains how to switch the printer on and off.
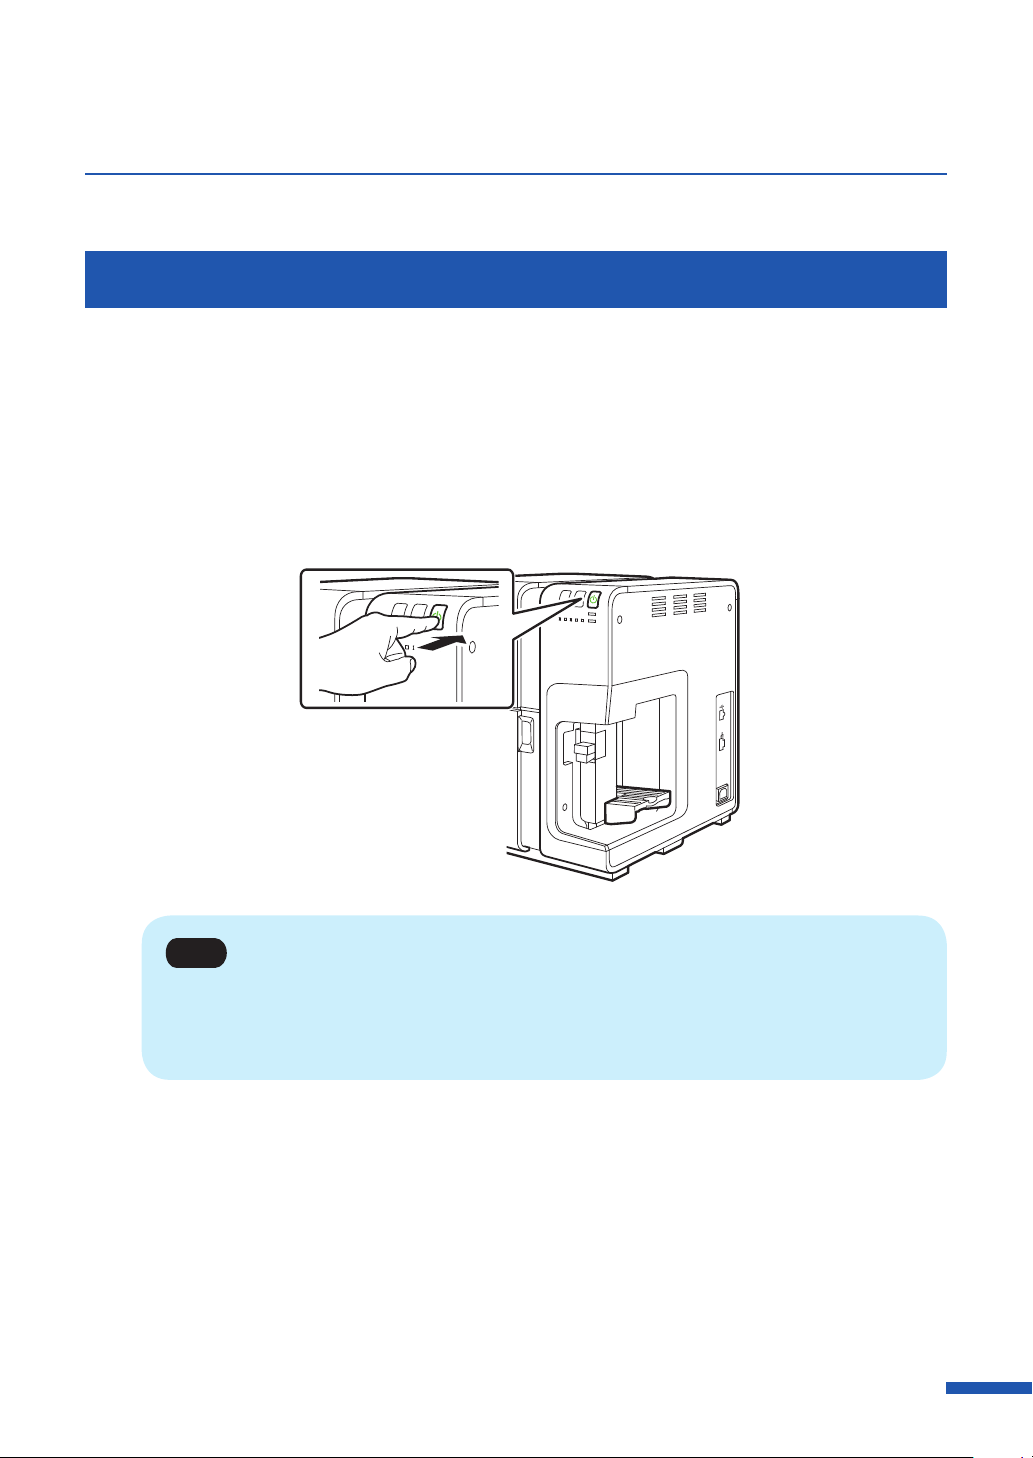
Turning on the Printer
Make sure that the power cable is connected properly, and then turn on the printer.
Press the Power key.
1
Printhead cleaning is performed and the printer becomes ready for printing. When the printer
is in the online mode, the status lamp stays lit.
TRAY
Note
When the printer is in the sleep mode, press the power key to return the printer to online
•
mode. Printer will also wake up from the sleep mode automatically as soon as it starts
receiving a print job.
13
Chapter 1 Before Using the Printer
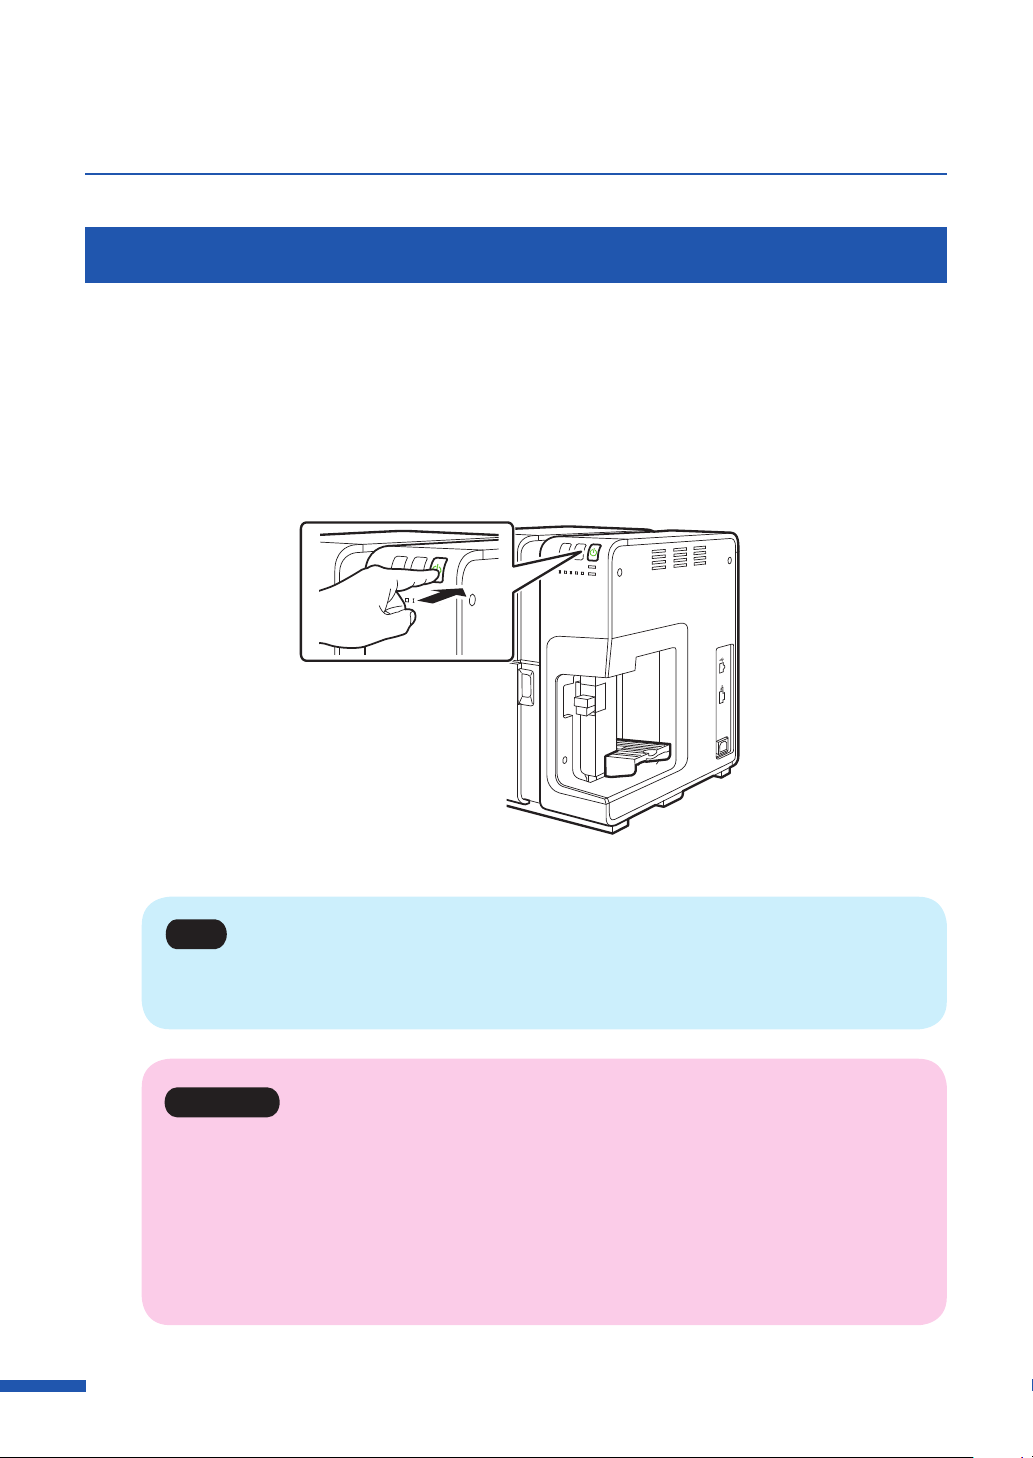
Turning o the Printer
Make sure the printer is not operating.
1
Press the Power key for at least 1 second.
2
TRAY
When the power lamp stops blinking, the printer is turned off.
Note
When a given length of time elapses after switching to sleep mode, the printer is
•
automatically turned off.
Important
When unplugging the power cord after turning off the printer, make sure the power lamp is
•
off. Make sure the power lamp is off before removing the power plug. Removing the power
plug while the power lamp is lit or blinking could result in a dry print head and paper jams
and poor quality prints.
If the printer will not be used for a long period, disconnect the power cord, AC adapter, and
•
interface cable.
(→ P. 9 2 )
14
Loading Paper
The procedure of loading paper is described below.
Make sure the power lamp is on.
1
If the power lamp does not stay lit or it is not blinking, press the power key.
While raising the side guide lever, move the side guide fully to the front side.
2
1
2
15

Chapter 1 Before Using the Printer
Prepare paper.
3
For business card/card/postcard/envelopes
●
1. When loading envelopes, press down on all four corners and edges of the envelopes to
flatten them.
2. As shown in the figure, flip through the four sides ( ) of the paper to separate
the sheets.
16
Note
Flip through the four sides of the paper thoroughly to remove paper dust.
•
Loading the paper after flipping through it might prevent multiple sheets from being fed at
•
once.

Loading Paper
3. Check the curl.
As shown in the figure, if the paper is placed with the printing surface facing up and the paper
is curled upward (Fig.1), fix the curl so that the paper is flat.
(Fig.1)
printing surface
If the paper is curled downward (Fig.2), flatten the paper so that the curl does not exceed 2 mm.
(Fig.2)
printing surface
0 - 2 mm
Paper that is curled upward can cause paper jams or printing surface rubbing. If the paper is
curled, bend in the direction opposite to the curl in order to flatten it.
For plastic card
●
1. Flip through the two short sides ( ) of the card to separate the cards.
Note
When flipping through the card, do not touch the printing surface with your fingers.
•
Flip through the two short sides of the card thoroughly. If you have difficulty flipping
•
through the card, do it in small amounts.
Setting the card after flipping through it will prevent multiple cards from being fed at once.
•
17

Chapter 1 Before Using the Printer
2. Check the curl.
As shown in the figure, if the
curled upward (Fig.1), fix the curl so that the
(Fig.1)
card
is placed with the printing surface facing up and the paper is
card
is flat.
printing surface
If the paper is curled downward (Fig.2), flatten the paper so that the curl does not exceed 0.5
mm.
(Fig.2)
printing surface
0 - 0.5 mm
Paper that is curled upward can cause paper jams or printing surface rubbing. If the paper is
curled, bend in the direction opposite to the curl in order to flatten it.
18

load the paper in the feeder lift tray according to the paper type of the paper.
4
Important
Align the edges before loading. Otherwise, printing may be slanted, or a paper jam may
•
occur.
The capacity of the feeder lift tray is as follows:
•
Loading Paper
Business card (Thickness: 0.245 mm (9.64 mil) or less):
Postcard (Thickness: 0.245 mm (9.64 mil) or less):
Special heavy paper (Thickness: 0.76 mm (29.92 mil)): 100 sheets
Plastic card: 100 sheets
Envelope: 100 sheets
Check that the height of the paper stack does not exceed the load limit mark. If a paper feed
•
error occurs, reduce the number of sheets loaded in the tray.
500 sheets
500 sheets
19
Chapter 1 Before Using the Printer
When using
●
Load the paper in the feeder lift tray as shown in the figure.
business card,
card or
plastic card
20
Direction
of paper feed
Loading Paper
When using
●
1. Pull out the auxiliary tray of the feeder lift tray.
2. Load the paper in the feeder lift tray as shown in the figure.
postcard
Direction
of paper feed
21

Chapter 1 Before Using the Printer
When using
●
envelopes
1. Pull out the auxiliary tray, and open the folded tray.
2. Load the envelopes with the flap closed and with the front facing up as shown in the figure.
22
Direction
of paper feed
Important
Do not print on the back of the envelope. A printing failure or other problems may result.
•
Loading Paper
While raising the side guide lever, slowly move the side guide until it stops against paper.
5
1
2
Important
Do not press the side guide against the paper stack too strongly. A paper jam can result.
•
23

Chapter 1 Before Using the Printer
Press the TRAY key.
6
The feeder lift tray rises automatically. Wait until it stops rising.
Caution
Do not touch the feeder lift tray while it is in operation. In addition, do not insert your
•
finger or any object under the tray. An injury or failure can result.
TRAY
24
Important
Do not operate the side guide after the feeder lift tray has risen. It may cause a paper jam.
•
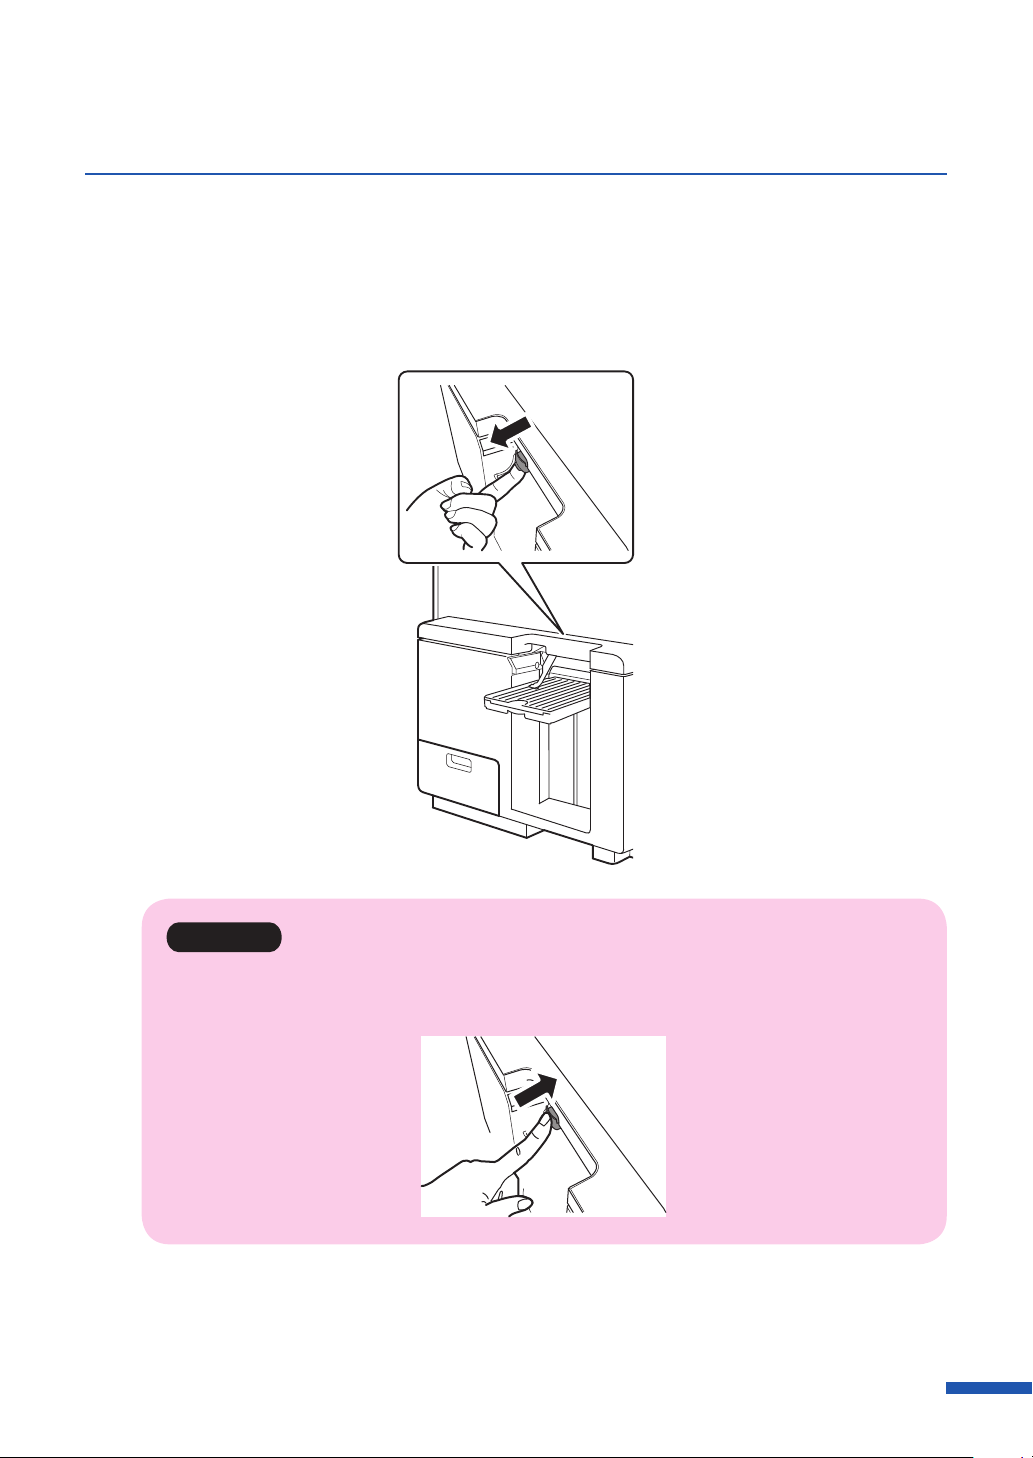
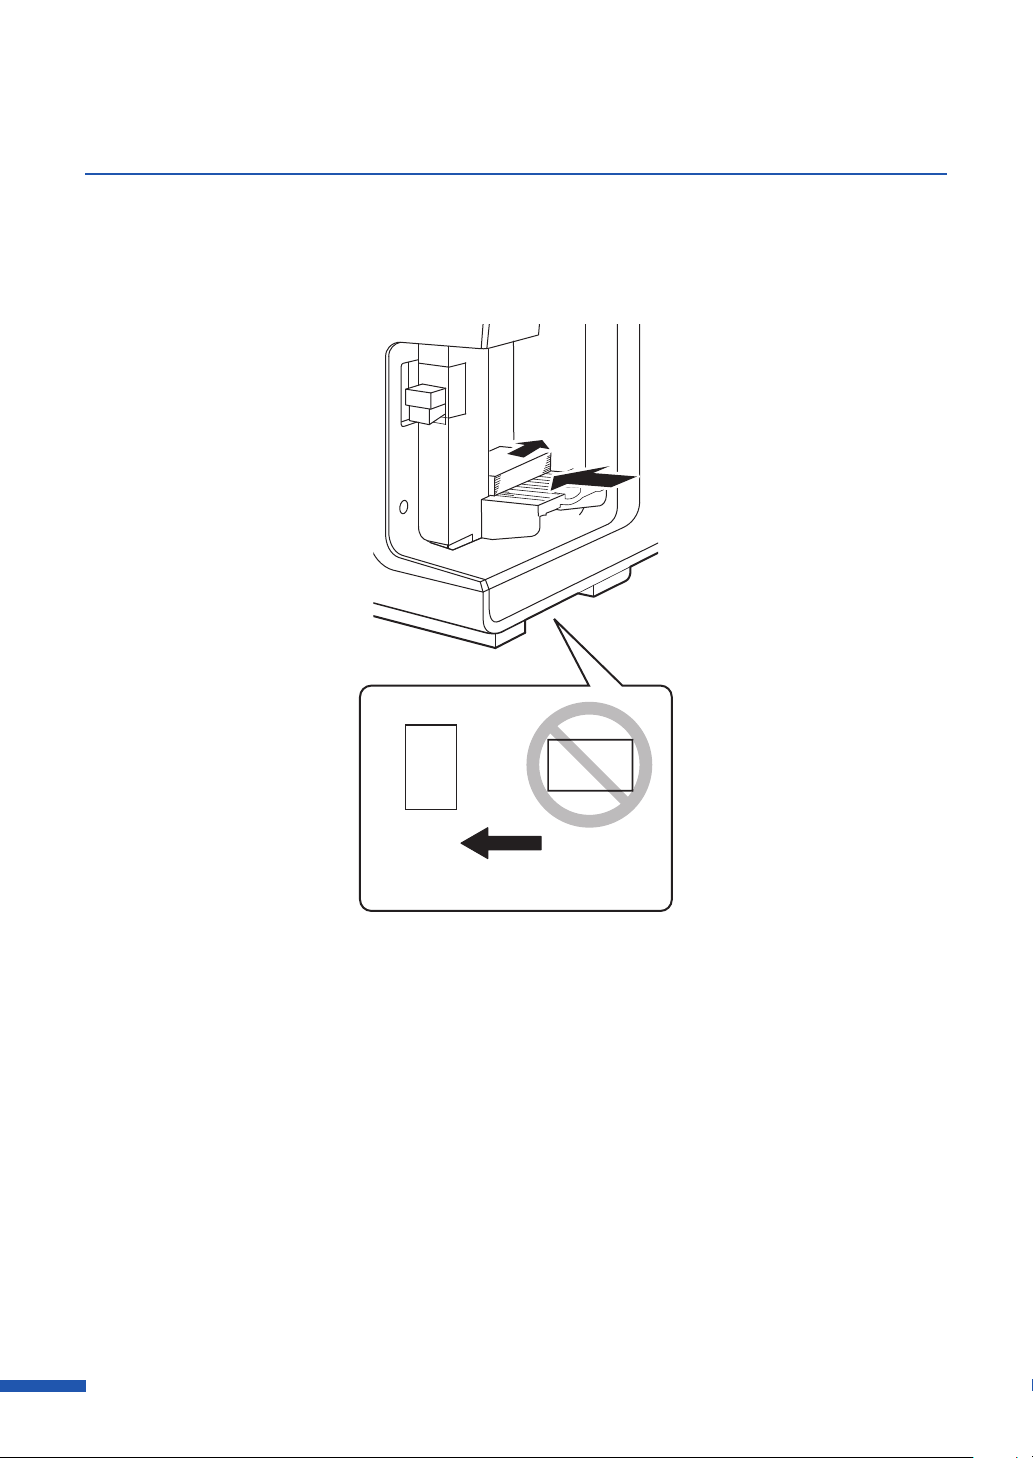
Set the each part on the delivery area according to the paper form of the paper.
7
When using
●
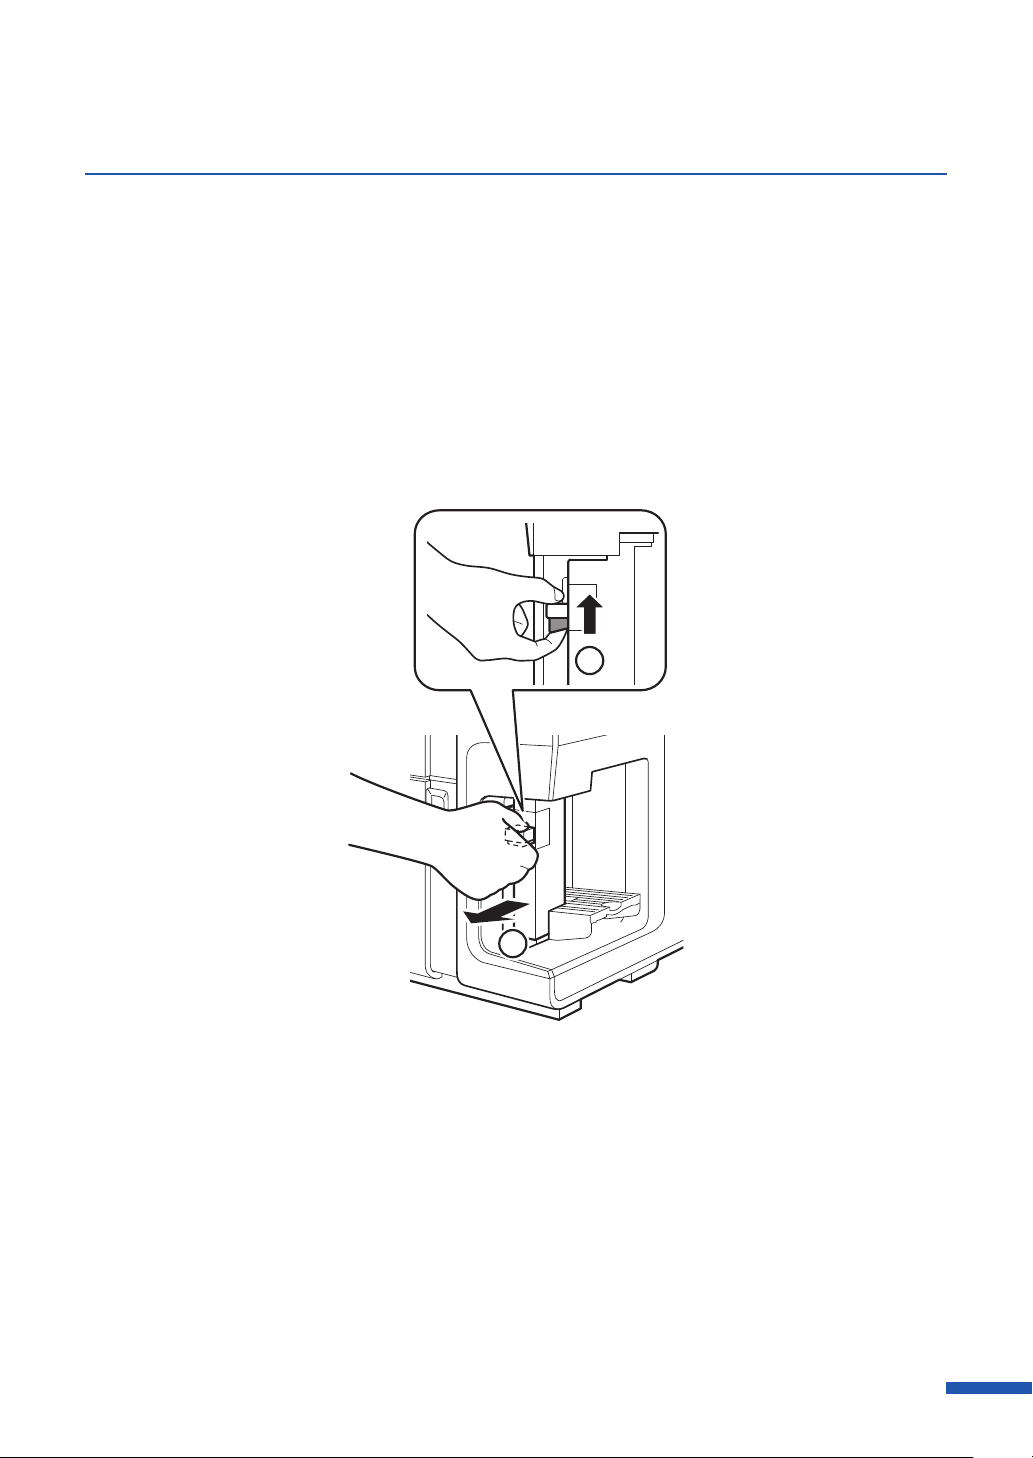
Pull out the thick paper transport lever in the paper delivery slot.
special heavy paper
or
thick
plastic card
Loading Paper
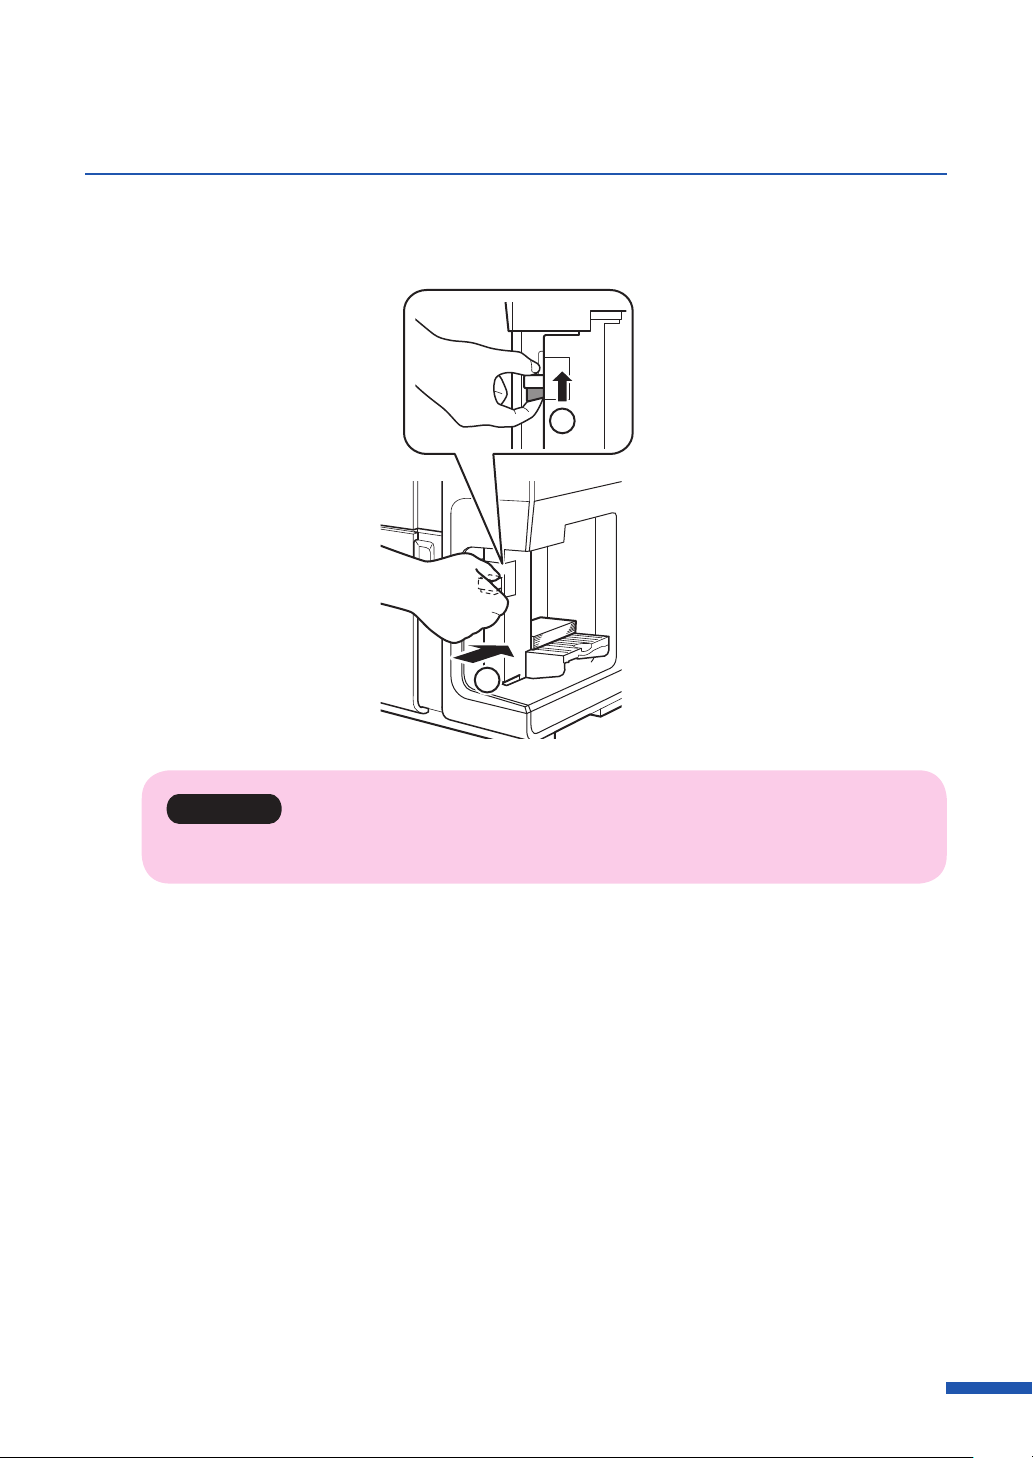
Important
When paper form other than special heavy paper or
•
If the thick paper transport lever has been pulled, push it.
thick plastic card:
25
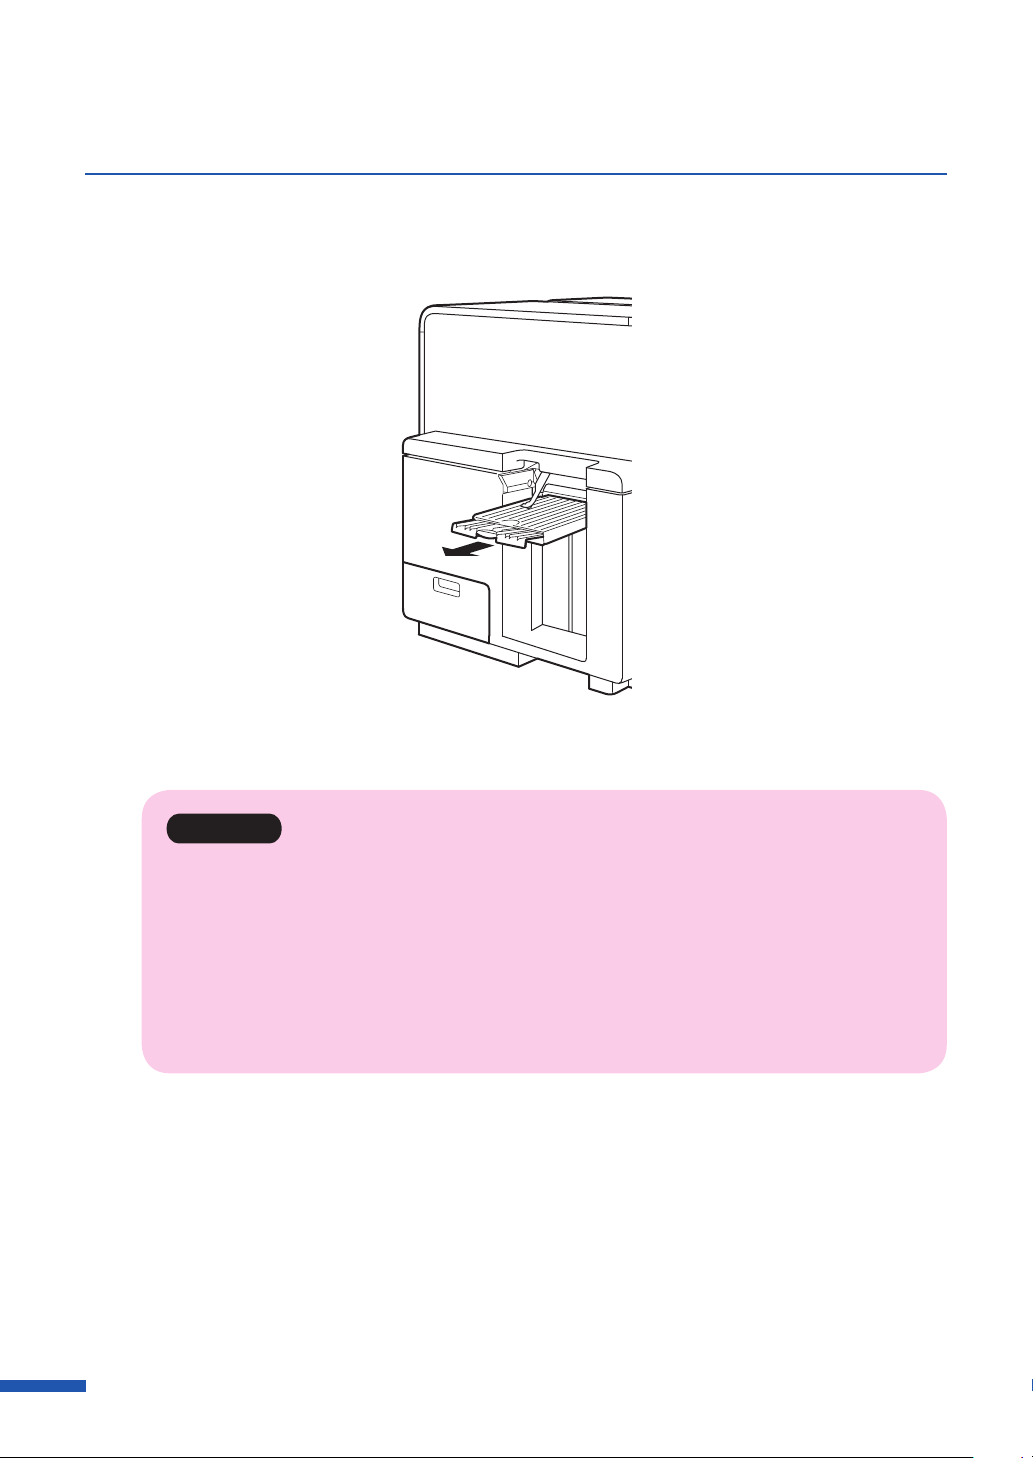
Chapter 1 Before Using the Printer
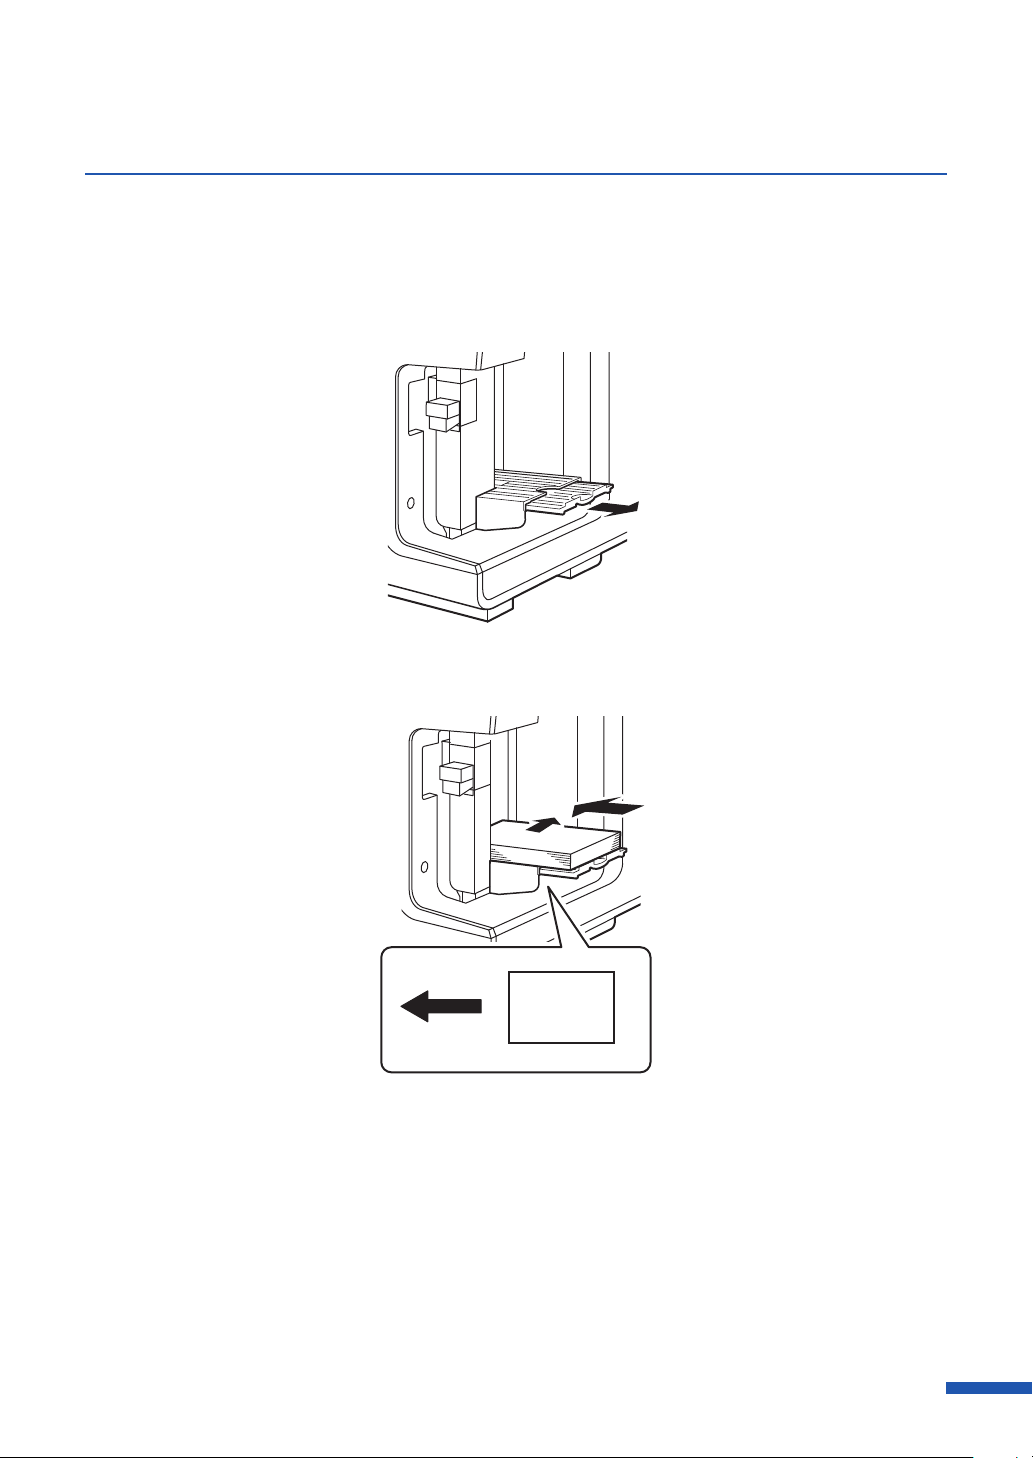
When using envelopes
●
Pull out the auxiliary tray of the auto stacker.
Loading paper is completed.
Important
If you change to a different type or size of paper, change the printer driver setting.
•
To print on both sides, print the side with less pictures and characters (e.g., front side) first.
•
If an image with a lot of pictures and characters is printed, paper may not be neatly stacked
•
onto the auto stacker. To prevent paper jams, it is recommended that printed paper is
removed frequently.
It is normal for some noise to occur during paper feeding when printing on plastic cards.
•
26
 Loading...