

Canon CX-G2400 User Manual
CX-G2400
COLOR CARD PRINTER
User's Guide
CANON FINETECH NISCA INC.2017
4Y1-8613-010

Table of Contents
Before You Begin
Conventions ...................................................................................iv
Sample Screens ............................................................................iv
Trademarks ......................................................................................iv
Abbreviations .................................................................................v
Important Notices .......................................................................v
Legal Notice ....................................................................................v
1. Basic Operation
Names and Functions of Components ................................2
External View...................................................................................2
Internal View ...................................................................................3
Transport Unit ................................................................................4
Operation Panel ............................................................................5
Turning the Printer On/Off............................................................7
Turning the Printer On ..............................................................7
Turning the Printer Off ..............................................................8
Changing the Power Settings ..............................................9
Loading the Paper ..........................................................................13
How to Print ........................................................................................24
Making Prints ...............................................................................24
Cancel Printing ...........................................................................30
Configuring Print Settings .........................................................31
Opening the Printer Driver ..................................................31
Printer Driver Setup Window Configuration ............34
2. Printing
Printing with the Custom Paper Size ...................................42
Setting Micro Margin Printing ................................................. 47
Adjusting the Print Position ................................................47
Adjusting the Trimming Position ....................................49
Changing Print Quality and Adjusting Color ..................55
Changing Print Quality Setting ........................................55
Printing with the Color Correction Method
Changed .........................................................................................57
Printing in Black and White .................................................58
Print the Gradation Smoothly ...........................................59
Setting the Sharpness ............................................................61
Adjusting the Color Balance...............................................63
Adjusting the Density ............................................................65
Adjusting the Brightness or Contrast ...........................67
Carrying out Overlay Printing ..................................................70
Printing a Form to a File ........................................................71
Carrying out Overlay Printing ............................................73
Setting Paper Feed Speed ......................................................... 75
Accelerating Printing on the 1st Sheet of Paper ...75
Adjusting the Paper Feed Speed .....................................76
Registering Print Settings You Use Frequently ..............78
Changing Special Settings .........................................................82
Registering Paper Type ................................................................86
3. Maintenance
Checking the Printer Status .......................................................92
How to Start and Display the Status Monitor..........93
Replacing the Ink Tank .................................................................95
Replacing the Ink Tank ........................................................... 95
Checking the Ink Information ........................................101
Replacing the Maintenance Cartridge .............................102
Replacing the Maintenance Cartridge .....................102
Checking the Status of the Maintenance Cartridge
.... 108
ii

Cleaning the Print Head ........................................................... 109
Normal Cleaning (Light Cleaning) ............................... 109
Strong Cleaning ......................................................................111
Adjusting Print Head Position ................................................113
Checking the Setting Values ..................................................126
Cleaning the Printer .....................................................................128
Cleaning the exterior of the printer............................128
Cleaning the Transport Unit ............................................ 130
Cleaning the Pick-up Roller ............................................. 143
4. Troubleshooting
For Troubleshooting Operations ........................................148
Status Lamp Lights up Orange ......................................148
Status Lamp Is Flashing Orange ................................... 150
Power Does not Turn on ....................................................151
Printing Does not Start/Complete .............................. 151
Paper Does not Feed Properly ....................................... 154
Improving the Print Quality .............................................155
Paper Is Jammed ....................................................................159
List of Error Messages/Warning Messages ...................165
Error Message ........................................................................... 166
Warning Message .................................................................. 172
Configuring the Network .................................................. 188
Configuring Network Using the Network Utility
.... 199
Specifications ..............................
Index .................................................
202
204
5. Appendix
Moving the Printer ........................................................................176
Moving the Printer Indoors ..............................................176
Shipping the Printer .............................................................179
Uninstall Printer Driver ............................................................... 185
About Network Utility ................................................................187
Starting the Network Utility ............................................187
iii

Before You Begin
Conventions
WARNING
Indicates a warning concerning operations that may lead to death or injury to persons if not performed correctly.
To use the machine safely, always pay attention to these warnings.
CAUTION
Indicates a caution concerning operations that may lead to injury to persons if not performed correctly. To use the
machine safely, always pay attention to these cautions.
IMPORTANT
Indicates operational requirements and restrictions. Be sure to read these items carefully to operate the machine
correctly, and avoid damage to the machine or property.
NOTE
Indicates a clarification of an operation, or contains additional explanations for a procedure. Reading these notes
is highly recommended.
Indicates an operation that must not be performed. Read these items carefully, and make sure not to perform the
described operations.
Sample Screens
The sample CX-G2400 printer driver screens displayed in this manual were created with Windows 10.
Trademarks
• Canon and the Canon logo are registered trademarks of Canon Inc.
• Microsoft and Windows are trademarks or registered trademarks of Microsoft Corporation in the United States
and/or other countries.
• Adobe and Acrobat are trademarks or registered trademarks of Adobe Systems Incorporated in the United
States and/or other countries.
• Other brand and product names may be trademarks or registered trademarks of their respective companies.
iv

Before You Begin
Abbreviations
Throughout this document the following abbreviations are used in text.
• Microsoft Windows 10 is abbreviated as “Windows 10”
• Microsoft Windows 8.1 is abbreviated as “Windows 8.1”
• Microsoft Windows 7 is abbreviated as “Windows 7”
• Microsoft Windows is abbreviated as “Windows”
Important Notices
• Copying this manual or any part of this manual without permission is strictly forbidden.
• The specifications for this printer and software provided with the printer are subject to change without prior
notice.
• We have done our best to make this manual as complete and accurate as possible, and we ask you to contact
your place of purchase. If you find any omissions or mistakes in this manual.
• We can accept no responsibility for loss or damages resulting from the use of this printer or its software; please
accept this before you use the printer.
Legal Notice
■Legal Limitations on the Usage of Your Product and the Use of Images
• It is illegal to reproduce currency, bills, negotiable securities and other documents prohibited by law.
Reproduction of such items may be subject to criminal prosecution.
• It is illegal to reproduce legal certificates, licenses, and certain public and private documents prohibited from
reproduction by law. Reproduction of such items may be subject to criminal prosecution.
• Please note that intellectual property protected by copyright may not be reproduced without the express
permission of the copyright holder except for personal or household use under limited circumstances.
■Product Name
CX-G2400
v

Chapter 1
Basic Operation
This chapter describes basic things to remember before using this product.
Names and Functions of Components .......................................................................................................................2
Turning the Printer On/Off .................................................................................................................................................. 7
Loading the Paper .................................................................................................................................................................13
How to Print ............................................................................................................................................................................... 24
Configuring Print Settings ................................................................................................................................................ 31

Chapter 1 Basic Operation
Names and Functions of Components
External View
4
3
2
1
1
Operation Panel (P.5)
Keys for selecting printer operations and lamps
indicating printer statuses are provided on this panel.
2
Stacker
Receives printed media output from the printer.
3
Transport Unit (P.4)
Pull this unit out when clearing paper jams or adjusting
the paper guides.
5
6
USB Connector
Connect a USB cable to this connector.
7
LAN Connector
Connect a LAN cable to this connector.
8
Auxiliary Tray
Open the tray to set paper. During use, keep the tray
closed. When long sheets of paper (paper length of
157 mm (6.18 inch) or longer) is set, keep the tray open
during use.
6
7
8
9
10
11
12
Ink Tank Cover
4
Open this cover when replacing ink tanks.
5
Paper Switch Lever
Switch the lever position according to the thickness of
the paper to be set.
2
9
Feeder Lift Tray
Load the paper.
10
Side Guide
Adjust the position of this guide according to the
media width.

Names and Functions of Components
11
Rating Plate
A serial number for identifying the printer is indicated
on this label.
(The serial number is required when repairing the
printer or registering the warranty.)
12
Power Socket
Connect the supplied AC adapter to this socket.
IMPORTANT
• While the printer is operating, do not open the ink tank cover or the transport unit lever. It could cause a printer failure.
Internal View
1
Maintenance Cartridge
1
Ink used to clean printhead is collected in this cartridge.
3

Chapter 1 Basic Operation
MM
58
51
54/55
G
MM
Transport Unit
4
3
2
1
Transport Unit Lever
1
Open this lever to pull the transport unit out.
2
Ejection Slot
Printed paper is ejected through this slot.
3
Transport Belt
Transports paper here.
Clean the transport area when stained with paper dust
and ink.
(P.136)
4
Paper Guide
This guide holds the paper down to keep it from
floating. Normally, set the lever to the MM position for
use.
If the guide is stained with paper dust or ink, clean it.
(P.130)
4

Operation Panel
Names and Functions of Components
Pause
Tray
1 32 4 5 6
Power Key/Lamp
1
Press this key to turn on/off the printer. This lamp lights
up or blinks depending on the power supply status.
On: The printer is powered on.
Blink:
The printer is in sleep mode (power-saving mode).
Off: The printer is powered off.
2
Status Lamp
This lamp lights up or blinks green or orange.
Lit (green): Printing from the computer is possible
(online mode).
Blink (green): The printer is processing or operating
(printing, cleaning, etc.)
Lit (orange): An operator call error has occurred.
Blink (orange): A service call error has occurred.
Off: Instructions and print data cannot be received
from the computer (offline mode).
Ink Lamps (Bk/C/M/Y)
3
Each lamp lights up or blinks when the corresponding
ink tank is out of ink or short of ink.
Lit: The ink tank is out of ink or faulty.
Blink: The ink tank is low.
Off: The ink tank is full.
Maintenance Cartridge Lamp
4
This lamp lights up or blinks when there is limited
space to collect ink in the maintenance cartridge.
Lit:
The maintenance cartridge has no free space or it is faulty.
Blink: The maintenance cartridge has a small free space.
Off:
The maintenance cartridge has free space.
5

Chapter 1 Basic Operation
Pause Key
5
Press this key to switch between online and offline
modes.
When printing is in progress, pressing this key stops
printing temporarily. Pressing this key again resumes
printing.
6
Tray Key
Use this key to move the feeder lift tray upward/
downward.
NOTE
• When the printer is in the sleep mode, the Status lamp, Ink Lamps, and Maintenance Cartridge Lamp will remain
off regardless of the statuses of the printer, ink tanks, and maintenance cartridge.
6
Turning the Printer On/Off
Turning the Printer On
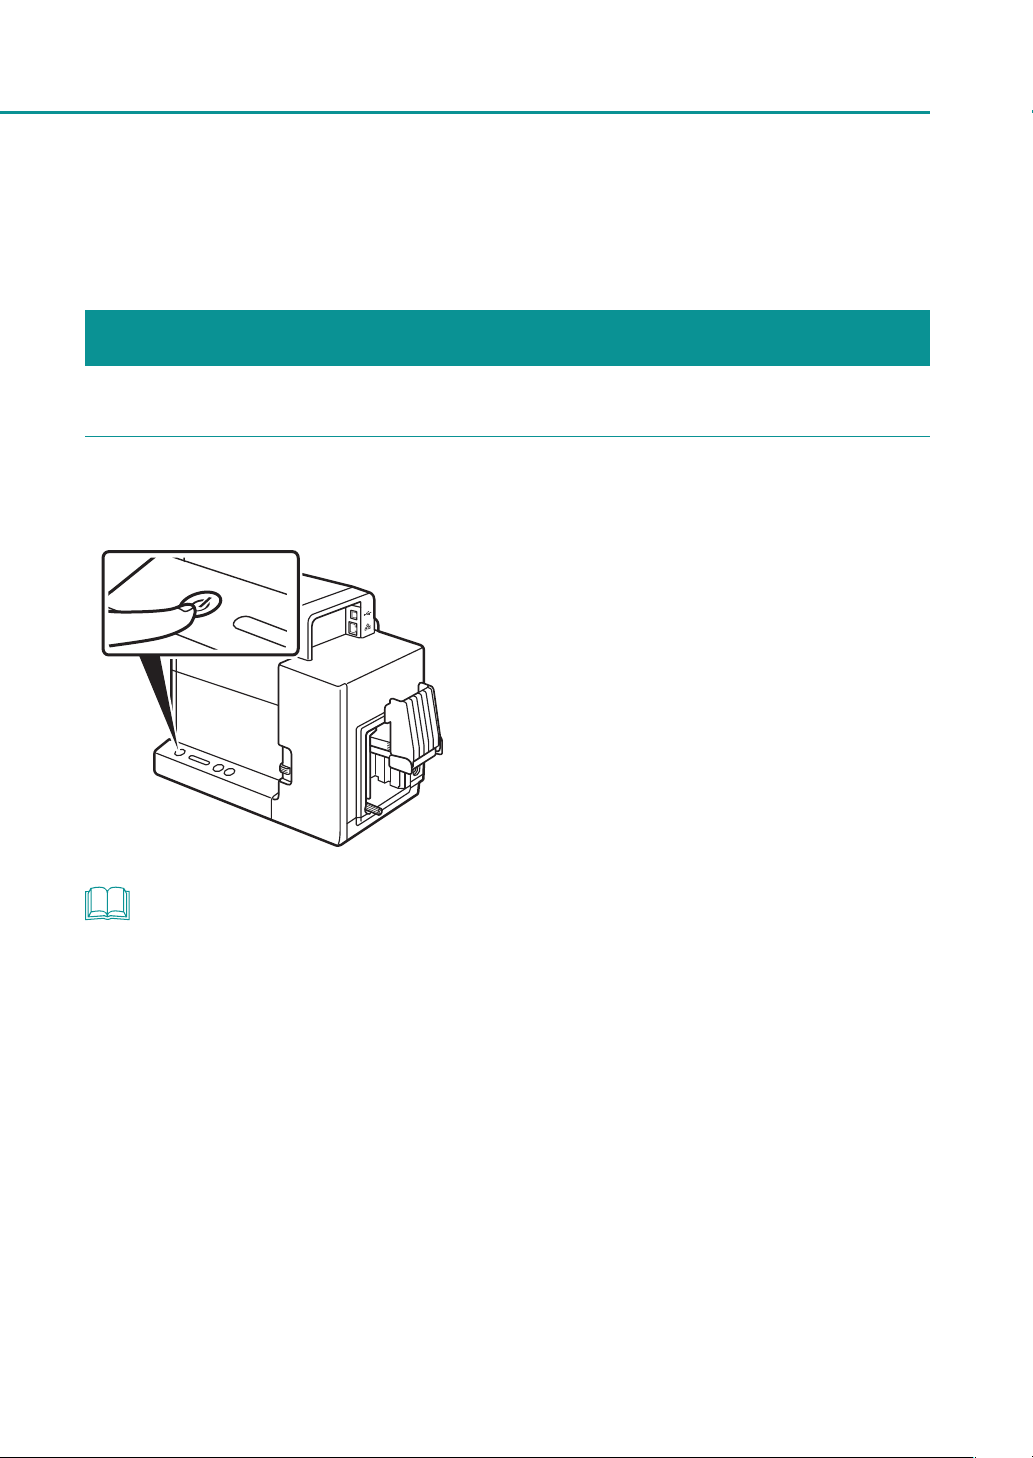
Press the Power key.
1
The status lamp will blink (green), and then
light up.
Turning the Printer On/Off
NOTE
• About the Sleep Timer (P.9)
The printer will automatically enter sleep mode if time elapses without printing. By default, the time is set to 4
minutes.
7

Chapter 1Basic Operation
Turning the Printer Off
Make sure all print jobs are complete.
1
When the Status lamp is blinking (green), the printer is operating. Make sure the Status lamp lights up
(green) before turning off the printer.
Press and hold the Power key until the Status lamp turns off.
2
When the Status lamp is off, press and hold the Power key for at least 1 second.
When the Power lamp stops blinking, the
printer is turned off.
IMPORTANT
• When unplugging the power cord after turning the printer off, make sure the Power lamp is off.
• If the printer will not be used for a long period of time, disconnect the power cord, AC adapter, and interface
cable.
NOTE
• About the O Timer (P.11)
After switching to sleep mode, if the printer is not in use for 240 minutes (4 hours), the printer will automatically
turn off.
8

Turning the Printer On/Off
Changing the Power Settings
■ Switching the Printer to the Sleep State
IMPORTANT
• When printing is in progress or an error has occurred, the printer cannot be switched to the sleep state.
NOTE
• The printer is automatically switched back from the sleep state to the online state in the following cases:
-When the Power key is pressed
-When print data is received
-When cleaning, etc. is performed
Make sure the printer is in the online state (the Status lamp is lit (green)).
1
If the printer is in the offline state (the Status lamp is off), press the
the online state.
Open the printer driver setup window.
2
(P.31)
Power
key to switch the printer back to
9
Chapter 1Basic Operation
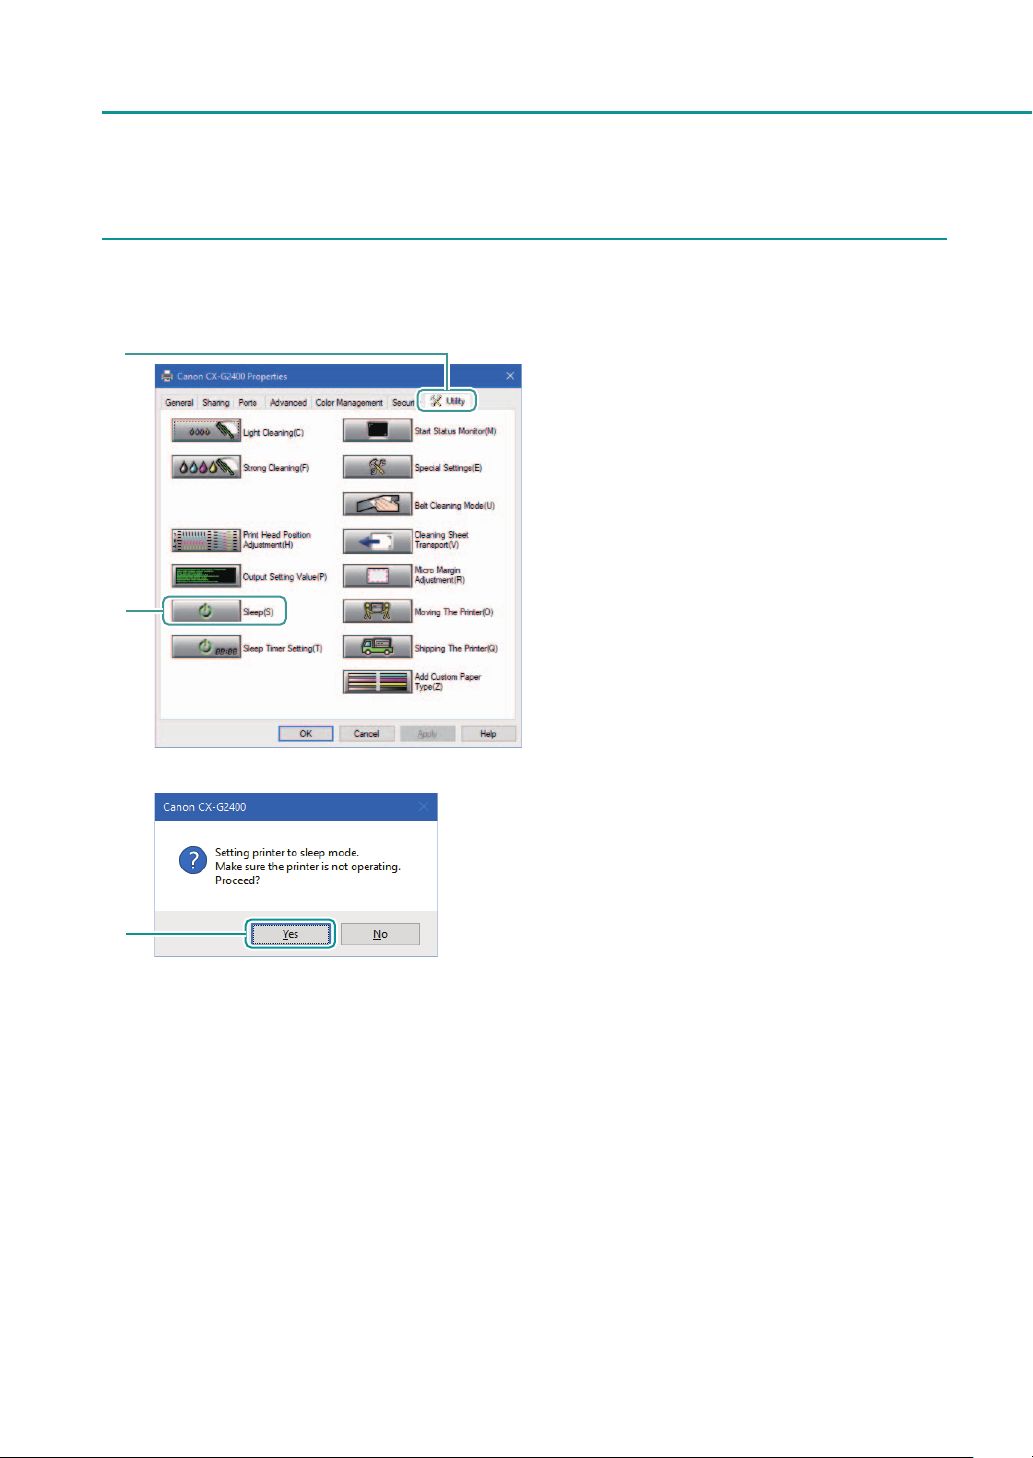
Switch the printer to the sleep state.
3
1
2
1. Click the [Utility] tab.
2. Click [ Sleep].
A confirmation message appears.
3. Confirm the message, and then click [Yes].
The Power lamp blinks slowly, and the printer is
switched to the sleep state.
3
10

Turning the Printer On/Off
■ Changing the Sleep Timer/Off Timer Setting
If the printer is not operated for a predetermined amount of time, it can automatically switch to the sleep state (sleep
timer), or automatically turn off ( off timer).
IMPORTANT
• Administrative privileges over this printer are required to configure sprinter settings.
If a user without administrative privileges proceeds with configuration of settings, a message ”You do not have
rights to printer management. Please contact your system administrator.” appears.
For more details, see
• When printing is in progress or an error has occurred, you cannot change the set time.
NOTE
• By default, the sleep timer is set to 4 minutes and the off timer is set to 240 minutes, (4 hours).
“Administrative privileges required for certain features (P.40)”.
• For the off timer, set how much time must elapse after switching to sleep mode before the printer is turned off.
Make sure the printer is in the online state (the Status lamp is lit (green)).
1
If the printer is in the offline state (the Status lamp is off), press the Power key to switch the printer back to
the online state.
Open the Properties window of the printer driver.
2
(P.32)
11

Chapter 1Basic Operation
Set the sleep timer.
3
1
1. Click the [Utility] tab.
2. Click [ Sleep Timer Setting].
The [Sleep Timer Setting] dialog box appears.
2
3. Enter the setting time of the sleep timer.
The time can be set in minutes within the range
3
4
5
from 1 to 60 (min).
4.
Enter the setting time of the off timer.
The time can be set in minutes within the range
from 1 to 720 (min).
If the off timer is not necessary, uncheck the
[Enable off timer setting] check box.
6
12
5. Click [Send].
A confirmation message appears.
6. Confirm the message, and then click [Yes].
Loading the Paper
Loading the Paper
IMPORTANT
• Use the dedicated paper. Using other paper could cause blurred or faint printing or have a negative impact on
the printer, resulting in a printer failure.
NOTE
• The following types of paper can be used with this printer:
Matte Coated Paper
-
Glossy paper
-
Plastic card
-
Please contact your place of purchase for paper specifications and availability.
Make sure the Power lamp is lit.
1
If the Power lamp is off, press the Power key to turn on the printer. (P.7)
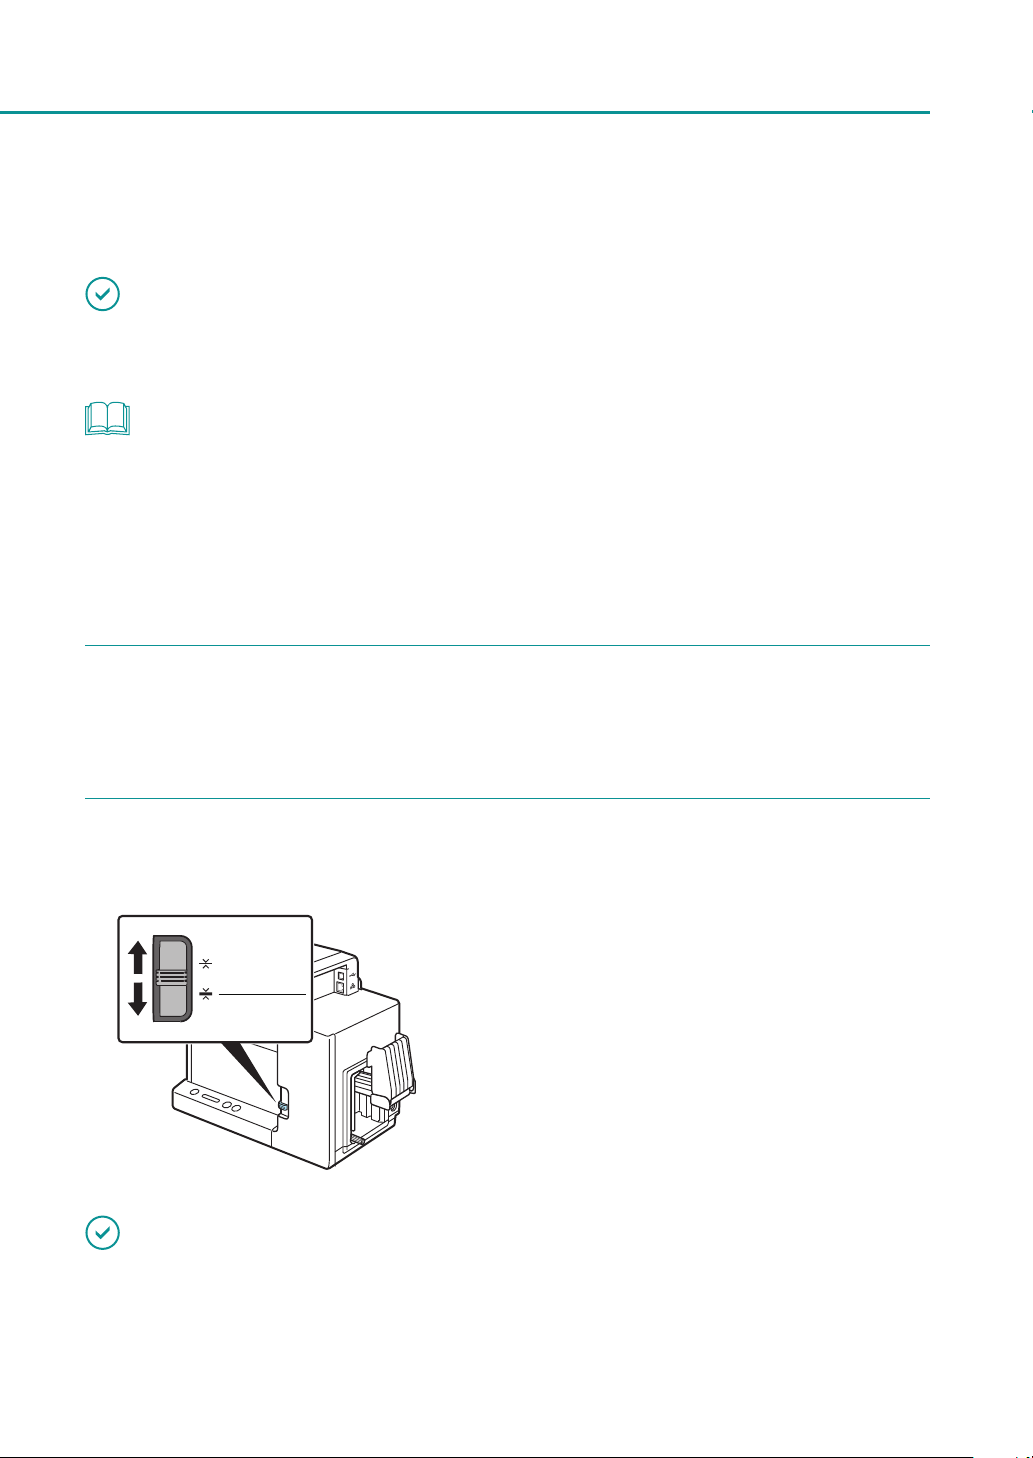
Set the paper switch lever.
2
Paper
Plastic Card
Extra Thick Paper
IMPORTANT
Set the lever to the appropriate position
according to the paper to be printed on.
Plastic card or extra thick paper:
Set it to [Plastic Card/Extra Thick Paper]
Paper other than above:
Set it to [Paper]
• Paper will not be fed properly if the paper switch lever is not in the appropriate position.
13

Chapter 1 Basic Operation
Lower the feeder lift tray.
3
If the feeder lift tray is already lowered, proceed to step 4.
1. Press the Tray key.
Wait for the feeder lift tray to stop.
CAUTION
• Do not touch the feeder lift tray when it is moving. Do not insert your hand or place objects below the
tray. Doing so can cause an injury or malfunction.
14

Remove the paper from its packaging.
4
For business card or card
Loading the Paper
1. Flip through the four sides of the paper to
separate the sheets.
As shown in the figure, flip through the four
sides (a, b, c, and d) of the paper thoroughly to
remove paper dust.
Loading the paper after flipping through it
prevents multiple sheets from being fed at once.
(Fig.1)
(Fig.2)
printing surface
printing surface
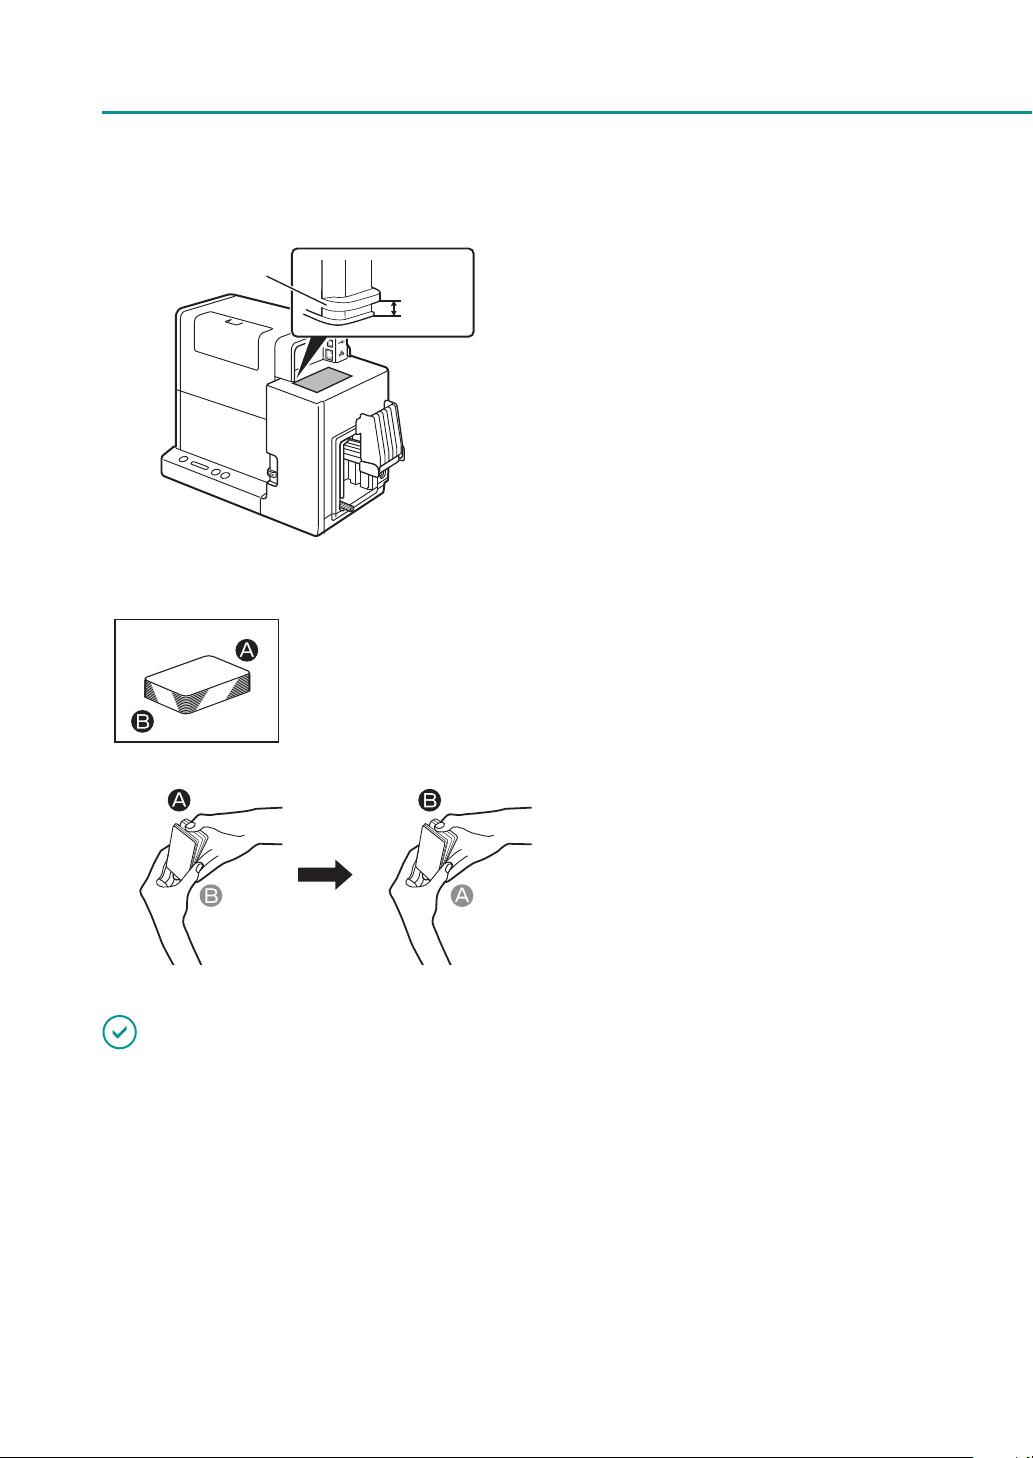
2. Check the paper curl.
As shown in the figure, if the paper is placed
with the printing surface facing up and the
paper is curled upward (Fig.1), fix the curl so that
the paper is flat.
If the paper is curled downward (Fig.2), flatten
the paper so that the curl does not exceed 2 mm
(0.08 inch).
Paper that is curled upward can cause paper
jams or printing surface rubbing. If the paper is
curled, bend in the direction opposite to the curl
in order to flatten it.
0 - 2 mm
(0 - 0.08 inch)
15
Chapter 1 Basic Operation
A
For plastic card
2 mm
(0.08 inch)
It is possible to check the amount of curl in
paper that is curled downward with the curl
index (A).
When you place the paper with the printing
surface facing down as shown in the figure,
check that the index is not exceeded (the curl is
2 mm (0.08 inch) or less).
1. Flip through the two short edges of the
card to separate the cards.
When flipping through the card, do not touch
the printing surface with your fingers.
Flip through the two short edges of the card
thoroughly. If you have difficulty flipping
through the cards, flip through small numbers of
cards at a time.
Loading the card after flipping through it
prevent multiple cards from being fed at once.
IMPORTANT
• Depending on the operating environment paper jams or printing surface rubbing may occur. In such a case,
adjust the paper guides to the paper width.
However, when the paper guides are adjusted to the paper width, micro margin printing is not possible.
(P.163)
16
5
Loading the Paper
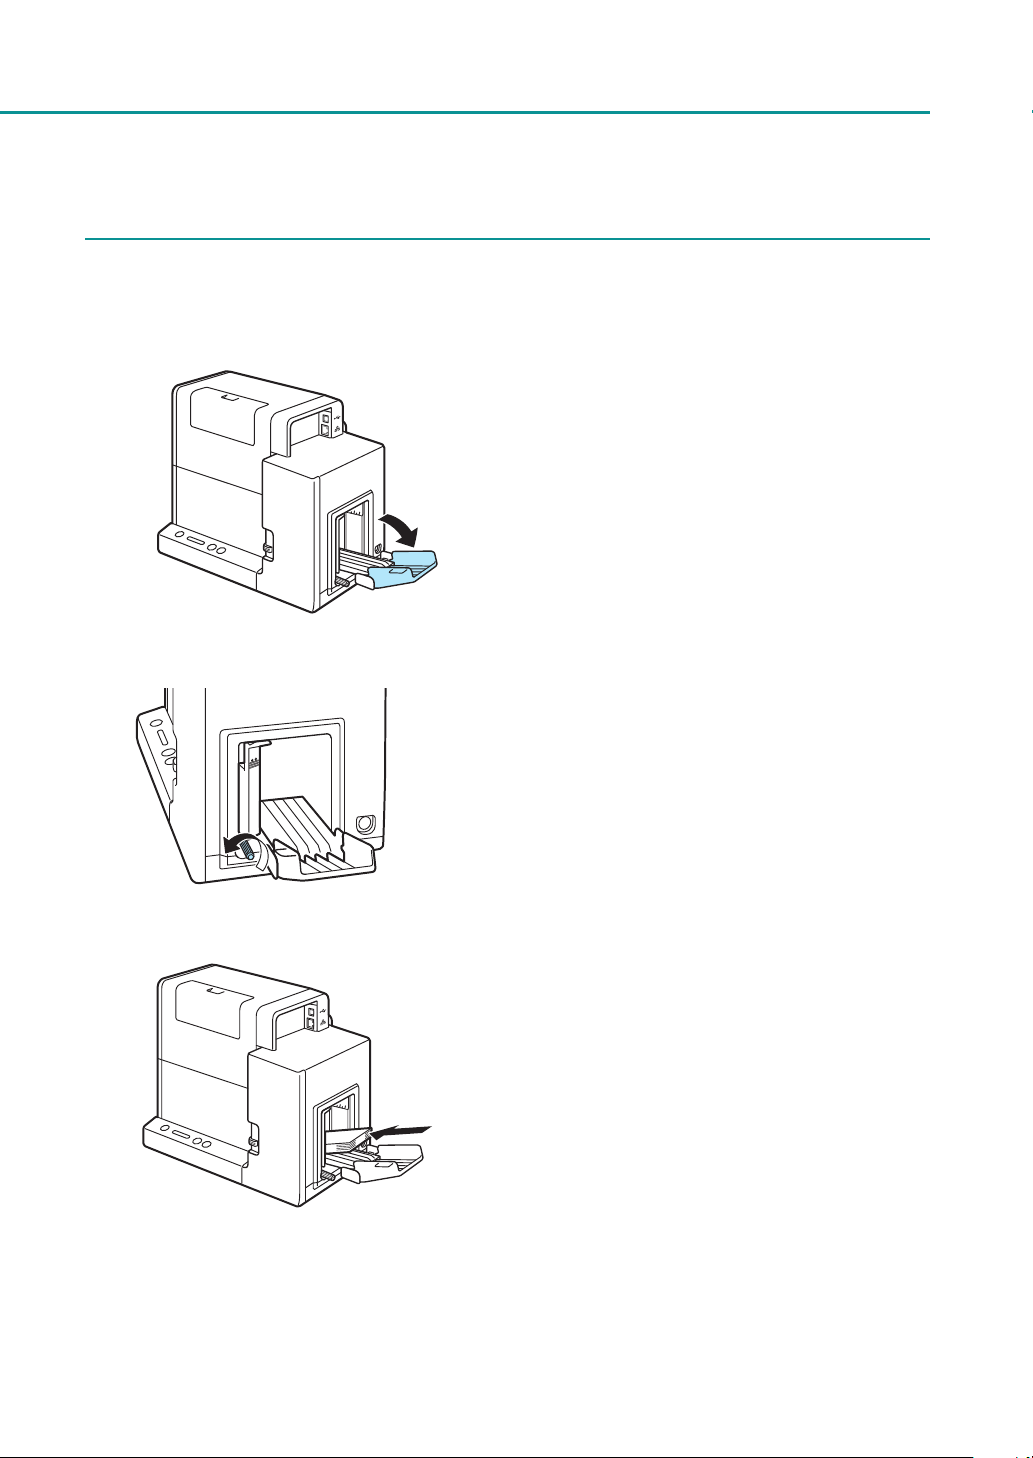
Load paper.
1. Open the auxiliary tray.
If there is paper in the feeder slot, remove it.
2. Loosen the side guide screw.
Please note, if the screw its turned too much, it
will come off.
3. Load the paper so that the furthest edge
touches the back of the feeder lift tray.
Align the paper neatly before loading.
If the paper has front and back sides, the side
that you want to print on must face up.
If the side guides are too narrow, pull them
outward and then load the paper.
17

Chapter 1 Basic Operation
4. Adjust the side guides to the paper edge,
and secure them in place with the screw.
5. Close the auxiliary tray.
For long sheets of paper (paper length of
157 mm (6.18 inch) or longer):
You do not need to close the auxiliary tray.
IMPORTANT
• Align the edges before loading. Not doing so can cause paper
jams.
• Check that the height of the paper stack is not exceeding the
load limit mark.
Paper length of 91(3.58 inch) mm or less (business card, etc.):
Can be set up to the load limit mark (arrow) (B).
Paper length of 157 mm (6.18 inch) or longer:
Can be set up to the load limit mark (line) (C).
18
B
C

Loading the Paper
• If a paper feed error occurs, reduce the number of sheets loaded in the tray.
• If the paper is not touching the back of the feeder lift tray, the paper may not be fed properly.
• Fix the side guides in place so that they gently touch the edges of the paper. If they are set too tightly against
the paper, the paper may not be fed properly.
• When changing the paper size, adjust the width of the side guides according to the width of the paper. If they
are not set properly, the paper may not be fed properly.
• When loading paper, close the auxiliary tray. When loading longer paper (paper length of 157 mm (6.18 inch) or
longer) there is no need to close the auxiliary tray.
• When printing on longer paper (paper length of 157 mm (6.18 inch) or longer), remove the printed paper
frequently. Continuing to print without removing the printed paper can cause paper jams or printing failure.
Raise the feeder lift tray.
6
1. Press the TRAY key.
Wait for the feeder lift tray to stop.
If the power lamp is blinking, press the Power
key to turn the printer on.
(P.7)
CAUTION
• Do not touch the feeder tray lift when it is moving. Doing so can cause injury or malfunction.
IMPORTANT
• Do not adjust the side guides after the tray has been raised. Doing so can cause paper jams.
19
Chapter 1 Basic Operation
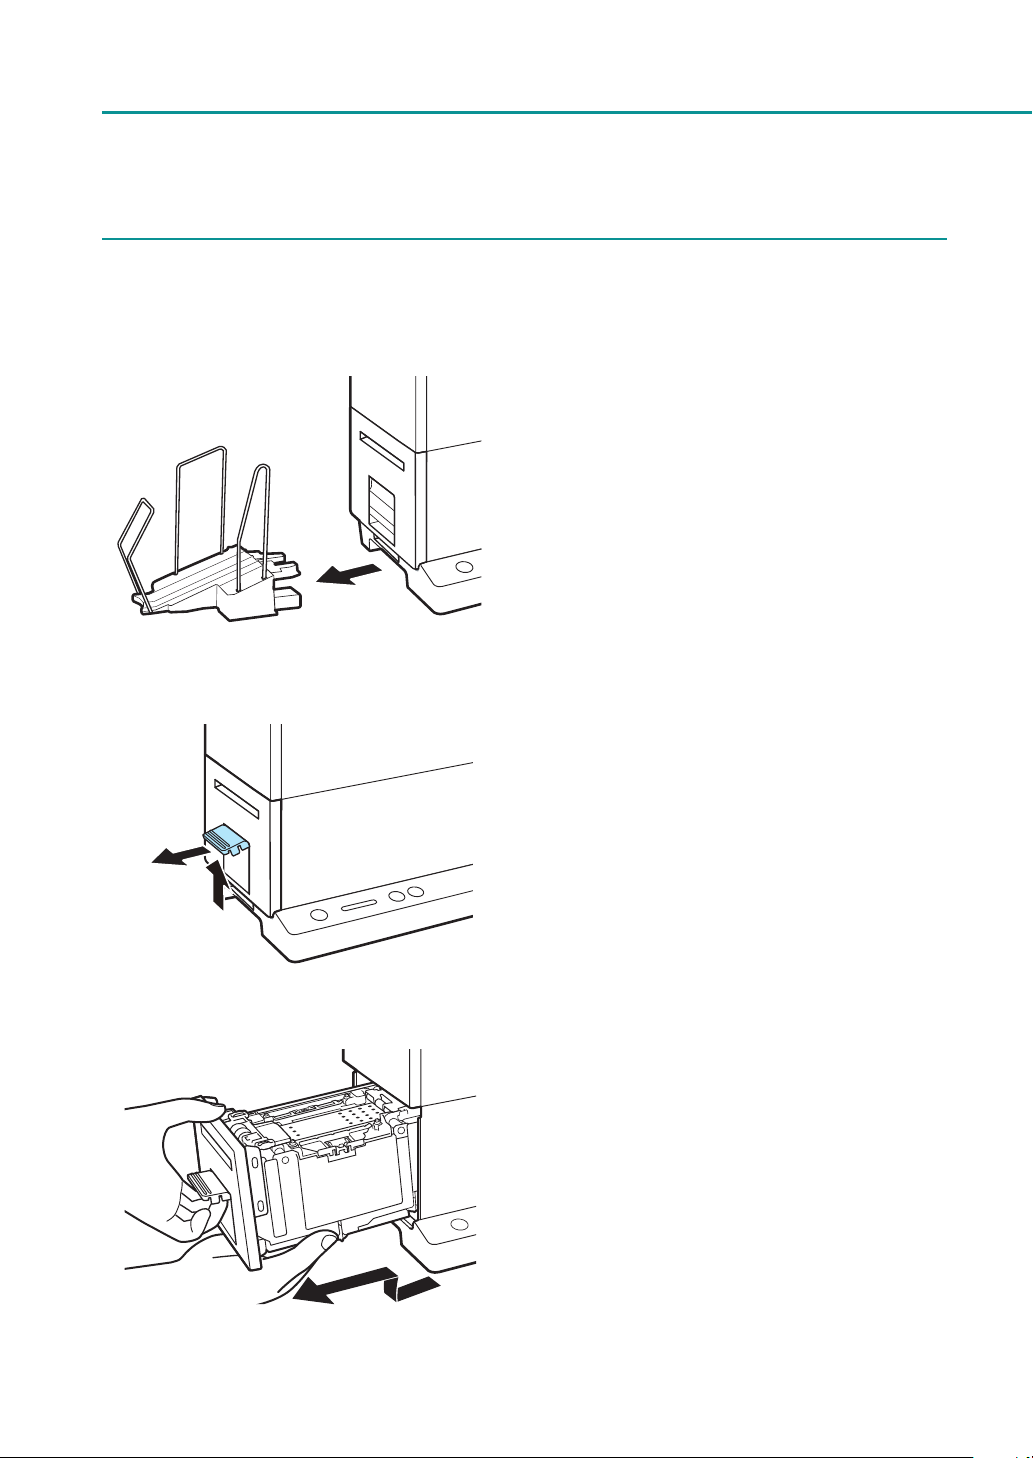
Check the paper guide positions.
7
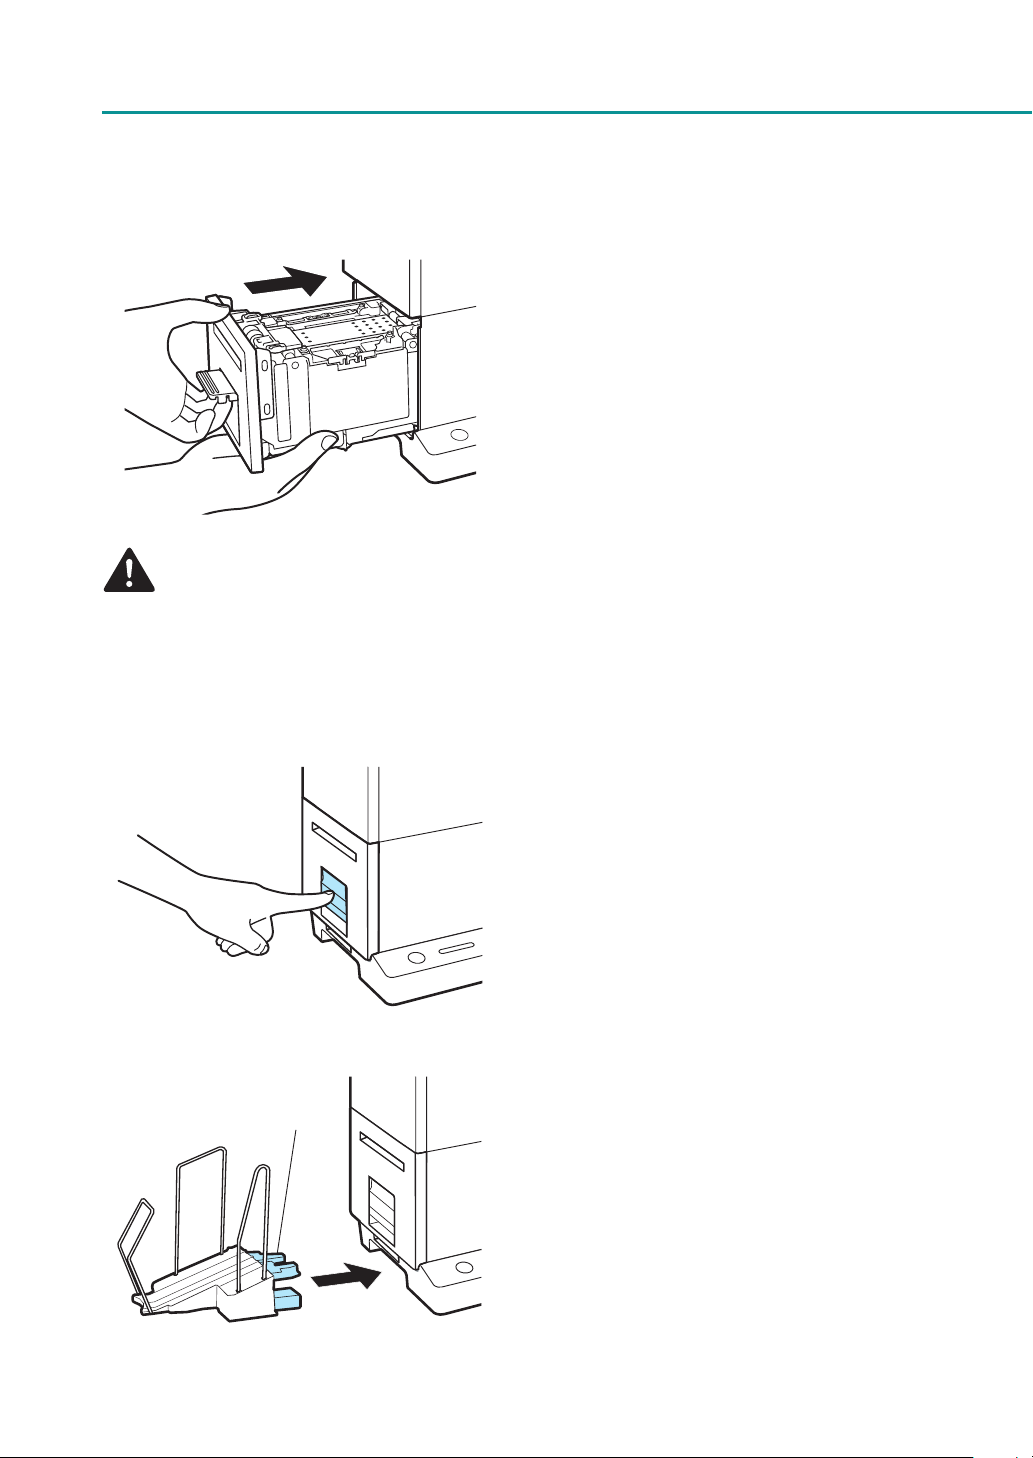
1. Remove the stacker if it is used.
2. Raise the transport unit lever, and pull the
transport unit out.
3. Pull the transport unit out with both
hands as shown in the figure.
20
Loading the Paper
G
MM
MM
58
51
54/55
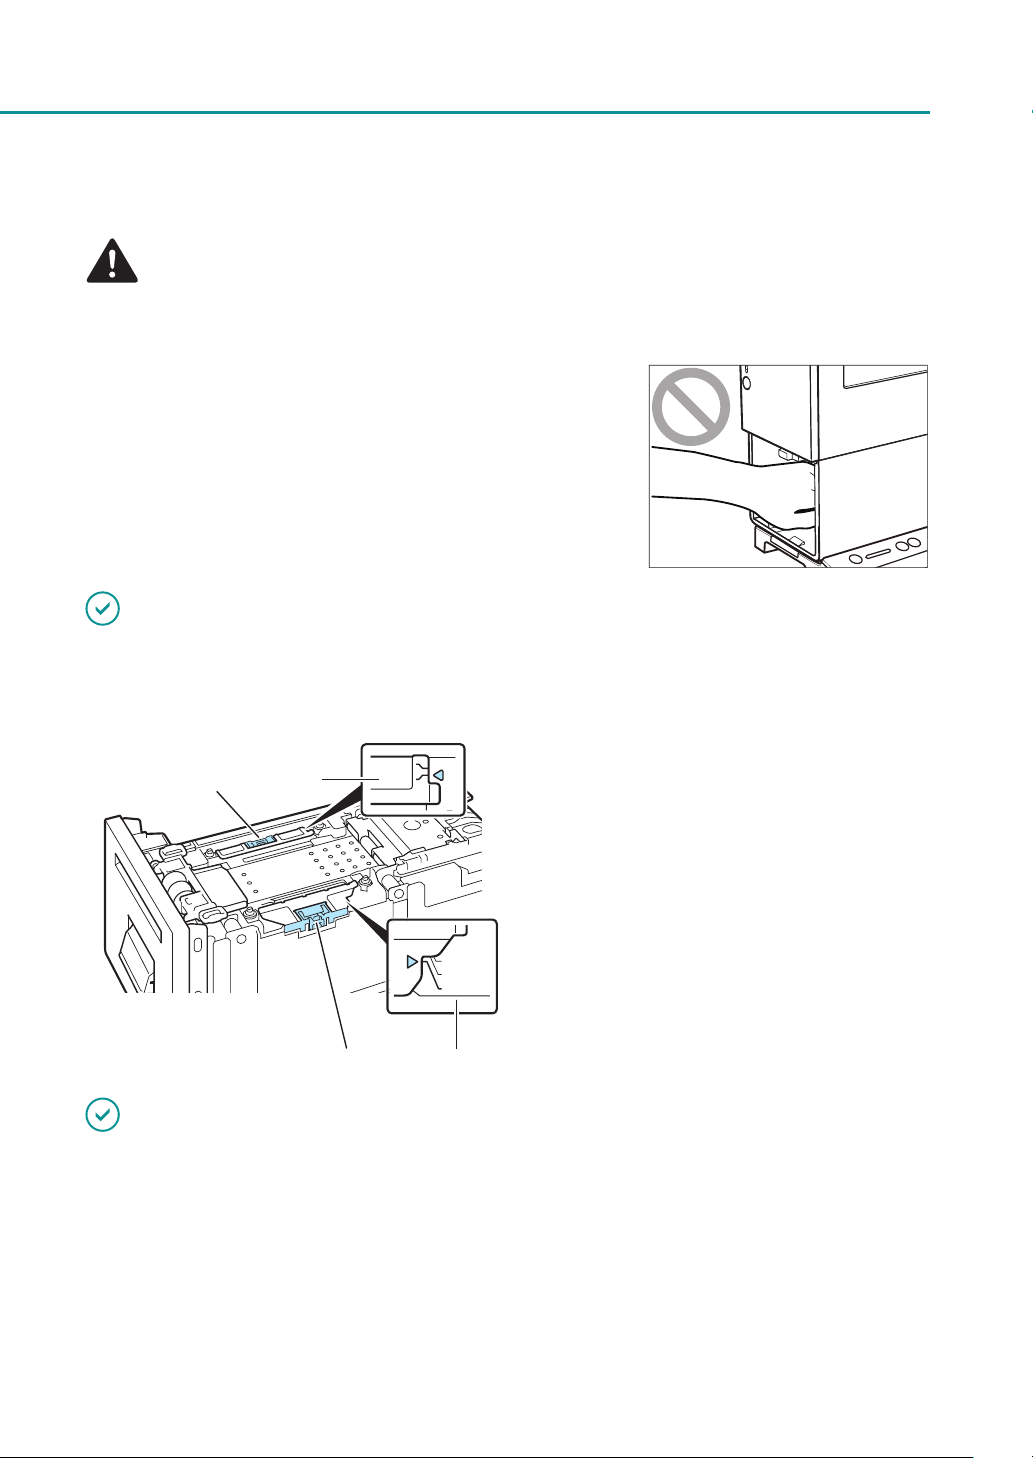
CAUTION
• When pulling the transport unit out of the printer, hold it firmly with both hands so it does not fall.
• Do not put your hands inside the printer. Failures or physical
injury could result. Ink adhered inside of the printer could stain
clothes or hands.
IMPORTANT
• When pulling the transport unit out of the printer or inserting it in the printer, be careful not to hit it strongly
against the table or shelf. The surface of the table or shelf could be damaged.
4. As shown in the figure, check that the
D
F
E
G
paper guides are set to the MM position.
While holding the paper guides (D and E) with
your fingers, adjust them to the paper width
indexes (F and G). For example, the figure on the
left shows adjustment to guide position MM.
IMPORTANT
• When performing micro margin printing, be sure to set the paper guides to the MM position. Otherwise, the
transport belt, paper guides, or other areas may be stained with ink. If a stain occurs, clean the transport unit.
(P.130)
• Normally, there is no need to set the paper guides to positions other than MM.
You only need to adjust the paper guides to the paper width when paper jams or printing surface rubbing does
not improve.
(P.21)
21
Chapter 1 Basic Operation
5. Slowly insert the transport unit as far as it
will go.
As you do this, be careful not to touch the paper
guides doing so will change their positions.
CAUTION
• When returning the transport unit back inside the printer, be careful not to get your fingers caught
between the transport unit and the inside of the printer.
Connection part
6. Push the transport unit lever until it clicks.
7. When using the stacker, install it back to
the correct position.
Insert the connection part of the stacker straight
into the slot of the printer.
22

Loading the Paper
For paper with the length of 91 mm (3.58 inch) or less
8. Set the extension tray according to the
paper to be printed on.
Extension tray
For paper with the length of 157 mm (6.18 inch) or more
Extension tray
For paper with the length of 91 mm (3.58 inch)
or less (business card, etc.), use the stacker with
the extension tray at the standing position.
For paper with the length of 157 mm (6.18 inch)
or more, use the stacker with the extension tray
at the open position.
IMPORTANT
• If the printer will not be used for a long period of time, remove paper from the printer to prevent it from
discoloring and curl. Put the removed paper in its original plastic bag or box, and store it in a place which is not
exposed to high temperature, high humidity, and direct sunlight.
• It is recommended that unpacked paper be used up first.
• If you change to paper of different type or size, change the printer driver setting. Printing on paper of a wrong
size could make the stain on the transport belt, paper guides, or other areas. If the stain occurs, clean the
transport unit.
• Store the transport unit in the printer.
• Install the stacker on a platform such as a table on which the printer is installed.
• Be sure to insert the connection part of the stacker in all the way. If it is not attached properly, a paper jam may occur.
• To maintain print quality, do not attach or detach the stacker while the printer is running.
• Stacking capacity of the business card is 250 sheets. (thickness 0.245 mm
(9.64 mil)) If the printer keeps running till the stacker is full, it may cause a
paper jam.
• When printing pictures or characters on paper with the length of 91mm
(3.58 inch) or less (business card, etc.), the edges of sheets of paper
stacked in the stacker may not be aligned properly.
To prevent paper jams, as a guideline, remove the printed paper when it
reaches position A in the figure.
(P.130)
A
23

Chapter 1 Basic Operation
How to Print
Making Prints
This section explains how to micro margin printing using Business Card 55.0 x 91.0 mm (2.17 x 3.58 inch) Matte
coated paper.
NOTE
• The micro margin printing is a function to print with a minimum margin (Top/Bottom/Left/Right: 0.3 mm (0.01
inch)).
• The printing procedure may be different depending on the application software you use. For more details, refer
to the Instruction Manual that comes with your application software.
• Take care that the Power Saver settings of the computer does not allow the computer to enter a sleep state
during printing. The printer is designed to discard data received from the computer when the computer returns
from a resting or sleep state to an operating state.
Selecting "Never" in the Microsoft Windows Power Saver or Power Option settings will prevent the computer
from entering a sleep state. Follow the procedure below to open the Windows Power Saver or Power Option
settings.
Windows 10
-
Selecting Control Panel -> Control Panel-> Power Options
For Windows 8.1/Windows 7
-
Selecting Control Panel -> Hardware and Sound -> Power Options
Refer to Microsoft Windows product documentation for instructions on adjusting your computer's power
settings.
In the application software, set the paper size of the document.
1
IMPORTANT
• For instructions on how to check the paper size specified in the printer driver, refer to the Instruction Manual that
comes with your application software.
• If you can set the margin on your application software, set all margins to “0.”
24
How to Print
NOTE
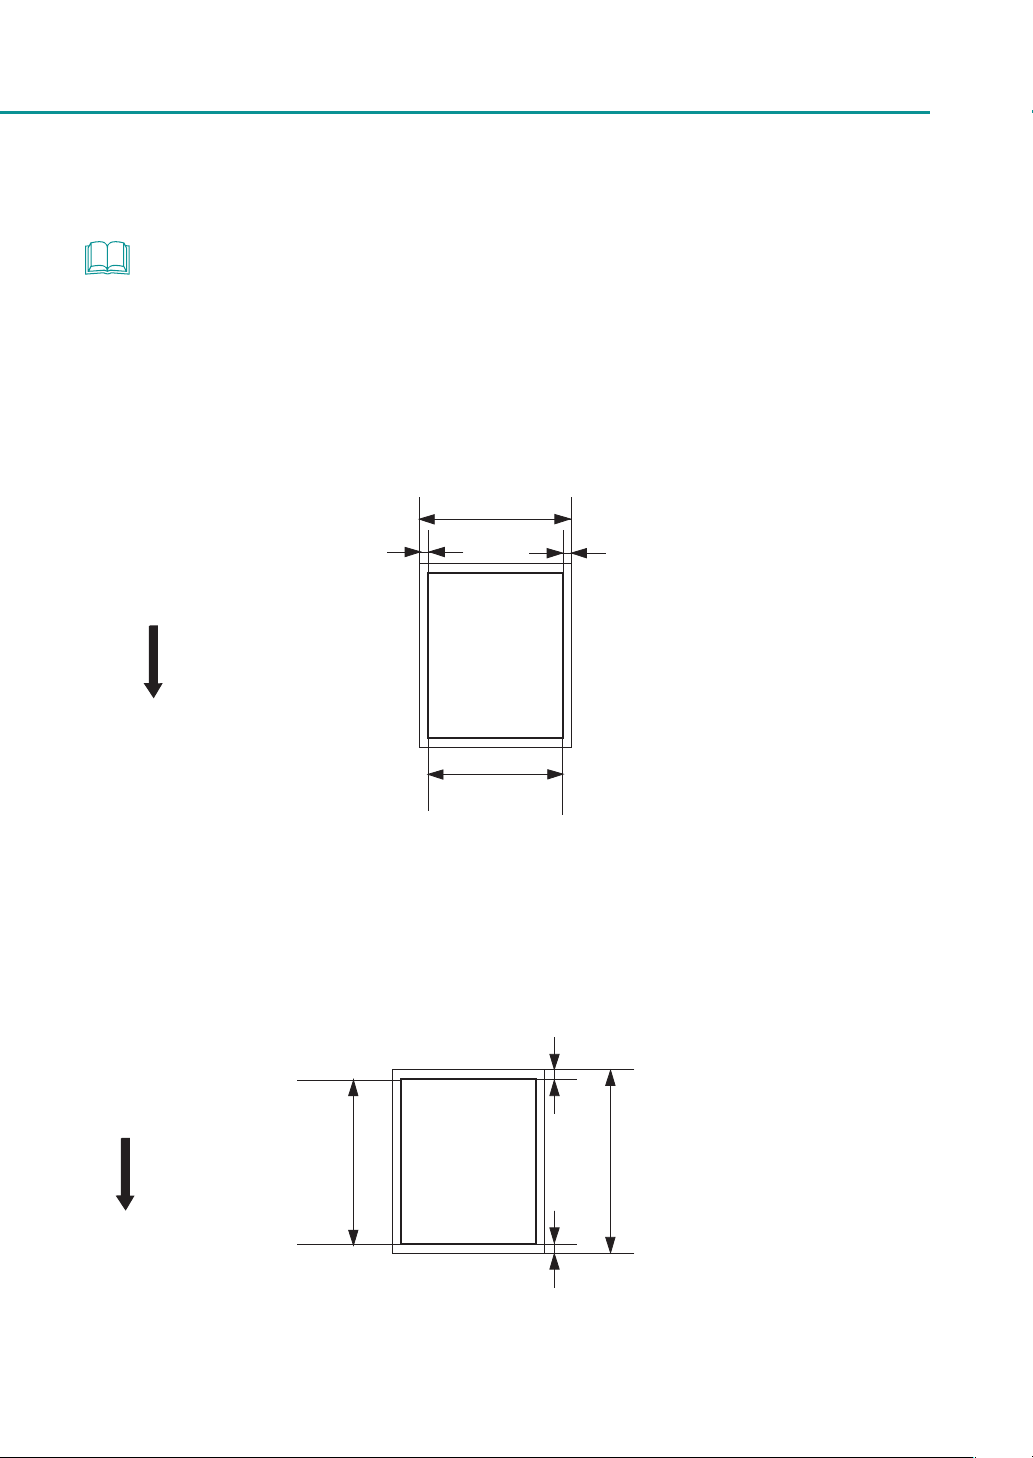
• If the paper size cannot be obtained from the printer driver, follow the procedure below to set the document
paper size. In micro margin printing, create the document larger than the actual paper size.
Document paper width
Set the paper width 0.7 mm (0.03 inch) wider than the actual width.
Document paper width
( = Paper width + 0.7mm(0.03inch) )
0.35mm
Transport
direction
(0.01inch)
Paper width
51.0mm - 58.0mm (2.01 inch - 2.28 inch)
Document paper length
When the 81.0 mm - 91.0 mm (3.19 inch - 3.58 inch):
Set the paper length 1.1 mm (0.04 inch) longer than the actual length.
0.55mm (0.02inch)
Transport
direction
Paper length
81.0mm - 91.0mm
(3.19 inch - 3.58inch)
0.35mm
(0.01inch)
Document paper length
( = Paper length + 1.1mm (0.04inch))
0.55mm (0.02inch)
25
 Loading...